Good morning everyone. First off, to all of you who linked posts up with my first ever linky party, thank you so much. I loved reading each one and seeing all of the cool projects, costumes, decorations, and tablescapes that you have done for the season of tricks and treats.
Julia and I, along with the help of her friend, drew names old school style for the giveaway prizes. Here is a list of the winners.
Sew Fresh Quilts – $15.00 gift certificate (Thank you Lorna!!) – Lena of Quilt Art by Lena.
Craftsy – one free class each
Carole, of From My Carolina Home
Emily of Emily.Ann
Linda of The Road to Oklahoma
Wendy of Pieceful Thoughts
Sheri of Sunshine in the Attic
C&T Publishing/Stash Books – $20.00 certificate
Mari of Academic Quilter
Sharon of Vrooman Quilts
Jeni of In Color Order
Lisa E who linked up via Flickr
Joan of MooseStash Quilting
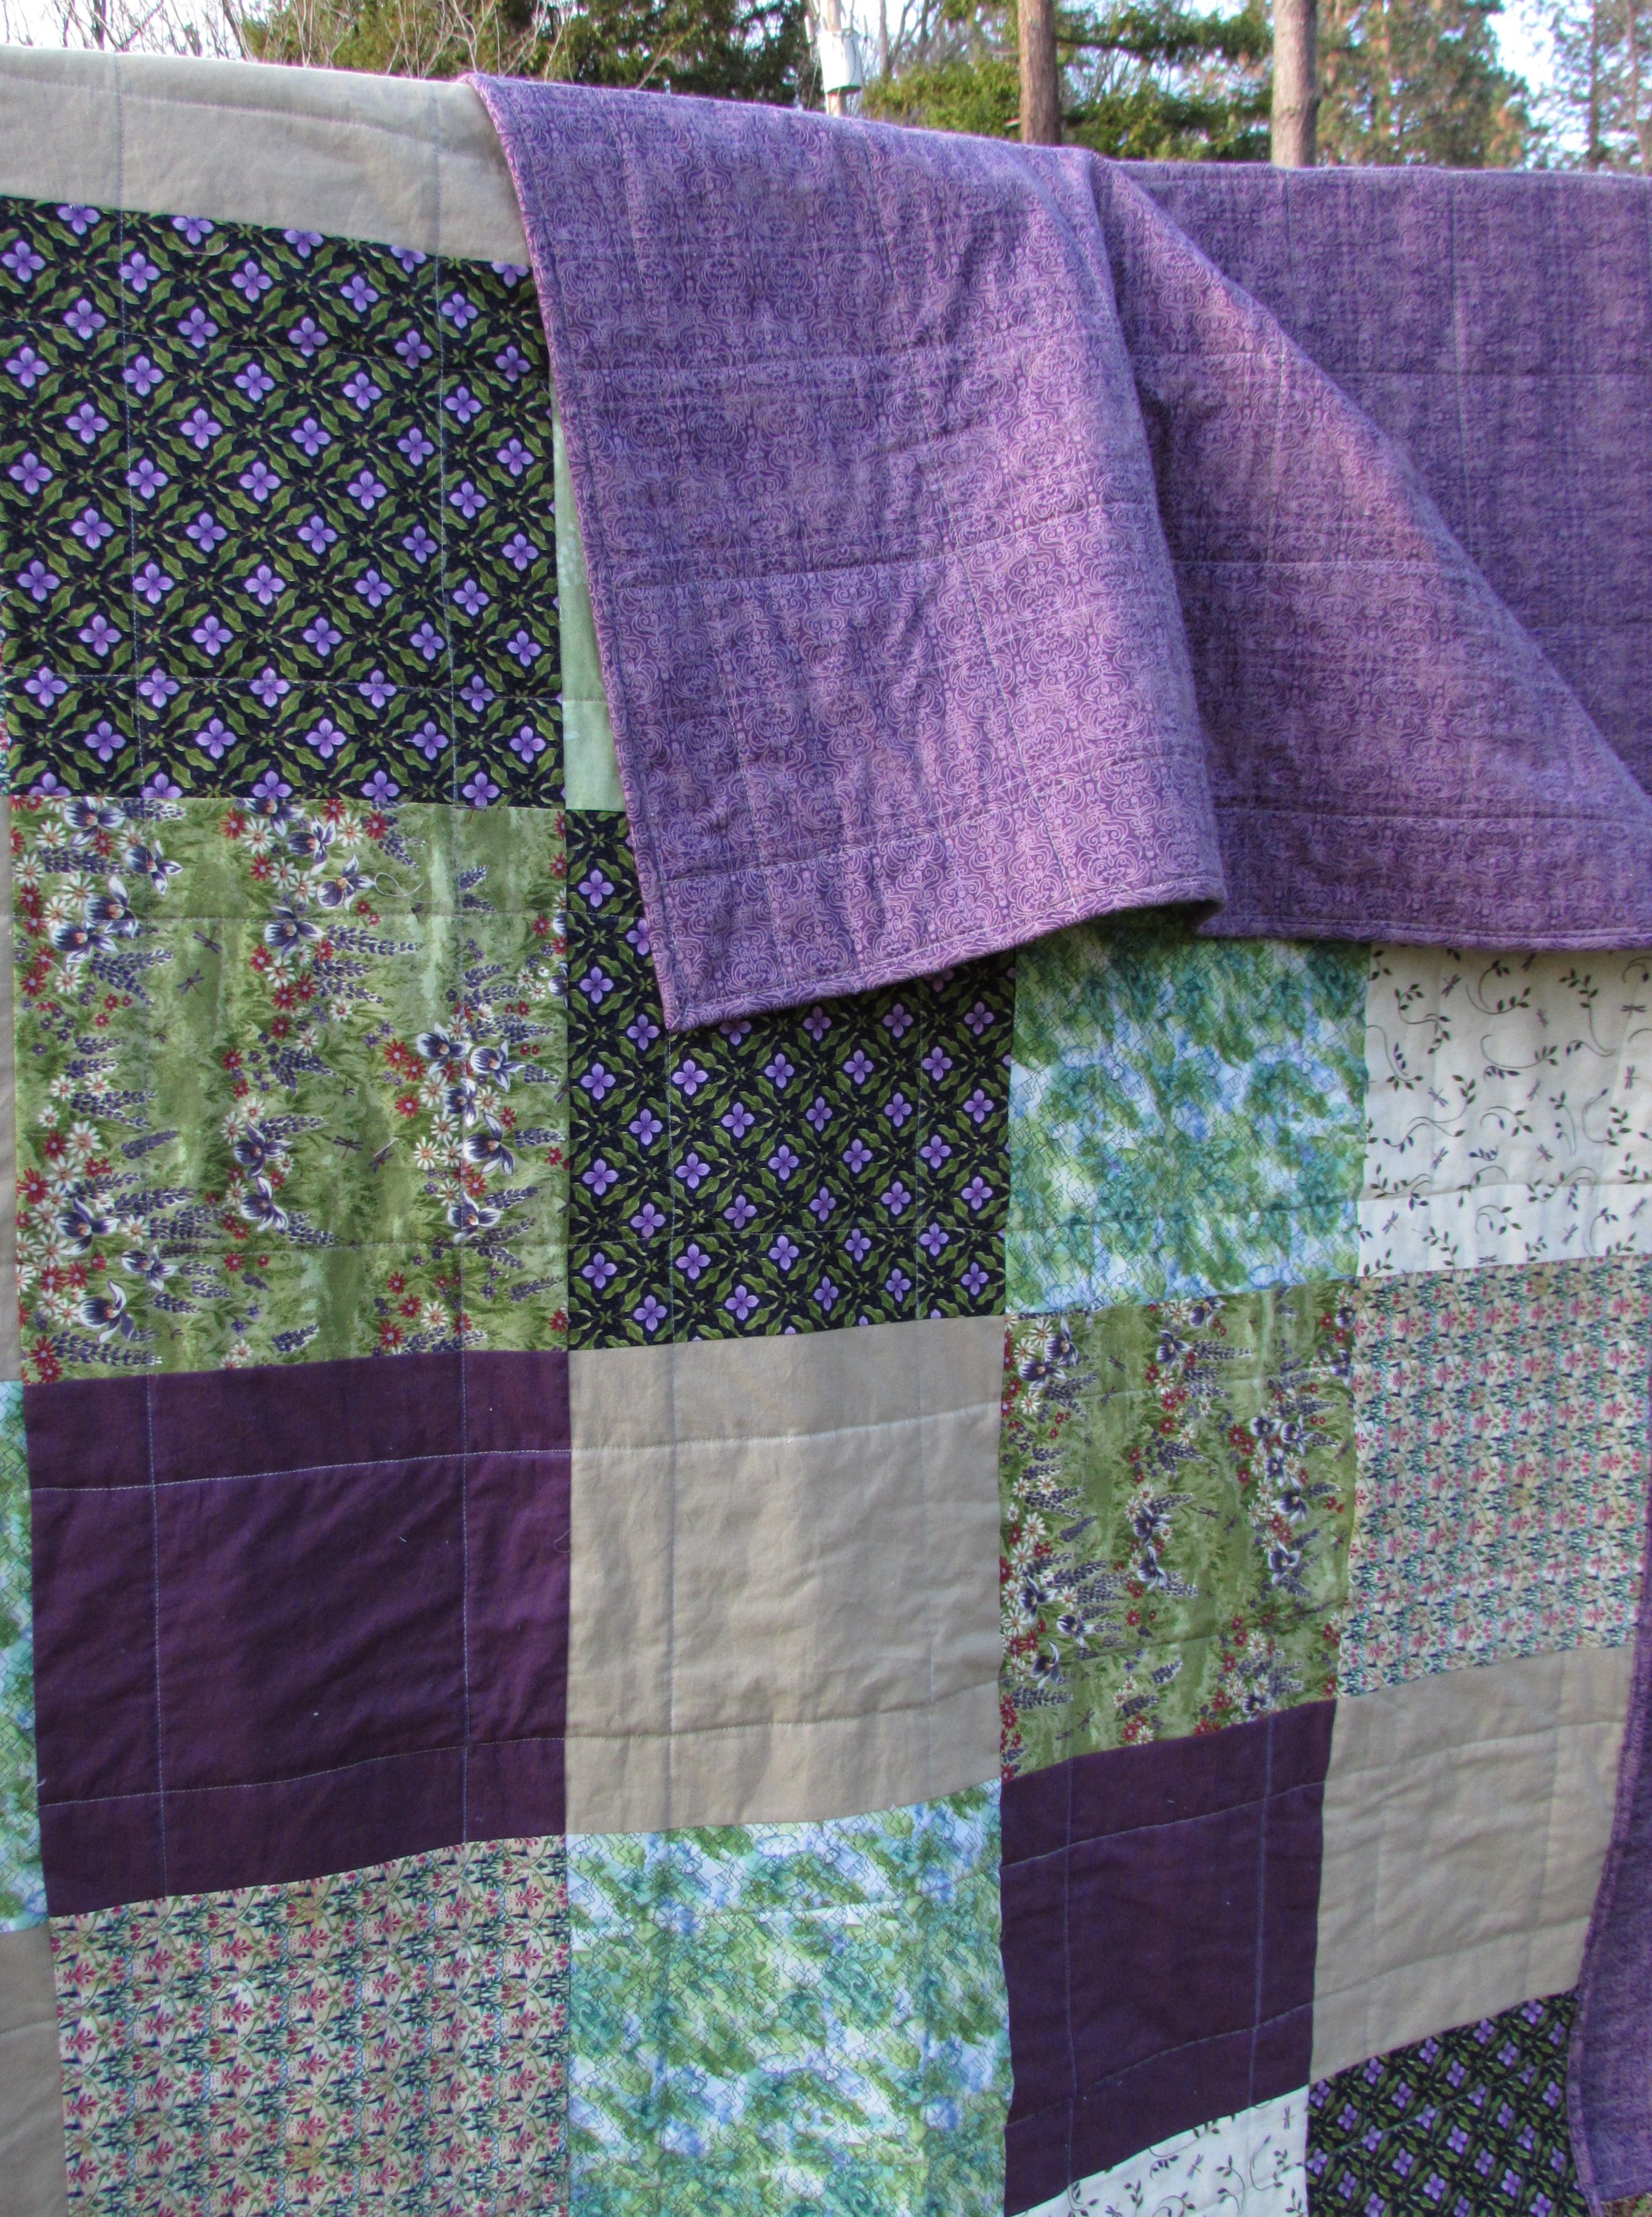
Buntings (made by me)
Sarah of Sarah Goer Quilts
Diane of Lavender Dreamer
This was such a fun week and I really appreciate all of the participation, link ups and wonderful comments. It will be fun to do this again sometime with another theme. I love the idea of rejuvenating prior posts. We write so many and it is nice to bring an older one back to the front of the line. It gives others an opportunity to read and be inspired by something they may have missed earlier. If you need Halloween ideas, the links will remain there for you to check out.
The weekend has been wonderful. I went to a fun quilt retreat Friday and Saturday. I’ll post about that in a day or so once I get my thoughts gathered. Today will be spent cleaning up the yard a bit. Fall is here and there is much to be done out there! Happy Sunday!
Welcome to Handmade Halloween! This is the first time I have hosted a link up and I am really excited about it. When I approached sponsors for prizes for this event, I was thrilled with the generosity of the gifts they provided! You are invited to link up your blog posts, be they brand new or from prior Halloweens, to this post. Each time you link a post, you will be entered into the drawing for prizes. You can link up one post or multiple posts, it is up to you! I invite you to read posts that are linked up. Surely there will be fun projects, costumes, and decorations to inspire you as we move into Autumn.
With fall weather approaching thoughts of all things autumn have begun in earnest. We have picked apples at my in-laws, harvested our mini pumpkins and three billion decorative gourds from the garden, and (finally) have weather chilly enough to wear a sweater. My parents came for dinner on Sunday and by the time they got home, there was a light snow falling. Certainly not enough to accumulate but I think this is the first time I have heard of snow here on October 2nd!
This is the time of year when children begin to plan their Halloween costumes. Julia has always been very independent. She is a person who very much knows her own mind. When it comes to Halloween, she usually comes up with an idea and there is no changing her mind. I thought it would be fun to share a few of the costumes she has picked over the years. While she comes up with the idea, it is up to me to figure out how to make it. She has only once wanted to be something with an easily purchased costume. That was the year she wanted to be a witch, “a pretty and kind witch, not a mean and scary one.” That was the year I got off easy and we picked out a costume at Target. I think she was in first grade?
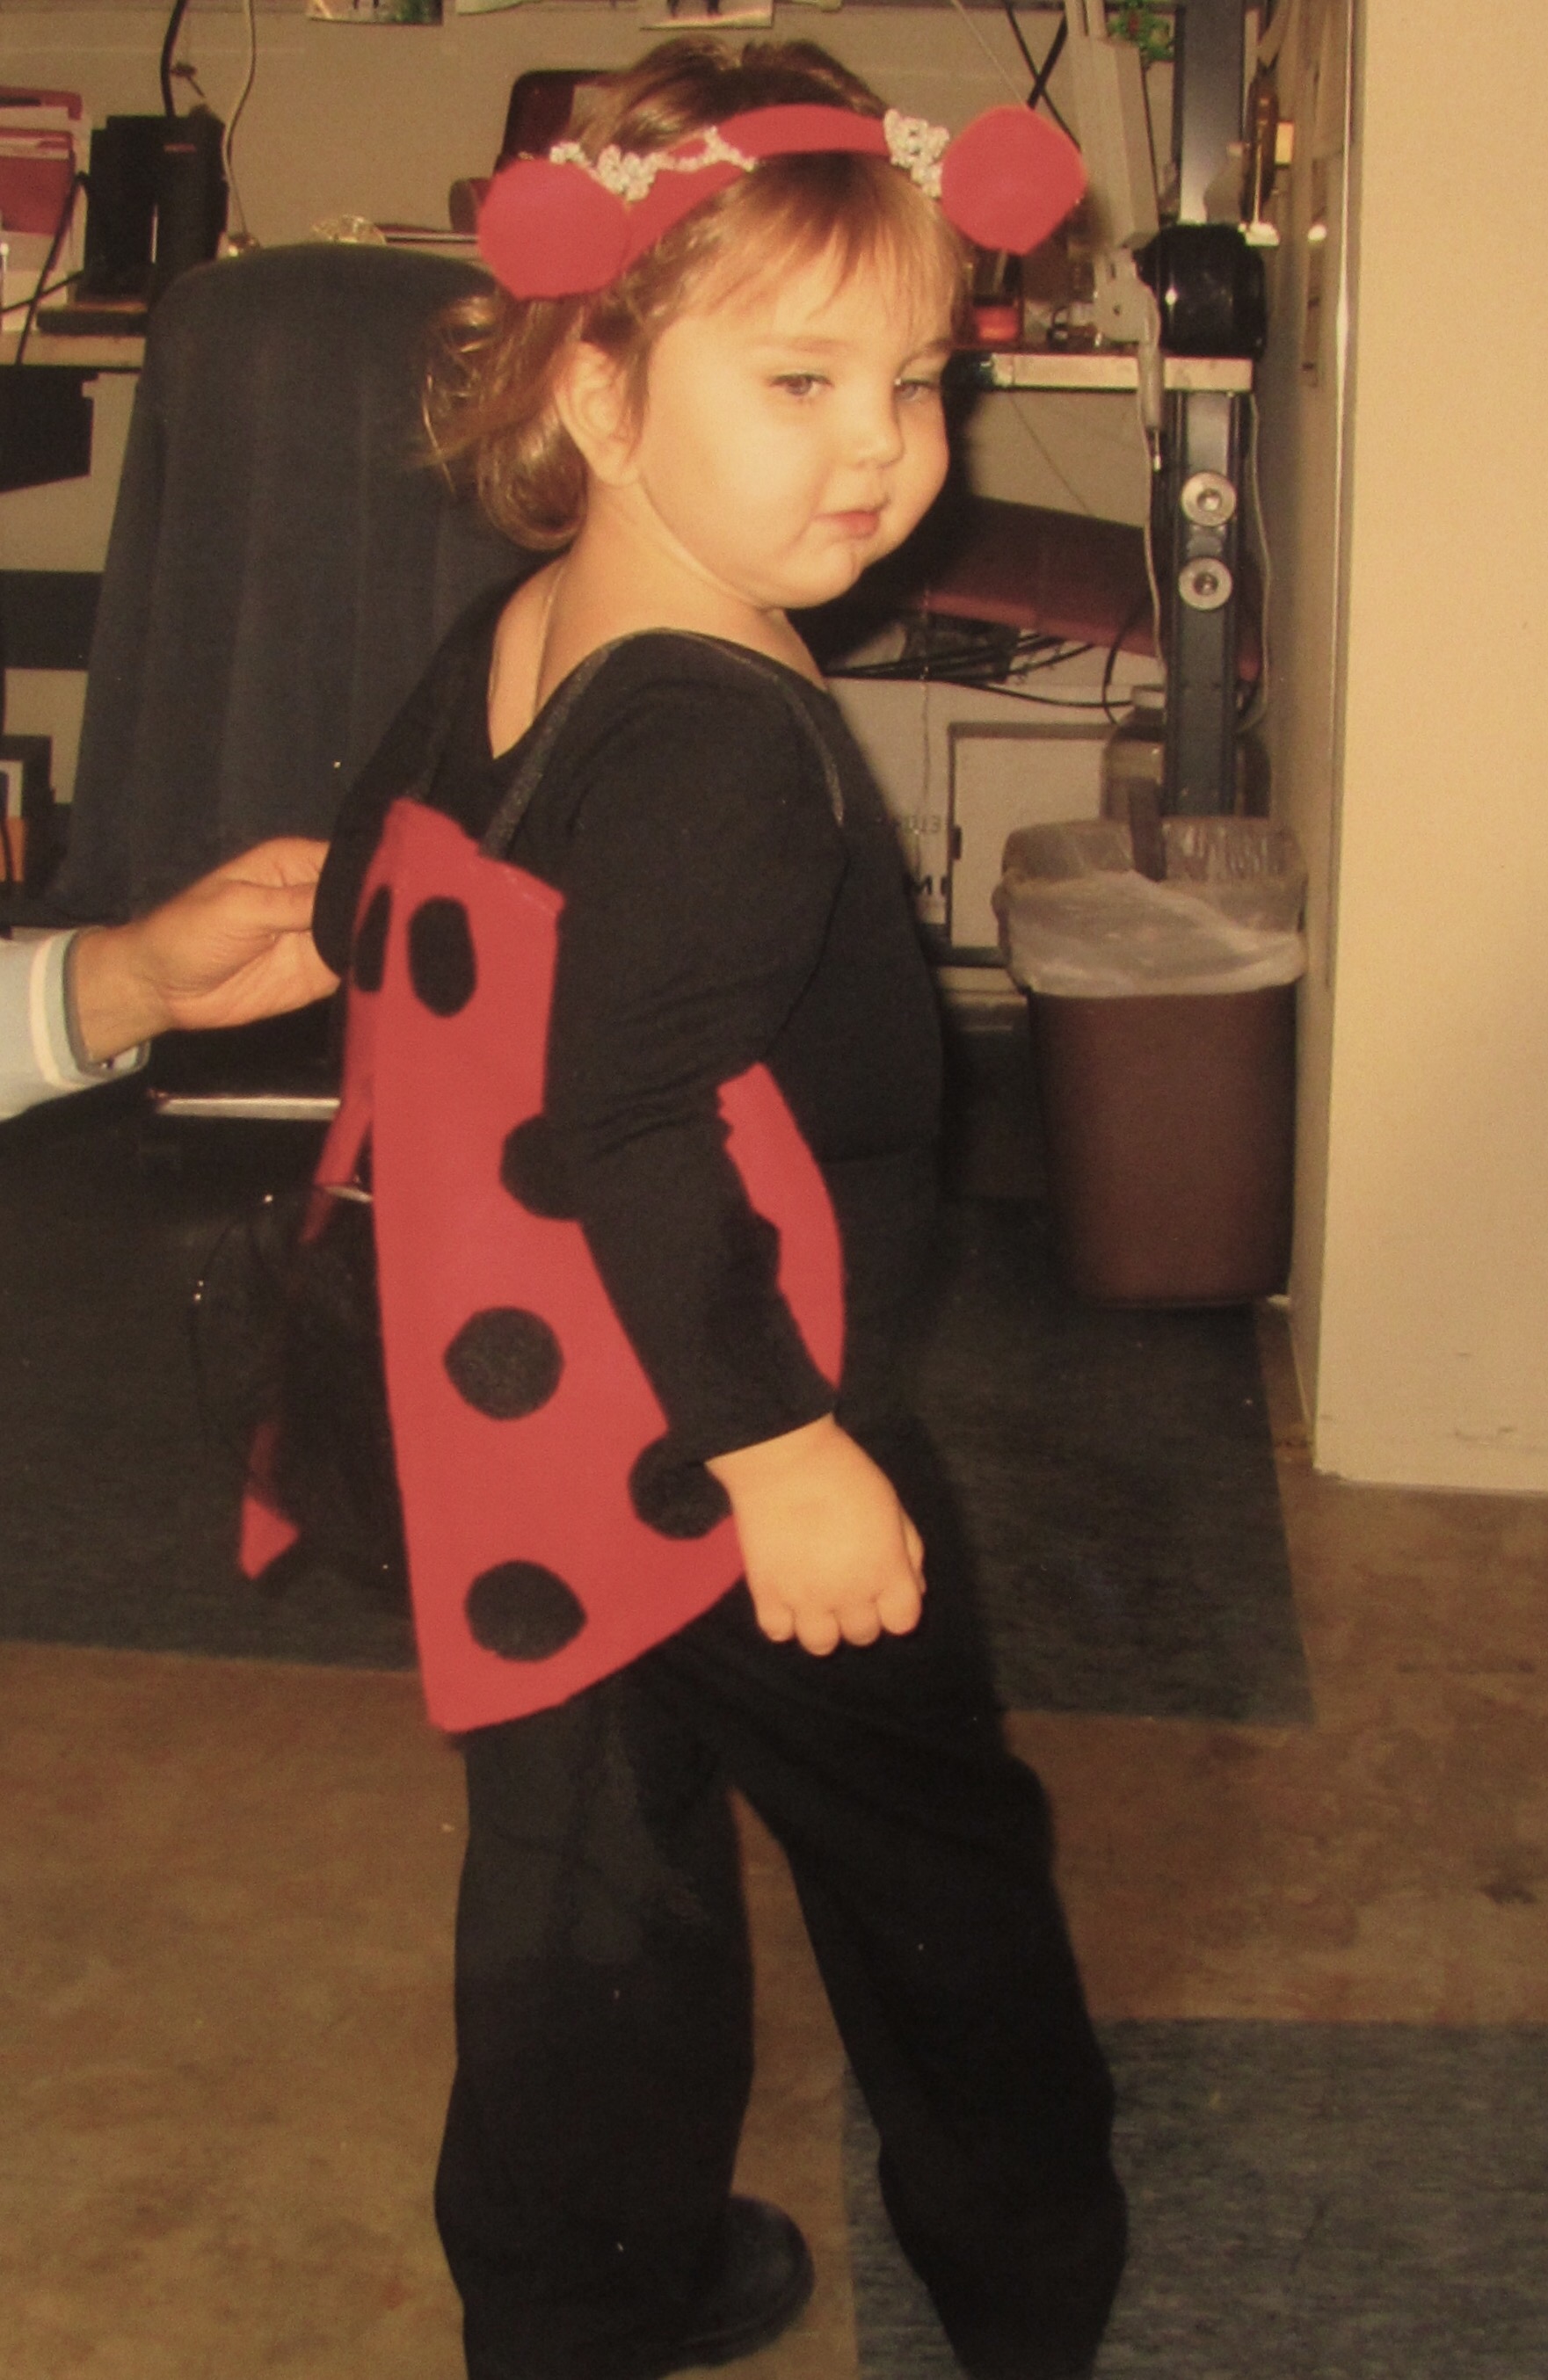
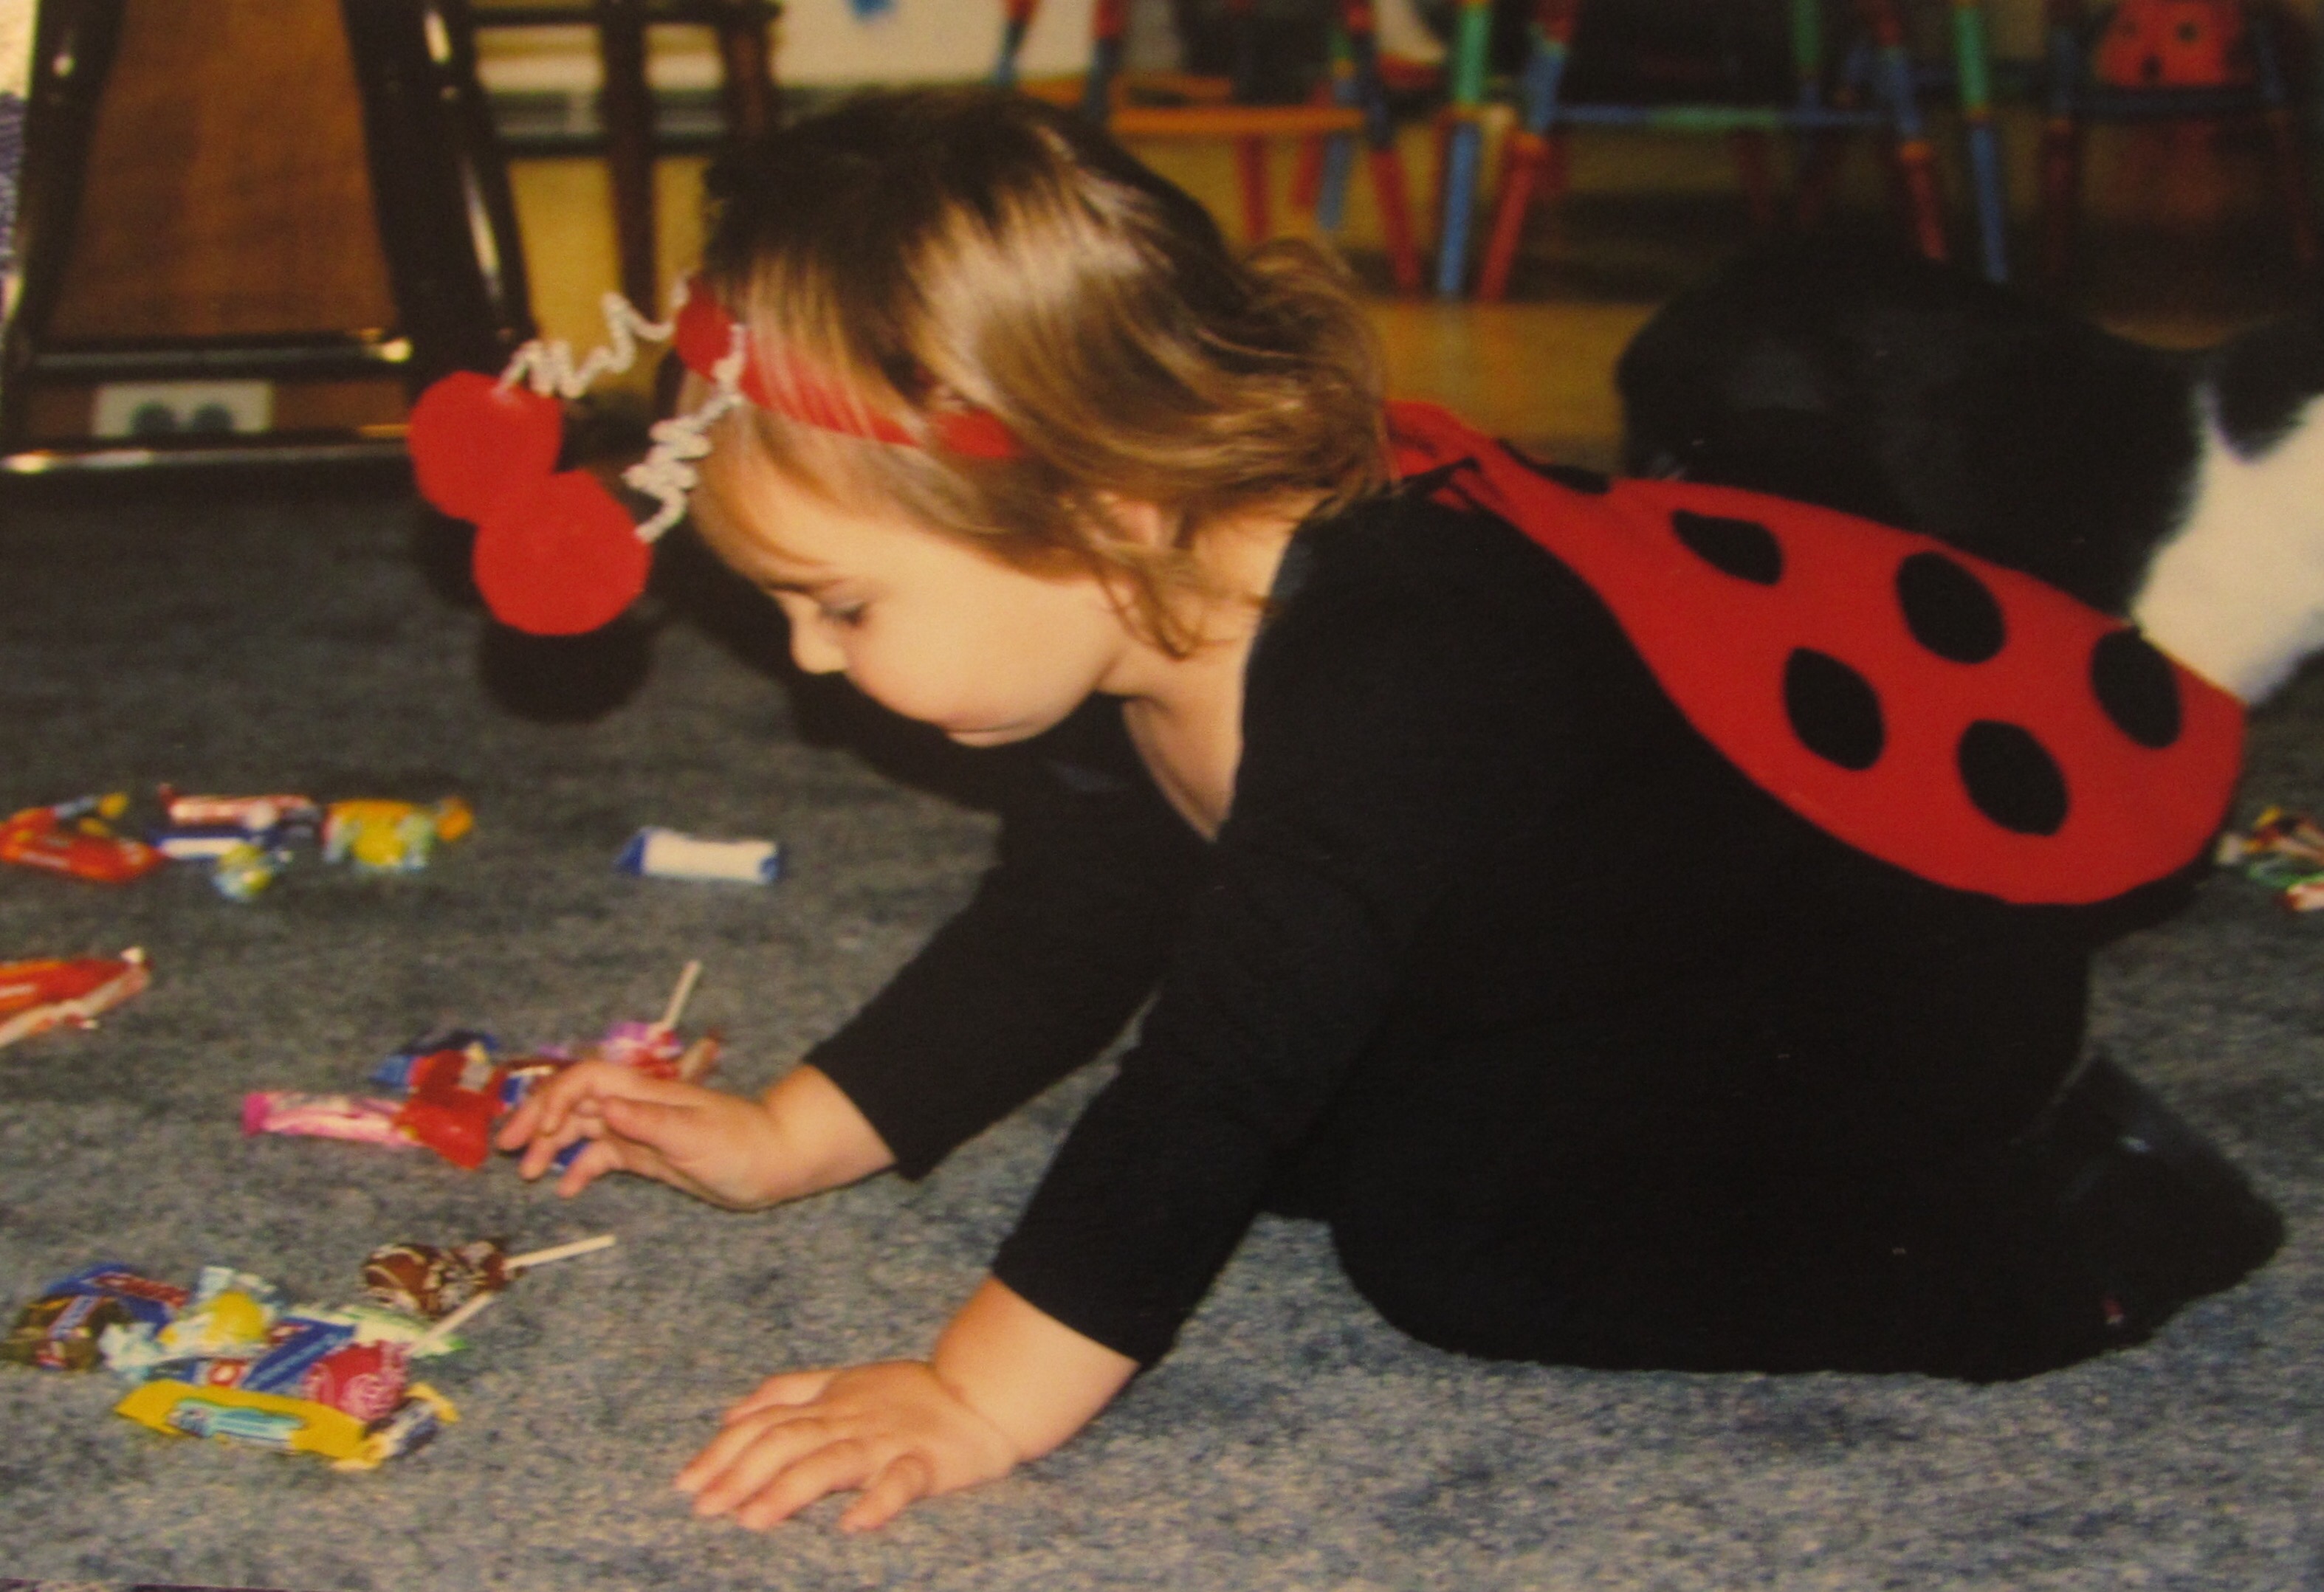
Her first time trick or treating was at the age of two. I made her a set of ladybug wings. She wore black pants and shirt with the wings. Using pipe cleaners and two styrofoam balls, I made little antennae that I attached to a plastic headband. She was adorable. She didn’t actually trick or treat but I did take her to my husband’s office.
She also had a Halloween party at her daycare.
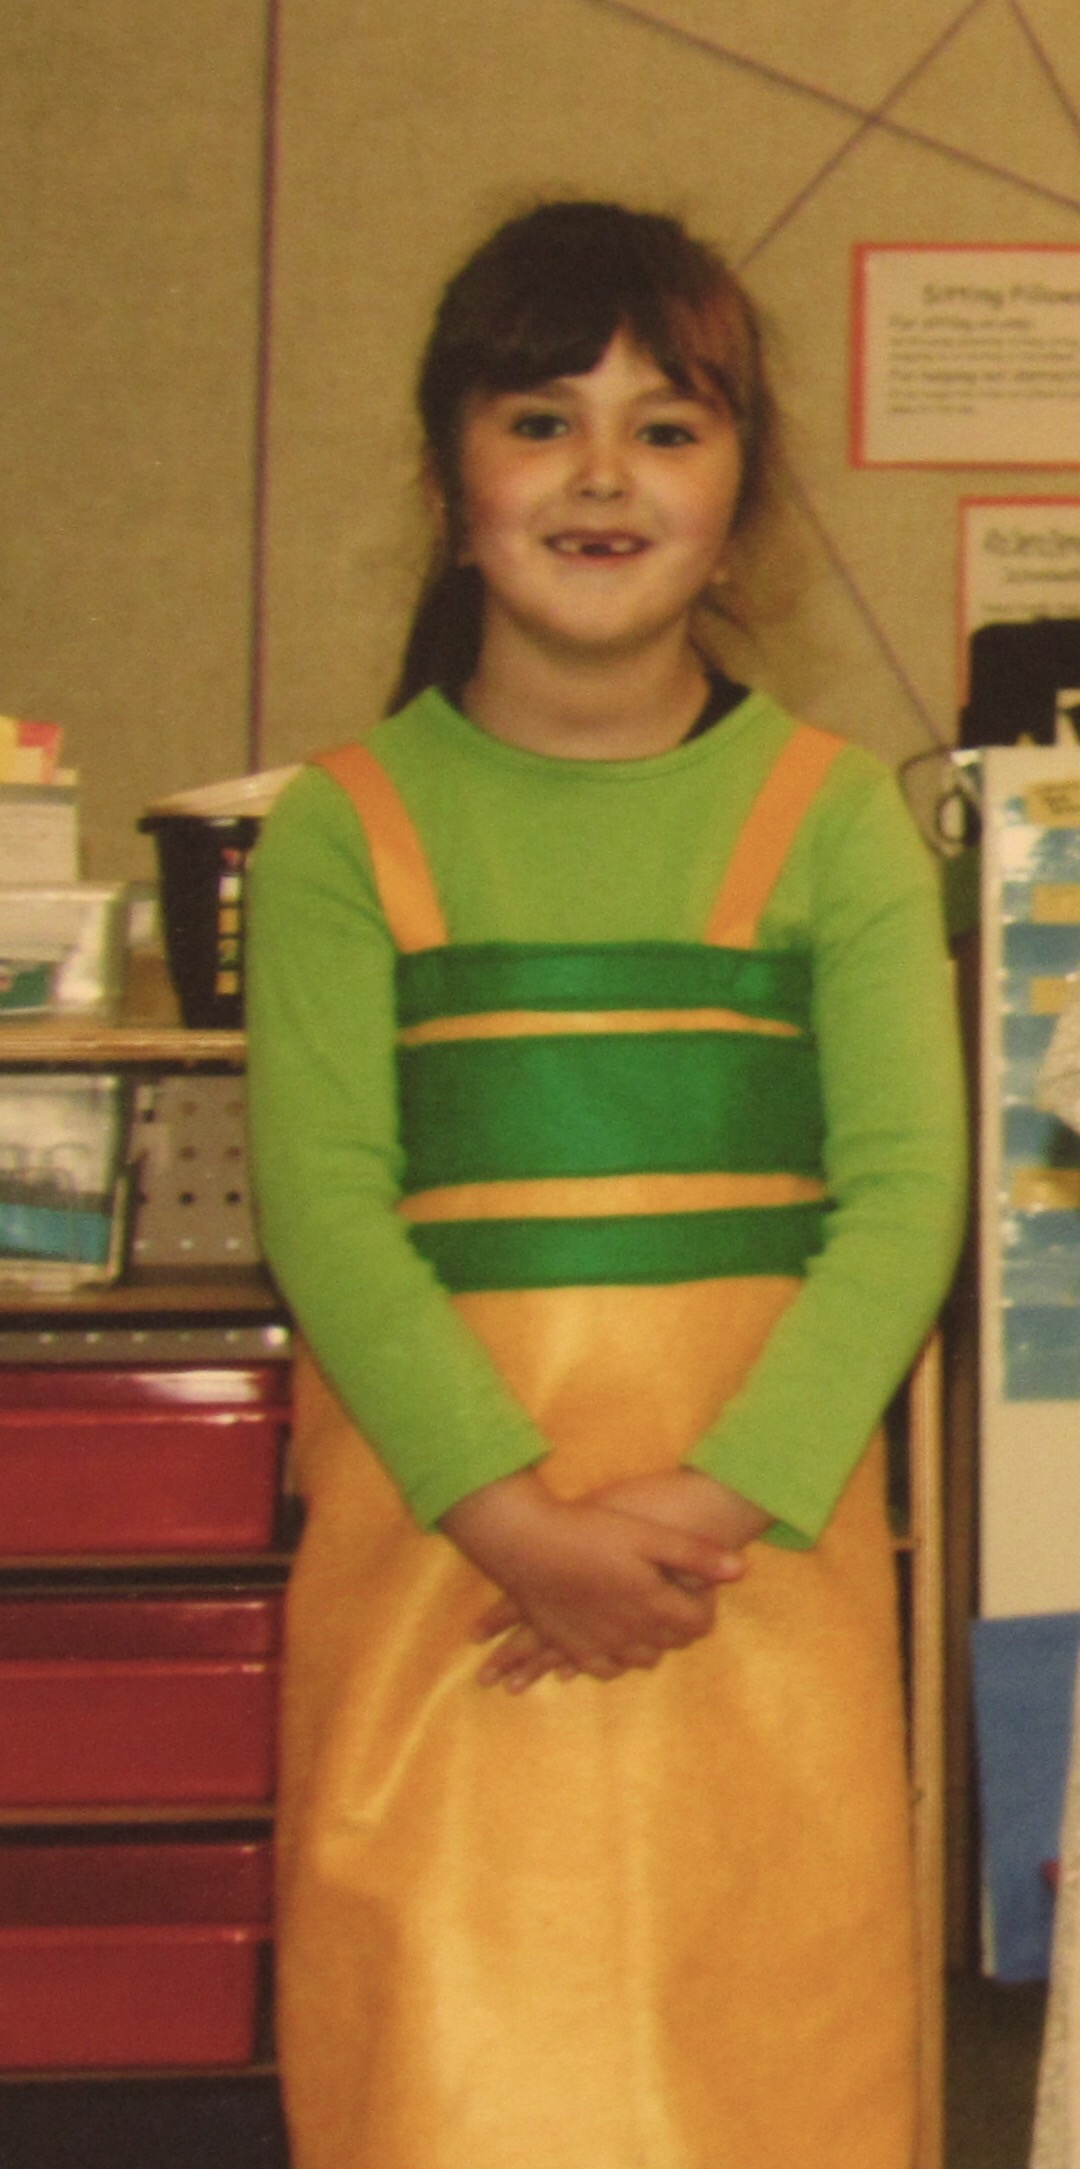
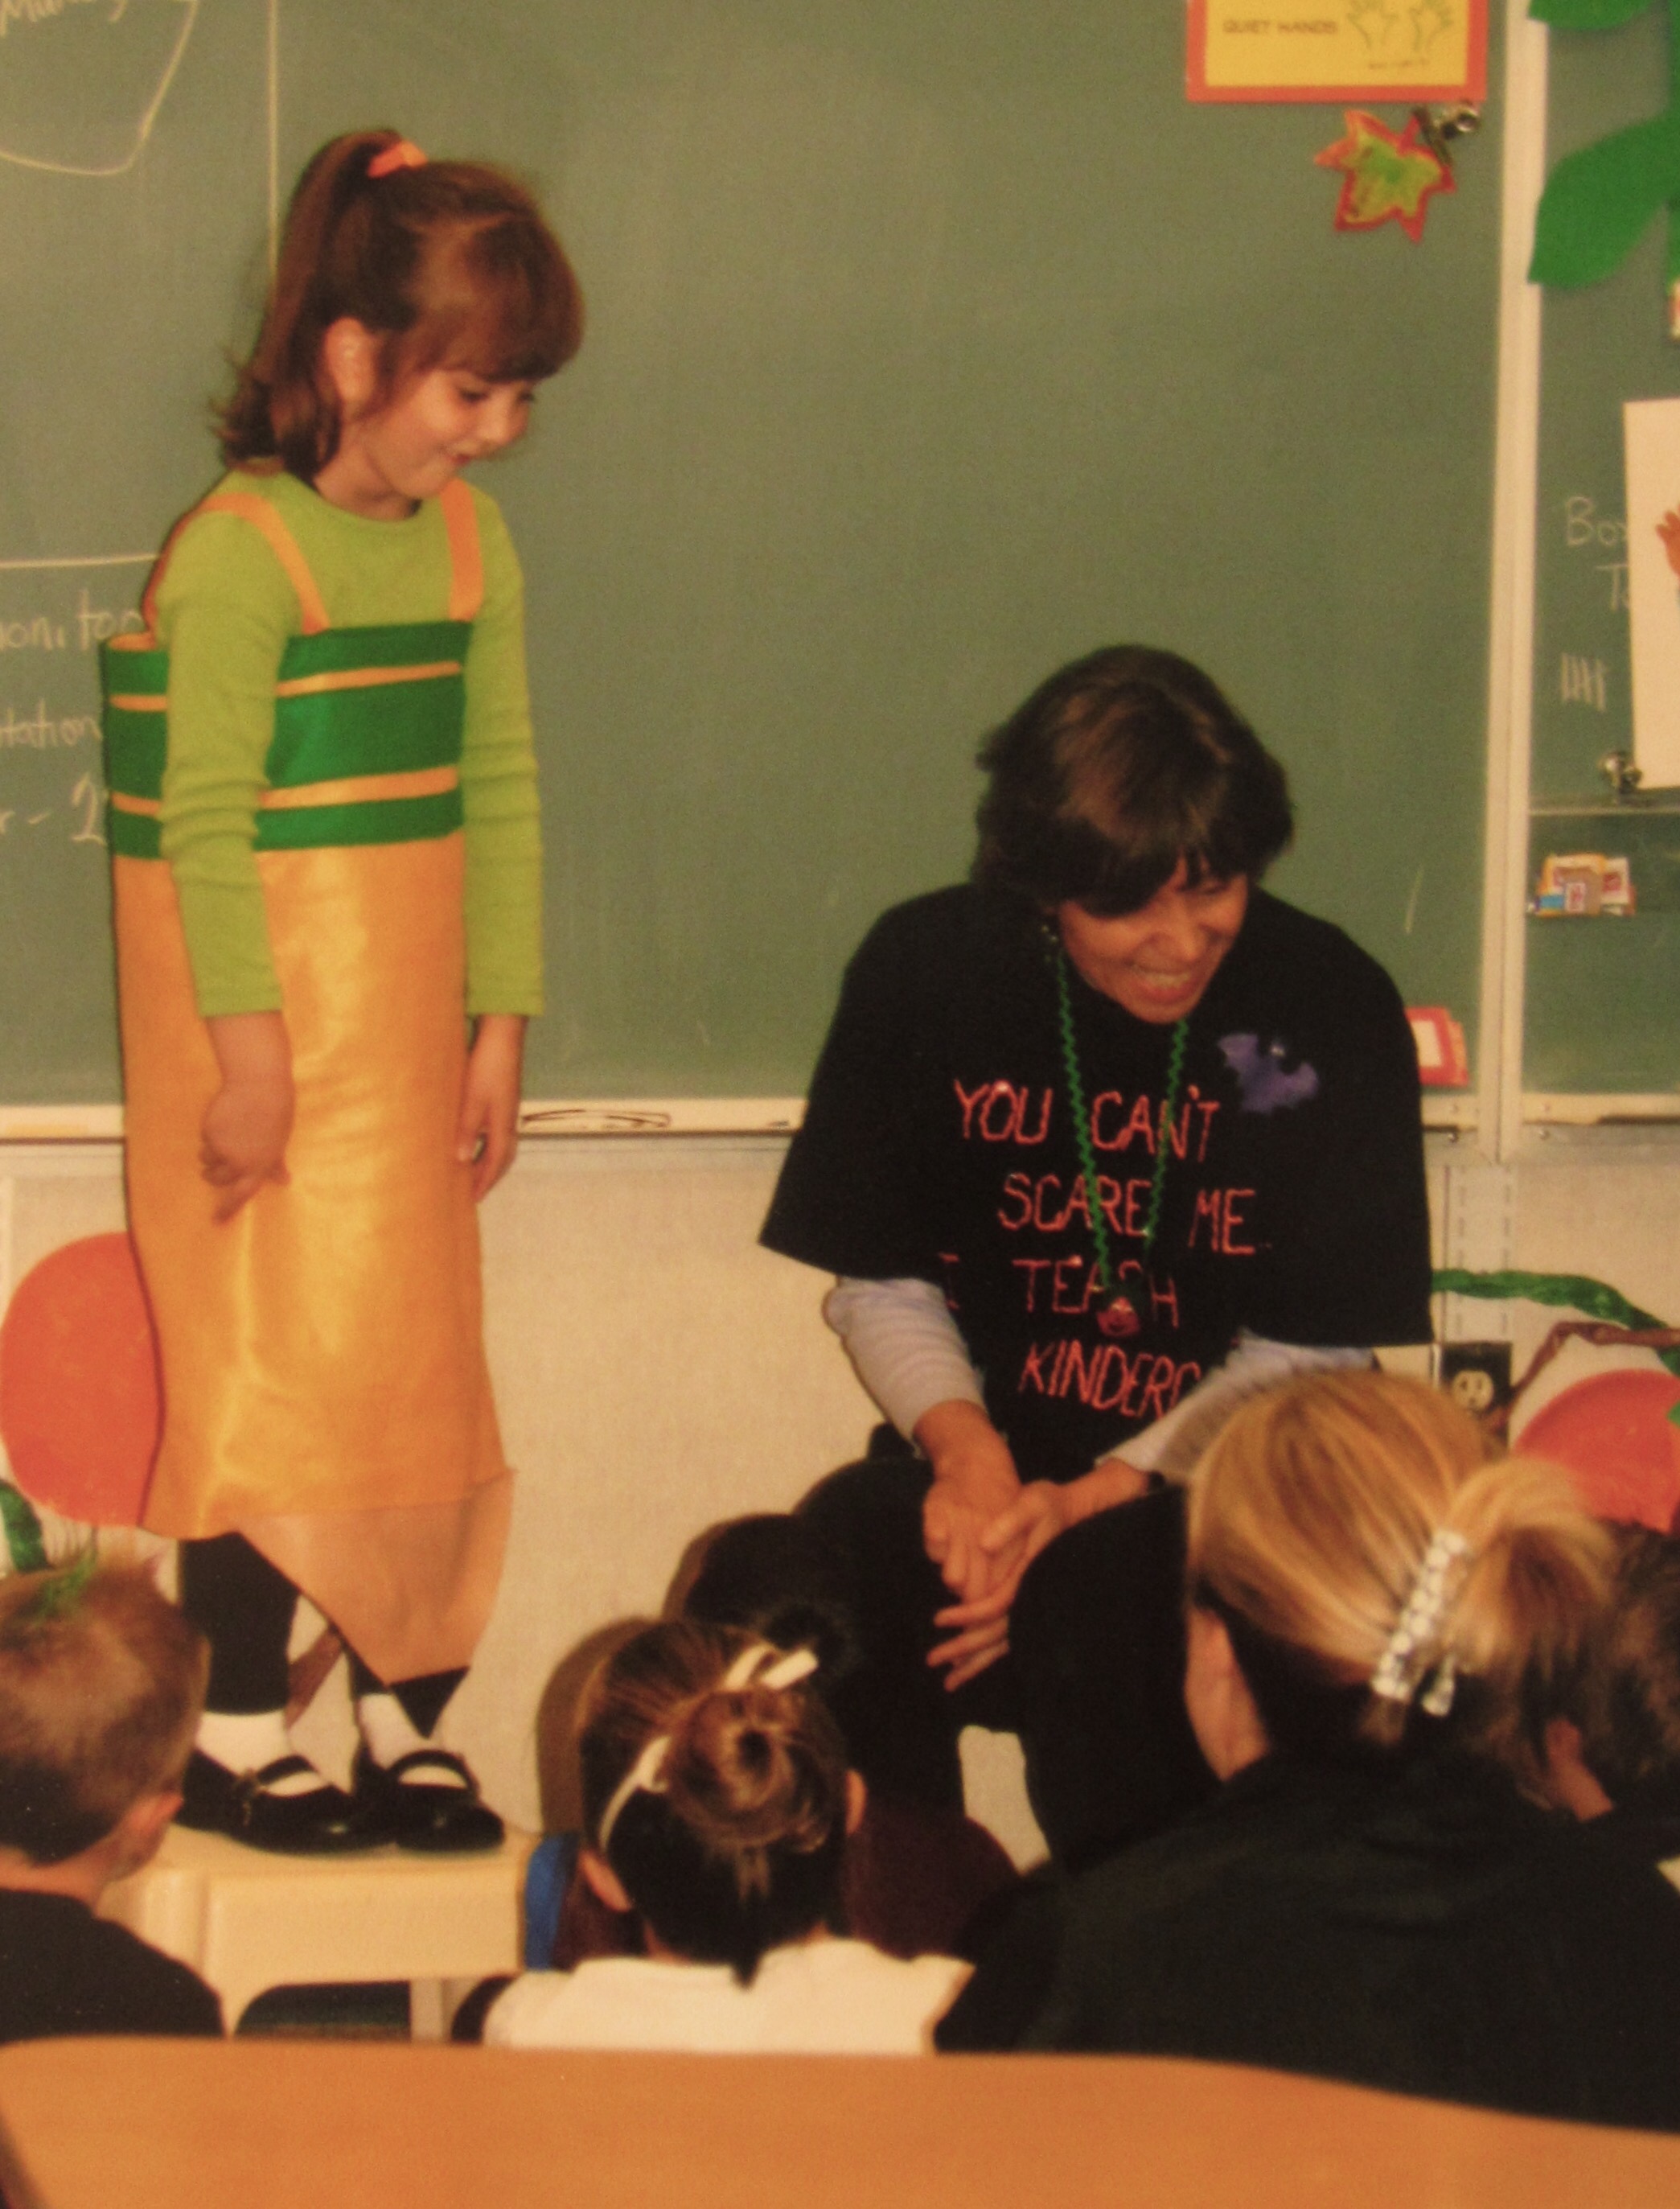
One of my favorites was in Kindergarten when she wanted to be…. Wait for it…. A pencil. What five year old decides to be a pencil? It was so funny. Off I went to buy felt in yellow and green.
This was made mostly with glue sticks and simple stitching. I believe the back of it was fastened with Velcro. I stitched rectangles of green felt over the yellow to make the green stripes at the top of the Ticonderoga and made two little yellow should straps. I even made a little pink felt cap so it would look like she had an eraser on the top. At the last minute, she nixed the eraser hat. When she got to school dressed as a brand new Ticonderoga, the kids would look at her quizzically and ask her what she was.
I am certain she thought they were all ridiculous not to see that she was a pencil. Ah, she was quite proud of that costume. She had such a fantastic teacher in Kindergarten. She had each child stand up and talk about their costume, making each one feel very special.
In 2nd grade she wanted to be a bat. I decided this would be a simple one. I made wings with black and silver sparkly fabric and hand stitched the wings to the inside seam of her sleeve and down the side seam of a black long-sleeved shirt.
This was so cute. When she lifted her arms, the wings appeared. She also had little bat ears that I hot glued to a plastic headband.
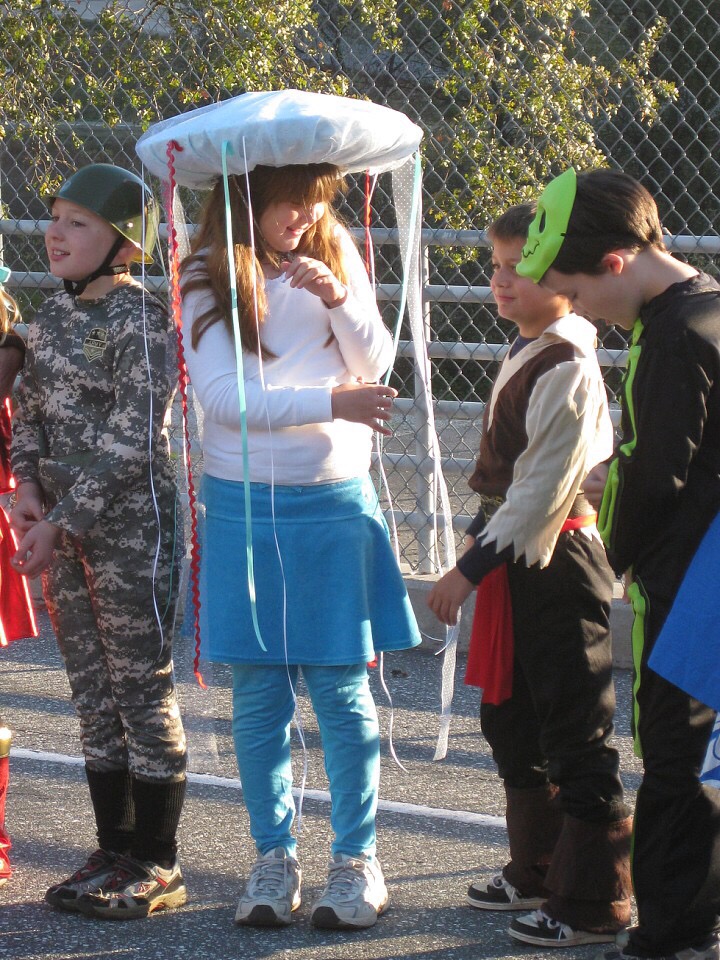
Julia chose to be a jellyfish when she was in 3rd grade. For this she wore blue sparkly leggings and skirt. We took an old sombrero and covered it with fabric and tulle over the top (lots of hot glue went into this costume!) Then we cut many lengths of ribbon and Rick-rack and glued them all around the brim of her jellyfish/sombrero hat.
She looked adorable, though again,many kids didn’t really get what she was dressed as.
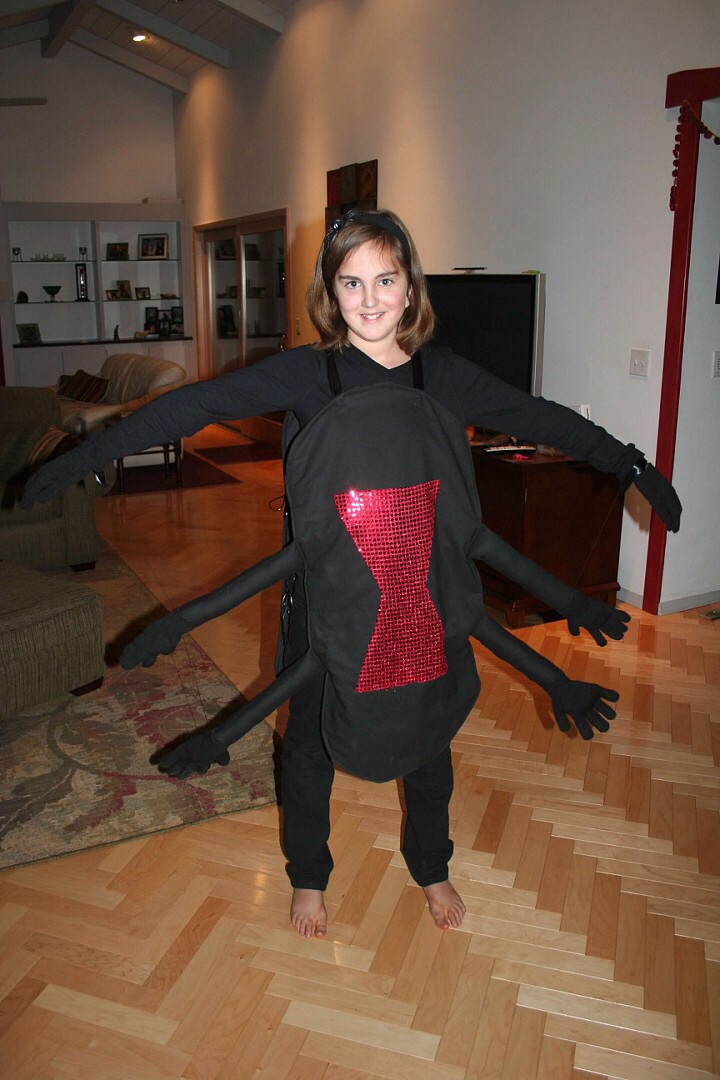
In fifth grade Julia asked to be a black widow spider. I love this costume; it is definitely one of my favorites.
We used a black shirt and pants as the base. I made a large oval for the front and back and attached shoulder straps to each piece. Then I made ‘legs’ with black fabric, stuffed with poly stuffing. At the end of each ‘leg’ was one of those little black knit gloves that you can find in a bargain basket at Target. I stitched one hand to the next so that when she lifted her (real) arm, all of the legs came up with her. We bought some flashy red, sequined fabric to make the tell-tale spot on her belly, signifying that she was a black widow. This year the kids knew what she was.
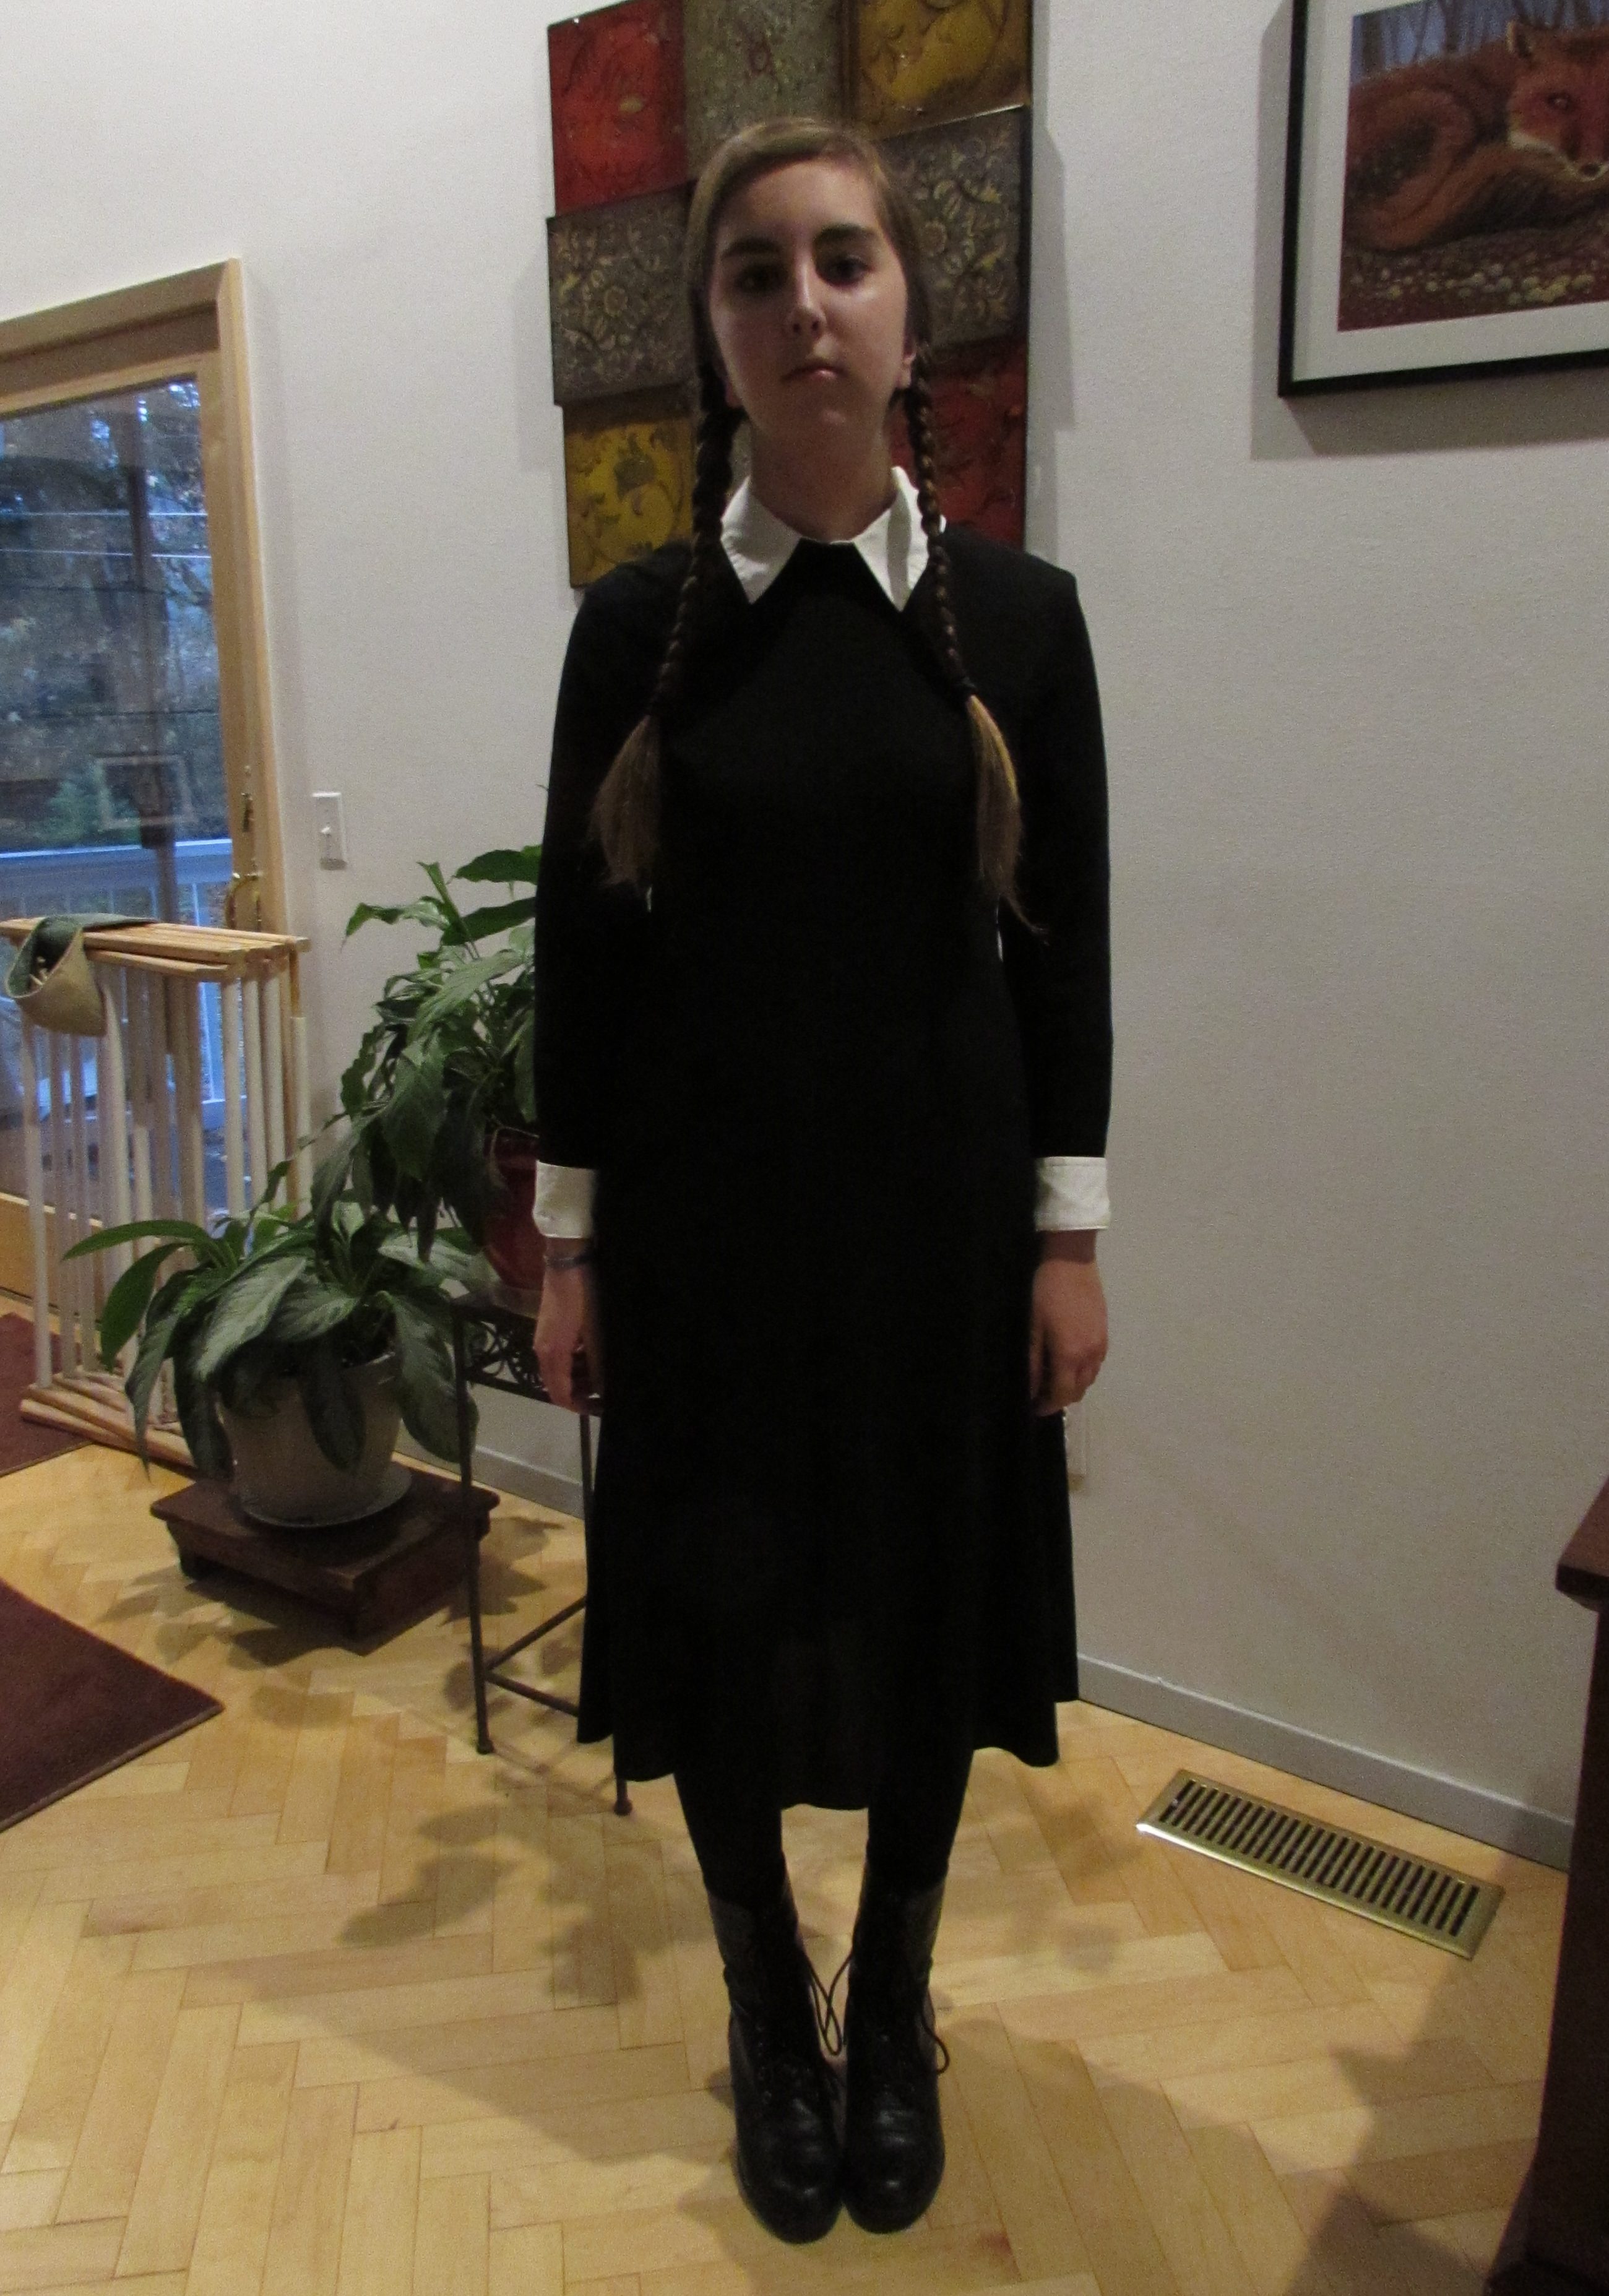
In seventh grade Julia went to a Halloween party. She dressed up as Wednesday Addams, from the old tv show, The Addams Family.
We found the black dress at a thrift store. It was a heavy knit dress and was far too long. I cut the bottom off and didn’t even finish off the hem. She put a white collared shirt under it, added black tights and boots that she already had. In my opinion, the long braids are what really turned her into Wednesday Addams.
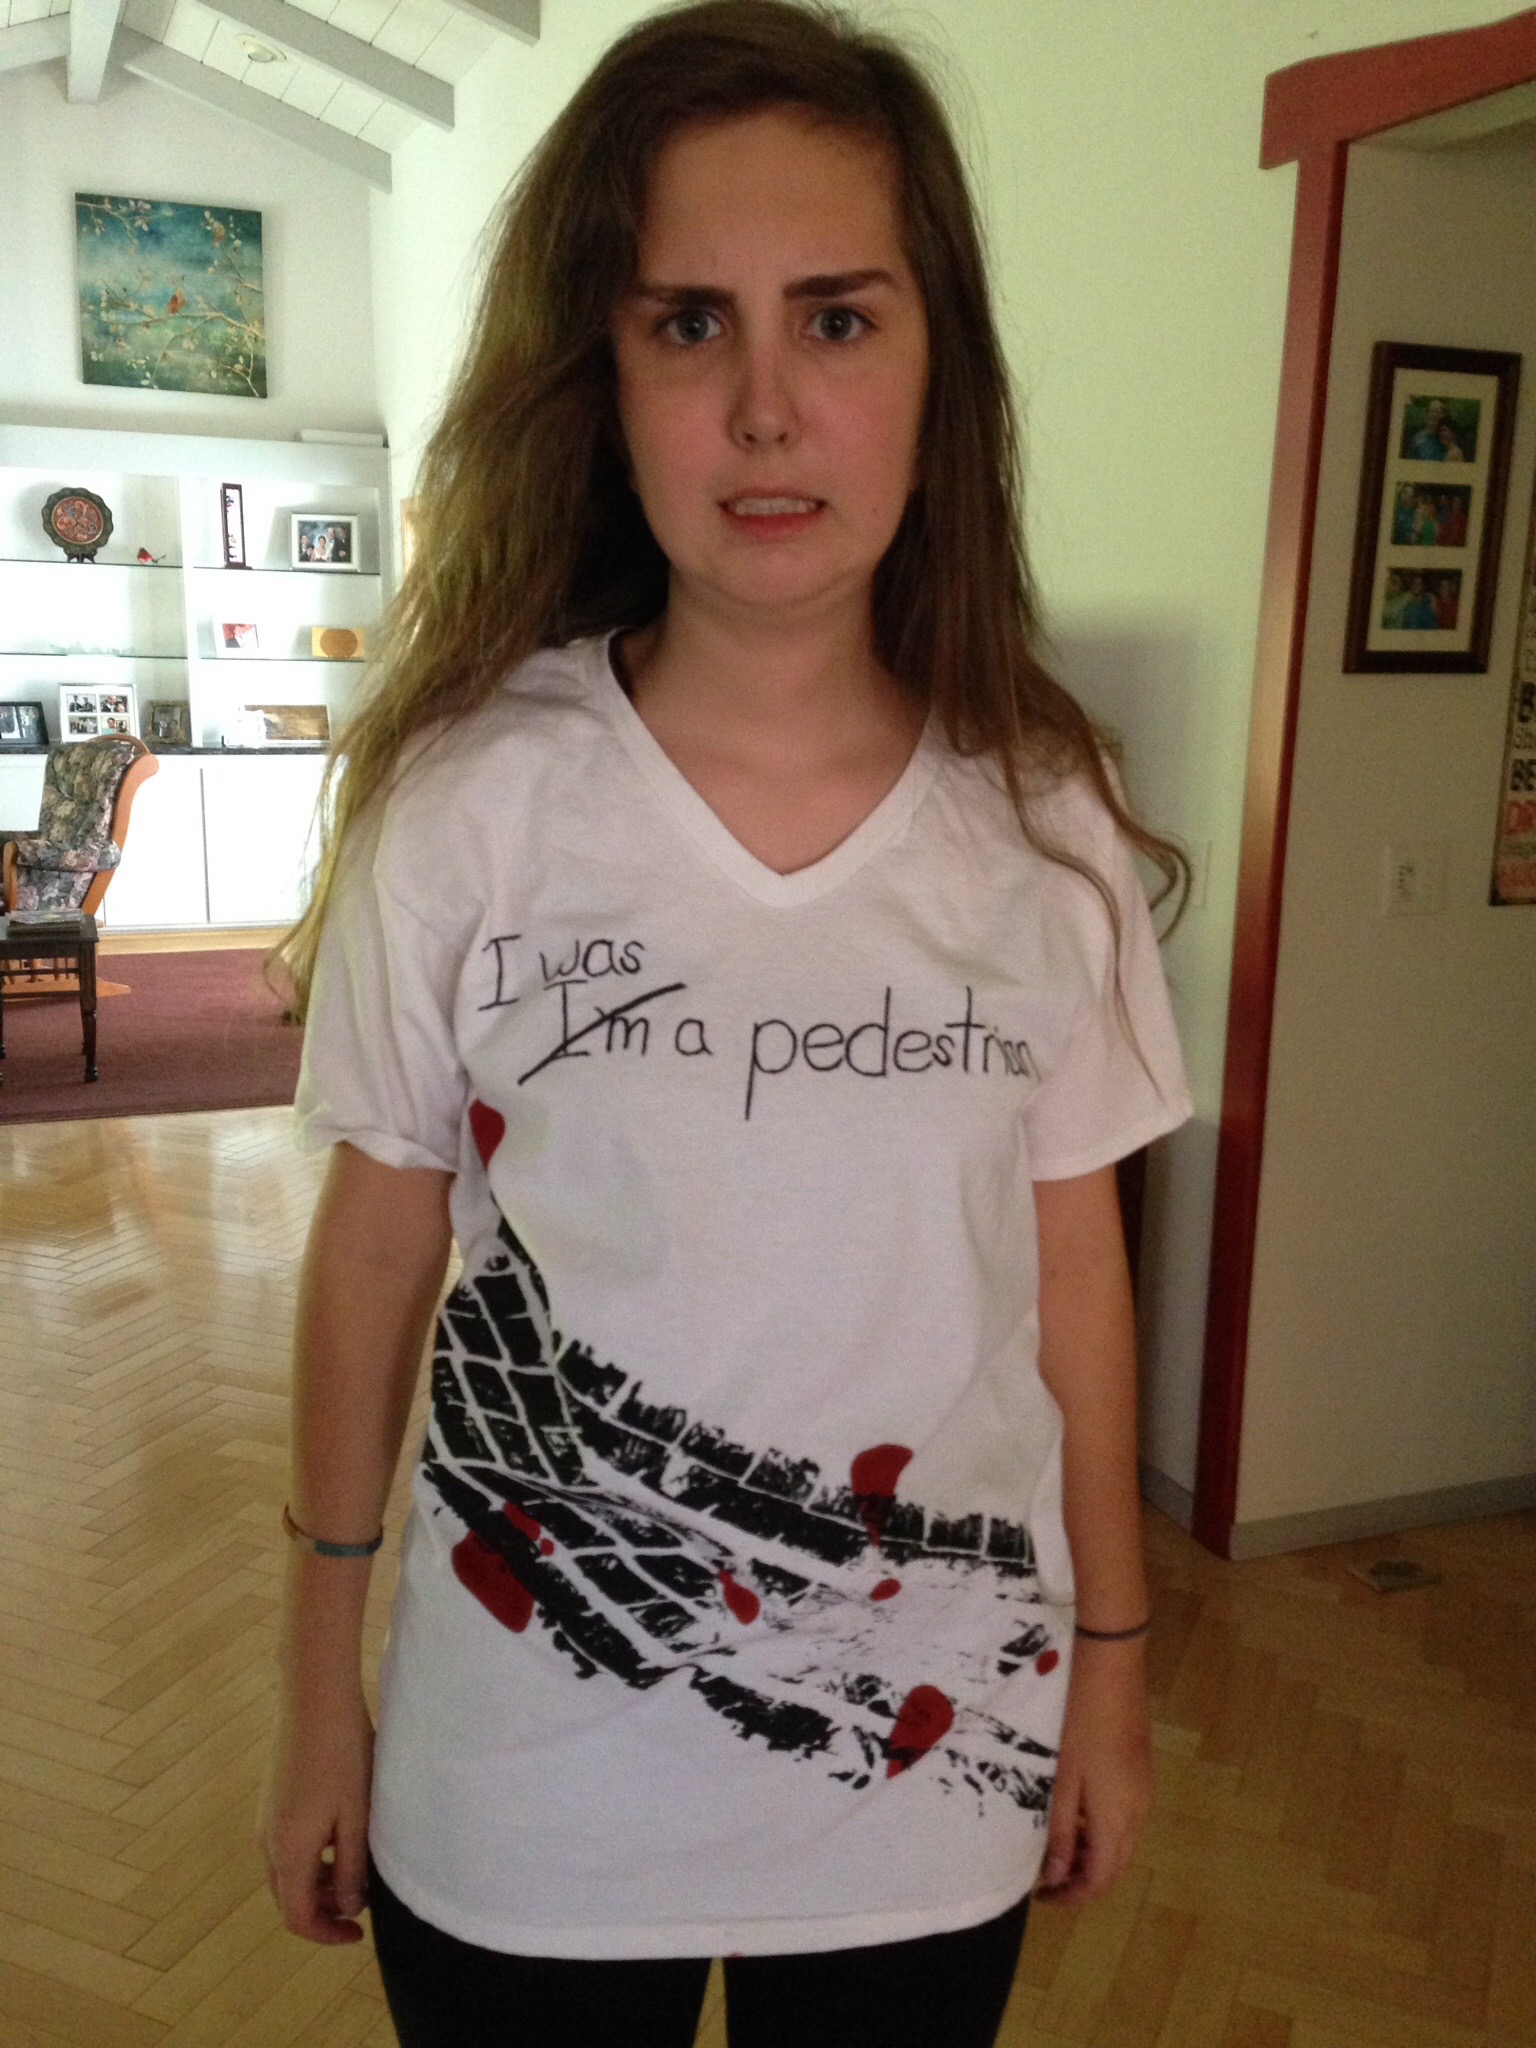
Last year she went to a Halloween Dance held by her high school. She had planned to use her Wednesday Addams outfit since she still had all of the pieces and this was a new group of friends who hadn’t seen it when she first wore it. However, the afternoon of the dance she changed her mind. She decided to go with a more macabre idea and became a pedestrian who had been run over.
The process for making this tshirt was hysterical. Remember, this is the afternoon of the dance so we were working fast. She needed to make the shirt and have time for it to dry. We thought about it and quickly decided to literally run over the tshirt with my car to get the tire track marks. We took black acrylic paint and painted my tire and then strategically place the tshirt on the ground and slowly drove over it. We took a few test runs over pieces of cardboard first so we could see how much paint we needed to put on the tire. She, very wisely, put a fresh piece of cardboard inside the shirt so the paint wouldn’t bleed through to the back side of the shirt. Once she was happy with the tire tracks, she ran into the house with it and dried it with a hair dryer. She added the fake blood and off she went. I thought it was hysterical and it was the fastest costume ever.
Here we are, in the first week of October and she hasn’t decided what she will be this year. Hopefully she will come up with something before the day of the dance!
Halloween doesn’t have to be too fussy or expensive. These costumes were easy to make and didn’t break the bank. If you have any questions on the process for any of them, leave them in the comments.
Now for the real fun – let’s talk about the giveaway prizes! There are some really fun gifts for you!
Lorna McMahon, of Sew Fresh Quilts, has provided a gift of $15.00 to her shop. If, by some very small chance, you aren’t familiar with Lorna’s patterns, click here and take a look. Lorna has some of the cutest quilt patterns, many of which feature little critters- raccoons, farm animals, fish, chickens, and squirrels for example. Lorna has so many fun and creative ideas.
Craftsy has donated five free classes! You know how I feel about the classes over at Craftsy. There are so many to choose from!
C&T Publishing has donated five $20.00 gift certificates. C&T publish many of the amazing craft, sewing, knitting and quilting books that are widely sold in bookstores and online.
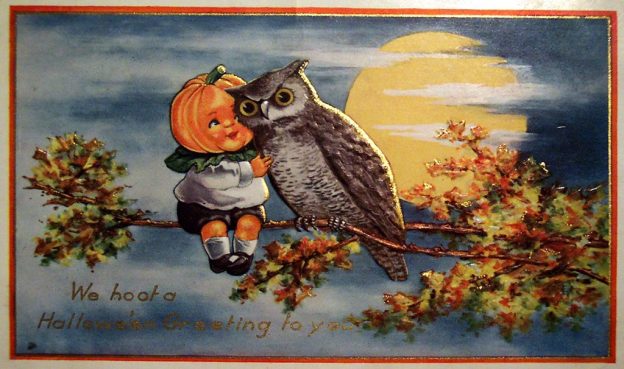
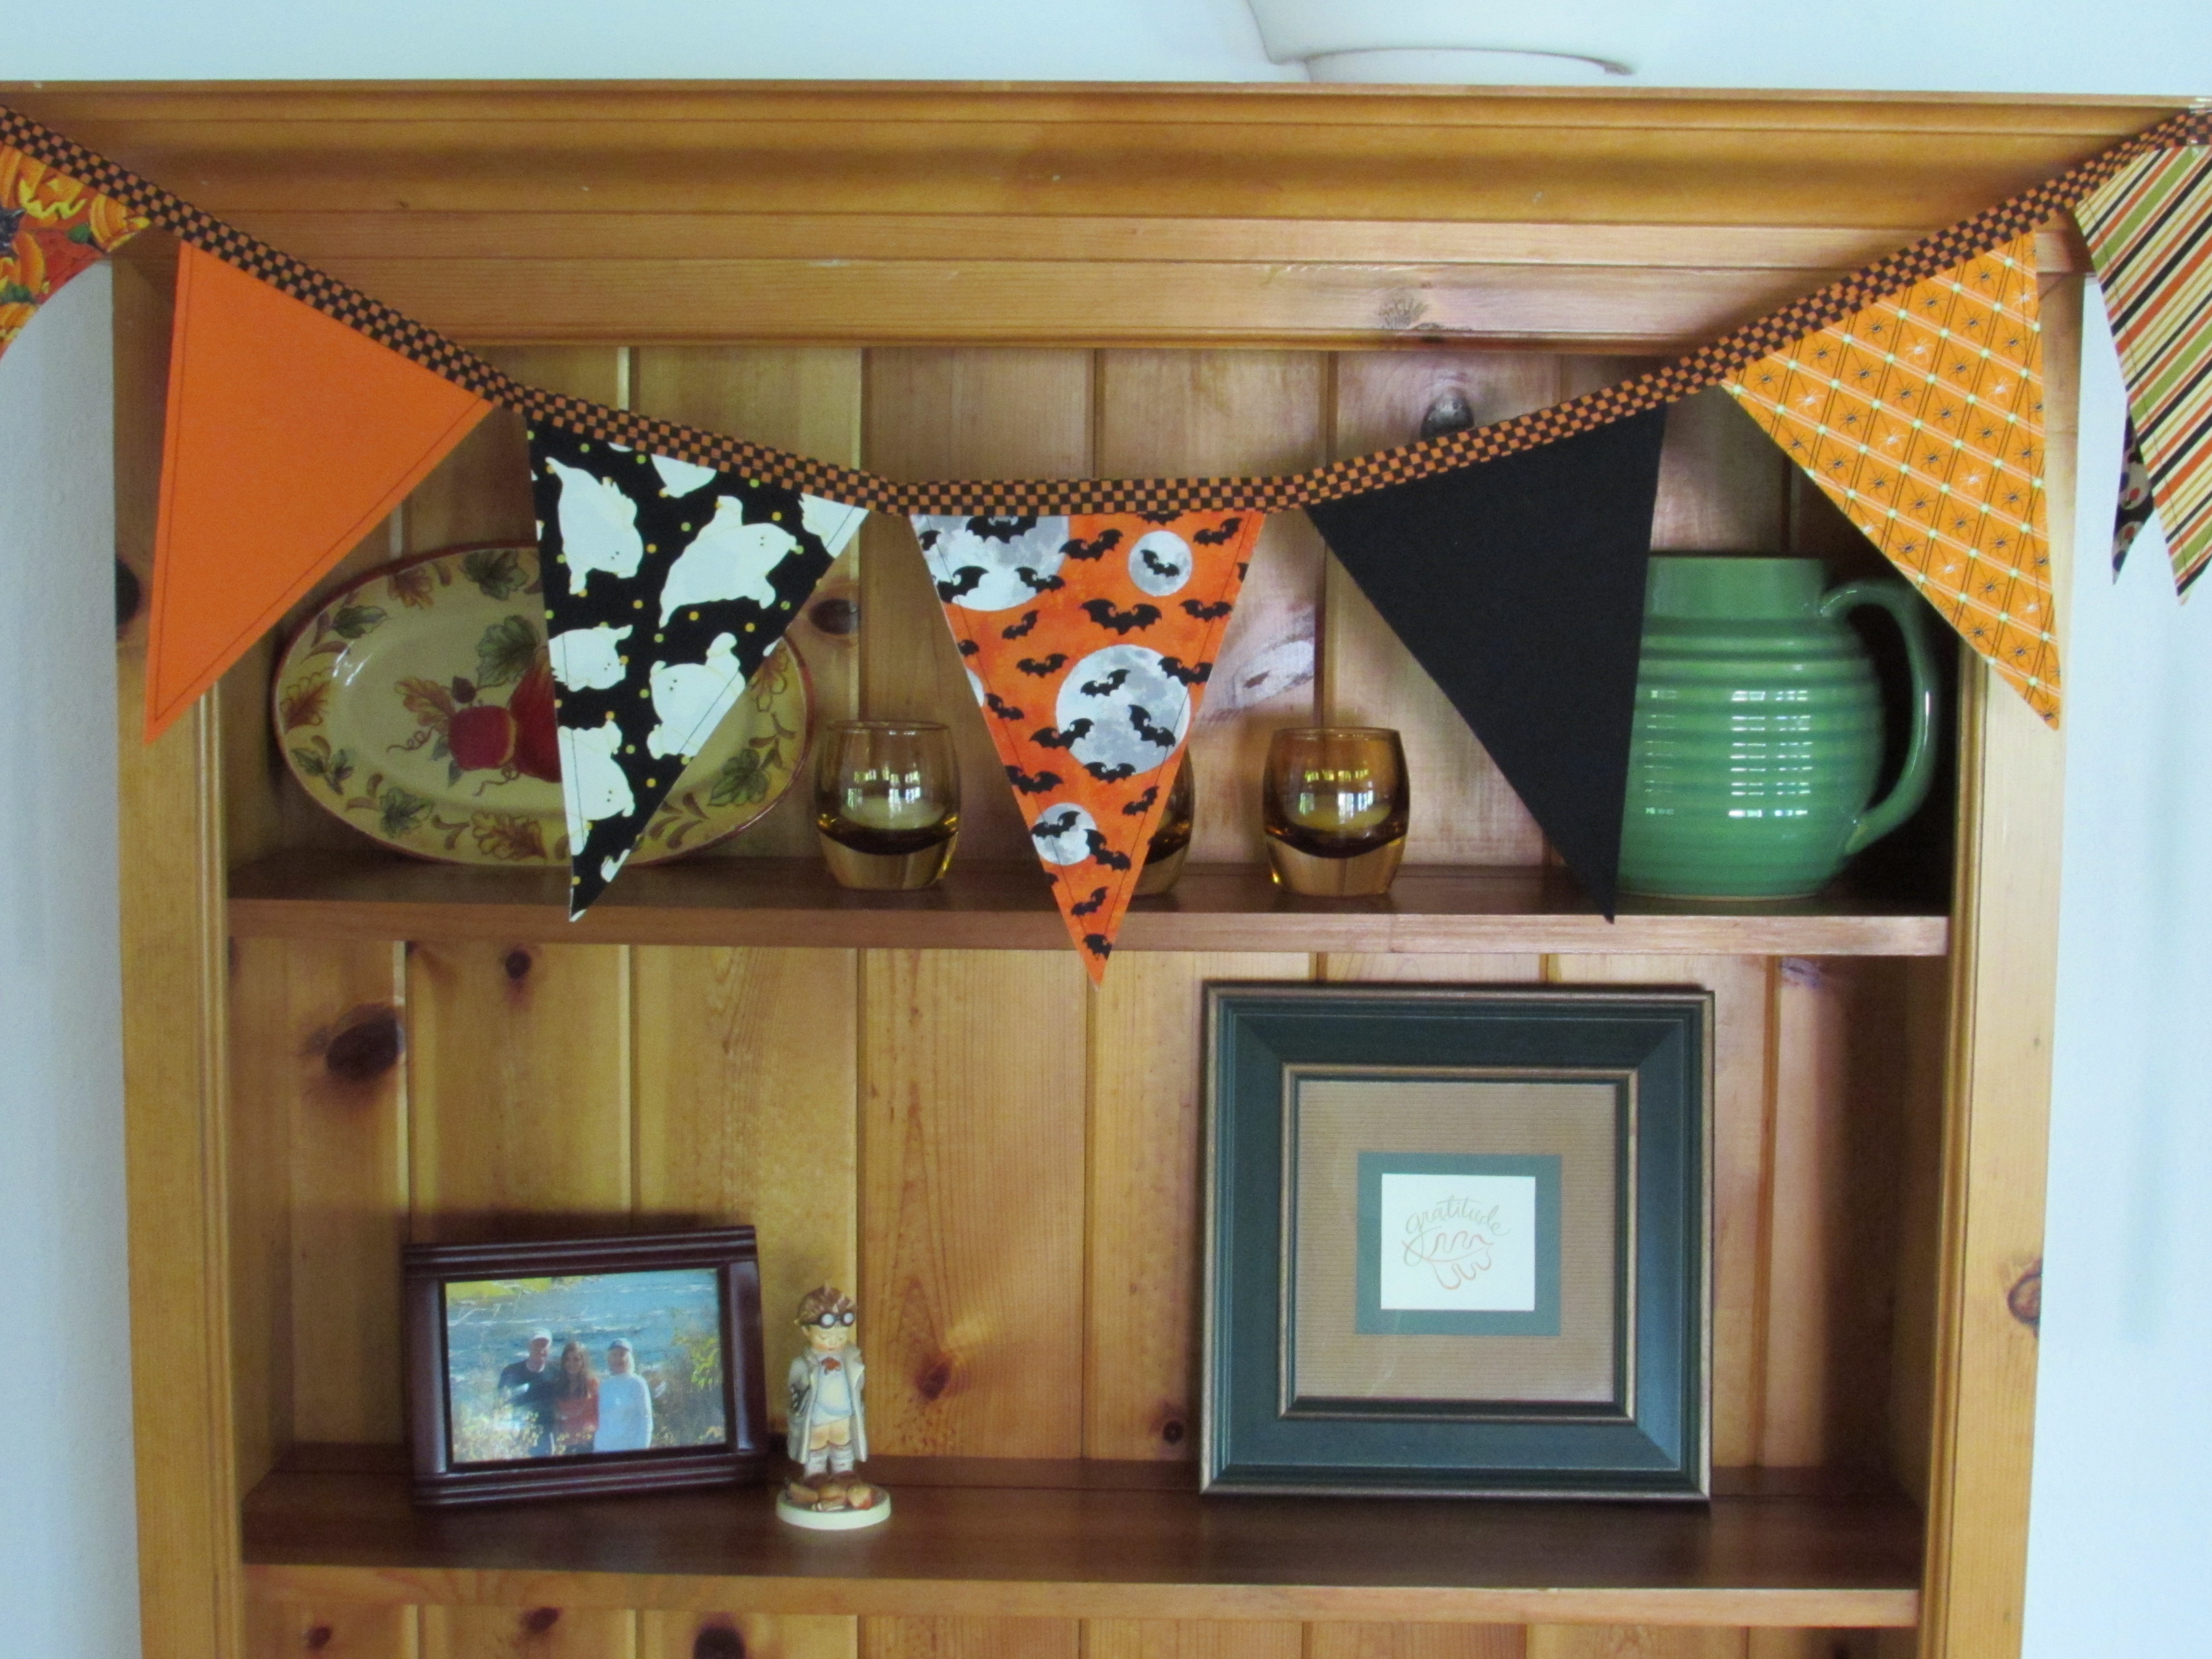
Finally, I made two Halloween buntings to give as prizes. They are similar to the one pictured above.
Each post you link up counts as one entry into the giveaway.
You are welcome to link up from your Instagram or Flickr accounts if you aren’t a blogger or prefer that media.
Please take a moment and enjoy some of the other link ups. Leave a little comment love as you go.
Have fun and thanks for coming to the party!! Link ups will remain open through Saturday night so if you haven’t finished your post, you can still link up over the next couple of days. Drawings for prizes will happen Saturday evening and winners will be posted first thing Sunday morning. (I will also email the winners.)
My sister Patti came up for the weekend from the Bay Area. What a treat. Her youngest son (of five children) went off to college this fall so for the first time in 38 years, she has some time for herself.
She brought me a box of treasures. As she brought the box into the house, she said, “This is a weird pile of fabric. If you don’t want it, that’s fine.” Someone explain what those last seven words even mean??
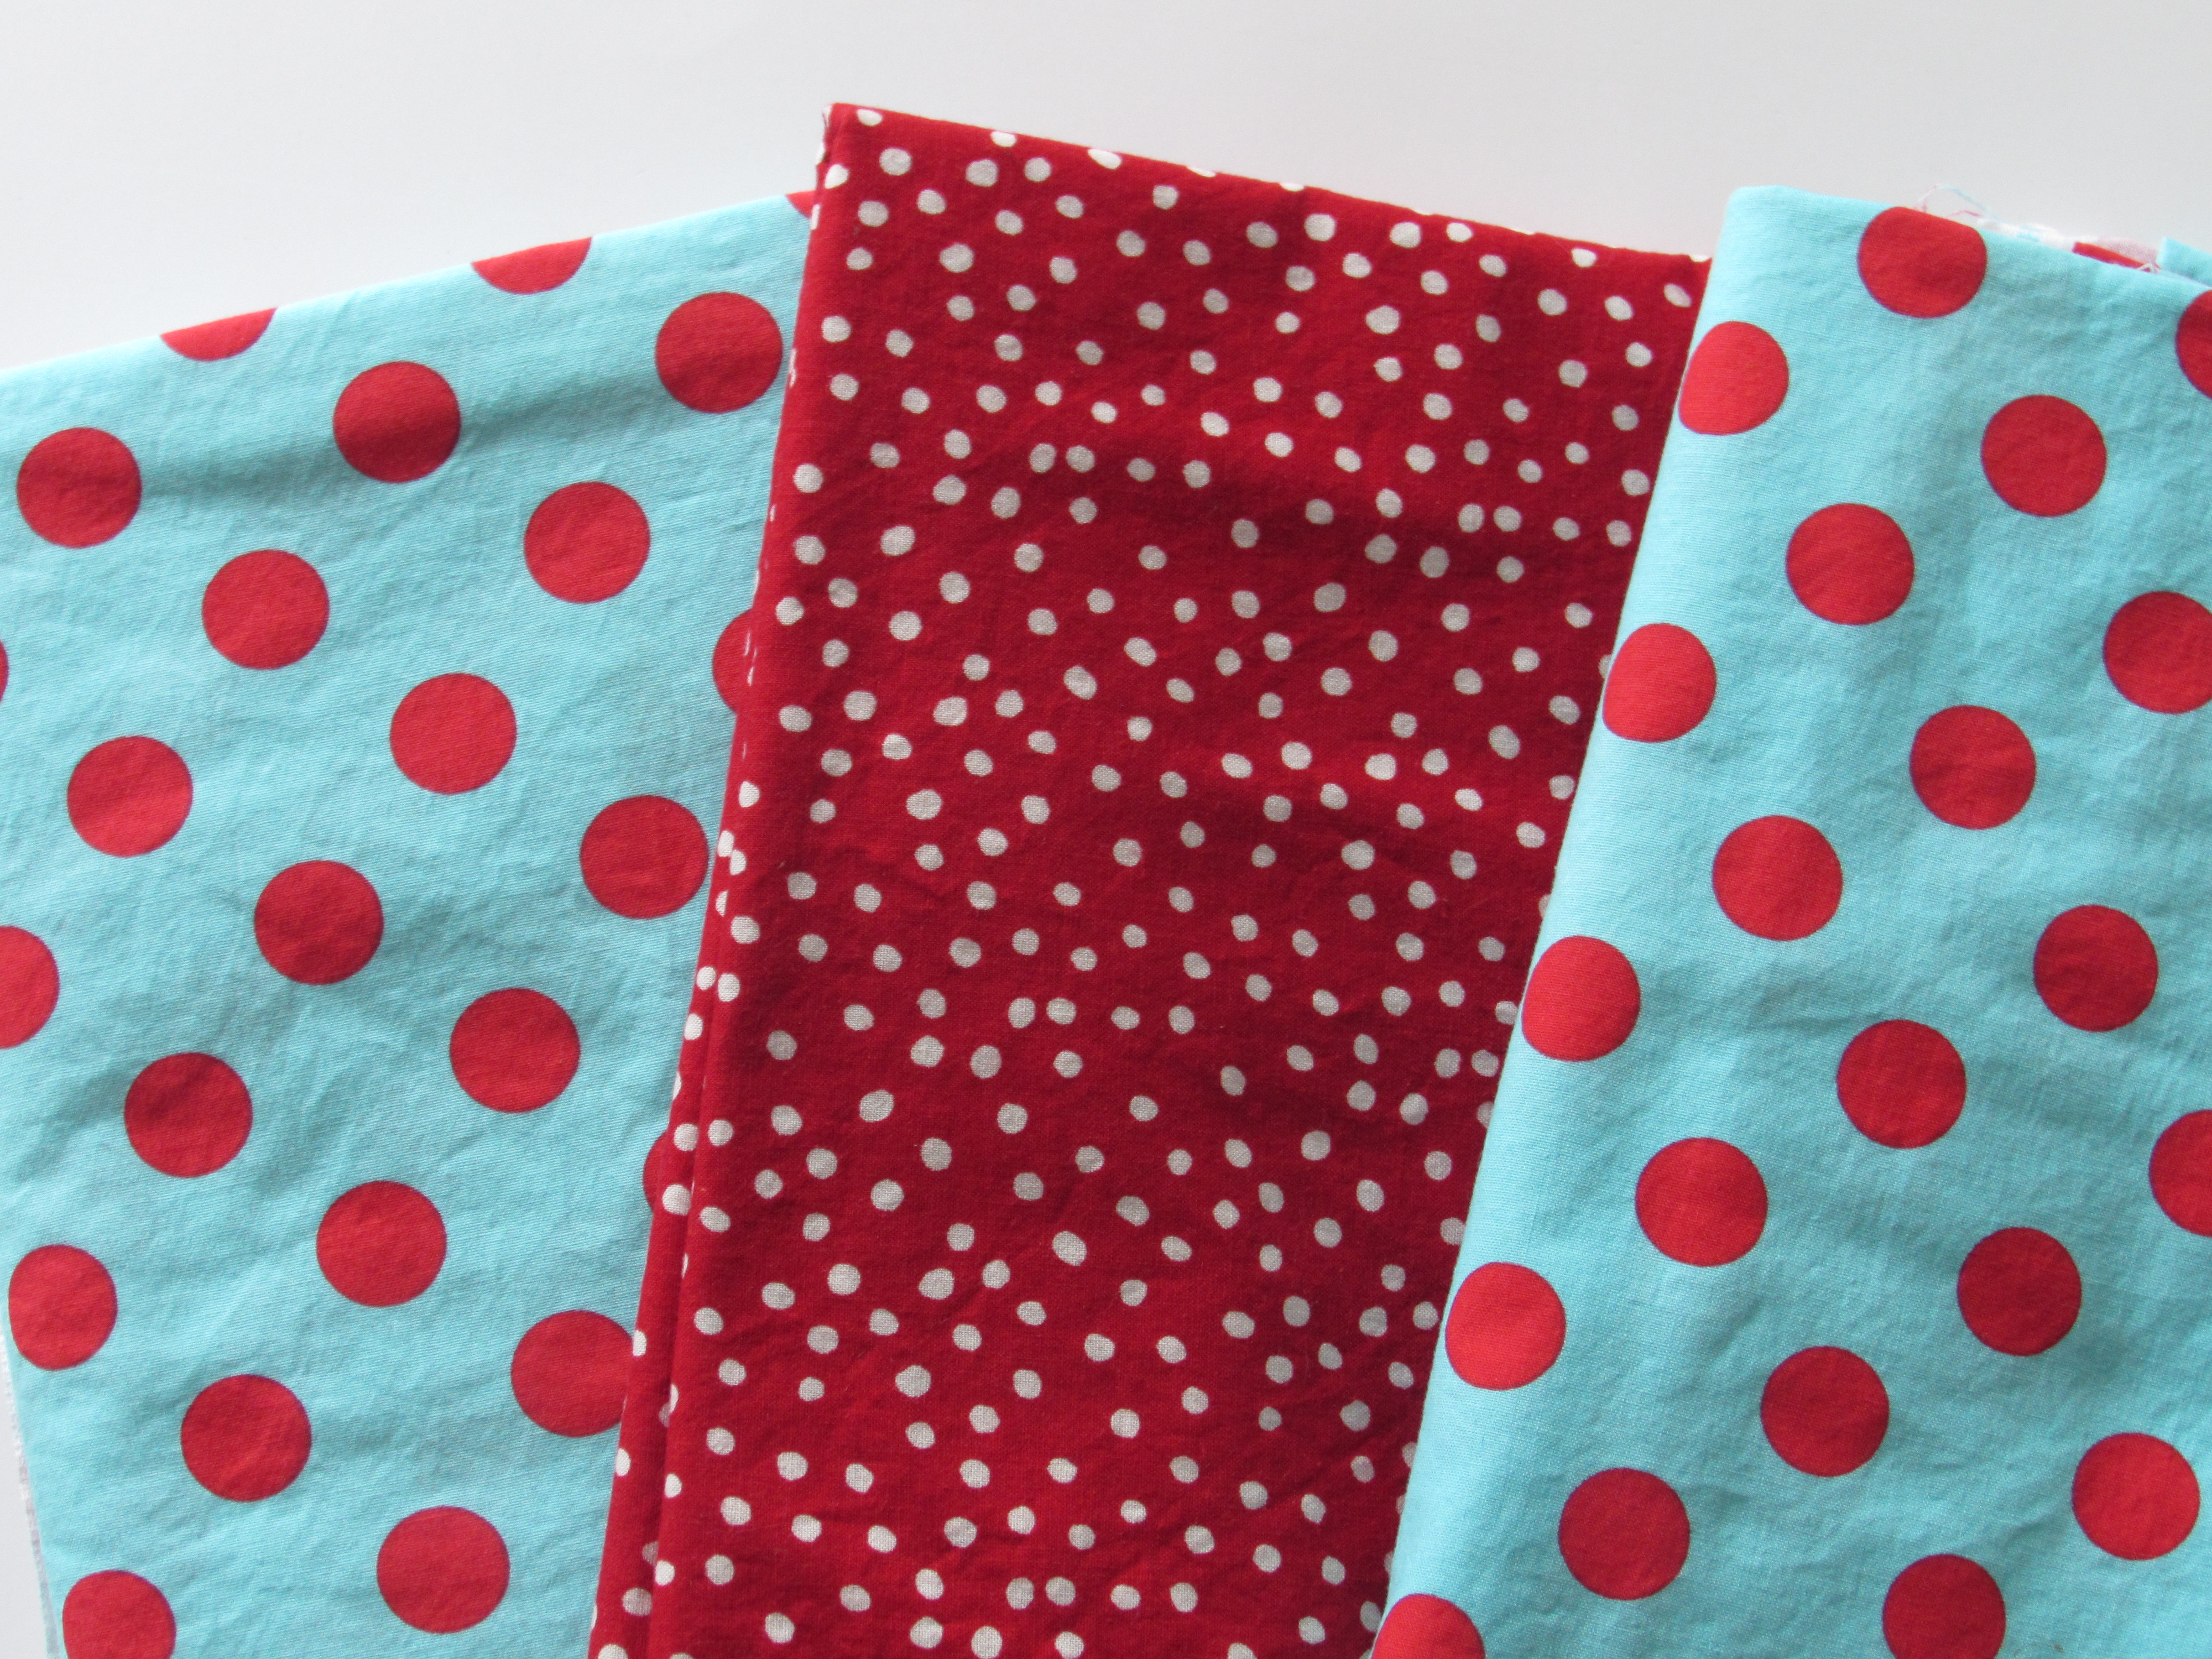
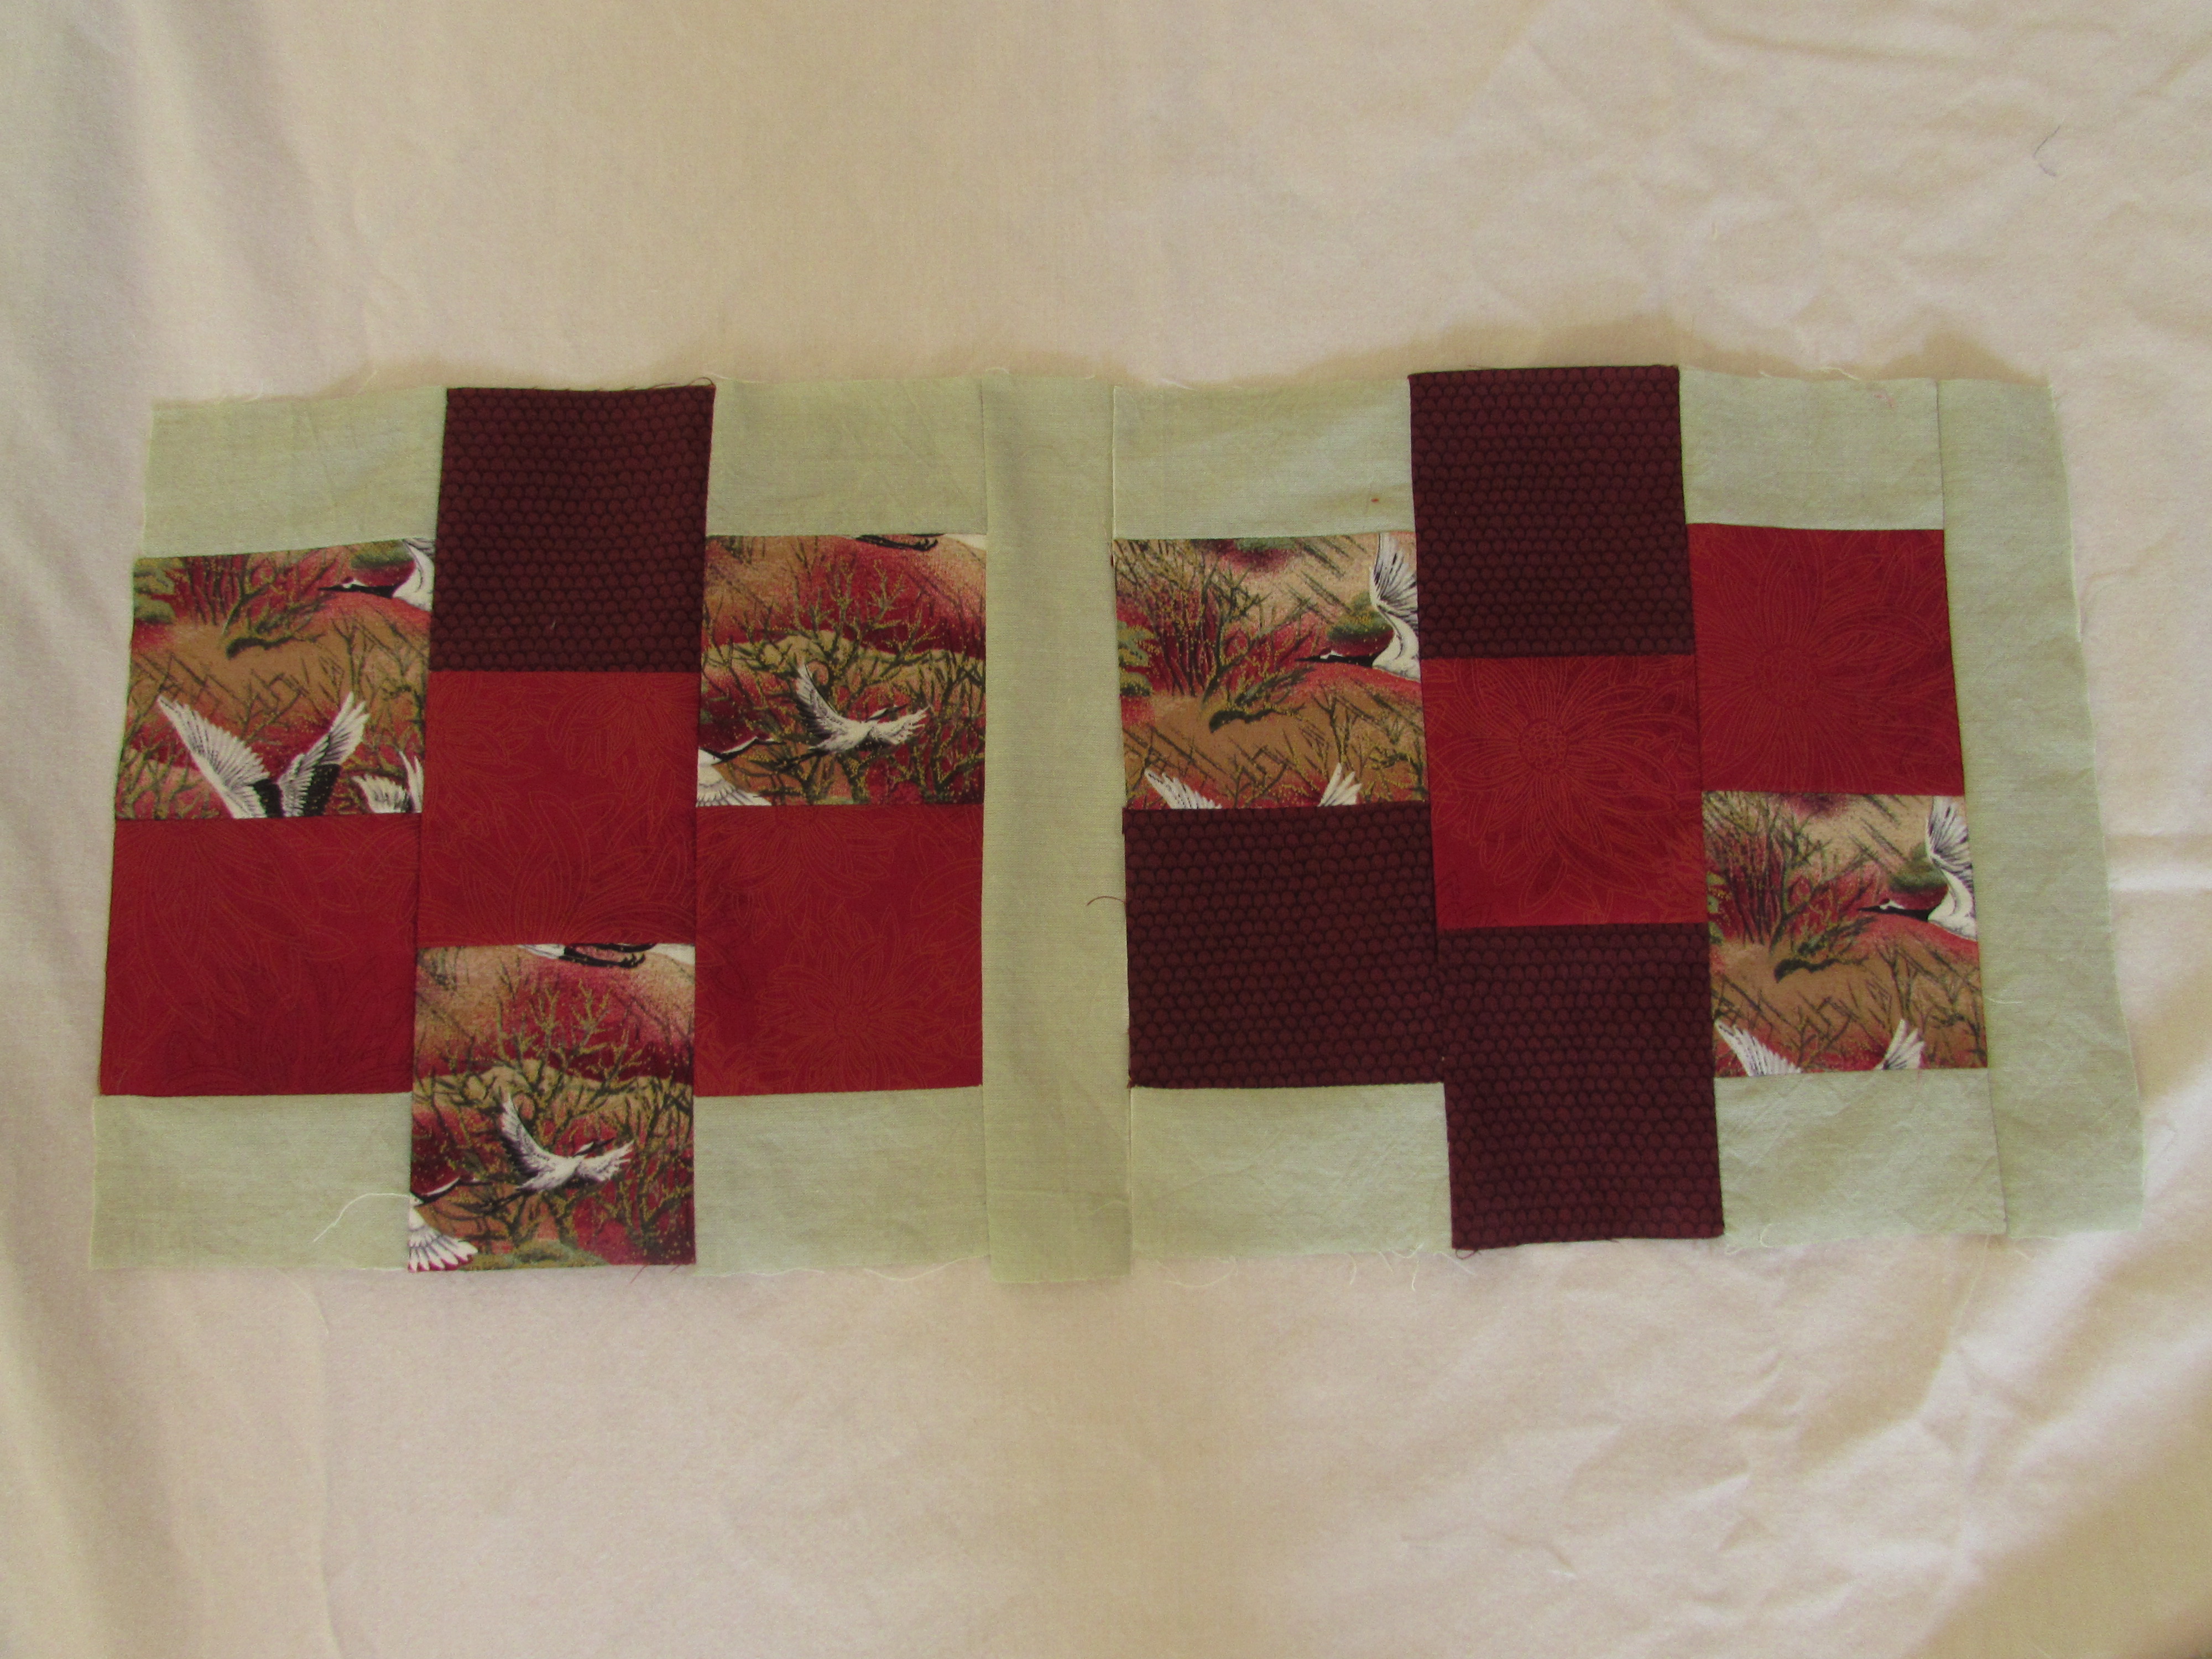
A couple of years ago, Patti held a circus themed birthday party for the nieces and nephews and her grandchildren. My sister throws amazing parties – she goes all out with decorations, themes, games, and food. It is a lot of fun. For the circus party she used lots of red and white with a splash of turquoise.
These are large pieces of yardage. The blue and red dots are a Michael Miller and each piece is about 2.5 yards long. The small red dot is only a 1/2 yard cut.
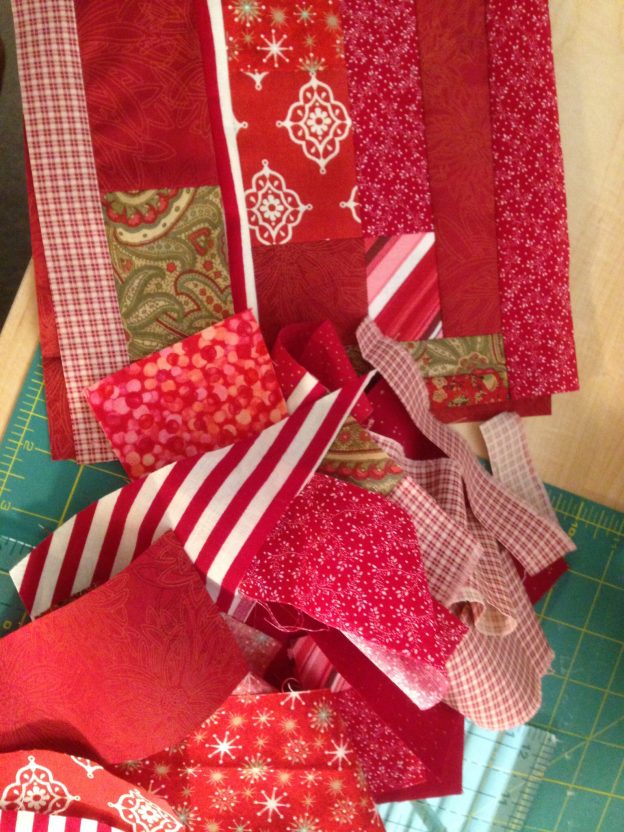
The stripes, wide and narrow are at least 2.5 yards each (and I think there are two pieces of each). The red dots on white are from the Dr. Seuss collection and is also about 2 yards. Lots and lots of red and white. There is easily over ten yards of fabric that wants to be used.
Ok – here is the part where you all chime in. I think I should use some of this for a few Project Linus quilts. Throw out some fun ideas. Combining the blue and red piece with the narrower red stripe would be fun. They would all be perfect for quilt backs. But I think some simply pieced projects would be perfect for Project Linus. What would you all do? The really wide stripe will probably be best on the back of a quilt due to its size. The tiny polka dot is a win for binding. If I add just a color or two, I could do something fun. How would you build from here?
“If you don’t want it”… I thought she knew me better than that. 🙂 Thank you Patti!!
REMINDER – Handmade Halloween begins in two more days, on Tuesday, October 4th!! See you then.
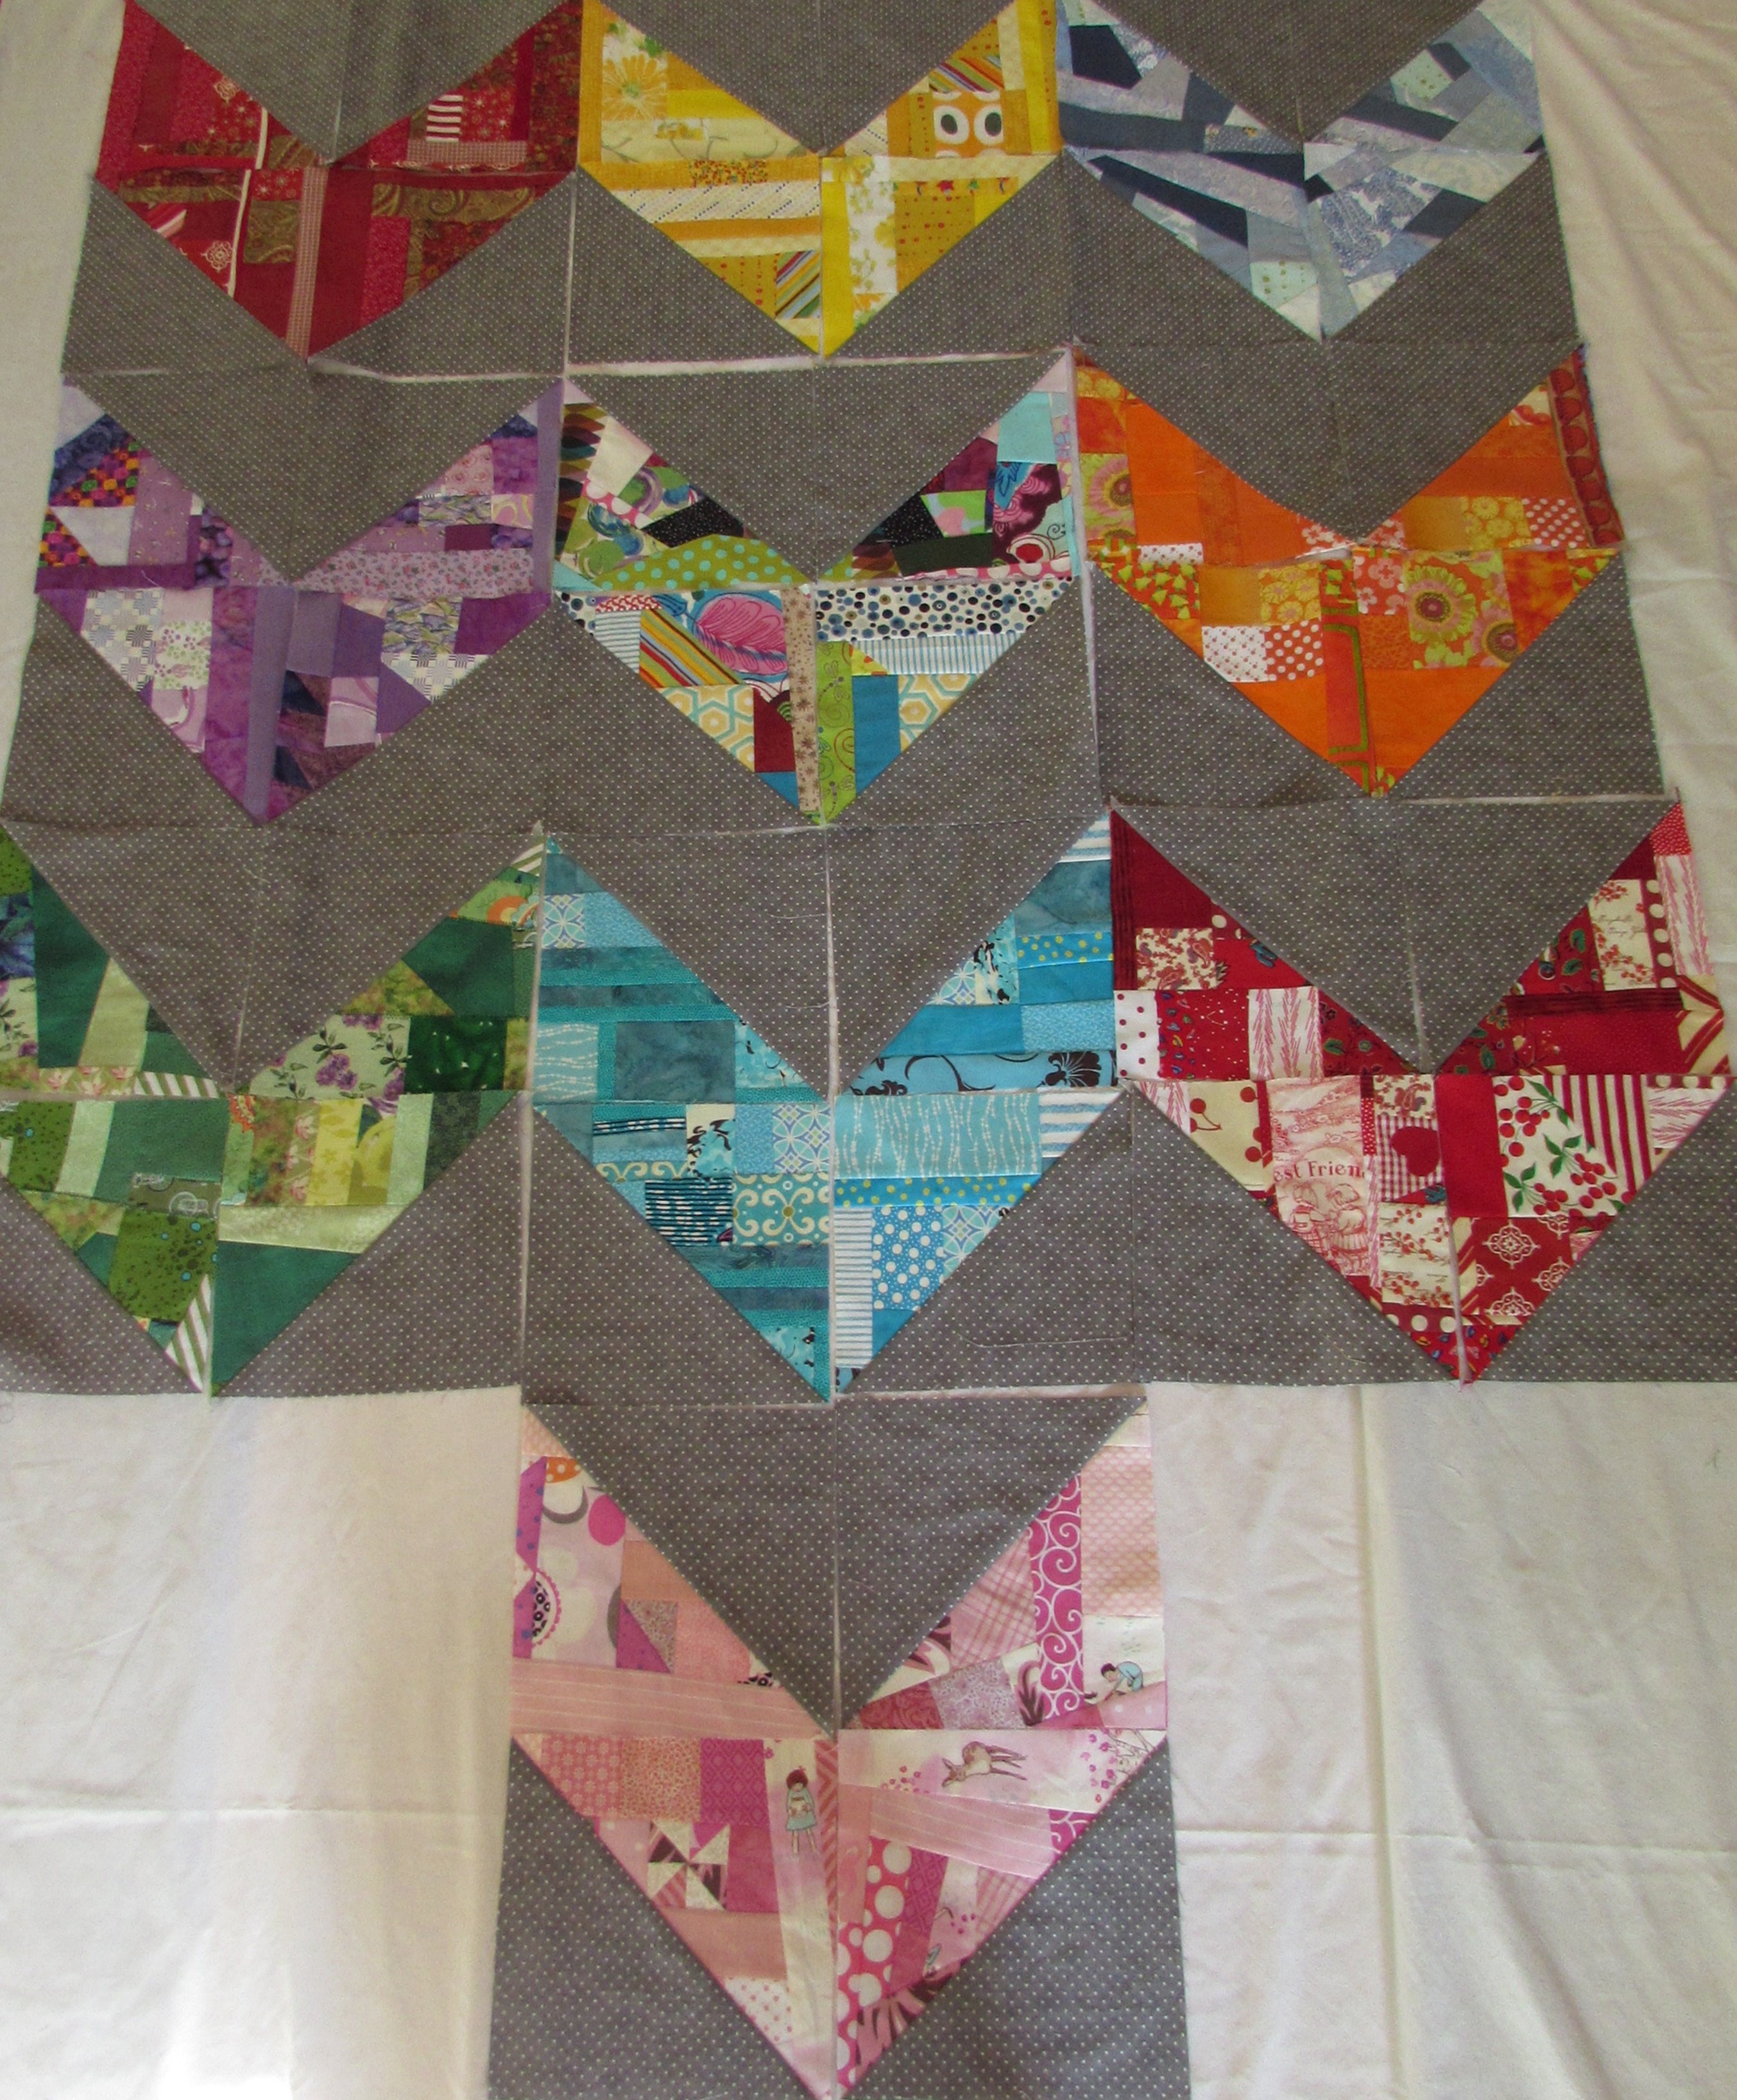
As with last month, I finished my scrappy blocks just in the nick of time. I finished with only one day to spare. September has come to a close. Time moves at a dizzying pace sometimes. Anyway, I played with some deep red scraps and added gold accents where I could as this was the RSC16 color scheme for September. This is a combination I really like. It worked better for my scrappy HST’s than it did for the gemstone project. The gemstone project requires I cut 3 1/2″ blocks and I didn’t really have very many deep red scraps that were big enough. I had tons of strings though which I used for the scrappy HST’s. Here you go. Take a look.
I love these colors. They add a richness to the project. What do you think?
I was playing with these blocks on Tuesday when Julia was recuperating on the couch. We looked at colors trying to decide the last two colors to finish this off. Of course I don’t know what the October color will be for RSC16 but I think I am going to do a set of deep purple blocks and a set a very pale yellow. (Unless, of course, Angela comes up with some crazy colors for the month of October that appeal to me more. We shall see. Also, I cannot decide if I should keep the multi colored scrappy blocks that are in the center. Do those stay or do they go?
As I said, I didn’t have much to work with for the Gemstones quilt. I do like the blocks but was only able to make two.
Here is the sum total of what I have thus far.
I definitely want to add some deep yellow blocks to this. I don’t know if I have the right scraps and may have to splurge on a fat quarter or two to supplement. Kind of silly to buy pieces for a scrappy project but I think it is calling for yellow. Also, it might need some blocks with a deep, midnight blue. Do you agree??
Glad I am keeping up with these, though just barely! I look forward to finding out the color for October and deciding if it works for either project, now that I am coming close to completing both of them.
Happy weekend everyone!!
As always, I’m linking up all over the place. My favorites are listed at the top of the page, under Link Ups.
Here is an early morning update for you. This has been a crazy week. Last weekend we were up in Downieville working on the house while Julia traveled with the tenth grade class to Ashland, OR (about a five hour drive) to attend the Shakespeare festival. She had a great time up until early Sunday morning when she woke with a nasty stomach flu. After talking with the mom’s and her principal who were taking care of her, it was decided she really couldn’t do a long drive to come home. My husband drove up to Ashland and they hunkered down in a hotel until the worst was over. Then they drove home on Monday afternoon. She has been recuperating but it looks like she is going back to school today – luckily she has a light morning so she will just go for the afternoon classes.
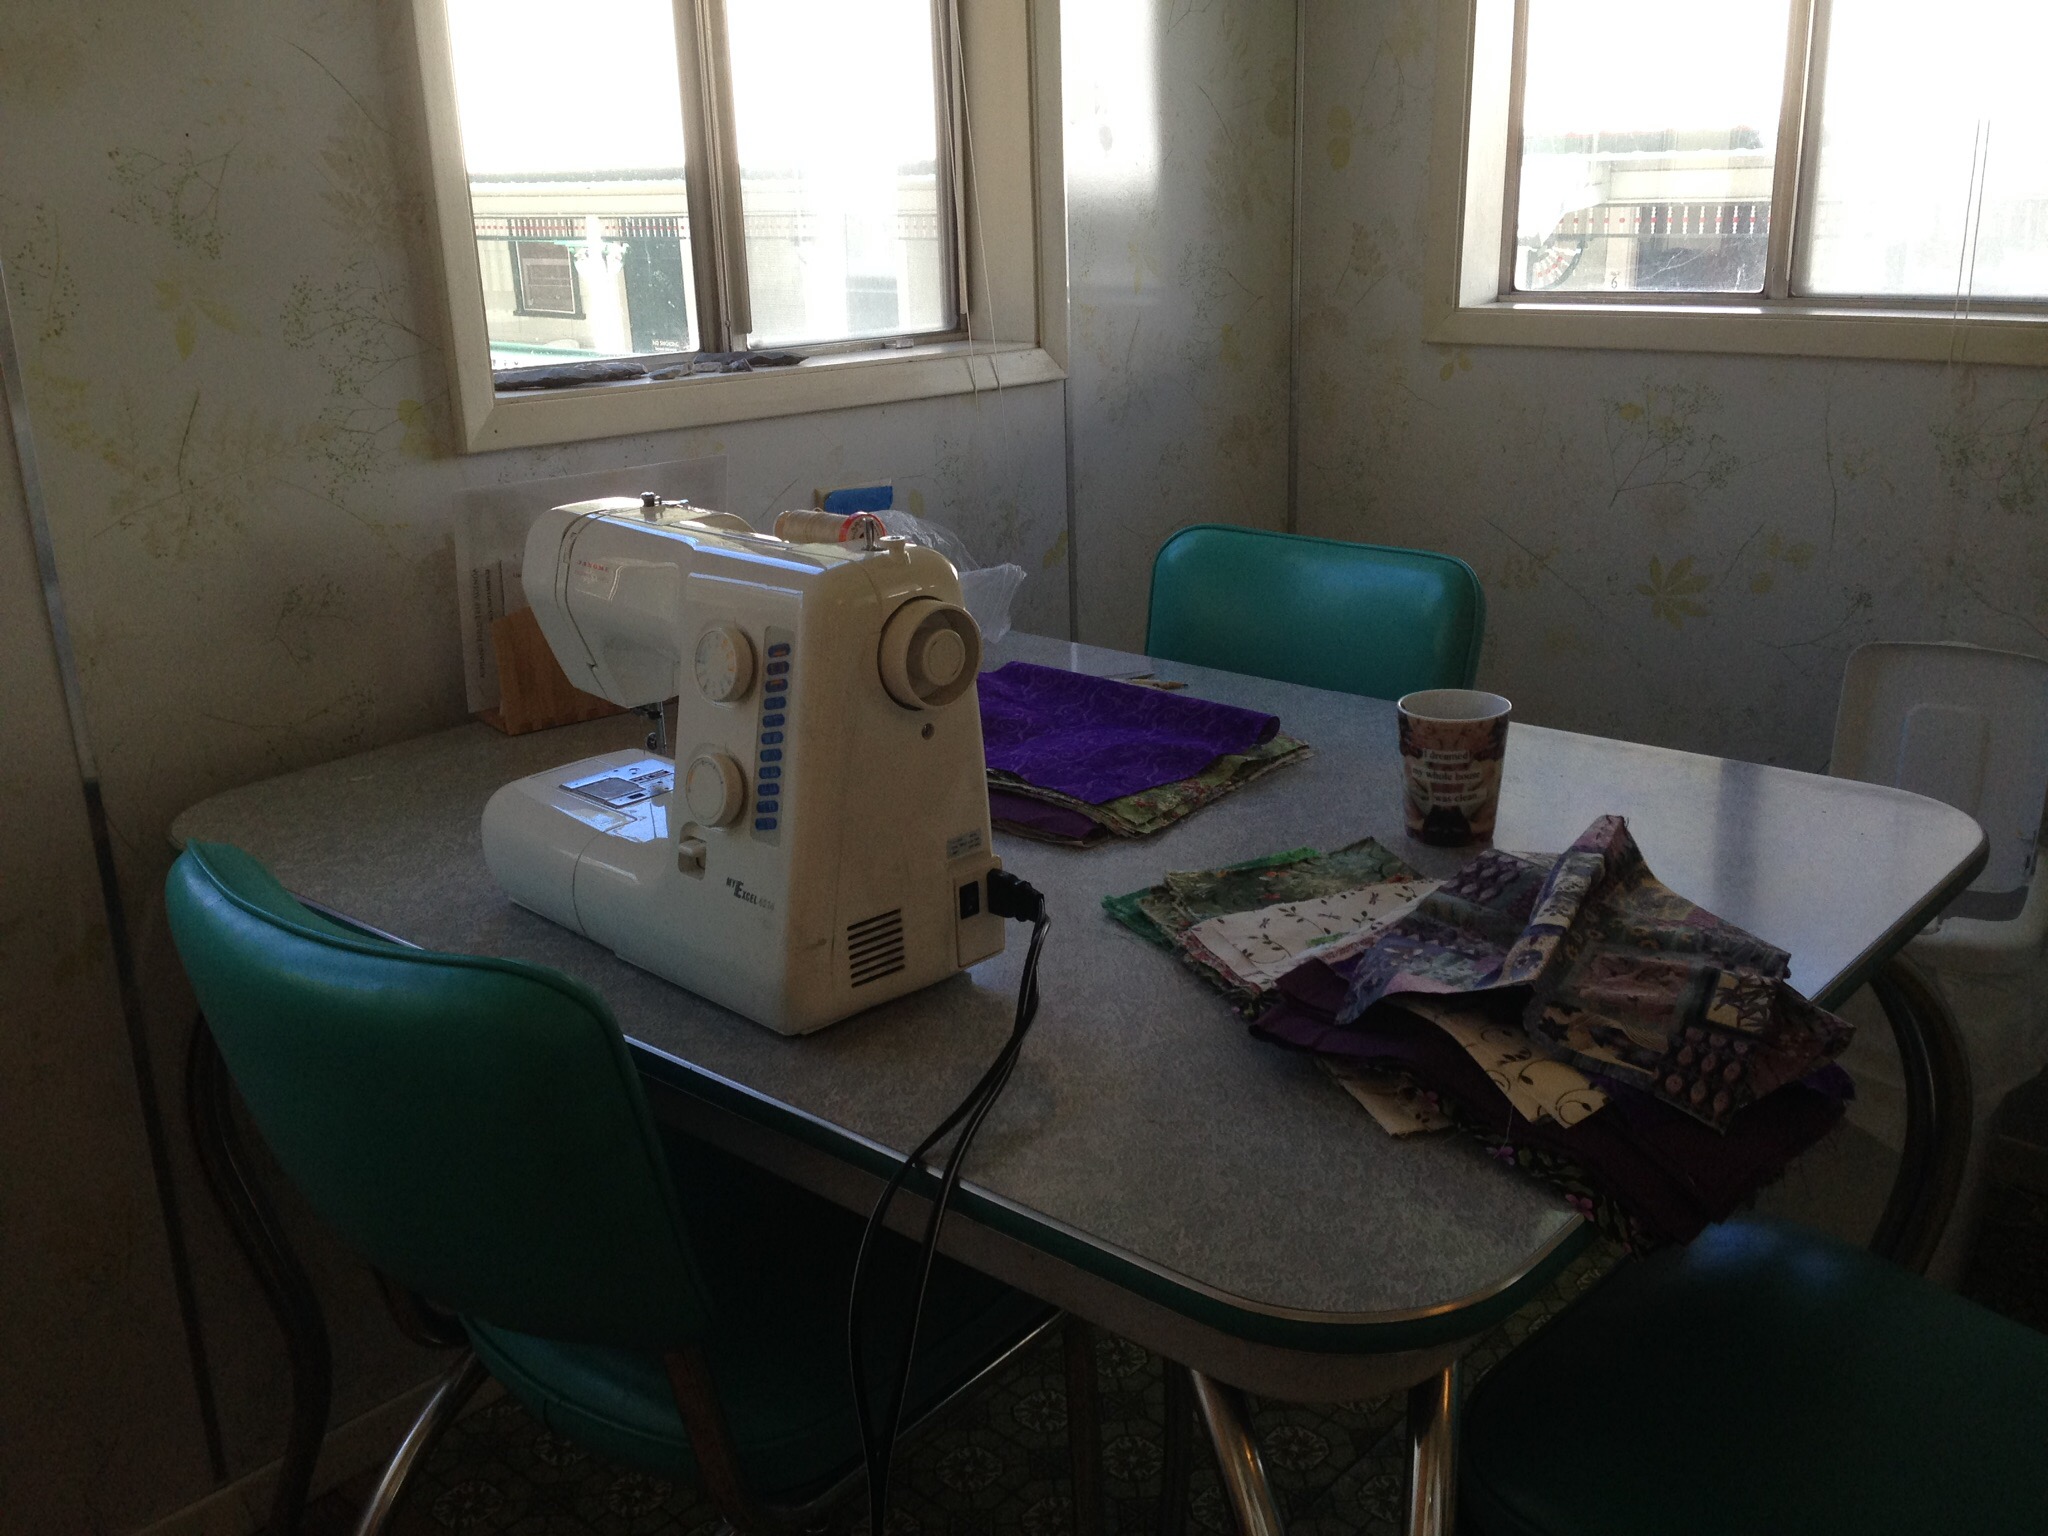
Until it came to an abrupt end, we were making good progress on the living room in Downieville. This room has been fun because it really only needed some paint, new trim and carpet. Friday last week was the day of the carpet install. I drove up in the morning to let the installer in. Remember the house is very tiny (approximately 700 square feet) and I knew I would be stuck either in the kitchen or bedroom while he was working on the living room. I brought my little sewing machine and set up shop in the kitchen. (Don’t you love the little kitchen table? I found it on Craigslist and I am crazy about it.)
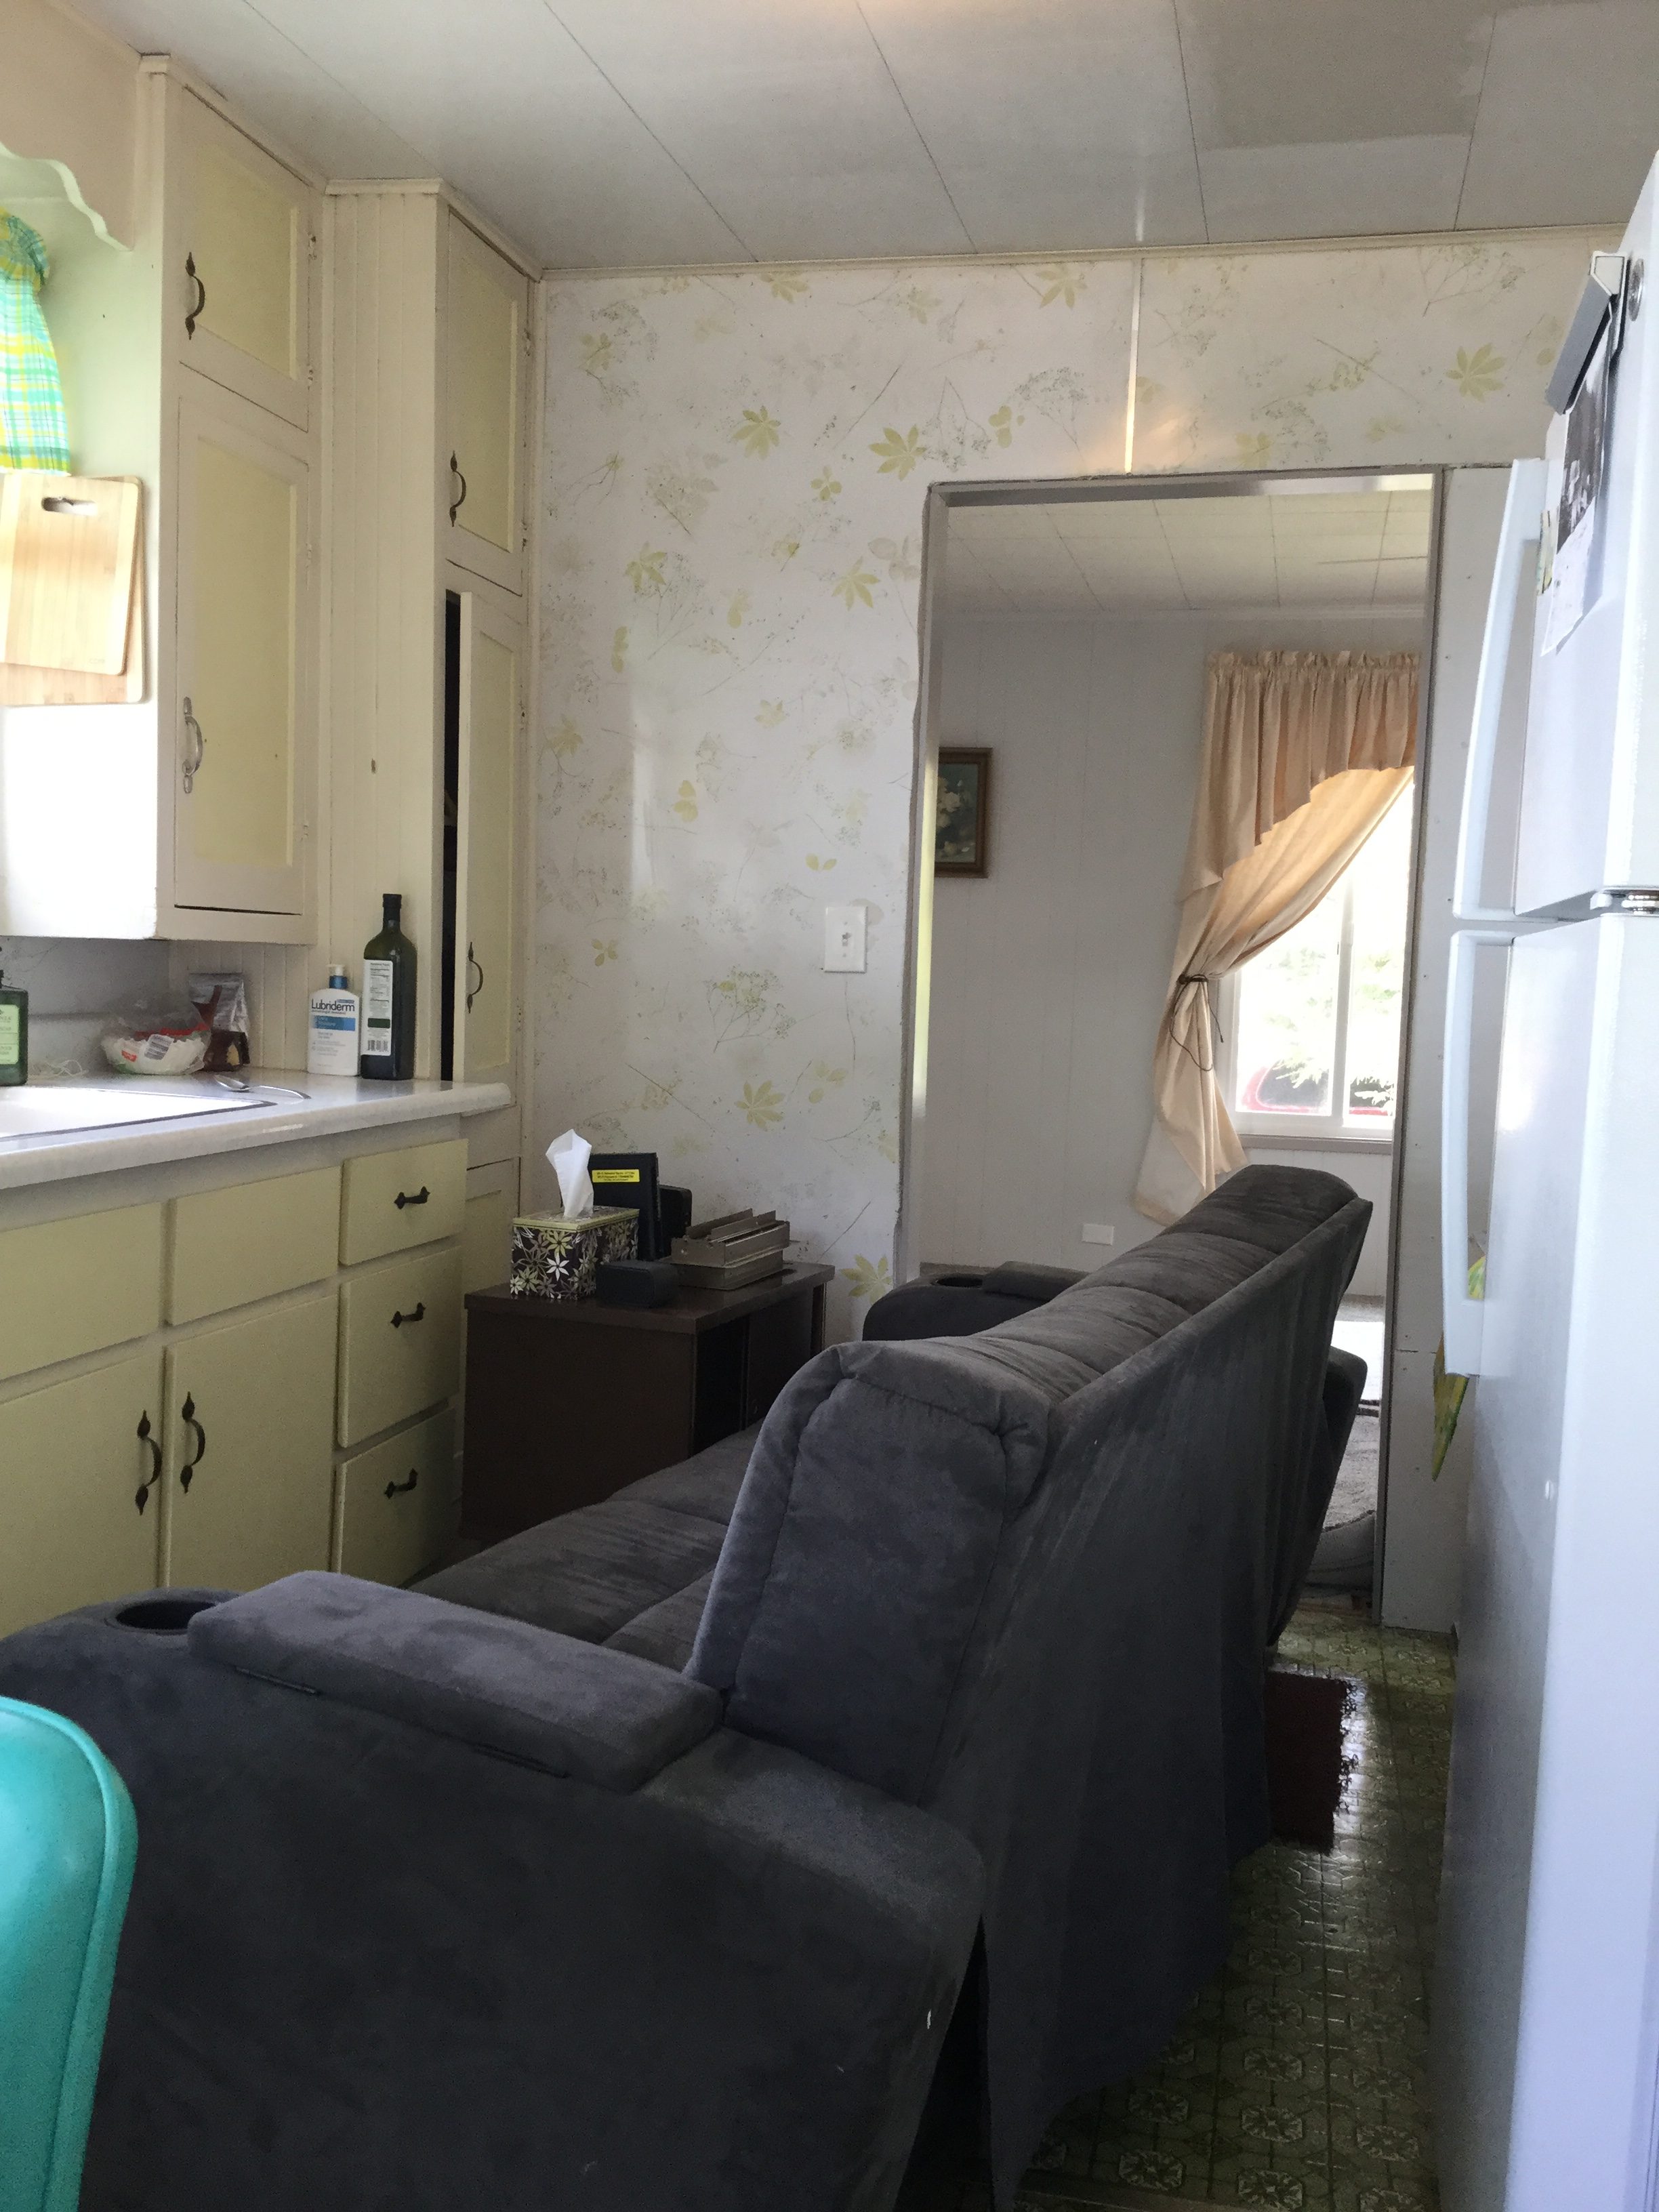
It was nice to be able to sew while he was working in the living room but it was quite cozy in the kitchen! There was no other spot for the couch so he pushed it through to the kitchen. Of course because it almost didn’t fit, there are new scratches in the paint of the door trim, but that can be taken care of later.
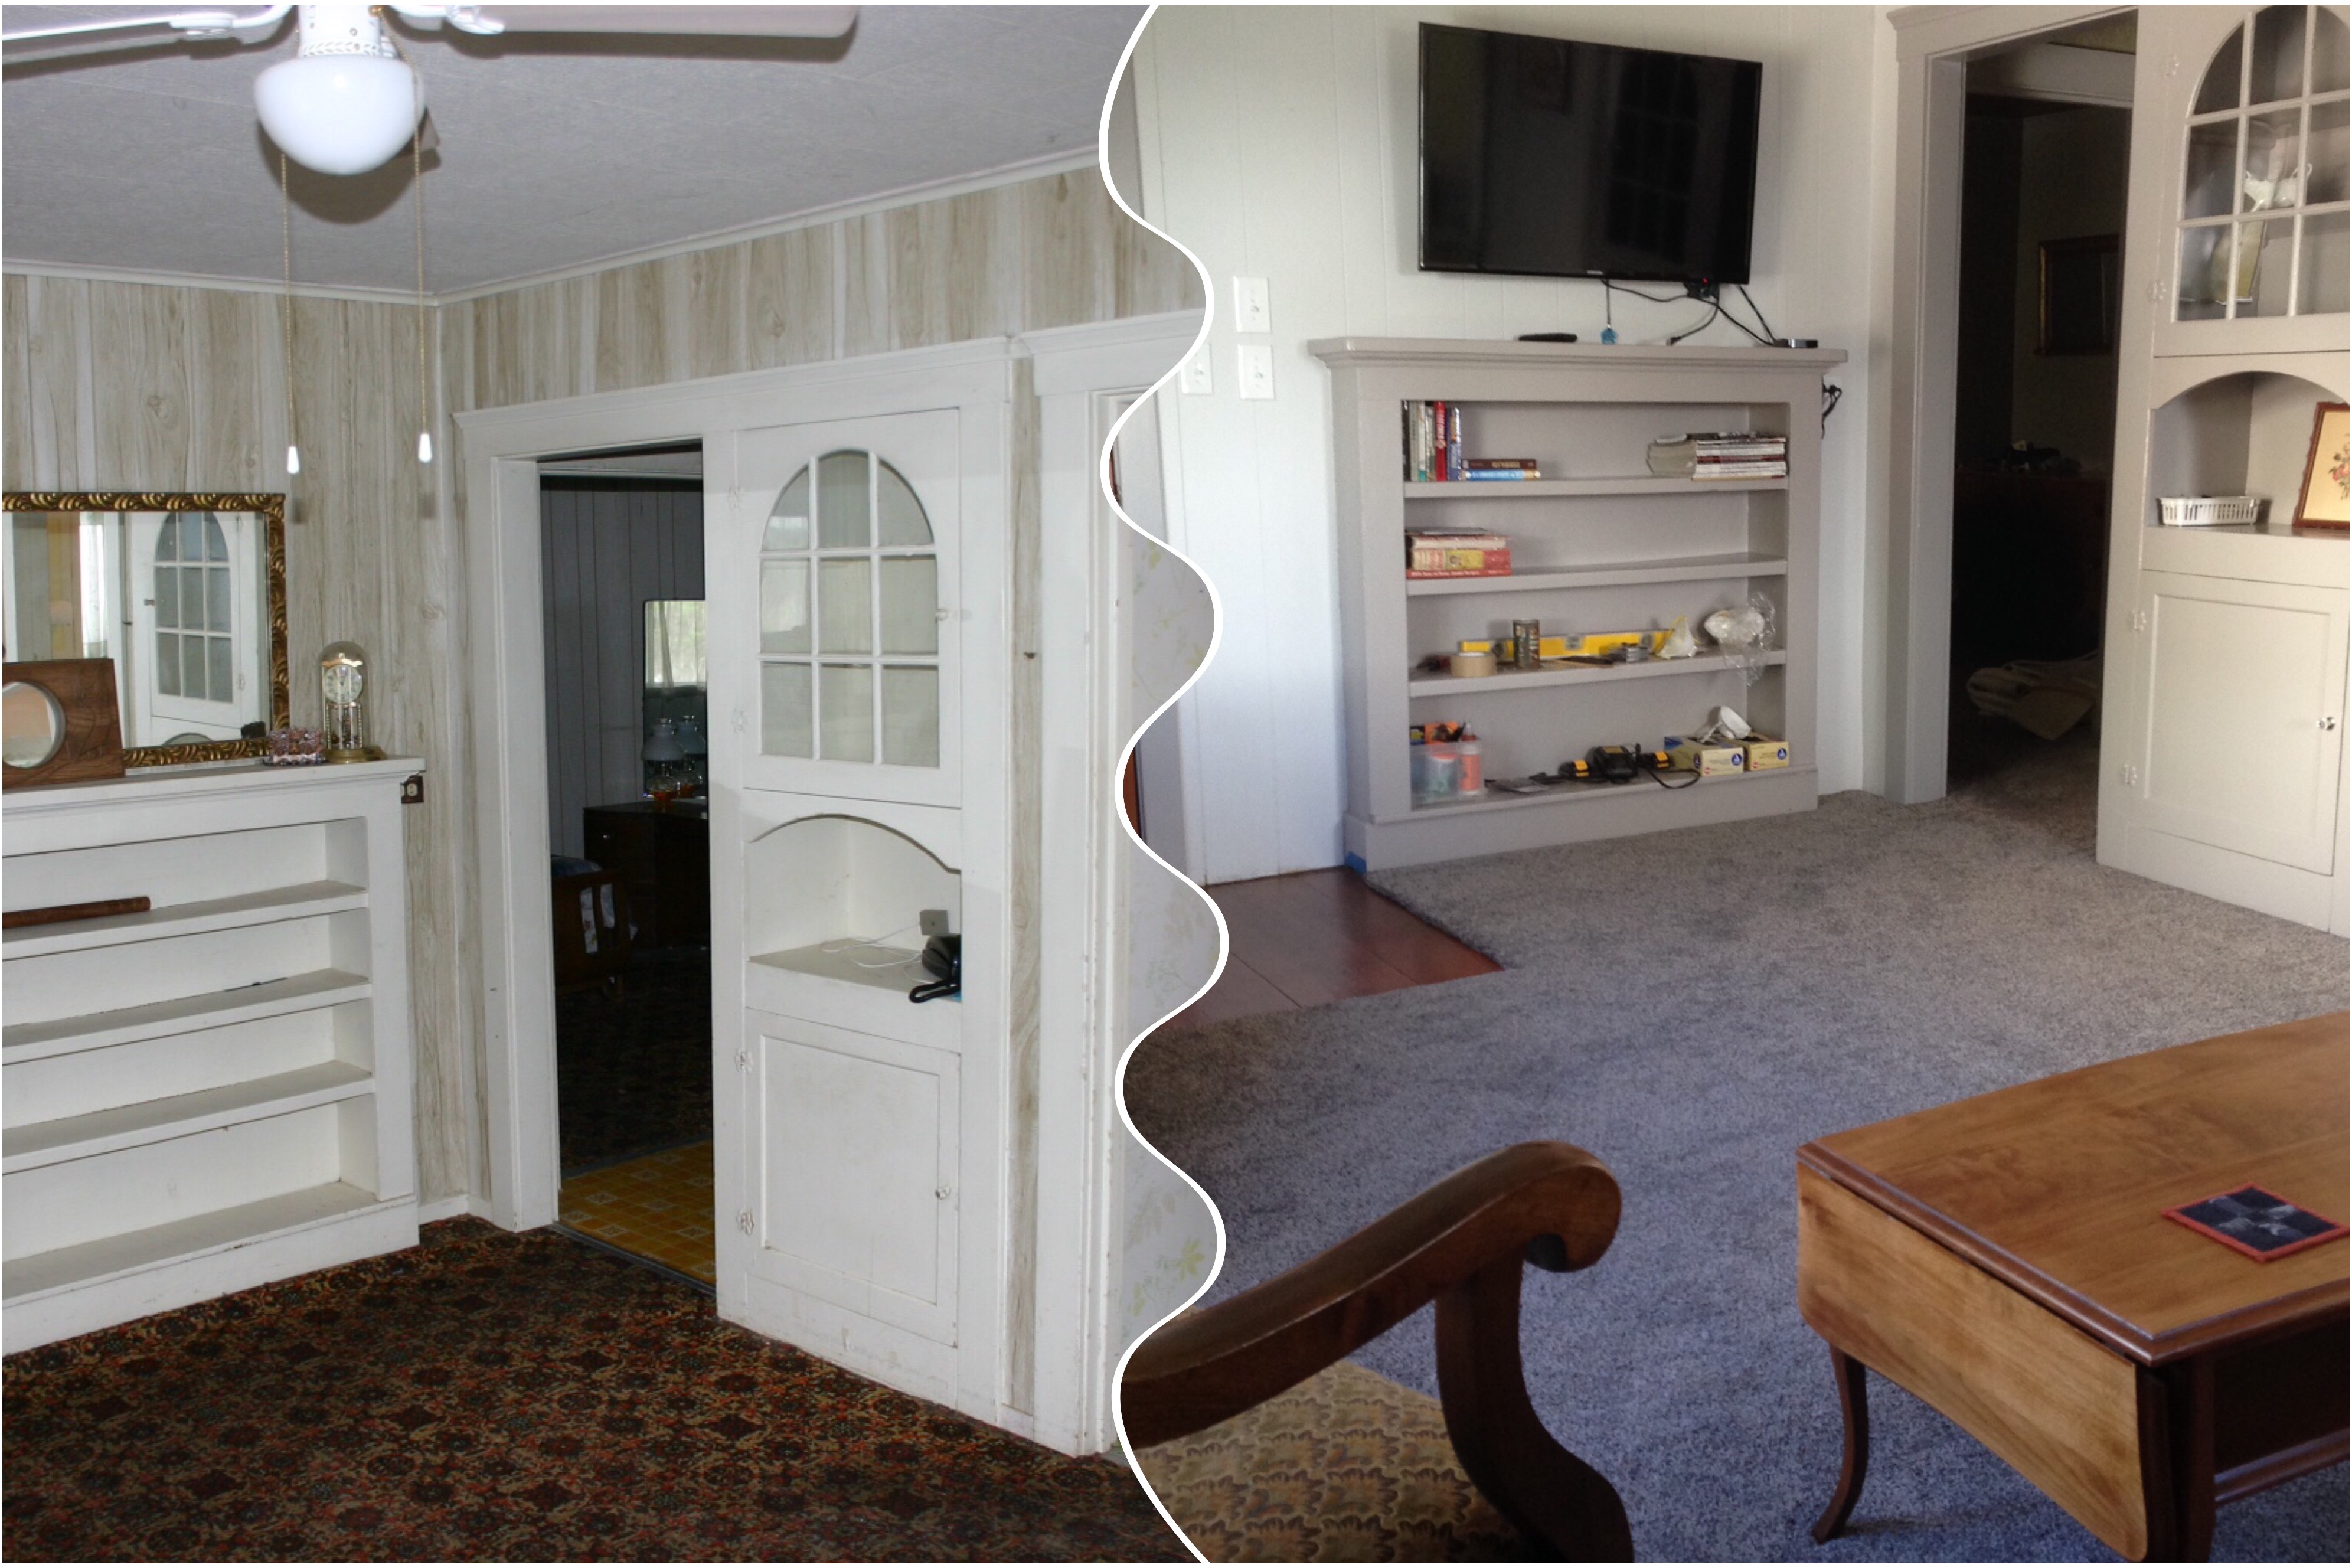
Here is a before and after shot of the living room. The left side is how it looked when we bought the house and the right is current.
Here is another angle on the current living room. We primed and painted the paneling and Ray put new crown molding up around the walls. Ray also refinished a portion of the original hardwood flooring in front of the door so we don’t walk in right on the carpet. Hopefully this will lessen wear and dirt on that portion of the carpeting.
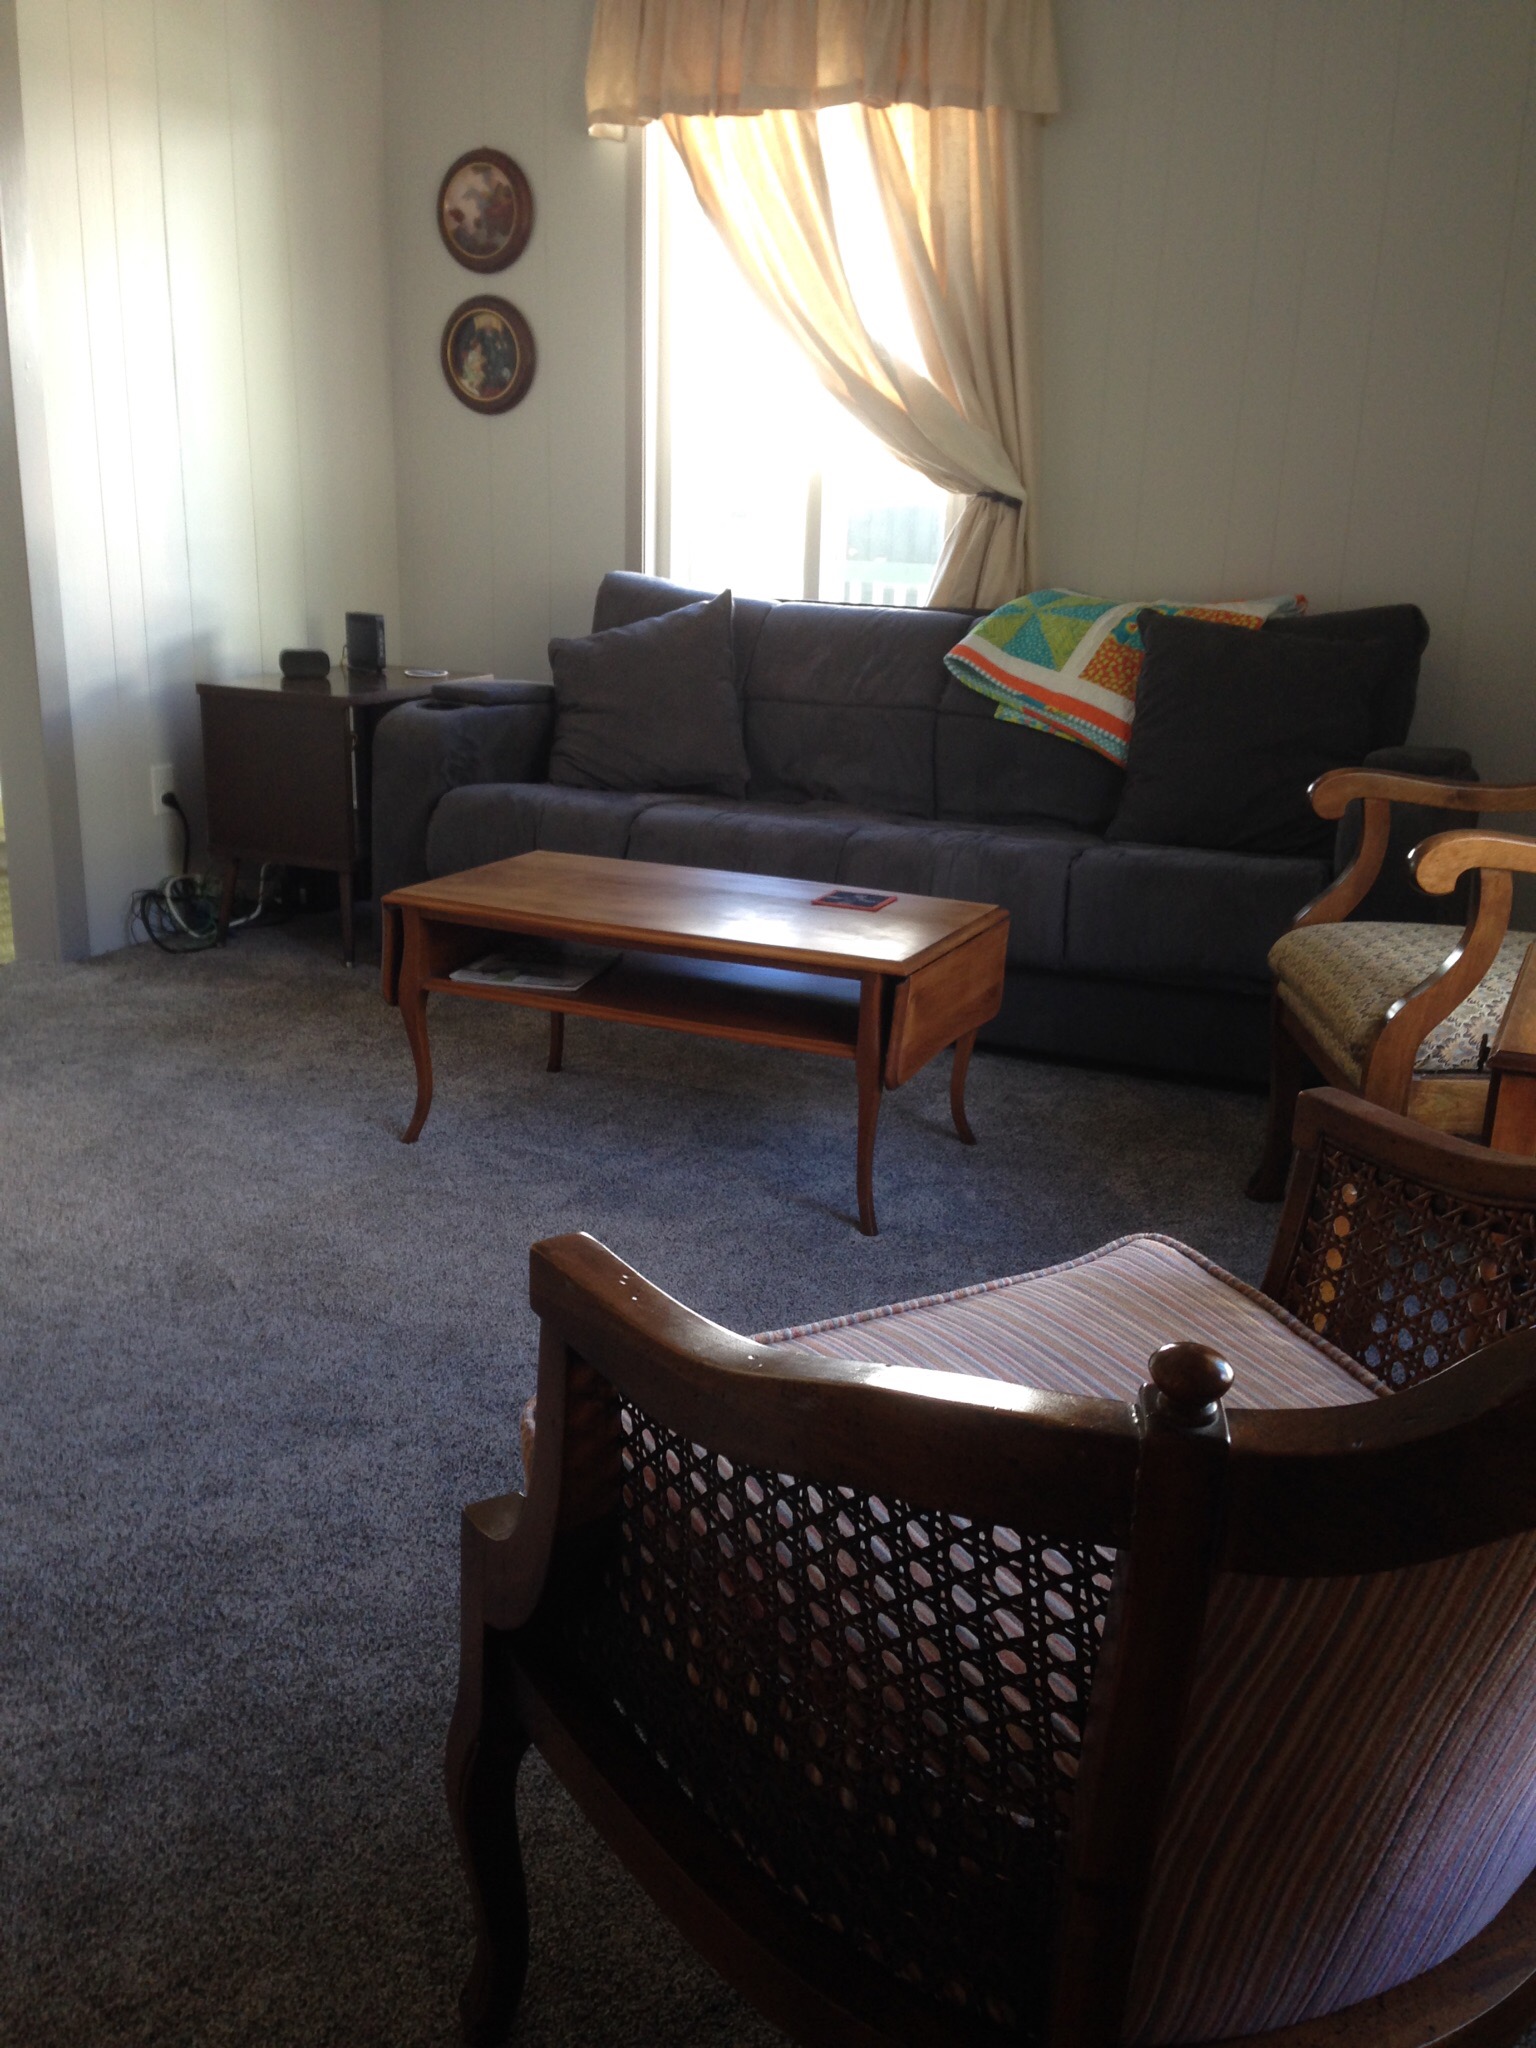
Since the picture was taken, Ray also got the baseboard installed and we hung some pictures. It looks so sweet now.
While I was trapped in the kitchen with only my sewing machine and a pot of coffee, I worked on the second quilt for the downstairs bedroom in Downieville. Remember this was the first one I made. I finished this one last February – you can check out this post for the details.
Downieville Quilt #1
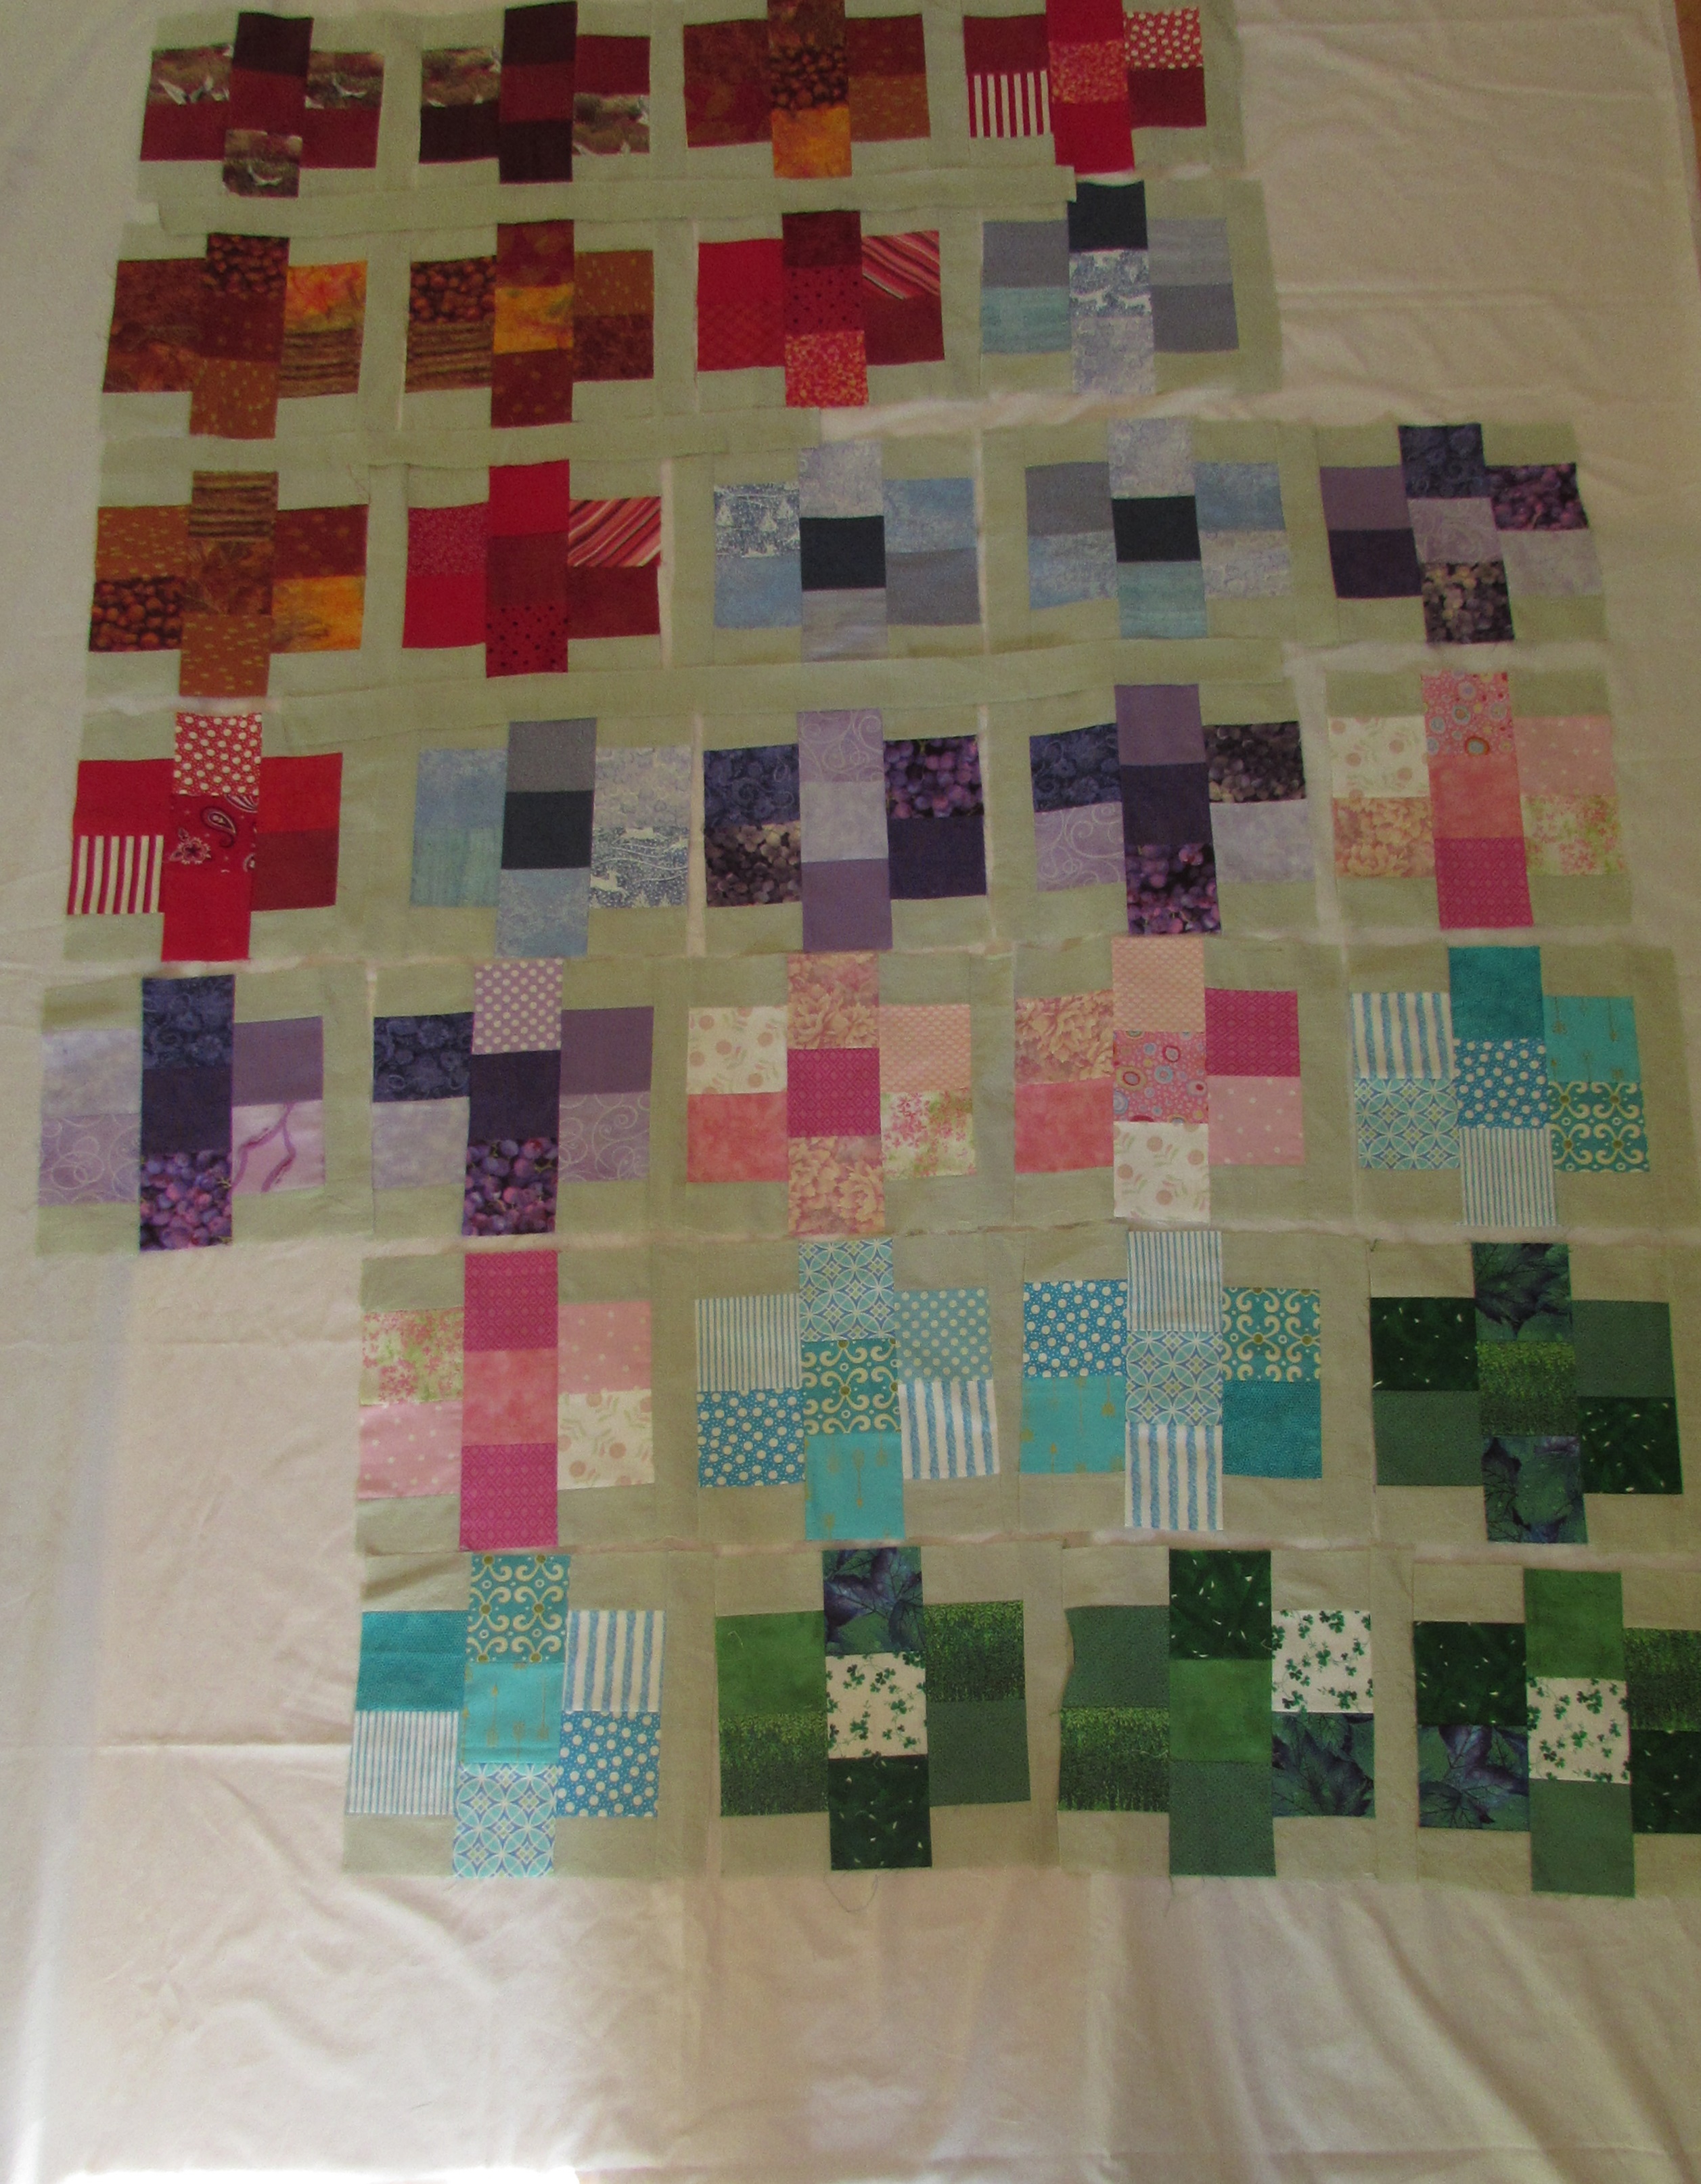
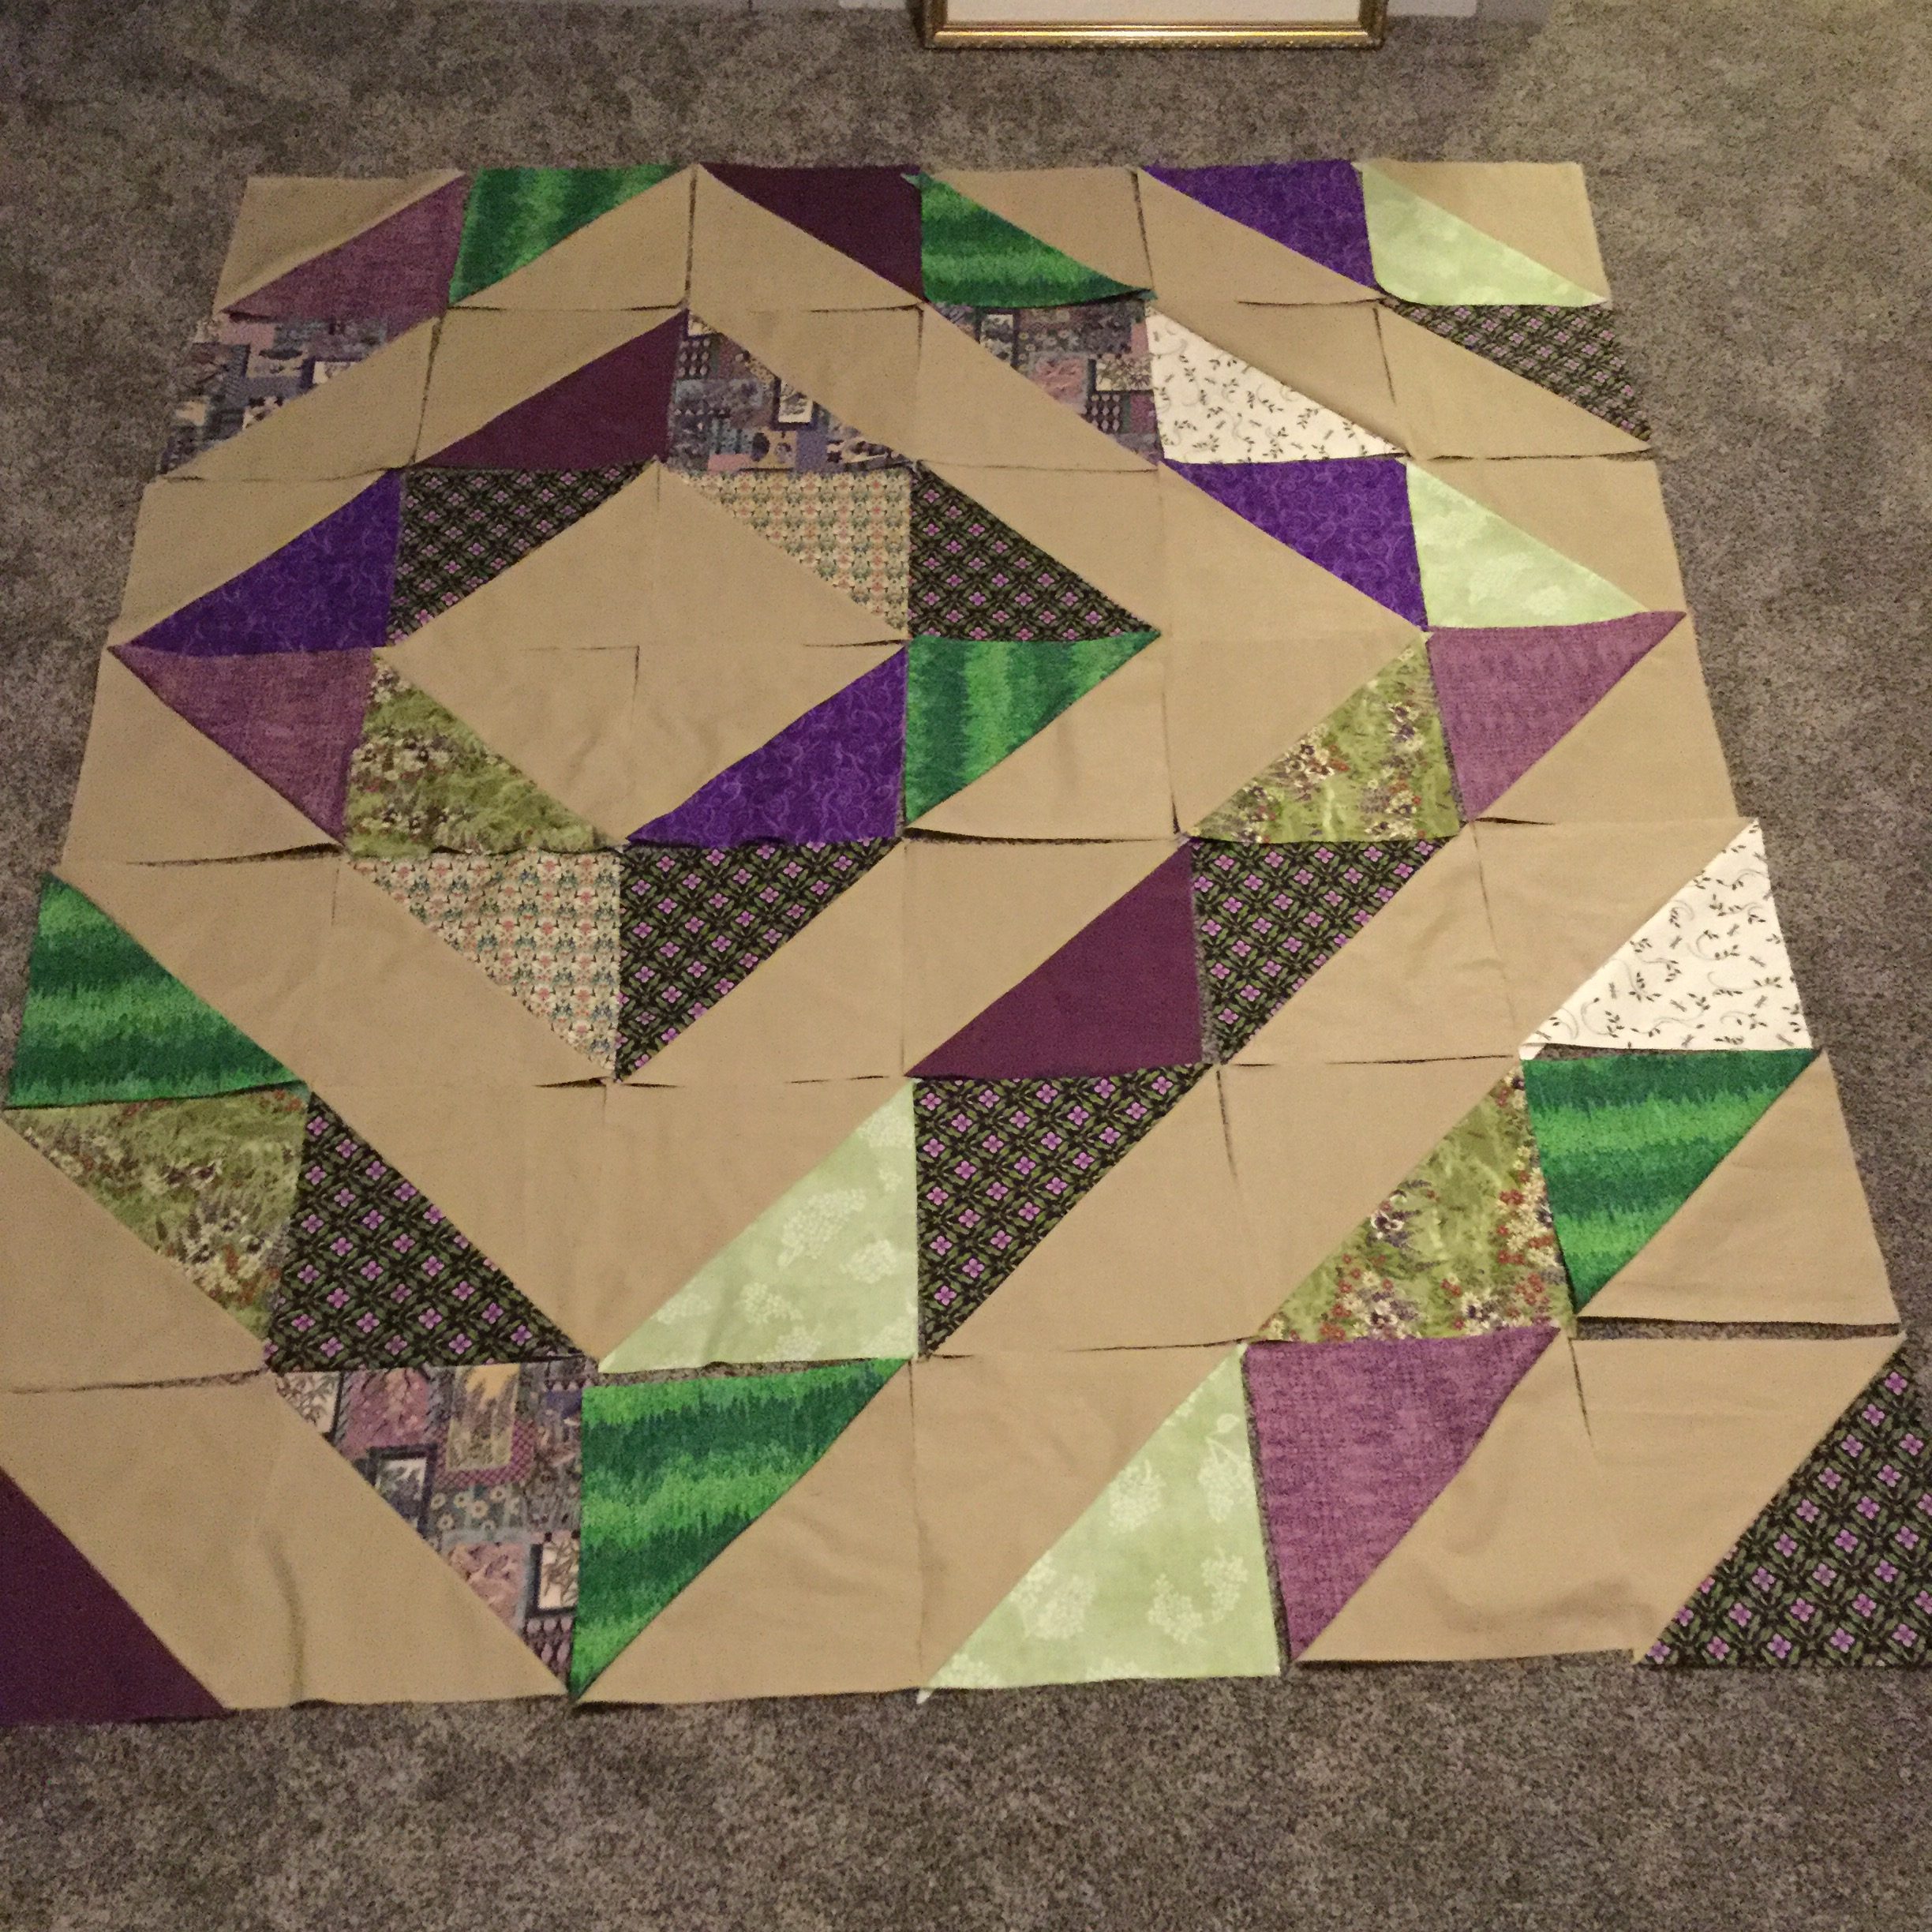
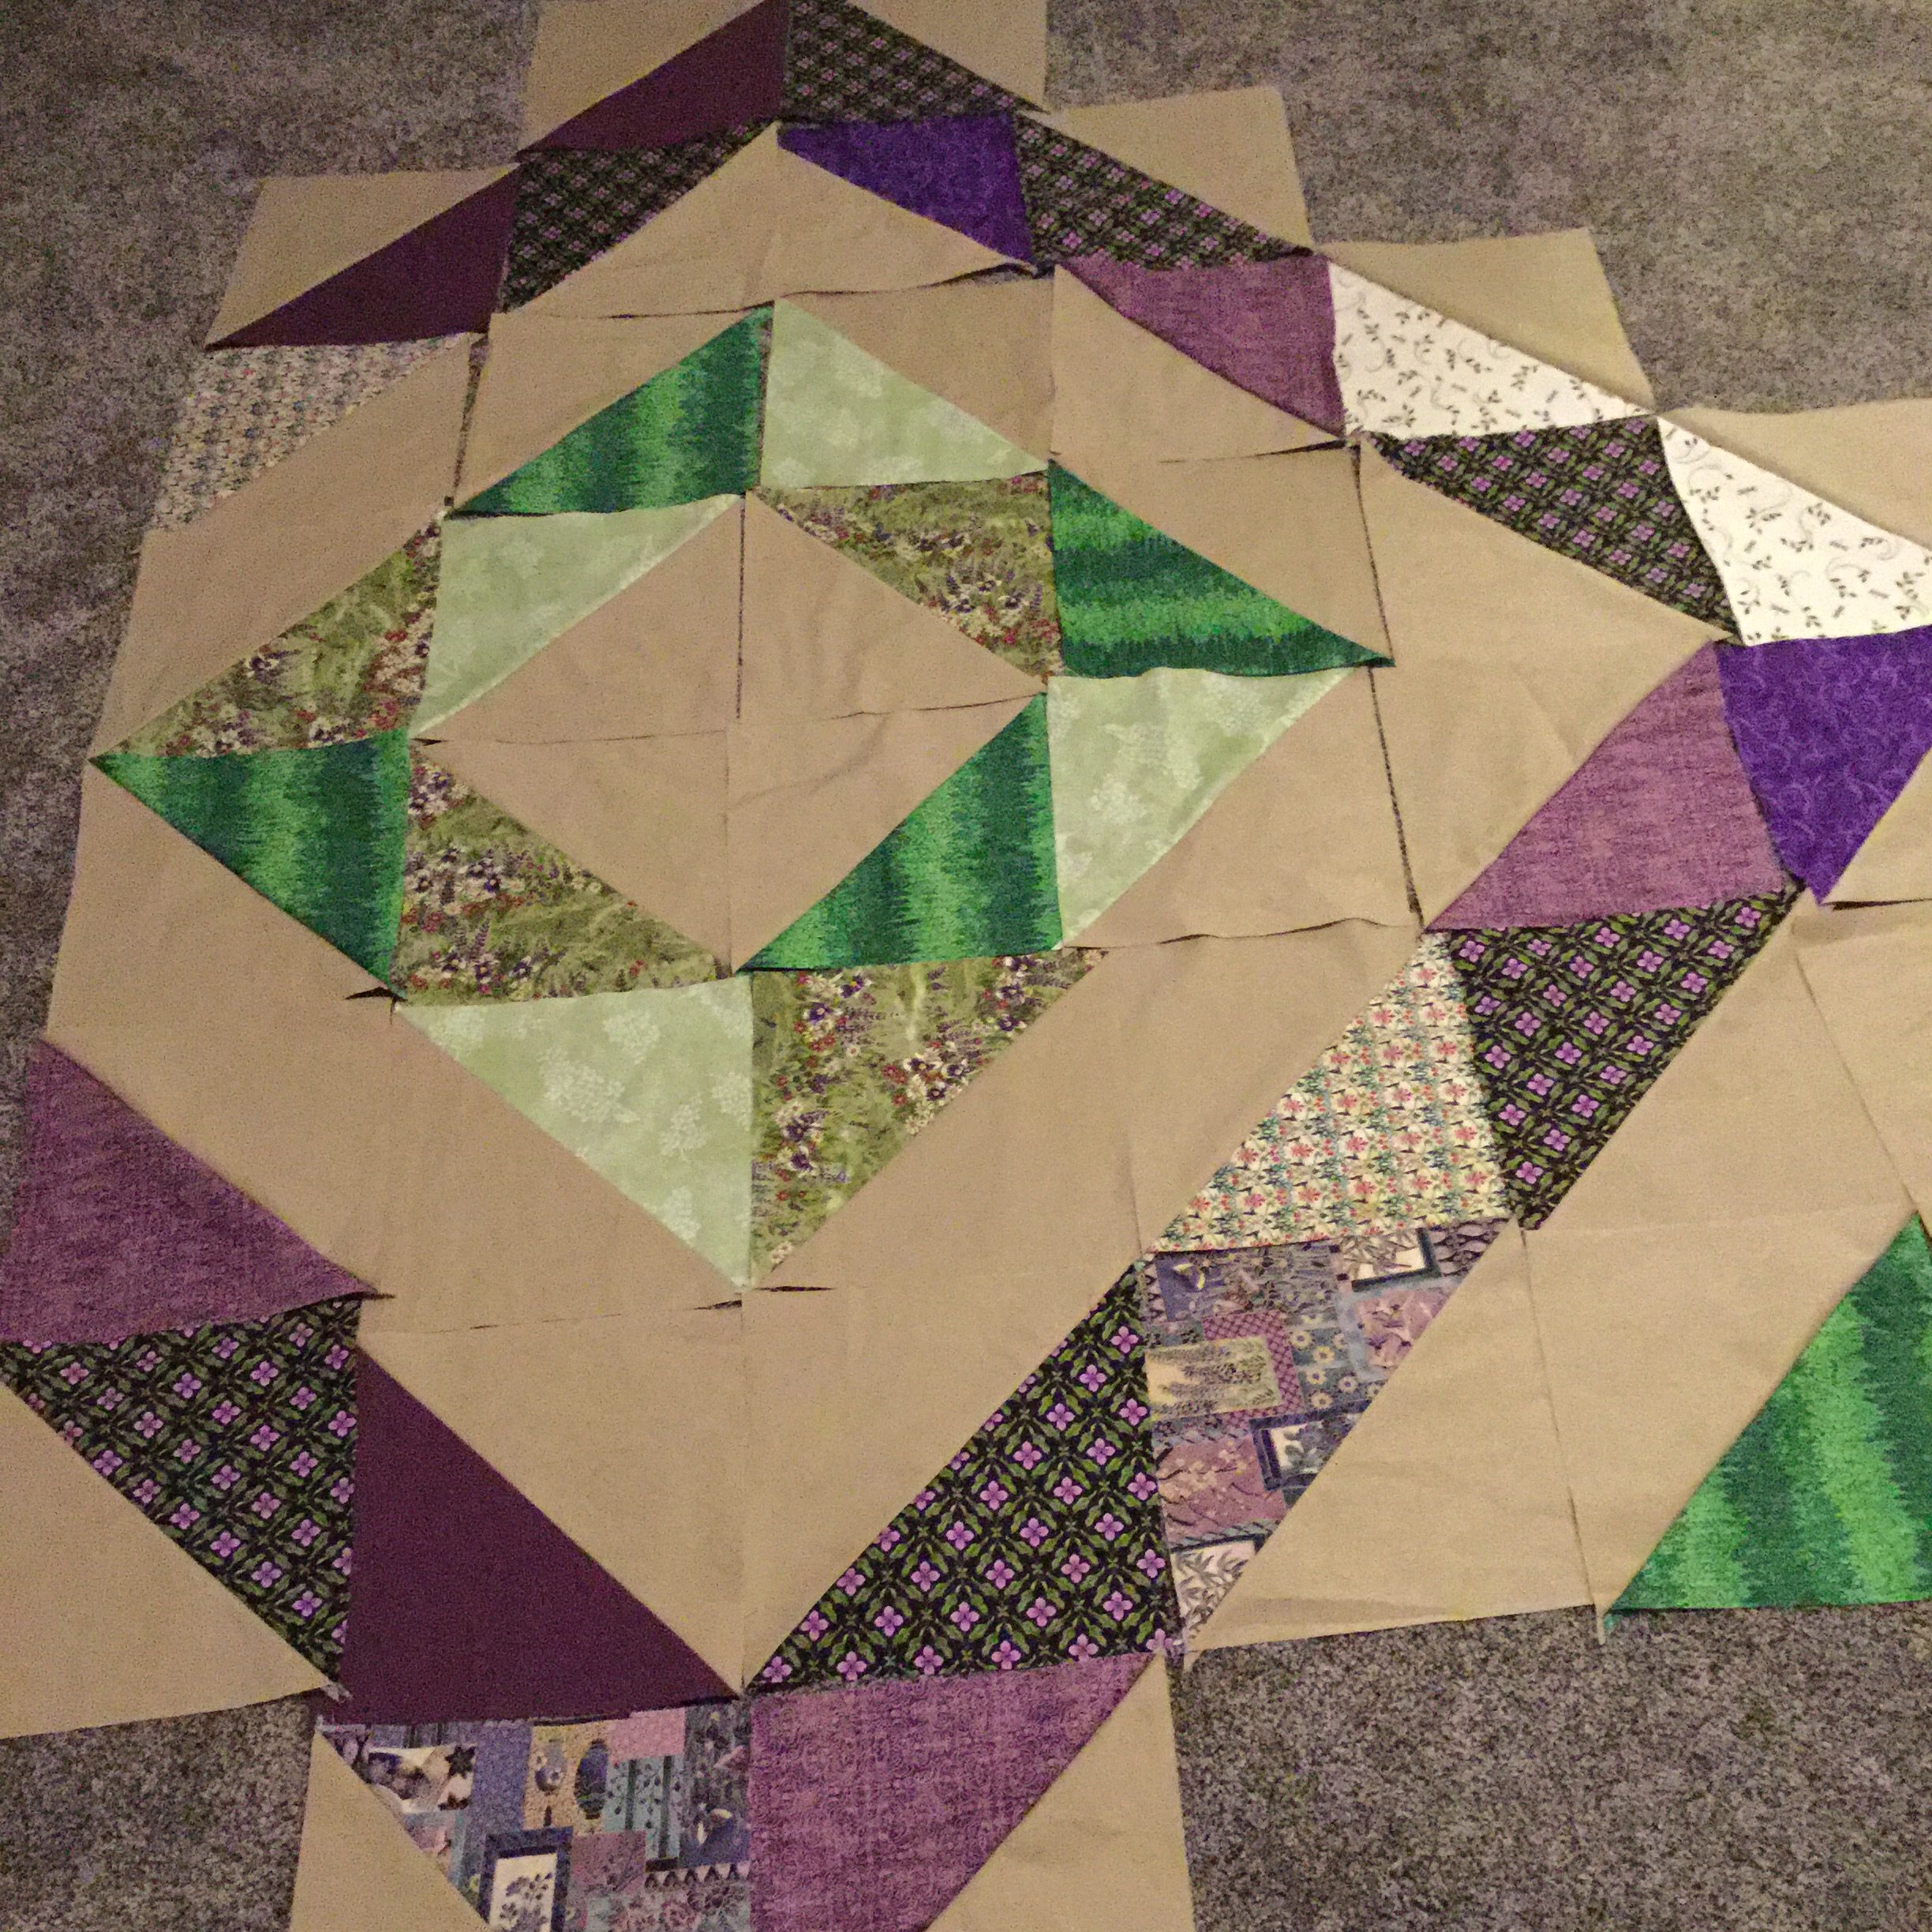
It is a basic patchwork using 10″ blocks. I thought it would be fun to make this one with the same fabric but a different pattern. (For the first one, I was in a hurry to get it done for winter as it gets really chilly in that bedroom.) Since I have time to complete this one (the second twin bed isn’t used all that often) I changed it up a bit and made large half square triangles using the tan solid as half of each one. I have about 40 blocks done so I am almost half way to a quilt top.
The layout above mixes the green tones and the purple together in a scrappy fashion. Here is a shot with the colors separated out in a more orderly layout.
At this time, I have more purples completed than green. I love the green tones though and look forward to playing with this when I get a few more completed. I am leaning toward the layout with alternating colors. The rest of this should go together in no time at all. The little downstairs bedroom will then have warm, coordinating quilts.
Hope everyone is finding some time to sew and staying healthy!!
Reminder: next week is the Handmade Halloween event here at Needle and Foot. You are invited to link up new and old posts about all things spooky! Quilts, costumes, decorations that are for Halloween will create a fun source of inspiration for readers. The link up will open on Tuesday, October 4th and stay open through Friday, October 7th. I have tons of prizes from Craftsy, C&T Publishing (makers of your favorite craft and sewing books) as well as Sew Fresh Quilts. I can’t wait to see what everyone comes up with!!
Linking up with Let’s Bee Social, Needle and Thread Thursday and Can I Get a Whoop Whoop this week. Links to all three can be found at the top of the page, under Link Ups.
We had a few days of fall weather this week – it was mostly a teaser. The highs dropped to the mid 60’s which was so nice. Now it is heating back up. I am trying to be patient. I know fall is just around the corner.
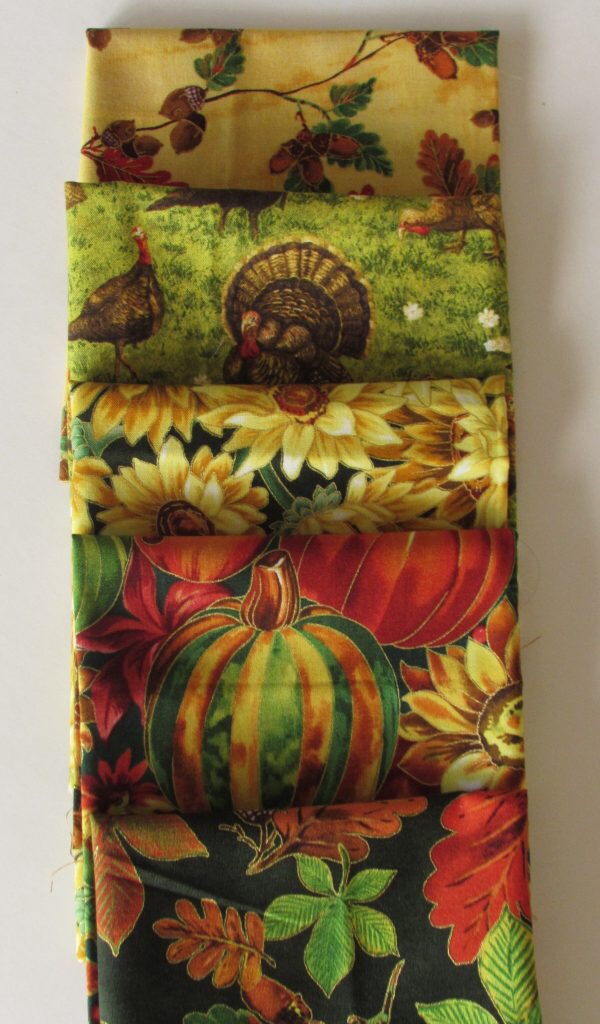
To get in the mood, I have been playing with a bundle of fabric that screams Autumn.
I love the theme of Thanksgiving that permeates this line. The sunflowers are so pretty, such a deep yellow. The pumpkins provide deep green and orange accents and the turkeys are adorable (much more so than the turkeys that roam in our neck of the woods!)
There are three blenders, green, yellow and orange in the bundle.
Above is some additional yardage that I need for this upcoming project. These two are a nice pine green and a deep brown.
The bundle is called Golden Harvest and was provided to me by Paint Brush Studios. They are sponsoring a blog hop that I am hosting at the end of October. I am so excited to start the project for the hop – pieces have been cut but I haven’t done a lot of piecing as of yet.
Along with Needle and Foot, there are four more quilters participating in the hop. Mari (Academic Quilter), Janine (Quilts From the Little House), Tish (Tish in Wonderland) and Sandra (MMM Quilts). If you’d like to see the fall beauties they will be working with, hop on over and take a look. Otherwise, we will be back to share finished projects with you in about four weeks. Till then, happy quilting!
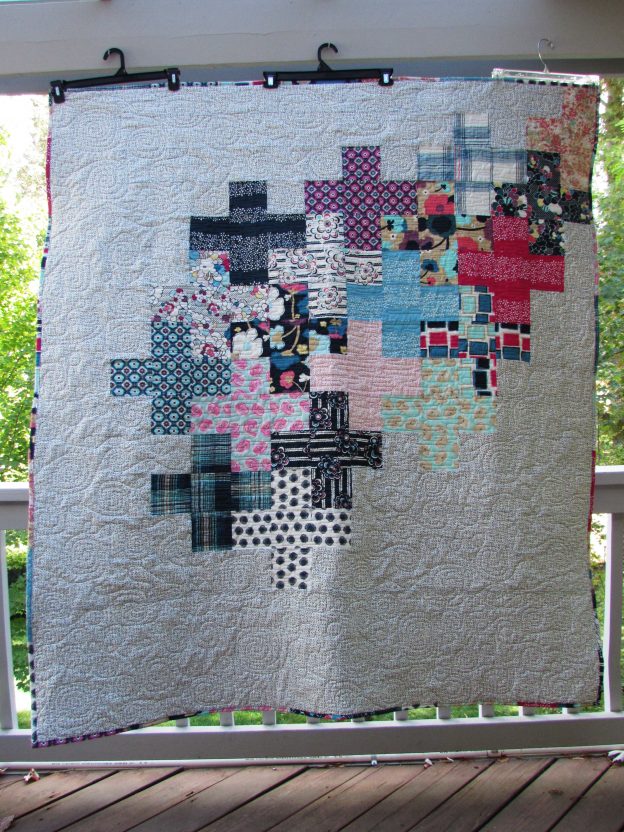
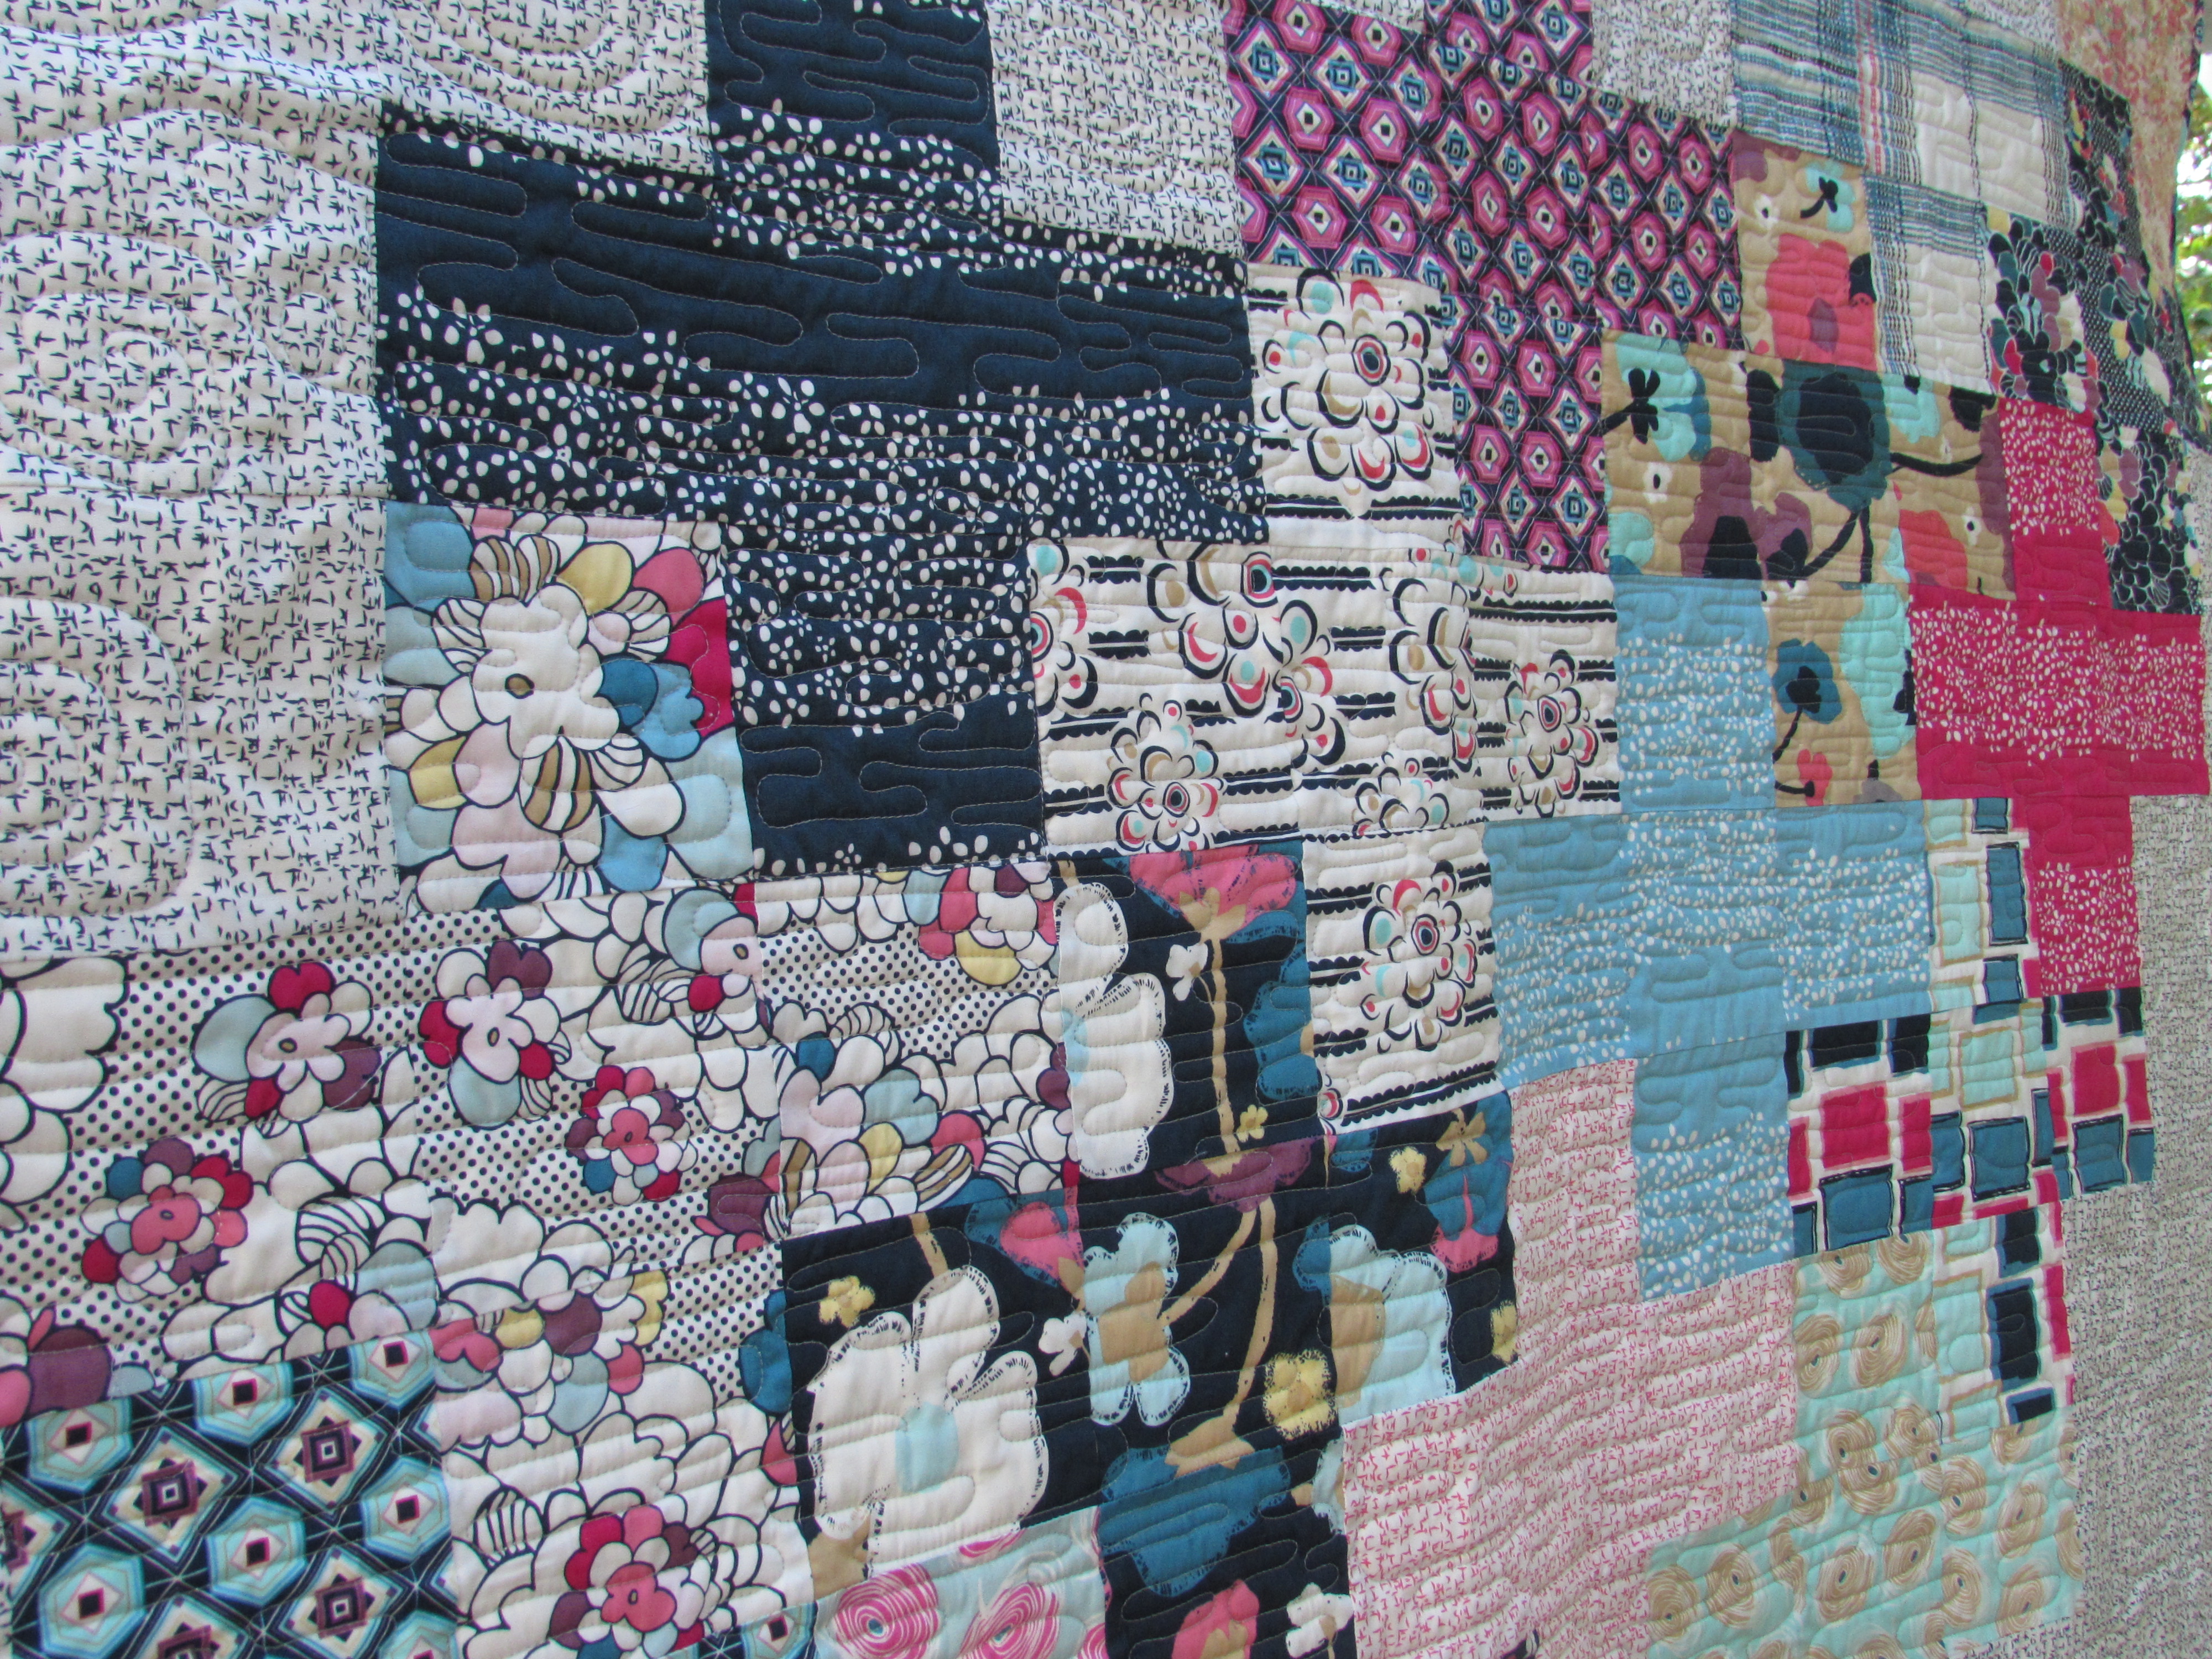
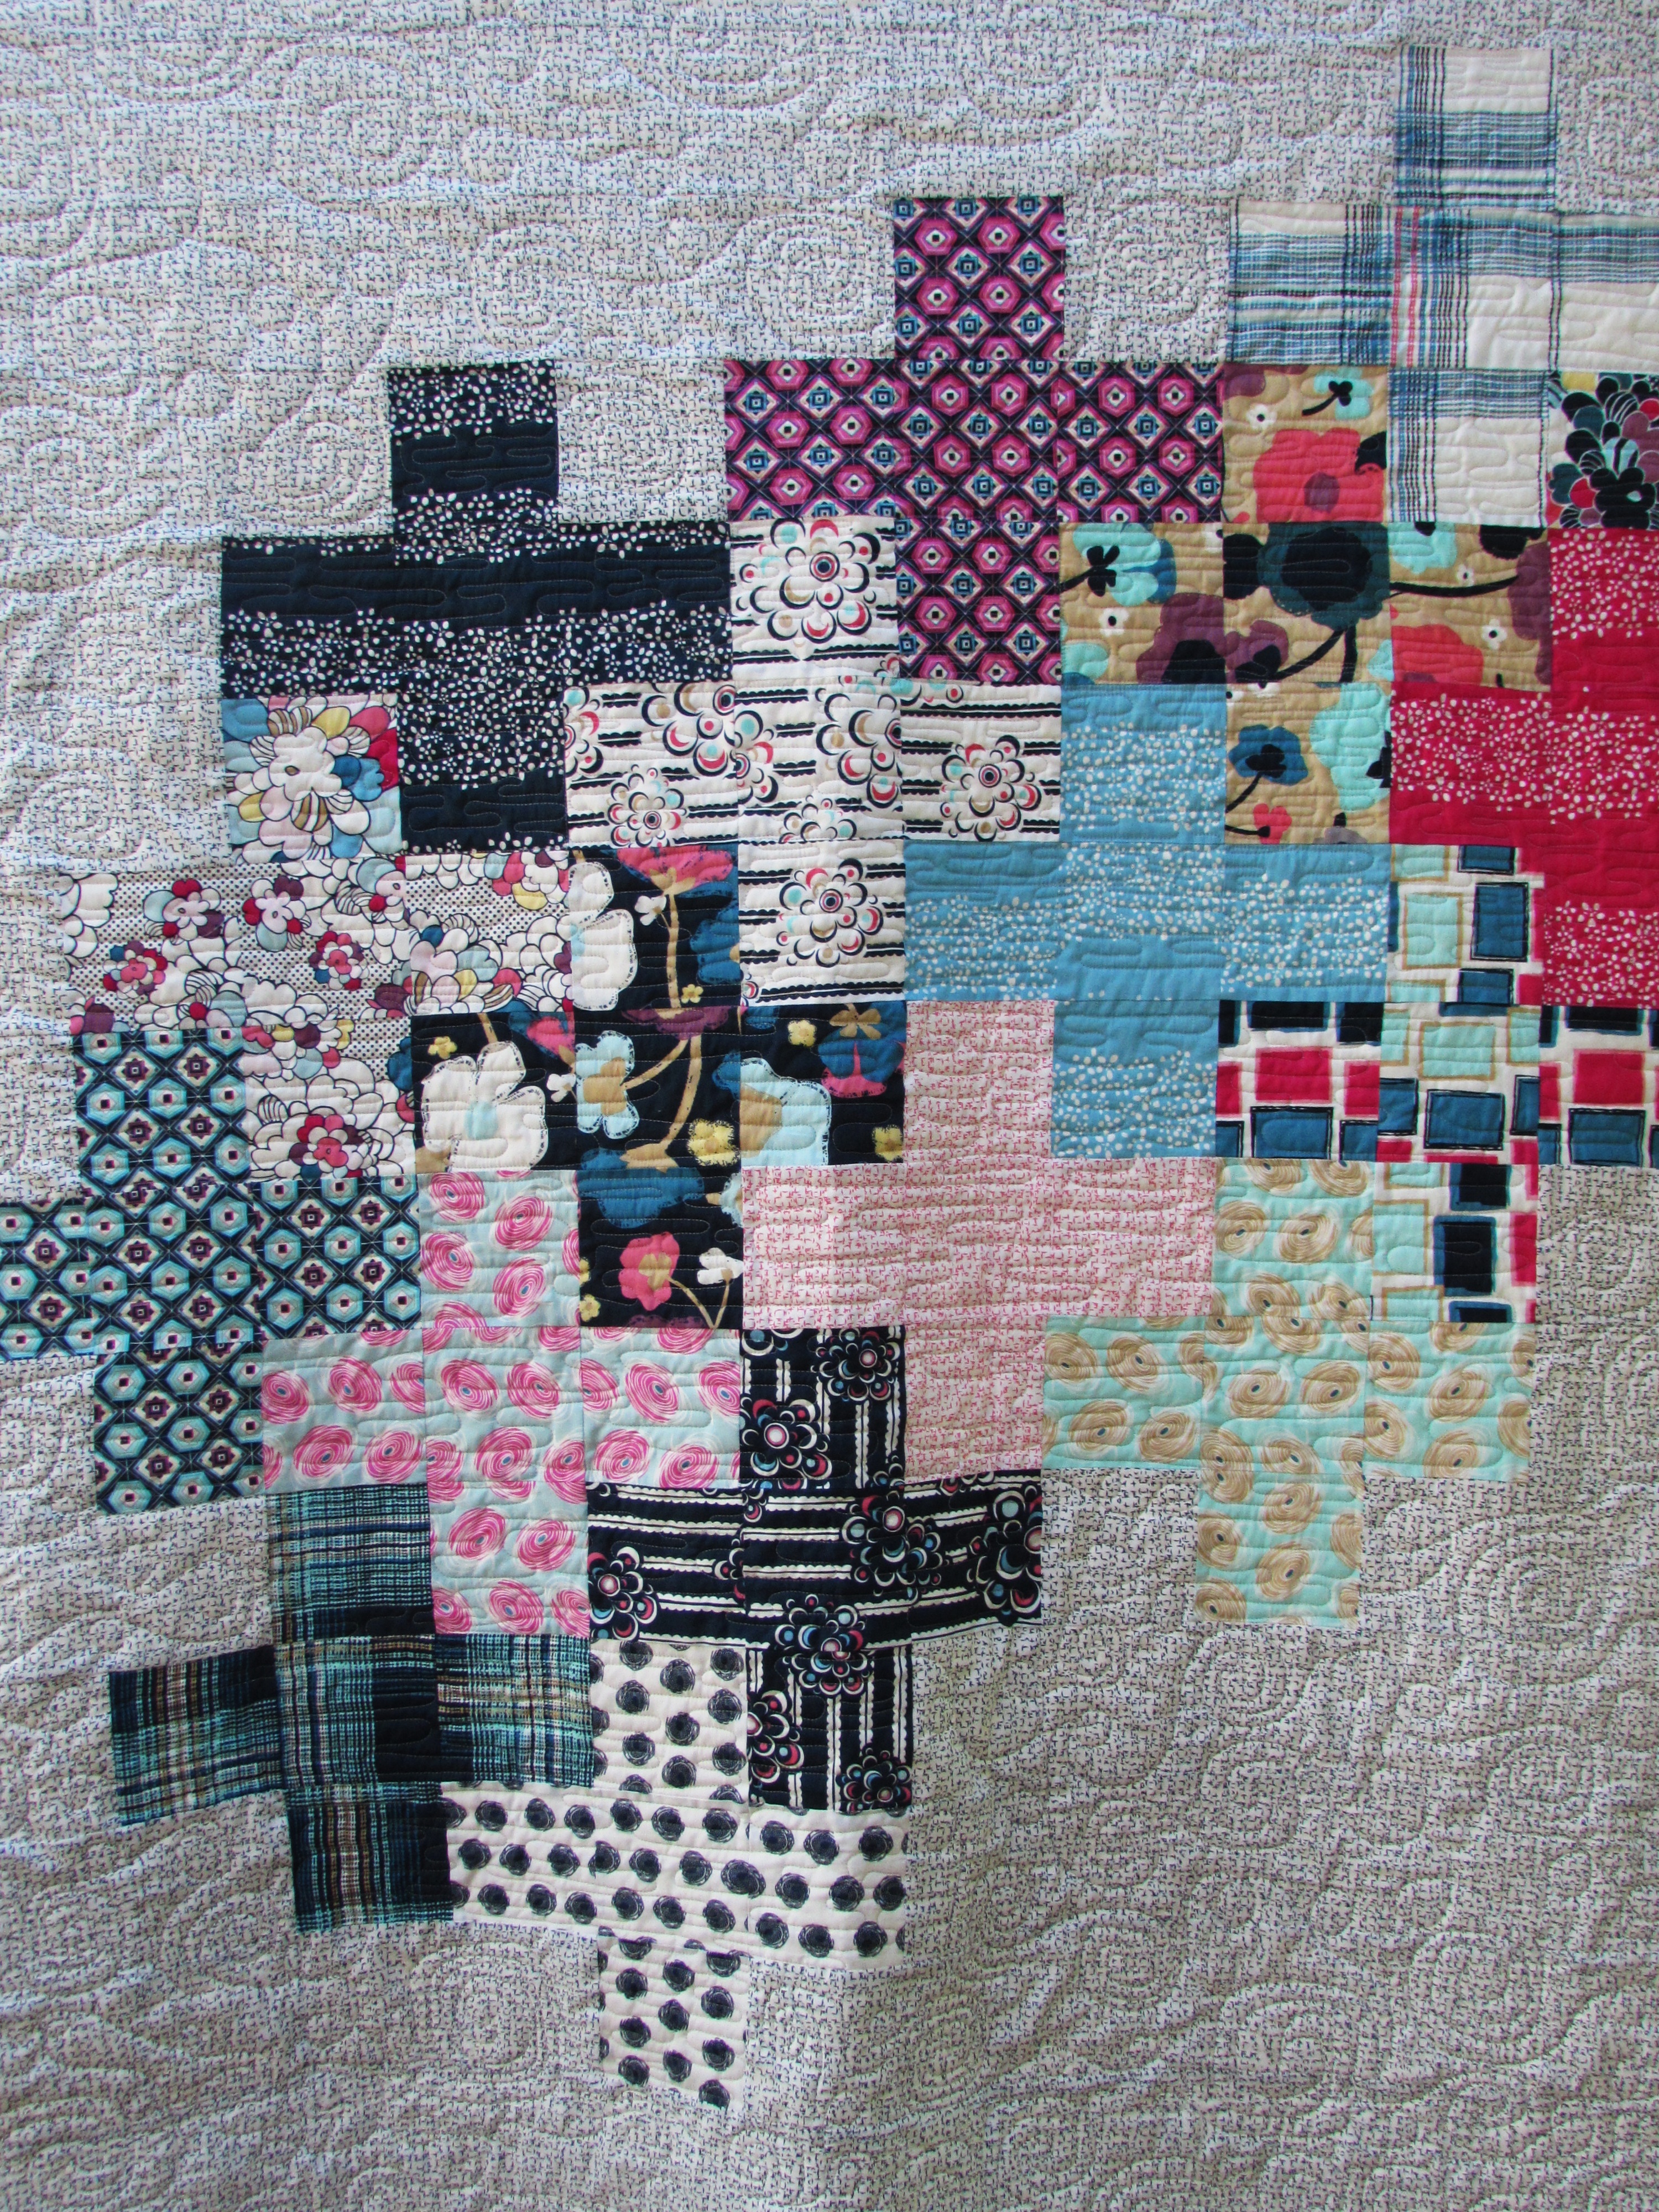
Earlier this summer I made a plus quilt using the Art Gallery Dare fabric line, designed by Pat Bravo. I set it aside for a while, as most of us tend to do. After taking the long arm class, I decided to quilt this one for my second round of practice. Thursday last week found me at the Sew-So Shop ready to load the project on the machine.
When I arrived, I was told that the owners would be running a bit late due to a family emergency. There was another woman, a very experienced long arm quilter (Diane), who was there to pick something up and she offered to help me get everything set up. I felt so fortunate to have run into her because she taught me a great deal in the 15 minutes that we worked together. It was so helpful! We got the backing, batting and quilt top loaded and straight.
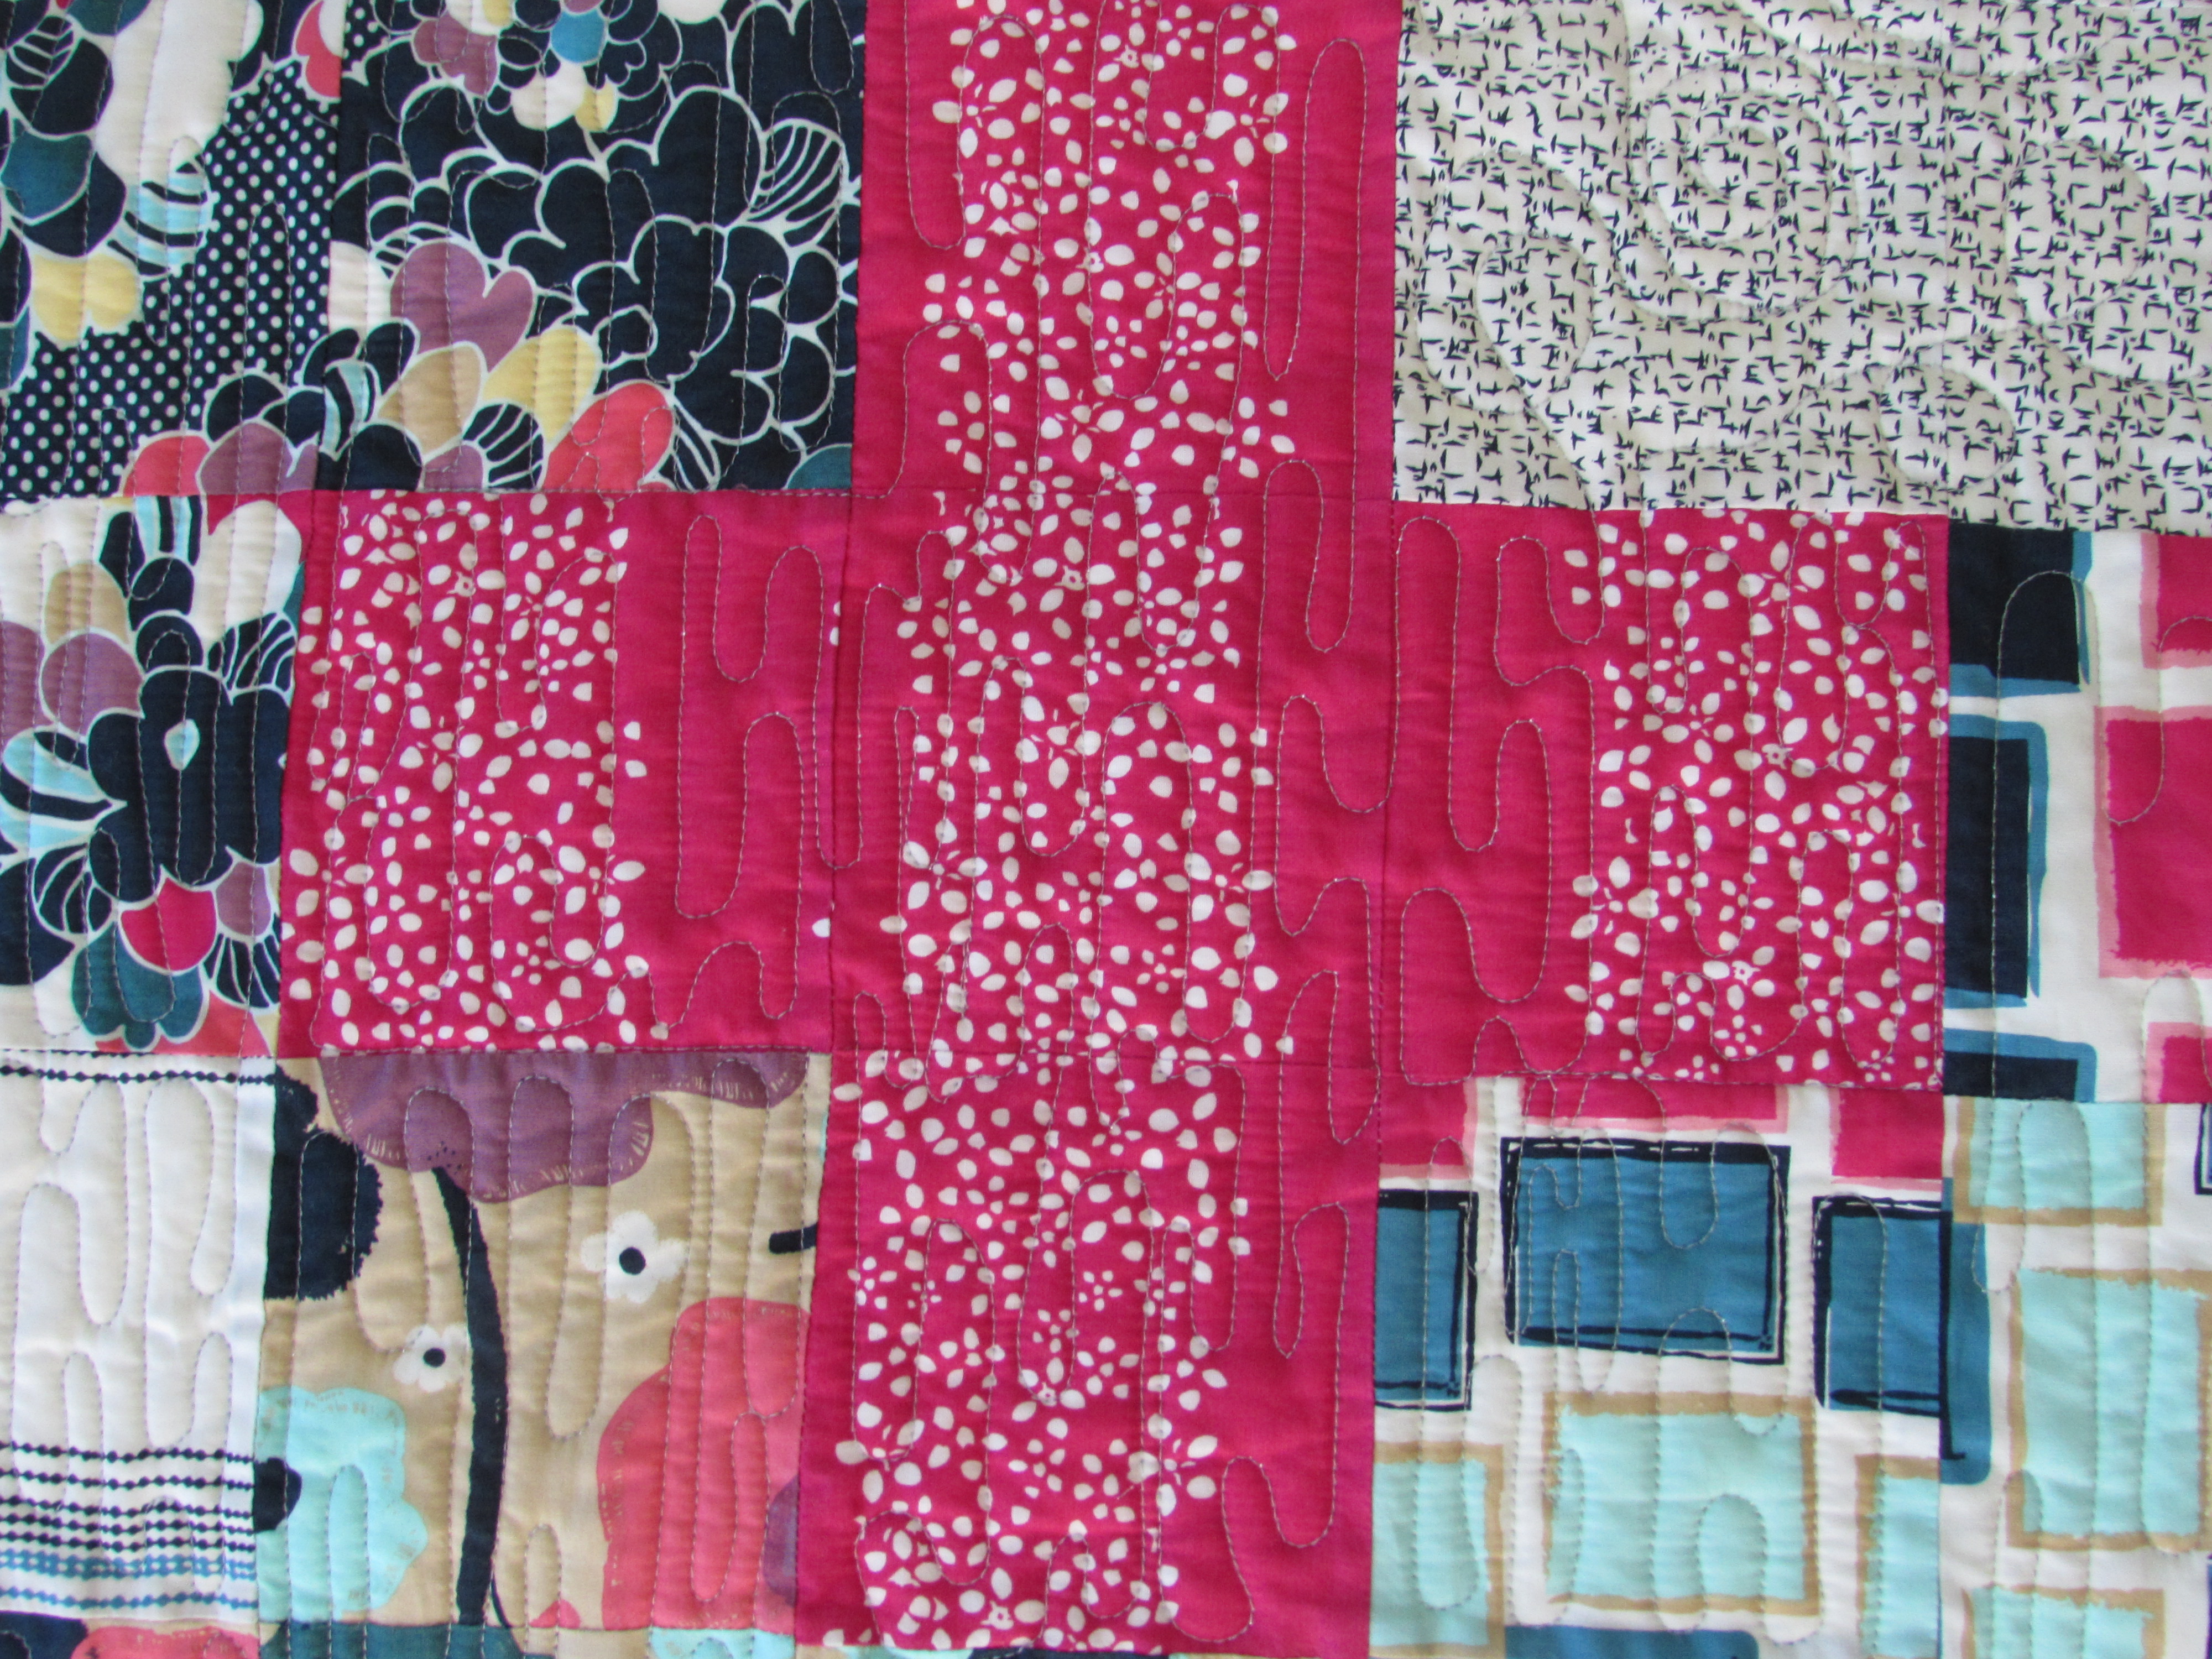
I talked with Diane about my plan to quilt this. I wanted to do simple spirals in the negative space and something linear within the pluses so they would be differentiated from the background. She and I scribbled on paper for a bit and decided on a flow of linear lines that look like water flowing. This would allow me to leave the machine free (as opposed to setting the channel locks for straight lines) and would give me a relaxed pattern to stitch. It worked perfectly (well, nothing is perfect but overall, it was very successful!)
I love the flow of these soft linear curves. At first I tried to treat each plus as a separate entity but it didn’t seem to make a difference so I relaxed on that and let the lines flow over the edge of one fabric and on to the next.
I love this motif – I don’t think I have used it prior to this but I will definitely use it again. It was really relaxing to stitch.
For the negative space, or the background, I did large, loose spirals and loops. My goal was to work on my speed control and precision so I picked a simple motif. Looking back, I wish I would have selected a darker gray thread because the quilting hardly shows up. I was not feeling very confident about my abilities so I picked a light thread, in case the stitching wasn’t the best.
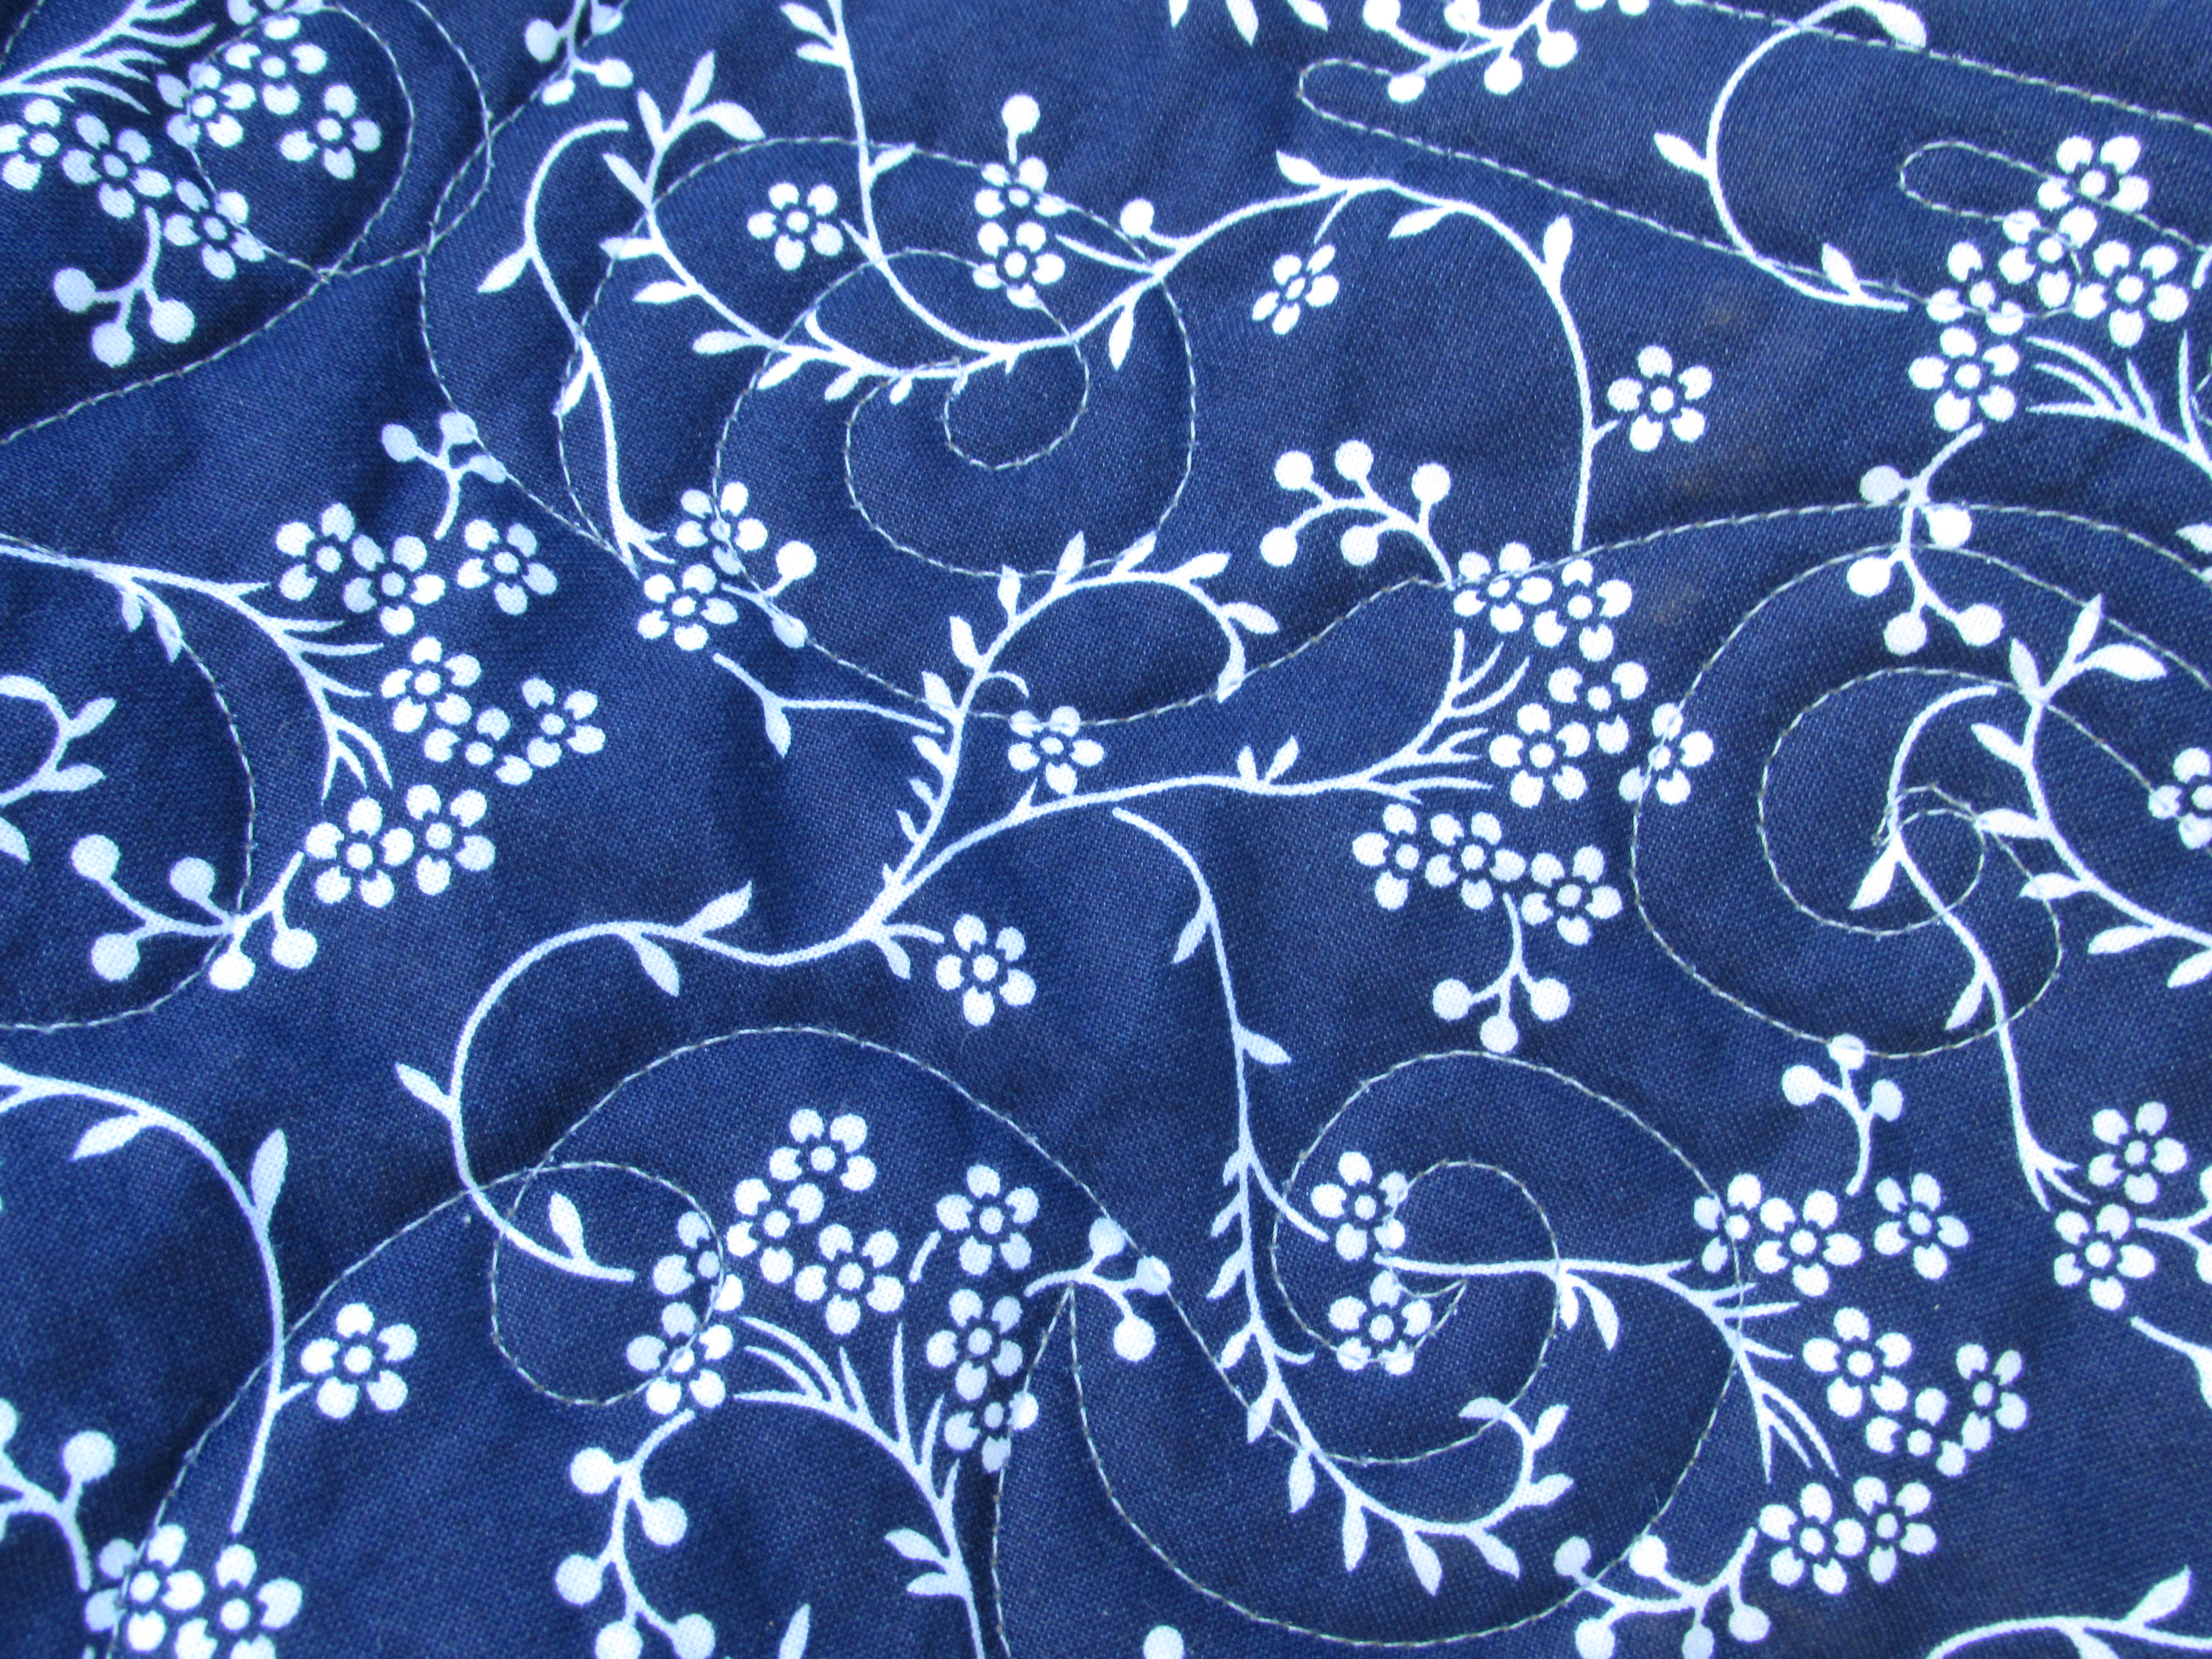
The stitching shows up better on the back. For the first time, I bought a wide back cotton for the backing. This was so convenient! I had begun to piece a backing using the leftover Dare fabrics but when I decided to do this on the long arm, I nixed a pieced backing. I have enough going on loading the long arm without having to worry about a potentially wavy or ‘un-square’ backing (is that a word?). Using a wide back fabric eliminated all of those possible issues.
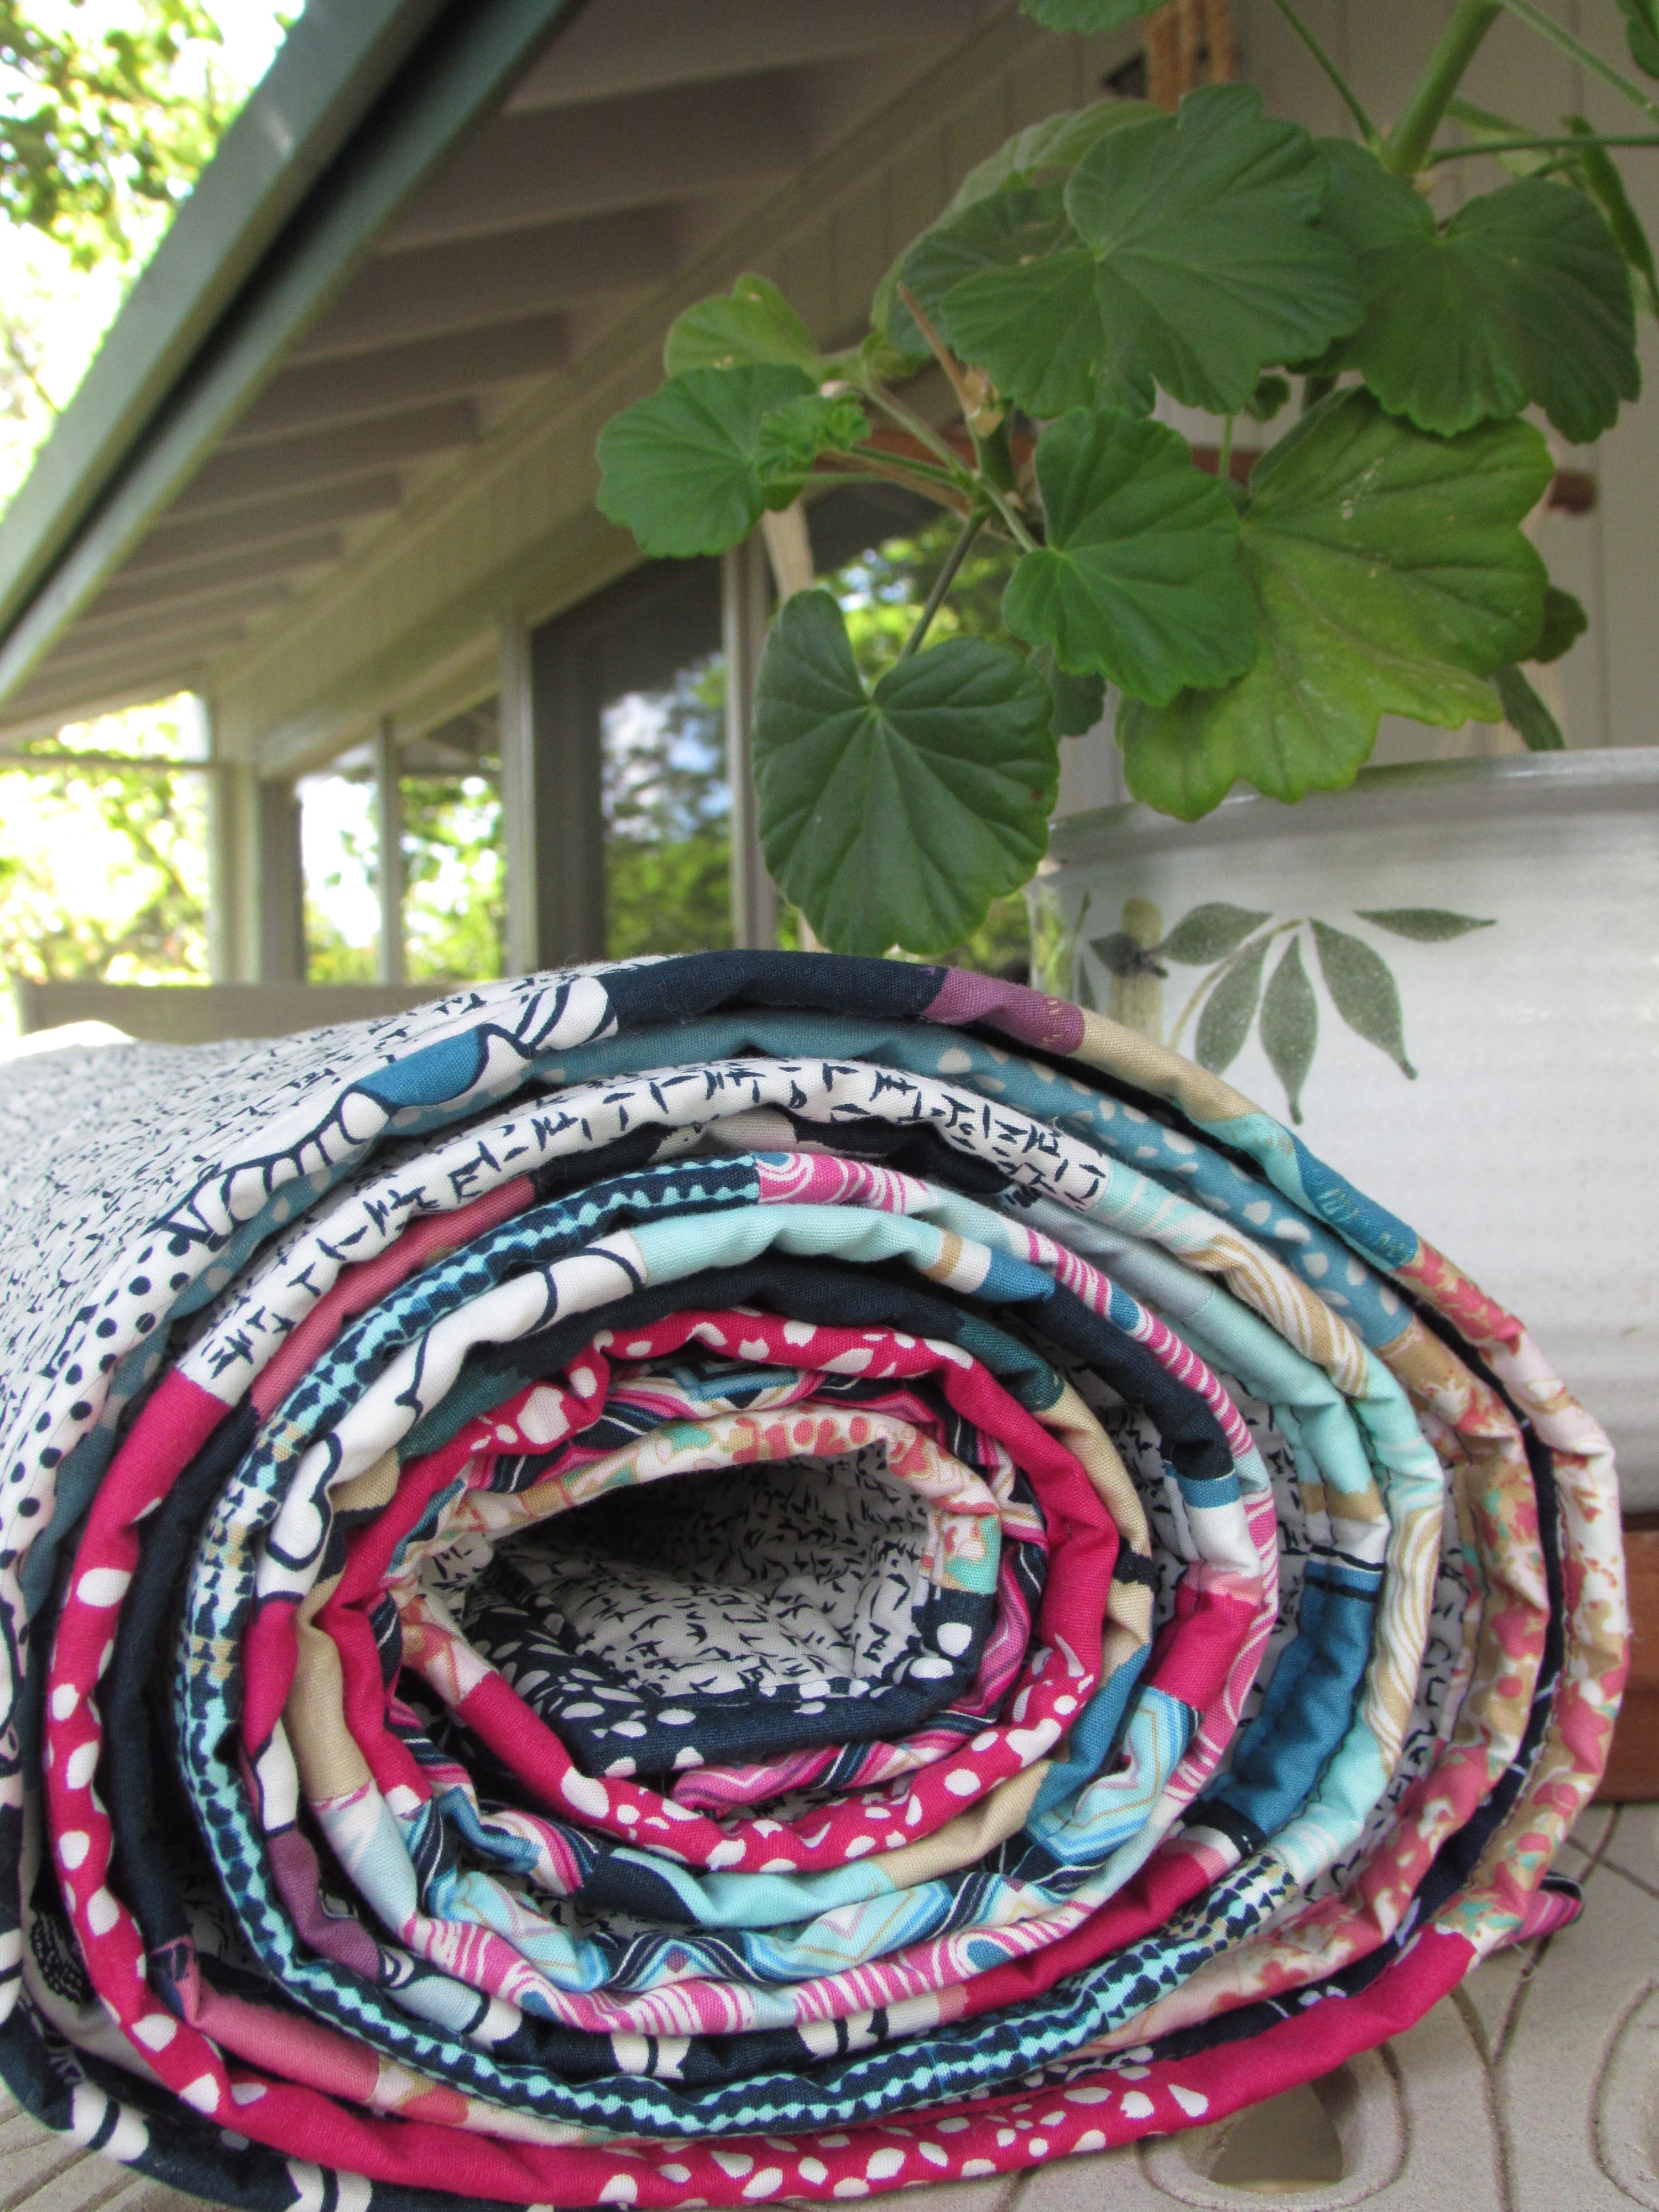
Since I had already pieced strips of the scraps, I decided to use that as the binding. I sliced the strips into 2 1/4″ strips for the binding. You know how much I love a scrappy binding.
As with each long arm experience before, I do have a question. The finished quilt has a bit of a wave to the center of it. (Look at the photo at the top and you’ll see it.) I feel it was flat and square when I started to quilt it. My question is, do you think this is because I quilted the Plus section more tightly than the negative space? It definitely has a stiffness to the Plus area. When I did the surrounding area, I kept it loose so the whole quilt wouldn’t be stiff but maybe I should have been consistent all the way through? Looking for some advice here. Yvonne….. Help please! 🙂
Oh how I have enjoyed learning about and using the long arm. I have one more finished quilt top to do so I will set up some time for that project soon! It has really helped me to get some projects finished up that were languishing a bit.
Couple of reminders –
The voting begins for the Quilt Bloggers Festival on Sunday! Go take a look and choose your favorites — so many gorgeous projects have been entered.
Handmade Halloween is coming soon! I hope you are checking your blog history for fun posts to link up that will inspire readers to make something for Halloween! If you don’t want to link an older post, you are welcome to write a new one. Lots of fun prizes have been provided by Craftsy, C&T Publishing, as well as Lorna from Sew Fresh Quilts. Come back and join the party October 4th!! Be sure to let me know if you have any questions!
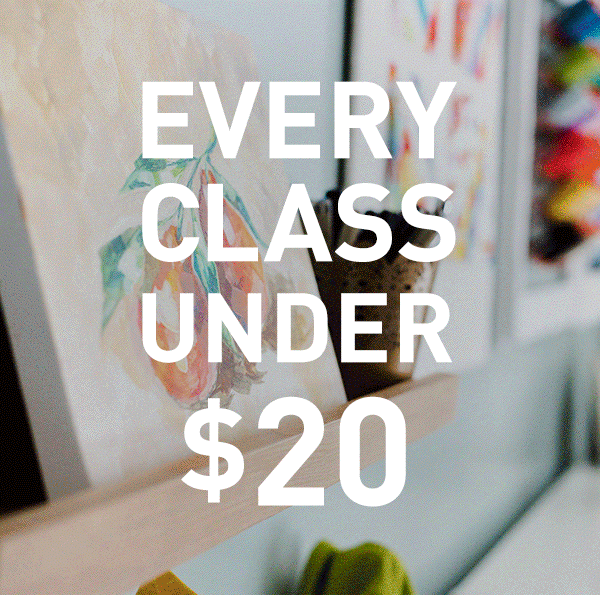
Craftsy has a sale going on this weekend. All classes are less than $20 (except for those in the Great Courses line.) Take advantage and learn something new!! There is always something new to learn. (Note, I am a Craftsy affiliate.)
Linking up to my favorites. See the tab at the top of the page, Link Ups, for more info.
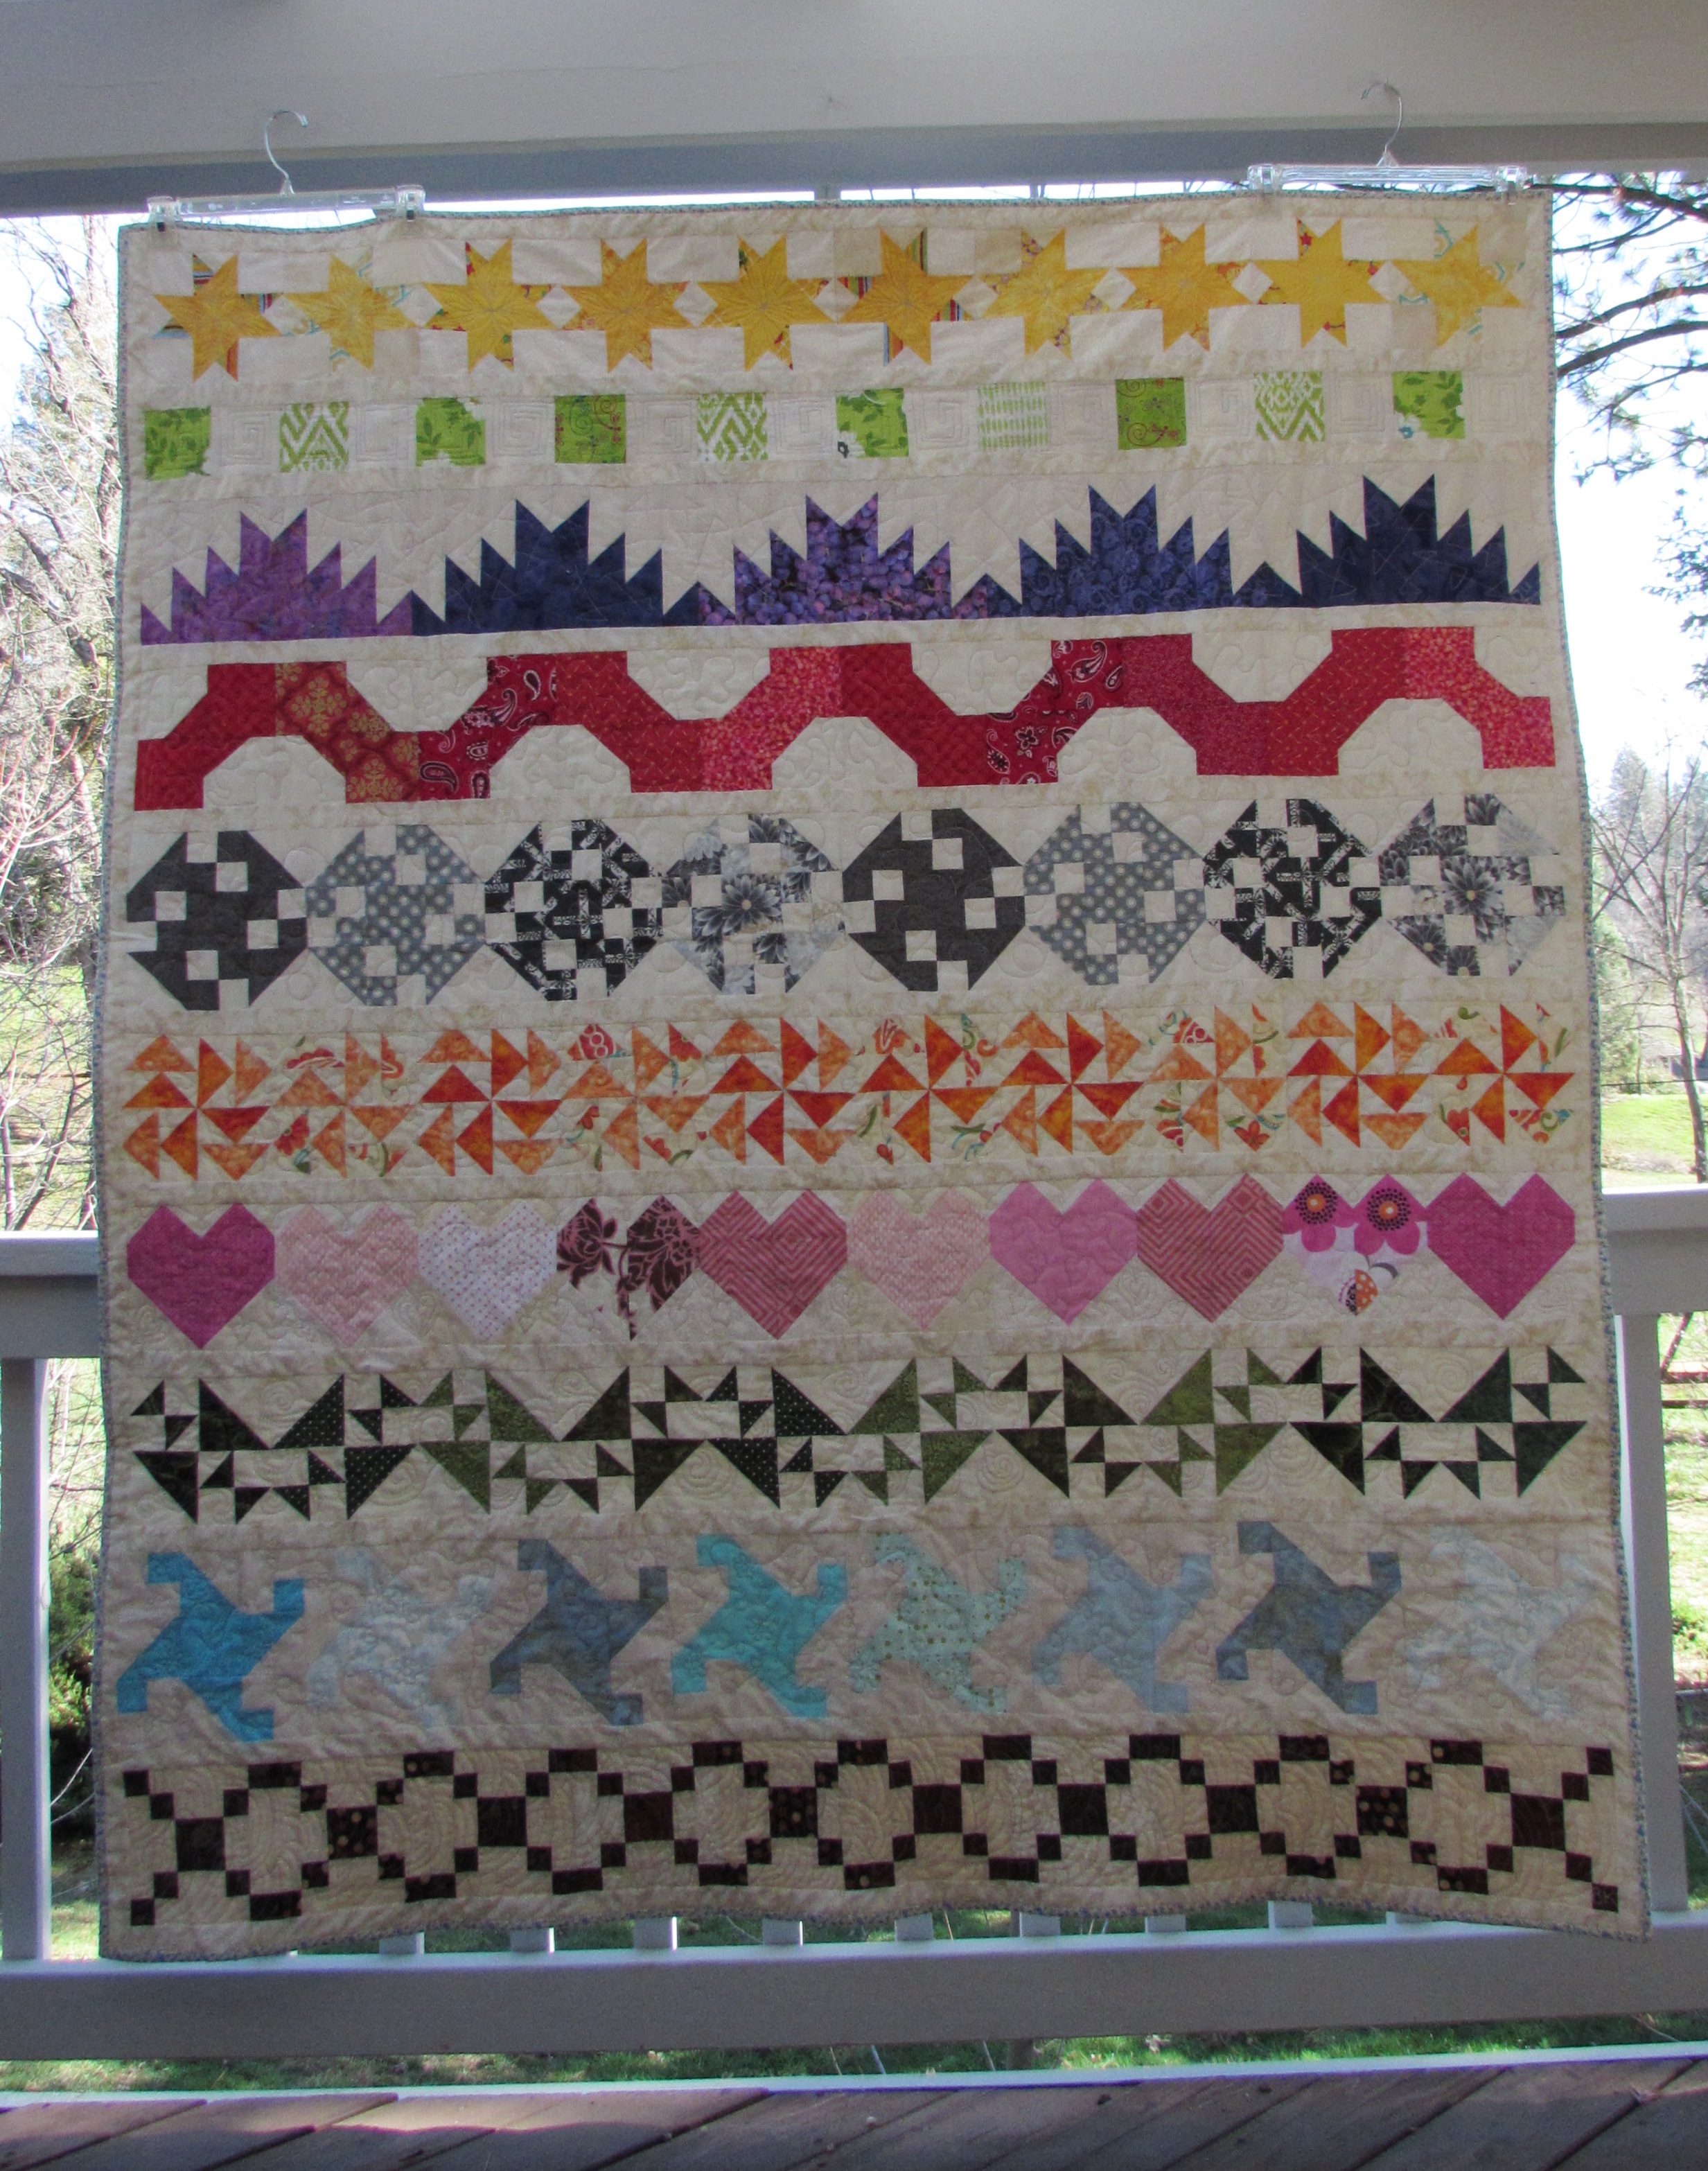
This post serves as my second entry to the Blogger’s Quilt Festival hosted by Amy’s Creative Side. The requirements are that we write a new post to share each entry (blogger’s can enter two separate categories). I am entering my Scrappy Row quilt in the Home Machine Quilted category.
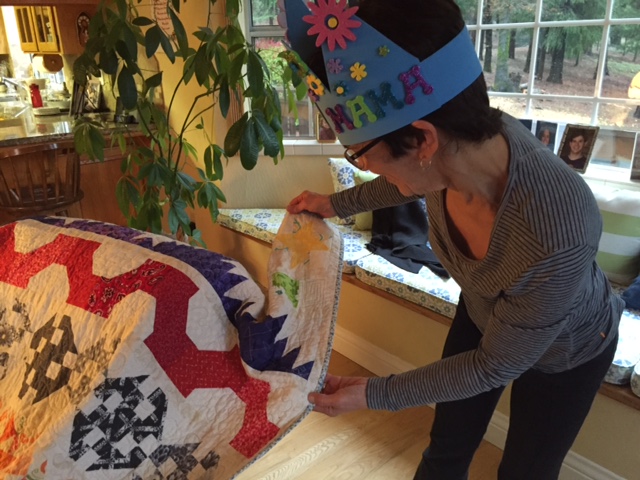
Rainbow Scrap Row Quilt, February 2016
I made this row quilt by following along with the Classic Stitches BOM, hosted by Mari at Academic Quilter throughout 2015 (great tutorials for each row are available on her blog). I spent a great deal of time quilting it at the beginning of 2016. I decided I would quilt each row with a different motif. Here are a few examples.
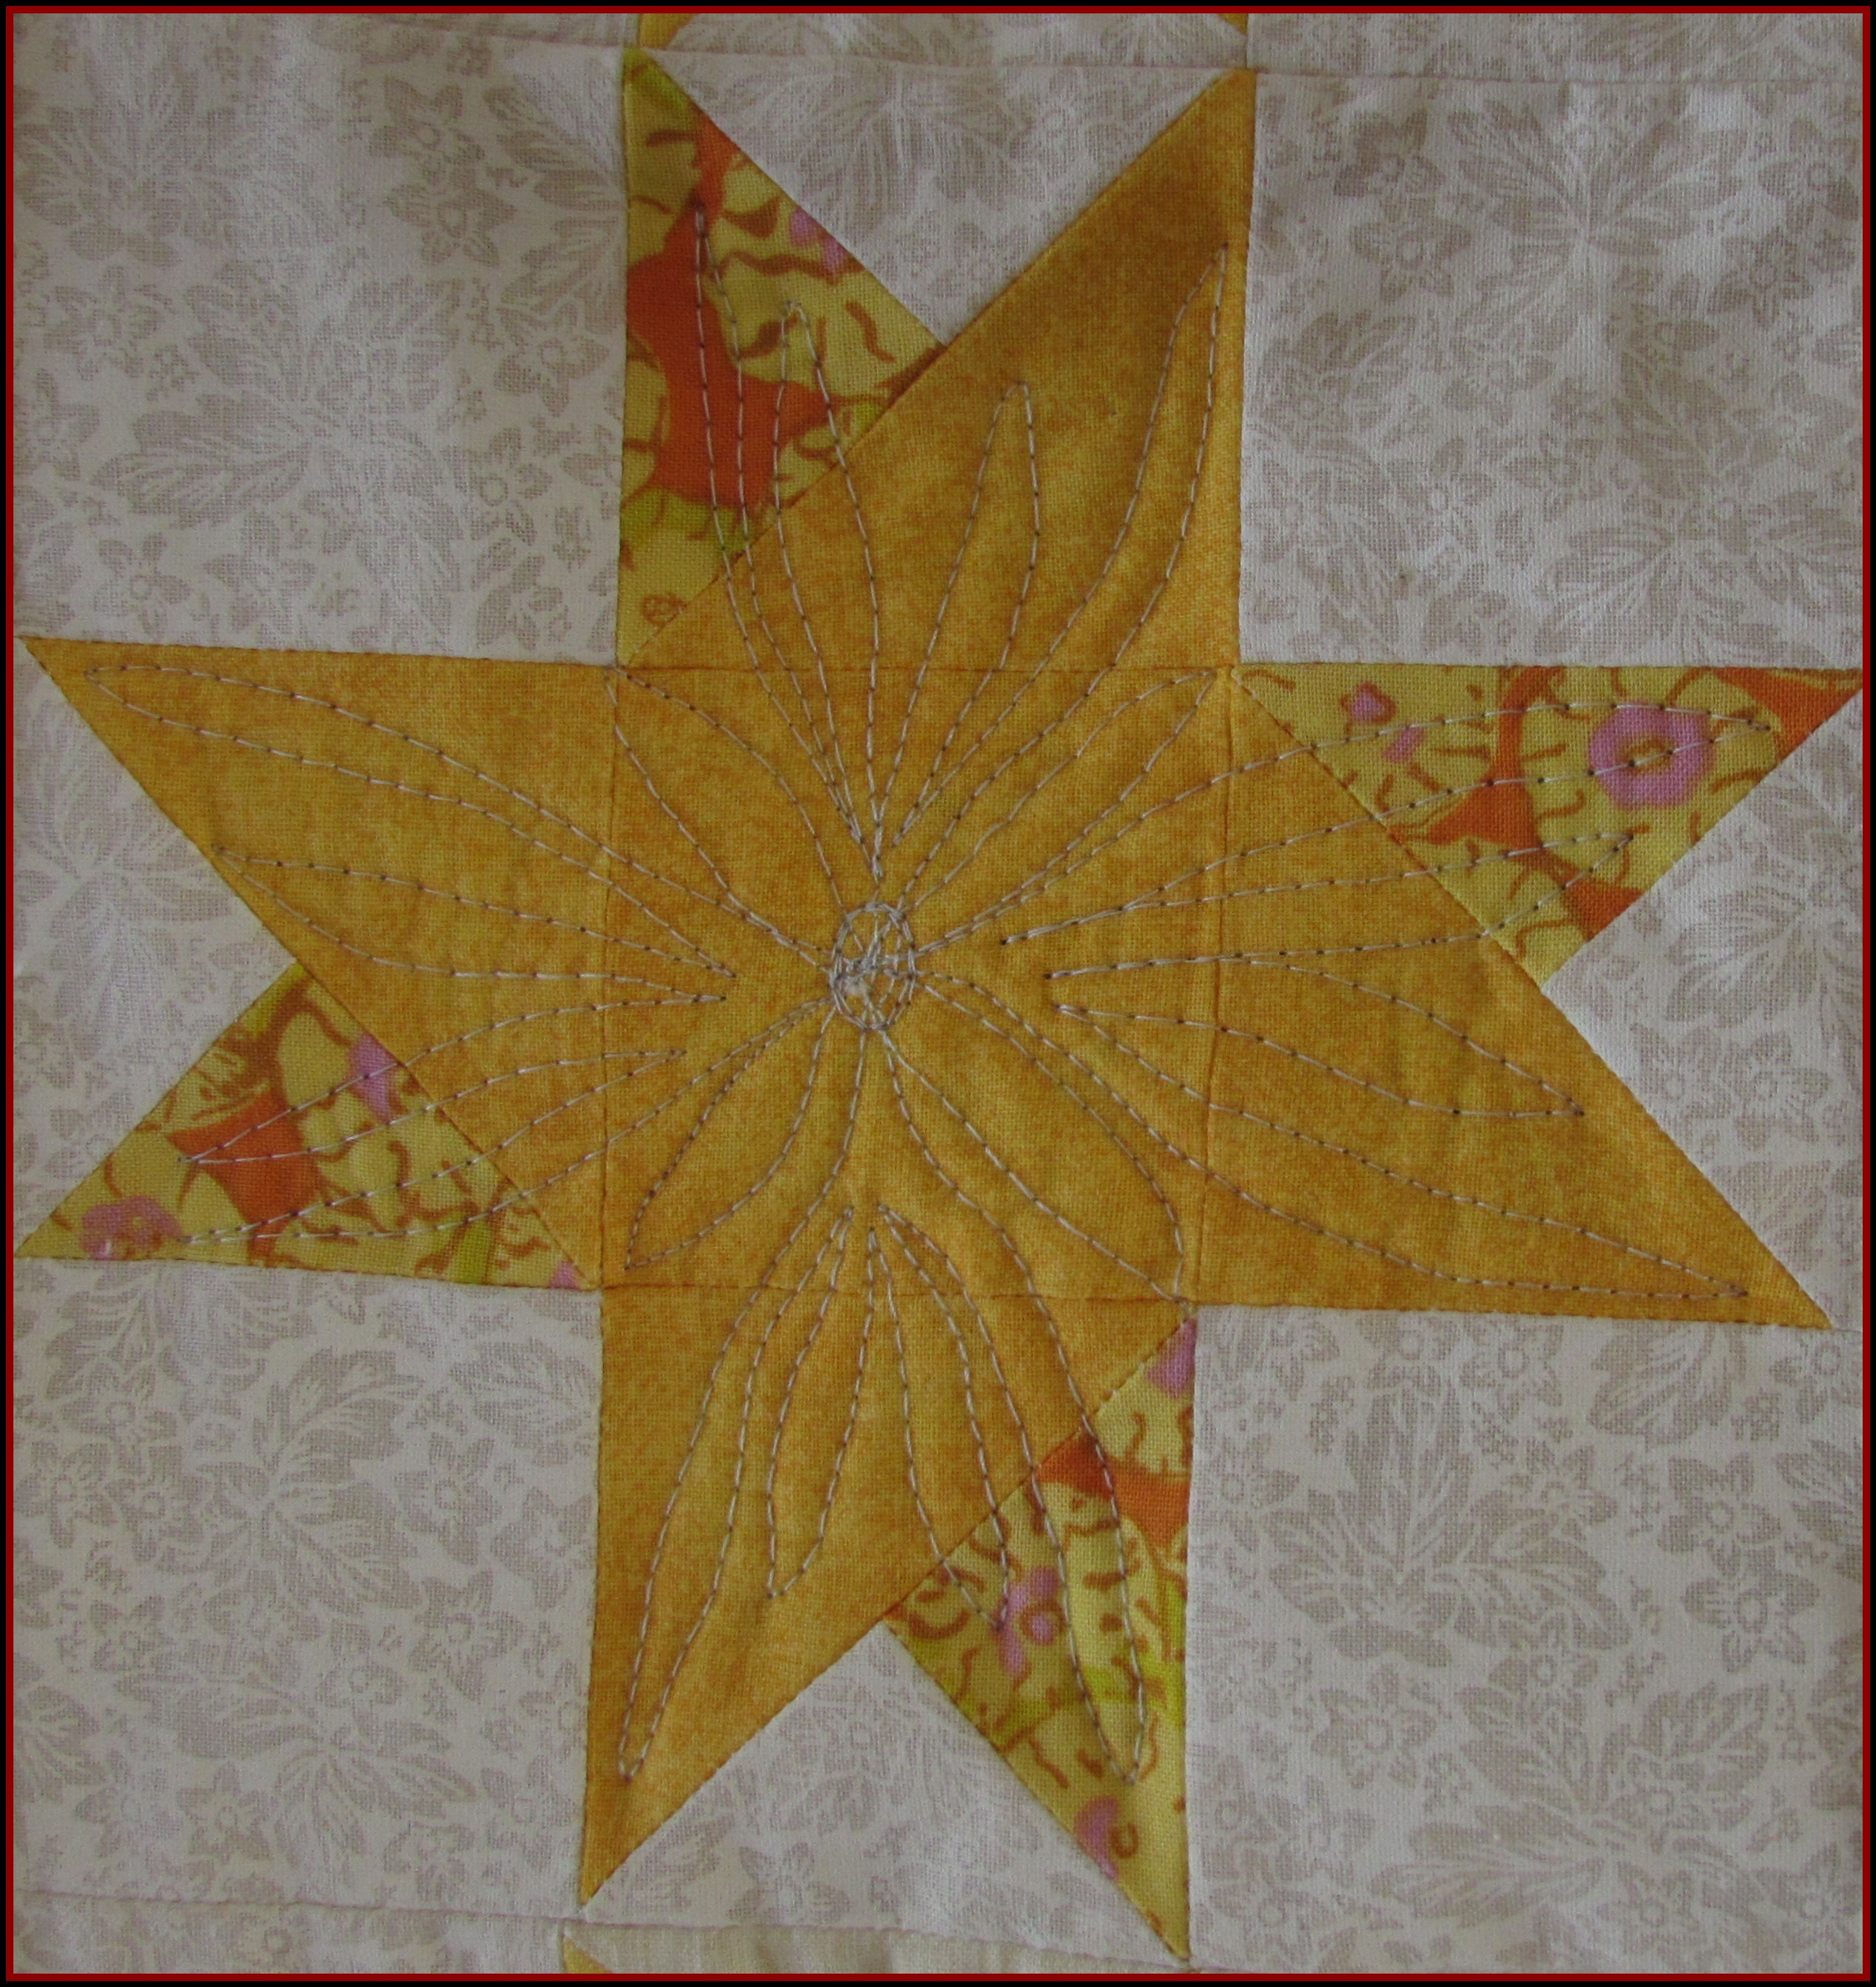
For the yellow stars, I used a large flower that extended into the points of the star.
The brown Pennsylvania blocks are sporting Baptist Fans and my initials down in the corner.
The blue waterwheel blocks have a flow of meandering loops and flowers.
The green row of Crosses & Losses blocks is quilted with a spiral motif.
These Dutchman’s Puzzle blocks are my favorite row. I did a tight stipple here as the row wasn’t entirely flat and required a lot of quilting to tame it down.
This quilt was gifted to my sister Tina (the one sporting her birthday crown!) for her 60th birthday. It was very fun to make and even more rewarding to give!
I hope you will pop over to Amy’s to check out the entries in the Quilt Festival. She hosts this event each fall and I have come to look forward to it – lots of inspiration and always one or two new bloggers to befriend. This year is the first time I have entered though. Voting begins Sunday the 25th!
It is likely that you all have been seeing the posts about the Blogger’s Quilt Festival that is currently going on at Amy’s Creative Side. This event is such a great source of inspiration. All kinds of quilt bloggers link up their favorite projects within the categories that Amy had set up (e.g. large quilt, small quilt, original design, art quilt, scrappy quilt, etc) I have not participated before but have enjoyed looking at the work of so many talented quilters. Viewers can vote for their favorites in each category and prizes are generously awarded. There are also some prizes awarded in a drawing of all those who enter.
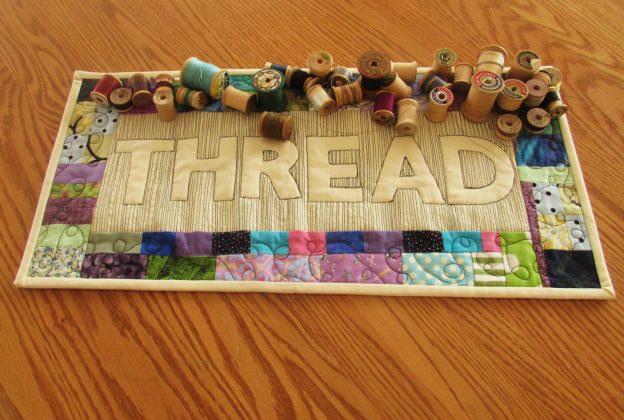
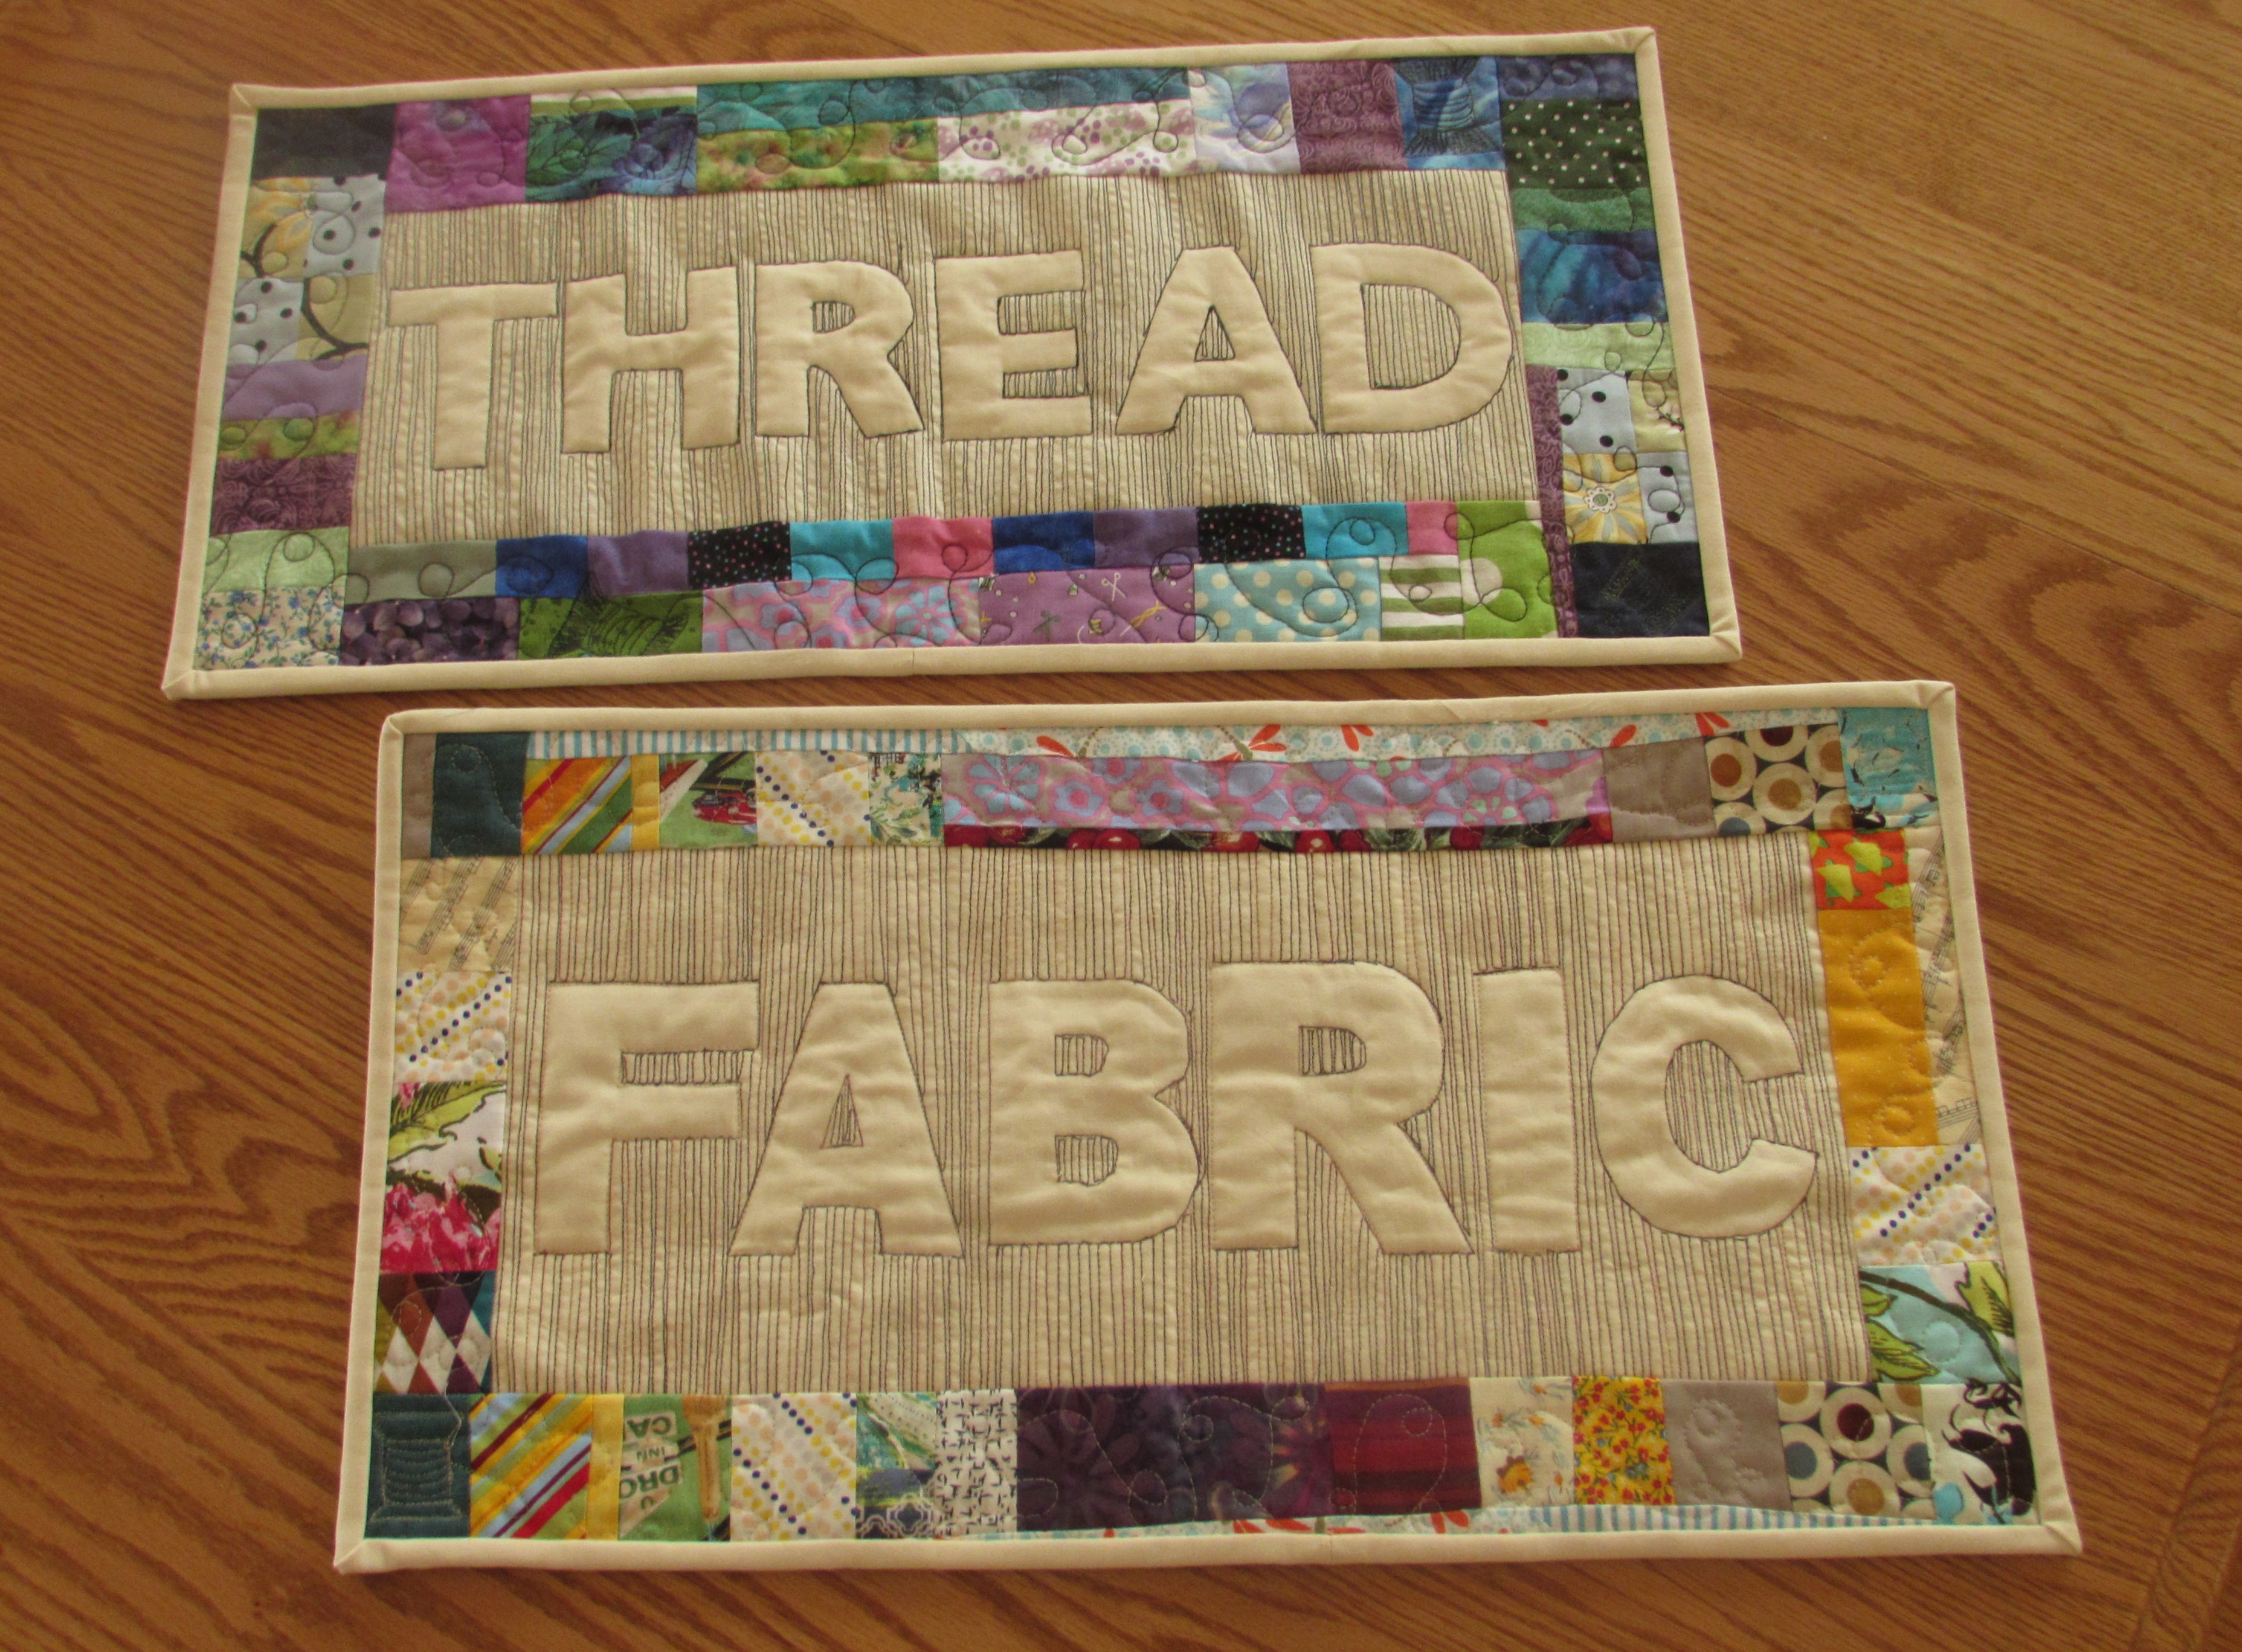
This year I am going to enter my THREAD quilt in the mini quilt category. You might remember this project because it was quite recent. If you are new to the blog and want more details, click here. I made a set of two that hang in my sewing room but only THREAD is being entered. I just love seeing both of them together though!
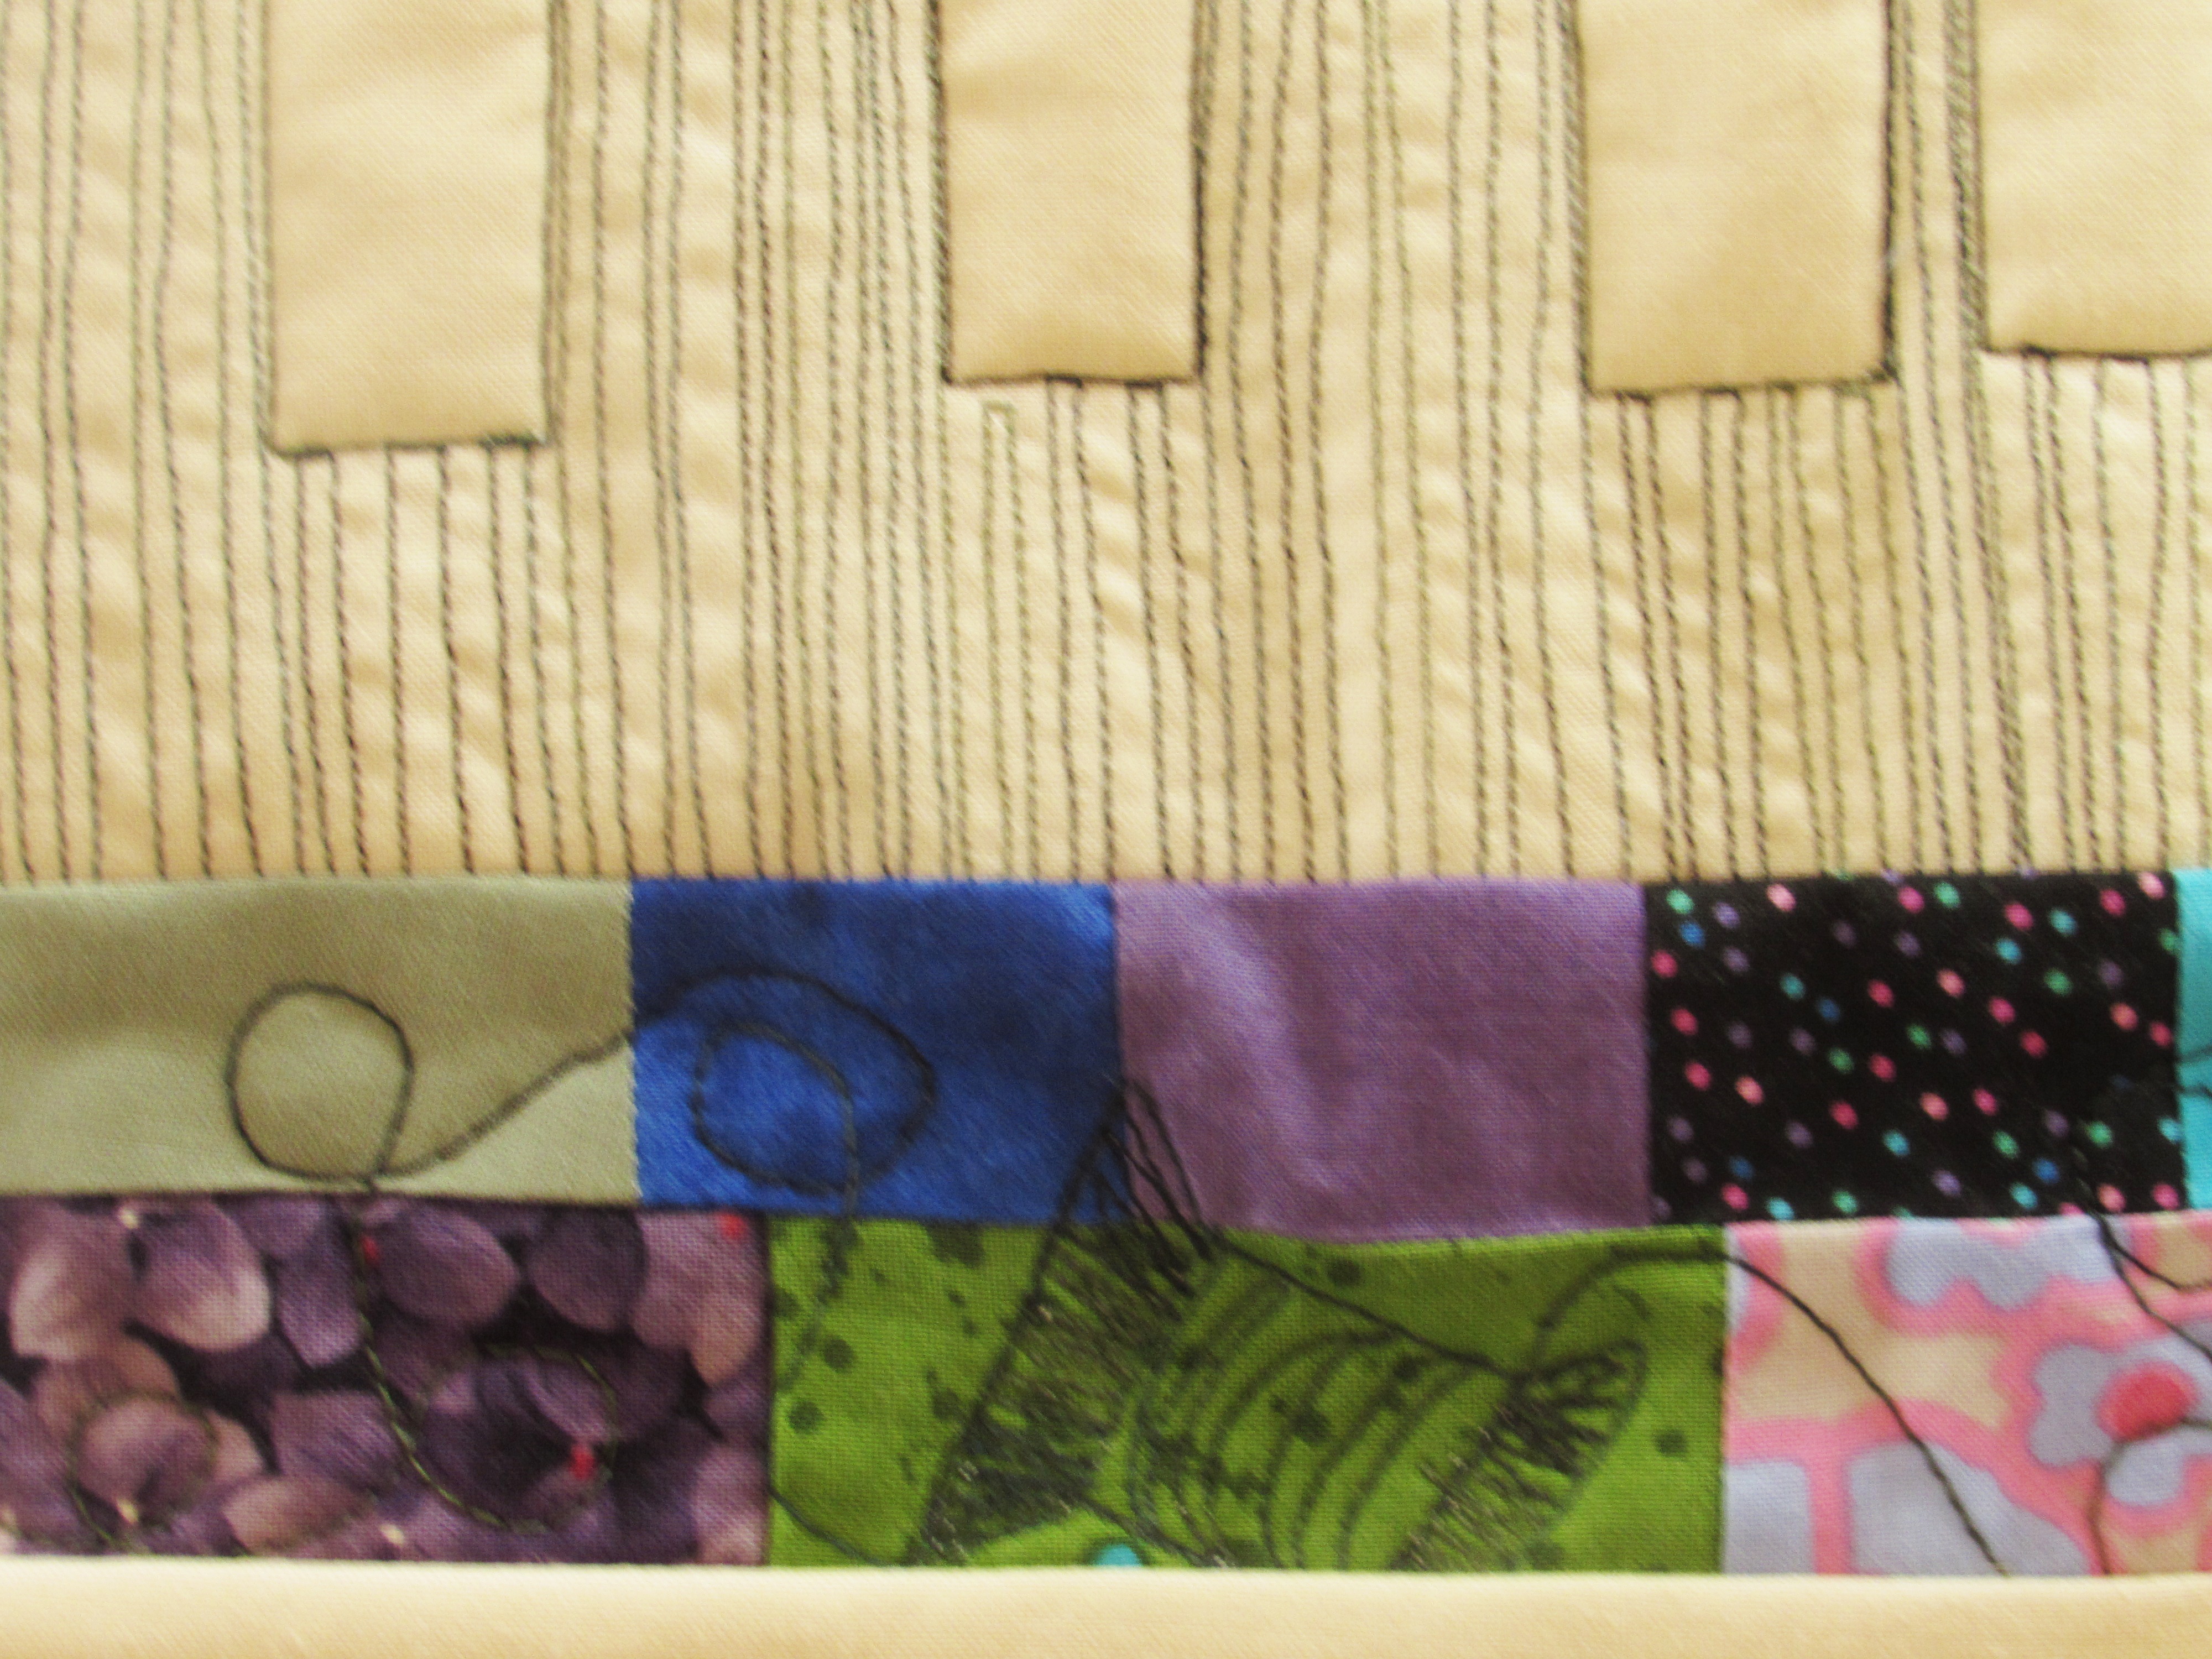
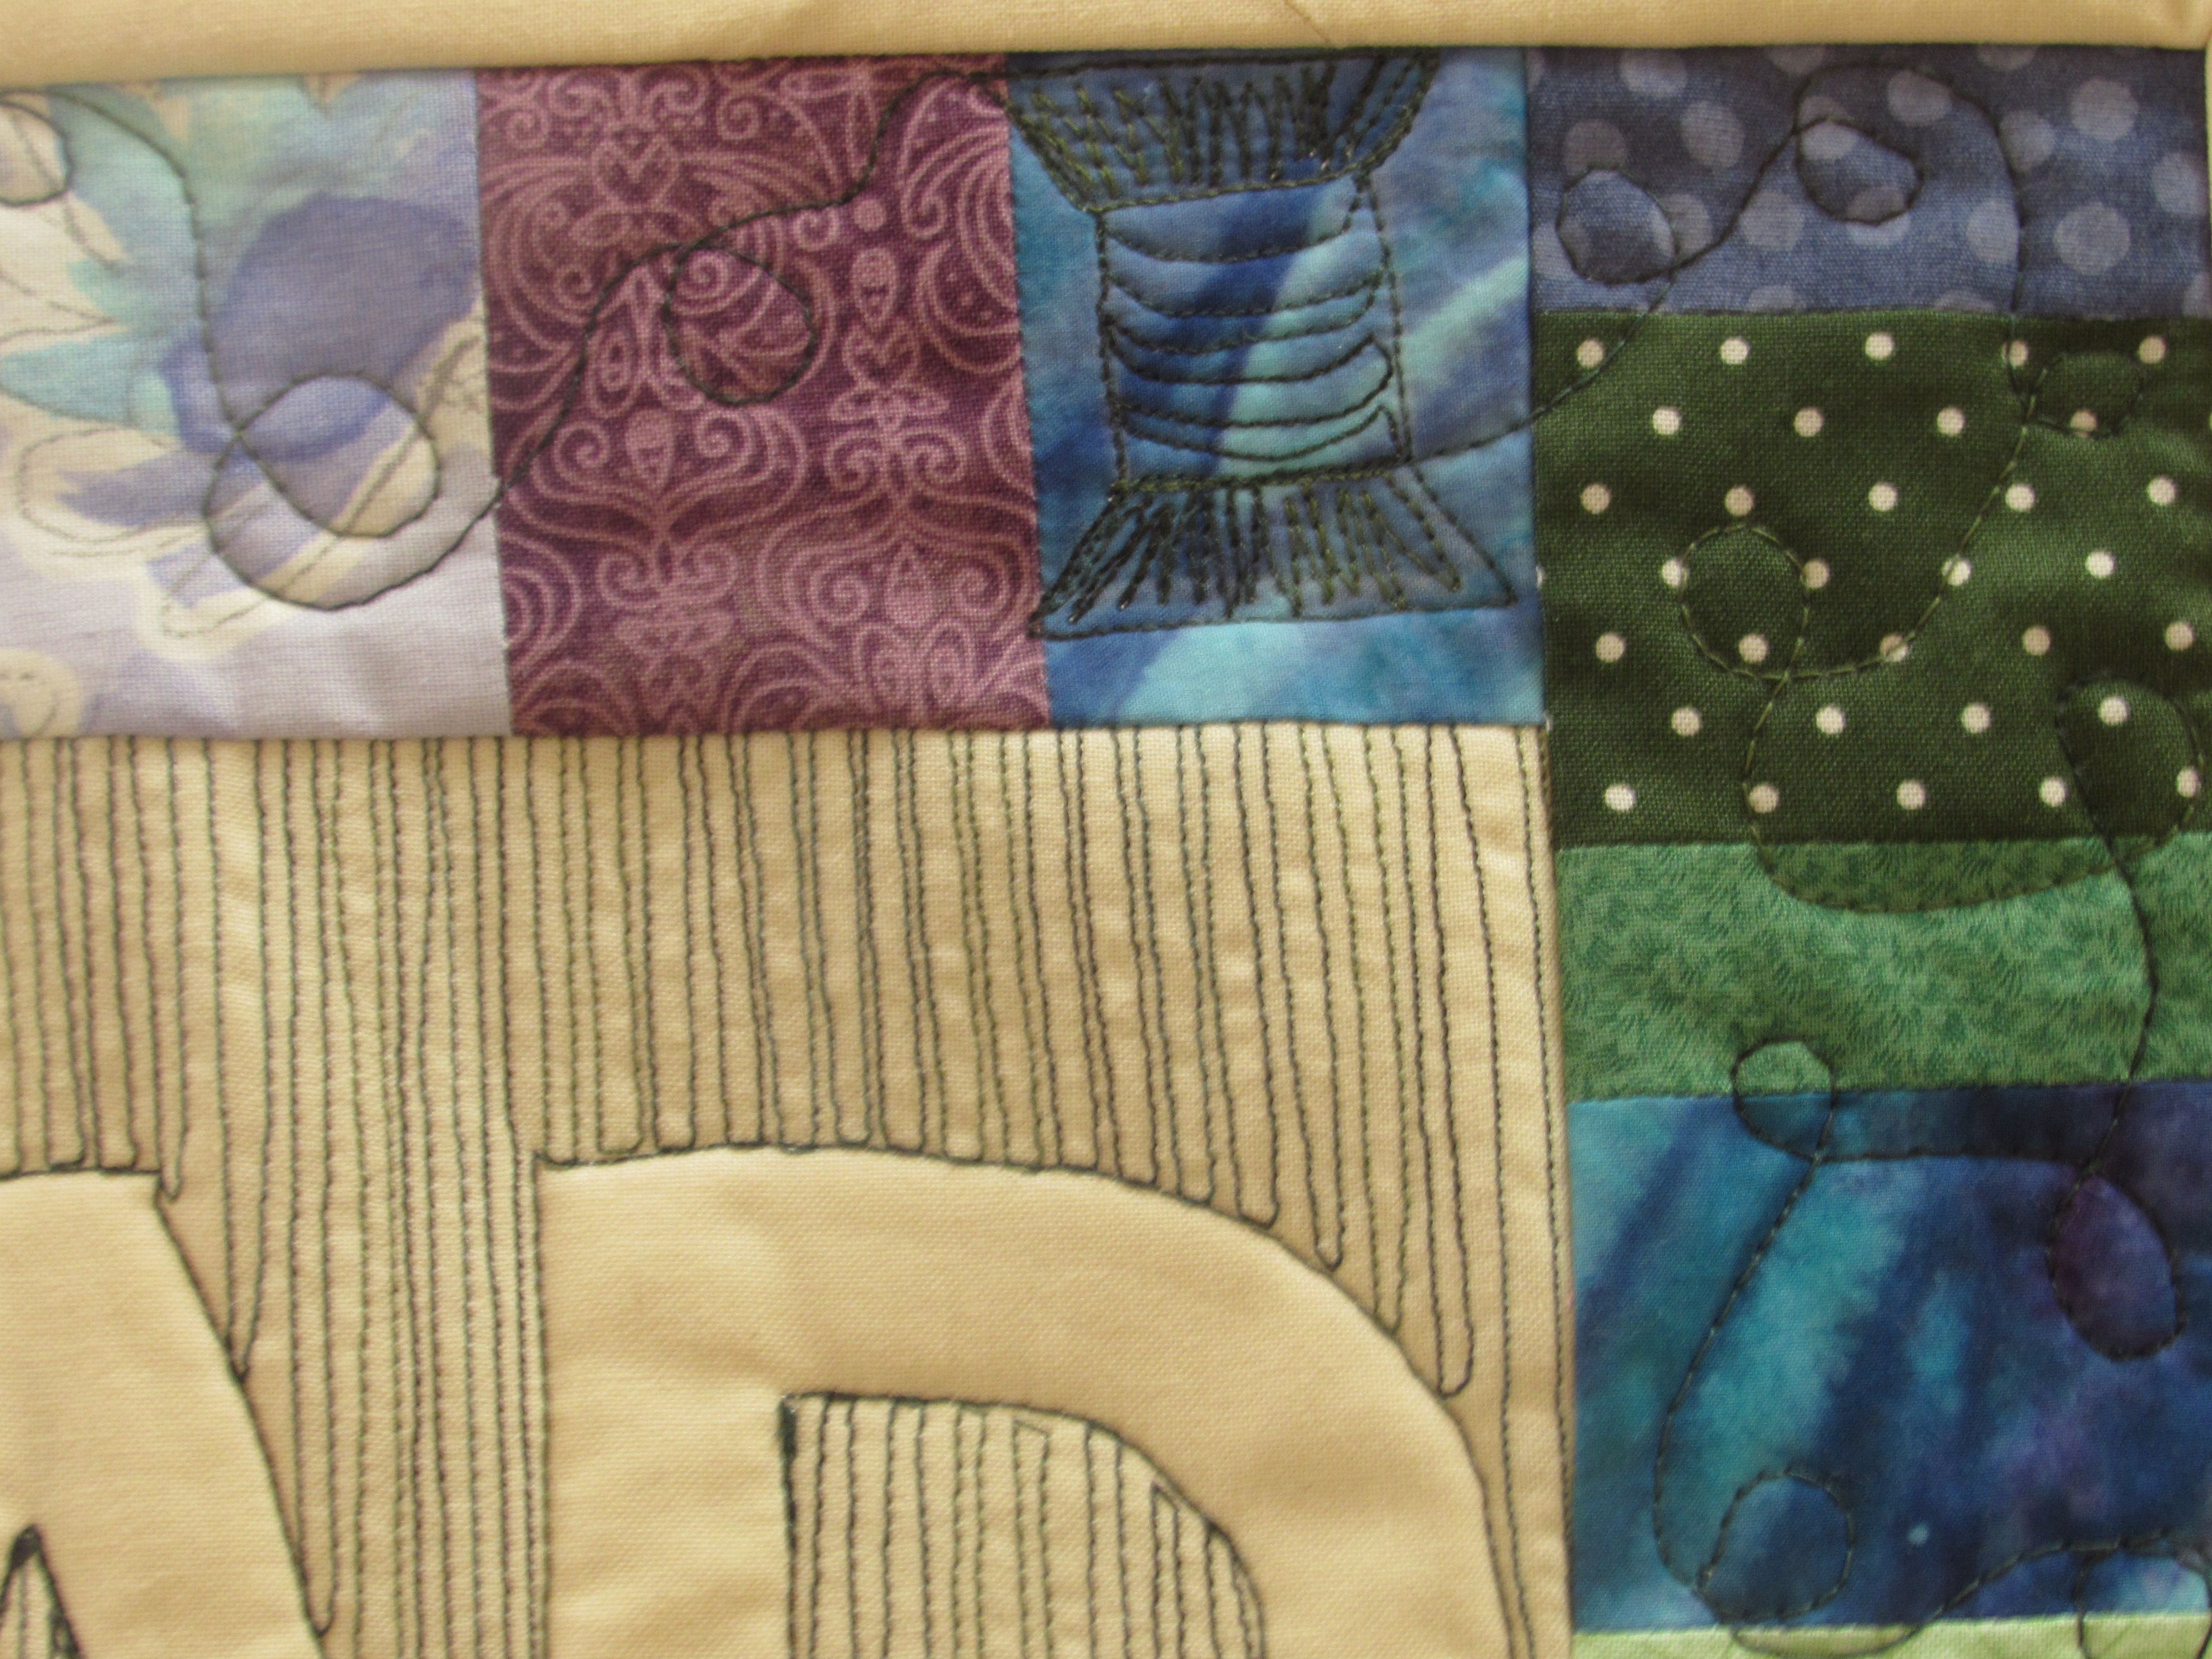
I had so much fun quilting this. There are a few spools incorporated into the border quilting.
If you are interested in trying to make one for your sewing room, I have a tutorial written up for you. It is a very simple process to relief quilt the word on the center. Of course you could swap the word out for anything. QUILT, CREATE, IMAGINE – any of those would be fantastic.
I hope you will check out the entries over at Amy’s. If you are interested, there are a few more days where the festival is open for bloggers to link to. Voting doesn’t open until Sunday, the 25th. It is worth popping over to Amy’s — there are so many wonderful quilts to ooh and ahh over. Have fun!!
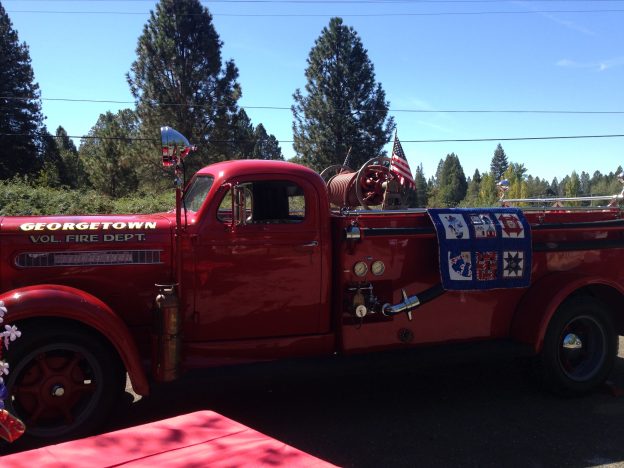
This weekend I had the opportunity to go to a small quilt show in the town of Georgetown, about an hour drive from home. The Georgetown quilt guild is small with about 30 members. They put on a quilt show each year, which is no easy feat with a small group! Last year the show was cancelled at the last minute because it was very smokey in the area, due to a wildfire. Their show is held in the park which makes for a really nice morning.
This year the show featured Lynn Wilder, of Sew’n Wild Oaks. She is a talented pattern designer and teacher that lives in Northern California. She has a book out on ways to simplify quilt math and was doing short demos throughout the day.
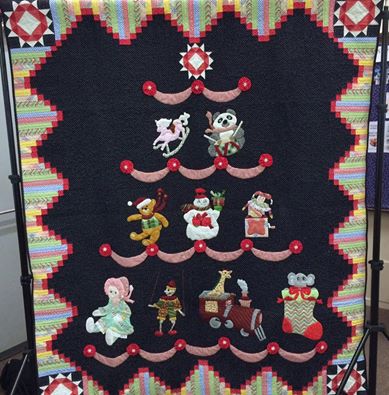
This year’s opportunity quilt for the guild was made with Wilder’s Toyland pattern. It was an adorable holiday quilt to raffle off. Funds from their annual raffle go to the Volunteer Fire Department, a wonderful cause. There were a number of quilts that guild members had made using this pattern and it was fun to see each quilter’s interpretation and color choice.
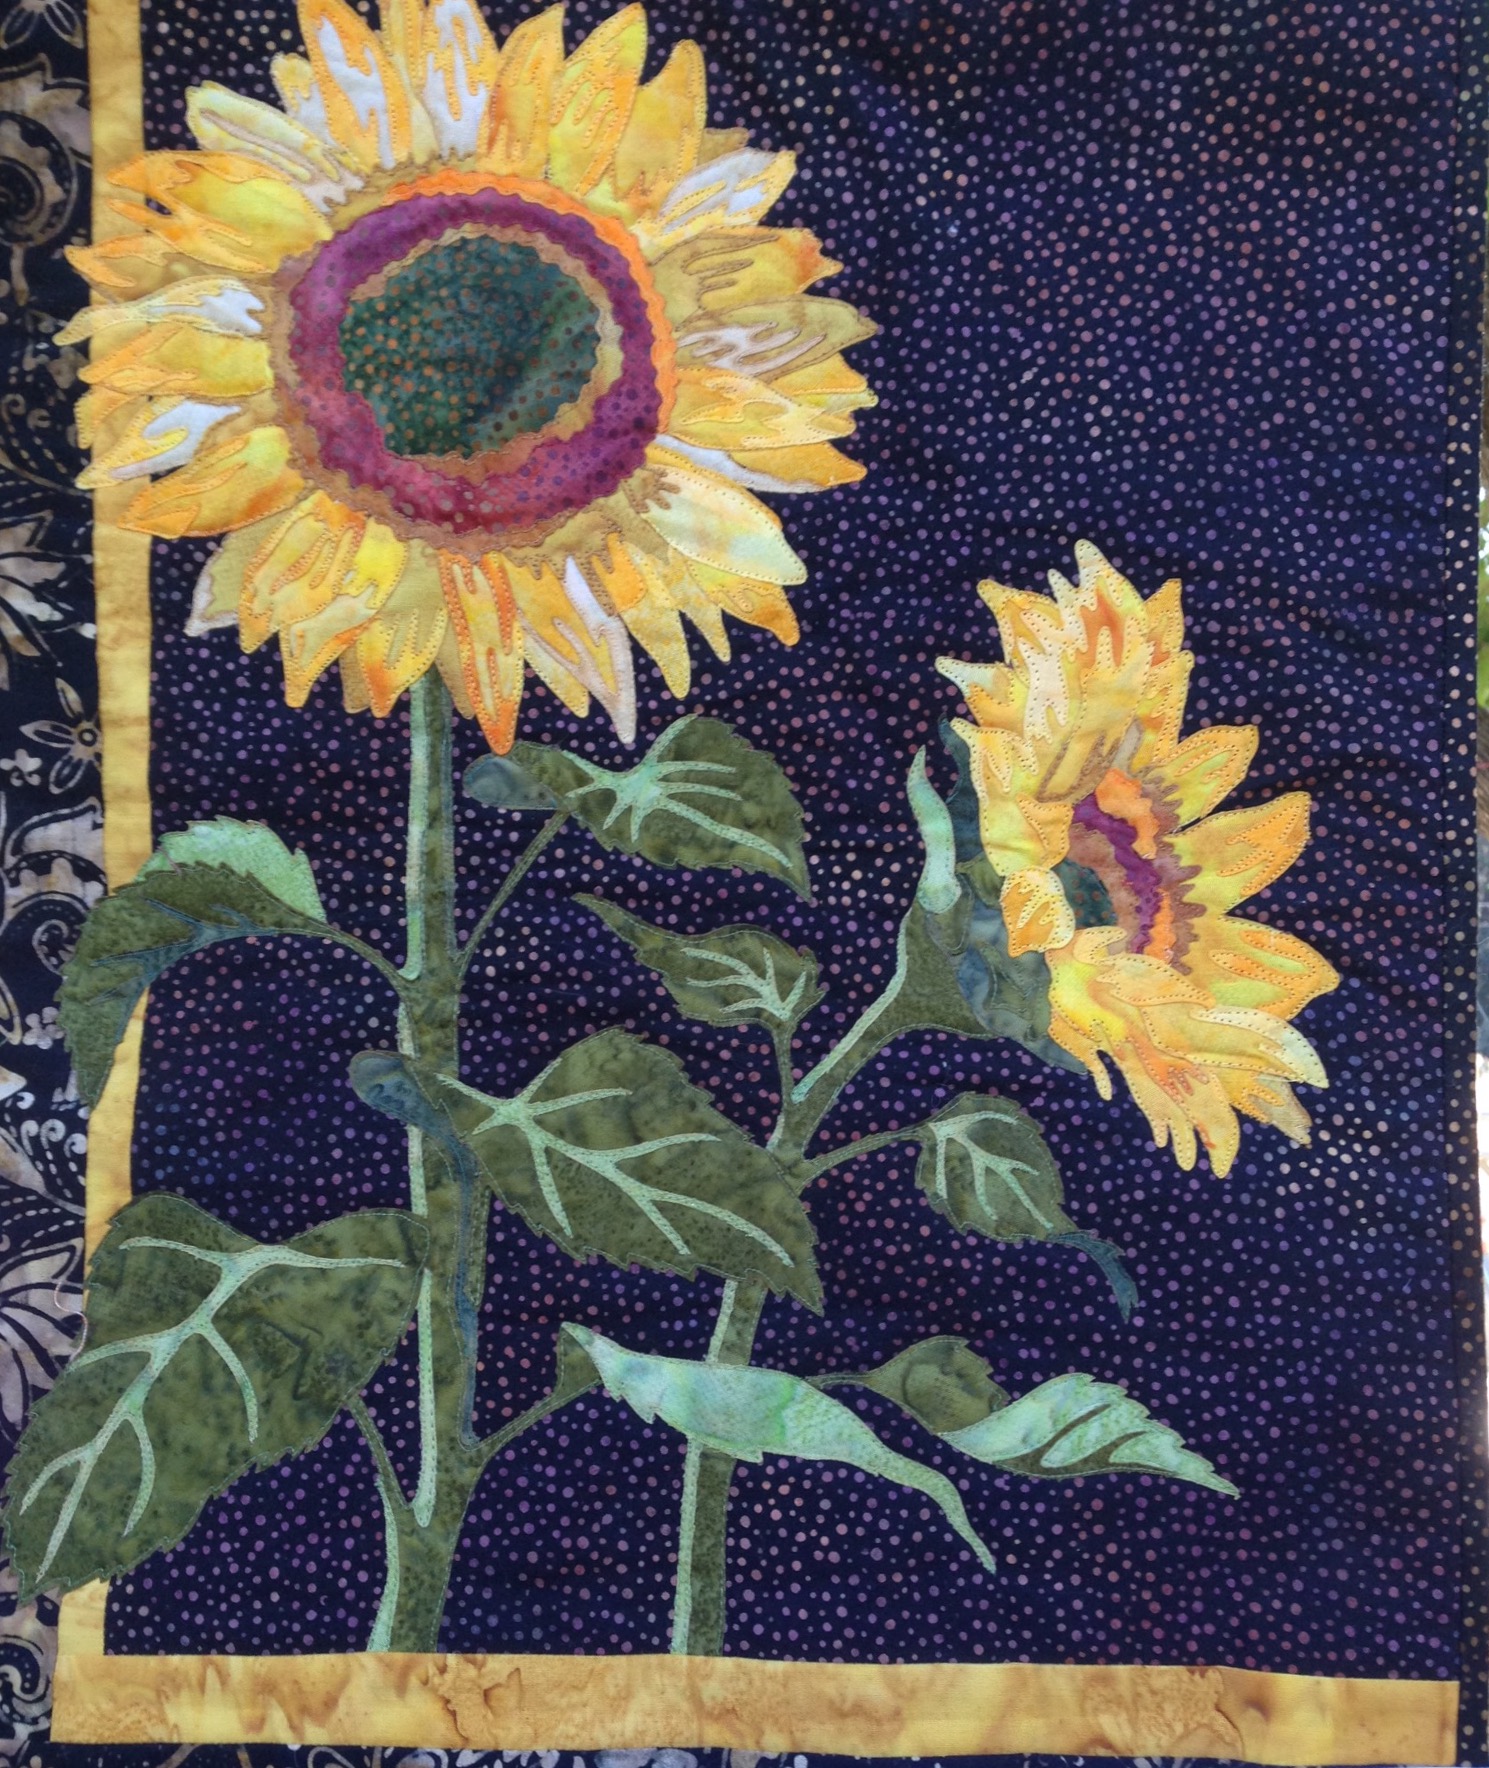
The show is not juried but visitors do vote for their favorites. Here are two of mine. This sunflower is a mini but I loved it. I took a close shot to save for inspiration.
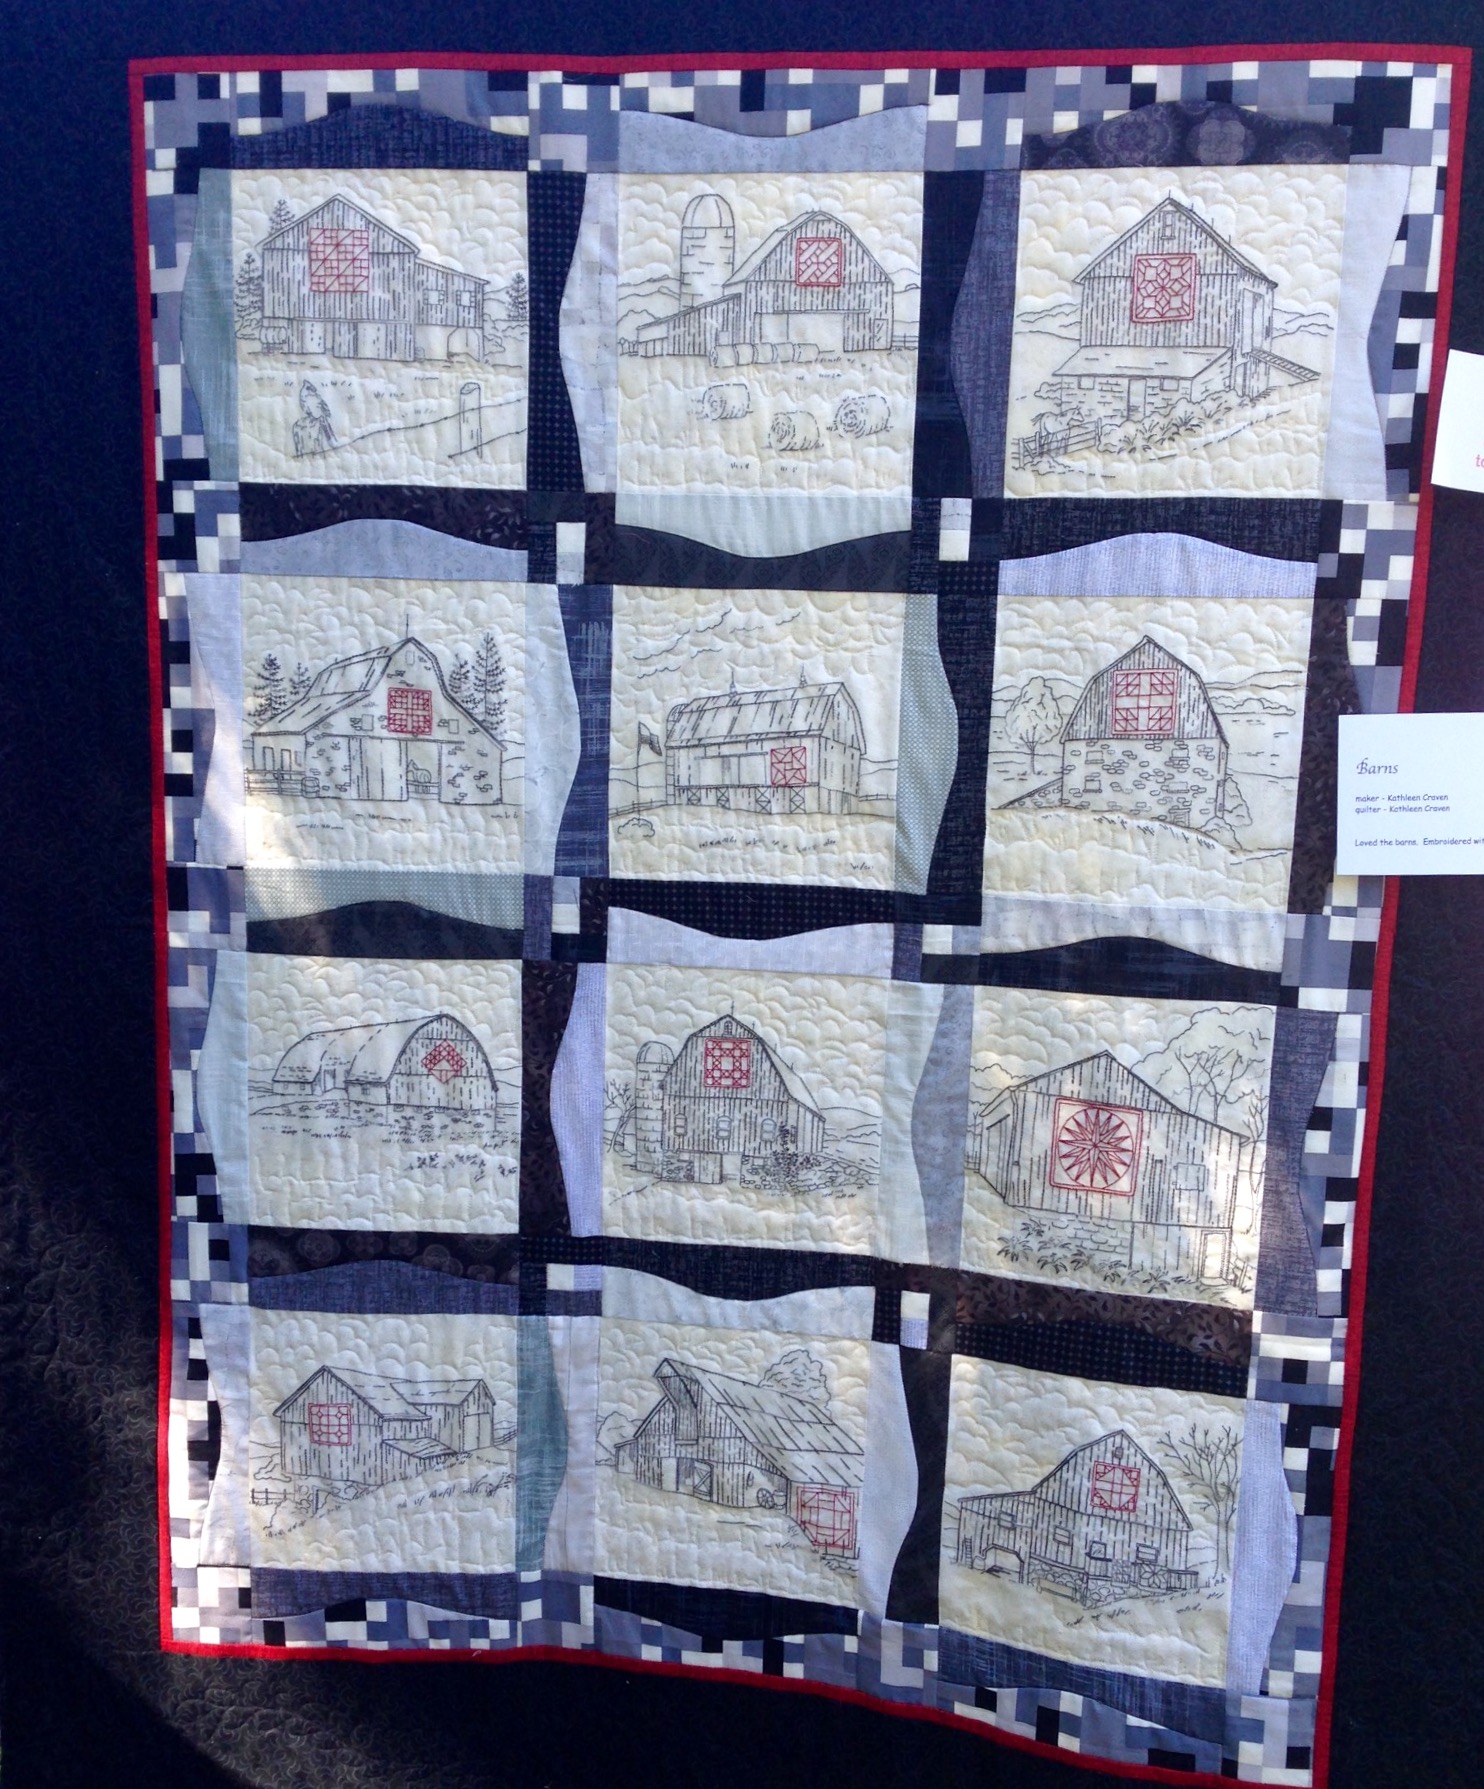
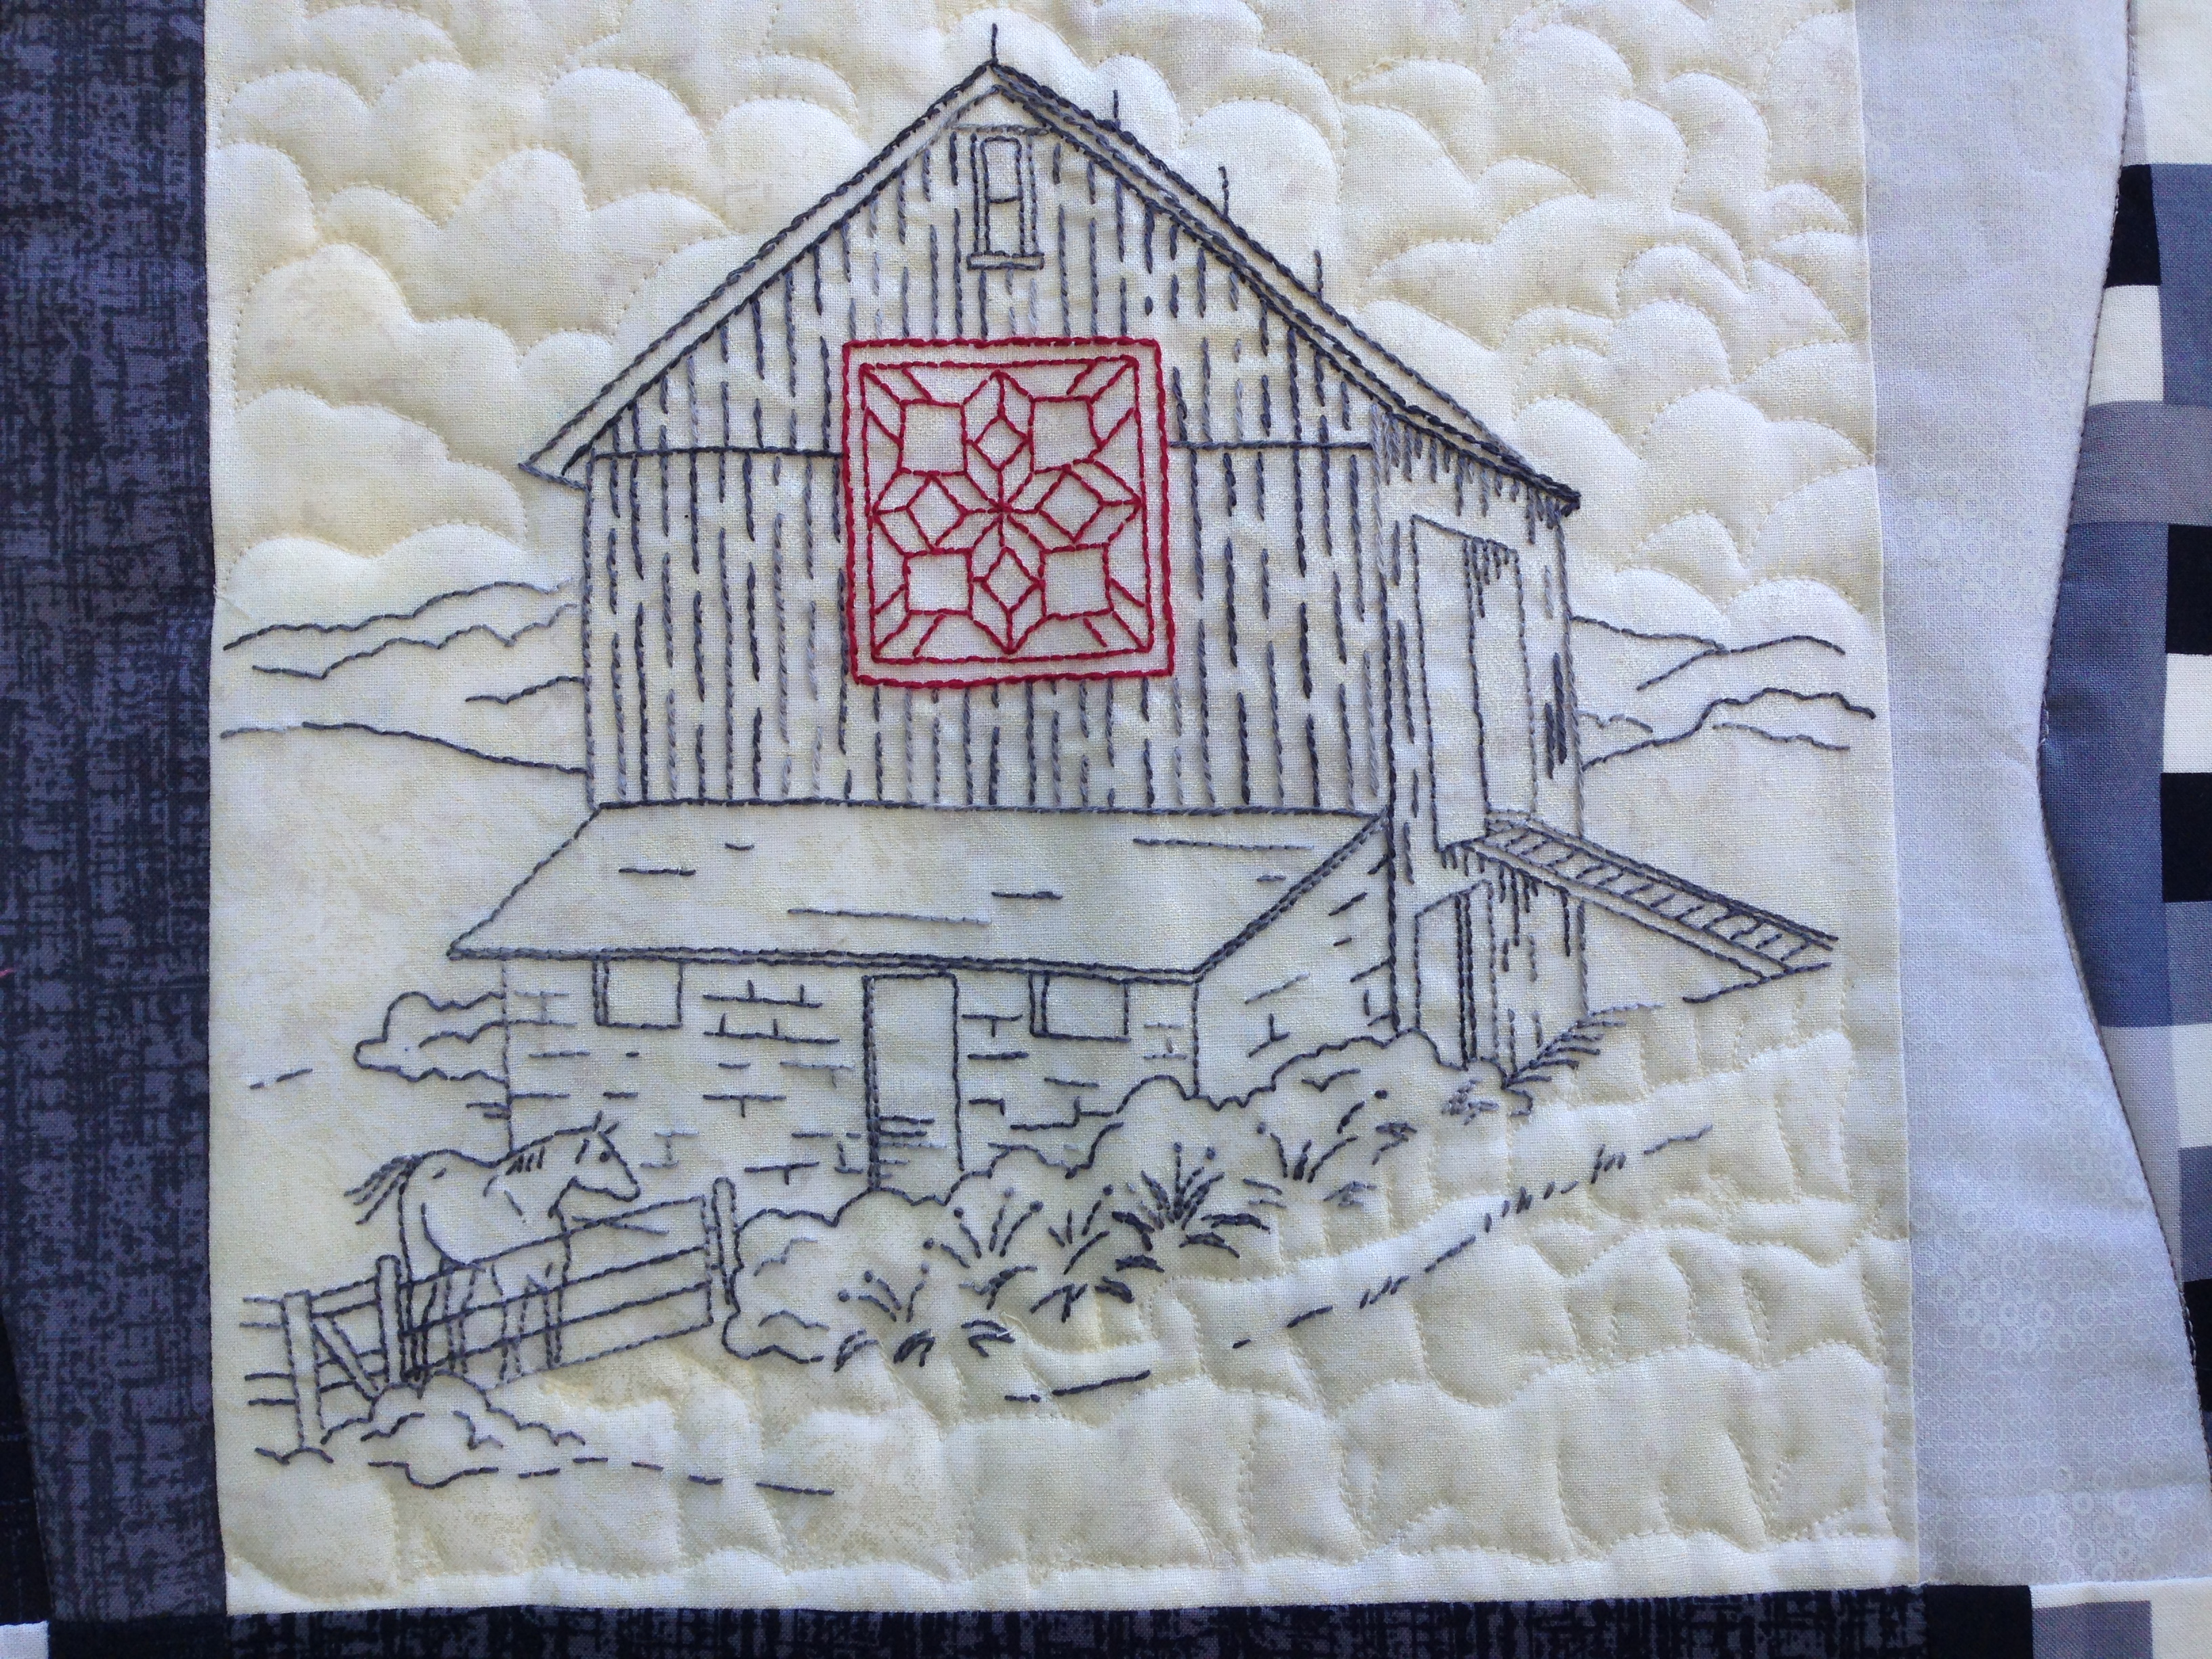
I am a huge fan of barn quilts and this interpretation caught my eye.
Each block was embroidered and the stitches were lovely. Very precise. Love the way she used the FMQ in the background to show clouds or to define the ground.
What would a quilt show be without a fun table full of fabric to rummage through? I did my fair share, you know, to support their volunteer fire department.
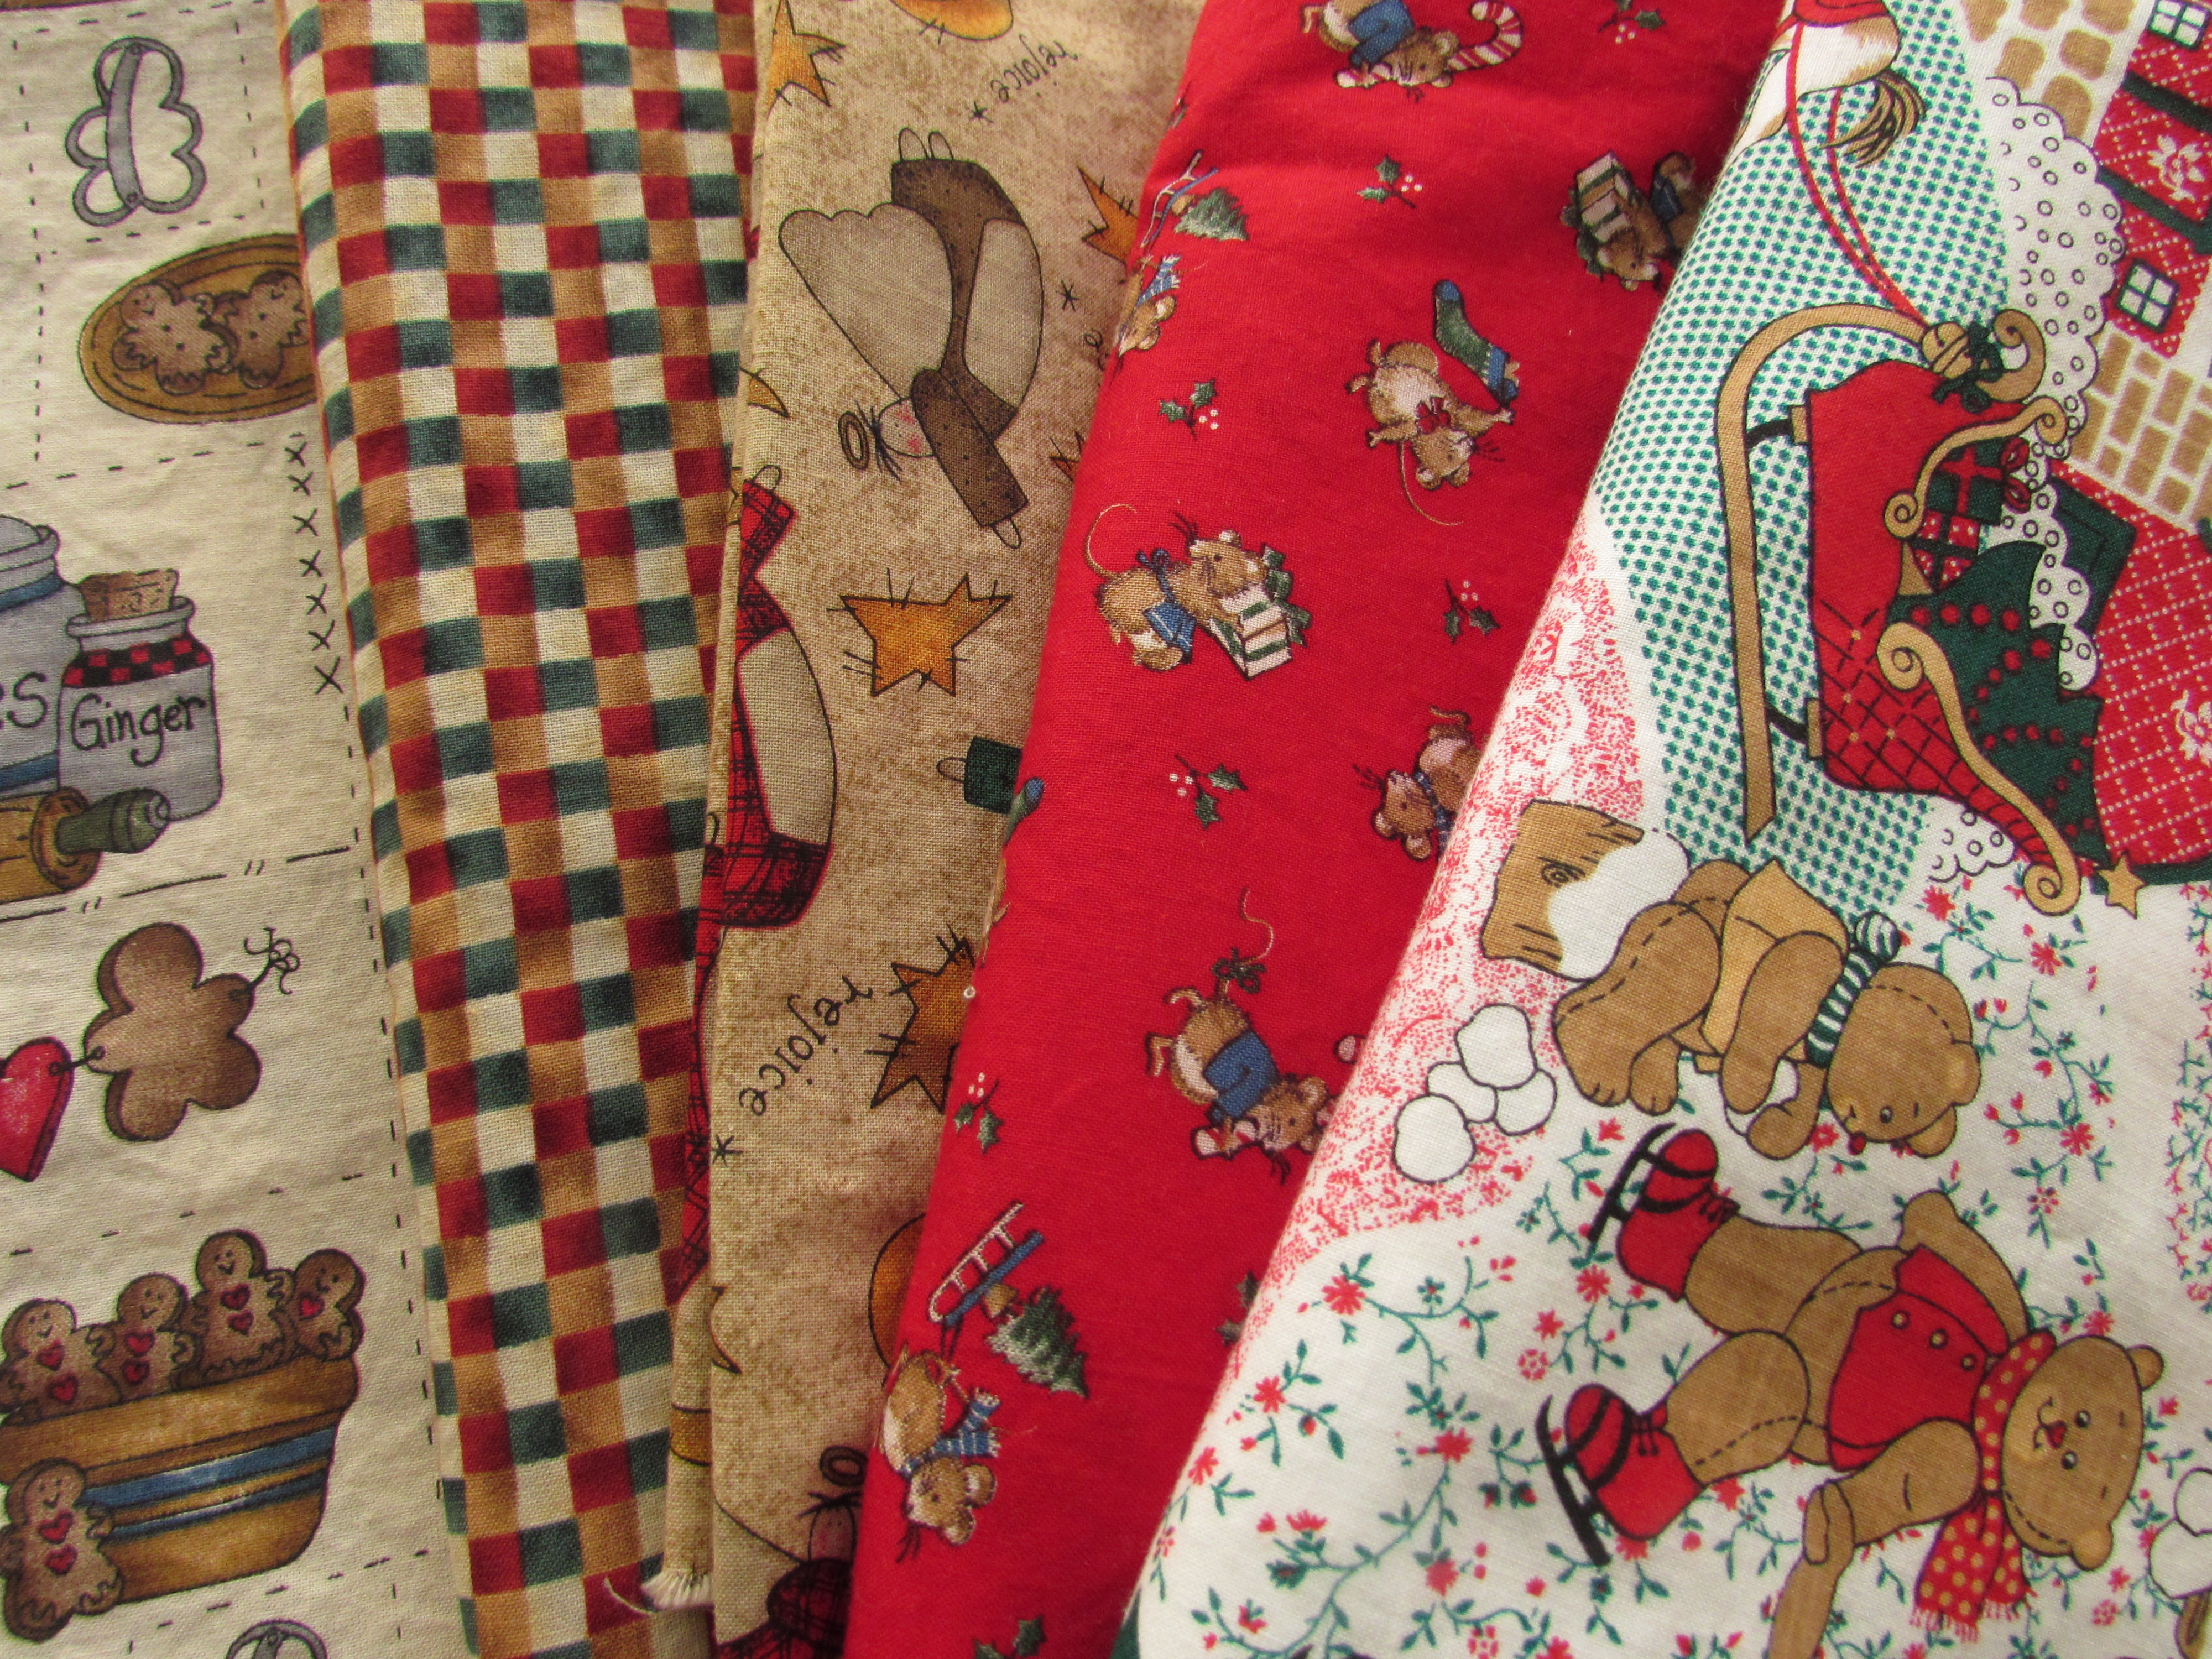
There was a fun assortment of Christmas fabric that I plan to use to make more reusable gift bags. I have done this for the past two years and love getting away from so much paper at the holidays.
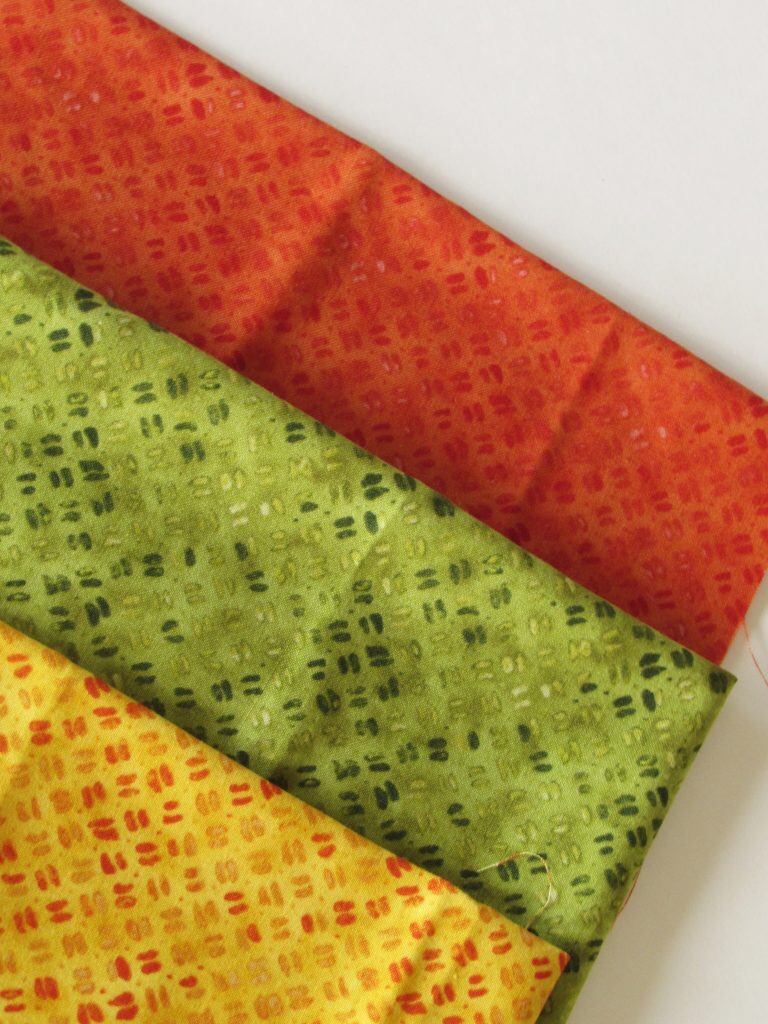
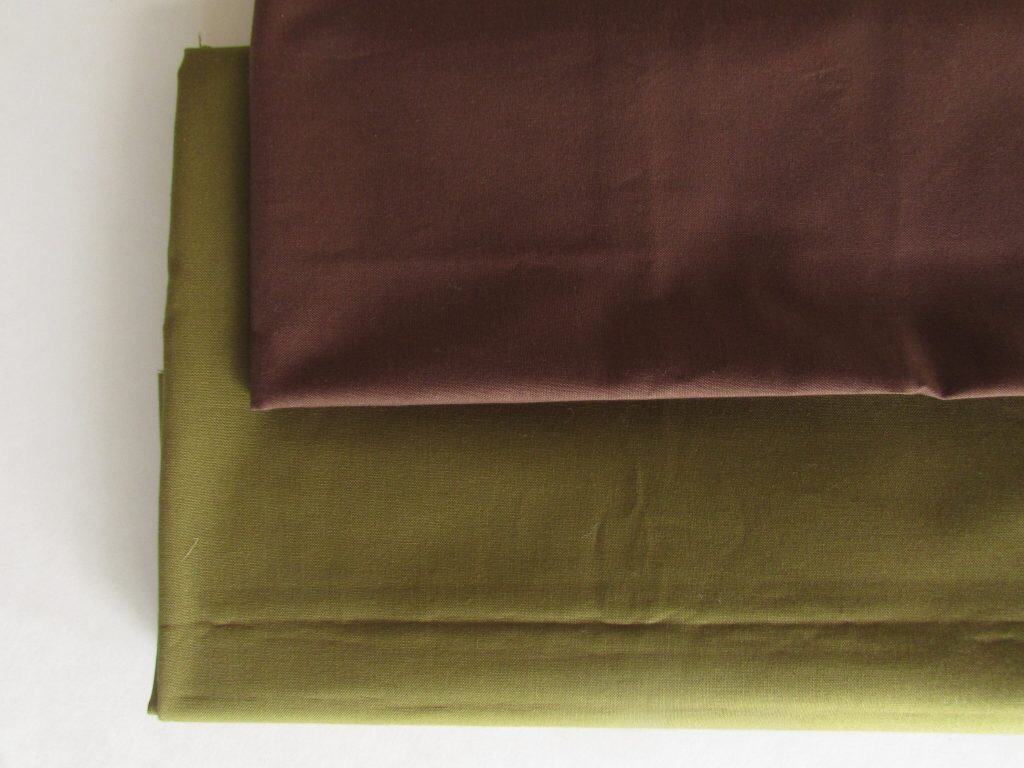
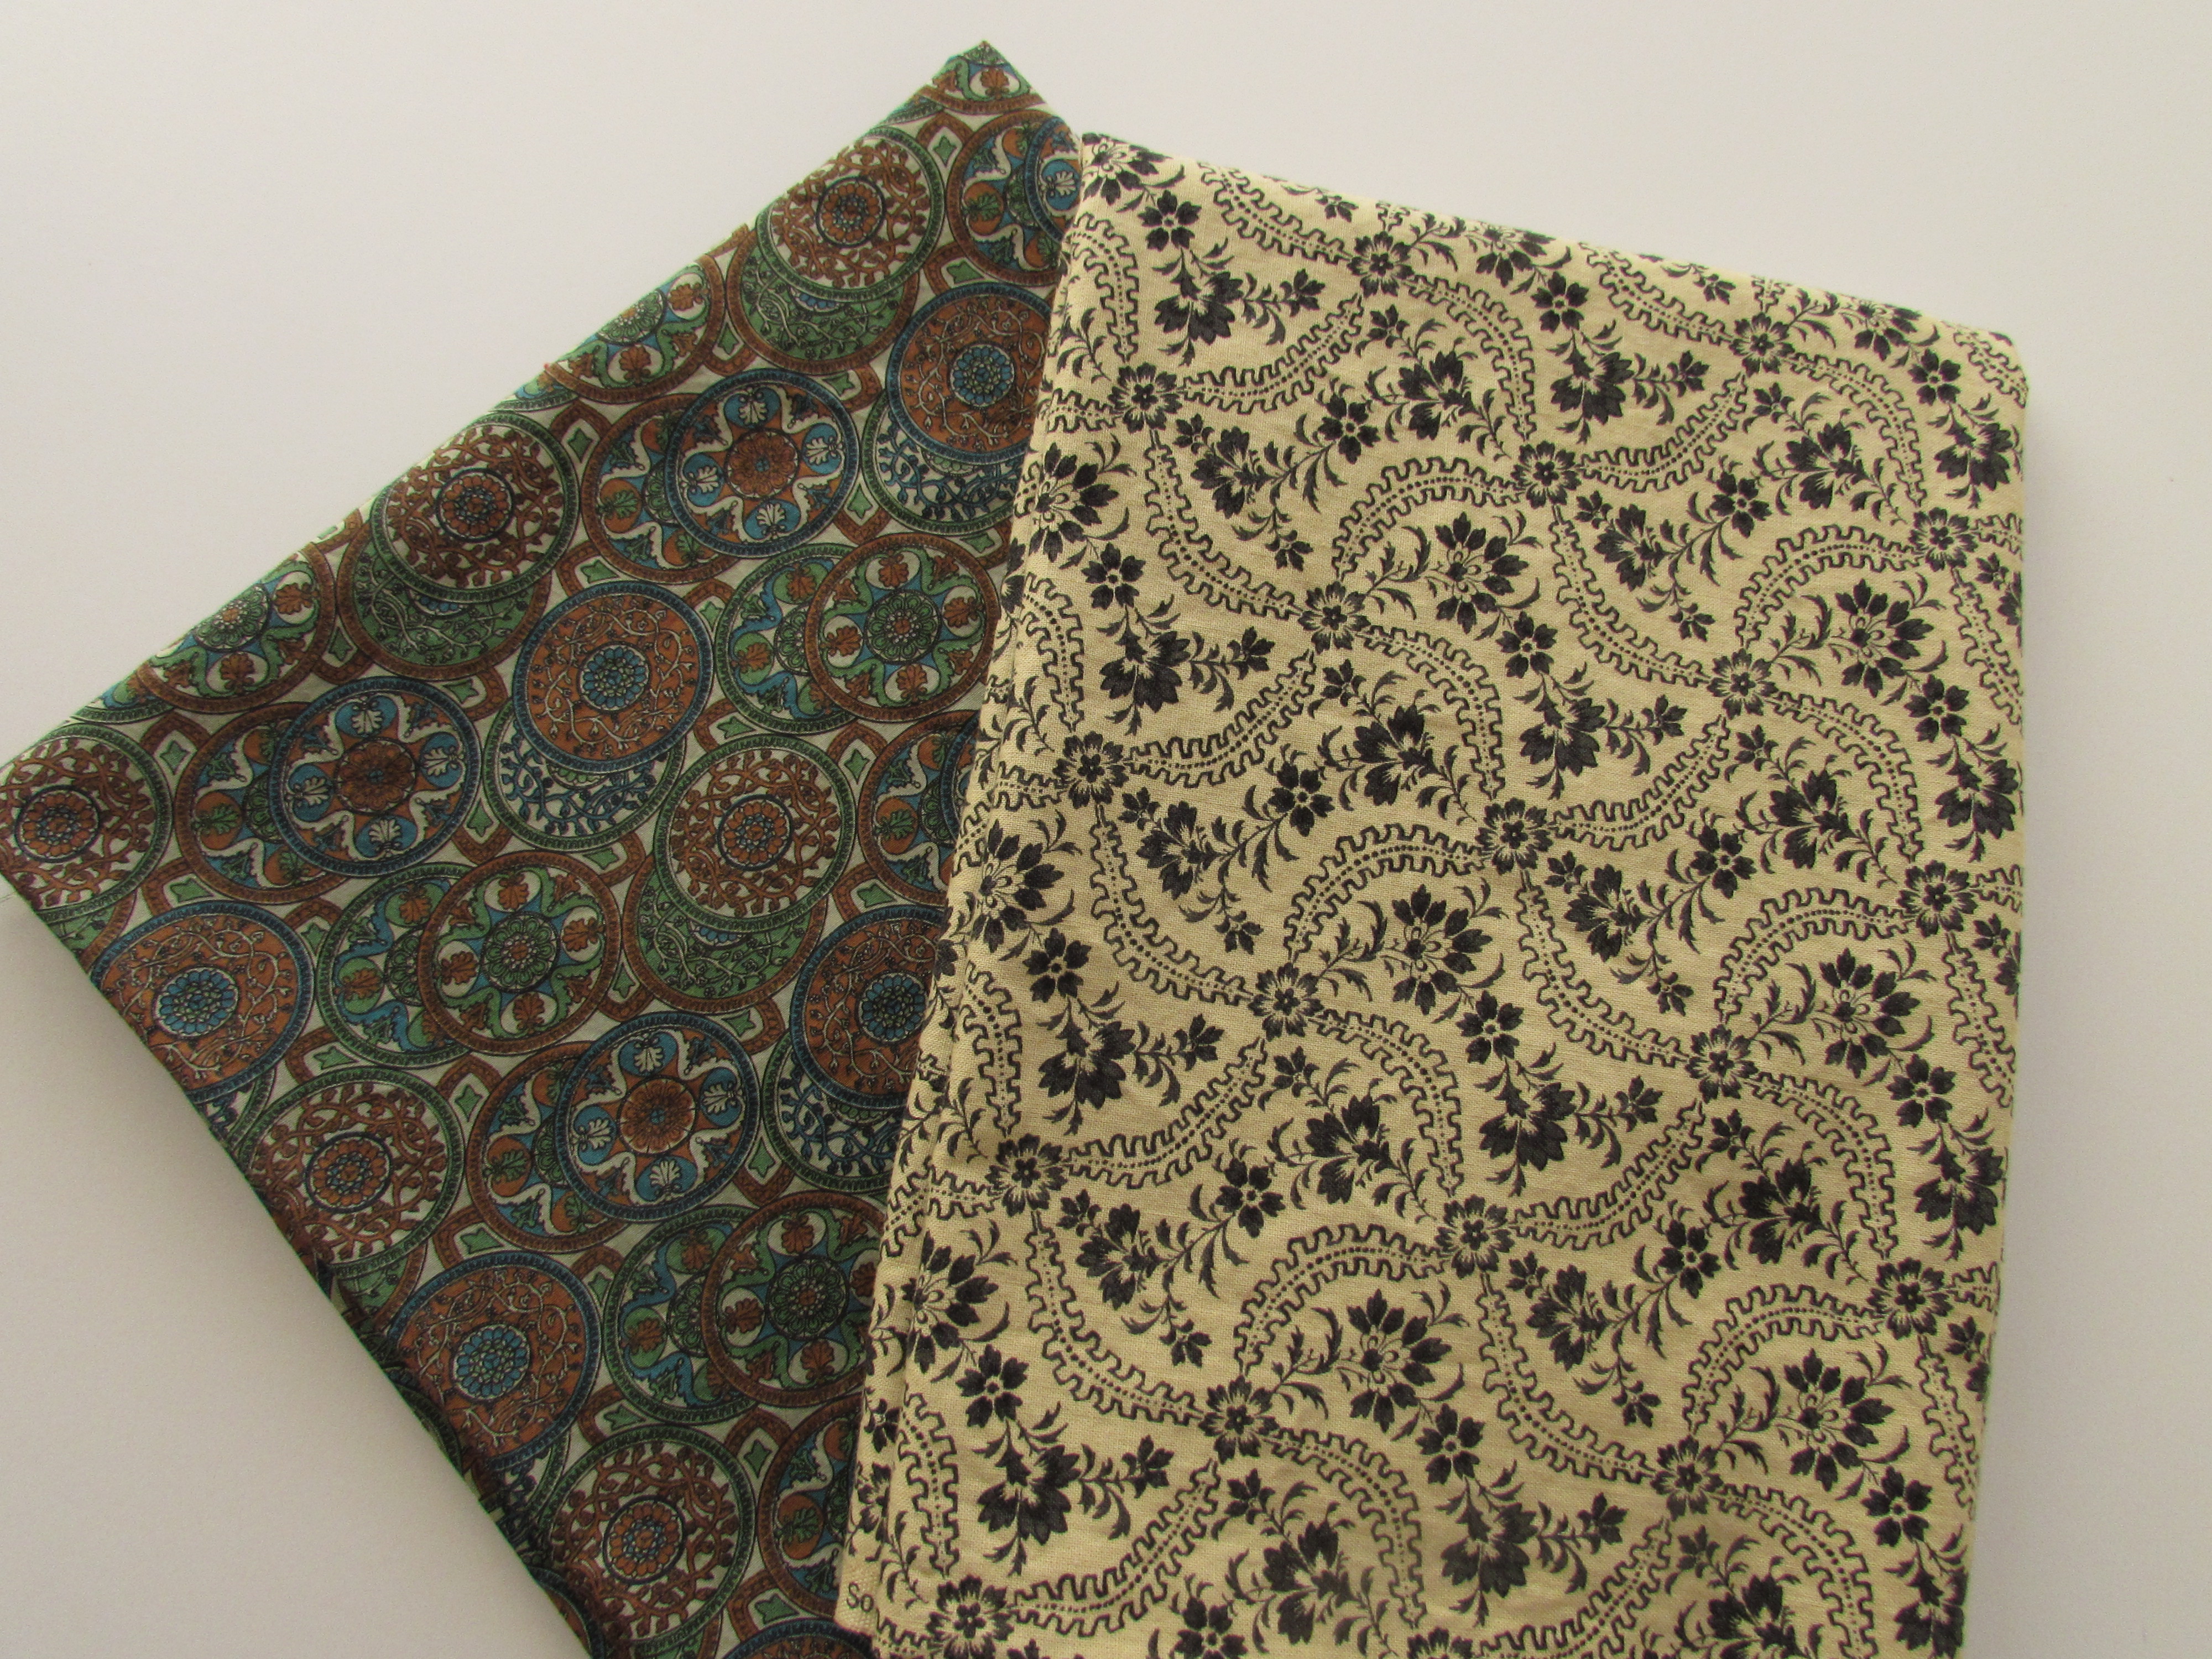
These two prints are just pretty. Especially the green and brown fabric on the left.
I found a book on the symbolism of quilts used during the Underground Railroad era. I picked that up as well and read most of it yesterday. I love learning about the meanings behind the blocks. There are a lot of patterns and instructions for making a sampler quilt with the blocks in the book and while I am not sure if that will happen, reading about the history is very interesting.
This week I need to set all of this aside to work on product for my Etsy shop. I did a bit of sewing yesterday but today I plan to devote the afternoon to it. Julia has a group of girls coming over this afternoon to work on a project and this is a great way to stay out of their way. Have a great week everyone! Linking to day with Main Crush Monday and Sunday Stash (albeit one day late!!) Links above under the Link Ups tab!

 Good morning everyone. First off, to all of you who linked posts up with my first ever linky party, thank you so much. I loved reading each one and seeing all of the cool projects, costumes, decorations, and tablescapes that you have done for the season of tricks and treats.