
I really enjoyed playing with relief quilting when I made my FABRIC mini quilt a couple of weeks ago. So much so that I decided to make another one! I took plenty of pictures while making it so I could post a tutorial. I hope you will give it a try. The effect is wonderful and it is such an easy process.
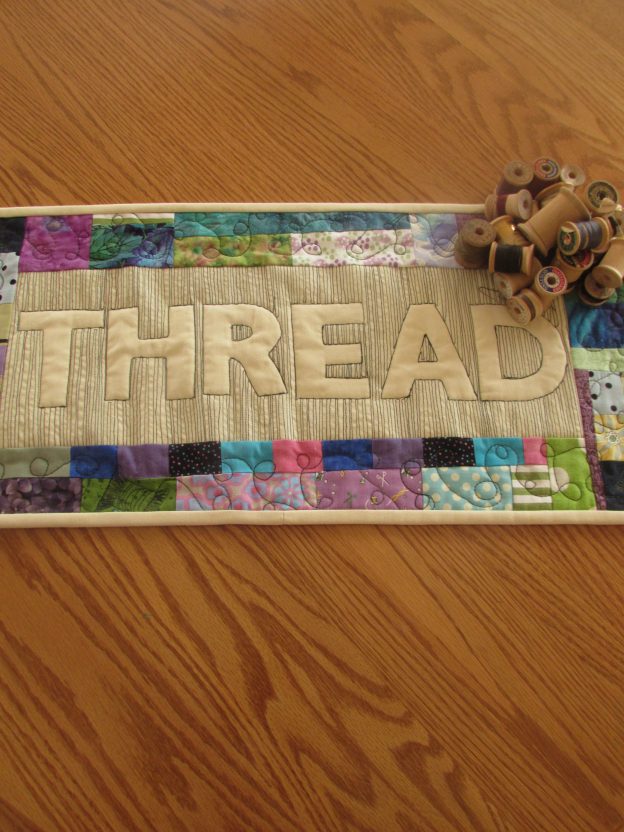
This time I wanted to try stitching the word on a piece of fabric with fusible stabilizer and then building the quilt from there. It worked out wonderfully. Since I already had one mini that said FABRIC, I decided to make another that said THREAD. This idea was inspired by a comment left on the first post by Diana, of A Red Delicious Life. She mentioned wanting to make one to hang above her thread. I decided to do the same. Now I have one to hang above the closet where I store fabric and another to hang above the thread collection hanging on the wall in my sewing room. Thanks Diana!!
Let’s get started.
I am going to provide the sizes that I used but this is so flexible. Increase or decrease as you like. My quilt finished at 11″ x 23″ so if you want a different size, adjust accordingly.
Materials List:
- Background Fabric: one rectangle measuring 7″ x 19″
- Heavyweight fusible interfacting: one rectangle measuring 7″ x 19″
- Scraps for your border
- Stencils for tracing the word THREAD. I used letters that were 3″ high.
- Frixion pen or similar fabric marking pen
- Binding fabric: Two strips that are 2 1/2″ by 42″ (Width of fabric)
- Quilting thread. I used YLI thread in a variegated green and loved it!
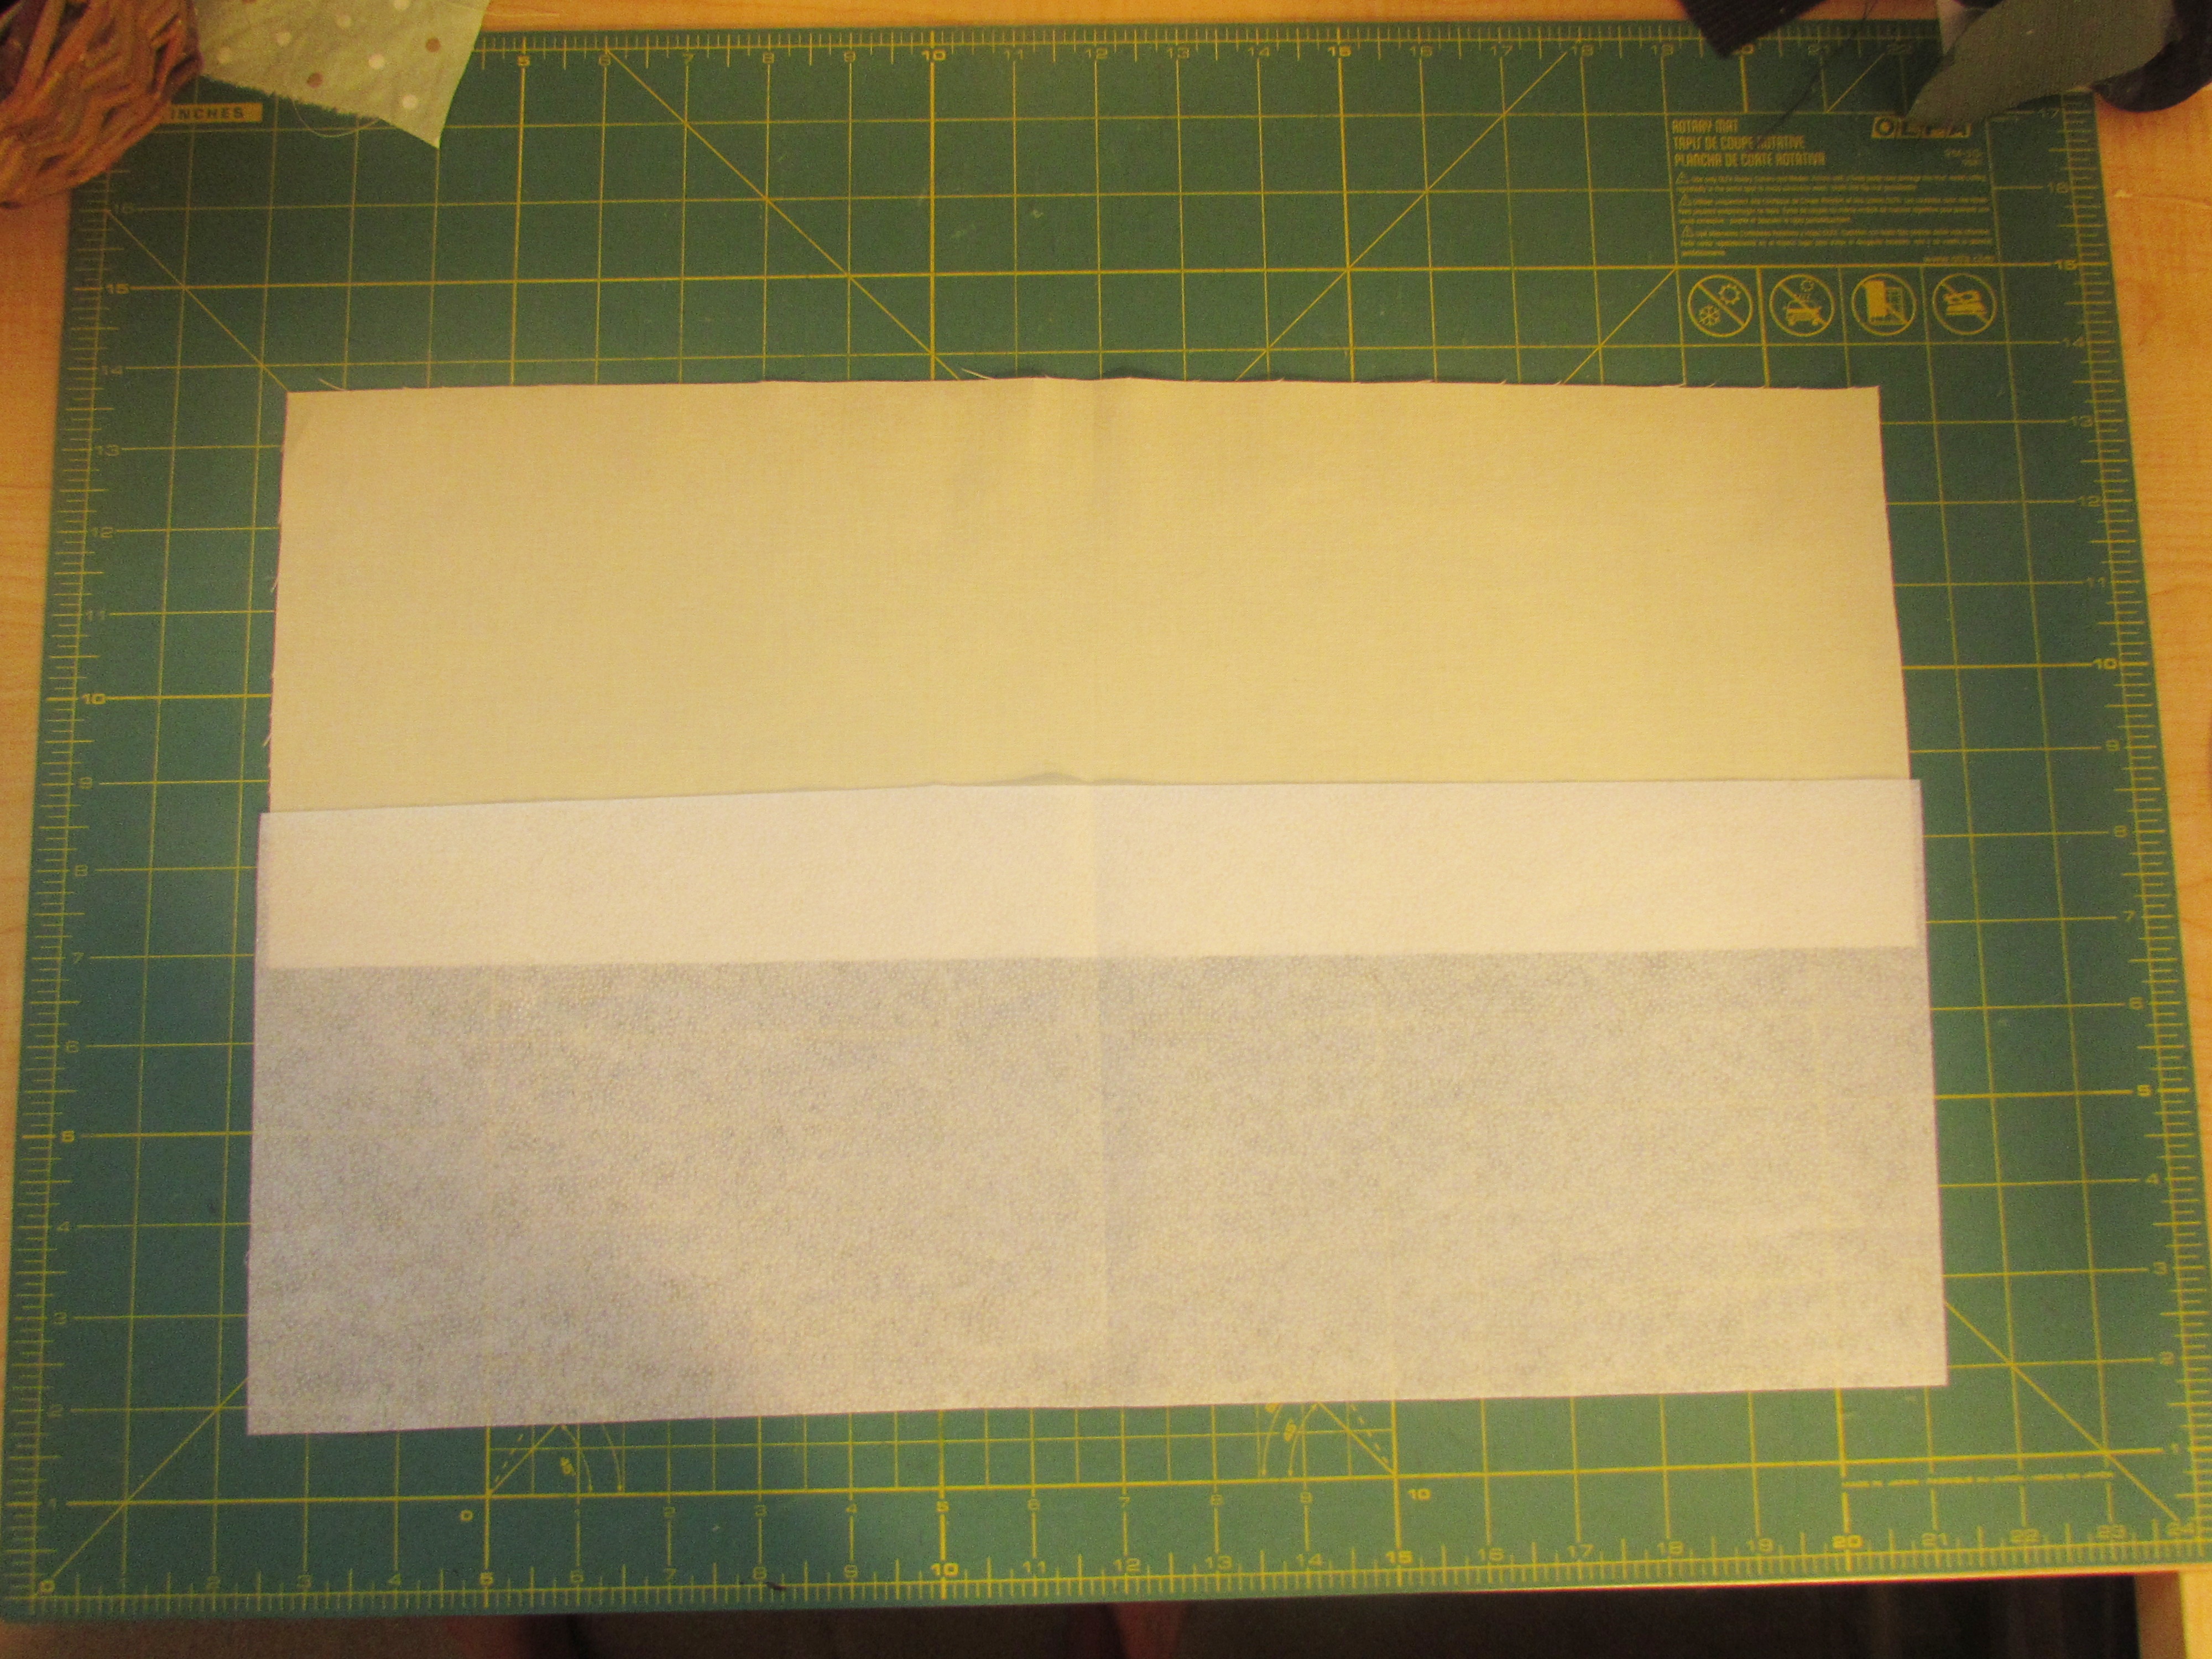 Take your background fabric and fuse the stabilizer to the wrong side of the fabric. Follow manufacturer’s instructions if you are not familiar with this process.
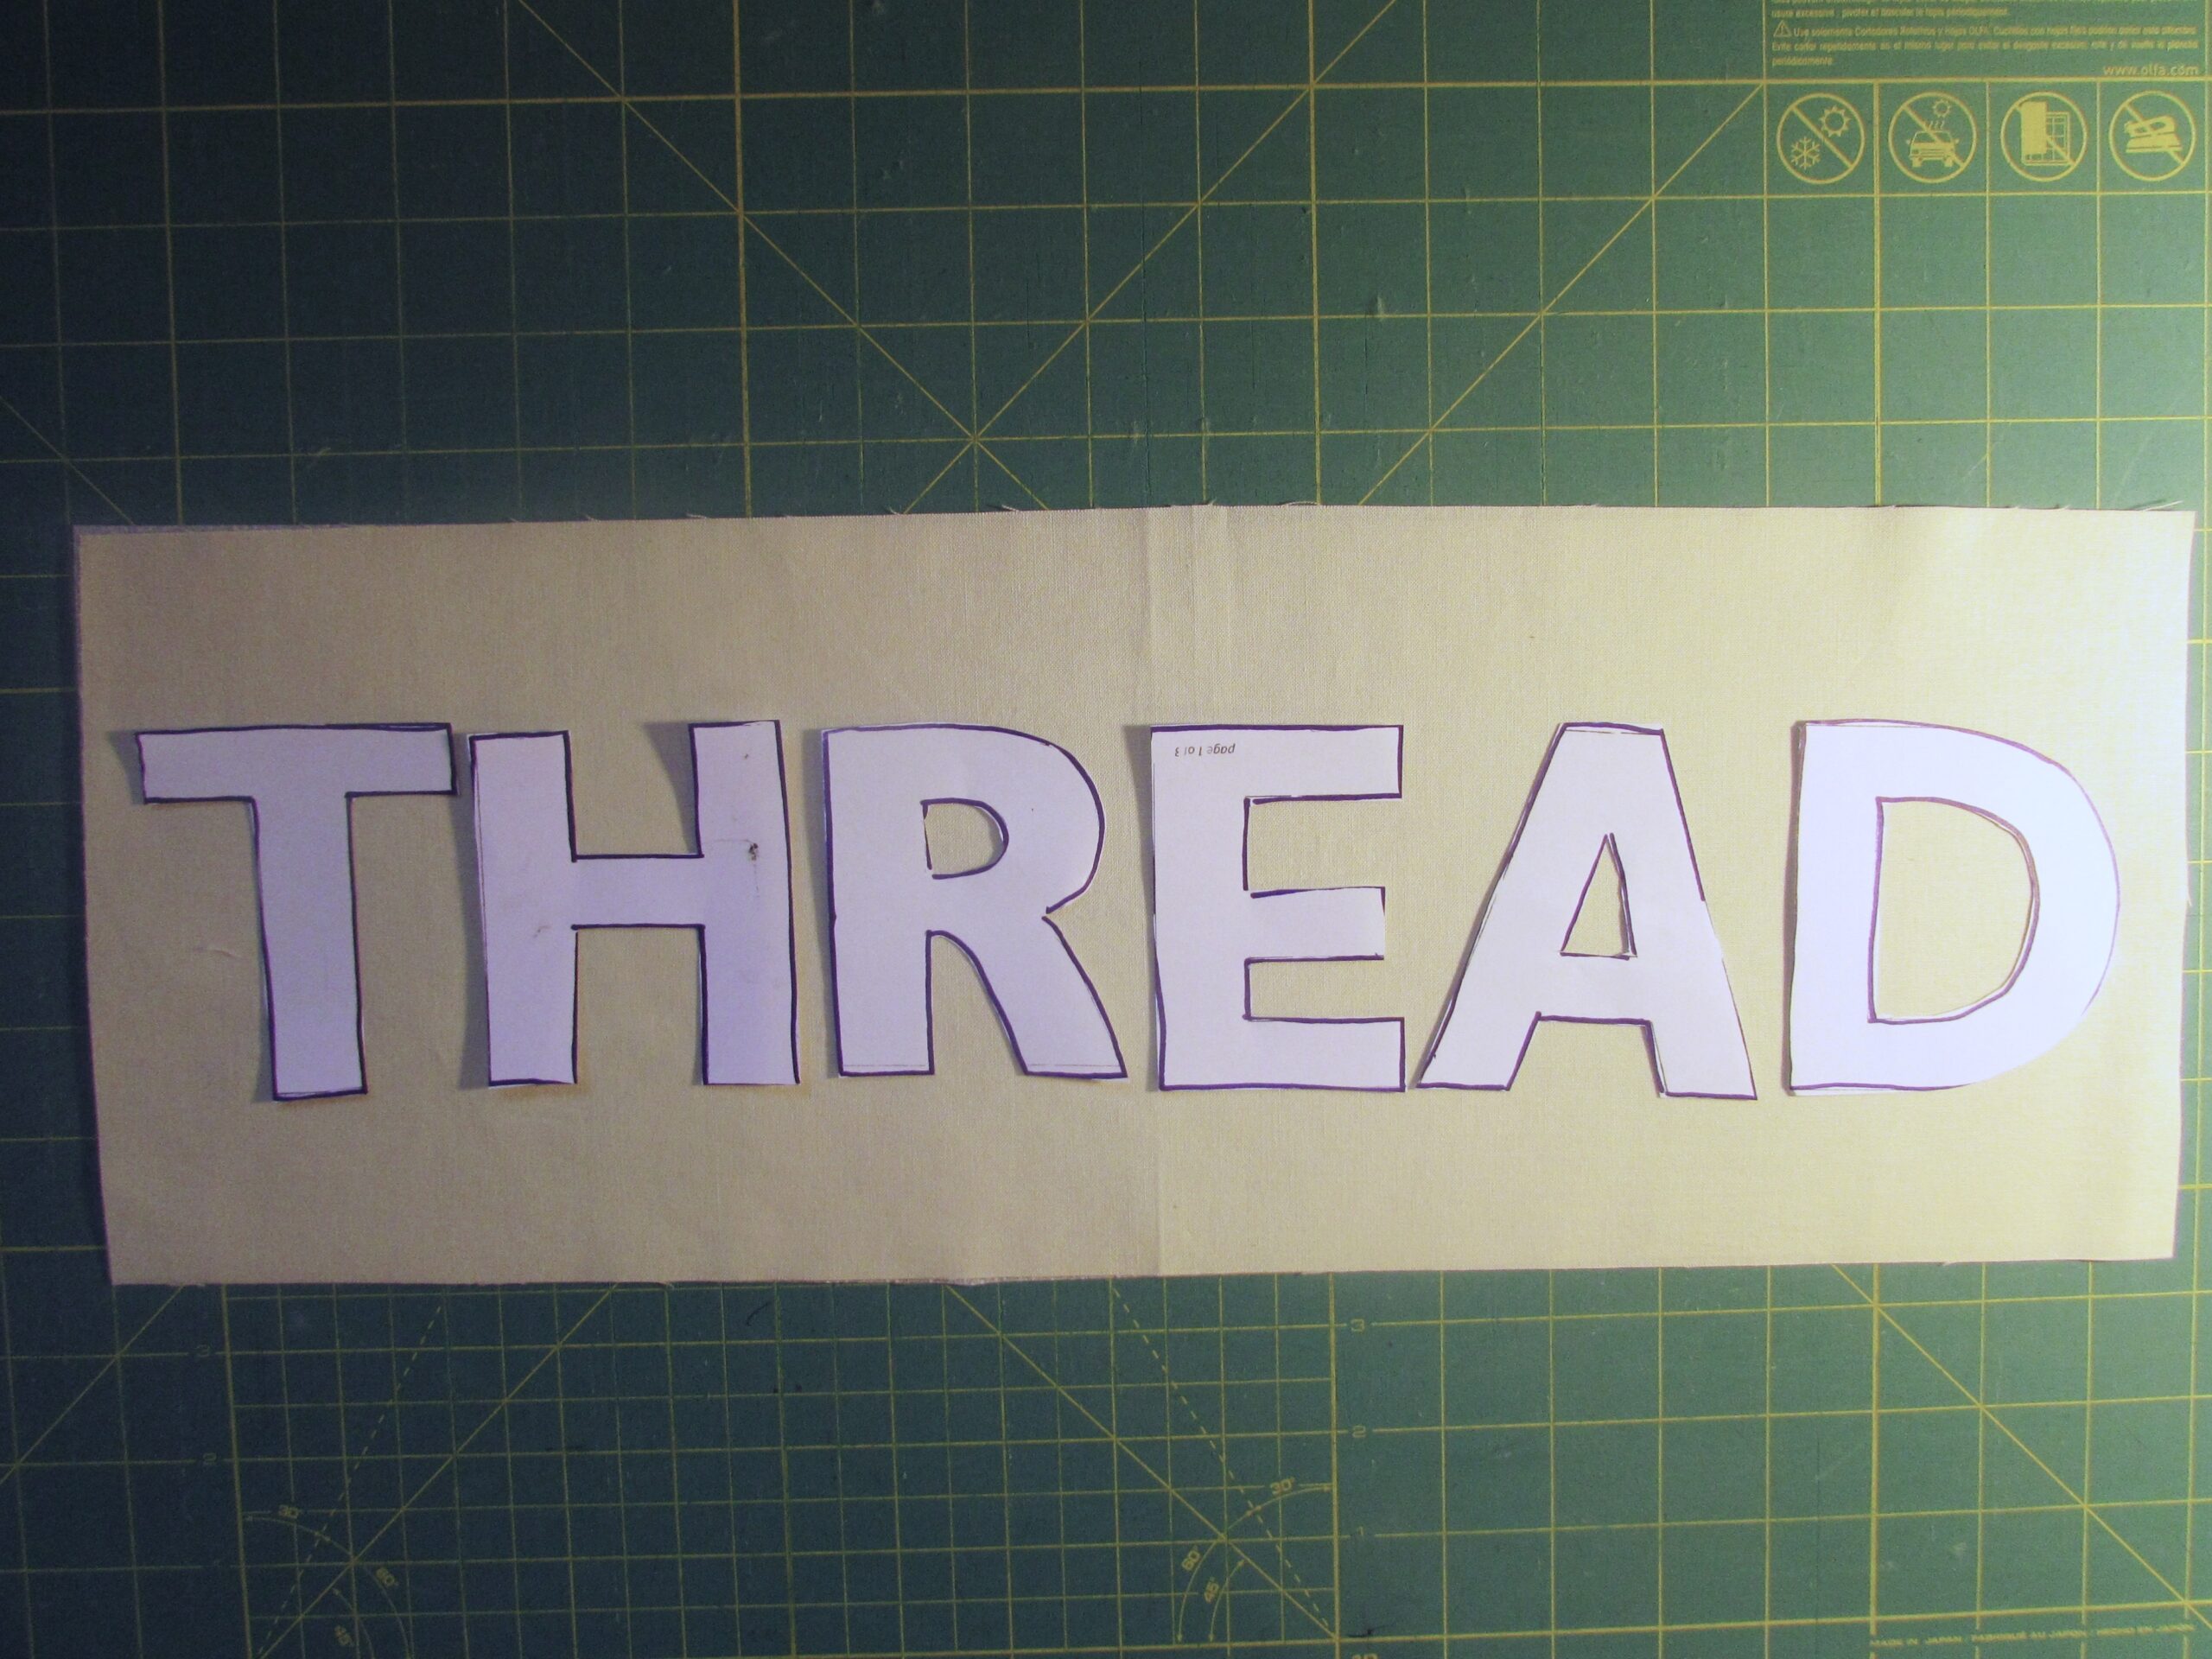
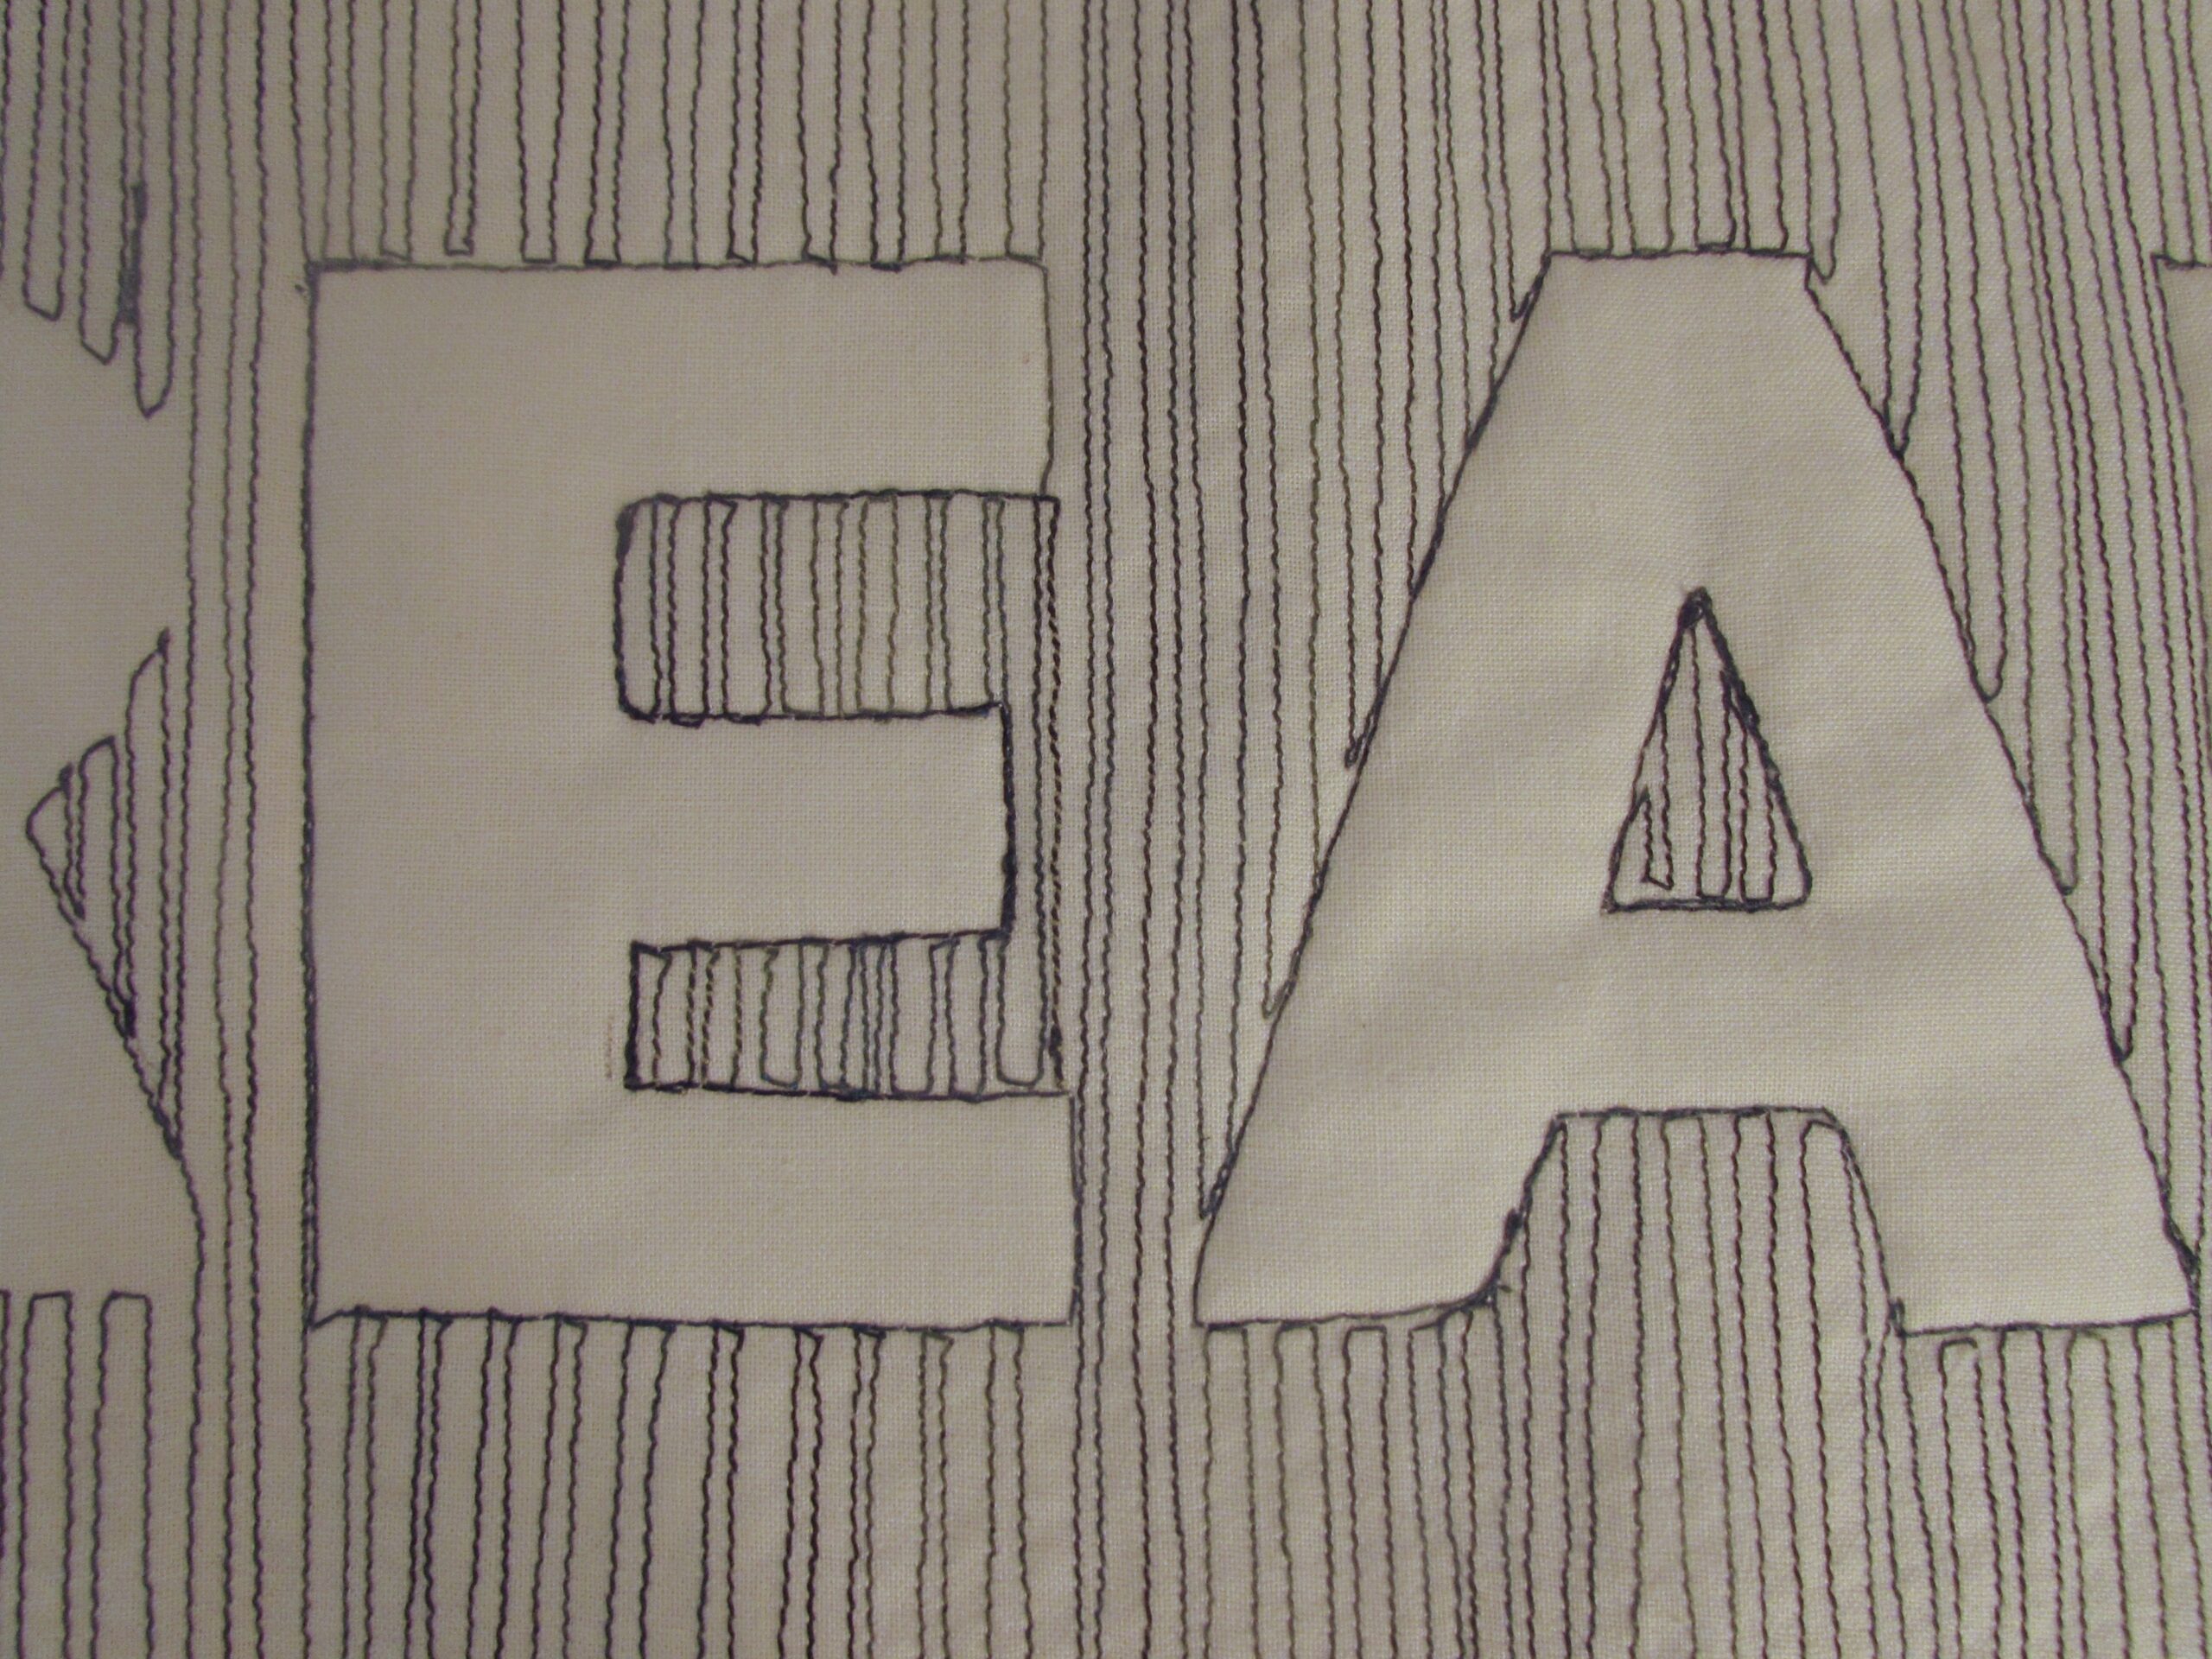
Trace the word on the fabric with the fabric safe marking pen of your choice. I didn’t leave very much room between the letters because I liked the way this looked. You could certainly adjust this to your taste. Also, I didn’t leave a ton of room on either side. Again, adjust as needed by cutting your background wider if you like.

Using a walking foot, begin stitching long straight rows above, below and between the letters. I didn’t stitch the outline of the letters. This happens later on when you are quilting everything together. For now, just fill in every bit of space above, below and between each letter. You might choose to use a free motion foot for the little openings within a letter (e.g. the A and the D) so you don’t have to start and stop, twisting the fabric. I kept working with the walking foot because the block is small and easily rotates. Each time I came to the botton or top and needed to move to the next line, I very slowly stitched one stitch over, sometimes doing so by manually turning the wheel on the machine so I moved just one stitch. This kept my rows extremely close together. If you have a needle down function, this helps. Just go one stitch and let the needle stay down while you turn the piece. Now and then, the width looked to wide to me and I would back up and fill in with another line of stitching. Remember you will be viewing this from a distance and it looks much better that way. While stitching, you are looking at it from 6-8″ away and you’ll see every wobble. Not a problem. You are going for the overall effect.
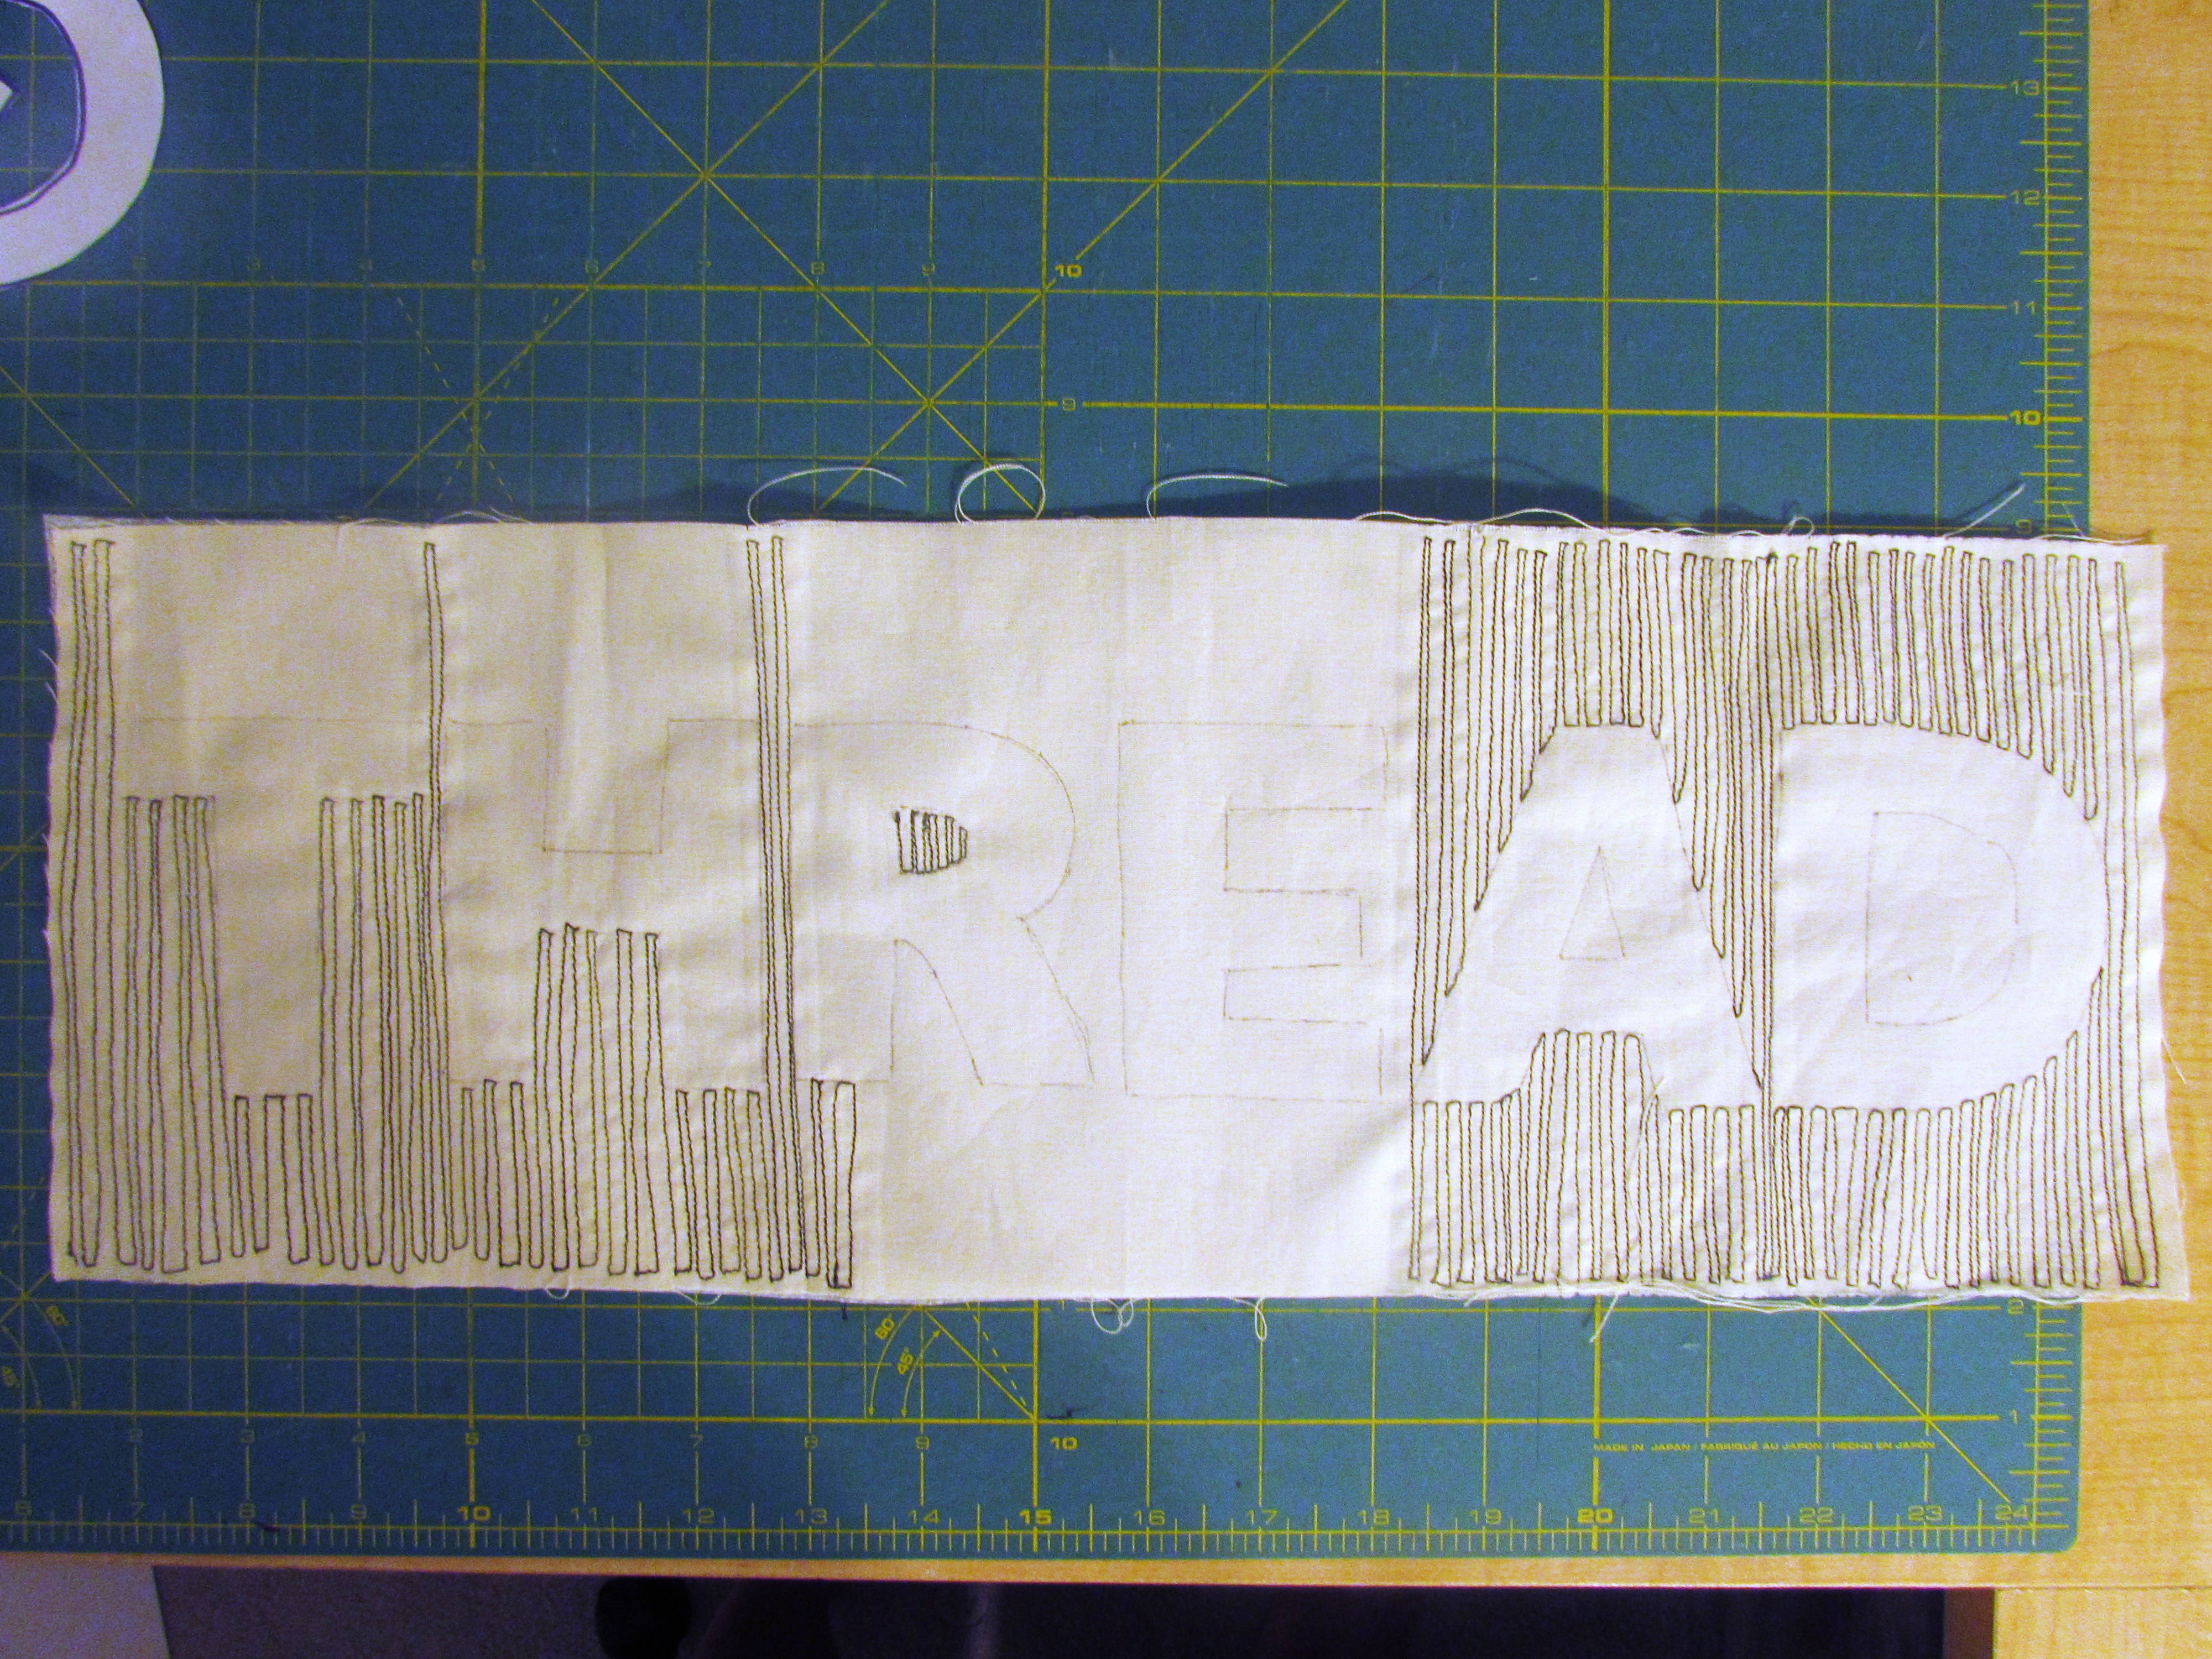
See how the word starts to come to life? I love that! Now keep on stitching!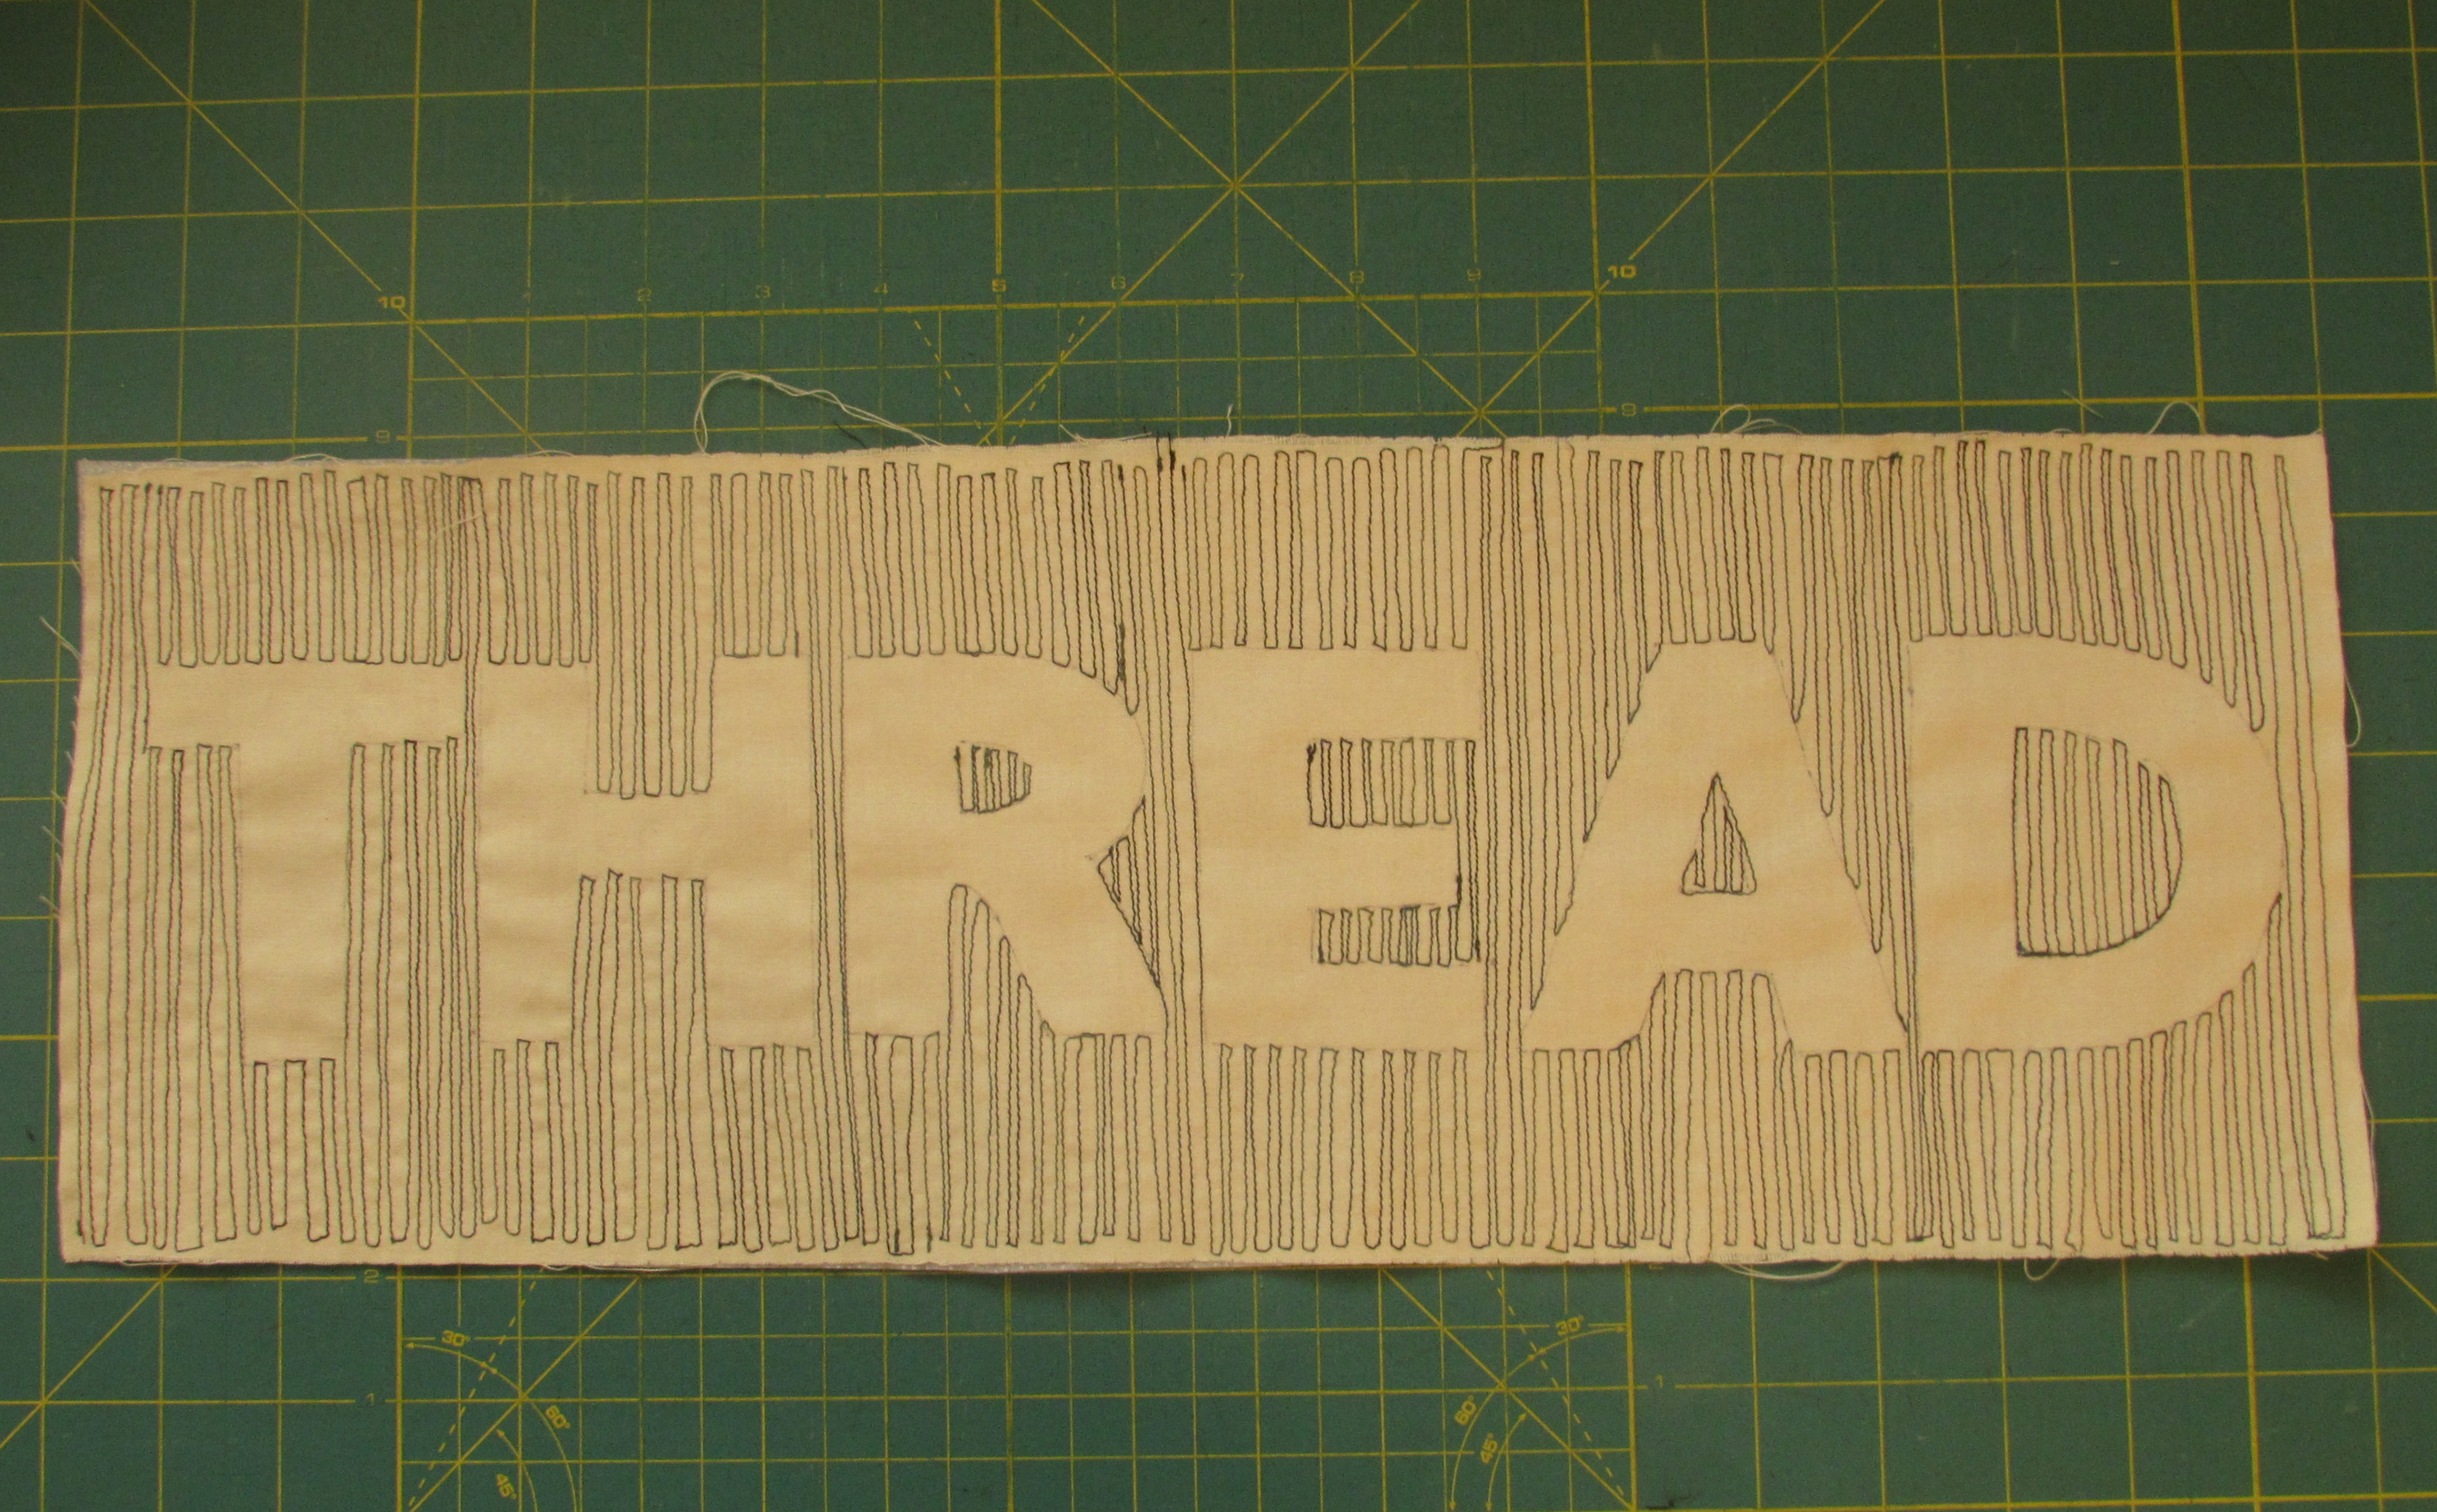
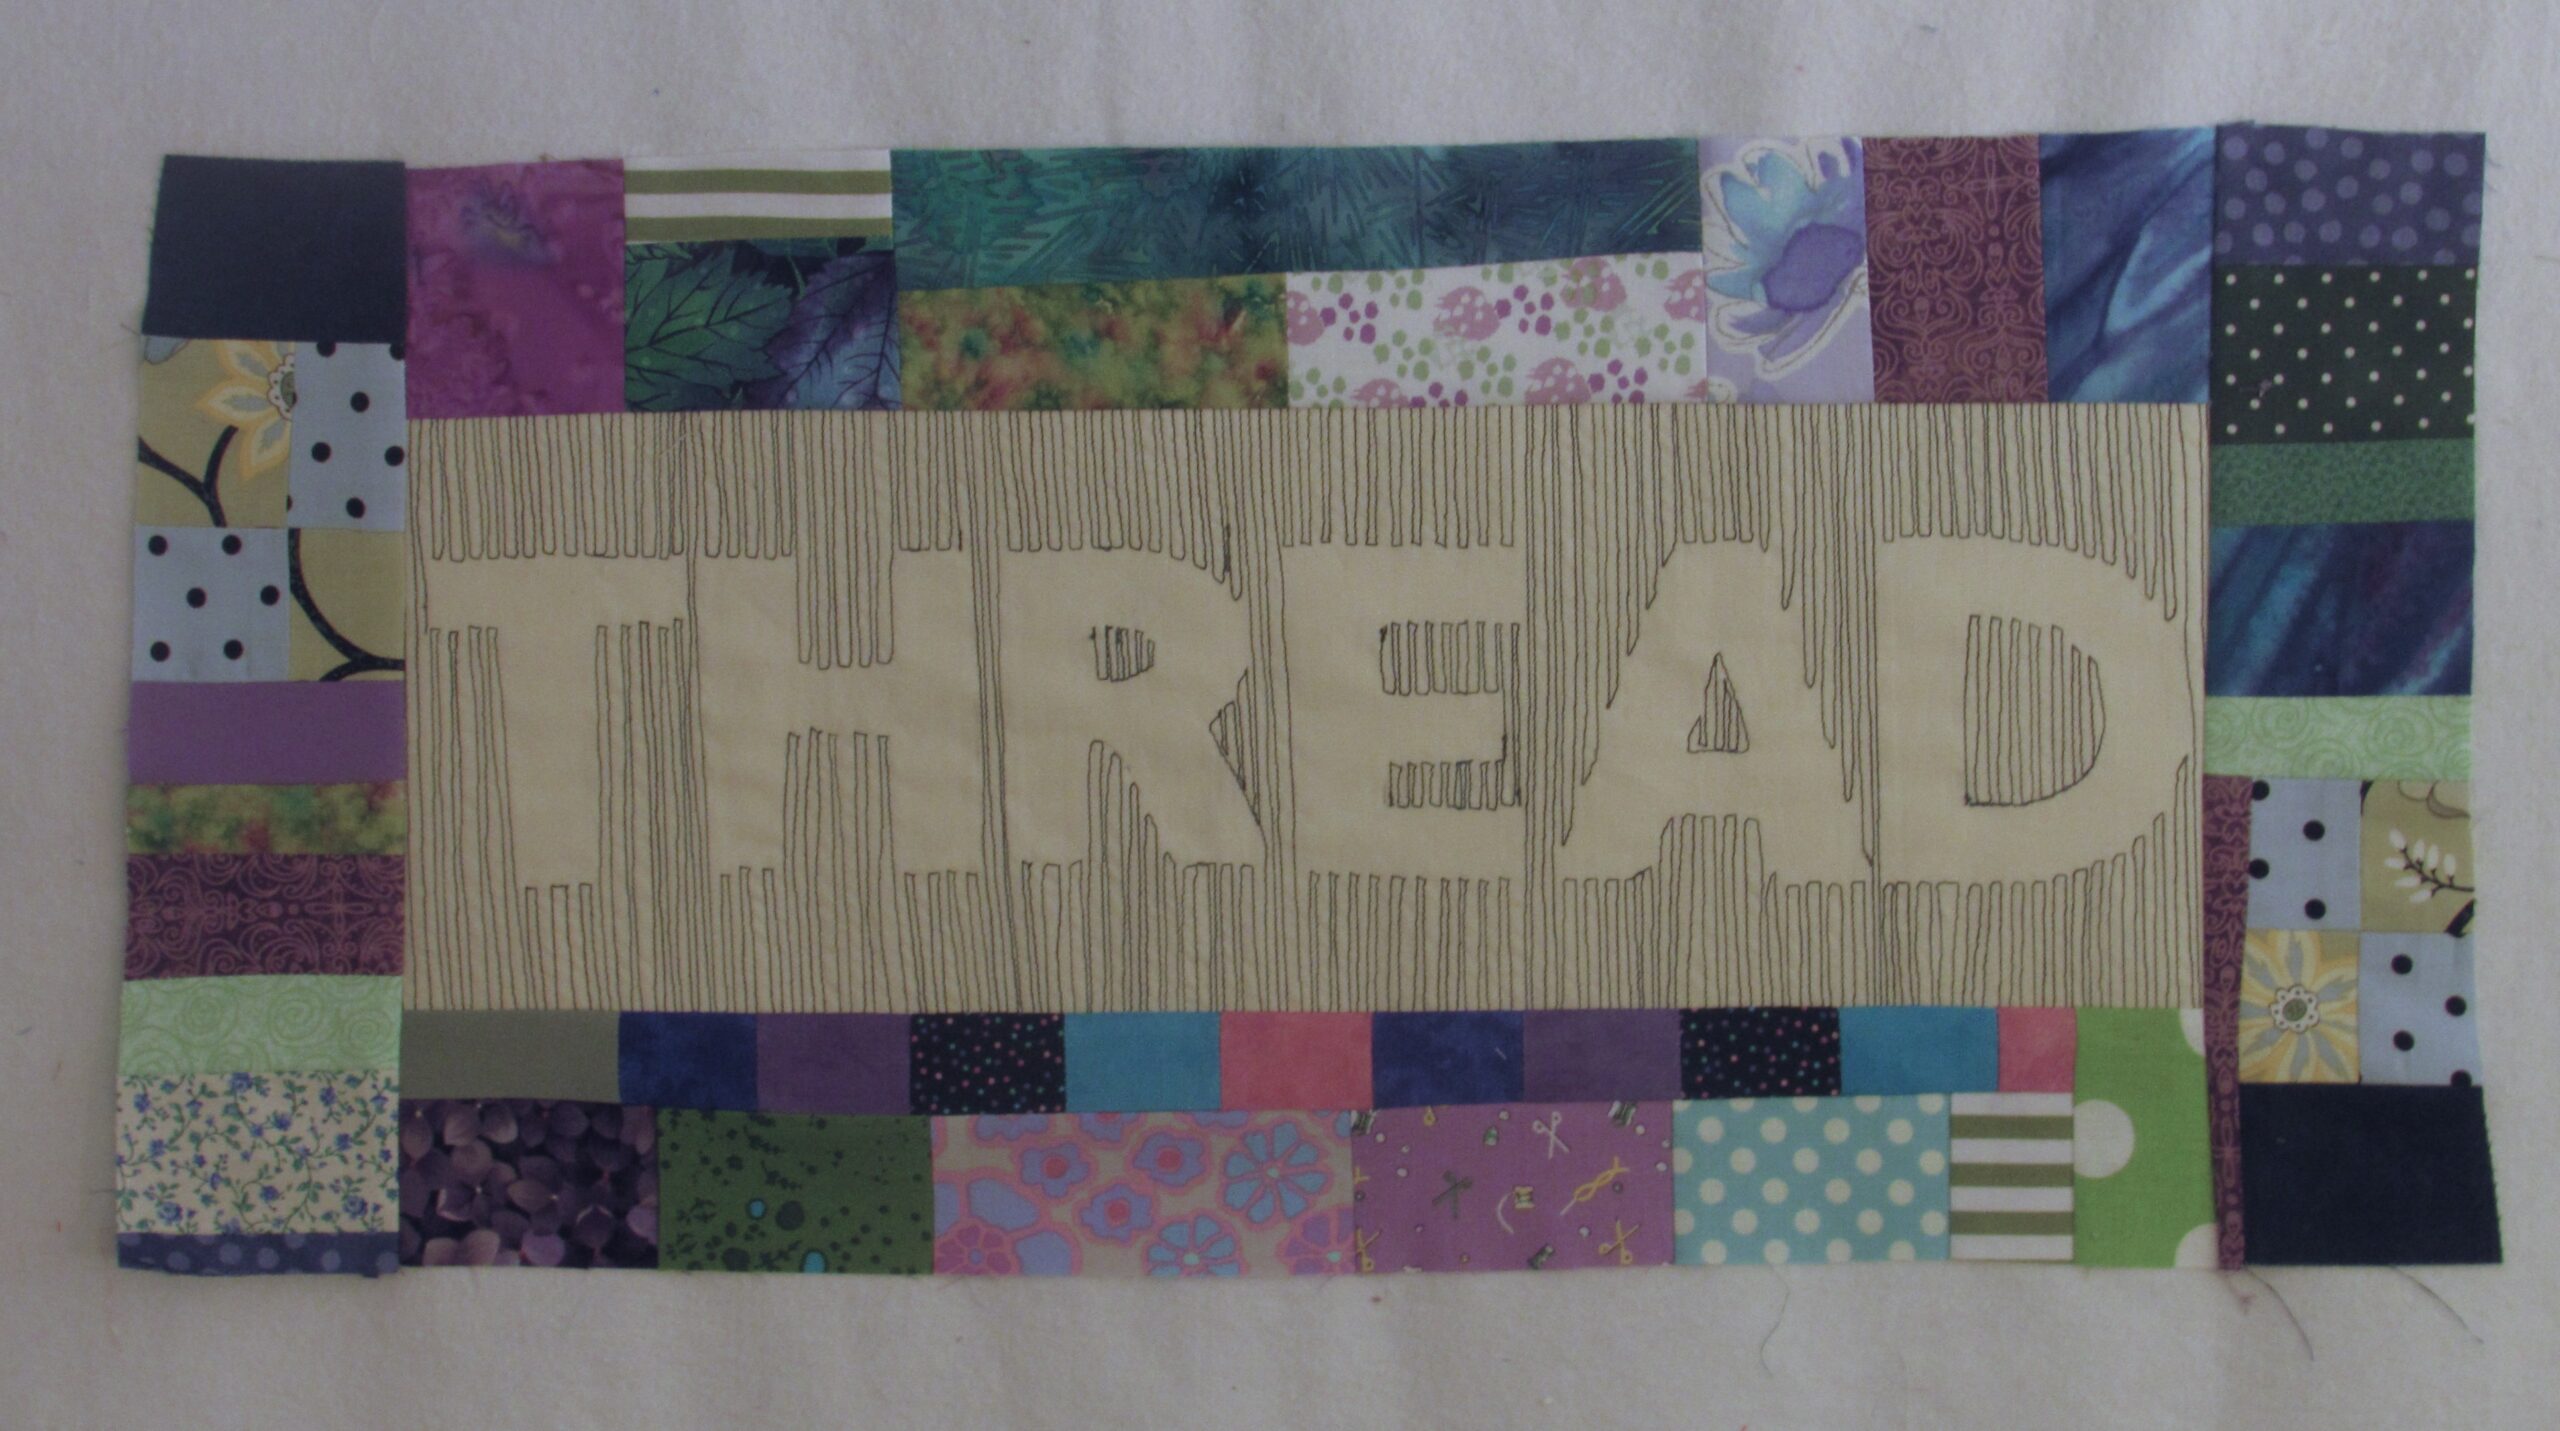
Making good progress here. The word is complete and it is time to begin working on your border.
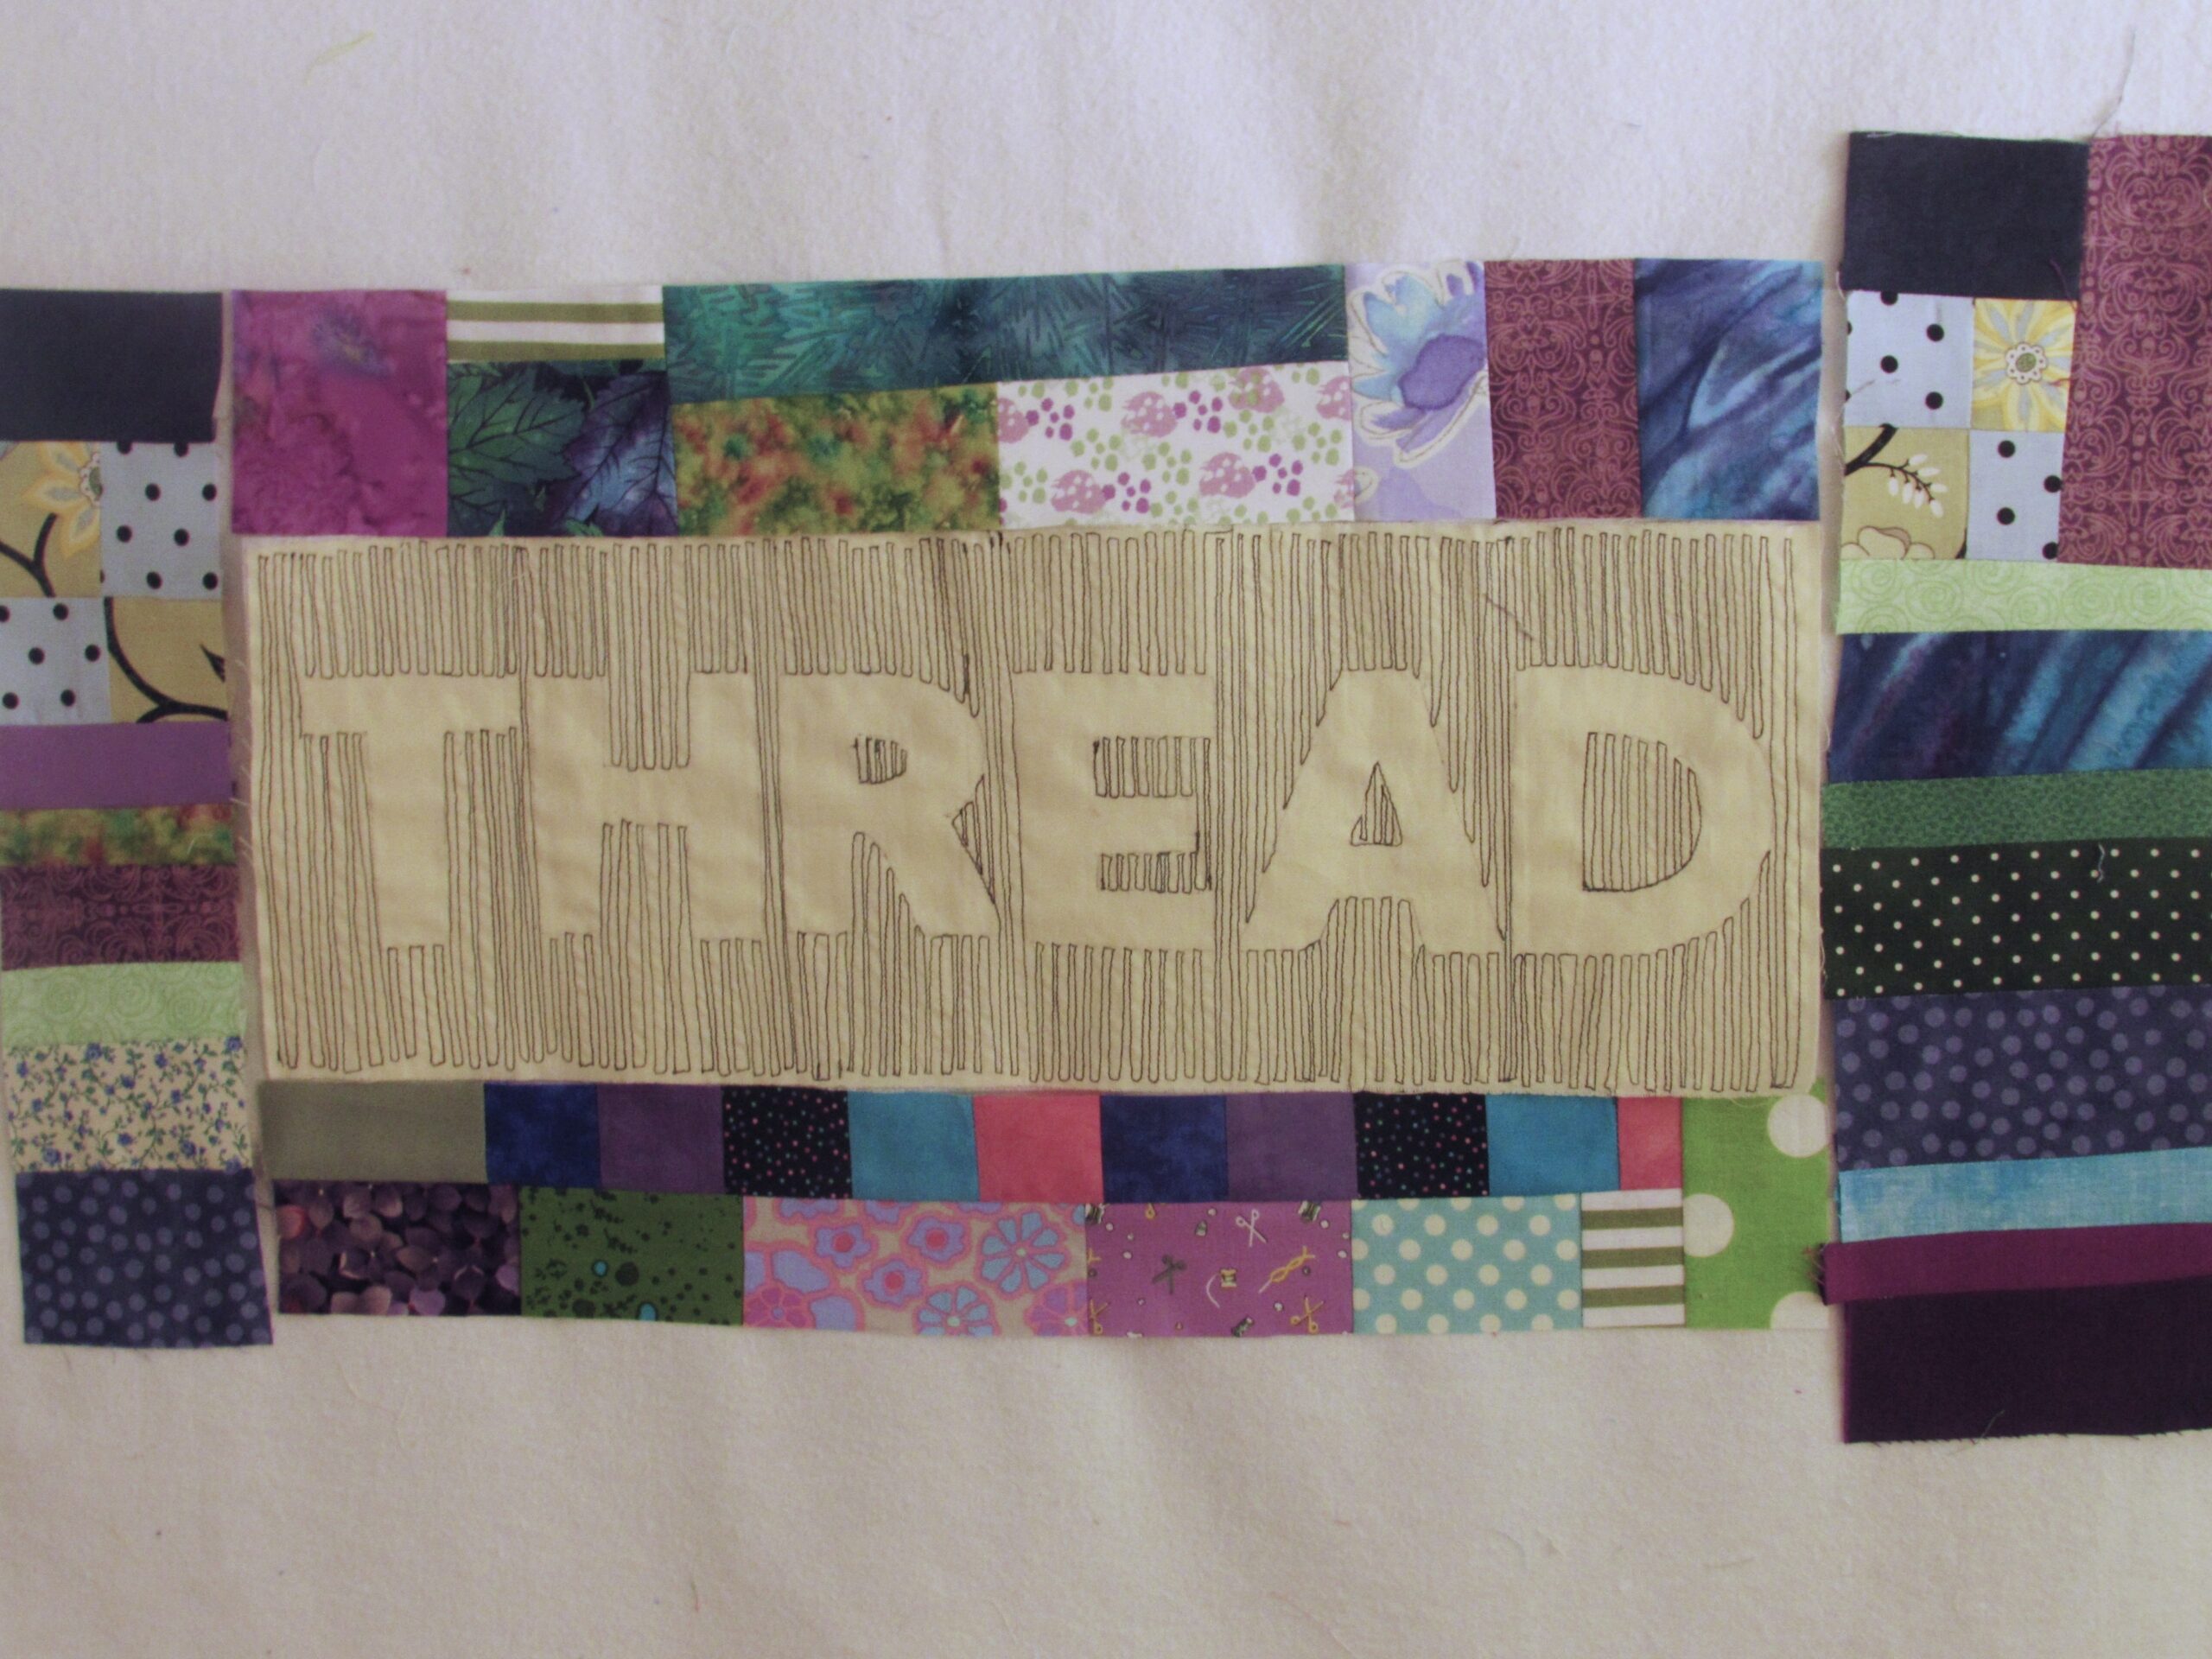
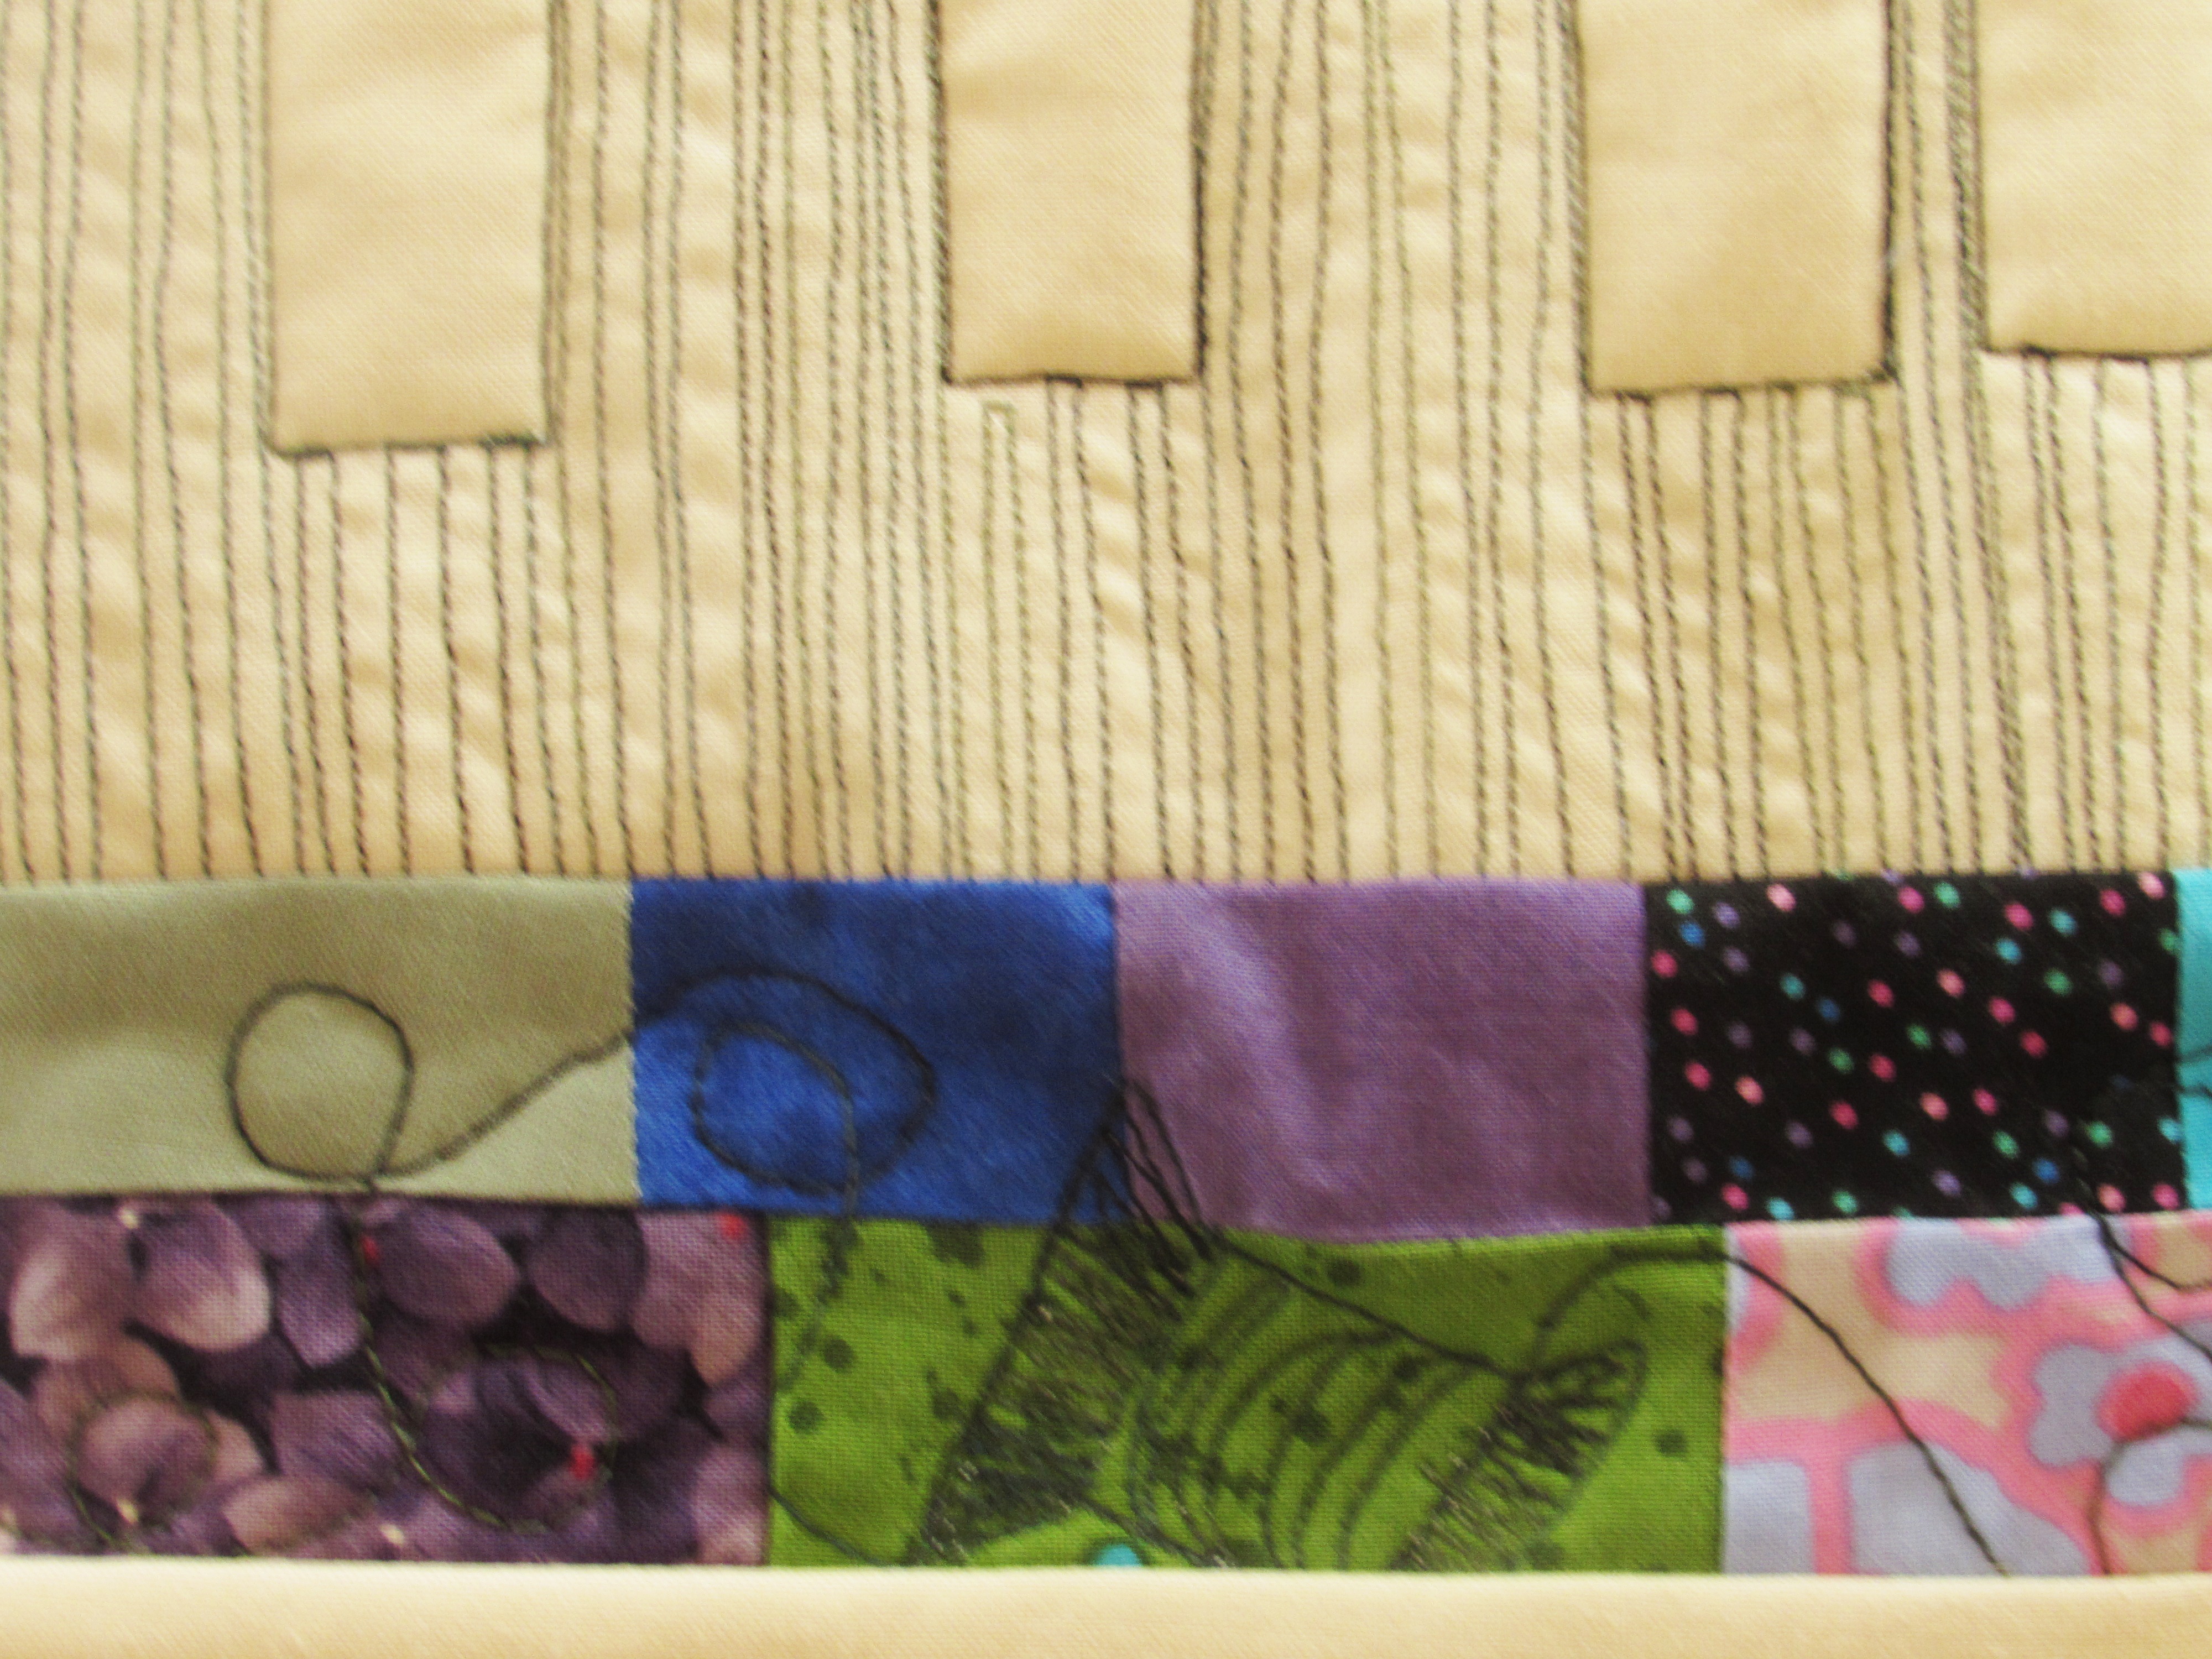
I made an improv border by taking squares and rectangles in my color scheme (basically greens, purples and blues) and built four pieces, two for the ends and two for the top and bottom. I didn’t worry about size too much. I made them a bit longer than the side I wanted to sew them to and since I wanted to have them trim out to 3 inches, I made sure the whole thing measured wider than 3 inches. Note: If you are not comfortable with this scrappy improv process, I recommend grabbing a copy of 15 Minutes of Play by Victoria Findlay Wolfe at your library. She does an excellent job of guiding you through. Alternatively, Amanda Jean Nyberg at Crazy Mom Quilts did a Quiltalong last summer called Scrap Vortex. In this post, she talks about building with scraps. It might be of help to you.
After playing with them on the design wall, I trimmed each to a width of 3″. I sewed the top and bottom borders on first and then added each side.
 The next step is to make a quilt sandwich with your top, the batting and your backing fabric. I pieced the batting from scraps I had. Just pin it around the border tightly since you are going to quilt in the center first. My batting was just barely bigger than the top but since it was such a small piece I felt ok with that. Normally I use batting that is a good two inches larger than the top all the way around.
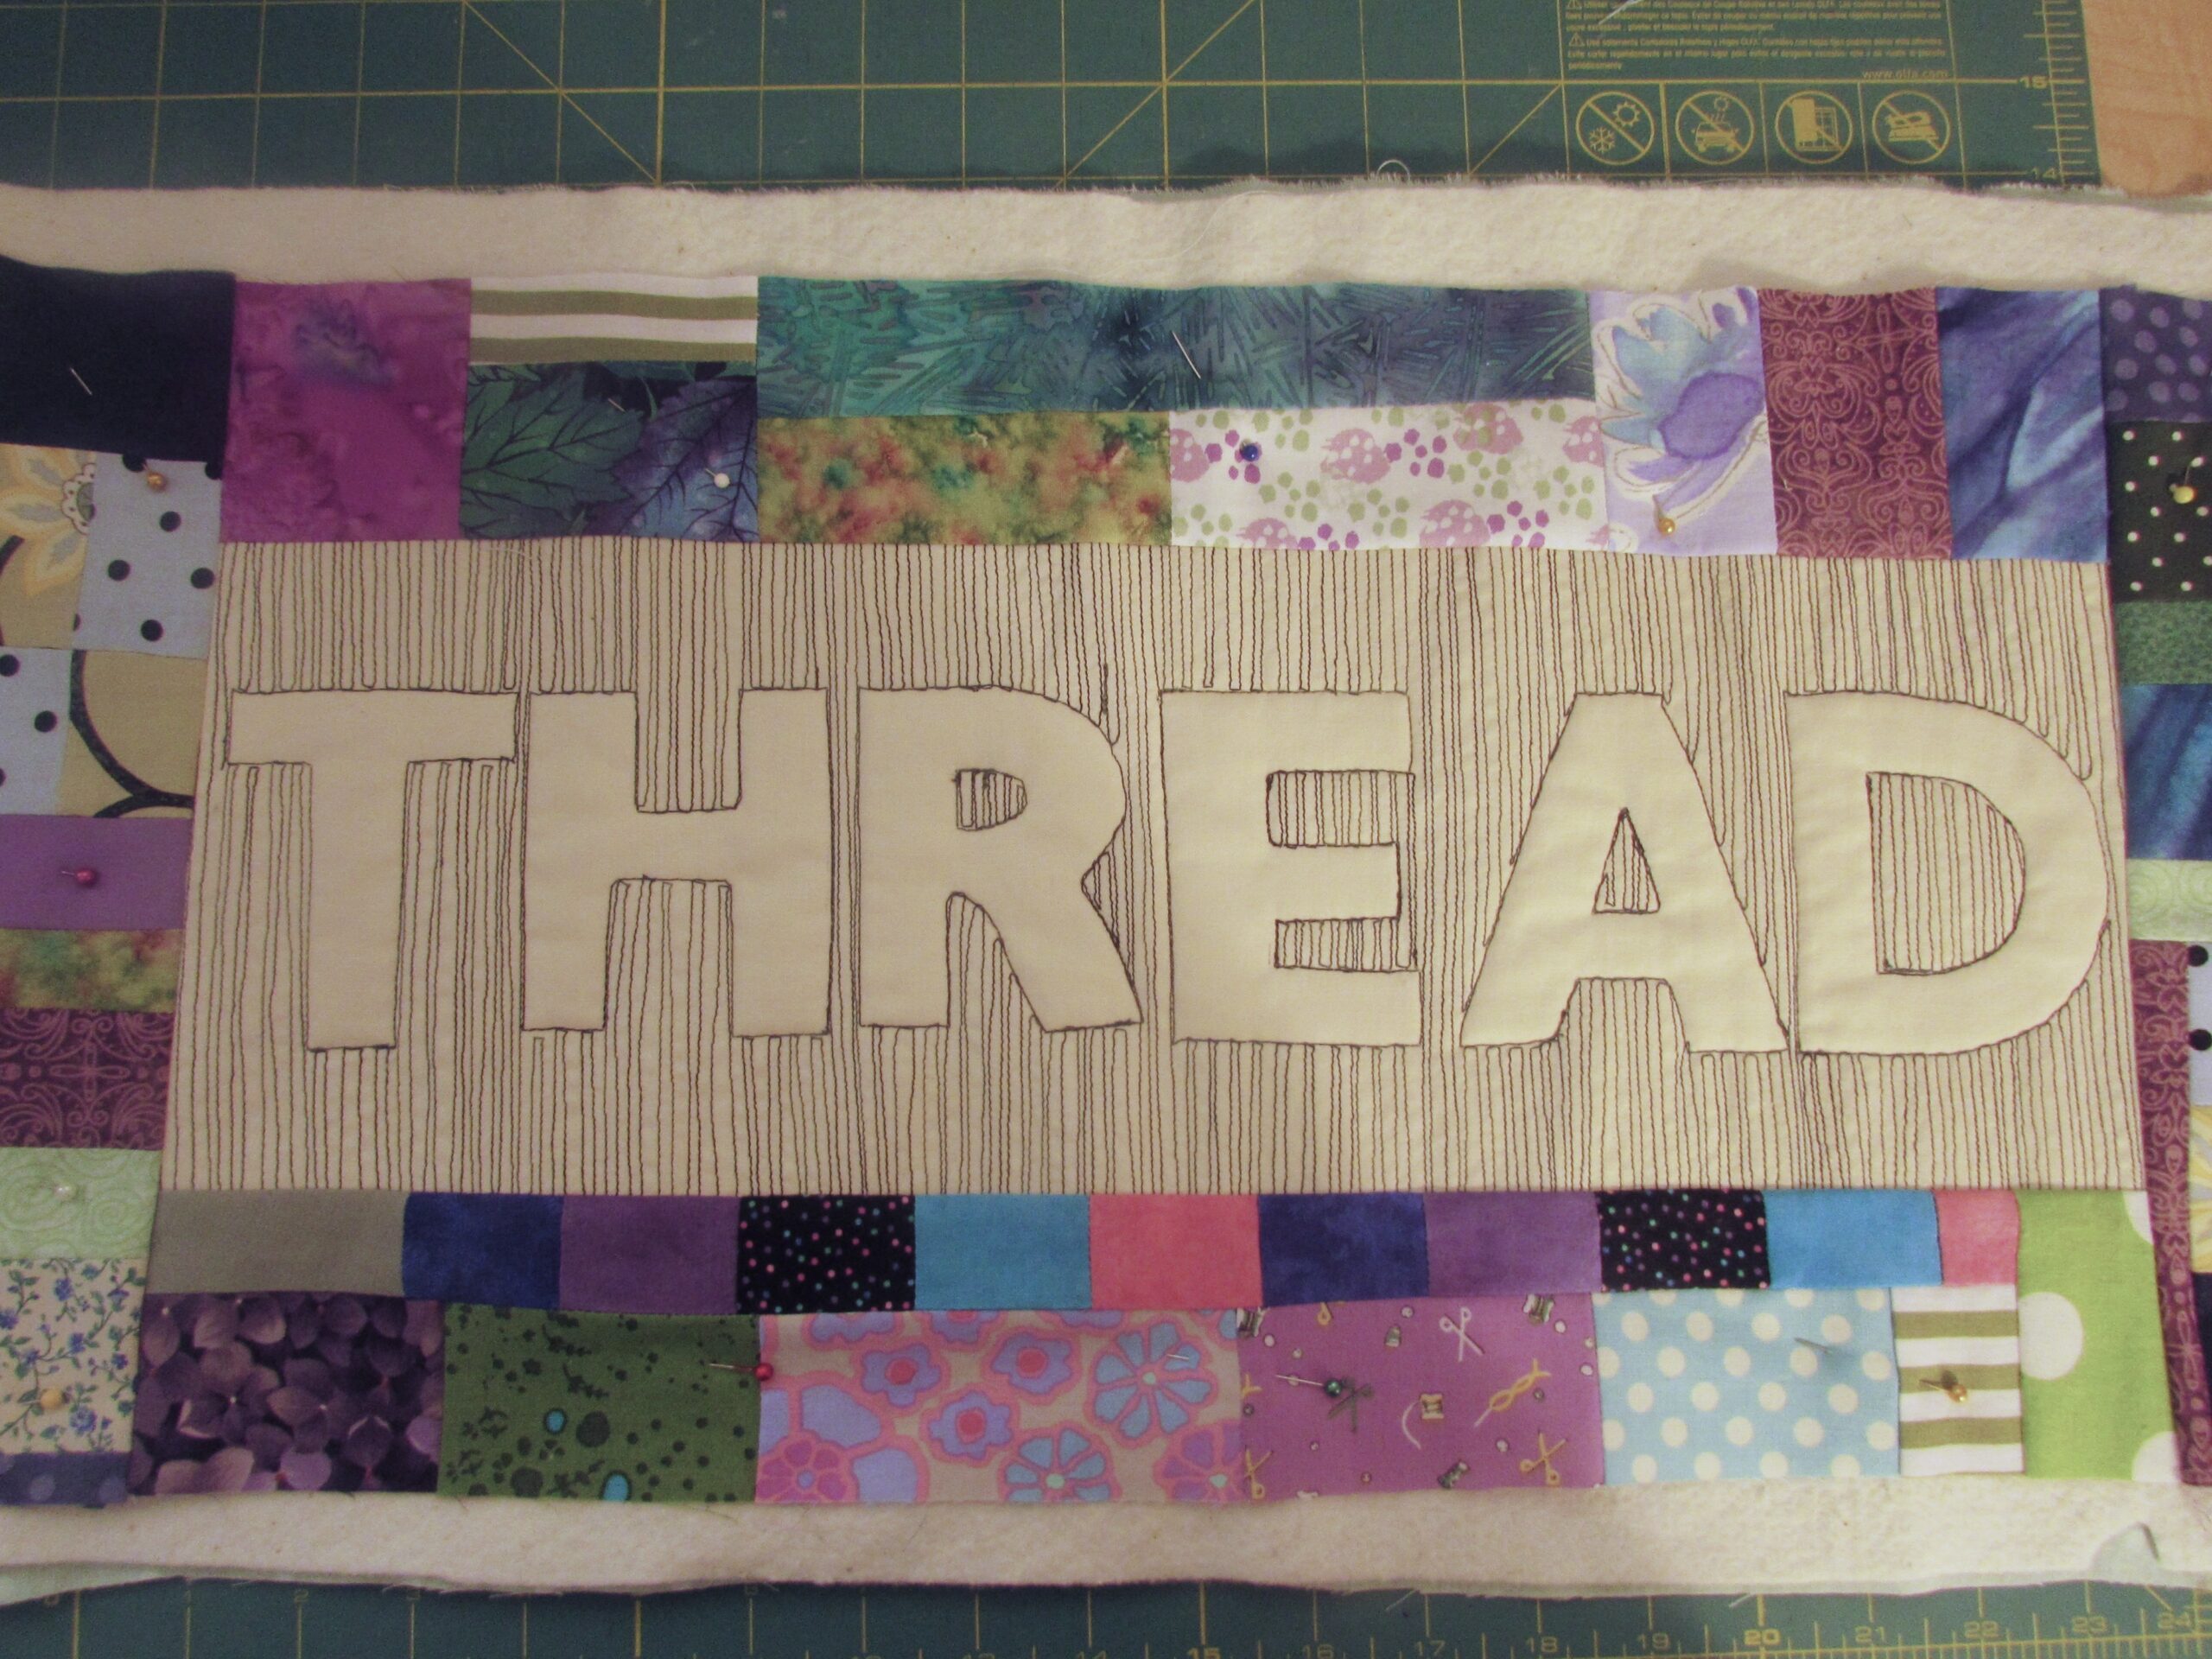
Continue to use your walking foot and slowly stitch around each letter. It is a bit like connecting the dots as you want to trace over the place where you stitched over to the next line. Just move slowly and turn frequently (with your needle down while turning) when stitching over a curve.
I love the way the letters come to life when quilted to the batting. Next I moved on to the border. I love the little spools of thread that I quilted on the first piece and carried them through to this piece as well. Considering the thread theme of this project, it worked well.
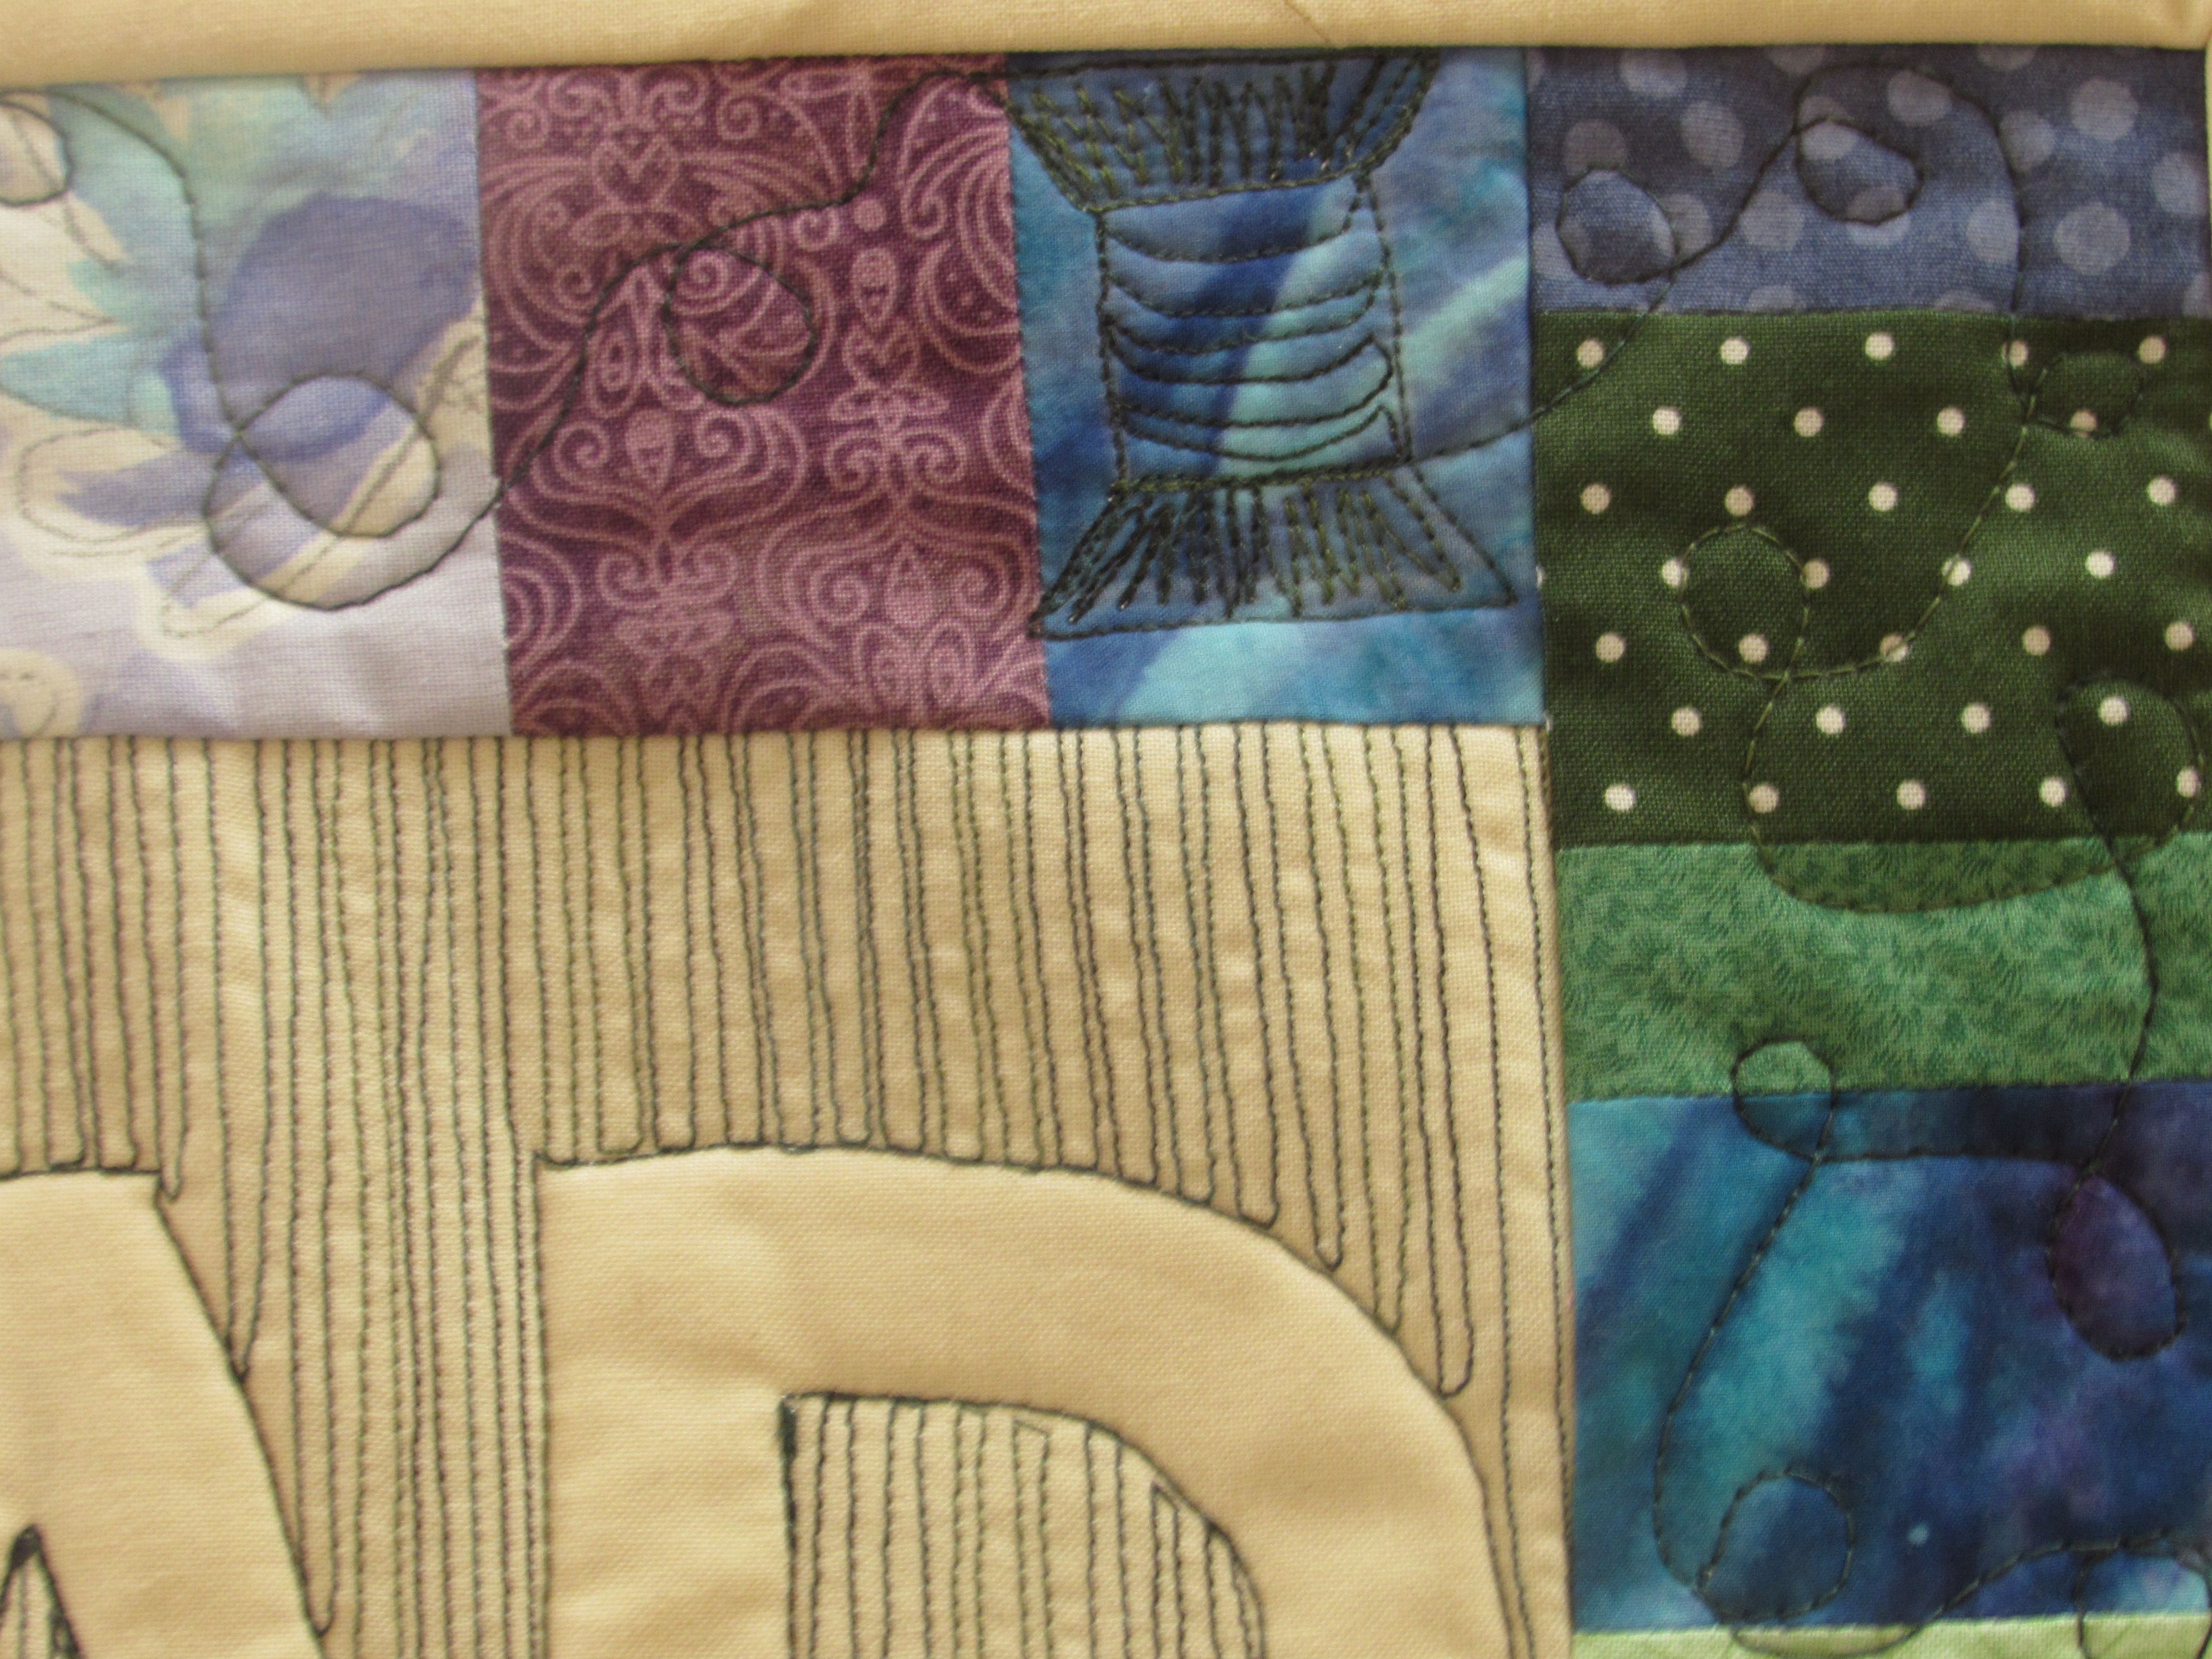
With each spool, I filled in the top and bottom so they would show up a bit better. If you like this idea, take a look at this tutorial of Lori Kennedy’s over at the Inbox Jaunt.
The spools are whimsical and they add a bit of movement to the quilting as the ‘thread’ flows off each spool.
Once you complete the quilting, trim, square and bind. Finished!

Isn’t this adorable?????
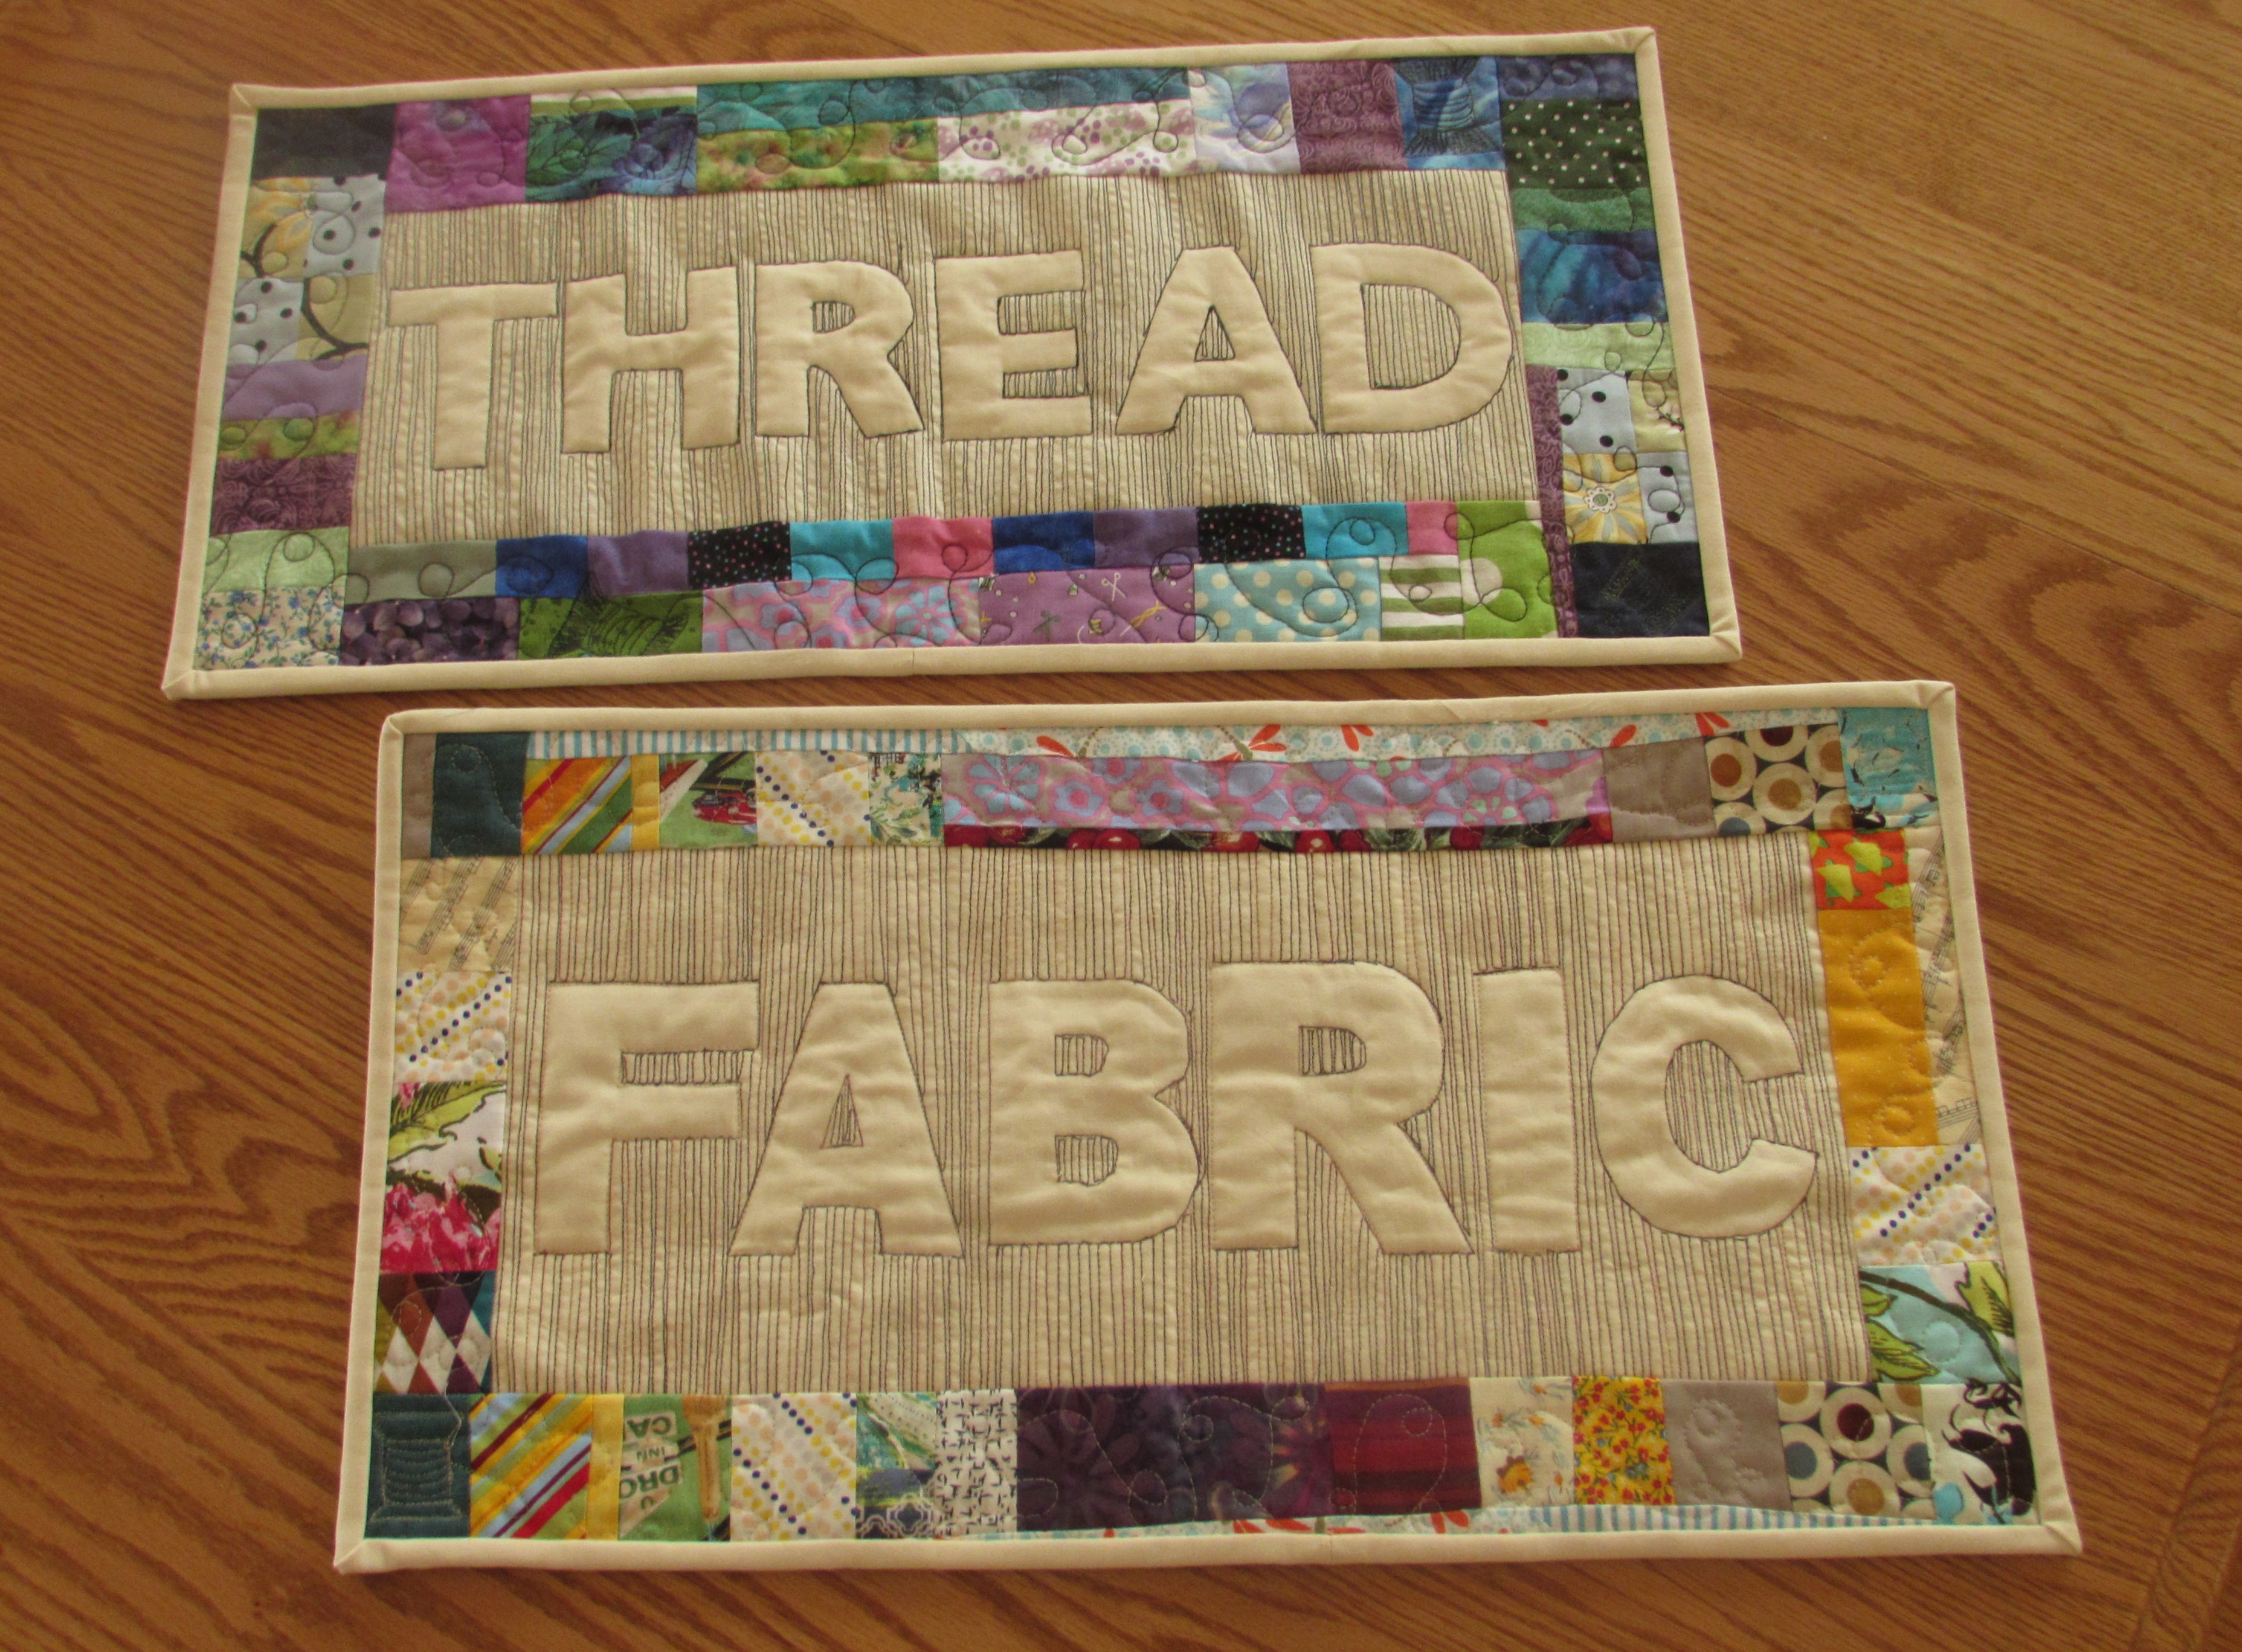
And both of them together?? All kinds of cuteness. What fun (and easy) projects both of these were. I have the sleeve sewn on to FABRIC but still need to make a sleeve for THREAD. They will be on the wall soon. I’ll post a picture next week.
I hope my explanation is helpful. If you make one, let me know. I would love to see it!
I’ll be linking to the usuals which can be found at the top of the page, under Link Ups.
Thanks for sharing your process. It’s very different from the process I’ve used when quilting words or names into the background of quilts and you’ve given me lots to think about… Your little wall hanging are wonderful! I look forward to your pictures of them hanging by your thread and fabric.
You’re welcome Laura. There are so many ways to come to a similar result. Hope this is helpful to you! I really enjoy the process. I can’t wait to hang them, hopefully this weekend!
These are fabulous!! Such perfect miNissan for your sewing room wall. Your tutorial is very helpful. This is stored away in my “someday” file!!
Thank you Tami. That “someday” file just gets larger and larger, doesn’t it? So many fun ideas are out there. Have a good weekend.
The “Thread” mini is such a perfect compliment to your “Fabric” mini quilt. Your description of your process is clear, and I am pondering if there are any words I need to quilt and hang in my sewing space.
Thanks Yvonne. They are a really fun pair of minis. Hopefully I will get the second sleeve on this weekend and so I can hang them up. I am sure there is an inspirational word for you to create and place in your sewing room.
This is such a good idea. Like all great ideas, it makes me wonder why I didn’t think of it! I think that all great ideas are obvious once seen, but shrouded in darkness before then. Except, of course, to the visionary.
This is definitely now in my tool box.
Thanks so much
There are just too many things to try, projects to make. One can only process so many ideas, right? That’s why it is so fun to share them with each other! Thanks for stopping by.
This is a new one for me and I’m very interested in giving it a try! It would be fun to put a teacher’s name on it for a gift…just an idea. Thanks for sharing your tutorial and taking the time to take photos. I hope your daughter’s school year is off to a super start!
No problem Kathy! I am glad you like it and hope you’ll share a picture if you make one. I’d love to see what you create.
Glad I inspired you to make the second one! One of these days I’ll get around to my thread mini. Yours looks adorable and coordinates so well with the Fabric one.
Yes, you certainly did. That’s the thing with all of these blogs and quilty conversations. So much inspiration.
Oh, my goodness! They look great together! Is there a third one, maybe? Super tute. Thanks a million! XO
Ha! A third one…. I’m not sure what that one would say. I am thinking of doing something like this around the holidays though. There are lots of fun things I can think of that are holiday related. Take care Karen!
It could say: SEW. That is what I thought when I thought about if I were to someday make one.
I loved this tutorial! I like the fact that you did the majority of the quilting before the sandwich, and I think I could actually accomplish this – I’m encouraged by your use of walking foot since I still have free-motion fear. I really want to make this to go above my little thread holder when I get in my new house! Thanks for taking the time to document.
It is very easy Linda. I hope you give it a try. Let me know how it goes!
Every quilter needs one of these! Thank you for the tutorial. I could see these as great gifts for friends.
So pleased that you like it Carol! These would be really fun to make as gifts. Enjoy!?
I love how your little pieces turned out! Thanks for the tutorial – without reading through it, I would never have thought I could make something similar, but now I think I will try it!
Yay! Give it a try, I think you’ll find it’s not difficult at all. ? show me a picture when you are done!
I really like these two together. While I’ll not do this in the near future I am putting it on the bucket list to try down the line! Love the colors in them and the display with the threads. It might be fun to try this with my grandkid’s names or something ….
I did this last summer using the word ‘Believe’ when I was going through an internal struggle with believing in myself and my work. It hangs in my sewing room and I love it. Your mini’s are fun and I think you did a great job on the tutorial.
Thank you Beth. I love the idea of an inspirational word – to serve as a little reminder to one self.
Hello Bernie,
This is a lovely matching pair. I love the little FMQ cotton reel! Now (I’m bound to say this) why don’t you try the parallel lines in FMQ too? I bet it would take half the time.
Thank you for linking up with Free Motion Mavericks!
Love, Muv
I used a walking foot because it is such a challenge to get a nice straight line with free motion. It would surely be faster but I don’t know that I would have a good result. What are your thoughts on this?
Awesome tutorial! Thanks Bernie. I want to try this!
Wow, Bernie, your design and technique on this are just wonderful. Thank you so much for sharing. I appreciate all you very creative folks…I am better at duplicating, rather than envisioning. I am definitely making some of these… I can see a table runner too. Thanks again!
Thank you Linda. I almost always duplicate as well – but not really, I make it my own, right? Take that inspiration or idea and tweak it. The table runner idea is a good one. For example a Thanksgiving runner with THANKFUL or GIVE THANKS as the lettering? That would be perfect! Thank you for stopping by.
This is really great. Thank you for the tutorial.
I’m glad you enjoyed it Nancy. I hope you will give it a try. I loved it and it is so easy. I have one that says THREAD, one that says FABRIC. I kind of want to do one more that says STITCH. It is on my to-do list for now.
HI Bernie! I am so inspired by this creative technique. Thanks for sharing this one at Tuesday Archives!! It’s perfect for a “word theme” this week.
So glad you enjoyed it. It is a simple thing to do and I love the way the relief quilting looks.
Great tutorial, thank you Bernie! I will give it a try, sounds like fun!
Thanks, Bernie, for sharing this fabulous tutorial! I really love this project and a fun one to decorate your studio and get some new FM experience.