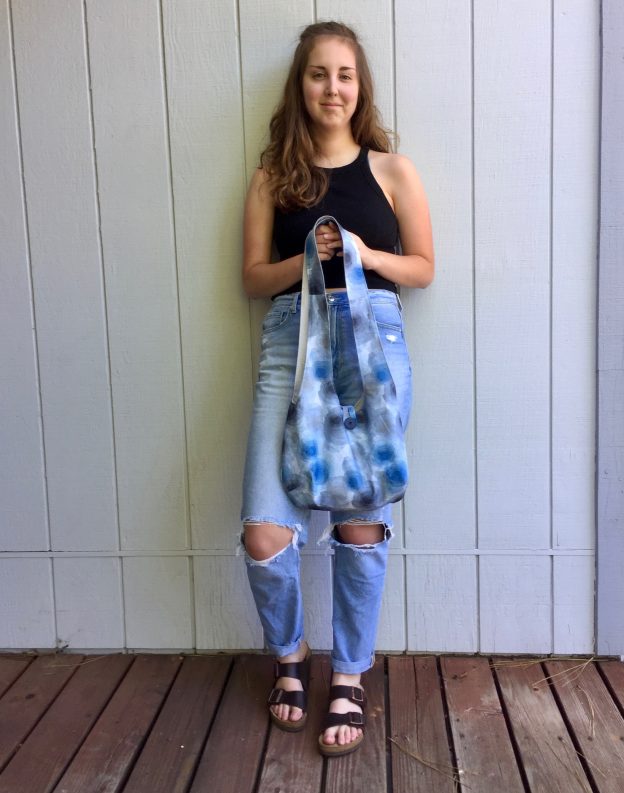
This is the second purse I have made for Julia. When she asked me to make her a new purse, she said she wanted the same pattern as the first one. This was fine with me because I really love the pattern. It is a free tutorial found over at Very Purple Person. The intention is to make a reversible bag but Julia wanted an interior pocket so this one isn’t truly reversible.
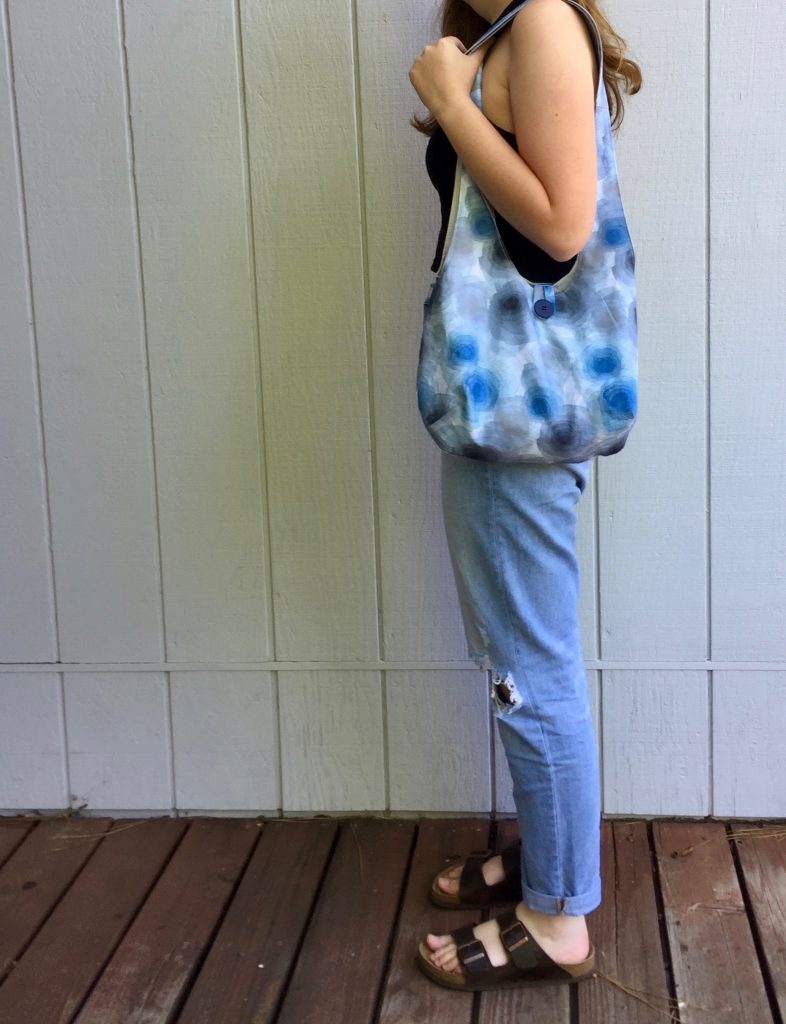
It is a great looking hobo style bag. Very casual and soft. Julia didn’t want any sort of batting or interfacing in it so it hangs with a cute slouchy look.
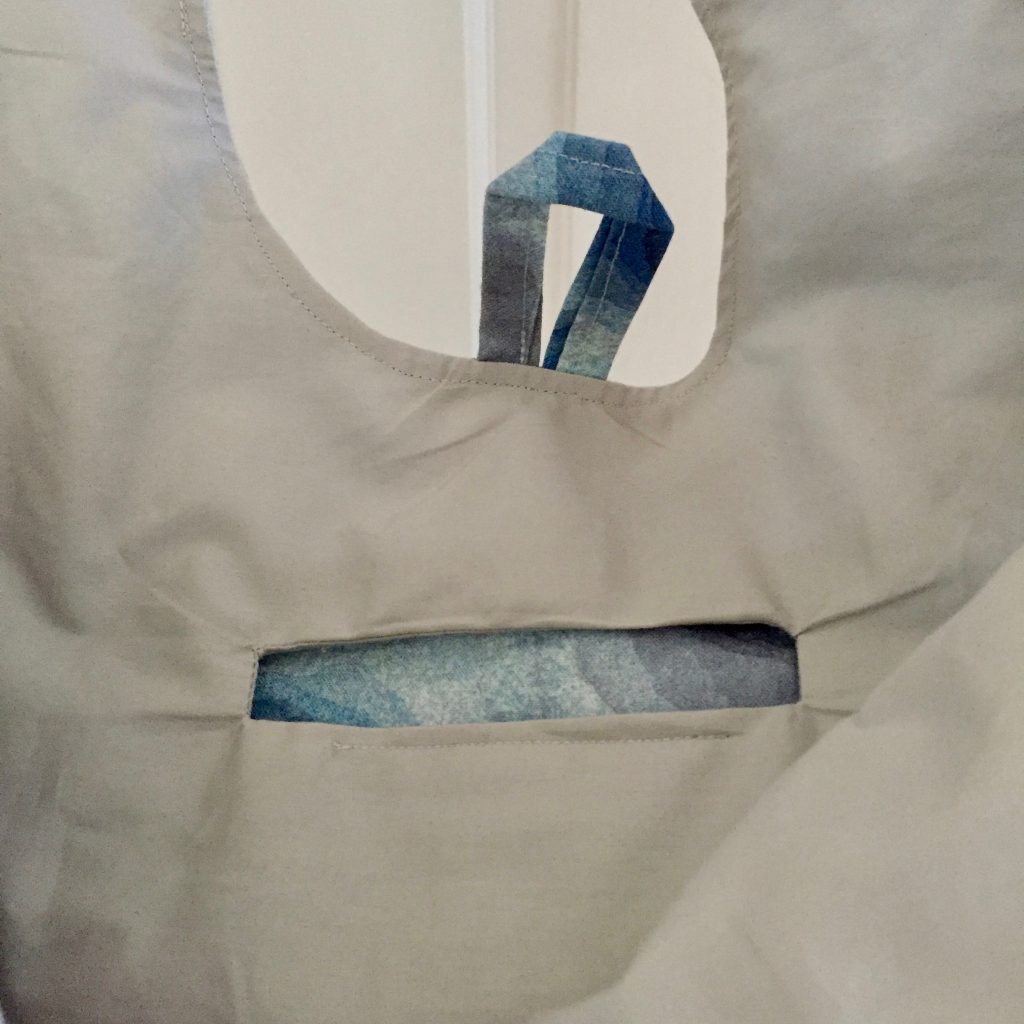
I did put the pocket on the interior. The corners are a bit puckered though so not my best pocket ever. It is nice and deep which means it will hold plenty of the small items that end up at the bottom of the purse.
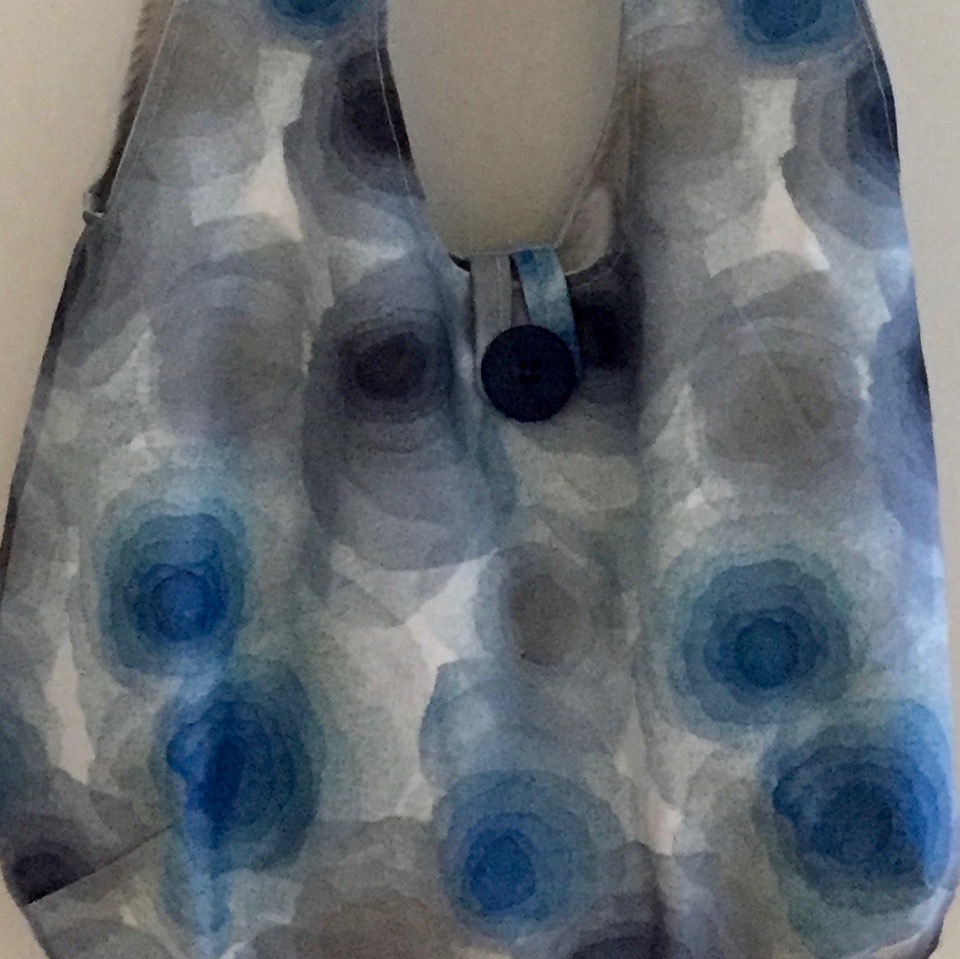
The first purse didn’t have any sort of closure so this time, I added a fabric loop and a nice big button. She also likes longer straps than the pattern calls for so with both purses, I added a 15 inch strip to the straps.
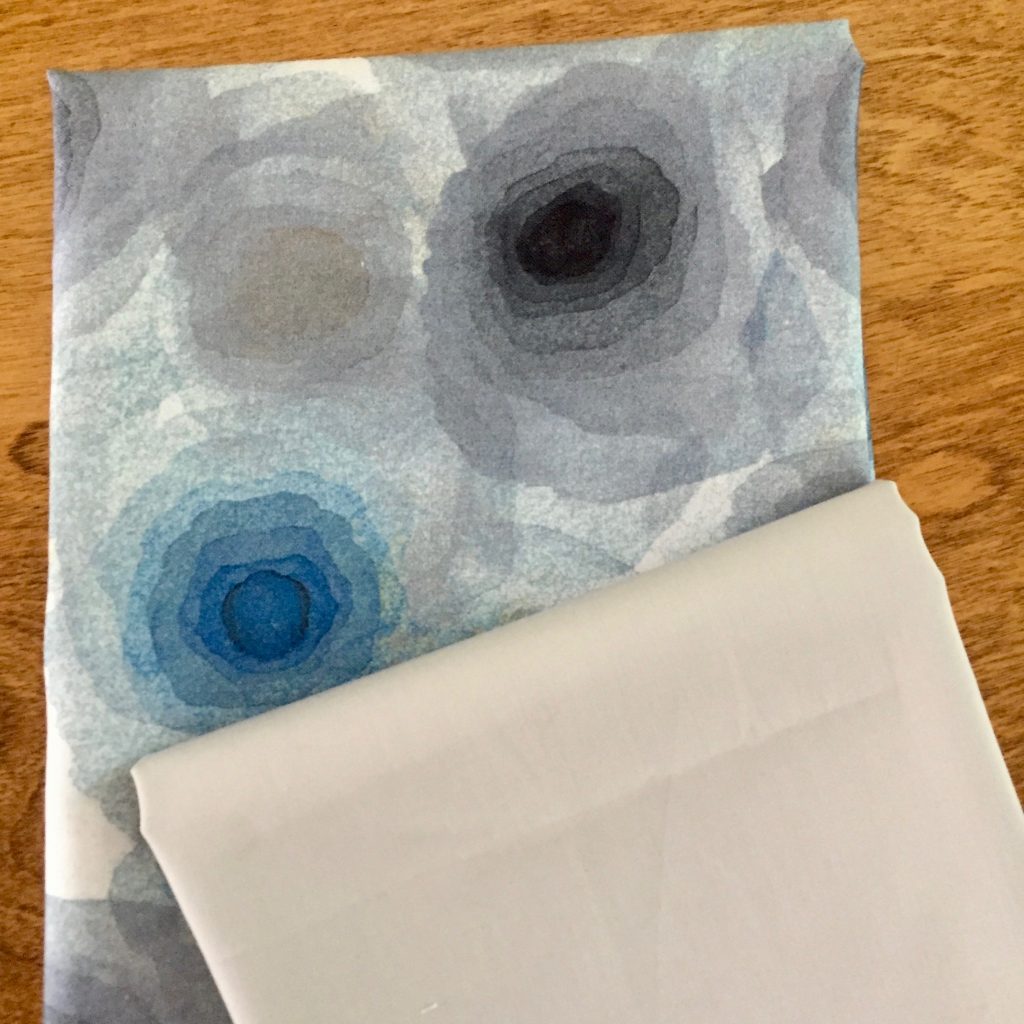
What makes the bag though is Julia’s fabric choice, Harmony with Nature. I really love this print. It has a great watery look to it. The gray circles have this taupe color in the middles looks like wet sand. The lining is called Mystic Gray and is a Pure Solid by Art Gallery Fabric.
I am thinking I will make a bag for me. This pattern is simple and shows off fabric nicely. I think it took about an hour to sew (other than cutting pieces out) so it is a quick finish. It would be fun to have a new bag for fall.
Shop Update
Just a little news about my shop! I have changed my shipping policy a bit and wanted to share that with you. Orders that are $35 and more will ship free in the USA! Orders less than $35 still ship for a flat rate of $6.99. Also, many items ship free regardless. Examples are most notions and the quilt patterns I stock. Hope you will check this out! Makes your online shopping really economical.
OK – that’s it for now. Hope you are working on a fun project or two. Have a great week all!
Lots going on around here lately. My husband has finally decided he is ‘done’ renovating our little house in Downieville and it is listed for sale. We bought it some years ago after I saw it for sale during a quilting retreat up in the mountains. We have enjoyed many weekends up there and Ray has really outdone himself with updating it. I suspect it will sell easily and make someone very happy.
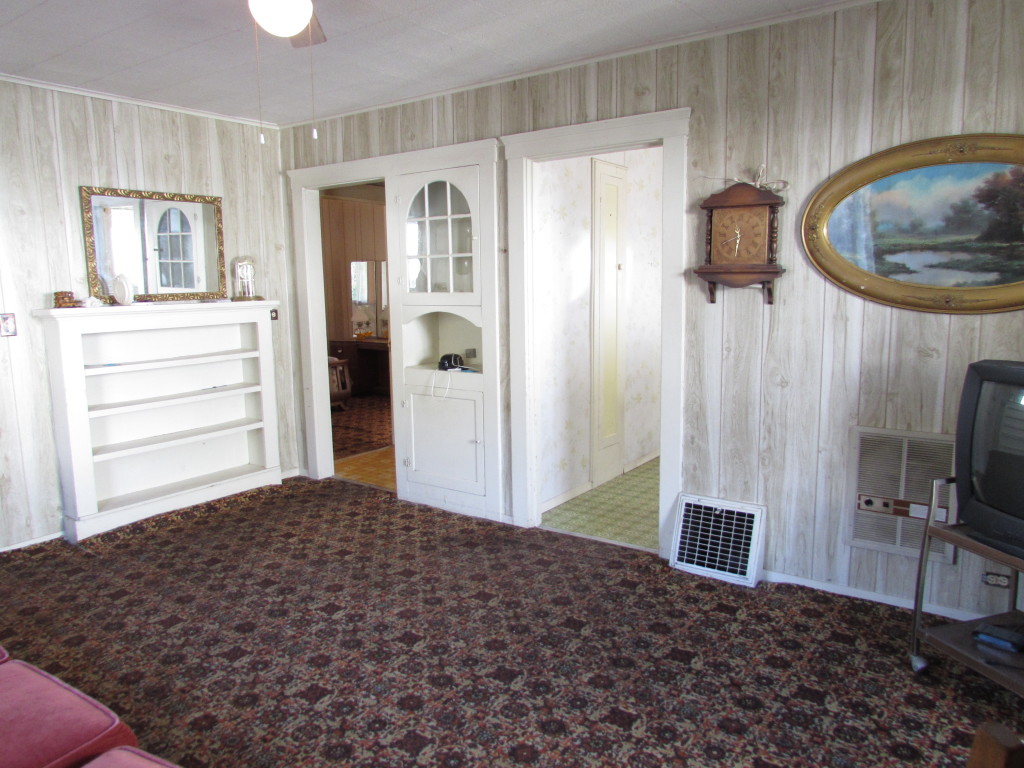
A “Before” photo
This is a shot of the living room when we were first looking at the house.
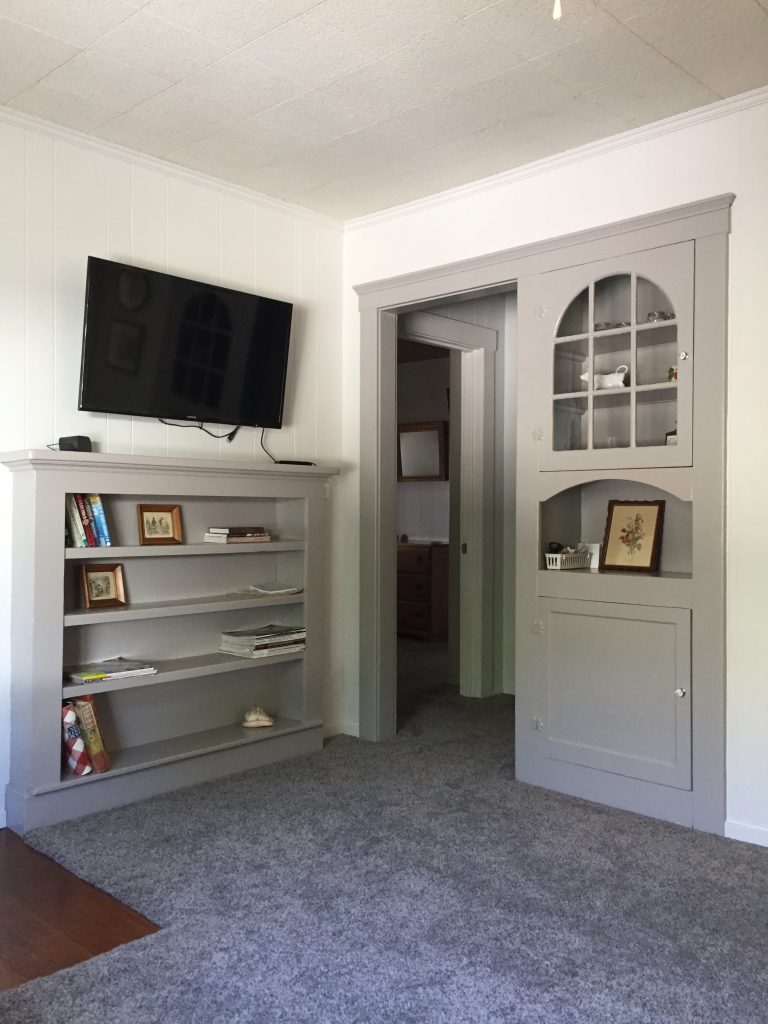
The same angle with Ray’s updates!
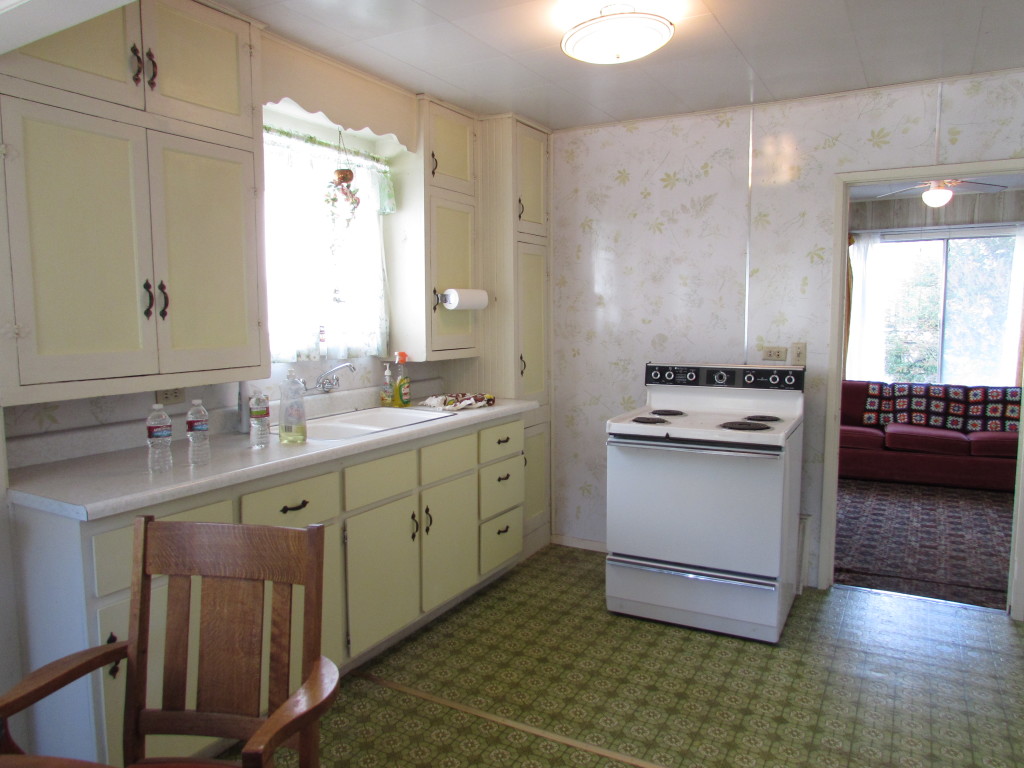
Want to see more? Here is the kitchen when we toured it the first time.
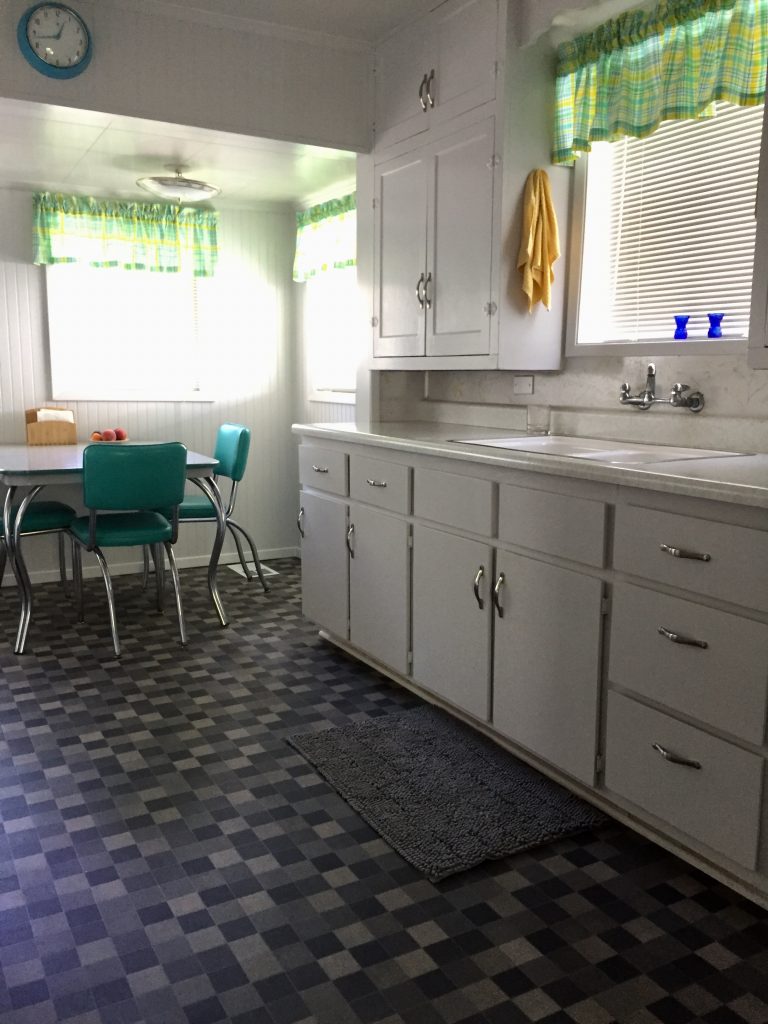
The “Before” shot of the kitchen.And the kitchen as it looks now. I love it!
In some ways we are sad to give this little house up but we are also ready to be responsible for just one house again. Life is always changing!
I did bits of sewing here and there over the past week but mostly I was napping and dealing with a long migraine cycle. Ugh, that is so frustrating. Started Sunday night and here it is Friday and I am not so sure it is over yet. Such a waste of time – dragging around and not accomplishing a whole lot. I am so fortunate that reading does not bother me when I am sick – many migraineur’s cannot read because of strong sensitivity with their eyes. I have a hard time looking at the computer, I think it is because of that little bit of movement that one’s eyes track while looking at a screen. But the T V and books are ok. Anyway, lots of napping and I am crossing my fingers it is over with soon. I did my second monthly injection of Ajovy yesterday. My neurologist said some people experience a benefit right away and it can take others 3 or 4 months to notice a difference. Maybe this month will be better!
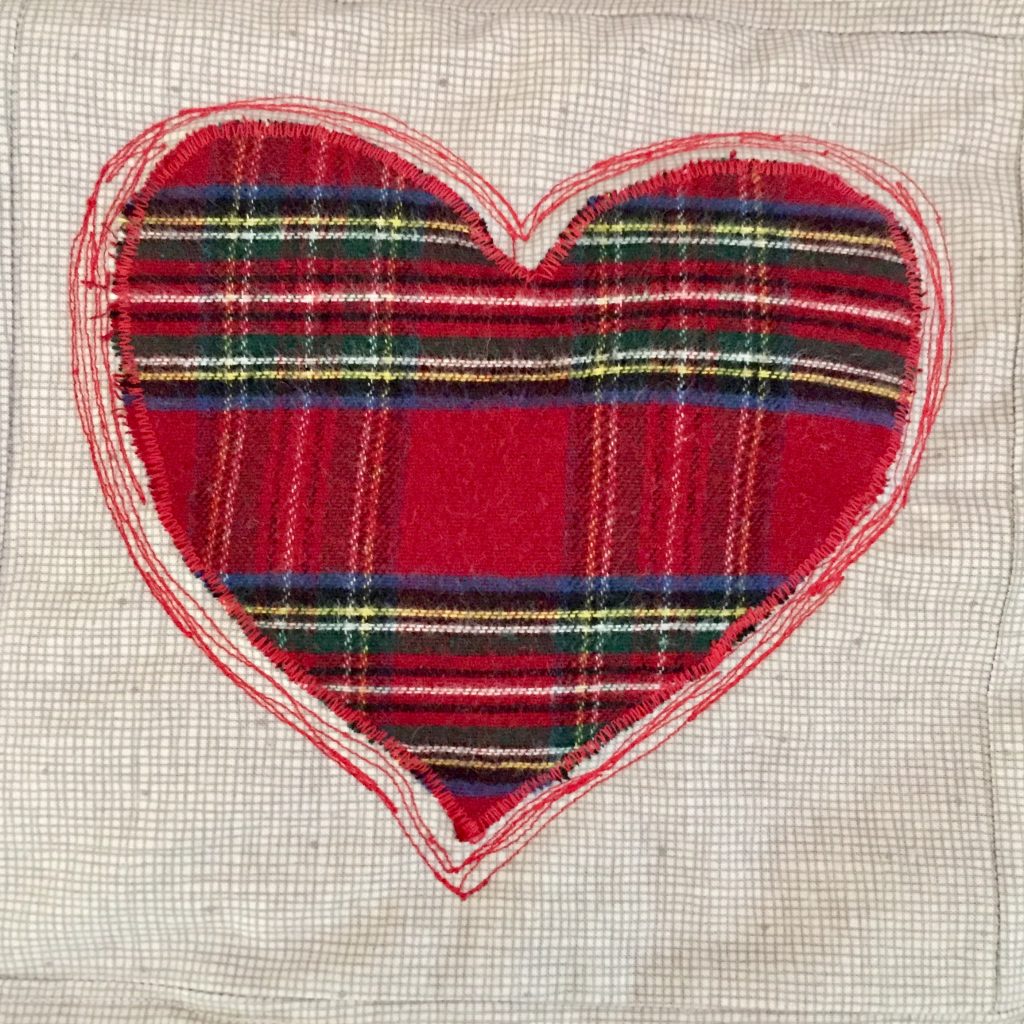
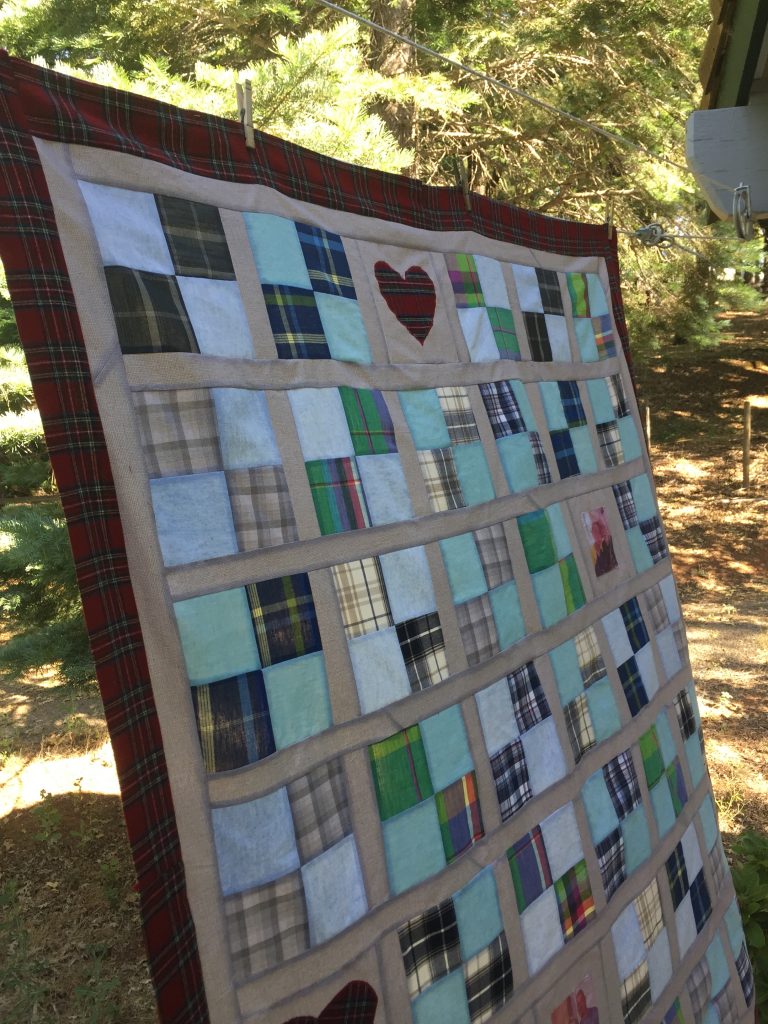
The sewing I did do was mainly working on my friend Susie’s memory quilt. I got it basted (Julia helped me crawl around on the floor for that!) I quilted straight lines through the sashing and have been thread sketching an echo of sorts around the two plaid hearts. I think it lends a rustic simple look which is perfect for the mood of this quilt. Next, I plan to work on the short sashing strips between the four patch blocks. Then I need to decide what I want to do with the four patch blocks. I am just taking it easy and enjoying the process.
Julia has asked me to make her a new purse. The last one was made in fall of 2017 and it is looking a bit worn. I love her fabric choices! The blue and gray fabric just arrived last week and I am happy to cut into it and give it a try. It is called Harmony with Nature and was designed by Norman Wyatt. She chose the Mystic Gray (an Art Gallery Fabrics Pure Solid) for the lining.
Sam’s Jersey Quilt; November 2017
My sister asked me (a LONG time ago) to make a hanging sleeve for a quilt I made for my nephew. Remember his baseball and football jersey quilt? She wants to hang it on a wall in his room. I finally cut a few strips of this gray dot and will get that off to her in the mail.
Today is my husband’s birthday. I just finished making him a chocolate cake with chocolate frosting. To keep it dairy free, I used coconut cream instead of butter for the icing – it is yummy and I was licking my fingers the whole time I frosted the cake! I used coffee for the liquid instead of milk or cream because the coconut is fairly sweet and I thought the coffee might cut that a bit. He requested enchiladas from our local Mexican restaurant which is a treat for me. No cooking!! Then we eat cake. Probably way too many calories after a week of napping but such is life.
Hoping all of you are enjoying summer. Have a wonderful weekend and if it is hot outside (it is in the high 90’s here!) now is the time to enjoy the cool of your sewing room and make something!!
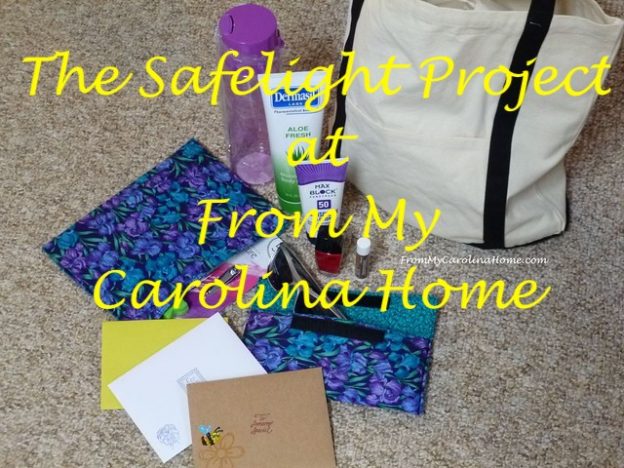
More than a year has flown by and it is once again time to sew for the Safelight Project. Hosted each year by Carole of From My Carolina Home, this project provides support to people in the domestic violence shelter that Carole advocates for. Just in case you are not familiar with Carole and her work, she is one incredibly kind soul. She has spent the better part of the last year working hard to gather hundreds of quilts for victims of the Carolina hurricane. Carole also is a very active blogger with all sorts of quilt alongs, fun tablescape ideas, upcycling and thrifting posts, as well as great recipes. Check out her blog as it is lots of fun.
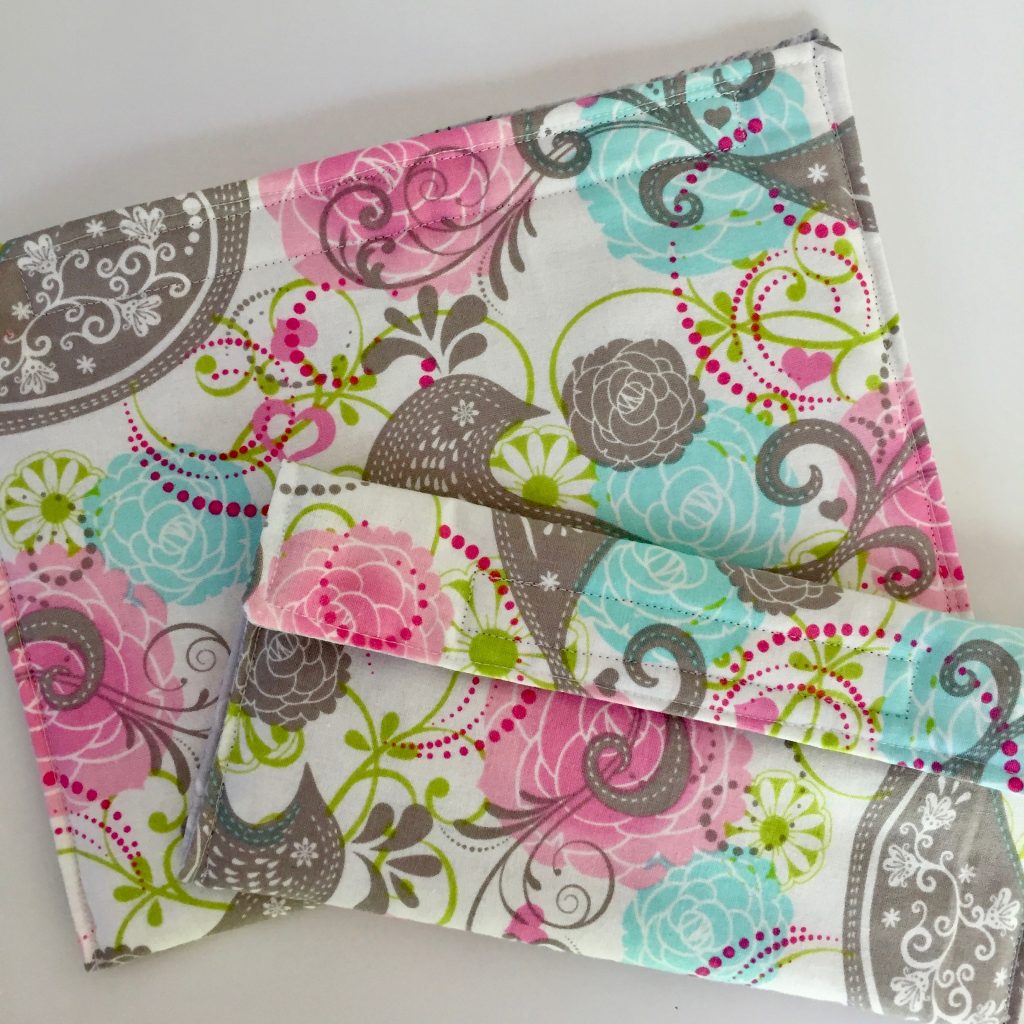
The Safelight Project is one I have contributed to before. People escaping domestic violence need all the support possible. I love the idea of these gift totes filled with little necessities because so many times the person leaves with just the clothes they are wearing and not much more.
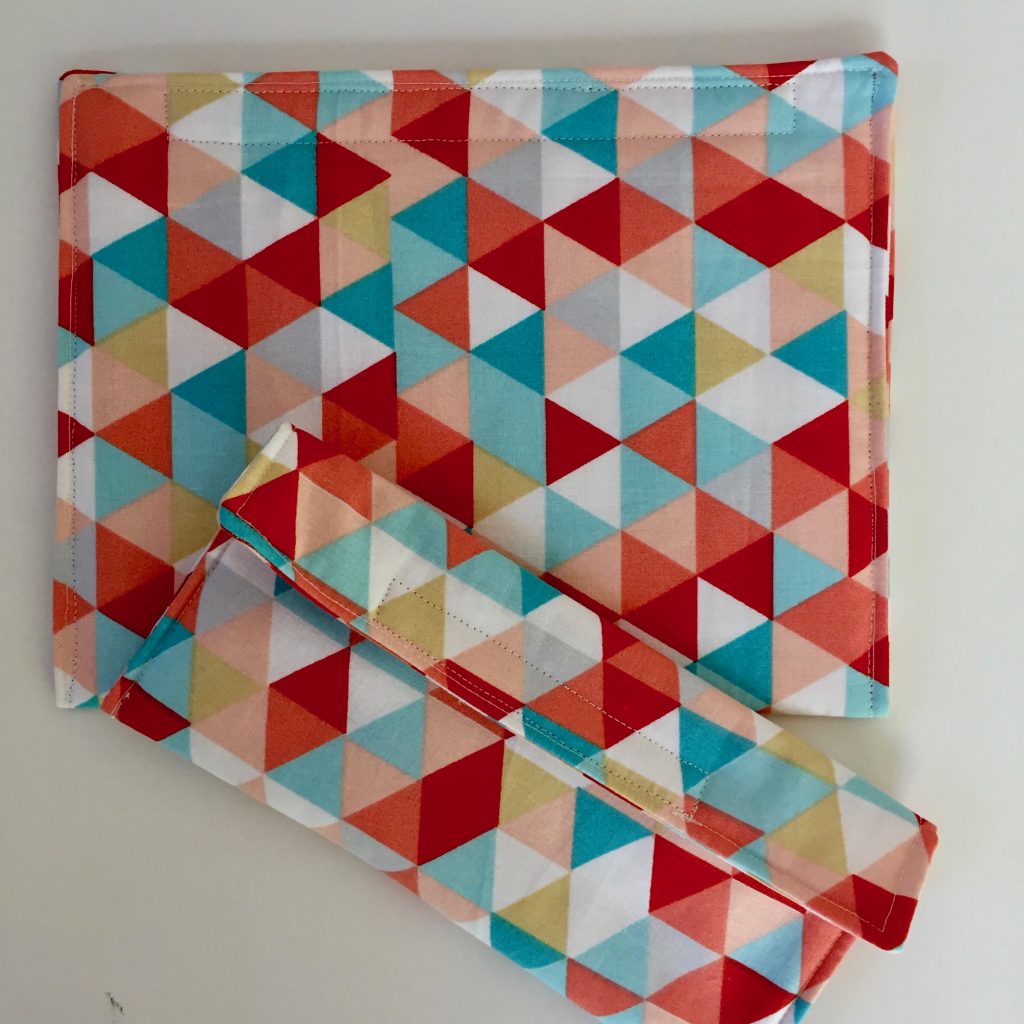
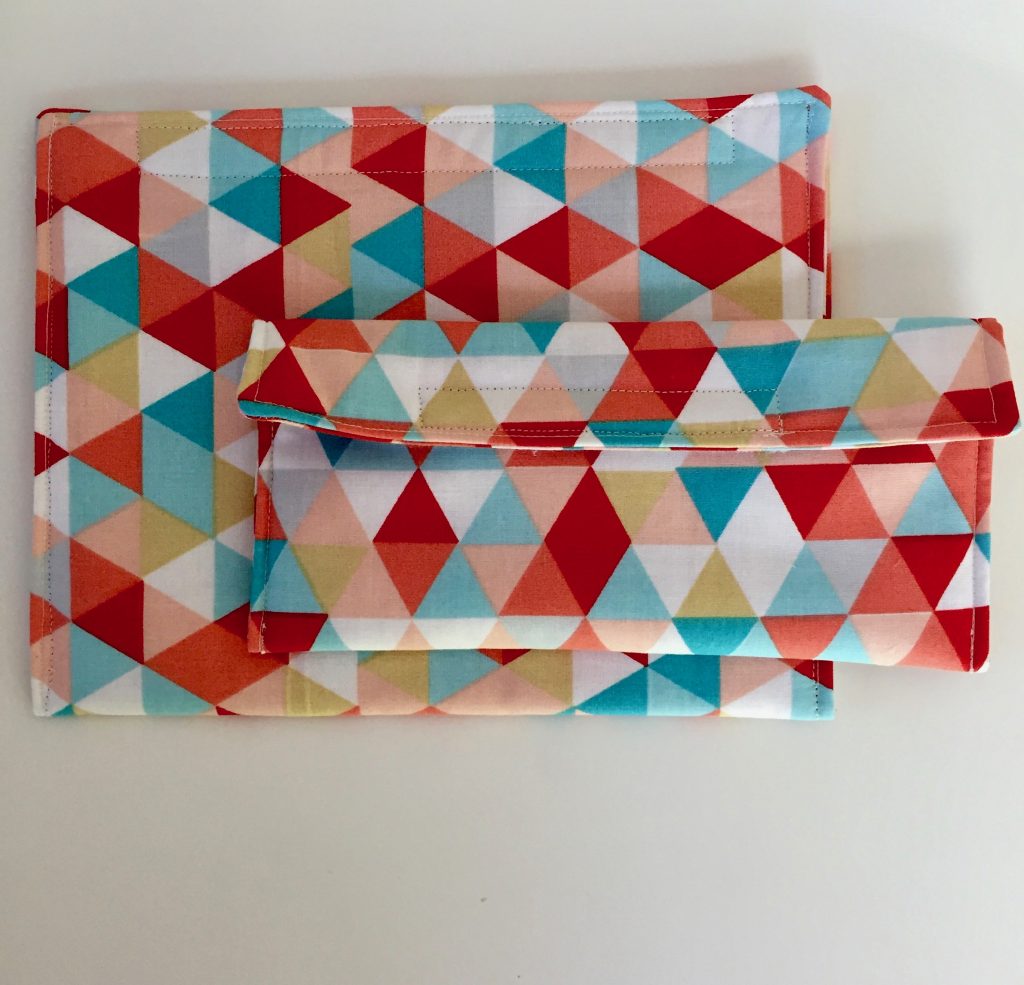
Making a cometic bag and sunglasses case takes little time and not a whole lot of fabric. The instructions are so simple (and available here). Each one just requires a bit of batting and a strip of velcro.
Carole collects many sets and includes them in the tote bags she fills with other sundries. It must be so gratifying to see these pouring into her mail each year.
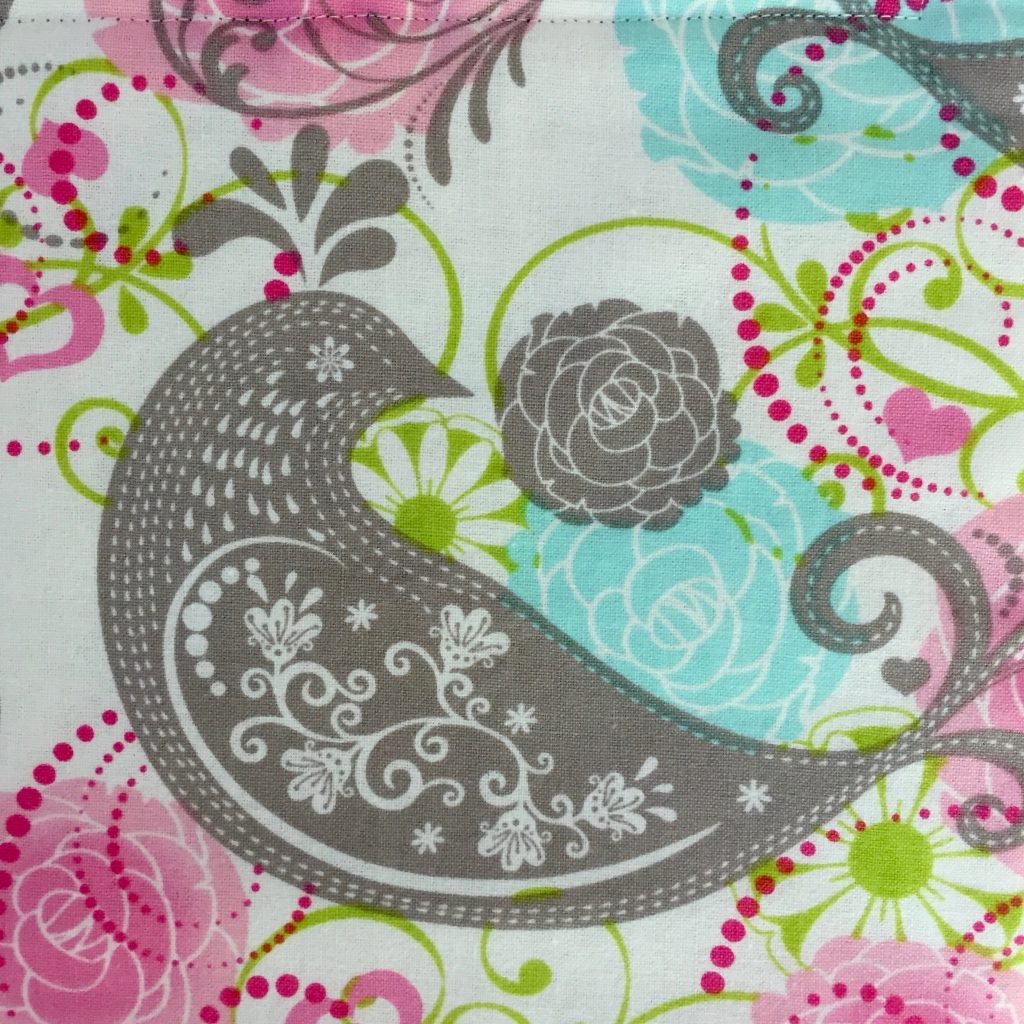
You know I have a thing for fabric with birds. This looks like a quail to me and I love it!! At first glance it looks like a paisley print but then this sweet bird shows through.
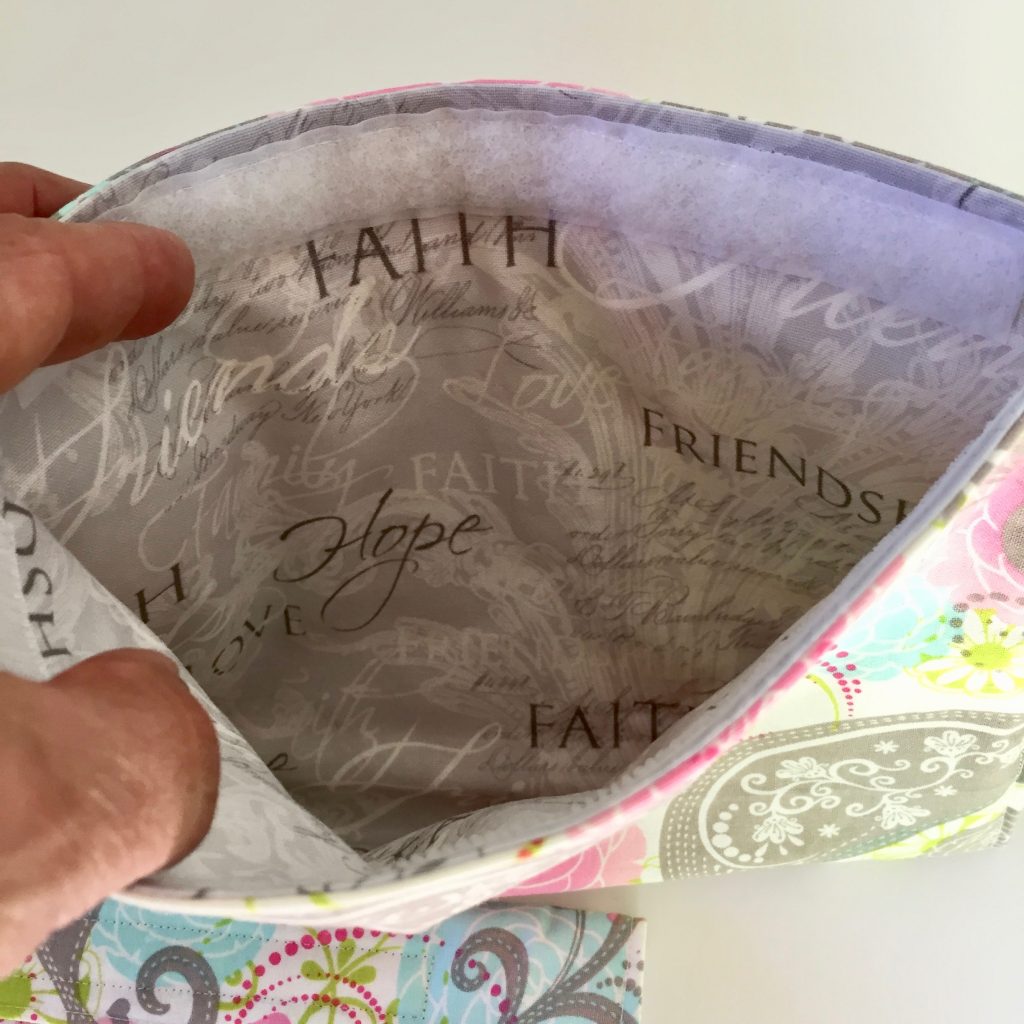
A bit of inspirational fabric made a sweet lining for this pouch.
Have to say, I was a bit disappointed when I realized I cut the triangles going opposite directions for each of the cases. Ooops!
Both sets are in the mail today heading for Carole. Thanks so much to Carole for coordinating this wonderful event each year.
Linking up with a few sites, check them out at the top of the page, under Link Ups.
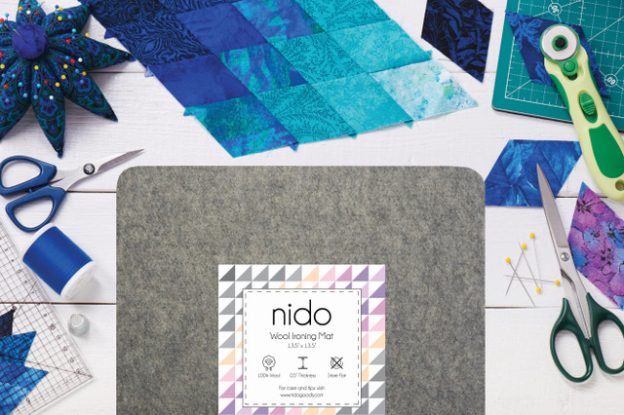
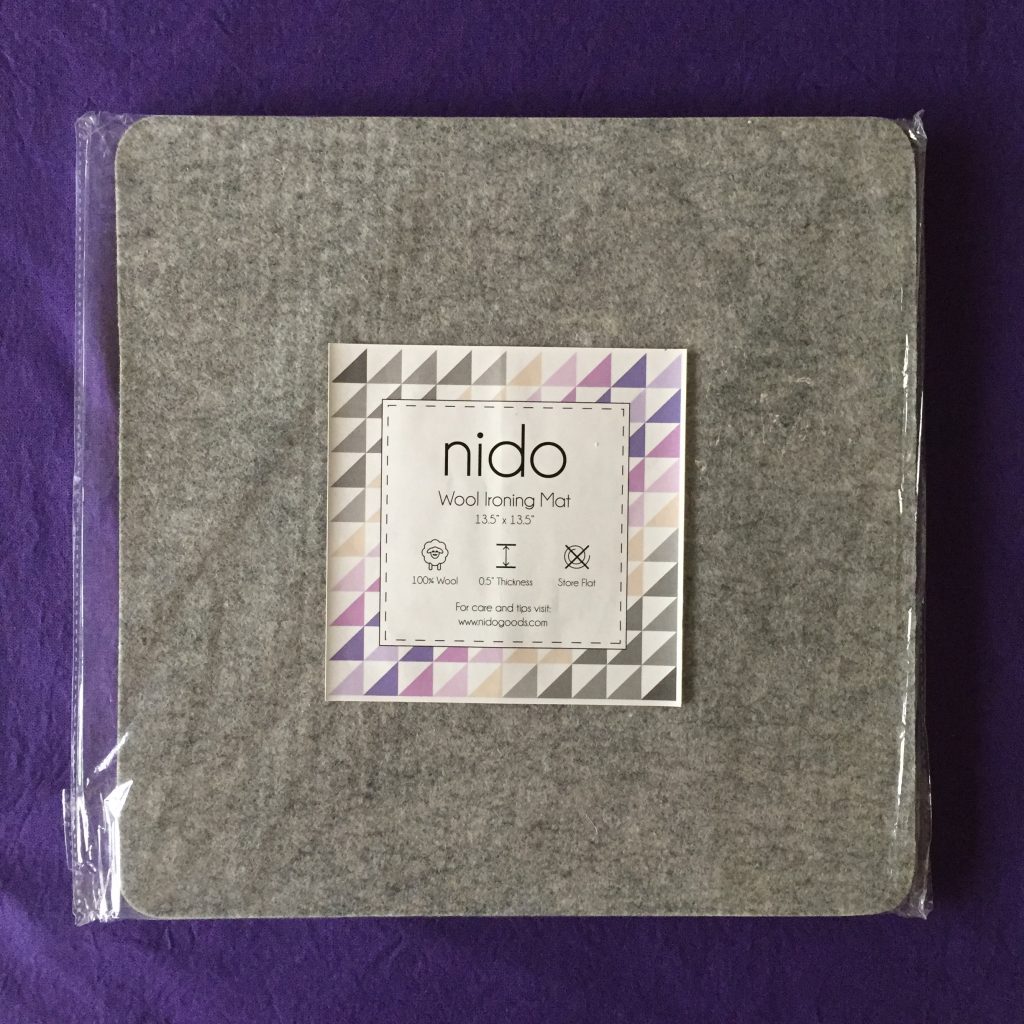
About two weeks ago, I was contacted by Winnie and Tyler, owners of Nido Goods. This shop has just begun and they sell a fantastic wool ironing mat. When they asked me to review their product, I was happy to do so. I have been reading about these mats a bit on-line and wondered if they were worthy of the fuss generated recently.
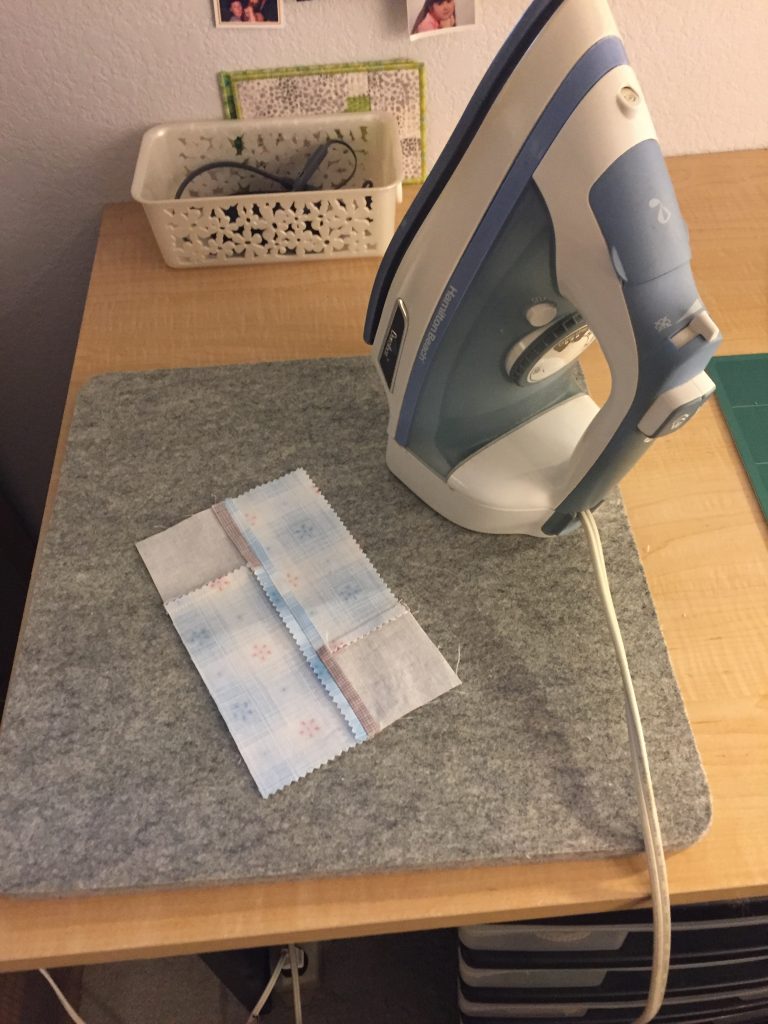
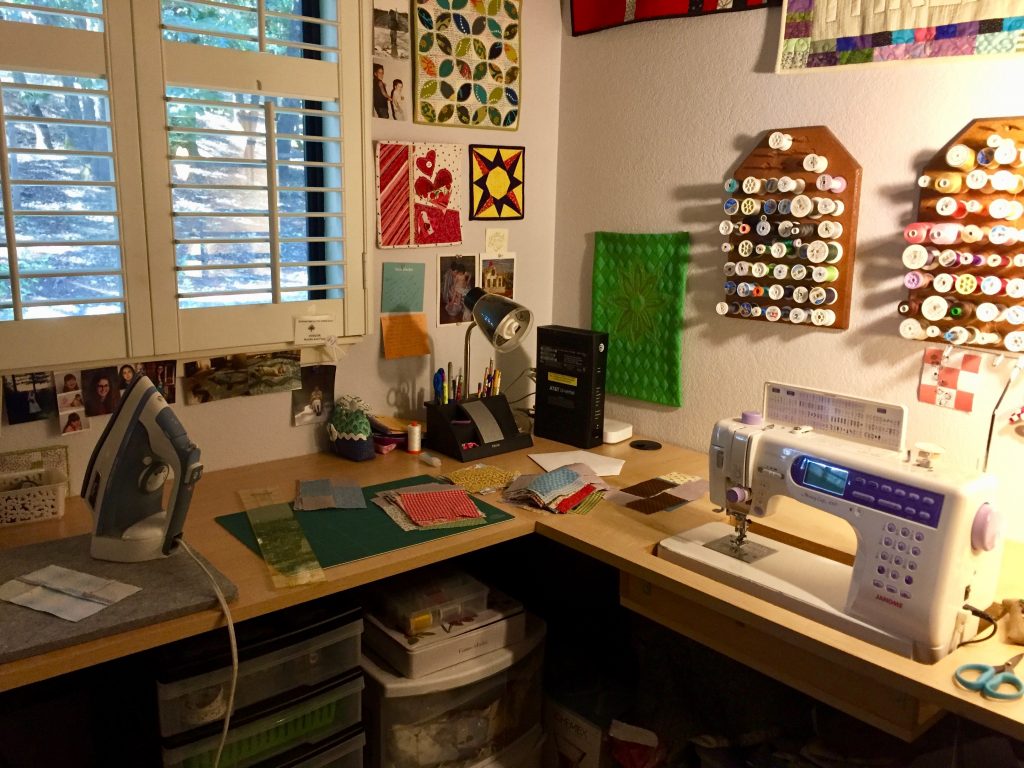
Guess what? They are! My sewing area is contained in my guest room. Luckily, I don’t have guests all that often. But it does mean the queen size bed takes up a good portion of the room, so space is tight. I have a laundry room which is next door to the guest room and that is where my ironing board is. Yes, you could say having to walk to the laundry room is a good thing because it gets me off my bum and walking a bit when I am sewing. But when I am piecing blocks it is annoying. I used to have a wooden, table top ironing board but it took up too much space. I also made an ironing mat with Insul bright and that silver color fabric one uses to make an ironing board cover. However it heats through and gets the table top really hot. (I think I should have used a lot more Insul Bright in the filling). Anyway, I was pretty excited to have a mat sent to me.
I had read that there might be an odor when ironing on wool, especially if using steam. The steam can make the wool a bit moist and possibly cause an odor. I found little odor, if any. The bit I did smell made me feel a bit nostalgic. When I was a girl I attended a private Catholic school which meant I wore a wool, plaid, pleated uniform through 8th grade. As soon as we were old enough to (sort of) do a decent job of it, my mom had us ironing our uniforms after she washed them. (Remember there are six girls and that was a lot of pleats for her to press!) So the smell of the mat reminded me of pressing the uniform skirts. But truly, it is a very light scent. Not a problem at all.
It measures 13.5 x 13.5 inches which is a great size since the largest block I usually do is 12 inches. Using up just 13.5 inches of space is really efficient as far as my sewing space goes. If taking a class, this would be a perfect tool to bring. The care instructions advise not folding or rolling the mat. But with a 13.5 ” square, it will fit into a tote bag without a problem. This will help avoid the lines that often happen at the ironing boards when taking a class!
As I was writing this review, I wondered what the word Nido meant. When I was on NidoGoods.com, I found out it means ‘nest, a structure, place or home where one finds comfort’. I love that! As I was emailing back and forth with Winnie and Tyler, I asked a few questions about their business. I thought it might be nice for you to read the conversation as it took place. These two are so fun to work with.
How did you start this business? Tyler and I had been thinking about starting an online business for a little while now. Meanwhile I recently started quilting in my free time. I am beginner so I don’t have a proper workspace. I started using our dining room table and had to constantly go back and forth to our ironing board. So basically I thought there has to be a better way and stumbled across wool ironing mats and our business was born.
Do you make the mats yourself? Do you outsource them? No, we do not make the mats ourselves. The product is manufactured in China and is made from 100% New Zealand wool! We had several manufacturers send us samples based on our specifications. We then spent the next few weeks testing them to ensure that we chose the best of the best.
Do you plan to make different sizes? We are currently in production of a larger 17×24 inch mat and are considering other sizes. If you have any thoughts on additional sizes we would love to hear them!
How did you choose wool used in the mat? What makes wool the right fabric? There were two major factors that we were focused on – performance and odor. When it comes to performance, we chose wool because it retains the heat very well which allows heat to be delivered from both sides. Also, we have a nice wood dining table so we wanted to make sure that it didn’t get damaged! The wool also creates some friction allowing for grip so things don’t slide around when pressing. The odor was a concern as well, as some of the samples released a not-so-great smell with steam and heat. We were determined to find the best combination of the two and we couldn’t be happier with our product!
Other things to share? We are brand new small business owners and very excited to get our product out on the market. If any of your readers have any questions or concerns feel free to contact us directly at winnie@nidogoods.com
As a small business owner, I enjoy supporting other small businesses. Nido Goods has a great product to offer and will soon have another, larger mat available too. I would love it if you would check them out and give their mat a try. These mats are sold on Amazon and, in fact, today happens to be the second day of the Amazon Prime sale! The mats are on sale today only for $24.99 which is nearly 25% off the regular price of $32. You do not have to be an Amazon Prime member to take advantage of this price. If you are reading this post AFTER the Amazon Prime sale ends, you can take advantage of a special discount offered to readers of Needle and Foot! Use code NEEDLEFOOT when ordering and you will receive 20% off. Thank you Nido Goods!!
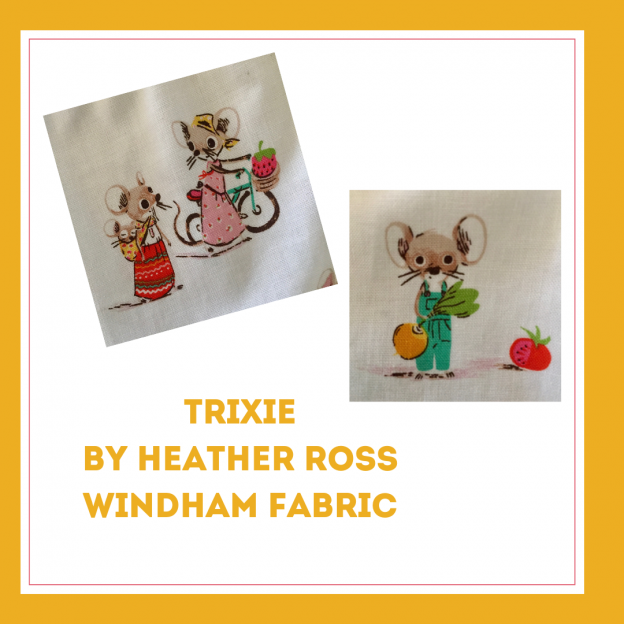
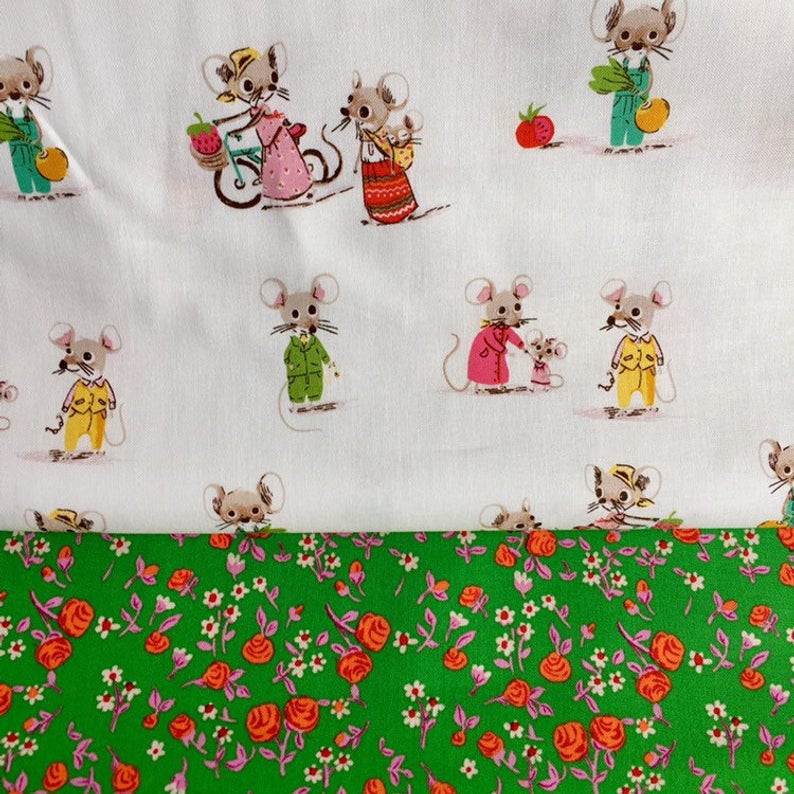
Another distraction popped up the other day. I have been wanting to make something for my grand daughter with the new Trixie fabric. This piece was designed by Heather Ross and it features two little mice, Trixie and her friend Thomas. I really love it! By the time I ordered it, a few key pieces were already sold out. However, I do have these two sweet bolts in the store.
I am fully aware the fabric in the shop is supposed to be sold. That is the goal. However, it is really difficult not to cut into certain bolts and this is one of those. These little mice are too cute. In real life, I have a huge issue with rodents, mice, etc. Ugh! But these, I can handle these little critters!
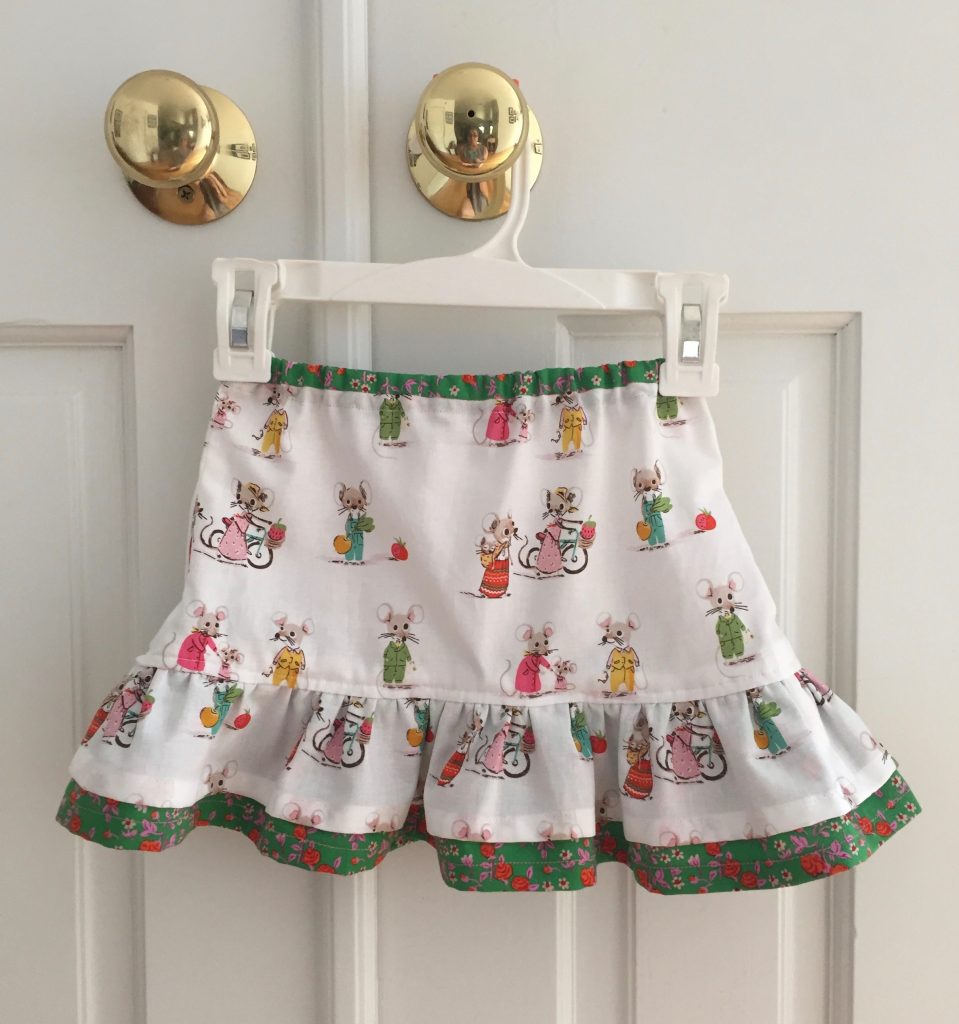
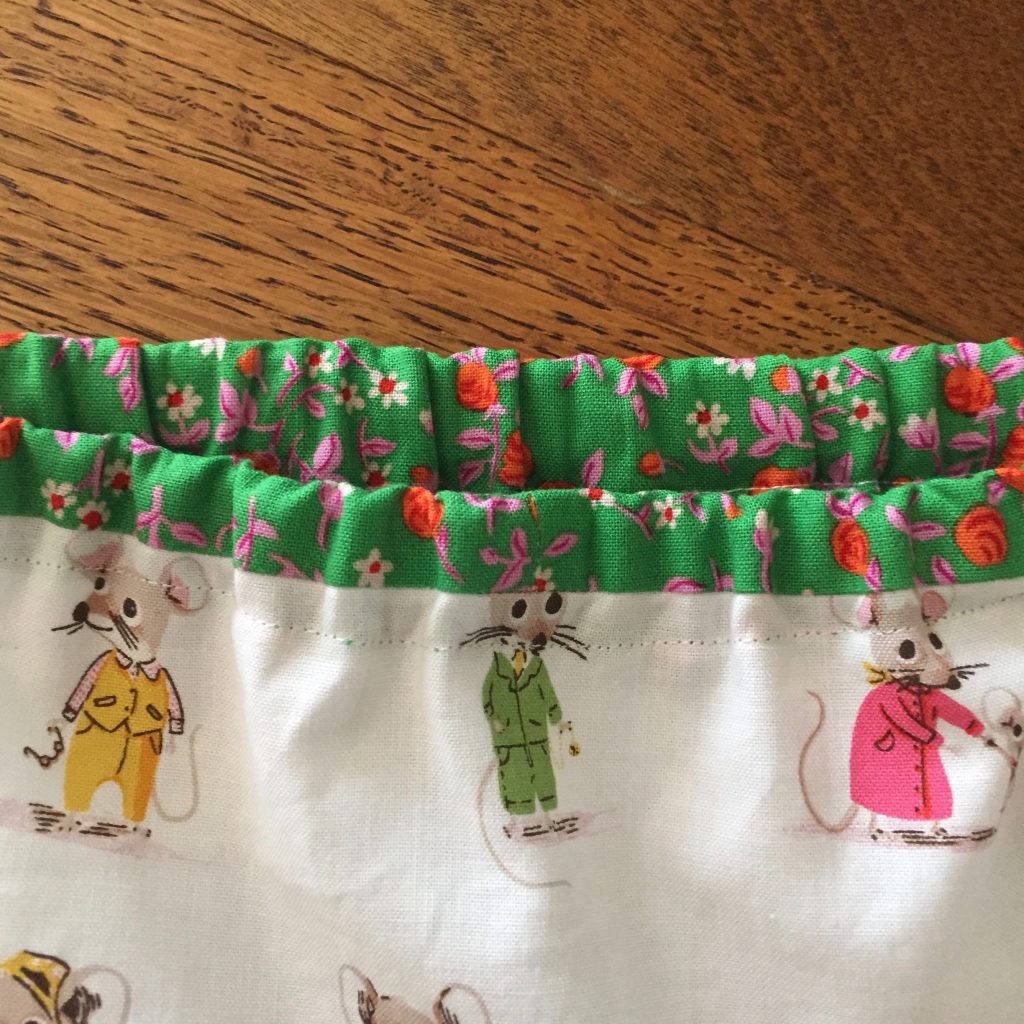
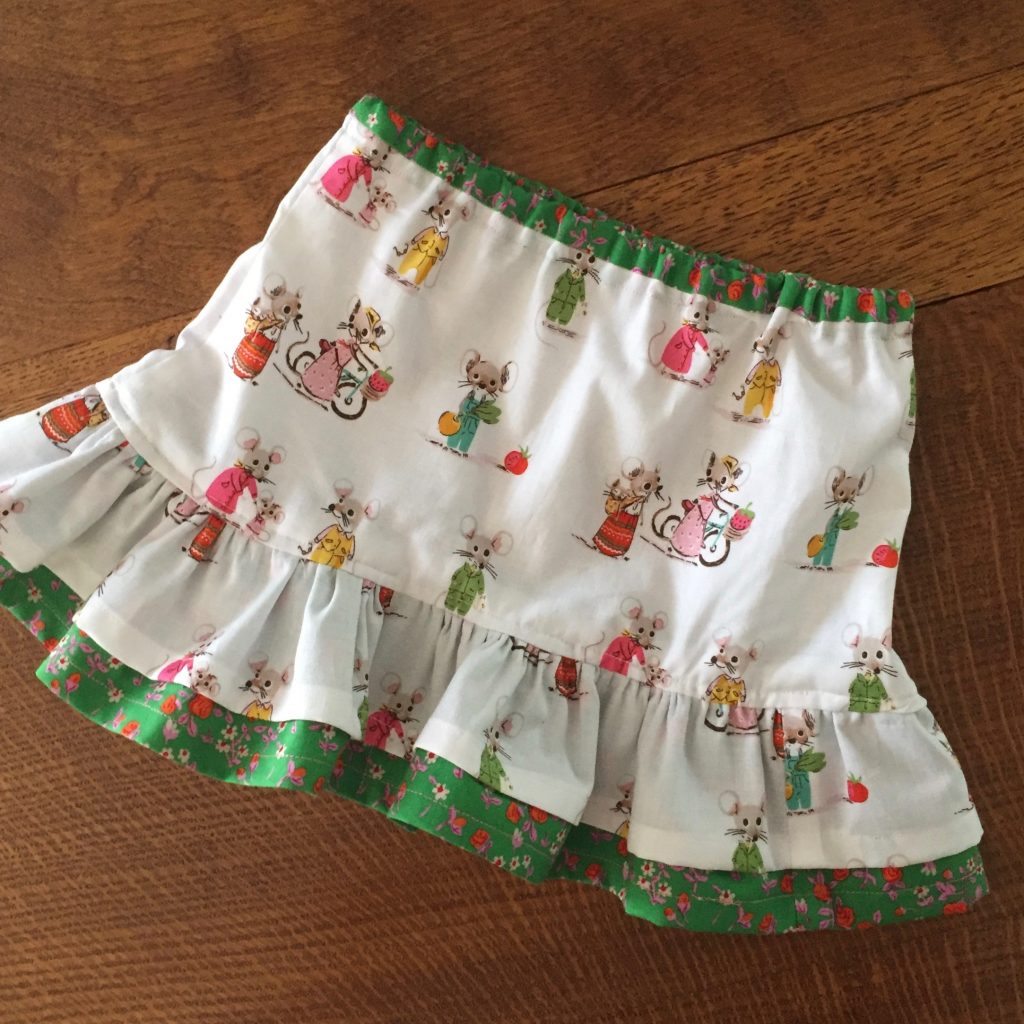
The pattern was a freebie from SewCanShe.com. This little skirt is so simple to make. The length of the skirt seemed quite short so I added a bit more length by adding on the second ruffle with the green floral.
I was also able to add some length by stitching a band of the floral around the top of the skirt. I used that to create the casing for the elastic. This added about one inch to the overall length. I love the way that pop of green looks at the top too!
I packaged up the skirt this morning and will mail it off to Vermont tomorrow morning. The elastic is not yet stitched together. I really wasn’t sure if I was making the waist the correct size so I am hoping my daughter in law can check the fit and then stitch it together. I know H will love these little mice with the bicycles.
Heather Ross creates such whimsical designs. Trixie is no exception. For those of you who are really into fussy cutting, the design lends itself perfectly! Hopefully it will fit H and I can share a picture of her wearing it soon.
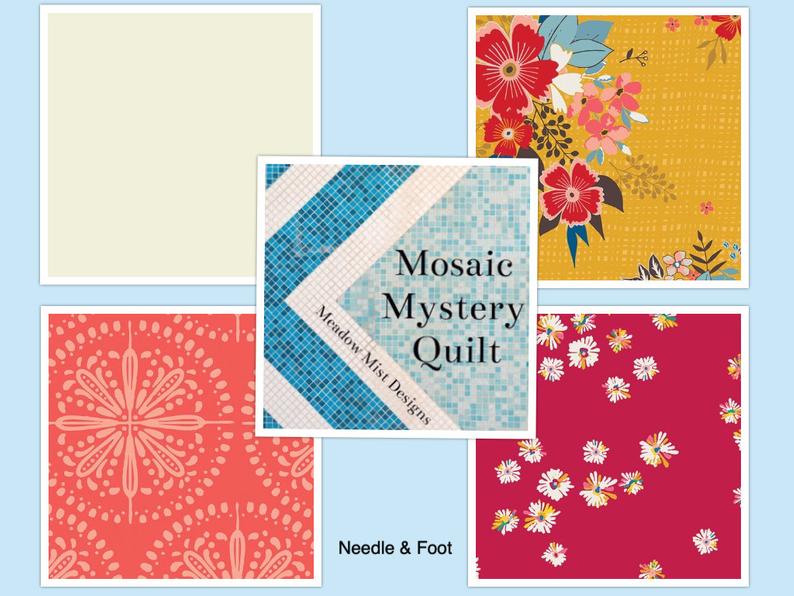
It is the first week of July, so you know what that means, right? The annual Meadow Mist Mystery Quilt kicks off! Cheryl Brickey of Meadow Mist Designs is back with her 5th annual mystery quilt, called the Mosaic Mystery, beginning on Thursday, July 4th. This confident beginner level quilt along is completely free to join and has a relaxed pace with monthly instructions posted on the first Thursday of each month. All quilt instructions will be posted on the Meadow Mist Designs blog and you can find all information about the quilt along on the Mosaic Mystery page. Join over 3,700 other quilters in the friendly and quite active Meadow Mist Designs Facebook Group . Cheryl is also offering a non-mystery option for those that want to join in, but would rather see the design ahead of time. You can sign up for the non-mystery option here.
This year I am involved on a couple of levels. Needle and Foot is sponsoring two different prizes during the event, one in August and another at the final reveal when the QAL wraps up. Additionally, Needle and Foot has two kits curated specifically for the Mosaic Mystery Quilt. This is really exciting! Cheryl and I worked together to create two kits, each with very different vibes.
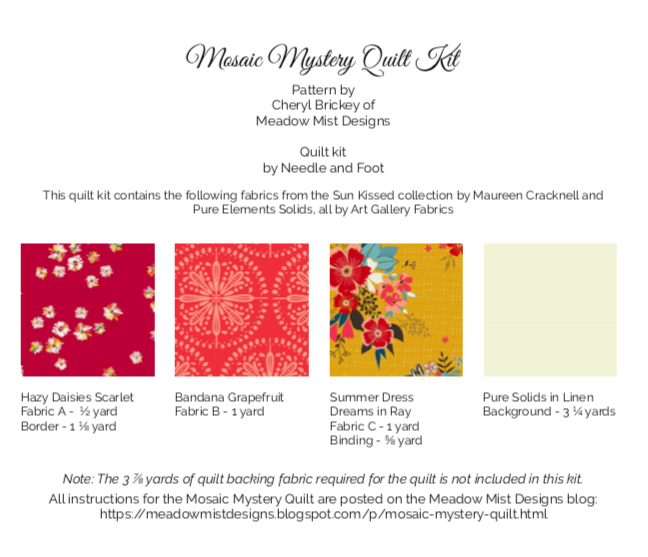
For some quilters, a Mystery Quilt can be somewhat daunting. It might feel a bit nerve wracking to pick fabrics without knowing what the pattern looks like. To this end, Cheryl and I thought it would be nice to have kits available for you to choose from. Both collections contain a selection of fabrics from Art Gallery Fabric, with a solid as the background and three prints used in the quilt and as the binding.
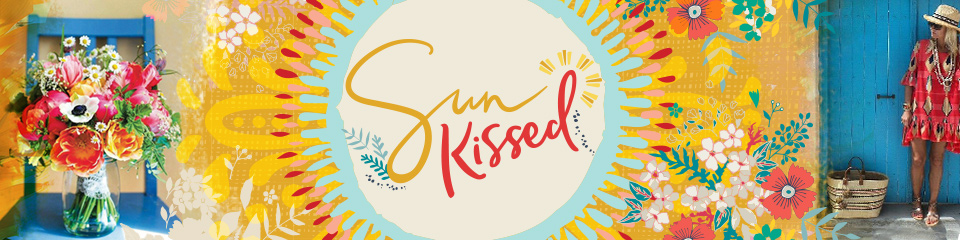
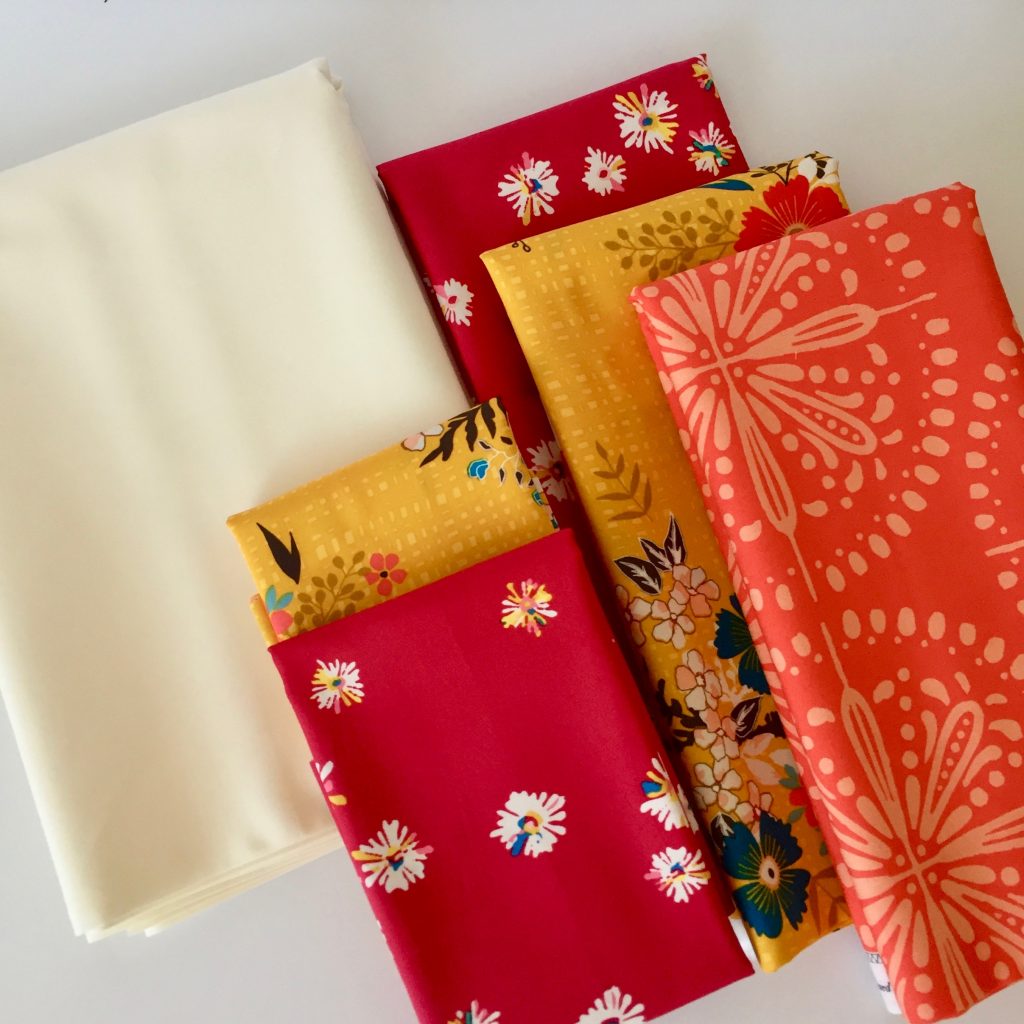
One of my kits contain three prints from the Sun Kissed line. Designed by Maureen Cracknell, these fabrics are summery and so cheerful. The Sun Kissed kit is available here.
Going clockwise, there is Linen for the background, Summer Dress Dreams, Hazy Daisies in Scarlet, and Bandana in Grapefruit.
The prints include large and medium scales which just happen to work well with the design of the Mystery Quilt.
Above are the details on the Sun Kissed kit for your review.
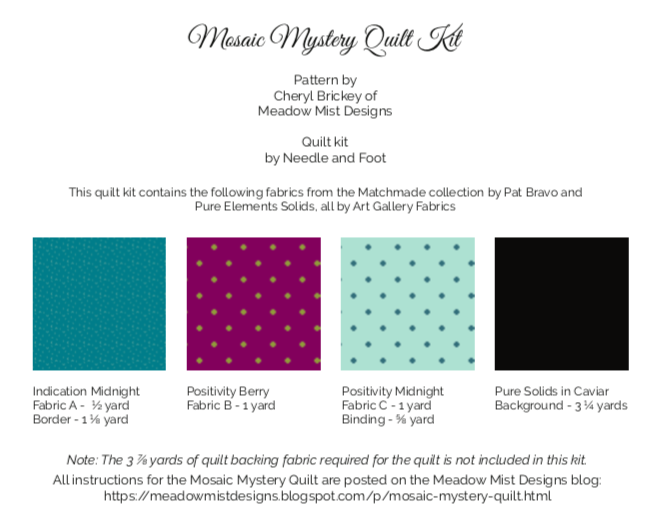
This stunning kit contains print fabrics from Pat Bravo’s Matchmade line. Created by Pat as a line of blenders, the range of color used for the Matchmade fabrics is bold and saturated. To see more details, click here.
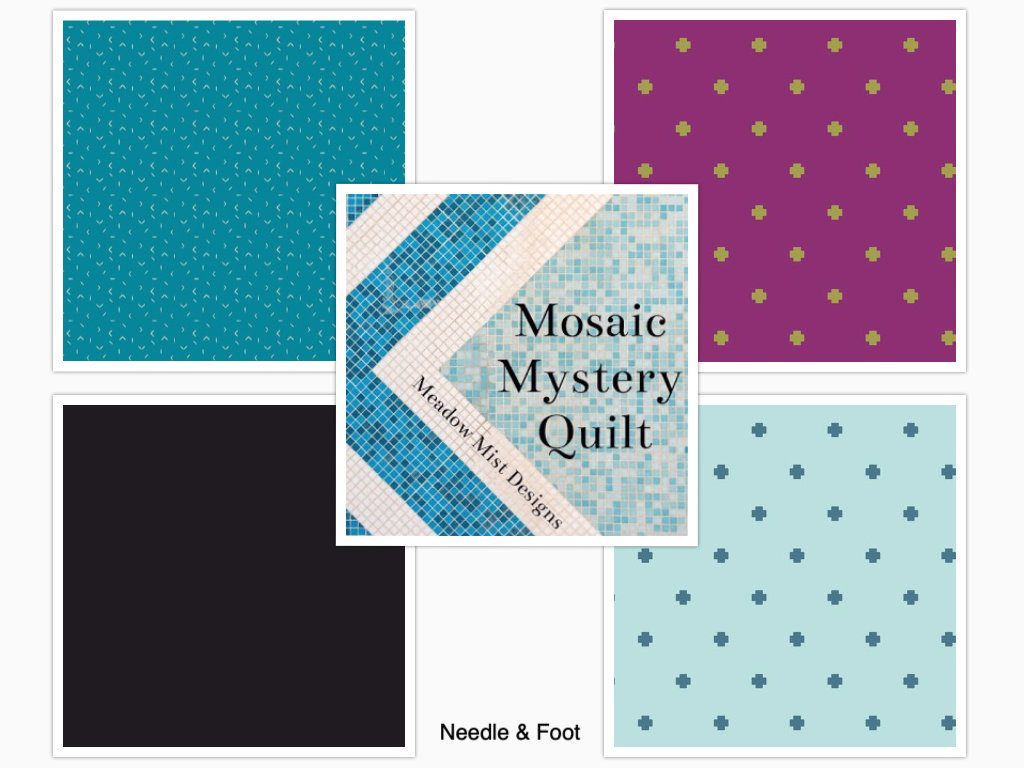
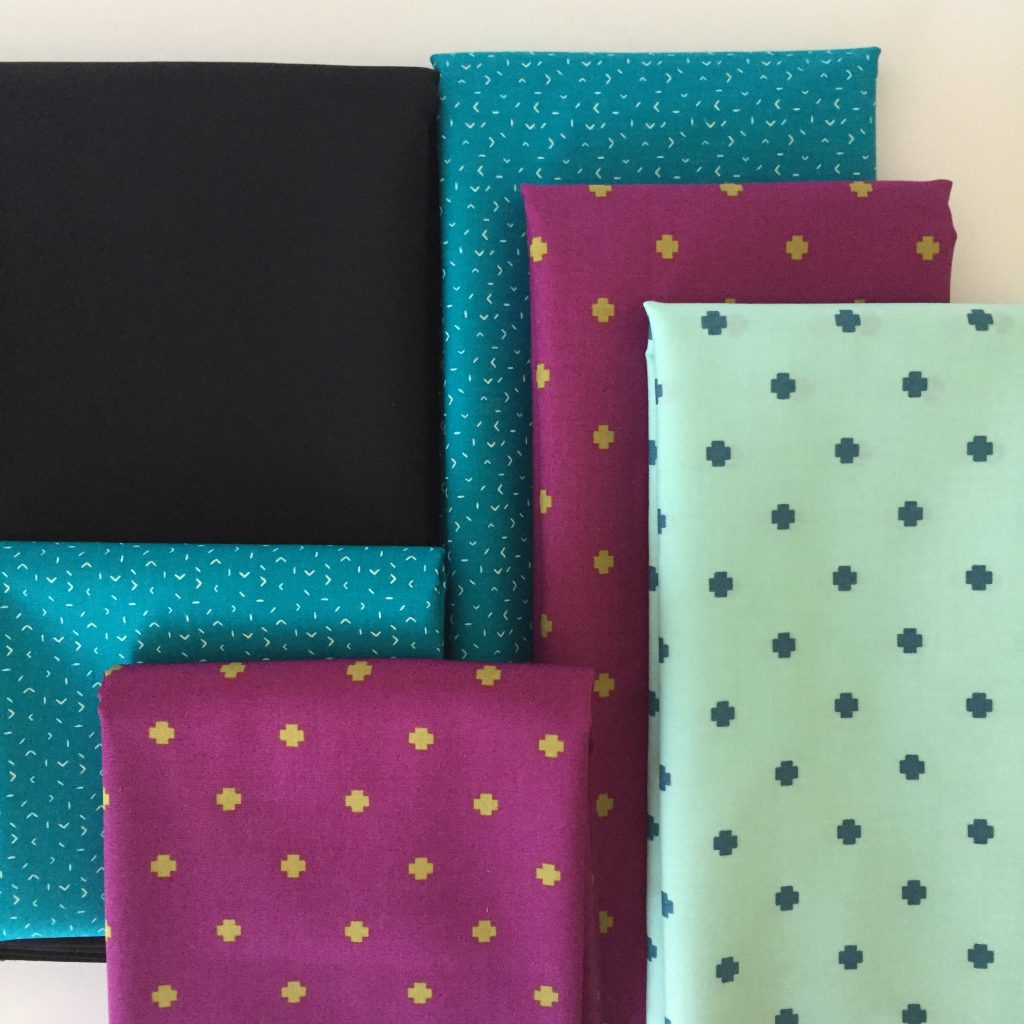
The background is a solid black called Caviar. The prints starting in the top left and going clockwise; Indication Midnight, Positivity Berry, and Positivity Midnight.
This kit is very modern with strong contrast. The prints are small scale and not the primary focus of the kit. The color is the focus – shades of teal and berry with a dramatic black background. Gorgeous!
Here are some details on the Matchmade kit for you to review.
I have had such a great experience working with Cheryl creating these two kits for you. If you are someone who is intimidated by the prospect of selecting fabrics for a mystery quilt pattern, be sure to take a look at the kits. Cheryl and I tried to create two very different kits, both modern with bold colors and yet each with a very different feel to them. Using strictly Art Gallery Fabrics in the kits means they are of the highest quality. Kits do not include the backing fabric or batting. However, I do have fabrics in stock that work really well for the backings for both kits. You can see backing suggestions when you click through to the kit links.
There are a number of each kit available in the shop. Come take a look! If you have any questions about the QAL – hop over to Cheryl’s so she can assist. Questions about the kits? Leave them in the comments or shoot me an email. And…. just to have some fun, let’s take a vote. Which kit is your favorite? Let me know in the comments. I am so curious.
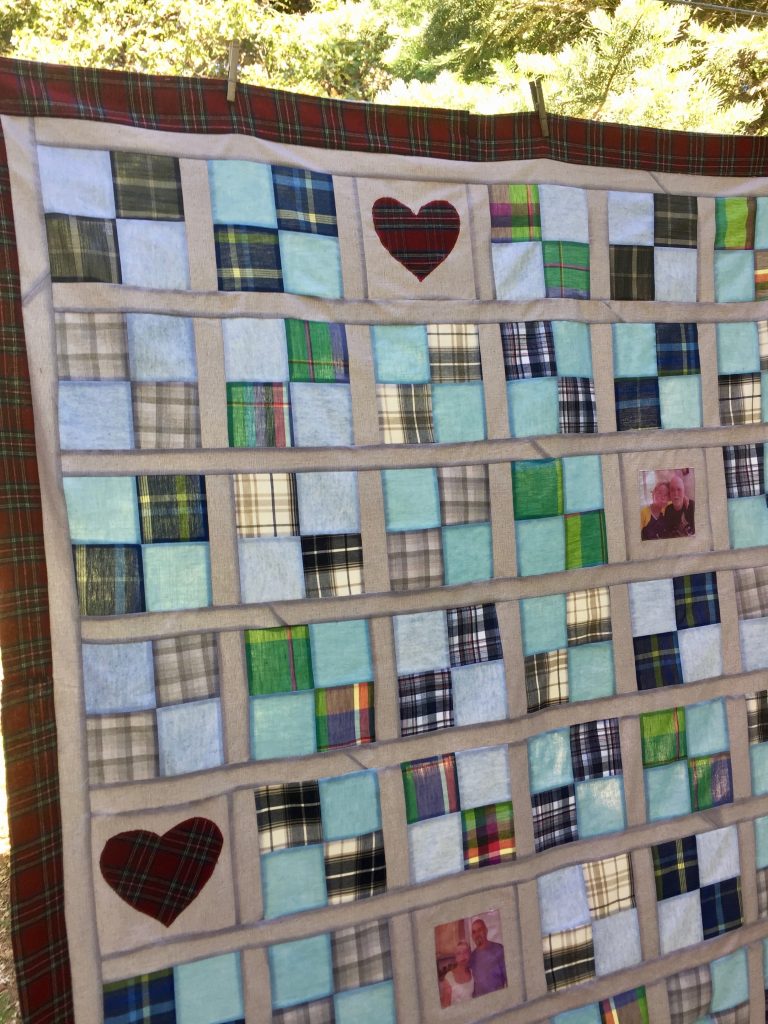
Over the past two years or so, I lost contact with my friend Susie. We used to take long walks together, never running out of chit-chat. We both really enjoyed it but life got so that we fell out of the routine. In January of this year, I contacted her about a volunteer commitment we both work on and she told me her husband had recently passed away of lung cancer. I didn’t even know Rick had been ill. I felt awful that we had lost touch and I hadn’t been around to support her during his very serious illness. I know all too well how important it is to have friends helping you during such a dark, painful time.
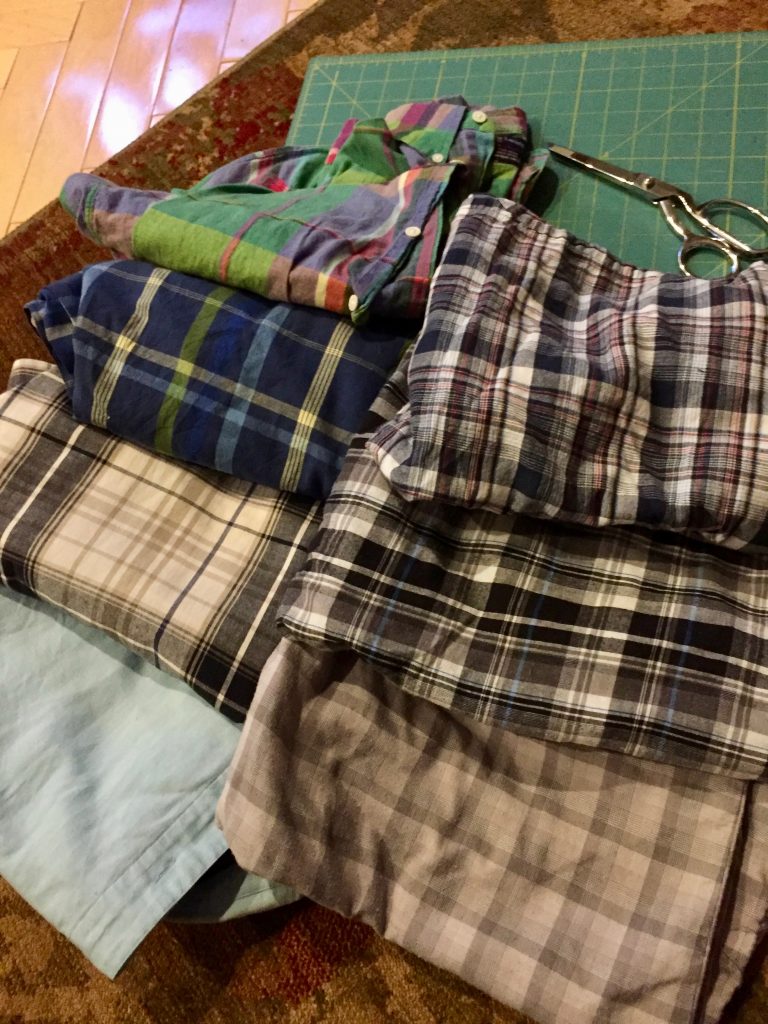
We got together a couple of times soon after and I offered to make a quilt for her with Rick’s clothes, whenever she thought she would be ready to part with some of his shirts. About a month later, she brought me a large bag containing his bathrobe, some shirts and shorts. We took a look at everything and talked about whether she was ok with me cutting them up. Then we looked at different quilts I had pinned to a memory quilt board on Pinterest. She was drawn to a simple four patch block with sashing. Easy enough to make! Susie also asked if I would include two photos of her with Rick she had printed on fabric. I haven’t used that sort of thing before but of course I was happy to add them to a block.
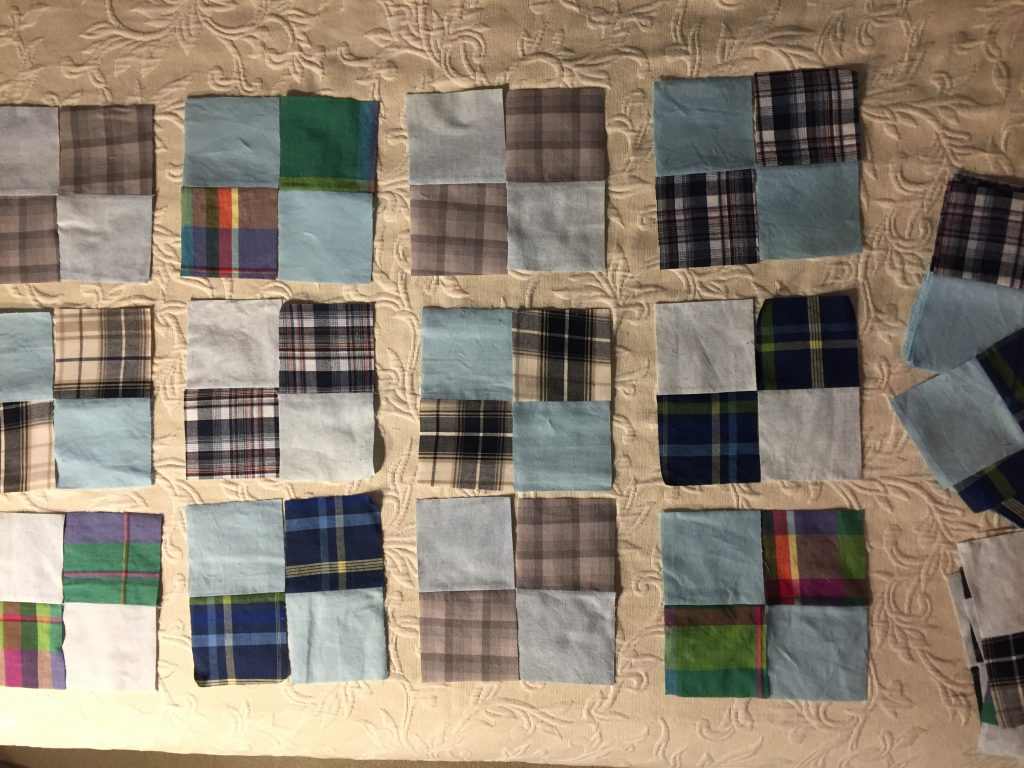
Looking at the collection of shirts and shorts, it seemed best to use the two pairs of solid blue shorts and then two plaids for each four patch. Susie looked in the shop downstairs and chose a very neutral textured solid for the sashing and border.
Making four patch blocks
Working with clothing that has been worn is a bit tricky. Susie chose the items Rick favored most because she had the sweetest memories of him in those shirts or shorts. Of course this means some of them were well worn. I wish I could remember who it was, but on Instagram, a nice quilter reminded me to back any thin fabrics with a stabilizer of sorts. This was perfect. I fused a woven interfacing to the back of some of the chunks of fabric before I cut the strips. Once that was done, I cut 3 1/2″ strips wherever I could. Then made strip sets and sliced them up to make the four patch blocks.
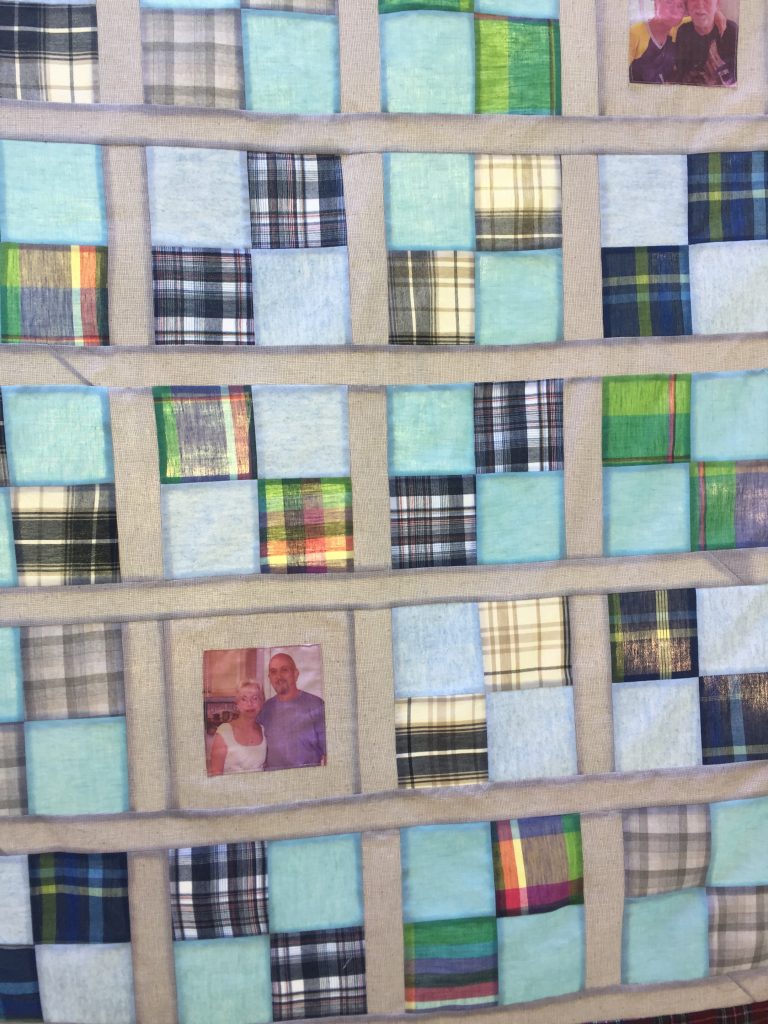
What a sweet photo of Rick and Susie
The next step was to create two blocks where I could utilize the pictures of Rick and Susie. I wasn’t really sure how to do this? The fabric they were printed on seemed to fray easily so I didn’t want to stitch a border directly to the printed piece. Instead I chose to fuse the photo to a square cut from the neutral sashing fabric. After fusing it (with each edge pressed under to create a clean look) I topstitched around the perimeter.
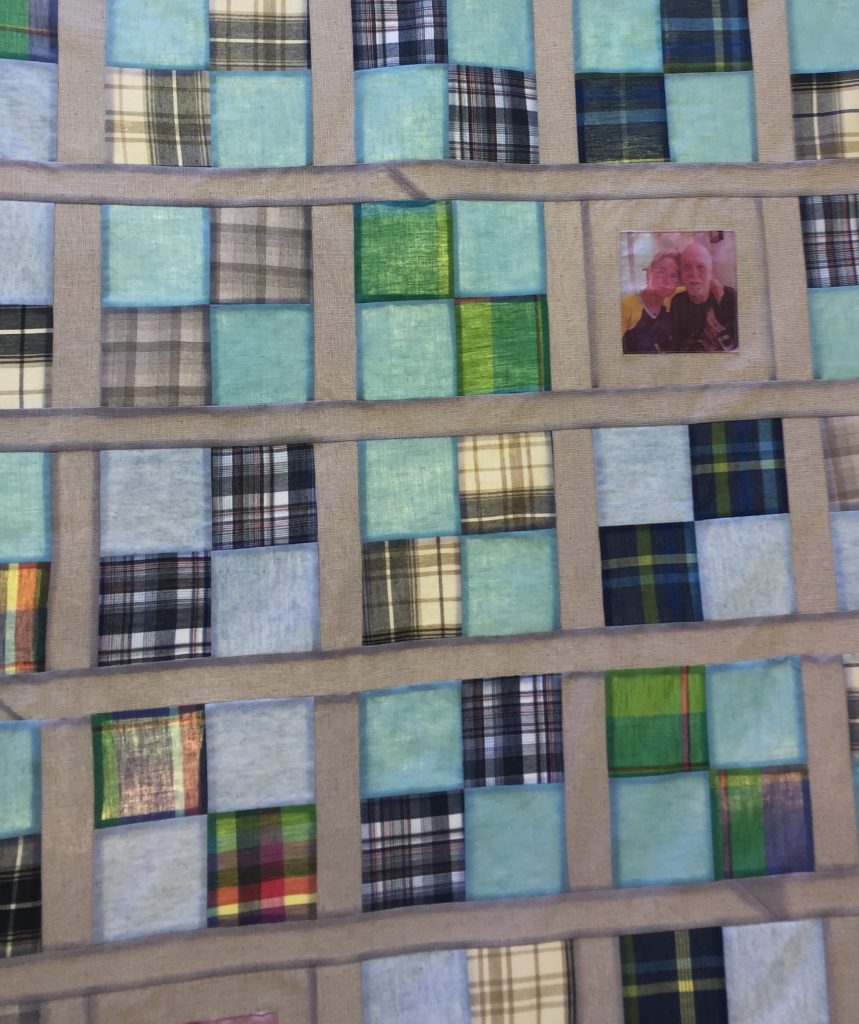
Another sweet picture!
I think that worked quite well. One limiting factor was the shorts I used as a solid. I ran out of that fabric with two blocks to go. What to do? I decided to cut two more plain blocks from the sashing fabric. Then I took bits of the flannel bathrobe and cut two hearts from it. Those were fused to the background squares and appliquéd to the fabric. They look very cute and I like the pop of the deep red plaid.
Finally, we agreed the red plaid flannel robe would be the perfect outer border. I really love how the red flannel gives a cozy and rustic look to the quilt top.
This photo captures the true colors best.
The quilt top measures roughly 60″ x 70″ which should be perfect for my very tiny friend. Now I need to choose a backing and get it basted. This is the type of project I really enjoy. It holds meaning and comfort for my friend. I really regret not having made something like this when Mark – my first husband – died in 1994. I was overwhelmed with being widowed, single parenting my boys etc. Sewing was not at the forefront of my mind – in fact I didn’t really sew for many years after that. Making this for Susie is very satisfying. I am really looking forward to quilting it up so she can enjoy it. September will mark the one year anniversary of Rick’s death and I want to be sure she has this before then.
Linking to my usual spots – check them out at the top of the page, under Link Ups.
Watch for a special post coming up on Friday!! Until then, to my US readers, have a wonderful Fourth of July holiday! Also, I have a fantastic giveaway happening today and tomorrow over on my Instagram feed. Be sure to check it out.