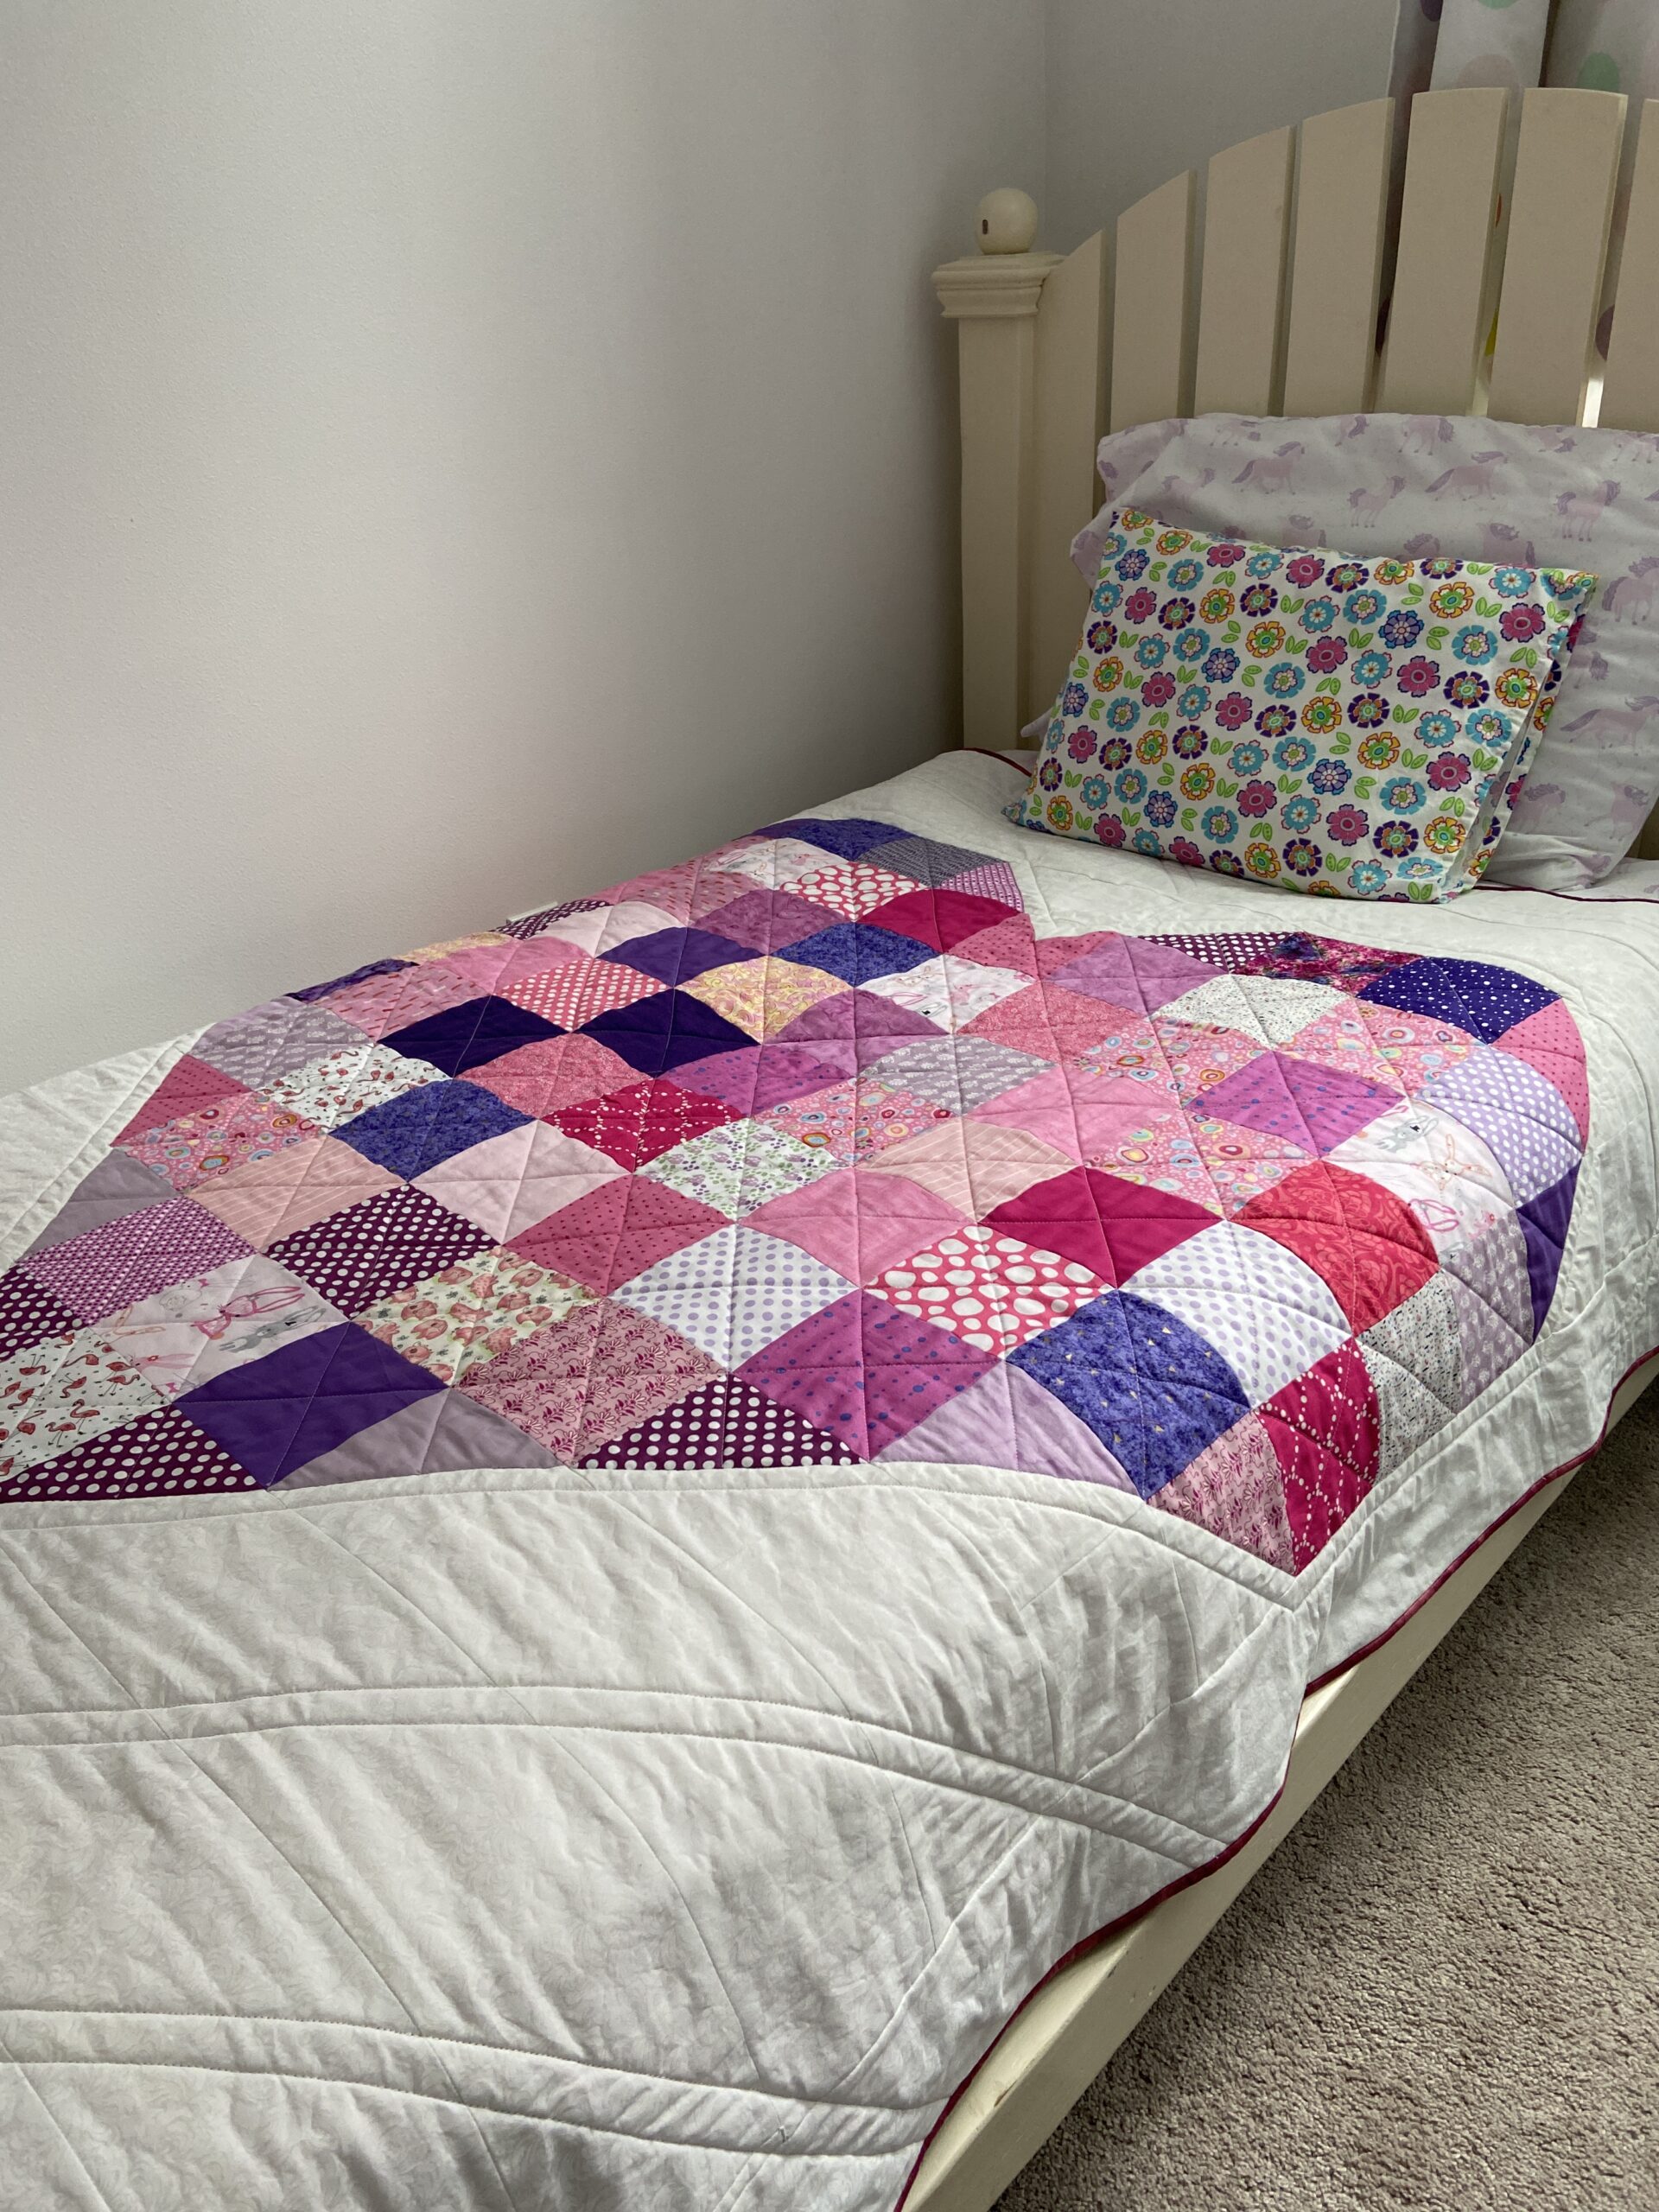
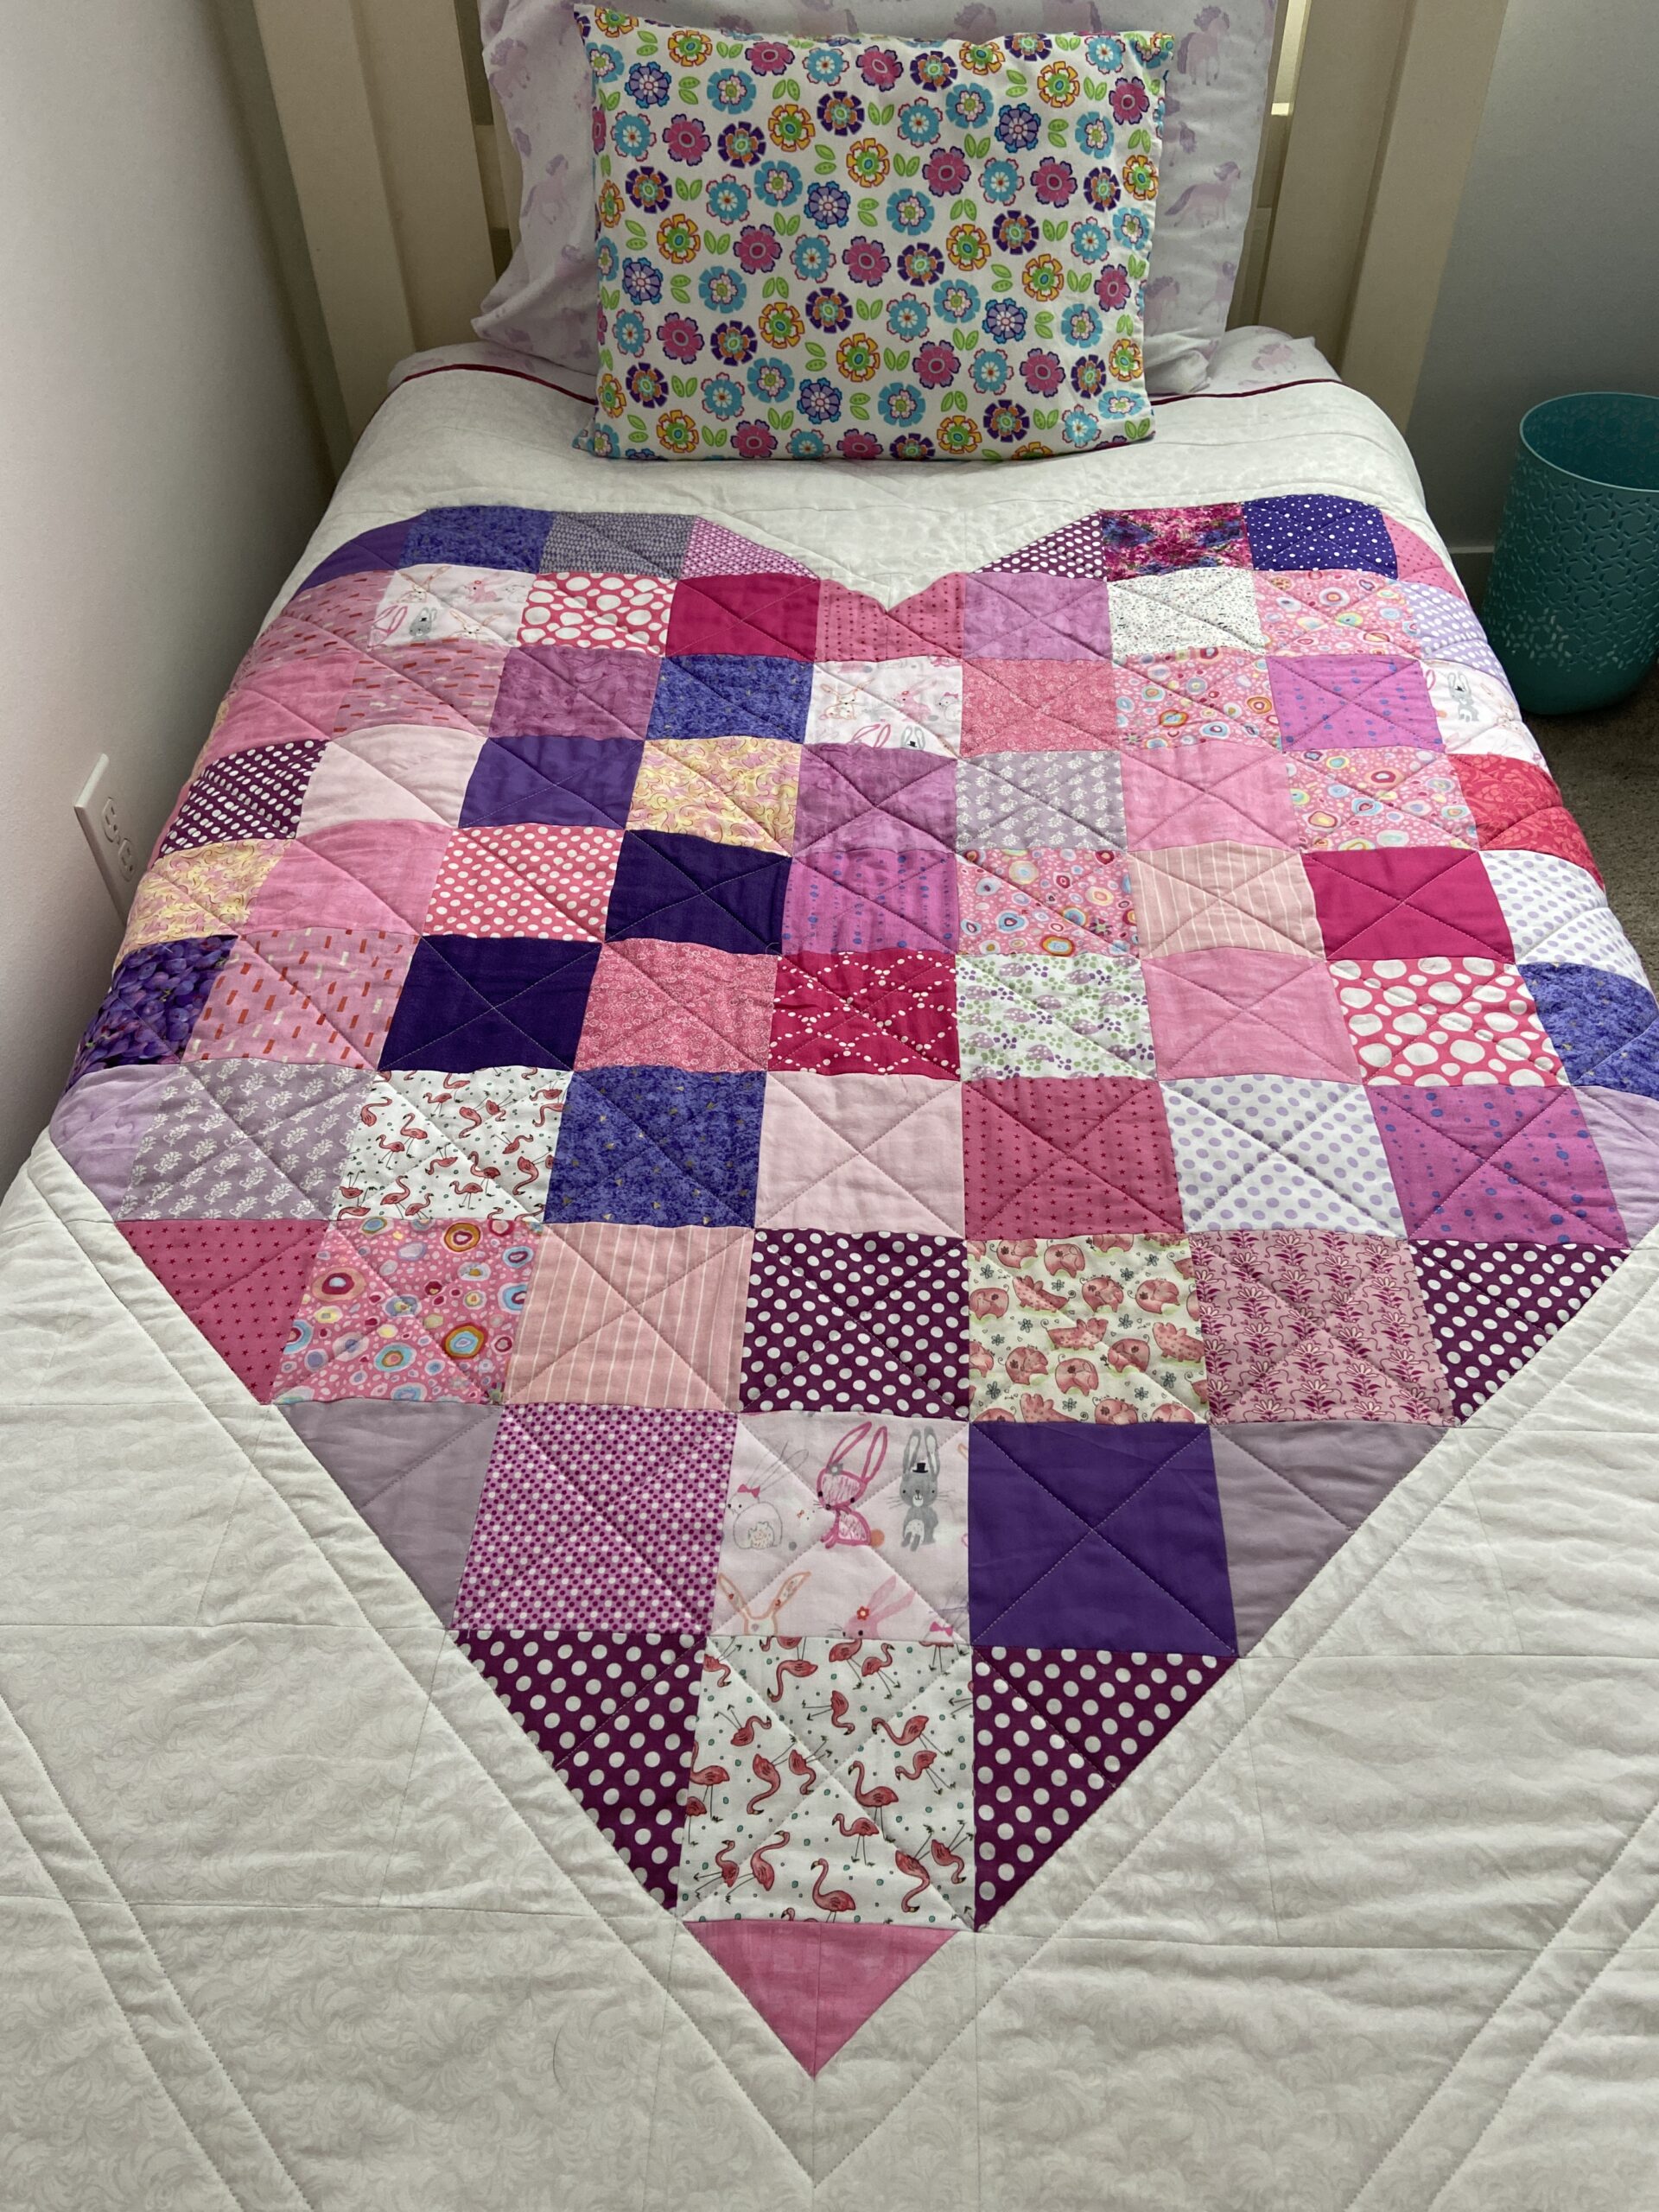
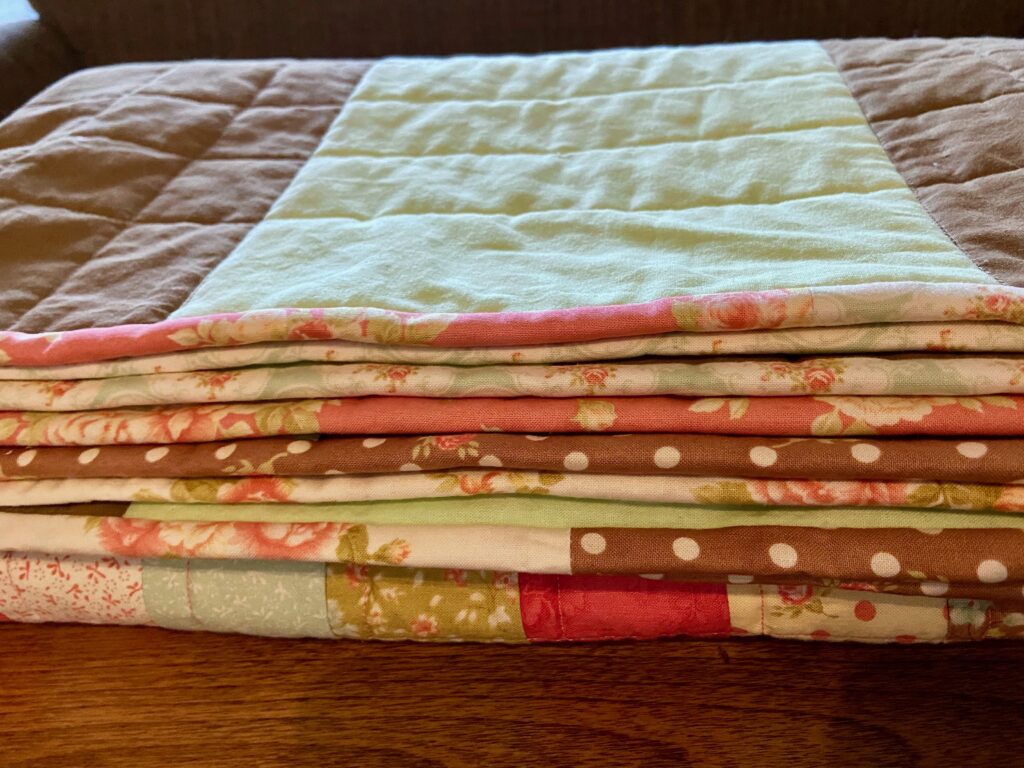
Not sure why I have not posted this already but I finished up the pink heart quilt for the twin bed. Actually I finished it several weeks ago. I kept thinking I would go take some sort of artsy, creative photos of it but really, a twin size quilt is a bit cumbersome to take outside and hang over a fence or tree branch. I settled for somewhat boring shots of it on the bed. Better than never recording the finish!
It is cozy, warm and very, very pink! Just what little girls need when spending the night at their grandparent’s house! Simple cross hatch across the heart and then minimal straight line quilting over the white portion did the trick. I am somewhat concerned I need more quilting over the white background and will add another set of double lines between the existing sets. Shouldn’t take any time at all to pop the walking foot on the machine and add a bit more stitching.
It looks puffy because it is! I wanted this to be super warm. The girls often wear nightgowns or little shorts and t-shirts to bed so I gave this quilt an extra layer. When I basted it, I had the batting (80/20) and then also added a layer to thin pink flannel between the batting and the dark pink backing. Not surprisingly, this added some heft to the quilt. I think it feels super cozy.
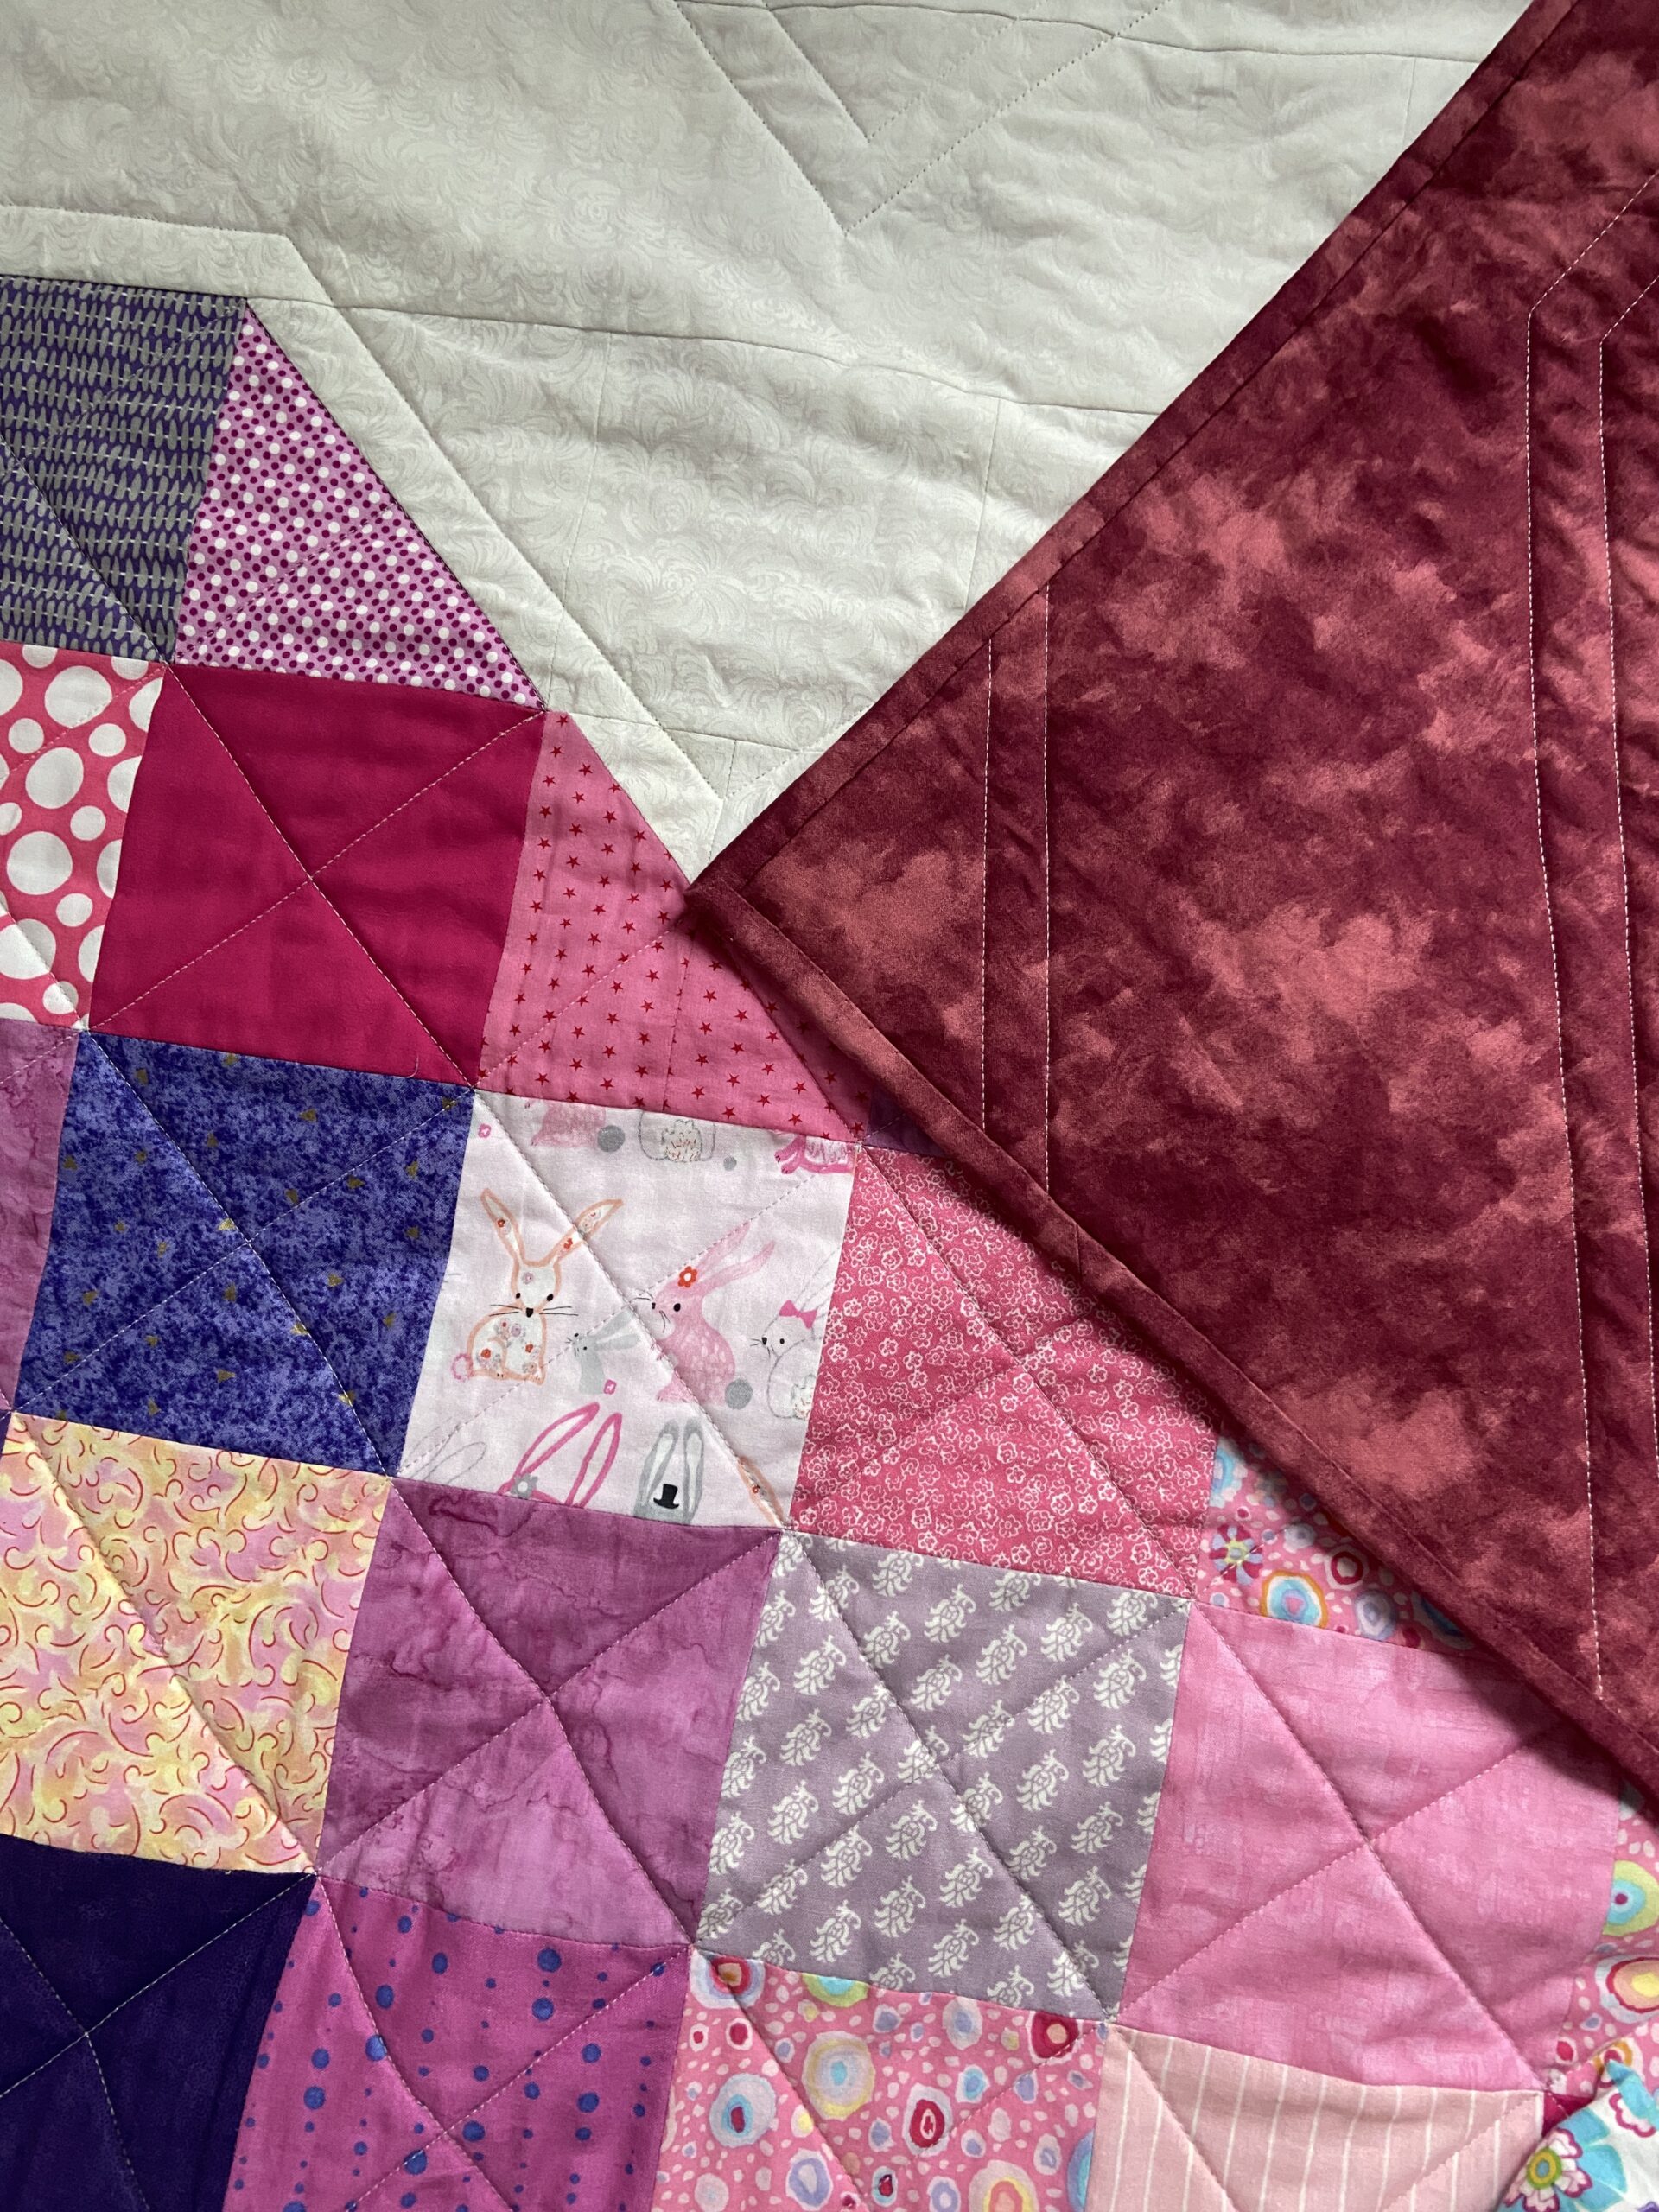
Here is the backing. I have a number of yards of this leftover from the shop so it felt great to use a large portion to back the quilt and to bind it as well. I prewashed it to prevent any color bleeding into the white portion from the front of the quilt. It shouldn’t be an issue.
Both of the heart quilts look sweet side by side in this guest room. These will keep the grand kids cozy for the next sleepover!! Enjoy the weekend everyone. We don’t have any plans so maybe a little sewing, a little exercise and some yard work. Sounds good to me!
Linking to my usuals. Check them out at the top of the page, under link ups. Additionally, I am linking to the Favorite Finish link over at Quilting Jetgirl.
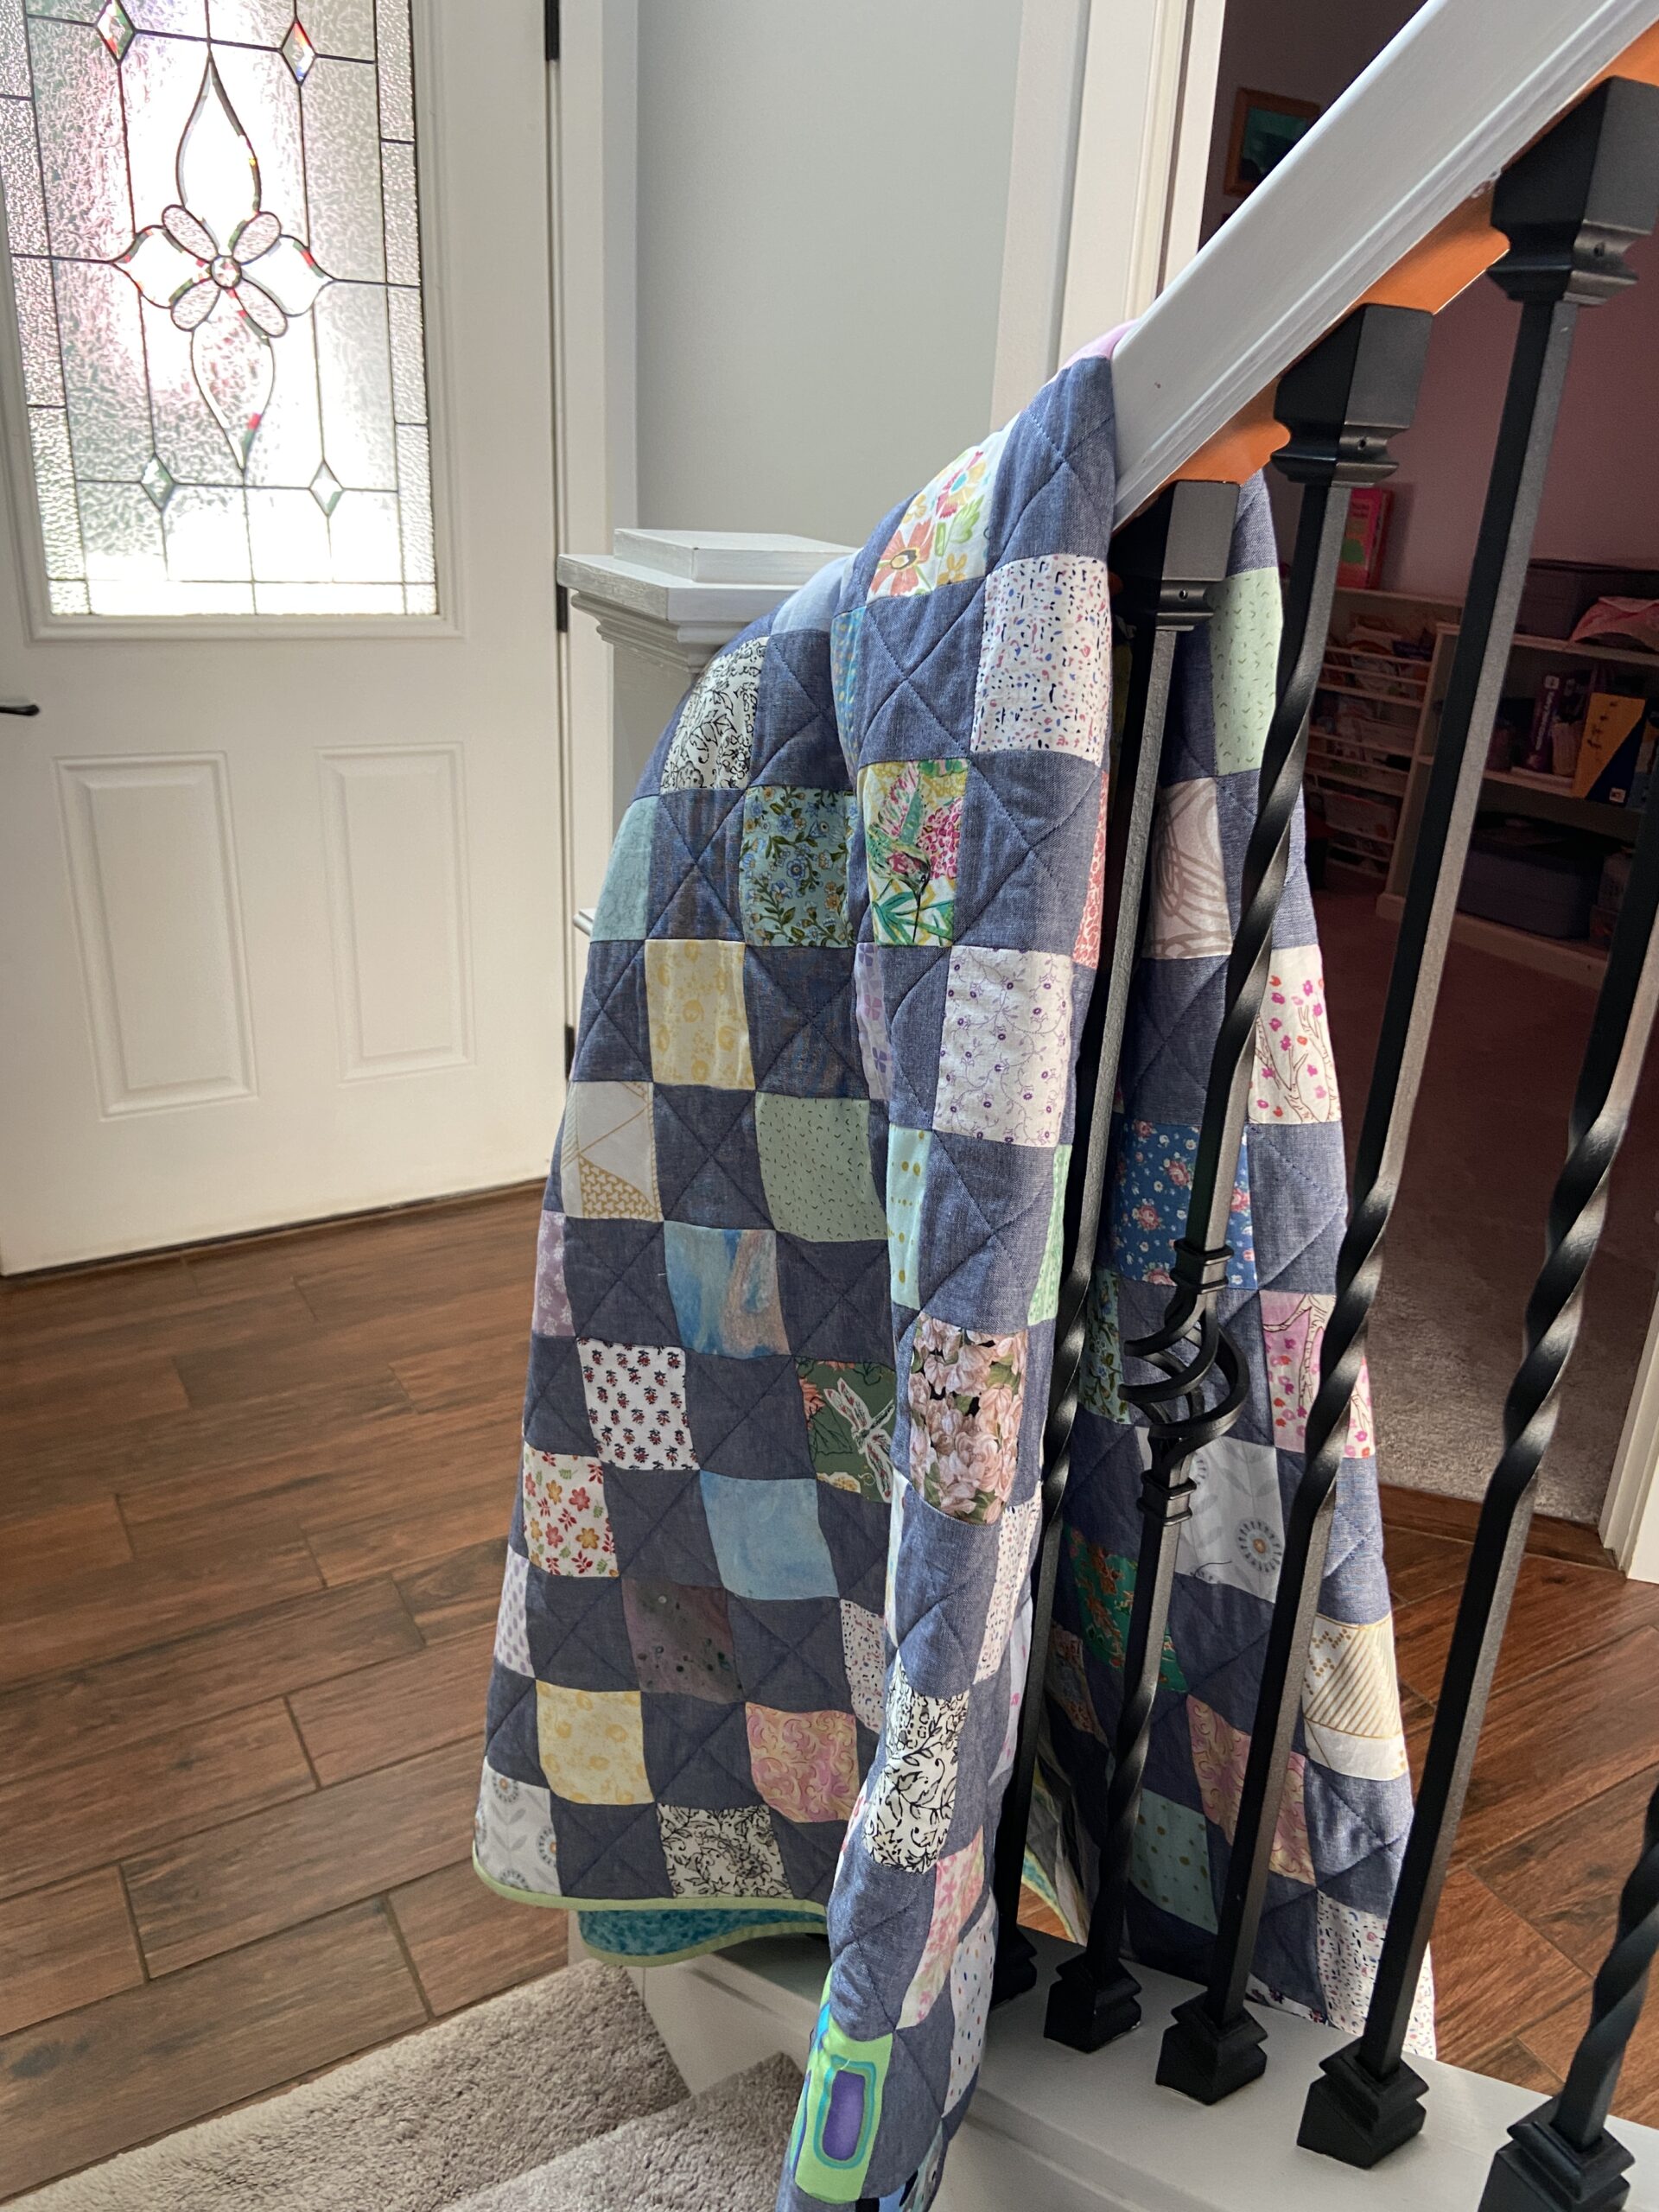
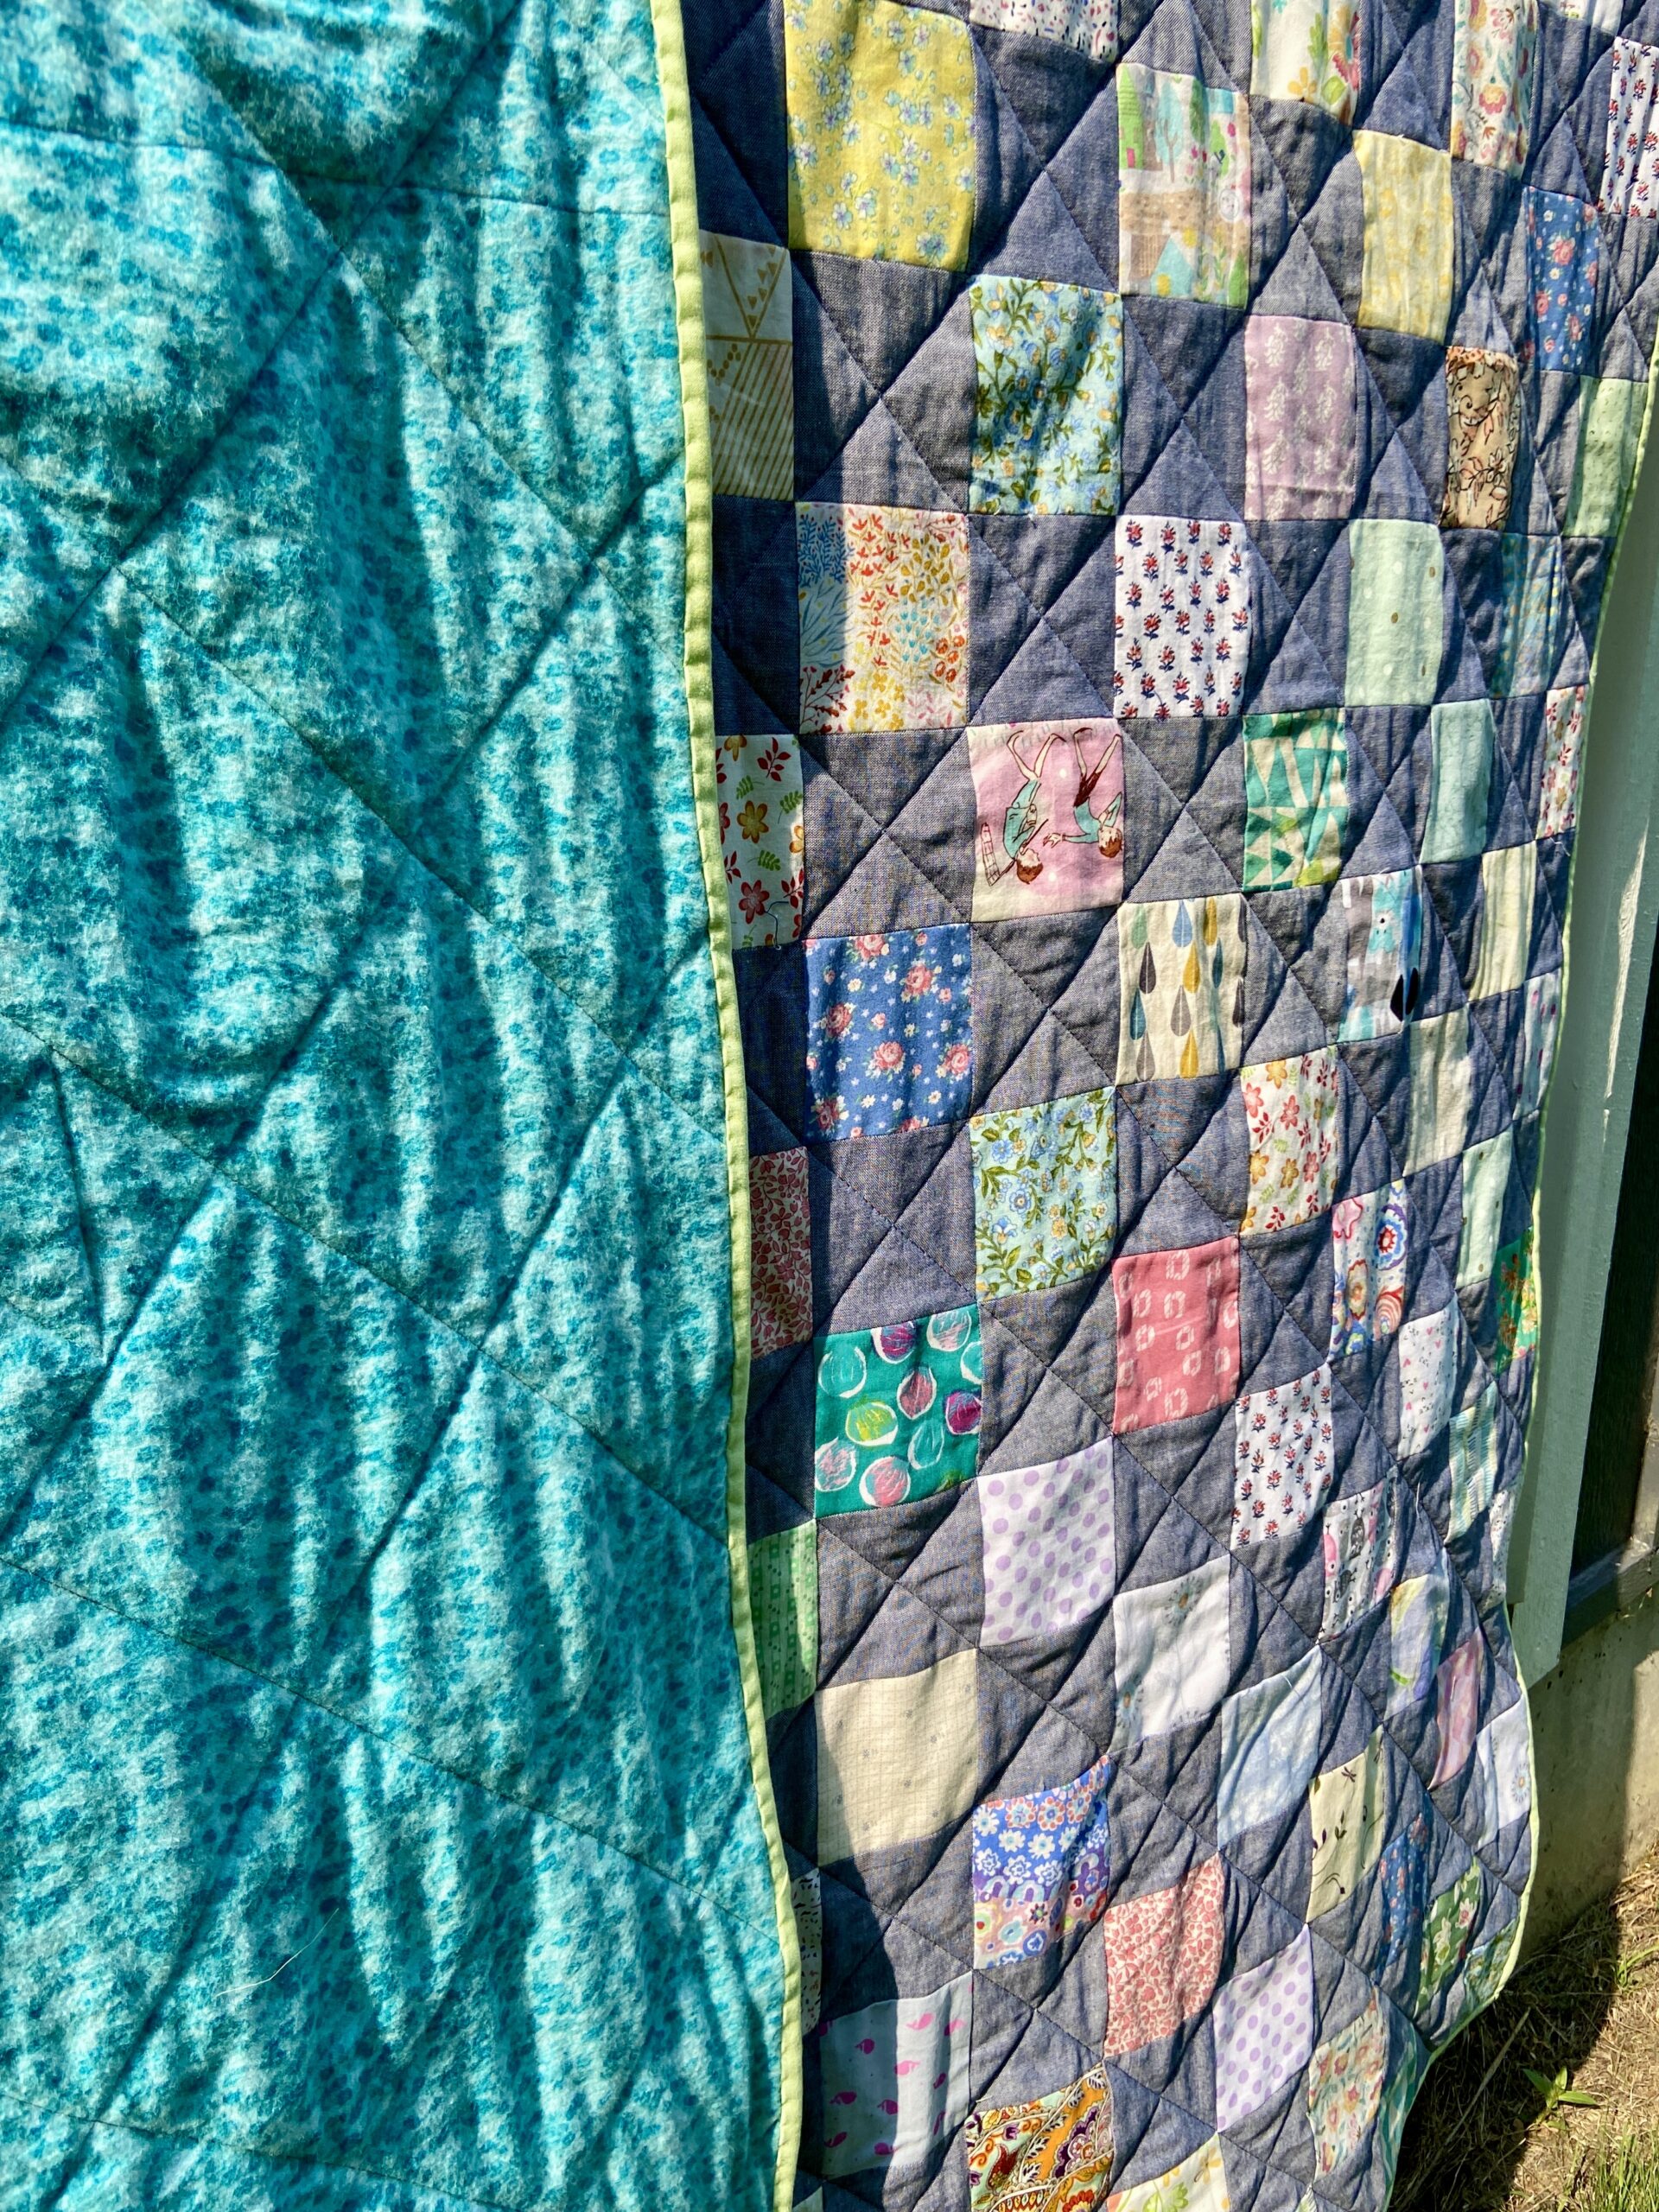
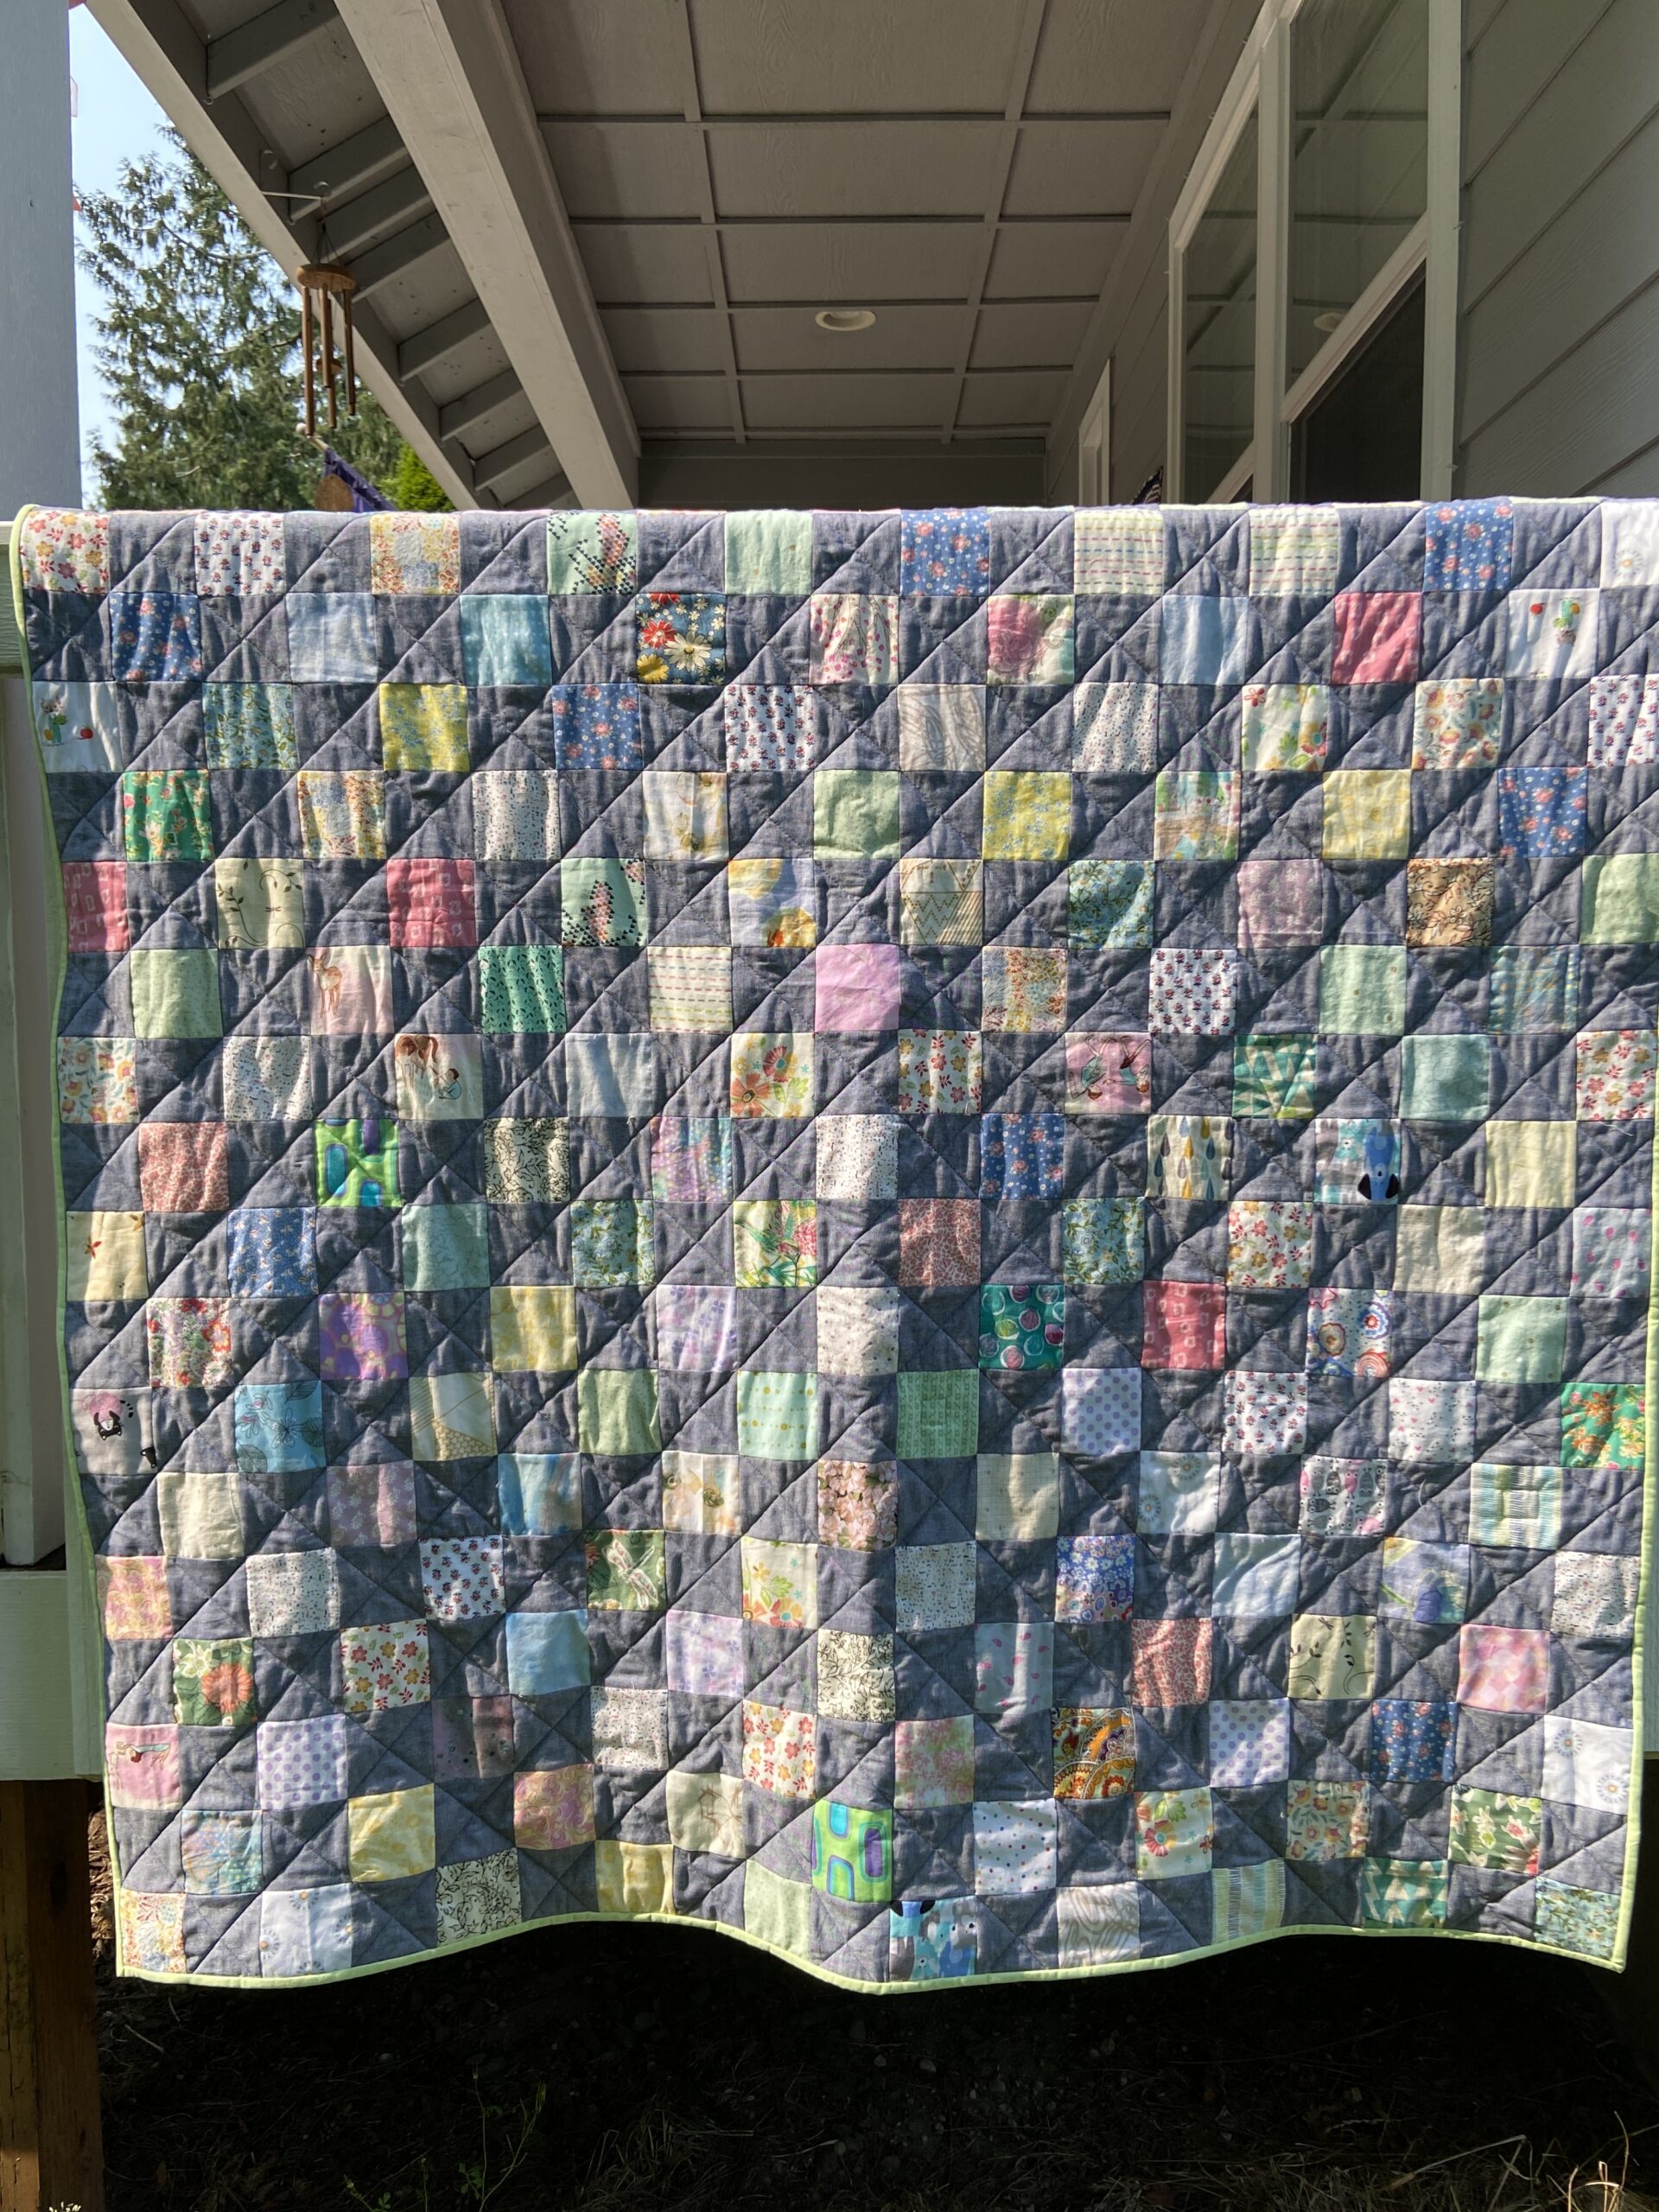
Just dropping in to share this cozy quilt! I finished it up last week which is fairly quick considering I started it just a couple of months ago. I posted that I was battling a ridiculously lengthy virus and, out of boredom, started stitching 3 1/2″ prints with alternate blue chambray squares. Then I got distracted with the leftover squares and made a matching baby quilt. Well, now I have a set!
The lap size version is so soft, drapes wonderfully and makes me happy! (Really, what more does one need)?
I quilted it just like the baby quilt with a straight line running through each chambray square.
The backing is a soft flannel I found at a thrift shop a month back. I think someone may have donated it because it somehow got a few spots of what looks like rust (?) on the fabric. Since it was close enough to the edges I was able to work around them nicely. Along with the flannel backing, I also used a light weight batting. This ended up giving the quilt just the right weight and drape.
This is the sort of quilt I love when I am watching tv or reading a good book.
After taking pictures the other day, I brought the quilt upstairs to the sewing room. I got an urge to free motion quilt a few designs in some of the print squares. I had pink Glide thread in the machine so I chose a variety of the pink squares and stitched a flower on them or a little swirl. I may do a few more today. I know I won’t quilt all of the print squares but it was satisfying to do a few here and there. It looks cute. Sorry, no pictures available. Maybe at some point?? This doesn’t change the overall look of the quilt anyway. It was just something I did for fun.
That is it for today. It is going to be a gorgeous day out. How about you? Are you enjoying some pretty spring weather?
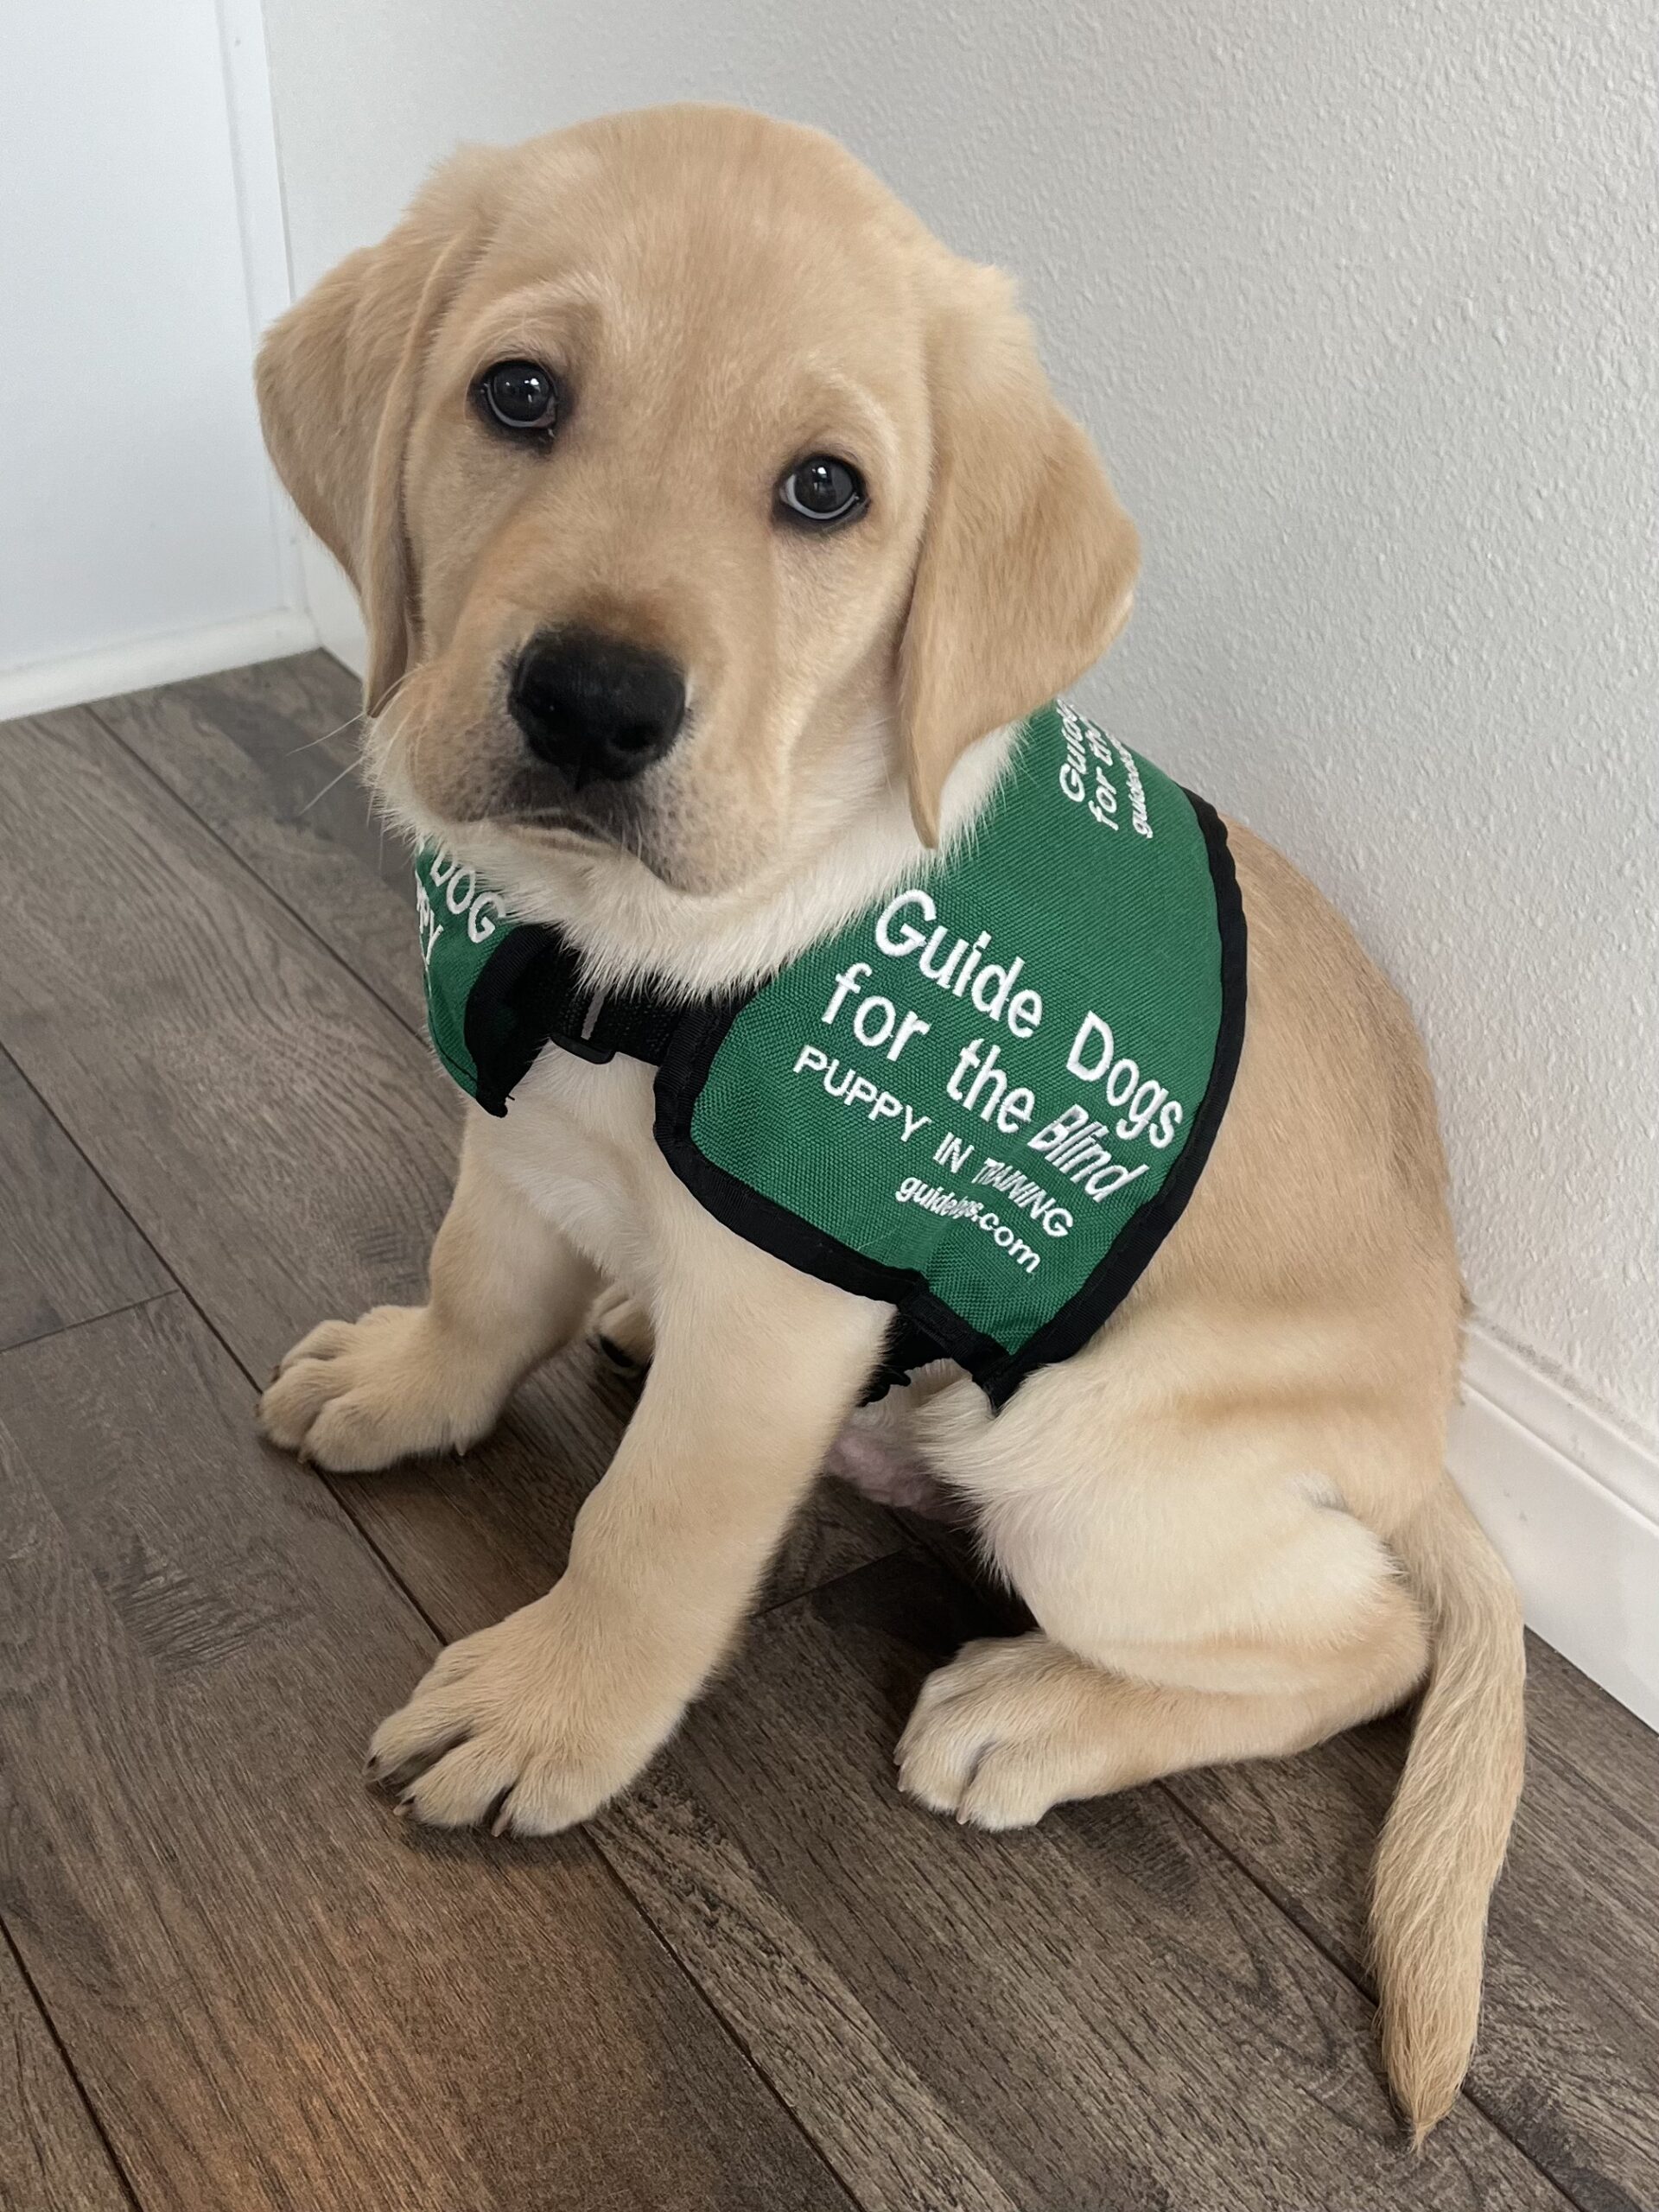
Friends – It’s been a fun week or so around here. First off, don’t let the title confuse you. Ray and I did NOT get a new puppy!! I don’t have the patience for that. But my sister does and she did get one. He is adorable so let’s start off with him!
This is Powers. My sister has already raised three guide dogs for the blind. This cute little guy makes number four. His name is Powers and he is nine weeks old. They are in the throes of housebreaking him and hoping he will soon be able to sleep all night. It is so much like having a new baby in the house. He is just adorable and like any good auntie, I went and met him. He has that sweet puppy breath and is so heavy!! He is going to be a big boy, that’s for sure. Cathy is already working on his training. Raising a guide dog is an enormous commitment.
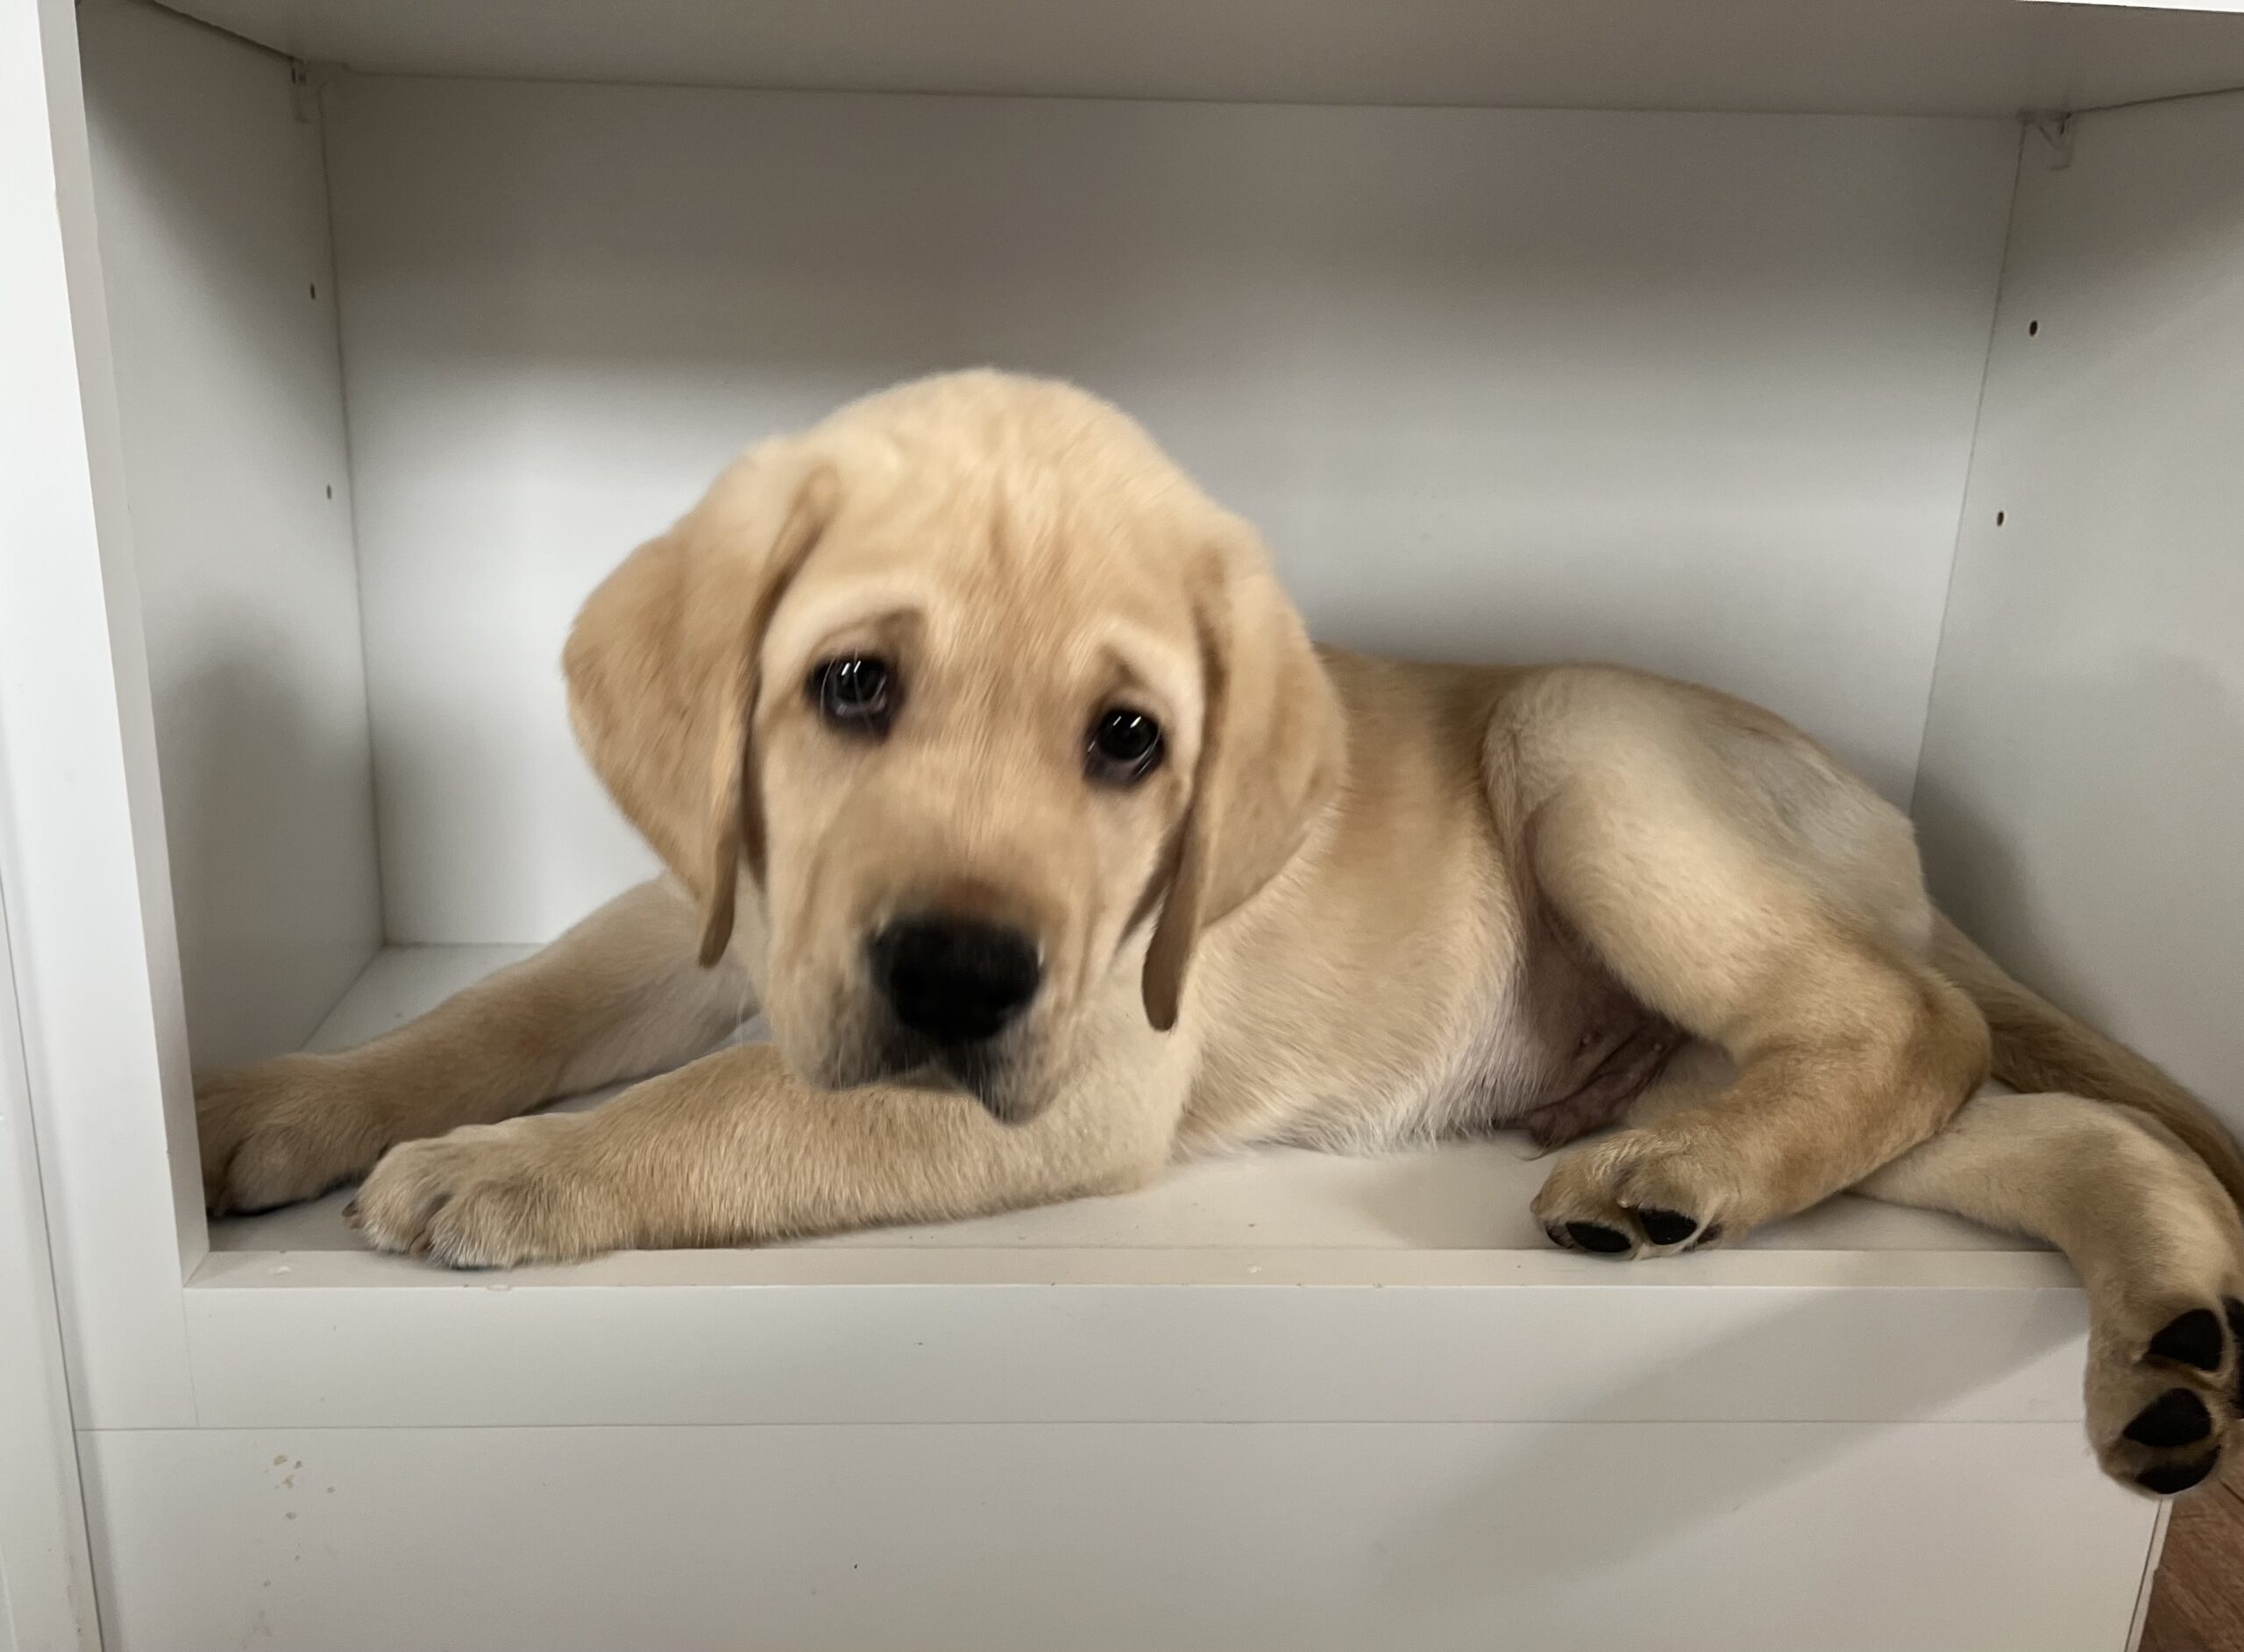
This face! I love his eyes and how soft he is.
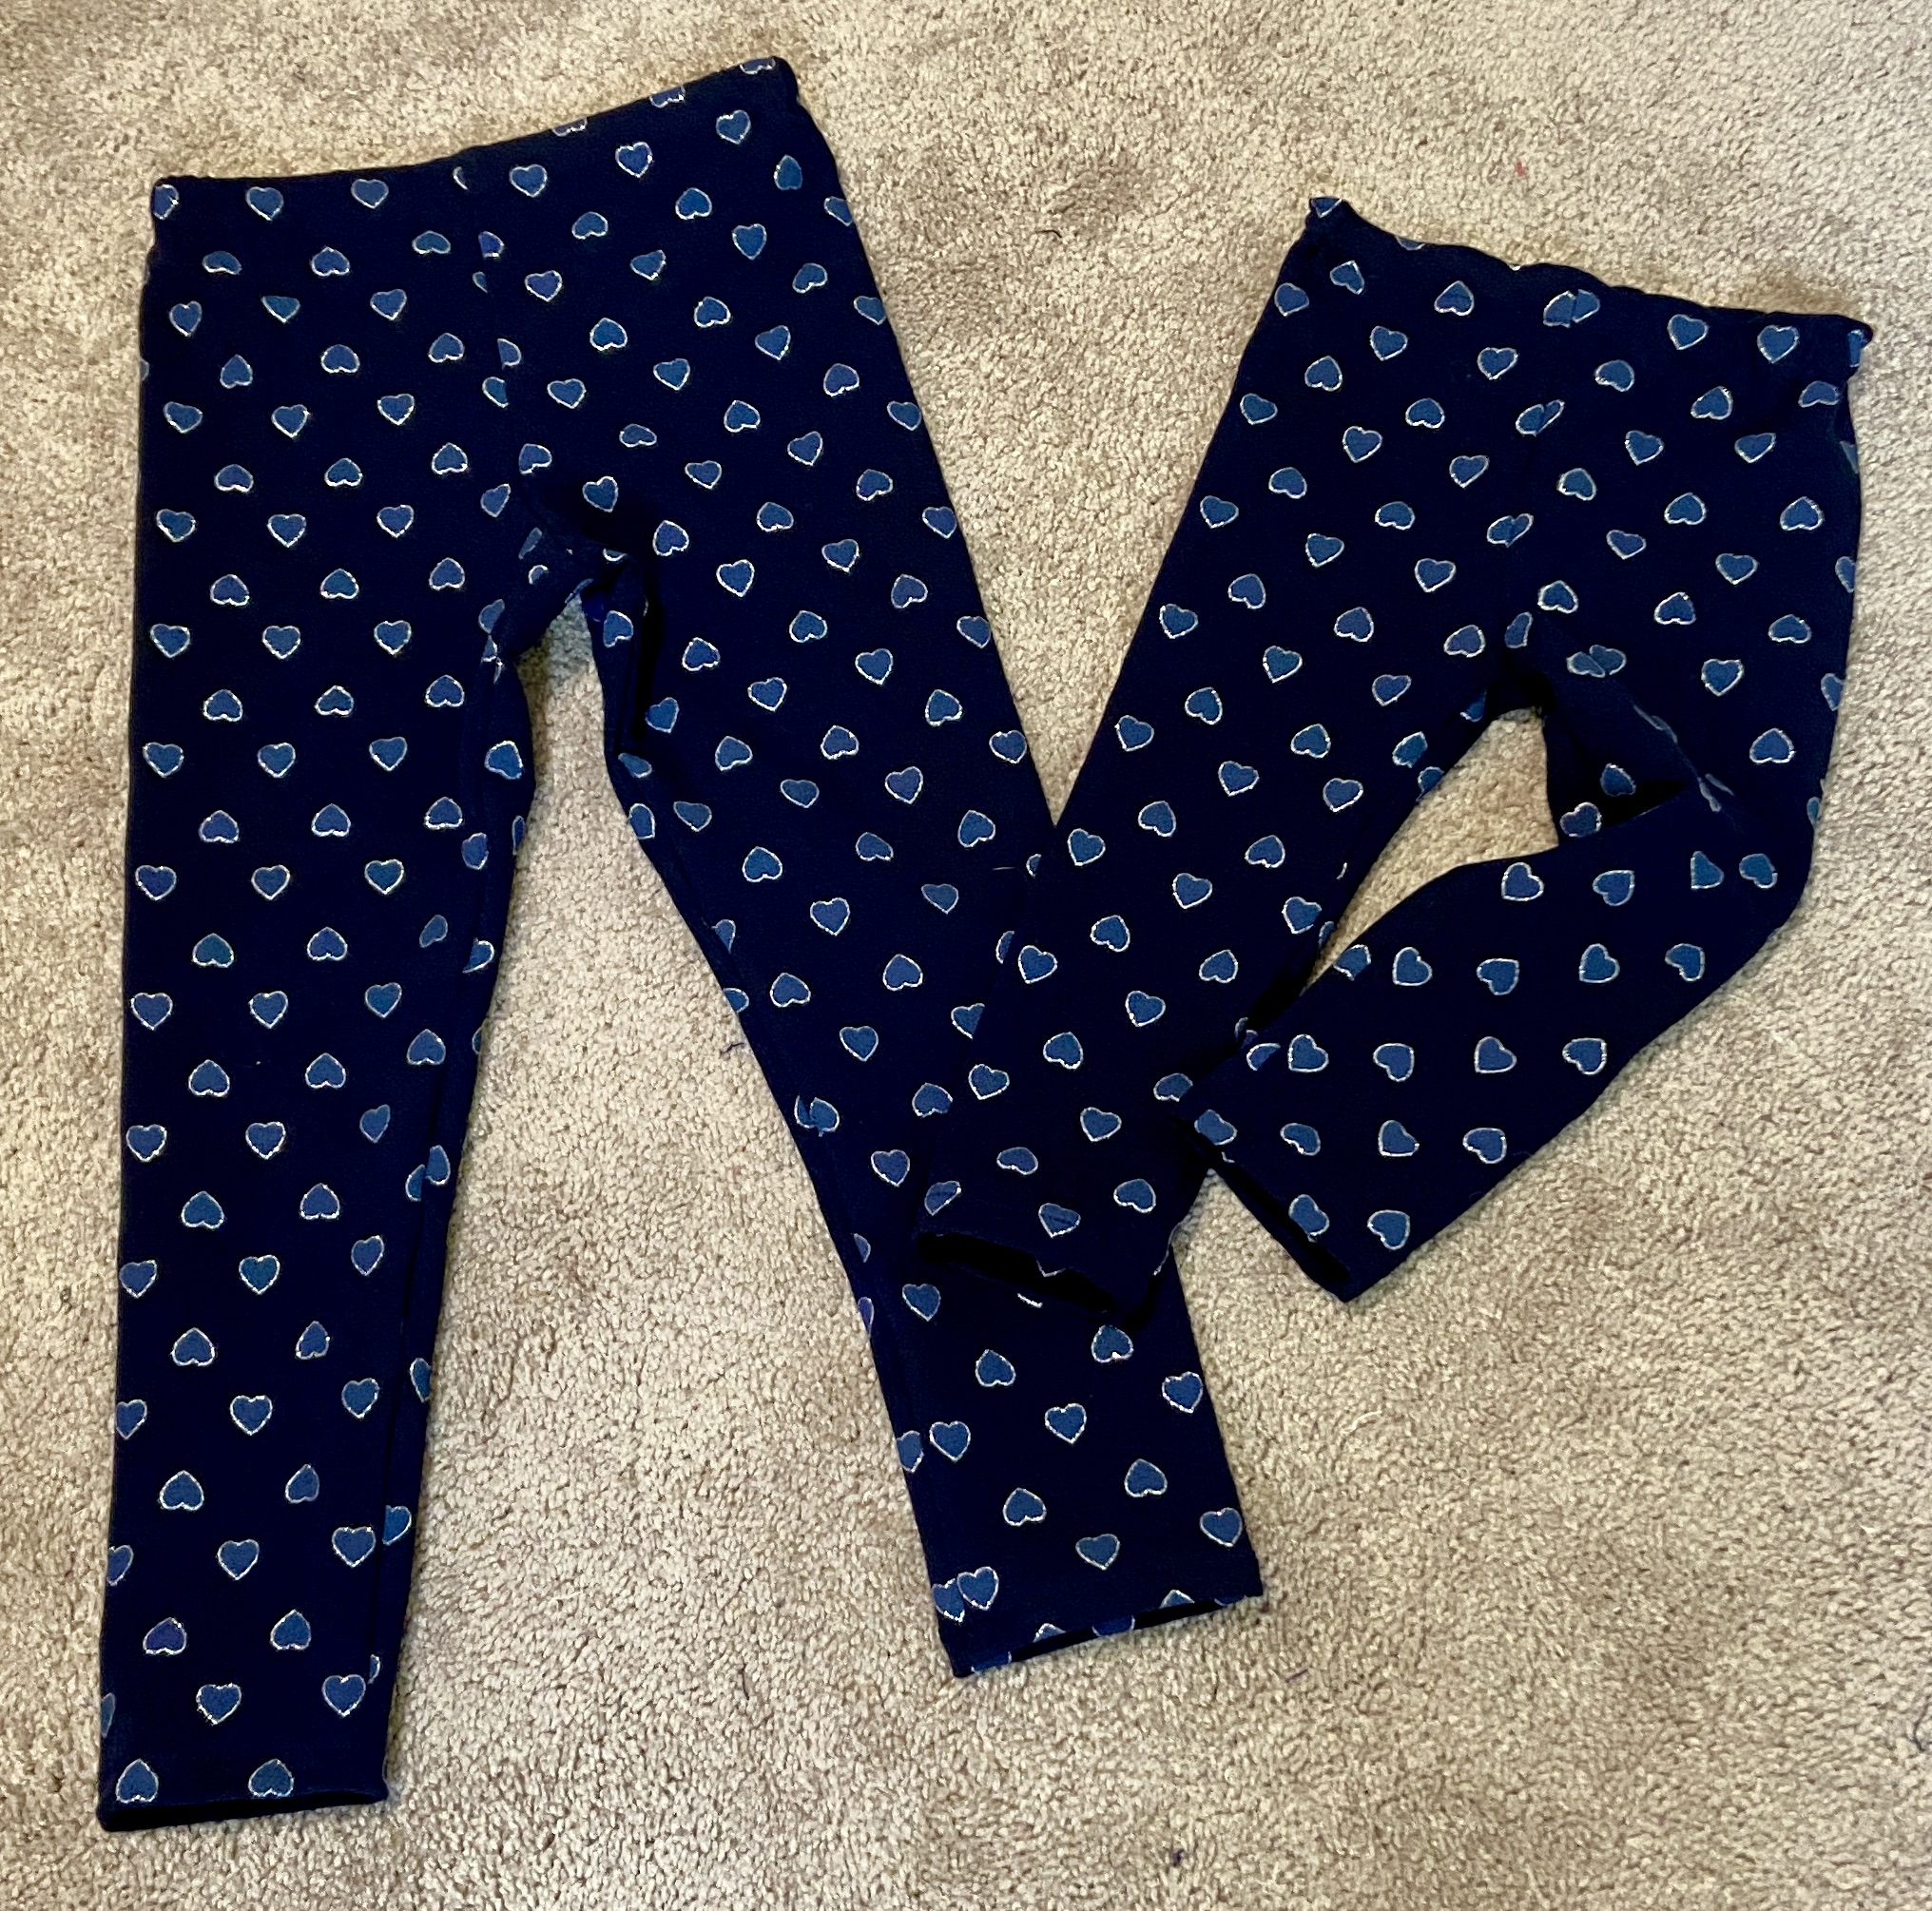
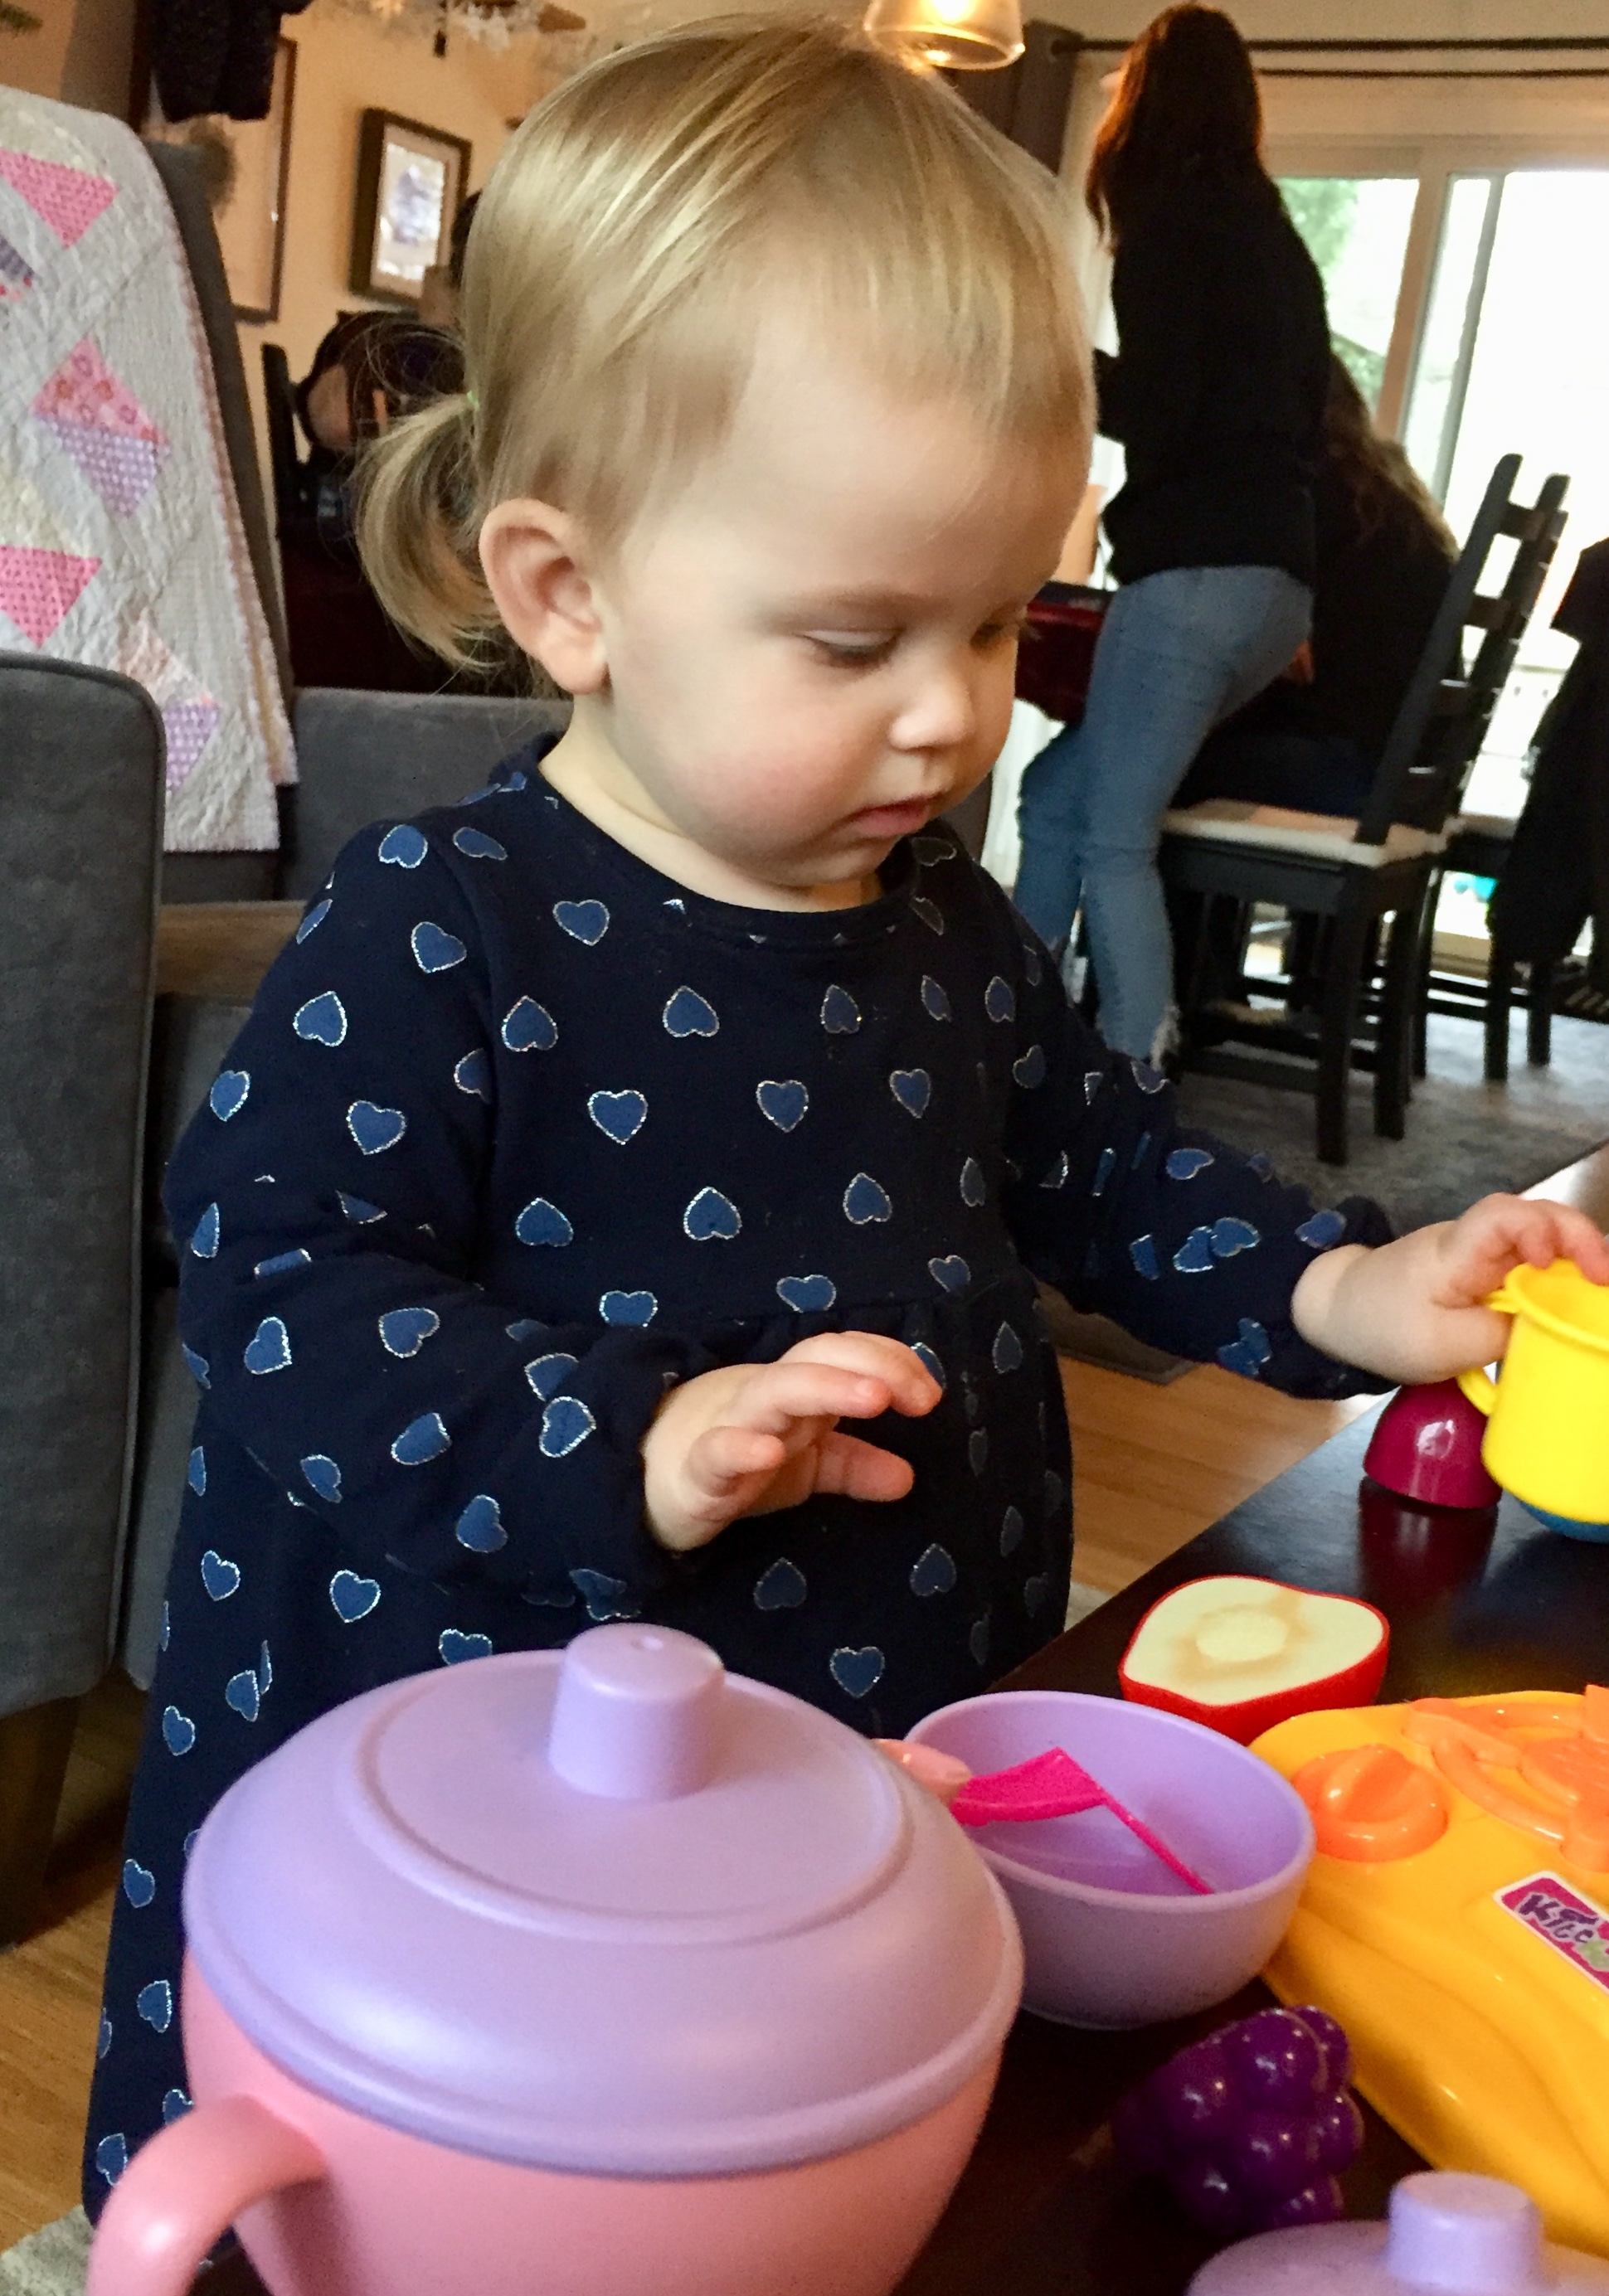
OK – moving along now! H and A were here last week. We had them plus their parents for a quick over night. They were on their way to take the ferry up to Victoria, Canada for a long weekend with some of their friends. We watched their dogs while they were gone. When they were here I noticed that H had on some leggings that were way too small for her. Not that she doesn’t have pants that fit but this child has her favorites and wears them forever! I told her I would make her a new pair and she was so surprised. “You can make me pants?” Sweet girl, of course I can. Let’s go pick out a fabric. She chose this stretch knit that I used years ago to make her a dress when she was not quite two years old. (You know how it goes – it was on sale so I bought a bunch!) Little sister now wears the dress in the picture above but honestly, it fits like a tunic now. Fortunately, I had enough to make a pair of leggings for big sister and little sis both. I haven’t seen them on yet but reports are they fit well. H wore them to school last week. It was a fun project and a quick finish.
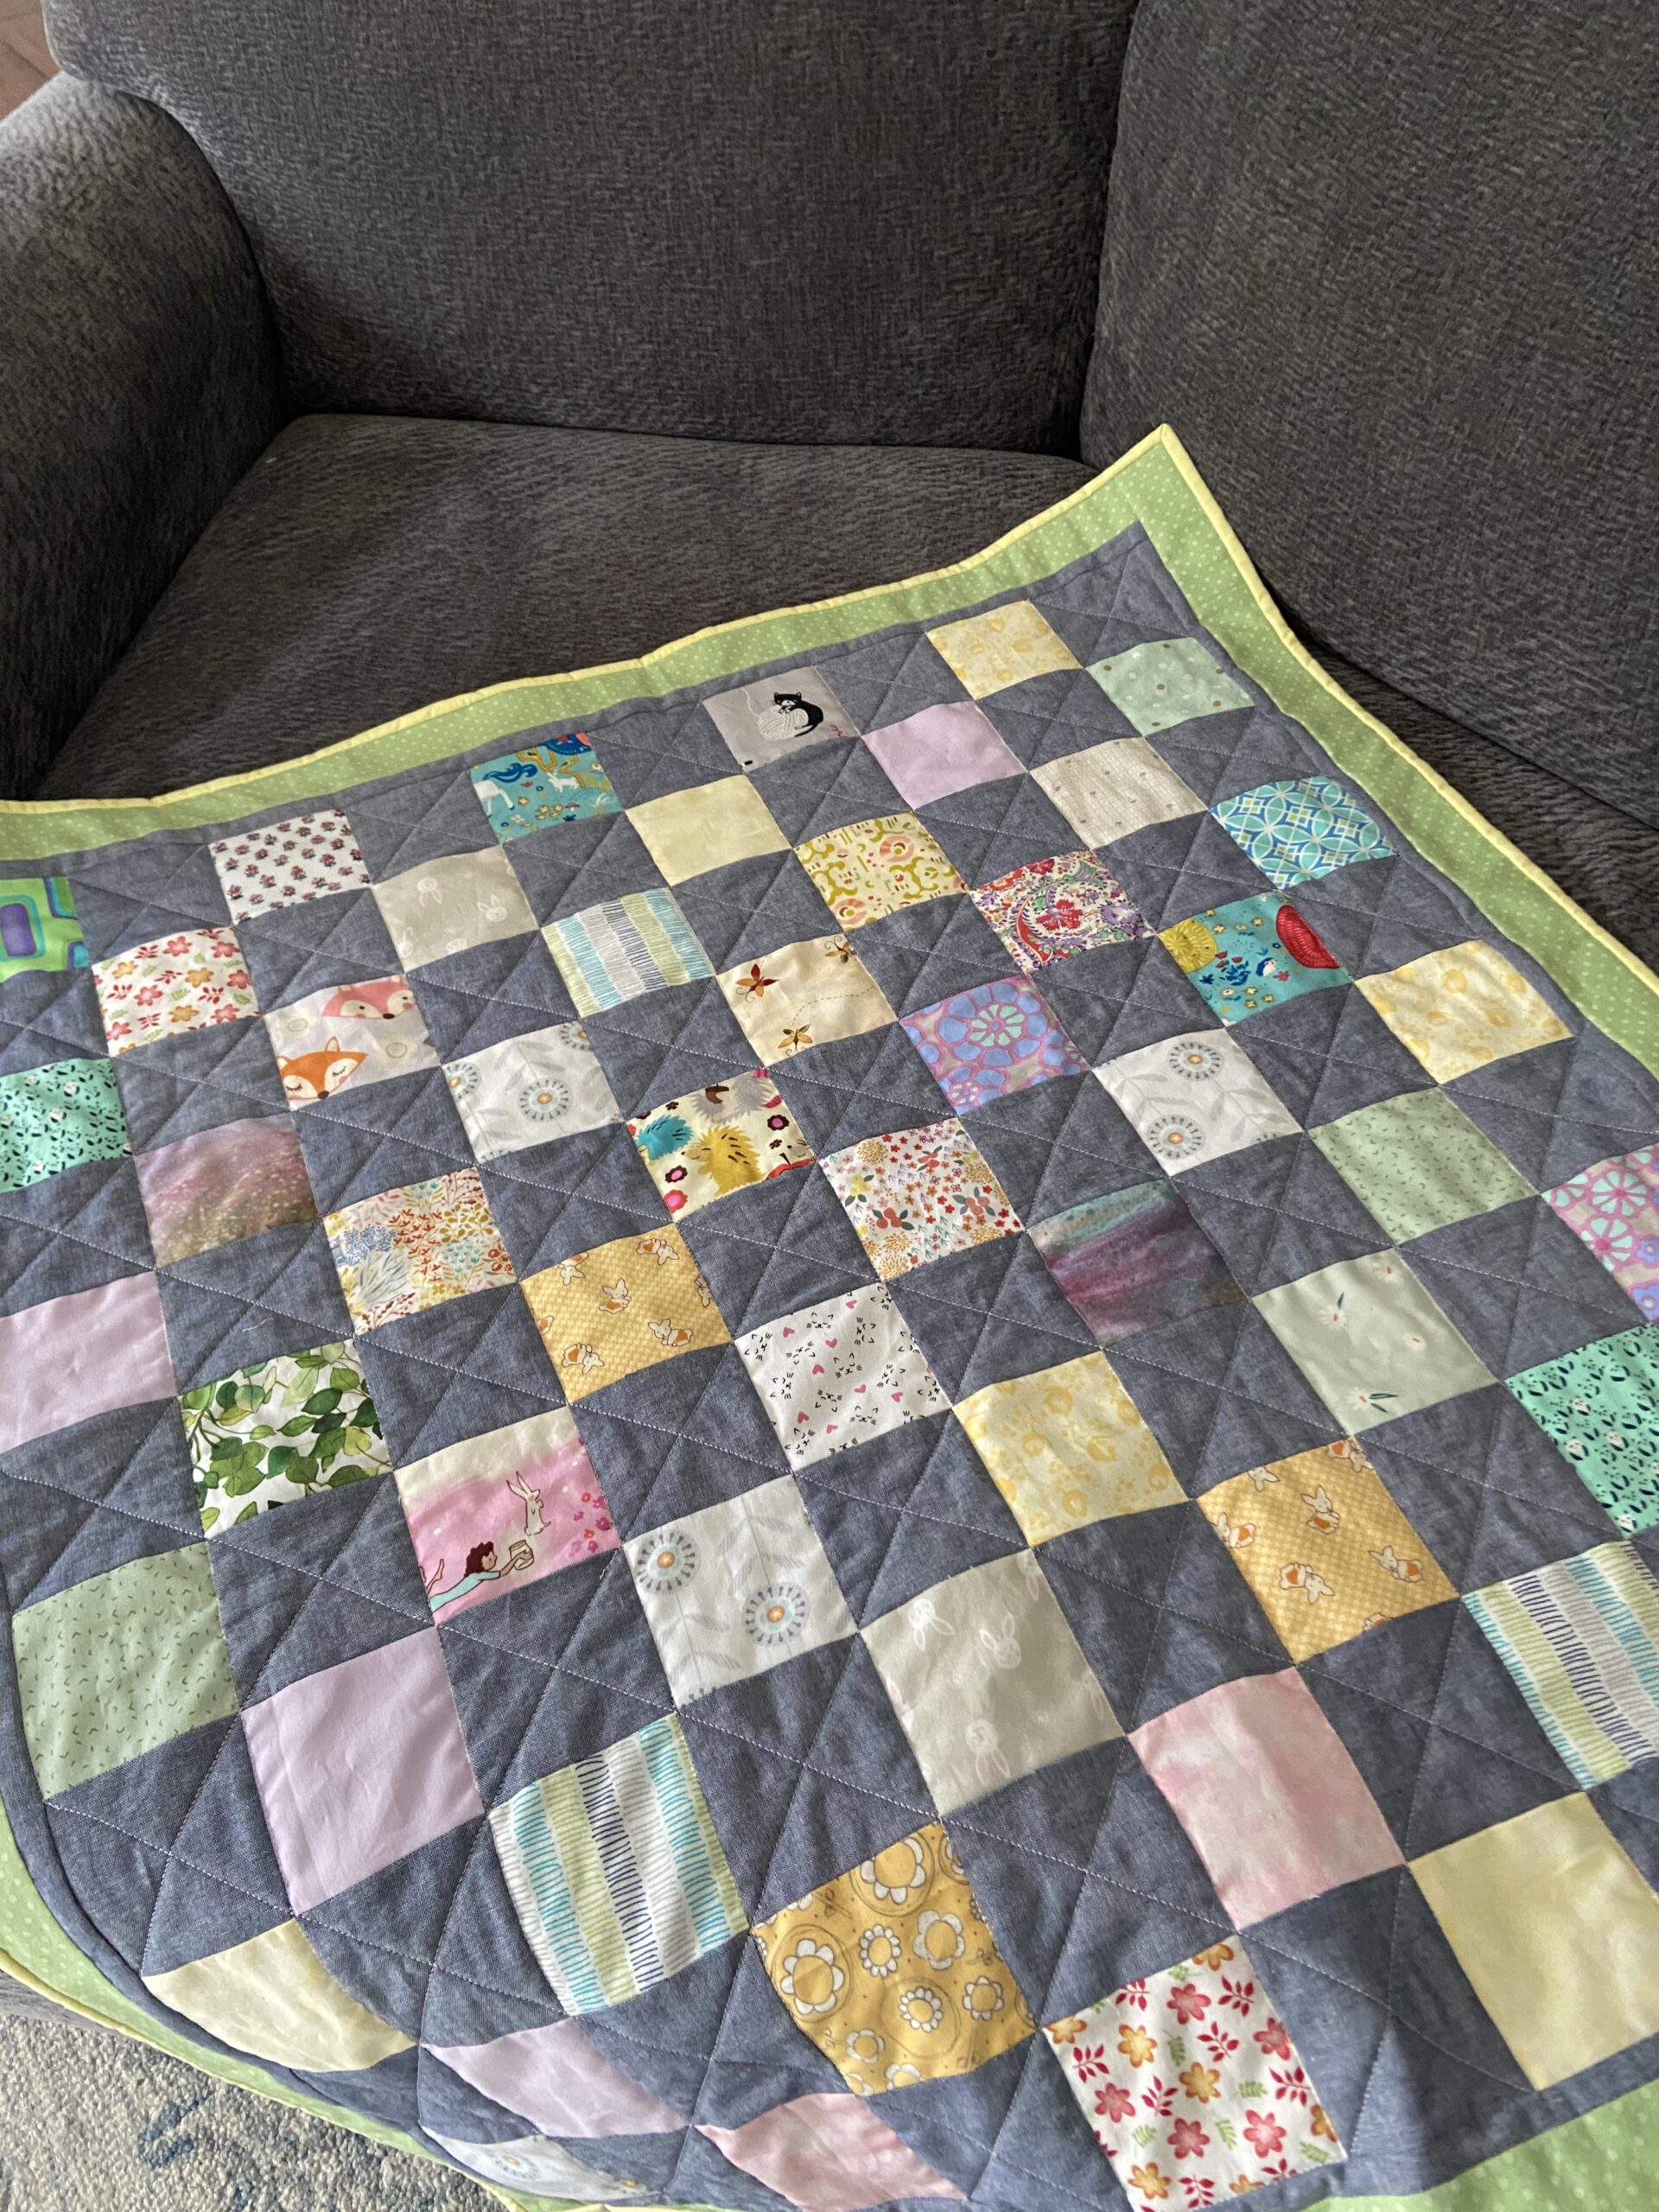
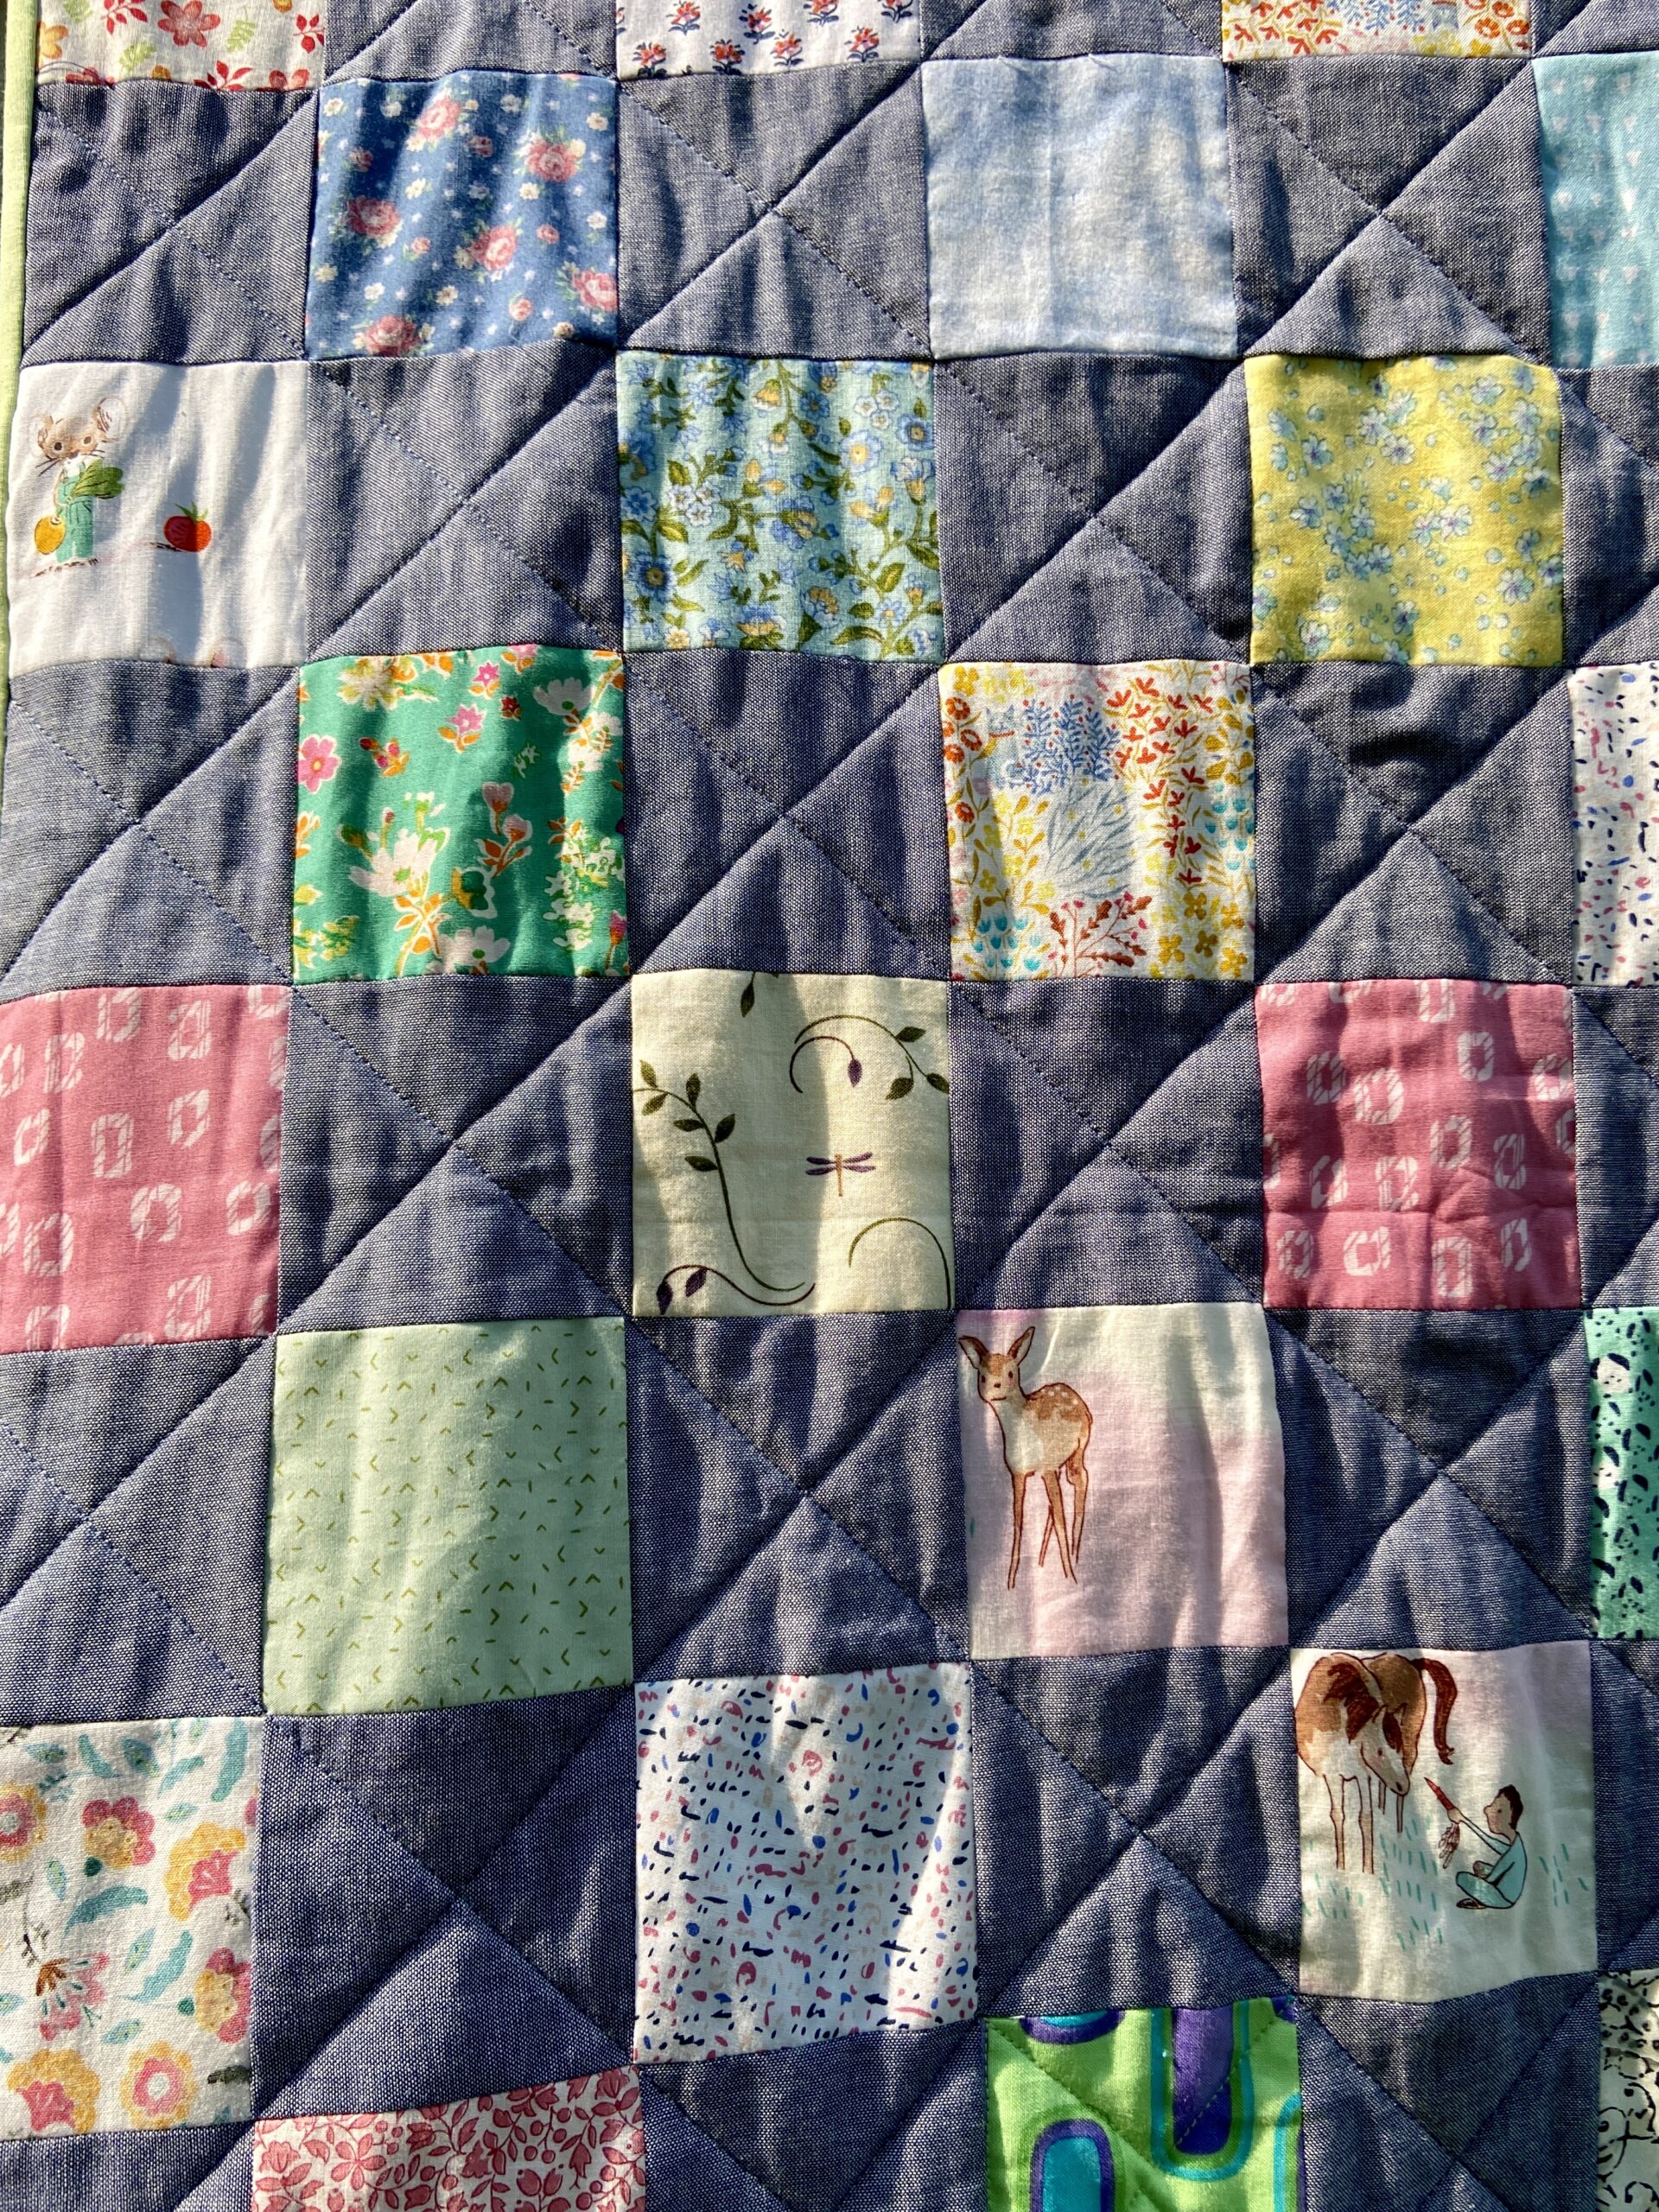
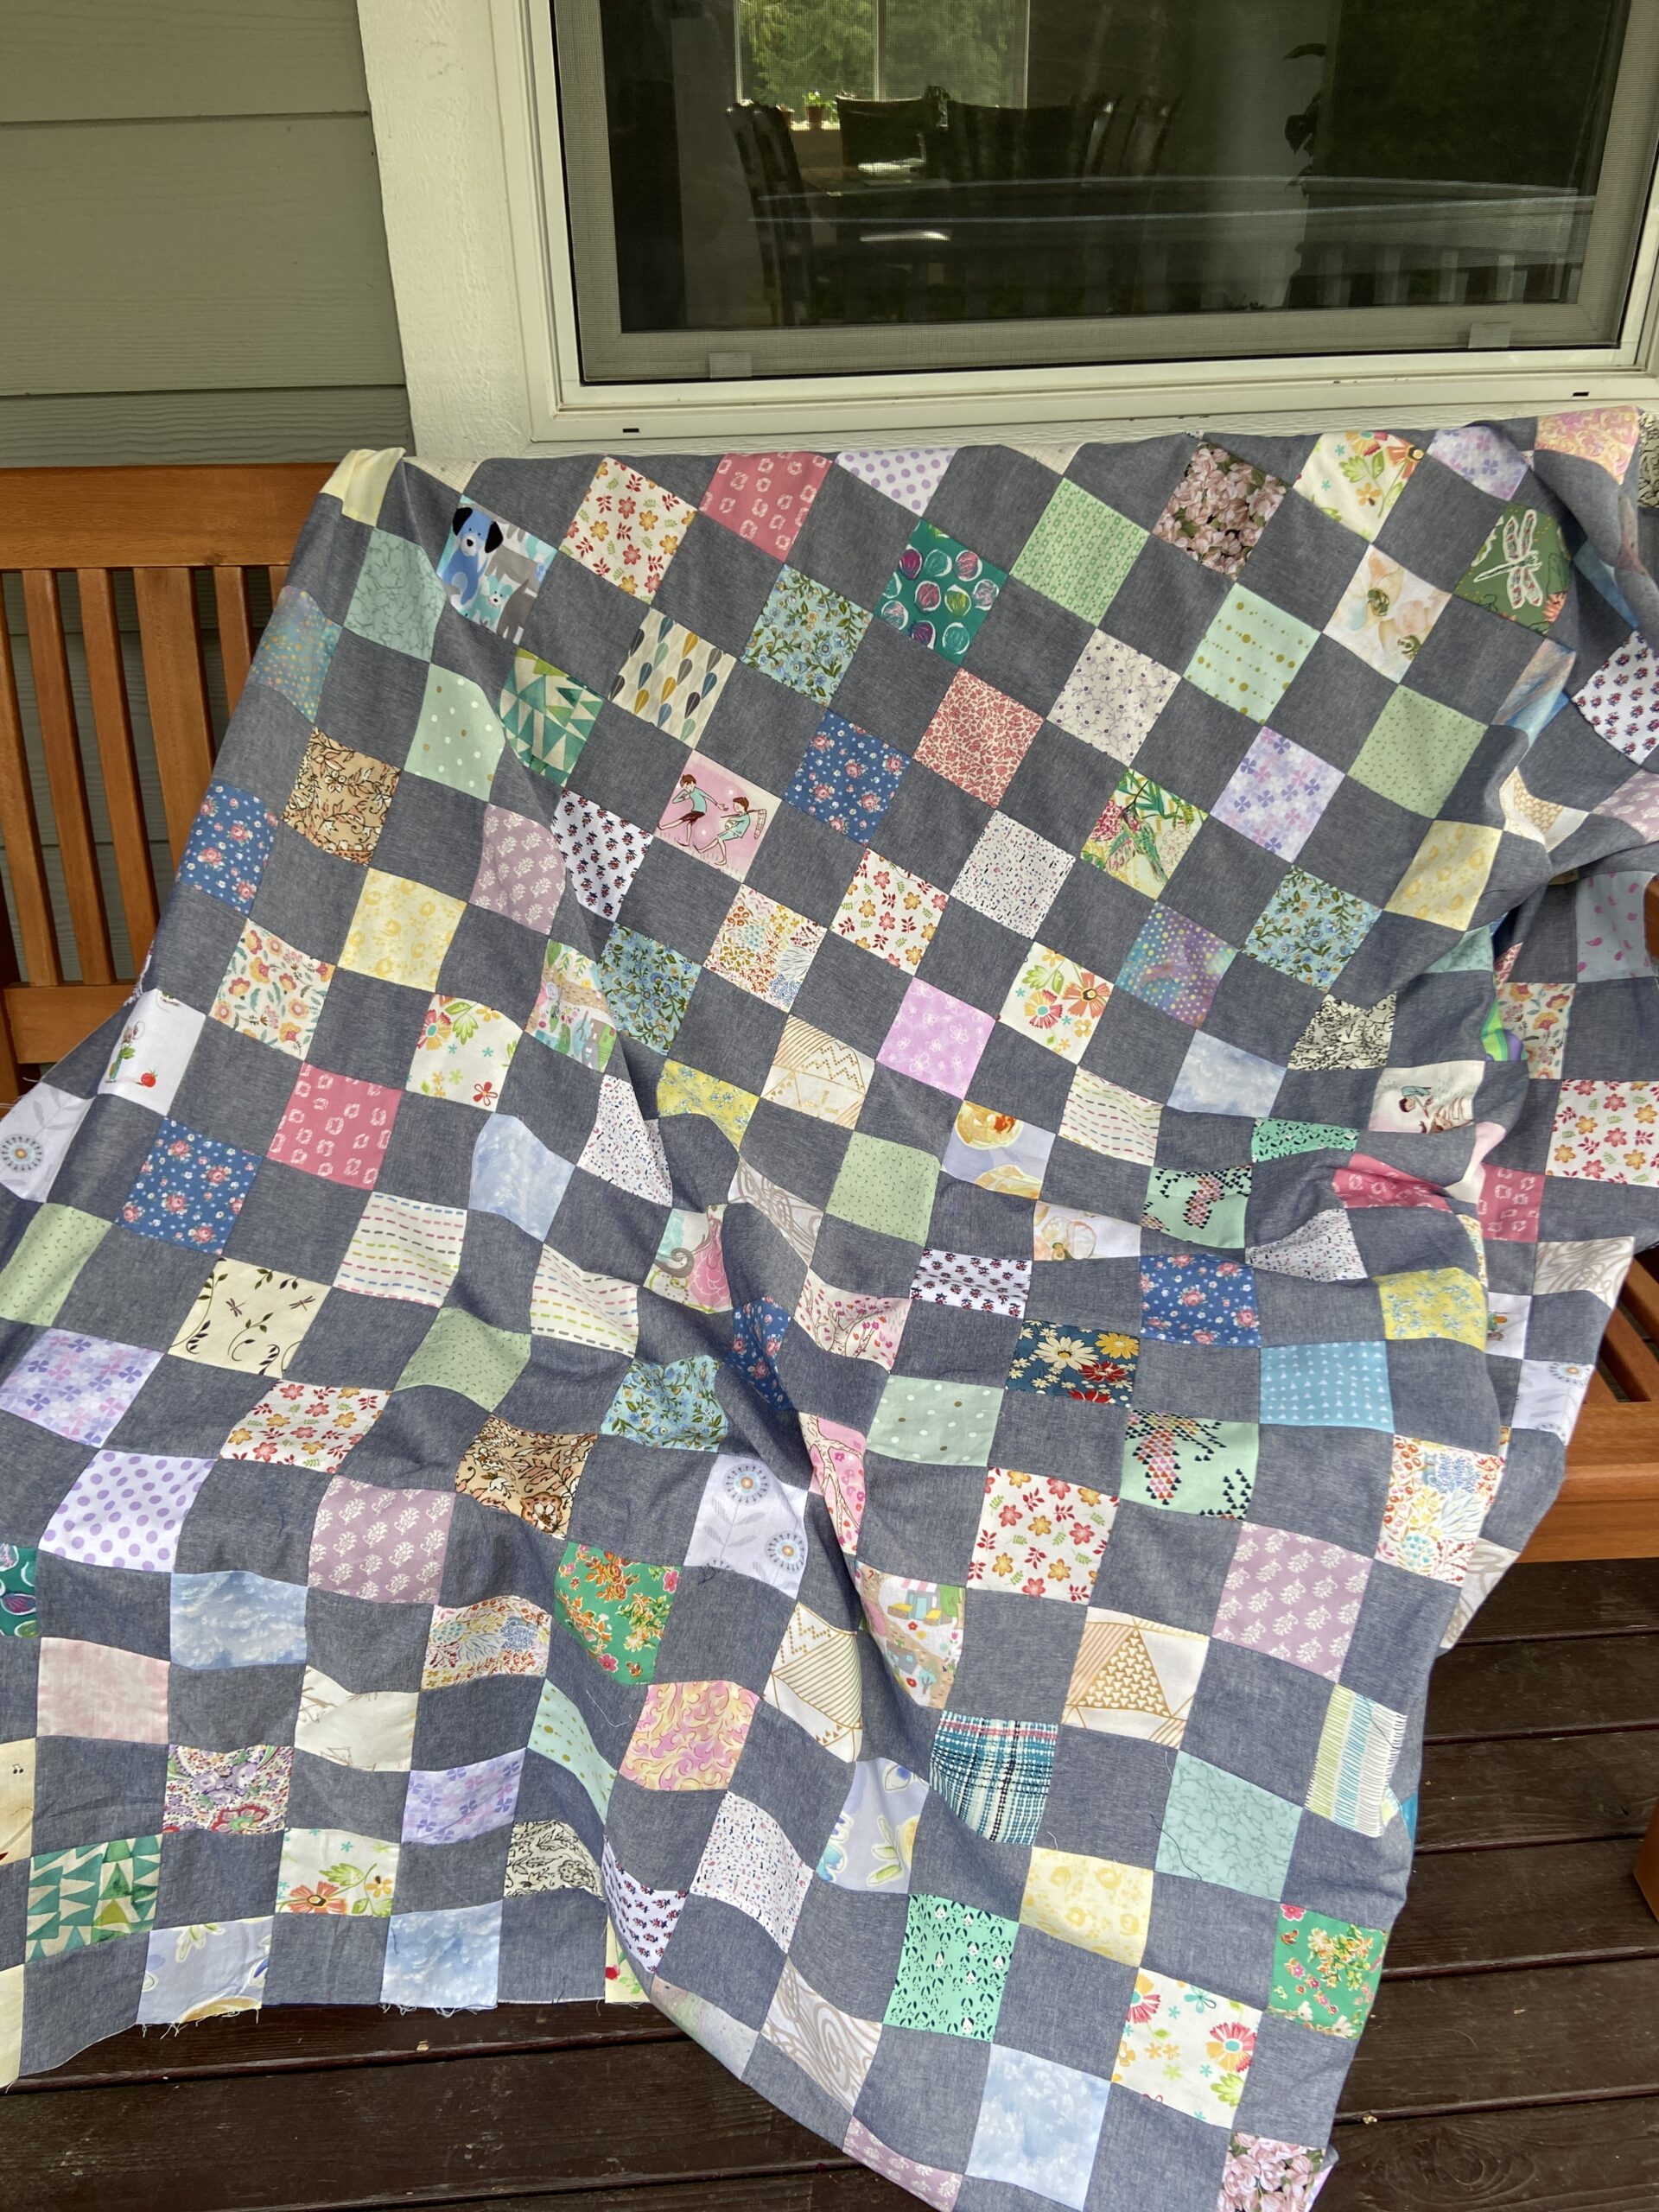
Over the past several months, I worked on this patchwork quilt. It is now a quilt top! I used a blue (leaning to gray) chambray fabric for the solids. Then went through the box of 3 1/2″ squares and chose as many as I could that looked soft and muted. There are some with deeper colors to add a bit of variety but the majority are very soothing tones. It is exactly what I had hoped for. The only issue was the darn chambray. Oh my gosh it frays so easily. This drove me nuts! When I get ready to baste this, it will take forever to clean the threads from the back side. I did use a very small stitch to ensure the seams remain strong.
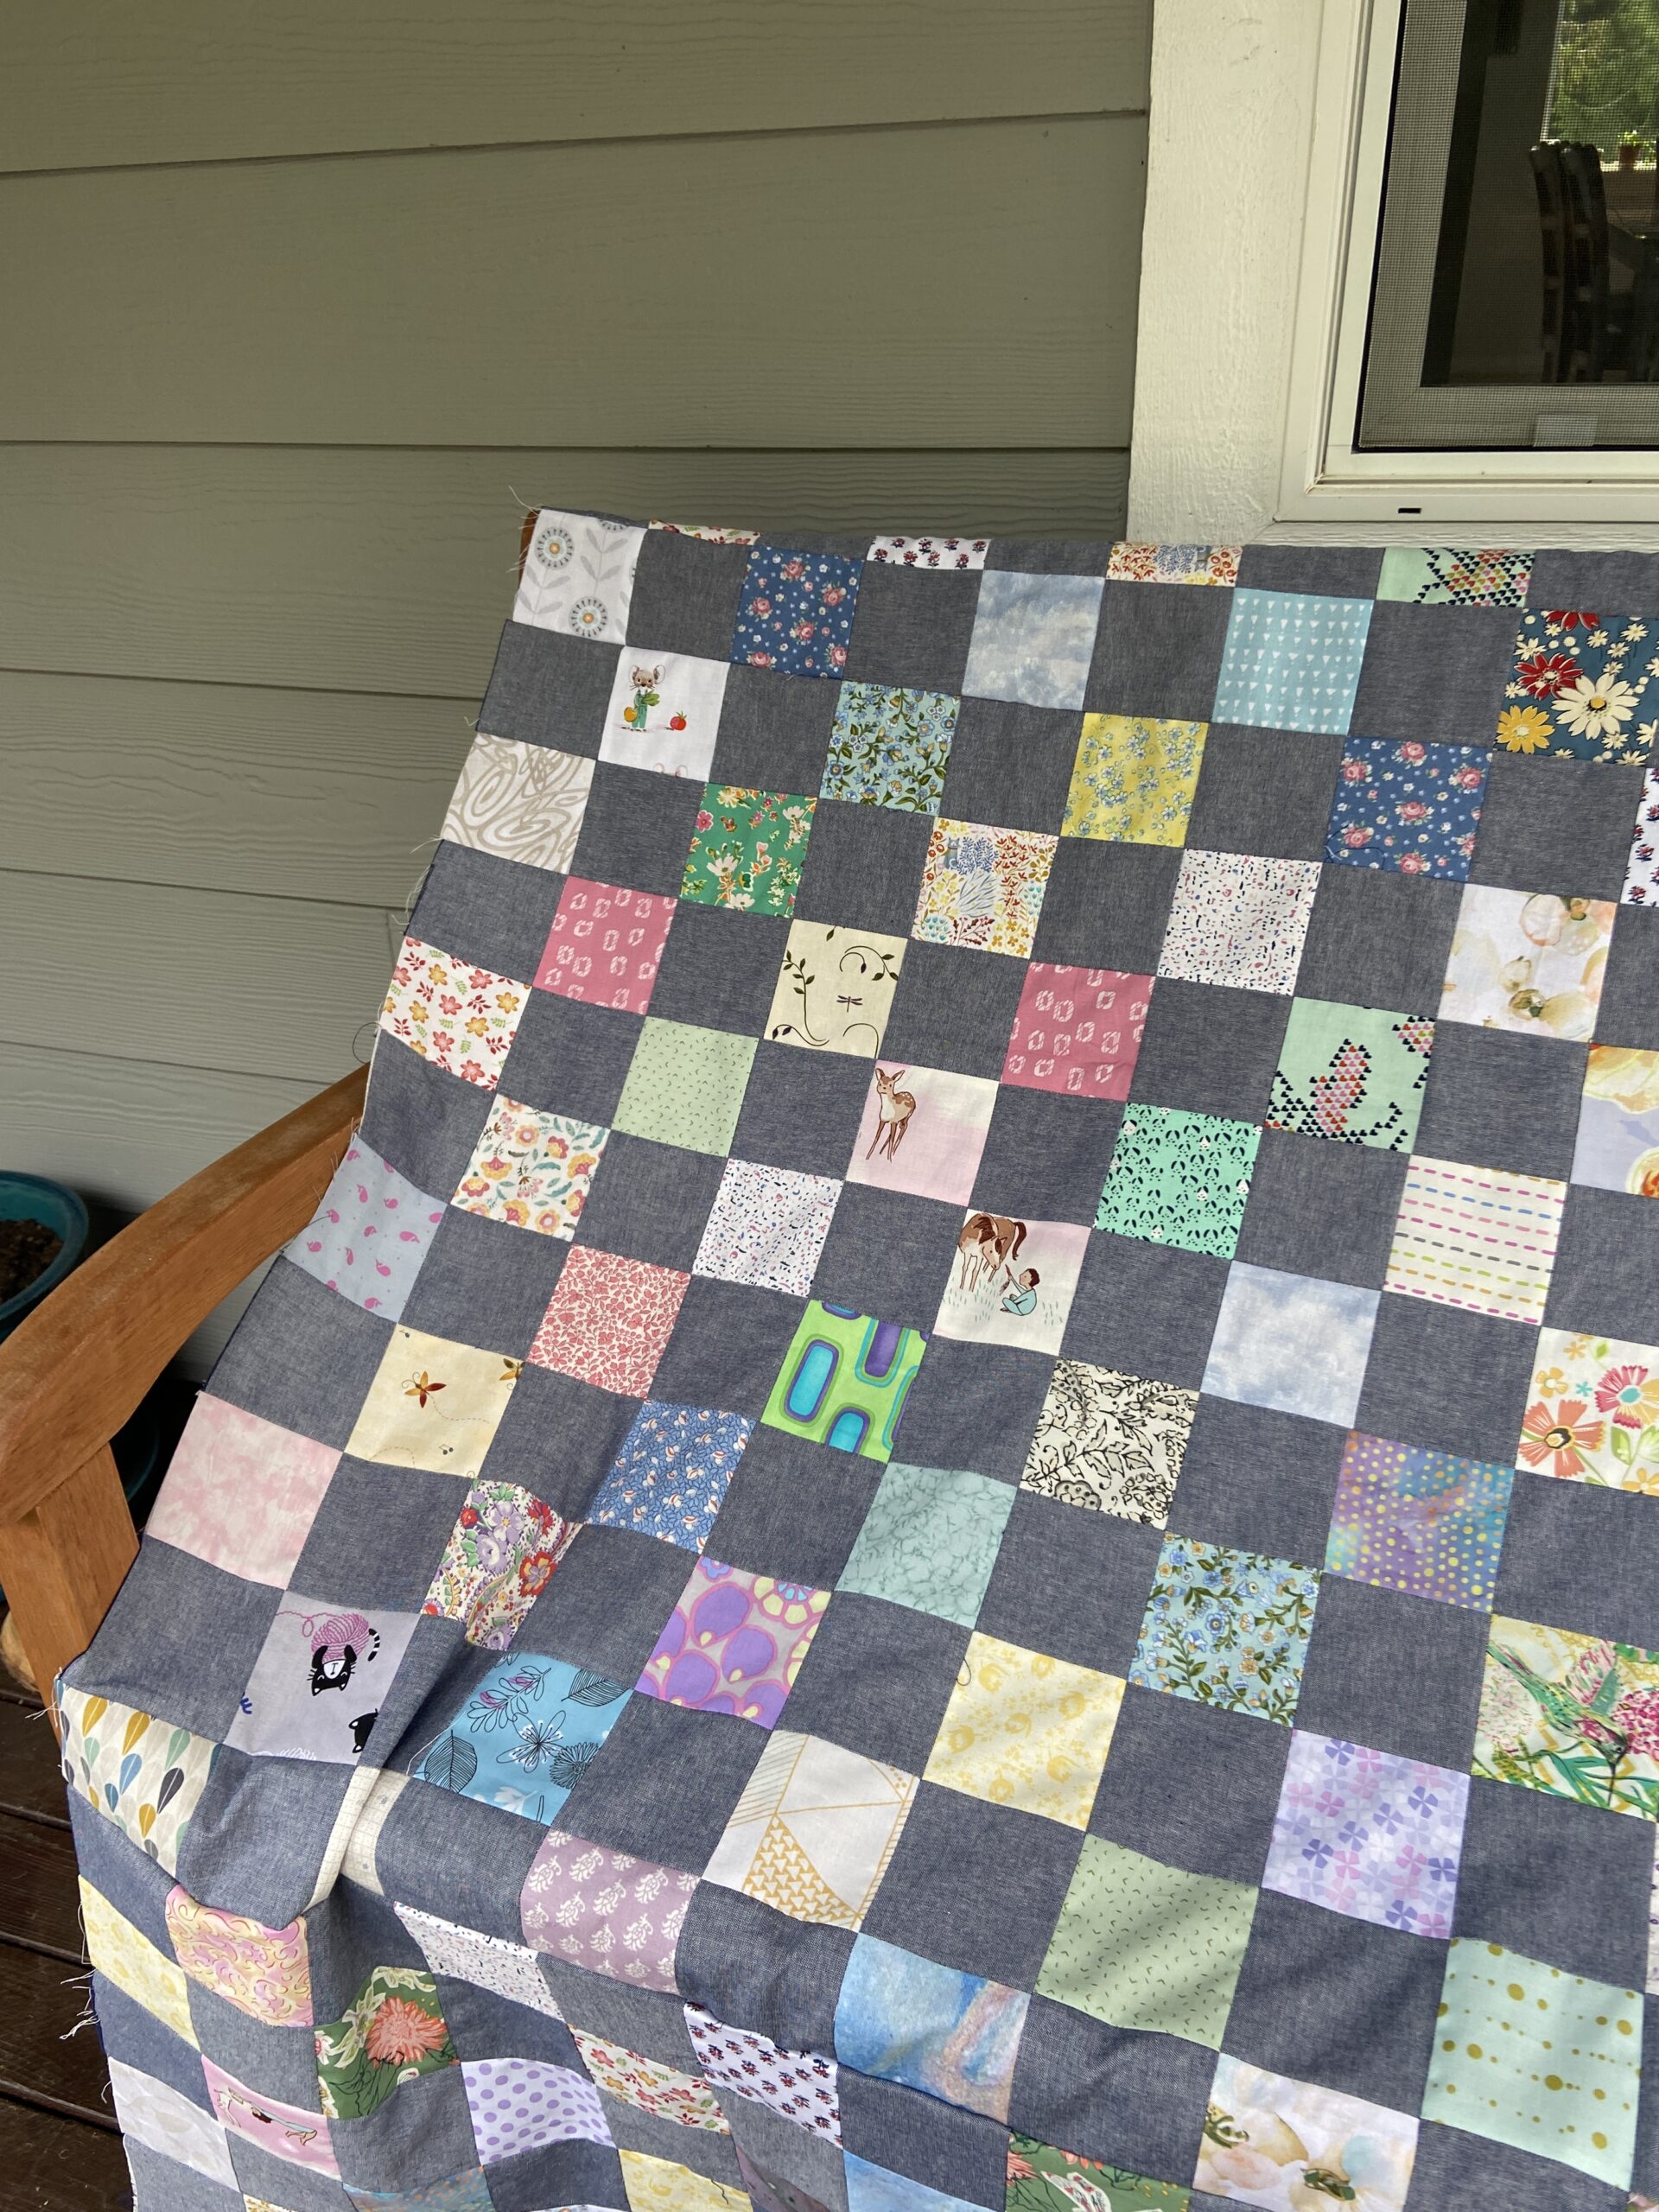
When I was satisfied with the size of this top, I still had a stack of the chambray squares remaining. Instead of putting them away, it seemed a good idea to just keep sewing!
This baby quilt is the result of the extras! It is so sweet! I put a narrow chambray coping strip and then a soft green dotted border to grow it to a decent size. At approximately 36″ square, it is a bit smaller than I usually make for a baby quilt.
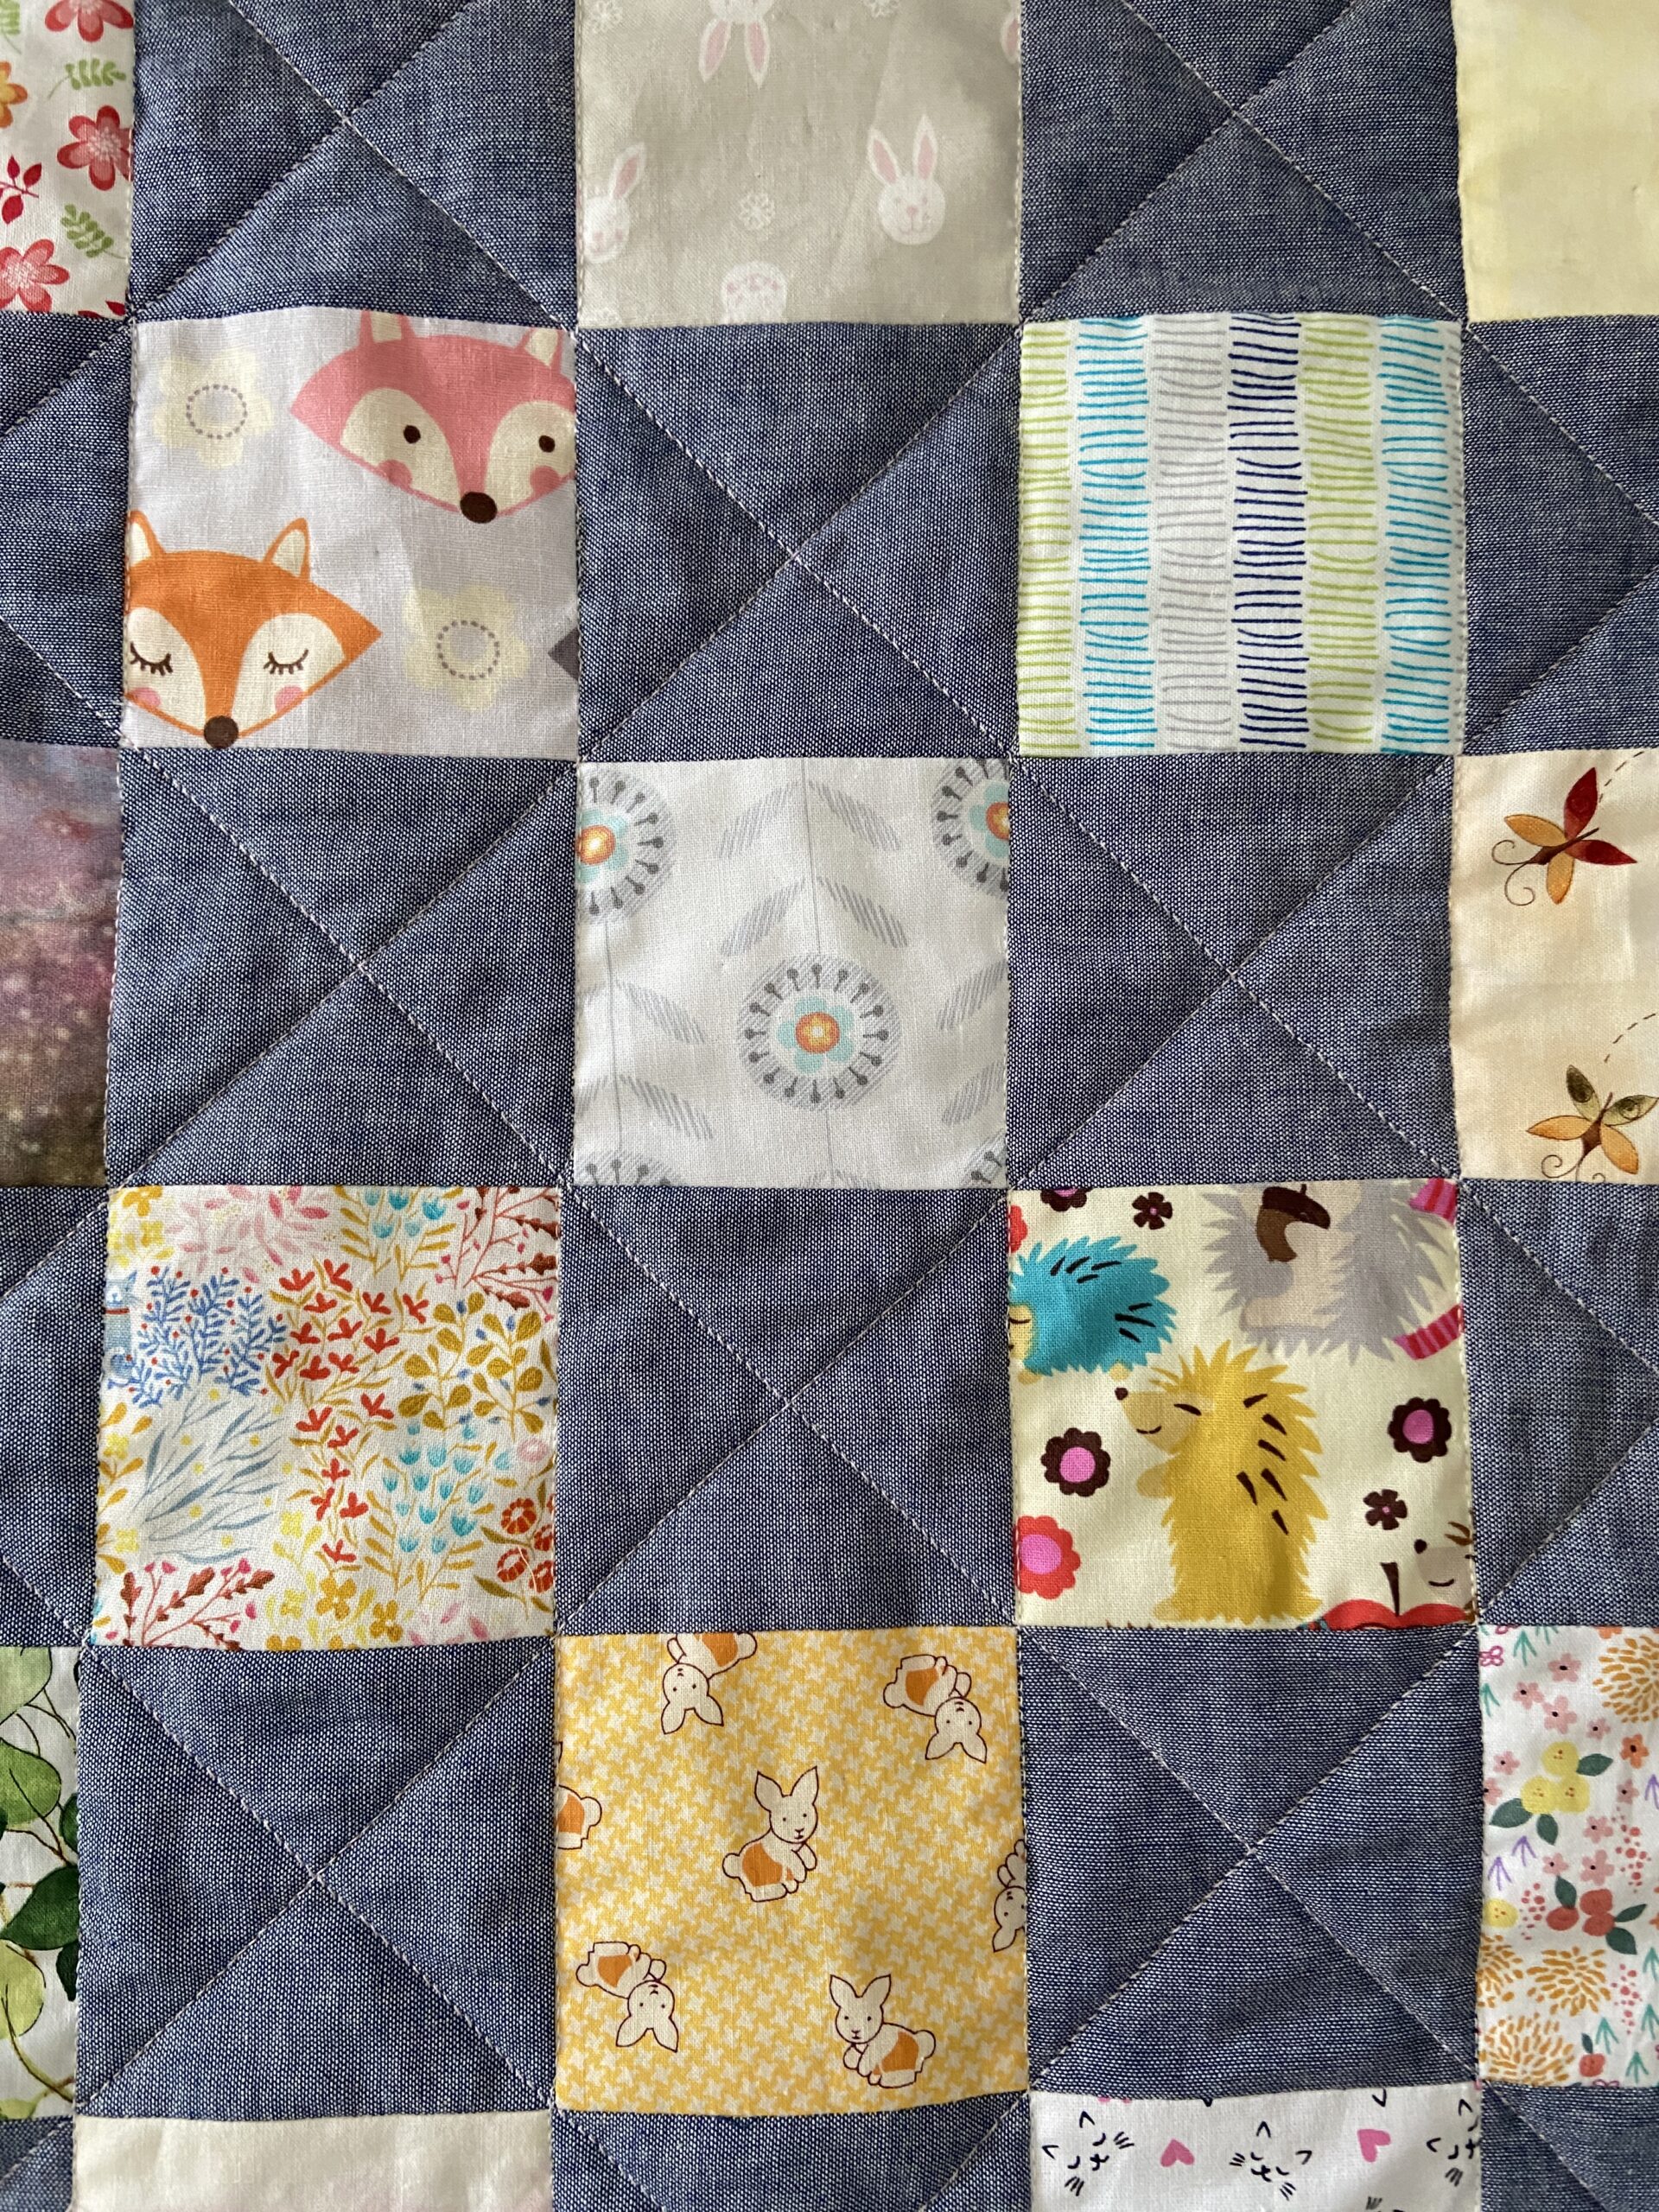
There are so many sweet prints in this little quilts. Kitties, butterflies, rabbits and hedgehogs can be found. I stitched in the ditch first and then did a crosshatch through the chambray. As with the lap quilt, I used a very small stitch to sew the patchwork.
The backing is an older Mode print I thrifted some years back. Because of the smaller size of the quilt, this piece fit perfectly. A pale yellow binding finishes it off well. As of yet, I am unsure where this quilt will end up but at some point, it will find a good home!
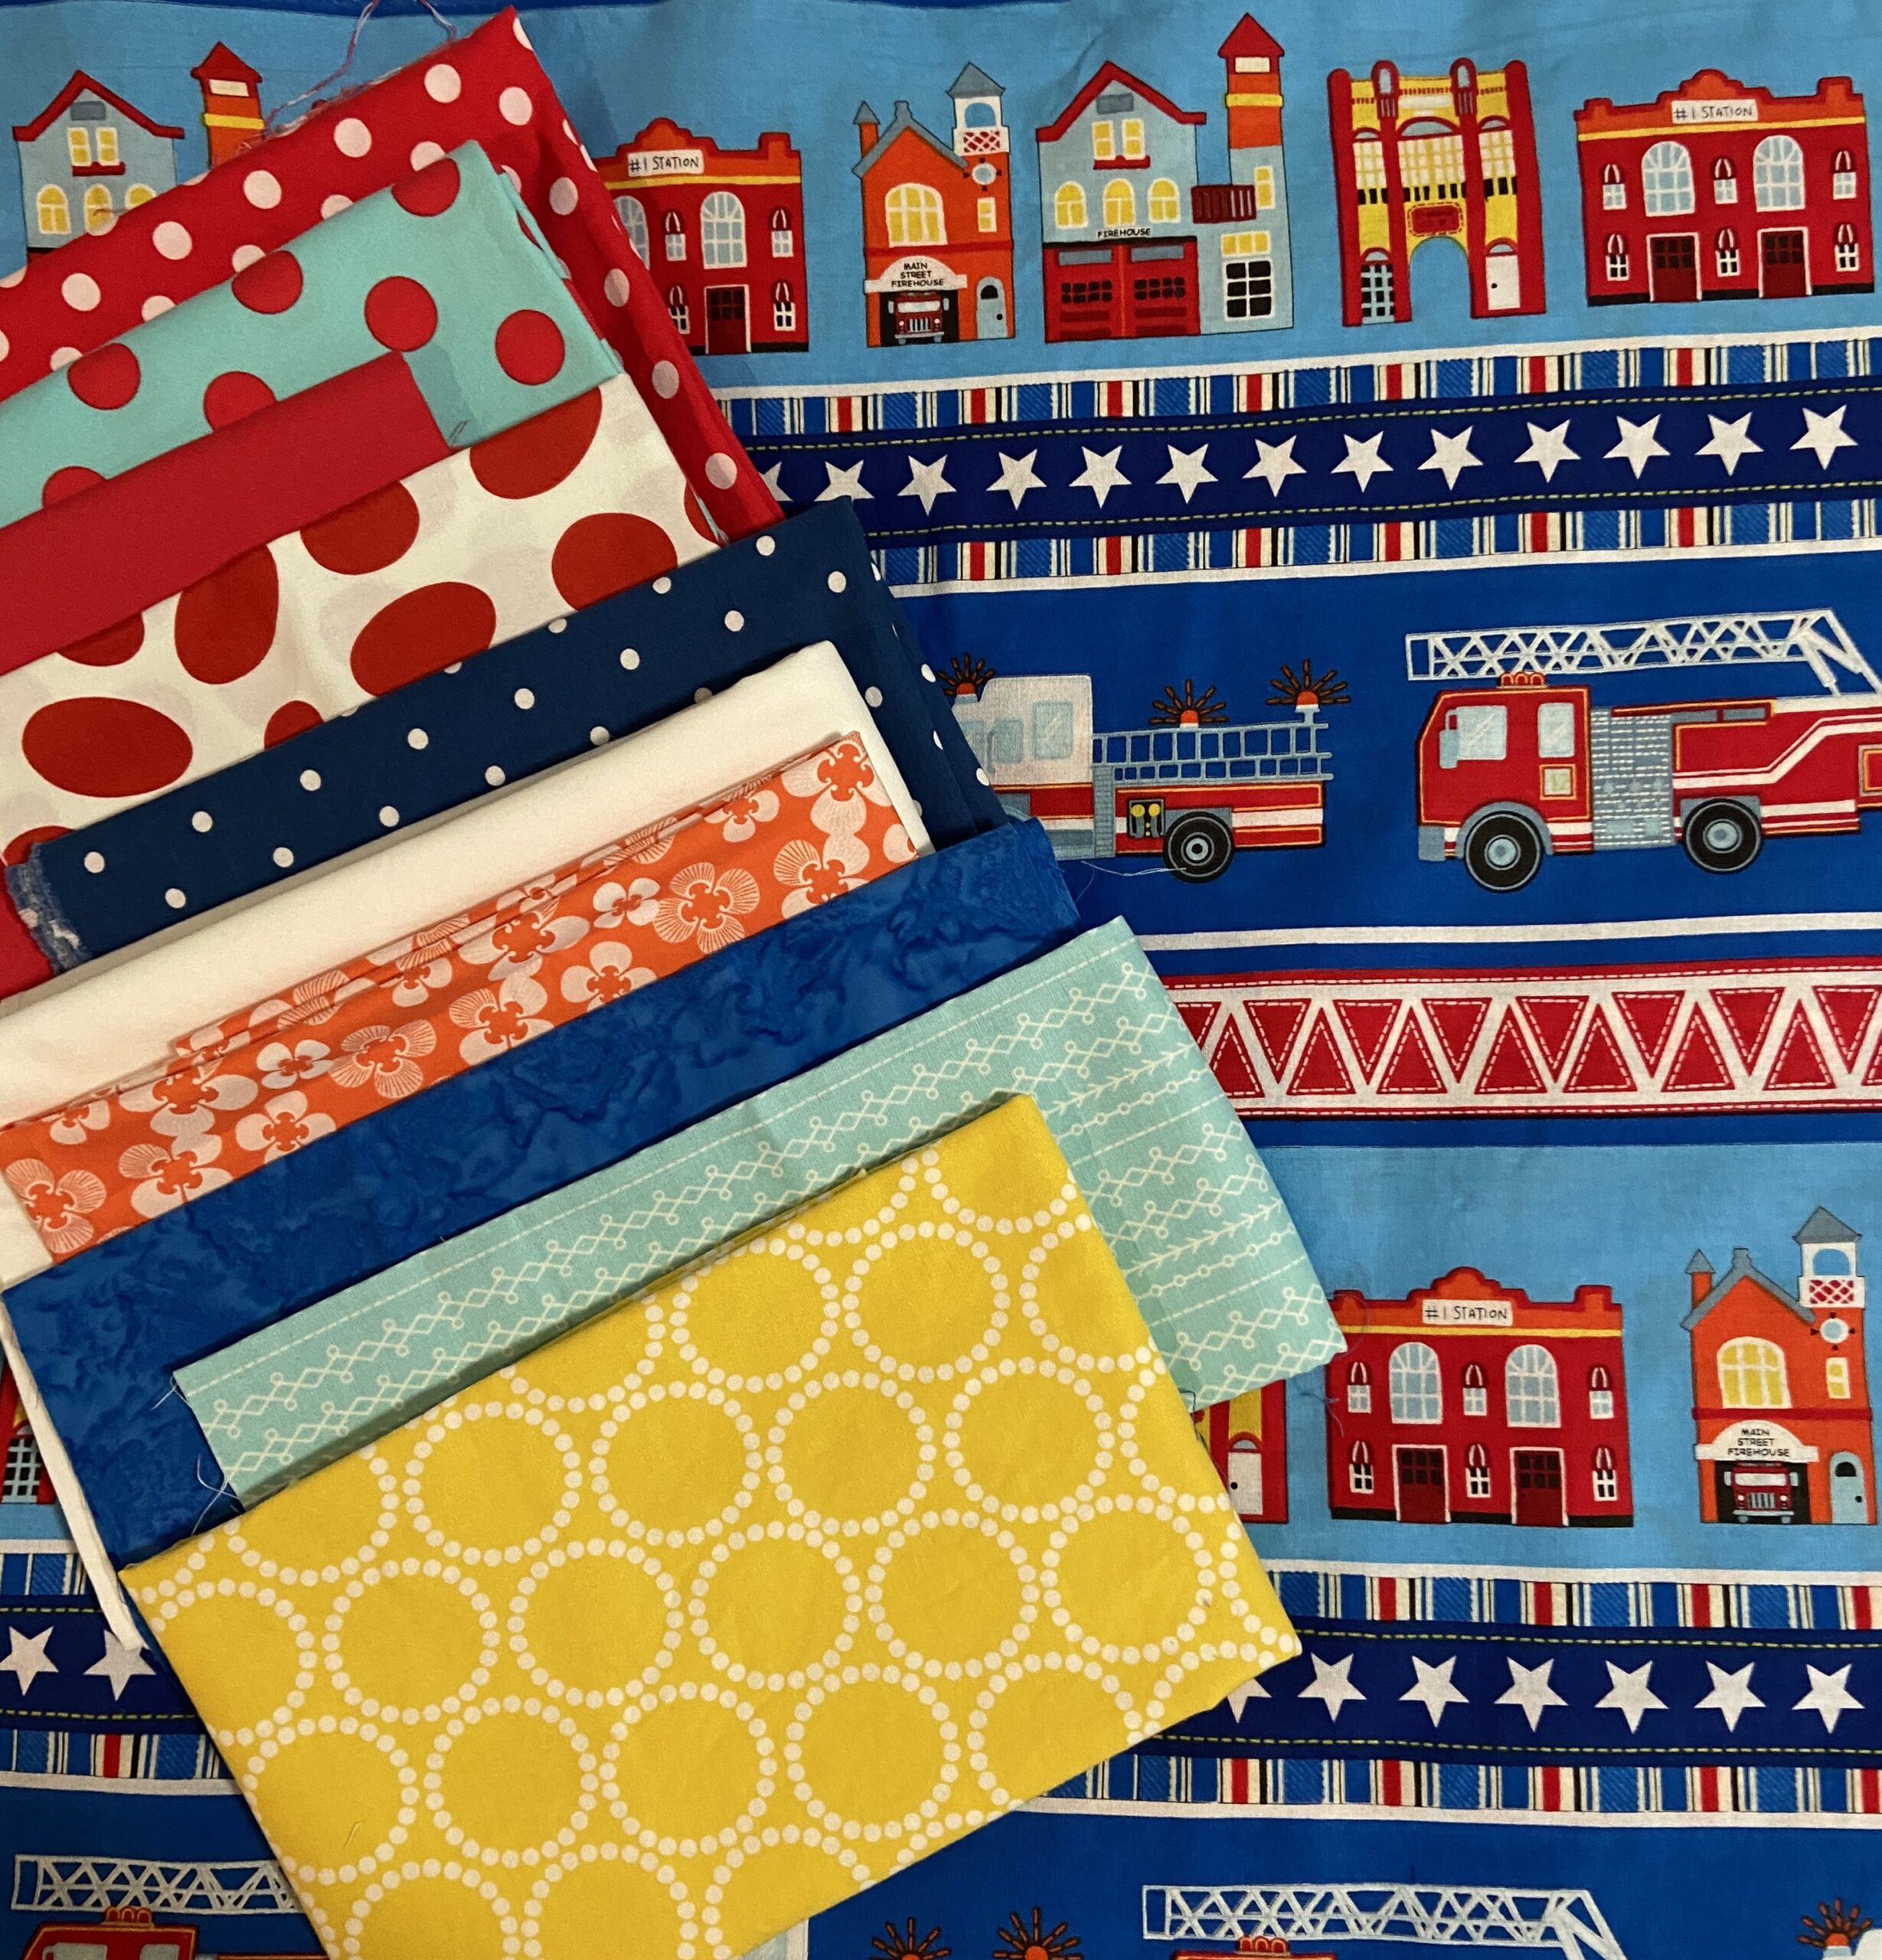
Recently there was a great course called Color Mixer offered by CT Publishing. I had posted about it a few months ago. Lots of great teachers gave one hour lessons on color. Anyone who registered for the class has access to the recordings to listen to as they like. While sewing, I have been listening/watching the classes. So much great information was imparted and I am learning quite a bit. Moving forward, when I was at my sister’s house last week to play with her puppy, she gave me a yard of the firehouse fabric in the picture above. She had ordered it not realizing the larger scale of the print and then couldn’t use it for her project. It is such a great print and I don’t want to cut it up. Instead, it will be the backing for a child’s quilt. I pulled fabrics to use to make the quilt top. The focus will be red, white and blue with orange and yellow to add vibrance. The only fabric I am unsure of is the lightest blue (just behind the yellow). I think that one doesn’t fit in. How about you? Should I remove it from the pull?
You all know I am always watching prices and can be very frugal. AccuQuilt dies can be super expensive so it is great to shop their overstock sale items. The dies are 40% off which makes the cost a bit better. To make the system even more affordable, I think it is a great idea to collect these with a friend and share them. When I am cutting, I do love using my AccuQuilt but there are plenty of times it is just sitting on the shelf. Sharing it would be super easy. Just a thought!
It has been so long since I have written a post, I hardly know where to begin! From mid-November to now, I have been sick with one thing after another. This has been incredibly annoying! There are so many respiratory viruses going around and I believe I have sampled all of them. Our area has been hit so hard that my primary care physician’s office is unable to see any respiratory/flu cases in person because the staff has come down with it and now they are very short handed. It is just wild. The kids have it the worst and the children’s Tylenol and Motrin is flying off the shelves. Anyway, in case you’ve wondered, that is what caused me to go missing. I have been reading and watching TV and doing bits and pieces of sewing as I could.
I think I need to do a general post to catch up with what has happened around here. This blog is somewhat a journal and I can’t just ignore a whole six weeks!
In mid-November my amazing sister hosted an early Thanksgiving for our family. There were about 50 people attending and another 15 couldn’t make it. We haven’t had the group together in a very long while and this was great fun. My parents have six children (my sisters and I) who then in total had 21 children and those grandchildren have had 16 children. If you add in all of the spouses and partners, we have one big family! When I think of the numbers that make up our group, I always come back around to my parents. I am so grateful they had a big family and started this whole ball rolling!
When we all got together it seemed like every single one of the kids attending was coughing like crazy. The following week, the adults started to catch the bug. It was nuts – but also worth it to be able to see everyone in one place.
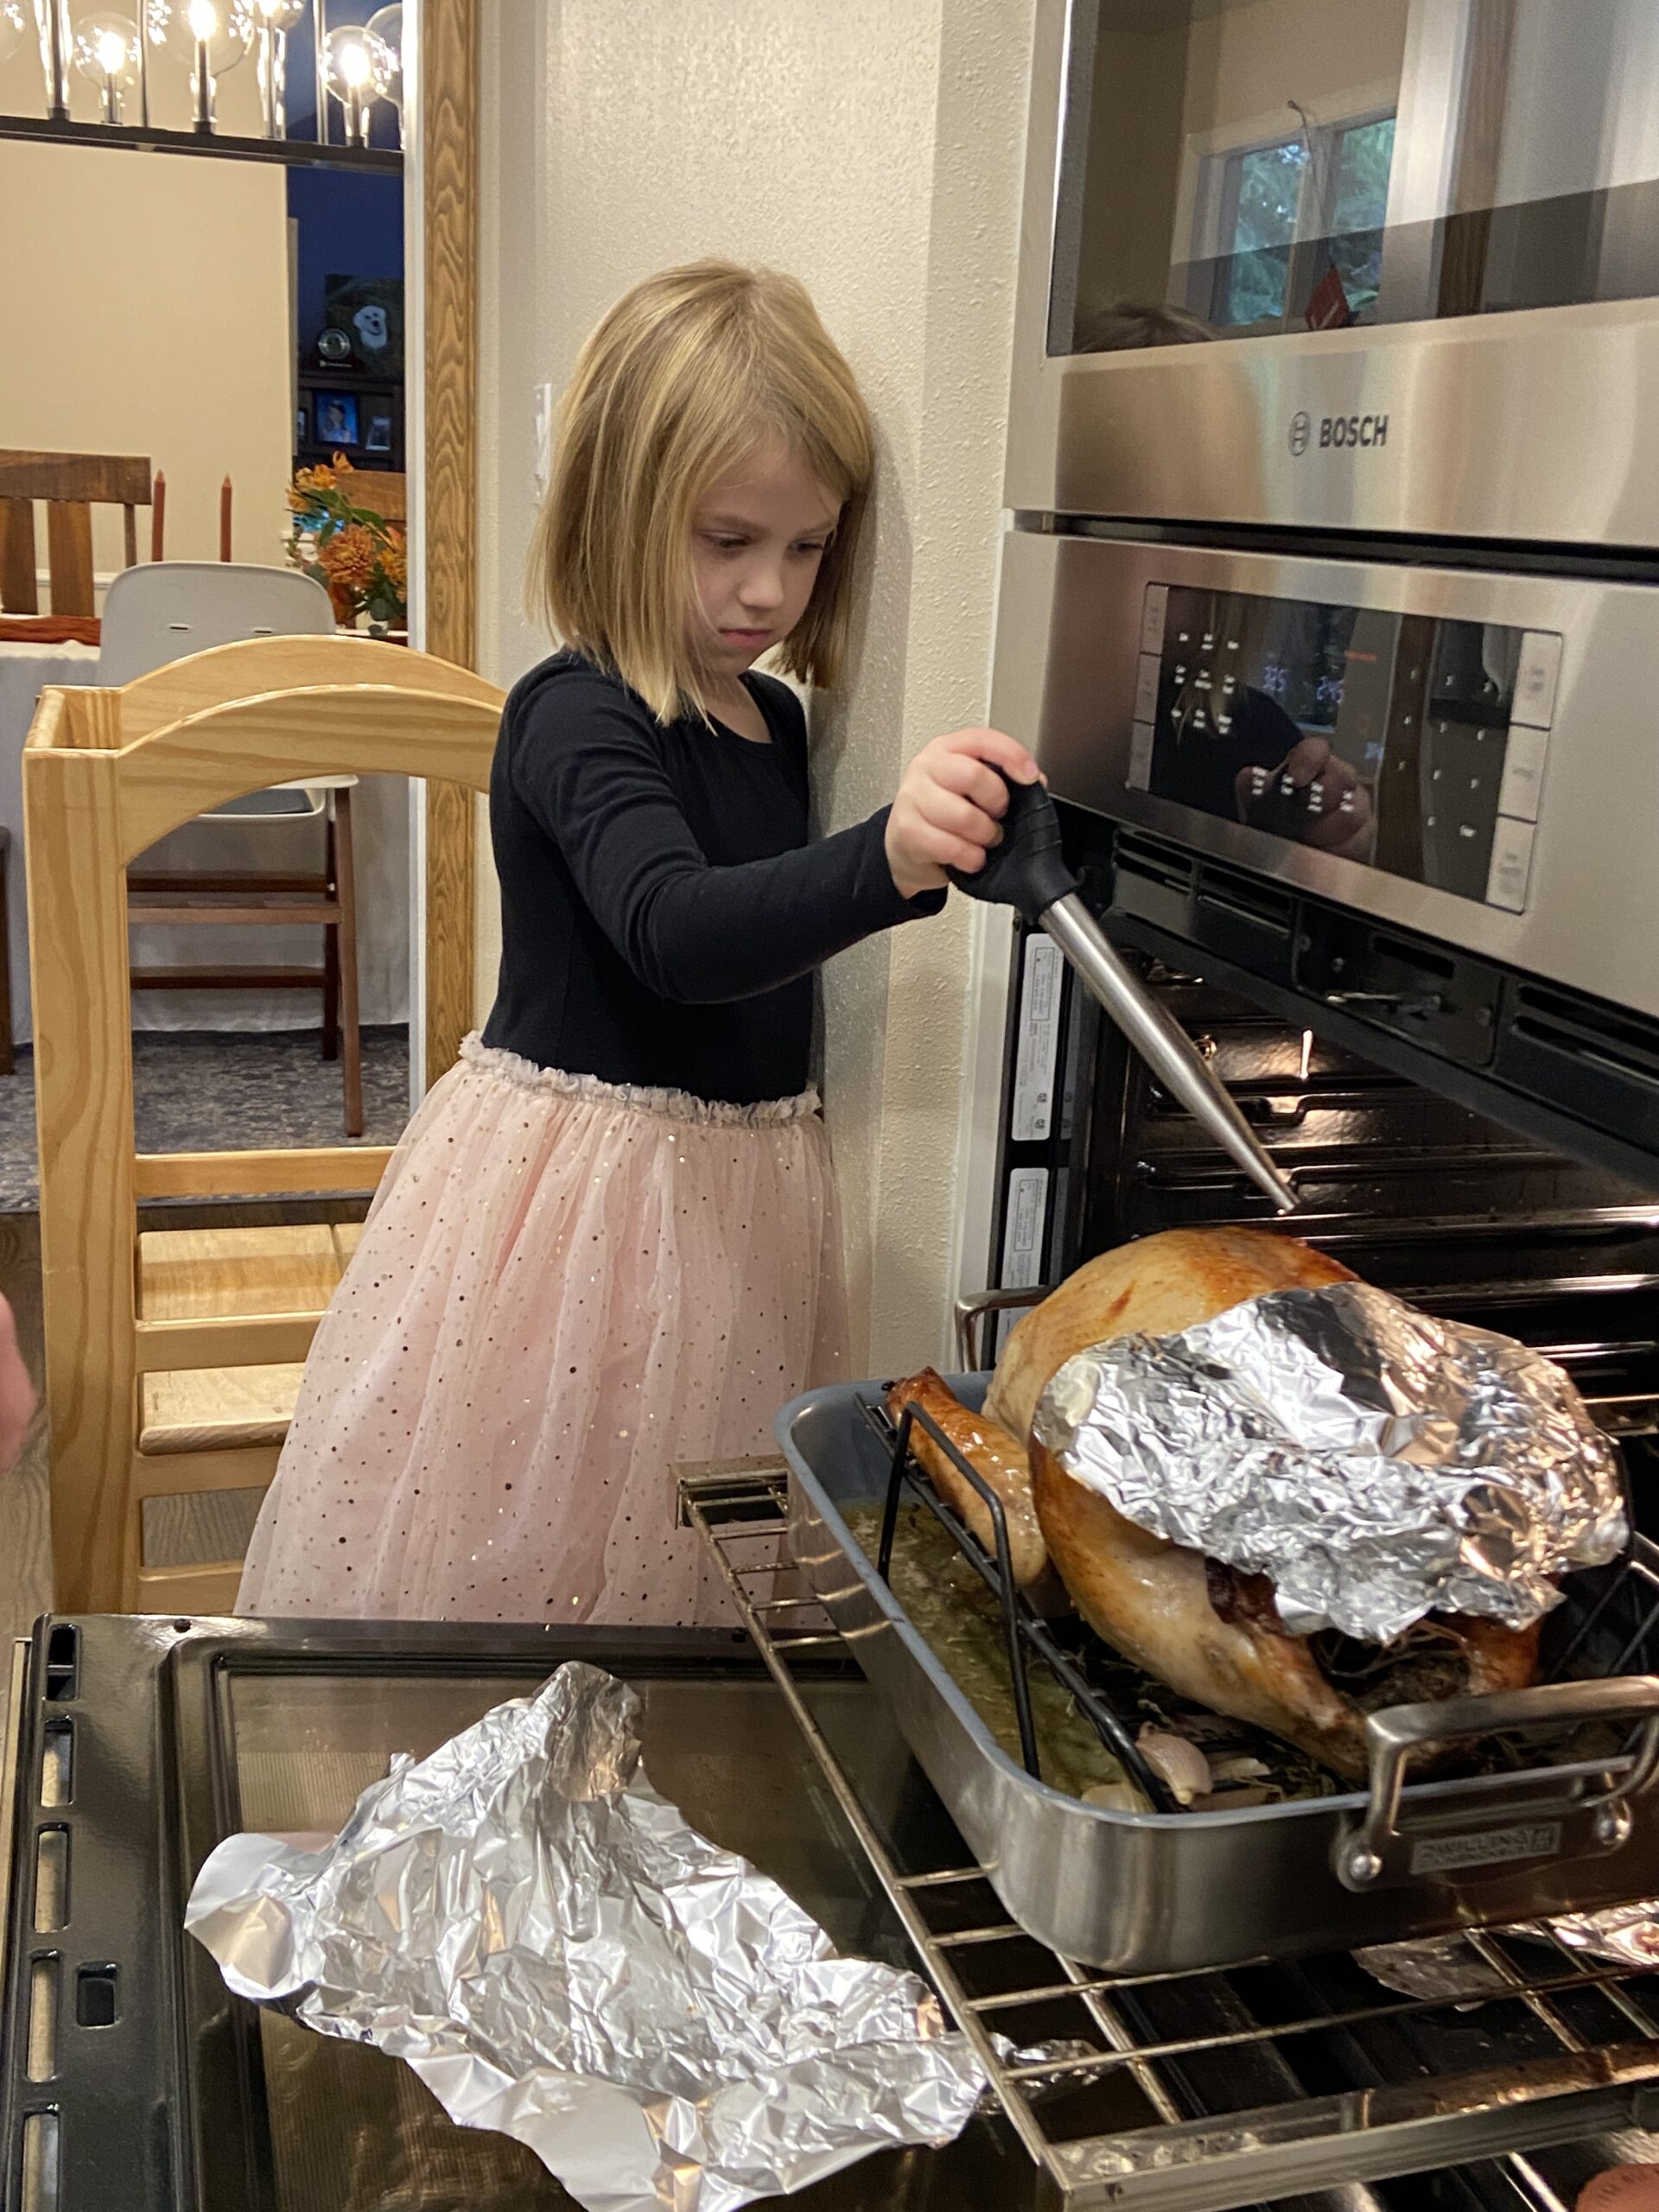
Two weeks later was Thanksgiving. We had dinner at my son’s house. Look at this big girl learning to baste the turkey! We enjoyed a smaller group this time. It was pure luck that most people felt decent for the holiday. (The girls have also been sick constantly for the past 6 or 8 weeks).
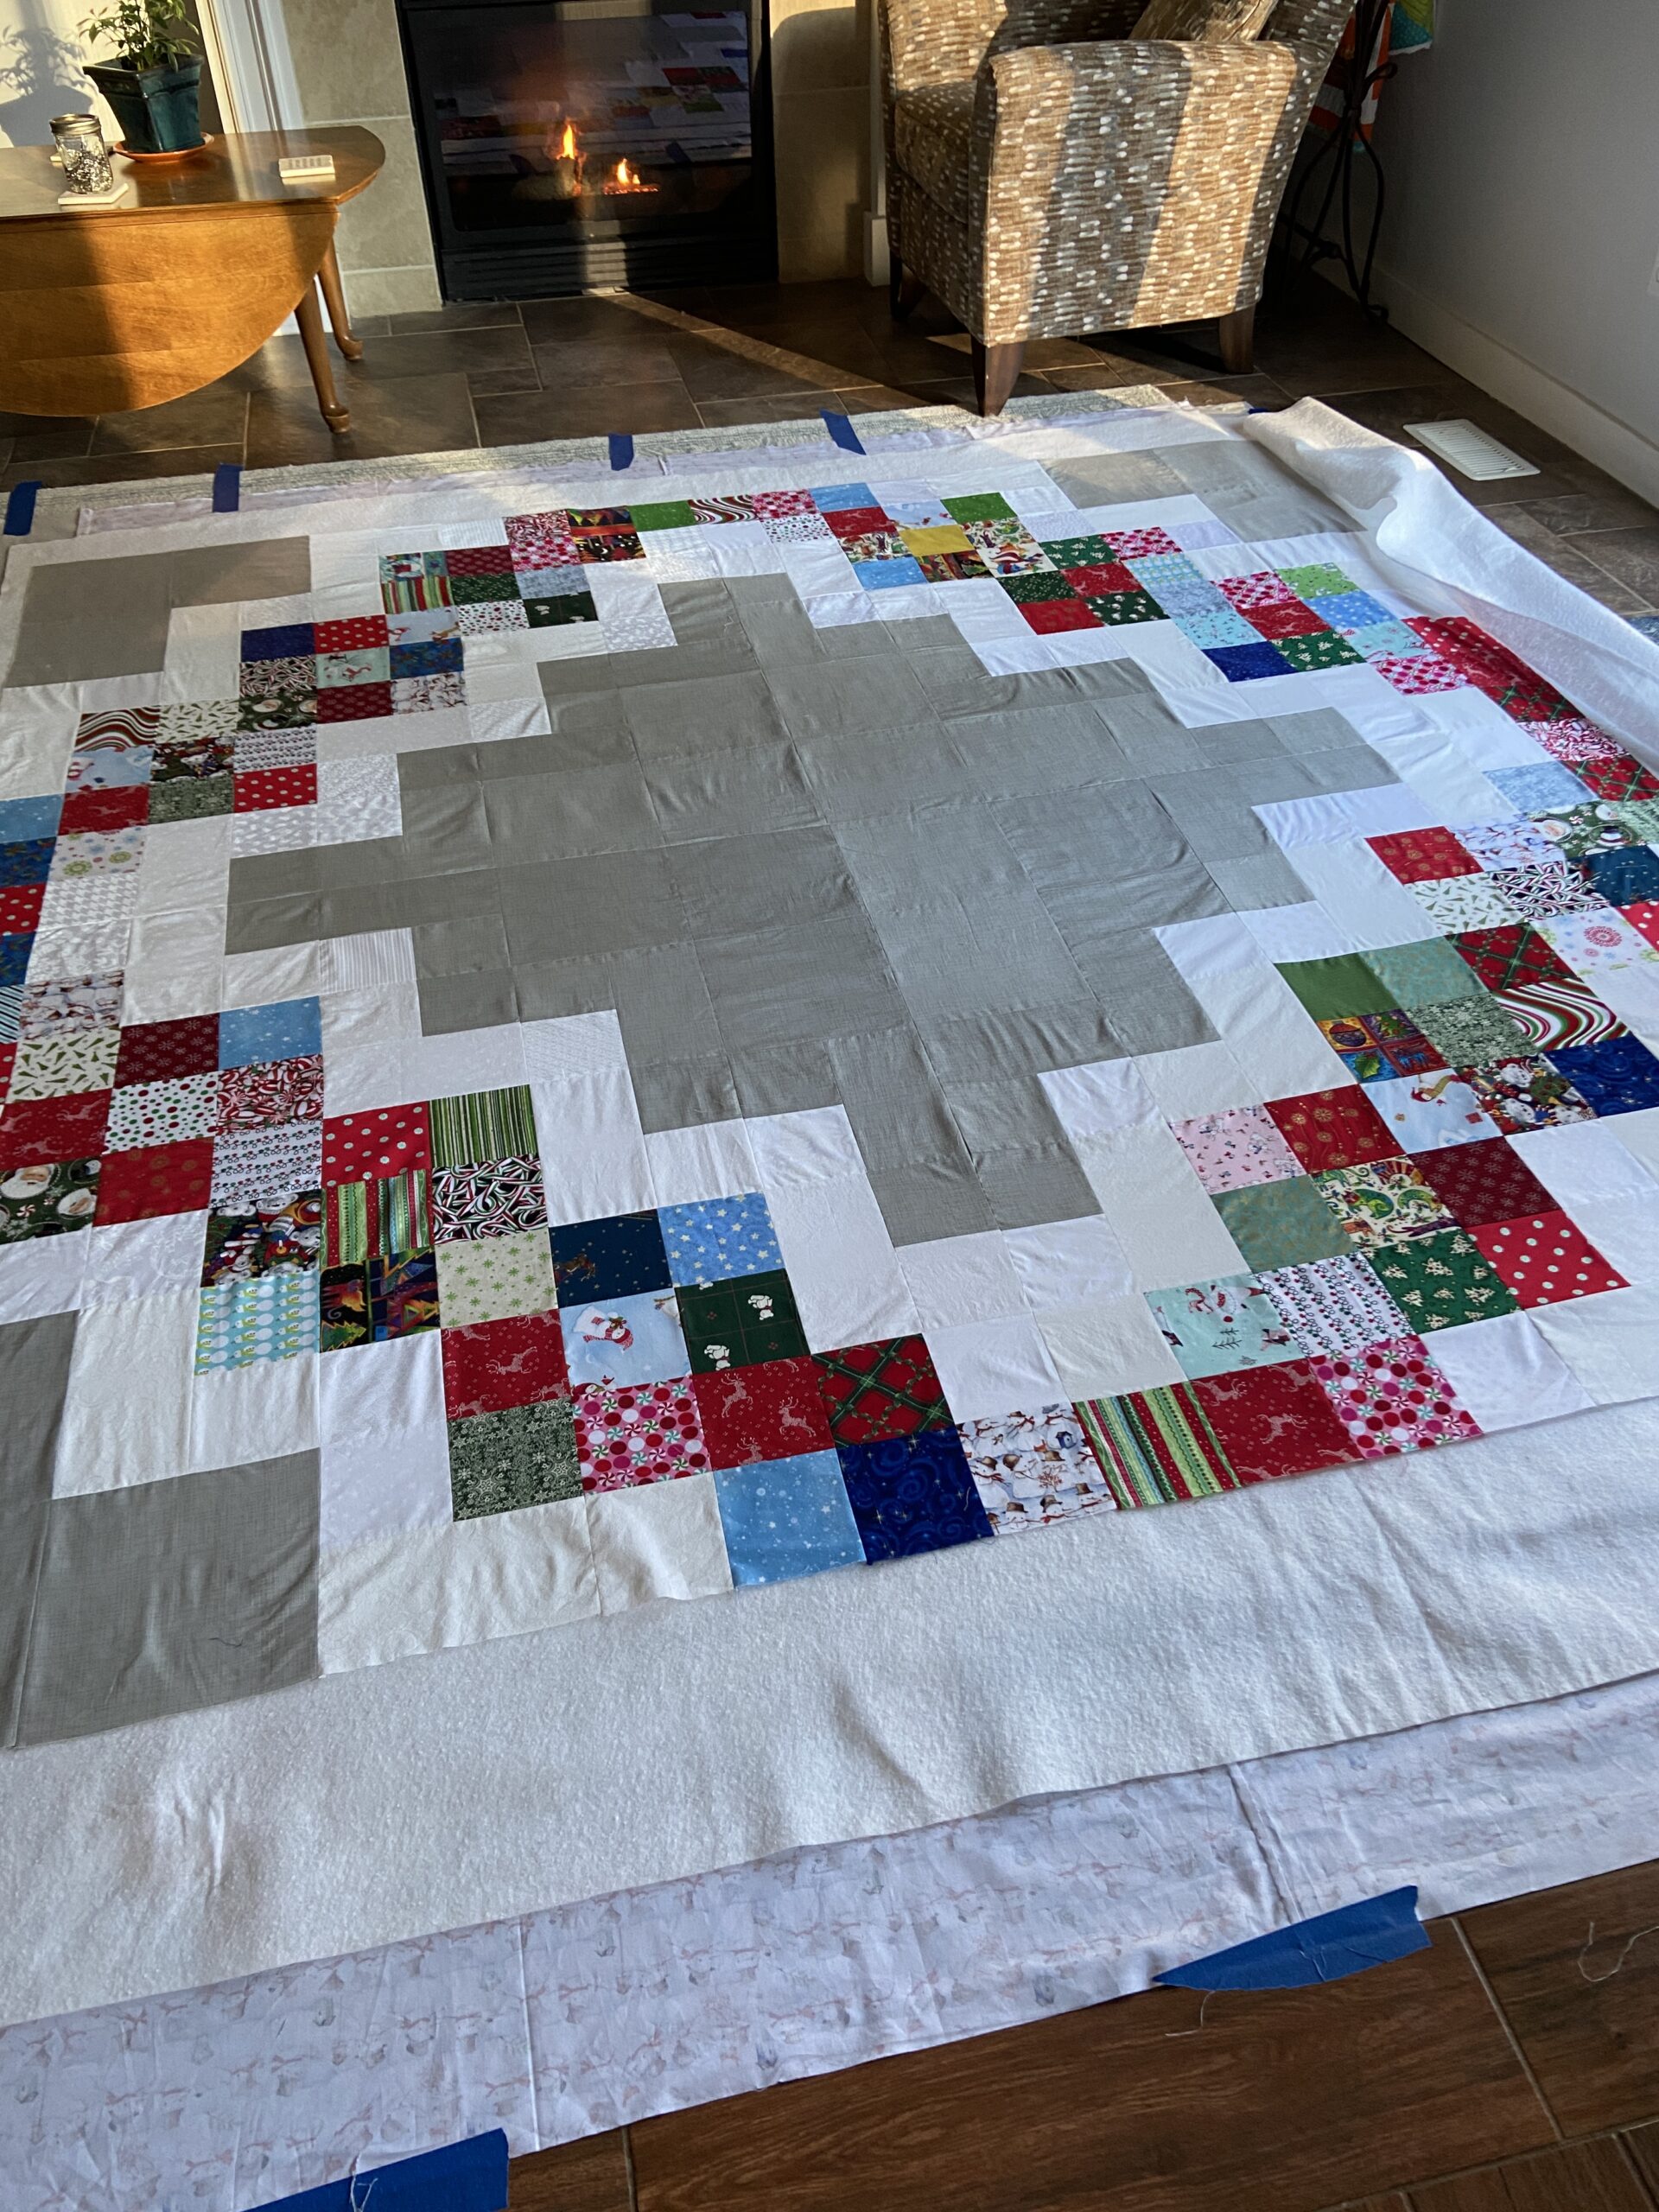
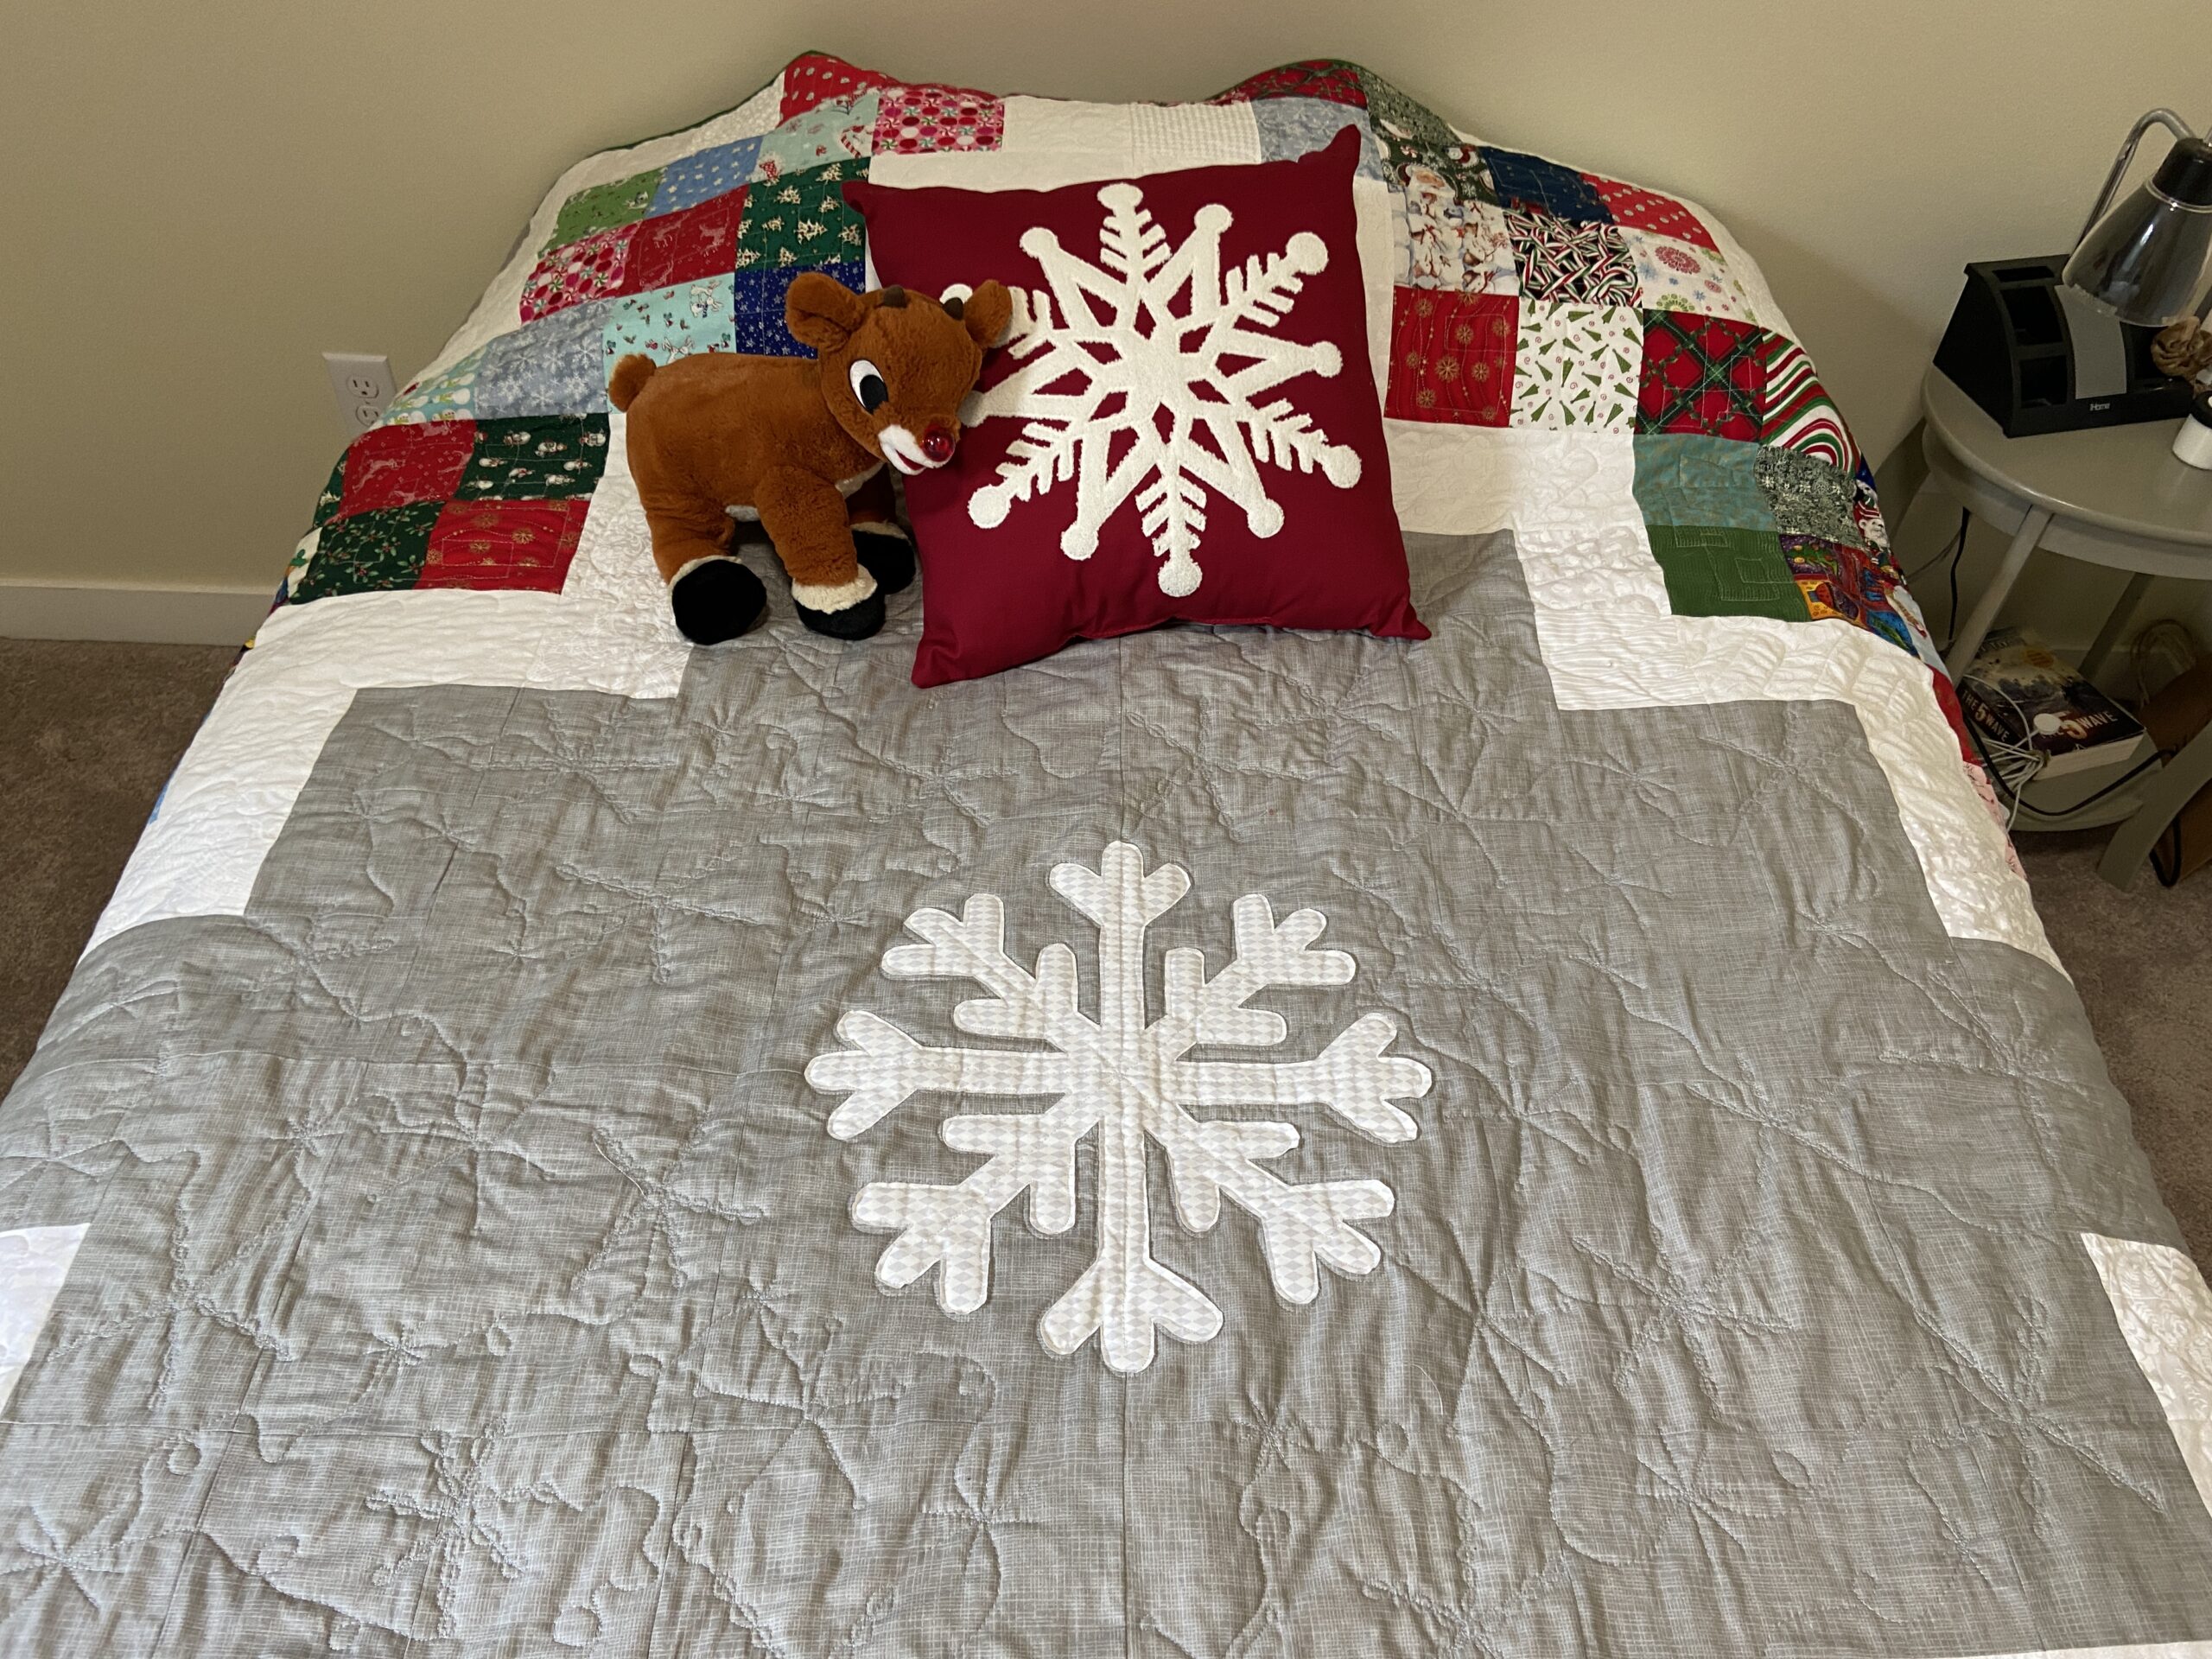
Being home so much did allow me to work on a holiday quilt. I saw a free pattern by Cheryl at Meadow Mist Designs called Candy Circle. I have a very large bin of holiday fabrics. Many of them were already cut into five inch squares which made putting this together quite easy. I chose the gray and white background to give it a modern wintry look.
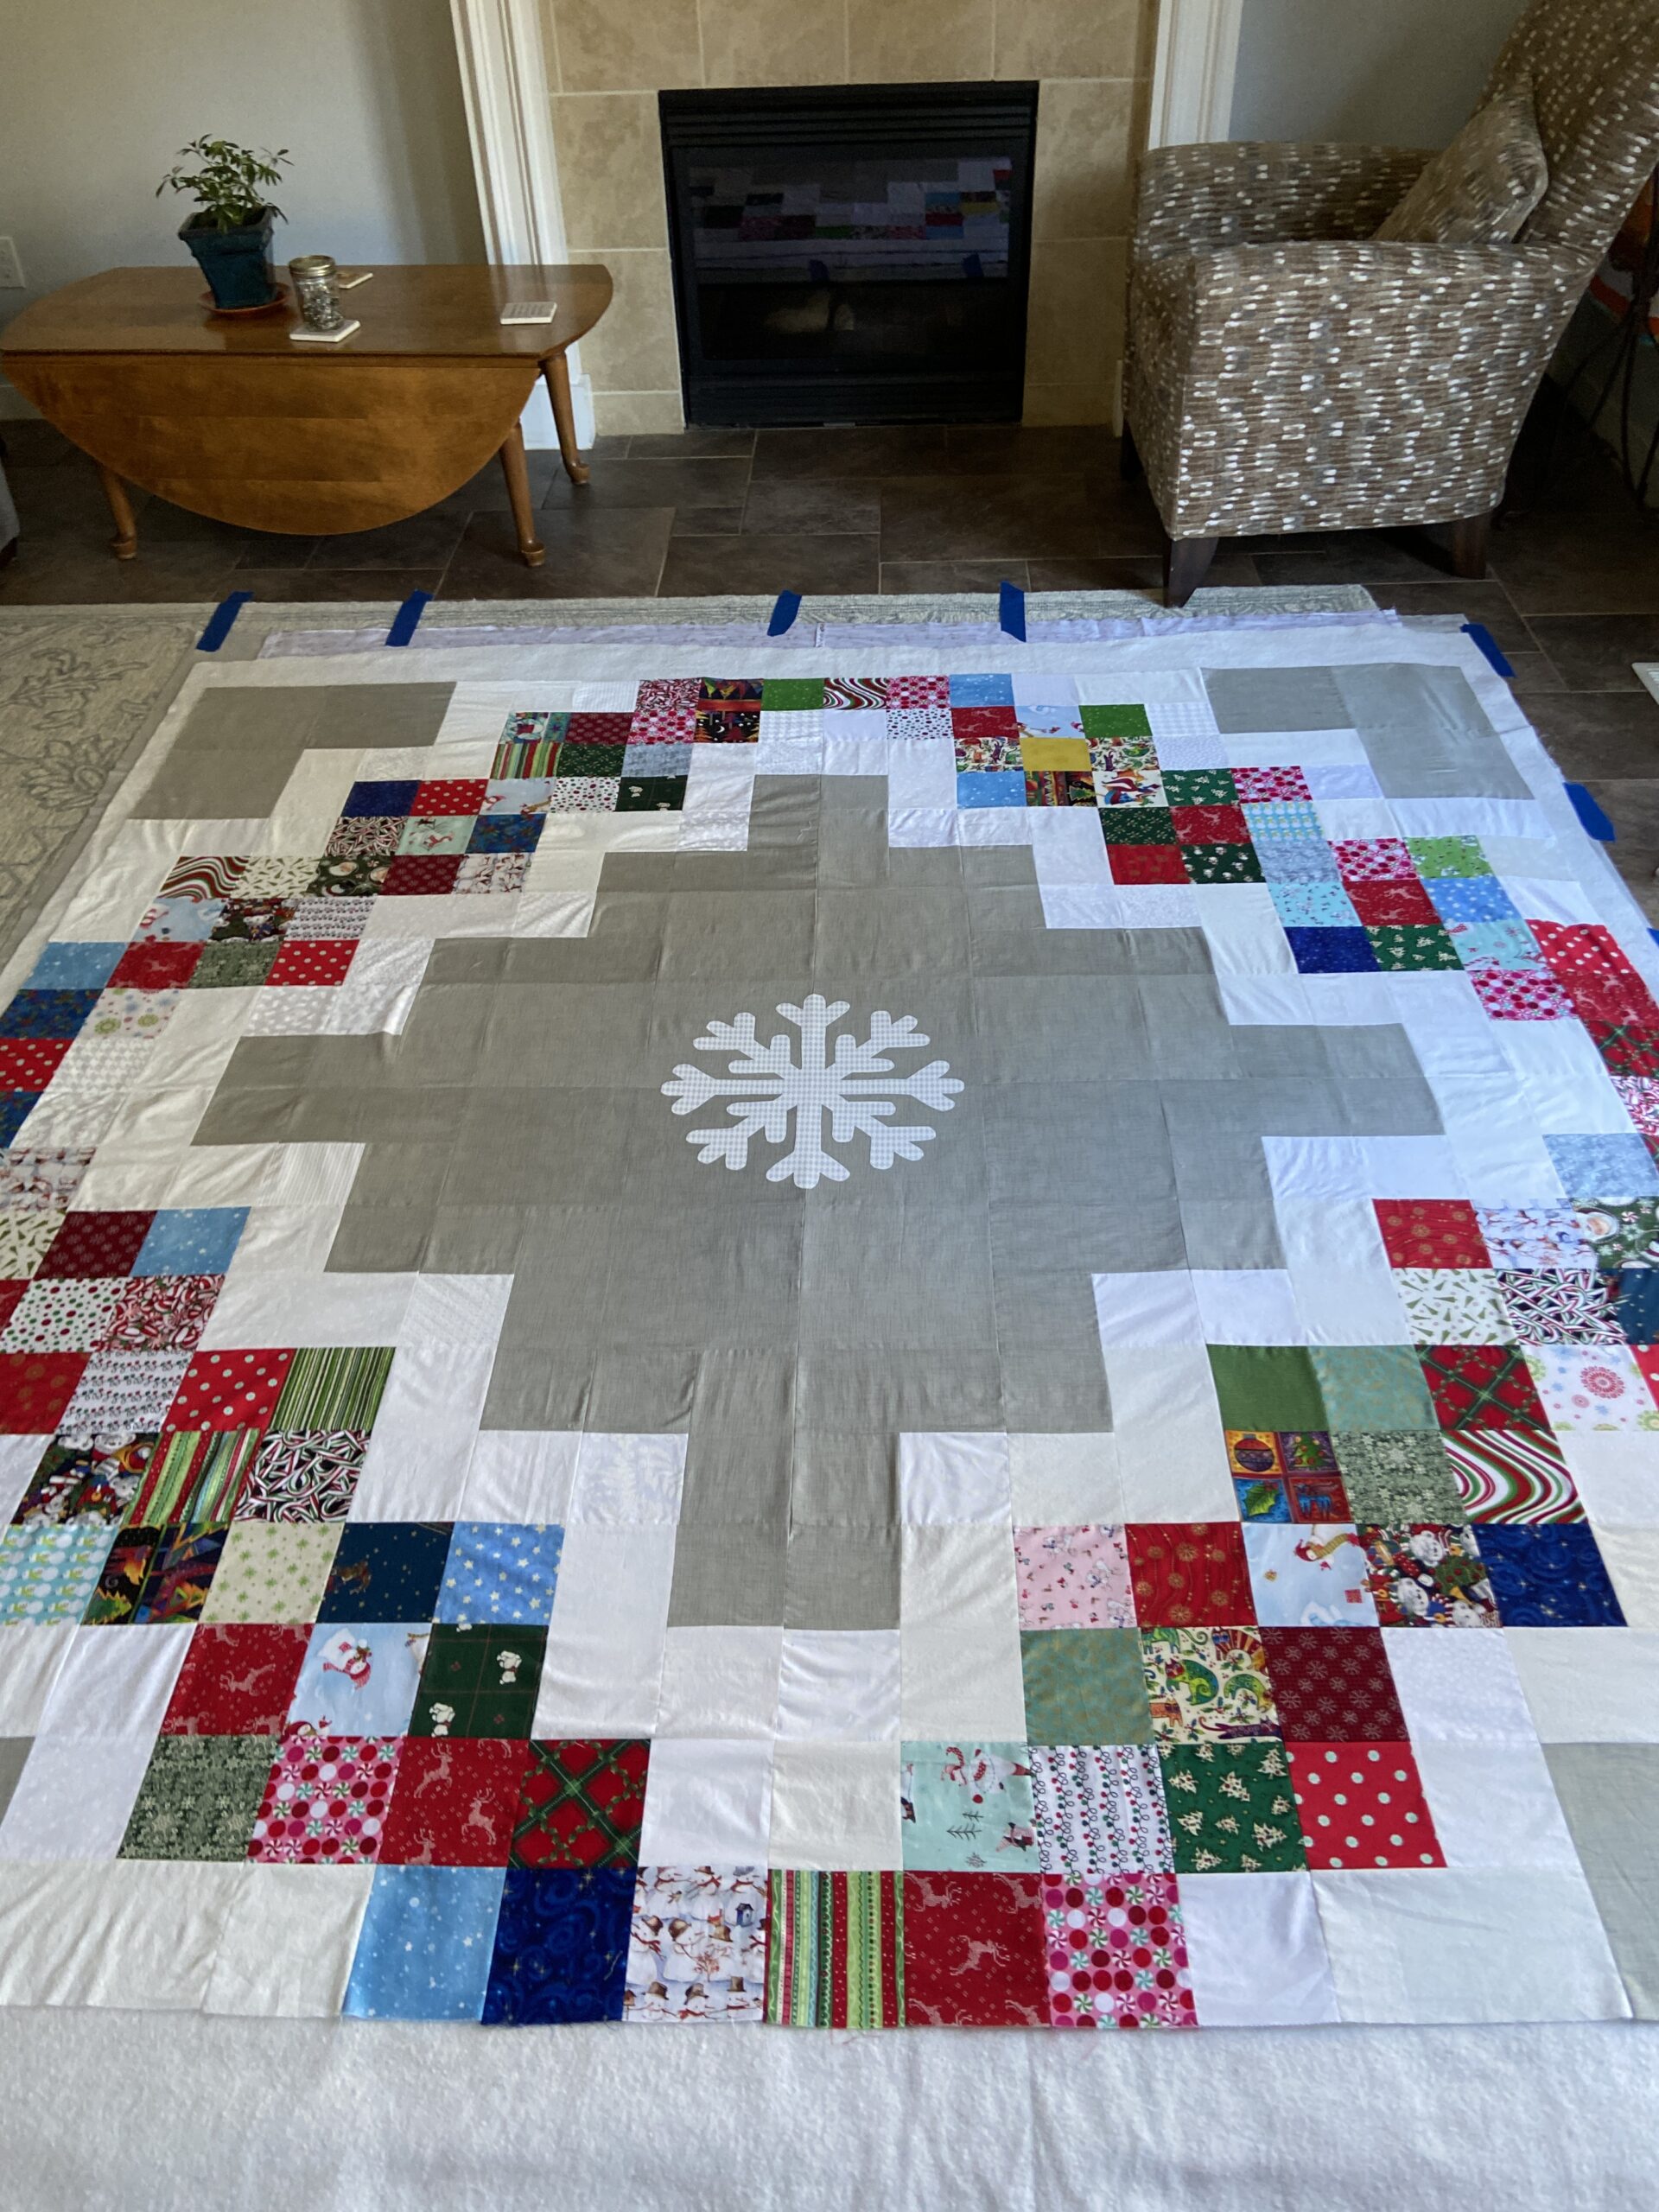
When I had the quilt top on the floor for basting, I decided I wasn’t happy with the large expanse of gray in the center. Not sure how it popped into mind, but I thought adding a big snowflake would be fun. My husband created the template for the snowflake and I found some white, tone on tone fabric with a very slight shimmer to it. Perfect!
I fused it to the center while the quilt top was on the floor and then stitched the raw edges of the snowflake first, before I started to quilt it.
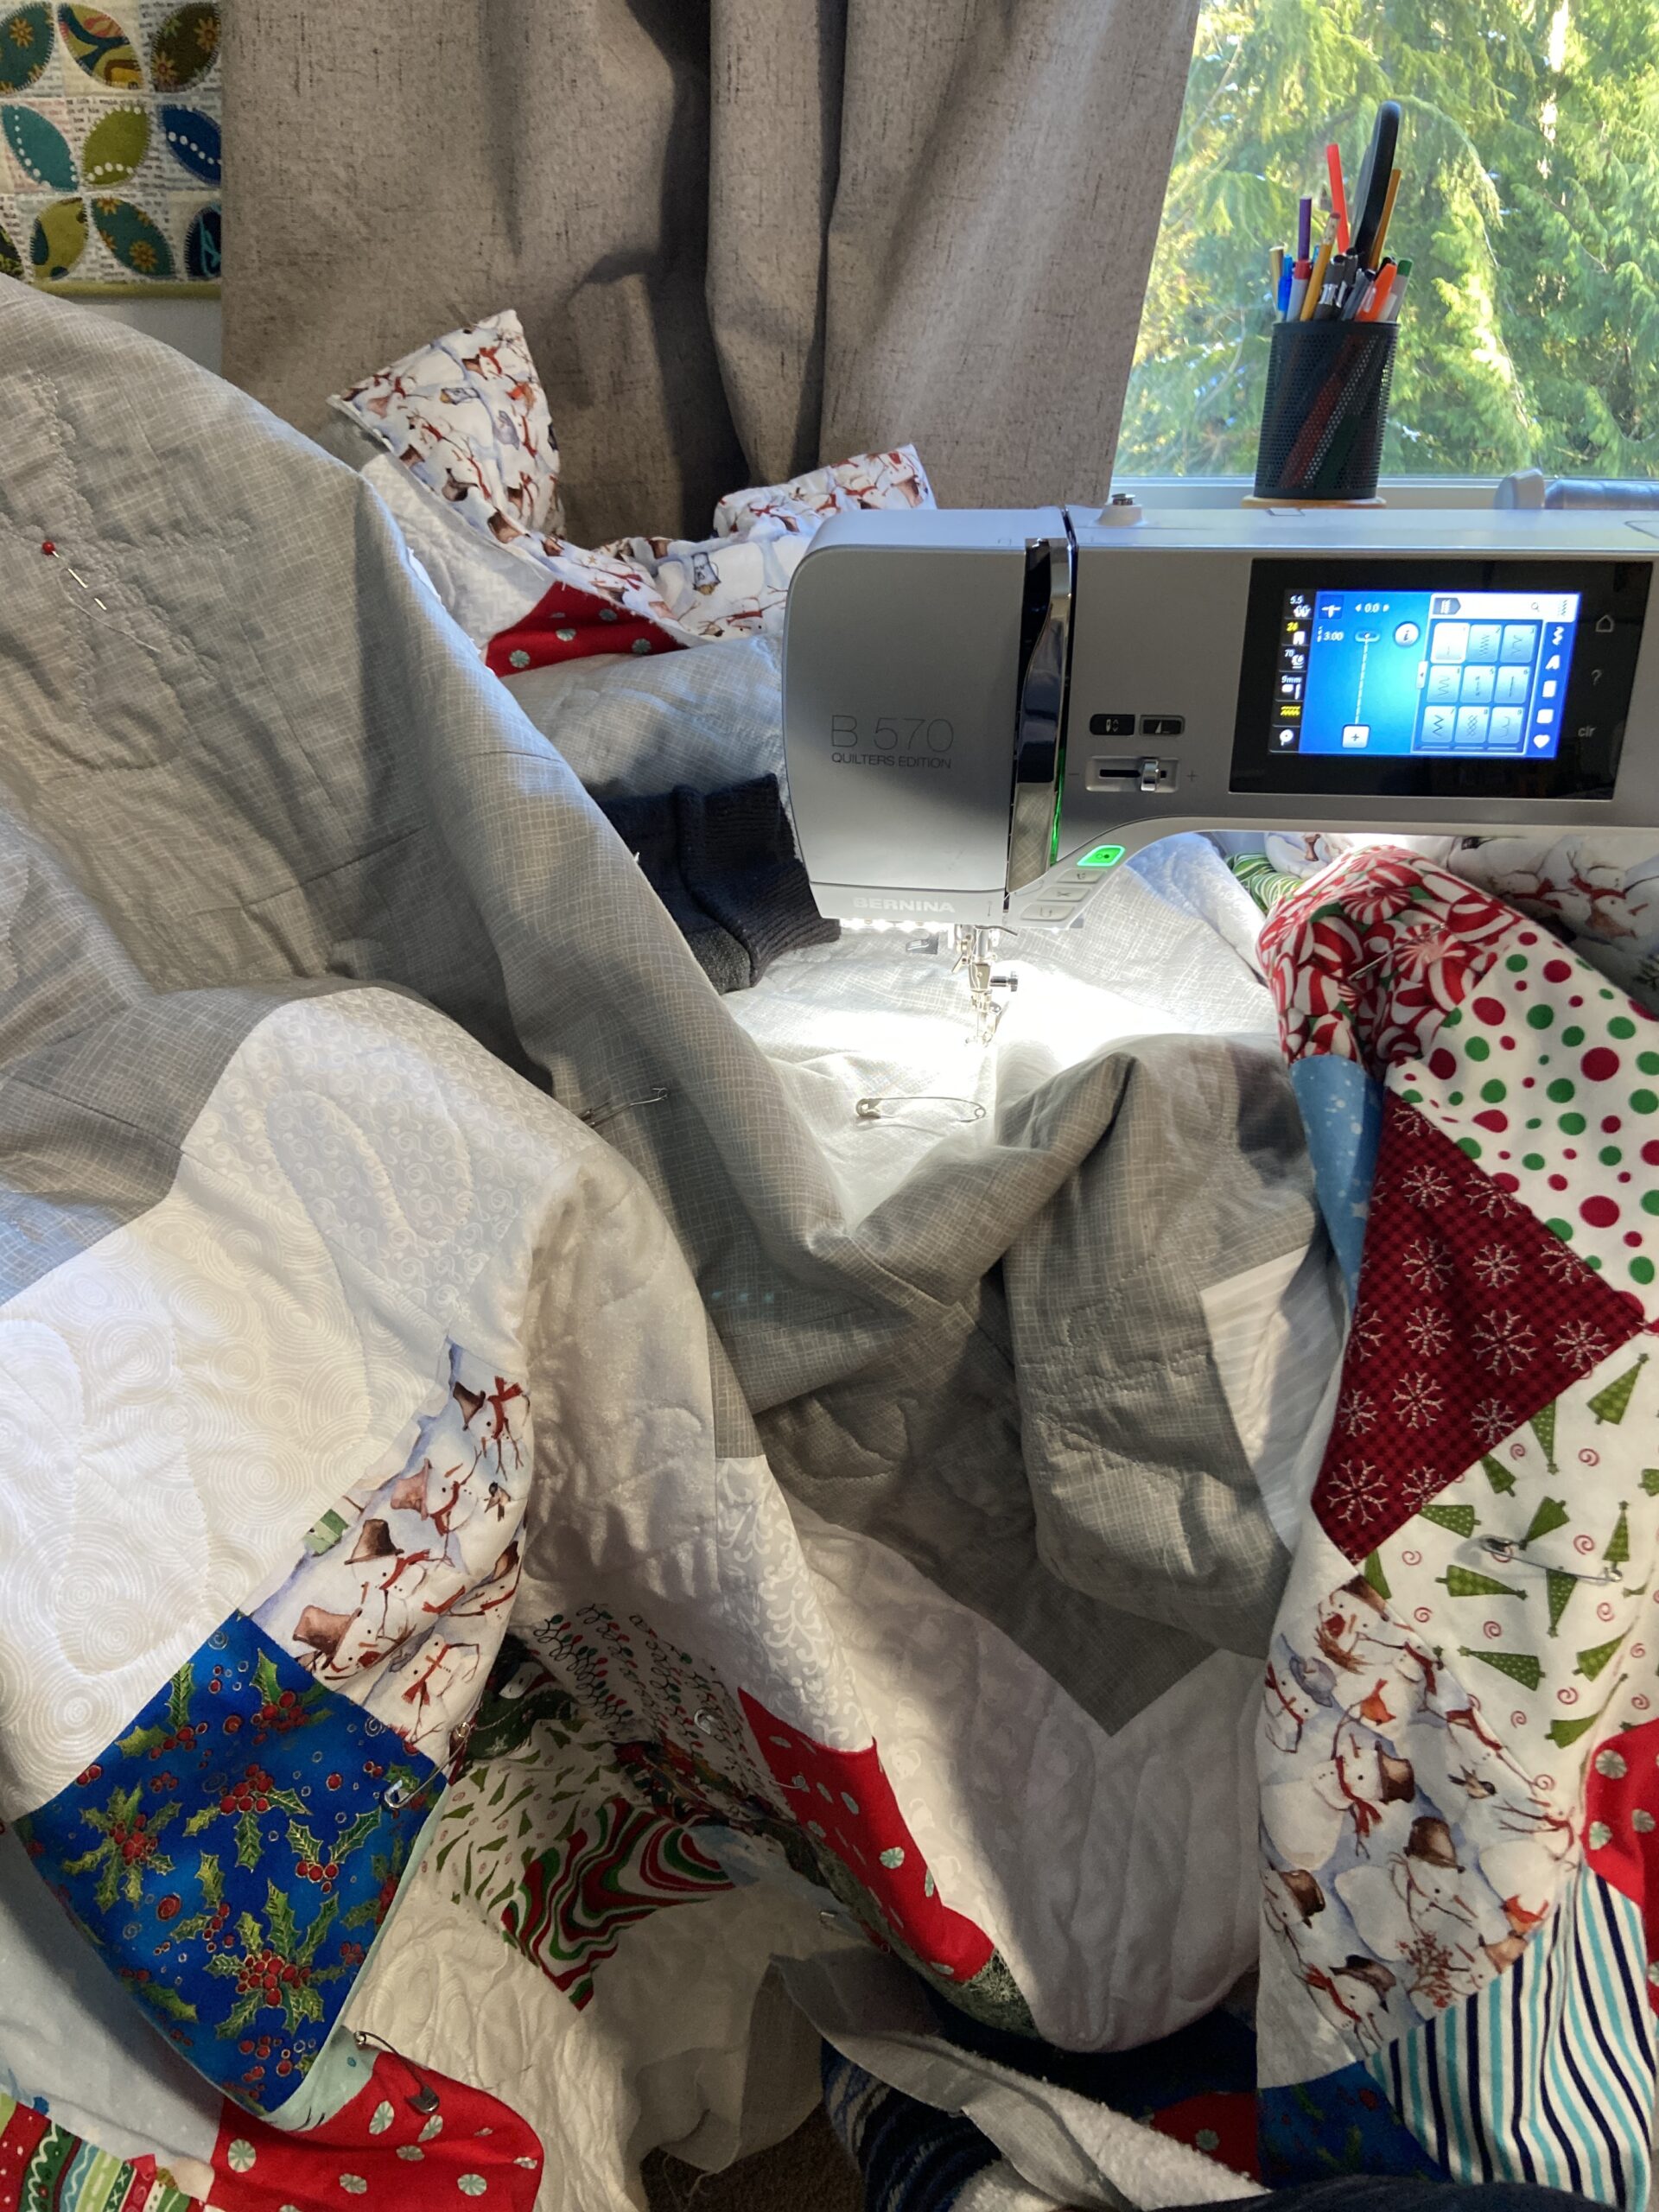
Quilting this piece was a bit unwieldy but overall, it went really well. On each section, white, gray, and colorful, I did a different motif. This kept me interested – honestly, quilting something this big becomes a bit mind-numbing for me after a bit.
It is now on Julia’s bed and I think she really likes it. (I couldn’t resist the snowflake pillow when I saw it in the store. It looks like it was made for the quilt!) Most impressive to me was the fact that I made the quilt top completely from stash. I had to buy the backing fabric but otherwise, this was all made using fabric and batting I had on hand!
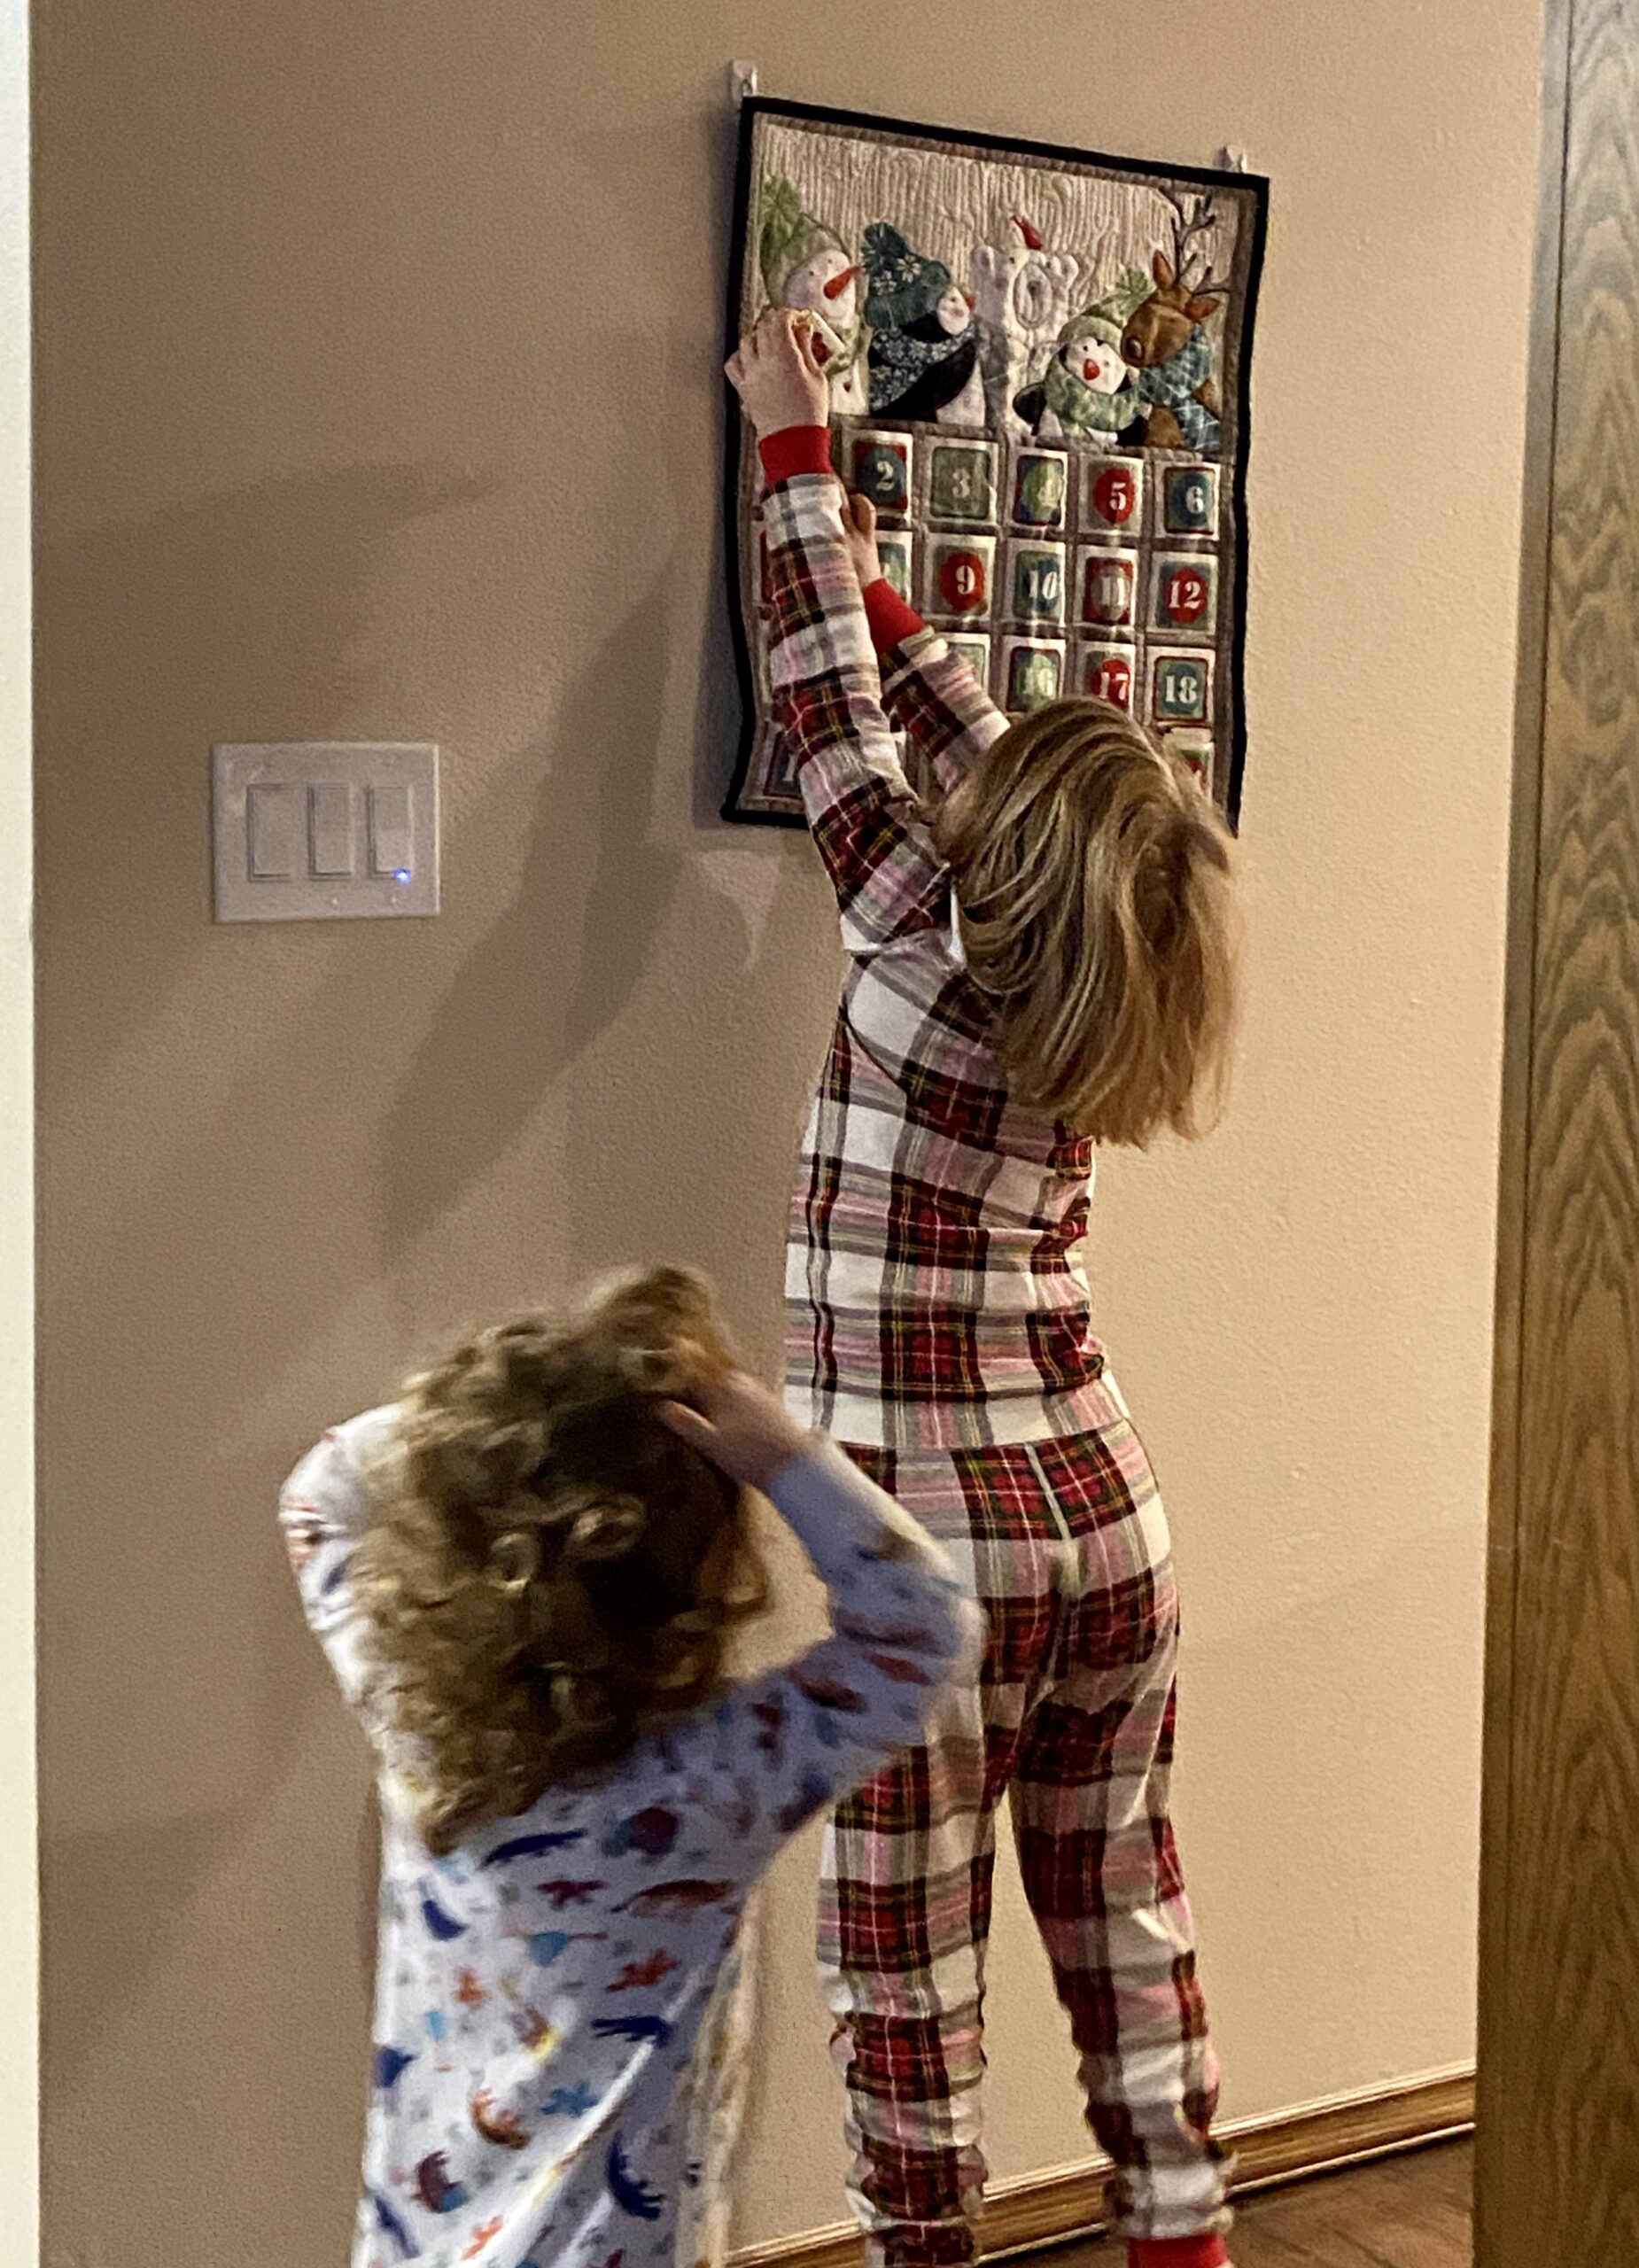
In the early fall, I went to a quilt show and as I wandered the vendors, I saw this advent calendar. I know I could easily make this but it was all finished and so cute. Supporting the vendors is important – I know I was very appreciative when quilters shopped my booth at shows in the past. I picked it up for the girls and later on headed over to the Dollar Store. Each pocket has two items in it, one for each girls. Some candy, some hair ties, stickers, and holiday stamps. This picture is from the first December 1st. I think they have enjoyed their daily treats. (It is hung somewhat high because of their Labrador – A calls him a Wabrador– puppy who would surely sniff out the forbidden chocolate).
Moving on! I have also been sewing gifts for the girls for Christmas. I am excited to be able to spend Christmas with them. We haven’t ever been there to watch them on Christmas morning so this year will be extra special.
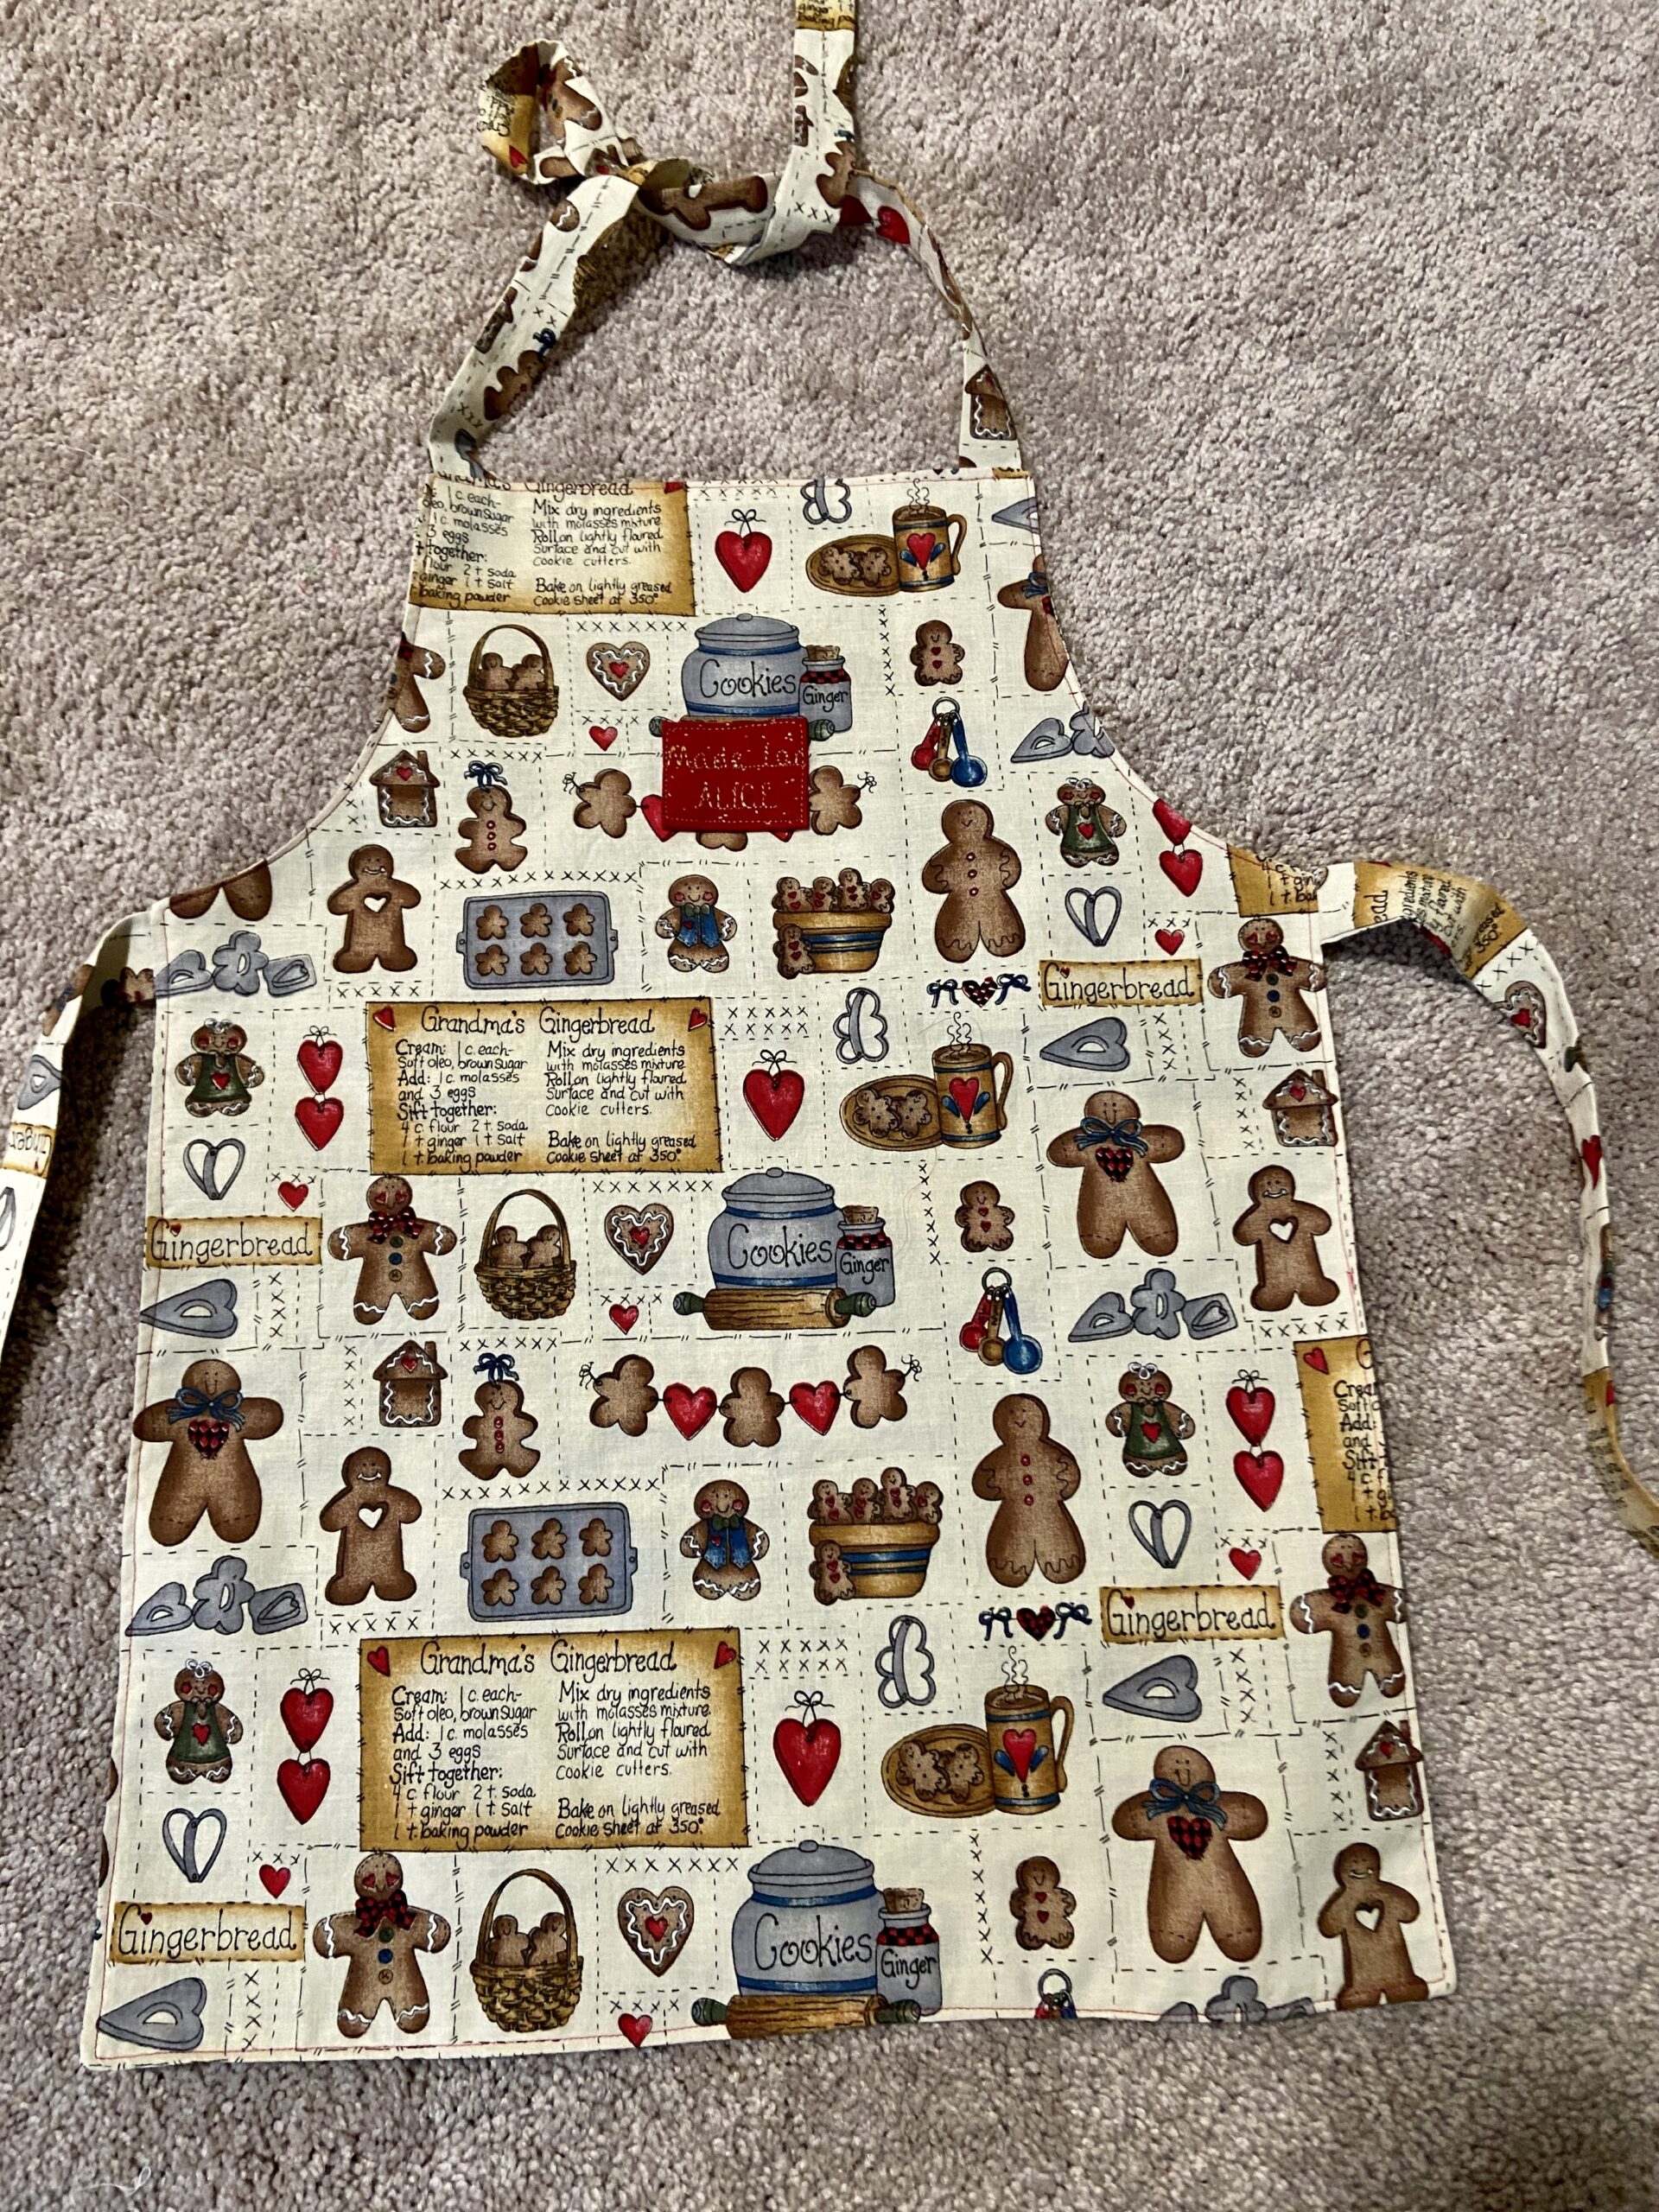
This apron is for little sister. It is lined so she can wear it either way. This fabric is an older print that has been in the holiday fabric bin for a while now. I think she will love the cookie print. For big sister I made one with princesses and castles. It is already wrapped and somehow I forgot to take a picture of it.
I also made each child a teddy bear. I have never made a stuffed animal and have to say, this was really easy. For me, the most challenging part was stitching the mouth. I had to take it out a couple of times to get a decent result. The teddy bear pattern is from TieDye Diva. Here is a link for you. The pattern comes with some clothes and I did use them for the pants. For the hoody, I went over to Best Dressed Bears. She has lots of simple and super cute teddy bear clothing patterns. Here is the link to the hoody. The patterns over at Best Dressed Bears are made for a slightly bigger stuffed bear so I just made the pieces a smidge shorter in length which did the trick.
OK – I think that sums up the last six weeks. After soooo many boxes of tissues, cups of tea and honey, inhalers, antibiotics, humidifiers, and more naps than I can even count, I think life is back on track. I hope you are healthy and happy. Julia is home and has been patiently waiting around for me to feel better. We love going to some of the cute towns around here for window shopping and just enjoying the Christmasy vibe. Hopefully we will do that tomorrow. Fingers crossed!
Linking up with lots of fun blogs. Check it out at the top of the page, under Link Ups.
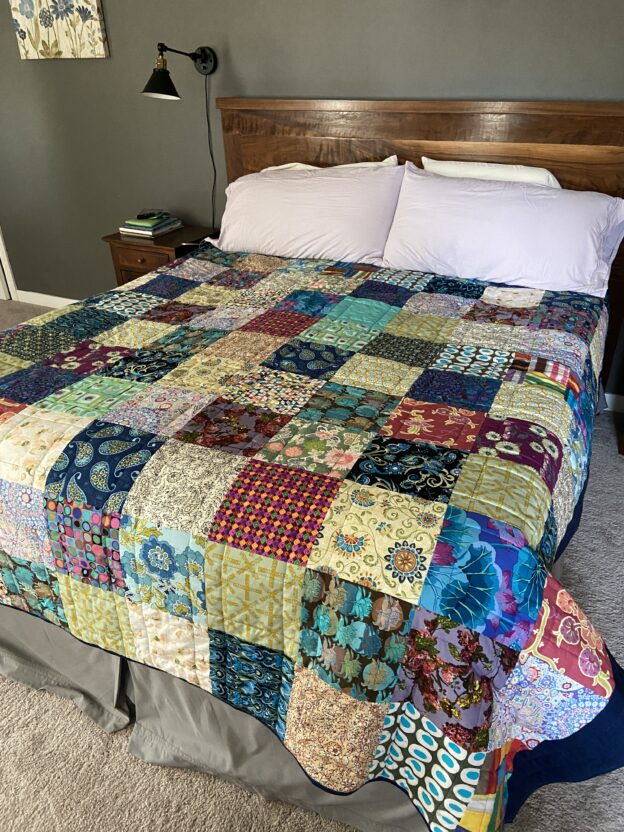
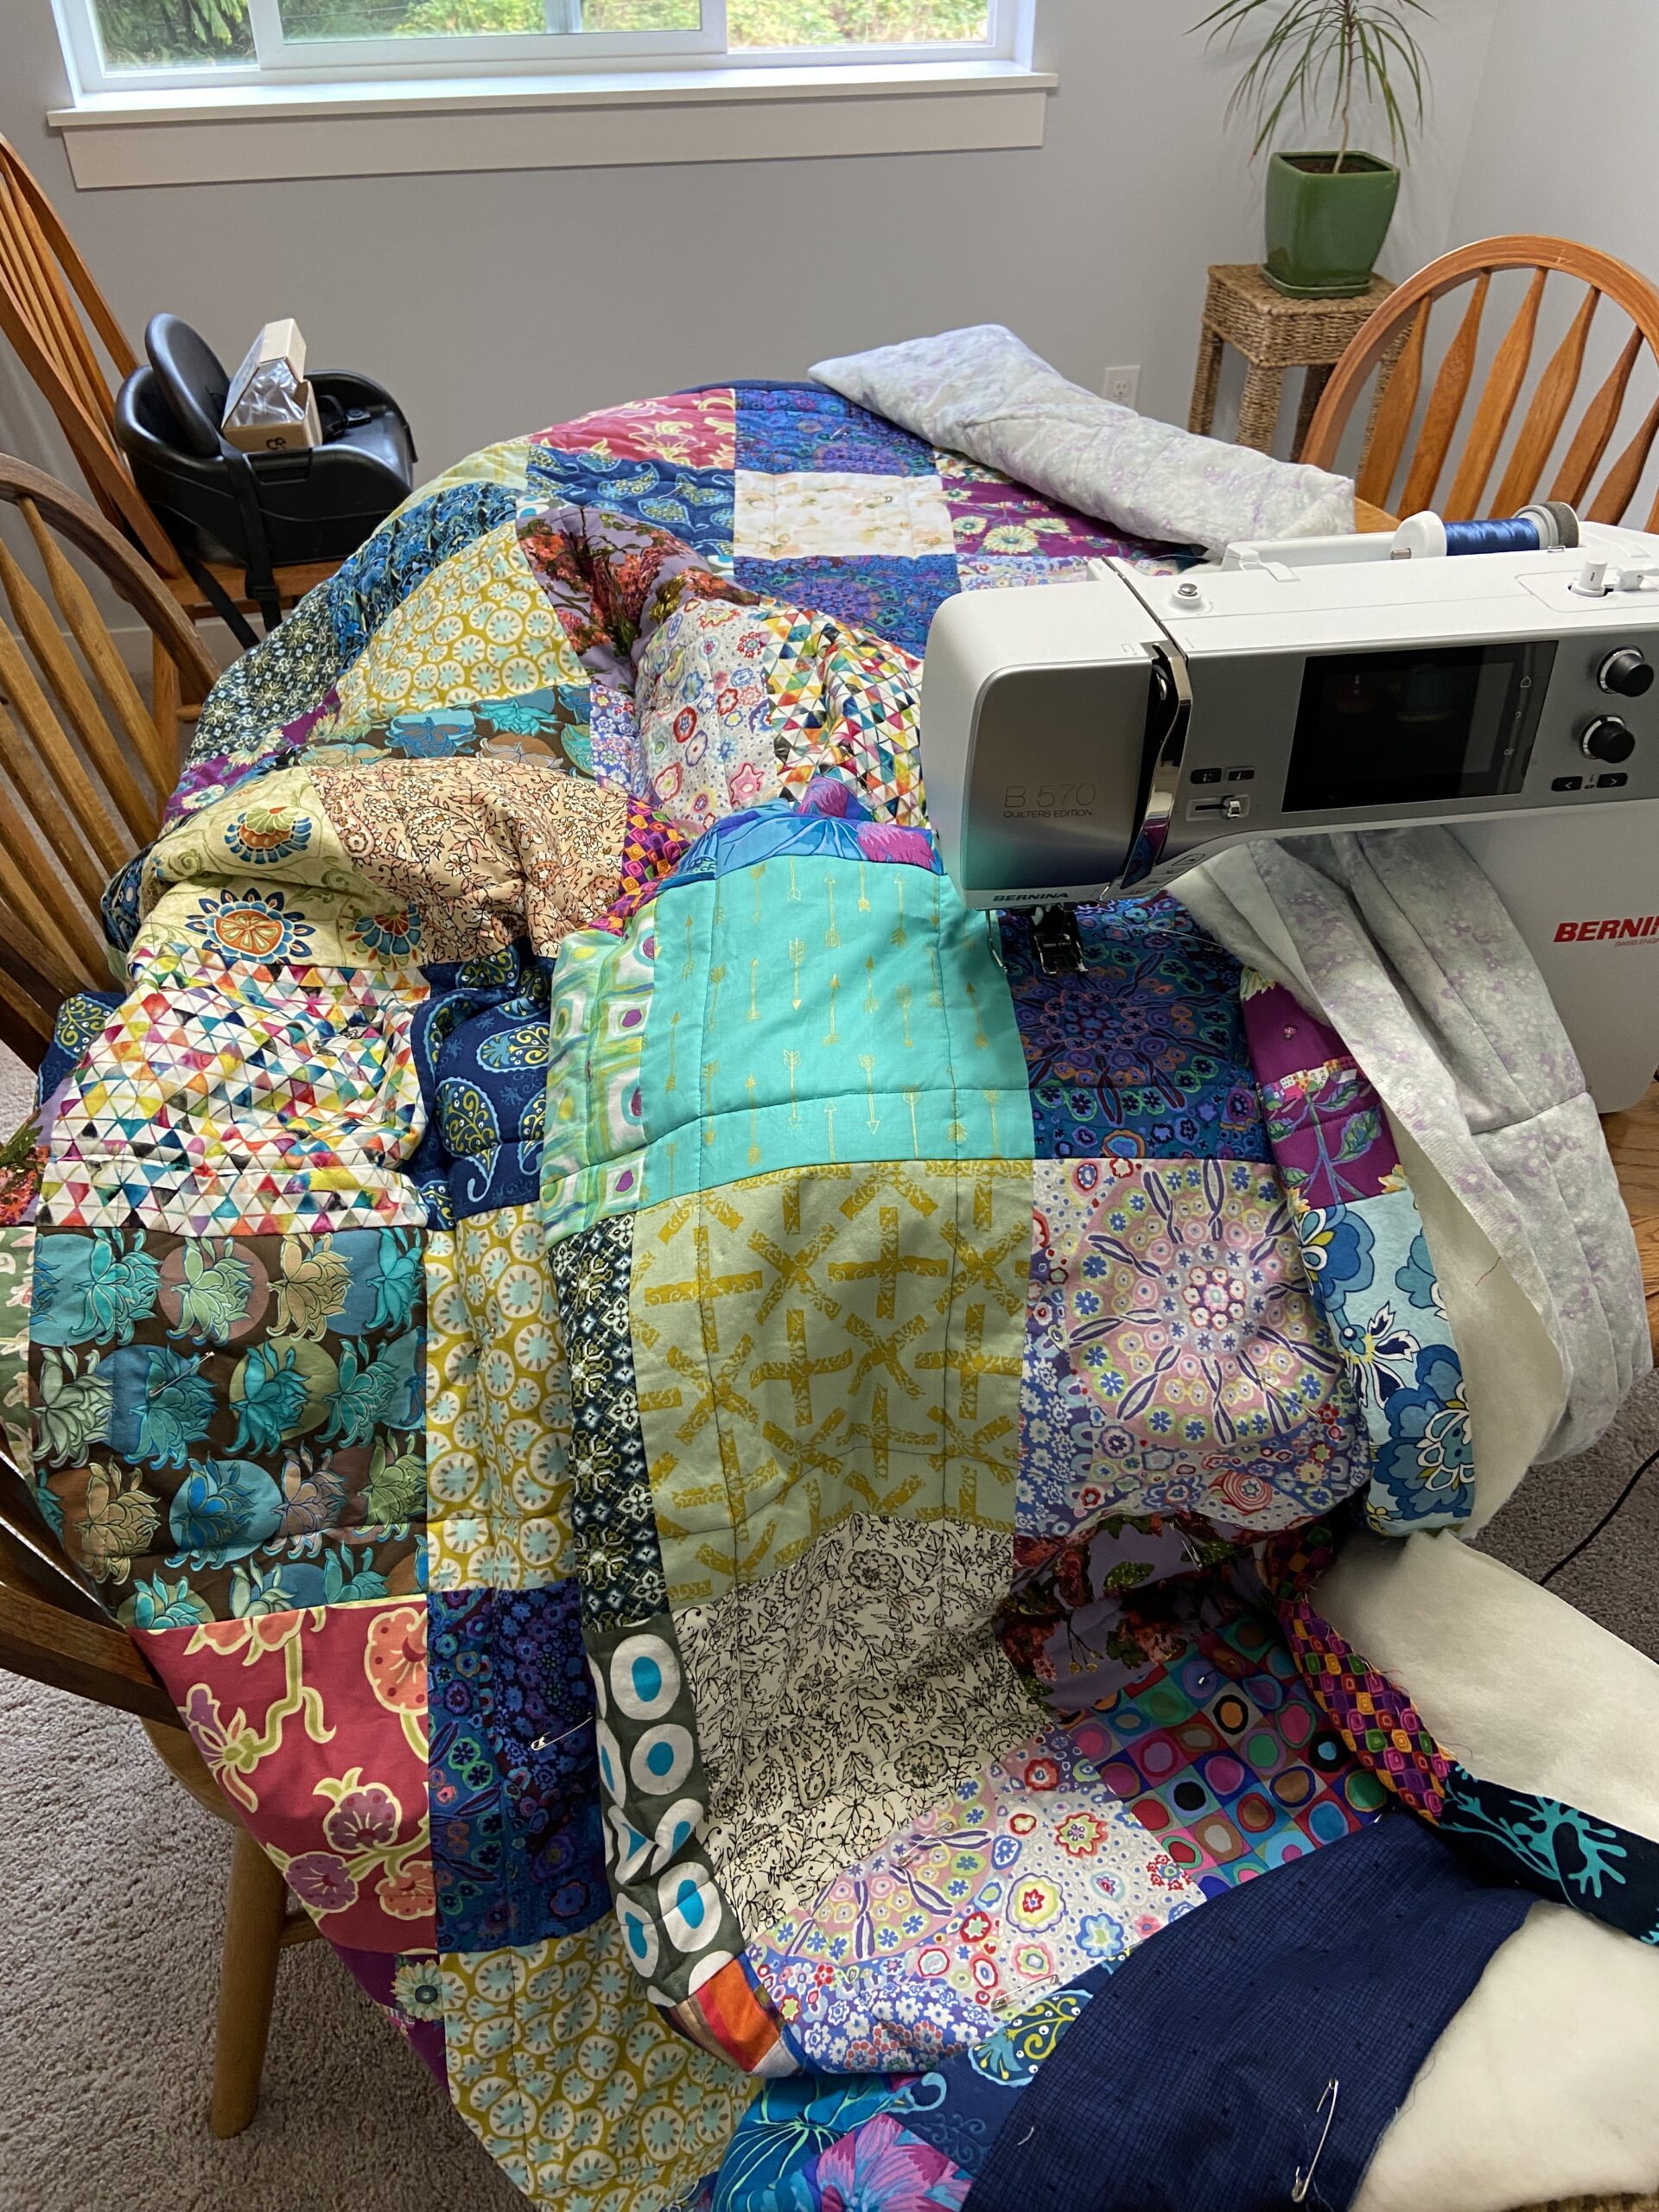
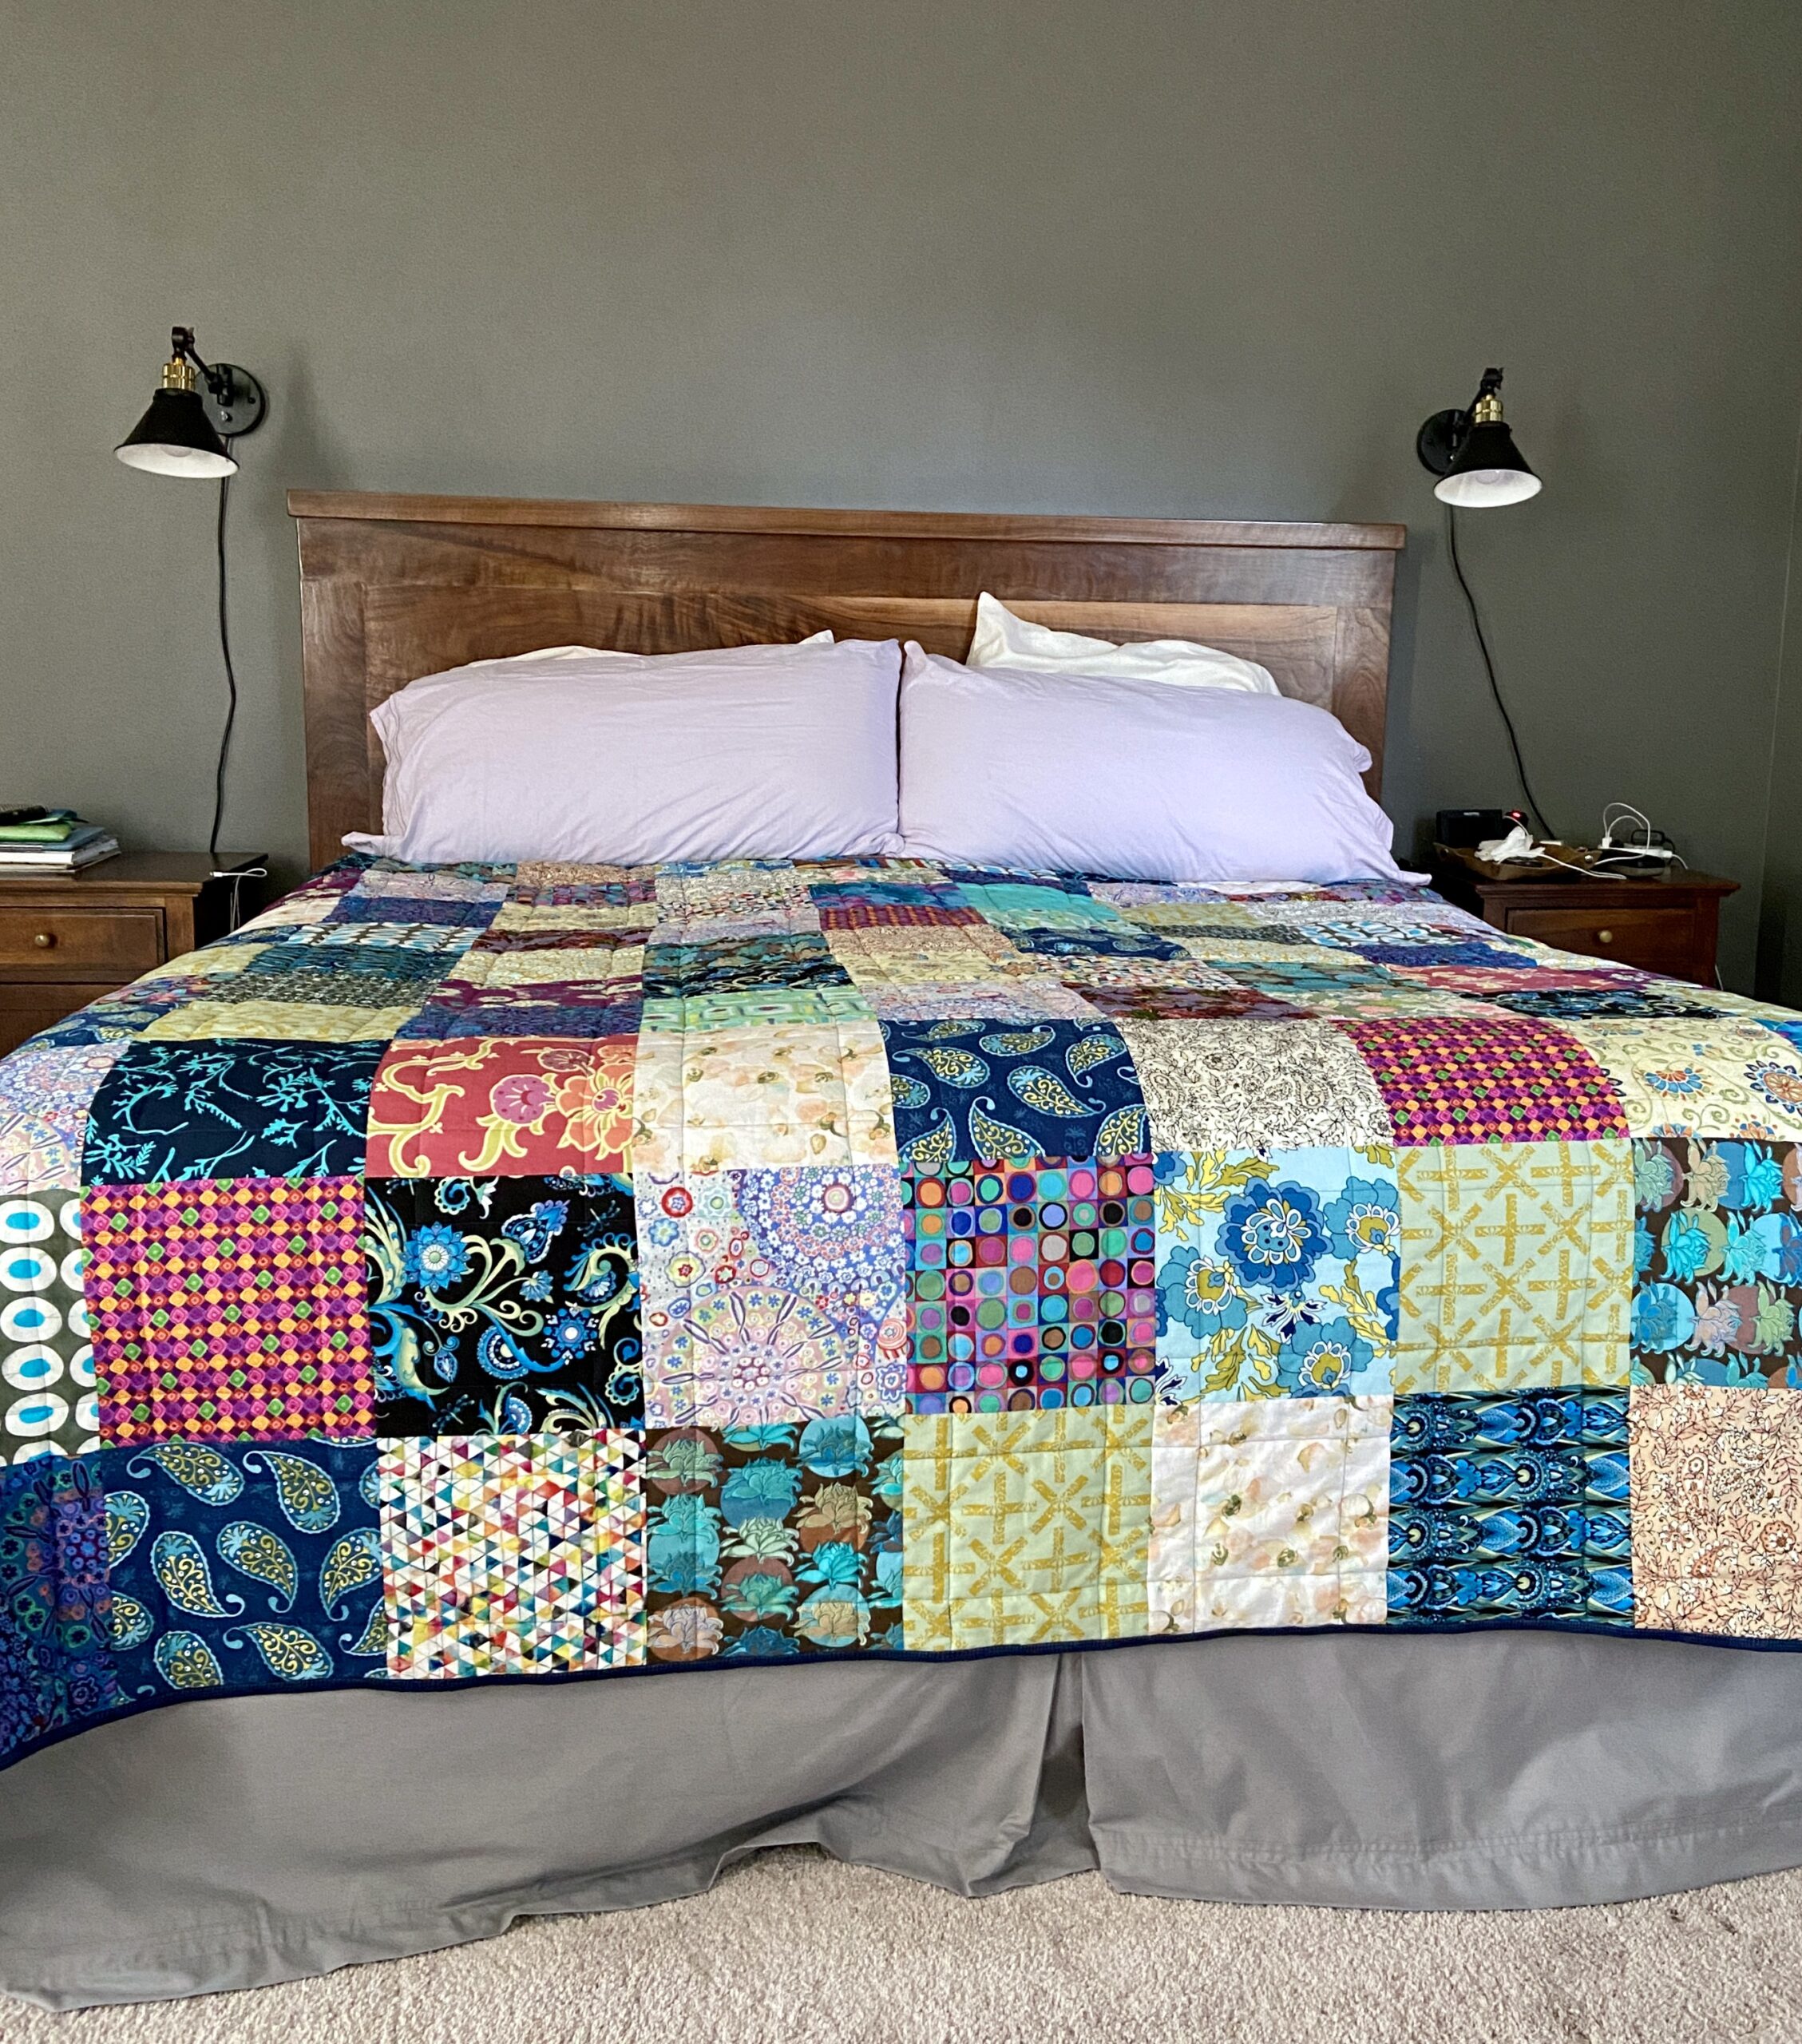
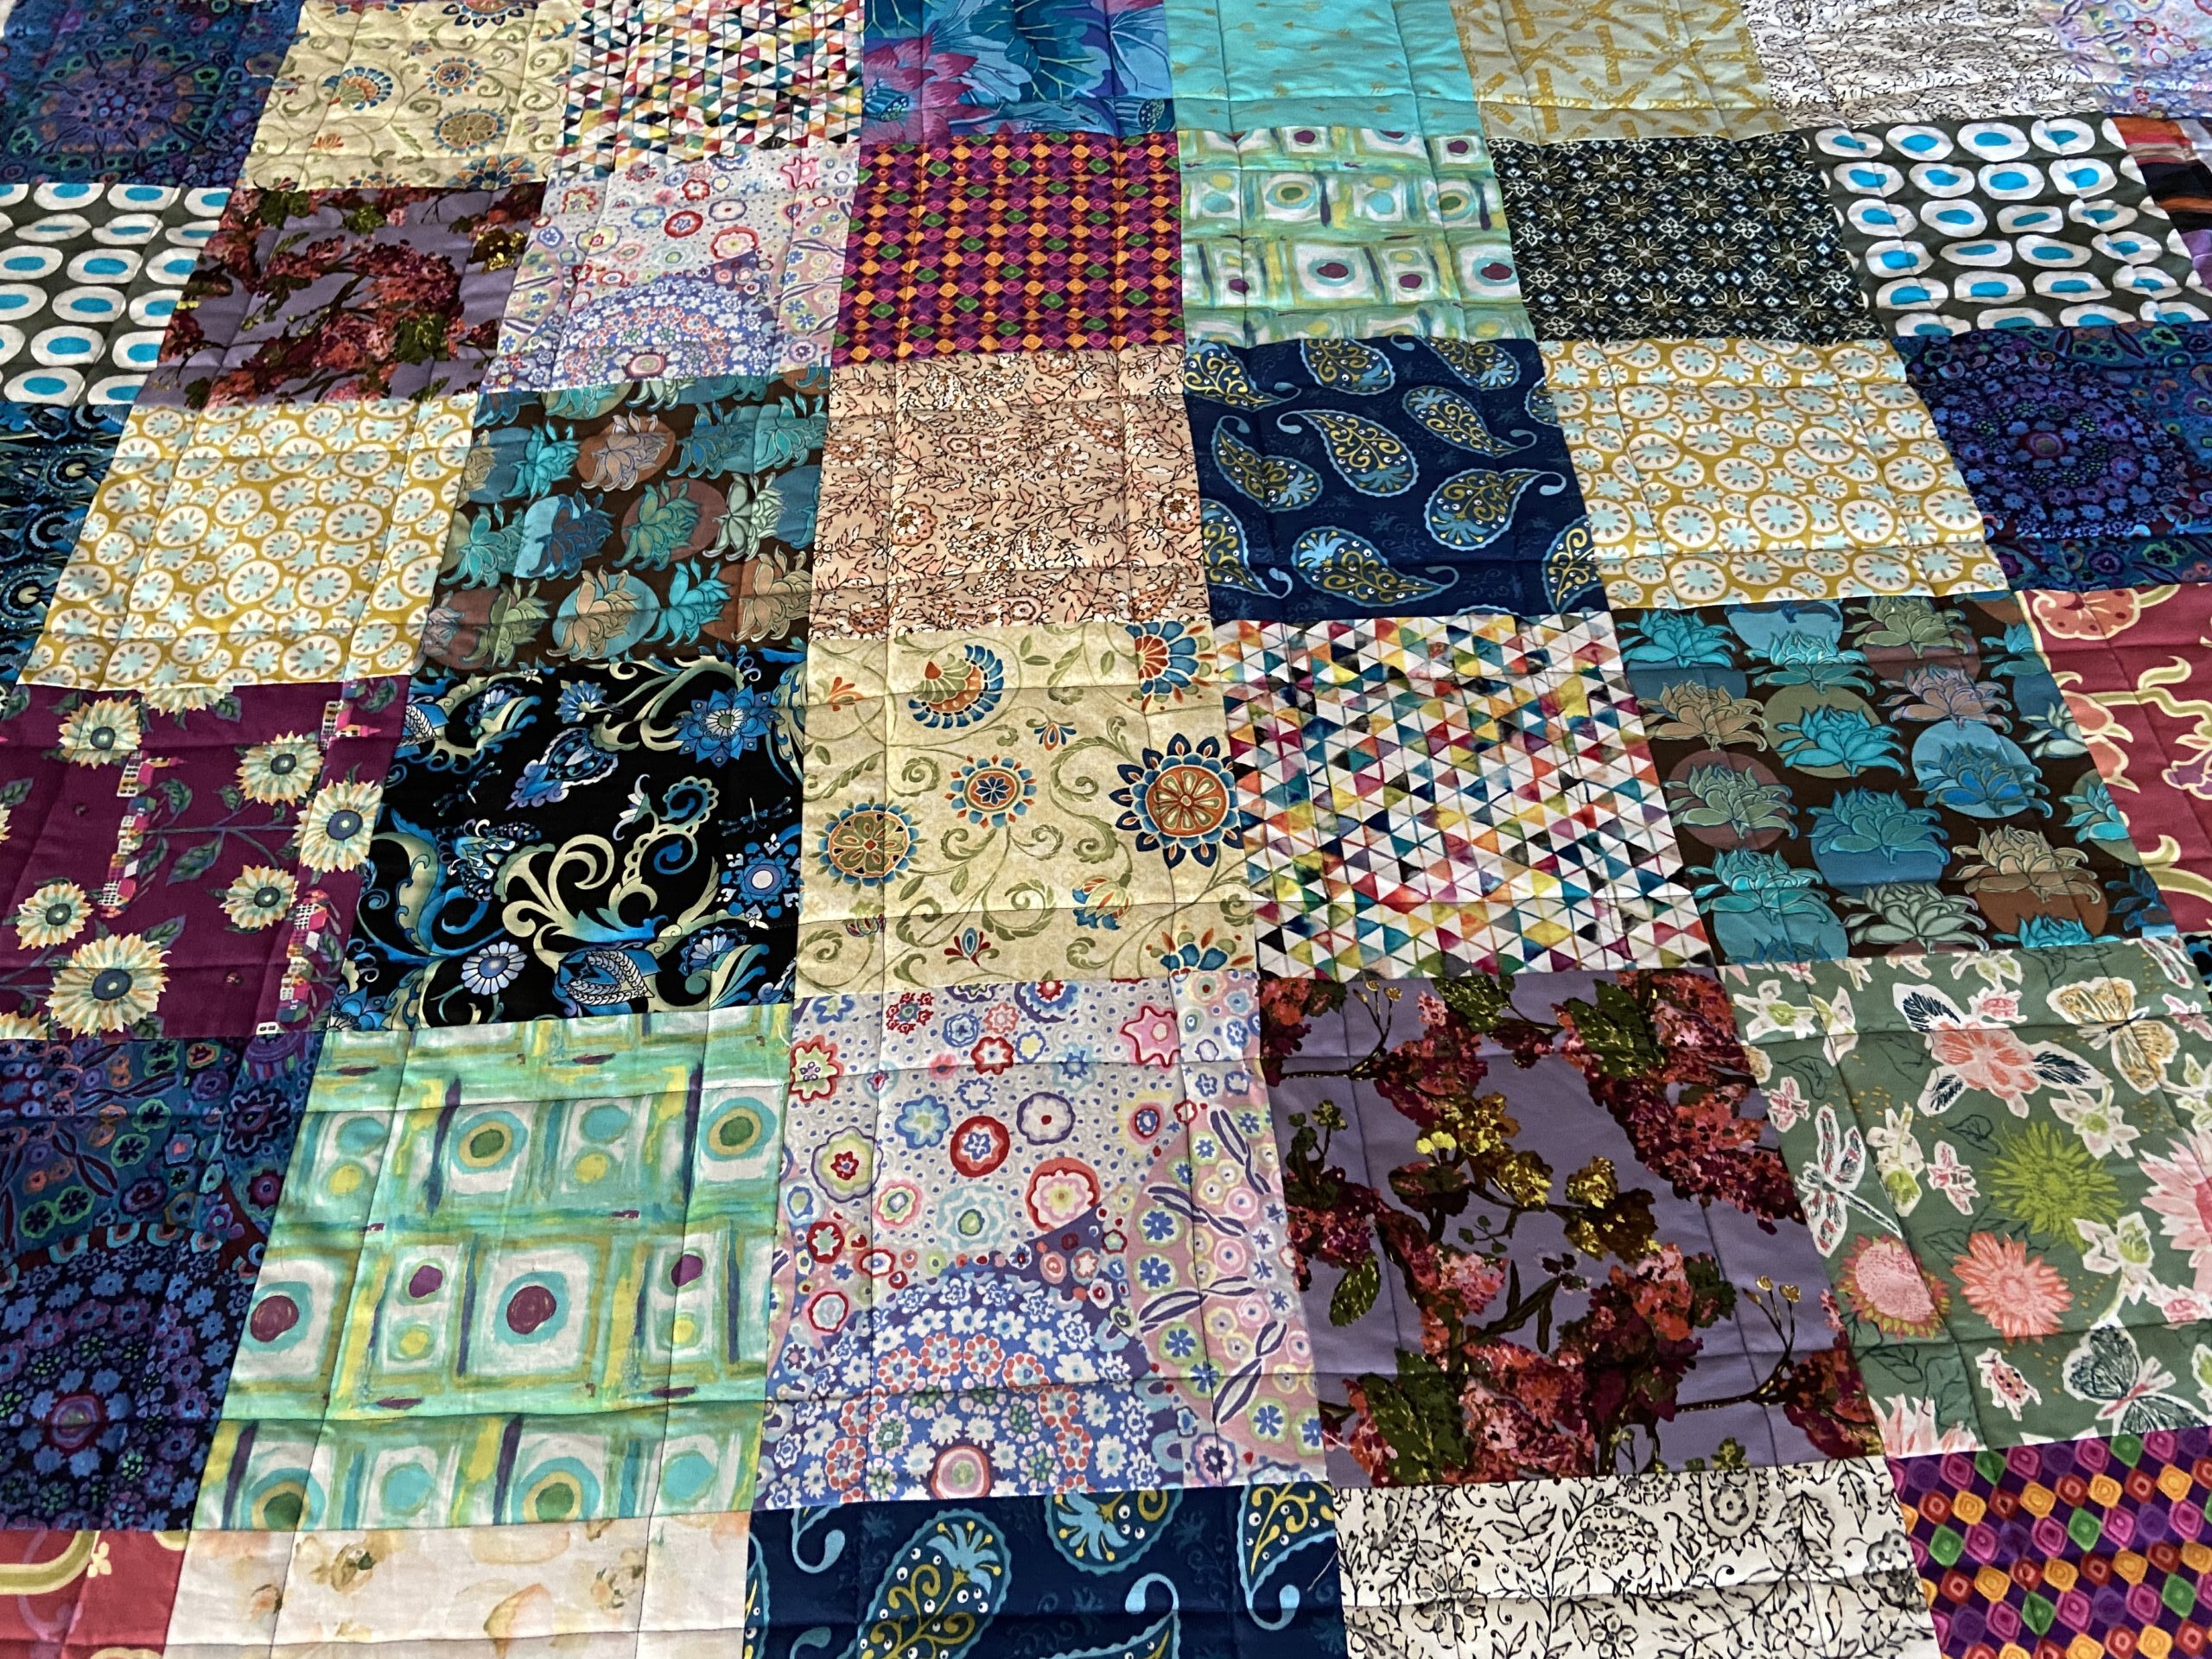
This quilt has been a long time in the works. It is ‘just a patchwork’, no complicated piecing, no fussy blocks, but oh I have wanted to make it for a really long time! There are a some really gorgeous quilts made with very bold colors which totally appeal to me. A while back, I started to collect pieces with powerful color and scale. When I had my shop, I would cut 1/3 yard of pieces that appealed to me and set them aside in a project bag. I got lucky at thrift stores and garage sales a number of times and picked up pieces that I knew would work in this quilt. Mixing the scale and the lights and darks to make sure there was a good variety was a lot of fun. Finally the project bag was full to bursting and I knew I had enough to work with.
Doing some very complicated math, I decided to cut 11″ blocks and end up with a quilt measuring about 100 x 110 inches. This is by far the biggest quilt I have made. The piecing was not a big deal. I laid the squares on the floor and moved them around for a bit trying to keep like fabrics from touching. Other than that, I didn’t worry too much about a particular layout.
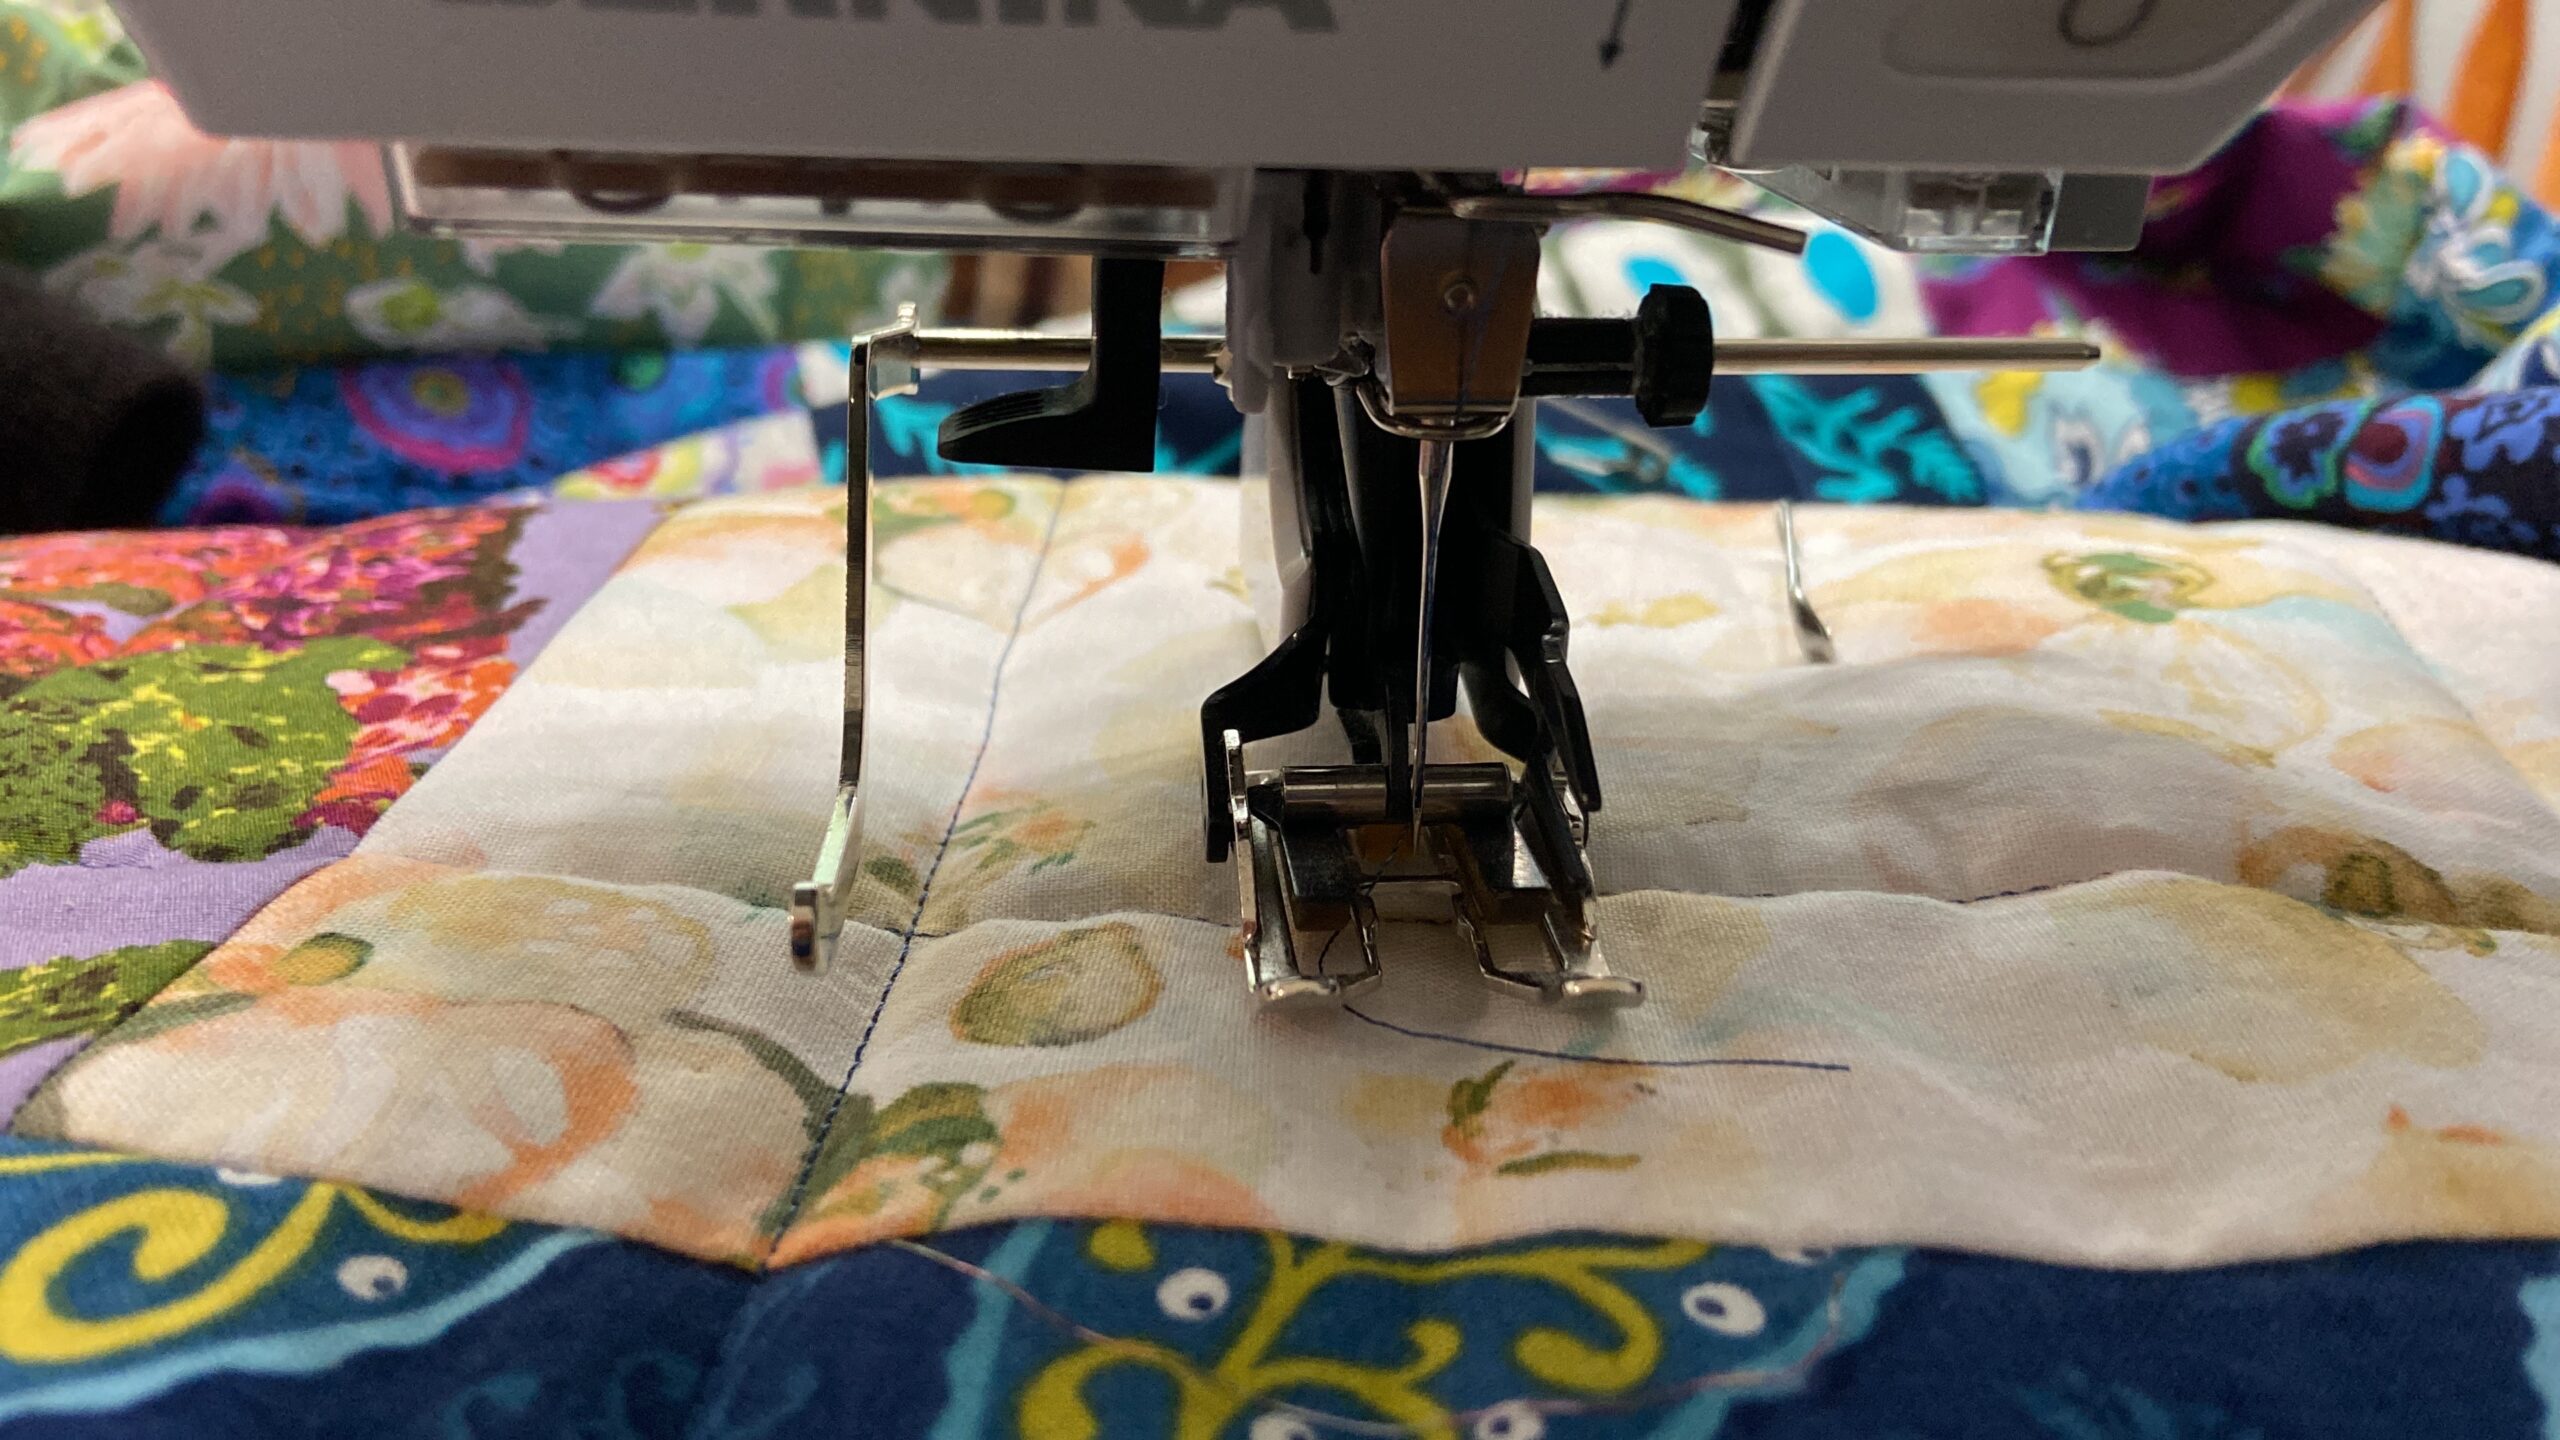
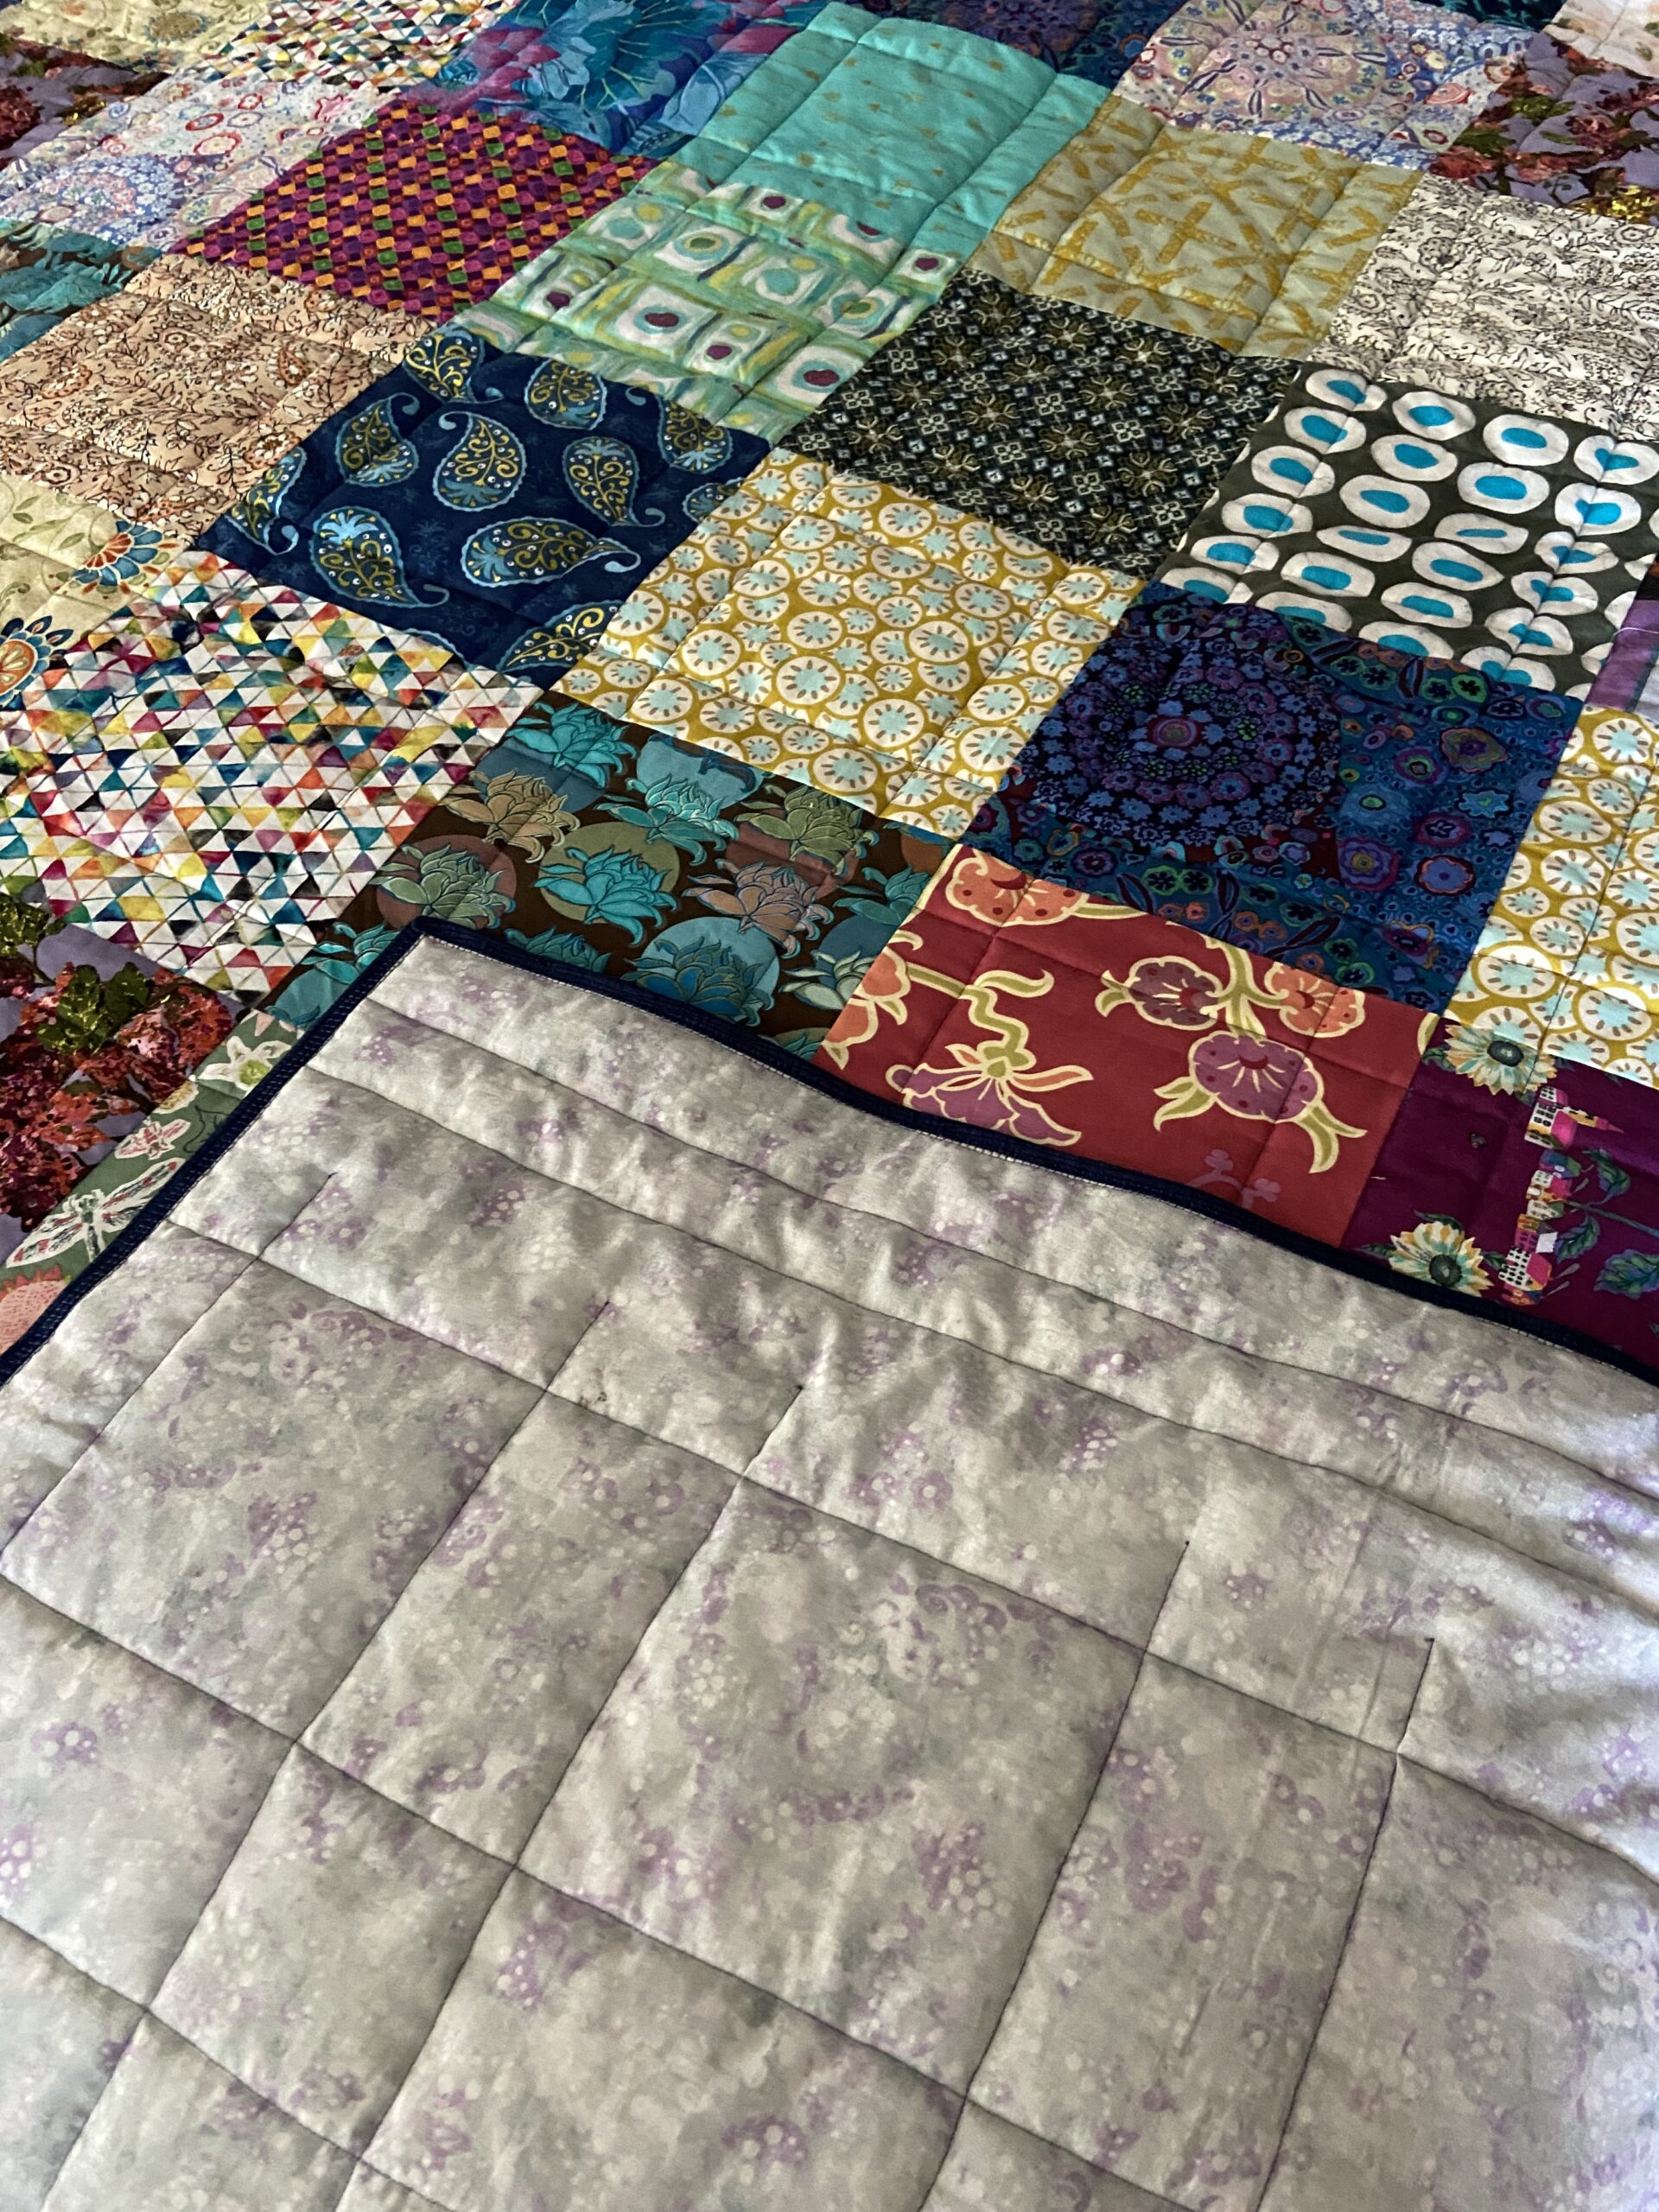
Once the top was assembled, I had to move furniture around to be able create enough floor space to baste it. Honestly, this is a monster size quilt (for me anyway)! The backing is a wide back I saved for this project when I closed the shop. I am fortunate to have a reasonably sized sewing table but it wasn’t going to work for this. So I commandeered the dining room for a couple of days to quilt this. I don’t know how I could have free motioned it – there is so much weight. Instead, I bought a walking foot (hurray!!) and stitched straight lines, two inches from each seam.
I do love this bar for projects like this. The walking foot came with one for the left and another for the right side. It really wasn’t too difficult except for when quilting the middle sections – there was a lot to stuff through the throat of the machine at that point. It all worked out though – save for a few puckers on the backing. I took a bit of time and ripped out some stitching to fix a few of the puckers. For the most part though, I left them as is. After all, it is the back side of a utility quilt. Who is going to see those puckers?
It doesn’t show in the photos but, on a whim, I decided to use the blanket stitch on my Bernina for the binding. I can’t give a reason for this – I just thought it would look cool. Which it does but, oh my gosh, it ended up taking fooorrevvver to bind this.
If you are admiring the walnut headboard on our bed, it was made by my talented husband.
This quilt is a bit like a quilter’s I Spy quilt. See if you can find fabrics by the following designers: Alison Glass, Sharon Holland, BariJ, Kaffe Fasset, Malta Dubrowsky, or Amy Butler – there is something from all of them. (Plus many where I cannot tell you who designed them)!
Another fun fact – this is the first time I filled a quilt with wool batting. It surprised me how different it was to work with. Much puffier (more loft) so the quilt is thicker. When I cut my usual 2 1/4″ strips of binding, I didn’t know there would be such a difference and it was a bit challenging to wrap that binding over the side. Next time I will definitely cut a 2 1/2″ binding. That should work better. I love the feel and heft of the quilt plus it feels warmer.
I have fabric set aside to make a couple of matching pillow shams. This is going to happen very soon. Shams will finish this off nicely!
Thanks for reading folks! Big quilt equals long post I suppose!
Beginning today, C&T Publishing is holding their warehouse sale! I love this event because they clear out some excellent books at great prices. Enjoy up to 70% off of loads of titles! Sale runs through Sunday, September 25, 2022. (Yep – this is an affiliate link!)
Linking with my usuals, found at the top of the page under Link Ups. Check out some of these sites to see what everyone is making!
It is the fourth of December and I am starting to feel some Christmas Spirit! I love this time of year and in 2020 we need every reason to celebrate and impart joy. I have two small projects to share with you today.
The First Three Stockings
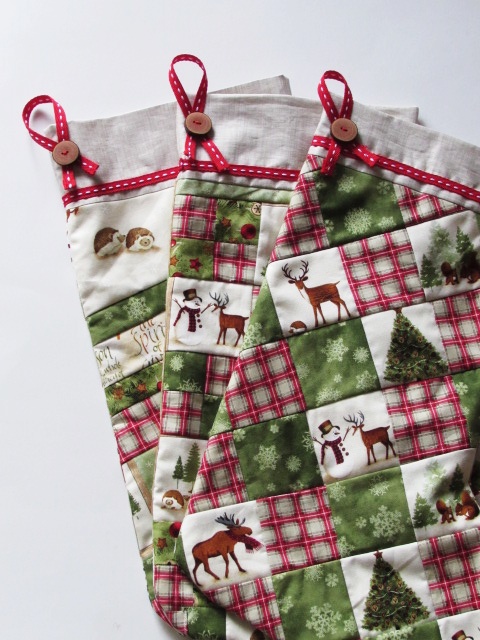
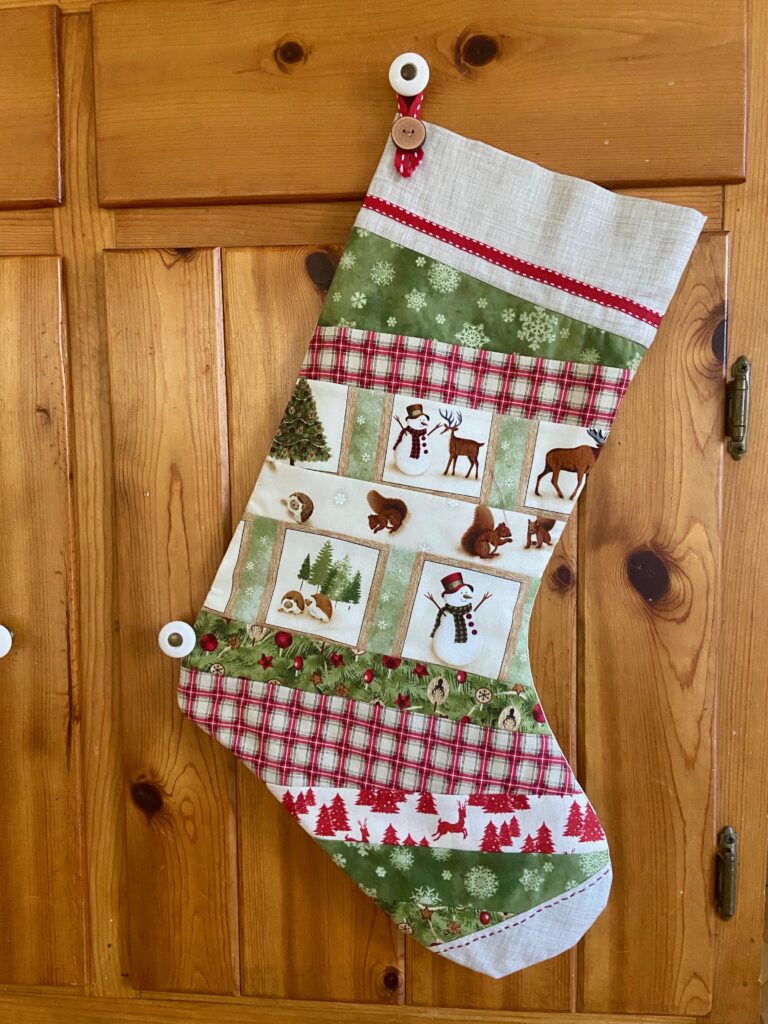
For my younger grand daughter, I had the fun task of making a Christmas stocking. Three years ago I made a set for my son, his wife and my oldest grand daughter. When I did this, I set aside fabric to make more stockings if/when his family grew.
Scrappy Christmas Stocking
This stocking is number four for their family. I used the easy peasy quilt-as-you-go method for the strips. As with the other stockings, I put a ‘toe’ on the foot of the stocking and embroidered a red line of stitching across it. Fortunately I saved some of the twill tape and wooden buttons (made by my husband!) so the stocking is a perfect match for the first three. I think it is super cute – the line of fabric was so much fun when I had it in the shop. It is long gone now.
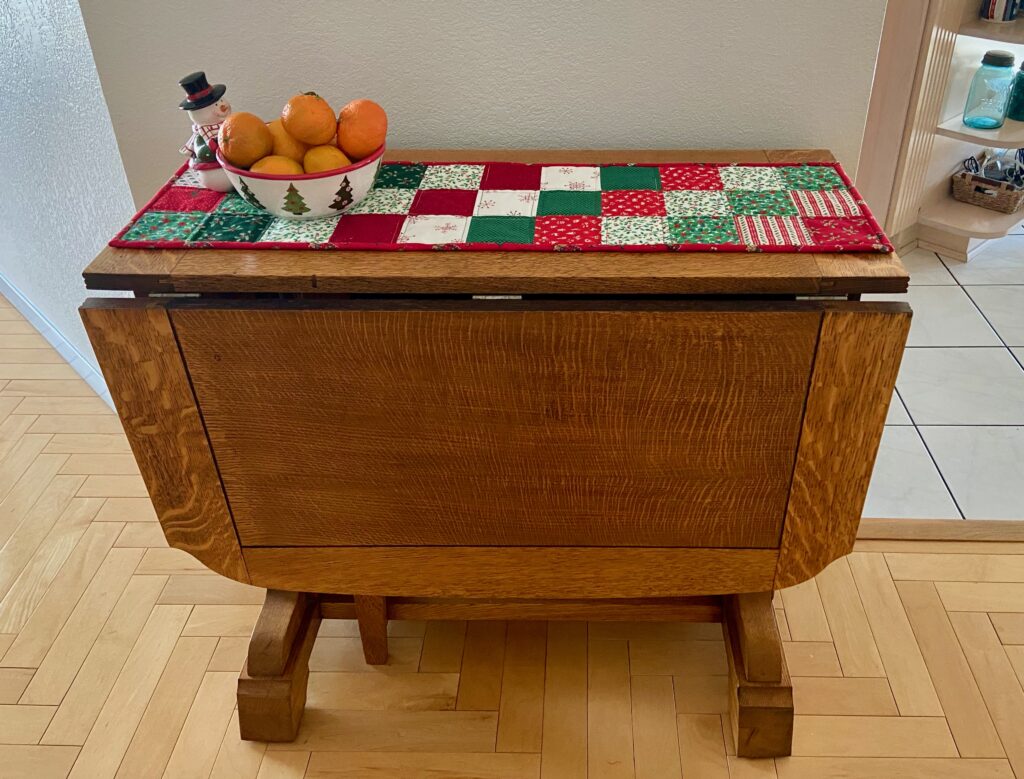
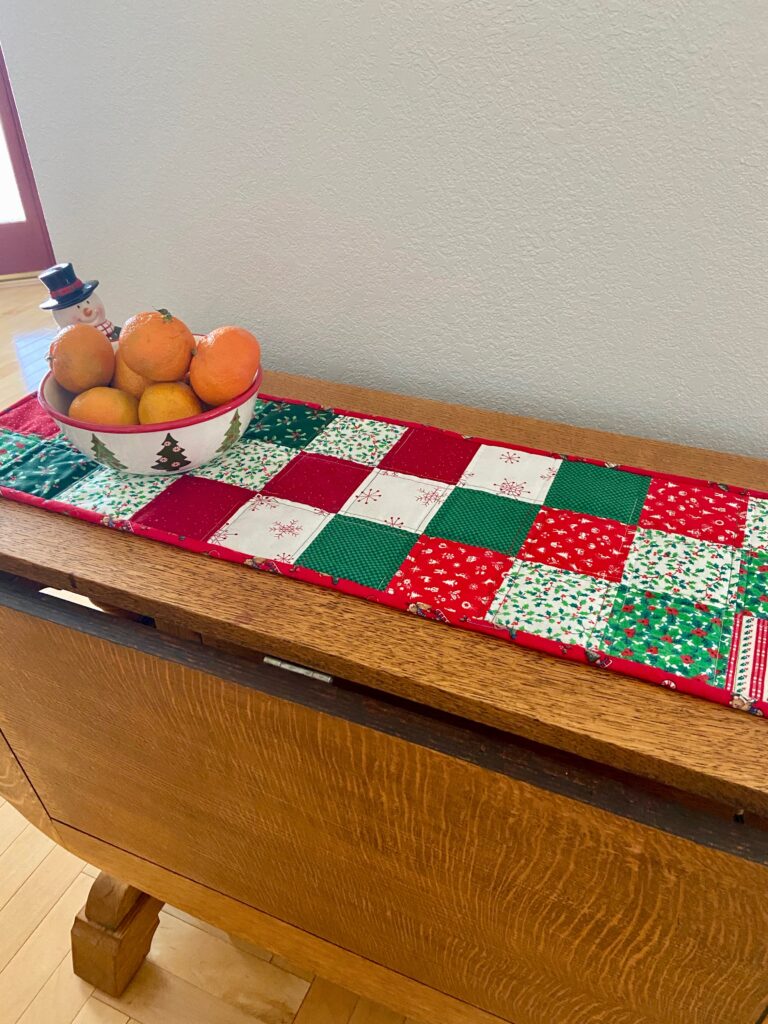
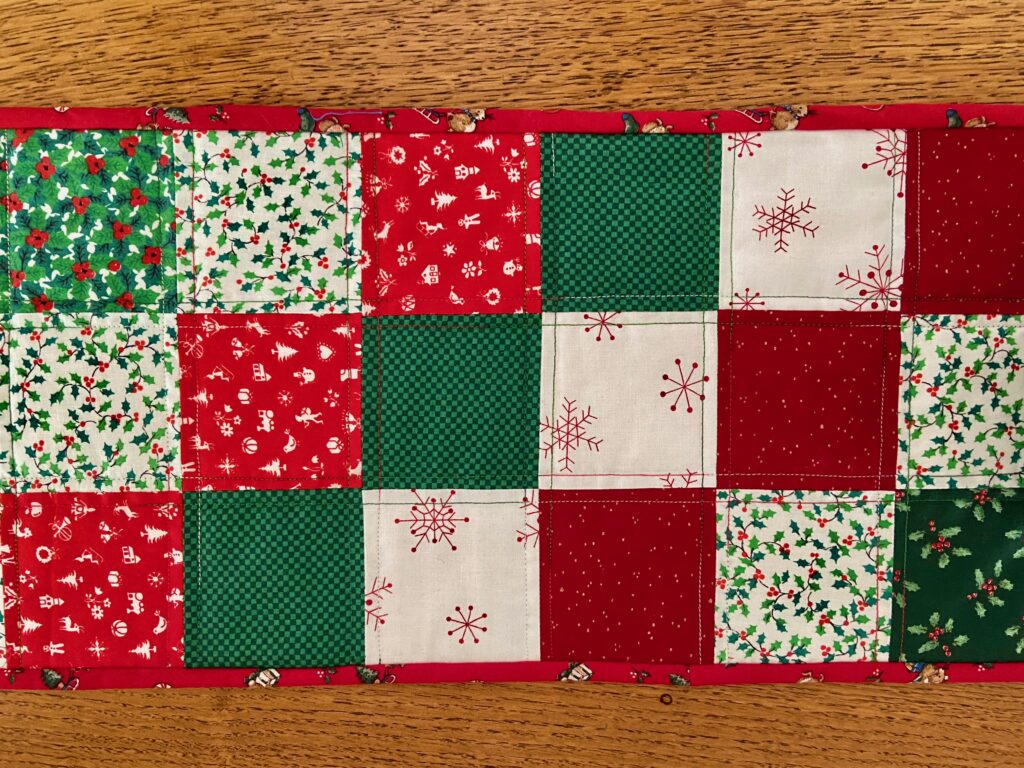
Next project? Well, remember how I have been ‘cleaning’ my sewing space? I sorted through some of my Christmas fabric. I have a large bag of vintage (1970’s-1980’s) holiday fabric and cut much of it into 3″ and 5″ squares with the AccuQuilt. Once I had that stack of squares sitting there, I couldn’t just put them away, right??
I decided to make a quick patchwork runner for the top of this drop leaf table. (My mom loaned this to me a long time ago for our Downieville house. We have since sold the house and I am hoping she doesn’t ask for it back…. I love the table!) I plan to put a set of photos here of my kids with Santa. I look forward to looking at those pictures each year. But I haven’t brought that box up yet. Julia and I plan to do some decorating this weekend and will put up the tree early next week.
As I have said so many times before, simple patchwork is by far my favorite of any quilt. I am so nostalgic and love the look of this – what can I say? This would have been made even cuter with some hand quilting but I really wanted to use it now. So instead I used a variegated holiday thread I had from Mettler and did simple straight lines.
If you look at the fabrics, you will see the small print of white objects on red (next to the holly on white). This fabric is definitely from 1978. It is the same fabric my sister, Cathy, used to make wedding favors for her December, 1978 wedding. (Side note – if you want to read a fun post from several years ago, I wrote about all the weddings in our family and how most of us made our wedding gowns. Click here for the post)
OK – that is it for today. I do want to let you know I have a few fun things coming up on the blog! Next week I will be hosting a Guess Who game. I have childhood pictures from lots of quilter/bloggers. I want to see if you can match of the adorable faces to the right quilter. Look for that on Wednesday, December 9th. Then the following week, on Wednesday December 16th, I am hosting a Holiday Memories Bloghop. Lots of us will be posting about some of our favorite holiday traditions and memories or stories. I am so looking forward to reading these. Keeping spirits bright in 2020!!
Oh my gosh, where to start! This is such a crazy world these days. The news is all-consuming as we constantly check for updates on the spread of Covid-19, within the US and internationally as well. Our philosophy is to take it seriously and try to remain calm and rational at the same time. The Governor of California spoke yesterday. He has ordered all pubs, bars, nightclubs and wineries in California to shut down for the duration. All restaurants are to cut their capacity for seating in half and move tables much further apart. People age 65 and over are to quarantine in place at their homes. No visitors at convalescent or senior homes unless it is a terminal situation and people need to be there to say goodbye. So, things are serious here in CA. I believe if people respect the rules and stay home for a bit, the contagion will be limited and hopefully the situation can be controlled. I hope you are in a safe situation and able to stay healthy.
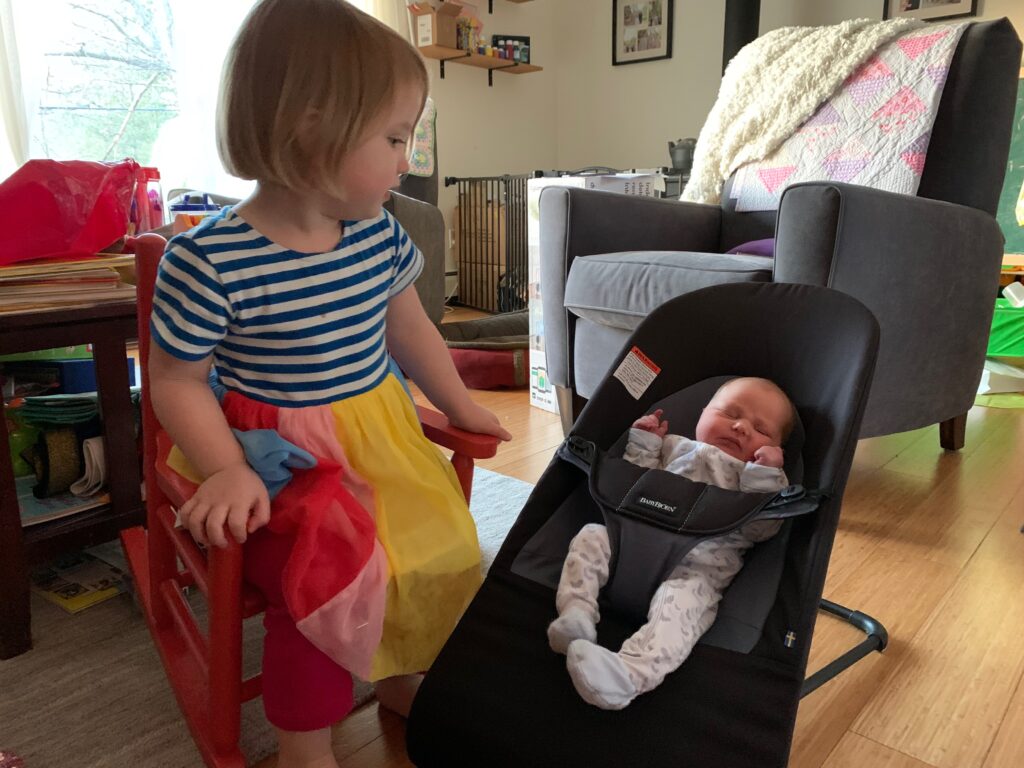
My son with his two sweet girls.
Moving on to better and more enjoyable topics, my new grand daughter arrived on March 12th!!! Such an exciting event to break up the negative vibe we have all been experiencing. When I look at the photo above, I just love how big sister has her hands up to her face, looking at her new sister with awe. Isn’t this heart-warming? The baby is healthy and mommy is healing well. She was very chunky at birth, weighing 8 pounds and 14.5 ounces. She has dropped to 8 pounds, one ounce but is feeding well and doing fine.
Two sisters just hanging around together.
Big sister surely loves little sister but is a tad disappointed in the baby’s lack of abilities. On the first day, she asked her father to bring the baby into her room so “she could crawl around a little”. Once she realized this wouldn’t happen for a while, she got a little bored of baby sister. Today I got to FaceTime with them and she was “playing” doctor with dad and little sister. I could hear my son quietly say, ‘gentle, gentle’. I think it is going well though. So all is as it should be. My husband and I were supposed to travel out to Vermont on March 31st and we are soooo sad to postpone the trip. We will go just as soon as the Covid crises calms down. Hopefully sooner rather than later.
Postage Plus Quilt
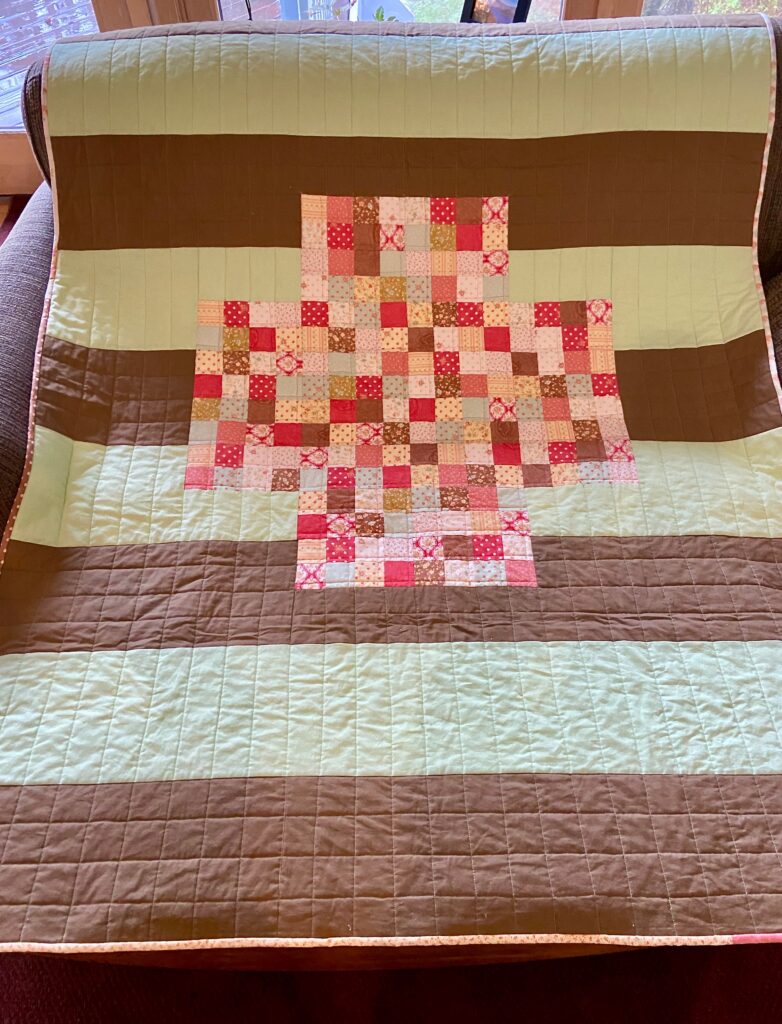
I finished up a quilt for Mercy Hospital! I am really pleased with this finish. You may remember I started this back when the blog hop was running for the Modern Plus Quilts book. I took it to quilt it on a friend’s long arm and had a horrible time with it. In frustration, I took it off the long arm and brought it home. After ripping out so many stitches I came to be extremely annoyed with the whole thing. It was folded and placed in a basket where it sat for two years!!
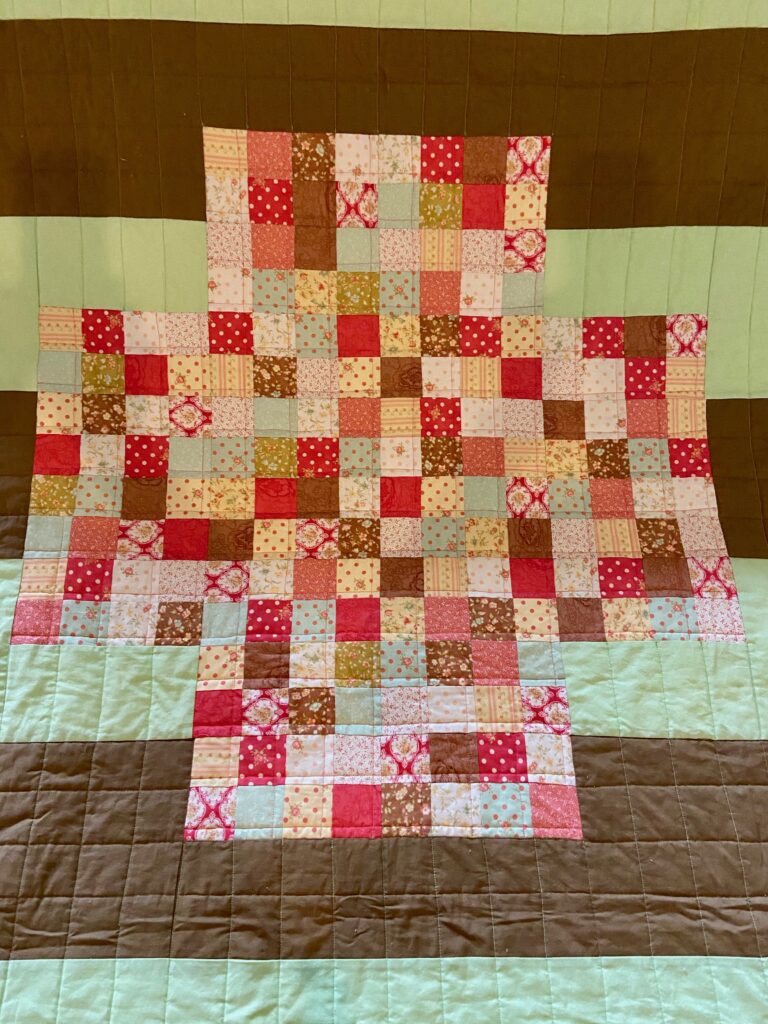
I decided it was time to finish it up and really had fun with it. I used my walking foot and quilted it in a grid fashion. I outlined the patchwork plus in the center. With the wide brown stripes there is quilting running in both directions. The horizontal lines are stitched in brown and the vertical lines in green. It looks wonderful!
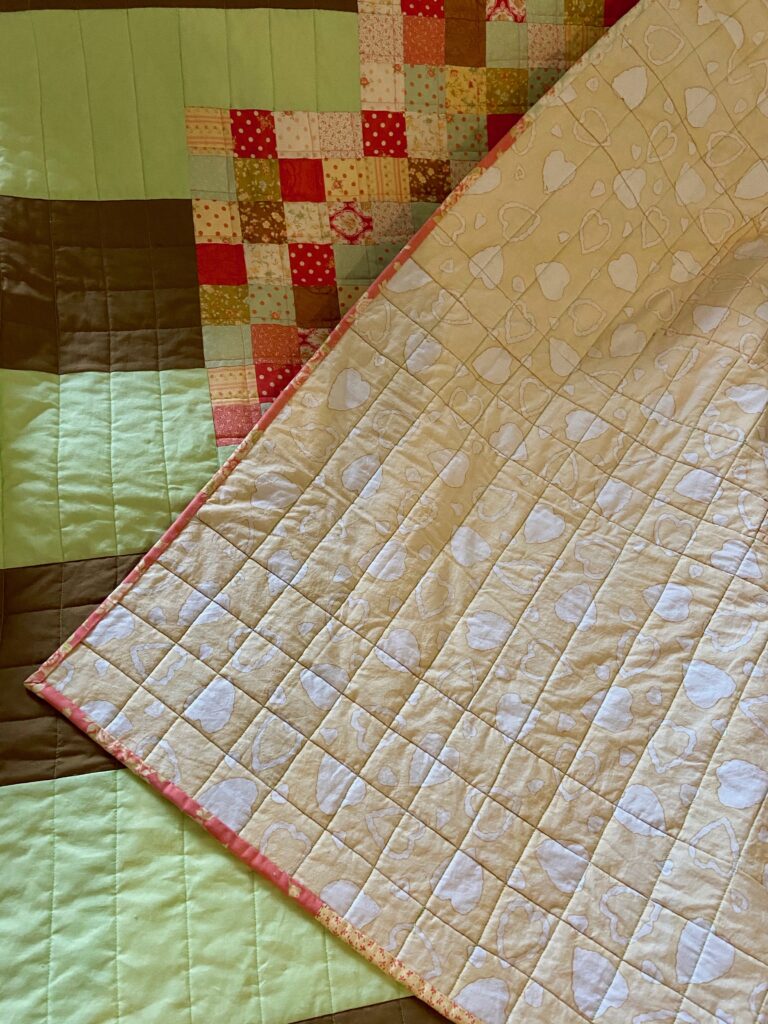
Backing is a pale yellow batik heart fabric.
For the backing, I used a piece I had thrifted years ago. It is a buttery yellow batik with hearts all over it.
Scrappy binding for the win!
When I pieced the plus in the center of the quilt, I used a jelly roll. It didn’t take but 1/2 of the strips so I decided to use some of the leftover strips for binding. It looks really pretty since, naturally, the prints and colors work perfectly.
Ready for Mercy Hospital
I am so happy to have this done and ready for Mercy Hospital. I am already working on the next one for them. Their supplies are down so I am trying to boost the stack for them just a bit. Mercyful Quilts is once again thrilled to be a recipient for quilts made through the 2020 Hands2Help event that is hosted annually by Sarah of Confessions of a Fabric Addict. I am so grateful to have our organization included. Last year so many gorgeous quilts were donated and it was hugely helpful. Thank you in advance to all the quilters who participate in this year’s event!
I have been thinking quite a bit about being home for the duration of the Covid-19 saga. Many of us are turning to our craft and sewing rooms. I read a great article about how soothing it is to involve oneself in a craft, such as sewing, art, woodworking or other project during stressful times such as these. Ray and Julia have been talking about working out in his woodshed while she is home. All three of us have been baking. Of course, I plan to sew. My shop has been quite busy the last couple of days so I think many quilters are planning the same thing.
To this end, I want to help out a bit. Lots of quilters are turning to on-line shopping if Covid is prevalent in their area. For instance, I have noticed a substantial increase in orders from the Bay Area in California where so many people are home and quarantined. To make things a bit better for those shopping on-line, I have a Free (standard) Shipping promotion going in the shop. It started today and will run through Wednesday. All orders will ship for free during that time! You won’t need to enter a promo code – it is all set up for you. I hope this is helpful to you! Click here and browse a bit.
I am going to sew this afternoon. I haven’t made any of my scrappy projects for March yet. So I need to make my orange block for the Monthly Color Challenge and then something with the teal scraps for RSC20. After that, I will pick up another quilt top to finish up for Mercy Hospital. What is your plan? Is Covid affecting you and your daily routine? I worry about people who live alone and are quarantined. Can we all support each other? Let me know how you are doing and let’s all keep each other busy and engaged.
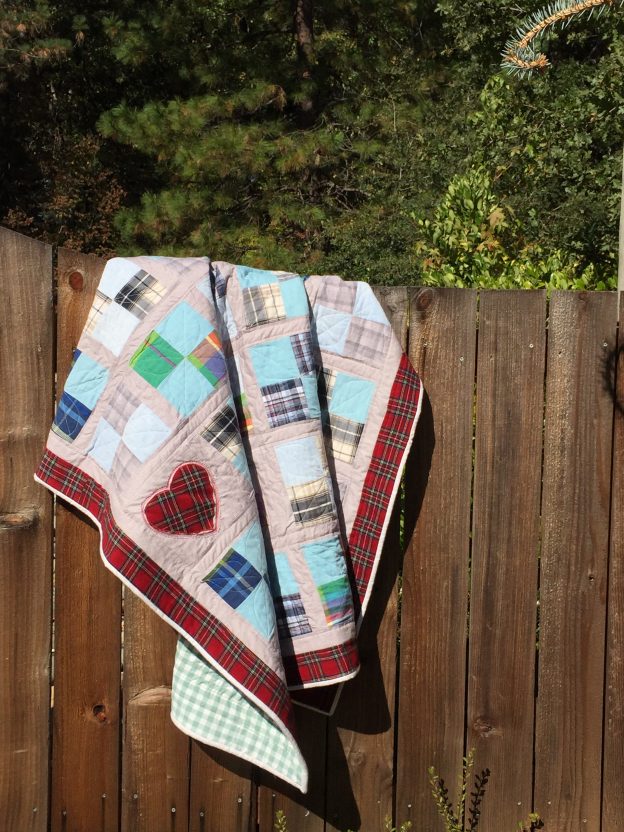
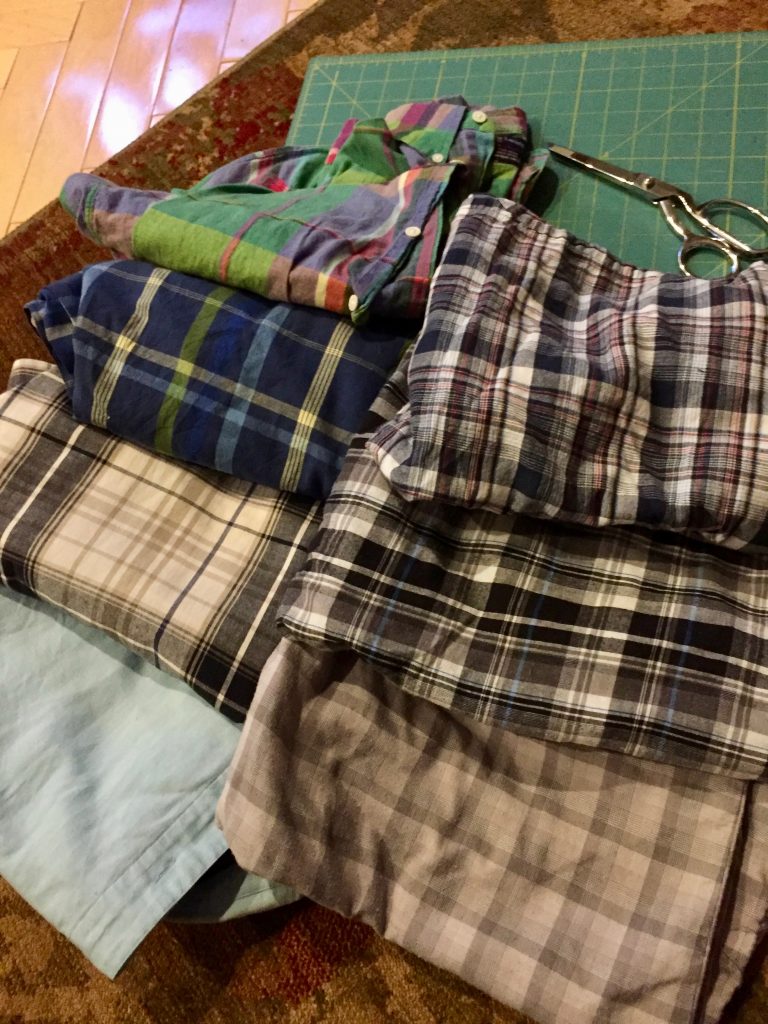
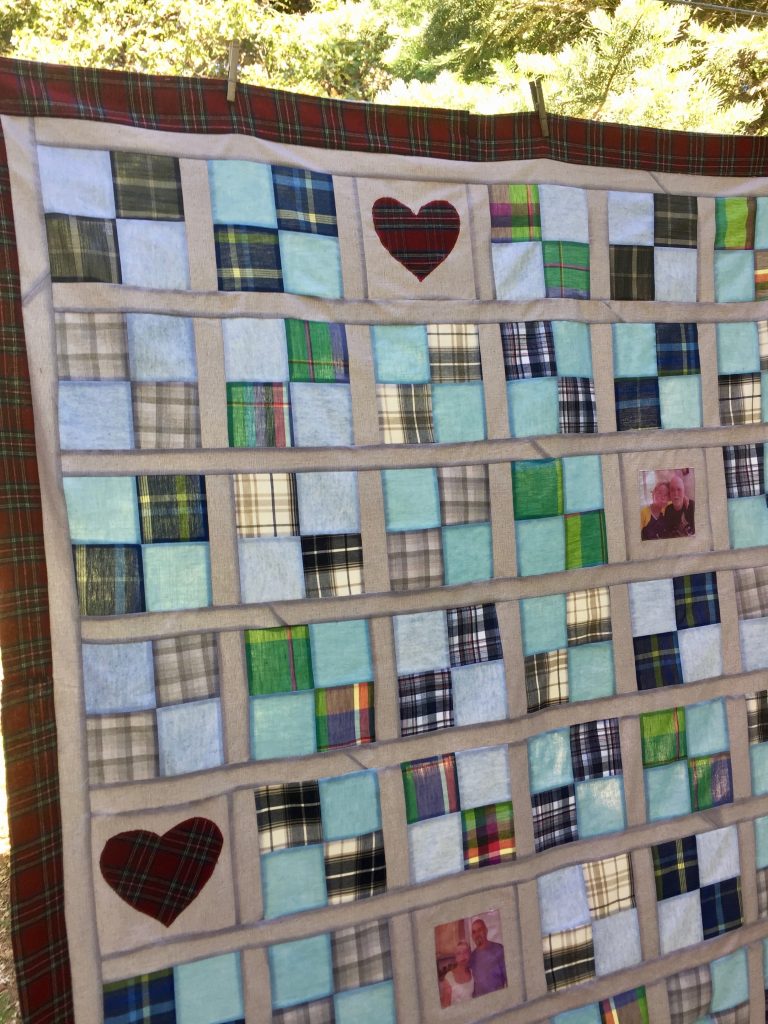
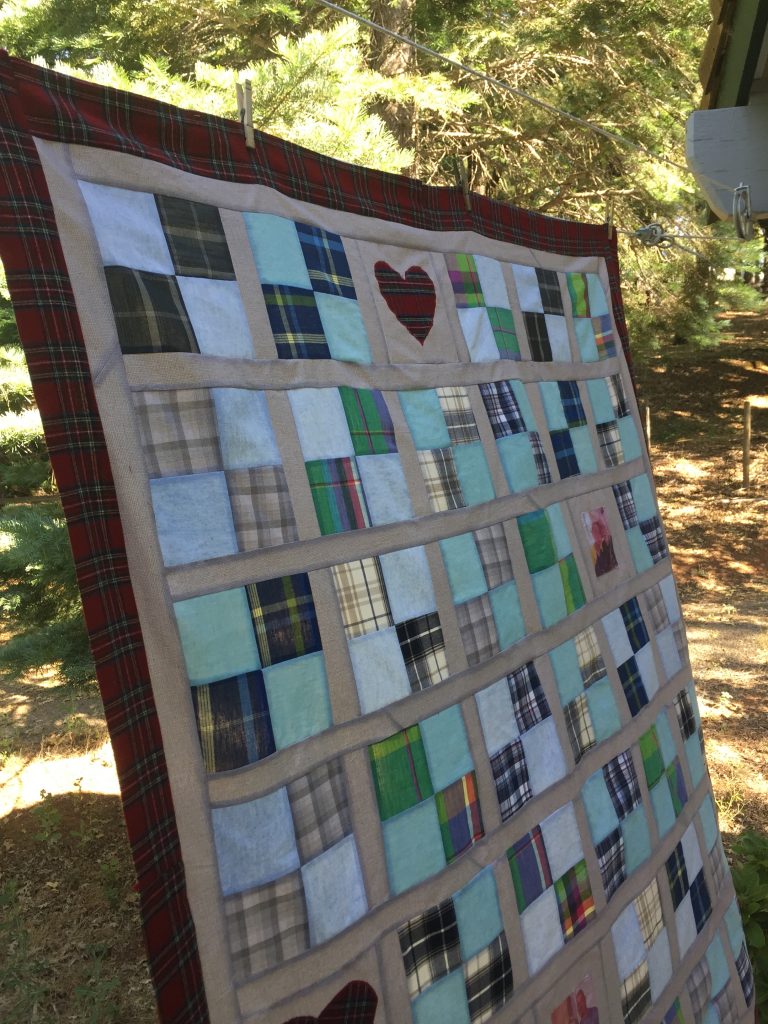
Months ago I started to make a memory quilt for my friend Susie. Her husband passed away in September of 2018 and some months later she gave me a stack of his shirts to make a quilt with. I first posted here about this project if you want to see earlier pictures.
That weird little curved line at the too right is a branch from a tree. Creative photography?!
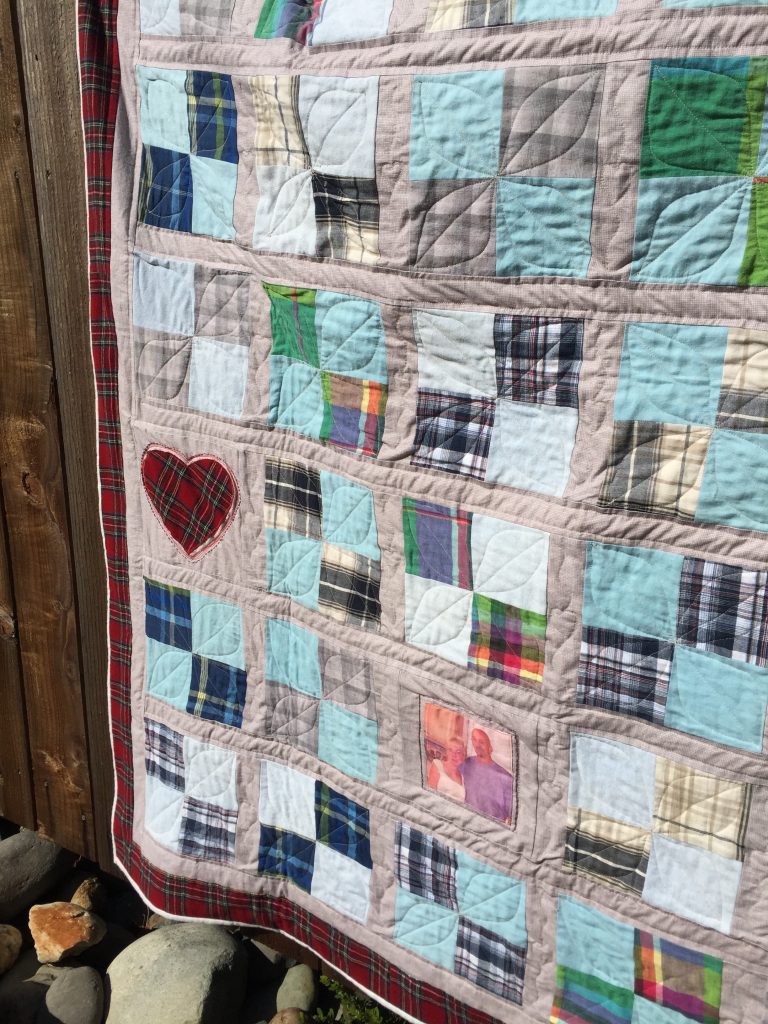
Yesterday I had lunch with Susie and (finally) gave her the quilt. She is really happy to have it and I am hoping she enjoys snuggling up with her quilt and a good book now that cooler weather is upon us. I think it finished at about 65 x 75″ so that is a nice size.
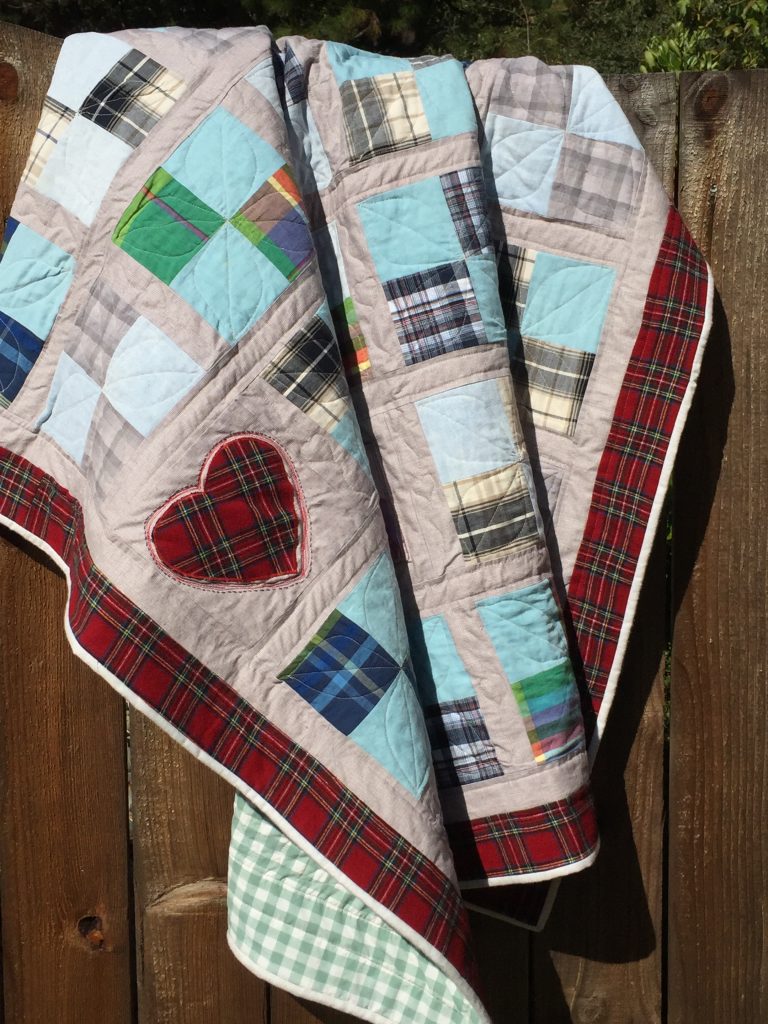
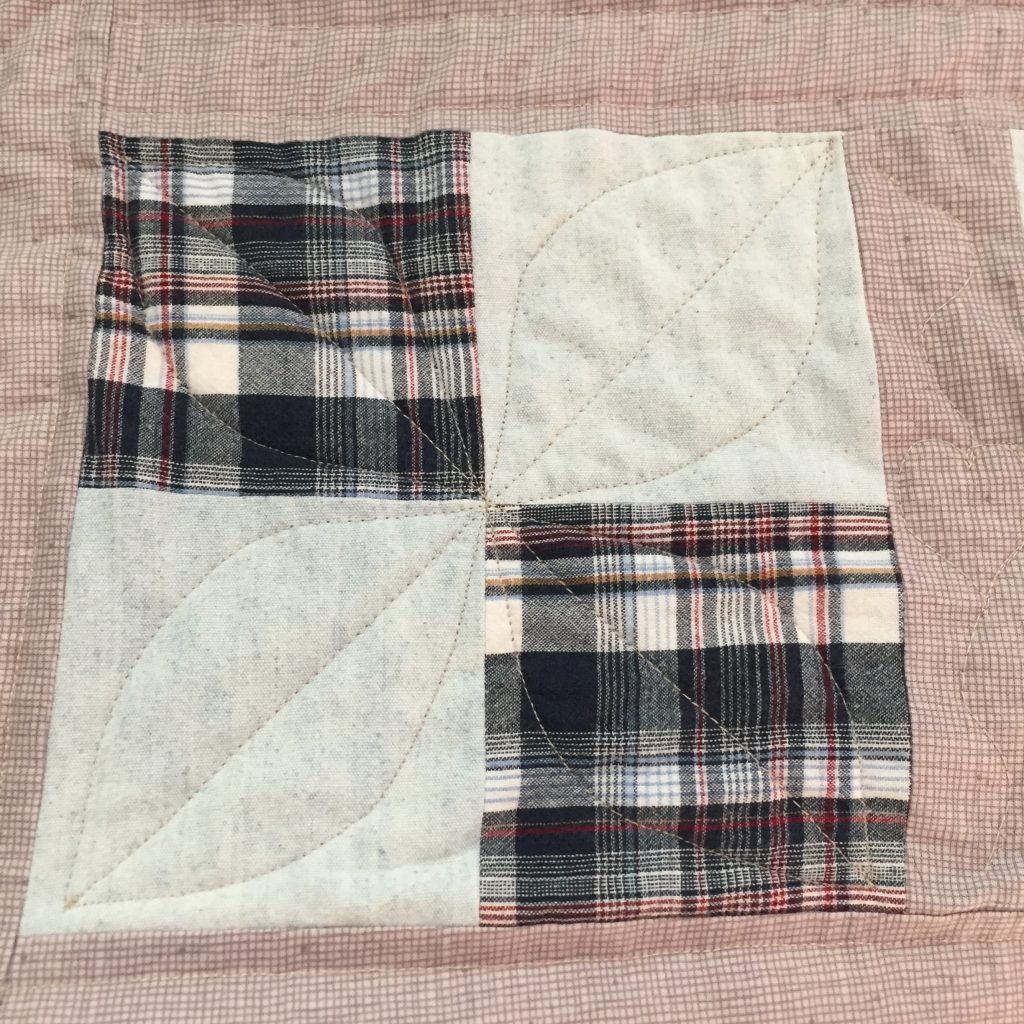
This quilt is rustic and cozy. Because all of the shirts were plaids, I chose to make each four patch block with a solid (from various pairs of shorts) and a plaid. The shirts were Rick’s favorites and he had worn some of them quite a bit. This made it nearly impossible to get a straight cut on the plaids. But I didn’t worry about it. This is a memory quilt and it will serve its purpose well.
My favorite part of the quilt is the red flannel that was used as the border and for the two red heart appliqués. The fabric was taken from Rick’s bathrobe and it frames the quilt perfectly. I love the deep red color. The binding is a soft creamy flannel that is in the shop. It seemed to be just the right choice with that rich red border. It complements the pale green gingham backing too.
I don’t know the name (or if there is a name) for this pattern I quilted on the four patch blocks. I quilted a diagonal line and then swooped up one side and down the other creating a leaf shape. It was so easy to do and it looks pretty. I first started with a free motion foot and had a heck of a time getting across the main intersection of the four patch. It made me crazy that I couldn’t get over that point without jumping all over the place. When I finally made the switch to the walking foot, it was just a breeze. I didn’t even think of that in the beginning but this design works really well with a walking foot.
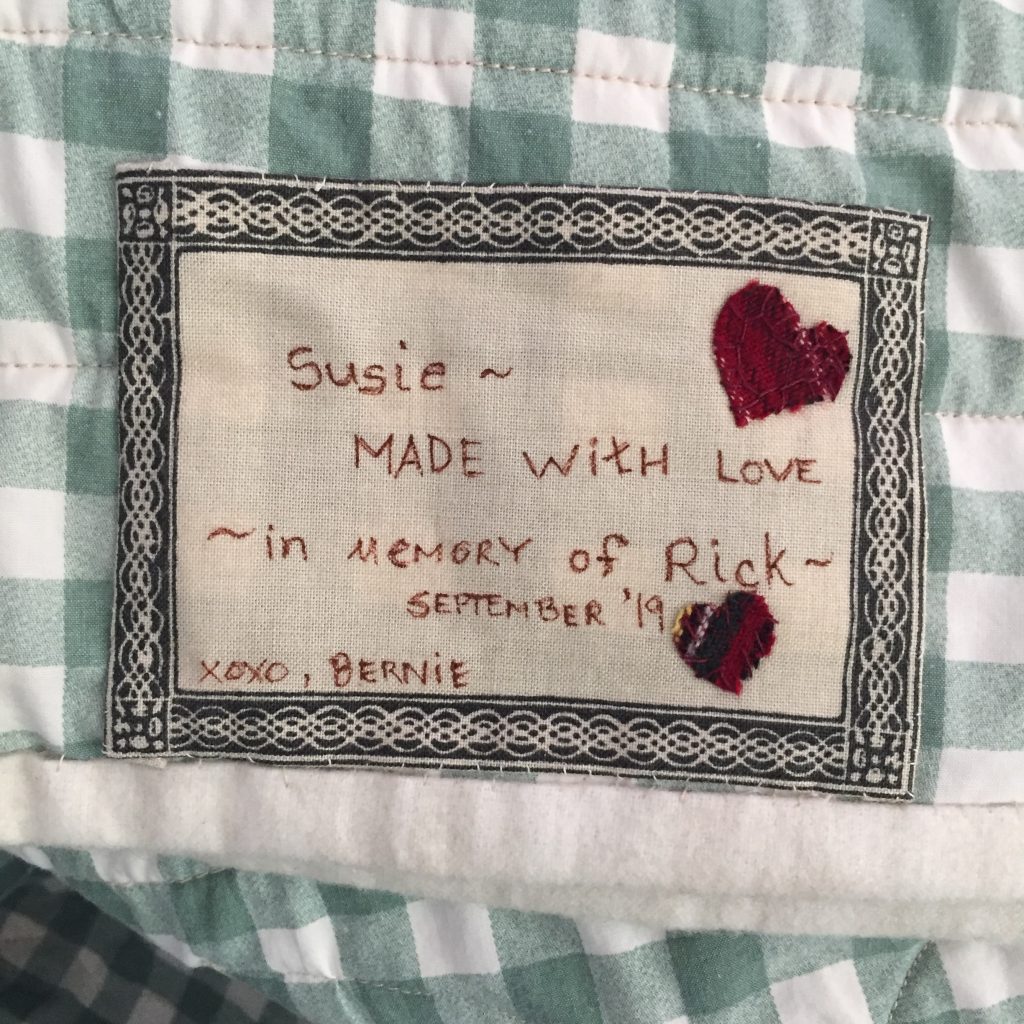
I rarely remember to label quilts but I did put one on the back of this quilt. My handwriting isn’t the best but I am glad I labeled it.
There are some tucks on the backing that really gave me trouble. Other than that, this was a wonderful project and I enjoyed making it. I hope Susie takes comfort in it and loves having the quilt as reminder of her many happy years with Rick.
Over the past two years or so, I lost contact with my friend Susie. We used to take long walks together, never running out of chit-chat. We both really enjoyed it but life got so that we fell out of the routine. In January of this year, I contacted her about a volunteer commitment we both work on and she told me her husband had recently passed away of lung cancer. I didn’t even know Rick had been ill. I felt awful that we had lost touch and I hadn’t been around to support her during his very serious illness. I know all too well how important it is to have friends helping you during such a dark, painful time.
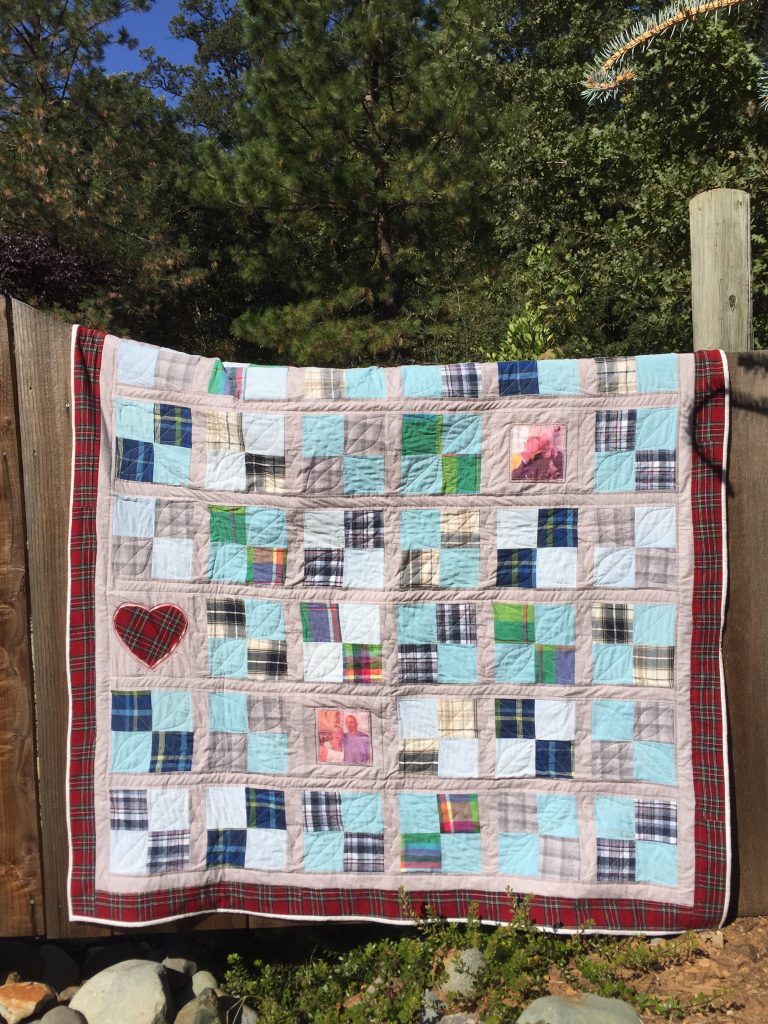
We got together a couple of times soon after and I offered to make a quilt for her with Rick’s clothes, whenever she thought she would be ready to part with some of his shirts. About a month later, she brought me a large bag containing his bathrobe, some shirts and shorts. We took a look at everything and talked about whether she was ok with me cutting them up. Then we looked at different quilts I had pinned to a memory quilt board on Pinterest. She was drawn to a simple four patch block with sashing. Easy enough to make! Susie also asked if I would include two photos of her with Rick she had printed on fabric. I haven’t used that sort of thing before but of course I was happy to add them to a block.
Looking at the collection of shirts and shorts, it seemed best to use the two pairs of solid blue shorts and then two plaids for each four patch. Susie looked in the shop downstairs and chose a very neutral textured solid for the sashing and border.
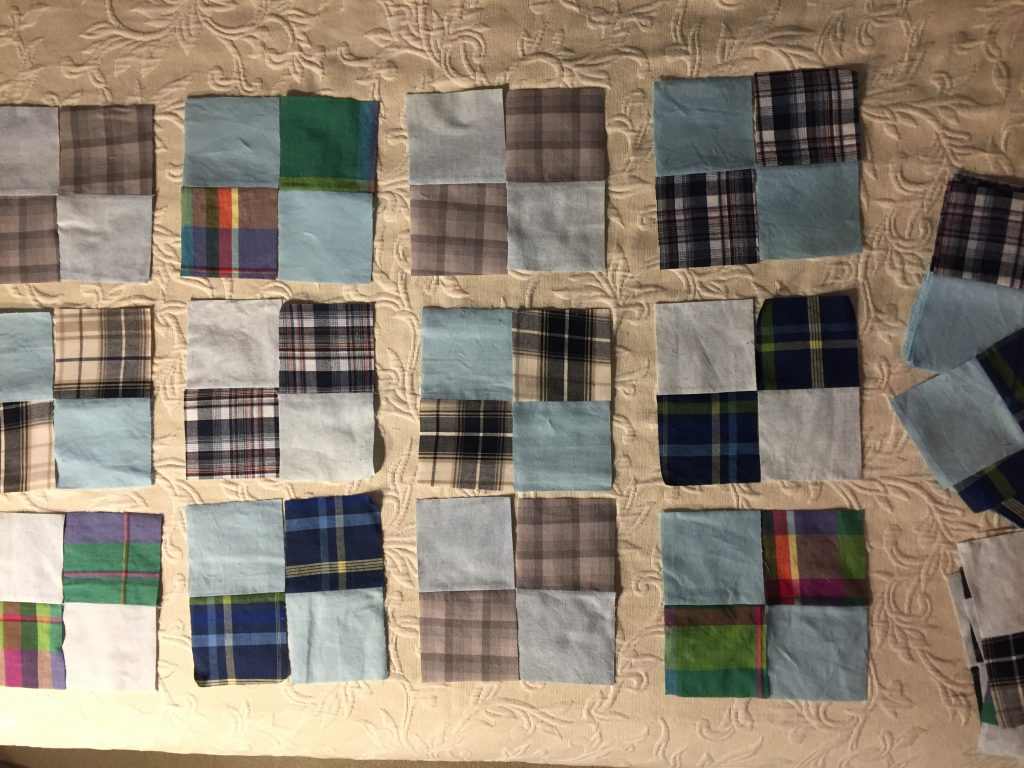
Making four patch blocks
Working with clothing that has been worn is a bit tricky. Susie chose the items Rick favored most because she had the sweetest memories of him in those shirts or shorts. Of course this means some of them were well worn. I wish I could remember who it was, but on Instagram, a nice quilter reminded me to back any thin fabrics with a stabilizer of sorts. This was perfect. I fused a woven interfacing to the back of some of the chunks of fabric before I cut the strips. Once that was done, I cut 3 1/2″ strips wherever I could. Then made strip sets and sliced them up to make the four patch blocks.
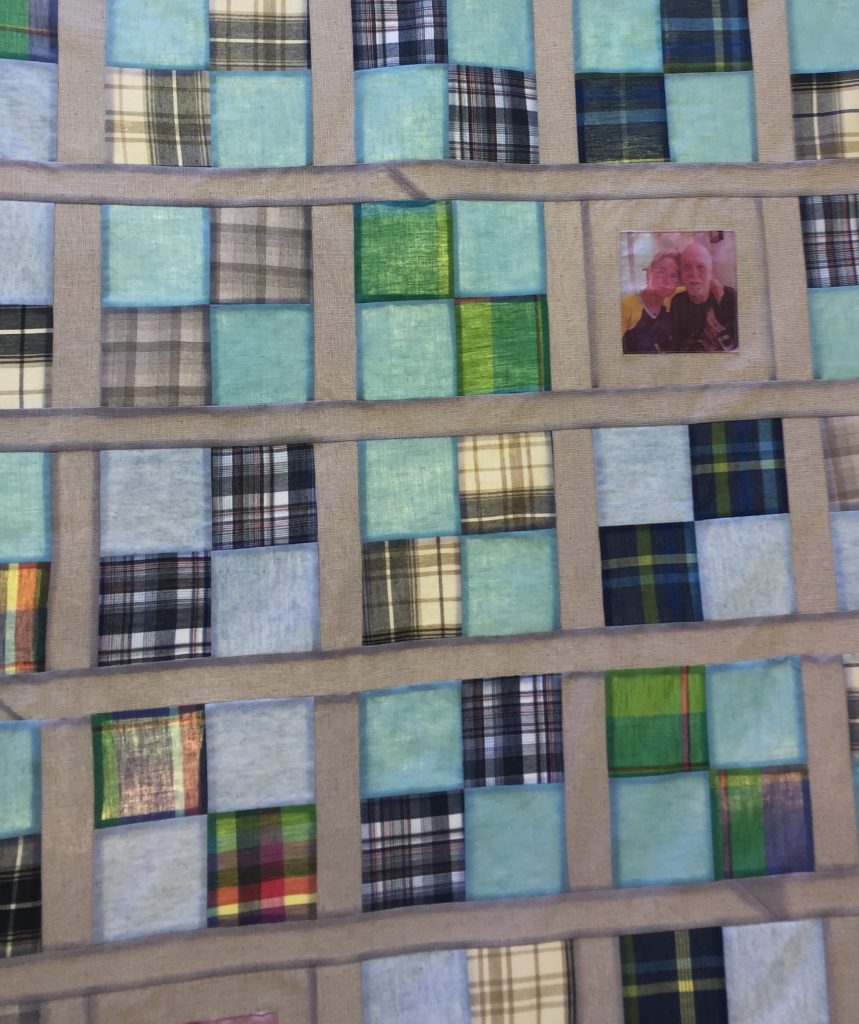
What a sweet photo of Rick and Susie
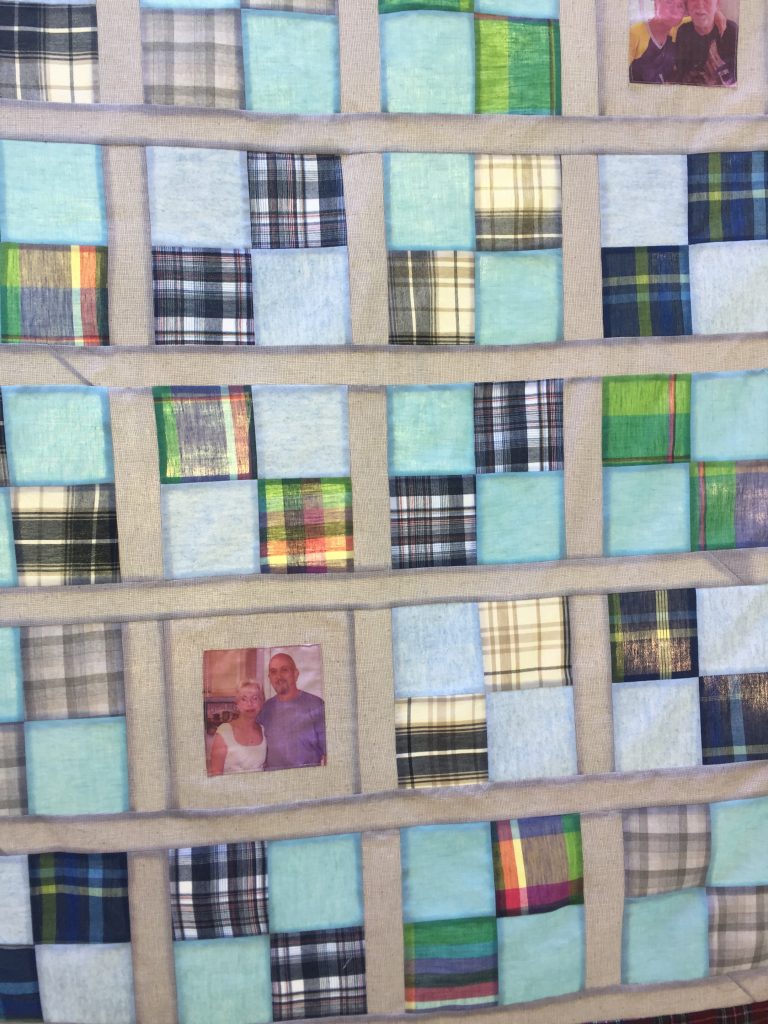
The next step was to create two blocks where I could utilize the pictures of Rick and Susie. I wasn’t really sure how to do this? The fabric they were printed on seemed to fray easily so I didn’t want to stitch a border directly to the printed piece. Instead I chose to fuse the photo to a square cut from the neutral sashing fabric. After fusing it (with each edge pressed under to create a clean look) I topstitched around the perimeter.
Another sweet picture!
I think that worked quite well. One limiting factor was the shorts I used as a solid. I ran out of that fabric with two blocks to go. What to do? I decided to cut two more plain blocks from the sashing fabric. Then I took bits of the flannel bathrobe and cut two hearts from it. Those were fused to the background squares and appliquéd to the fabric. They look very cute and I like the pop of the deep red plaid.
Finally, we agreed the red plaid flannel robe would be the perfect outer border. I really love how the red flannel gives a cozy and rustic look to the quilt top.
This photo captures the true colors best.
The quilt top measures roughly 60″ x 70″ which should be perfect for my very tiny friend. Now I need to choose a backing and get it basted. This is the type of project I really enjoy. It holds meaning and comfort for my friend. I really regret not having made something like this when Mark – my first husband – died in 1994. I was overwhelmed with being widowed, single parenting my boys etc. Sewing was not at the forefront of my mind – in fact I didn’t really sew for many years after that. Making this for Susie is very satisfying. I am really looking forward to quilting it up so she can enjoy it. September will mark the one year anniversary of Rick’s death and I want to be sure she has this before then.
Linking to my usual spots – check them out at the top of the page, under Link Ups.
Watch for a special post coming up on Friday!! Until then, to my US readers, have a wonderful Fourth of July holiday! Also, I have a fantastic giveaway happening today and tomorrow over on my Instagram feed. Be sure to check it out.
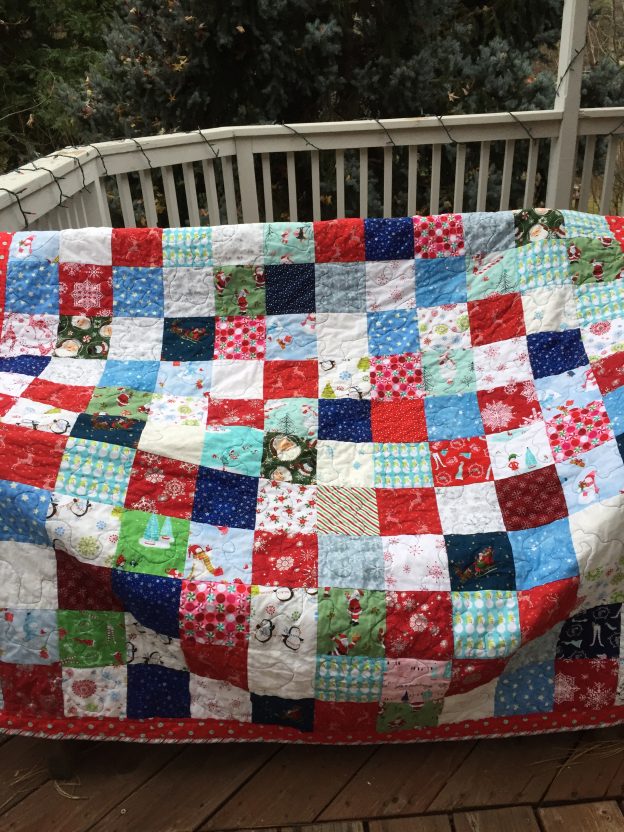
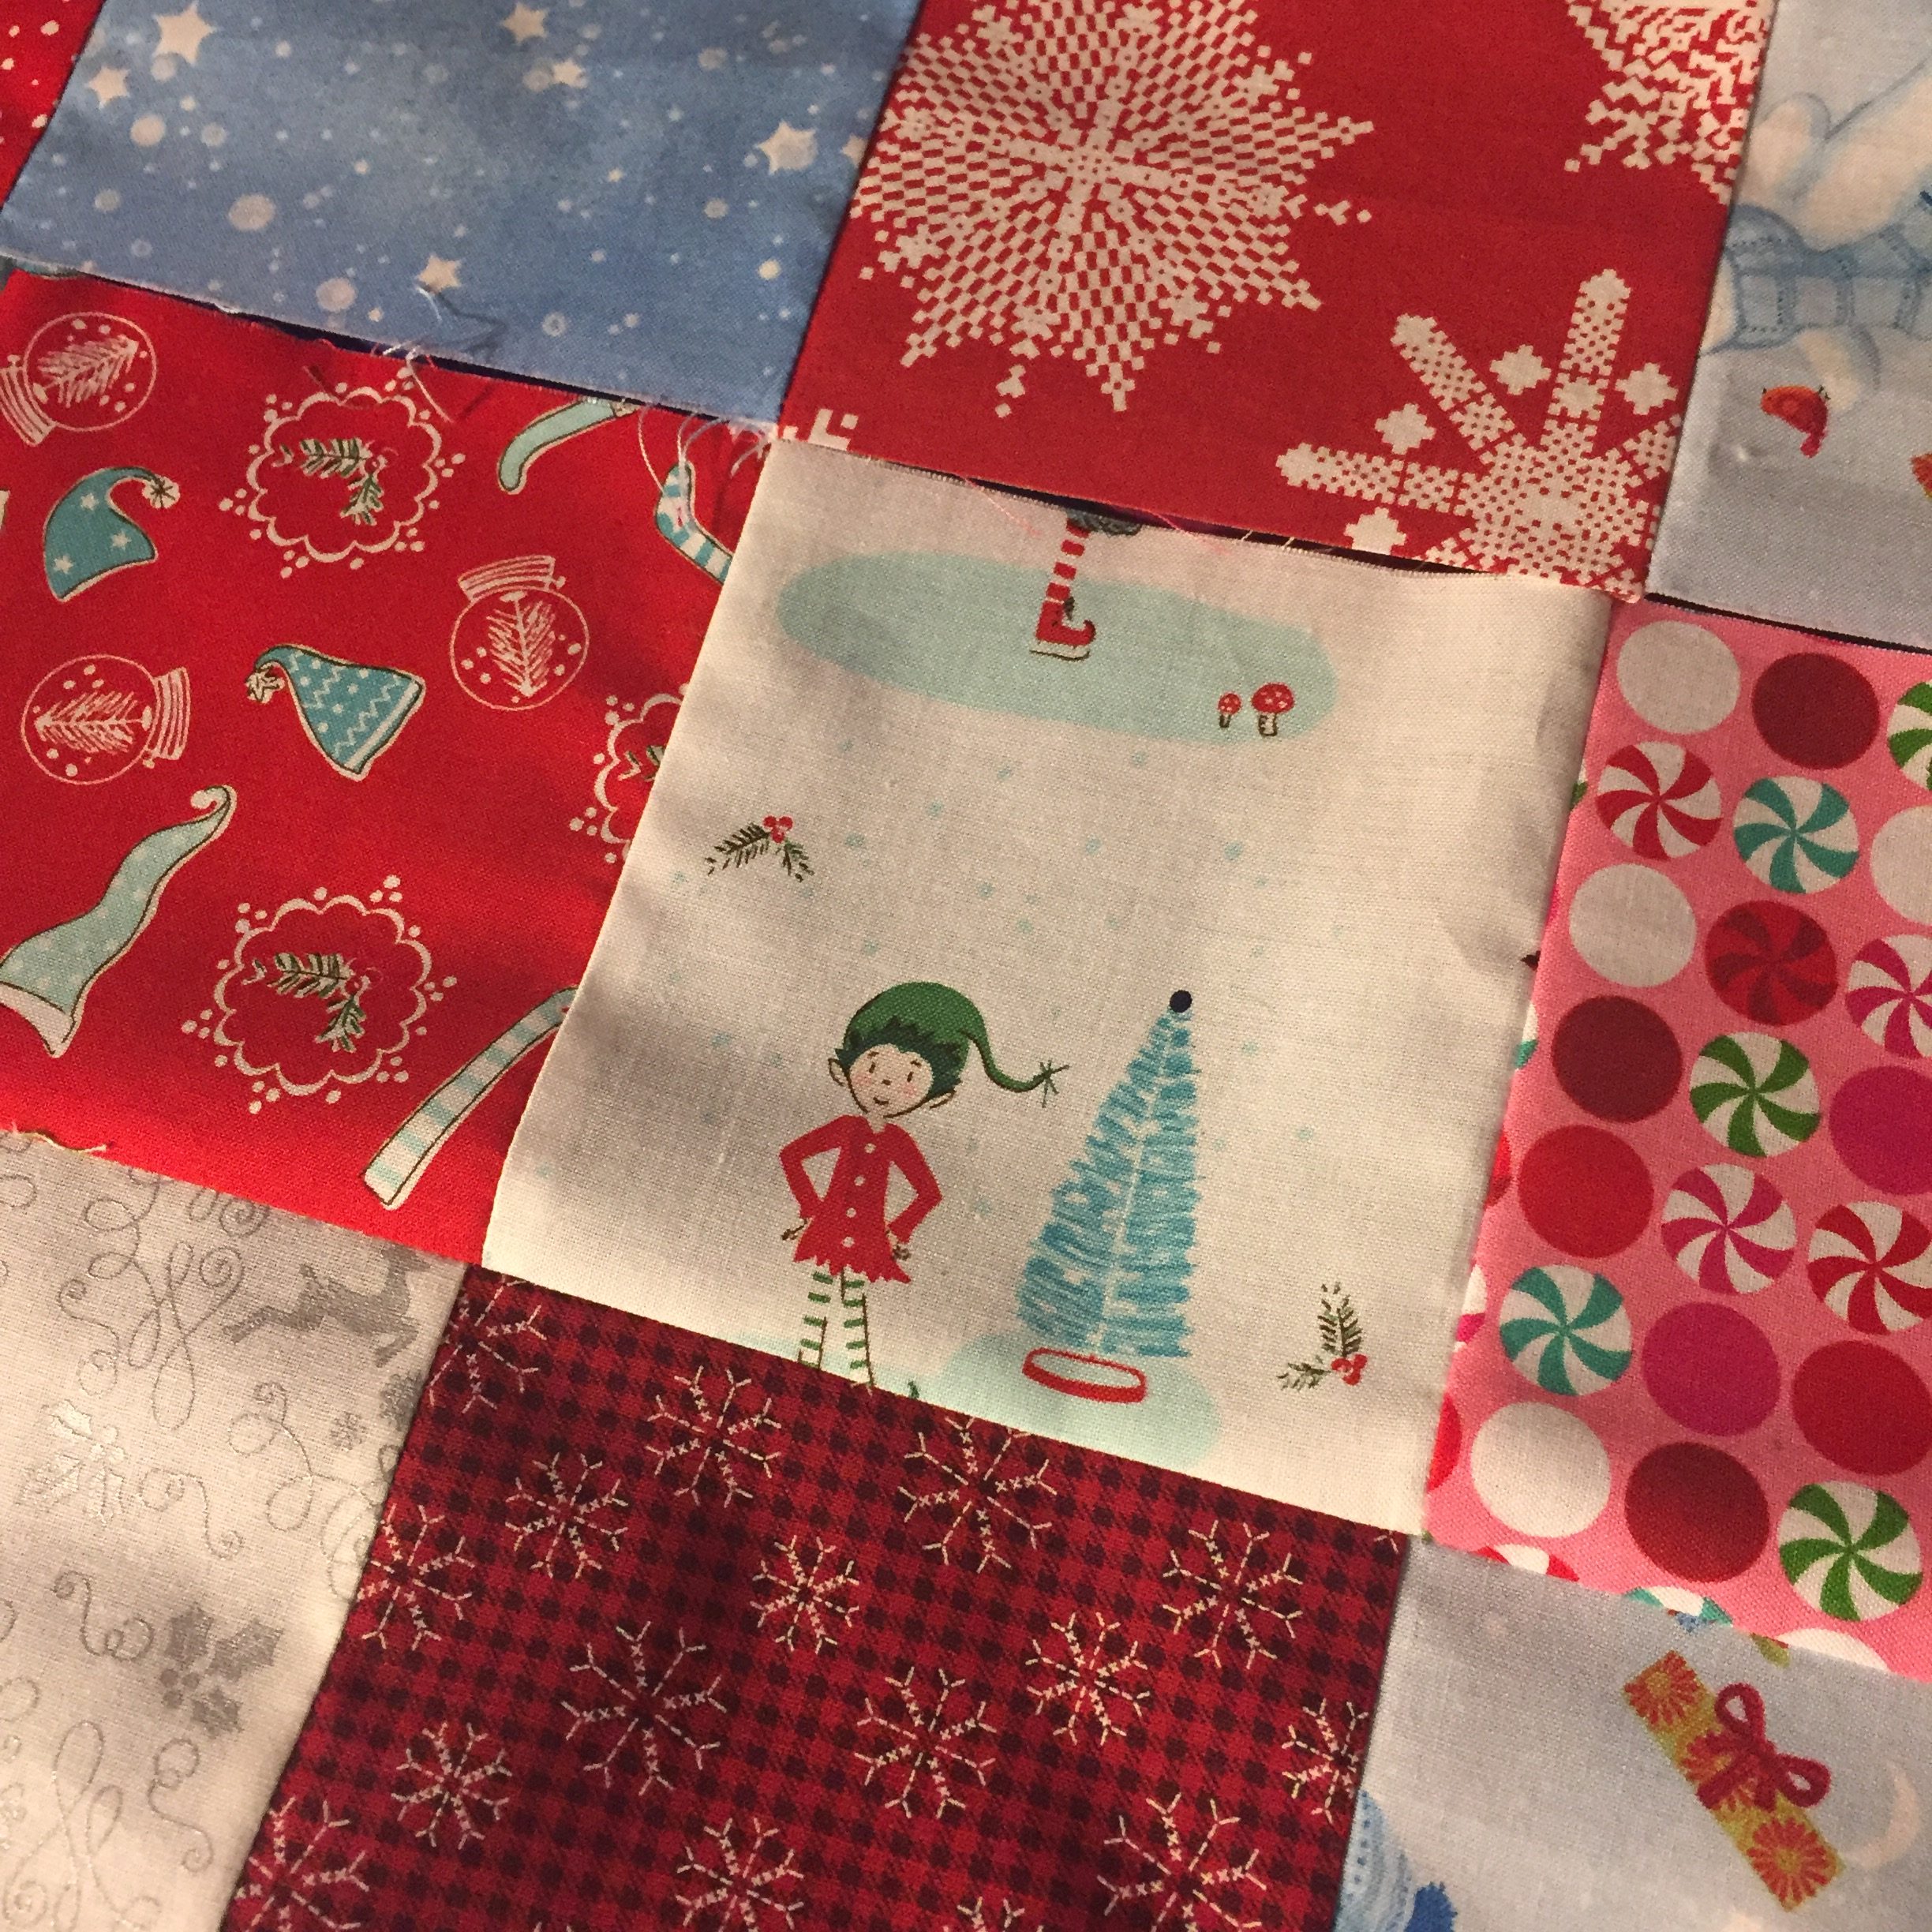
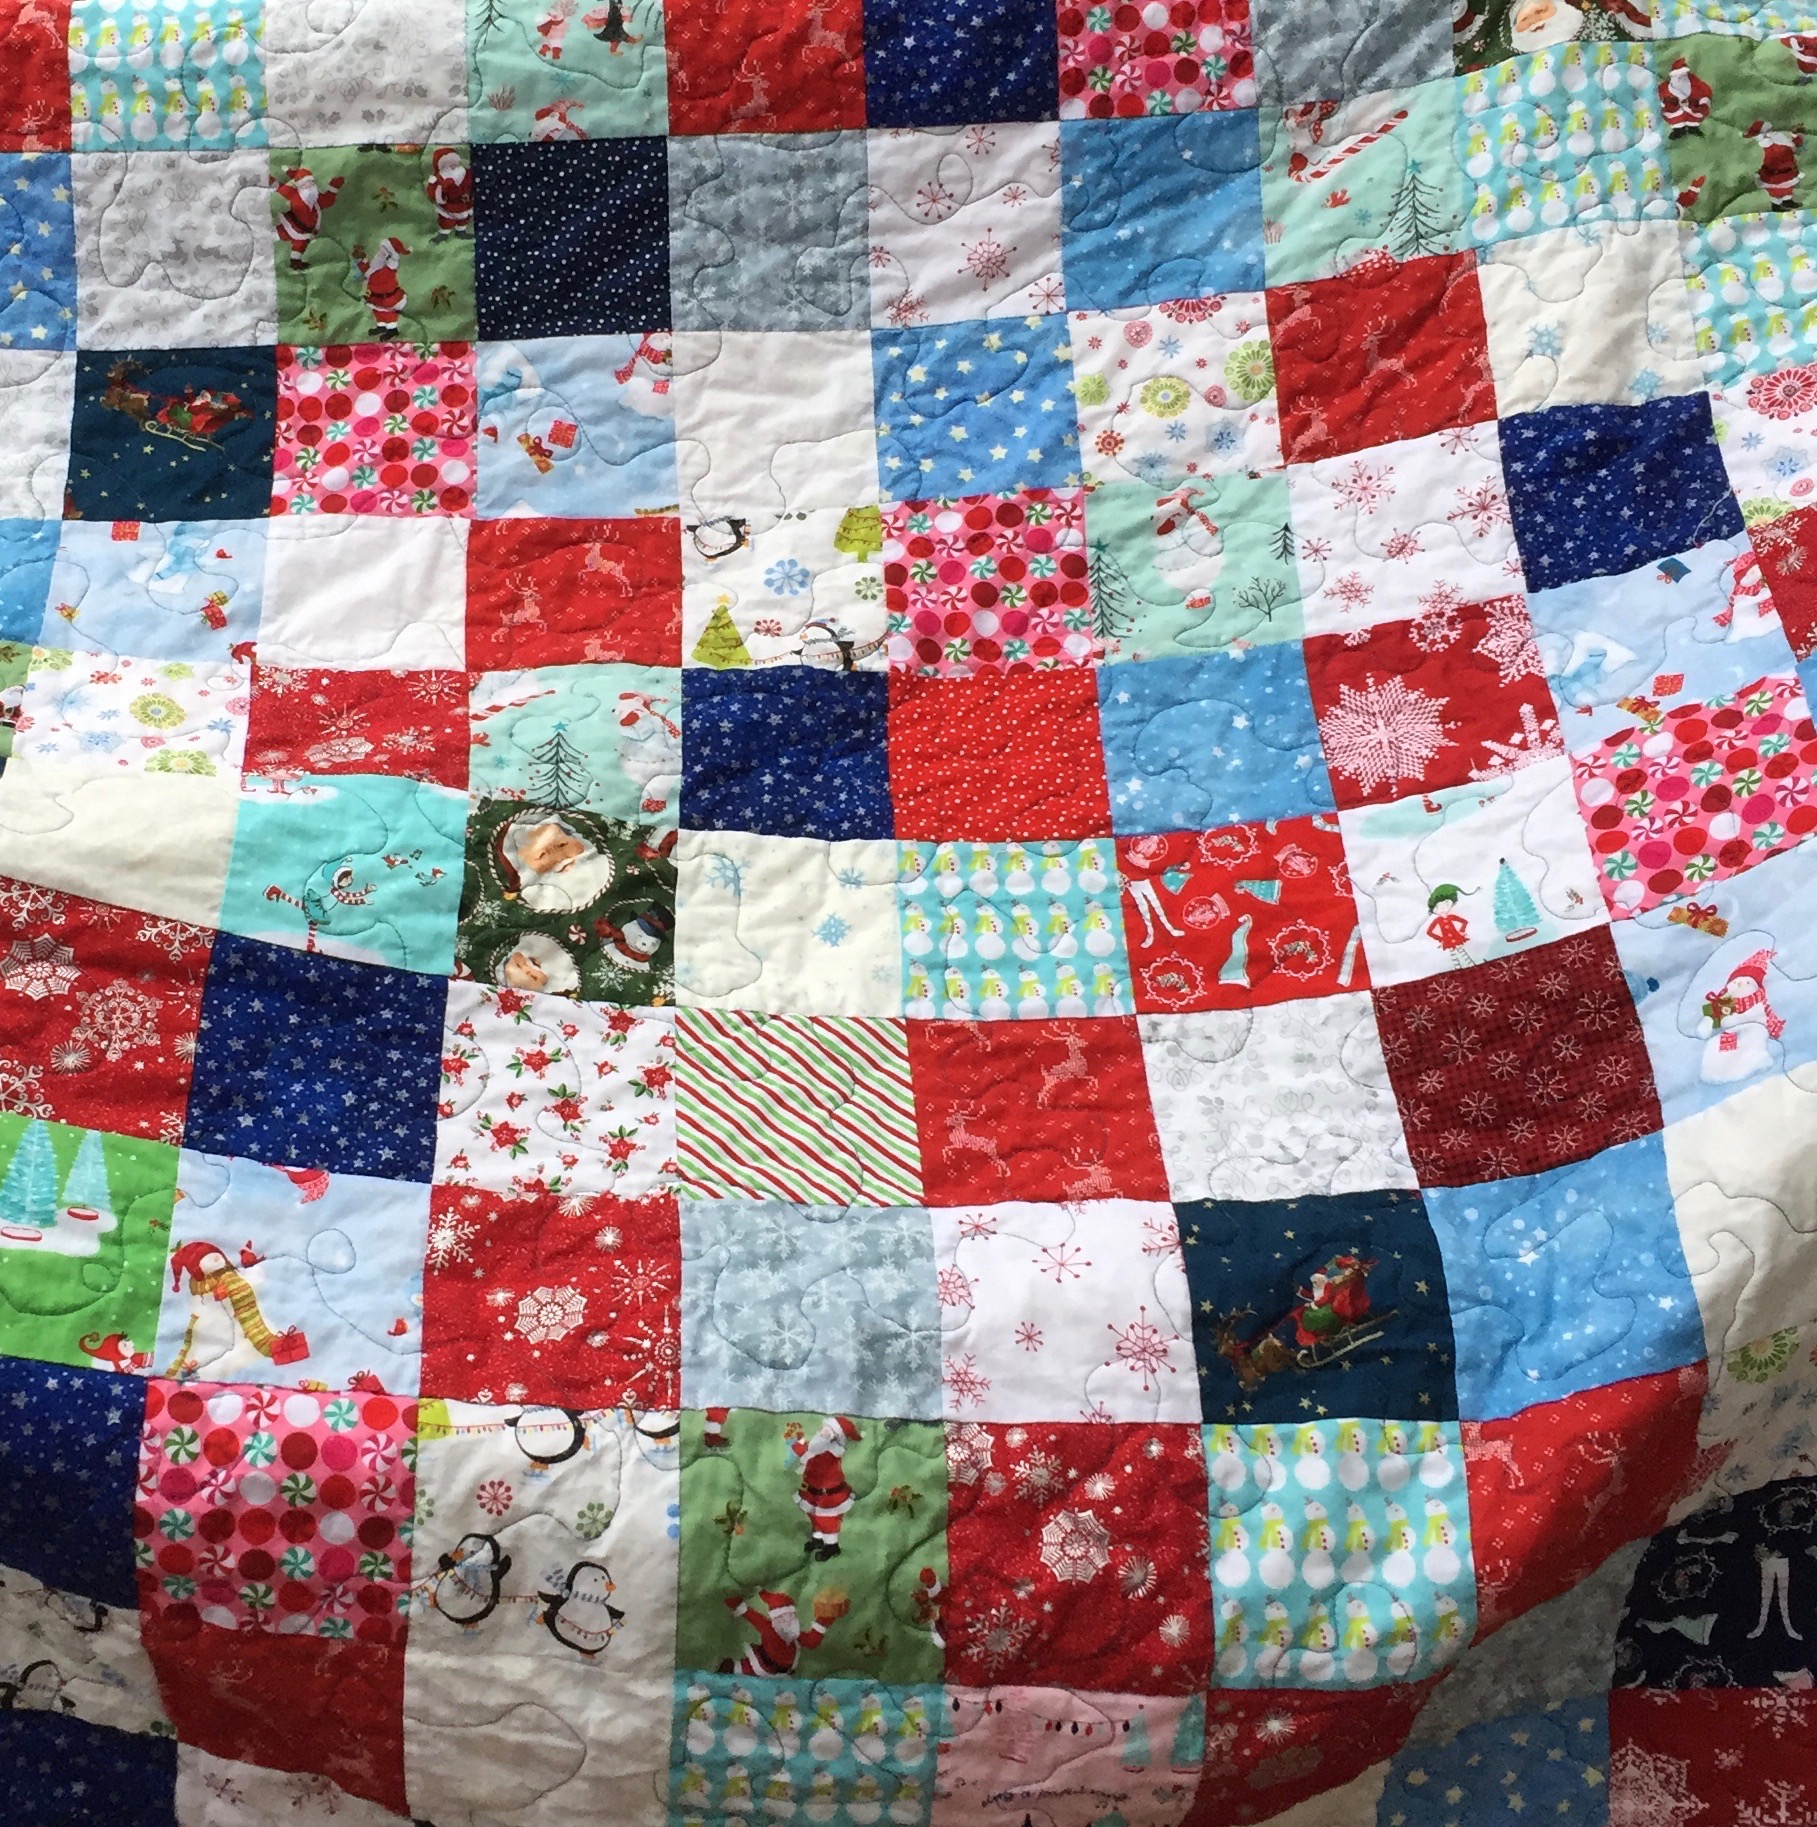
My newest daughter-in-law has a December birthday, just a few days before Christmas actually. This year I decided to make her a quilt. Some time back, I had given Ian a lap quilt for their couch but thought it would be fun to make a Christmasy quilt for Shar to use in winter months.
The cute white square is from the Pixie Noel line.
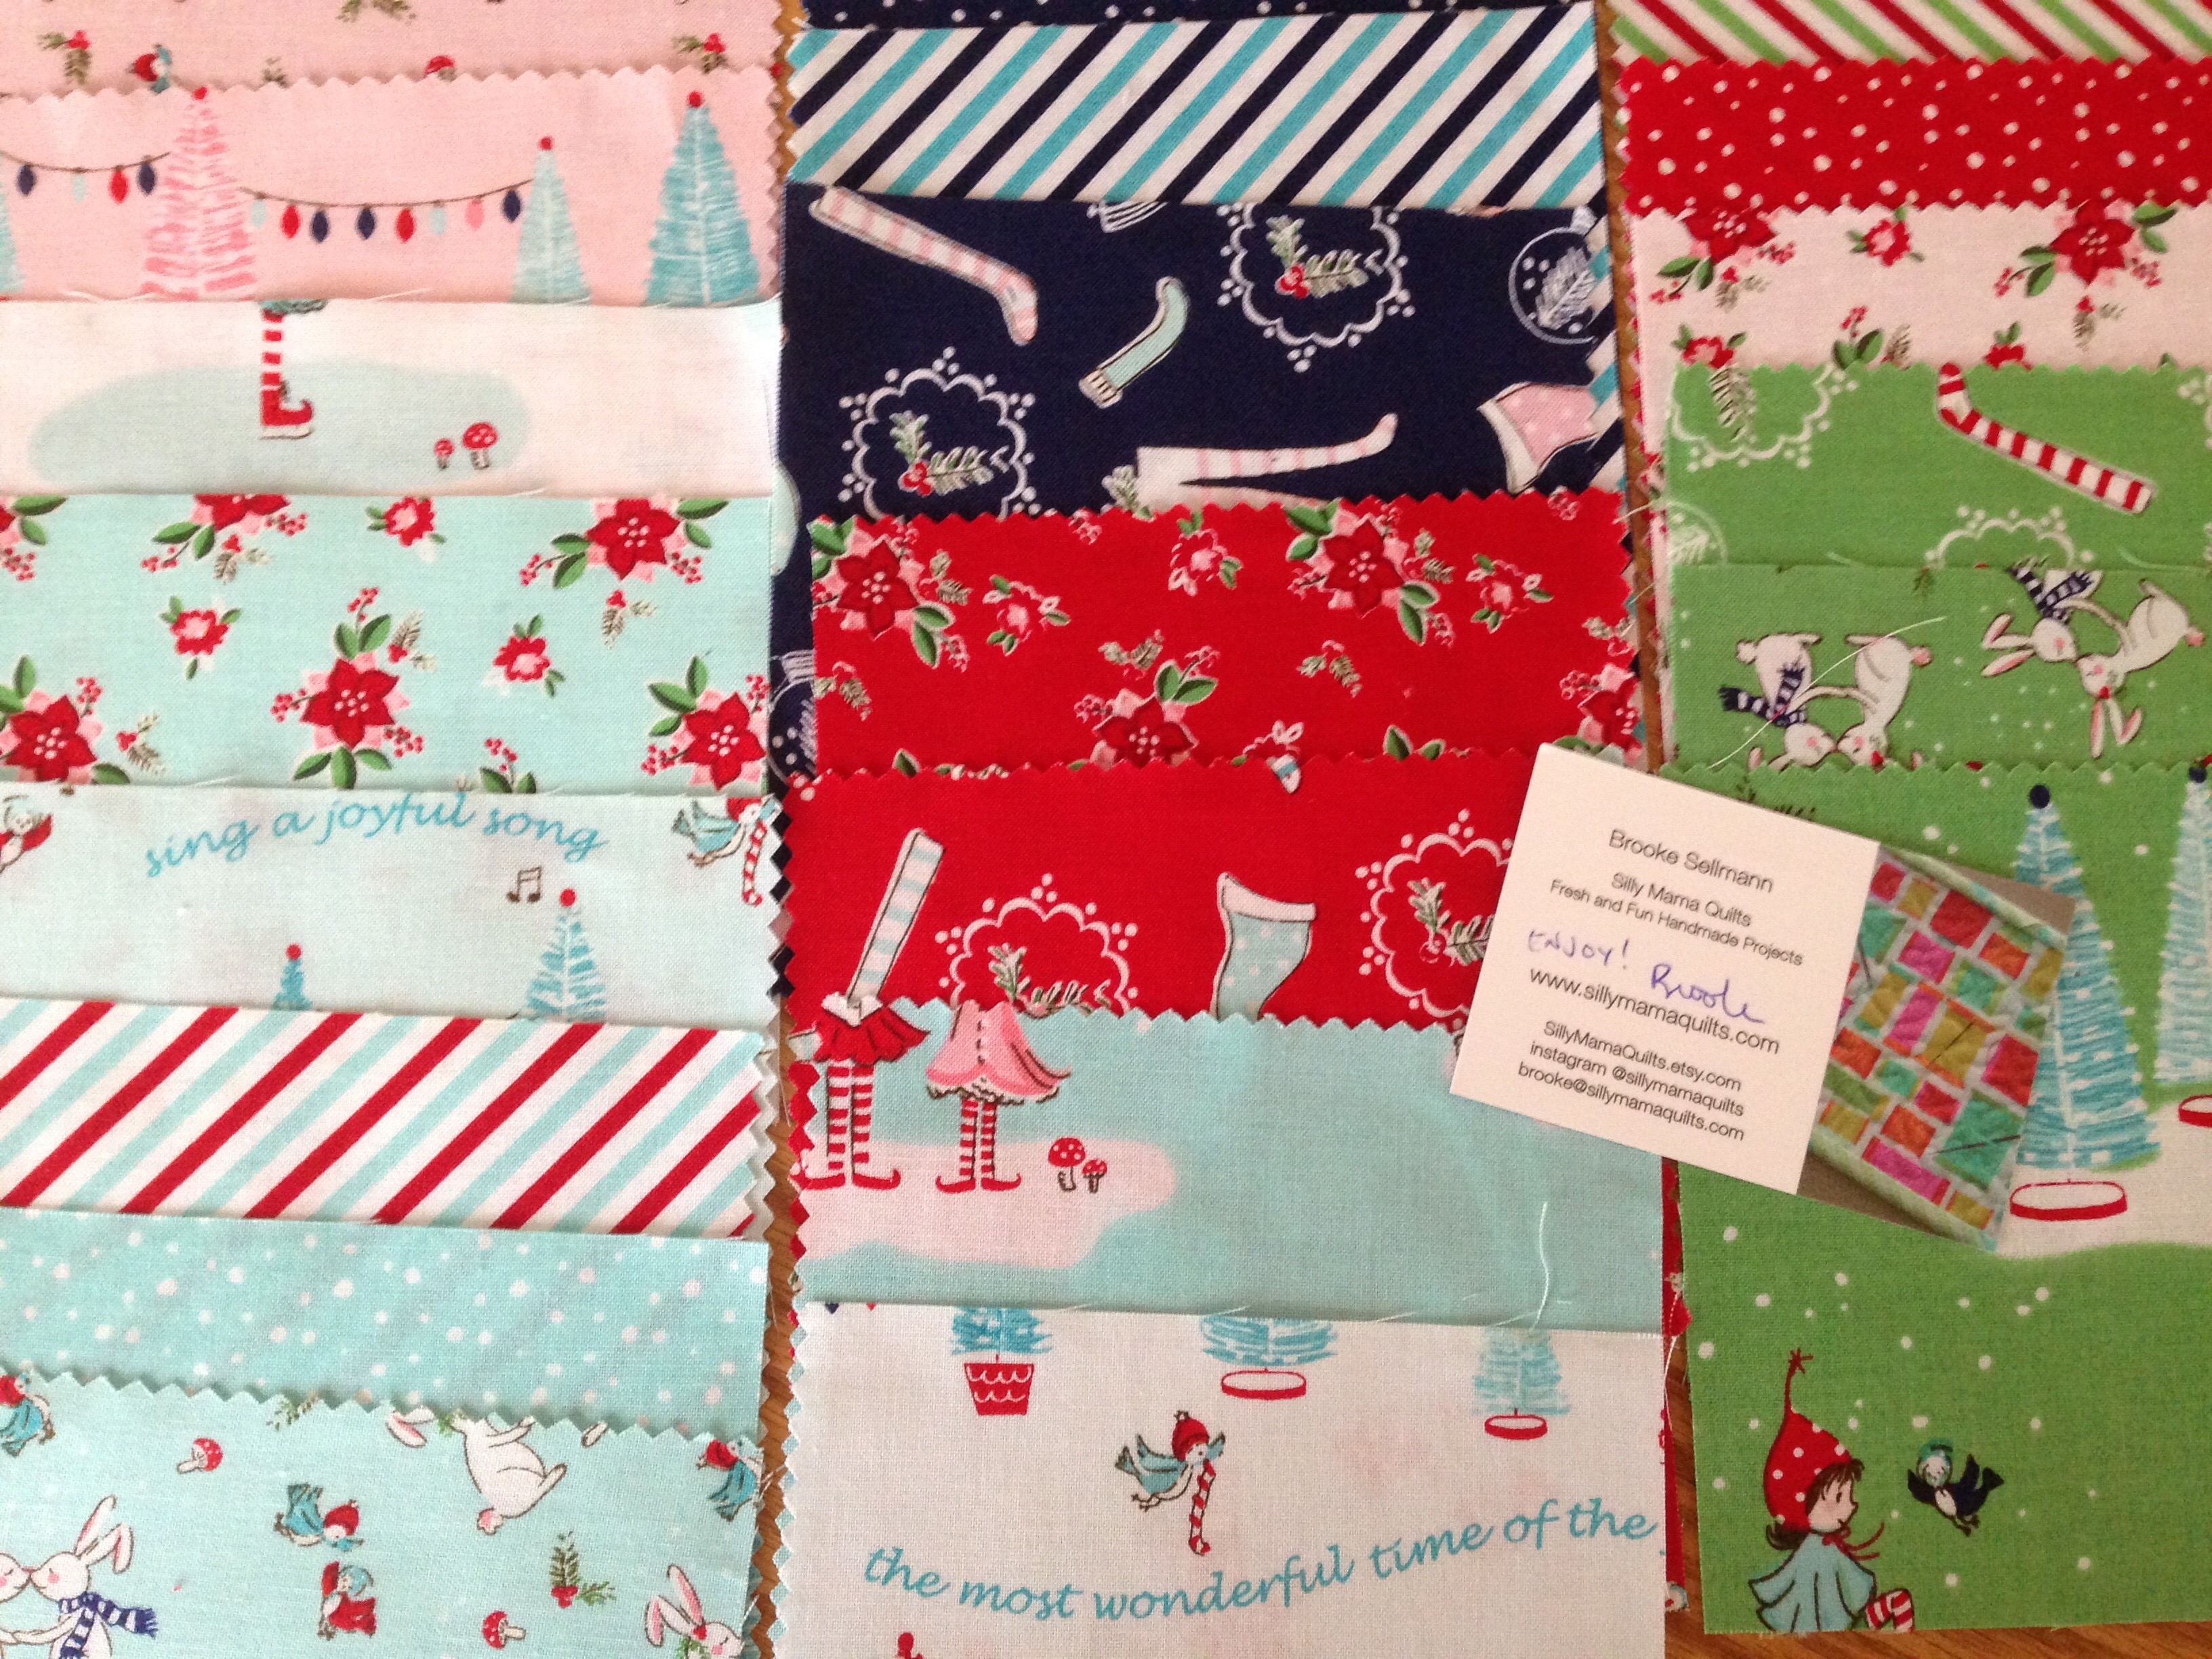
The plan was built around the need for a quick quilt and this cute package of Pixie Noel charms I won in a giveaway several years ago over at Silly Mama Quilts. It was not the complete set so I think I had about 20 or so charms.
I hunted through my holiday scraps and cut about 200 charms so I would have plenty to play with. (I have soooo many holiday scraps!). I wanted to make it a bit less traditional in color so I used a lot of blue and white.
Being a simple patchwork, the top came together quickly. Then it sat for a while because I had a flurry of holiday orders to sew for my shop.
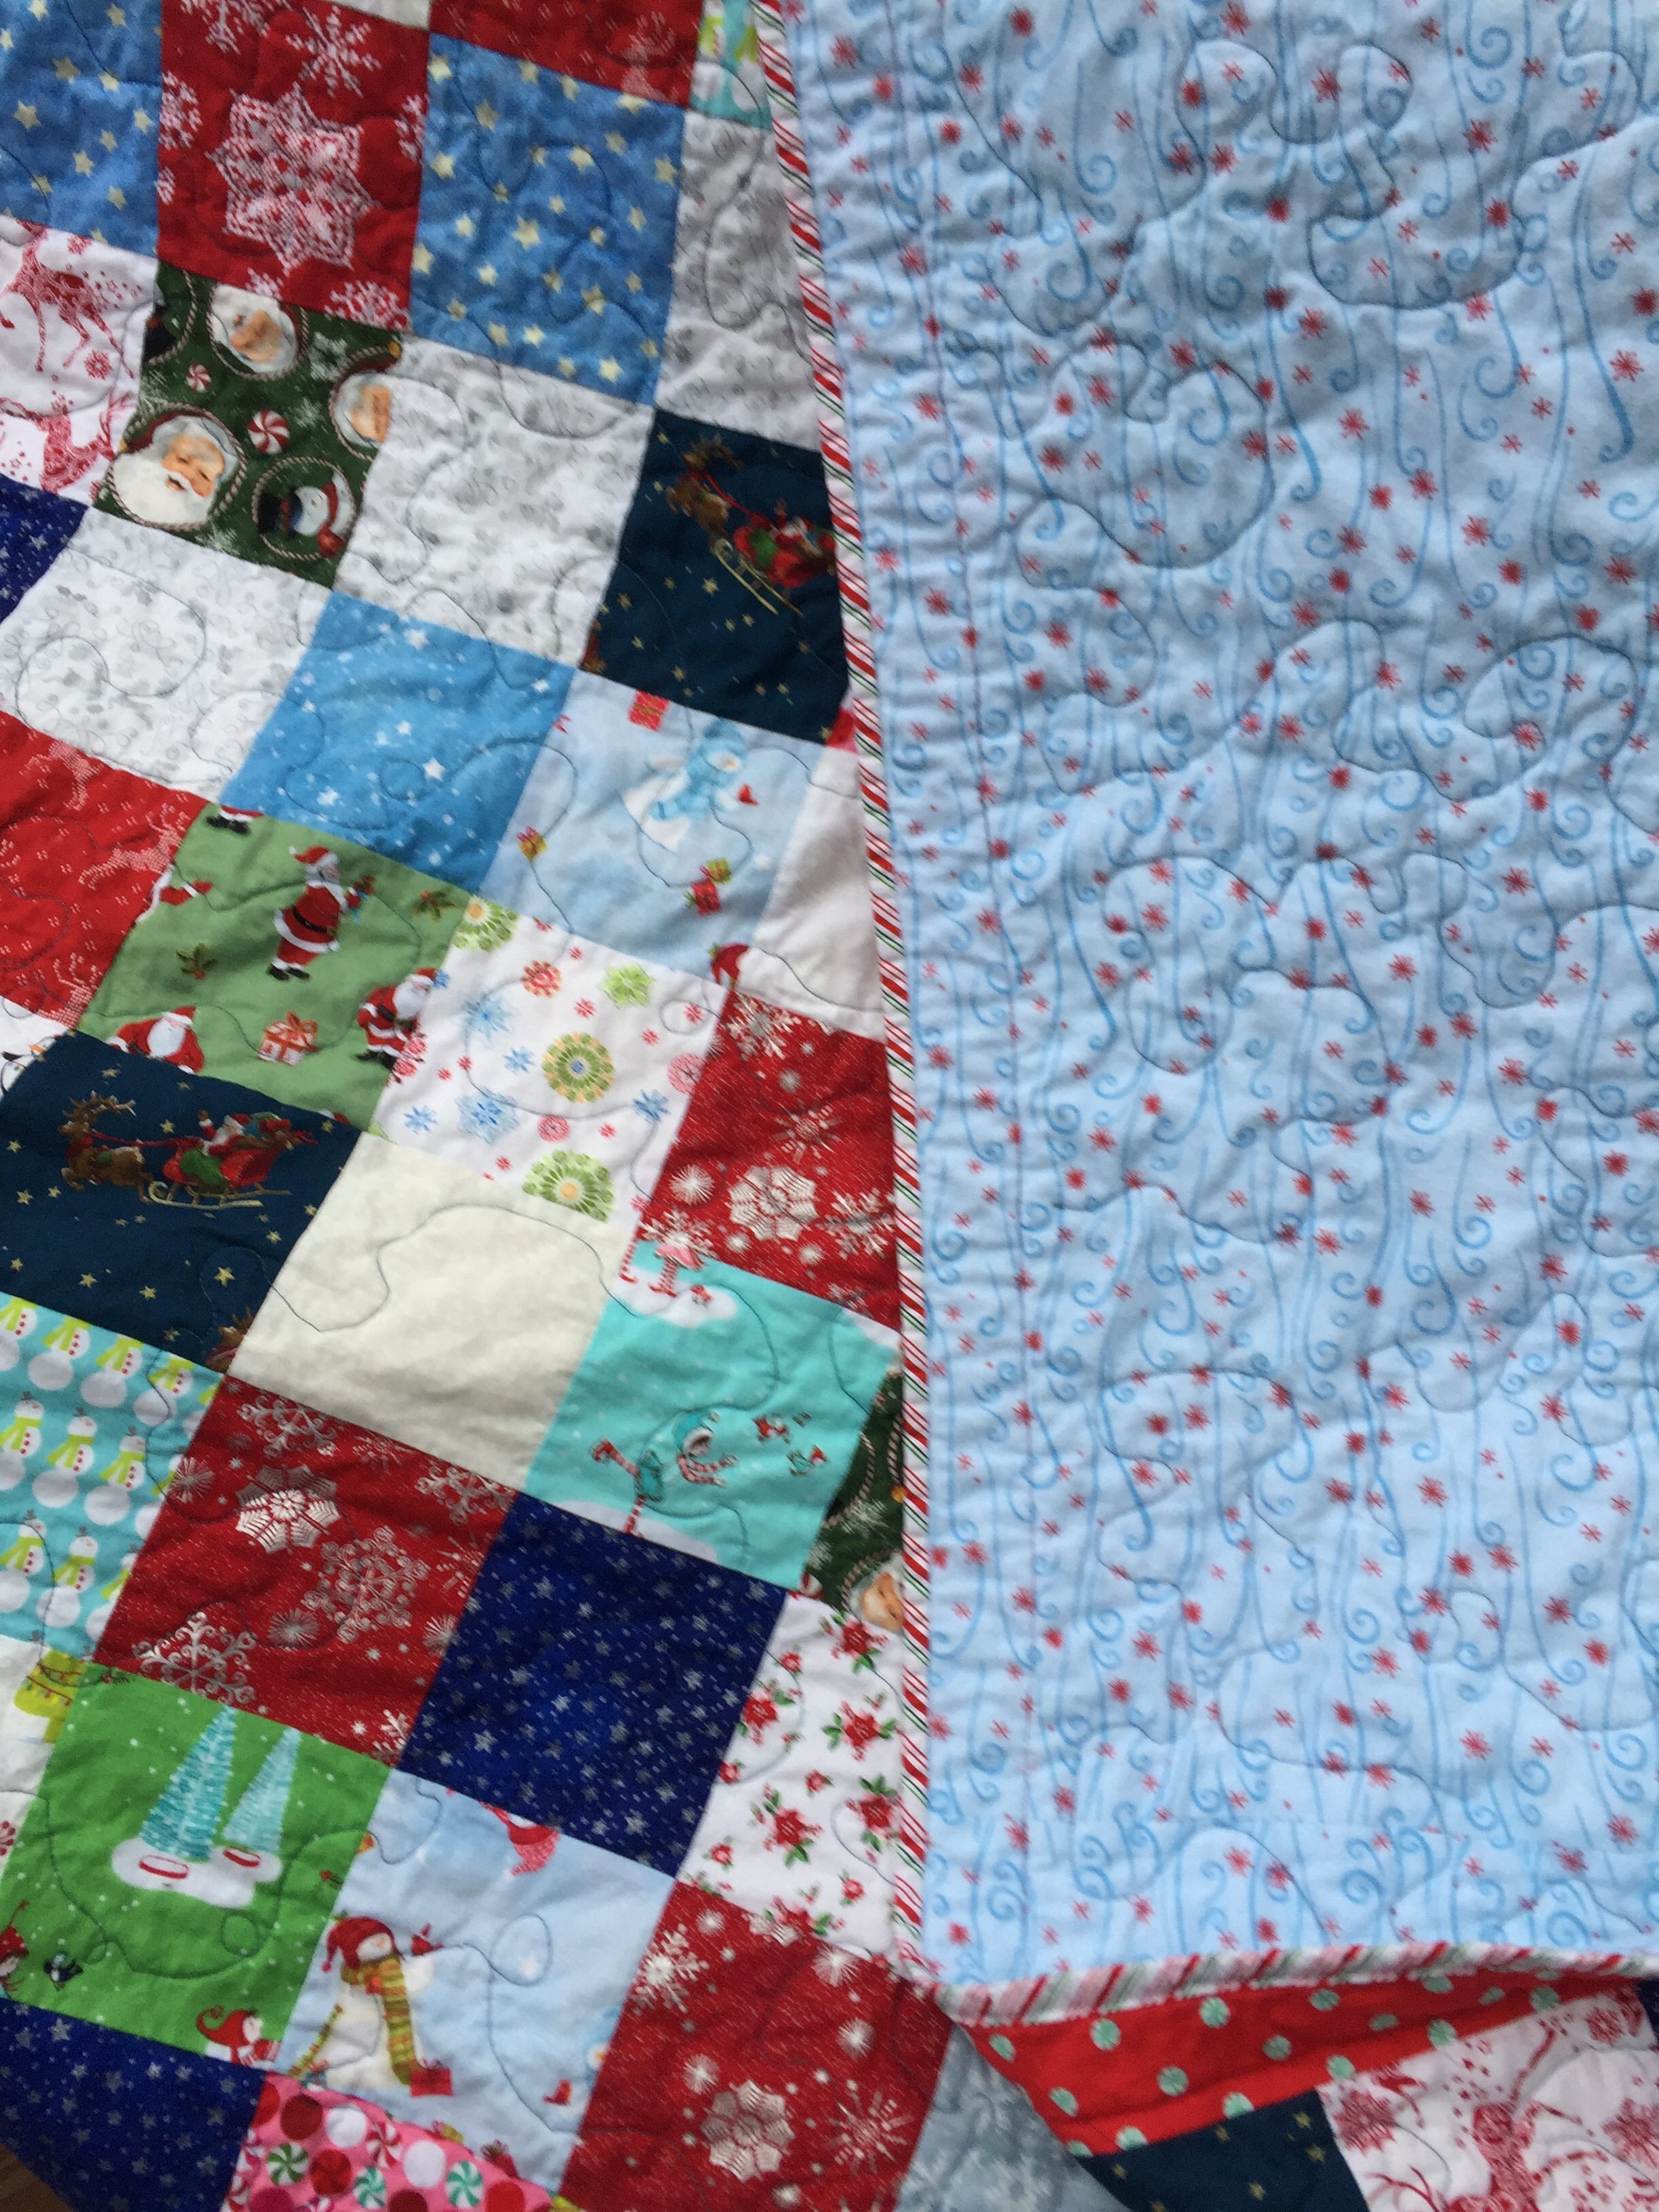
I decided to back it with a soft flannel to make it really cozy. I think this is the first time I backed a quilt with flannel but I like how soft it is. Julia really liked it too and requested the next quilt I make for her be flannel backed too. The wintry blue color worked well with the front.
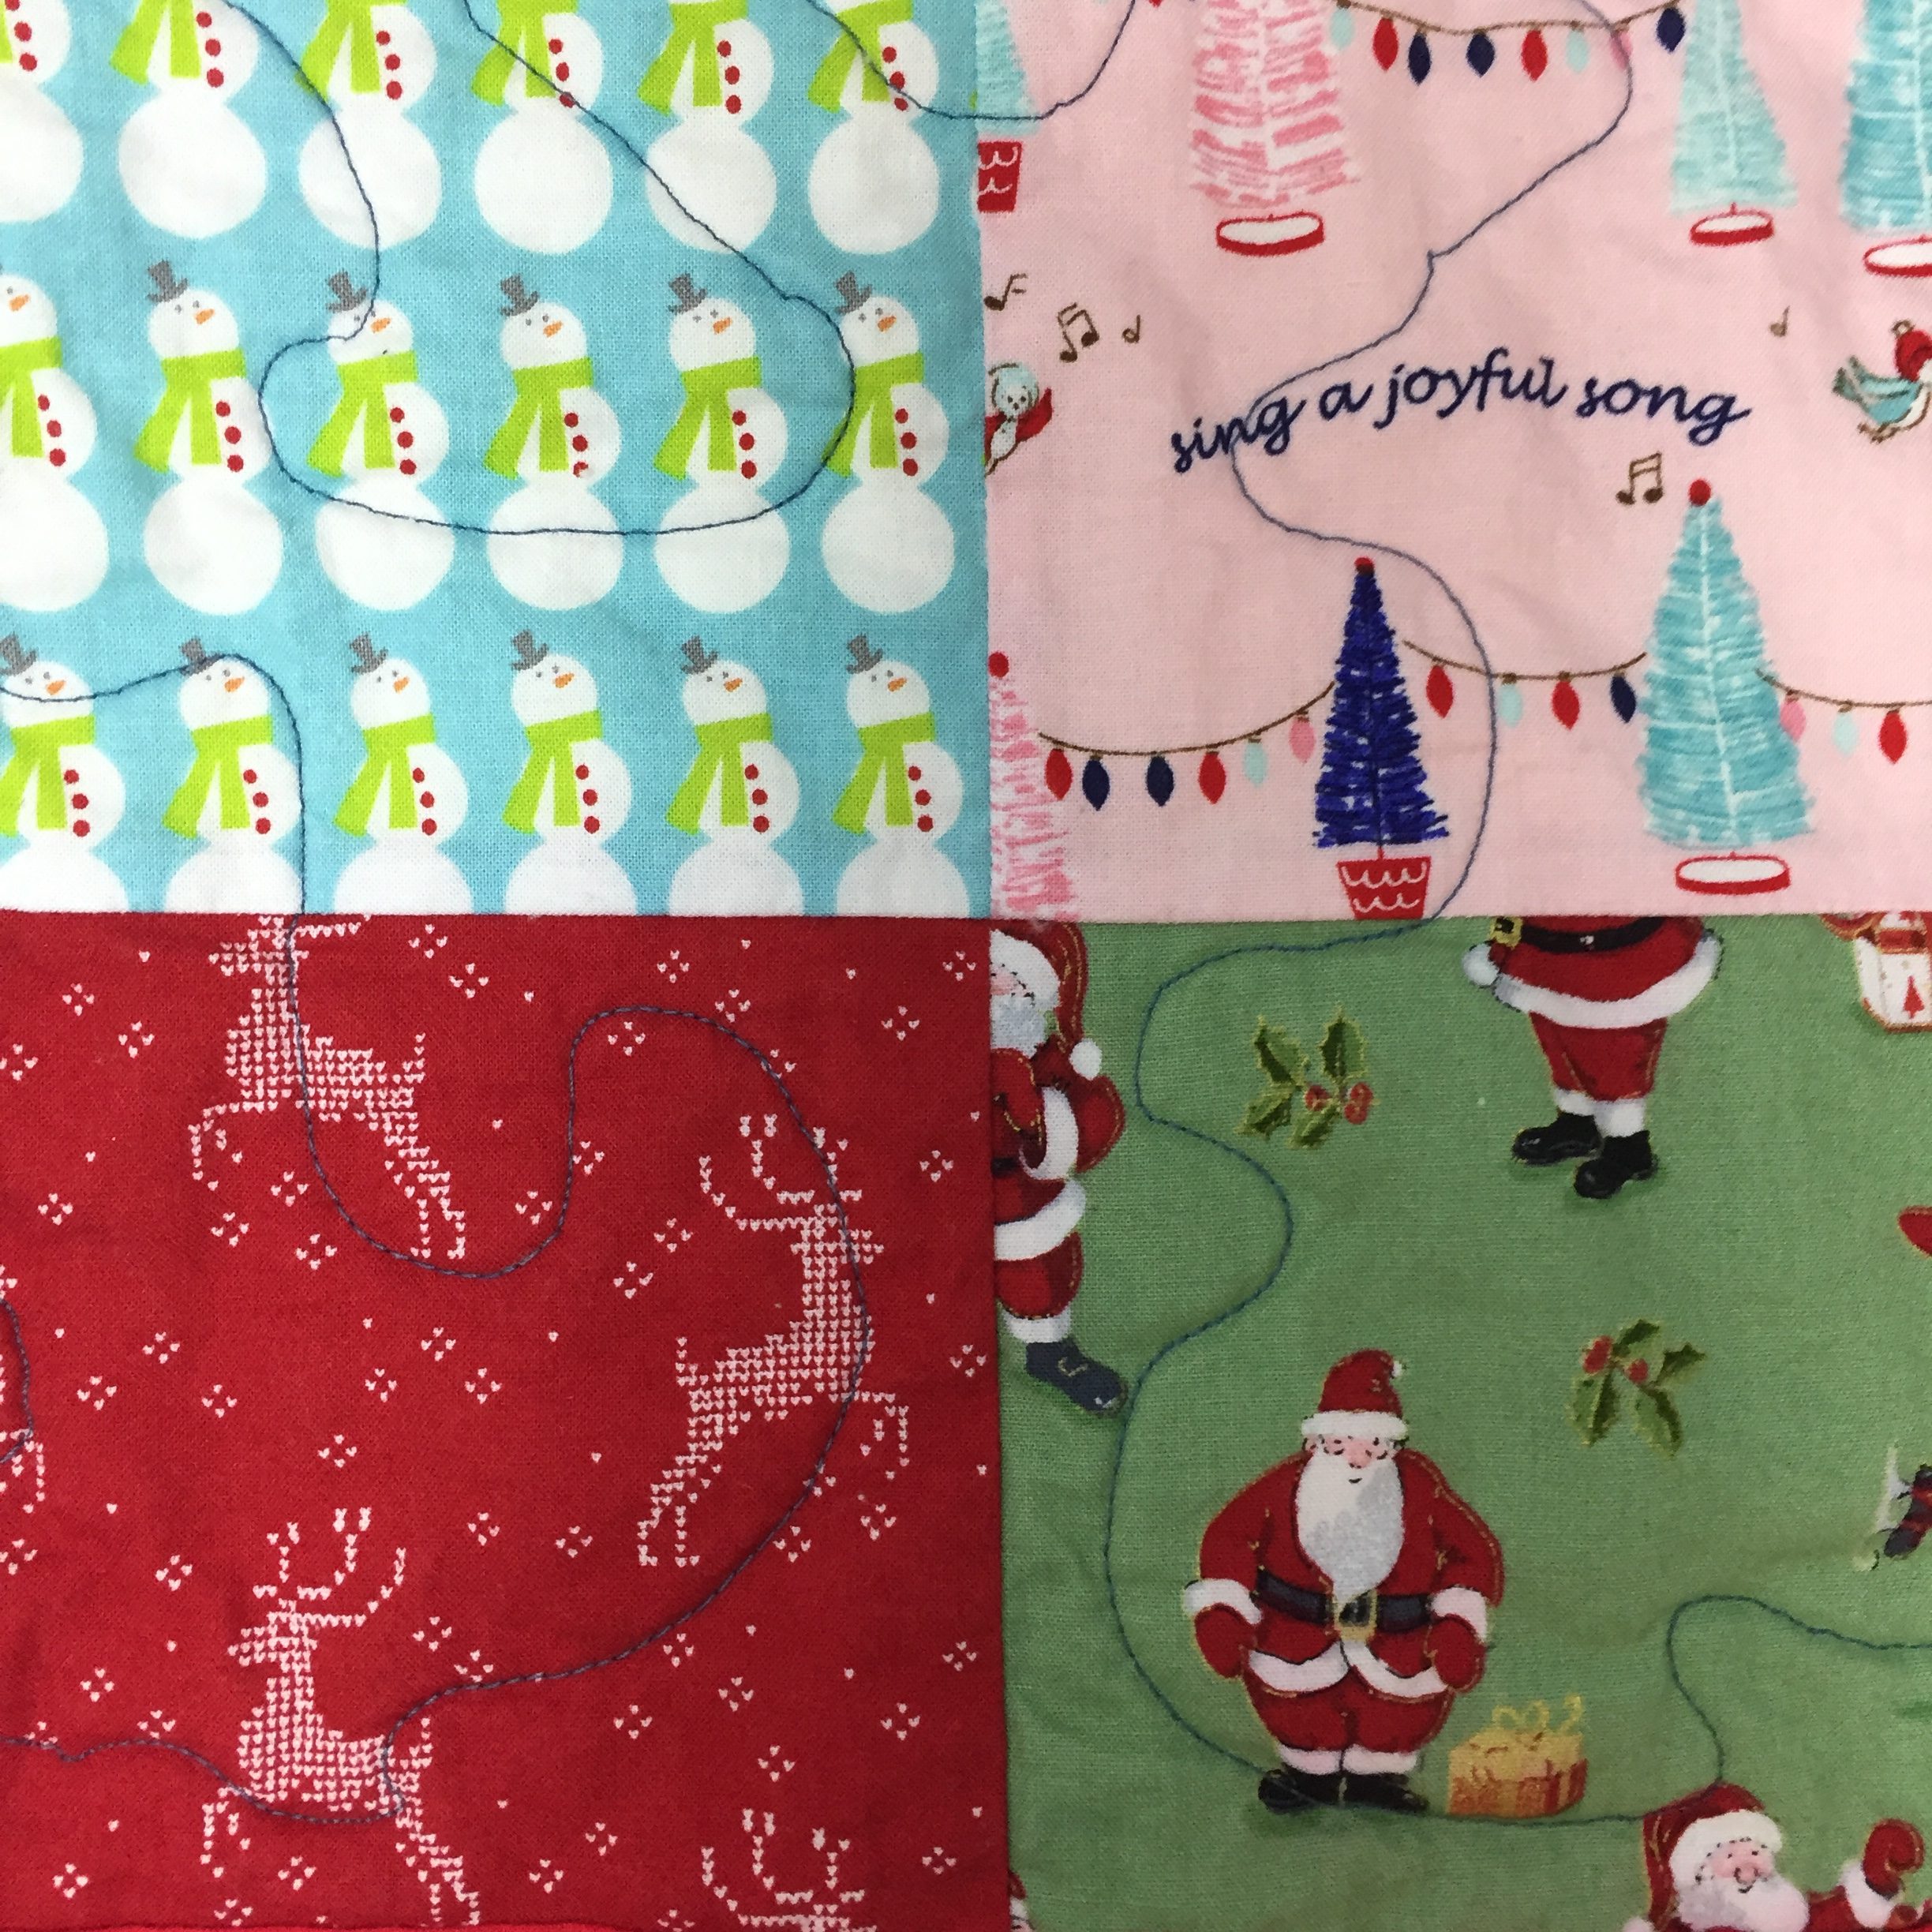
It has been a long while since I free motion quilted anything and jeez, I was so rusty. This simple stipple was so awkward. Definitely showed me the need to practice more – my hands were not at all cooperative!! Now that it is washed and crinkled, it looks better but still…. I intentionally used a very large stipple so it would stay very soft.
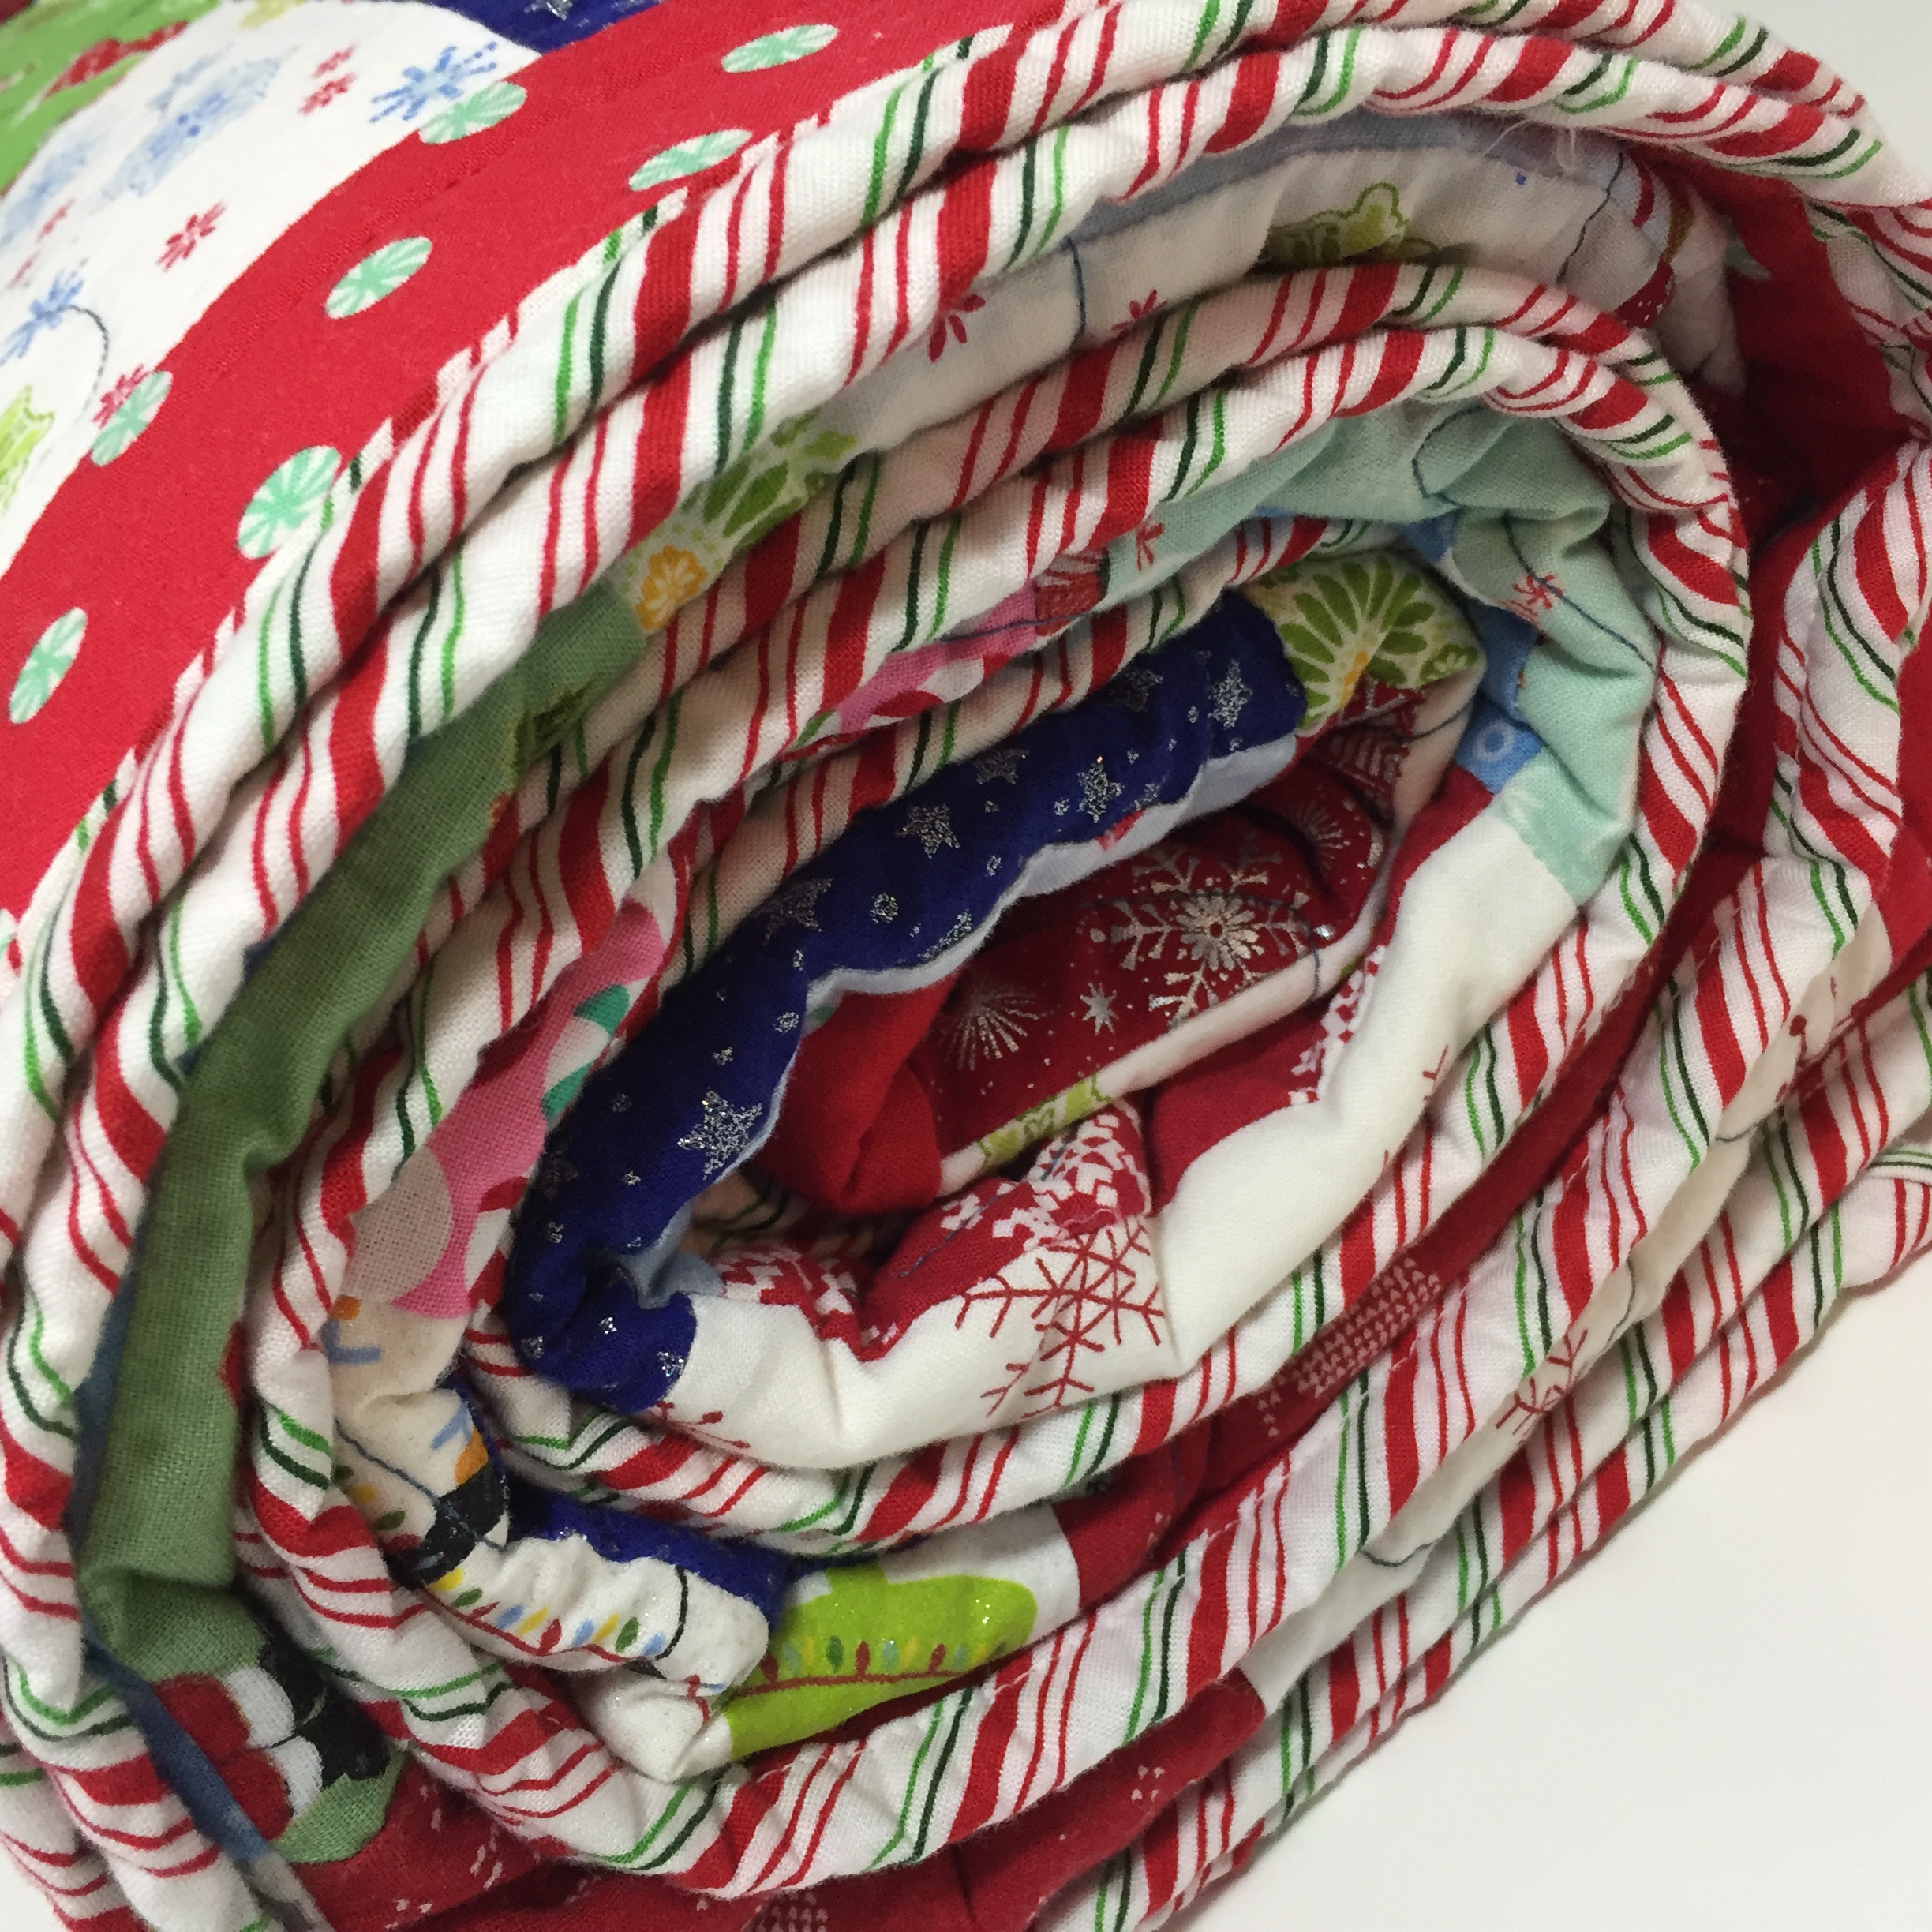
Given the choice, I will often opt for a bias stripe binding. I love this one!! It looks just like a candy peppermint stick.
At this point in the year, I suspect this will be my last quilt finish. There is a slim chance I will get my Fireburst quilt top finished but not for sure. We shall see! I am working on a few things for my grand daughter that I hope to bring her when we go to Vermont the last week of December. So it just depends on how much time there is…… December’s days require more than the 24 hours we are given. There is always so much to do!!
Linking up at Brag About Your Beauties and a few other spots. Check them out at the top of the page under Link Ups.
Newsletter!
Have you signed up for my newsletter? It is published every month or so and contains information about my shop, new arrivals, sales, and events. Click here to sign up!