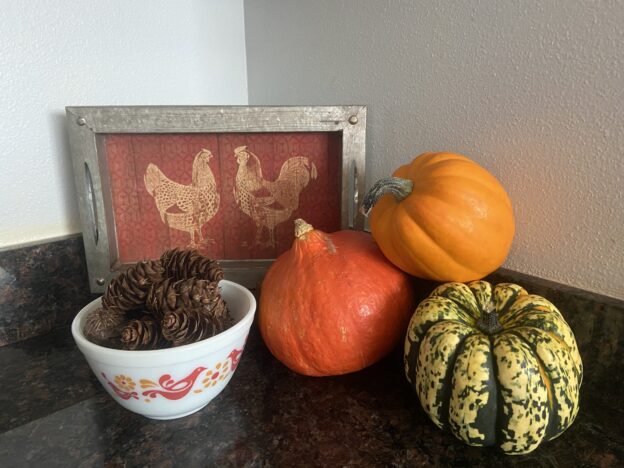
October is here which means we have been in our new house for almost six months. Seems like one would have all the boxes unpacked at this point but nah… there are too many other fun things to do.
Ray and his mom on the beach
For instance, we had my mother in law here for a visit last week. She had not seen the house yet. It was super fun to show her the area. Like me, she is a fan of beach combing so we spent a lovely afternoon wandering at the water’s edge picking up shells and sea glass. The weather could not have been better.
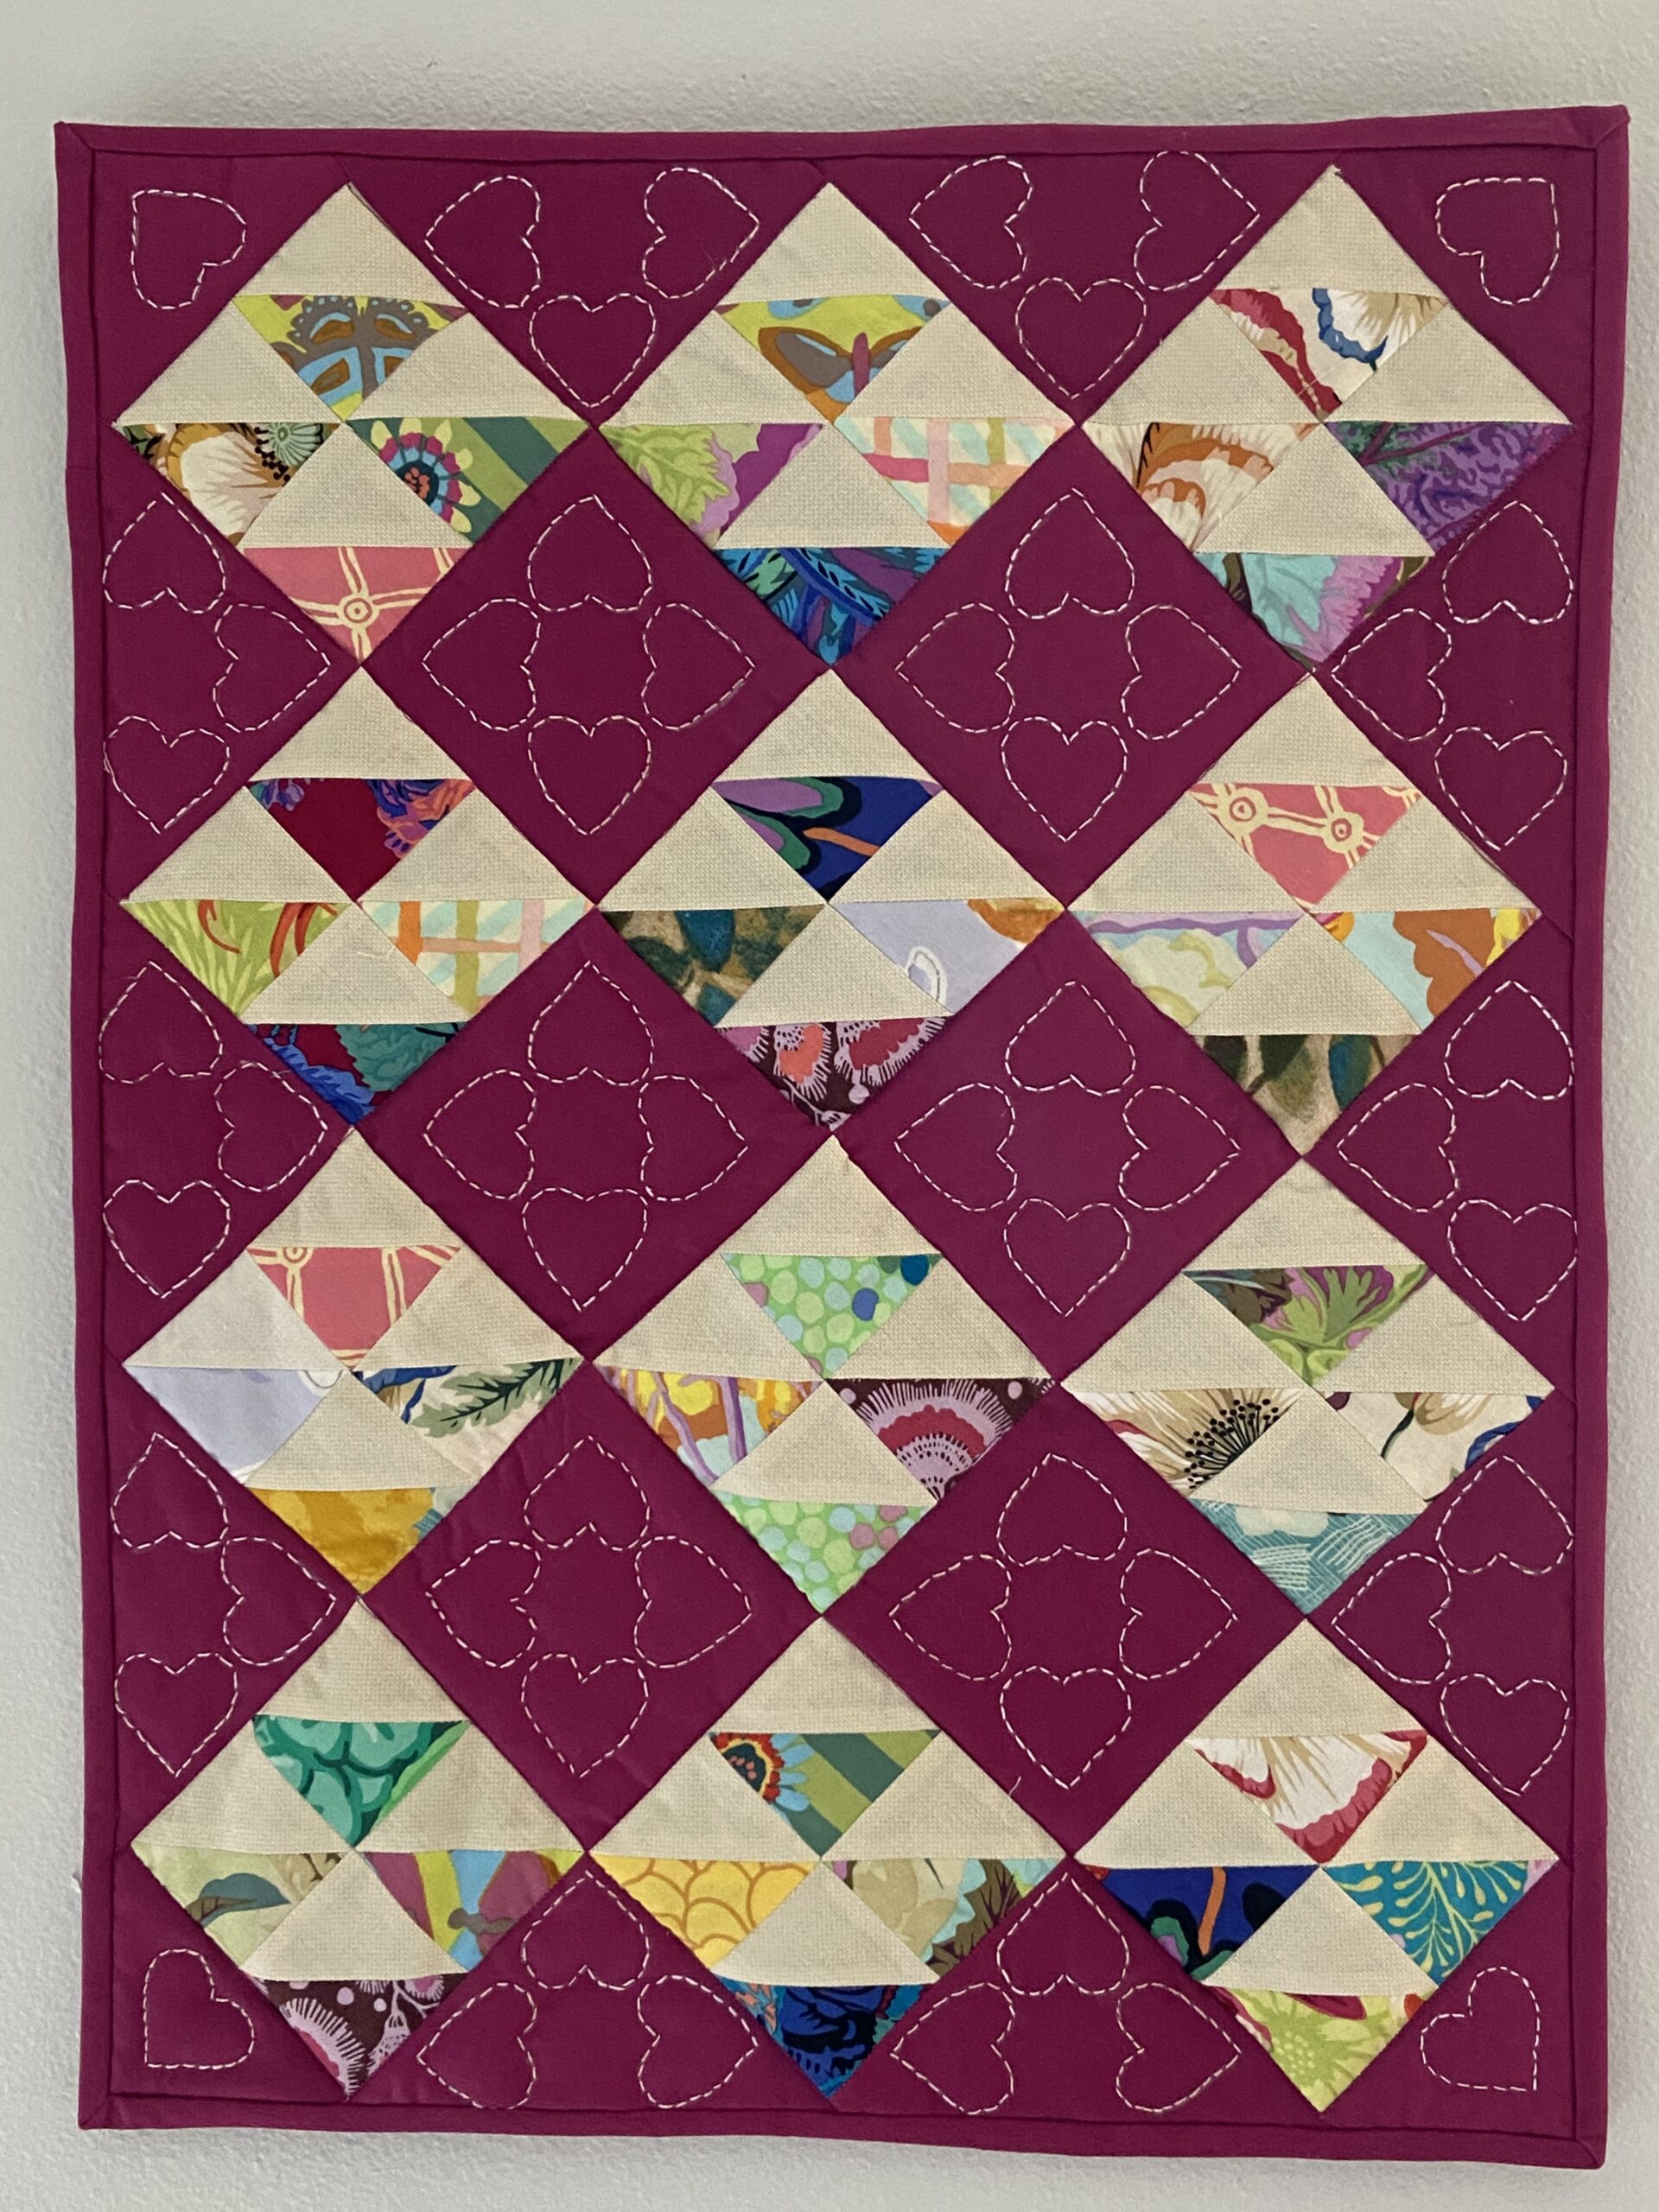
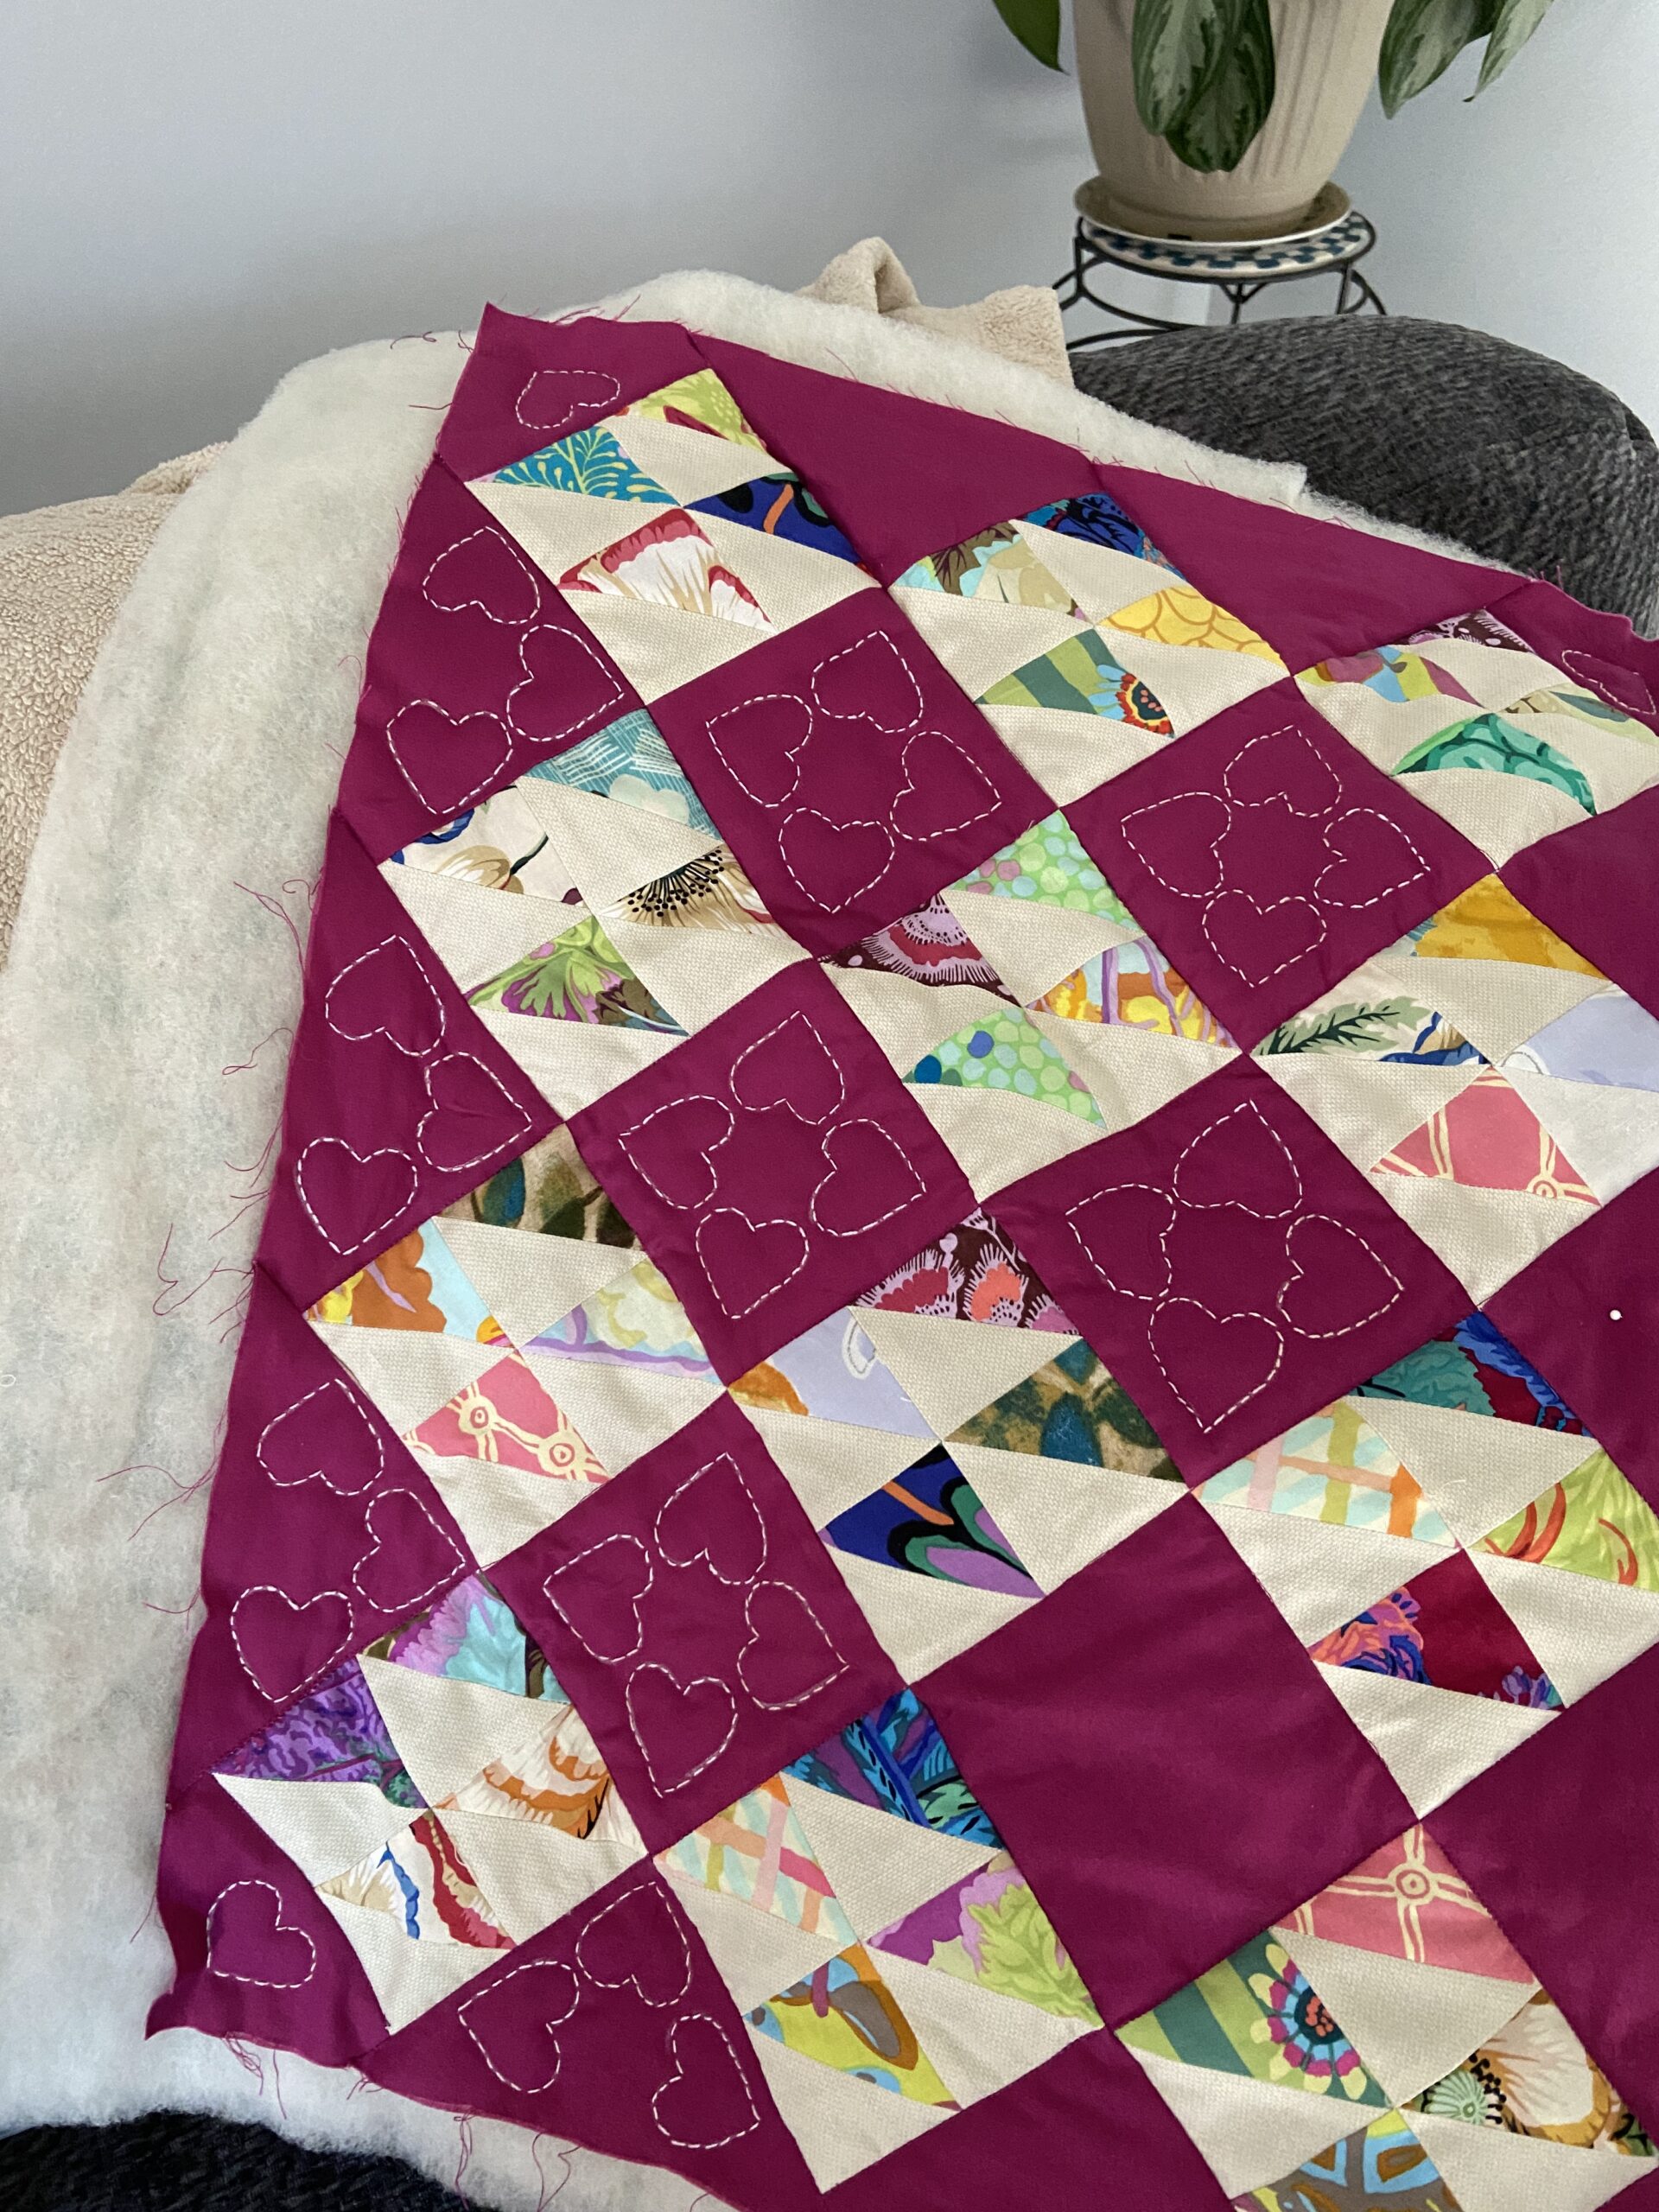
It is finished!
Just before she came, I put the finishing touches on this mini. I worked in slow motion when attaching the binding so I could minimize any issues with the hearts. I just didn’t leave quite enough room for the binding. All is well though and I hardly touched the little hand quilted hearts.
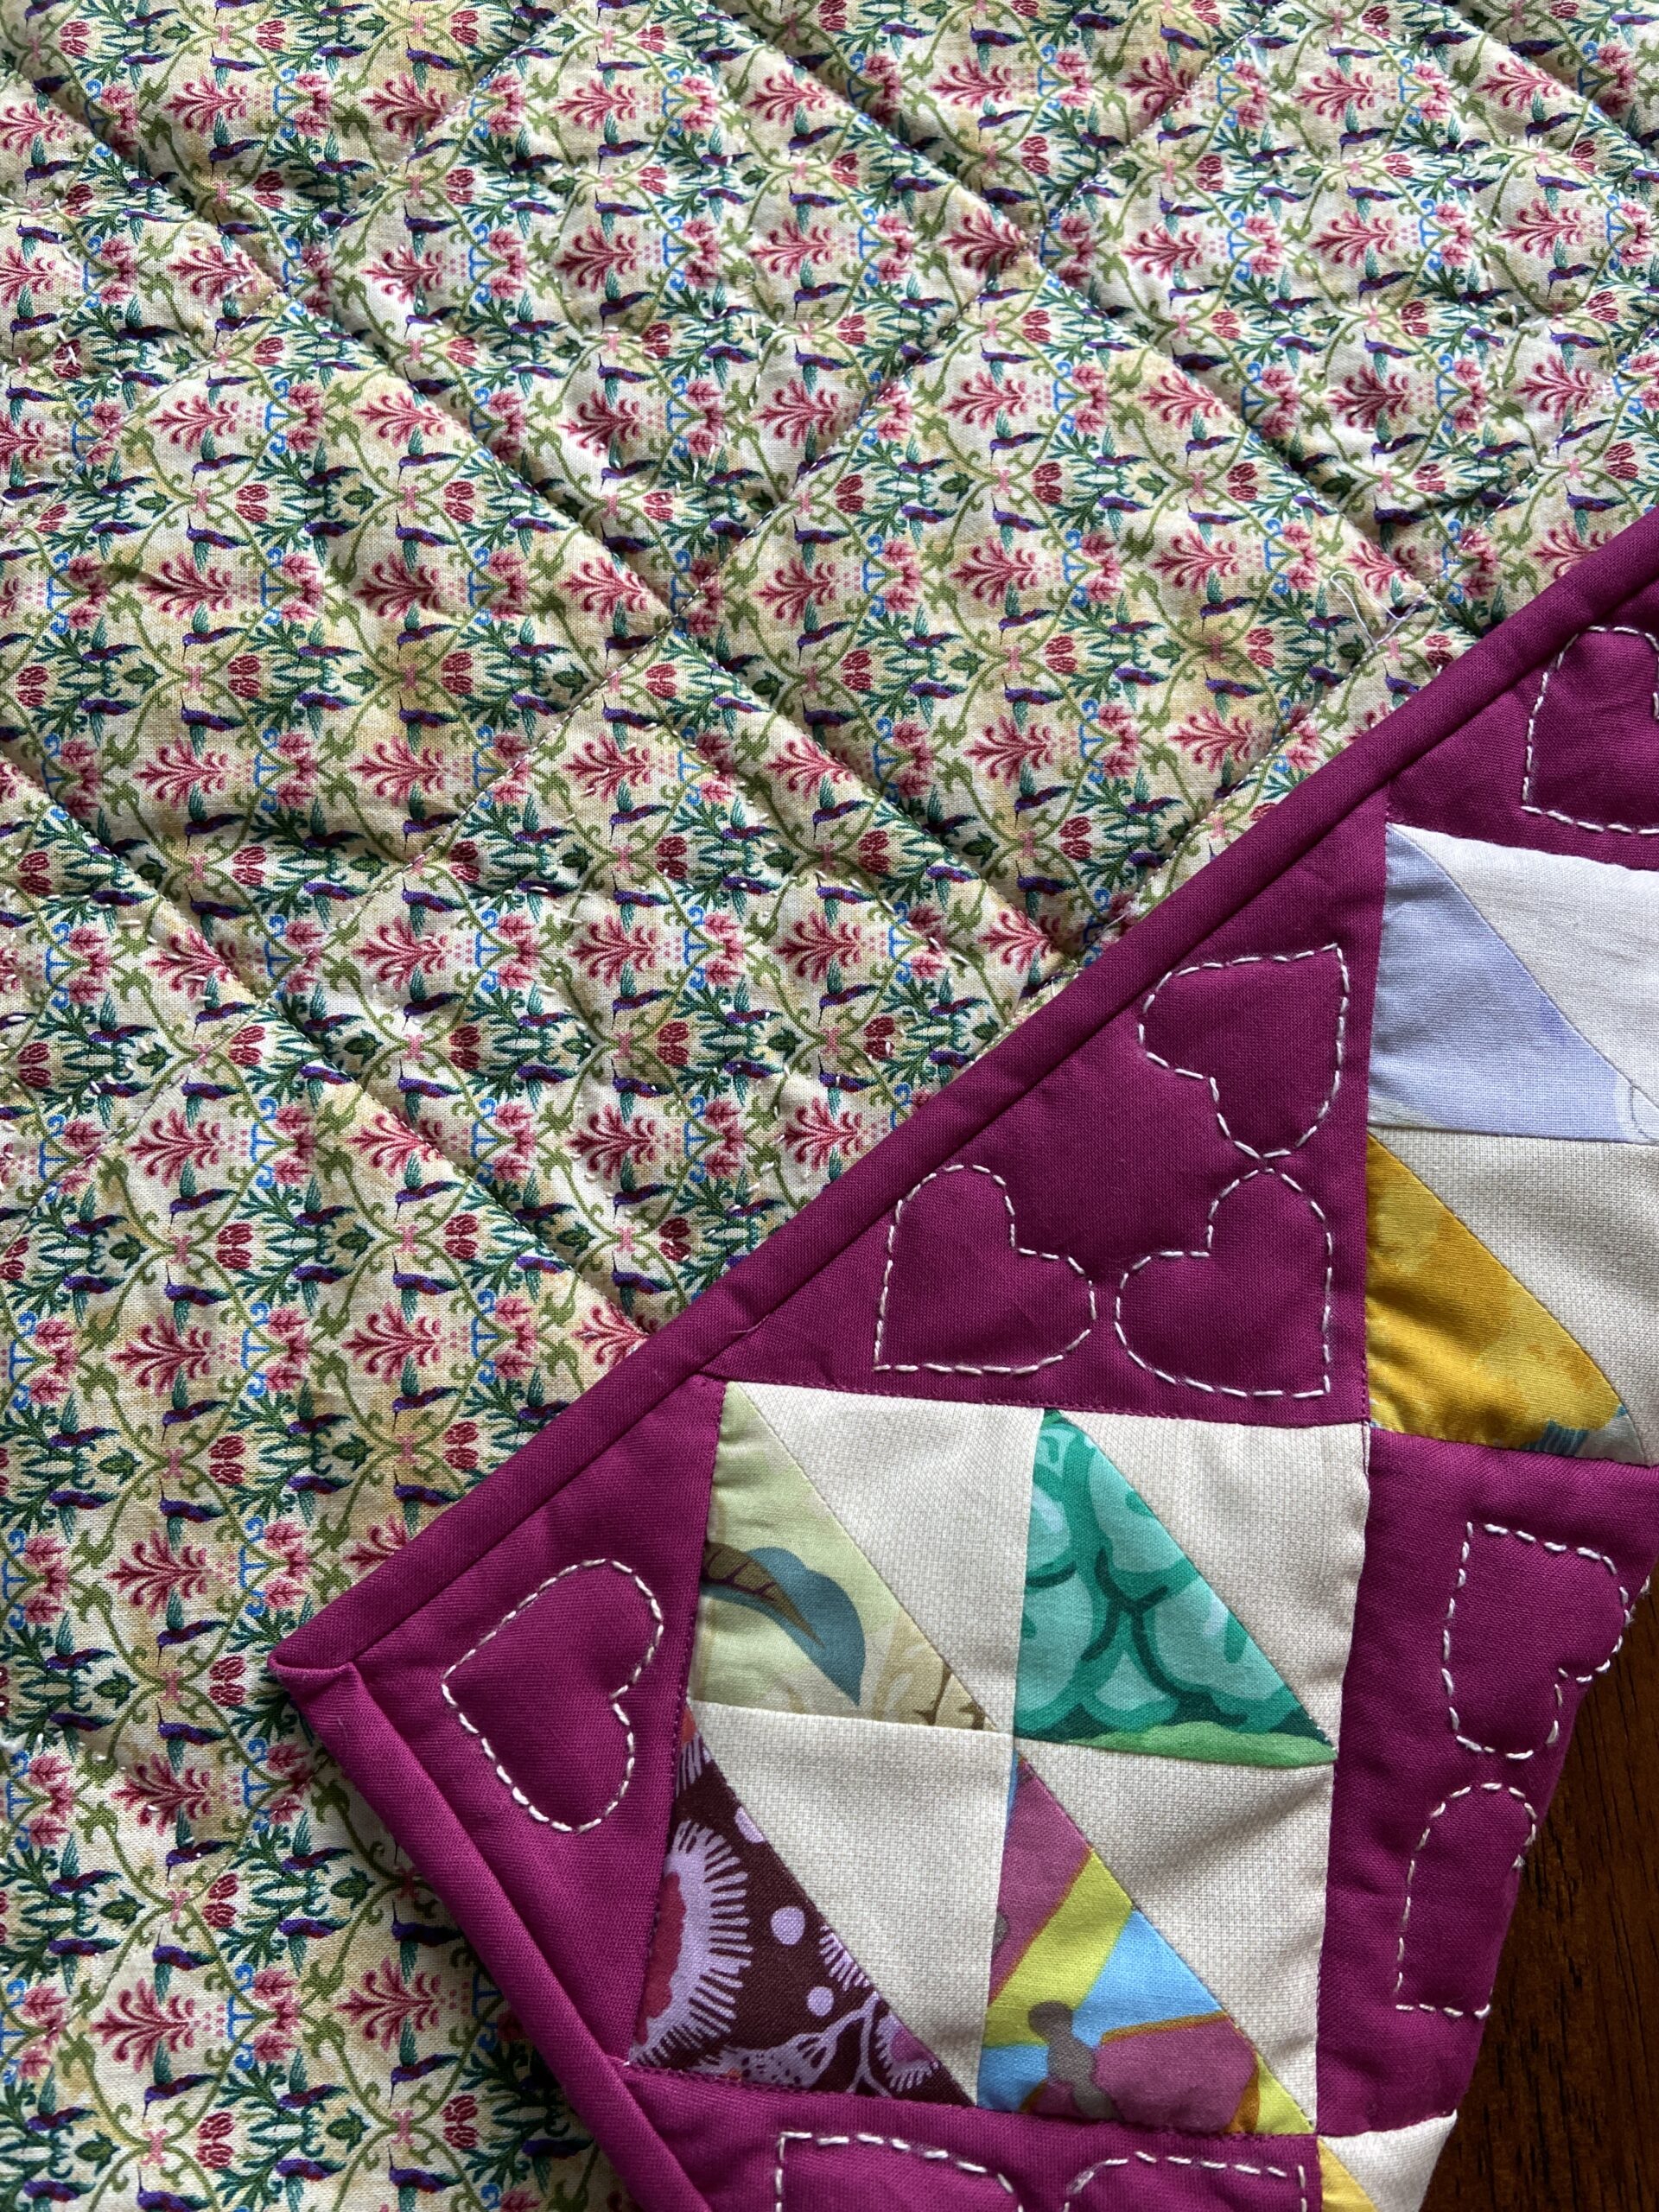
With the backing.
It looks so cute on the wall. I already want to start a new mini. They are super satisfying because I can finish them quickly.
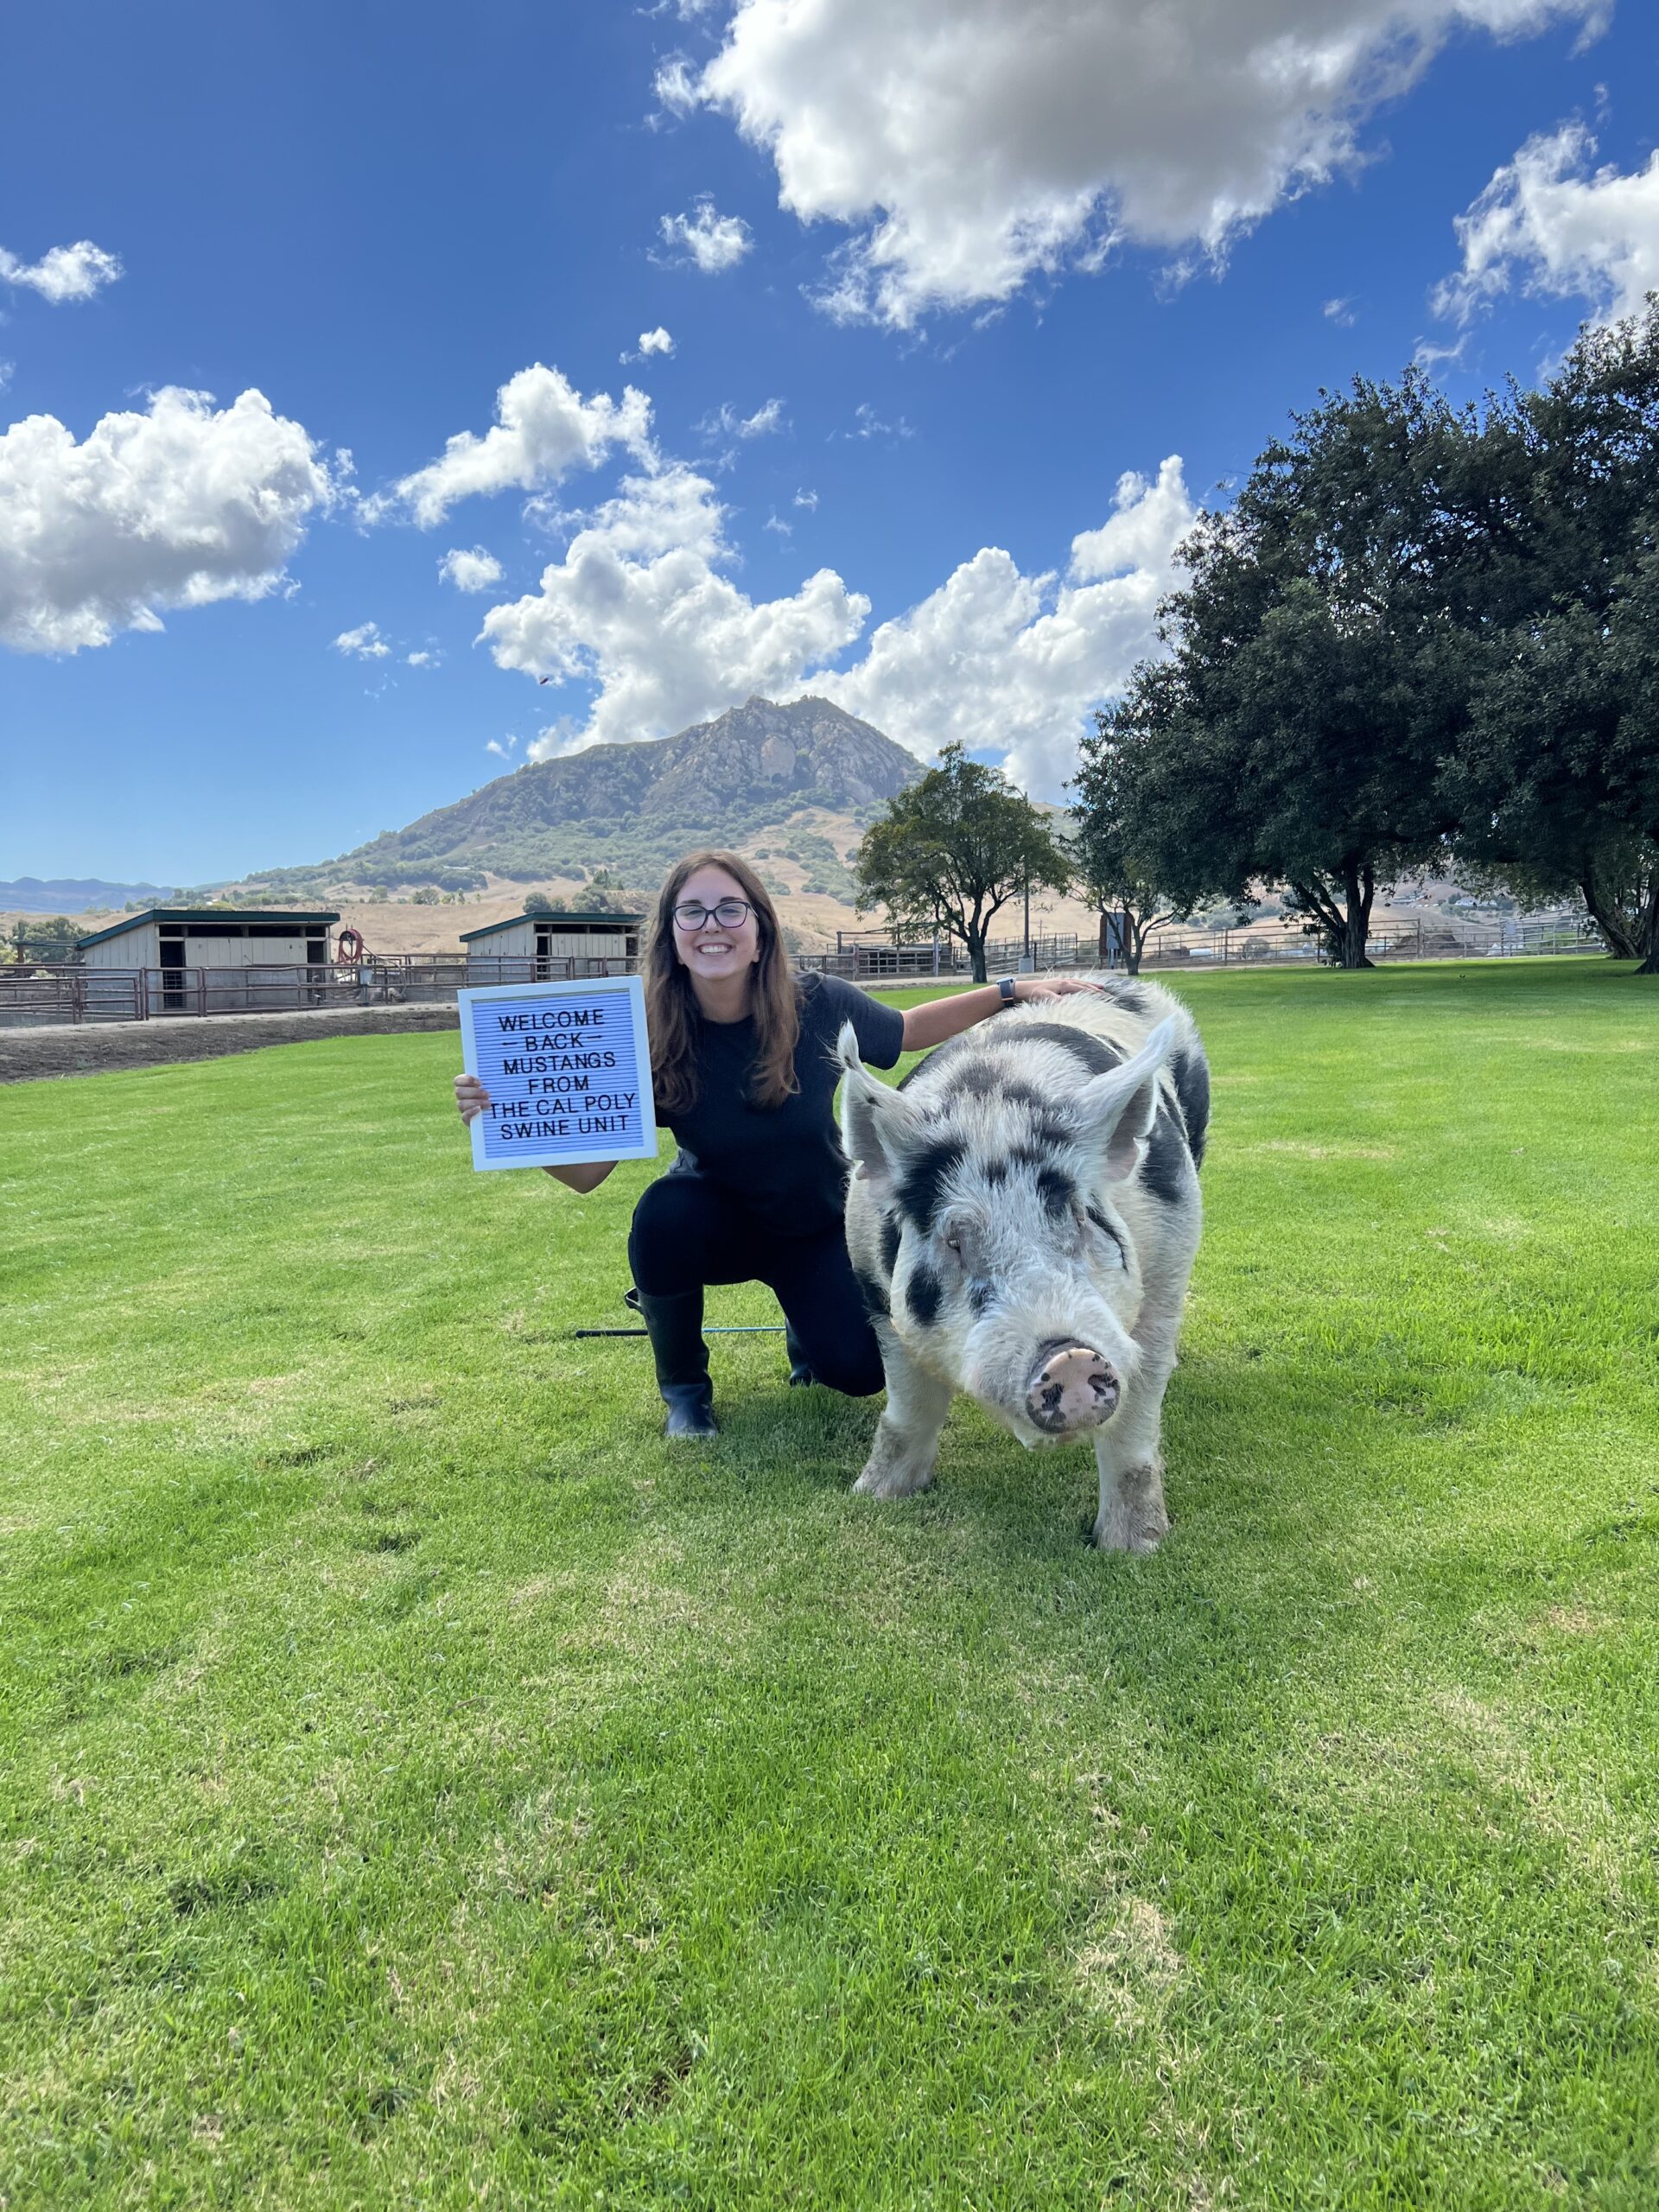
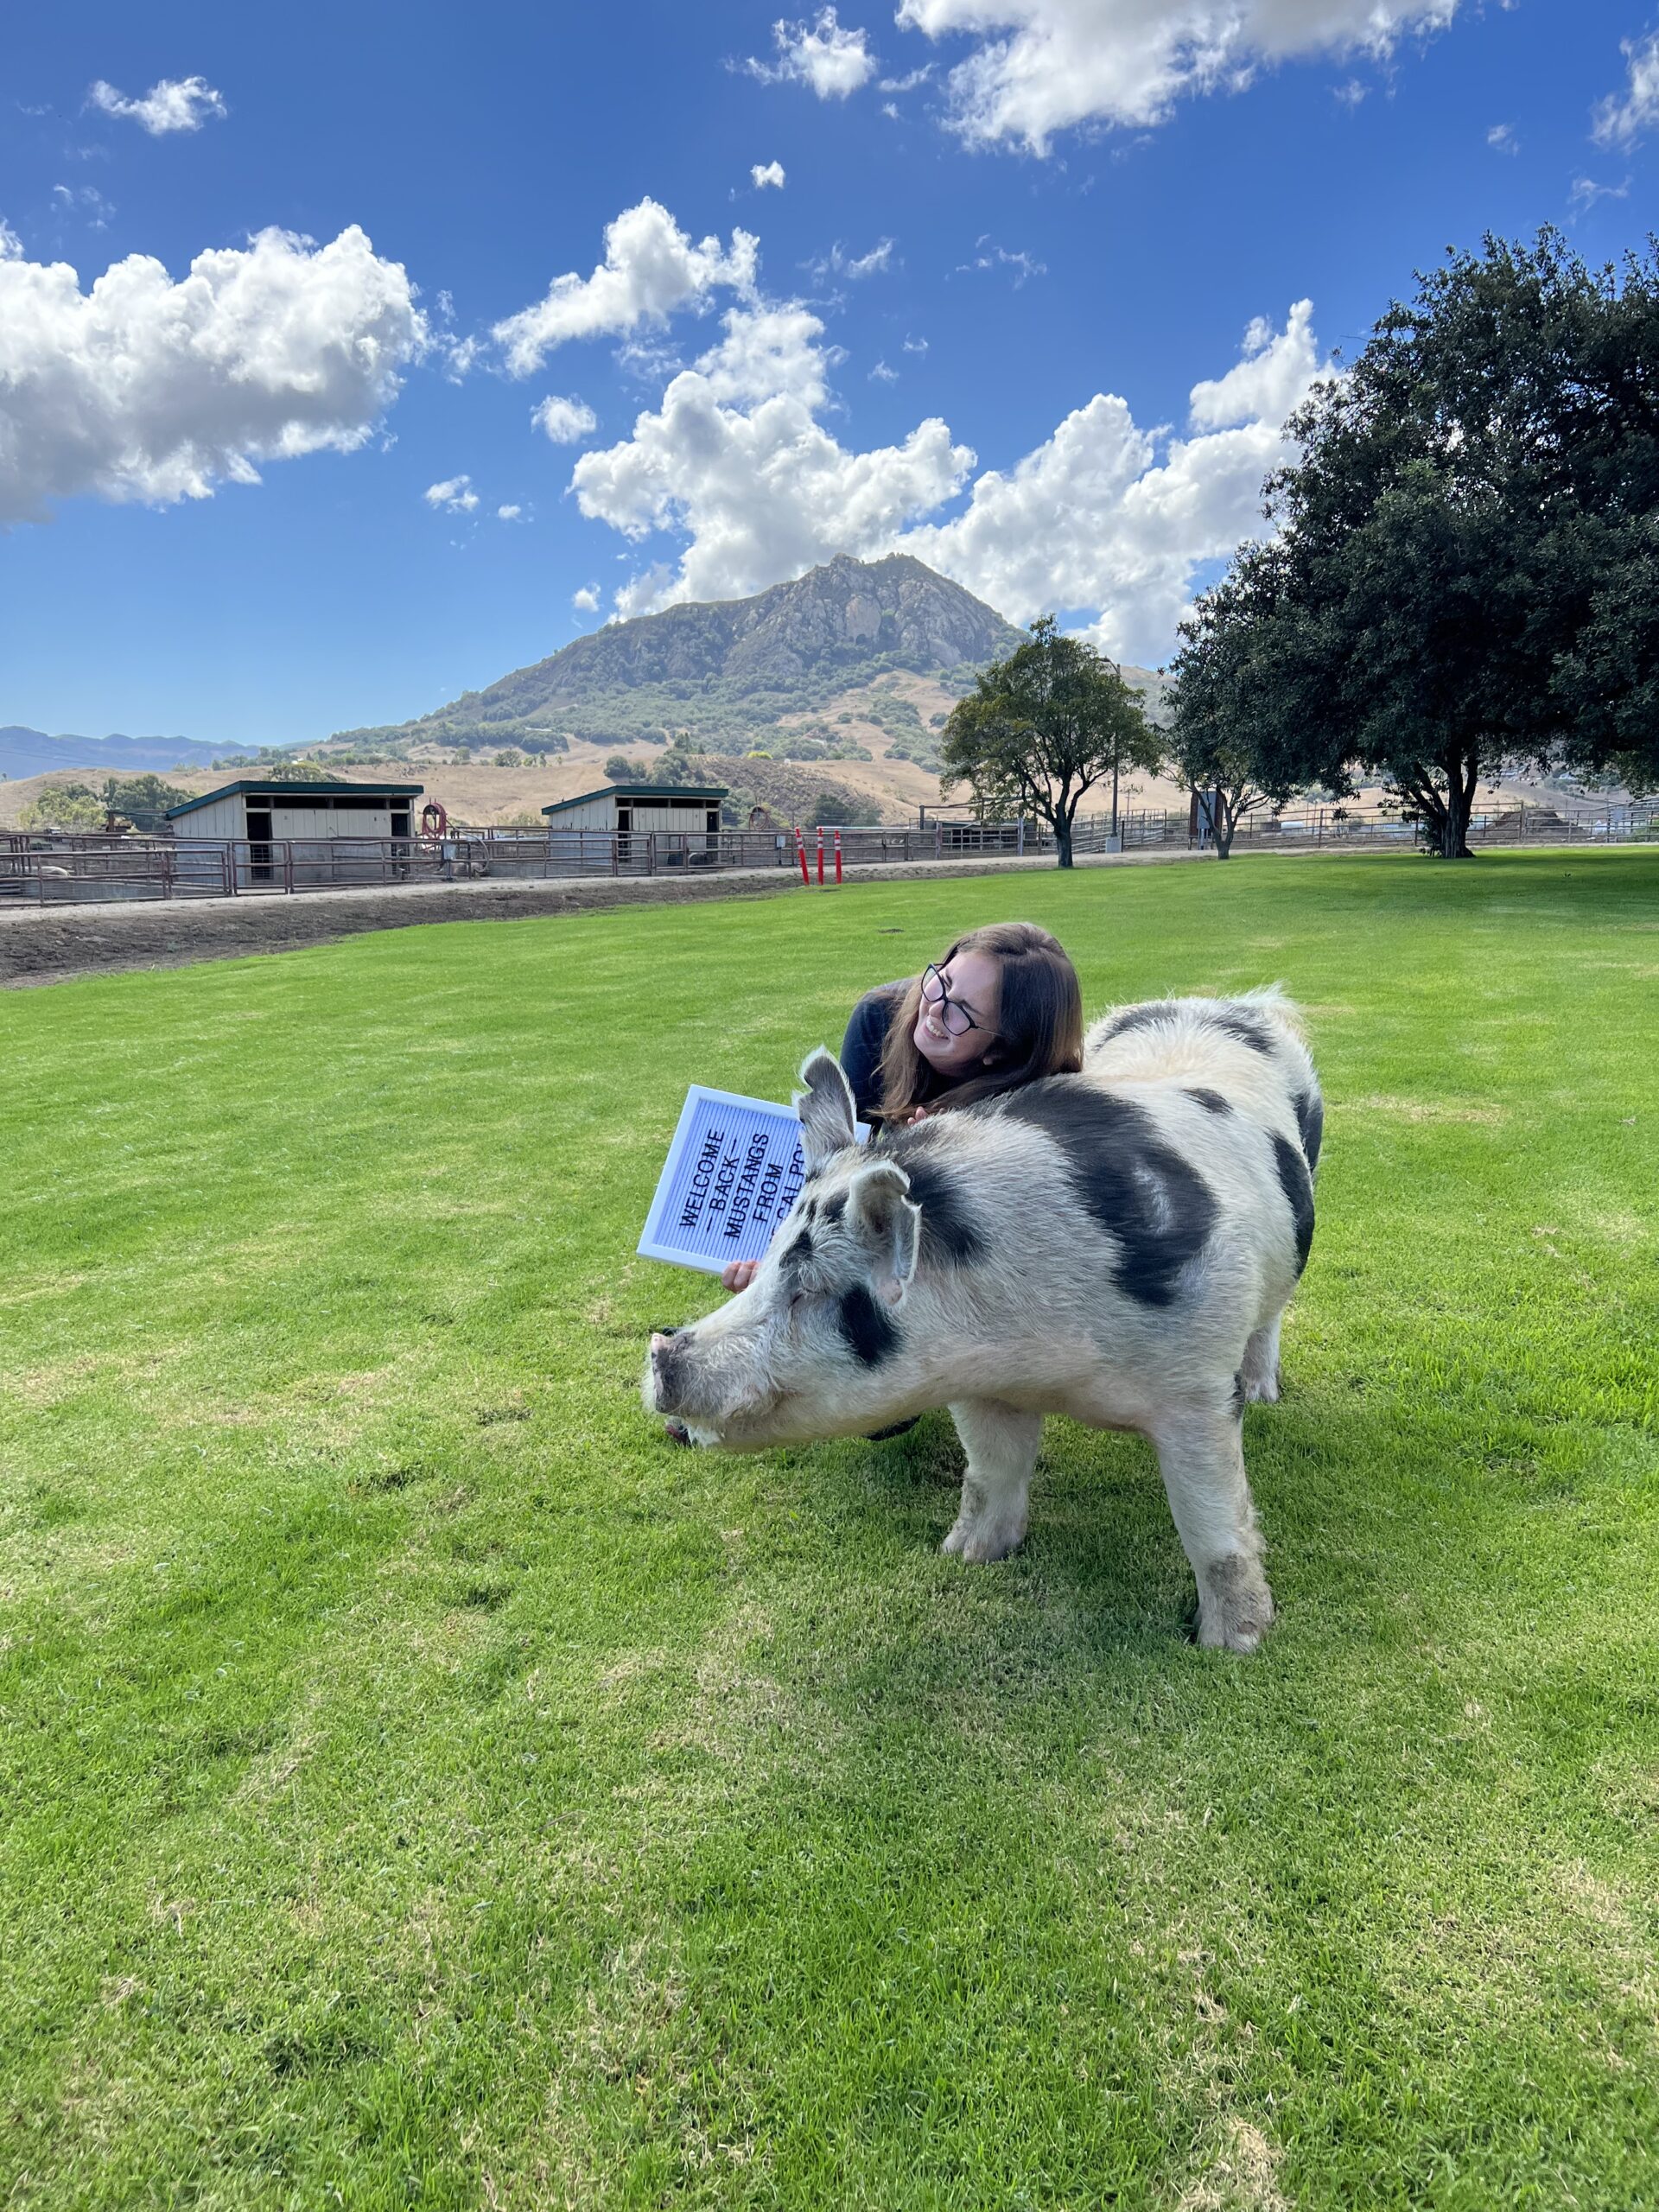
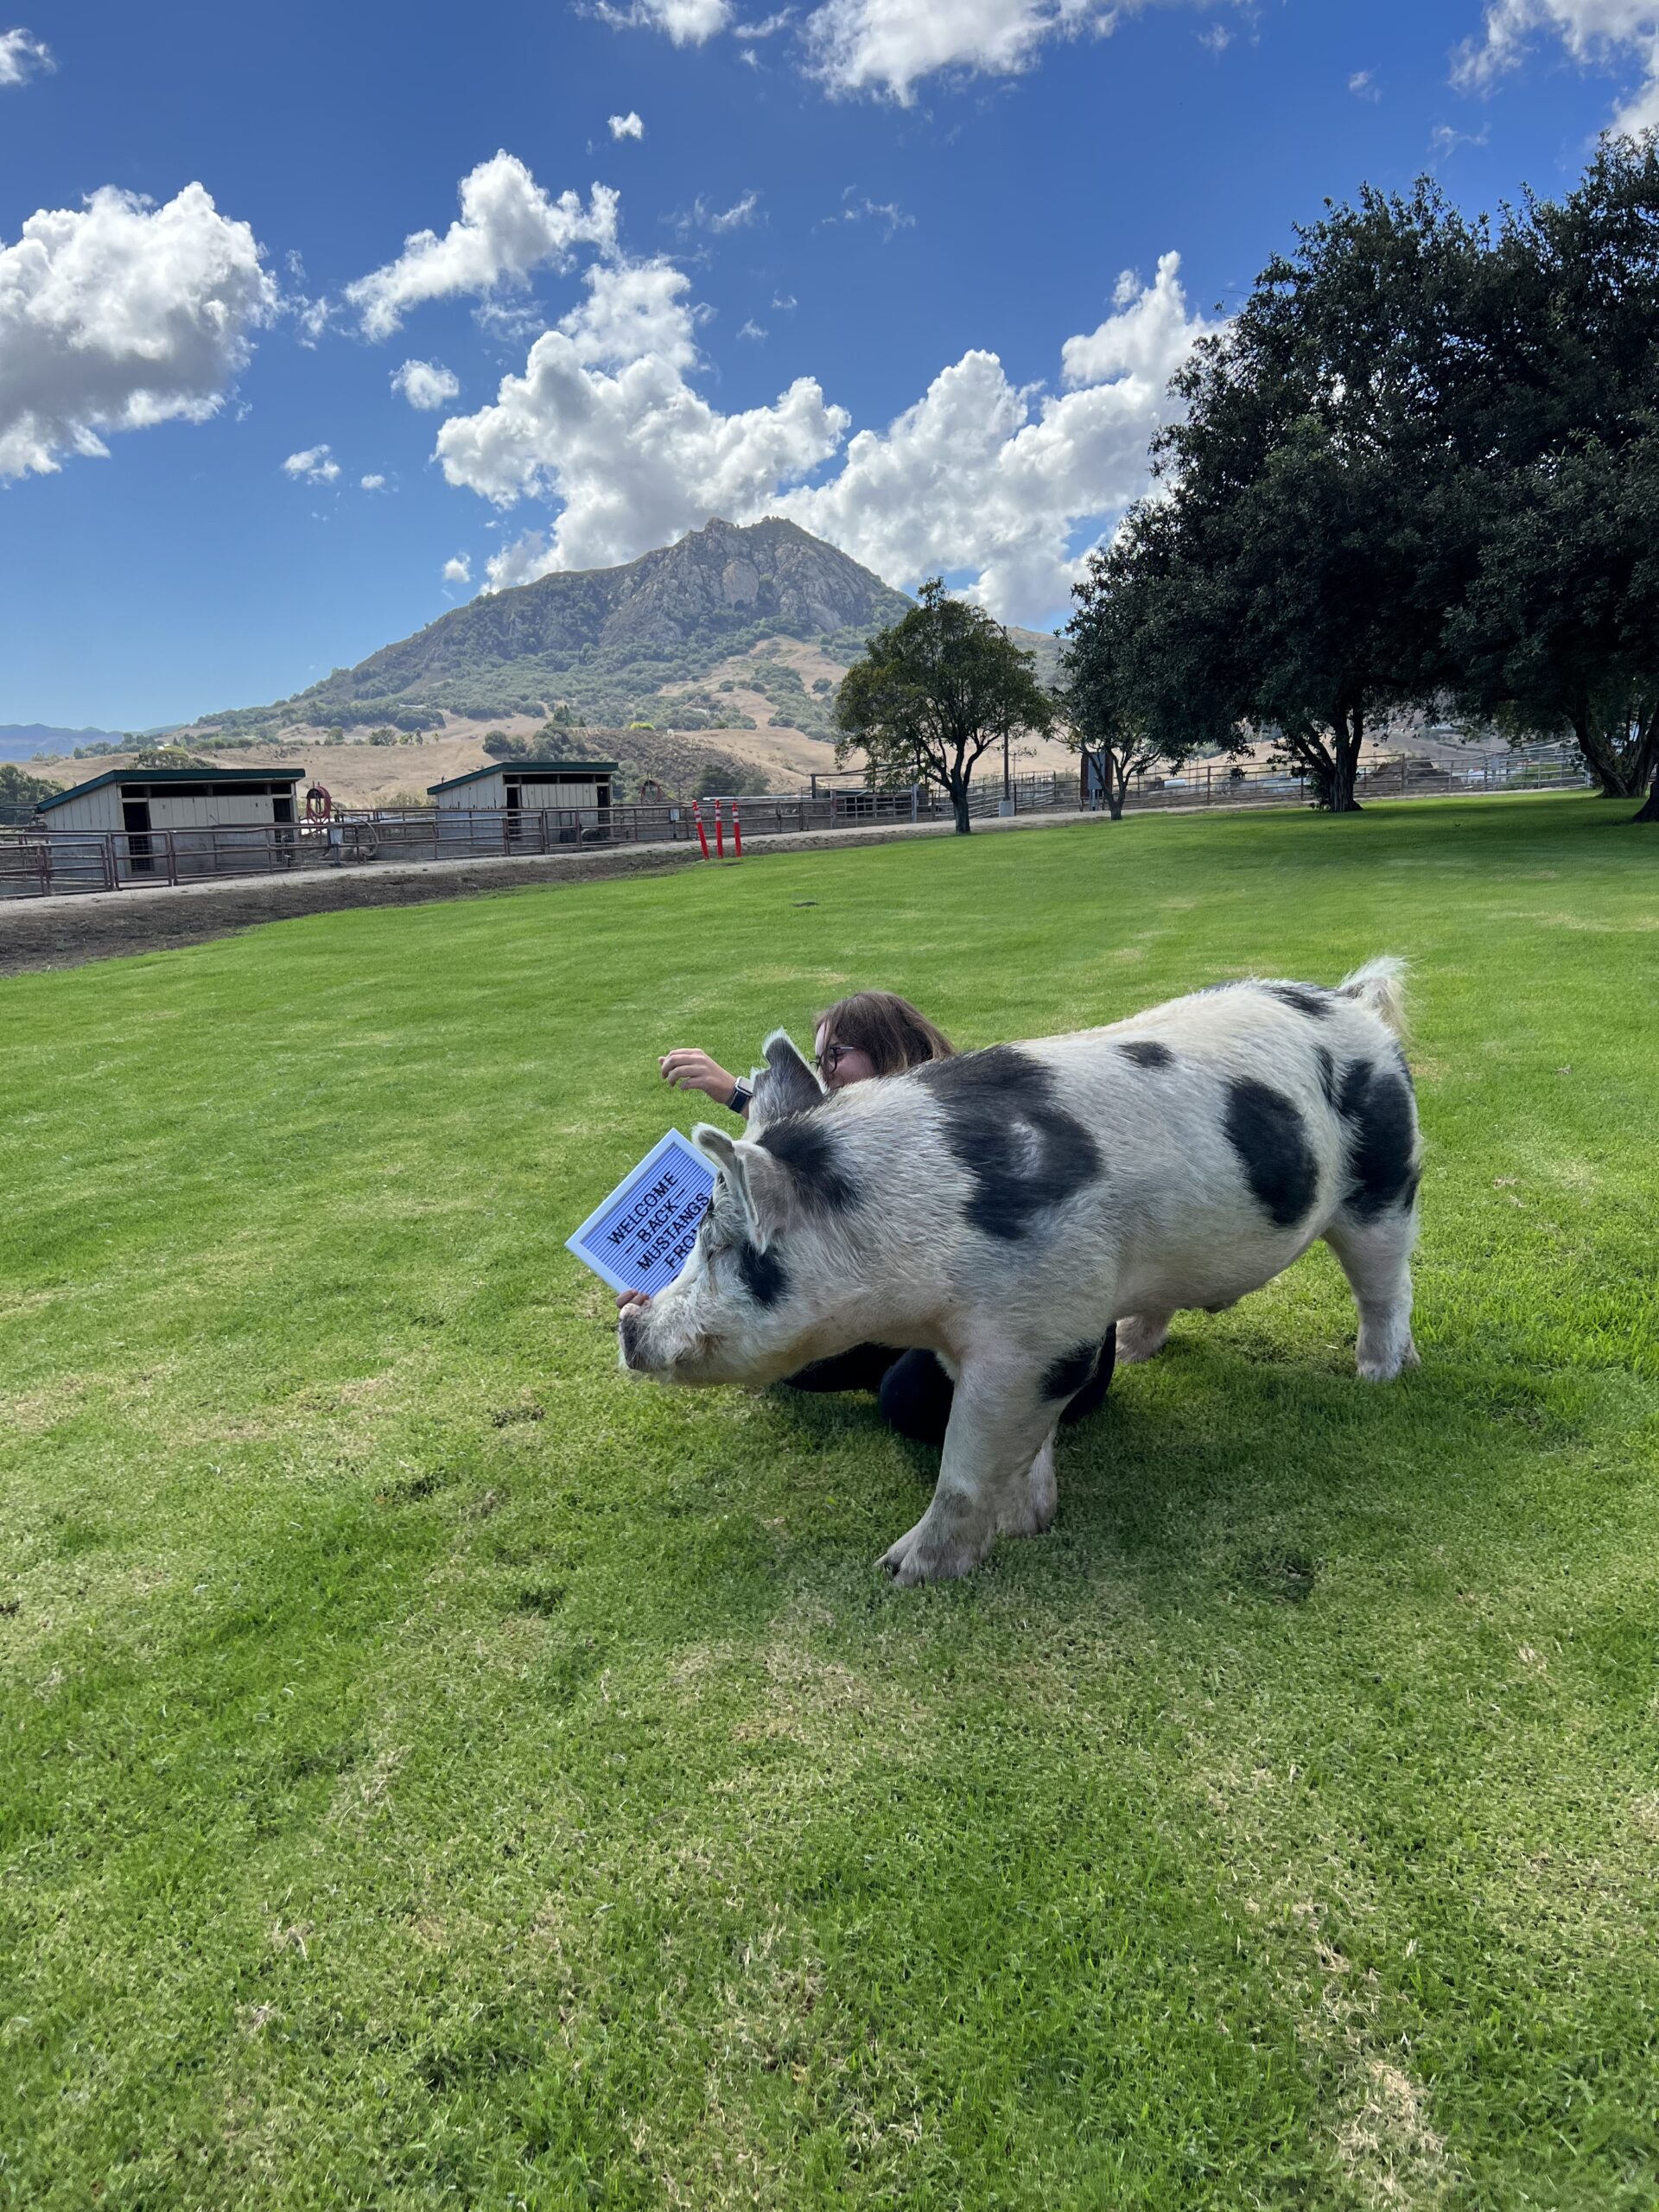
Such a cute pose!Oh no!Down she goes.
These photos make me laugh each time I look at them. Julia and her buddies at the swine unit were making a social media post to welcome the students back to campus. She was trying to pose with one of her favorite 500 pound boars, Leopard. He was feeling frisky and wanted to play rather than stand still. Hahaha.
Taking his girls for a ride
My son built an electric bike with two seats on it for the girls. The three of them love it and cruise all over with it. It helps for him to have a little boost of power to cart the weight of two kids behind him.
The coolest cotton candy ever!
Yesterday Andrew was trying to keep the girls out of the house. My DIL has to work nights for a couple of days so she needs to sleep during the day. They found a festival they could ride too. The girls waited in line for quite a while for this fancy cotton candy. It was huge so they shared it. Isn’t it cool though? I haven’t seen anything like this before.
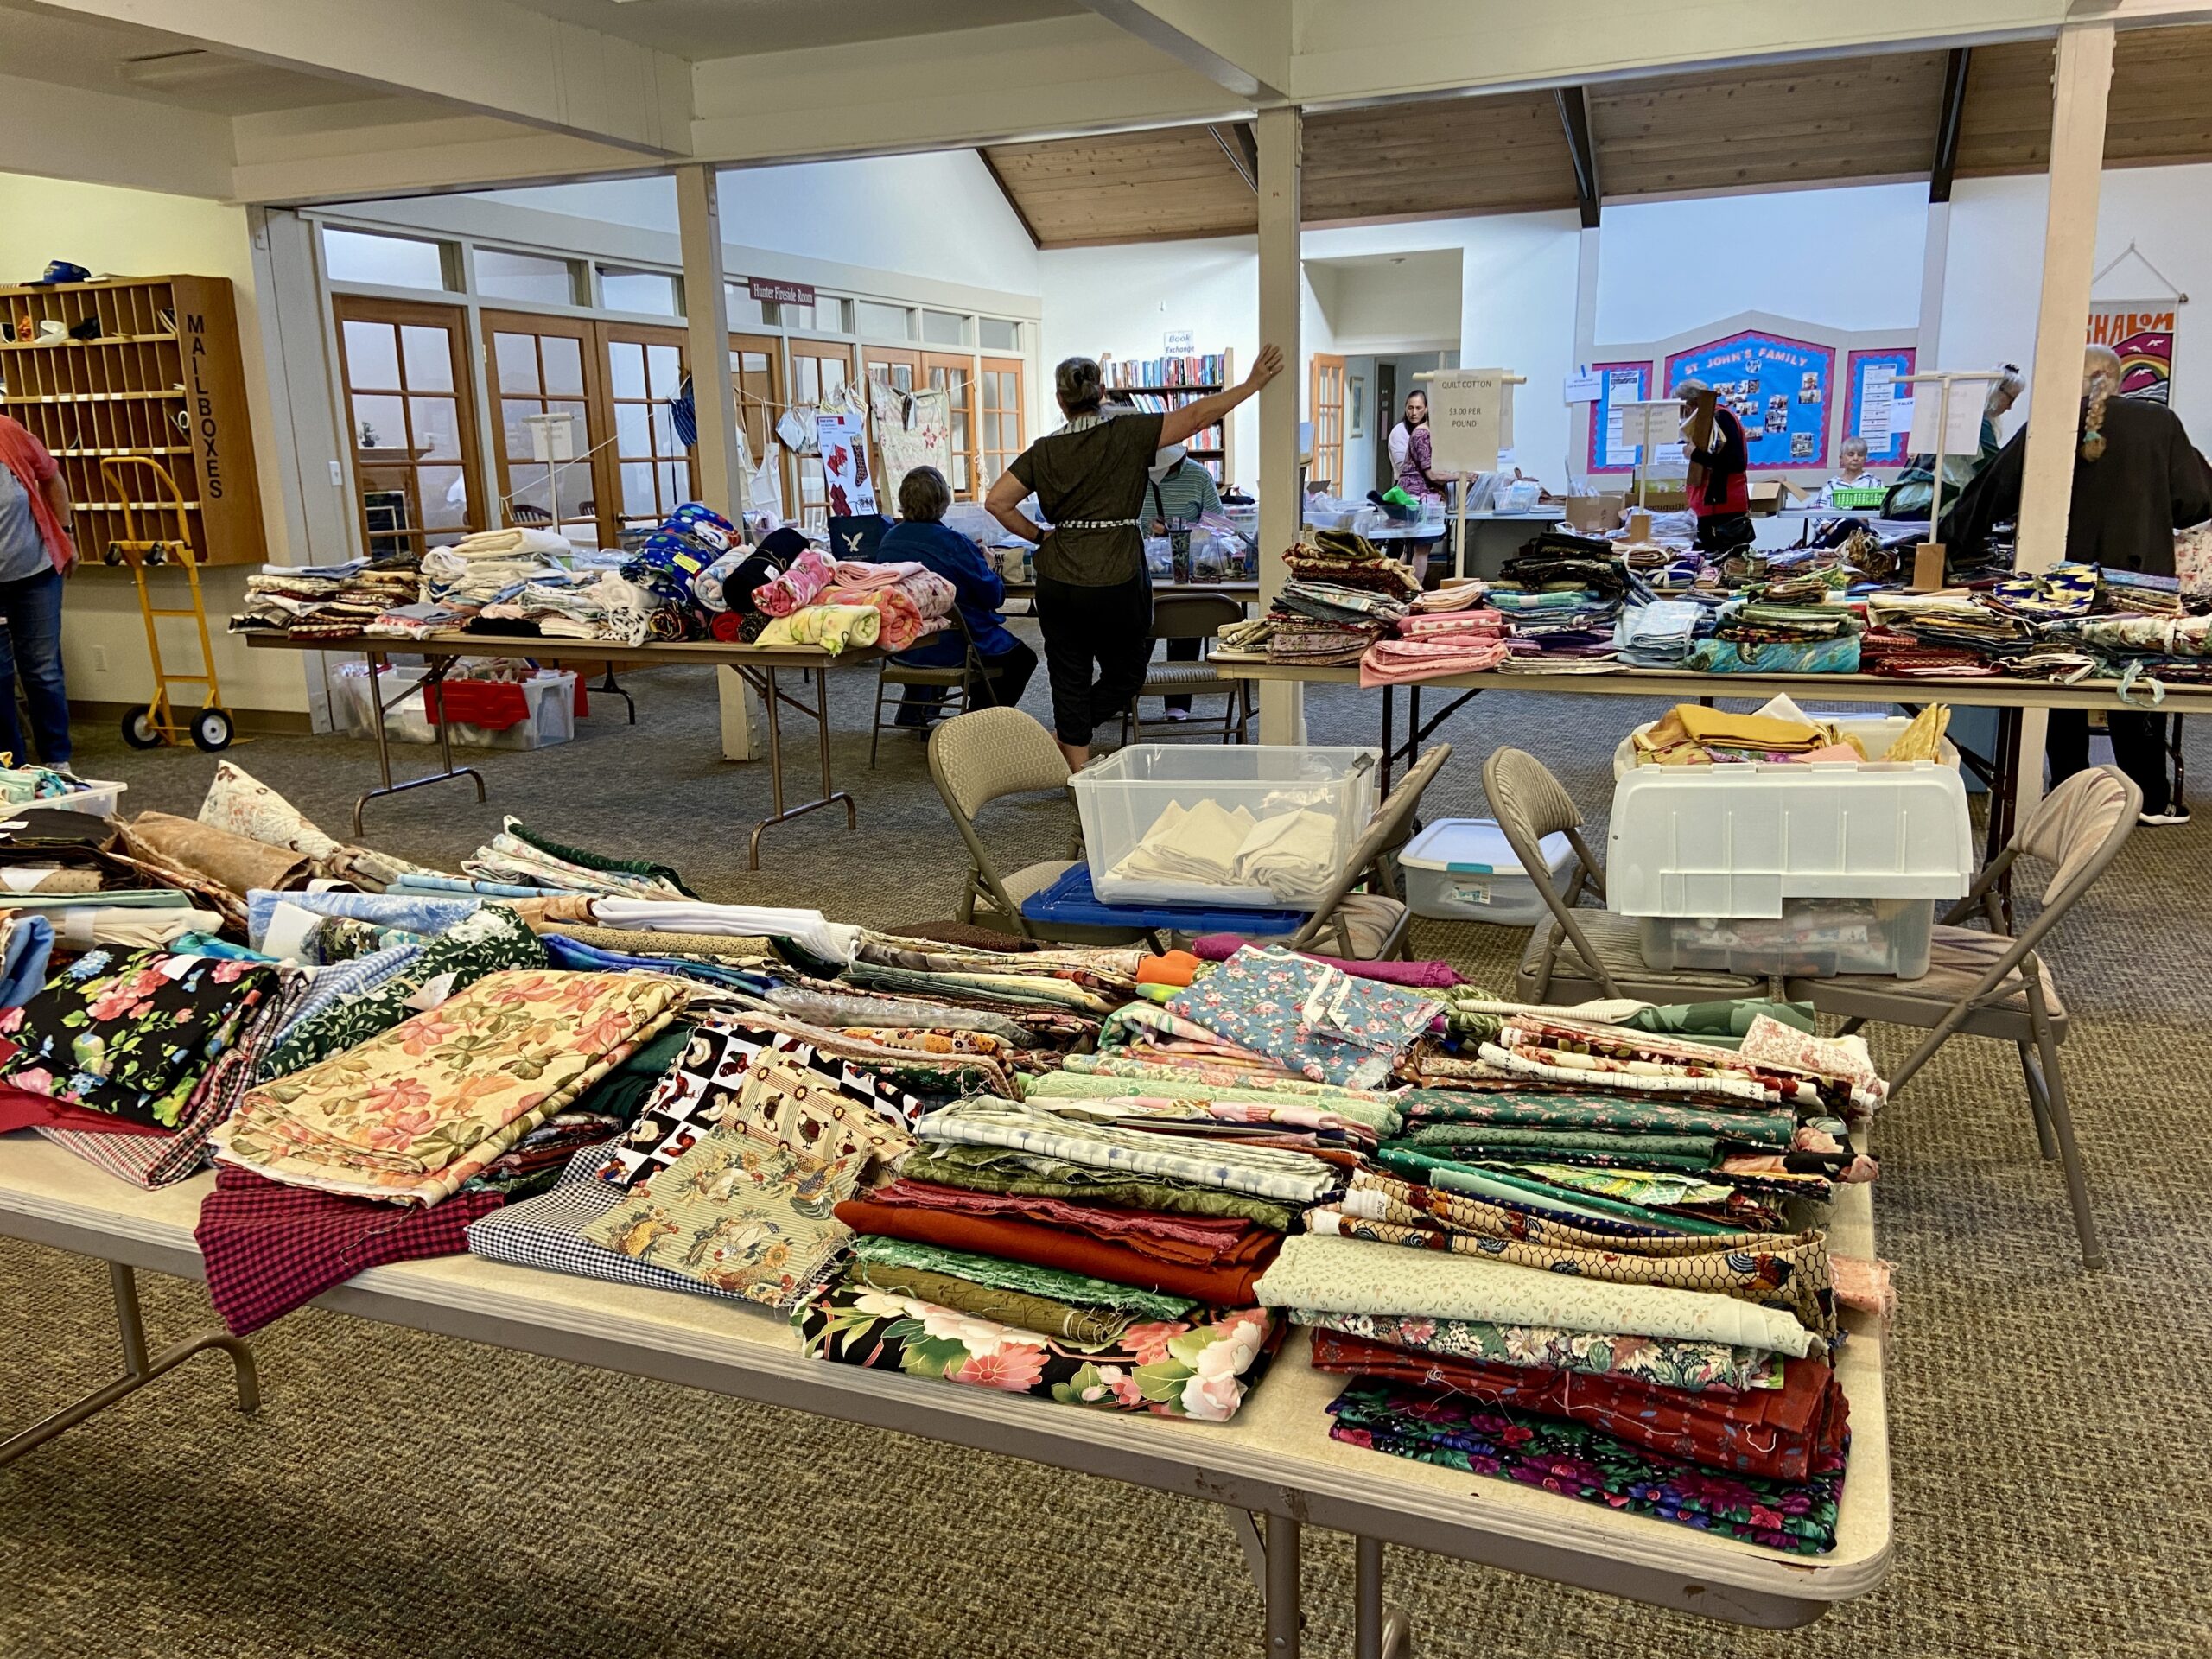
My own sort of festival
I had my own bit of fun yesterday. One of the local quilt guilds held a fabric sale as a fundraiser. Fabric was $3.00 per pound so shoppers just filled their bag, it was weighed and then calculated. I told myself not to buy any small pieces as I just don’t need them. Instead I looked for stretch knits to make t-shirts and larger pieces of cotton for potential backings. I also needed some fusible batting for a project I am going to make (more on that later). I was so successful! I bought 20 yards of fabric, a large unopened package of fusible batting and a new triangular ruler for $27.00. I am in the process of washing the fabric now. What fun!
That is it for now. Today’s plan is a long walk this morning and a bit of yard work. Hope you are enjoying your weekend!
When I started to collect my thoughts for this post, I realized that pink is a common theme with the projects I intend to share. This is strange because it isn’t one of my favorite colors. Hence the title to the post. Let’s see what I have been working on.
Another Mercyful Quilt!
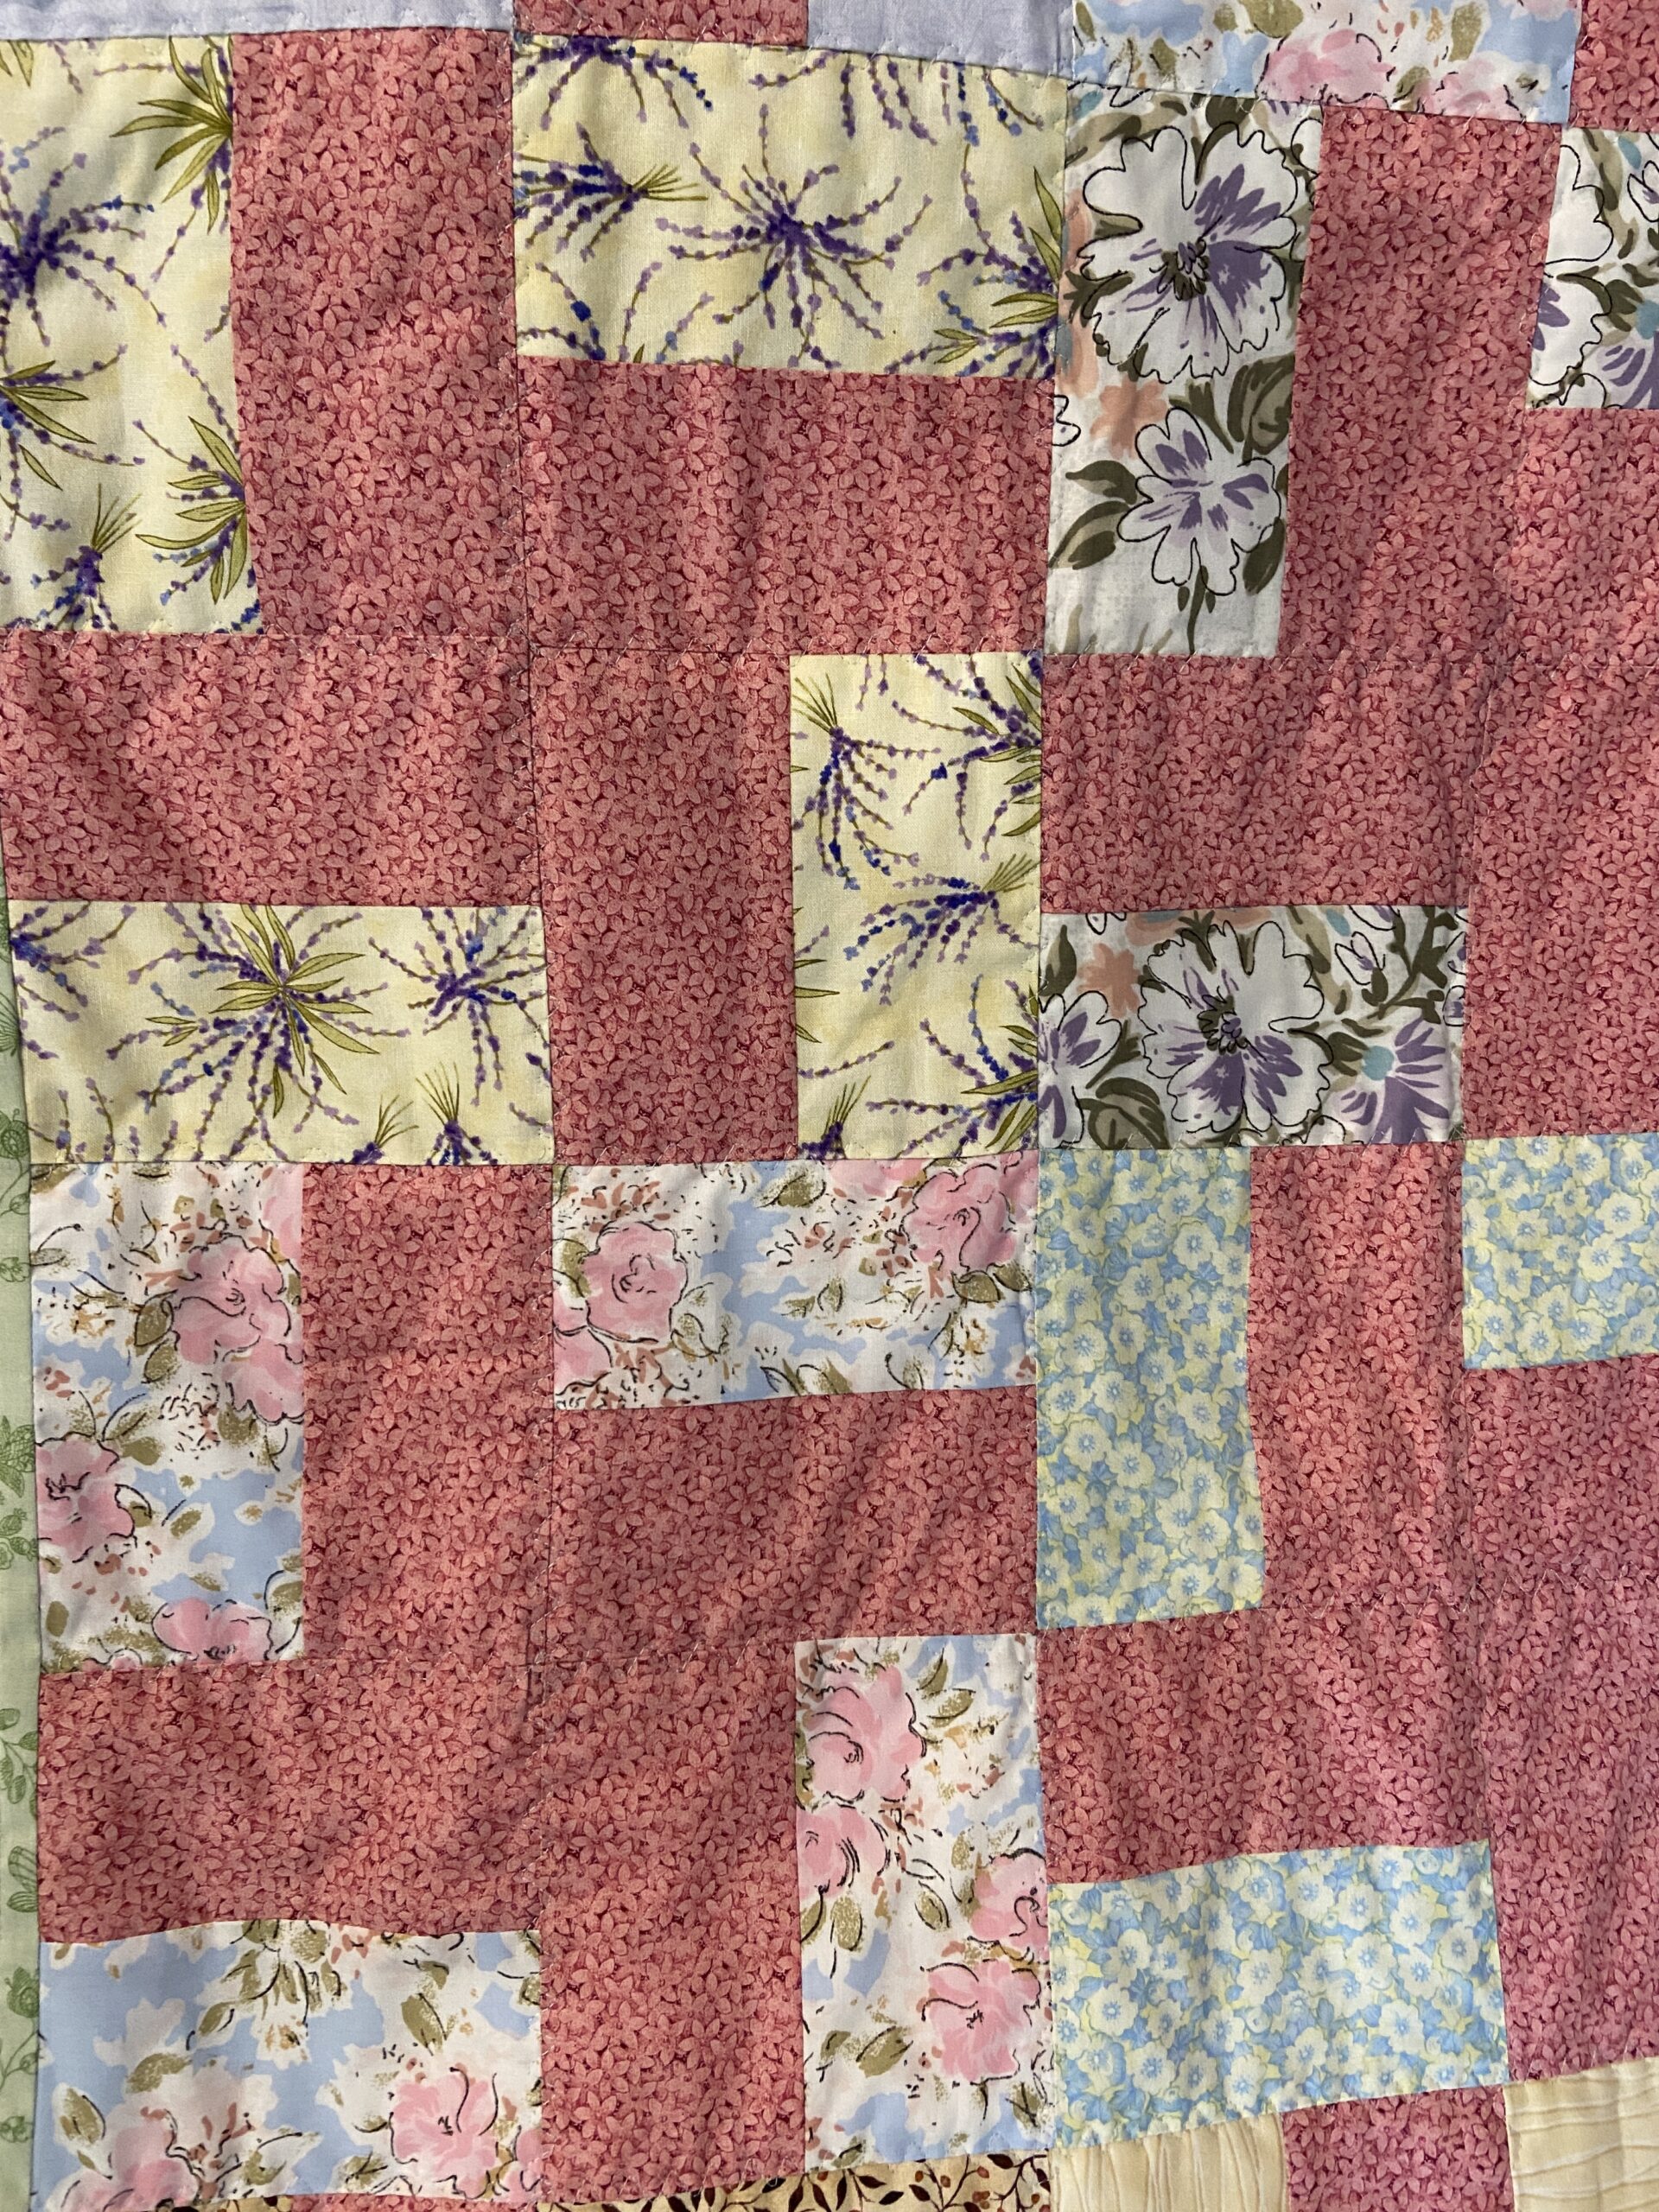
Remember I shared about a quilt show and lavender festival I attended earlier this summer? While at the show, I picked up an almost finished quilt top because I knew it would be sweet as a Mercyful quilt. Then center was complete but smaller than I wanted so I added two borders.
Two borders made this just big enough.
Quilting this was a quick effort using a serpentine style straight stitch following the lines of the blocks.
Sweet pastel colors.Super soft voile backing.
What makes this quilt for me is the backing. I have a few pieces of 60″ wide voile made by Frou Frou. It is so silky soft. It was a trick to make this work because the quilt is nearly 60″ wide. Using an excessive of pins when basting (to make sure it didn’t shift while quilting it) worked though. I used a sweet pink floral for the binding. It is ready to be sent off to Patty for Mercy Hospital.
Totally different feel with this project!
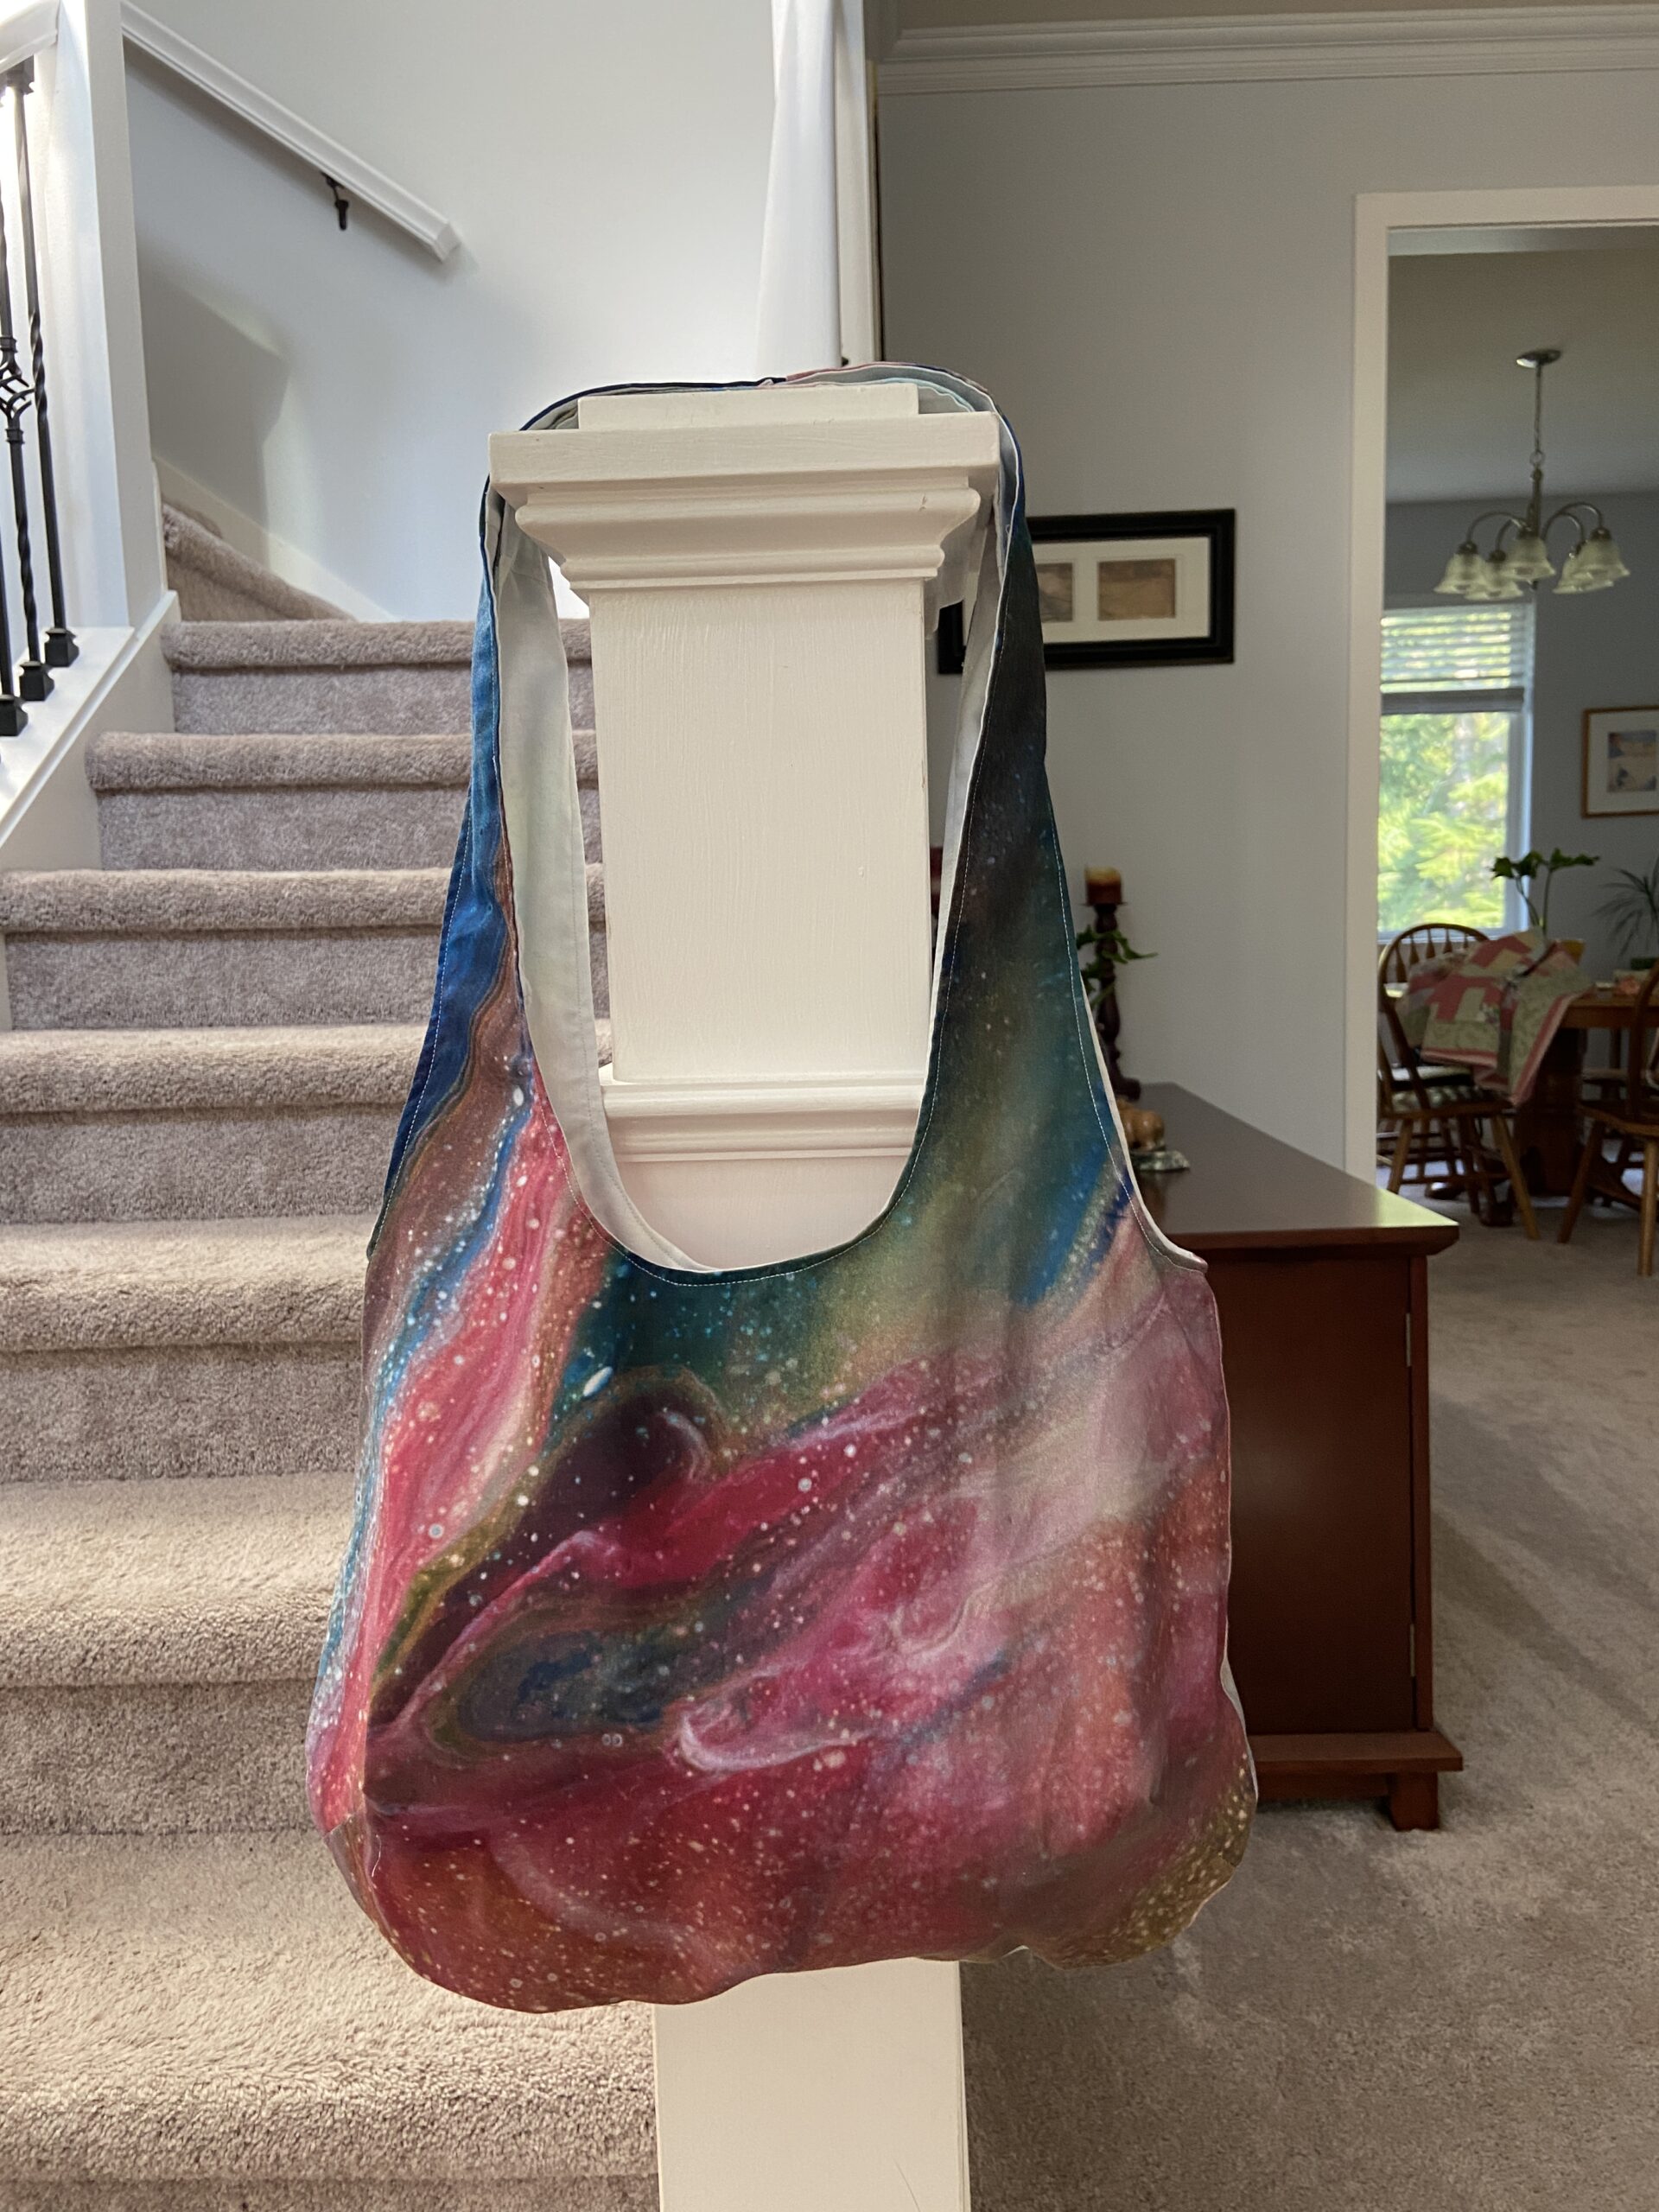
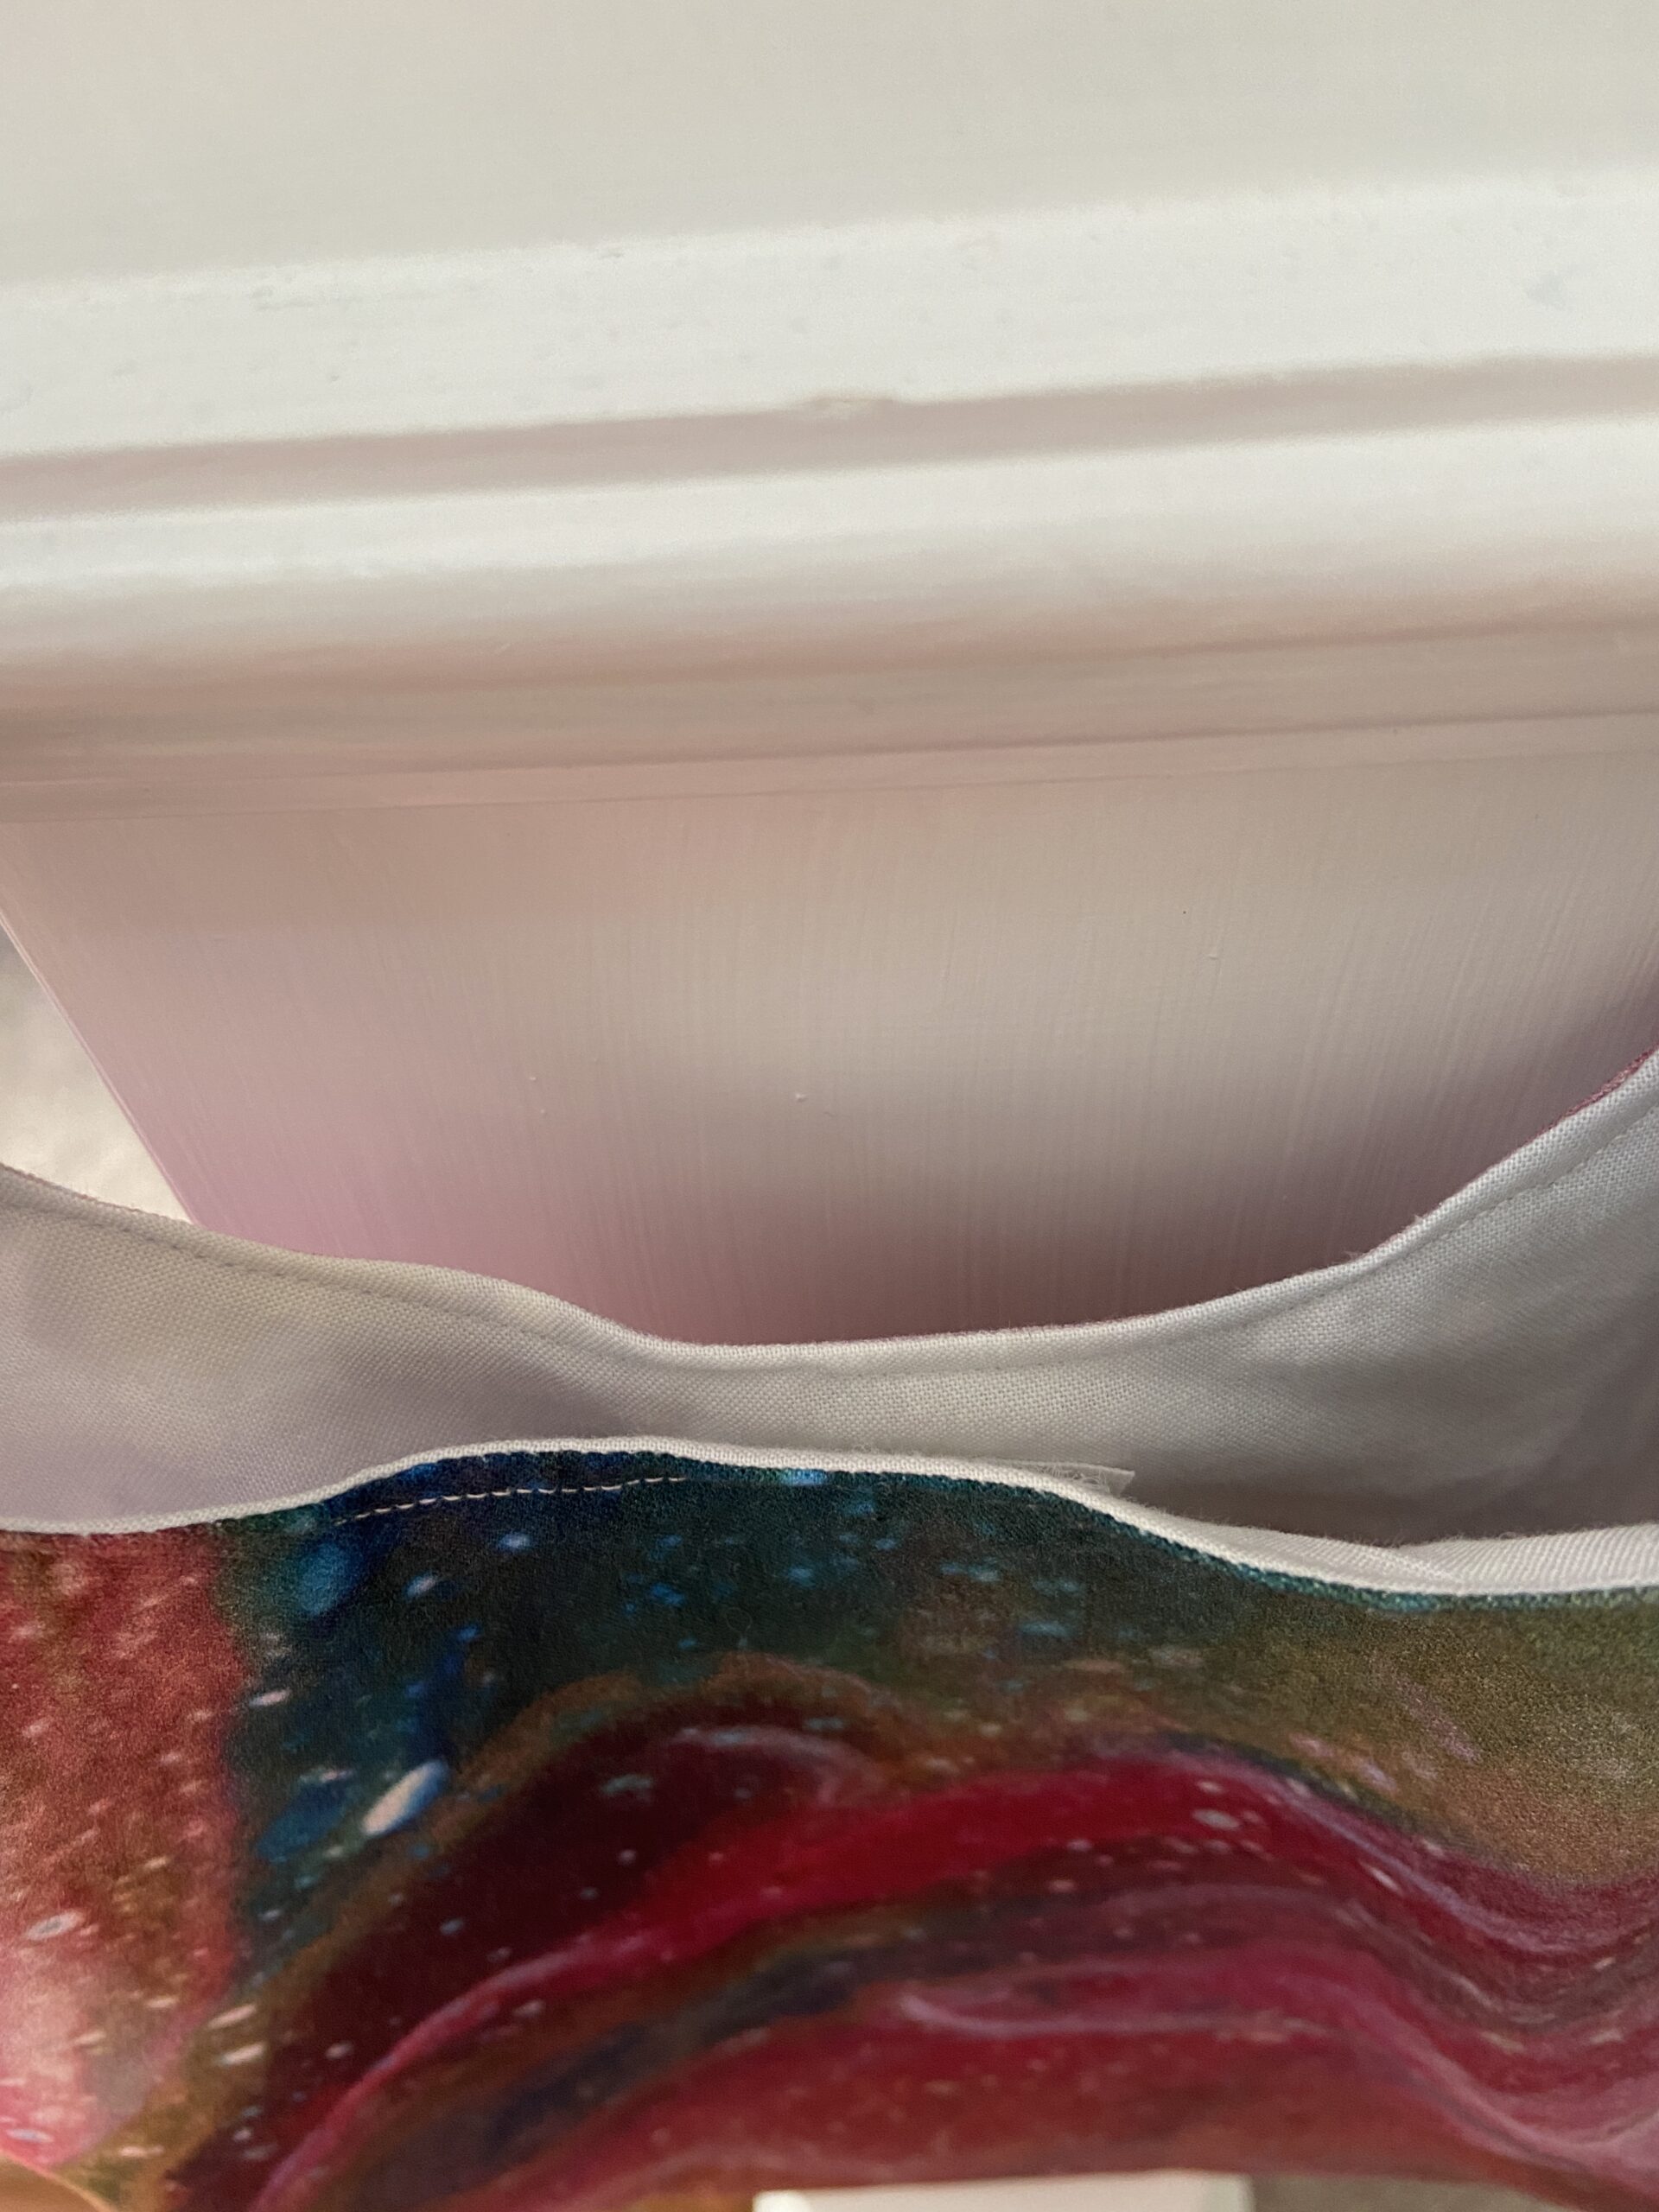
Before Julia went back to California in July, she asked me to make her another bag. She wanted the same pattern as the previous two I made for her. (When this girl finds something she likes, she sticks with it!) I have used this reversible bag tutorial at Very Purple Person. I believe this is the fourth bag I have made with this pattern. Julia shopped my fabrics and found this piece; a fantastic print designed by Ocllo Mason for QT Fabrics. I received it as a sample when I had my shop (I do miss those occasional freebies!). It looks like a galaxy and the colors are so rich.
The other side of the bag.
Julia helped me to center the pieces for the bag so she would have two distinct patterns, one for each side. She chose a pale white tone on tone fabric for the lining.
This girl loves simplicity so there is one medium size pocket inside with a velcro closure as well as a velcro closure for the main bag. Easy peasy. I just mailed off a few things to Julia the other day and this bag is included in the box.
Final project for this post! At the same quilt show I mentioned earlier, I also picked up a few books. This little pamphlet by Moda Fabrics was one of those. It contains super simple ideas for using up 2 1/2″ squares. I often cut my scraps this size and knew it would come in handy.
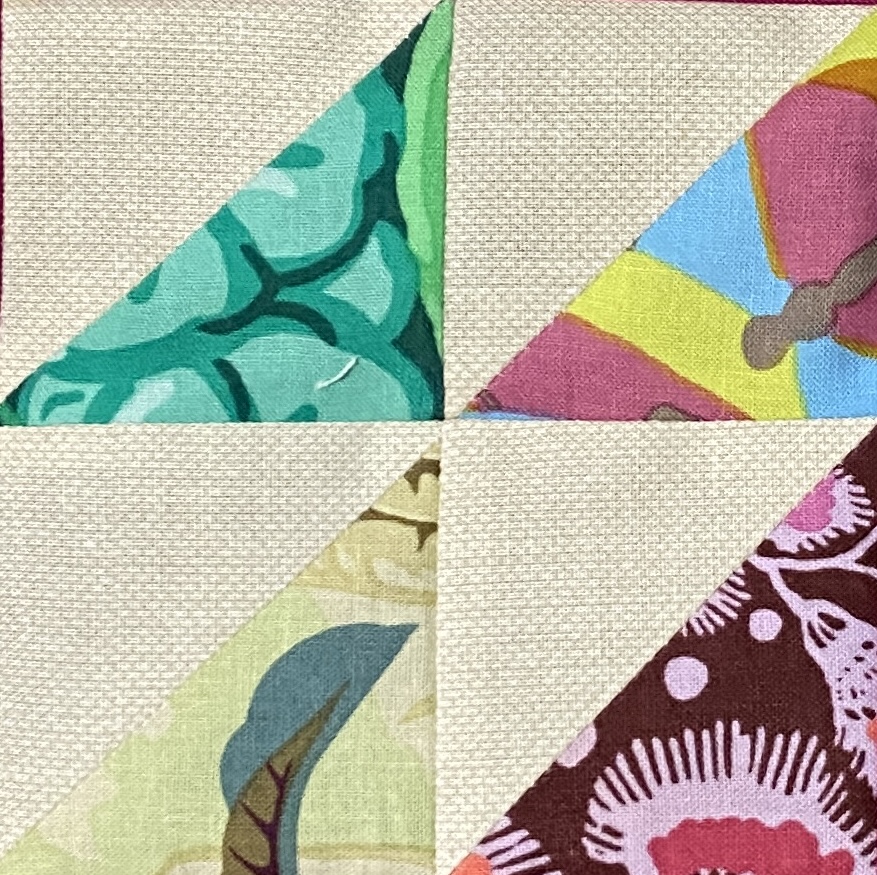
Bonus HST’s
I have several sets of those bonus HST’s from making flying geese blocks. If I can remember to just stitch them before trimming the corners, they are almost ready to go for use in a new project.
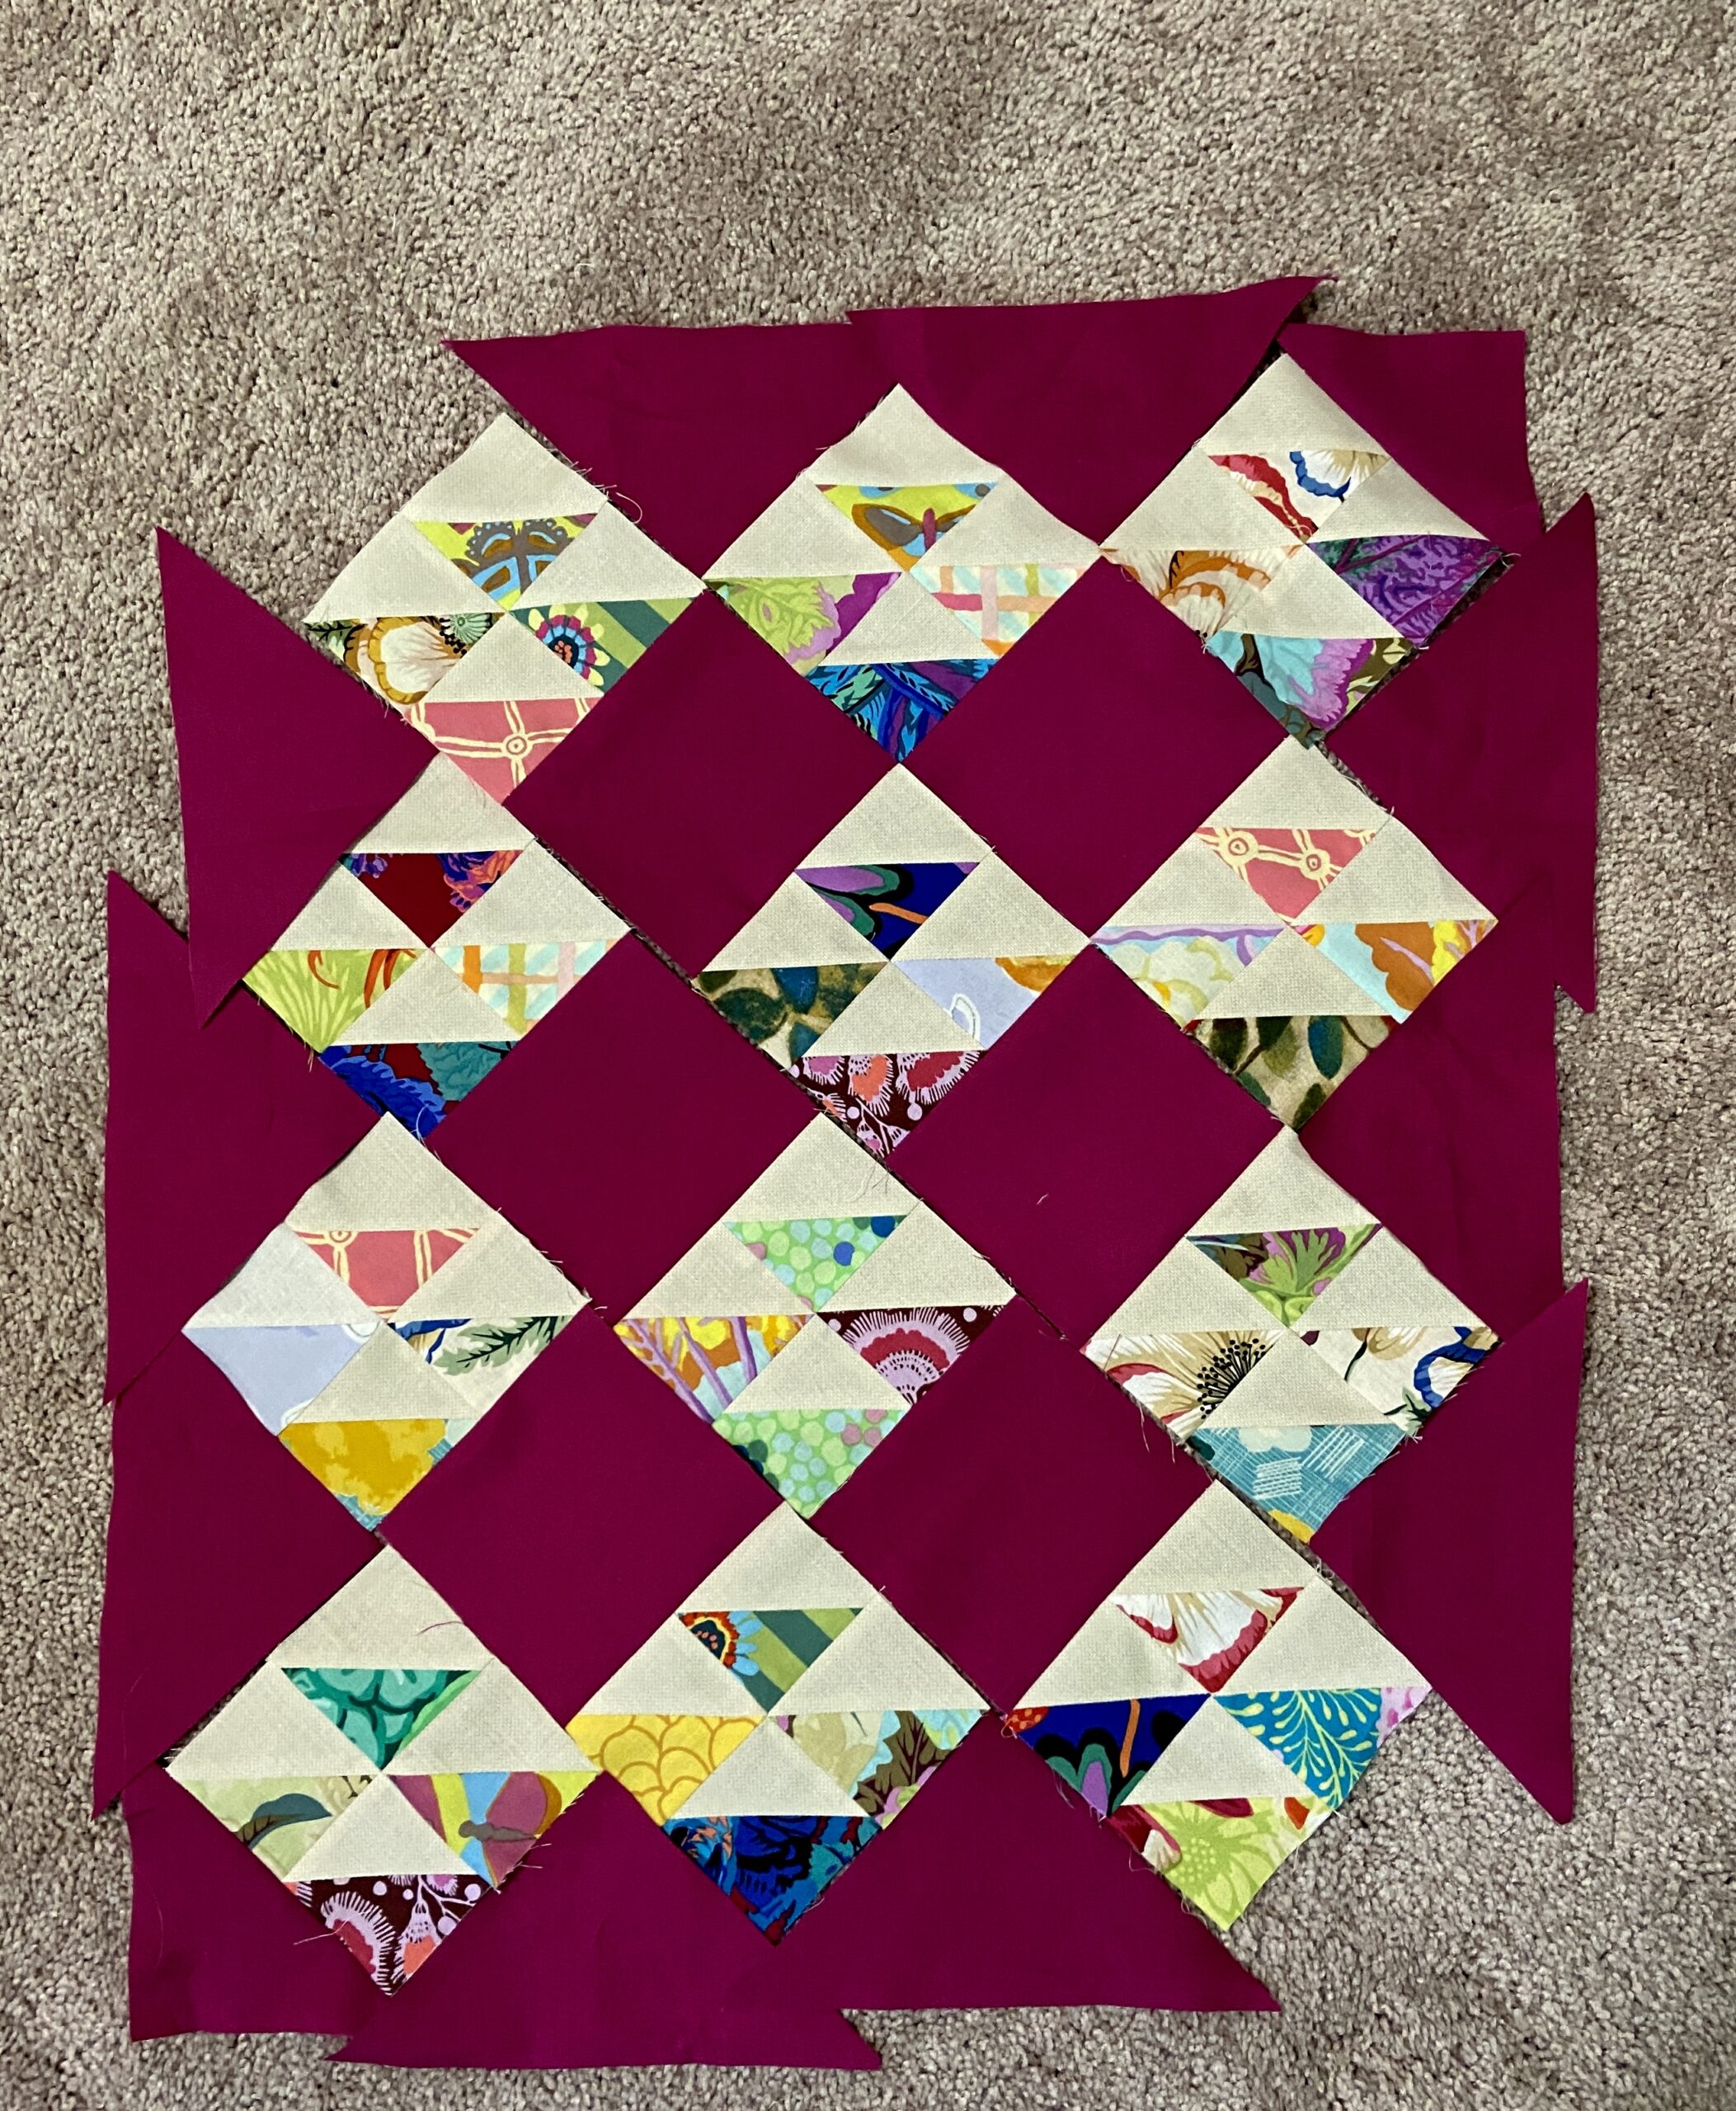
Set on point with a deep background.
OK – this project is only sort of pink. But the background (while it doesn’t photograph as such) is fuchsia and there is pink in some of the HST’s so I decided it still fits.
Hand quilting hearts on the solid squares.
The quilting is a lot of fun and nearly complete. The trick will be binding it and not catching any of the hearts in that process. I kind of wish I had added a small border to help with this but I didn’t have enough of the background fabric. I’ll just have to go slowly (not my forte!)
OK – those are the projects I have been working on – and two are even finished! Woot! Here is my closing picture of my girls. Little sister sure misses H during the day. Kindergarten is a full day program in their district and A is so excited when her big sister gets home!
In the ‘live’ version of this picture, A is running toward her big sister. It is adorable!
Hope everyone is looking toward a fun weekend. I know so many parts of the country are dealing with this horrible heat wave. Because it is super difficult to cool off in many parts of the US; I think staying inside and sewing is the only sensible solution. 🙂
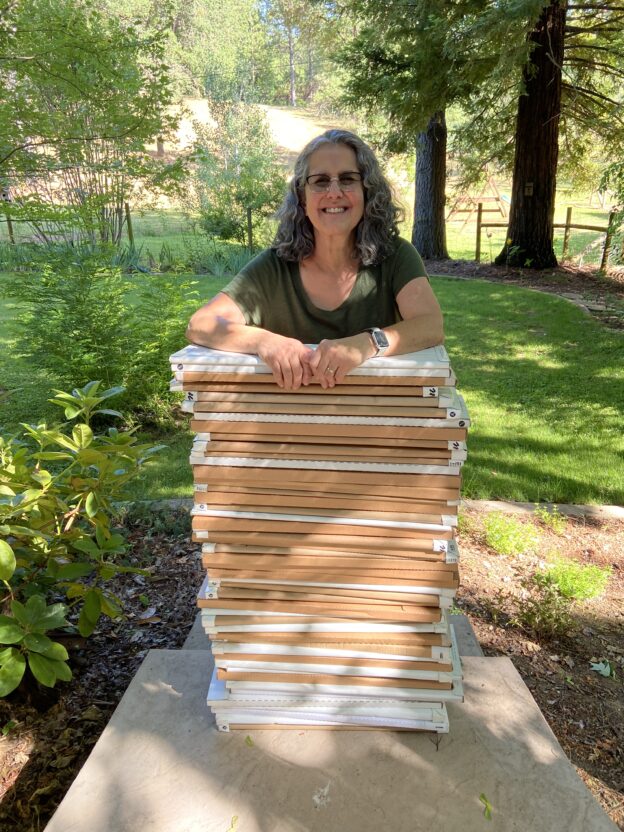
First of all, thank you for all the well wishes you left on my last post. What a nice bunch of friends! So…after posting about my plan to retire, the orders for my shop went nuts! Truly, it was an incredible response. In the first four or five days, I cut over 400 yards of fabric. This was a lot. Honestly, a lot! Many customers like to order a stack of 1/2 yard cuts so who knows how many cuts that 400 yards really was. Just believe me, so many! Check out all of the empty bolts. Shelves are thinning out quickly.
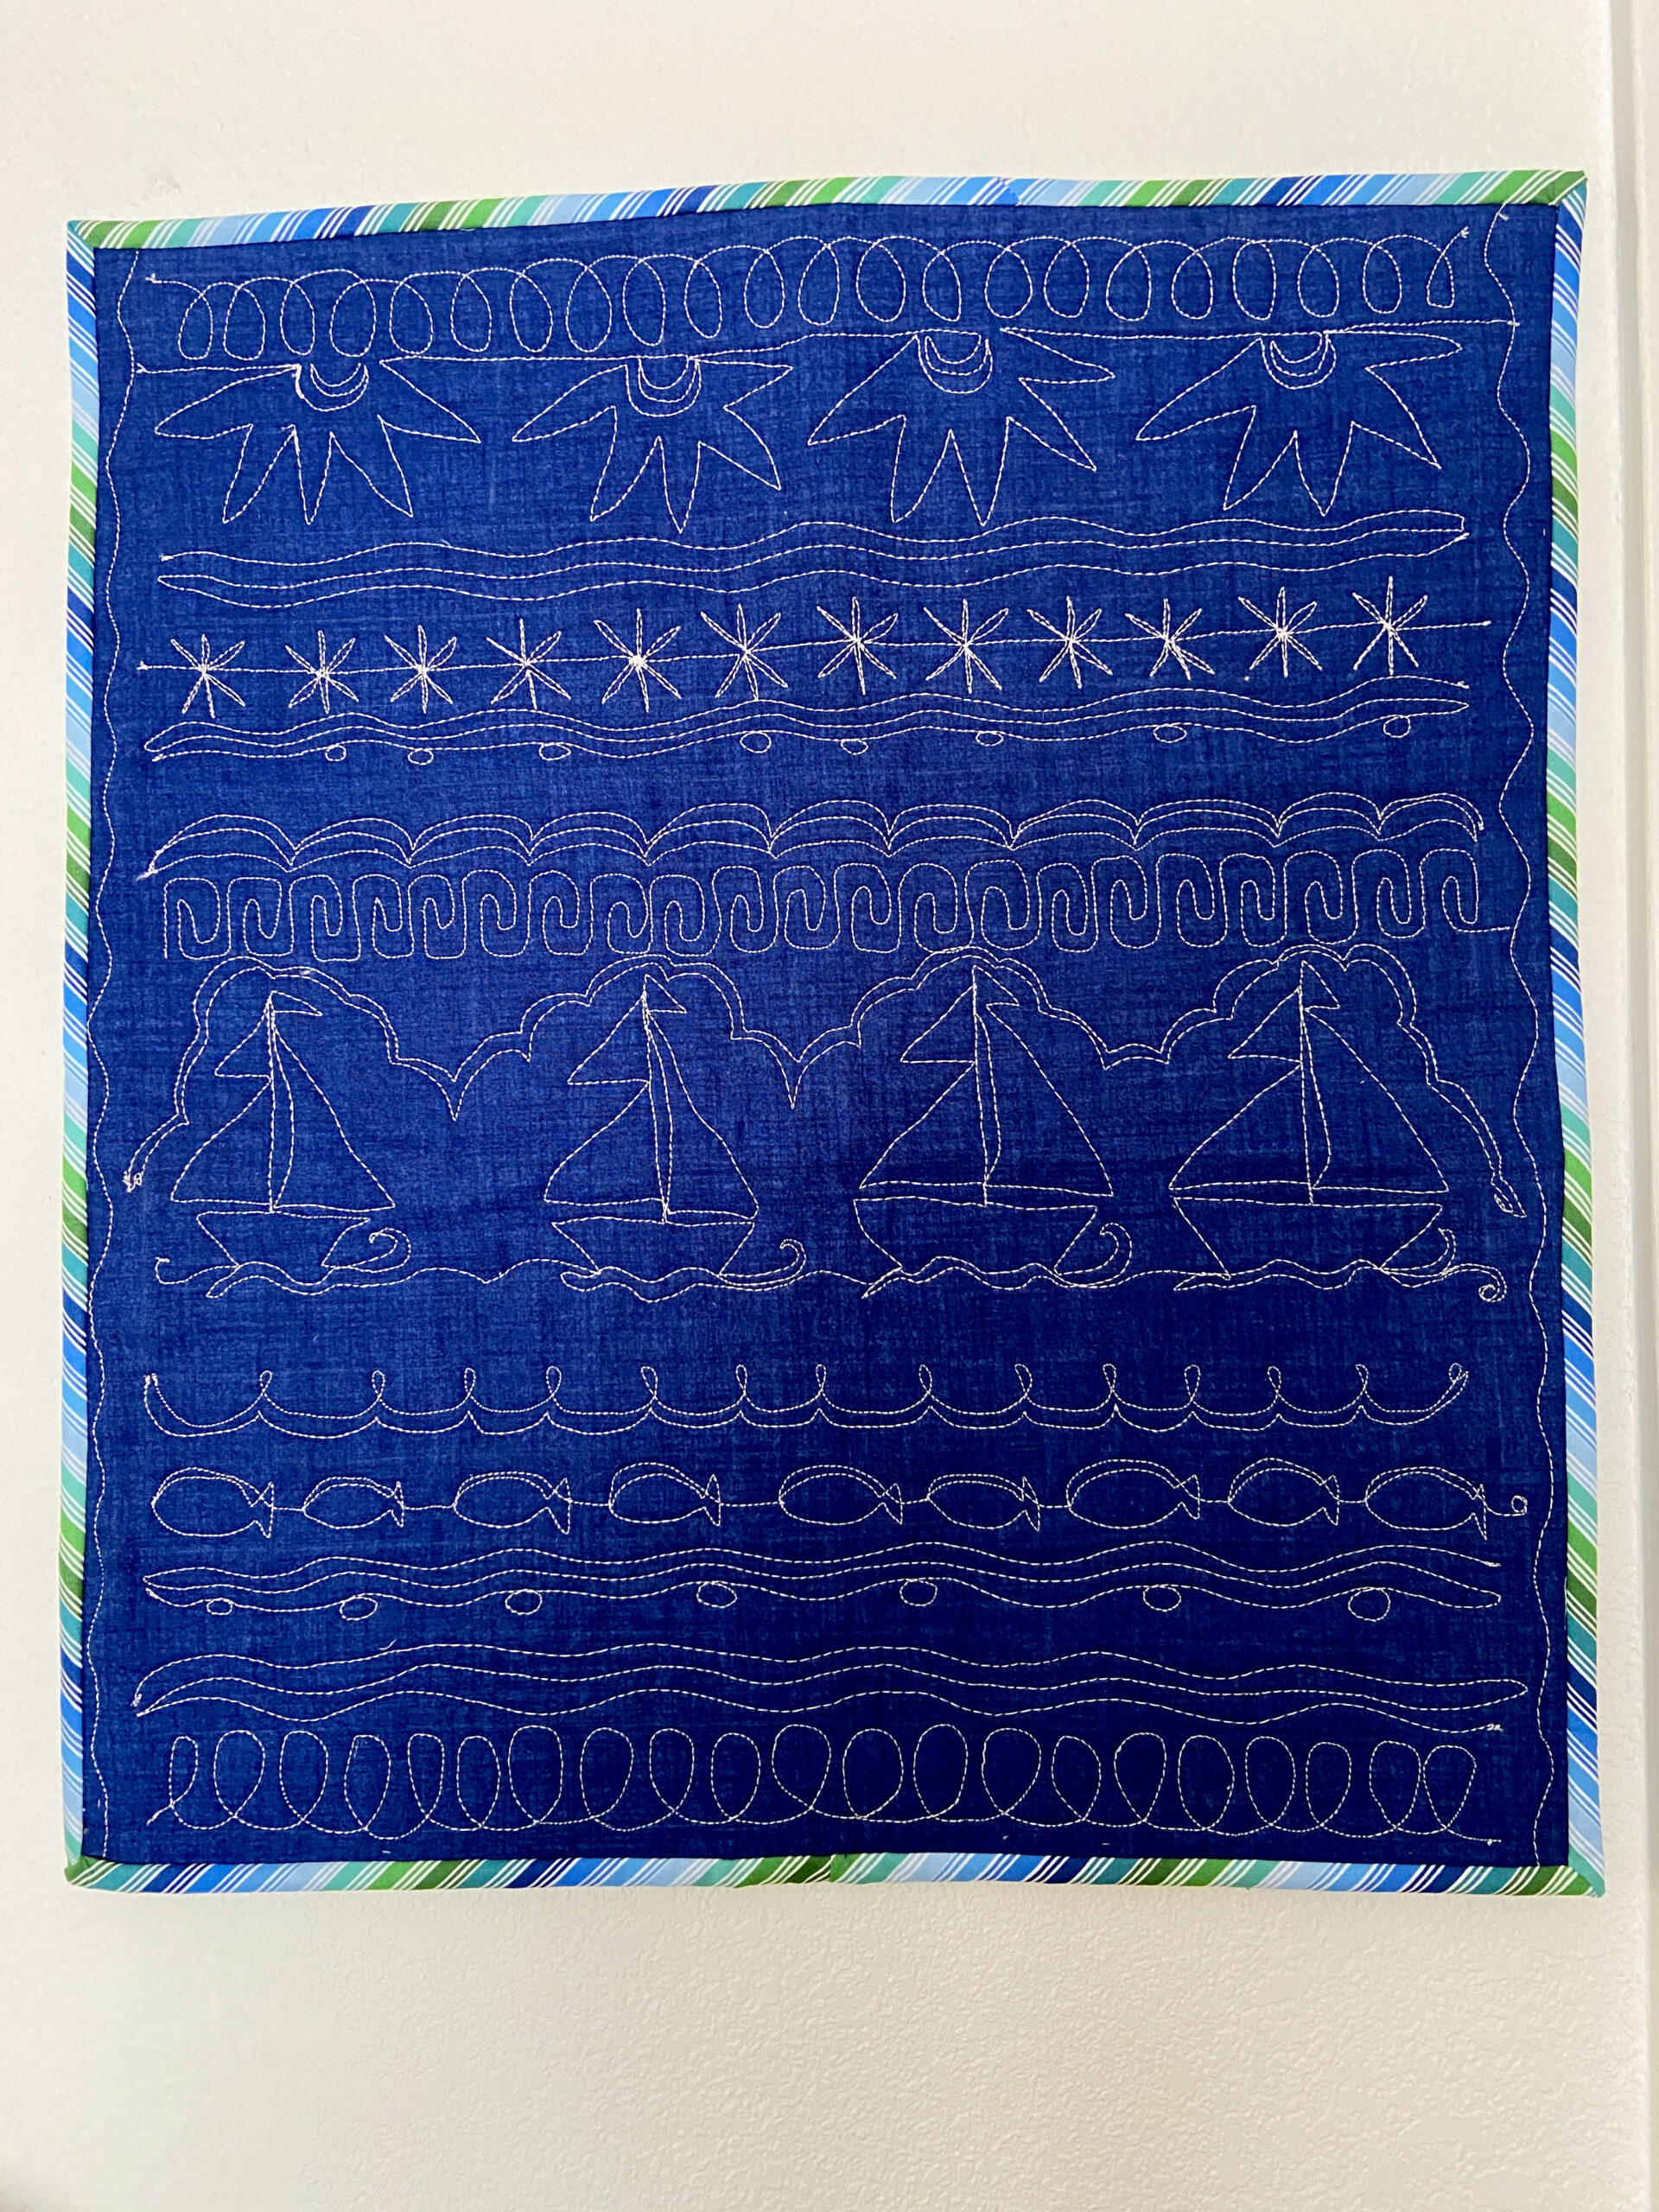
As the shelves empty out, I keep moving bolts and condensing them. This is freeing up space for me to move my personal stash downstairs. I am moving all of my sewing supplies and machine downstairs so we can have a ‘real’ guest room. I continue to organize and purge through my fabrics which has been really helpful. As I was working on this last week, I found a free motion quilting project I had made a few years ago. It was a quilt along hosted by Lori Kenedy back in 2016. I had a lot of fun stitching along with her but when I finished it, I put it in the closet and forgot about it. Upon finding it, I decided to bind it and hang it. It is so summery with the boats, fish and sunshine.
The quilting is far from perfect but the overall look is cute and worth enjoying during these summer months. I love the bias stripe binding. It is from the shop, just in case you are wondering. (Haha.)
Just a tiny peek!
Moving on, I have also been working on a quilt to be shared during a blog hop in July. The flimsy is done and I am trying to decide on a backing. This will be shared soon!!
I have also been cutting a stack of strips in gray and blue. I am making my largest quilt yet. It is a king size for our bed. This is going to be a great project. Assembling the top shouldn’t take terribly long as it is a simple design. Now basting this monster and quilting it is a whole other story!!
This sums up my week! I think the weekend will be focused on the king size quilt. I am so anxious to see it come together. Hopefully I will have some progress photos for you soon. I also need to pull purple scraps for my RSC diamond blocks. So many projects and never enough time!
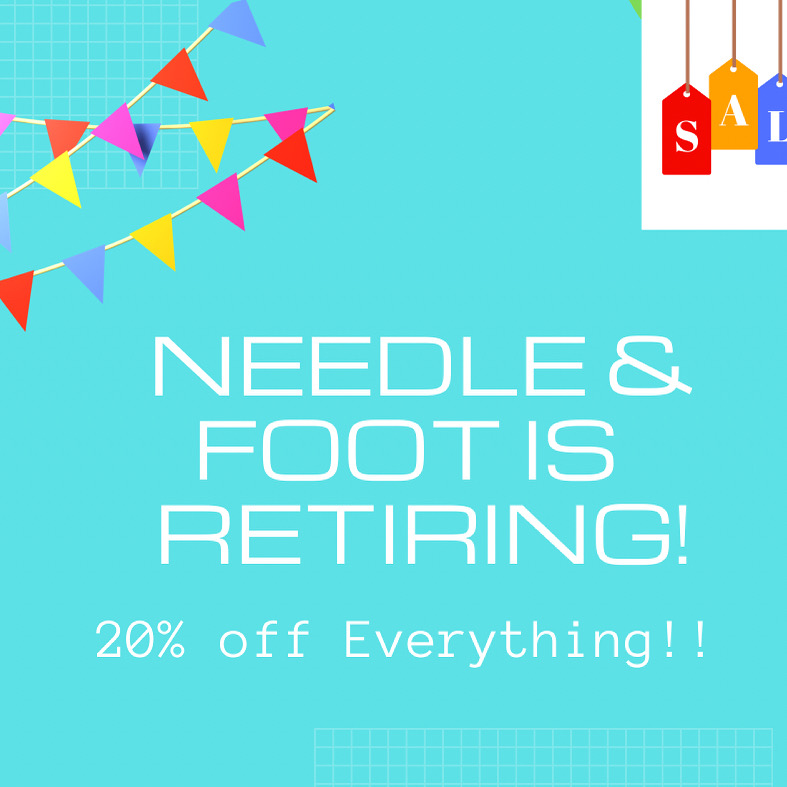
Don’t forget – all fabric, quilt patterns and notions are on sale, 20% off! I hope you will come by and check it out!
Linking to my favorites – including Brag About Your Beauties. The rest are located at the top of the page, under Link Ups.
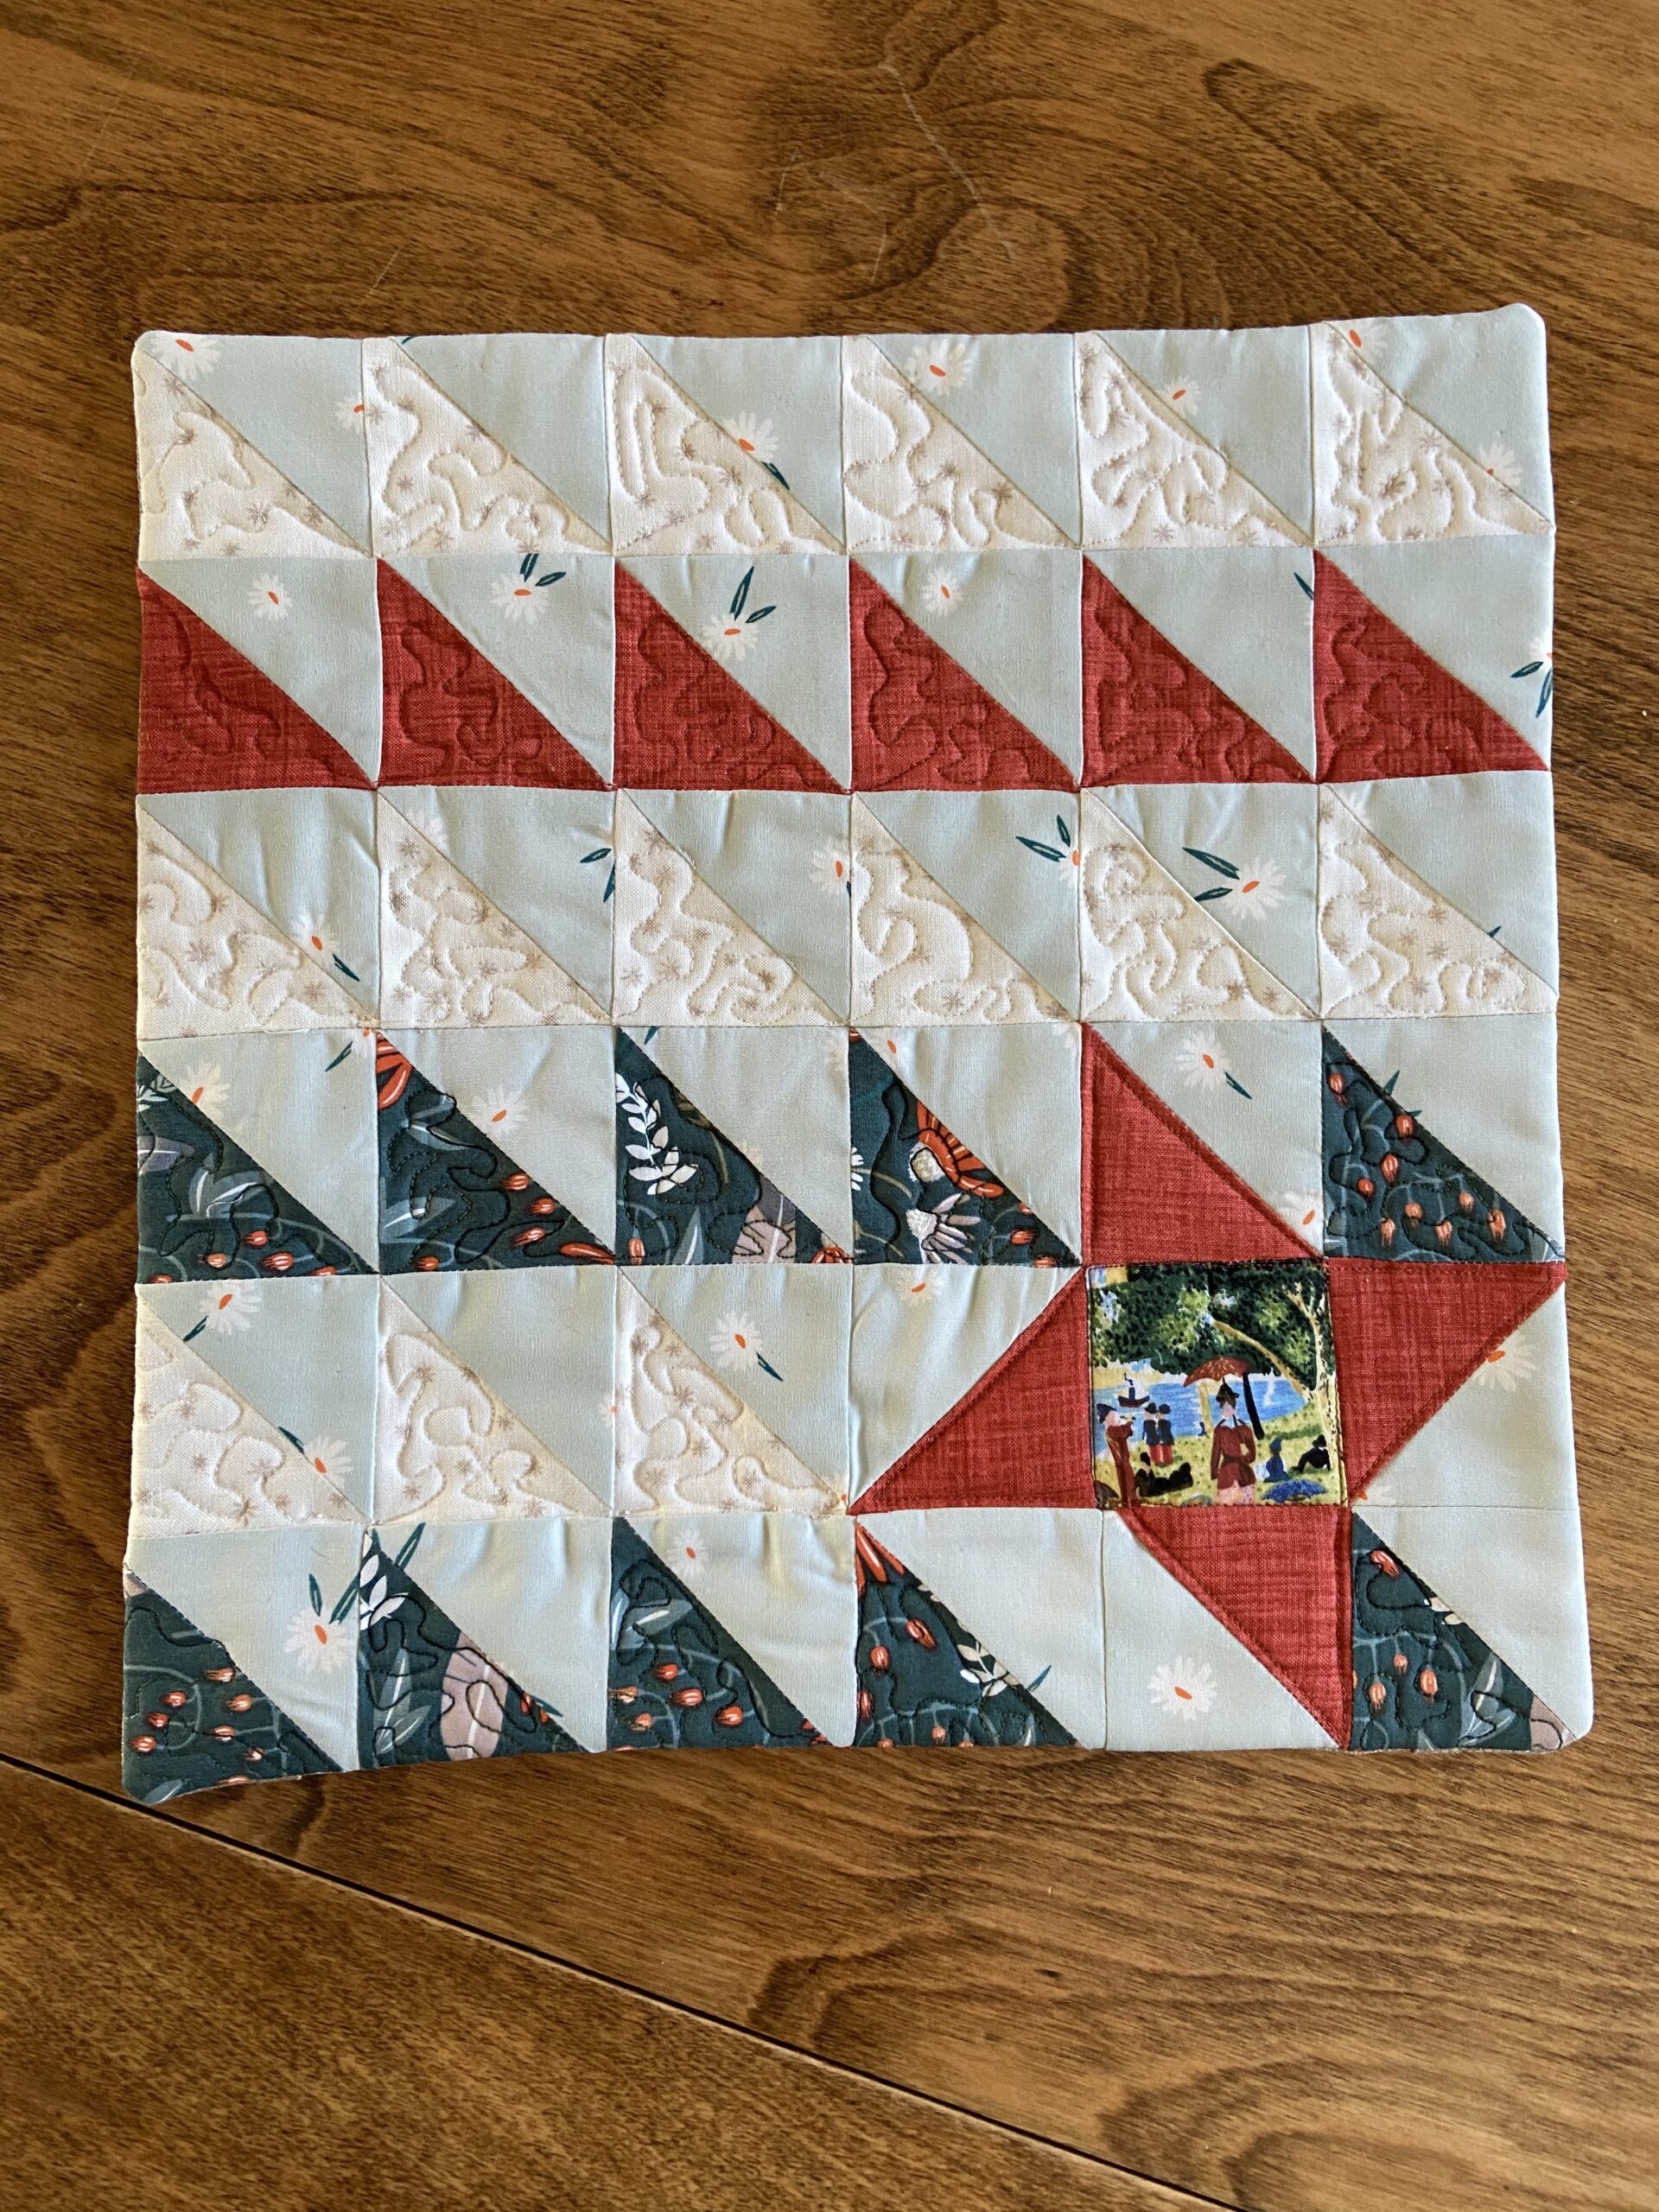
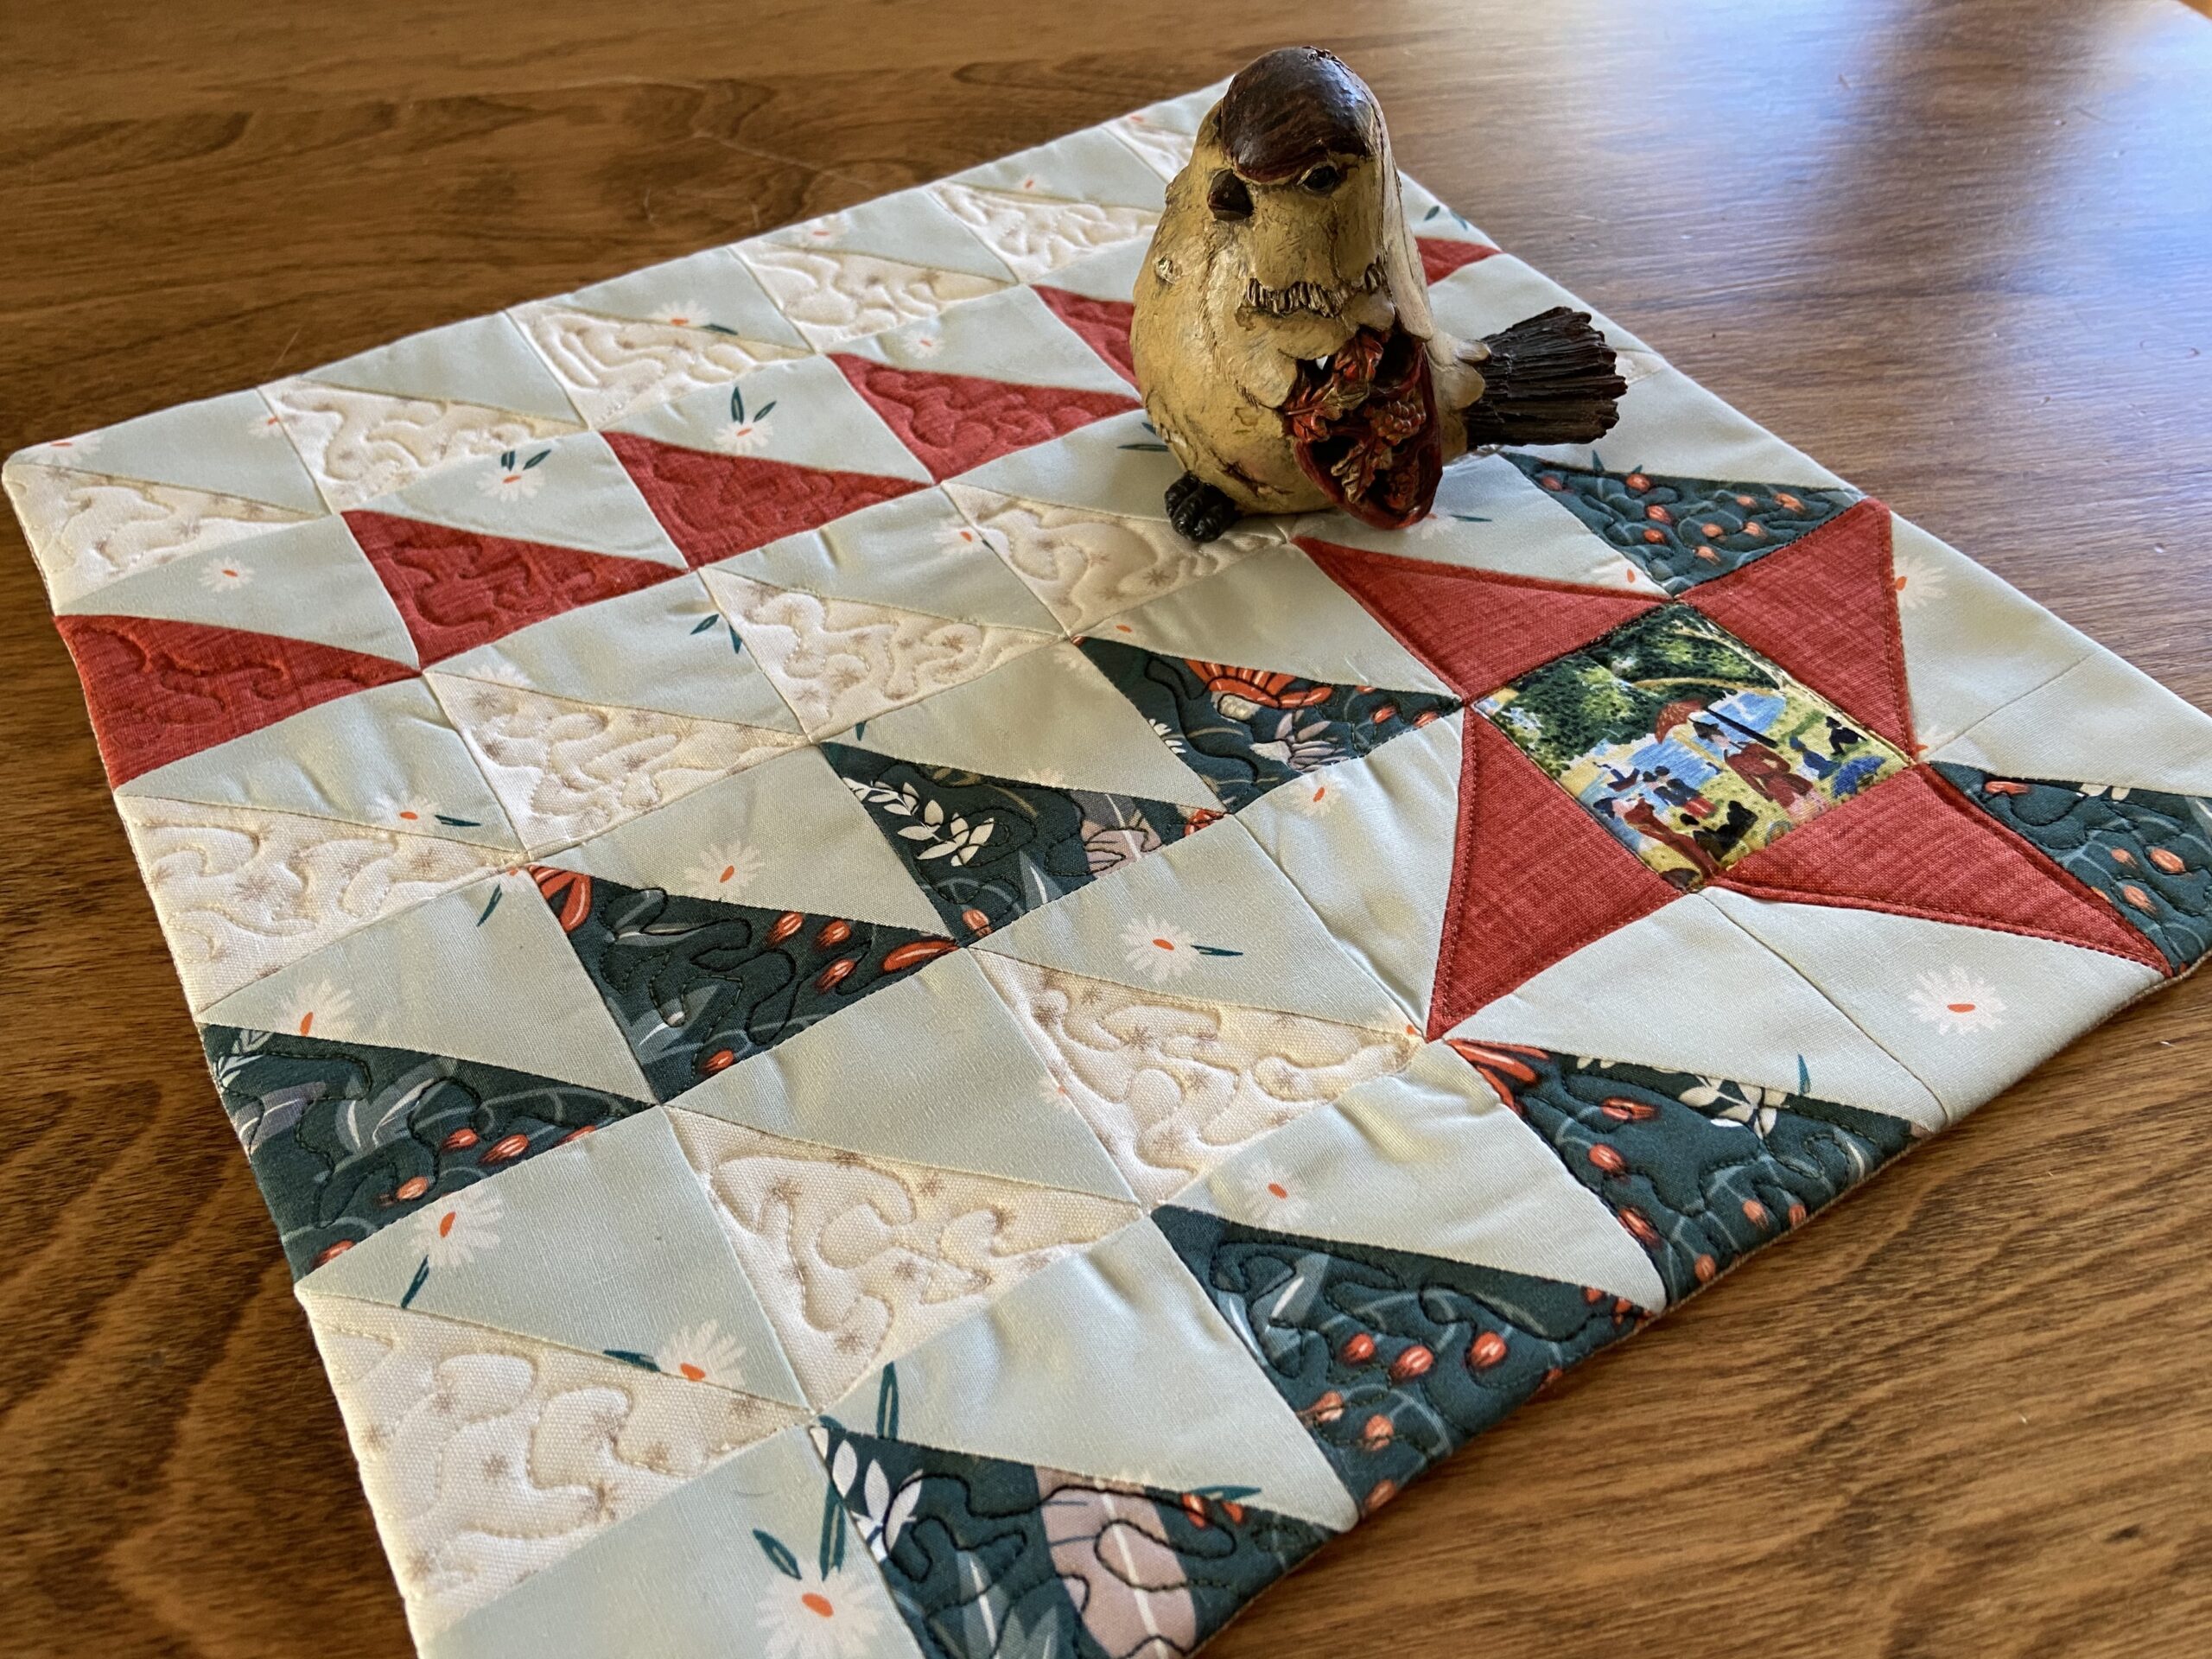
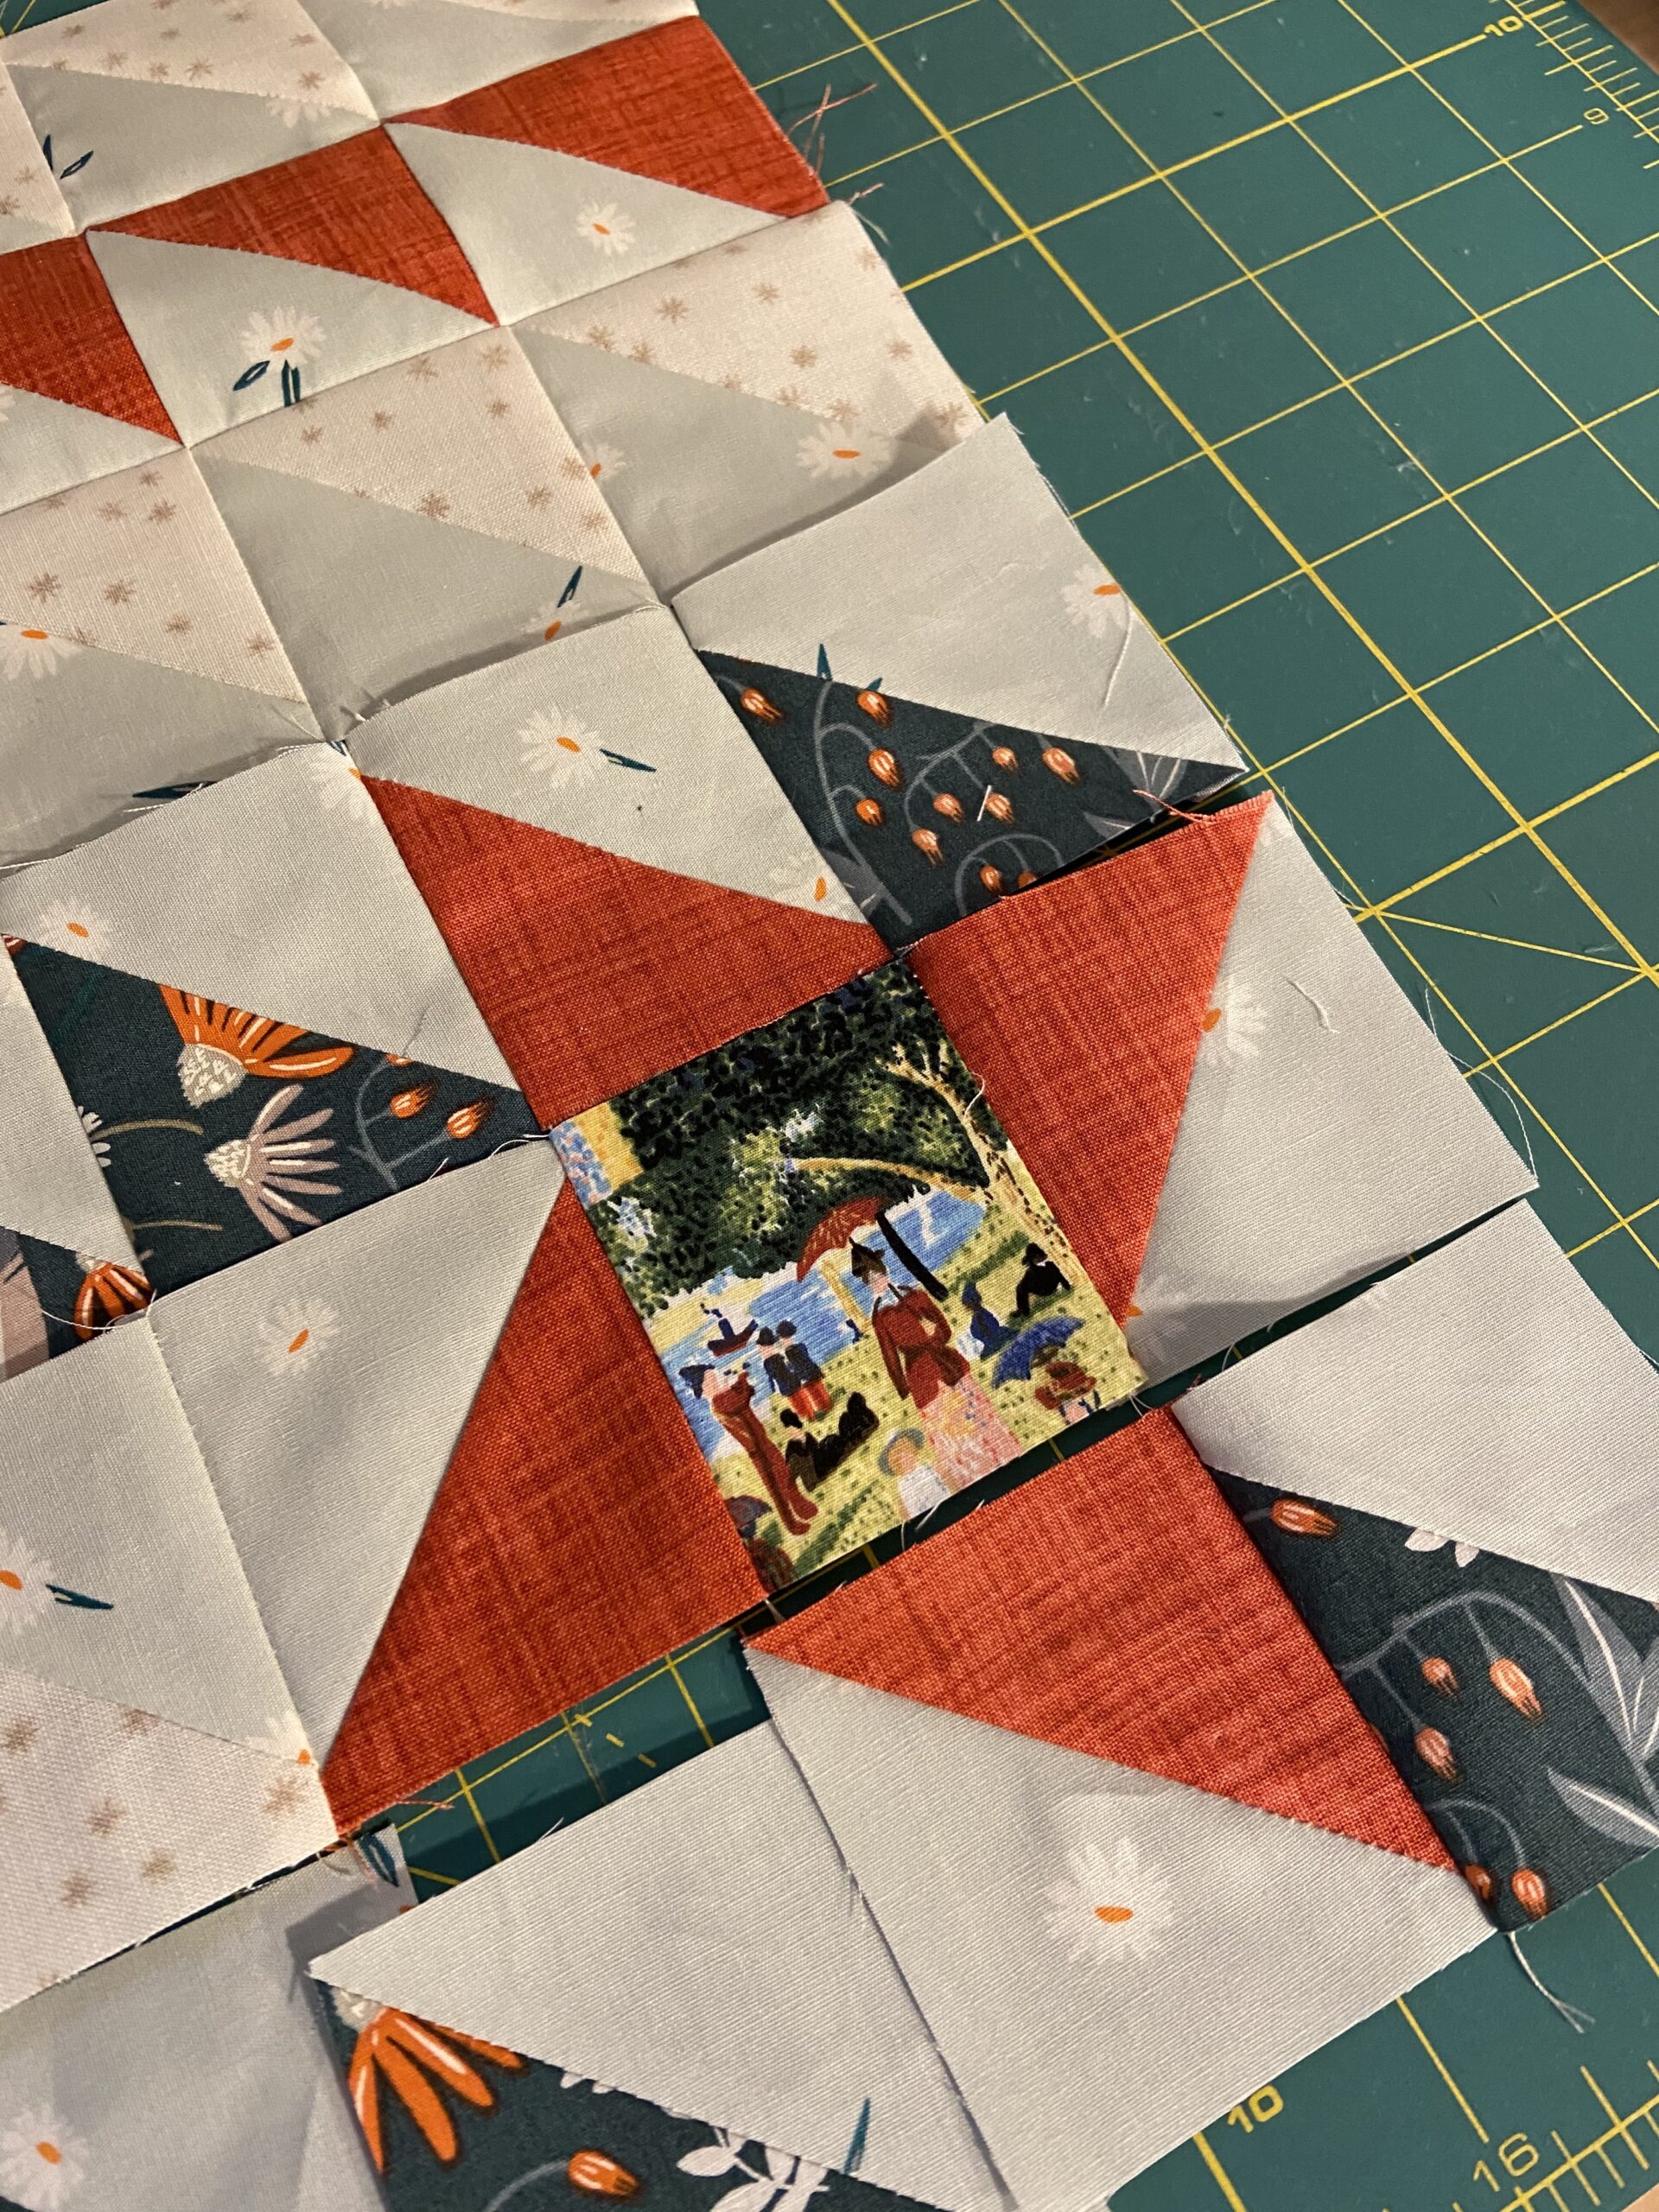
Like the really creative title says, I finished up the mini I shared with you earlier! It is so cute. When I was piecing the Mosaic Mystery Quilt (yet to be finished) I had loads of bonus HST’s – you know, the bits that are left over when you make a flying geese block? Luckily, I stitched them as I made the blocks so they were all ready for me to use.
Making this mini used only a small portion of the little 2 1/2″ HST’s. I saw the idea to incorporate a friendship star with the fussy cut center on a site and I cannot remember which it was. I think it was something like All People Quilt but I am not sure. If I figure it out, I will update the post accordingly.
At twelve inches square, it will be easy to find a little spot to hang this. I quilted all triangles except for the background (pale green) pieces. It looks cute and for the most part went well. There are a few wrinkles near the friendship star that could look a little better.
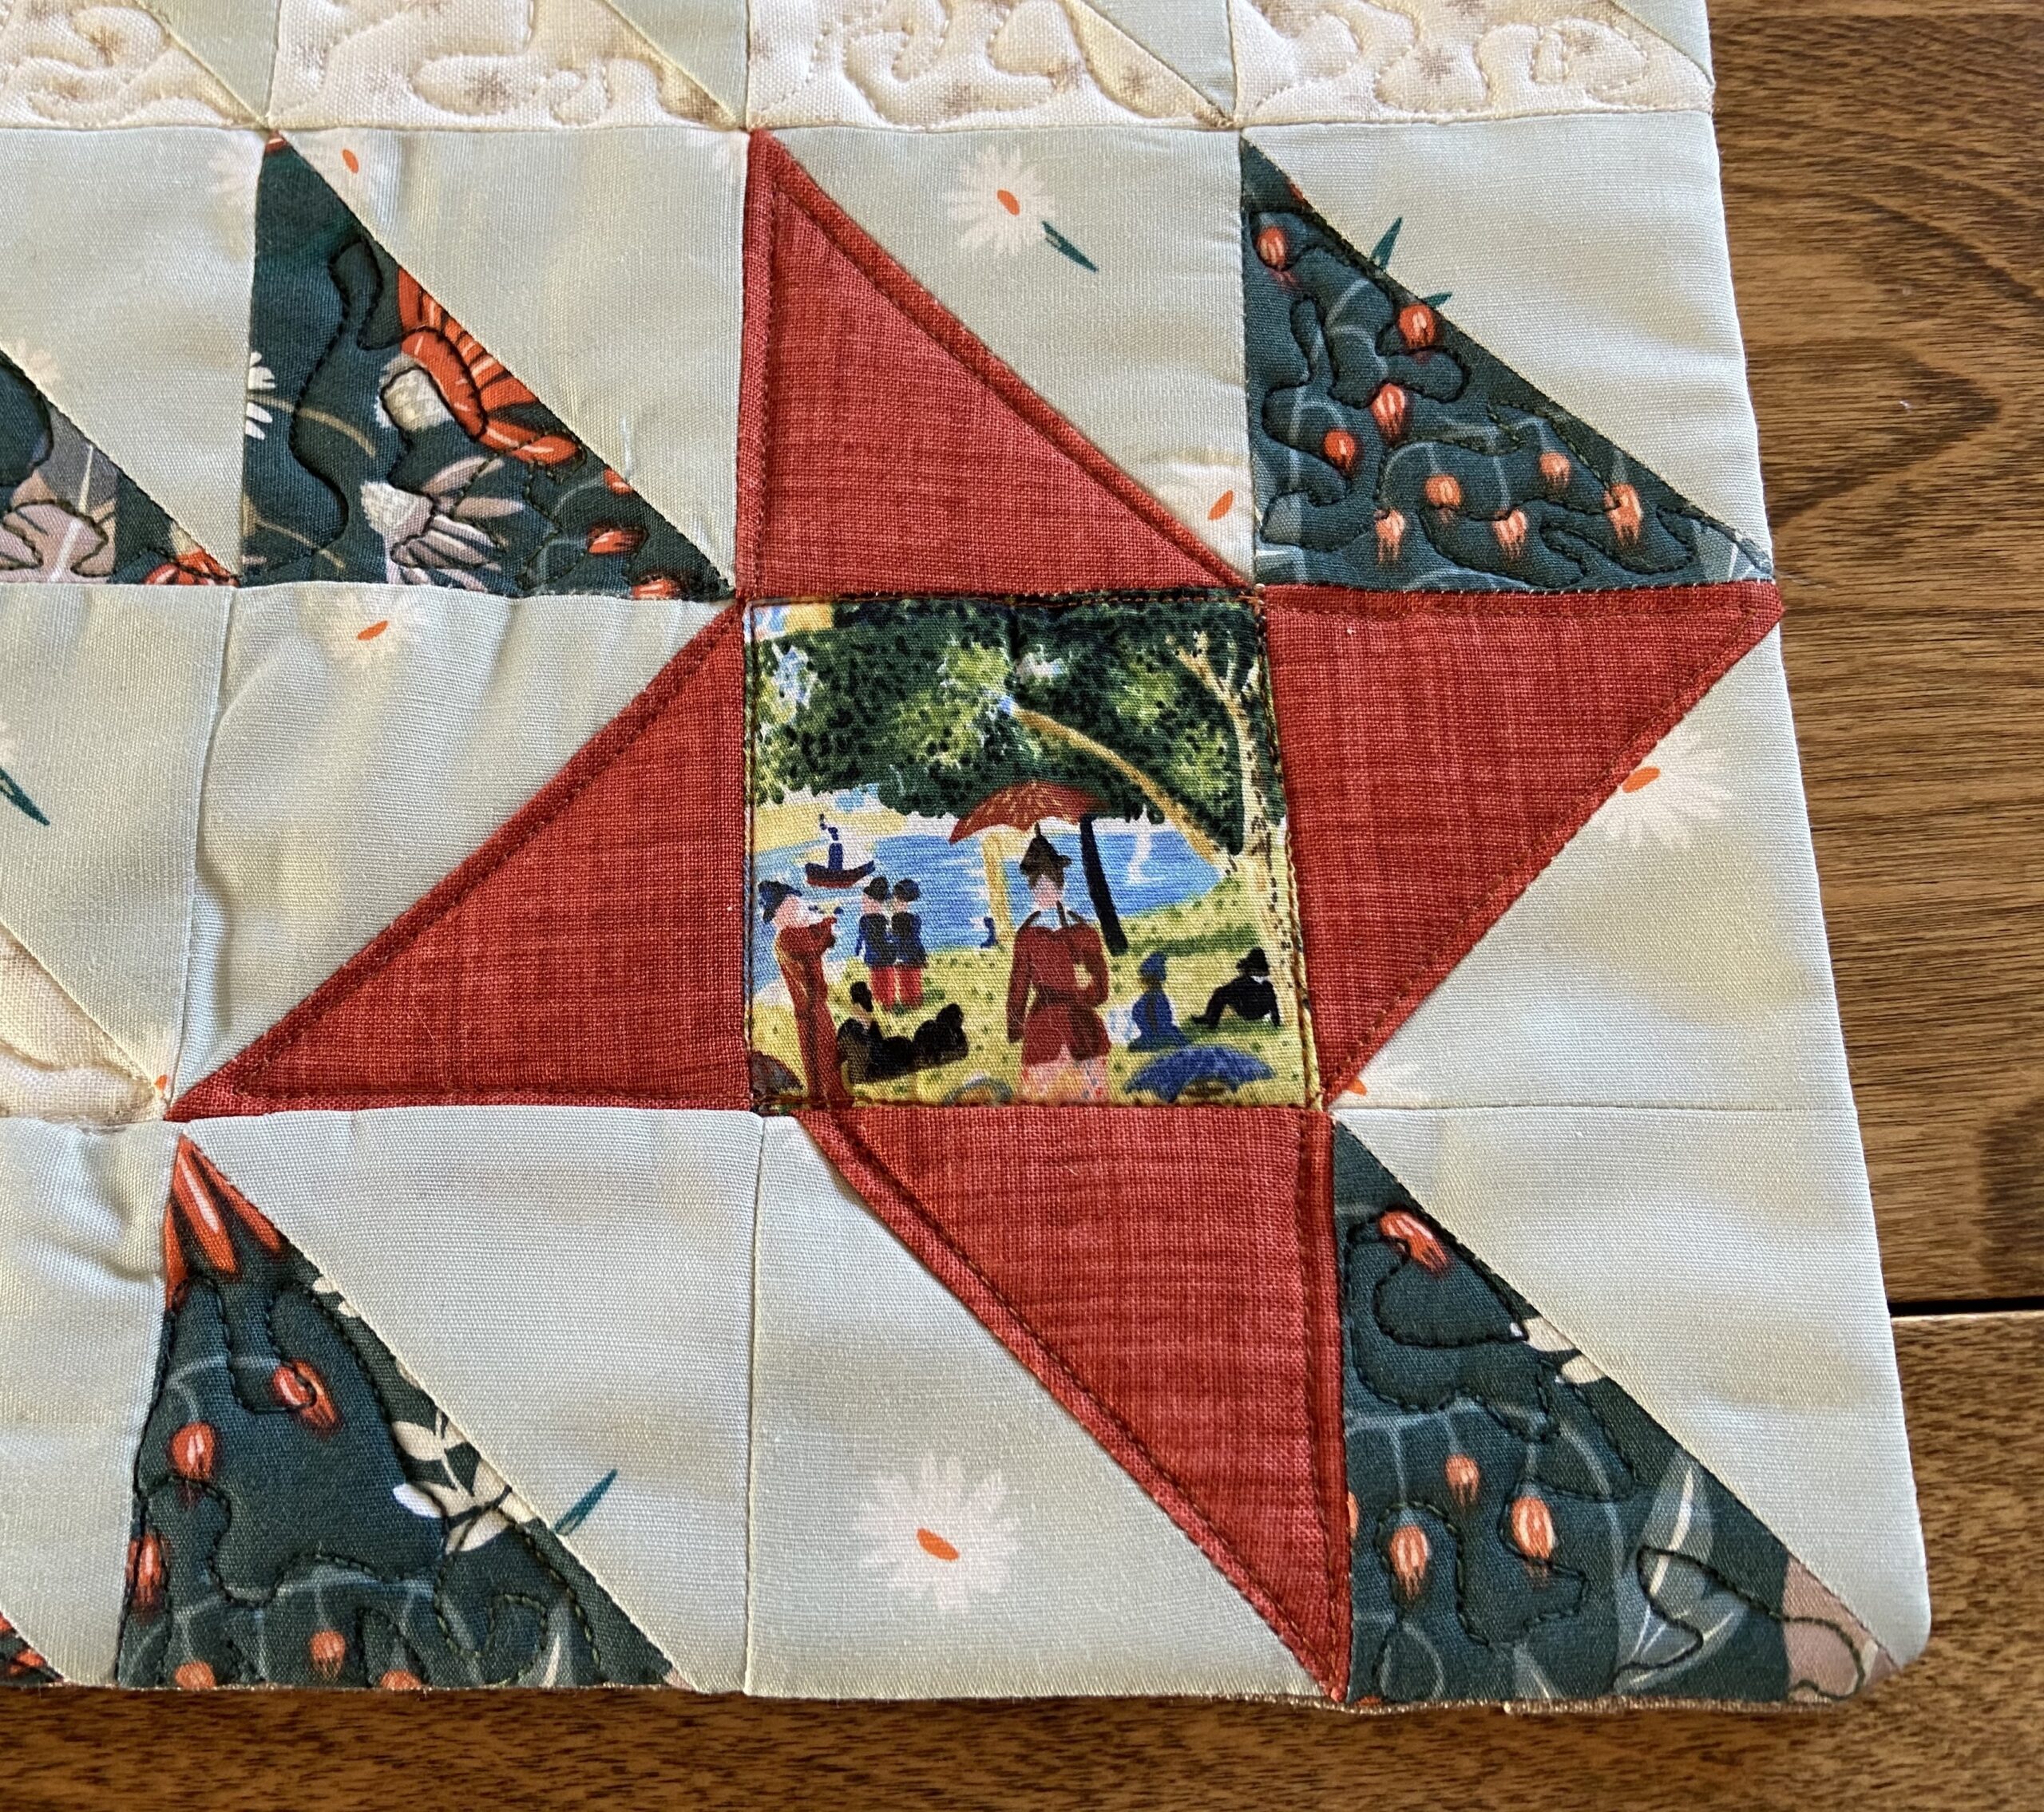
The fussy cut square in the center of the star is my favorite part. I have a stack of squares of this fabric depicting the very famous Sunday Afternoon on the Island of La Grande Jatte painting by Georges Seurat. While on a trip to the Chicago, I saw this painting at the Art Institute of Chicago. It is so beautiful. When I saw a handmade shirt at a thrift store made with this fabric, I grabbed it, deconstructing it for the fabric.
There are only so many ways to take a photo of this little quilt. But here is a cute one. You probably noticed I decided to face the quilt, rather than bind it. I like the look of this but it caused me to lose some of the points on the top and right side of the mini. I didn’t lose them by stitching over them with the facing. Rather it was when I rolled the facing to the back, those points are rolled over just enough to make the points round off. Sigh. This was disappointing but I have managed to recover from the trauma. I didn’t have leftover strips of any of the fabrics used on the mini and when I looked at using other fabric for the binding, nothing appealed to me. I do like facing quilts; I just hadn’t considered the issue of those points.
In other projects, I decided what I would do for an RSC quilt this year. Since I skipped doing anything for Rainbow Scrap Challenge last year, the bins are loaded. I need to make some scrappy projects for sure. I saw these pretty diamond shaped blocks over at Bonjour Quilts and thought they would be fun to make each month. Not hard to piece and they will use up some fabric. The blocks will be 6″ x 12″. I suppose I should figure out how many I need to make but I have plenty of time for that. This month is pink and I have cut pieces to make three of them. Pink is probably the scrap bin with the least fabric in it so three will be plenty.
Not a whole lot more to report today! I have had an annoying cold this week. Where the heck I picked that up from, I have no idea. But it means I got no exercise this week and took lots of naps. Hoping to be a little more active this weekend! Hope all of you are well and staying healthy.
Post Update: Now that I am informed about the fussy cutting challenge for Project Quilting this week, this will be entered! Thanks to Wendy and Kathleen for commenting and letting me know. 🙂
Linking with my favorites – check them out at the top of the page under Link Ups.
Somehow almost two weeks have passed since the last post. Not sure how that happened, but here we are. I have actually been in the sewing room quite a bit so I will do a quick update on what has been in the works.
First and foremost, I have been working on a cute baby quilt for my niece. It is just about done – I have a few more inches of binding to stitch down and then into the wash it goes. Once she receives it, I will share it here. I am 99% sure she doesn’t read the blog but since I haven’t taken photos of it anyway, it will have to wait.
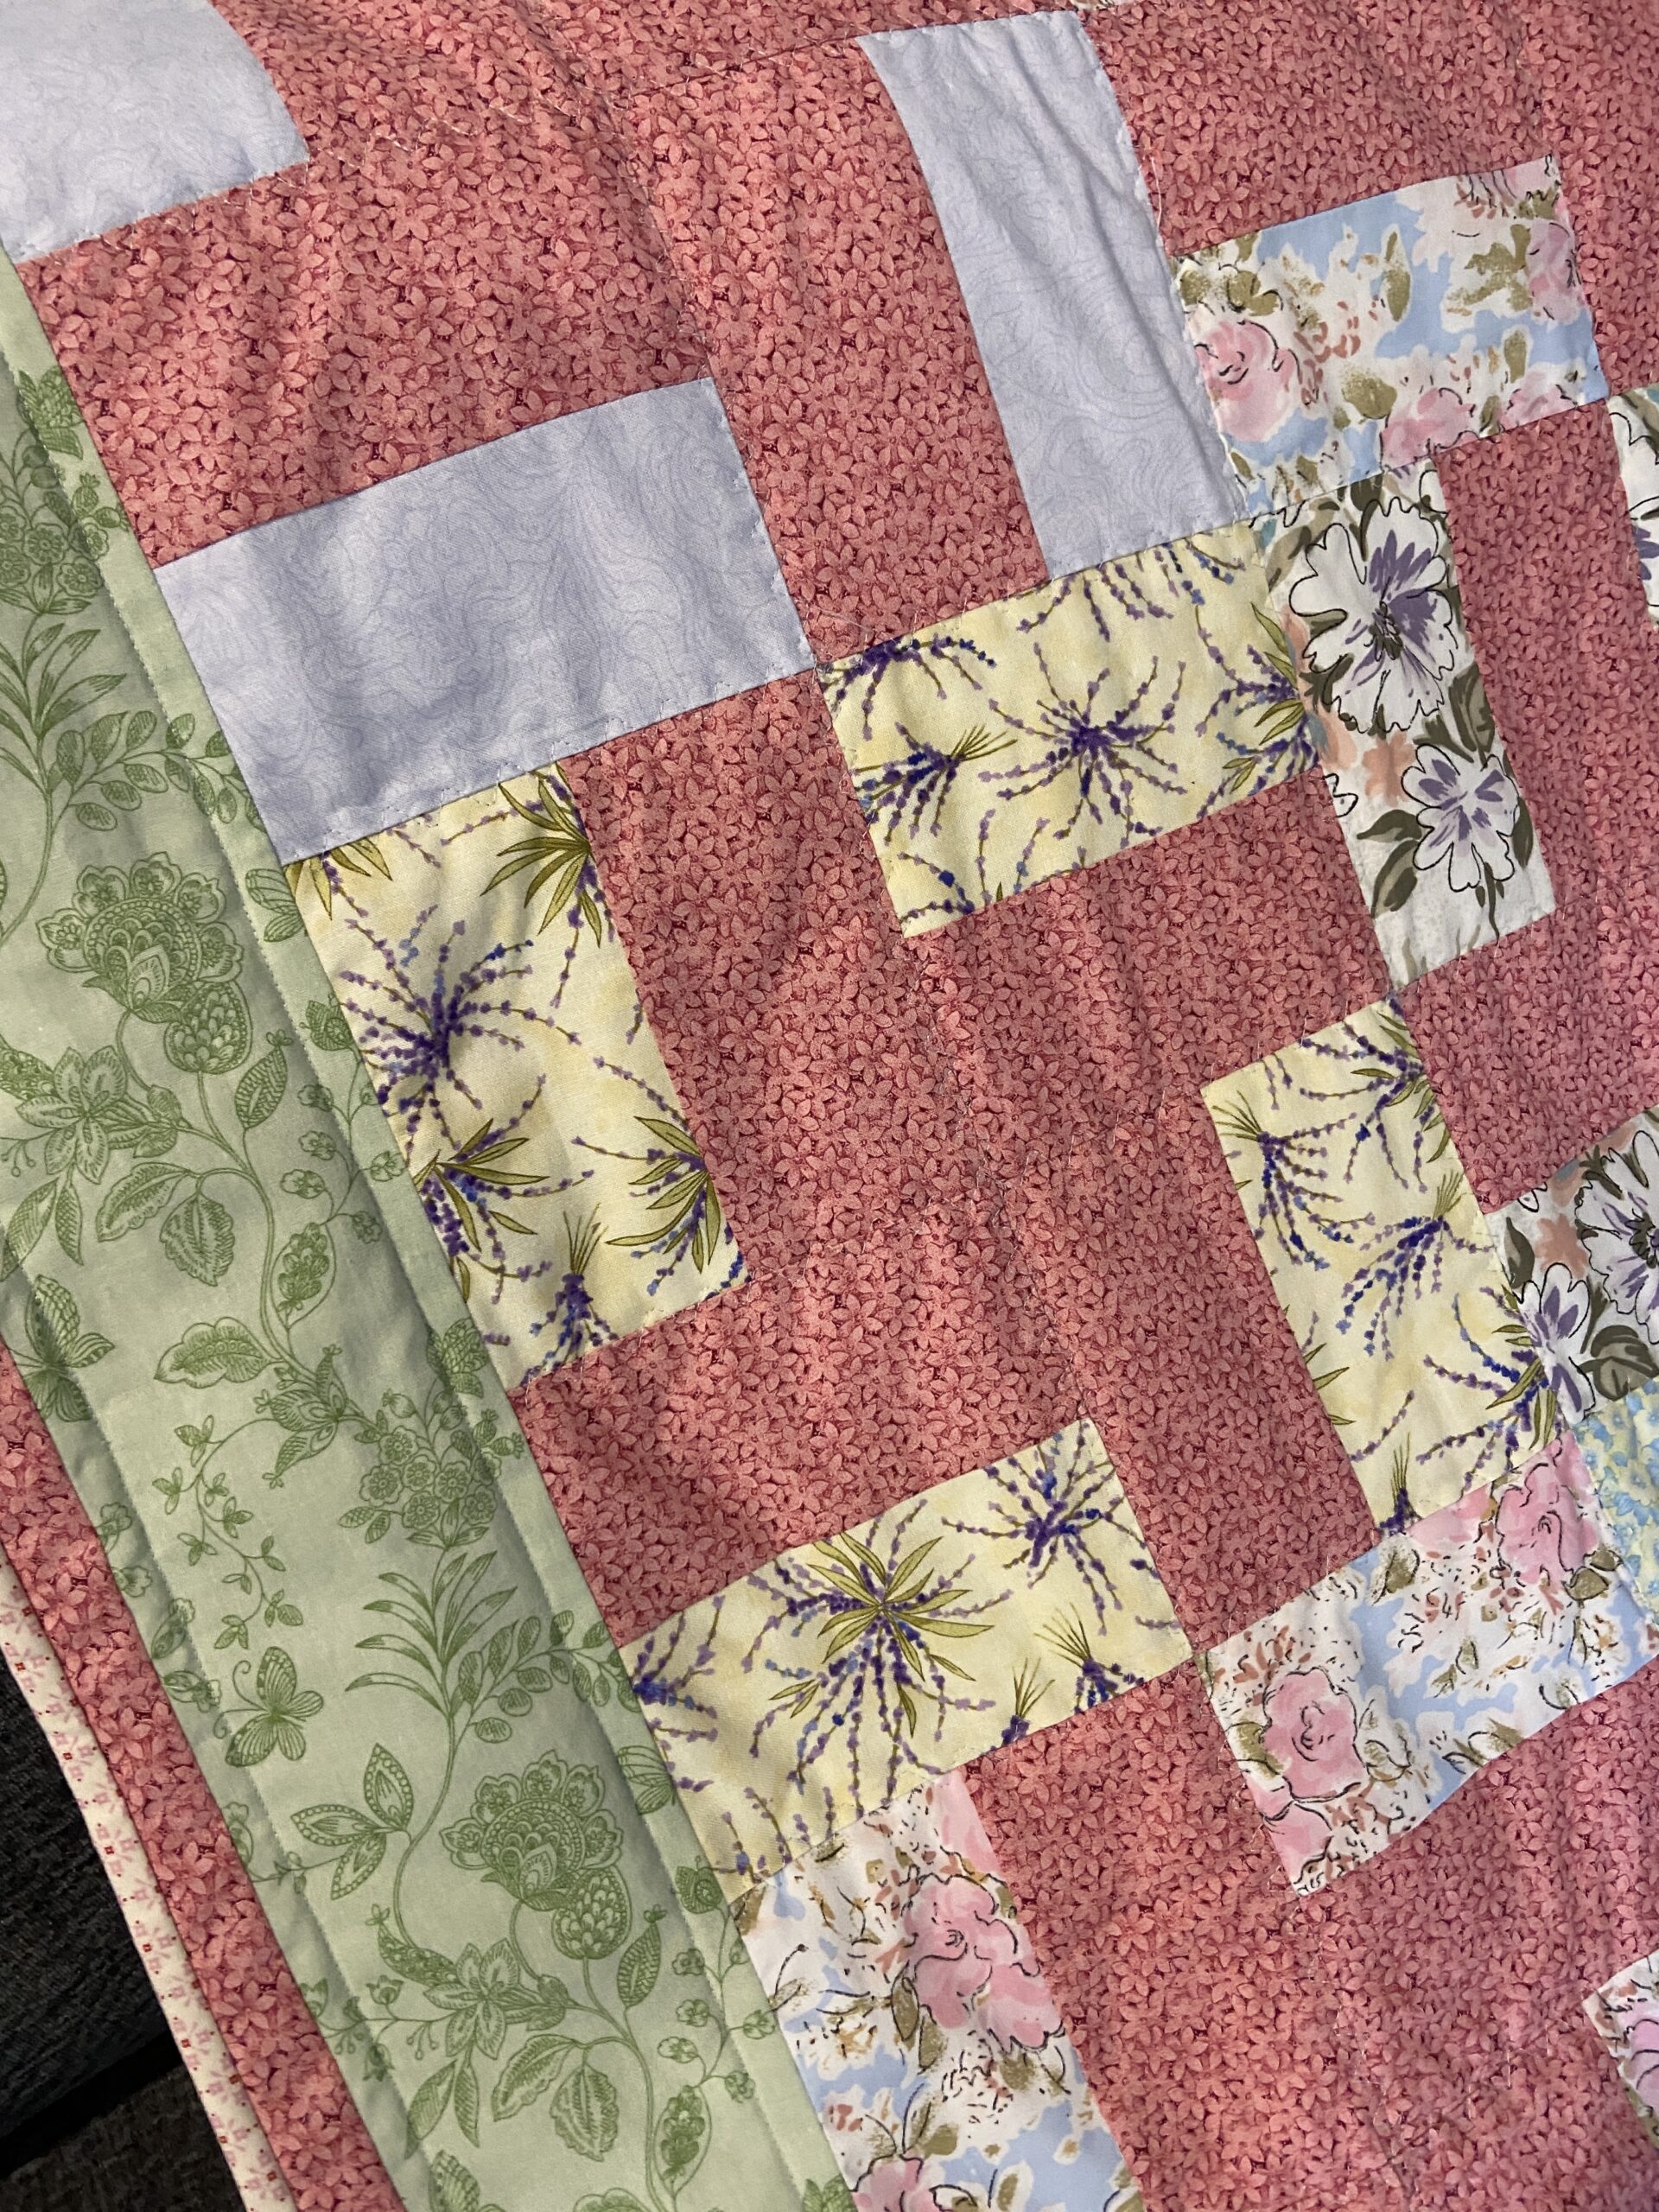
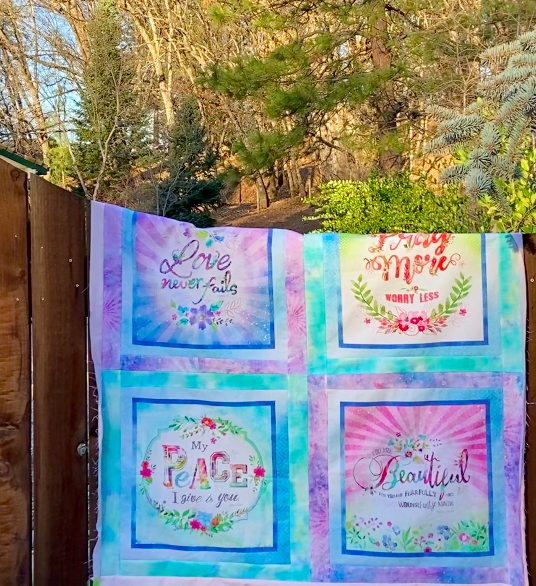
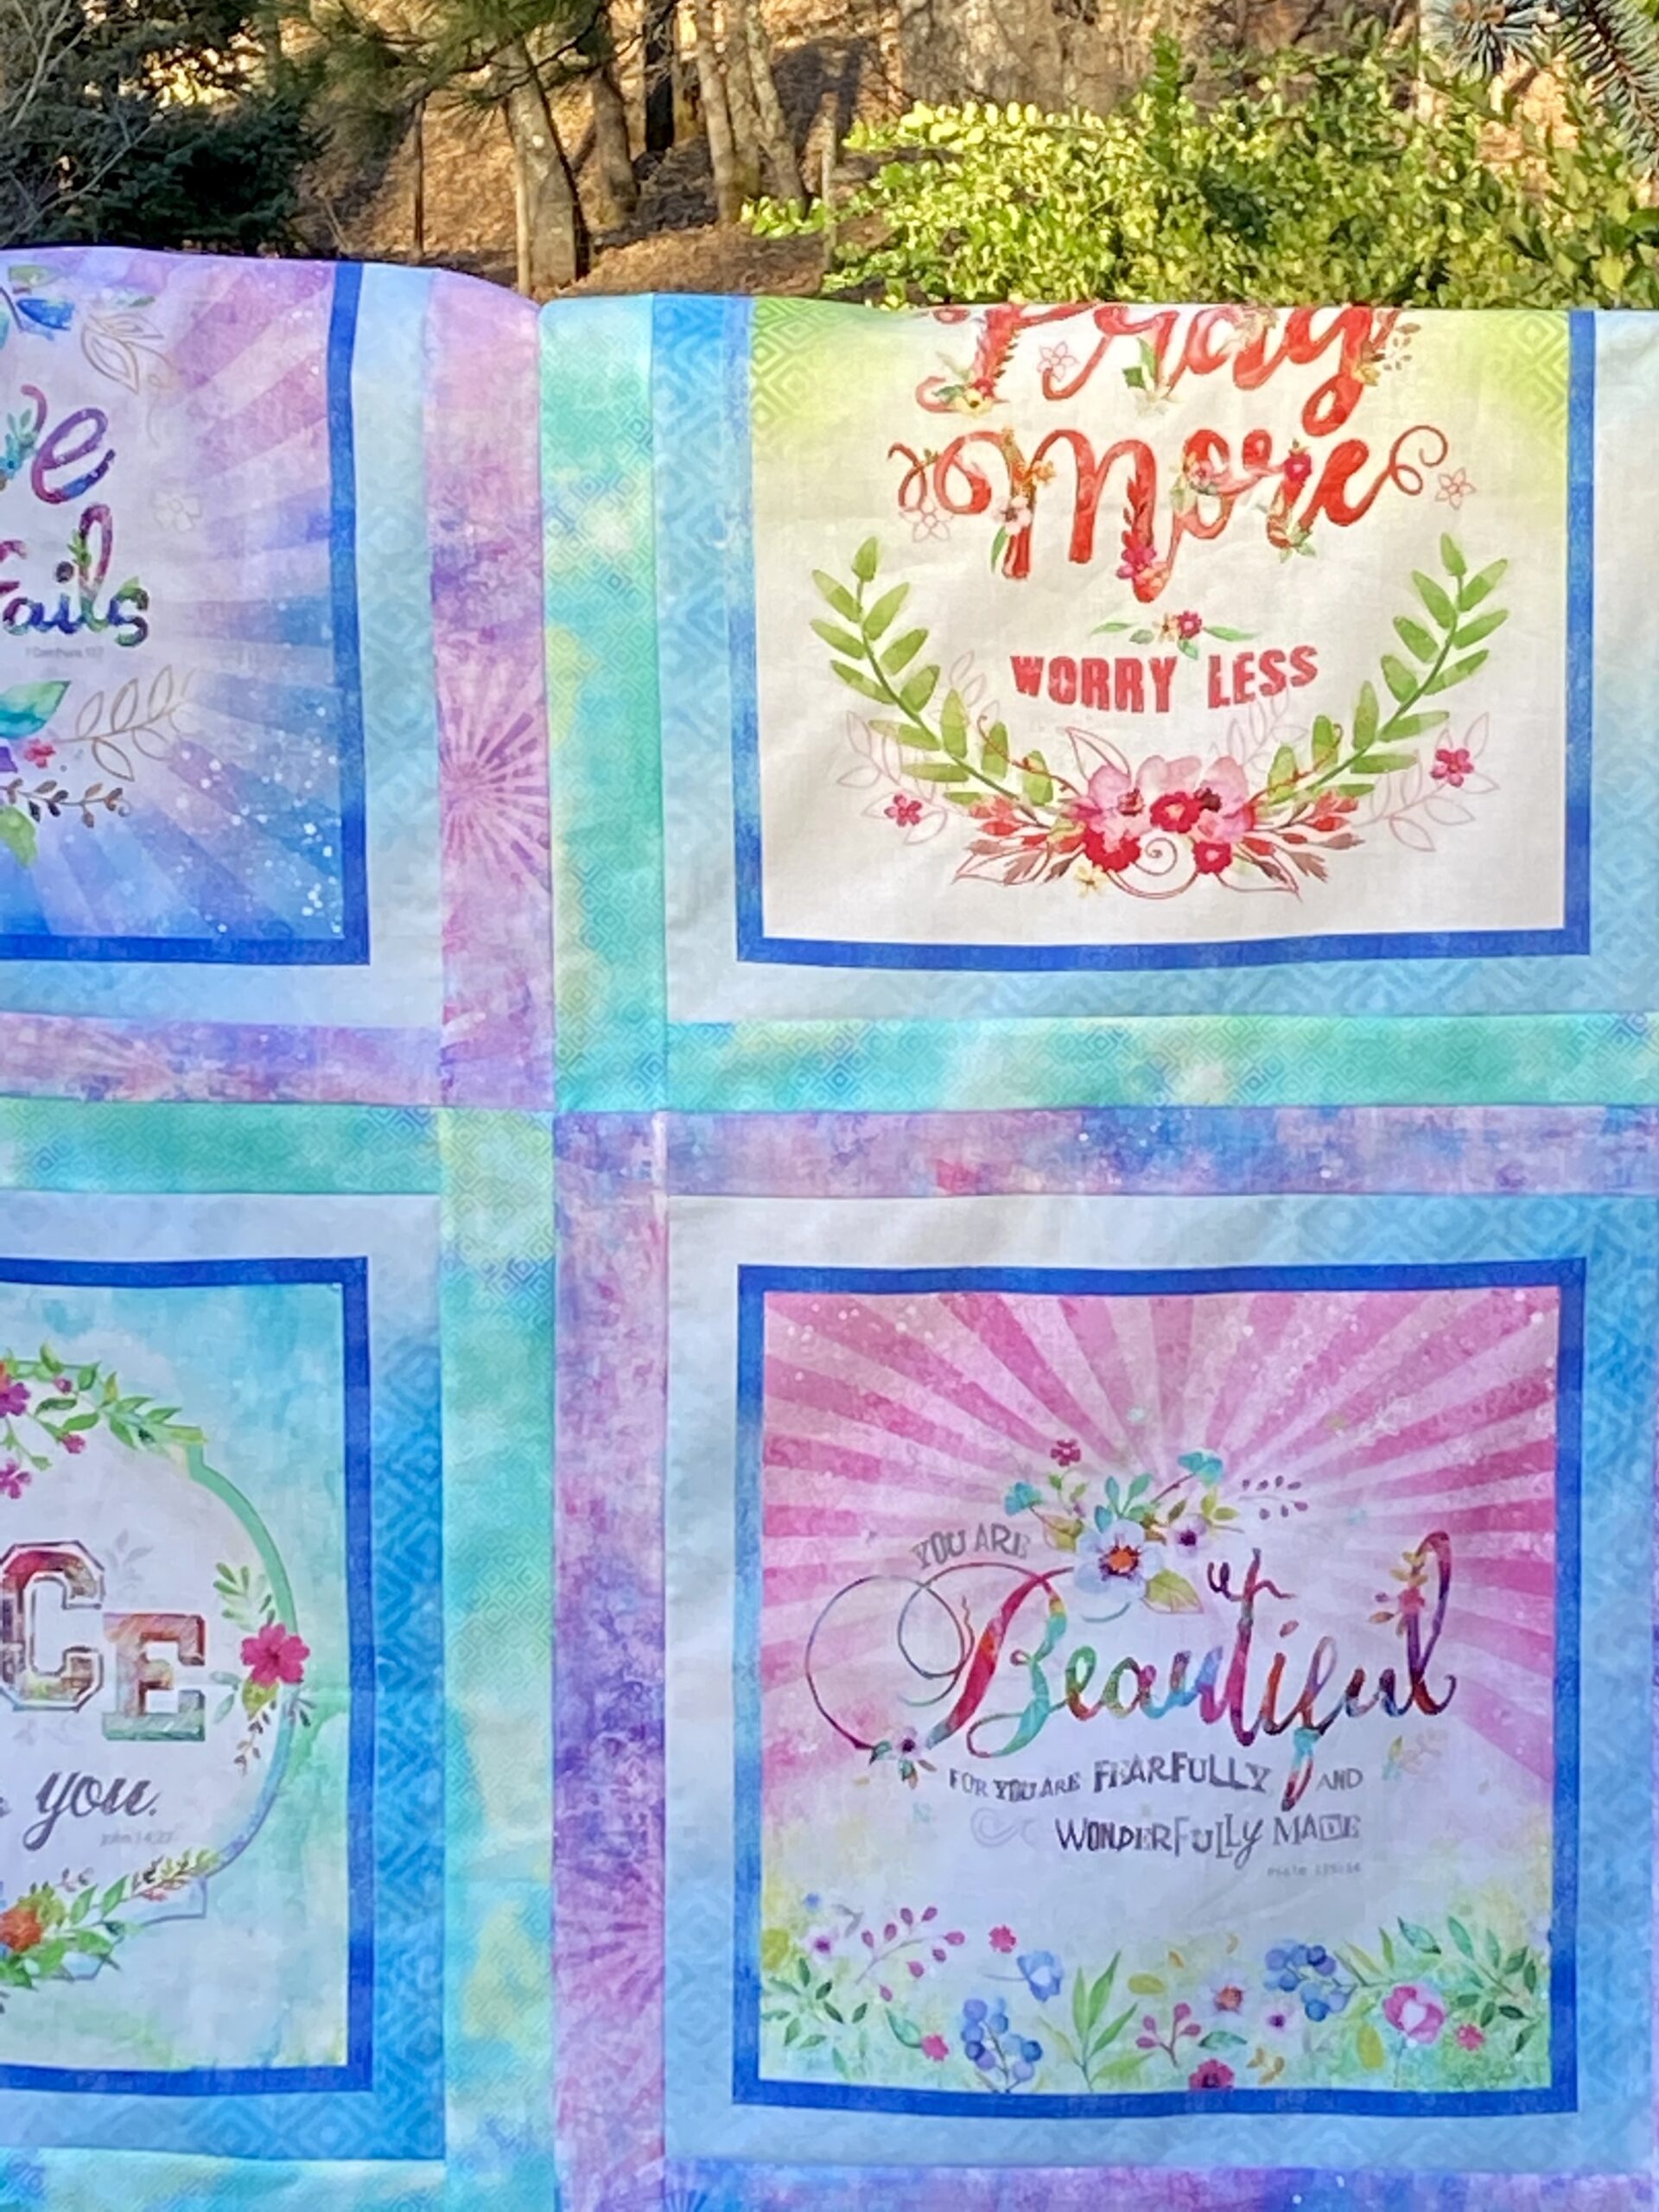
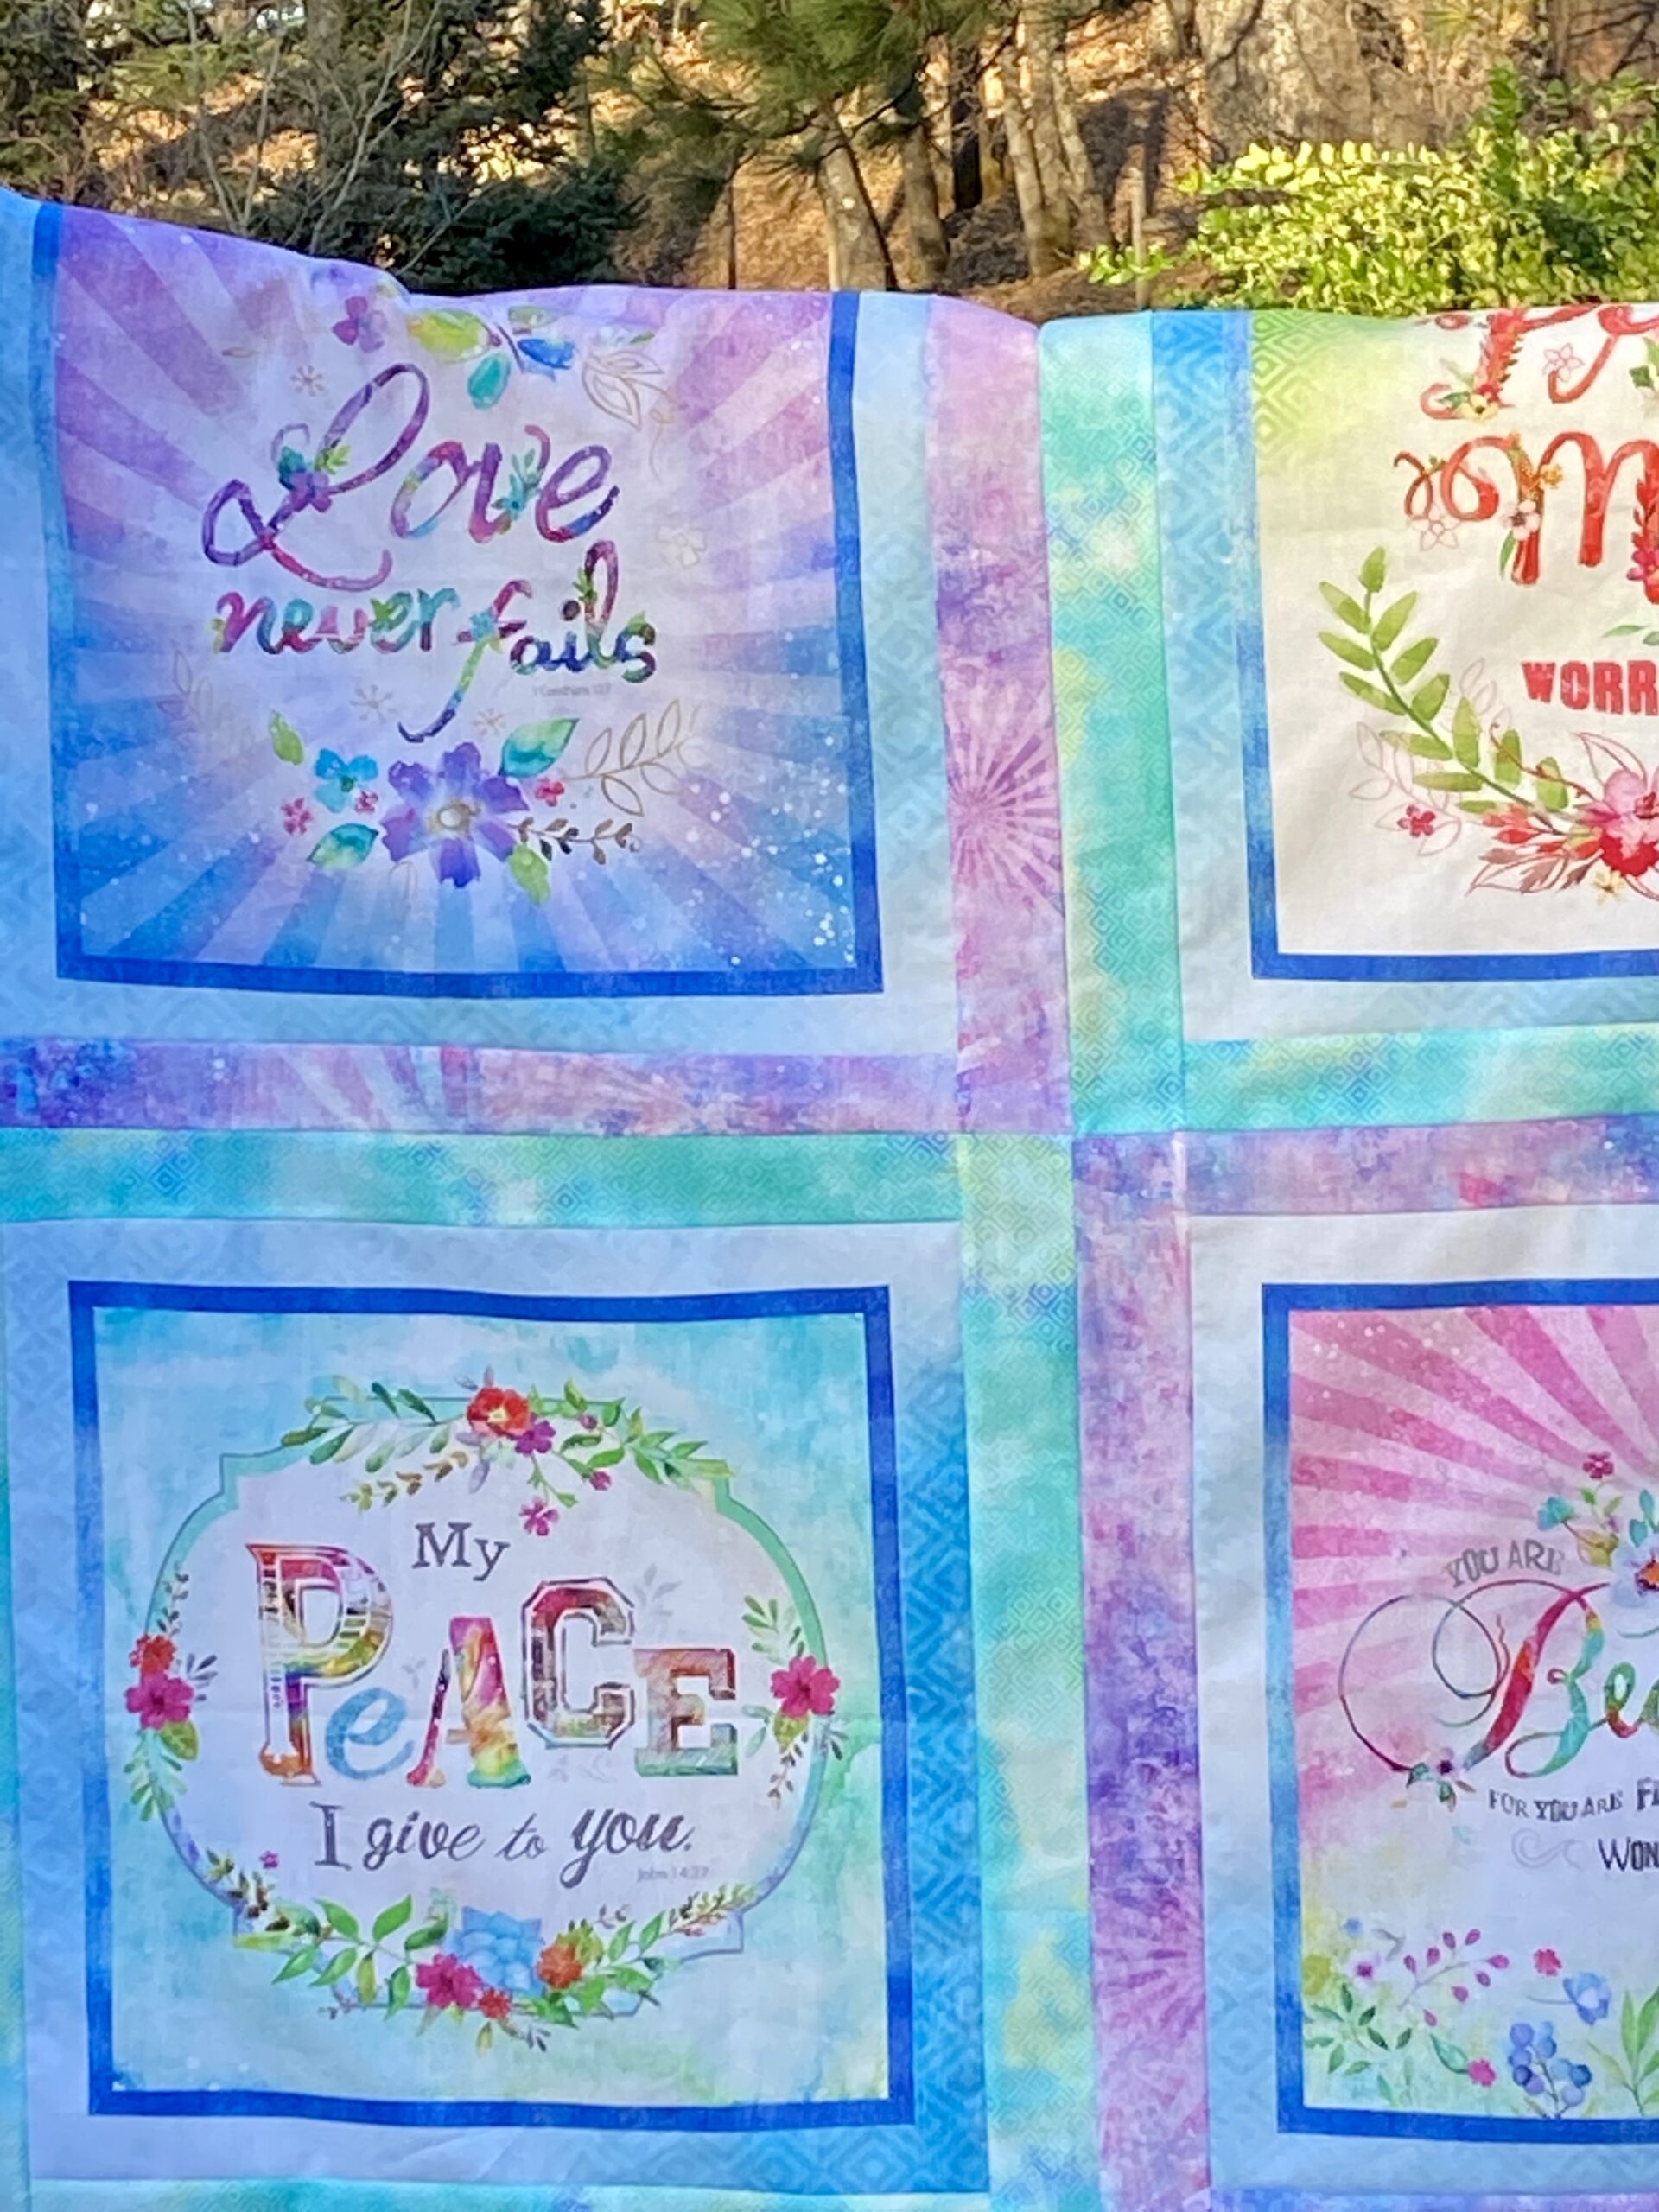
Additionally, I decided to make a quilt for Mercy Hospital. If you are new here, I coordinate a program called Mercyful Quilts and you can read more about it here. It seemed like a good way to start off the new year by making a quilt for them. I have a panel (by Three Wishes) in the shop that is very pretty. It has four large sections and each has a quote. I thought, for people who are going through the process of saying goodbye to a loved one, this quilt would provide comfort. The prints are reminiscent of a water color painting.
Being a panel, this was a simple quilt top to create. I cut the panel into four sections and used some of the coordinates to create borders around the squares. (Looking at the squares, I think these would also be fun to use for a tote bag for bible study.)
Now that it is all put together, I am thinking it might be a tad small at 49 inches square. Just trying to decide if I add another border or go ahead and get it basted. Decisions, decisions. I am thinking of using a soft vintage sheet for the backing. I hope I have one in the right colors for this.
In the on-going saga of pretending to clean the sewing room, I started playing with a stack of leftover HST’s from the Mosaic Mystery Quilt I participated in last winter. (The top is still in the closet, patiently waiting for me to get it finished up.) As a result of piecing that top, I have a large stack of 2 1/2″ HST’s that I want to use for something. I poked around that wonderful rabbit hole, aka Pinterest, until I found some inspiration. I am working on a mini. I haven’t made a mini in quite a while. I remember making a bunch of them when I first started blogging but seems like it has been a while. So this will be finished up soon and I will share it with you then. I am thinking it may need to be hand quilted.
OK – that is it for now. Sorry to have been remiss in posting. I have been reading tons of posts and am loving the Stay at Home Round Robin that is going on. Have you seen the posts about this? It is being hosted by Quilting Gail and I am enjoying it. Check it out – maybe you have the perfect orphan block to build from.
Linking up to Stitch Show & Sew as well as a few others. Check out my Link Up tab at the top of the page.
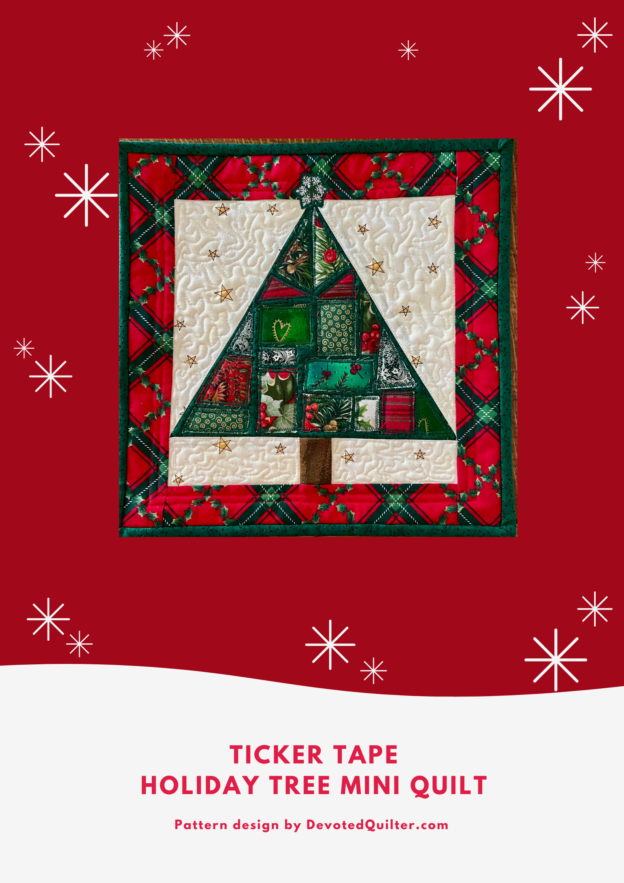
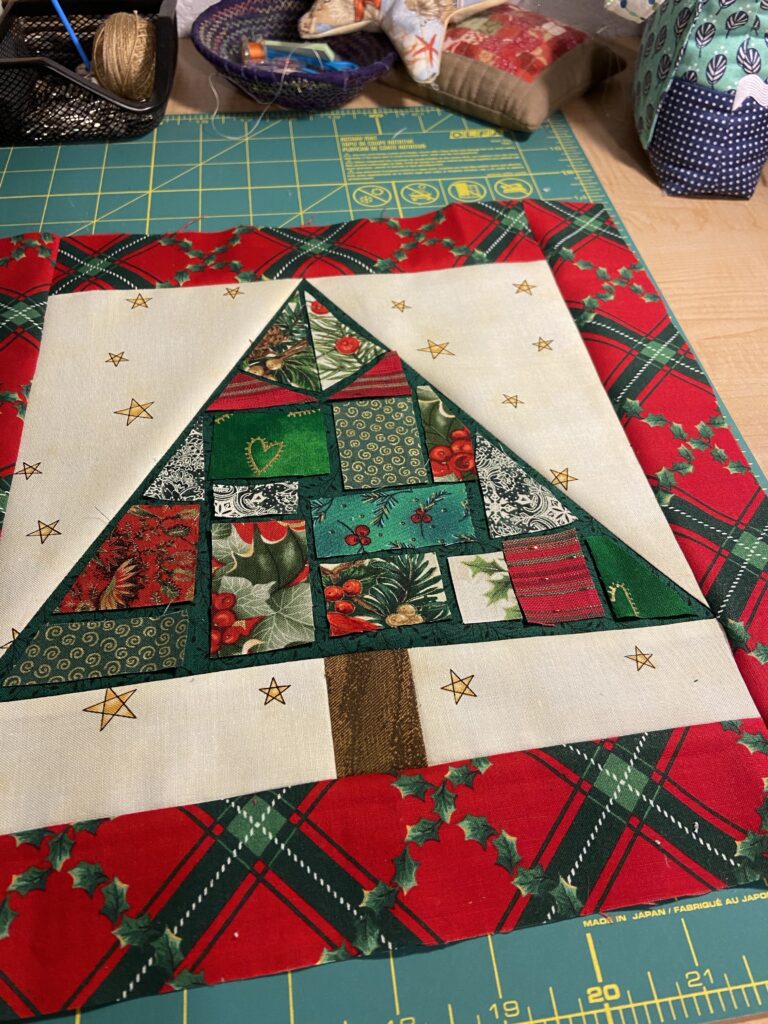
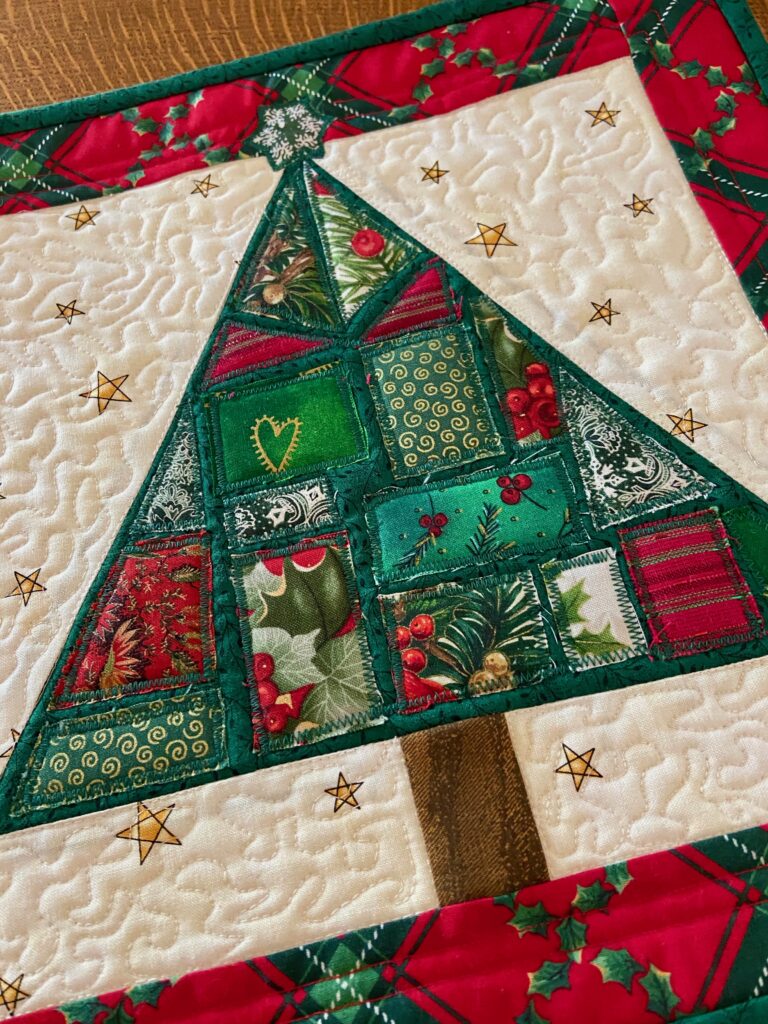
I have loved ‘ticker tape’ projects since I first saw them on Crazy Mom Quilts, some years back. They are so cute and a really fun way to use up bits and pieces of fabric. Fast forward to a couple of days ago when I saw the cutest ticker tape tree over at Devoted Quilter’s site. Leanne created this 12″ block for Quilt Mania. I thought, “ok, I am going to do this. ” I have loved these little scrappy projects for a long time and I decided to set aside the jillion other things I needed to do and make this fun mini. (Thank you Leanne!!)
I have to say, I am especially excited that this quilt turned out because I made it on a ‘post-migraine day’. Normally, I never make anything the day after a migraine. If you have never had one, a migraine leaves a person with scrambled eggs for brains. The day following one, I don’t think clearly, feel very foggy and definitely do not drive anywhere. So when I decided to make this, I figured it was low risk. Using scraps, it wasn’t a huge deal if it ended up in the trash. Fortunately Leanne’s instructions were really helpful. I did get all turned upside down when I was trying to stitch the tree shape (using two rectangles of the cream fabric and a square of dark green for the tree. I kept flipping the rectangles around and could not see my way through it. I finally texted my friend, Sophia, and she was going to talk me through it. But suddenly the lightbulb flipped on and I got it. Seriously, it is very frustrating to know I ‘should’ know how to do something and have this muddled brain that just can’t get there.
Anyhow….. I did get there. Once the little tree was constructed, I put the borders on. The red plaid was a scrap from a big bag of fabric scraps my sister gave me a while ago. It was perfect for framing the little tree.
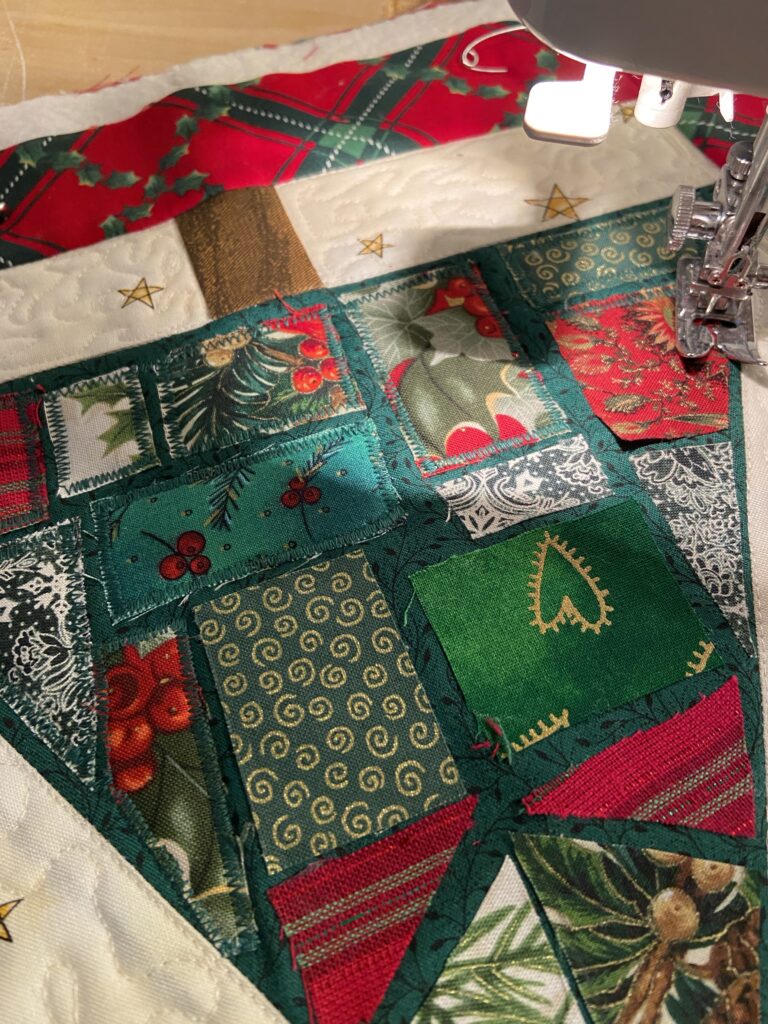
Then came the fun part – cutting up scraps and decorating the tree. Leanne had made hers with various shades of green but I decided to make mine festive with various holiday fabrics. Once I had an arrangement I liked, I used a fabric glue stick to place the pieces.
I used a tight zig-zag to applique the pieces to the tree. This is more than adequate since it will hang on a wall during the holidays and shouldn’t require laundering.
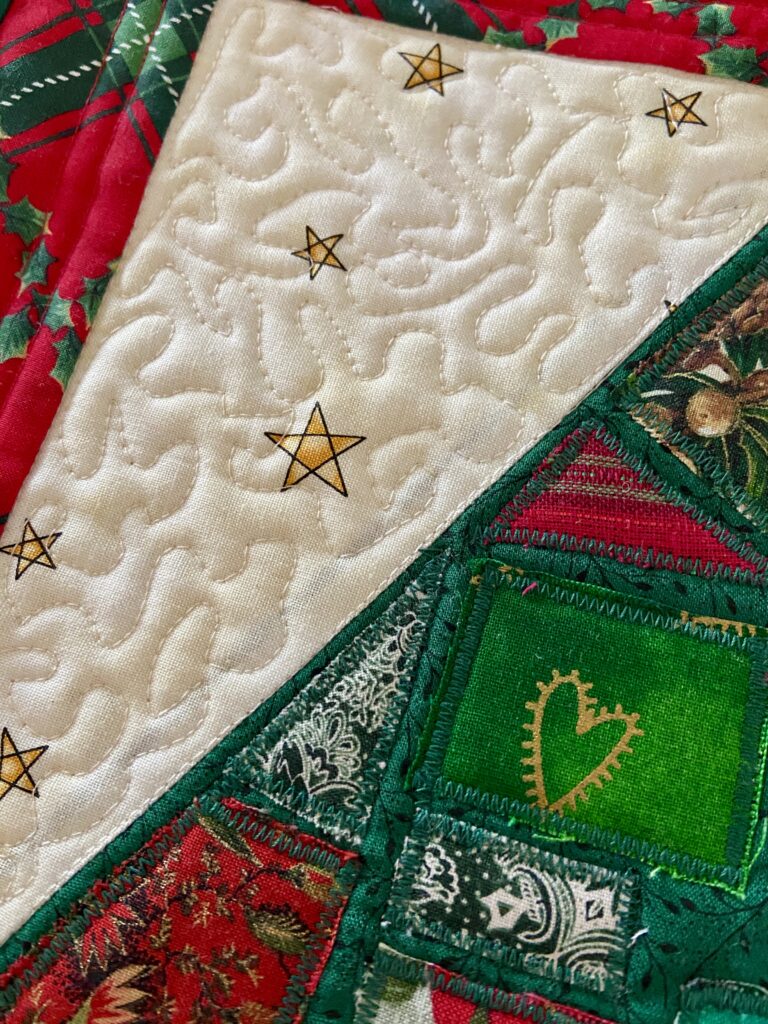
I had fun using a micro stipple on the background. Nothing like a mini quilt to give that satisfying feeling of a finish, right?
See that little snowflake at the top of the tree? Love it! Also, the green heart in the center just adds a little sparkle to my tree.
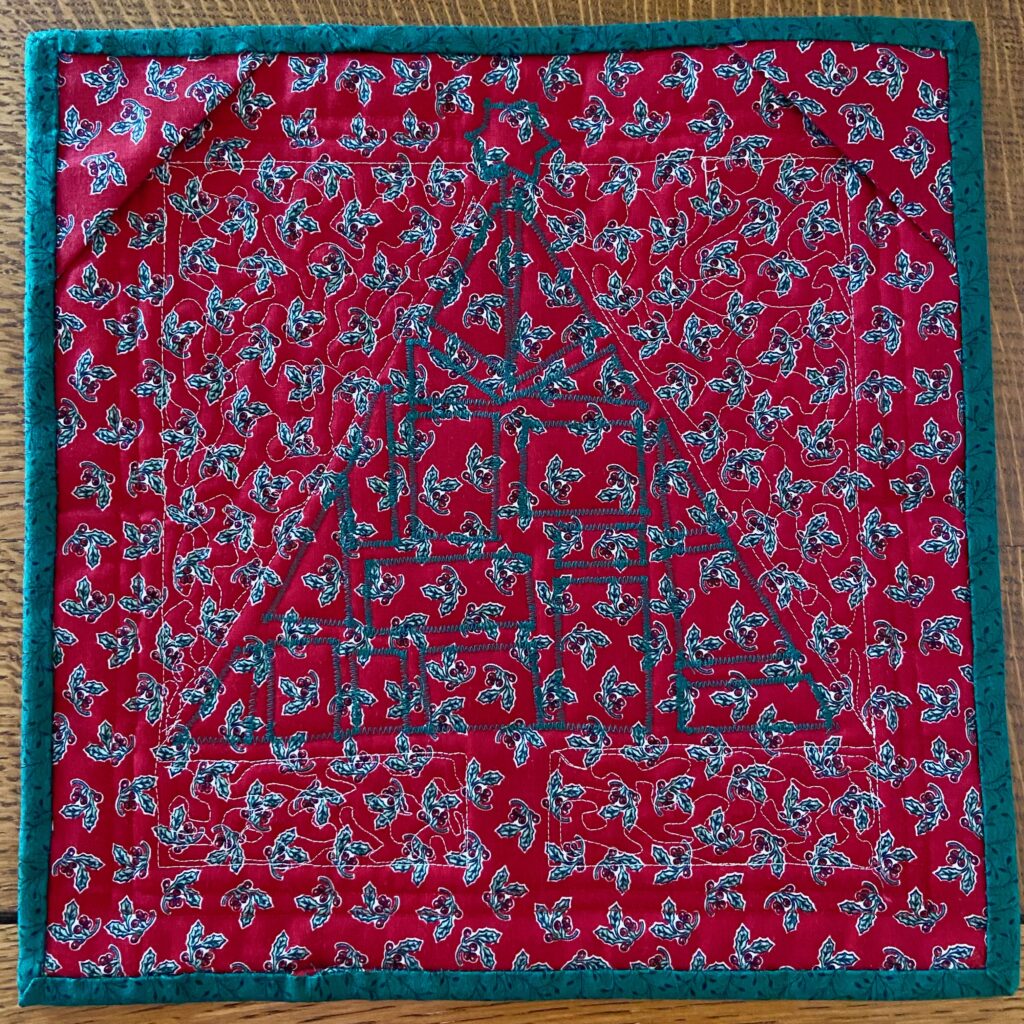
The backing was a bit of a holiday print I had in my drawer full of Christmas fabrics.
Overall, this was just a very fun project that I enjoyed making. It has been such a long time since I played around like this. Be sure to give it a try. The directions are available here. I am looking forward to hanging this in the entryway during the holidays! Thanks again Leanne – writing tutorials takes a bit of time and I am so appreciative to you for putting this one together.
I don’t know if it is the same for you, but it is always with mixed feelings that I end a trip or vacation. Julia and I had such a wonderful time in Vermont. The week seemed to fly by and it was difficult to leave. Having my kids living so far from California isn’t the ideal situation but it is what it is, right? While I was a bit sad to leave them, and especially my sweet grand baby, I was happy to come home. I love my home and was more than happy to see my husband after ten days apart.
As for my grand baby, since I know you are all dying to hear, she is just adorable. I loved having the opportunity to spend a long stretch of time with her. She is full of all that newborn wonder that just melts a person’s heart. Her little cooing sounds when she is nursing, the happy smile she does when she is dreaming (what do newborn babies dream about anyway?) and the adorable cat-like stretches she does when she is waking up – the stuff newborn babies are made of. Ahh, I do love babies. She does have a touch of colick and can be quite fussy during the late afternoon and into the evening. Her parents handle these episodes with such patience. I am really proud of both of them.
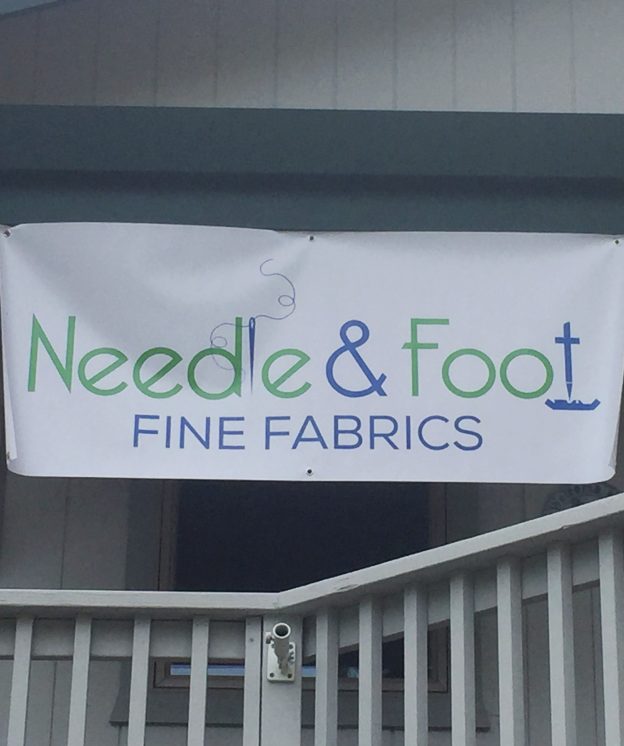
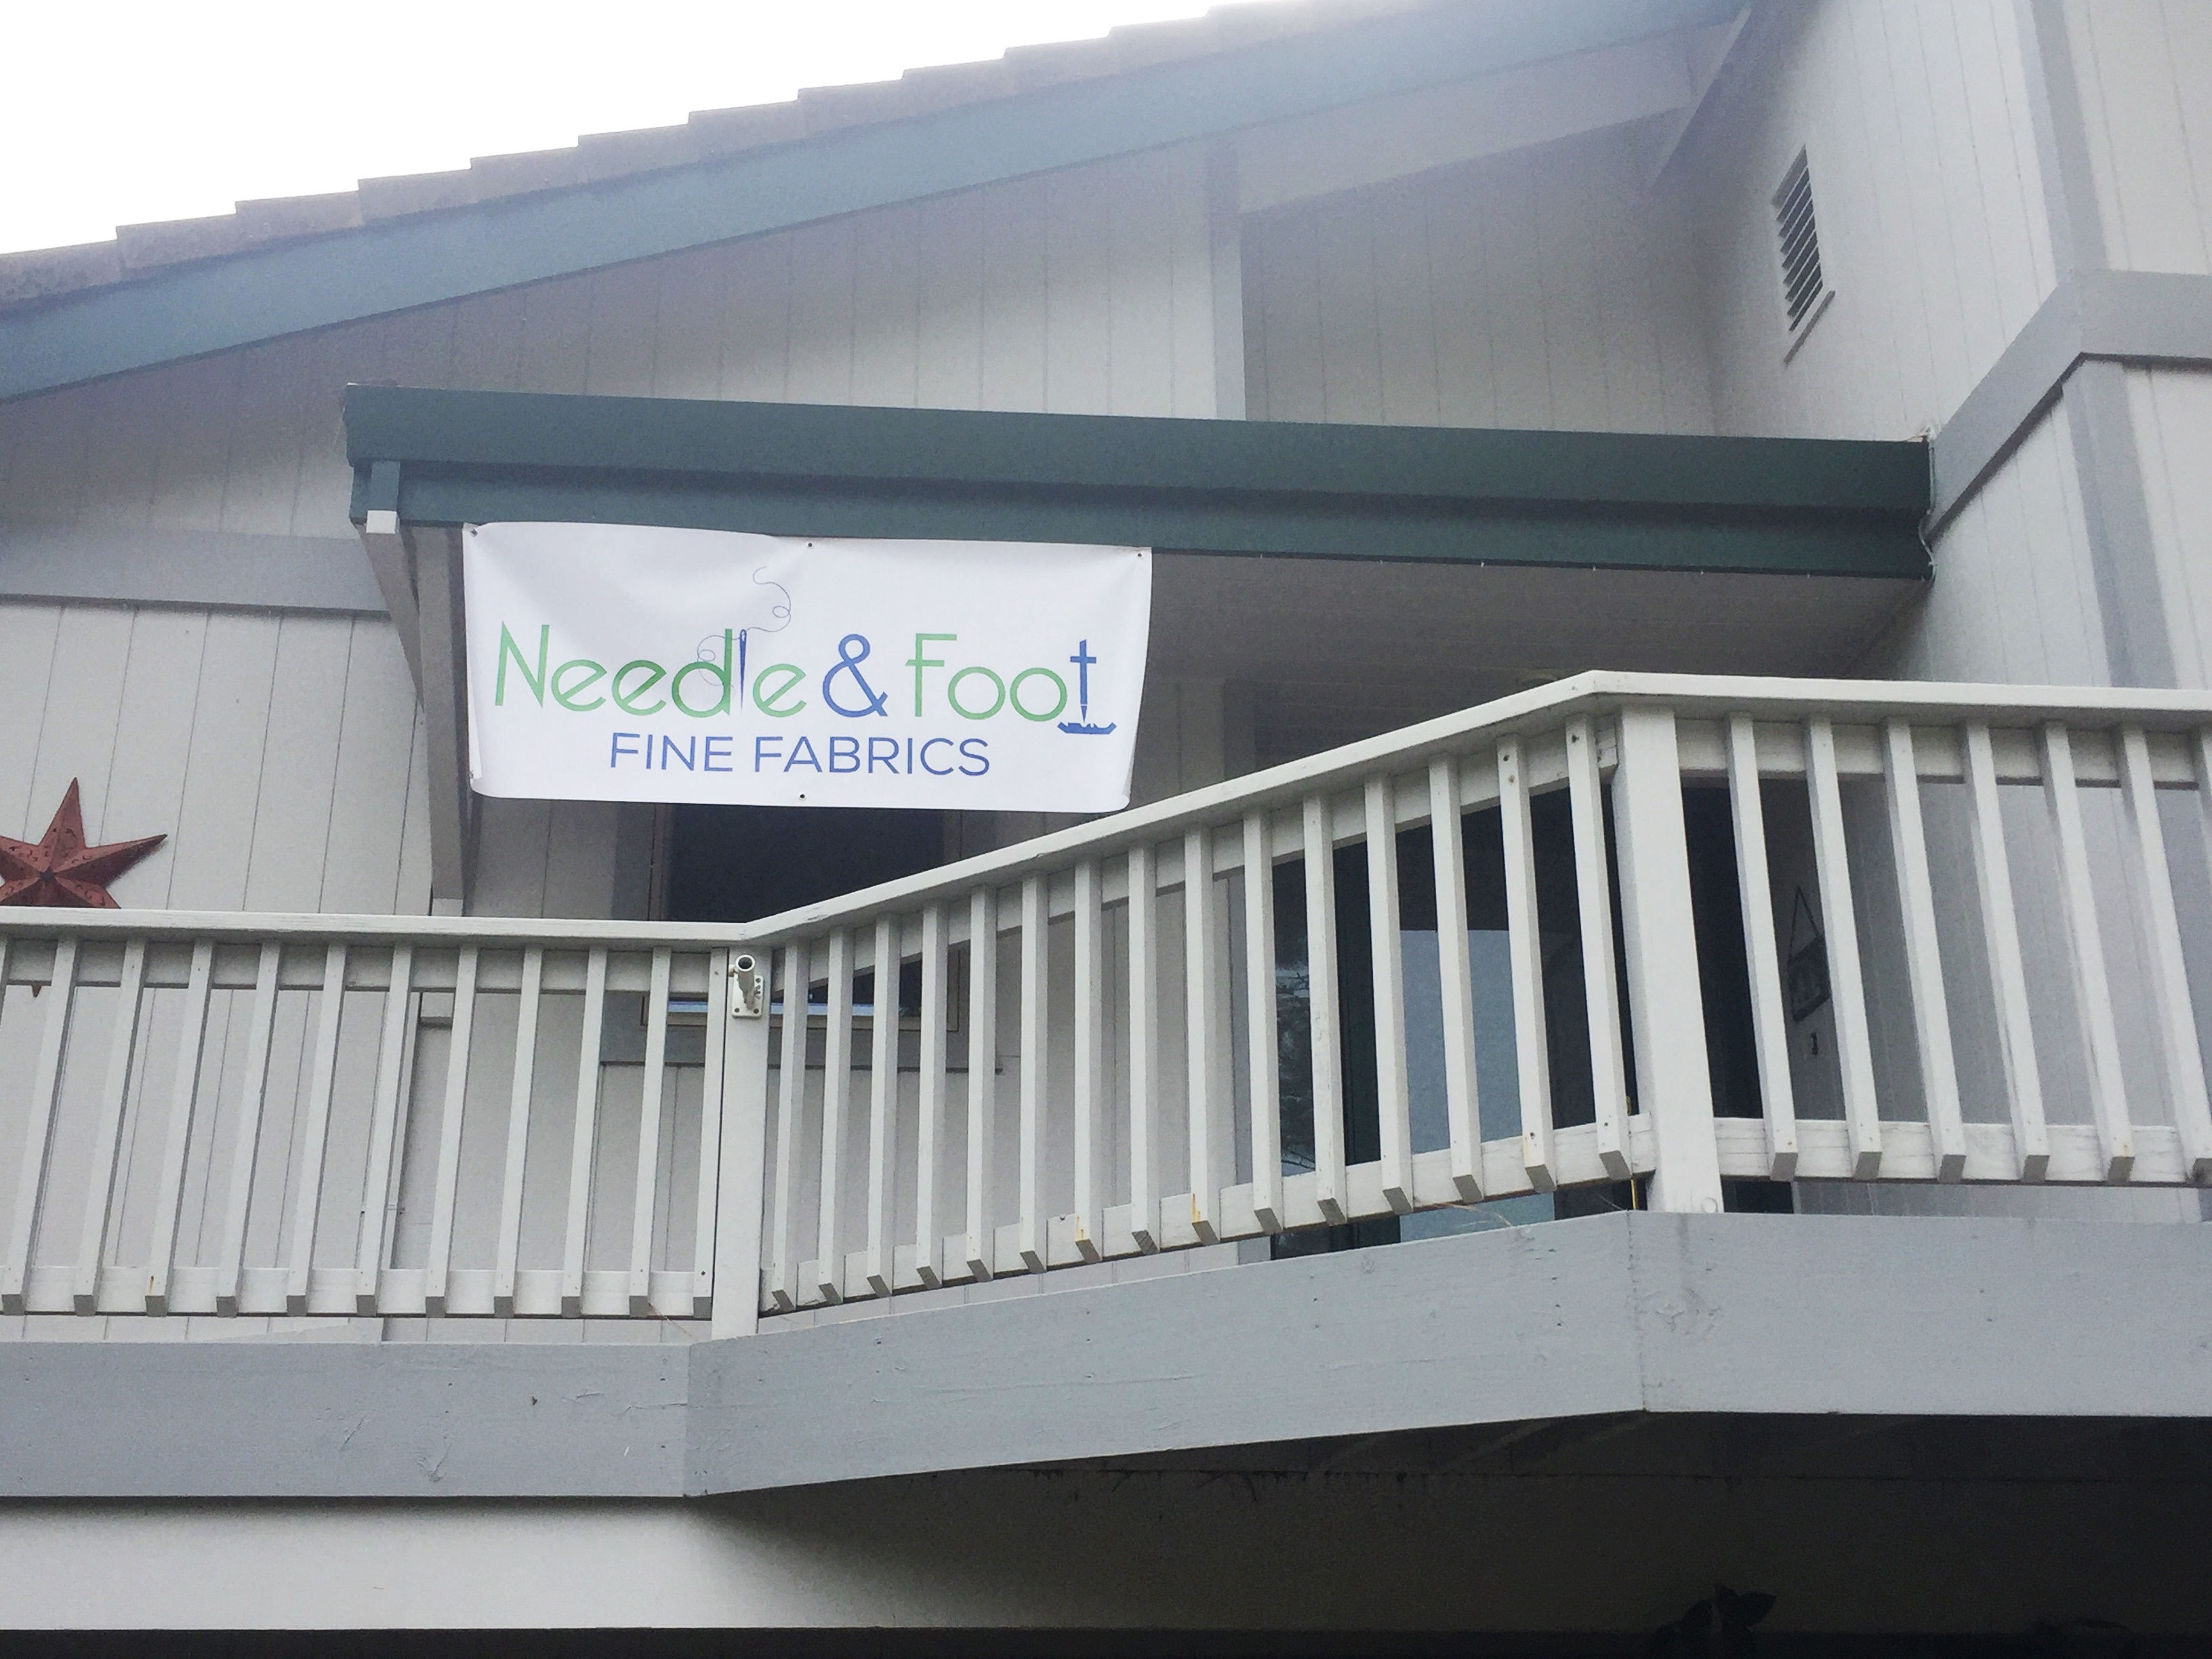
When I got home, this was the first thing I saw as I drove up to the house. Isn’t it great? I ordered this banner a few weeks ago from Vistaprint. I will be a fabric vendor at our local quilt show in May and wanted to have something hanging at the back of the booth so shoppers would know the name of my shop. I am thrilled with how well it turned out. These pictures don’t do it justice. Ray hung this for me as a surprise but it was very gray and cloudy out and we took it down right away so it wouldn’t be rained on.
The size is 2 1/2 feet by 6 feet. It seems big to me but I am a poor judge of these things. Ray thought it was perfect so I am going with his opinion. We will see when I get the booth set up.
I also came home to a lot of happy mail. There was a lovely thank you note from a reader that won some fabric. How sweet of her to send a real note. It is a treat to receive a real card when email is usually the way we communicate these days. The card featured a very pretty crazy quilt picture.
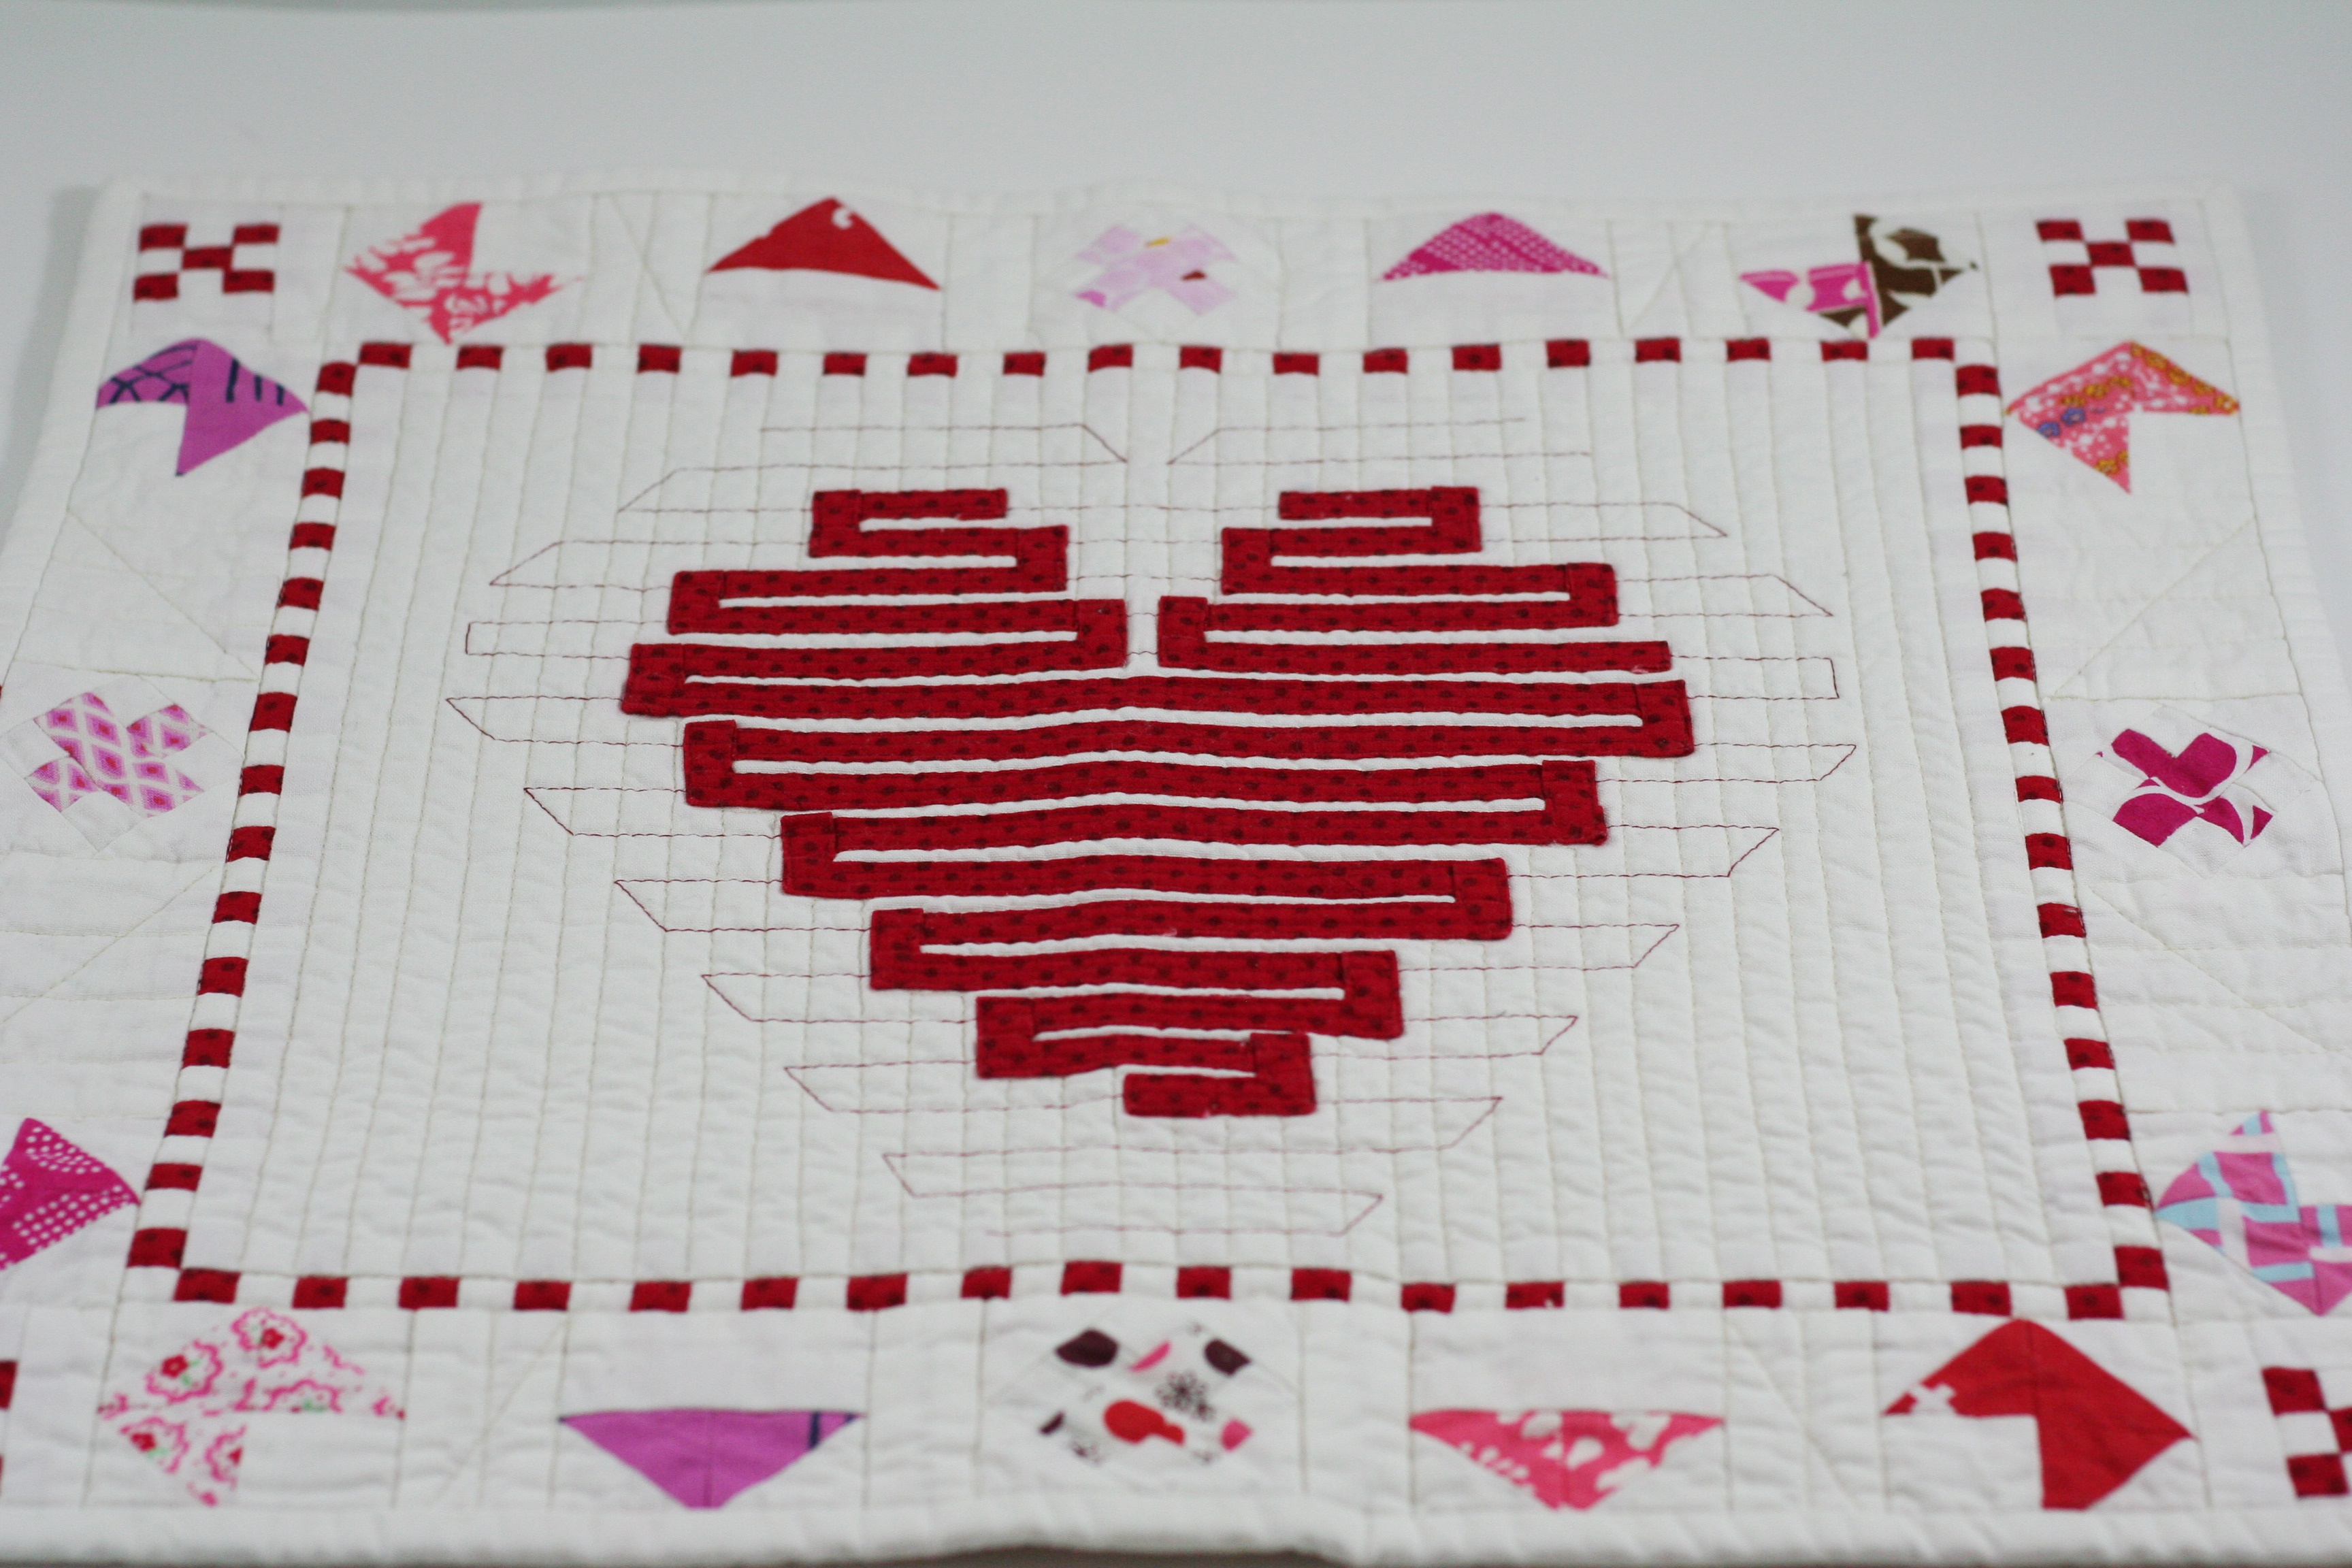
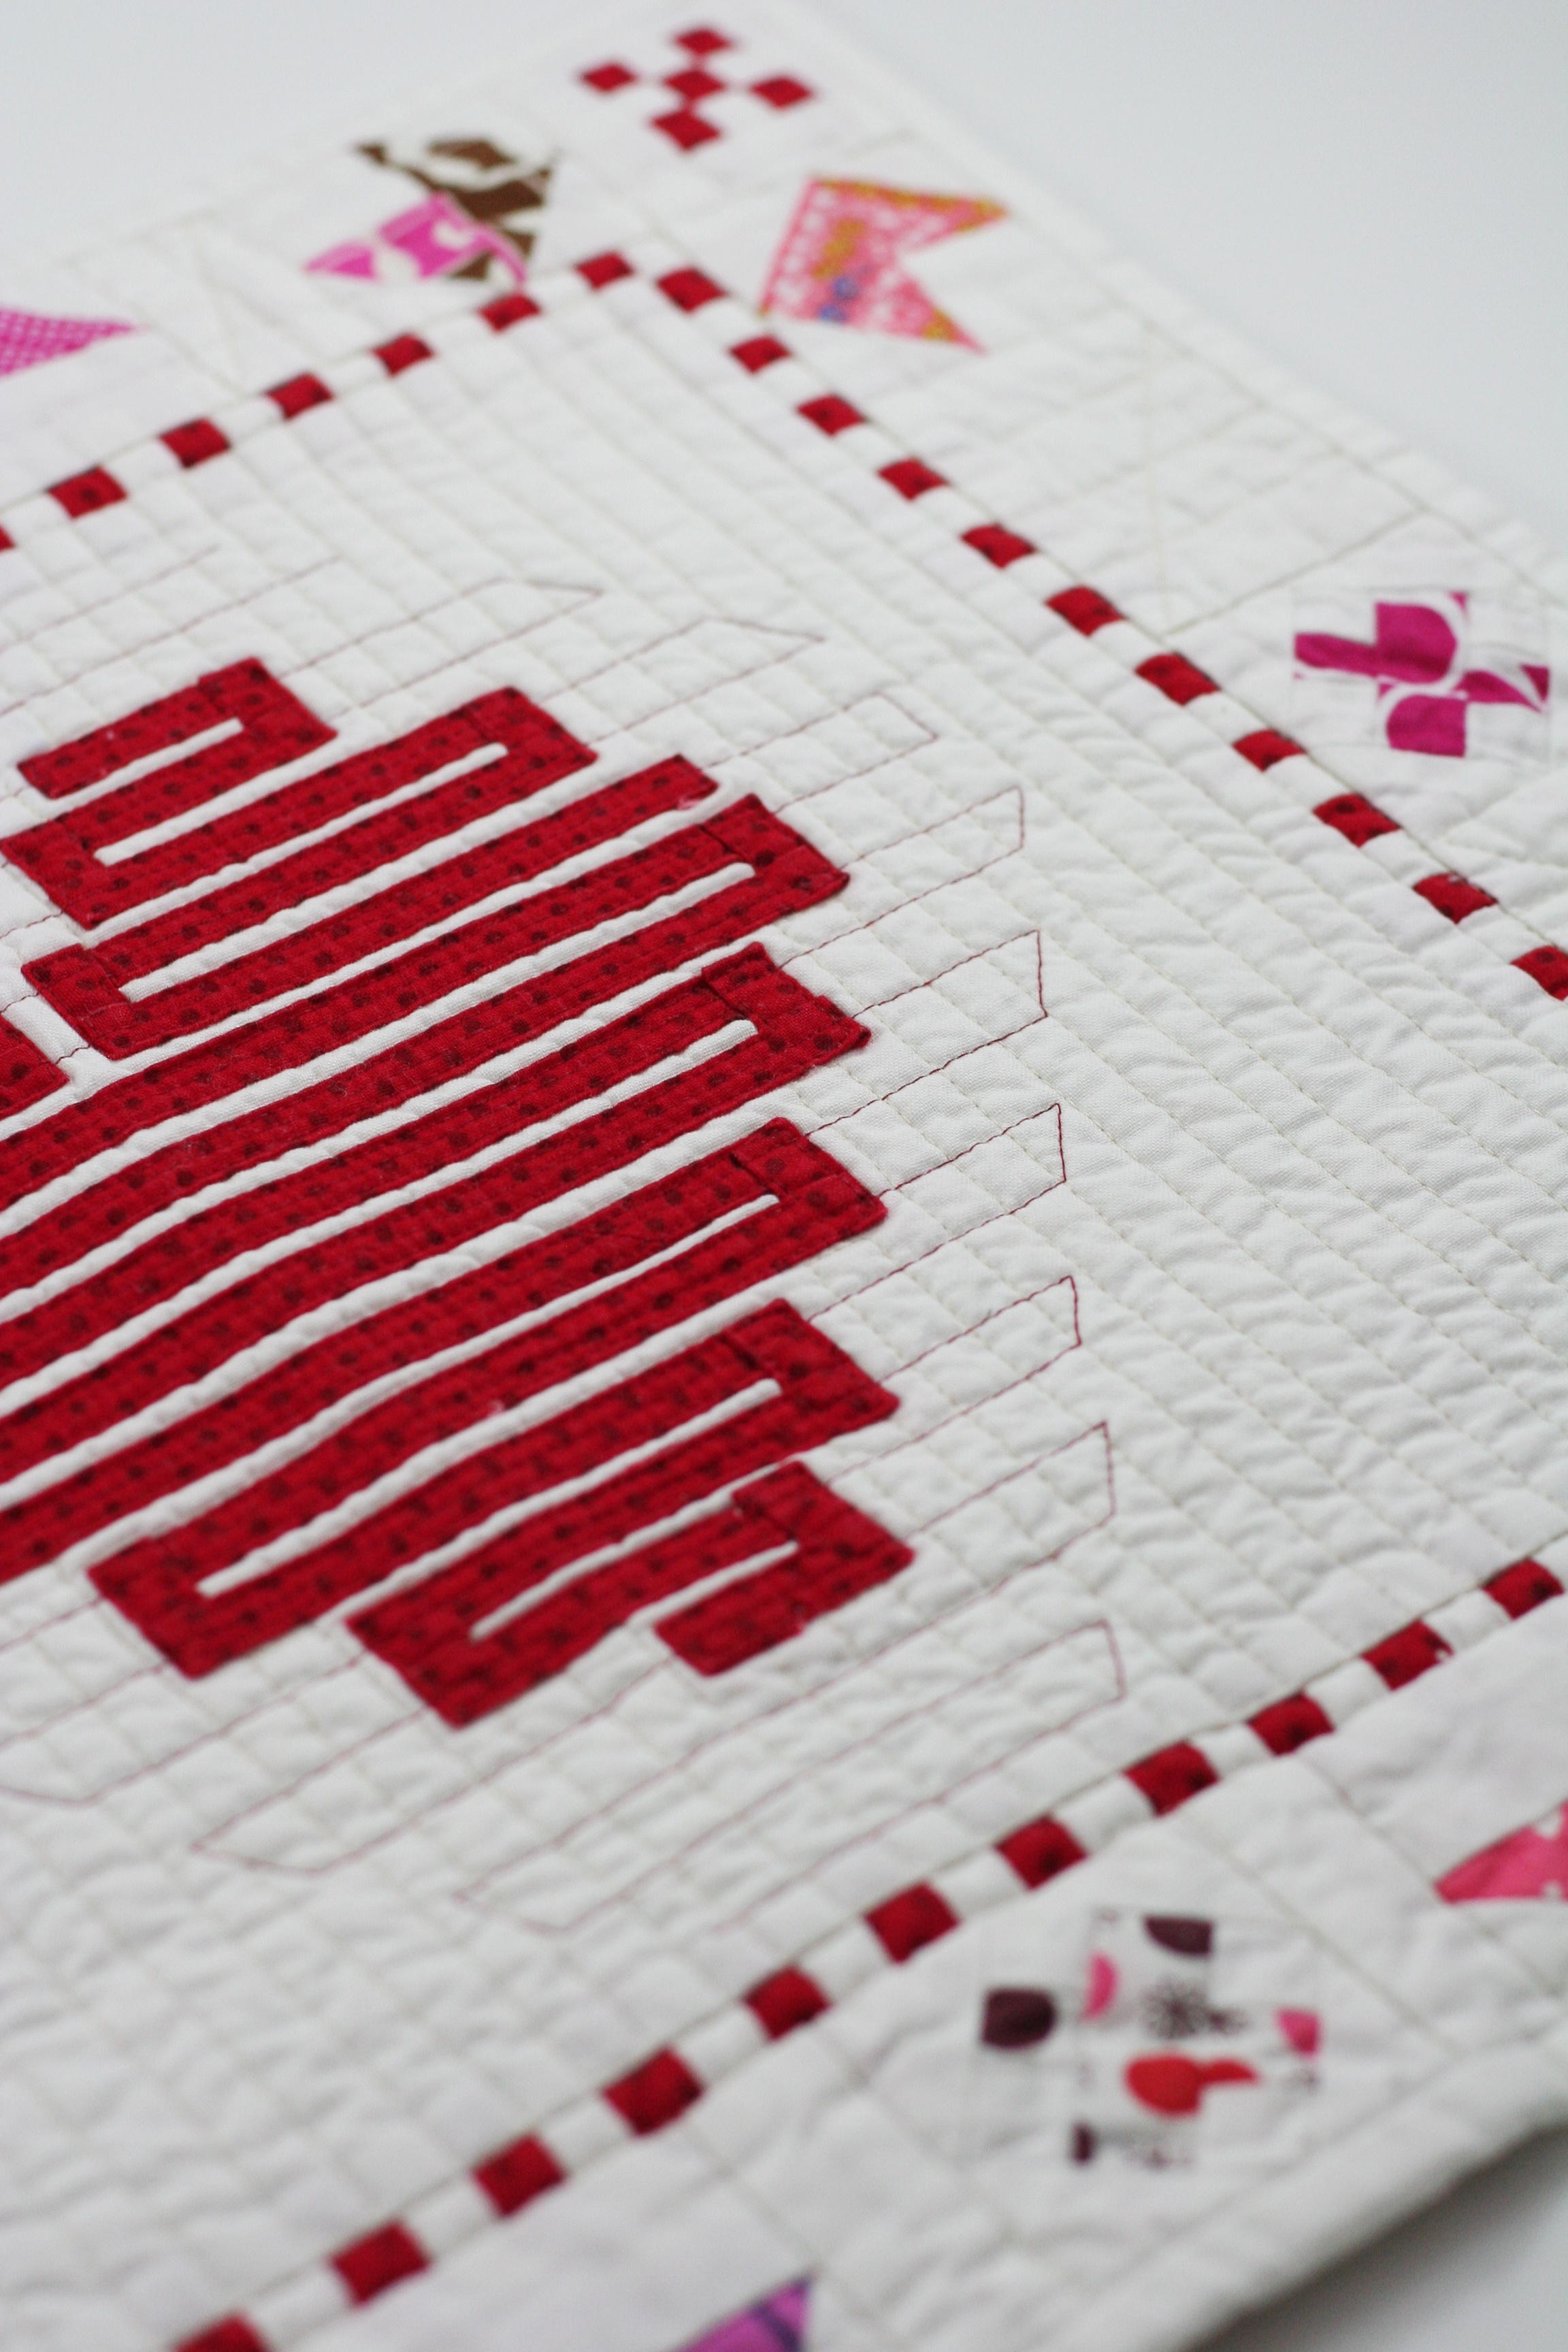
After opening the card from Gloria, I opened a package sent to me by Jayne of Twiggy and Opal. I cannot even describe my surprise to see this gorgeous mini quilt. Jayne enclosed a note saying this was just a little gift for me. Really? For me? Just because??? I am beyond happy to have this quilt. I watched Jayne’s progress on this project on her Instagram feed. (Side note: do you follow Twiggy & Opal on IG? If not, hop over there and follow her. She is just a constant source of inspiration. I love her feed.) Anyway, I loved this project from the beginning.
I love the quilts Jayne designs. It seems like (and I may be totally wrong) she starts with an idea and it just organically evolves while she is sewing. From what I saw on her IG feed, Jayne made the bias strips she used to create the heart in the center. Then she started creating little (teeny, tiny) pieces to use in the border. The nine patch block on the left side of the photo above measures just under one inch. I have no words. It is adorable. The little HST’s to the right are also just under an inch. Yikes. My fingers are too clumsy for such miniature piecing.
She must have done some strip piecing for the nine patch and then also used it for the checkered border. That isn’t a striped piece, it is pieced! I just love her straight line quilting and also the quilting she did over the bias strips to emphasize the heart shape.
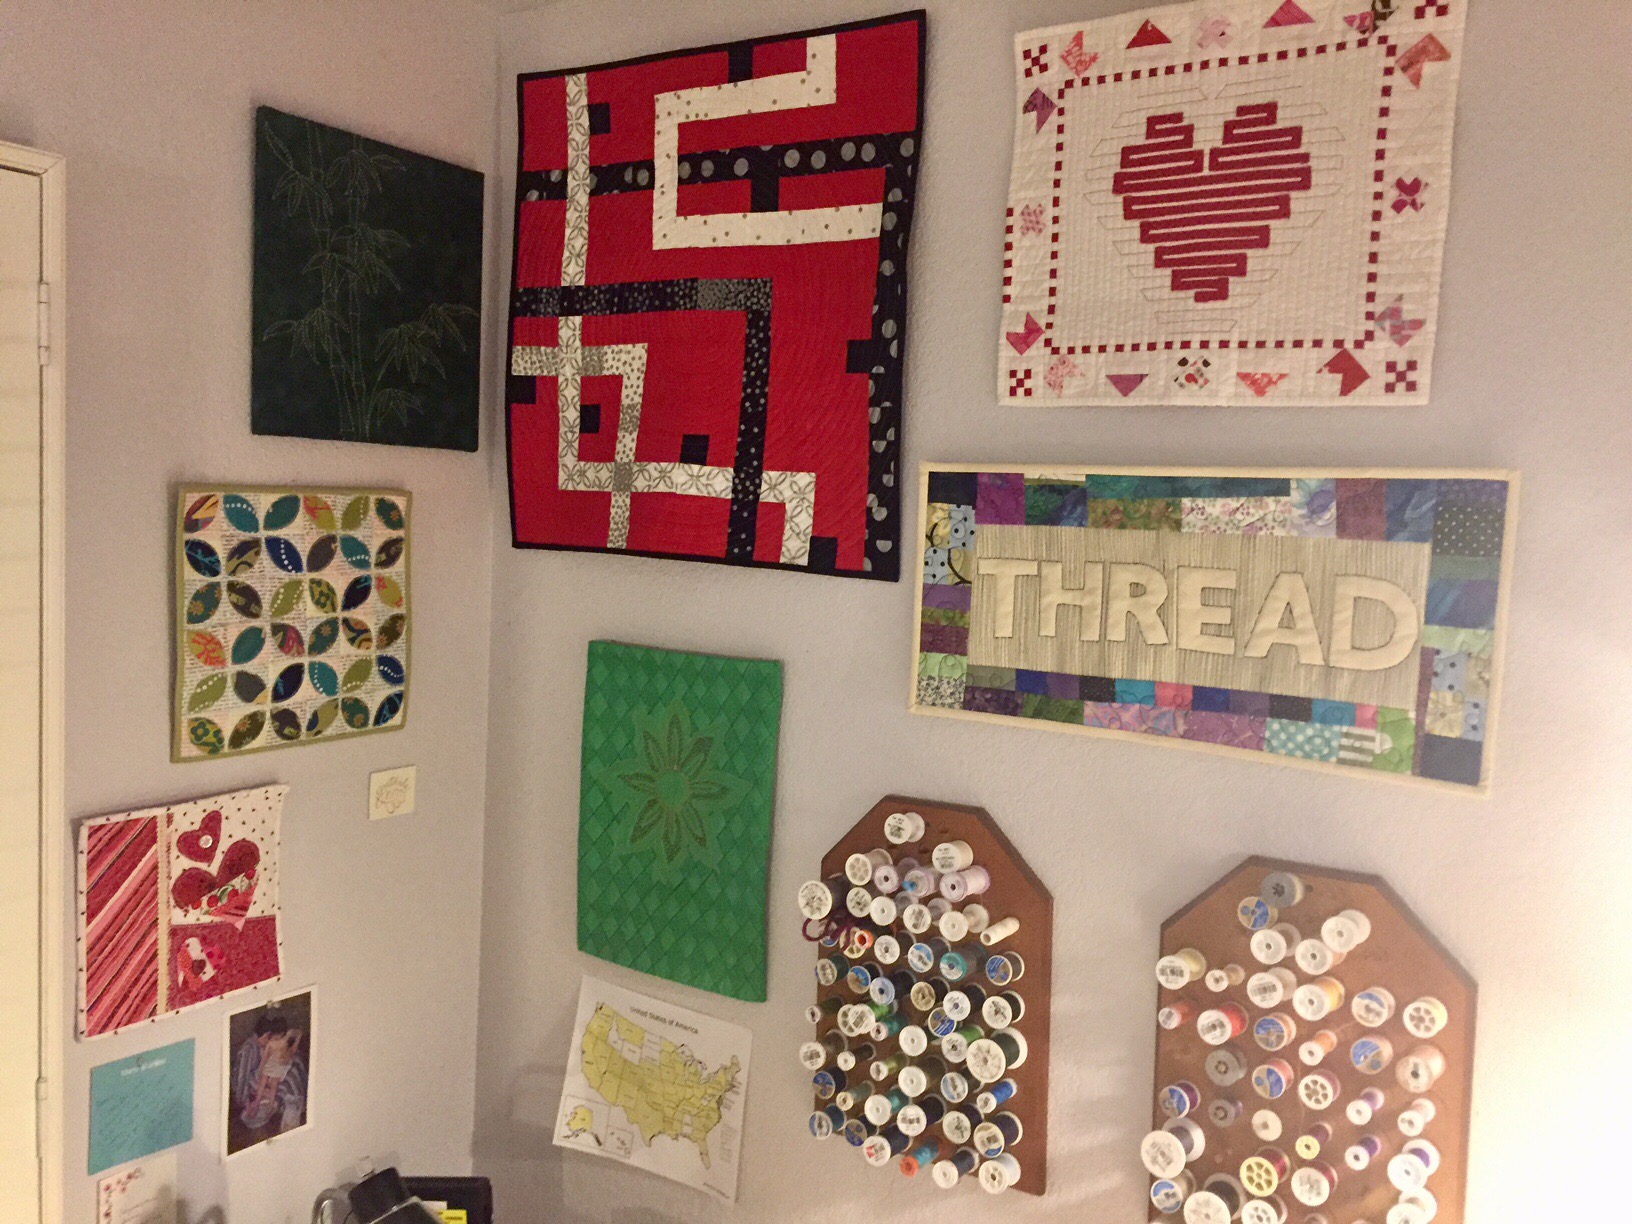
It is already hanging in my sewing room. I love having this treasure from Jayne and will think of her when I see it. It is such a special gift.
I have so many blog posts to catch up on this week. I didn’t read too many while I was away last week. There is so much going on right now. The New Quilt blogger Blog Hop is on going and there are lots of new bloggers to befriend. Check out the links at Quilting Jetgirl, Cooking Up Quilts and She Can Quilt. I will have a new Meet the Designer post up in a few days. This one will feature Kim Schaefer, a designer of cute, whimsical fabric lines for Andover. Hope you will come back Wednesday to get to know Kim. Until then, happy sewing to you!!
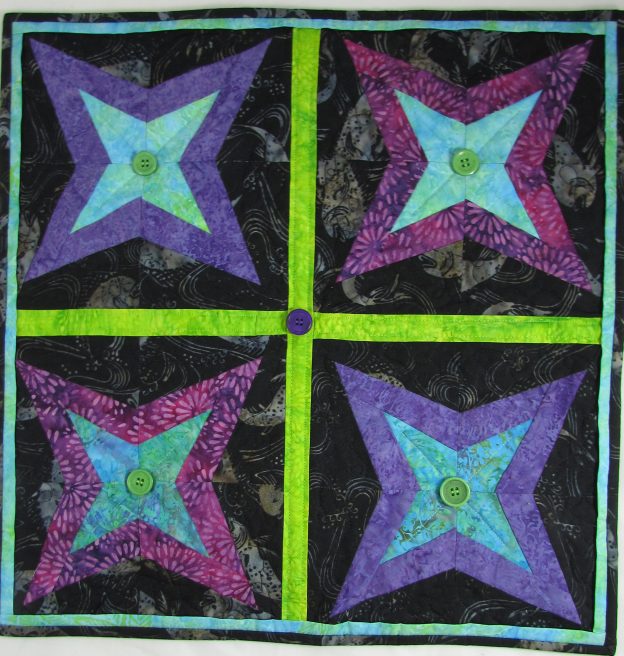
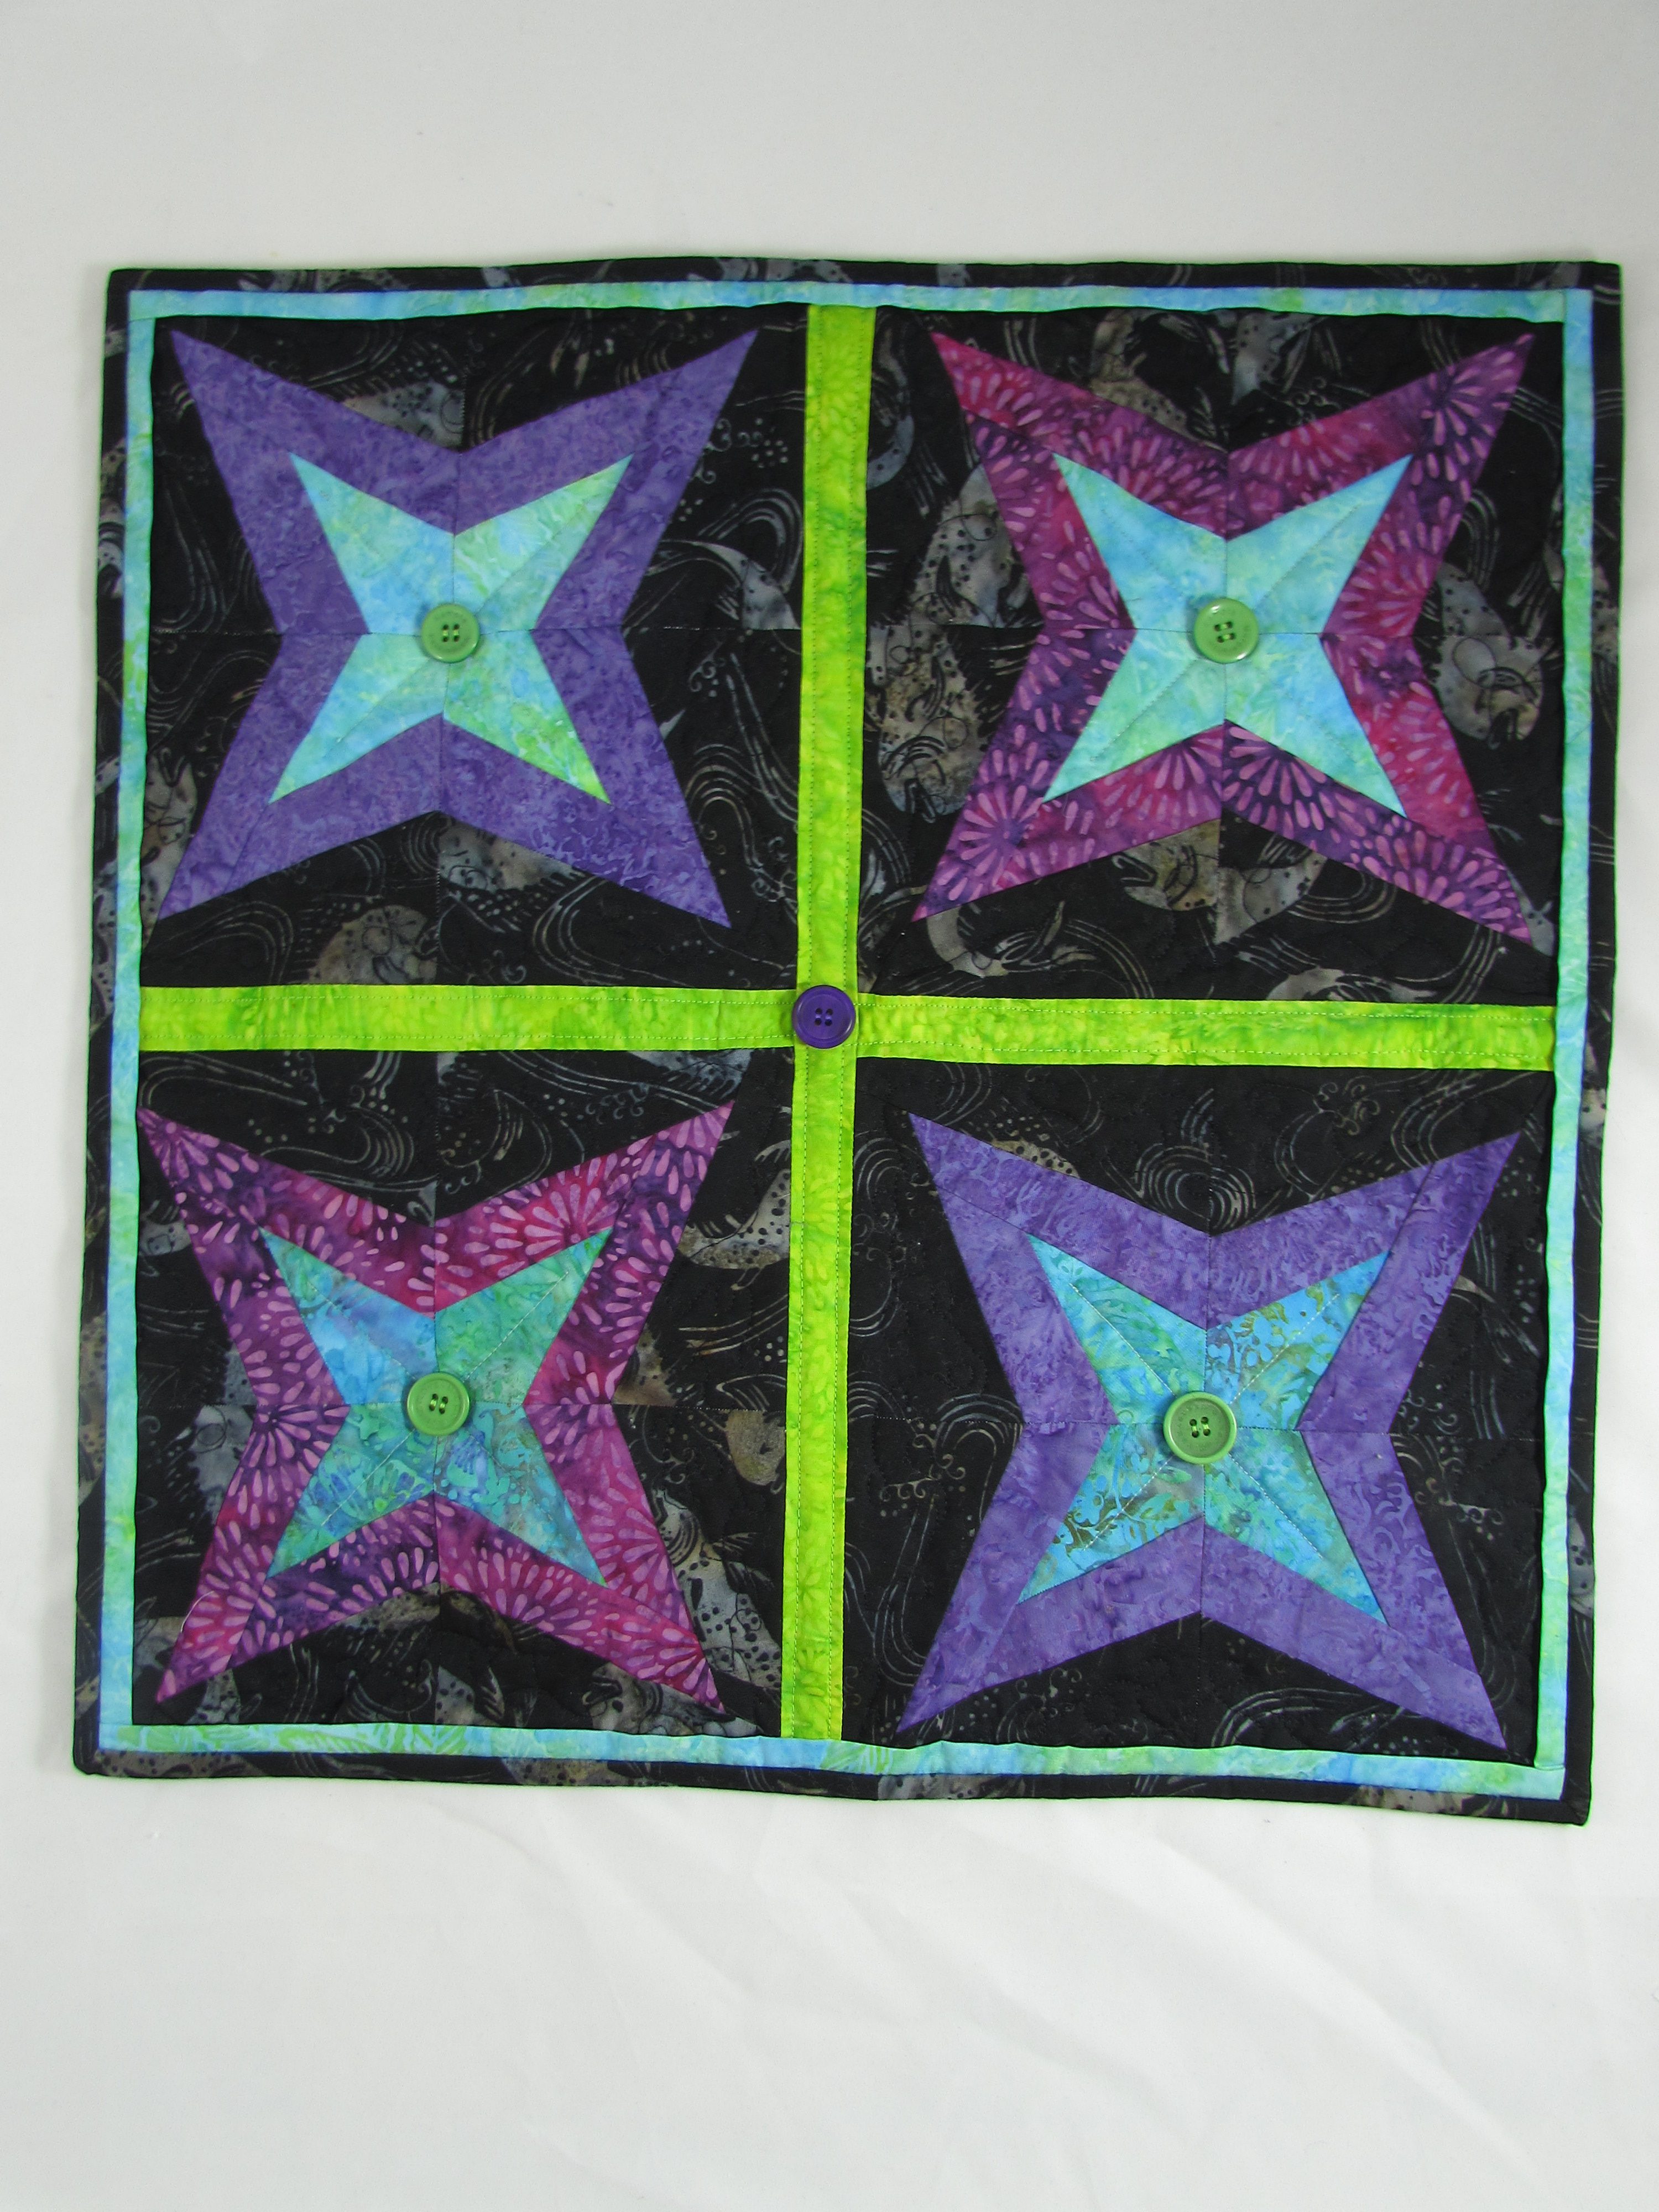
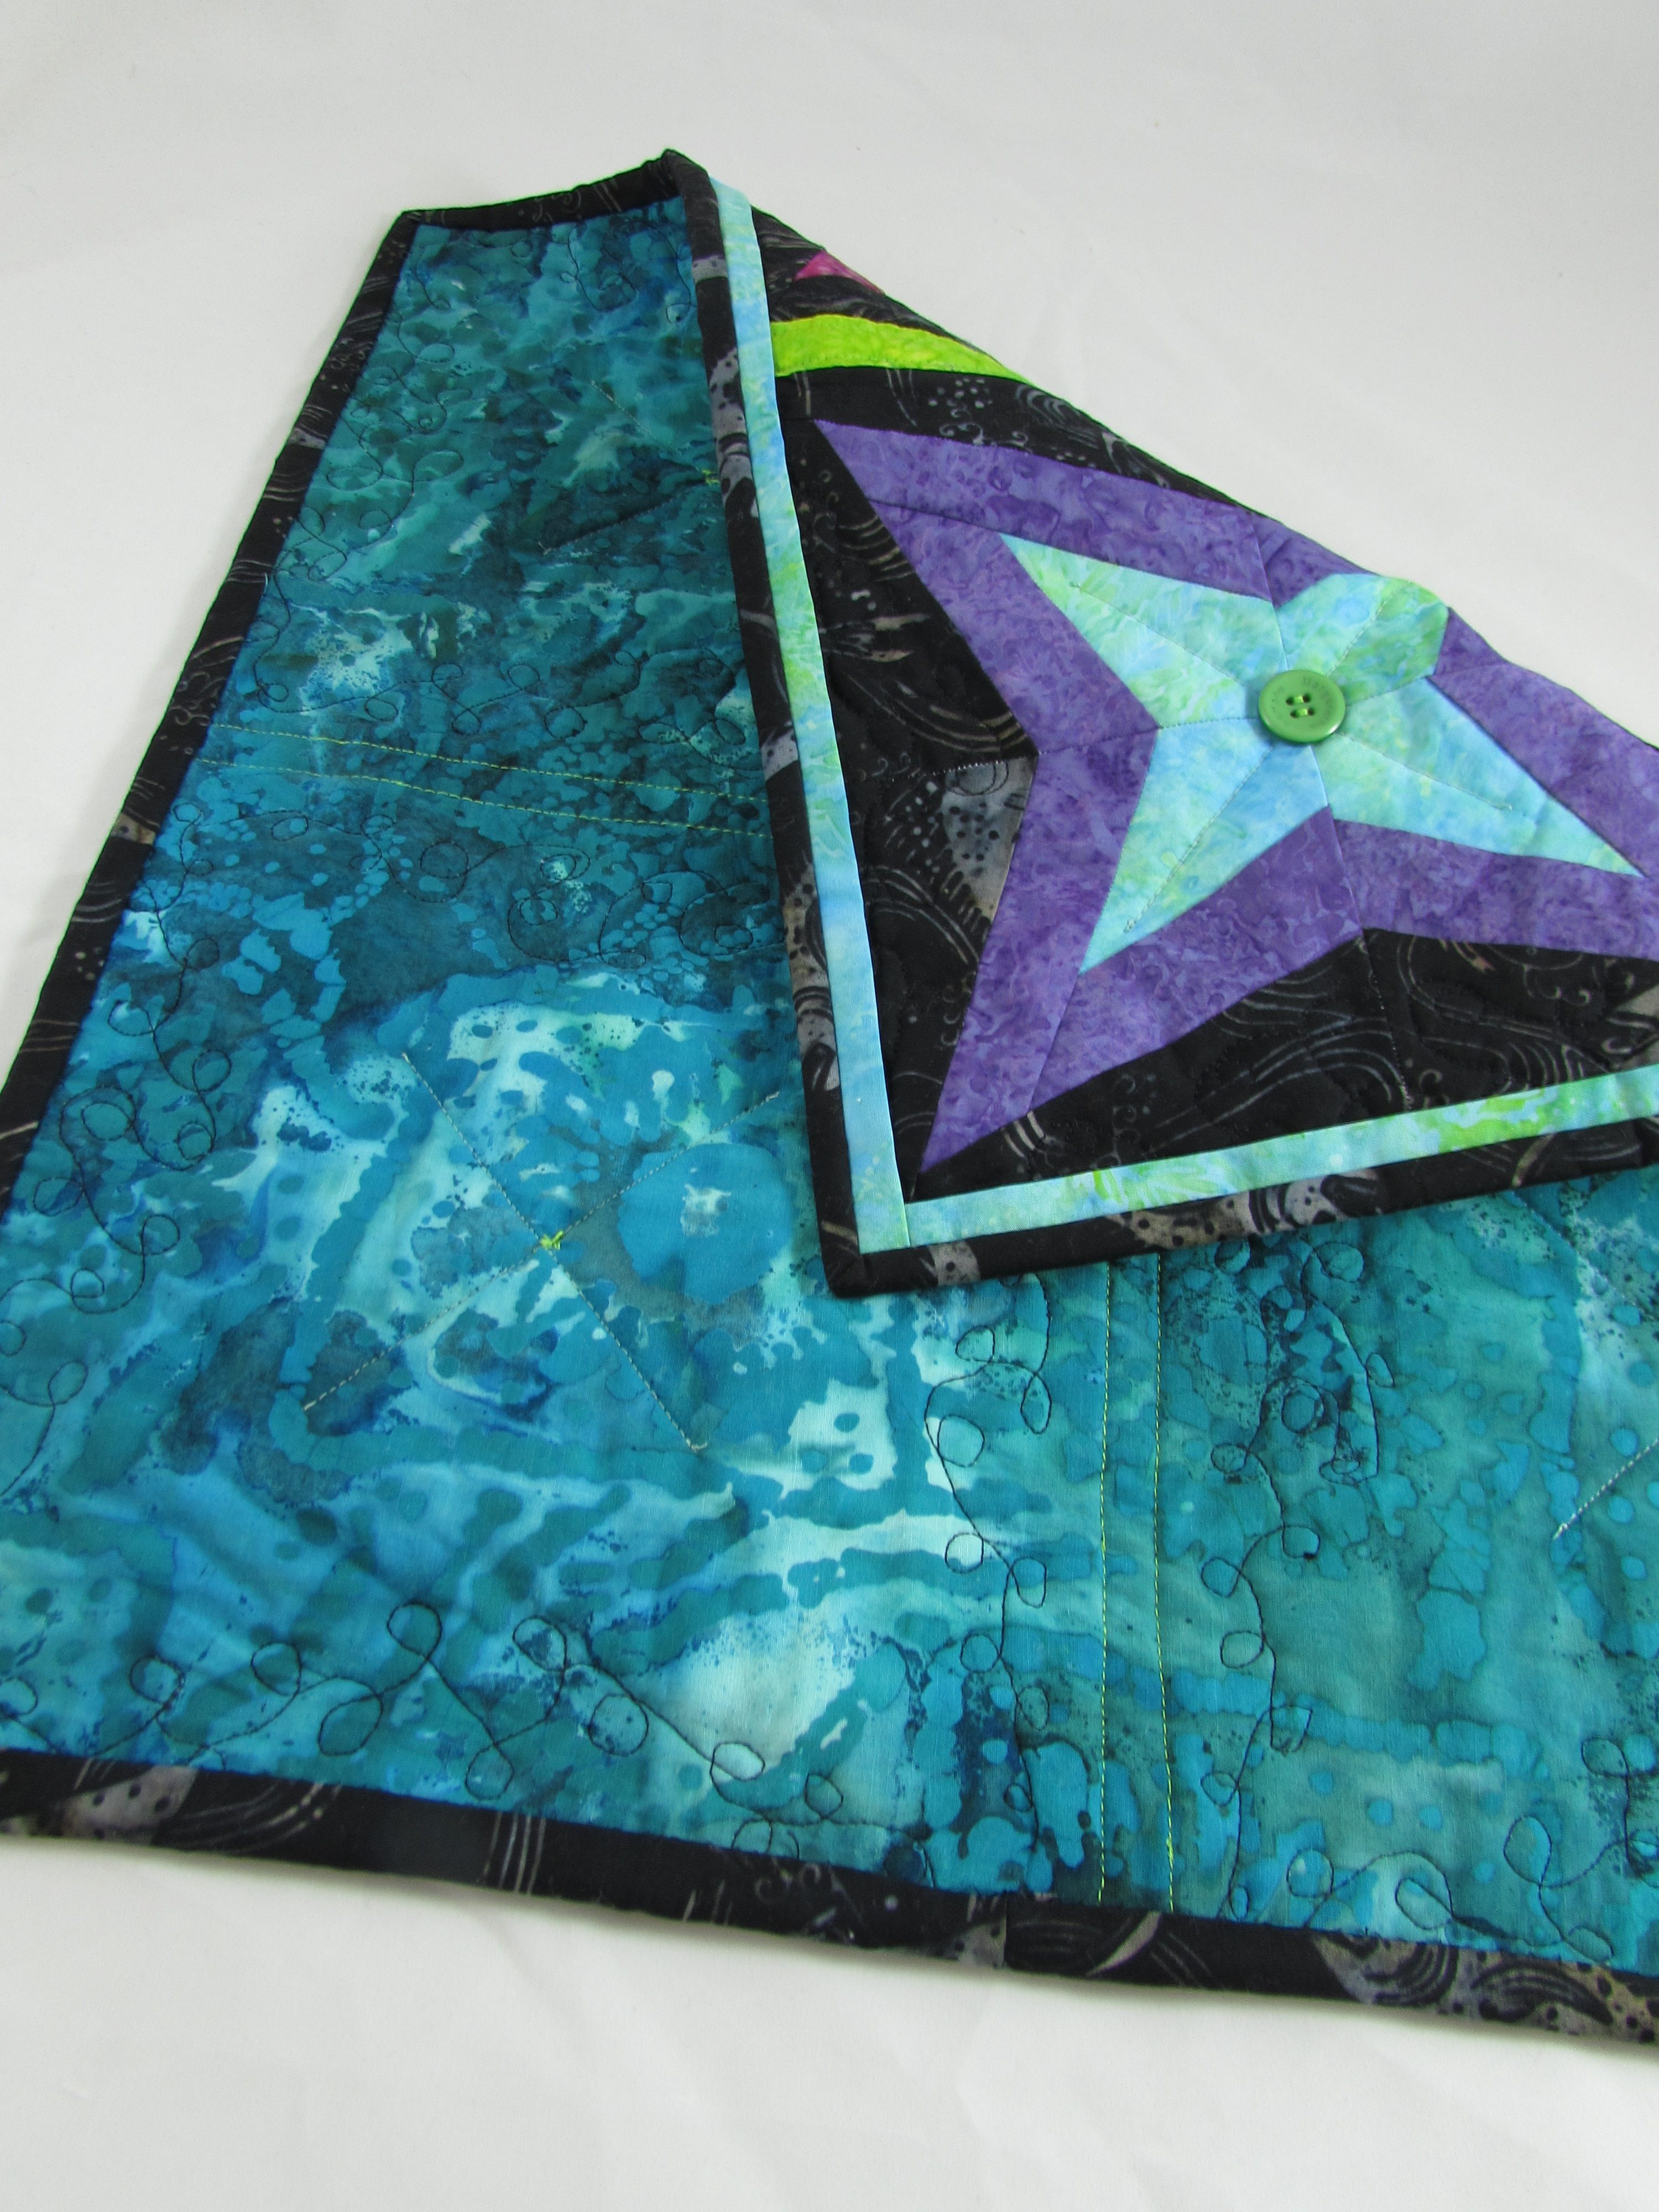
As an ambassador for Island Batik, I have a schedule of challenges issued each month to create with their gorgeous fabrics. The theme for the month of March was March Mini Madness and the quilt was to be constructed with paper pieced blocks.
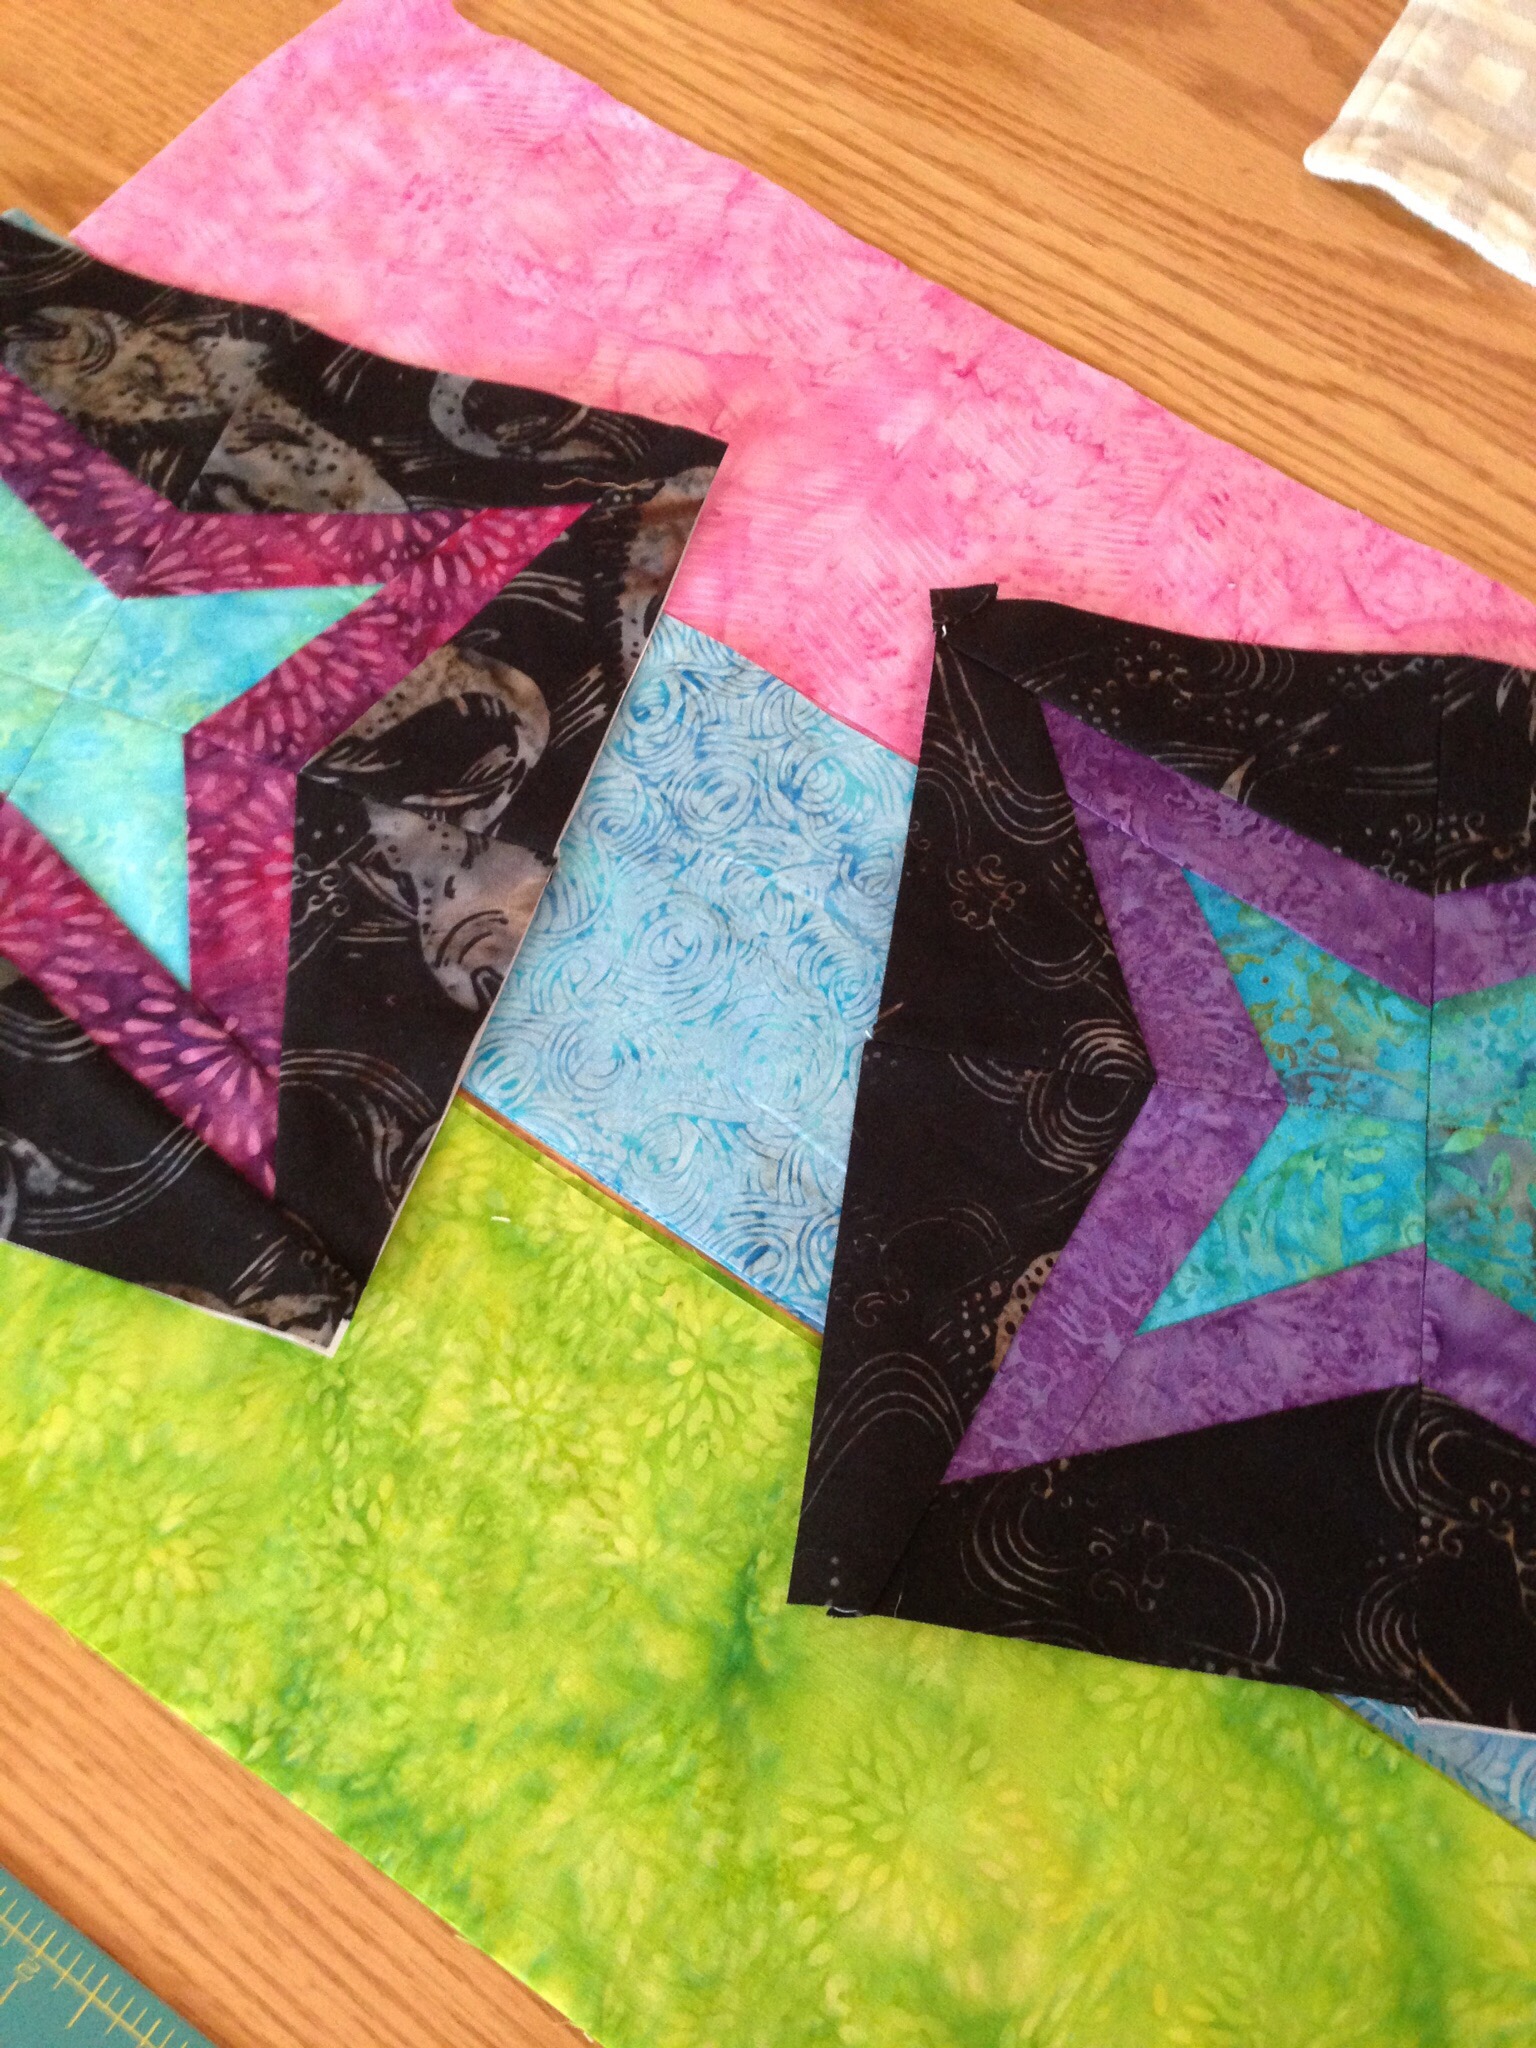
:ast week I shared the beginnings of the mini I was working on with Island Batik fabric. Using a paper pieced star pattern (free download from Craftsy) I made four blocks. Each one became a bit easier than the last which was nice. I feel like I made progress and have a better feel for paper piecing now. (These blocks were very simple which was helpful). I like the various themes designated by the coordinator at Island Batik as it forces me out of my comfort zone a bit. Isn’t it nice to have the oppportunity to learn something new?
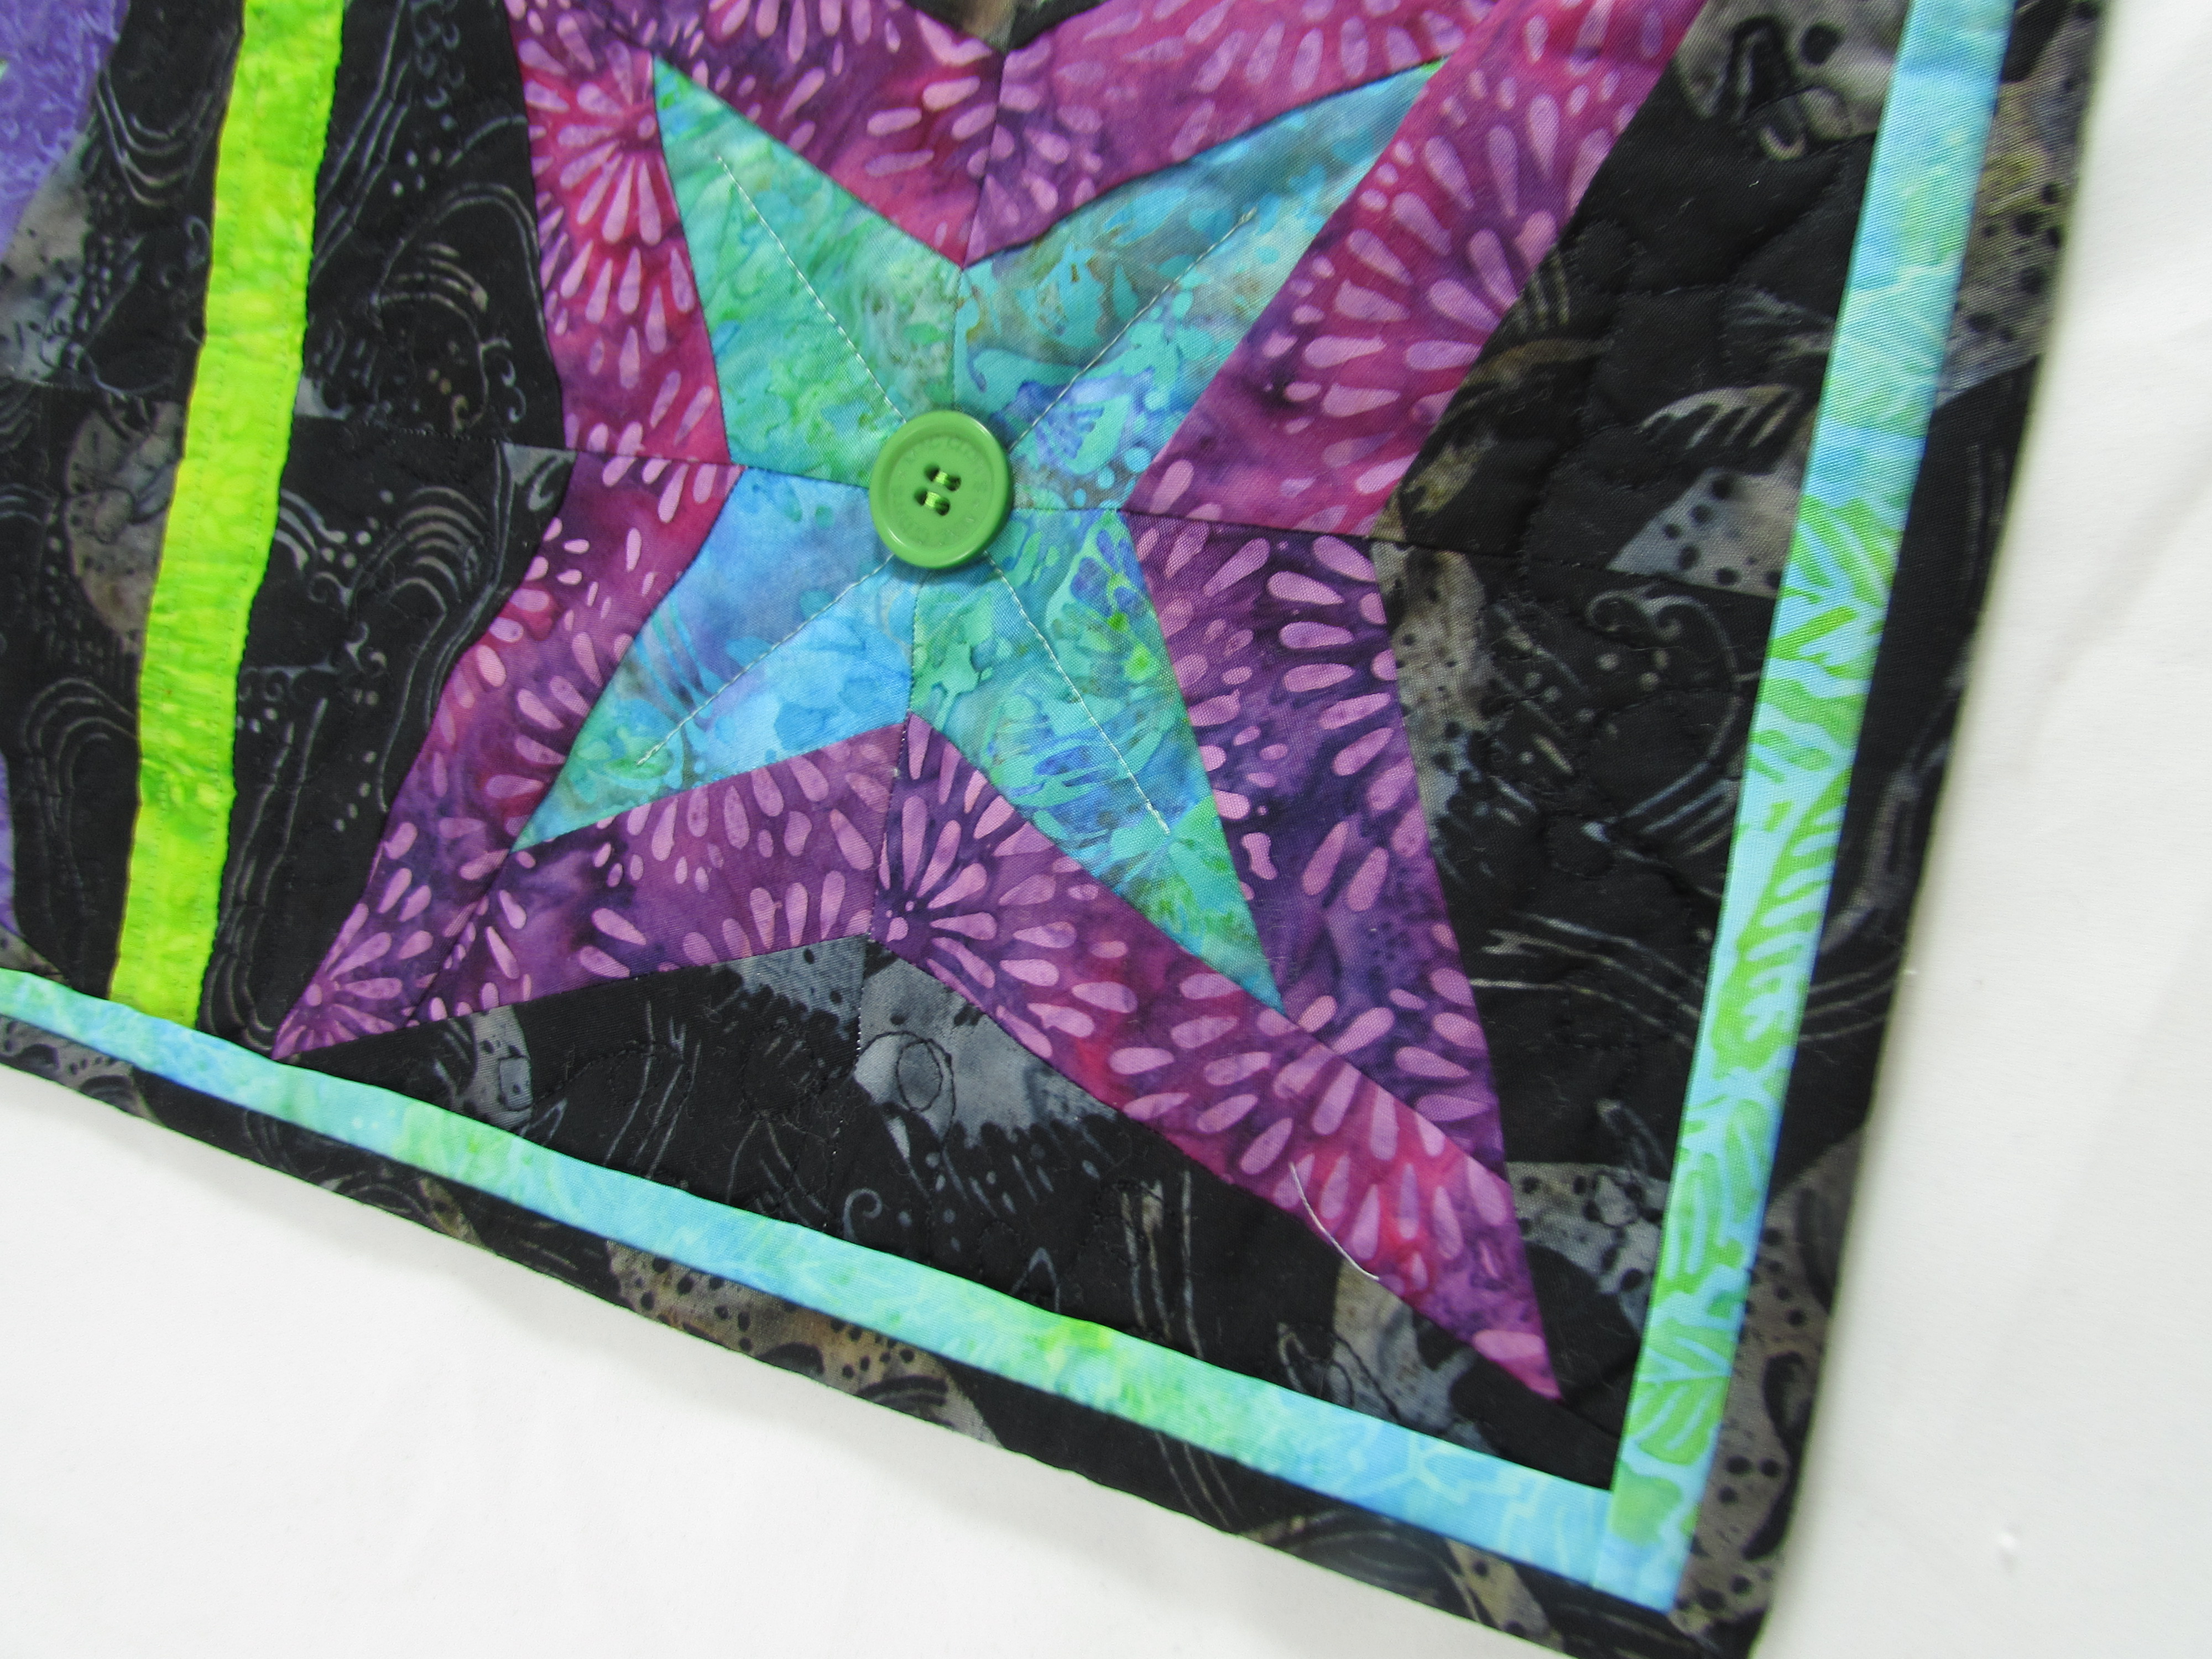
The overall look of this little quilt is bright and cheerful. I love the purples and blues against the black batik. Bright green strips were used for the sashing.
After the top was assembled I quilted it by first adding some straight lines to the greeen sashing, using a bright green Mettler thread. Following that I free motion quilted small loops over the black background as well as an X through each star. With a dark batik, the quilting is not the star of the show. It is very hard to see.
I decided it needed a bit more detail to finish it off. First I decided to add buttons. I think it was about two weeks ago that I read a post written by Janine, over at Quilts from the Little House, where she used buttons to embellish a project of hers. I have a jar of buttons and thought it would be fun to take that bit of inspiration and apply it to this mini. Don’t they look cute? Makes it sort of whimsical.
After the buttons, I still wanted more detail. I decided to add a flange to the outer edge before I attached the binding. Doesn’t this make a nice polished finish? I am very happy with this. Hopefully I will put a hanging sleeve on it soon and it will join the other minis on the wall in my sewing room. Just in time for spring!
Linking to all the usuals – find the links at the top of the page, under Link Ups!
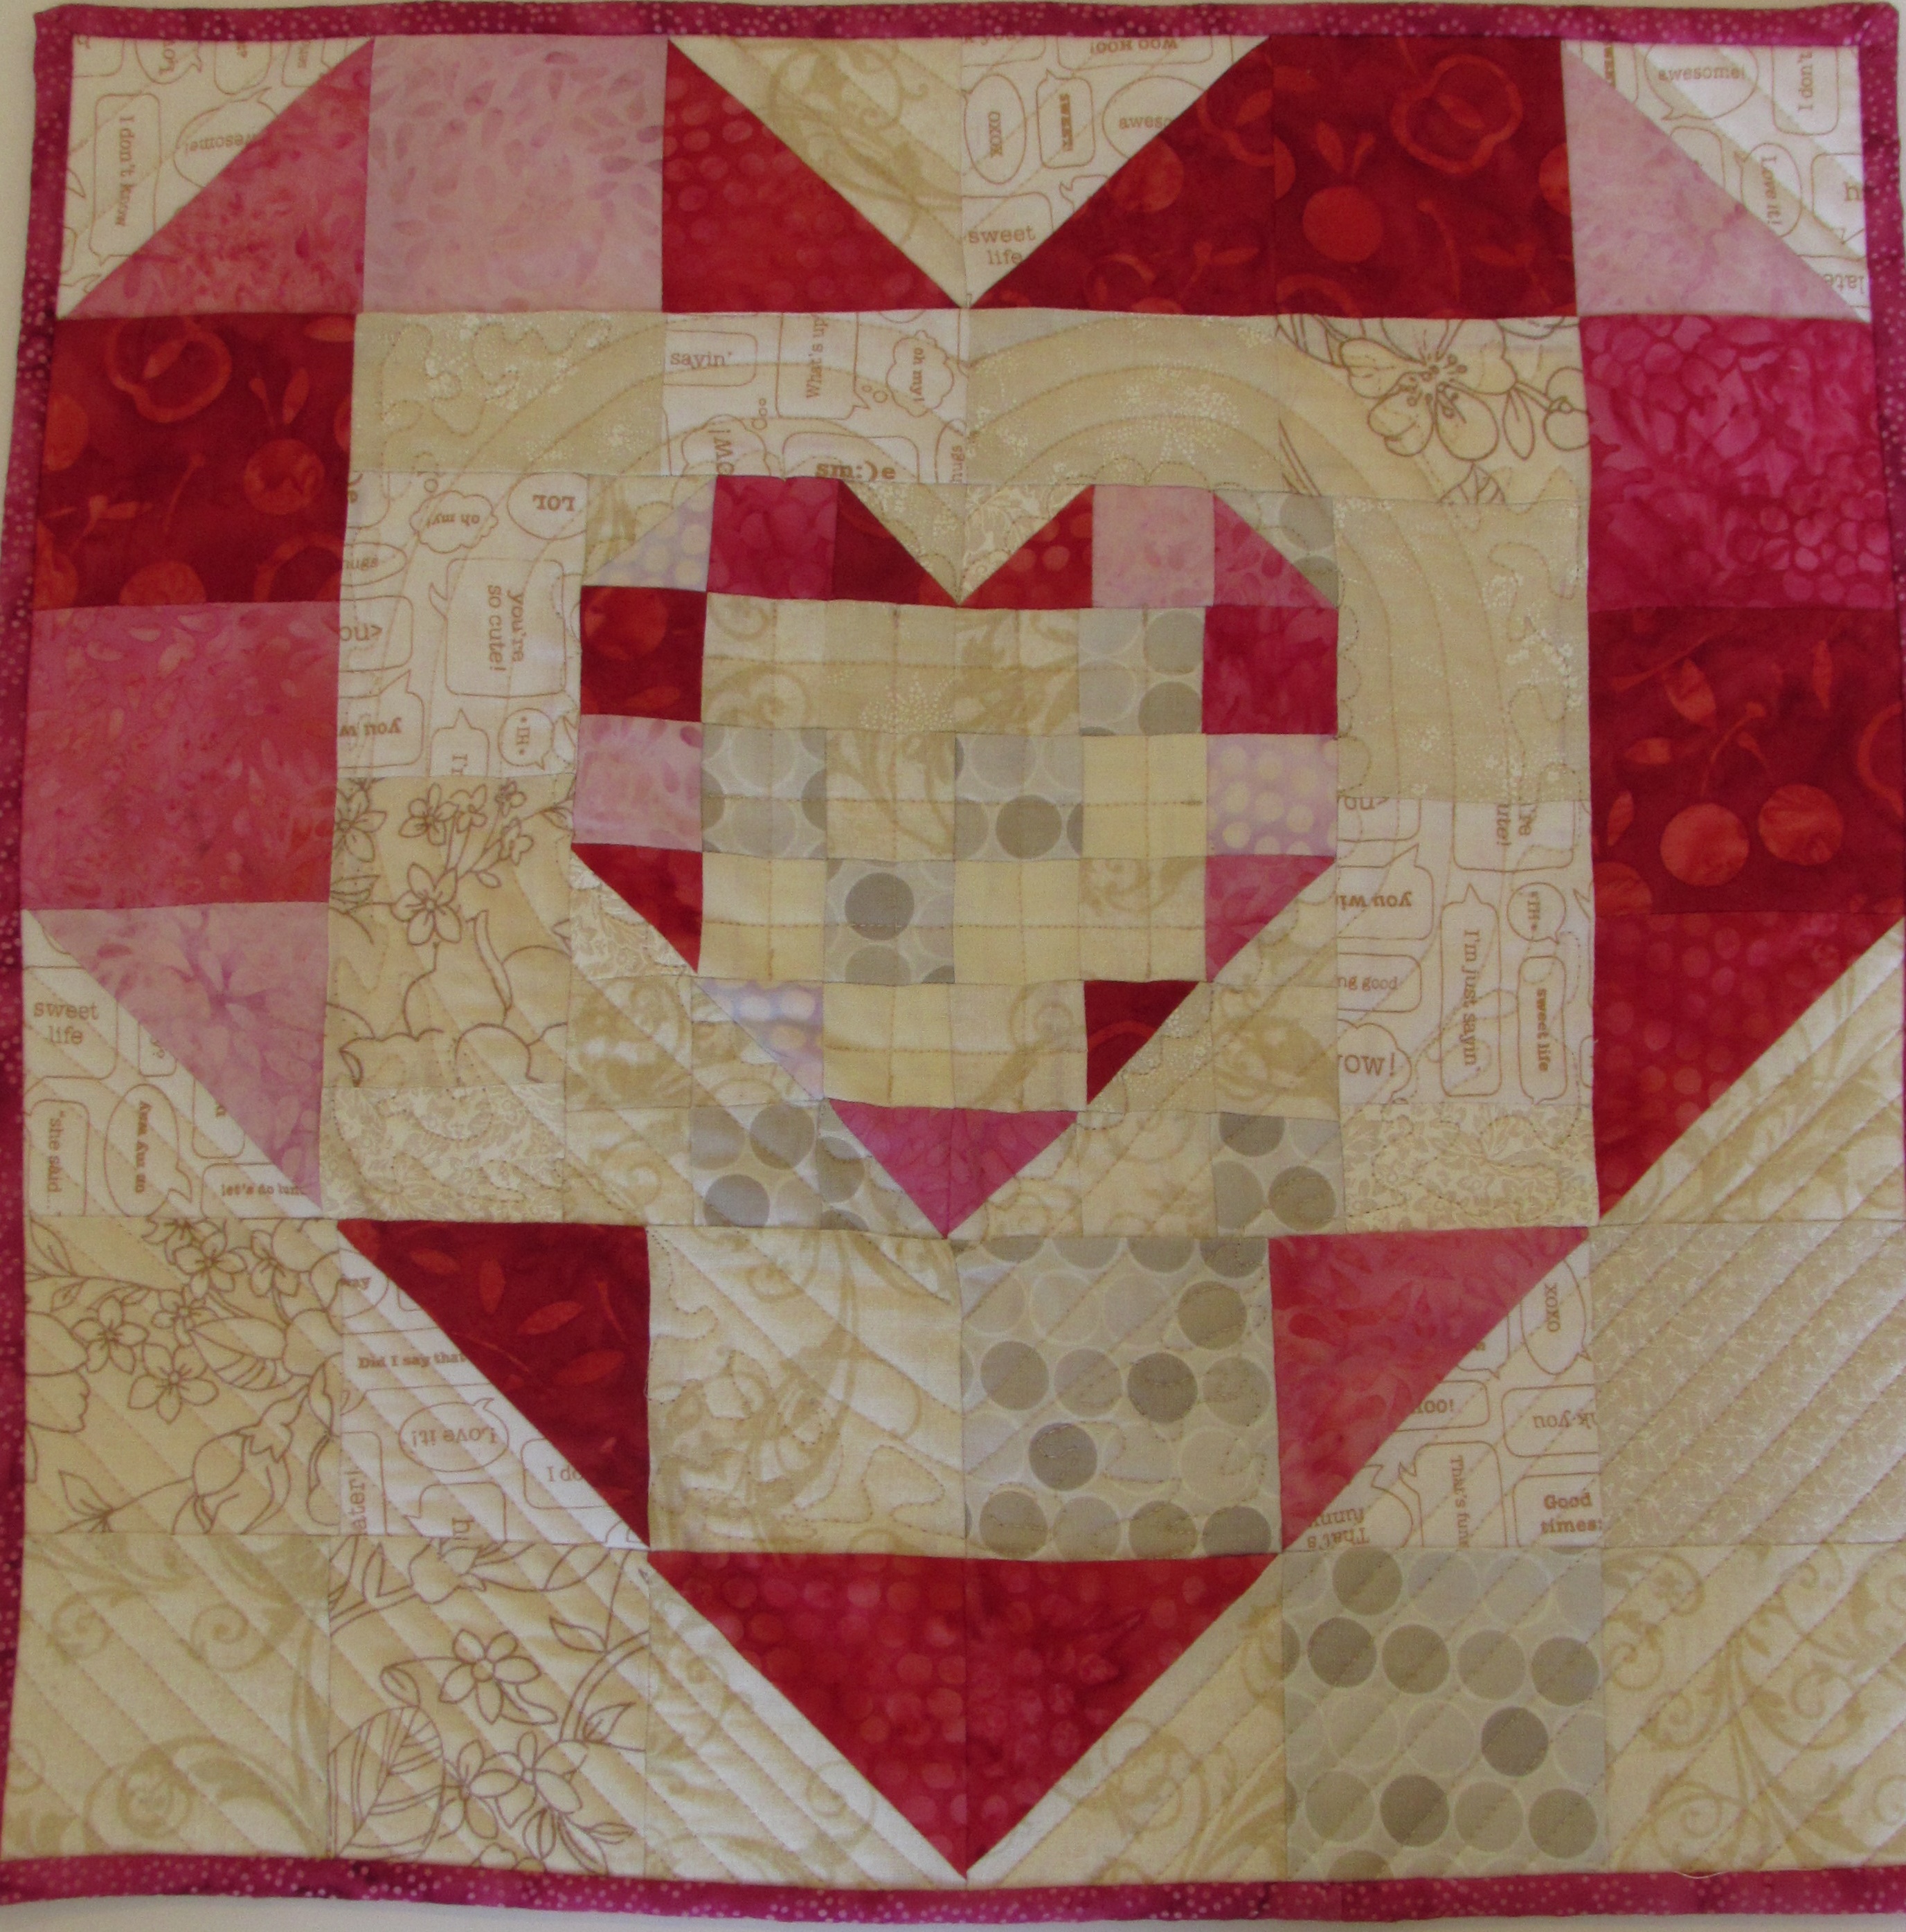
If you are a fan of the TV show Parks & Rec, you are probably familiar with Galentine’s Day. The main character Leslie (played by Amy Poehler), holds a Galentine’s Party with her girlfriends each year on the night before Valentine’s Day. It made me smile to see this graphic sent to the Ambassadors by Island Batik.
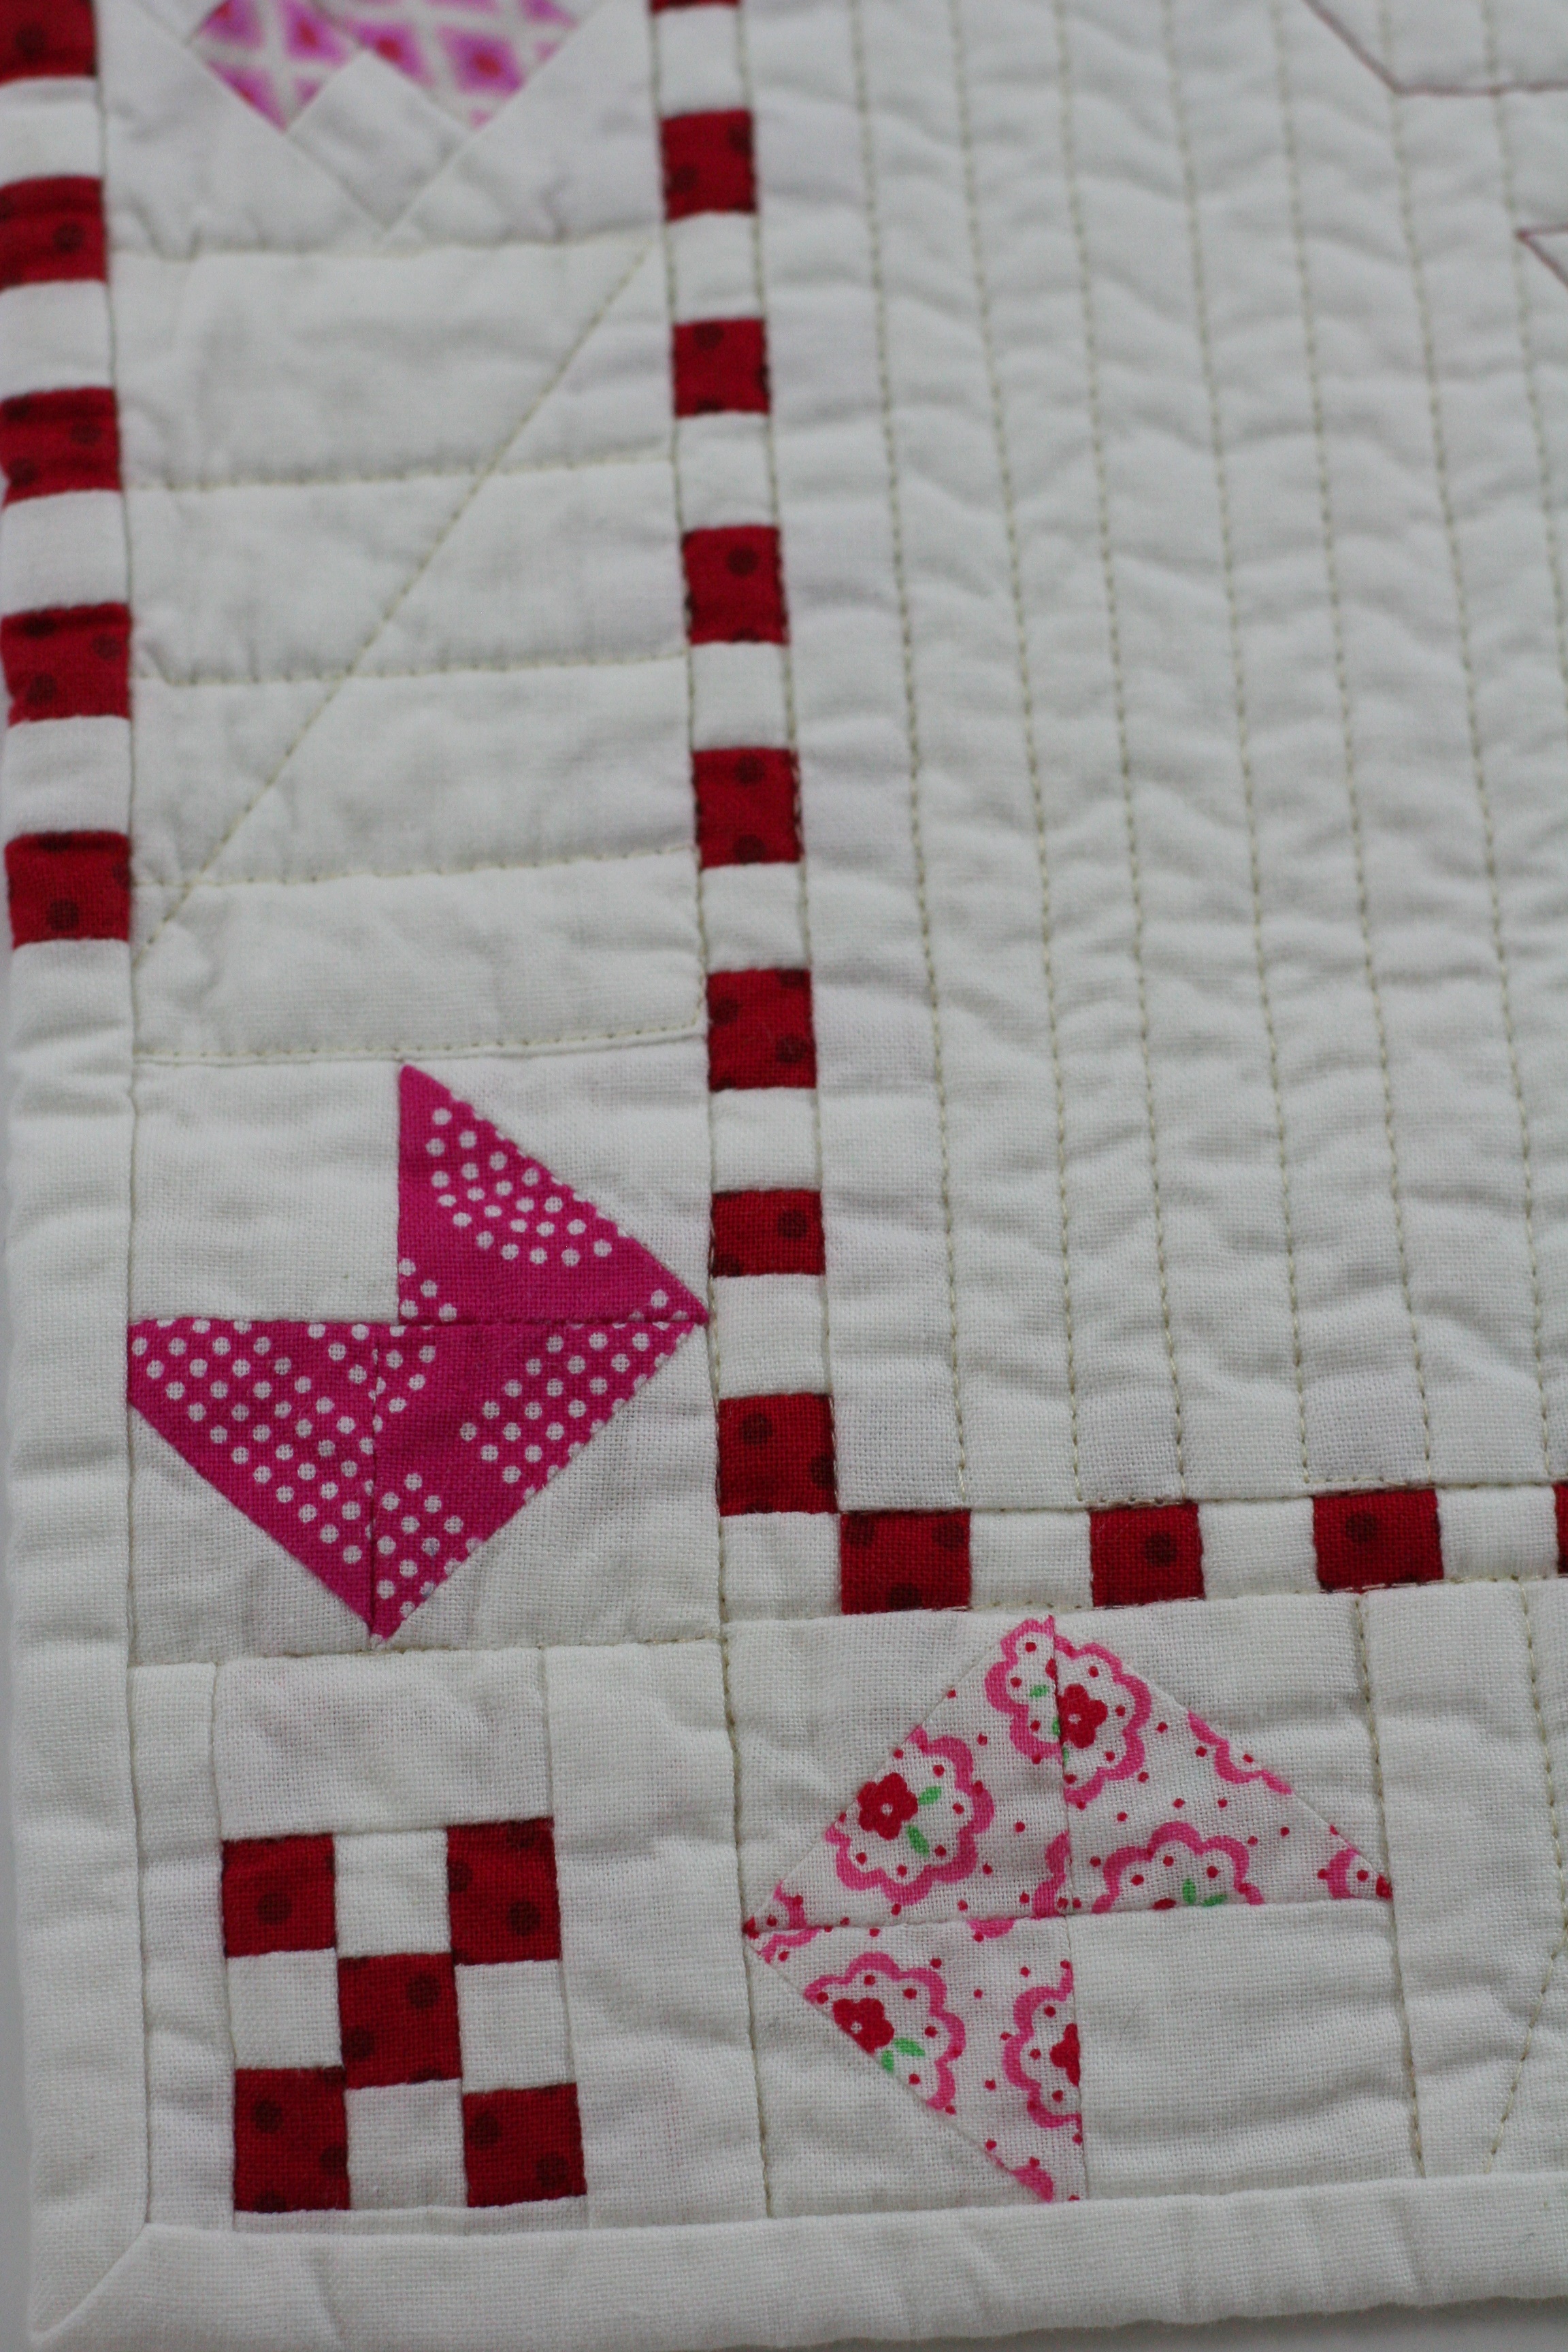
Since I was in the spirit, last week I made a Valentine, to me from me. I have a number of little heart mini quilts that I have made over the last several years. I like them. Simple hearts of red, pink, cream and white. Remember how much fun Valentine’s Day was? We decorated brown paper bags, wrote the “to” and “from” on each card, and hoped there would be some candy involved.
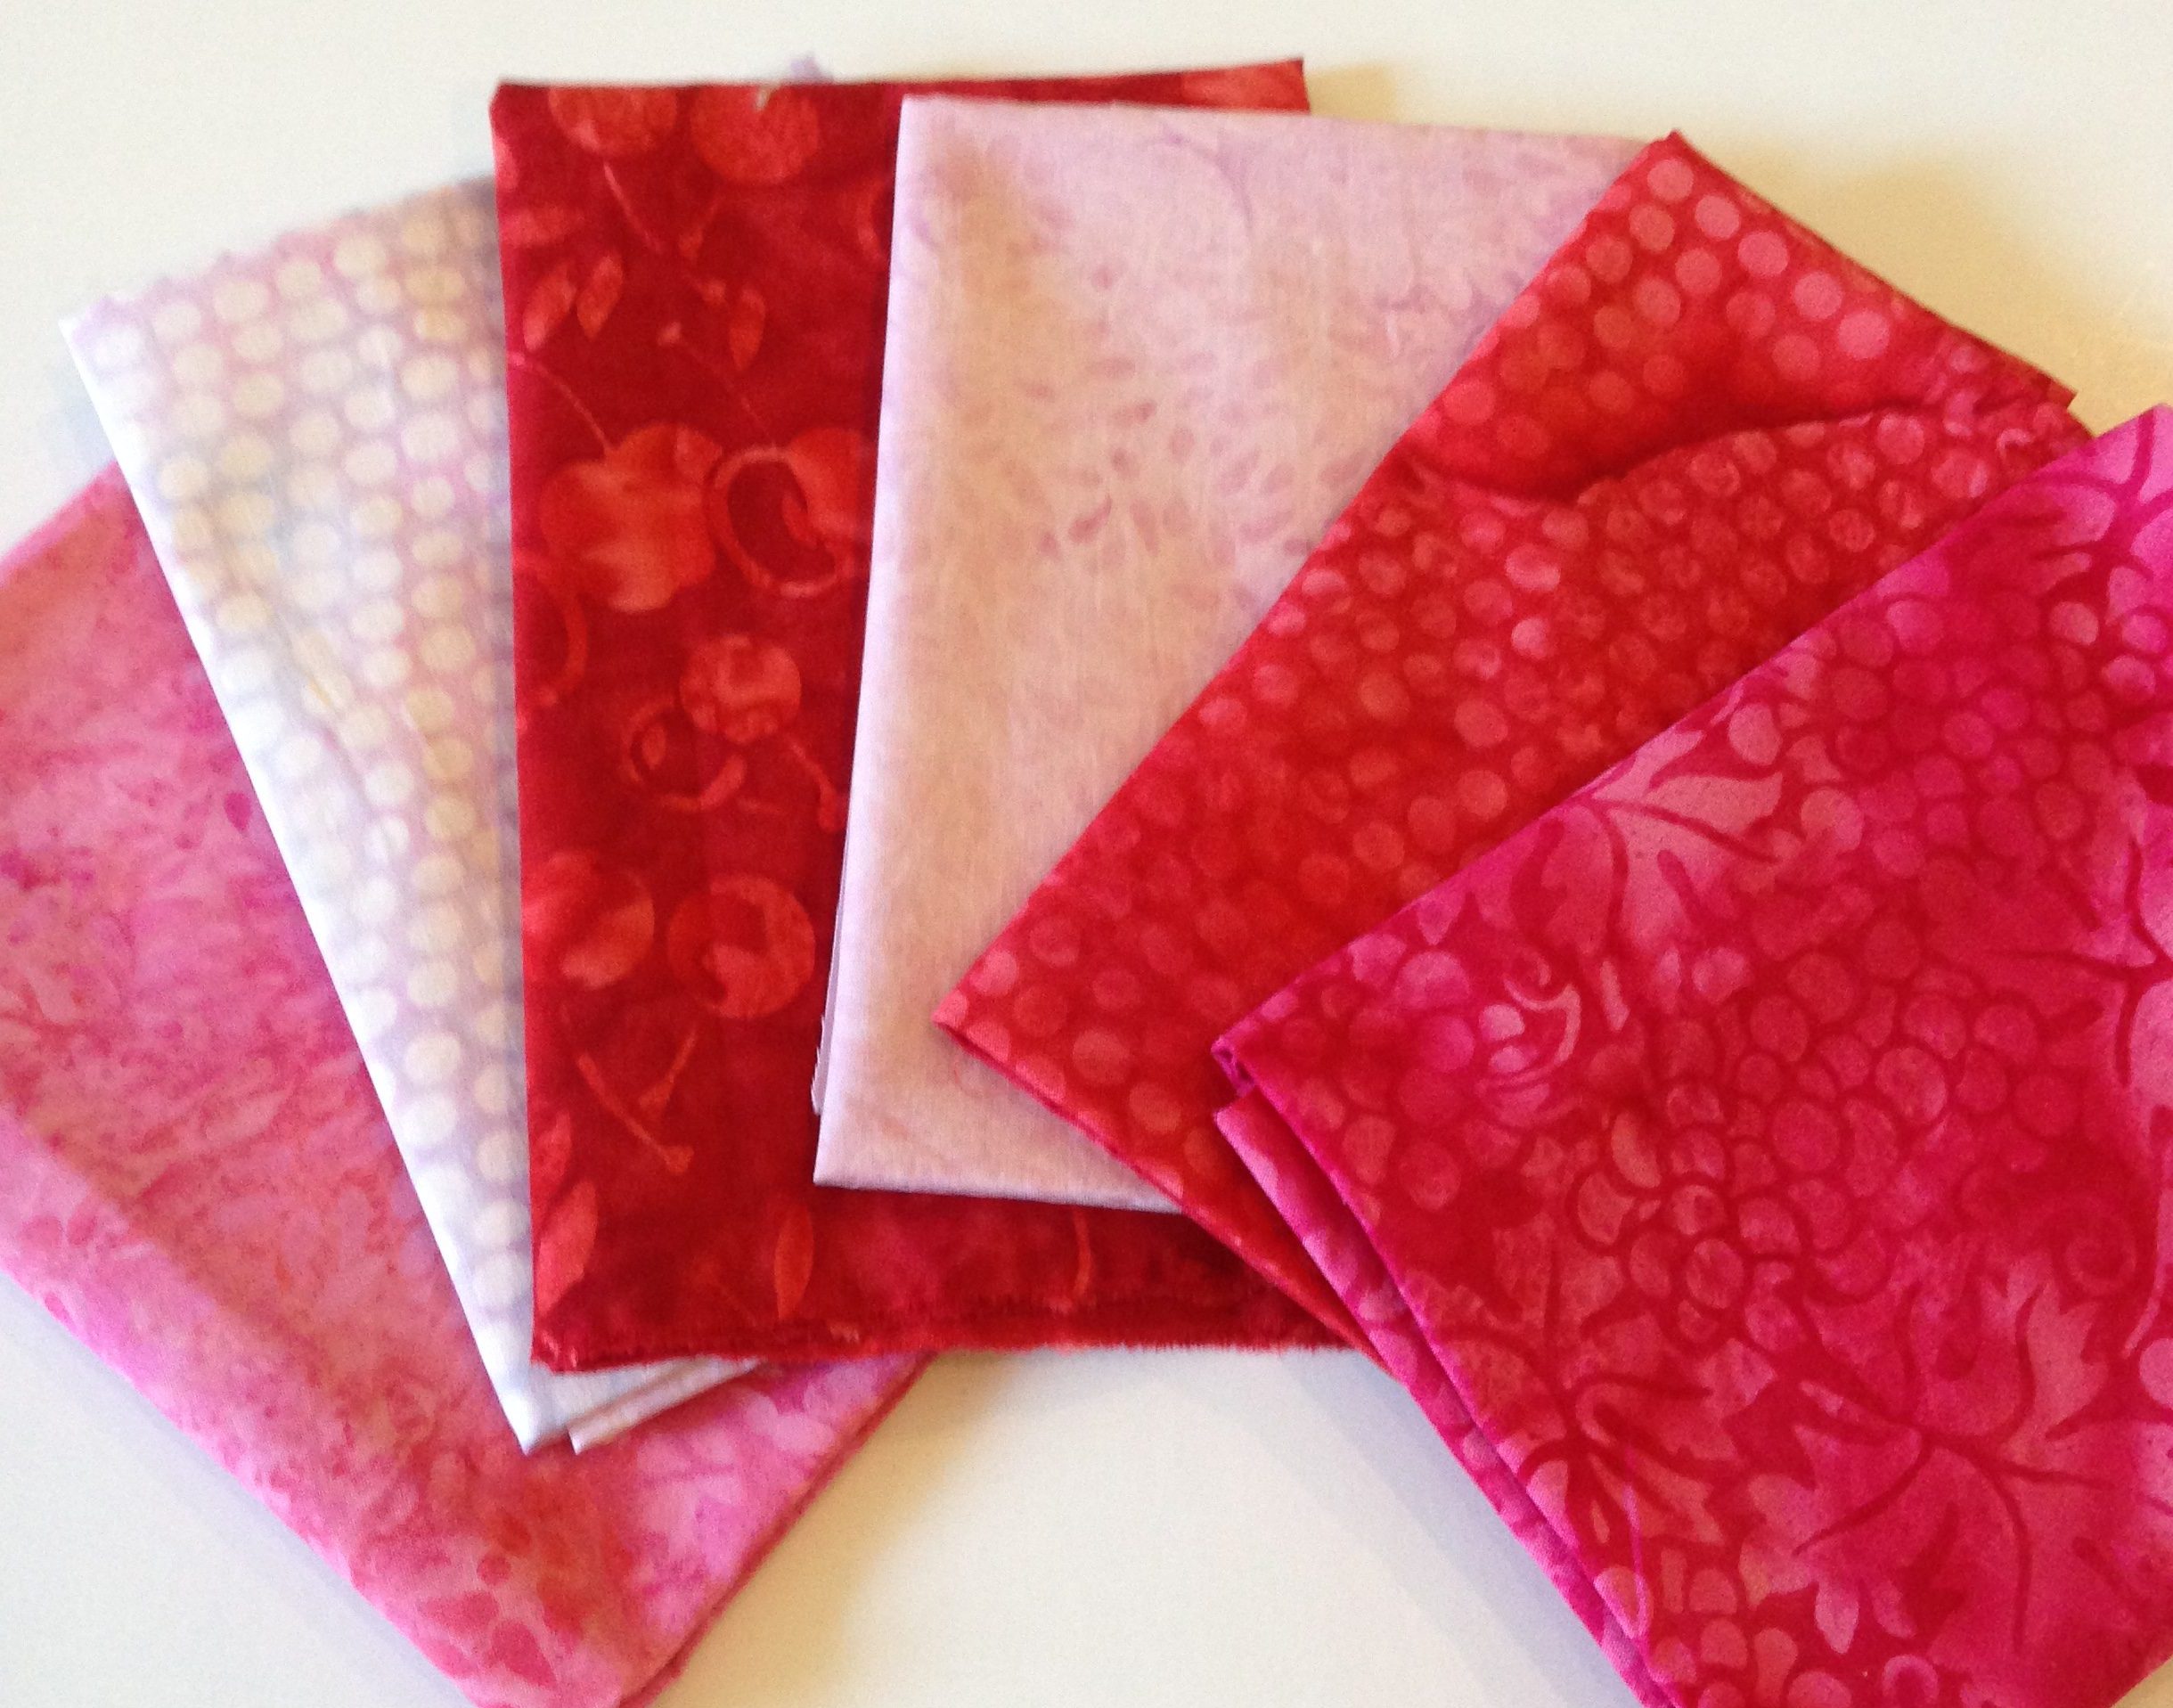
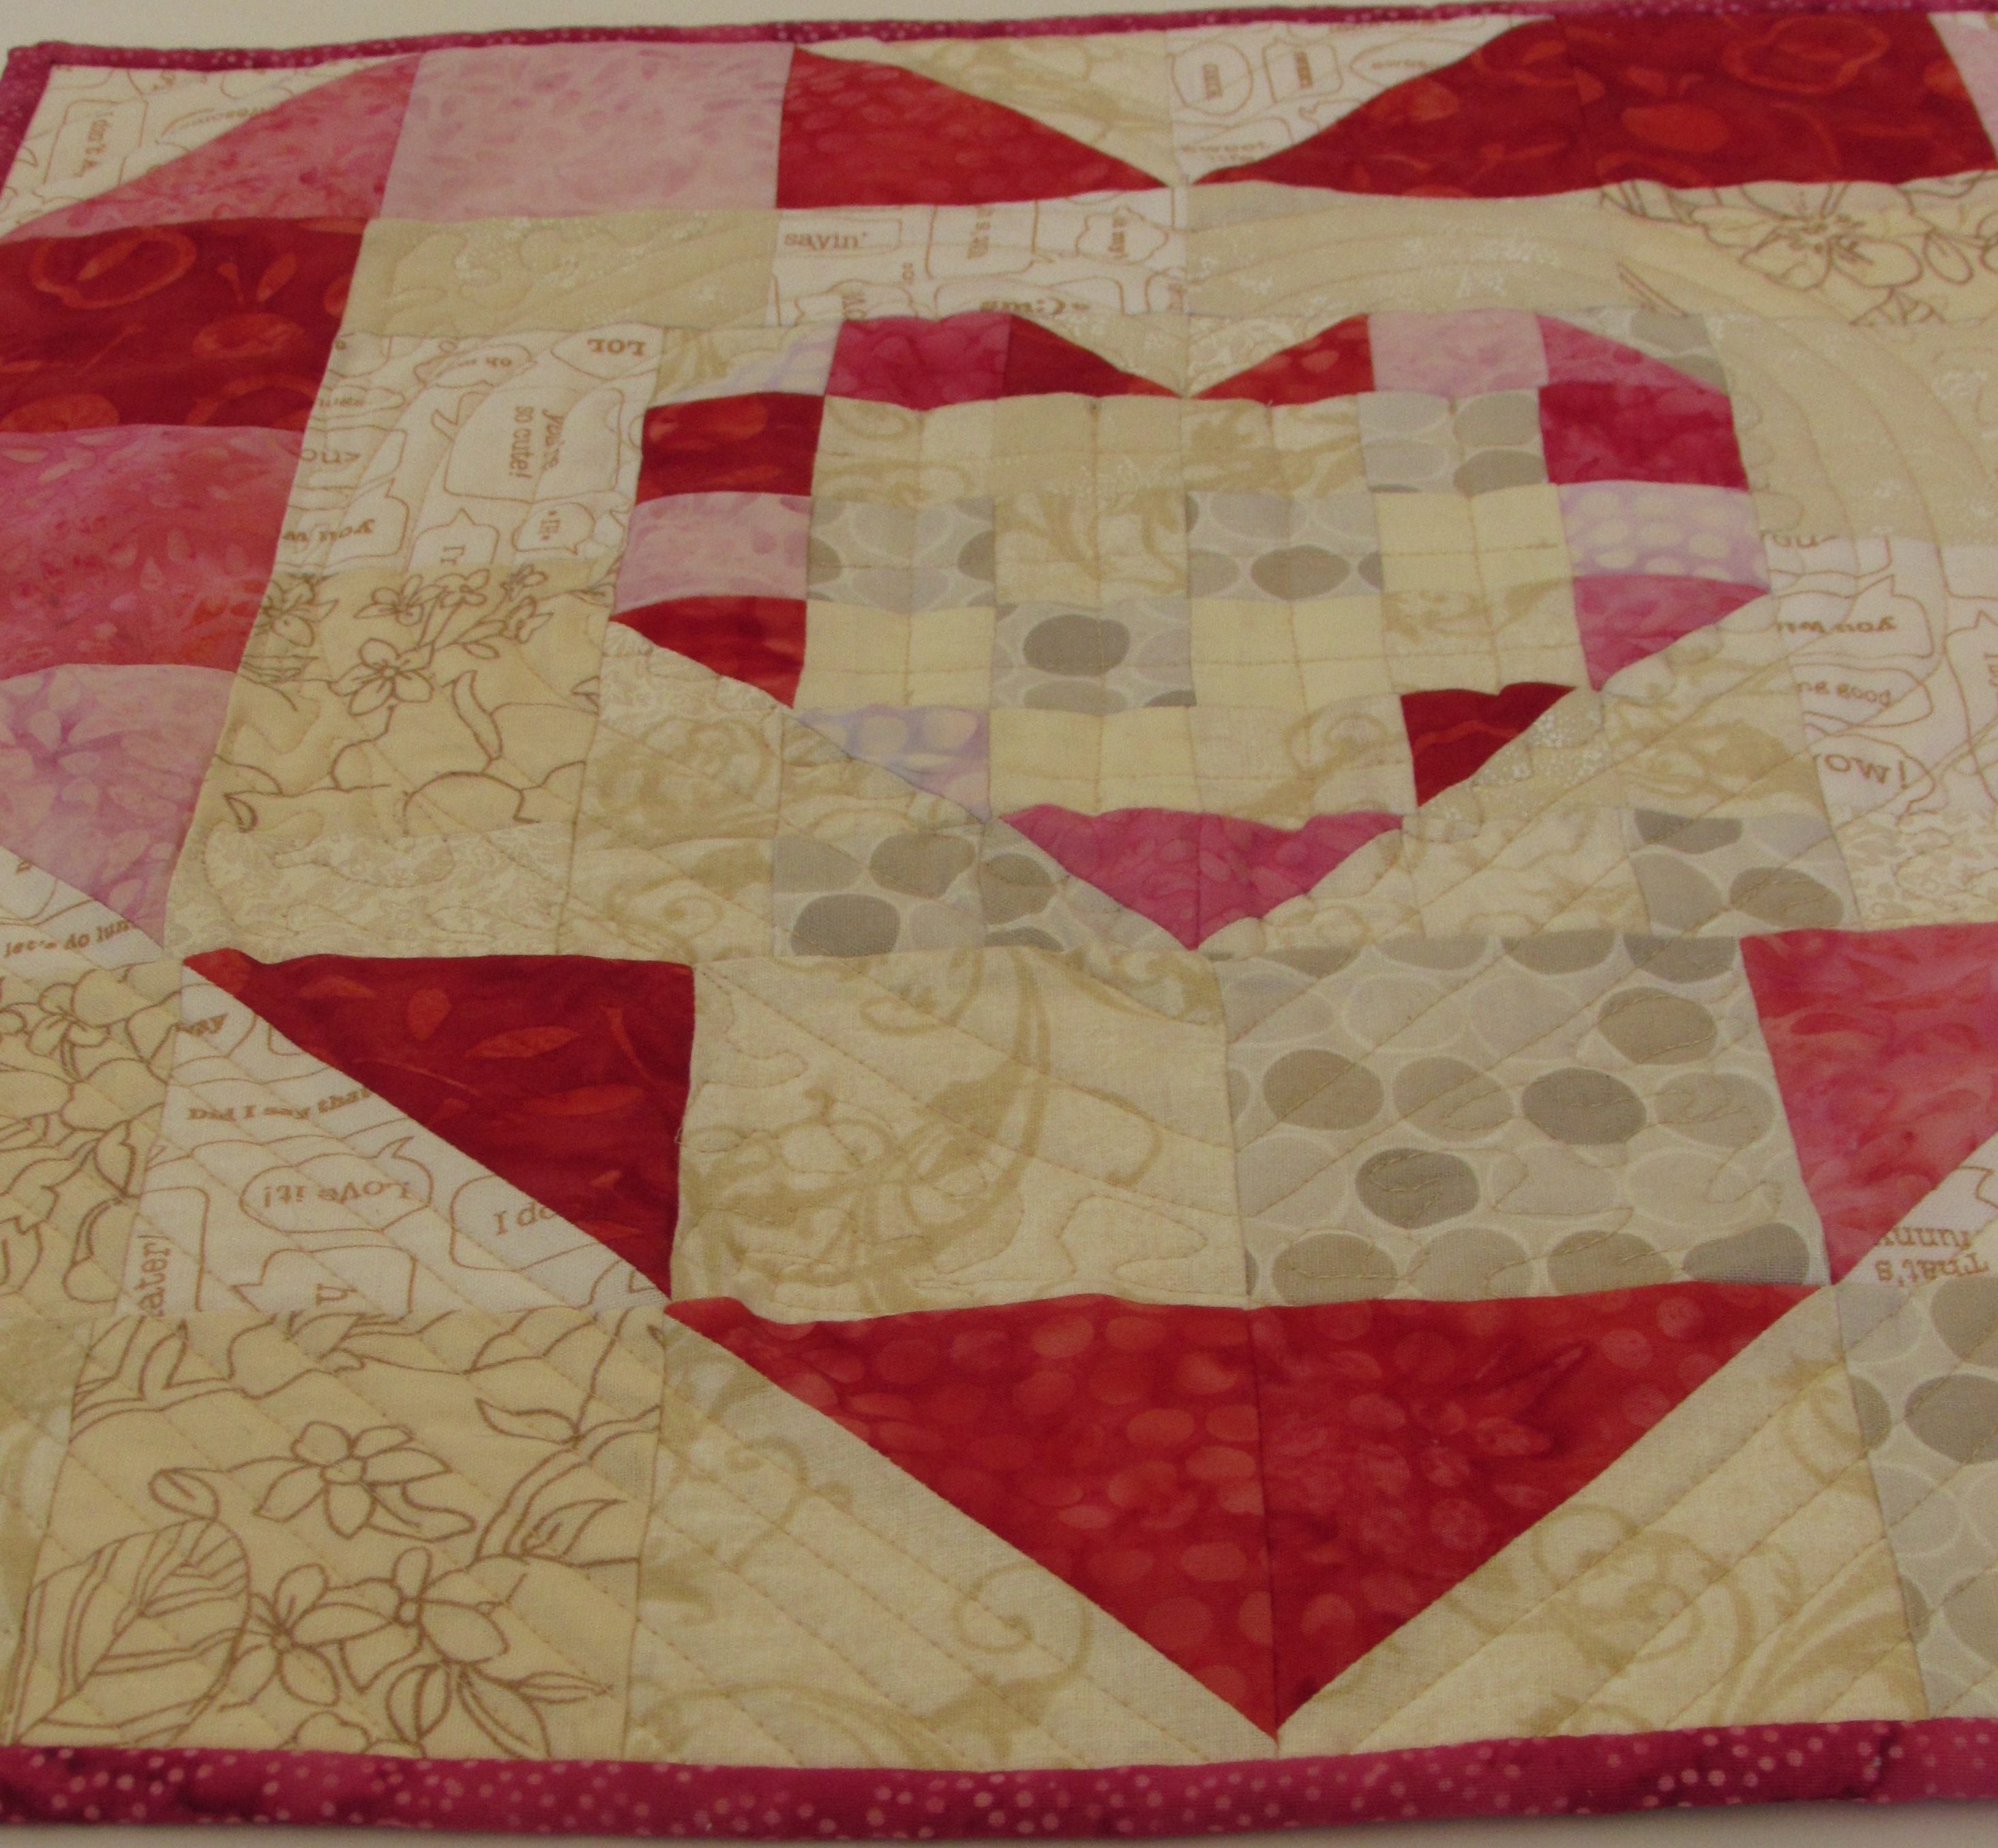
This year Island Batik included some red and pink batik fat quarters in each of the Ambassador boxes. It just so happened that I recently purchased a pattern from Jayne of Twiggy and Opal called Rainbow Heart Trio. I made just one of the three minis included in the pattern. Don’t you love how the tiny heart is nestled into the center of the larger heart? Since I only made the one mini, I have hardly made a dent in the bundle of pinks and red fat quarters. No worries though, Island Batik has plenty of projects in store for us. I will put them to use soon enough.
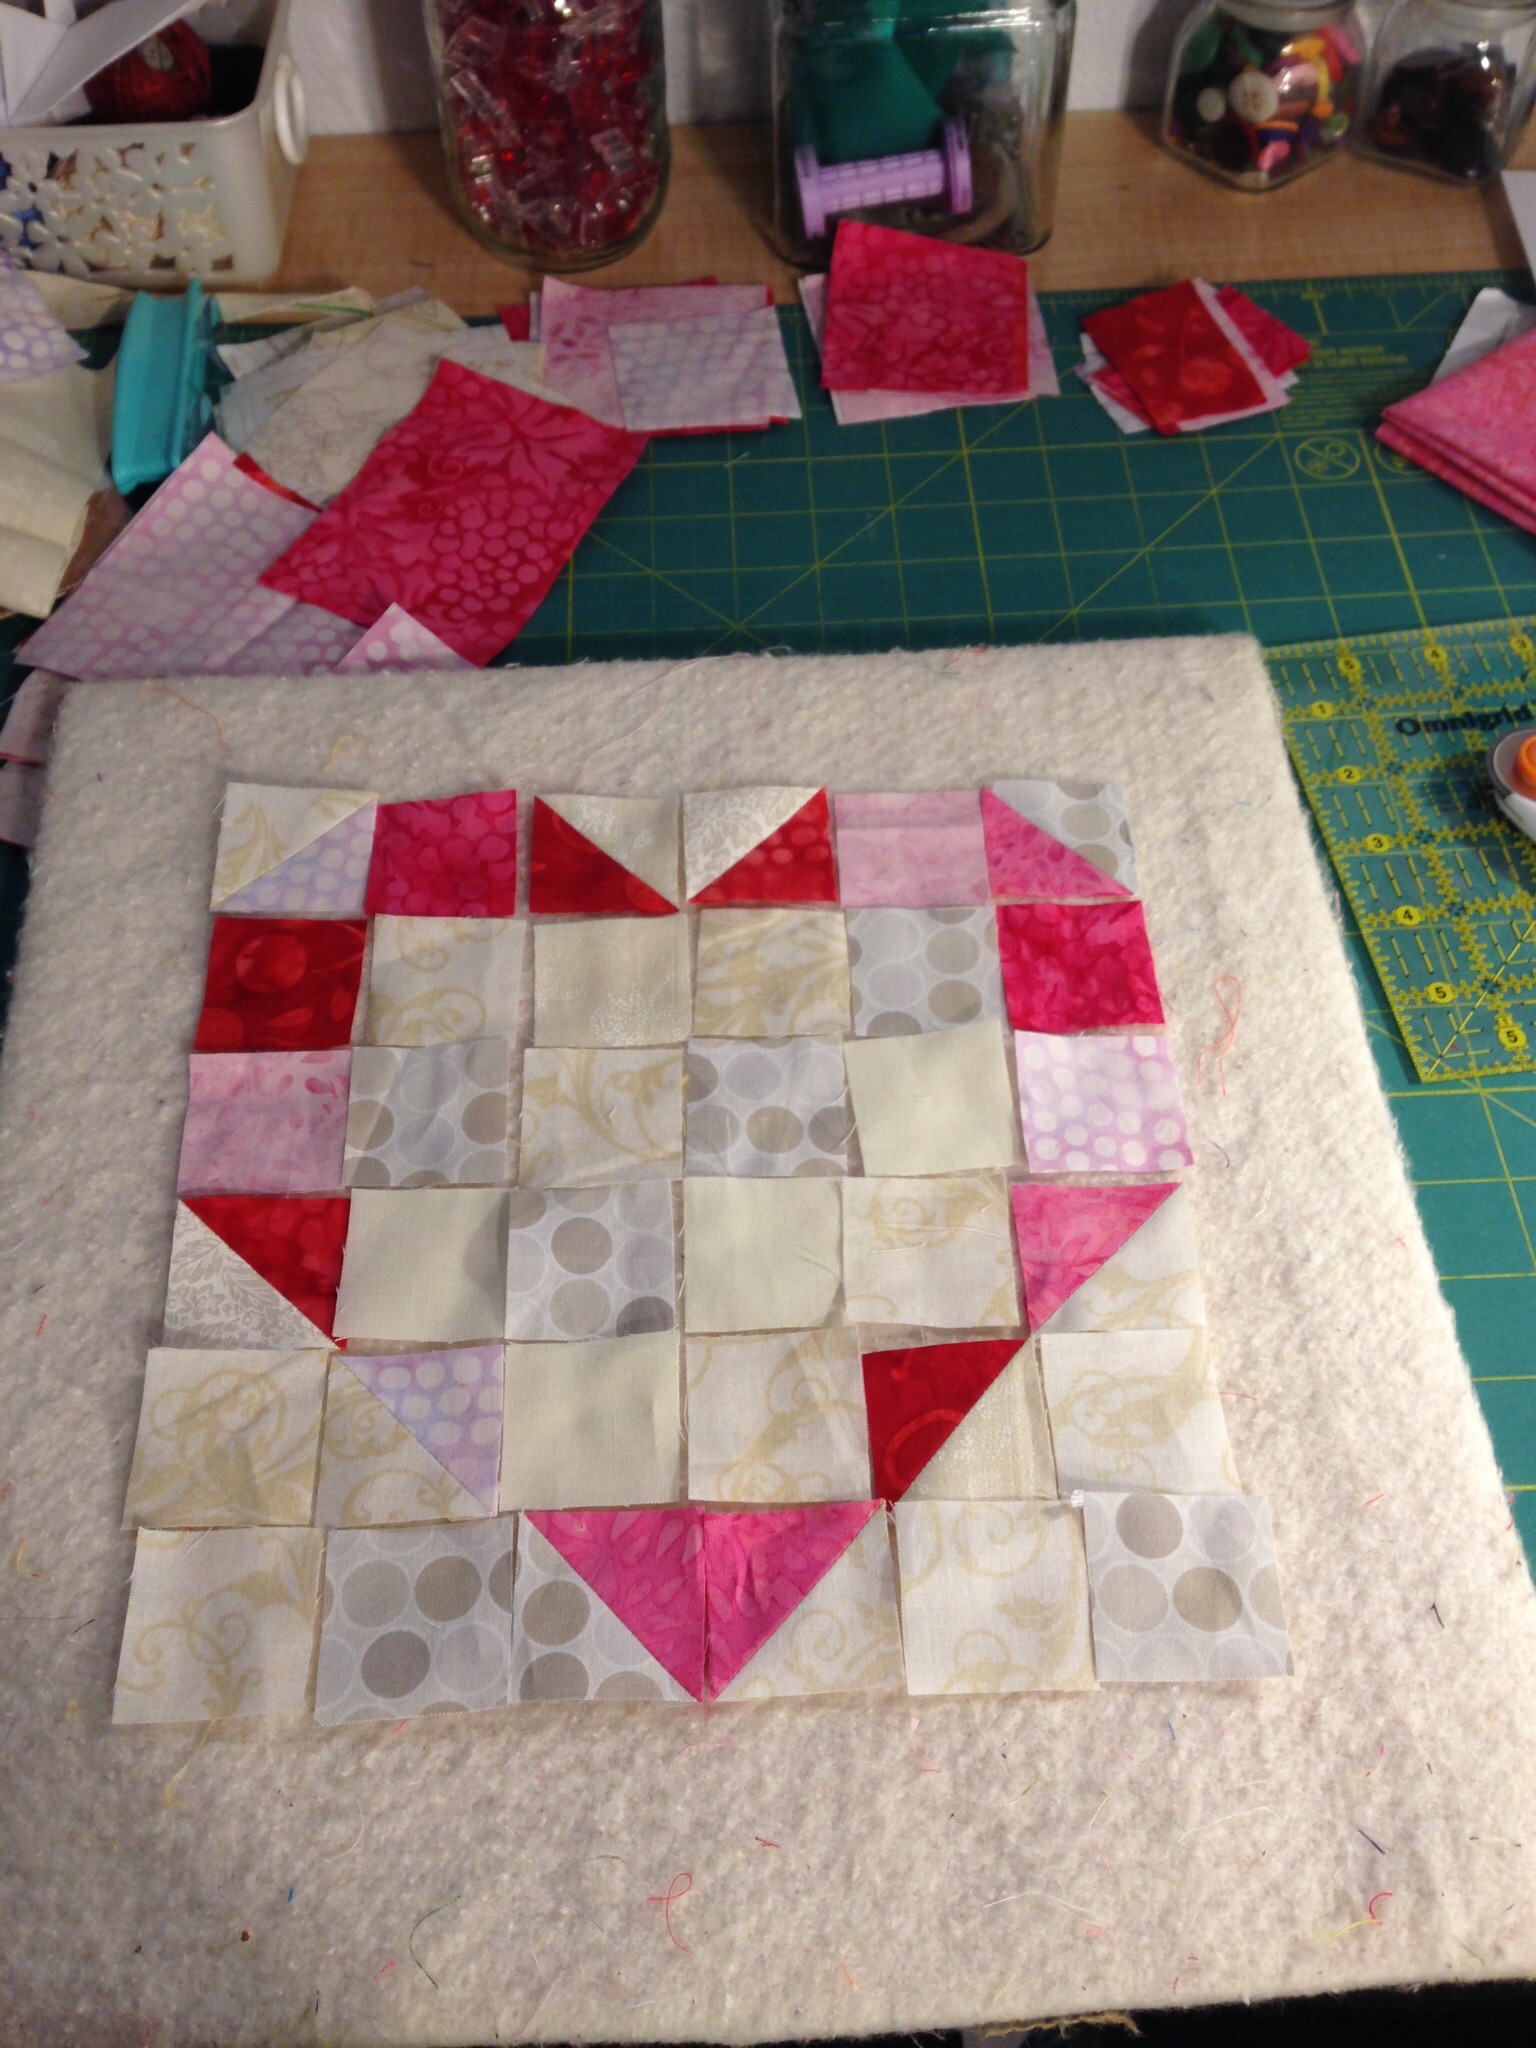
This project was yet another lesson in value and color (when, oh when, will I learn these lessons!?) If you look at the tiny heart, you might notice a few pieces of a pale dotted batik. It is a very pale shade of lavender. On its own, it is very pretty. Included with this project and surrounded by the creamy background pieces, it is totally lost. I didn’t really get it until that smaller heart was surrounded by the larger heart. Looking at the photo above, this is the smaller heart when I was piecing it. I thought there was just enough difference between that pale dotted batik and the background. Once it was surrounded by the background it faded out. I also had some of that fabric used as blocks in the larger heart. I was able to unpick those stitches and swap the fabric out with something darker. I left the smaller heart alone. I will get this figured out one day. But for now, the shape of the smaller heart doesn’t show up as much as it would have if I had used darker fabric in those spots. I will get there though. It just takes practice.
The Rainbow Heart Trio pattern comes together quite easily. The longest task is definitely the cutting. The HST’s that make up the smaller heart finish out at 1 1/2″. Tiny little things. I quilted it with my walking foot. The quilting was inspired by the pattern. I liked how Jayne quilted the samples and I followed along with her. The only part that I free motioned was the little scallops around the outer edge of the smaller heart.
Wishing each of you a Happy Galentine’s Day and an even sweeter Valentine’s Day!
Linking to all of my favorites. Check out the tab at the top of the page, Link Ups.
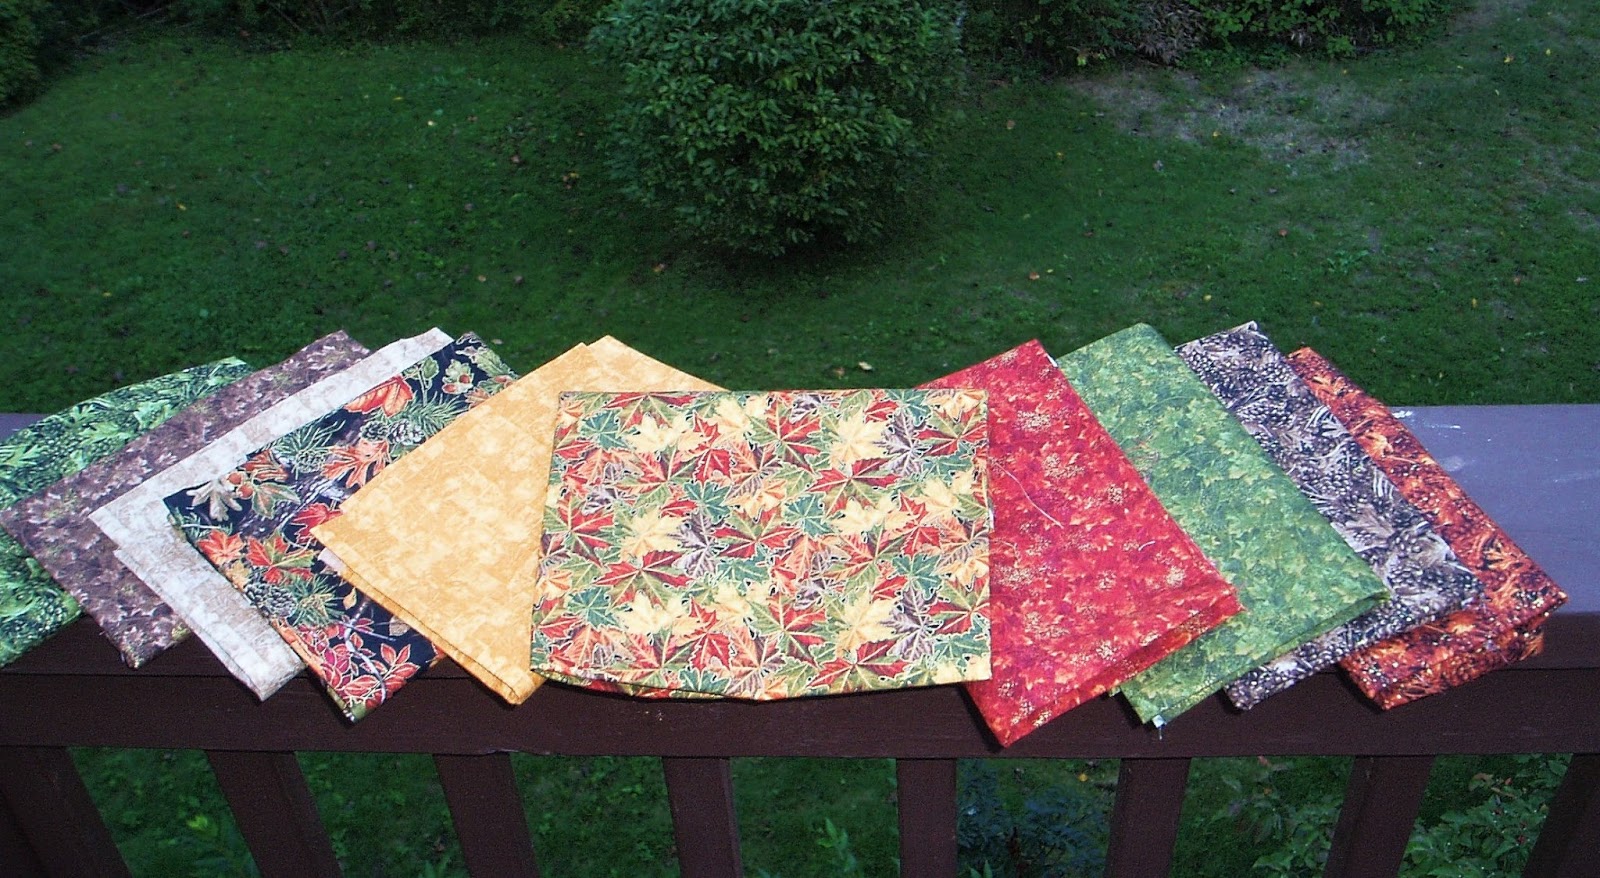
Today I am celebrating Autumn! Our maple trees are filled with color. Fortunately, we have several different varieties which means the leaves all change at different times, enabling us to savor the season for a bit longer. It is gorgeous.
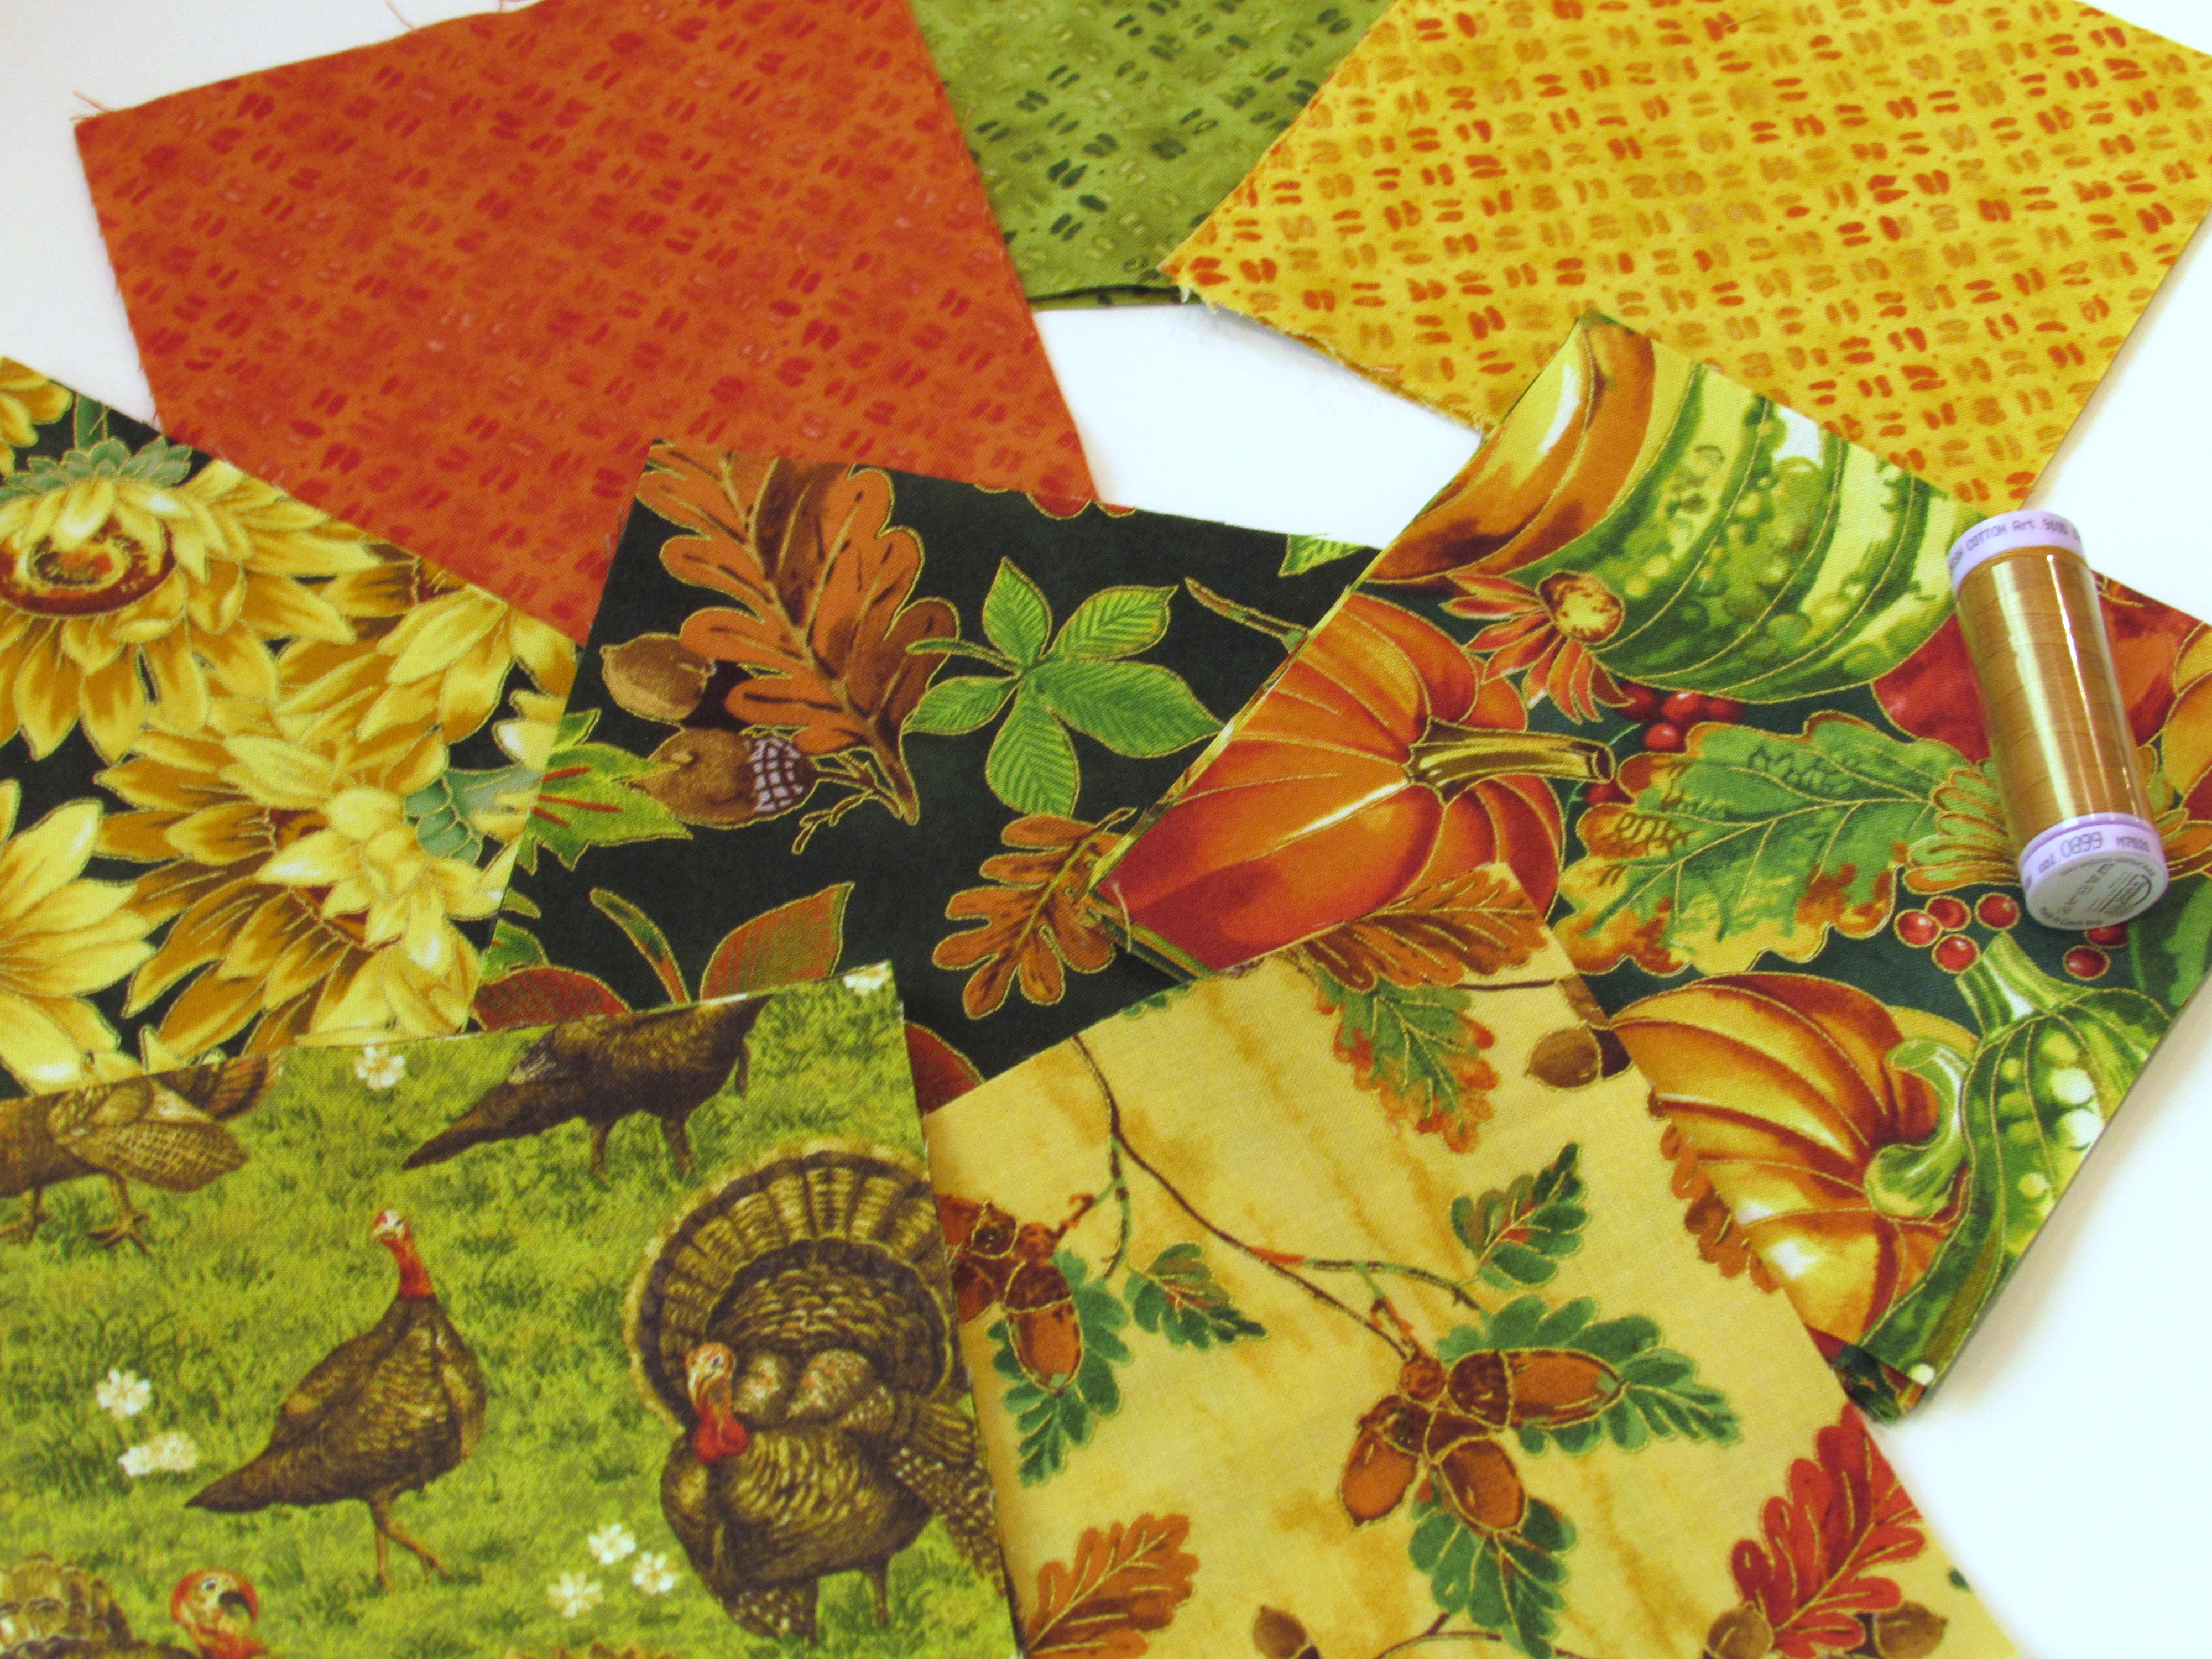
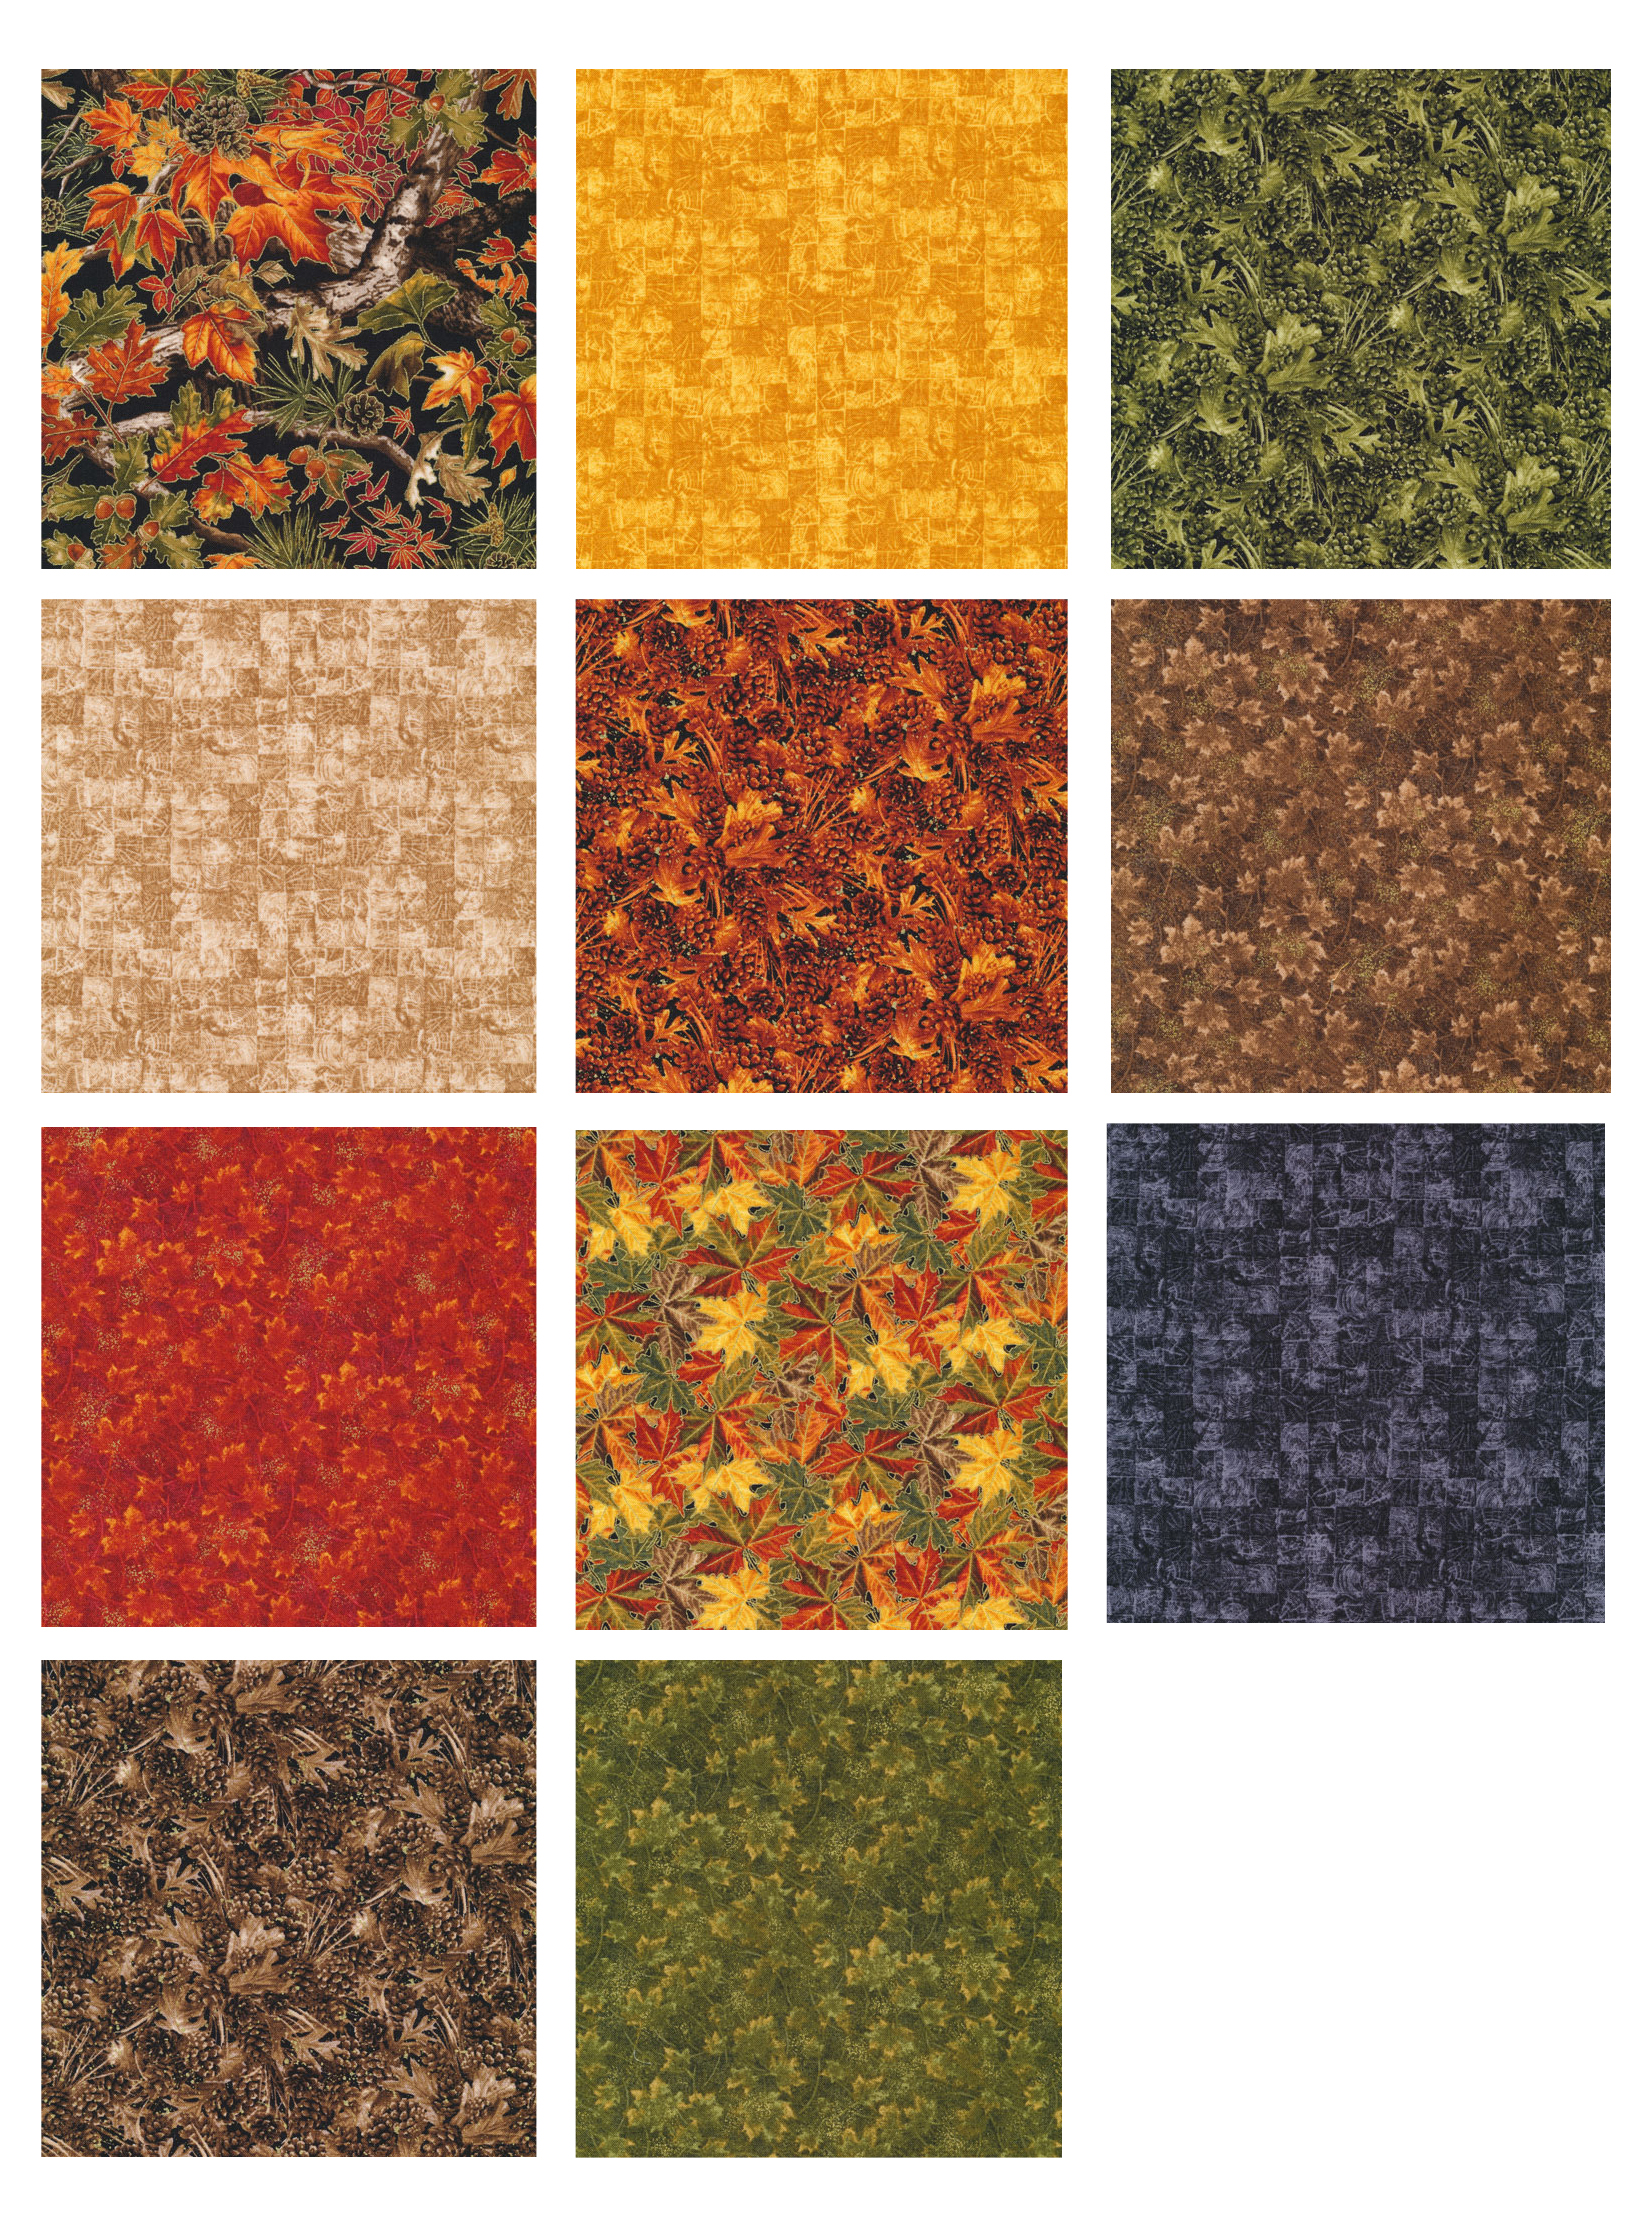
In preparation for this blog hop, I have been working with a line of autumnal fabrics provided to me by Paintbrush Studios. PB Studios has been a very generous sponsor. They provided me and four other bloggers with the fabrics of our choice in different fall lines and we have each made a project showcasing their beautiful fabrics. The line that I selected for my project is called Golden Harvest.
Here is the schedule for the Autumn Abundance Hop this week.
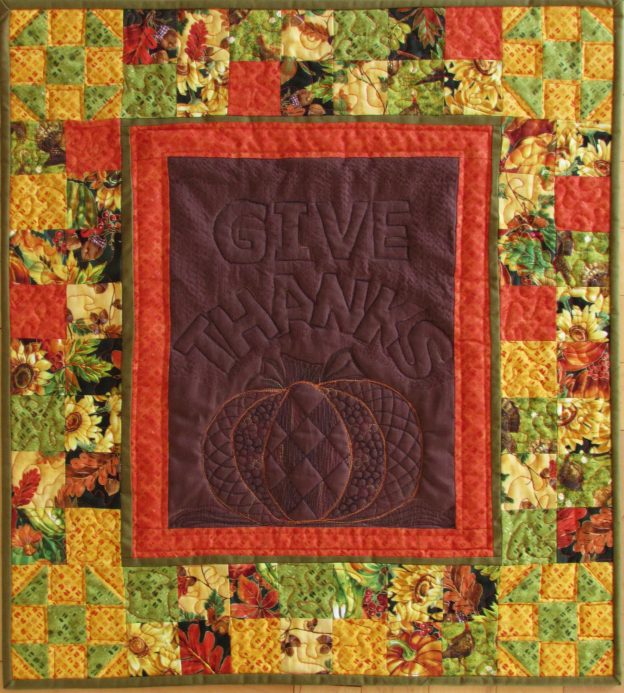
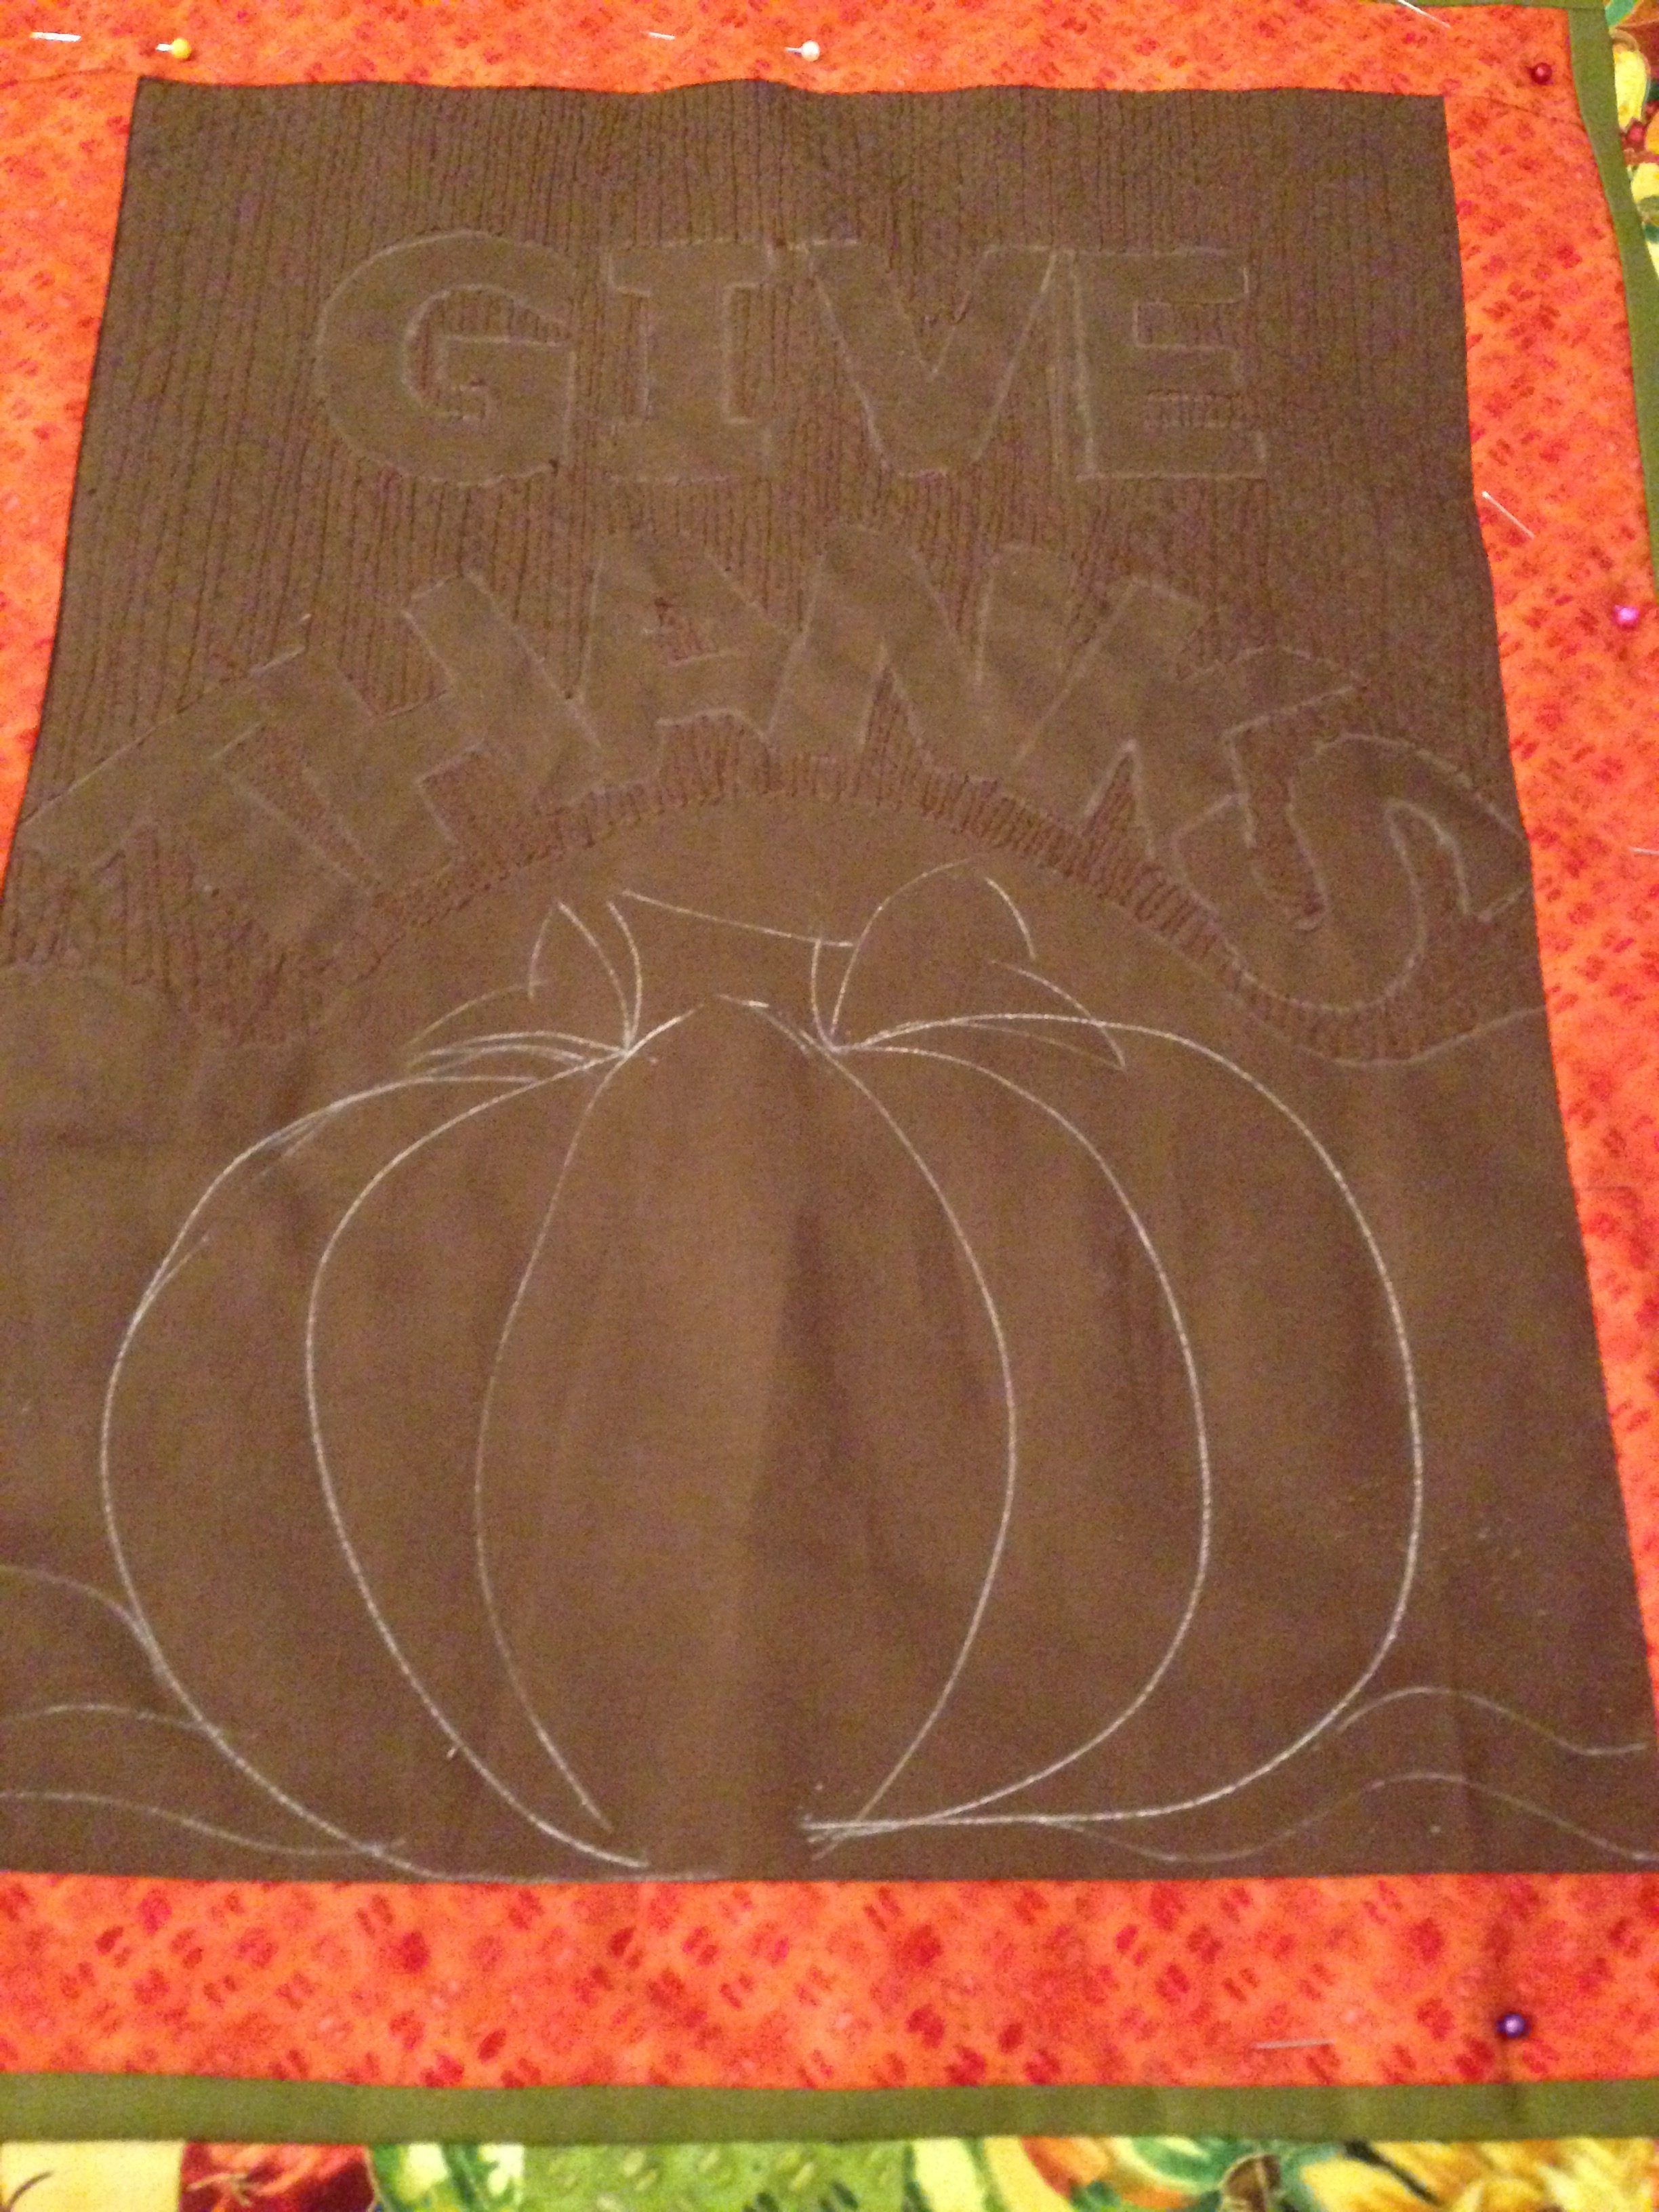
When considering my options for what sort of project I wanted to make, I decided I wanted to have something to hang during the Thanksgiving season. Thanksgiving is my all time favorite holiday. It centers around family and food – what else does one need? I have been having a lot of fun doing some relief quilting (remember my THREAD and FABRIC pieces?) and thought it would be a good idea to do another one.
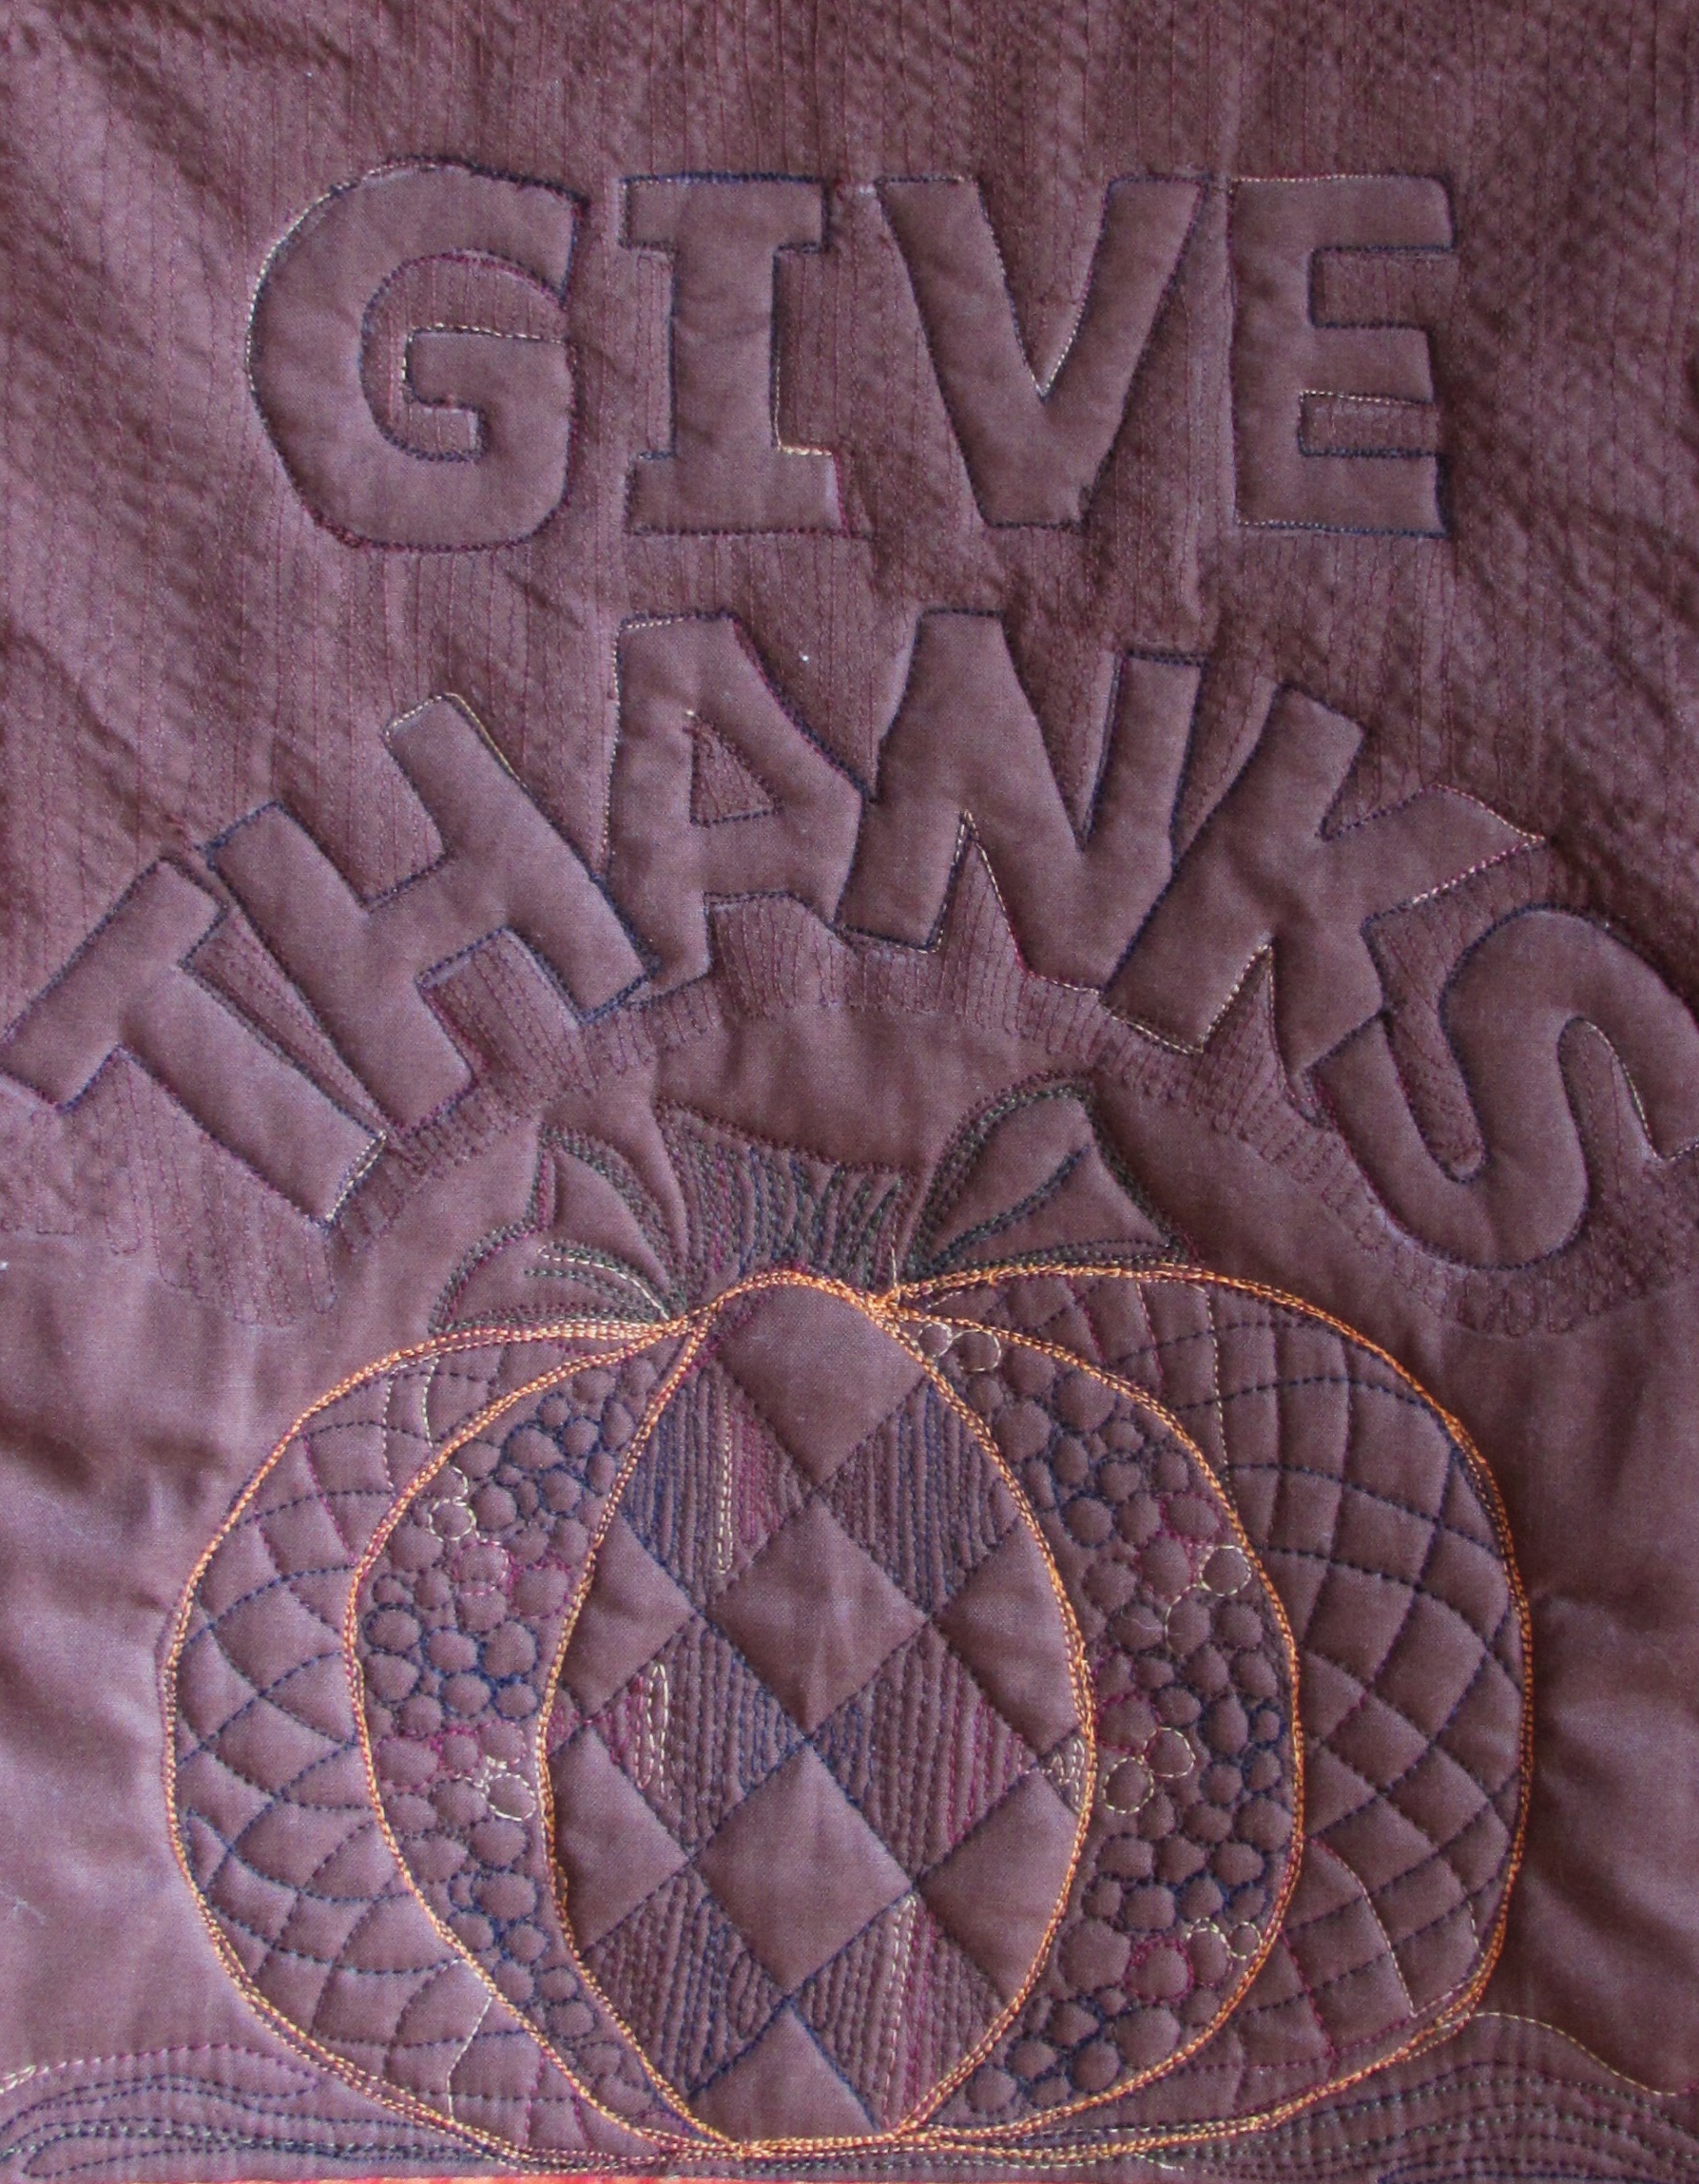
I did a quick sketch but didn’t really plan too much beyond that. I began with the center piece. I had this gorgeous brown solid (PB Studios calls is Espresso) and I cut a rectangle and played around with the placement of the lettering. GIVE THANKS was my focus. With the stabilizer fused to the back, I quilted the letters. This goes quite quickly. Especially since Muv over at Lizzie Lenard Vintage Quilting encouraged me to free motion this instead of using a walking foot. She is absolutely right – it worked just fine! Much, much faster to get the lettering done.
Once I had accomplished that, I thought about what sort of design should be placed below the words. At first I thought of doing some applique but the more I thought about it, I decided I wanted to quilt a design instead. I love playing with thread and here was an open space to do with as I pleased. I decided on a pumpkin and took a look at Lori Kennedy’s site, The Inbox Jaunt, for some inspiration. She never fails me. Never! This pumpkin is taken directly from this tutorial. It came together easily.
Using YLI variegated thread, I started by outlining the pumpkin, stem and leaves. Next I filled in the sections of the pumpkin. Following that I added to the outlining to give it some depth. The stem and leaves were also filled in and outlined a couple of times. So much fun!
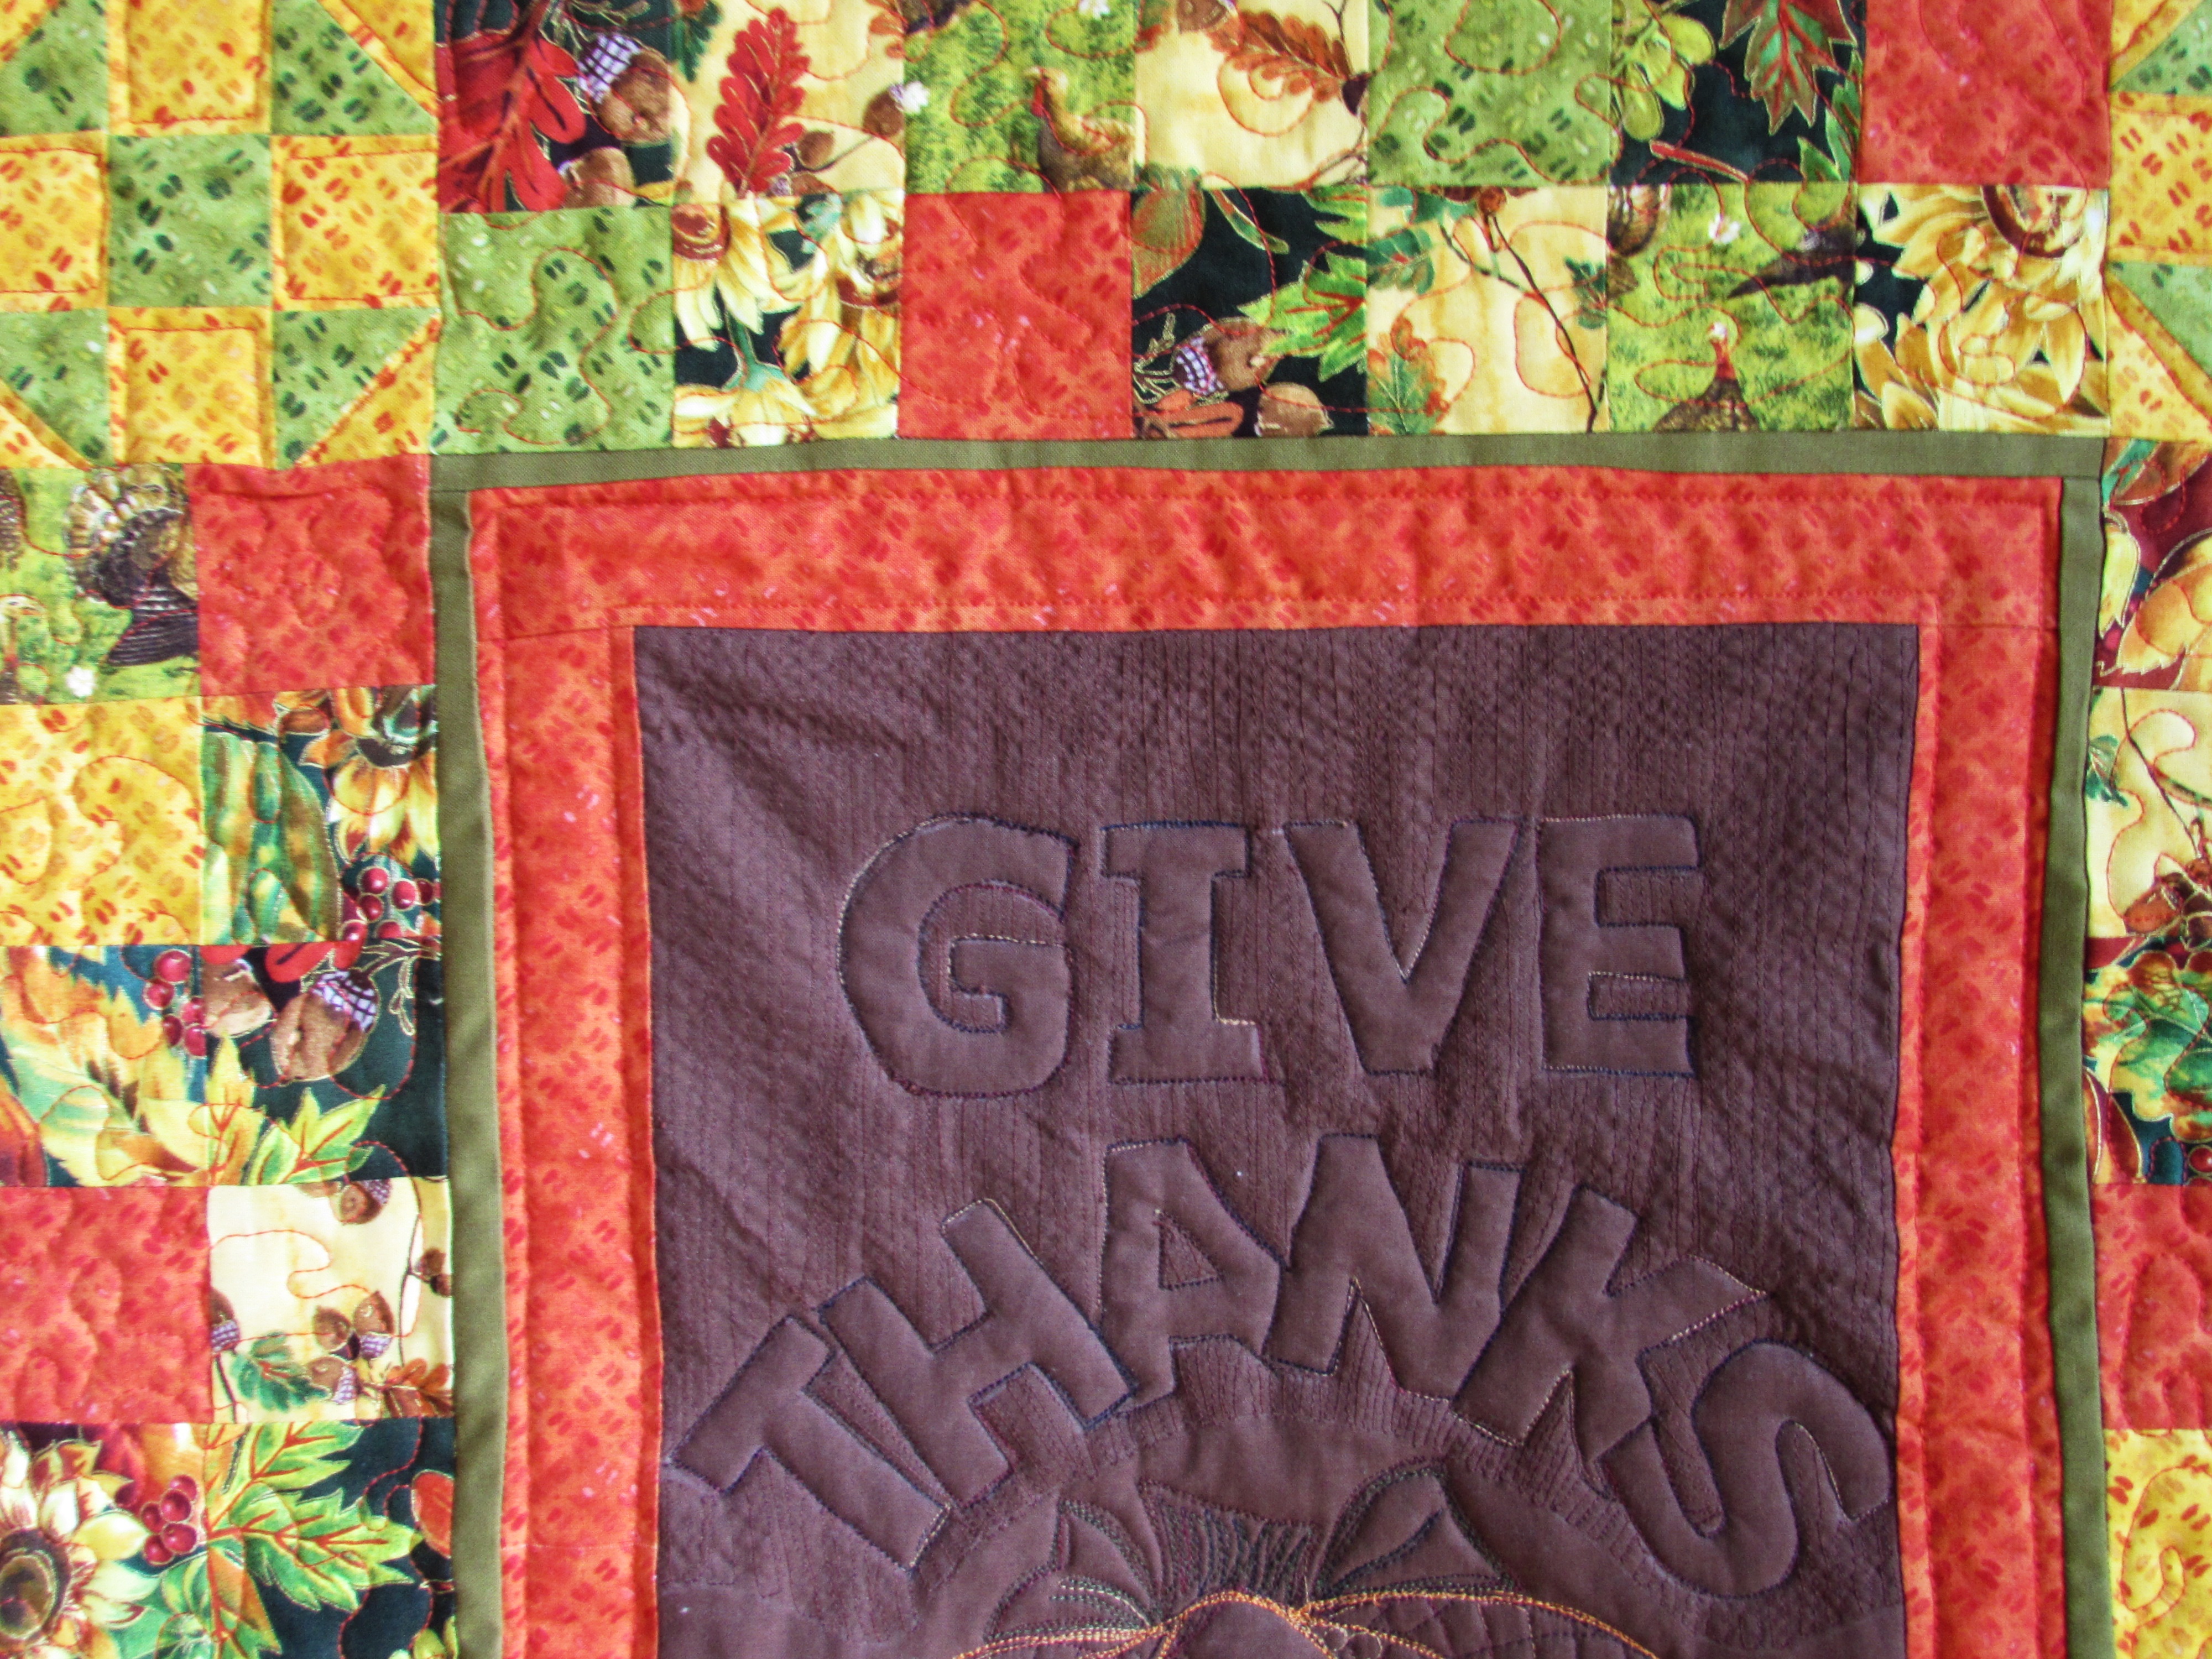
The next step was to put a narrow border of the olive green solid. I had already decided to do a patchwork border to set off the center. I wanted to use a 2 1/2″ square because of the scale of the fabrics I was playing with.
While I worked things out with the patchwork border, I was thinking about the corners. I made some pinwheel blocks but thought they looked too flat. Following that I made some churn dash blocks and liked these much better.
As it always does, the quilt came together with the sum being so much greater than its parts. I really love this project. The sunflowers, pumpkins, leaves and turkeys are so cheerful. The fabric really is adorable. The green, orange and yellow blender prints worked well to tone down some of the color within the borders. The traditional colors and themes of this line are just right – they made me happy just playing with them. I used a brown print that was in my stash to back it and then used the olive green fabric to bind it. The quilt finished out at 23″ x 25″ inches.
As with most projects, there are a few things I learned. One is better planning equals better results. While it is fun to just sew and see how things come together, I should have done a bit of measuring and planned the patchwork border in more detail. I had to fuss with trimming borders and such to get everything to work together. Also, when I was trimming the piece, after quilting it, I somehow forgot that about the bits that the binding would consume. This is a little bit ridiculous considering the number of quilts I have bound. But I trimmed too deeply, forcing myself to cover points on the churn dash squares on each corner. I was going too fast without considering the details.
I will enjoy hanging it this season and bringing it out again with each Thanksgiving. This simple message of gratitude will remind us of all that we have to be thankful for.
Something I am very thankful for is the generous support of Paintbrush Studios. They were a pleasure to work with and the fabrics they sent to me are just lovely. They are a nice weight and have a very nice feel to them.
Photo courtesy of Academic Quilter
Paintbrush has also provided me with a fat quarter bundle of Into the Woods to offer to one lucky winner. Enter the giveaway by telling me about your favorite part of Thanksgiving Dinner. (Mine is definitely stuffing followed closely by homemade cranberry sauce. Way back when, I posted the recipe for the cranberry sauce I make at Thanksgiving…. just in case you want to try something new.) Leave me a comment and tell me about your favorite. If you are following the blog, leave a second comment and tell me how for an additional entry.
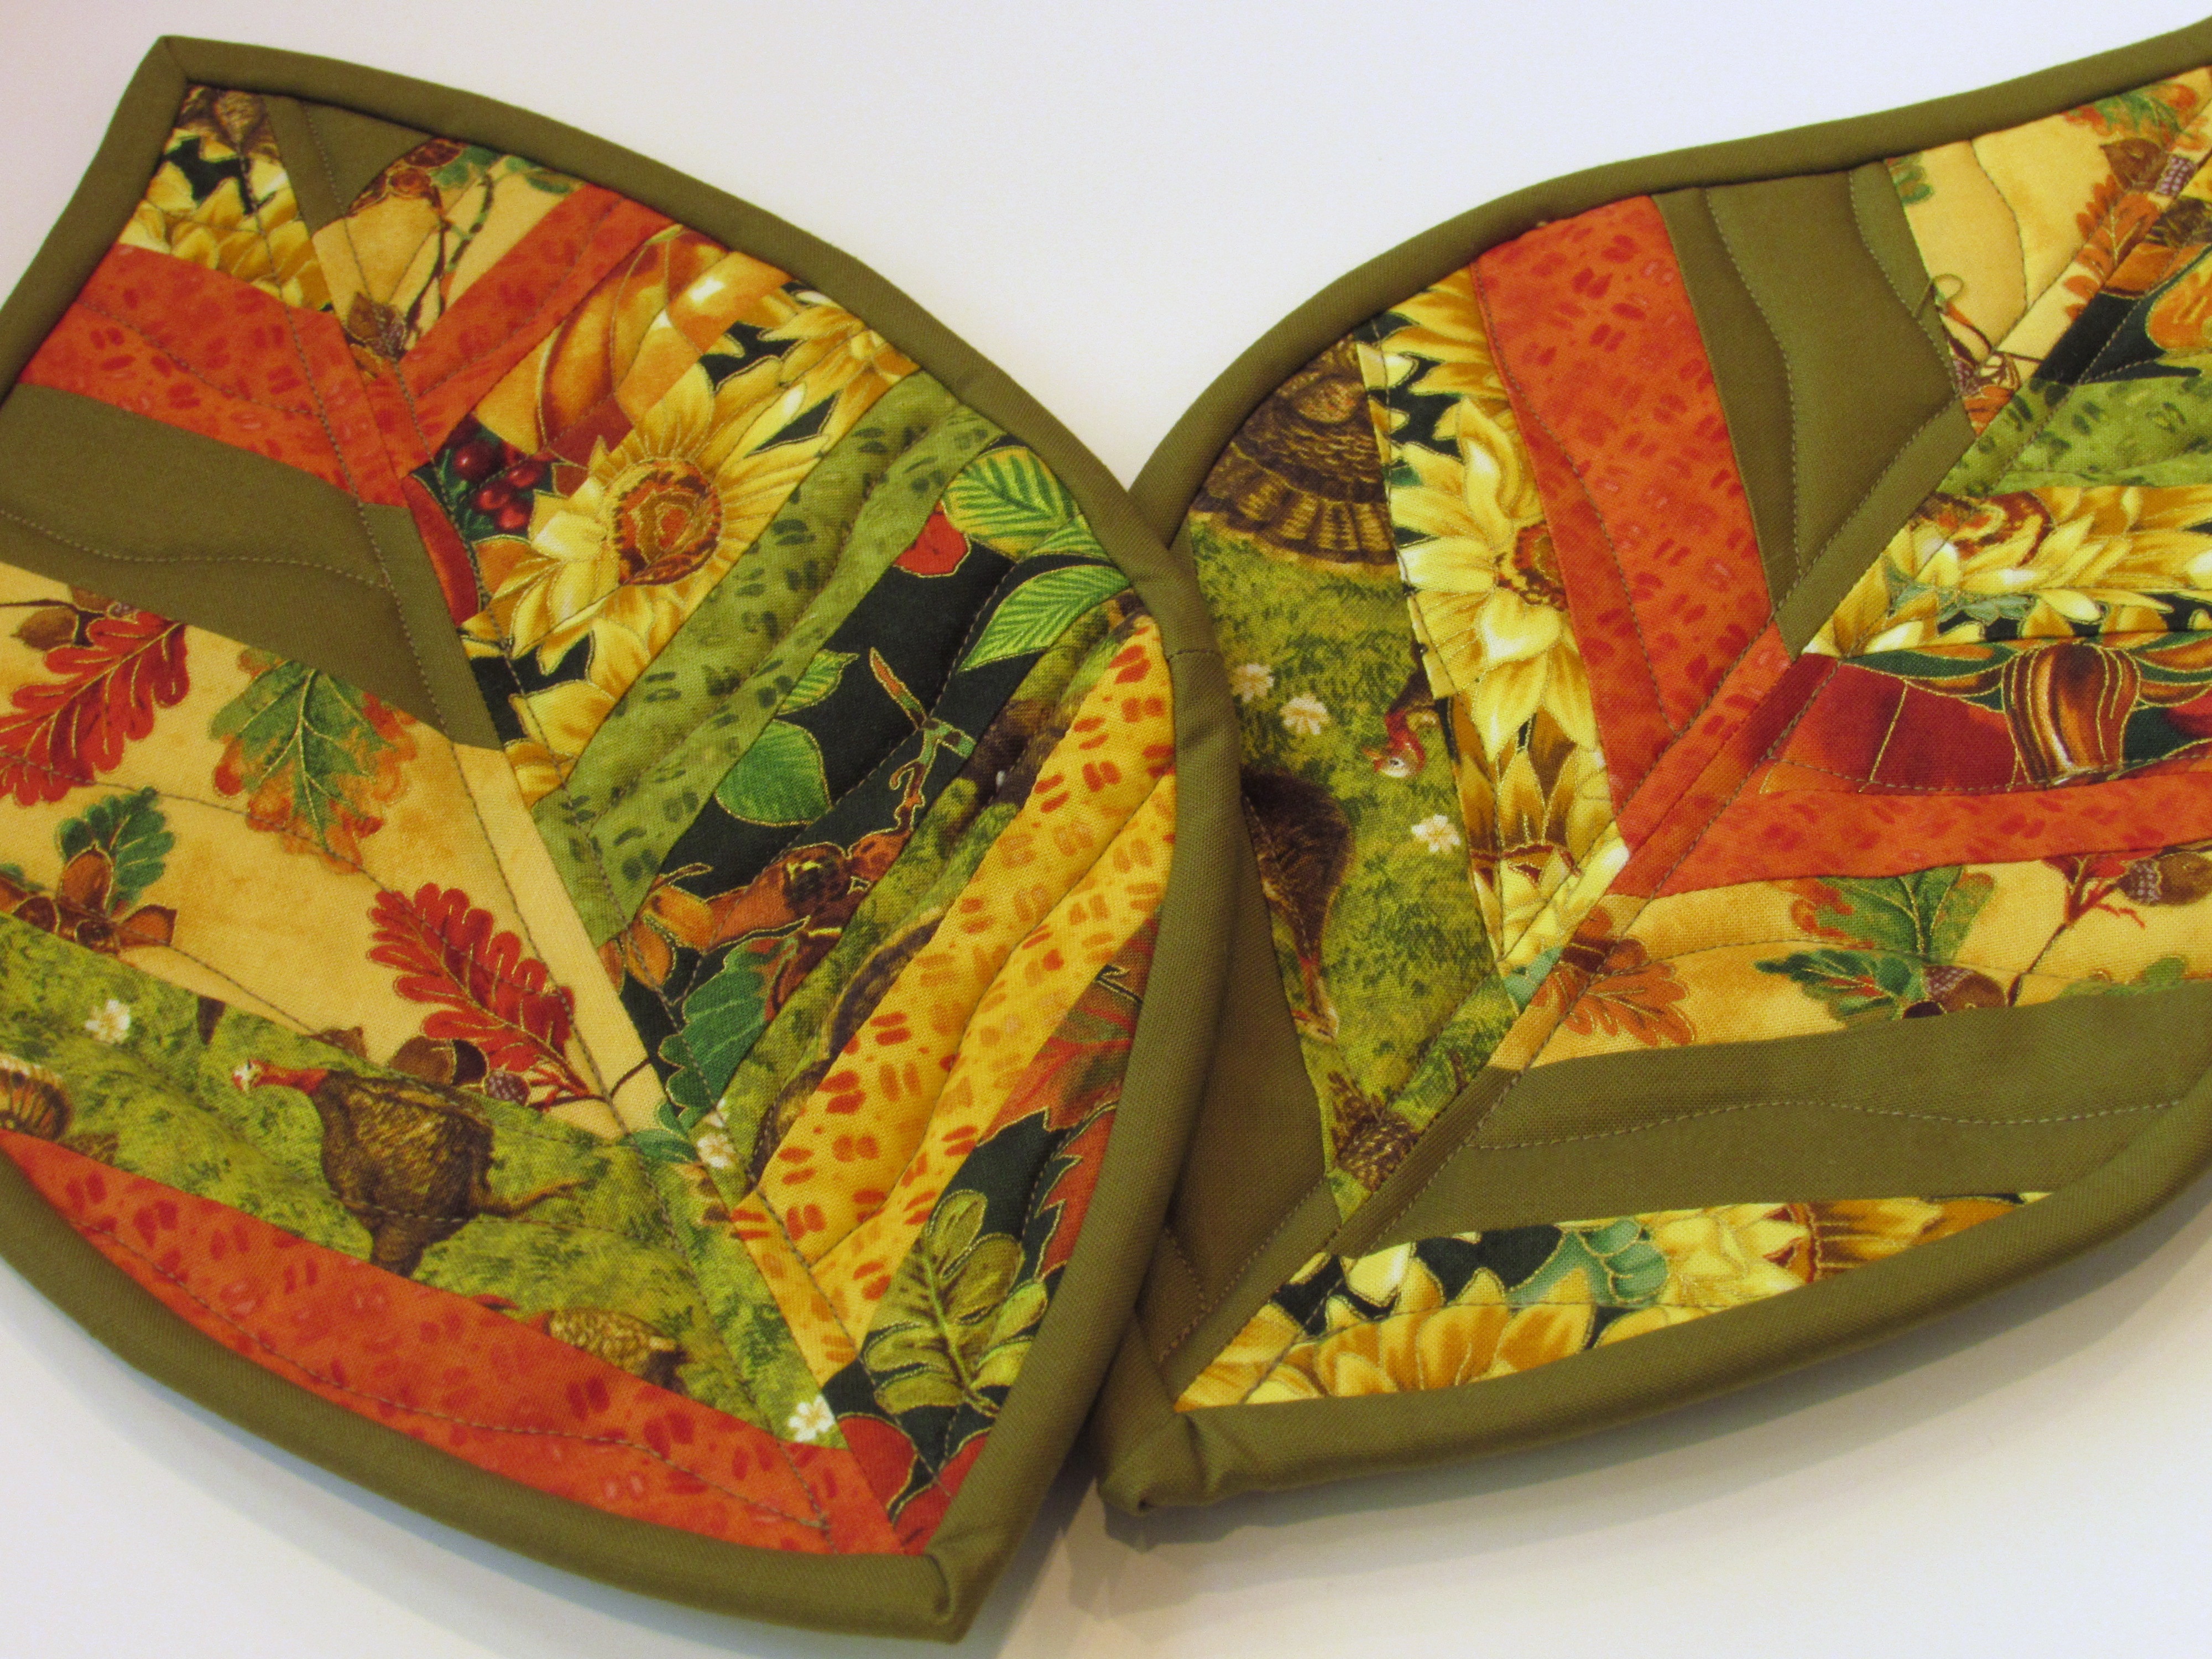
Now for my giveaway. I wanted to make something to give as thanks for all of the friends, inspiration, and community that happens within our online group of amazing quilters. Using this tutorial from Buttons and Butterflies, I made a pair of potholders from some of the scraps. I will pick a name from the comments to win these two potholders as well.
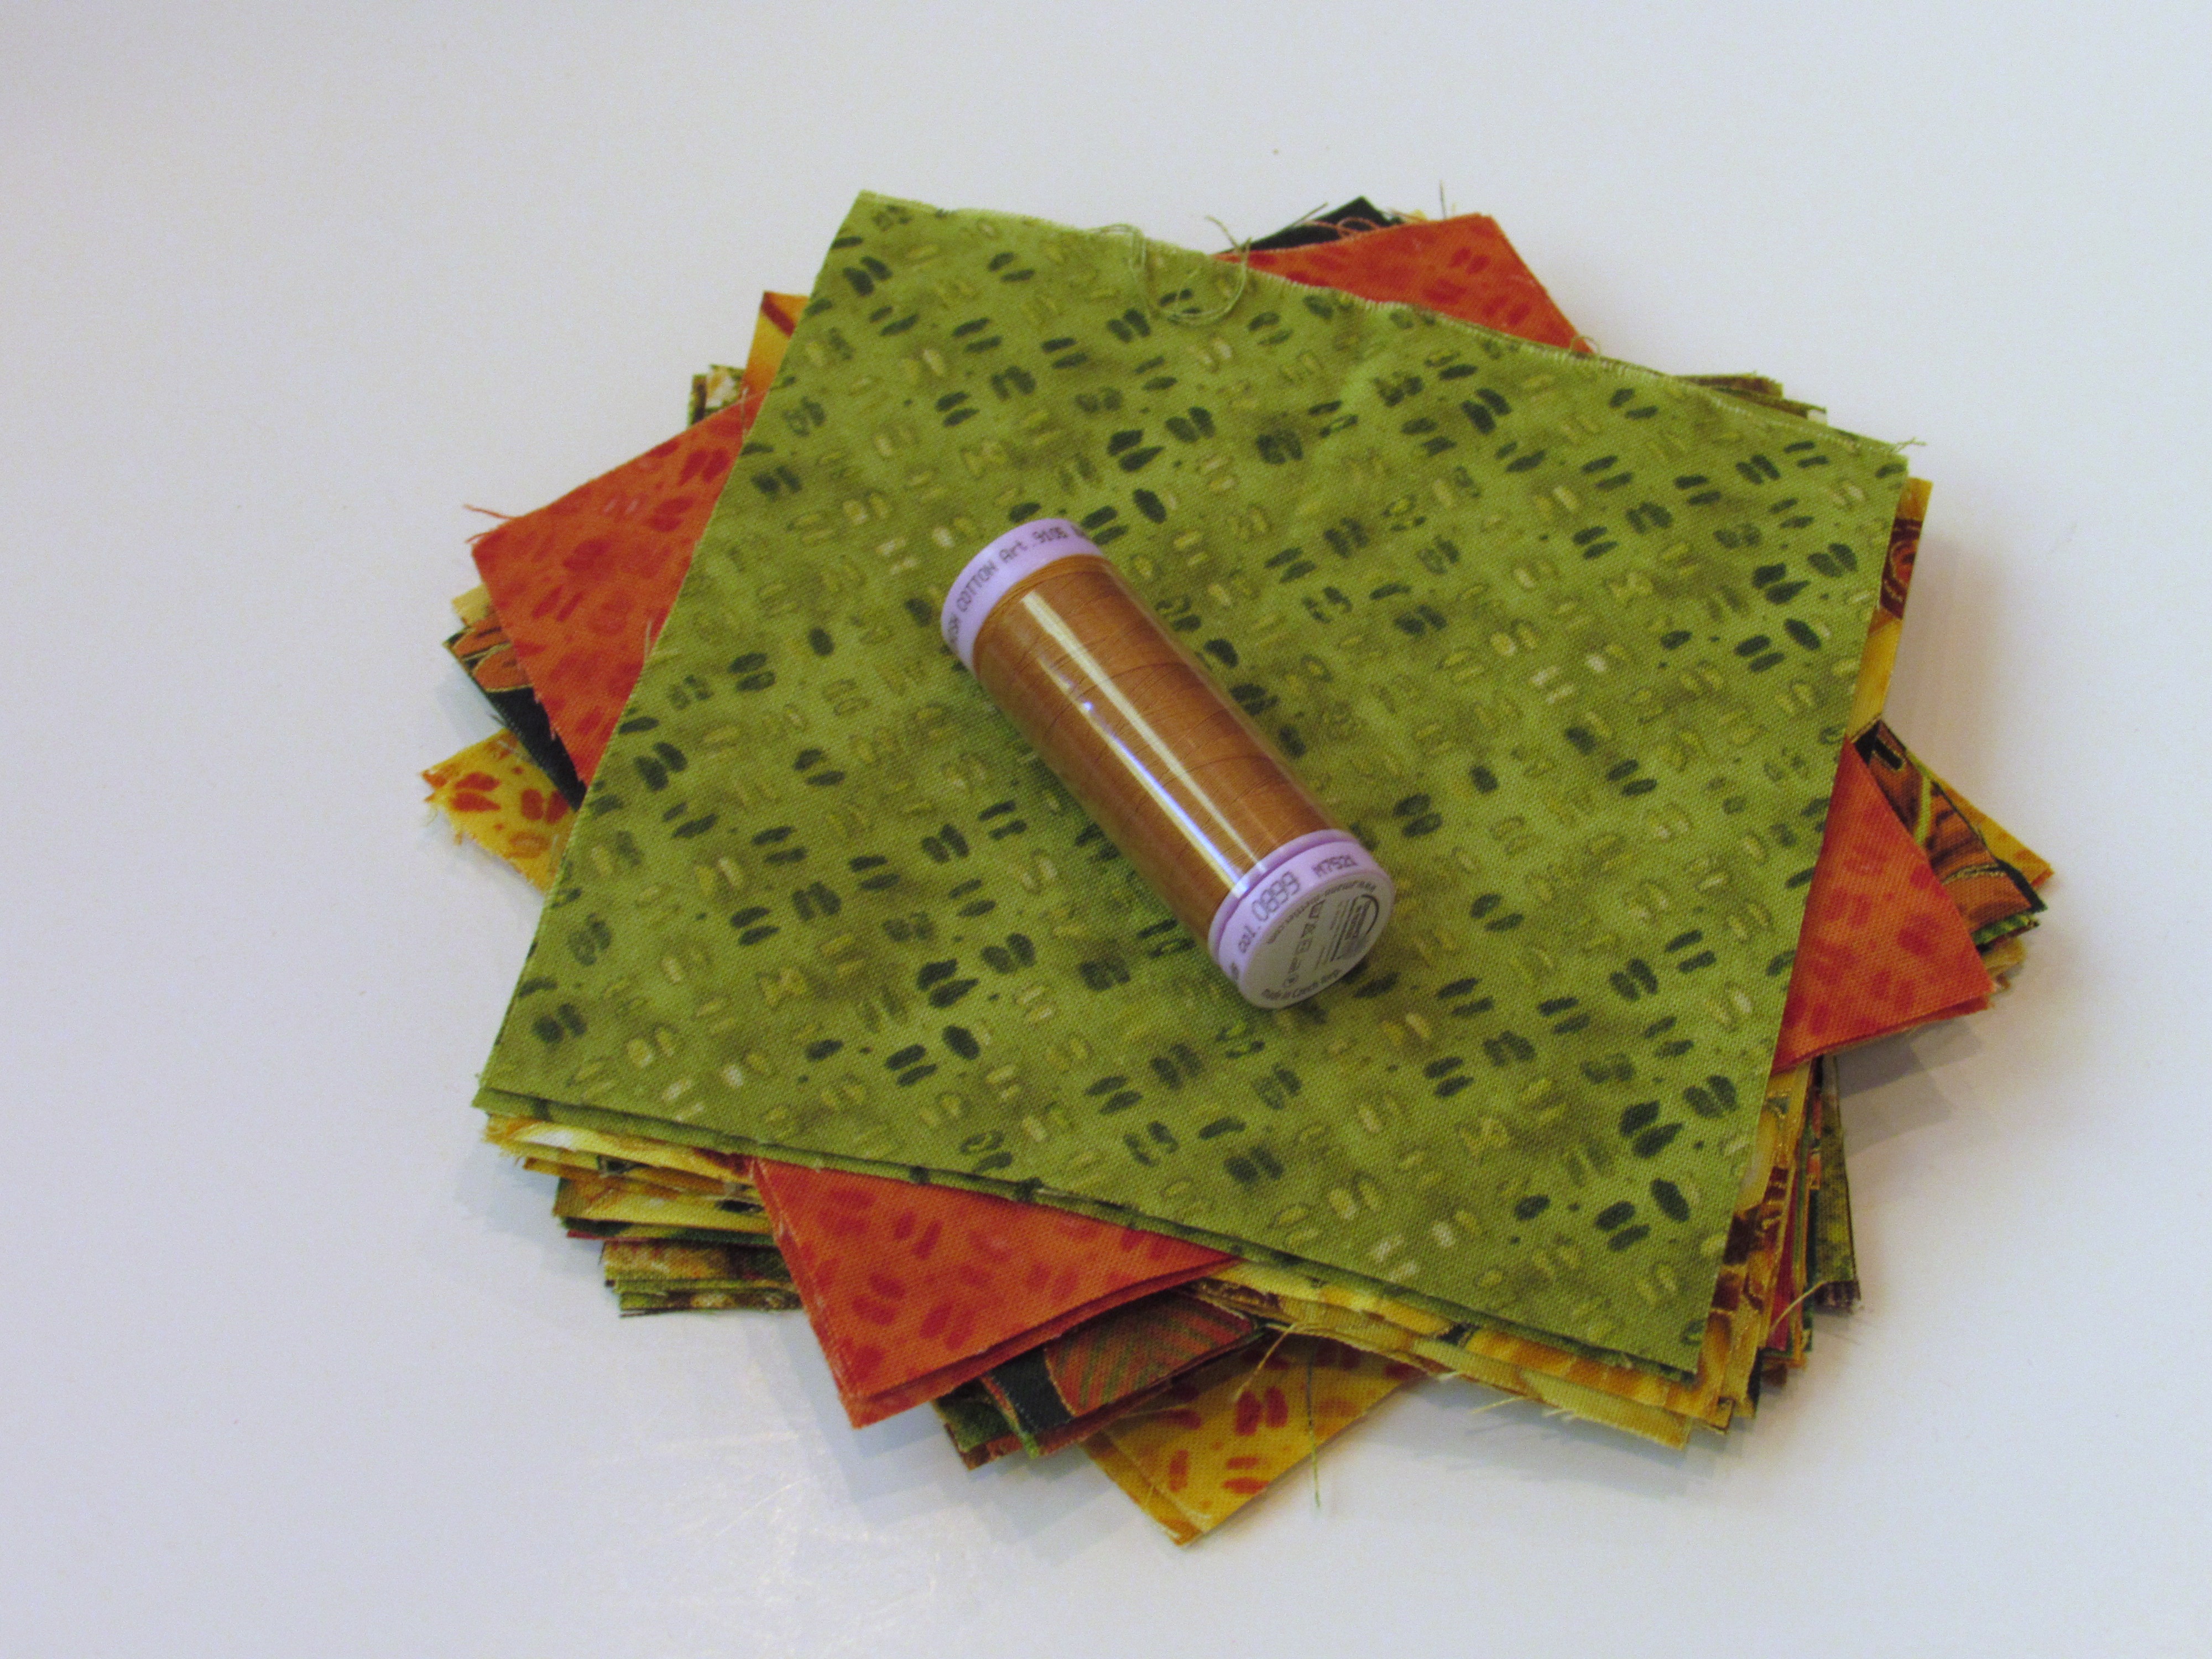
After finishing the potholders, I decided to cut the remaining scraps into charm squares. I was able to cut a set of 40 charms. So, let’s give those away as well!
I added a small spool of coordinating Aurifil so you can make a fall inspired project of your own!
Good luck! Winners for all three giveaways will be drawn on Friday evening, October 28th. I will email winners and announce them the following day on the blog. Make sure I have an email address to contact you!
Be sure to check back each day this week with the others on the hop. They have been working on wonderful projects for fall and have used gorgeous Paintbrush Studios fabrics that are different from mine. You are sure to enjoy their work. There may just be some giveaways on their sites as well. Enjoy this season of brilliant colors, family and friends, and some darn good food.
THIS GIVEAWAY IS NOW CLOSED. Thanks everyone!
Linking this post to She Can Quilt as a part of the Q4-FAL event.
If you are wanting to gain confidence in your free motion quilting skills, today might just be the day to purchase a Craftsy Class! Just today, all classes are $14.99. Can’t beat that. I know I learned a great deal with the classes I have taken. I have taken this one from Lori Kennedy and this one with Angela Walters.