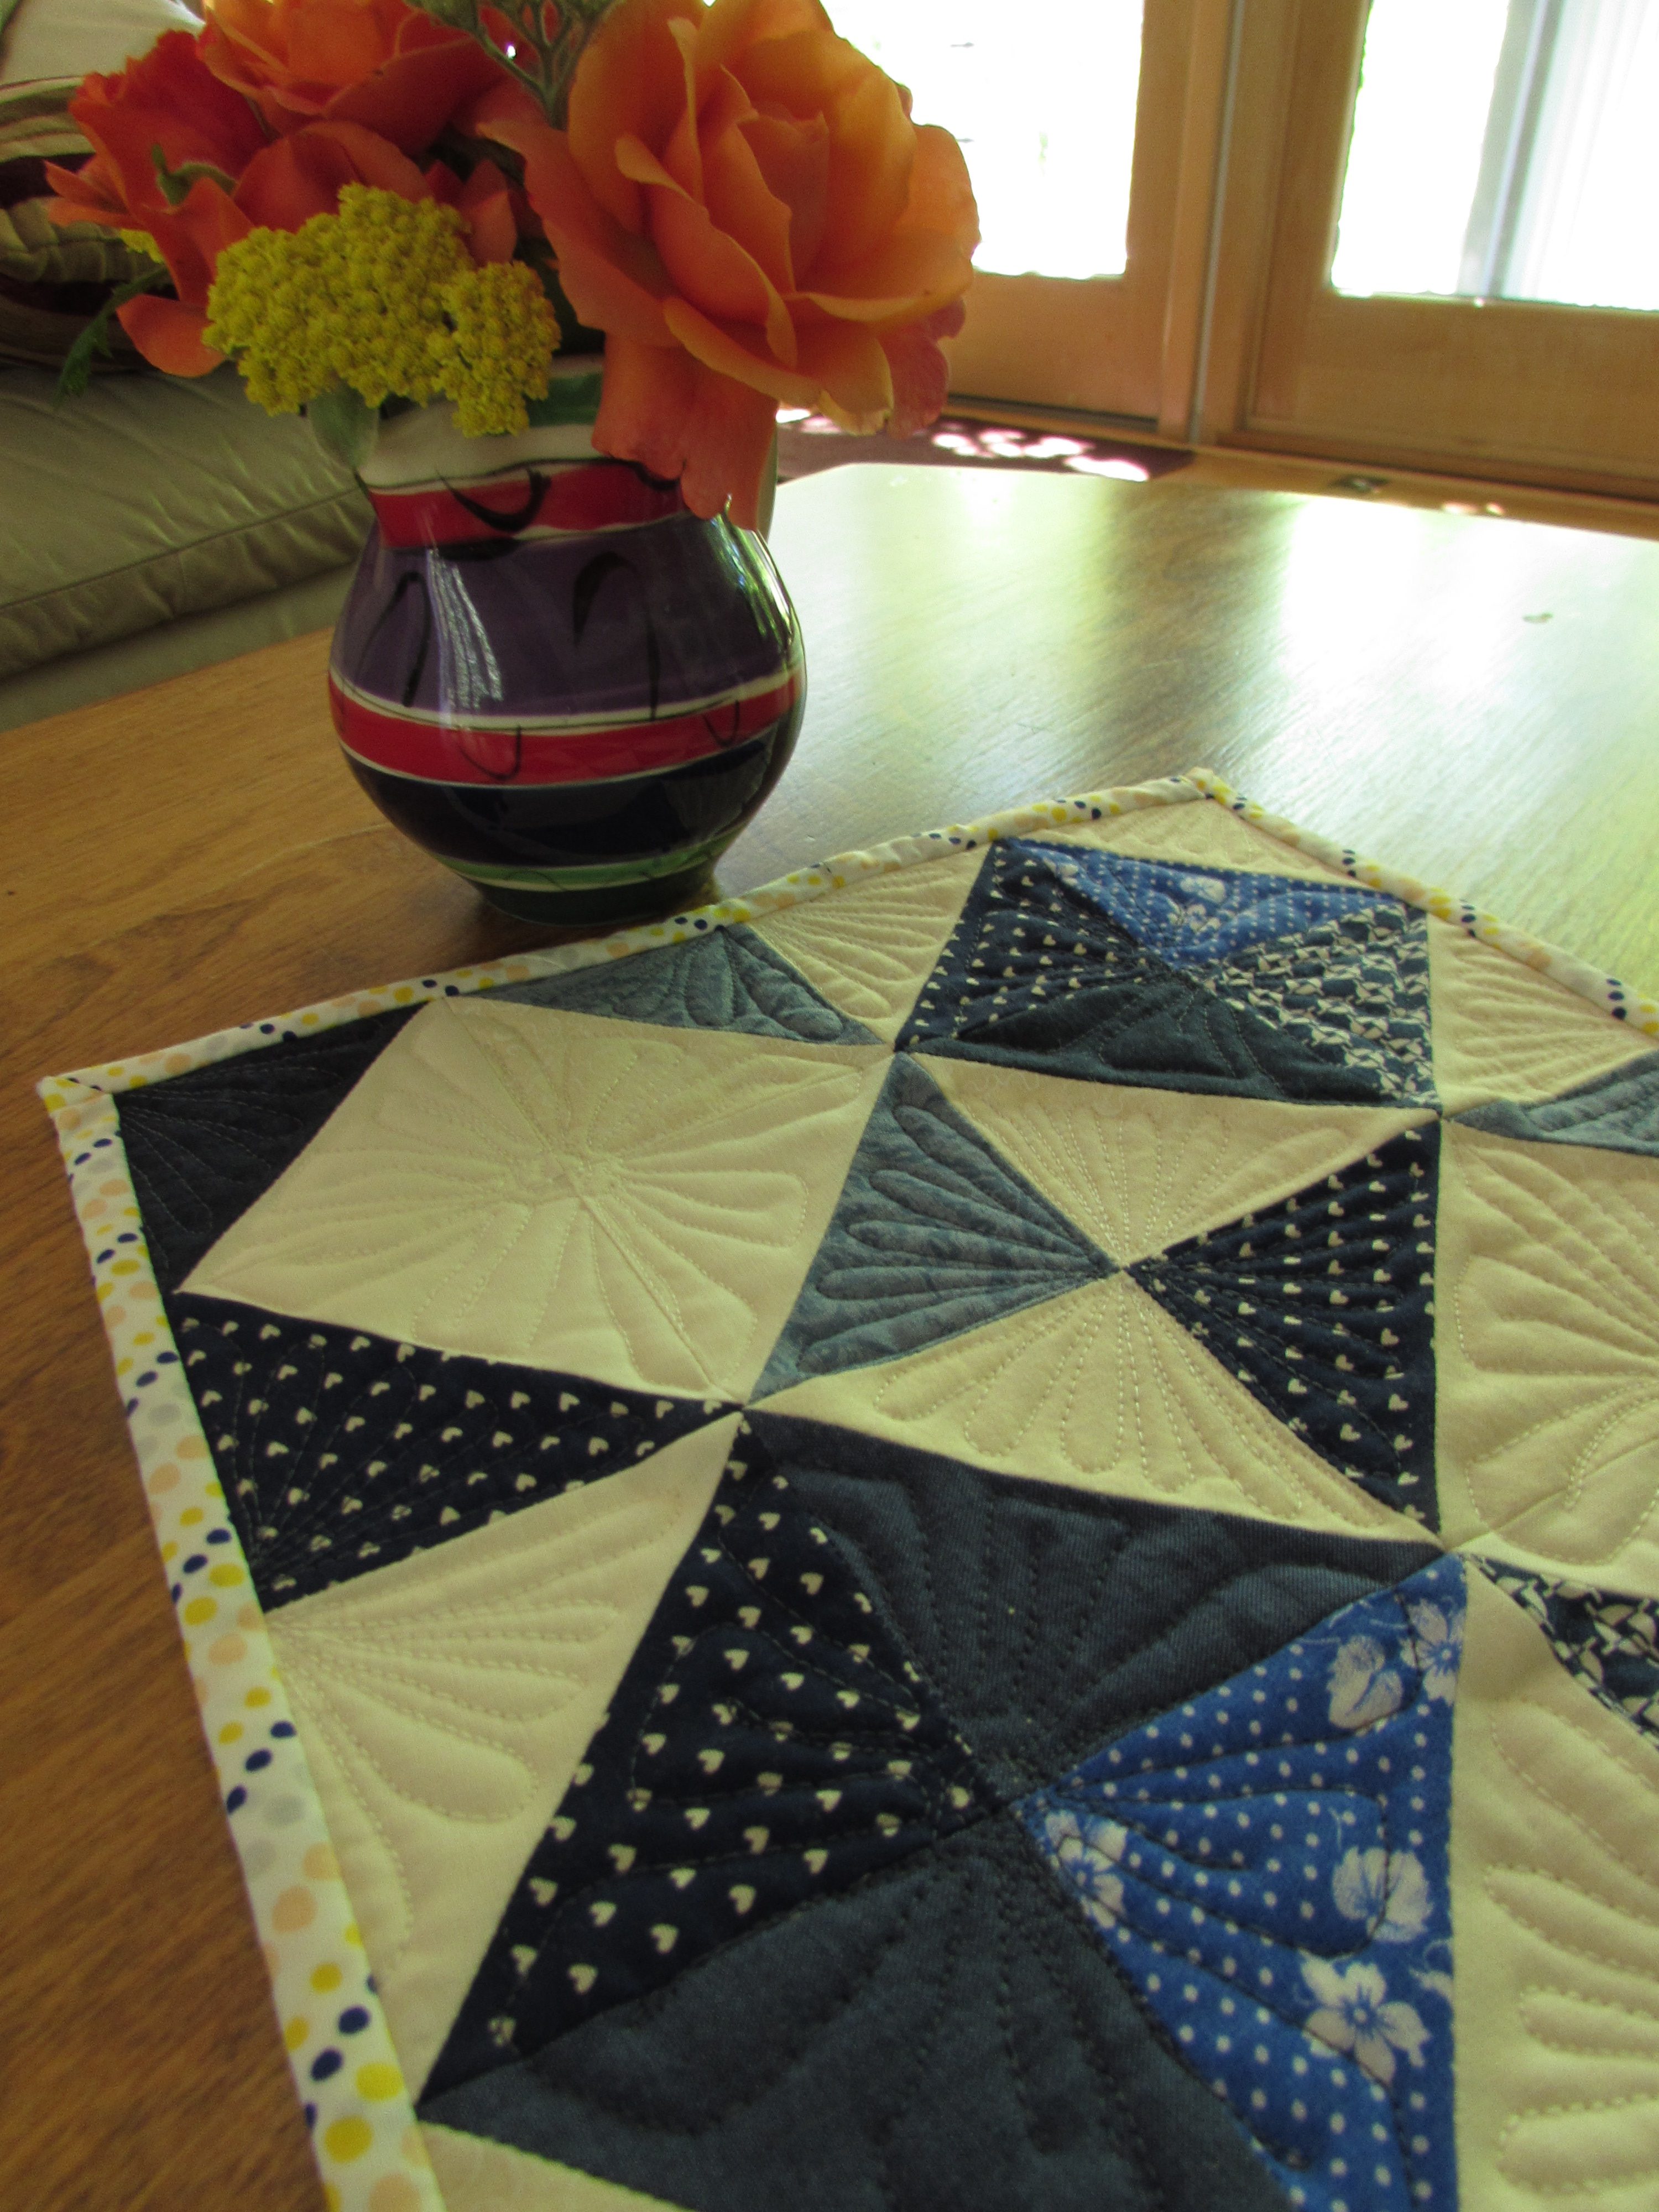
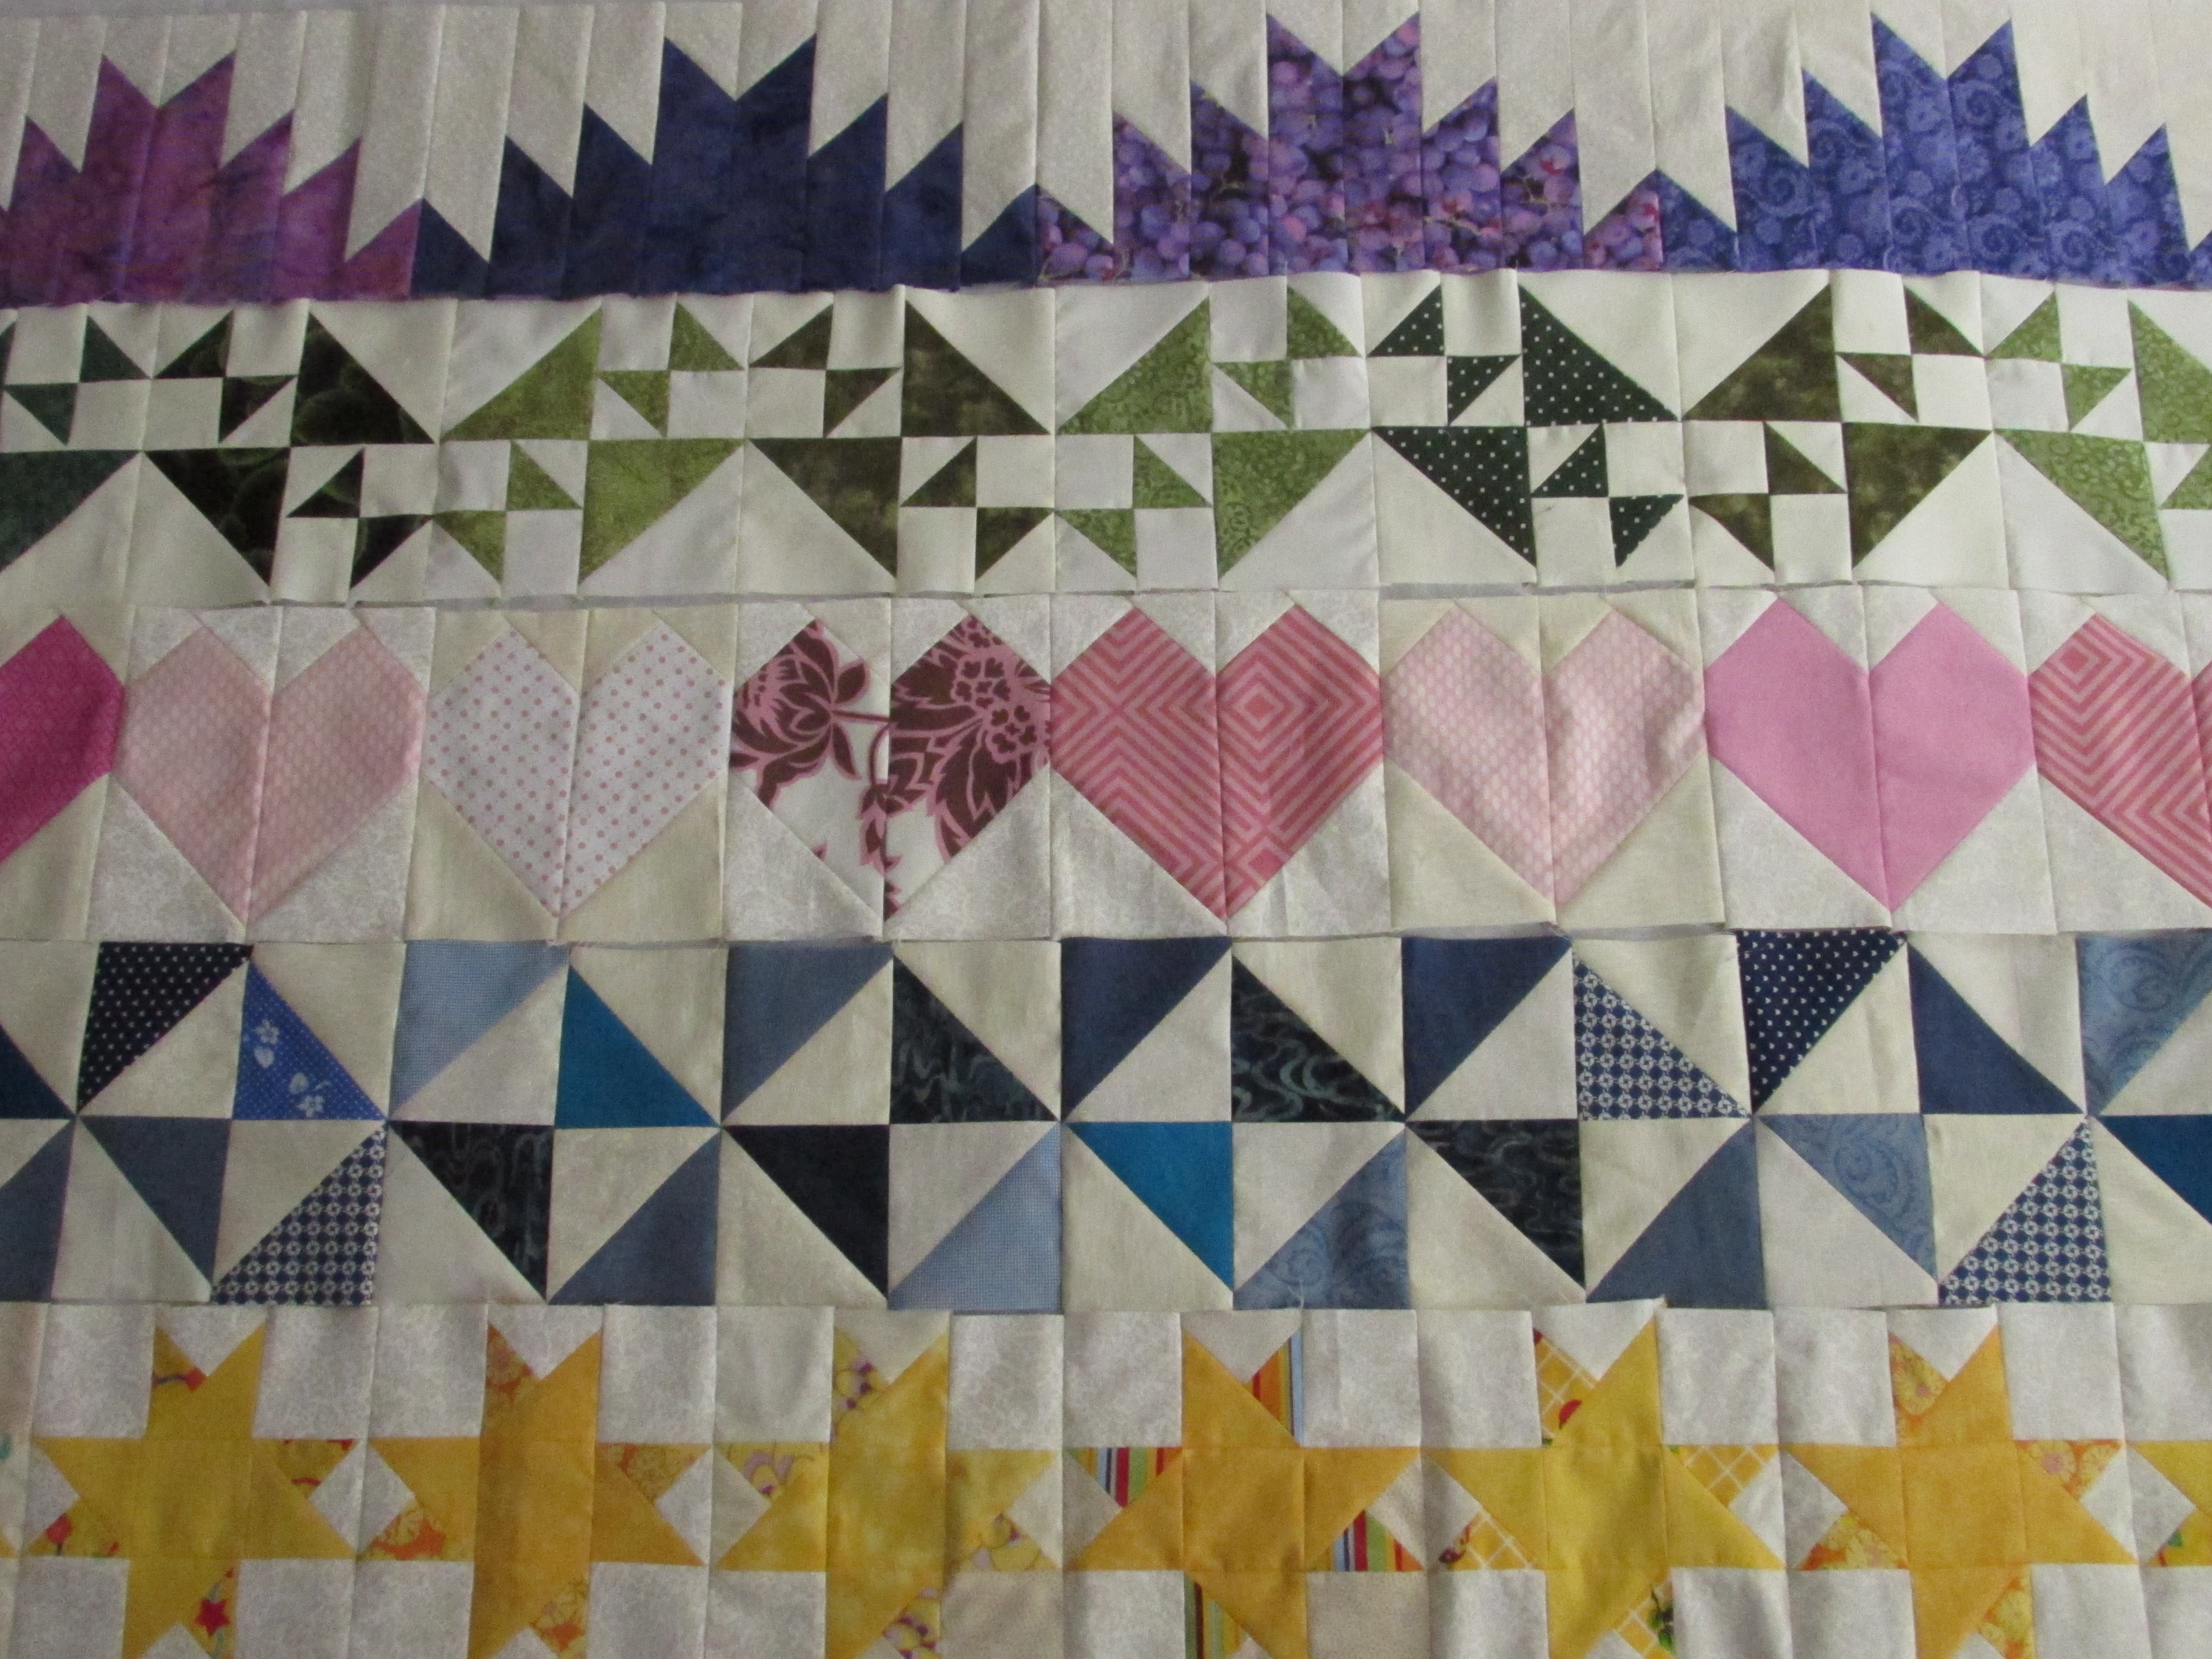
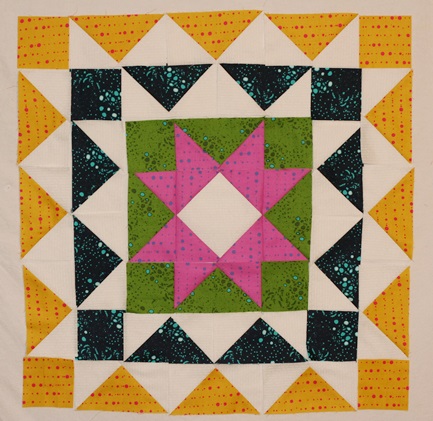
It took me all week to get upstairs to work on my Round Robin project this week. But yesterday I did it! This week was Quilting Gail’s week to supply the prompt. Her only request was that, somehow, the number 4 factored into our decision for what to do with this round. Four patch blocks, use four colors, maybe 1/4 square triangles or pinwheel blocks – these use the number four in one way or another.
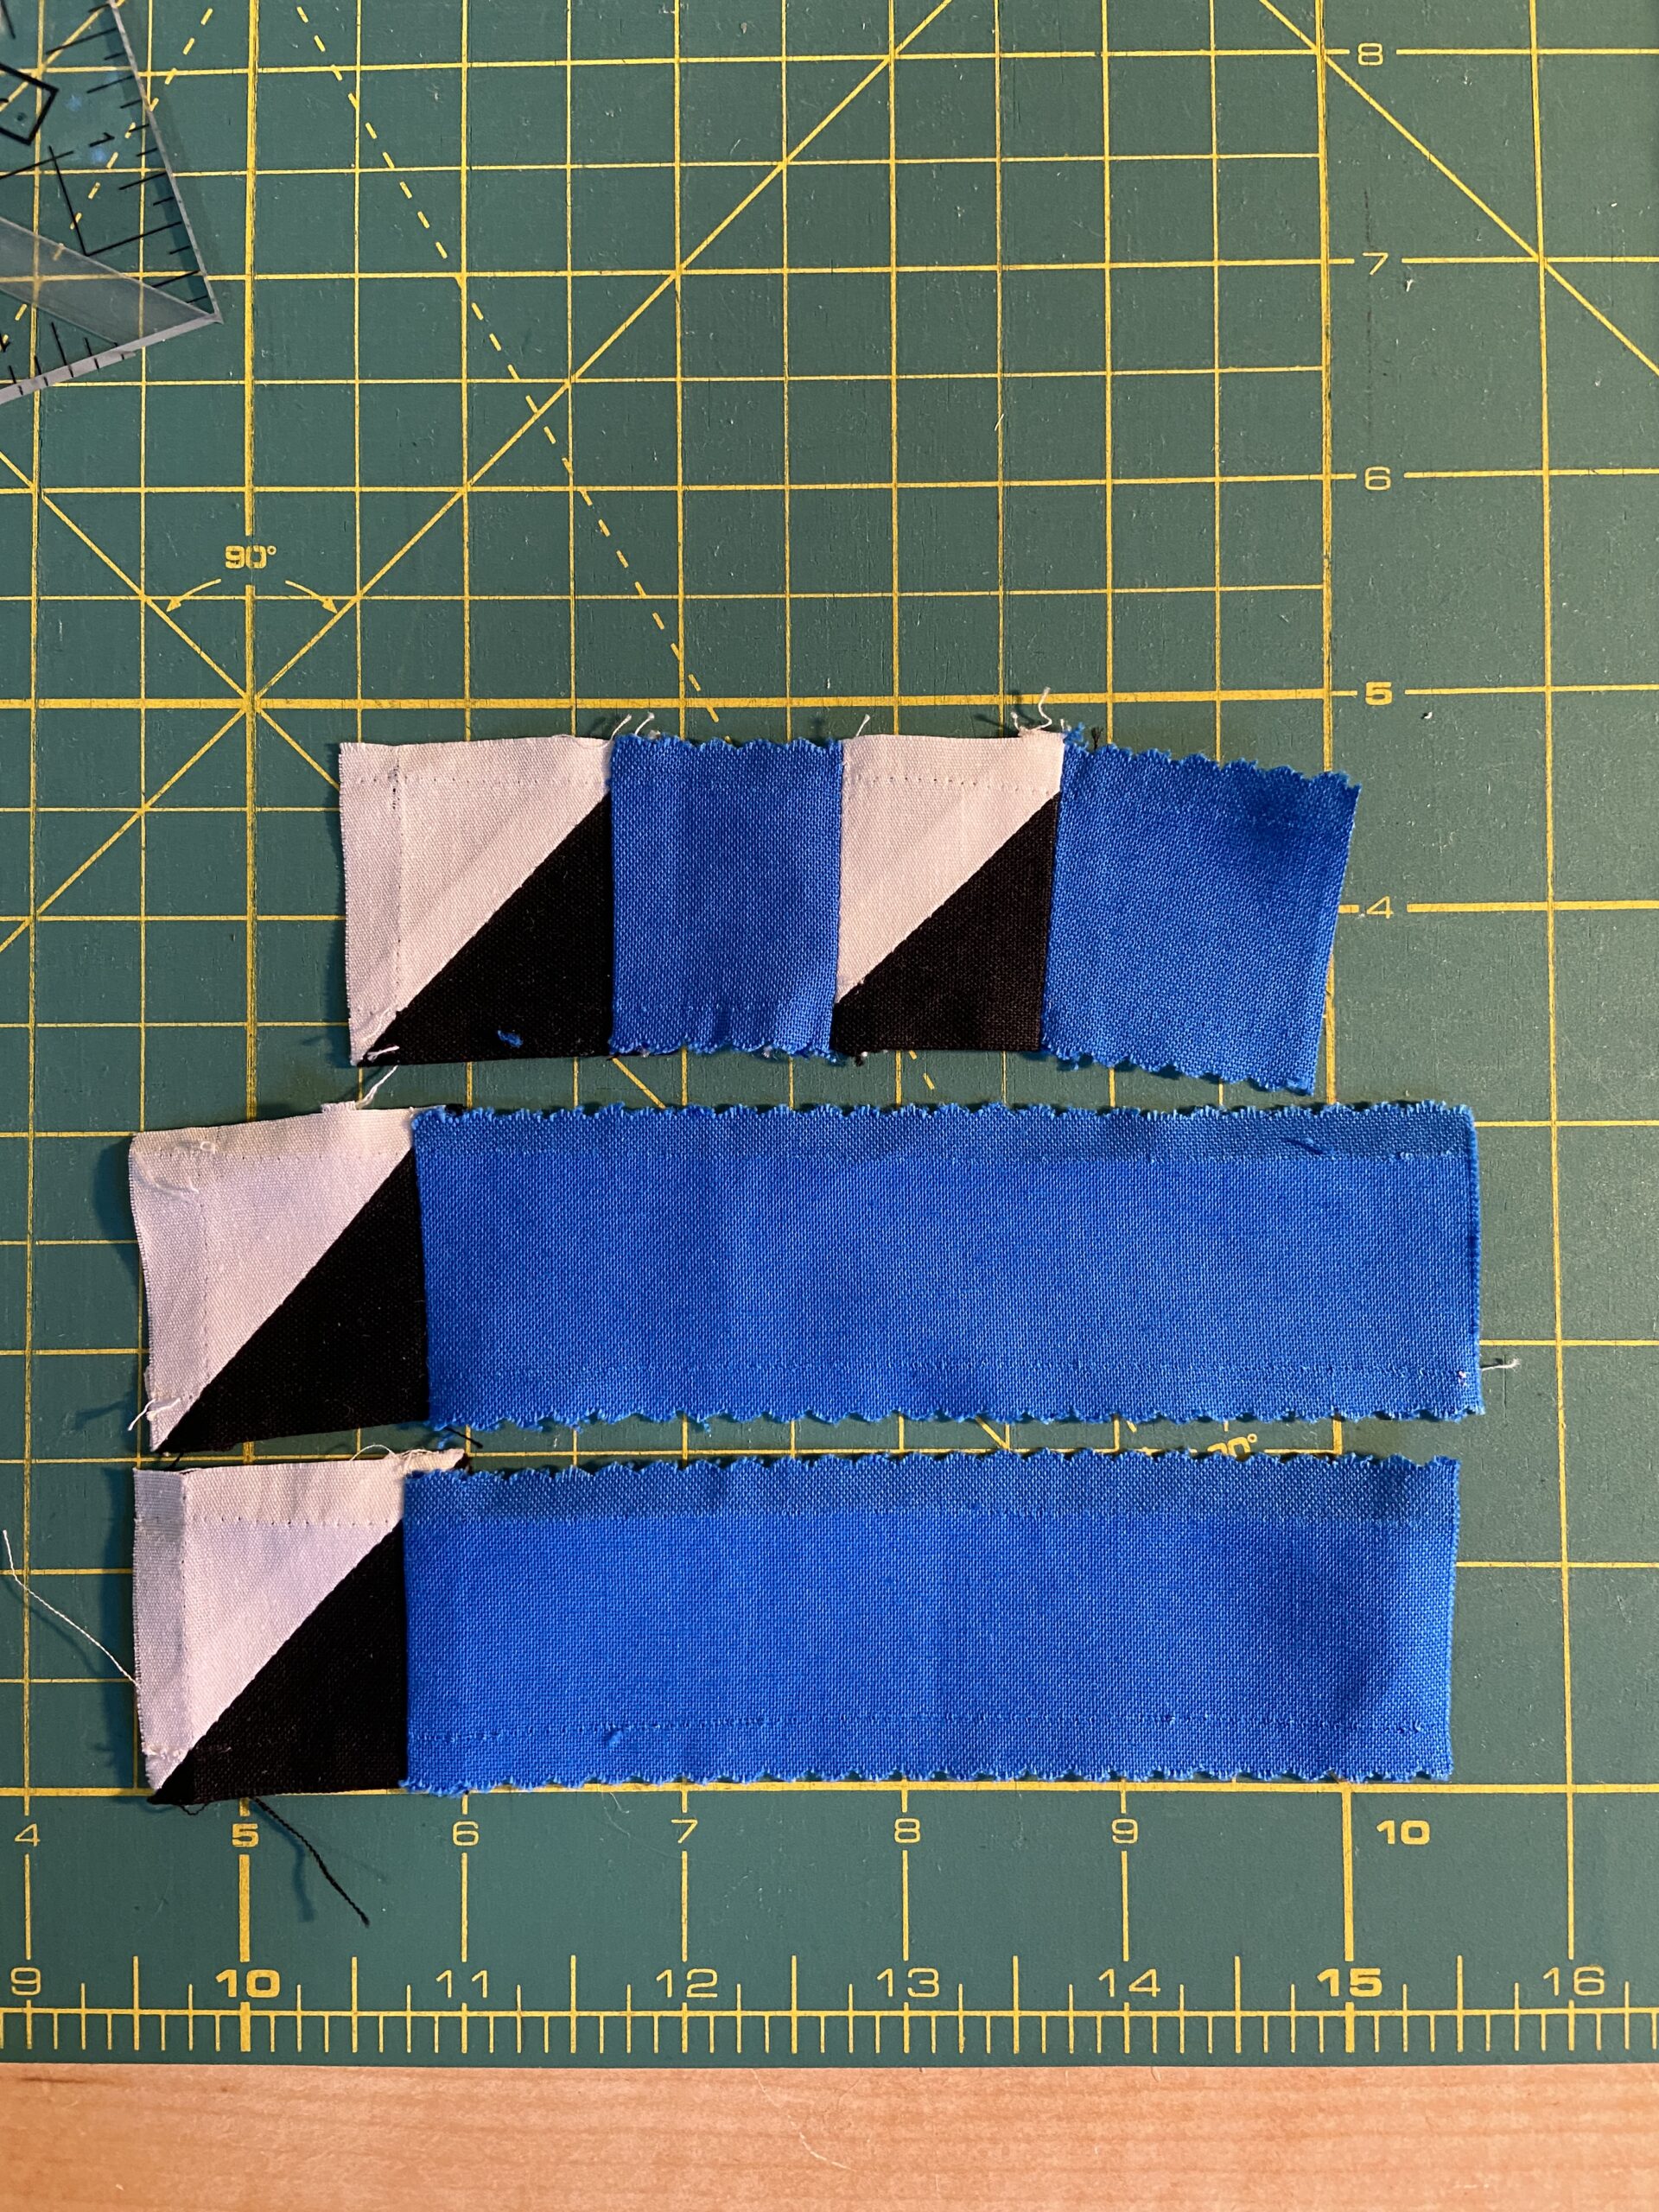
I had no problem deciding how to implement the suggestion of four in my round. I looked at the bits of leftovers I am working with and counted out four blue strips with tiny black and white HST’s attached to them.
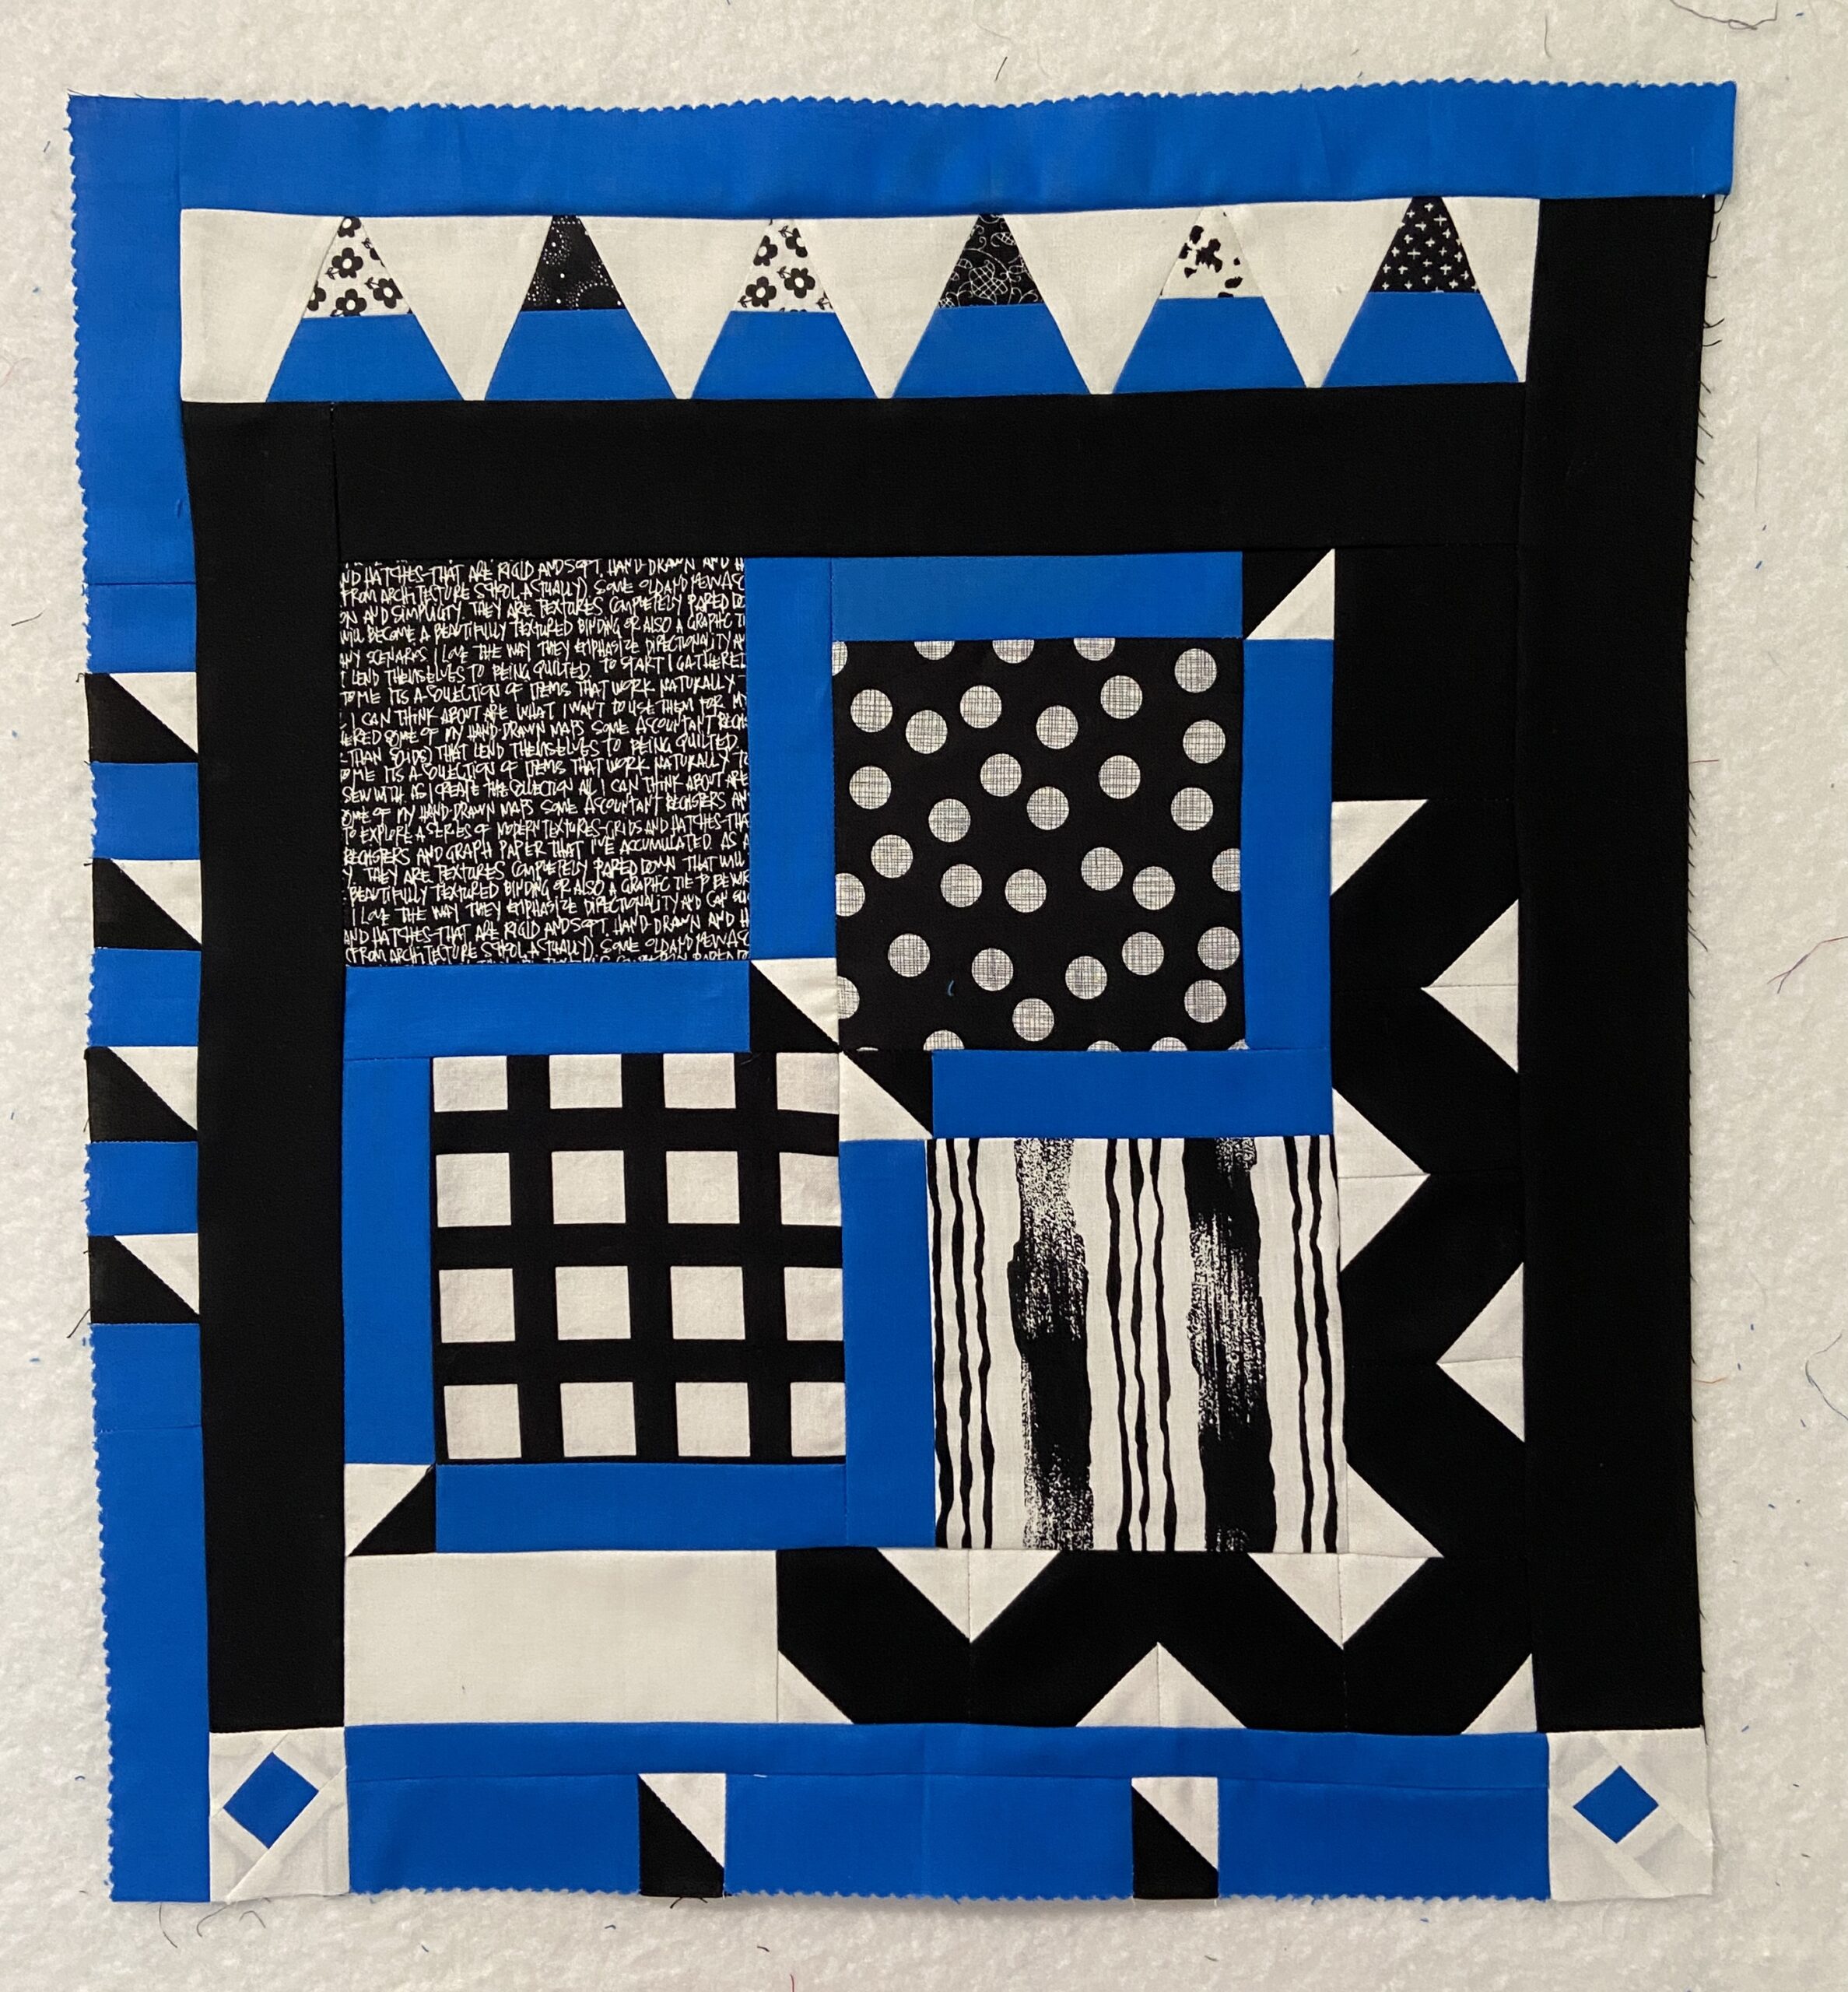
I connected four of the HST’s with a square of the blue in between each one. Then I added enough of the blue strip to each end to be able to border one side of the Round Robin project.
It looks great. After attaching it to the left side of the quilt top, I measured the width of the rounds on each side of the original center block. Unless the prompt doesn’t work out, I plan to add the final round to the left side of the project and hope to emphasize black in that last round. This should lessen the asymmetry and balance things out a bit.
This has come together quickly and now that it is almost finished, I am looking at each section and planning how to quilt it. I enjoy quilting something small and easily maneuvered. This one will be fun.
We had one really nice day of sunny weather this week which was such a treat. Ray wanted to take out the boat as he had done quite a bit of work on it and needed to test a few things out.
As you can see, there was no one on the water. But the sun was out and the sky was just gorgeous. It was the perfect way to take advantage of a bit of sunshine. Heading to the end of February is leaving me hopeful spring is not far off!
This weekend I plan to attend a monthly meeting of the local chapter of Project Linus. I have donated to them before when in California. However, I haven’t ever gotten involved. Since moving up here, I haven’t been interested in joining a guild but I am interested in meeting other quilters and, as always, love service clubs and projects. Have any of you gotten involved with Project Linus? I am sure I will meet some like minded, nice people in the group!
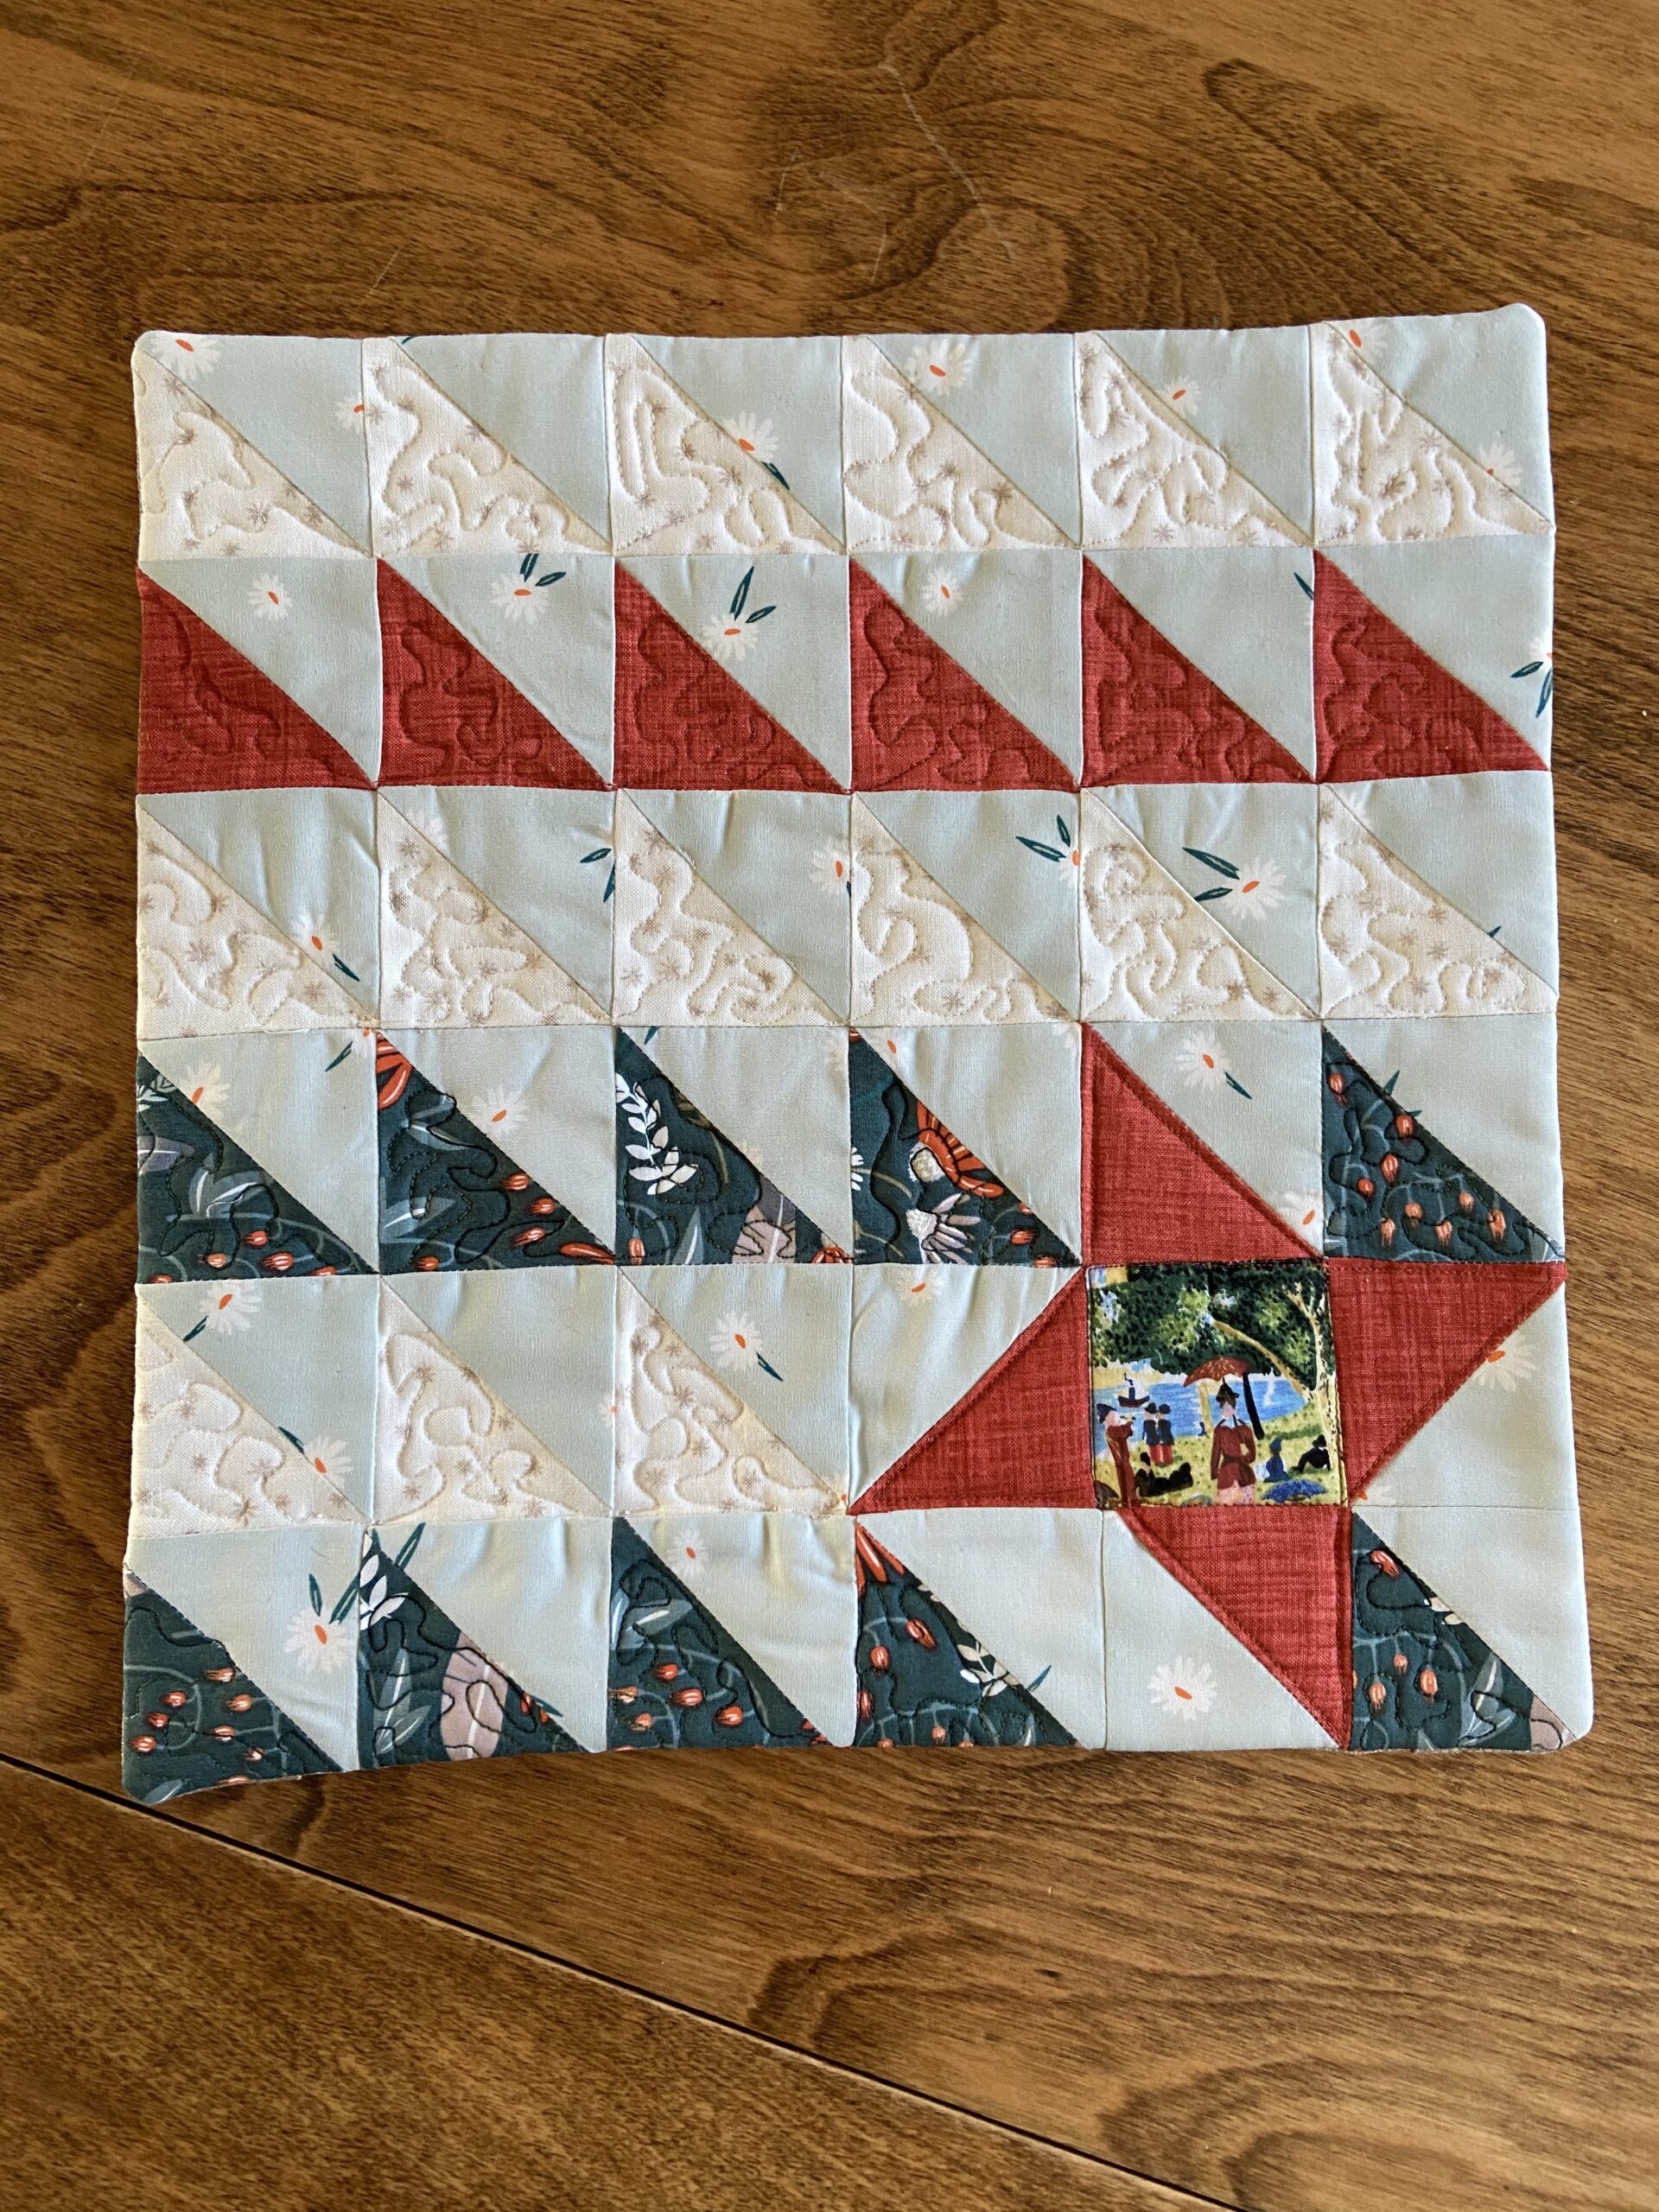
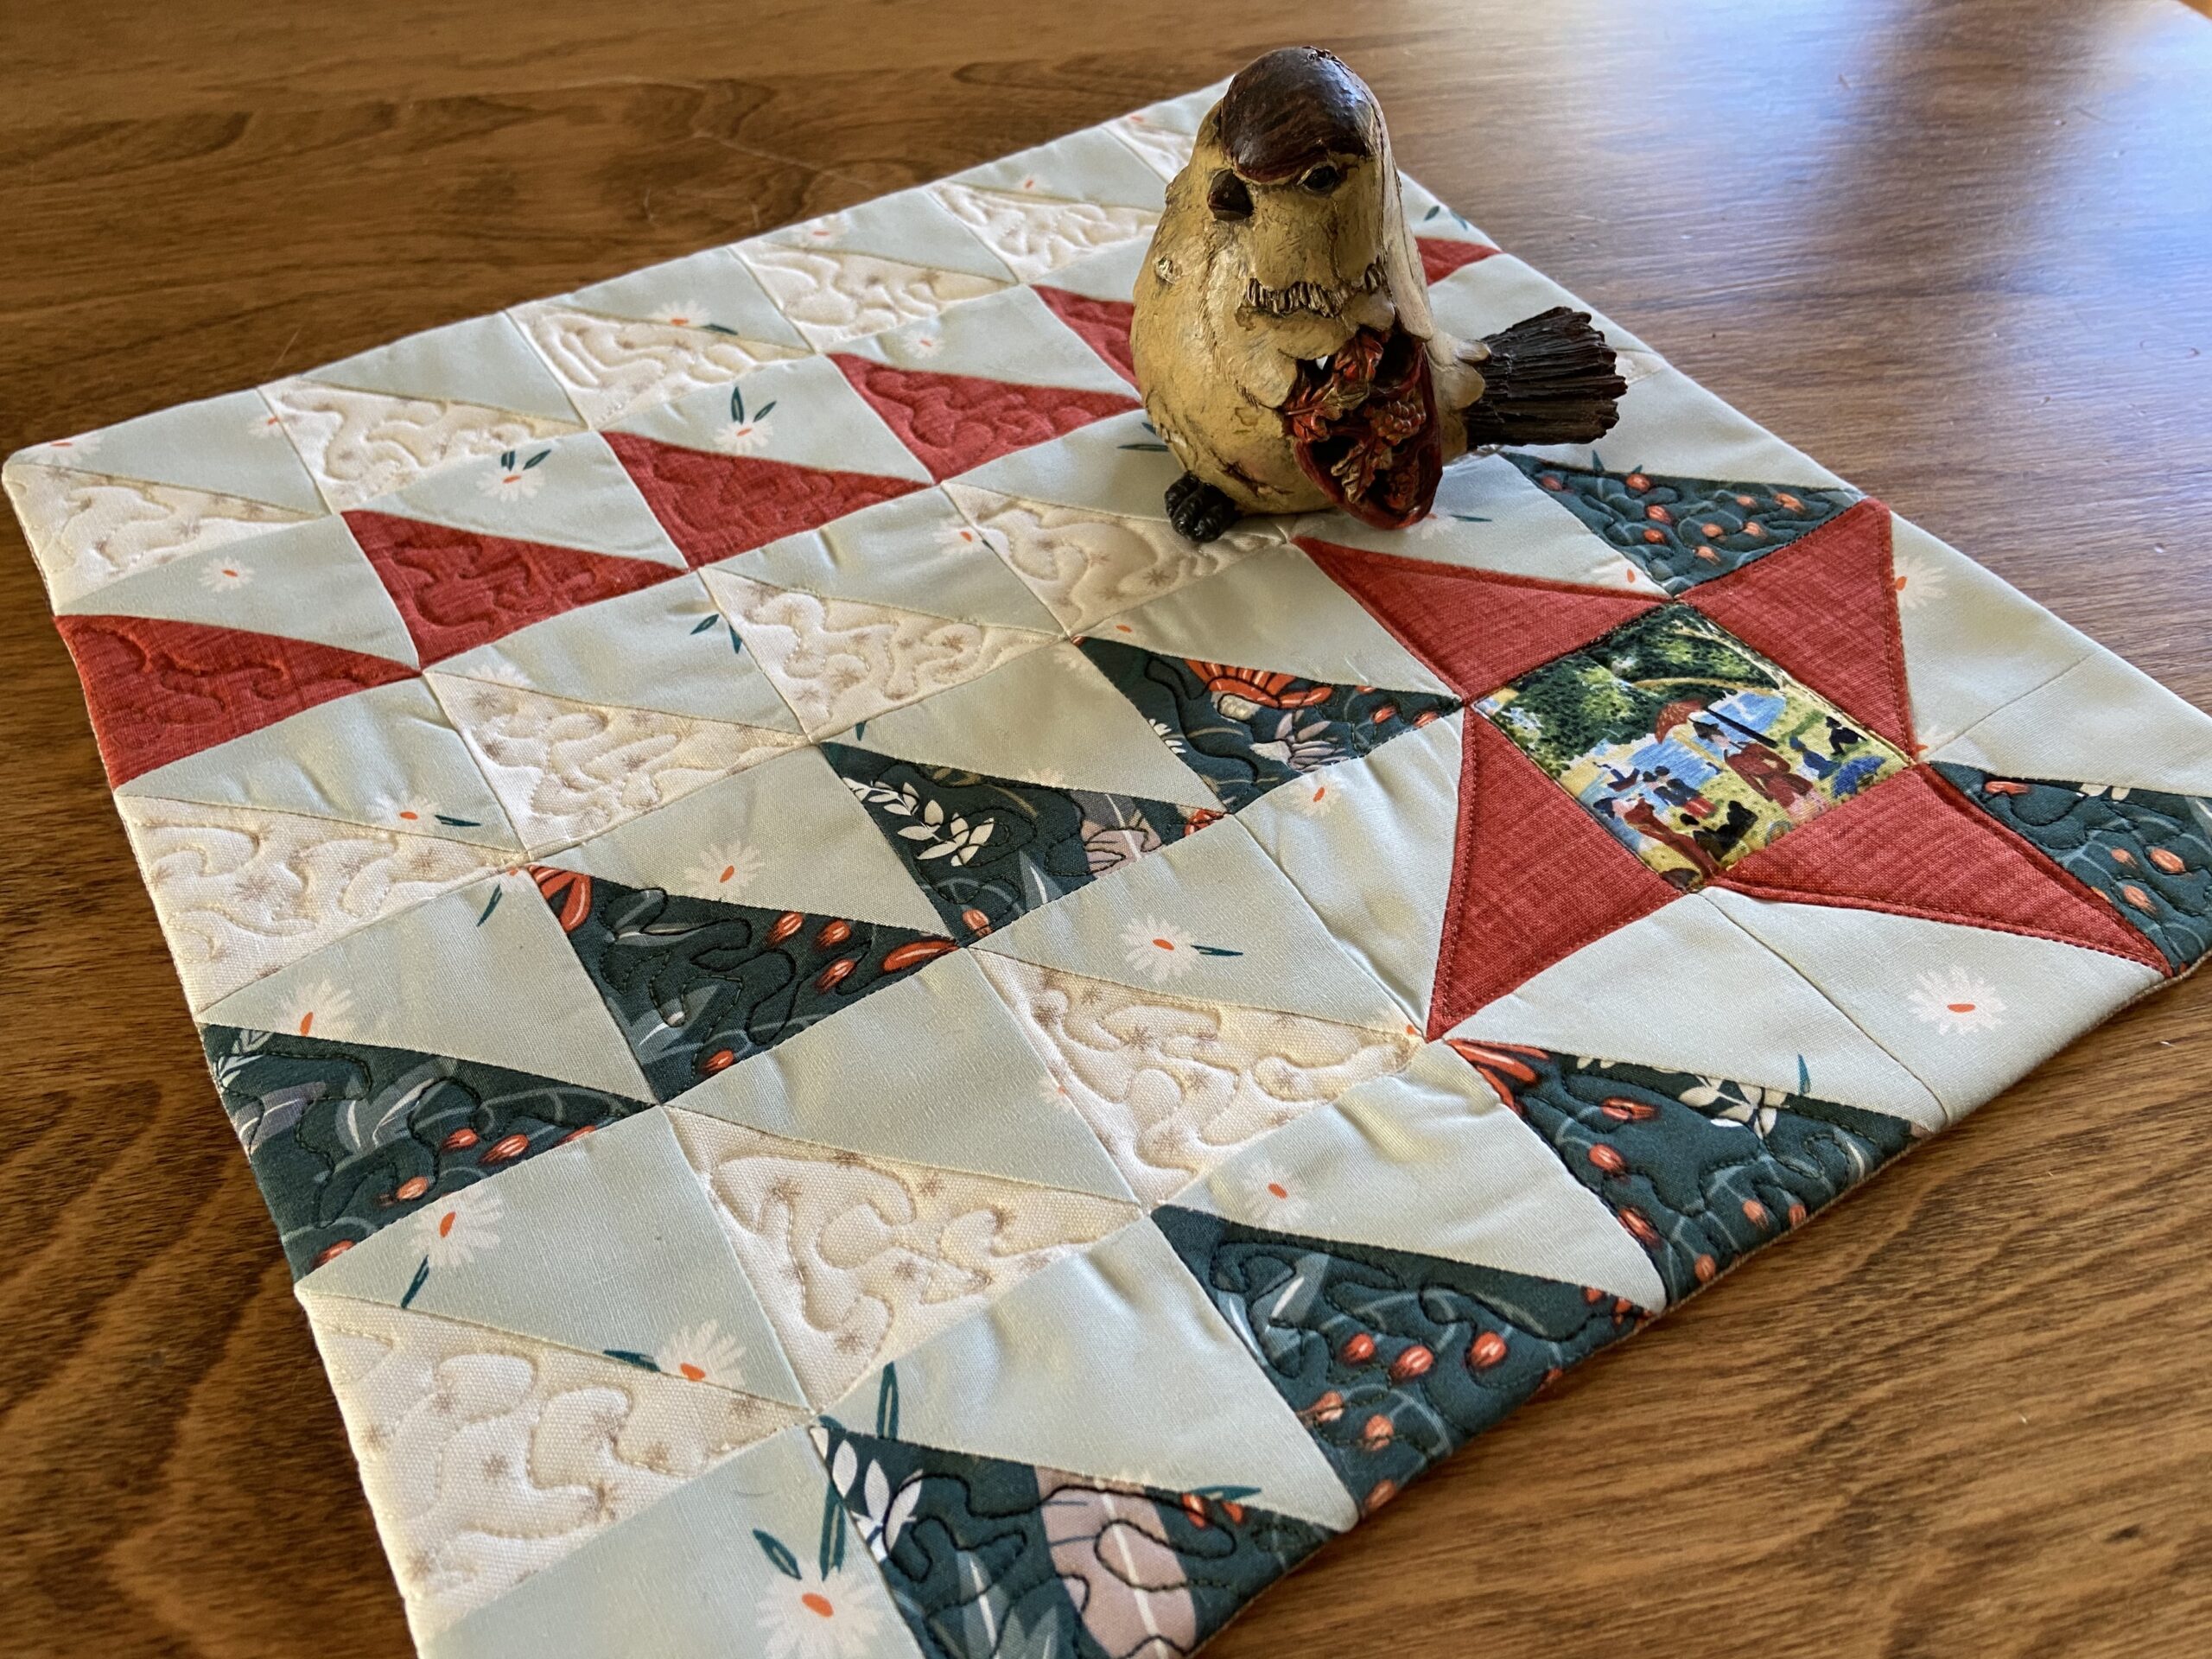
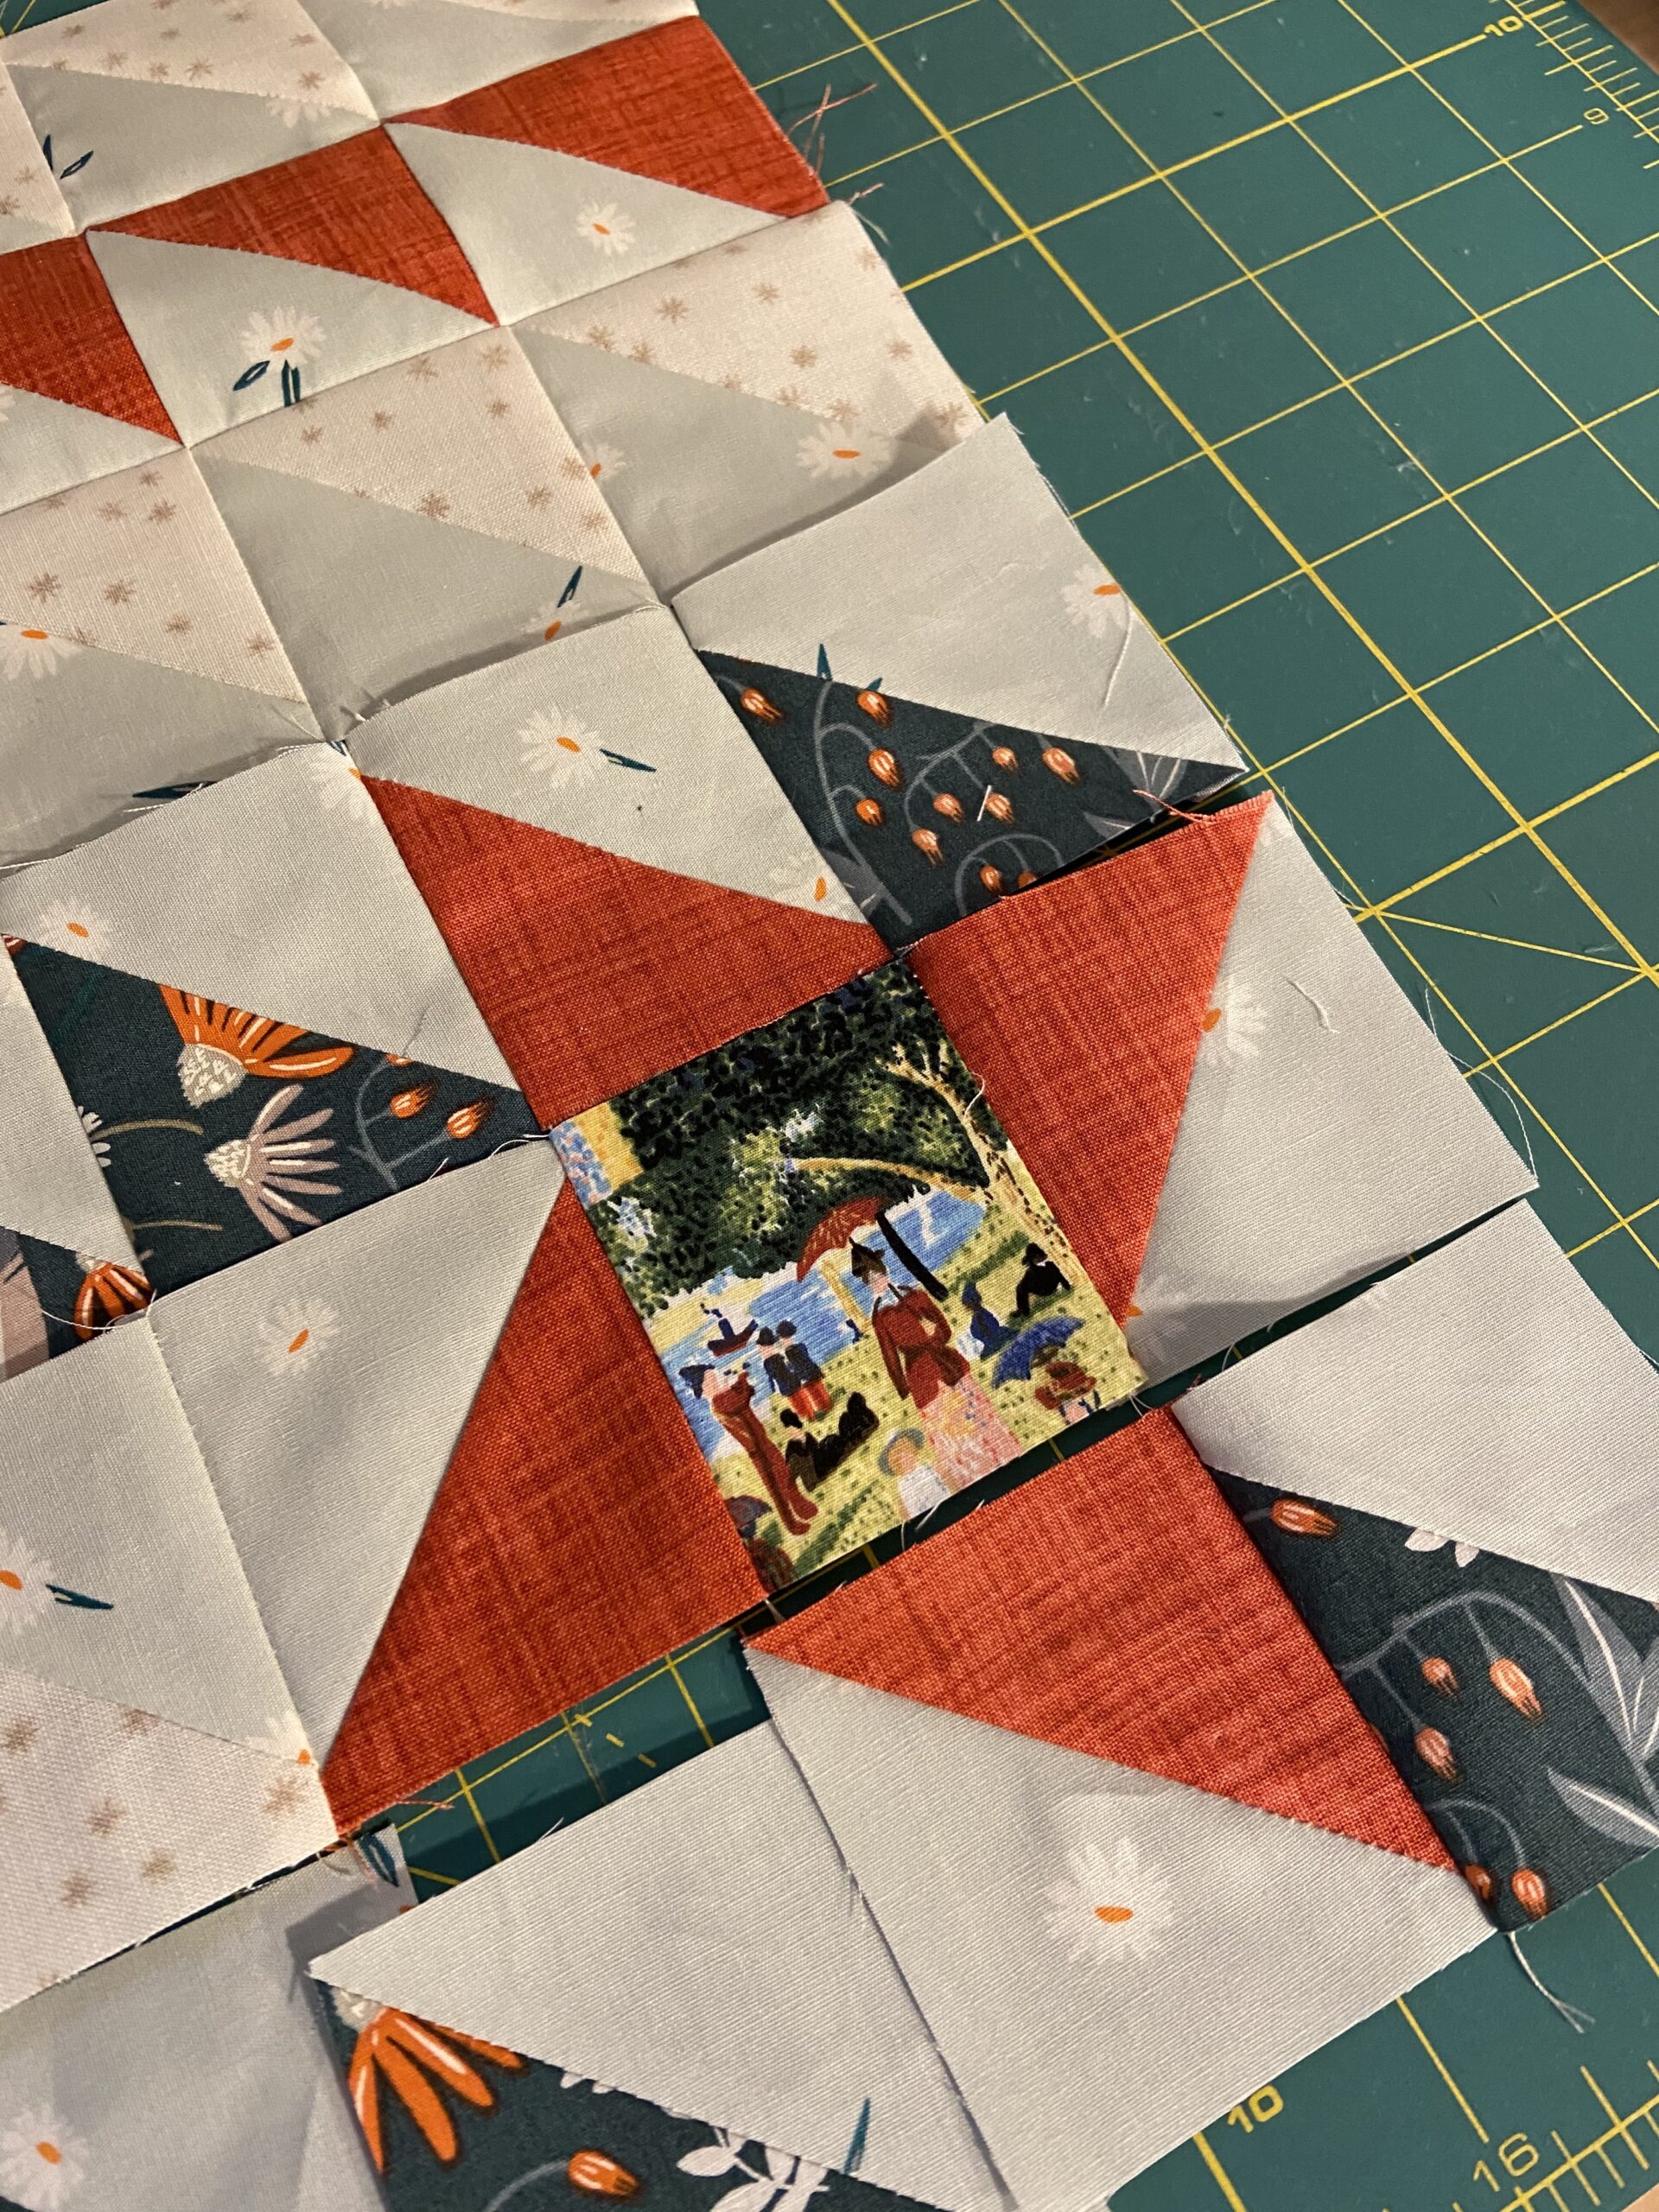
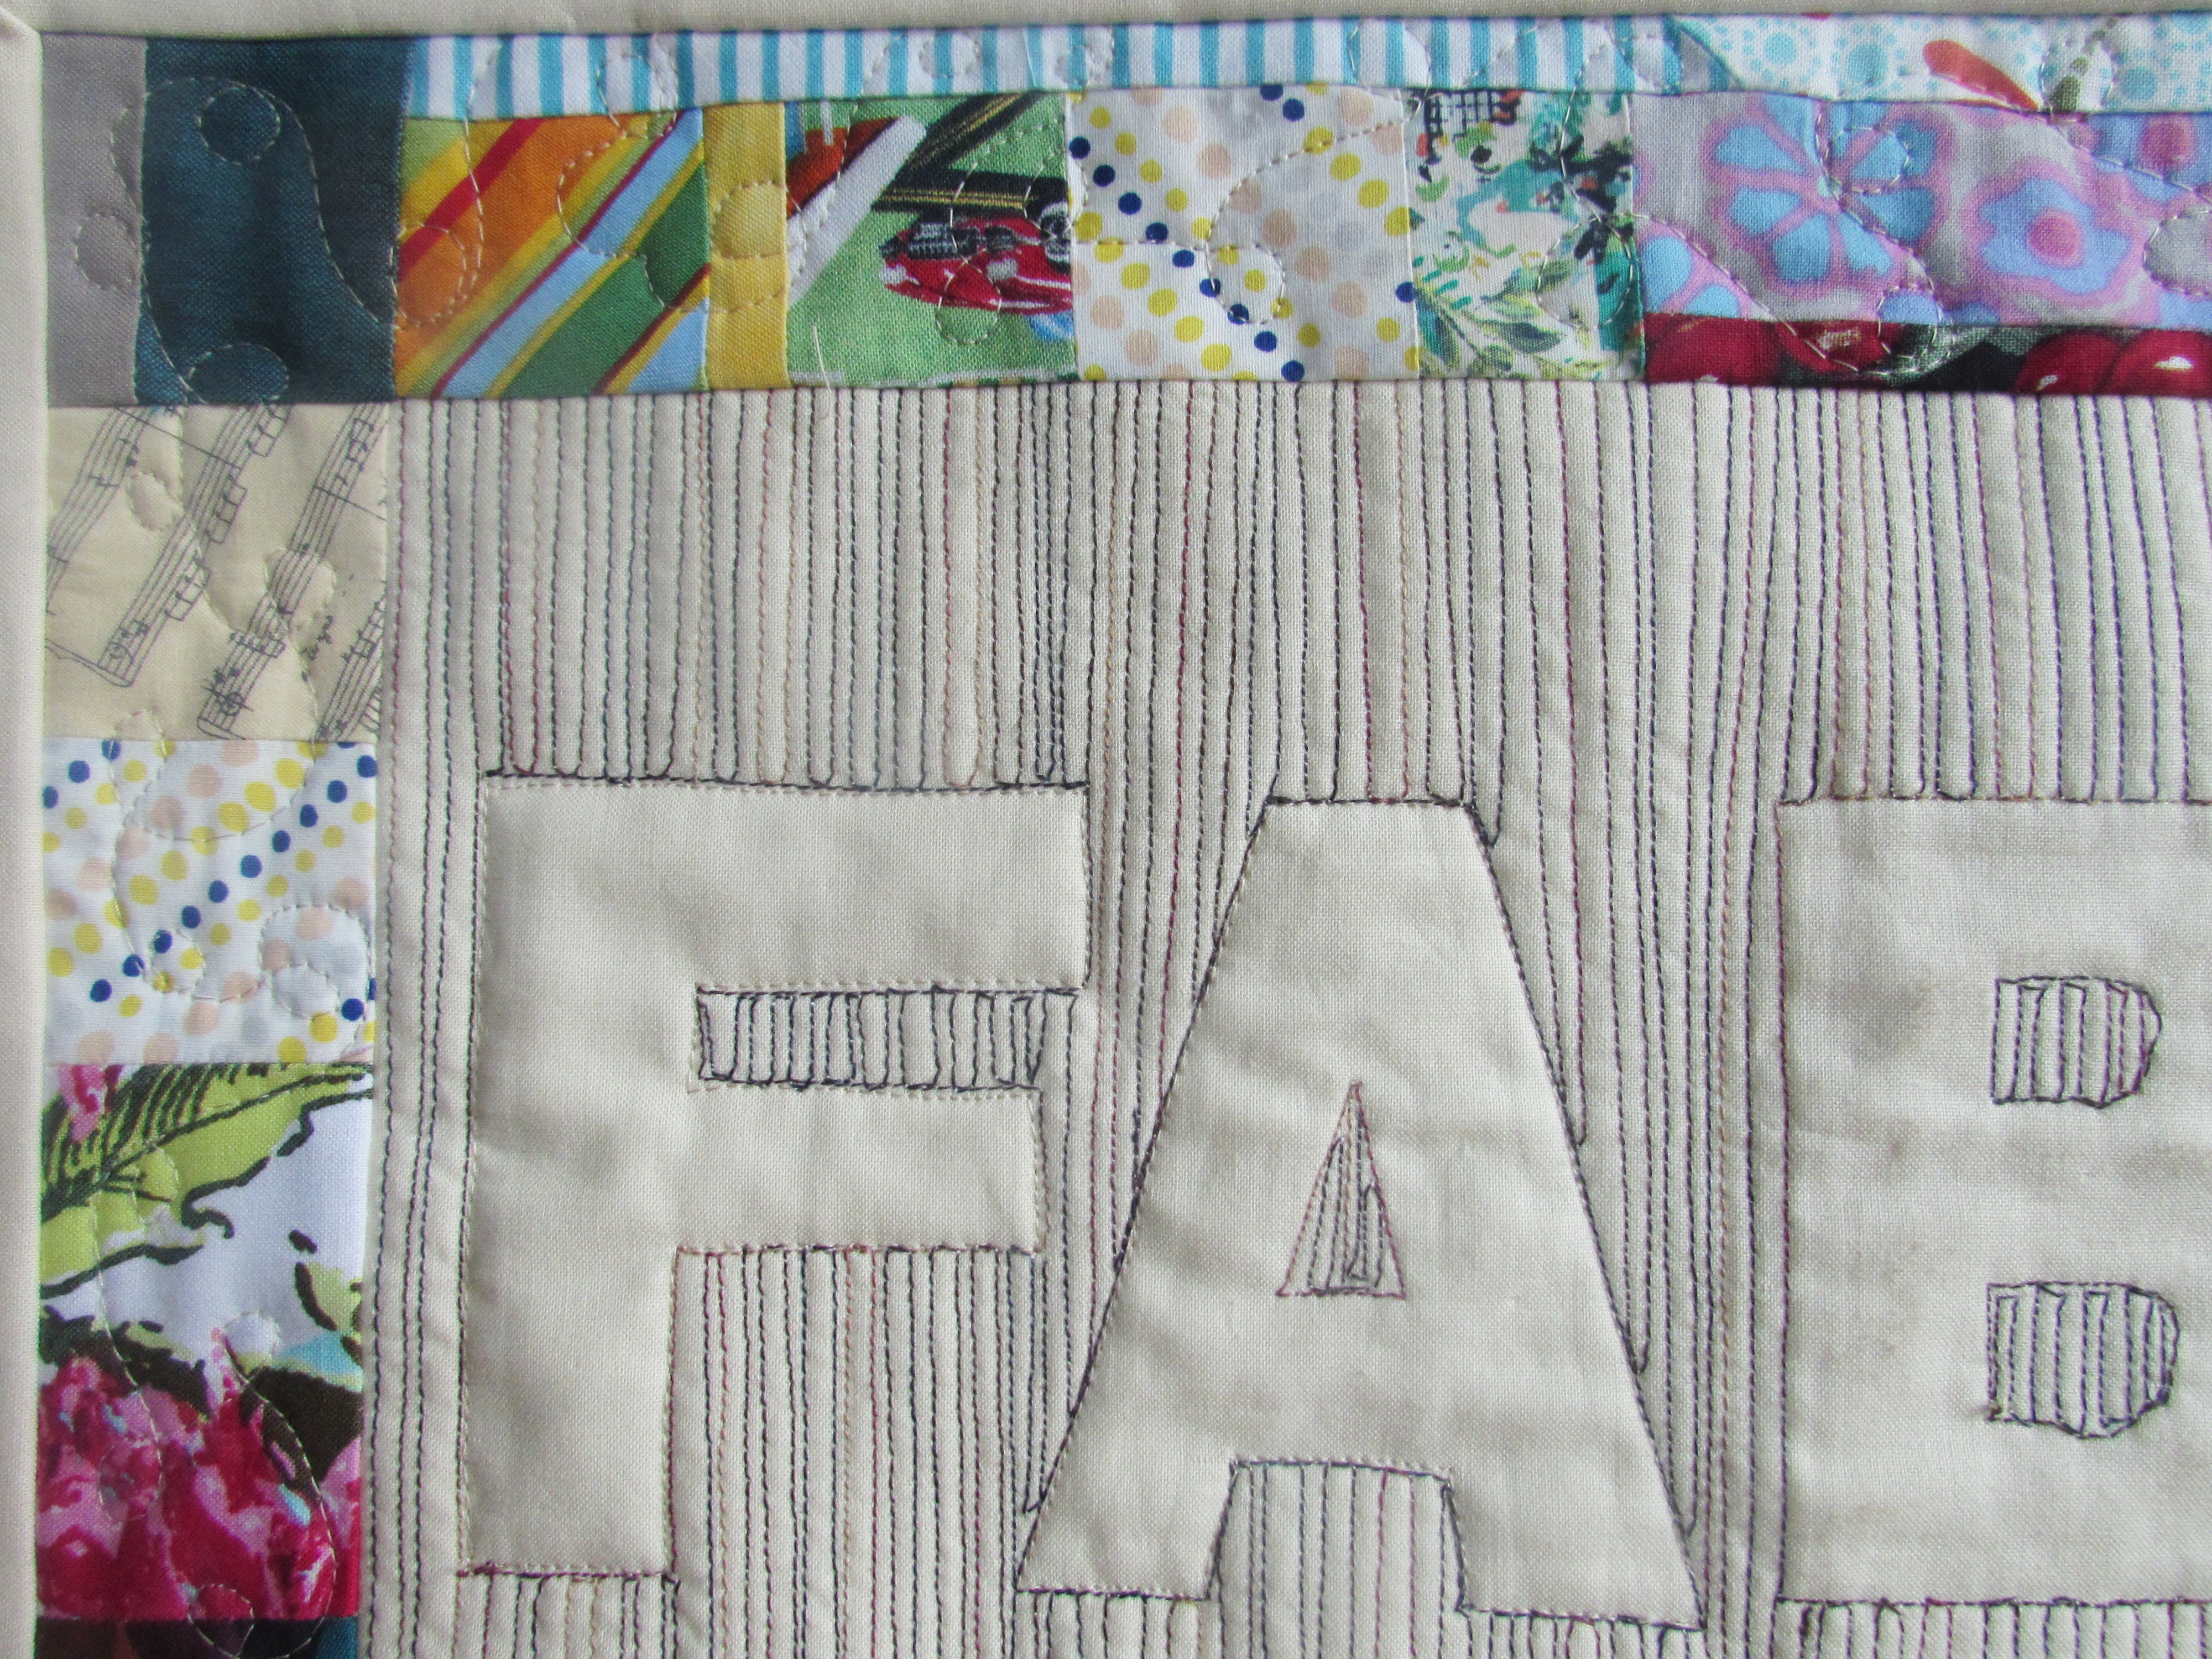
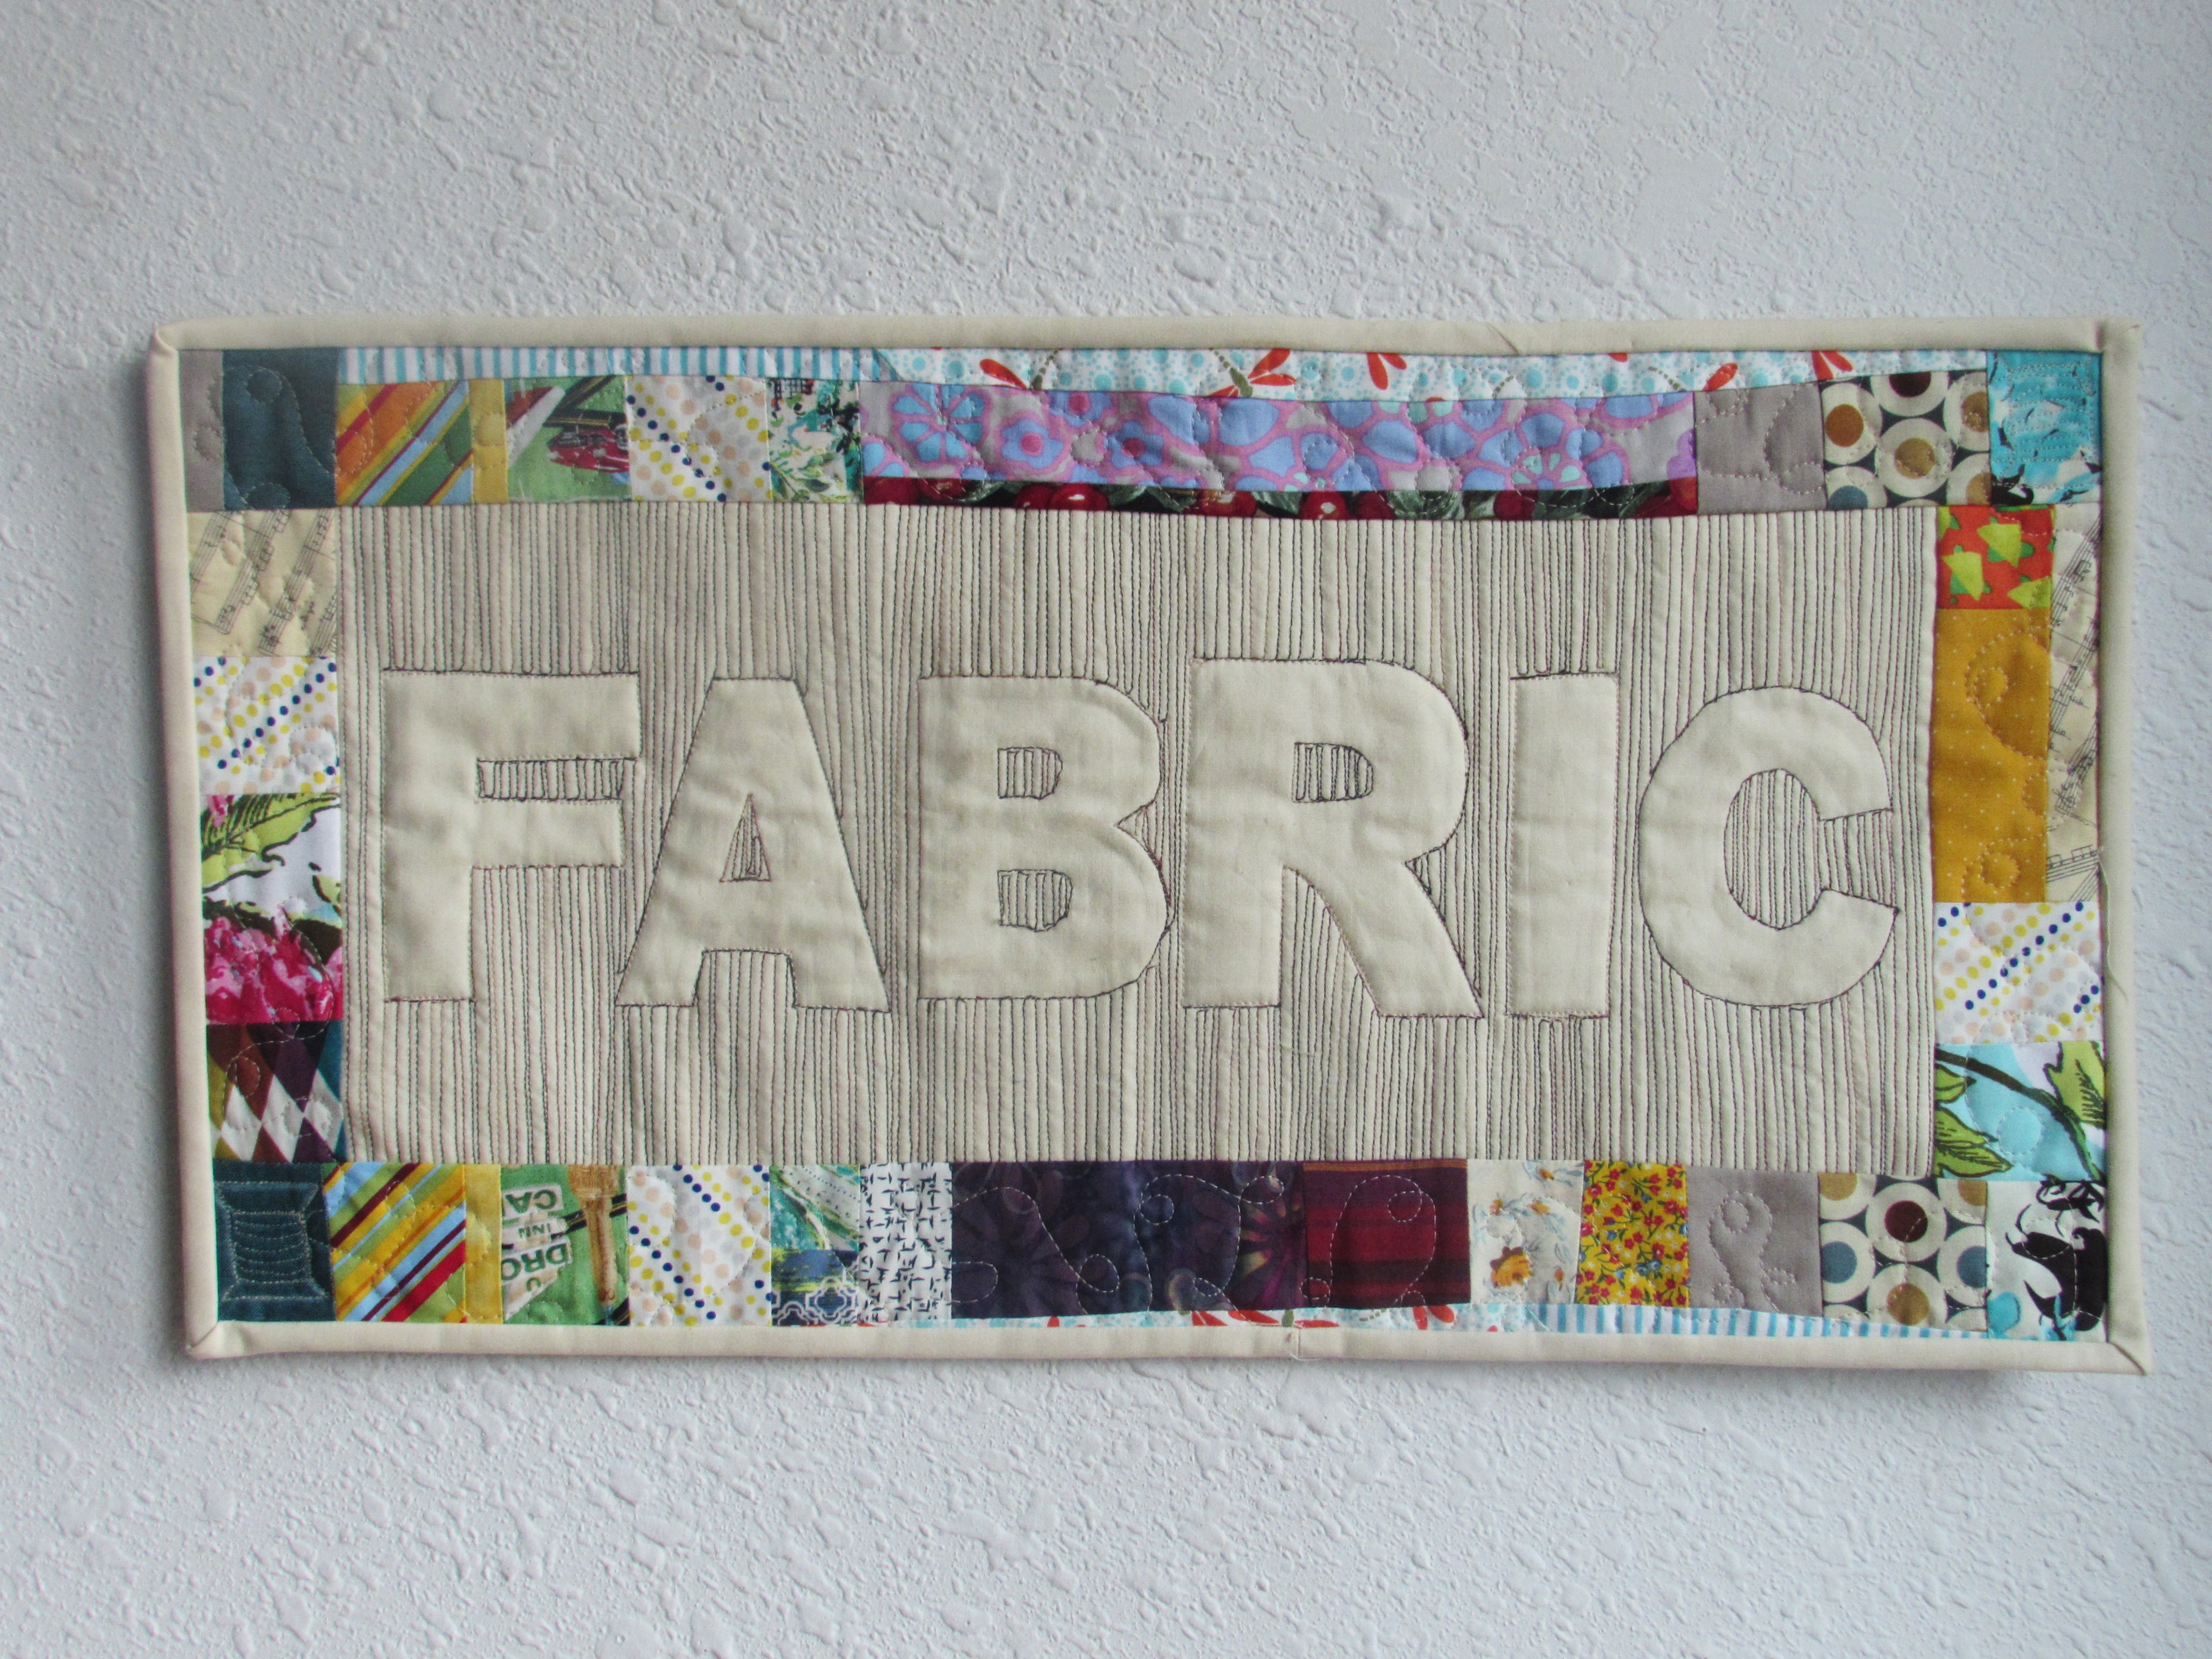
Like the really creative title says, I finished up the mini I shared with you earlier! It is so cute. When I was piecing the Mosaic Mystery Quilt (yet to be finished) I had loads of bonus HST’s – you know, the bits that are left over when you make a flying geese block? Luckily, I stitched them as I made the blocks so they were all ready for me to use.
Making this mini used only a small portion of the little 2 1/2″ HST’s. I saw the idea to incorporate a friendship star with the fussy cut center on a site and I cannot remember which it was. I think it was something like All People Quilt but I am not sure. If I figure it out, I will update the post accordingly.
At twelve inches square, it will be easy to find a little spot to hang this. I quilted all triangles except for the background (pale green) pieces. It looks cute and for the most part went well. There are a few wrinkles near the friendship star that could look a little better.
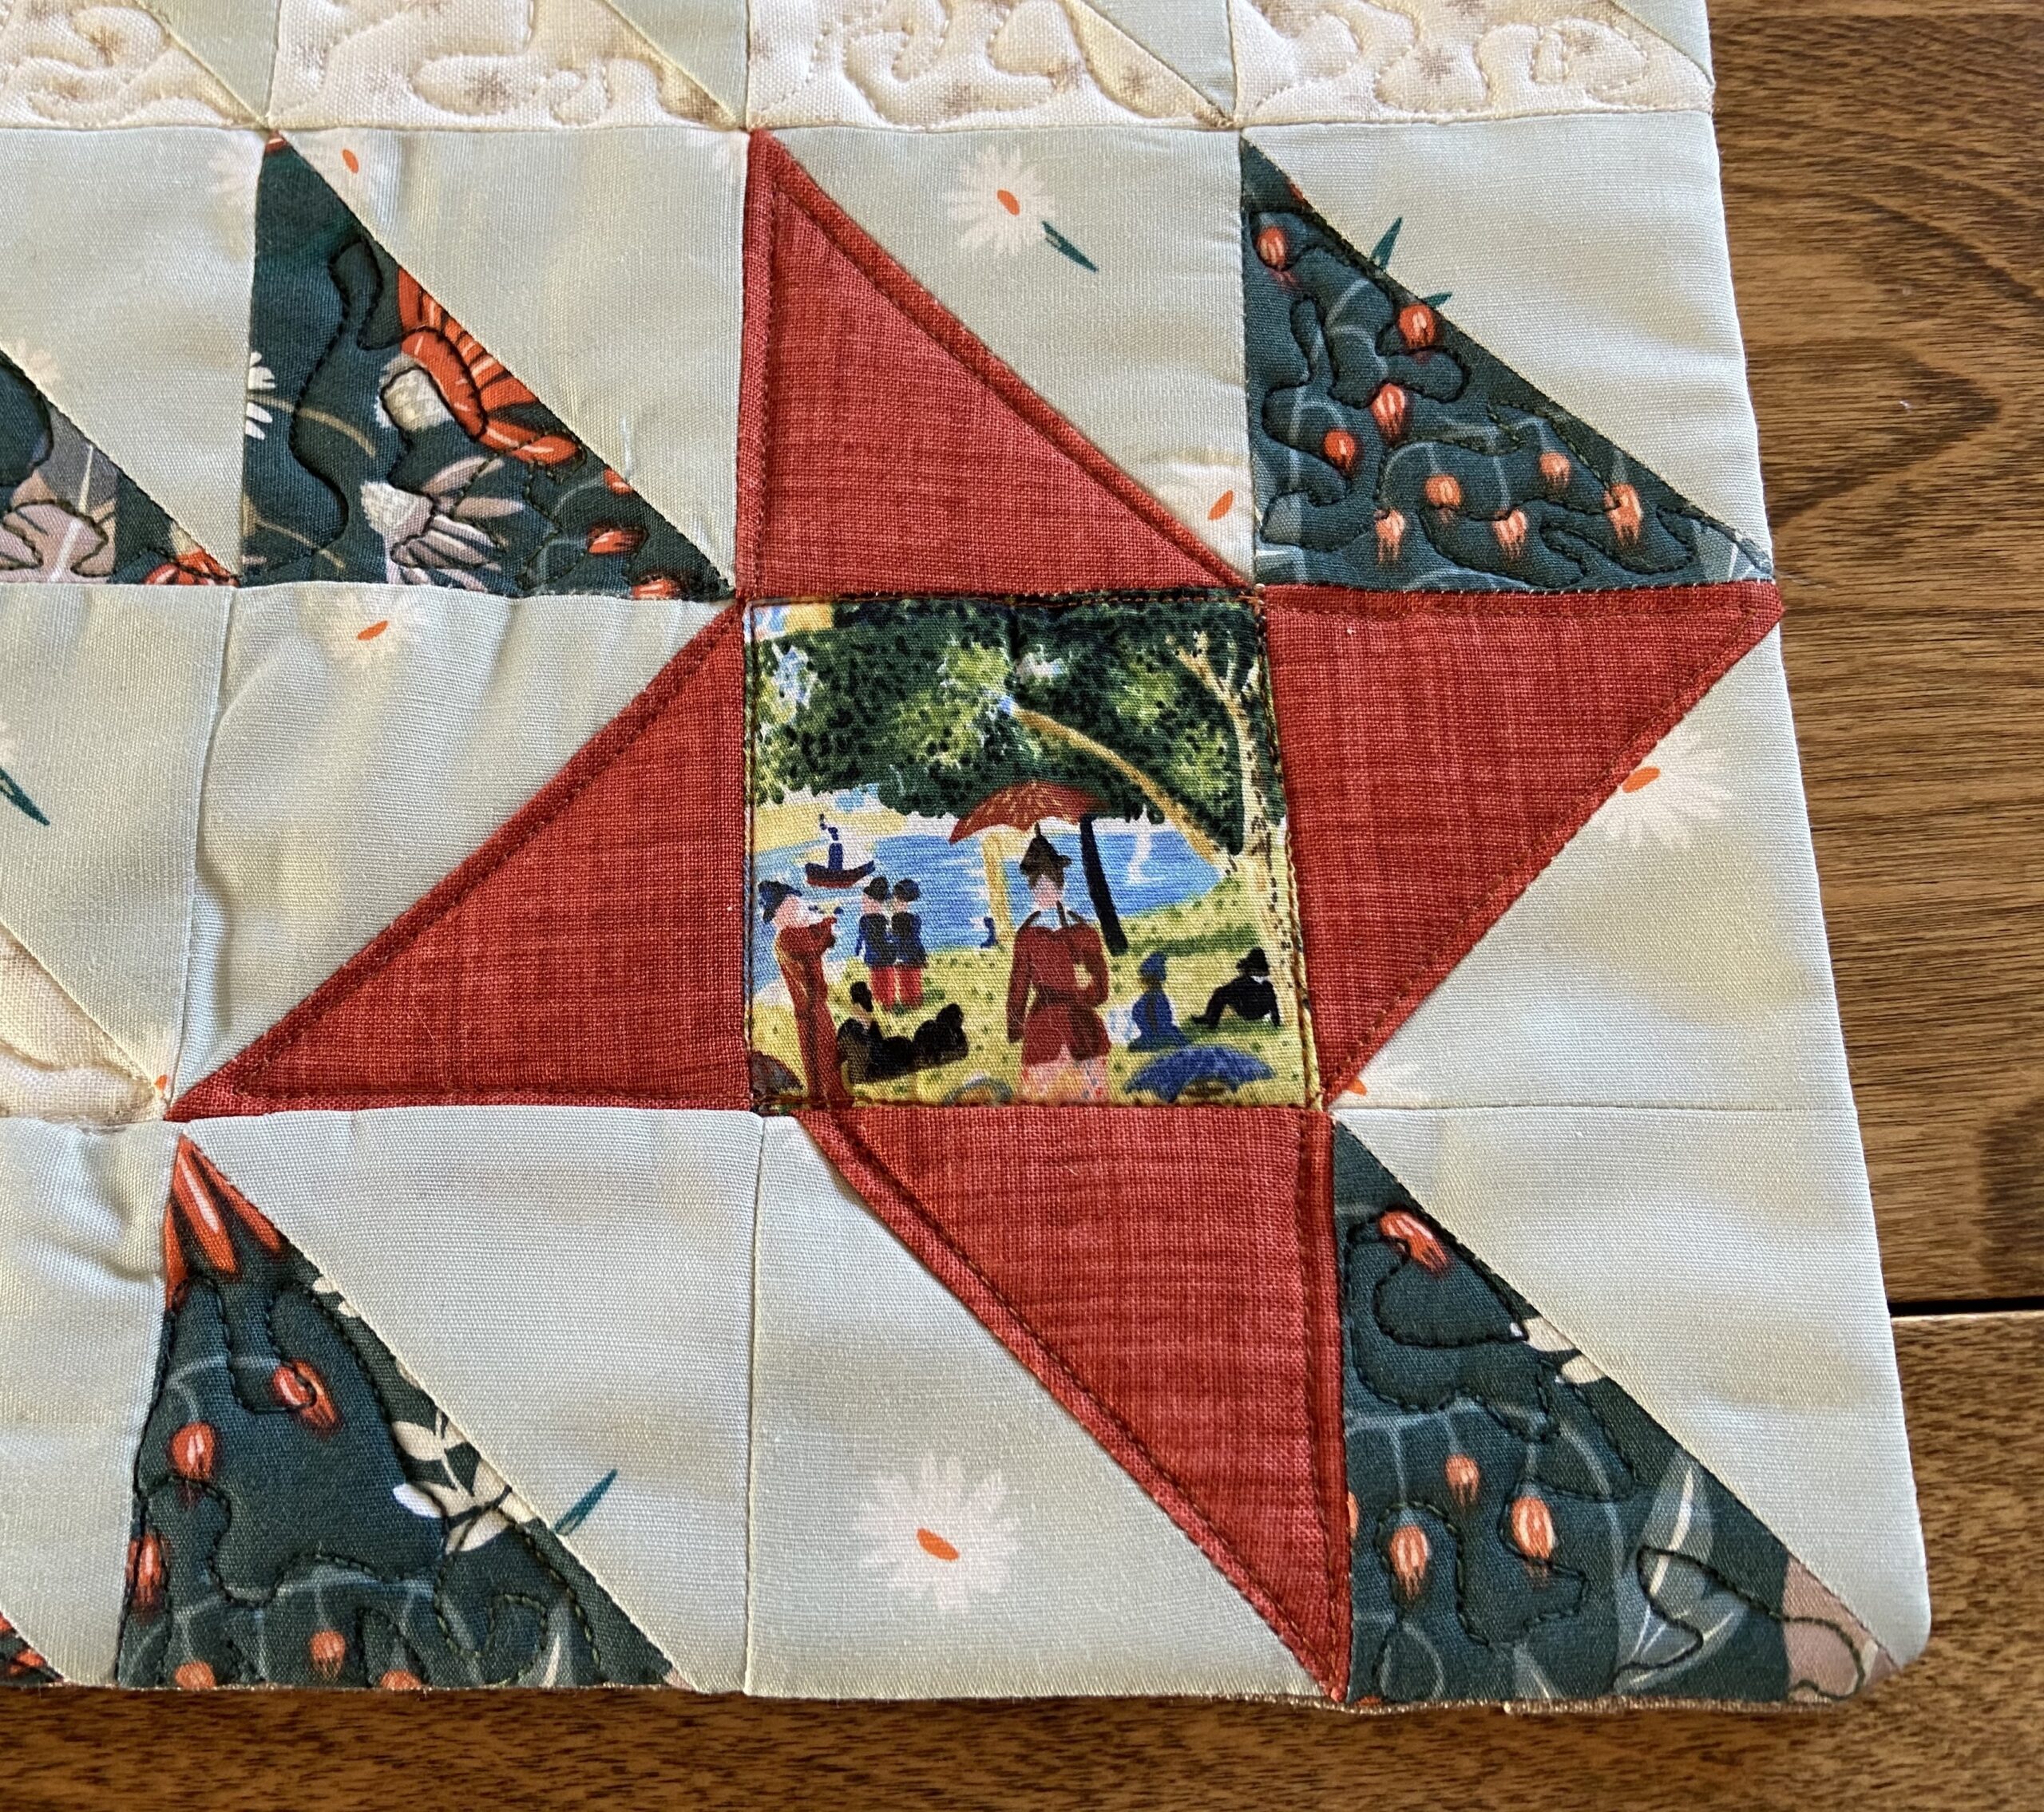
The fussy cut square in the center of the star is my favorite part. I have a stack of squares of this fabric depicting the very famous Sunday Afternoon on the Island of La Grande Jatte painting by Georges Seurat. While on a trip to the Chicago, I saw this painting at the Art Institute of Chicago. It is so beautiful. When I saw a handmade shirt at a thrift store made with this fabric, I grabbed it, deconstructing it for the fabric.
There are only so many ways to take a photo of this little quilt. But here is a cute one. You probably noticed I decided to face the quilt, rather than bind it. I like the look of this but it caused me to lose some of the points on the top and right side of the mini. I didn’t lose them by stitching over them with the facing. Rather it was when I rolled the facing to the back, those points are rolled over just enough to make the points round off. Sigh. This was disappointing but I have managed to recover from the trauma. I didn’t have leftover strips of any of the fabrics used on the mini and when I looked at using other fabric for the binding, nothing appealed to me. I do like facing quilts; I just hadn’t considered the issue of those points.
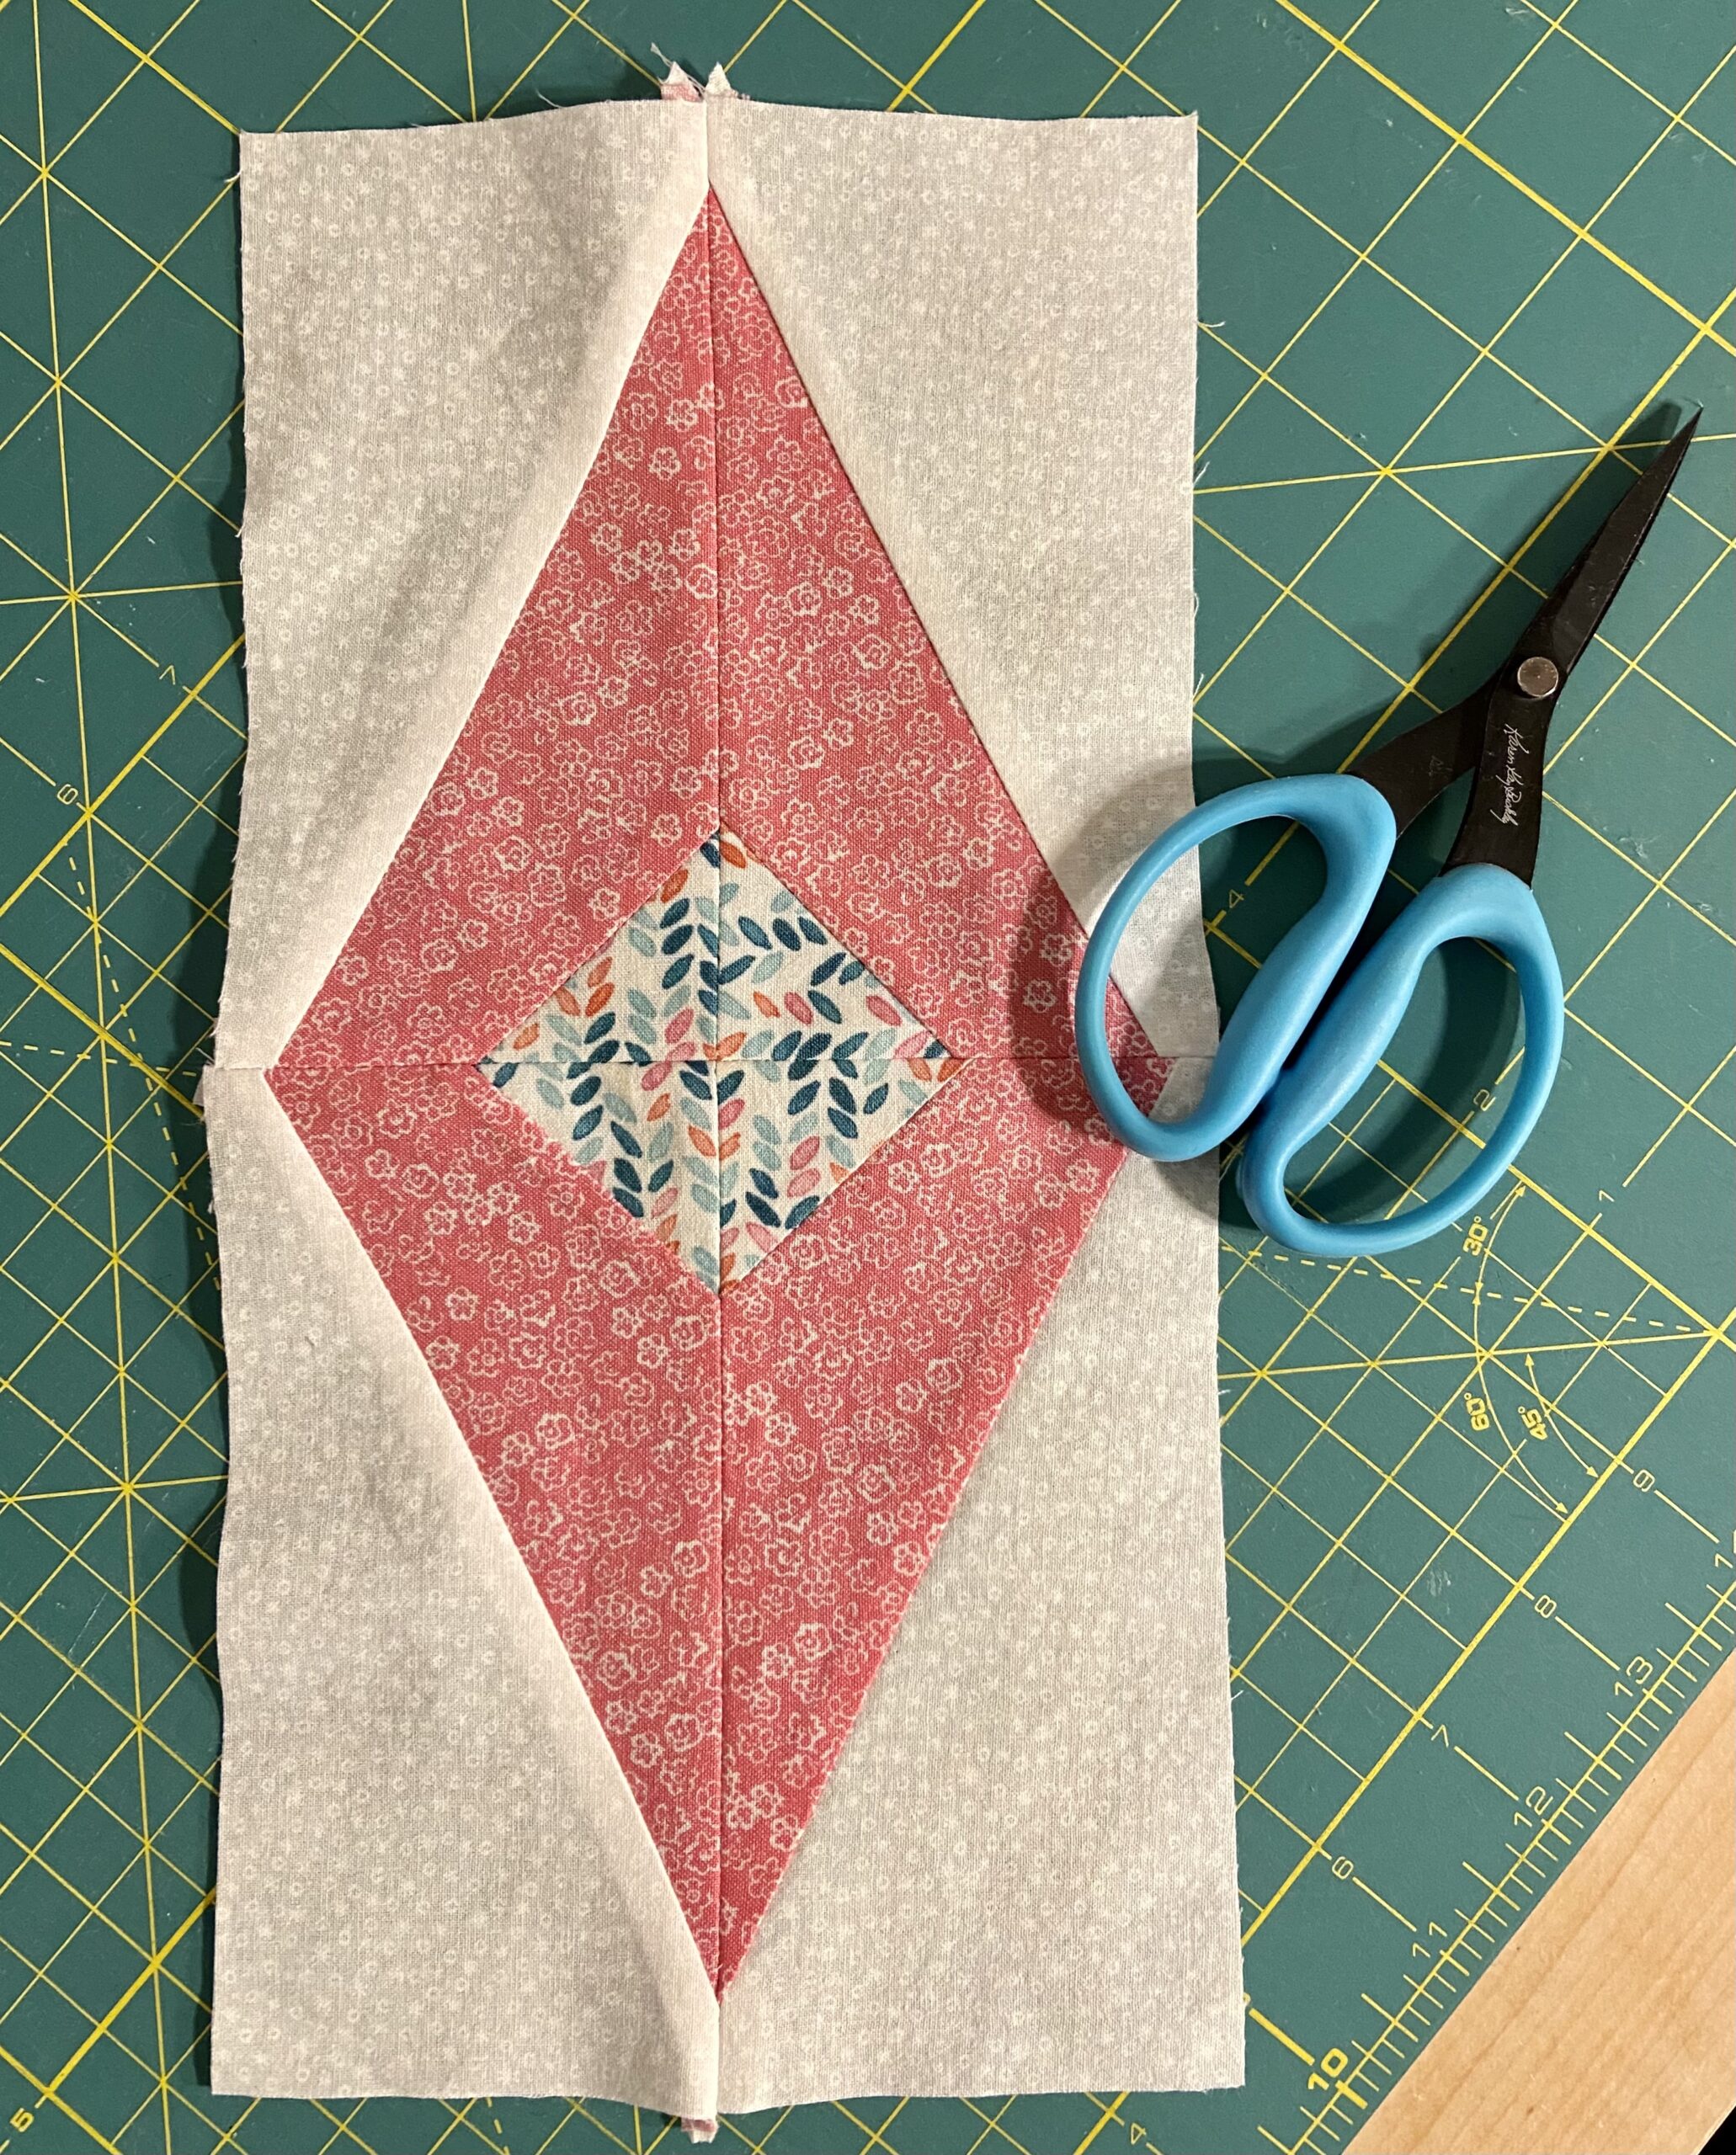
In other projects, I decided what I would do for an RSC quilt this year. Since I skipped doing anything for Rainbow Scrap Challenge last year, the bins are loaded. I need to make some scrappy projects for sure. I saw these pretty diamond shaped blocks over at Bonjour Quilts and thought they would be fun to make each month. Not hard to piece and they will use up some fabric. The blocks will be 6″ x 12″. I suppose I should figure out how many I need to make but I have plenty of time for that. This month is pink and I have cut pieces to make three of them. Pink is probably the scrap bin with the least fabric in it so three will be plenty.
Not a whole lot more to report today! I have had an annoying cold this week. Where the heck I picked that up from, I have no idea. But it means I got no exercise this week and took lots of naps. Hoping to be a little more active this weekend! Hope all of you are well and staying healthy.
Post Update: Now that I am informed about the fussy cutting challenge for Project Quilting this week, this will be entered! Thanks to Wendy and Kathleen for commenting and letting me know.
Linking with my favorites – check them out at the top of the page under Link Ups.
Somehow almost two weeks have passed since the last post. Not sure how that happened, but here we are. I have actually been in the sewing room quite a bit so I will do a quick update on what has been in the works.
First and foremost, I have been working on a cute baby quilt for my niece. It is just about done – I have a few more inches of binding to stitch down and then into the wash it goes. Once she receives it, I will share it here. I am 99% sure she doesn’t read the blog but since I haven’t taken photos of it anyway, it will have to wait.
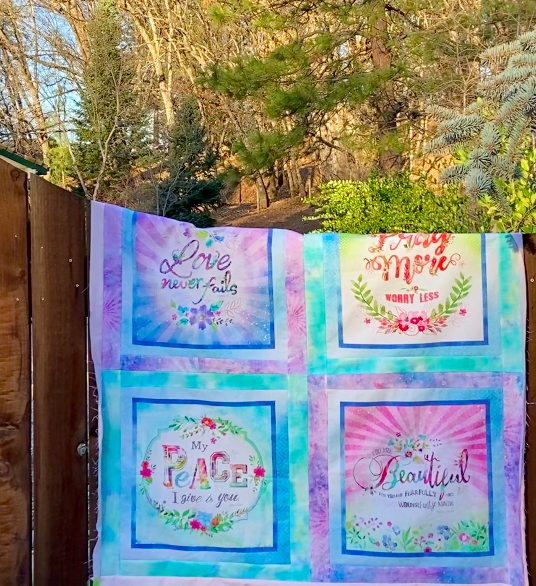
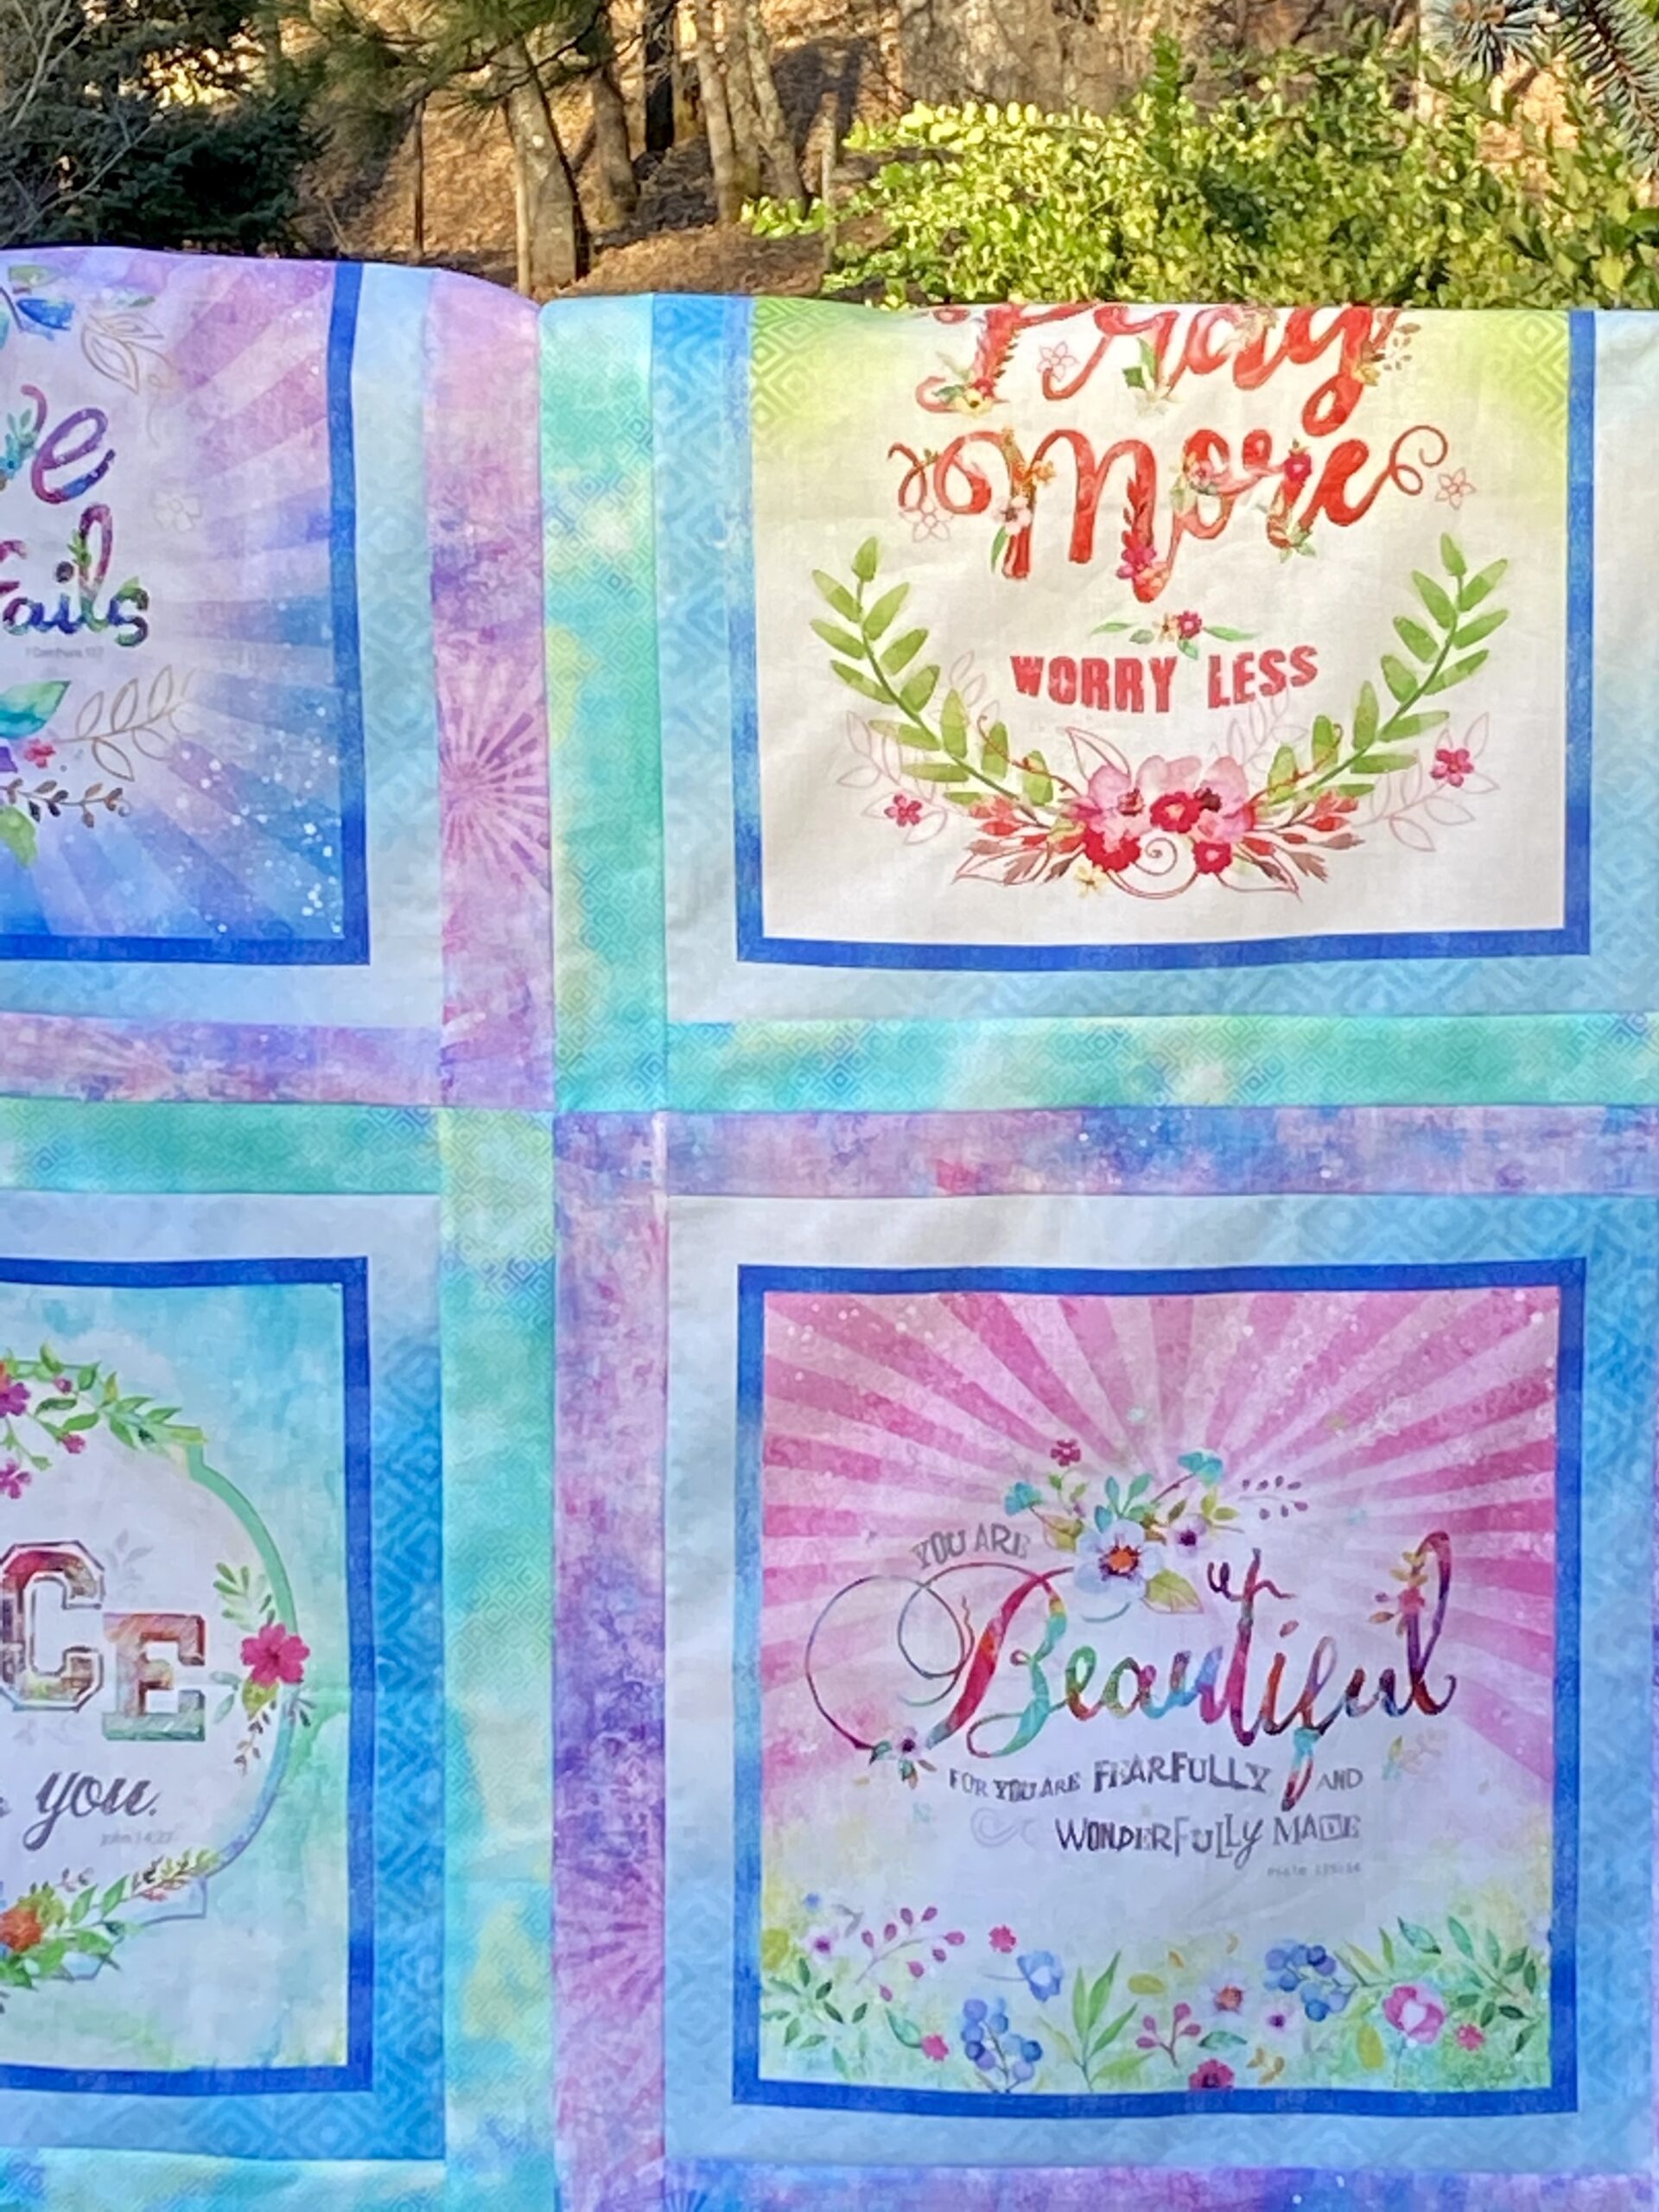
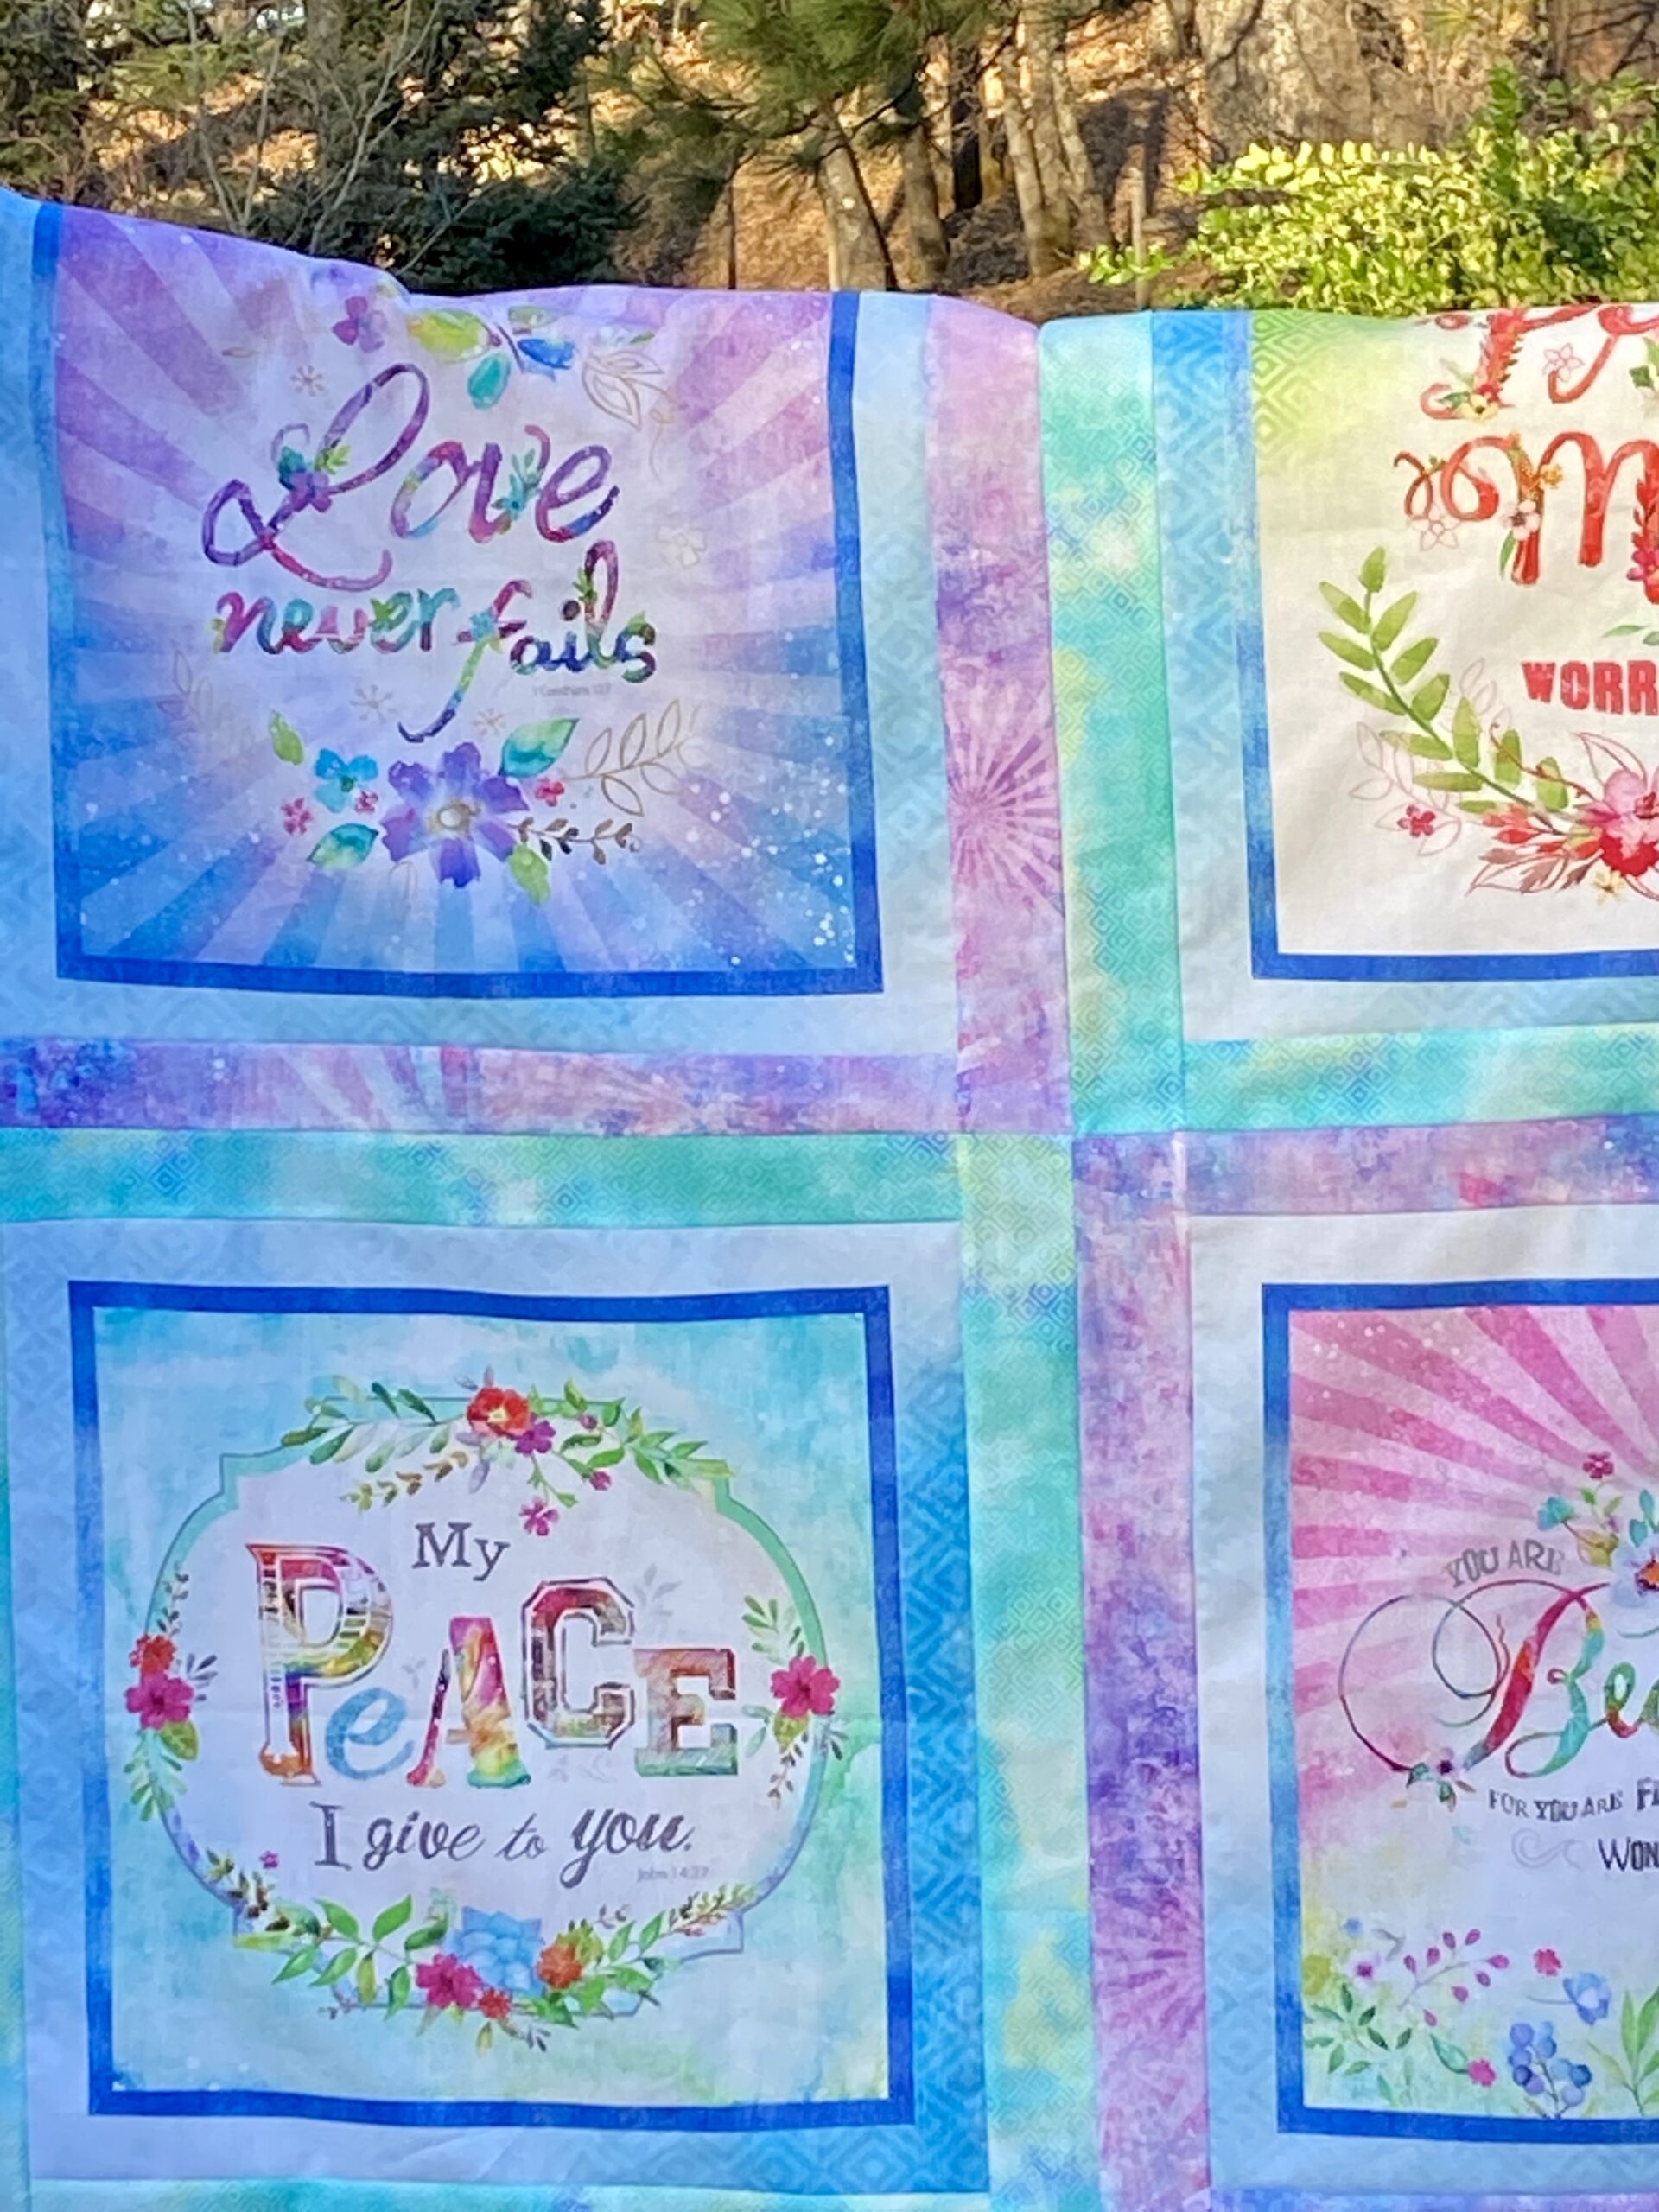
Additionally, I decided to make a quilt for Mercy Hospital. If you are new here, I coordinate a program called Mercyful Quilts and you can read more about it here. It seemed like a good way to start off the new year by making a quilt for them. I have a panel (by Three Wishes) in the shop that is very pretty. It has four large sections and each has a quote. I thought, for people who are going through the process of saying goodbye to a loved one, this quilt would provide comfort. The prints are reminiscent of a water color painting.
Being a panel, this was a simple quilt top to create. I cut the panel into four sections and used some of the coordinates to create borders around the squares. (Looking at the squares, I think these would also be fun to use for a tote bag for bible study.)
Now that it is all put together, I am thinking it might be a tad small at 49 inches square. Just trying to decide if I add another border or go ahead and get it basted. Decisions, decisions. I am thinking of using a soft vintage sheet for the backing. I hope I have one in the right colors for this.
In the on-going saga of pretending to clean the sewing room, I started playing with a stack of leftover HST’s from the Mosaic Mystery Quilt I participated in last winter. (The top is still in the closet, patiently waiting for me to get it finished up.) As a result of piecing that top, I have a large stack of 2 1/2″ HST’s that I want to use for something. I poked around that wonderful rabbit hole, aka Pinterest, until I found some inspiration. I am working on a mini. I haven’t made a mini in quite a while. I remember making a bunch of them when I first started blogging but seems like it has been a while. So this will be finished up soon and I will share it with you then. I am thinking it may need to be hand quilted.
OK – that is it for now. Sorry to have been remiss in posting. I have been reading tons of posts and am loving the Stay at Home Round Robin that is going on. Have you seen the posts about this? It is being hosted by Quilting Gail and I am enjoying it. Check it out – maybe you have the perfect orphan block to build from.
Linking up to Stitch Show & Sew as well as a few others. Check out my Link Up tab at the top of the page.
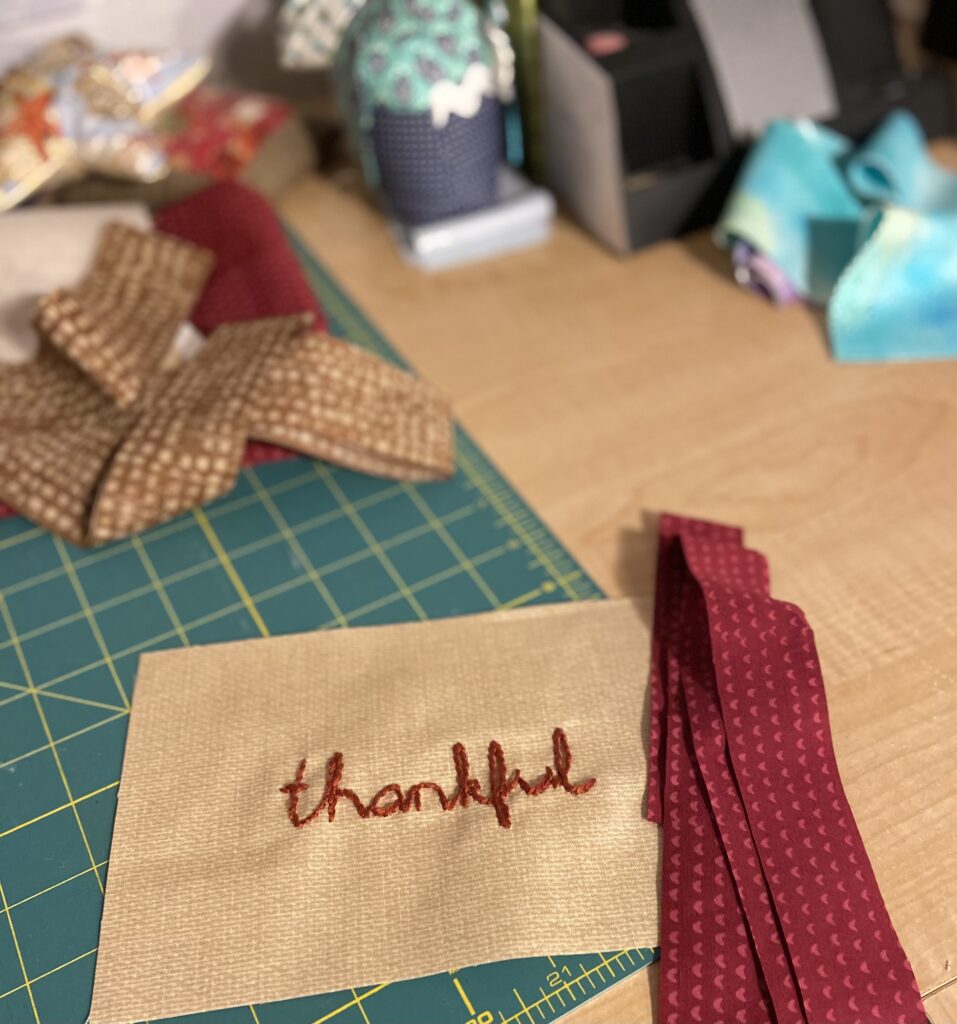
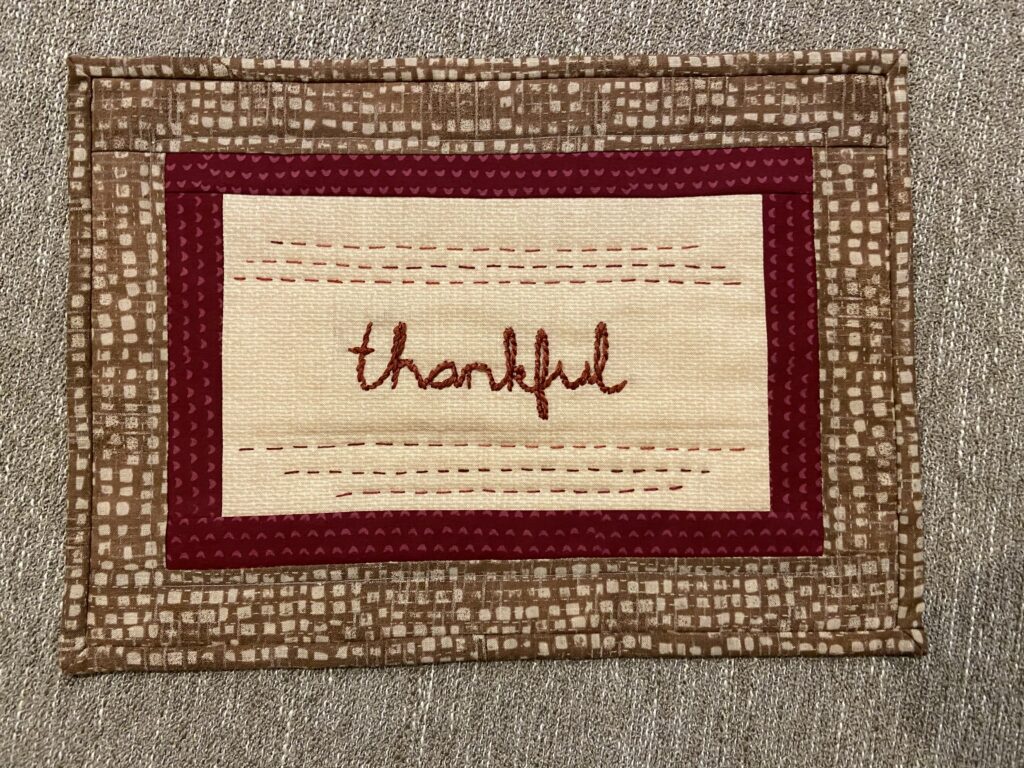
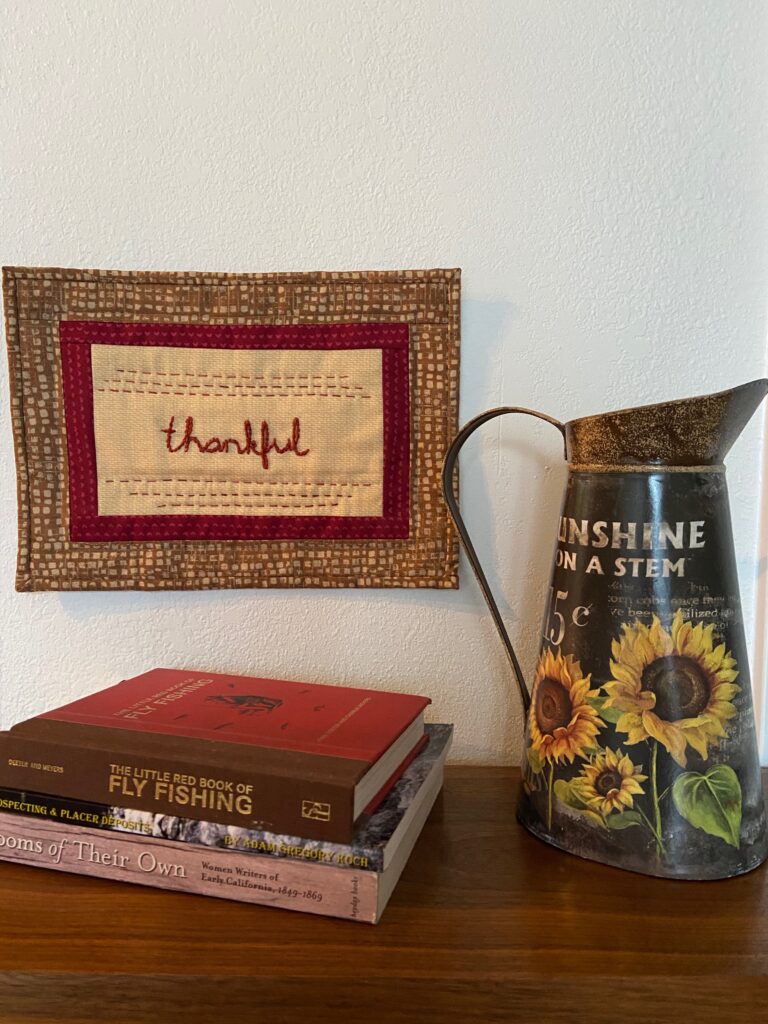
OK – this is such a sweet little finish! Remember I mentioned Julia is learning to embroider and to knit? She stitched the word thankful for me on a simple square of quilting cotton. (She was looking for something to do and I asked her to stitch one word I could display during the fall season.)
I knew I would make something very understated with this. Using a deep red scrap, I sewed on the first border. It finished at 3/4″ wide. Then I took an earthy brown scrap and attached a second border which finished at 1 1/4″ wide.
The quilting is simple and quite minimal. I did a few rows of big-stitch hand quilting above and below the word. You can still see the (crooked) line I had marked with the Hera marker right below the word. That has since melted away (I love using a Hera marker!) I think this is really all it needed. I did machine stitch a tiny border just outside of the red fabric as well. The binding is the same fabric as the outer border which less distracting, keeping the focus to the center.
Measuring only 8″ x 11″, it is easy to tuck into any spot. I originally planned to hang it during Thanksgiving but truly, it is something that should always be displayed. It will most likely be kept on display as a little reminder throughout the year.
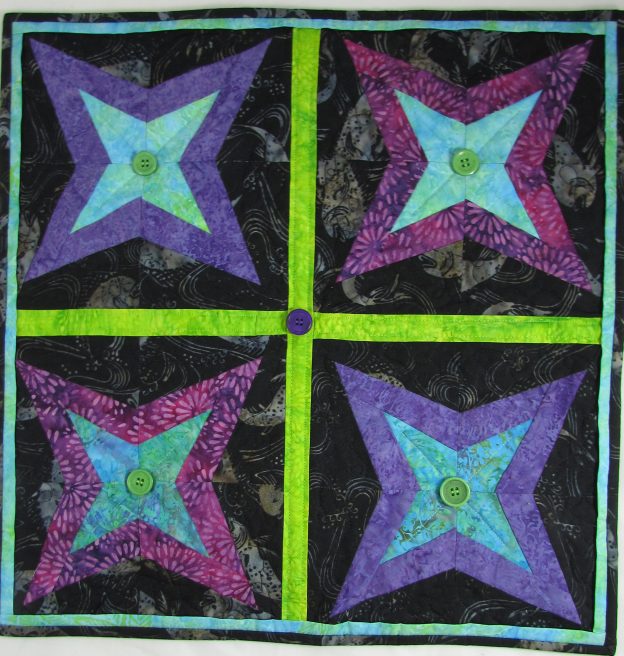
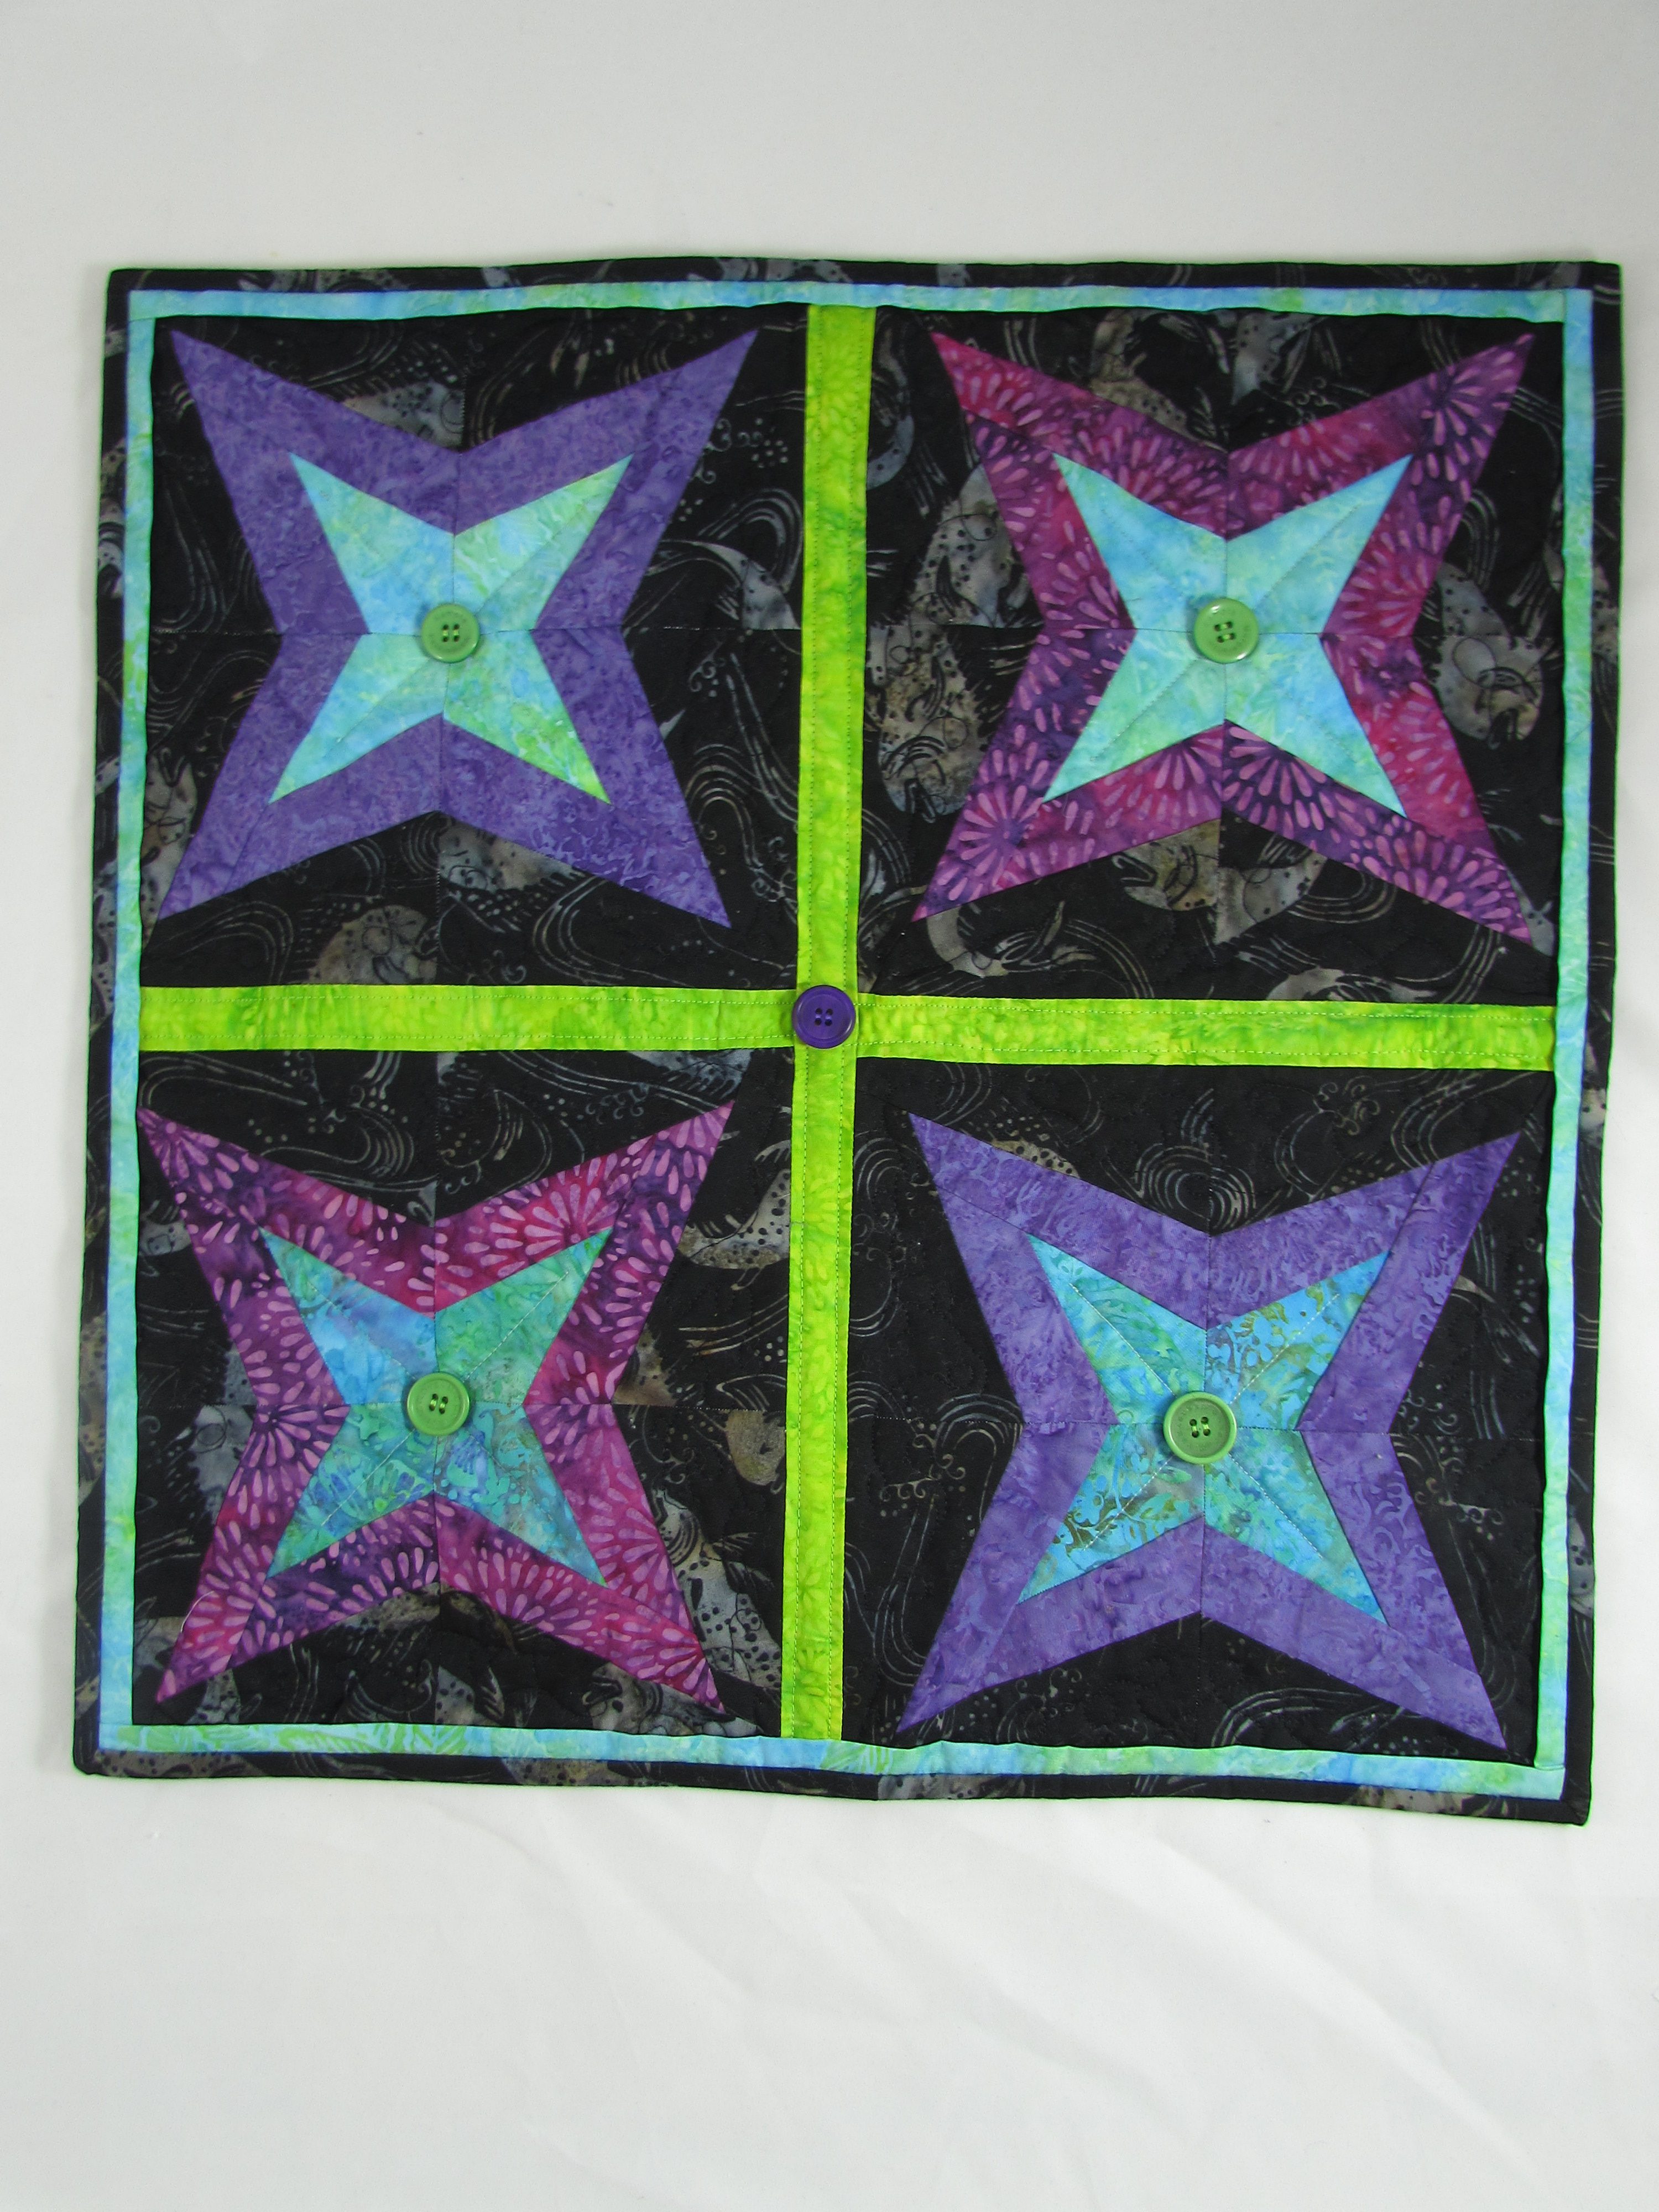
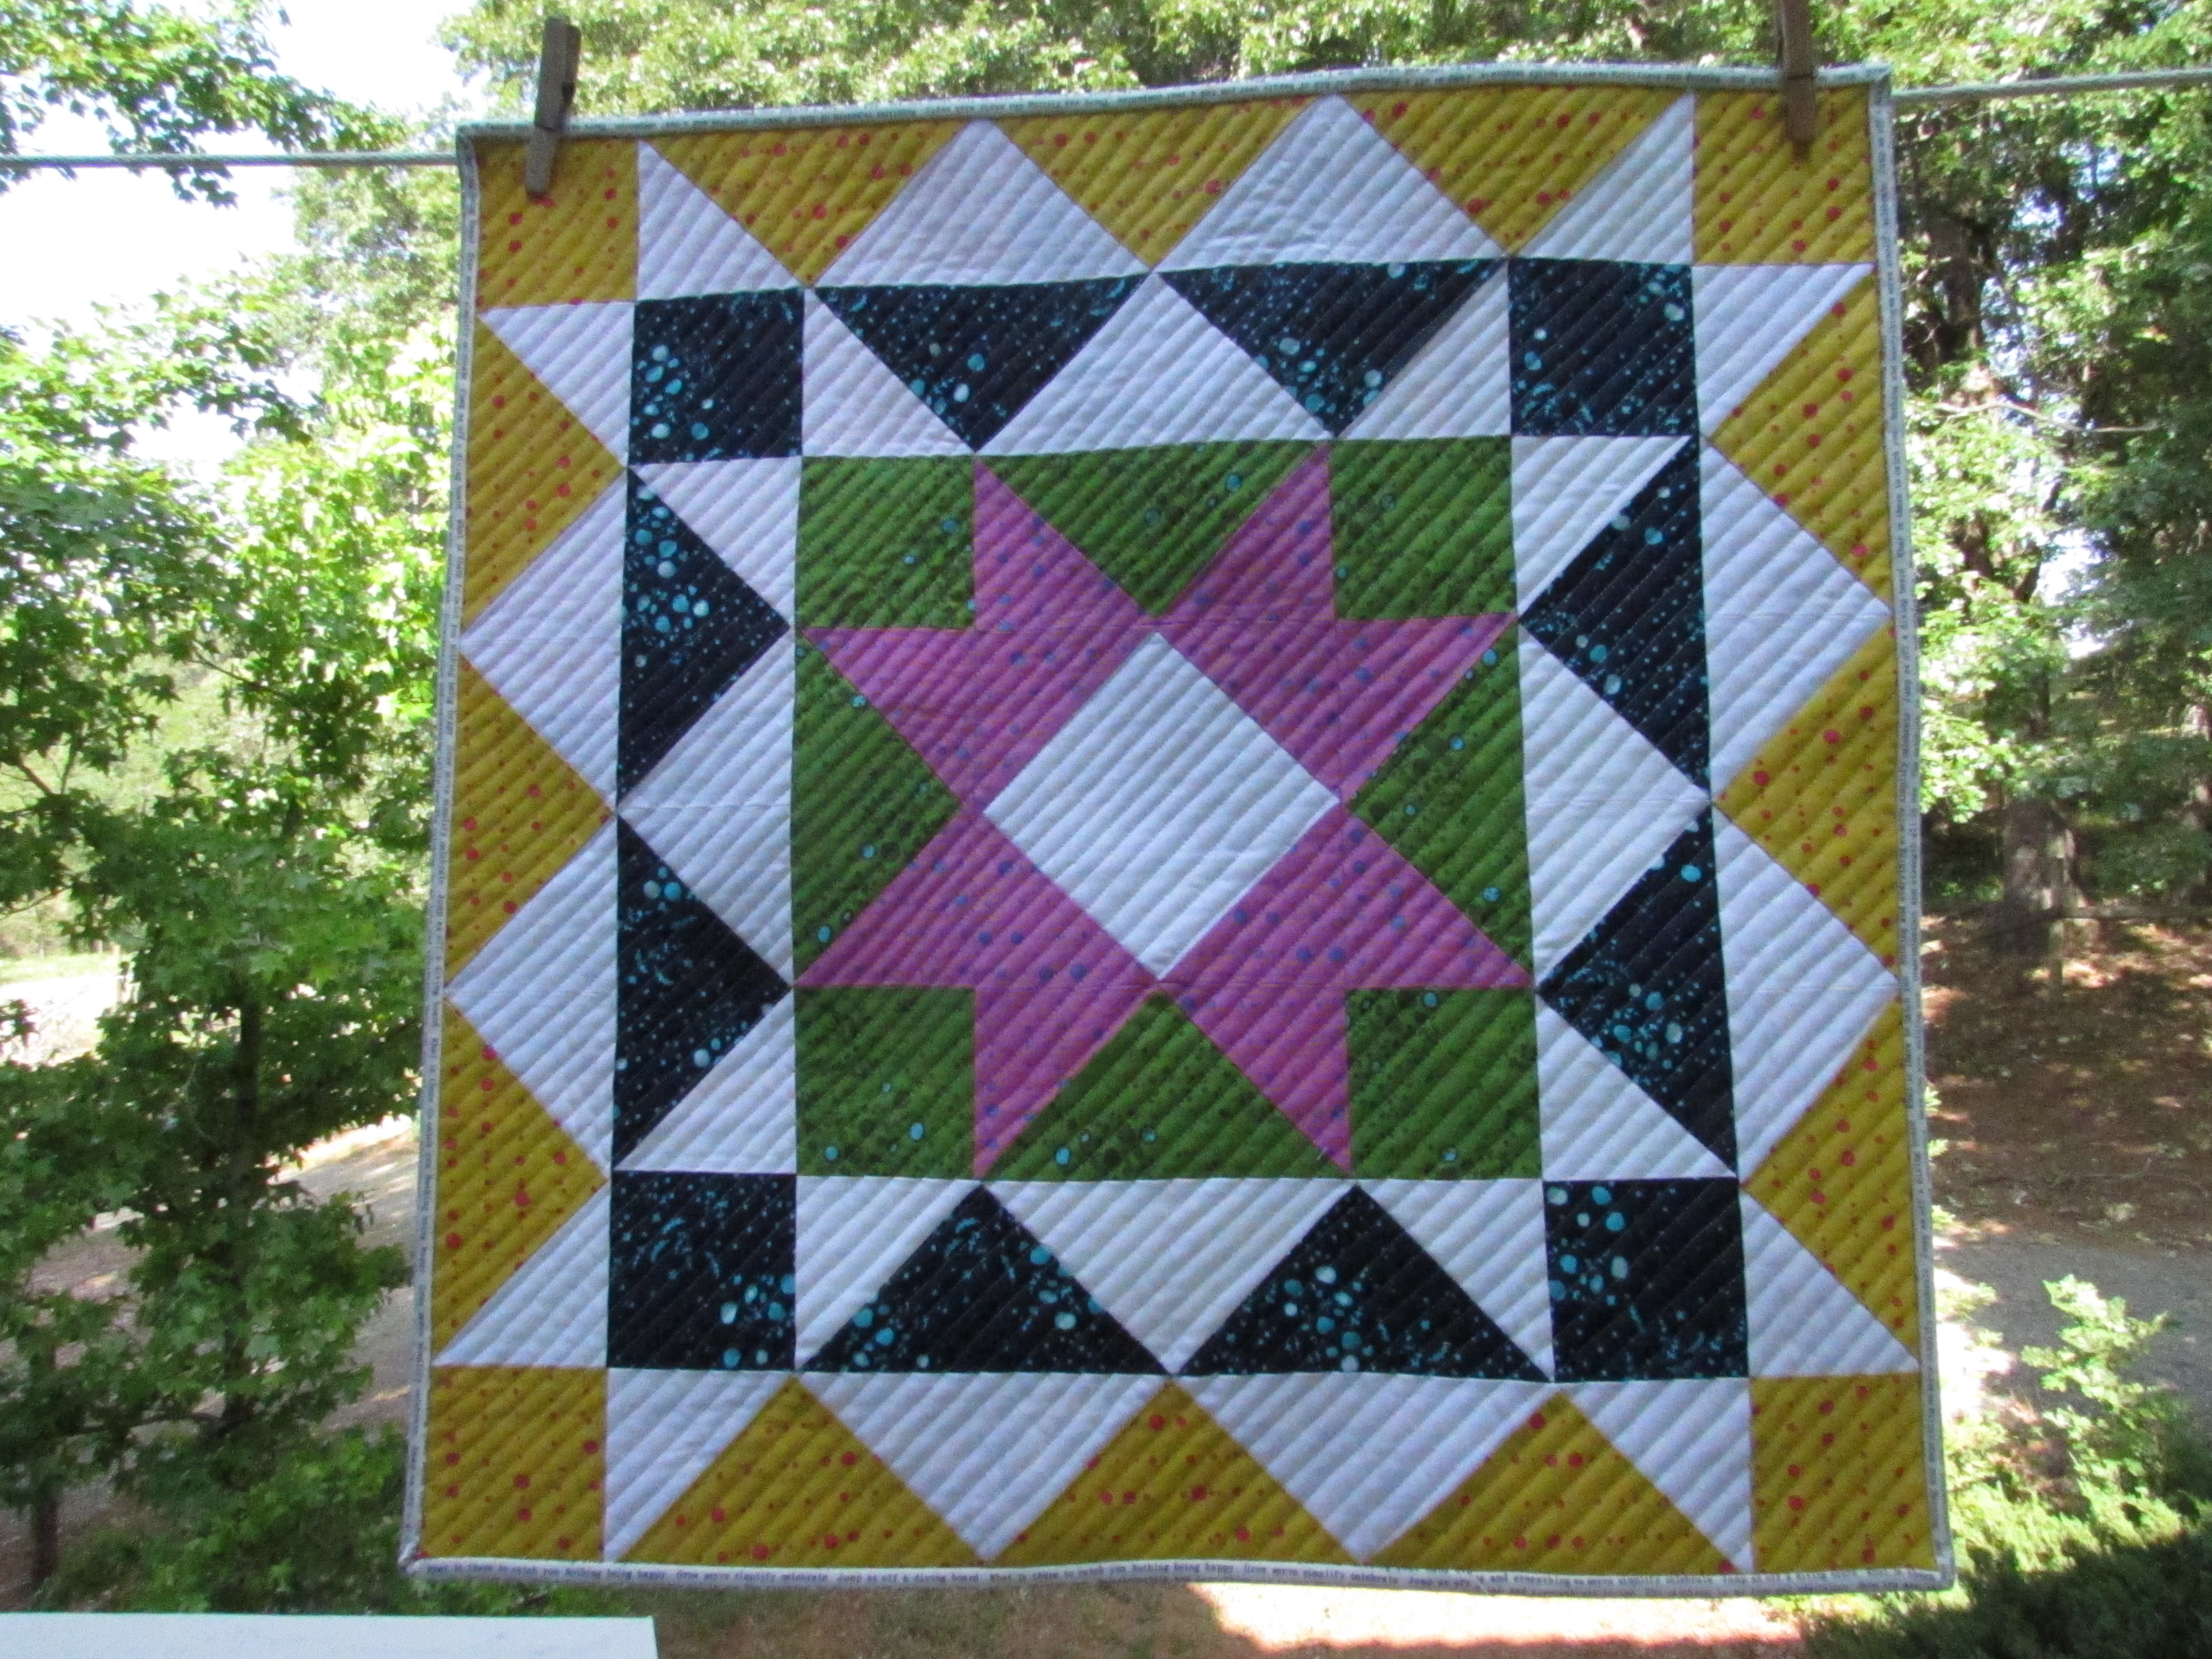
As an ambassador for Island Batik, I have a schedule of challenges issued each month to create with their gorgeous fabrics. The theme for the month of March was March Mini Madness and the quilt was to be constructed with paper pieced blocks.
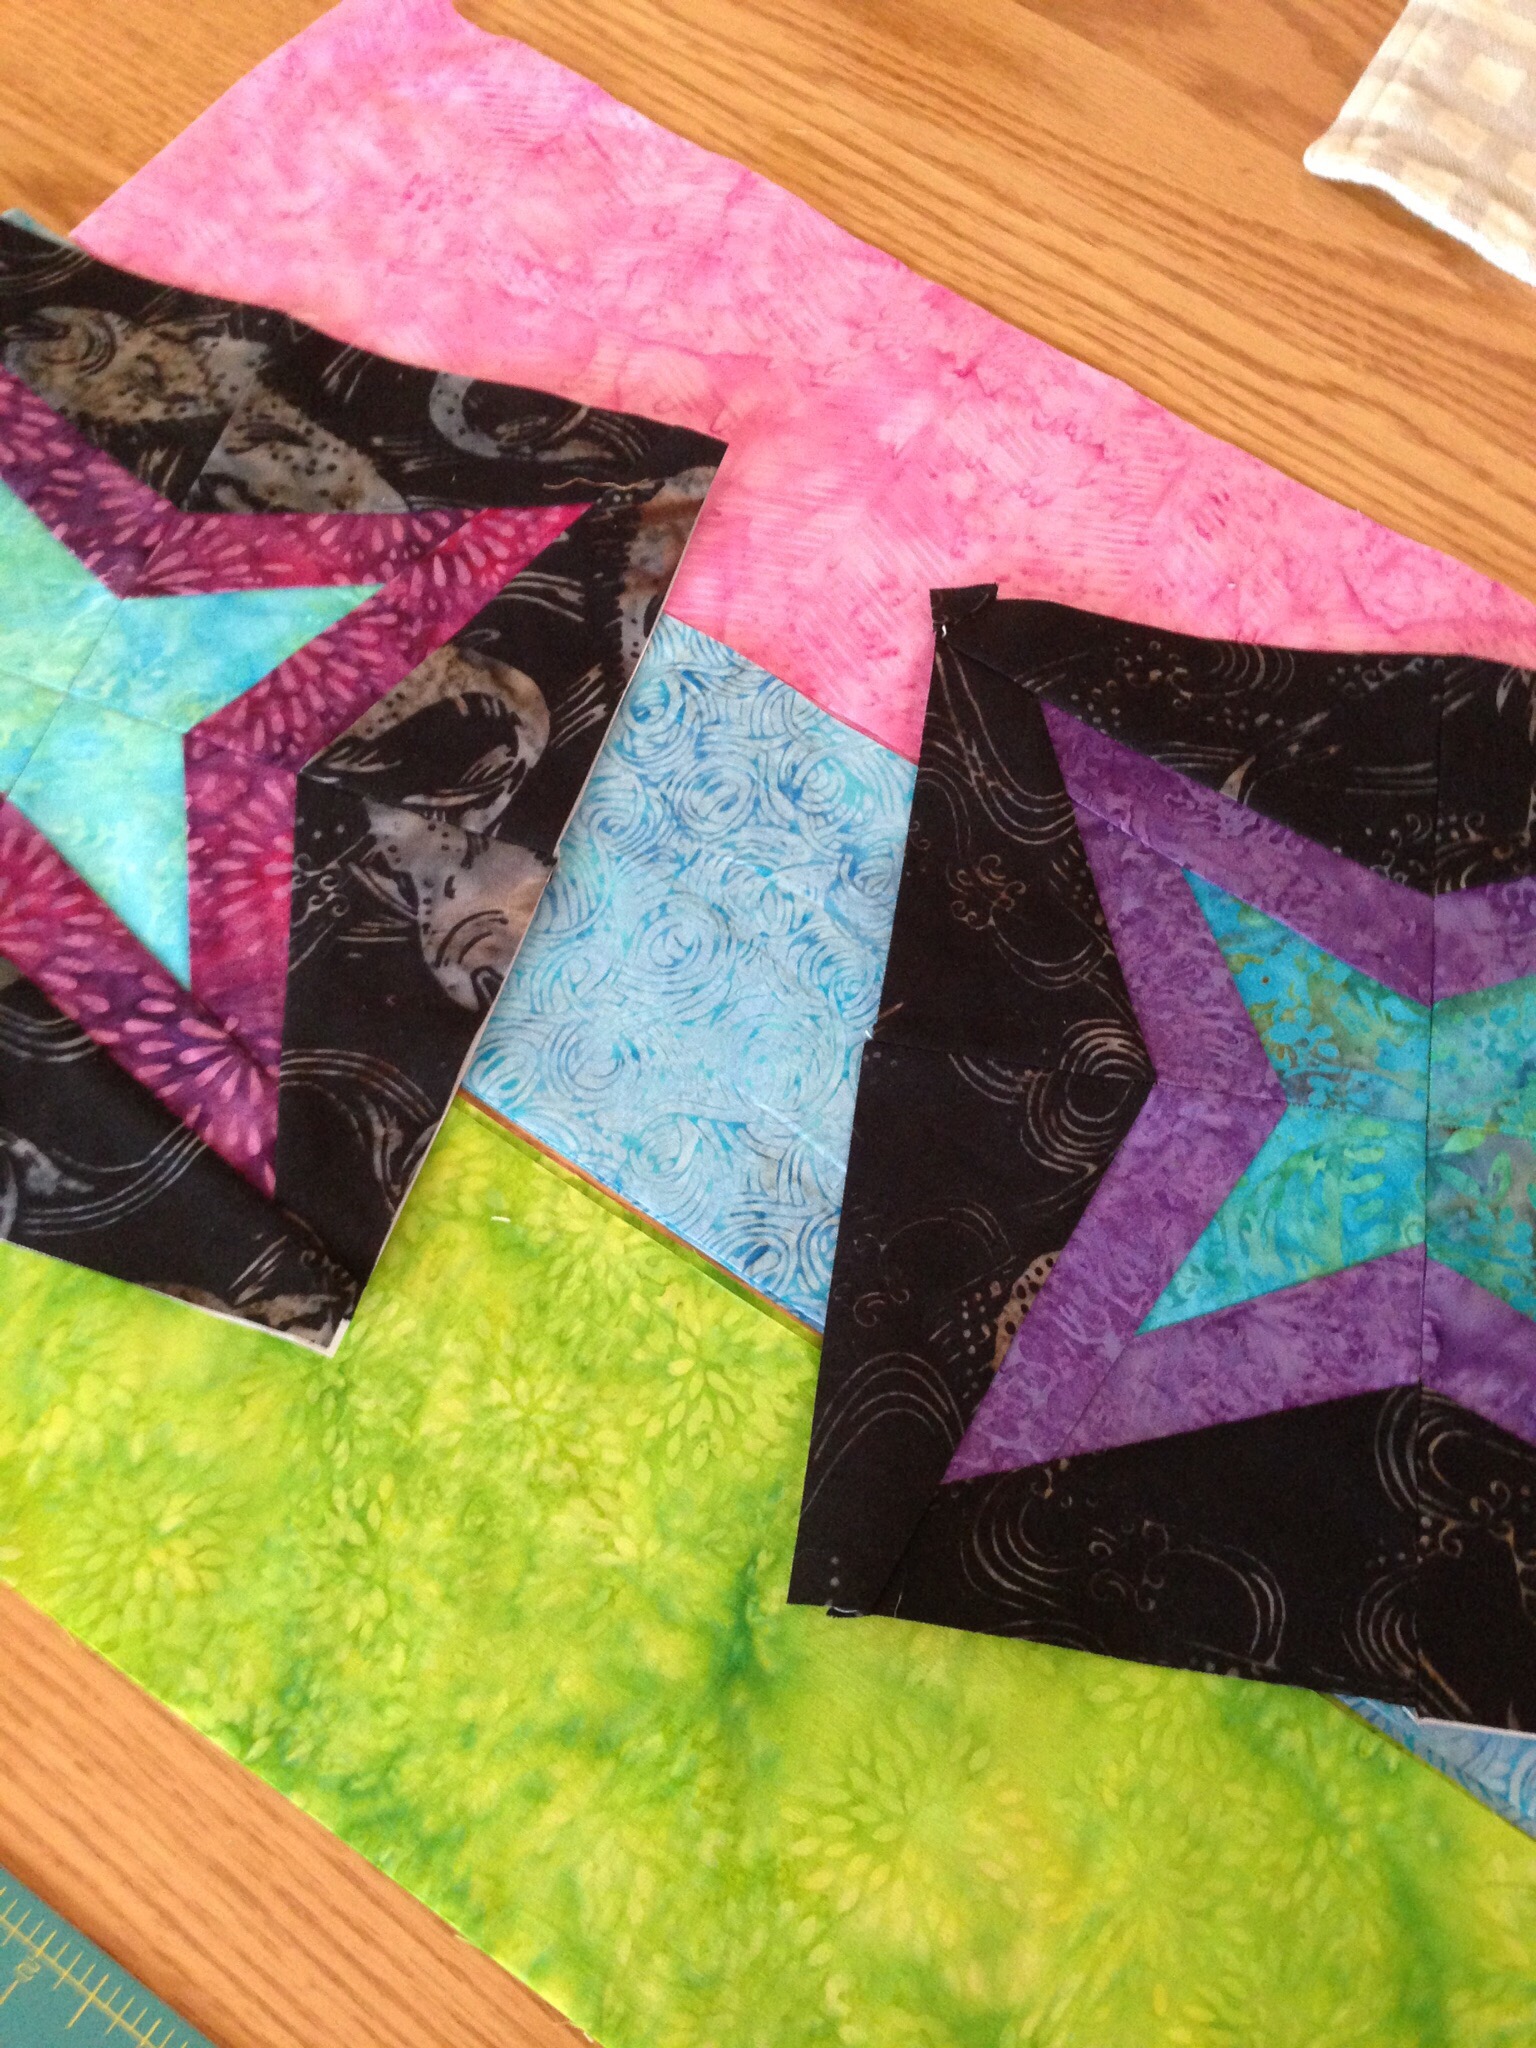
:ast week I shared the beginnings of the mini I was working on with Island Batik fabric. Using a paper pieced star pattern (free download from Craftsy) I made four blocks. Each one became a bit easier than the last which was nice. I feel like I made progress and have a better feel for paper piecing now. (These blocks were very simple which was helpful). I like the various themes designated by the coordinator at Island Batik as it forces me out of my comfort zone a bit. Isn’t it nice to have the oppportunity to learn something new?
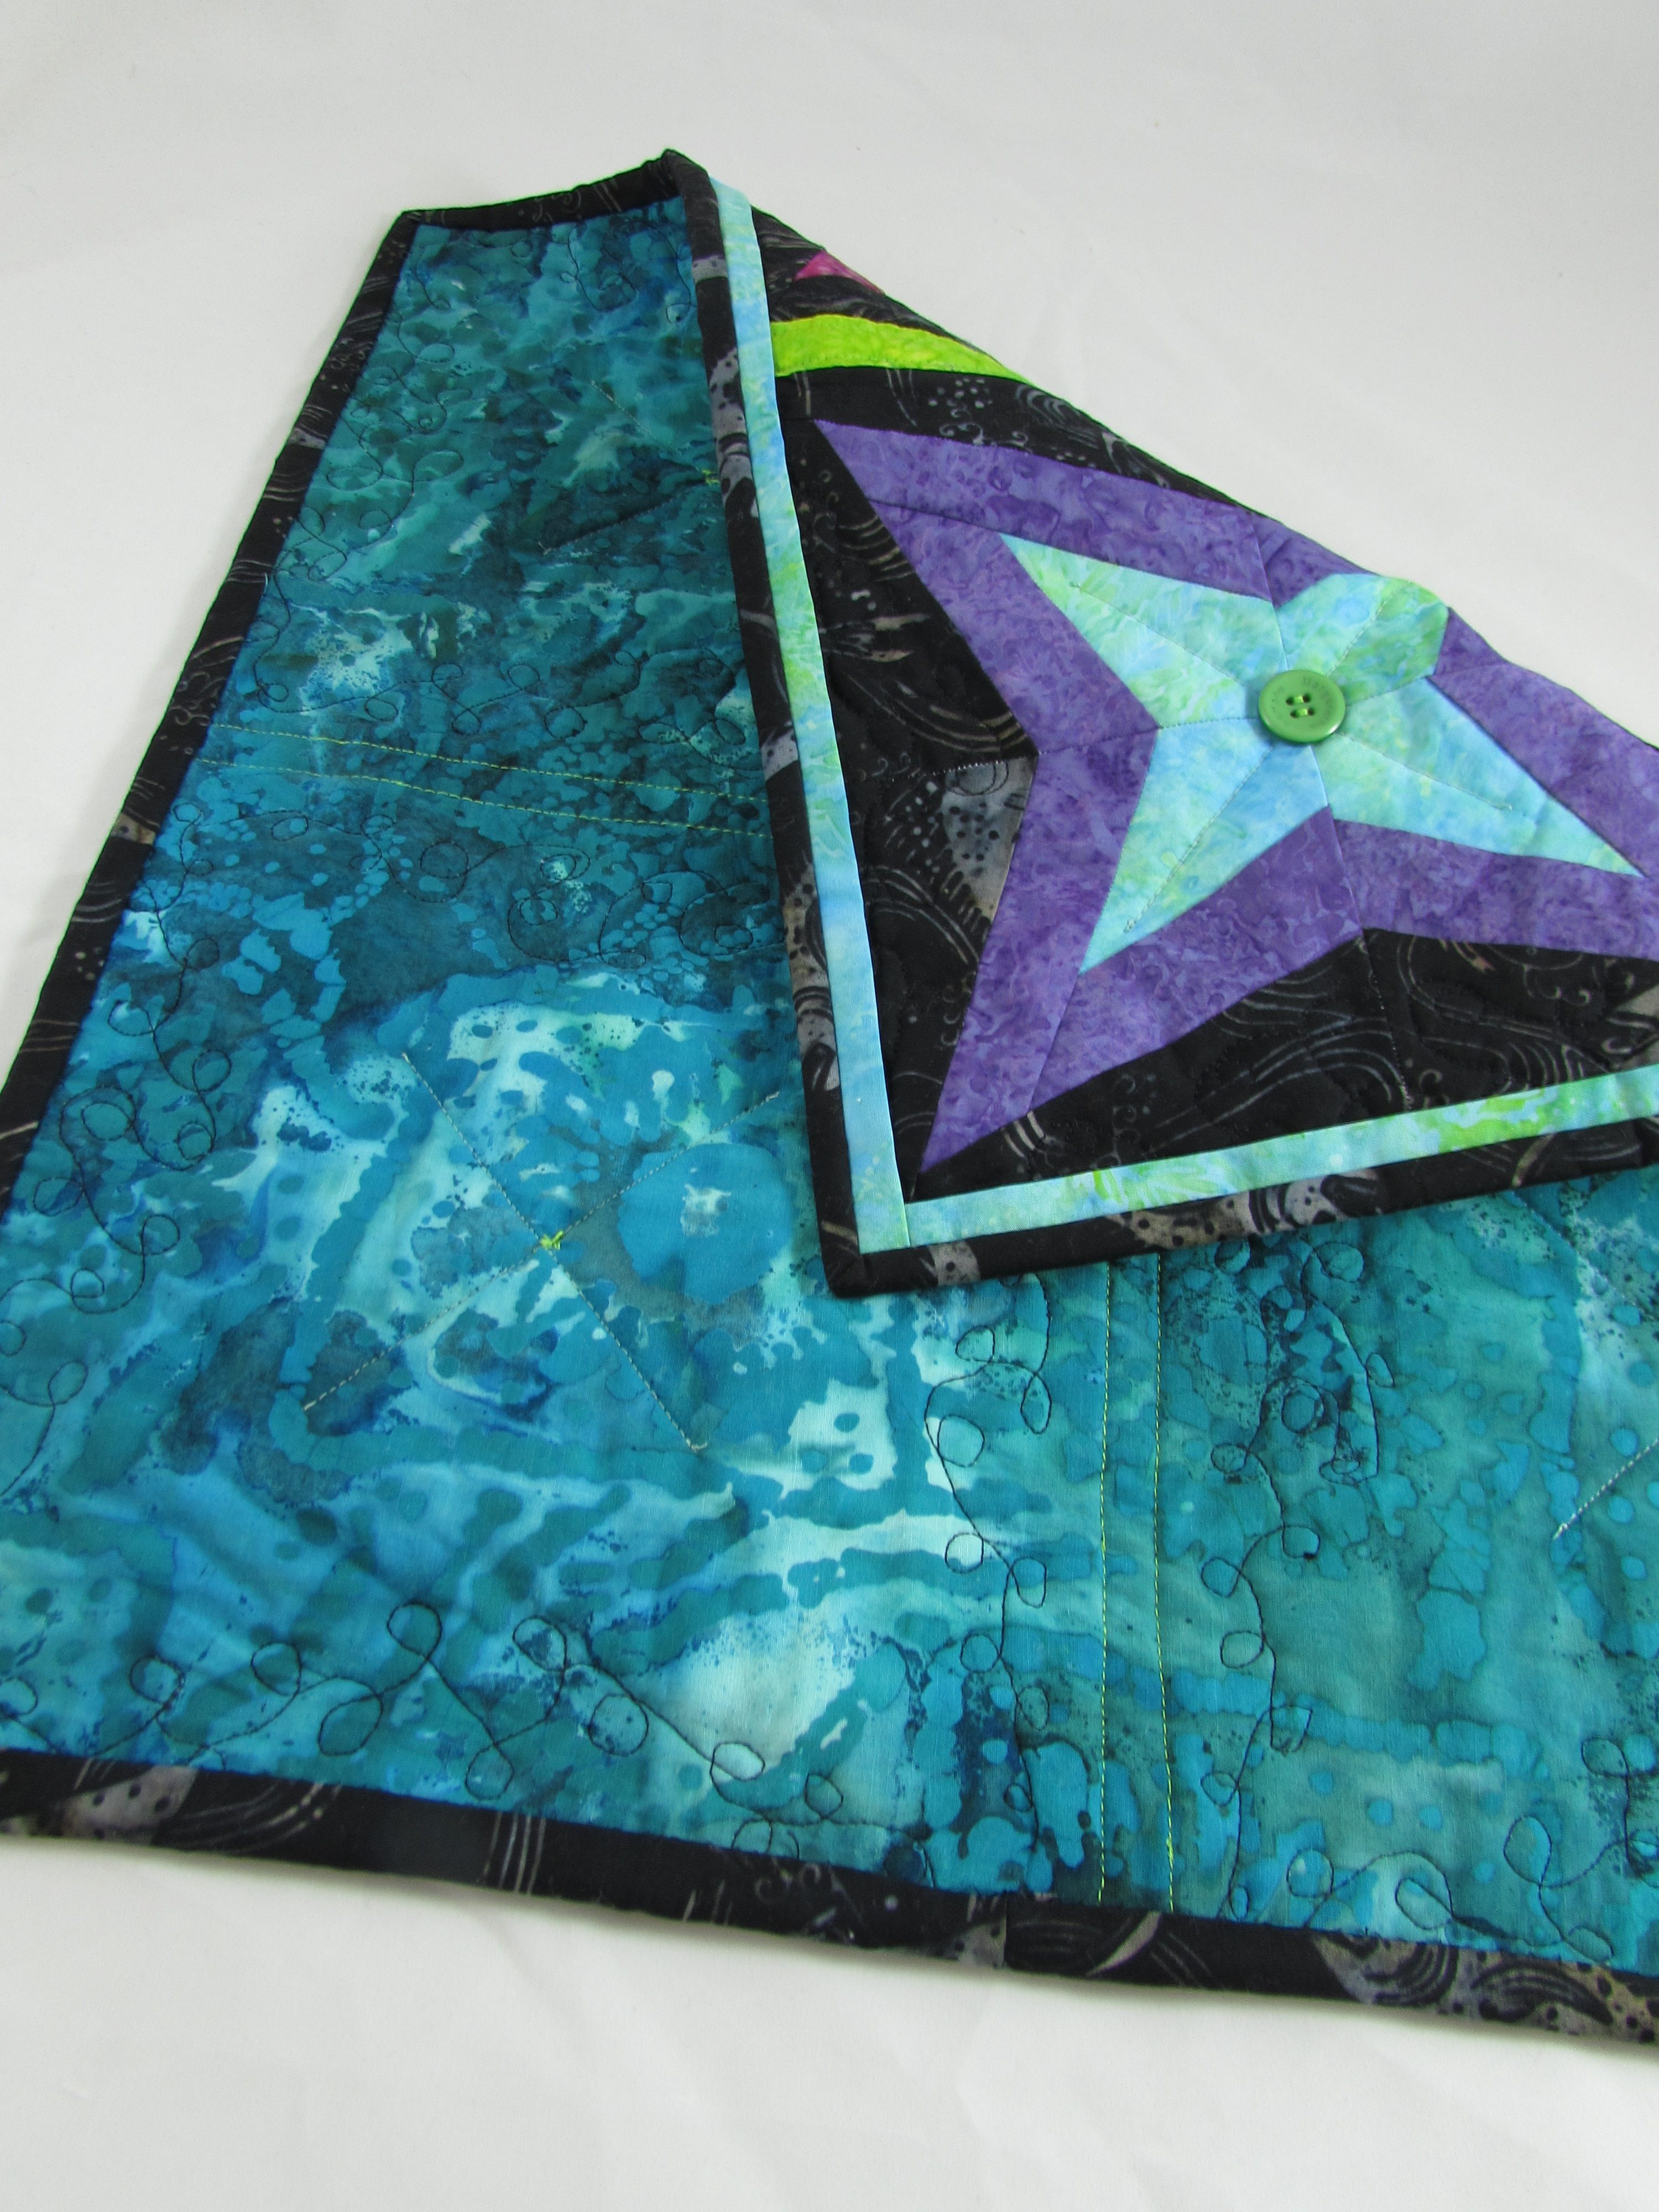
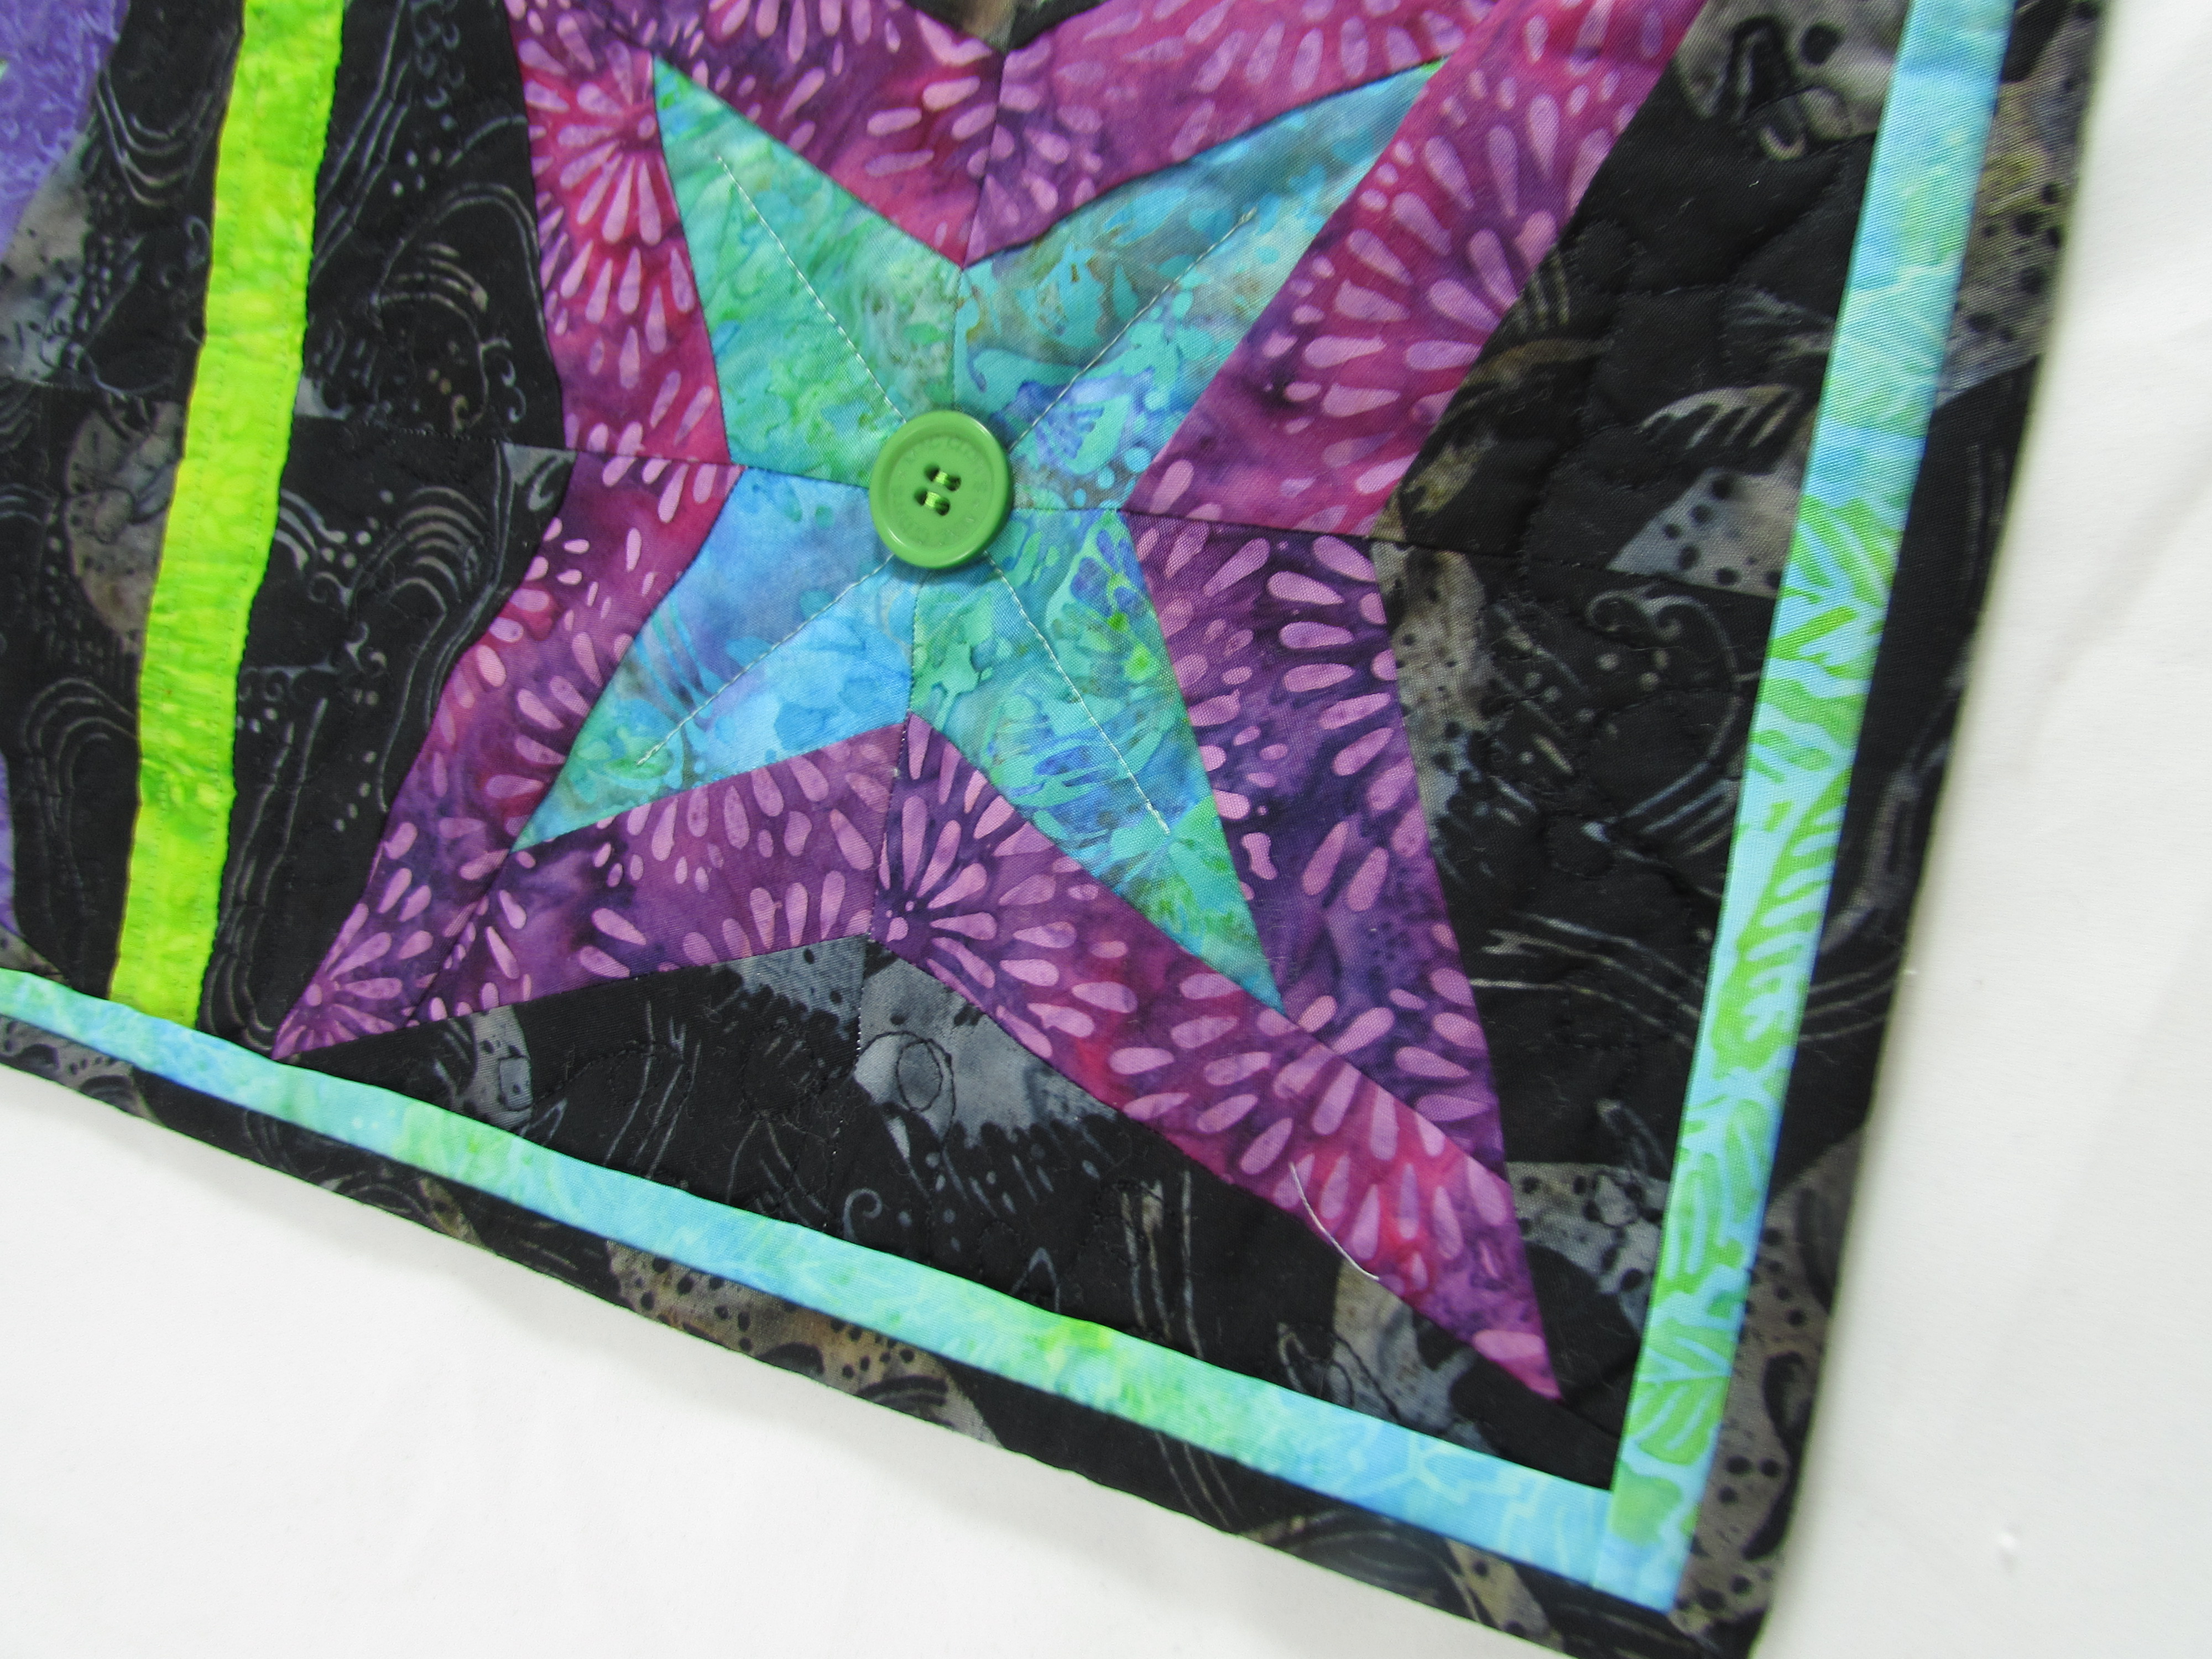
The overall look of this little quilt is bright and cheerful. I love the purples and blues against the black batik. Bright green strips were used for the sashing.
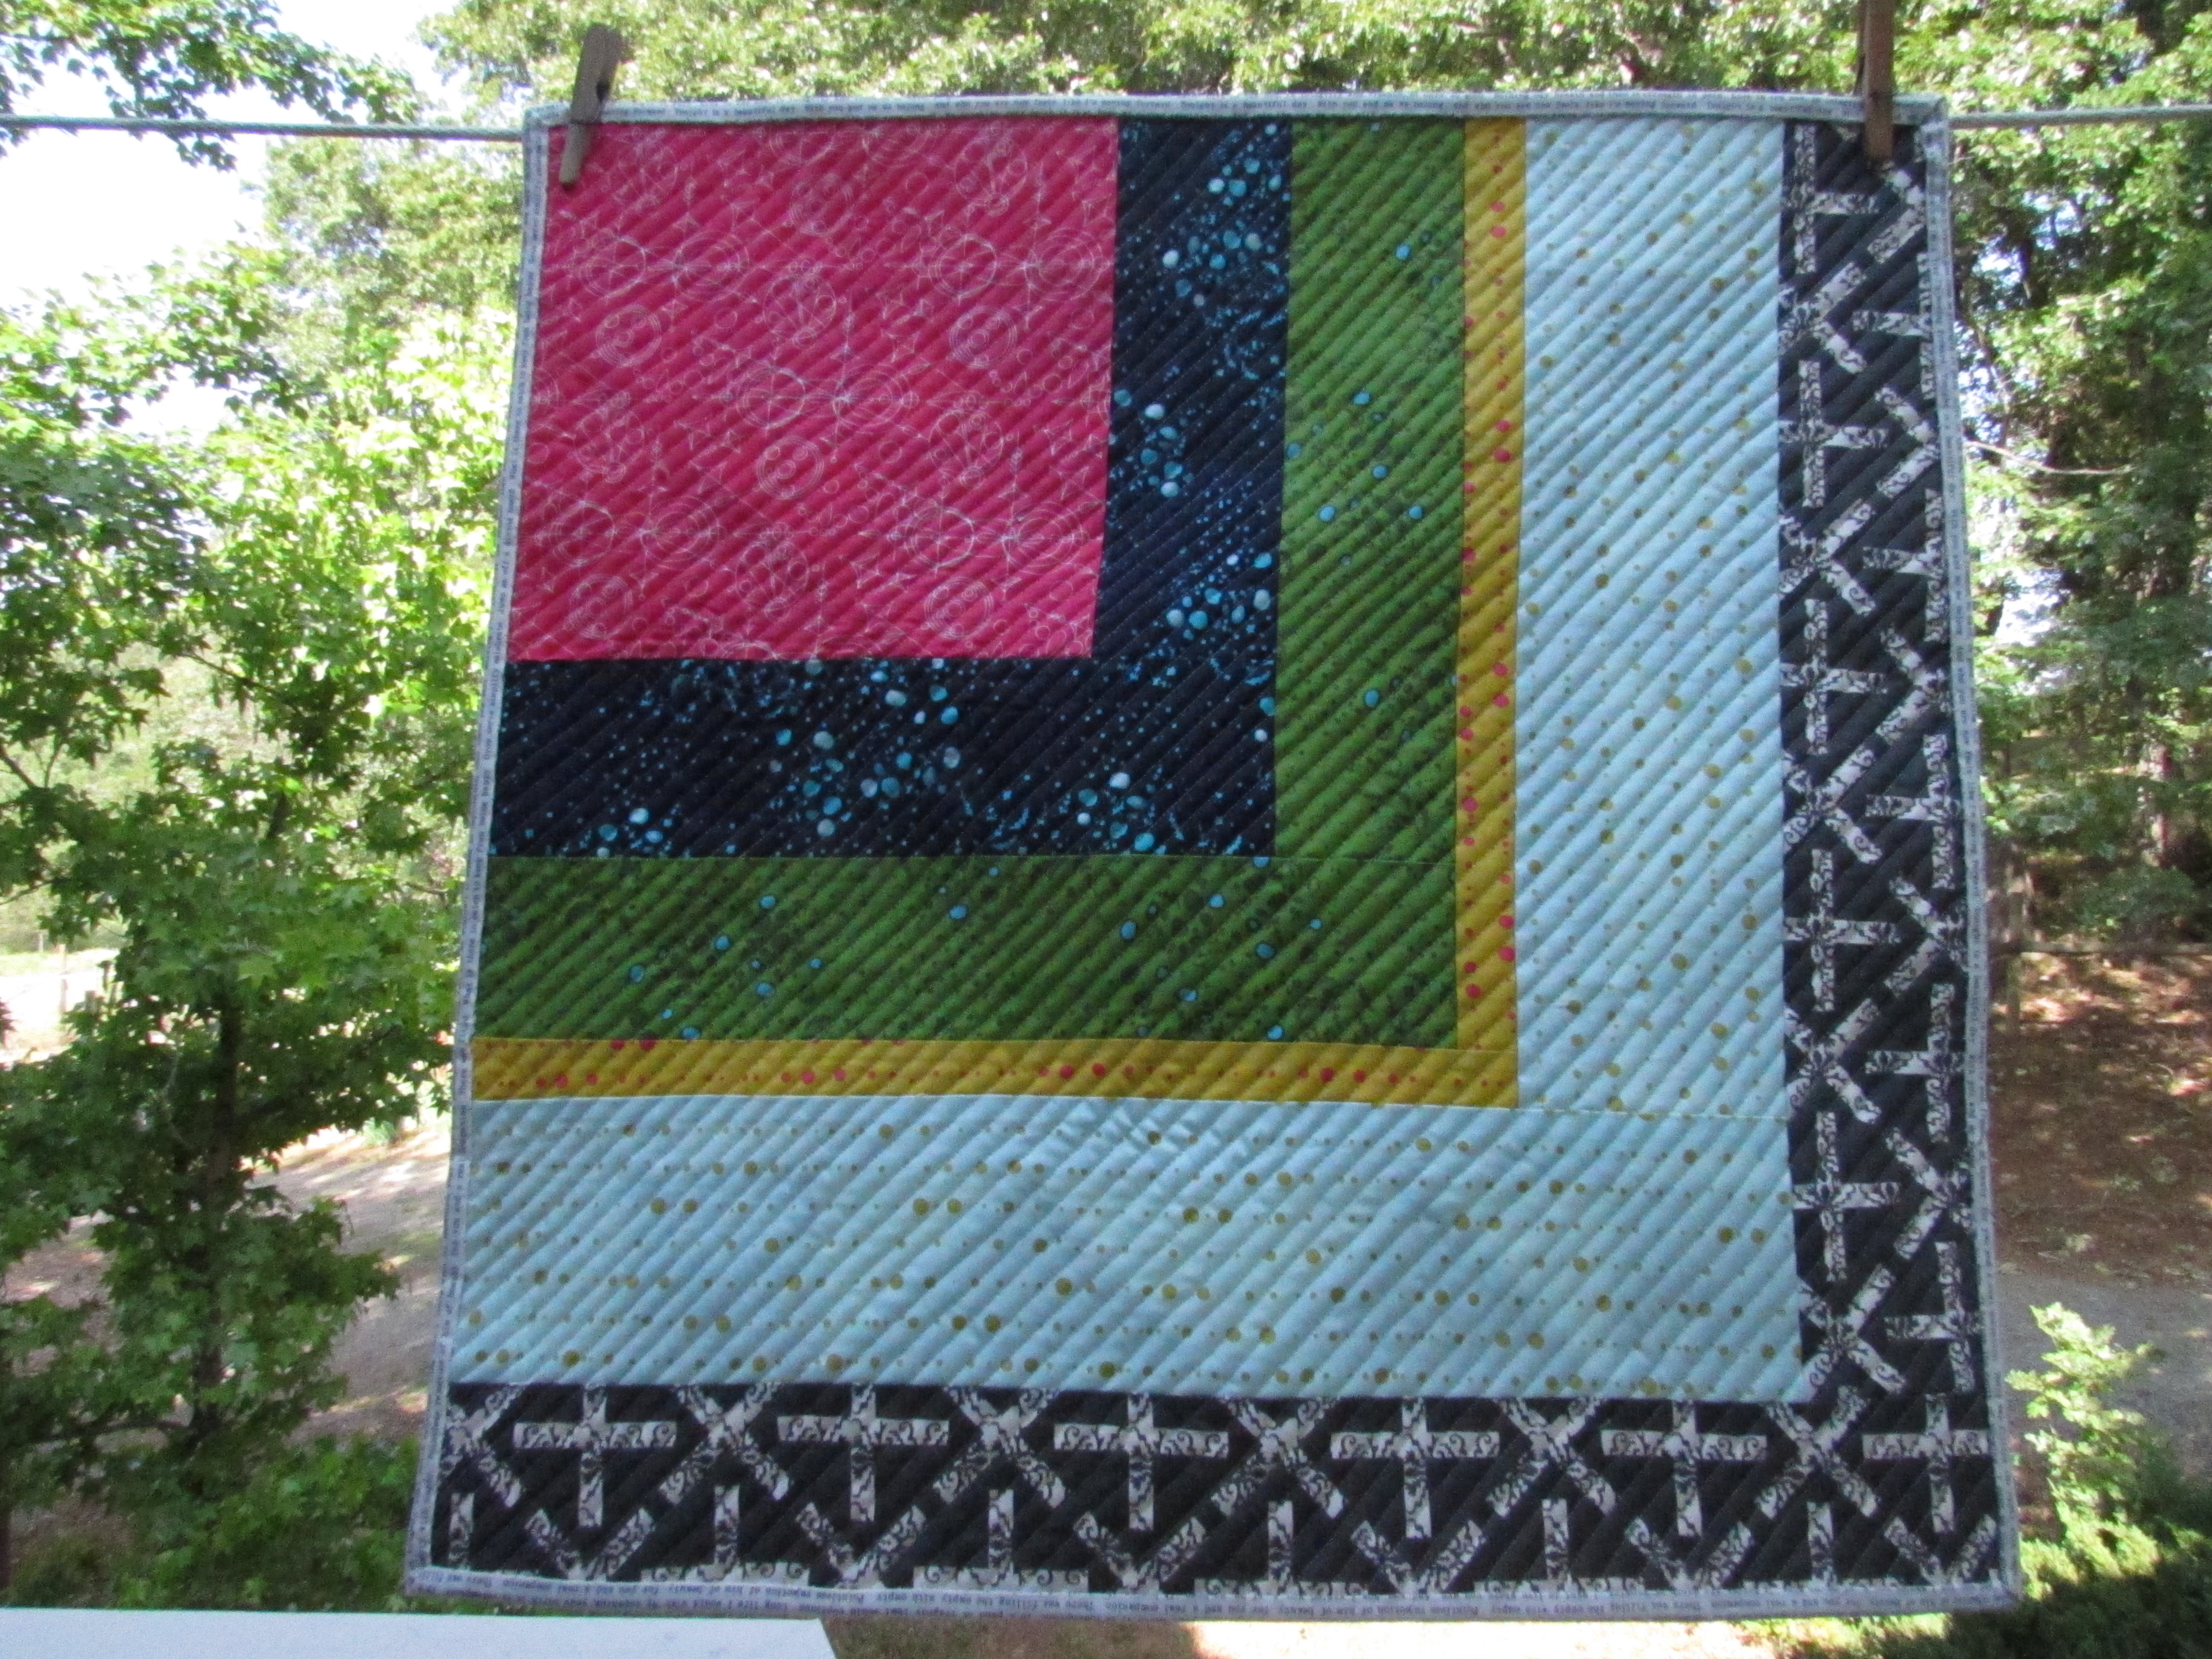
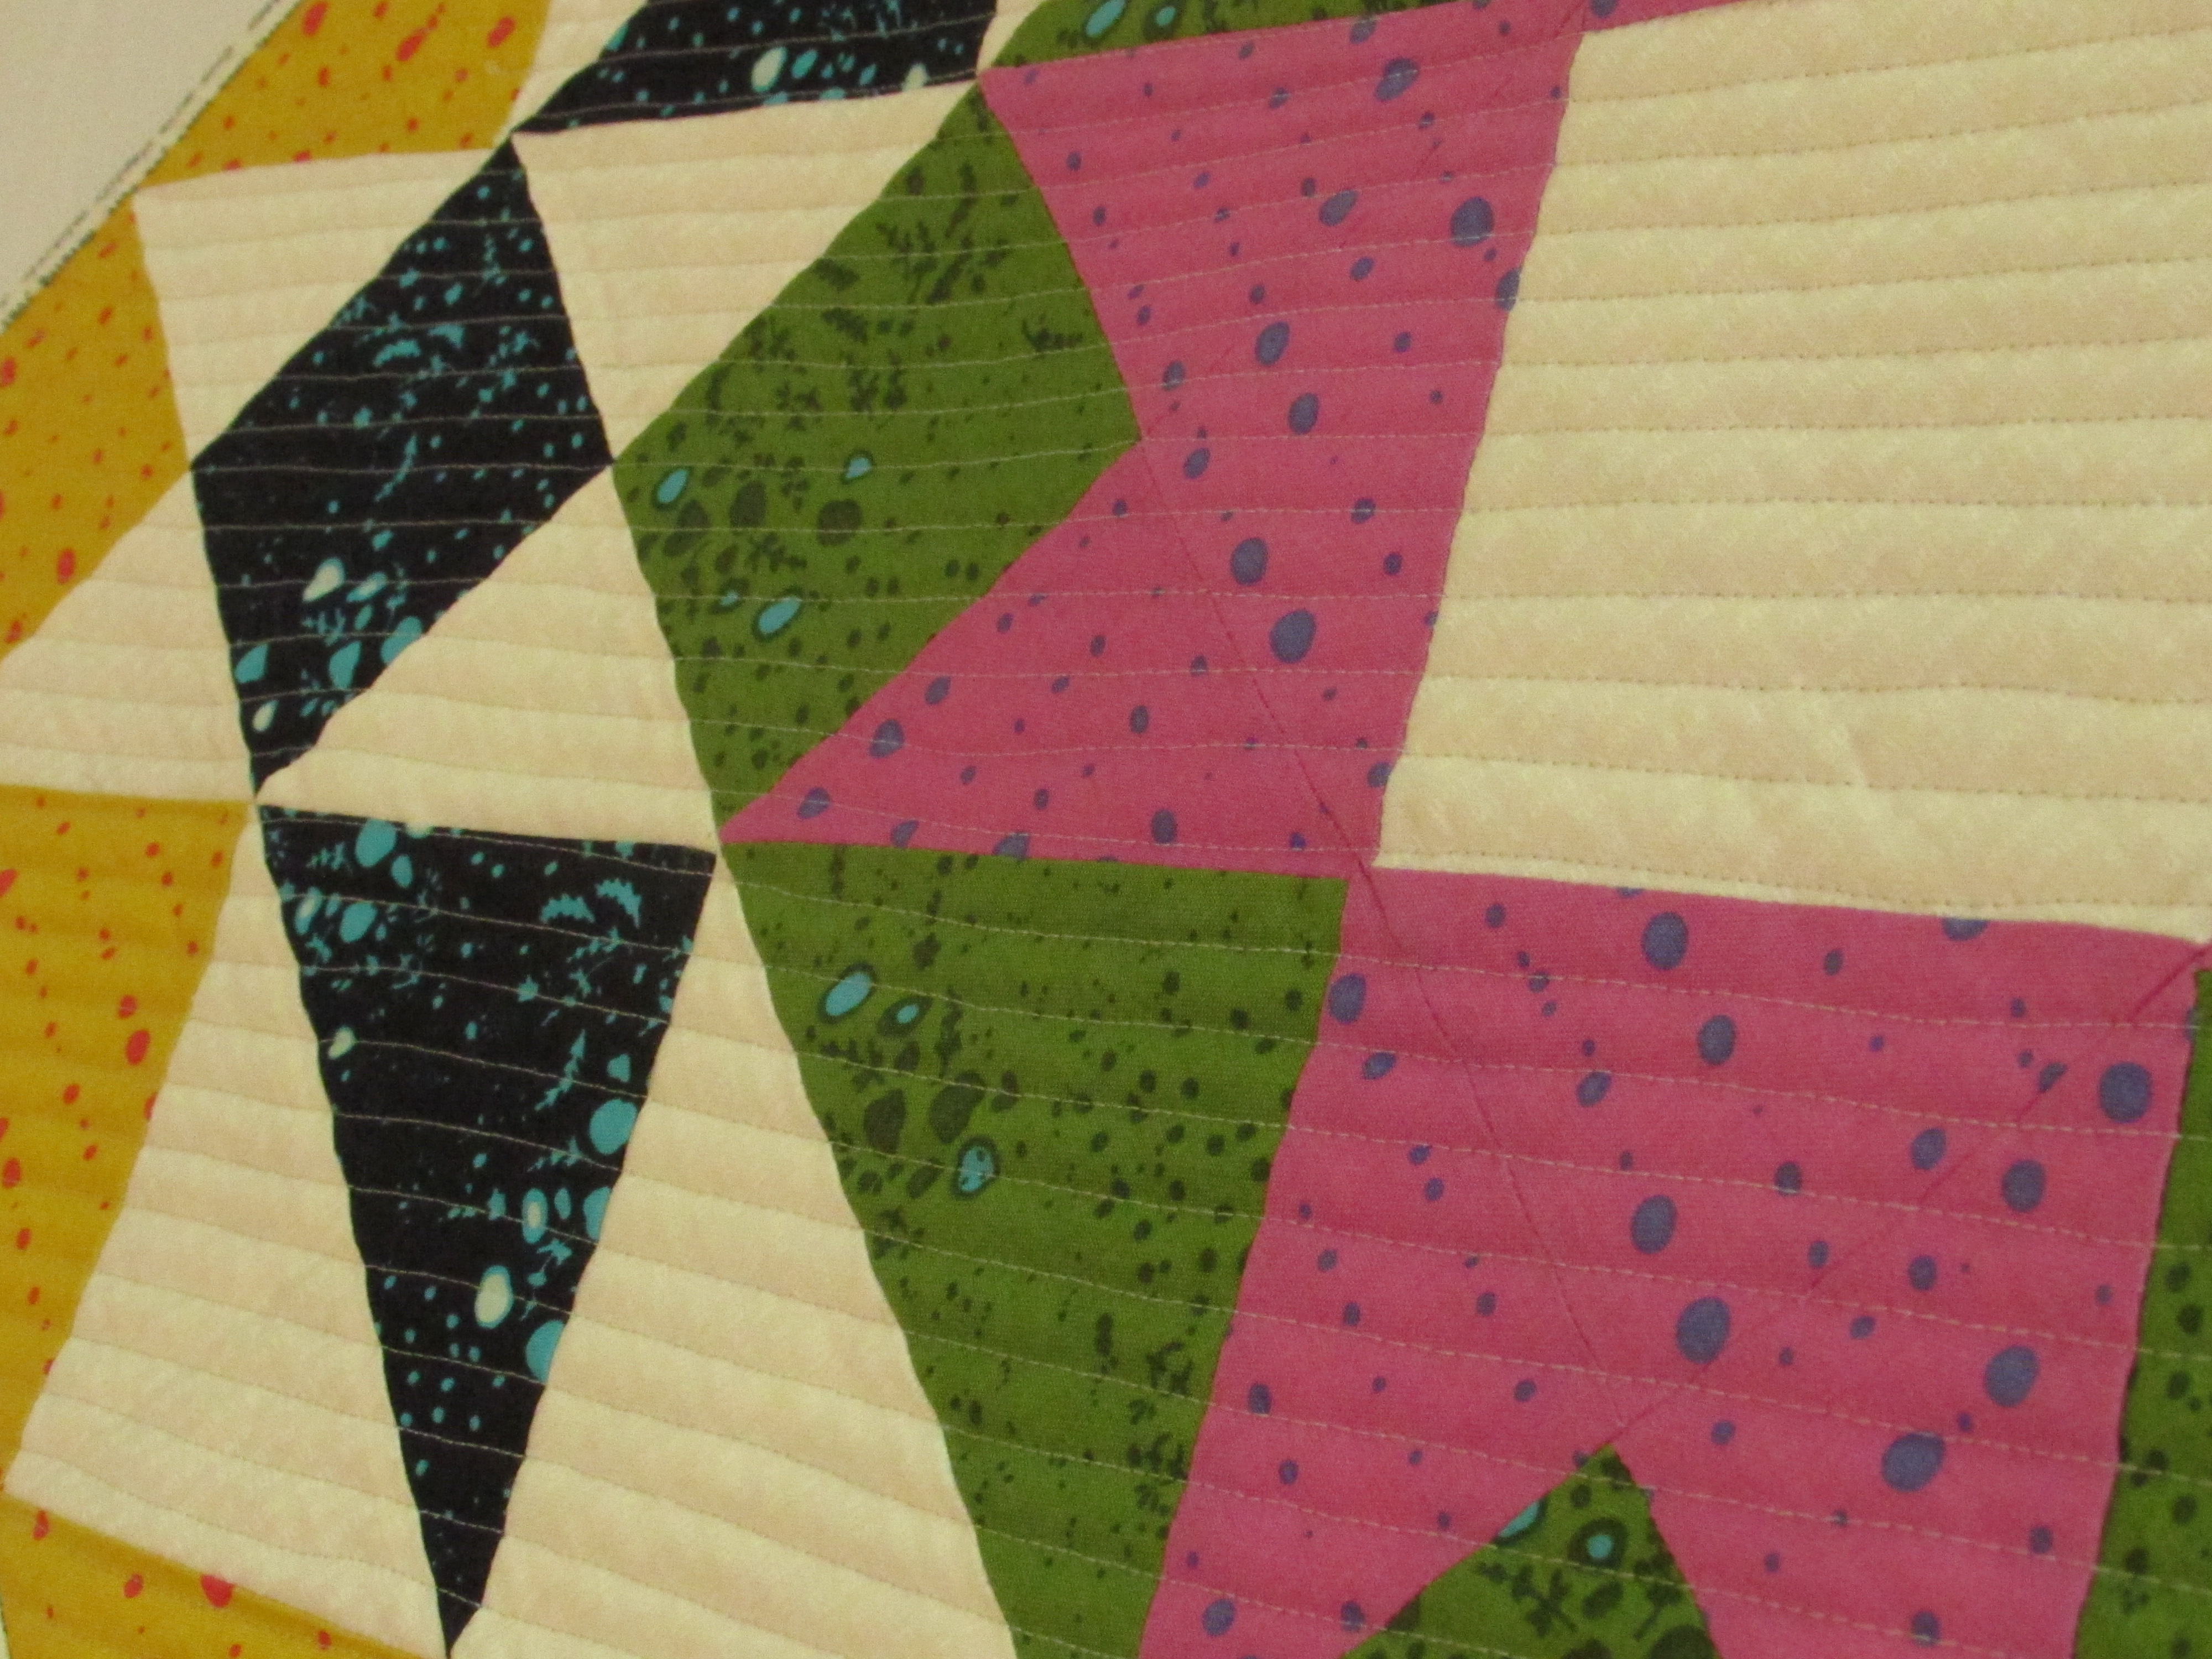
After the top was assembled I quilted it by first adding some straight lines to the greeen sashing, using a bright green Mettler thread. Following that I free motion quilted small loops over the black background as well as an X through each star. With a dark batik, the quilting is not the star of the show. It is very hard to see.
I decided it needed a bit more detail to finish it off. First I decided to add buttons. I think it was about two weeks ago that I read a post written by Janine, over at Quilts from the Little House, where she used buttons to embellish a project of hers. I have a jar of buttons and thought it would be fun to take that bit of inspiration and apply it to this mini. Don’t they look cute? Makes it sort of whimsical.
After the buttons, I still wanted more detail. I decided to add a flange to the outer edge before I attached the binding. Doesn’t this make a nice polished finish? I am very happy with this. Hopefully I will put a hanging sleeve on it soon and it will join the other minis on the wall in my sewing room. Just in time for spring!
Linking to all the usuals – find the links at the top of the page, under Link Ups!
I have been remiss in posting lately. It has been really hectic and I haven’t had time to sit with my laptop. What little free time there was, I spent in front of the sewing machine. A girl’s got her priorities, right? As summer came to a close, Julia had the typical teenager desire to pack as much as she could into those last few days. That is fine – she will soon be a slave to homework and won’t have a lot of free time. There were movies to see, shopping to do, and friends to hang out with. School started Wednesday and so another year begins.
When it is busy I like to have a simple project to work on during those 15 minutes of sewing time that present themselves now and then. I have been wanting to try relief quilting for quite a while now. Over a year ago, I read a cute post over at Night Quilter where Kitty explained her process of relief quilting a name on a baby quilt. I love the look and have been planning to give it a try. I pulled out some graph paper and fabric scraps and got started.
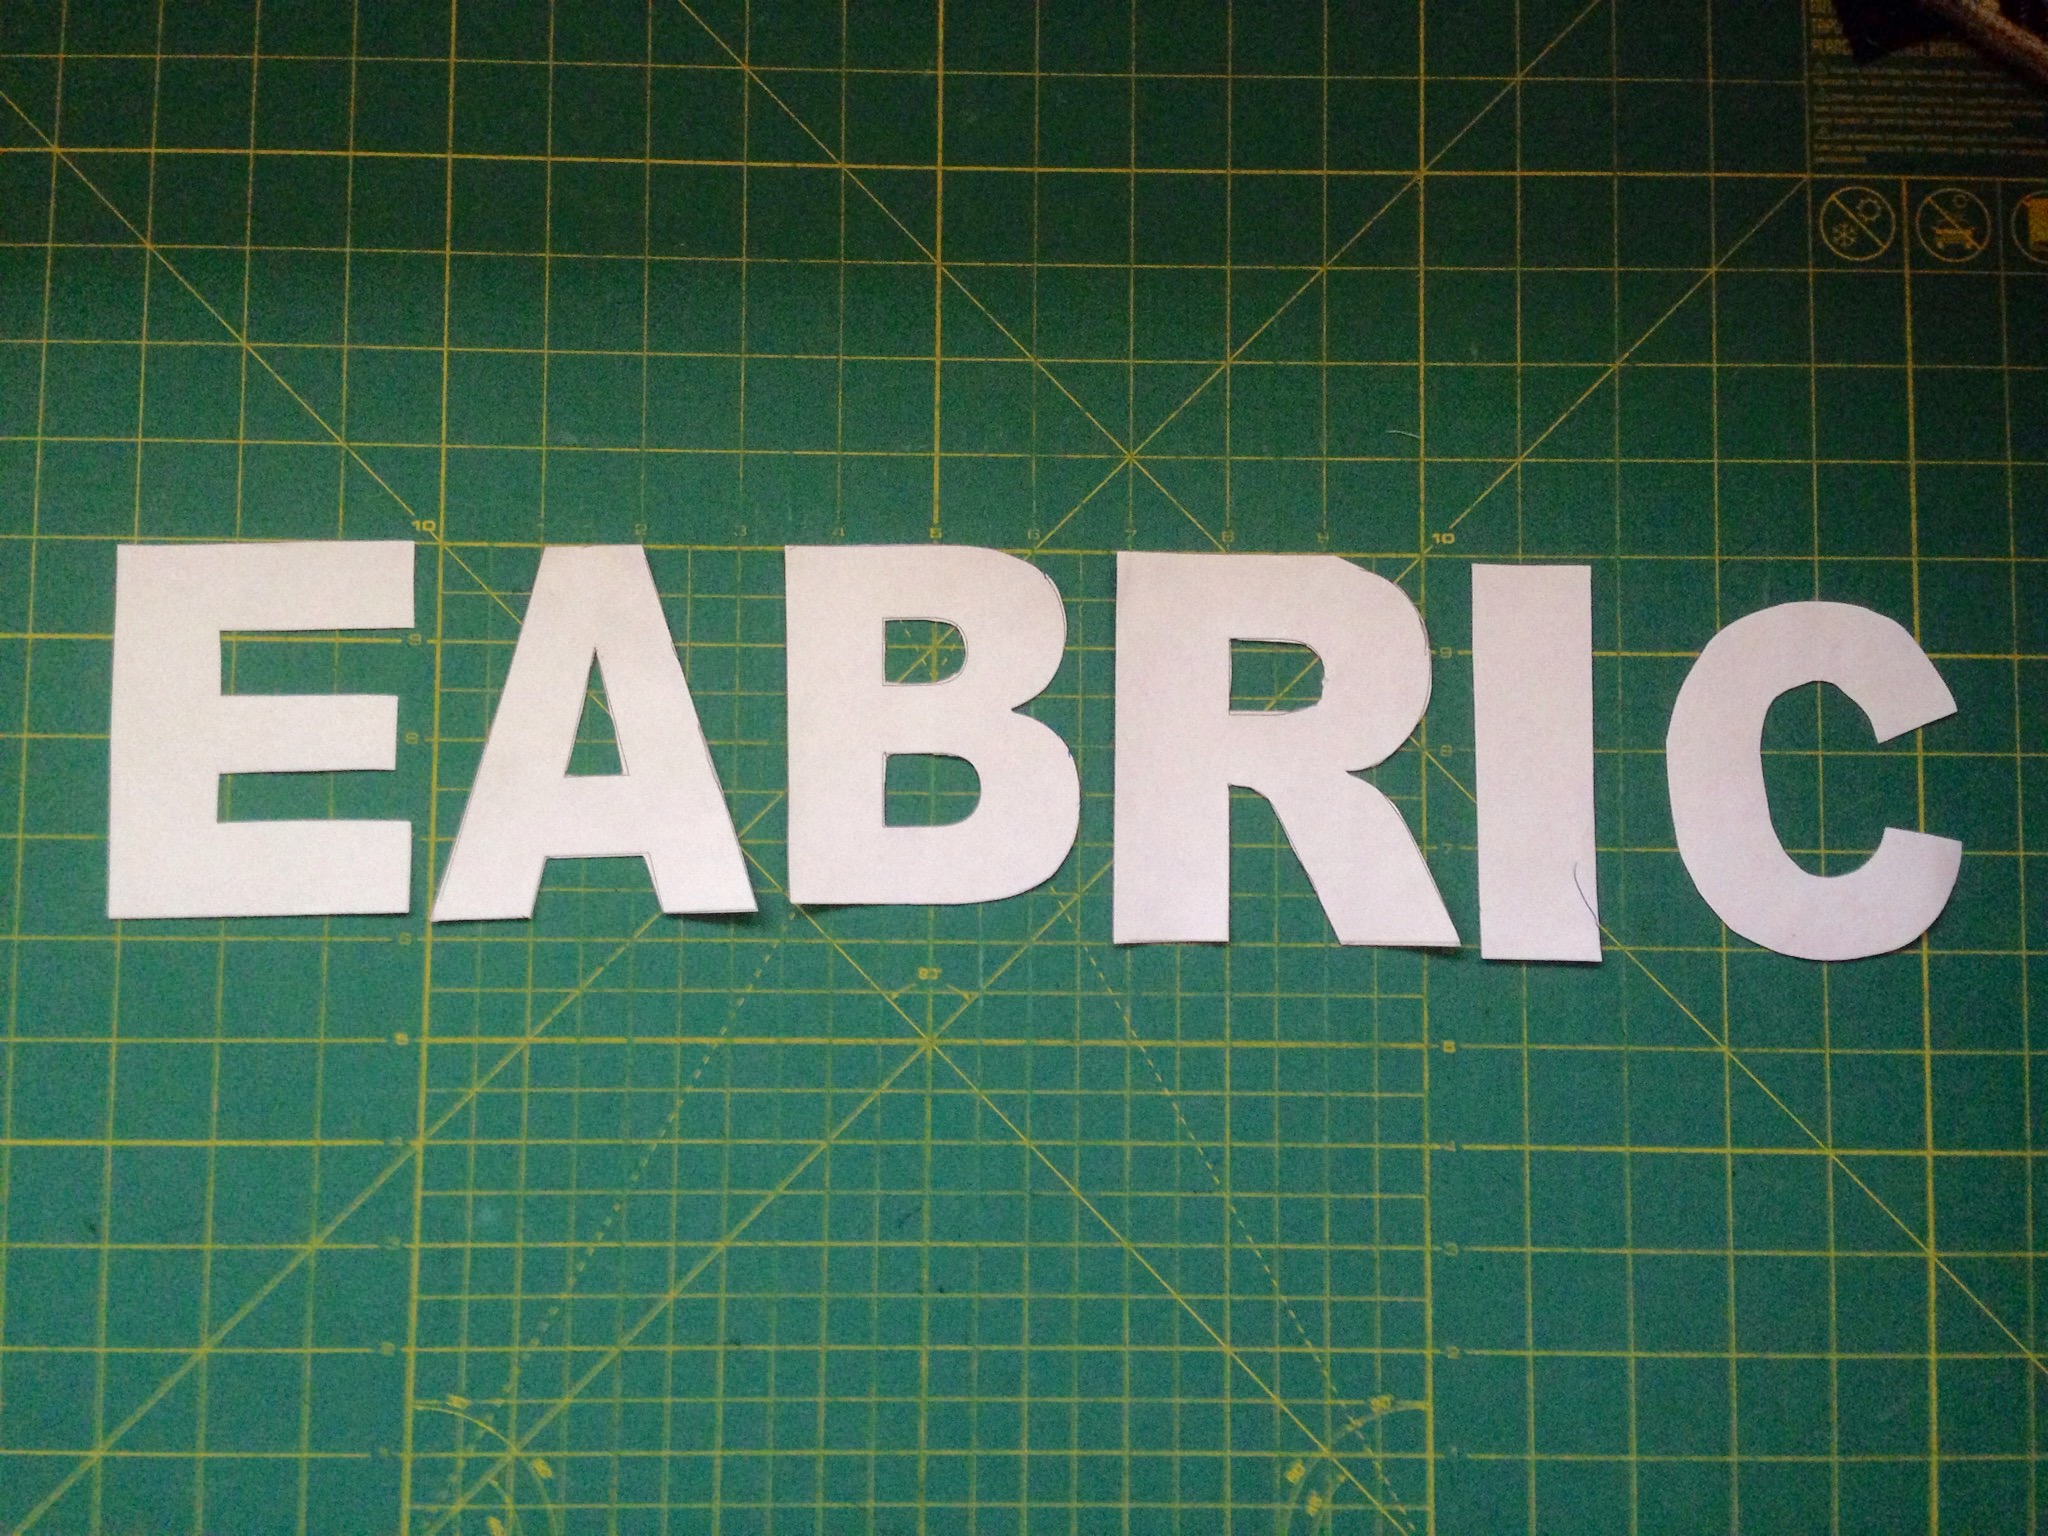
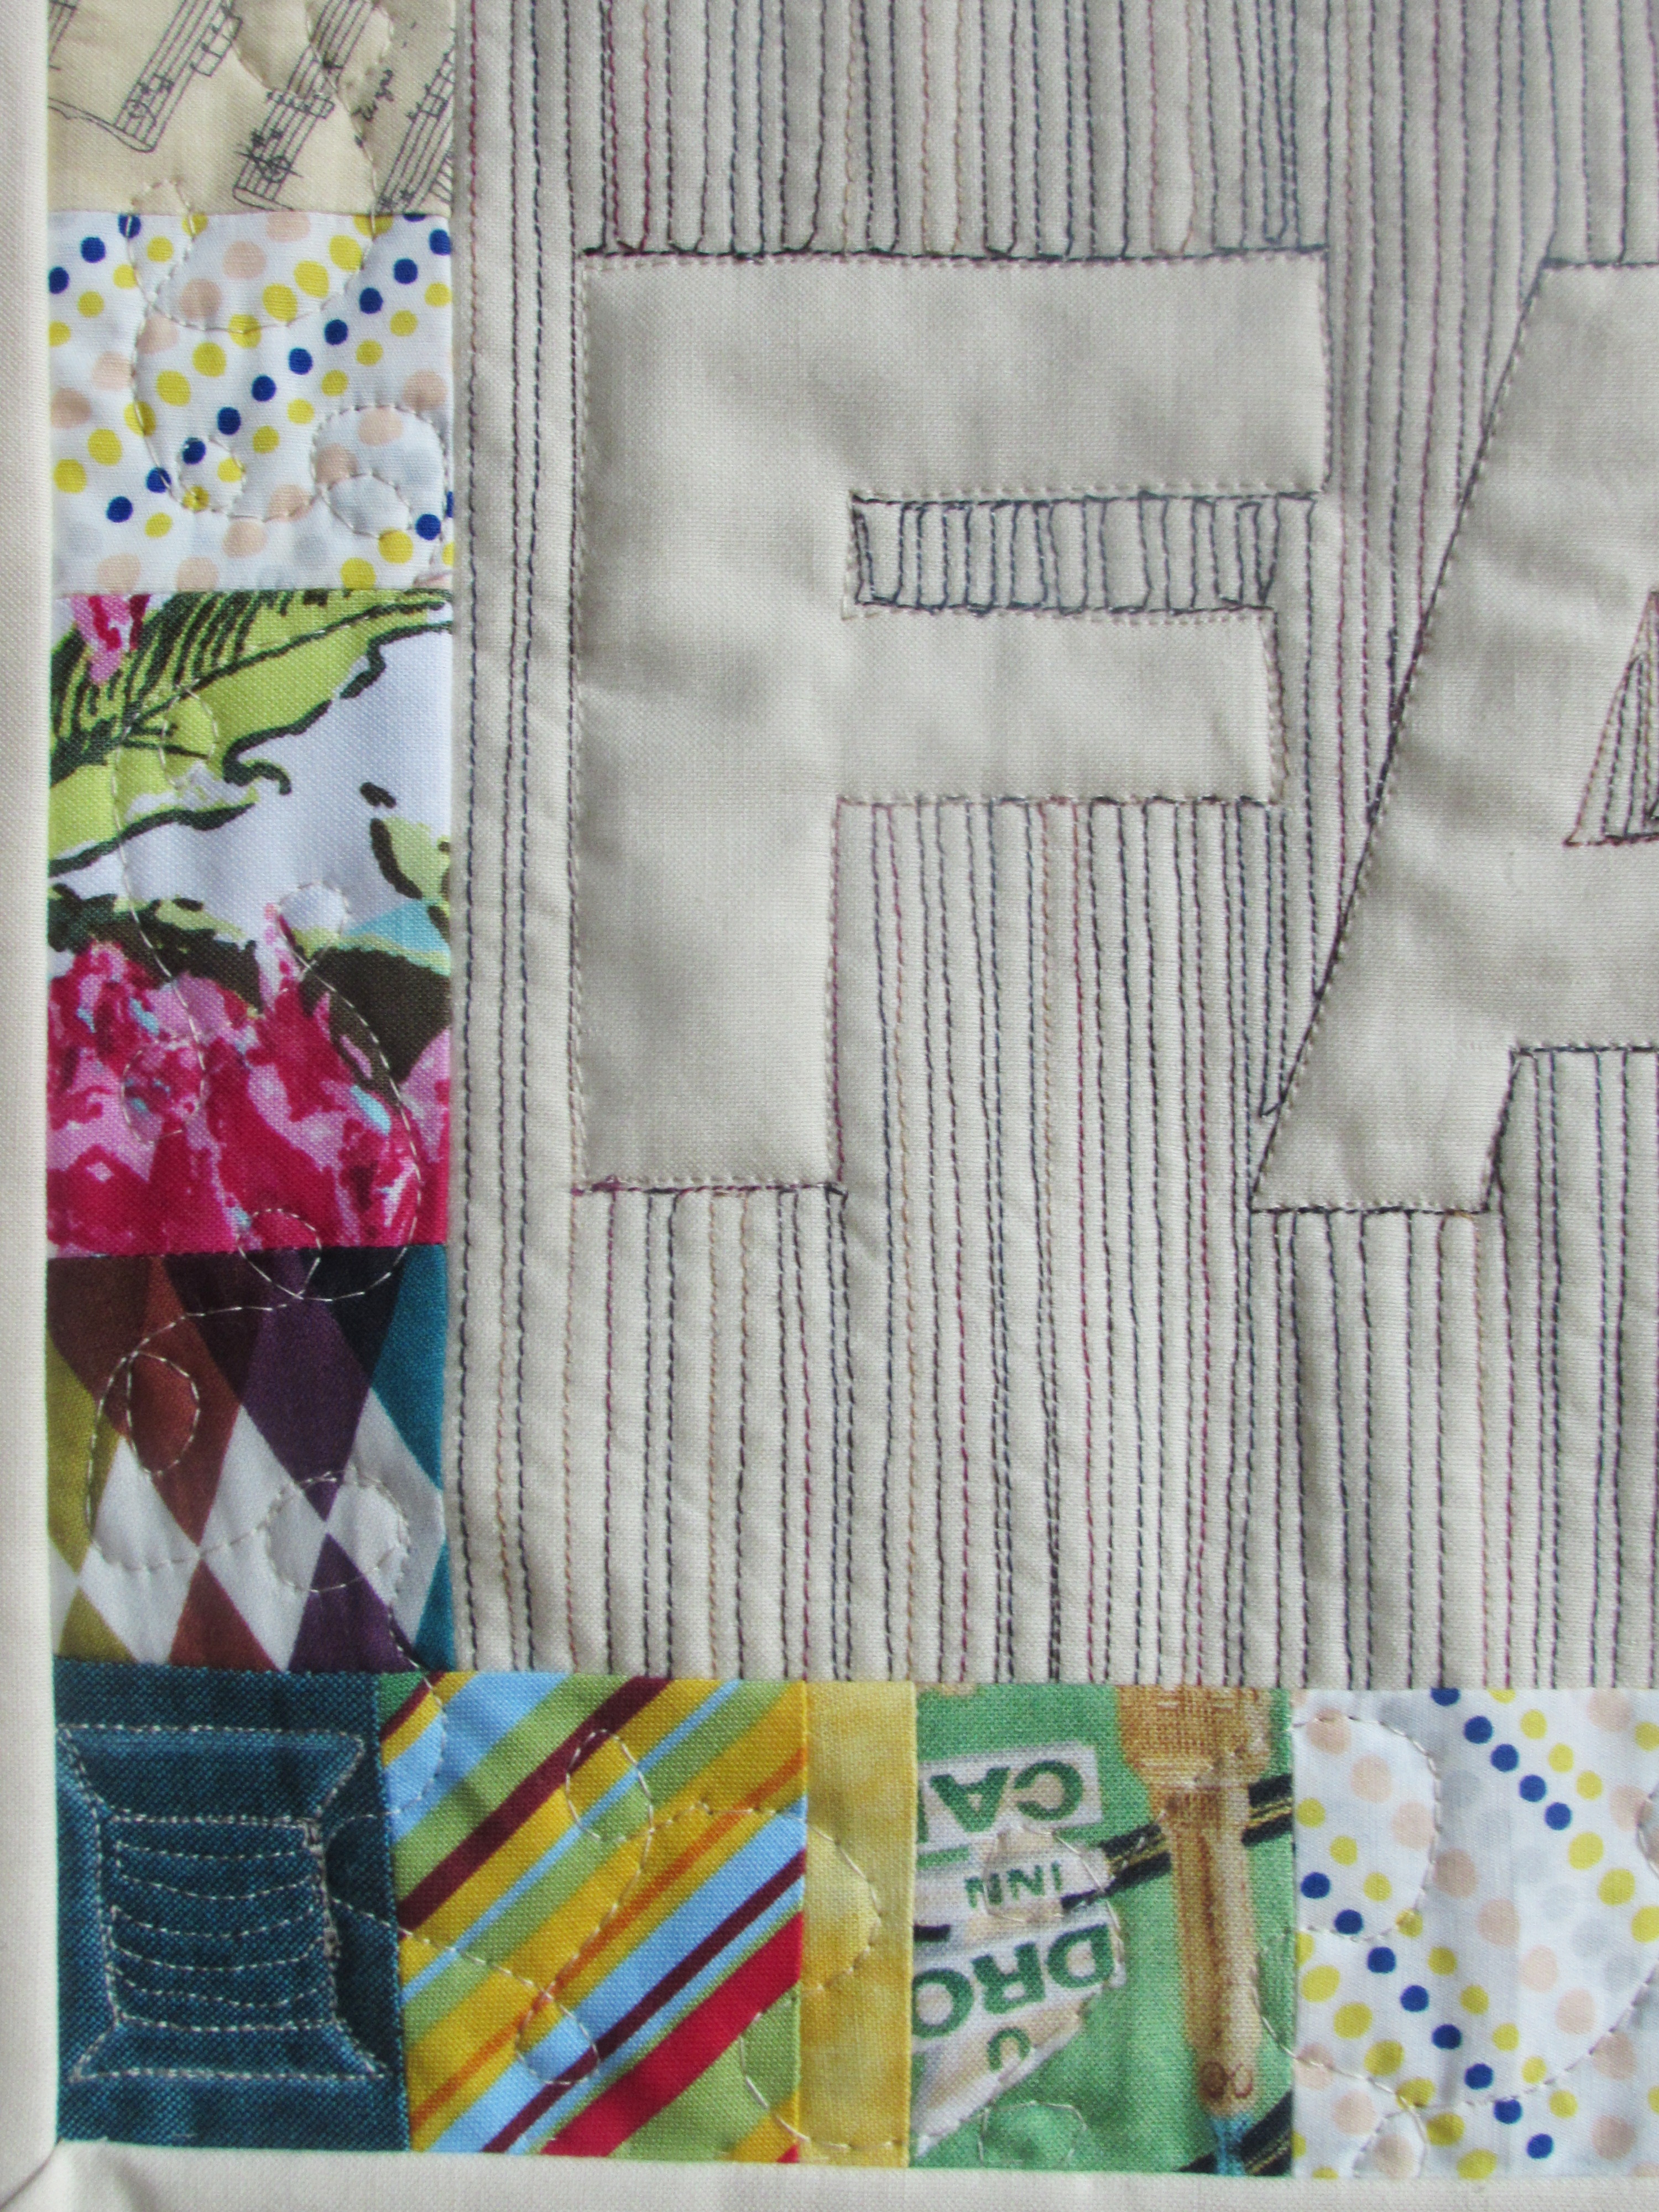
After creating this incredibly inspiring sketch of the project that was floating in my head, I brought out some alphabet stencils that I have. I don’t have the whole alphabet but it was enough to get going. I used the E in place of the F. For some reason, the R was a bit bigger than the rest. I think there are multiple sets in the zip-lok bag and these letters weren’t really from the same set.
Next I found a rectangular scrap of some Kona cotton and traced the letters, centering them as best I could. I didn’t measure this at all. I used a Frixion pen to trace them. I am not a huge fan of Frixion pens for marking but I figured this was just a practice piece so I wasn’t too worried about the final result. Isn’t there something totally freeing about working on a practice piece? Knowing it isn’t going to be your best work and it doesn’t have to be spot on allows one to sit down and have fun. No pressure.
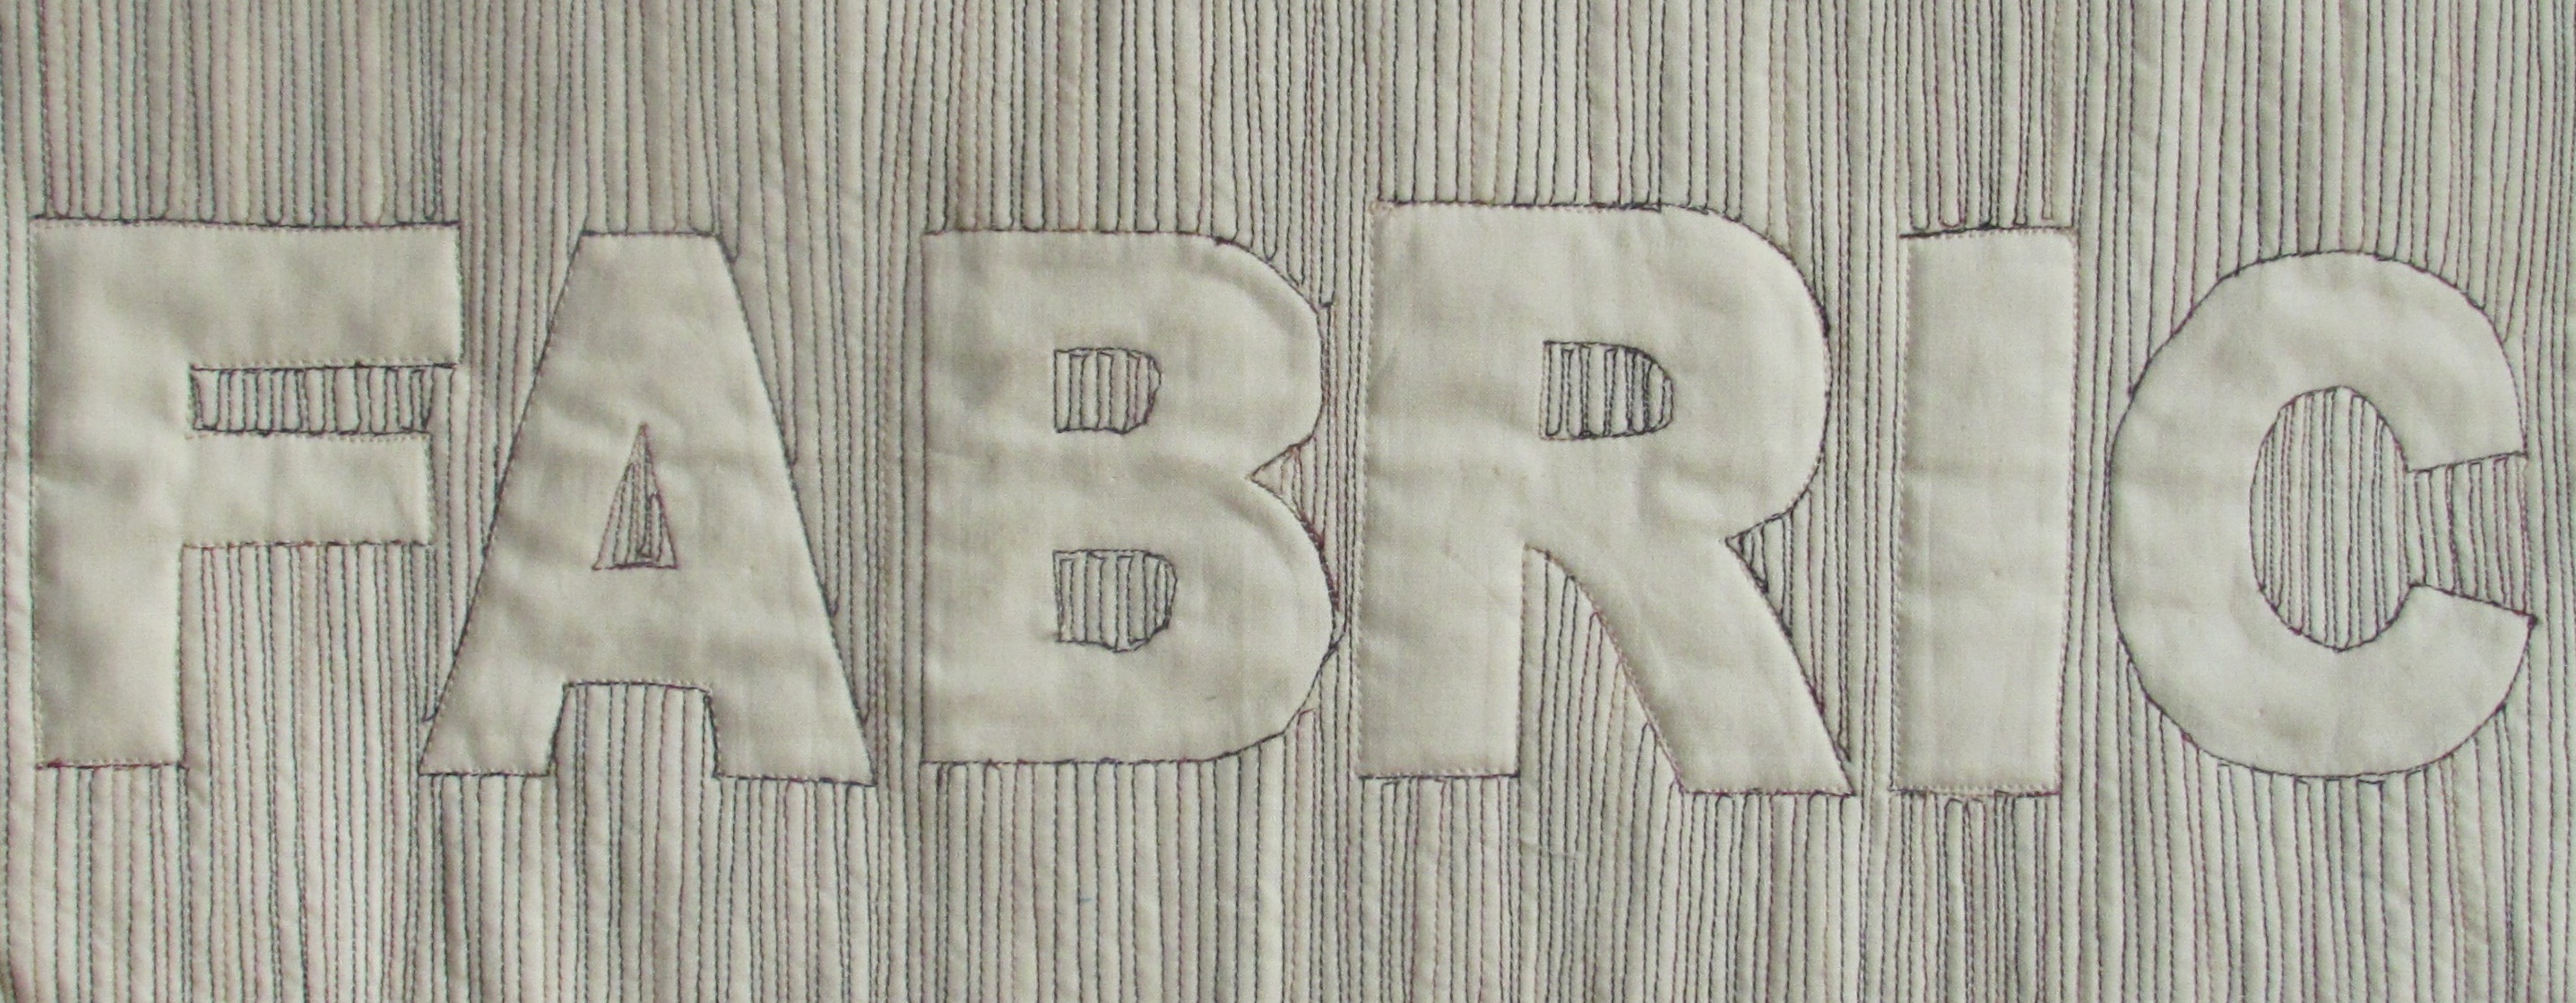
I placed the fabric on top of the batting (which was a large piece that I had created with batting scrap). Using a walking foot, I started to fill in the areas around the letters I had traced. I used tight, straight-line quilting. Without a real plan, I was sort of all over the place – just filling in areas.
In retrospect, I see that I didn’t need to stitch as wide a swath above and below the letters. With my next attempt, I will plan a bit further and decide how far I really need to stitch. I wasted quite a bit of thread with the extra quilting. I used a variegated YLI thread which provided a nice bold look. The more I use YLI thread, the more I love it. The texture is provides is just wonderful.
When the quilting was done I was just thrilled with the look, even with the slightly oversized R!
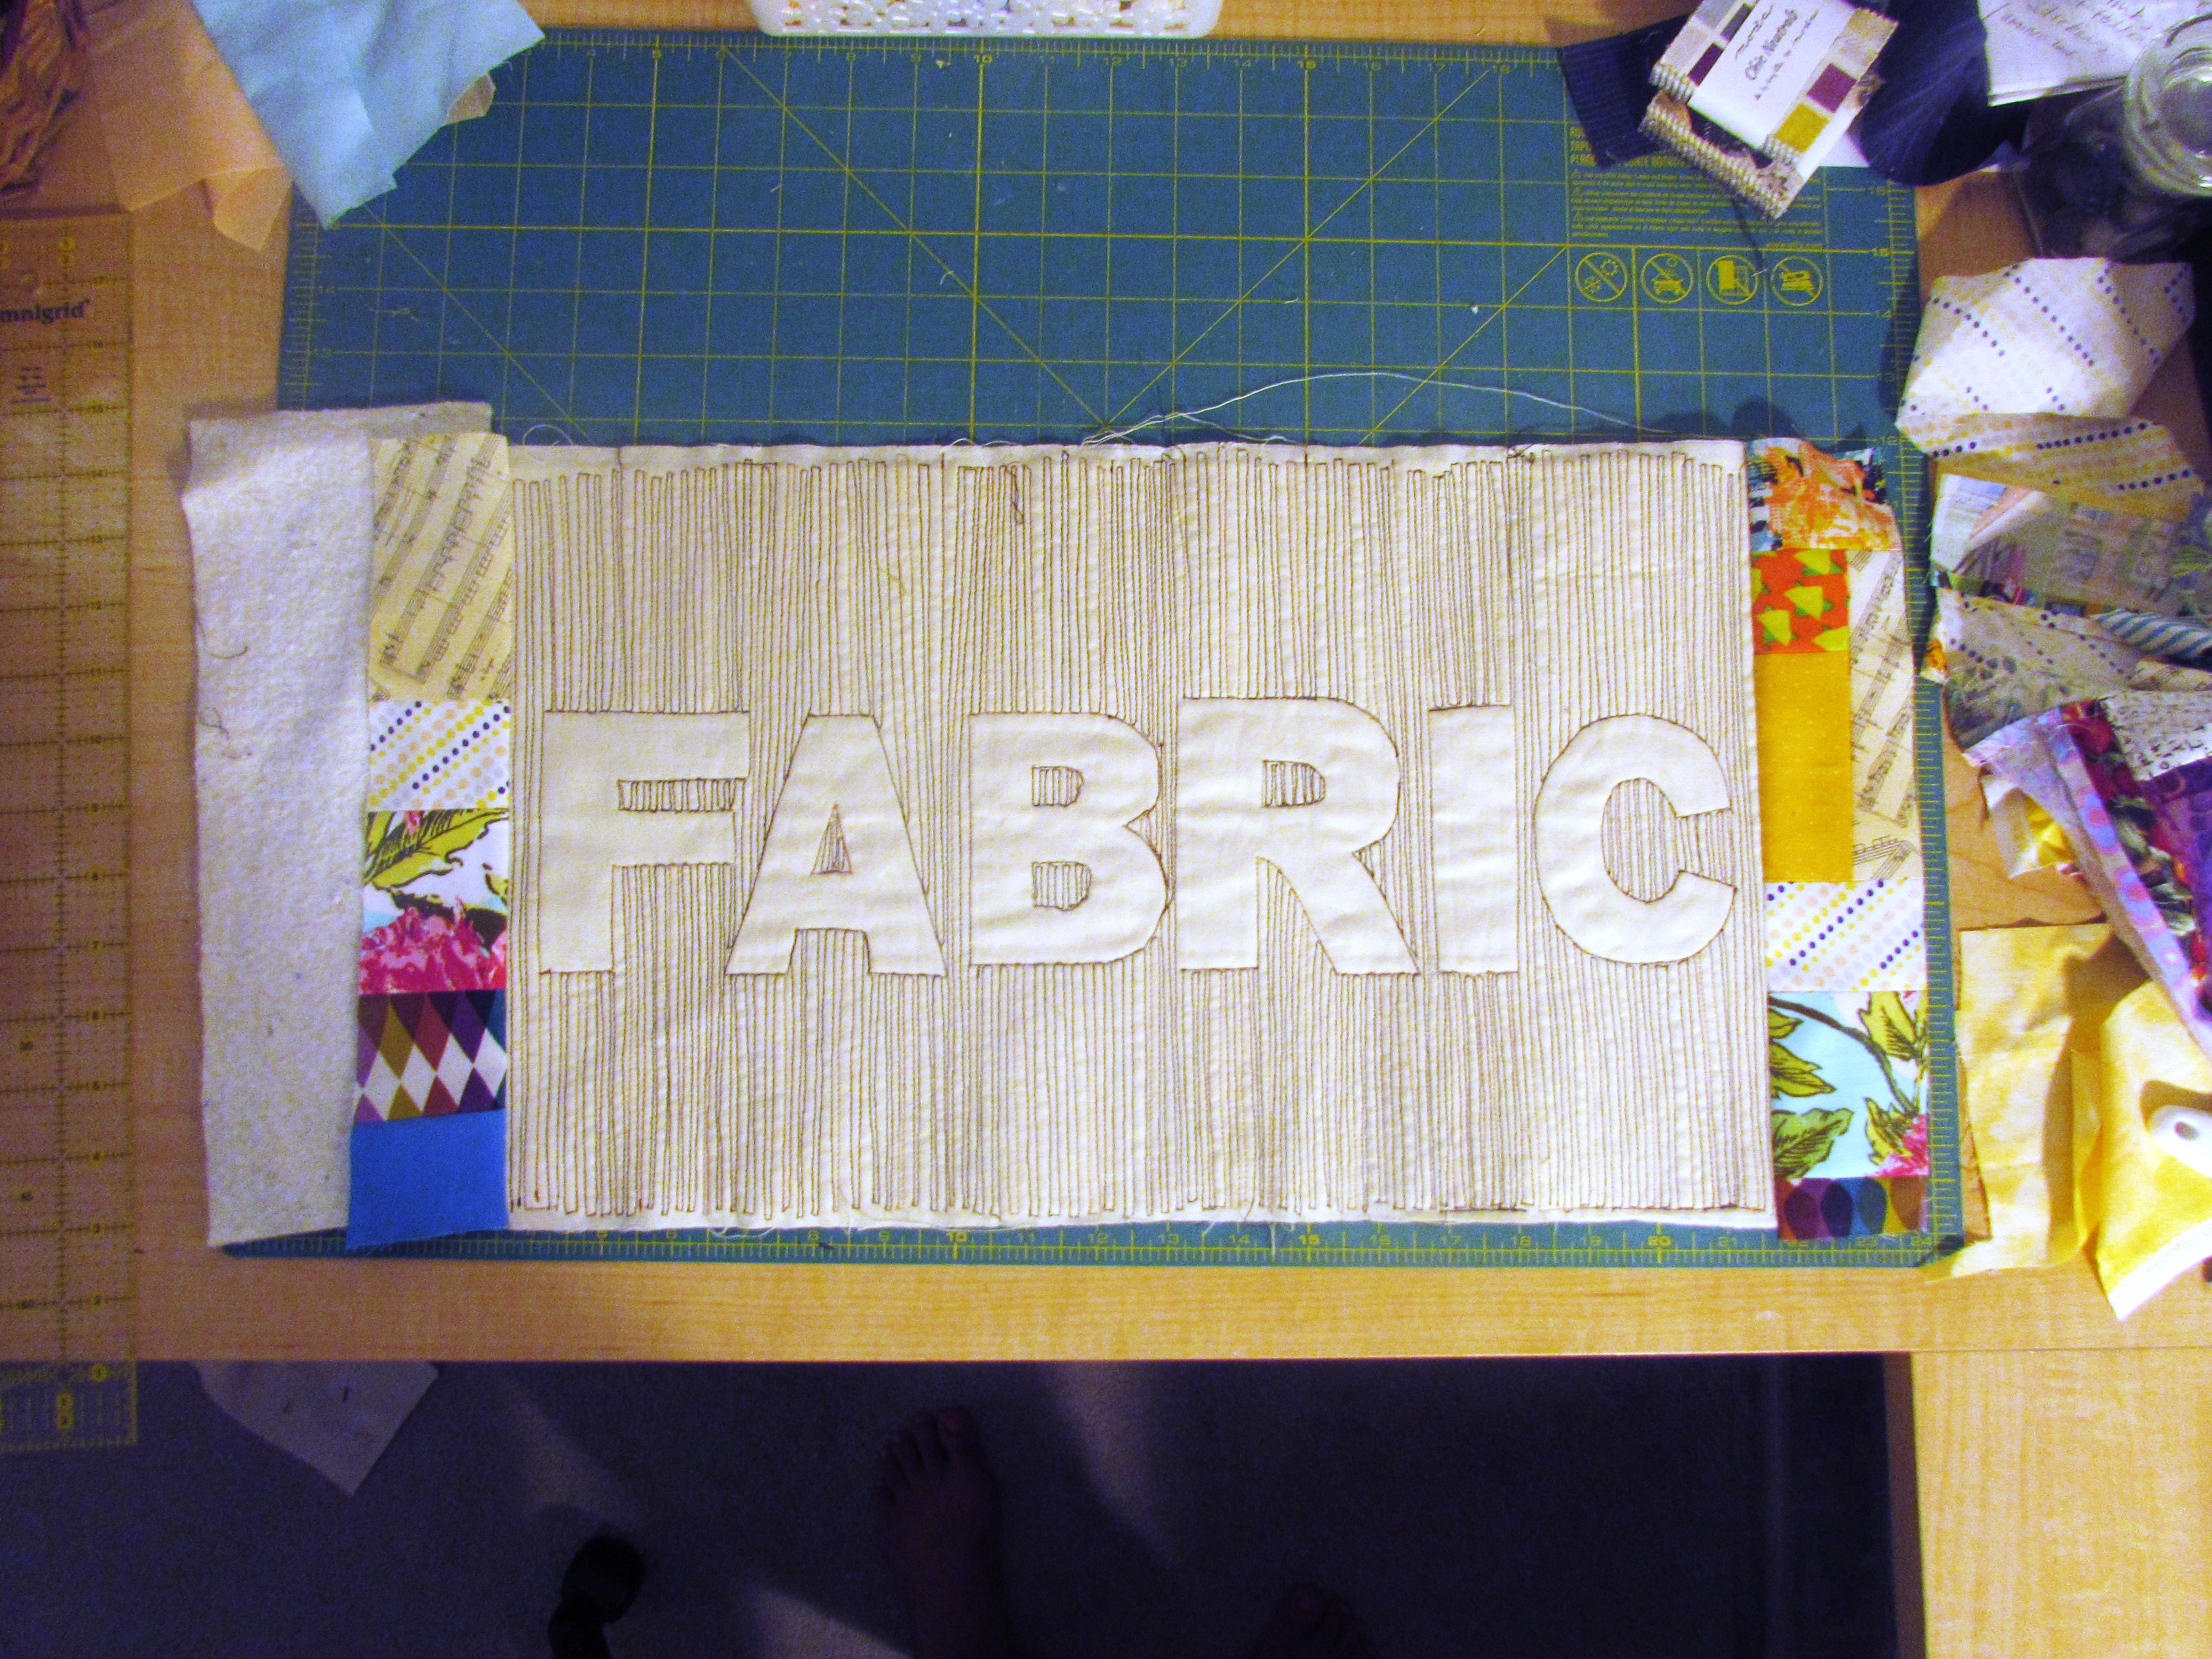
When I first sketched the project out, I planned to use a stack of 2 1/2″ squares that I have collected to make a border for this. Once I got to this point though, I changed my mind. This guy was calling out for a scrappy, improv border. With my bin of bright, multicolored scraps, I began piecing bits together with only a rough idea of what I wanted the result to be. For the borders I created two large improv pieces that were both more than five inches wide. Then I sliced each in half lengthwise, creating 4 strips measuring 2 1/2″ wide.
I laid them, right sides together, on both sides and stitched the border on. It was a bit of a Quilt as You Go project, since I was just sewing right on top of the base fabric and the batting. The bottom borders were stitched a few inches below and above the lettering. (This is where it became very clear that I didn’t need to quilt as high and low as I had done.)
Borders on and pressed, all that was left was to make baste the top to a backing and quilt it. I thought it would be cute to FMQ a spool of thread in one corner and then have the “thread” spooling off of it, looping along the borders.
After creating that little spool, I wished I had used a solid fabric on each corner so I could place spools on all four of them. I did put one on another corner but it doesn’t show up very well with the print fabric. The overall look is cute though, isn’t it?
I love all the bits of different fabric that surround this piece. They bring back a little memory of whatever project they were originally used in. A piece of green dotted fabric was used for the backing (I think I got it out of the remnant bin at Jo-Ann’s) and I bound it with the same Kona that is in the center.
As always, I would do a few things differently the next time I made this sort of project. If I were doing this sort of thing as a part of a larger quilt, I would fuse stabilizer behind the solid fabric and do the relief quilting over just the fabric (sans batting). Then I would incorporate the block into the larger project. Once I was quilting the larger project, I would use a walking foot to outline the letters (to quilt the block down).
I need to make a sleeve for it and then I will hang it above my sewing machine. This was great fun and I am really pleased with the result. I encourage you to give it a try. Let me know if you have any questions or check out Kitty’s tutorial.
Linking up all over the place – for details, look at the top of the page, under Link Ups.
Weekends are the time to shop Craftsy. This weekend they are having a Black Friday “When You Need It” sale on kits and supplies. If you are hoping to make handmade gifts in time for the holidays, it is a good time to make a plan and stock up. I love the kits at Craftsy – the fabric is often a huge bargain and no one will know if you use that fabric for a different purpose. I am loving this Benartex quilt kit – 100 charms and 3 yards of fabric? Another one is the Eclipse kit, which uses the Allison Glass Sunprints line. There are almost 18 yards of fabric included and the pattern is gorgeous.
If fabric isn’t your thing this weekend, there is also a great sale on books over at C&T. They are having a $5.00 Blowout Sale and many great quilting titles are on sale. I love C&T – they are the publishers of so many of our favorite quilty books. Check it out! Sale runs through the end of day on Sunday, August 21st.
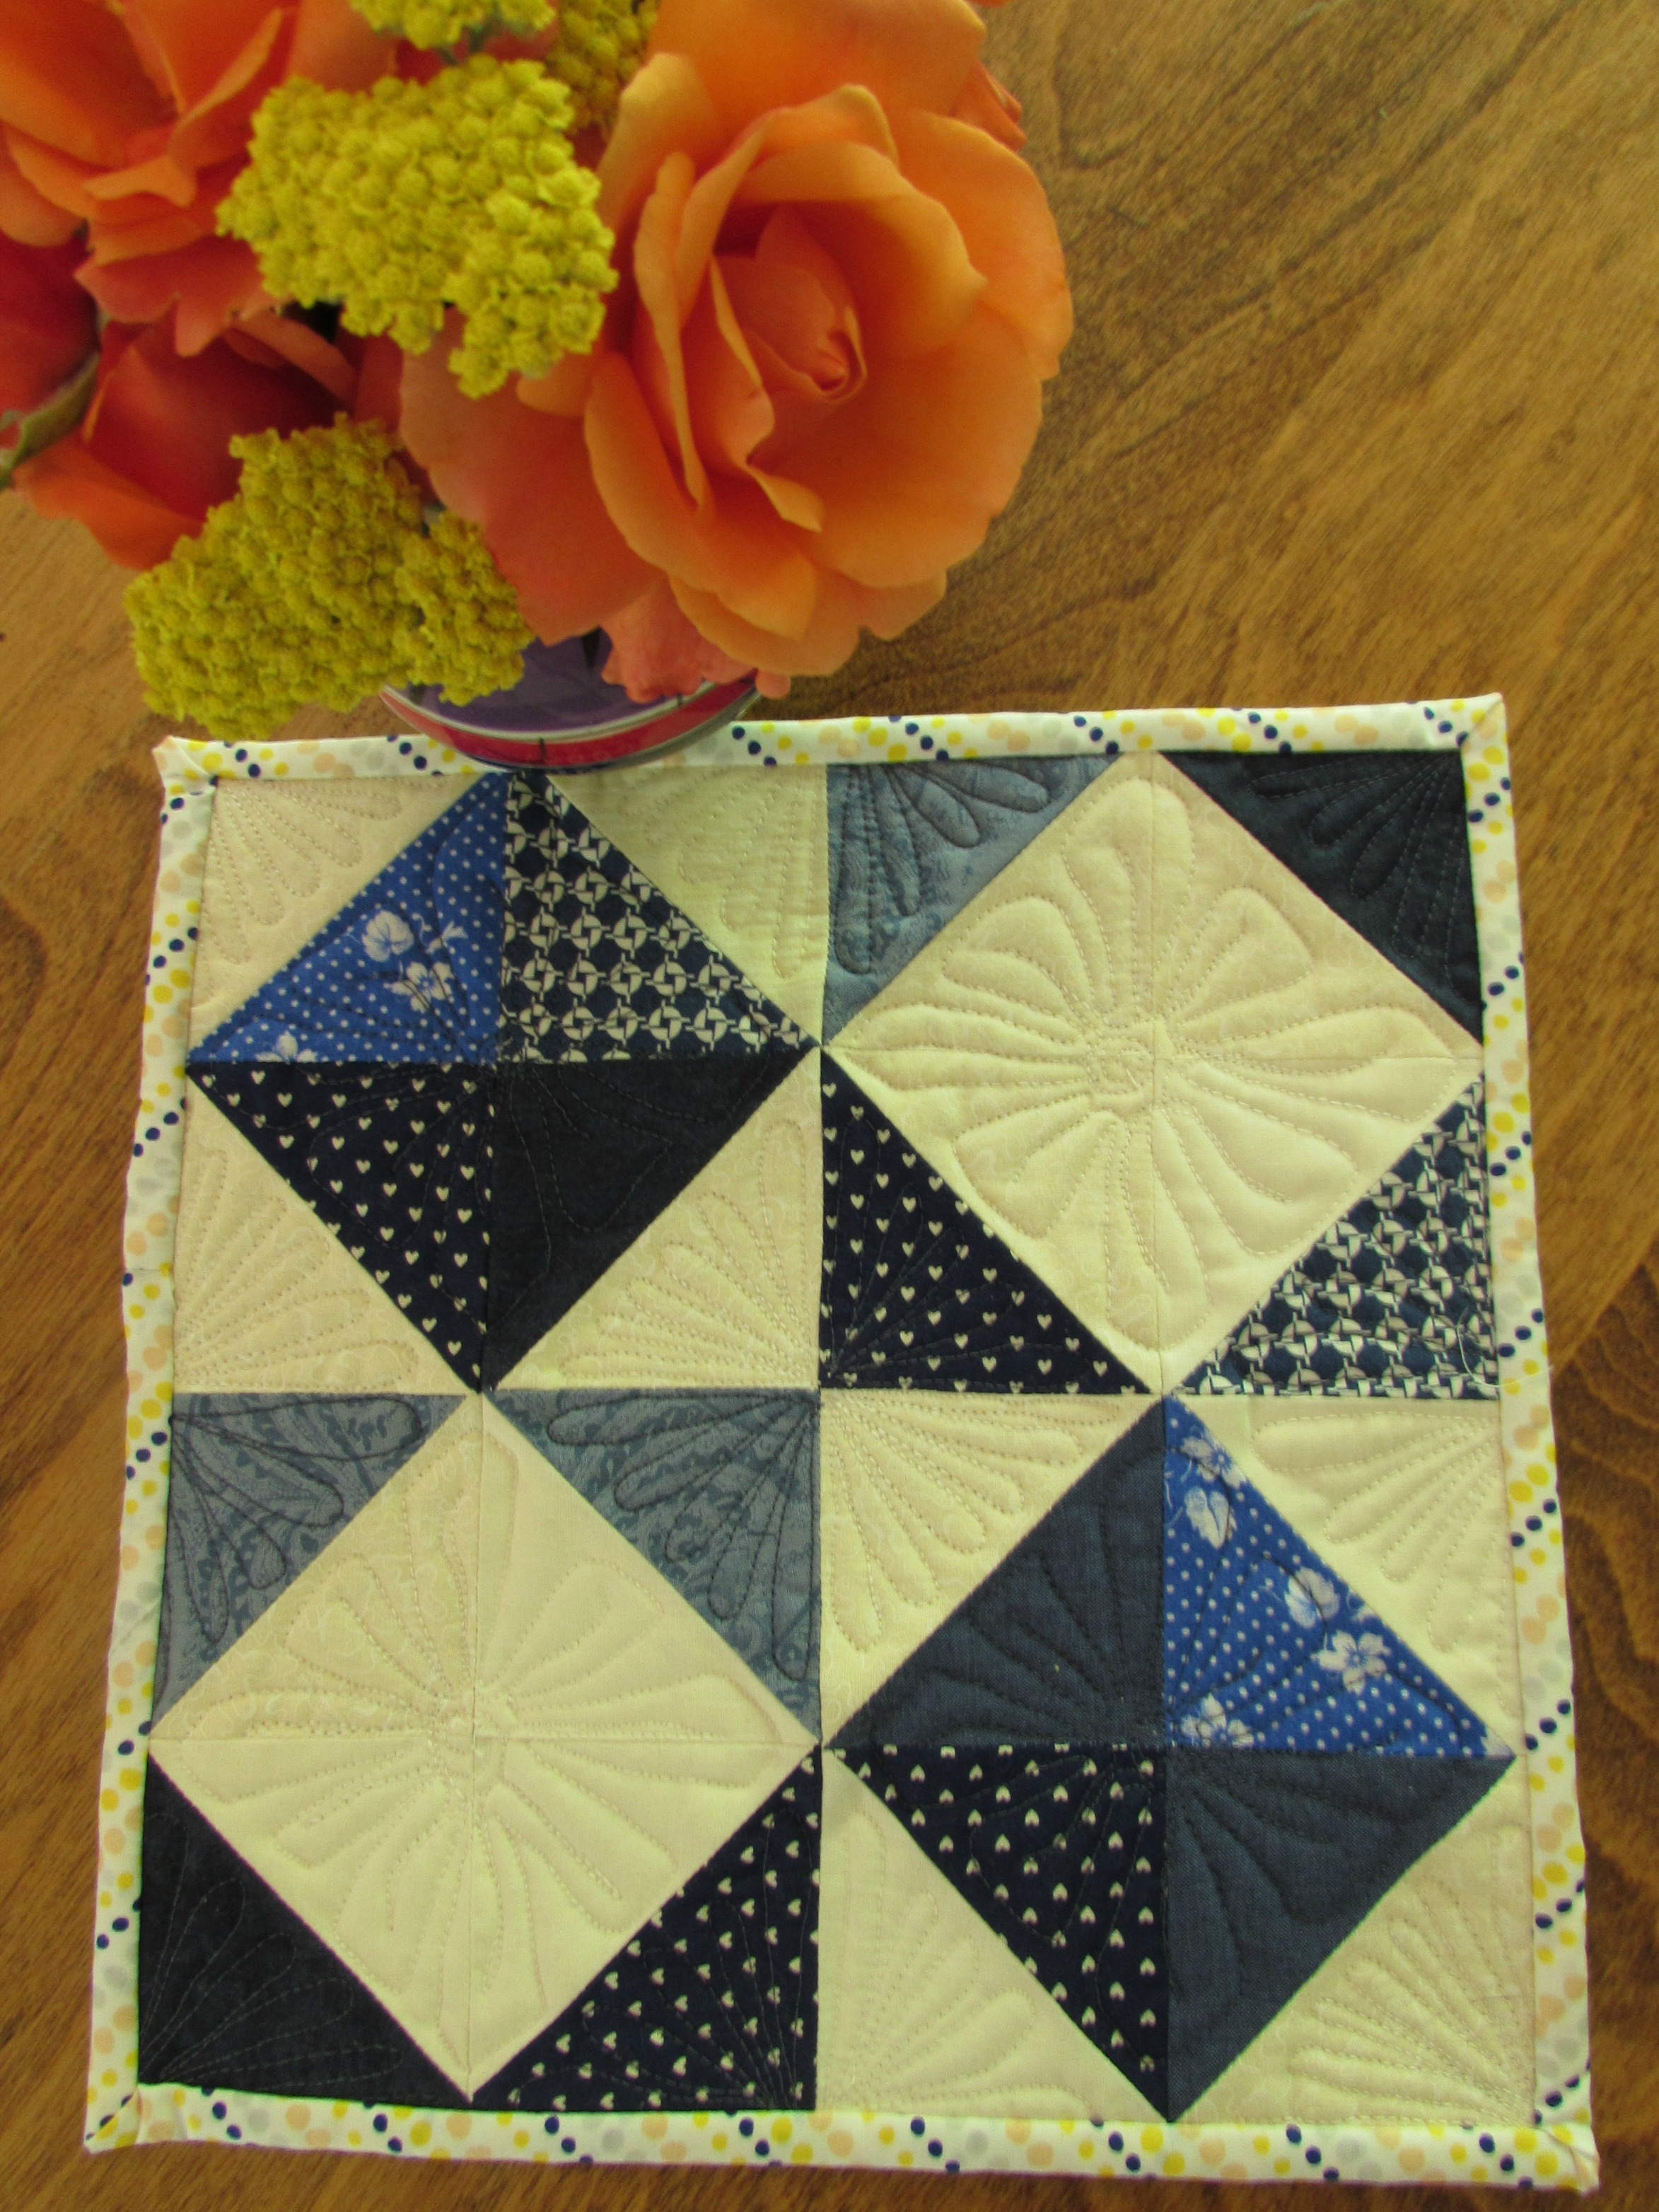
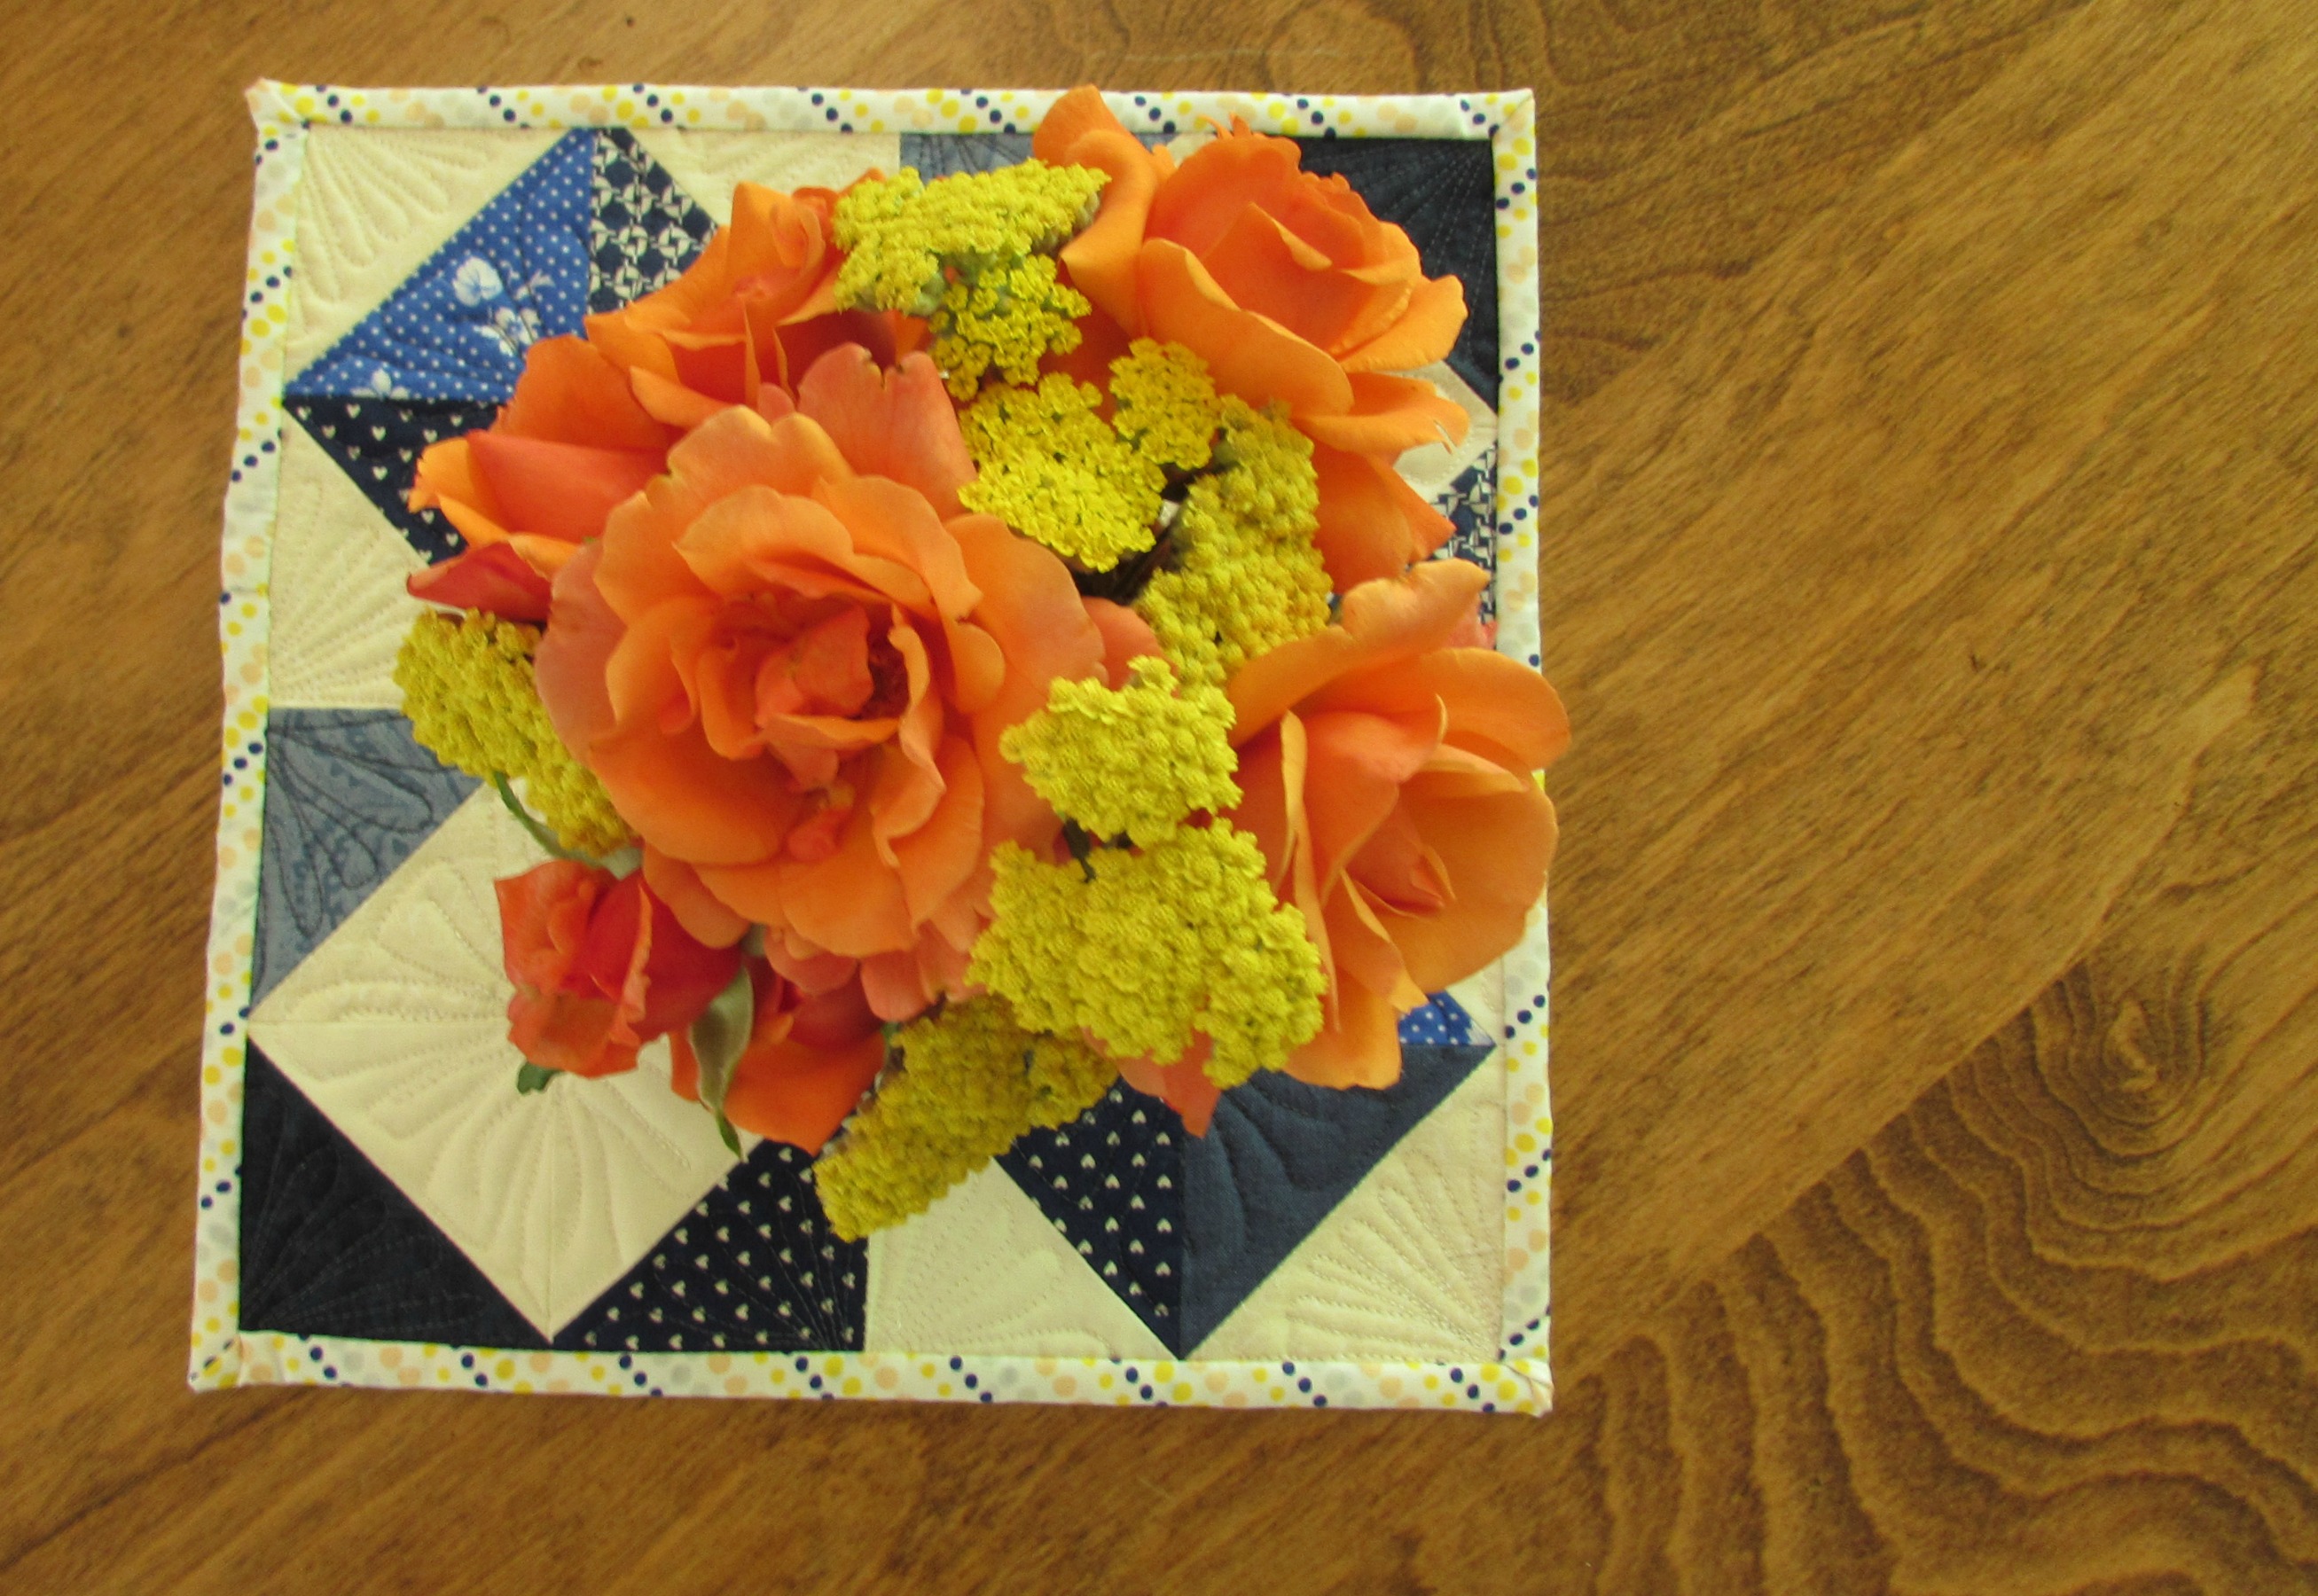
It has been a long while since I have done any free motion quilting. I had the itch a few days ago. Of course that itch wasn’t big enough to get me to baste and quilt either of the two quilt tops that are waiting patiently for me to finish them. I wanted a quick fix. Know what I mean?
I have a drawer where I toss extra HST blocks that seem to accumulate from time to time. I sewed a dozen together and ended up with a cute little block.
I quilted every inch of it with little flourishes in the triangles and flowers in the center of the four diamonds. At first I didn’t plan to bind it, since it was just a quick practice piece. But is that fair? To just throw it away??? I think not. Leave it in the sewing room cluttering up my desk? Nope, that doesn’t work either. I can always put it under a vase of flowers. So I trimmed it to 12″ square and found a little scrap of polka dots to use as binding. The binding was actually the hardest part. I cut it too narrow and it pulls in spots.
Stitching this was so gratifying. One evening of play and practice.
I switched between blue and cream thread but didn’t change the bobbin. It looks kind of funky on the back side.
Now that the itch to FMQ has been scratched, it is time to move on to something else. Hope you are all enjoying some time at the sewing machine.
Linking up with Muv at Freemotion Mavericks because I haven’t done that for a while and I have been missing her lately.
Setting goals on a monthly basis, as I have been doing this year, seems to make the time buzz by even faster. I am not sure this is a good thing. My goals for this month were to finish my Alison Glass Mini Quilt for my first swap, make the row of green blocks for the RSC15 project that I am doing, and to finish two bunk bed bags (a custom order for a friend). Here we are with four days to spare and it is all completed!
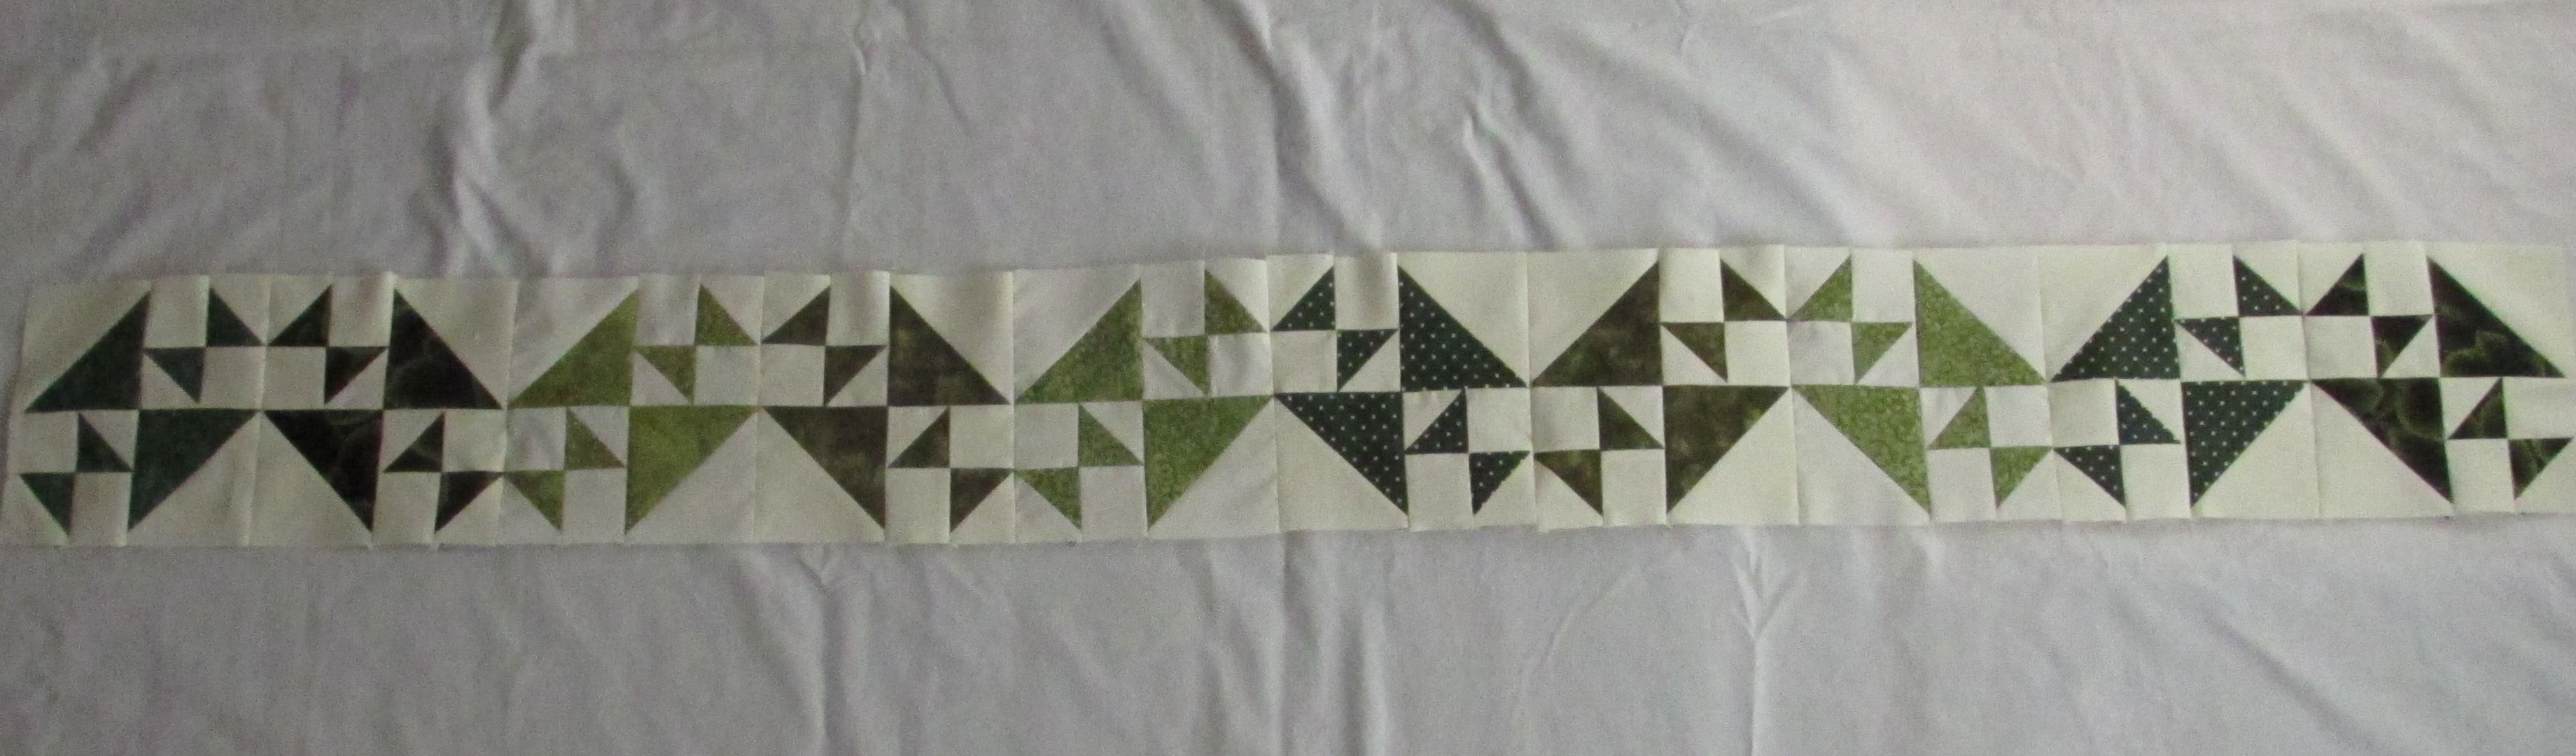
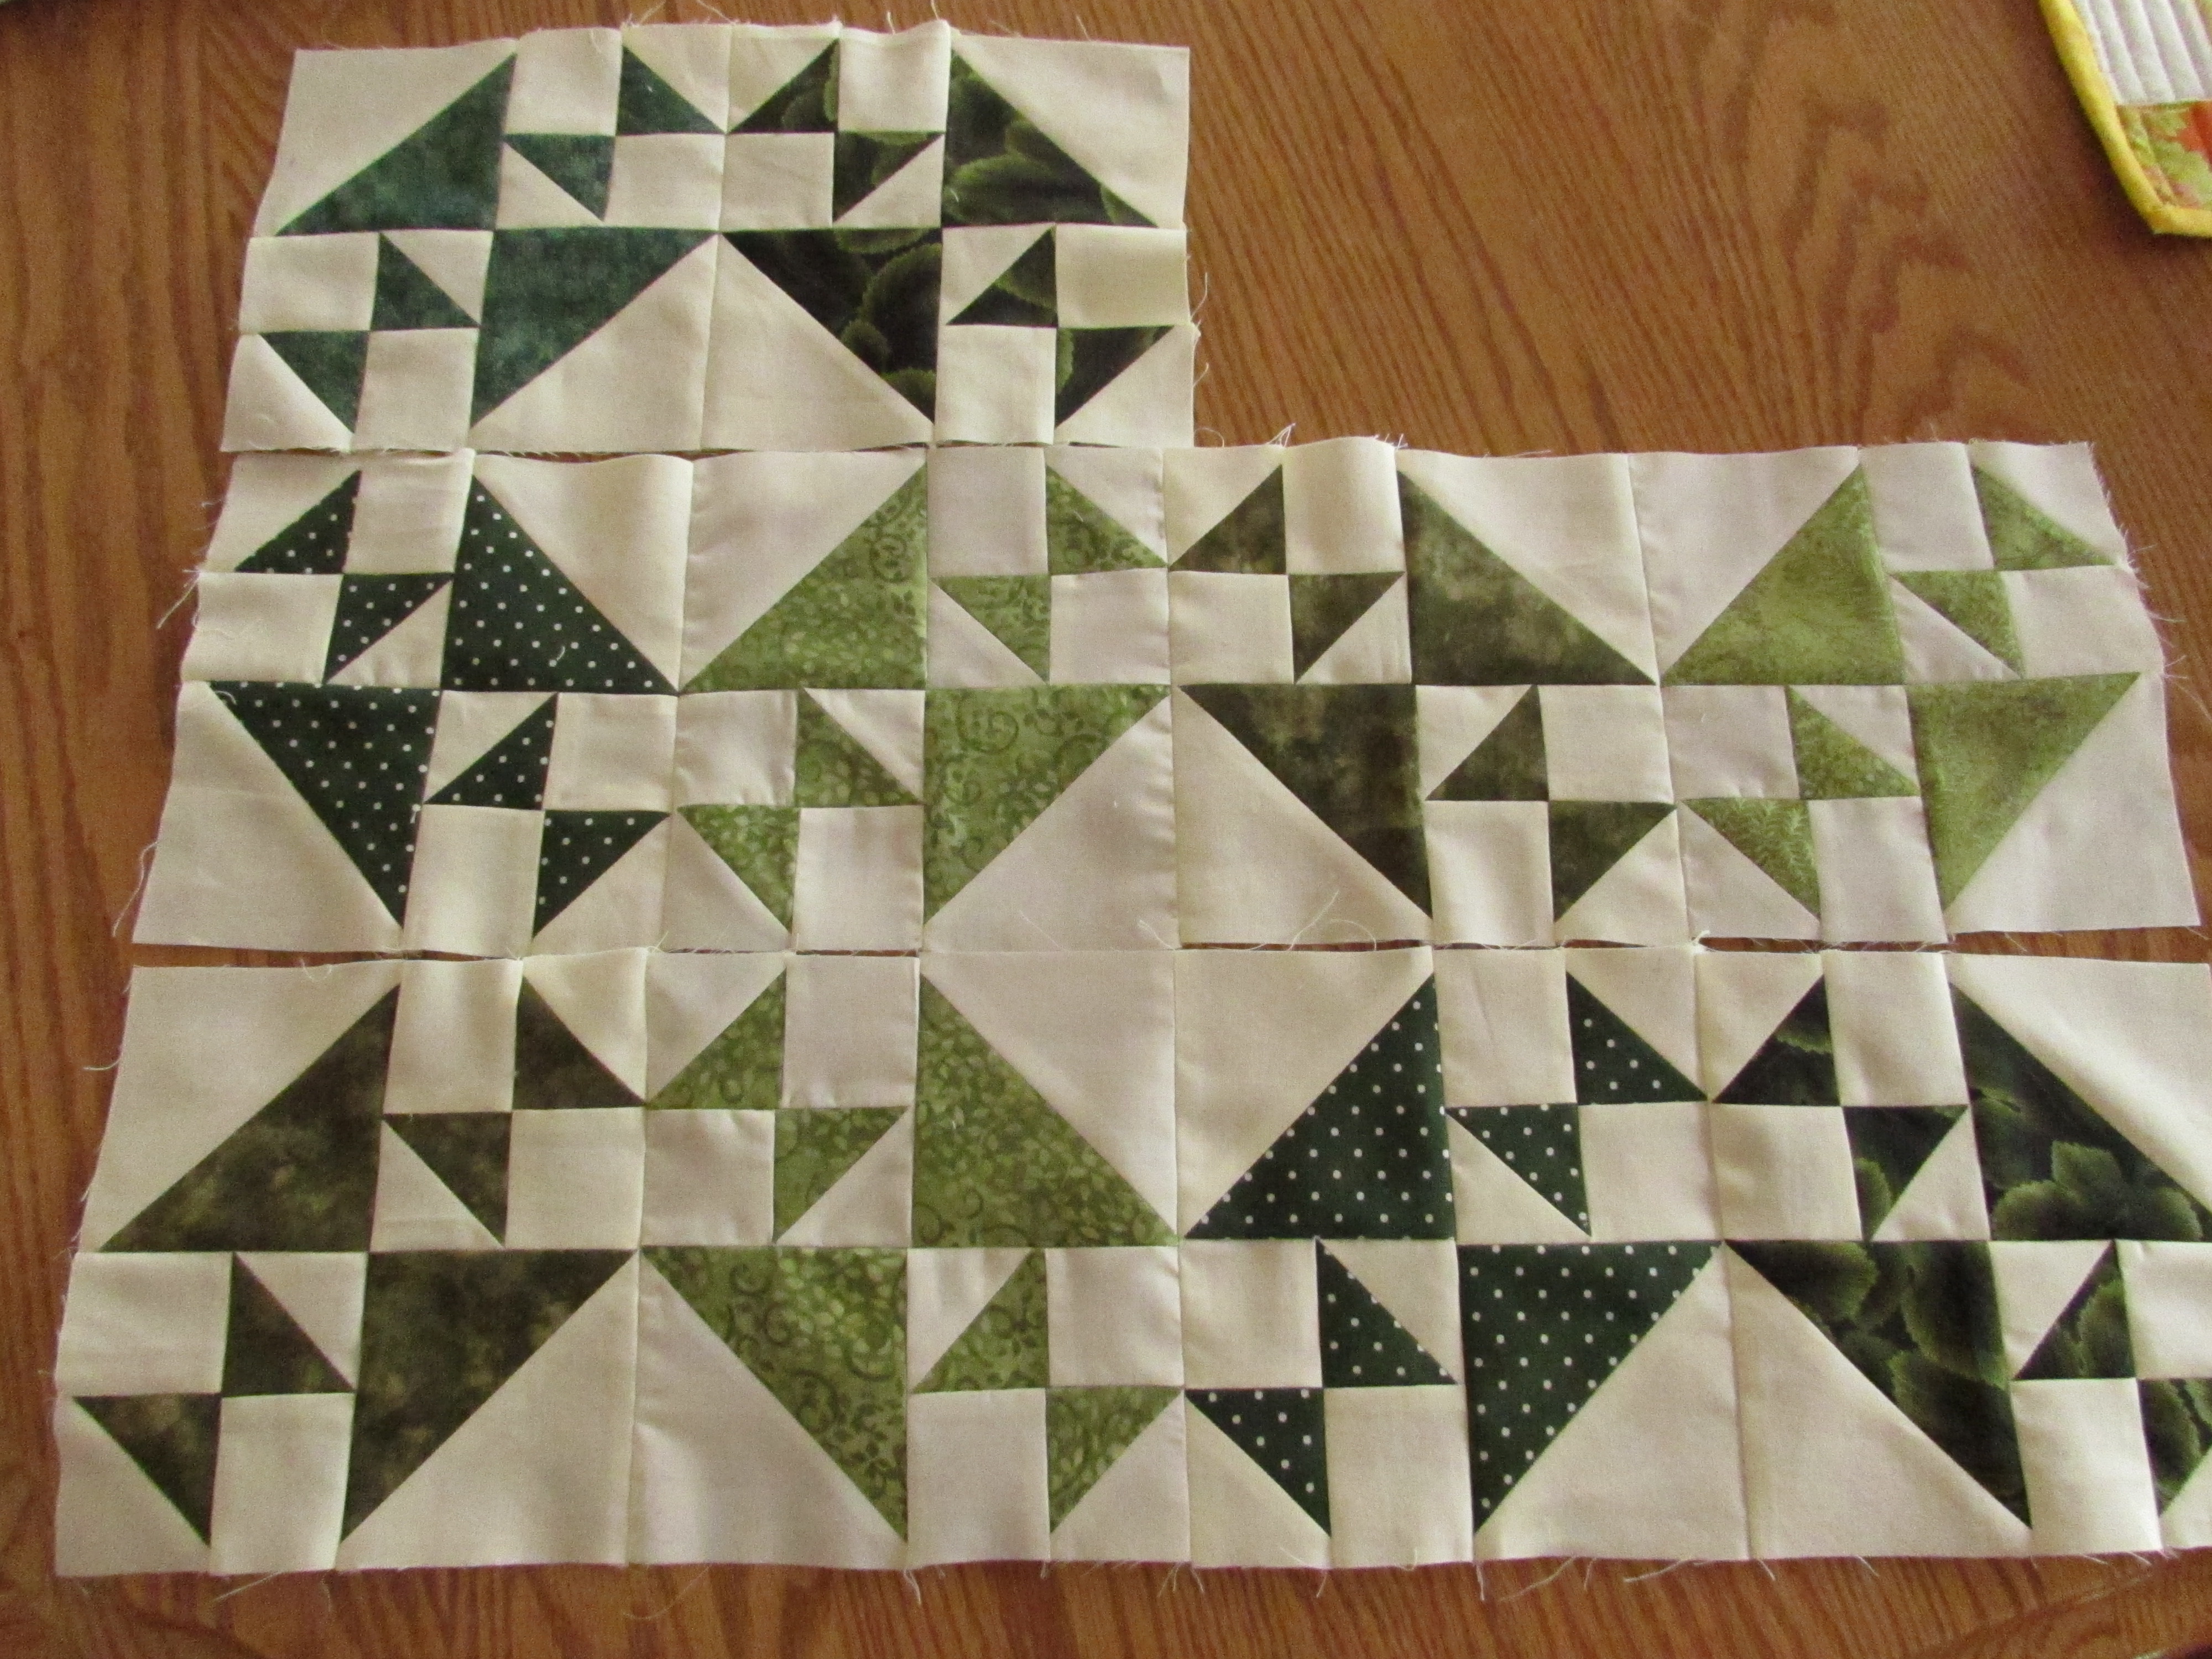
It was kind of one of those silver lining deals. I finished the bunk bed bags first (posted about them here). After that I completed the mini quilt. I didn’t think I would get to the Classic Stitches Row Quilt (my RSC15 project) but things are always changing, right? I was supposed to go visit some family in Houston last week but I was knocked flat with a succession of migraines. I ended up not going at the last minute. This was a huge disappointment for me, but certainly wasn’t the first (and won’t be the last) time that I have had to cancel plans due to migraines. Once I was past the worst of it, I was left with a couple of unexpected days to sew (that is the silver lining!) I cut into a pile of green scrap and came up with a row of Losses and Crosses blocks which were the Classic Stitches BOM for May.
I made the simpler version of the blocks that Mari offered up for this month. These blocks are a bit fussy and I decided I could only make so many 2″ HST’s without going crazy. I like the blocks though I think they are better suited to a larger layout so that the secondary patterns show up. You don’t get the full effect in one row of six inch blocks. If they are clustered together, the effect is very nice.
This row quilt is growing and growing. I am trying to decide if I want to keep making all of the rows with six inch blocks or if I should make some rows with larger blocks to add variation. I need to decide this soon since I am nearly half done.
The mini quilt turned out great. Very glad to have this finished and also that I am able to link up with ALYOF since I missed that boat in April! I just packed it up to ship it off to my partner in Michigan. Kind of hard to gIve it up so I really hope she love it! I am excited to see what sort of mini I will receive.
I have quite a bit of Alison Glass fabric so I made a pieced back for it.
I love the dense quilting.
My points match up well which I am quite proud of. I have been working on precision and it is finally improving.
Looks like it is time to think about what to work on in June! I have several things in process so it will help to block it out and make a plan.
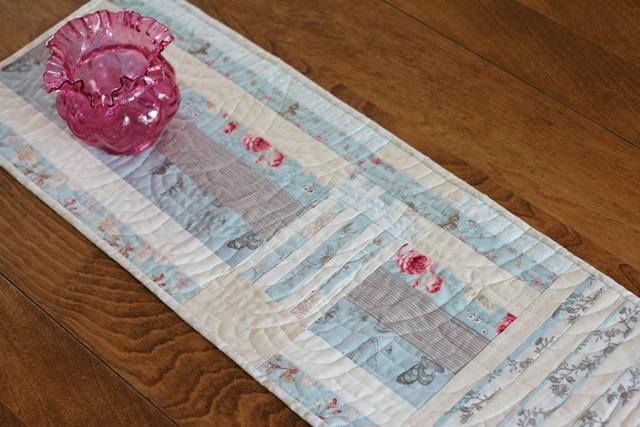
This has been a good week for sewing. I made progress toward my April goals for ALYOF. Which is a good thing, considering April will be over before you know it. The speed with which time passes seems to increase frighteningly each month. Anyway, it is April 23rd and I am over 3/4 of the way there. My goal was to make two table runners and either a wall hanging or runner. I wanted to complete three smaller projects this month. I finished the chevron table runner which I posted about last week.
This week I completed the second table runner. The process I used was new for me and was inspired by the way that Victoria Gertenbach at The Silly BooDilly works. I started reading her blog and looking at her style over the past couple of months. She is a modern quilter with a gorgeous sense of line and color. She quilts and does a lot of other work in fiber and paper art. I strongly suggest you take a look at her site as her work is lovely. One of the tutorials she wrote was about pattern-less design. She has developed a way of cutting a piece of fabric and then adding sections to it, thus creating her piece. I love the idea. While I didn’t actually follow her tutorial with this project (because it didn’t work with the fabric I had on-hand) I was surely inspired by her process .
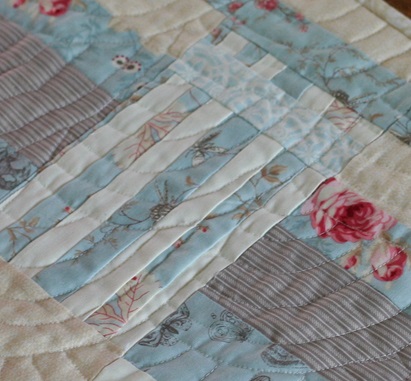
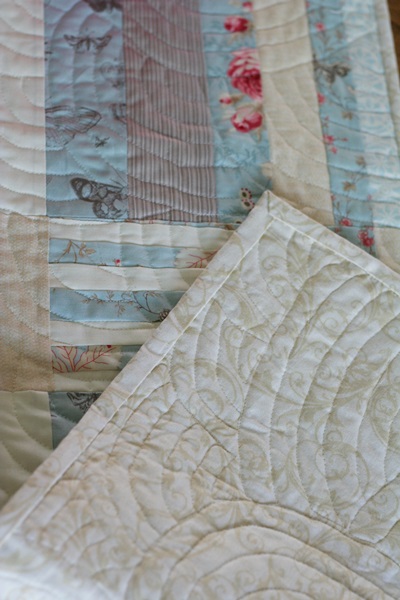
About a year ago, I purchased a scrap bag from an on-line fabric shop. Sorry, I am not positive but I belive it was Alaska Quilting Adventures. I ended up with loads of strips, probably end cuts from the bolts as she was creating bundles of precuts. First I cleaned up the strips so they were (relatively) straight, though I did not cut them exactly the same width. Next, I sewed a set of them together to make a long rectangle of fabric. I cut that into three sections. I then played with more of the strips, creating blocks to add between the sections. Kind of hard to describe, but it was a very simple process. As I have mentioned before, I usually sew from a pattern or tend to copy other’s ideas for inspiration. This was very freeing. I want to try this again with a Kaffe Fassett jelly roll of shot cottons that I have. Here is the resulting table runner.
The colors are soft and soothing. I had fun creating the block in the center which has a bit of extra detail in the piecing.
When I was ready to quilt it I decided to use something with curved lines to offset the straight lines of the piecing. I chose the Baptist Fan pattern. I had not done this before so I drew it on newspaper with a sharpie until it was comfortable and then sewed a few fans on a practice piece. It is really a simple shape to FMQ. I didn’t trace it on the runner before quilting. If I had, I am sure my lines would have less wobble.
It is backed and bound with the same fabric. Not sure what it was but it used up some of my stash which is always a good thing. Overall, I am happy with the result and it was a huge learning experience, both in piecing and quilting. Yay!
The third April project I worked on is for my first mini-swap. This swap features fabrics by Allison Glass. I was really getting nervous about this project, doubting my abilities till I was just about stuck. I decided to start cutting fabric last weekend and just dive in. I chose the Fireworks pattern by Canoe Ridge Creations. She does a lot of mini quilt pattern design and I have several of her patterns. They are easy to use and her instructions are great. I have the blocks done and need to stitch them together. It should finish out at 24″ x 24″. The swap isn’t due to be mailed out until early June so I am way ahead of schedule. May is going to be a busy month so I’m glad to check this one off. (By the way, for those of you who have done swaps, do you usually put anything on the back for hanging, or is that up to the recipient to do that? Please leave a comment if you have experience here! I appreciate it. )
The colors aren’t showing correctly due to the poor lighting but I am happy with it. The blue in the third section out is much more vibrant than shows here. I really need better light in my sewing room. When this is finished I will take a picture outside. I am hoping to sew the blocks together later today and get it quilted next week. Of course, that leads to the perpetual questions, how do I want to quilt this? Most likely I will straight line quilt it with a narrow spacing.
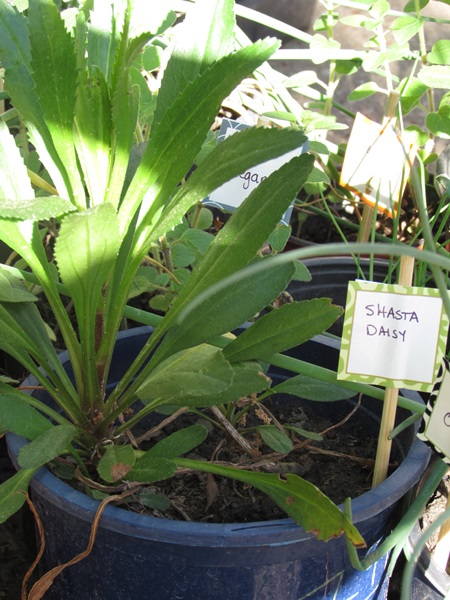
First though I have a garden swap to go to this afternoon. I joined a gardening group and we are exchanging plants from our gardens. About six weeks ago, I potted starts from my Shasta Daisies, Oregano, and Chives.
It will be fun to give these to the group and bring home something different. Hoping for plants that don’t require much in the way of water!
Linking to Let’s Bee Social, Needle and Thread Thursday and Crazy Mom Quilts. Links to these wonderful sites are at the top of the page, under Link Ups.