It has been a long while since I have done any free motion quilting. I had the itch a few days ago. Of course that itch wasn’t big enough to get me to baste and quilt either of the two quilt tops that are waiting patiently for me to finish them. I wanted a quick fix. Know what I mean?
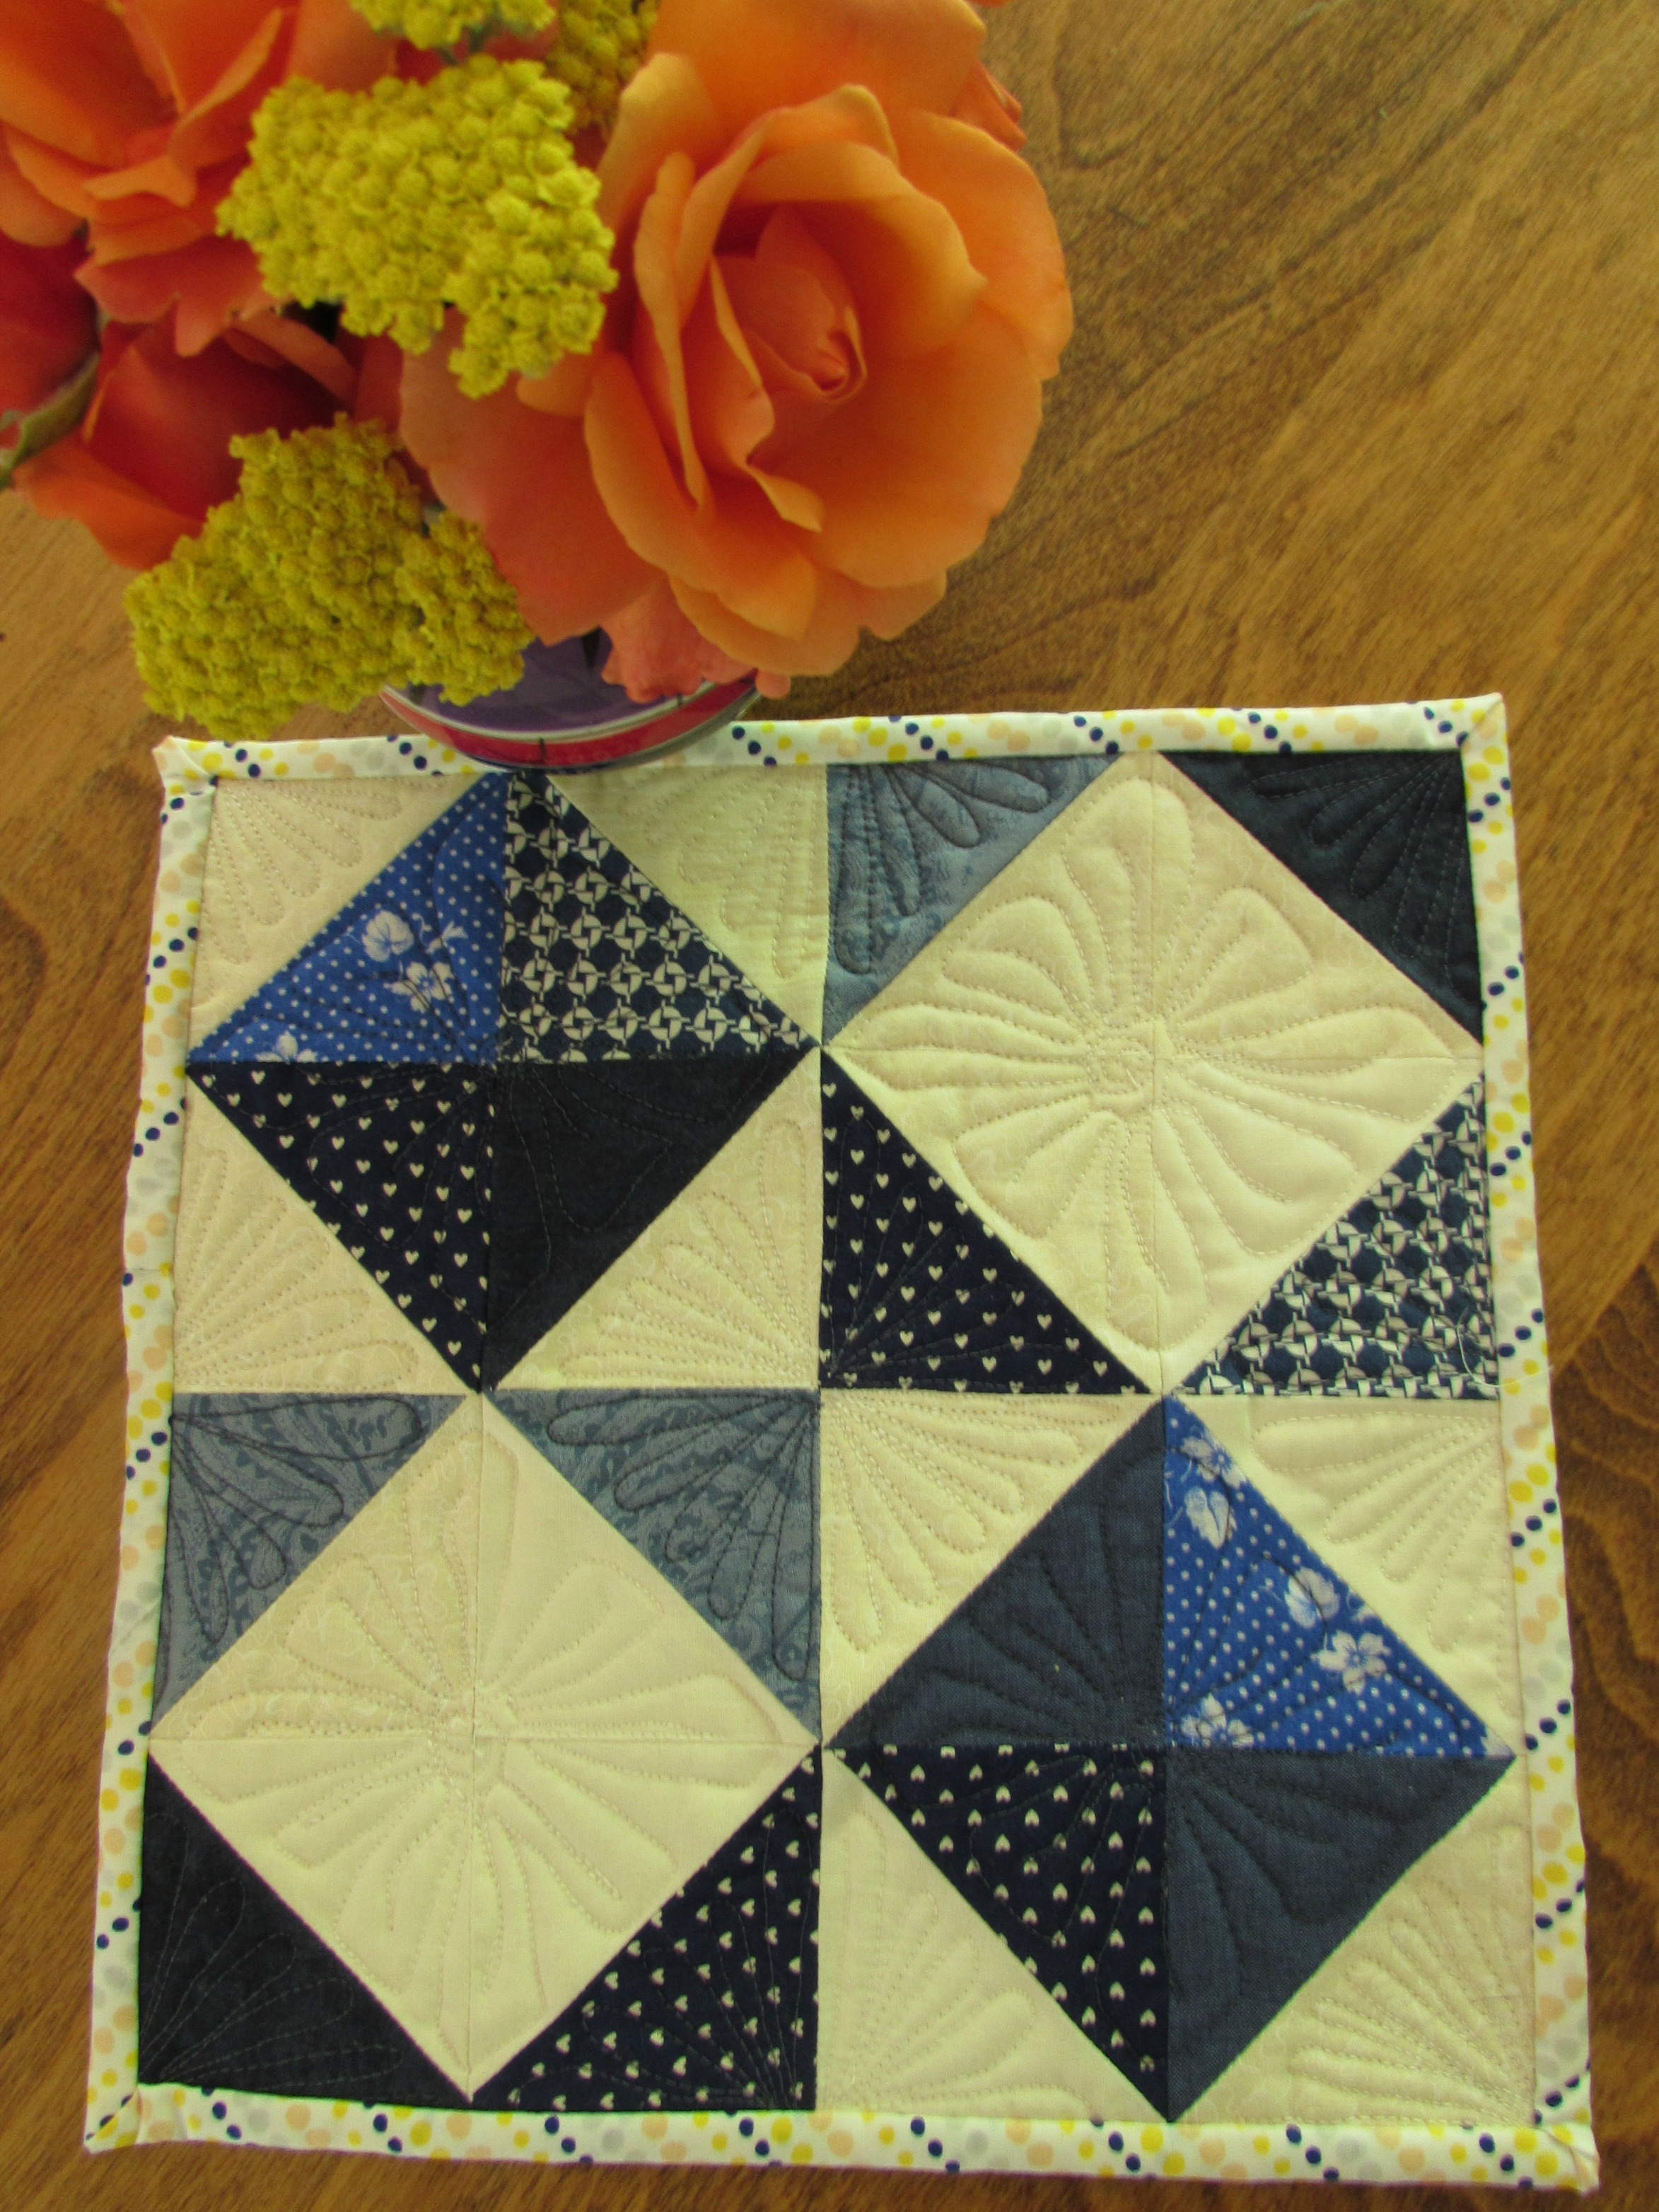
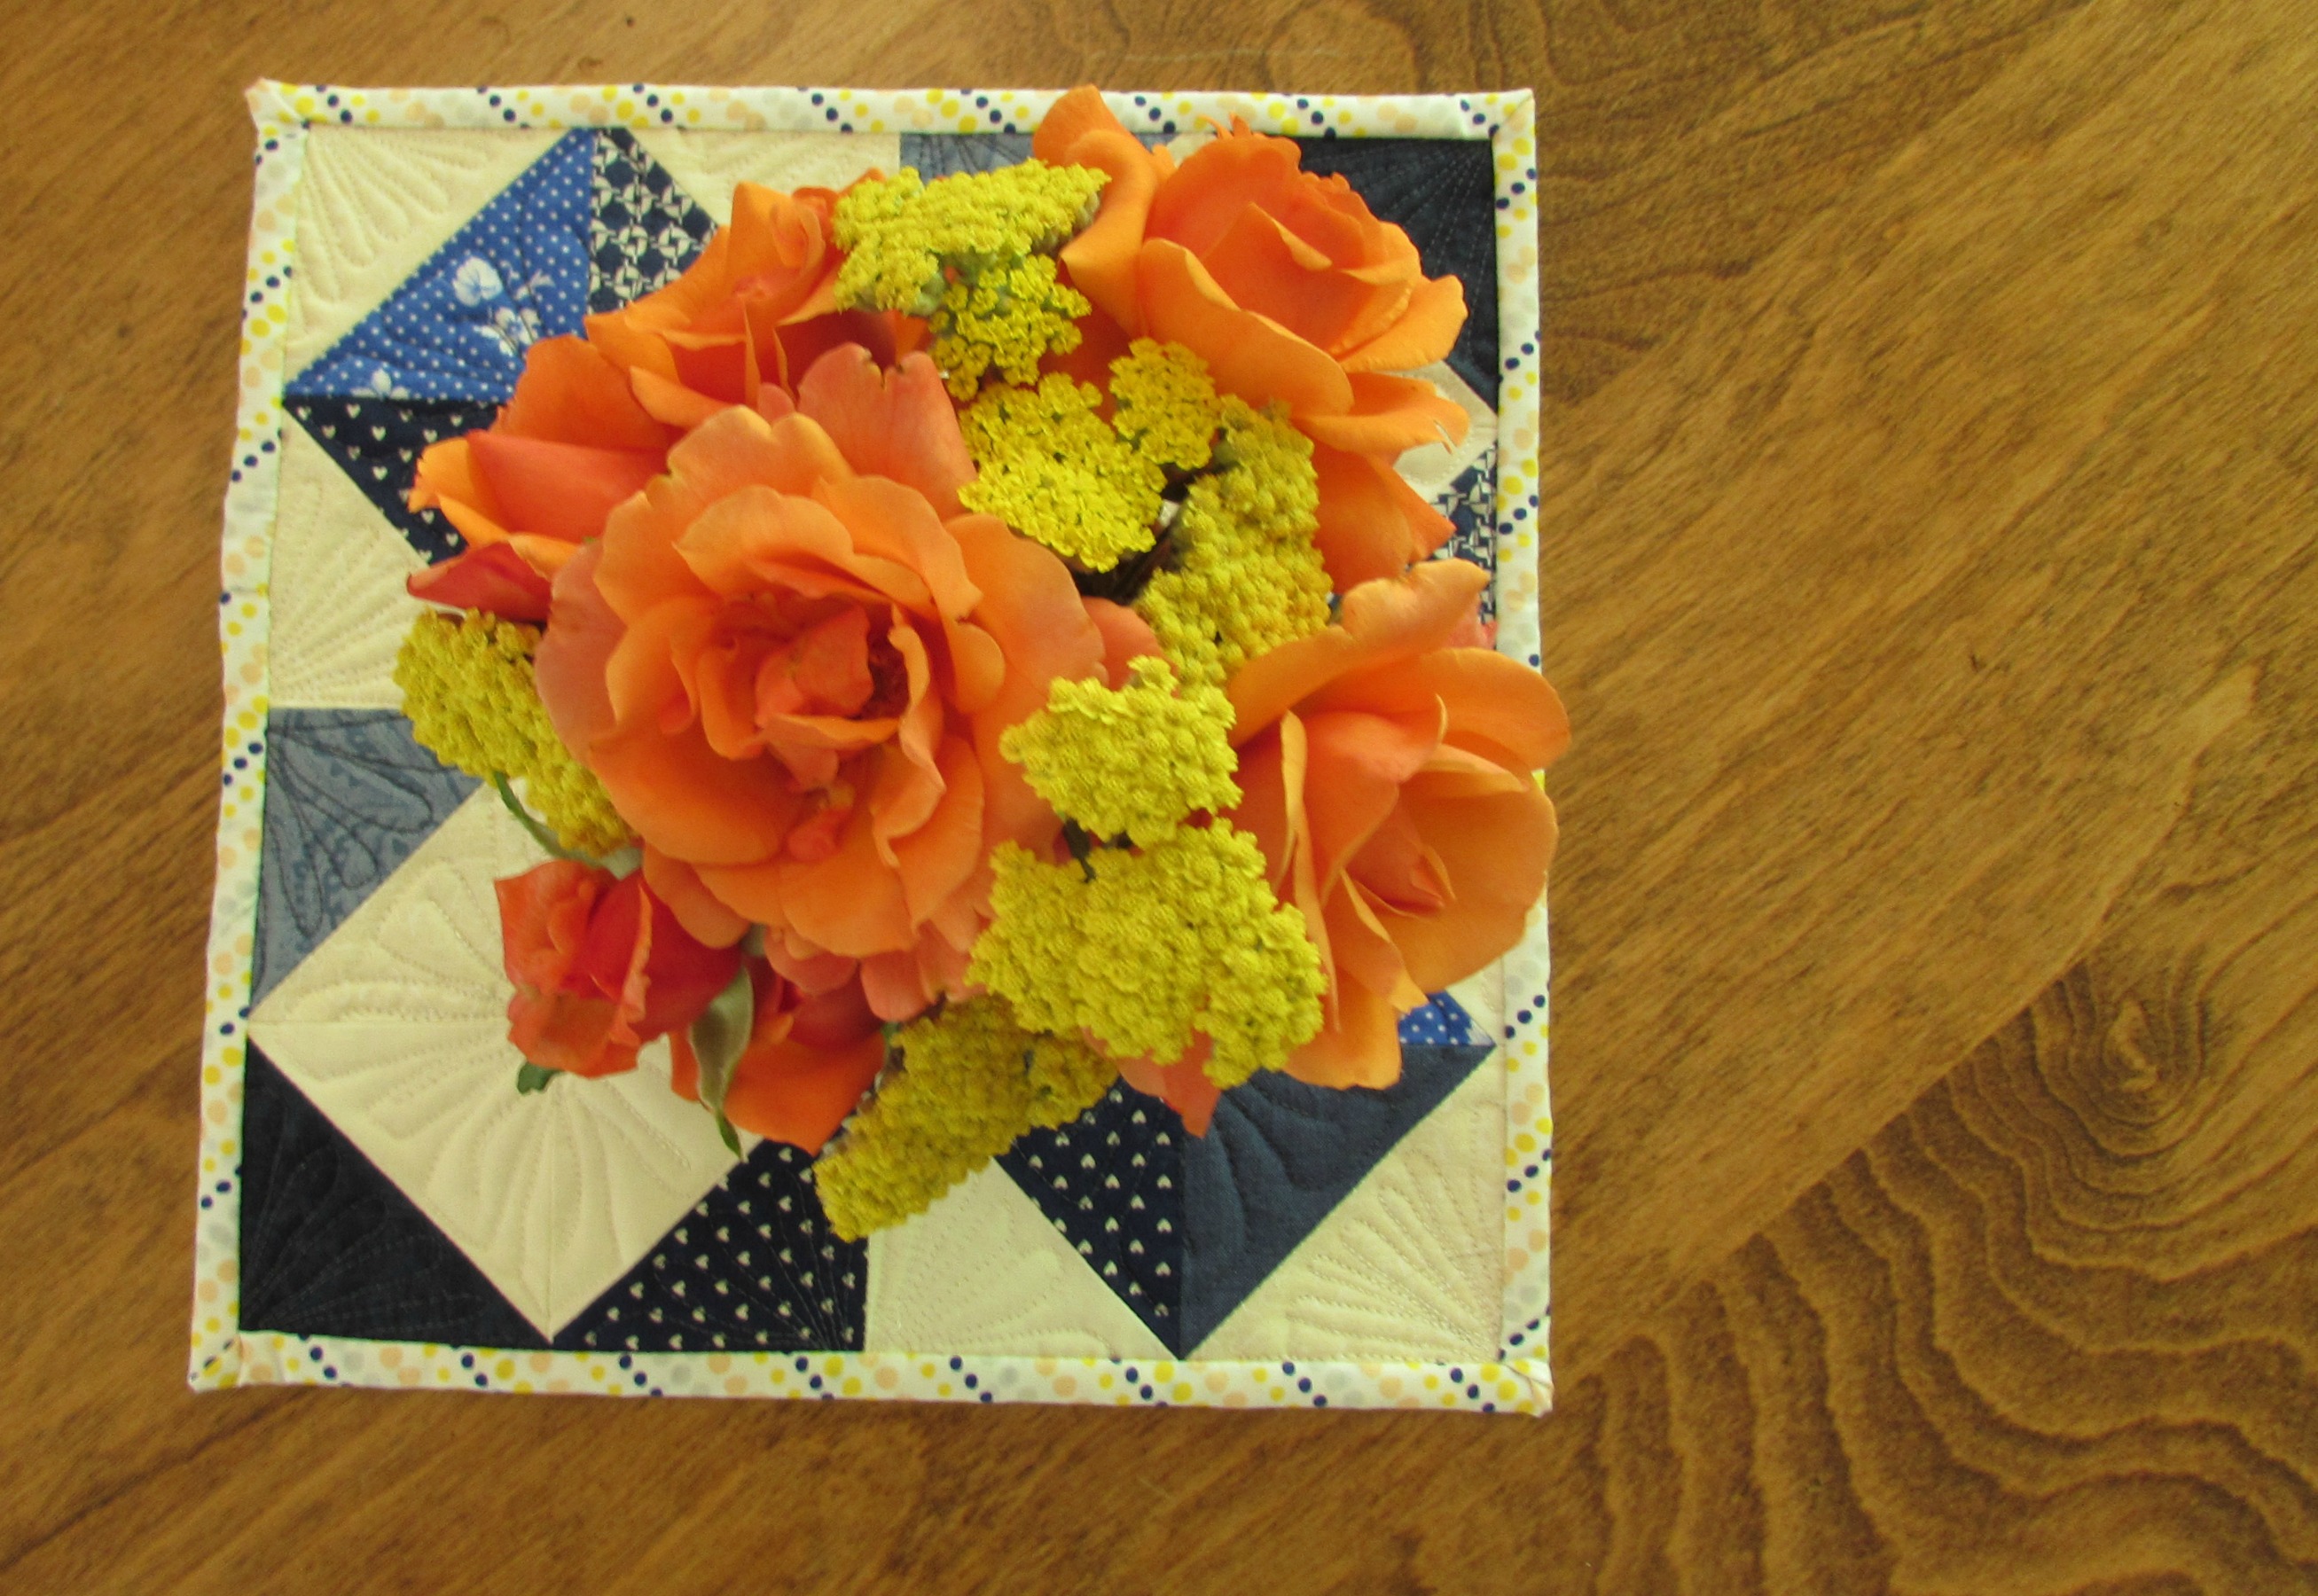
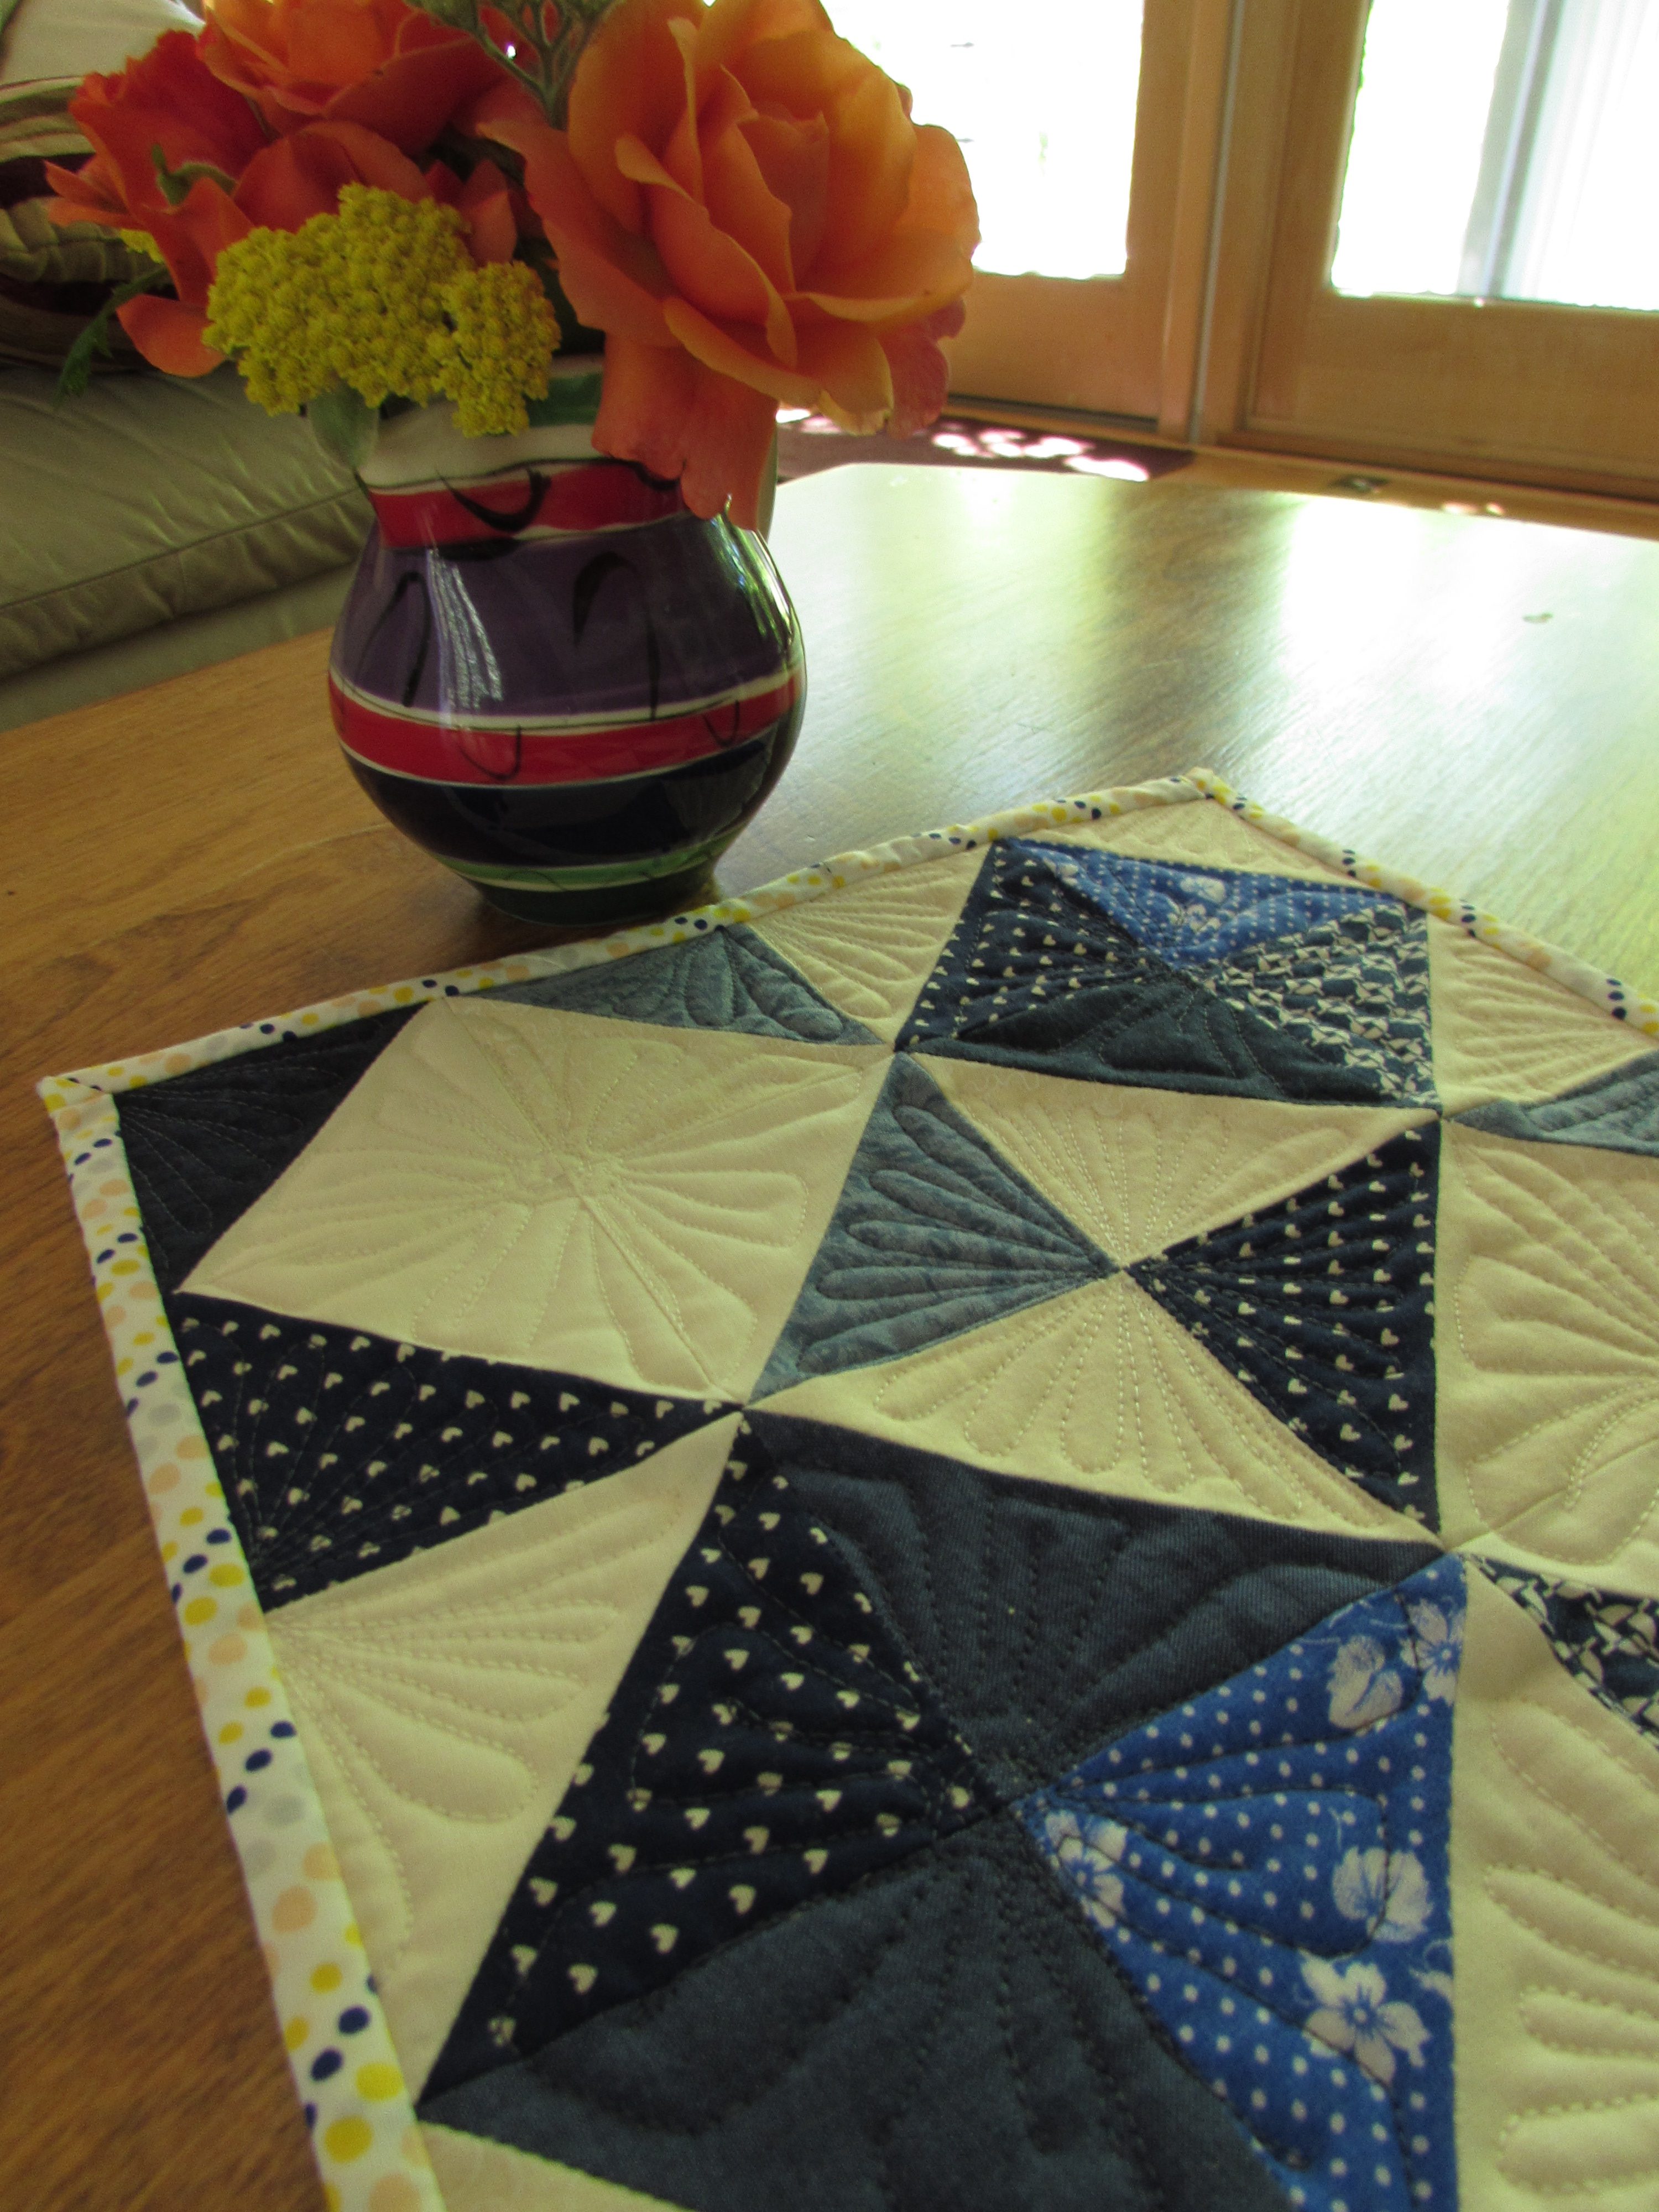
I have a drawer where I toss extra HST blocks that seem to accumulate from time to time. I sewed a dozen together and ended up with a cute little block.
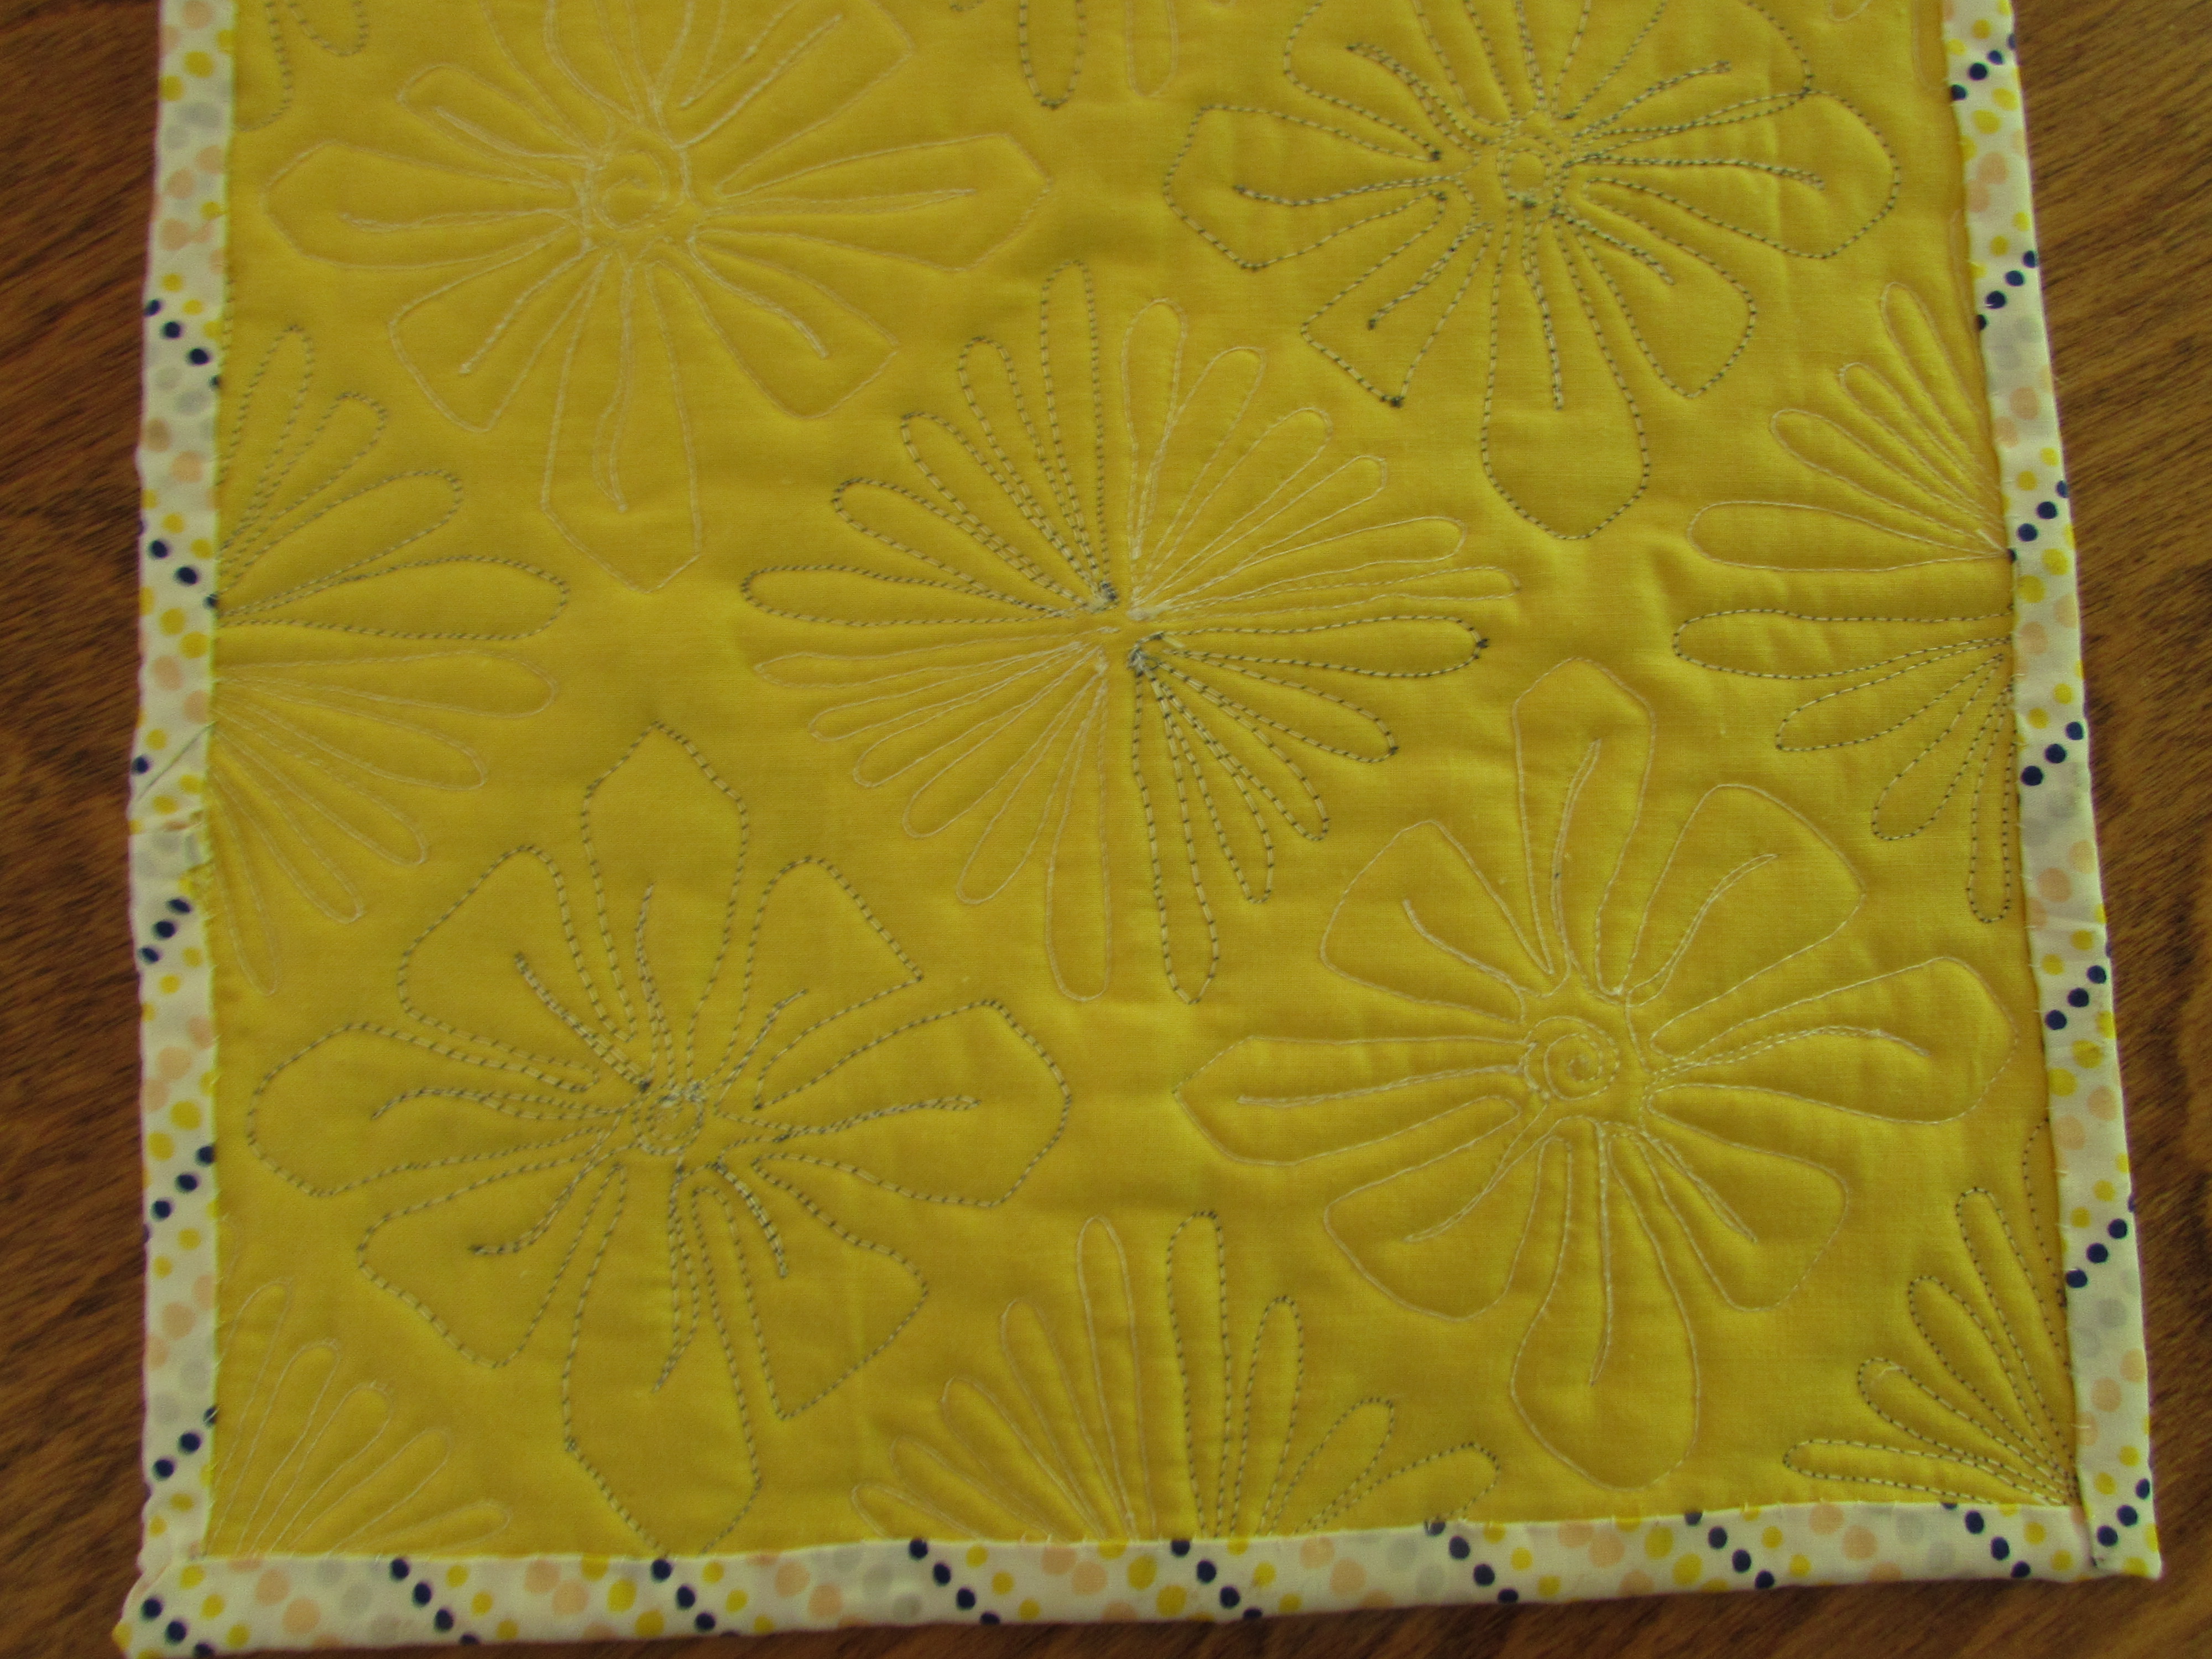
I quilted every inch of it with little flourishes in the triangles and flowers in the center of the four diamonds. At first I didn’t plan to bind it, since it was just a quick practice piece. But is that fair? To just throw it away??? I think not. Leave it in the sewing room cluttering up my desk? Nope, that doesn’t work either. I can always put it under a vase of flowers. So I trimmed it to 12″ square and found a little scrap of polka dots to use as binding. The binding was actually the hardest part. I cut it too narrow and it pulls in spots.
Stitching this was so gratifying. One evening of play and practice.
I switched between blue and cream thread but didn’t change the bobbin. It looks kind of funky on the back side.
Now that the itch to FMQ has been scratched, it is time to move on to something else. Hope you are all enjoying some time at the sewing machine.
Linking up with Muv at Freemotion Mavericks because I haven’t done that for a while and I have been missing her lately. 🙂
Lots of projects in various stages in my sewing room this week. It is actually kind of fun to have multiple things going on. I sew a while, cut for a bit, practice a little FMQ – none of it feels tedious because I am moving back and forth between projects.
My main sewing machine is being very cranky right now so I am sewing on my smaller machine. I love this machine though – the tension is not sensitive and it sews like a little work horse. Much like The Little Engine That Could, this machine just keeps going (I think I can, I think I can.) I really miss the needle down feature and the thread cutter on my bigger machine though. Makes such a difference when I am sewing for a long period of time.
Anyway… Here is what’s going on:
I am working on my 241 tote bag that I mentioned in this post last week. This project has become so much fun because after reading that post, Tami from Sew Much for Free Time commented that she was also going to make a 241 tote. We did a bit of emailing back and forth and decided we would have our own little sew along. After working on my Stepping Stones quilt though the quilt along at Inquiring Quilter, I found I really enjoy the social aspect of the project. I love seeing everyone’s progress, having others to ask questions and get input, and seeing the fabric choices and how much that changes the pattern that we are all using. I think working on this tote with Tami will be the same. We set up a few deadlines for progress and hope to finish up together. It is low key though. If life gets in the way, so be it. We are just enjoying our virtual time sewing together! If you want to see Tami’s progress, hop over. We are just getting started. Anyone that wants to, is more than welcome to join us. Leave me a comment if you want more info.
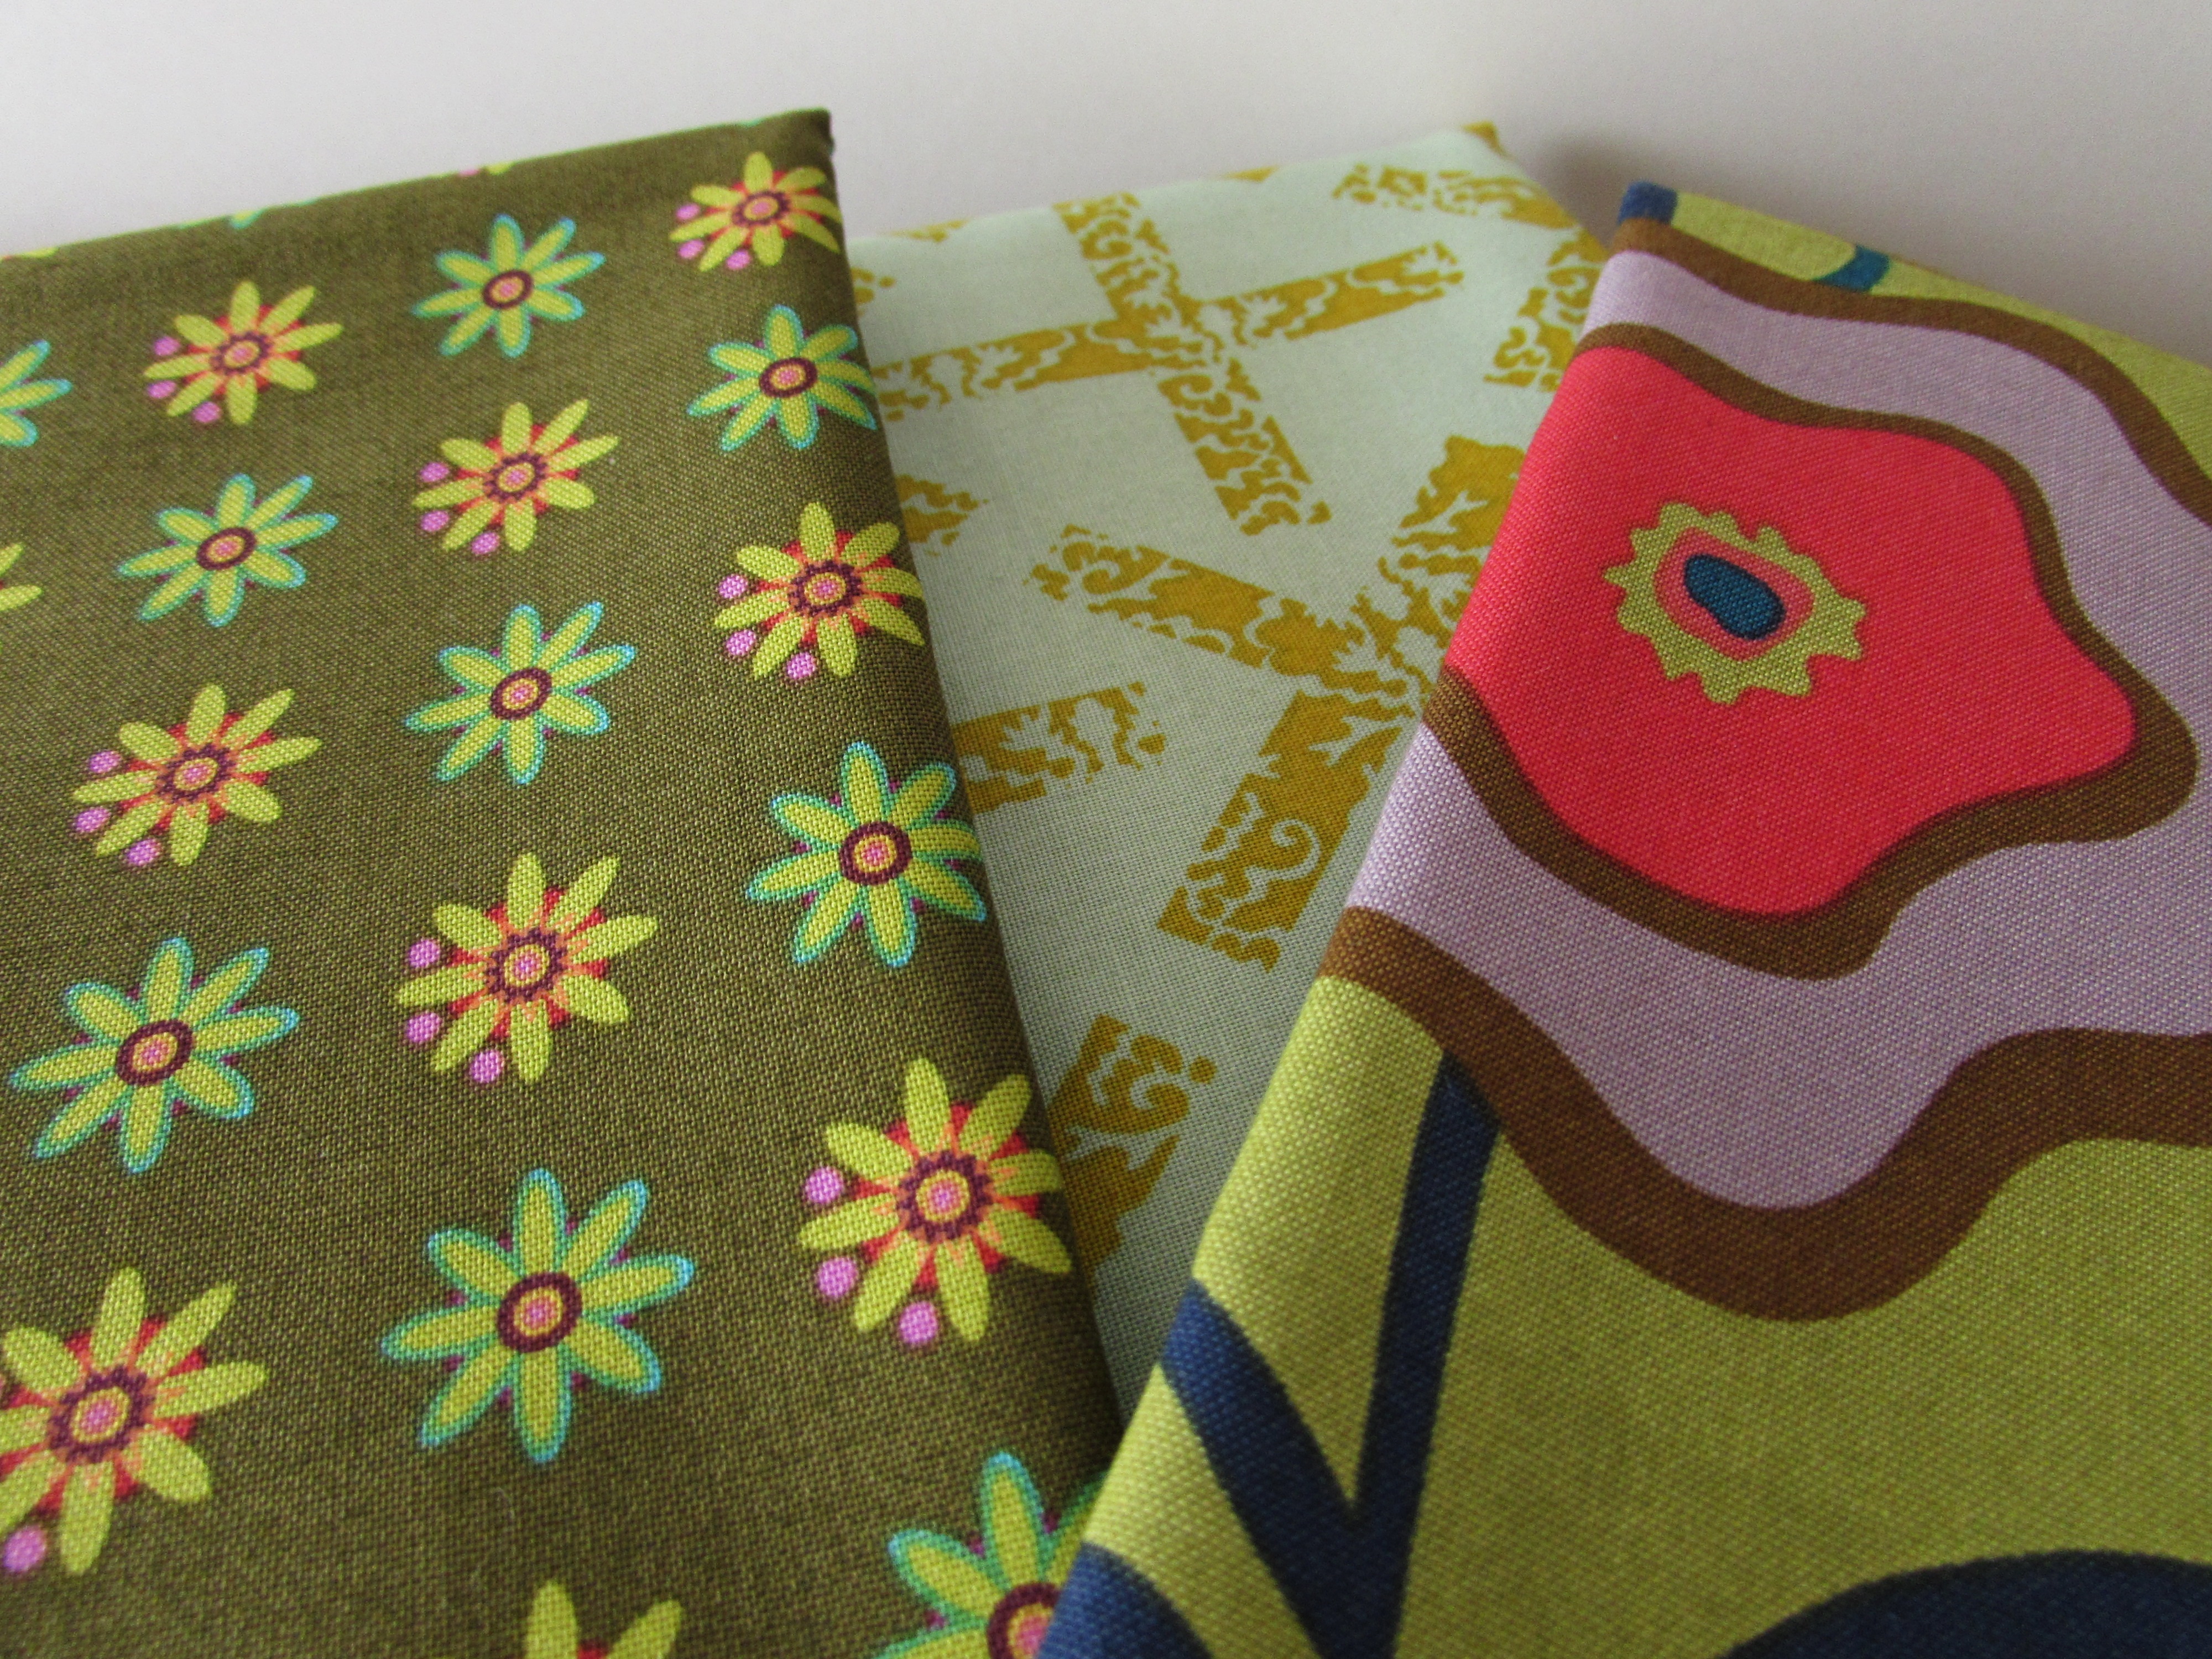
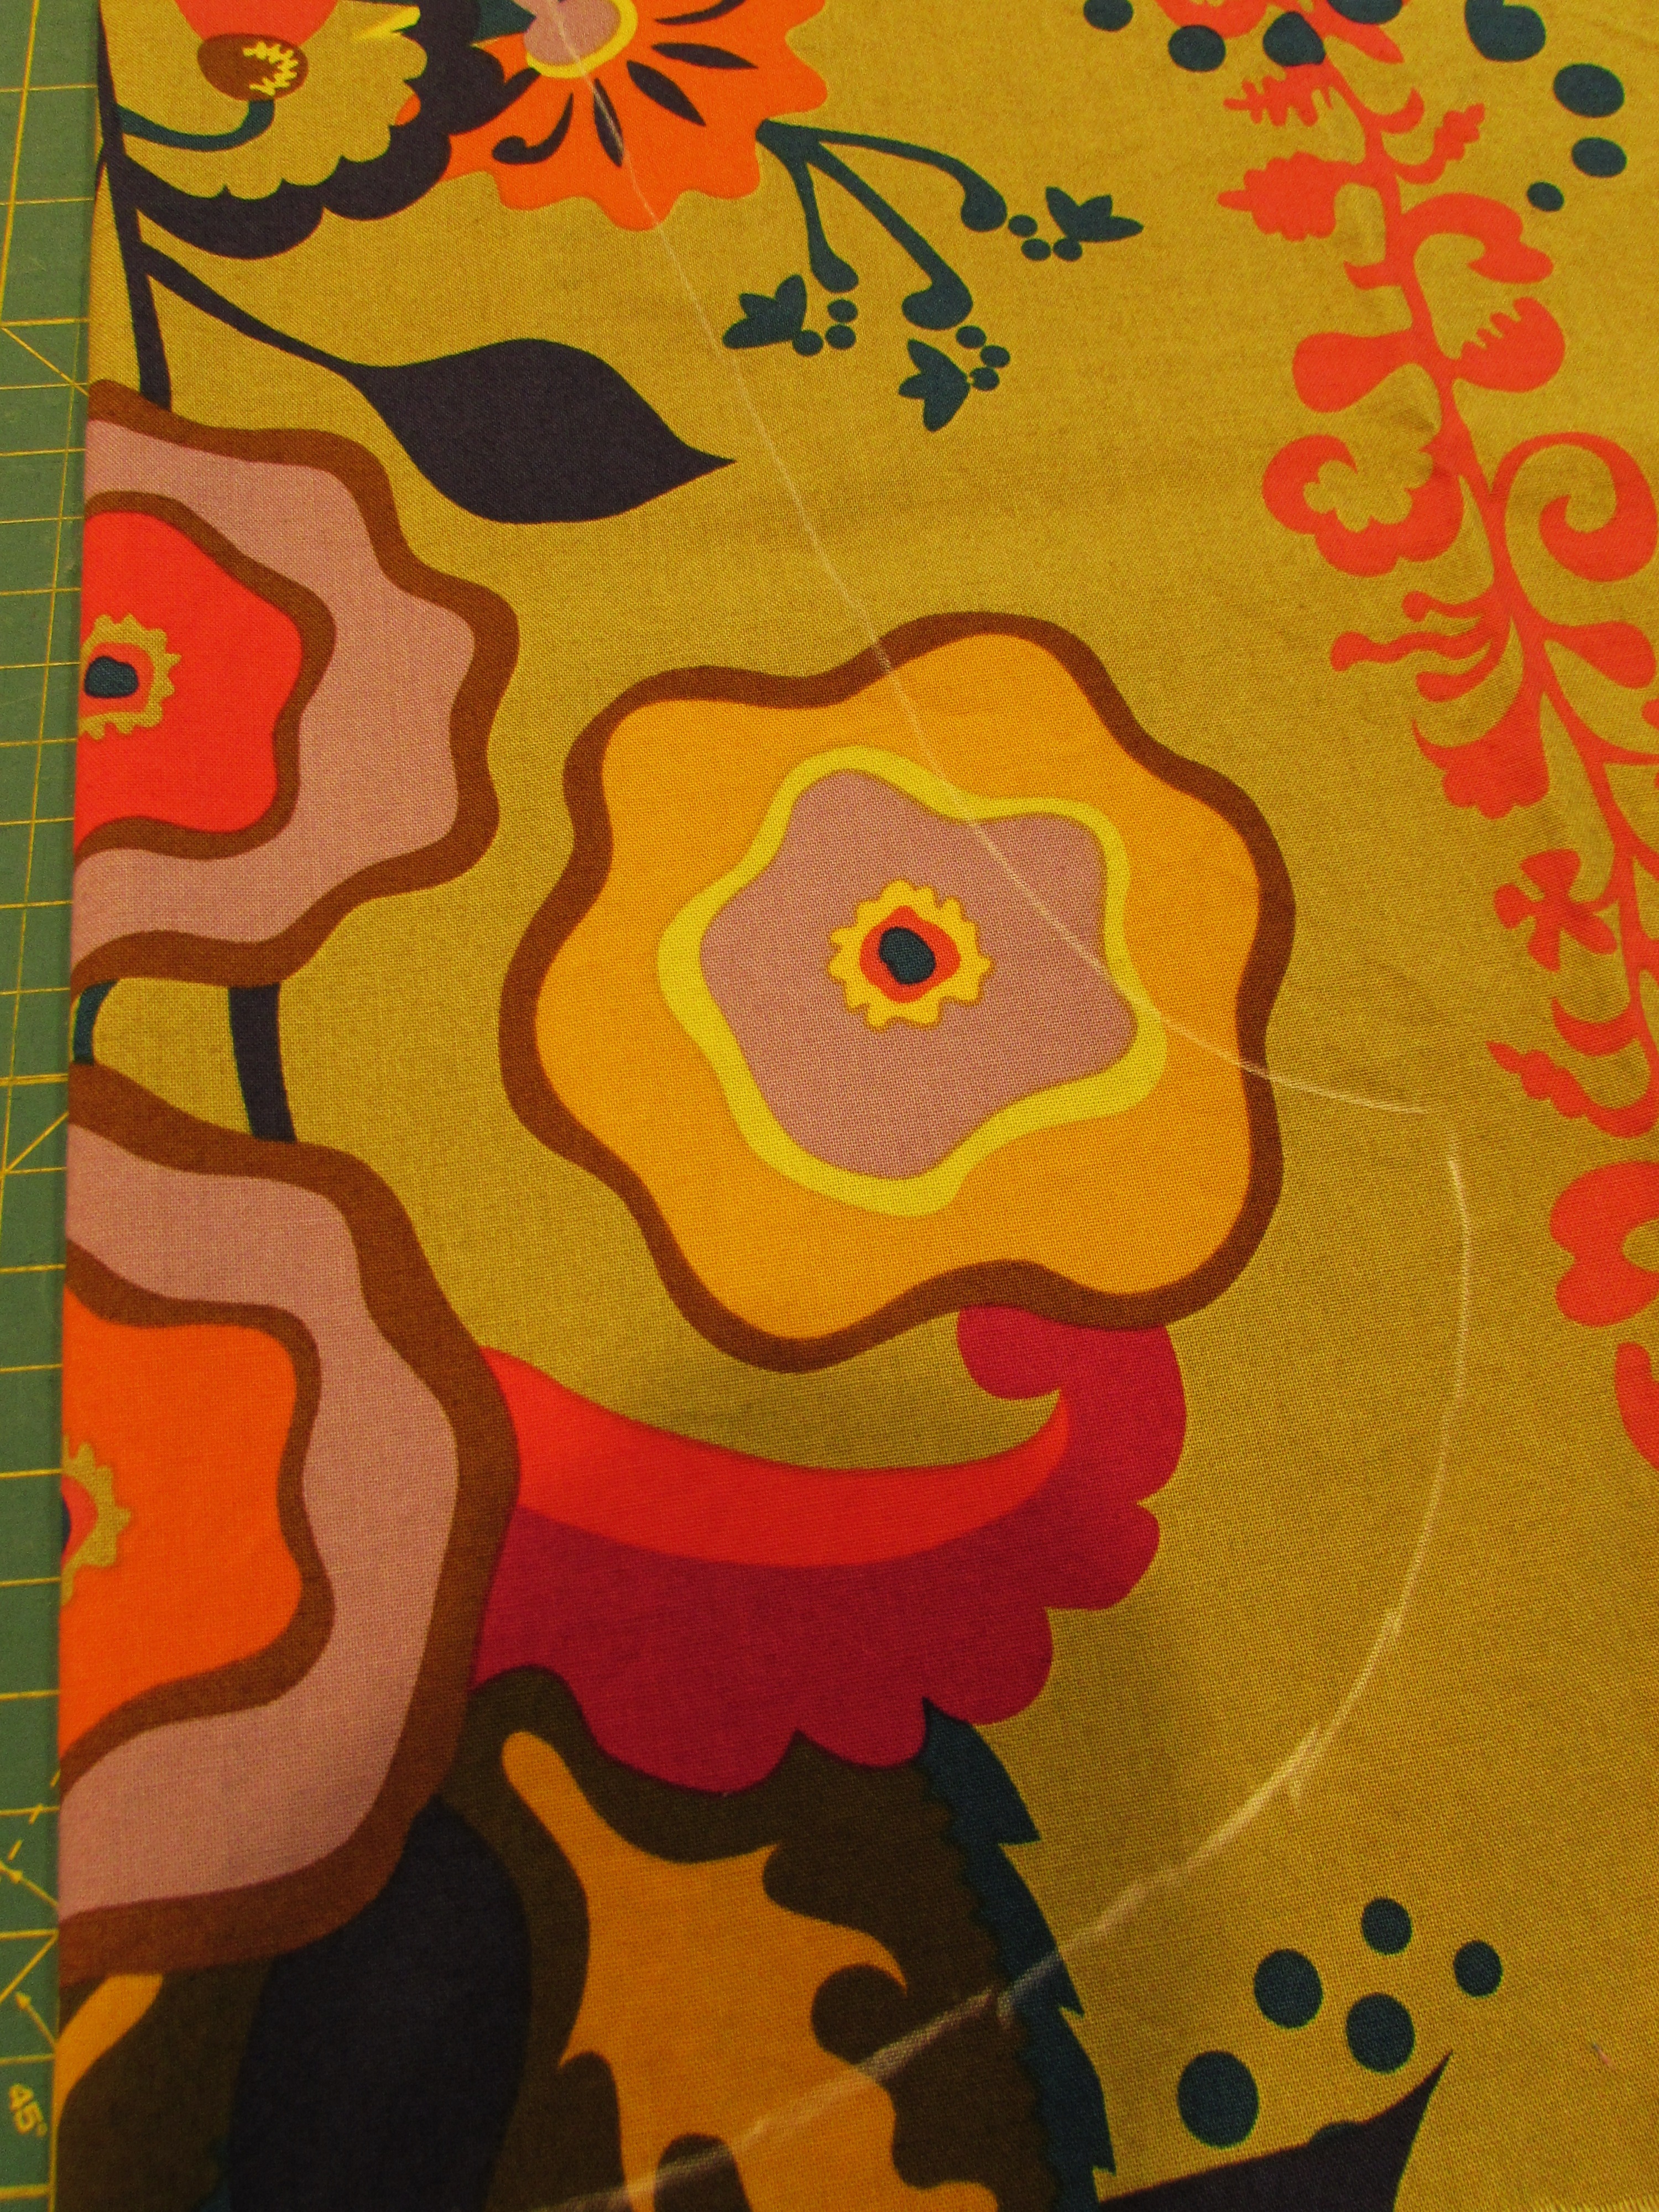
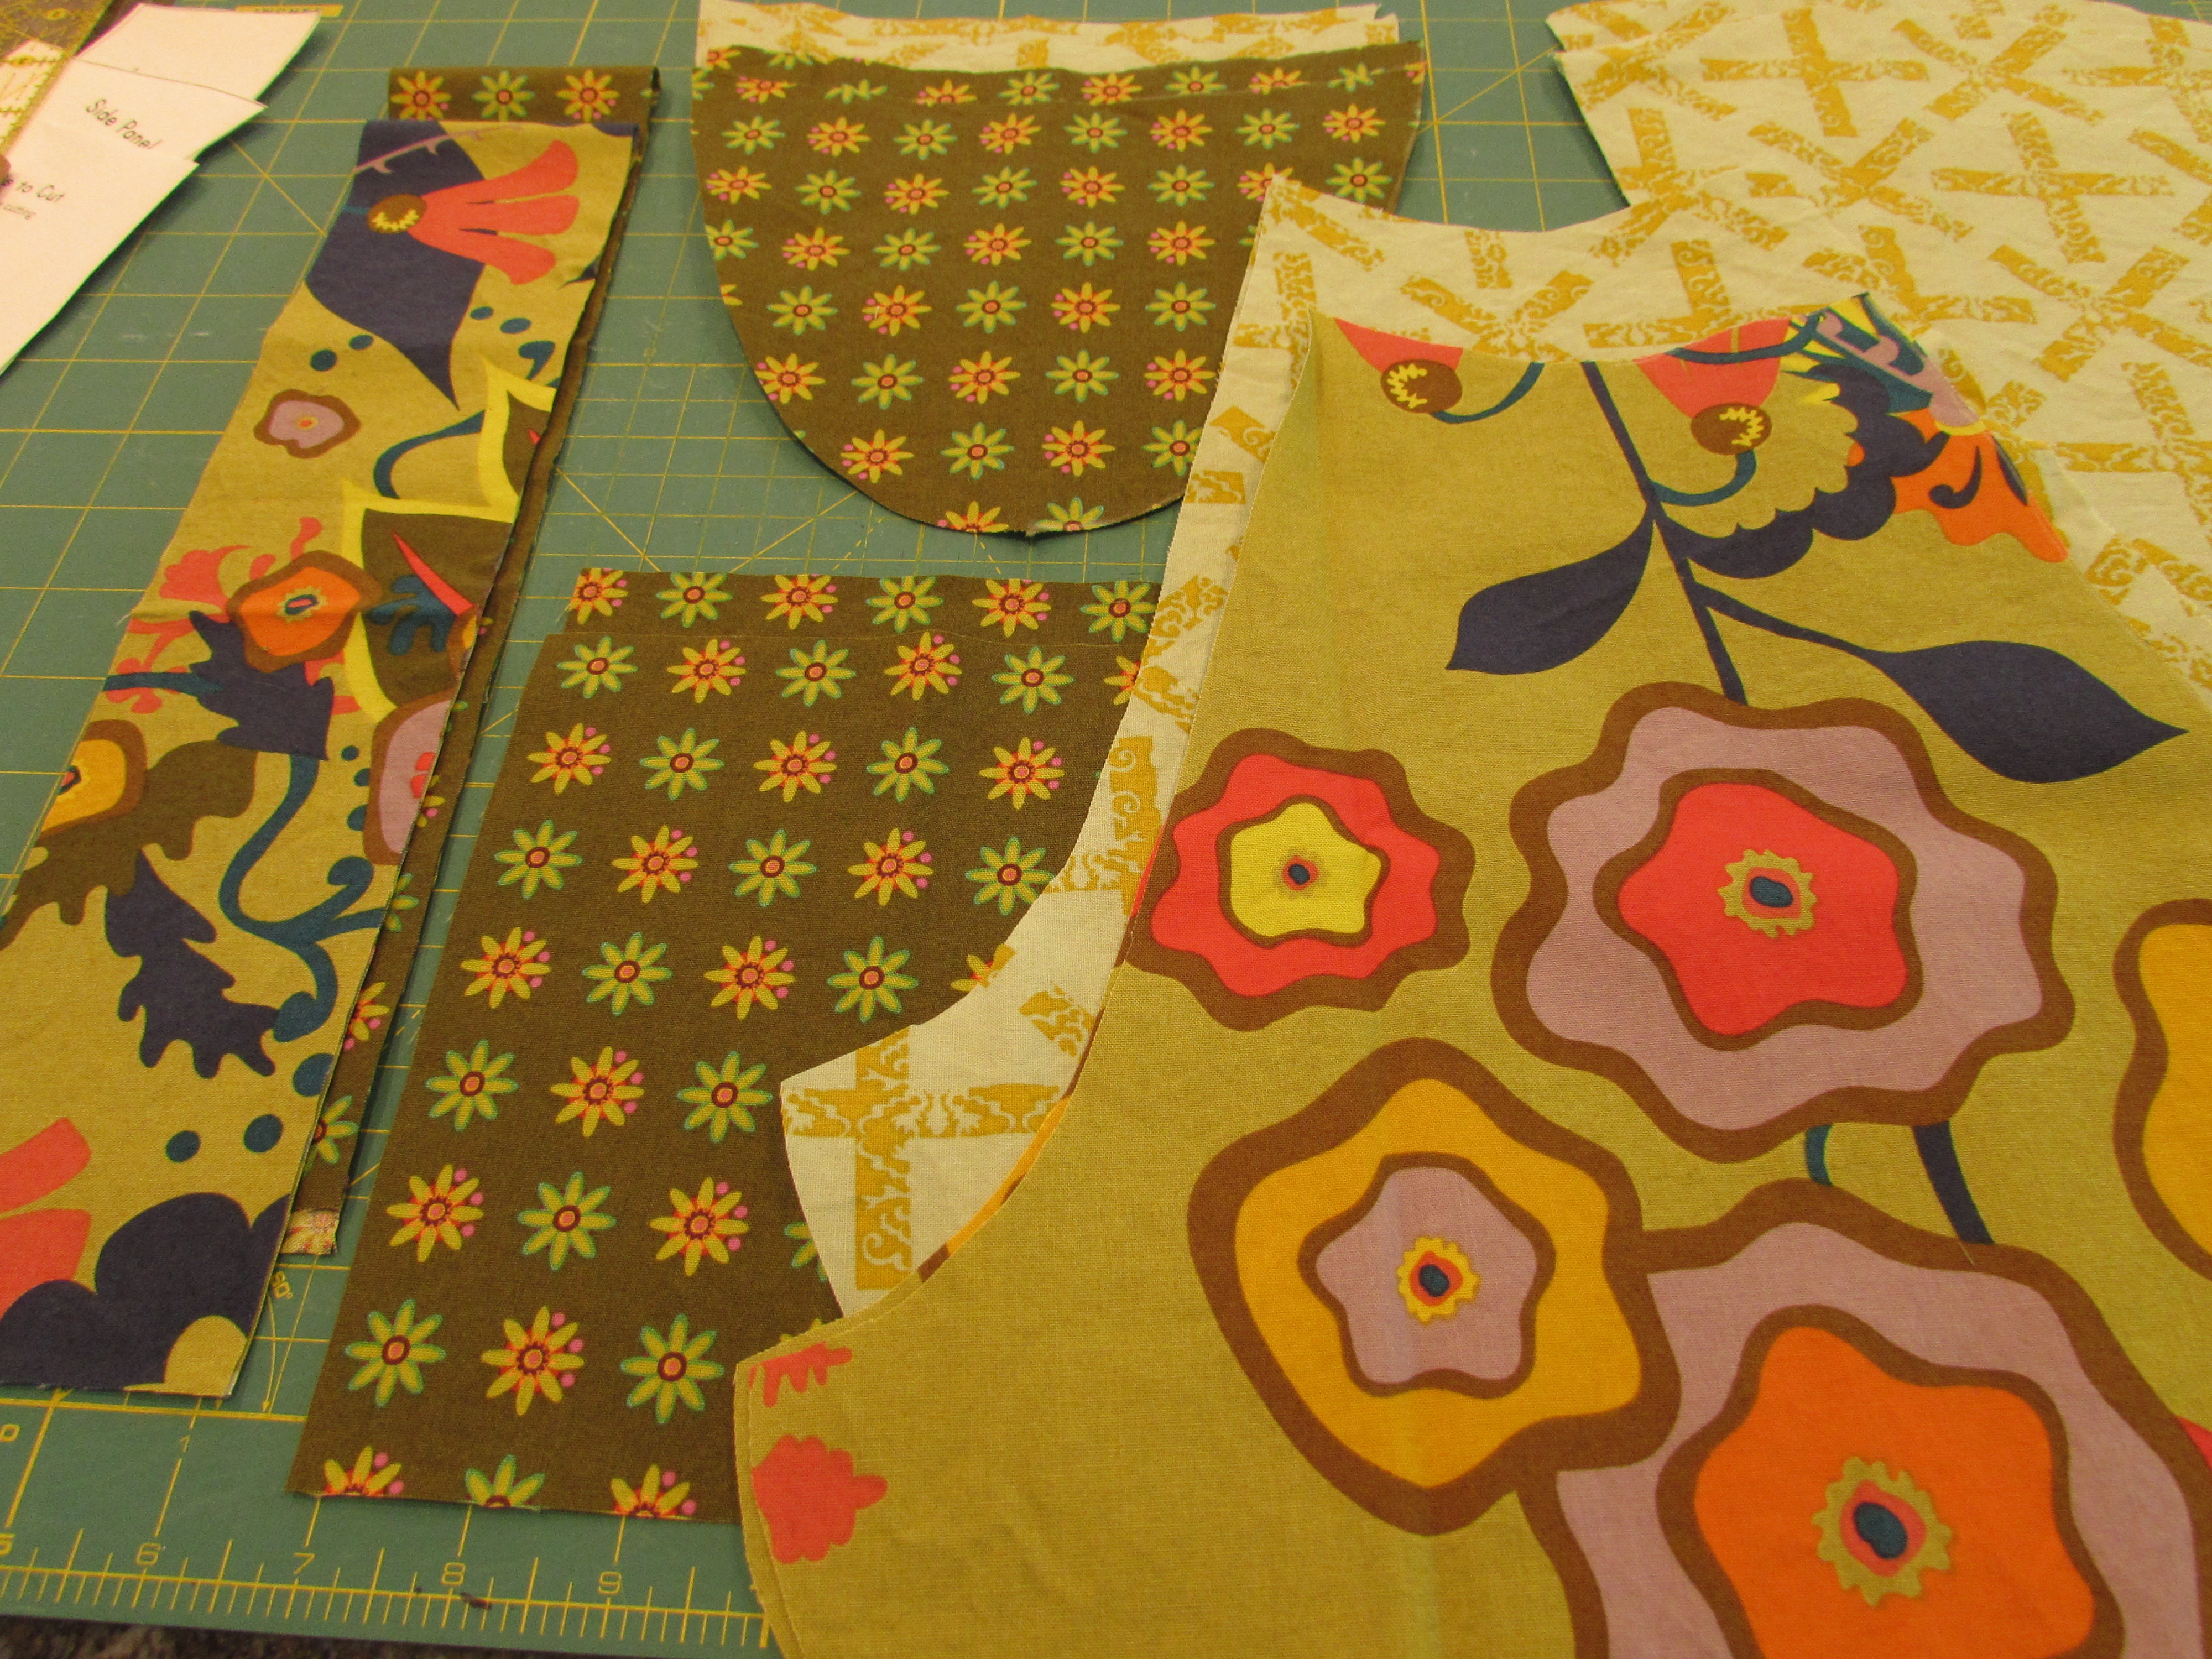
By today, we are both aiming to have our bags cut out and pieces prepared. I spent yesterday morning prepping everything. I plan on using these Allison Glass fabrics.
The pattern seems very straight forward so I doubt there will be much difficulty makijng this bag. I traced my pieces with a chalk marker and cut from there. Printing the pieces on regular printer paper made for thick pieces. I didn’t want to pin and cut them because there might be some inaccuracy. Tracing the pieces was quick. (When I was cutting pieces, I took the pictures under the kitchen lights which distorts the color.)
Once the pieces were cut, I fused the interfacing to the outer pieces.
I’m really excited about this project. It is going to be perfect for my niece’s birthday gift.
Besides working on prepping the bag, I also did some FMQ on the Mystery quilt along that Lori Kenedy is hosting over at the Inbox Jaunt. This week we were instructed to quilt little stars and suns. Lori calls them Spirograph Suns though we did a simplified version of them. The motif is so fun and you’ll find the tutorial here.
We only have a few more sections to quilt and I think I will be a little sad to see this finish up. I love that the structure of this QAL only requires I quilt two lines each week. Not time consuming but it forces me to practice two new motifs each week. (Also, take a look at my fish. I feel like I stitched my fishies going upstream. Shouldn’t they should swim from left to right…. I must have gotten turned around (not all that unusual for this quilter.) 😉
My Stepping Stones quilt is basted and ready to be quilted. I am looking forward to the weekly post tomorrow as she plans to give some ideas on possible quilting motifs for this pattern. Choosing how I will quilt something is still a challenge for me but maybe I will be inspired by Jennifer’s post tomorrow.
Finally, I am working on a mini that I will share later this week. It is going to be cute though. Here is a sneak peek.
I am going for an old-fashioned, vintage feel and I think it is coming together well.
OK – what do you have going on in your sewing room? i would love to hear.
Linking this post up with all sorts of fun sites. Take a look at the list. You’ll find it at the top of the page, under Link Ups.
Just in case you need an idea for Mother’s Day gifts (for a friend, your mom, even yourself – even if you aren’t a mom!) Craftsy has awesome classes and I can’t imagine a crafty mom who wouldn’t love one (or two, or three…) Classes last longer than flowers and they are way more affordable! Click here to check it out.
I was fortunate to spend hours over the past week with Lori Kenedy! She is the blogger at The Inbox Jaunt and I have mentioned her many times in various posts about practicing and learning to FMQ. She is a rock start when it comes to quilting! She has two classes available on Craftsy and I took one of them this week. 🙂 It was awesome!
I recently signed up with Craftsy to become an affiliate. (Note – this is an affiliate post and if you purchase products through the links in this post, I will be paid. A very, very small amount, but yes, paid.) When I finished the process of signing on, Craftsy asked whether I would be interested in reviewing a class. Knowing that Lori’s class “Creative Free Motion Techniques: From Doodle to Design” was recently released, I happily agreed!
Purchasing a class at Craftsy means that you will forever have access to the class on your Craftsy account. It means you can watch it whenever and whereever you would like. For me, living in a rural area without access to a wide variety of courses, this is perfect. I have purchased a few classes so far at Craftsy. I have the Machine Quilting: Small Changes, Big Variety class taught by Angela Walters. Additionally, I have the class, Machine Quilting Wholecloth Quilts, by Cindy Needham. (Cindy’s class is good but the quilting is too advanced for me at this point. Something to strive for though!) And now, I have Lori’s newest class.
Of the three classes I have taken thus far, Lori’s Doodles to Design is by far my favorite. If you have worked with Lori’s tutorials, you already know that she is a huge proponent of doodling, or drawing, your design over and over to build the muscle memory up before stitching it. Doodling it also helps me to spot the paths I will need to take to move around with the design. I tend to get stuck in corners, or on edges, with no way to move out of them. In this class, Lori shows each motif, or design, by doodling it on paper and then she shows how to stitch it. At the end of each “chapter” Lori does a quick trunk show and displays quilting with that actual design. For me, each of these steps reinforces the lesson. By combining visual and auditory tips into each lesson, I was able to pick up my pen and follow along easily. Converting that to stitching was the obvious next step and it came naturally. In full disclosure, I will say that the designs she teaches in this class are available as tutorials on her blog. However, I am not a visual learner. I read blogs continually and love the tutorials and free patterns that are readily available. But it takes me quite a while to read about doing something and then take that knowledge and implement it. Listening to the instructions is how I learn. I need the auditory input. Taking Lori’s class and listening to her describe what she is doing helped me to advance considerably. Everyone has different ways of absorbing information and this was perfect for me. Watching the video and listening to her instructions = personal success.
Watching a Craftsy class gives the student the option to use a 30 second repeat button. I LOVE this feature. I was drawing along with Lori while watching the class. I had large sheets of newspaper laid out on the table and was trying to doodle her designs with a sharpie. If I couldn’t get a section, I would click on the 30 Second Repeat and, as you would think, that clip just plays over and over (much to the annoyance of my daughter when she is in the room.) It is really helpful though. Another cool feature is the ability to post notes to myself, or questions to Lori, at certain sections of the video. When she answers the question, her reply shows up on the side of the screen during that section of the lesson. Other student’s questions and the reply to the question also show at the relevant point in the class. It is nice to see what people are asking and discussing. Each class comes with a downloadable class materials file. Some classes have templates, required materials lists, or patterns. There is huge value and very high quality in Craftsy’s class offerings.
I did a fair amount of practicing yesterday afternoon on scrappy quilt sandwiches.
I was enjoying playing with the little rainbows. They remind me of miniature Baptist Fans. But you can see that moving around with the motif is a trick. I need to go back to paper and pen and draw more of them.
I am pleased to see that my stitch length is becoming more consistent. Also, the tension on my machine is so much better. This is in part because I am evening out the speed of my foot in relation to the speed with which I move the fabric. When I take these pictures taken at such a close range, I do cringe a bit at the herky jerky stitching. But I share them anyway. I am almost certain that Lori or Angela had to stitch like this to become the quilters that they are now. The other day I came across a great quote on Creations by Nina.
“Everything worth doing is worth doing badly. If you ever want to do anything well, you need to be willing to do it over and over again. Badly at first. You need to be willing to weather that through.” I found the quote on Nina Marie’s blog but she gave credit to Ellen Anne Eddy. This is perfect, right? With free motion quilting (as with most things) the quilter has to be willing to put in the time to gain skill.
After taking the Doodle to Design class and practicing on scraps, I pulled out a long forgotten UFO and worked on it. I started this art quilt almost two years ago. For whatever reason, I put it in the closet and there it sat. On the far corner of my sewing table, I have had the fabric I was using, the stabilizer and fusible webbing all together in a neat little stack, waiting for me.
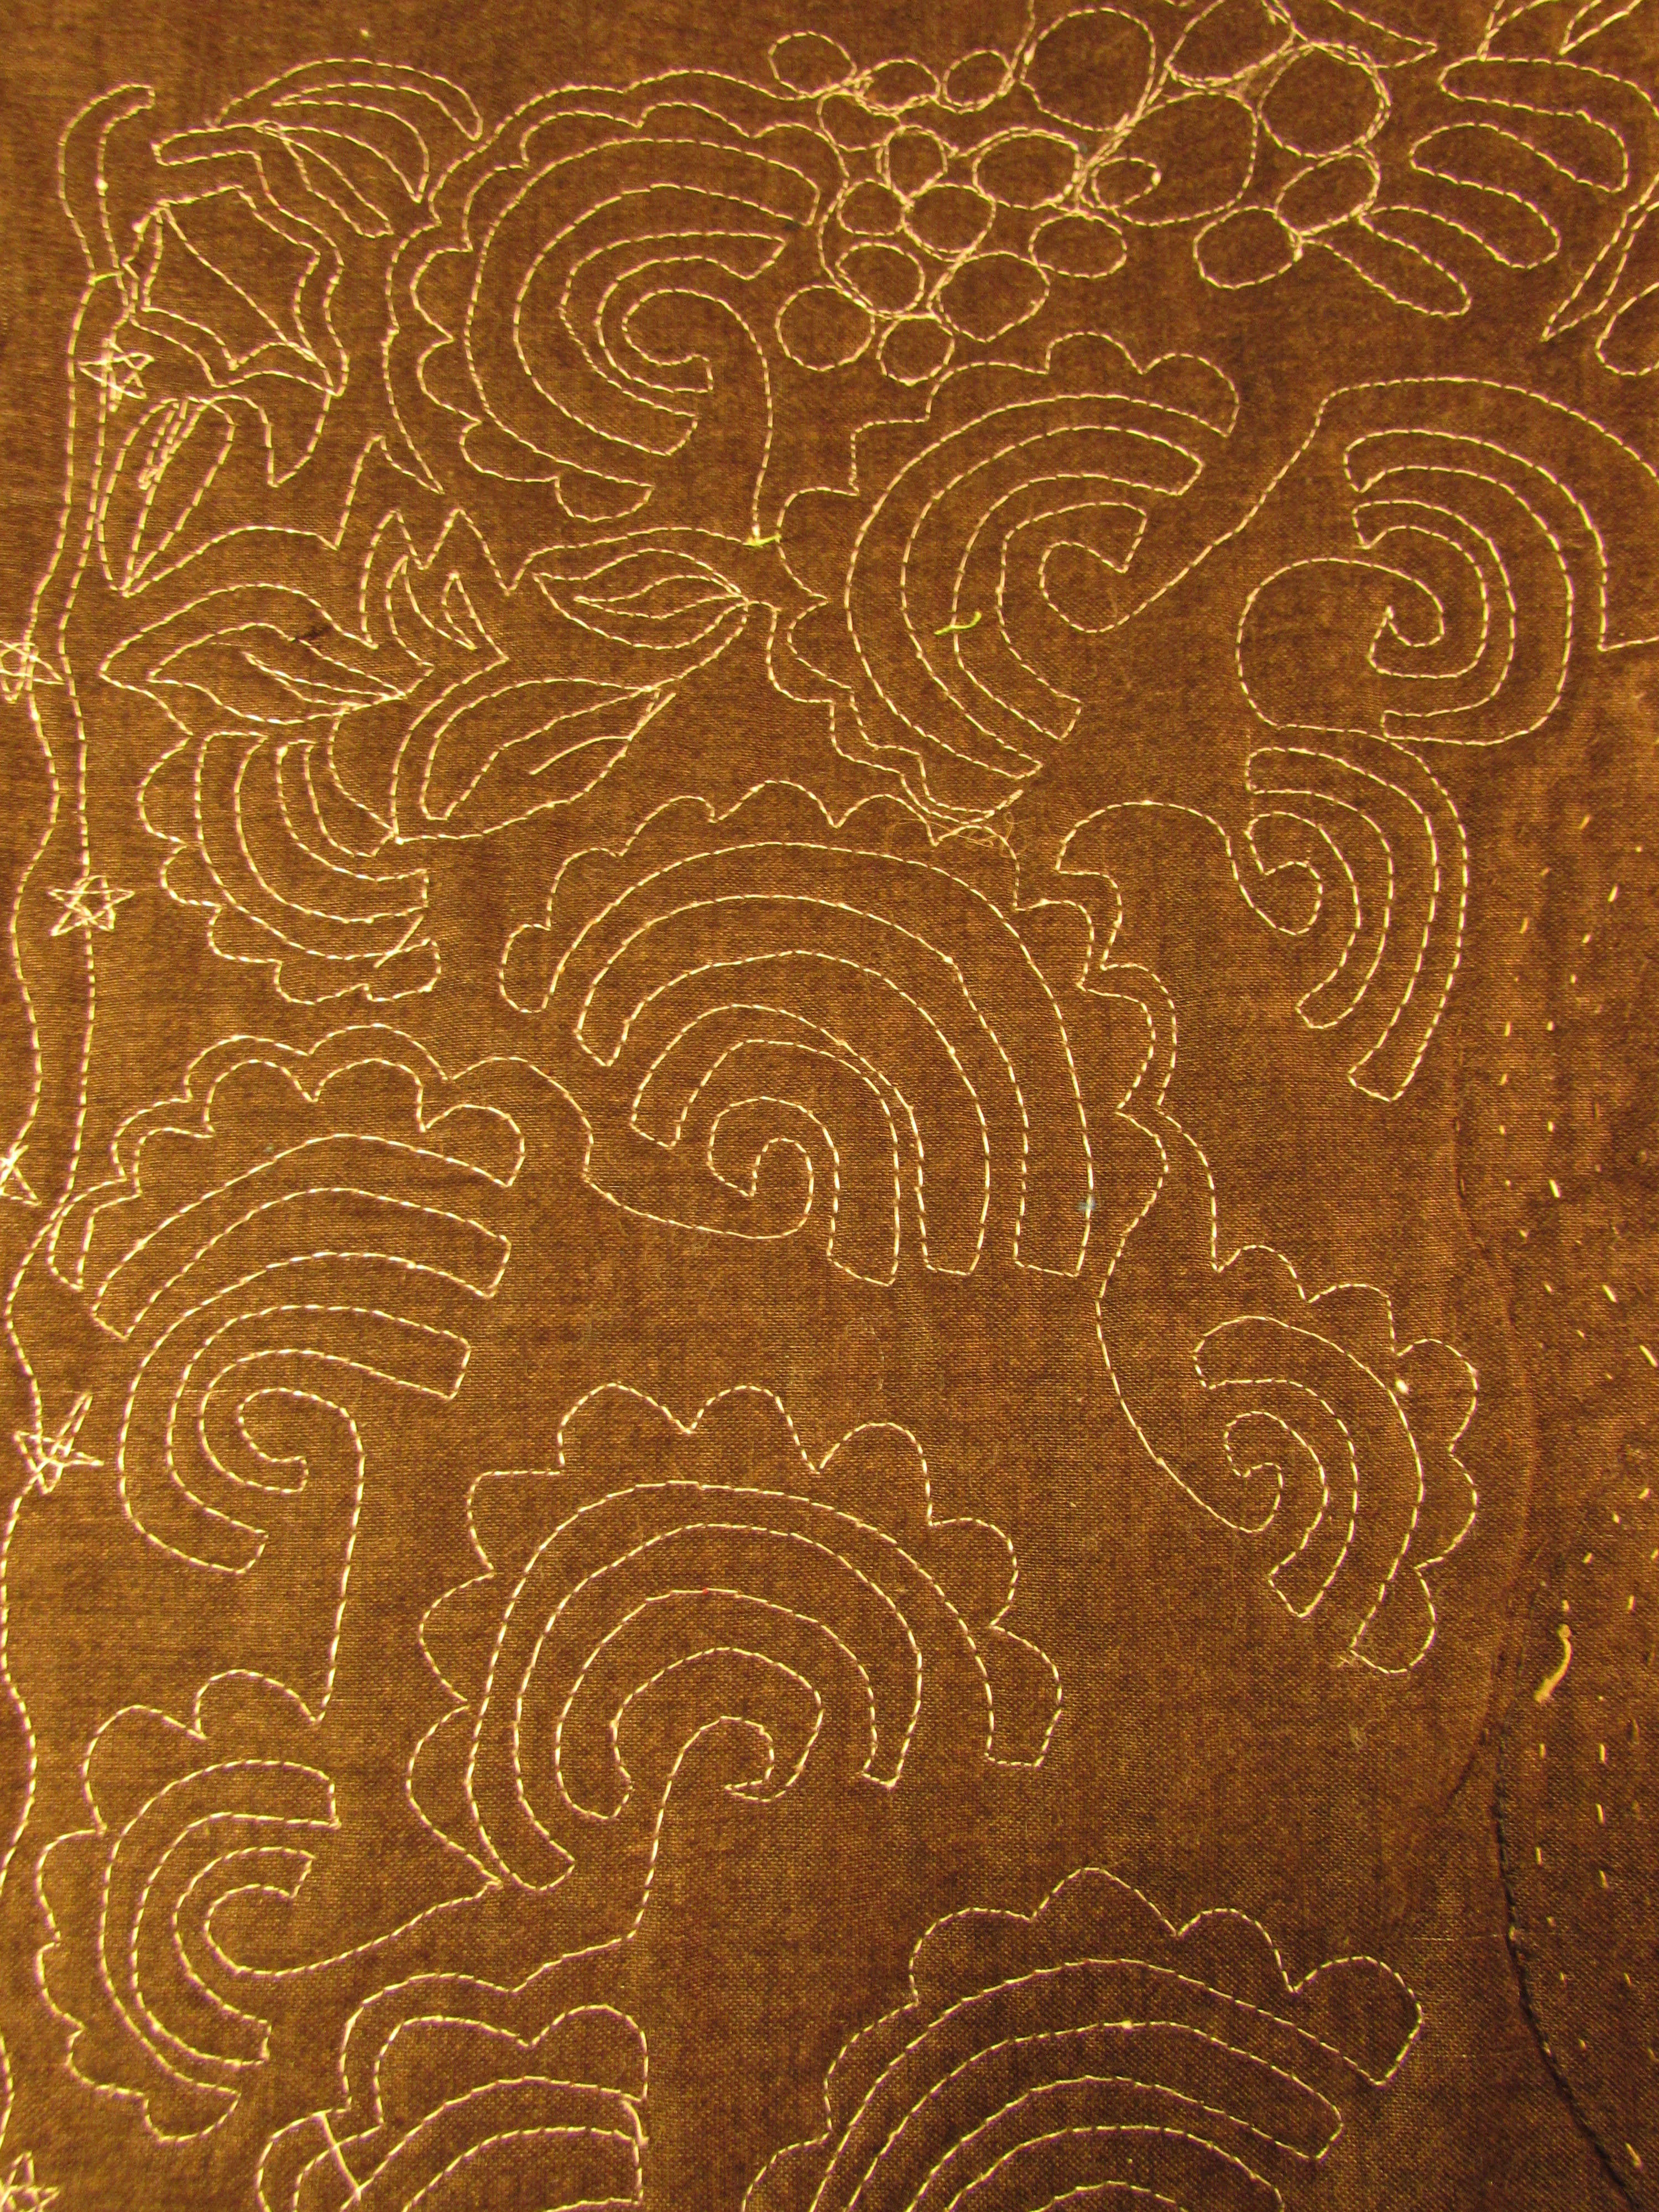
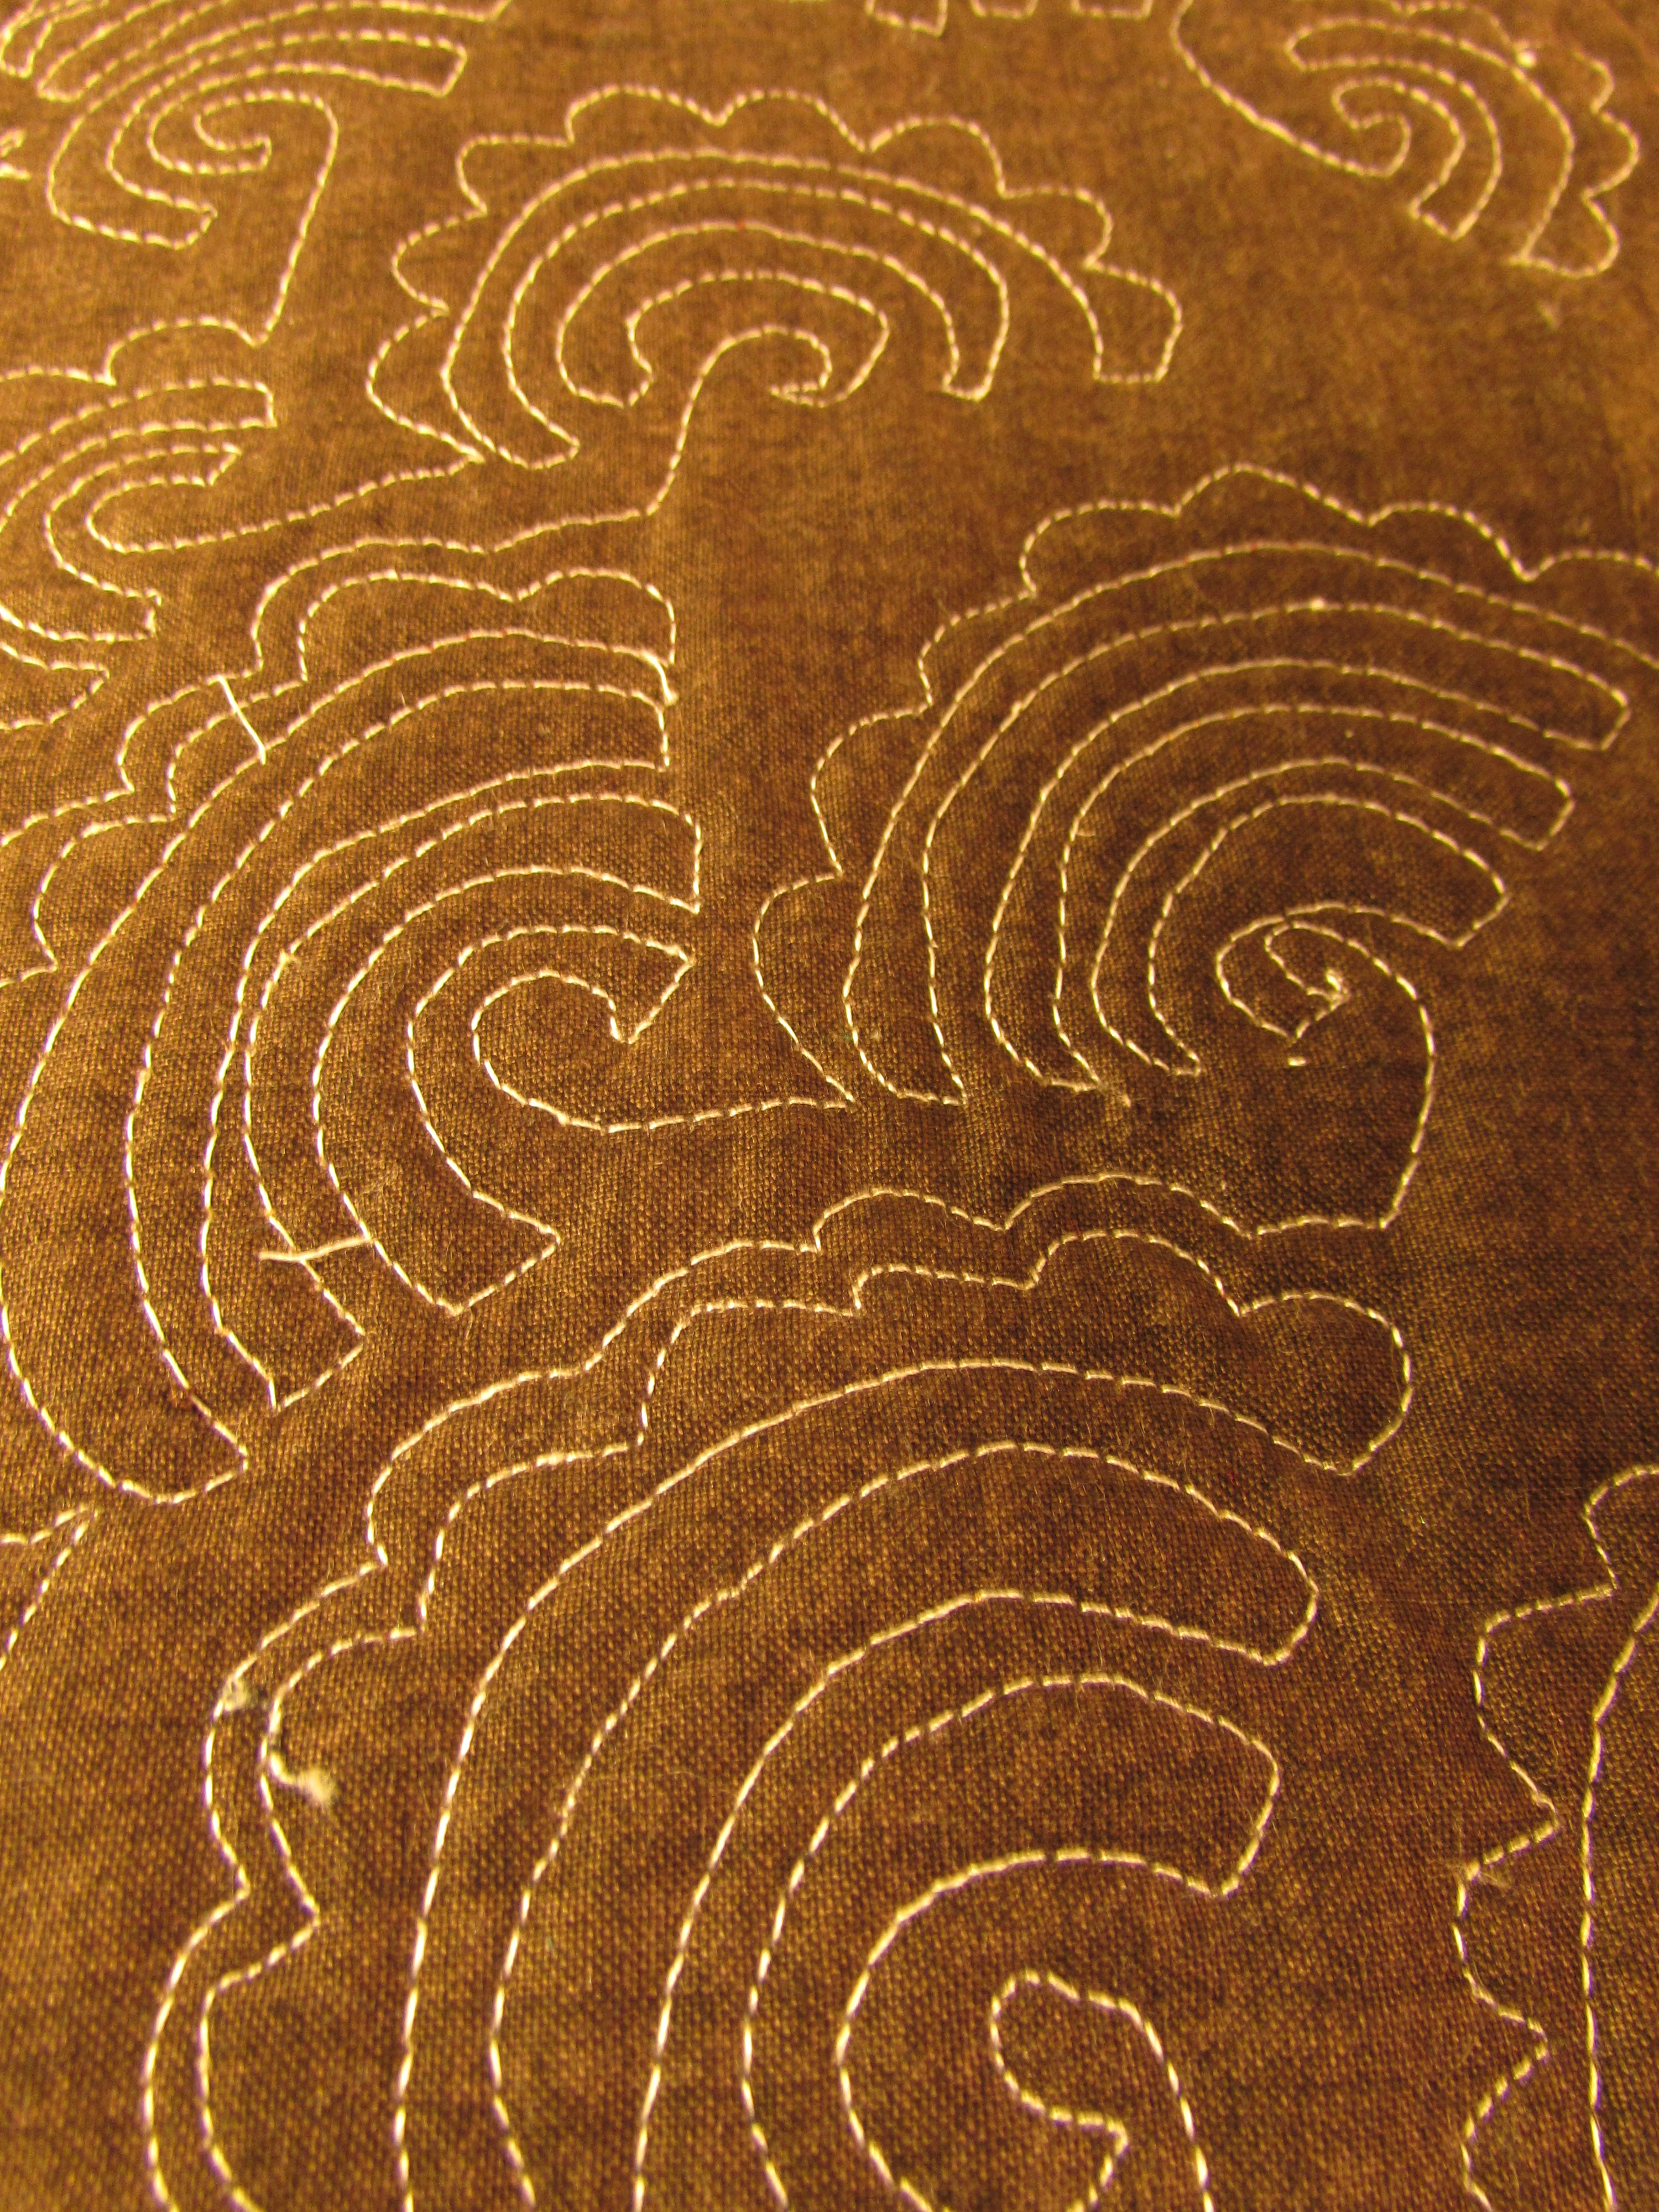
This provided a great project to practice quilting. Here are a few shots of various parts of the project. These swirls are (hopefully) going to represent wind, or swirling clouds.
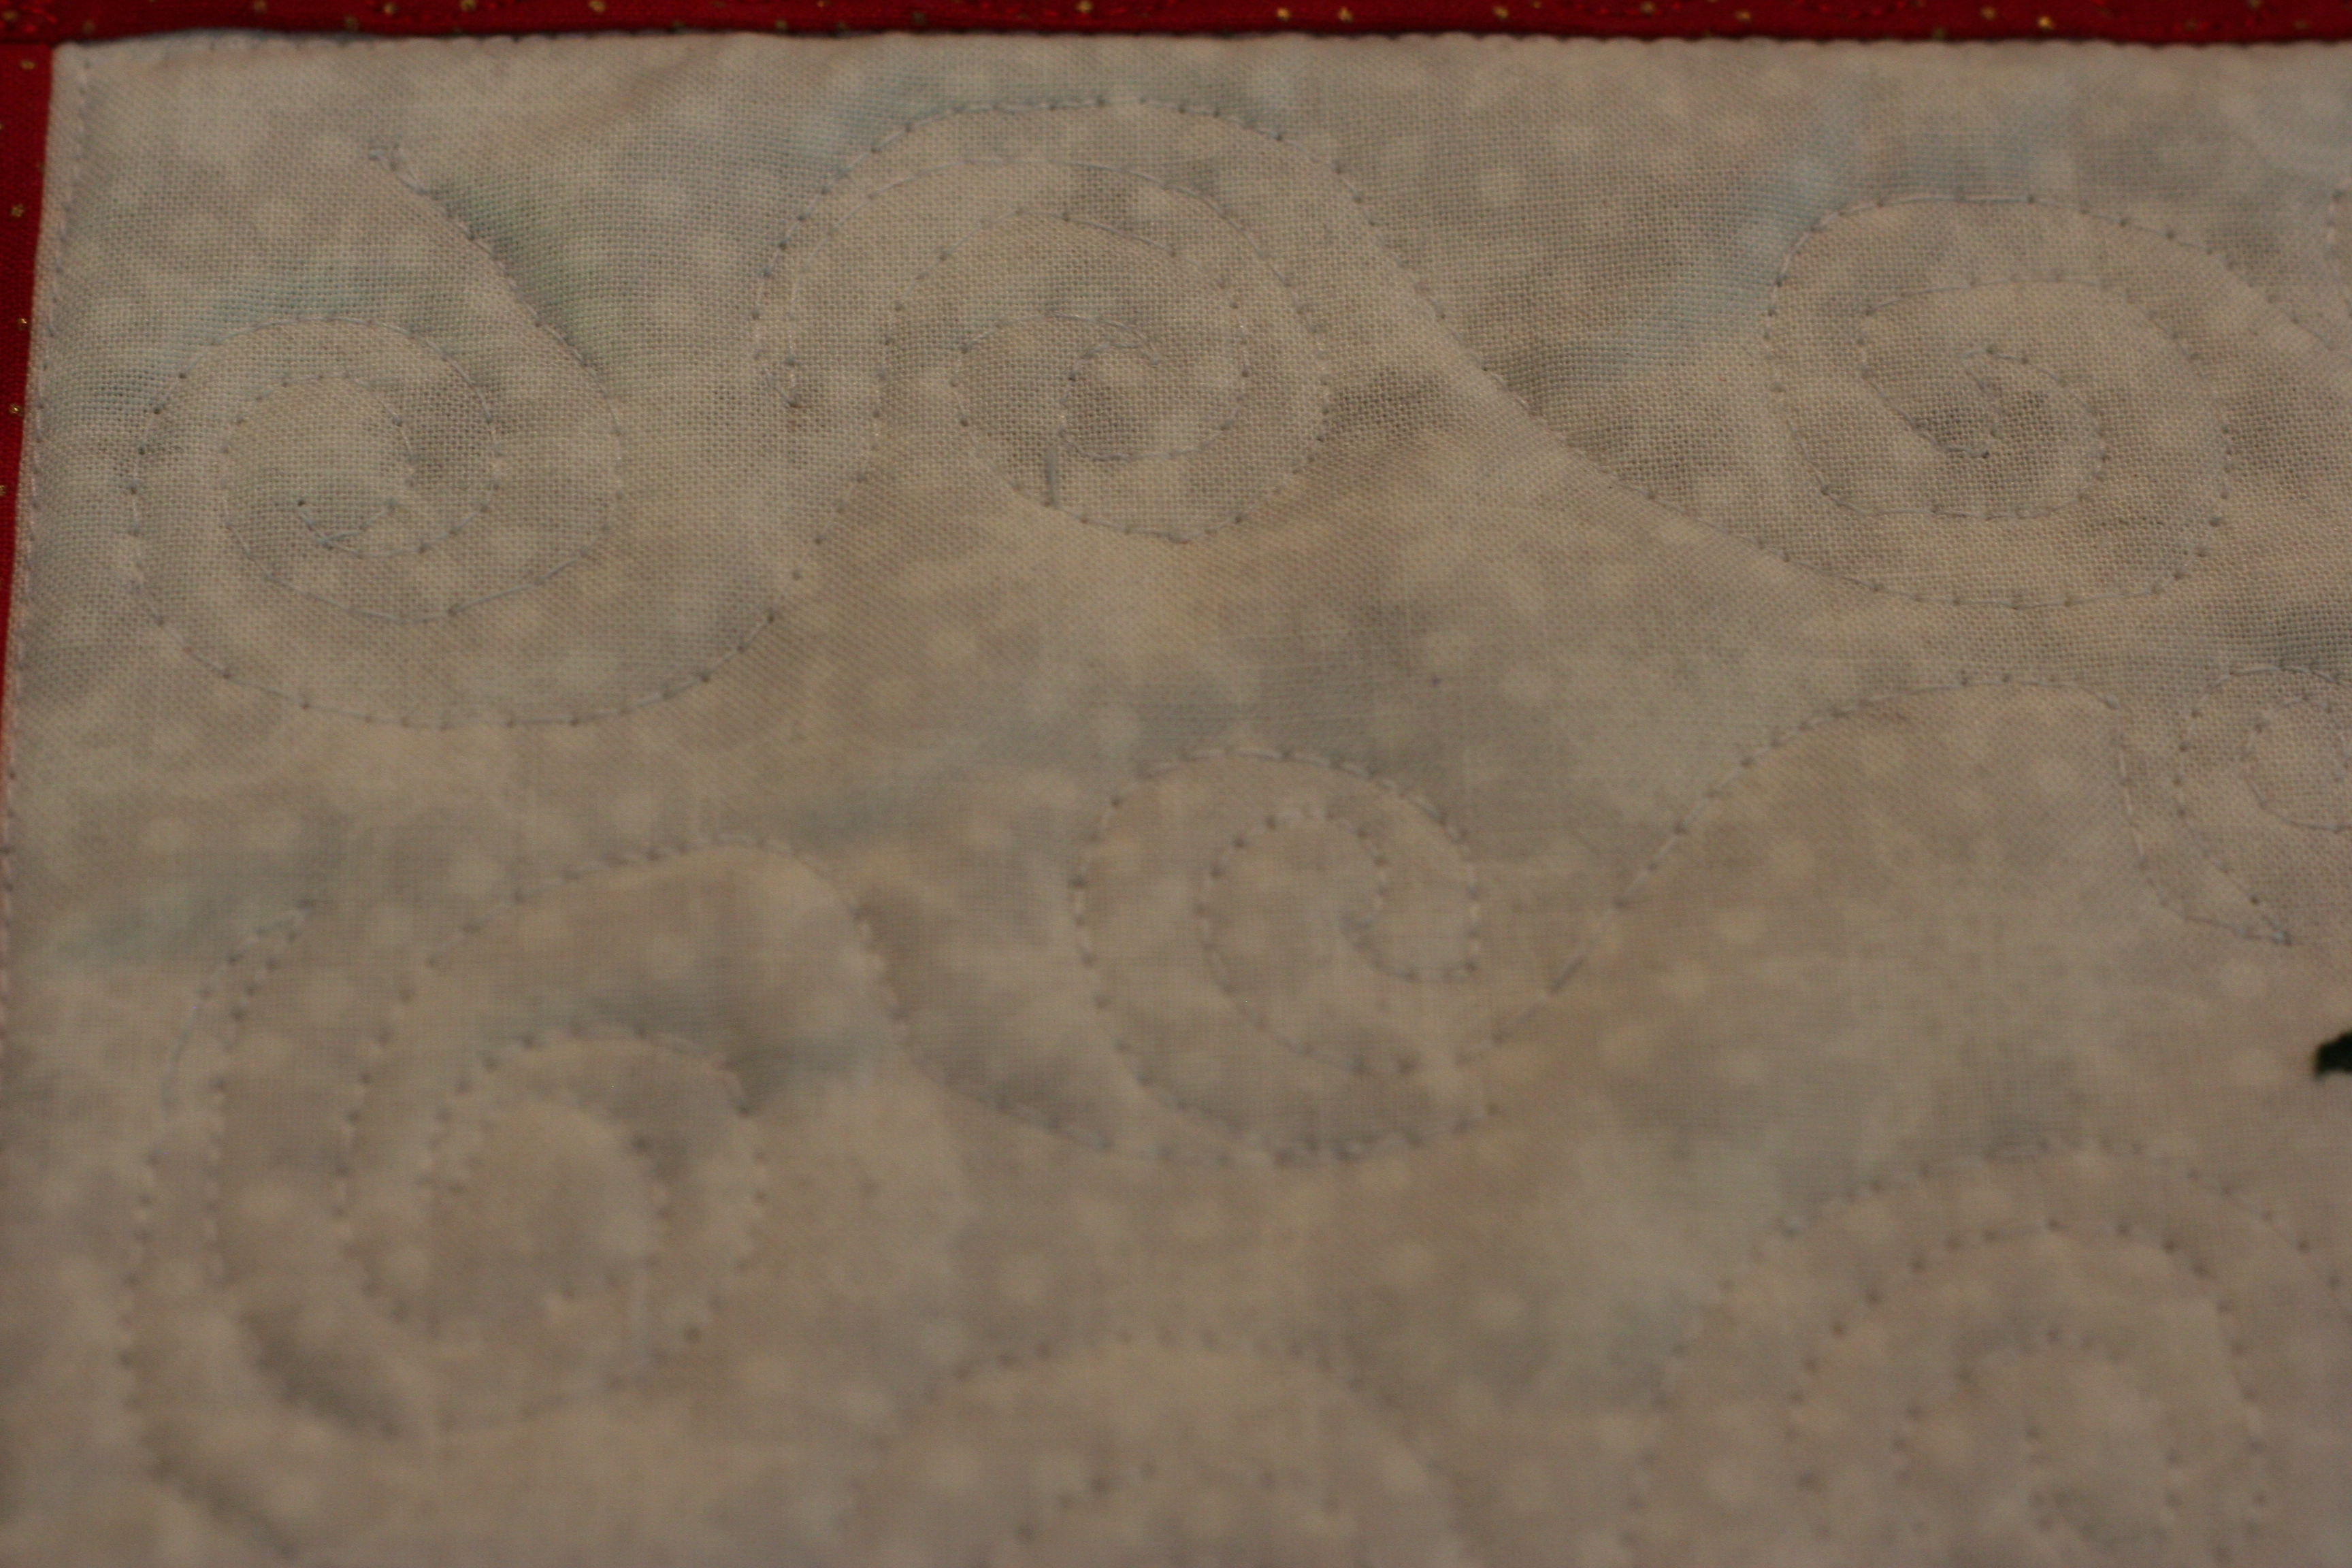
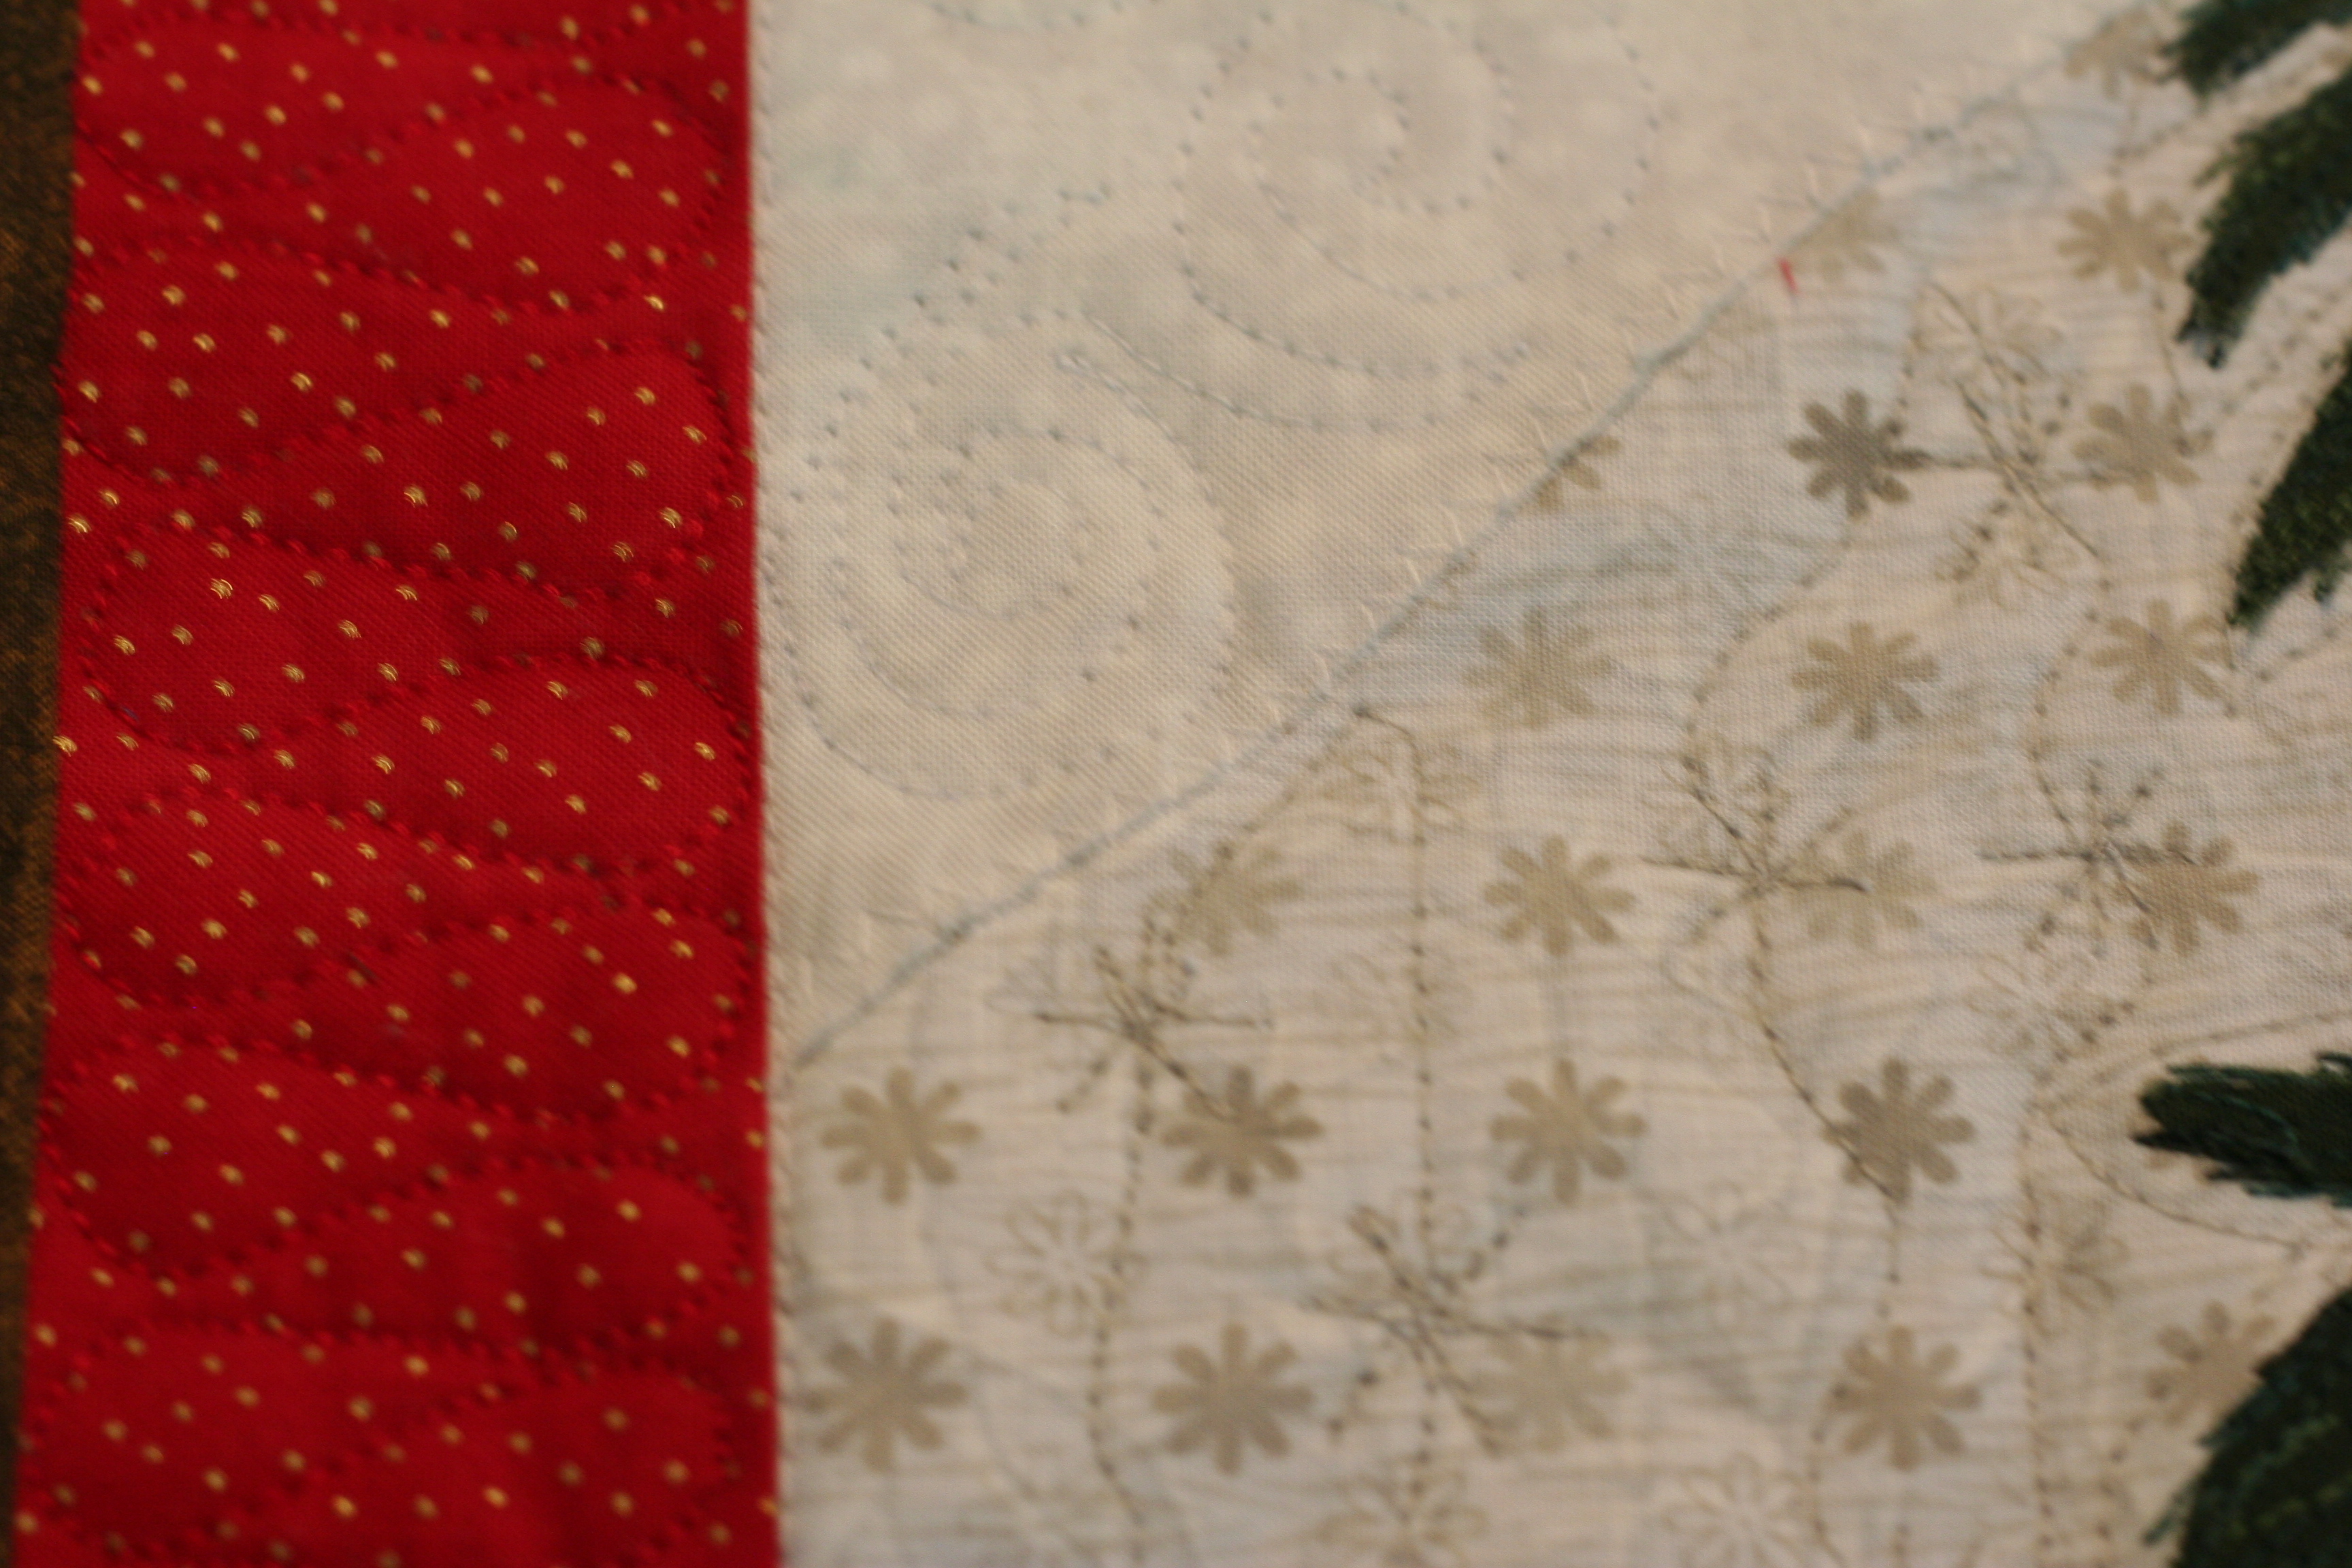
The next shot shows some ribbon candy stitching on the red border. That was really fun to stitch and I am pleased with the result. (Lori went over this thoroughly including variations of it, in her Doodle to Design class.) On the snowflake print, I did wavy lines with little snowflakes. Again, this was covered in Lori’s class. It was satisfying to be able to put the lessons from her class to use right away.
I have just about finished quilting this. I am trying to decide between binding it traditionally or facing it. Facing it is winning at this point. Hopefully I will have a finish to show you soon!
Check out the classes on Craftsy. There are so many to choose from. I love to be able to learn on my schedule and also love the quick interaction with the teacher. If you have questions, leave them in the comments. If you do click through to Craftsy from my links, thanks so much!
Linking for the first time with Sew Can She, Show Off Saturday! Also linking with Beth at Main Crush Monday. For all other link ups, check the top of the page, under Link Ups.
I did a little practice session (actually it took a few sessions) of free motion quilting. It’s been a while since I last sat down and focused on it. Really, when it is truly a practice session and I don’t have a lot invested in the outcome, it is very fun. FMQ is a skill (like most) that will never improve unless one invests the time.
My main issue is the whole look-at-every-wiggle obsession that I have. I have heard it so many times; when we sit at the machine to quilt, our line of sight is up close and personal. The finished product is usually viewed from a distance which improves the look of things tremendously. As I played with this practice piece, I made many wiggles and hops that I was unhappy with. However, for the most part, I left them as they are. My strong dislike for the seam ripper makes it easier for me to ignore the less than perfect stitching. I don’t need to make it perfect. I just need to keep stitching. If I spend lots of time ripping things out, the joy is lost; given up to the pursuit of perfection when really, good is enough for me.
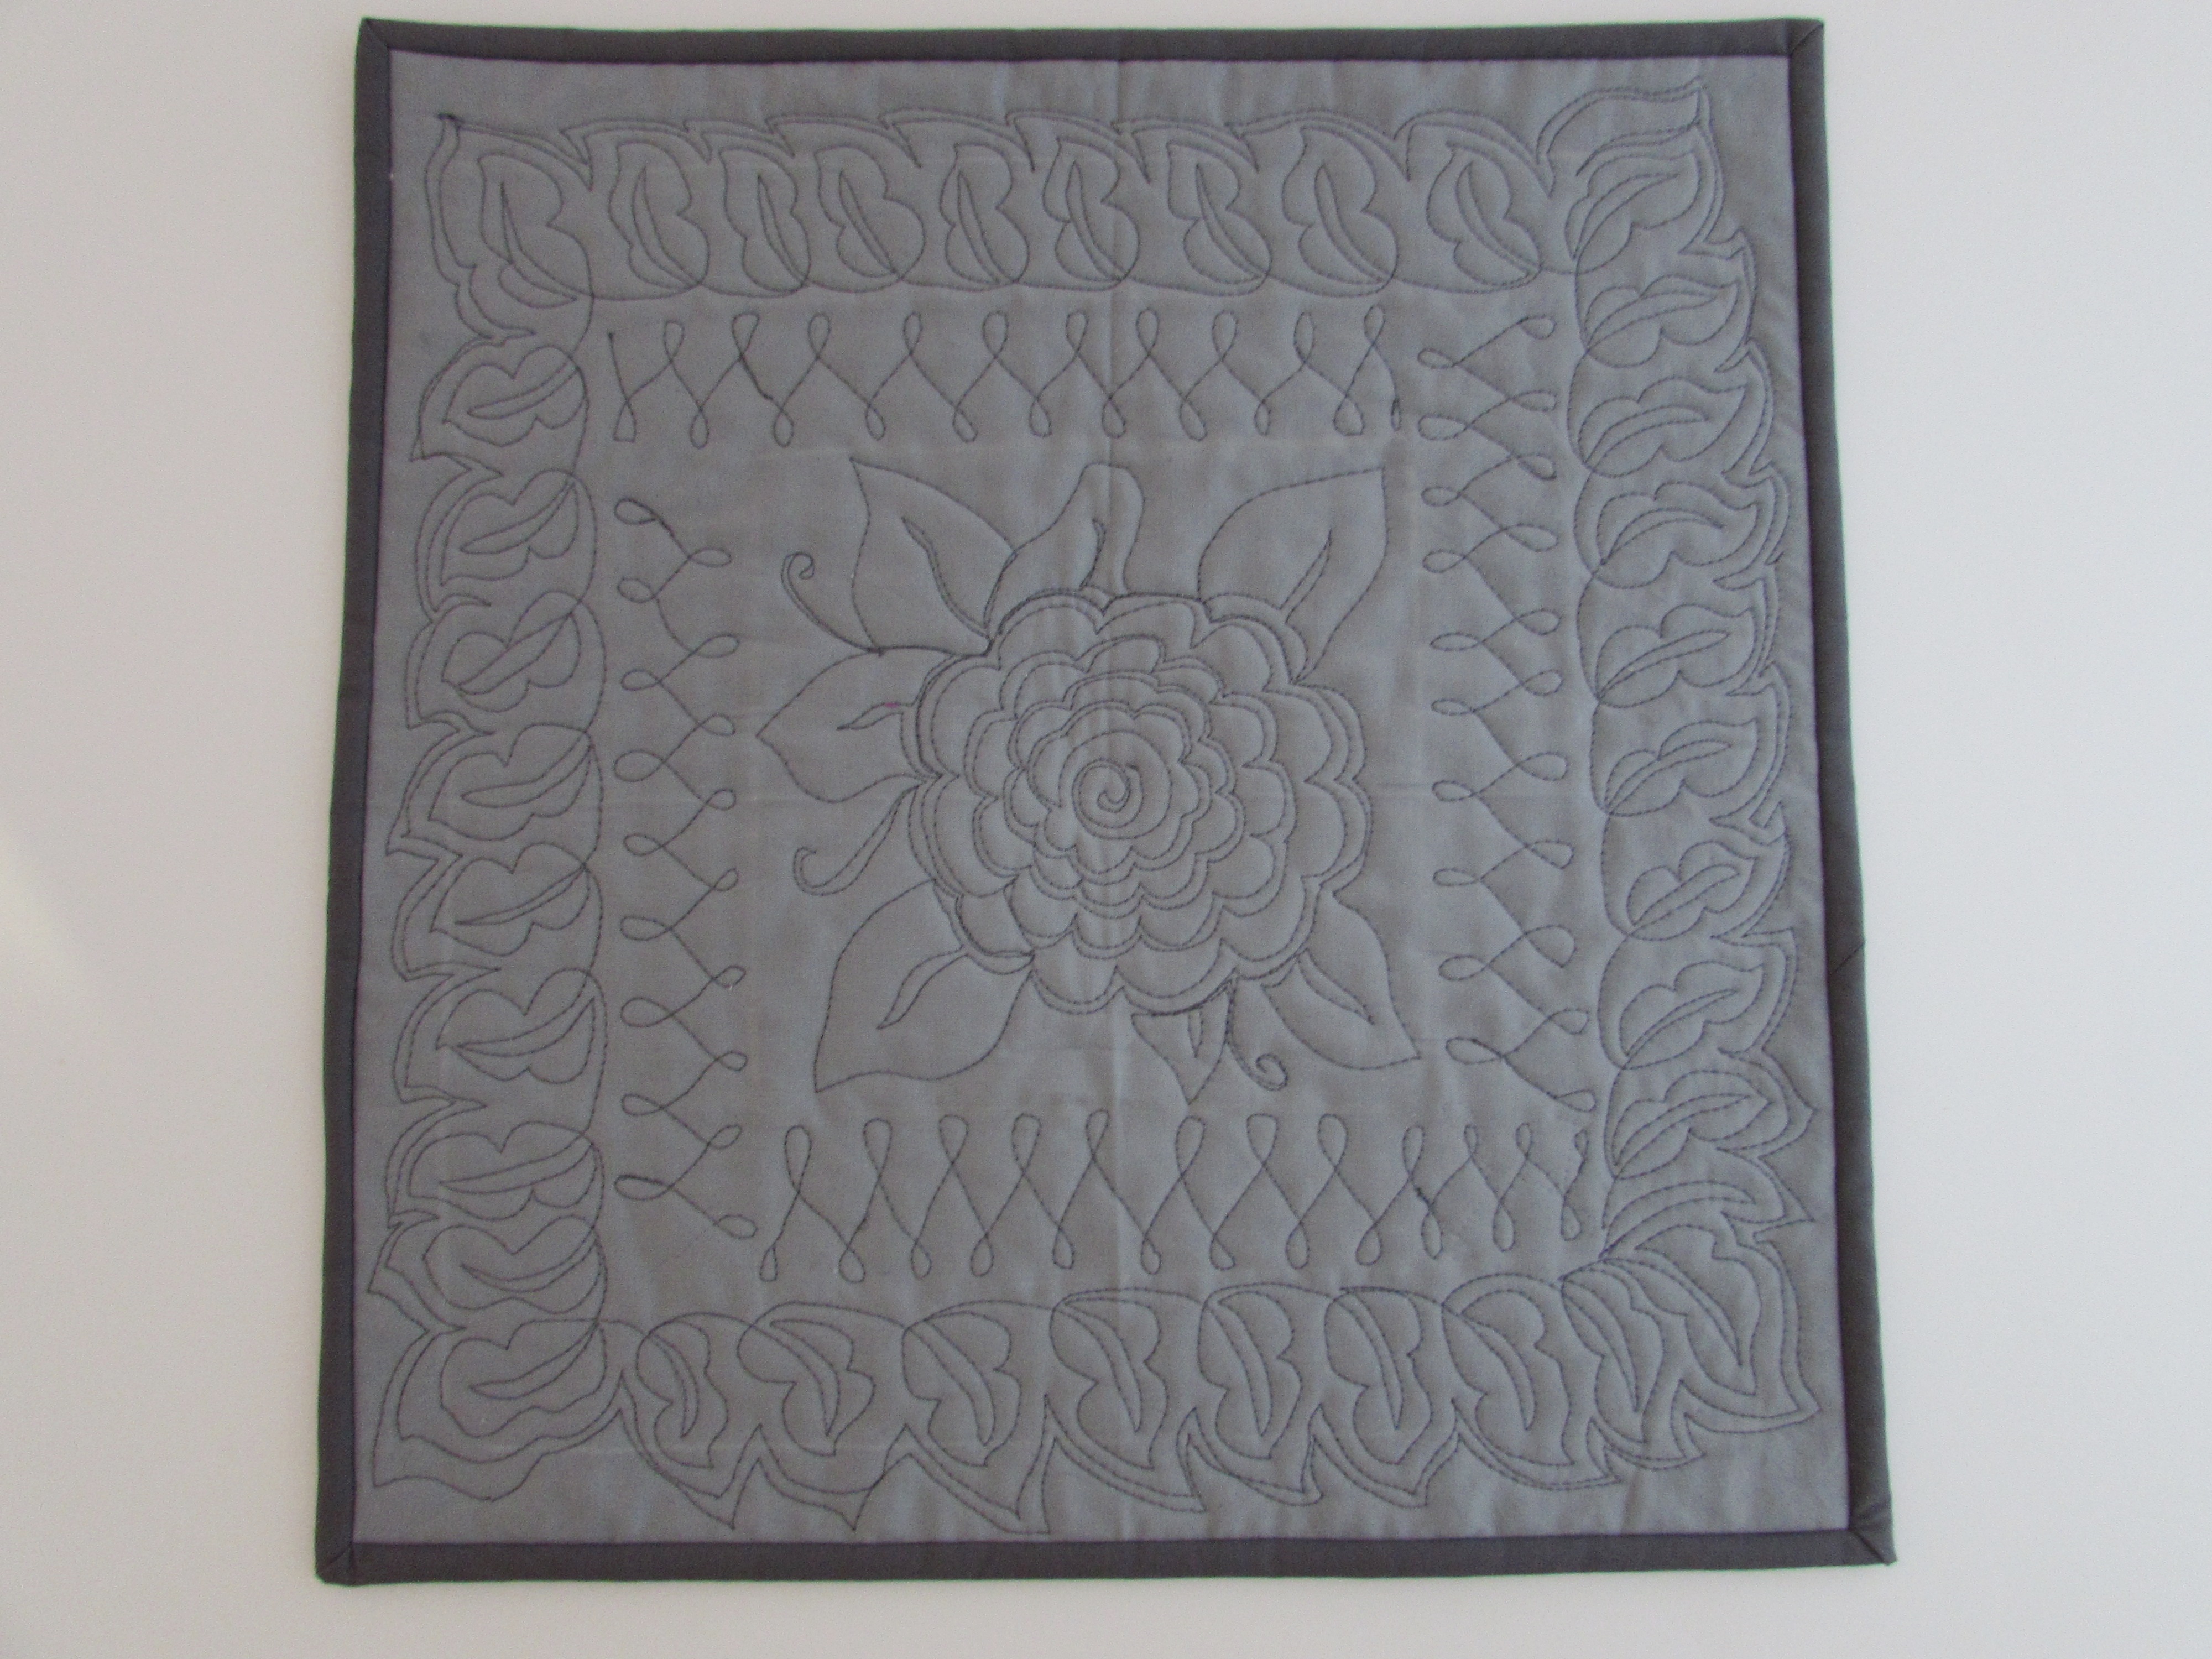
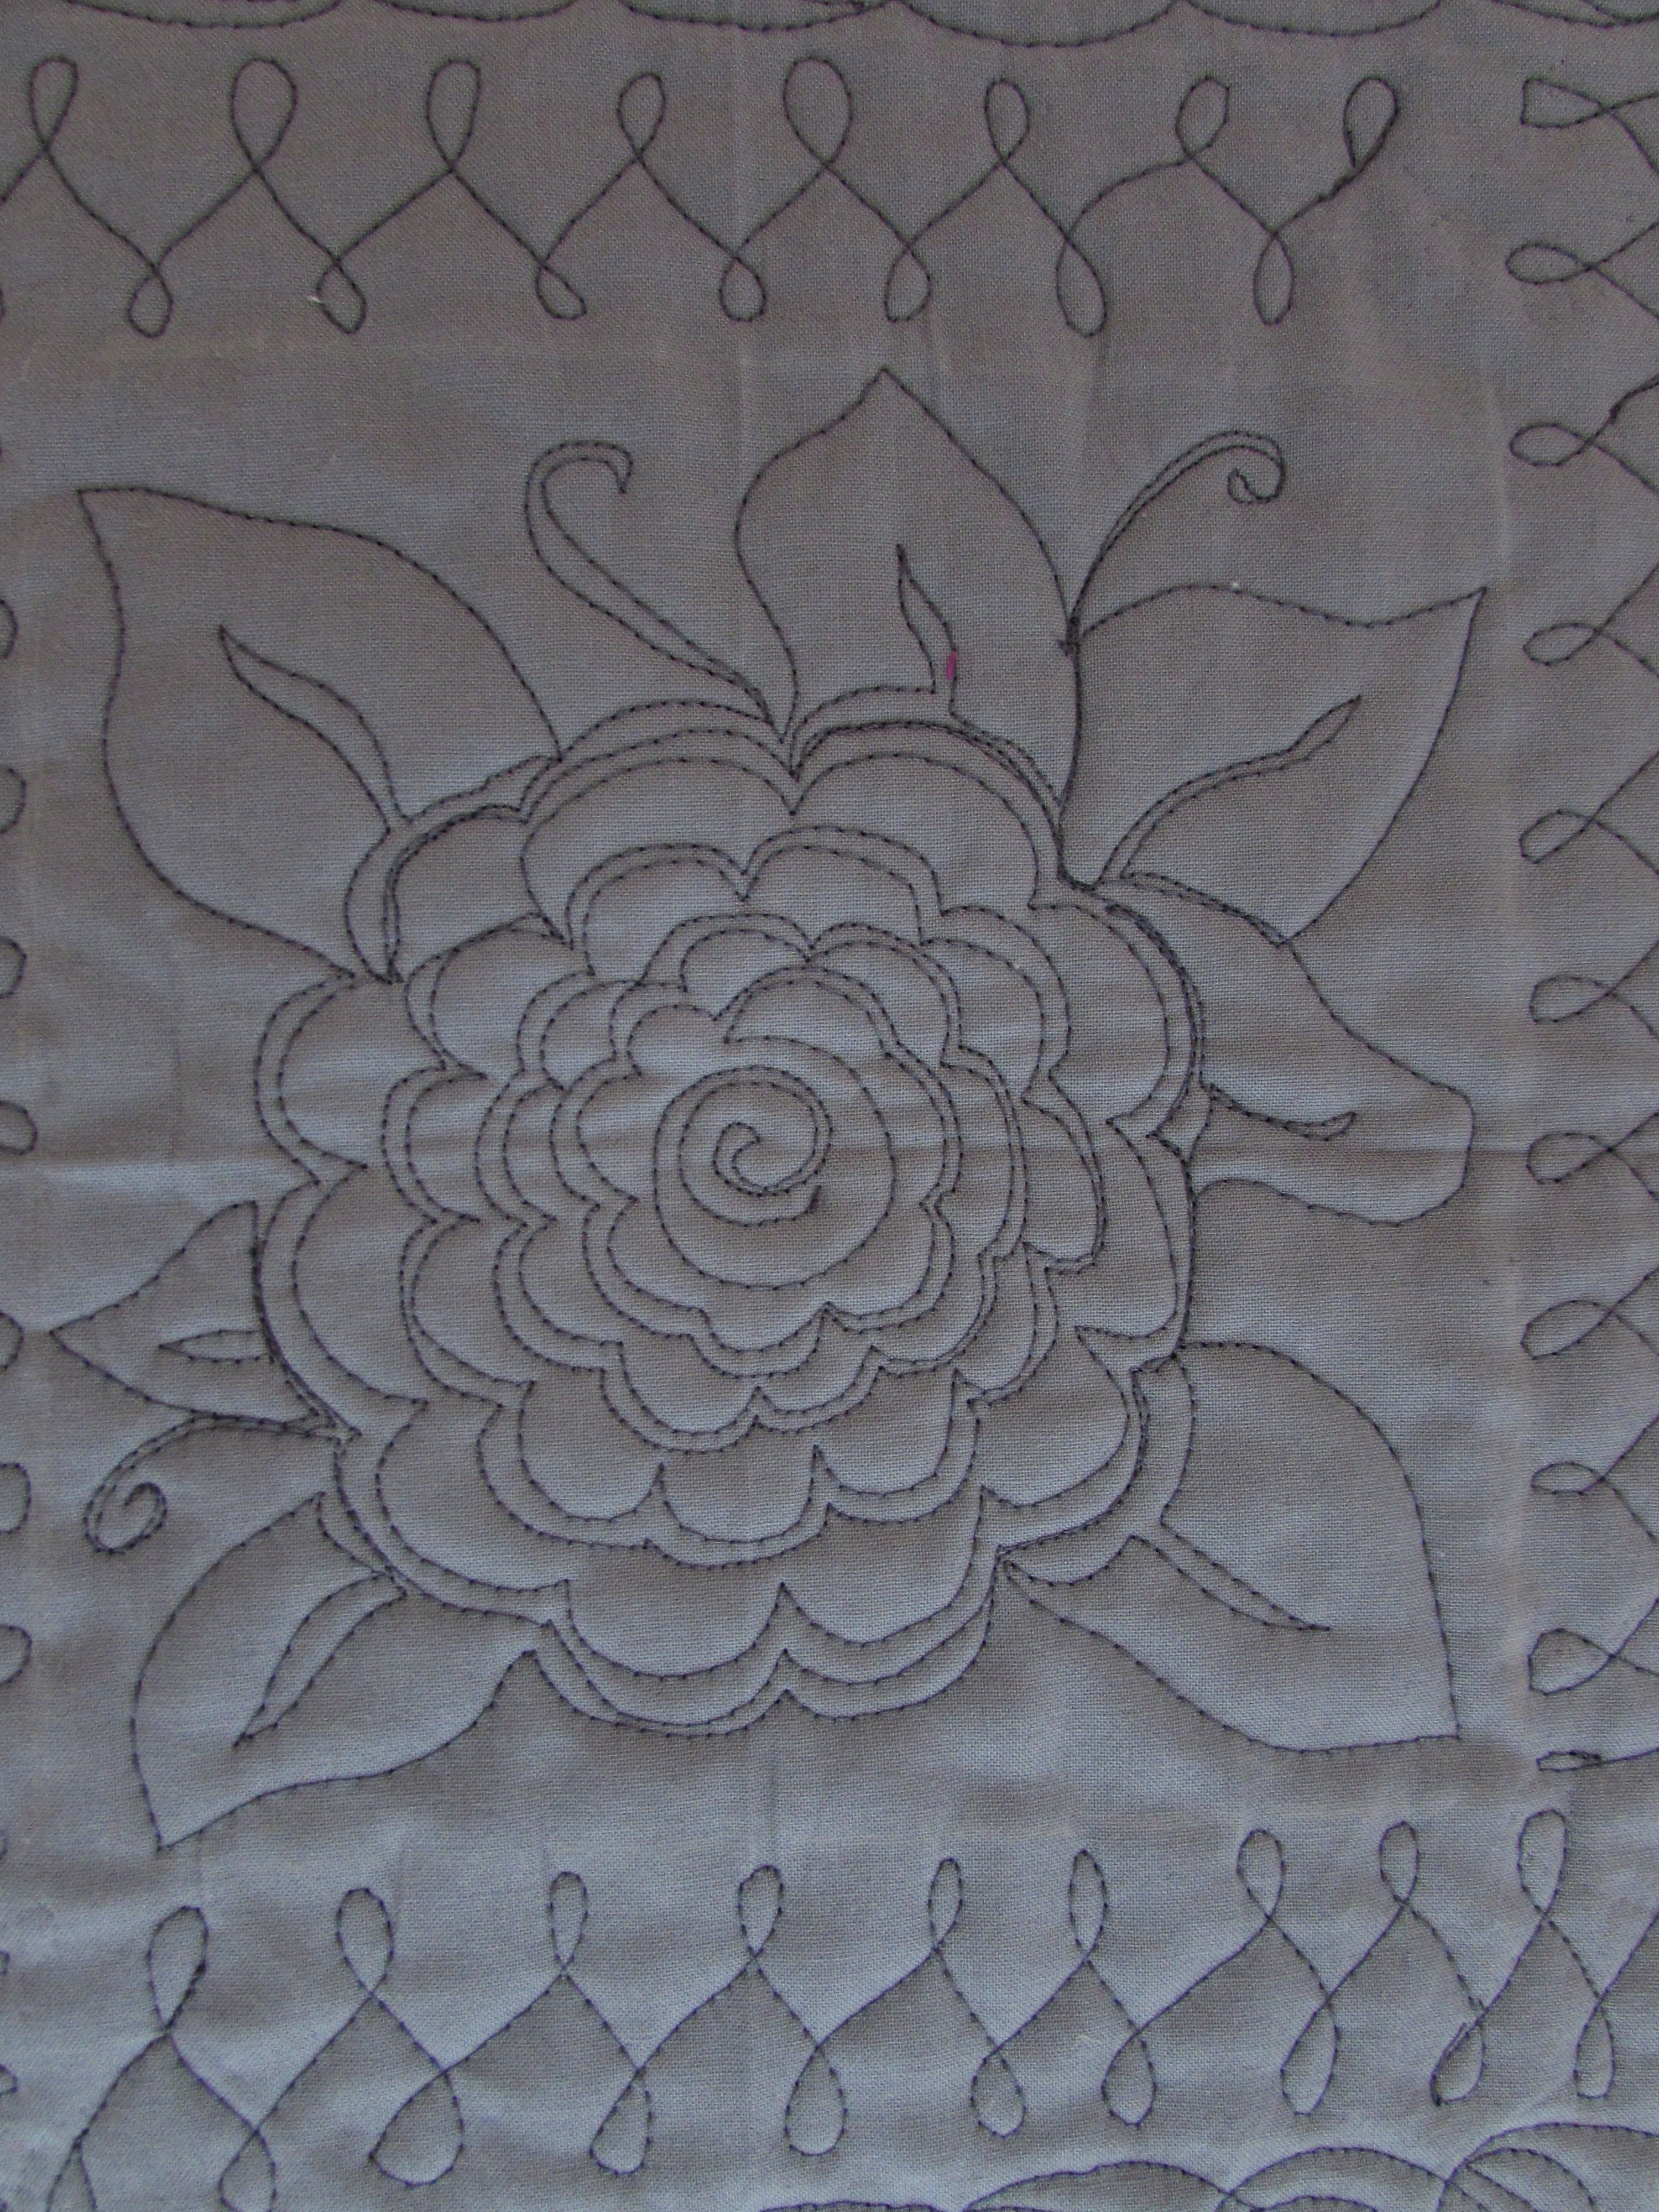
As expected (and hoped for) I learned quite a bit with this piece. First of all, in a Craftsy class, Machine Quilting Wholecloth Quilts with Cindy Needham, she suggests folding your practice piece in half and ironing a line and then folding one more time (so you have 4 quarters) and ironing again. You end up with the center marked well and four gridlines to guide you. The lines are still slightly visible on this piece. Following that I worked on the flower in the center. The tutorial for this motif was taken from Lori Kenedy’s site, The Inbox Jaunt. The name of the motif is Claire’s Peony. This flower is really fun to do.
I bordered the flower with a simple twist. Here comes lesson number two. I found out that I had no idea how to deal with the corners. This design doesn’t really lend itself to turning a corner. I tried, oh, I did try! With this one, I used my seam ripper and tried a few times to find a way. After a couple of tries, I just went end to end and gave up on the turn. It isn’t award winning but then, this isn’t going to a show, it’s practice. So I am fine with it.
The outer border is inspired by another of Lori’s tutorials, The Maypop Leaf. I doodled this one for a while on paper (actually I draw anything first, before stitching) but it is still a bit rough. Again, practice, right? I felt like it needed one last bit so I echoed the leaf border a couple of times.
I was going to toss this into a pile of odds and ends but after looking at it for a while, I decided to keep it. I like the way it looks as a whole so I put a quick binding on it and kept it. It finishes out at 15″ x 15 1/2″ (I know – where did that extra 1/2″ come from???) Keeping these is a good thing – as I progress, it is nice to look back and see how far I have come. You know, the hardest part of writing this post is to keep the critcism of this practice session to a minimum. I feel like if I am going to share these projects, I need to zoom in and explain or defend every mistake. But I am not going to. It isn’t perfect but it is certainly good enough.
Linking to Freemotion Mavericks and other assorted wonderful linky parties. Info on all of them are listed at the top of the page, under link ups.