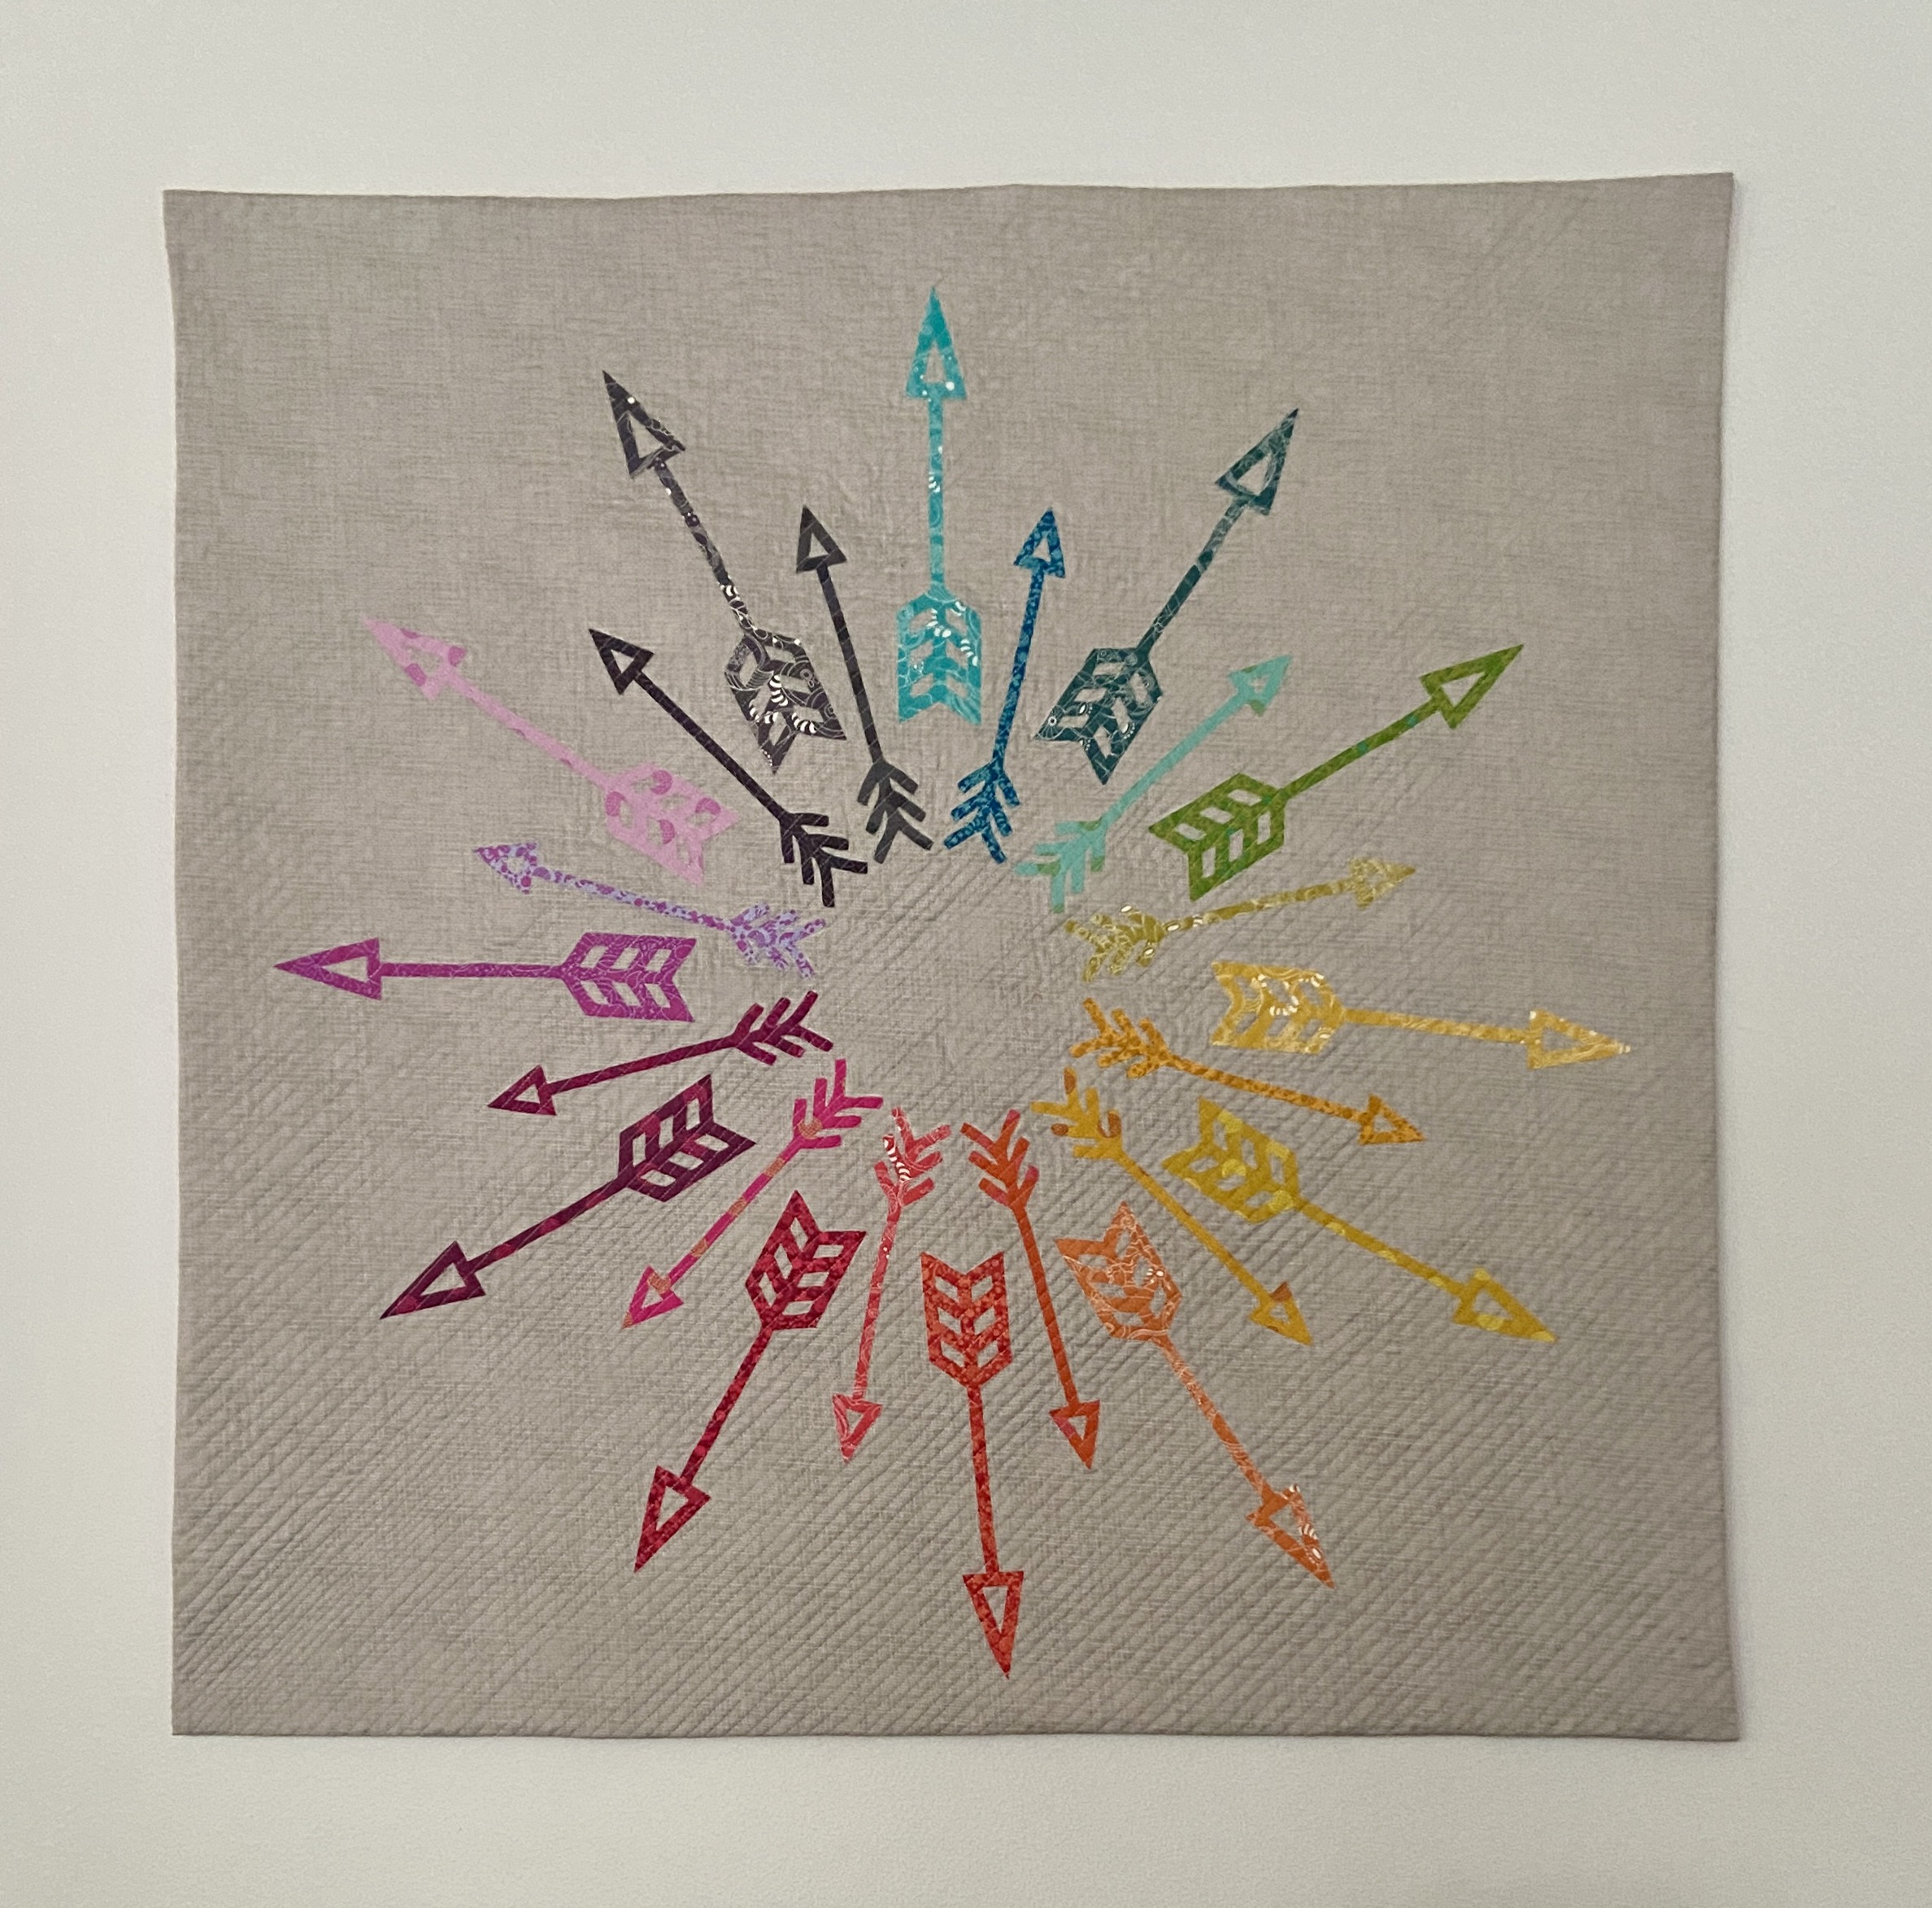
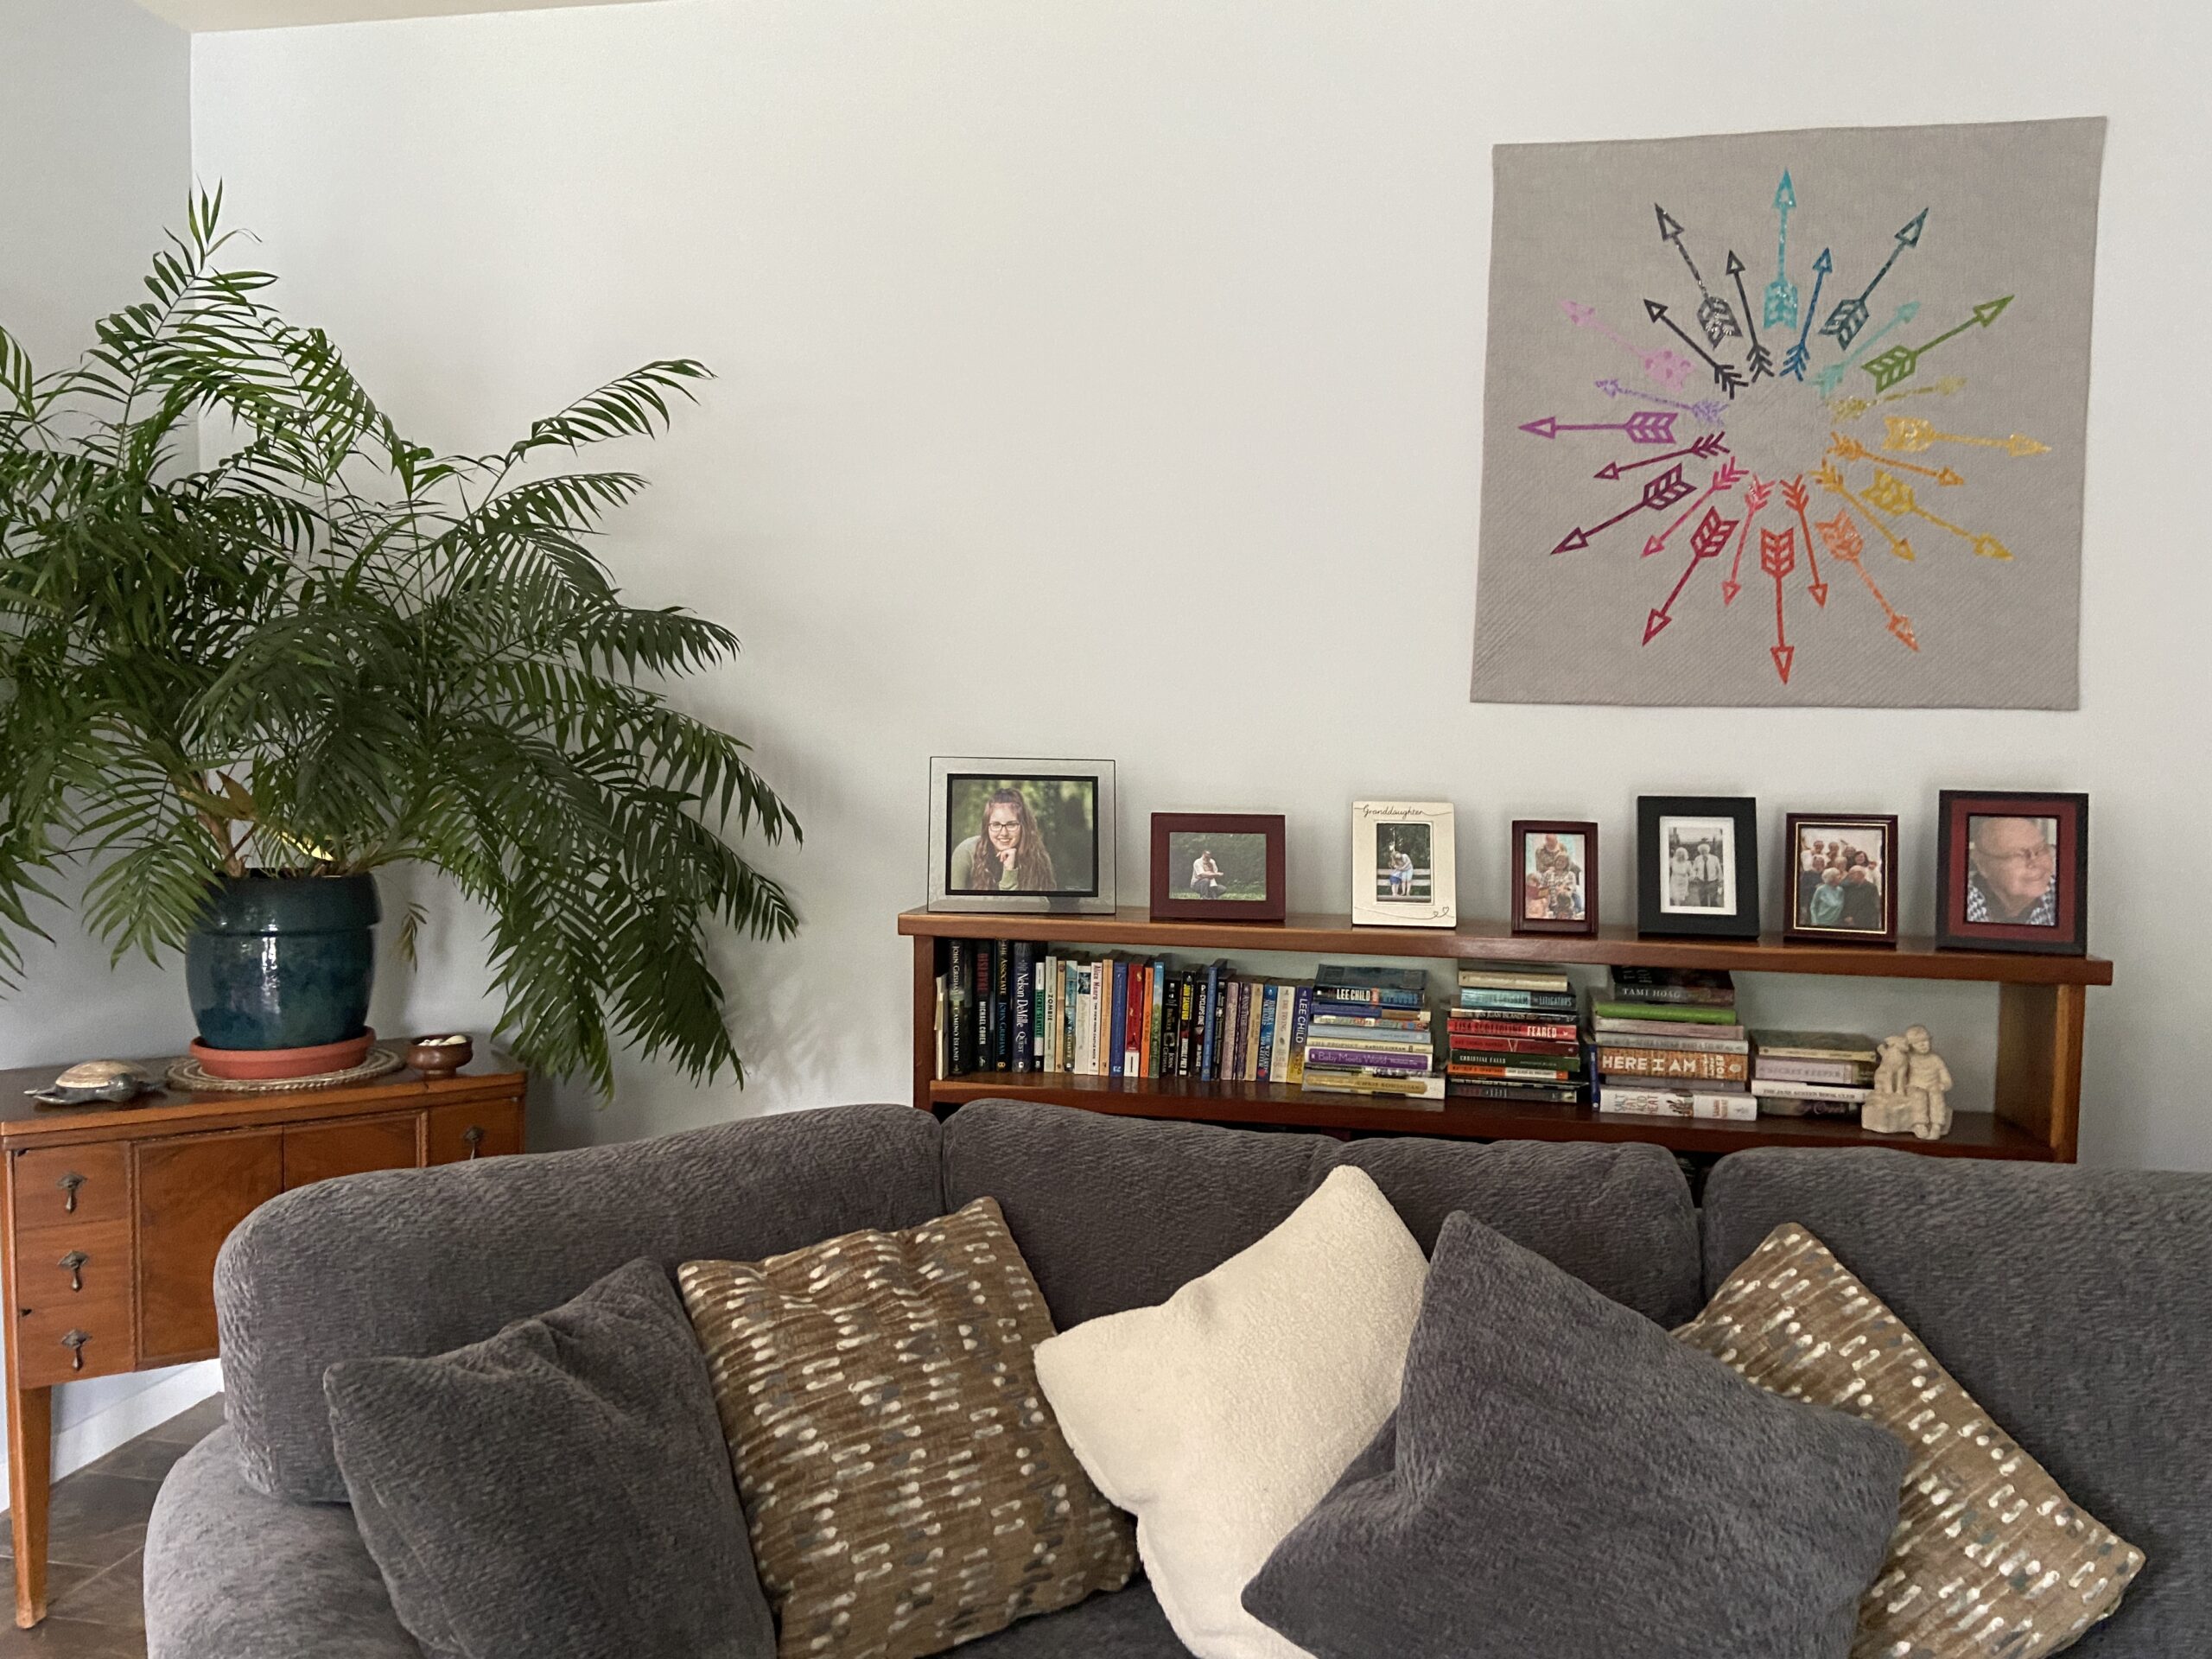
The quilt I am sharing today exemplifies our many choices and the potential with each one. All arrows point outward to a possible path taken. Many colors to choose from allows a person to pick what is right for them. This project is really different from anything I have made previously and thus presented a few hiccups along the way. But the result is great and I am happy to see it hanging in our family room.
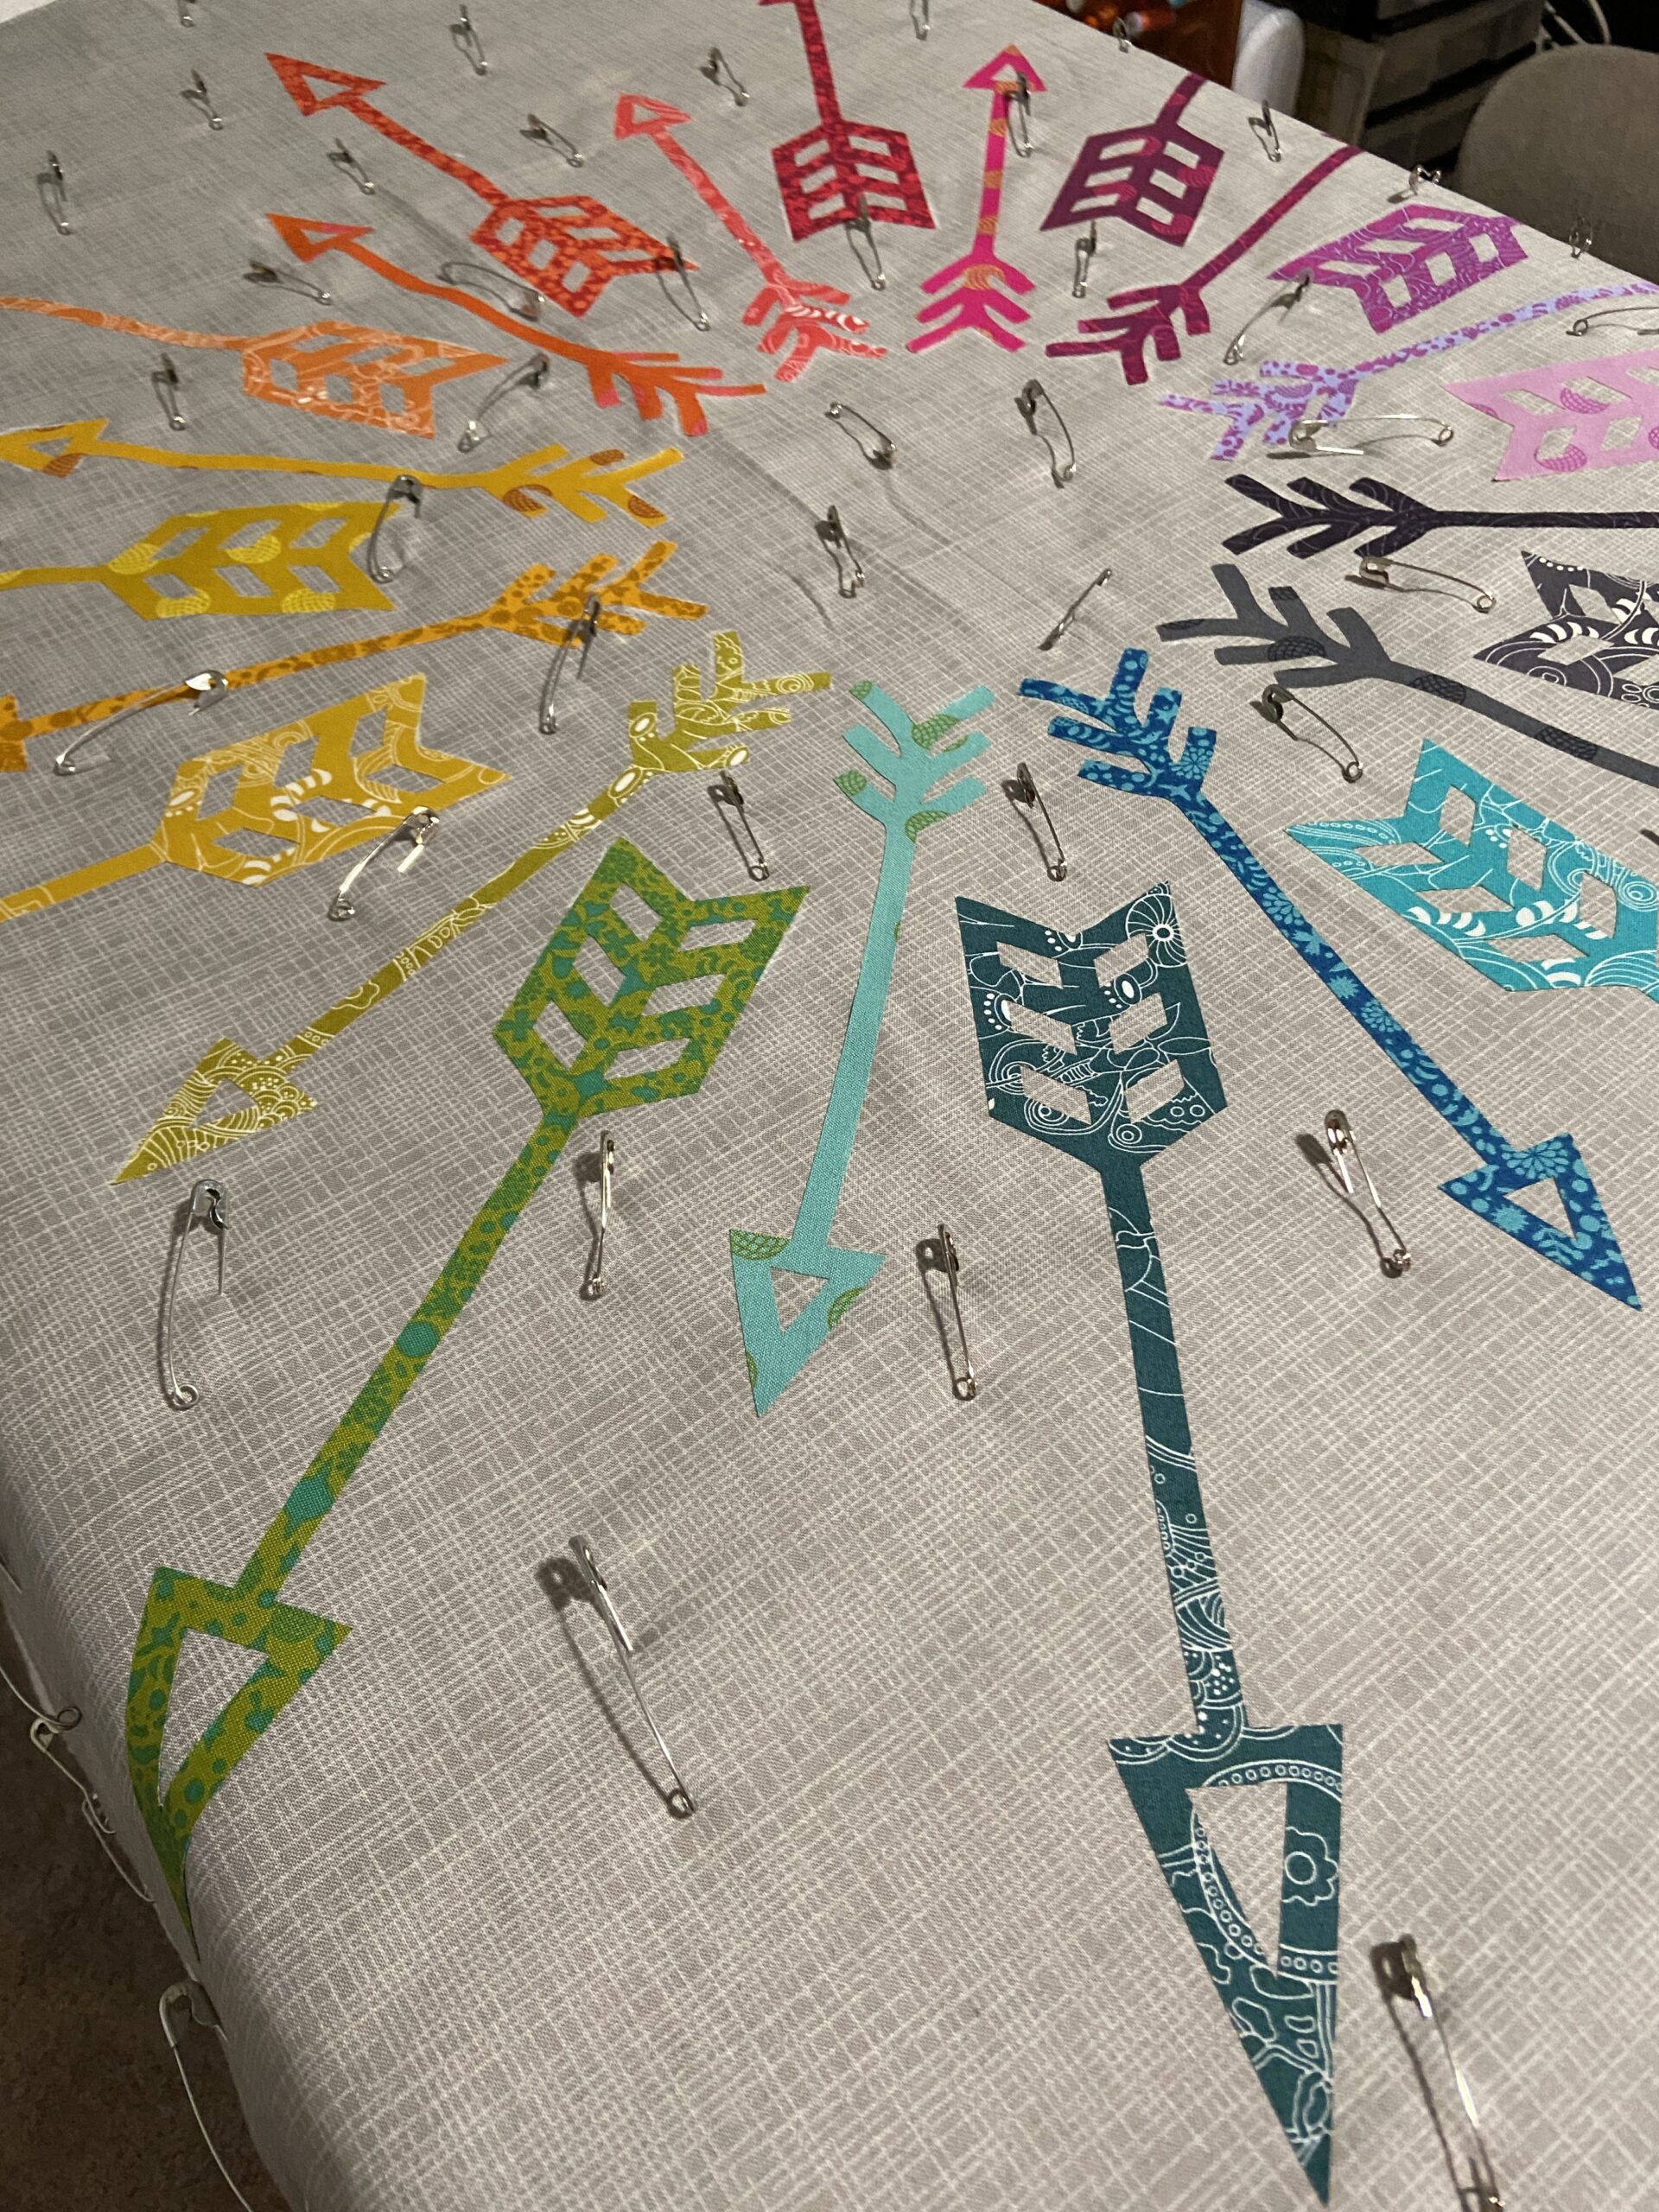
I bought this as a kit at a quilt show last summer. The arrows are laser cut from Alison Glass 2016 Sunprint line. They had the fusible backing already applied to them. All of this is great because the arrows are very thin and delicate. It would have been a tedious process were I to have to apply the fusible myself. Anyway, I think I actually fused the arrows to the backing in November. With the holidays and myriad illnesses all winter long, I didn’t get it basted until some time in February.
To really be sure the arrows stayed glued to the backing, I decided to use matchstick quilting. I started with wide-ish lines. Maybe spaced an inch apart? Then I filled it in, stitching between the lines. This is when I had the problems!
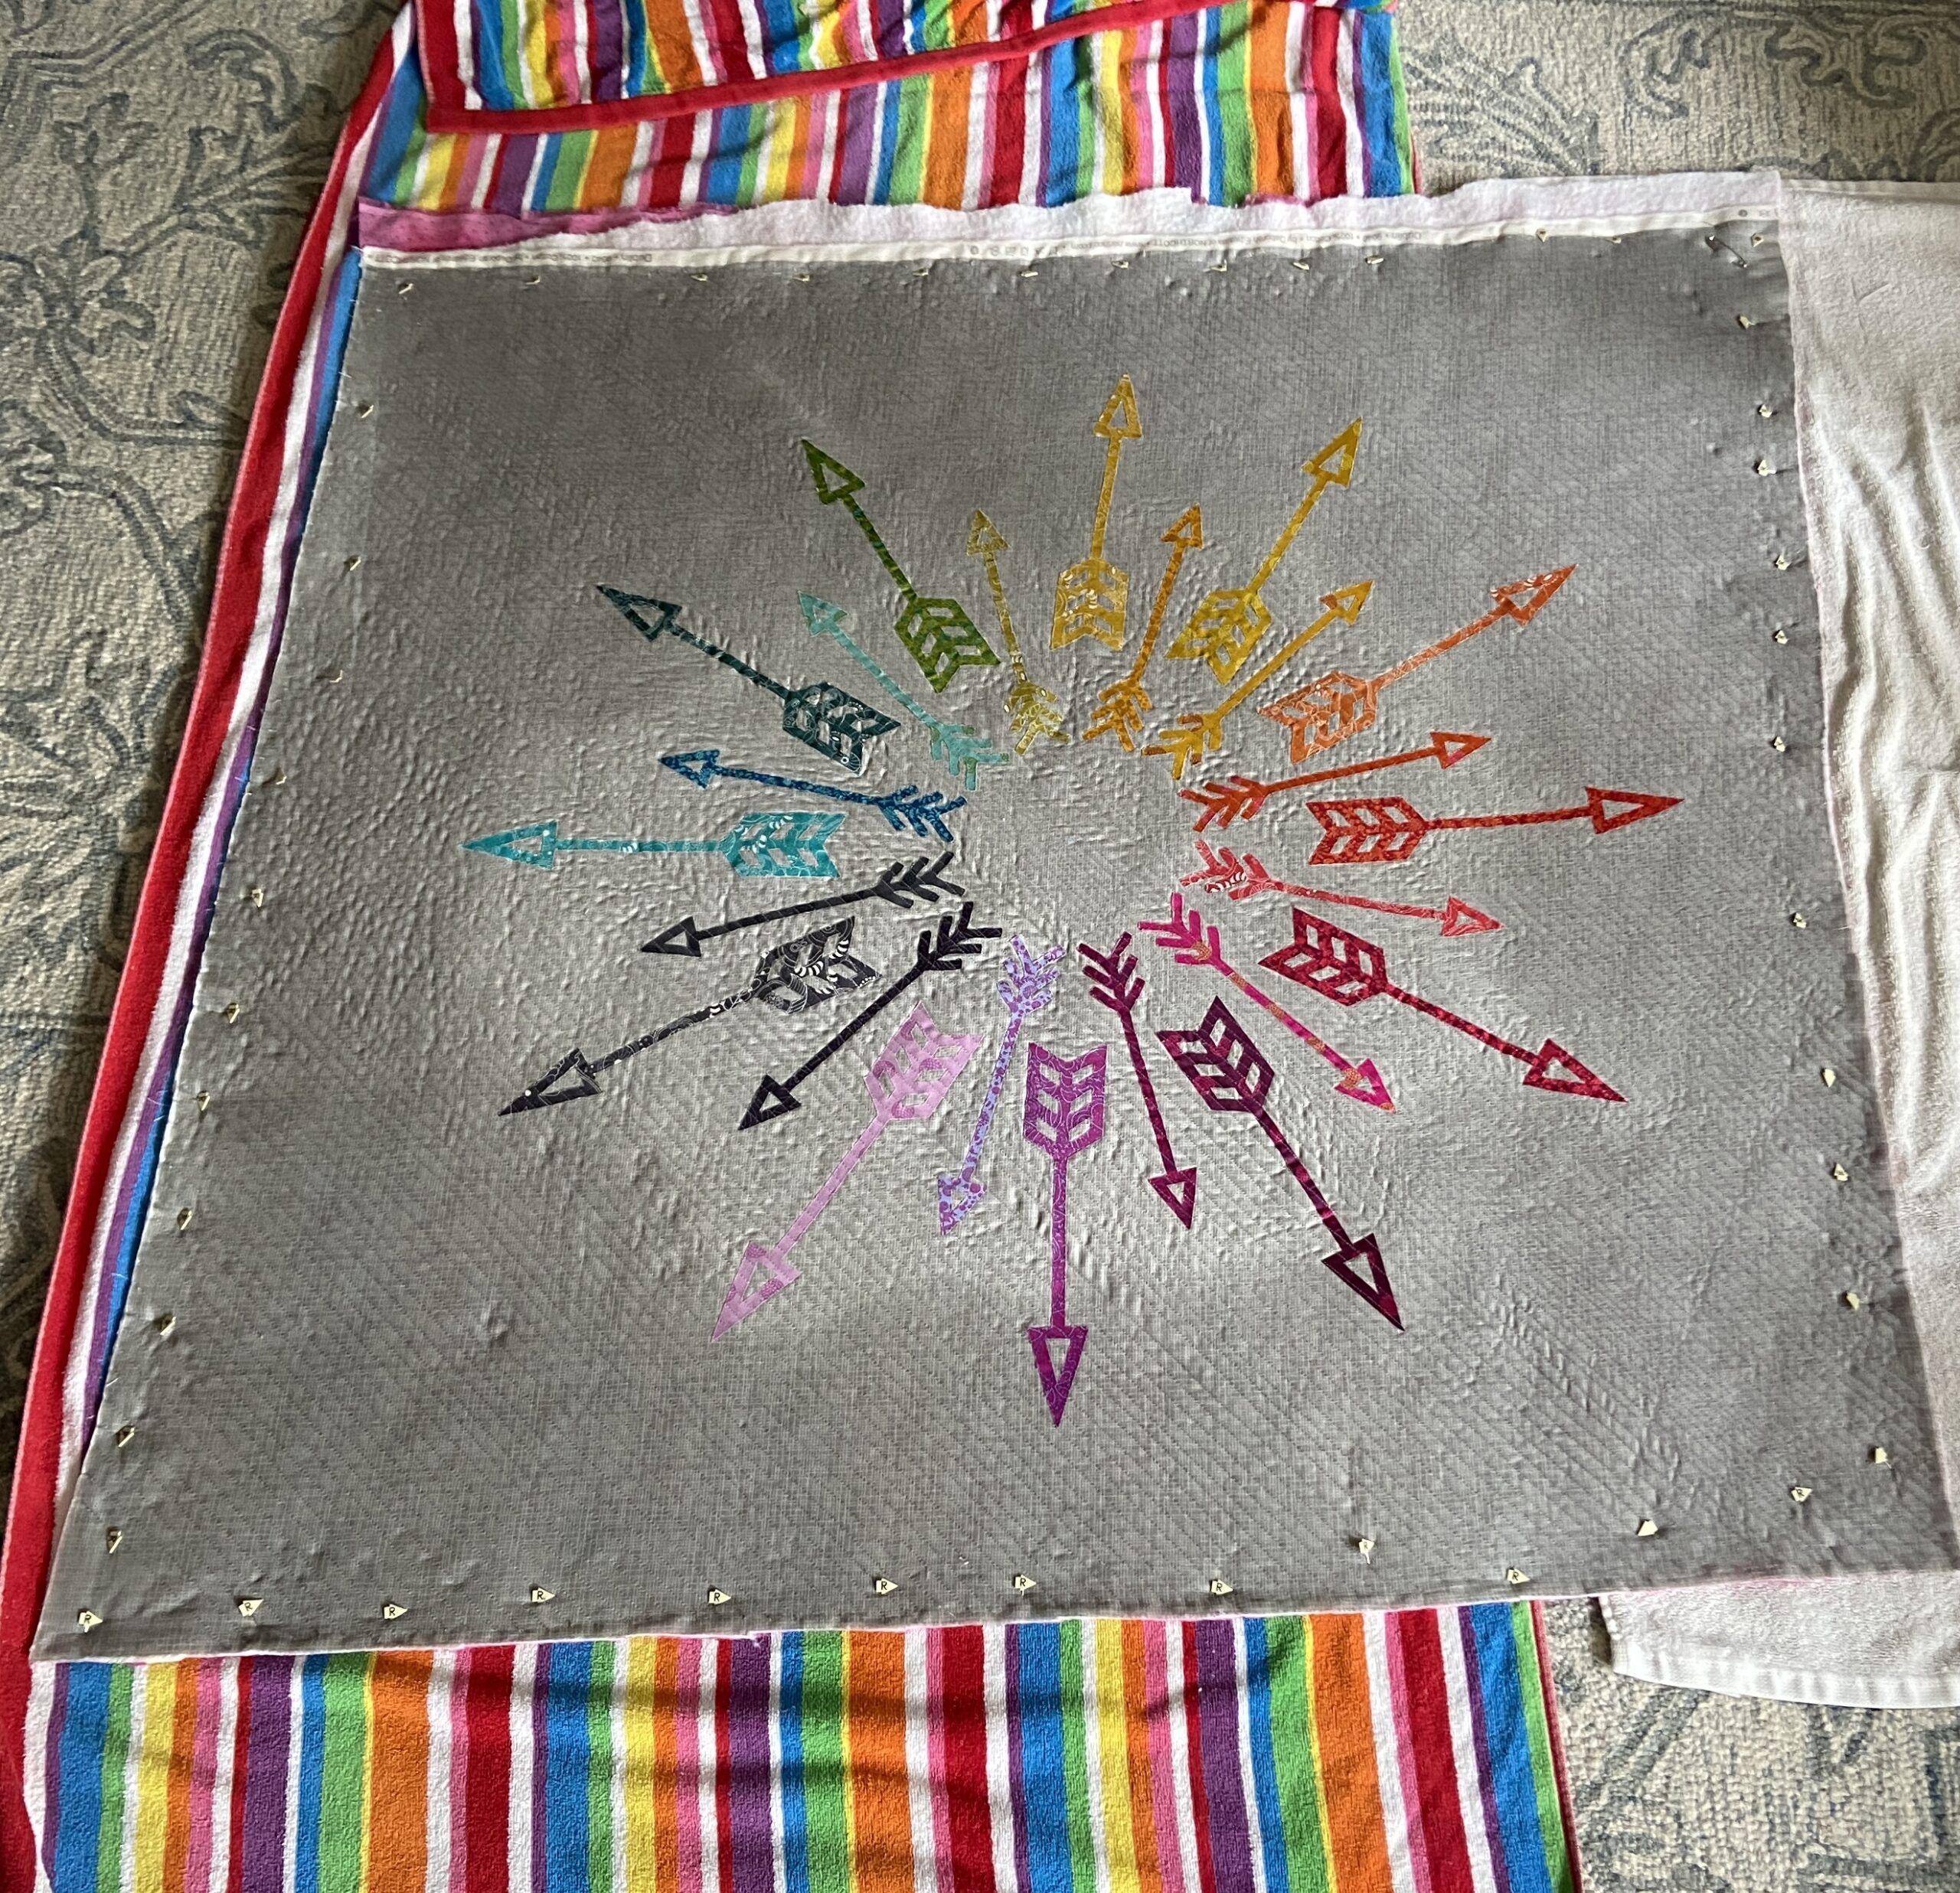
As I got to the corners the fabric just ruffled – it was a mess and I was really concerned. I posted on Instagram and Facebook asking for advice. Yvonne, Quilting Jetgirl, sent me a link to a tutorial she has for blocking a quilt. I decided to block it before I finished quilting it. I was somewhat skeptical because I had tried to block a quilt some years ago and wasn’t successful (and now I know I didn’t do it correctly)! But with her tutorial, I got to work on this piece.
With beach towels under the quilt to protect the carpet, I sprayed water all around the permitter of the quilt. I didn’t want to soak the arrows if possible because I think it would have diluted the fusing. But I really wet the outer portion. Then I took long pins and pinned all the way around. As I was pinning, I was either stretching or patting inward to get the fabric back into shape. I left it pinned to the towels & carpet for several days to be sure it was truly dry. This worked beautifully.
After the quilt was flat and shaped nicely, I finished the quilting. With Yvonne’s advice playing in my head, I stitched very slowly and tried to be sure not to pull on the piece at all.
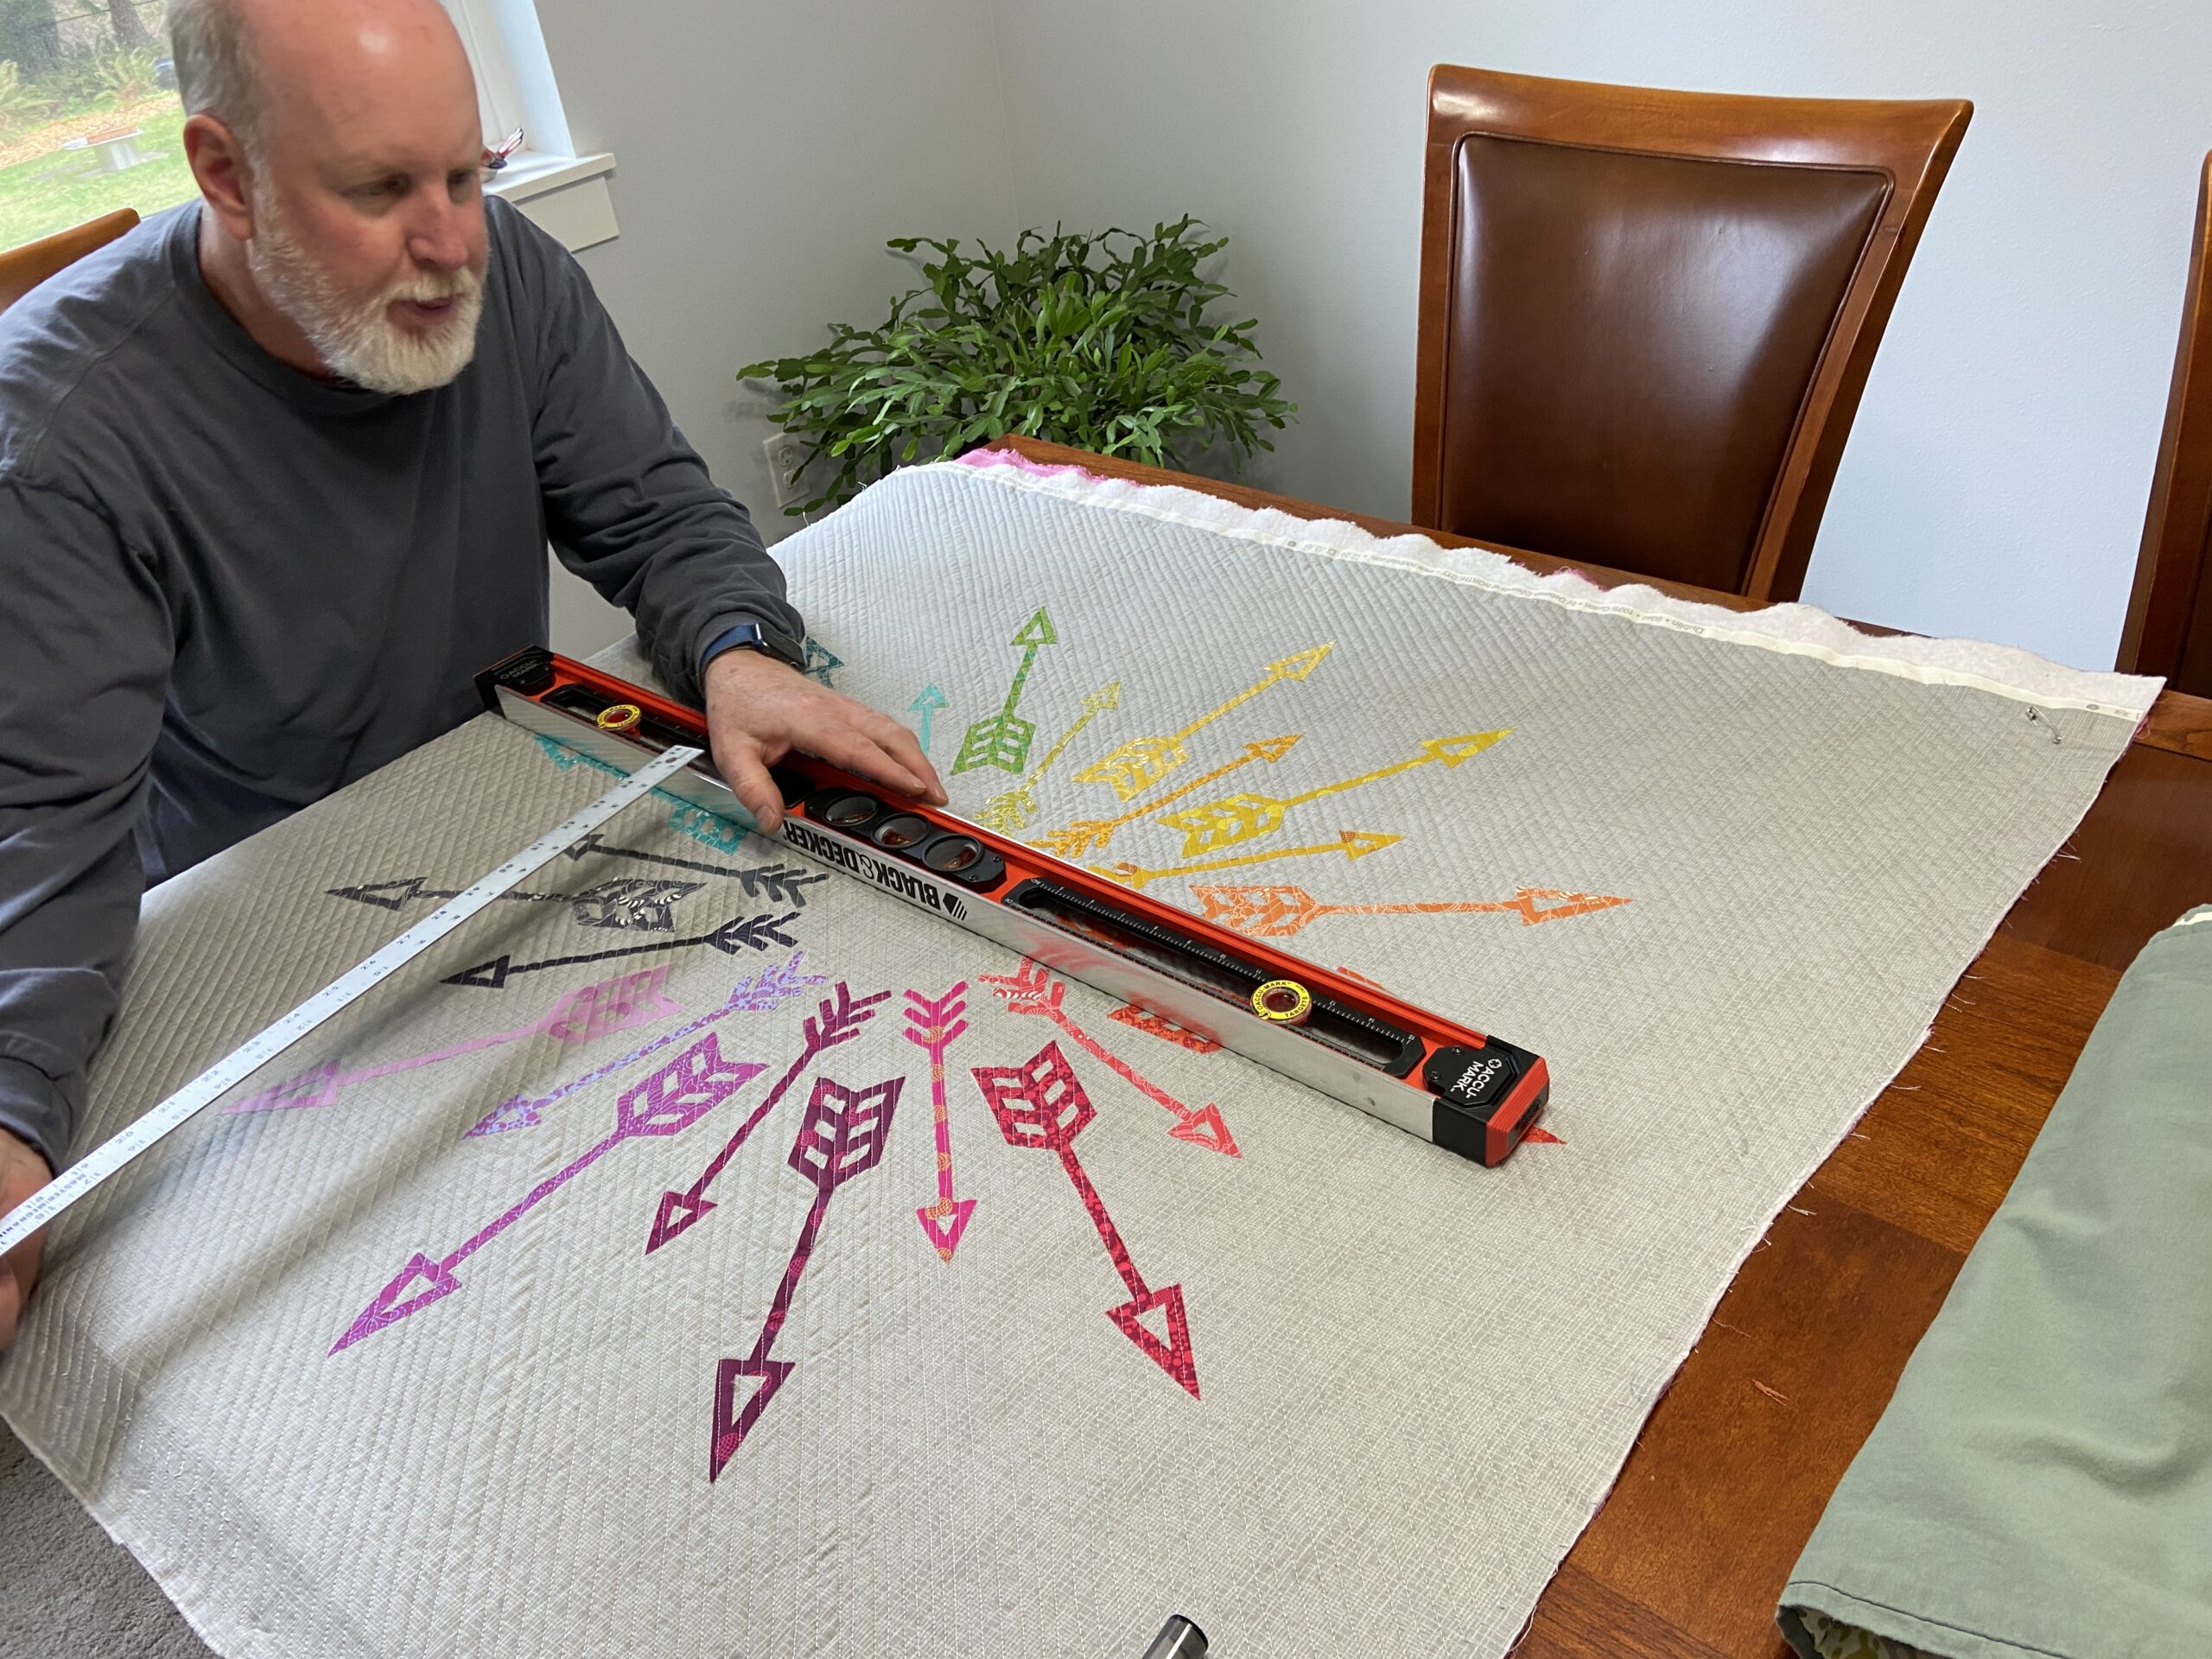
The next task was to square it up. Truth be told, I did a poor job of placing the arrows on the background. Because of this, I was having a heck of a time figuring out how to square this and have the arrows centered properly. Ray to the rescue. This is right up his alley and he got a border drawn for me to cut. After squaring the quilt, I did a facing instead of a binding. I wanted a clean edge for this piece.
It is hanging above the couch and I love it. This project included quite a series of lessons for me! But this is a good thing – there is always more to learn.
Happy to call this finished and to check off one more unfinished project from my list.
I have moved on to the next UFO. I am quilting the chambray patchwork this week. Hope to share it with you soon!
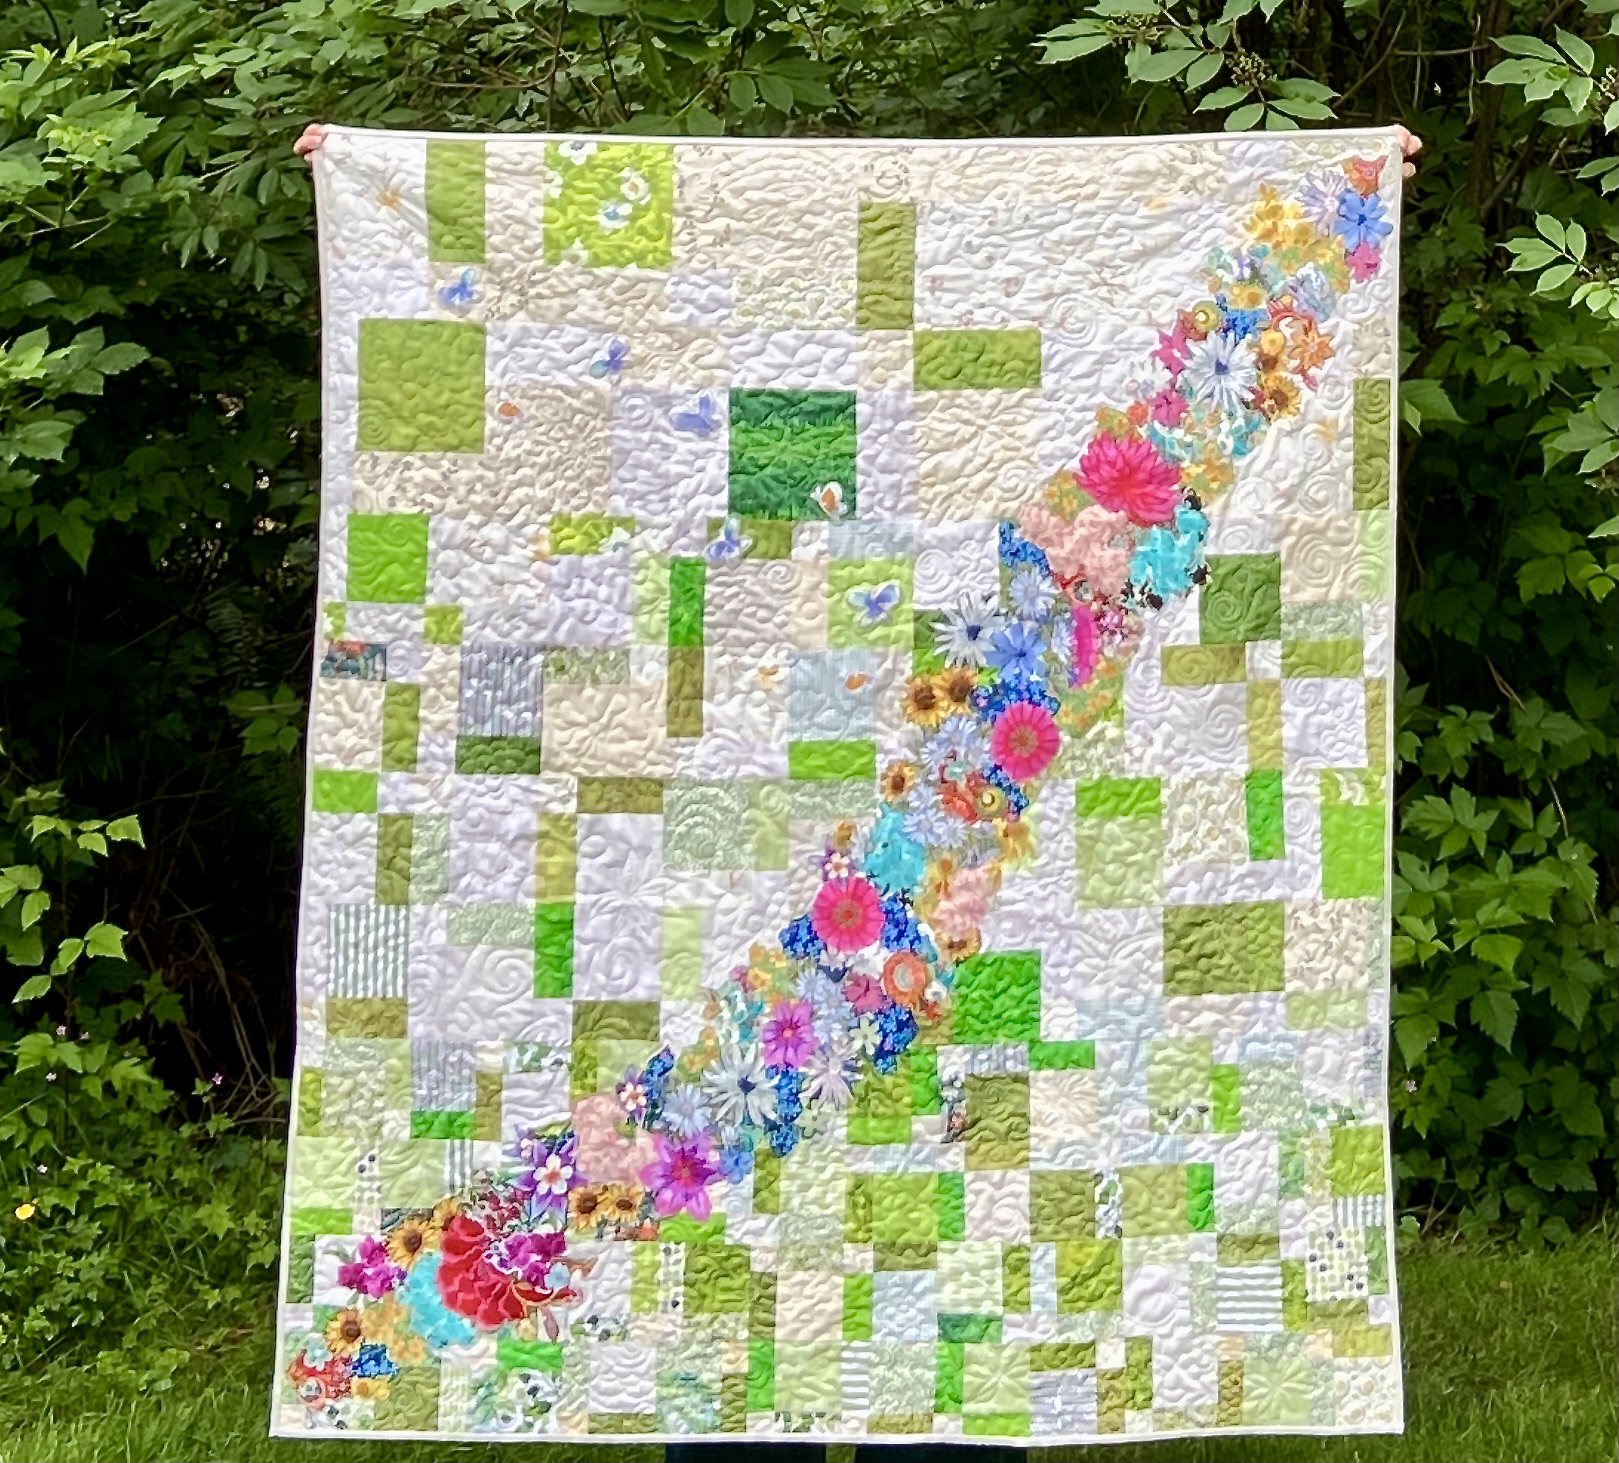
Making a quilt is not a quick endeavor. At least for me it isn’t. Back in 2016 I read a tutorial by Bonjour Quilts and left a comment about how much I loved the quilt. Then in 2020, in a newsletter by Bonjour Quilts (side note – if you don’t receive her newsletter, check it out. Kirsty writes a great newsletter and I very much enjoy reading it) I was reminded of the quilt. At that time, I started cutting pieces for the background. I believe this was at the beginning of the pandemic. Fast forward to 2021, I decided to finish the quilt so I could give it to my nephew and his bride when they married in July 2021. Well, then we decided to list the house and move so all sewing came to an abrupt halt.
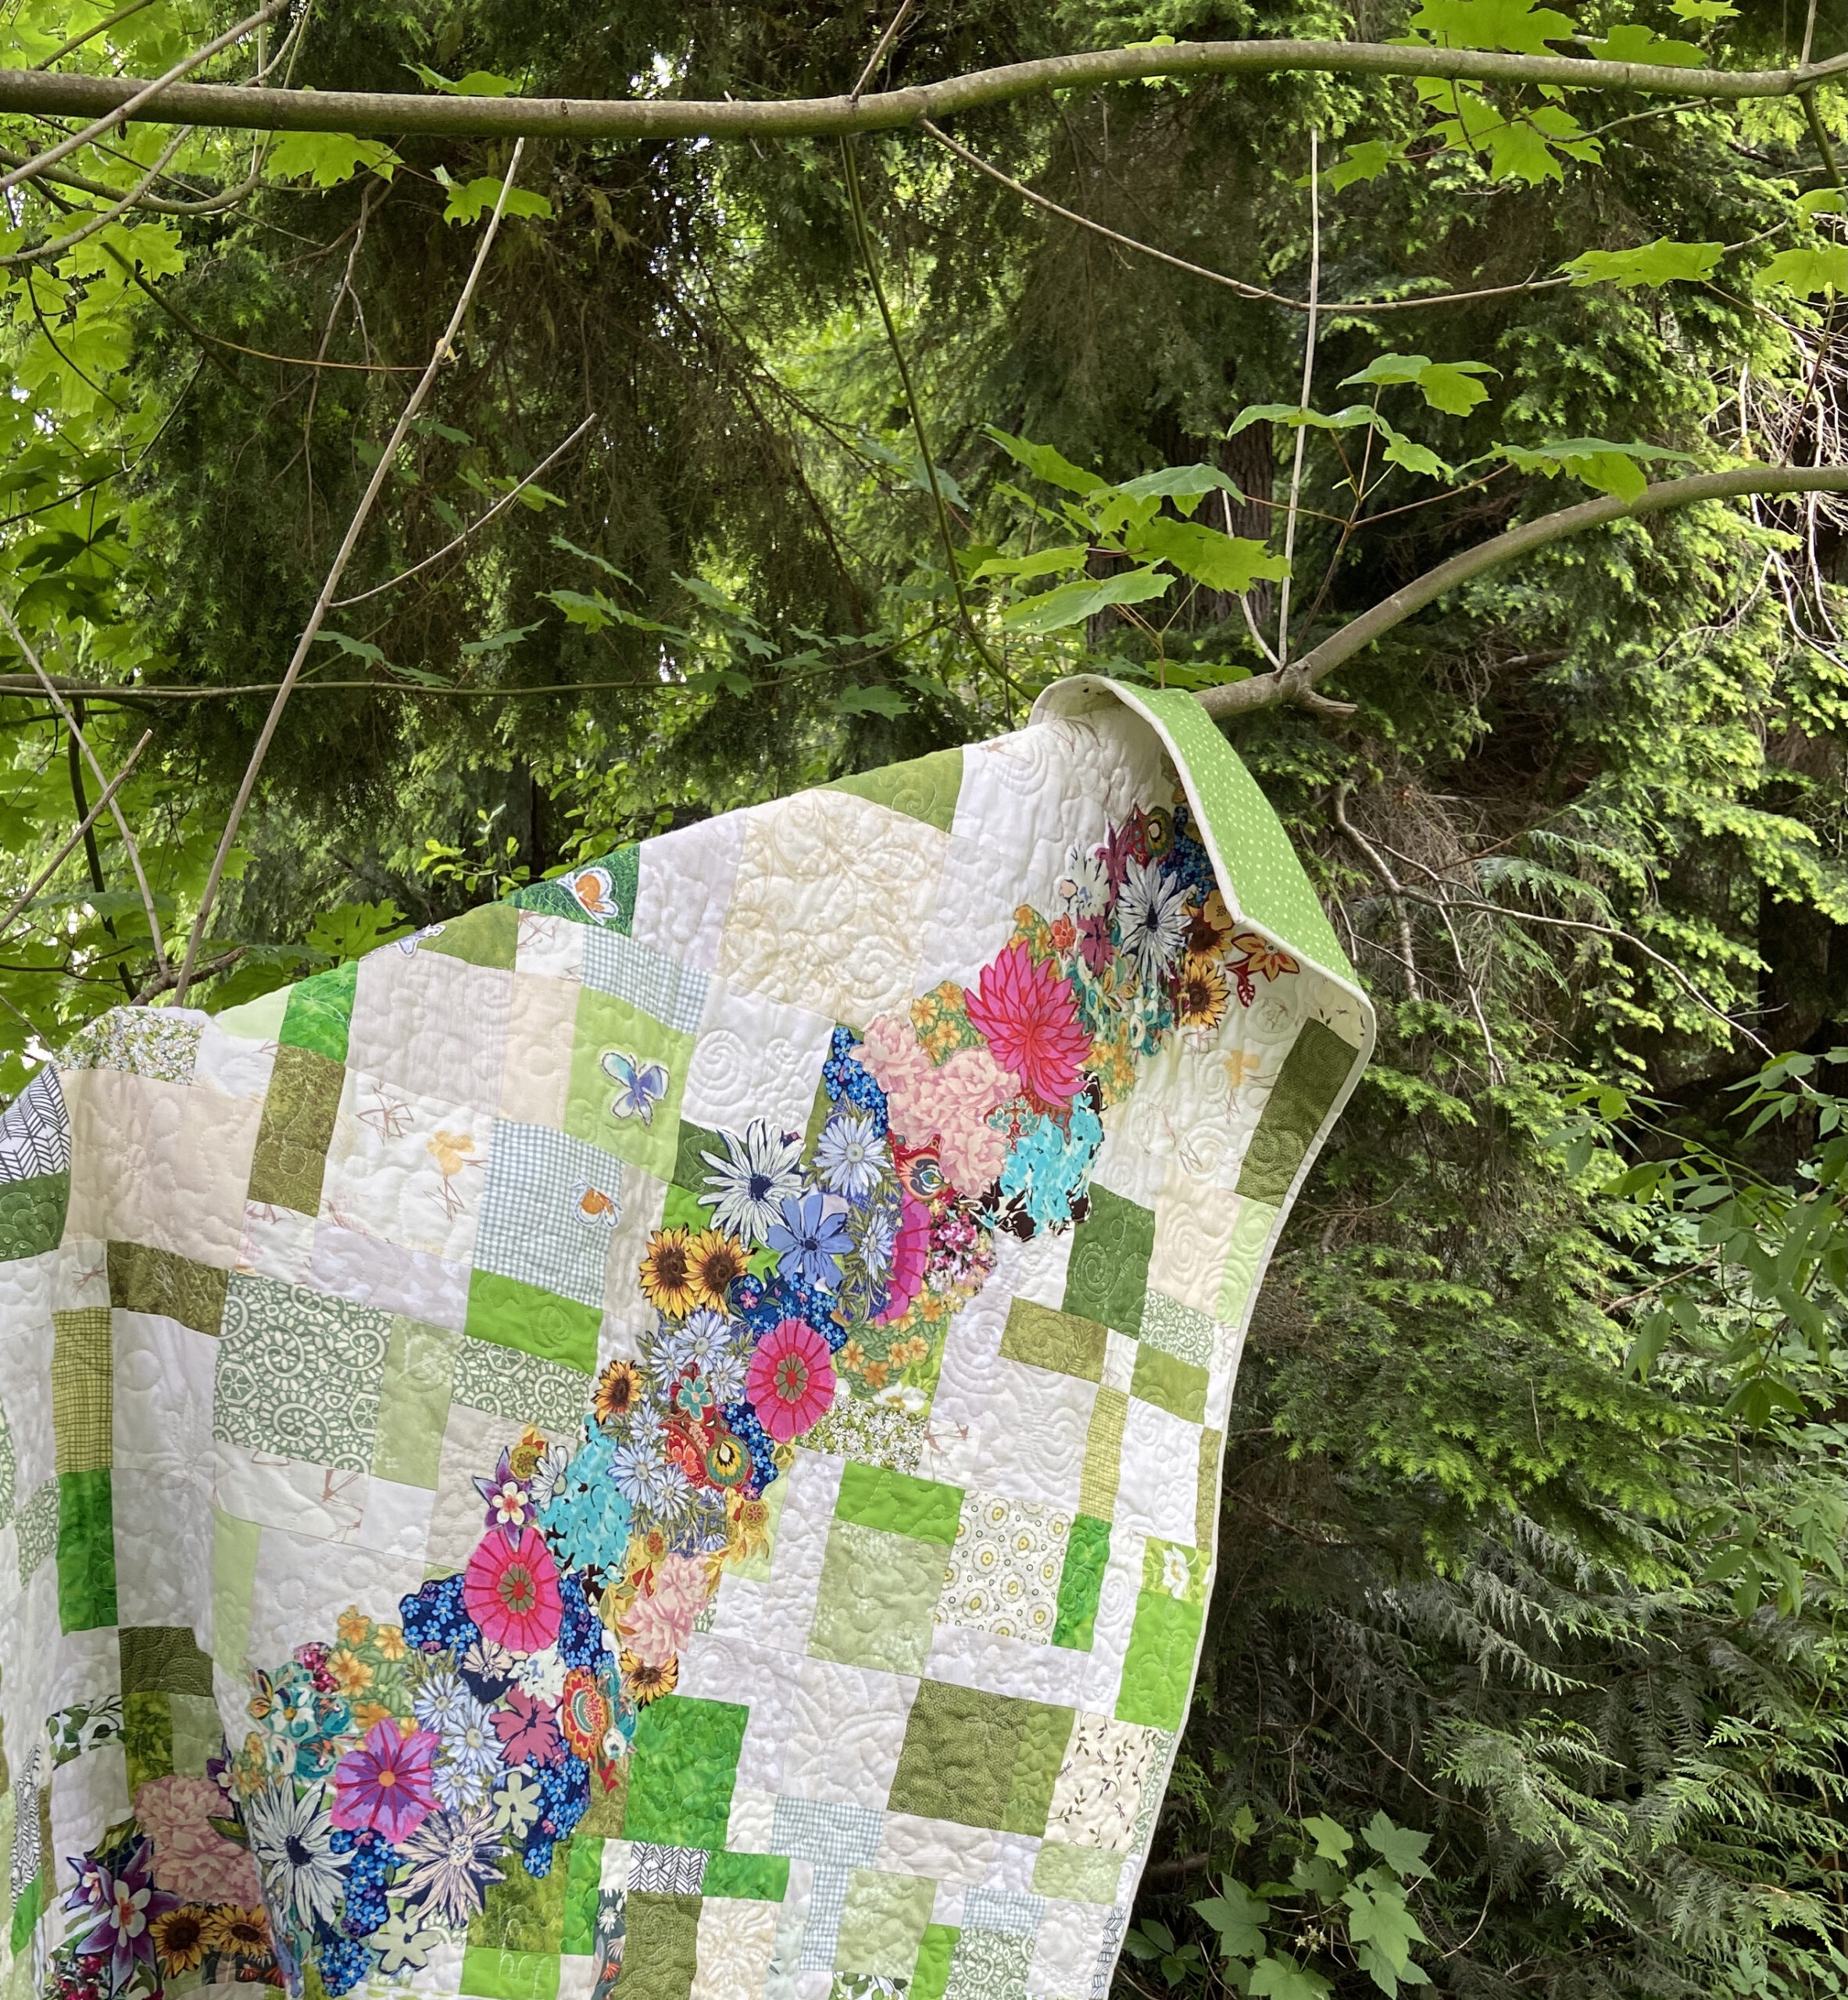
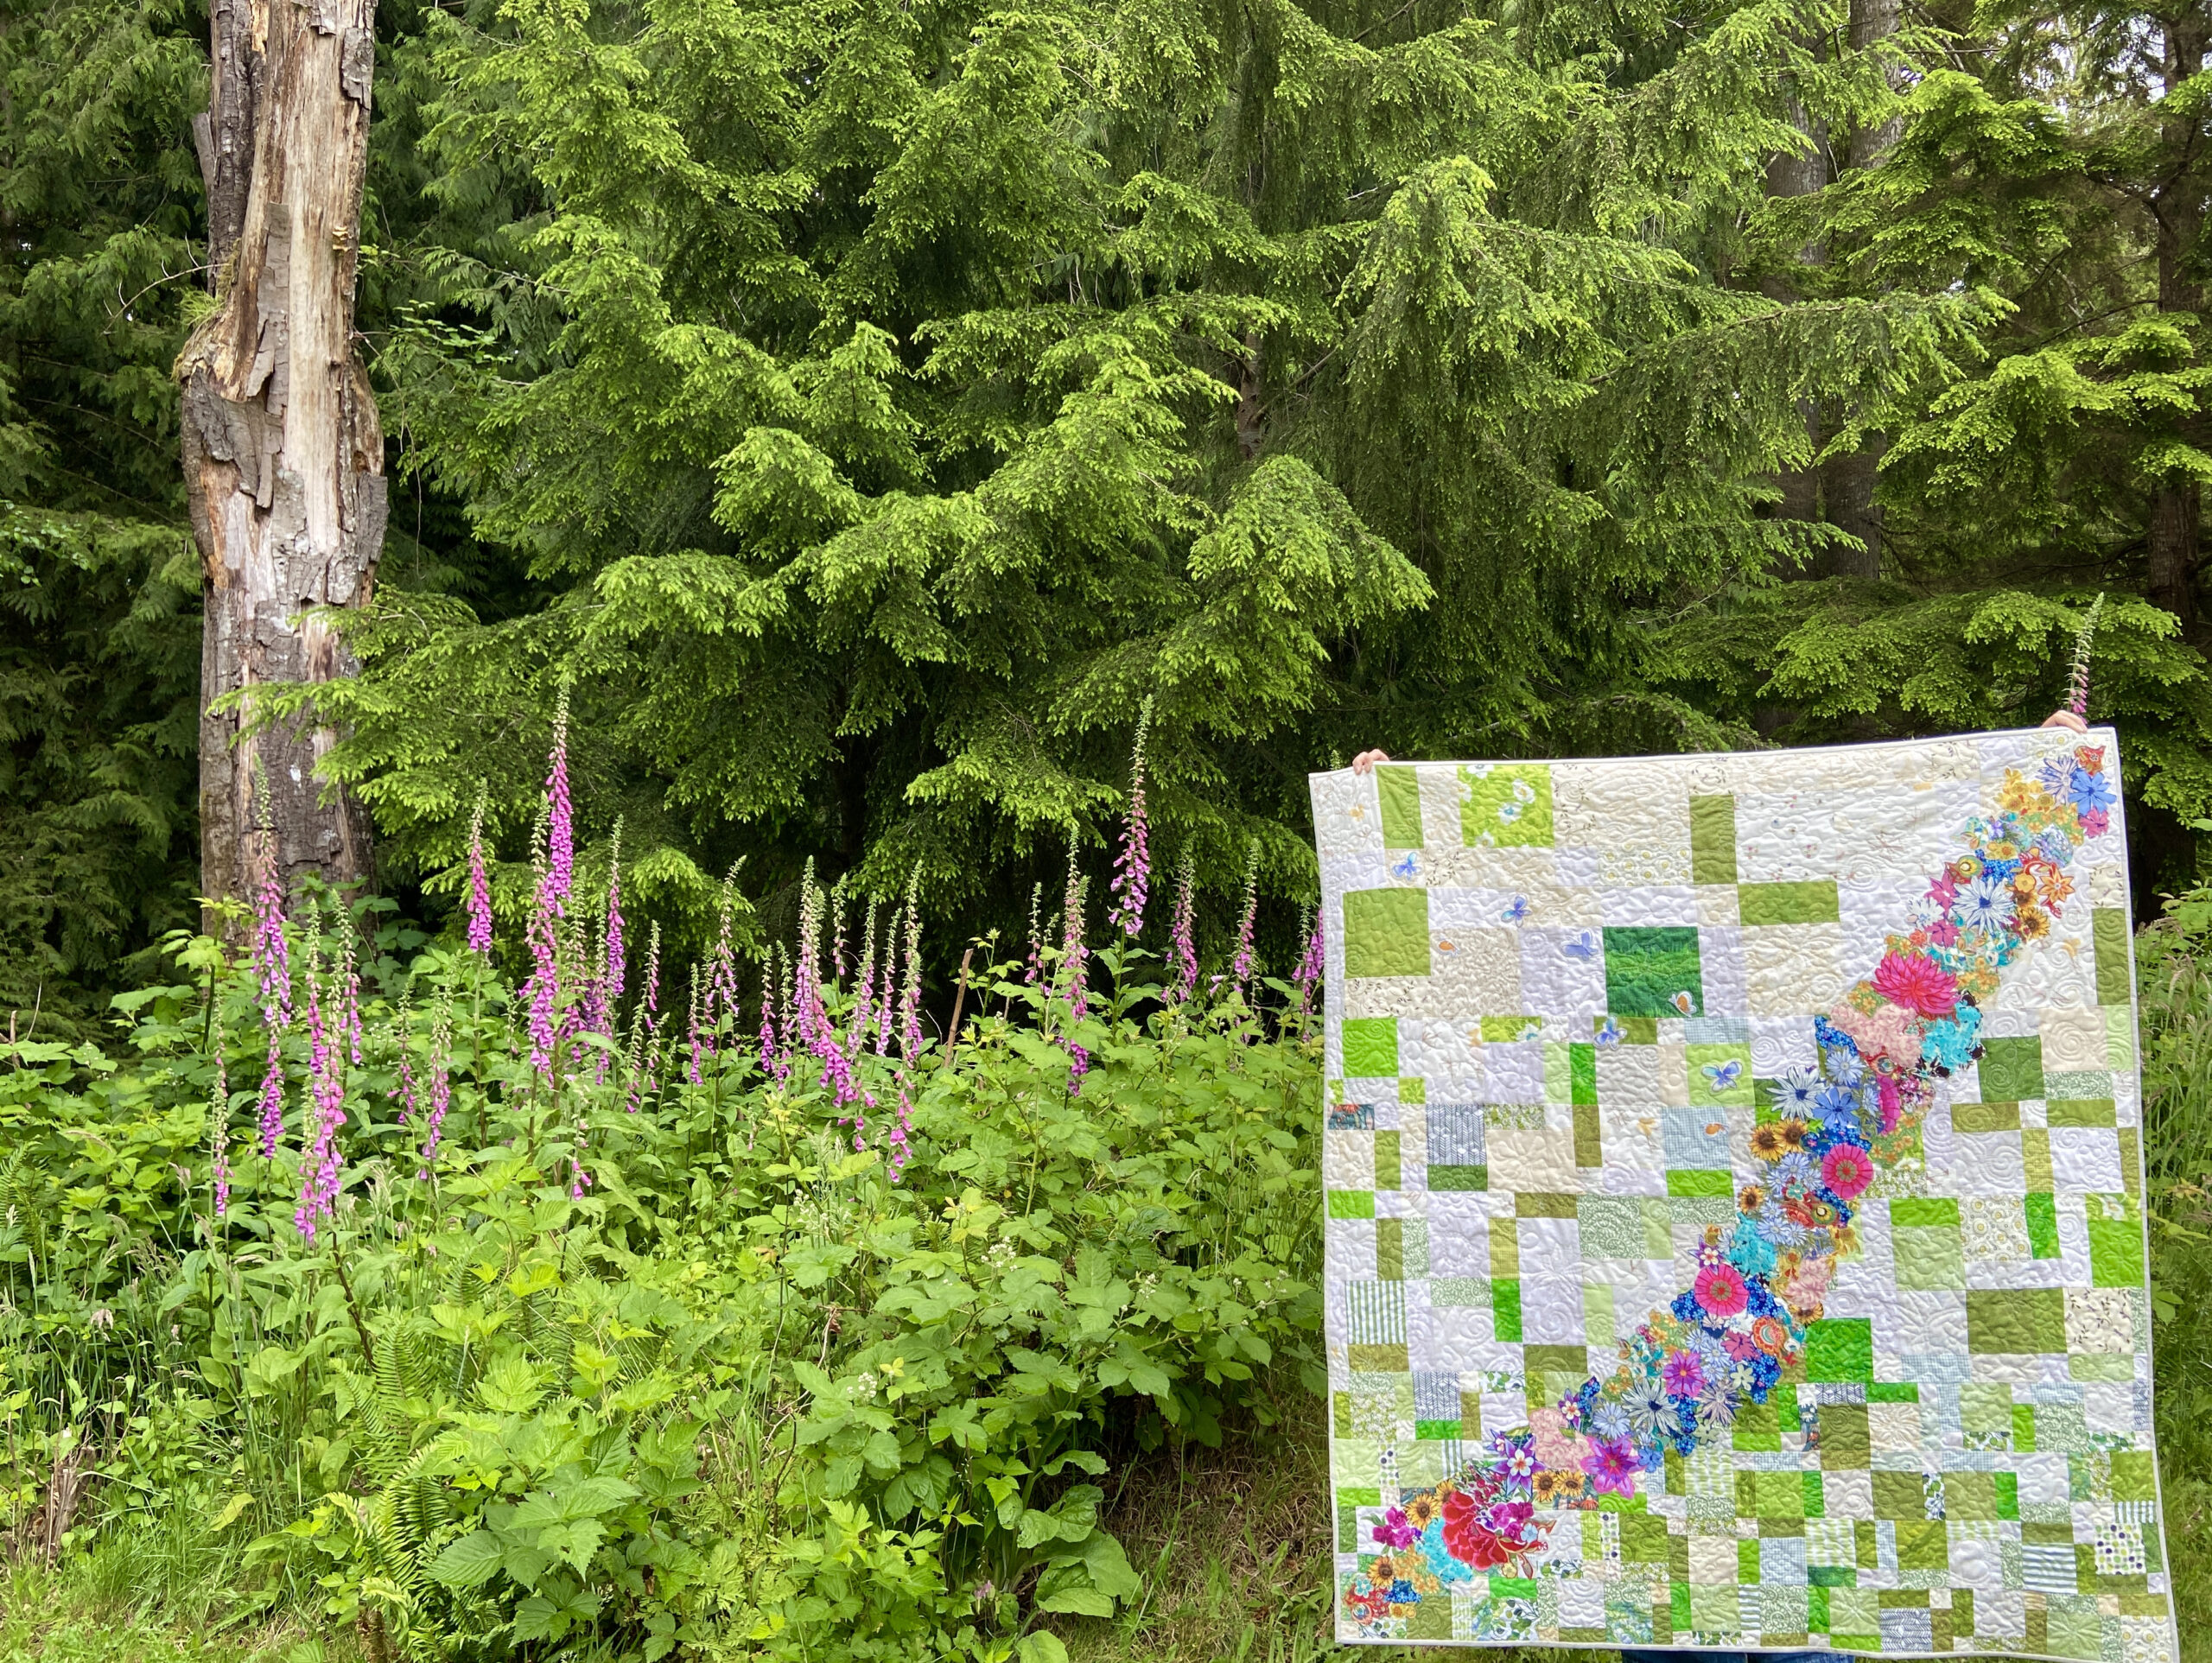
With my sewing room (almost) set up and my time freed up, I am sewing and quilting again! I had the Meadow quilt top finished and basted before we moved, so I started to quilt it. Before basting it, I did some FMQ over the flowers in the center. I knew I wanted to secure them tightly, even though they are fused to the base. However I didn’t want all of that to show on the back. I did a preliminary set of stitches before basting and then finished securing the flowers after it was basted.
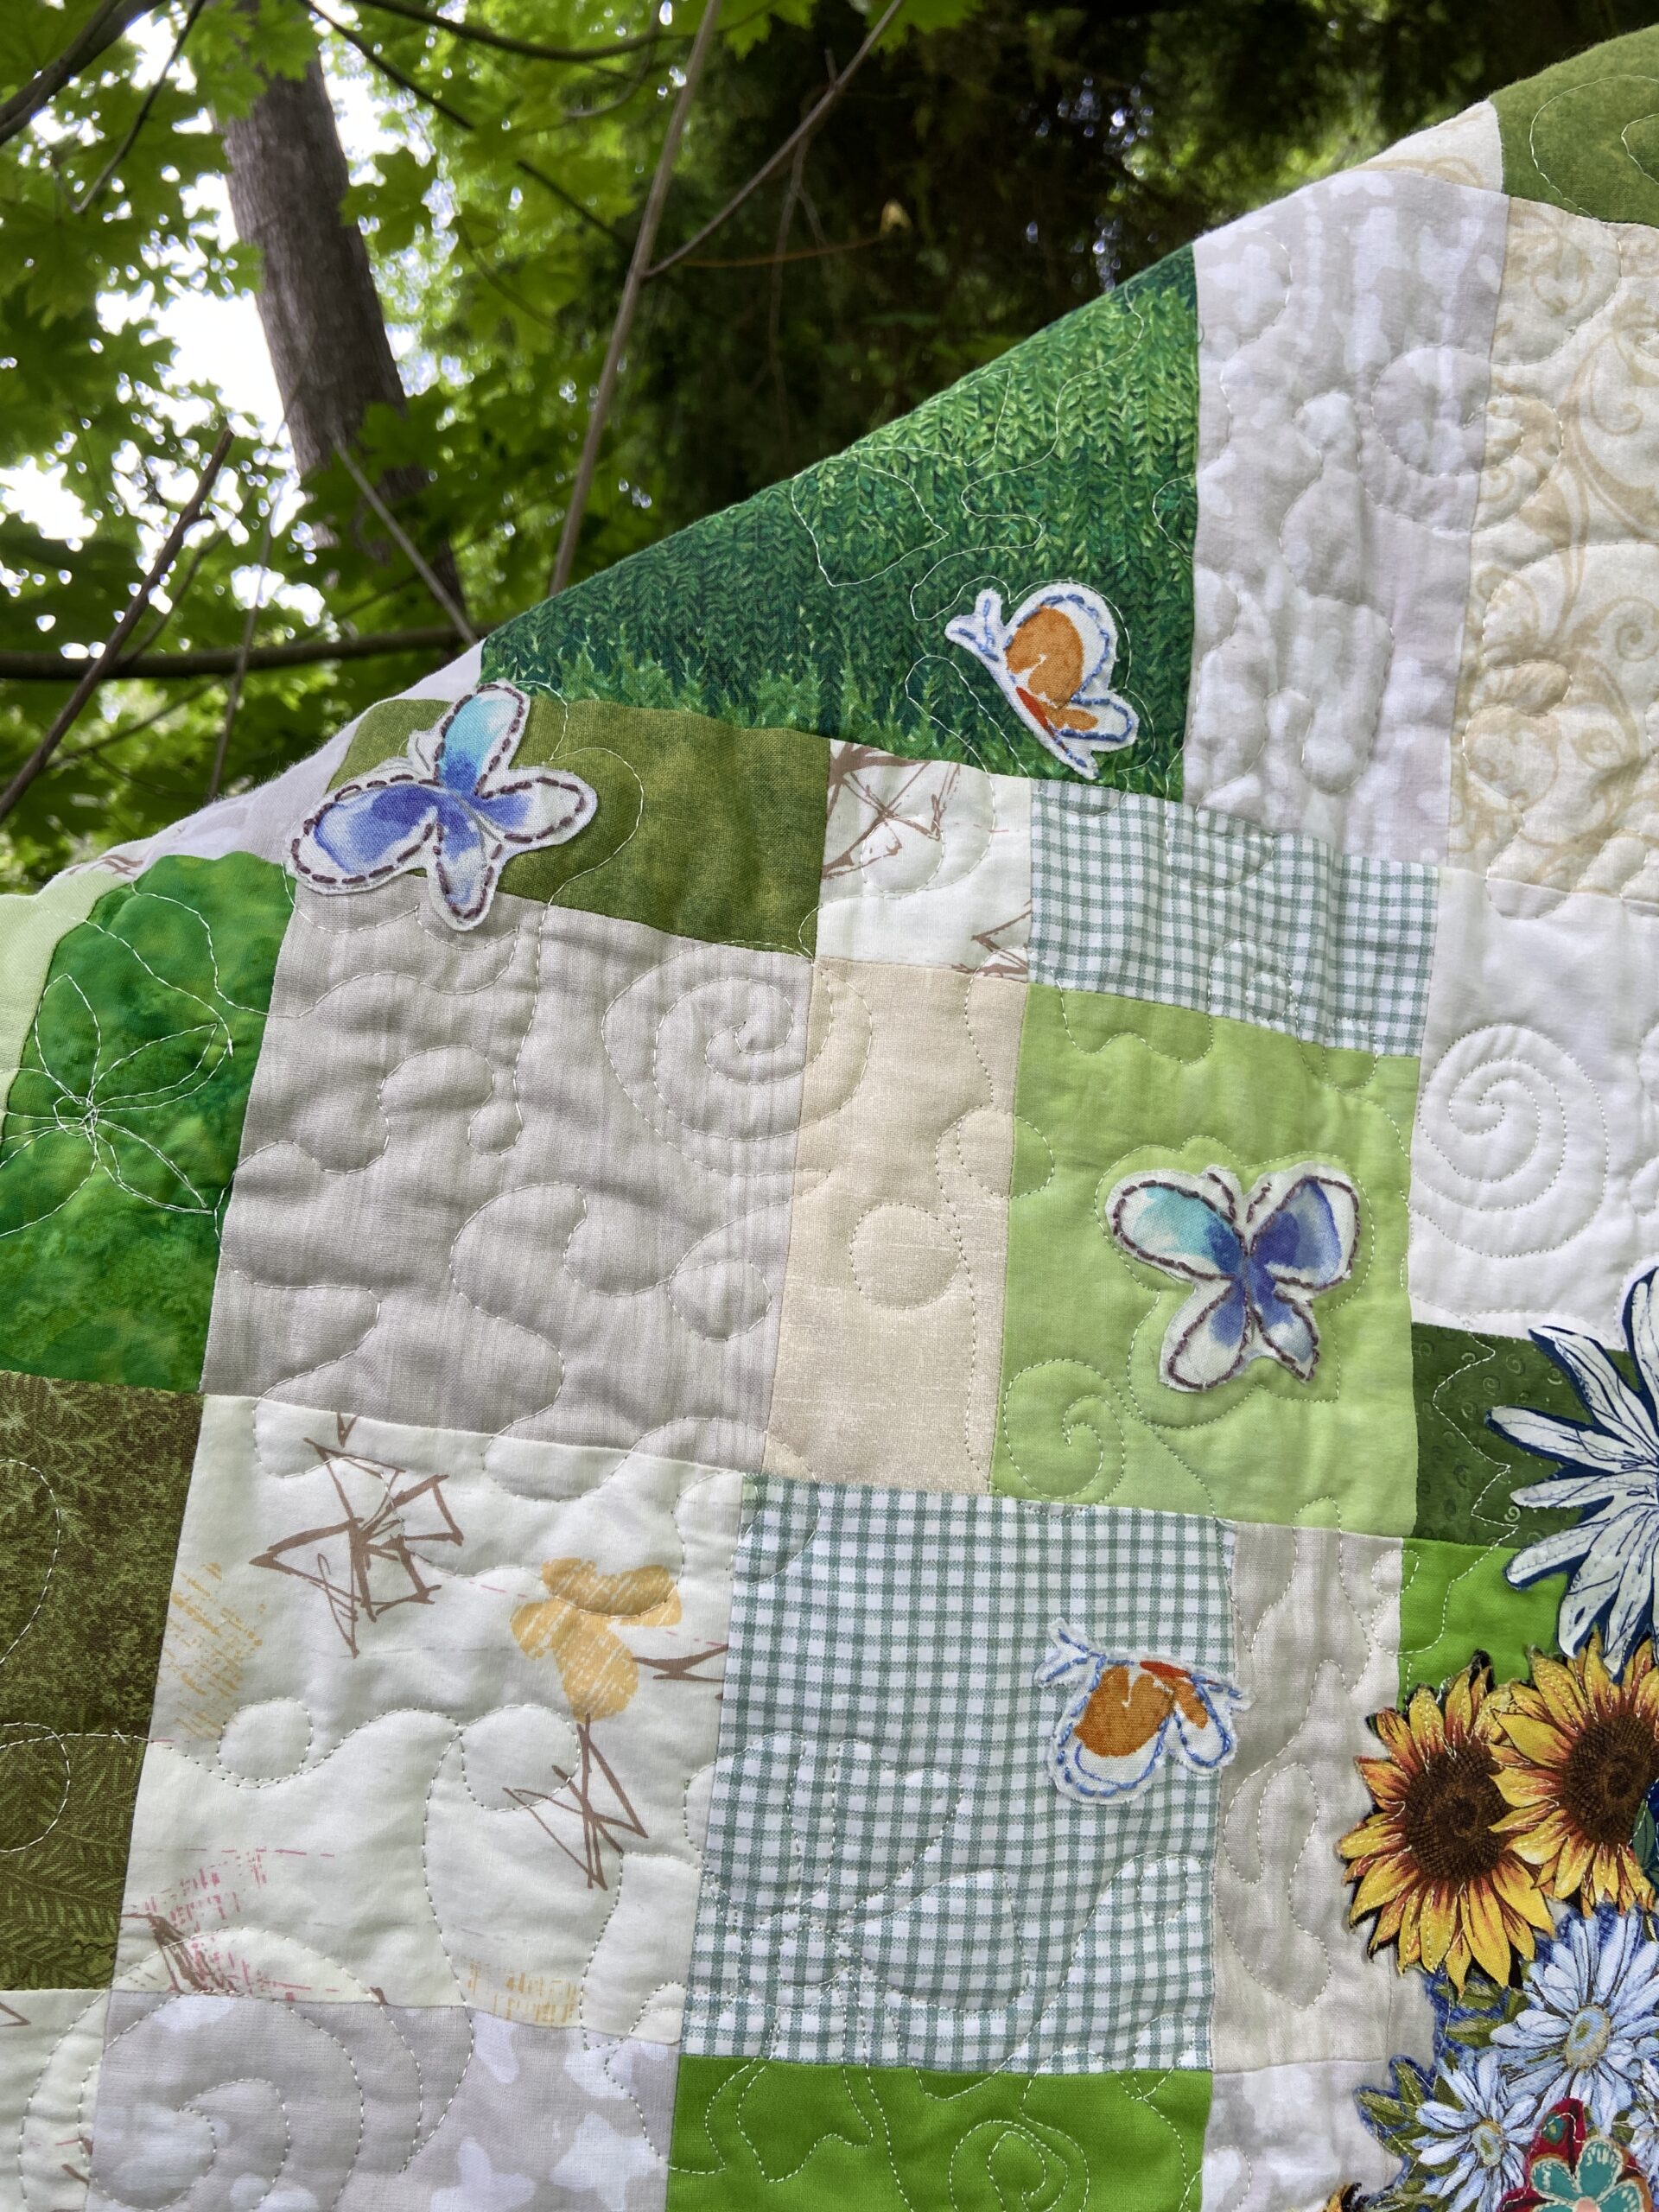
The background is free motion quilted with whatever came to mind. There are swirls, basic stippling, some flowers, hearts, sunshines and a few words here and there. On the top I used an off-white Glide thread and the bottom is a pale green Glide thread. (I am a big fan of Glide for free motion quilting).
Every meadow has a few butterflies fluttering about, right? I fussy cut these and fused them to the top. Using Perle cotton, I did some basic stitching around the edges to help them stand out a bit.
I forgot to take a shot with the backing showing but in this one you can see a bit of the corner. It is a 60″ wide voile by Frou Frou. Grassy green with tiny white stars on it, the fabric is so soft. I think it gives a cuddly feel to the quilt. (I have had this on the shelf for a long time so don’t know that it would be available anymore?)
The pictures were all taken in our yard. Right now everything is so green. Foxglove are standing tall in the backyard, giving a meadow like feel to it.
I am so happy with this finish. It is unusual but not difficult. I actually think this is the case with many of Kirsty’s (Bonjour Quilts) patterns and tutorials. It is on the way to the bride and groom, just in time for their first anniversary!! I hope they love it.
Sharing at my favorite link ups – see the list at the top of the page for the details!
REMINDER: The first link up for 2022 Positivity QAL opens this Sunday, June 26th. Please come back (here) then to link up and show us your progress with your blocks. I am looking forward to seeing the different color combos!!
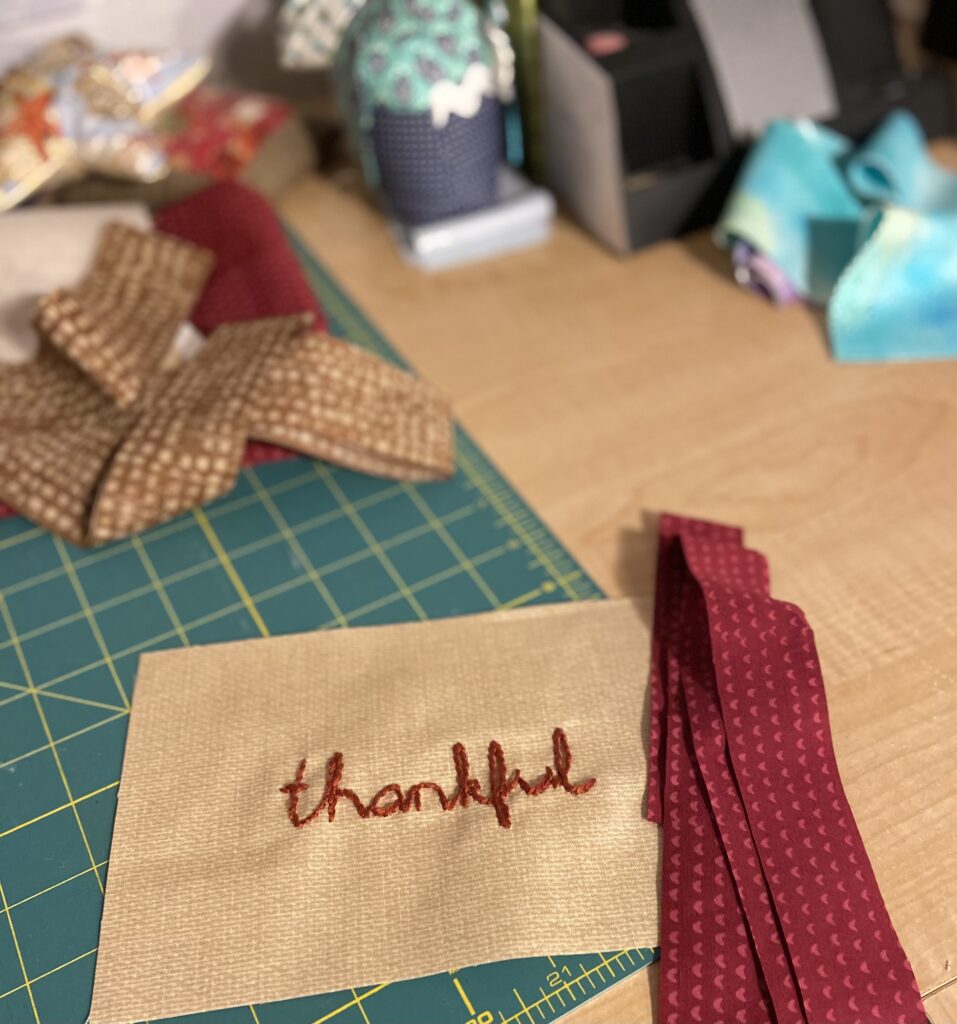
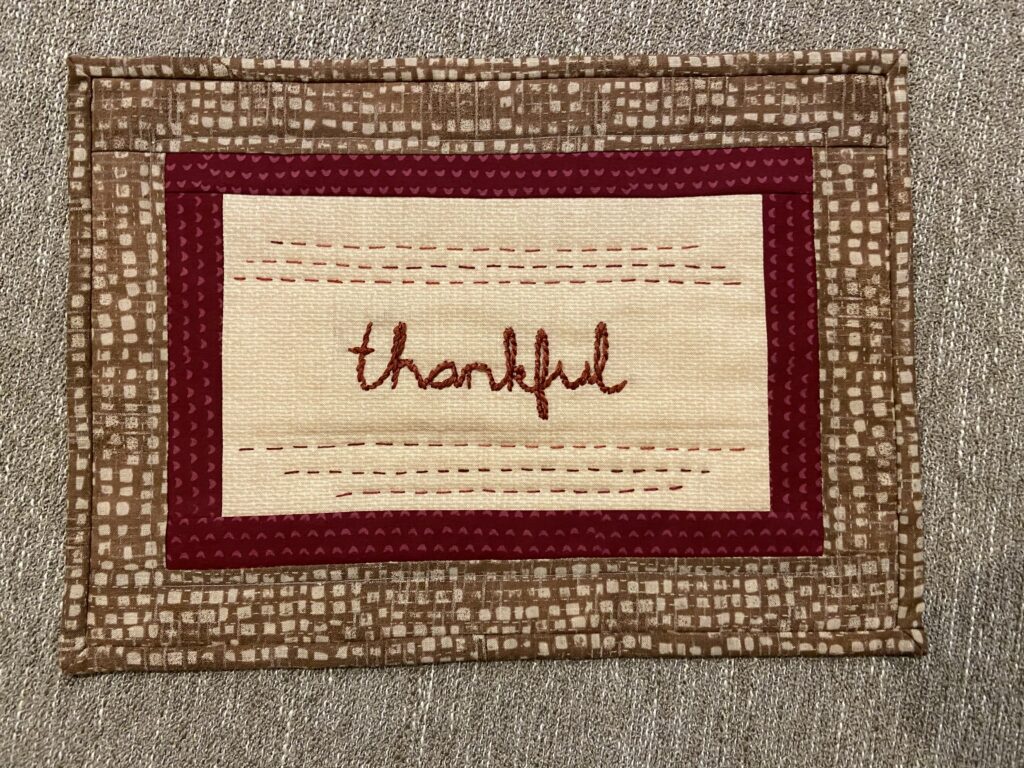
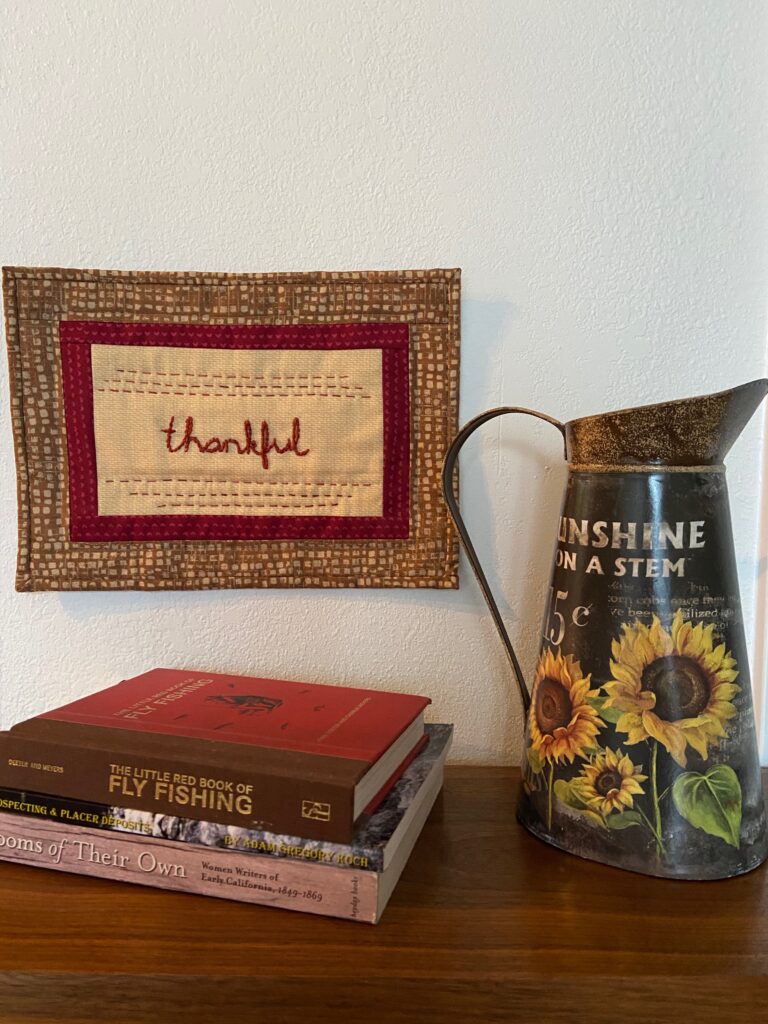
OK – this is such a sweet little finish! Remember I mentioned Julia is learning to embroider and to knit? She stitched the word thankful for me on a simple square of quilting cotton. (She was looking for something to do and I asked her to stitch one word I could display during the fall season.)
I knew I would make something very understated with this. Using a deep red scrap, I sewed on the first border. It finished at 3/4″ wide. Then I took an earthy brown scrap and attached a second border which finished at 1 1/4″ wide.
The quilting is simple and quite minimal. I did a few rows of big-stitch hand quilting above and below the word. You can still see the (crooked) line I had marked with the Hera marker right below the word. That has since melted away (I love using a Hera marker!) I think this is really all it needed. I did machine stitch a tiny border just outside of the red fabric as well. The binding is the same fabric as the outer border which less distracting, keeping the focus to the center.
Measuring only 8″ x 11″, it is easy to tuck into any spot. I originally planned to hang it during Thanksgiving but truly, it is something that should always be displayed. It will most likely be kept on display as a little reminder throughout the year.
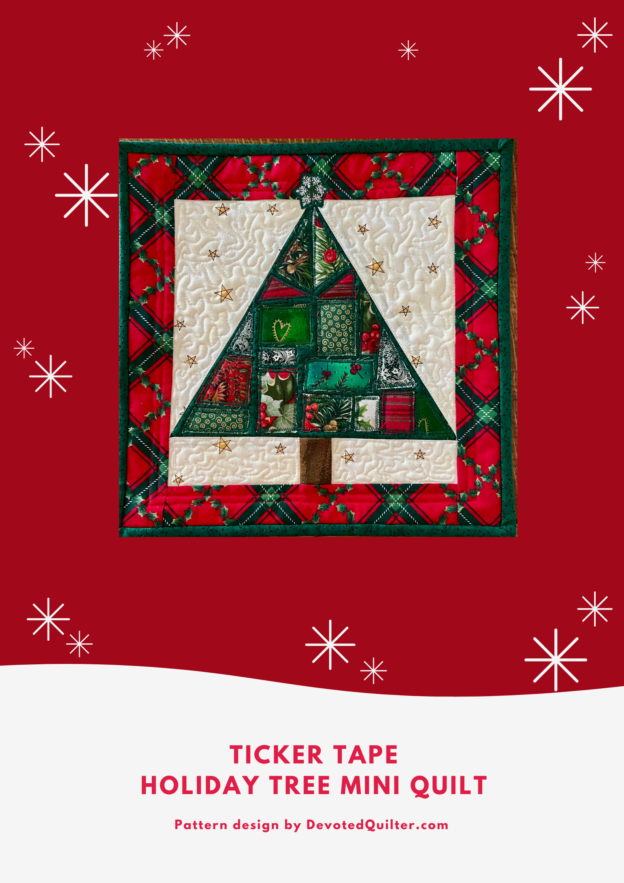
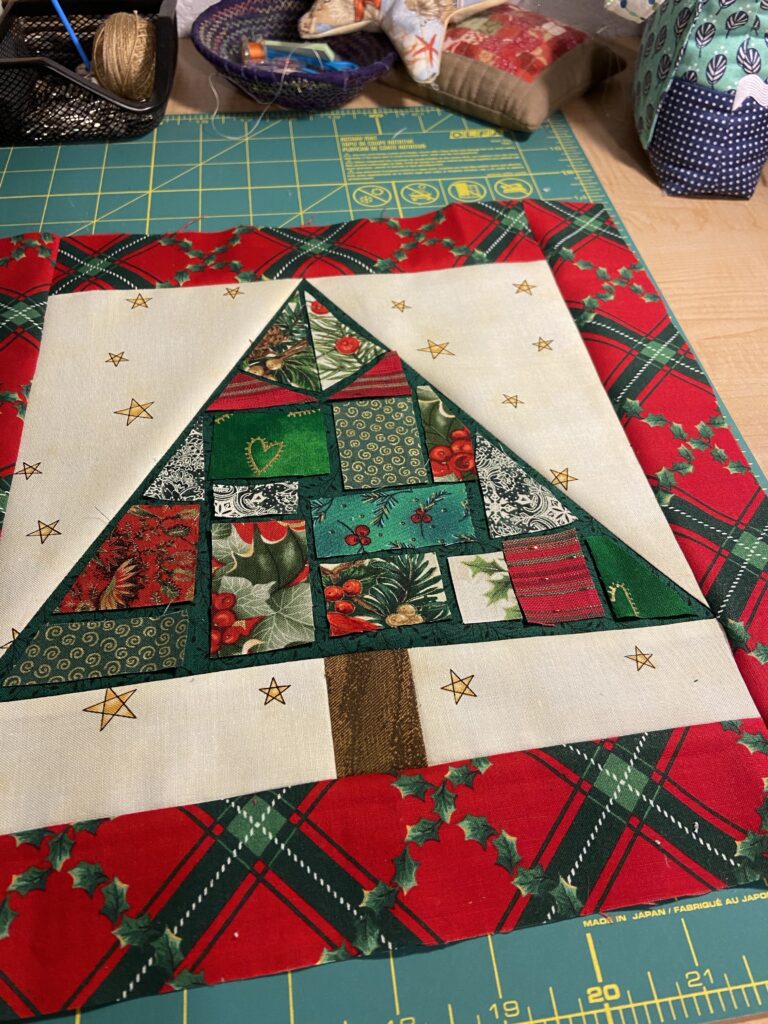
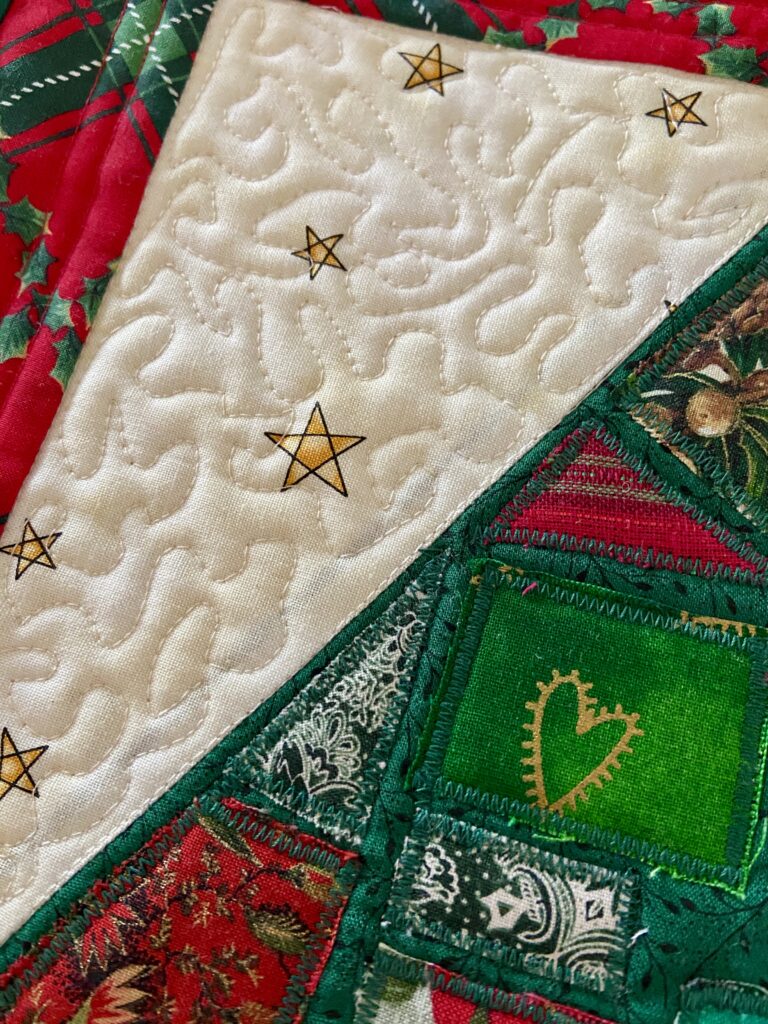
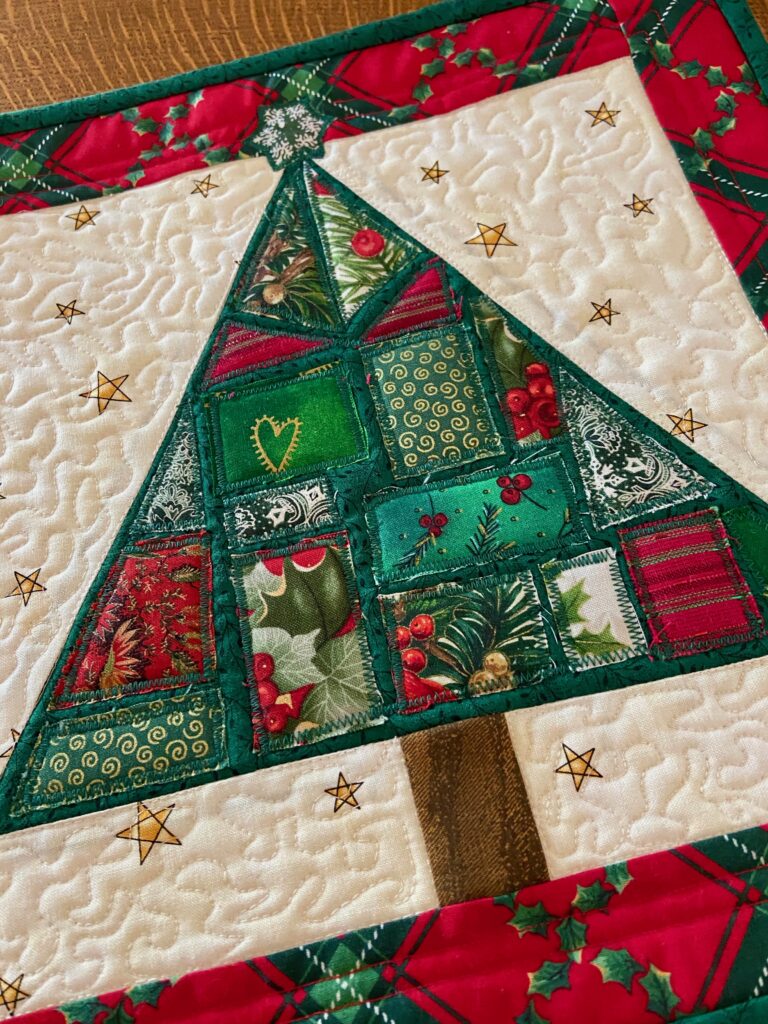
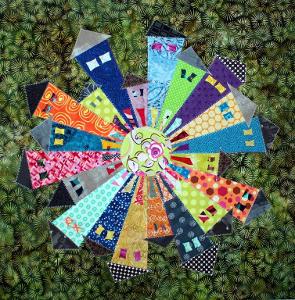
I have loved ‘ticker tape’ projects since I first saw them on Crazy Mom Quilts, some years back. They are so cute and a really fun way to use up bits and pieces of fabric. Fast forward to a couple of days ago when I saw the cutest ticker tape tree over at Devoted Quilter’s site. Leanne created this 12″ block for Quilt Mania. I thought, “ok, I am going to do this. ” I have loved these little scrappy projects for a long time and I decided to set aside the jillion other things I needed to do and make this fun mini. (Thank you Leanne!!)
I have to say, I am especially excited that this quilt turned out because I made it on a ‘post-migraine day’. Normally, I never make anything the day after a migraine. If you have never had one, a migraine leaves a person with scrambled eggs for brains. The day following one, I don’t think clearly, feel very foggy and definitely do not drive anywhere. So when I decided to make this, I figured it was low risk. Using scraps, it wasn’t a huge deal if it ended up in the trash. Fortunately Leanne’s instructions were really helpful. I did get all turned upside down when I was trying to stitch the tree shape (using two rectangles of the cream fabric and a square of dark green for the tree. I kept flipping the rectangles around and could not see my way through it. I finally texted my friend, Sophia, and she was going to talk me through it. But suddenly the lightbulb flipped on and I got it. Seriously, it is very frustrating to know I ‘should’ know how to do something and have this muddled brain that just can’t get there.
Anyhow….. I did get there. Once the little tree was constructed, I put the borders on. The red plaid was a scrap from a big bag of fabric scraps my sister gave me a while ago. It was perfect for framing the little tree.
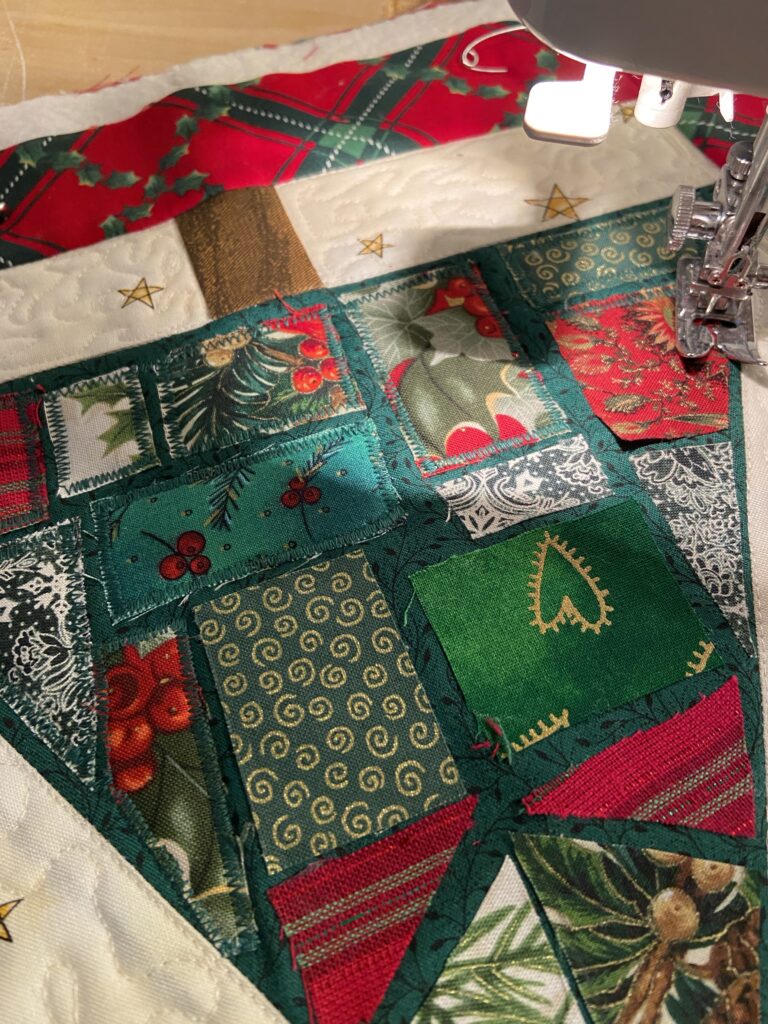
Then came the fun part – cutting up scraps and decorating the tree. Leanne had made hers with various shades of green but I decided to make mine festive with various holiday fabrics. Once I had an arrangement I liked, I used a fabric glue stick to place the pieces.
I used a tight zig-zag to applique the pieces to the tree. This is more than adequate since it will hang on a wall during the holidays and shouldn’t require laundering.
I had fun using a micro stipple on the background. Nothing like a mini quilt to give that satisfying feeling of a finish, right?
See that little snowflake at the top of the tree? Love it! Also, the green heart in the center just adds a little sparkle to my tree.
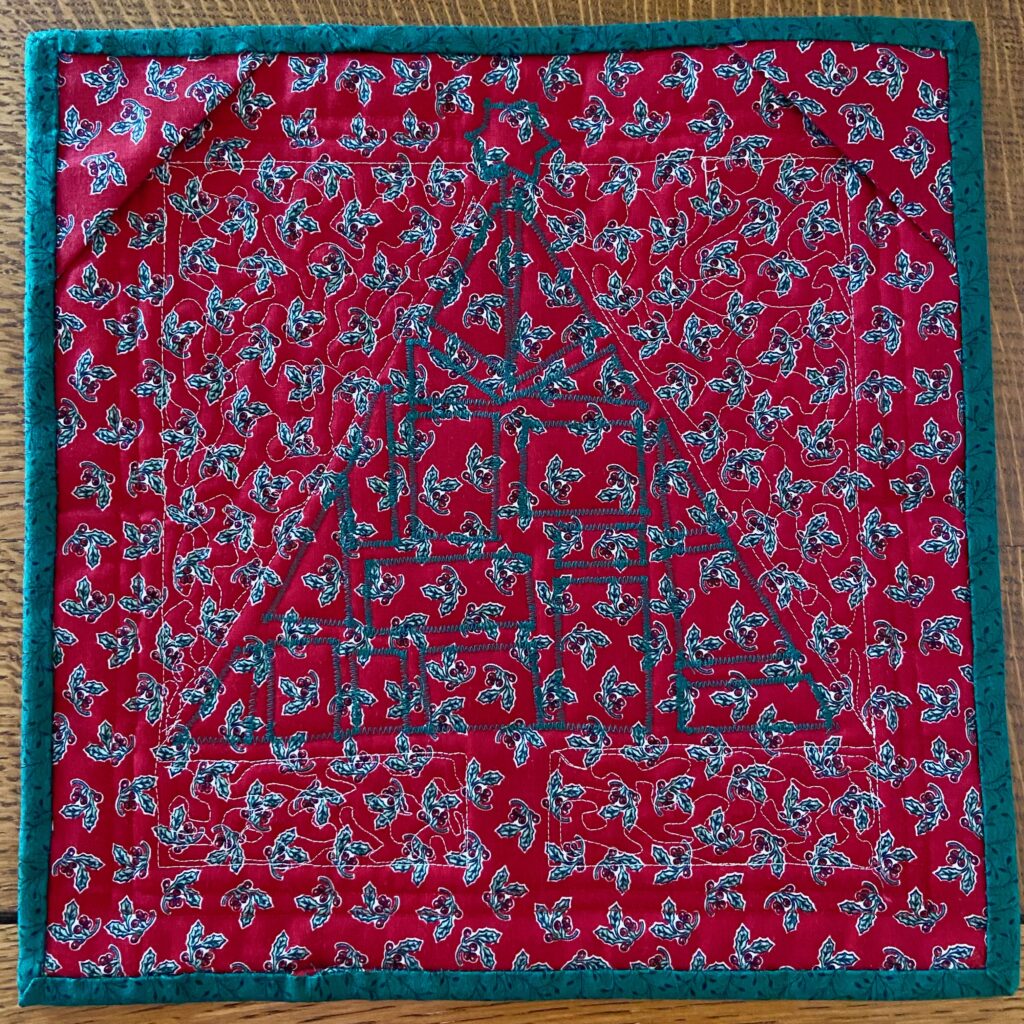
The backing was a bit of a holiday print I had in my drawer full of Christmas fabrics.
Overall, this was just a very fun project that I enjoyed making. It has been such a long time since I played around like this. Be sure to give it a try. The directions are available here. I am looking forward to hanging this in the entryway during the holidays! Thanks again Leanne – writing tutorials takes a bit of time and I am so appreciative to you for putting this one together.
It is likely that you all have been seeing the posts about the Blogger’s Quilt Festival that is currently going on at Amy’s Creative Side. This event is such a great source of inspiration. All kinds of quilt bloggers link up their favorite projects within the categories that Amy had set up (e.g. large quilt, small quilt, original design, art quilt, scrappy quilt, etc) I have not participated before but have enjoyed looking at the work of so many talented quilters. Viewers can vote for their favorites in each category and prizes are generously awarded. There are also some prizes awarded in a drawing of all those who enter.
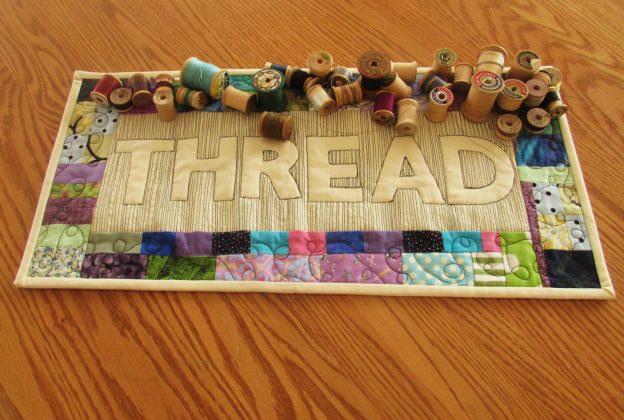
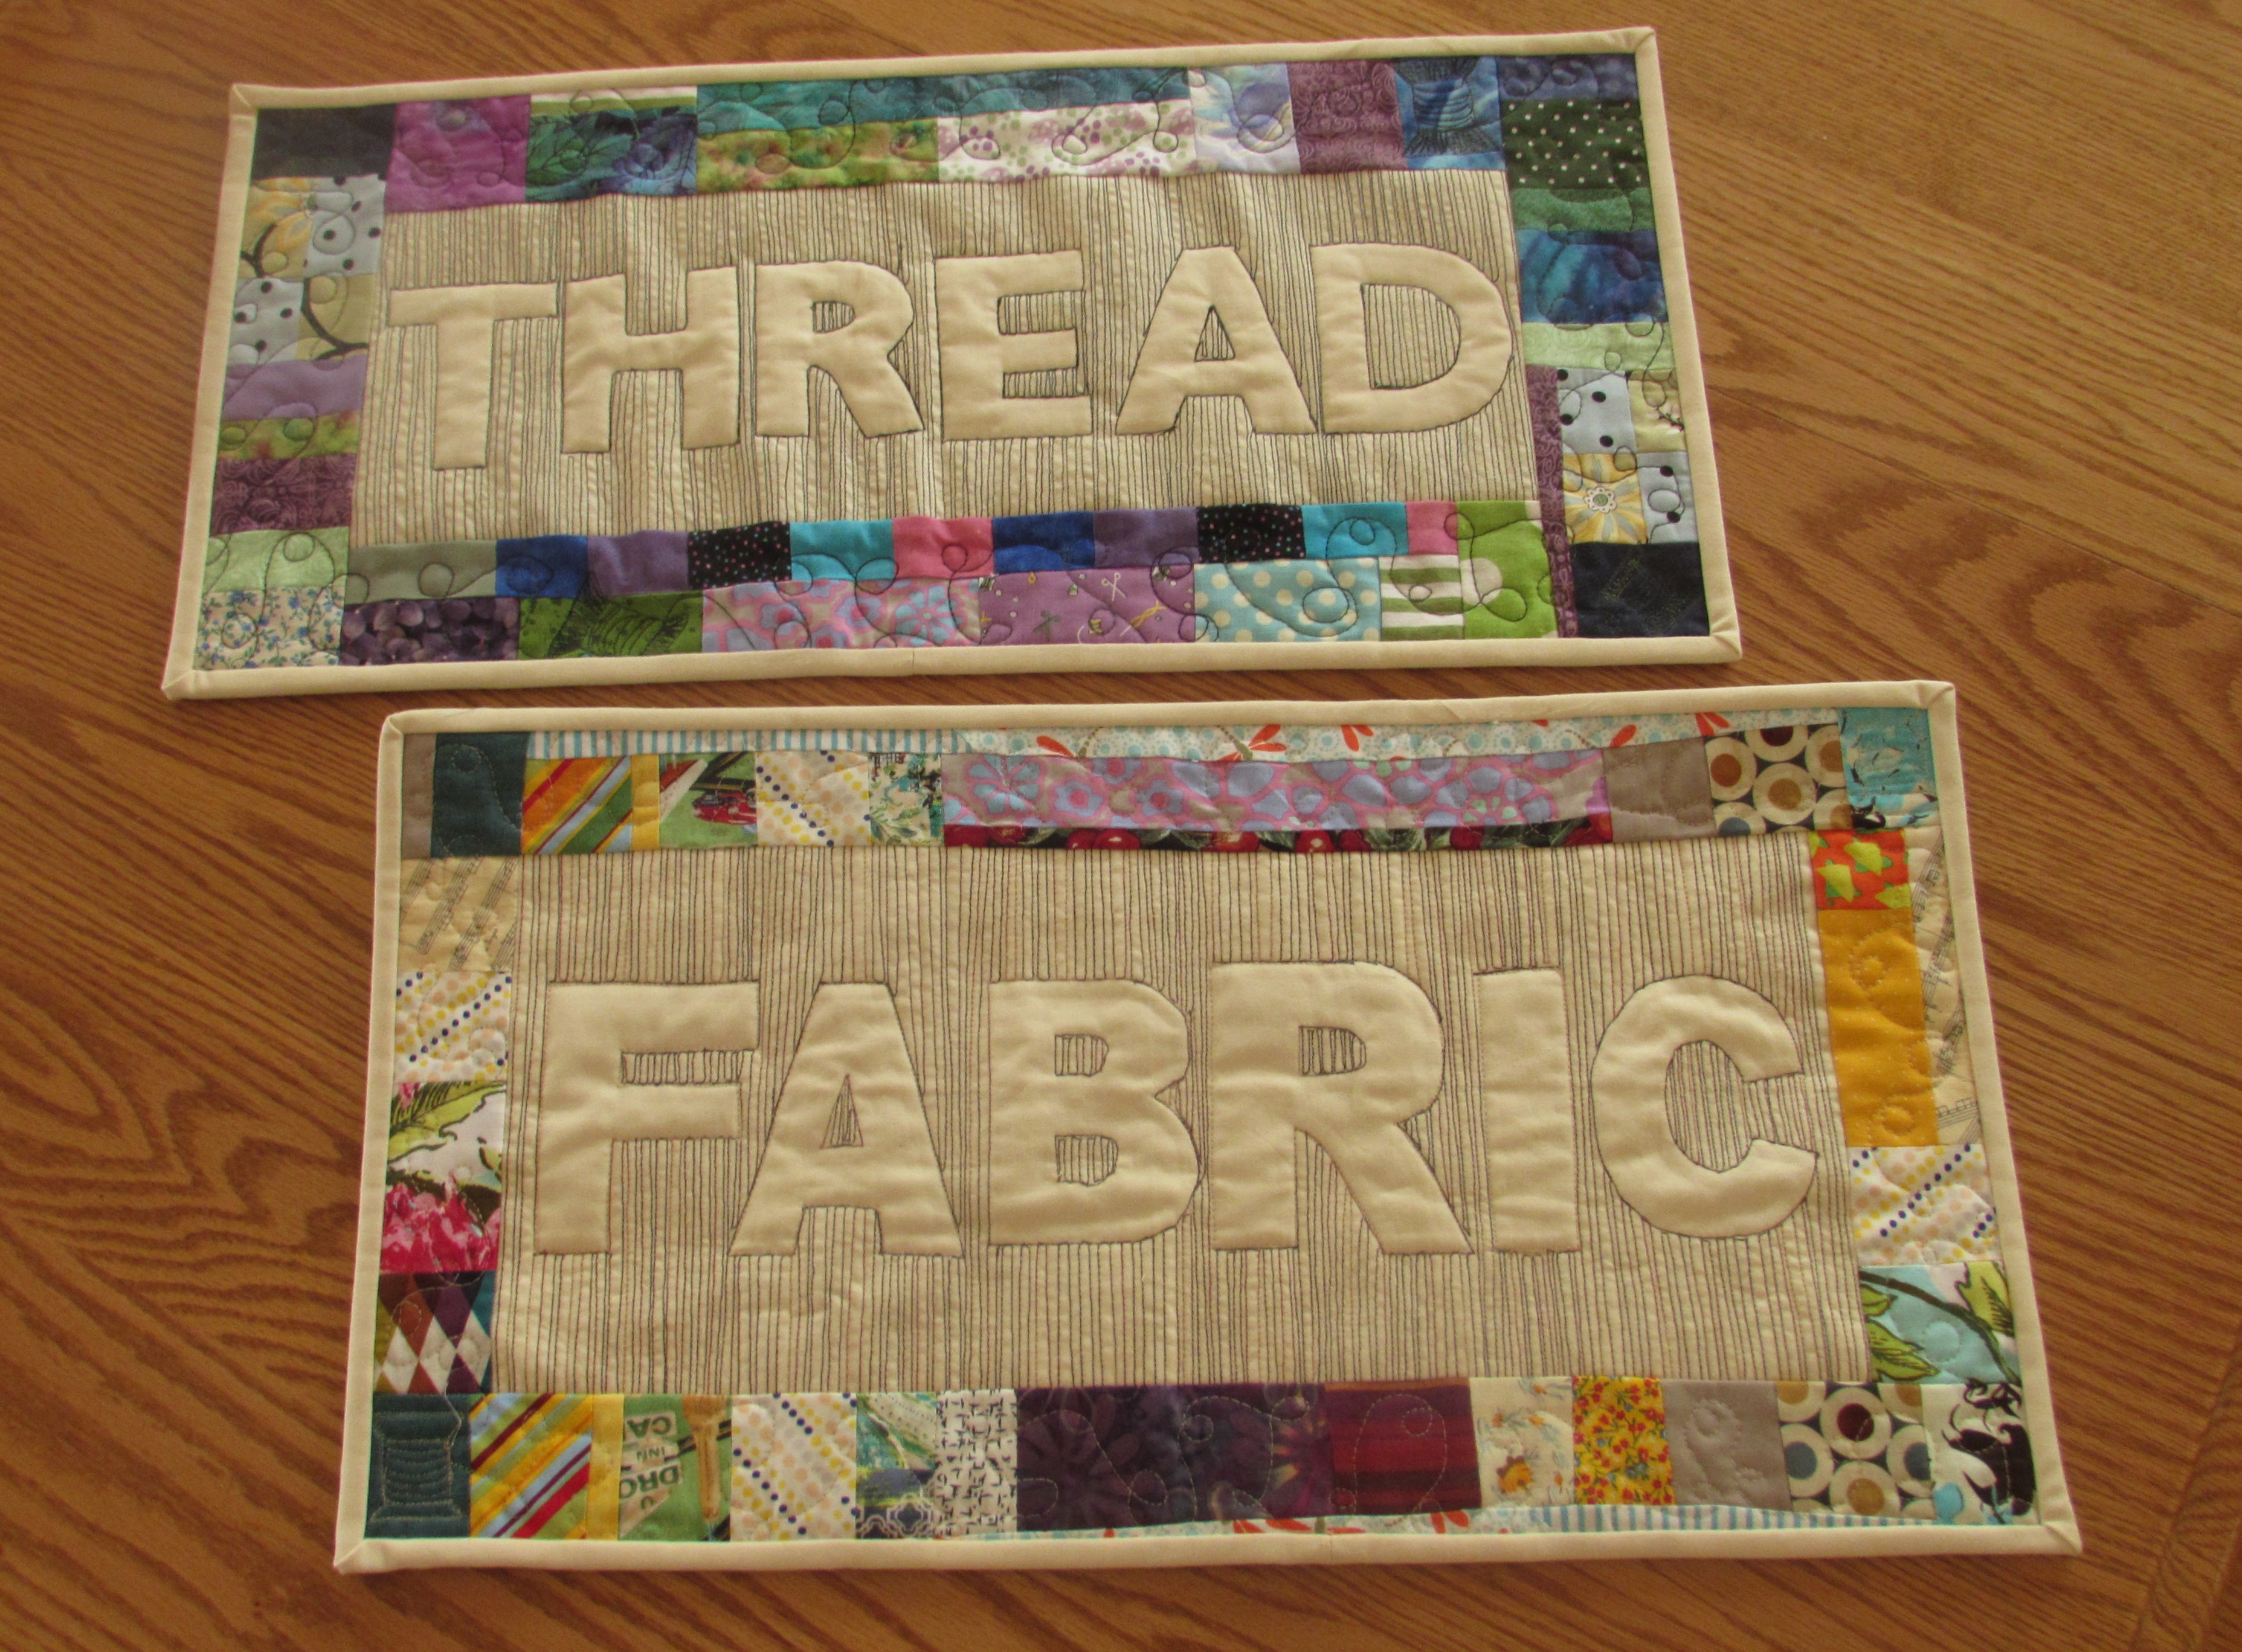
This year I am going to enter my THREAD quilt in the mini quilt category. You might remember this project because it was quite recent. If you are new to the blog and want more details, click here. I made a set of two that hang in my sewing room but only THREAD is being entered. I just love seeing both of them together though!
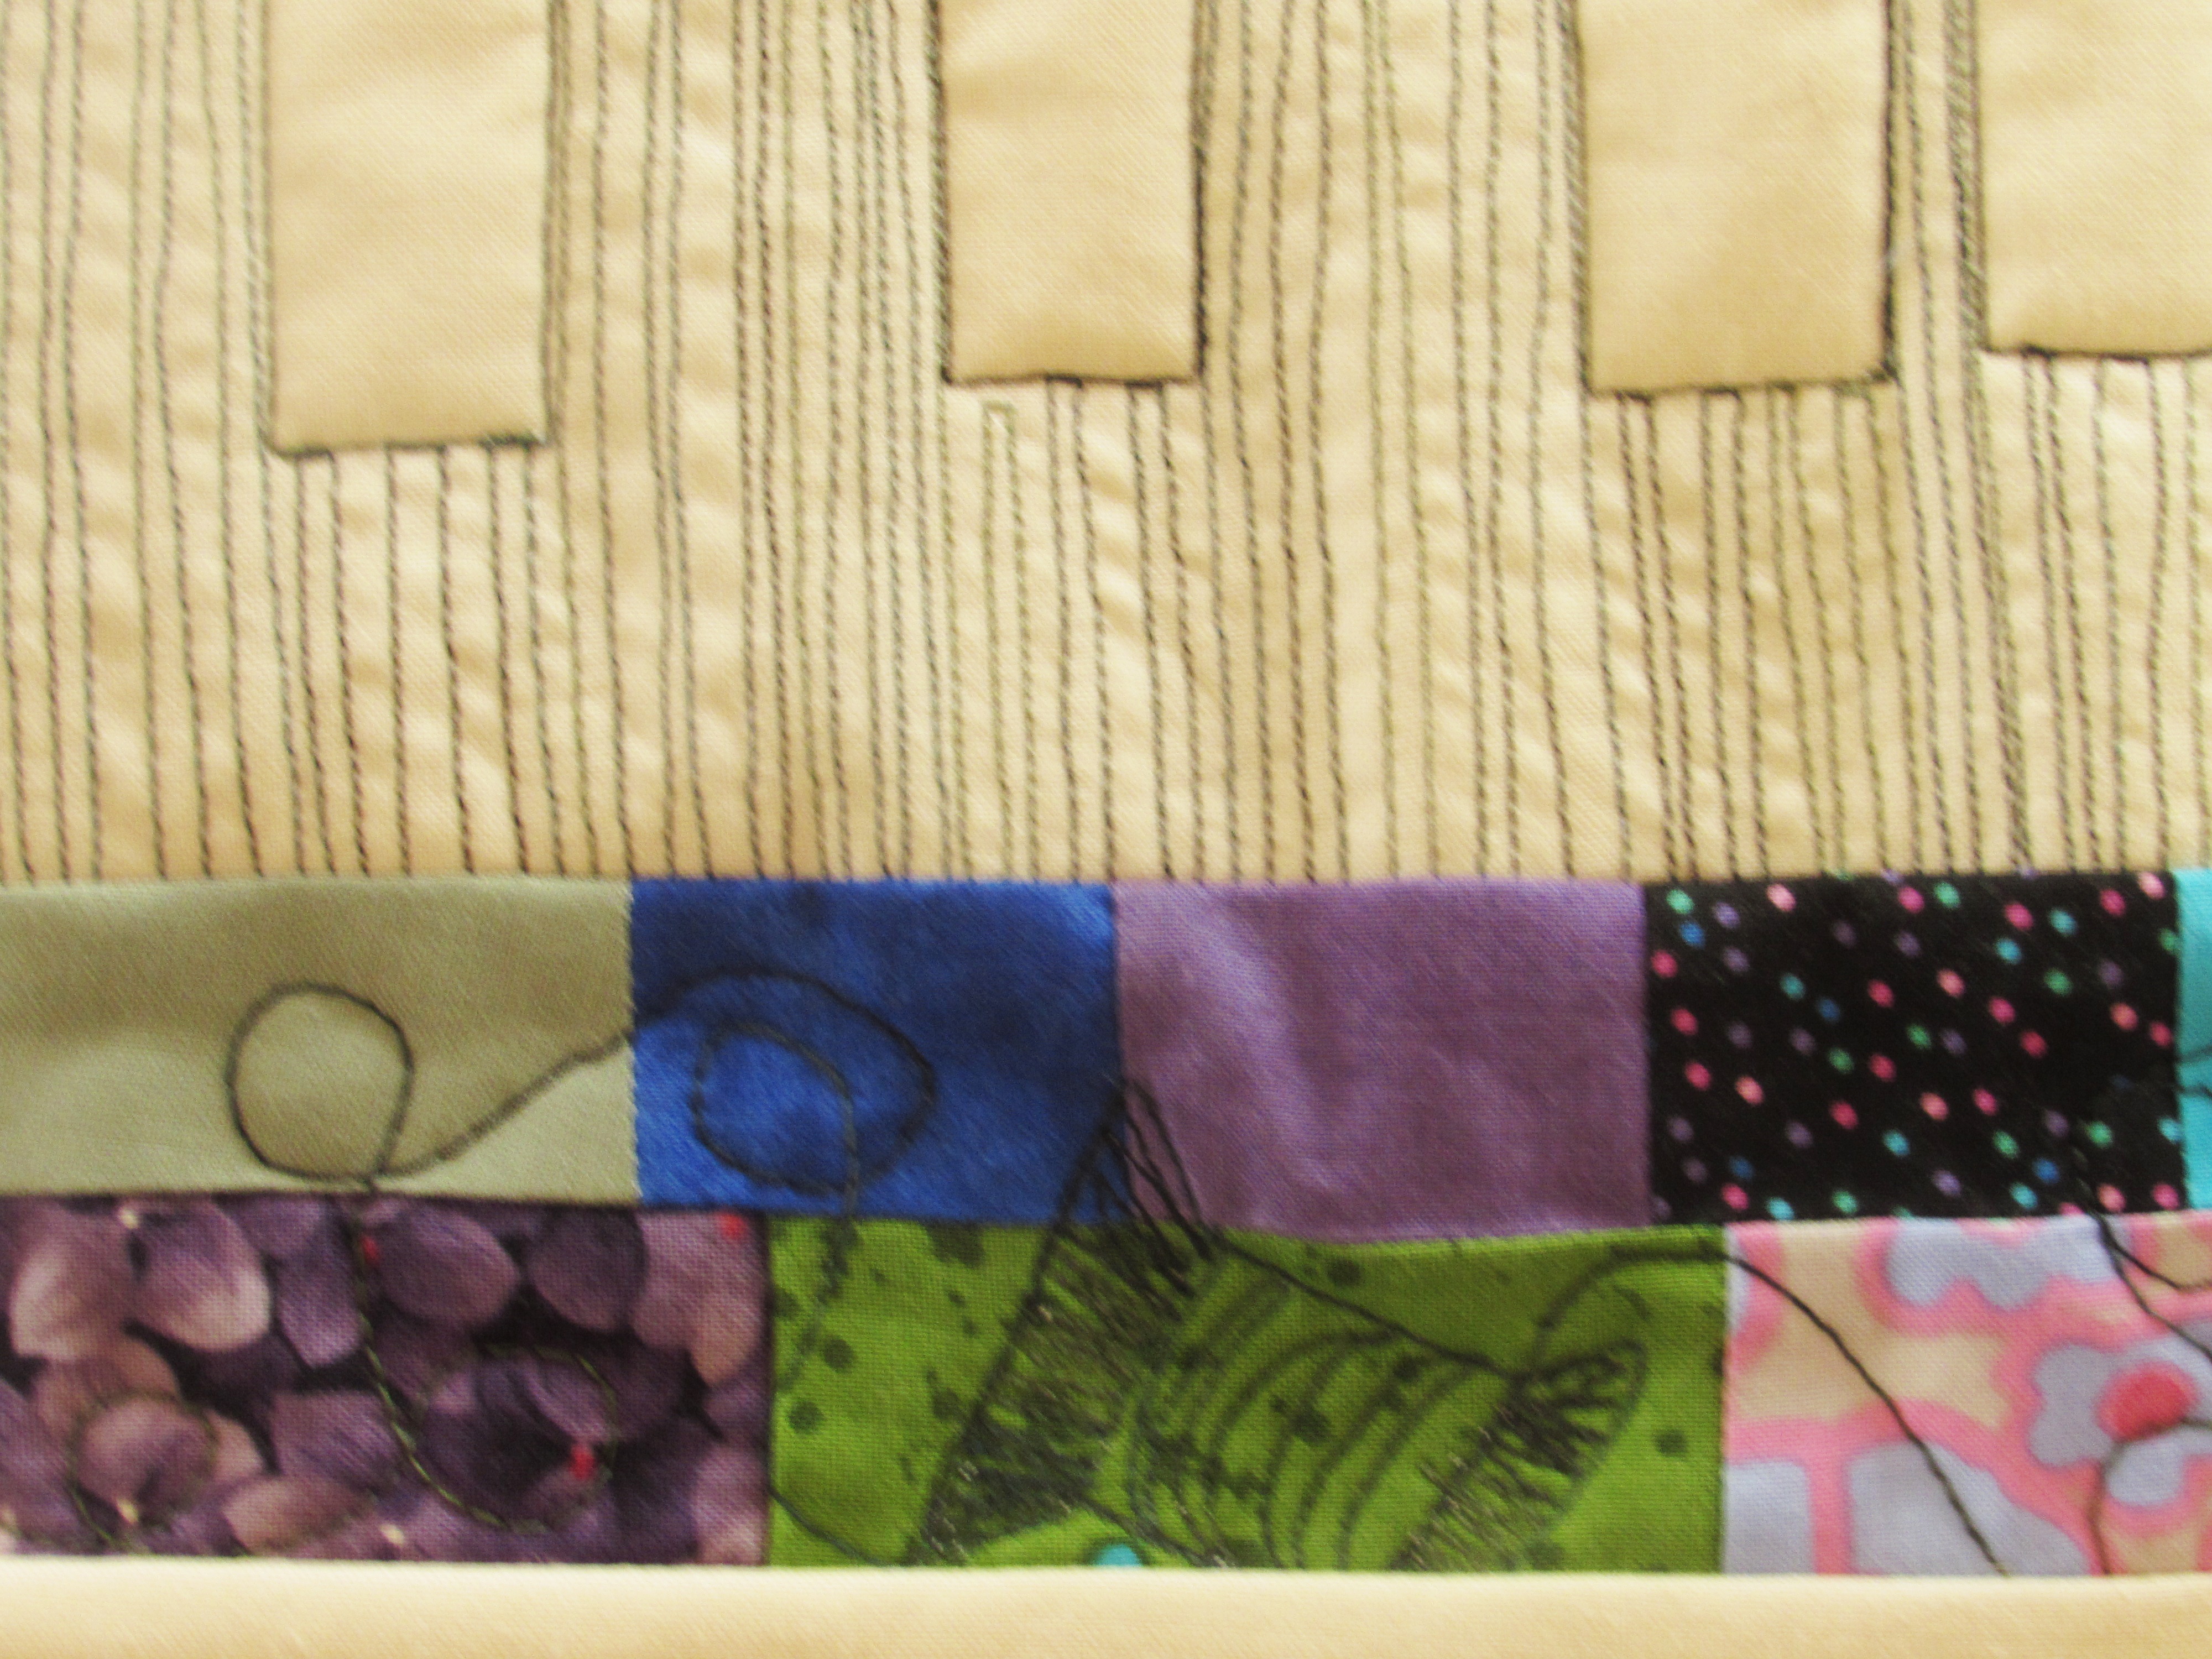
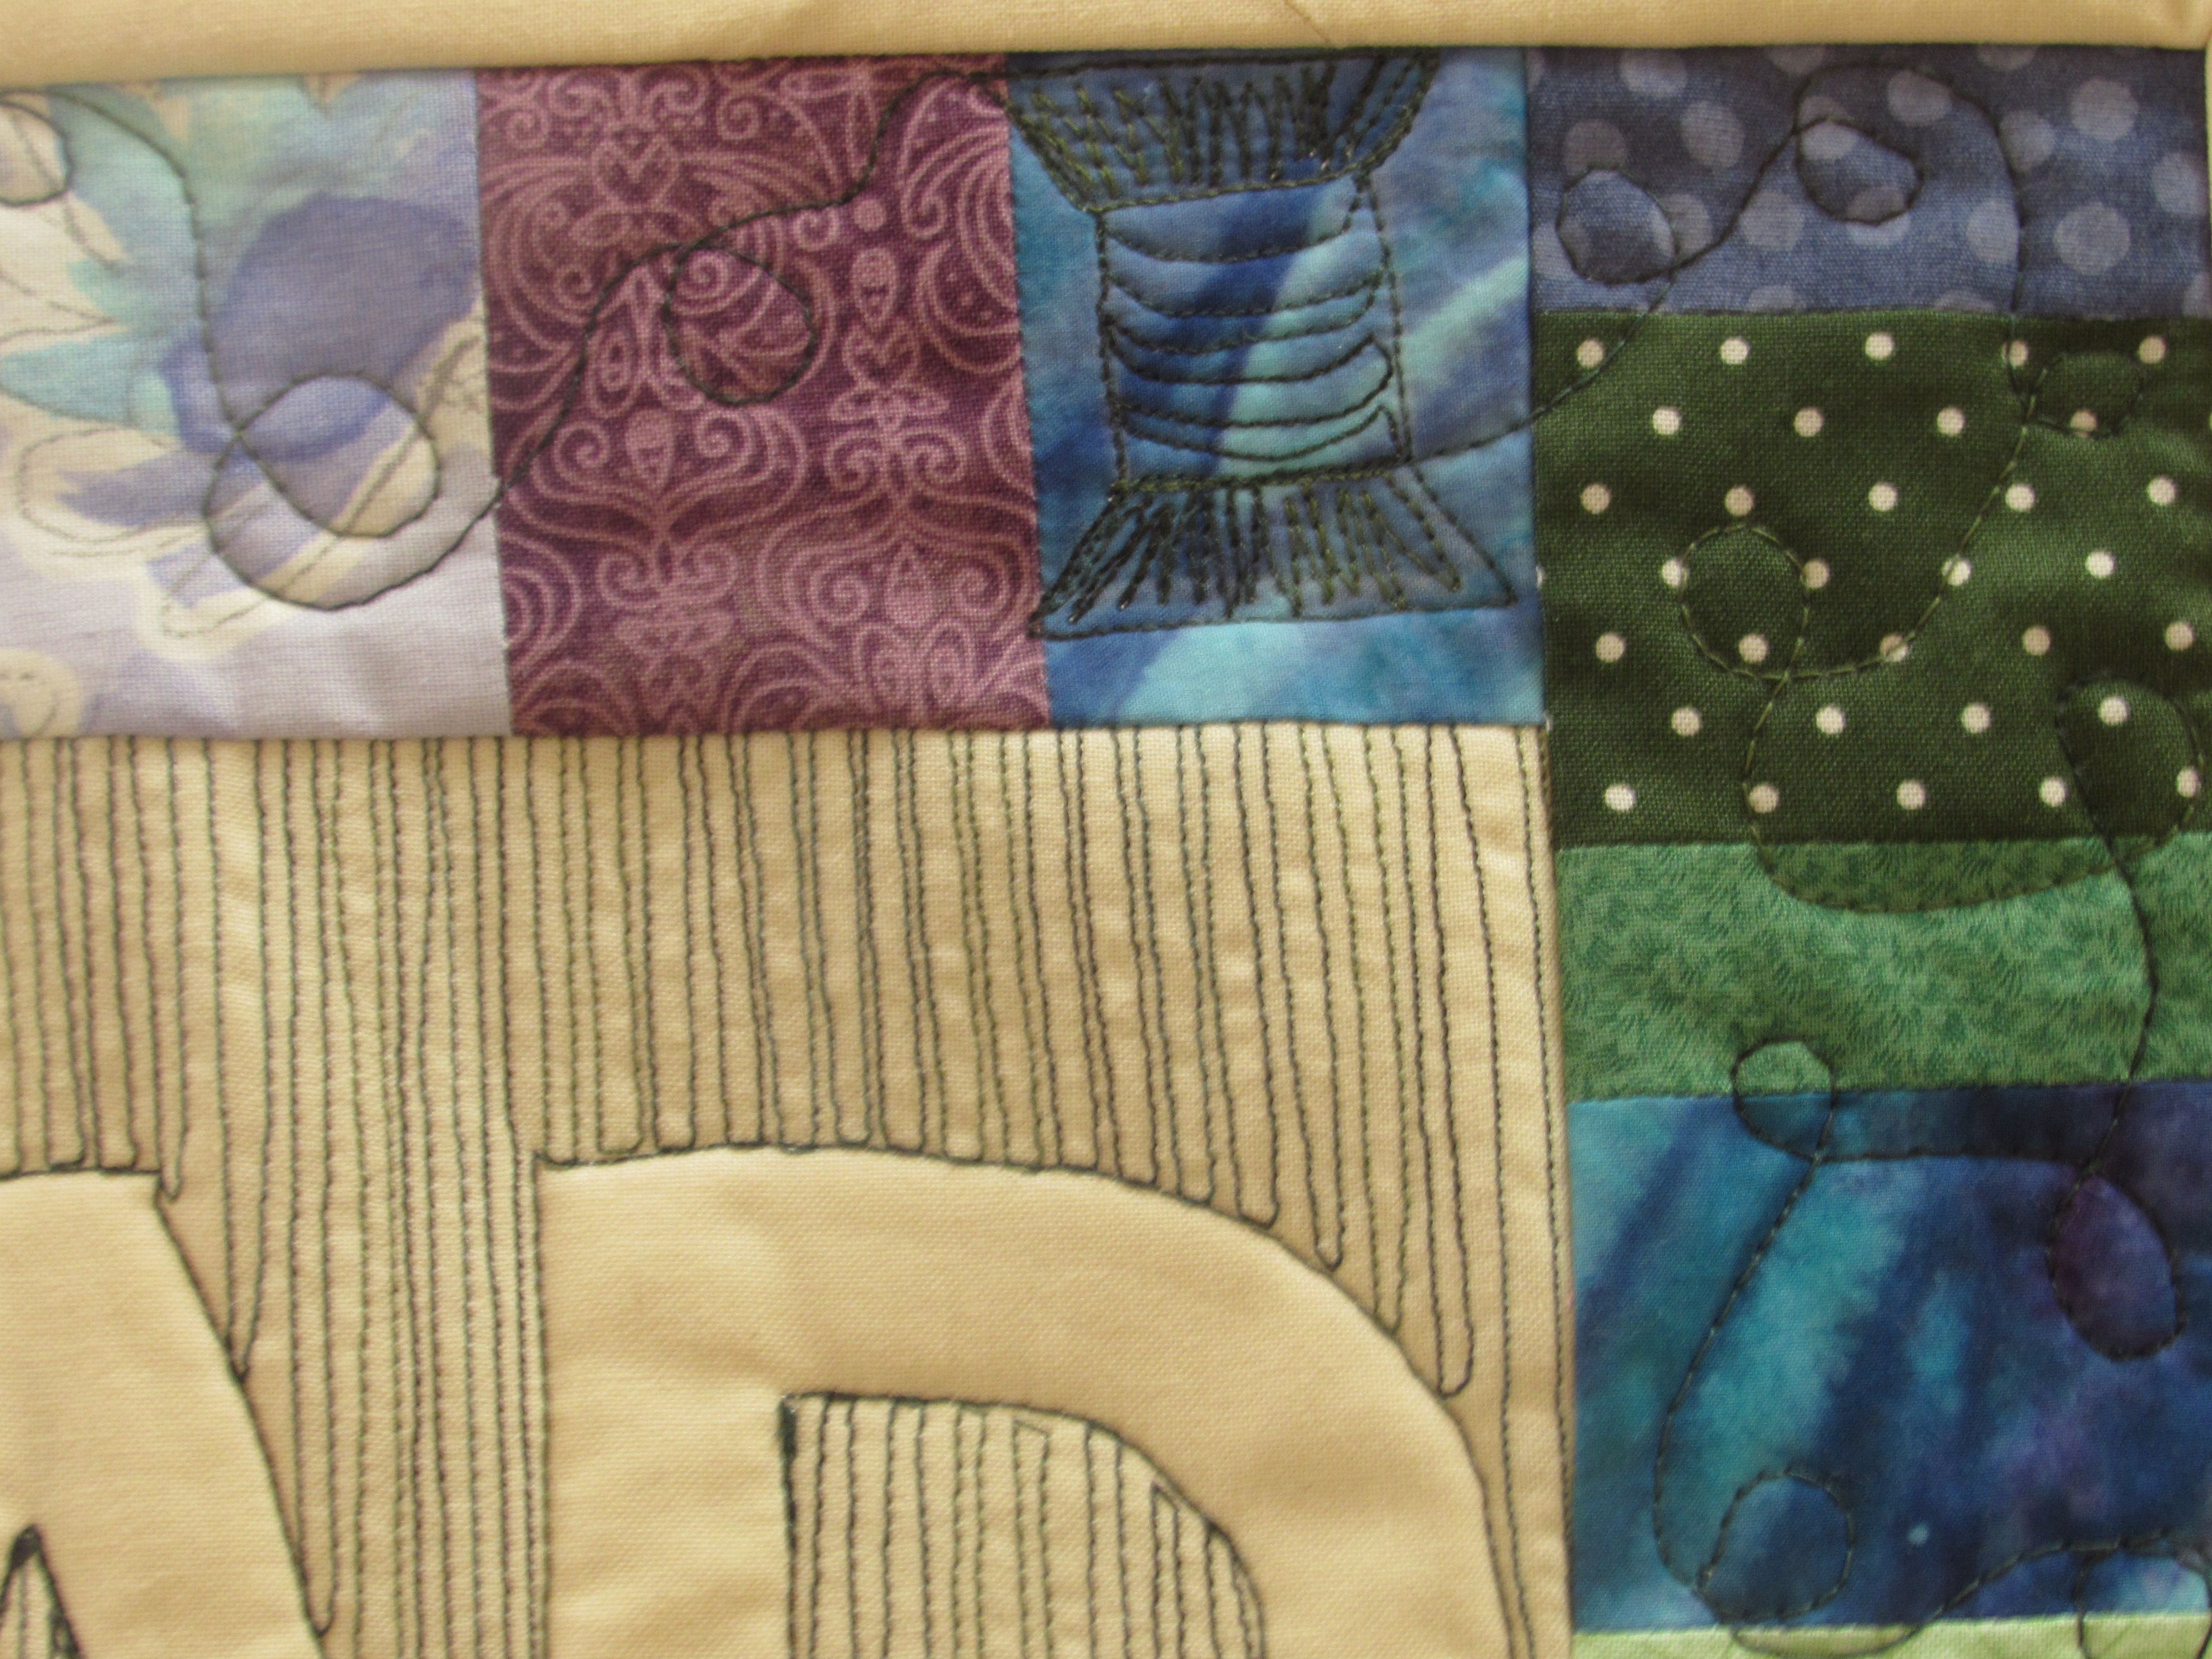
I had so much fun quilting this. There are a few spools incorporated into the border quilting.
If you are interested in trying to make one for your sewing room, I have a tutorial written up for you. It is a very simple process to relief quilt the word on the center. Of course you could swap the word out for anything. QUILT, CREATE, IMAGINE – any of those would be fantastic.
I hope you will check out the entries over at Amy’s. If you are interested, there are a few more days where the festival is open for bloggers to link to. Voting doesn’t open until Sunday, the 25th. It is worth popping over to Amy’s — there are so many wonderful quilts to ooh and ahh over. Have fun!!
I was fortunate to spend hours over the past week with Lori Kenedy! She is the blogger at The Inbox Jaunt and I have mentioned her many times in various posts about practicing and learning to FMQ. She is a rock start when it comes to quilting! She has two classes available on Craftsy and I took one of them this week. 🙂 It was awesome!
I recently signed up with Craftsy to become an affiliate. (Note – this is an affiliate post and if you purchase products through the links in this post, I will be paid. A very, very small amount, but yes, paid.) When I finished the process of signing on, Craftsy asked whether I would be interested in reviewing a class. Knowing that Lori’s class “Creative Free Motion Techniques: From Doodle to Design” was recently released, I happily agreed!
Purchasing a class at Craftsy means that you will forever have access to the class on your Craftsy account. It means you can watch it whenever and whereever you would like. For me, living in a rural area without access to a wide variety of courses, this is perfect. I have purchased a few classes so far at Craftsy. I have the Machine Quilting: Small Changes, Big Variety class taught by Angela Walters. Additionally, I have the class, Machine Quilting Wholecloth Quilts, by Cindy Needham. (Cindy’s class is good but the quilting is too advanced for me at this point. Something to strive for though!) And now, I have Lori’s newest class.
Of the three classes I have taken thus far, Lori’s Doodles to Design is by far my favorite. If you have worked with Lori’s tutorials, you already know that she is a huge proponent of doodling, or drawing, your design over and over to build the muscle memory up before stitching it. Doodling it also helps me to spot the paths I will need to take to move around with the design. I tend to get stuck in corners, or on edges, with no way to move out of them. In this class, Lori shows each motif, or design, by doodling it on paper and then she shows how to stitch it. At the end of each “chapter” Lori does a quick trunk show and displays quilting with that actual design. For me, each of these steps reinforces the lesson. By combining visual and auditory tips into each lesson, I was able to pick up my pen and follow along easily. Converting that to stitching was the obvious next step and it came naturally. In full disclosure, I will say that the designs she teaches in this class are available as tutorials on her blog. However, I am not a visual learner. I read blogs continually and love the tutorials and free patterns that are readily available. But it takes me quite a while to read about doing something and then take that knowledge and implement it. Listening to the instructions is how I learn. I need the auditory input. Taking Lori’s class and listening to her describe what she is doing helped me to advance considerably. Everyone has different ways of absorbing information and this was perfect for me. Watching the video and listening to her instructions = personal success.
Watching a Craftsy class gives the student the option to use a 30 second repeat button. I LOVE this feature. I was drawing along with Lori while watching the class. I had large sheets of newspaper laid out on the table and was trying to doodle her designs with a sharpie. If I couldn’t get a section, I would click on the 30 Second Repeat and, as you would think, that clip just plays over and over (much to the annoyance of my daughter when she is in the room.) It is really helpful though. Another cool feature is the ability to post notes to myself, or questions to Lori, at certain sections of the video. When she answers the question, her reply shows up on the side of the screen during that section of the lesson. Other student’s questions and the reply to the question also show at the relevant point in the class. It is nice to see what people are asking and discussing. Each class comes with a downloadable class materials file. Some classes have templates, required materials lists, or patterns. There is huge value and very high quality in Craftsy’s class offerings.
I did a fair amount of practicing yesterday afternoon on scrappy quilt sandwiches.
I was enjoying playing with the little rainbows. They remind me of miniature Baptist Fans. But you can see that moving around with the motif is a trick. I need to go back to paper and pen and draw more of them.
I am pleased to see that my stitch length is becoming more consistent. Also, the tension on my machine is so much better. This is in part because I am evening out the speed of my foot in relation to the speed with which I move the fabric. When I take these pictures taken at such a close range, I do cringe a bit at the herky jerky stitching. But I share them anyway. I am almost certain that Lori or Angela had to stitch like this to become the quilters that they are now. The other day I came across a great quote on Creations by Nina.
“Everything worth doing is worth doing badly. If you ever want to do anything well, you need to be willing to do it over and over again. Badly at first. You need to be willing to weather that through.” I found the quote on Nina Marie’s blog but she gave credit to Ellen Anne Eddy. This is perfect, right? With free motion quilting (as with most things) the quilter has to be willing to put in the time to gain skill.
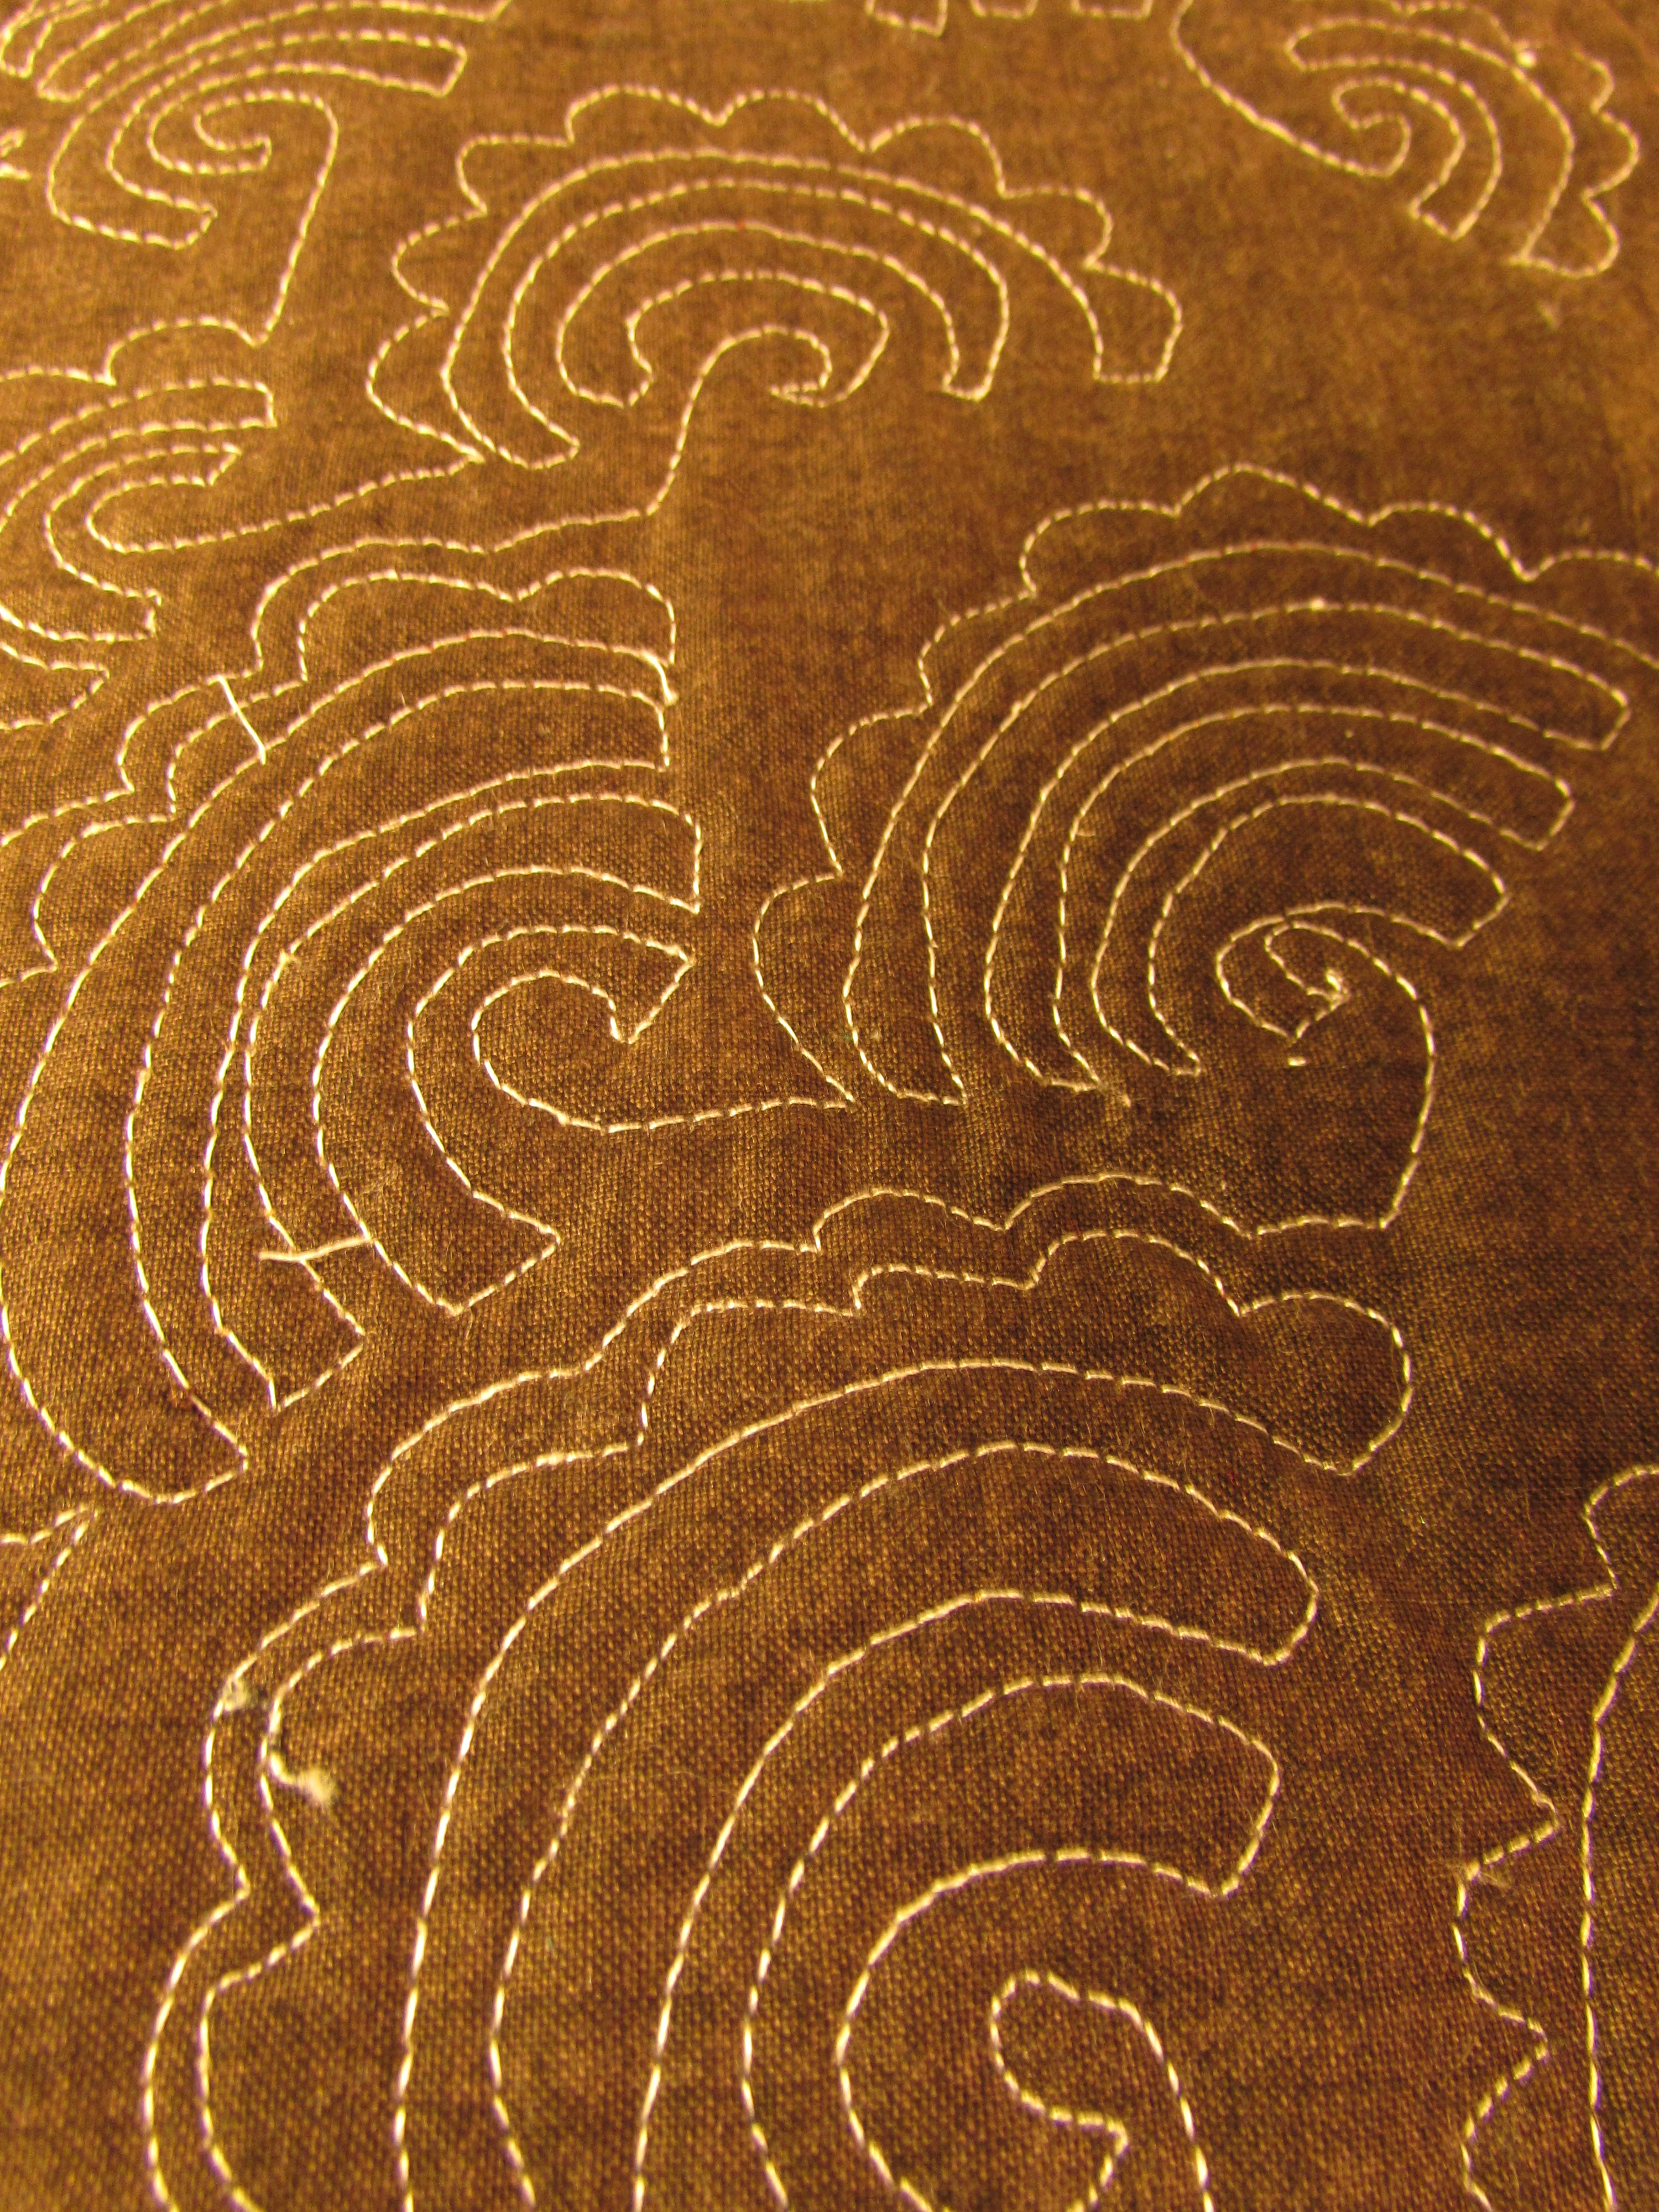
After taking the Doodle to Design class and practicing on scraps, I pulled out a long forgotten UFO and worked on it. I started this art quilt almost two years ago. For whatever reason, I put it in the closet and there it sat. On the far corner of my sewing table, I have had the fabric I was using, the stabilizer and fusible webbing all together in a neat little stack, waiting for me.
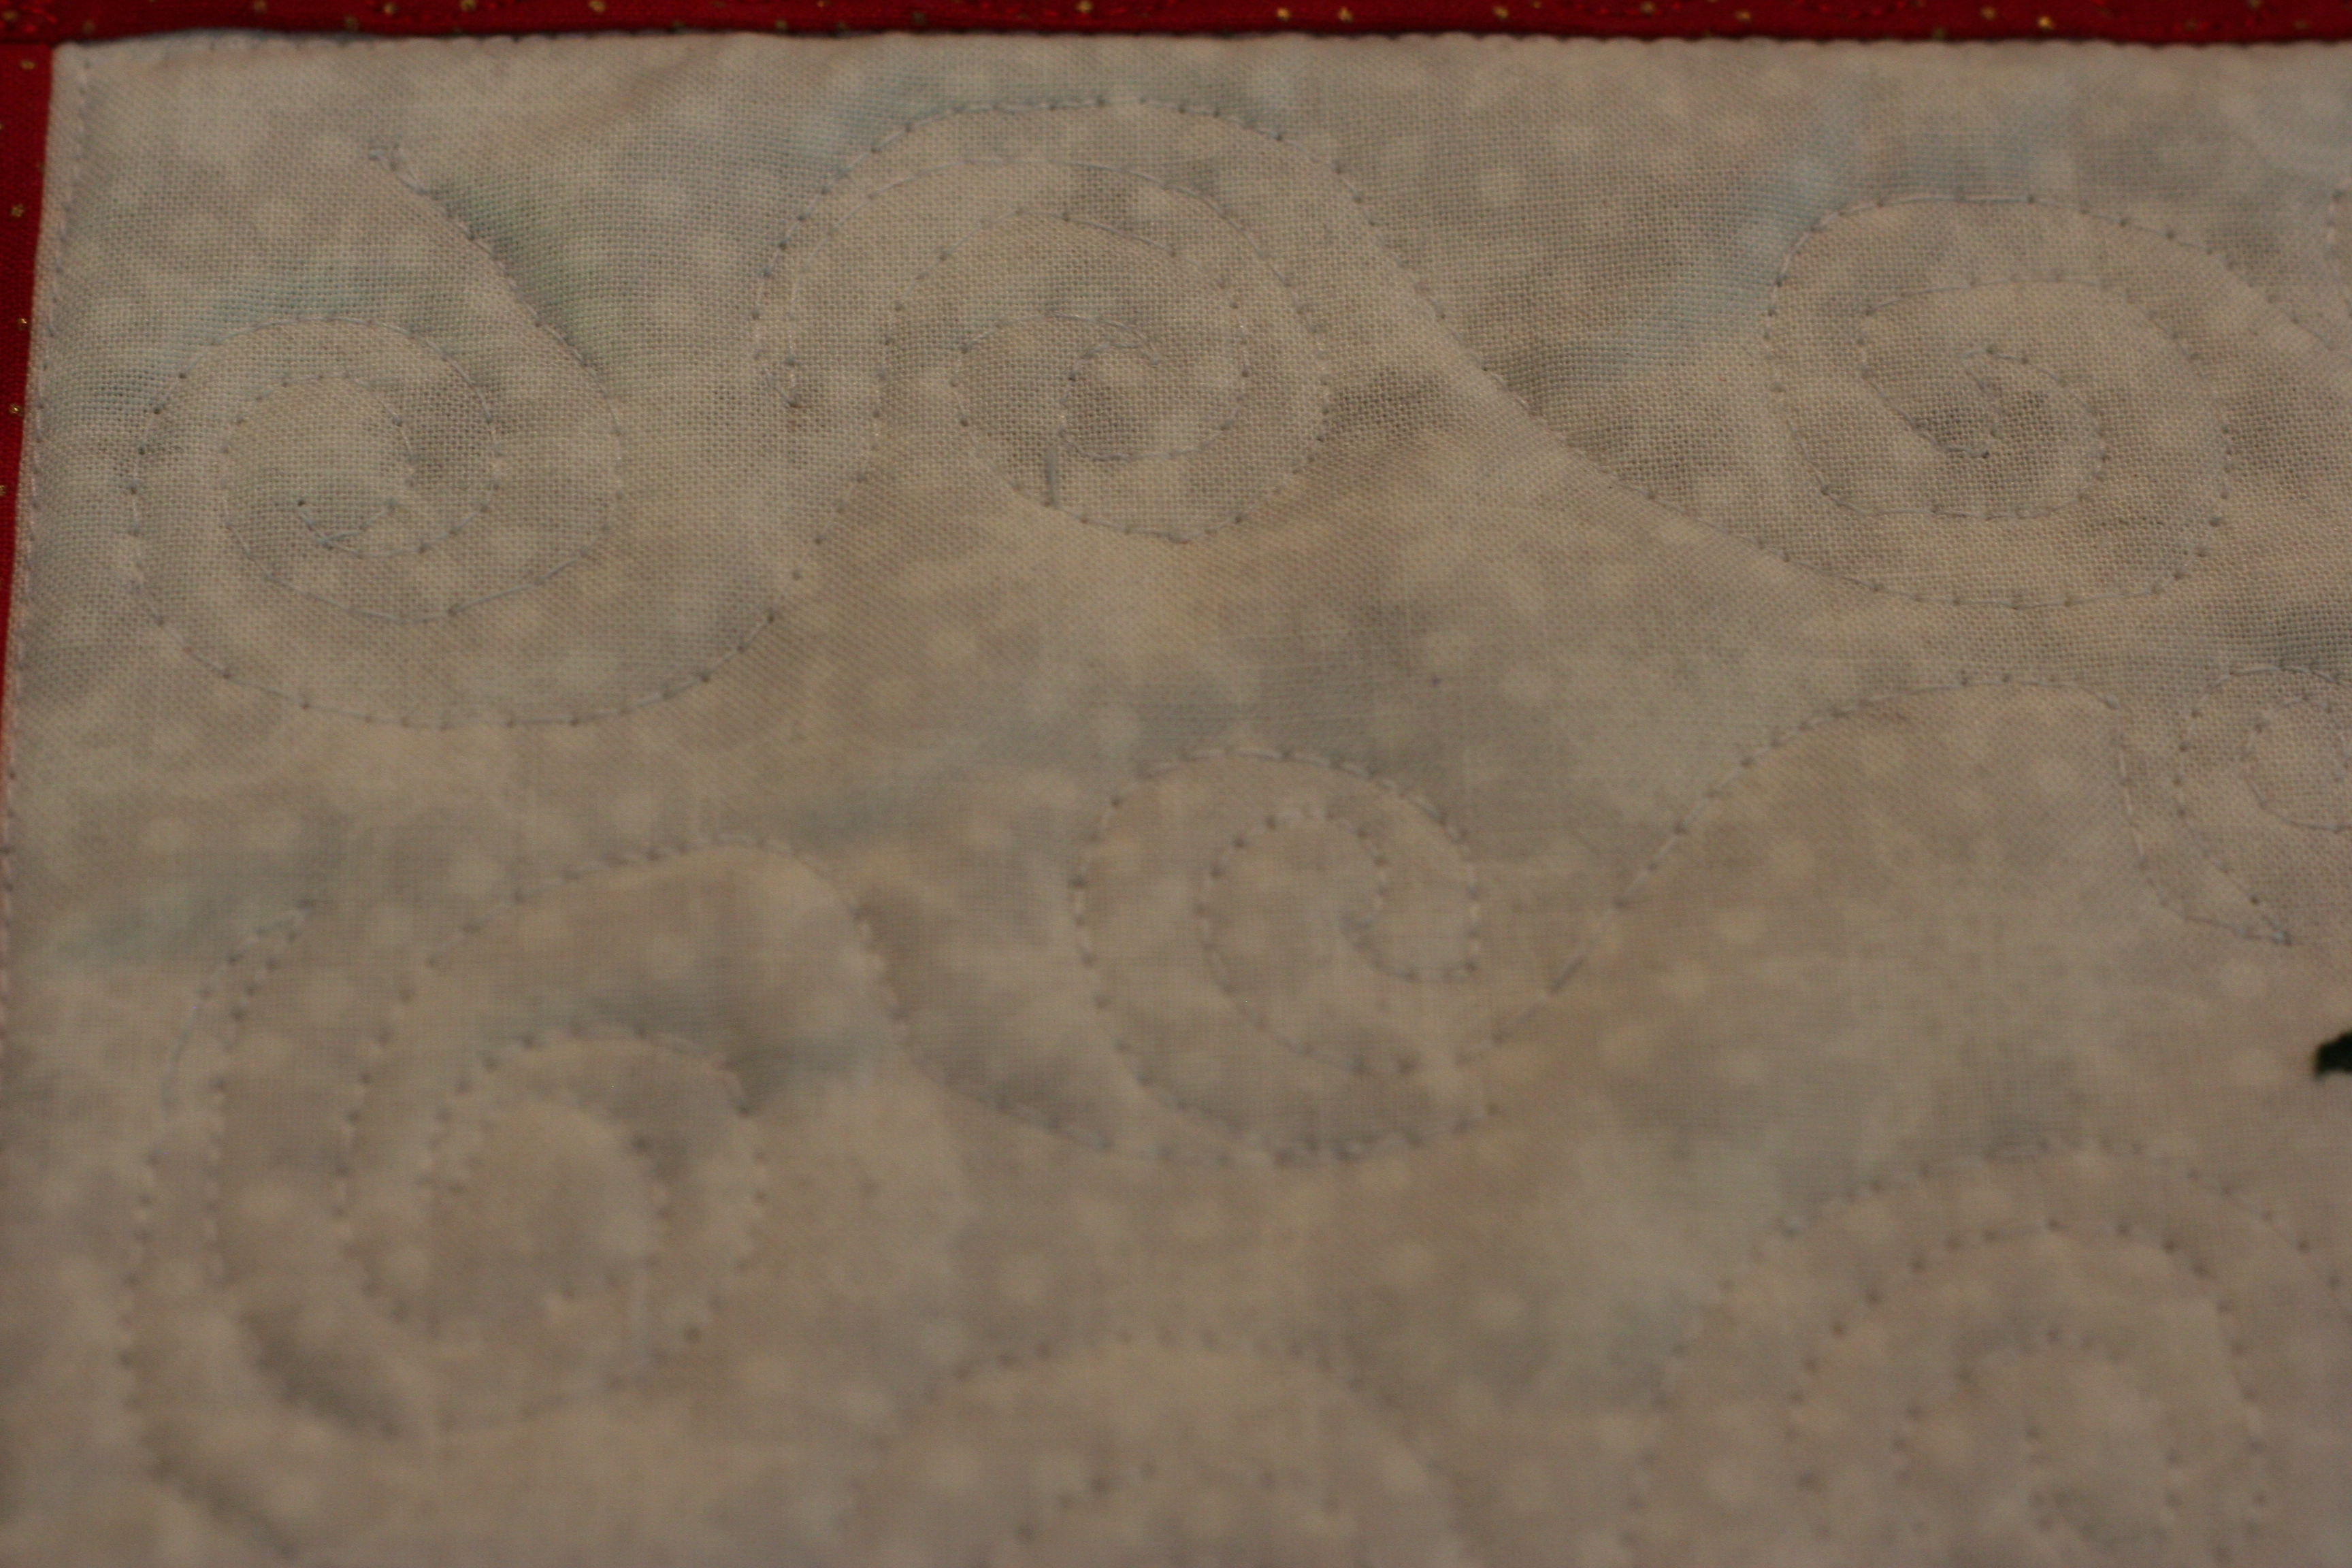
This provided a great project to practice quilting. Here are a few shots of various parts of the project. These swirls are (hopefully) going to represent wind, or swirling clouds.
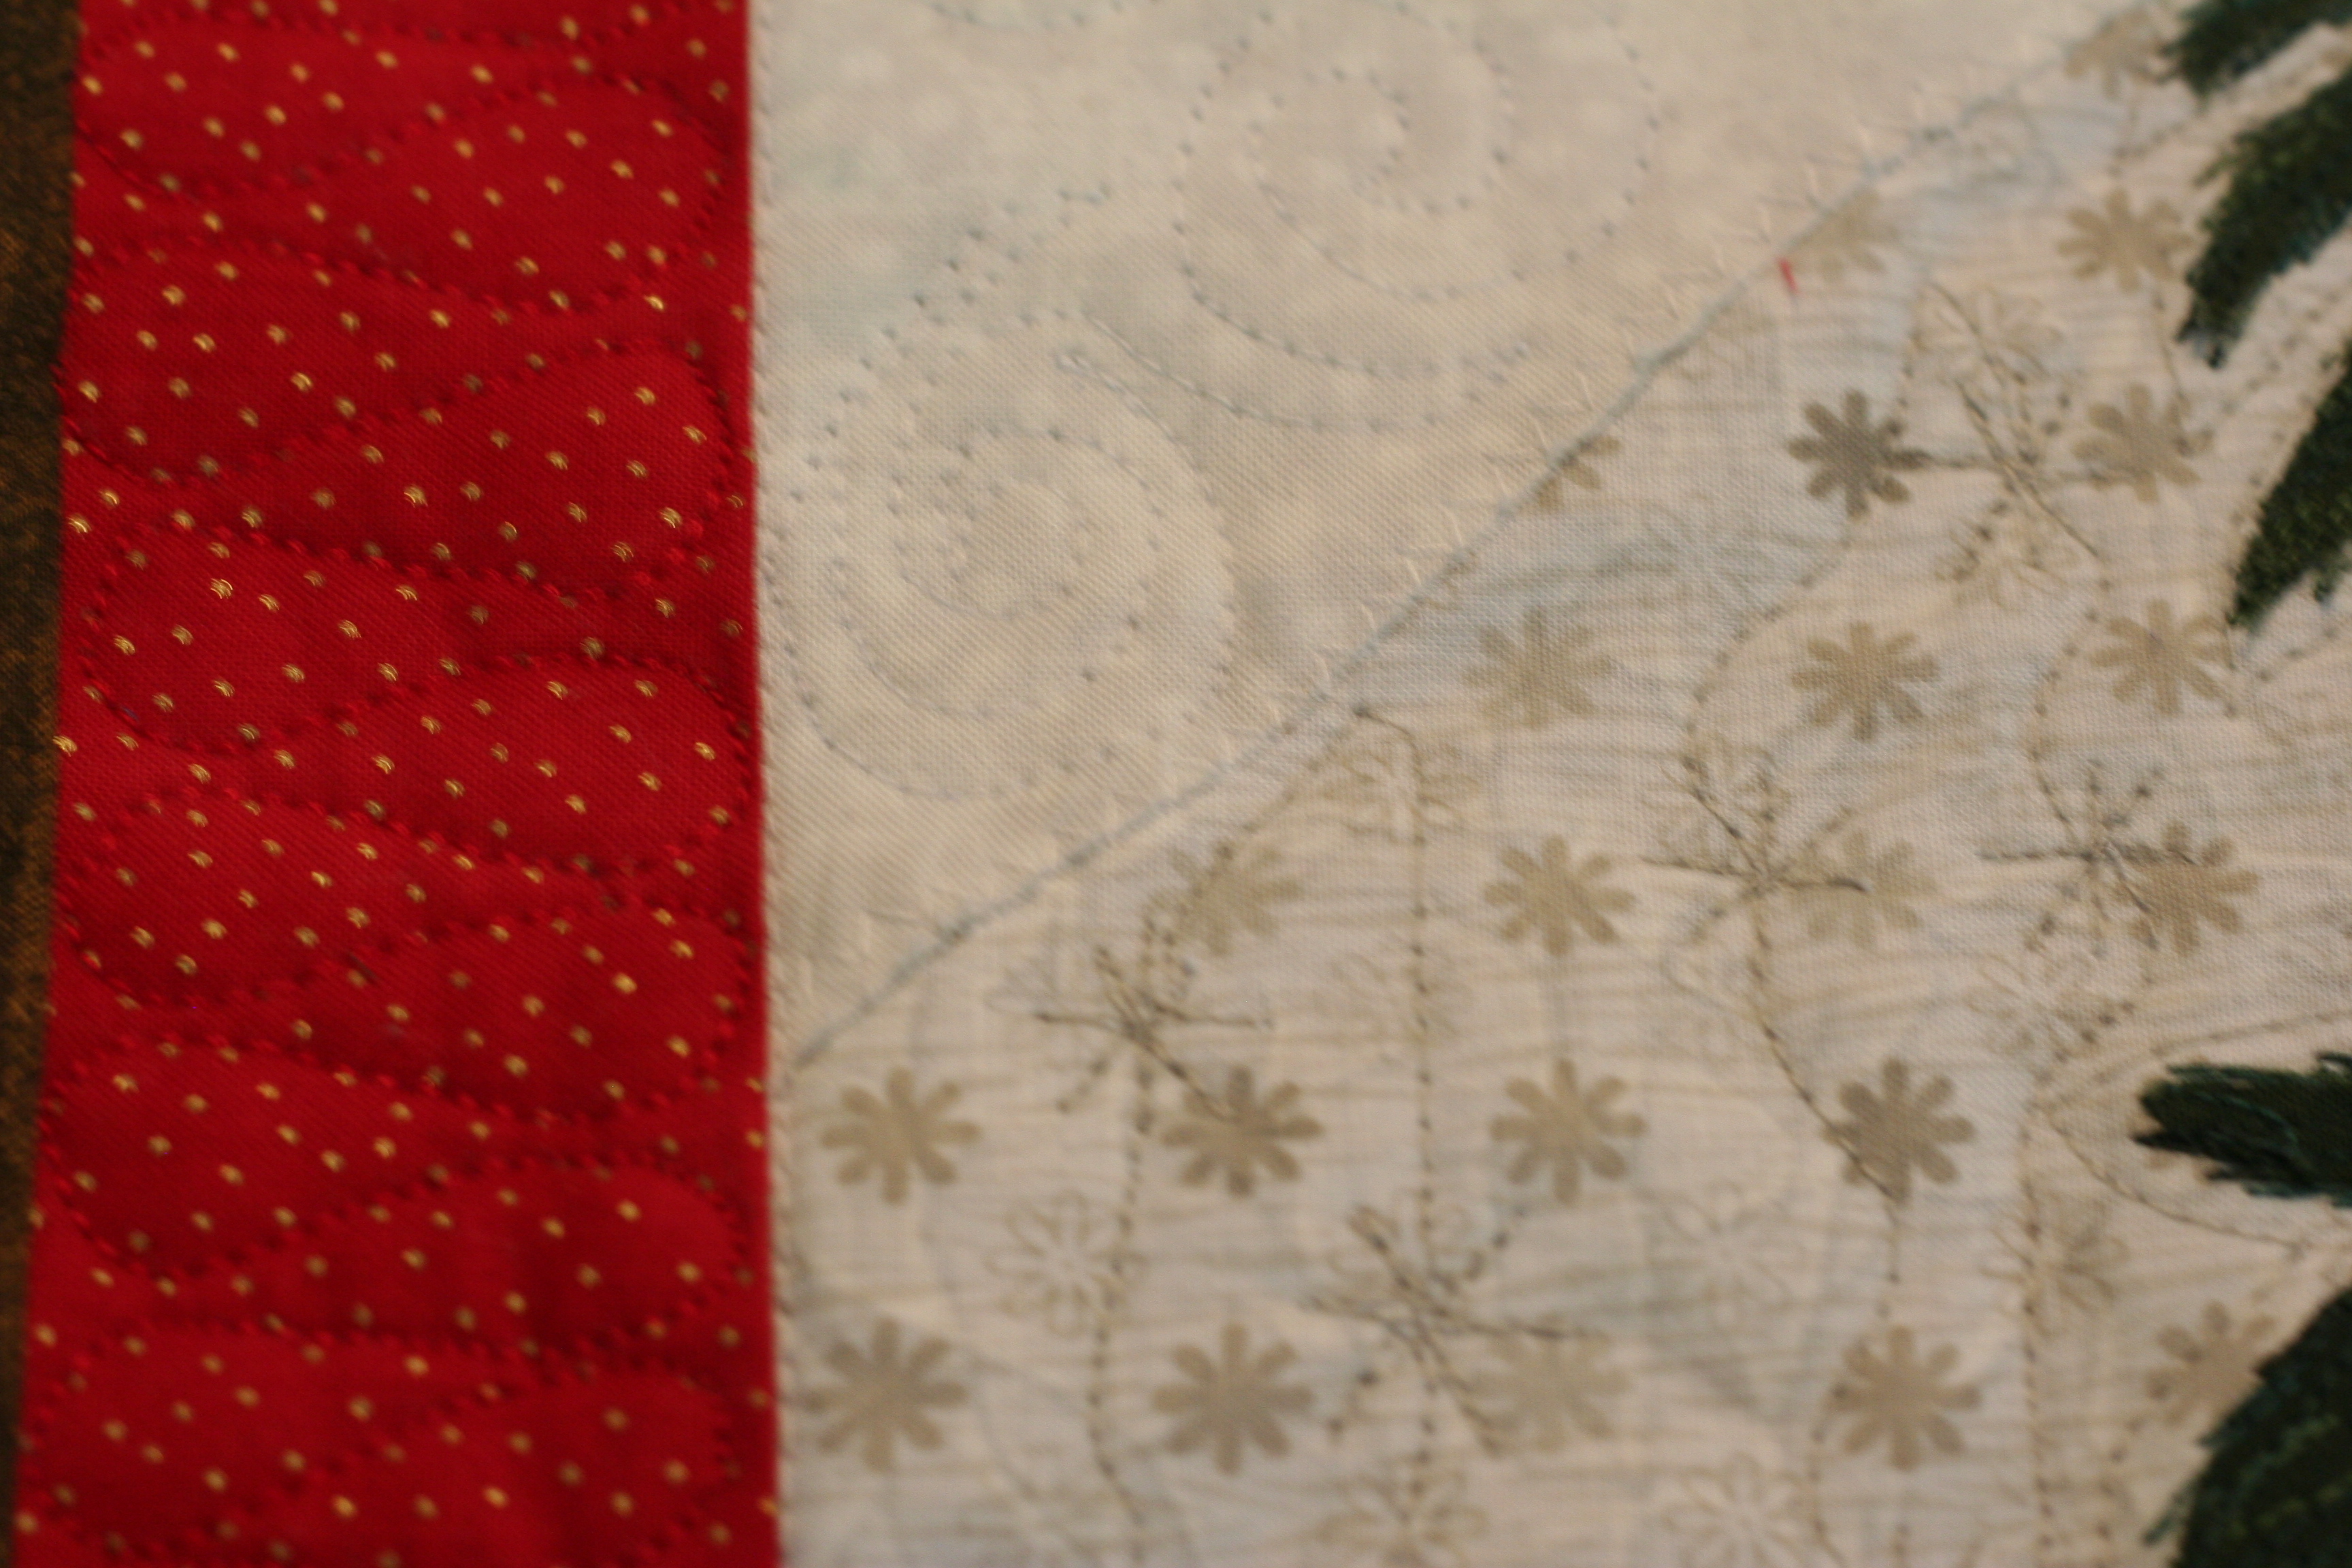
The next shot shows some ribbon candy stitching on the red border. That was really fun to stitch and I am pleased with the result. (Lori went over this thoroughly including variations of it, in her Doodle to Design class.) On the snowflake print, I did wavy lines with little snowflakes. Again, this was covered in Lori’s class. It was satisfying to be able to put the lessons from her class to use right away.
I have just about finished quilting this. I am trying to decide between binding it traditionally or facing it. Facing it is winning at this point. Hopefully I will have a finish to show you soon!
Check out the classes on Craftsy. There are so many to choose from. I love to be able to learn on my schedule and also love the quick interaction with the teacher. If you have questions, leave them in the comments. If you do click through to Craftsy from my links, thanks so much!
Linking for the first time with Sew Can She, Show Off Saturday! Also linking with Beth at Main Crush Monday. For all other link ups, check the top of the page, under Link Ups.
First of all, just know that it is raining as I type this post. That makes me so happy!!
Today I thought I would share about a class I took with Carol Taylor back in spring of 2013. If you aren’t familiar with Carol, she is an extremely talented quilt artist from New York. She works on quilts that are often abstract and are always beautiful. Her talent with thread is beyond belief. If you are unfamiliar with her work, check out her gallery. It is a treat to look through.
One day (a long while back) I was looking at the website for my LQS and there was a post about a class with Carol Taylor coming soon. At first I didn’t think much of it because it didn’t seem possible that this Carol was the same Carol whose site I had looked at so many times. Then I saw the description of the class and was thrilled to see that it was her. Wondering how the heck our tiny guild could afford to bring her out, I called the shop. Apparently, we had partnered up with a guild about an hour away and the two guilds were splitting her travel expenses which made it just barely affordable.
I was very hesitant to sign up though. I felt like the class was out of my league and it was also fairly spendy for my budget. I talked to my husband and he encouraged me to go. I really wanted to just learn from her at whatever level I could, even if I wasn’t quite up to speed on the techniques. I am so glad I did becasue it was fantastic!
At the last minute, I talked one of my friends into going with me. There was a woman that had signed up and was ill so her spot was up for grabs. This was the second quilting class I had ever taken and I was more than a little unprepared for it. When Sophia (my friend that went with me) and I entered the room it was obvious that we were newbies. We both came with a tote bag of supplies and fabric, plus our machines. Yikes, the other women there had (literally) suitcases and duffel bags filled with fabric. They had large boxes, or kits, filled with needles, thread choices, mysterious feet for their sewing machines etc. I was overwhelmed. I brought exactly what the supply list said, no more than that.
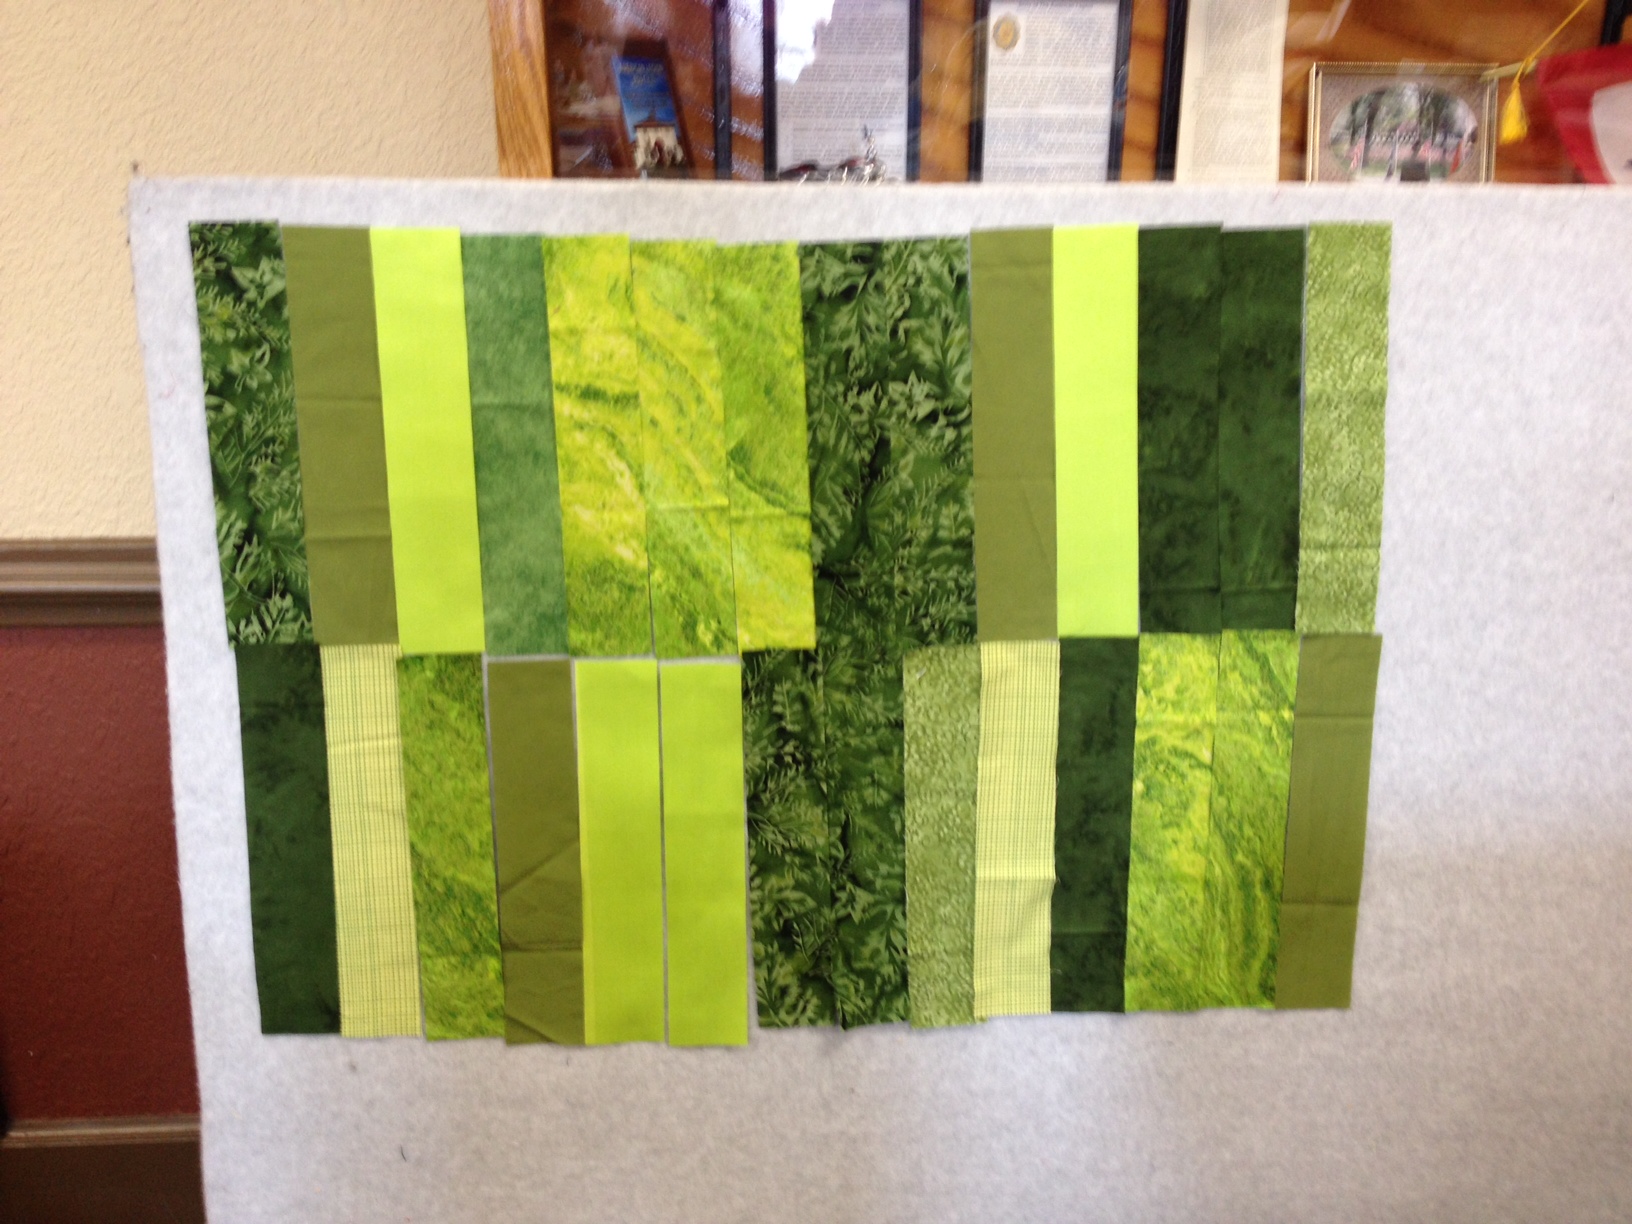
After lecturing for a bit, Carol had us get out the colors we wanted to use for the background. I had about five fat quarters. She came by and actually asked me where the rest was. I was baffled. Then she said to the class, “we need greens over here” and it was like the story of the ‘Loaves and the Fishes’. Twenty women started to hunt through their fabric, pulling out greens of every shade. This was really my first exposure to the kindness of the quilting community. I ended up with plenty. 🙂 We started cutting strips and playing with them.
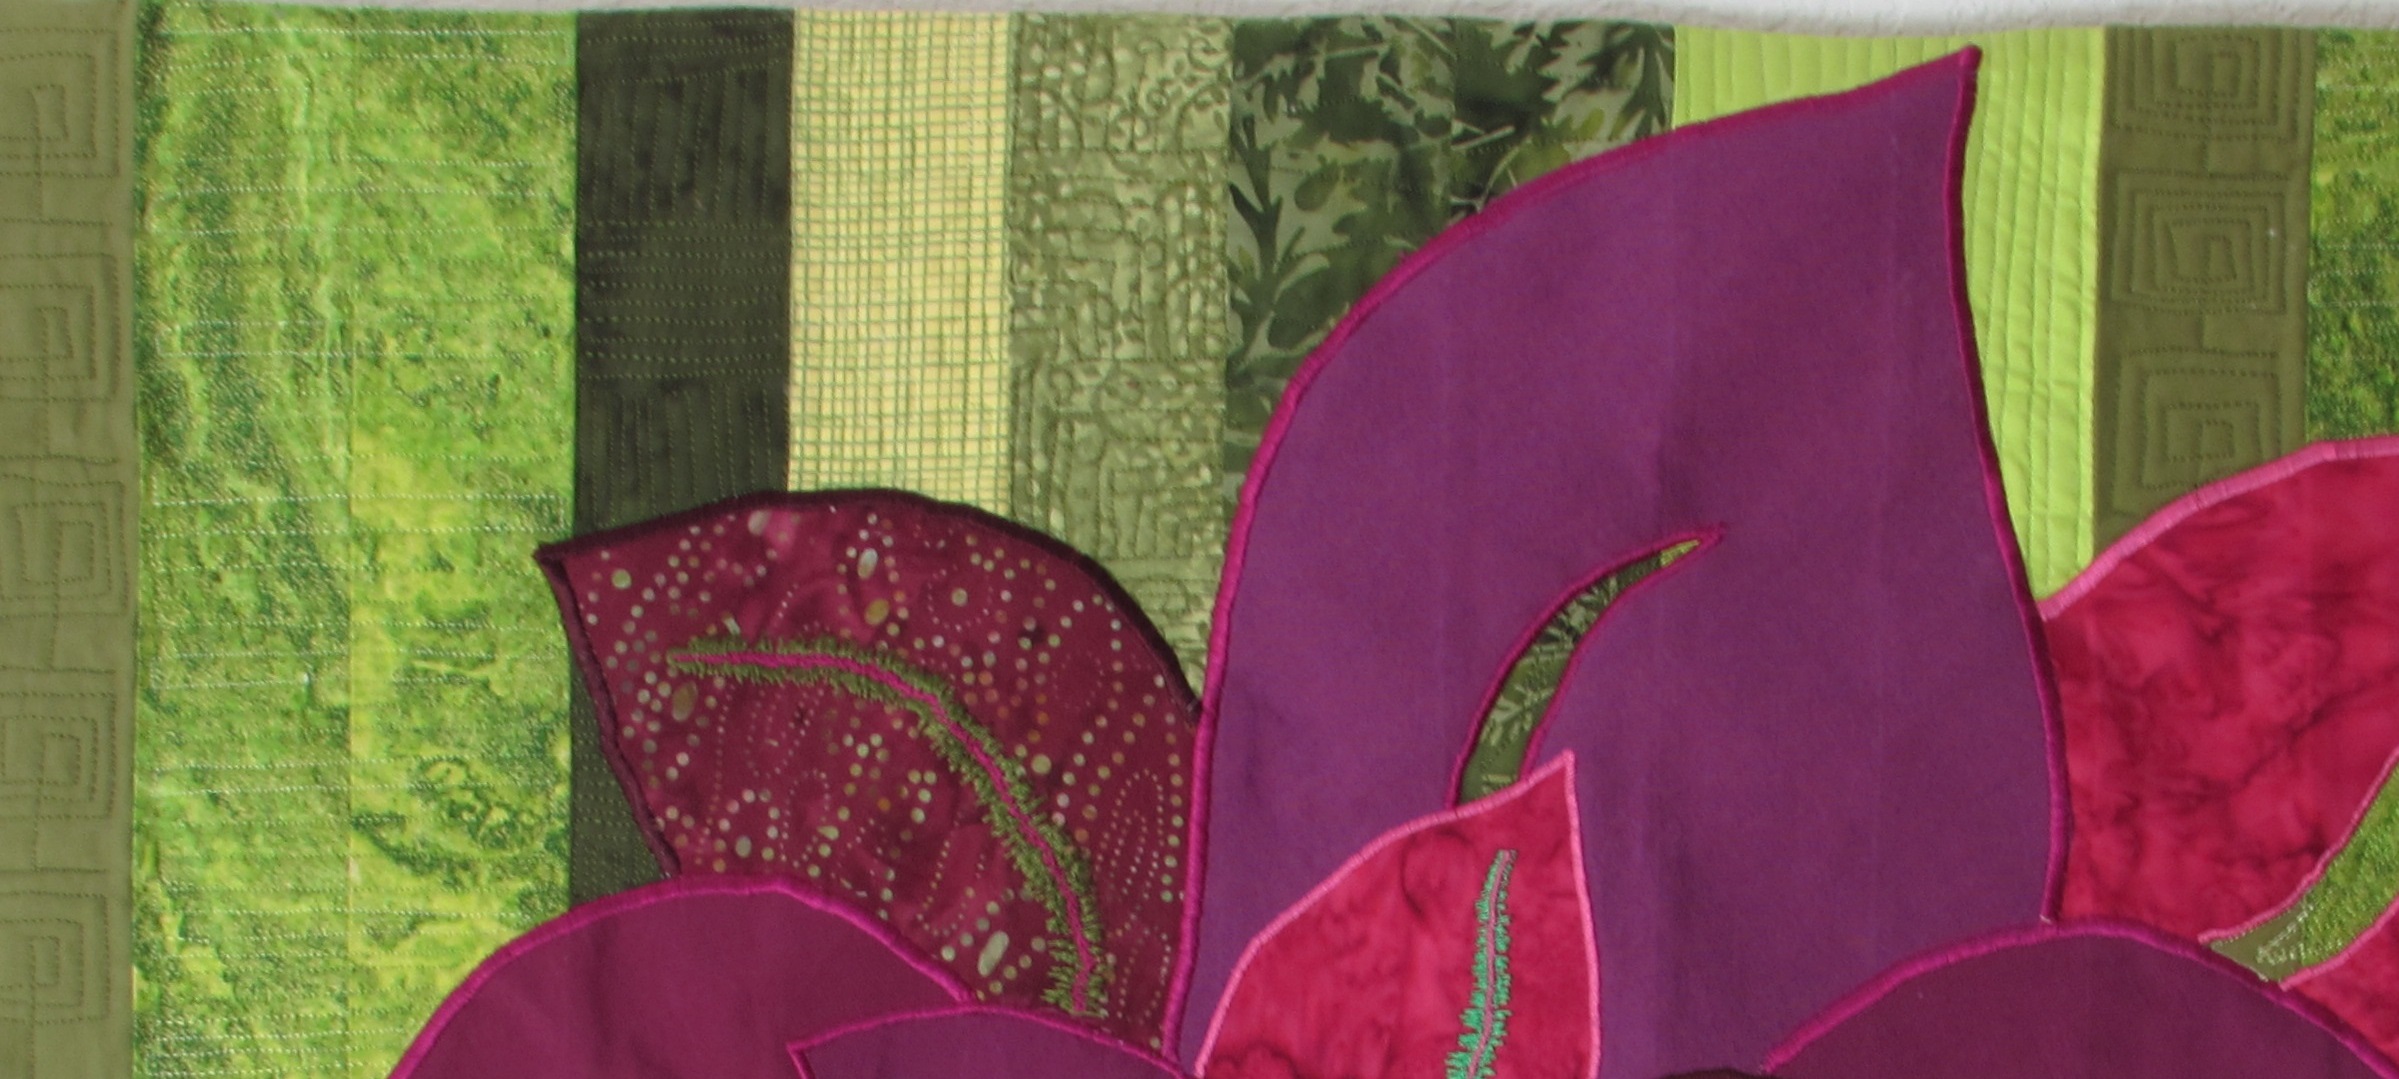
One of Carol’s strengths is her use of color and that is something that I have mentioned struggling with. She was so helpful. When she looked at my first choices (above) she explained there wasn’t enough value difference. Working together, and using donations from classmates, I finally ended up with my backgound. The lightest solid green is a gorgeous silk given to me that adds a wonderful texture to the collection.
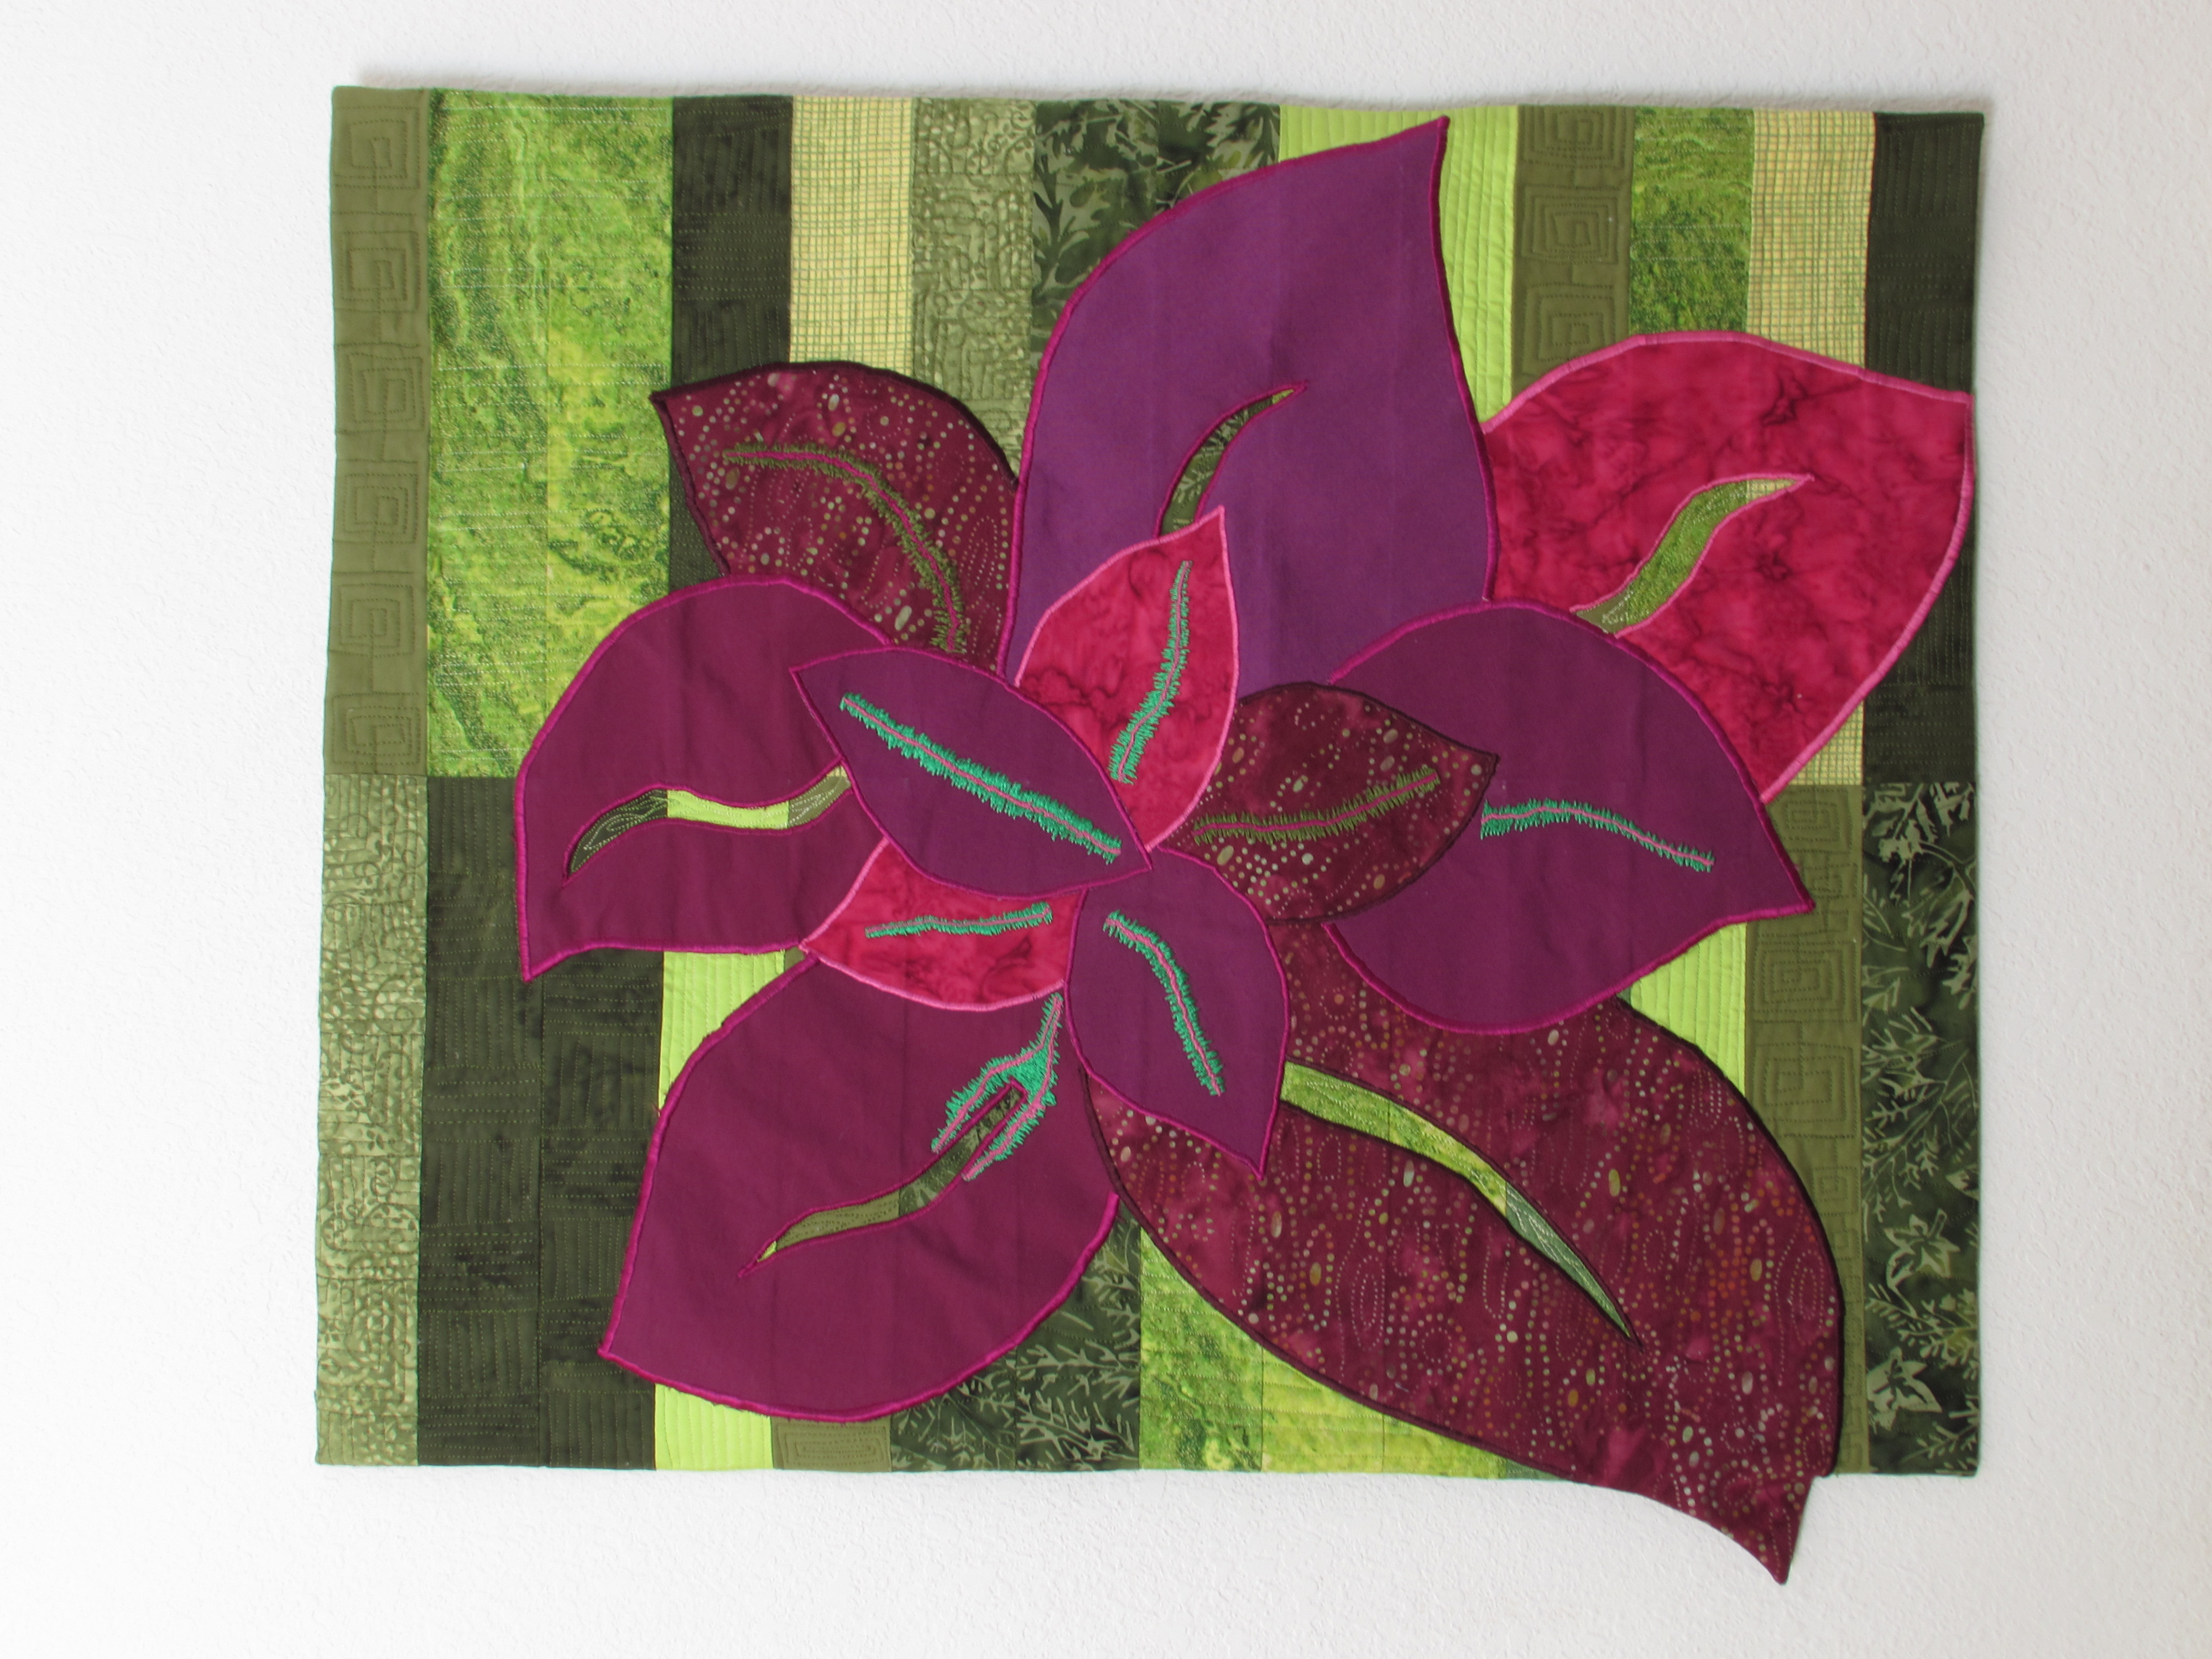
Beyond learning about value, I learned about design and free-form applique. I wanted to make a wall hanging that was inspired by some pictures of Coleus plants that I had brought to class. She had me cut huge leaves with my rotary cutter without drawing them or making any sort of pattern. It worked great and was so much fun. (I wish I had taken pictures of the process but this was long before blogging so I don’t really have any.) Below is the end result of the class. I did have to finish much of this at home. By the end of the two day class, I had the background done and the leaves in place. It wasn’t quilted and much of the thread sketching down the center of the leaves was incomplete.
One of my favorite aspects of the quilt is the little point of the petal that hangs below the finished edge. Carol suggested this and it worked perfectly. There is a cute story behind the idea. As a well-known artist, many of Carol’s quilts hang in different shows and galleries. She had made a quilt that she wanted to enter in a show and it was 1/2″ short of the size requirement. The show held firm on their size requirement so Carol added a tiny fish that hangs off of the edge of the quilt. They took her entry. You can see a photo of this on my Flikr page. Carol did a fantastic trunk show and was kind enough to let us take pictures.
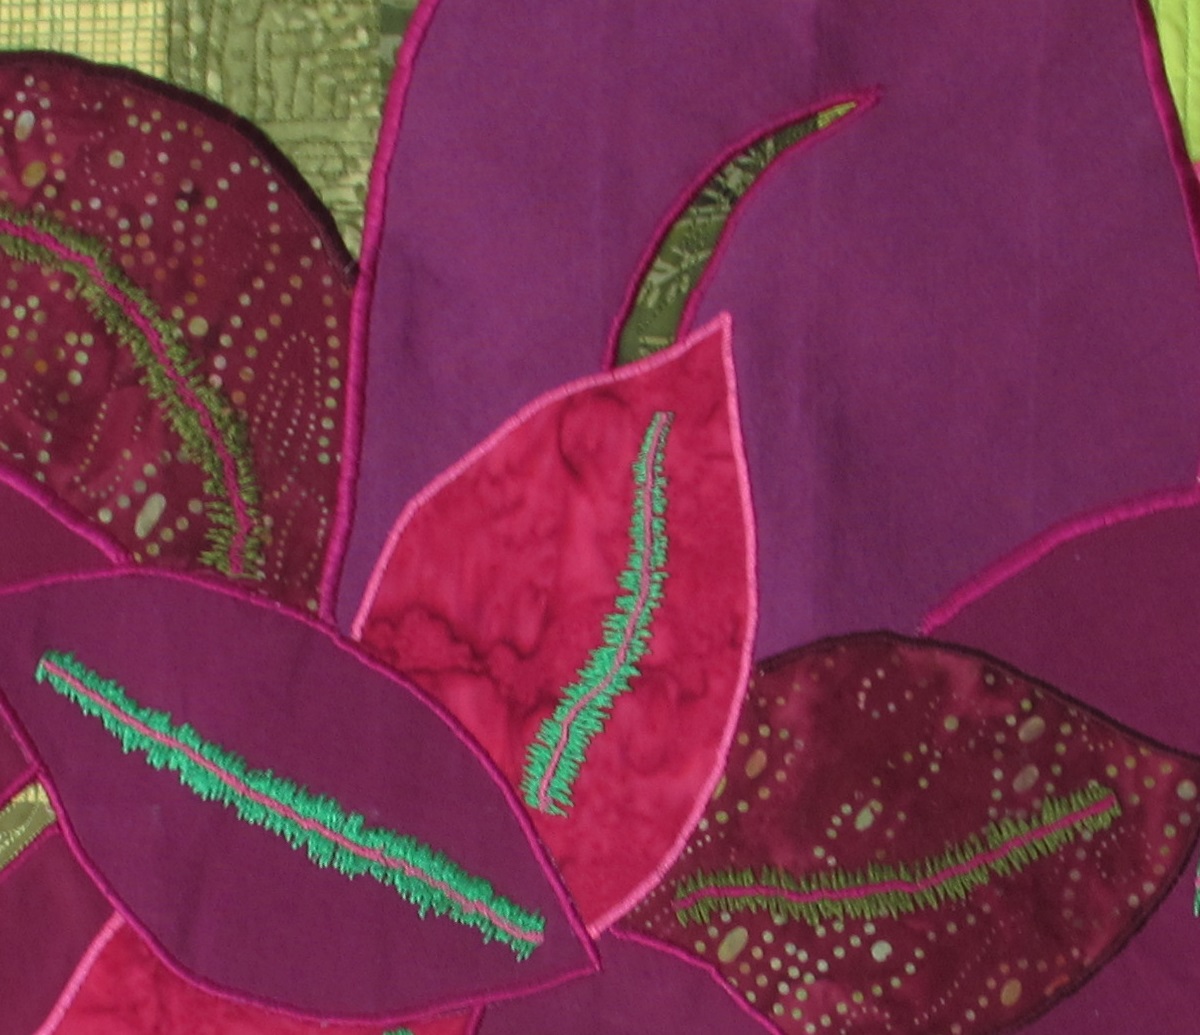
This class was actually my first exposure to thread play. We used Sulky threads (which she sold in class in every color of the rainbow.) I love the veins that are sketeched in the center of the petals.
I also learned to incorporate texture with simple ideas such as cutting the center of some of the petals to show the green behind it as the center vein.
When I was ready to quilt it I used a different FMQ pattern in each of the green fabrics, repeating the pattern wherever that particular color strip was used.
With a faced edge, rather than regular binding, the quilt finished out at 28″ wide by 25″ tall (including the tip of the leaf!)
This class was such a fantastic learning experience. If ever you have the opportunity to take a class with Carol, I cannot emphasize this enough – Do it! She has such talent and is a very good instructor as well.
Giveaways are pretty darn fun. Luck has been on my side and I have two wins to brag about. I know it isn’t nice to be boastful but what can you do? Plus I want to show my thanks to the bloggers that sponsored these giveaways.
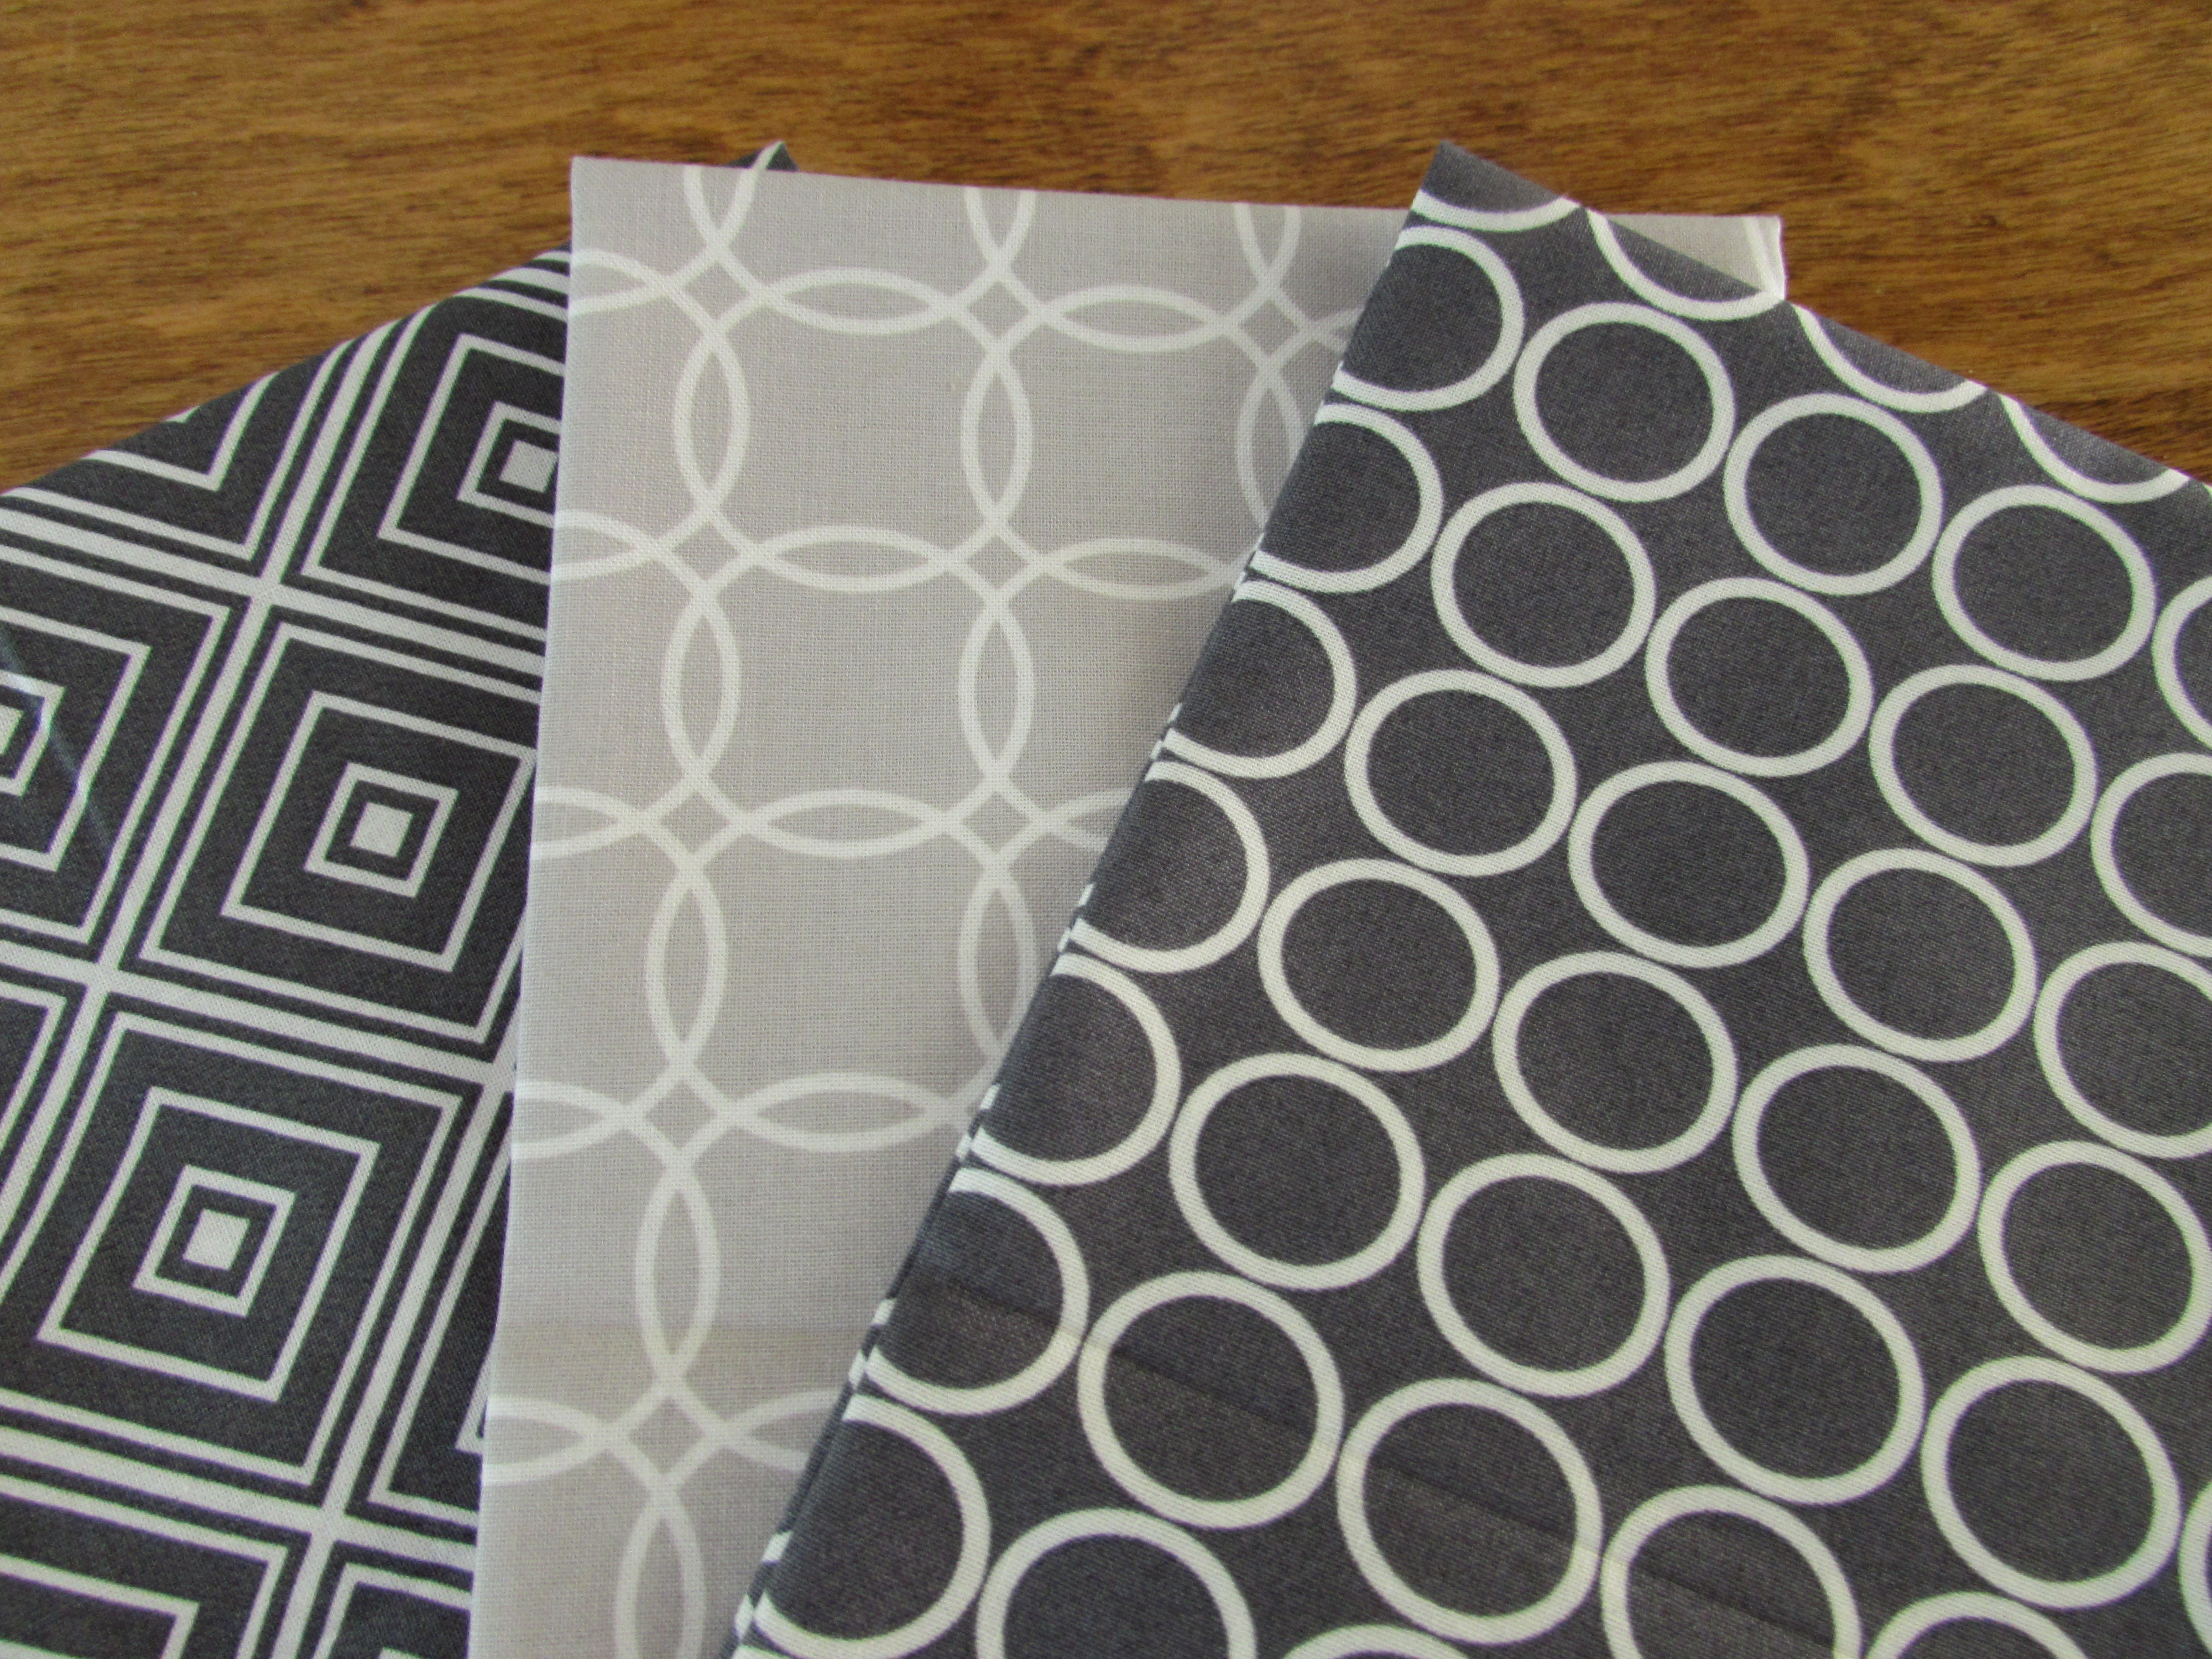
The first win was actually in late spring which means I am a bit late in writing about this one. I entered a giveaway on Linda Smith’s blog, Scrapmaster. She and several others were writing posts to introduce their guild, the Maritime Modern Quilt Guild. I was lucky enough to win the draw for three lovely fat quarters! Thanks so much to Linda.
The dark and light grays in these prints are so pretty and they will be fun to incorporate into an as of yet unknown project.
The other prize I won was from the June giveaway for A Lovely Year of Finishes (ALYOF) which I have been faithfully linking to each month since January. (If you aren’t already familiar with it, ALYOF is a fun link up. At the beginning of each month you link one quilty goal that you have for that month. If you finish the goal, link again at the end of the month. They have a number of prizes that they draw names for each month.) When I won, Kim Lapacek, of Persimon Dreams, gave me the pattern of my choice. It wasn’t easy. She has a selection of really fun patterns that she has designed. Being a lover of dresdens (here is a post a bout the first, and so far only, dresden project) I chose her pattern titled, Dresden Neighborhood Block. This pattern is such a cute riff on a neighborhood. I plan to make a mini with it. If you want a closer look, the pattern is available here on Craftsy.
Thanks so much to these two blogger/quilters for their generosity! I do love this community of ours.
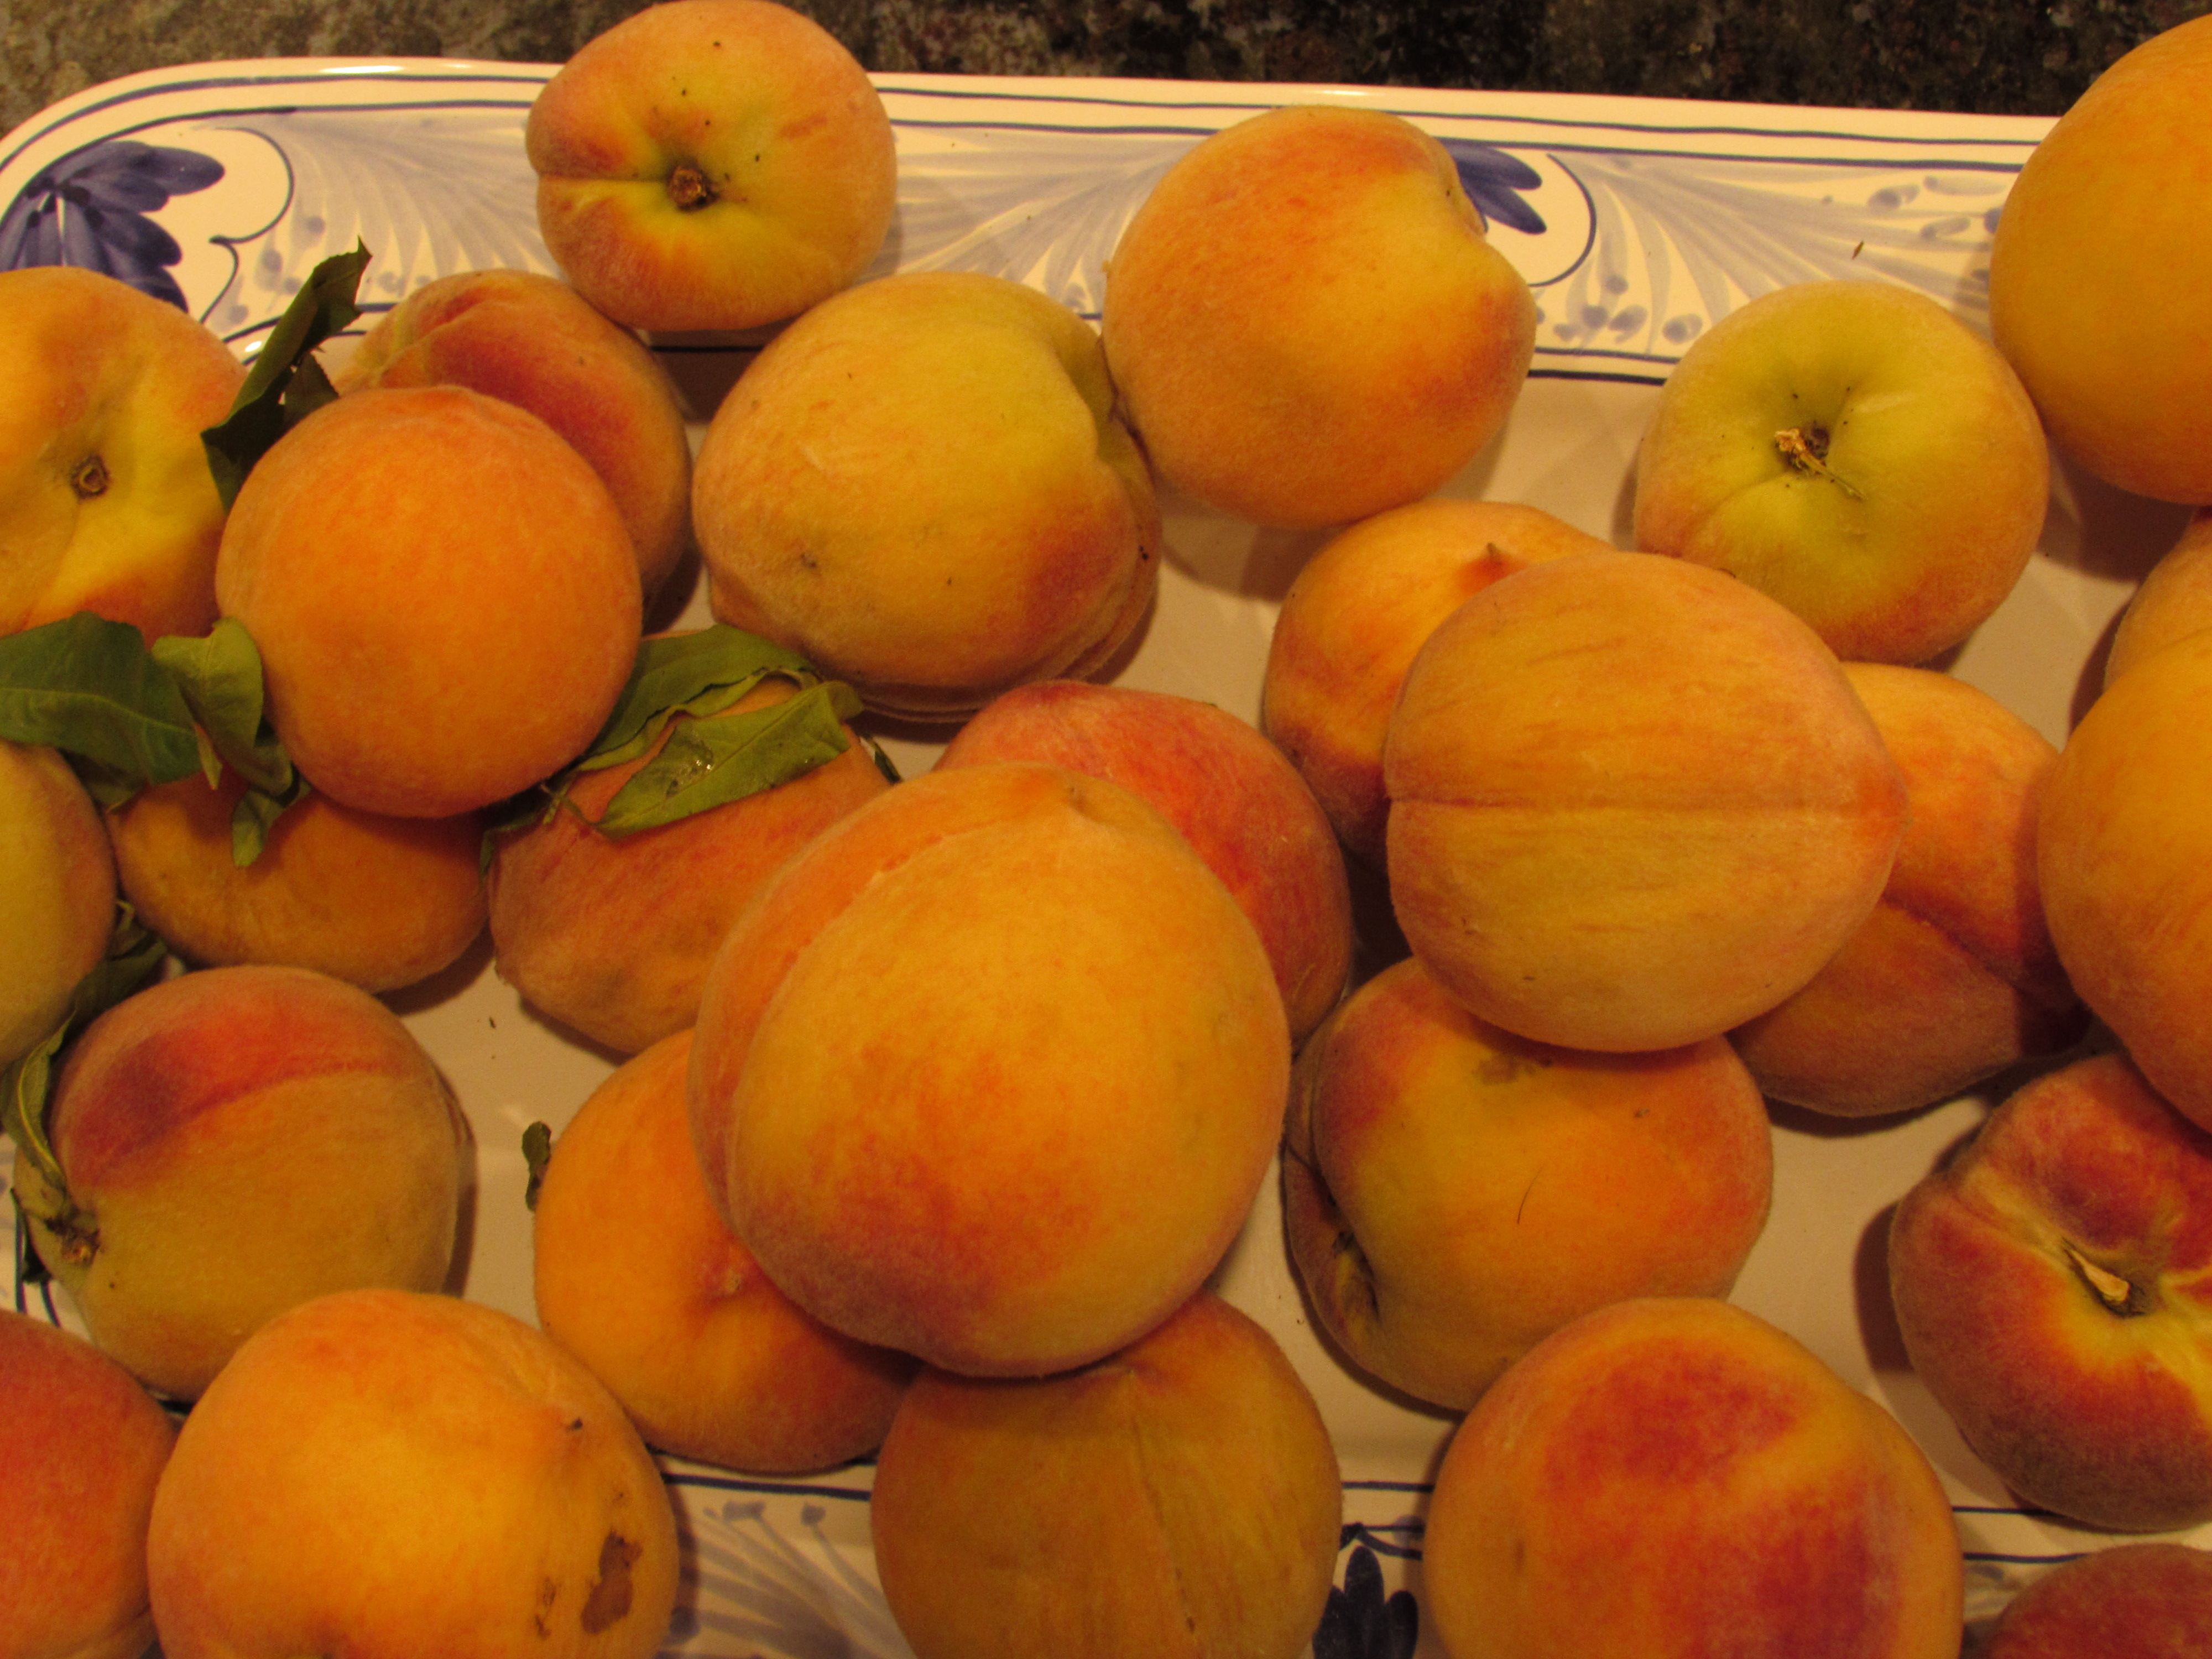
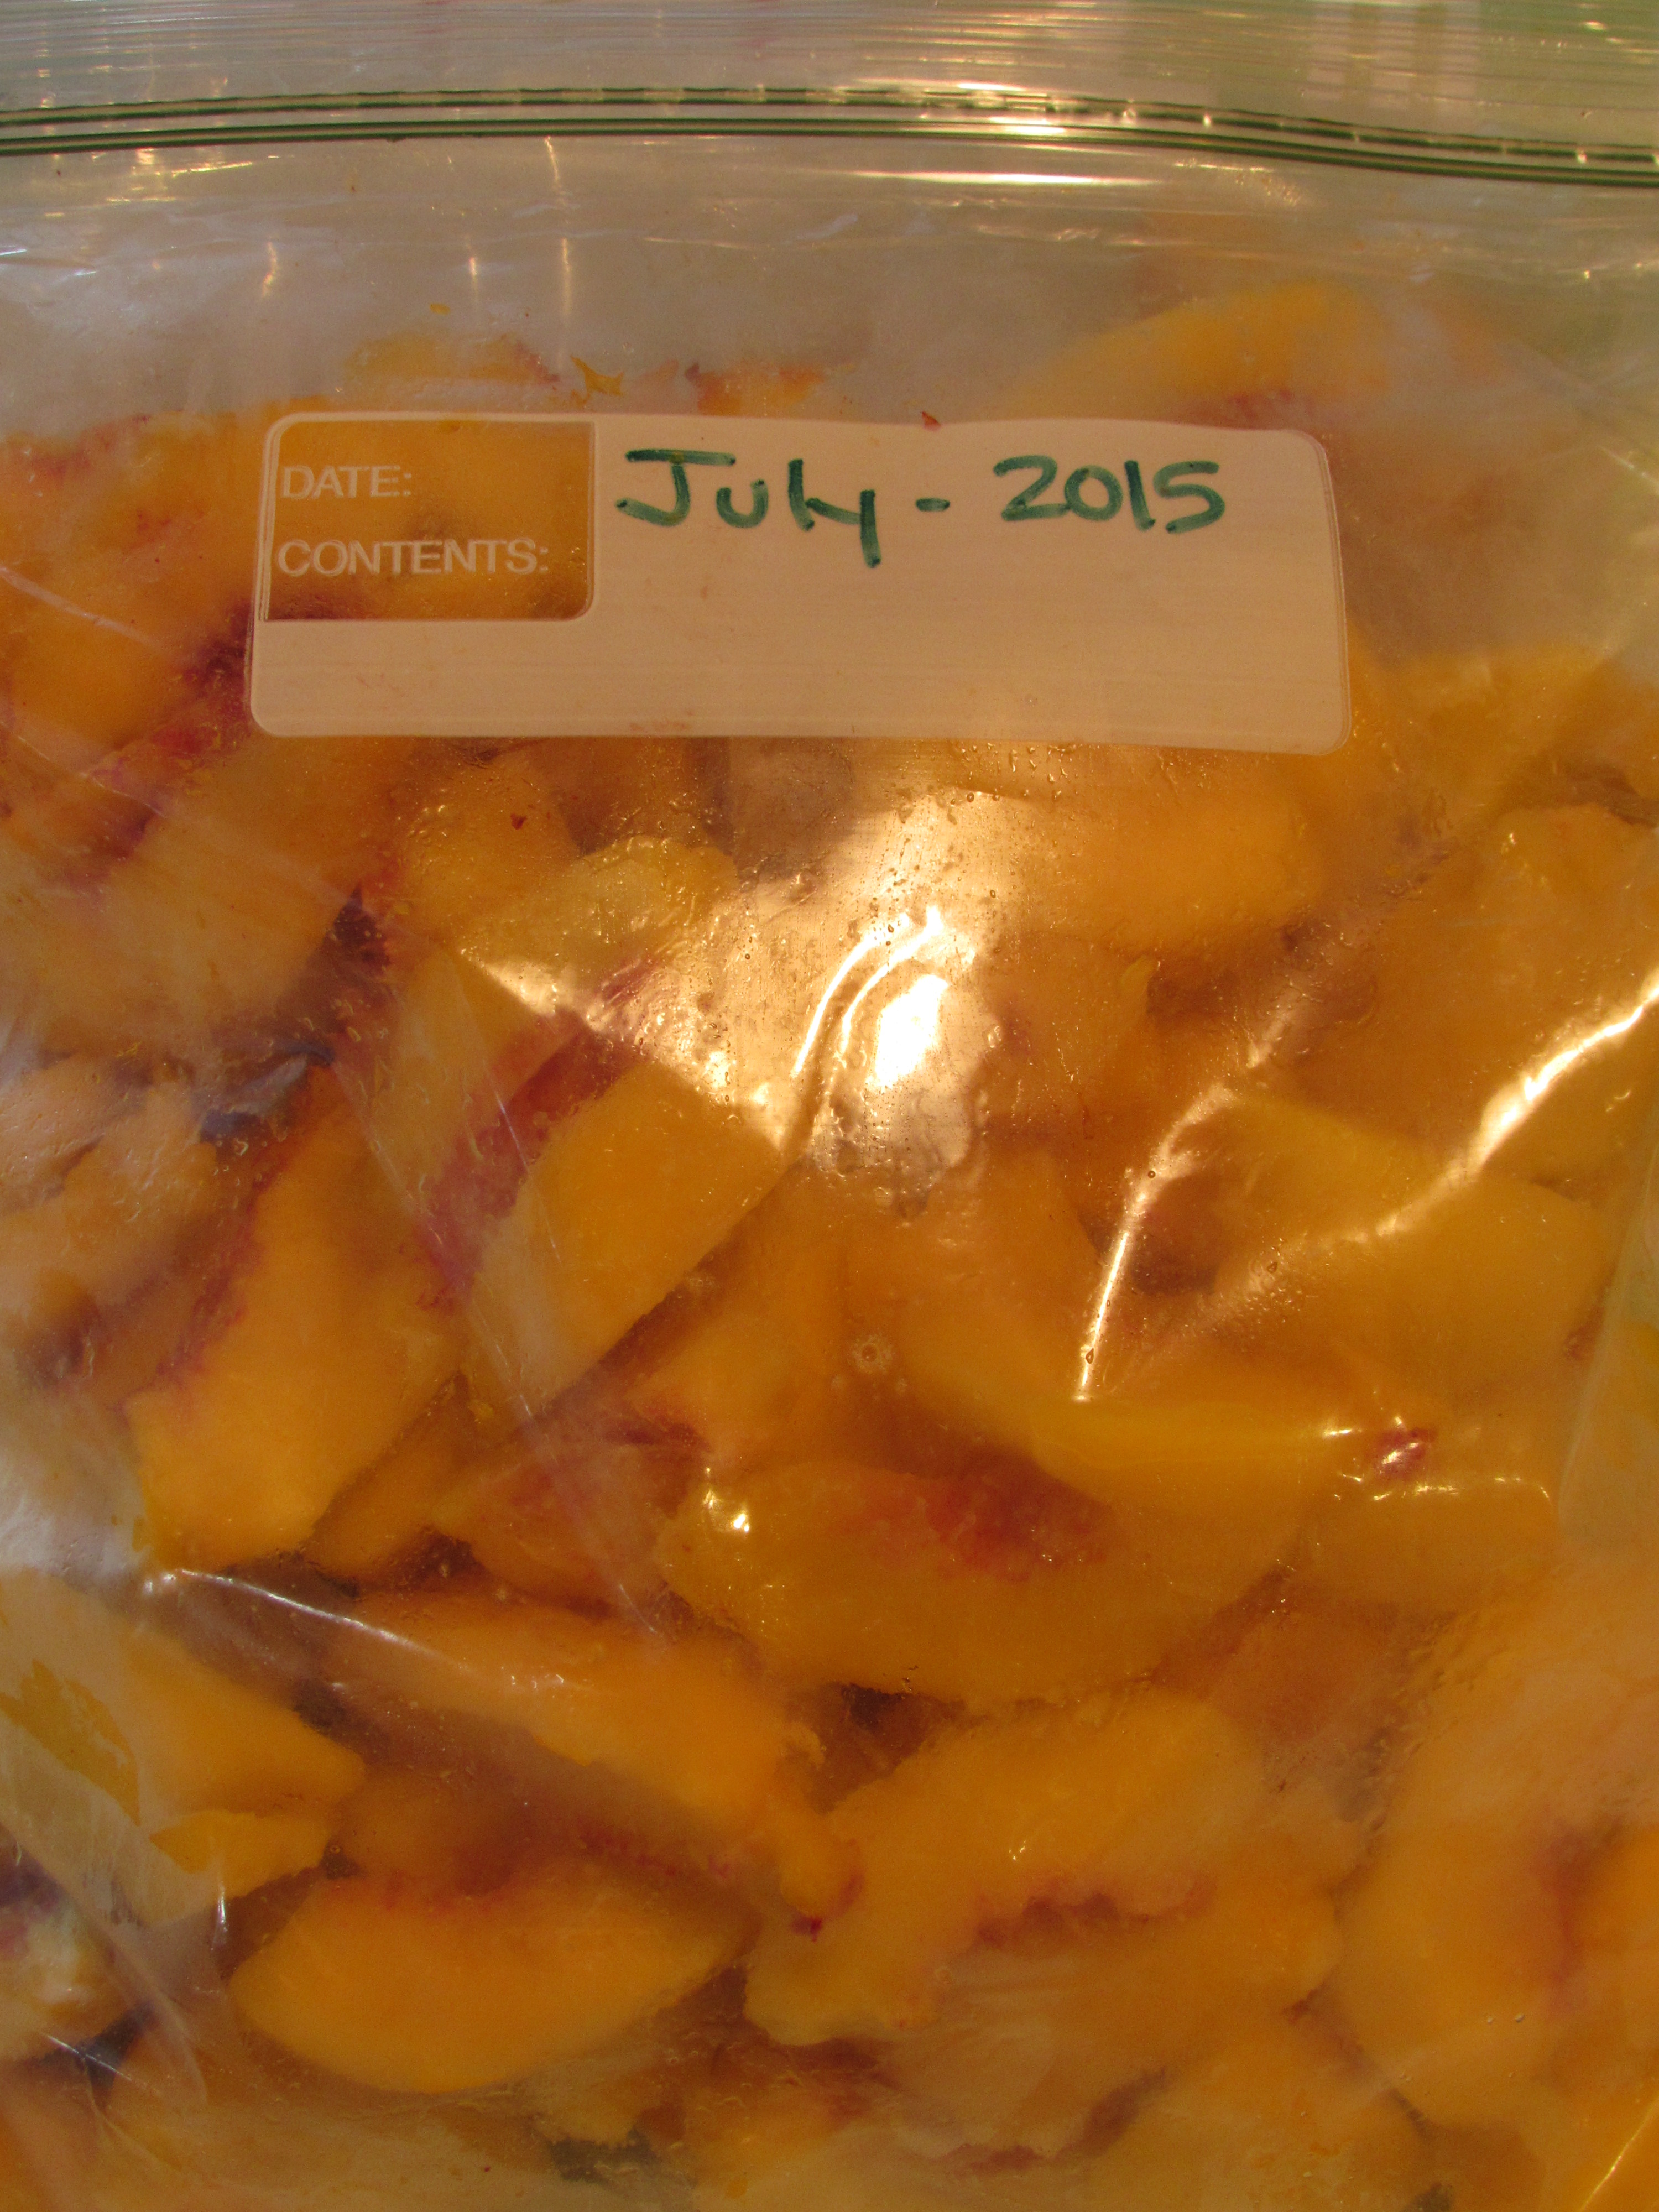
I have been squeezing in minimal time for sewing over the past few days. Instead of my sewing room, I have been in the kitchen dealing with the amazing number of peaches ripening on our tree. They are so juicy and sweet but really, we have more than we can handle.
So far, I have frozen five gallon size zip lok bags of sliced, peeled peaches for making pies over the winter.
This morning Julia and I made a batch of jam using strawberries and peaches.
We canned 8 half pint jars and will do at least one more batch. I think peach jam on its own can be a bit bland so I like to add berries to it. Last year I did raspberry peach and it was really good.
I am a bit worried that this batch isn’t going to set up properly. It doesn’t seem to be getting thick enough as it cools. True confession time – my husband is really the jam maker in the family. He does a great job and just uses fruit and sugar, cooking it down until the consistency is perfect. Me, not so much… Last year I tried his method and ended up with a product similar to Jolly Rancher hard candy. I tossed the whole batch. I just cannot get a consistently reliable result. Today I used pectin and followed a recipe (which for some reason, Ray never needs to do) and I am just not confident it worked. We shall see. If this batch turns out to be too soft, I will just have to resign as assistant jam maker and leave it to the expert.
Post Update: Yay!! The jam set up just fine. I will make a second batch now that I have seen success. 🙂
Summer is going so fast. Today Julia received an email from the high school with an assignment to read two books before school starts on August 18th. And so it begins!
Hope you are all enjoying your summers and savoring the days.
OK, May is going to be busy. We have my daughter’s 14th birthday (yikes!). I have a family trip planned that lasts nearly one week and we have my daughter-in-law’s graduation from medical school (double yikes!!) Lots of activity going on so I am trying to be reasonable.
My main goal for the month (which will by my ALYOF goal for May) has to be the completion of my Allison Glass Mini Quilt. The swap has to be mailed out in the first part of June so this needs to be at the top of the list. It shouldn’t be a problem as the top of the mini is done. I need to make the back and quilt it up. I want to make the quilting shine and as I still consider myself a newbie, I need to spend some time with this. I also want to make an “extra” giftie to include with the mini using some of the Allison Glass scrap. Here is what I have left to make the backing with as well as an extra. I should have plenty of fabric.
Second to the Allison Glass Mini is a custom order I am doing for a friend. She frequently has her granddaughters for the night and they sleep in bunkbeds. She asked me to make two hanging bags so they can have books and stuffies up on the bunk with them. The bags will hang from the rails of the beds. These are already cut and 1/2 way done so I shouldn’t have any trouble finishing them up. Hoping to do that this week. I am using a polka dot twill by Riley Blake and lining the bags with the lovely “Wander Woods” print from Wee Wander.
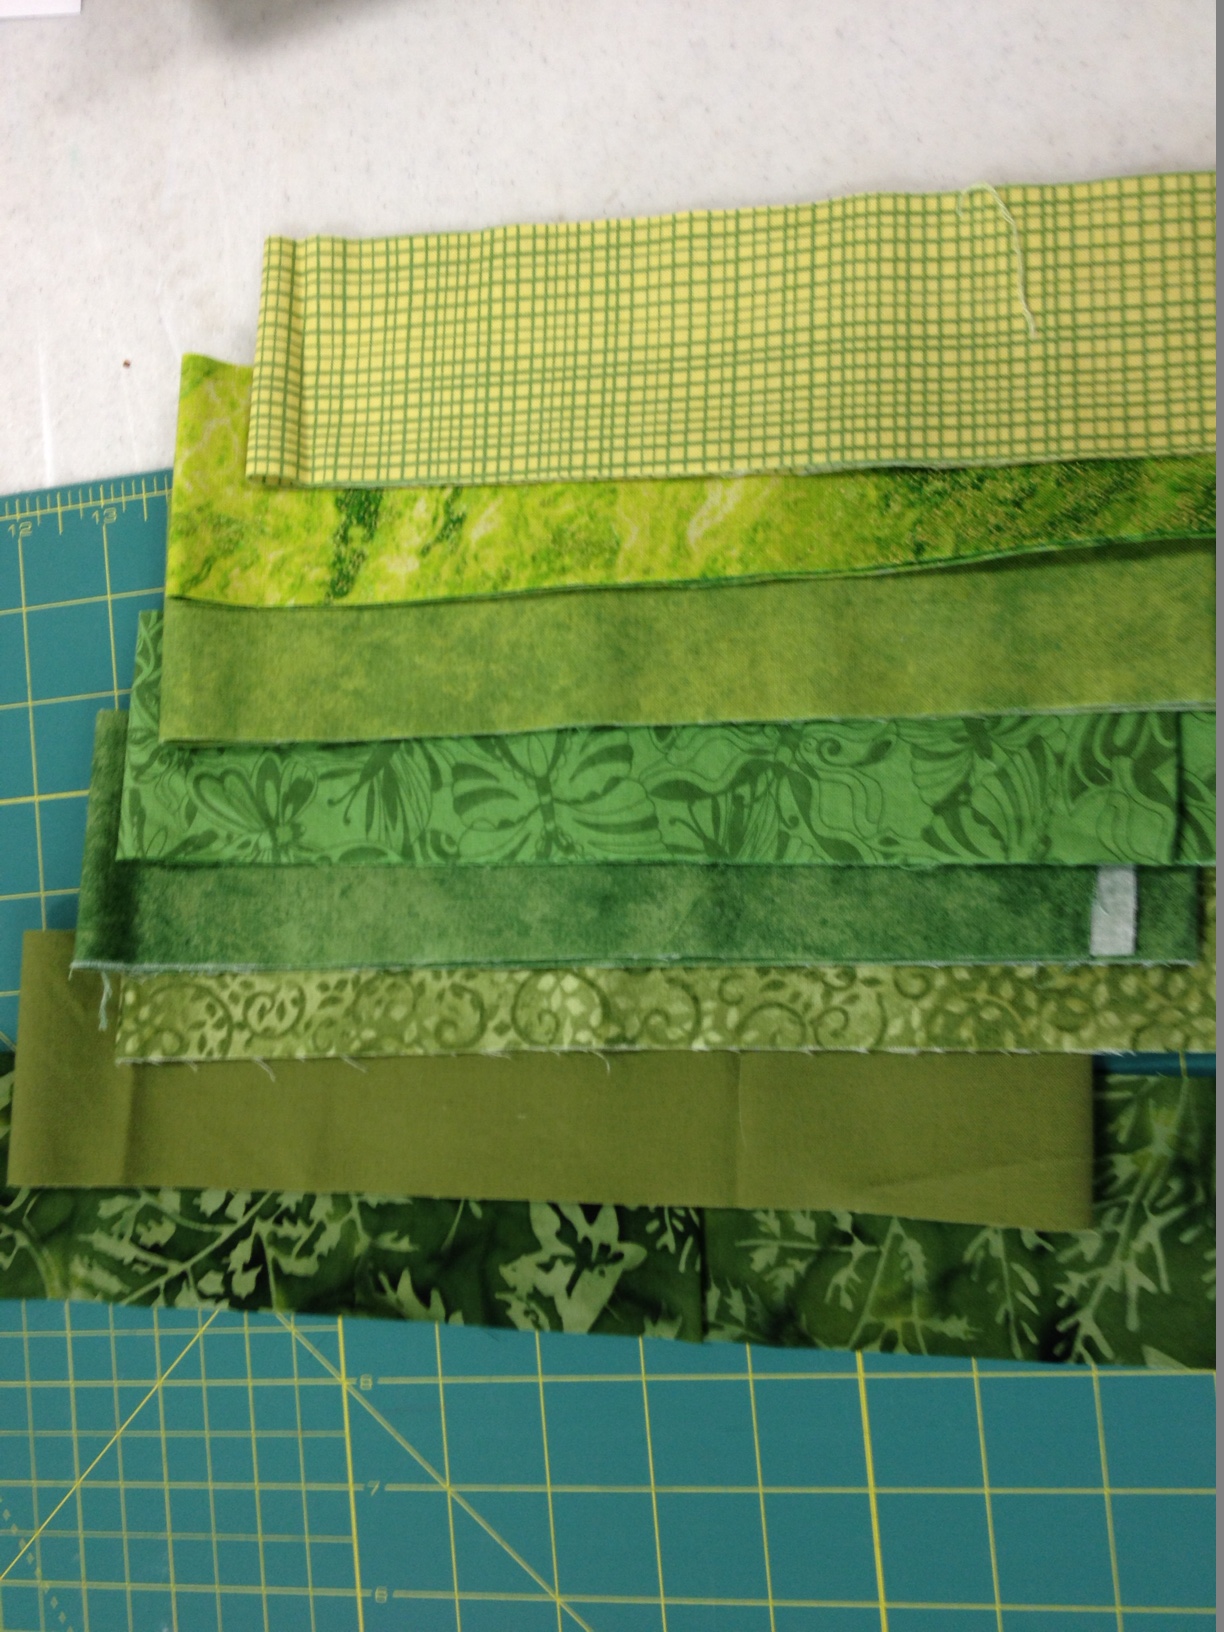
Third on the list is to make this month’s row for my Classic Stitches Row Quilt that I am doing with Mari over at Academic Quilter as my RSC15 project. Tomorrow she will post the block that is to be made for this month. Luckily May’s color is green – I love green and have a bundle of scraps for it.
That is it for goals. Anything that is accomplished beyond that is a bonus.
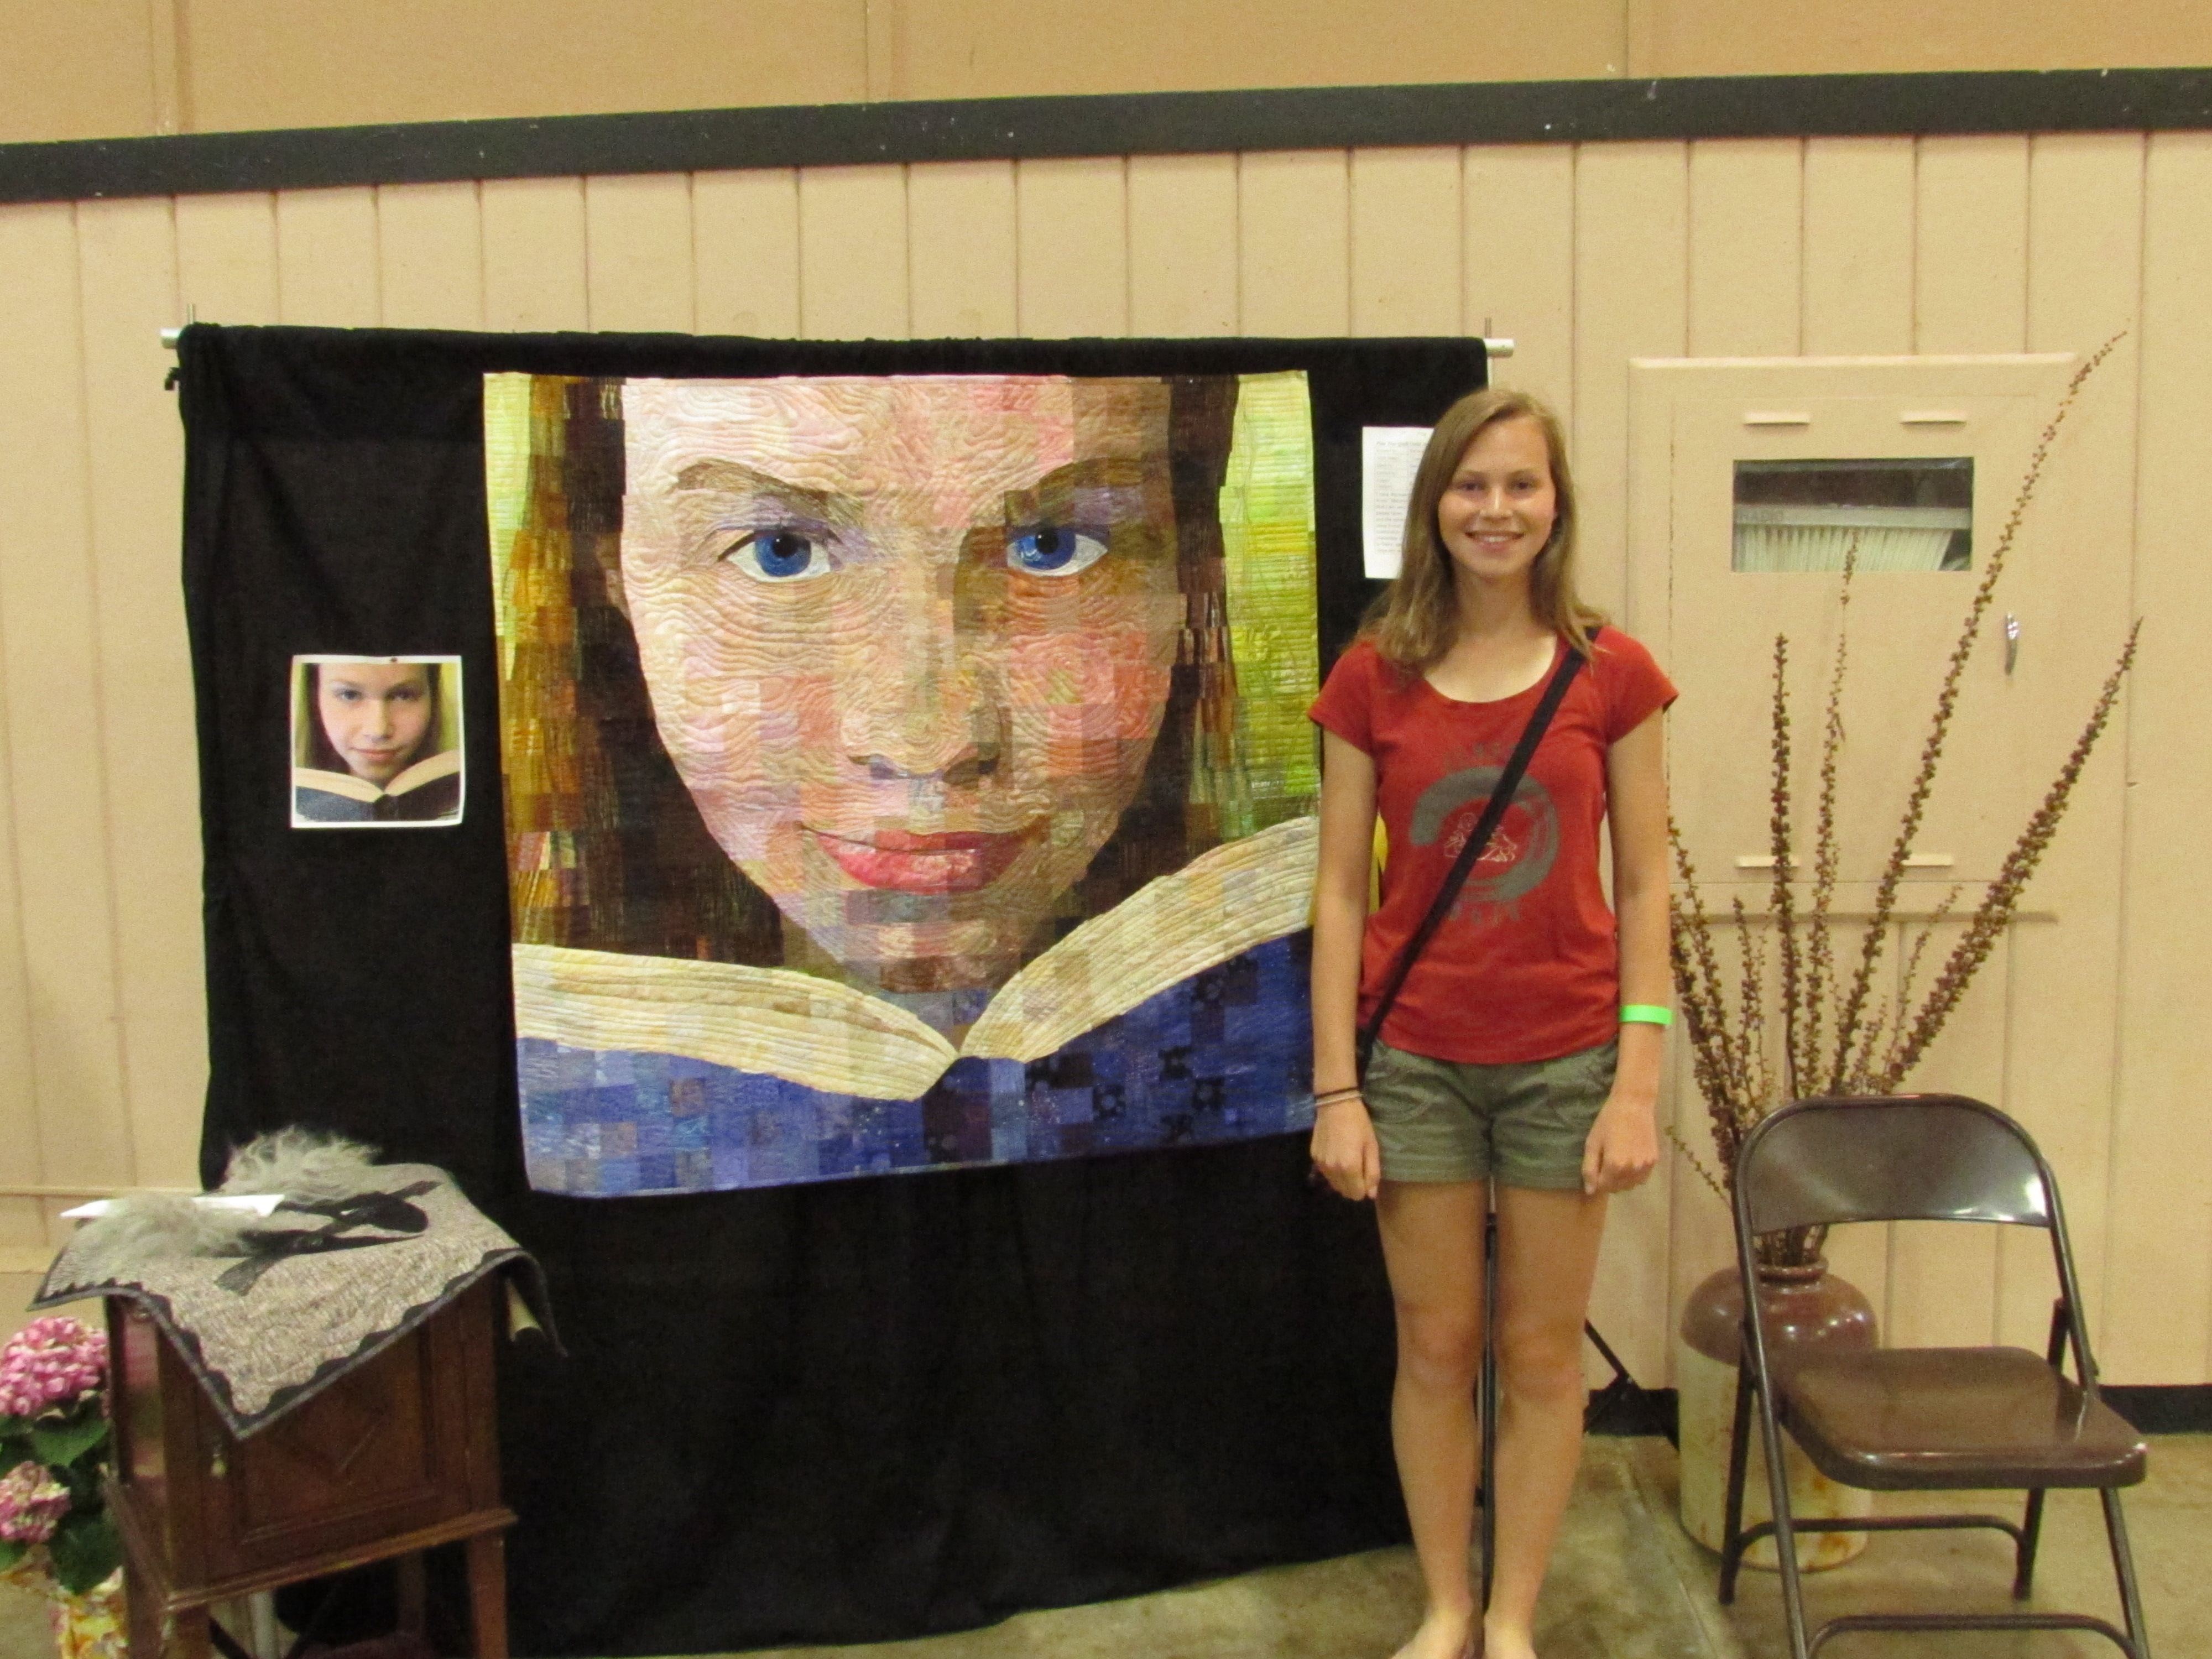
This weekend was our local quilt show. It was great fun and so inspiring. I want to share the quilt that won Best of Show. This local artist, Sandra Bruce, is amazing. I posted about a class that I took with her last spring to learn her process called “Material Matrix”. It is a great process that takes a photo and divides it into patchwork squares by overlaying a grid on it. Sandra is an excellent teacher and a brilliant artist. Her portrait of Clair is approximately 4′ x 5′. Really striking, it is a perfect portrait of this sweet girl. When I was oohing and ahhing over the portrait, Sandra pointed out Clair to me. I asked her to pose for a picture and, while she probably thinks I am some sort of stalker, she did it for me.
Below is a closer look at the quilt. Sandra’s ability to create the human expression with bits of fabric never ceases to amaze me. If I remember correctly, she used 2 1/2″ squares to create this. Click on the link above if you want to check out her gallery. She does travel and teach so you never know, maybe she’ll be in your area some time. If she is, it’s totally worth your time to work with her for a day or two!
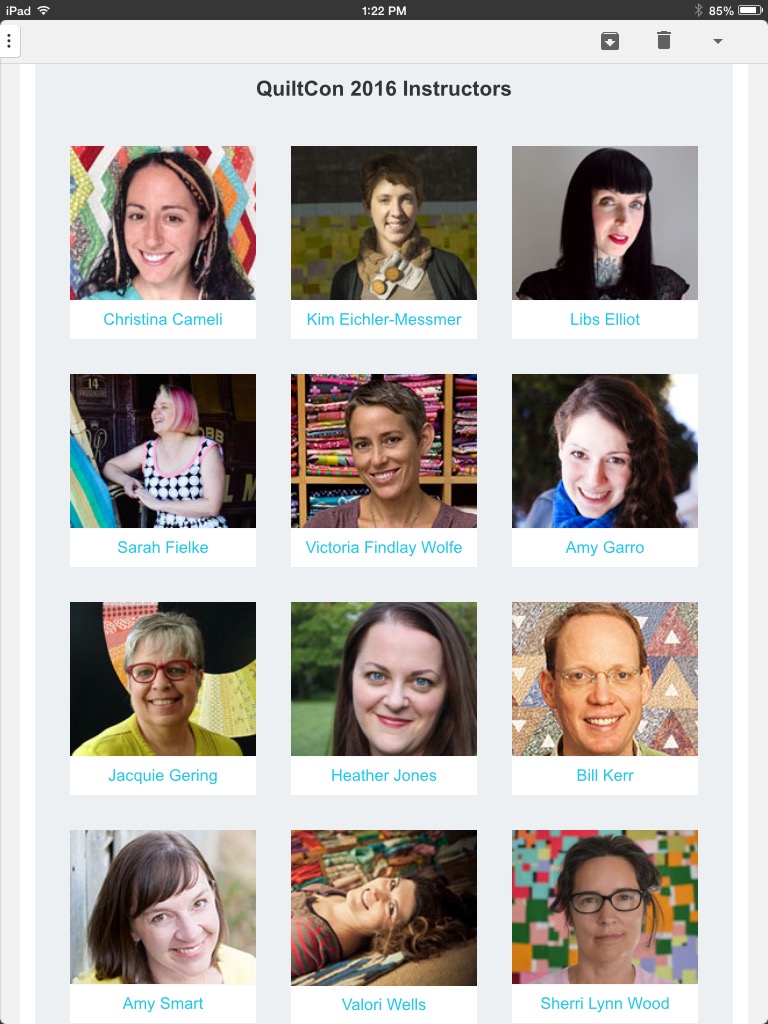
Finally, have you seen the list for some of the instructors at 2016 Quilt Con??? This was in today’s issue of the Modern Quilt Guild Newsletter. Absolutely. Amazing. I am so excited and am considering whether this might be my first time attending. It is in Southern CA in February of 2016 so it would be fairly easy for me to attend.
Big question is, how would a person even choose which one(s) to take a class with??? Most of my quilty heros are in this line up. It’s too good to be true!! Are you going? C’mon, you have a nearly a year to figure it out!
The holidays are crazy sometimes. I am one that can get all wound up about how much needs to be done, making lists and running around far more than is necessary. But over the last couple of days I had a couple of sweet reminders about what the holidays are truly about. Let’s just say there are loads of very kind people in this world and many of them just happen to be quilters!
Here is the first story: Last week I participated in the Sew Mama Sew Blogger Giveaway day. I asked people to enter by commenting with three words that come to mind when they think of Christmas. I loved reading through all the comments. They were heartfelt. My daughter picked the winner, number 48, who happened to be Mara from Secretly Stitching. It so happens that Mara lives in Greece and my giveaway was not open internationally (the postage to ship a bit of fabric internationally just didn’t make sense.) I emailed Mara and she explained that she was entering the US – Domestic only giveaways for a friend of hers in Texas. She thought that if she happened to win, she would ask the hostess of that giveaway to mail her prize to her friend in Texas. She said this friend could use something fun in her life right now and she hoped this would happen. And it did. I mailed off a package to Shirley in Texas on behalf of Mara, from Greece. Shirley, you have a sweet friend in Mara. By the way, if you haven’t read any of the posts on Secretly Stitching, take a hop over there. Mara has a fun giveaway posted today. I won’t spoil it for you – go take a look!
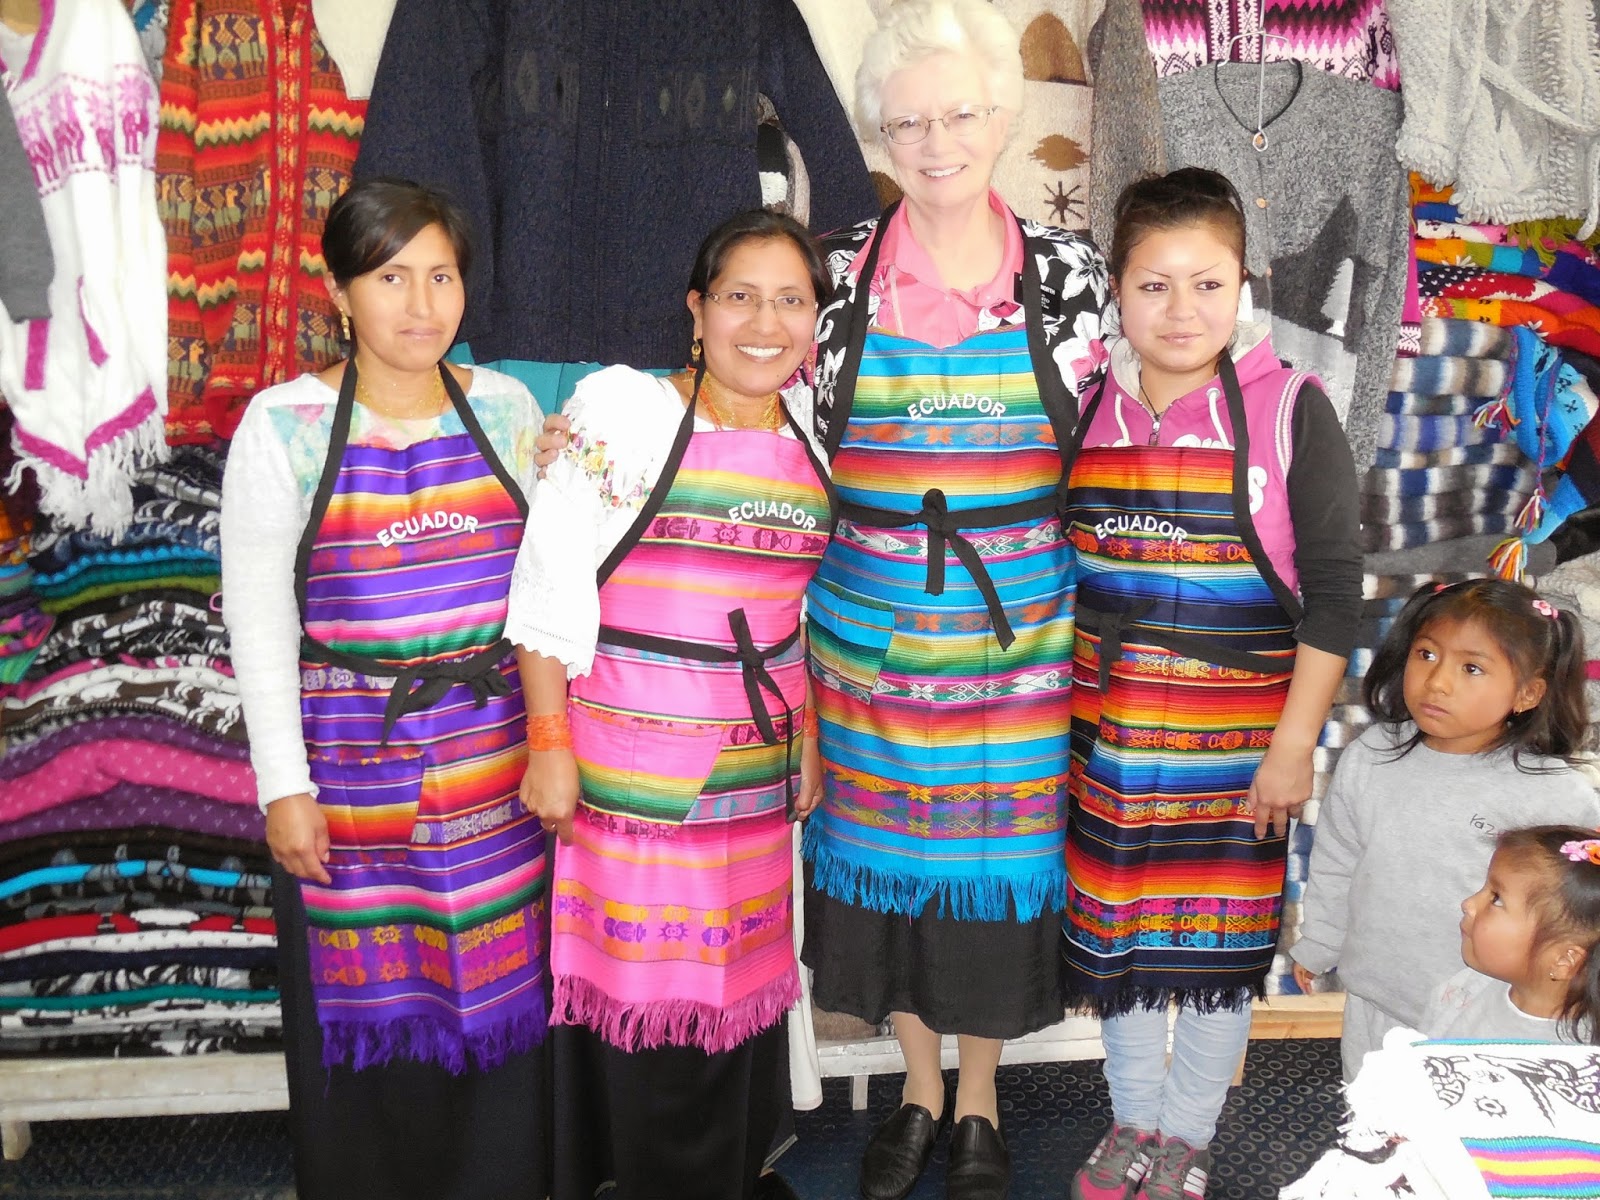
Second reminder came about this morning. I was reading some of my favorite blogs and opened the most recent post on Diary of a Quilter, blogged by Amy Smart (one of my quilty heroines.) Her topic today is three ways to give this Christmas season. Each of them is sewing/quilting related and each touched me. I supported all three. Amy describes a GoFundMe that she is running to finance a sewing machine or two for a village in Ecuador.
Amy also mentions a woman who is making quilts for chronically ill children and needs financial support. Finally she talks about a woman in New York who is teaching senior citizens to quilt and needs fabric donations. (I bet there isn’t a one of us that doesn’t have an extra piece to send off for the cause!) All of these are unique ways to help someone out that is working in our arena this Christmas. If you would like more information, check out Amy’s post today.
I hope you are all enjoying the holidays without succumbing to the frenzy that it can become. I am working hard to enjoy it and not let myself get overwhelmed with it all. My kids come home next week and for me, that is what makes the holidays. I can’t wait!! Julia and I did some crafting the other day. We have loads of pinecones around as we live in the Sierra Foothills. With a little white glue and a bottle of glitter we came up with these.
I haven’t accomplished a whole lot of sewing over the past few days. I am working on a small art quilt though and have been thread sketching a bit. Here is a peek. With any luck, I will post the finish just after the holidays.


