
I did a little practice session (actually it took a few sessions) of free motion quilting. It’s been a while since I last sat down and focused on it. Really, when it is truly a practice session and I don’t have a lot invested in the outcome, it is very fun. FMQ is a skill (like most) that will never improve unless one invests the time.
My main issue is the whole look-at-every-wiggle obsession that I have. I have heard it so many times; when we sit at the machine to quilt, our line of sight is up close and personal. The finished product is usually viewed from a distance which improves the look of things tremendously. As I played with this practice piece, I made many wiggles and hops that I was unhappy with. However, for the most part, I left them as they are. My strong dislike for the seam ripper makes it easier for me to ignore the less than perfect stitching. I don’t need to make it perfect. I just need to keep stitching. If I spend lots of time ripping things out, the joy is lost; given up to the pursuit of perfection when really, good is enough for me.
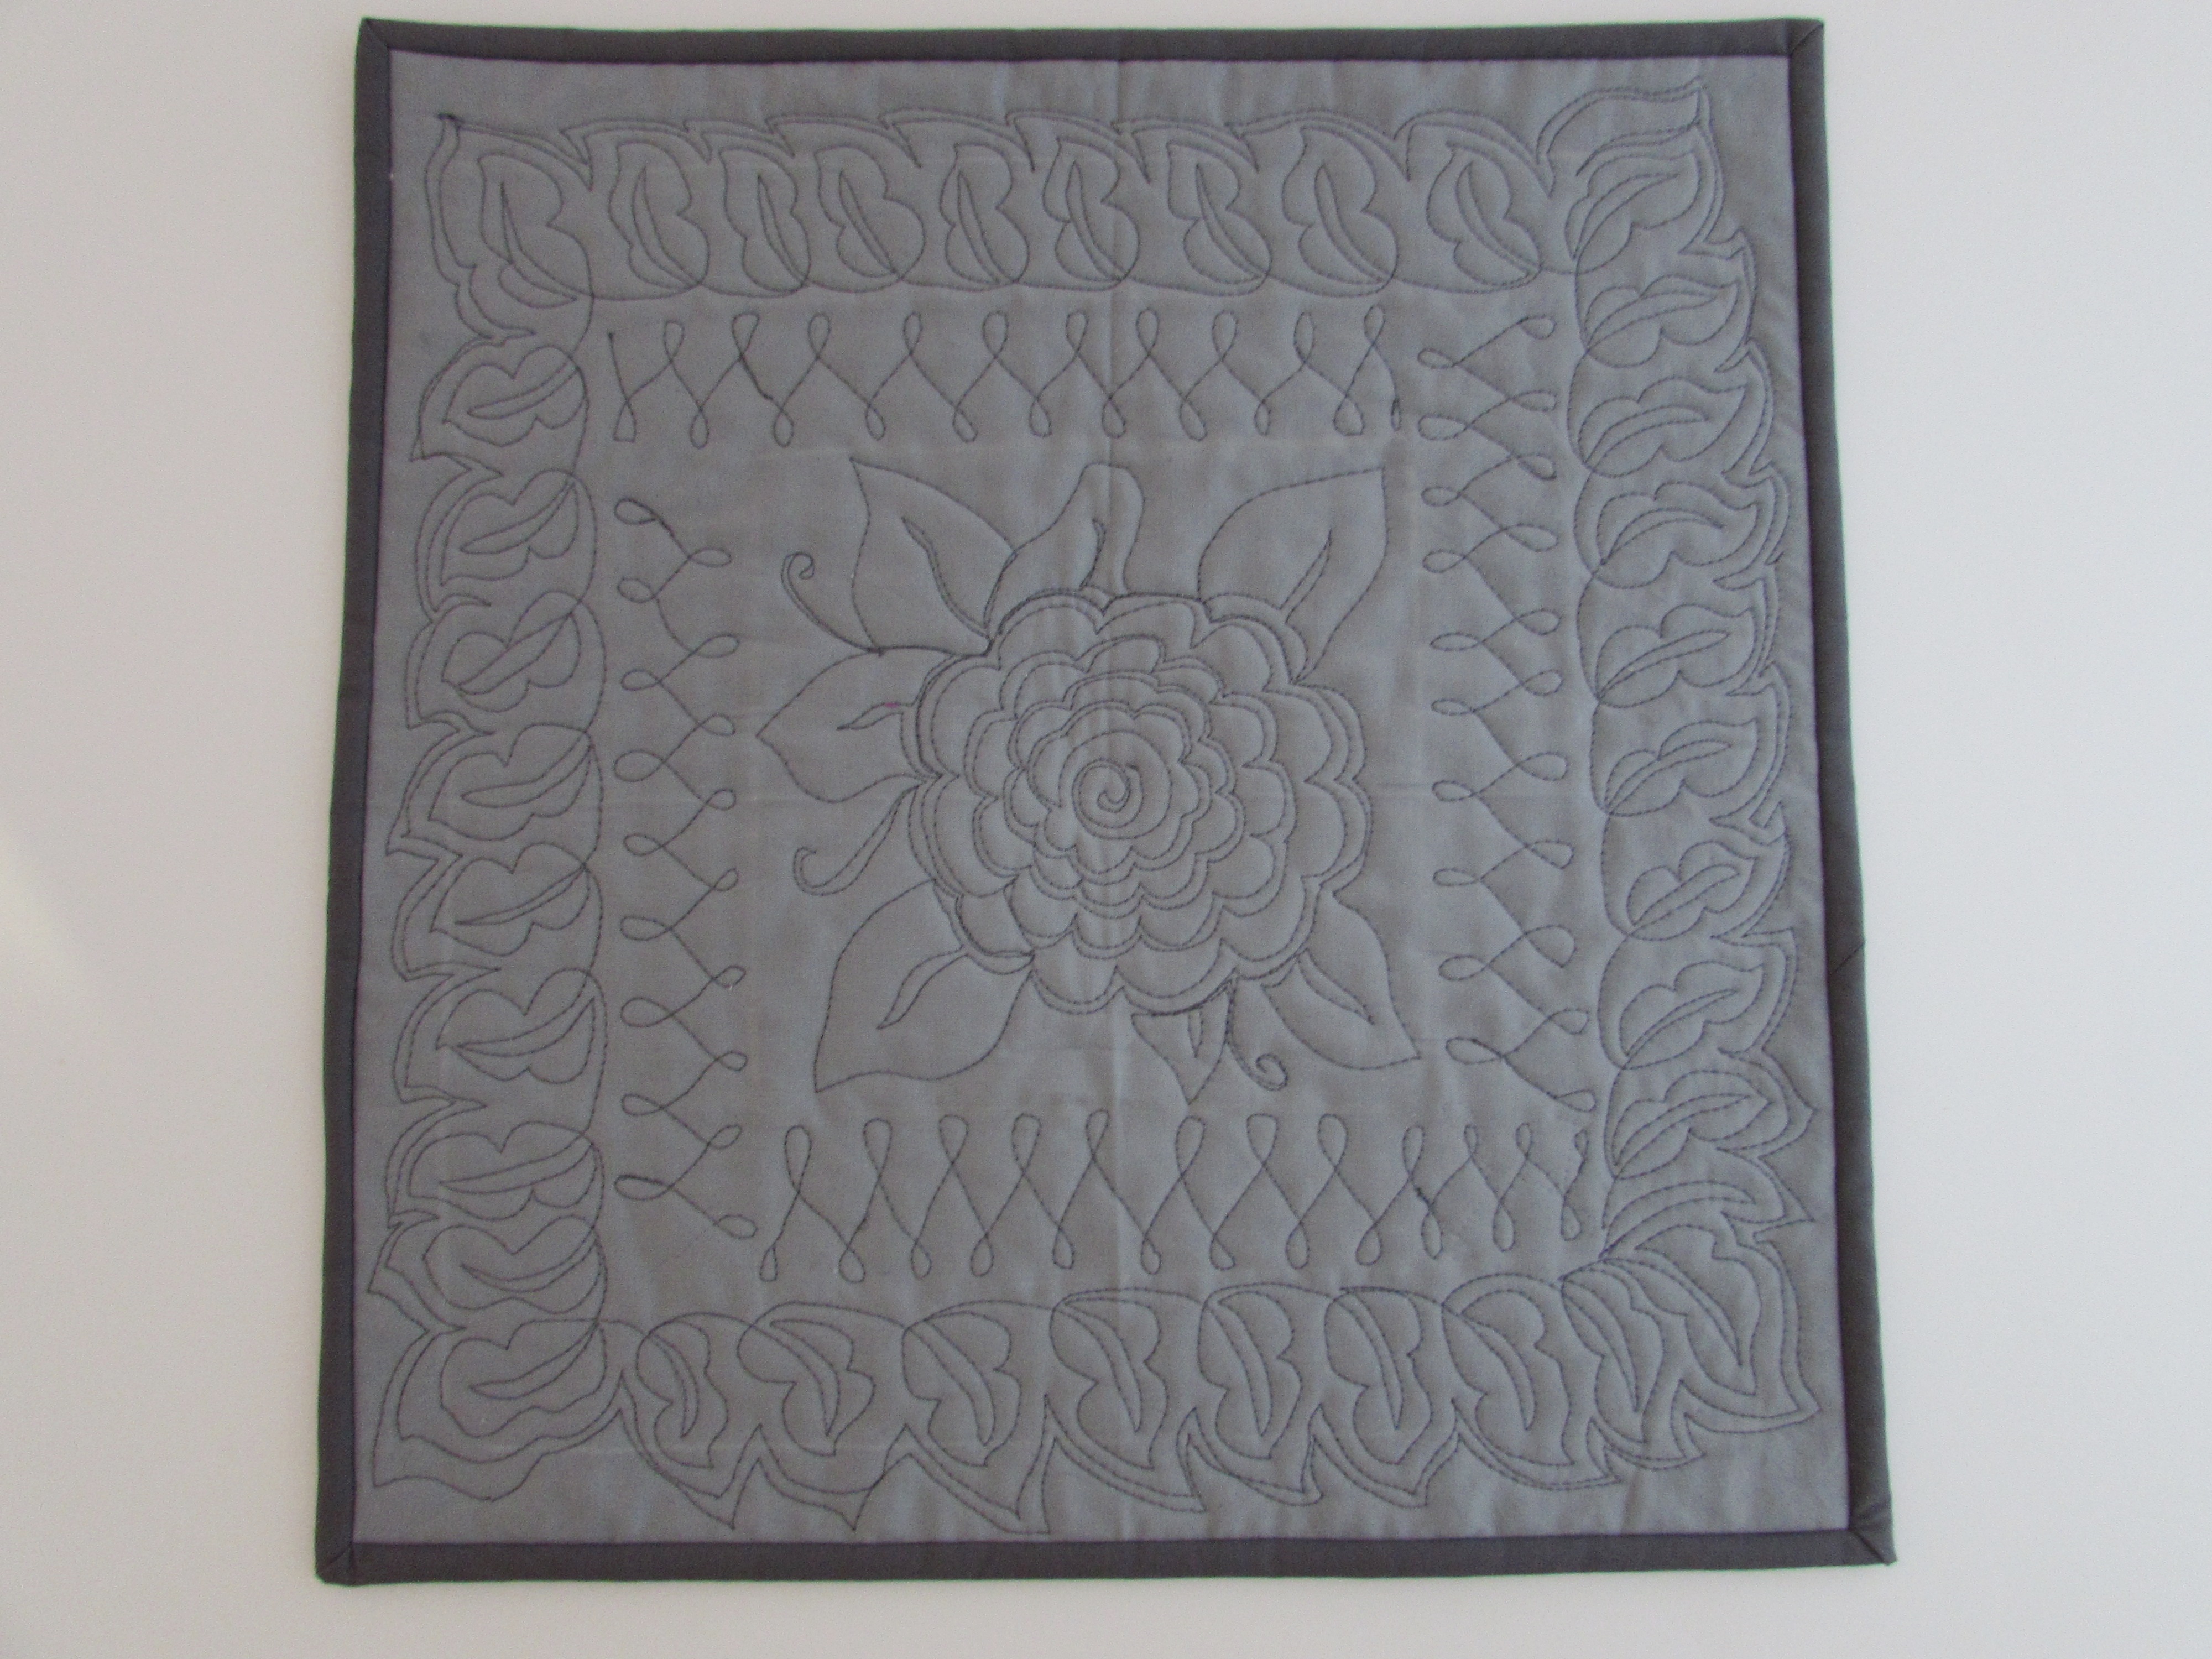
As expected (and hoped for) I learned quite a bit with this piece. First of all, in a Craftsy class, Machine Quilting Wholecloth Quilts with Cindy Needham, she suggests folding your practice piece in half and ironing a line and then folding one more time (so you have 4 quarters) and ironing again. You end up with the center marked well and four gridlines to guide you. The lines are still slightly visible on this piece. Following that I worked on the flower in the center. The tutorial for this motif was taken from Lori Kenedy’s site, The Inbox Jaunt. The name of the motif is Claire’s Peony. This flower is really fun to do.
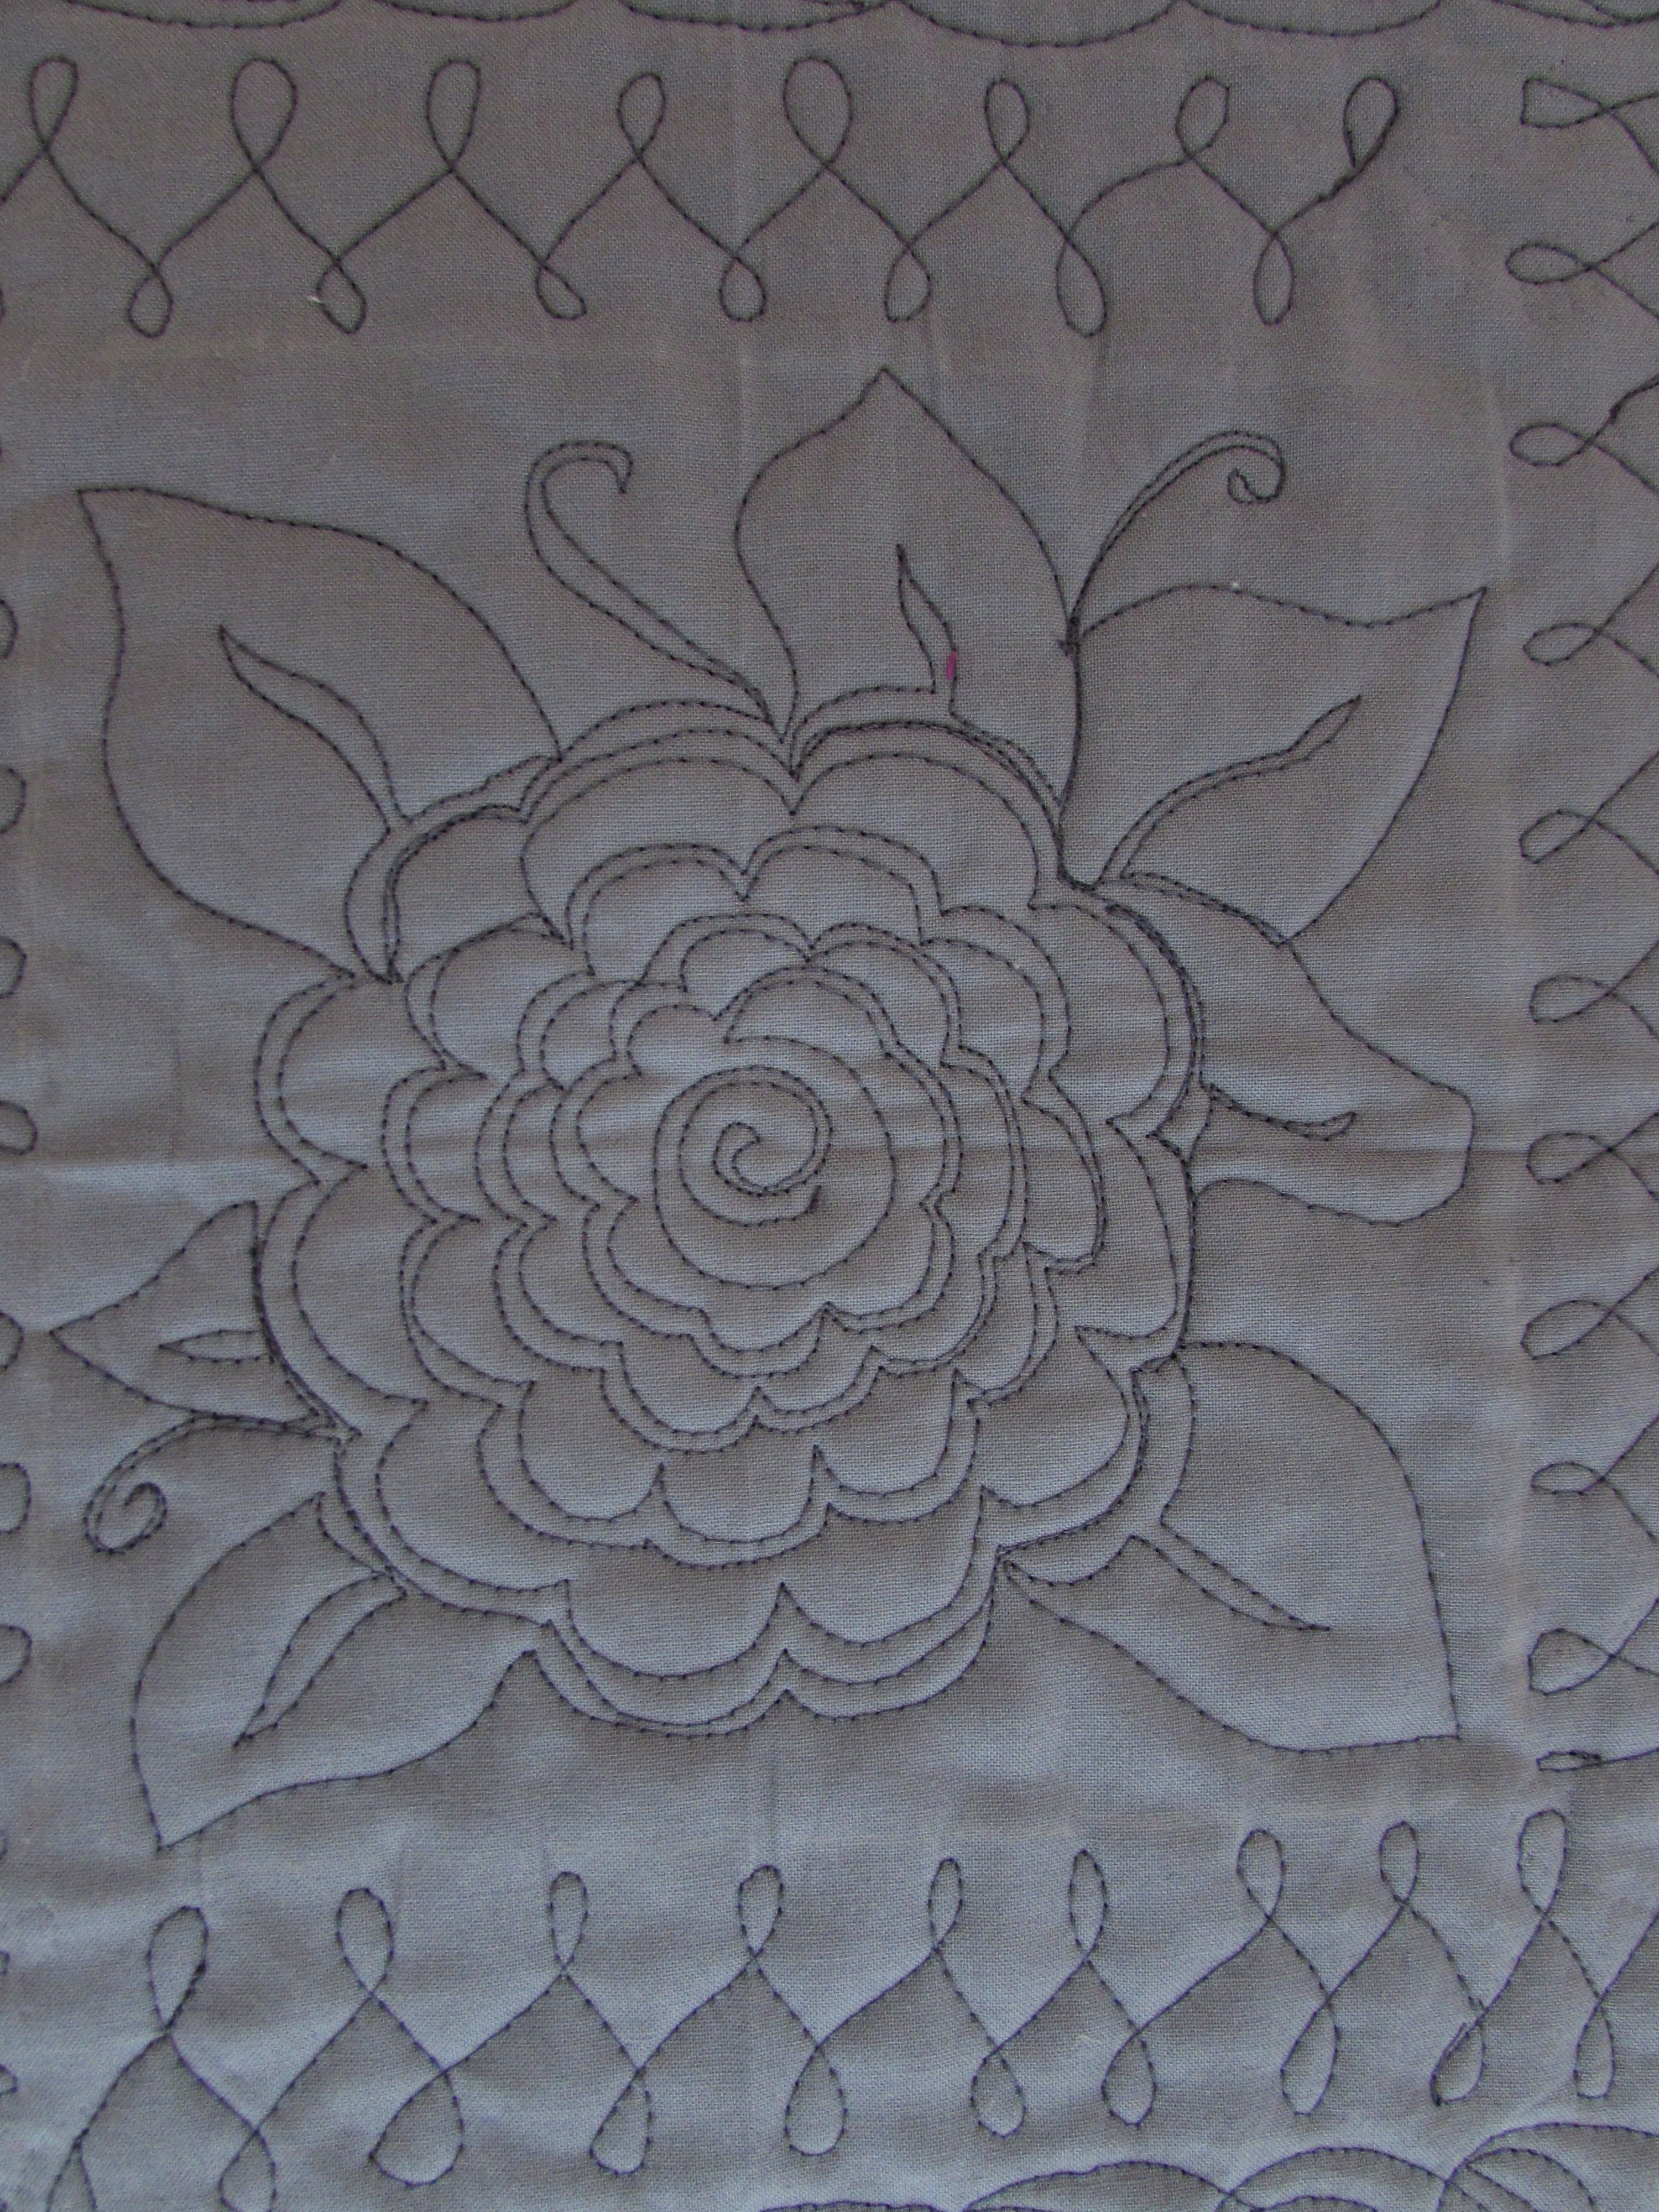
I bordered the flower with a simple twist. Here comes lesson number two. I found out that I had no idea how to deal with the corners. This design doesn’t really lend itself to turning a corner. I tried, oh, I did try! With this one, I used my seam ripper and tried a few times to find a way. After a couple of tries, I just went end to end and gave up on the turn. It isn’t award winning but then, this isn’t going to a show, it’s practice. So I am fine with it.
The outer border is inspired by another of Lori’s tutorials, The Maypop Leaf. I doodled this one for a while on paper (actually I draw anything first, before stitching) but it is still a bit rough. Again, practice, right? I felt like it needed one last bit so I echoed the leaf border a couple of times.

I was going to toss this into a pile of odds and ends but after looking at it for a while, I decided to keep it. I like the way it looks as a whole so I put a quick binding on it and kept it. It finishes out at 15″ x 15 1/2″ (I know – where did that extra 1/2″ come from???) Keeping these is a good thing – as I progress, it is nice to look back and see how far I have come. You know, the hardest part of writing this post is to keep the critcism of this practice session to a minimum. I feel like if I am going to share these projects, I need to zoom in and explain or defend every mistake. But I am not going to. It isn’t perfect but it is certainly good enough.
Linking to Freemotion Mavericks and other assorted wonderful linky parties. Info on all of them are listed at the top of the page, under link ups.
I love Lori’s blog…her tutorials have been really helpful to me…as well as her Craftsy class…Divide and Conquer. I totally agree with you—Good enough really is GOOD enough. When I quilt the ribbon border I angle that last ribbon out at a 45 degree angle and make the loop at the top (right in the corner) bigger; angle it back out and continue up the side with the ribbons. If I get the size of the ribbon twist the same in the 4 corners the whole thing looks pretty good. When I’m away from fmq’ing for any length of time it’s almost as if I have to start from scratch again. I always start with a short warm-up session and do best when I doodle and quilt at least a little each day…..I find I’m a bit happier too! Blessings….I truly enjoy your blogposts….
Hi Kathy! Thanks for the tips. I felt like if I tried and ripped it out again, I would just go crazy so I just left it be. I think I should practice the corners on paper. I will try to use your explanation as a guide. I am so happy you came by!
You’re right – I’m viewing it from a distance and to me, it looks gorgeous! I would bind that and keep it too! I just have such fear of FMQ right now, and the dread keeps me from even practicing. 🙁 I’ve GOT to get over that! Thanks for the inspiration and the tips. 🙂
I have a feeling that once you start, and if you don’t ‘have’ to do anything with the quilt sandwich you are practicing on, your fear will melt. You are a skilled quilter. Just grab some batting scraps and fabric and go for it. Stitch some loops, write your name, doodle. It is truly a lot of fun. Just have to get out of your head and not think about it. (BTW, I am really liking leaving the feed dogs up and setting the stitch length to zero.) Give it a try!
Those wishbones are fun, but you are so right that I don’t know how to wrap my head around doing a corner. I just tried to sketch it out on paper, it is so tough! Another hard one (for me) is ribbon candy. I think the mini looks great: your central flower is such a great focal point, the wishbones make me think of the flower climbing a trellis in a garden, and the final border of leaves is the perfect balance.
Thank you! It is nice to hear that the corners are a challenge for others as well. I appreciate your sweet comment, Yvonne.
I LOVE THIS!! Isn’t it fun throwing perfection out the window? I’ve decided that imperfect is perfect for handmade. It keeps it real. I like how you did the leaves on the flower in the center. (And I love Lori’s tutorials. They are so clear–even though I’m guilty of not following her guides to use registration marks.) Thanks for sharing the tips about getting ready for whole cloth quilting. As you know, I’ve uncommitted myself to a big whole cloth quilt with my recent purchase, but your quilt does make it look like lots of fun.
It is fun and with the quilting you are doing on the big quilt, I know a whole cloth quilt from you would be amazing. I look forward to seeing it one day. 🙂
I think you’ve made great progress in your pursuit of perfection. It’s okay to pursue it, but one never achieves it. I’ve not taken that particular craftsy class but it sounds like there are definitely some good take-aways from it. One thing that I learned with free motion quilting is that I struggle when I use a hopper foot (one that jumps up and down). My stitches are wiggly and just not smooth. Once I switched over to a darning foot, which is a closed FMQ foot that doesn’t hop, my stitches looked 100% better. Leah Day made a post on how to “break” your hopper foot but I’ve never tried it and don’t think it will work with my machine.
I do use a darning foot. I haven’t ever tried the ‘hopper’ foot. It just takes loads of practice. But that’s what all that fabric is for, right?
As a teacher I told my students: Learning is a waste of time if you do not make mistakes. It is also a mstake when you do not learn from your mistakes. I forget that when I am practicing quilting. Like you I want to do it perfect. I am always frustrated the first half hour and then I know my piee is not perfect again. That is the moment to aks my husband if it is OK for a present. After his yes I enjoy the quilting, because I make mistakes and I am learning! A more or less beautiful piece is just a bonus.
Hi Maartje: Thank you for the boost! I also consult with my husband when I am freaking out that something isn’t ‘good’ enough. It is nice to have his support and positivity!
Enjoy the weekend.
I am glad that I’m not the only one that gets stumped when I get to a corner. I avoid a lot of designs that I love when FMQing just because a corner scares me. I think your practice piece turned out amazing. I agree that it is extremely hard to quiet that criticizing part of our brain when we work on projects like this one. But practice is sooo important, even doodling.
This is nice to hear Tish because your quilting seems to have such a nice flow to it. I appreciate your input!
B.
Your practice piece turned out great and yes corners can be a real pain in the butt… and mine are never perfect. Keep on pushing forward, your flower in the center is lovely and a great focal point.
Thank you! I know it just takes practice and, fortunately, I have loads of scrap – both fabric and batting – so I will just keep on trying! Take care Cindy and enjoy your weekend.
Now only if I had that kind of patience…
Honestly, perfection is overrated. You are fearless when it comes to FMQ and I am loving the results. Keep it up and I may send my flimsies to you for FMQ 🙂
Hugs,
Preeti.
Well, If I was quilting for someone else, that fearlessness would be out the window! It is only because I know that it is just for my eyes alone (and the billions of readers that look at my blog) that I can let go of the perfection! Ha ha. Take care Preeti!
It is the variation from one leaf to another when FMQ that gives it character and IMHO brings the piece to life.
Ahh, that makes me feel good. My quilting definitely is inconsistent. That’s ok tho. It is getting better and better with each project. Thanks for stopping by!
To me your practice piece is lovely, Although there is always someone better there are a lot of others like me who are just starting and could not do as well, without a lot, well ok then, YEARS of practice. Thank you for sharing the process, I learned a lot.
Smiles from
Kate
Thank you Kate and I am happy that you found the post helpful. That is what it’s all about right? Sharing what we find works or doesn’t work as well? I am happy you stopped by and now I will pop over to your site as I don’t think I am familiar with it! Happy Friday!!
I think you did a great job. I’ve been trying to improve my FMQ skills.
Enjoyed your post. I have just taken a class on free motion quilting. I keep telling myself I need to practice more before I forget what I learned. Your work is very nice and if it was on a patterned quilt it would look beautiful. Good luck and keep on practicing.
Thank you! You are so right -printed fabric hides so much of the jitters in my stitching. It is much harder to get a good look on solids. The practicing is fun though. So glad that you stopped by!
Bernie,
I have never believed it is worth trying to get the perfect look. The irregular, asymmetrical, organic look has far more charm. I really love everything about this piece. Just think how nine of these would look joined up as a QAYG project.
Thank you for linking up with Free Motion Mavericks!
Love, Muv
Hi Muv:
I have not yet done a QAYG project. But yes, a collection of these big blocks would be fun to do. Hope you have a lovely Easter this weekend.
B.