Tag Archives: canoe ridge creations

Mint Green

This has been a nice week. Hope the same goes for you. I joined the 2015 New Quilt Bloggers group that is being hosted by Quilting Jetgirl, Childlike Fascination, Late Night Quilter, and Meadow Mist Designs. So far, we are all getting to know each other. There are about 70 bloggers in the group which is a load of blogs to familiarize myself with. I really like the writing style of many of these bloggers and can tell already that this is going to be a fun project. The goal is to work together to improve our blogs. There is always something to be learned from a group such as this. I so appreciate the work of the four bloggers that put this together.

Even with the huge amount of time I spent reading these new blogs, I have a minty green finish this week. I came across a pattern on Pinterest from Canoeridge Creations. I love Megan’s patterns. This is the second one I have used. Her “Fireworks” mini quilt pattern was used for my Allison Glass mini swap. This free pdf pattern is called “Firefly” and it is a fun, quick project. It took no time at all to cut the fabric and piece the top (maybe a little over an hour?)

image

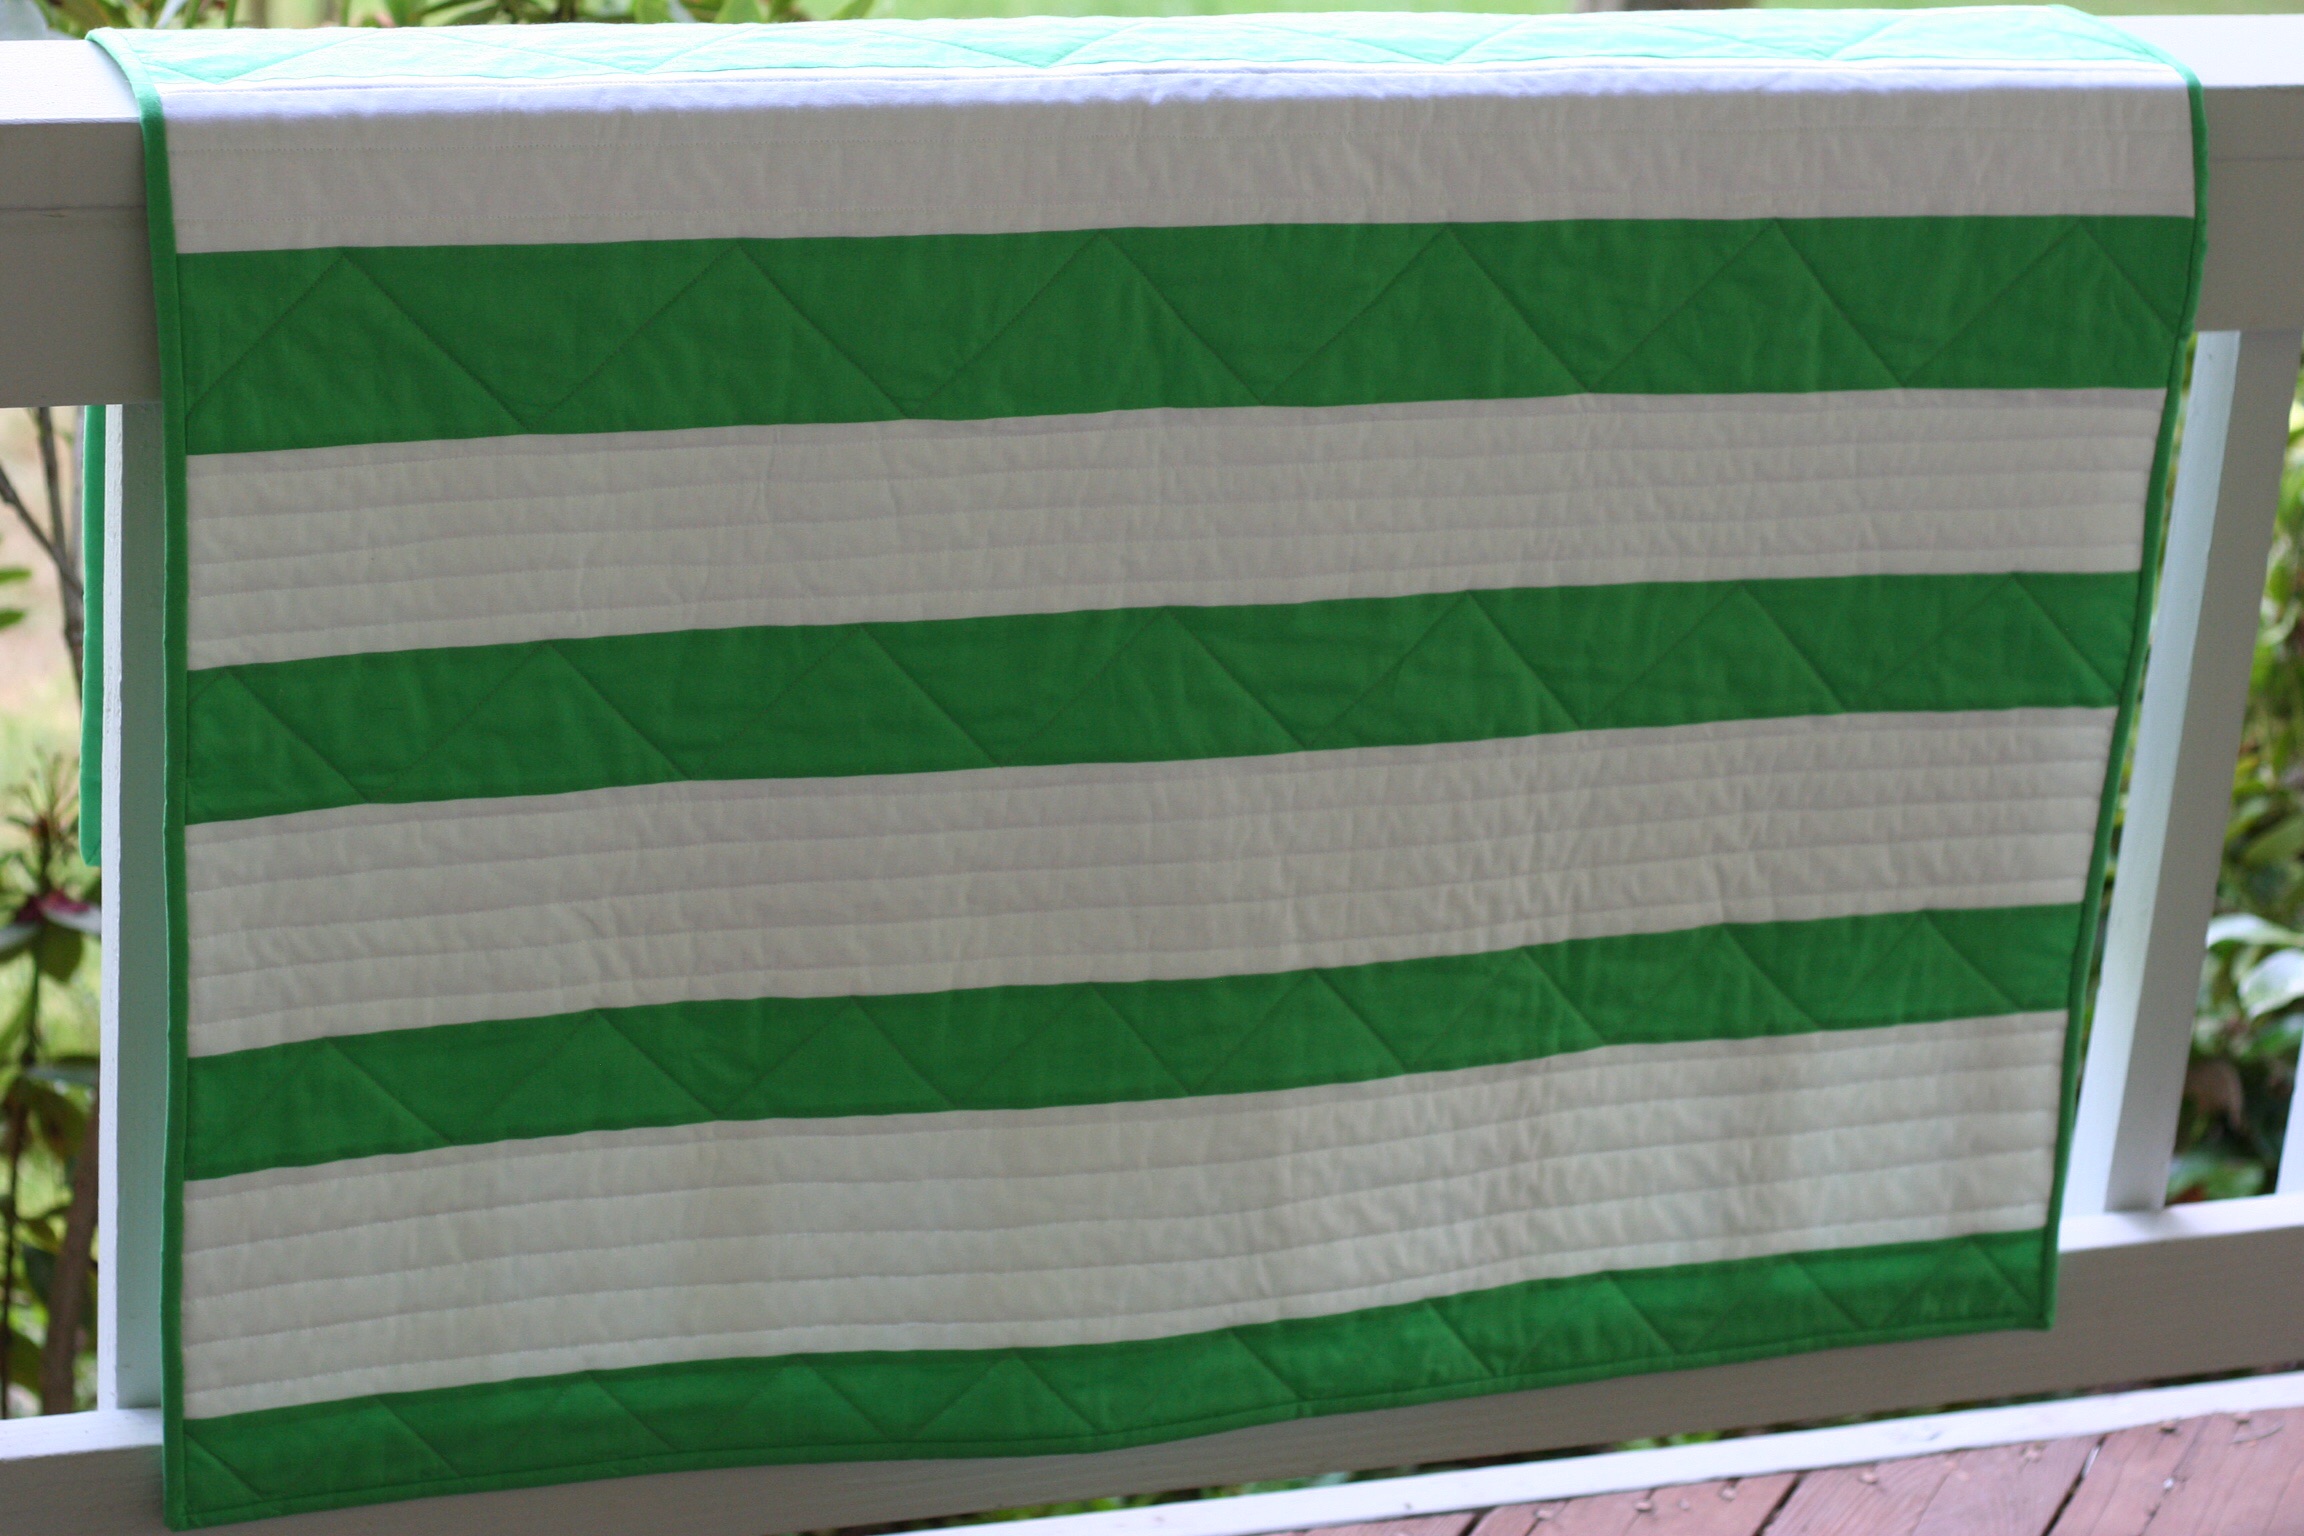
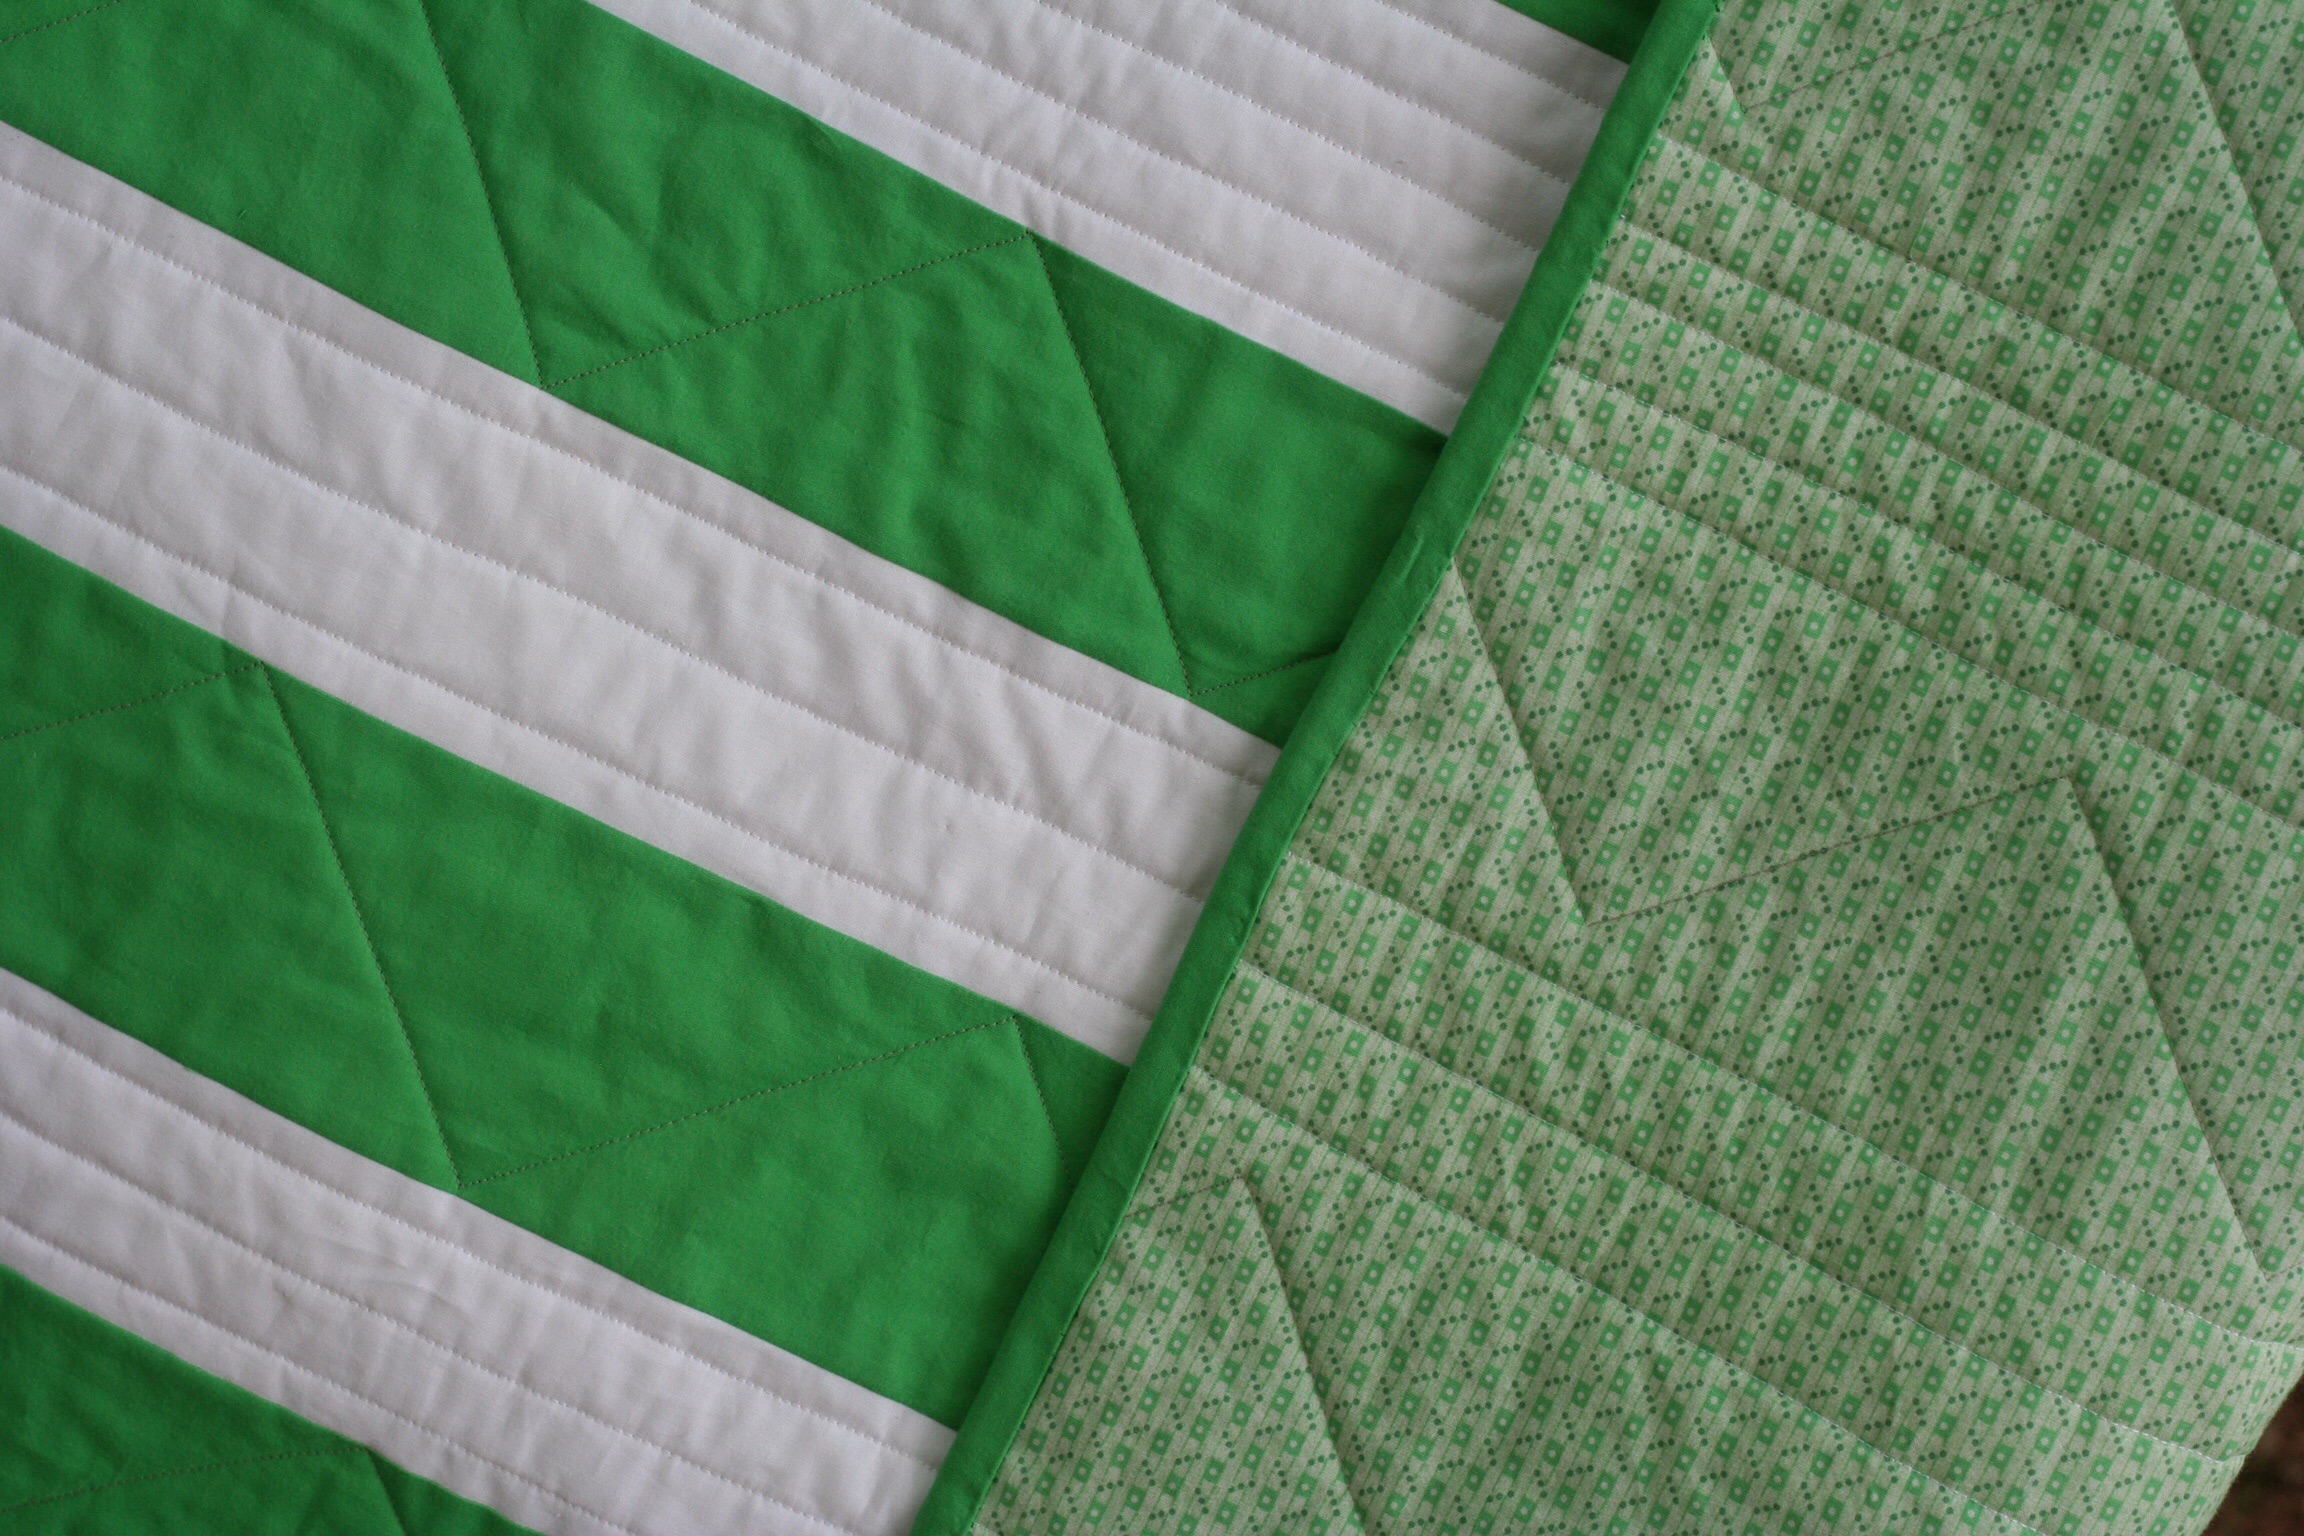
I had some solid minty green fabric and a large piece of white Kona that looked great together. The pattern is basically a series of stripes. Each color has a set of stripes that decrease one-half inch with each strip. They begin at 5.5 inches and decrease to 2.5 inches. The size of the stripes alternate such that one color begins with the widest and the other color begins with the most narrow. I like the effect.

image

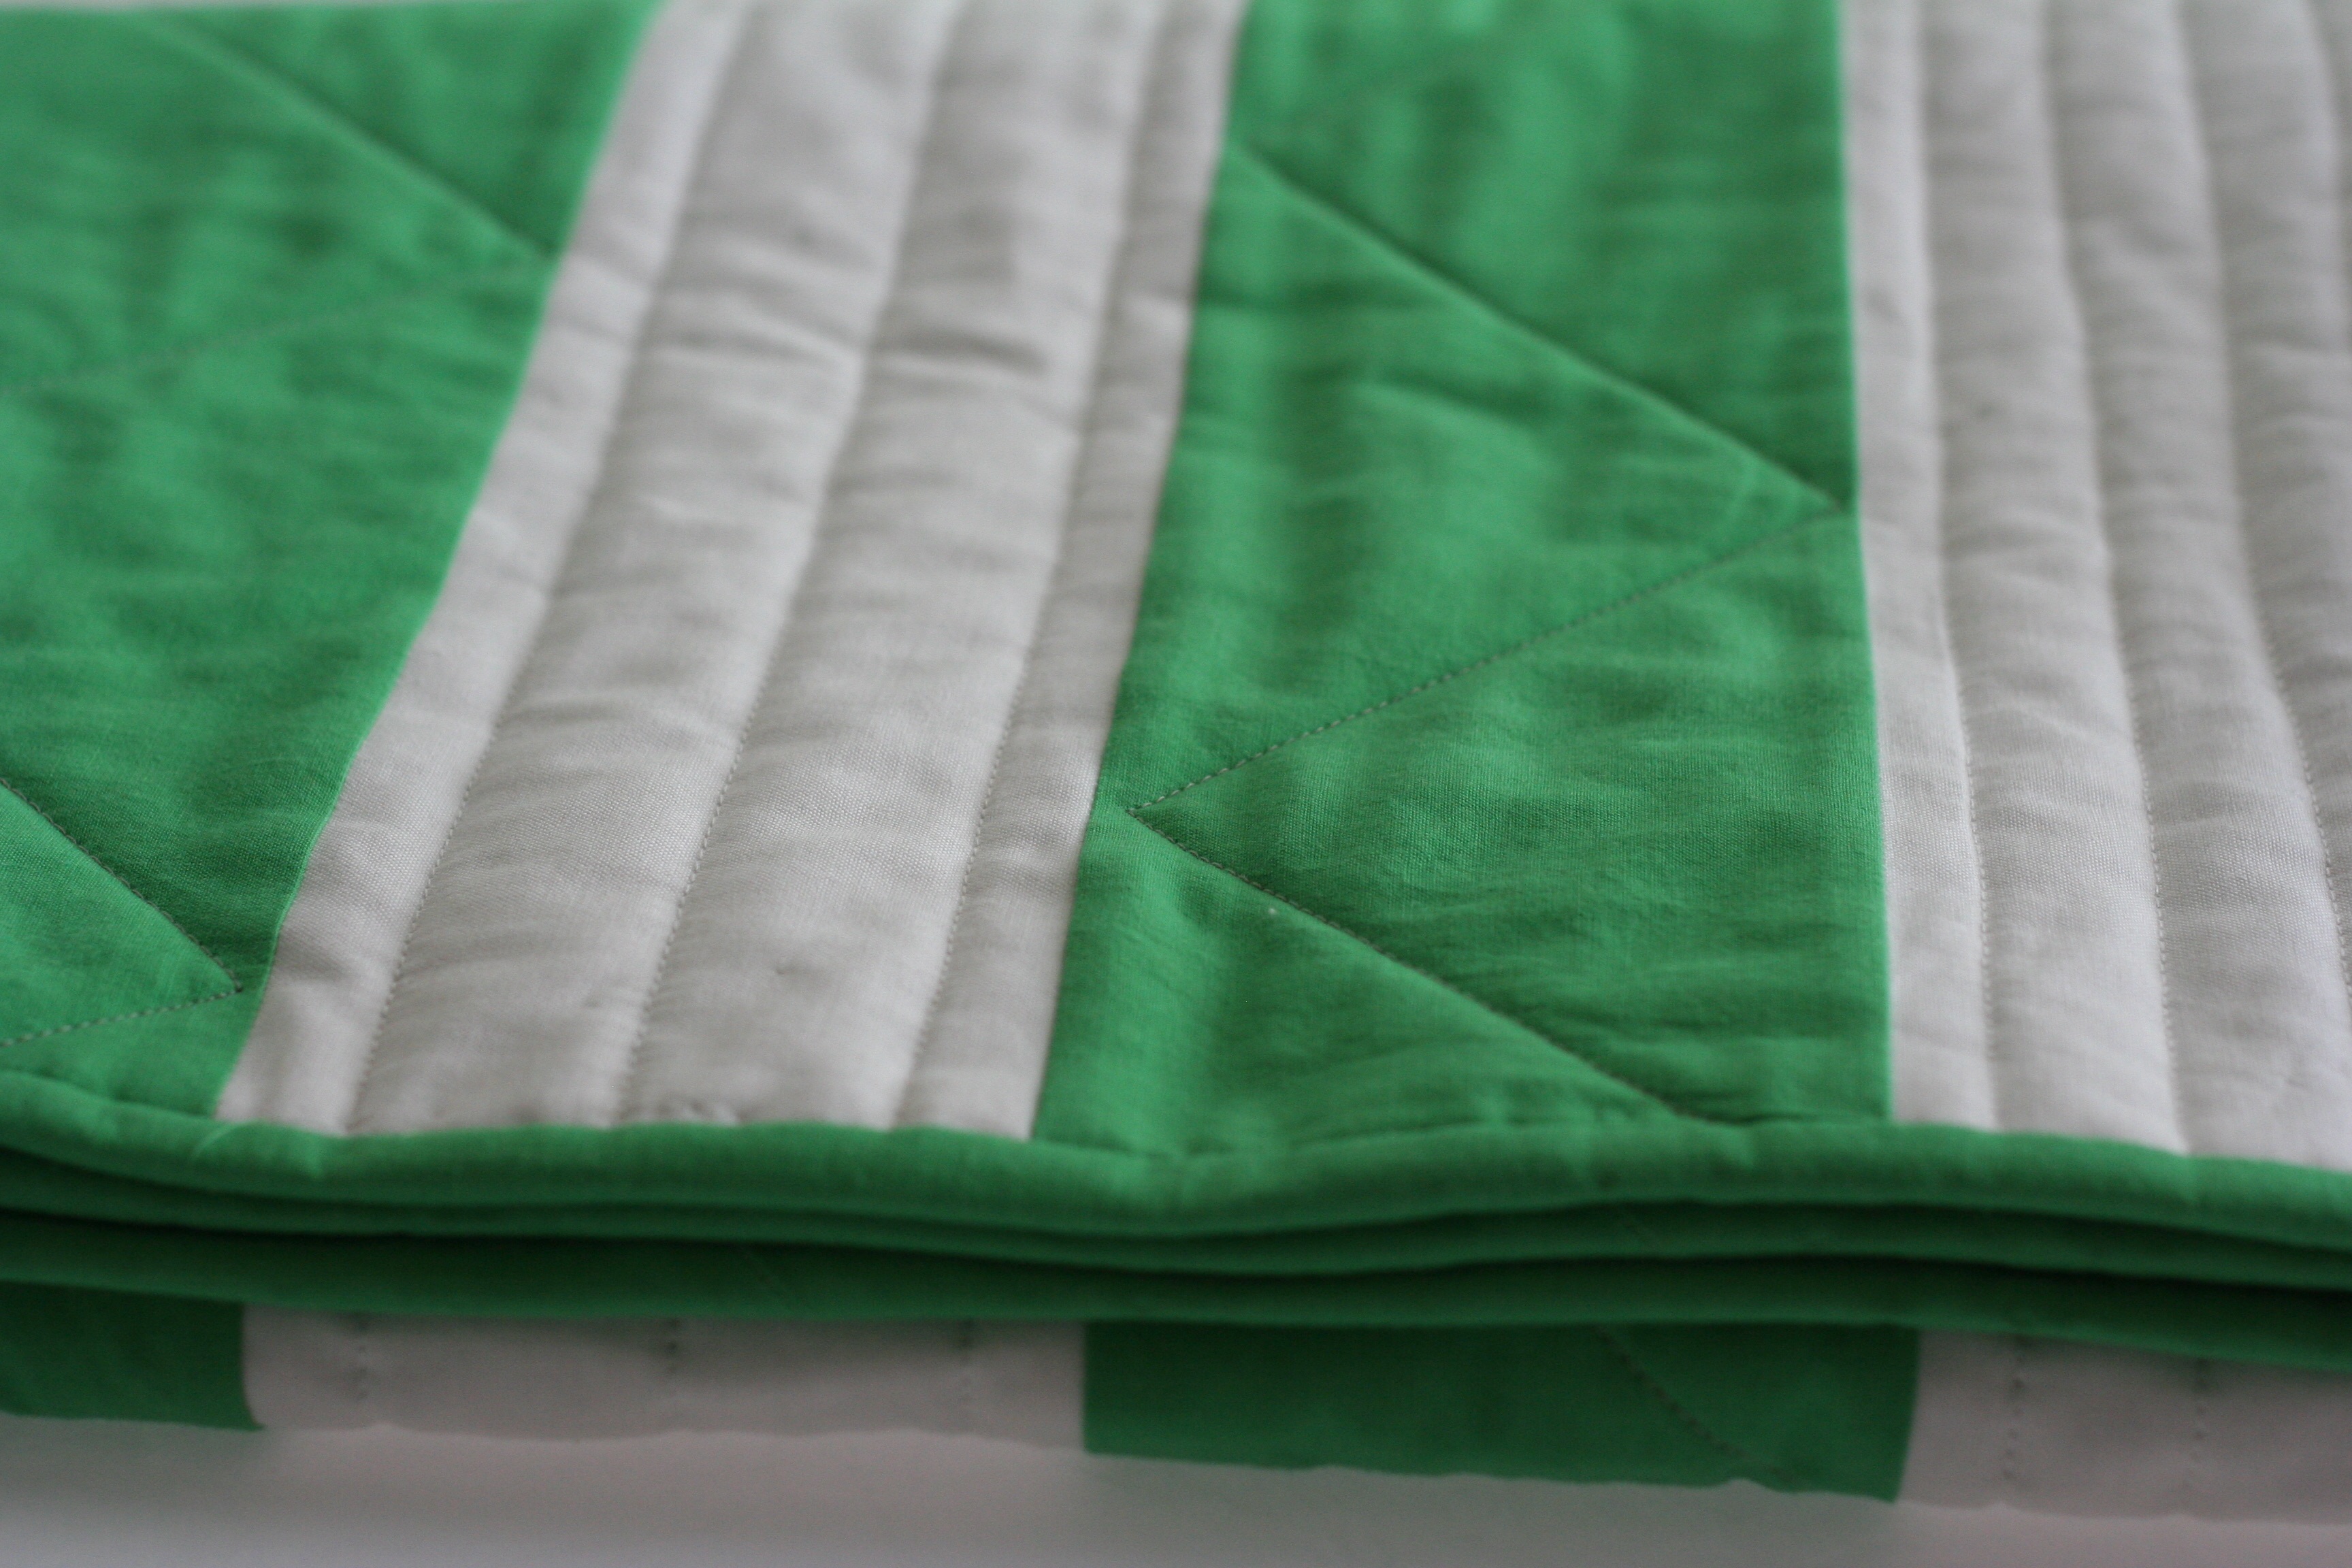
I felt this quilt did not warrant an all over FMQ pattern. Initially I quilted straight lines on the white stripes. I wanted to keep it soft, thus didn’t want to densely quilt it. Without measuring or marking, I used the walking foot and/or the edges of the strips as my guide. My pin basting wasn’t tight enough and I ended up with huge fold in the backing fabric. Ugh. Ripping out that part of the quilting was really the longest part of making the quilt.

My thought was to quilt the white and leave the green blank. Feeling unsure about that decision, I put it out there to my Facebook quilting community and asked what to do with the green. I really didn’t want the quilt to be dense, I wanted a puffy soft feel to it.  Someone suggested doing a very wide, edge to edge zig zag on the green. That was genious. Perfect.

image

I tried to FMQ the first stripe. I marked it and used the free motion foot. Yuk. I hate quilting straight lines without the (stabilizing) help of the feed dogs. For the rest of the rows I marked them with a Frixion pen and a 90 degree trianglular template that I already had. Using the walking foot, I quickly quilted the zig zags.

The back is a very simple Timeless Treasures print that has the perfect shade of green in it.  I bound the quilt with the solid green to retain the simplicity of the quilt top. I listed this quilt in my Etsy shop.

image

In keeping with my goals for June, I did get the batik quilt (my ALYOF goal) pin basted and plan to  start quilting it this weekend. I am using an all-over pattern of a leafy vine from Christina Cameli’s book. Crossing fingers for this one!

Hope everyone has a wonderful weekend!

Linking to Amanda Jean over at Crazy Mom Quilts as well as Sarah at Confessions of a Fabric Addict.

The Week’s Progress

This has been a good week for sewing. I made progress toward my April goals for ALYOF. Which is a good thing, considering April will be over before you know it. The speed with which time passes seems to increase frighteningly each month.  Anyway, it is April 23rd and I am over 3/4 of the way there. My goal was to make two table runners and either a wall hanging or runner. I wanted to complete three smaller projects this month. I finished the chevron table runner which I posted about last week.

This week I completed the second table runner. The process I used was new for me and was inspired by the way that Victoria Gertenbach at The Silly BooDilly works. I started reading her blog and looking at her style over the past couple of months. She is a modern quilter with a gorgeous sense of line and color. She quilts and does a lot of other work in fiber and paper art. I strongly suggest you take a look at her site as her work is lovely.  One of the tutorials she wrote was about pattern-less design.  She has developed a way of cutting a piece of fabric and then adding sections to it, thus creating her piece. I love the idea. While I didn’t actually follow her tutorial with this project (because it didn’t work with the fabric I had on-hand) I was surely inspired by her process .

About a year ago, I purchased a scrap bag from an on-line fabric shop. Sorry, I am not positive but I belive it was Alaska Quilting Adventures.  I ended up with loads of strips, probably end cuts from the bolts as she was creating bundles of precuts.  First I cleaned up the strips so they were (relatively) straight, though I did not cut them exactly the same width. Next, I sewed a set of them together to make a long rectangle of fabric. I cut that into three sections. I then played with more of the strips, creating blocks to add between the sections. Kind of hard to describe, but it was a very simple process. As I have mentioned before, I usually sew from a pattern or tend to copy other’s ideas for inspiration. This was very freeing. I want to try this again with a Kaffe Fassett jelly roll of shot cottons that I have. Here is the resulting table runner.

runnerThe colors are soft and soothing.  I had fun creating the block in the center which has a bit of extra detail in the piecing.

table runner detailWhen I was ready to quilt it I decided to use something with curved lines to offset the straight lines of the piecing. I chose the Baptist Fan pattern. I had not done this before so I drew it on newspaper with a sharpie until it was comfortable and then sewed a few fans on a practice piece. It is really a simple shape to FMQ. I didn’t trace it on the runner before quilting. If I had, I am sure my lines would have less wobble.

image3 (3)

It is backed and bound with the same fabric. Not sure what it was but it used up some of my stash which is always a good thing. Overall, I am happy with the result and it was a huge learning experience, both in piecing and quilting. Yay!

The third April project I worked on is for my first mini-swap. This swap features fabrics by Allison Glass. I was really getting nervous about this project, doubting my abilities till I was just about stuck. I decided to start cutting fabric last weekend and just dive in. I chose the Fireworks pattern by Canoe Ridge Creations. She does a lot of mini quilt pattern design and I have several of her patterns. They are easy to use and her instructions are great. I have the blocks done and need to stitch them together. It should finish out at 24″ x 24″. The swap isn’t due to be mailed out until early June so I am way ahead of schedule. May is going to be a busy month so I’m glad to check this one off. (By the way, for those of you who have done swaps, do you usually put anything on the back for hanging, or is that up to the recipient to do that?  Please leave a comment if you have experience here! I appreciate it. )

agmini

The colors aren’t showing correctly due to the poor lighting but I am happy with it. The blue in the third section out is much more vibrant than shows here. I really need better light in my sewing room. When this is finished I will take a picture outside. I am hoping to sew the blocks together later today and get it quilted next week. Of course, that leads to the perpetual questions, how do I want to quilt this? Most likely I will straight line quilt it with a narrow spacing.

First though I have a garden swap to go to this afternoon. I joined a gardening group and we are exchanging plants from our gardens. About six weeks ago, I potted starts from my Shasta Daisies, Oregano, and Chives.

IMG_20150423_3148

It will be fun to give these to the group and bring home something different. Hoping for plants that don’t require much in the way of water!

Linking to Let’s Bee Social, Needle and Thread Thursday and  Crazy Mom Quilts. Links to these wonderful sites are at the top of the page, under Link Ups.