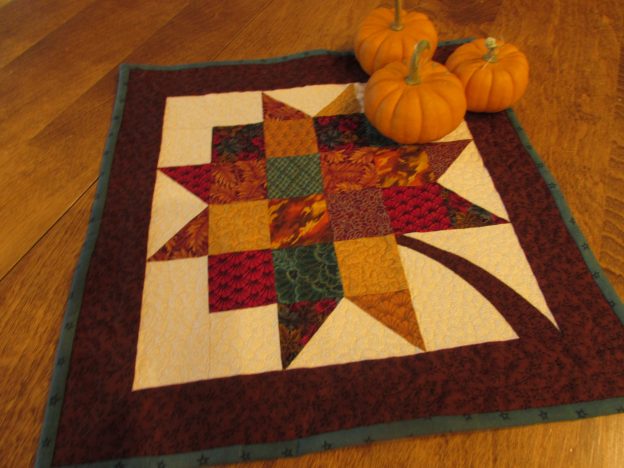
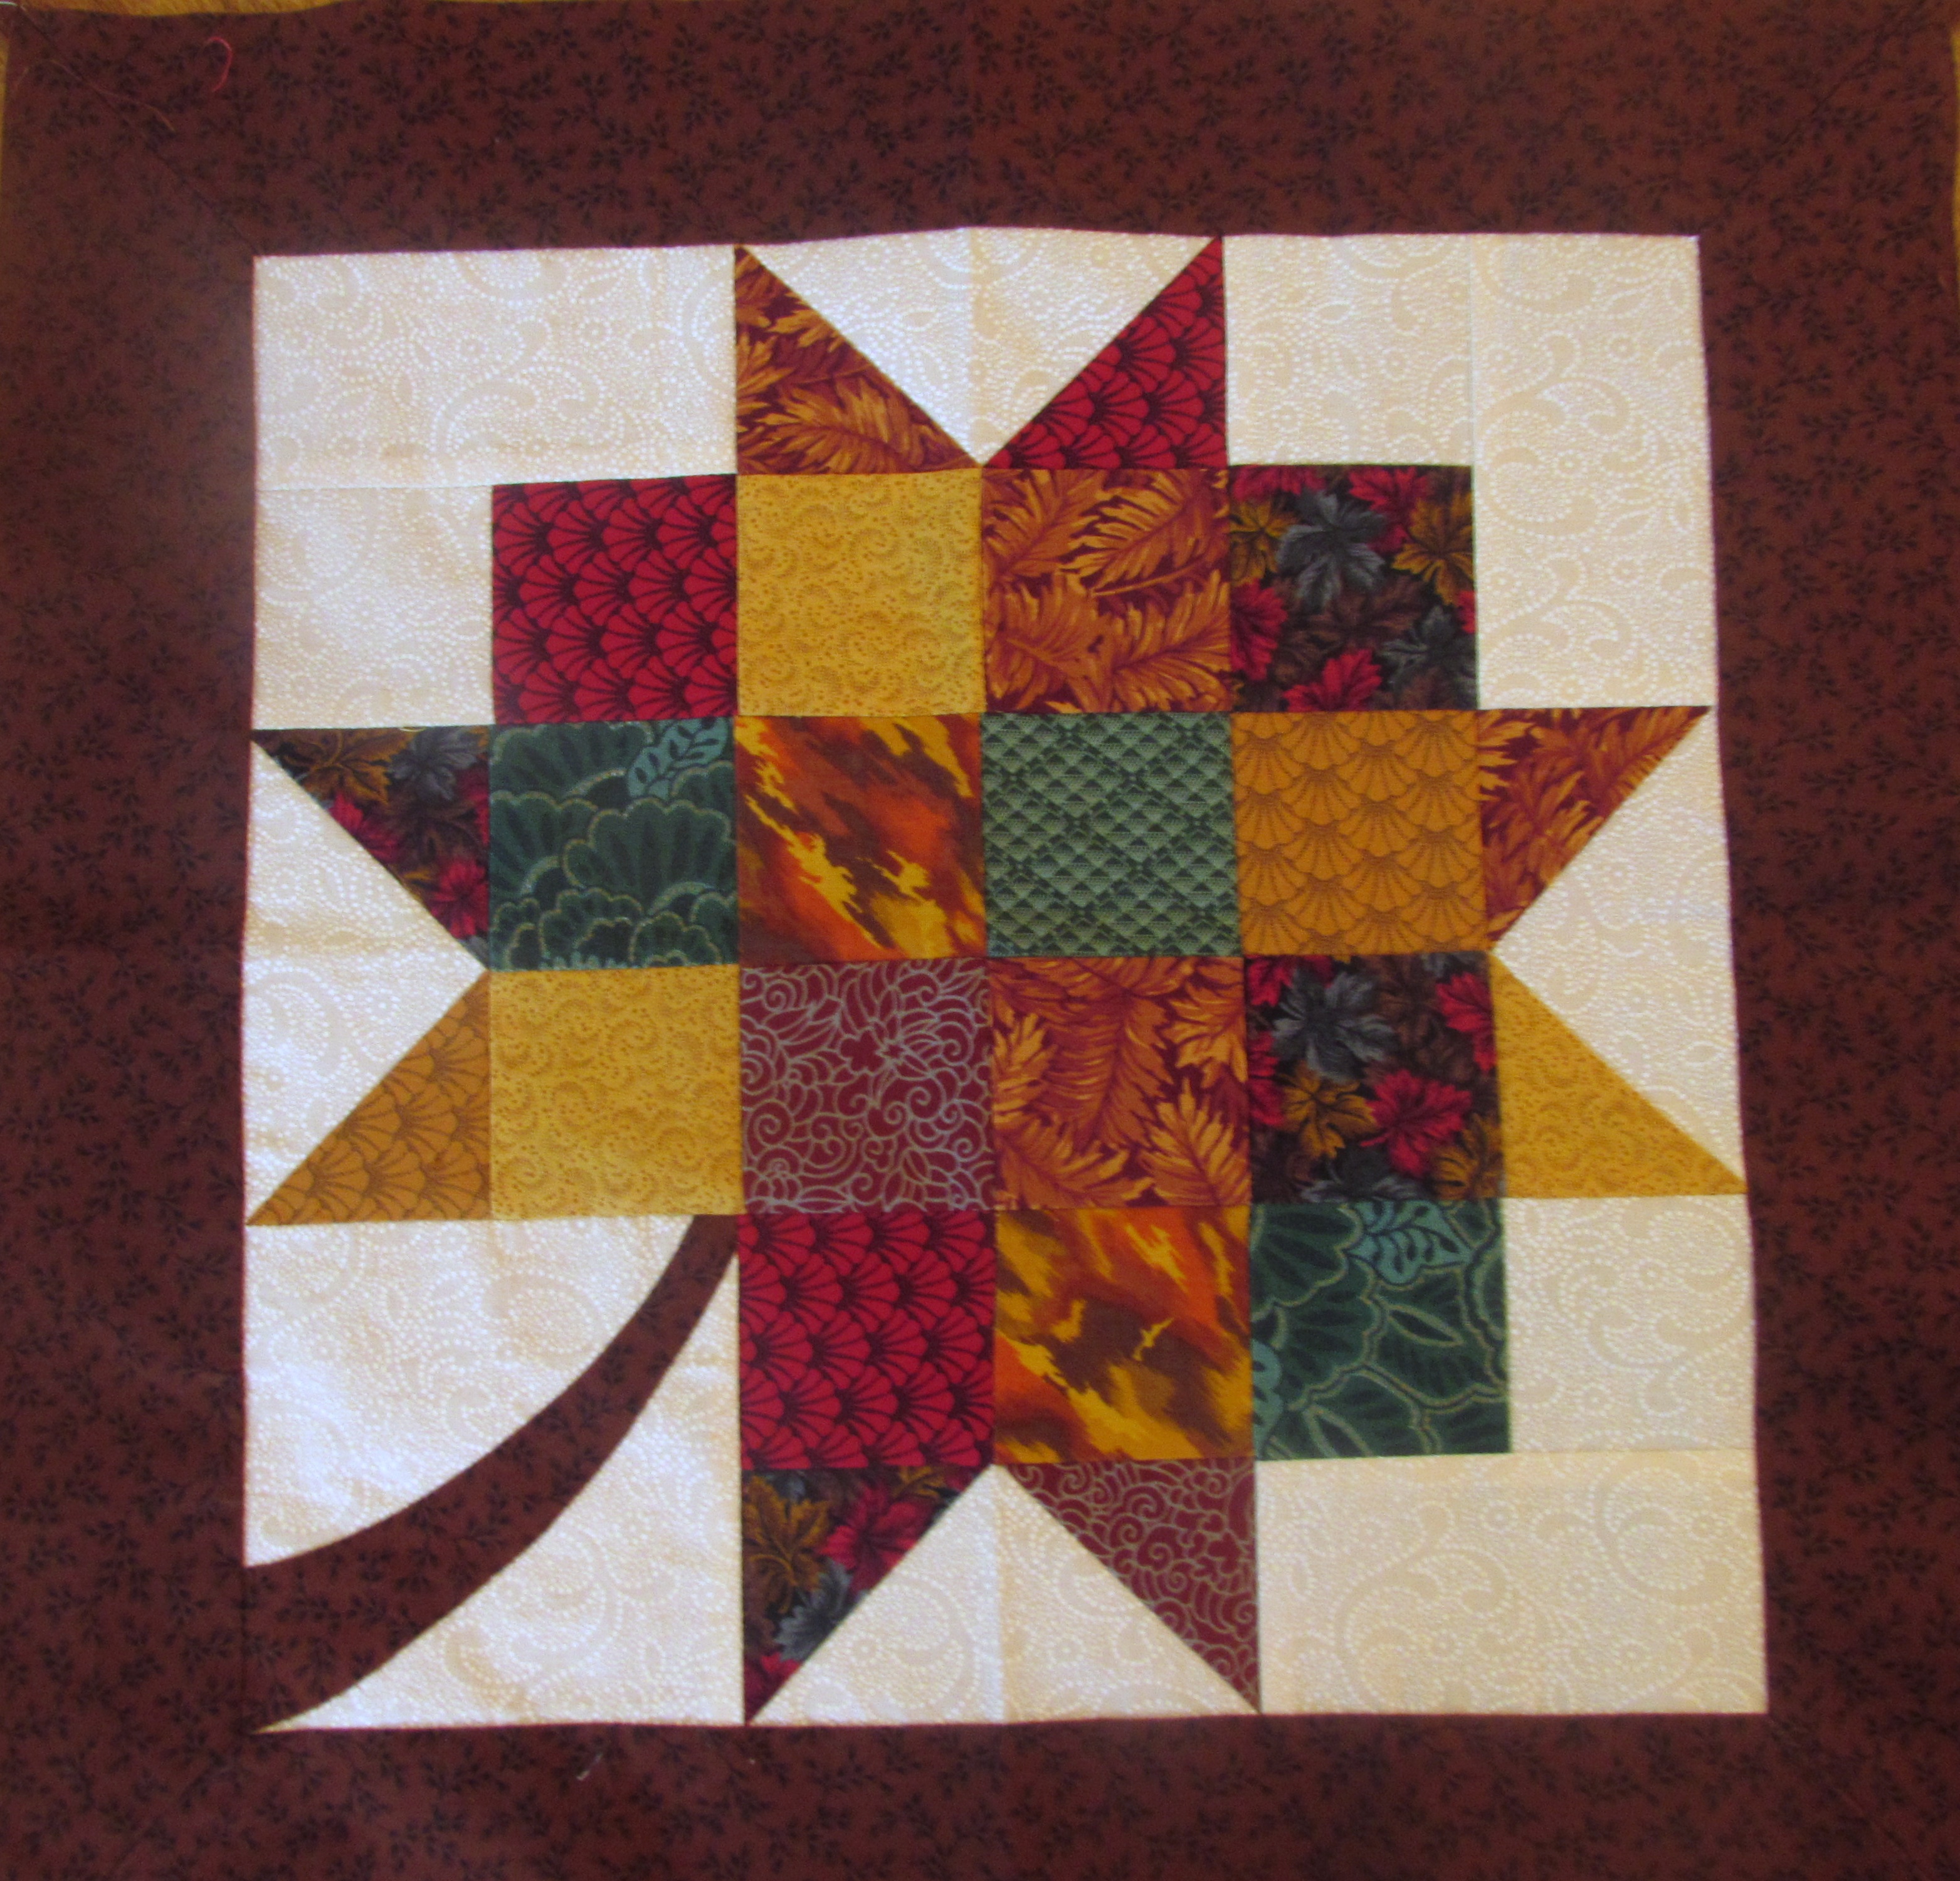
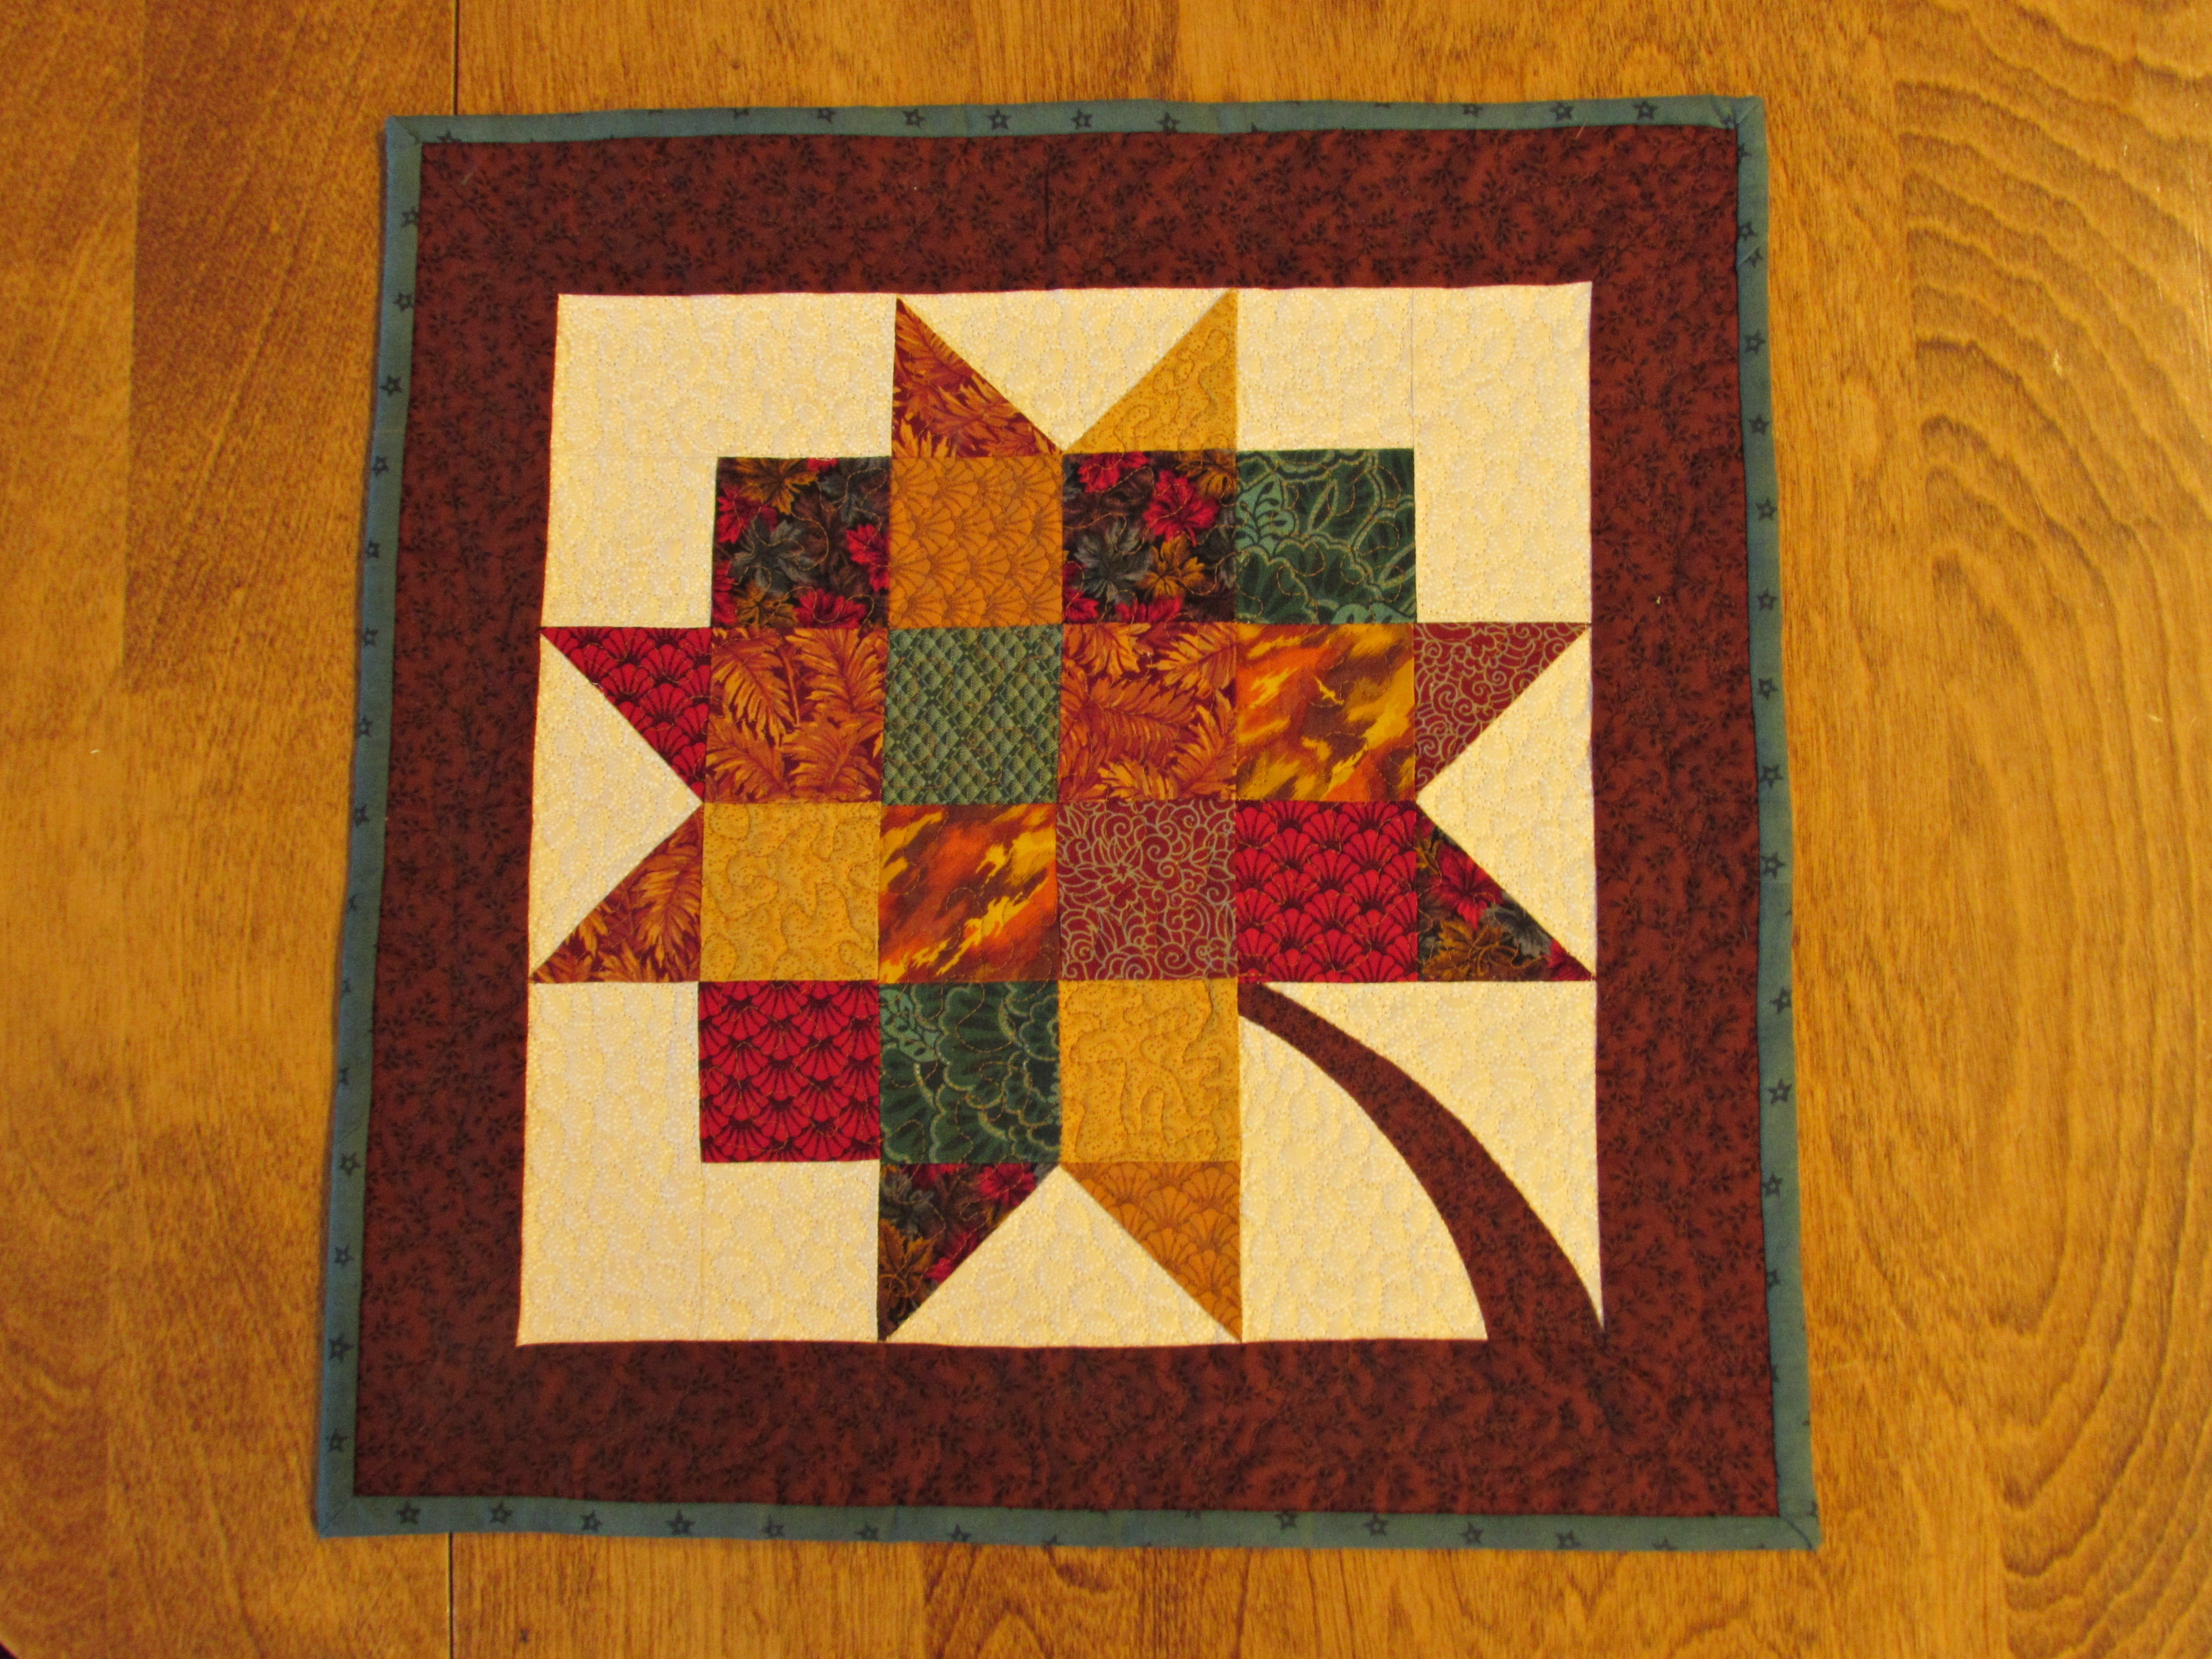
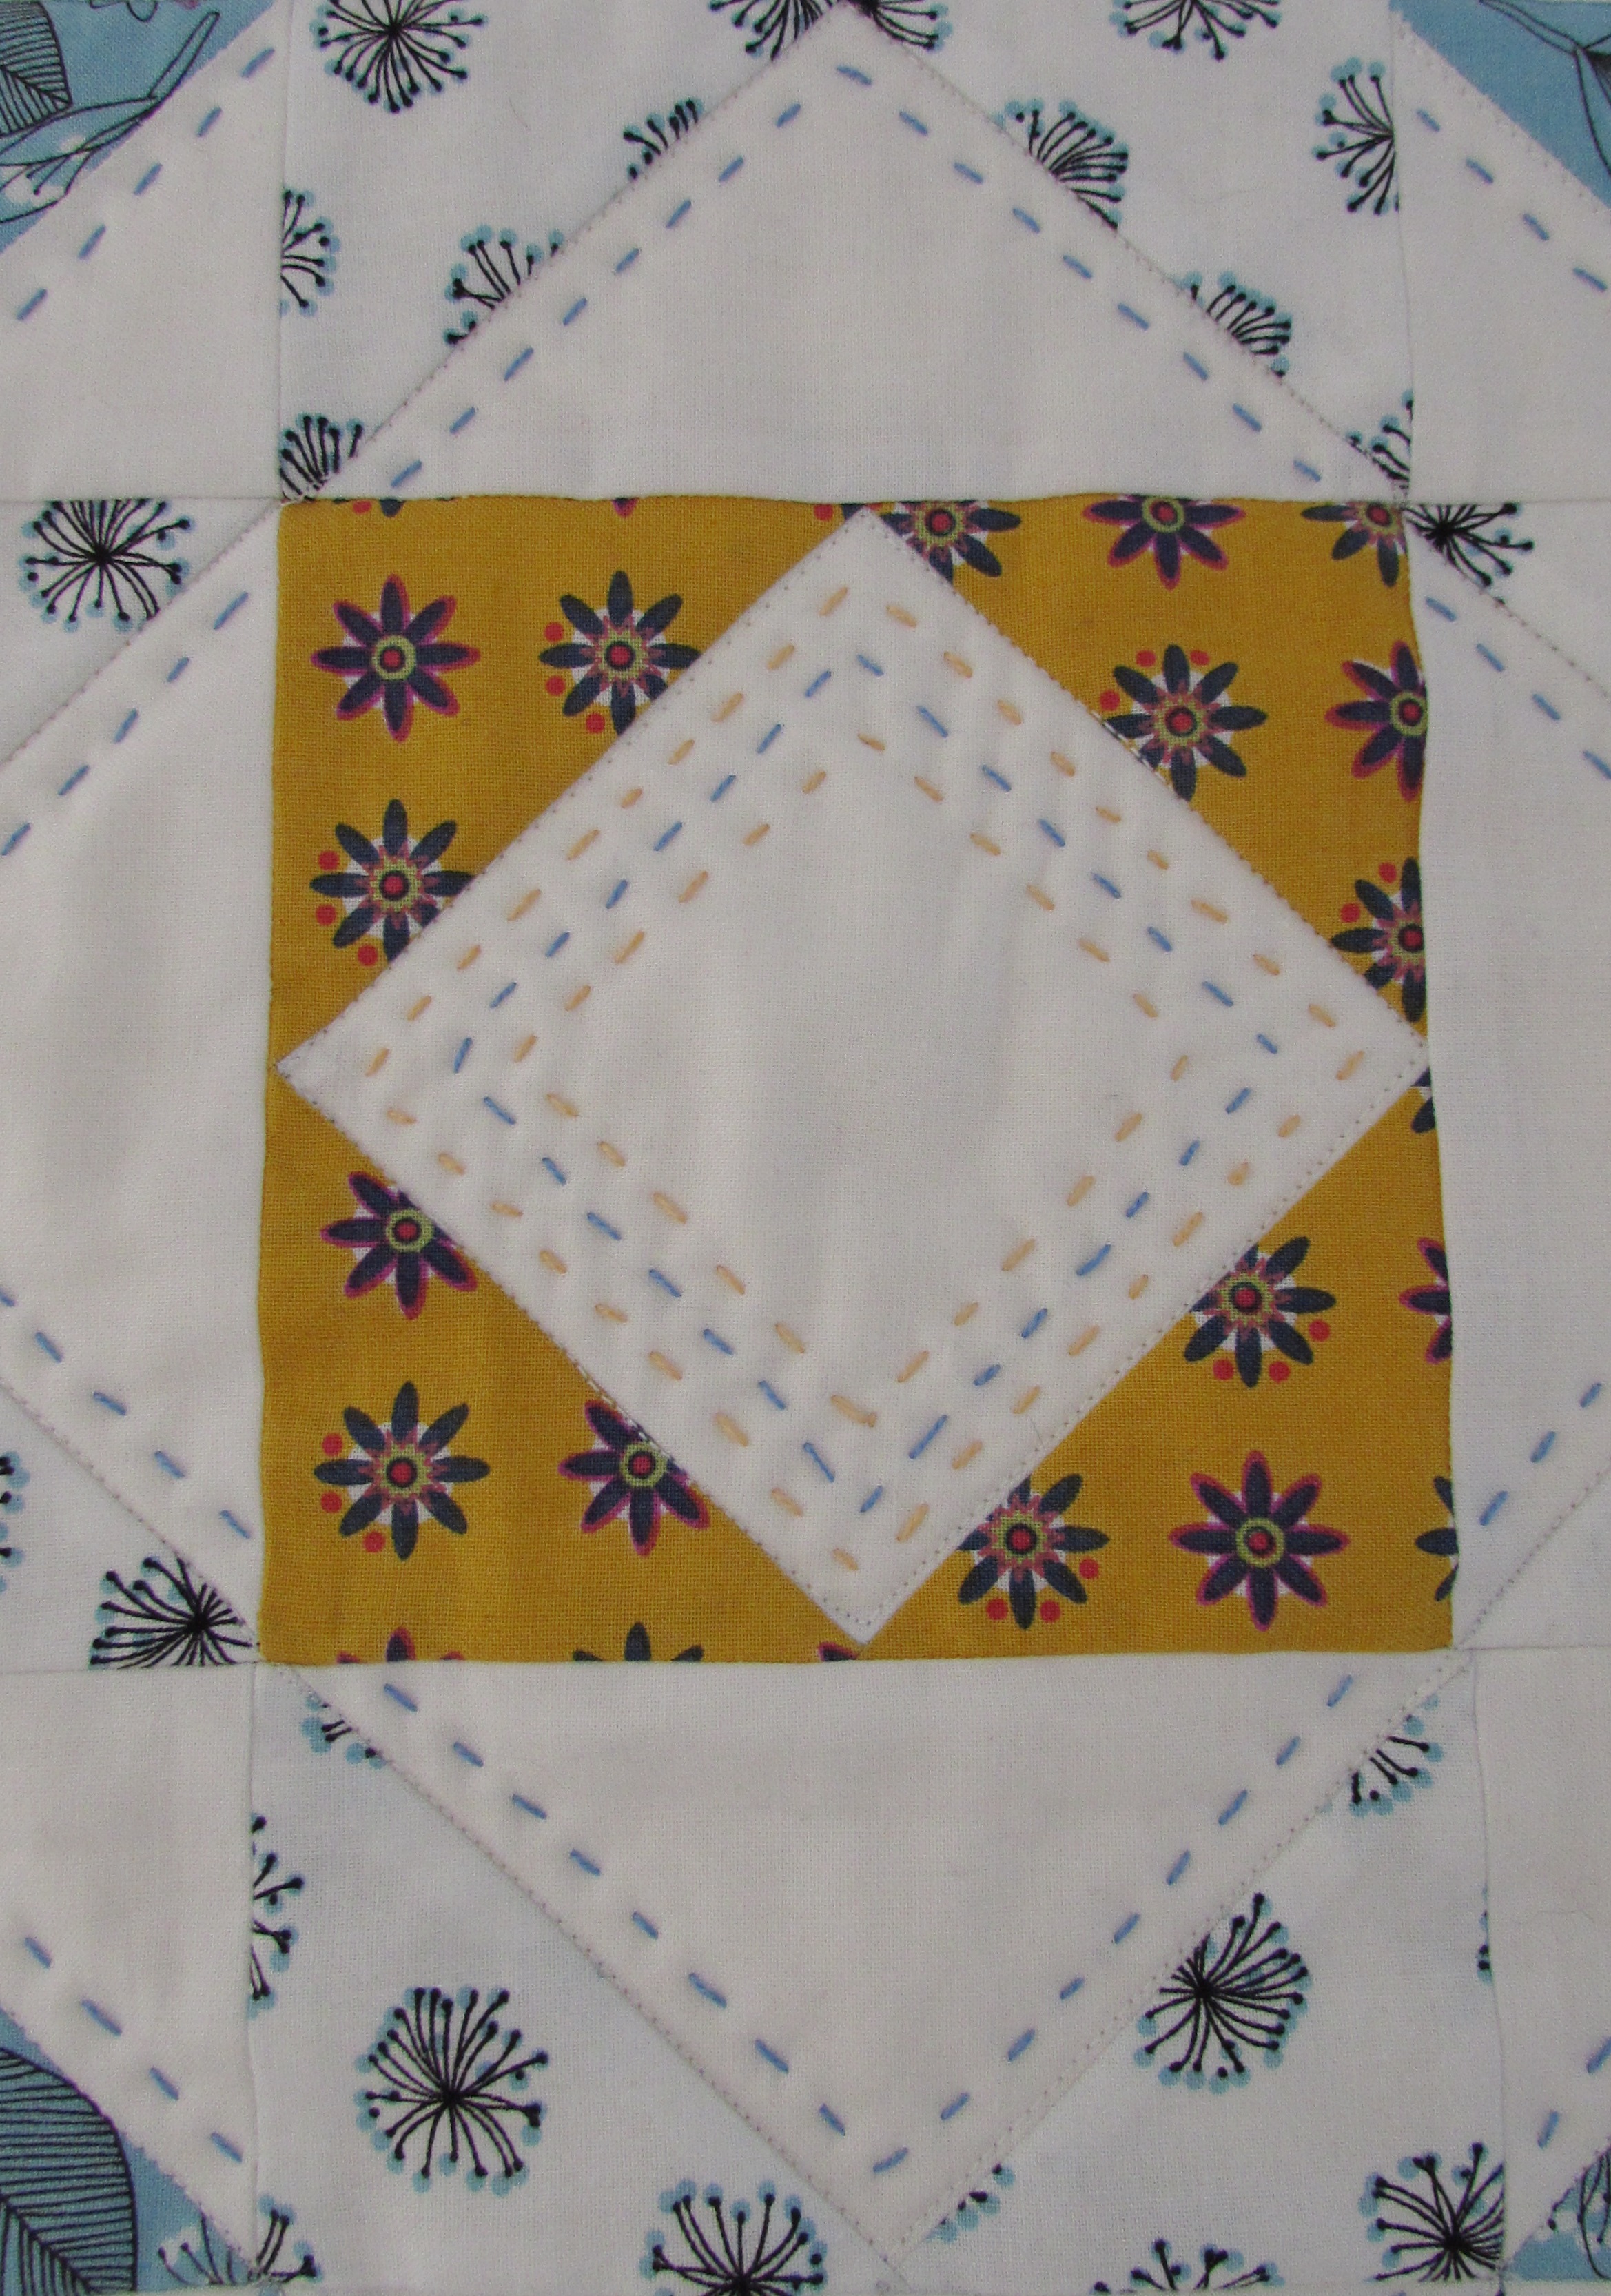
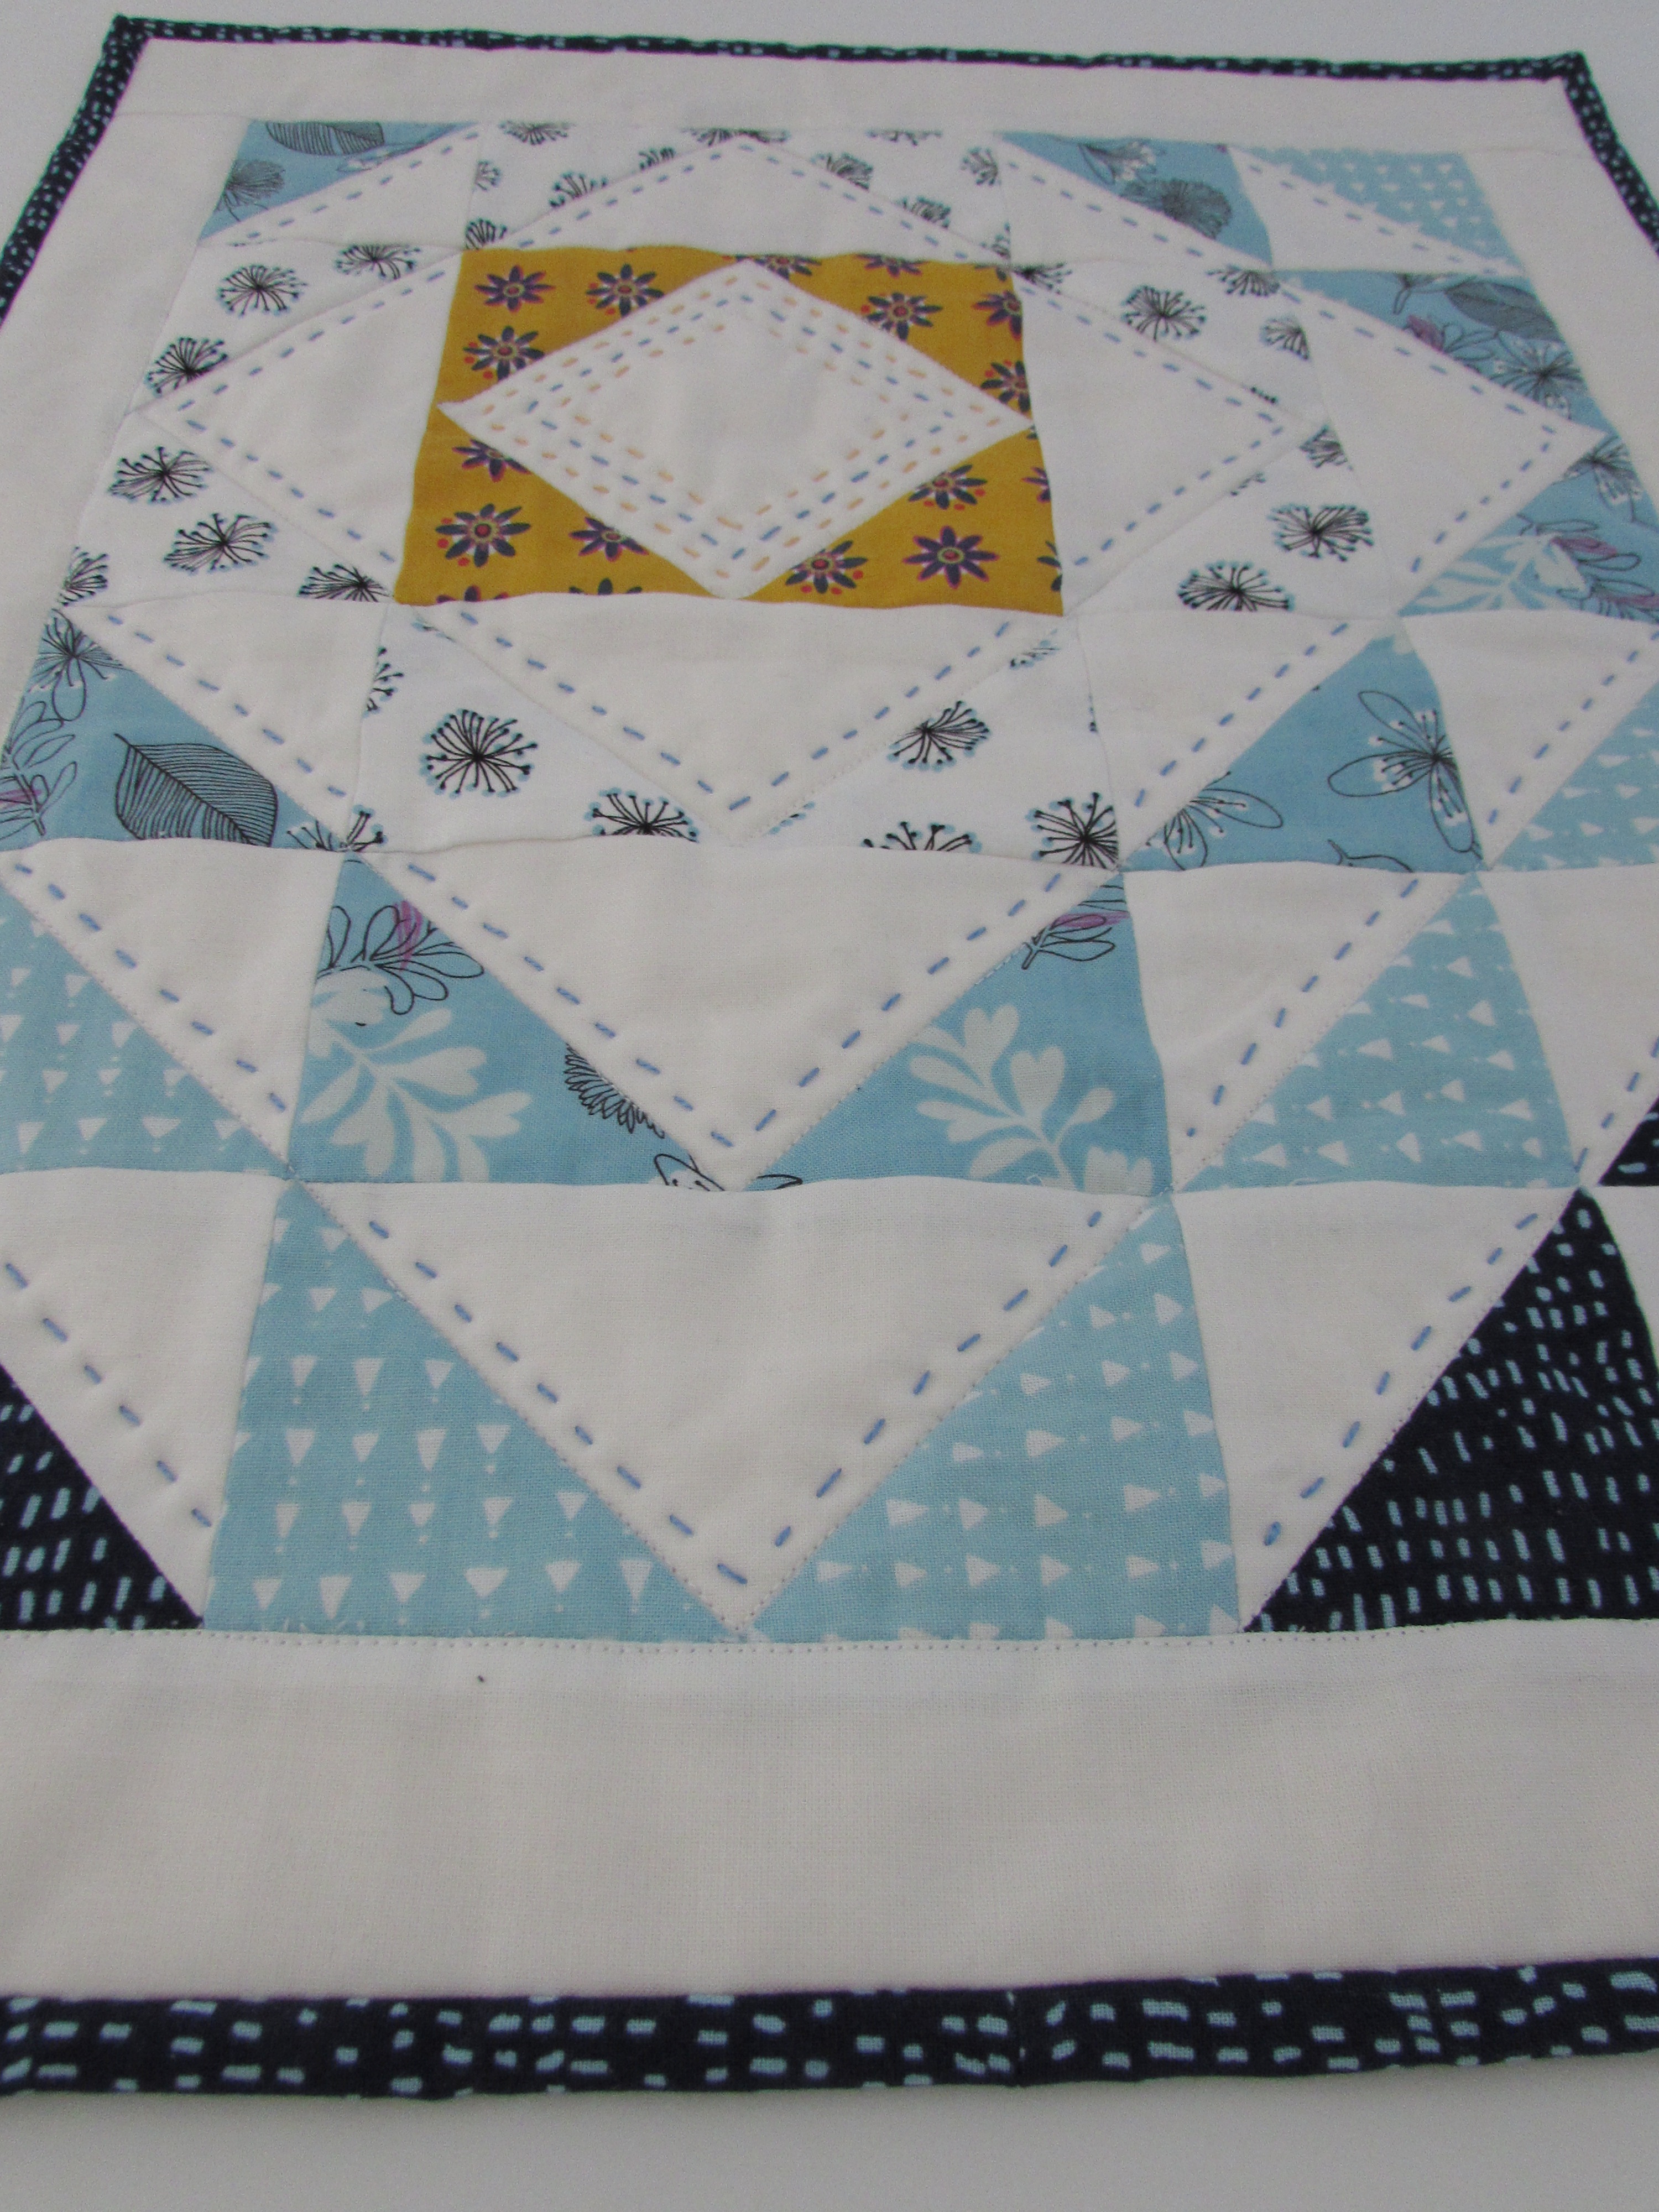
Remember this little orphan block that I scored at a thrift store a couple of weeks ago?
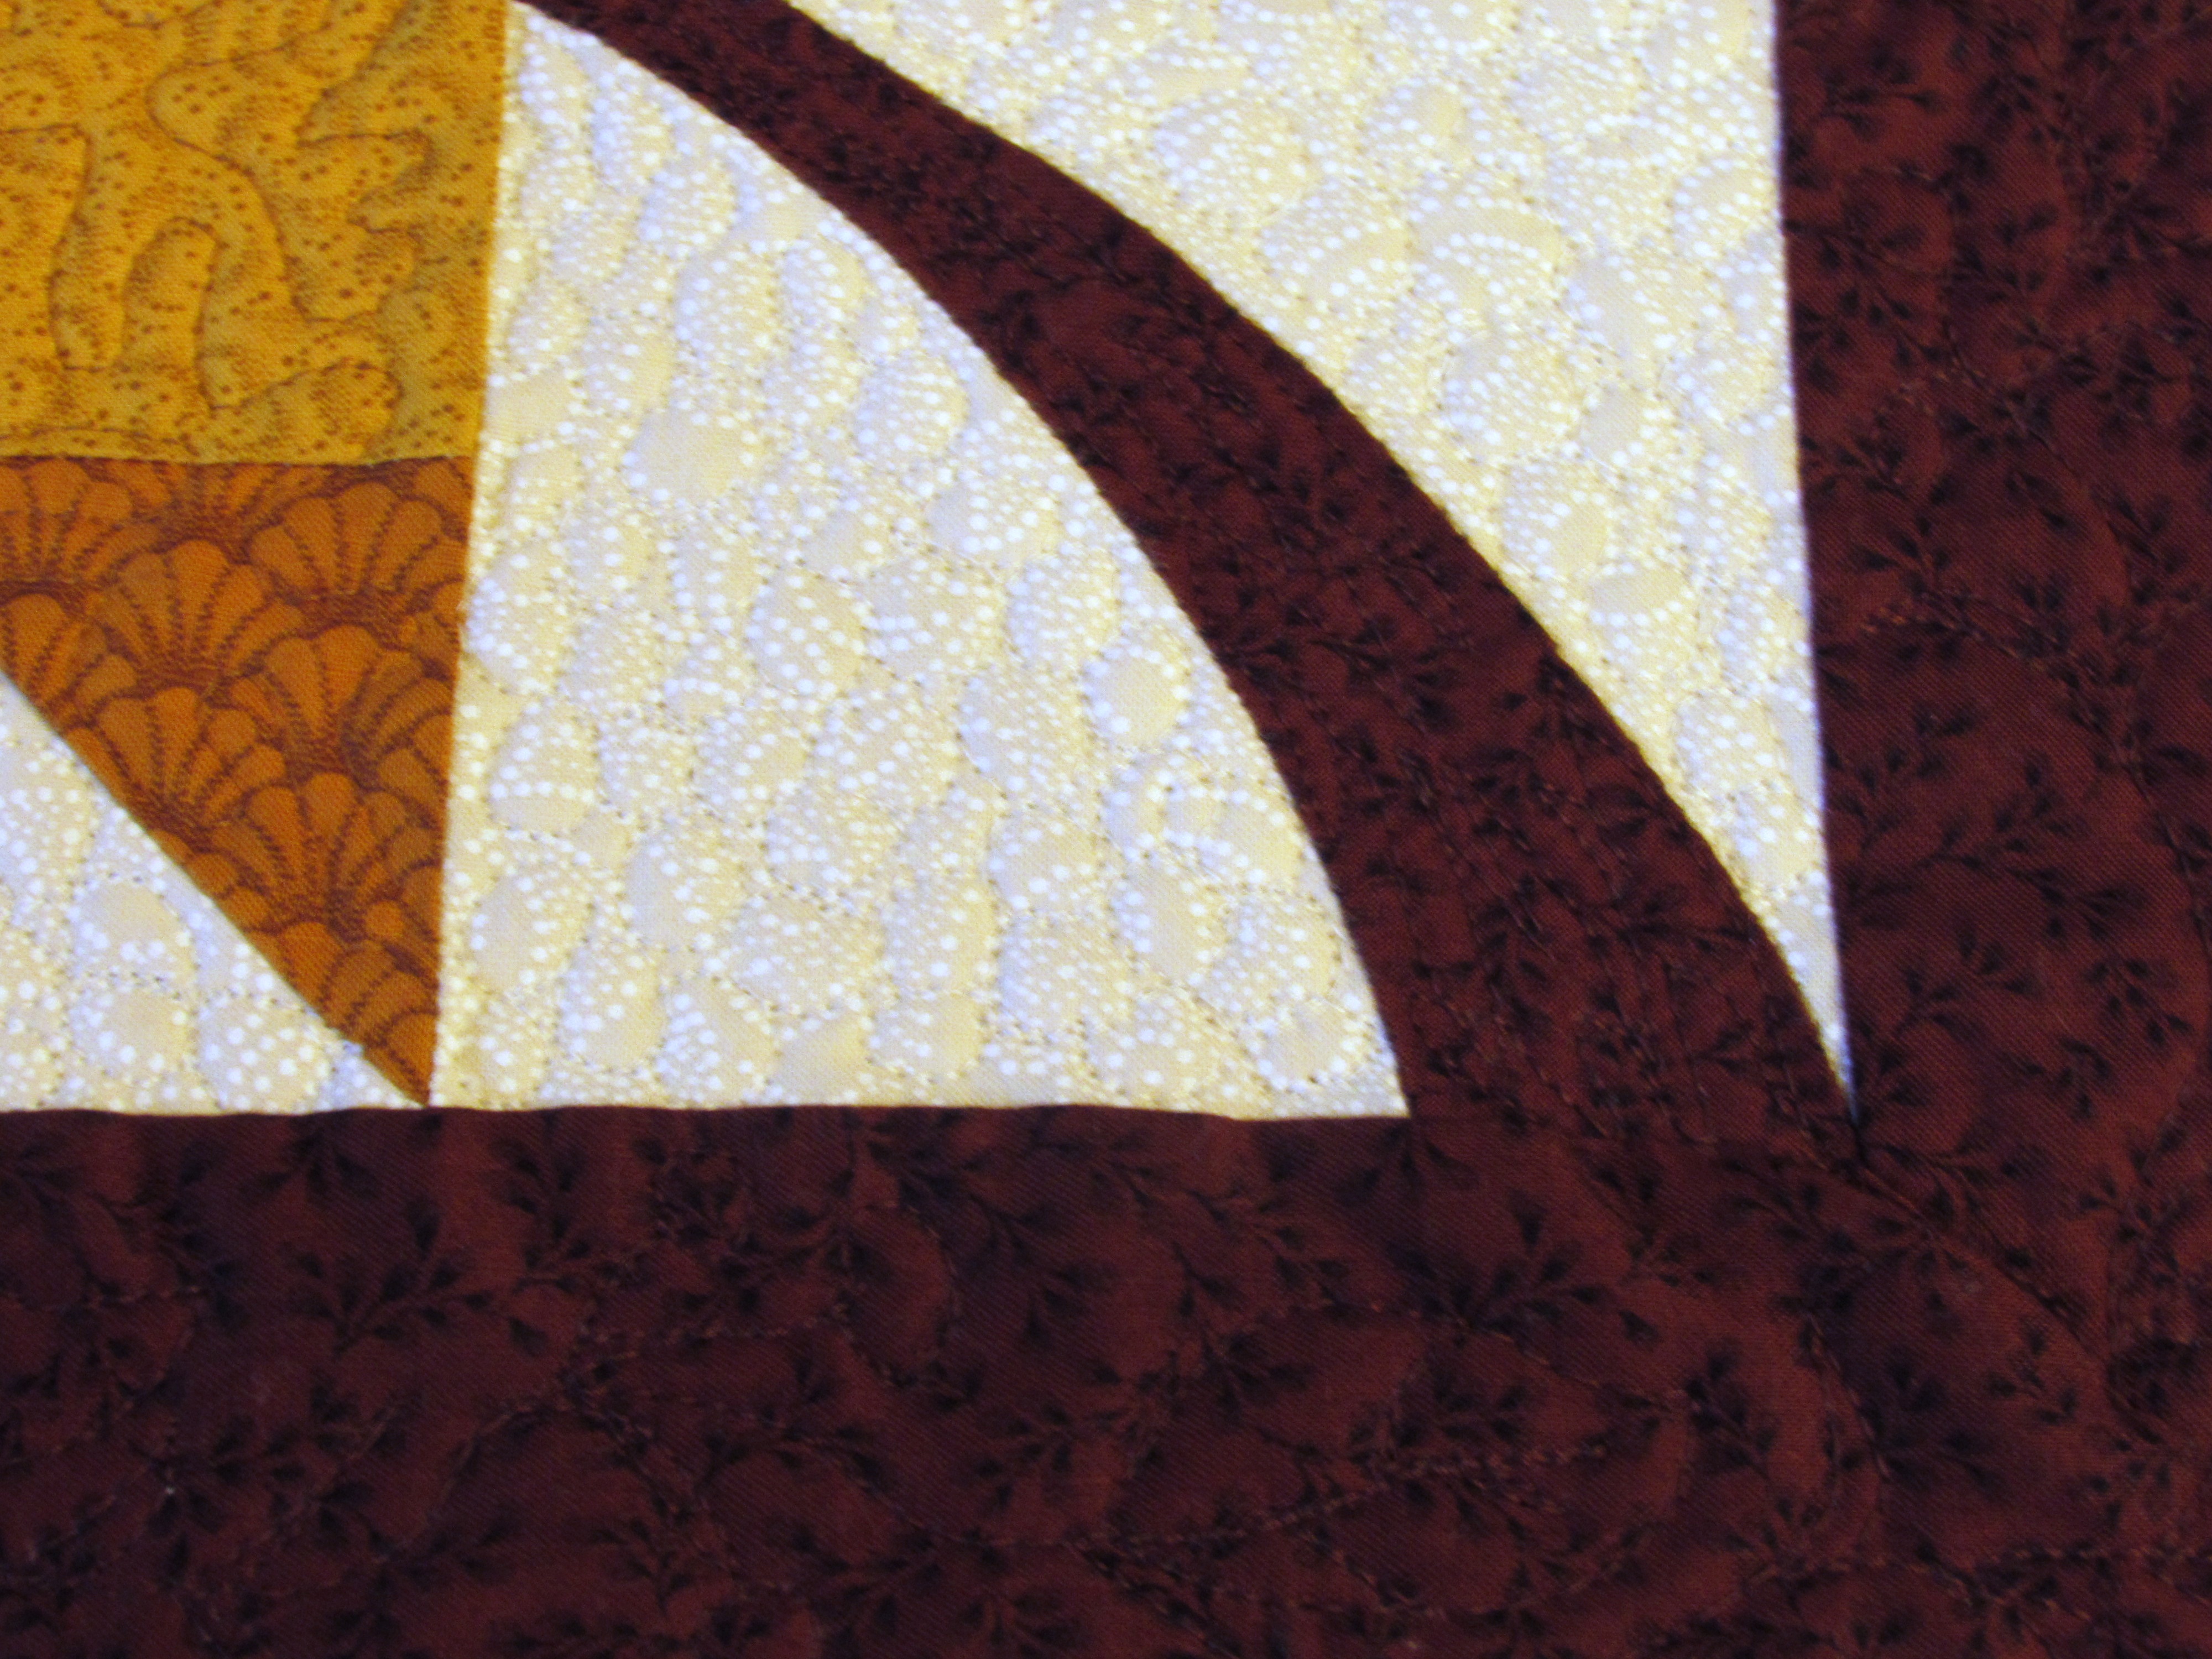
I spent a fun afternoon quilting it up. I used a rust colored thread for the main leaf portion and quilted it with a tiny stipple. These little stitches look so darn cute.
For the white background, I pebbled away for about one-half hour and filled it up. Sometimes it is so satisfying to work on a quick project. When I first started to pebble the white portion, I quickly remembered that I don’t really like to FMQ pebble patterns and thought I would regret it. But with such a tiny project it didn’t really matter. I was done before I could even get annoyed with the tedium.
For the border I quilted little leaves and berries but it is nearly impossible to see because the thread matches too well. It was good practice but really, I have to look very closely to see it. Kind of funny.
The dusty green binding wraps it all up into a sweet little mini. Perfect for fall.
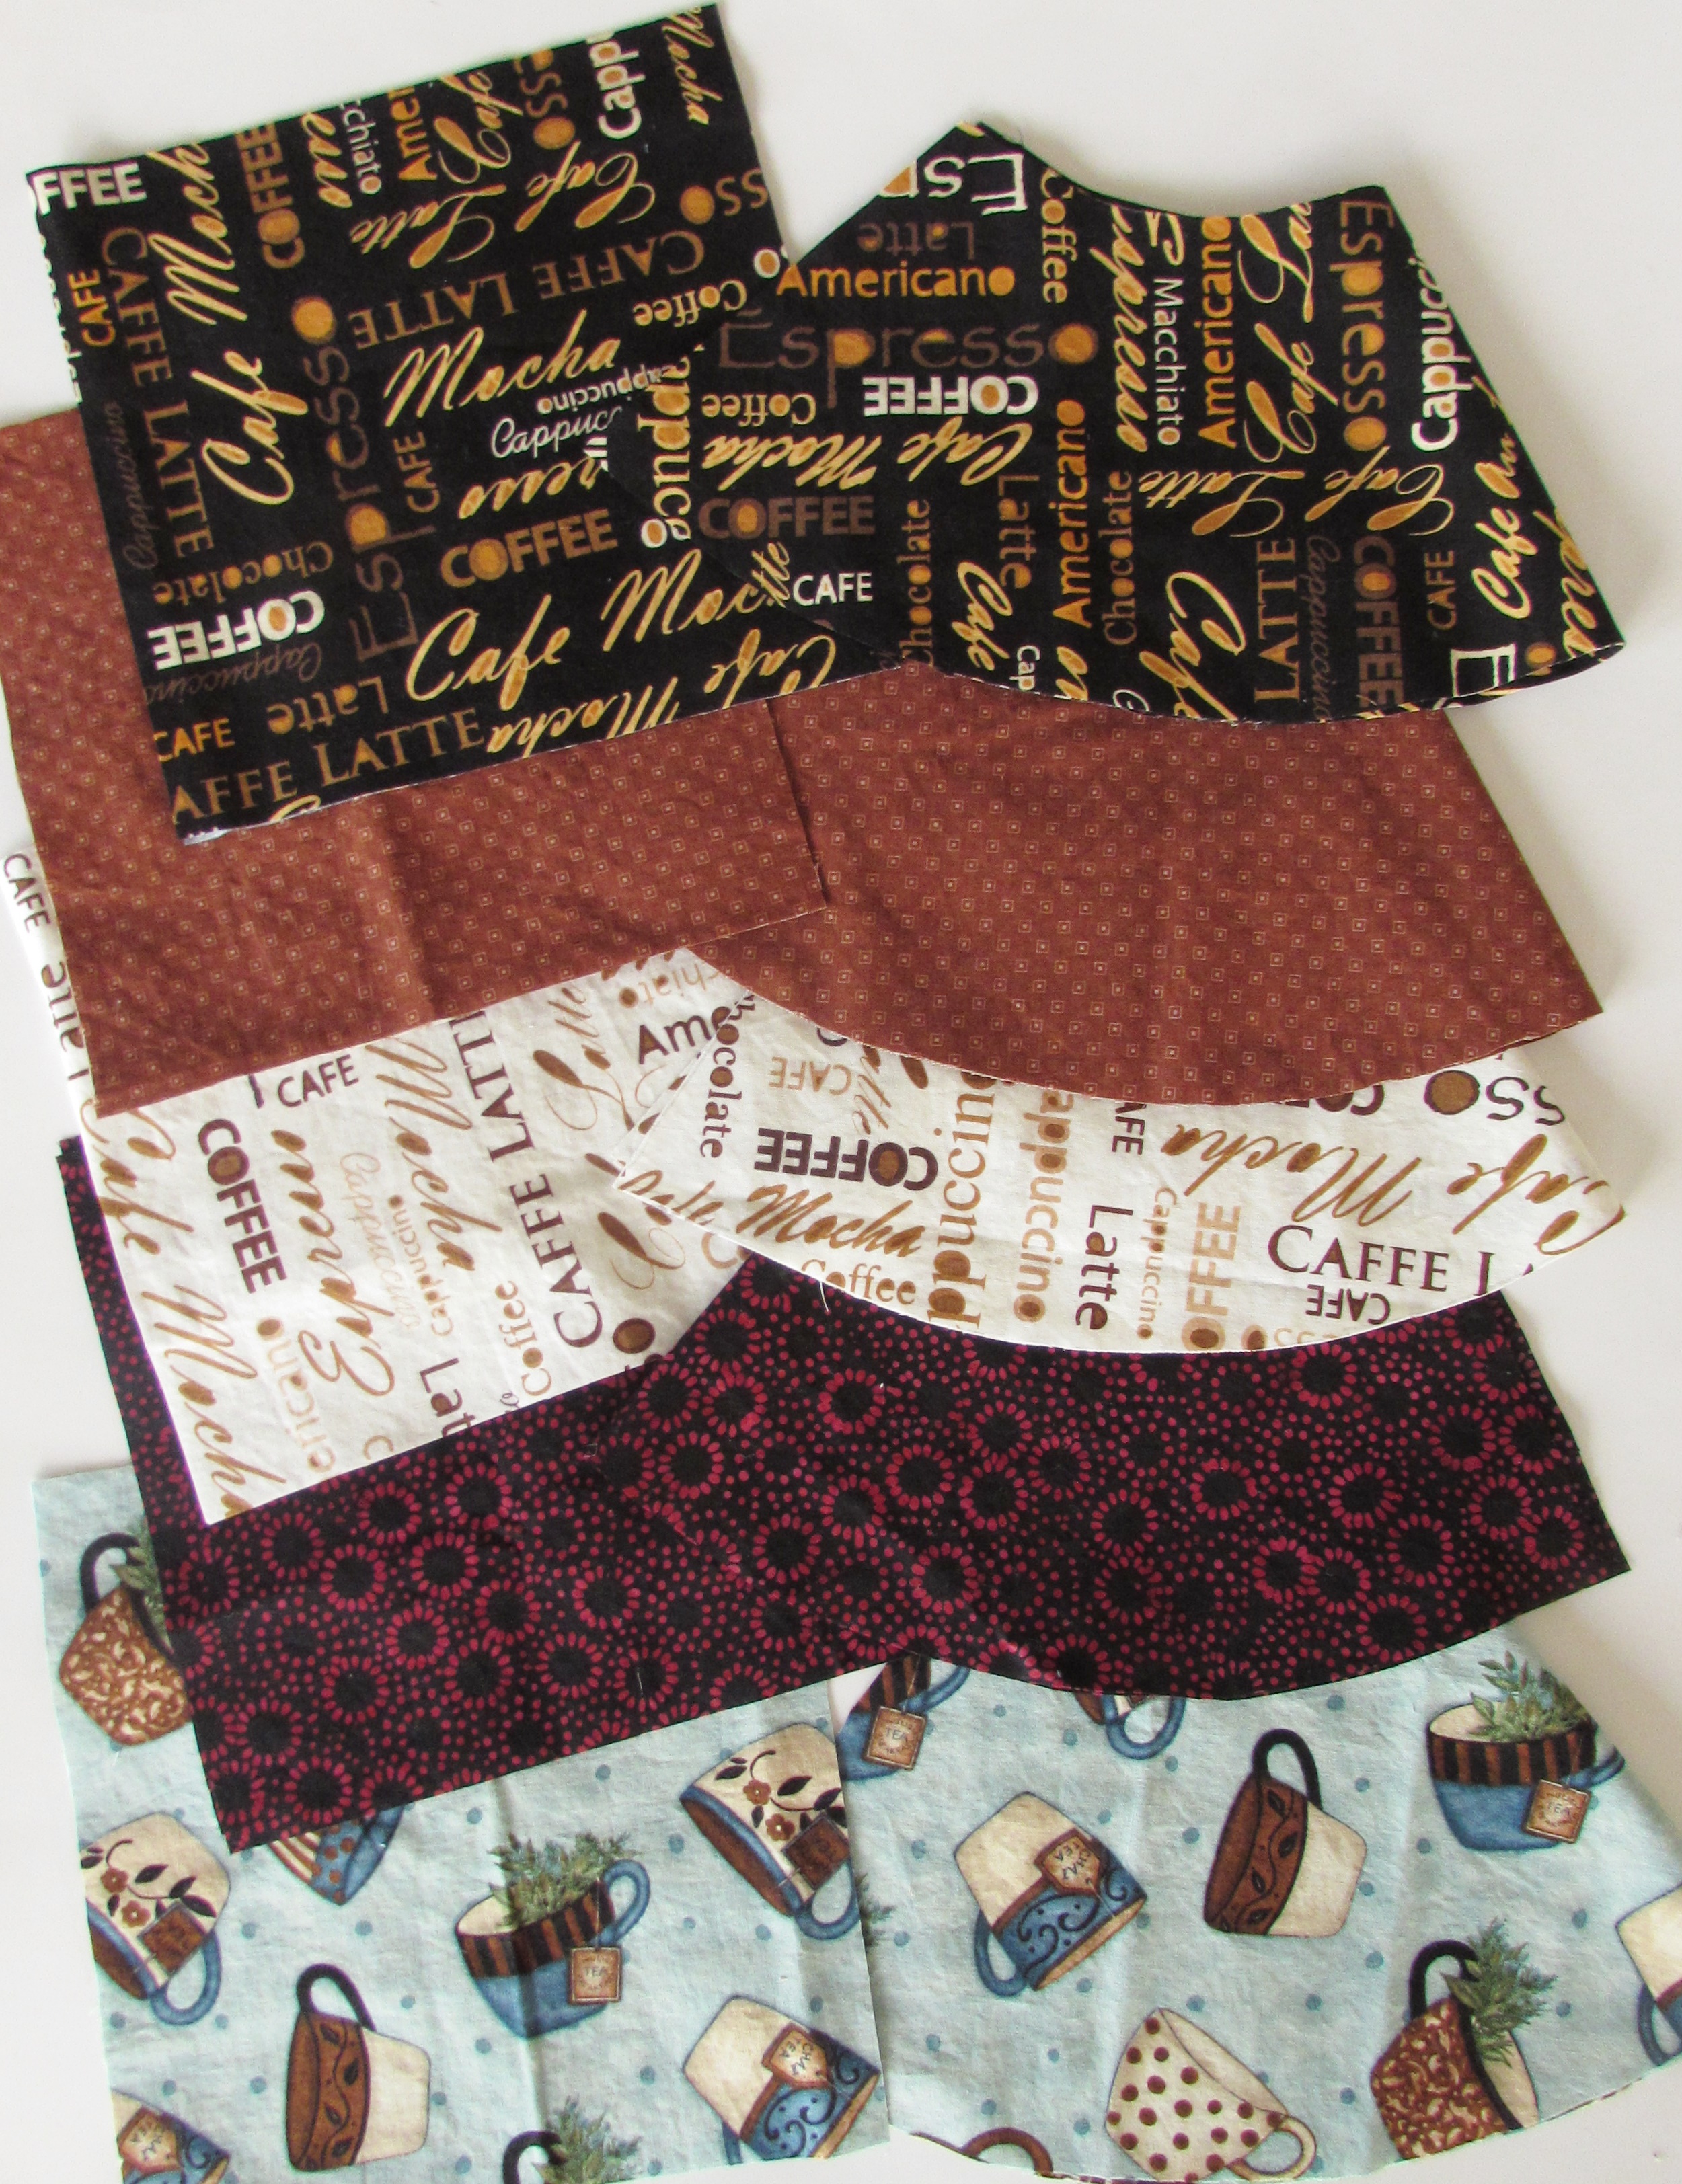
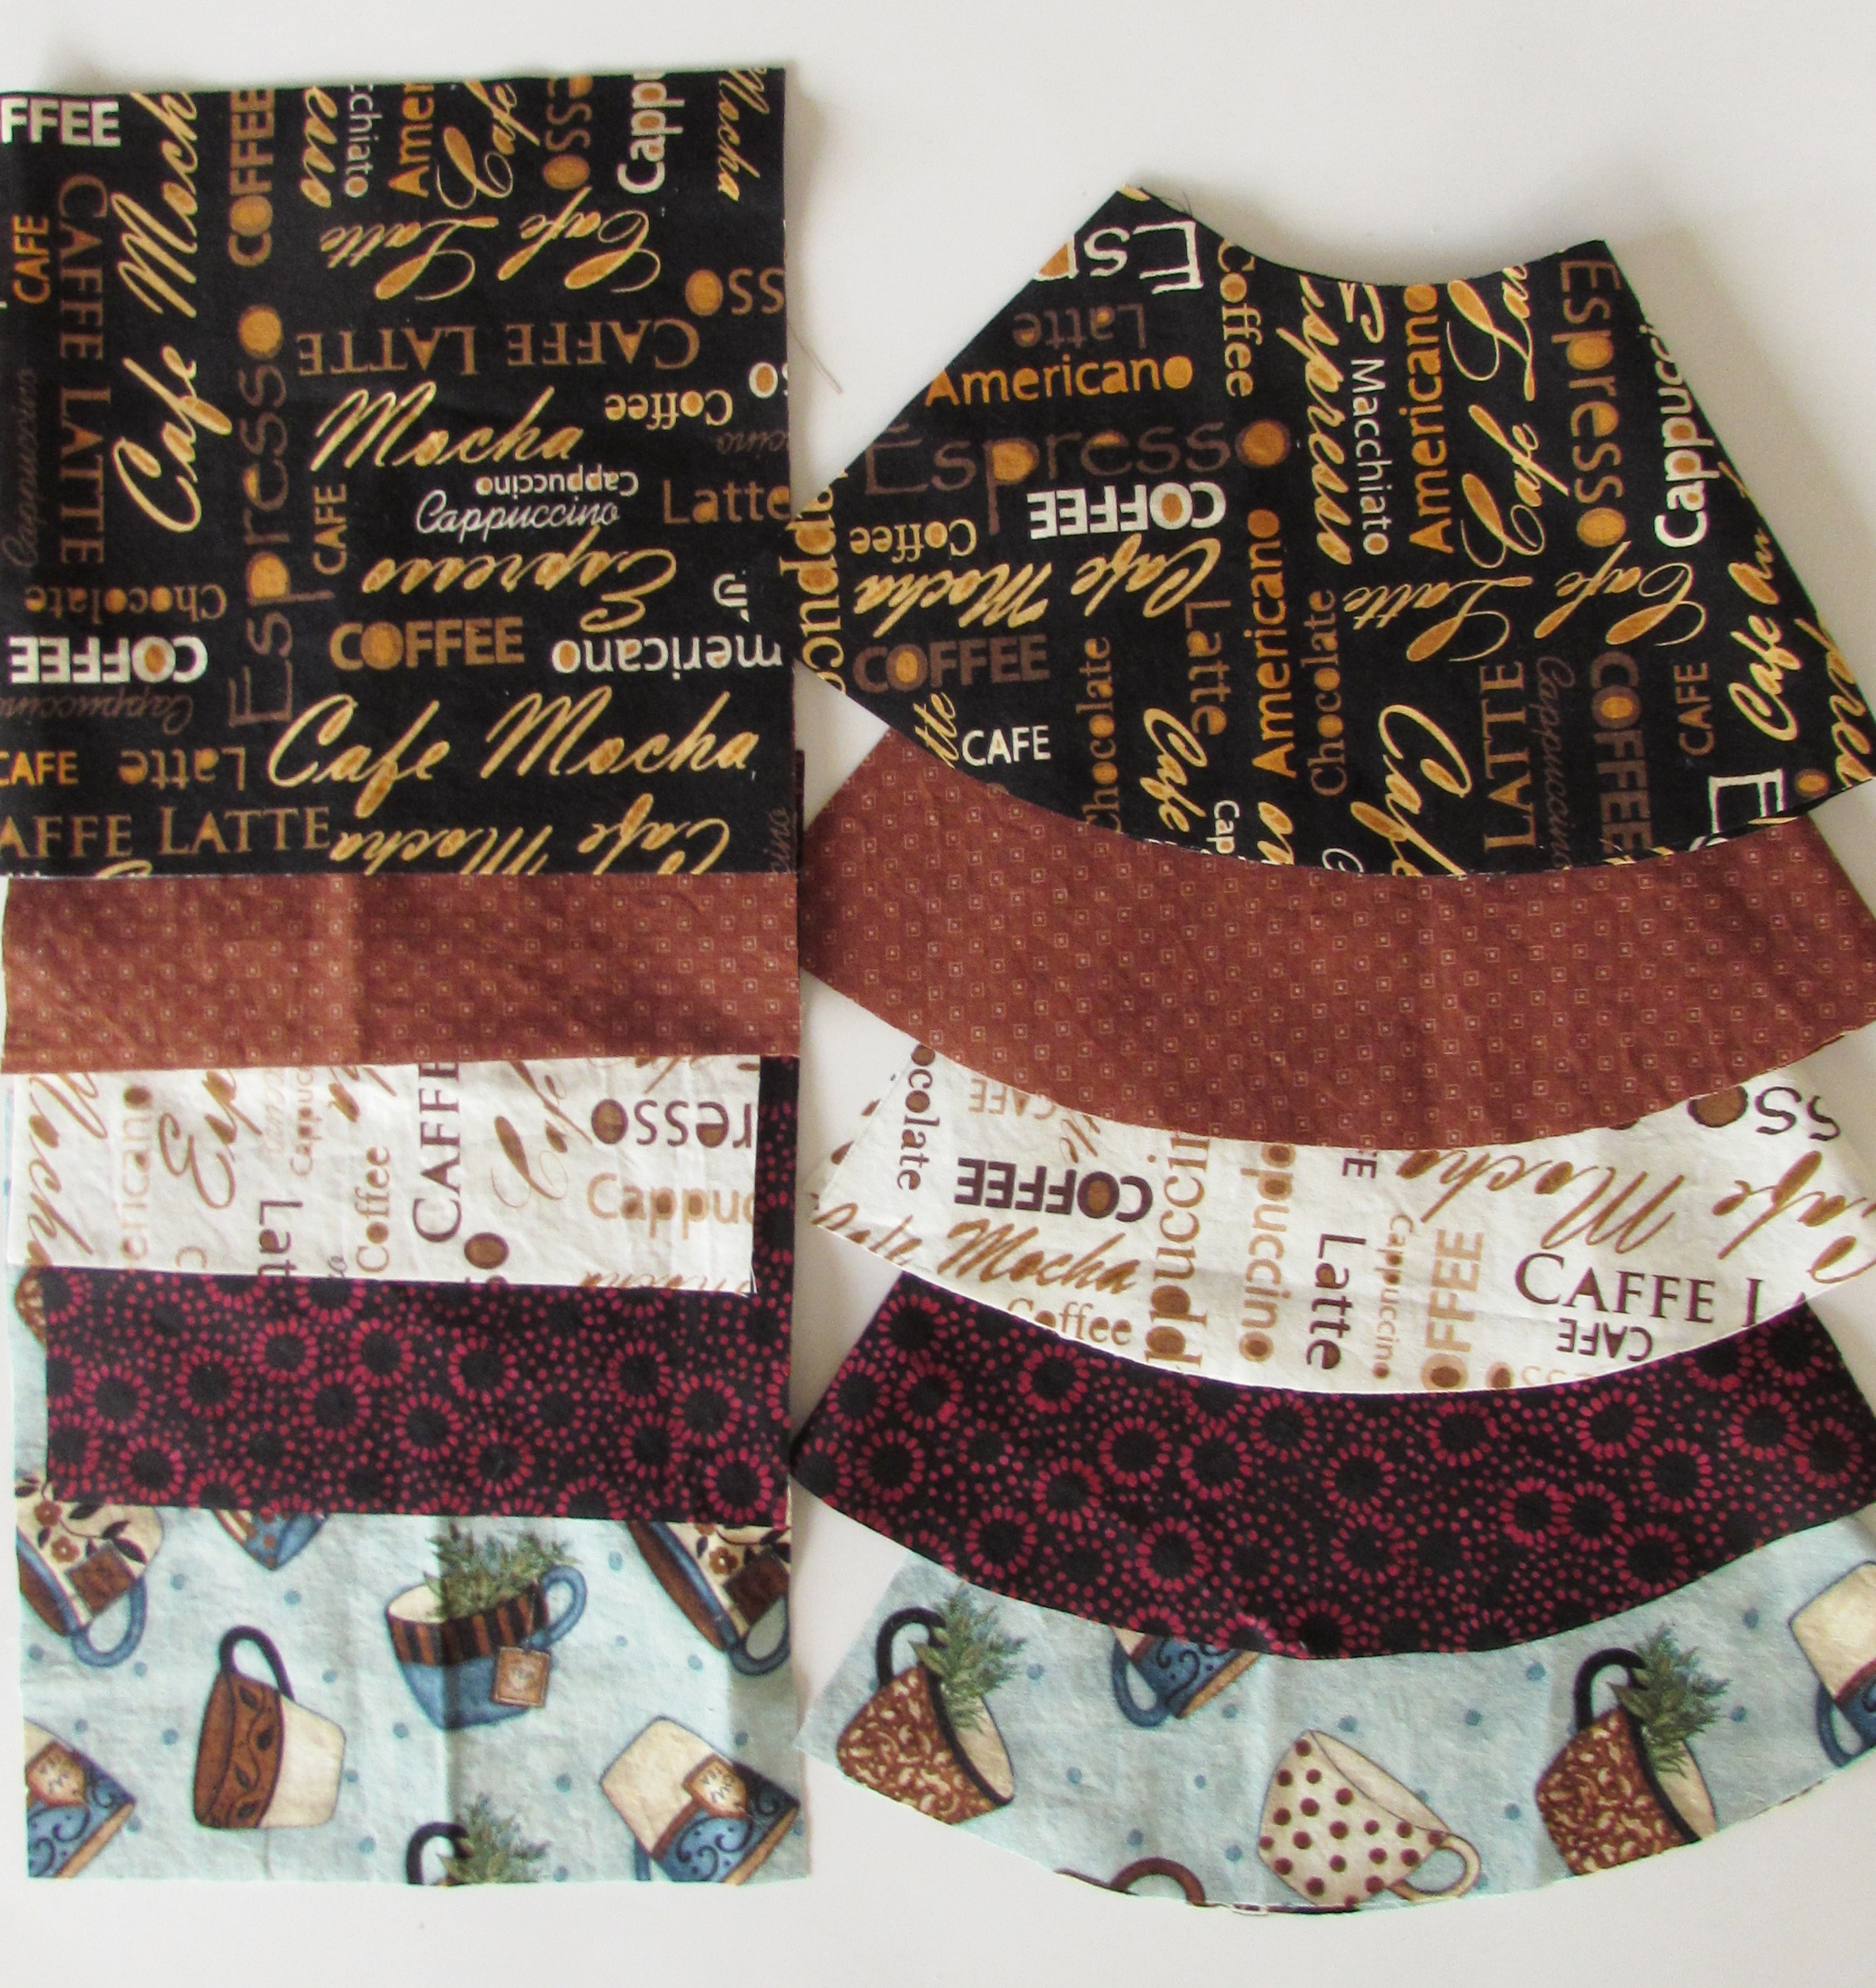
Now that we are approaching fall, I need to start getting my Etsy shop stocked for the holidays. The Chemex cozies that I make are definitely my best seller around Christmas which means I need to get busy. Yesterday I cut fabric for five covers.
Selecting the fabrics is fun but also a bit of a challenge. Looking back at what has sold well over the past two years, the favorites are definitely gray, blue, black, and red tones. Also, the two fabrics with the coffee theme text prints (in cream or black) are usually good sellers. These are the last two I could cut from that fabric so I need to purchase more of it.
I love to make a few with novelty fabric. I have done some with bicycles for coffee drinking cyclists and another one with Marvel comics on it which made someone very happy. Last Christmas I had a custom order for a cozy made with Star Wars fabric. I am debating making a few fun ones like this but choosing a theme is hard, kind of a guess as to what will sell – if you have any suggestions, please feel free. I truly love your input. For now, these will get me off to a good start.
Have a wonderful weekend everyone! Remember, I am hosting Handmade Halloween on October 4th!! Link up any blog posts, new or old, that are related to Halloween – costumes, decorations, quilts, even fun recipes. Let’s make it a fun round up of all things Halloween! I will tell you that I have had some really nice prizes offered in support of this party. Go write a post and come back and link it up. This will throw your name in the draw – maybe for a win! See you then.
Linking up today with the best of the best. See the top of the page, under Link Ups.
This is a good weekend to shop Craftsy! They have some great discounts on kits and supplies for their End of Summer Clearance. Take a look. This sale runs through Sunday night, 9/18/16.
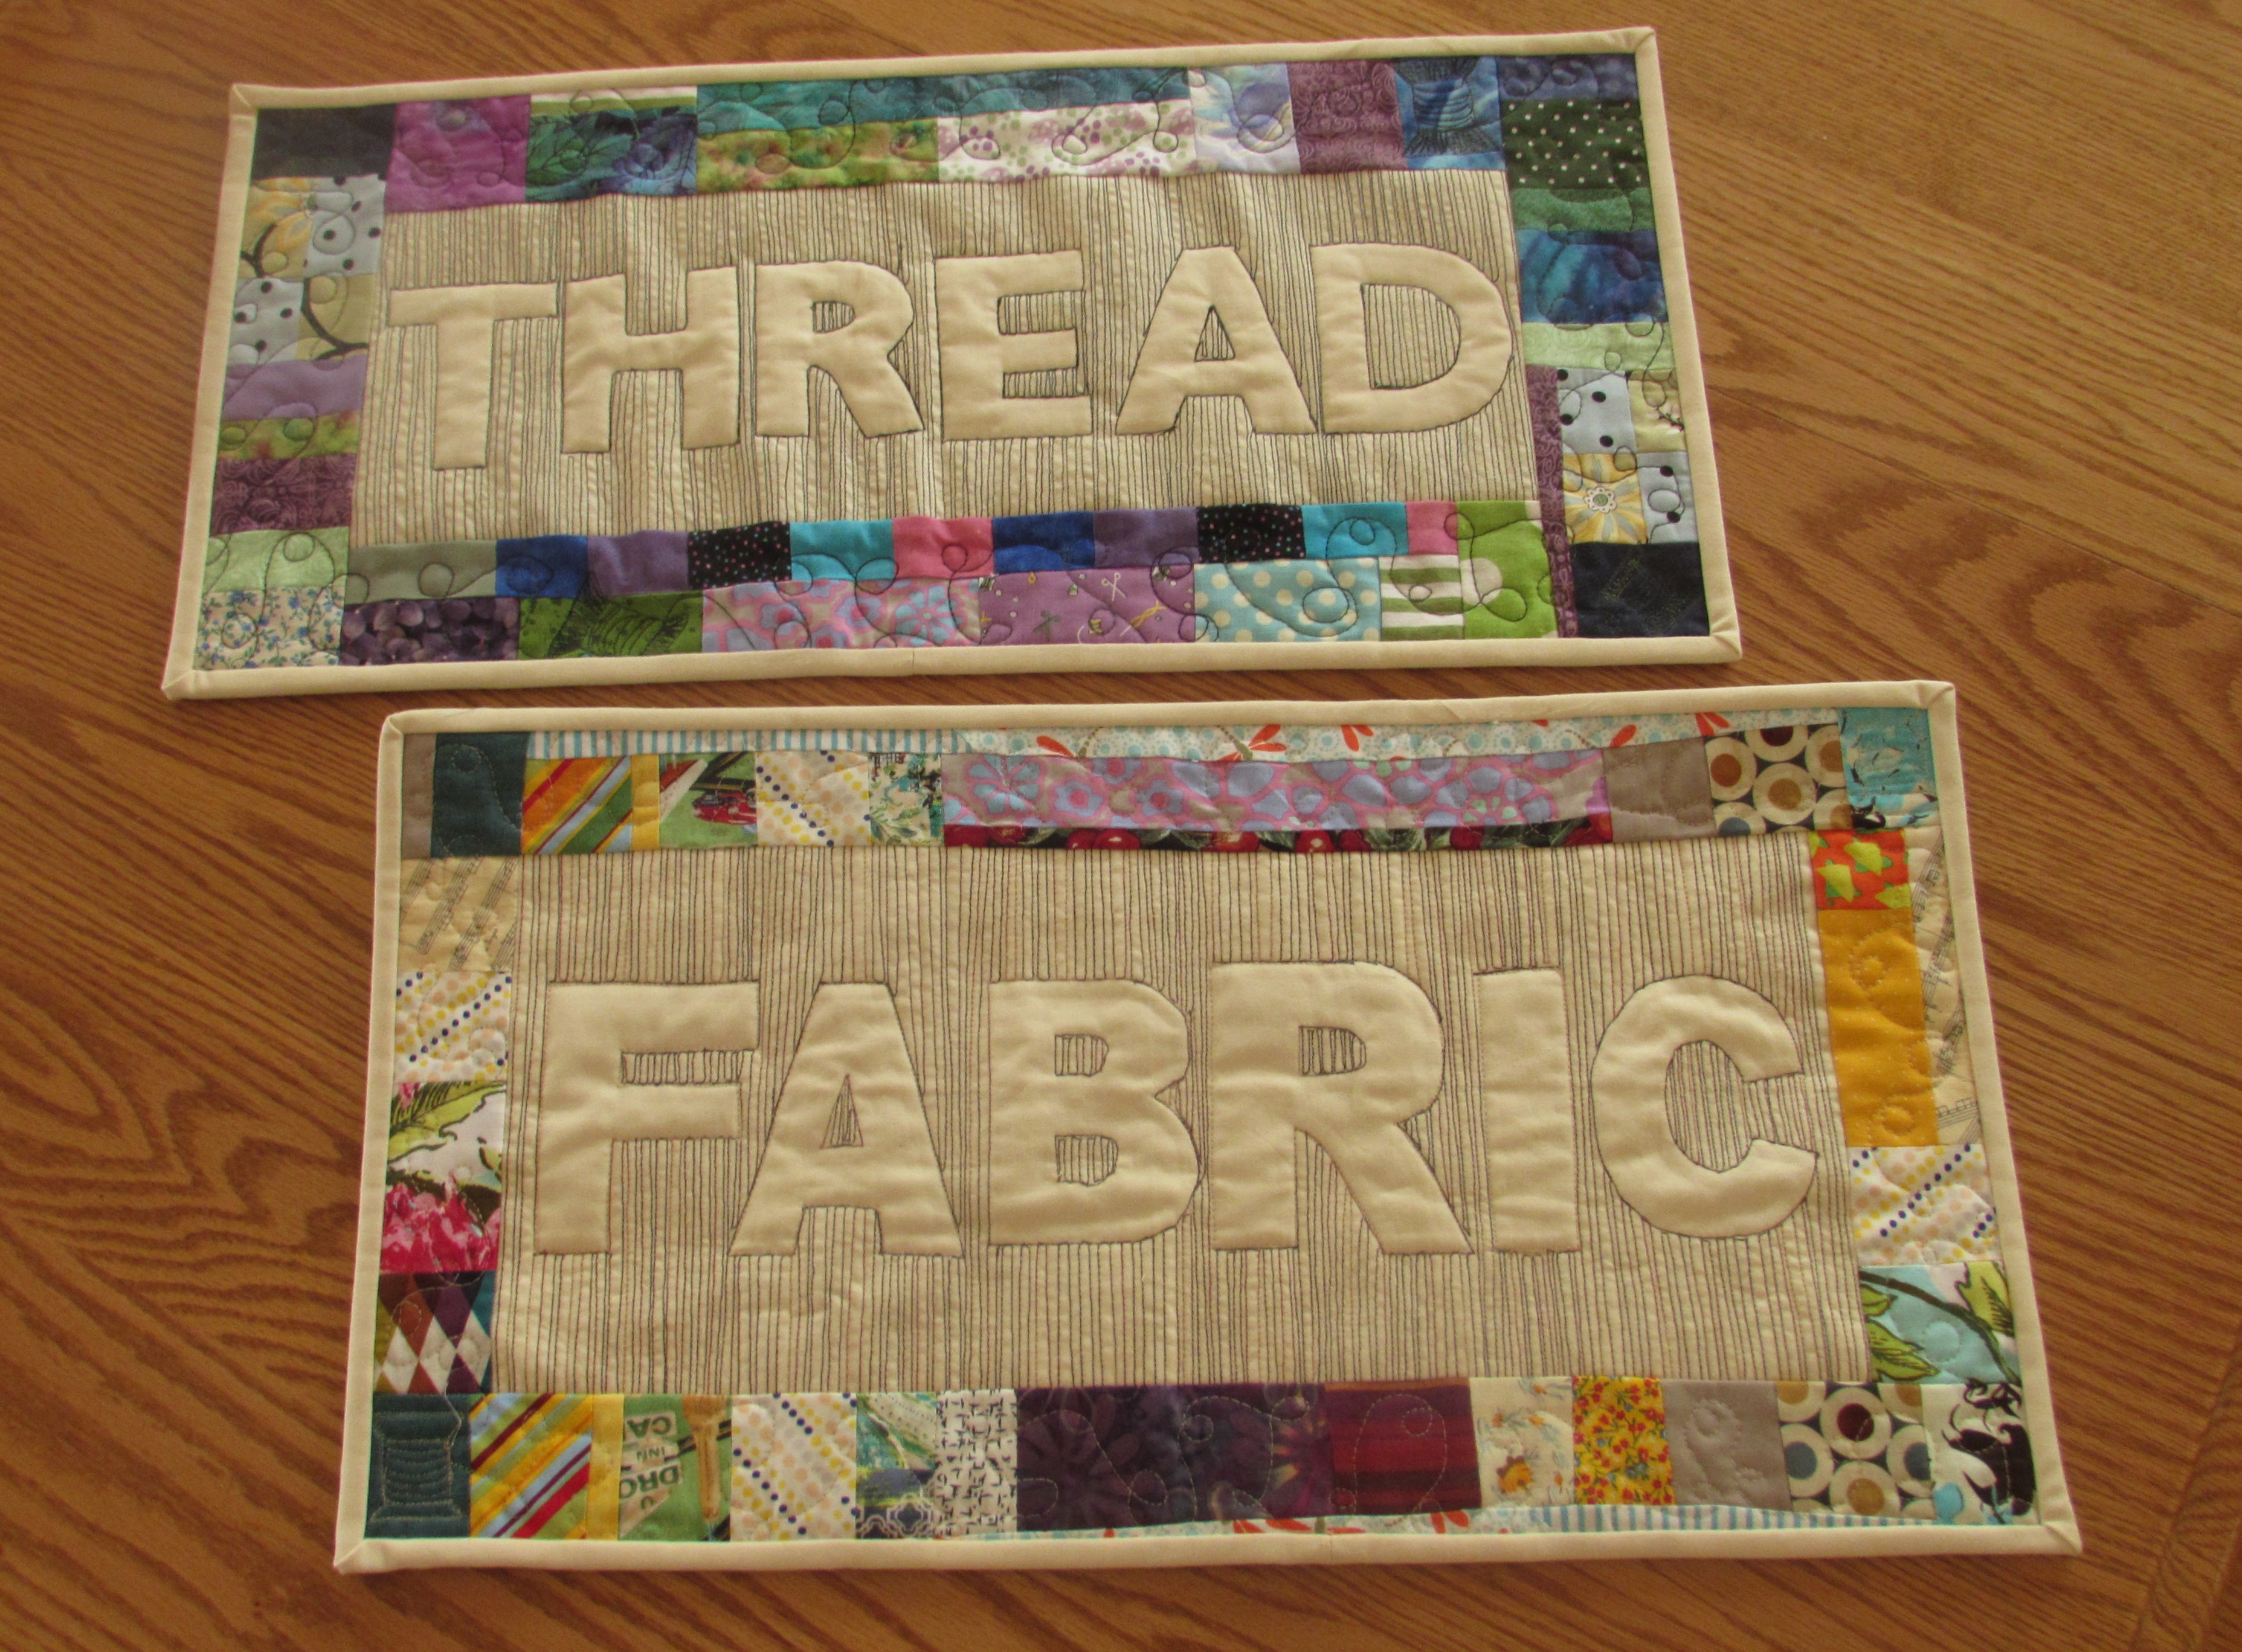
I really enjoyed playing with relief quilting when I made my FABRIC mini quilt a couple of weeks ago. So much so that I decided to make another one! I took plenty of pictures while making it so I could post a tutorial. I hope you will give it a try. The effect is wonderful and it is such an easy process.
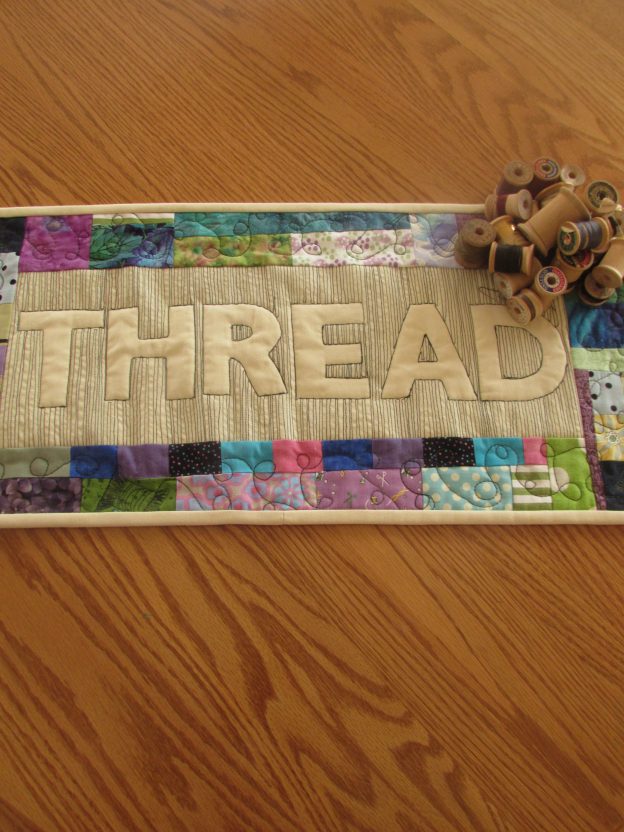
This time I wanted to try stitching the word on a piece of fabric with fusible stabilizer and then building the quilt from there. It worked out wonderfully. Since I already had one mini that said FABRIC, I decided to make another that said THREAD. This idea was inspired by a comment left on the first post by Diana, of A Red Delicious Life. She mentioned wanting to make one to hang above her thread. I decided to do the same. Now I have one to hang above the closet where I store fabric and another to hang above the thread collection hanging on the wall in my sewing room. Thanks Diana!!
Let’s get started.
I am going to provide the sizes that I used but this is so flexible. Increase or decrease as you like. My quilt finished at 11″ x 23″ so if you want a different size, adjust accordingly.
Materials List:
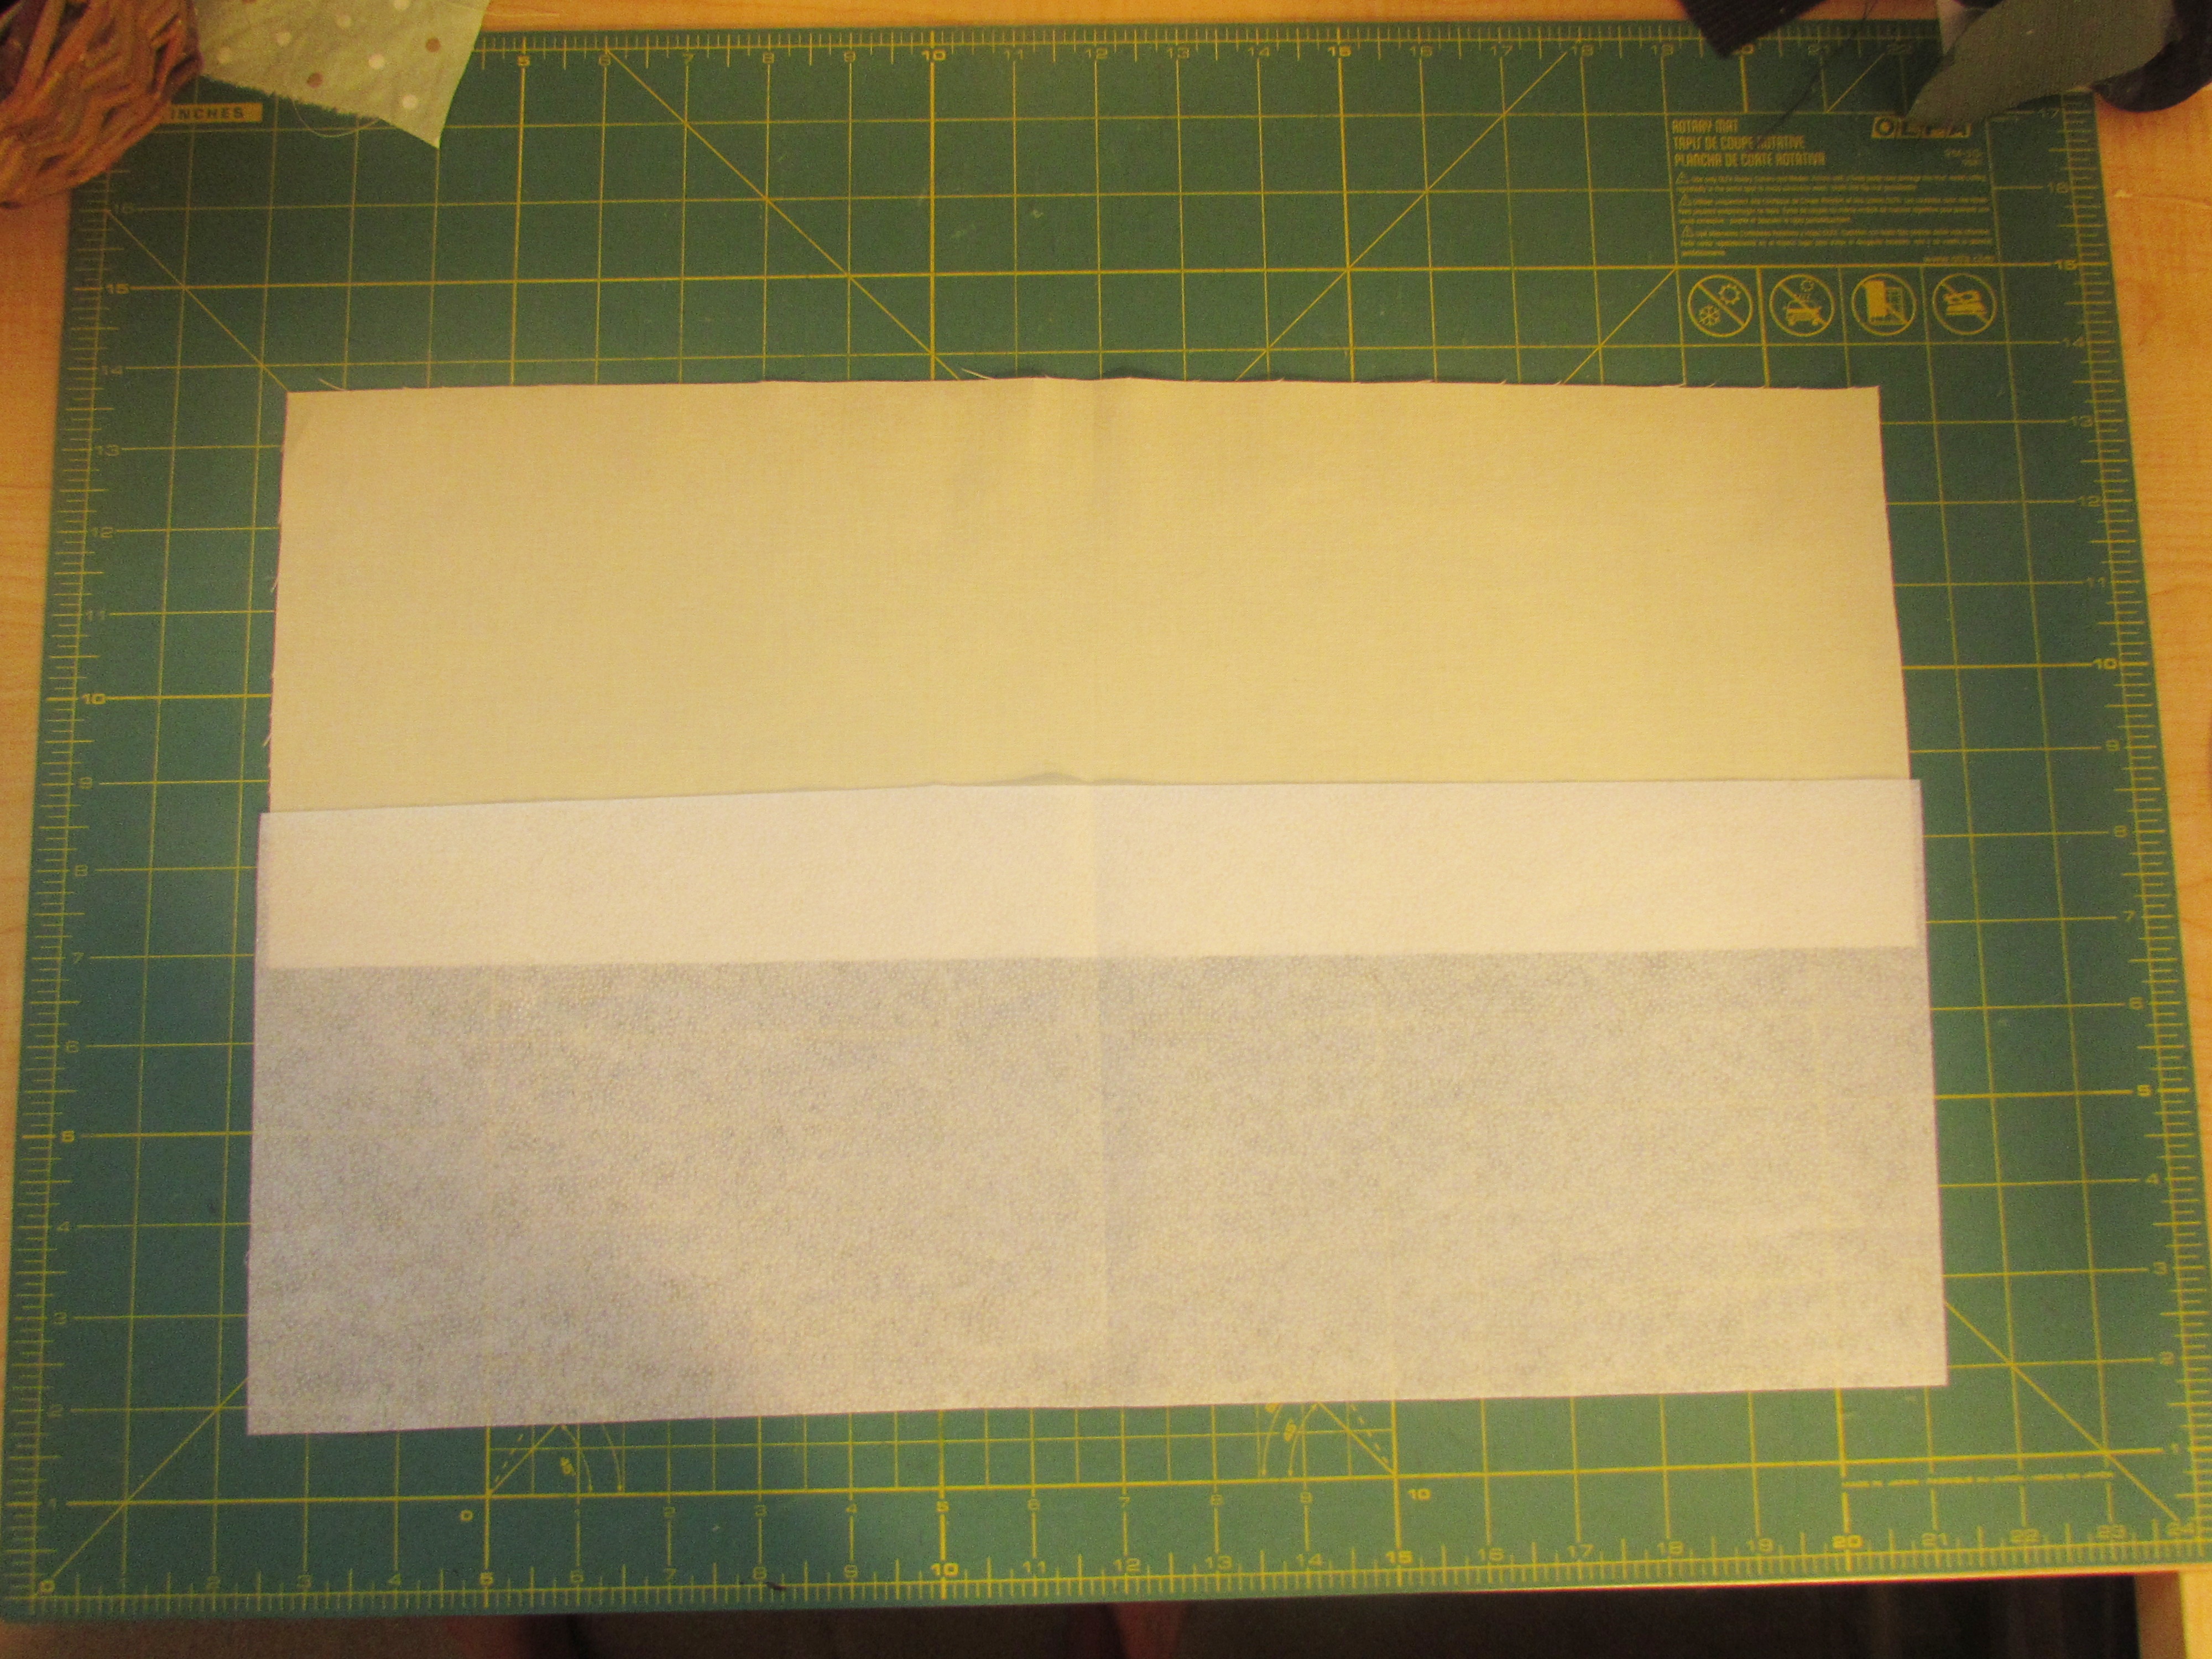
Background Fabric: one rectangle measuring 7″ x 19″
Heavyweight fusible interfacting: one rectangle measuring 7″ x 19″
Scraps for your border
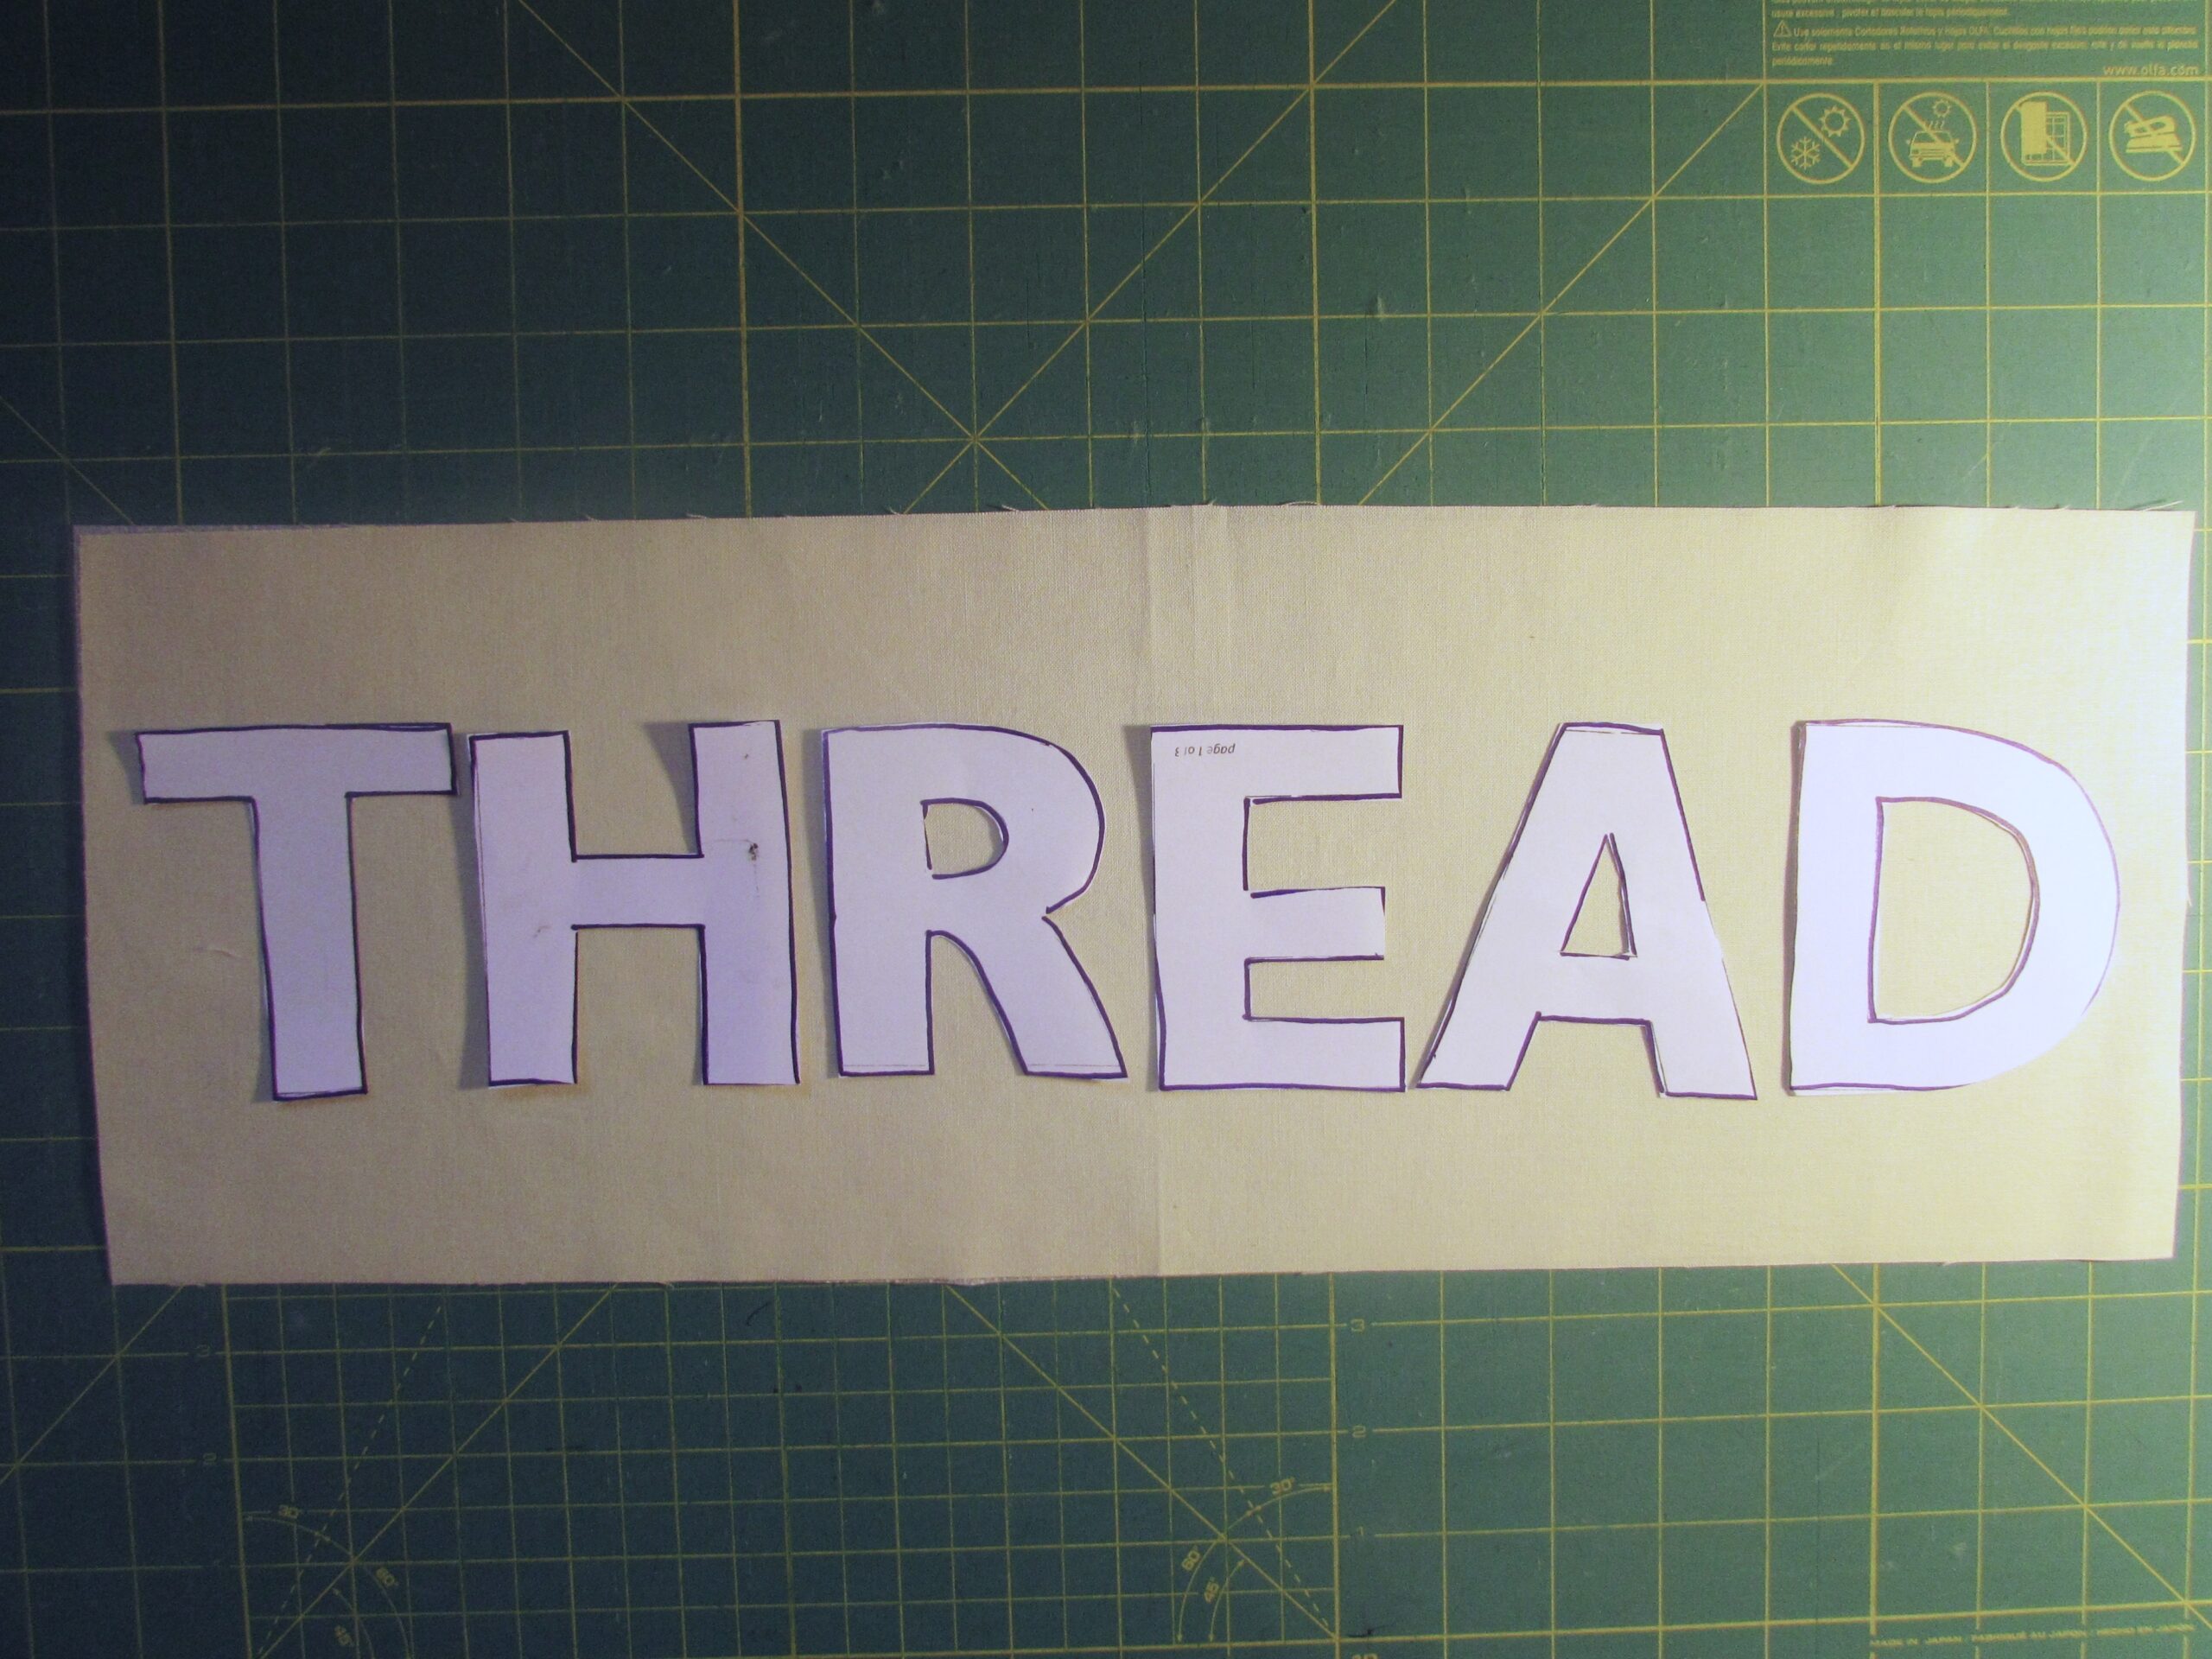
Stencils for tracing the word THREAD. I used letters that were 3″ high.
Frixion pen or similar fabric marking pen
Binding fabric: Two strips that are 2 1/2″ by 42″ (Width of fabric)
Quilting thread. I used YLI thread in a variegated green and loved it!
Take your background fabric and fuse the stabilizer to the wrong side of the fabric. Follow manufacturer’s instructions if you are not familiar with this process.
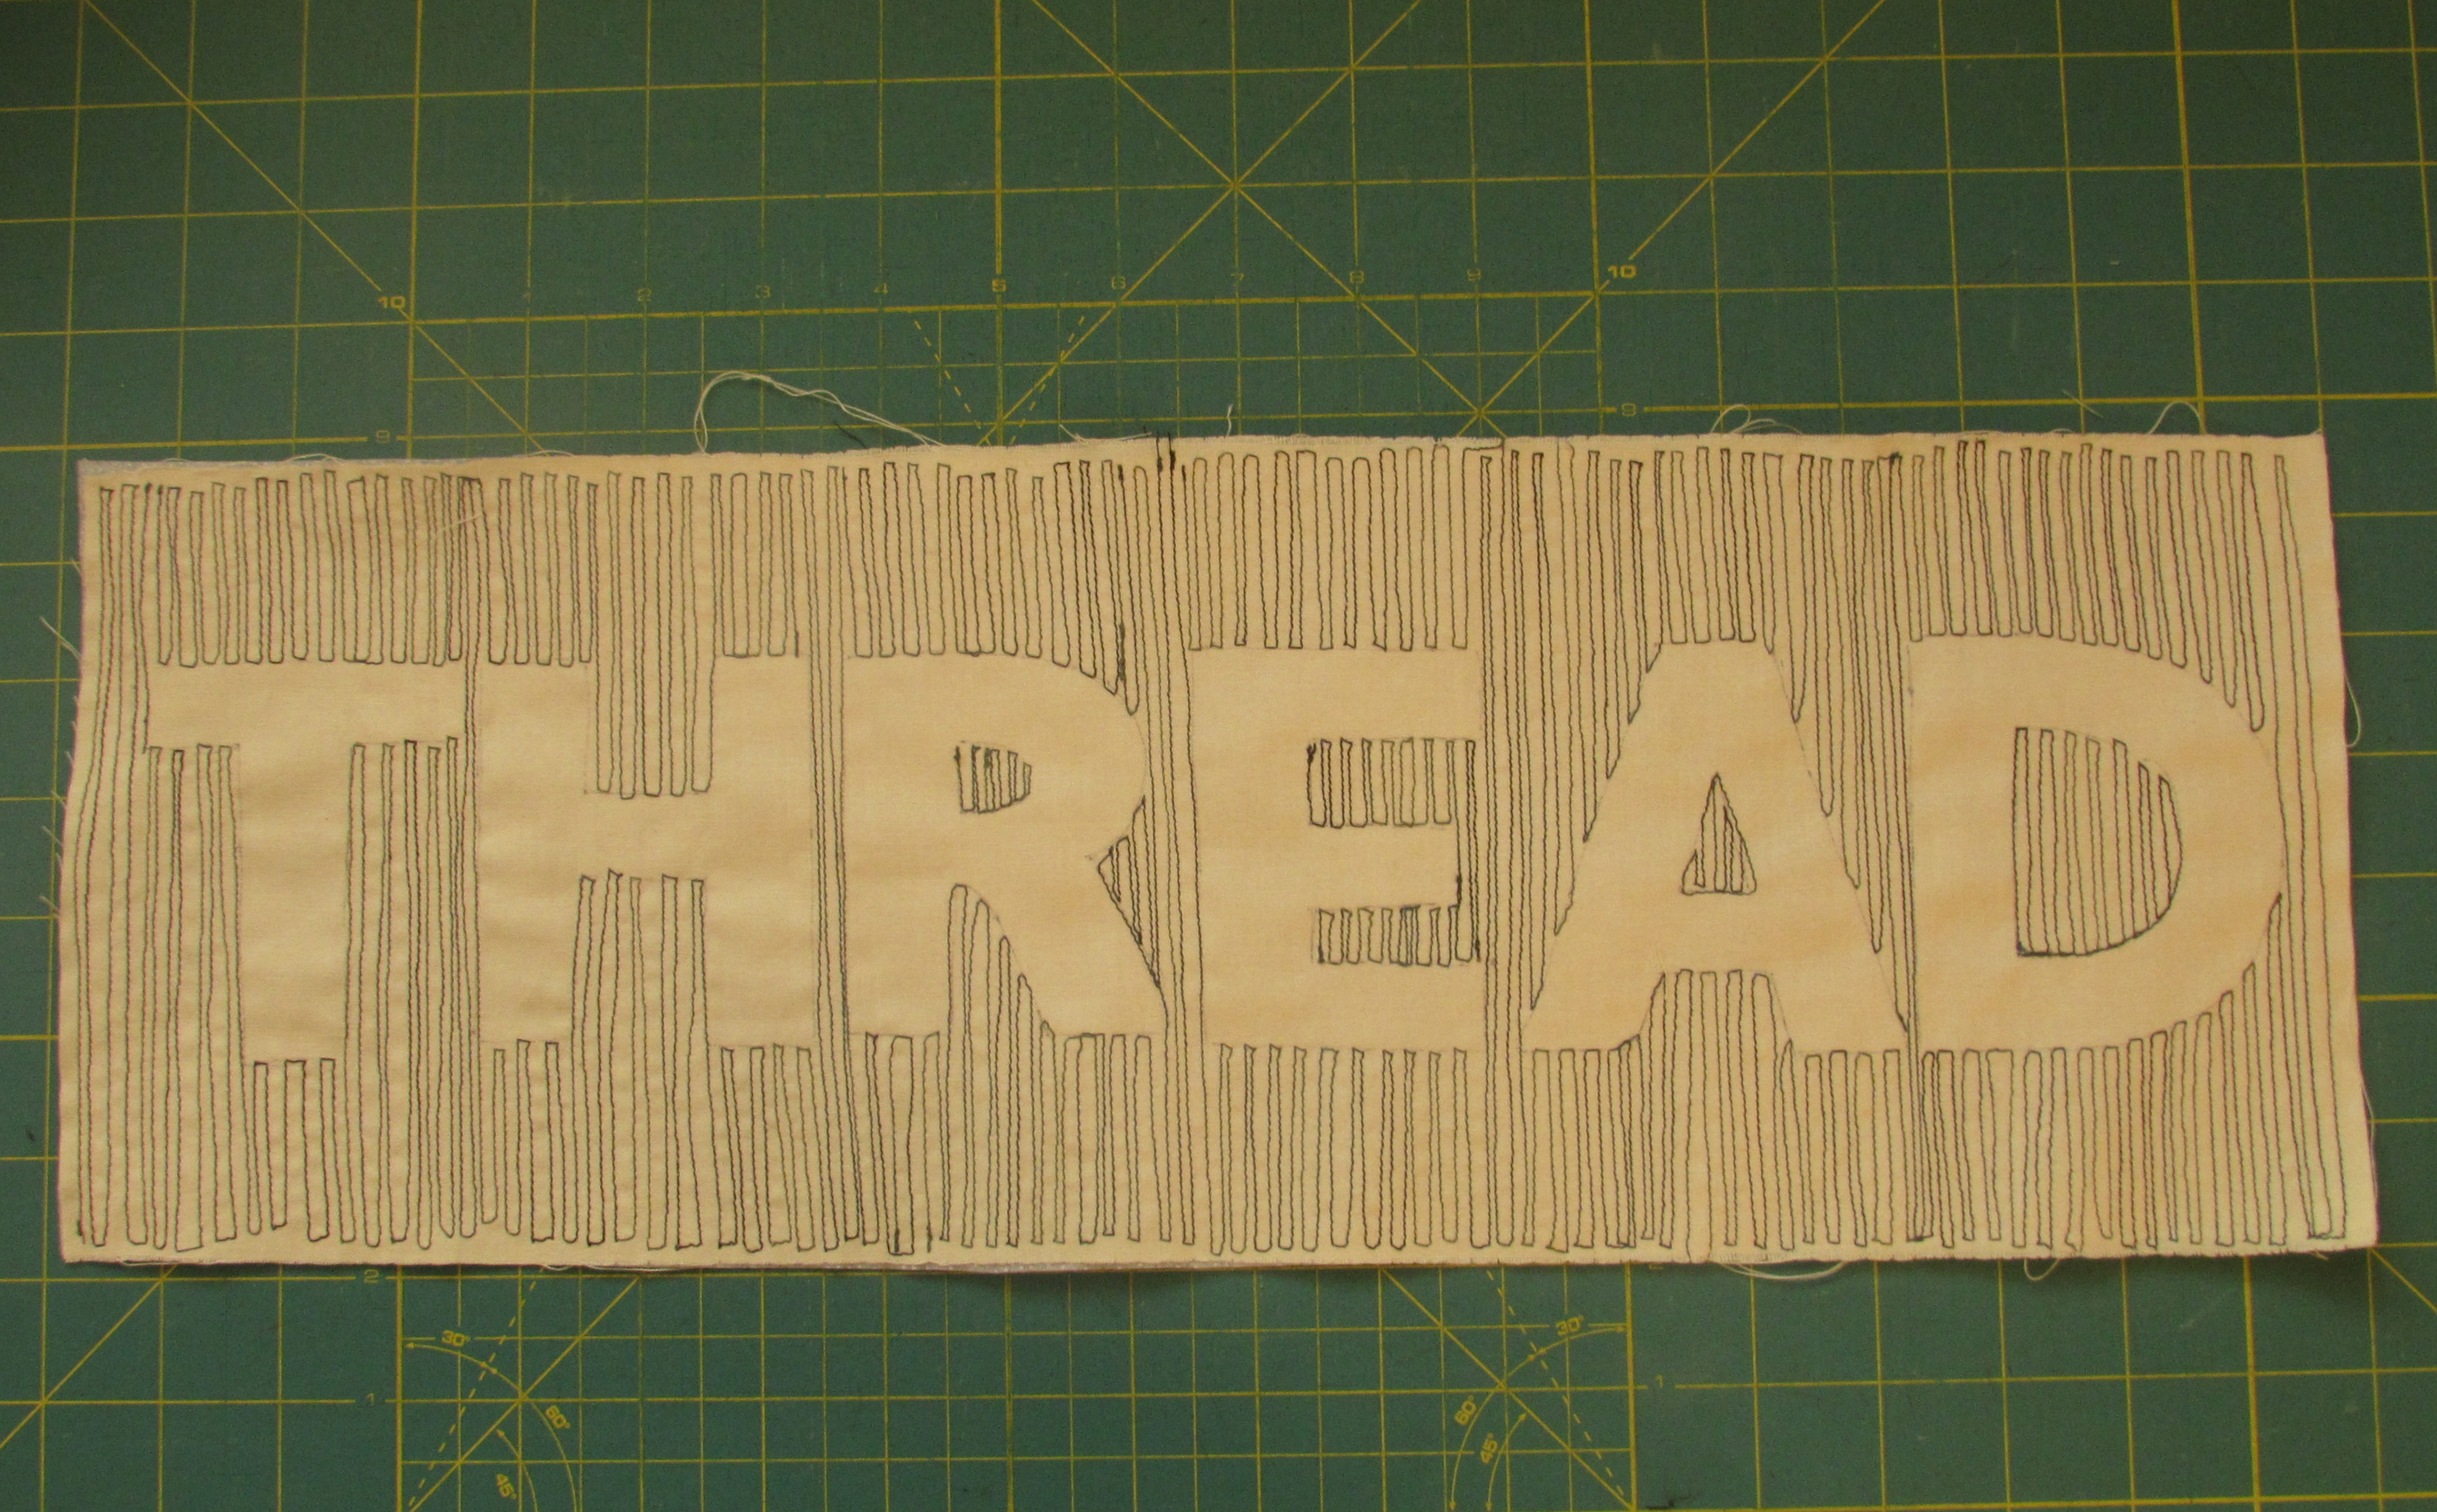
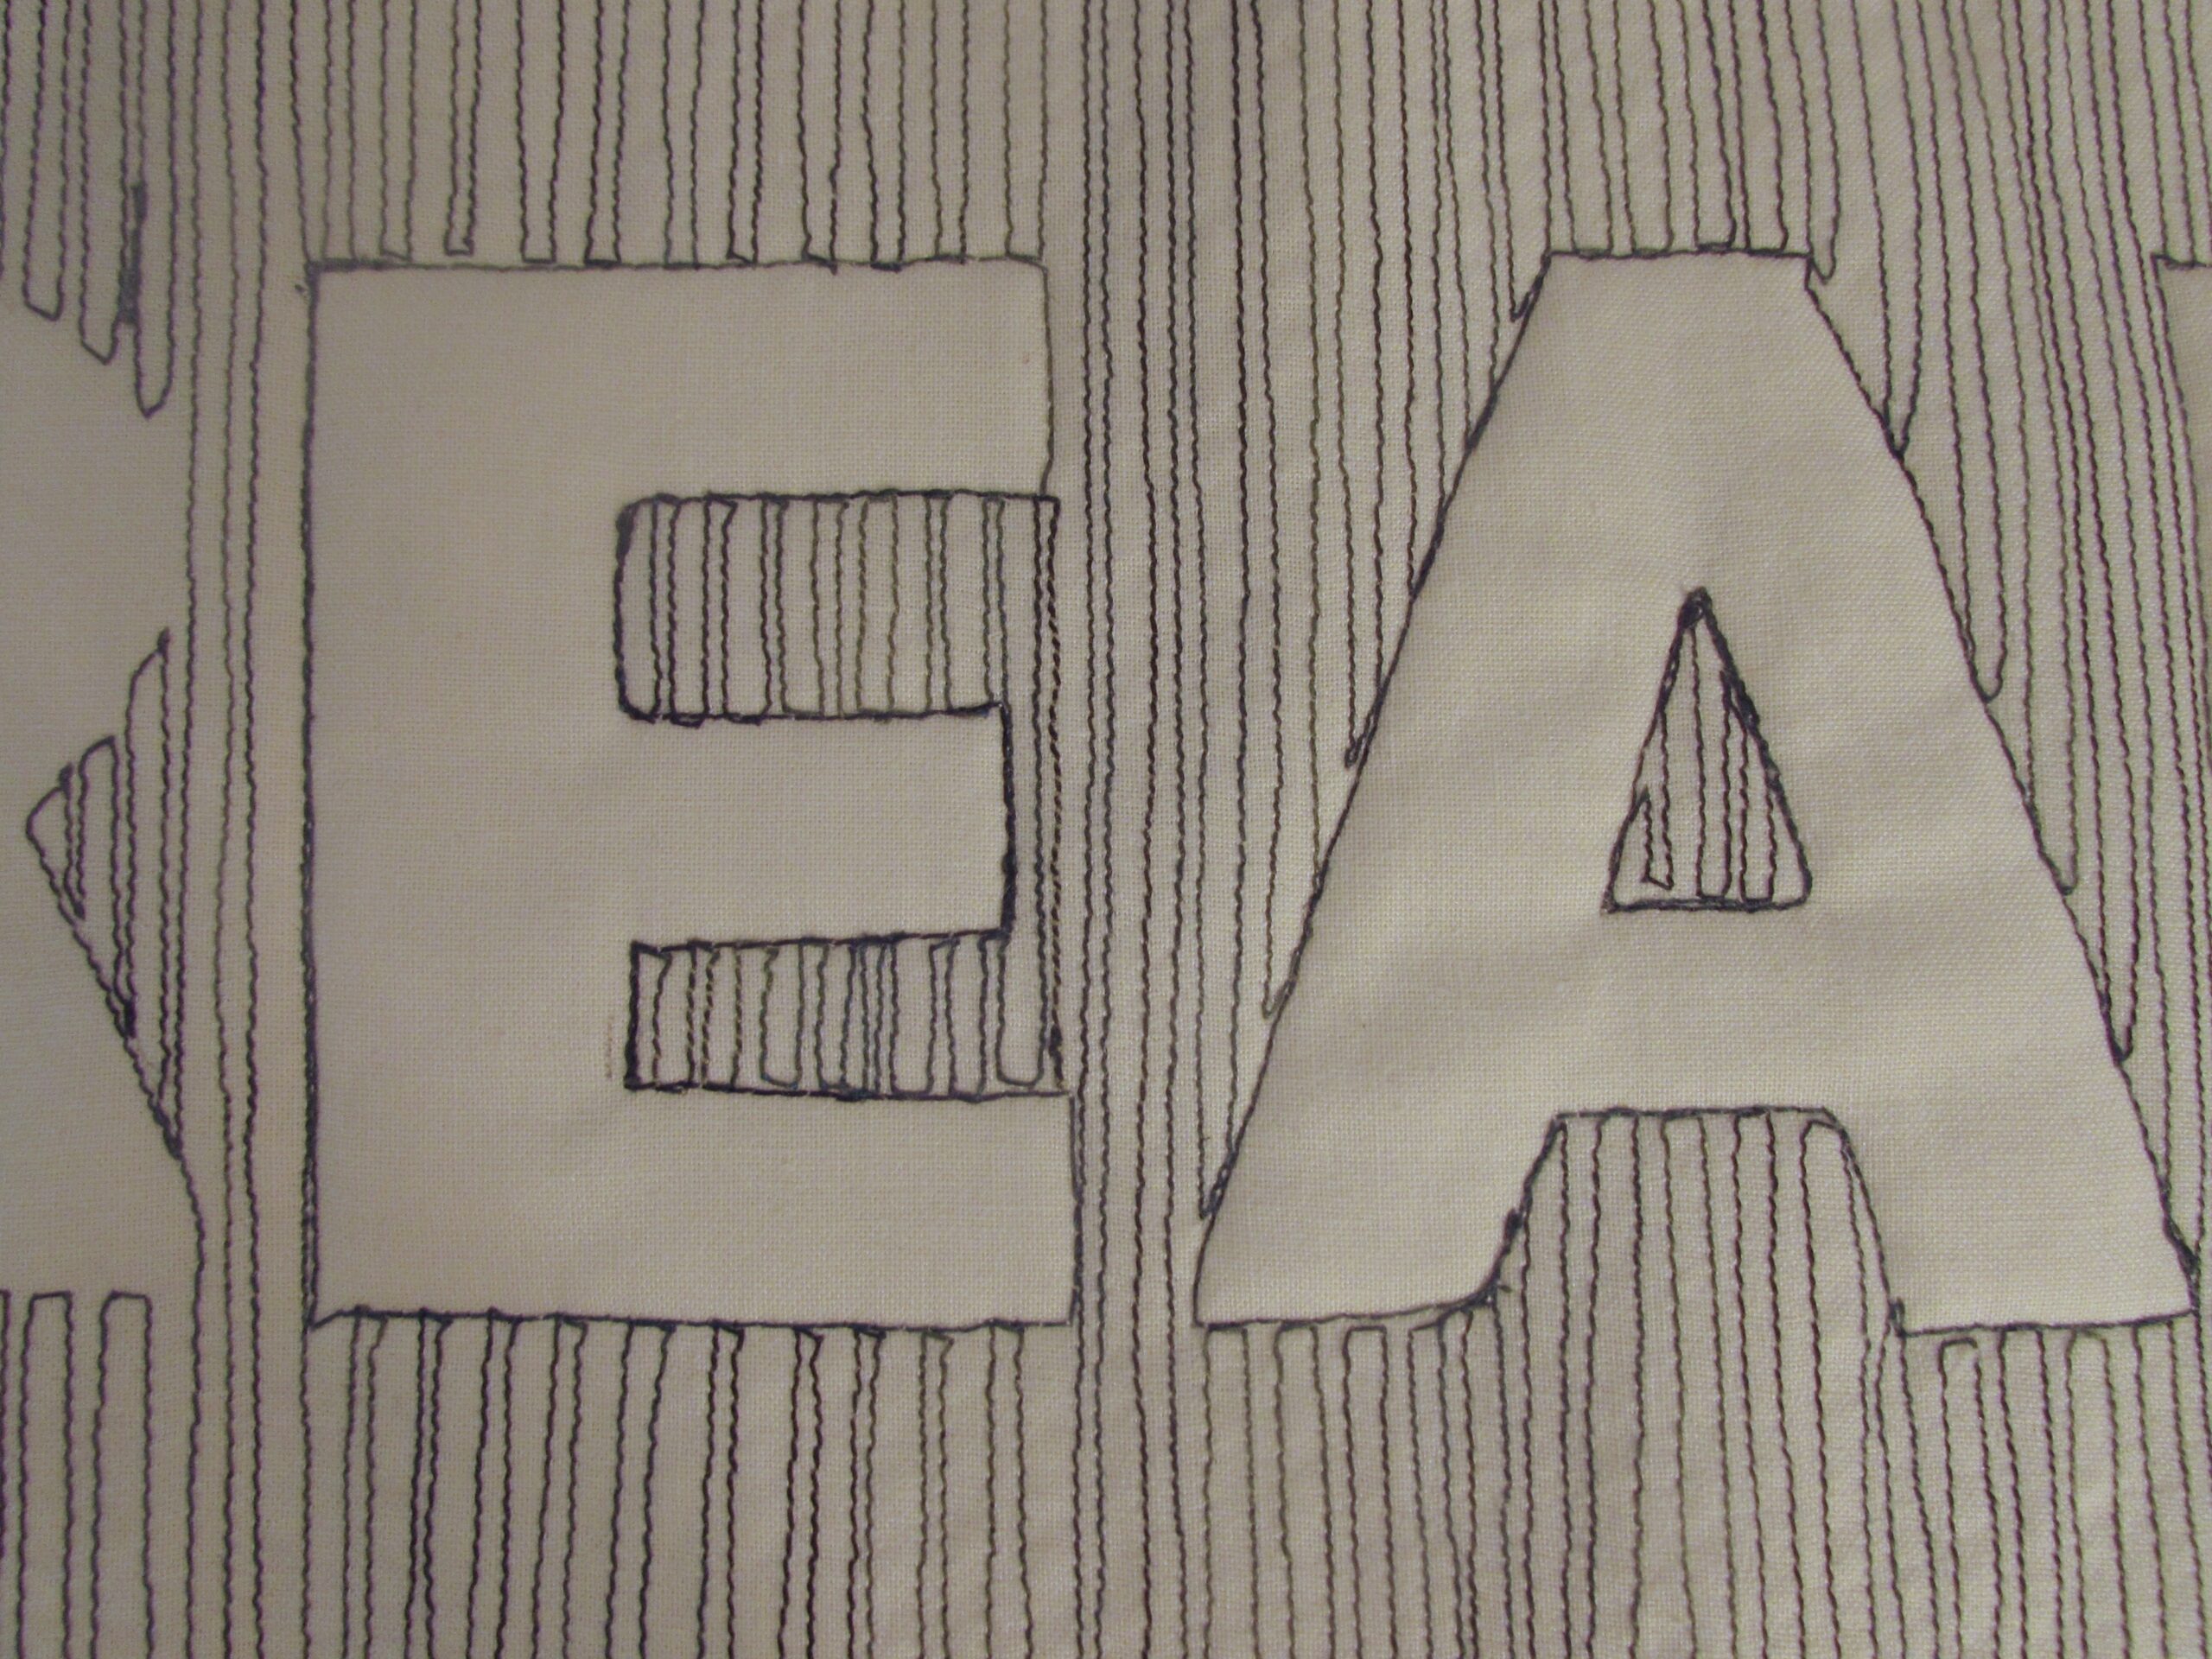
Trace the word on the fabric with the fabric safe marking pen of your choice. I didn’t leave very much room between the letters because I liked the way this looked. You could certainly adjust this to your taste. Also, I didn’t leave a ton of room on either side. Again, adjust as needed by cutting your background wider if you like.
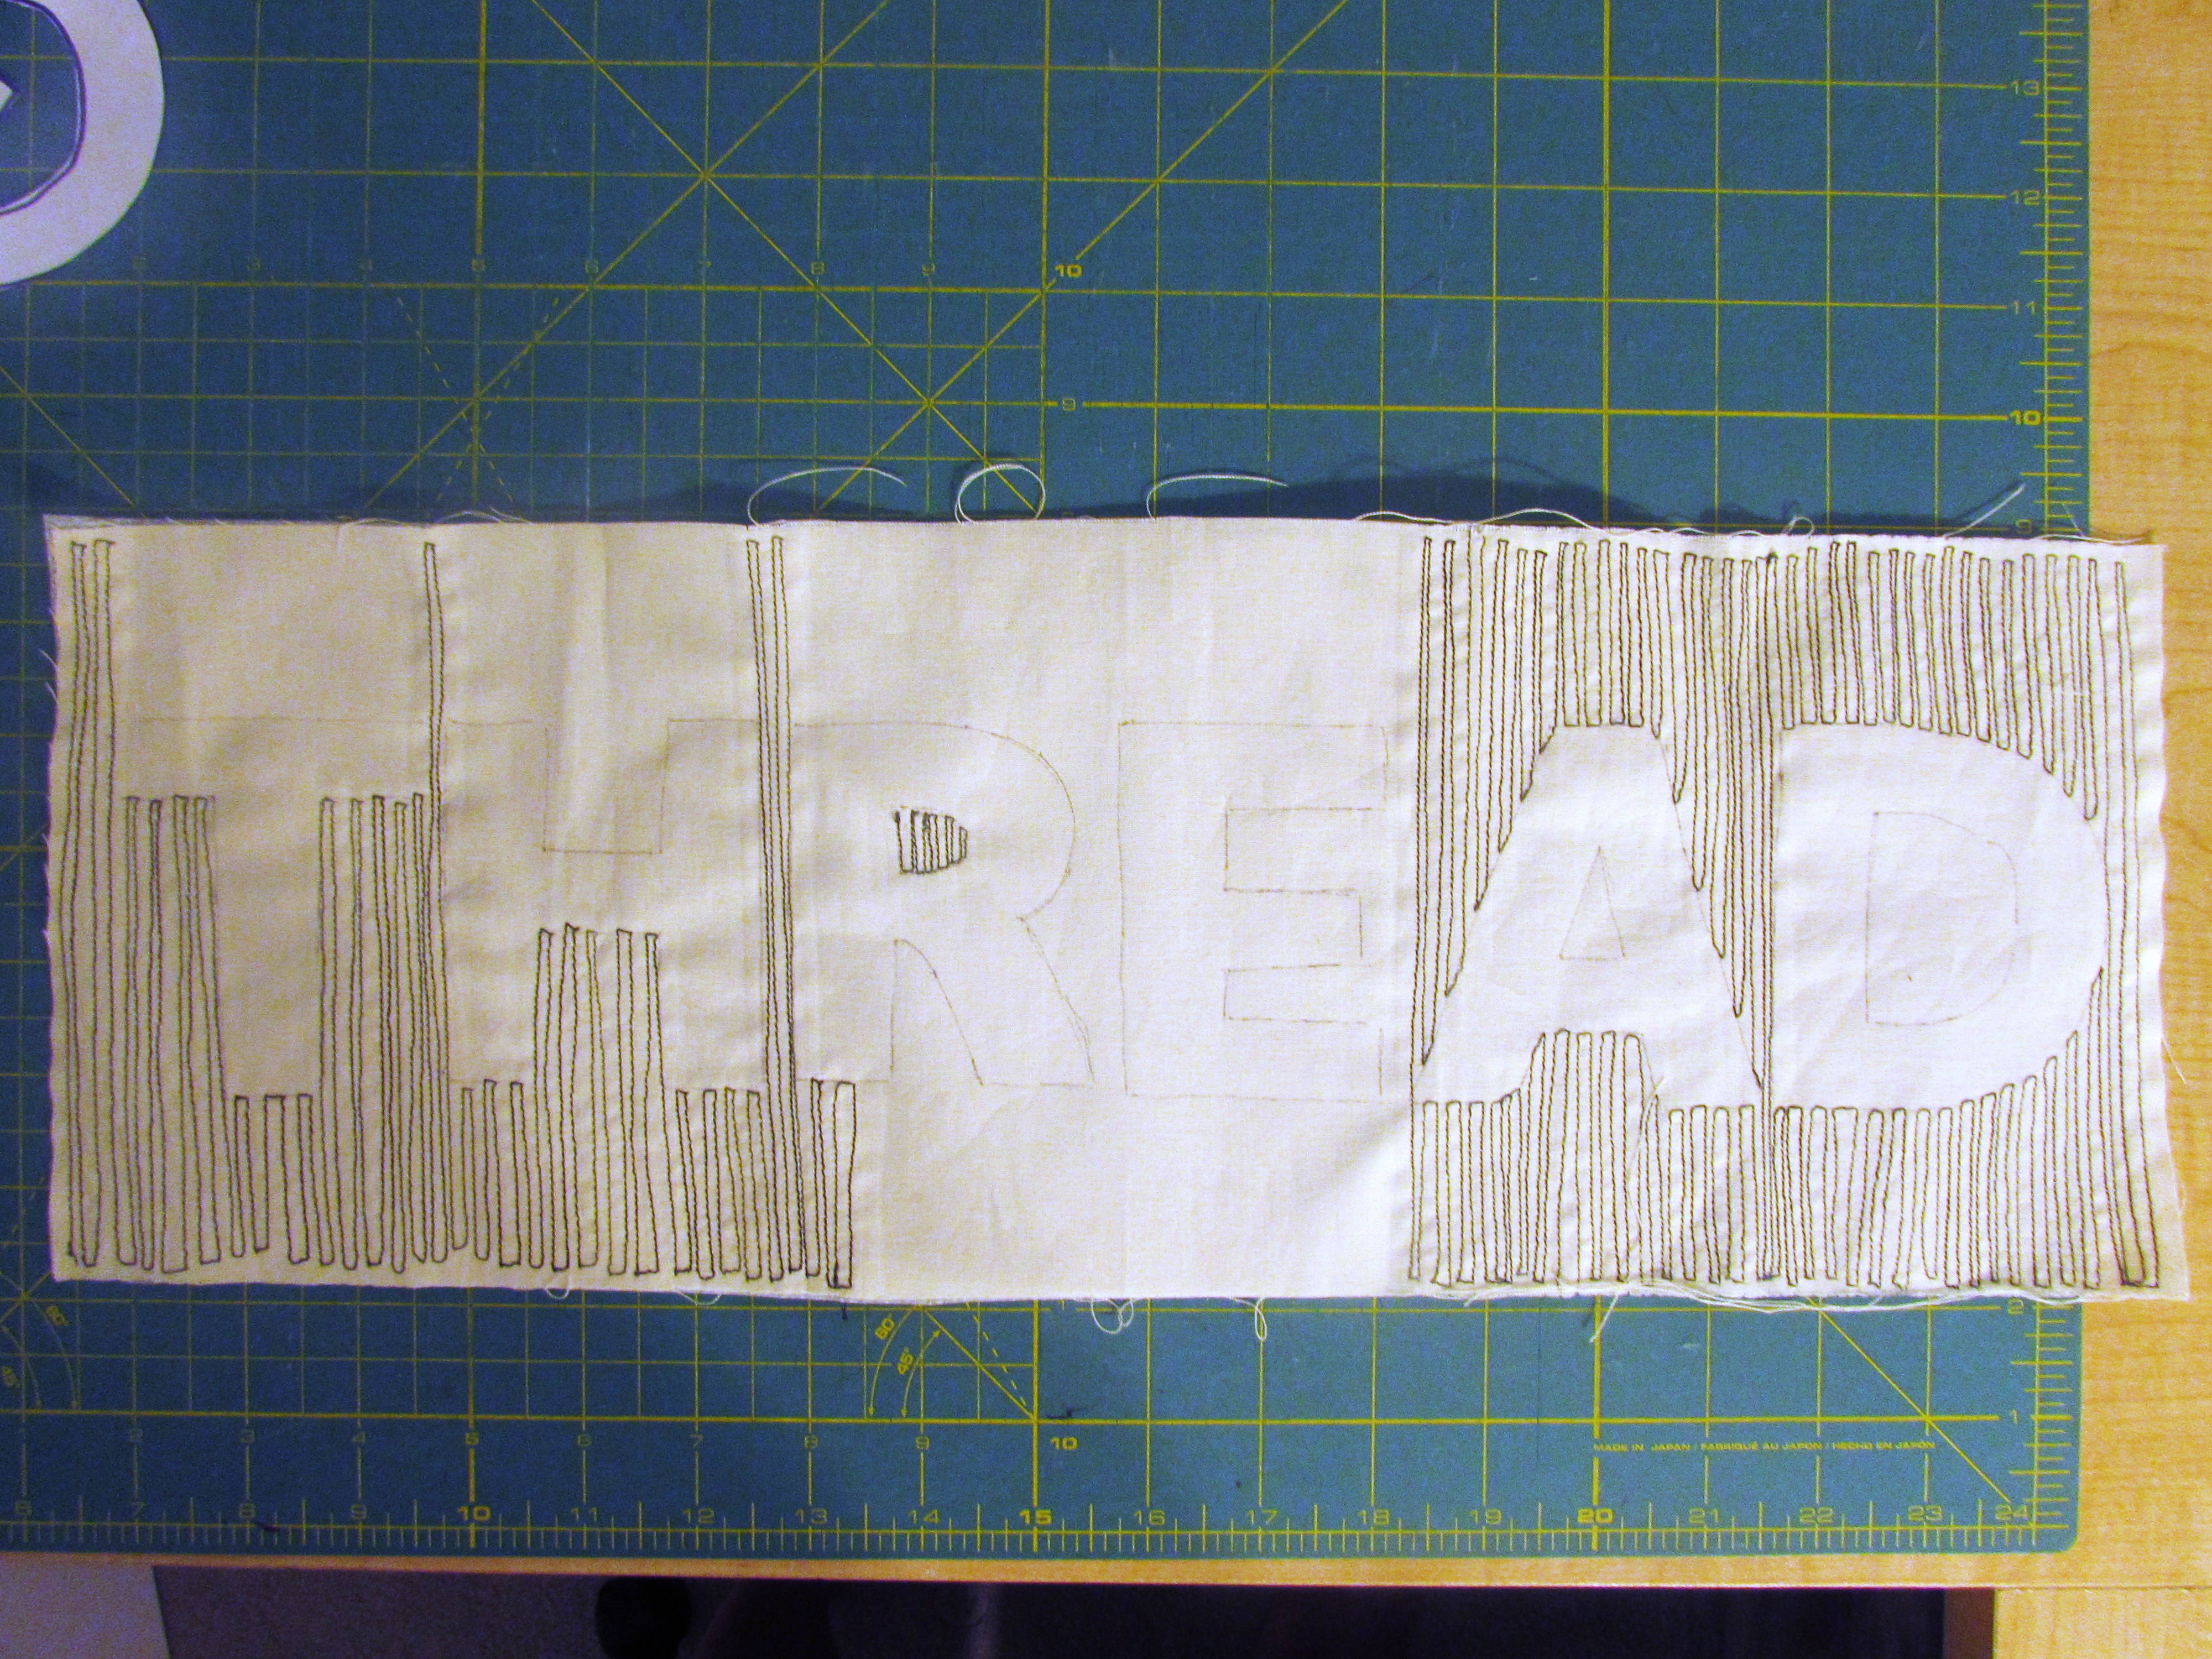
Using a walking foot, begin stitching long straight rows above, below and between the letters. I didn’t stitch the outline of the letters. This happens later on when you are quilting everything together. For now, just fill in every bit of space above, below and between each letter. You might choose to use a free motion foot for the little openings within a letter (e.g. the A and the D) so you don’t have to start and stop, twisting the fabric. I kept working with the walking foot because the block is small and easily rotates. Each time I came to the botton or top and needed to move to the next line, I very slowly stitched one stitch over, sometimes doing so by manually turning the wheel on the machine so I moved just one stitch. This kept my rows extremely close together. If you have a needle down function, this helps. Just go one stitch and let the needle stay down while you turn the piece. Now and then, the width looked to wide to me and I would back up and fill in with another line of stitching. Remember you will be viewing this from a distance and it looks much better that way. While stitching, you are looking at it from 6-8″ away and you’ll see every wobble. Not a problem. You are going for the overall effect.
See how the word starts to come to life? I love that! Now keep on stitching!
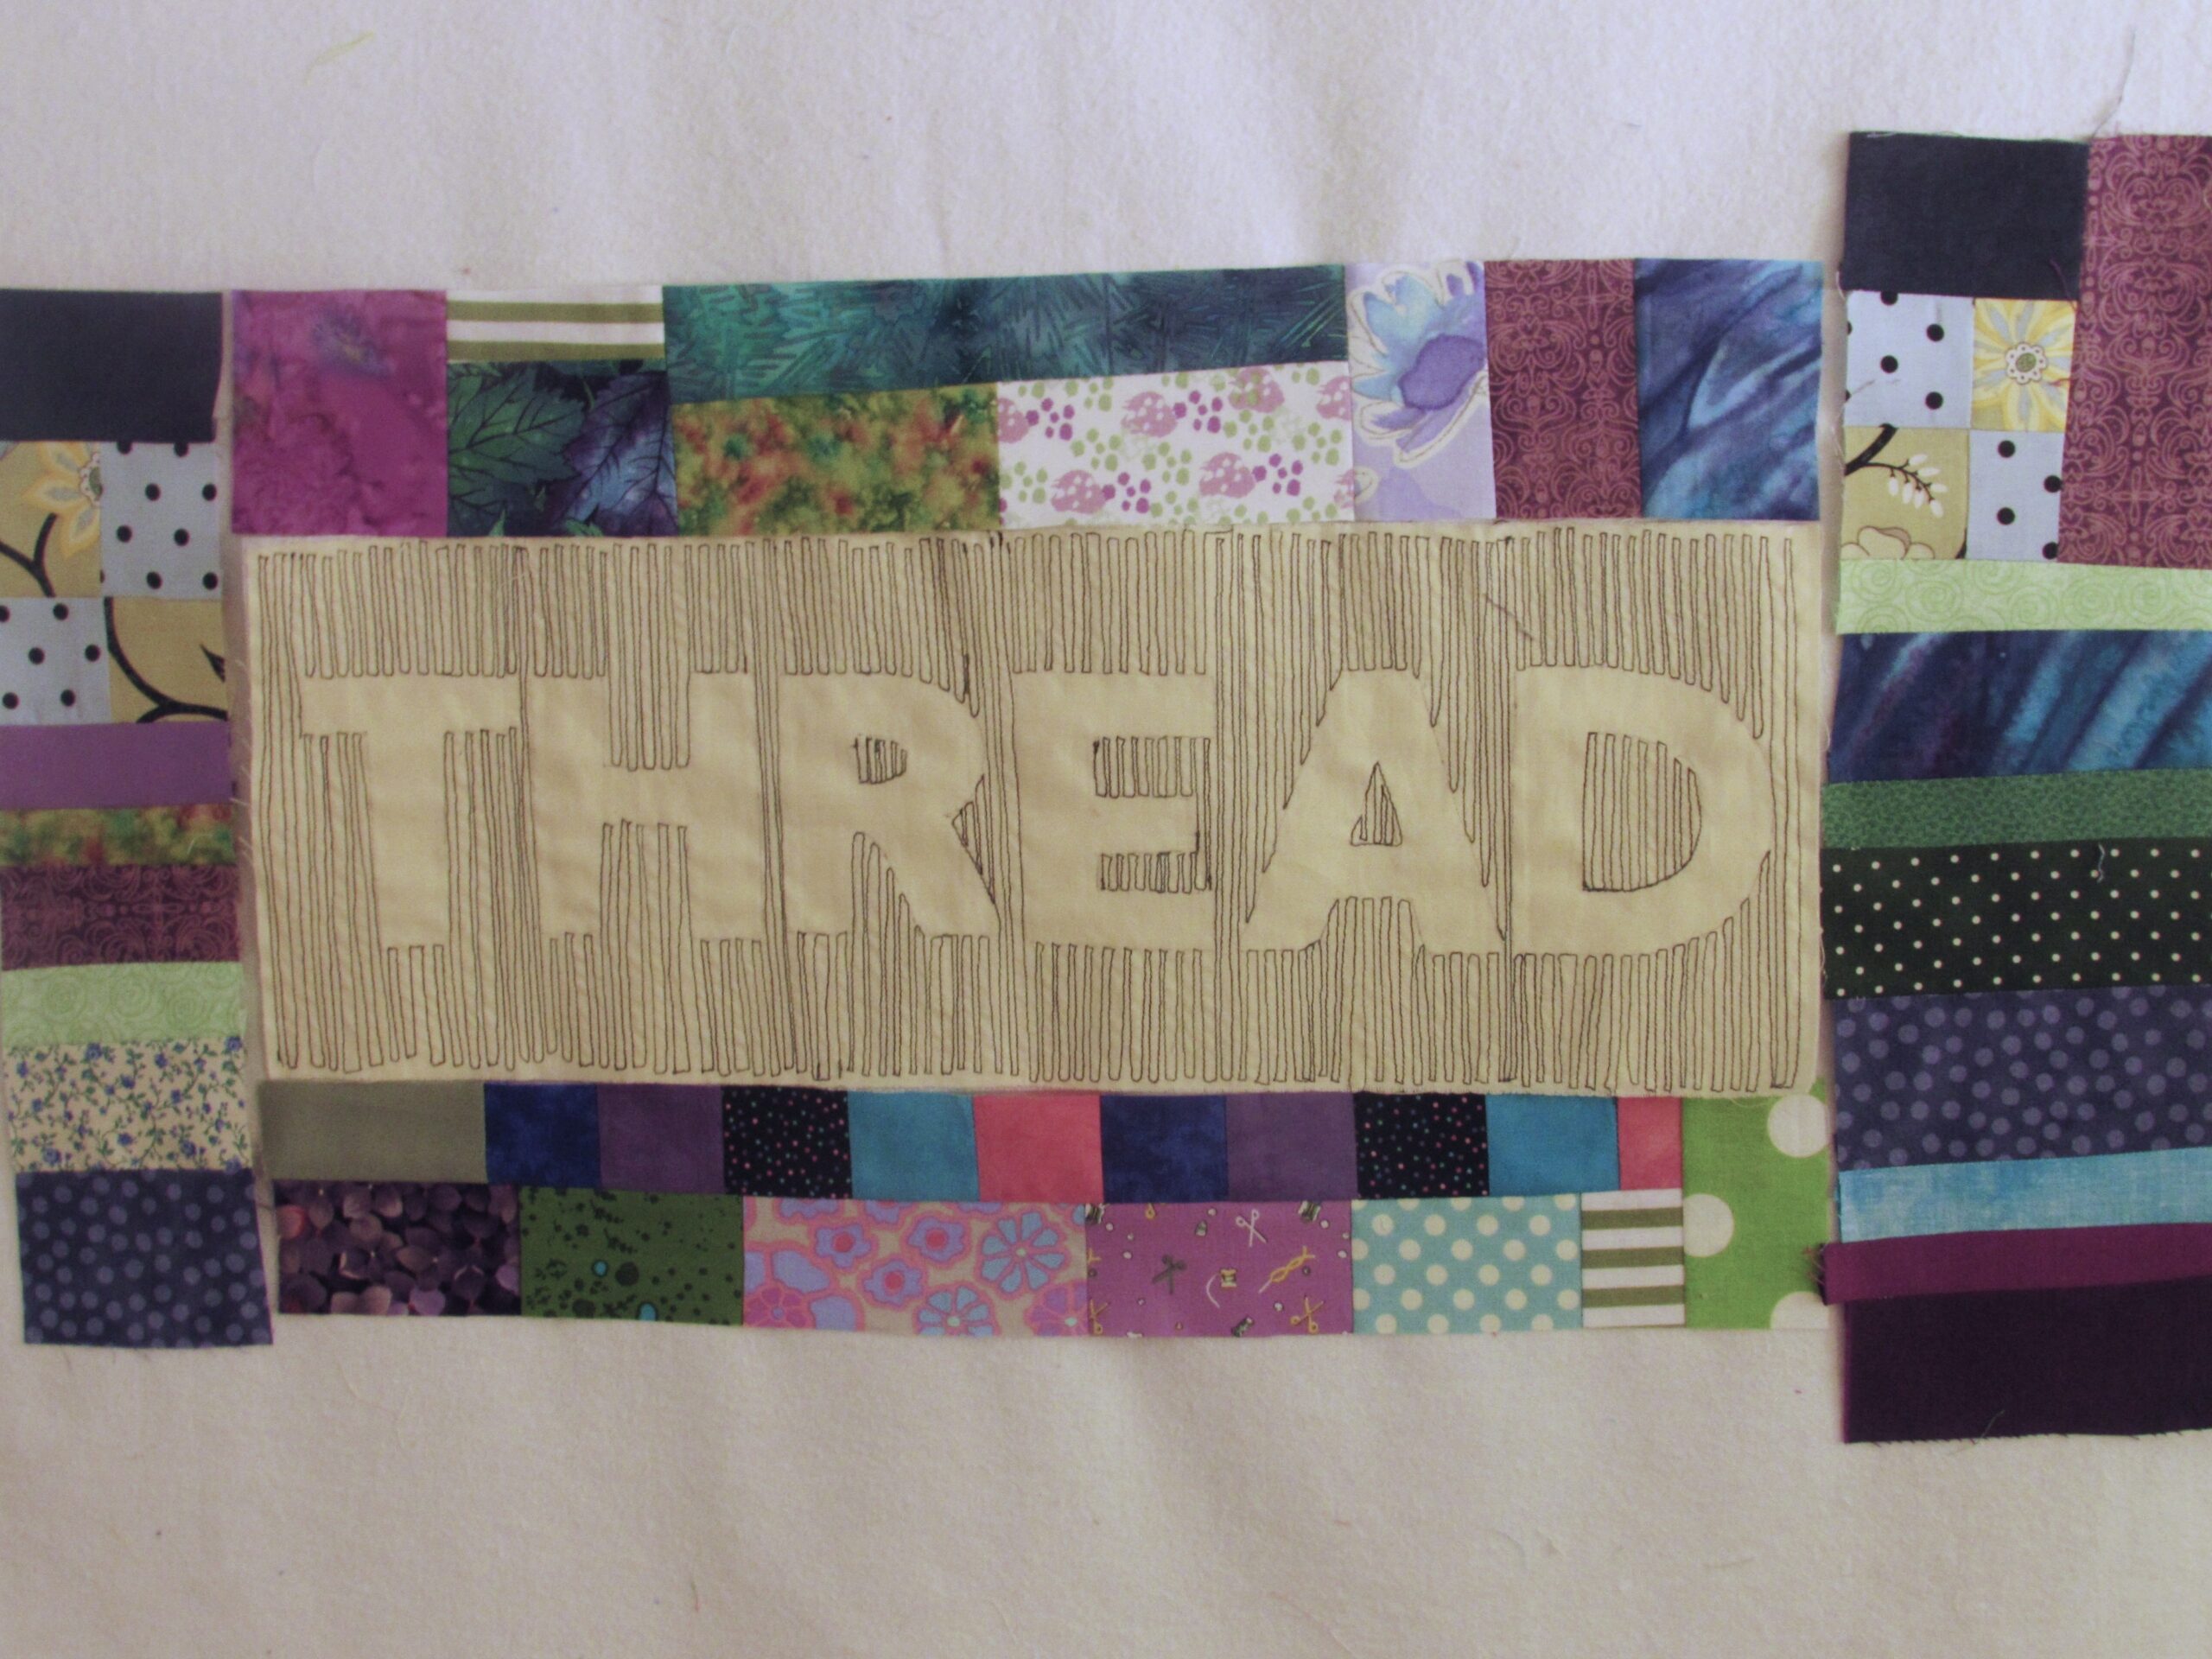
Making good progress here. The word is complete and it is time to begin working on your border.
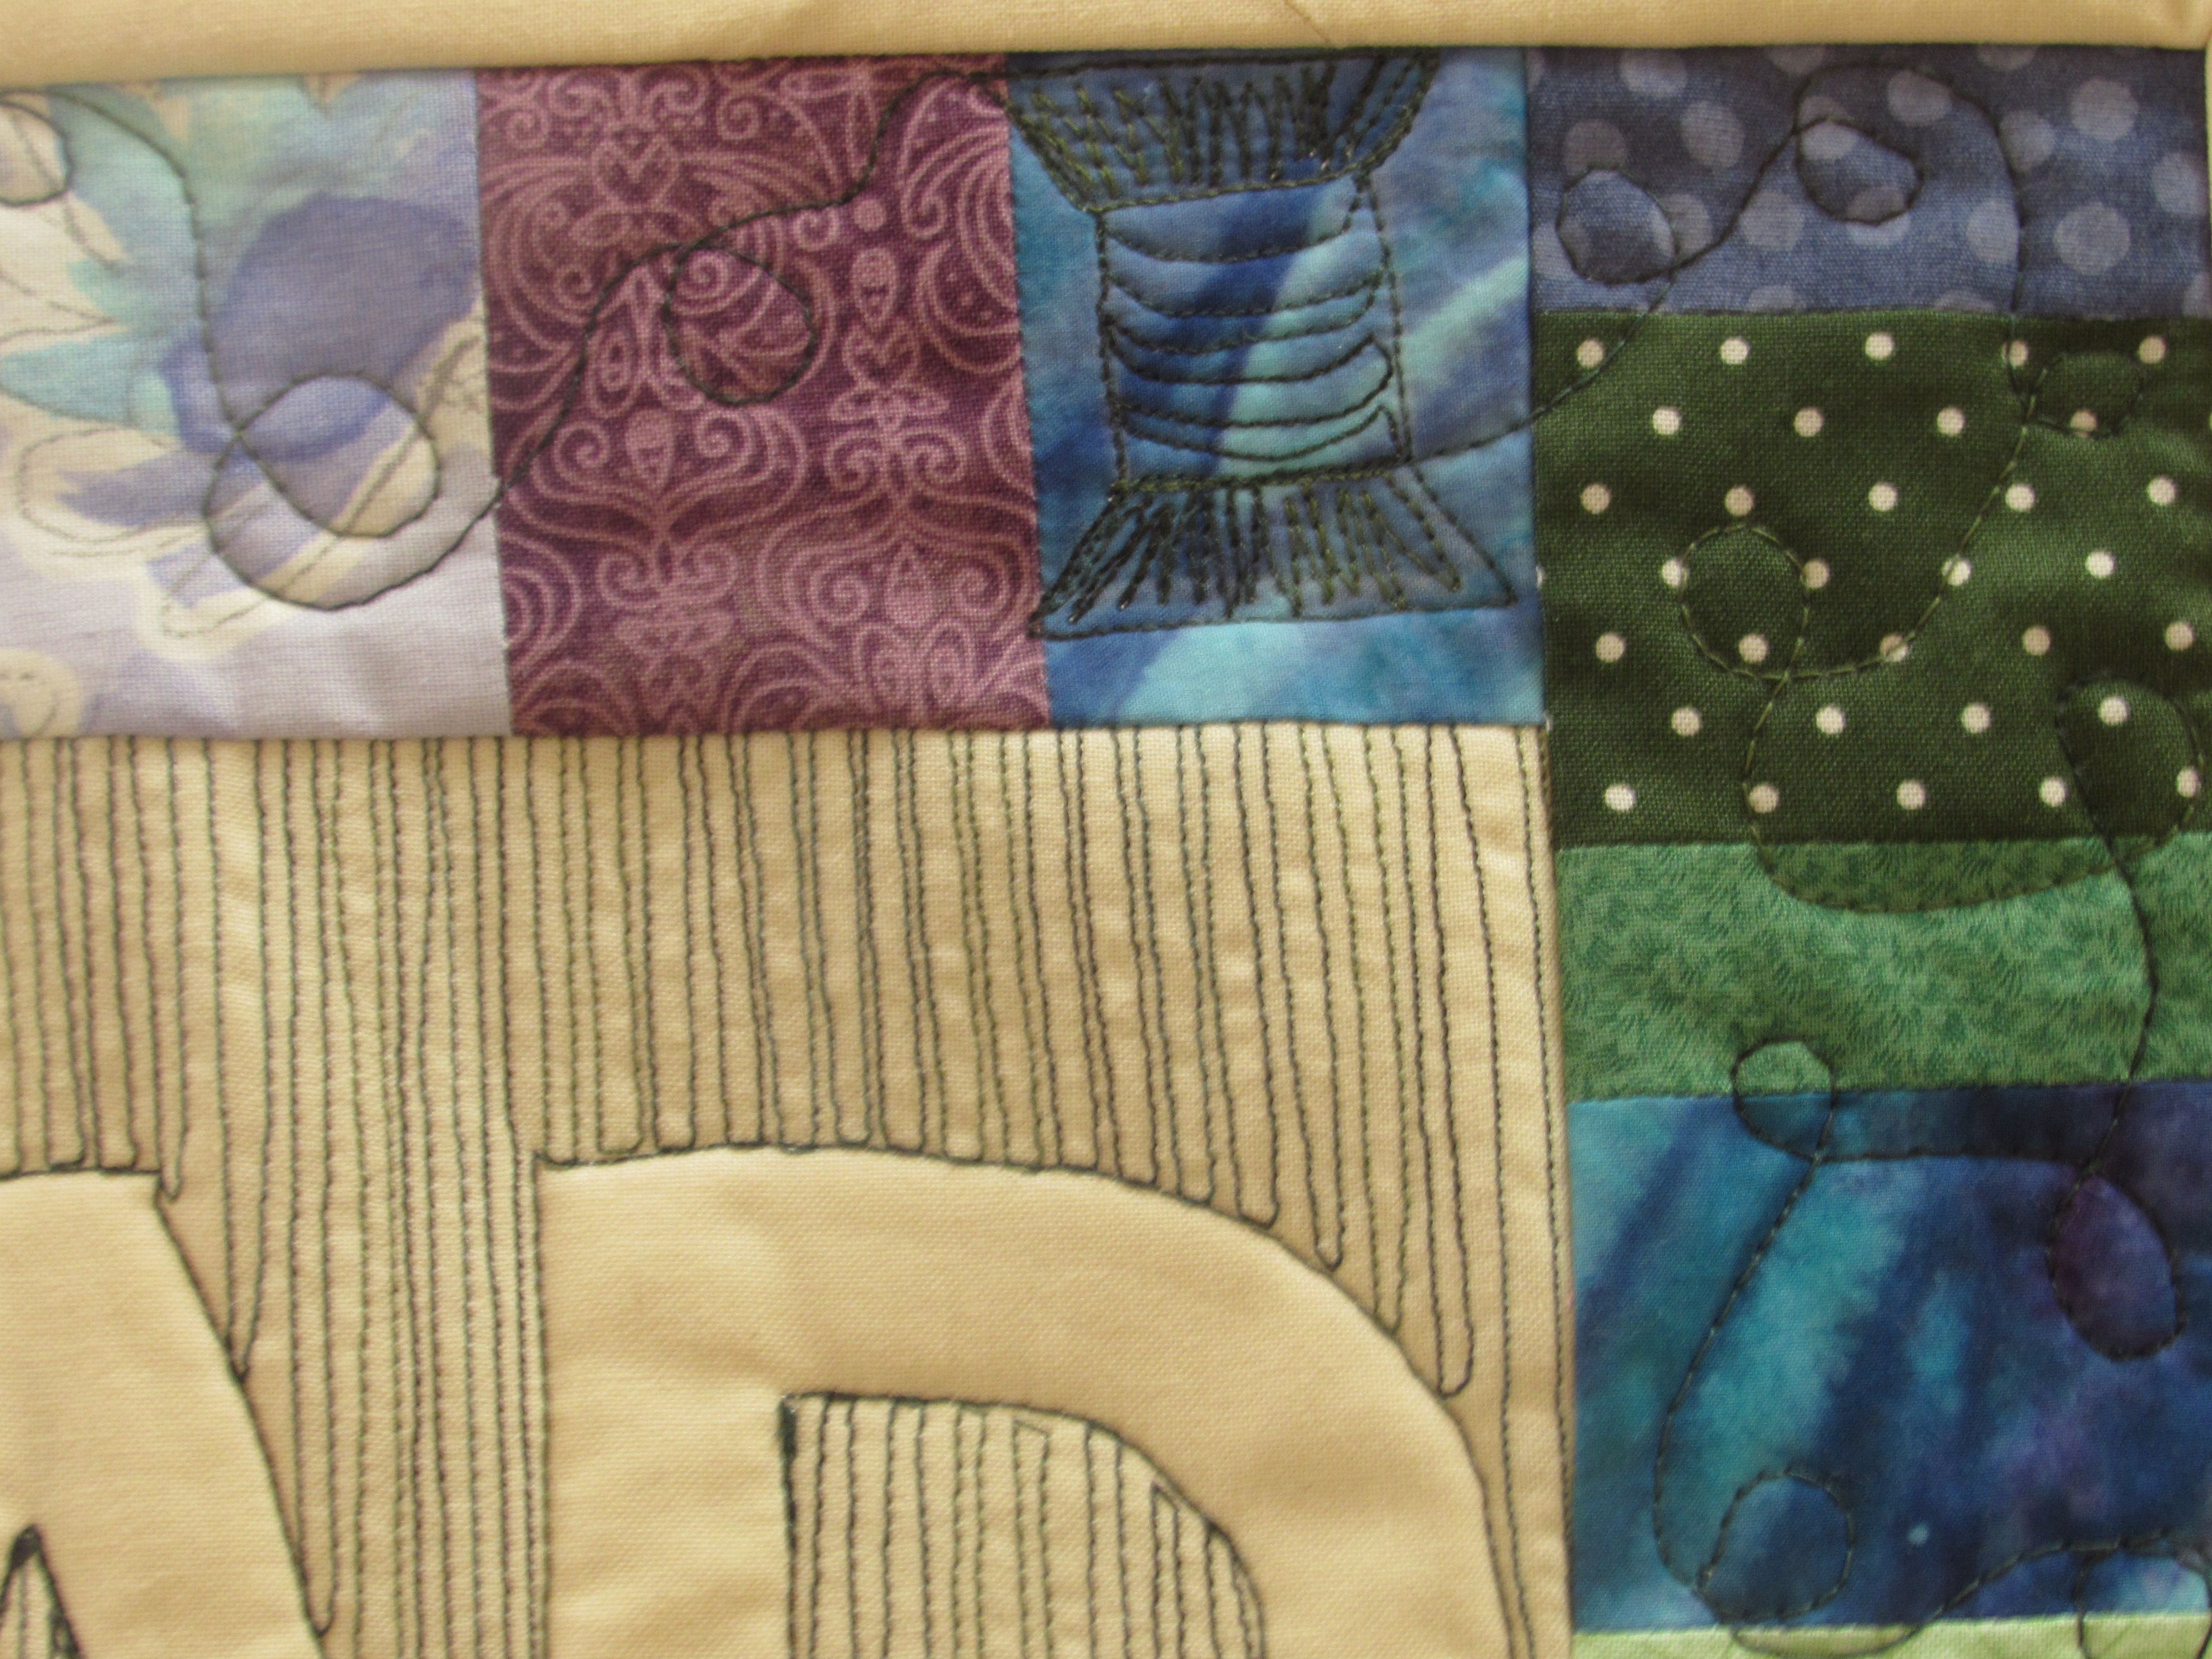
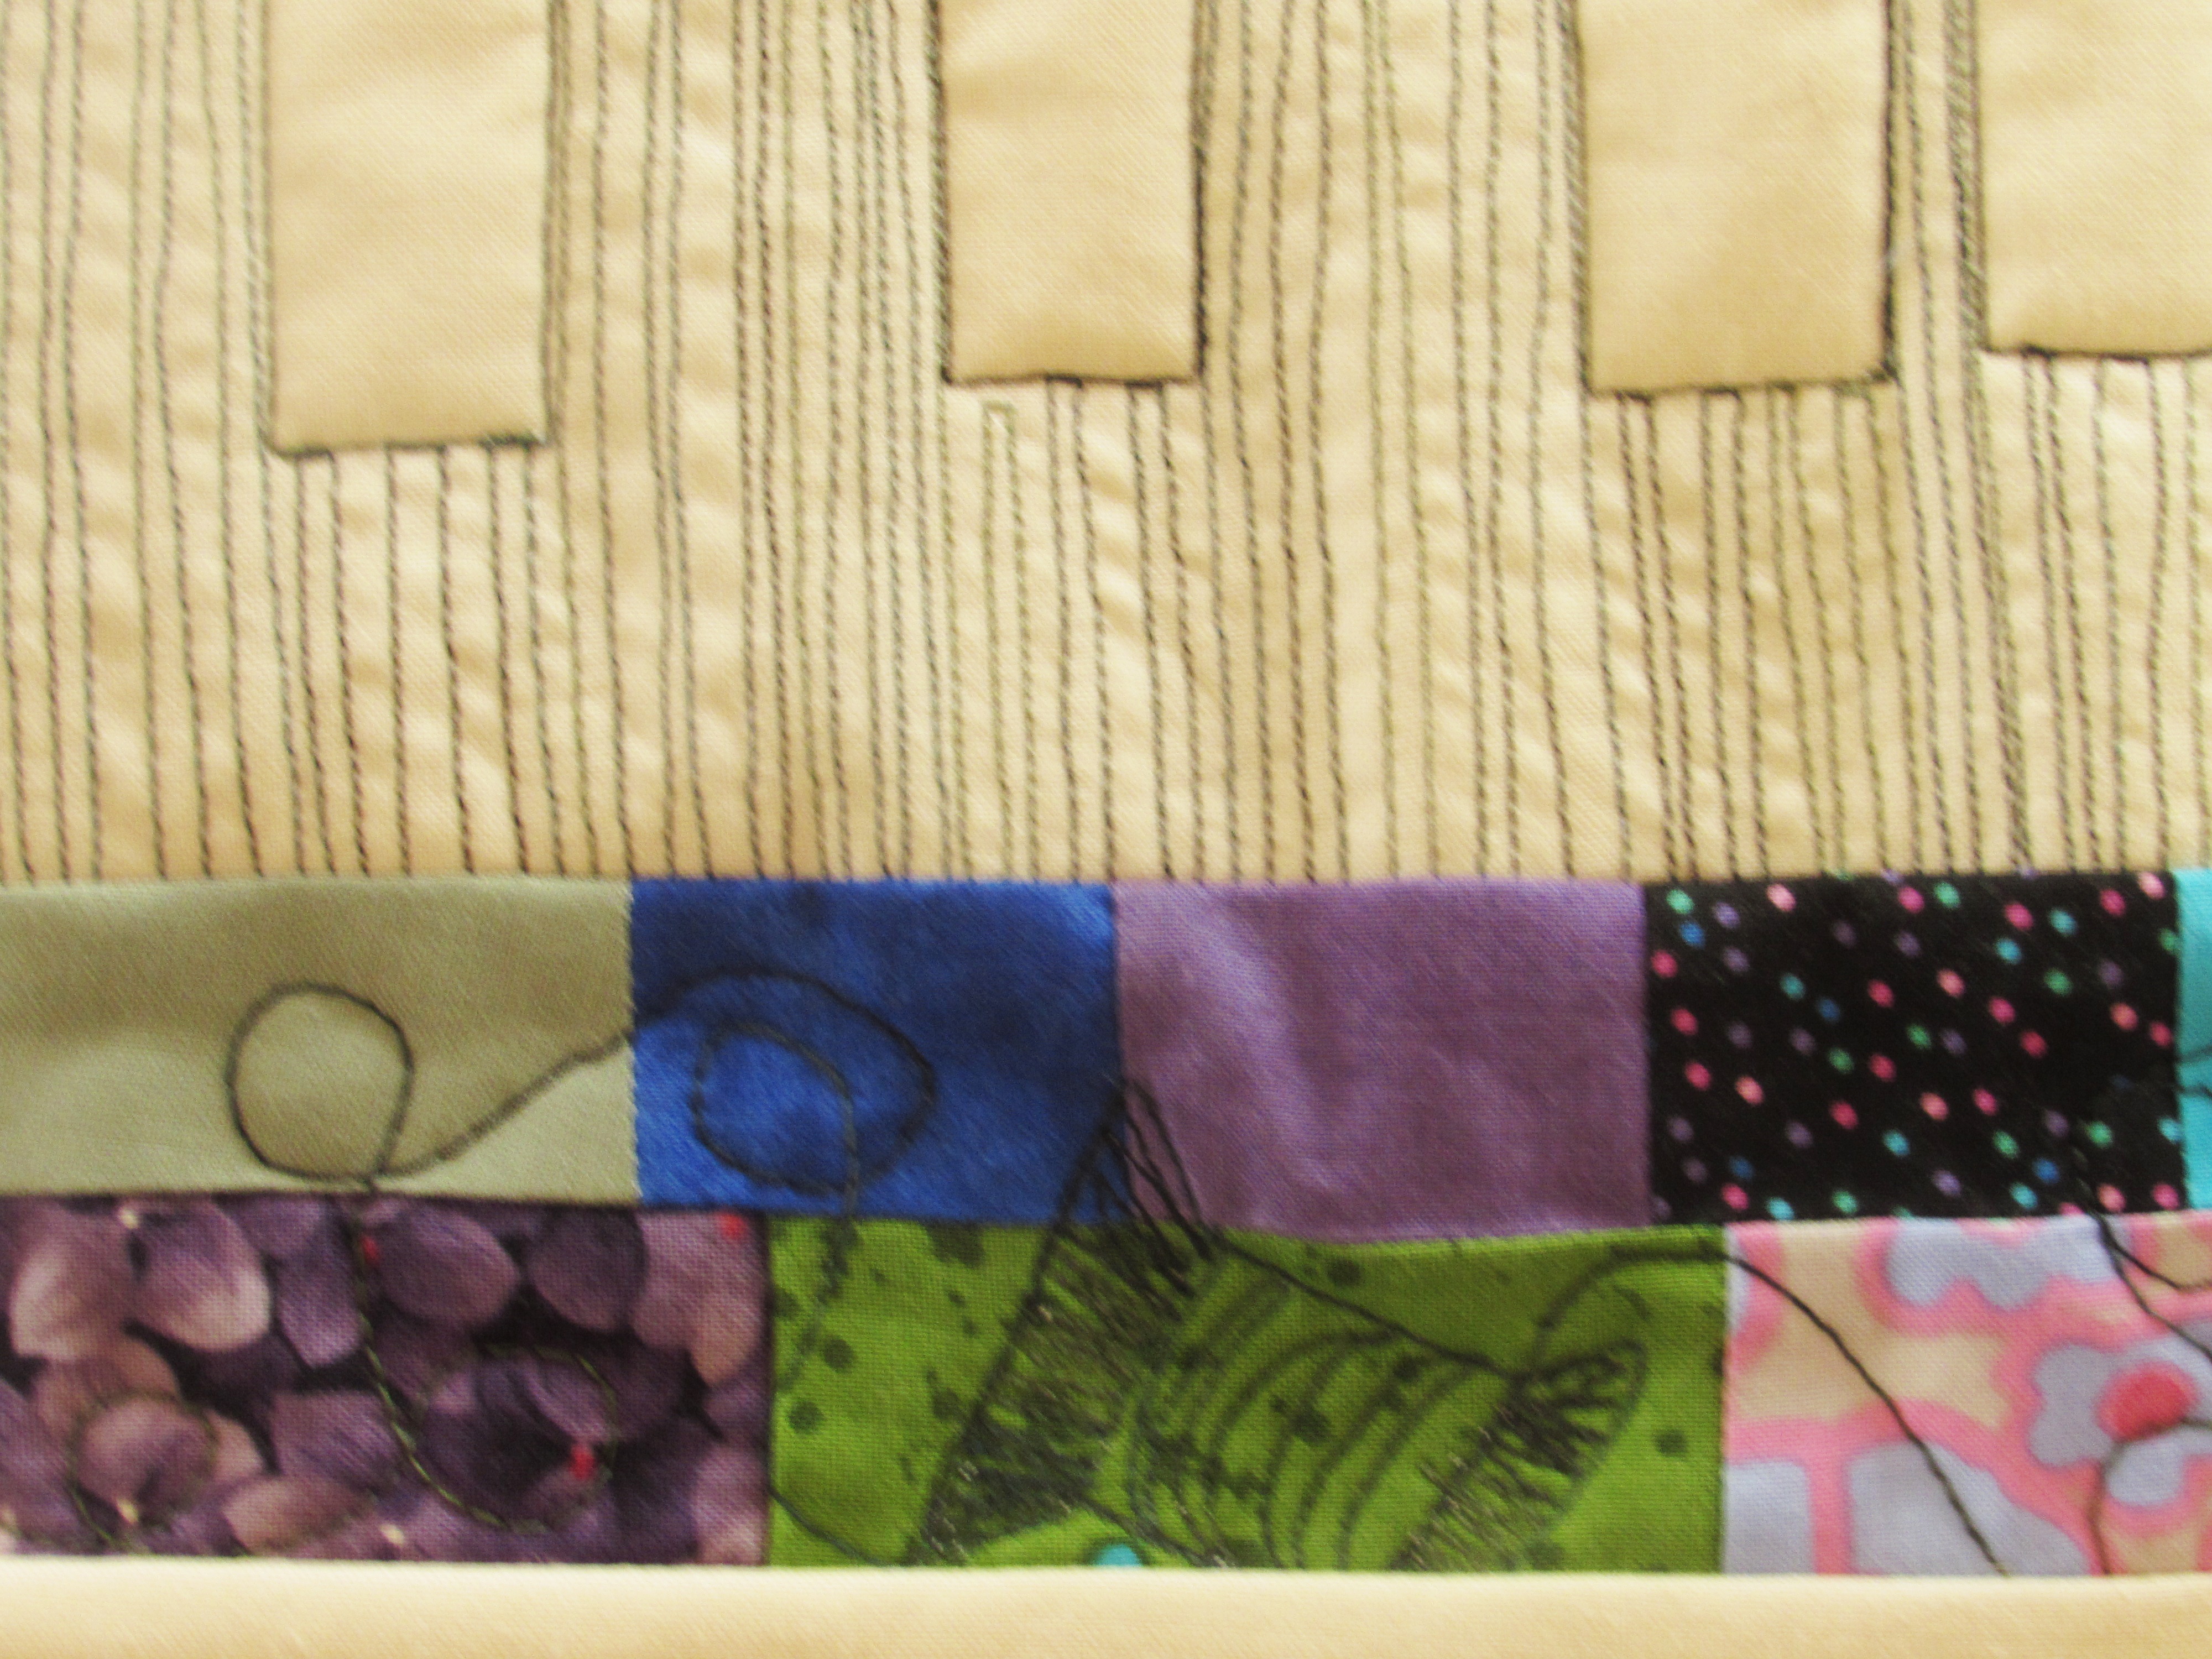
I made an improv border by taking squares and rectangles in my color scheme (basically greens, purples and blues) and built four pieces, two for the ends and two for the top and bottom. I didn’t worry about size too much. I made them a bit longer than the side I wanted to sew them to and since I wanted to have them trim out to 3 inches, I made sure the whole thing measured wider than 3 inches. Note: If you are not comfortable with this scrappy improv process, I recommend grabbing a copy of 15 Minutes of Play by Victoria Findlay Wolfe at your library. She does an excellent job of guiding you through. Alternatively, Amanda Jean Nyberg at Crazy Mom Quilts did a Quiltalong last summer called Scrap Vortex. In this post, she talks about building with scraps. It might be of help to you.
After playing with them on the design wall, I trimmed each to a width of 3″. I sewed the top and bottom borders on first and then added each side.
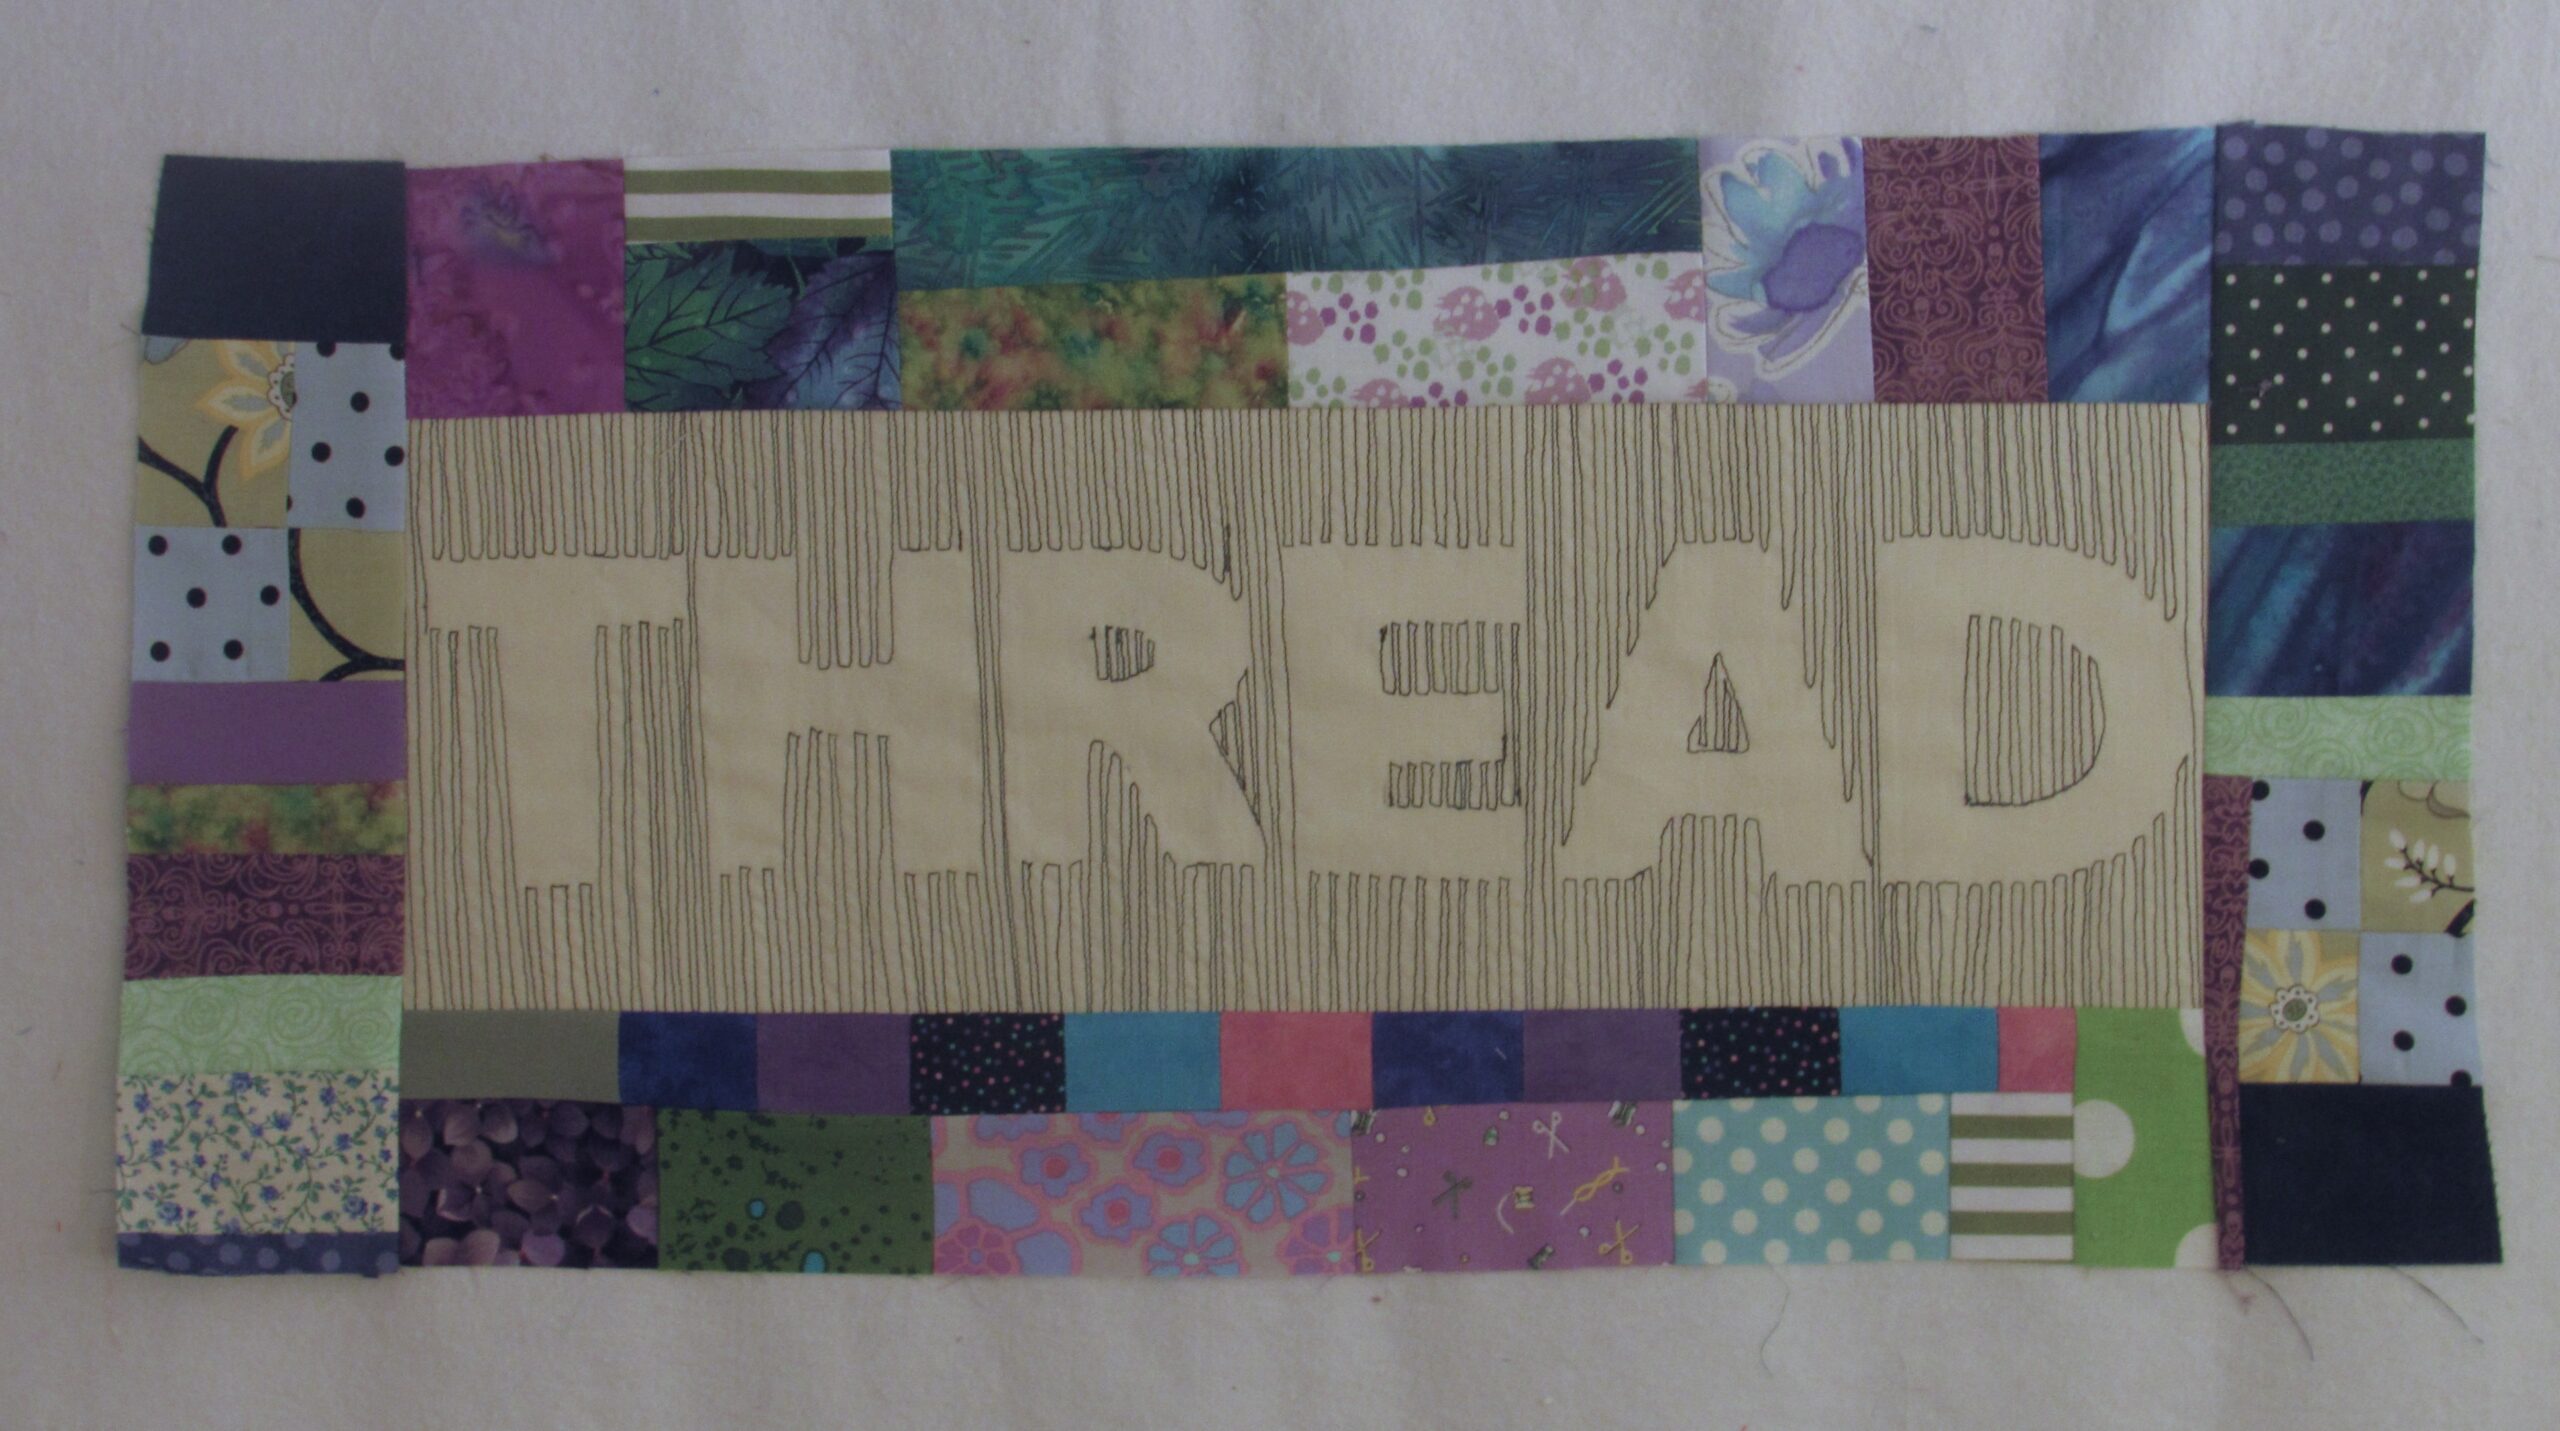
The next step is to make a quilt sandwich with your top, the batting and your backing fabric. I pieced the batting from scraps I had. Just pin it around the border tightly since you are going to quilt in the center first. My batting was just barely bigger than the top but since it was such a small piece I felt ok with that. Normally I use batting that is a good two inches larger than the top all the way around.
Continue to use your walking foot and slowly stitch around each letter. It is a bit like connecting the dots as you want to trace over the place where you stitched over to the next line. Just move slowly and turn frequently (with your needle down while turning) when stitching over a curve.
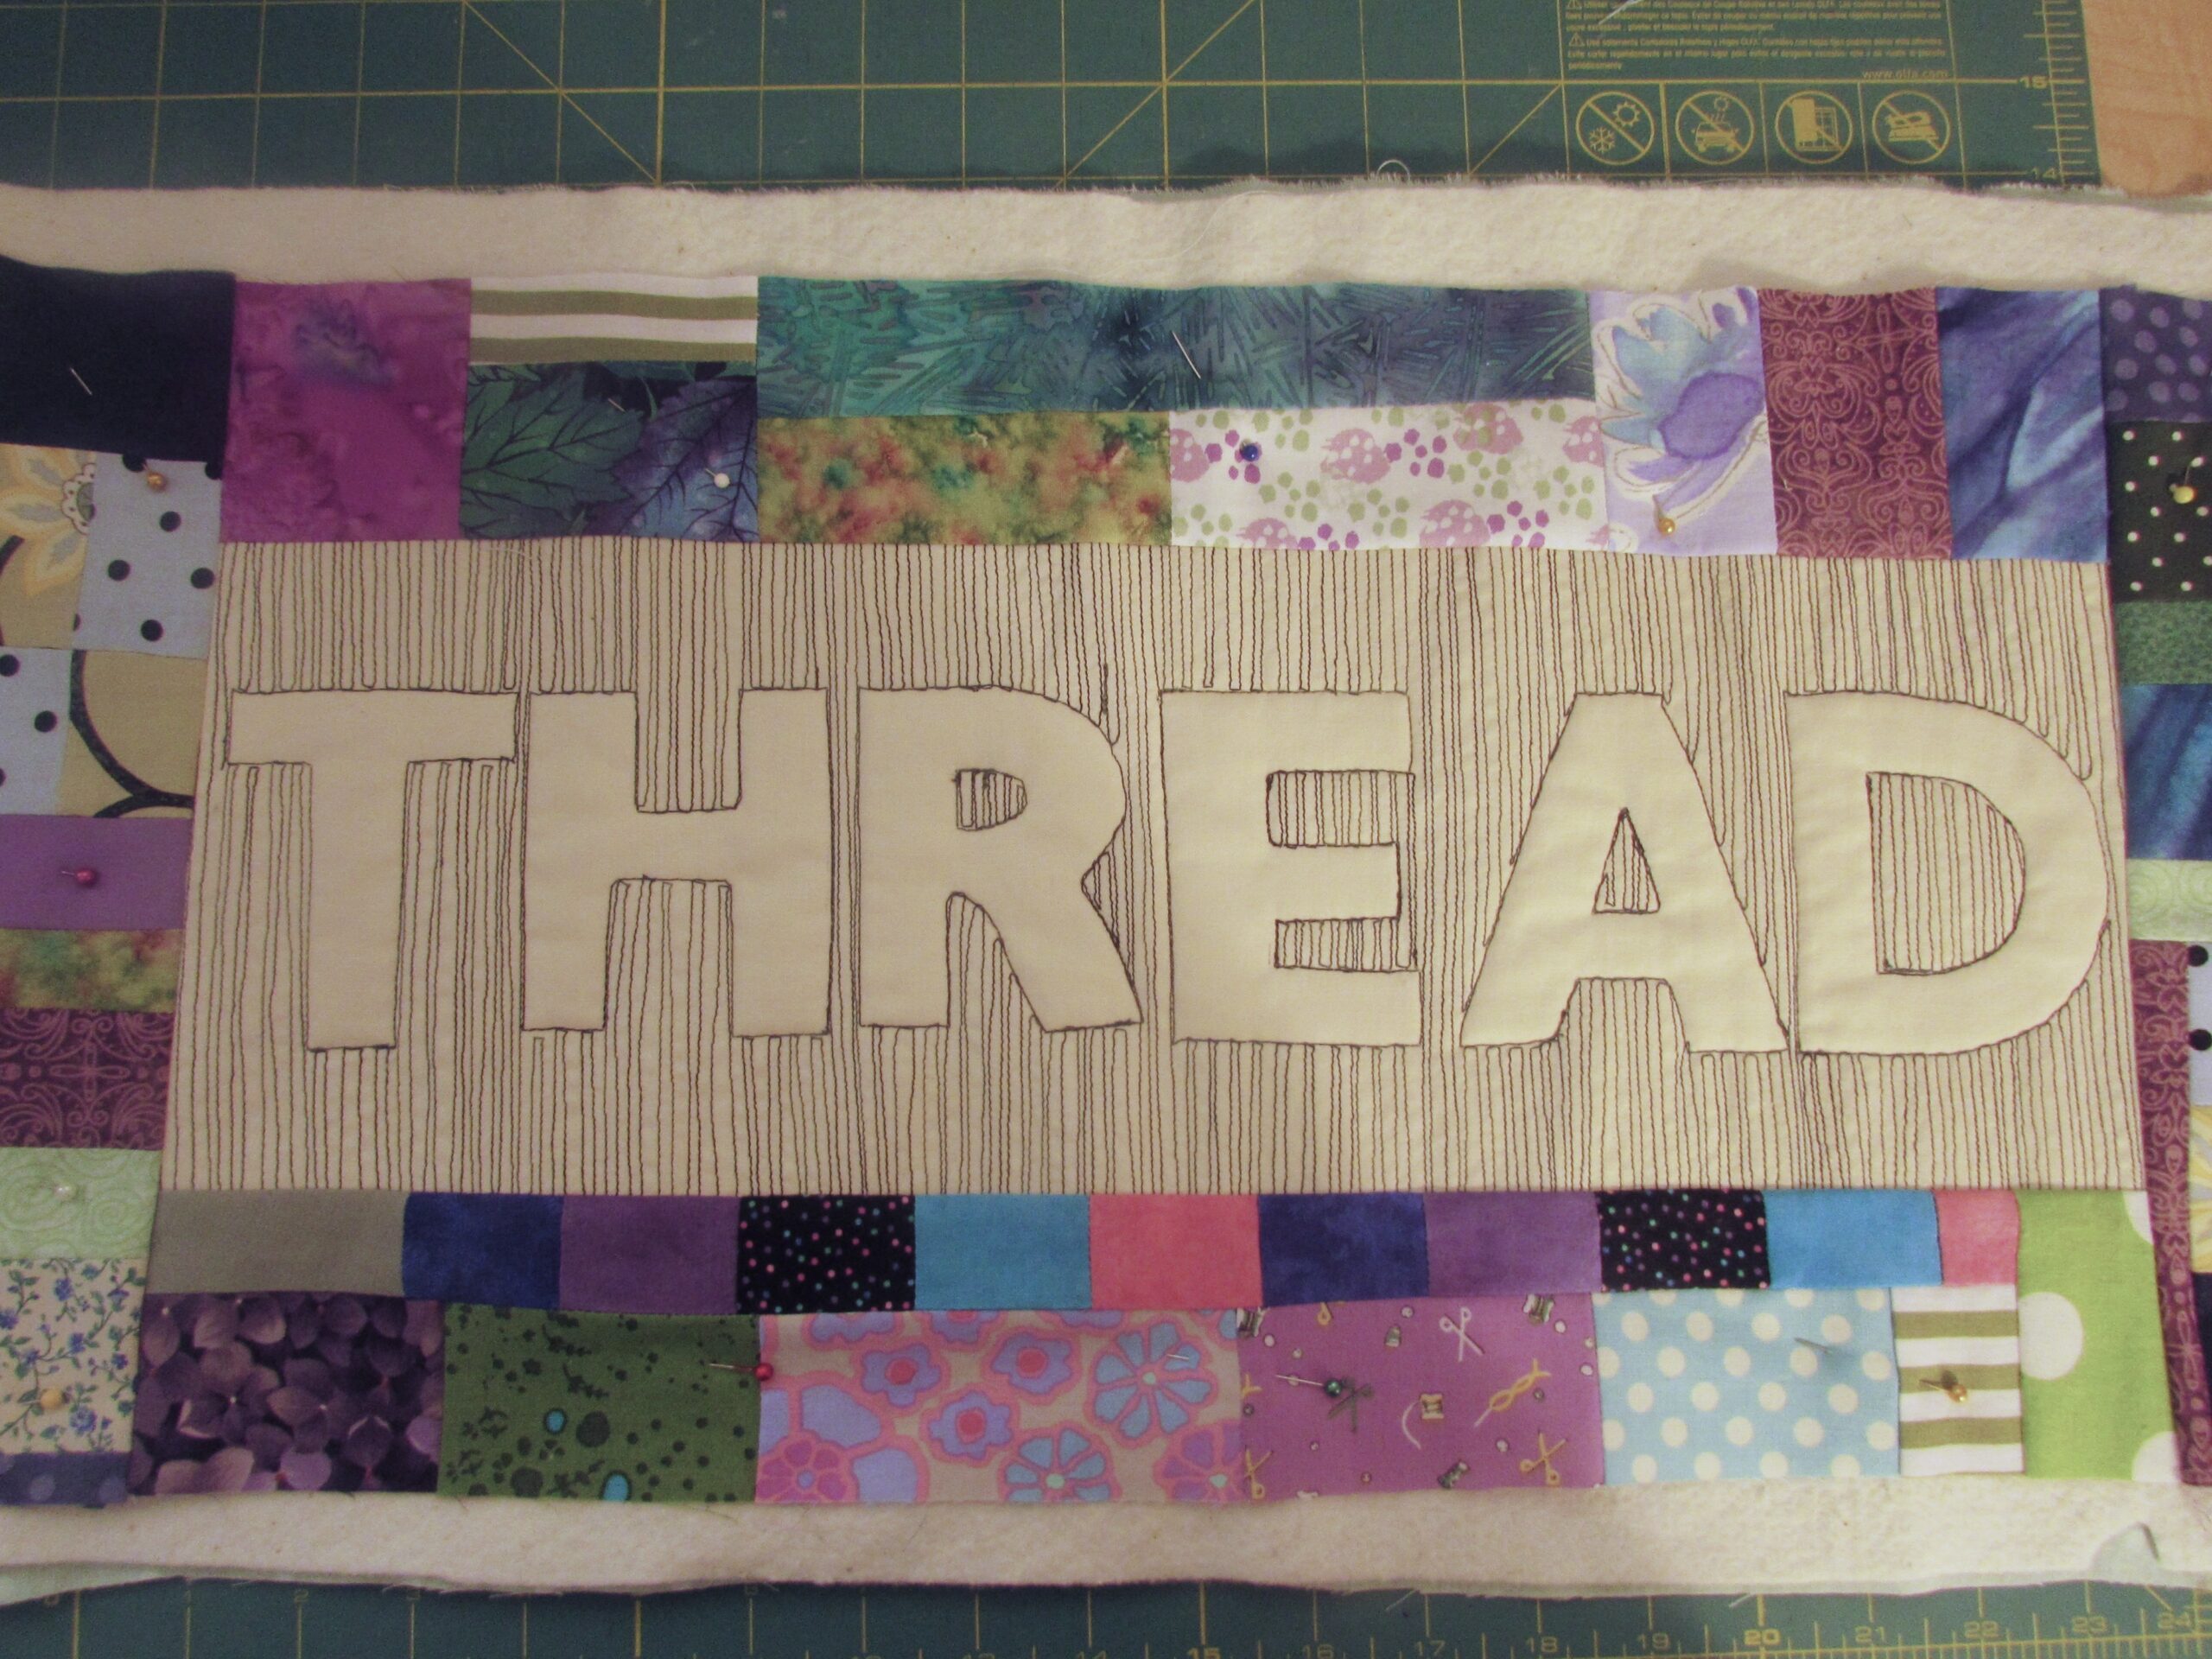
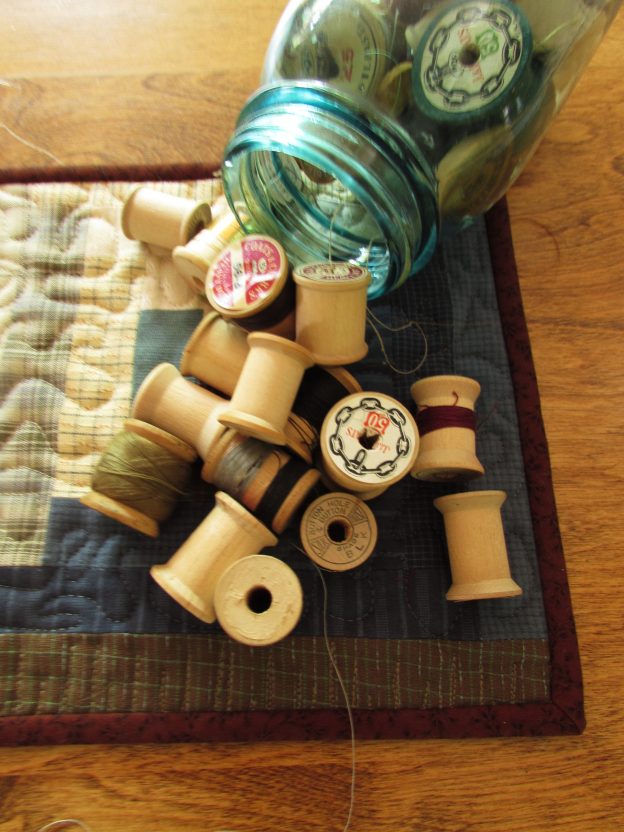
I love the way the letters come to life when quilted to the batting. Next I moved on to the border. I love the little spools of thread that I quilted on the first piece and carried them through to this piece as well. Considering the thread theme of this project, it worked well.
With each spool, I filled in the top and bottom so they would show up a bit better. If you like this idea, take a look at this tutorial of Lori Kennedy’s over at the Inbox Jaunt.
The spools are whimsical and they add a bit of movement to the quilting as the ‘thread’ flows off each spool.
Once you complete the quilting, trim, square and bind. Finished!
Isn’t this adorable?????
And both of them together?? All kinds of cuteness. What fun (and easy) projects both of these were. I have the sleeve sewn on to FABRIC but still need to make a sleeve for THREAD. They will be on the wall soon. I’ll post a picture next week.
I hope my explanation is helpful. If you make one, let me know. I would love to see it!
I’ll be linking to the usuals which can be found at the top of the page, under Link Ups.
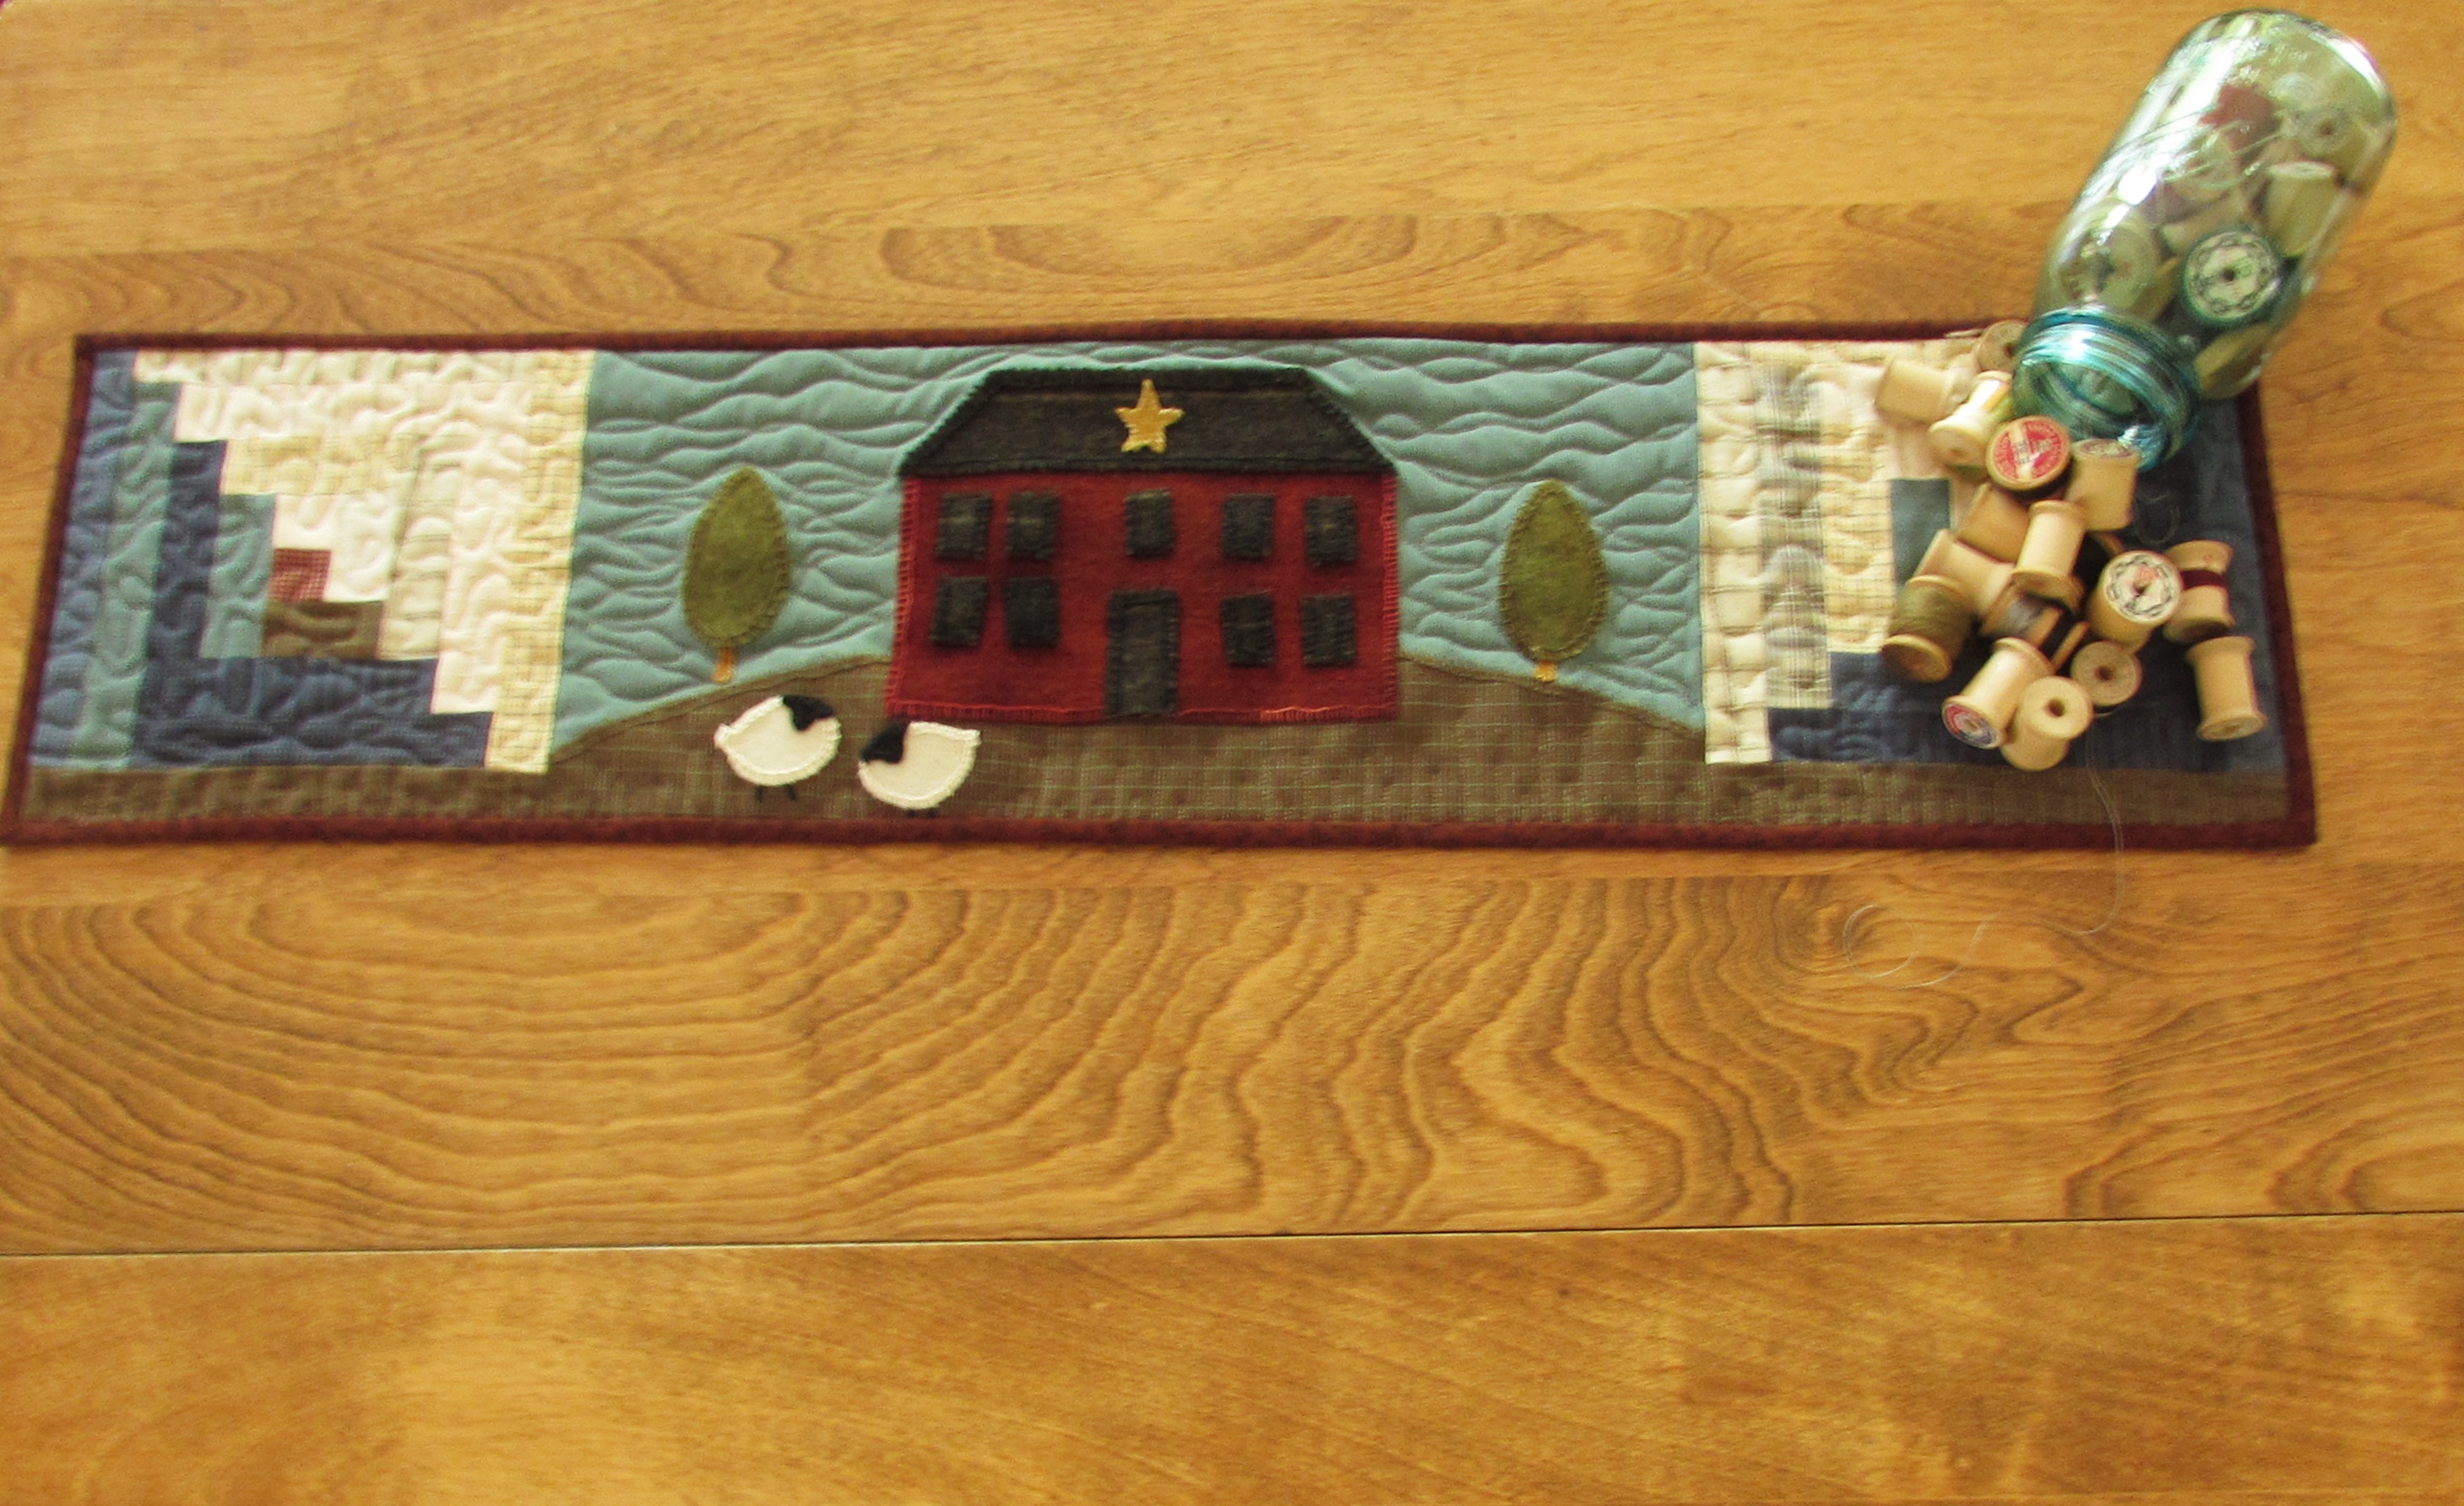
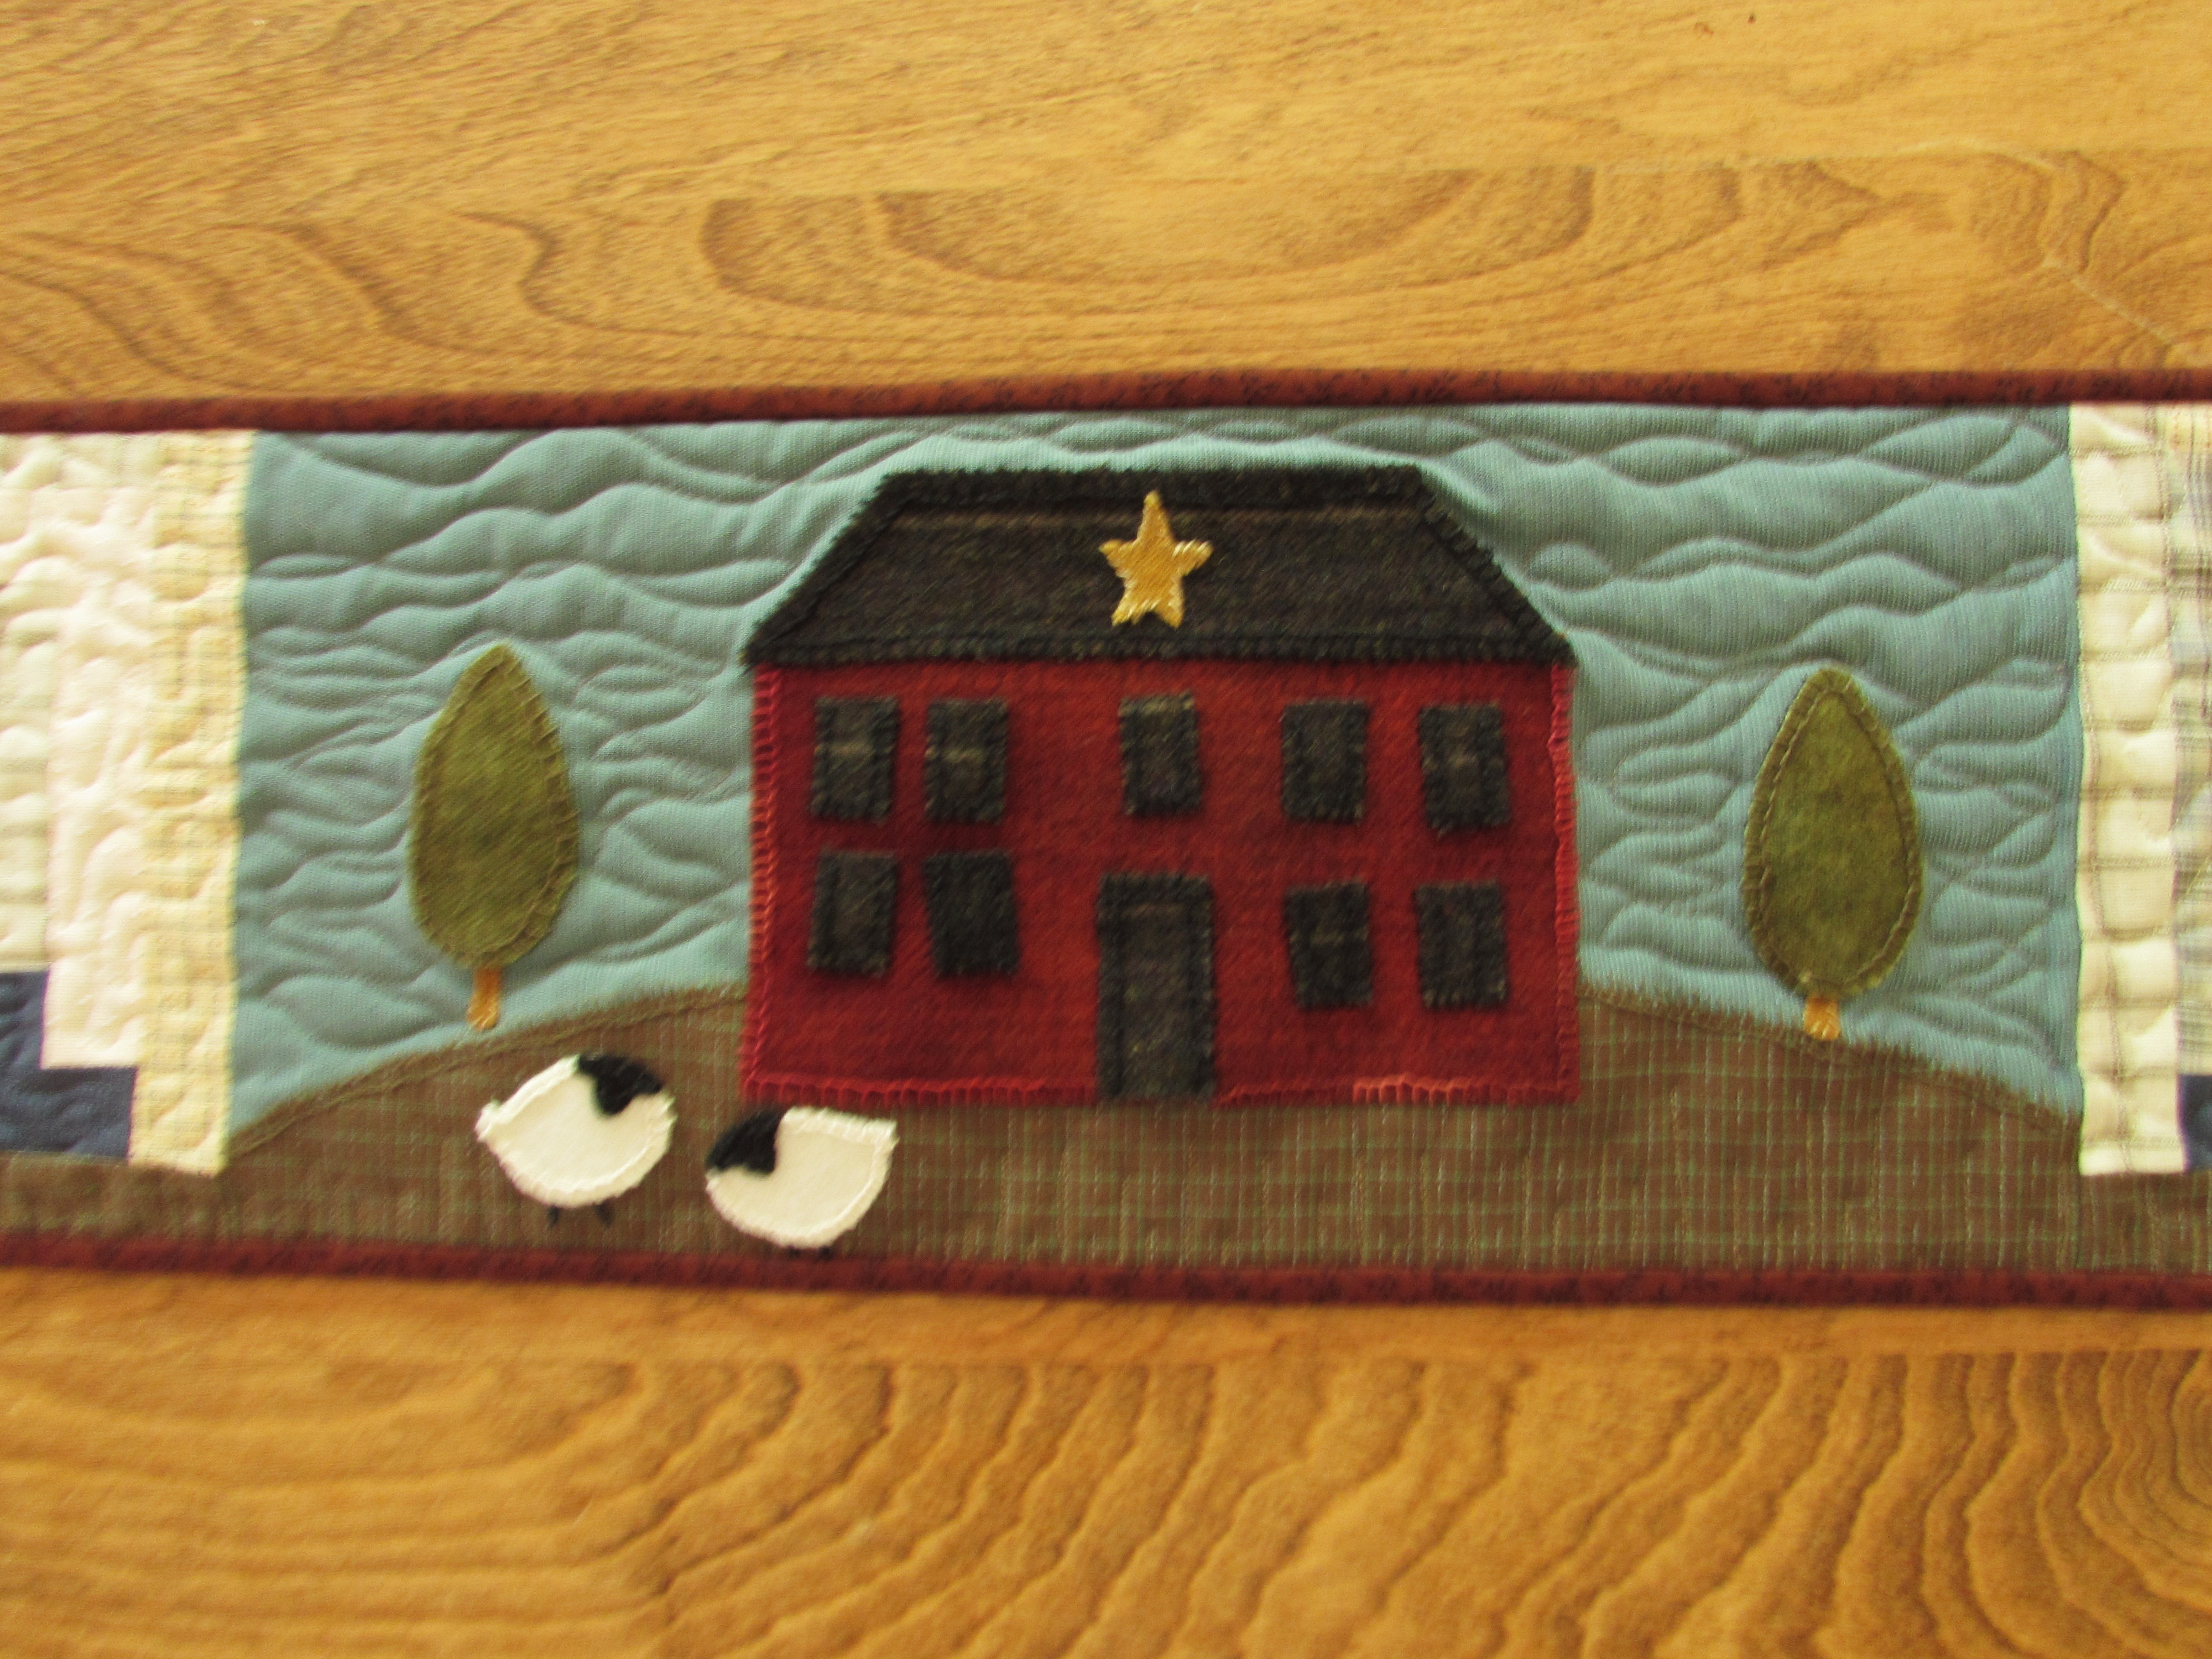
Remember my trip to Maine? The one where I found all sorts of awesome quilt shops? When I was at Attic Heirlooms in Damariscotta I took a long look at some traditional wool applique projects. Having never made anything like this, I decided to give it a try. When I saw the Row by Row project for Attic Heirlooms it looked like a row that could stand alone and be used as a wall hanging or table runner. (I wrote more about that shop here.)
Making this project was fun in that it was slightly unfamiliar to me. I have only done a bit of applique and haven’t hand stitched applique at all. I dug into the kit enthusiastically. Cutting the little pieces didn’t take long at all. I fused the pieces as far as I could go (without stacking pieces in areas that needed to be stitched first.) Then I took the kit and my assorted Perle cotton skeins over to the coast last week. We spent a long weekend over at Bodega Bay (about three hours drive from home) with lots of family to celebrate my husband’s birthday. What a perfect weekend for hand stitching.
While I was working on it there were a couple of mishaps. At one point I was stitching and not really paying attention and somehow I sewed the project to my pants. Ha. I felt so silly. Ian and Julia found it most amusing. Fortunately it didn’t take too long to pull the stitches out and free myself from the project. 😉
After that, the little windows started popping off of the house. I am not sure what I did but the fusing clearly wasn’t working! The more I handled the piece, the more bits fell off. I didn’t have an iron and of course, wasn’t patient enough to wait and fix it when I got home. Instead I just held the windows in place and stitched. It worked out and I was able to continue stitching. The windows aren’t as precise as they might have been but that’s ok.
The center block is surrounded by a log cabin block on each side. Once I got the three blocks assembled, I wasn’t sure how to quilt it. Wanting to stick with tradition, I really didn’t know how to treat the area around the wool house and trees. It seemed like it should be quilted. I wanted to leave the wool pieces alone because I think the fabric is just gorgeous and I like the blanket stitch that I used to attach the pieces. (Except the tiny star and the tree trunks; I wasn’t sure what to do with those so I just stitched around the edges.) After consulting with one of my trusted quilting advisers, Janine, I decided on some wavy lines on the background. The color of the sky (background) fabric looks like a heavy sky to me. The wavy lines make it look just a bit stormy.
I used an older calico fabric that I had for the backing and binding. I haven’t put a sleeve on it yet but I think I will. It would be fun to pull this out in the fall and hang it somewhere. I don’t really want to put it on the table because of spills. The wool isn’t really washable.
This is my first try at wool applique and I absolutely enjoyed it. It is a sweet reminder of our vacation. I think I will give it another try. First I want to look at the process and learn more about it. Anyone have any recommendations for a book or a quilter who is into this sort of work? Please let me know. 🙂
As always, I am linking this sweet finish with my favorite linky parties. Find the links at the top of the page, under Link Ups.
Want to know what is happening at Craftsy this weekend? A sale, that’s what! Craftsy has marked down their newest classes for the weekend. If you have had your eye on a class, now is the time! You can escape the brutal heat that August can bring and learn something new in the cool of your house.
As an affiliate, I will earn a bit of a commission for any sales made by clicking through links on my blog.
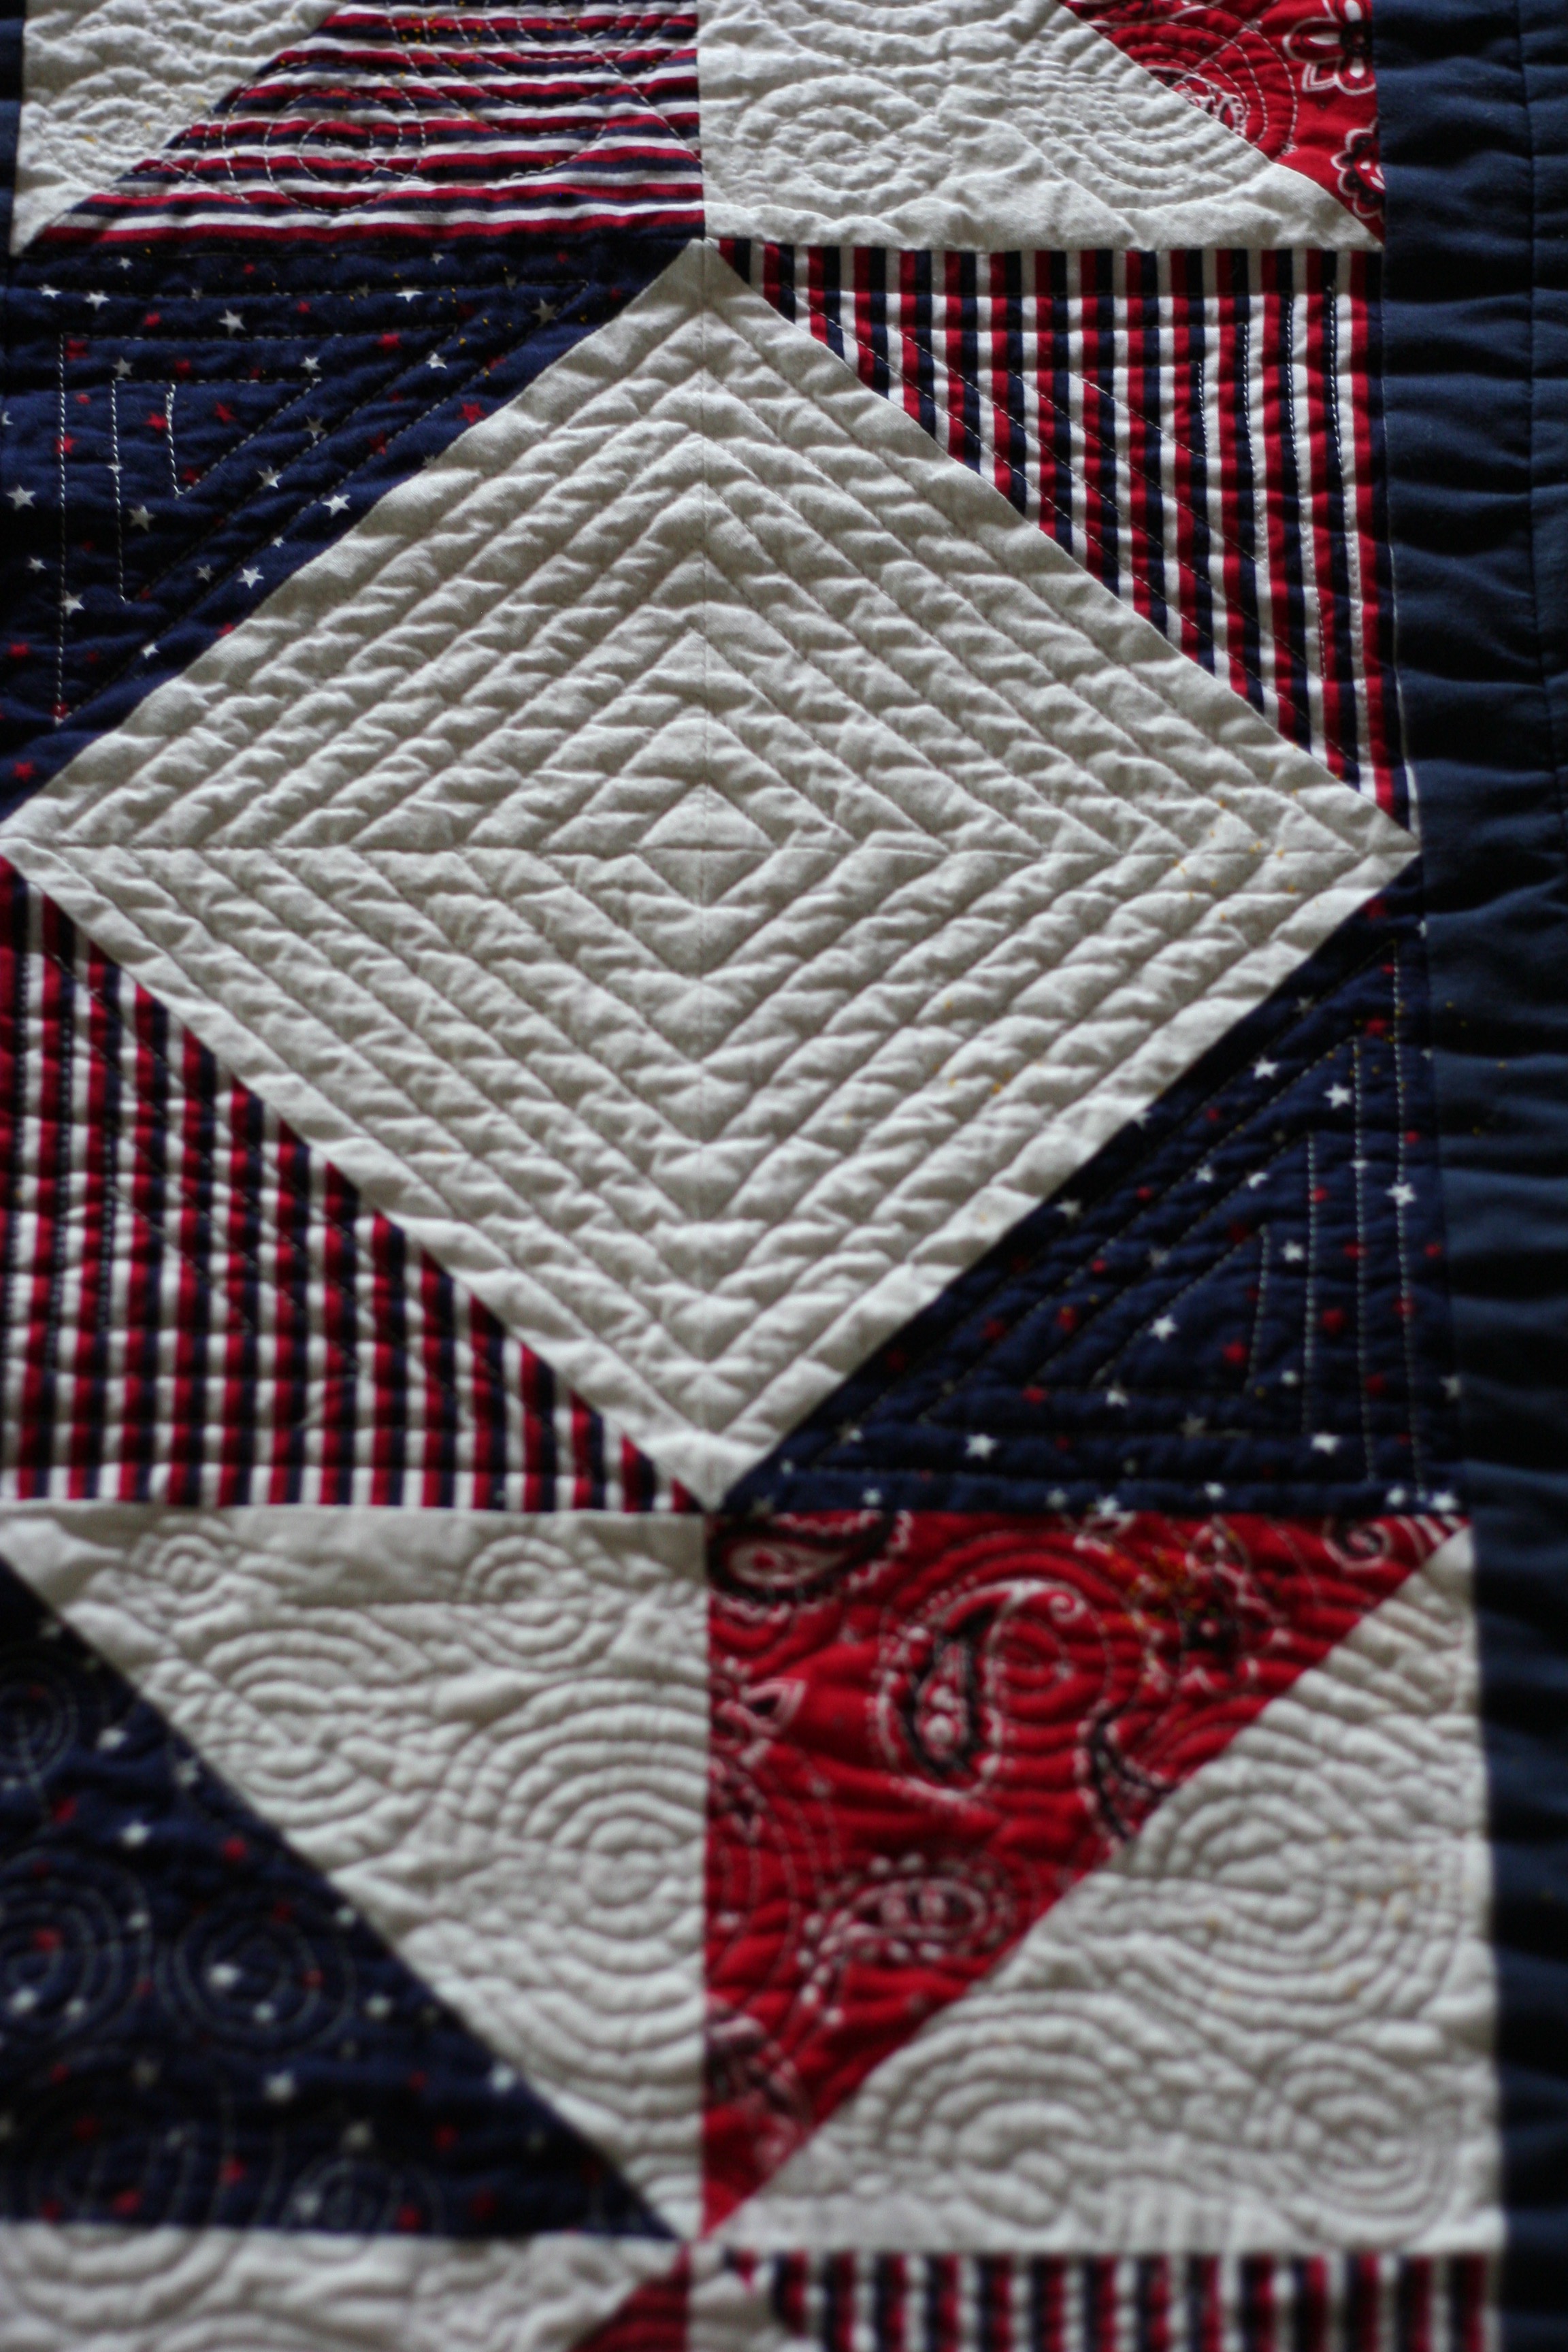
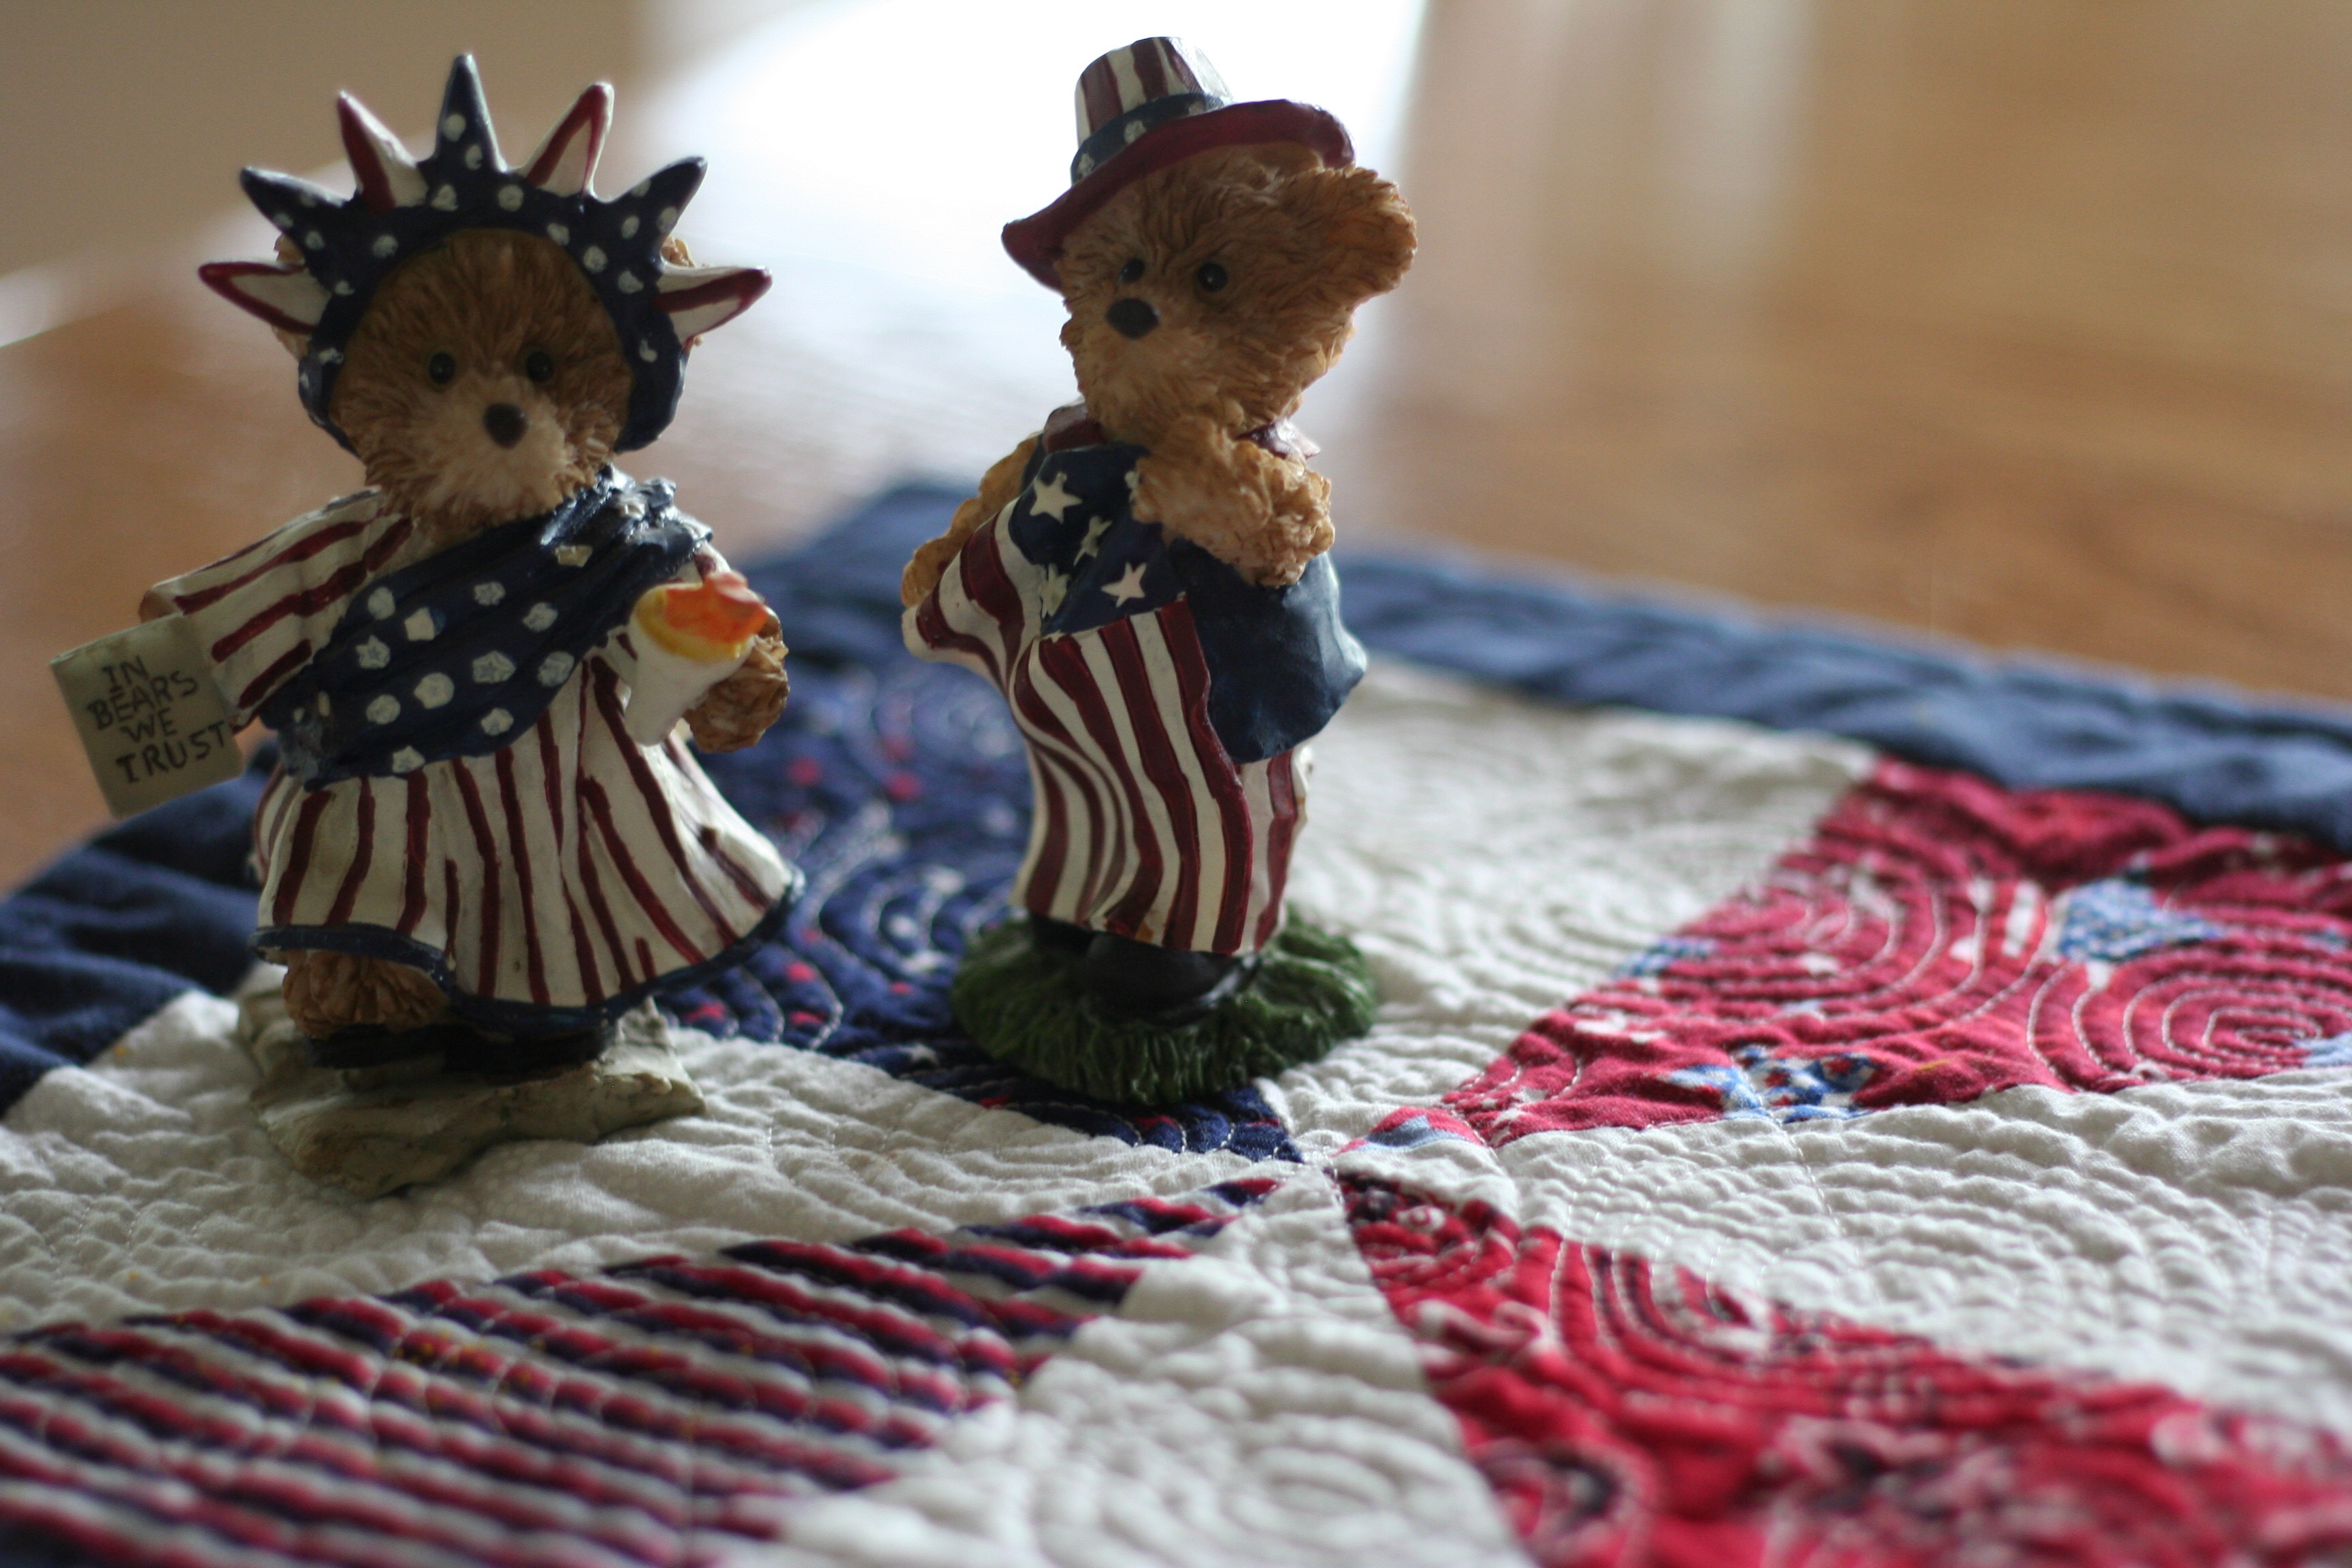
To the US readers, Happy Independence Day! To all others, Happy Monday!
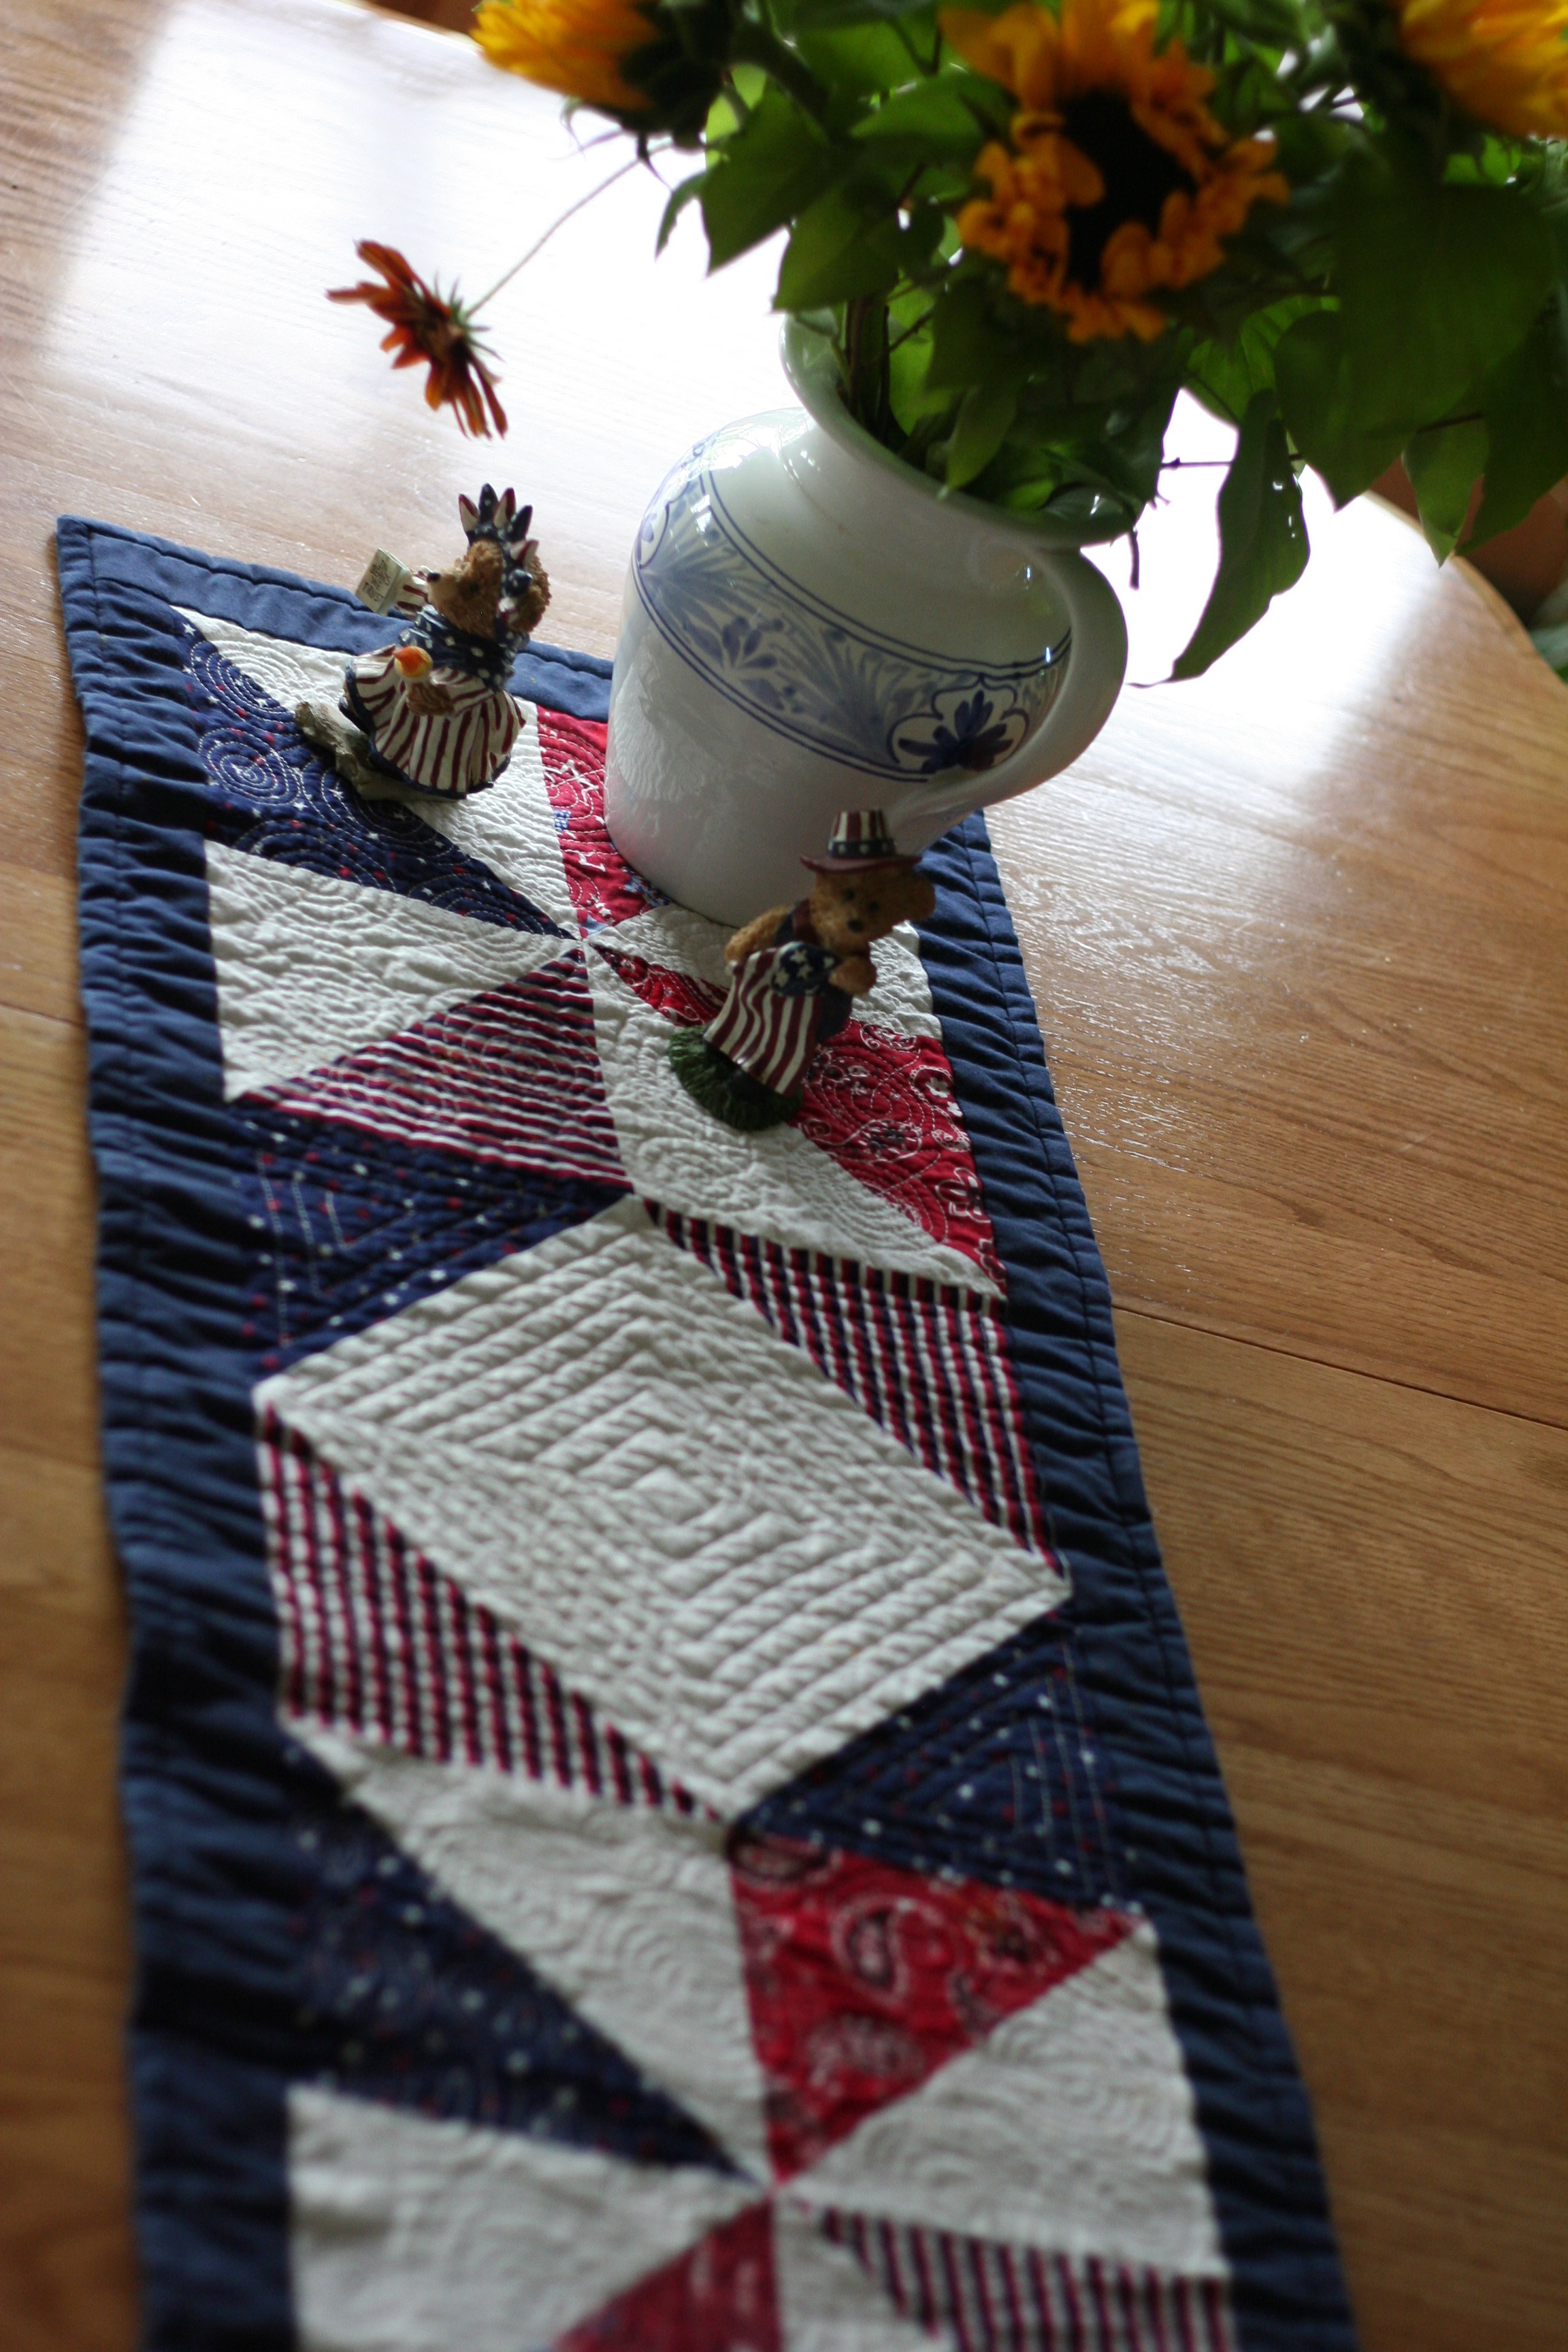
I was looking for something to decorate the table with since my parents were coming to BBQ and I found this table runner. I made this one several years ago. It was during a horrid heatwave where it was just too hot to be outside on the 4th. (We aren’t far from that this year either!!). I remember we stayed inside and I found some scraps to make this runner so I would feel like I was celebrating the 4th in some way.
This was very early on as far as free motion quilting goes but it looks pretty good. I remember thinking the spirals were a bit of a trick.
I think it is a sweet 4th of July decoration and it makes the table so festive.
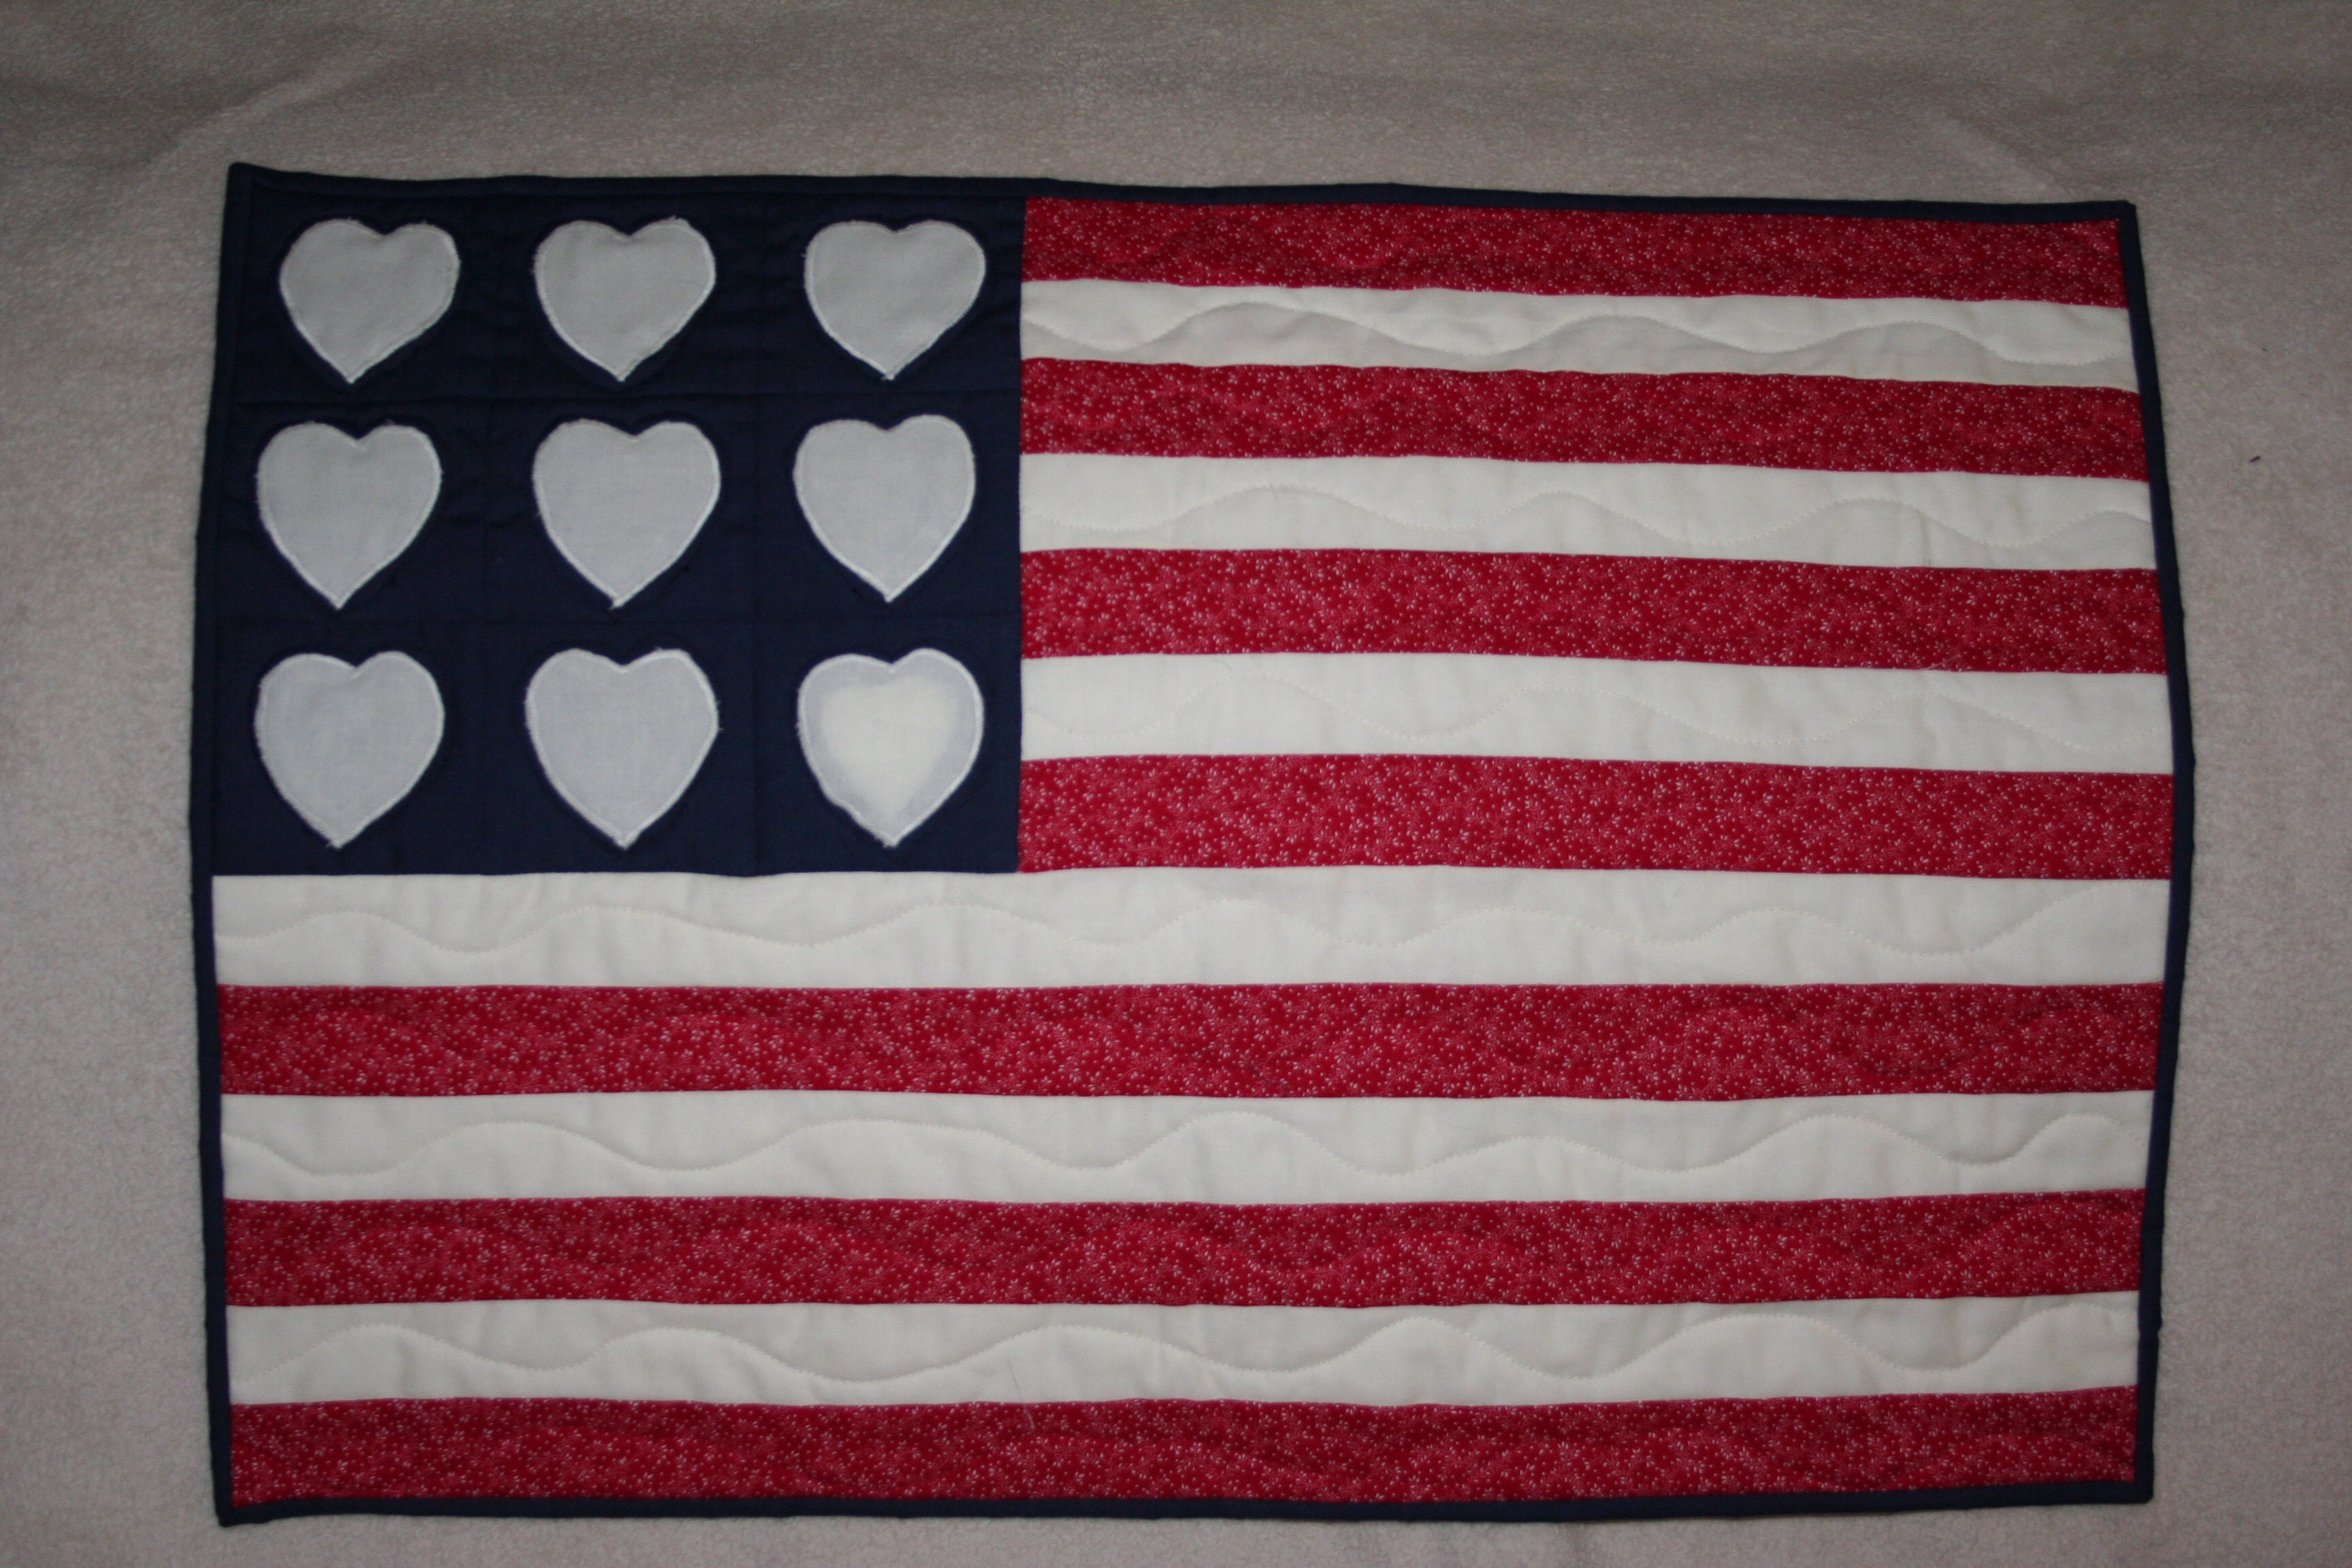
Additionally, around the same time, I made this little flag for Mom and Dad. They hang in on the house during the summer. They live up the hill from me in a big house that has a large wrap around deck and it looks pretty hanging there.
I think this could be one of the first times I did any appliqué on a quilt. It is a cute little flag with an Americana feel to it.
Linking up to a few fun parties which, as always, are found at the top of the page under Link Ups. Have a safe and happy 4th of July!!
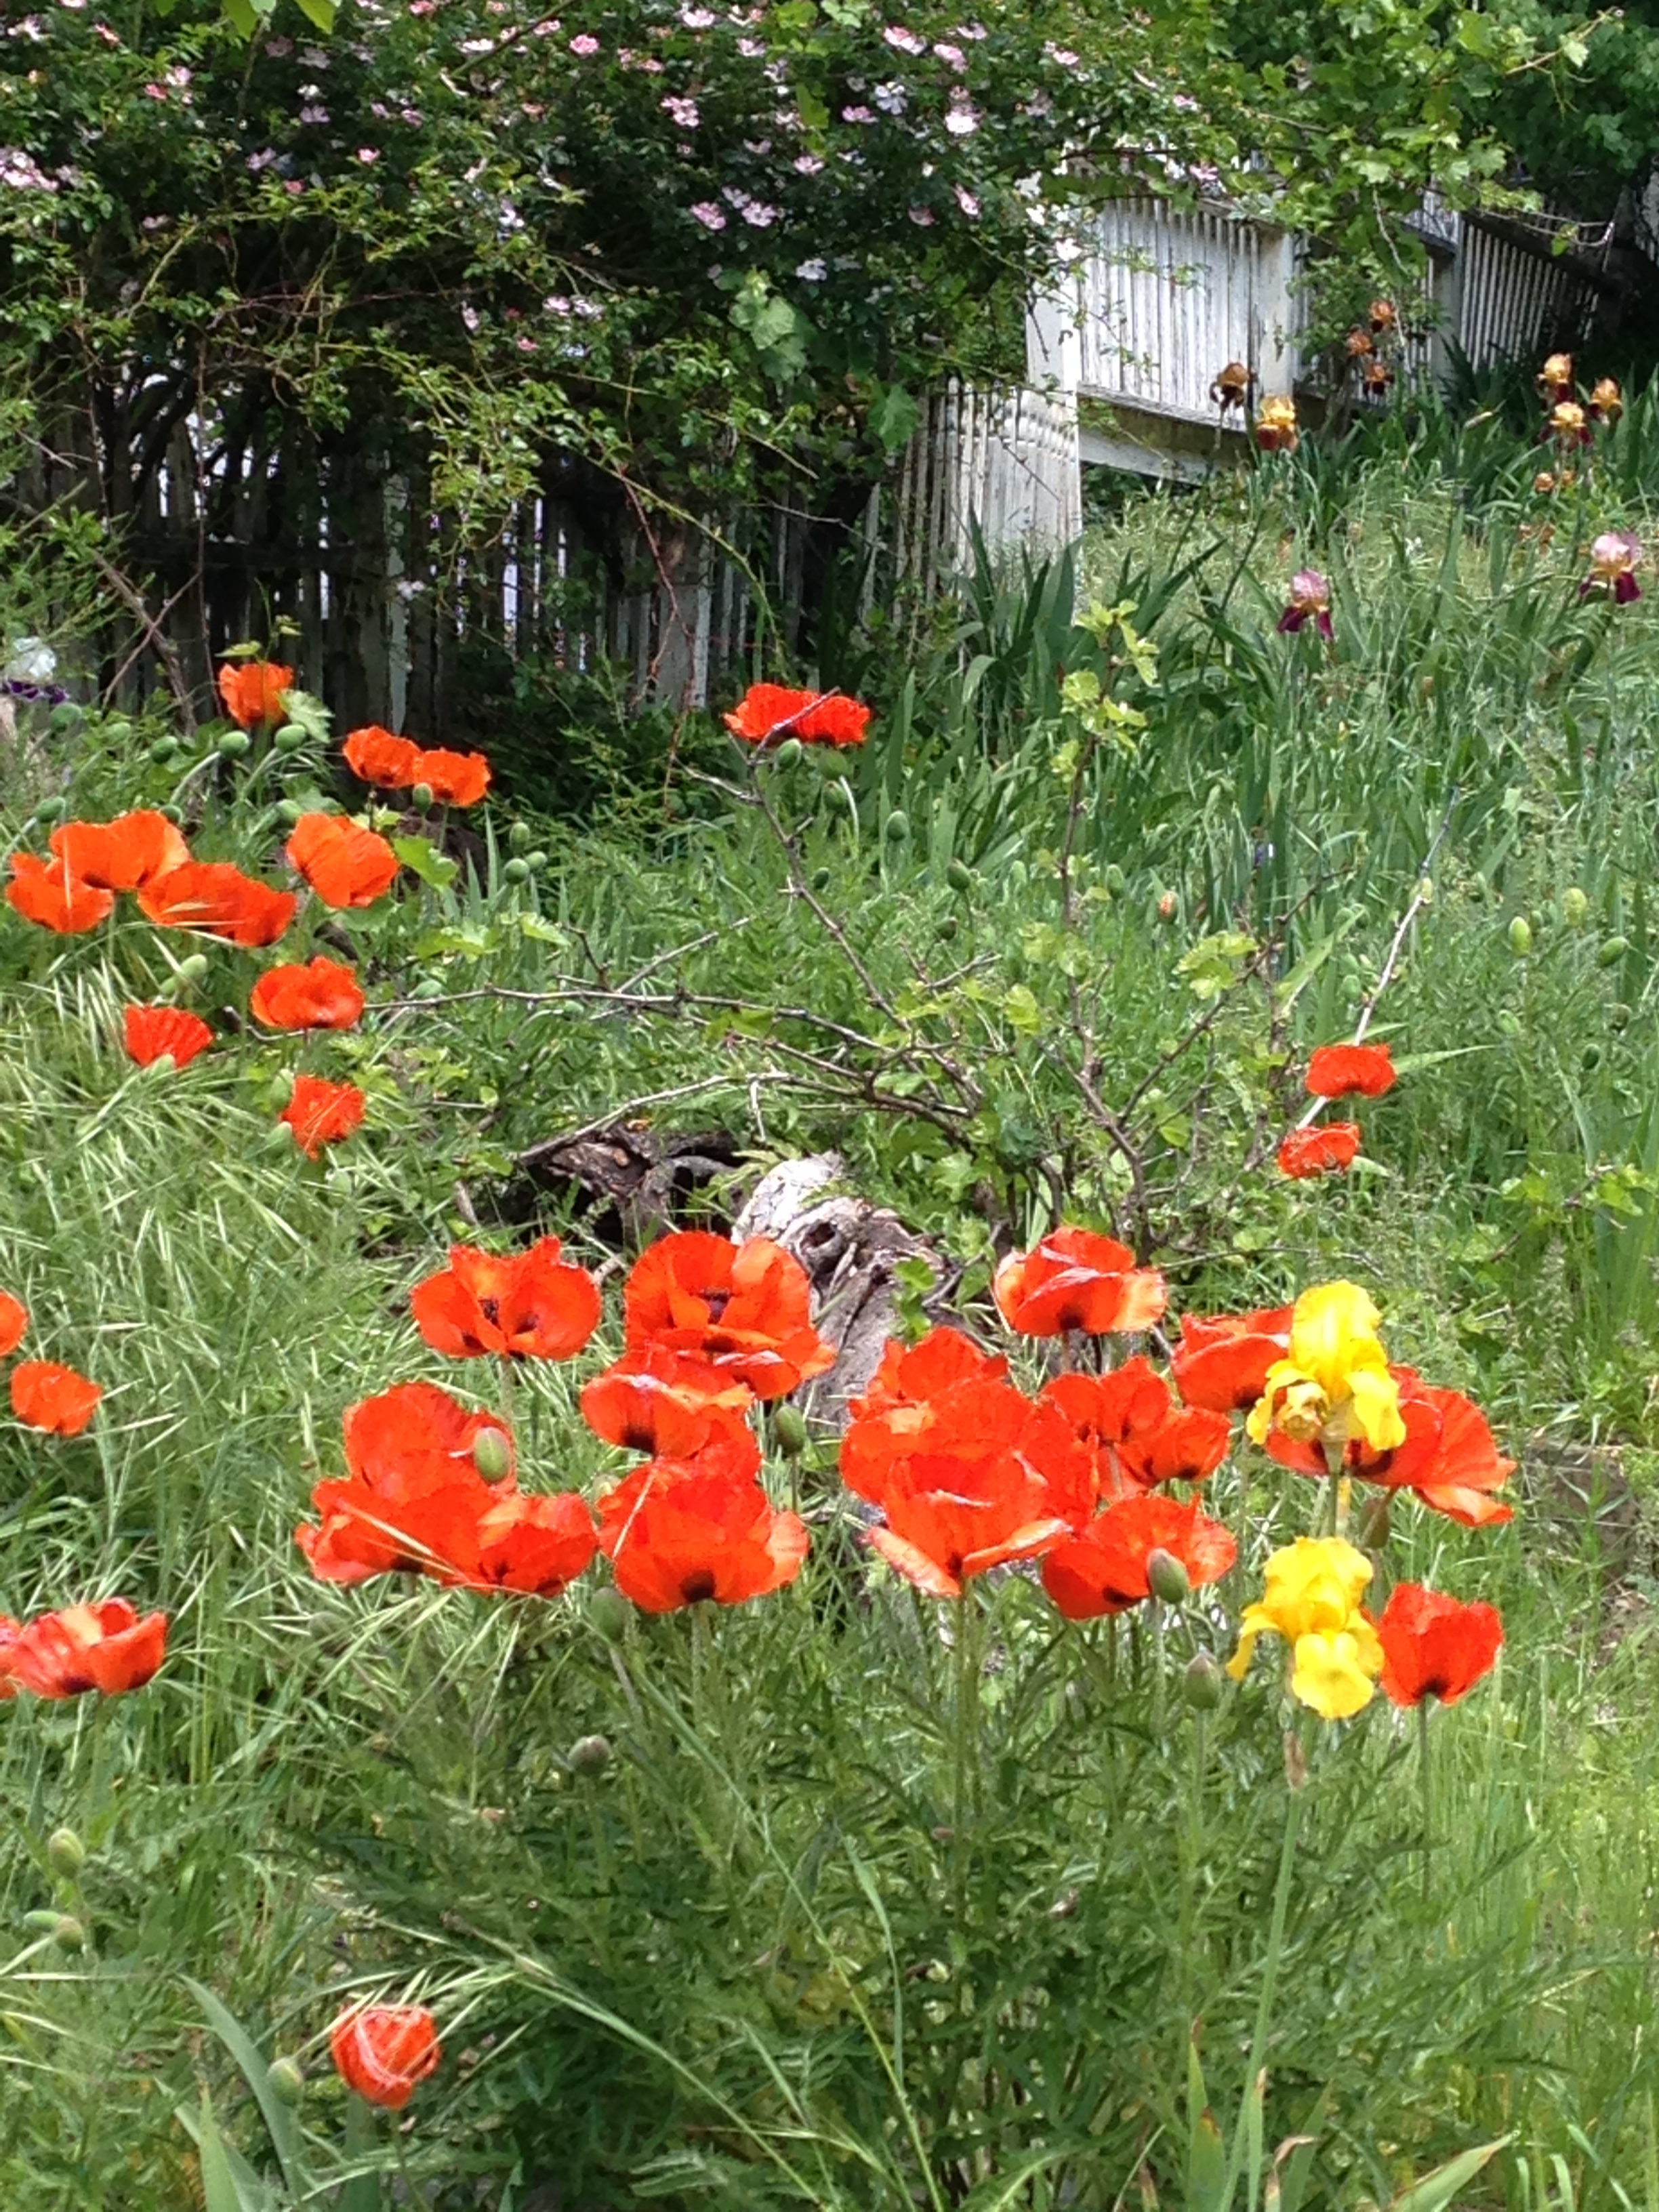
The week is starting out with a bang! Yesterday I was scheduled to have some dental surgery today and I really, really, really wasn’t looking forward to it. Imagine my joy when the dental office called to reschedule my appointment (hopefully in another decade, another century, as far out as I can schedule it!) Anyway, Ray had taken the day off because he expected to be driving the patient home and rolling his loopy wife out of the car and into bed. Since we didn’t have to do this, we opted for a drive up to Downieville and a hike.
These poppies are just everywhere. Last year when they all went to seed, I collected tons of seed pods and tried to start them in our garden. Not one plant came up. I am not sure why but I am going to give it another try this fall. I know they are grow happily up here as they are just covering everyone’s yards and hillsides. I love the drama of these vivid red poppies.
Really deep and crystal clear, the river is running so fast. Ray and I are curious to see how high it remains this summer. Last year, with the drought, it ran quite low. I suspect this summer will be a different story. Monday was a totally different day than the one I expected. Hurray for small blessings like dental appointment cancellations!!!
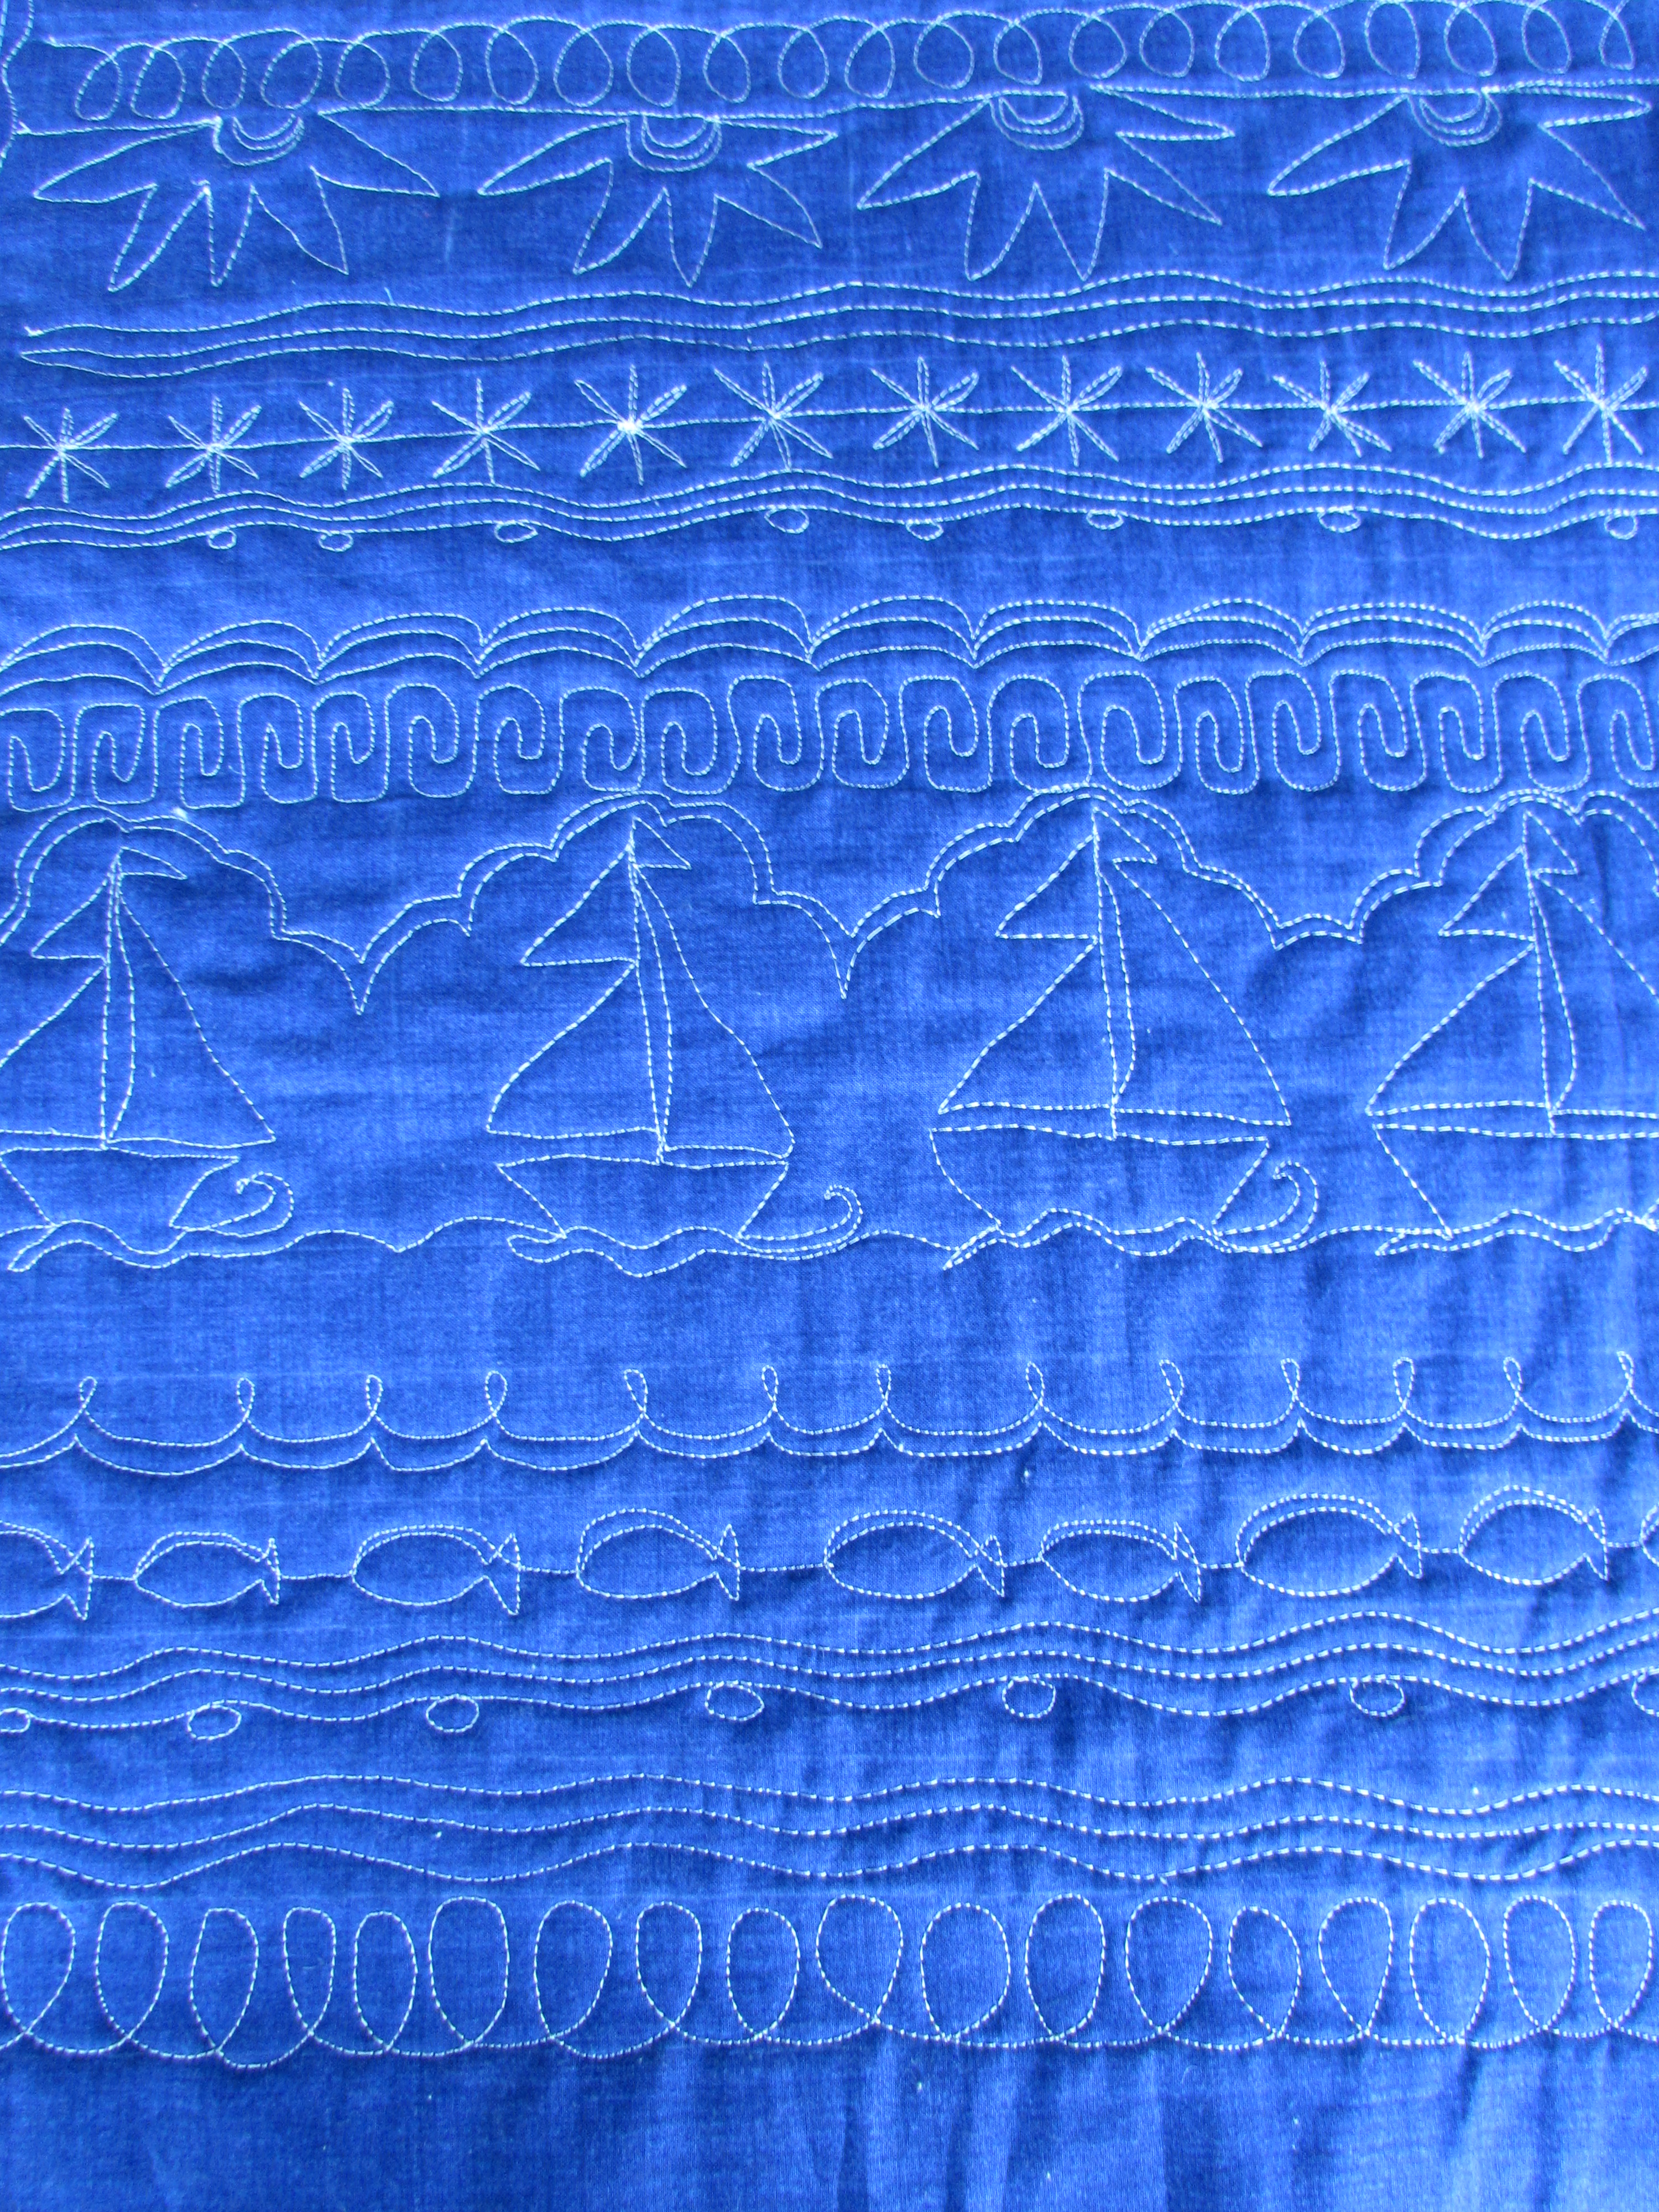
This weekend I was able to catch up on the FMQ quiltalong that I have been doing with Lori at The Inbox Jaunt. This project just gets cuter and cuter.
Those sailboats make this whole project shine! I love them and kind of want to make something for a child that features the boats. I think they are just adorable. It is with mixed feelings that I watch for today’s post from Lori. This week we will be quilting the last row and adding some finishing touches. Overall, this was a fun way to practice my FMQ.
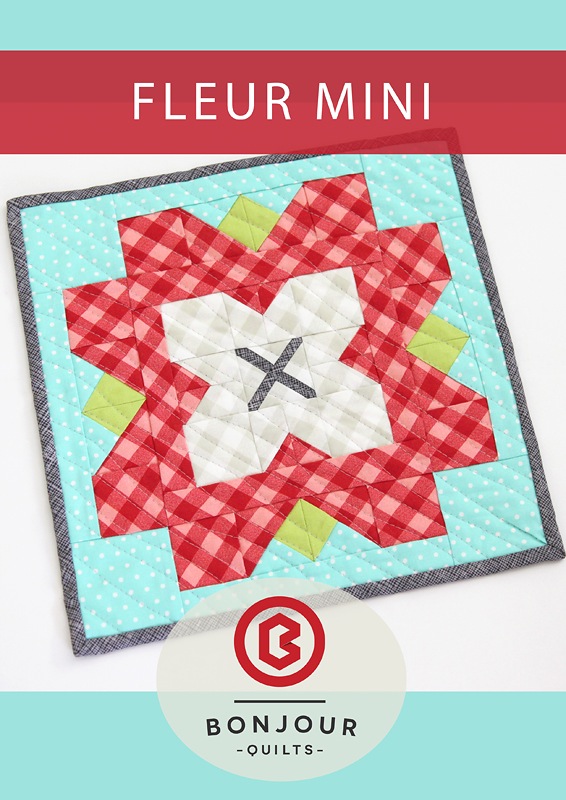
In support of the May is for Makers theme this month, I purchased my second indie pattern of the month. Yikes, it was hard to choose. It sort of reminds me of when my youngest son was little. (Ok, even now at 25 years old, he is still like this.) He had such a hard time making choices – picking out an ice cream flavor took such a long time. The donut shop was even worse. When he grew to be a teenager, I dreaded the hours we would spend shopping when it was time to get new shoes. It looks like the apple doesn’t fall far from the tree. Here I was, shopping for a pattern-just for fun, no parameters. I was buying a pattern only because I wanted to support someone in their creative efforts. And I just COULDN’T DECIDE! Finally, I made my choice and bought a newly released pattern from Kirsty over at Bonjour Quilts. It is called Fleur.
This mini finishes at 11″ square though she also sells a pattern for a jumbo size Fleur which works into a queen size quilt. I am thinking this mini would look great with four blocks so that it finished at 22″ x 22″. It is a sweet, summery look and will be fun to put together.
Finally, guess what! I am working on my first tutorial for Sew Mama Sew! I am excited about it and a little nervous because I really want to get all the details written up clearly and concisely. The tutorial is for something I have made so many times that I can do it without thought. Now I am making a few of them and trying to take good notes of the steps necessary. It posts in three weeks so hopefully I will have it all worked out by early next week.
I hope your week has started out as happy as mine!!
Linking to my usual favorites. Check them out at the top of the page, under Link Ups.
Craftsy Update: In a continued celebration of their birthday, Craftsy is offering some of their most popular classes for 50% off. Sale begins Wednesday, May 18th! Check them out. I have taken some quilting classes purchased at Craftsy and feel that that the caliber of the classes is first rate! (I am a Craftsy affiliate, meaning if you click through my link and make a purchase, I will receive a small payment.)
Lots of projects in various stages in my sewing room this week. It is actually kind of fun to have multiple things going on. I sew a while, cut for a bit, practice a little FMQ – none of it feels tedious because I am moving back and forth between projects.
My main sewing machine is being very cranky right now so I am sewing on my smaller machine. I love this machine though – the tension is not sensitive and it sews like a little work horse. Much like The Little Engine That Could, this machine just keeps going (I think I can, I think I can.) I really miss the needle down feature and the thread cutter on my bigger machine though. Makes such a difference when I am sewing for a long period of time.
Anyway… Here is what’s going on:
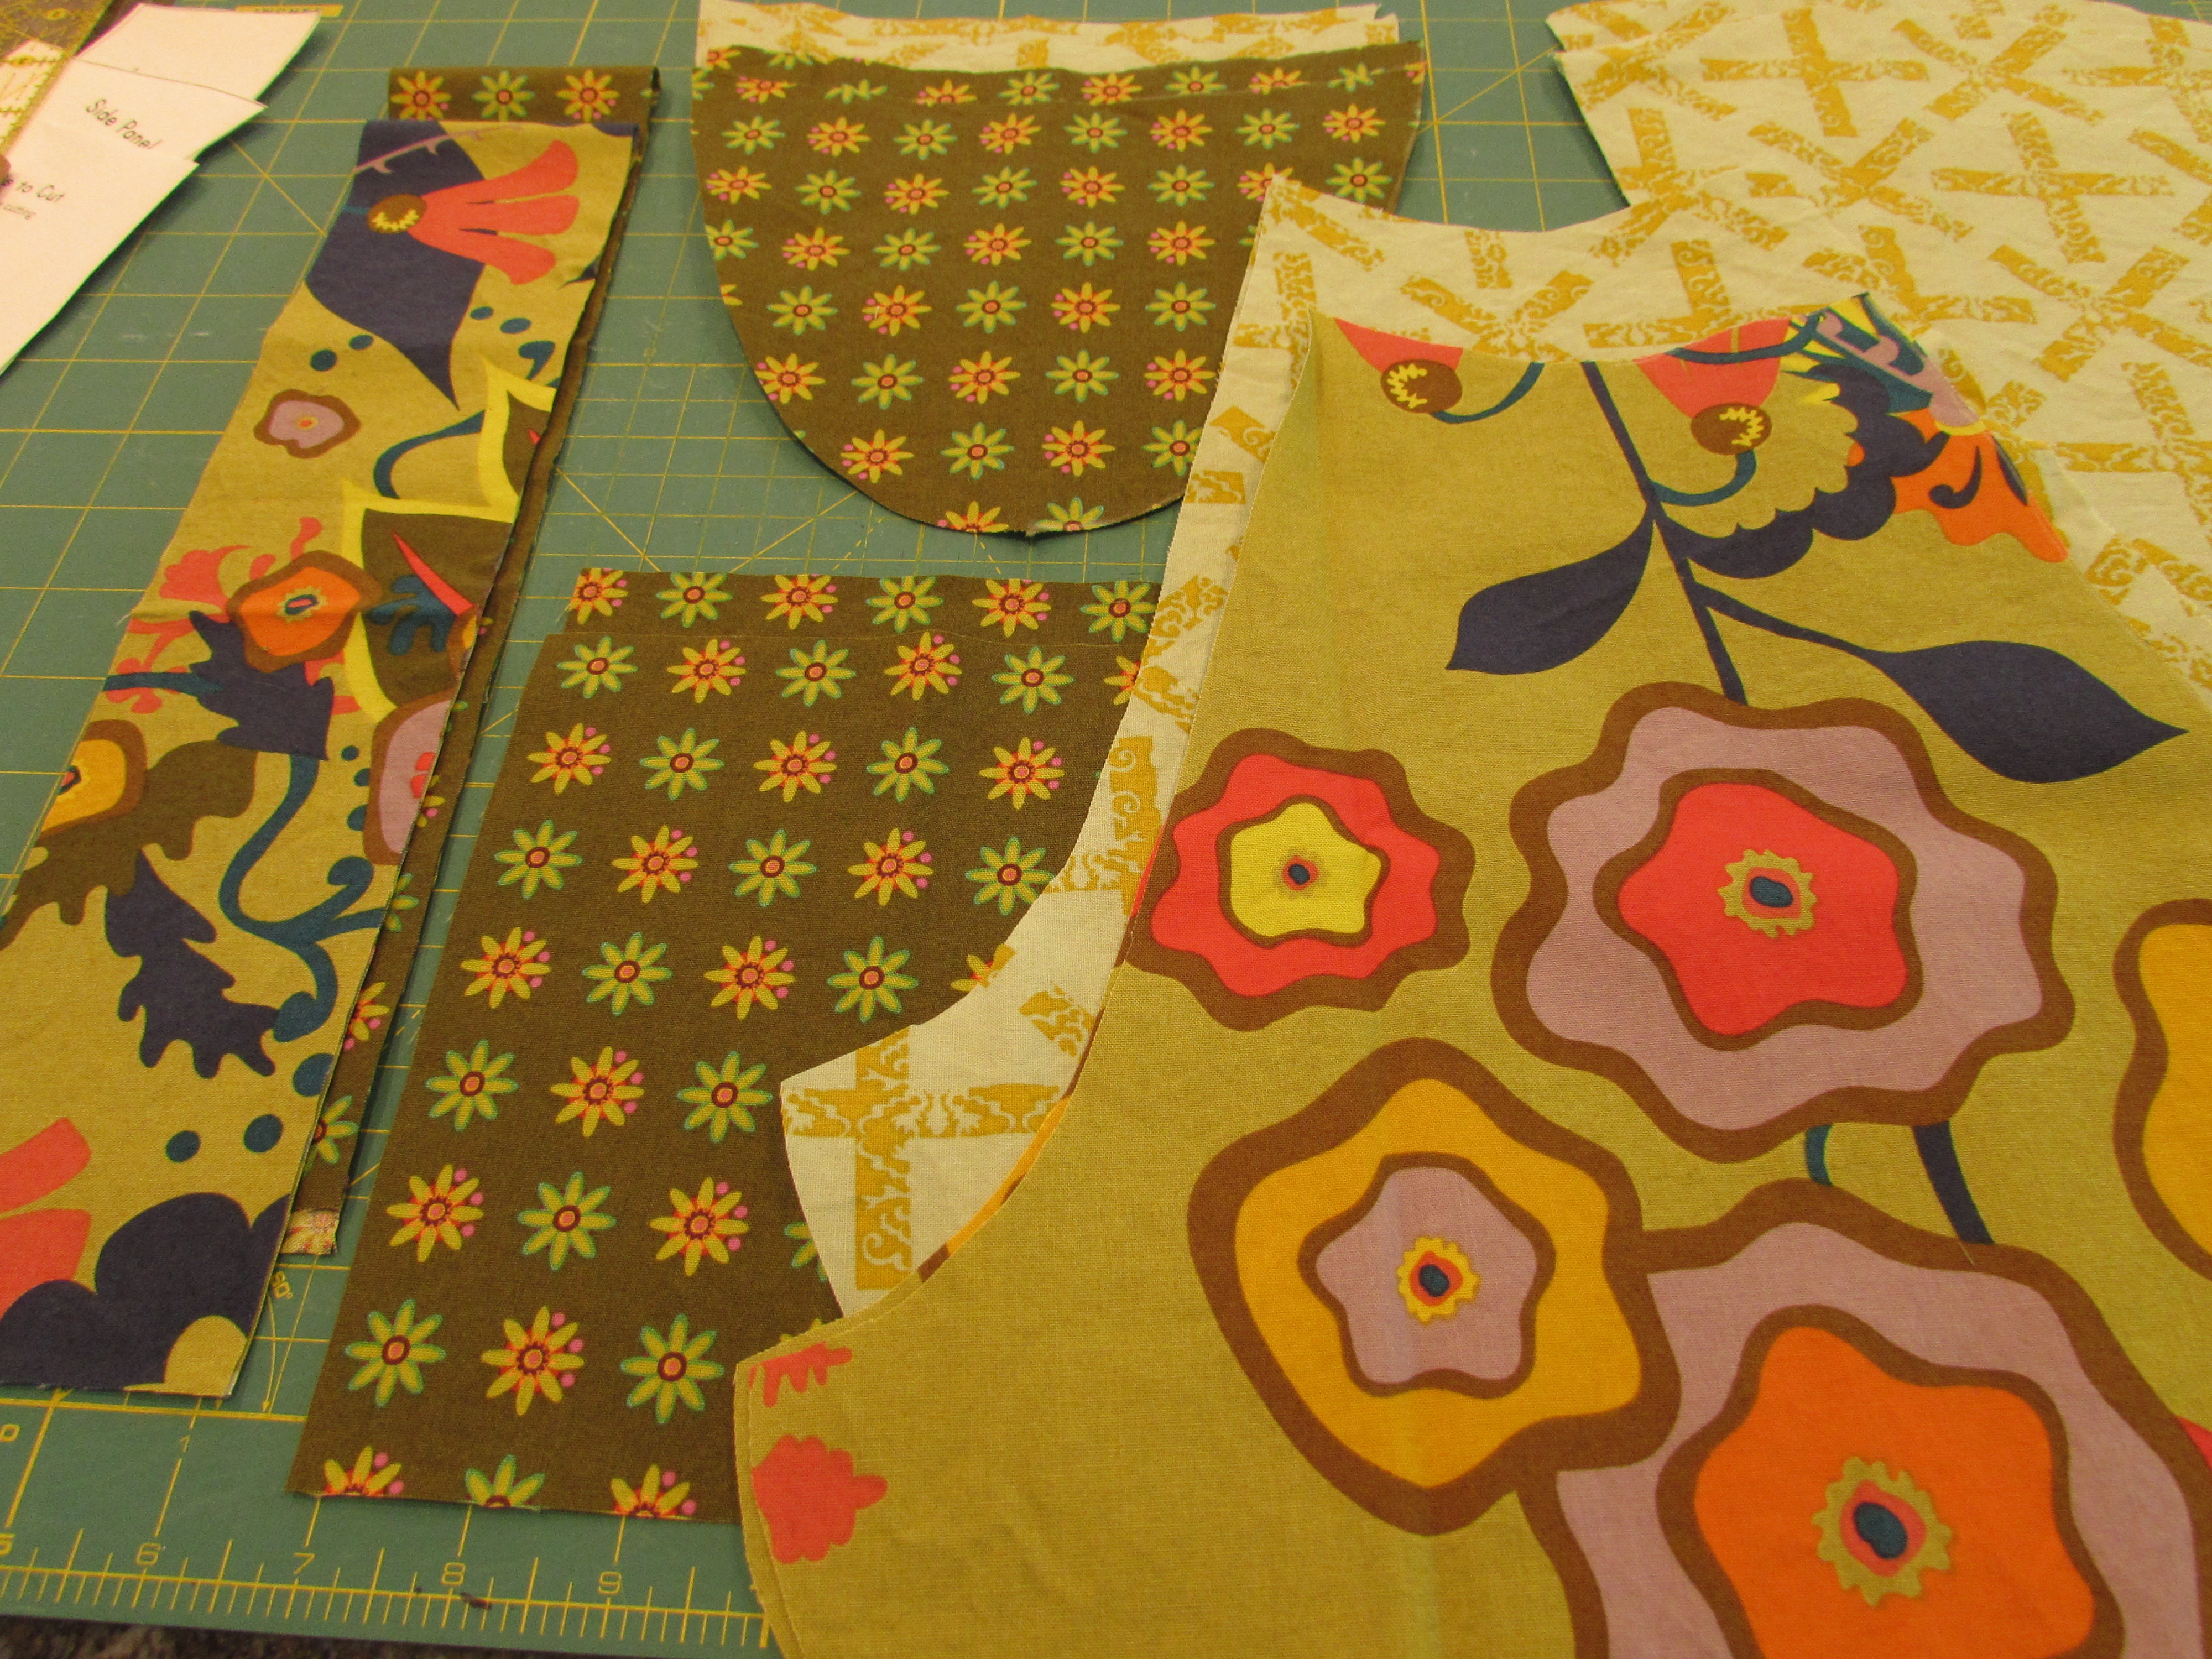
I am working on my 241 tote bag that I mentioned in this post last week. This project has become so much fun because after reading that post, Tami from Sew Much for Free Time commented that she was also going to make a 241 tote. We did a bit of emailing back and forth and decided we would have our own little sew along. After working on my Stepping Stones quilt though the quilt along at Inquiring Quilter, I found I really enjoy the social aspect of the project. I love seeing everyone’s progress, having others to ask questions and get input, and seeing the fabric choices and how much that changes the pattern that we are all using. I think working on this tote with Tami will be the same. We set up a few deadlines for progress and hope to finish up together. It is low key though. If life gets in the way, so be it. We are just enjoying our virtual time sewing together! If you want to see Tami’s progress, hop over. We are just getting started. Anyone that wants to, is more than welcome to join us. Leave me a comment if you want more info.
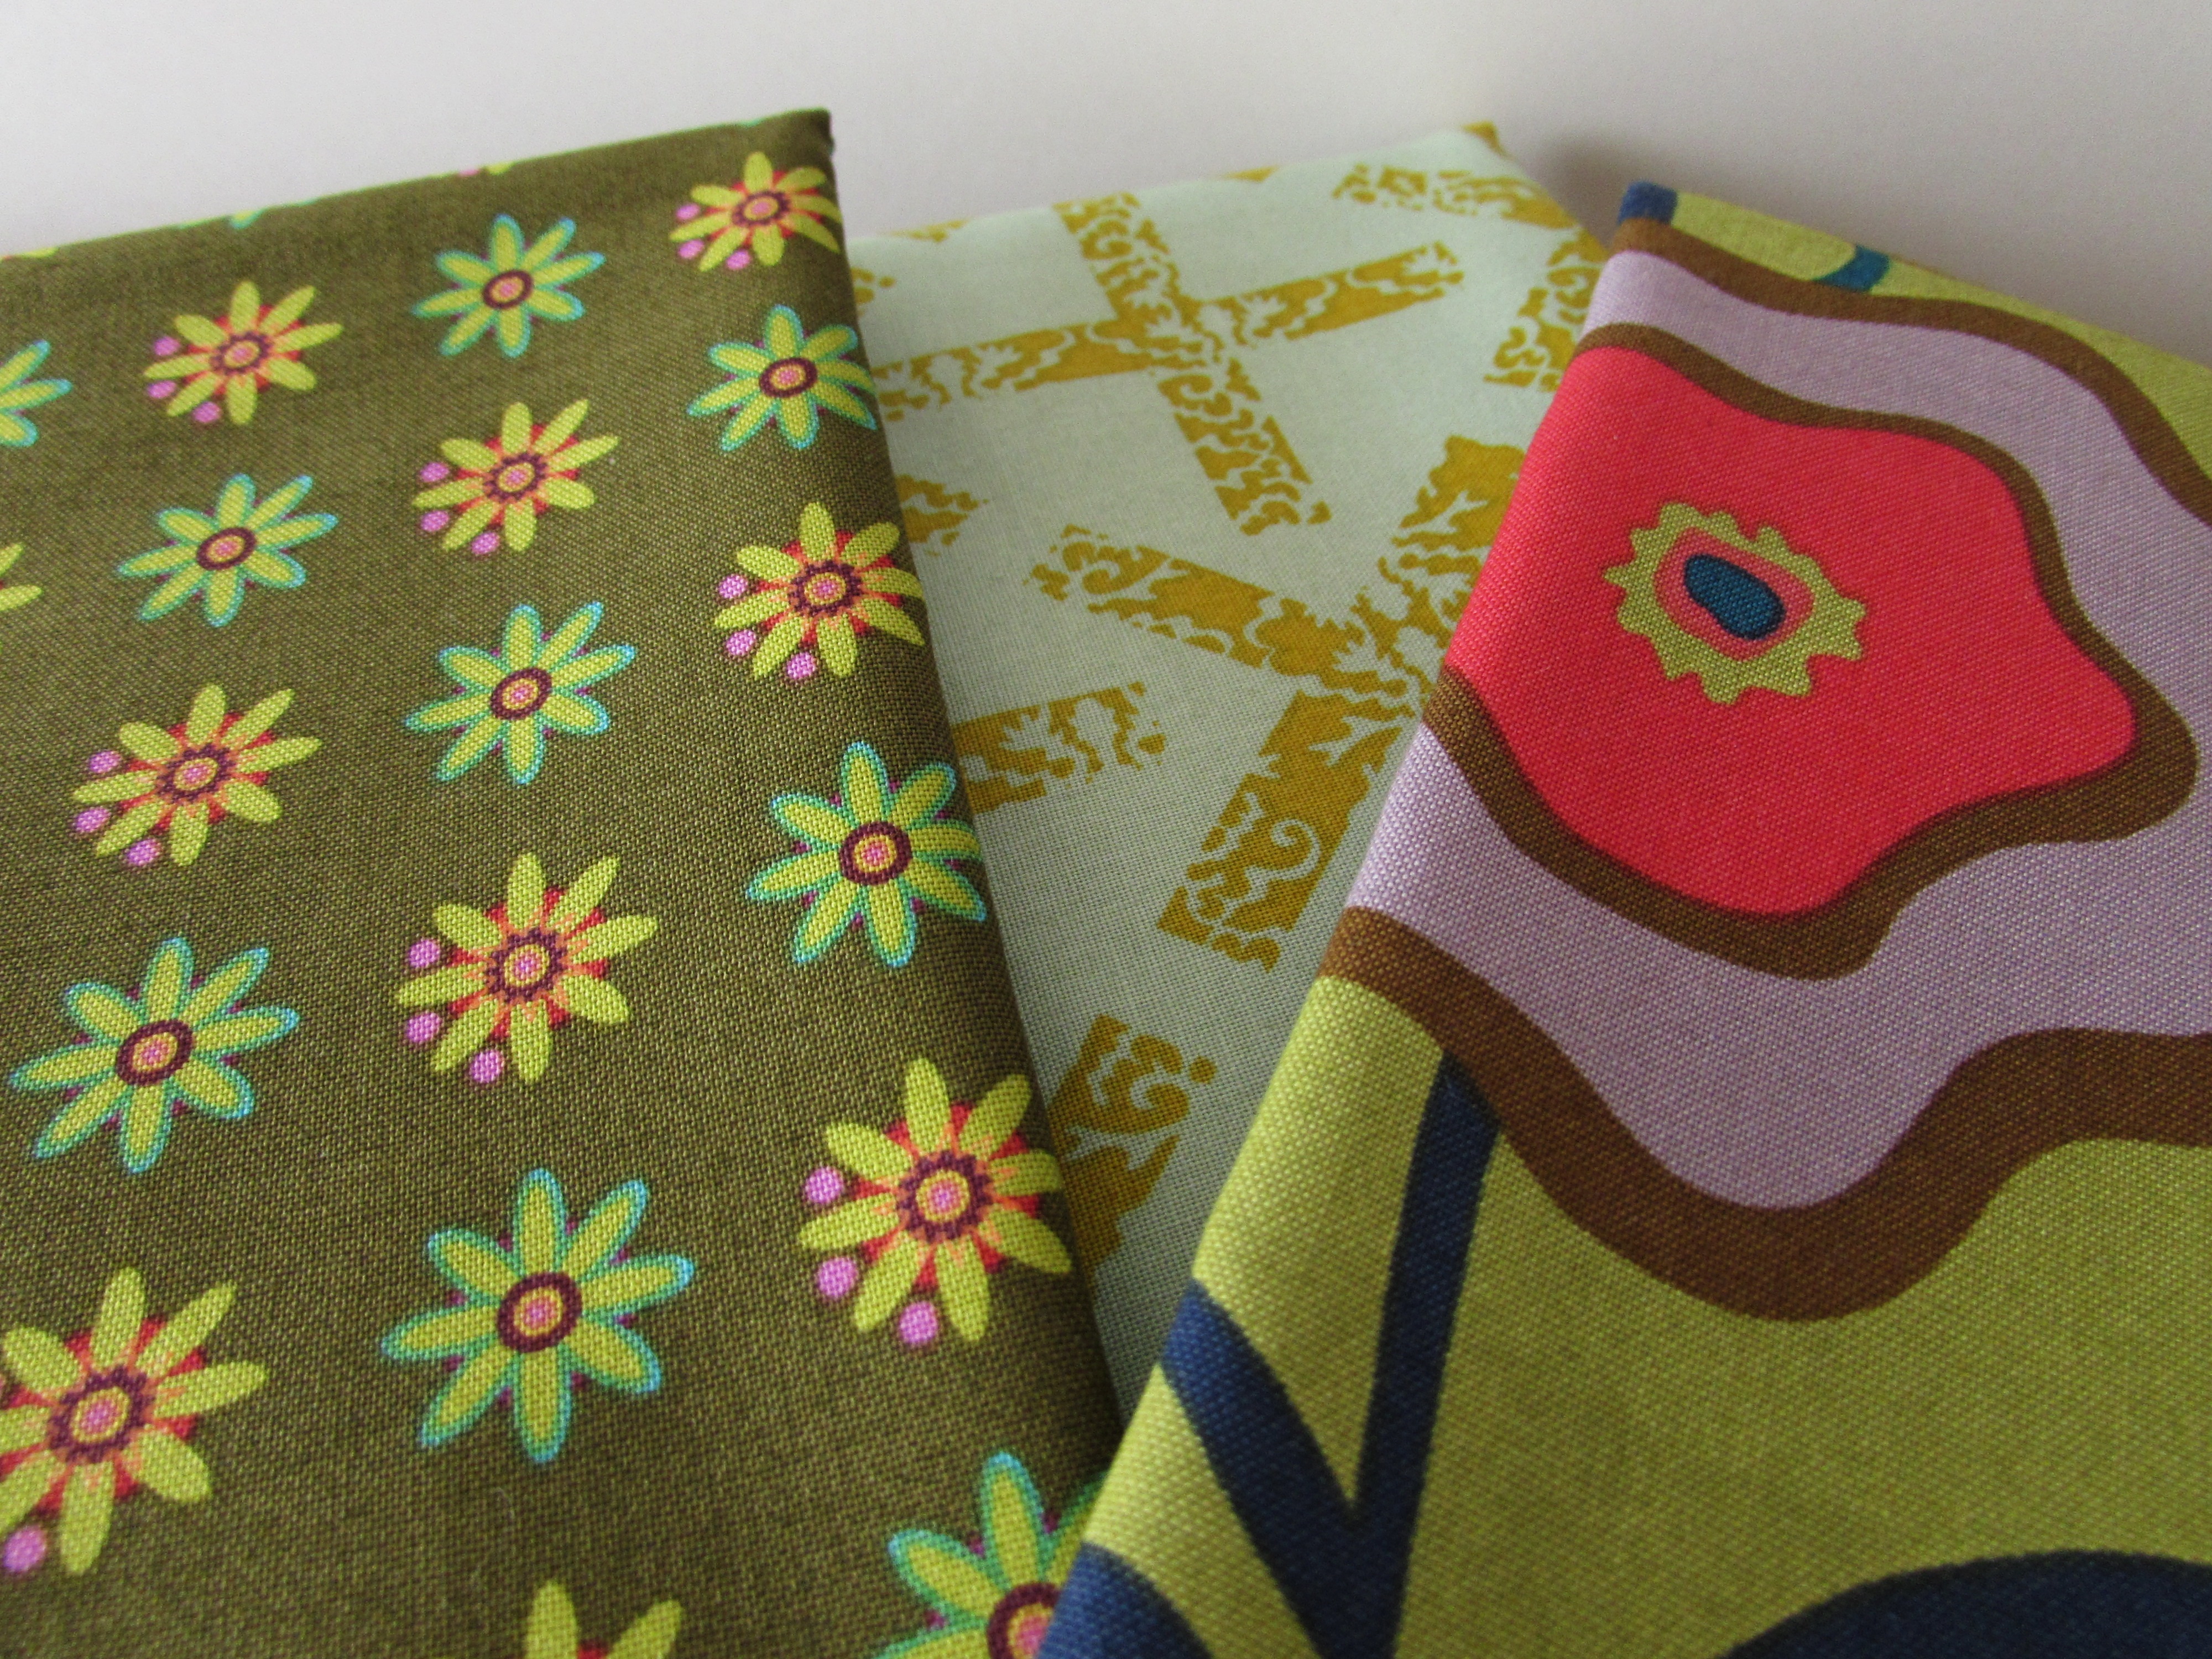
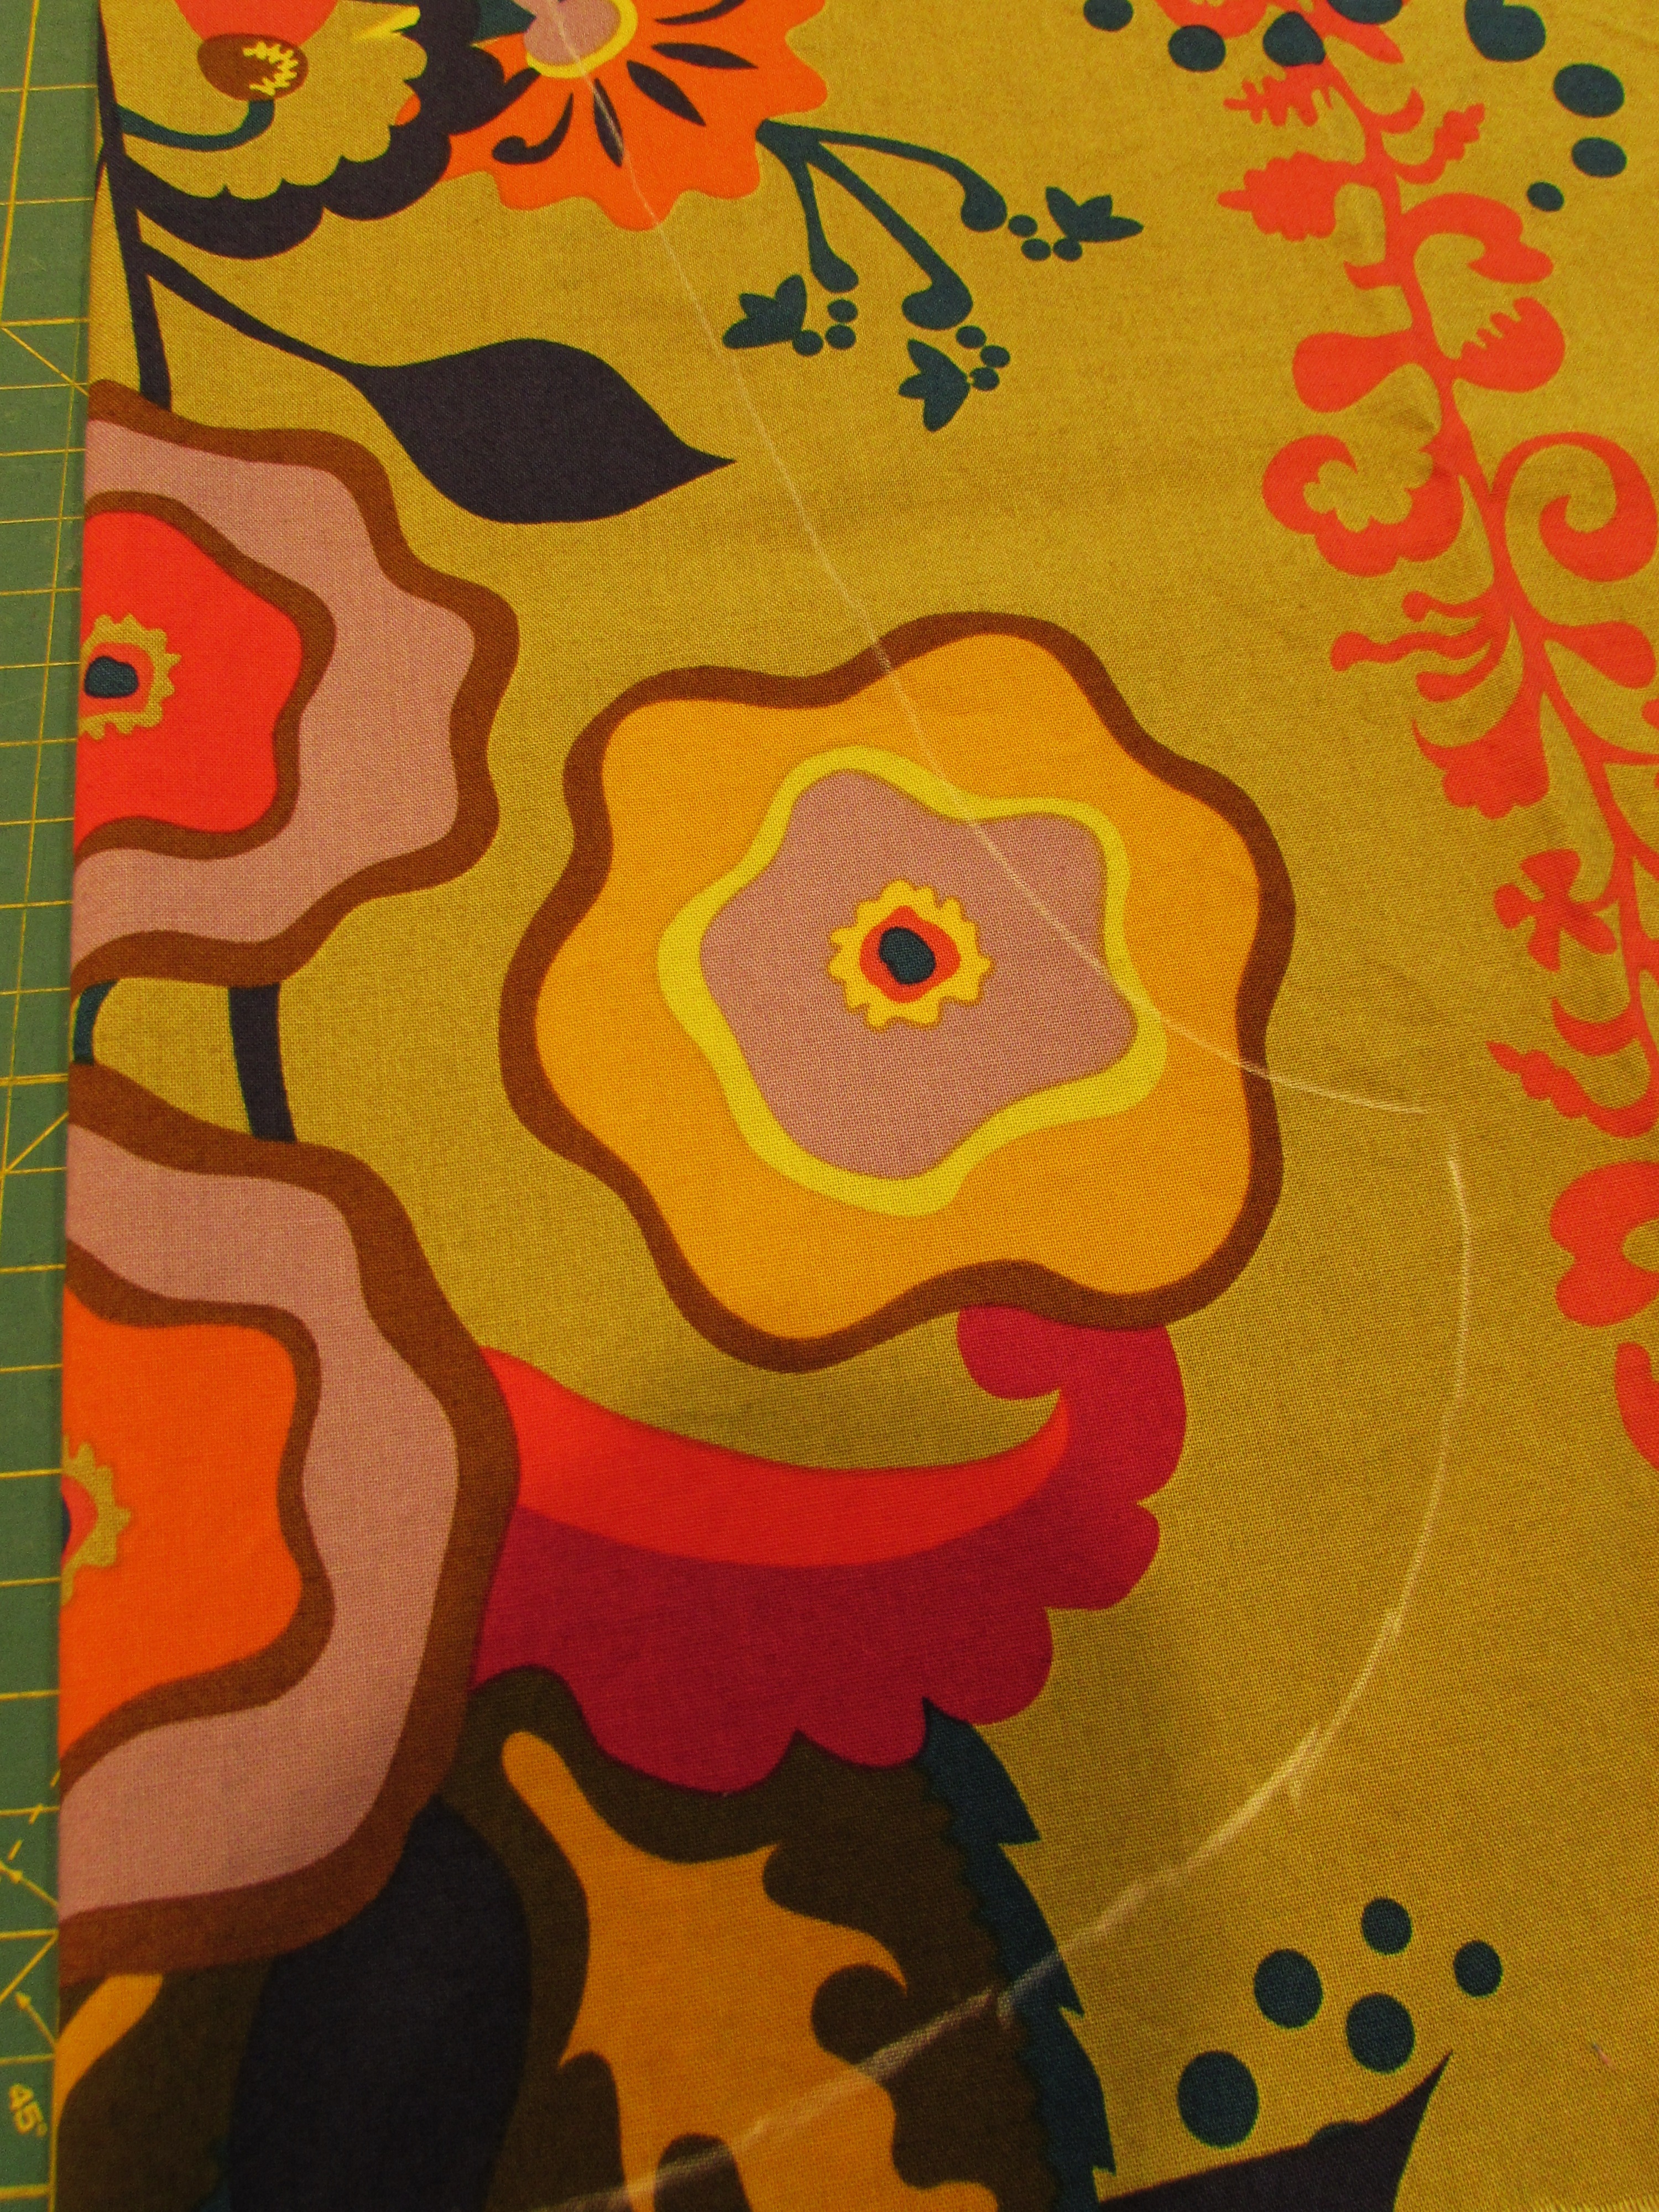
By today, we are both aiming to have our bags cut out and pieces prepared. I spent yesterday morning prepping everything. I plan on using these Allison Glass fabrics.
The pattern seems very straight forward so I doubt there will be much difficulty makijng this bag. I traced my pieces with a chalk marker and cut from there. Printing the pieces on regular printer paper made for thick pieces. I didn’t want to pin and cut them because there might be some inaccuracy. Tracing the pieces was quick. (When I was cutting pieces, I took the pictures under the kitchen lights which distorts the color.)
Once the pieces were cut, I fused the interfacing to the outer pieces.
I’m really excited about this project. It is going to be perfect for my niece’s birthday gift.
Besides working on prepping the bag, I also did some FMQ on the Mystery quilt along that Lori Kenedy is hosting over at the Inbox Jaunt. This week we were instructed to quilt little stars and suns. Lori calls them Spirograph Suns though we did a simplified version of them. The motif is so fun and you’ll find the tutorial here.
We only have a few more sections to quilt and I think I will be a little sad to see this finish up. I love that the structure of this QAL only requires I quilt two lines each week. Not time consuming but it forces me to practice two new motifs each week. (Also, take a look at my fish. I feel like I stitched my fishies going upstream. Shouldn’t they should swim from left to right…. I must have gotten turned around (not all that unusual for this quilter.) 😉
My Stepping Stones quilt is basted and ready to be quilted. I am looking forward to the weekly post tomorrow as she plans to give some ideas on possible quilting motifs for this pattern. Choosing how I will quilt something is still a challenge for me but maybe I will be inspired by Jennifer’s post tomorrow.
Finally, I am working on a mini that I will share later this week. It is going to be cute though. Here is a sneak peek.
I am going for an old-fashioned, vintage feel and I think it is coming together well.
OK – what do you have going on in your sewing room? i would love to hear.
Linking this post up with all sorts of fun sites. Take a look at the list. You’ll find it at the top of the page, under Link Ups.
Just in case you need an idea for Mother’s Day gifts (for a friend, your mom, even yourself – even if you aren’t a mom!) Craftsy has awesome classes and I can’t imagine a crafty mom who wouldn’t love one (or two, or three…) Classes last longer than flowers and they are way more affordable! Click here to check it out.
This week we have been reading and talking about the idea of supporting all of the Indie pattern designers that are working so hard to design and release original patterns. Besides purchasing these lovely patterns we can also offer our time as pattern testers. Two weeks ago I was reading a couple of posts by Mihaela of A Beautiful Day. She blogs from Romania (don’t you love the ease with which we are able to befriend quilters from all over through this blogosphere.) Mihaela is working on a new pattern she calls Urban Folk Quilt. In one of her posts she asked for some testers that would help to verify that her English all translates correctly. I happily volunteered. It is hard enough to design patterns, figure out the measurements, draw up the instructions etc. But to do this in a language that is not your primary one must be very challenging.
You can be sure, language isn’t an issue for Mihaela. Her English is just wonderful and I did not find even one problem with her pattern and/or the translation to English. She includes every detail of instruction and sometimes more than one would expect. She discusses how to confirm that your blocks line up correctly, how to properly bind a quilt, and suggests ways to avoid block distortion. Overall, this pattern is complete and a great tool for the beginning quilter. I loved making it and would happily make another (and probably will!)
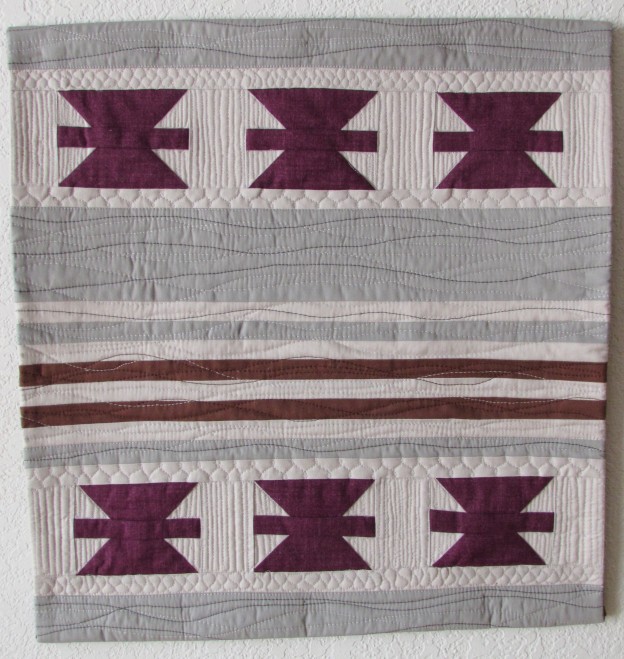
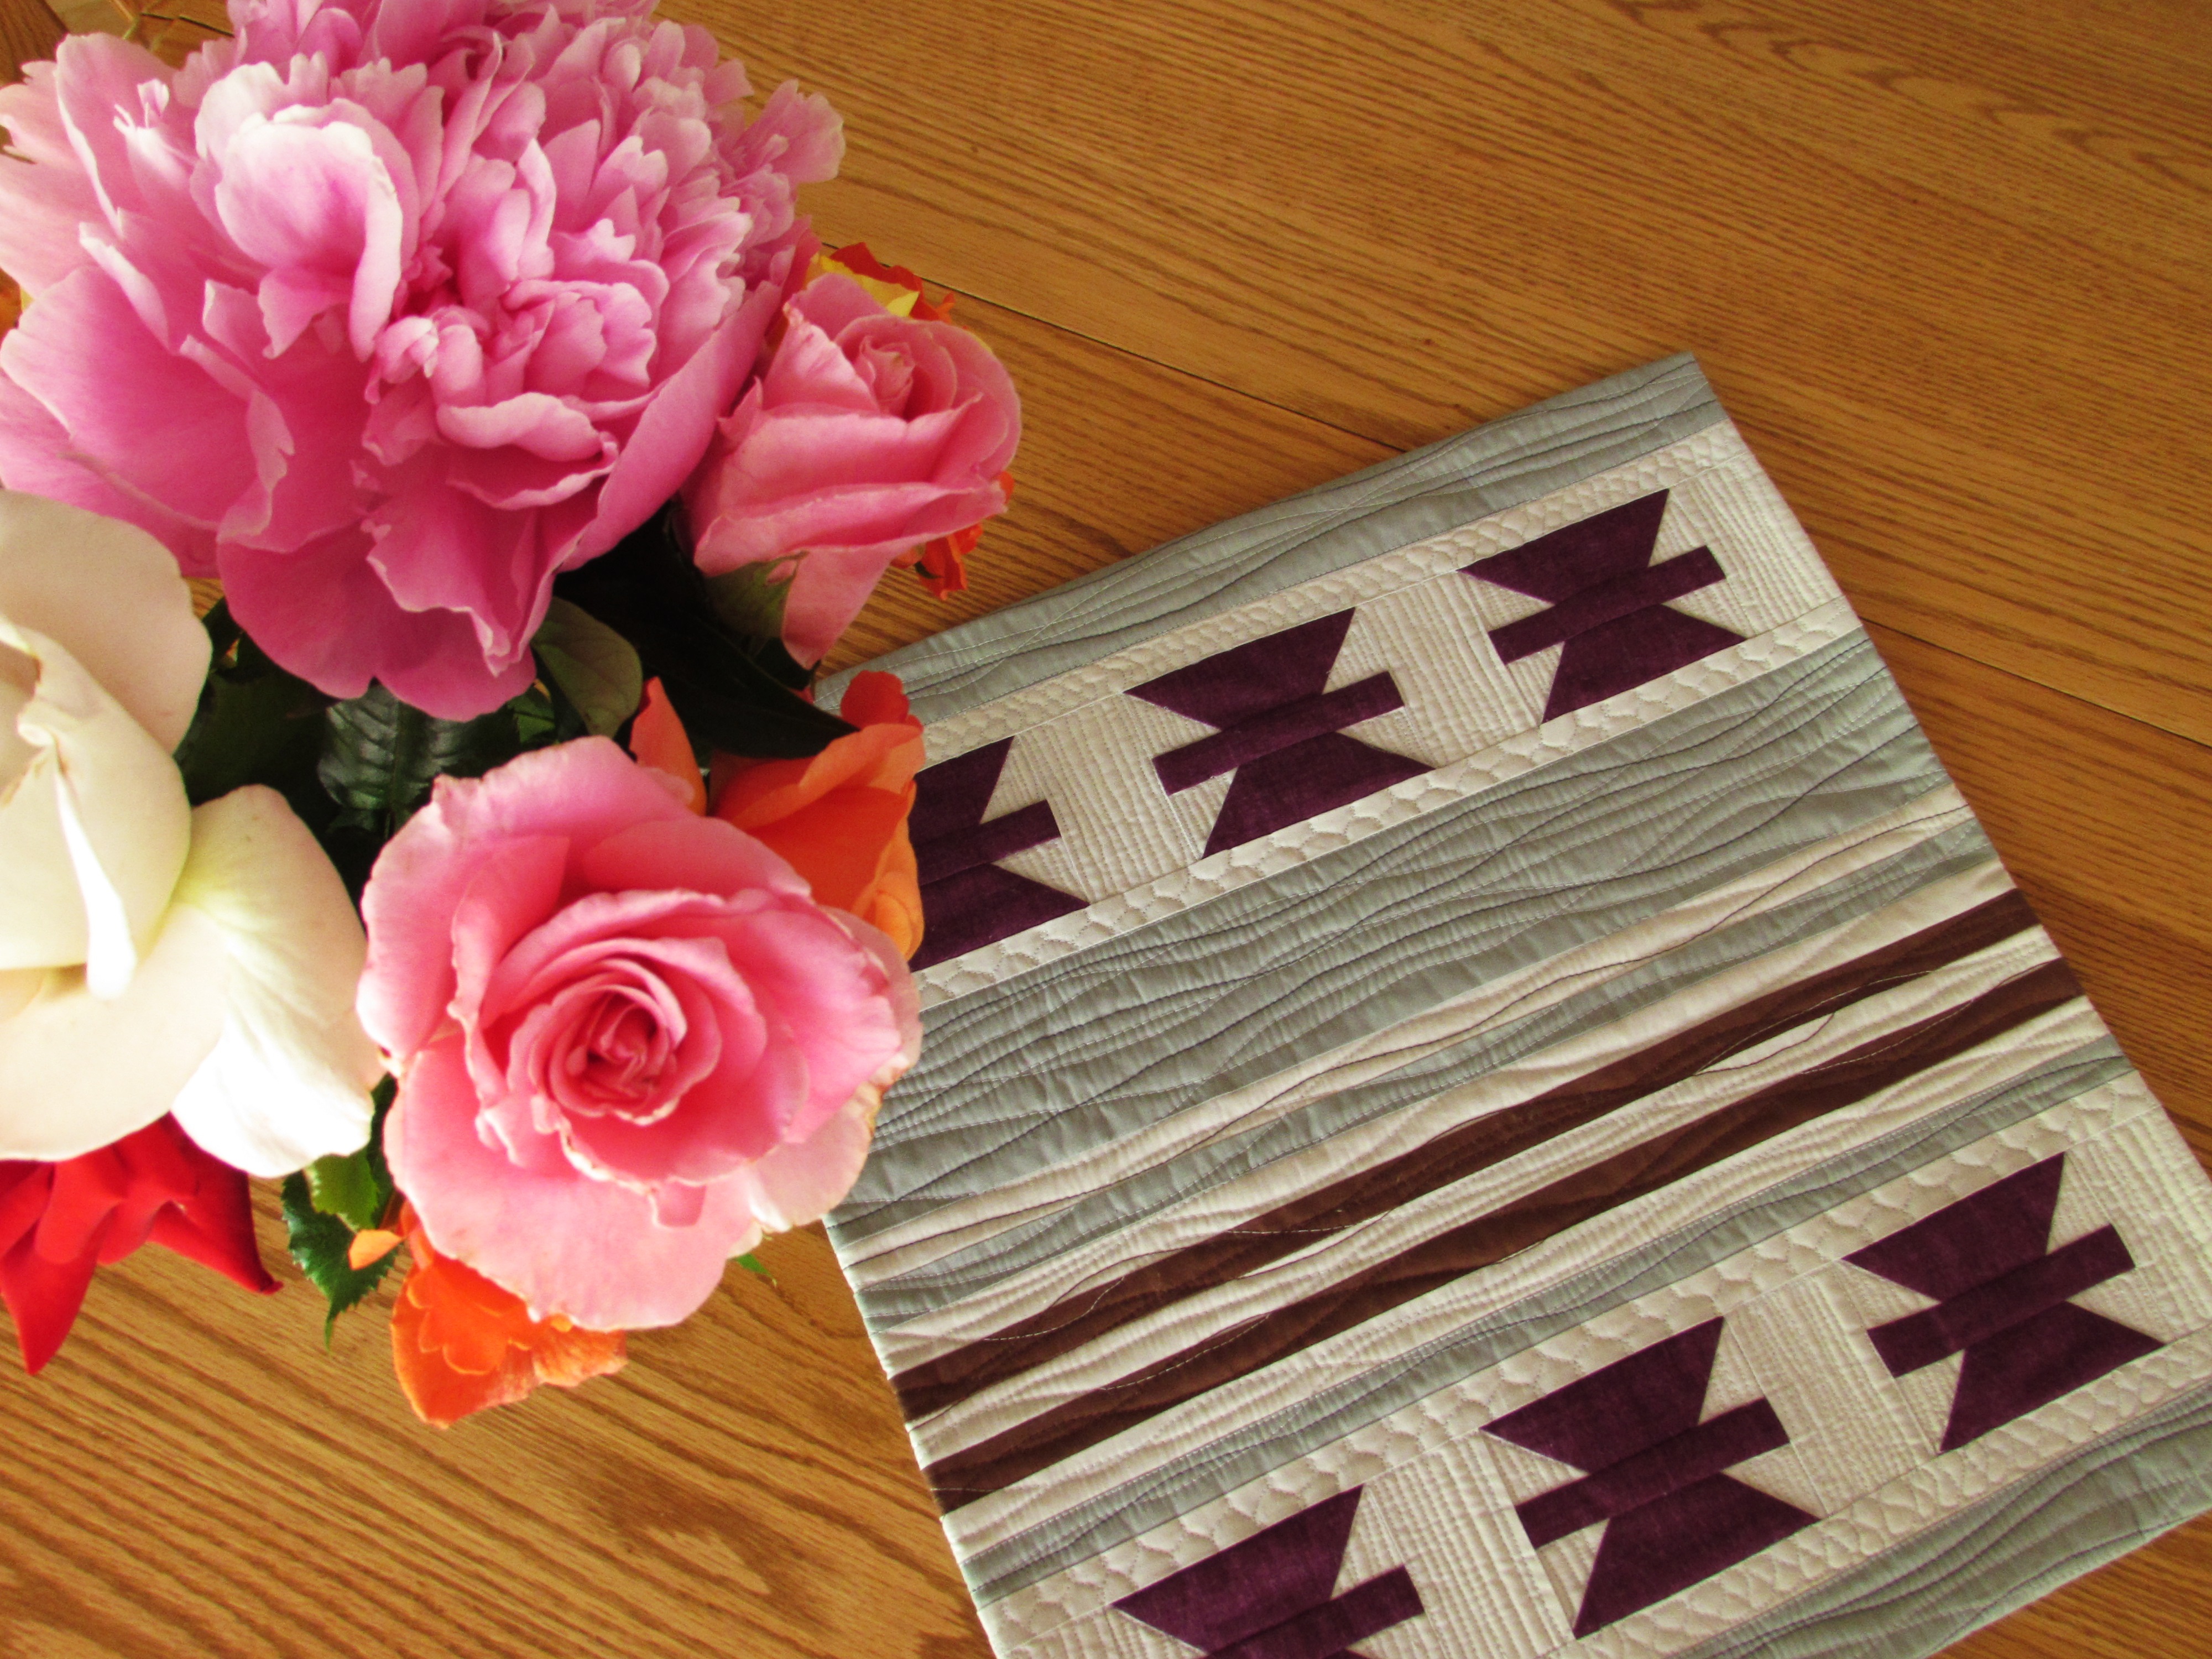
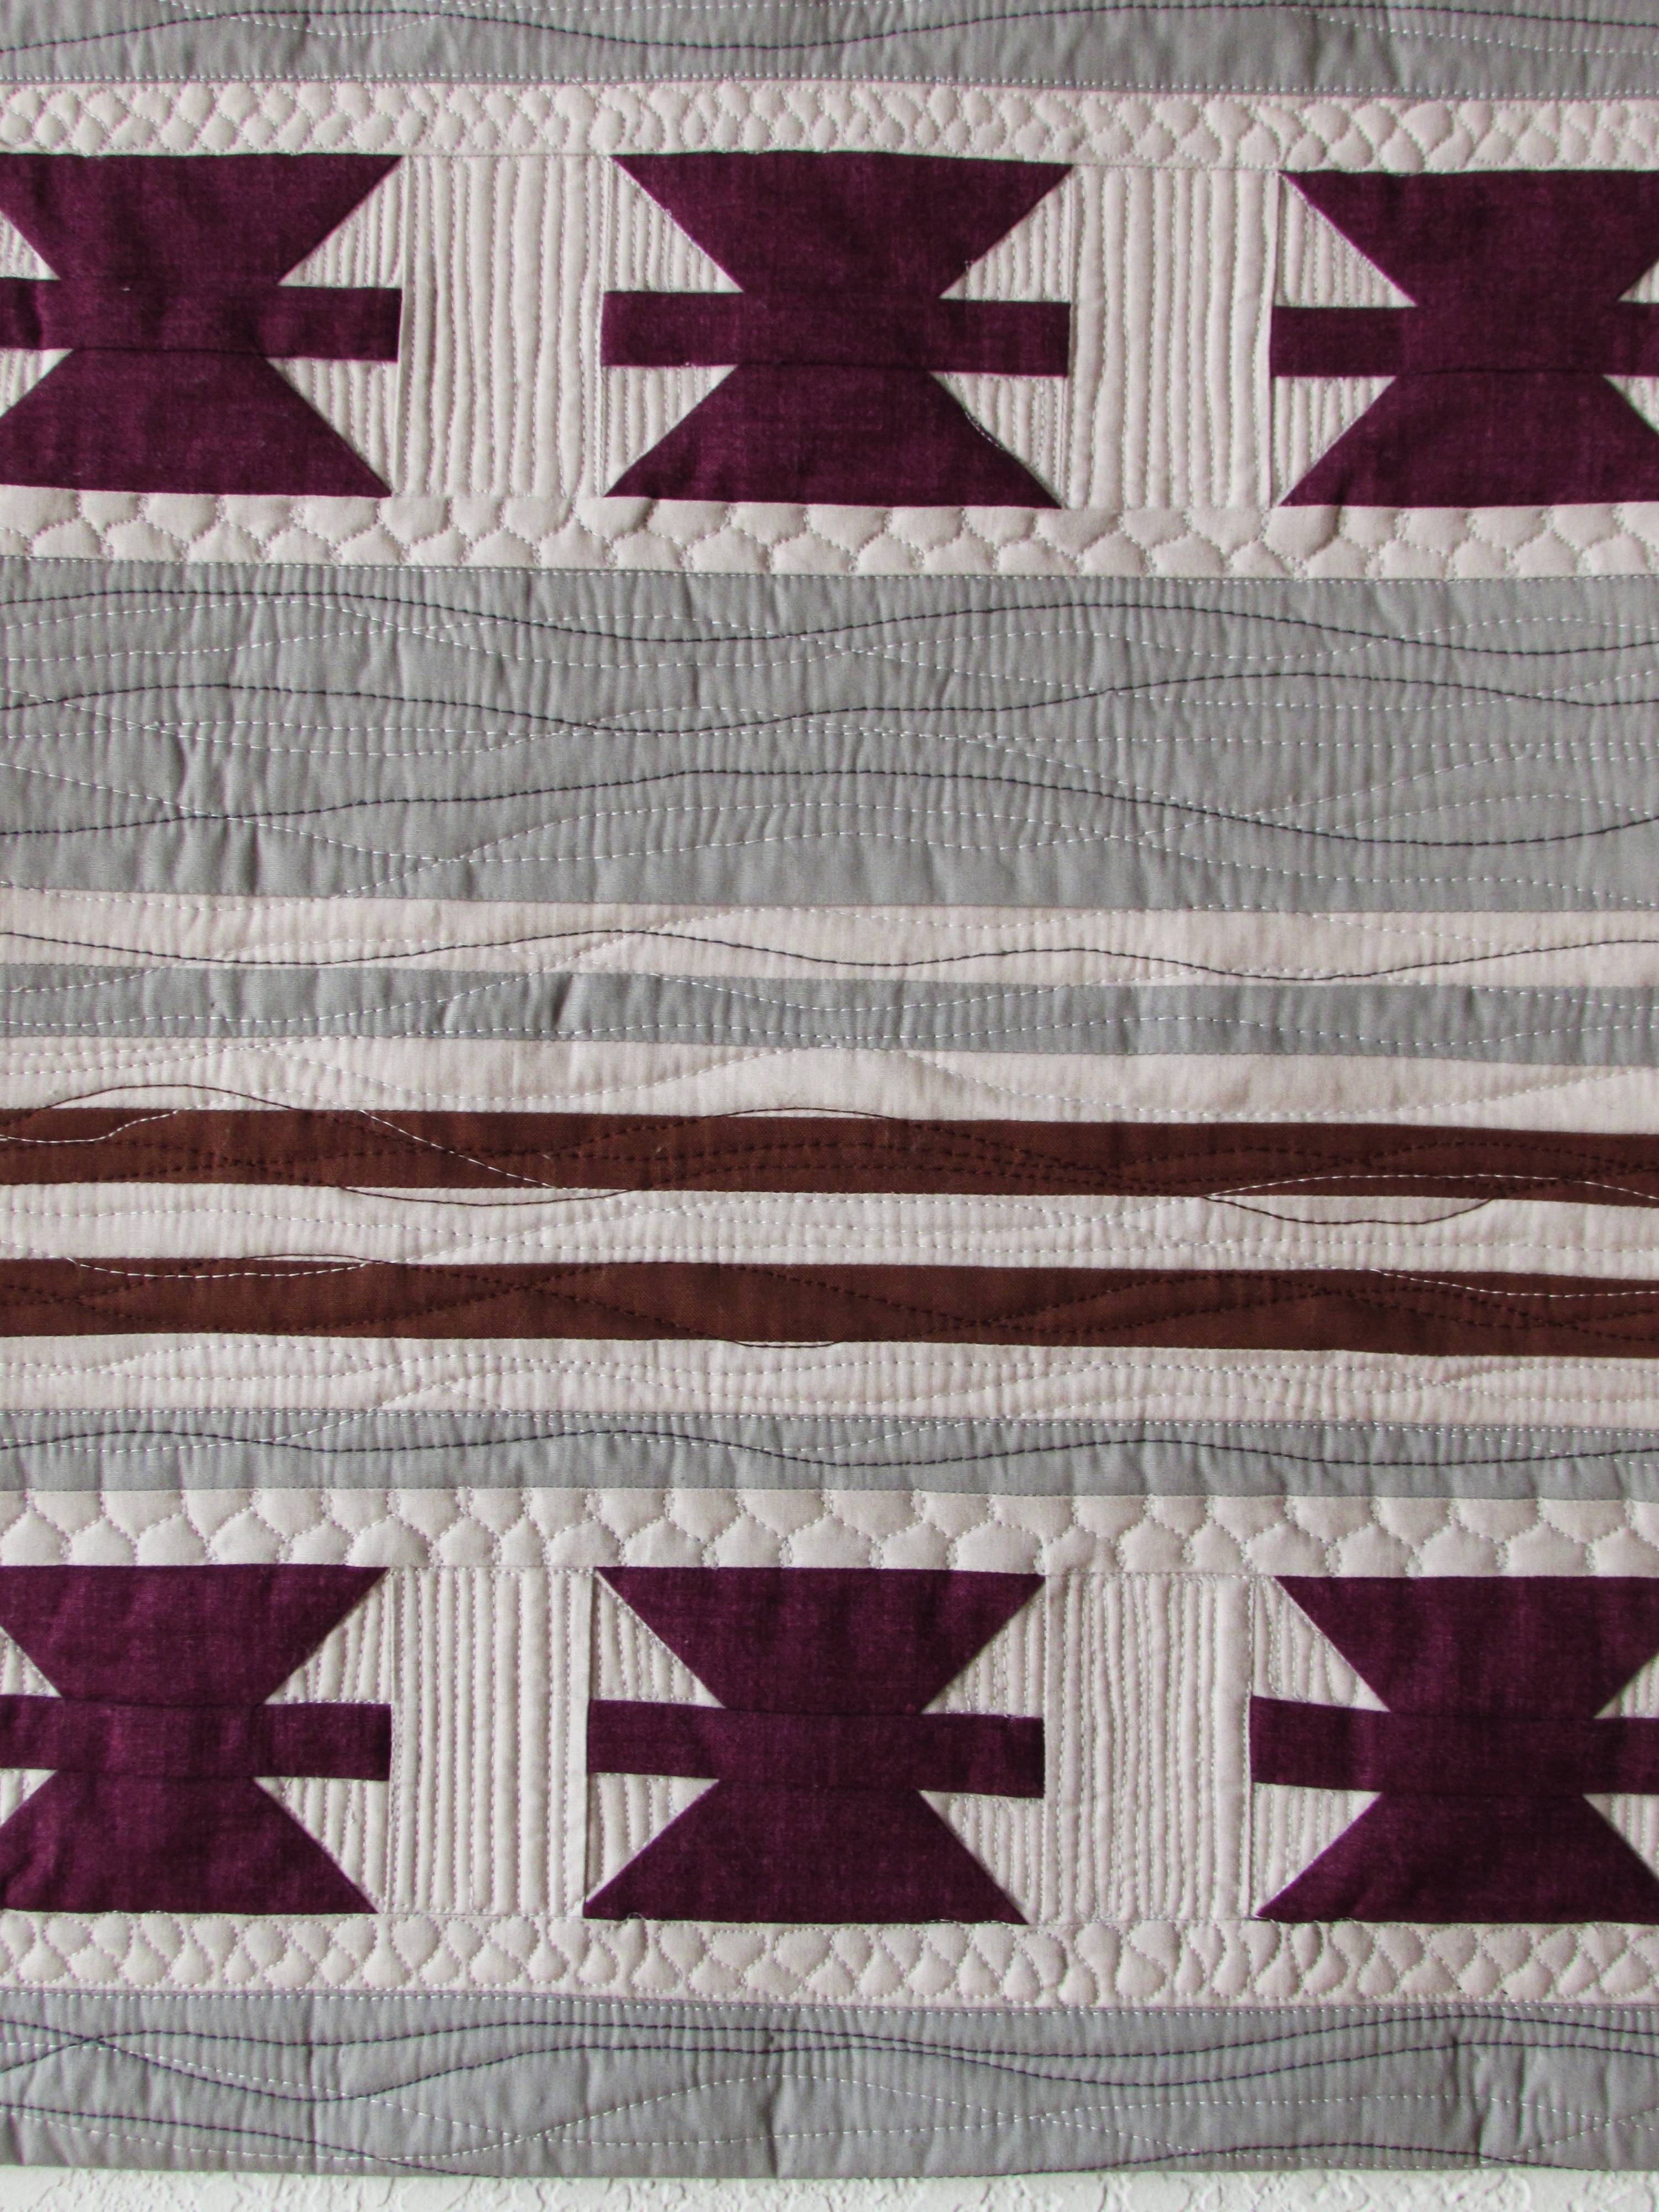
For this project, I chose colors that would work in our master bathroom. There are lots of bare walls in there. Bathrooms don’t rate very high on my need-to-decorate scale. Especially the master – who sees it besides Ray and I? I decided to make something to spruce it up. These colors work wonderfully.
I had so much fun quilting this. Finishing at 16 1/2″ squared, it was small enough to feel secure in trying new things. This quilt design feels a bit southwestern to me. It reminds me of a couple of throws that Ray bought some years ago on a trip to Mexico. This inspired me to quilt wavy lines, in three colors, across the horizontal stripes. Using the dark and light gray as well as the brown gives nice texture to the stripes.
Within the two rows of pieced blocks I used matchstick quilting. Having never quilted these narrow stripes before, I tried quilting with my darning/FMQ foot and with the walking foot.
Both work – the walking foot creates much straighter lines but oh my, it was taking forever! Having to stop and turn the quilt at each end was more than annoying. If it was a larger space being quilted, I would try the walking foot again. After a short stint of this though, I switched to my darning foot and FMQ’d the lines. They have a bit of an organic wobble to them but it still look ok. I love how the purple blocks have a bit of a puffiness to them from the tight quilting that surrounds them. Above and below each pieced row, I did some teeny tiny FMQ. Those rows are only one inch tall – it was a challenge to keep the movement flowing in such a small space.
What a fun project this was. Testing this pattern was an easy way to help another quilter out. There are lots of opportunities to test patterns. Be sure that you can meet the timeframe of the pattern designer though. Most likely she is relying on you to complete the task by a certain date so she can release the pattern. Speaking of which, Mihaela is releasing this pattern today! Check it out and show her some quilting love. It would make a great mini, table topper, or you could use it as a pillow cover if you add the backing to it.
Linking to several of my favorites, including Freemotion Mavericks, Finish it up Friday, and Off the Wall Fridays. Links to all of these are available at the top of the page, under Link Ups.
Just in case you need an idea for Mother’s Day gifts (for a friend, your mom, yourself – even if you aren’t a mom!) Craftsy has awesome classes and I can’t imagine a crafty mom who wouldn’t love one (or two, or three…) Classes last longer than flowers and they are way more affordable! Click here to check it out.
(Always reminding you that I am a Craftsy affiliate which means if you click through from my site and make a purchase, I will be compensated.)
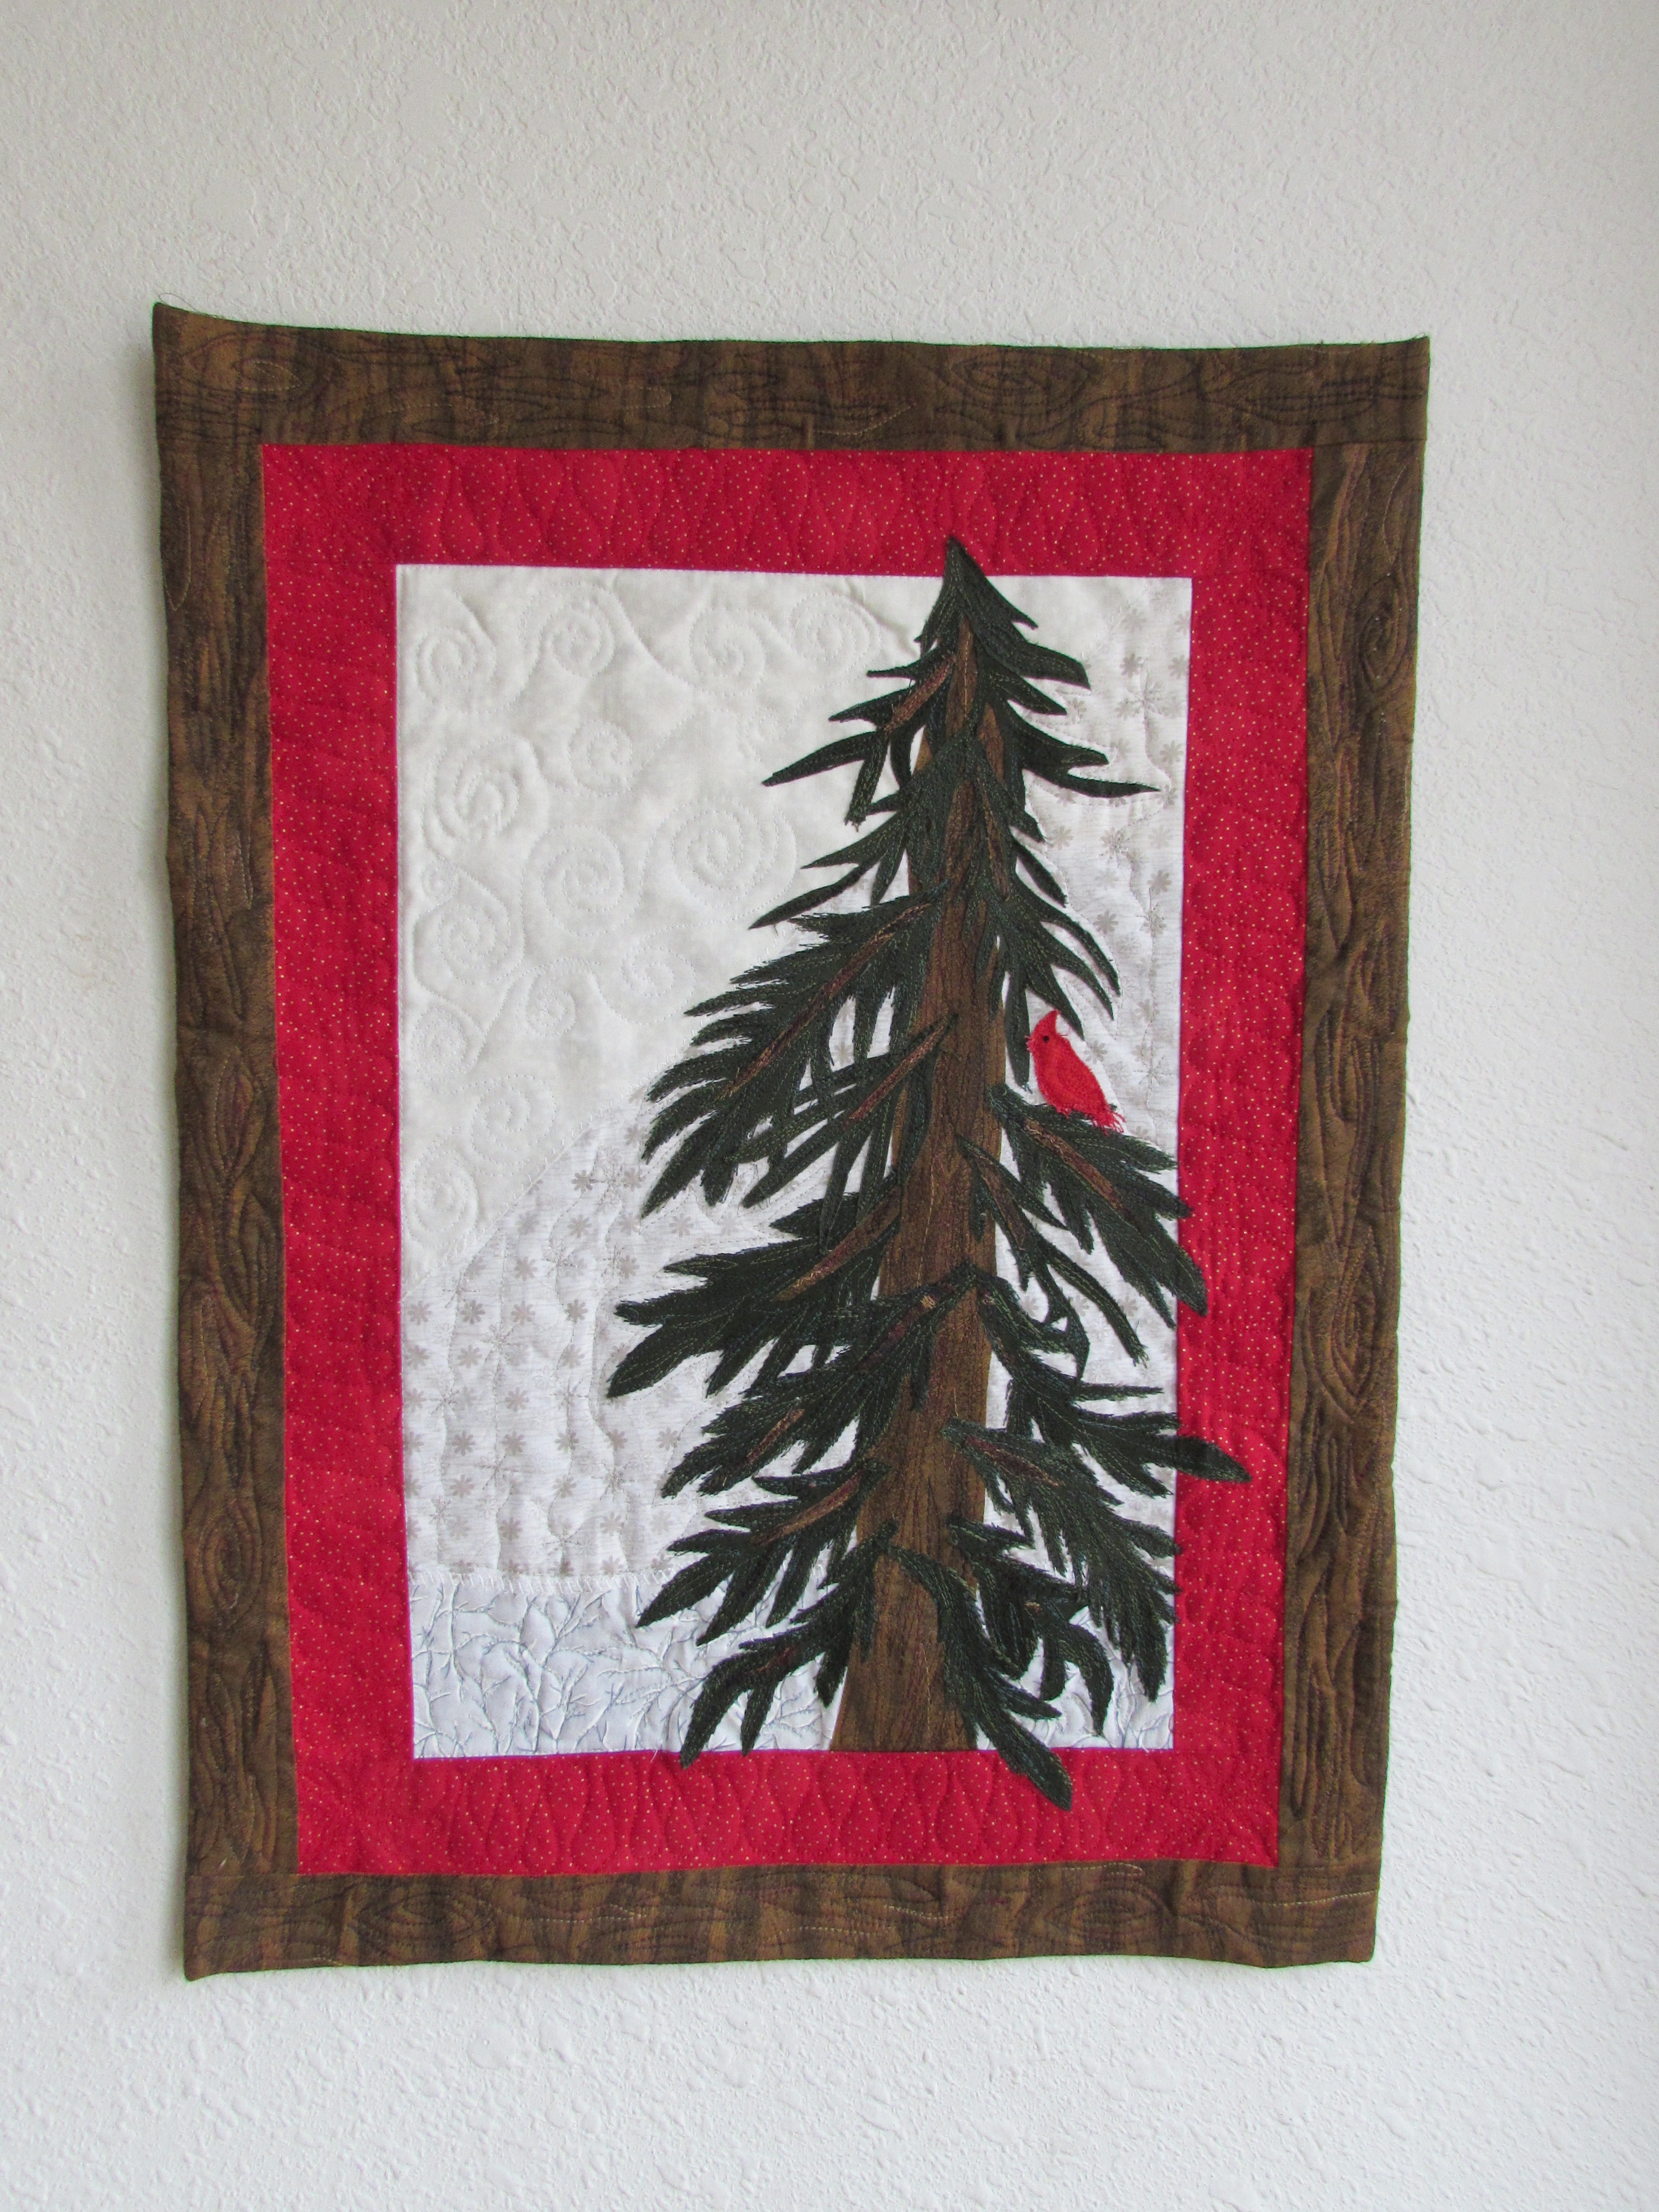
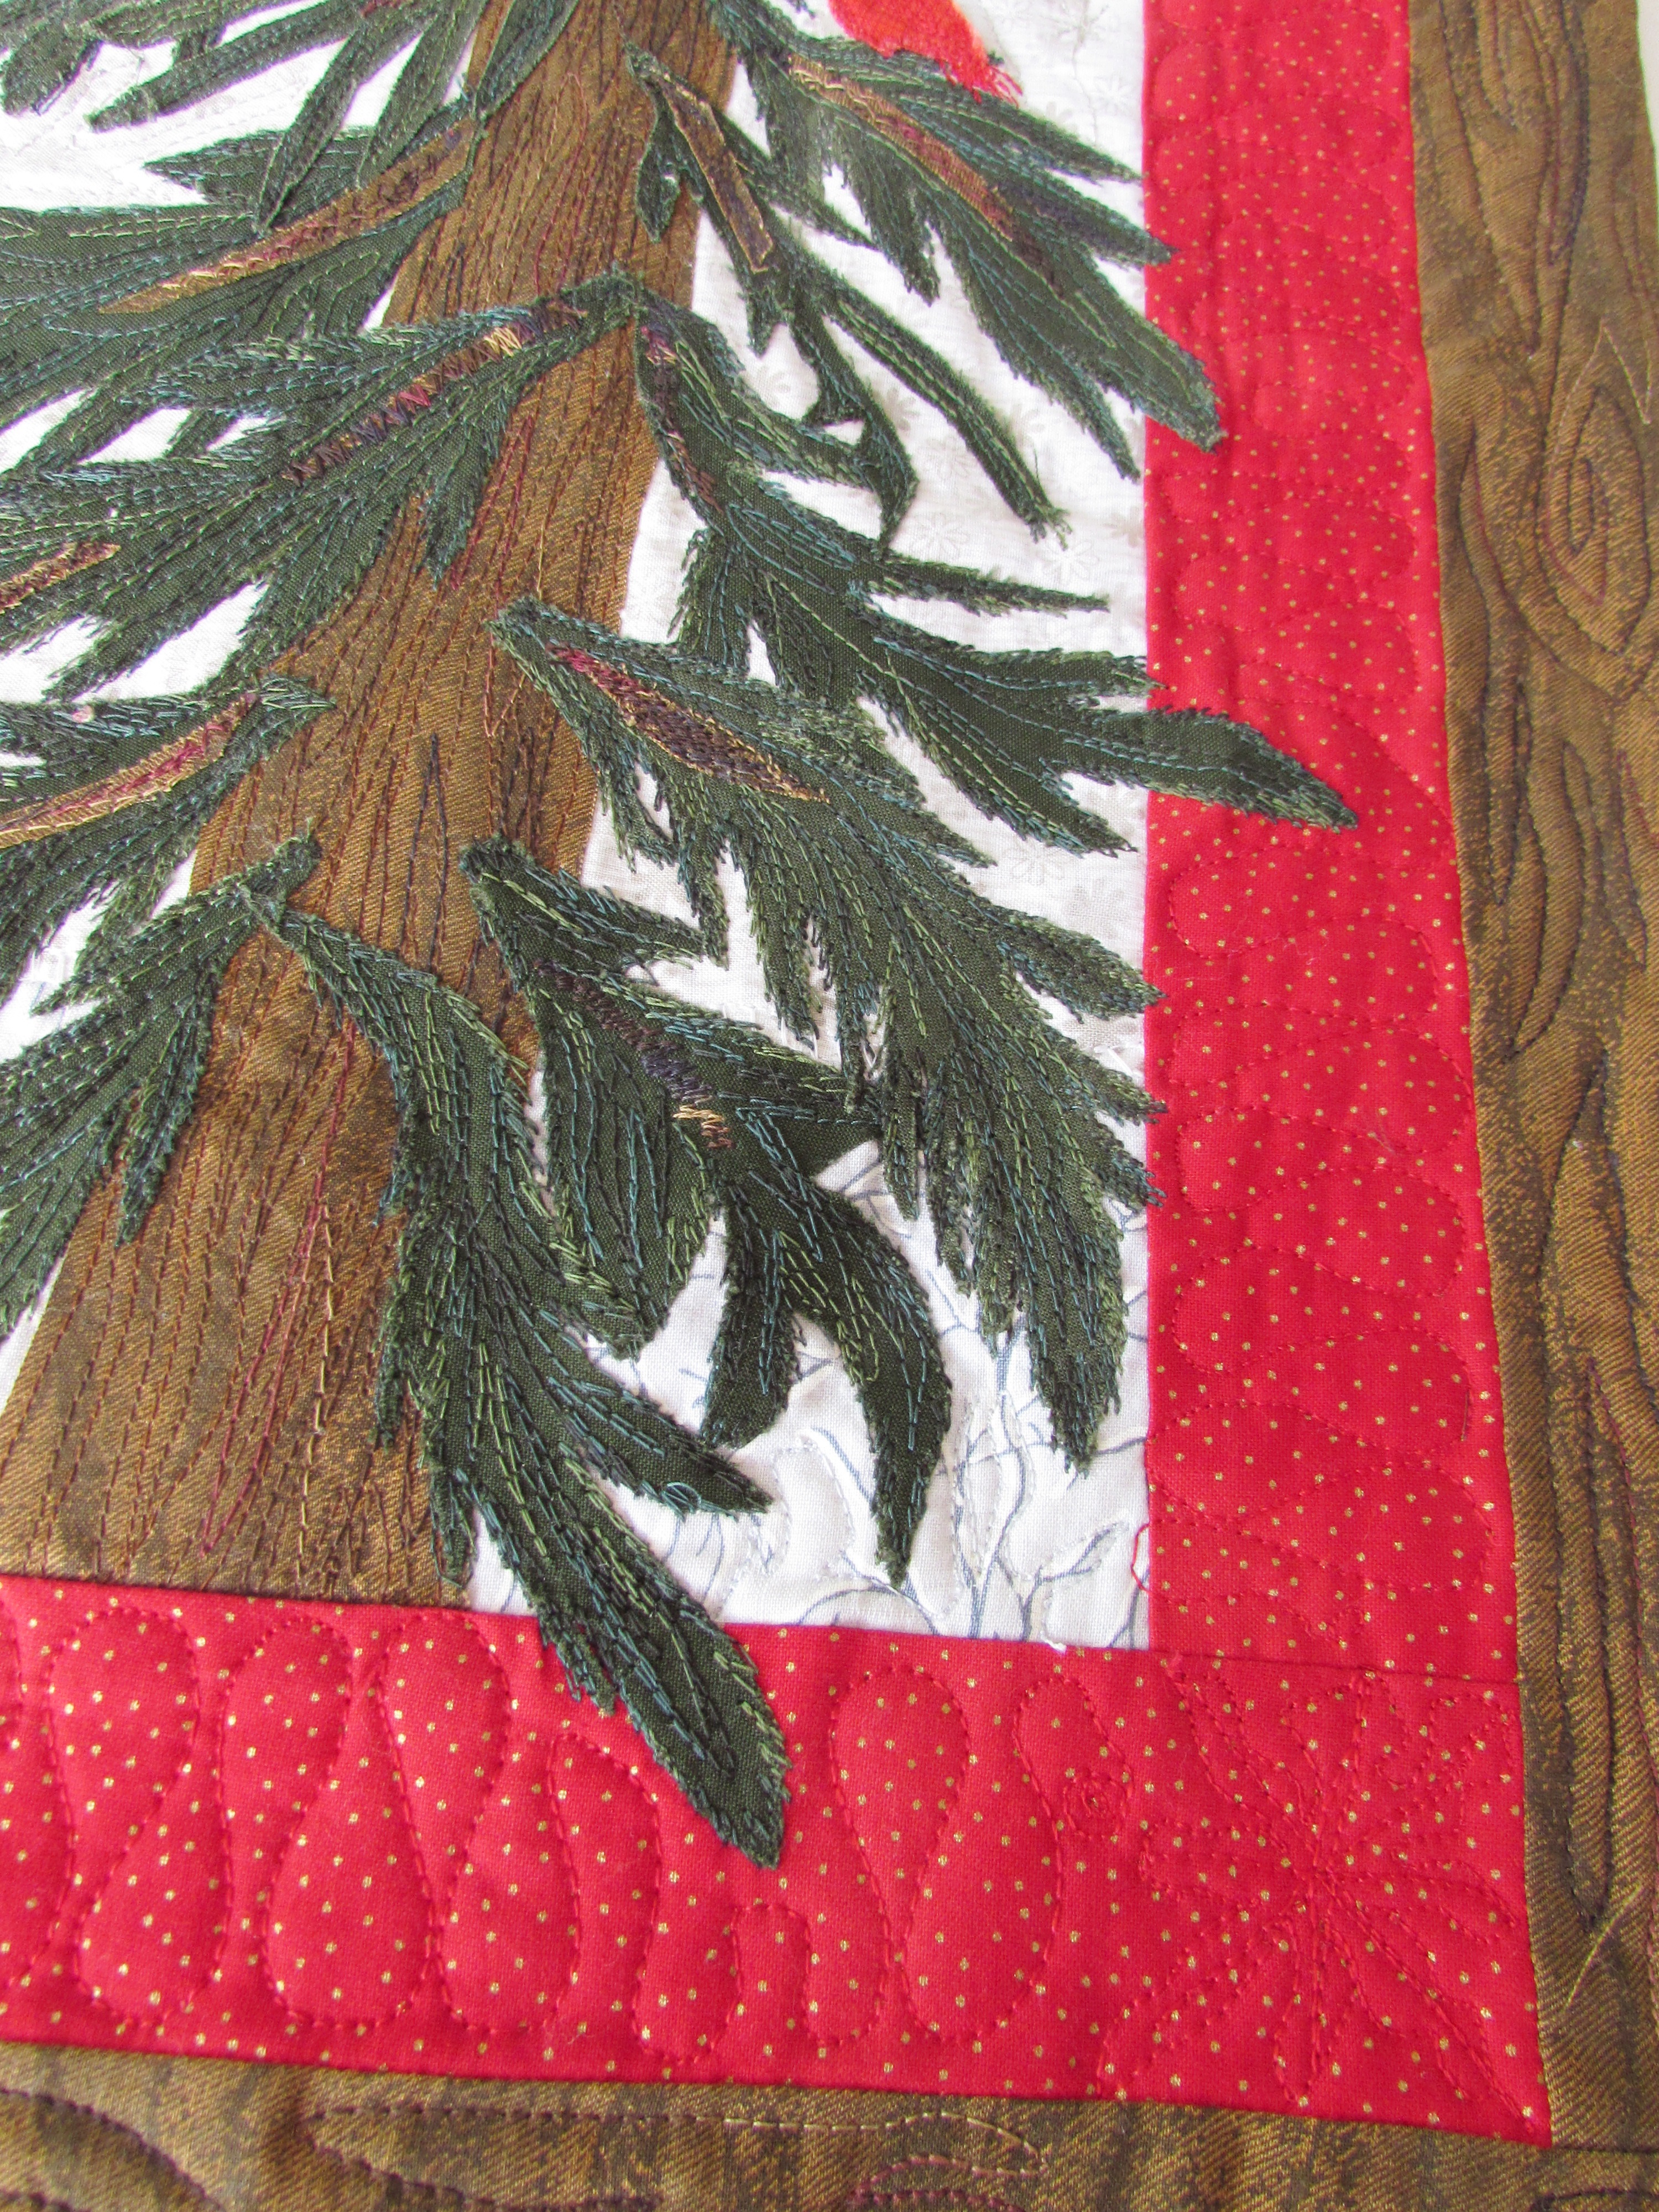
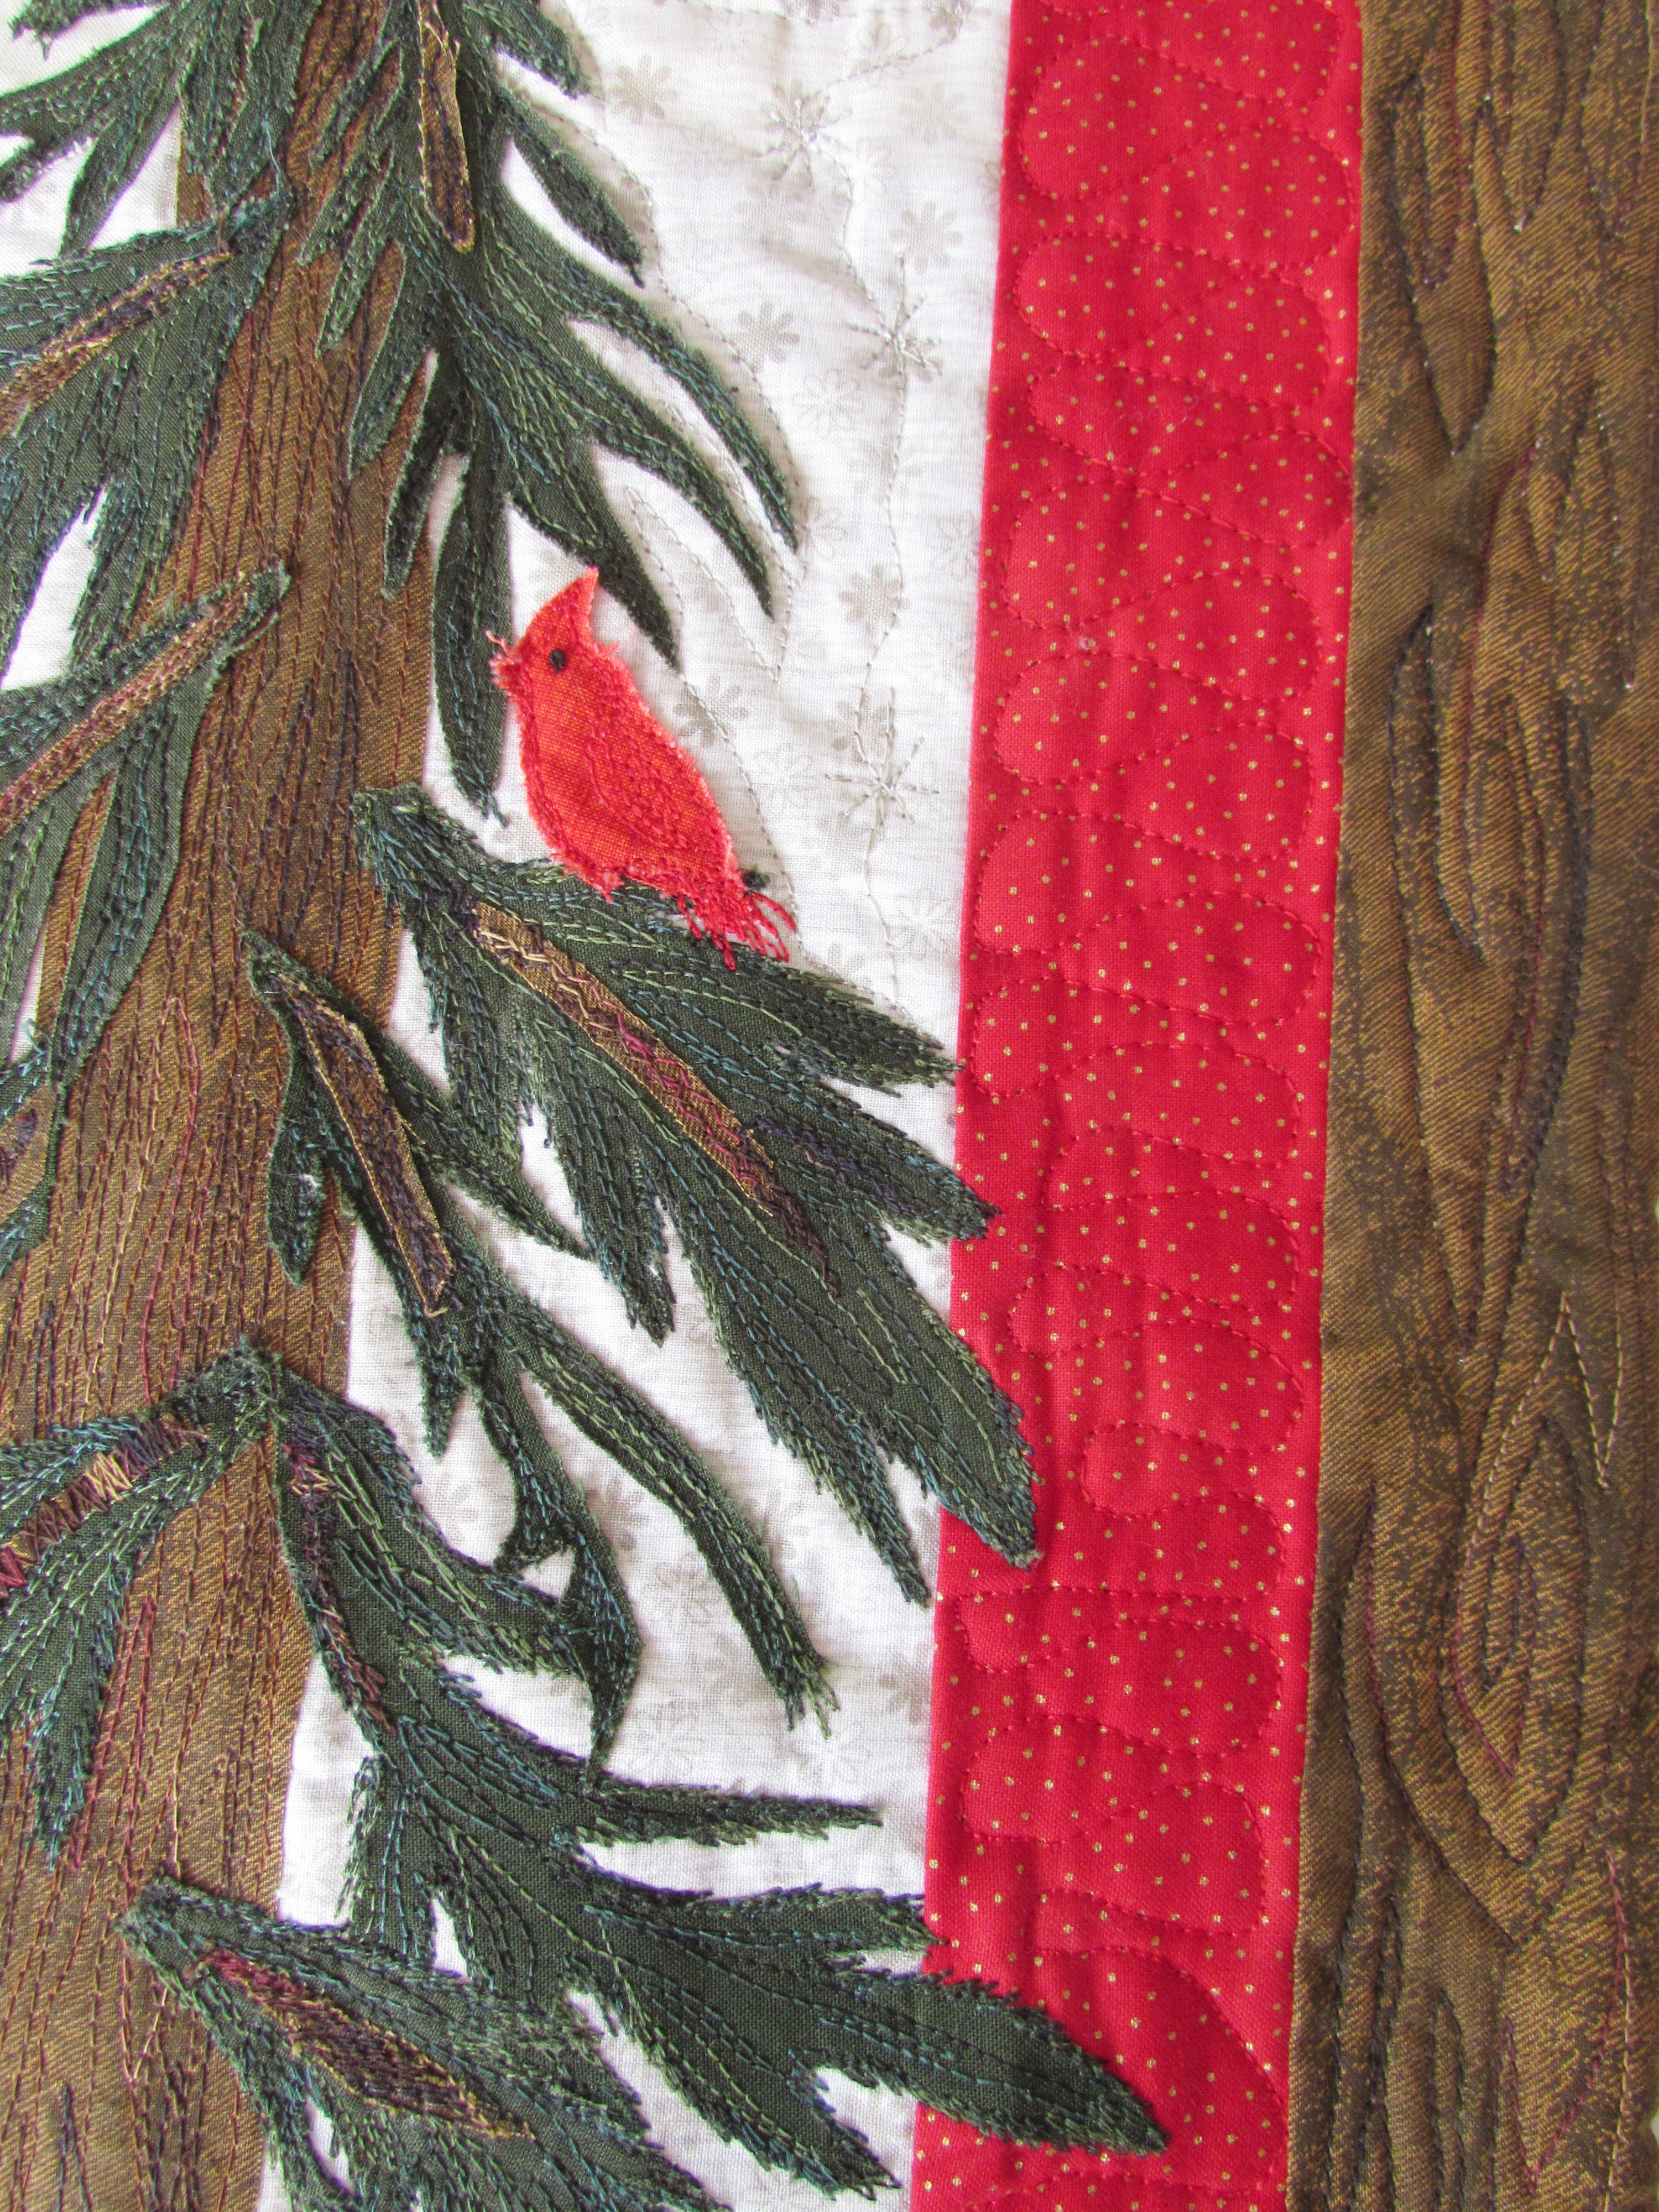
Last night I finished my Lone Pine art quilt. I am so glad I resurrected this UFO and finished it. Two years ago I pinned a lovely art quilt that is listed in an Etsy shop, Prairie Fiber Arts. I just loved it and I based my project on hers. Overall, I am very happy with the finish.
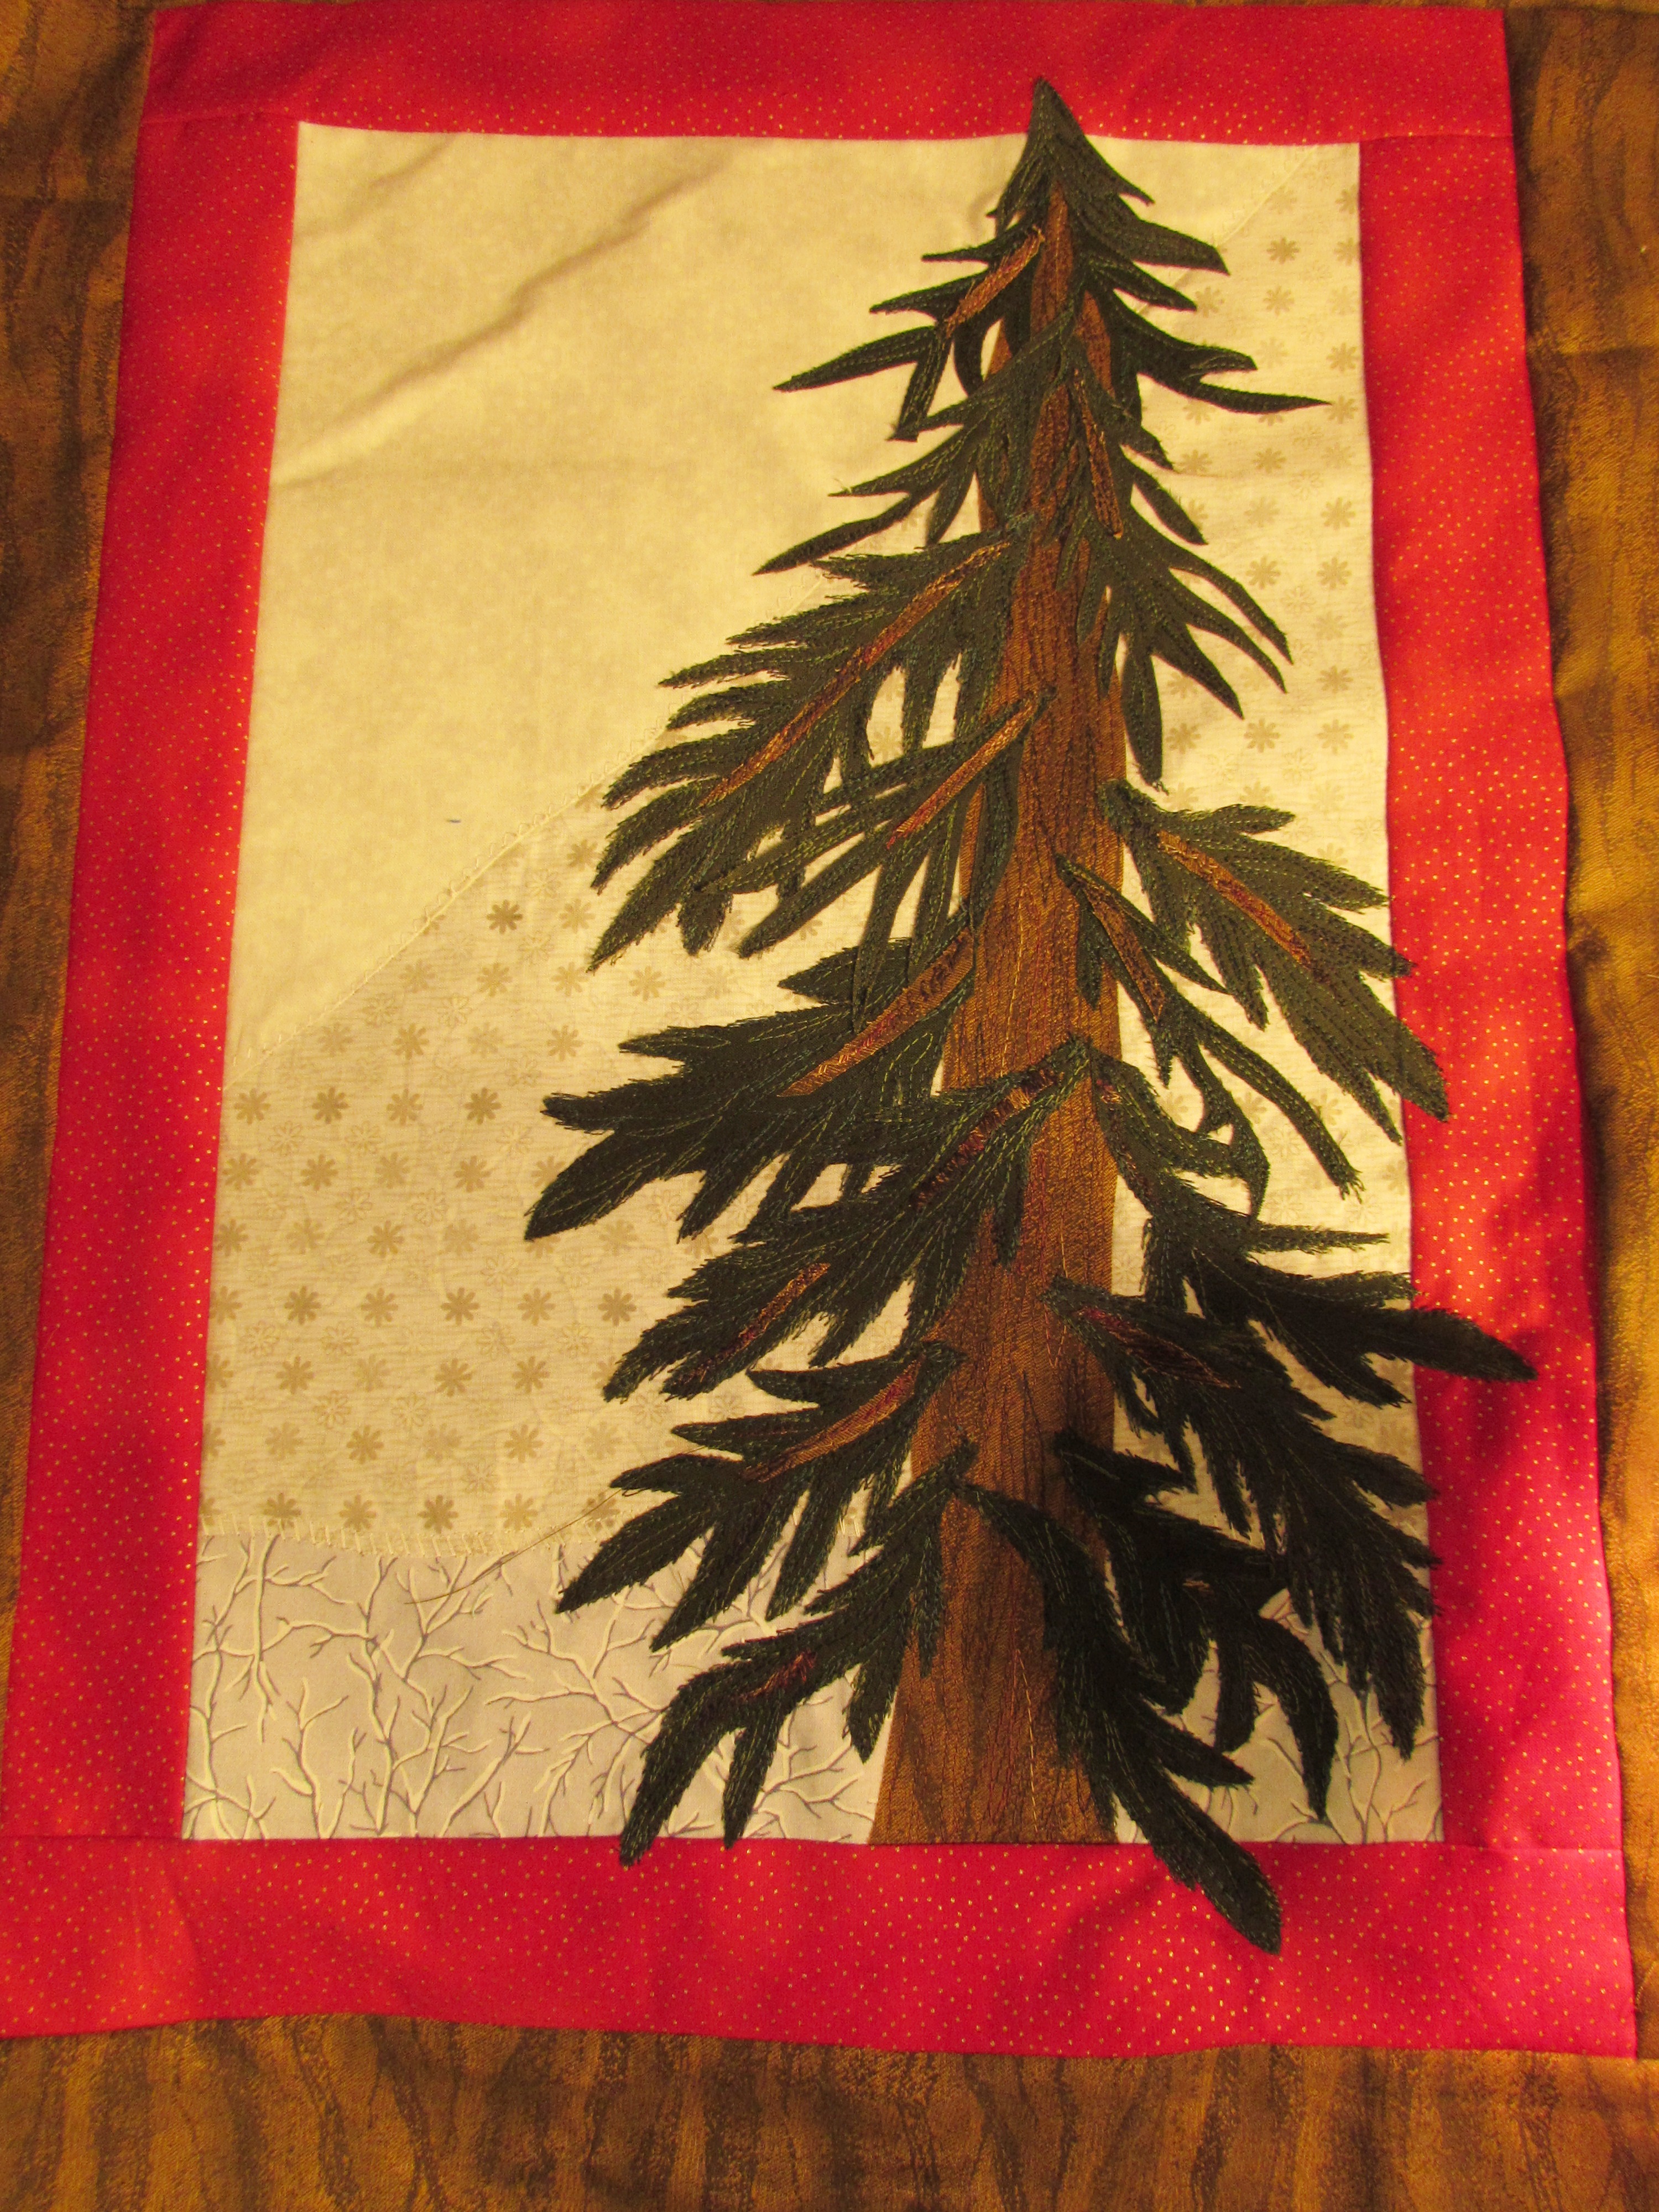
The background is pieced with three different low volume fabrics that exude winter. Once the background was pieced I added both the red and brown borders. I wanted to be able to let the boughs from the tree extend into the border. I fused some stabilizer to the back before I started any applique. Because I wasn’t exactly sure where I would be fusing the applique, I applied the stabilizer to the entire back side. You can see on the below picture that somehow I bubbled part of the background. Once I removed the stabilizer it all smoothed out.
The stabilizer was problematic. It took quite a bit of time to remove it. I finally compromised and left a fair amount of it behind the tree. With the thread sketching, it was close to impossible to get all of the paper off.
Once the tree and my little cardinal were complete, I sandwiched top, batting and backing and planned my quilting. For whatever reason, I quilted the red border first and then worked the inside. I ended up with a pesky fold on the backing. It must not have been pin basted tightly enough.
By the way, what was I thinking when I used this blue and white fabric for the backing. I know it doesn’t really matter, but every time I see the backing I wonder at my choice. Honestly, I think it was that I was so excited to quilt it that I didn’t even stop and think about the back. Yikes!
I am not going to list the negatives here. Rather, I will celebrate what I love most about this piece.
I love, love, love the thread sketching on the pine boughs. To give texture and color to the tree, I used a variegated green YLI thread. For the branch that makes up the core of the bough, I fused teeny tiny strips of bark and then thread sketched over it tightly. Again, I used a variegated brown YLI thread. I love the texture obtained with YLI threads. I also ran stitches up and down the main trunk of the tree. (I did most of that stitching prior to adding the boughs.I am also happy with the boughs that extend over into the red. I wasn’t exactly sure how to handle this when I was quilting the ribbons on the red. I made shorter waves where I had to. Rather than turn the corner with the ribbons on the red border, I stopped and made a little snowflake in each corner and then moved back into the ribbon motif. Hard to see with the red thread but I am pleased.
I love cardinals and we don’t get them at my house. When we lived in State College, PA, we had many that would visit the feeder in the winter. They are such a pretty suprise. My little bird would look like any sort of bird and only by making her red did she become a cardinal. (Drawing isn’t my forte!) On the outer border, I quilted wavy lines and did some pointy spirals to imitate the knots in a piece of wood. (Tutorial is available here from The Inbox Jaunt.)
It was an easy call to use a facing rather than a traditional binding on this project. For those who haven’t faced a quilt yet, here is an excellent tutorial by Terry Aske. If you have not had the opportunity to look at Terry’s art quilts, please do. She is very talented!
This was so much fun. It makes me look forward to another small and satisfying project like this. The weekend is nearly here. We are supposed to have cooler days and maybe a bit of rain. Hope you all have a wonderful weekend.
Linking to Free Motion Mavericks, Finish it Up Friday, Off the Wall Friday, and Can I Get a Whoop-Whoop. All links are listed at the top of the page under link ups.
Have you all been looking for little signs of the arrival of spring? Living in California, spring is noticeable early on. My daffodils are done blooming and our fruit trees are leafing out, with all of their blossoms raining down. It is definitely spring here.
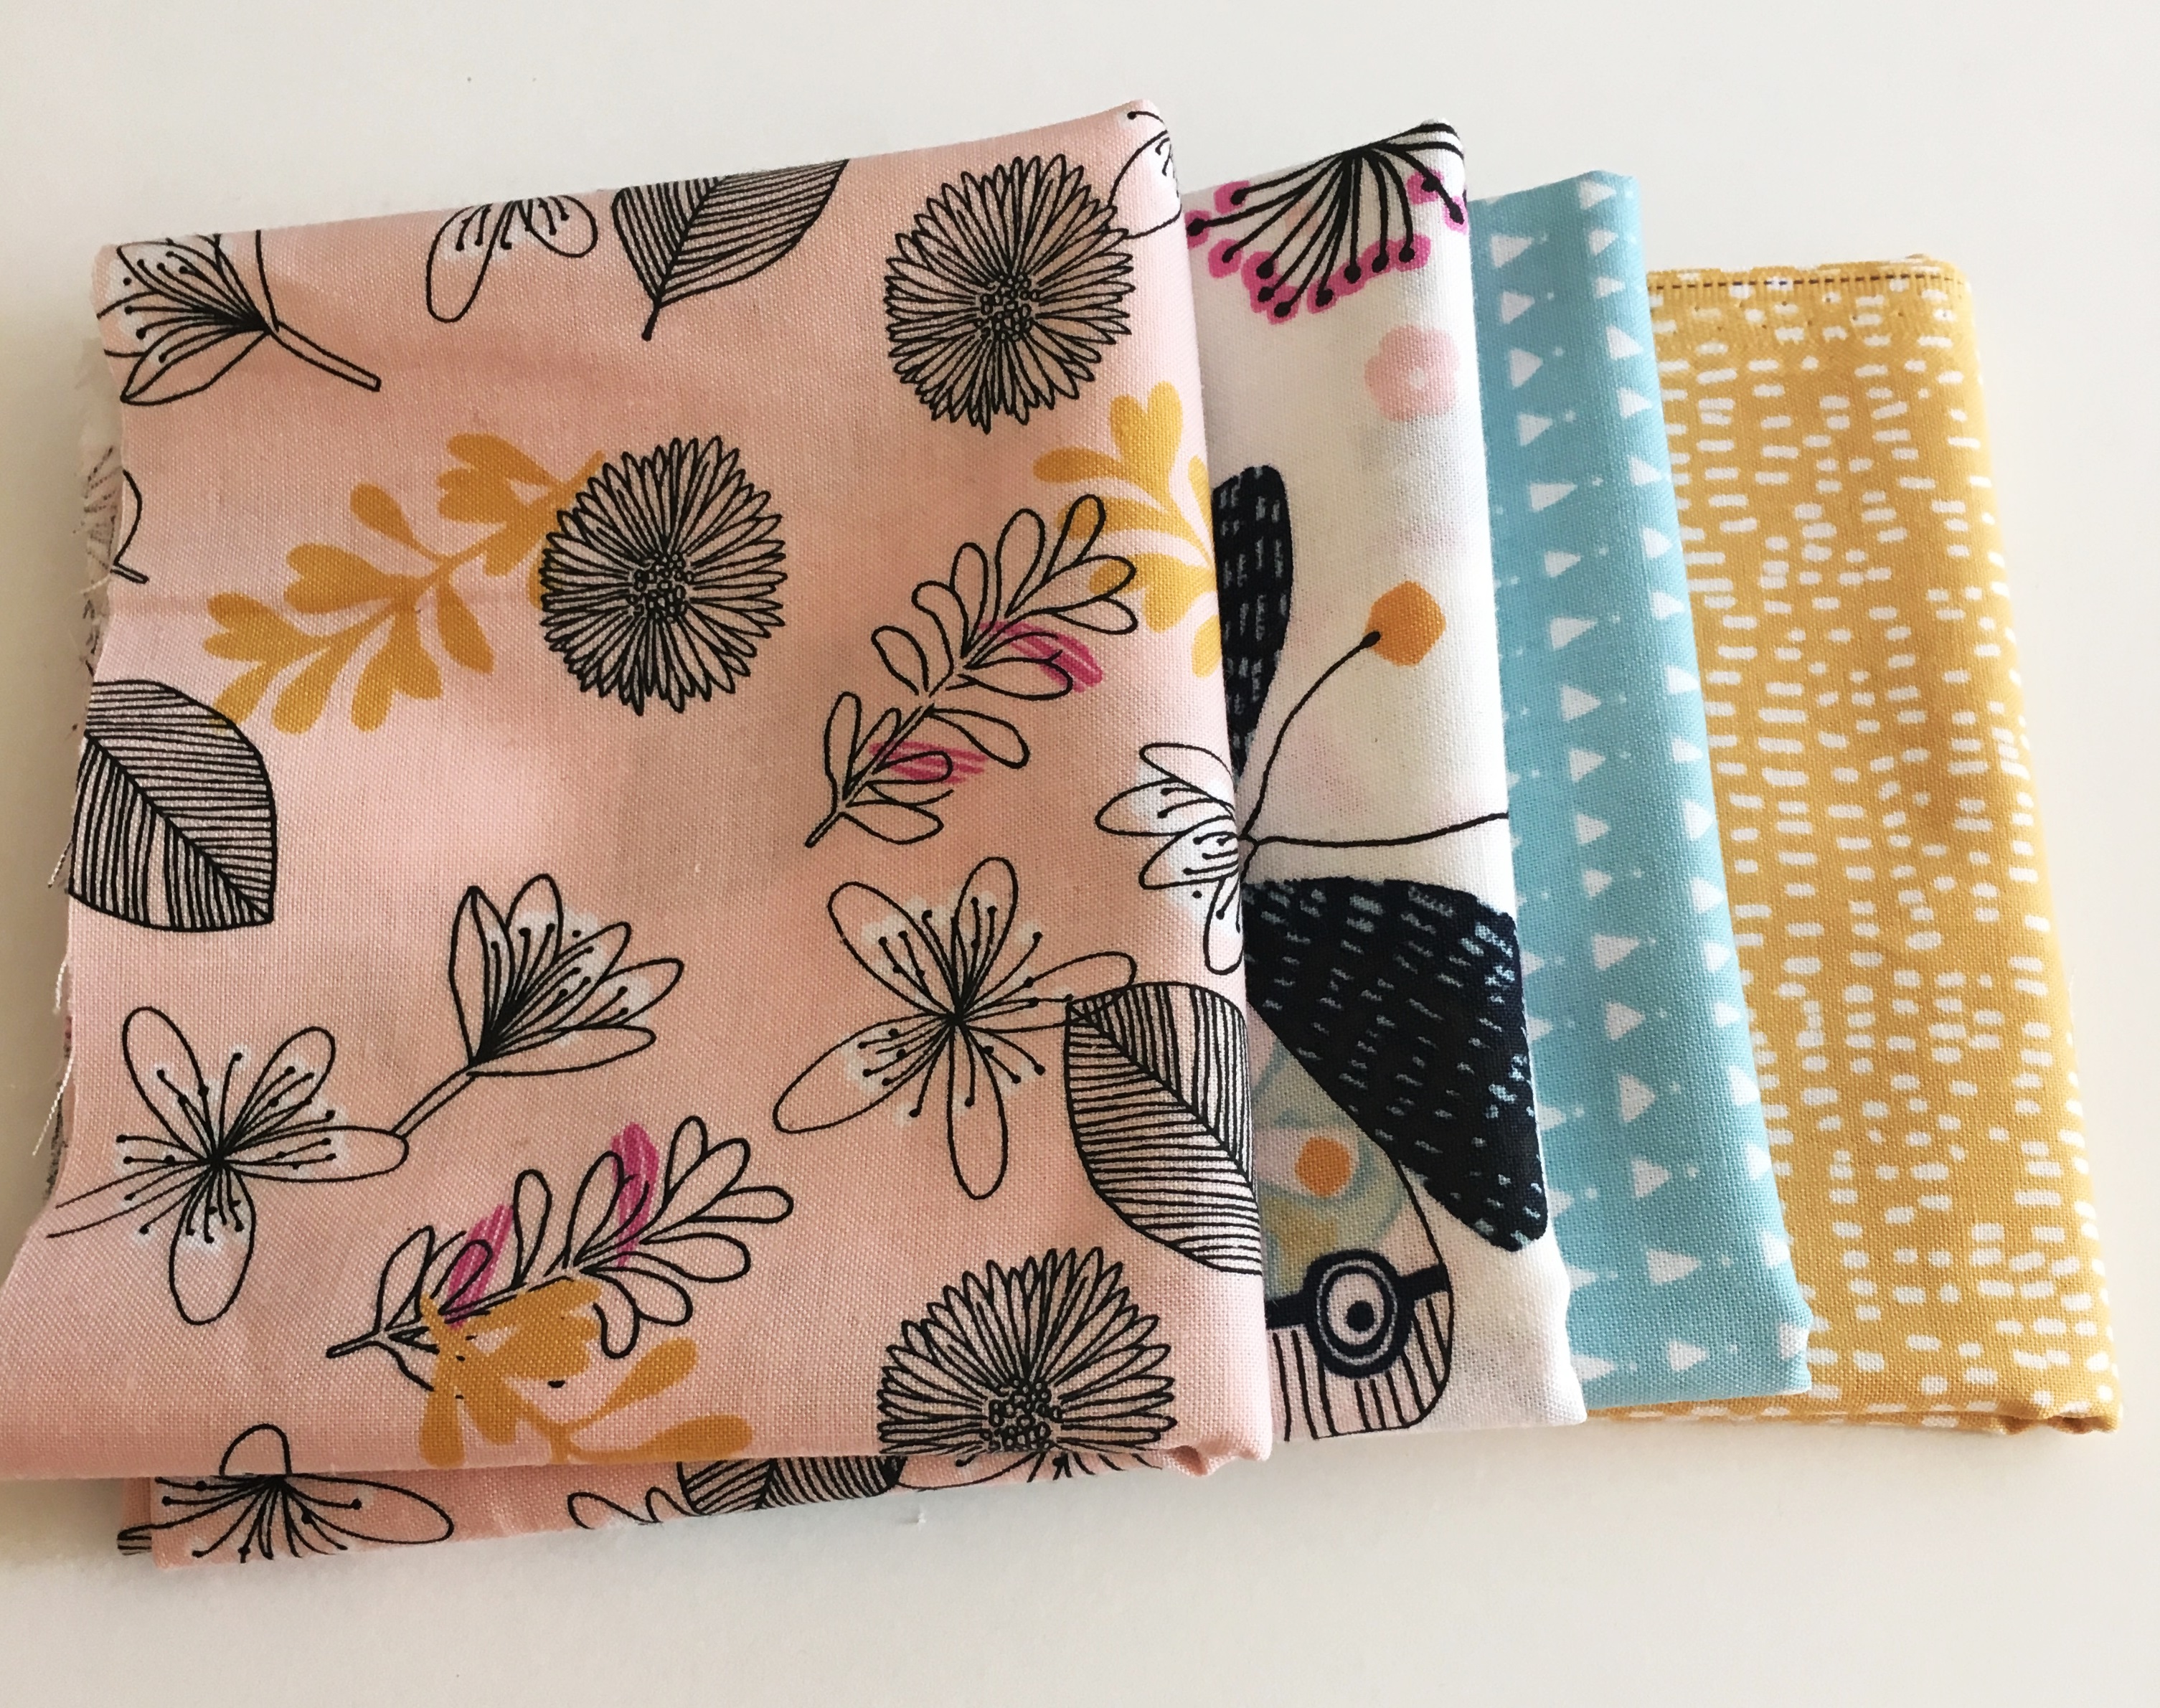
Another sign of spring is the gorgeous Windham Fabrics collection, Whisper, which was recently released and is now shipping at Brewstitched. I love the gorgeous pallette used in this line. Soft, muted shades of blue, pink, and mustard yellow are used in this springtime collection. The fabric features various florals and sweet butterflies for a truly feminine feel. Sheryl, the owner of Brewstitched, would like to give four fat quarters to a lucky reader!
For those of you living in cold weather country, this is the perfect way to bring a bit of spring to your sewing room!
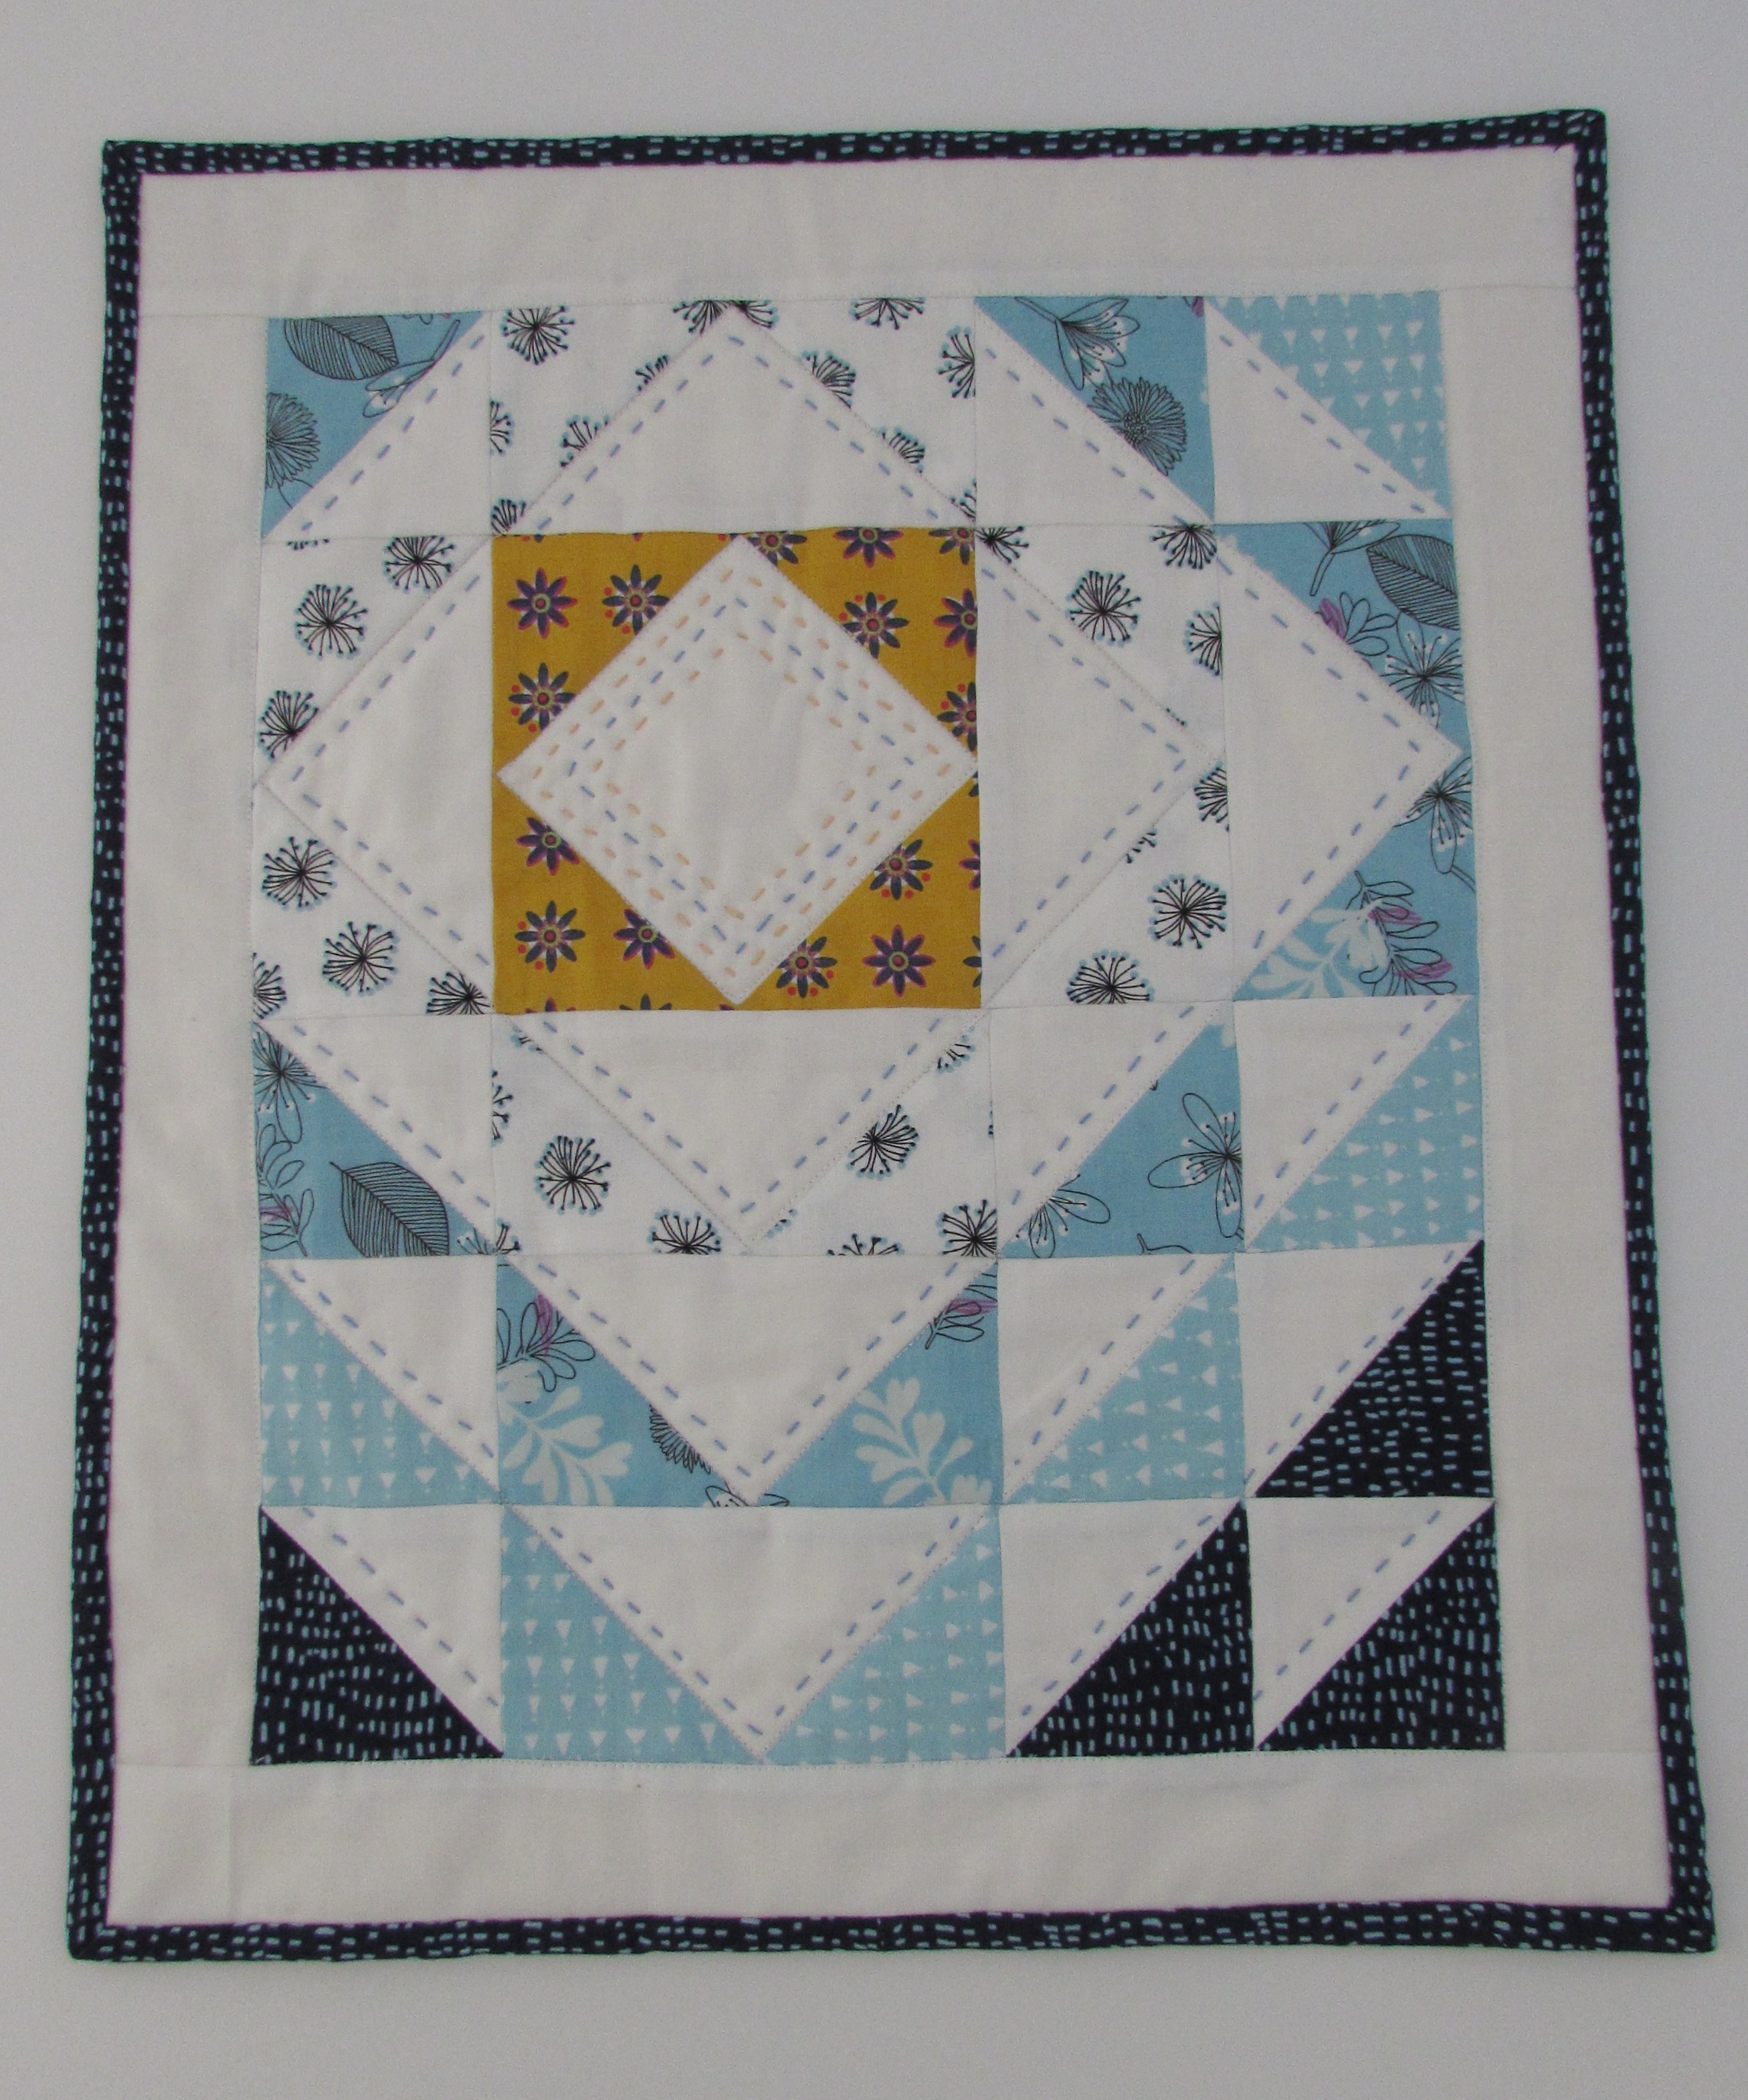
Sheryl sent me a few fat quarters of Whisper to play with. I immediately thought of our Downieville house. It could certainly use something cute hanging on the walls.
The pattern for this mini is one that I downloaded last winter during the Aurifil Designer Mini series. It was designed by Kim Jolly over at The Fat Quarter Shop. It’s been on my list to make for a while now and this was just the right opportunity. I added a scrap of bright yellow to make the center pop a bit.
One of the reasons I wanted to make a simple project was to practice some hand quilting. I have some spools of Pearle cotton floss that I have been itching to use.
I ditch quilted in several of the seams so that I wouldn’t have to worry about things slipping around as I hand quilted. Adding a bit of hand stitching makes just about anything look that much sweeter.
Stitching with Pearle Cotton was a treat. I will definitely keep practicing to increase the consistency of my stitching.
OK – Back to the Whispergiveaway! In order to enter, please take a peek over at Brewstitched. Sheryl has recently added some wonderful new fabrics to her shop. She is carrying the entire line of Whisper and I happened to notice she now has several pieces of the crazy popular Cotton and Steel line, Bluebird. So hop over and then come back and tell me about your favorite. Spring is here and it is blissfully evident over at Brewstitched!
If you follow me, you are welcome to comment a second time telling me how you follow. Are you following Brewstitched on Facebook or Instagram? If so, that is worth a third entry. Be sure to let me know how you follow them.
This giveaway is open through March 29th. The winner will be announced first thing, March 30th! Make sure to leave an email address if you are a no-reply blogger. In the event that someone is picked and I cannot email them, I will draw another winner. Due to the cost of shipping, this giveaway is open to US residents only. Good Luck!
GIVEAWAY IS NOW CLOSED.
Remember that Needle and Foot readers have a discount this month over at Brewstitched. Enter coupon code NANDFMARCLUB10 for 10% off your order through the end of March!
Linking to my usual parties – all links are listed at the top of the page under Link Ups.
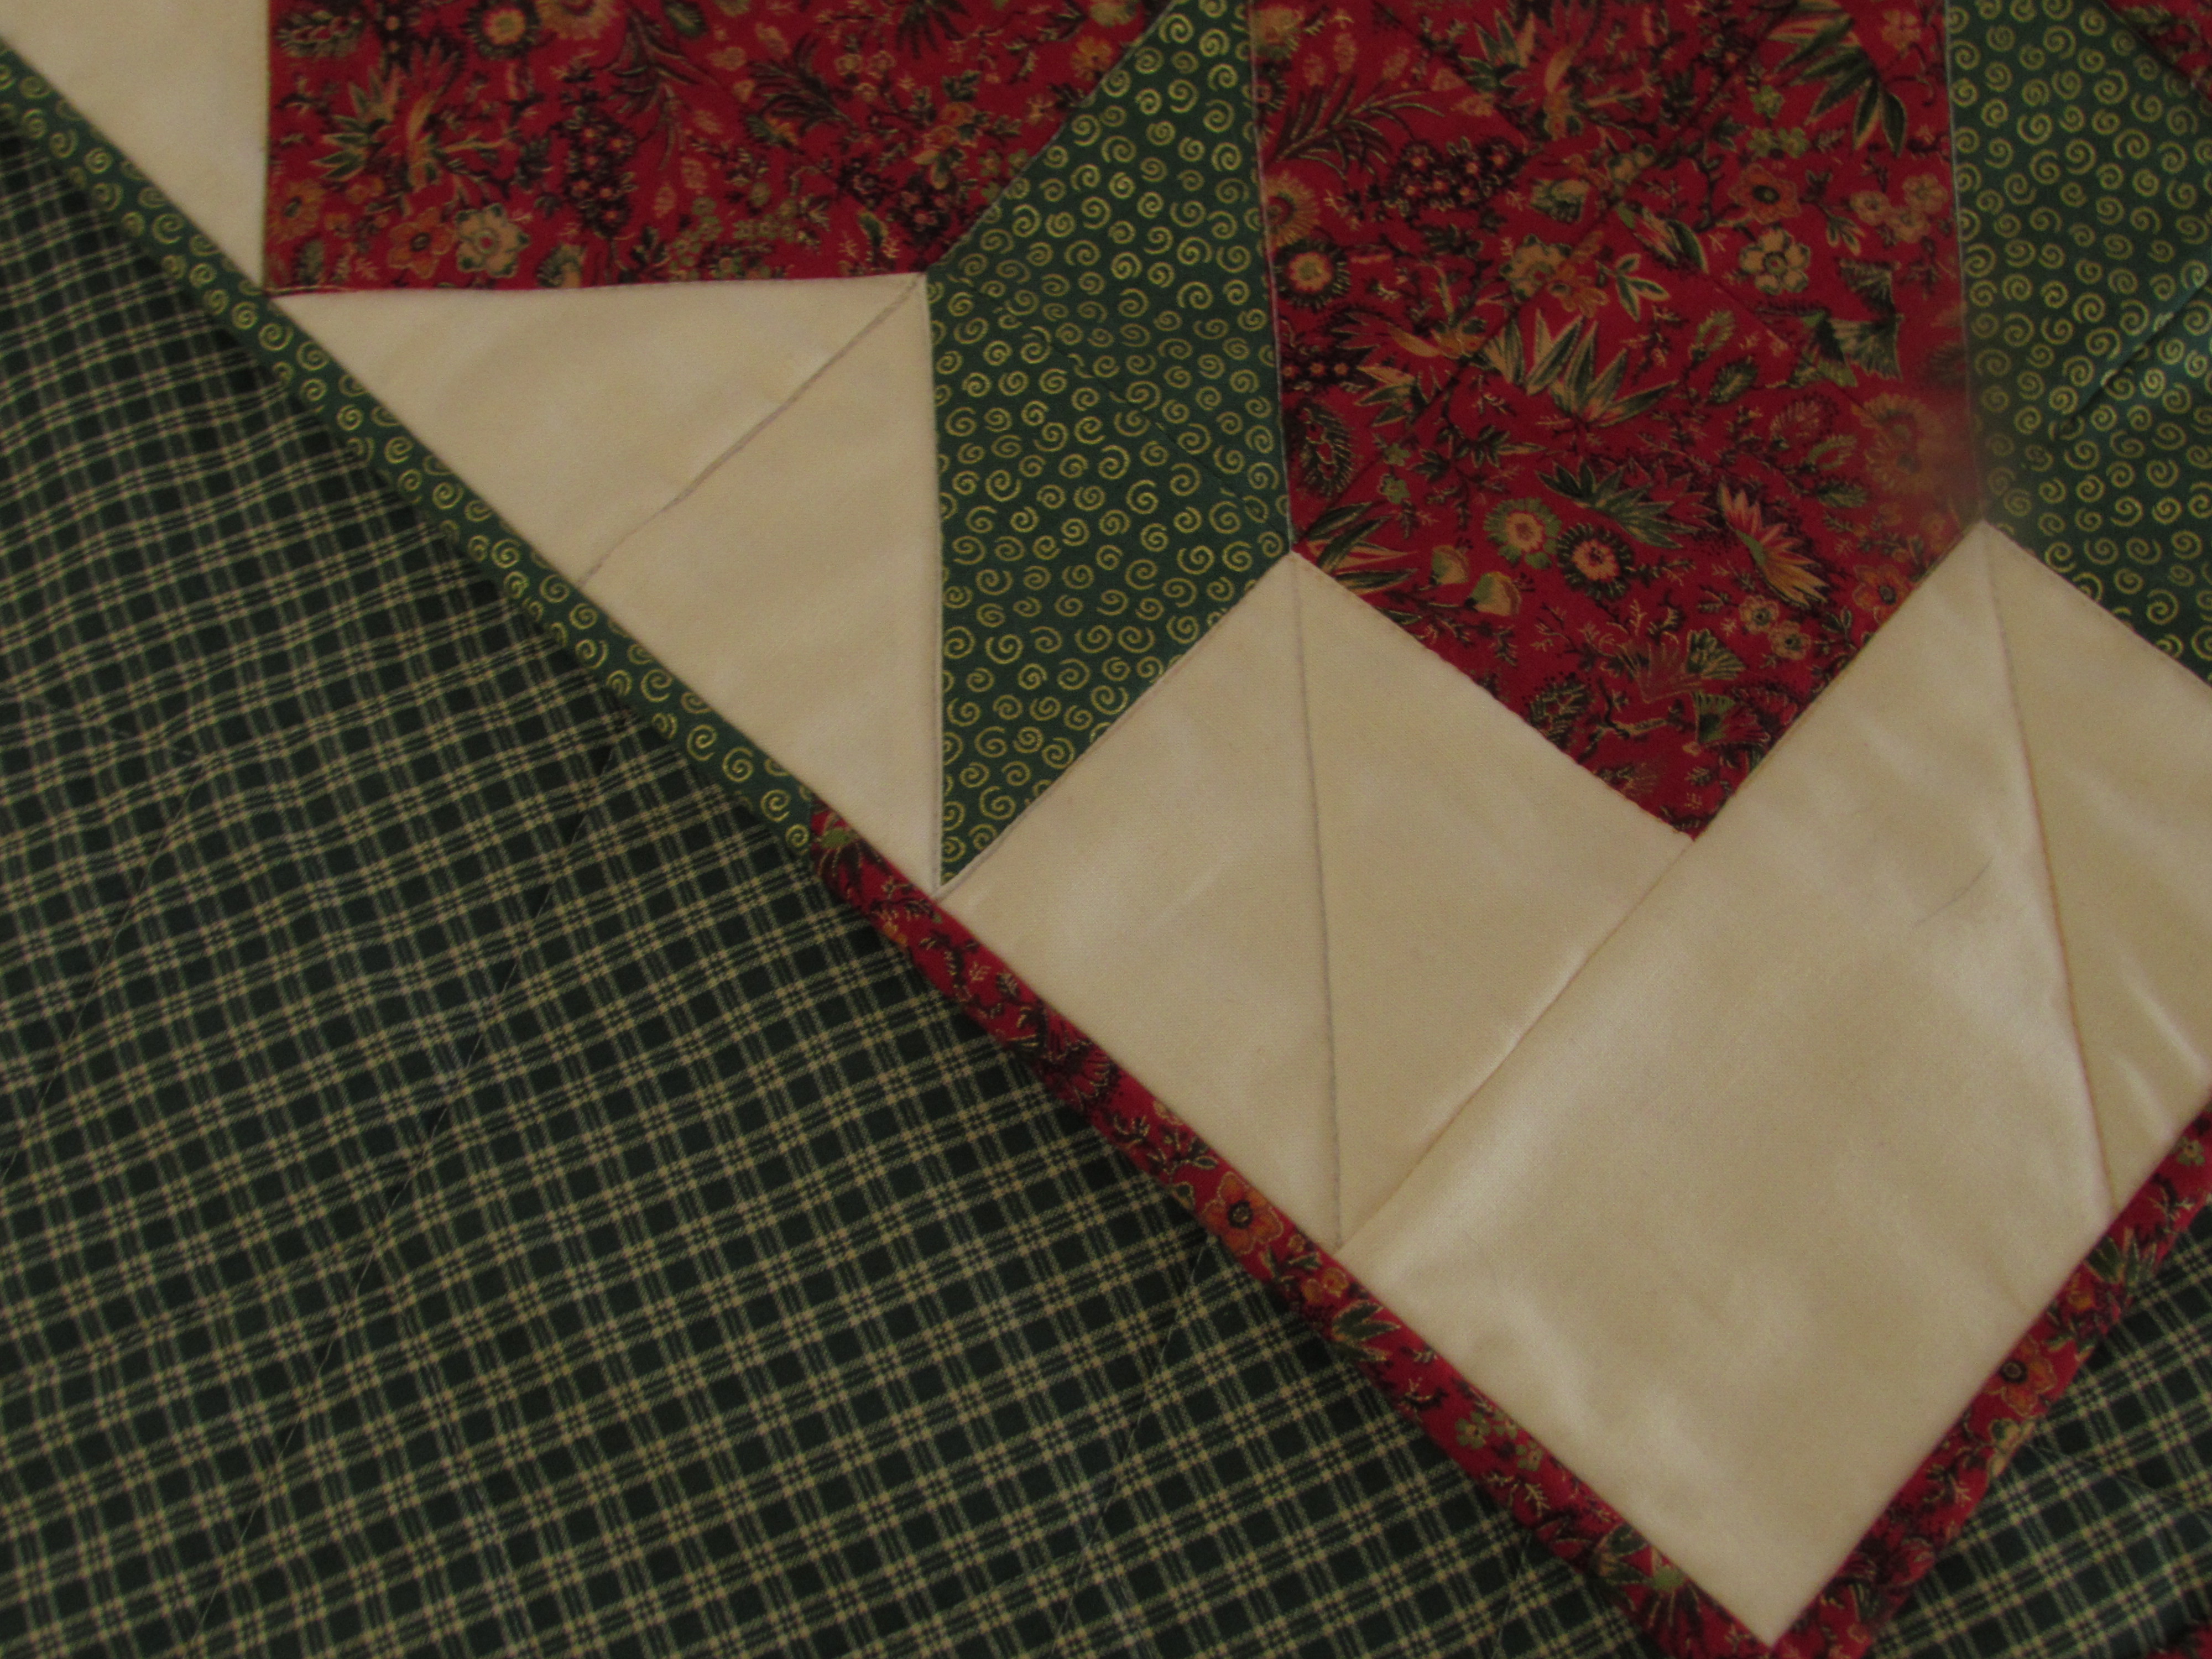
A few weeks ago we had a quiet weekend – Ray was up working on our house in Downieville and Julia and I stayed home. I pulled out my pile of Christmas fabrics, trying to think of an easy project. I wanted something that would come together easily and could be made entirely from my stash. After spending some time looking at ideas that I have collected on Pinterest, I made my decision. I would make a mini that consisted of one large swoon block.
I have been drooling over pictures of quilts with swoon blocks and minis made from swoon blocks for a long while now. I am not sure what it is about them, but I love them. The pattern for the swoon block was developed by Camille Roskelly over at Thimble Blossoms. She really started something when she created this pattern. The pattern makes a quilt with nine swoon blocks that measure 24″ square. For this project, I decided to just make one block and use it as a mini.
Using only minimal quilting, the fabrics and the pattern shine.
It turned out so festive.
I was able to make the quilt using only scraps I had on hand. The backing is a green and cream plaid that a neighbor gave me a long while back. I didn’t have enough of any one the fabrics to bind it so I made a scrappy binding.
Because it is made of rectangles, HST’s and Flying Geese blocks, the block was a breeze to cut and piece. Making a large quilt with them would be very easy. I love the oversized look of the block.
There you go. A really satisfying finish that was so fun to make and used up some stash.
Linking to Freemotion by the River, Let’s Bee Social and Finish It Up Friday. Links to all of these are located at the top of the page under Link Ups.