Hi All! Crazy busy here over on the western side of Washington state these days. There has been so much happening. Julia moved up here just a few weeks ago. My mom and dad were successful in selling their California house and just moved up here as well. The family has been working on helping them with unpacking which means no sewing time.
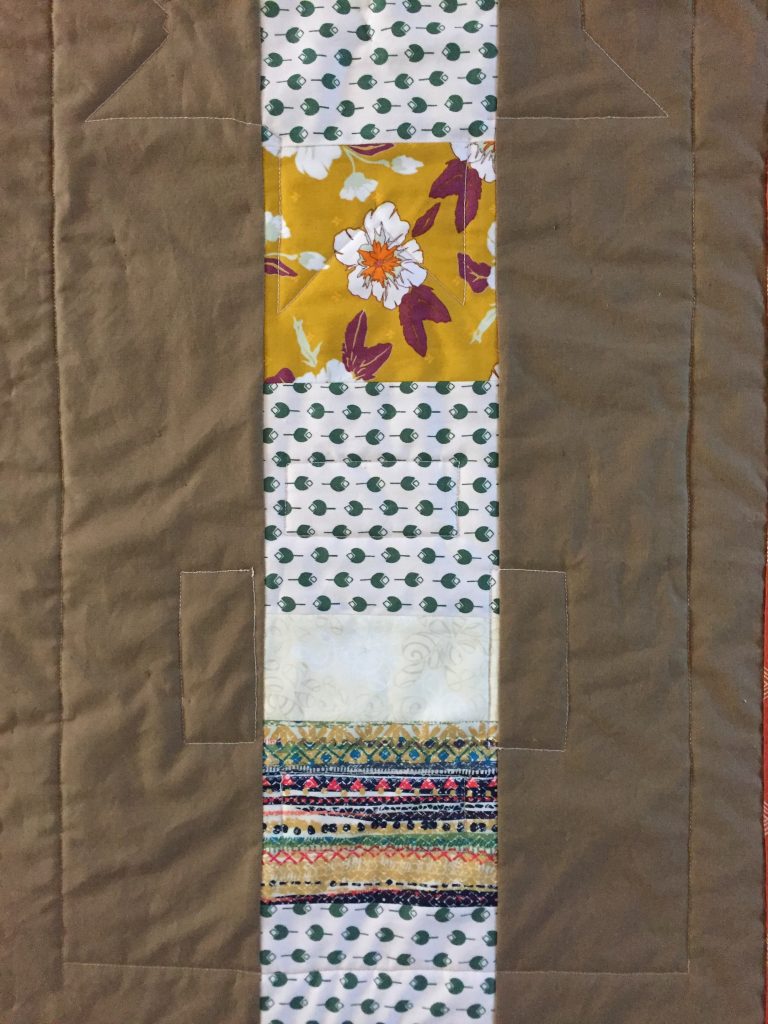
Quilt top without the flowers
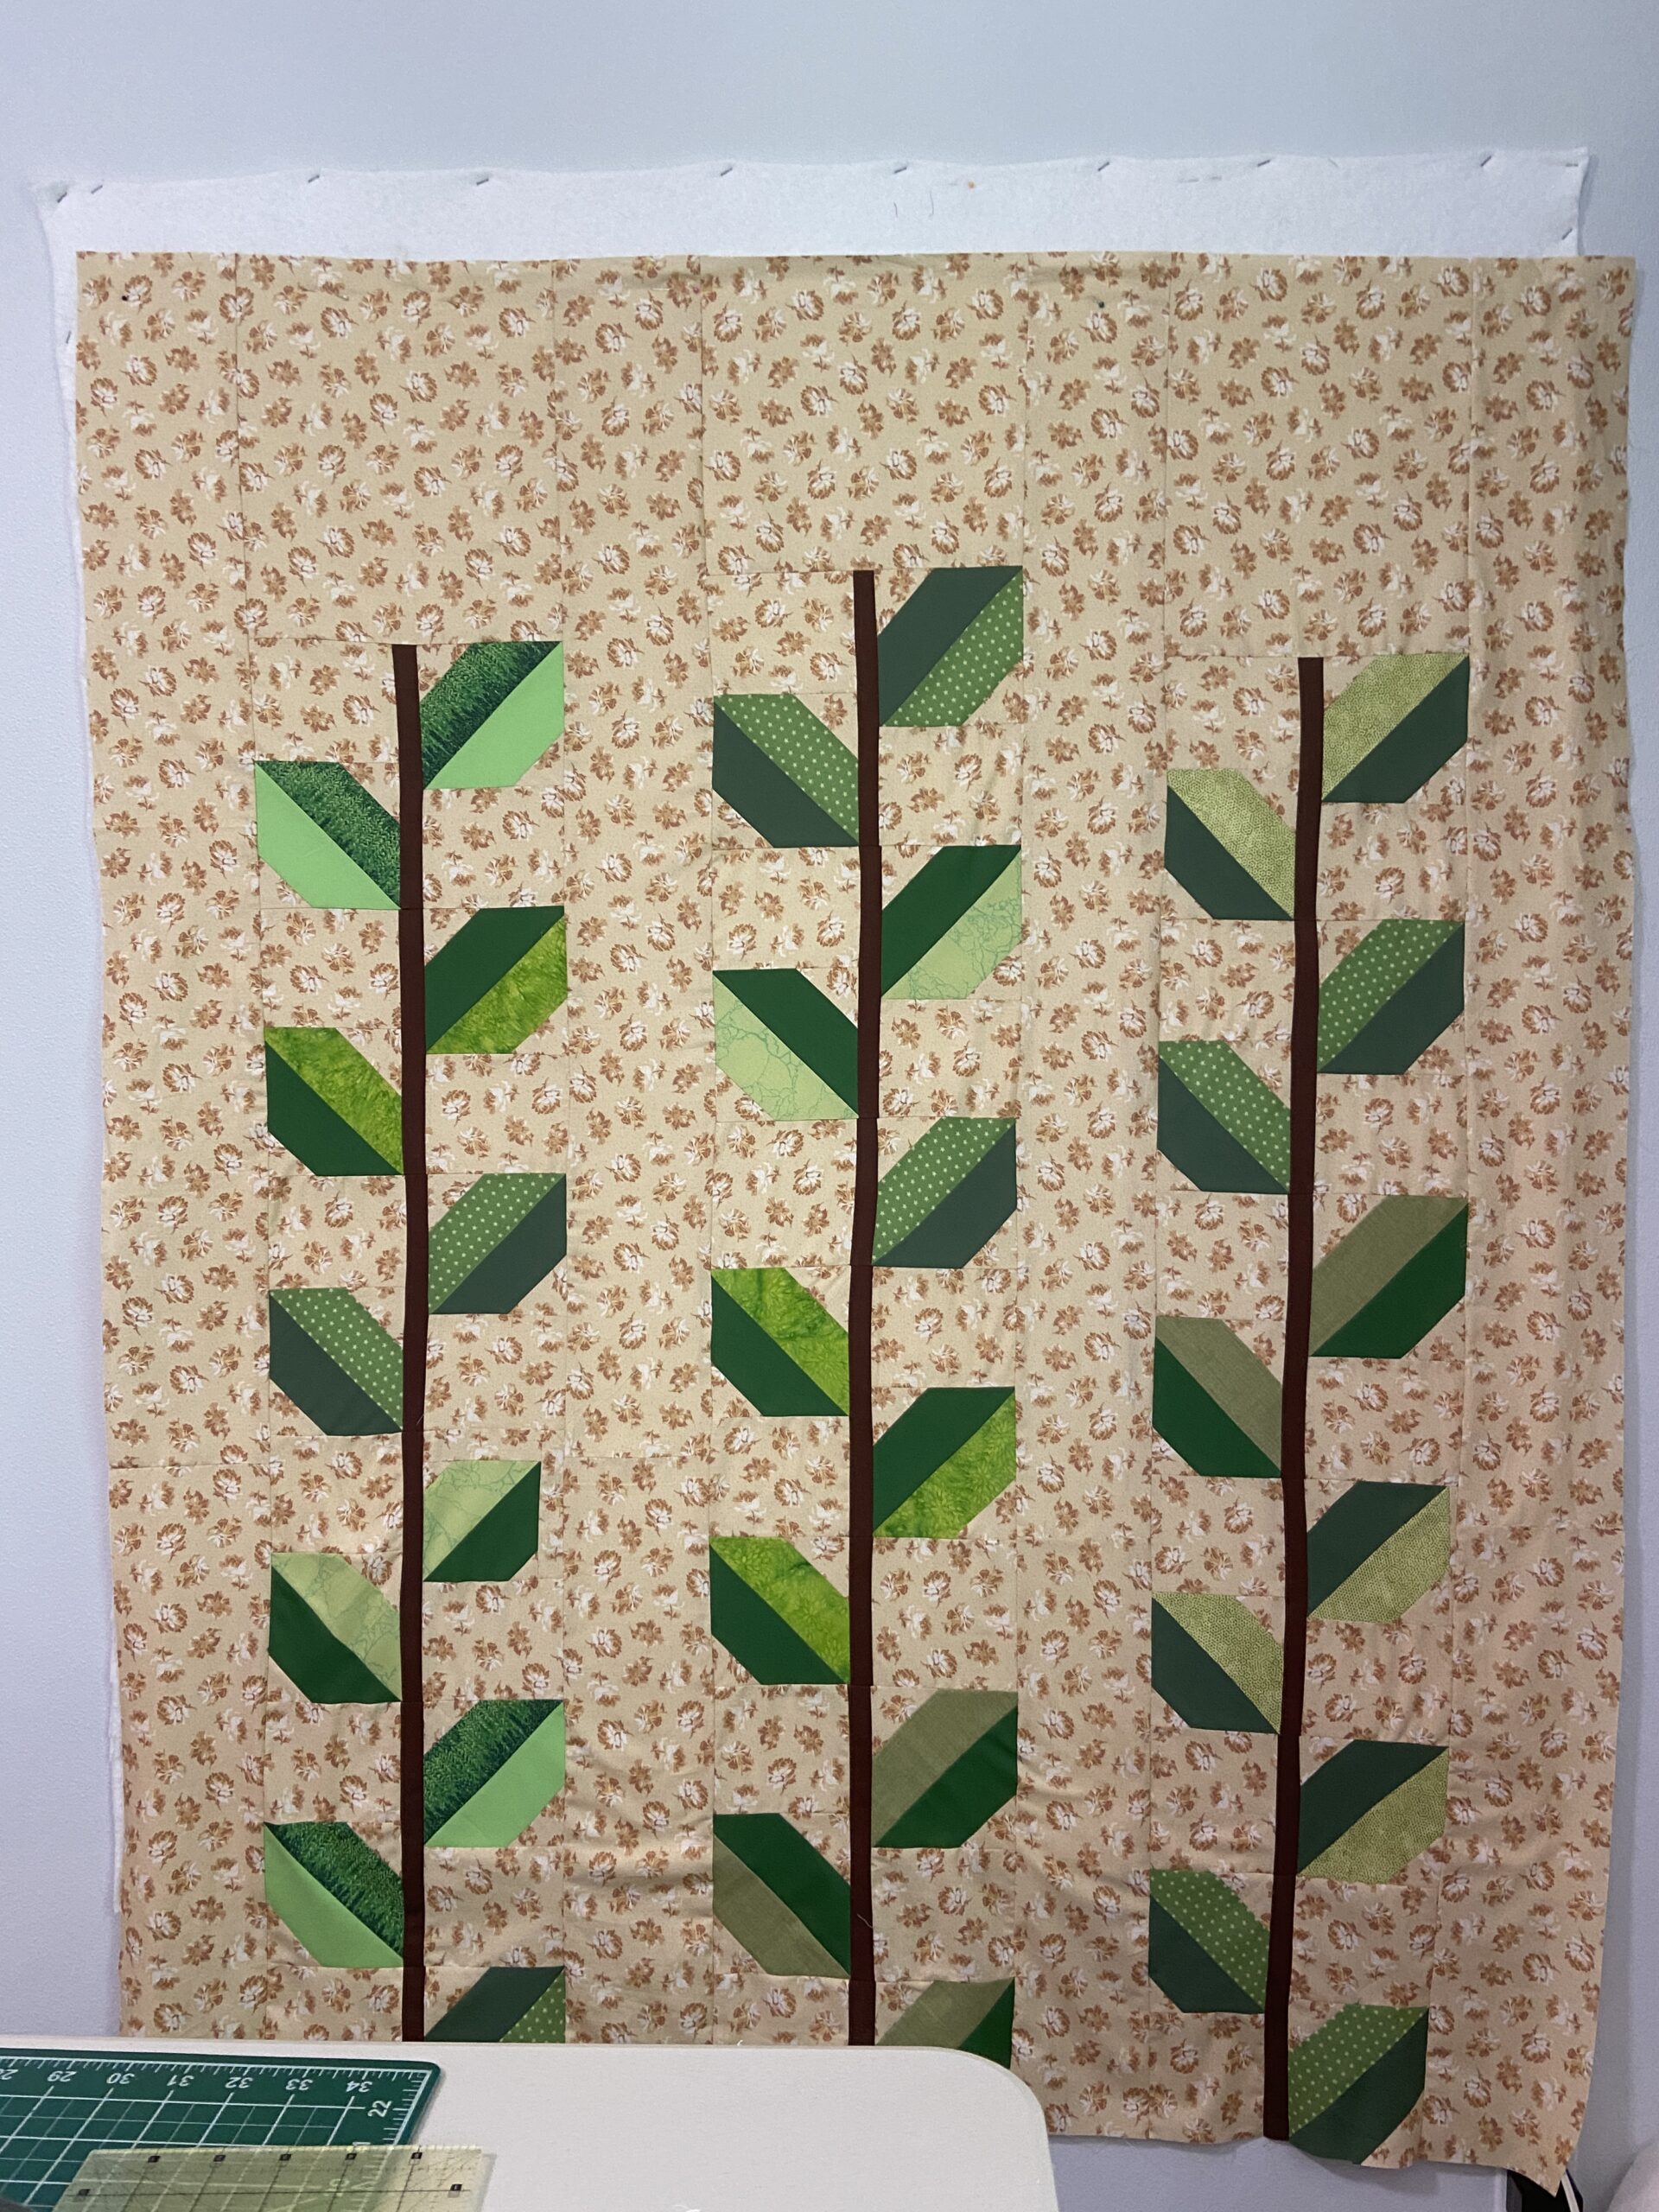
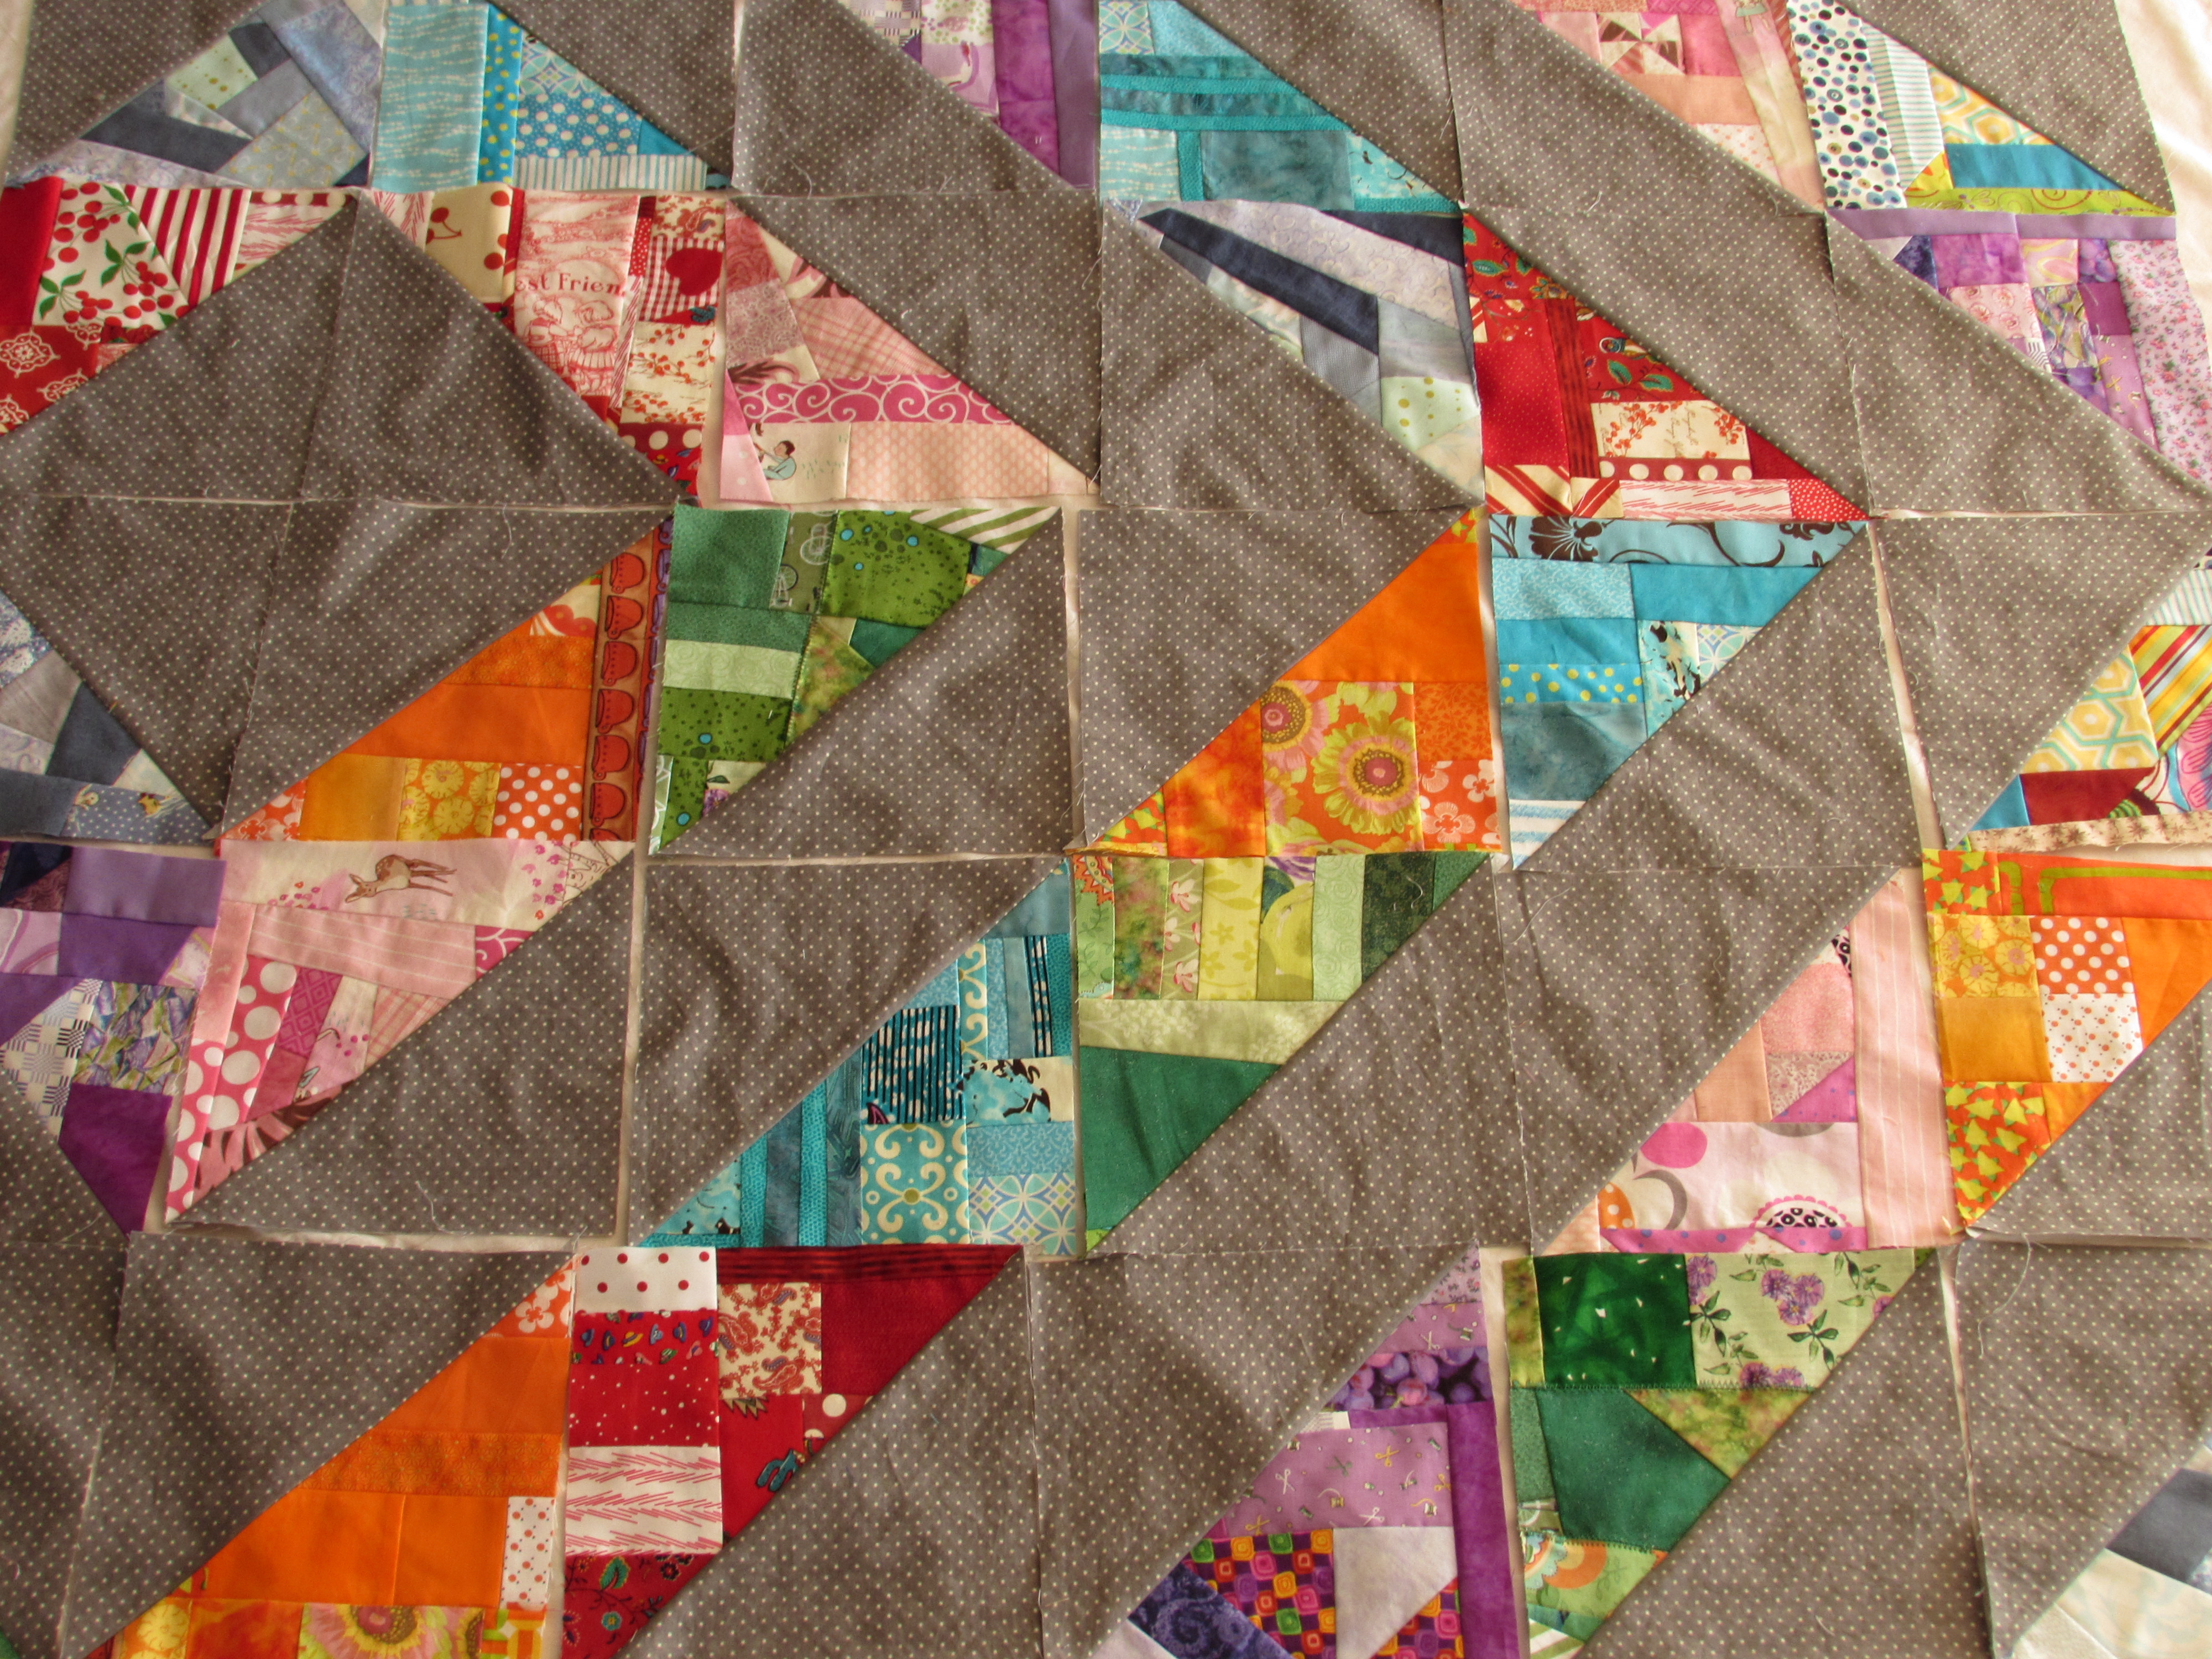
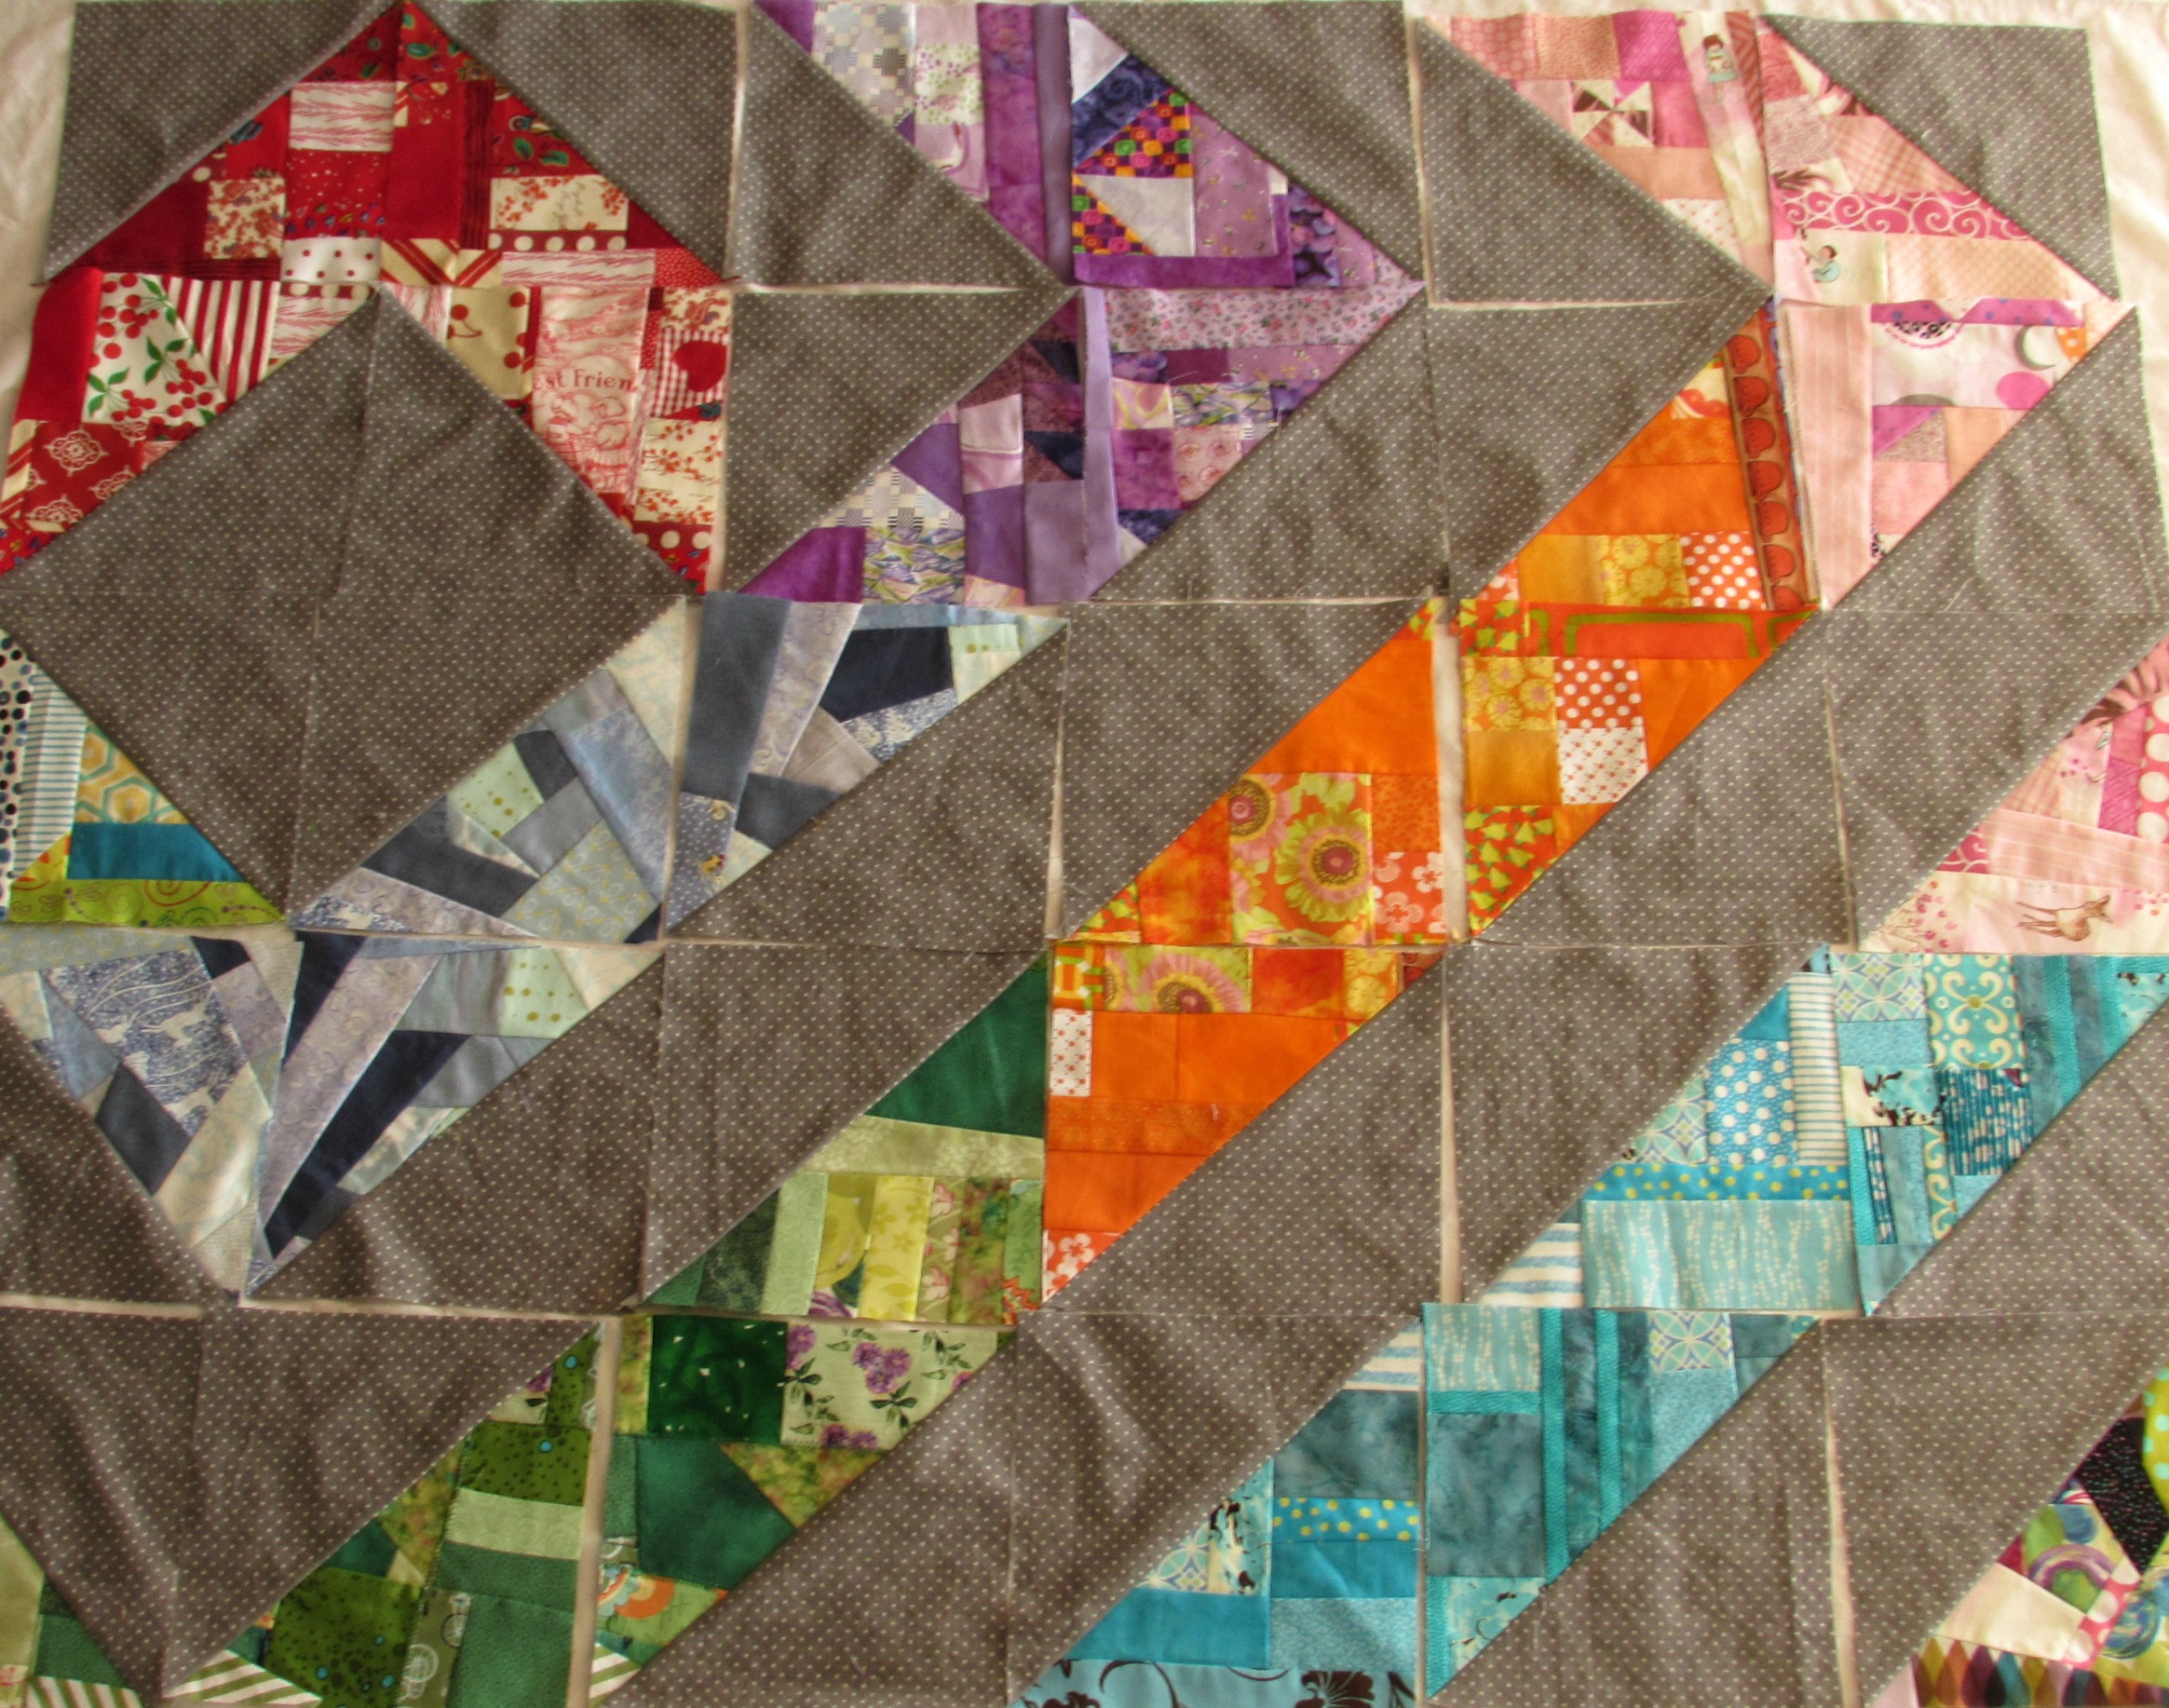
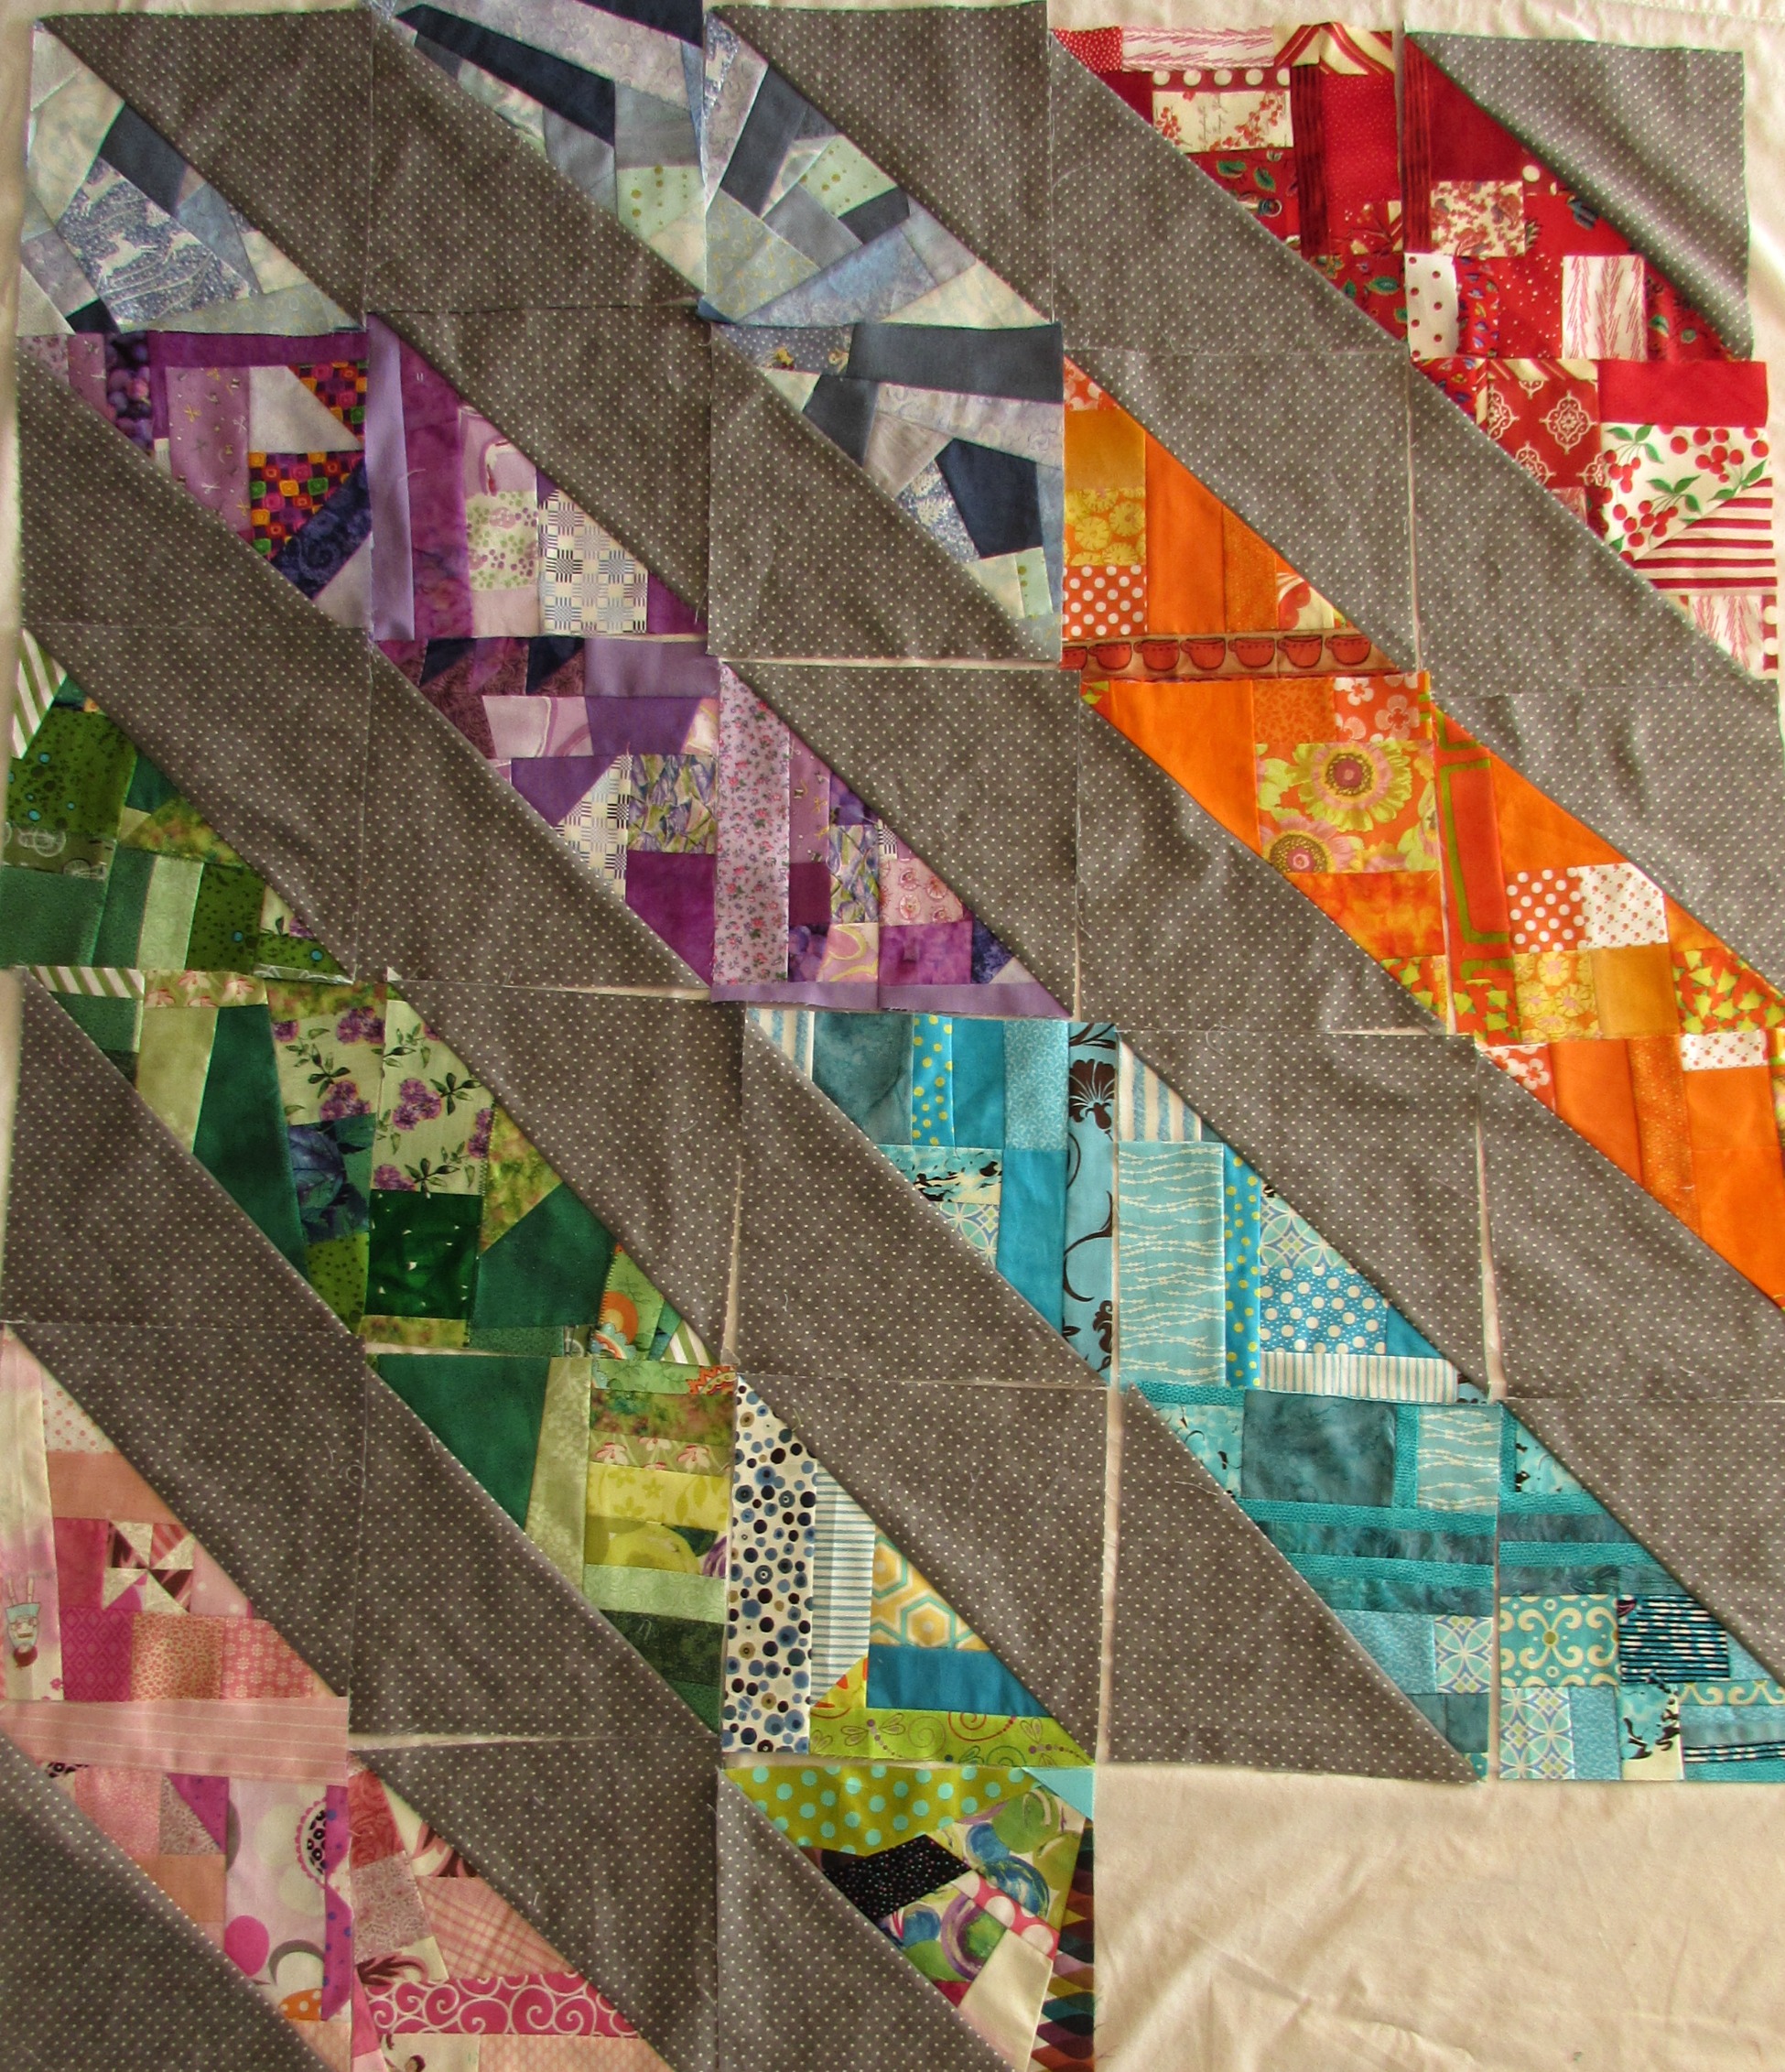
I did get some progress made on my quilt top before all of this began however. I am very happy with it. My plan is to use the Dresdens I made some time ago, as well as a few new ones, for the flowers. This is a time saver for me which is so helpful. Time is just not plentiful these days!!
I am experimenting with the placement of the Dresdens. They won’t be sitting right on top of the stem. If you look up on the left side, you’ll see a partial Dresden. I want to put a cone shape center at the top so it looks like a partial bloom. (Does that make sense)? I am loving how this is coming together. I borrowed some bias tape makers from my sister and will make stems with it. I want them to be narrower than the stems I made for the leaves. I may use a few slightly different fabrics to add some variety to the flowers.
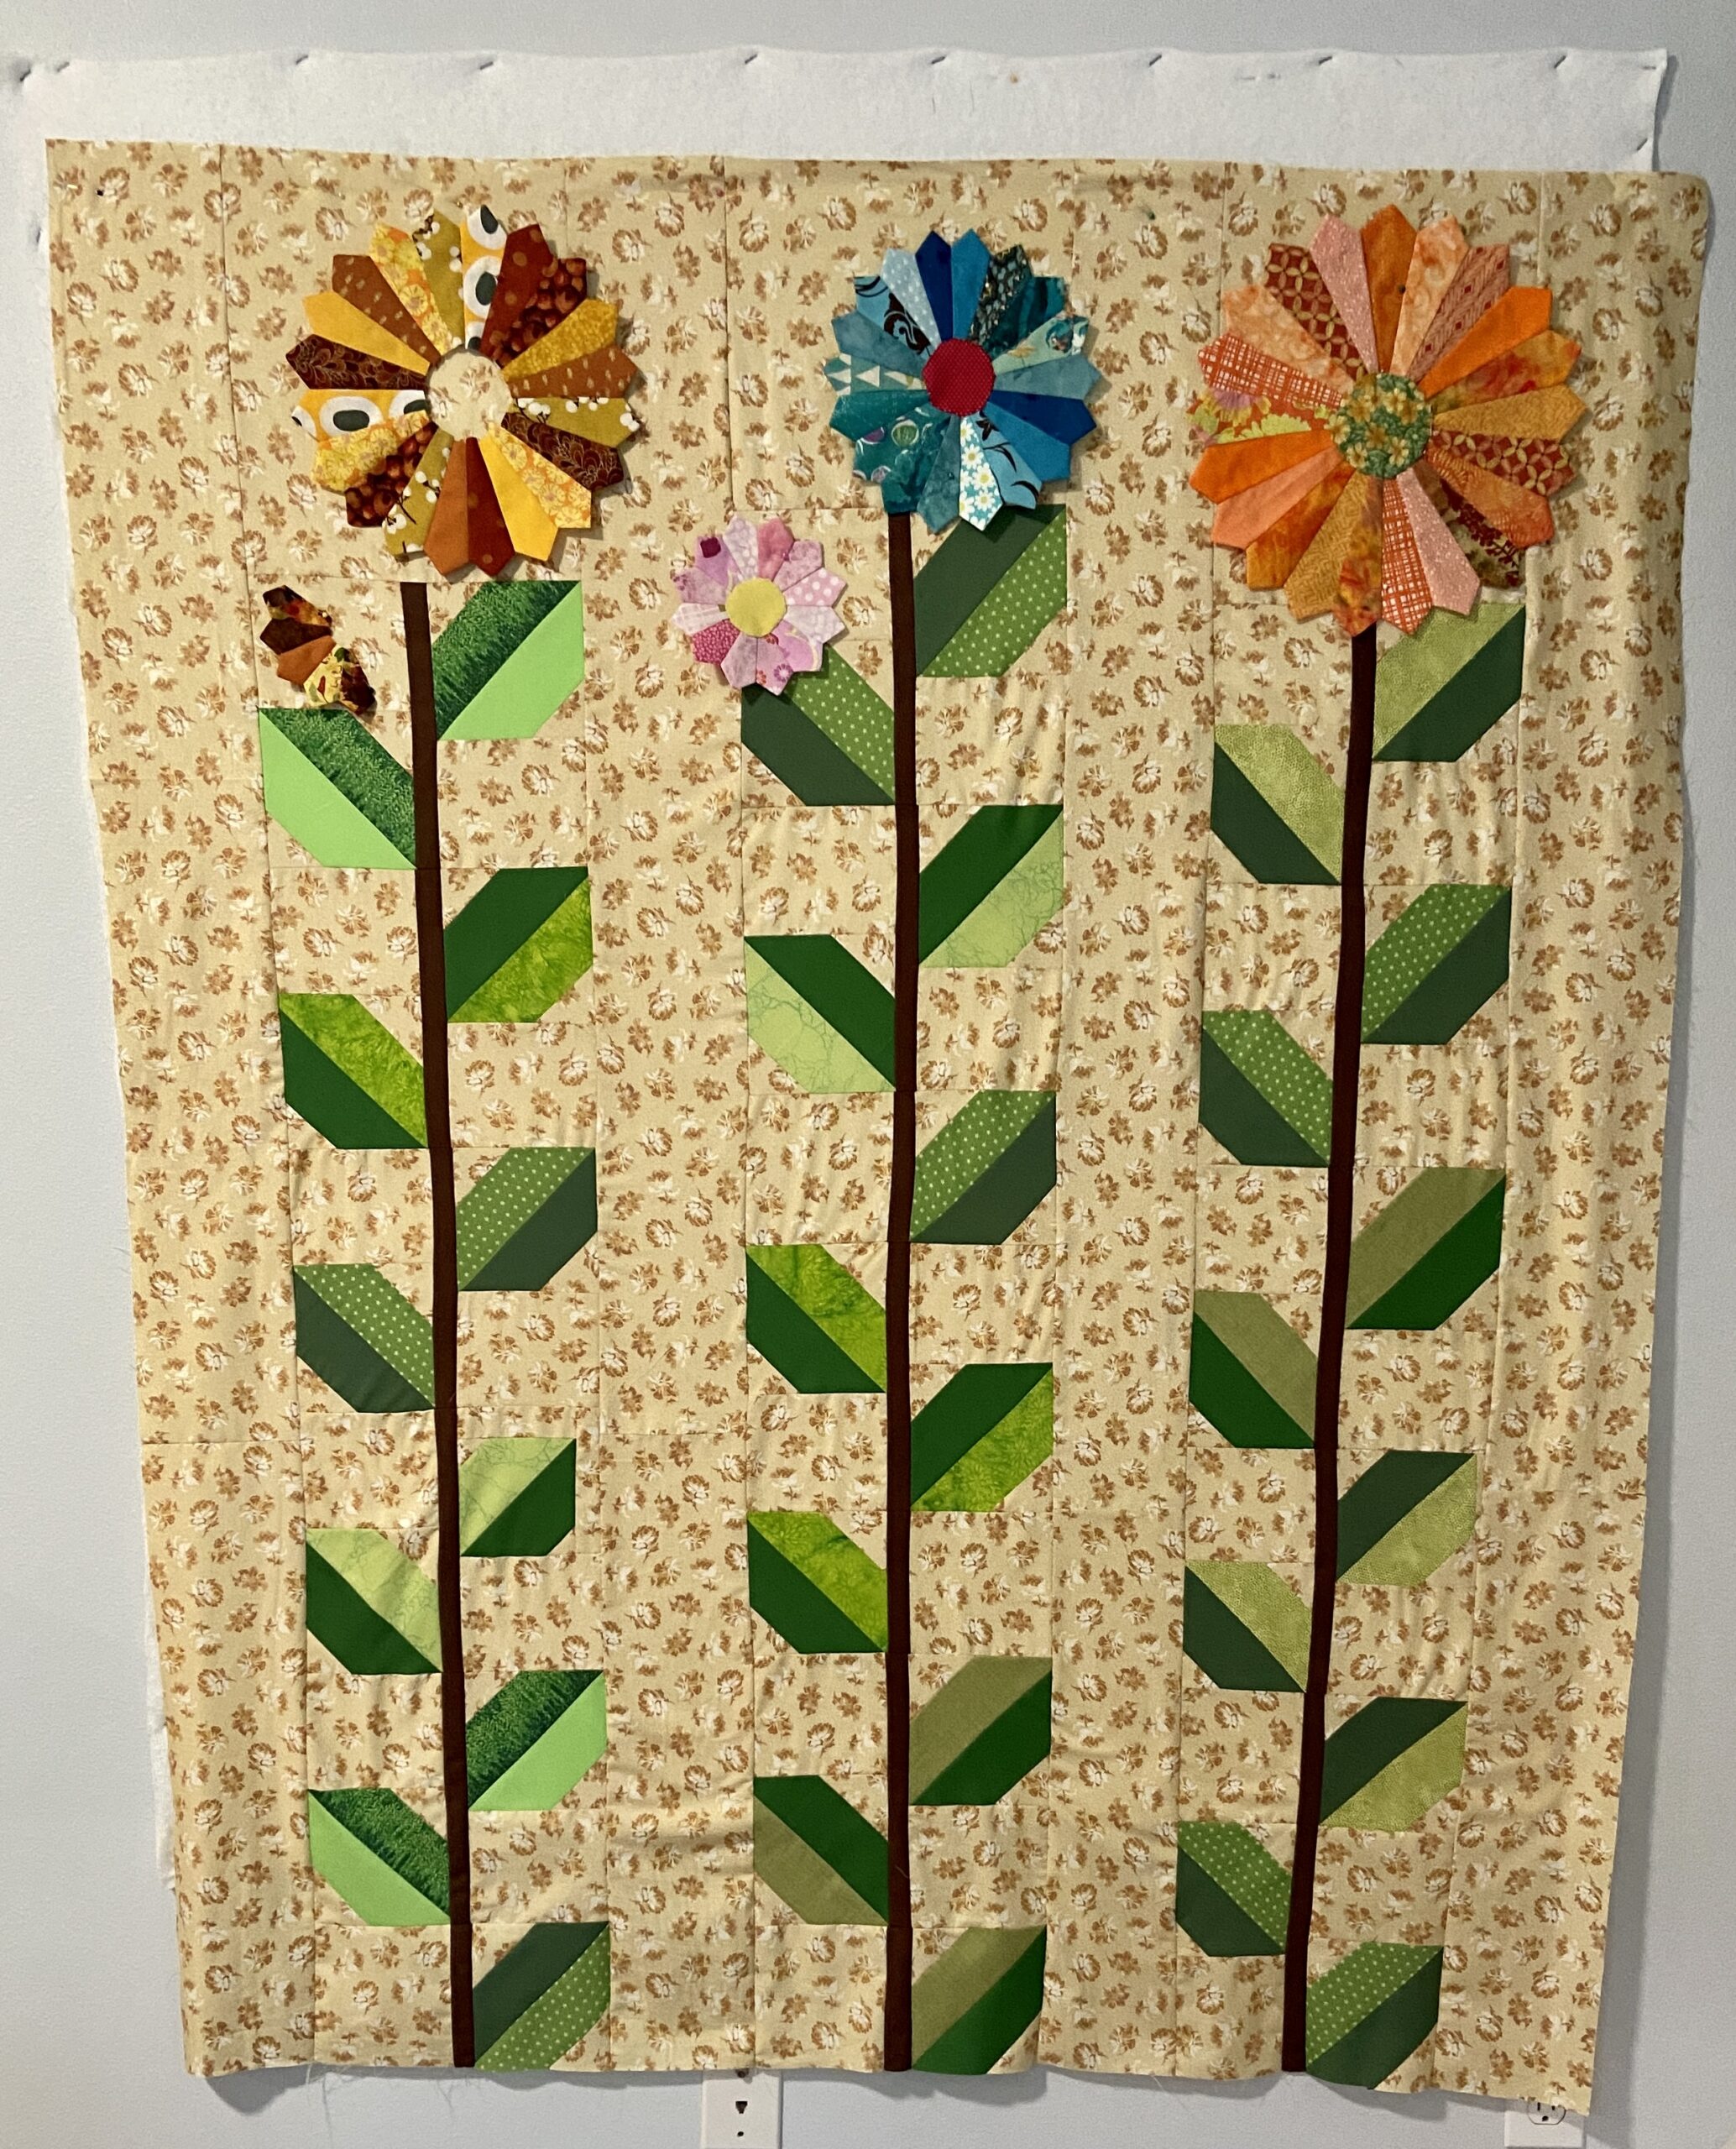
These are sunflowers Ray and I planted in our backyard this year. They are blooming profusely. My favorite flowers by far are sunflowers and peonies. Anyway, see the pale yellow, partially open blossom? That is what I am trying for with the small, partial Dresden. In another week or so I should have the Dresden’s finished and will be able to baste the quilt.
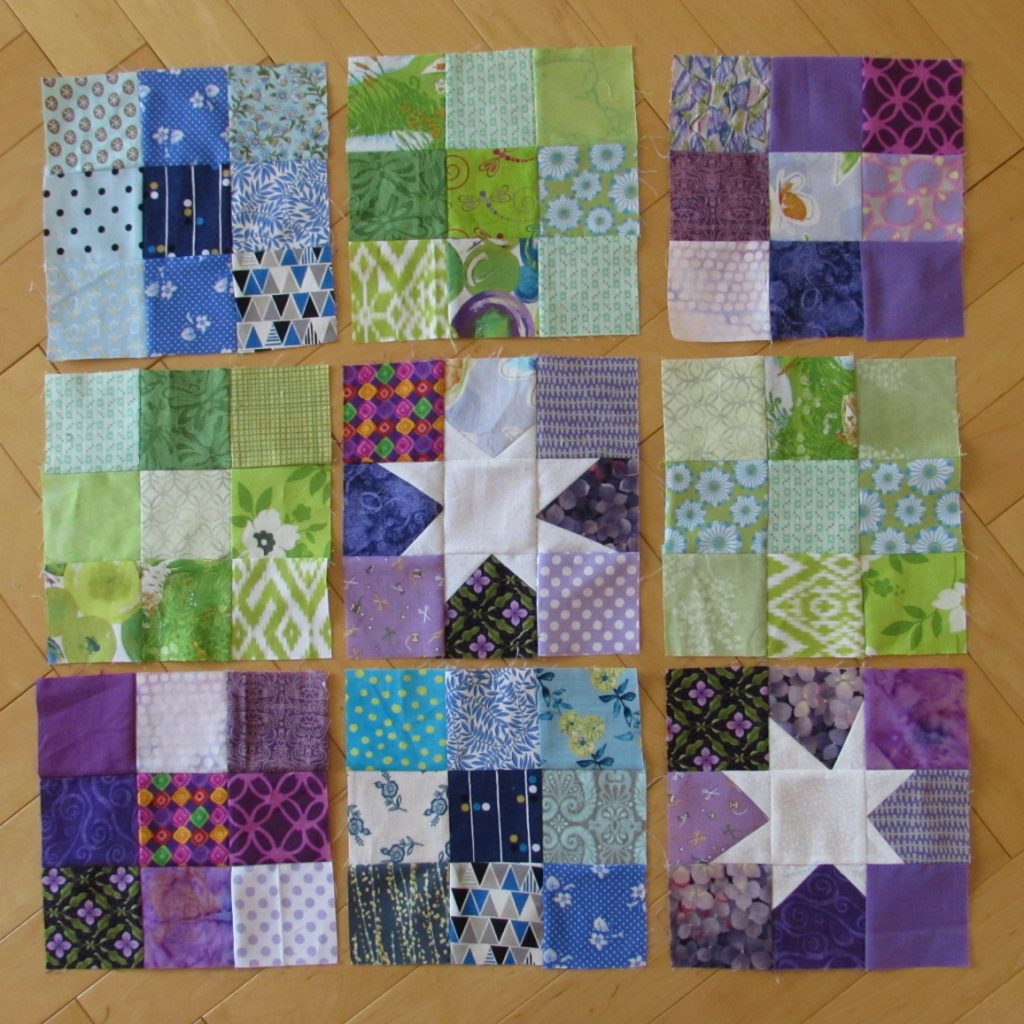
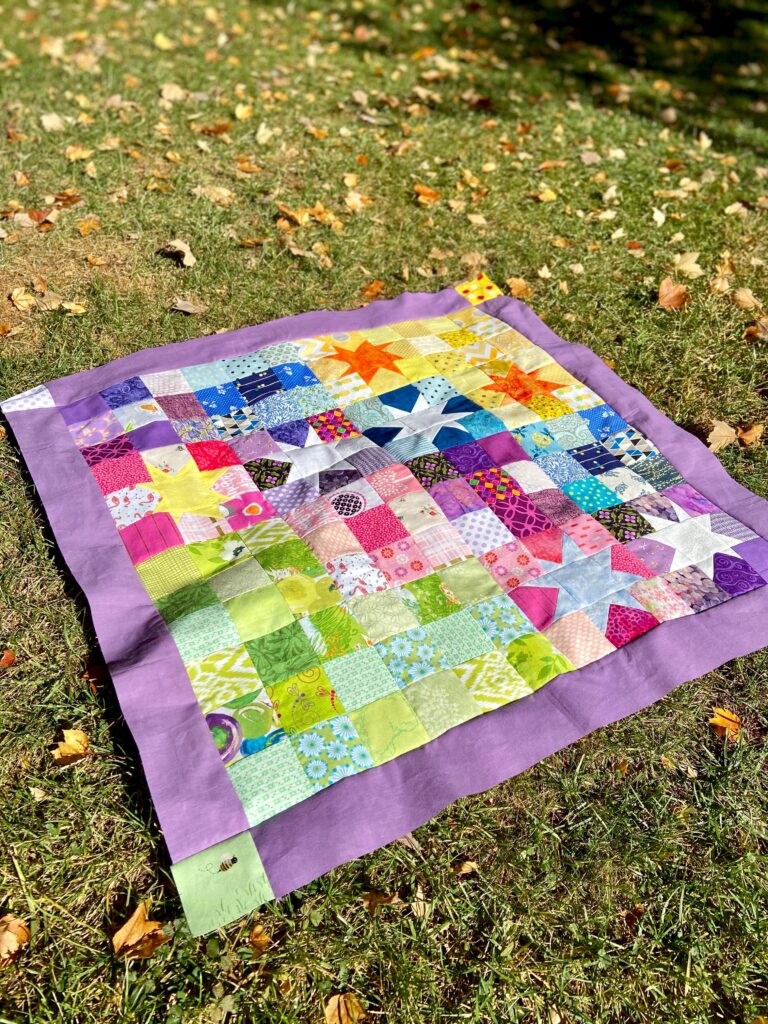
OK – time to see some quilt tops!! Remember we will be giving away a number of quilt patterns for entrants in this week’s link up. If you don’t know how to link up or just want me to share a photo of your quilt top, please email it to me. Can’t wait to see what the quilts are looking like at this point! Thanks so much for participating in the 2023 Positivity QAL!!!
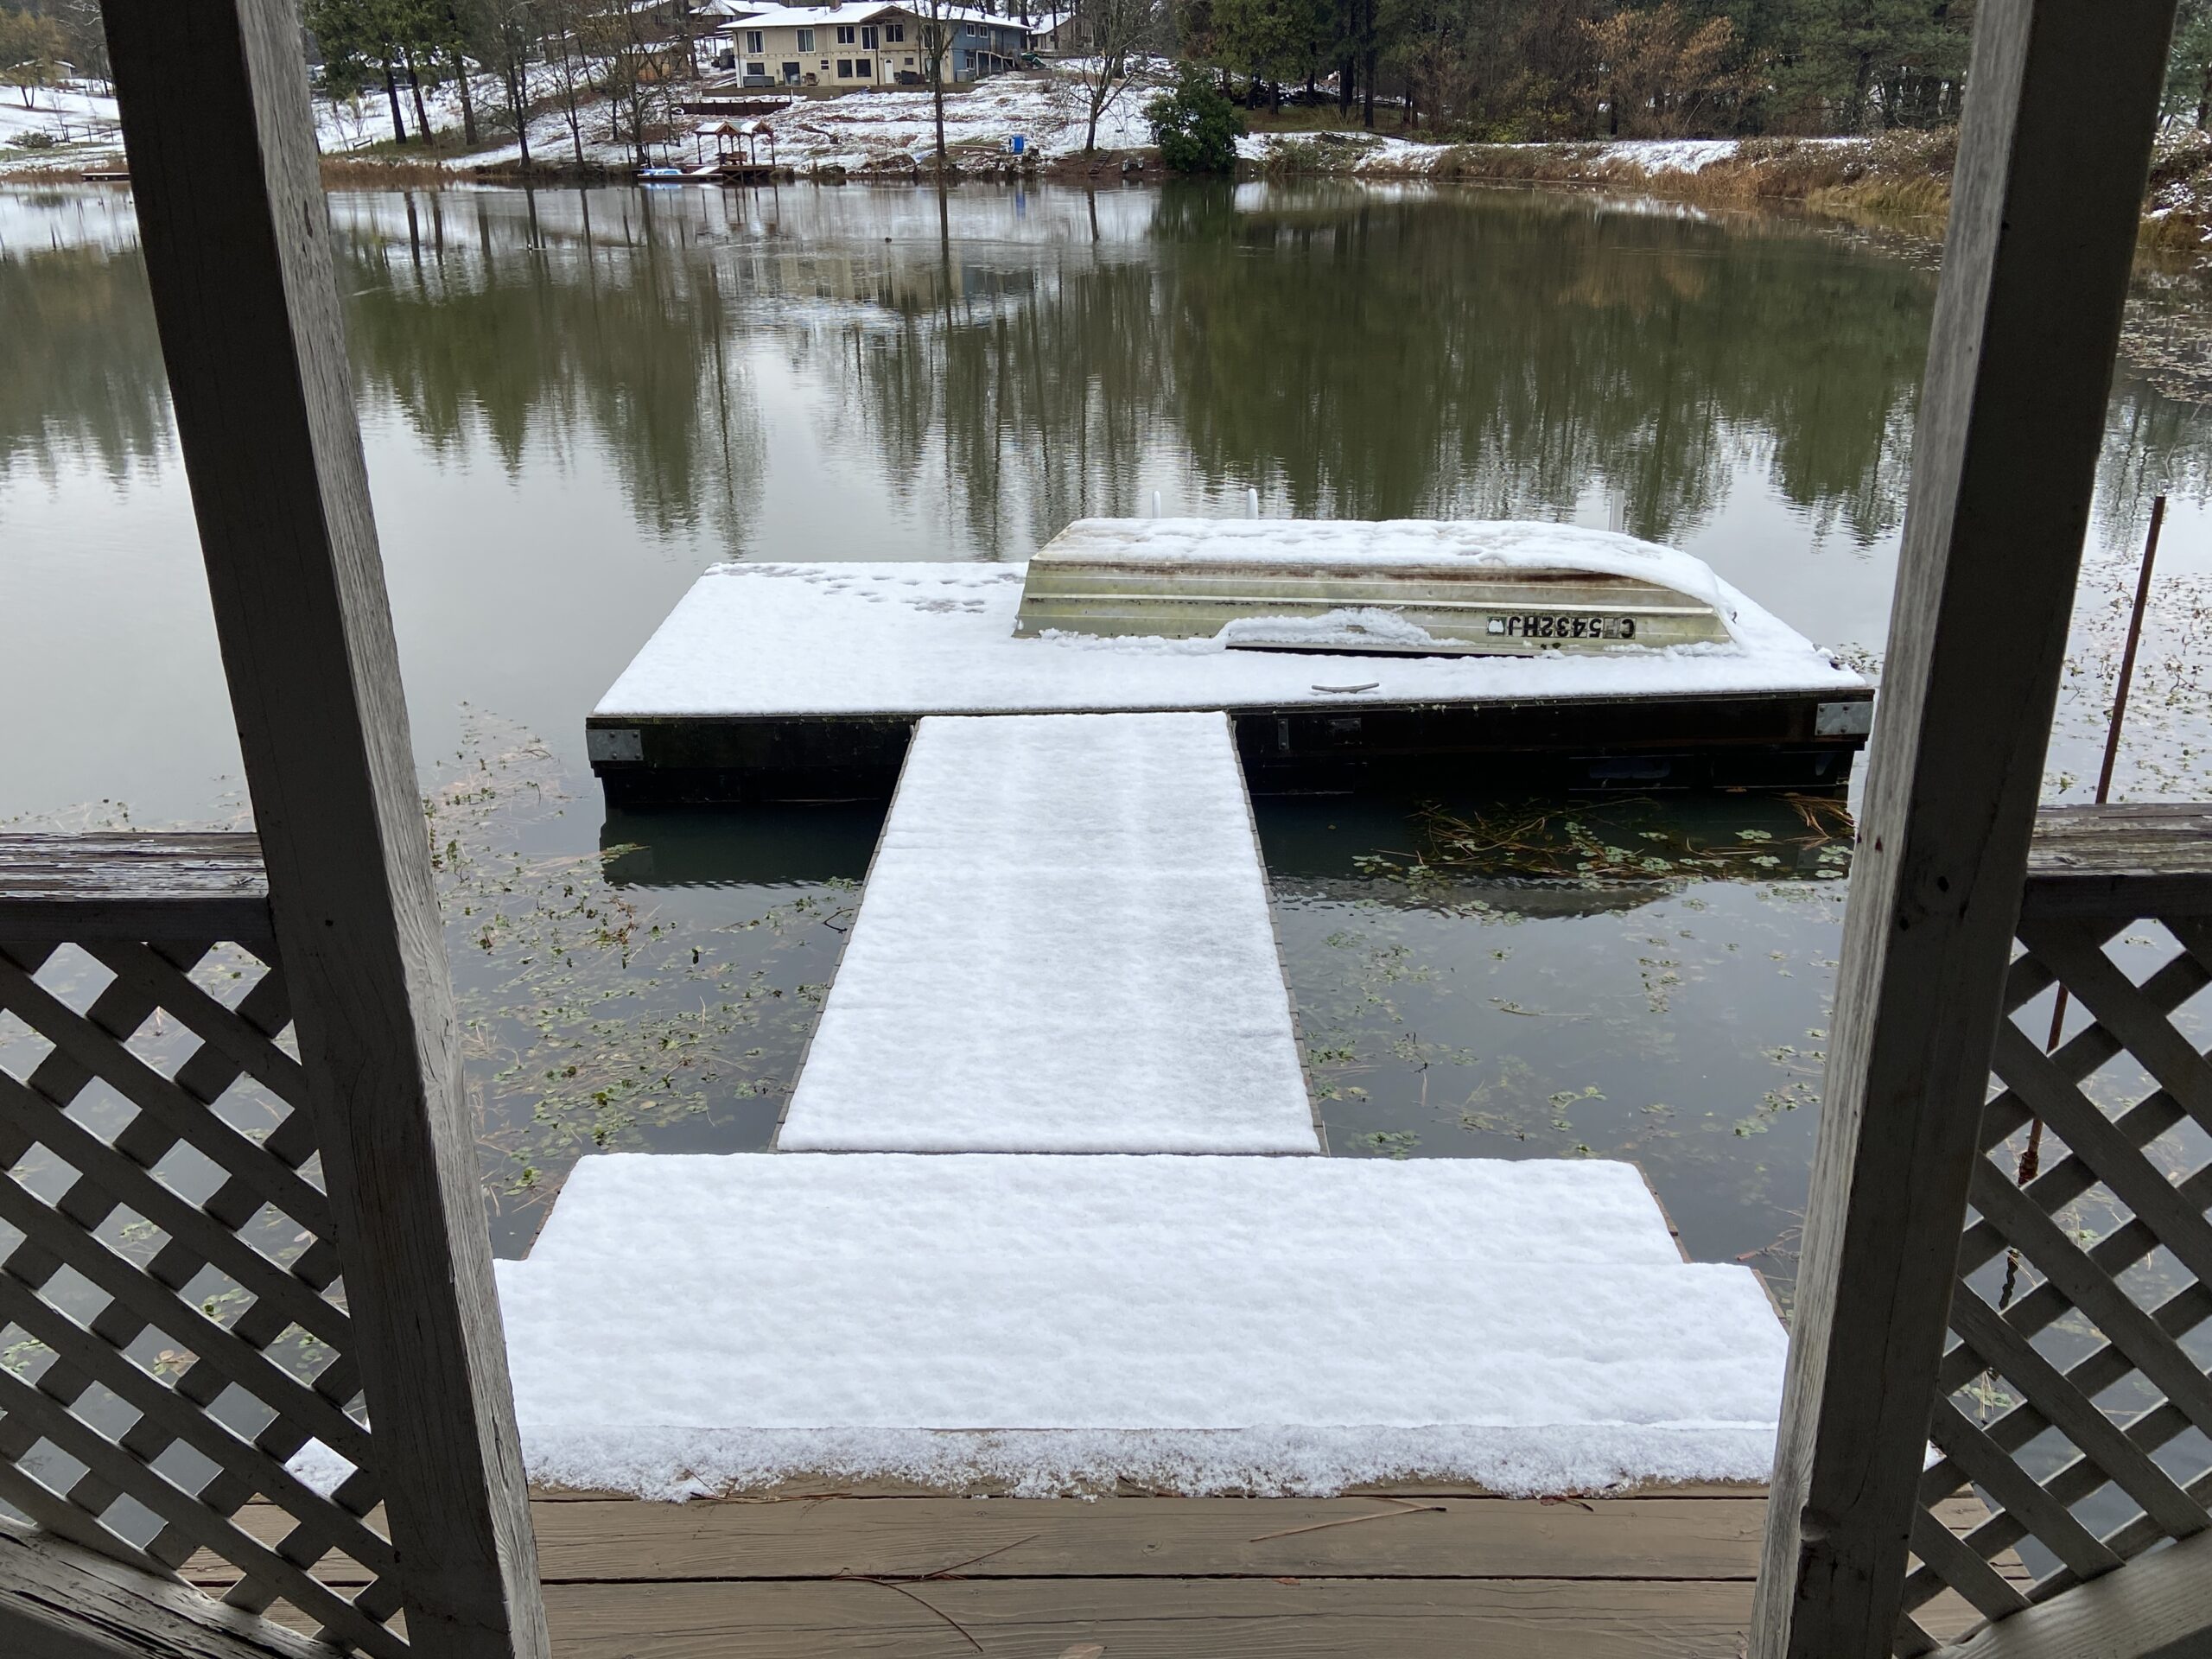
It snowed this week!! Years ago, it seemed like we got a snowfall every year. The kids would get the day off of school and it was a treat for all of us. With climate change, we rarely see snow. But this week we got about two inches and it was wonderful. Prior to this we got rain, a lot of rain. Living with drought and fires like we do, nothing is better than rain. Anyway, we are enjoying this wintry weather up here in Northern California.
Taken after the snow started to melt off, this is a peek at the pond from our gazebo.
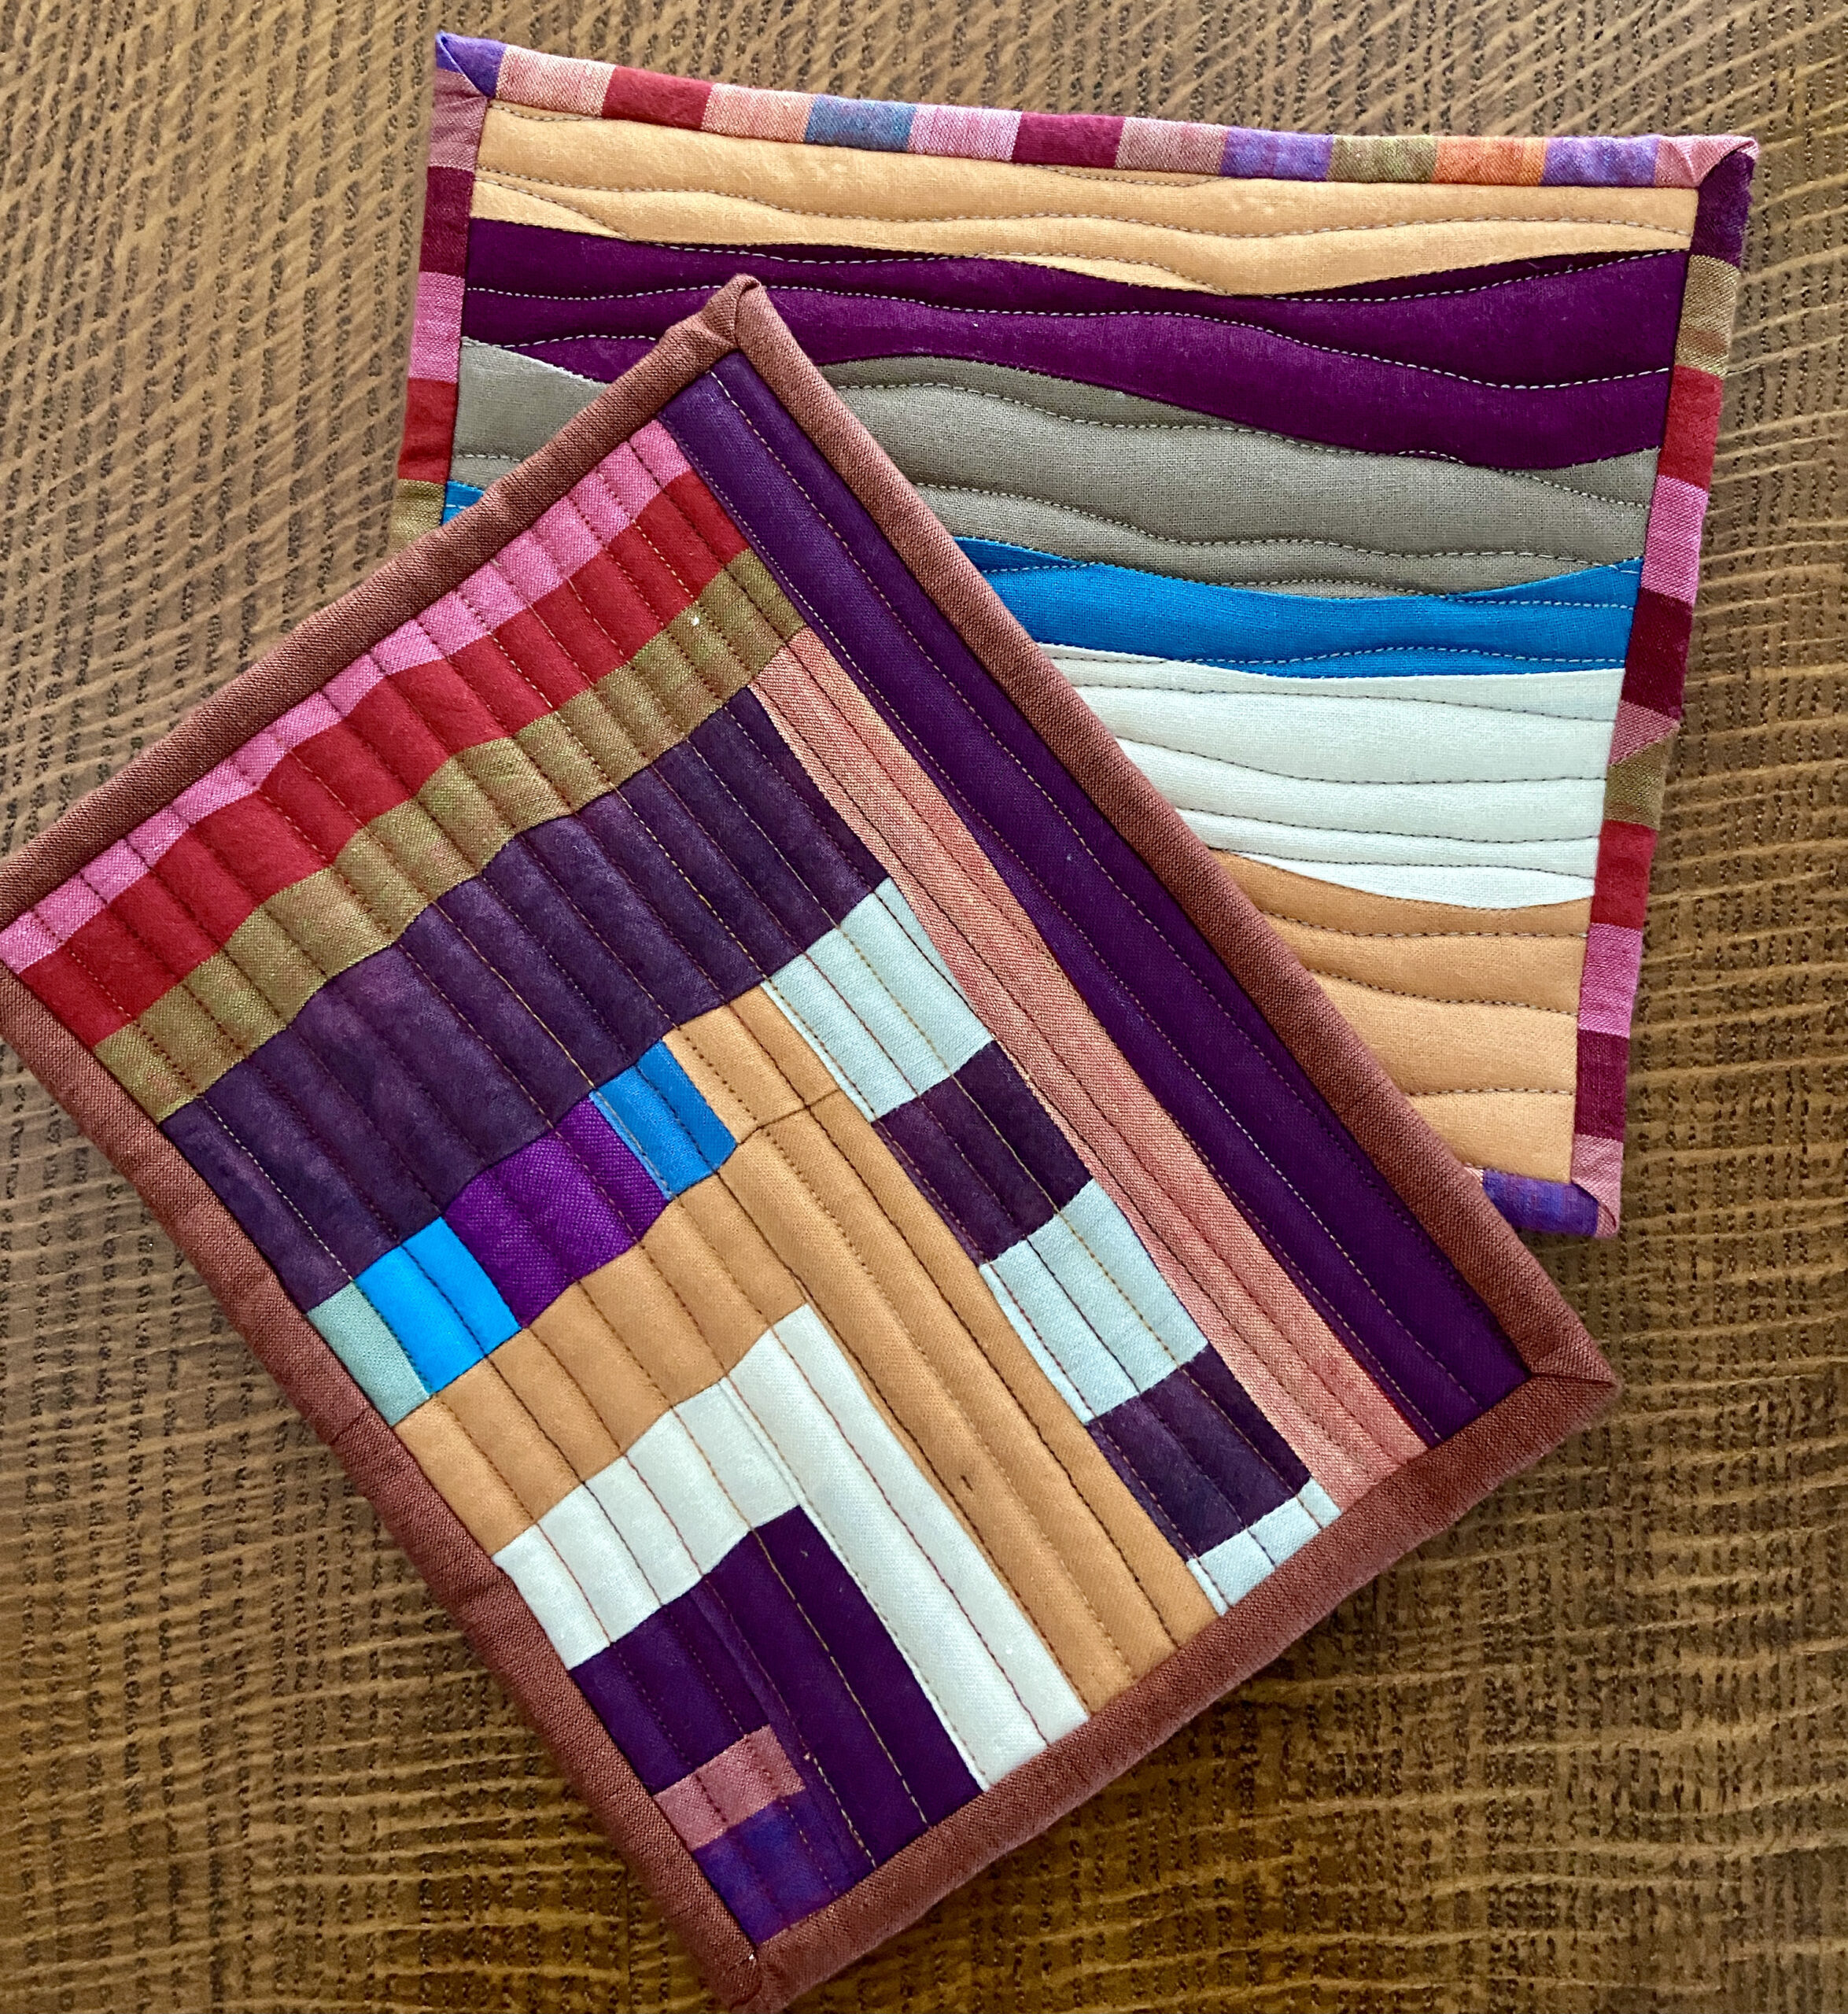
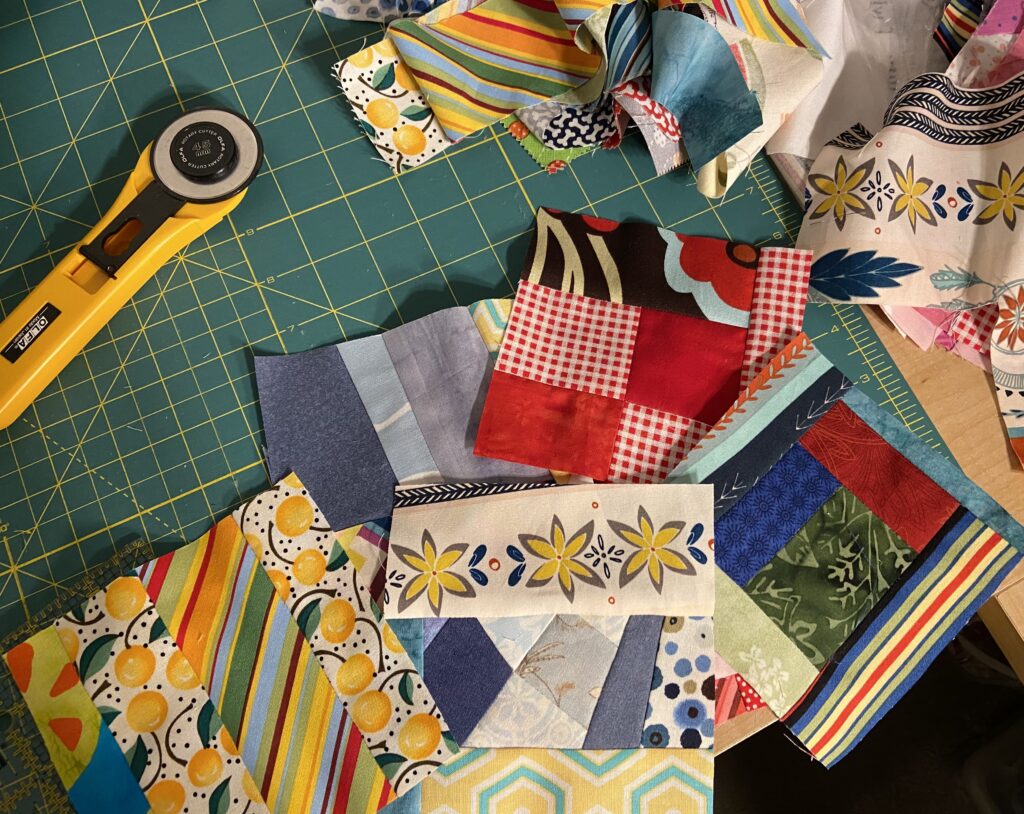
Most of my time has been spent packing and great progress has been made. However I have found a few minutes here and there to sneak in a little bit of sewing. When I was sorting scraps last week, the pull of the solids bin was great. I did a little improv and ended up with two cute minis.
Aren’t these fun?
I put Insul Bright and regular batting scraps in these so they can be used as pot holders or trivets on the table. They are a little be stiff since I quilted them densely.
Wavy piecing and quilting
This was the first one I made. The wavy piecing was fun but I do have to say, I am not hugely satisfied with the jittery look of my wavy quilting.
This was number two. It is made mainly with shot cotton which doesn’t have a ton of body. (Hmmm, I should have starched the pieces.) So it pulled with the quilting. No worries though – still fun to just sew!
The backs
Both of these little projects are backed with Kaffe Fassett stripes.
A Community Service Project for our guild
This is what I have on my machine this week. As I packed, I found a quilt top that belongs to our Guild’s Community Service team. Guild members can drop by and pick up completed tops and finish them or quilts that need to be bound. I have had this on the shelf for months! (Sorry team!) So I basted it and am giving it a meander this week. I have the binding strips cut and ready to go. It should be finished in a day or two.
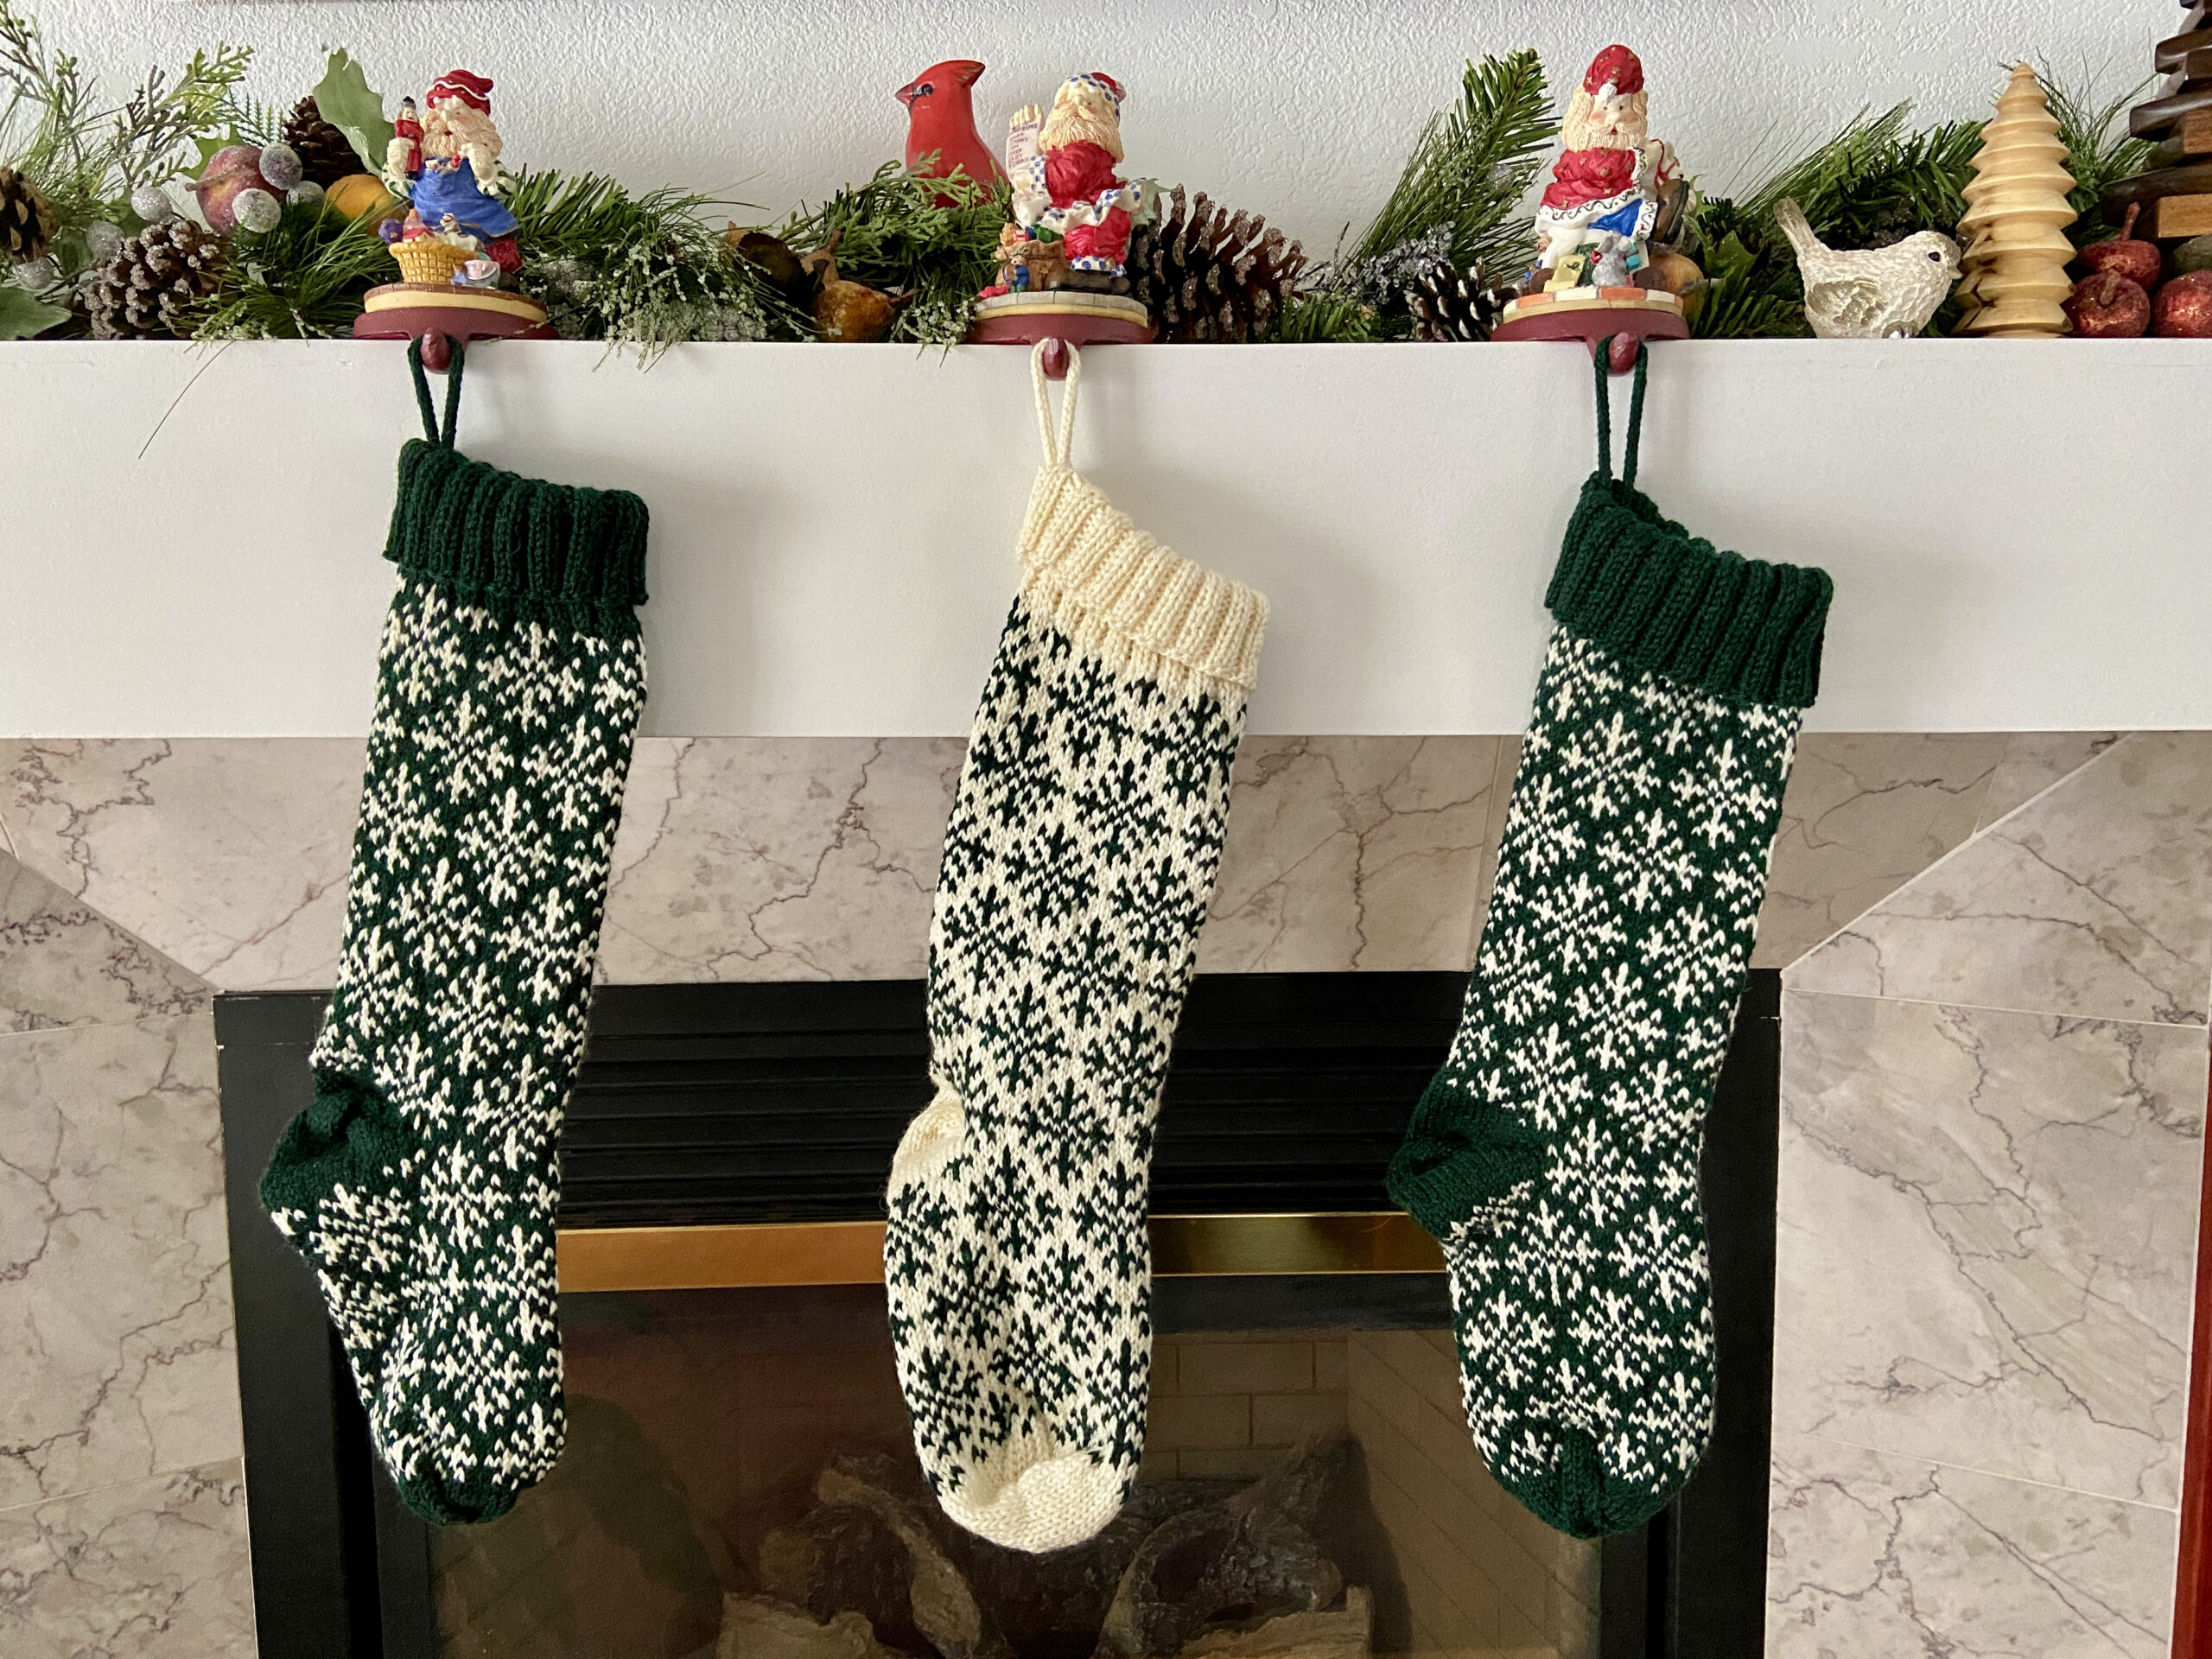
New Christmas Stockings!!
Finally, aren’t these holiday stockings gorgeous? My sister sent these to me, Ray and Julia. She is incredibly talented with her knitting needles and made these for us. I really, really love them. Her work is just amazing. I can’t wait for Santa to fill our stockings this year!
That is it for now. Since it is Tuesday, I think I will head over to Linda’s for To Do Tuesday. You can click here to check out what everyone is working on this week. Also linking up with Pat at Stitch, Sew & Show.
Know what I mean? I keep pulling bins and zip lok bags out to sort and organize. Then I find something fun and ditch the cleaning process and start sewing. I suppose I am kind of cleaning up but if you look at my sewing room, you wouldn’t really know it. Hahaha. Surely this is not unique to me. Cleaning up a mess usually means making a bigger mess temporarily. However, the inability to overcome the temptation to play with little bits here and there is certainly slowing down the process!
Just a sampling of the blocks I found.
When I was pulling out a stack of zip lok bags I found a stack of 17 nine patch blocks. I made these during the first half of 2018 and then got tired of them. This is a habit of mine! Anyway, when I found the stack I decided I should use them up rather than put them away again.
It took very little time to stitch them together and put a border around the whole top. It will be just the right size for donating to Jack’s Basket. I wish I had made a few more with the wonky stars but I knew if I set it aside, telling myself I would do that, it would be months before I picked it up again. Better that it is going to be finished and sent off. I found some purple flannel for the backing and will get it basted and quilted up asap.
What the heck?
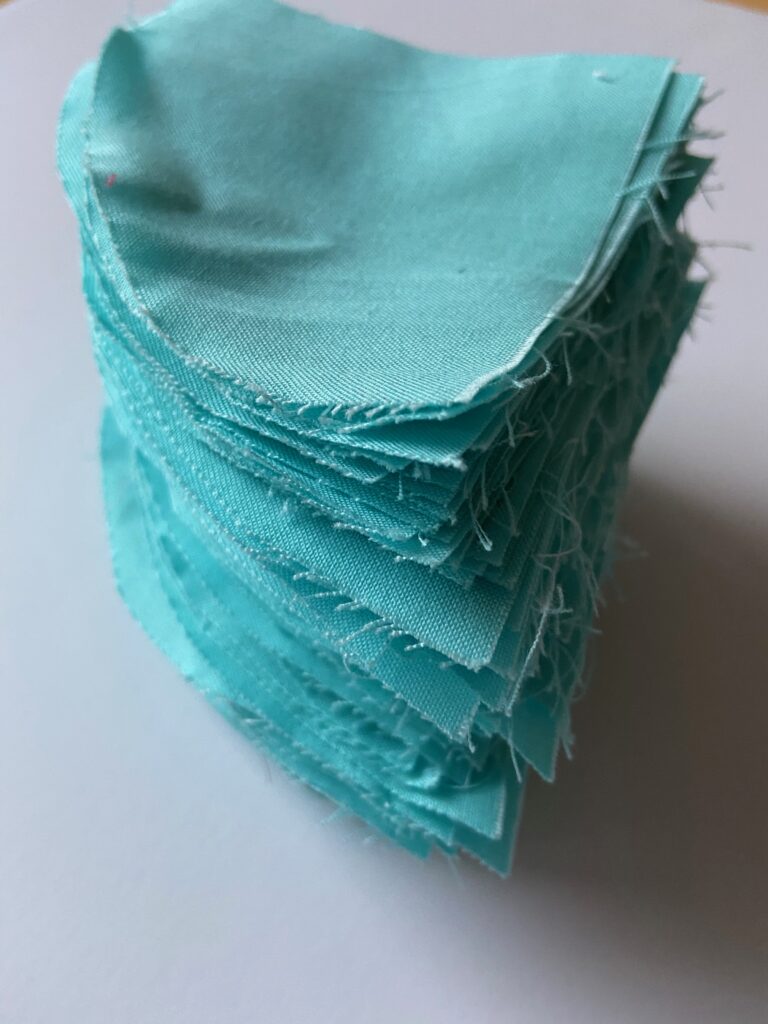
I have a bin marked solids. All colors are in there, all sizes and shapes. When I was picking through it, I found all of these light blue 1/4 circles. They are from the quilt I made for Julia’s bed back in 2013. I don’t know how many there are in the stack so we will just say a million. I was contemplating what I might do with these and in the blink of an eye, I was at the sewing machine playing with curves. Sigh. Maybe I am just not meant to have a clean sewing room?
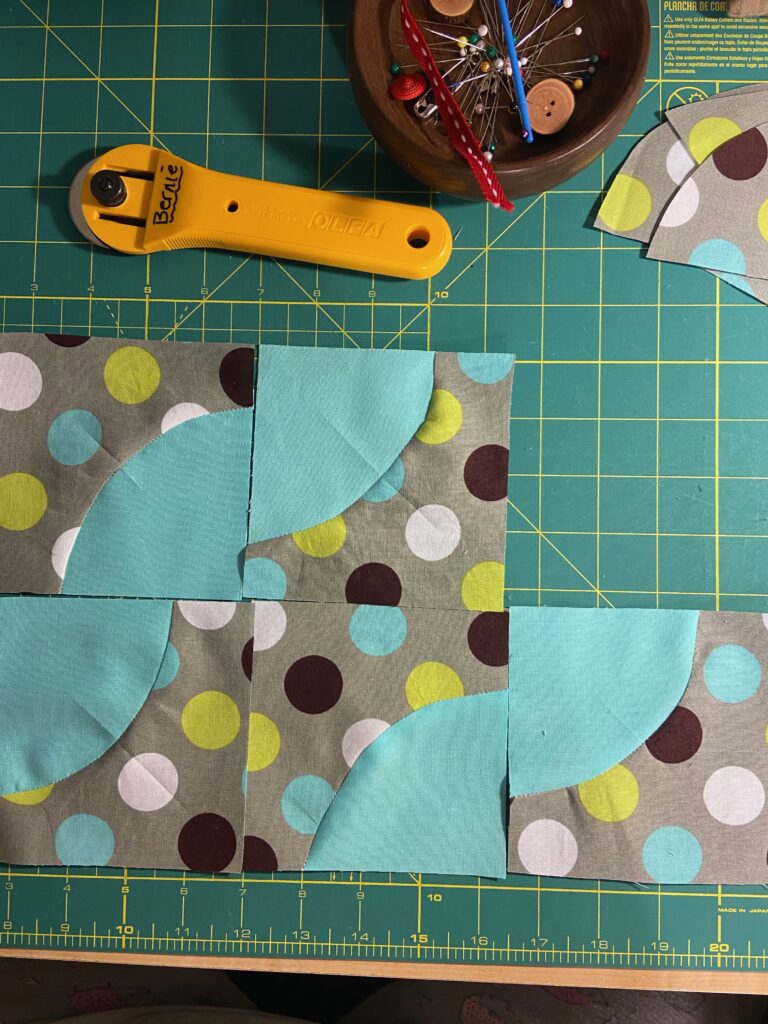
But look at this. I think it is really cute and could be a fun quilt or mini. I pulled some chocolate brown and chartreuse and bagged all of it up as a project to work on soon. I love making the curves without having to measure. I am just tracing around the blue curve on the polka dot fabric and sewing them together. Then I square each block to 4.5″. I know I will use them in some fashion.
I put the blue 1/4 circles and related fabric away and – I kid you not – I found another zip lok bag. Jeez, it is endless. But this one had a lot of brightly colored strings in it PLUS about ten little improv crumb blocks. This was a huge distraction and I spent the evening yesterday making more of the blocks. I am up to about 18 or 19 now. The crumb blocks finish at five inches. My plan for these is to make economy blocks using the crumb blocks at the center. I believe the blocks will finish at nine inches which is a nice size. I need to make more of the crumb blocks to have enough for a lap size quilt. This project is now in the “make for Mercy Hospital” pile.
In between all of this, I have been using the AccuQuilt Go to trim scraps into usable squares. I now have a bin that is really stocked up with 2.5, 3, 3.5 and 4.5″ squares. Plus a huge stack of 5 inch squares. This is quite satisfying!
OK – now I am off to cut out a pair of flannel pajama pants for Julia. Hers are looking a little ratty so she is in need of a new pair.
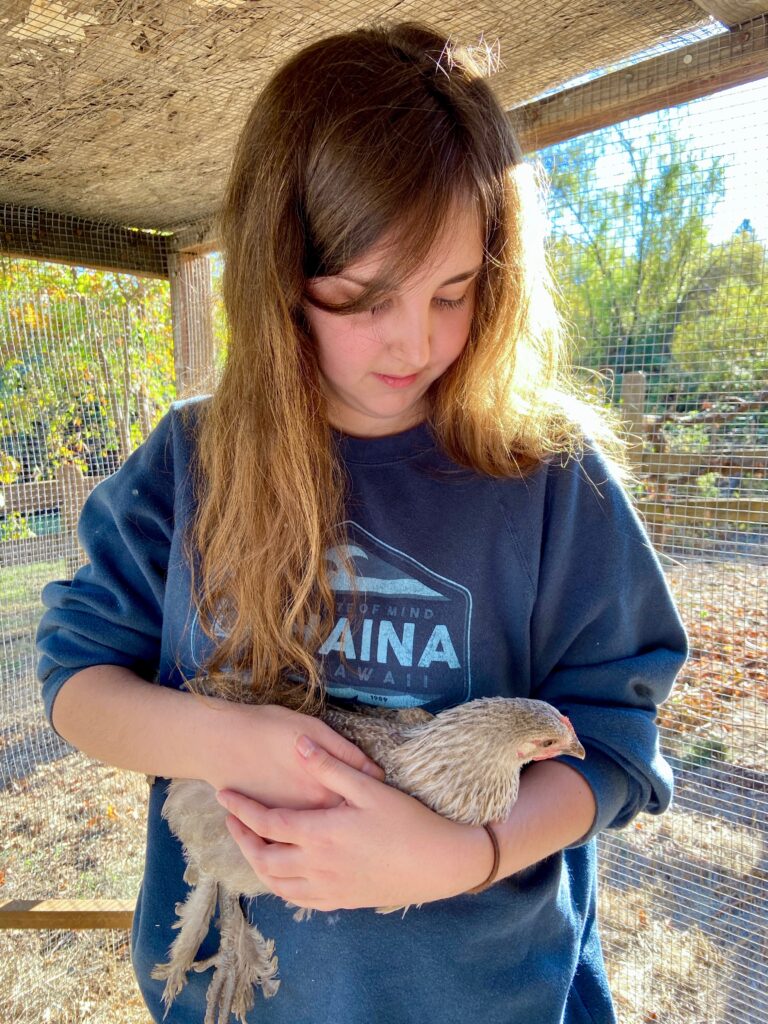
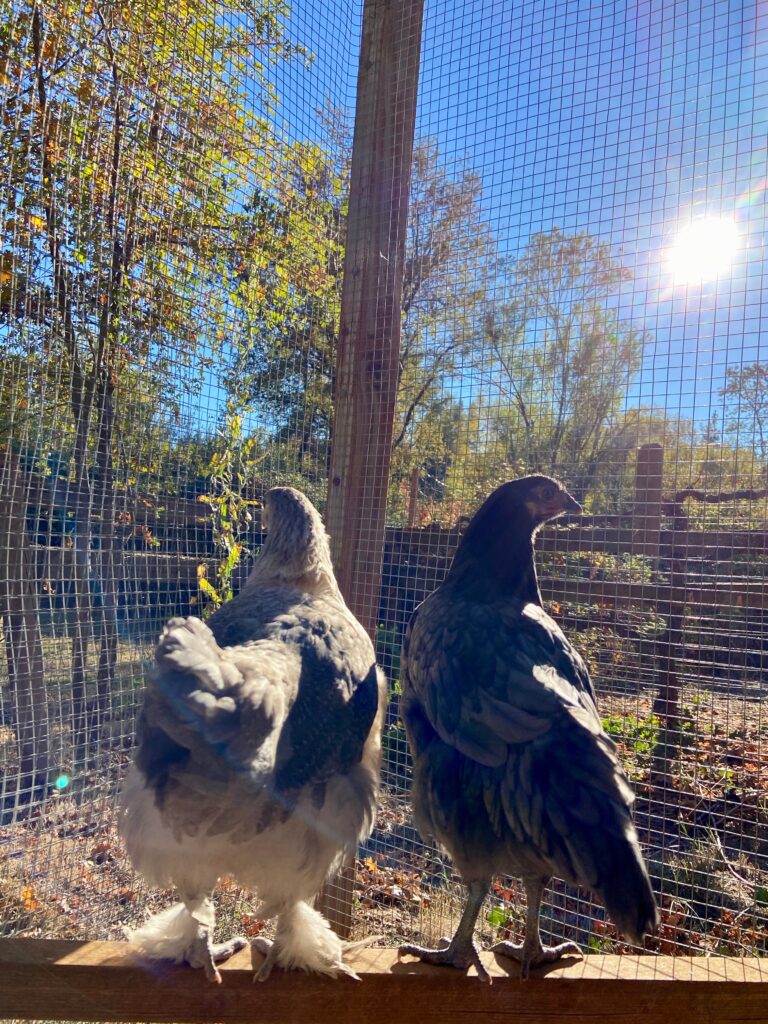
Here is a picture of her with one of her older chickens. She has two out in the coop and is trying to socialize them a bit. I think she is working her magic because they are calmer now when we hold them.
Flora and Fauna, enjoying a little sunshine.
Enough for now. Hoping all of you are well and happy. 🙂
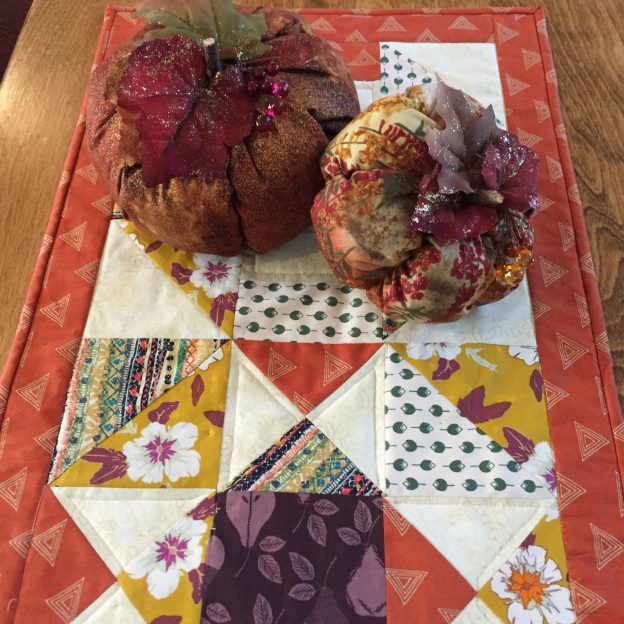
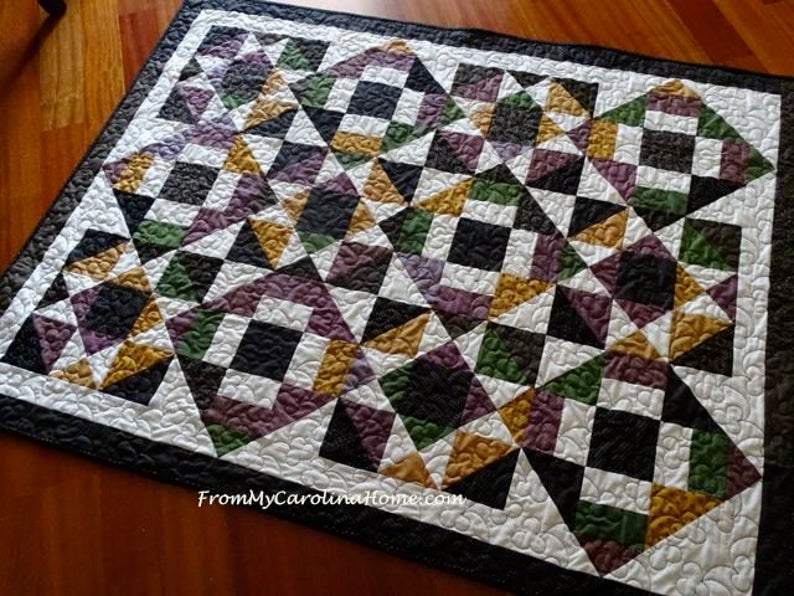
I have a fun finish to share with you all today. I have been doing a little collaborating with Carole of From My Carolina Home for the past couple of weeks. She is hosting her fabulous Autumn Jubilee which happens each fall season. One of her projects is a set of placemats which I supplied the fabric for. You can check those out here – they are really pretty. Carole does an amazing job creating tablescapes – whenever I see one, I wish I was sharing a meal with her! I love what she did for this festive autumn table. Below you can take a look at the fabric she used. The kit is available in the shop but in very limited supply. I suspect it will sell out quickly. It is a great bundle and she is supplying the tutorial for you!
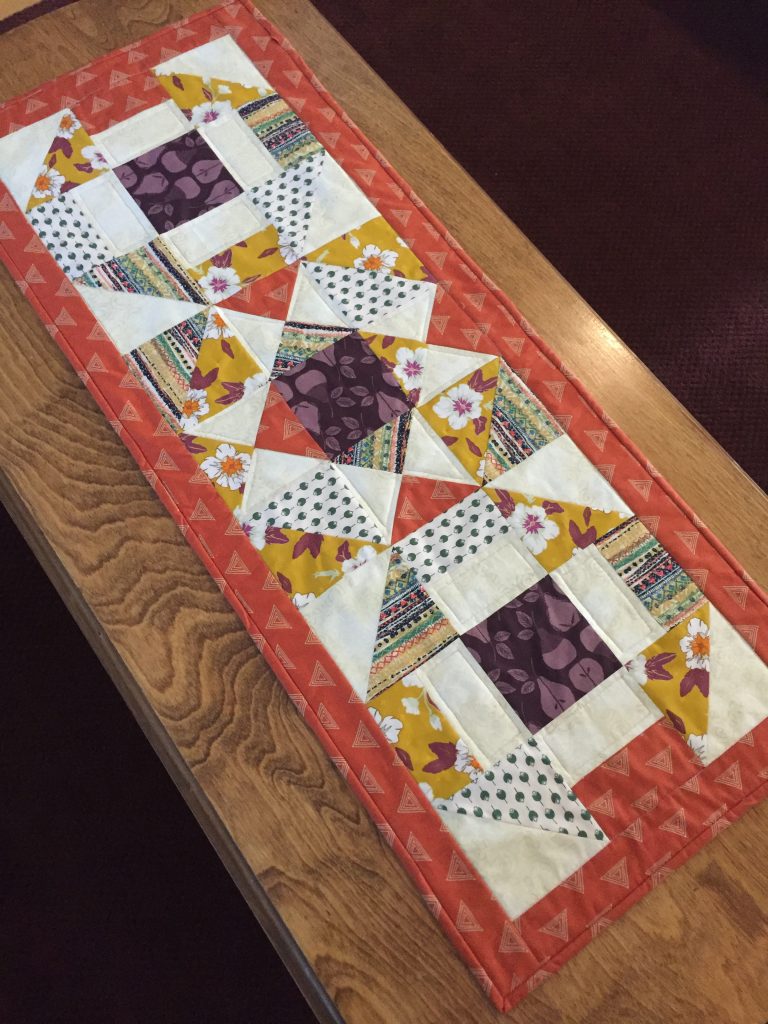
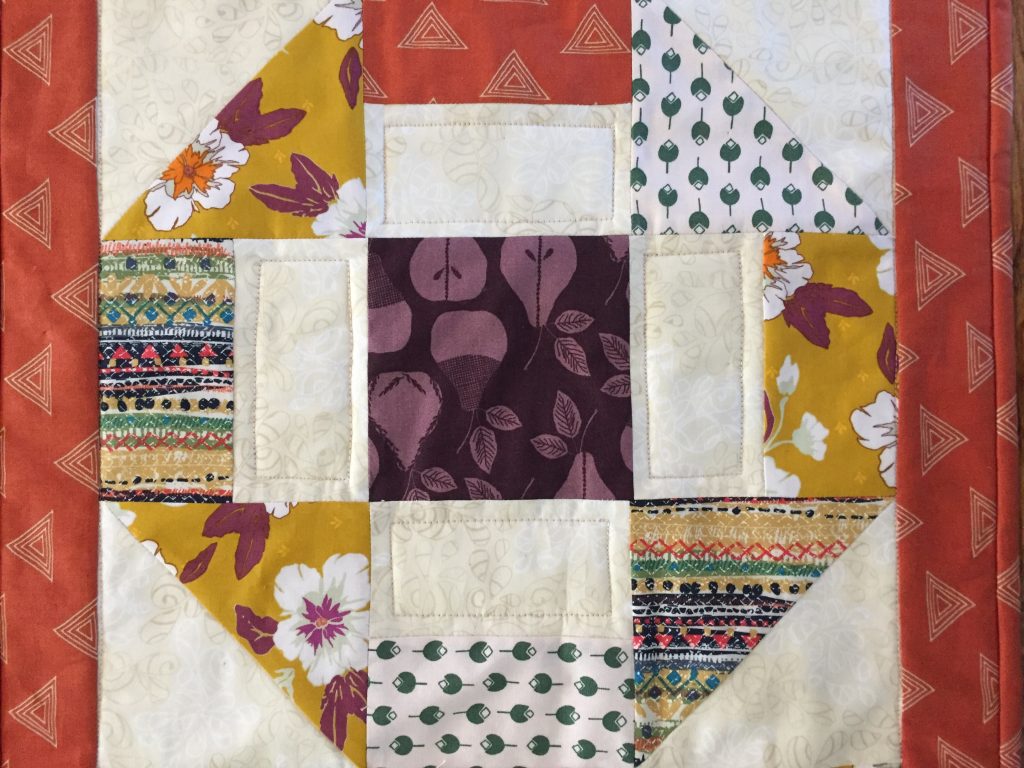
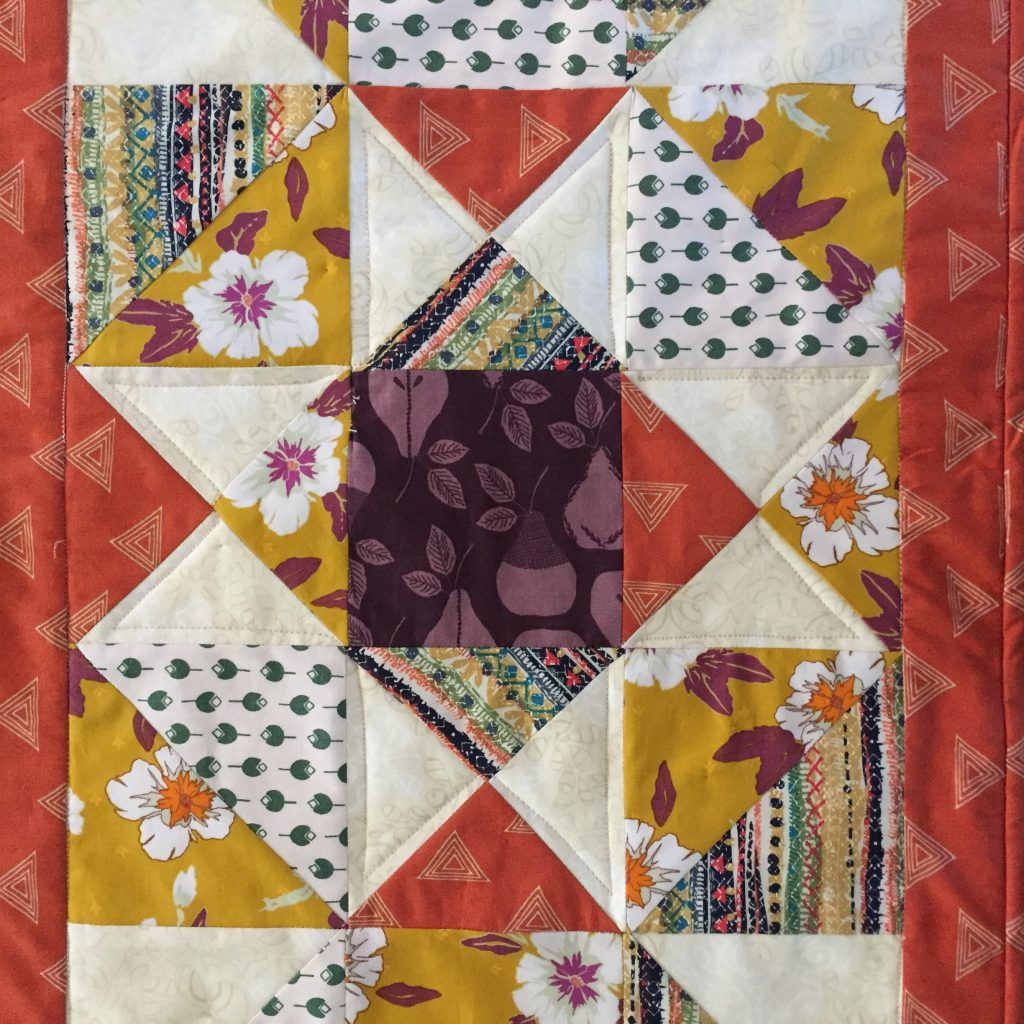
I wanted to make a scrappy project for my table as well. In return, I decided to try out one of her Scrap Dance patterns.
I chose the Scrap Dance Two Step pattern for my project. As you know, I like simplicity and this pattern has some great blocks that are really easy to piece. Just my style. Though it is intended for a larger quilt (which is really necessary for the secondary patterns to show up), I decided to use it for a table runner containing only three blocks. This is the perfect size for my table because the blocks finish at 12″ square.
I chose pieces from a few of my scrap bins as well as a few fabrics in my shop. It is hard to resist using them, they are just downstairs! Can you blame me?? I cut a bit of Sweet Harvest for the centers of each block as I really love that plum color. Then I used scraps of other Art Gallery pieces for the remaining. The background is Natural Elements. Be it from the scrap bin, or the shop, I did use all Art Gallery Fabric for the top. A little Maureen Cracknell, Pat Bravo, Bonnie Christine and some Sharon Holland, are all put together for an autumnal scrappy look. I do think you could go scrappy on the background but only if they were the same values and the colors were super close. Otherwise the pattern might be lost.
Because there is so much going on with the colors and patterns of the fabrics, I went very simple with the quilting. I did some ditch stitching first to hold everything together. Following that I only outlined some of the background pieces.
The rectangles on either end as well as the triangles making up the star in the center. To keep things calm, I used the same fabric for the border and binding.
Originally, I had planned to make four blocks. However (after cutting pieces) I decided it would be too long for my table. This left me with some extra cut pieces to incorporate into the back. You can’t see the entire back here but the pieced stripe extends the length of the runner. The brown solid was in my stash so I used that bit up.
I have to say, Carole’s pattern was a dream to use. I think it would make an adorable bed size quilt. If you used solid scraps, it would be a bit on the modern side. With prints or repro fabrics you would achieve a very traditional look. I love that Carole includes so many sizes in her patterns. This pattern includes everything from table topper to a king size bed quilt. This gives the quilter many options and the math is all done for you! If you haven’t yet made one of her patterns, go check them out here. She has a number of them to choose from and I know you will enjoy using her beautiful designs and easily understood instructions.
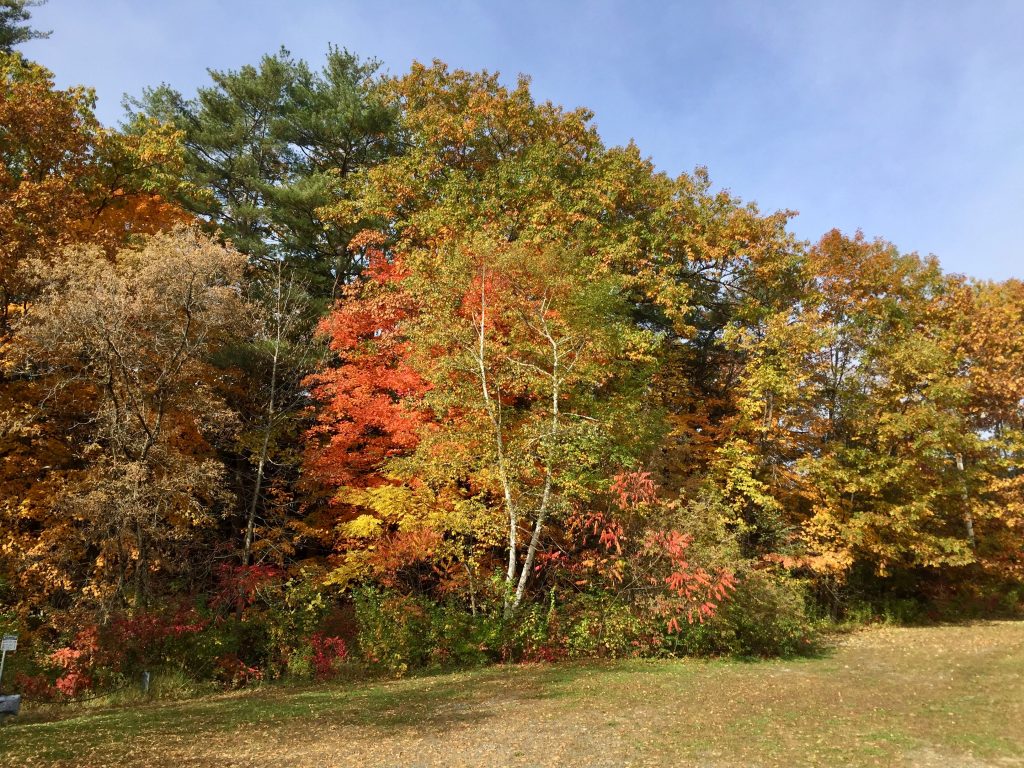
Southern Vermont is gorgeous at this time of year!
I am loving autumn here in the north east. We have had clear, gorgeous skies as well as some stormy gray days. Fall is my absolute favorite season so I plan to enjoy it regardless of the weather!
Linking up with a few fun places. Check them out at the top of the page, under Link Ups.
It all adds up, right? I have had a lot going on but each is a small-ish project. Somehow this has filled my days over the past week or so. It’s all good though – creativity takes many forms and, for me, it is always quite satisfying.
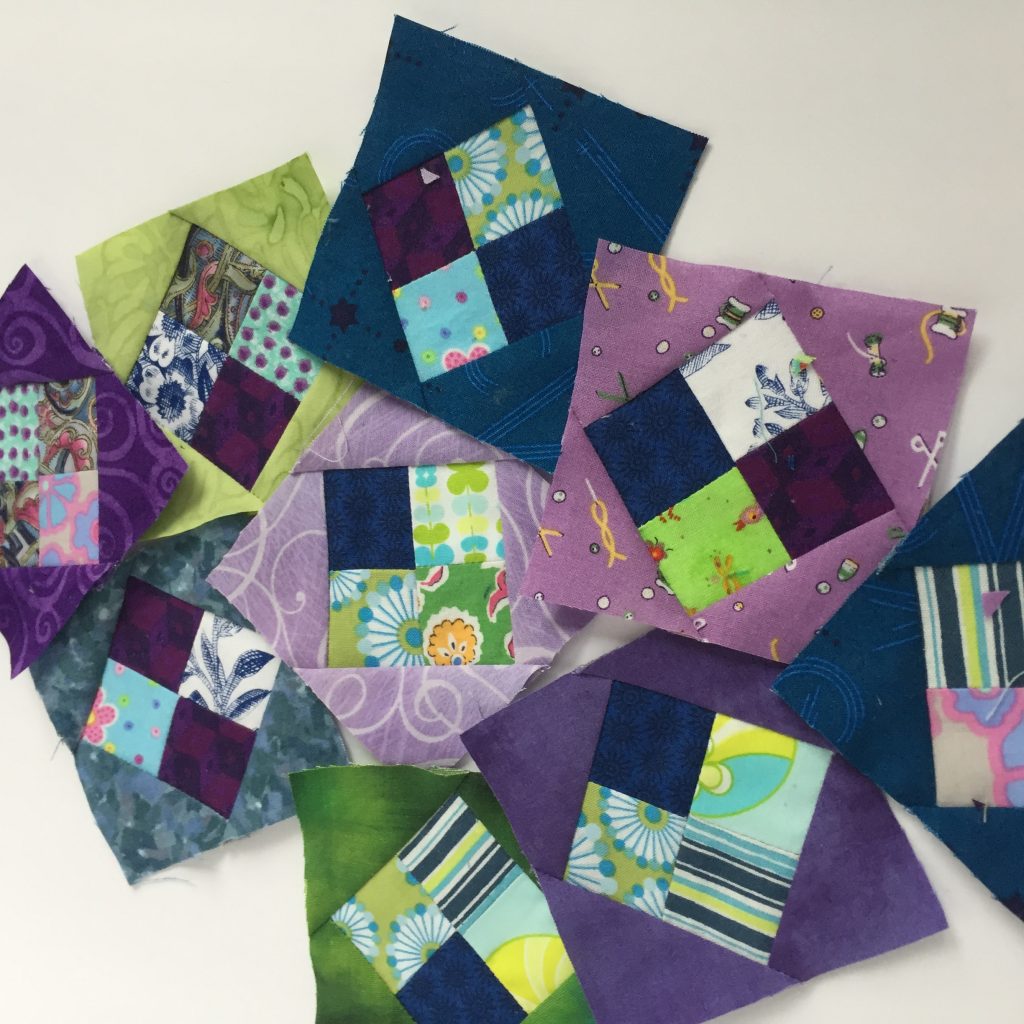
Little four patch blocks.
I am working on a project for an upcoming book review. You’ll see the review and more of the project in a couple of weeks or so. But these little scrappy blocks are a lot of fun. The four patch blocks are 2″ finished. I don’t usually opt for small piecing (and for many, this isn’t very small at all!).
They are fun to make and I think the project is going to look really good. Plus I am using up a few scraps. I have not touched my scrap bins in many months so this makes it extra satisfying!
Binding a quilt for our guild
In our local quilt guild, there are many ways one can help with the community service projects. My usual choice is to bring home quilted pieces and machine bind them. Very quick to do and it enables me to contribute. Since we have a guild meeting a week from today, I thought I should finish this one up. That way I can bring it in and grab another one to take home.
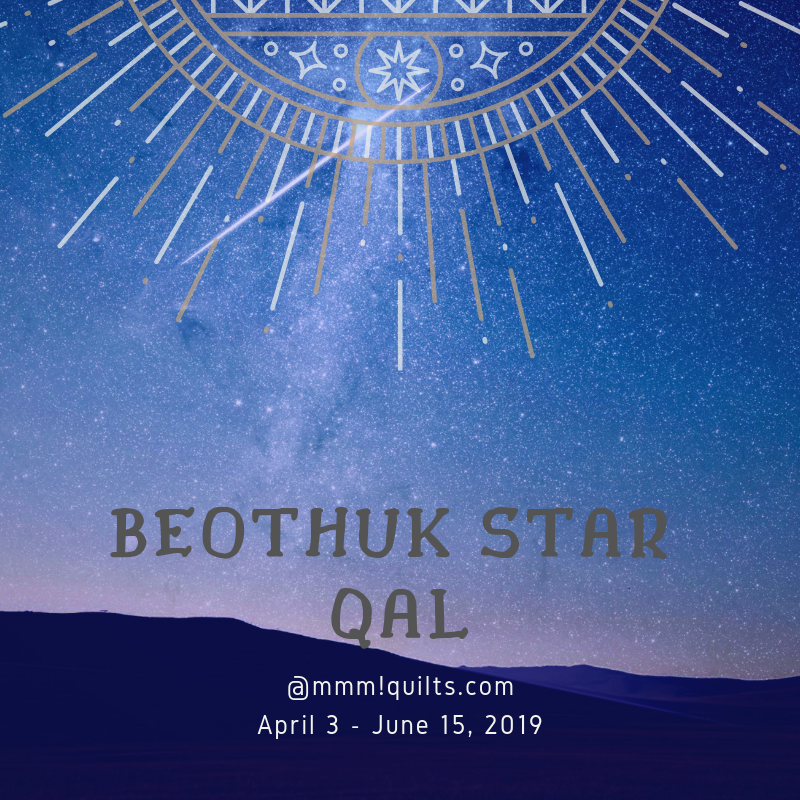
A new QAL coming up soon!
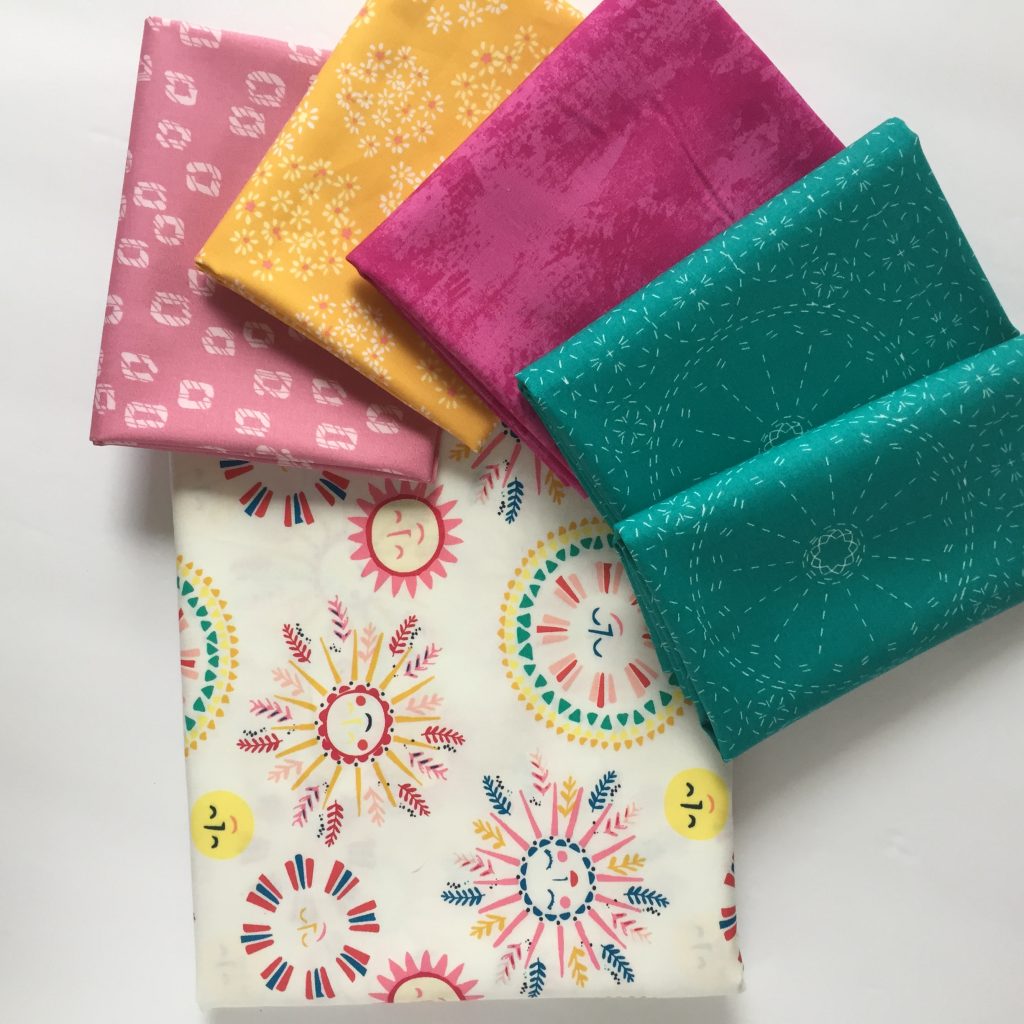
My friend Sandra over at MMM! Quilts is hosting her 3rd annual QAL. She is so much fun – which I am sure you already know. She had curated a blogger bundle for me last year (the November bundle). Some of her readers asked if she would do a QAL using the bundle. She graciously agreed and this Beothuk Star the resulting event. Because there are only five or so of those November bundles left (should anyone else want to make it with those fabrics) she and I decided to create a second bundle for the QAL. Sandra curated this one as well and it is so bright and cheerful.
This bundle is built around the Sunny Side Up piece of fabric in center, by Maureen Cracknell
I really love this bundle! The reason there are two of the teal pieces is because one is used as the binding. If you are curious to see it close up, it is available in the shop now.
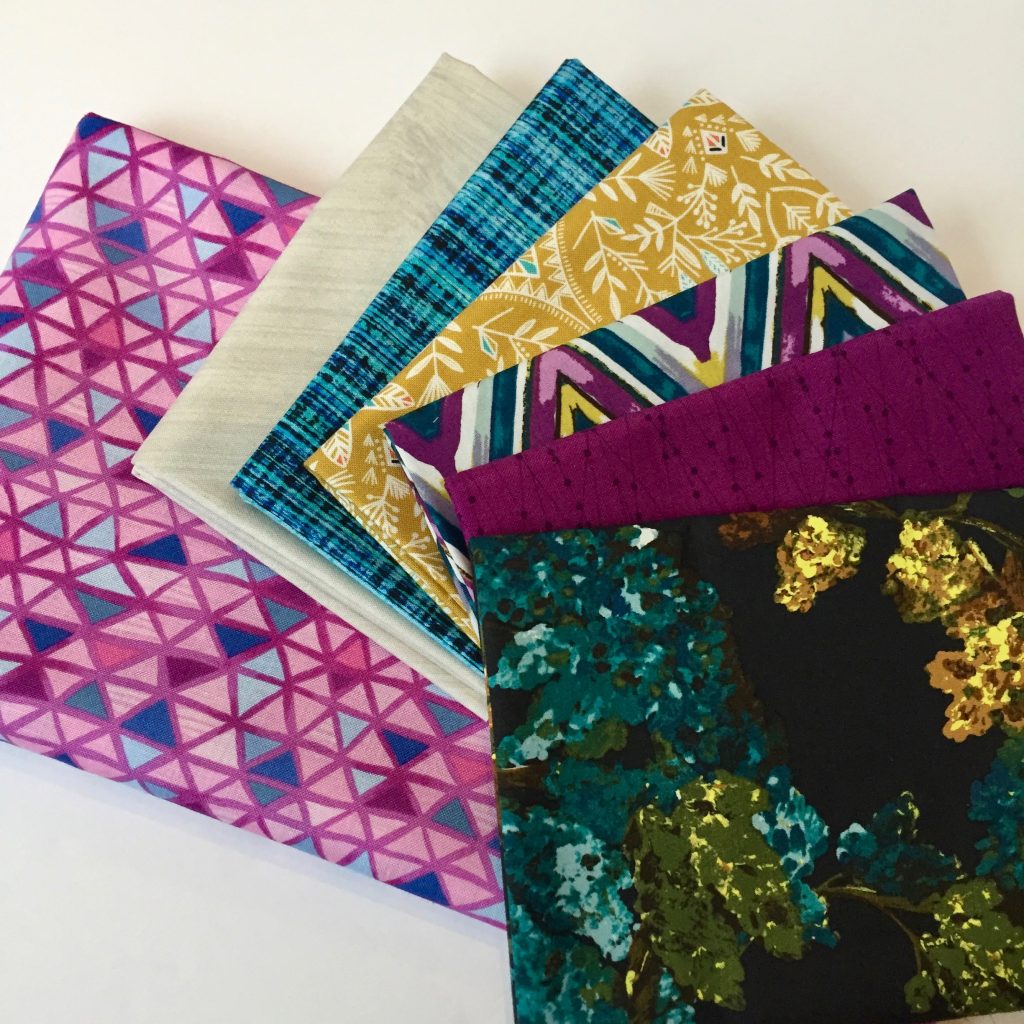
The other bundle, based on the November Blogger Bundle
Above is the other kit being offered for this QAL. It is based on the November blogger bundle but with two changes.
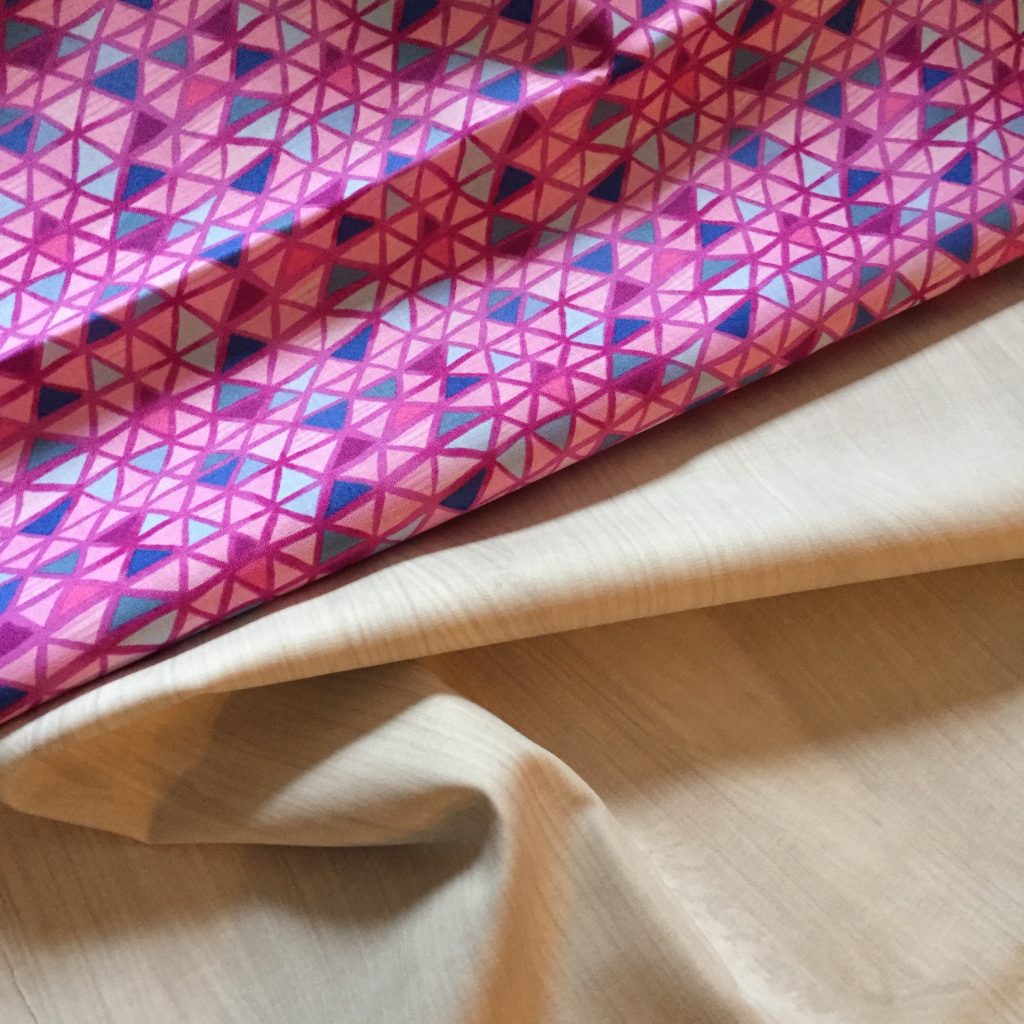
Additional pieces needed for the November blogger bundle
She needed another fat quarter so the pink and blue triangular print (Mosaic) was added. To have enough for the background, the amount of the sandy off-white piece was increased. This means if you have the bundle already, you might choose to purchase the kit extension for that original bundle. It is available here. Of course it isn’t mandatory. You could certainly use a different background if you have one you prefer. You could also add one complementary fat quarter of your choosing.
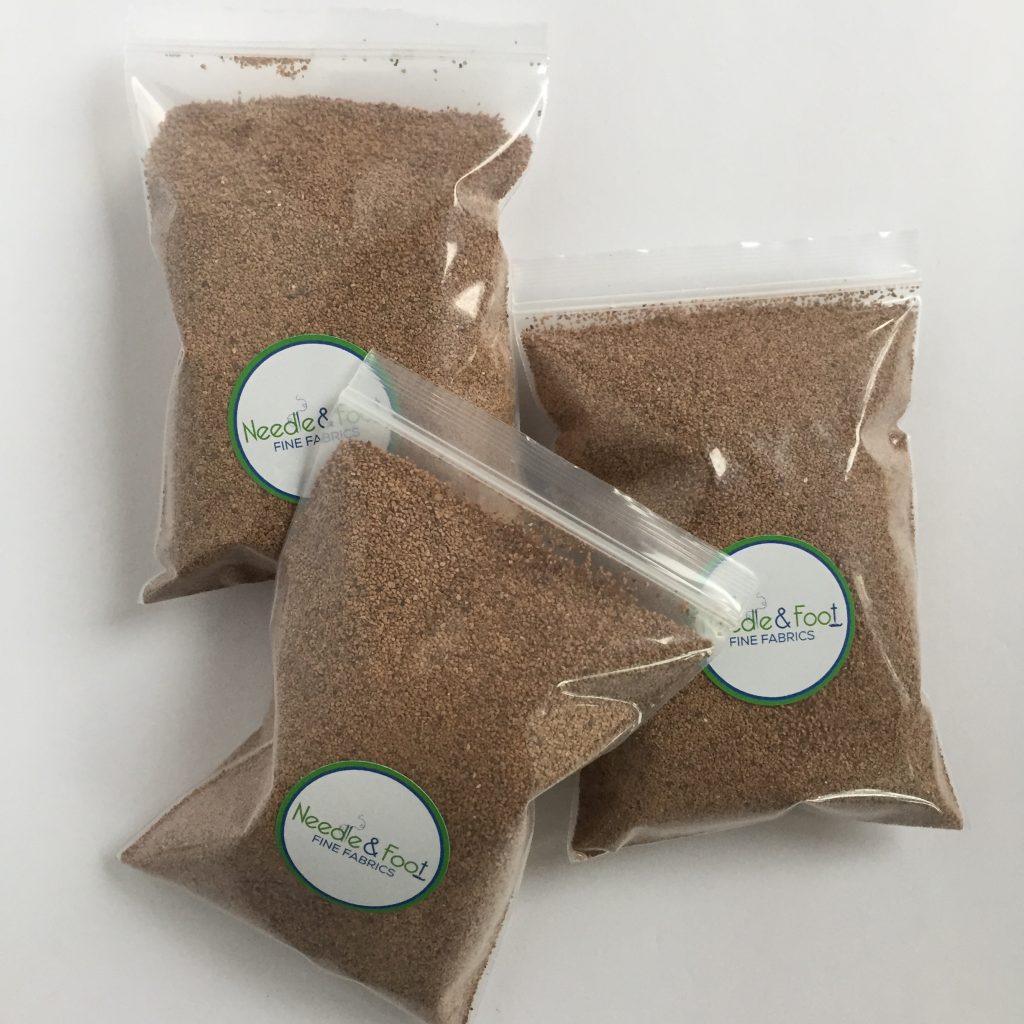
Crushed walnut shells – a new item in the shop
I have been adding a few different notions to the shop lately too. Most recent are these bags of crushed walnut shells for filling pin cushions. Yesterday I bagged up a number of them so they are now available too! Each bag holds six ounces and each order will be for two bags (so twelve ounces total).
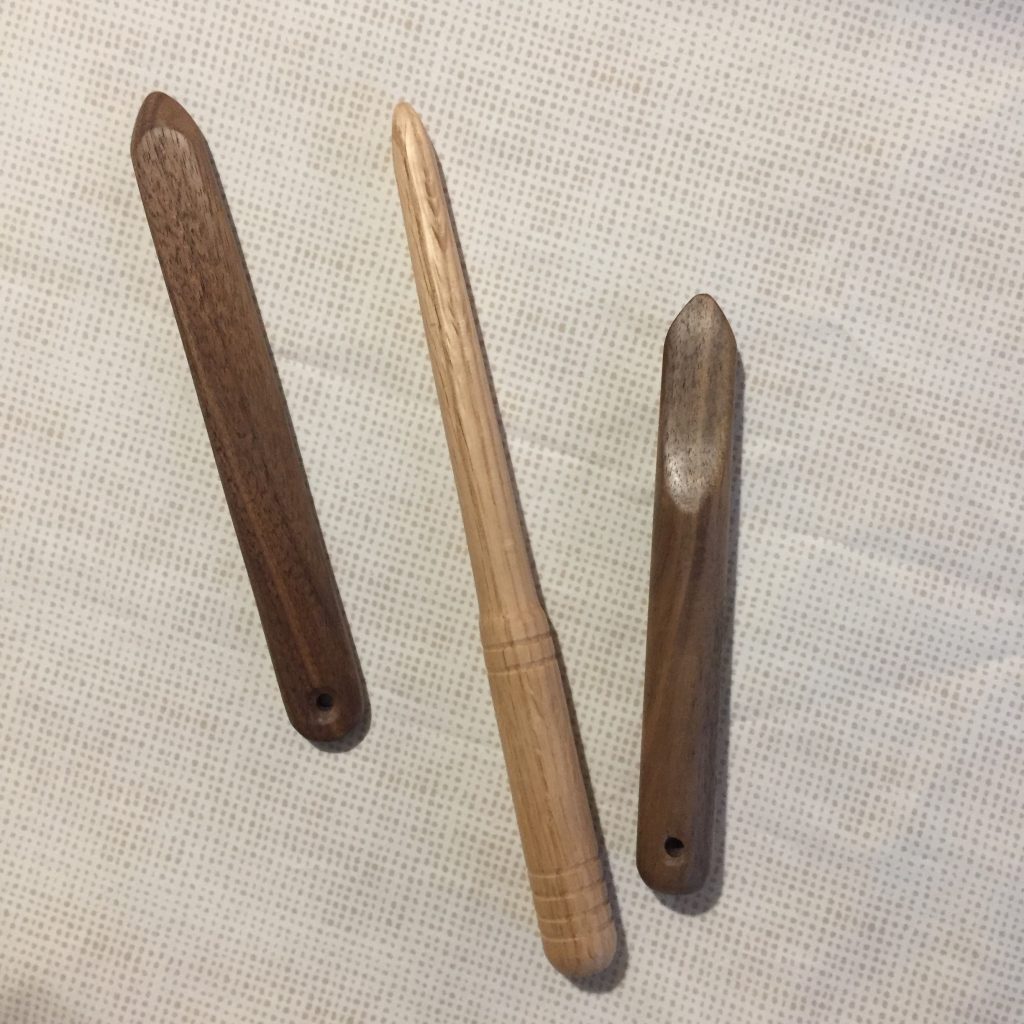
Handmade Point Turners
These are not yet available but I am excited to show them to you. I asked my woodworking spouse to make a point turner for me. I have seen them and thought maybe I could be using something more effective than the chopsticks I currently use. (Chopsticks are a reasonable choice but the ends of mine are more square than round so I can’t obtain as sharp a point as I would like. He asked me what I thought I wanted and I described the one on the far left. He said ok but when he made that one, he also made two more so I would have something to compare. His designs are so much better (why doesn’t that surprise me???) I like using the fully rounded handle of the middle one. The piece on the far right has a nice point to it but the handle is flatter and it isn’t quite as comfortable to use. So, I am going for the one in the middle. I also like the extra bit of length on that one. They are really pretty aren’t they? Do you use a point turner? What works for you?
Last, but certainly not least, I have a fun event coming up next week! I have written before about the issues with a lot of us using social media for inspiration. Sometimes it is great to see all of this amazing work out there. Other times, it is kind of a downer and leaves us feeling ‘less than’. I know we are not ‘less than’ but it can feel that way seeing so much amazing work and then looking at our progress and feeling a little bit defeated. In an effort to show the real side to all of us, let’s share some of the ridiculous. We have all goofed. We have all made a project and thought, ‘nope, I’m not sharing this.’ Here is the chance to get real. What better day to open the event than on April Fool’s Day!! Think about this and write a post sharing a mistake or misunderstanding you might have had about our craft. Mine is quite ridiculous and I am sure it will entertain you. Share it next week and link up with me. Prizes will be awarded – just by a random drawing – no judging here! I think it is a great way to all get on the same level with our art by sharing these imperfections. If you have questions, leave them in the comments. Hope you will join in!!
Linking up with my favorites. Check them out at the top of the page, under Link Ups.
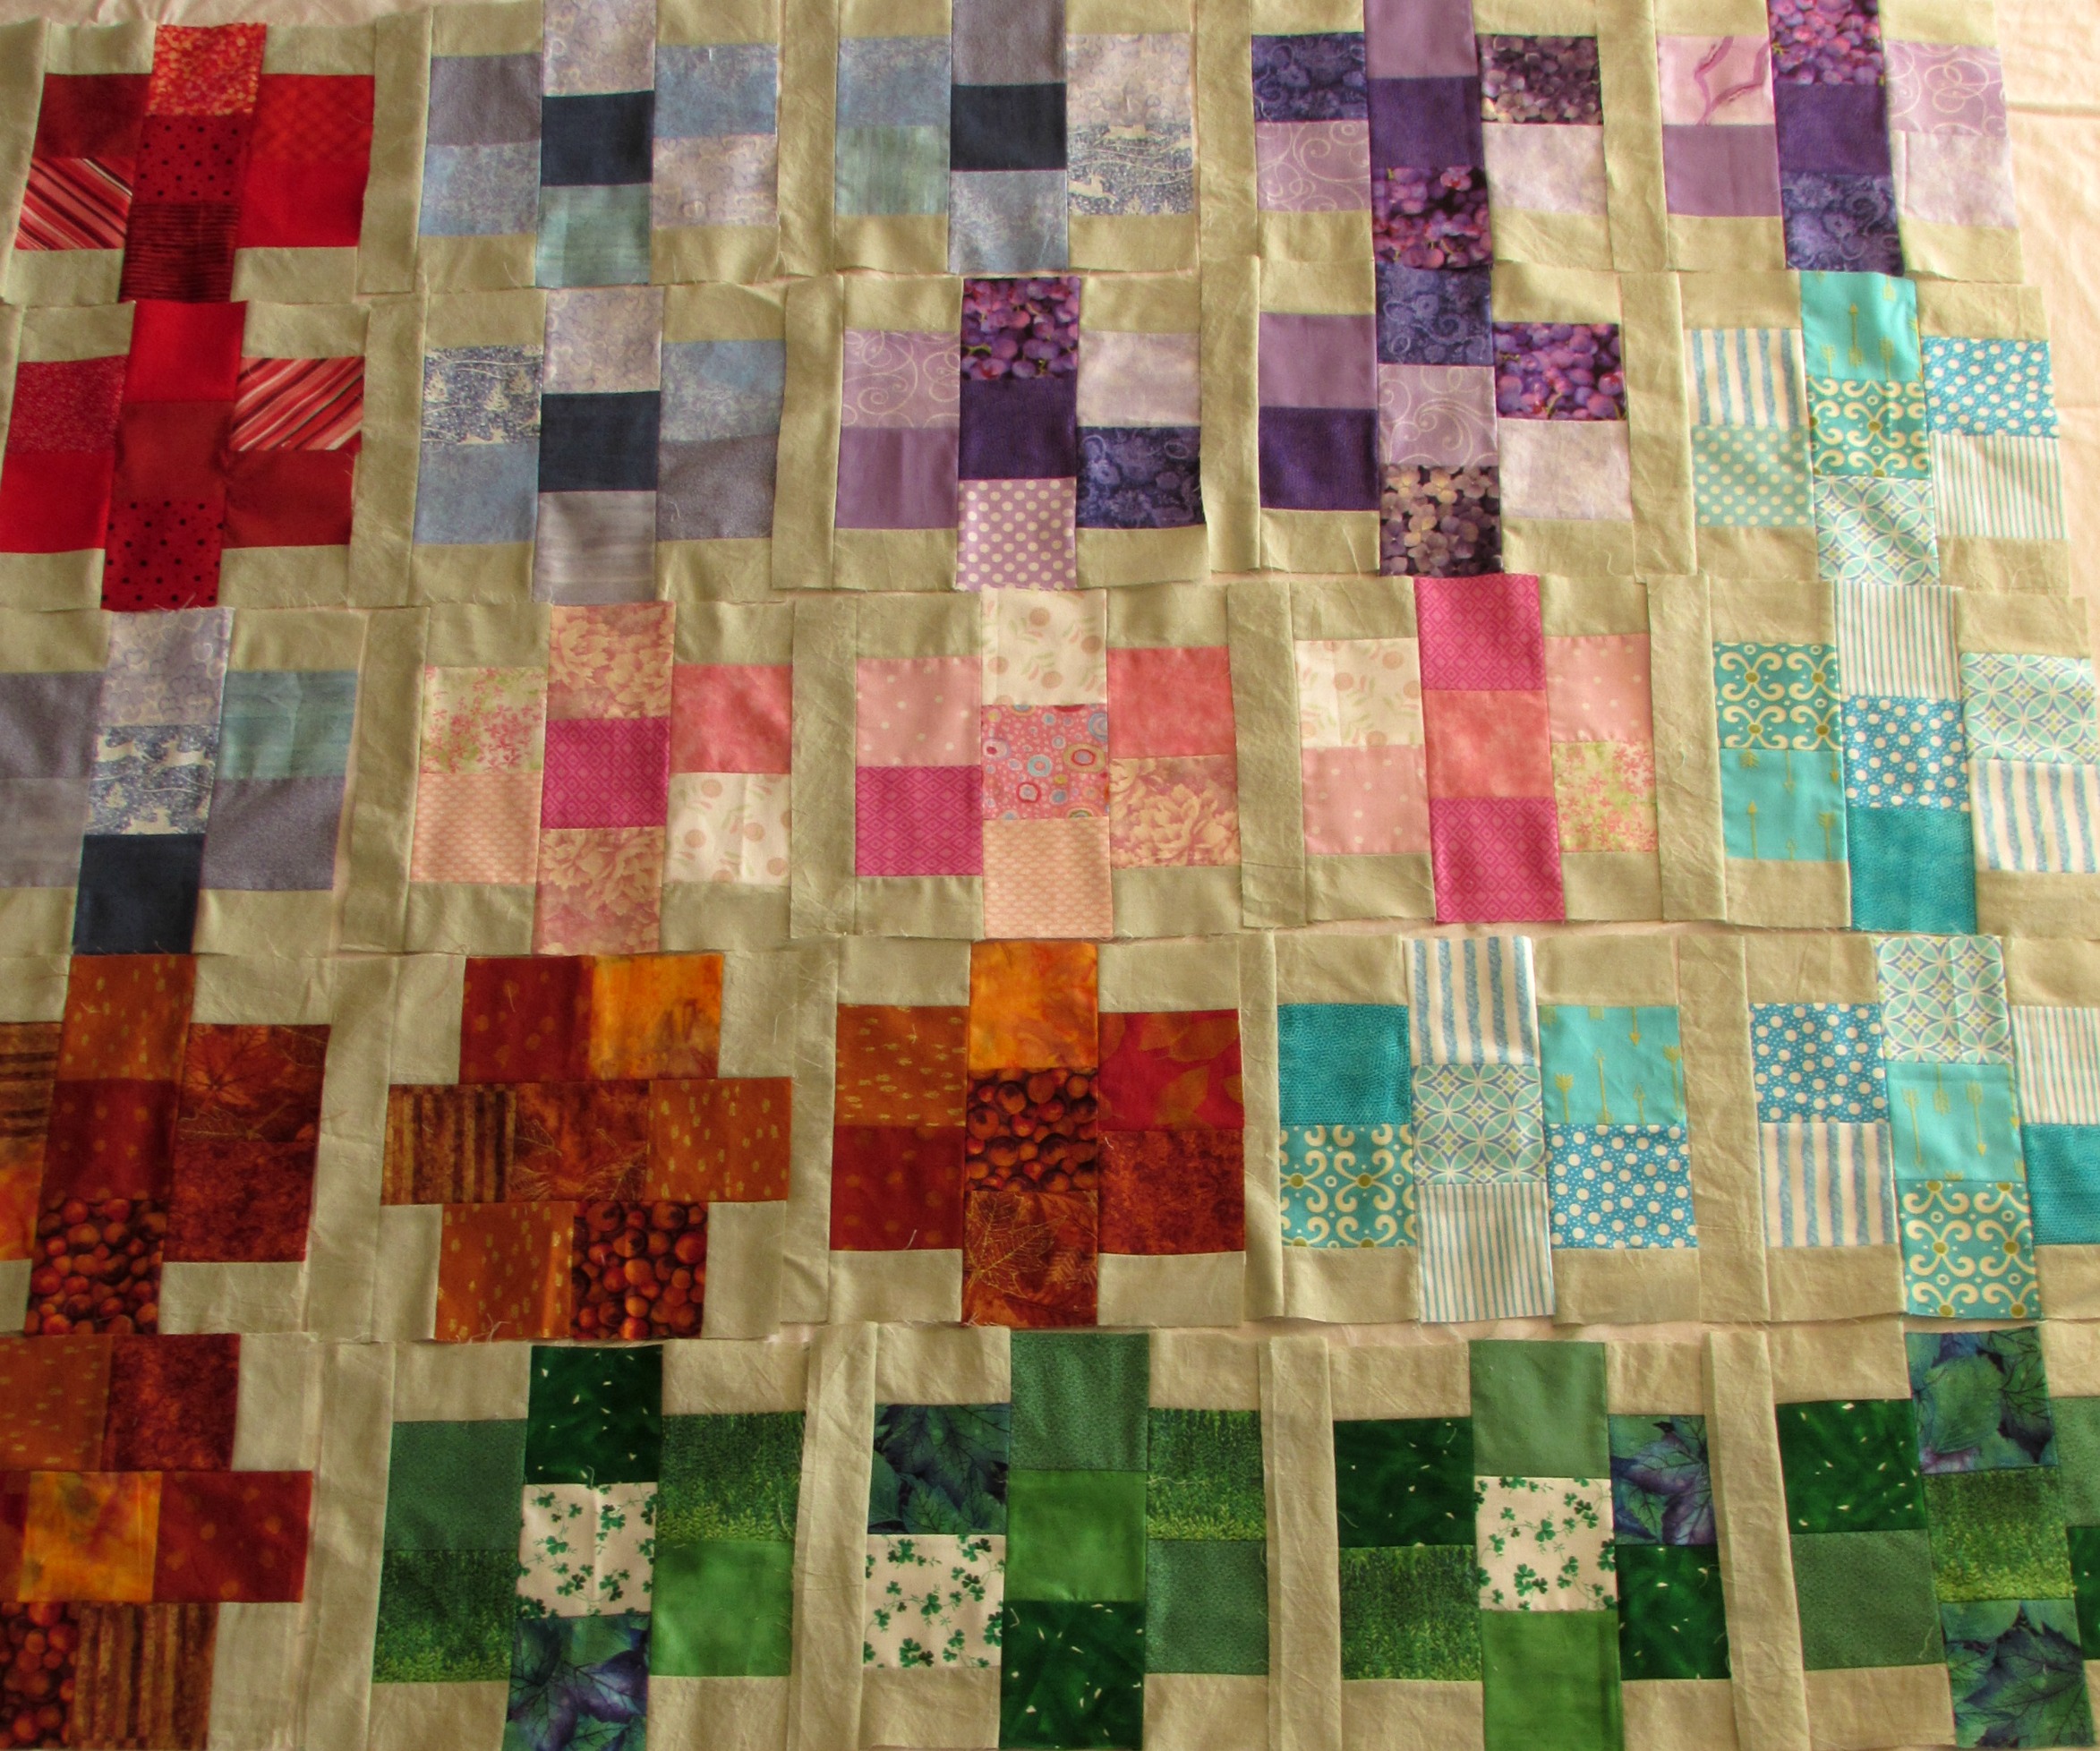
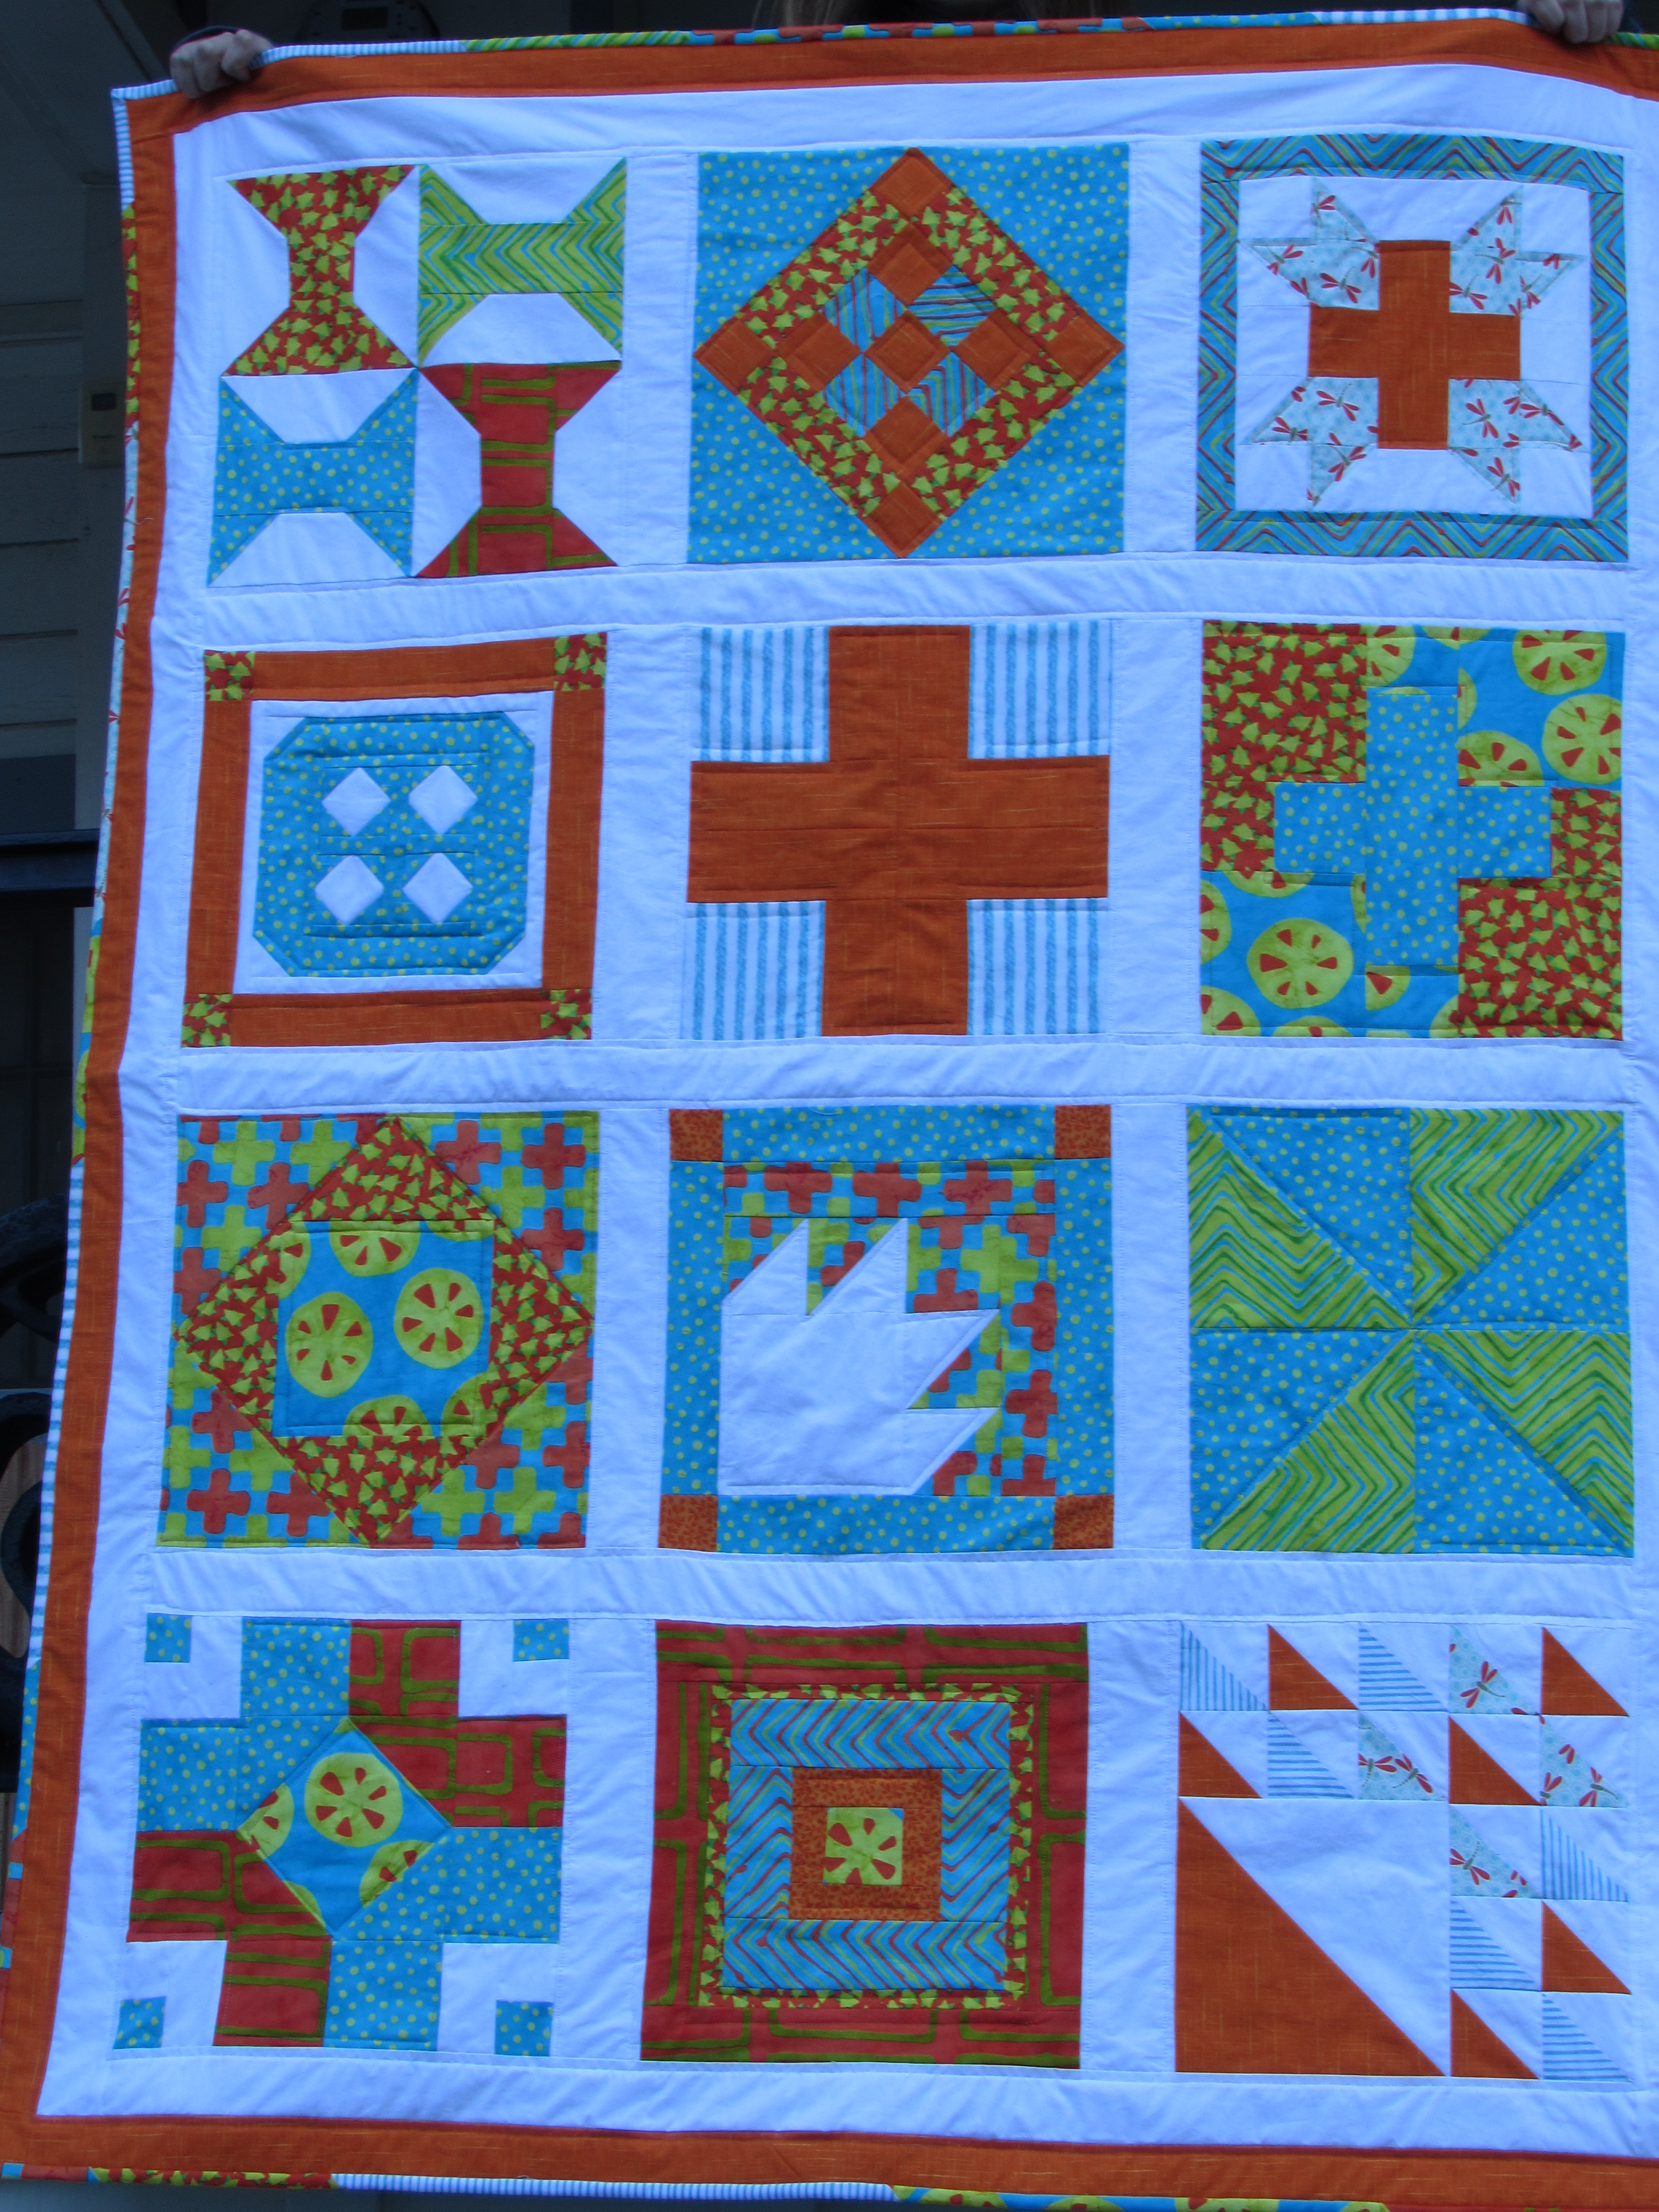
Last year I didn’t participate in the Rainbow Scrap Challenge held each year by Angela of So Scrappy. I did participate in 2015 and 2016 though – it is a great way to use up scraps. This year I plan to follow along with the BOM hosted by Mari of Academic Quilter, Squared Away. I sewed along with Mari during her first quilt along, Classic Stitches, back in 2015. I had a great time and loved the clear directions Mari provided with her posts each month so I am happy to sew with her again this year! If you want to see the row quilt I made, click here.
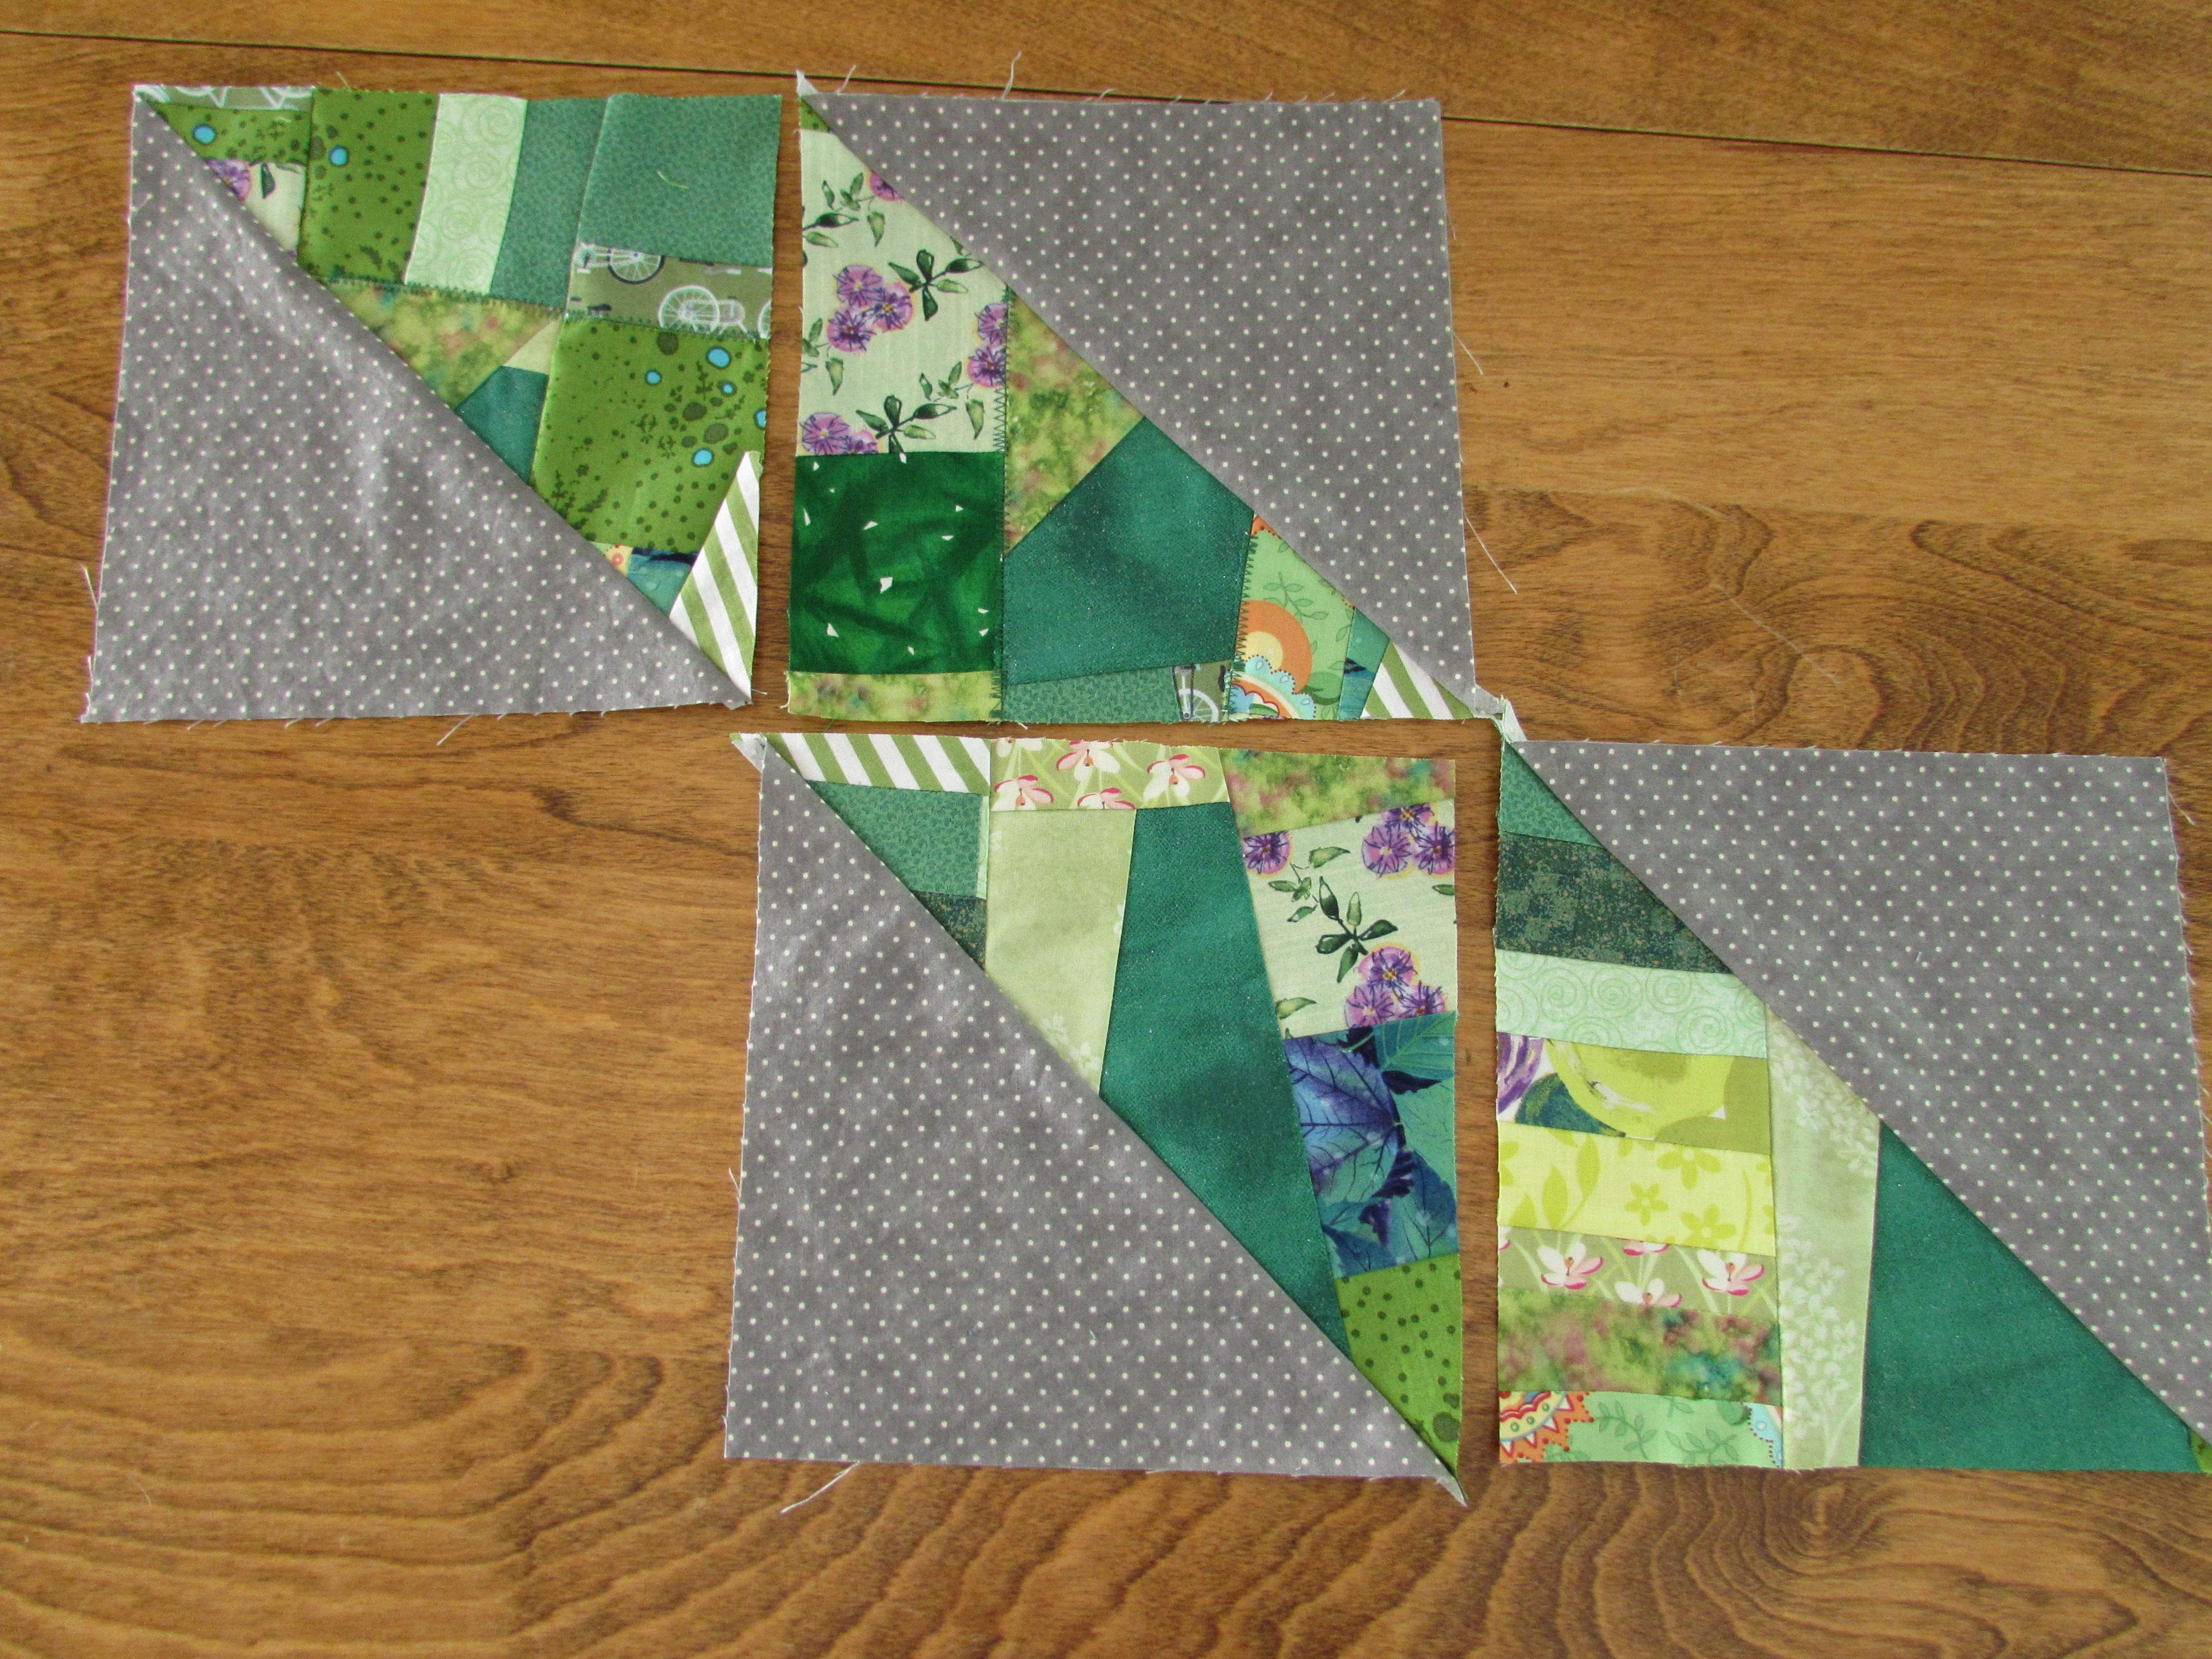
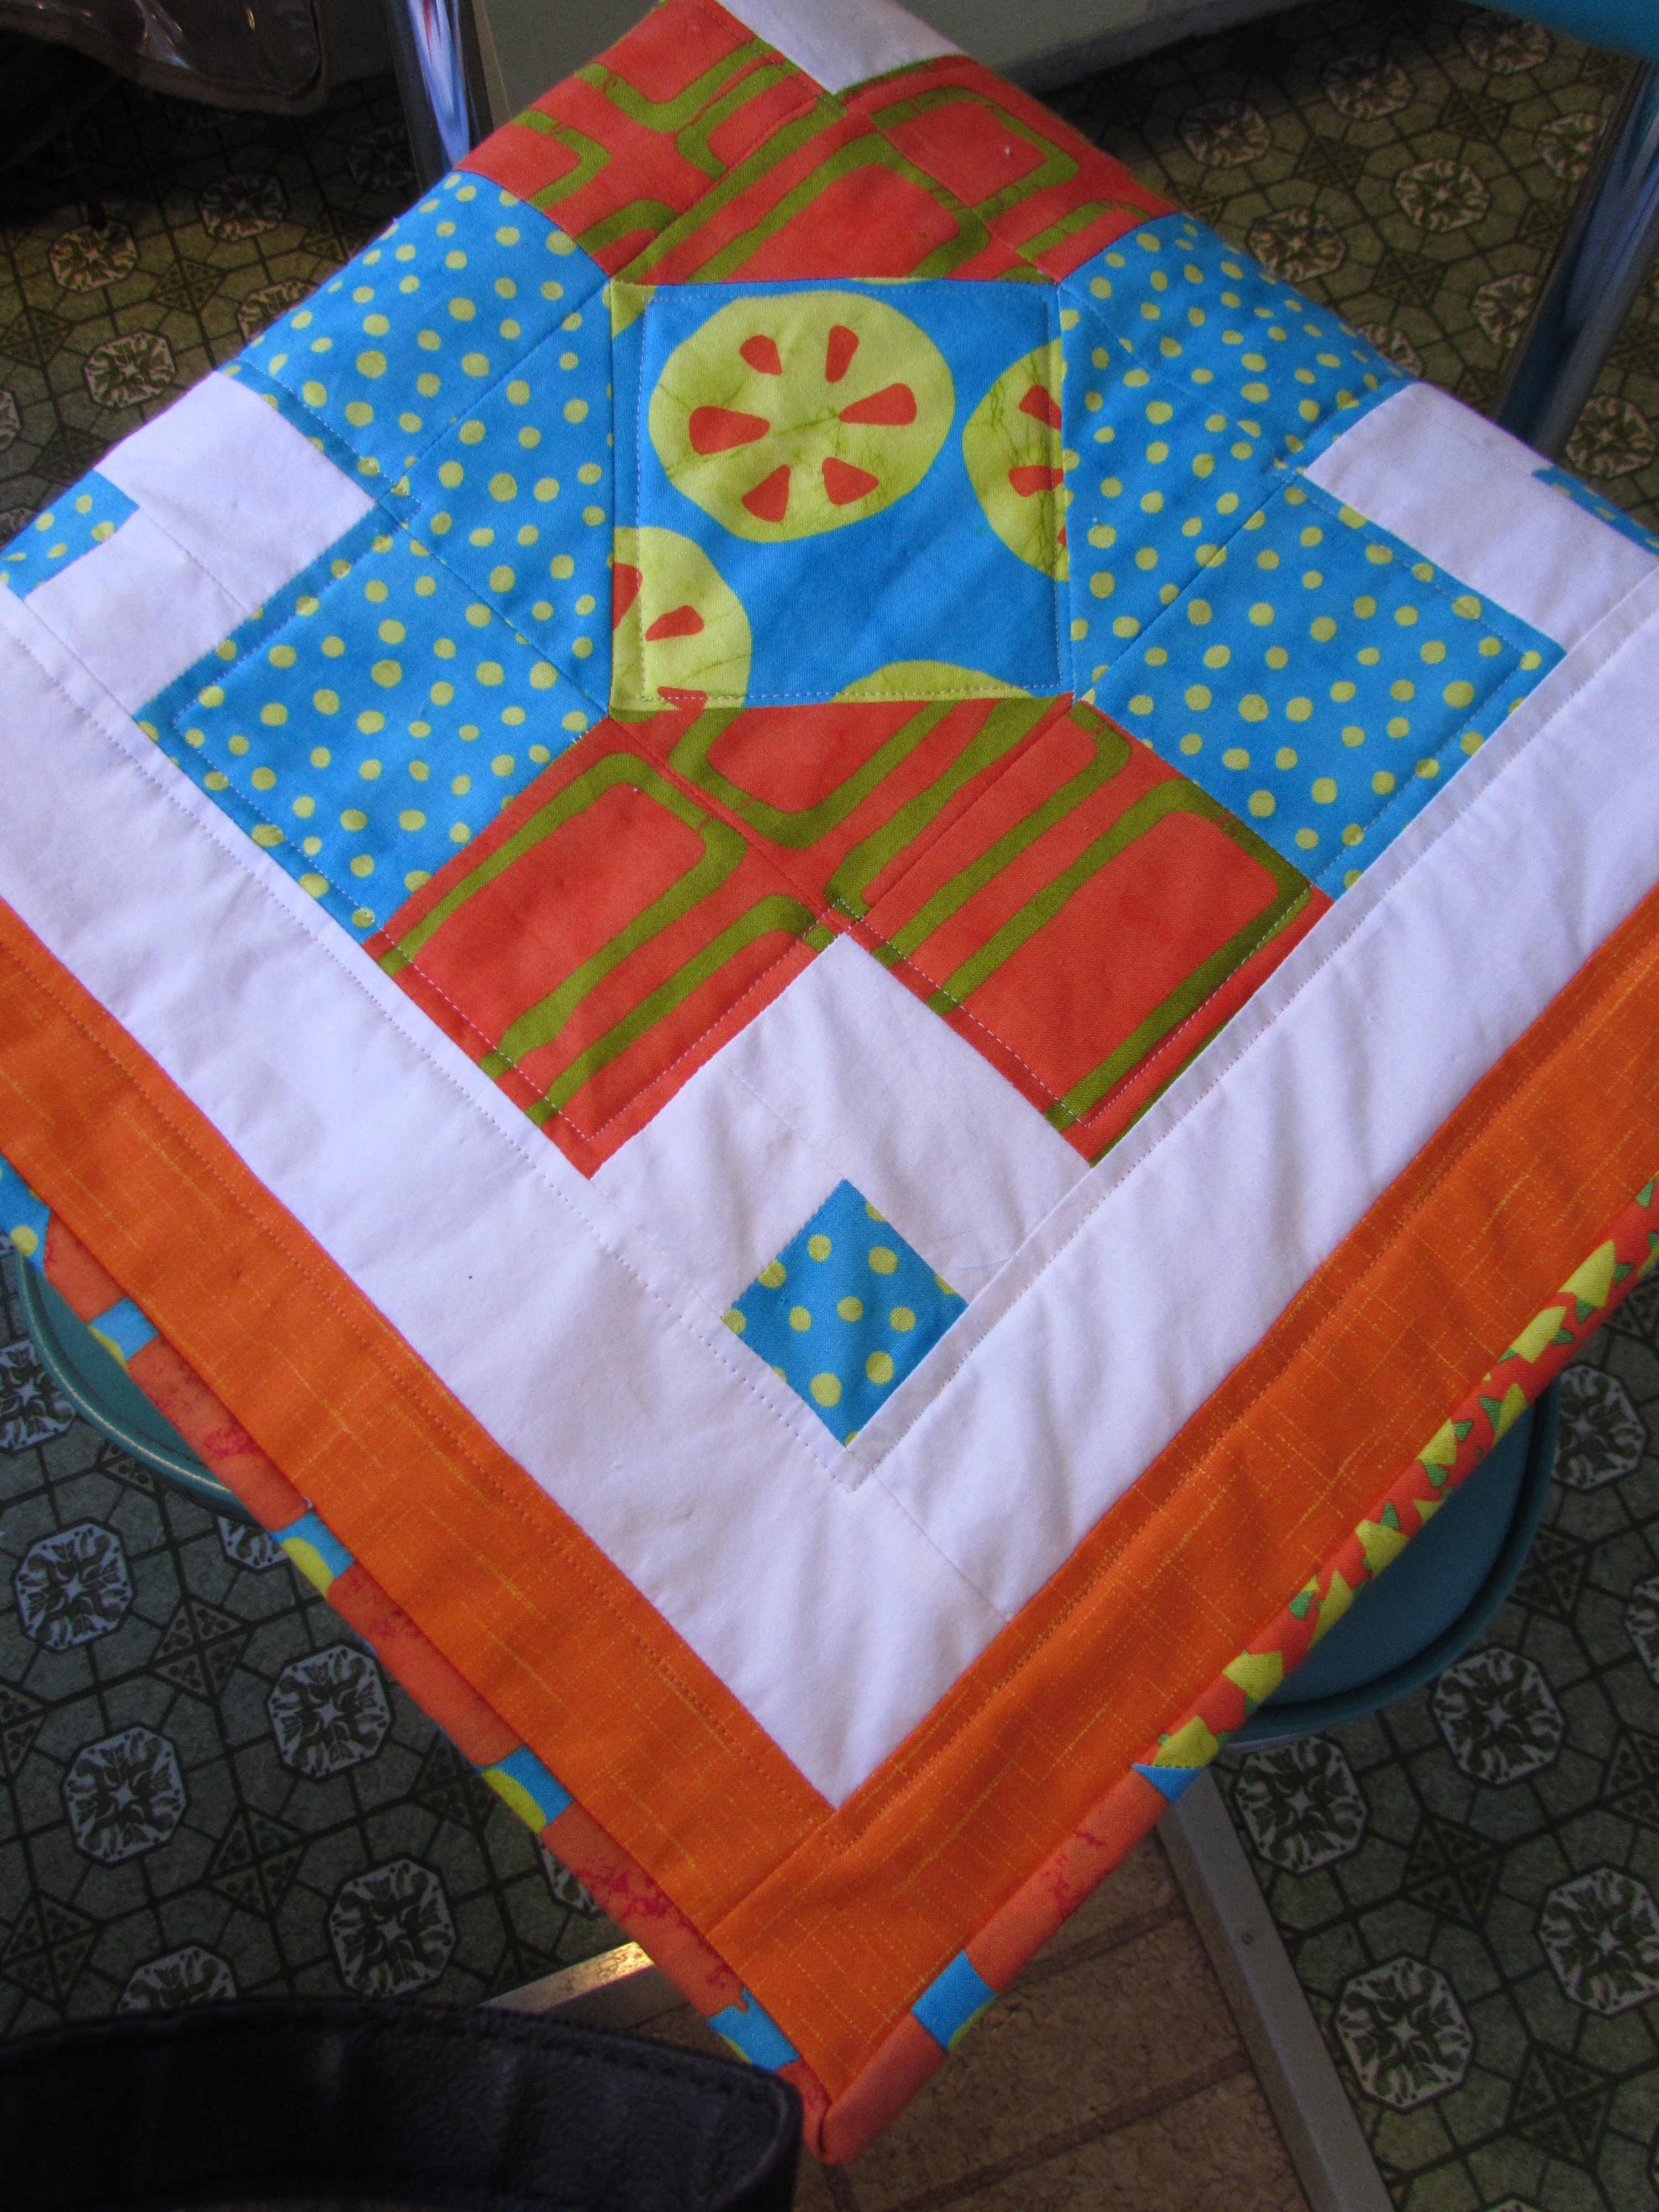
Here is the first month’s block, Red Cross. According to Mari, the block is a Clara Stone block that dates to 1906. Traditionally, this block is made with red, but since the color this month is light blue, that’s what we made it in. I have a large piece of pale gray solid fabric (I am fairly sure it is a Moda Bella solid but I don’t know which one) I have set it aside in the hopes it will be enough to use as my background color for this year. We are making three 10″ blocks each month which will make a nice size quilt by the end of the year.
I am happy with the look of this first batch of blocks and they came together easily. Not to say I didn’t have to rip one apart though. I had one corner section pointed the wrong way. It hung on my design wall for quite a while before I noticed it. At least it is early in the game and was a quick fix.
RSC16 Scrappy HST Quilt Top
I am also making little 5″ square crumb blocks. I want to finish this scrappy HST quilt I started in 2016. I really like it but feel it would be nice to have it a bit larger before I finish it. I am going to make a border by alternating five inch crumb blocks of all colors with the gray polka dot. I think the gray polka dot will be rectangles, not squares, to make the border more interesting. I have to look at the math on that, certainly not my strong suit as you all know!!
I don’t plan to take all year to make these crumb blocks though (by following the color schemes of RSC18). I hope to get this one finished earlier in the year.
Did you see the giveaway I am hosting on Facebook today and tomorrow? Go check it out – might be your time to win. 🙂
In other wonderful news, I just had SIX days migraine free days in a row! It was heavenly, like a gift, you know? It has been many months (probably didn’t happen at all in 2017?) since I had that long of a run. Unfortunately, I woke up last night with a zinger but I was able to sleep it off and I feel reasonable this morning. It will be a good day to take it easy and play with my scraps. Fortunately, one doesn’t need to think too hard to make crumb blocks. 🙂 Hoping you have a lovely weekend and are able to enjoy some creative time!
Linking to Finished or Not Friday at Busy Hands Quilt as well as a few others. Check the Link Ups tab at the top of the page!
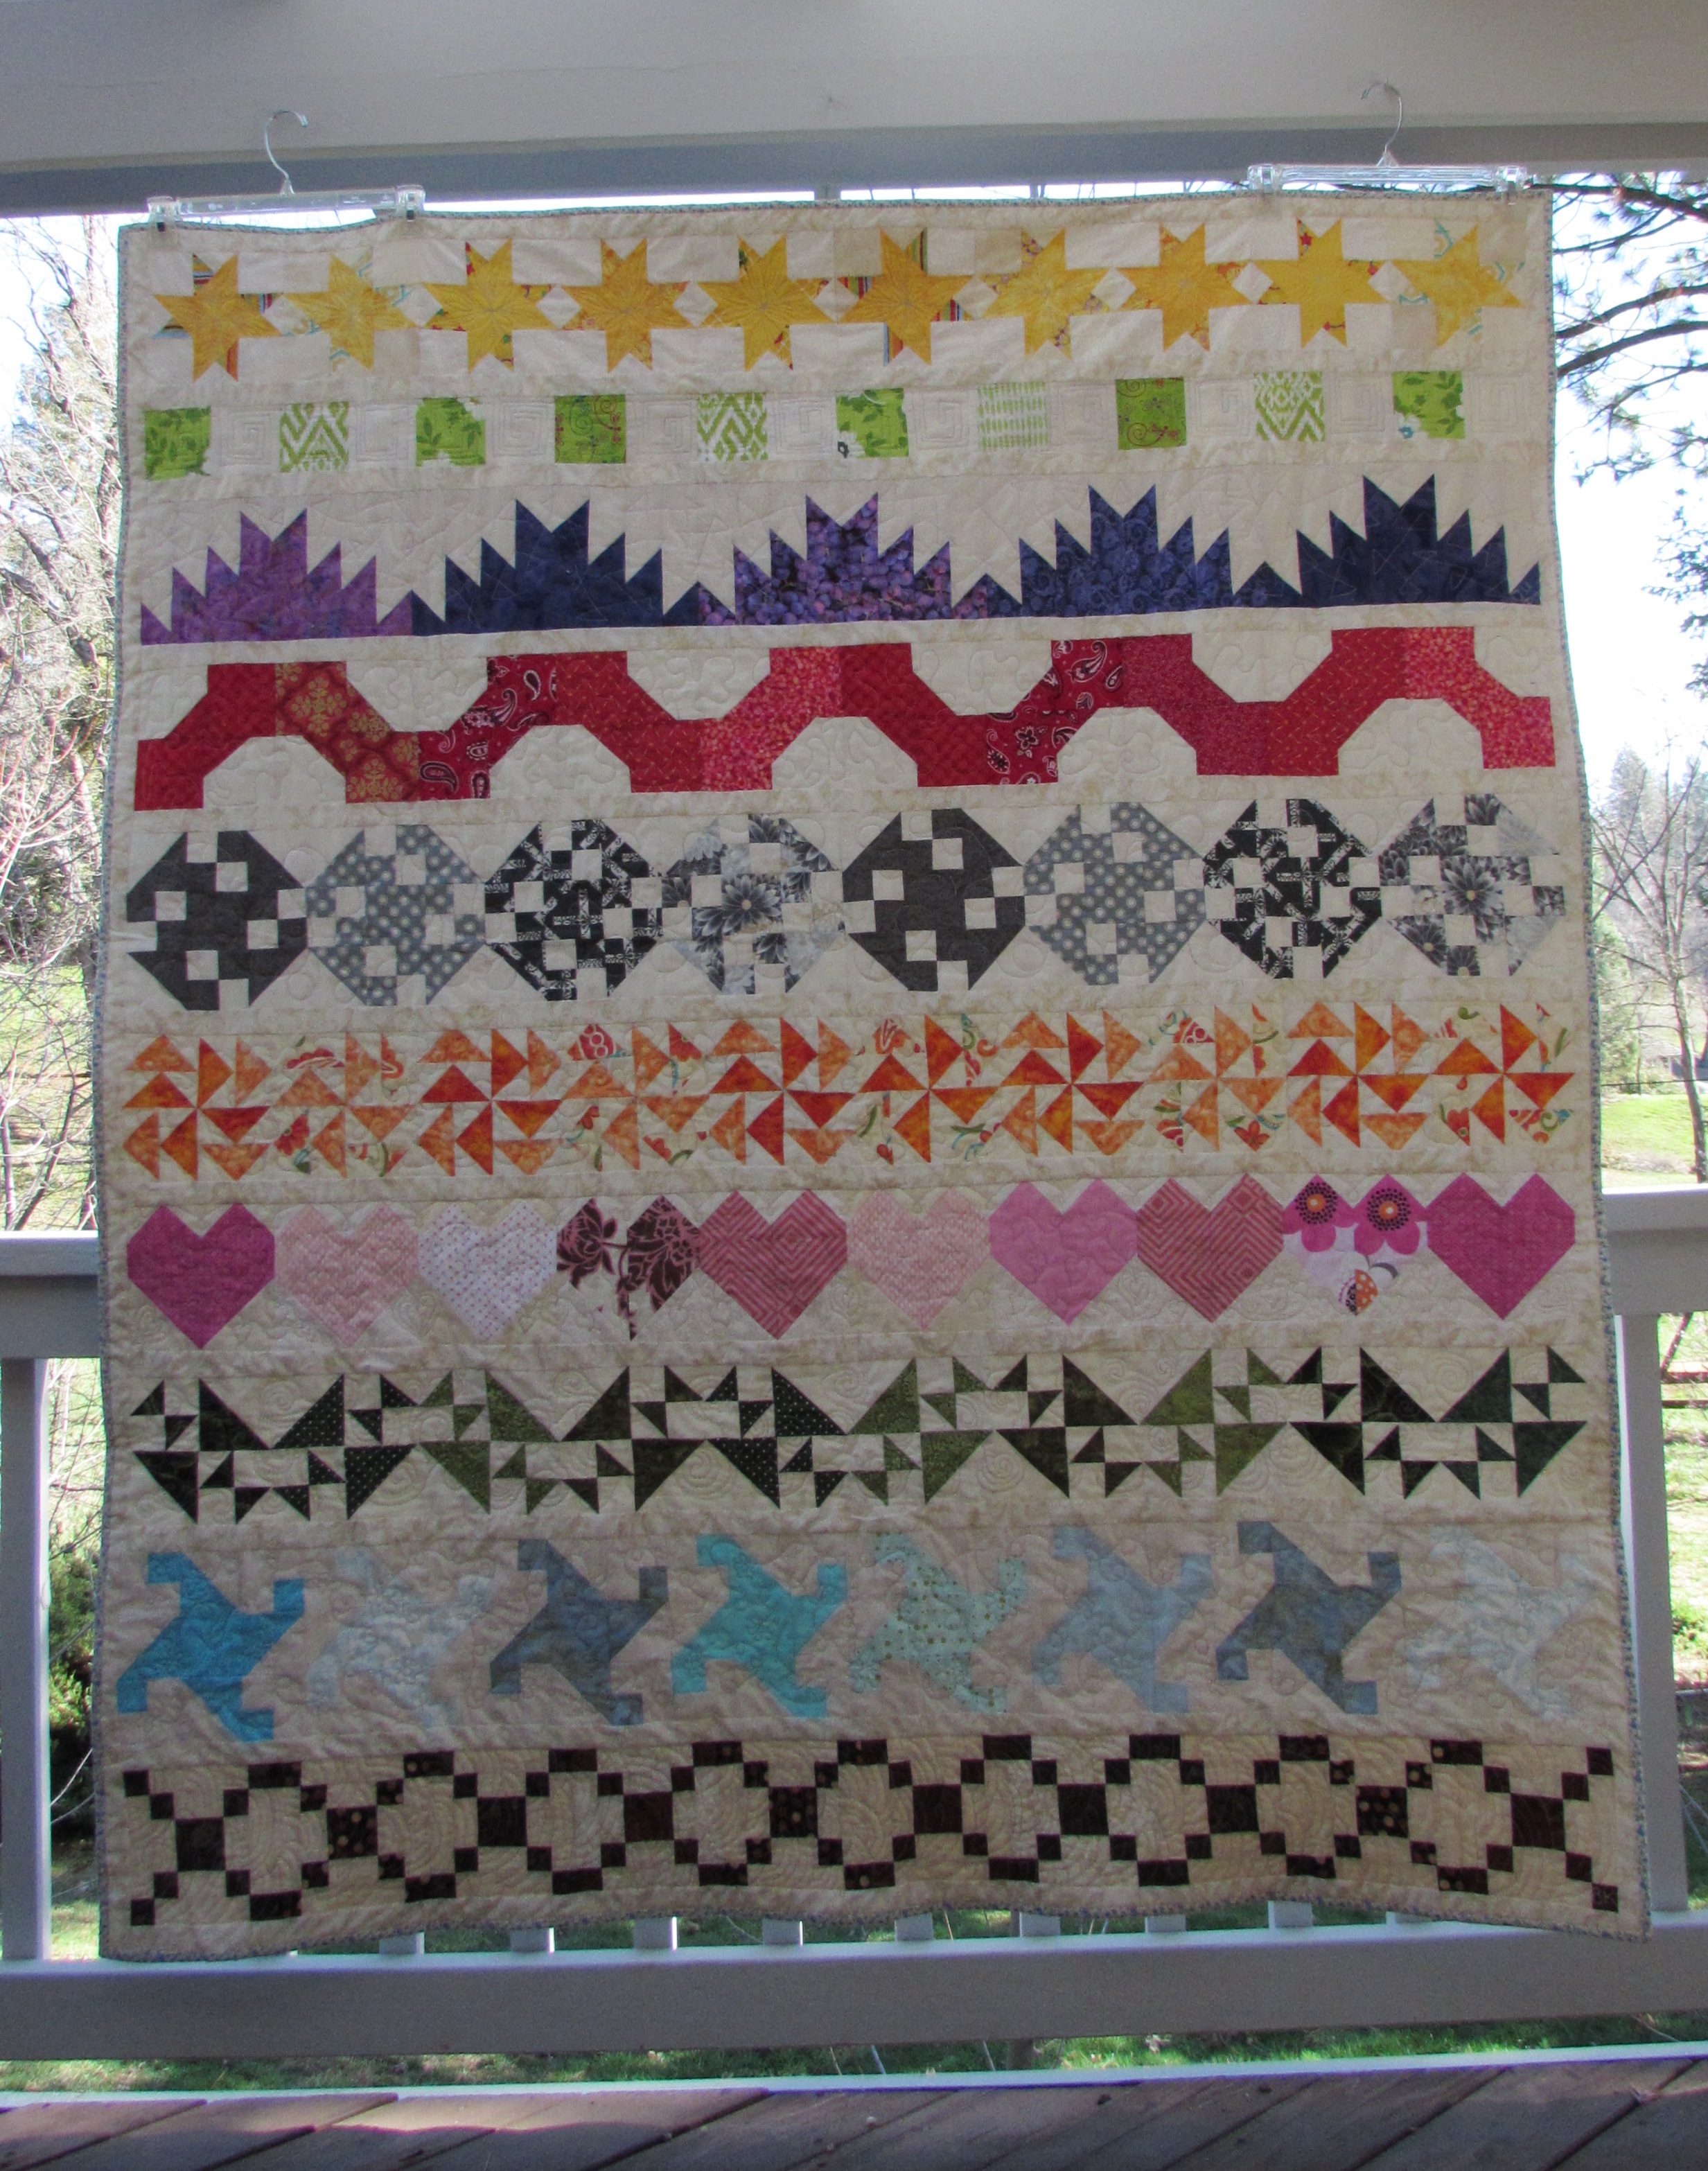
This post serves as my second entry to the Blogger’s Quilt Festival hosted by Amy’s Creative Side. The requirements are that we write a new post to share each entry (blogger’s can enter two separate categories). I am entering my Scrappy Row quilt in the Home Machine Quilted category.
Rainbow Scrap Row Quilt, February 2016
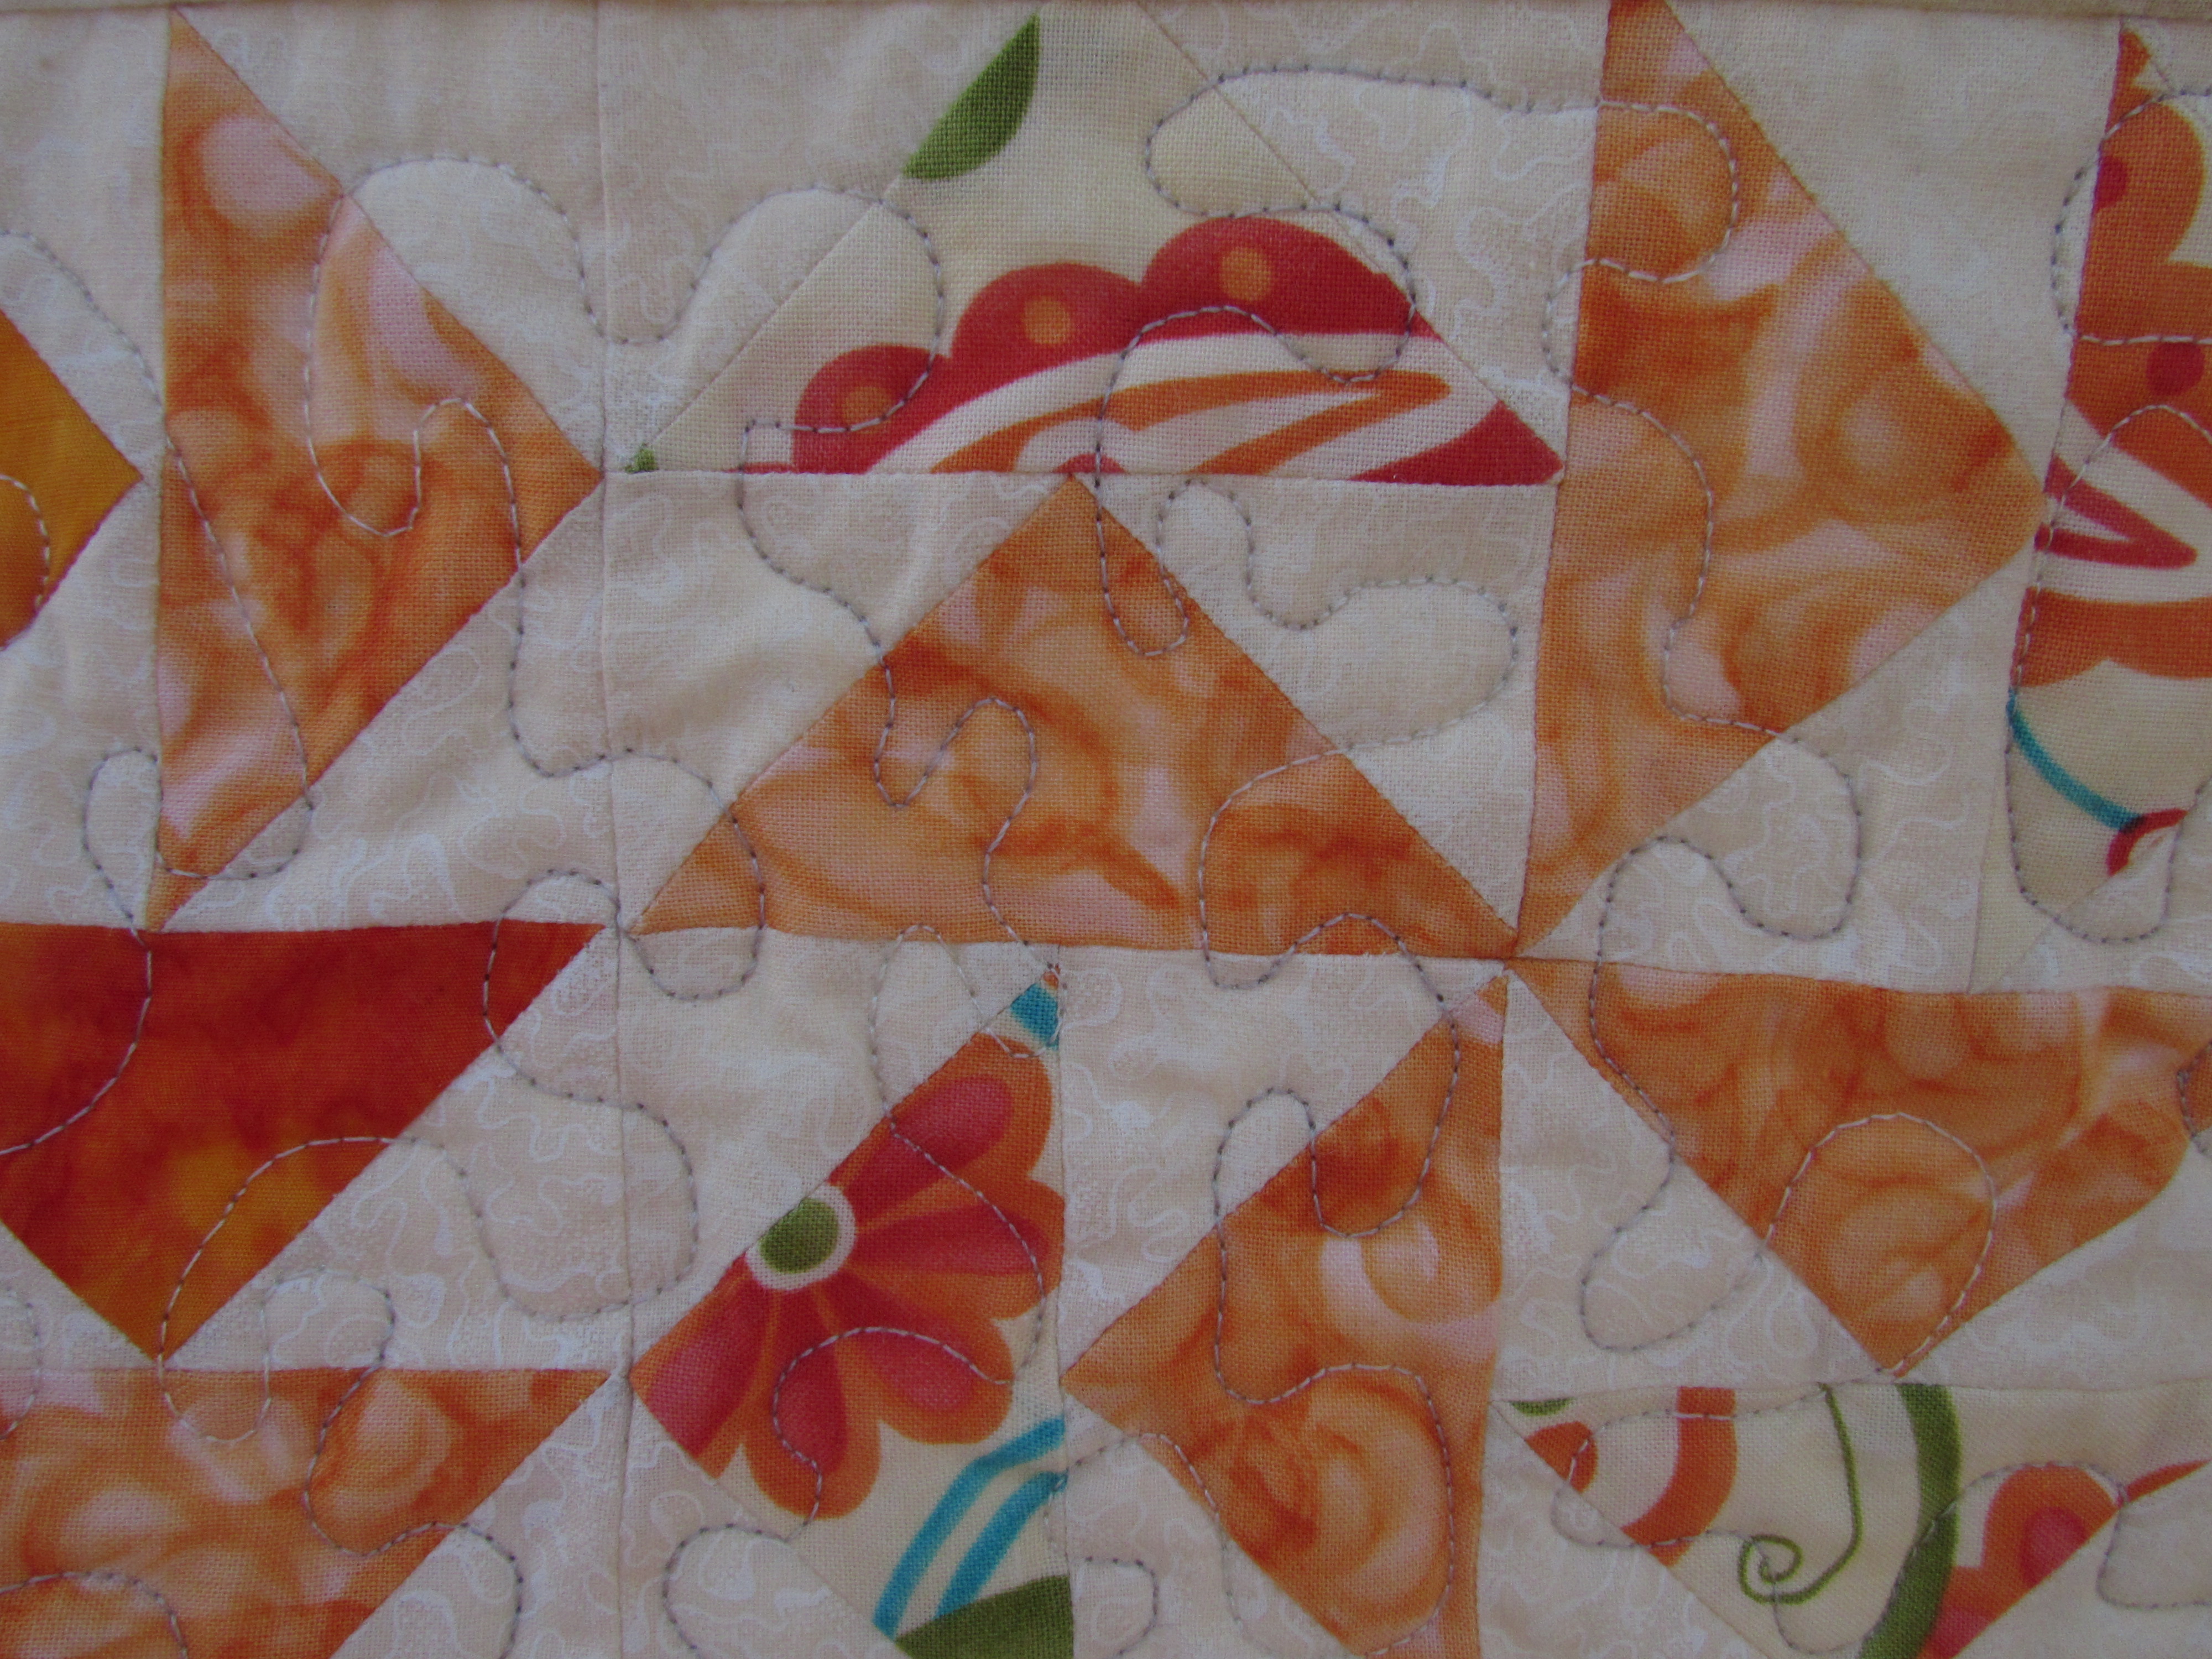
I made this row quilt by following along with the Classic Stitches BOM, hosted by Mari at Academic Quilter throughout 2015 (great tutorials for each row are available on her blog). I spent a great deal of time quilting it at the beginning of 2016. I decided I would quilt each row with a different motif. Here are a few examples.
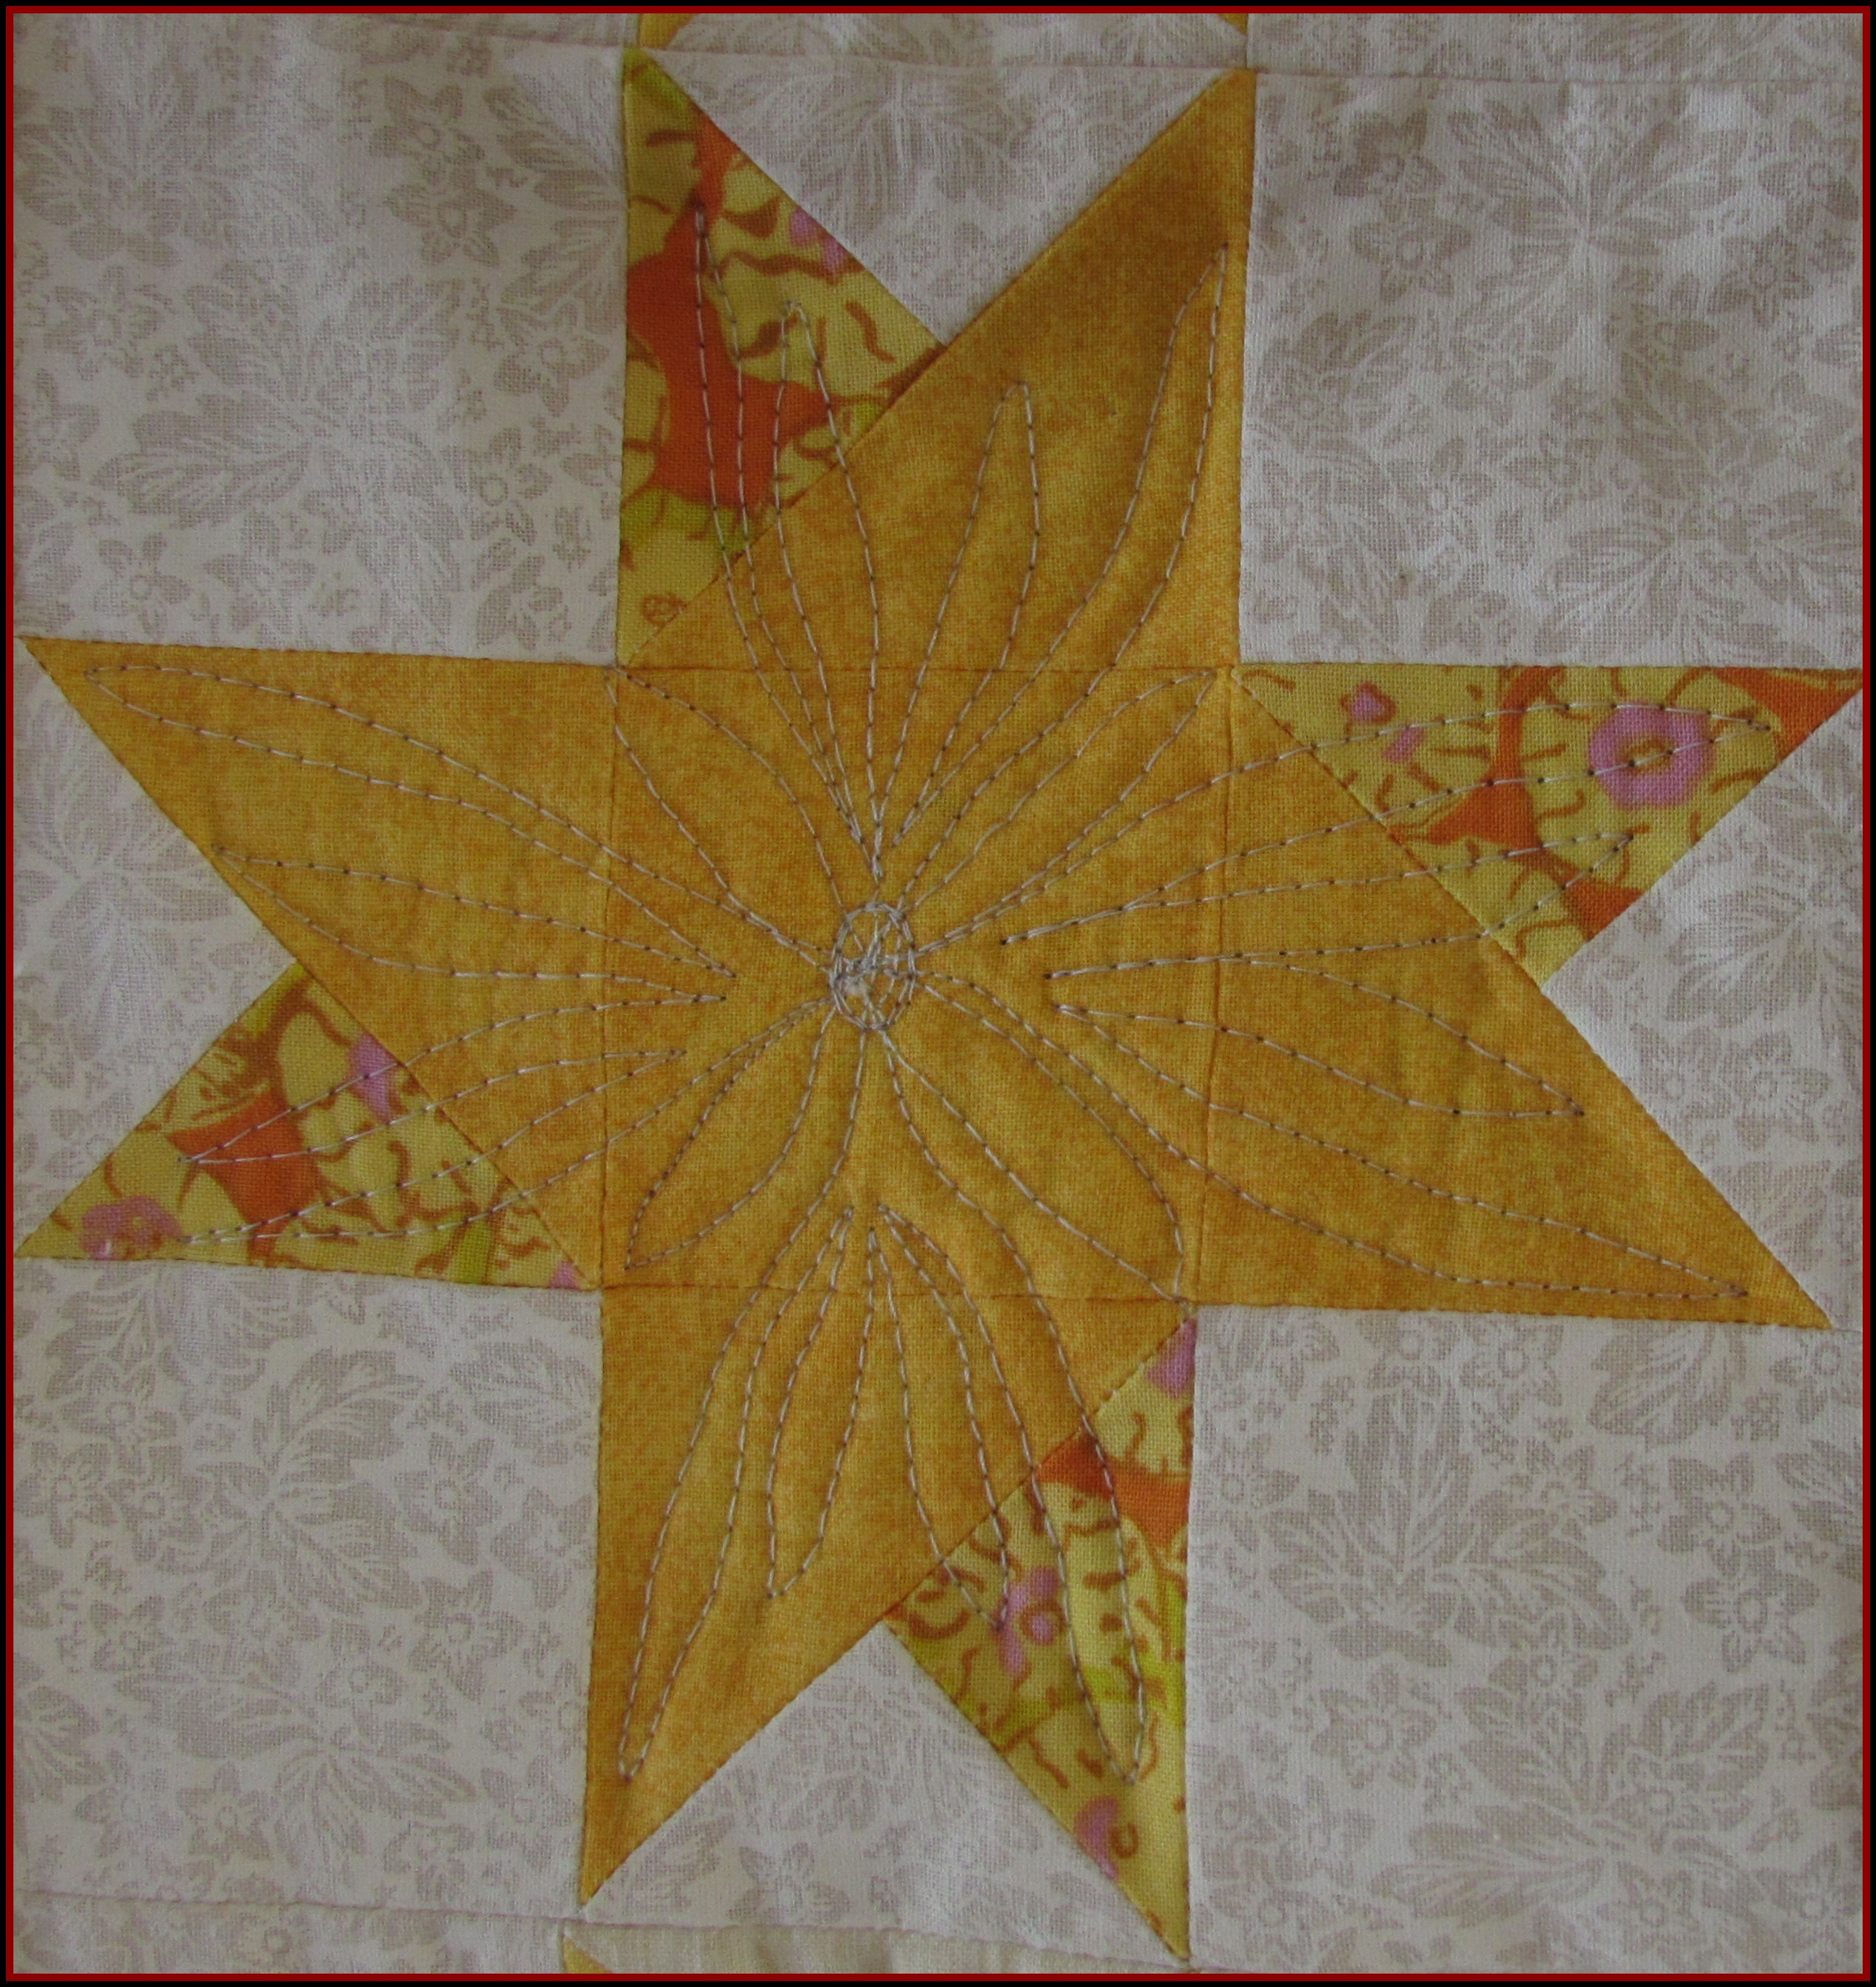
For the yellow stars, I used a large flower that extended into the points of the star.
The brown Pennsylvania blocks are sporting Baptist Fans and my initials down in the corner.
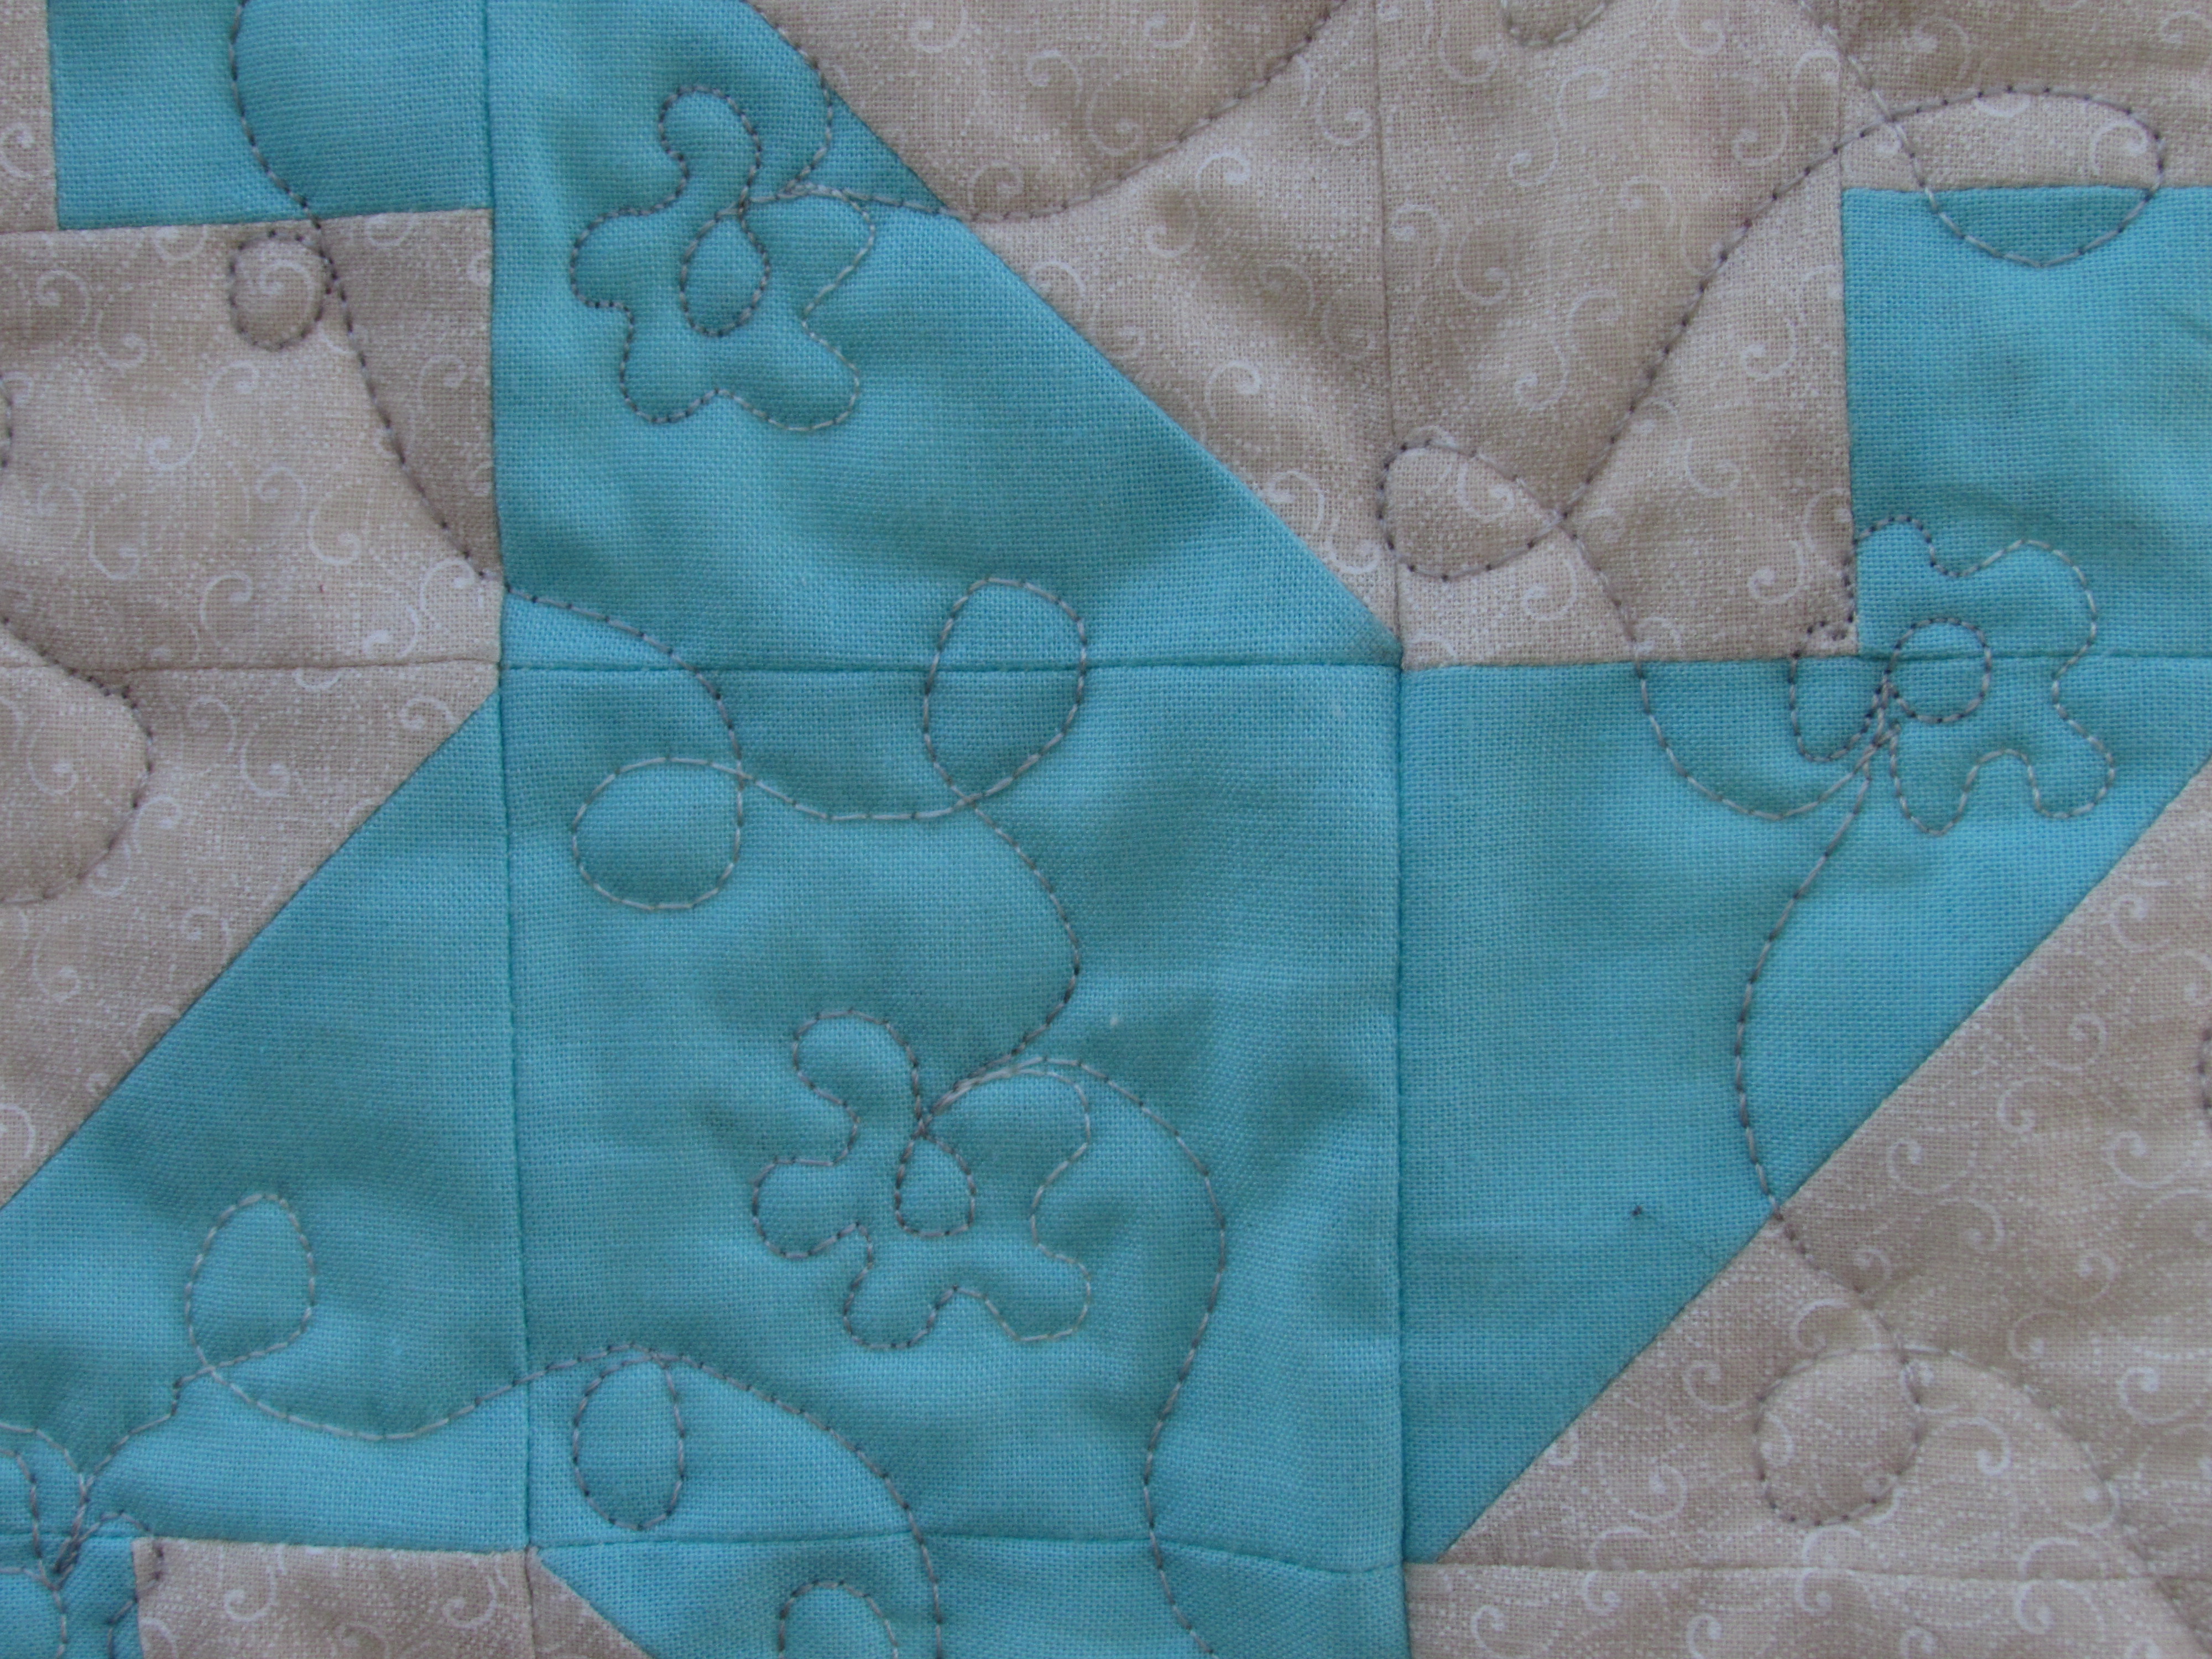
The blue waterwheel blocks have a flow of meandering loops and flowers.
The green row of Crosses & Losses blocks is quilted with a spiral motif.
These Dutchman’s Puzzle blocks are my favorite row. I did a tight stipple here as the row wasn’t entirely flat and required a lot of quilting to tame it down.
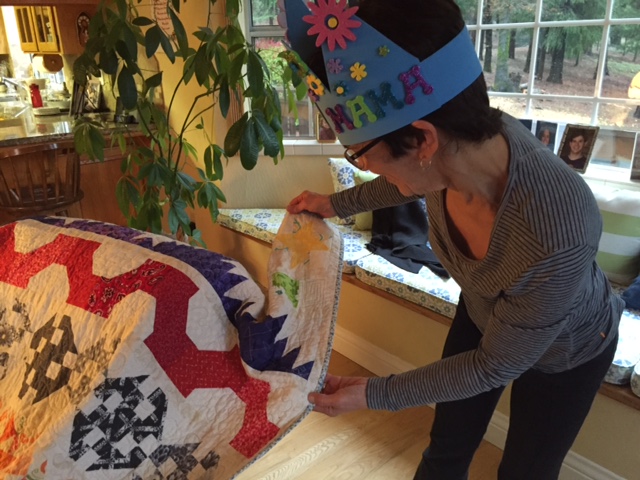
This quilt was gifted to my sister Tina (the one sporting her birthday crown!) for her 60th birthday. It was very fun to make and even more rewarding to give!
I hope you will pop over to Amy’s to check out the entries in the Quilt Festival. She hosts this event each fall and I have come to look forward to it – lots of inspiration and always one or two new bloggers to befriend. This year is the first time I have entered though. Voting begins Sunday the 25th!
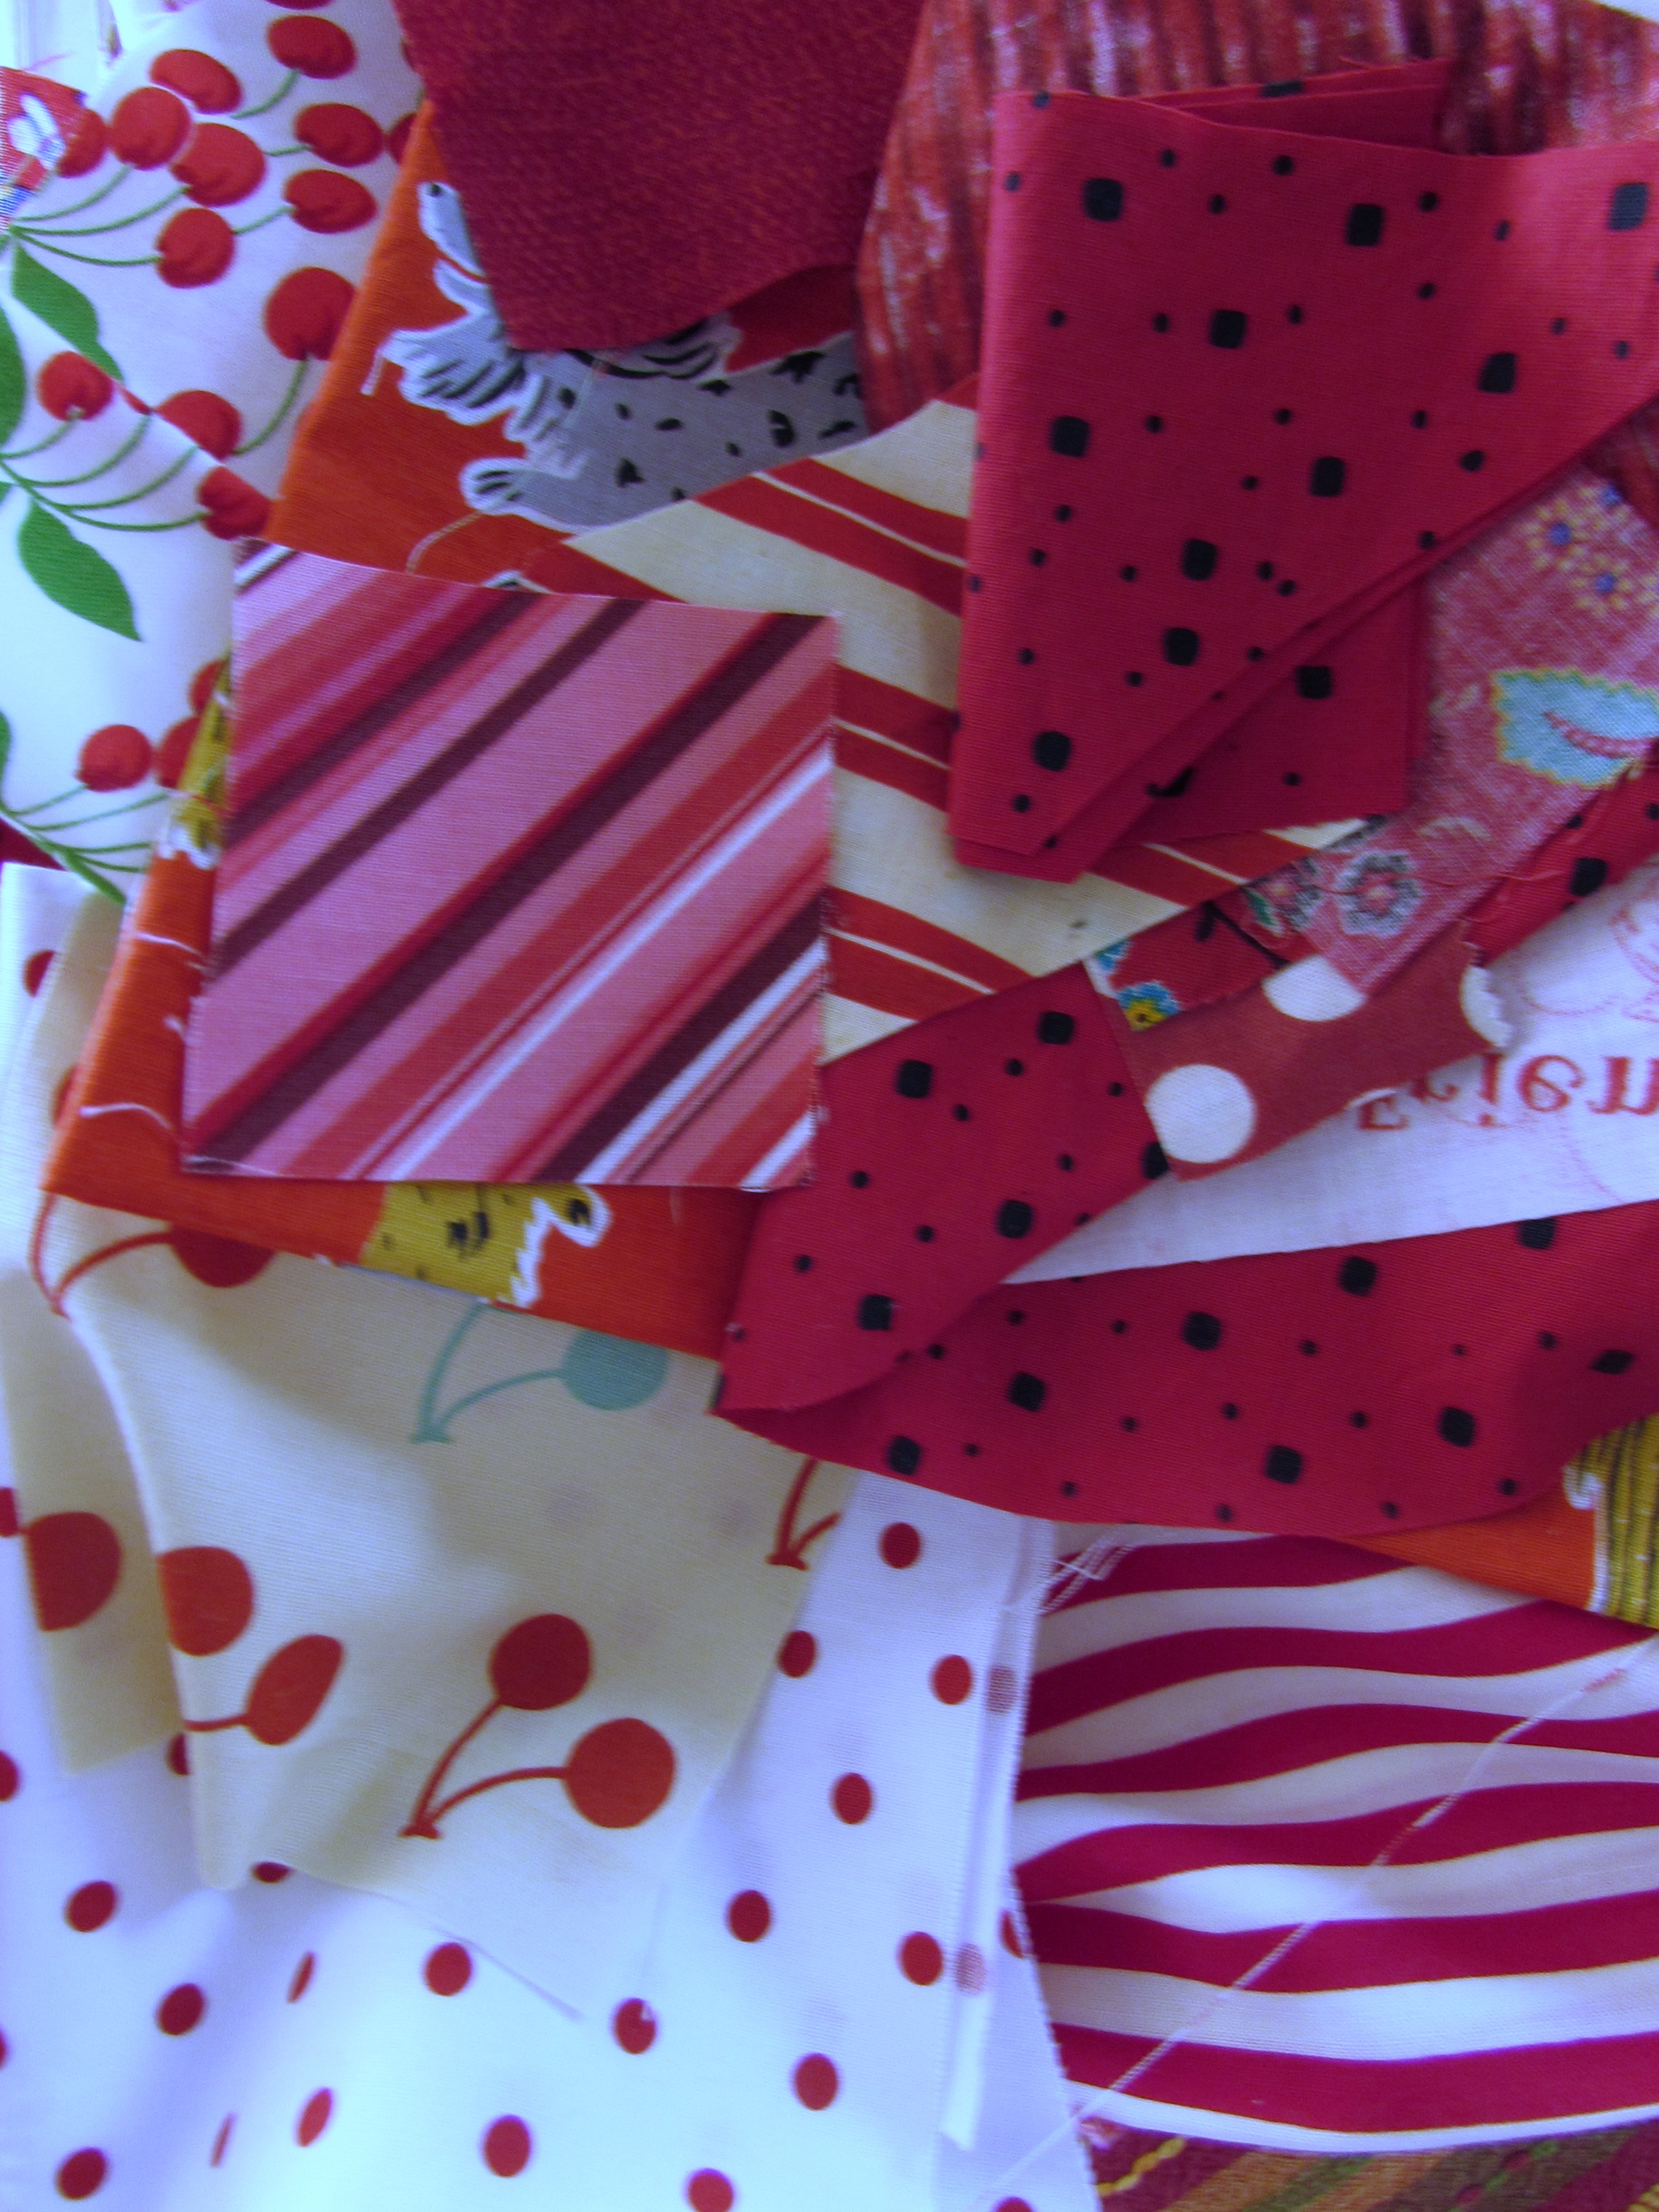
This month I barely made it in time! I kept thinking about working on my two scrappy projects but there was always something else going on so I would put it off. But I squeaked them in. Part of the problem was that this month in RSC16 land, the color is hot pink with a lime green accent. People have been making some really awesome blocks with this combination but it just wasn’t calling to me. So I decided to change it up and pulled out my bin of red scraps instead.
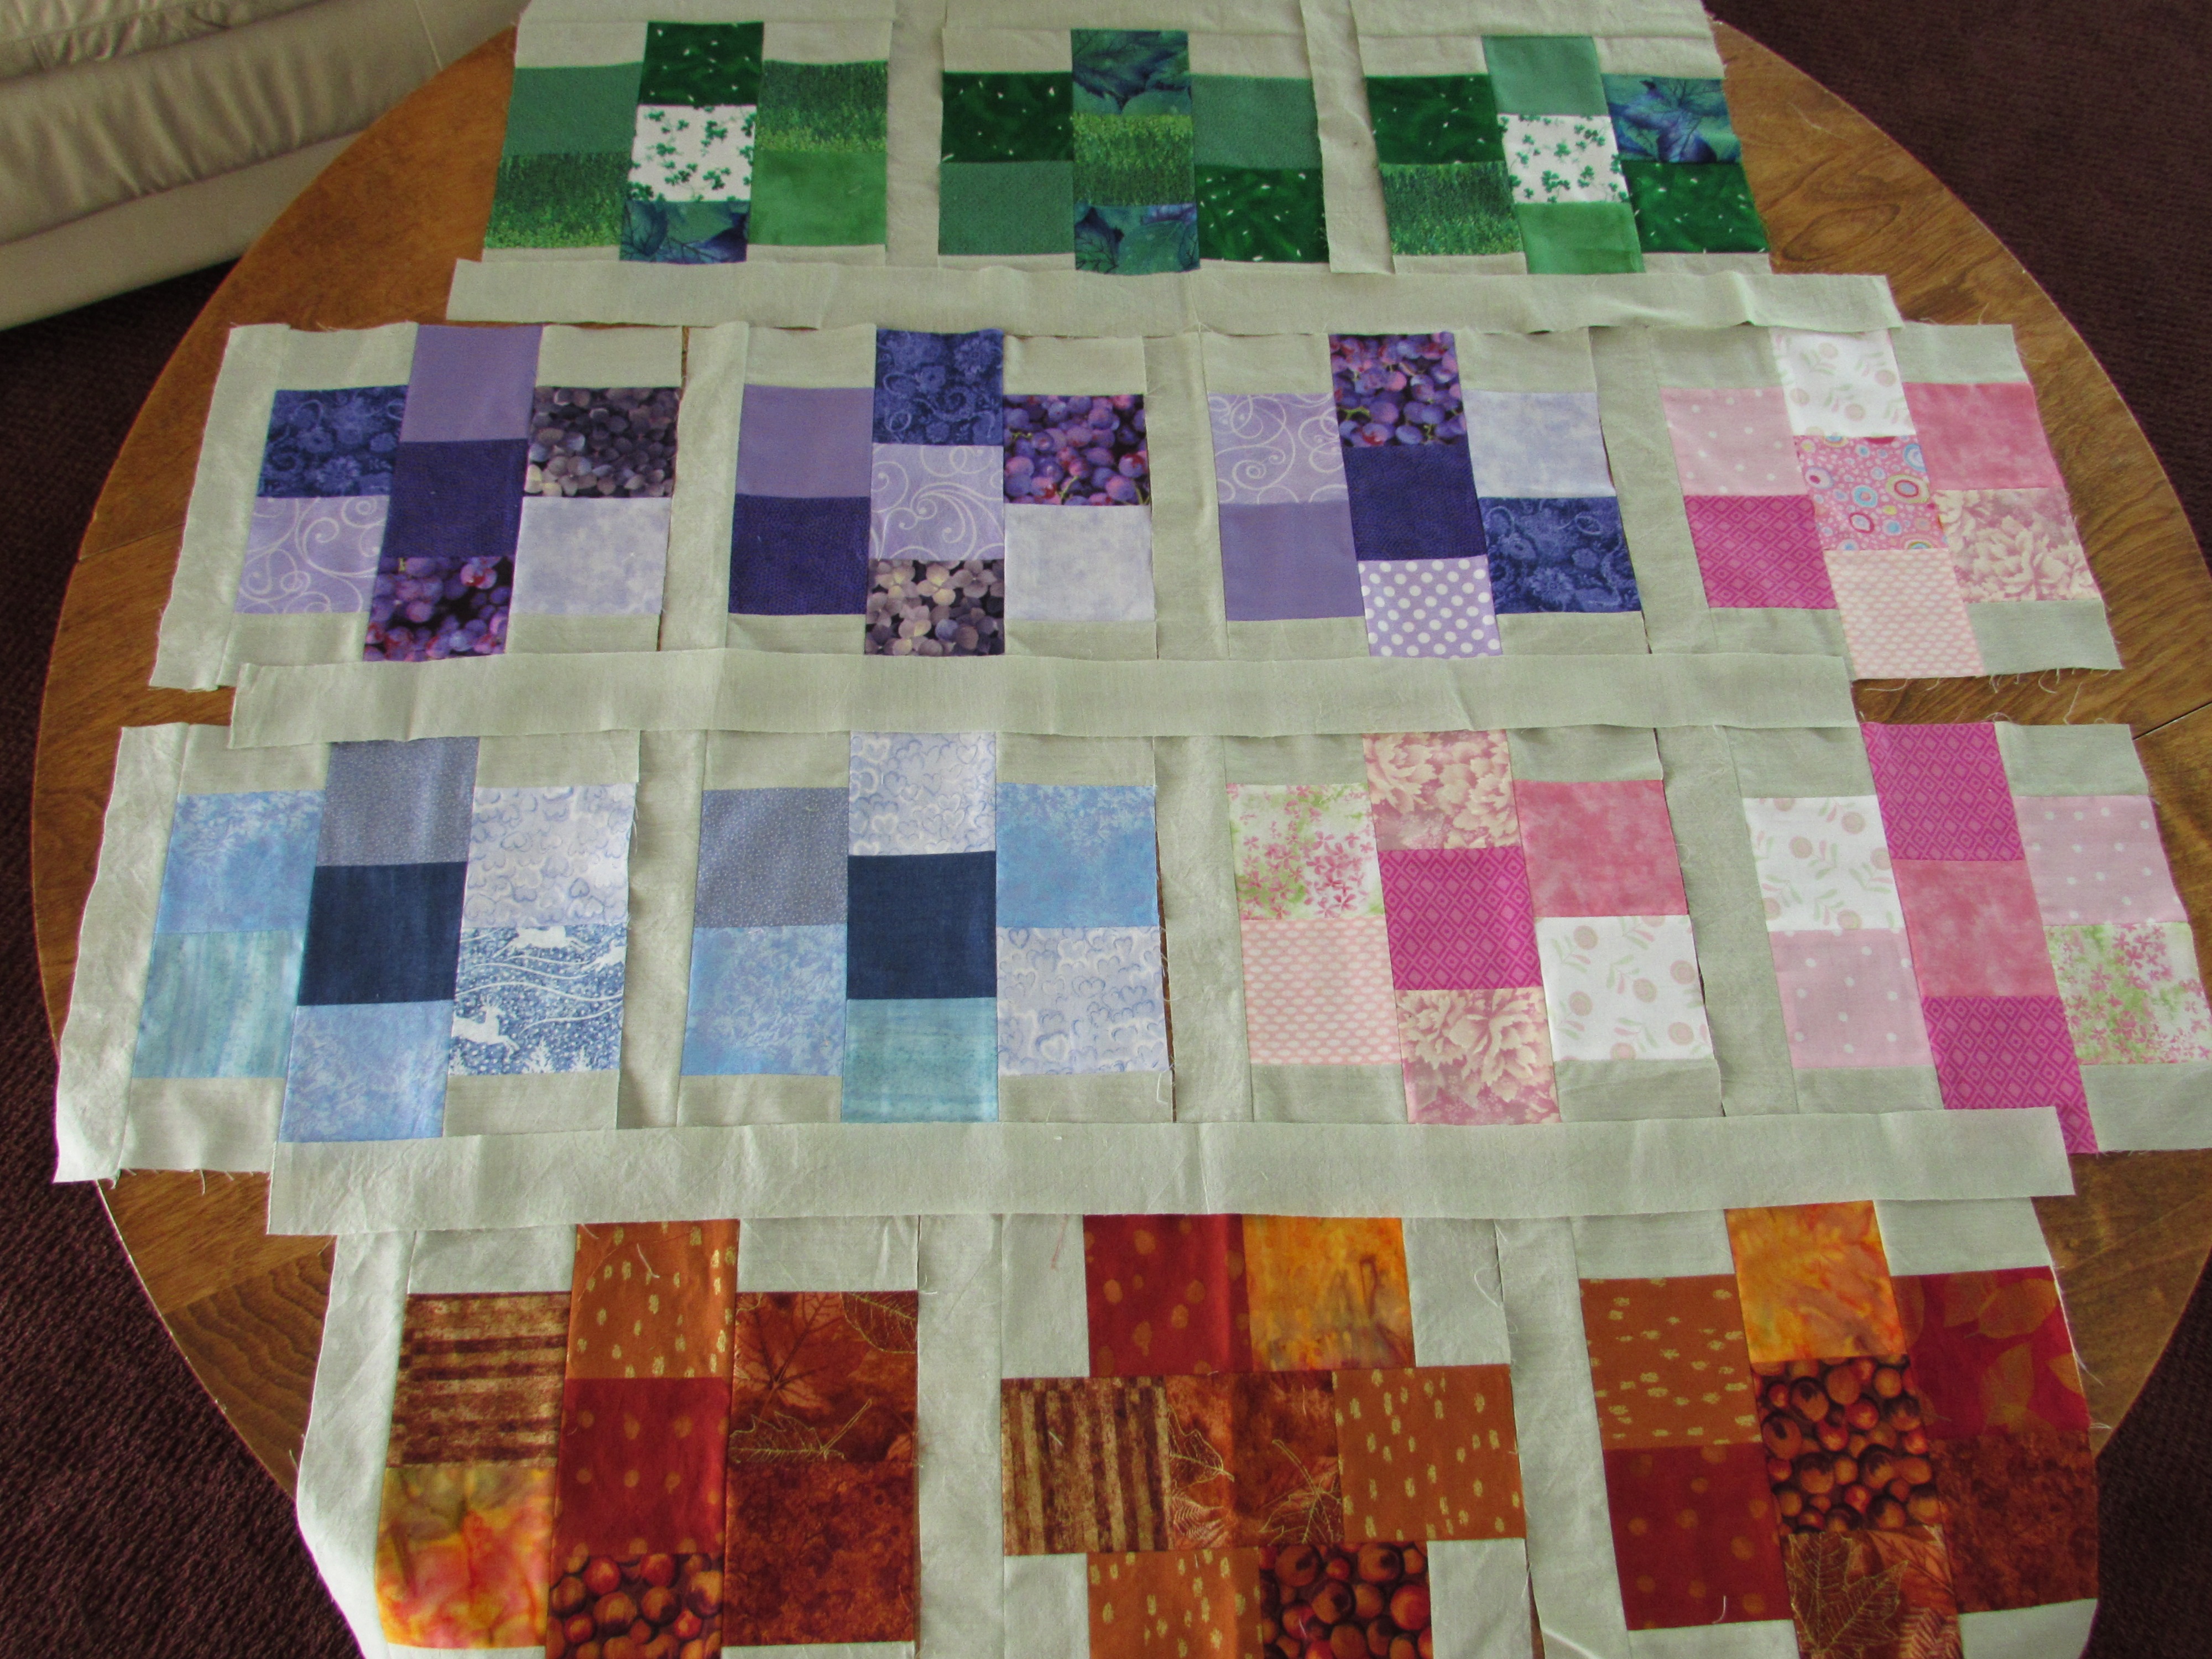
Once I made that change I was able to get into the idea and worked first on my made fabric. Scraps came together well as the red bin is packed with scraps to choose from. For the Gemstones quilt, I wasn’t sure how any red blocks to make. I started with two. But I like the addition of the red so I will need to make two or three more. Looking at them all together, I am getting excited to finish this one up. Remember there will be sashing between the rows when I start to piece the top.
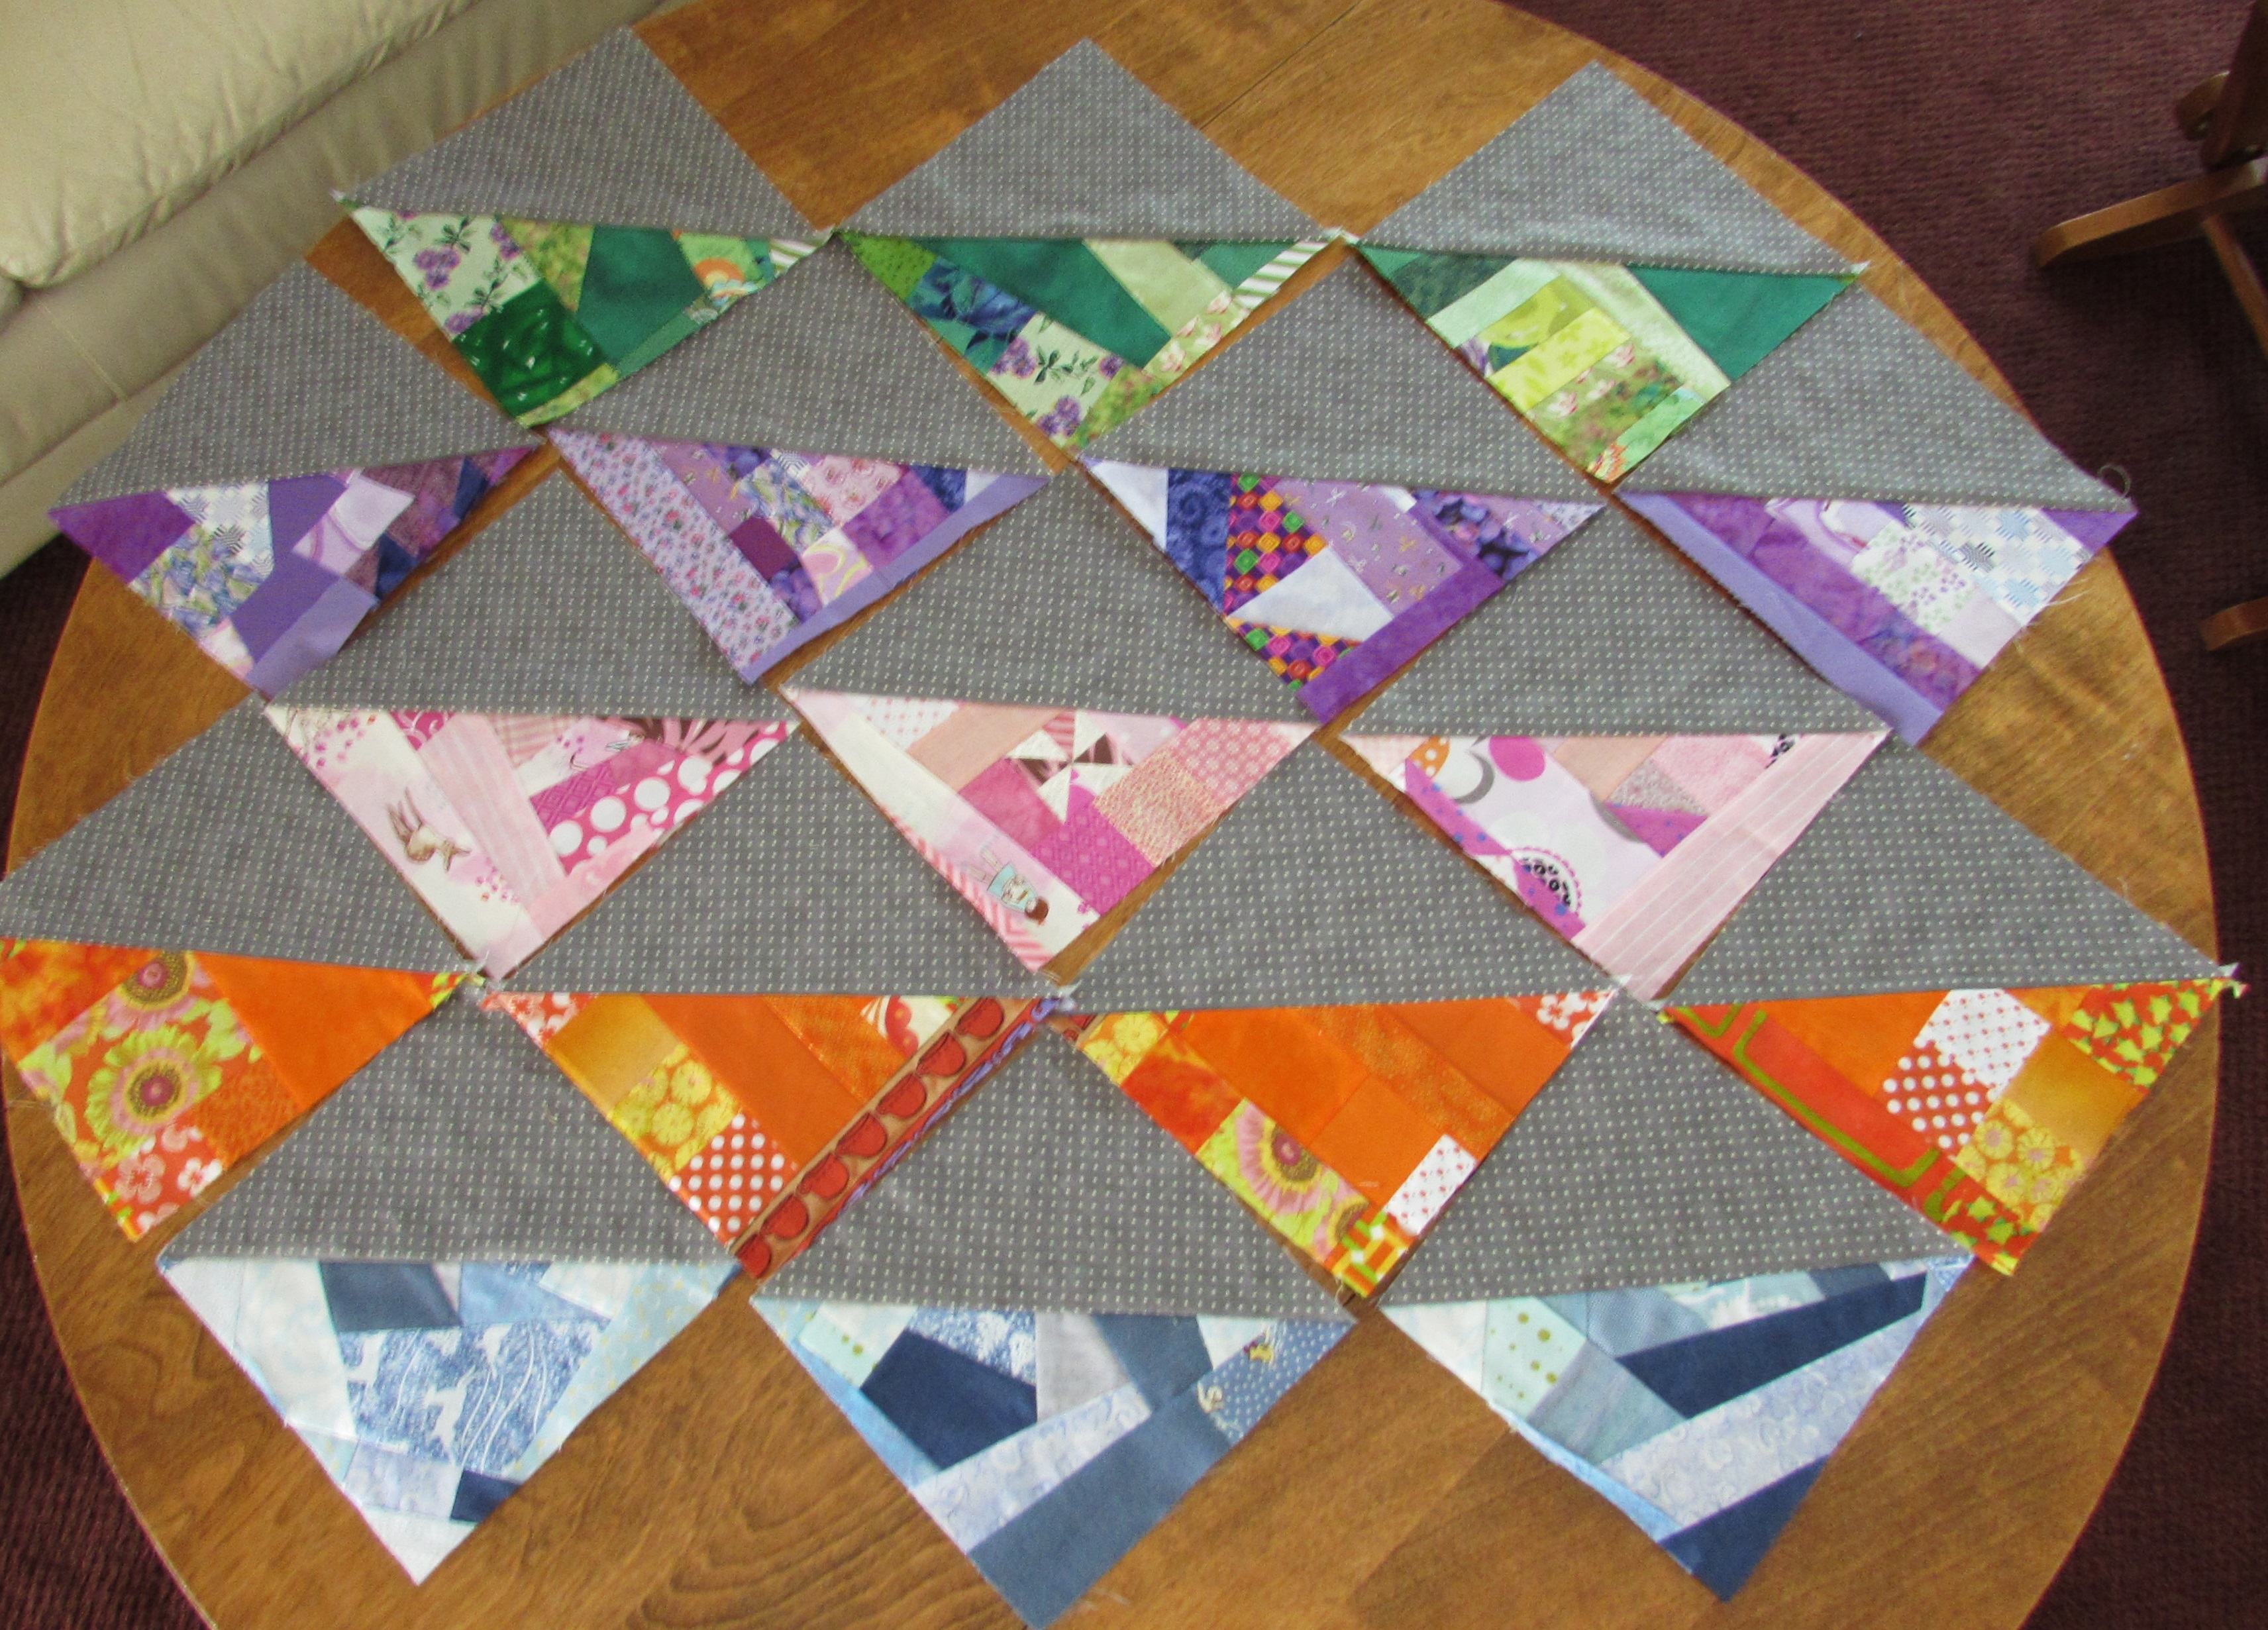
Looking at the scrappy HST’s, I am at somewhat of a deciding point.
I think it is time to commit to a layout. The layout will determine how many of any one color I will need. Well, unless I choose to go scrappy and not group by colorway. Above is a scrappy layout without grouping colors. Below is one where I am keeping colors together.
If I keep colors together, I think I need to sketch this out and try to plan how many blocks of each color will are needed. Do I break the colors up in any one row, or make enough that the row is cohesive. Decisions, decisions… I think I will do some planning using the Quiltography app that I recently posted about.
Alternatively, I could use a simpler layout. With this one, it feels like each row should be one color. Planning is still needed though. Luckily, I have been saving any chunks of the scrappy made fabric in case I need to make more of any color. It won’t take any time to add blocks here or there.
I am strongly leaning toward the first layout shown above. However, I am equally enjoying the scrappy look and the more organized, cohesive look. Will you throw in a vote? Striped layout or the diamond? Scrappy or organized colors? I am curious and would love to hear your thoughts.
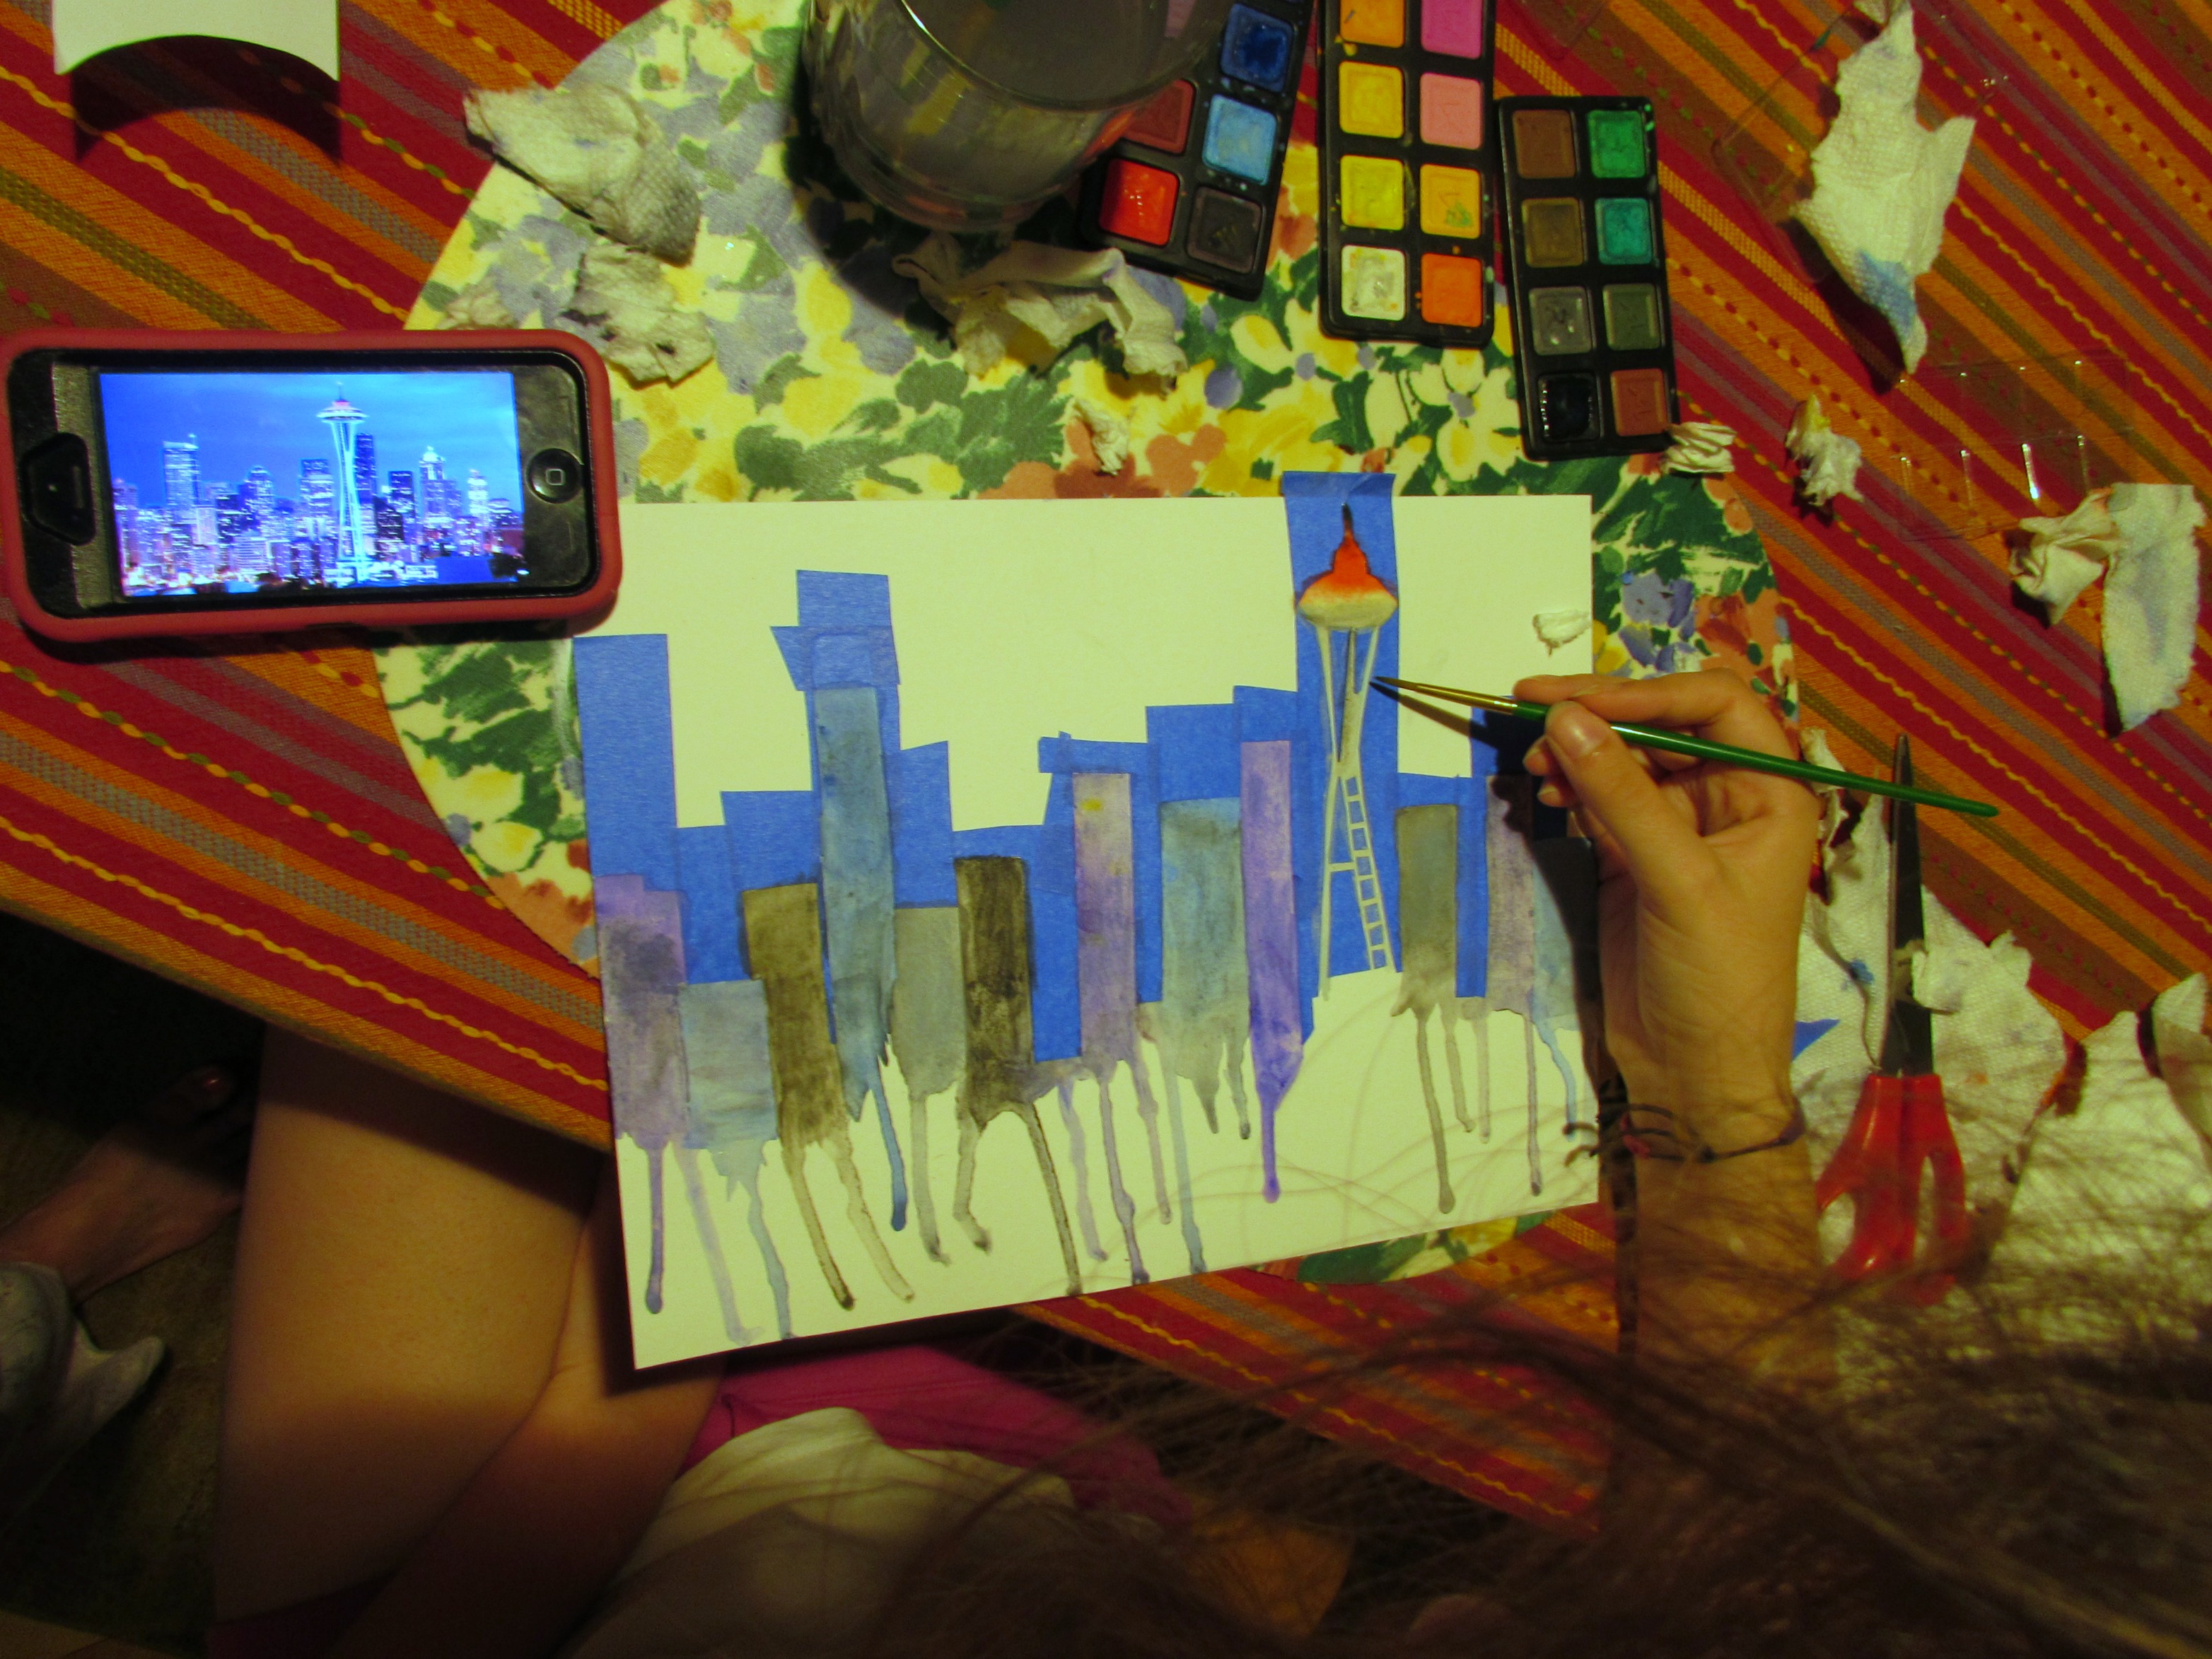
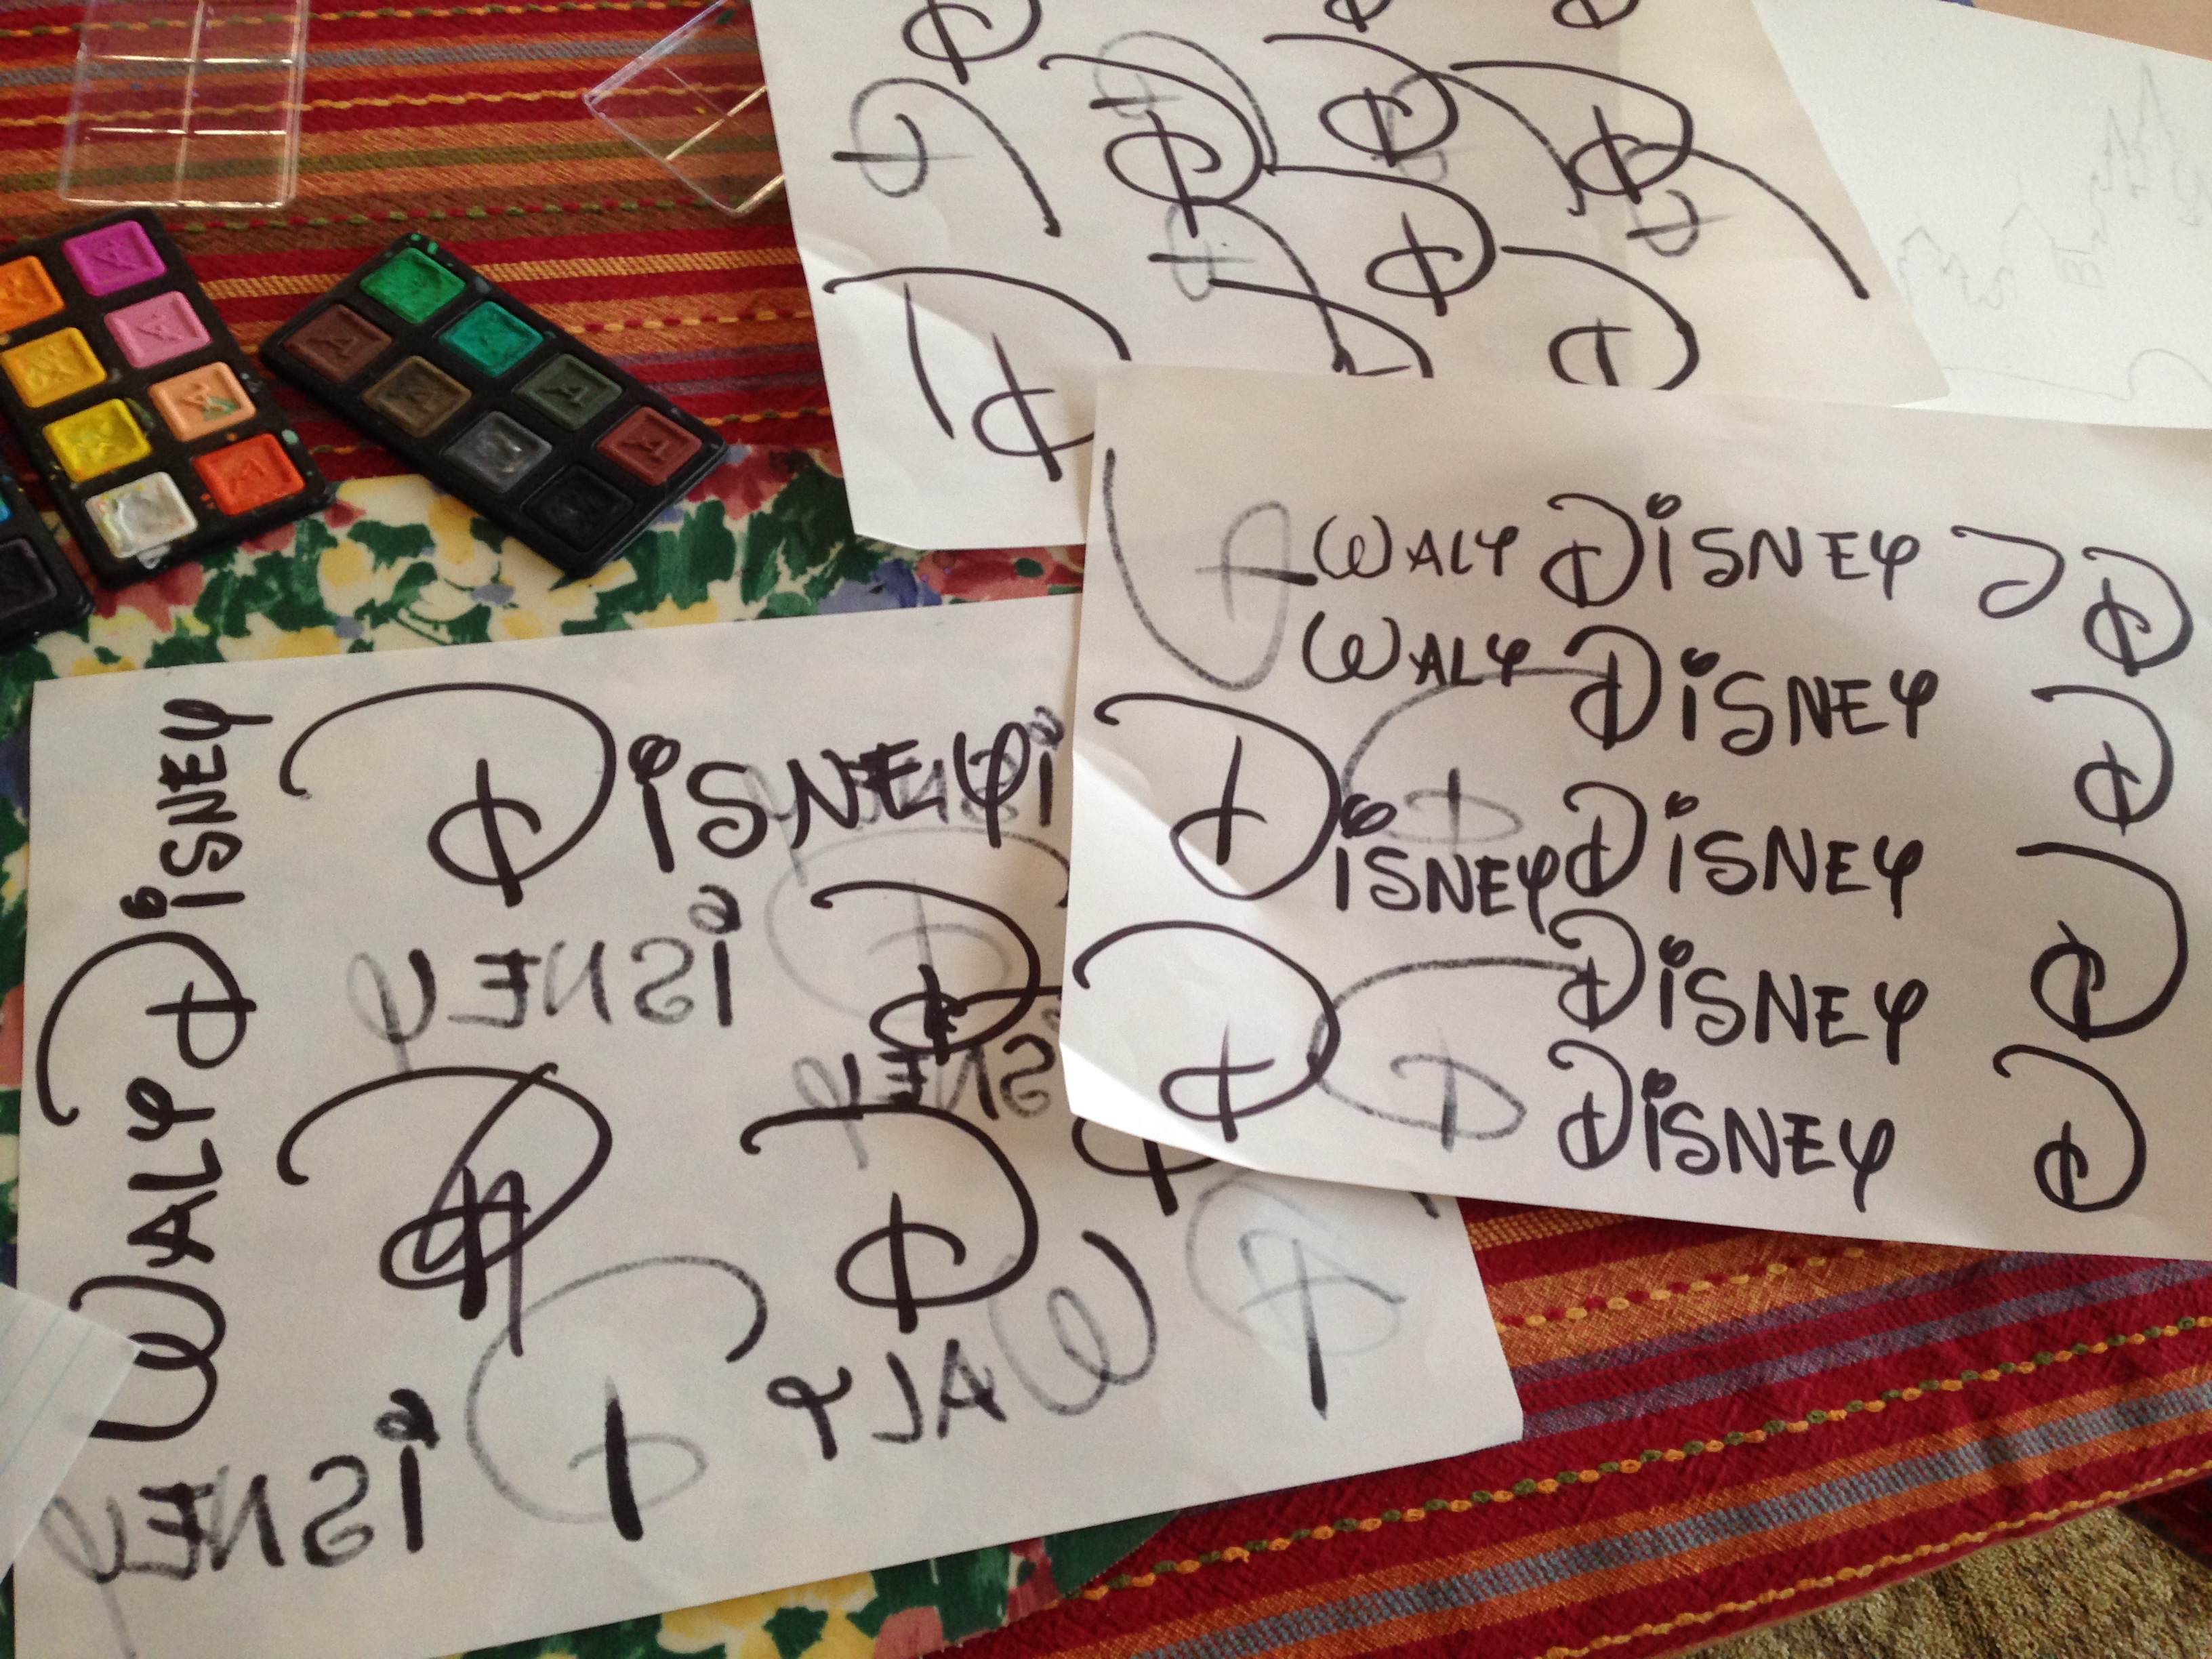
This is the hottest part of our summer thus far with triple digit heat all week and into next. We were able to escape some of the heat while at the coast for a few days. Now that we are back home, Julia and I have been hunkered down enjoying the AC. It is just awful outside. Julia has been trying out some fun techniques with her water colors, making stencils with painters tape. This one is an interpretation of the Seattle skyline with the Space Needle featured.
She is also working on some lettering. Yesterday she was channeling Walt Disney.
I am pleased to see her enjoying other activities and relying less on technology. Three more weeks and school resumes. Hard to believe but summer is winding down. Hope you are staying cool these days!
Linking to Oh Scrap and Crazy Mom Quilts, both of which are listed at the top of the page, under Link Ups.
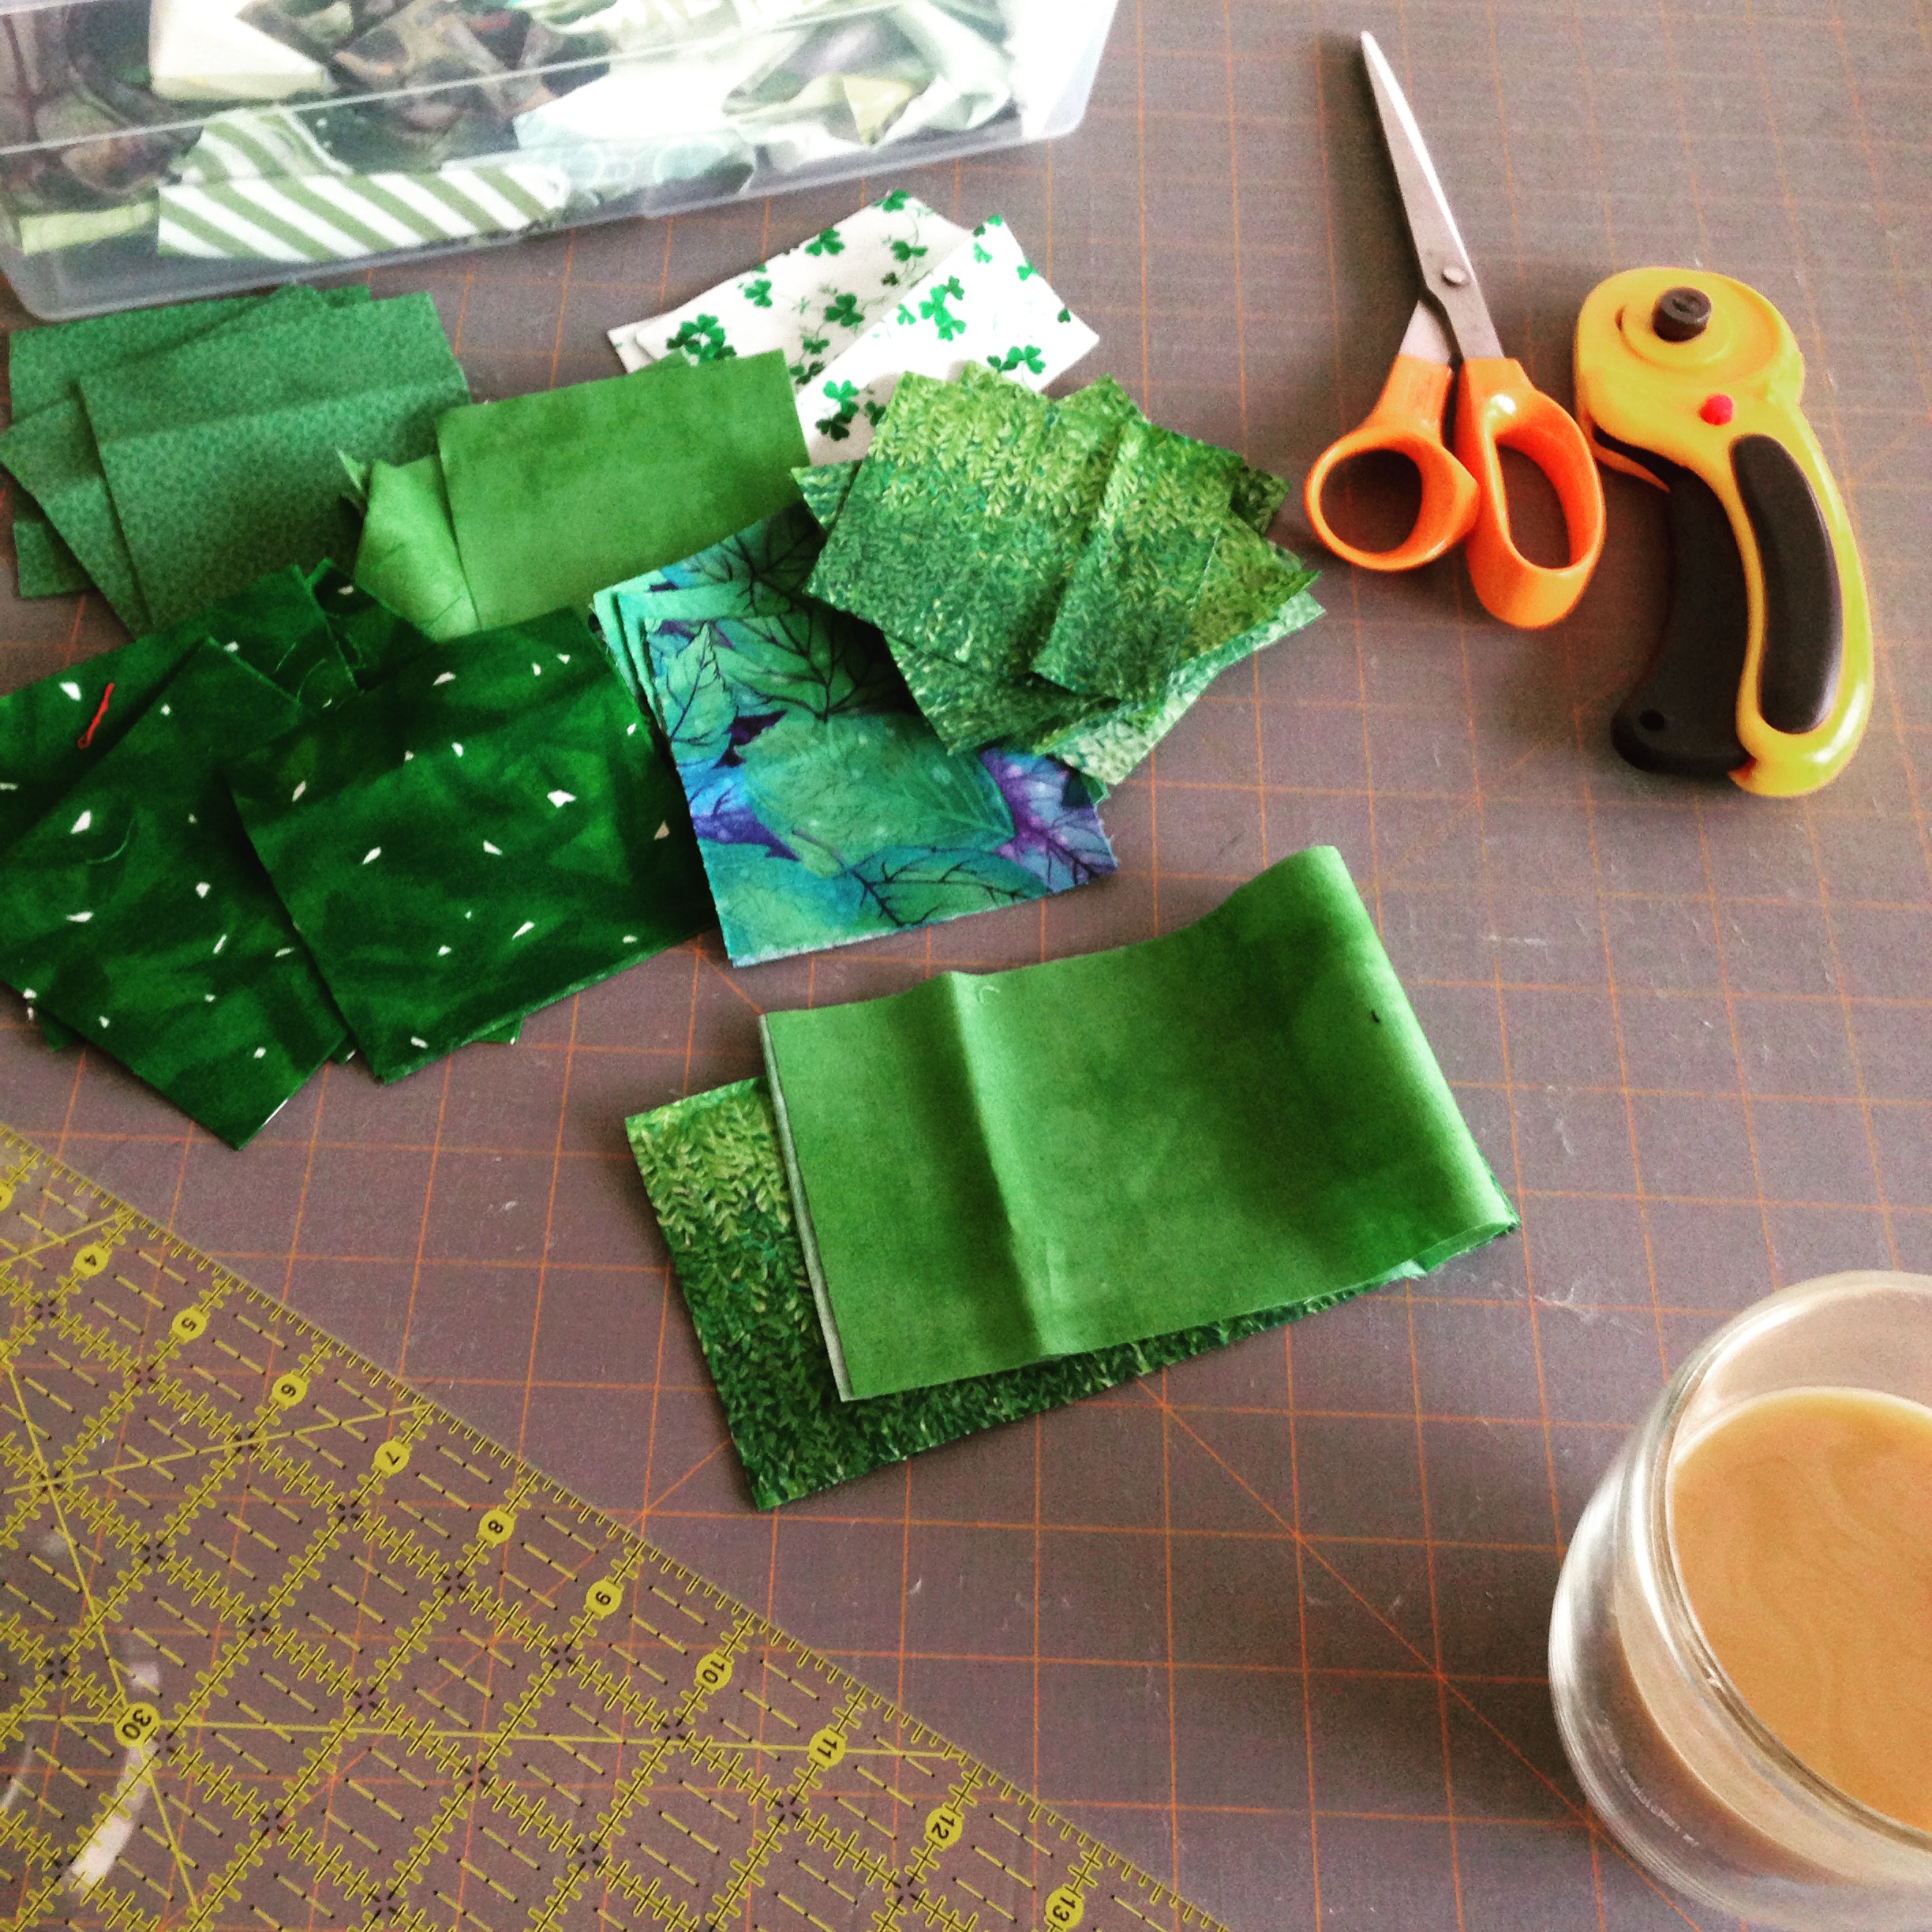
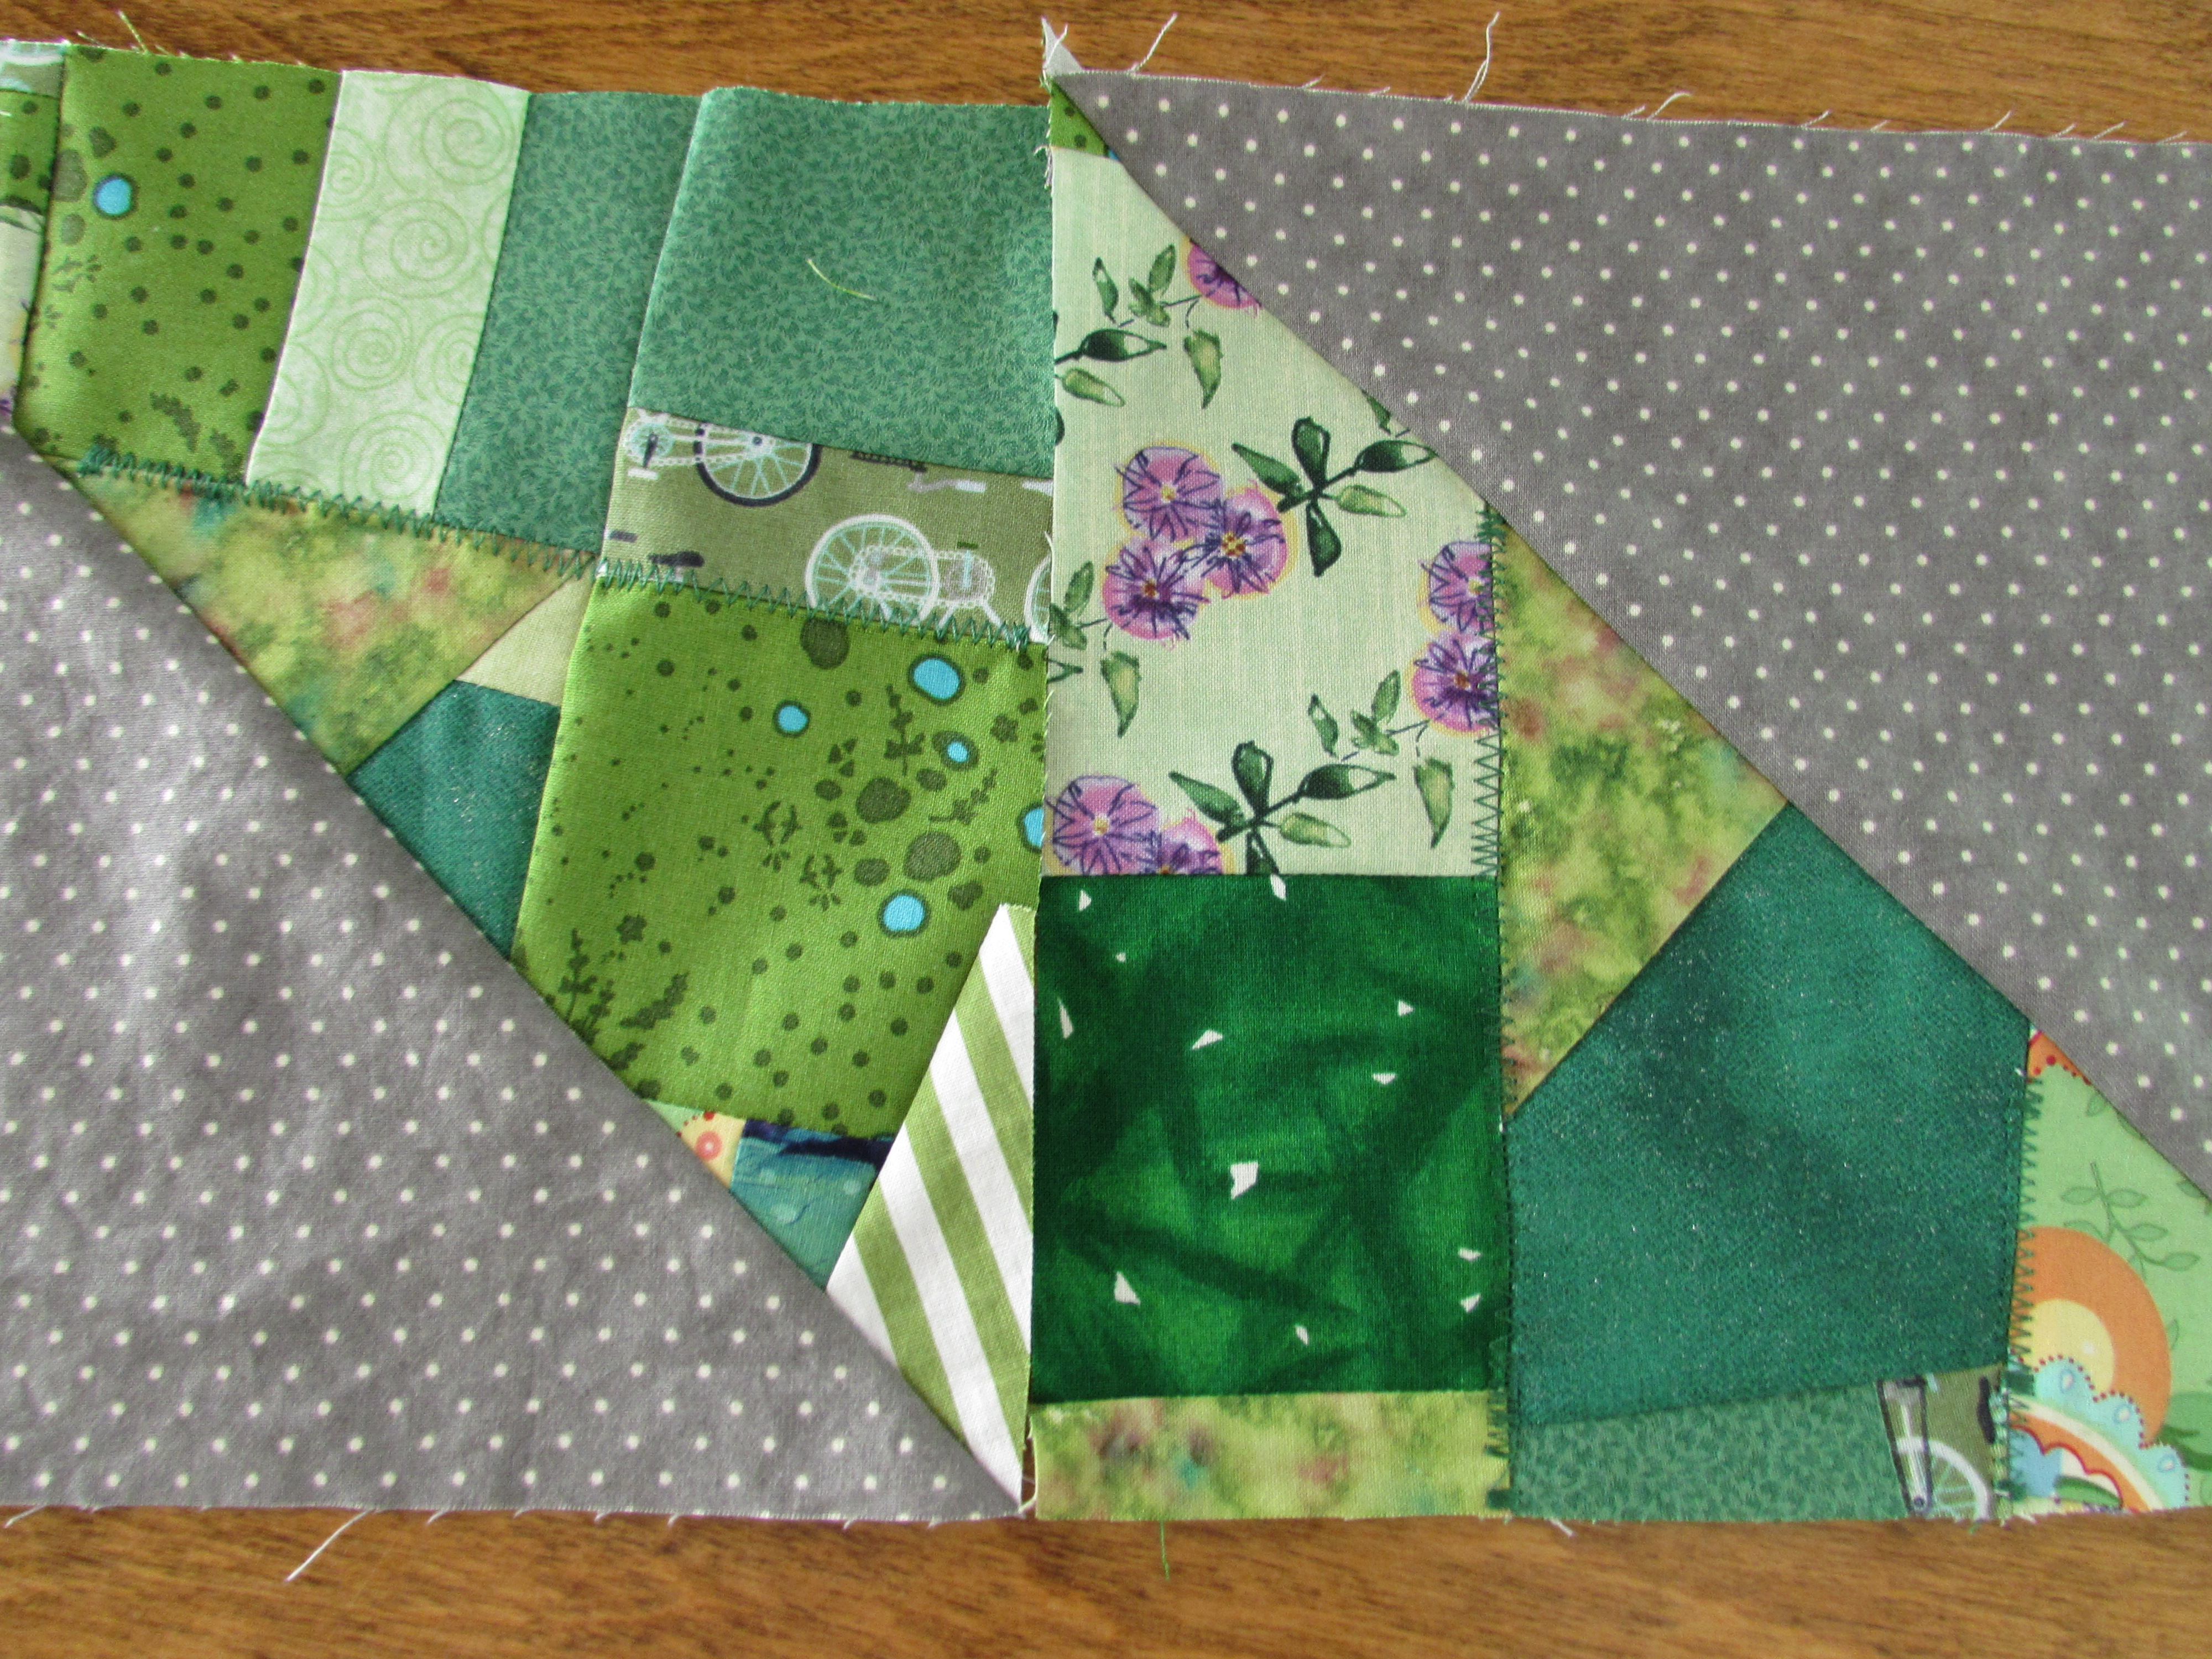
Green is by far, my favorite color. I love all shades of green so it was very easy for me to sit down this morning and pull out my green scrap bin to make my RSC16 projects for the month of May.
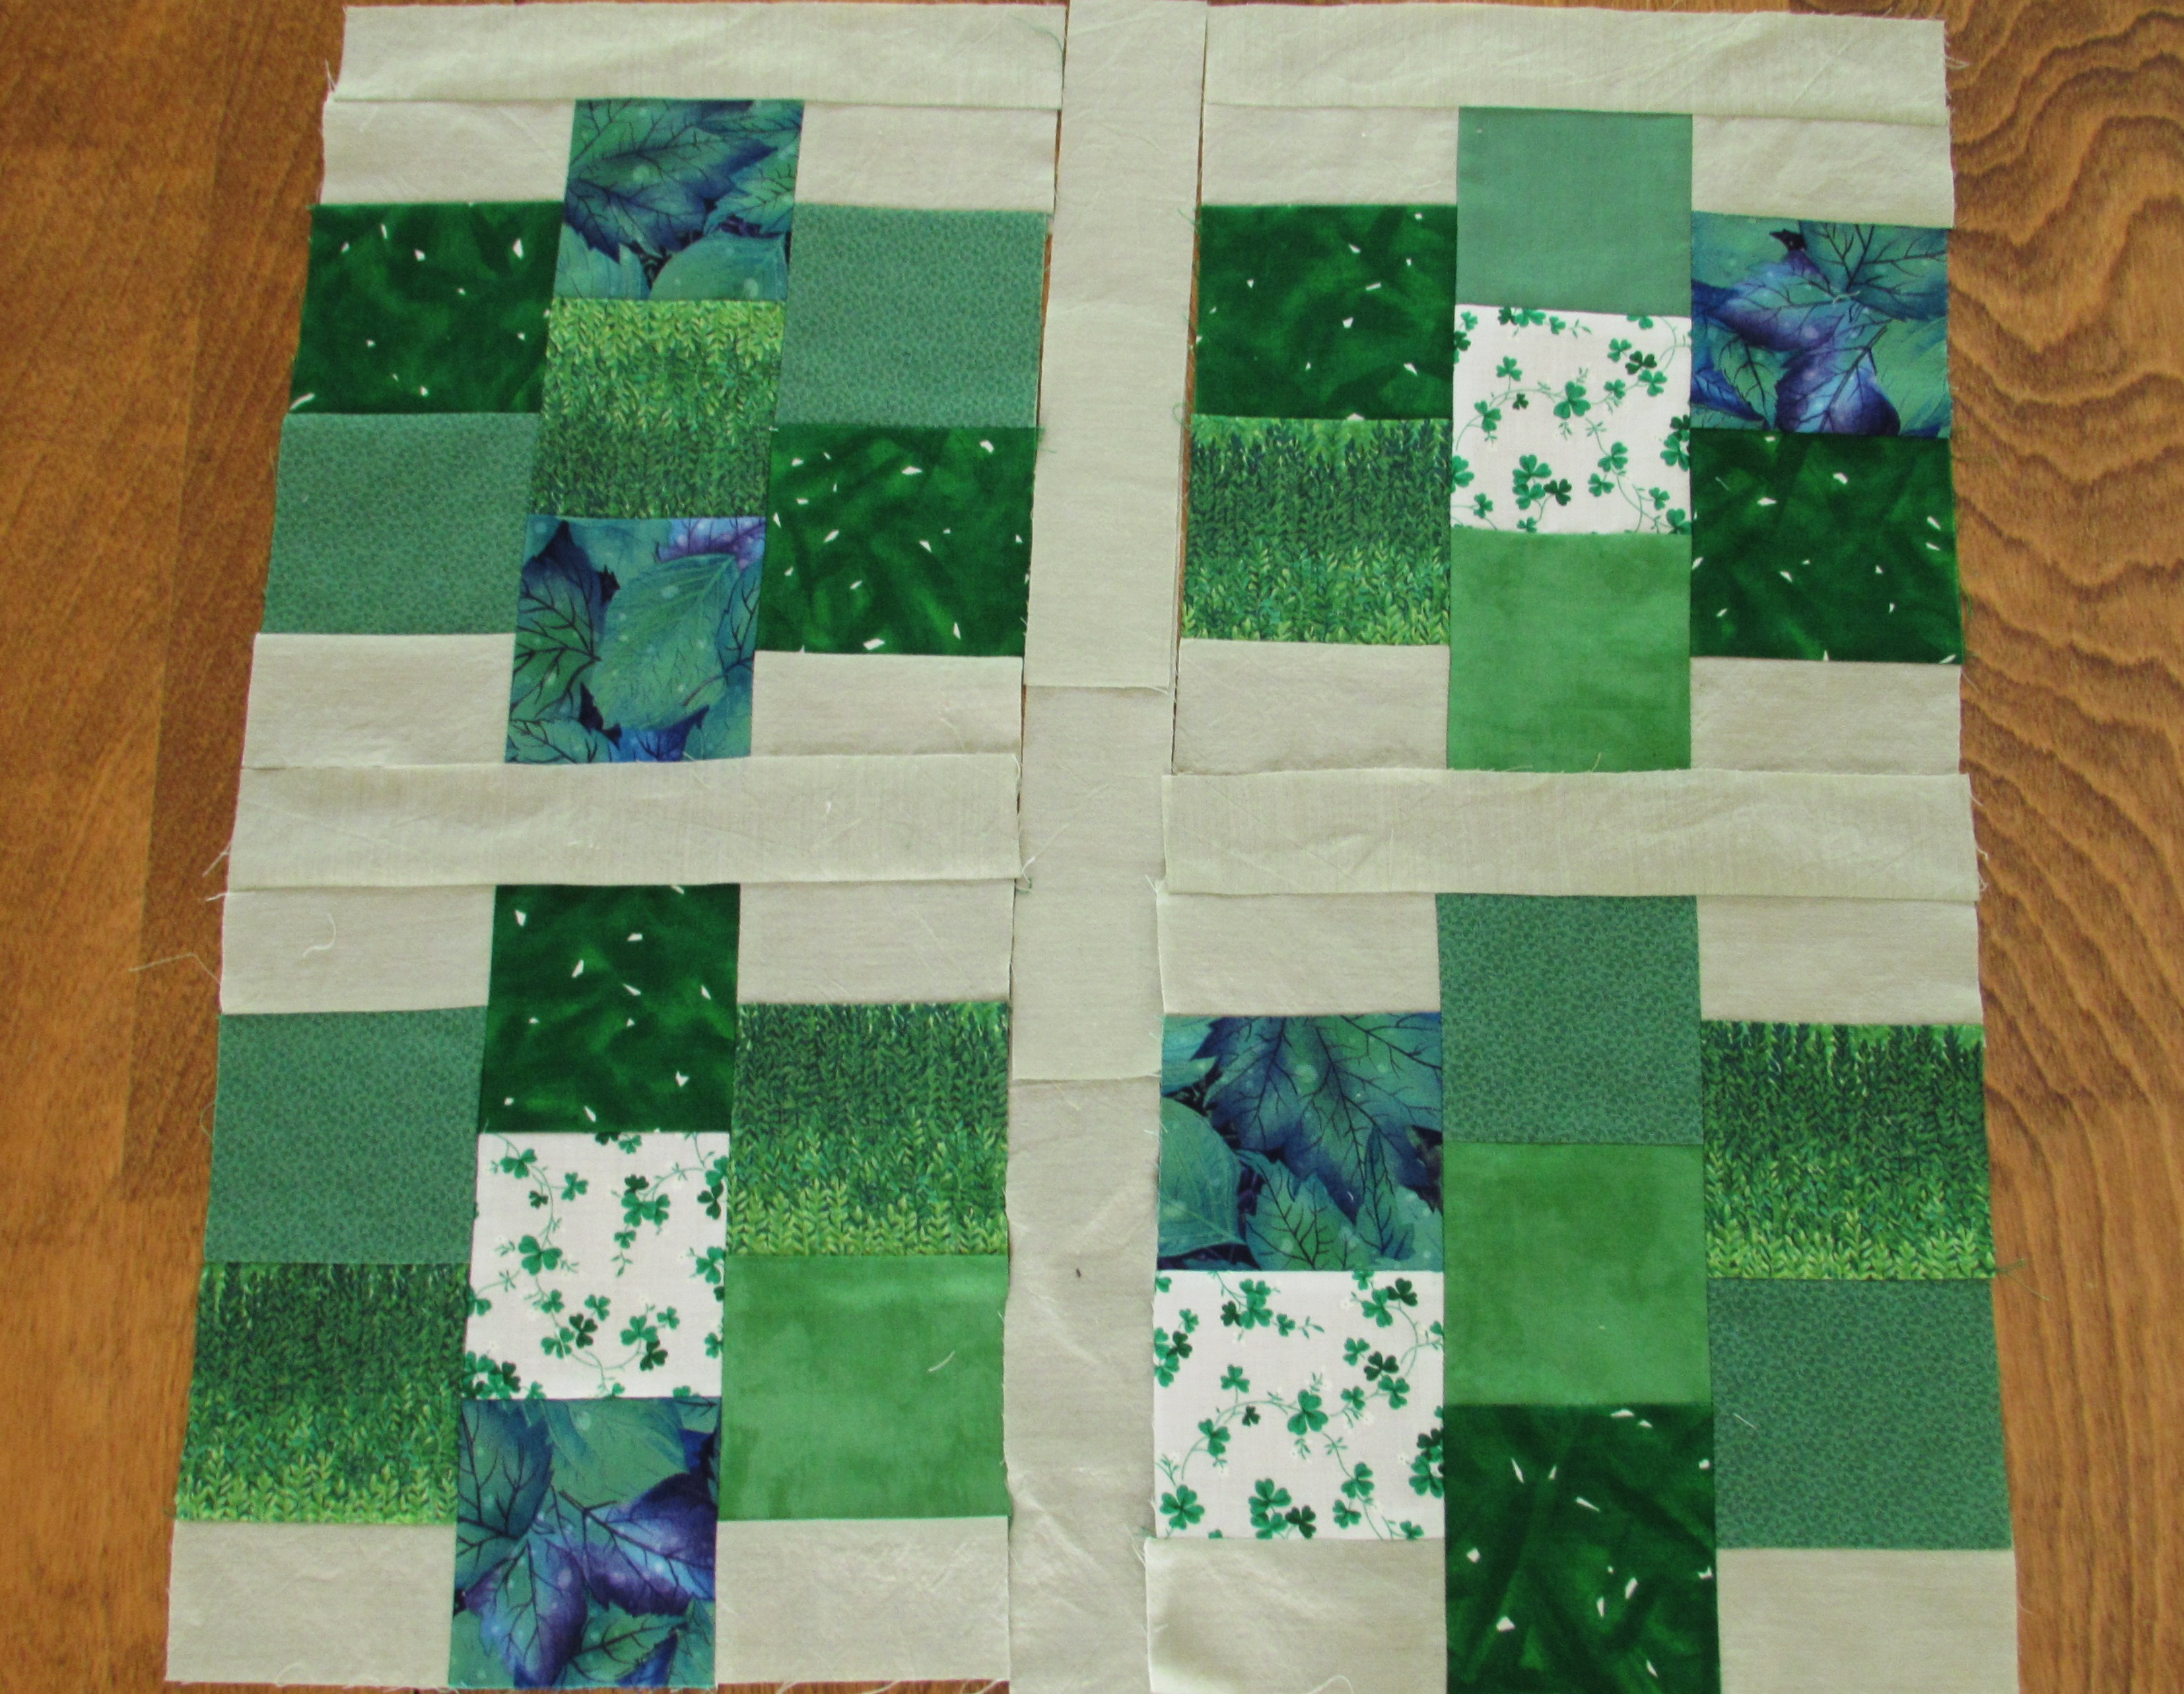
I decided to make my blocks for the Gemstones quilt first. You might remember that this pattern was designed by Cynthia over at Quilting is More Fun Than Housework. I’m not sure why, but I hadn’t thought to chain piece these blocks before. This morning I had a revelation though and zipped through the blocks in no time at all.
Love the emerald tones in these blocks. I wanted to use only greens that evoked an emerald gemstone so my options were a bit limited. They look so pretty though!
When I was taking photos (which is becoming a challenge as the blocks stack up) I noticed that I stitched the sashing to the wrong edge of these blocks. I will have to rip those seams and fix that.
Next I moved on to my scrappy blocks that were inspired by Victoria Findlay-Wolfe’s book, 15 Minutes of Play. These blocks are so satisfying. It is playful and freeing to make these because there is really no right or wrong. I branched out and used different shades of green for these, reaching for whichever scrap seemed to fit.
Now that these scrappy blocks are accumulating, it is fun to play with the HST layout. Endless possiblities.
Here is another idea.
The scrappy HST’s remind me of crazy quilts. I am playing around with adding some random stitching to the scrappy side of the HST to give it more of the crazy quilt look. What do you think? I did a few zig zag seams on two of the HST’s. I could also do a blanket stitch which would be characteristic of those quilts. Also, if I do this, maybe I should use some Sulky Rayon threads so that there would be that great sheen Sulky has as well as add more body to the stitching. Opinions please? Finally… should I do these little stitches now or when I actually quilt it? If I do it now, I will have to figure out how to quilt it such that it doesn’t interfere. I could focus the quilting on the polkadot side of the HST’s. Decisions, decisions, decisions!
Glad to have my scrappy green projects checked off the list for this month! Though I must say, it didn’t make the slightest dent in my green scrap bin. Not one little bit.
Linking to my favorites. Check them out at the top of the page, under Link Ups!
Craftsy Update: In a continued celebration of their birthday, Craftsy is offering some of their most popular classes for 50% off. Sale begins Wednesday, May 18th and runs through Sunday, May 22nd! Check them out. I have taken some quilting classes purchased at Craftsy and feel that that the caliber of the classes is first rate! (I am a Craftsy affiliate, meaning if you click through my link and make a purchase, I will receive a small payment.)
One down, two to go! In my last post I outlined some goals I have for my quilting in 2015. One of which was to finish my three UFO’s before starting a new quilt. So here is the first one, the Aurifil Designer 2014 BOM quilt. You might remember that I only made nine of the Aurifil blocks and then did three blocks of my choosing.
The back (shown here by my lovely quilt model) is a sweet blue polka dot, one of Riley Blake’s La Creme line.
Technically I am calling this a 2014 finish because all I did yesterday was to sew the back of the binding on, the bulk of it was made in 2014. So bright and happy.
You might remember that I only made nine of the Aurifil blocks and then did three blocks of my choosing. To quilt it, I used my walking foot and outlined various shapes within each block. Also I quilted a 1/4″ line inside of each side of the sashing. I ended up using three different thread colors on the top, white, orange and a light gray. I kept white in the bobbin for all three colors though.
We we spent the New Year’s holiday at the Downieville house. Remember, the tiny bungalow we bought after I saw it during a Quilt Retreat weekend up here? Ray has been coming up about every other weekend to work on it. Julia and I have come a couple of times to clean. This weekend Ray made great progress on replacing a large amount of the (very old and unsafe) knob and tube wiring. Lots of this was done from the attic which is sort of unpleasant considering all the dust and insulation up there. Yuk. Julia pulled nails from the exposed studs in the bedroom. She also did some mopping. What a trooper. I sanded a few shelves in the kitchen cabinets and scrubbed down a bedroom that is technically in the basement but is actually one of the more normal rooms in this house. We are definitely making progress.
i think my next project will be to sash the blocks for the RSC2014 challenge. I am setting the finish of this quilt as my goaI for January. I am linking up with Sew Bittersweet DesignsALYOF (A Lovely Year of Finishes) which is a fun challenge for quilters to set a goal or two each month. It is a good way to keep organized and be sure to finish what you set out to do. I will link my goal(s) at the beginning of the month on her site and then report in at the end of the month.
I also plan to participate in RSC2015 as well (as always, this is sponsored by Angela at So Scrappy). This year I am going to follow along with a row quilt BOM that Mari is doing over at her blog, Academic Quilter. She will be posting the block for the first row on Tuesday of next week. I am very much looking forward to see what her plan is. (Completing the January row is another goal for ALOYF). I appreciate that Mari has taken the time to sketch the rows out and do the math for the blocks as that takes time. Since she did it, I don’t have to! It will be fun to work through this with her. If you are interested in using up some scraps, I expect this to be a great project!
Linking to Crazy Mom Quilts. If you haven’t read her post today, please do. It inspired me to see all that she accomplished in 2014. Wow!! ALso linking to Sew Bittersweet Designs ALOYF.