Category Archives: Scrappy Quilting

Row Quilt Top Finished

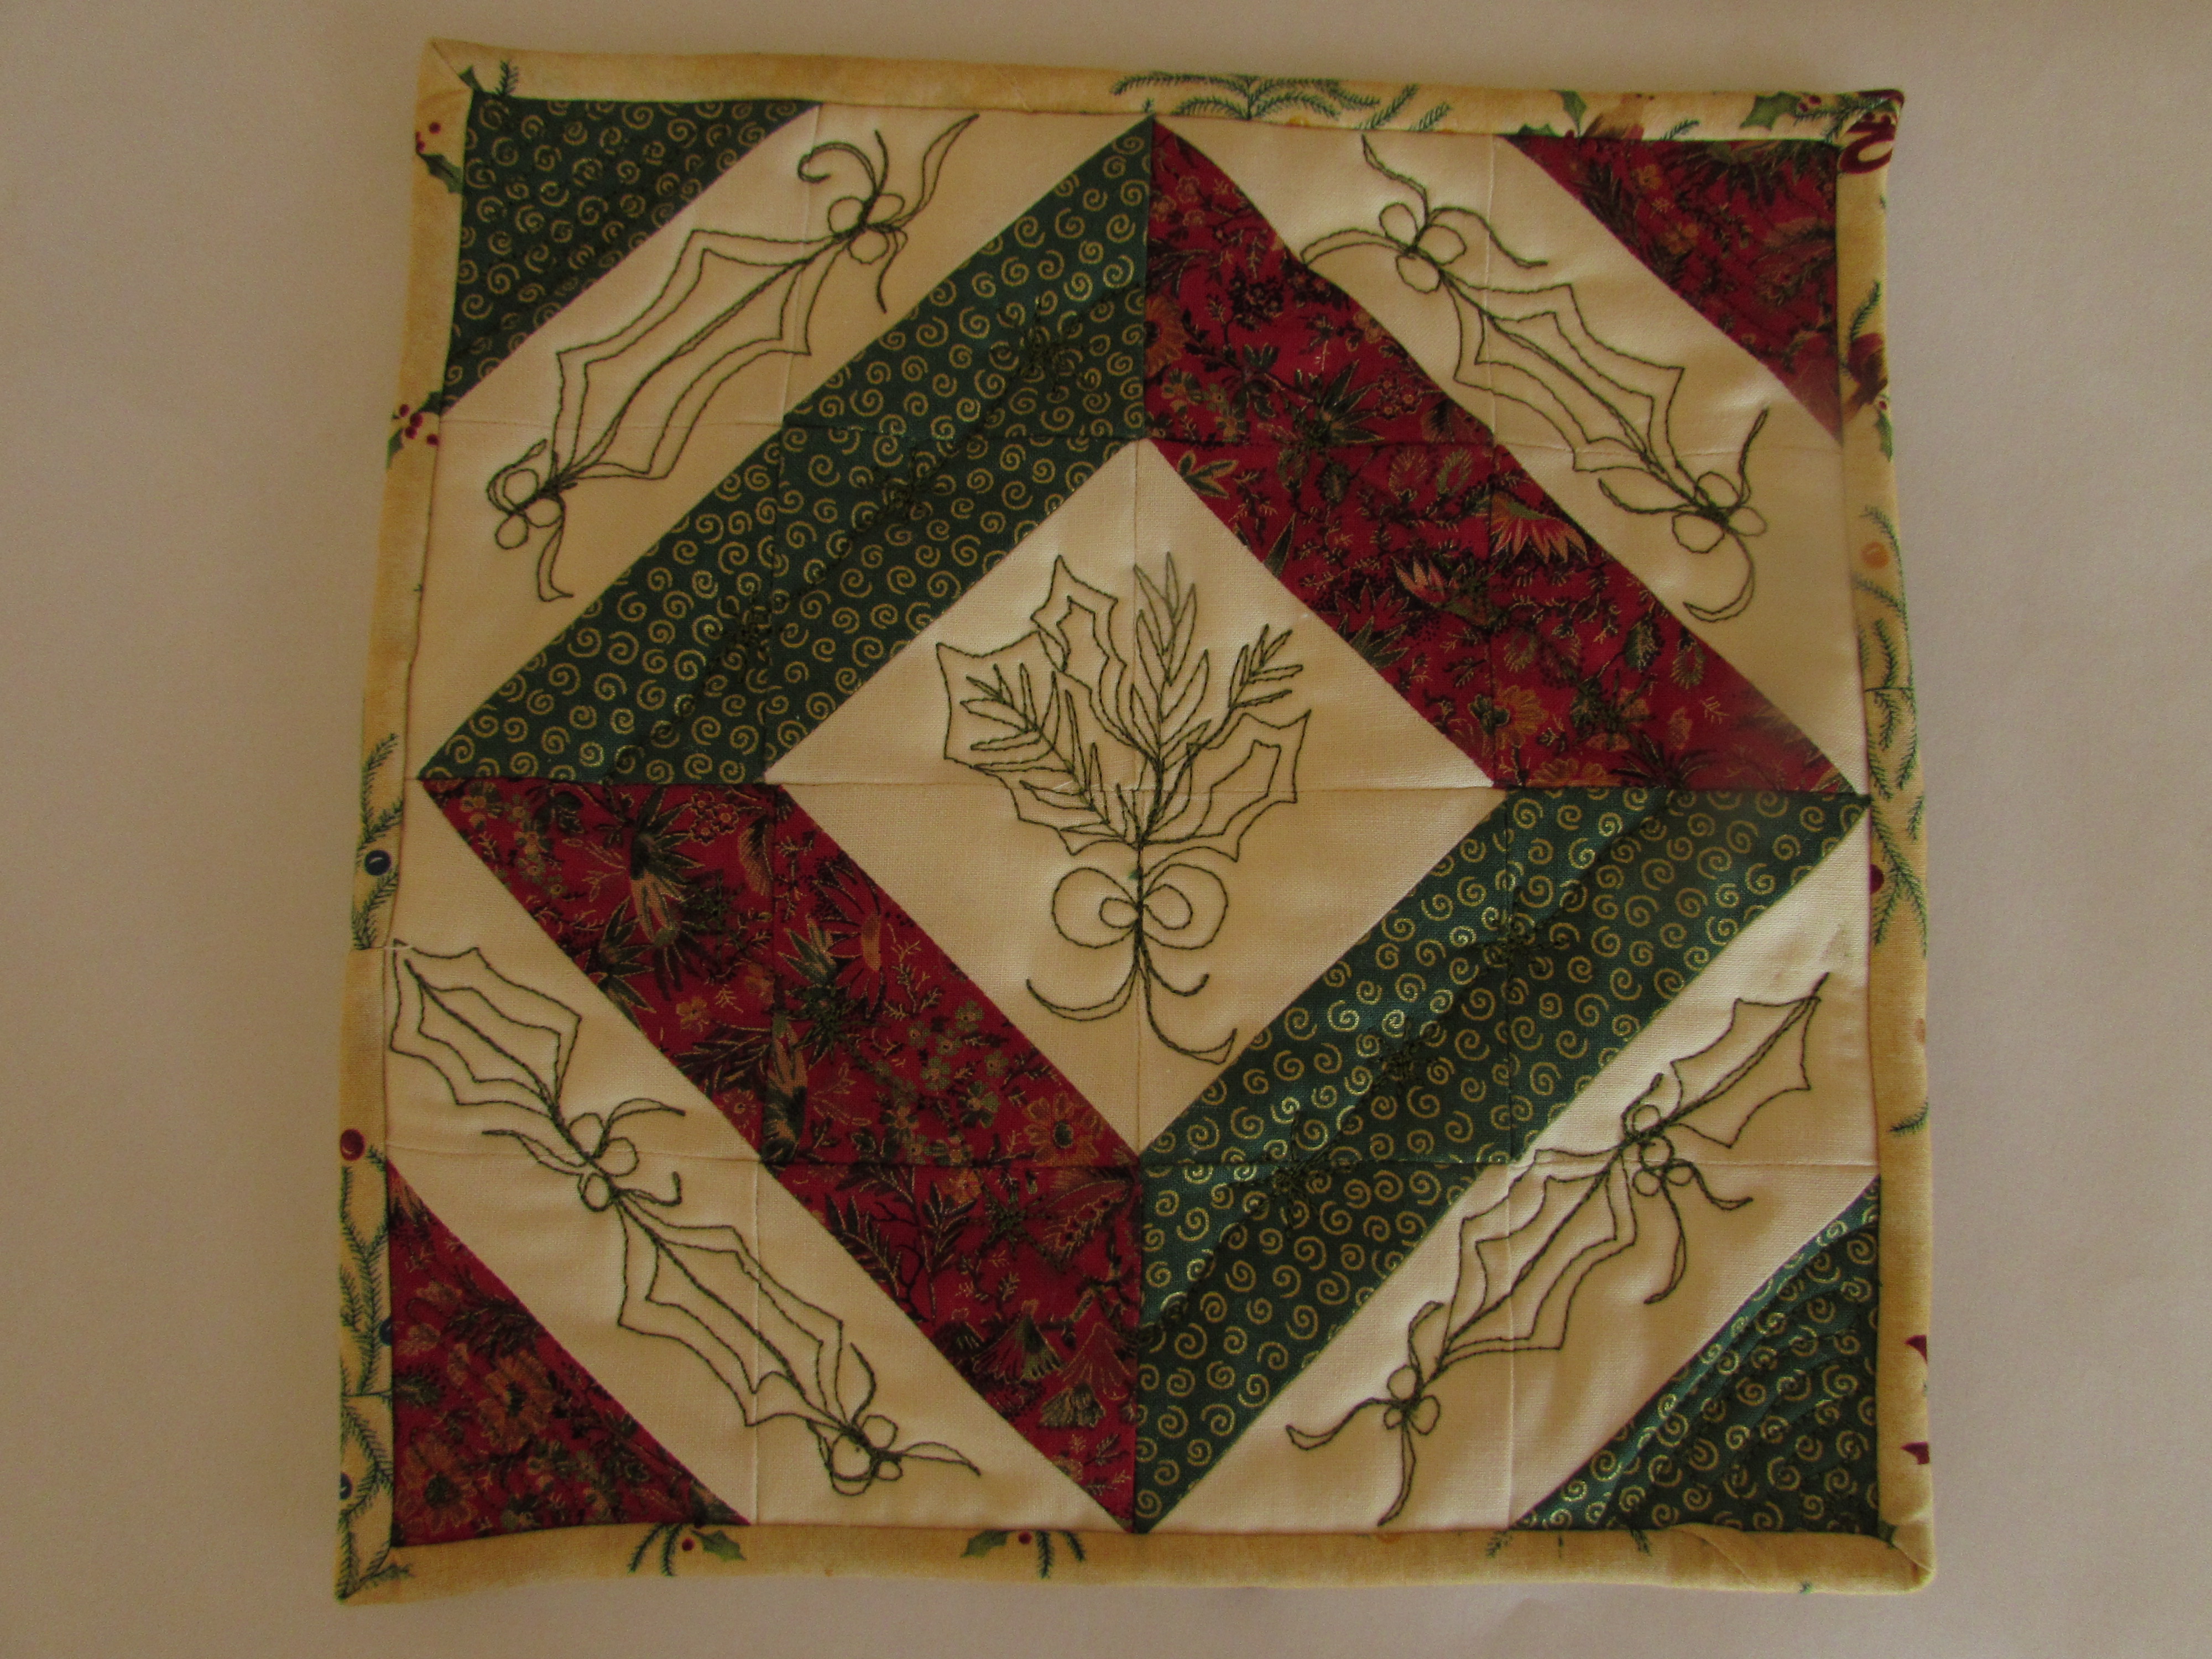
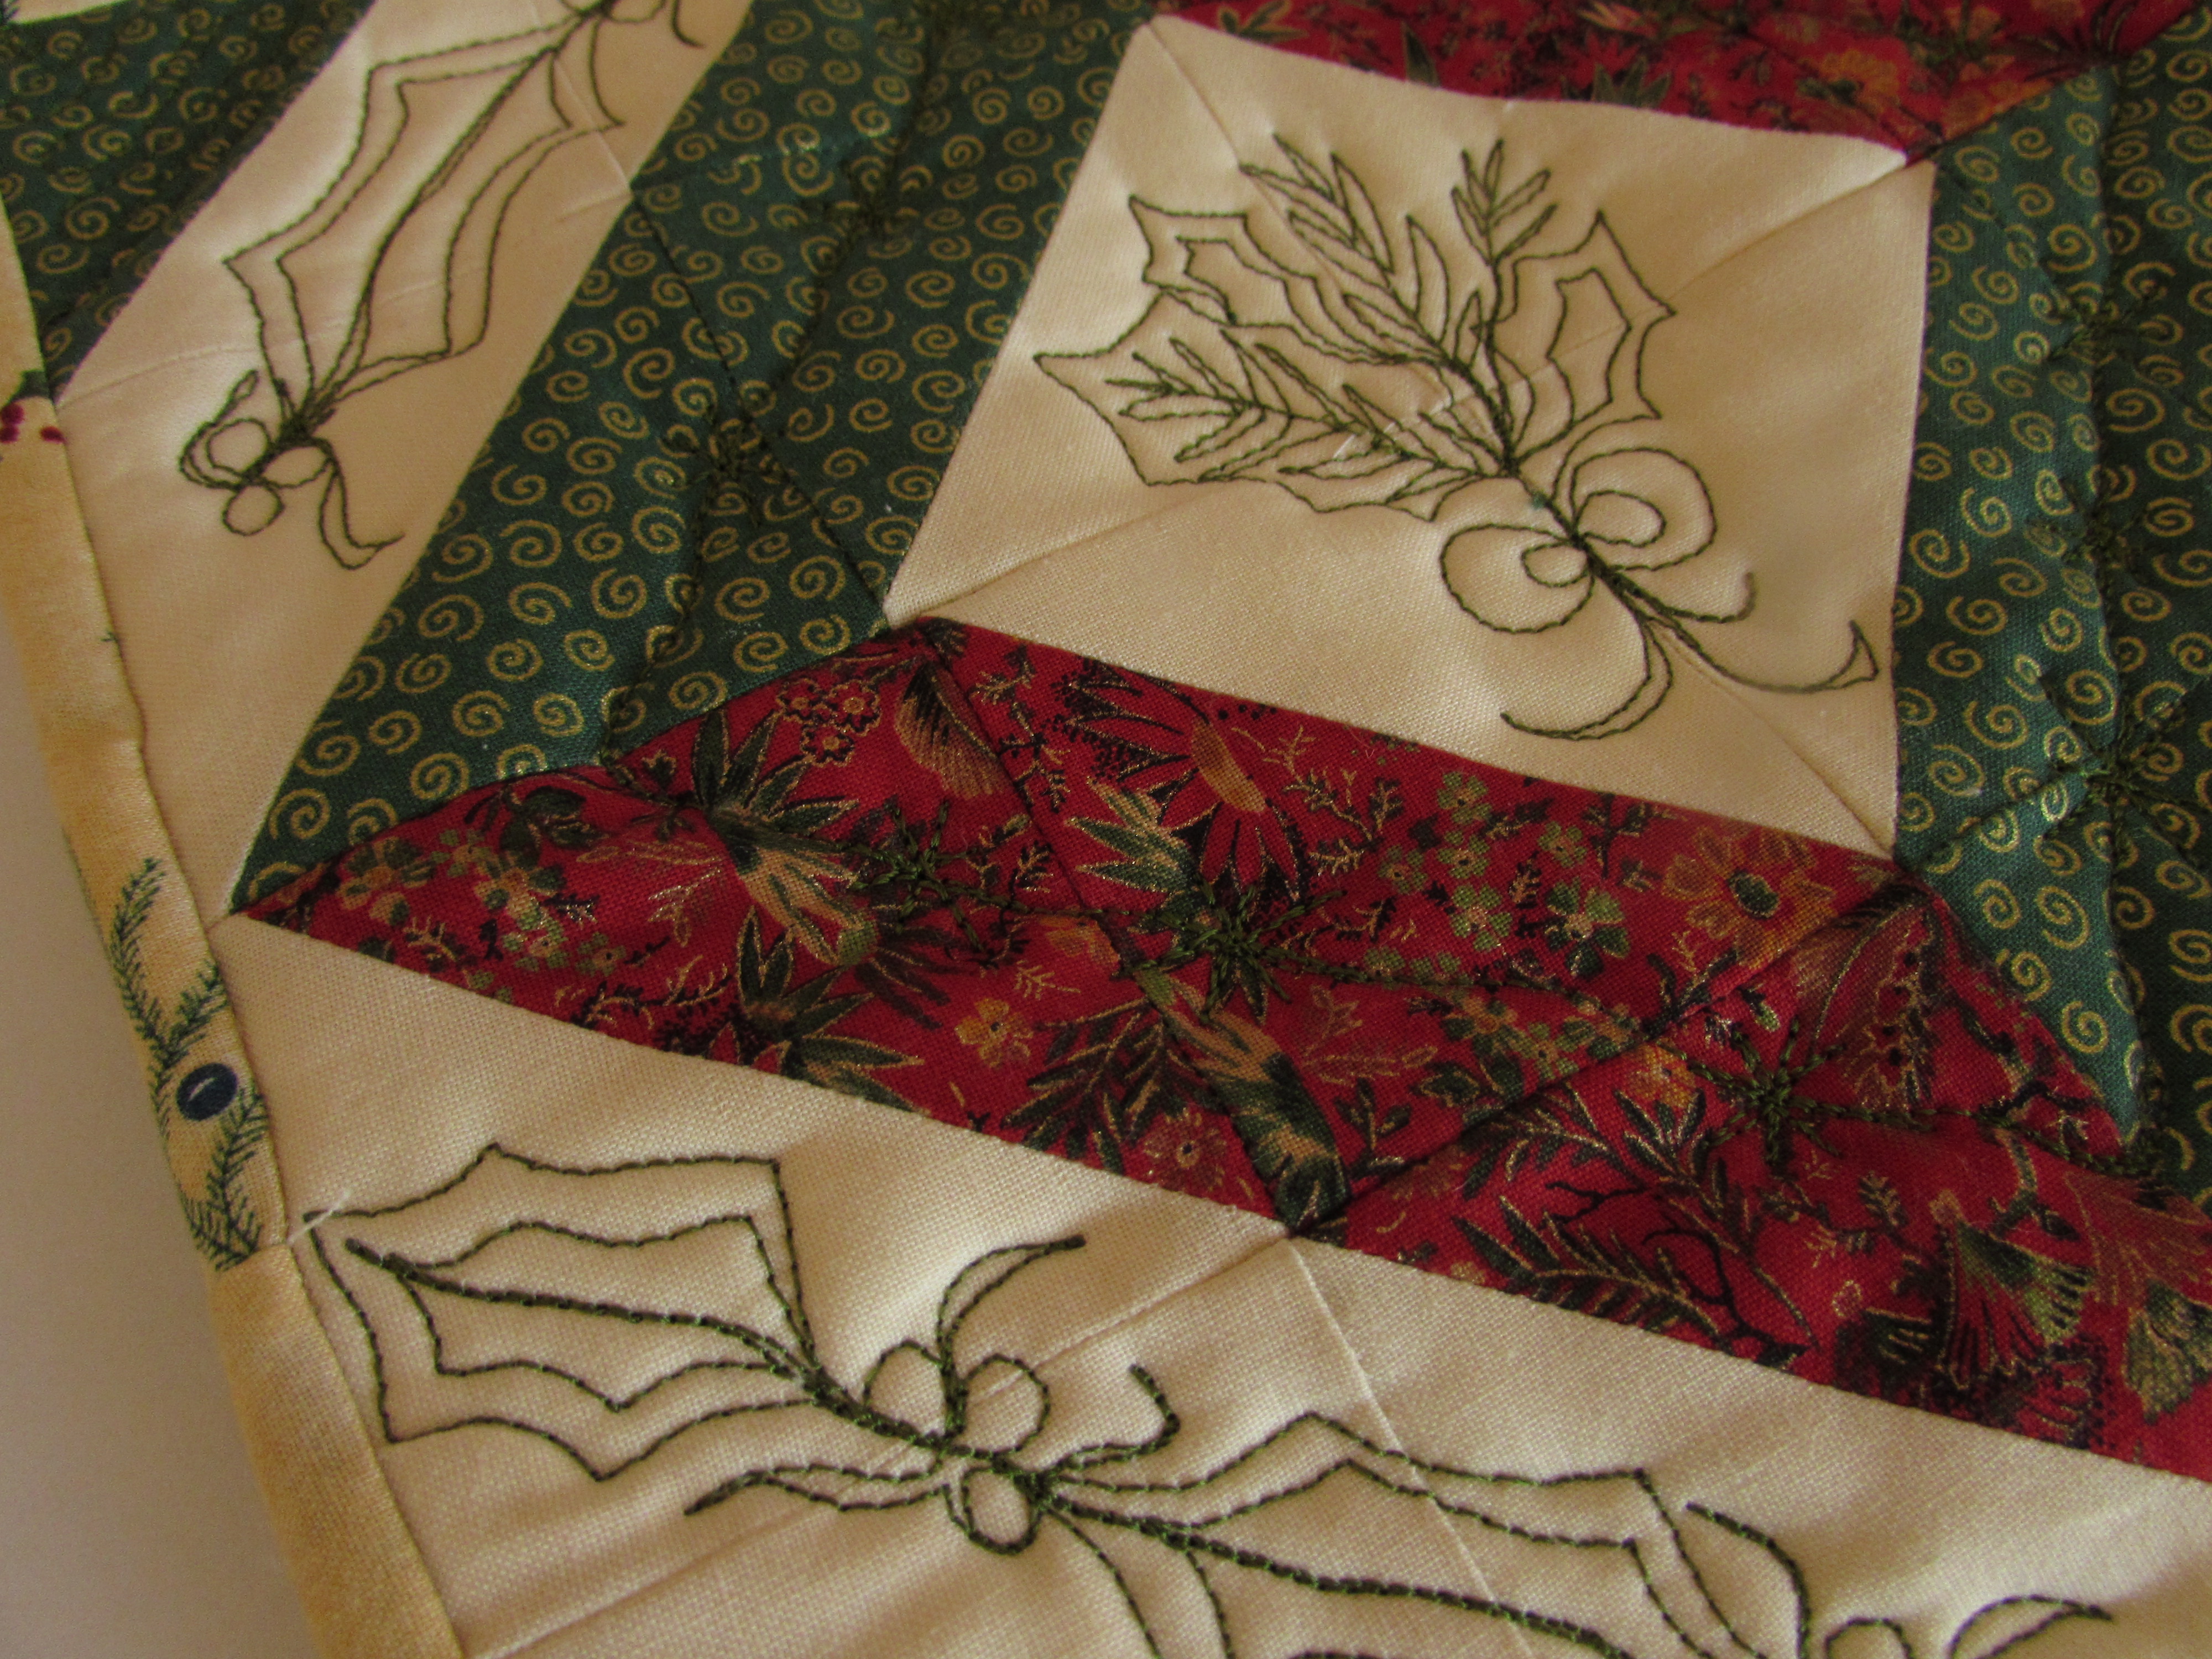
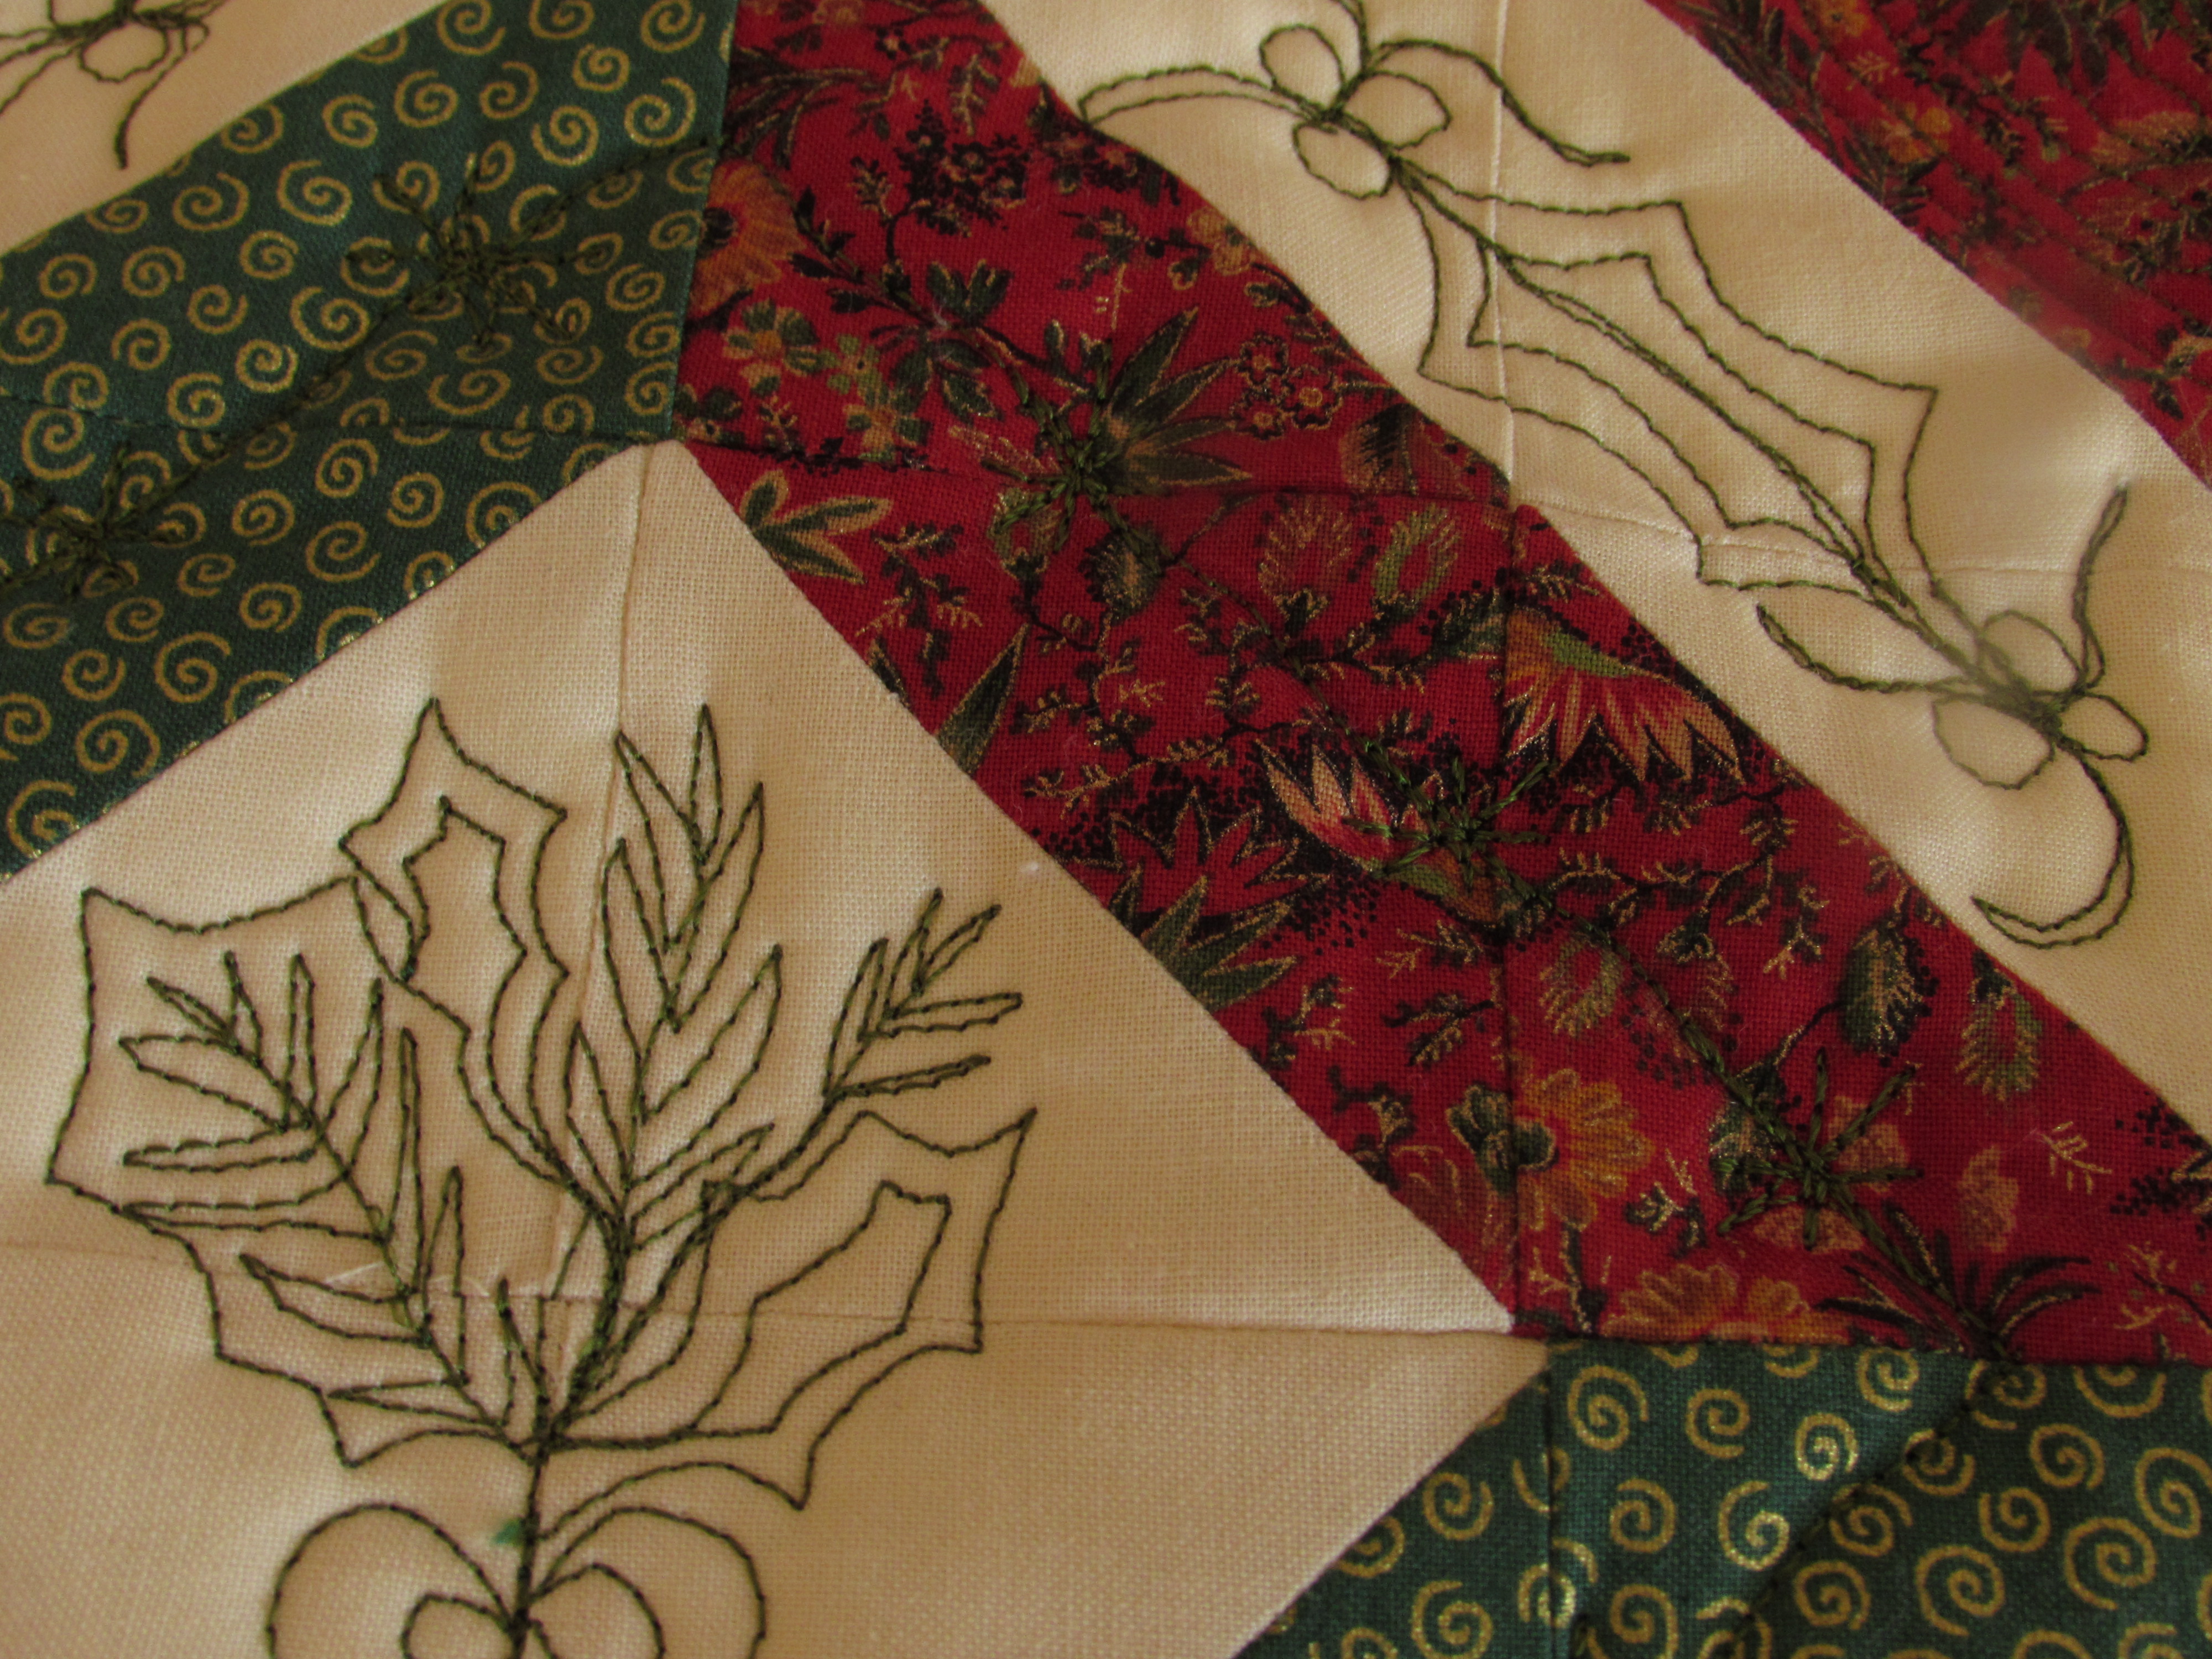
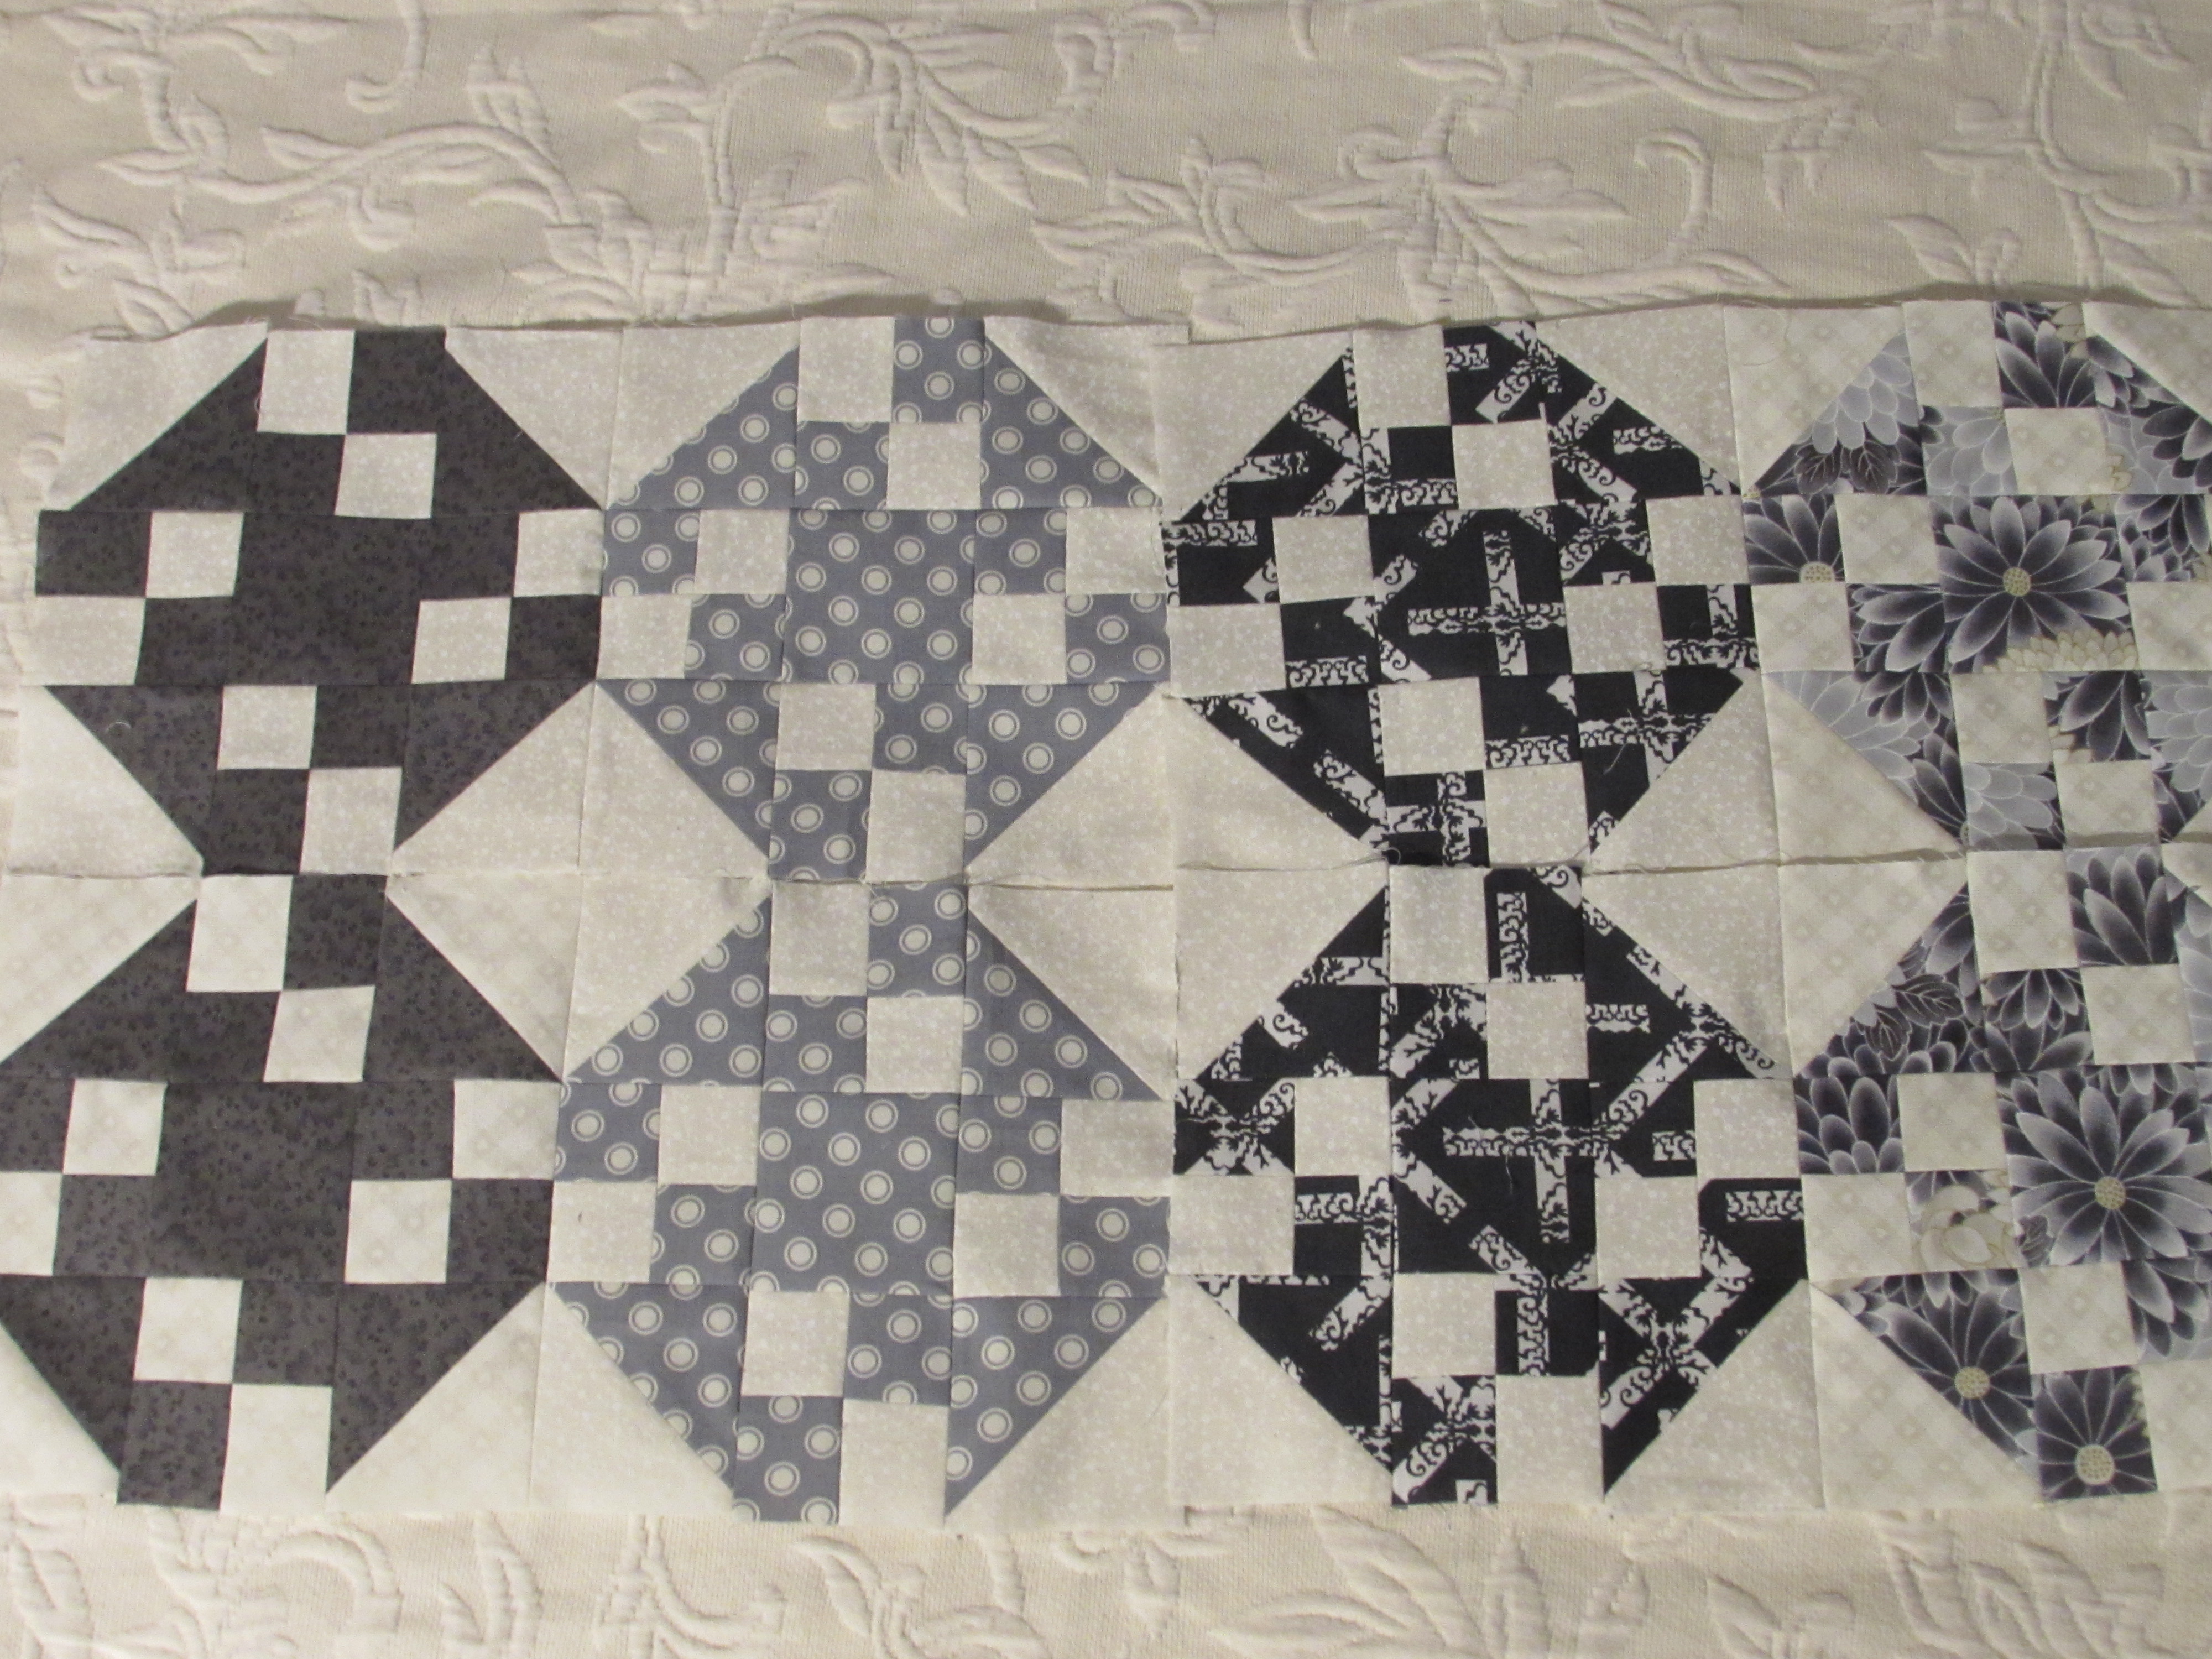
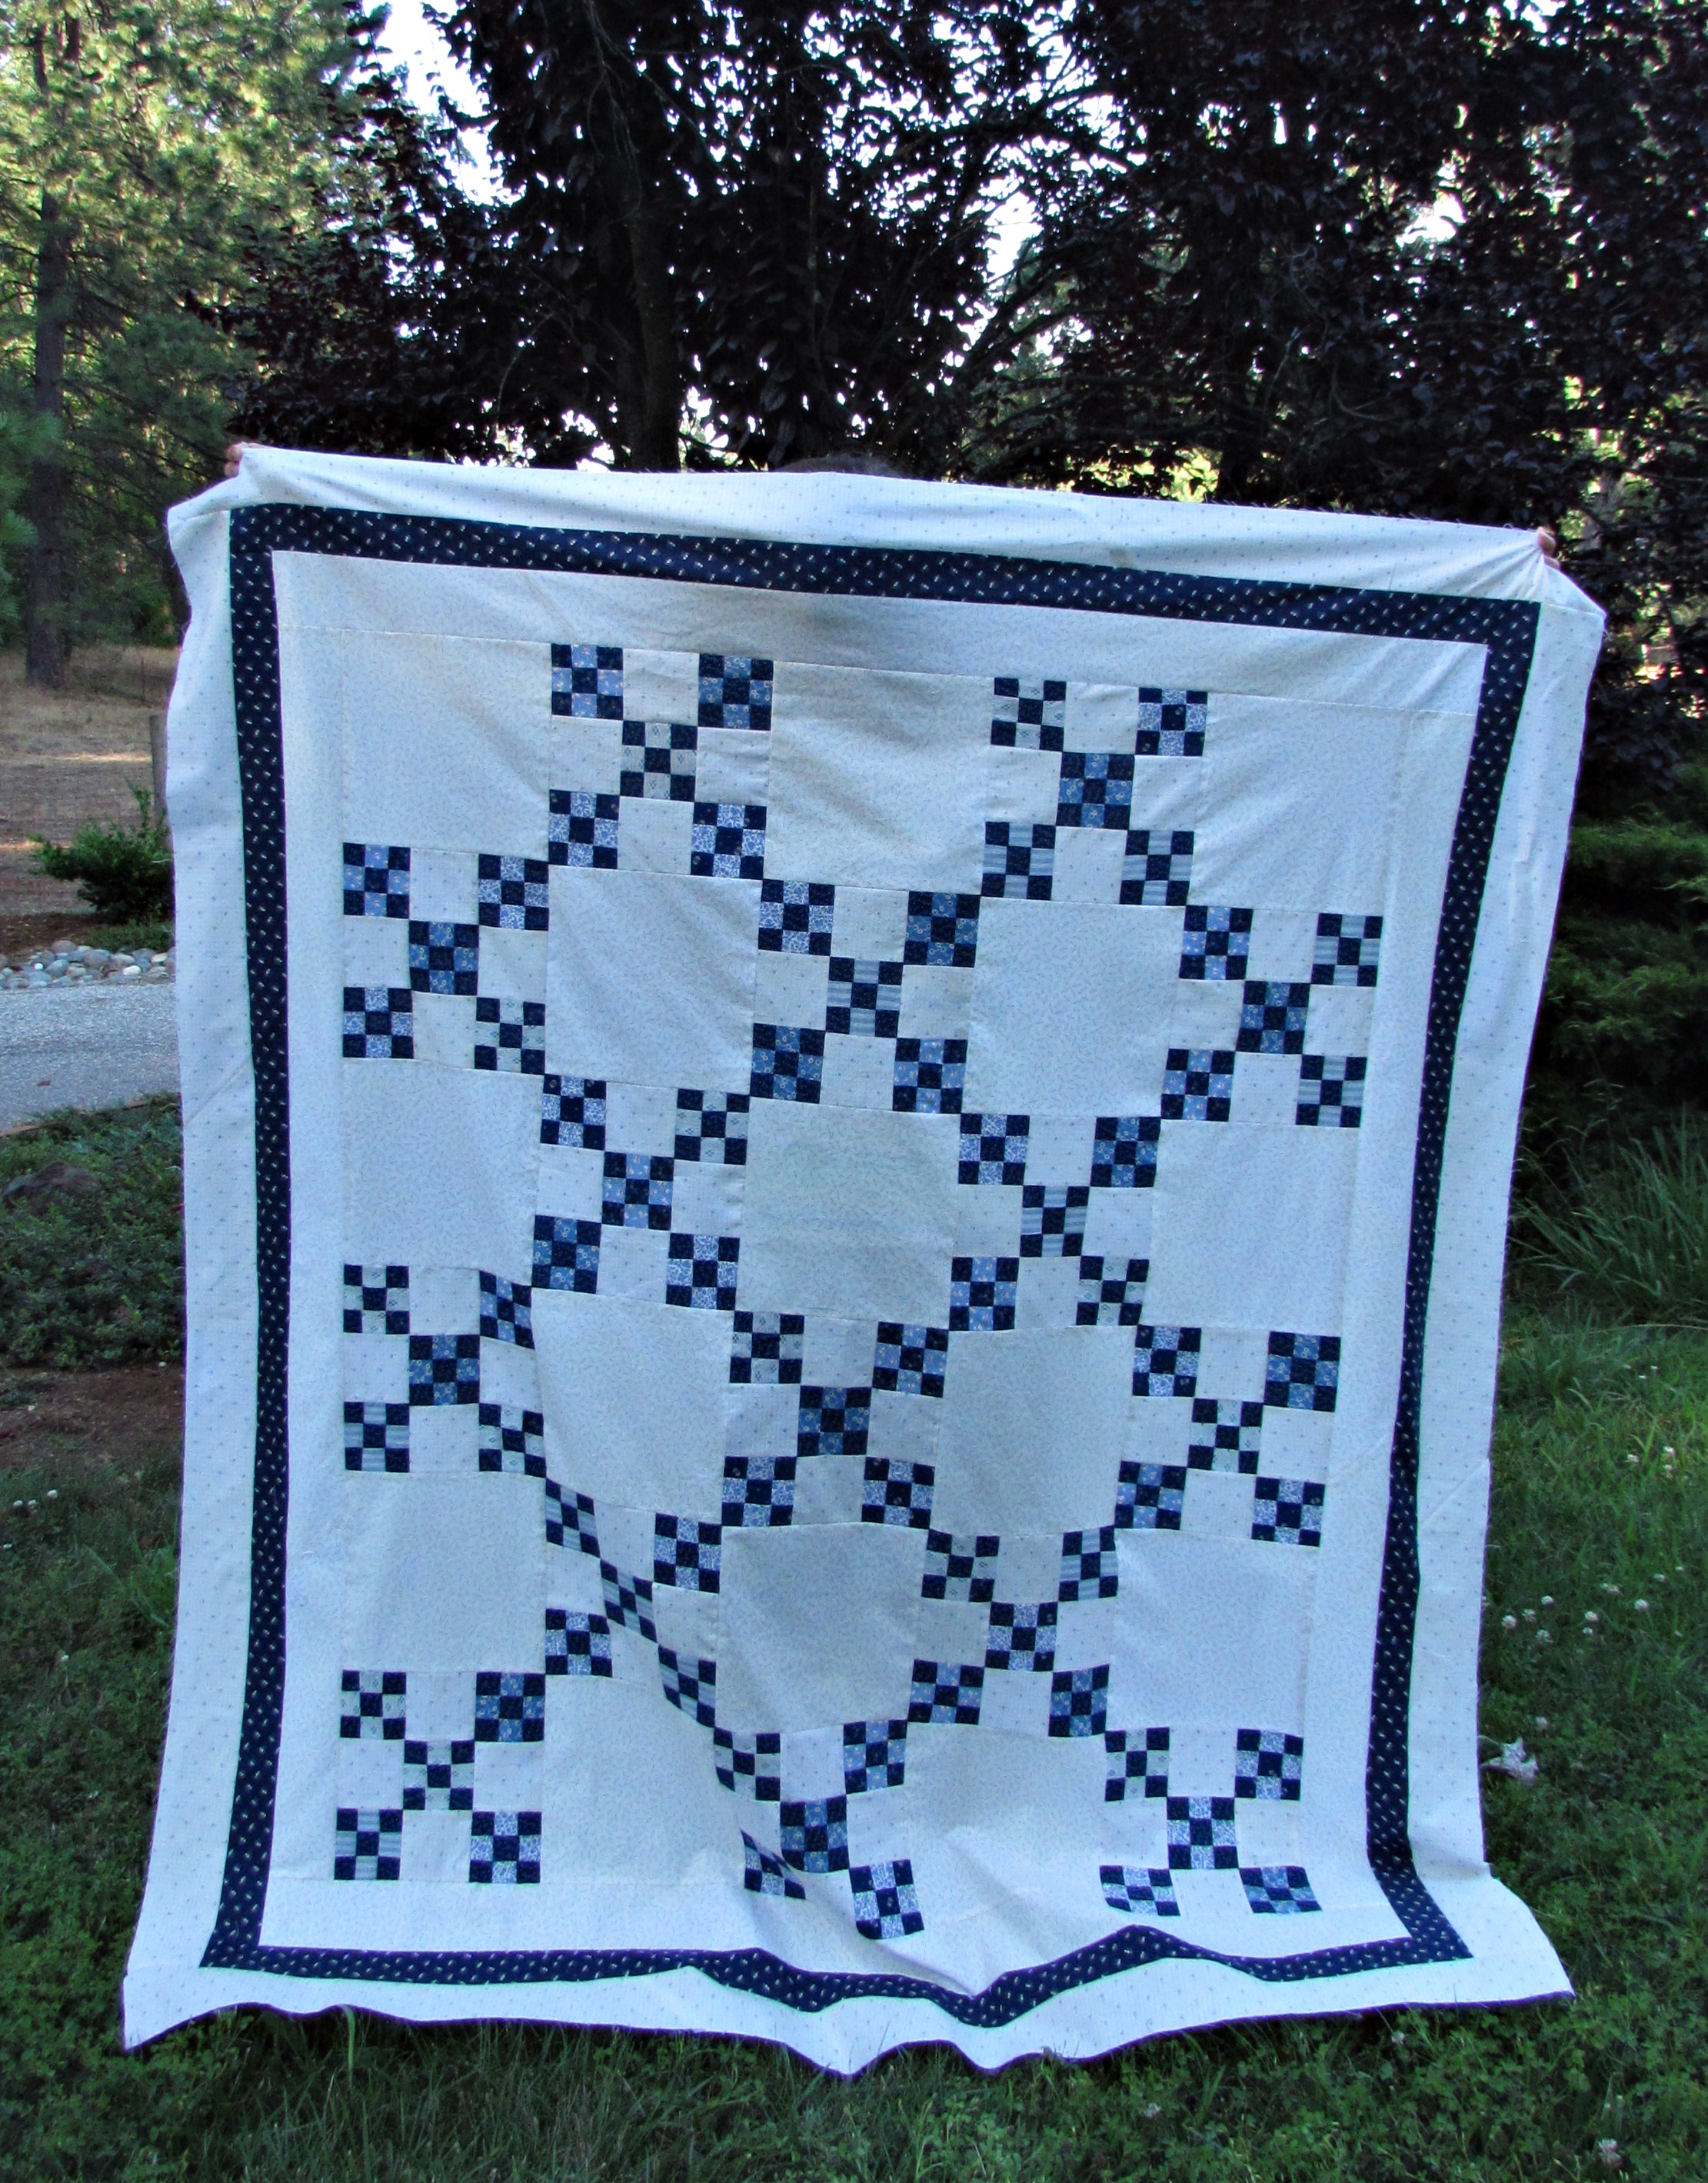
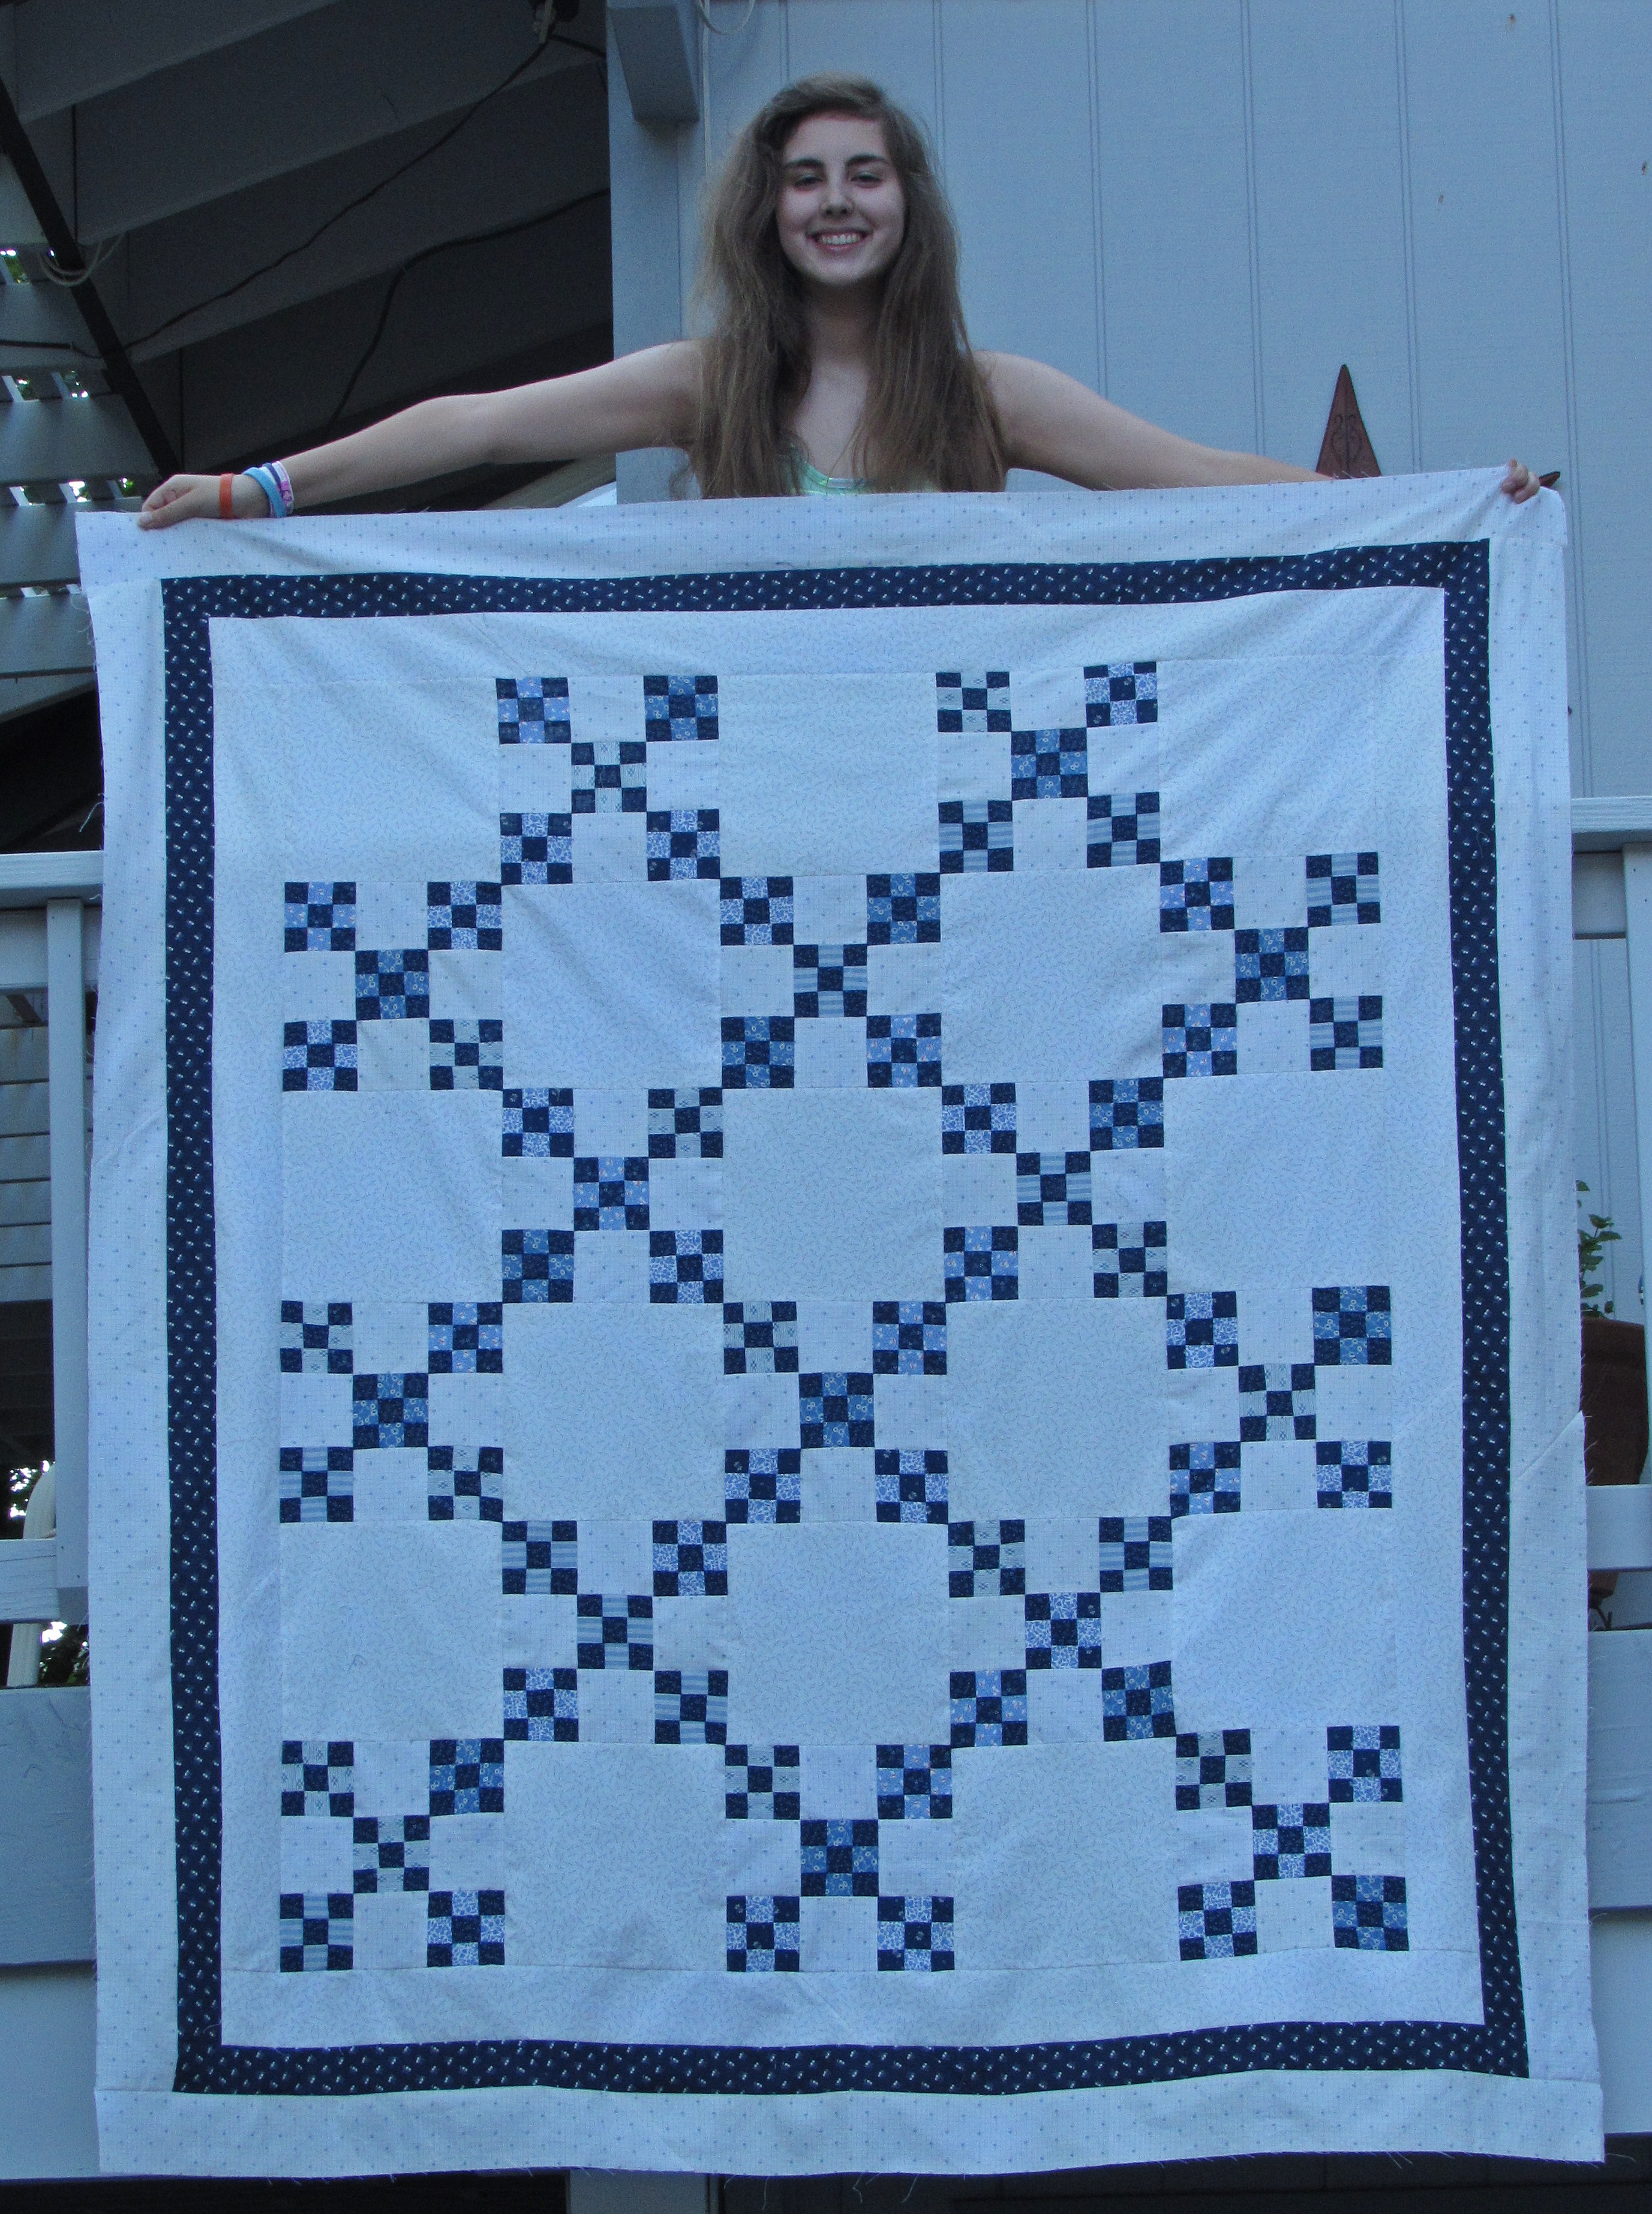
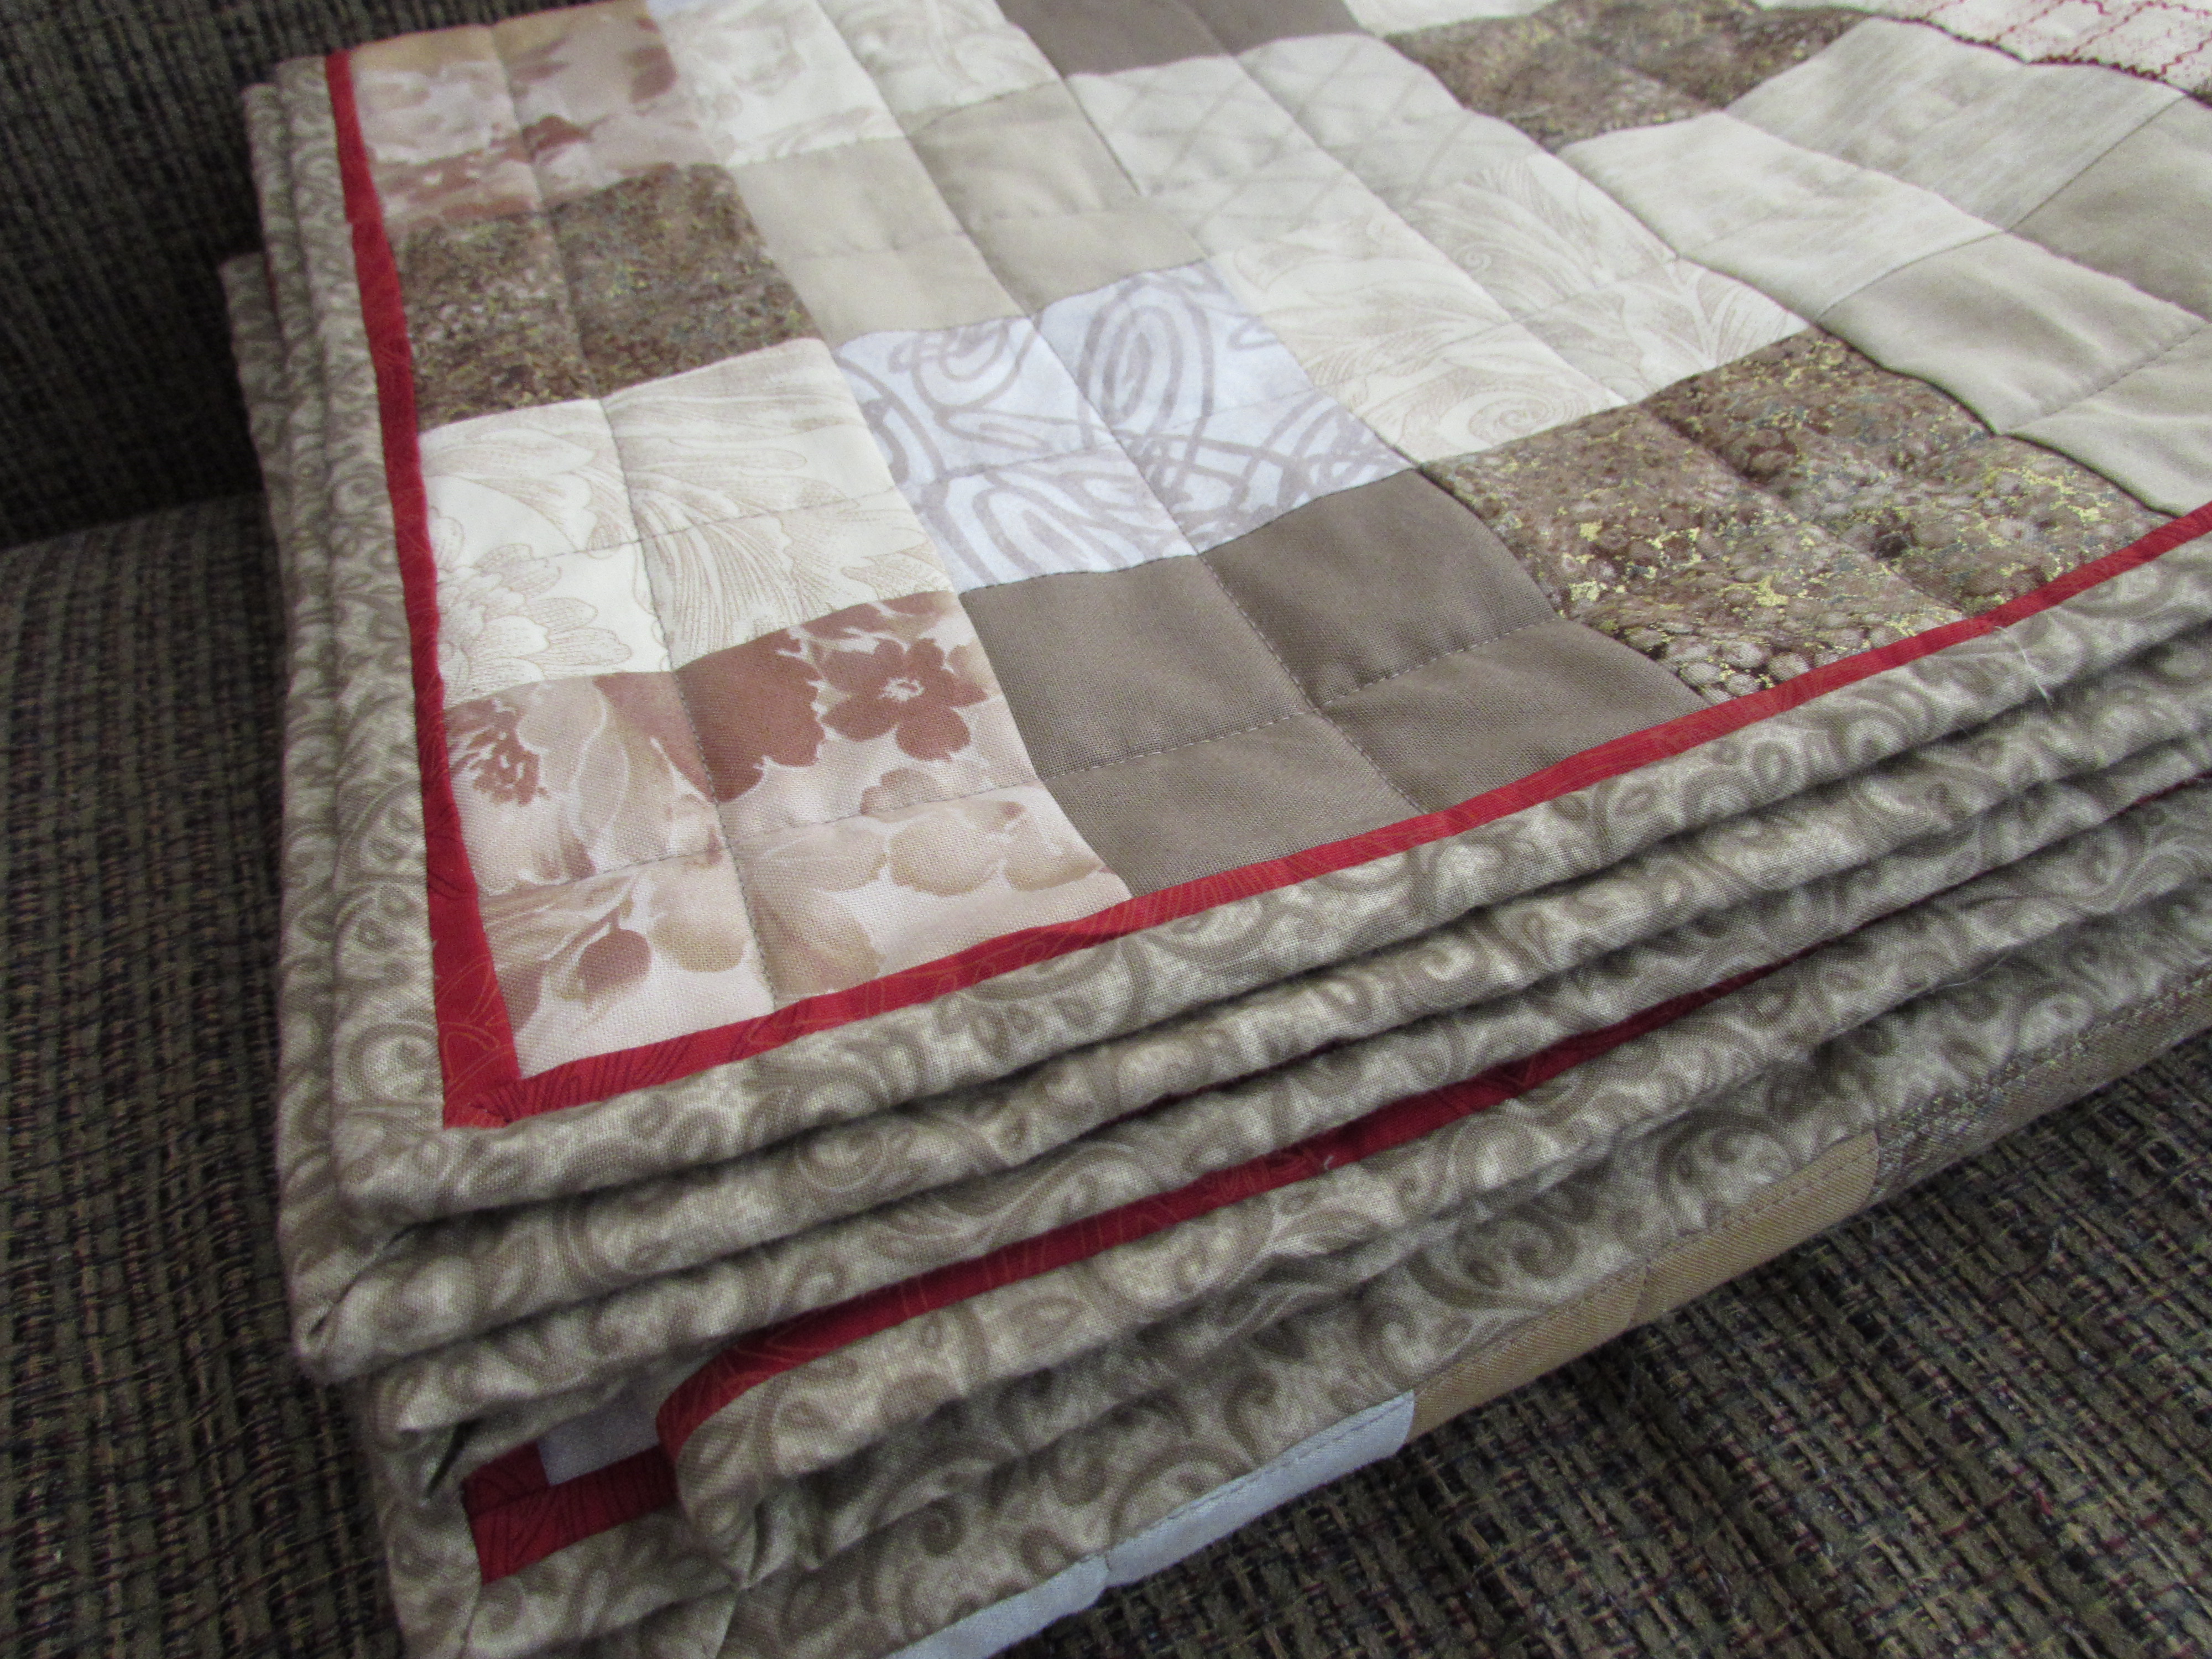
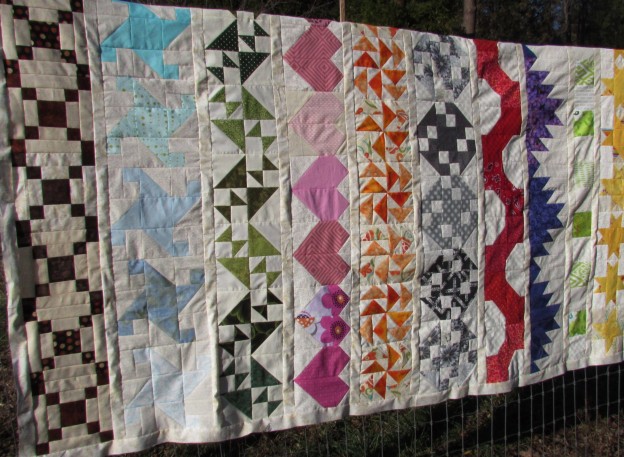
I am so excited to show you the top and backing for my Classic Stitches Row Quilt.  It was (just over) a year in the making and it looks great. Thank you again to Mari over at Academic Quilter for hosting this BOM throughout 2015 and posting 11 awesome tutorials.

IMG_20160101_4411

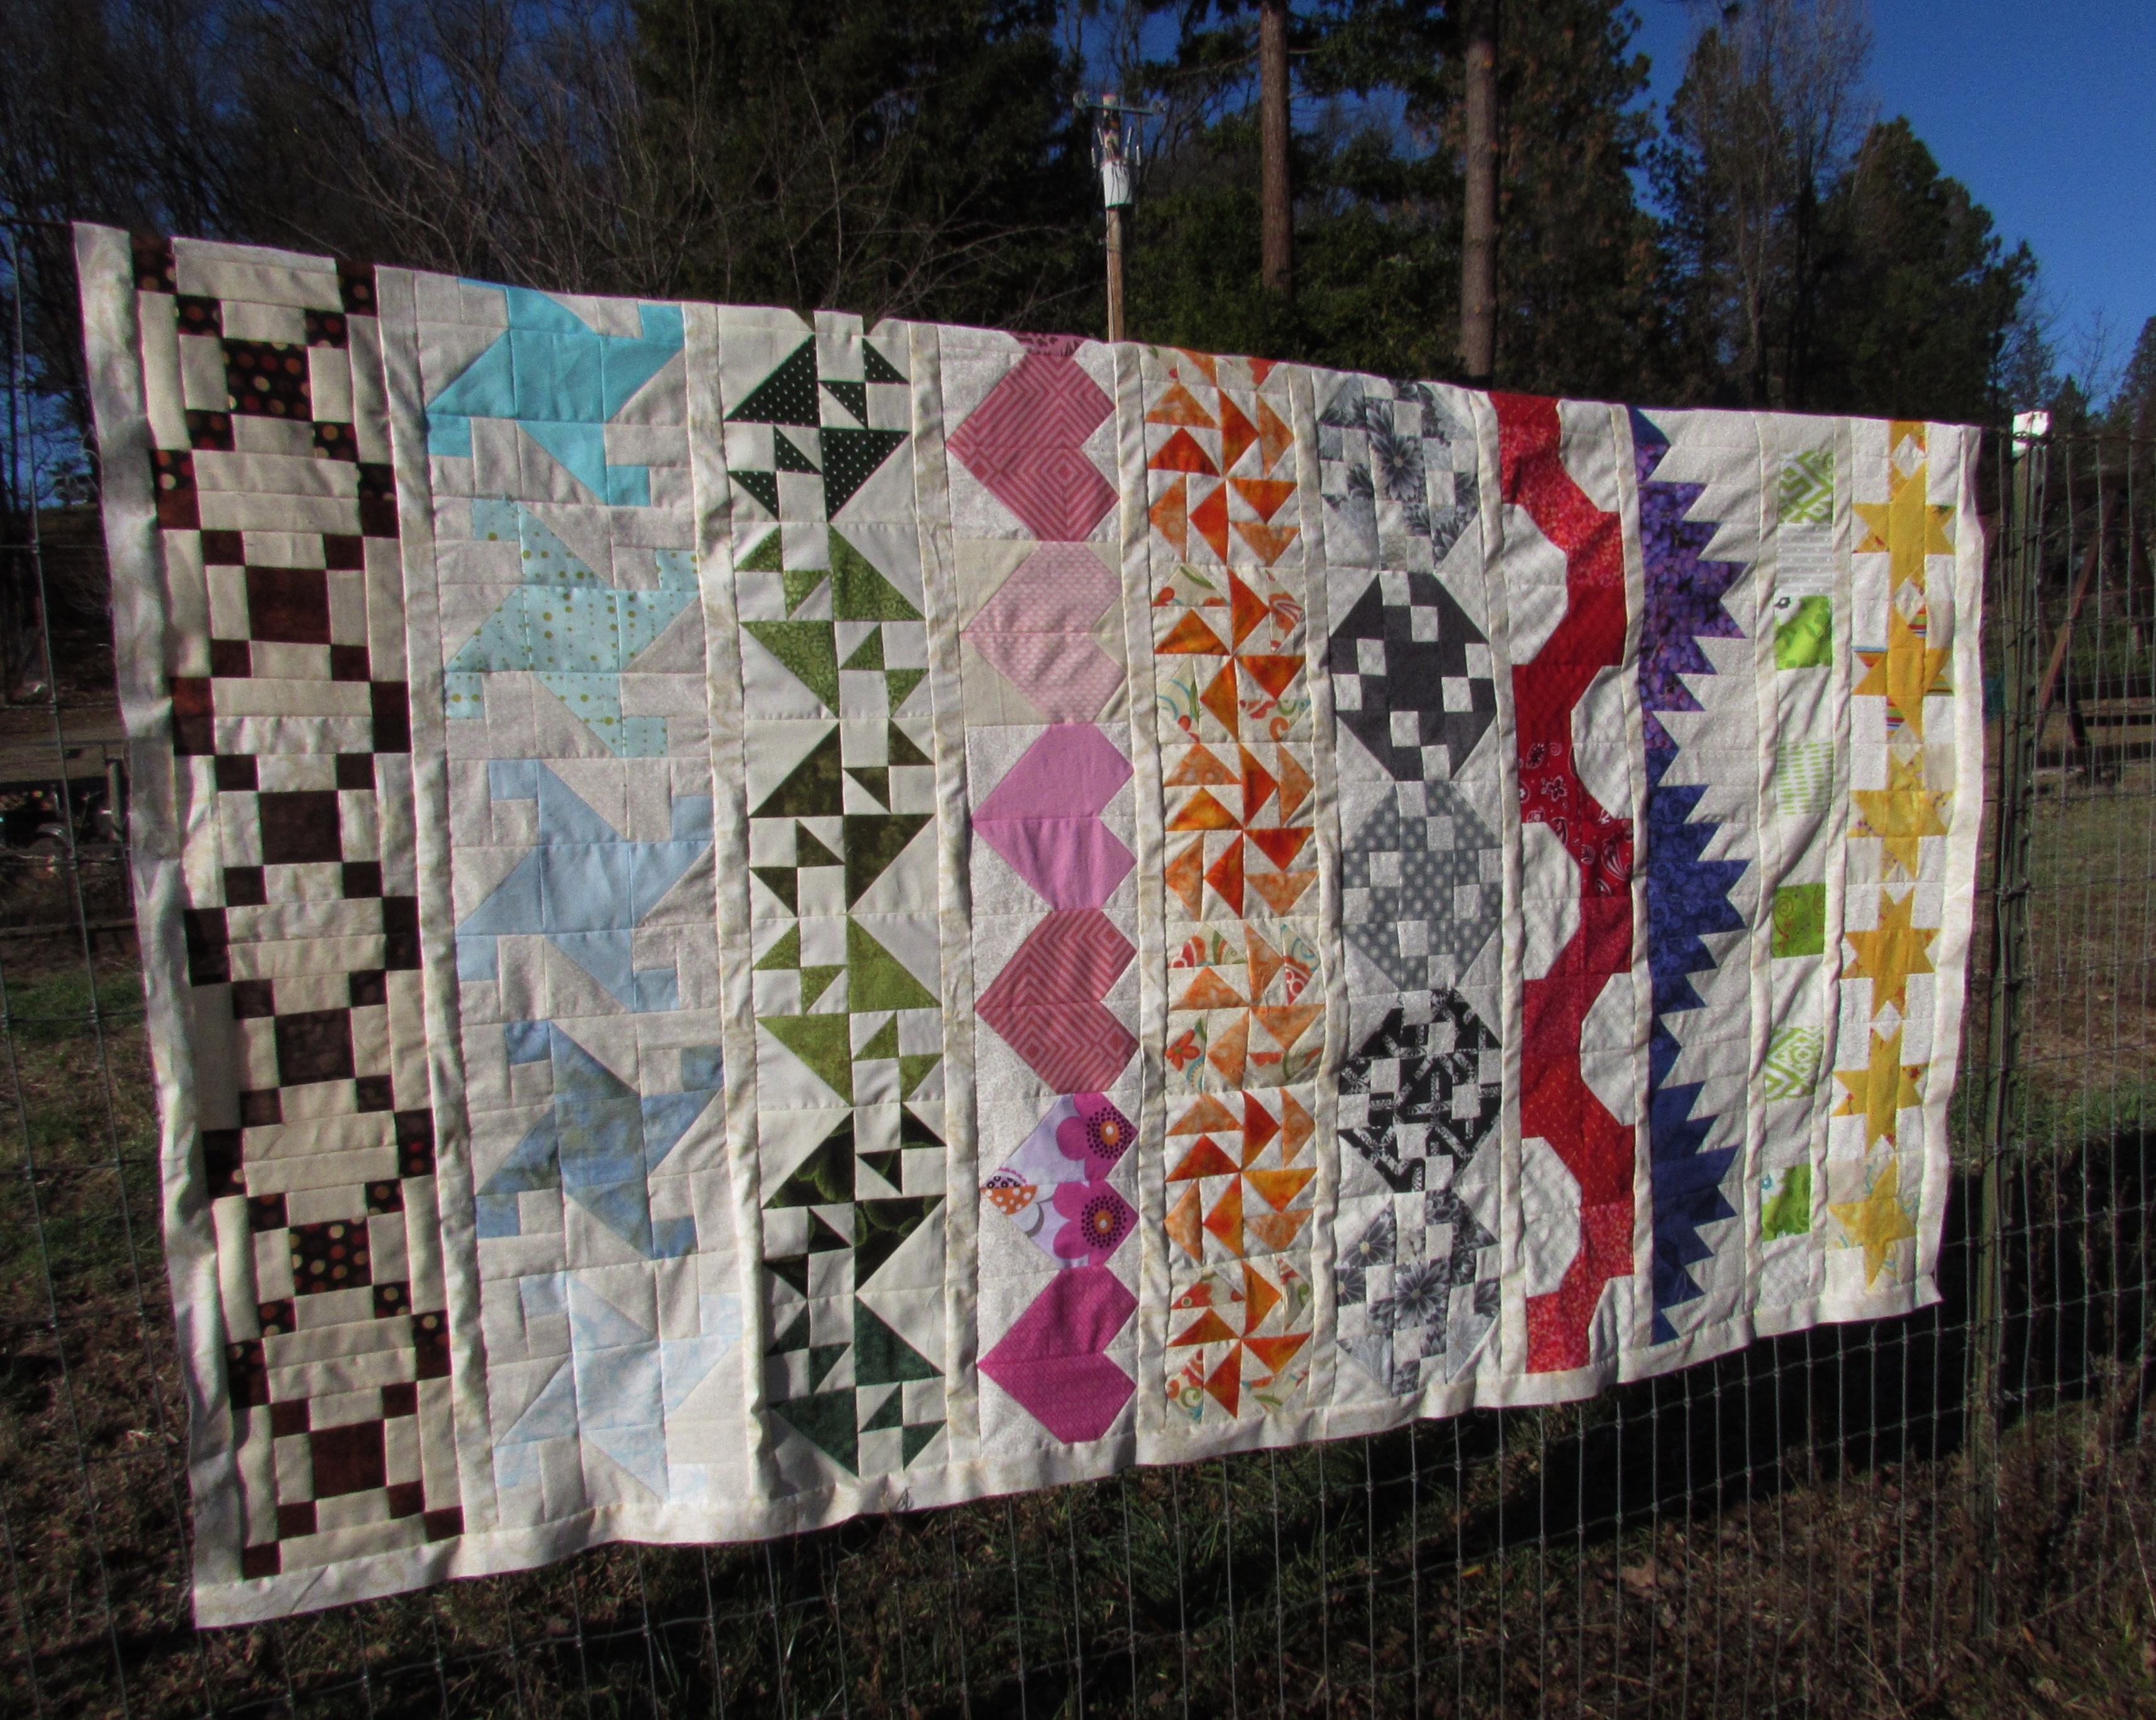
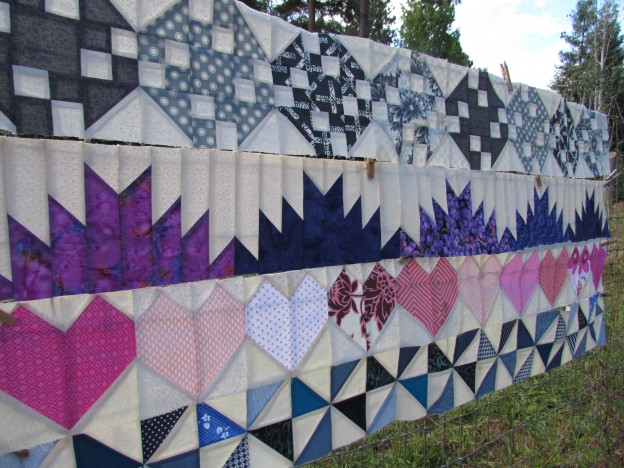
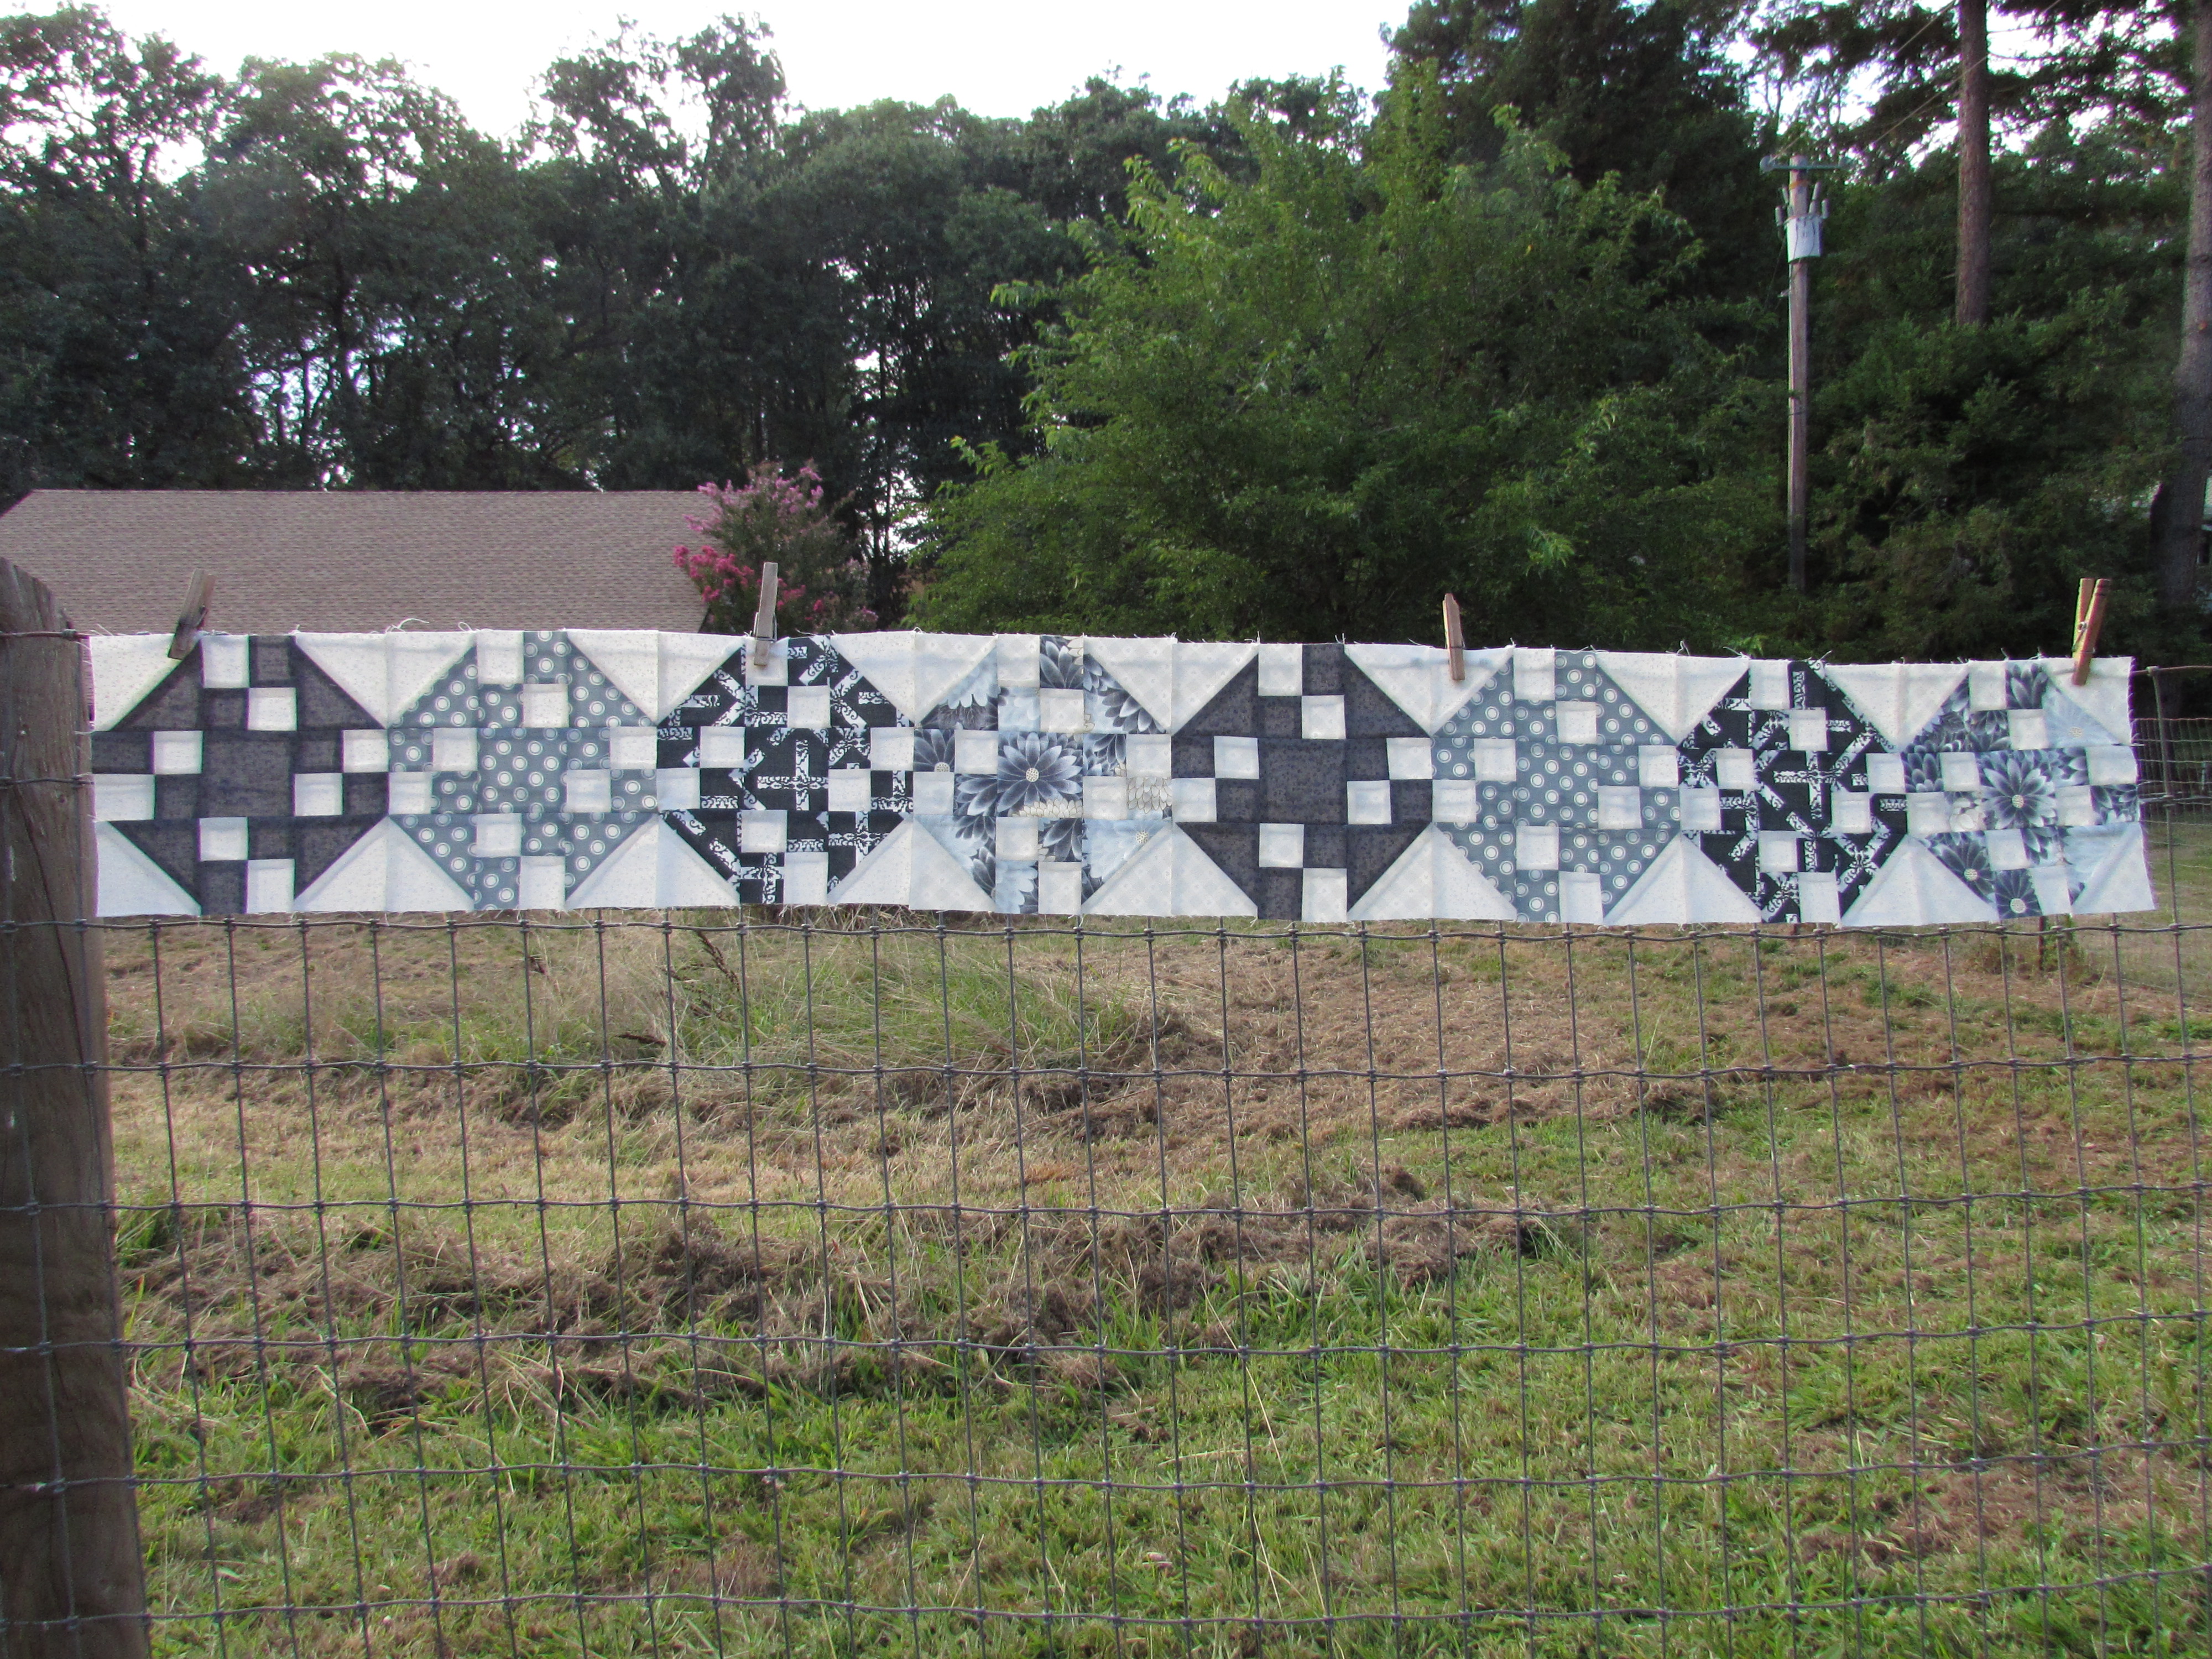
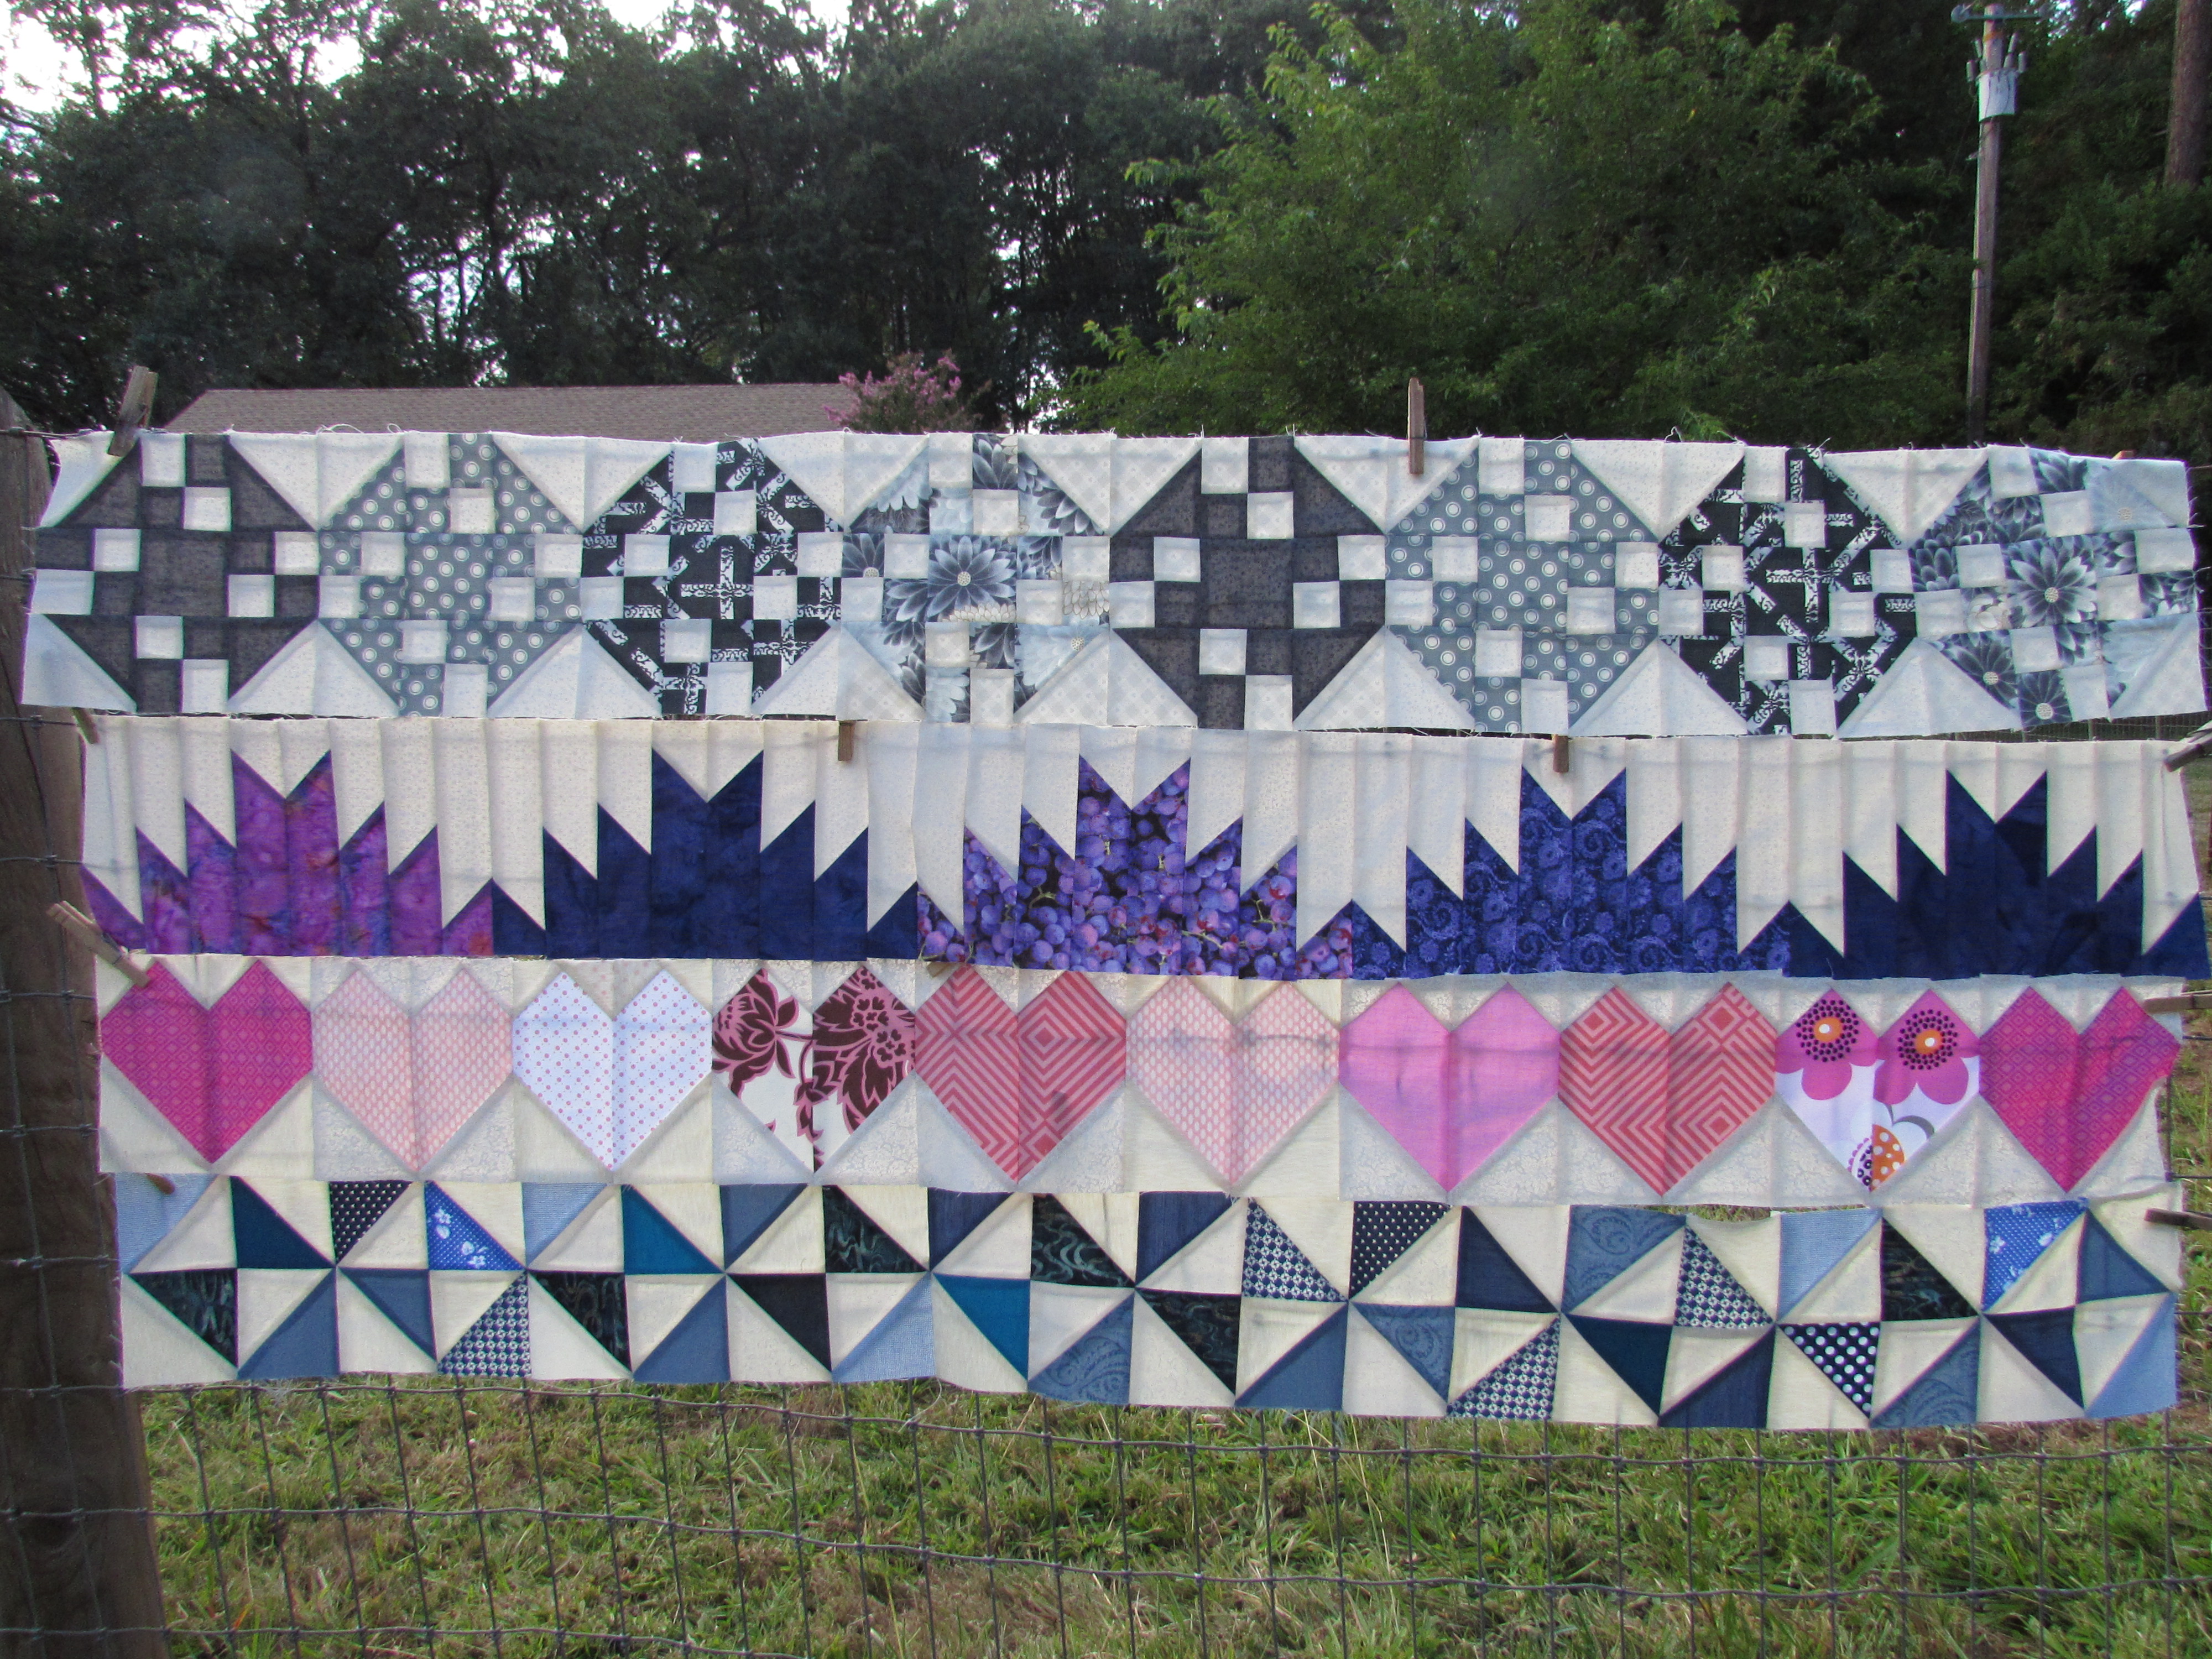
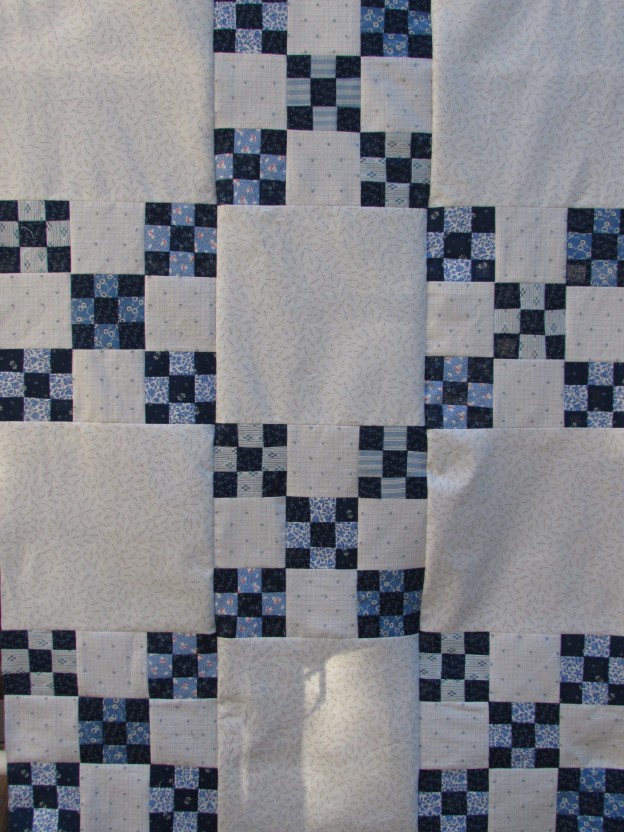
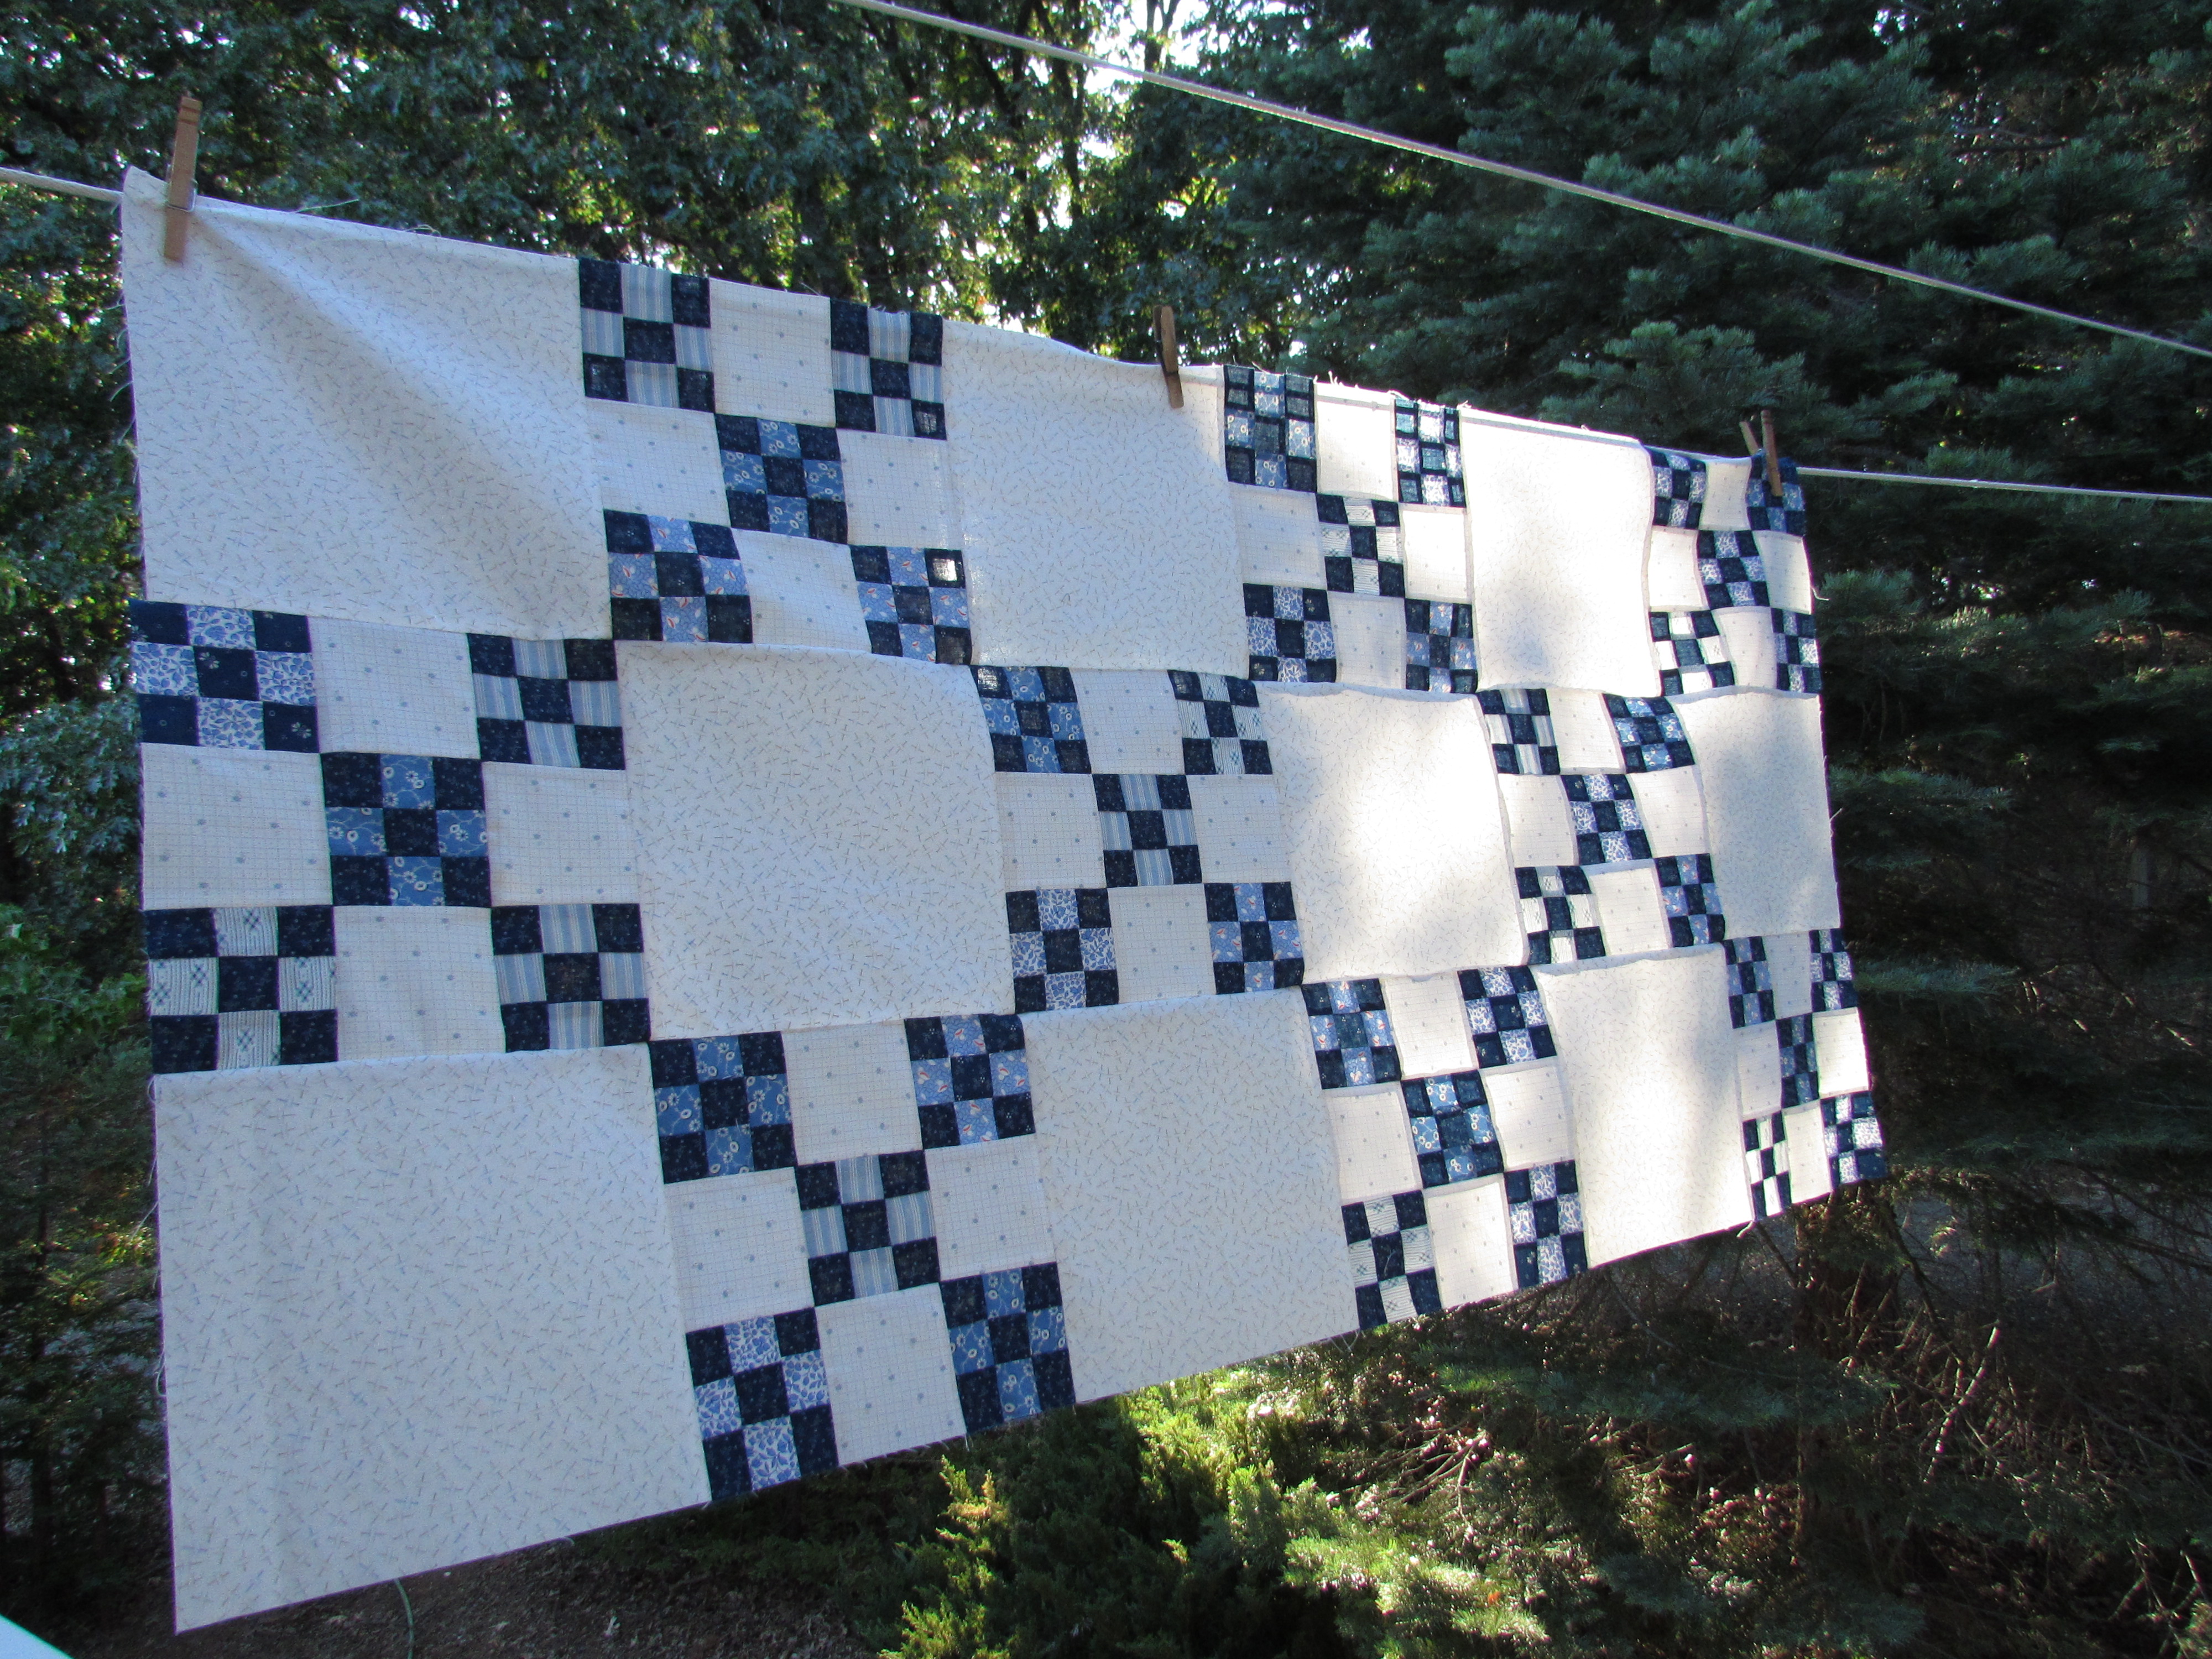
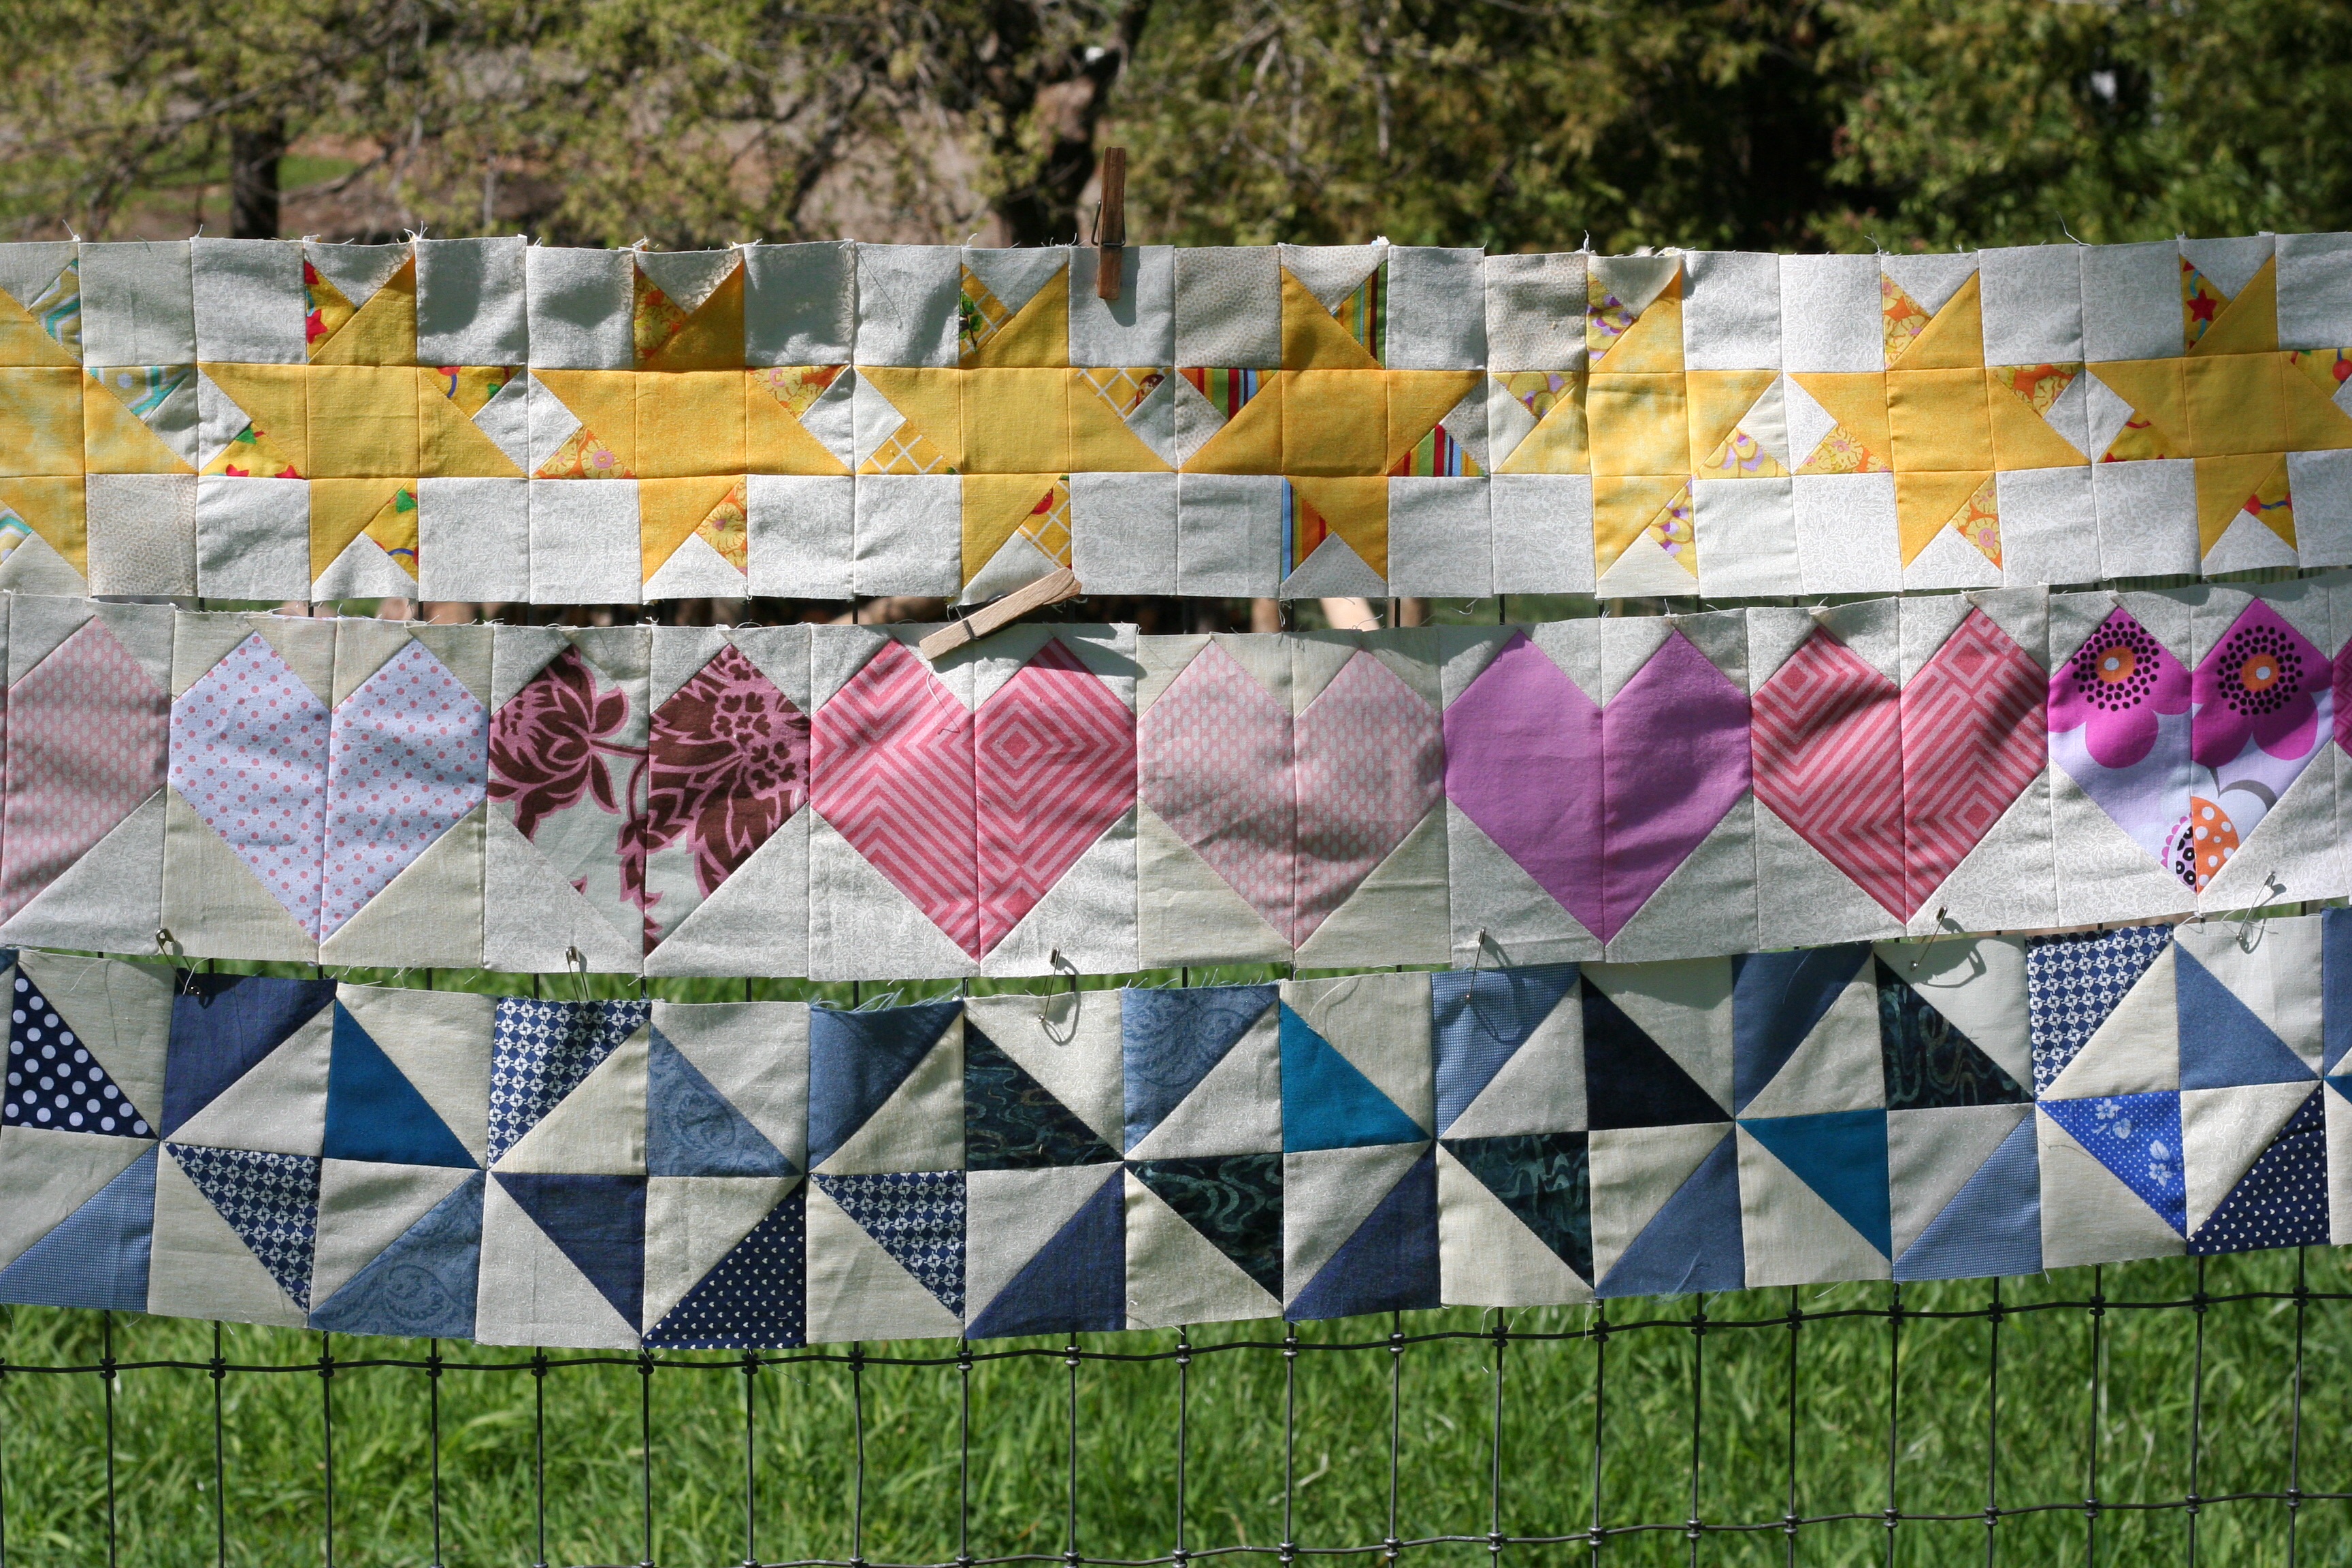
I sashed it with 1″ (finished) strips of a plain cream fabric that I had in my stash. I had planned to do a colorful border after the sashing but it is already 60″ x 70″ and since I plan to quilt it at home, I decided that was big enough. (It was quite windy when I took these photos so they aren’t the best.)

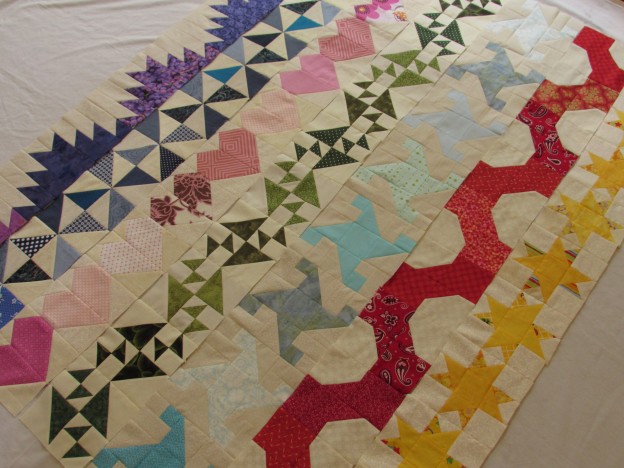
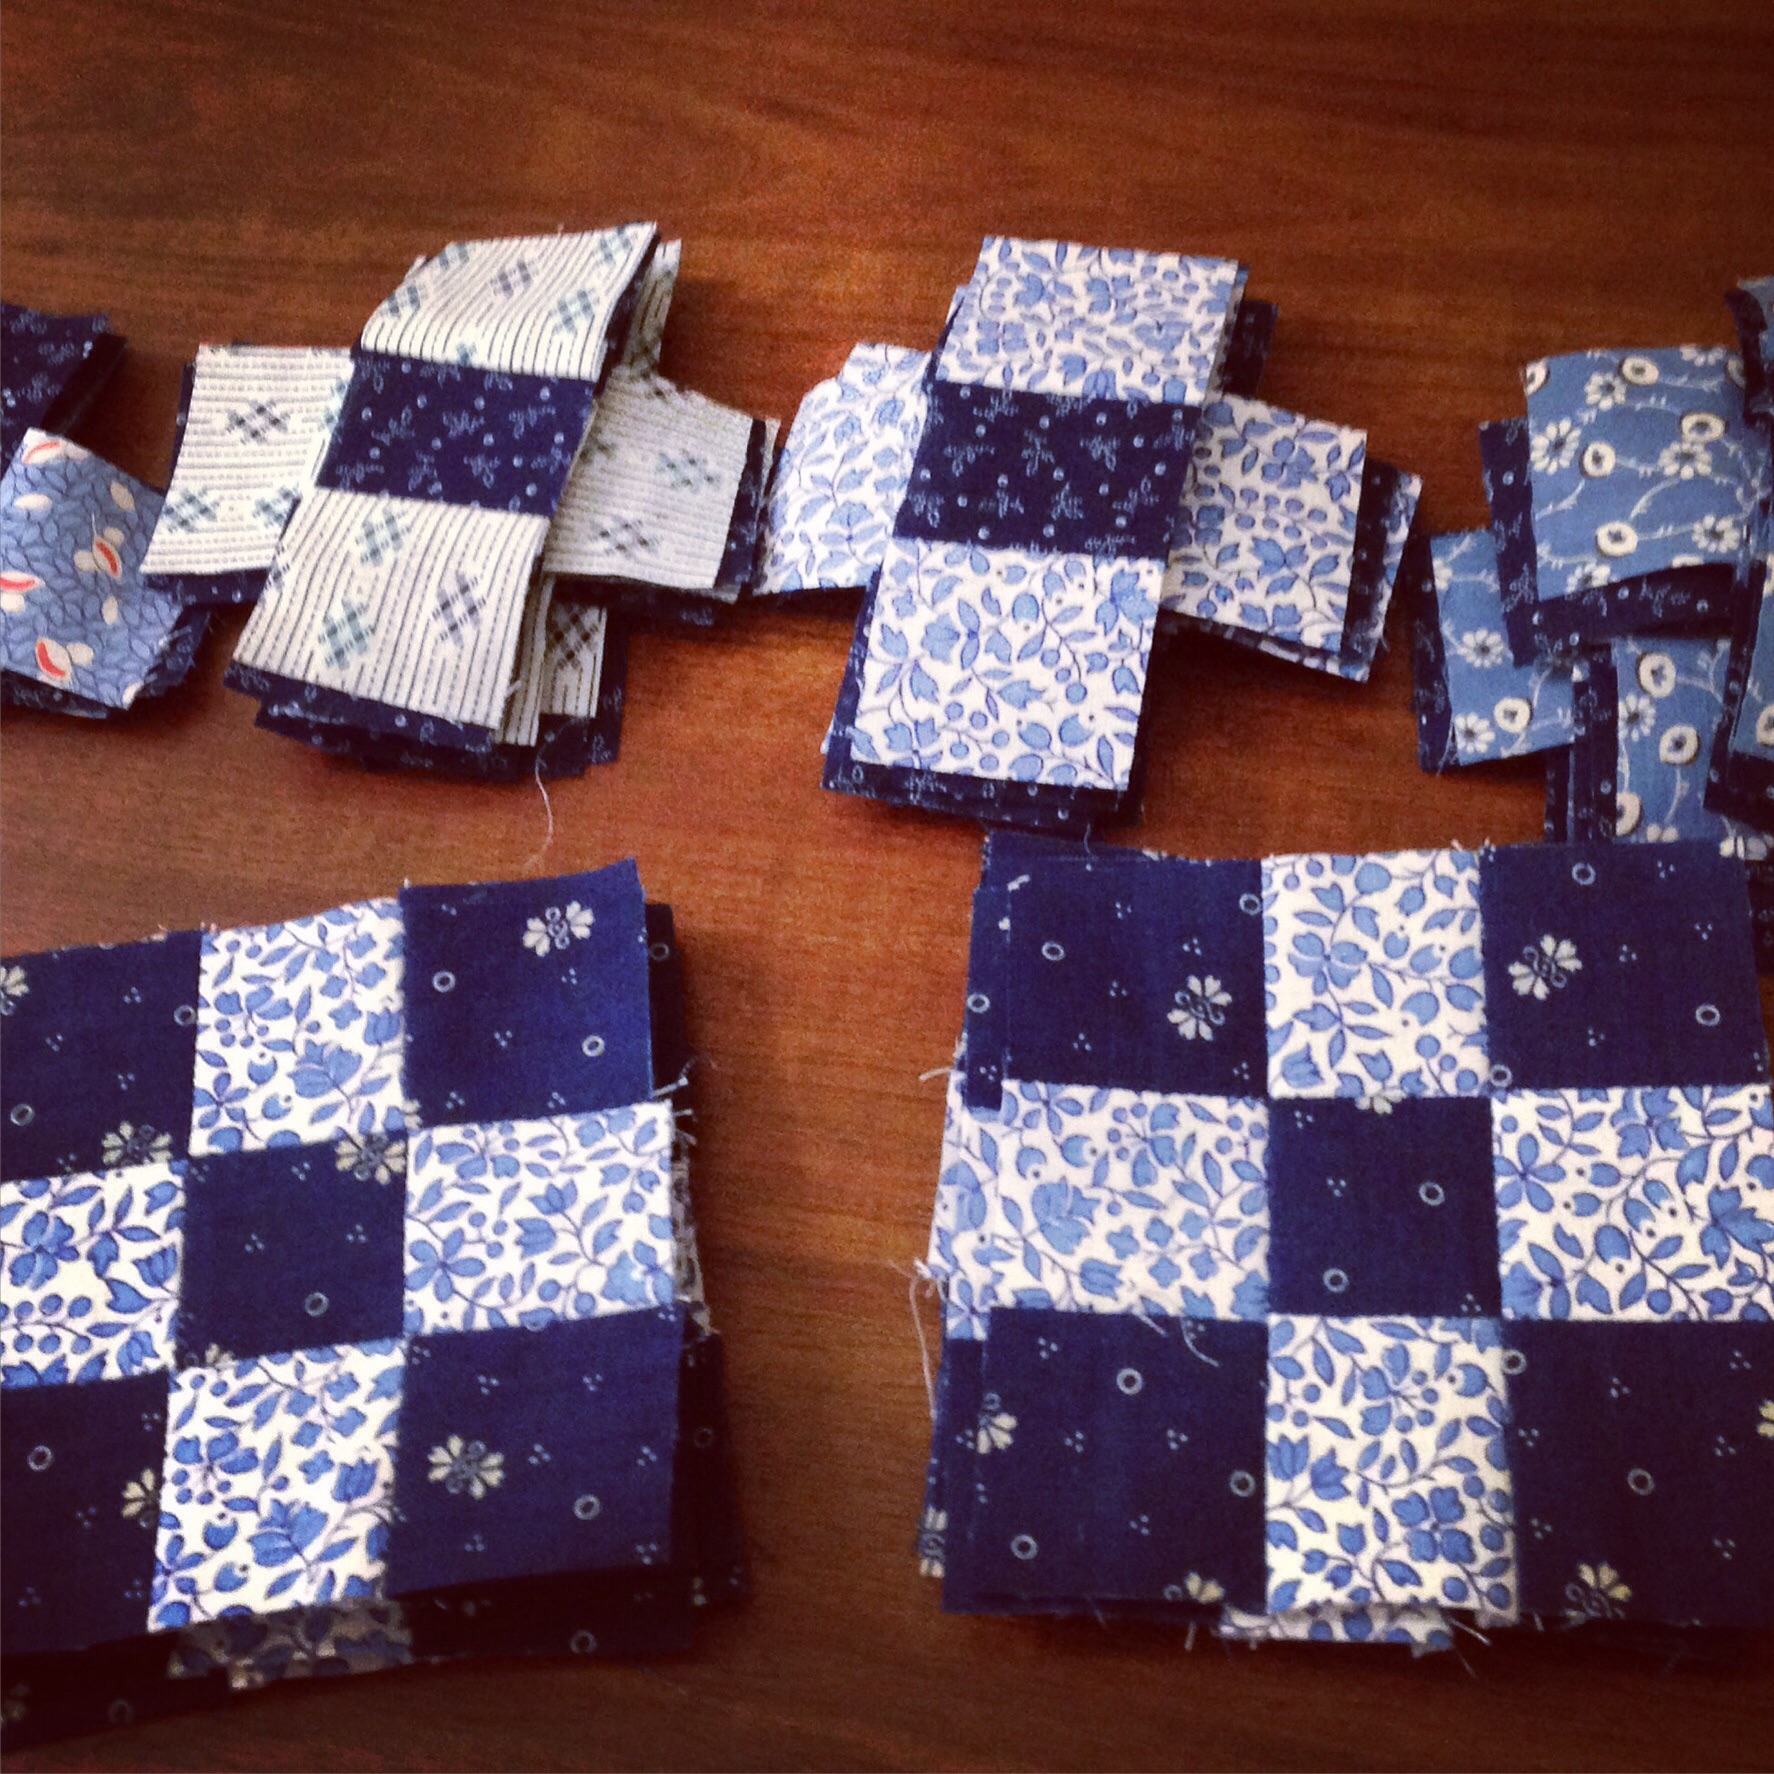
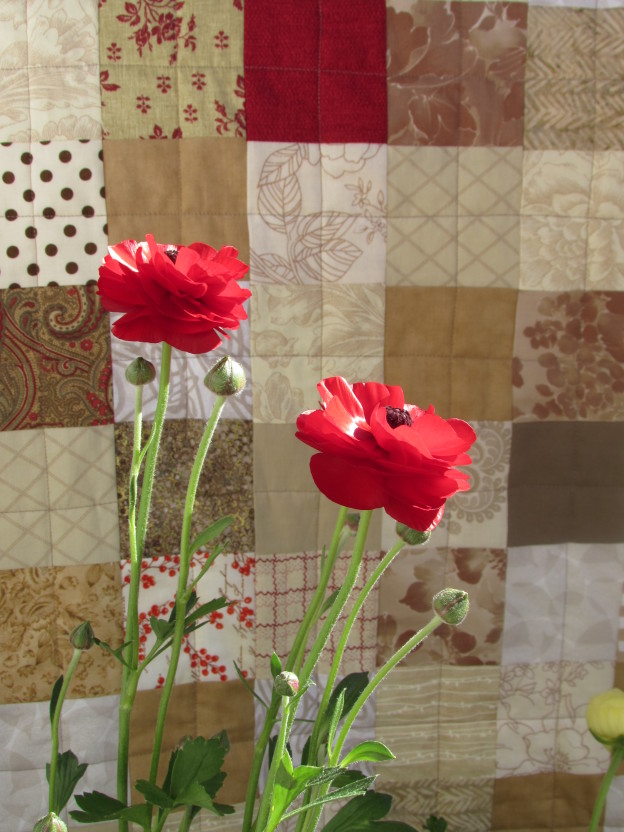
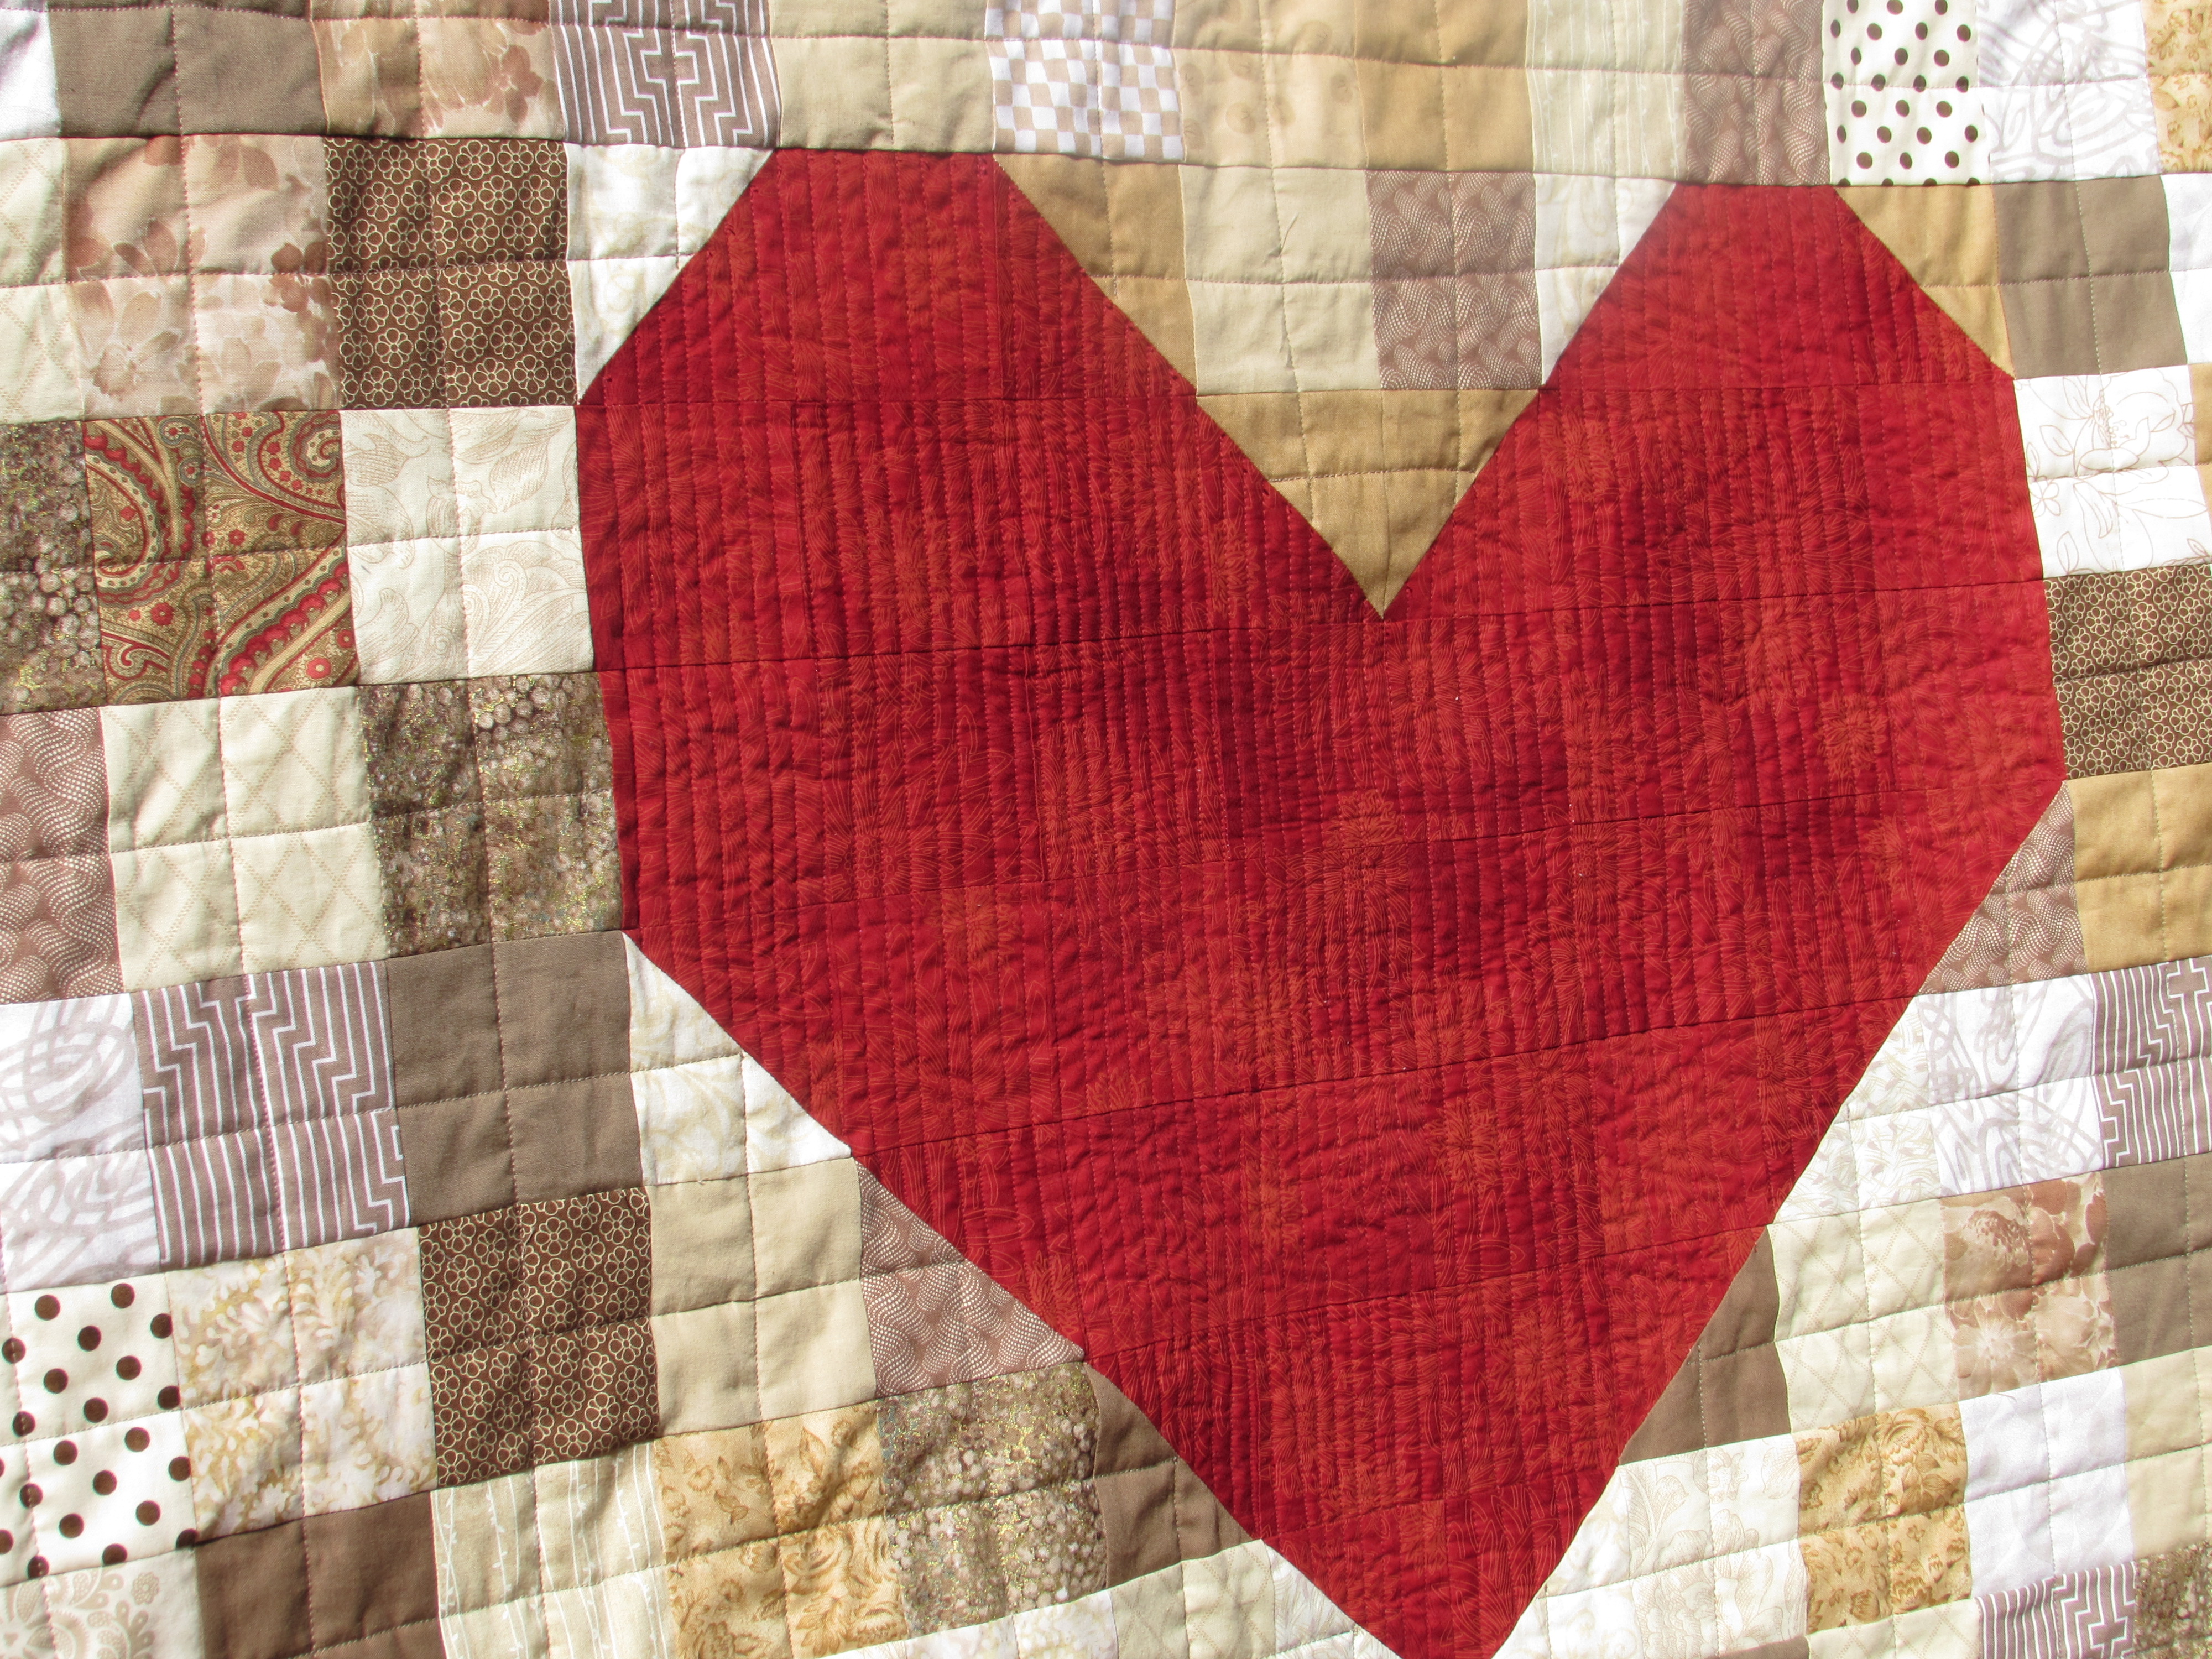
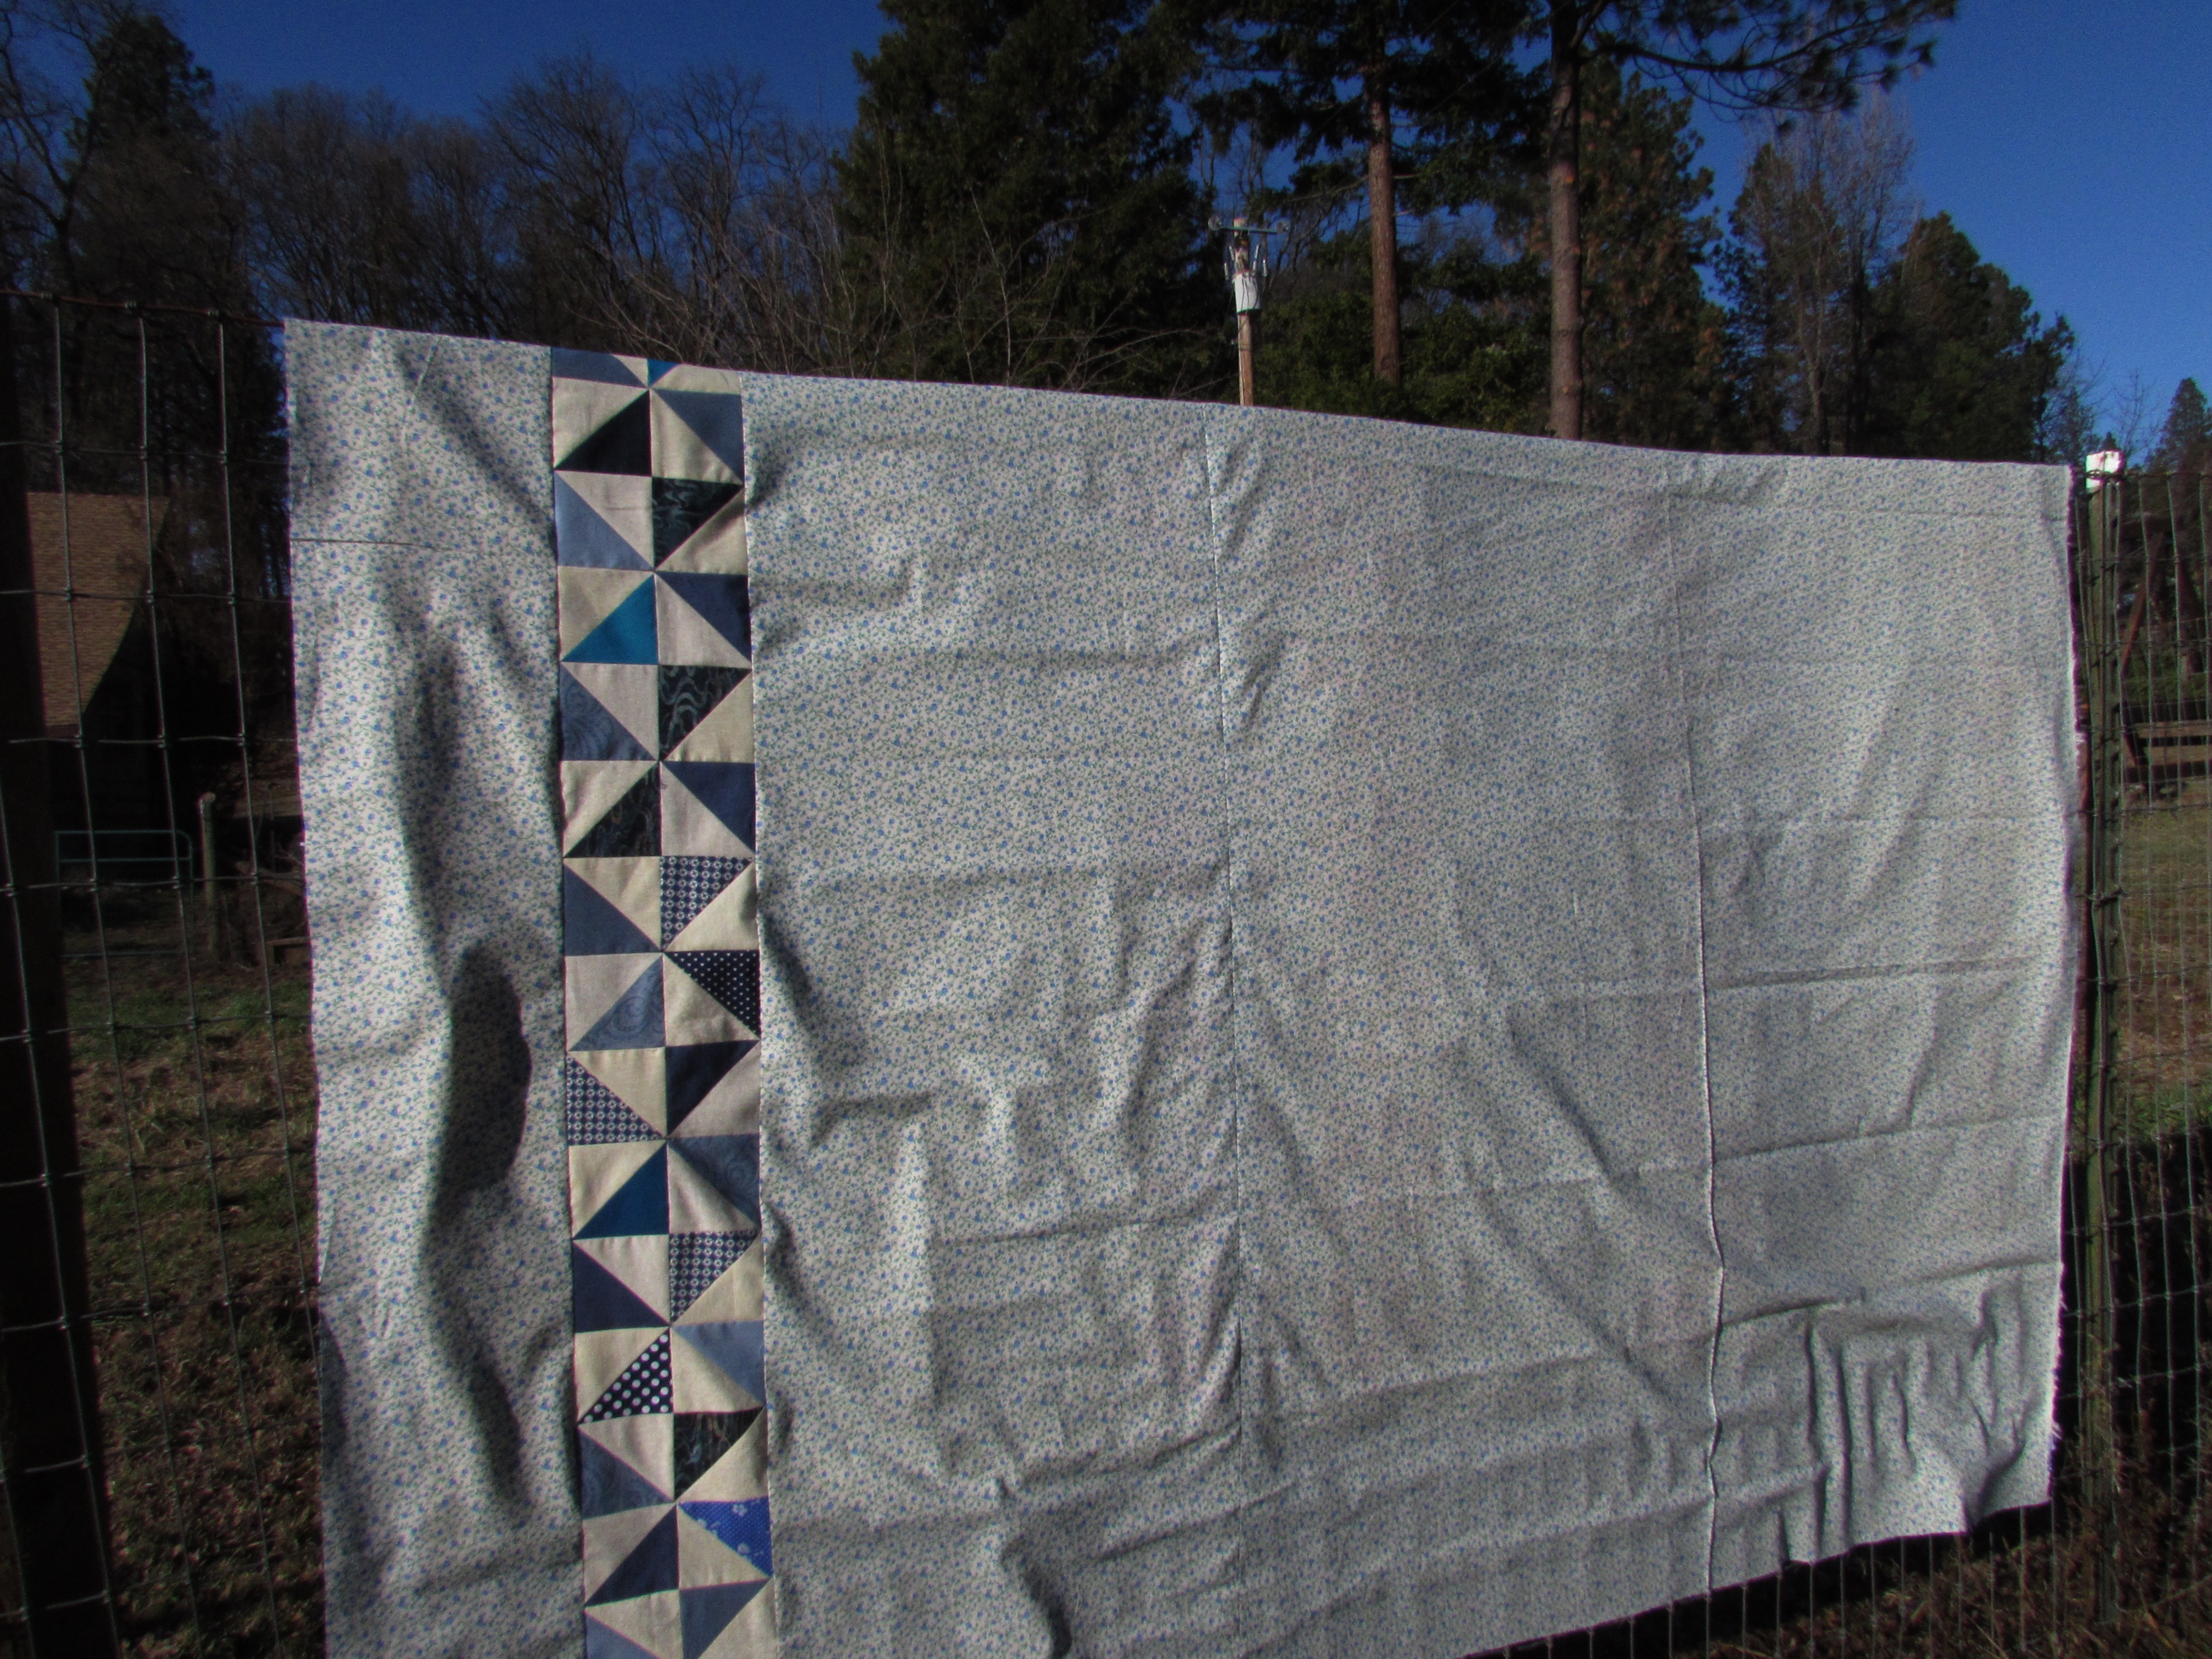
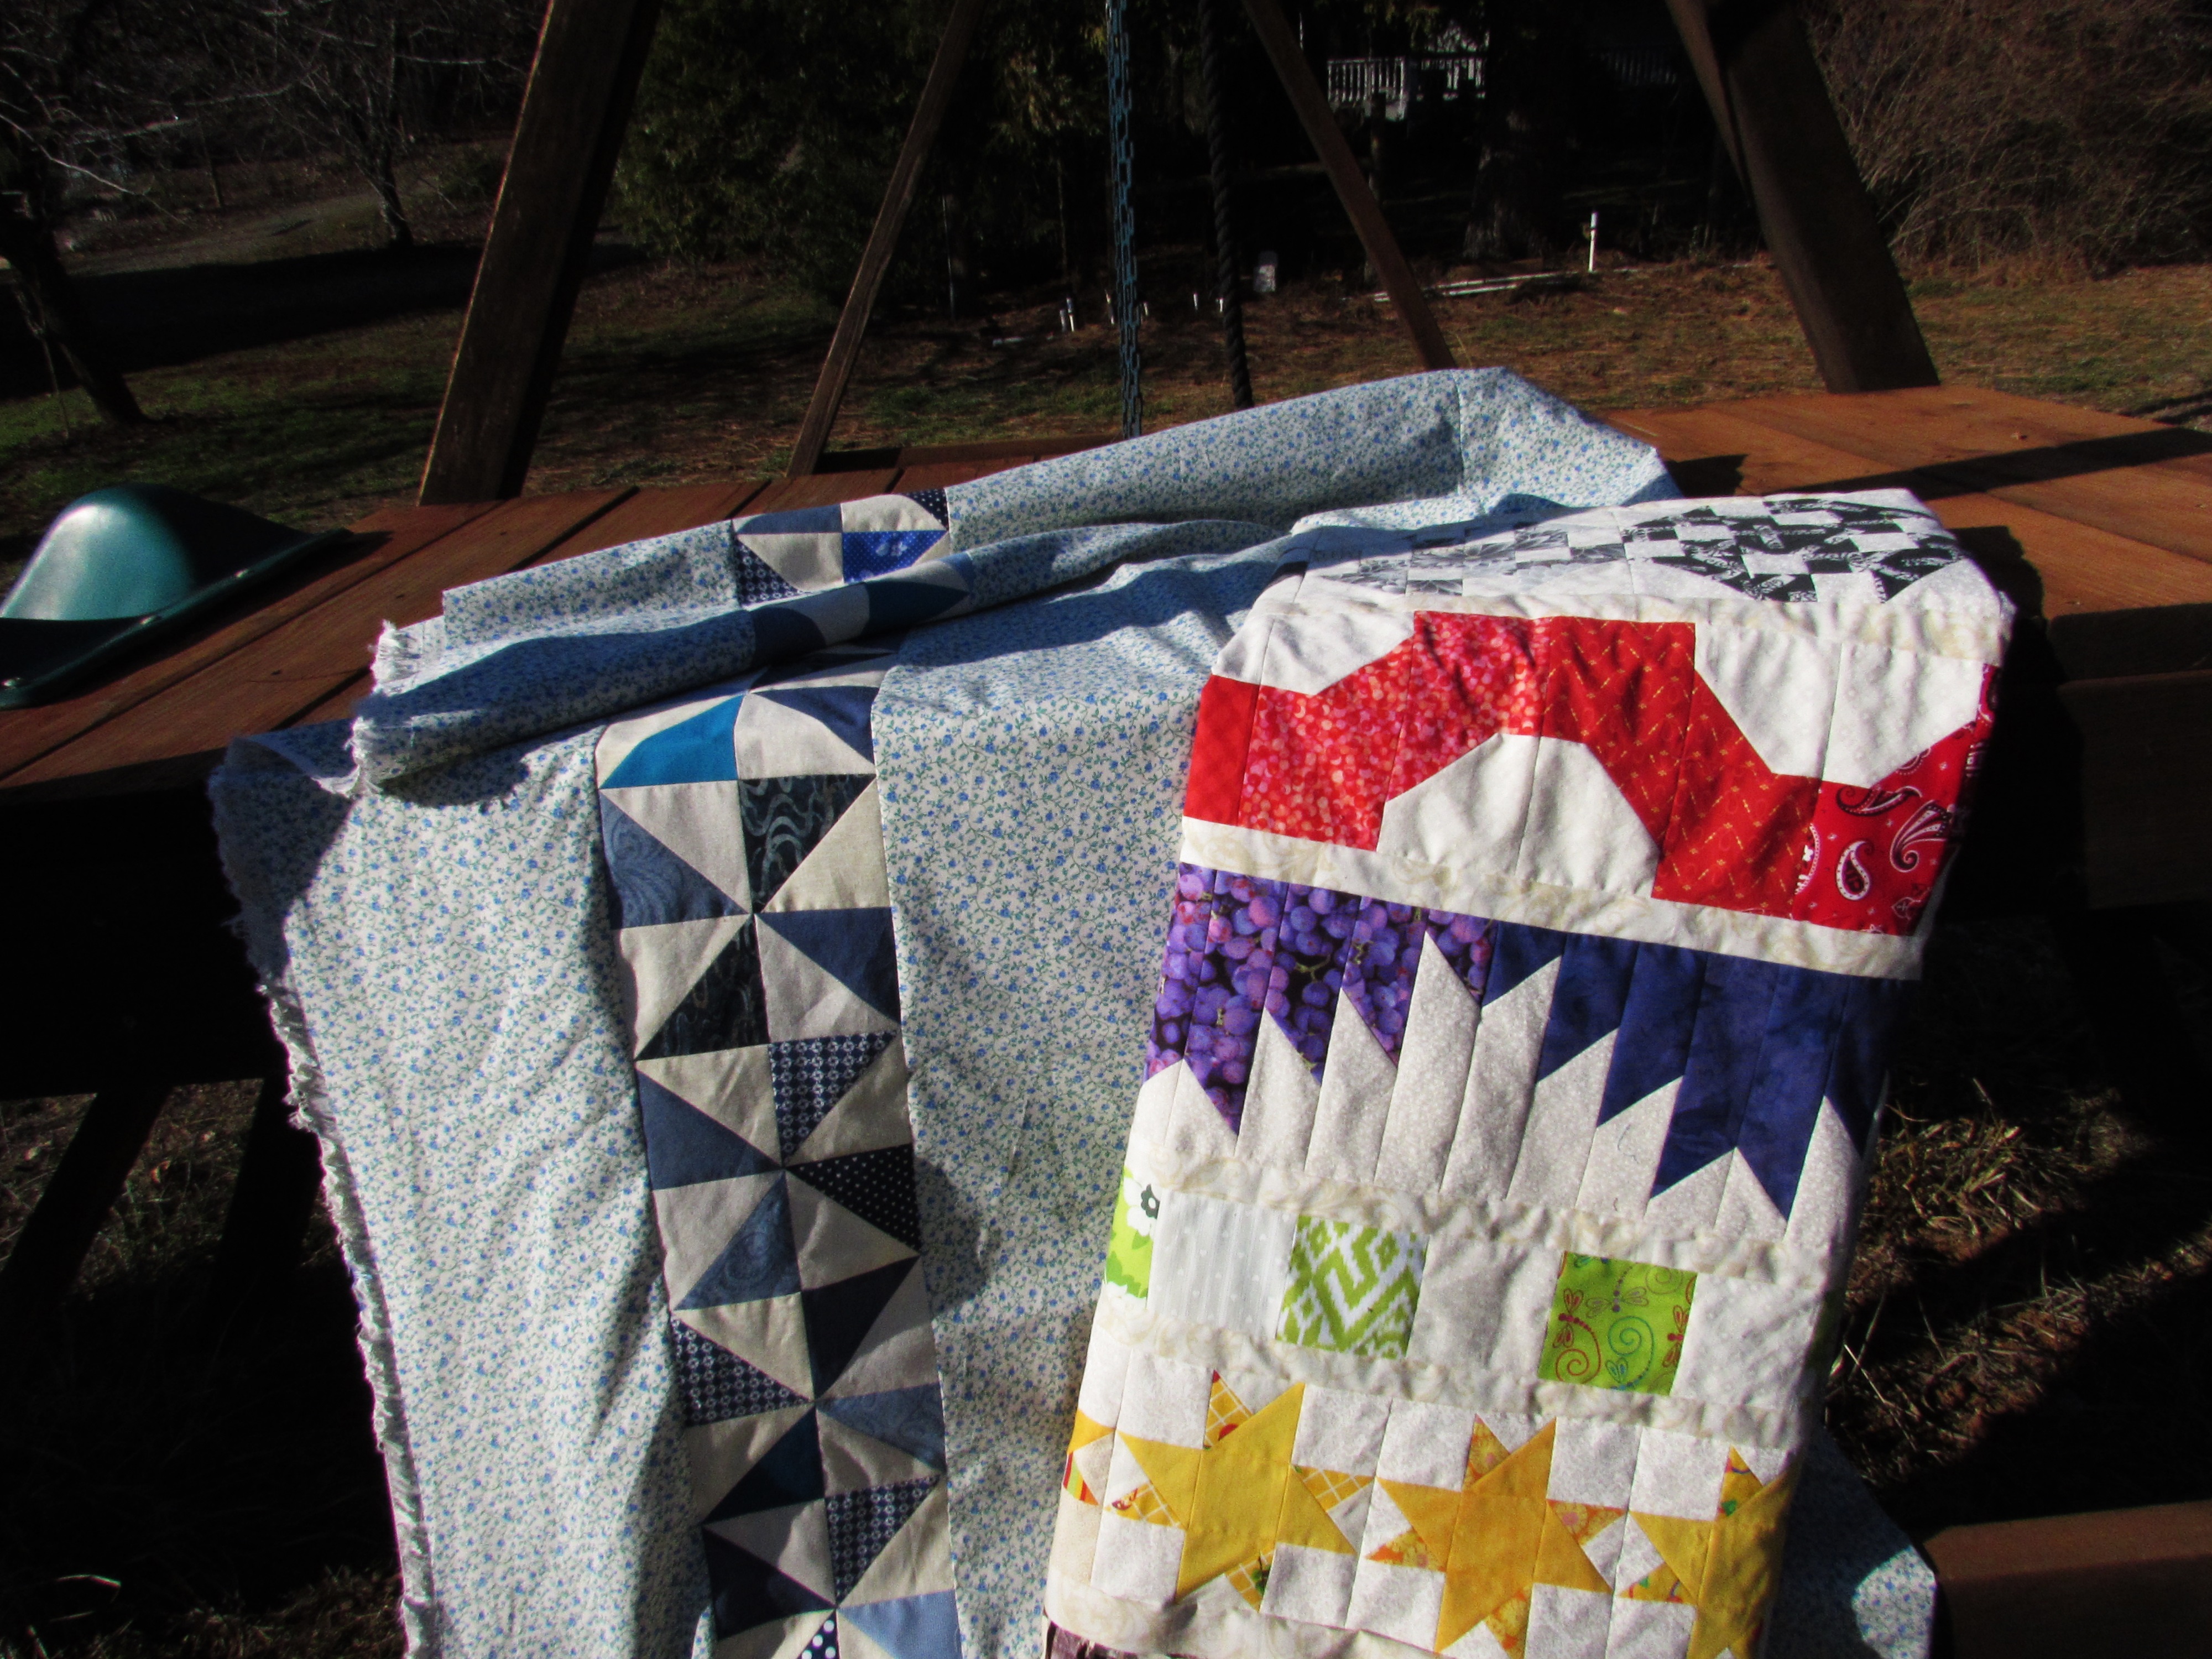
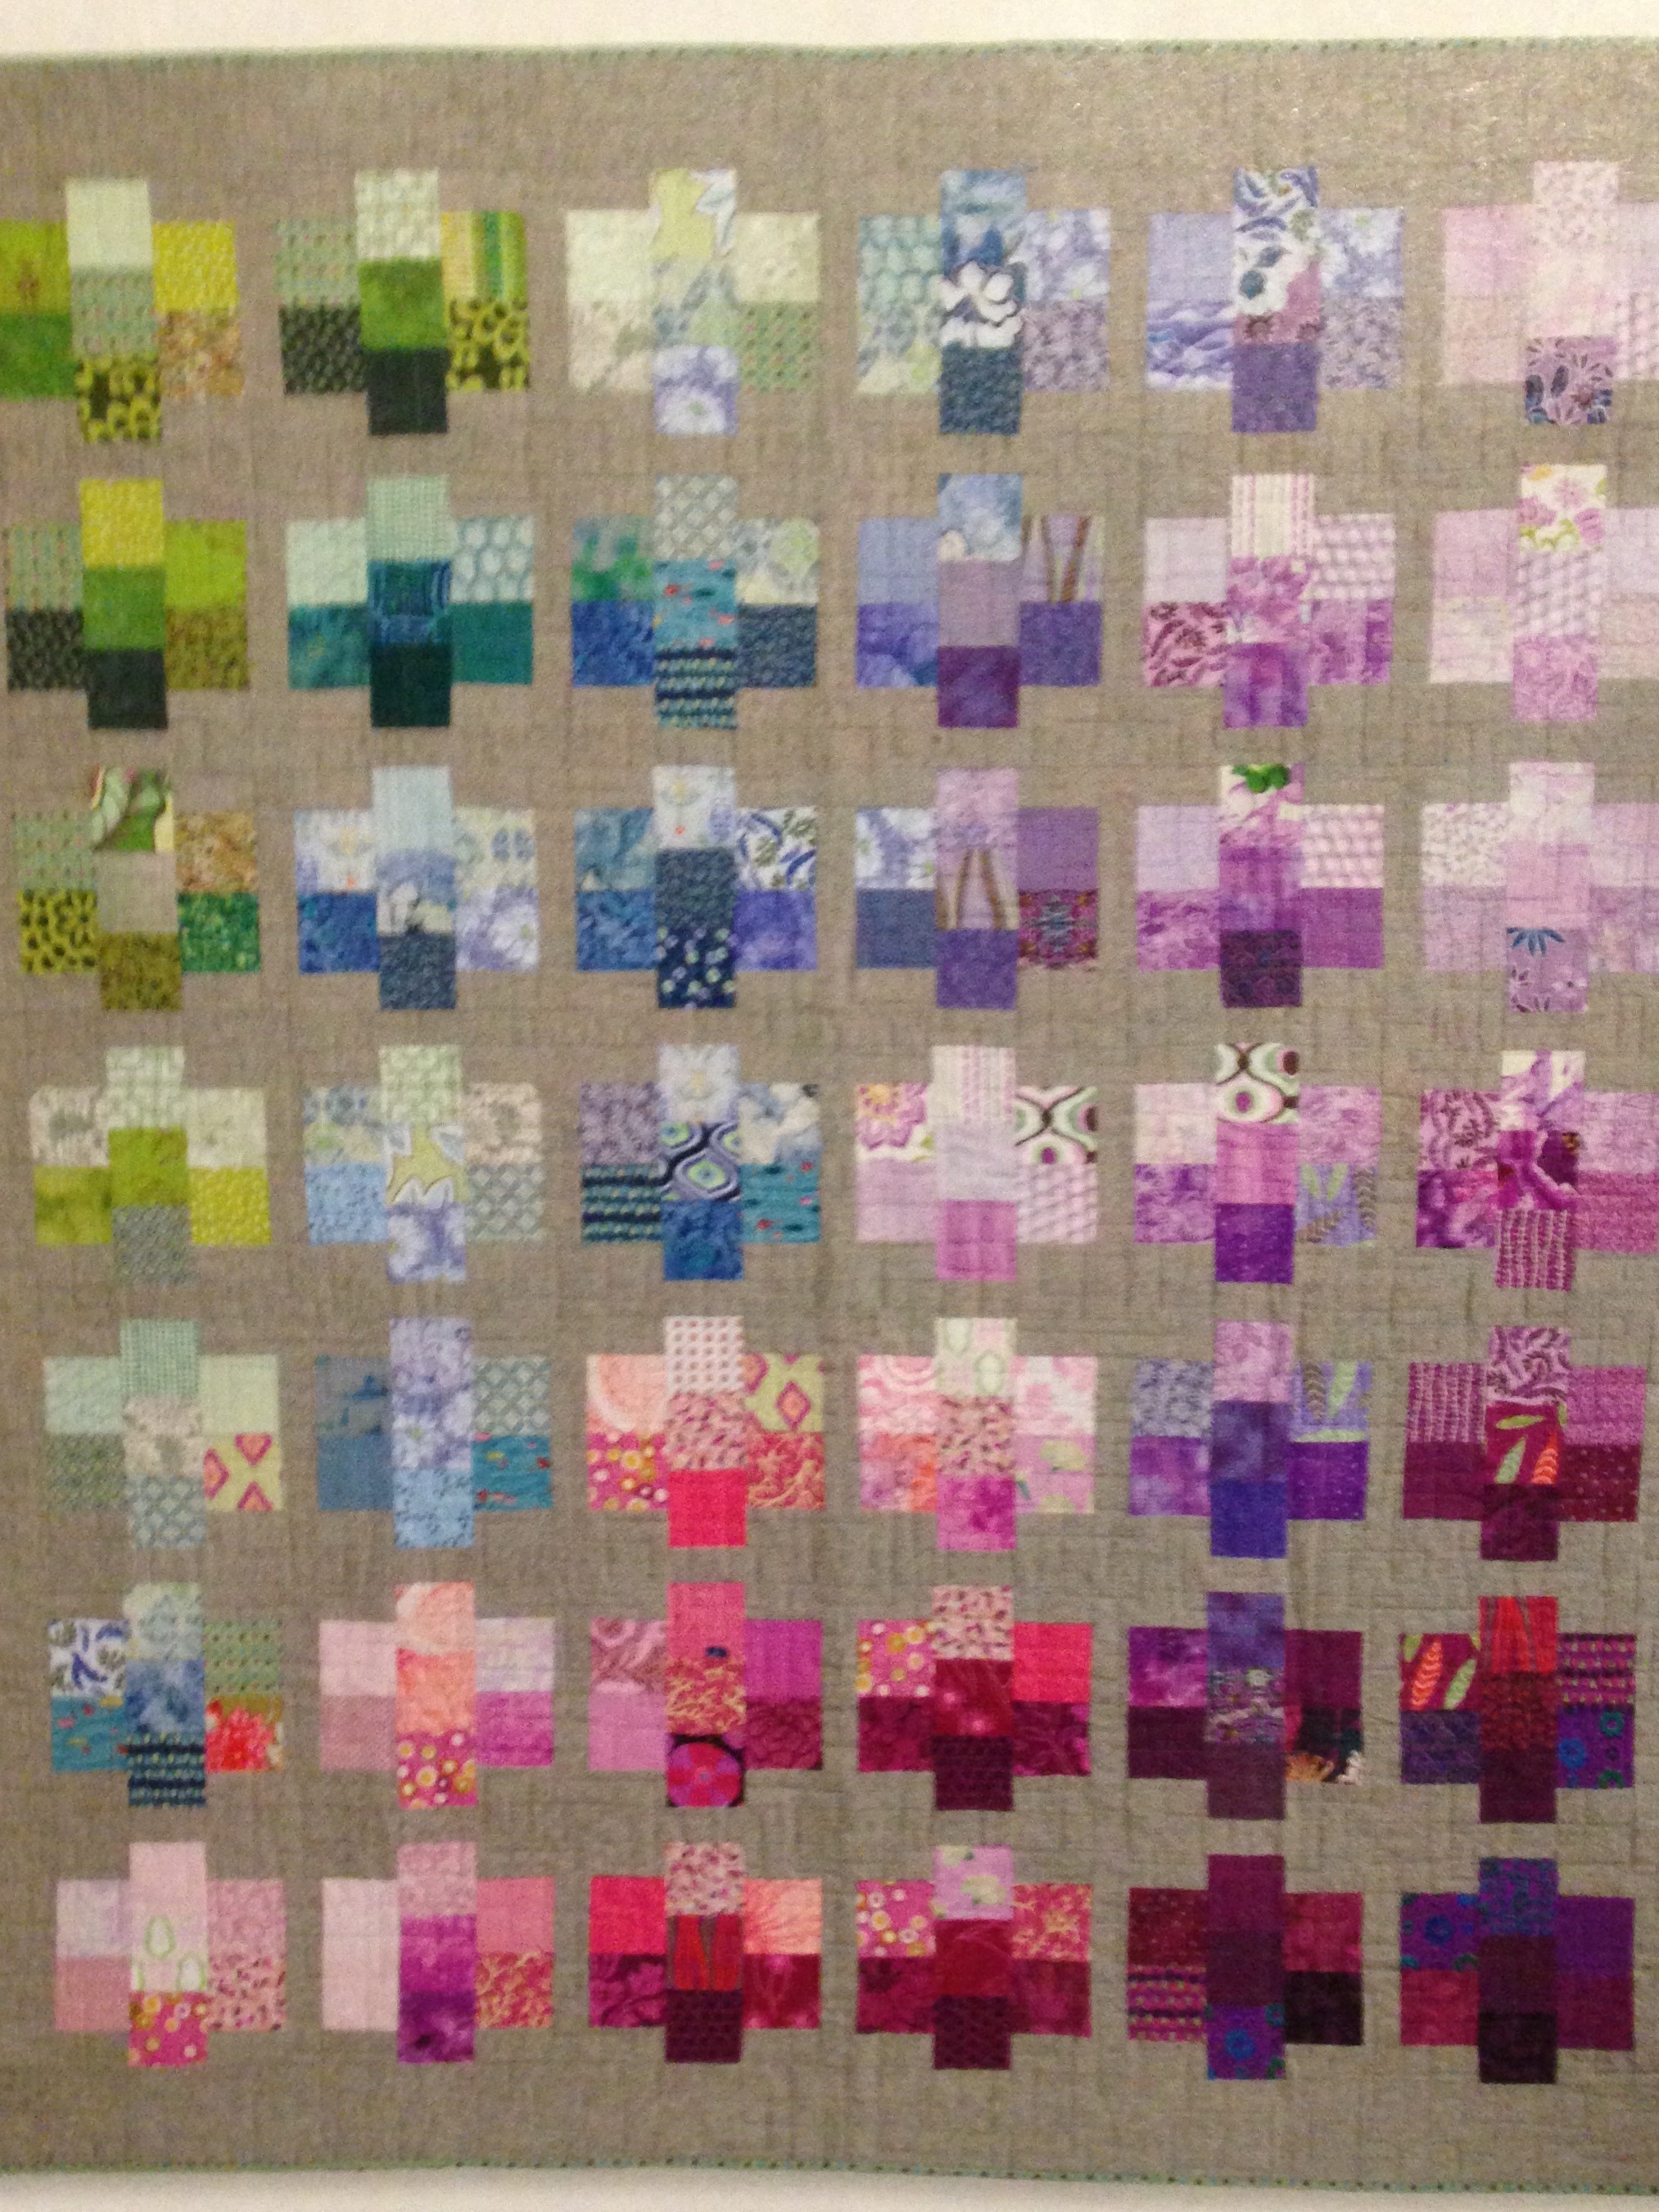
For the backing, I found a cute blue floral print on a clearance table for a great price. I held my blue ‘Broken Dishes’ row back (to control the length of the quilt overall) and pieced it into the backing.

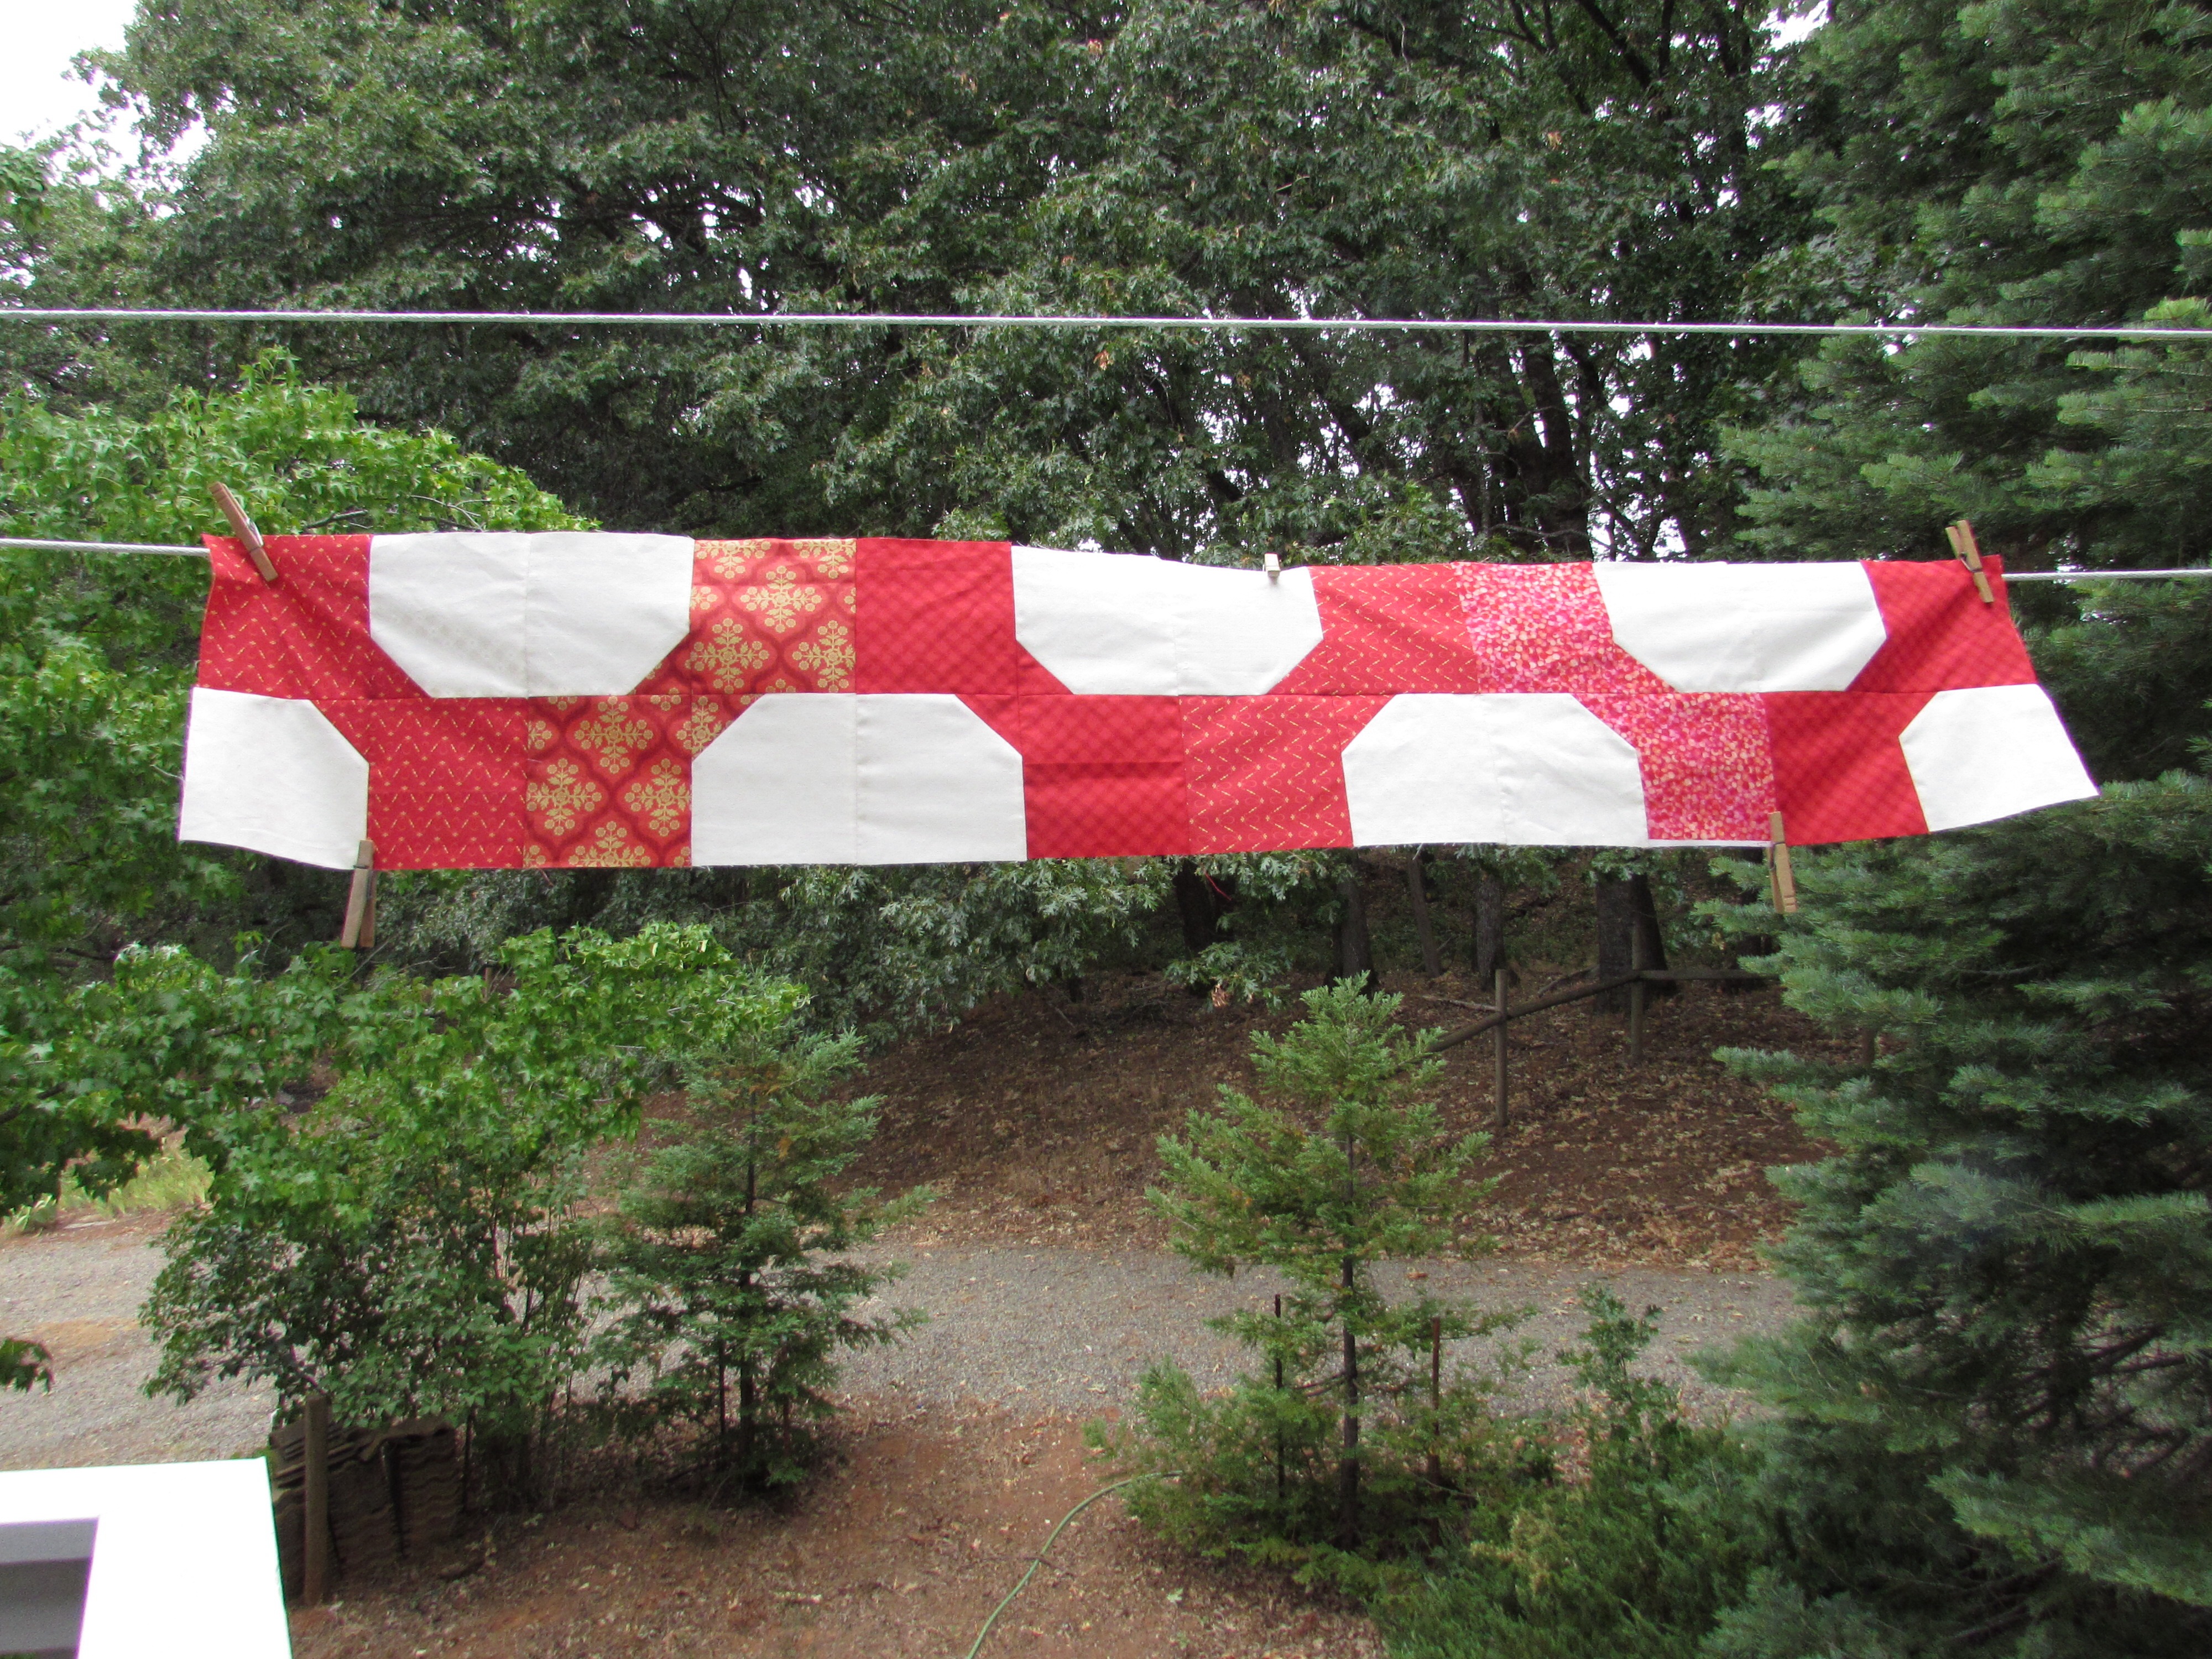
I am very happy with the way the back looks. I definitely learned my lesson with this Broken Dishes row. It was the first row in the project and I mixed too many scraps within each block. I didn’t realize that mixing the prints and values this way would cause the block to lose the pattern. I feel like it doesn’t even look like the traditional Broken Dishes pattern, but rather like a Pinwheel block instead. This was a good lesson to learn and I didn’t mix the scraps as much in the later rows.

IMG_20160101_4414

Overall, I call this project a success and will be basting and quilting it soon.  I have just about finished quilting the brightly colored baby quilt (made from those blocks I found at the thrift store). But once that is done, I will move on to finishing up this row quilt.

IMG_20160101_4421

This project is my second quilt made while following along Angela’s Rainbow Scrap Challenge. You can see the first one here. My RSC challenges for 2016 will be two projects that have a modern slant. For one, I be using a pattern called Pretty Gemstones, designed by Cynthia Brunz and published in the latest McCall’s Quilting magazine. I just bought the background fabric so I canstart piecing it soon.

Pretty Gemstones

Isn’t this a pretty quilt? I look forward to working on it. I have a second project in mind using improv fabric made from my scraps. There are all sorts of ways to do this and I haven’t quite decided what to do. At this point, I am making the fabric slabs and will wait to see what sort of quilt evolves from them.  The color for January is Icy Blue and I have some perfect scraps for it!

Wishing you all a great weekend! We have enjoyed  (lots of) rain and snow all week long in much of California. Some flooding is occurring in Southern California but up in the northern end of the state, we are all fine – just really appreciating the rain.

Linking to Crazy Mom Quilts and Confessions of a Fabric Addict this week. Both links are available at the top of the page, under “Link Ups”.

A Bonus Finish!

I spent yesterday afternoon playing in the sewing room. I had plenty of other things that I should have been working on.  Namely, putting away the fall decorations and cleaning up so we can put up our Christmas tree this weekend. There is too much mess around here to create the mess that happens when we decorate the tree.  But I just didn’t feel like it. Instead, I really wanted to play with the 16 bonus HST’s that resulted from the Swoon block mini that I made a couple of weeks ago.

The Swoon block is based on rectangles, HST’s and Flying Geese blocks. The best thing about Flying Geese blocks is the pile of ‘bonus’ HST’s that accumulate when you trim the corners on the block. If you aren’t familiar with this happy little prize, allow me to explain. Briefly, when the blocks are sewn to the upper right corner of the rectangle, creating the Flying Geese block, there is a corner that is cut off. If you take an extra second to sew a second seam, 1/2″ to the right of the first seam, you have the opportunity to have a ready made (albeit untrimmed) HST. I admit, I am not very careful when I do this. My feeling is that these are just little scraps that I am giving a second chance to possibly be used in a future project. I don’t mark the second line, I don’t even measure it.  I just eyeball it and sew about 1/2″ from that first seam and slice it off.  When I had finished the Swoon mini, I took the pile of HST’s and pressed them open. I looked at the smallest one – They were all approximately 2.5″ – and I squared them to the size of the smallest block. Then I had a pile of uniform HST’s. (If you can’t go with my very casual method or if you don’t understand what I am talking about, Bonnie Hunter has a nice tutorial on making the extra HST’s in a more precise manner. Take a look here.)

Look what I made yesterday. At 8 x 8″, it is a teeny tiny finish.

IMG_20151204_4234

I spent a bit of time playing with the HST’s, trying different layouts. It is a bit like playing Tangrams. There is no limit to the number of ways to position the blocks. I didn’t want to actually make anymore so I limited myself to use the 16 that I had – no more, no less.

IMG_20151204_4235

Once I had them sewn together, I decided to practice some FMQ with the little piece. Going to my usual sources, Pinterest, Leah Day, and Lori Kennedy, I found a holly motif that I liked. Here is the link to the tutorial on Lori’s site, The Inbox Jaunt.

IMG_20151204_4238

Two things made quilting this a challenge. One is that I used two layers Insul Bright batting scraps inside of this in case I wanted to use it as a hot pad or a trivet on my dining room table.  The Insul Bright was a bit annoying to quilt through, especially a double layer. Second, I decided to use Sulky thread on top and I put Mettler in the bobbin.  I love Sulky threads – so shiny and glossy. But also a bit slippery soI had to play with the tension to get it right.

Overall, the little hot pad is pretty cute. The FMQ is a bit rough. The bow at the bottom of the holly in the center is an eyesore but obviously not enough that I was willing to take the time to rip the stitches out. (It is a hot pad after all.) I haven’t practiced free motion quilting for a long while so it was fun to play with this. I am ever thankful to Lori’s site for the endless FMQ tutorials. I love that she has so many seasonal themes. It is very fun to play with them.

IMG_20151204_4236

Finally, I wanted to point out something that took me by surprise. I used a scrap of holiday fabric for the back. After I was done and it was trimmed and ready for binding, I was digging through my scraps and found a few more pieces of the backing fabric to use as binding. There was barely enough. I had to cut narrow 2″ strips which were a trick to use – the quilt sandwich being extra thick from the Insul Bright. Anyway… come on Bernie and get to the point. As I stitched the binding down on the back, the folded binding matched up with the backing quite closely at one point.

IMG_20151204_4237

Isn’t that cute? The holly just about matched up, as did the little bird. Nothing earth shattering but it is a fun coincidence. (Doesn’t take much to amuse me!)  There you have it, my second finish this week!

Is your tree up (if you are a Christmas-tree-decorating person)? How about lights outside on the house? I am hoping Ray will put ours up this weekend. I think the outdoor lights are one of my favorite parts of the season and I leave them up as long as possible.

Linking to Amanda Jean at Crazy Mom Quilts and Lizzie at Free Motion Mavericks.

Gorgeous Grays

Yikes. I think it has been a week since I wrote a post. My routine got all turned around and all of a sudden a week passed by. (Were you sitting and waiting anxiously for another amazing read on Needle and Foot? My apologies for the wait!)

As things often do, one project led right into another. I have been making blocks for the eighth row of the Classic Stitches BOM (led by Mari over at Academic Quilter). The color for this month is either indigo blue or gray. I went with gray. We have already done two rows in shades of blue and I didn’t want to add a third. I am loving this gray row. For August, Mari wrote a tutorial for a quick block called “True Blue”. She explained that it was a block which dated back to the Civil War years (on the Union side, hence the name True Blue.) It is a really simple block utlizing four patch squares and HST’s. I chose to make the blocks in the 7 1/2″ size. This is the second row of 7 1/2″ blocks for the quilt, the rest are 6″ blocks.

I don’t know how everyone else does it but I am sort of ADD when I am making blocks. I cut for a while, piece a whole block, cut some more, piece a few more. It is really inefficient and makes me crazy. I end up cutting more than I need of one fabric and not enough of another. (I know, It is so silly. I highly doubt that my methodology is taught in any of the billions of quilting books out there, due to the inefficiency of it.) I vowed to make a change with this project! For these eight blocks, I cut the pieces for all of the blocks, stacking them in nice orderly piles. Then I made the four patch blocks. (I used strip piecing, sewing long strips and sub-cutting them into pairs, which were then joined into four patch blocks.) Next came the HST’s. Doing it in this amazingly organized manner, I had my HST’s all prepared. It was so much better – the best part of piecing is putting the actual block together, right? Once all of the tedium was done, those blocks went together in  a snap. It was much better than my usual “a little of this, a little of that” method.

Plus, when I had that stack of HST’s, I started playing with them. I spent some time laying them out in different patterns, which is pretty fun with HST’s. (It’s kind of like playing with Tangrams.) I found a design that I really liked and decided that is what I would use for my New Blogger Block Hop project. (Remember, I posted last week about having to make a block with a tutorial for the project sponsored by Fabri-Quilt?) This made me so happy. I have been playing with fabric and mocking up blocks (a version of a Herringbone block and a version of a Plus block, neither of which I liked.) Seeing this simple little pattern (which, as far as I know, isn’t some really common pattern?) was the perfect inspiration.

Back to the row of True Blue blocks. Take a look. Here they are before sewing them into the row. I enjoy playing with them and getting an idea of how the blocks would look as a quilt of their own. These blocks are fairly busy. I don’t think I would do a whole quilt with only these. It makes my eyes go a little crazy. 😉

IMG_20150810_3664


And now a row of True Blue blocks (that are gray instead of blue!)  The pasture behind the blocks is looking a might dry, right?

IMG_20150810_3666

I hung a few of the other rows with this newest member of the family. They all look great together.

IMG_20150810_3667


It is amazing that eight rows of this project are complete. Summer is ending, fall is on its way.  This is very apparent in our garden these days. The squirrels are making a huge mess each day, eating the pinecones and dropping the pieces all over the deck. The apples on our tree are growing and it looks like, for the first time, we will have apples. The tree is about three or four years old and hasn’t really produced any apples yet. These look great though.

IMG_20150808_3660

I have mentioned before that we didn’t put in a vegetable garden this year due to the drought in California. We had a volunteer plant come up though and Ray couldn’t resist watering it just a little. We were very negligent and only gave it a drink every now and then. The foilage looked like squash and it was in a bin where we had spaghetti squash last year. We figured that was what it would be. What a surprise to see these growing on it.

IMG_20150808_3658

In the next bin over, we had planted decorative gourds last year. They were so much fun and we had tons of them. Apparently there was some cross-pollination going on and we now have a plant bearing some weird combination of spaghetti squash and decorative gourd. They are hard, bumpy and dry, like a gourd, They have that cool coloring of a gourd, but the shape and larger size of the spaghetti squash.  We had so much fun trying to figure out what they would be. (Doesn’t take much to amuse us.) I am fairly sure they are not edible but they look pretty.

IMG_20150810_3670Finally, I leave you with this gorgeous picture of our front lawn in all of its droughty glory. (I know… I made that word up.) It is criminal to waste water on growing green grass so we are only giving it enough that it doesn’t totally die on us. This is the year though, right? Rain all winter long. (Please?)


Linking to a new linky party over at What a Hoot as well as Freemotion by the River, Let’s Bee Social, and Crazy Mom Quilts. Links to the last three sites are available at the top of the page, under Link Ups.


Double Nine Patch Update

Hey everyone! I finished the vintage double nine patch quilt top. Yay for staying with it and getting it done. It is a good size for a lap quilt. Finished, it should measure out to about 60″ x 70″. I am really happy with it and look forward to getting it basted and ready to quilt.

IMG_20150716_3530The quilting decision is an important one due to all of the negative space that this quilt has. My FMQ skills are improving but aren’t stellar. What to do?? My thinking is that this sort of traditional quilt calls for FMQ over straight line quilting (I usually associate straight line quilting with a more modern project). Because this will be auctioned off at a 1940’s themed fundraiser in October, I feel like I need to do some decent quilting on it. I need a foolproof idea! Please help me out here and send ideas my way! Do I do an easy all over stipple? If so, do I stipple the main portion and do something different on the borders or just cruise right over the borders too? I have plenty of time to decide. I don’t have any batting just now (well, other than the piles and piles of batting scrap – I could probably stitch those scraps together and make a piece large enough for a king size quilt). I need to spend some time on Pinterest and hop over to a few sites (The Inbox Jaunt and The Freemotion Quilting Project come to mind) for inspiration.

IMG_20150716_3532

One more thing…. Totally off topic here, but yesterday my quilt model and I went to the movies and saw “Inside Out”. I had high expectations for this new Pixar film since the reviews are glowing. Yikes, I was disappointed. Both of us kind of shook our head on the way out, wondering what the hype is all about. I found it really preachy – sort of like they were forcing a lesson down my throat. Neither my daughter nor I could figure out what age group this was aimed at. The plot doesn’t seem suitable for early elementary school ages and it seemed very trite for older kiddos.  Did I miss something? Maybe I wasn’t in the mood for it? Just curious what others are thinking about this movie.

Linking up with Crazy Mom Quilts and Needle and Thread Thursday. Links to these sites are available at the top of the page, under link ups.

Double Nine Patch Progress Report

Well, I am happy to say It have made great progress on my vintage double nine patch quilt. I have all of the blocks done and have been sewing the rows together. It worried me to set this as my goal for June but it appears I’ll be able to finish it this week and we are only at the middle of July!  Just never know.

Here are a few rows – they are not yet pressed though.

IMG_20150715_3522This quilt has been fairly mindless to create. Lots of repetition in making the smaller nine patches and then sewing those into the 9″ blocks.  For the most part I have been happily listening to music and stitching away. I usually have either music or a podcast on when I am sewing, unless I really have to focus on the pattern. This week I indulged in lots of oldies. I had my playlist set to include music from the early 1970’s (which would have been junior high and high school for me). Carole King, Van Morrison, Cat Stevens and The Lovin Spoonfuls, to name just a few.

Music doesn’t seem to distract me when I am sewing but TV is not such a great idea. When I was cutting the smaller background squares for this quilt there was an episode of “The Office” playing. (Julia recently discovered this show.) It was so distracting – I think that show is so funny. I ended up cutting 3″ squares instead of 3 1/2″ squares. Dang it. I have tons of the fabric so that wasn’t a problem but now I have a pile of 3″ squares ready for another project and I had to spend the time to cut a new stack in the correct size. Clearly watching tv doesn’t work for me when I am sewing or cutting.

The quilt will have two borders of the cream fabric with a narrow border of navy blue in between them. If you remember, the small nine patch blocks are made with the vintage fabric that I received last spring. I need to look through the vintage stash to see if I have a big enough piece to make the navy border. I think I need about 1/2 yard and doubt I have a piece that big, especially since the vintage fabrics are 24-36″ wide. Looks like a trip to my LQS is on the agenda for tomorrow, darn it. I am really excited to sew the rows together and put the borders on.  Hoping to have a quilt top finish for you by end of the week.

So, what’s on your playlist when you are sewing??? Do tell.

Linking to Lorna at Let’s Bee Social and Connie at Freemotion by the River.  Links to both of these parties are at the top of the page, under Link Ups.


Red Blocks Resized

Here is an update to yesterday’s post! Because the size of those red blocks was driving me crazy, I decided to fix them. It was simple and well worth the bit of time it took. Being made of simple squares, I just cut them down. I didn’t even rip the original blocks apart. They were so much bigger than necessary that I just sliced them apart. First I cut them to 7 1/2″ blocks but they still looked too big. I cut them back to 6 1/2″ and they are just fine. I had to make a few more blocks to complete the row.

imageI don’t know yet in what order I will put them together. They need sashing though. With each row made of a different block, the patterns don’t line up.  I think they need separation between the rows. I also have some definite issues with a few rows being short or long. That will have to be dealt with before I can assemble this. I don’t look forward to that….. If anyone has a strong desire to do a random act of kindness, please come and fix them for me.

Very glad to be able to call this a finish for the month of July on my RSC15 project!

Linking to Crazy Mom Quilts.


Red Bow Tie Blocks

While I am making good progress on the vintage double nine patch blocks this week, I got a bit bored with them this afternoon. I decided to take a bit of a break today and I worked on my July row for my RSC15 project. I mentioned earlier that the block that Mari decided on for the month of July was a bit labor intensive.  Because of this, I opted out of the Classic Stitches BOM just for this month. I will go back for the August row.

Instead, I chose to make a row of simple bow tie blocks. Red is the color for July for RSC15 and that is a fine color for a bow tie. This will be my power tie row. I love the blocks and think they would make a great quilt all on their own.  Excuse the weird colors on the picture below. I took this in my sewing room so it the lighting was sub-par.

image

I wanted to add some bigger rows to the quilt. So far I have five rows that are made of six inch blocks, one row with 7 & 1/2″ blocks and this month I made 10″ blocks. To avoid doing the math needed to create 10″ blocks, I used the Block Fab HD app on my iPad that I have mentioned previously. While I like this row on its own, I am not so sure I like it with the other rows that I have made.

image
When I lay out the rows together, this row is so huge and chunky. I may just leave it for now and see what the block is for August. If I make another row or two of ten inch blocks, it might balance out. If not, I can easily make a new row of bow tie blocks. They go together quickly.

image


The more I look at this picture, the less I like the huge row of red. If I just shrink them down to 7 1/2″ blocks – that might give it the balance it needs. Then the bow tie blocks would be the same size as the light blue water wheel row and would be different from all of the six inch rows. Do I call this a finish for RSC15 for this month? I doubt it. Me thinks I will be making more red bow ties.

linking to Let’s Bee Social, So Scrappy and Crazy Mom Quilts.


Not a Lot of Sewing Going On

This has been a week spent in the car rather than my sewing room. Some months ago, I enrolled Julia in a class at our ‘local’ state university. They hold summer academy classes in a range of subjects for high school age kids. She wanted to take the Forensic Science class. This academy is very well done. She has a professor from the college and only 16 students are in each class. She has been working on extracting DNA from samples of blood and learning about how things are done at a crime scene. She loves the class. This girl loves her science.imageThe university is about 1 and 1/4 hours from our house. Her class lets out at 5:00 which is, naturally, prime traffic time so the commute home is long and tedious. It has been worth it though to hear the stories of what she is working on. Choosing to live in the rural area that we do means driving your kiddos all over kingdom come in order to expose them to all the experiences a child needs.

We spent one night in a hotel near the university to avoid a couple of the drives. I brought my small sewing machine and set up shop for a day and an evening.

image

I made a bit of progress on a new project I am just starting. I am using some of the blue fabrics from the vintage collection that I posted about here.  I cut strips from the blue scraps and joined those in sets of three strips. Each stripset was then sub-cut into strips that are 1 and 3/4″ wide. Those strips were then joined to  make tiny 3″ nine patch blocks. The little nine patch blocks are the cutest. I will be combining those blocks with solid 3″ blocks into a larger, double nine patch to end up with a 9″ block. I have made about 25 of the baby blocks and need 100 so I am just getting started.

image

Hopefully I will get caught up this weekend. It is supposed to be fairly warm so I don’t see that I will be outside very much. Spending the week in Sacramento with my daughter really made me appreciate living in the Sierra Foothills. Sacramento is so darn hot – it was 107 degrees today! In addition, the traffic is lousy. We are so lucky to have nice cool nights and no traffic. I am thankful for our little town in the mountains.

Hope everyone has a wonderful weekend!

Linking to Yvonne at Quilting Jetgirl and Let’s Bee Social.


Yellow stars – Done!

Another finish! Trying to get things all finished up for March. These stars are my RSC15 project for this month. The color is yellow and these turned out so cute.

image


Two of the stars have a bit of a mistake. However, I am calling this creative design. Mostly because I don’t feel like ripping it out.  Do you see the mistakes? Hint, hint, look at the star that is second to the left in the picture above.

image

Here are the first three rows of the quilt. I am following along with Mari over at Academic Quilter. She is posts a new block for this row quilt the first Tuesday of each month. Looking forward to seeing what is up for April!

We are going to work on the house in Downieville this weekend so I won’t get a lot of sewing done. I do plan to take up some hand sewing. I am making some throw pillows for the guest bed and I am going to try hand quilting one while I am up there. I have never hand quilted before so we’ll see how it goes. Are there any tricks? Advice is more than welcome. I plan to quilt straight lines running on the diagonal. Hope everyone has a great weekend!

Linking to Angela at So Scrappy for this month’s RSC15 challenge.

A Finish with a Flange

So pleased to show this week’s finish!!  I love this quilt for a variety of reasons. The colors are just what I wanted for one.  I have always loved a basic pallette using neutral colors. As I mentioned earlier, I then decided I wanted to put a pop of red it. The more I played with this, the more I liked that red. Thus the addition of the large red heart!

IMG_20150325_2982

The biggest reason though is that it is my own.  The design is simple but it came from me; I didn’t use anyone’s pattern and that is absolutely a first. I used straight line quilting going in several directions. The hearted was densely quilted with lines about 1/2″ apart. I used the edge of the walking foot as my guide for that. The body of the quilt has straight lines going through each square, both horizonally and vertically. I started out marking each line with my Hera Marker but after a while, I got used to the patterns in the fabric and used those to guide me along and just freehanded it. Much simpler and very freeing!

IMG_20150325_2986

I took my time with this and didn’t rush to finish it. I did get antsy when I was quilting it and again when I was burying the threads around the red heart. I reminded myself to relax and enjoy the process and it was so nice. I loved every bit of it – even the annoying tasks like cleaning up the myriad little threads all over the back before sandwiching it. Even (and especially) sewing the binding to the back. I do love the process. I think part of the issue is that I feel like I should crank something out so I have “something” to write a post about. This was in the back of my mind but really, even though this blog is something I truly enjoy, I don’t want to be cranking out finishes just so I have a post. That doesn’t make any sense to me.

IMG_20150325_2988

After I got the quilting finished up, I was looking at it trying to decide how I wanted to bind it. I had enough of the fabric from the backing to use as binding but I was torn between using that and using the red fabric from the heart. Finally I remembered a post I had read a long while back over at Persimon Dreams. She had placed a very narrow flange on the quilt before binding it to add a pop of color. Yay-it was the perfect solution. I commented on that particular post and Kim was so kind to send me a quick email explaining how she did it. (So, actually part of this quilt was inspired by another but that’s ok. I want to give credit where credit is due.) Adding the flange took very little time and I think the effect it provides is wonderful.

IMG_20150325_2996


If you haven’t ever done a flange, it is very easy. I cut strips that were one inch wide of the contrasting red fabric. Then I sewed them together, just as one would with a binding strip. Fold it in half and press so you are left with a 1/2″ wide folded strip. (Kim used a 3/4″ strip ending up with a 3/8″ folded piece but I wanted something a little bit wider.) Once you have the flange prepared, attach it to the quilt’s raw edge on the top side. Sew it to the quilt using a VERY scant 1/4″ seam. I used a longer stitch (my Janome was set to 3.5 stitch length) which made attaching it a breeze. Then attach your binding as usual. Be sure to hand stitch the binding to the back. If you machine stitch it, those stitches will show on the flange. Easy peasy!  If you have any questions, let me know in the comments.

IMG_20150325_2989

Yep, this was a great finish and I will be gifting it to someone soon. That is the best part – giving it away and giving someone the joy of a cozy quilt. Hope the recipient loves it.

Linking to Sew Bittersweet Designs as this is my March finish for ALYOF. Yahoo for setting a goal (I had better plan my projects for April soon.) Also linking to Freemotion by the River and Let’s Bee Social.