
I spent yesterday afternoon playing in the sewing room. I had plenty of other things that I should have been working on. Namely, putting away the fall decorations and cleaning up so we can put up our Christmas tree this weekend. There is too much mess around here to create the mess that happens when we decorate the tree. But I just didn’t feel like it. Instead, I really wanted to play with the 16 bonus HST’s that resulted from the Swoon block mini that I made a couple of weeks ago.
The Swoon block is based on rectangles, HST’s and Flying Geese blocks. The best thing about Flying Geese blocks is the pile of ‘bonus’ HST’s that accumulate when you trim the corners on the block. If you aren’t familiar with this happy little prize, allow me to explain. Briefly, when the blocks are sewn to the upper right corner of the rectangle, creating the Flying Geese block, there is a corner that is cut off. If you take an extra second to sew a second seam, 1/2″ to the right of the first seam, you have the opportunity to have a ready made (albeit untrimmed) HST. I admit, I am not very careful when I do this. My feeling is that these are just little scraps that I am giving a second chance to possibly be used in a future project. I don’t mark the second line, I don’t even measure it. I just eyeball it and sew about 1/2″ from that first seam and slice it off. When I had finished the Swoon mini, I took the pile of HST’s and pressed them open. I looked at the smallest one – They were all approximately 2.5″ – and I squared them to the size of the smallest block. Then I had a pile of uniform HST’s. (If you can’t go with my very casual method or if you don’t understand what I am talking about, Bonnie Hunter has a nice tutorial on making the extra HST’s in a more precise manner. Take a look here.)
Look what I made yesterday. At 8 x 8″, it is a teeny tiny finish.
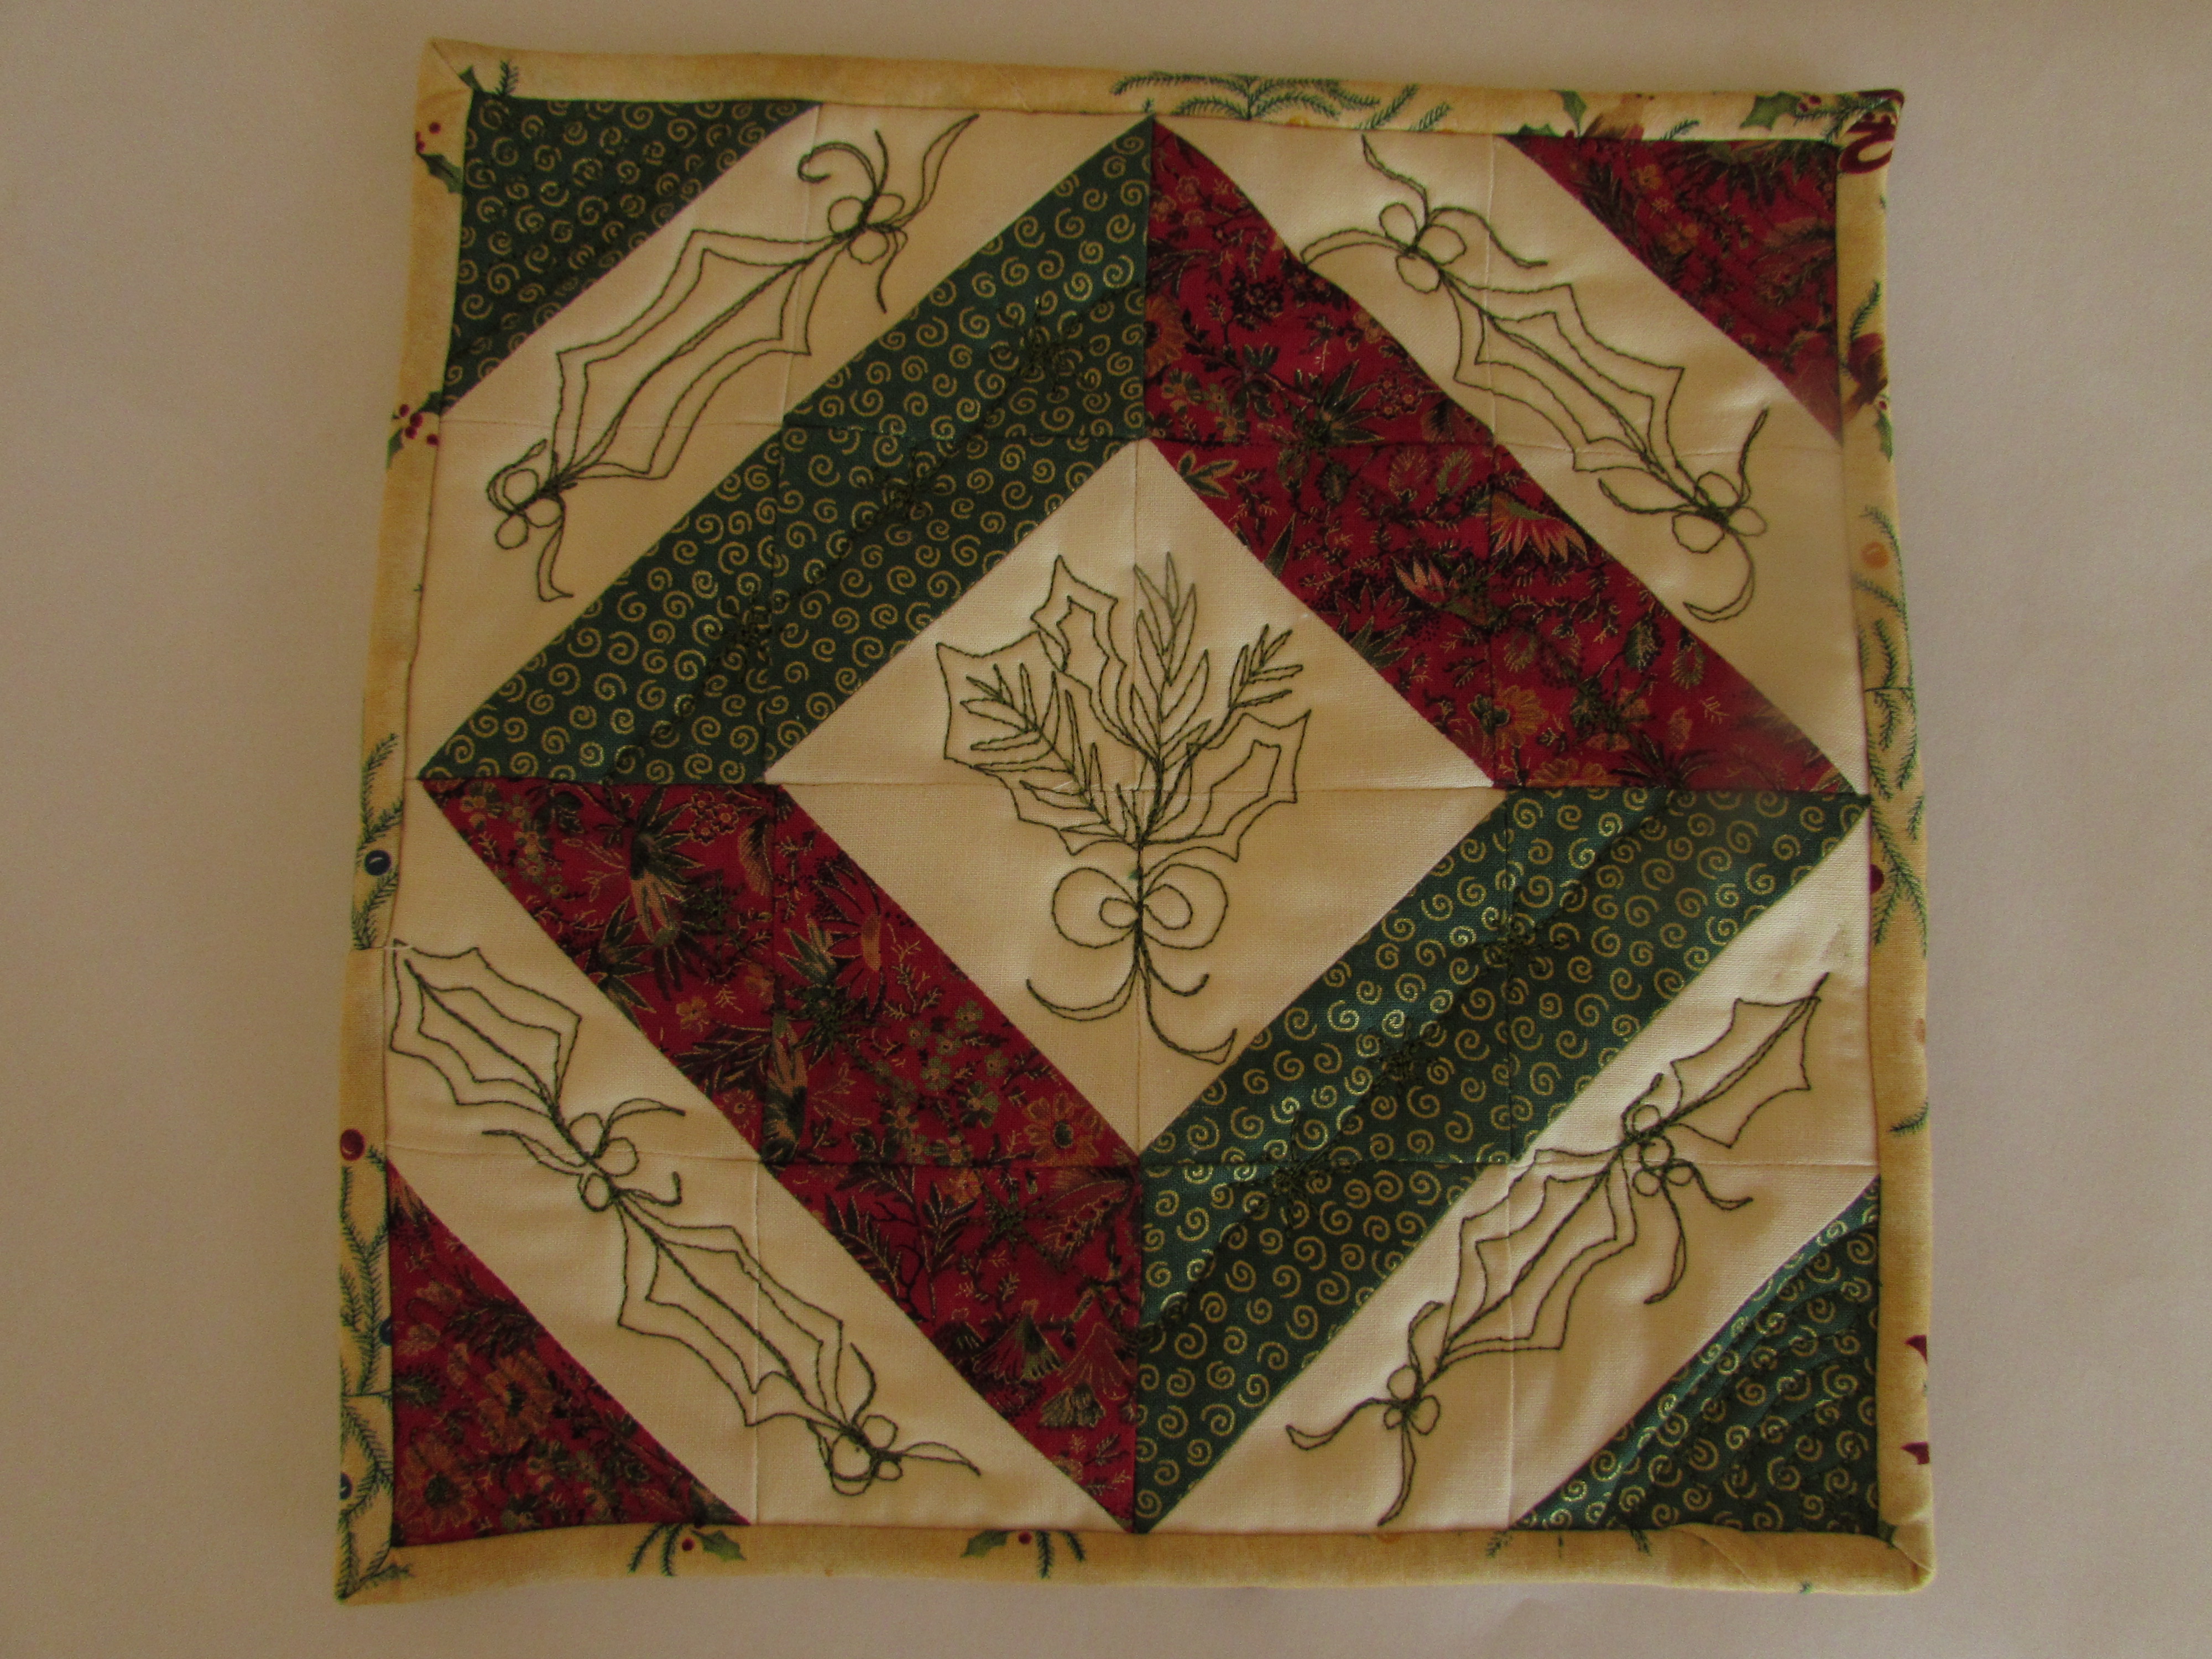
I spent a bit of time playing with the HST’s, trying different layouts. It is a bit like playing Tangrams. There is no limit to the number of ways to position the blocks. I didn’t want to actually make anymore so I limited myself to use the 16 that I had – no more, no less.
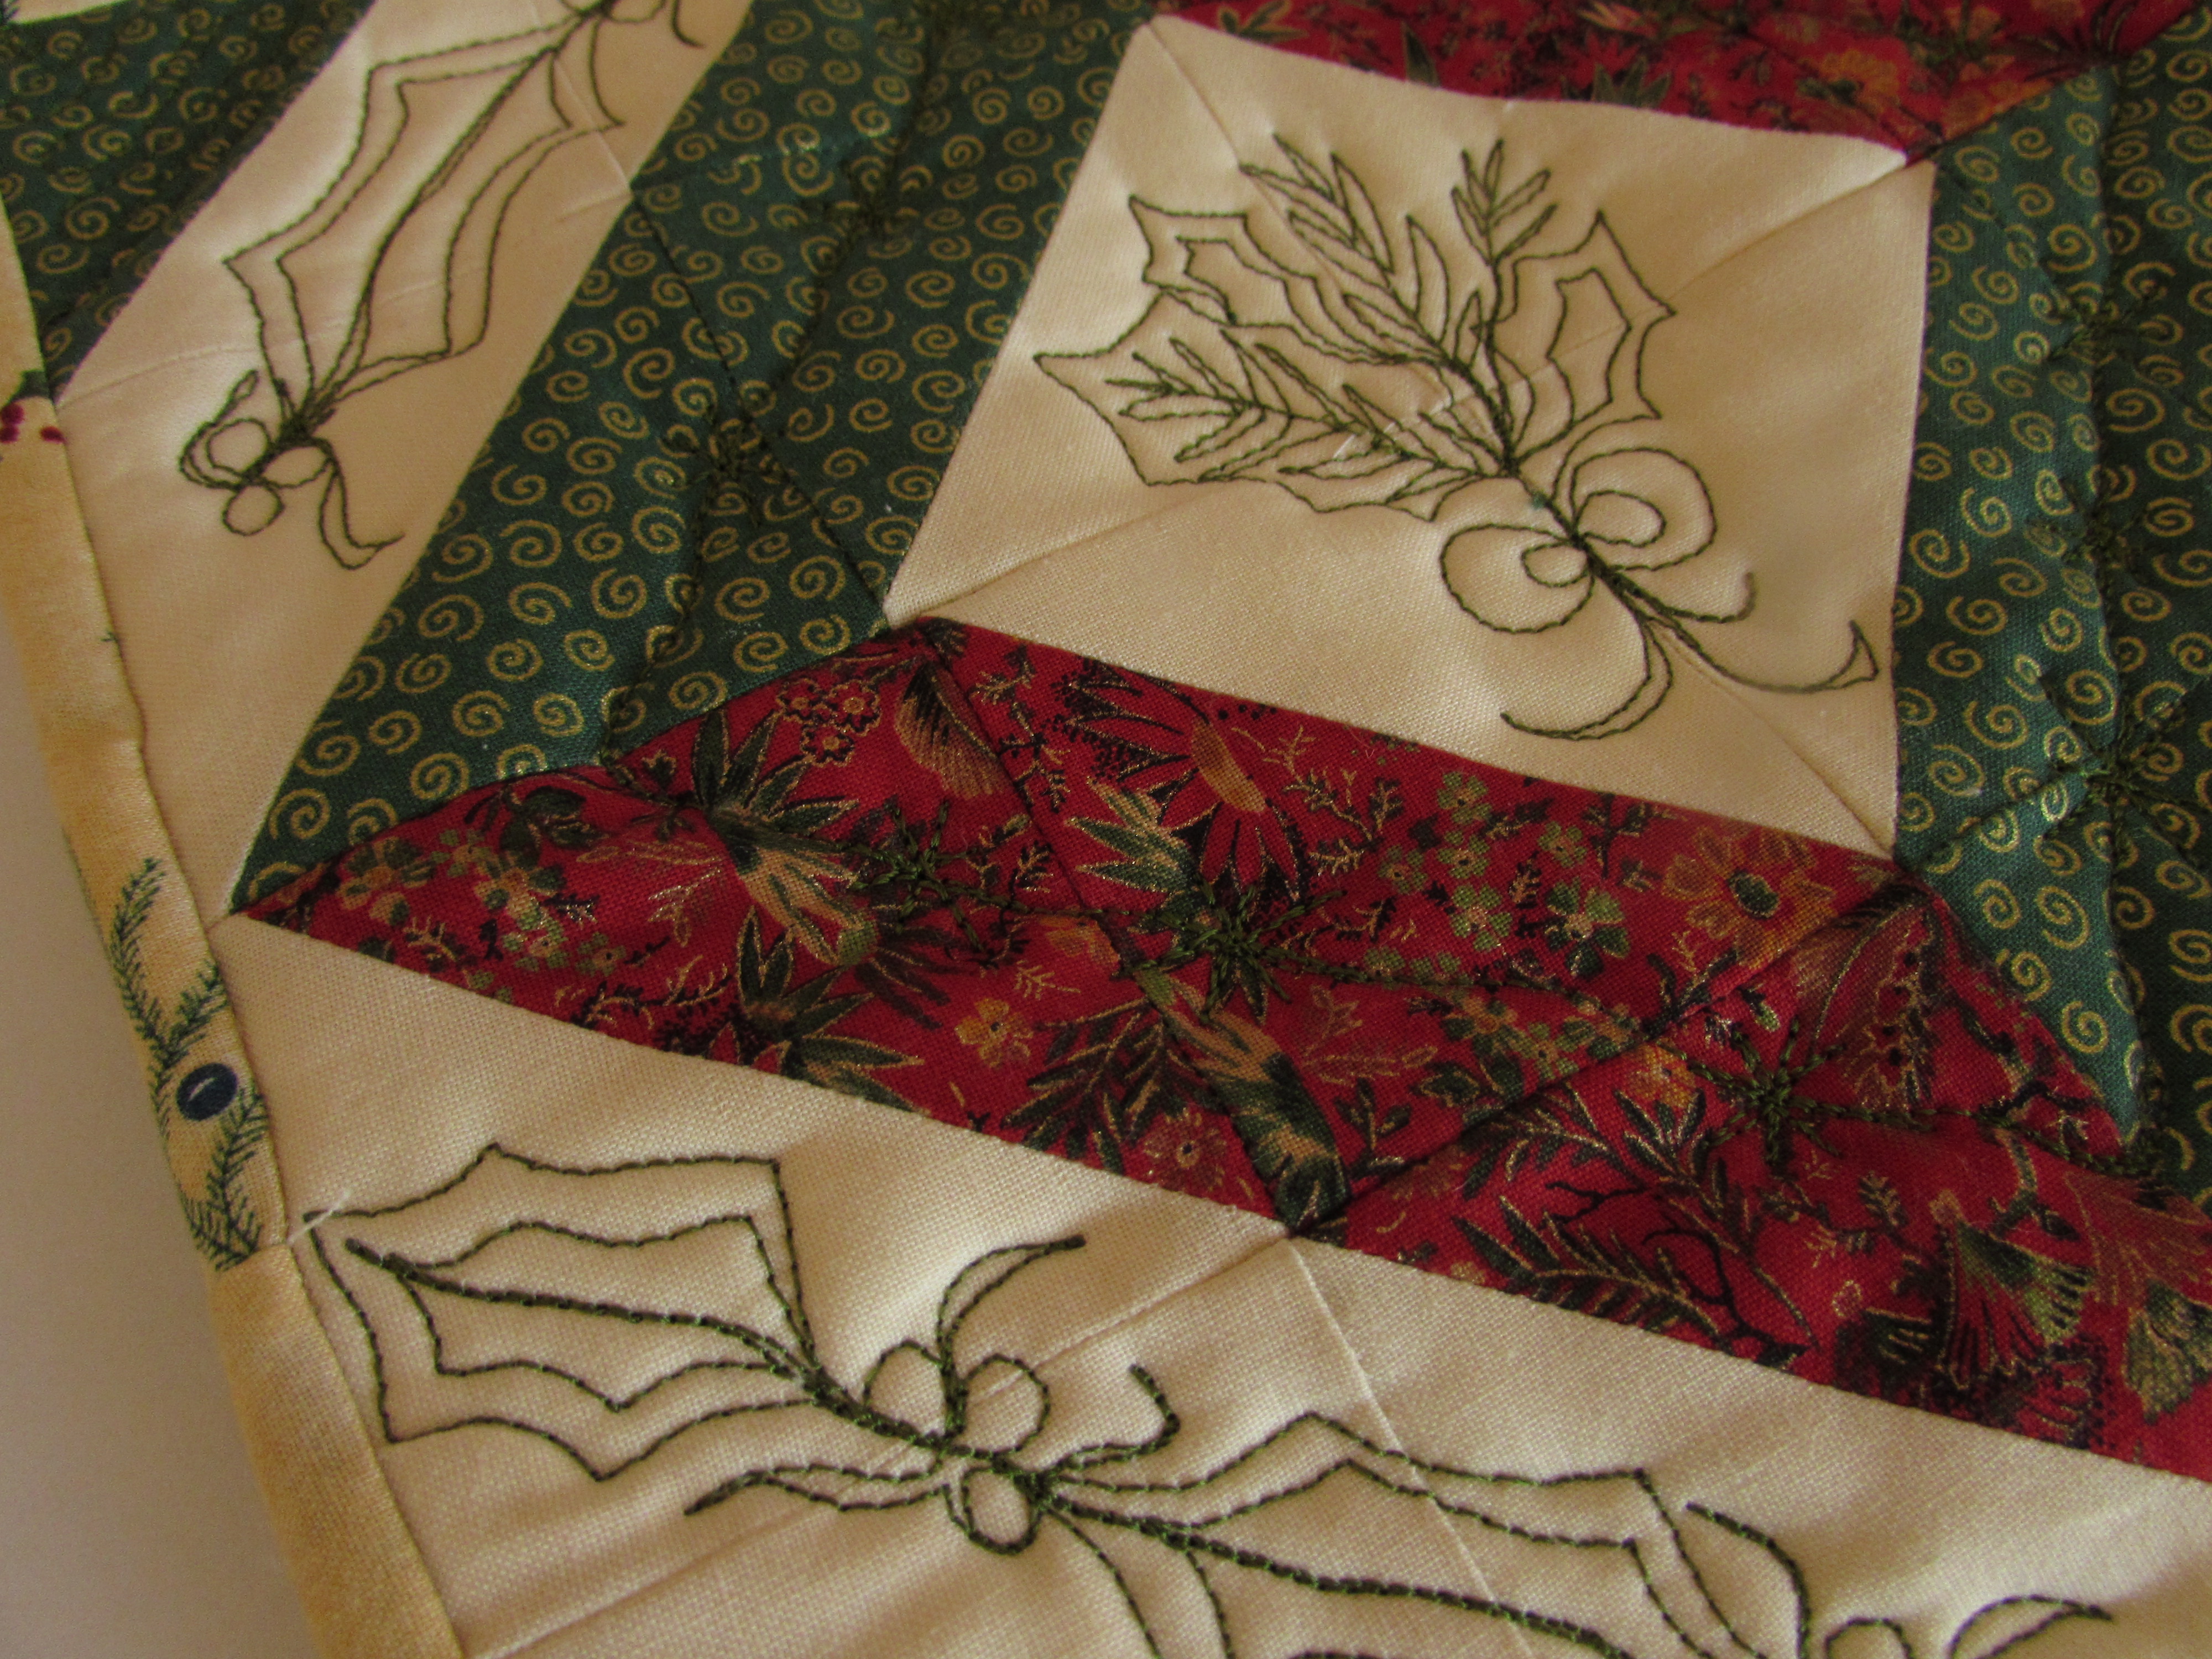
Once I had them sewn together, I decided to practice some FMQ with the little piece. Going to my usual sources, Pinterest, Leah Day, and Lori Kennedy, I found a holly motif that I liked. Here is the link to the tutorial on Lori’s site, The Inbox Jaunt.
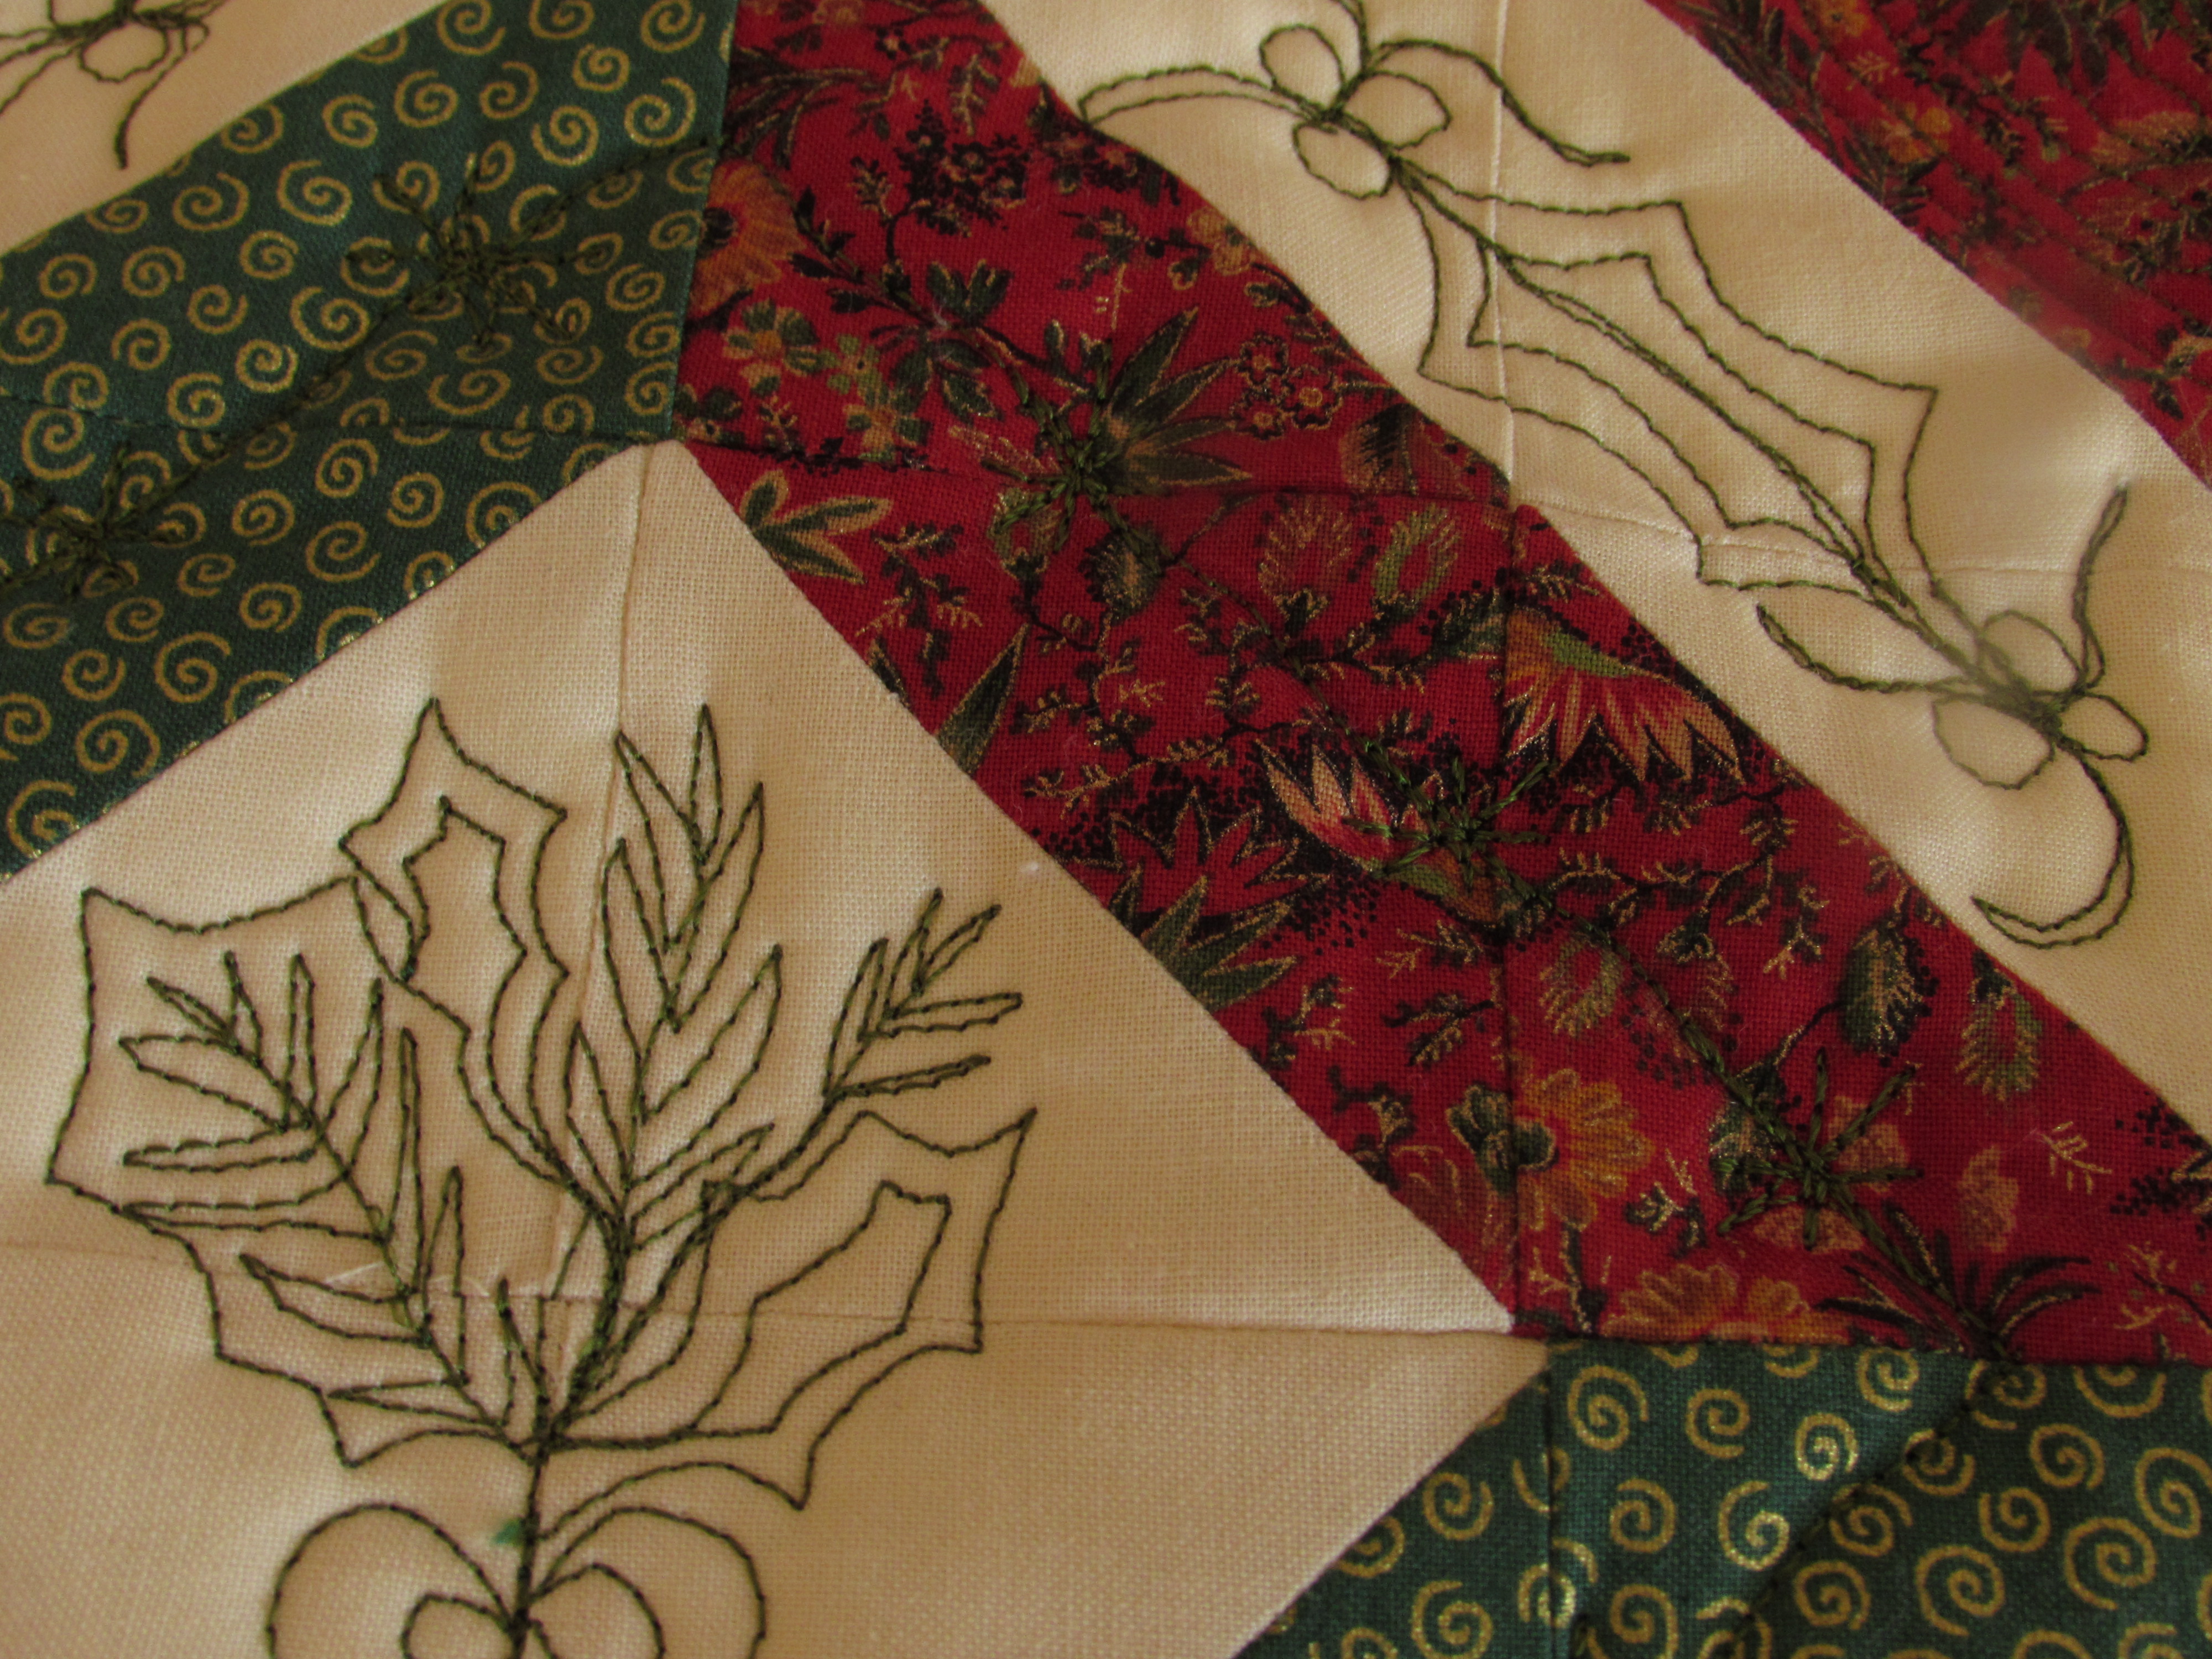
Two things made quilting this a challenge. One is that I used two layers Insul Bright batting scraps inside of this in case I wanted to use it as a hot pad or a trivet on my dining room table. The Insul Bright was a bit annoying to quilt through, especially a double layer. Second, I decided to use Sulky thread on top and I put Mettler in the bobbin. I love Sulky threads – so shiny and glossy. But also a bit slippery soI had to play with the tension to get it right.
Overall, the little hot pad is pretty cute. The FMQ is a bit rough. The bow at the bottom of the holly in the center is an eyesore but obviously not enough that I was willing to take the time to rip the stitches out. (It is a hot pad after all.) I haven’t practiced free motion quilting for a long while so it was fun to play with this. I am ever thankful to Lori’s site for the endless FMQ tutorials. I love that she has so many seasonal themes. It is very fun to play with them.

Finally, I wanted to point out something that took me by surprise. I used a scrap of holiday fabric for the back. After I was done and it was trimmed and ready for binding, I was digging through my scraps and found a few more pieces of the backing fabric to use as binding. There was barely enough. I had to cut narrow 2″ strips which were a trick to use – the quilt sandwich being extra thick from the Insul Bright. Anyway… come on Bernie and get to the point. As I stitched the binding down on the back, the folded binding matched up with the backing quite closely at one point.

Isn’t that cute? The holly just about matched up, as did the little bird. Nothing earth shattering but it is a fun coincidence. (Doesn’t take much to amuse me!) There you have it, my second finish this week!
Is your tree up (if you are a Christmas-tree-decorating person)? How about lights outside on the house? I am hoping Ray will put ours up this weekend. I think the outdoor lights are one of my favorite parts of the season and I leave them up as long as possible.
Linking to Amanda Jean at Crazy Mom Quilts and Lizzie at Free Motion Mavericks.
Wow, that’s some pretty good fmqing. and beautiful rich colors.
Thank you Linda. I really like the colors. The stitching needs work but I won’t get any better unless I keep practicing. I appreciate your sweet comment.
Enjoy your weekend!
It’s darling! What a fun way to play in your sewing room. Love the “fun coincidence”.
We have a wreath on the front door, and other than pulling out some of my Pfaltzgraff Winterberry glasses and Irish coffee glass mugs (we never actually use any of it), that’s it for this year.
Hi Linda,
That was a pretty unlikely match on the back of this project. I was watching tv and stitching the binding down and had to smile when I got to that point. I couldn’t have done it as closely if I had actually tried.
Enjoy the weekend!
What a neat idea to use the double batting and make this into a hot pad. I like everything about it–the FMQ the use of bonus triangles, just enough of the backing fabric to make the binding–and of course the little match-up between the binding and the backing. Totally worth the extra effort to sew through all those layers! Have fun with it on your table! My decs are all up. Now the challenge will be to keep my sewing mess to a minimum so I don’t end up cluttering all the holiday goodness away.
Thanks. I love to practice FMQ and always feel like I should be able to make something out of it. This project was so tiny tho that I didn’t get very much practice in. A better idea would be to stitch batting scraps together, sandwich it with ugly fabric (and you know it is hidden in my stash… there is plenty), FMQ the heck out of it and then toss it. I think my skills would greatly improve with more practice.
Tomorrow is tree decorating day! Have a nice weekend Janine.
I think your mini quilt looks great, and I especially like your holly inspired quilting. And happy coincidences like the binding matching the print make my day when I notice them, too.
Beautiful Bernie. So pleasing to the winter soul.
Thank you Vickie. What a sweet phrase – pleasing to the winter soul. I love that.
It turned out so beautiful!!!
Thank you Denise. I appreciate your kindness. Have a wonderful week.
Tiny but useful! It looks terrific. I think your fmq skills are already great, but if you think you need more practice we’ll enjoy the eye candy! Have a great weekend!
Hi Mari,
There is always room for improvement – I need to focus on this more because I really like that part of the process. Maybe that should be a focus for the new year. (A much more pleasant resolution than say…. lose weight or exercise!)
Happy Monday! Are you giving finals this week??
B.
Hello Bernie,
I’m all for quick projects and tiny finishes at this time of the year. The holly FMQ is so pretty and seasonal, and you have reminded me about a little box of HSTs I should get round to using…
Thank you for linking up with Free Motion Mavericks!
Love, Muv
Thank you Muv! Enjoy your day.
–Bernie