Tag Archives: charm squares

It’s All About Color

That’s the truth, right? If the colors don’t work, the quilt doesn’t work. This has happened to me more than I like to think about. Color doesn’t just happen. So, this month’s Might Lucky Quilting Club challenge resonated with me. Taught by Amanda Jean Nyberg of Crazy Mom Quilts (which I know you already knew!) the lesson is all about color, scale and value. At the risk of repeating myself, I have great admiration for Amanda’s sense of color, her use of every.single.scrap of fabric  and her down to earth style of communicating. Her blog is one of the first that sucked me into this awesome on-line community.

I joined the Might Lucky club in January and I will be honest with you. I am not thrilled with it. I was hoping the monthly lessons would speak to me – some did, but most? Not so much, until this month. This month Amanda explains selecting colors, working with value and scale, and making the quilt more interesting. It made sense to me. I am only beginning to play with her ideas.

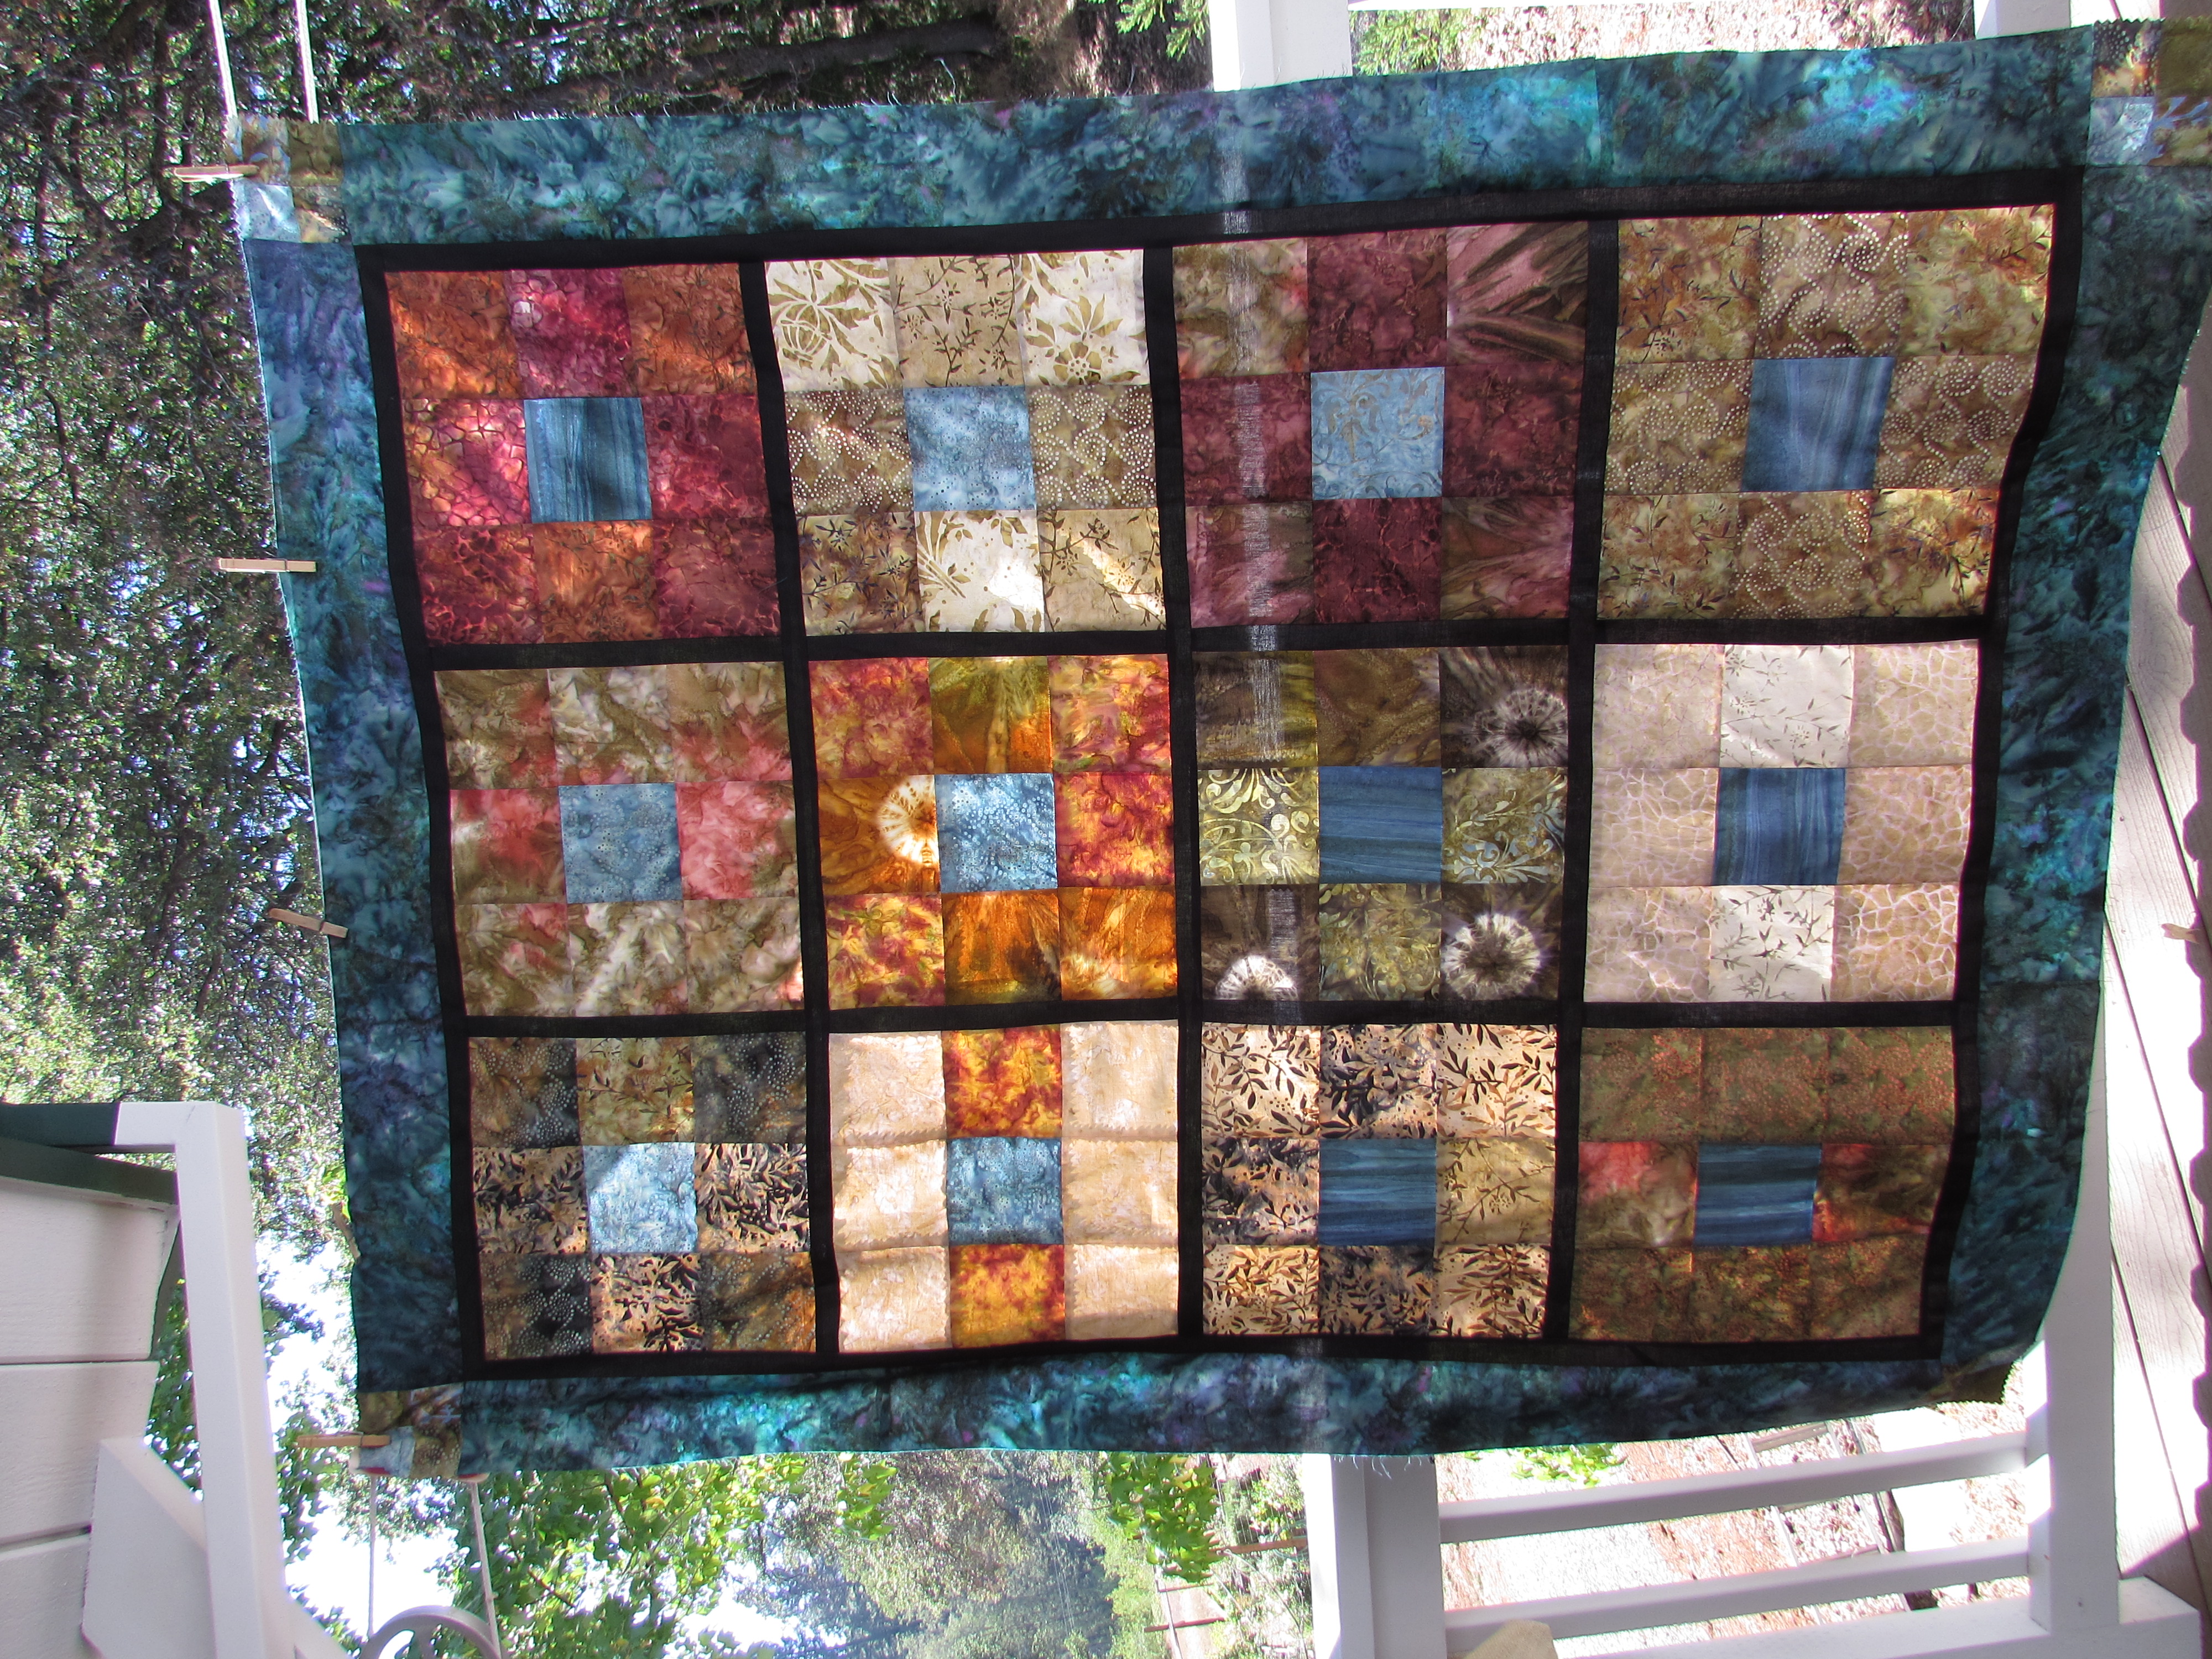
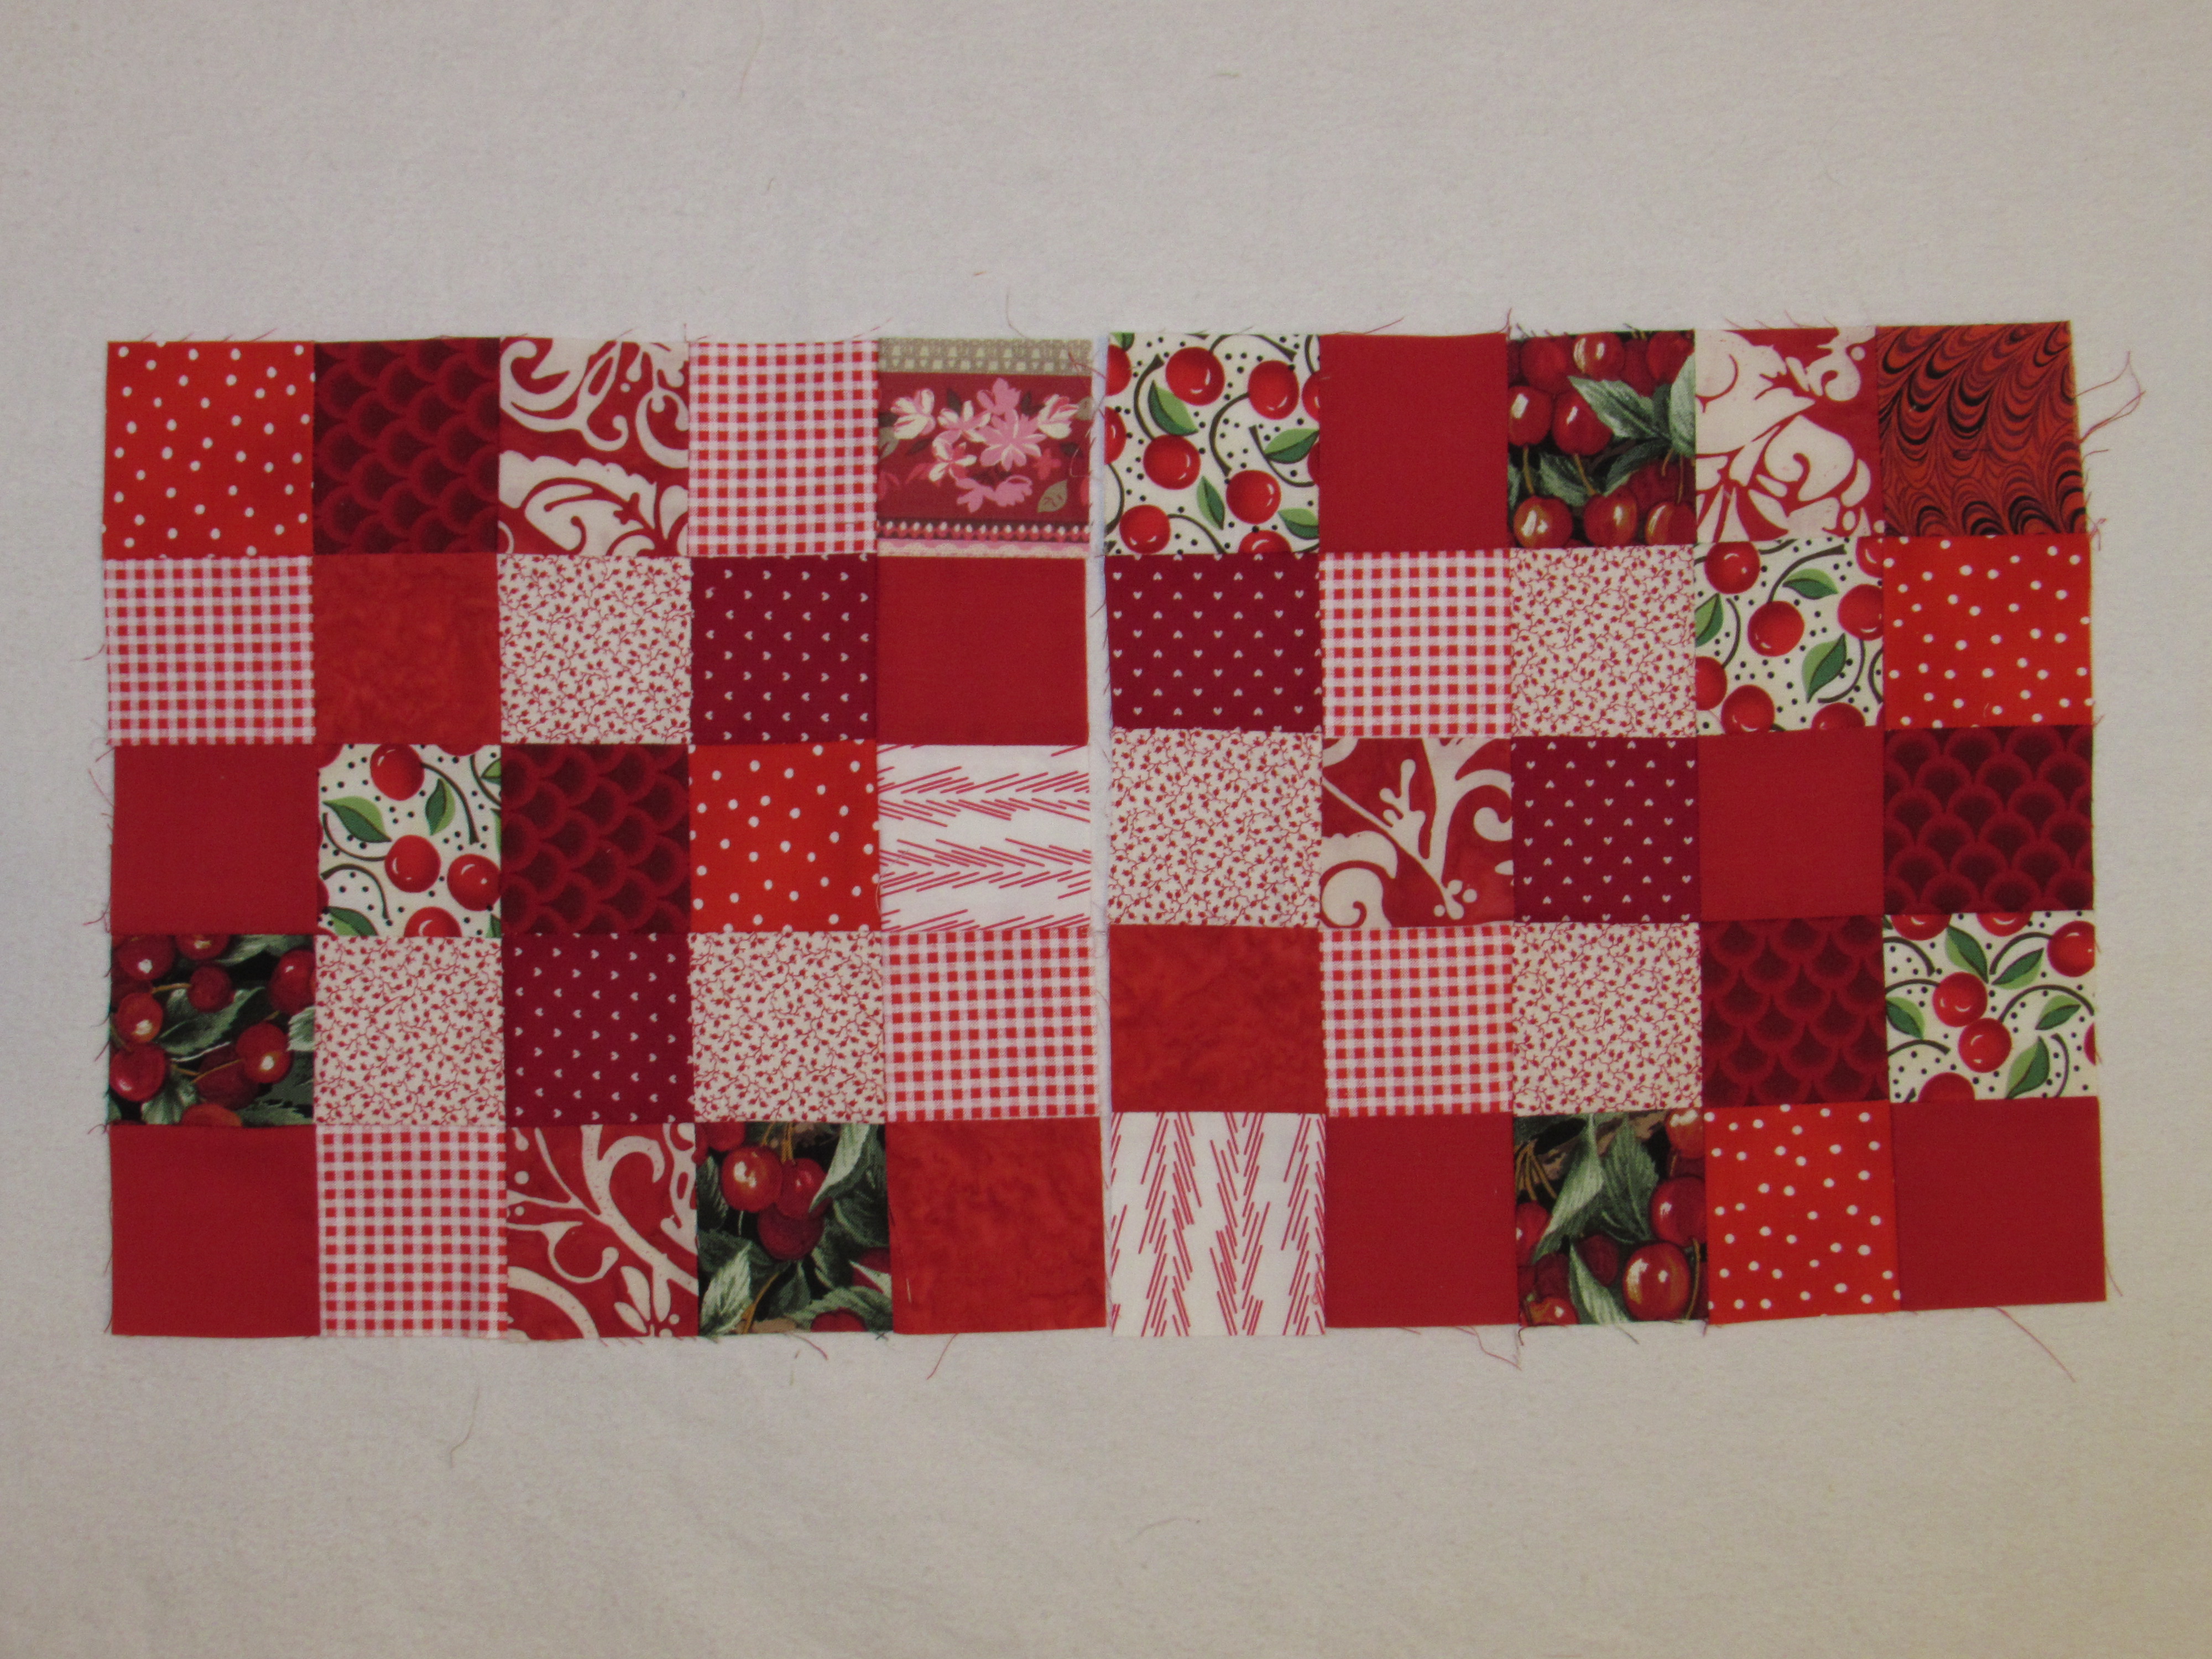
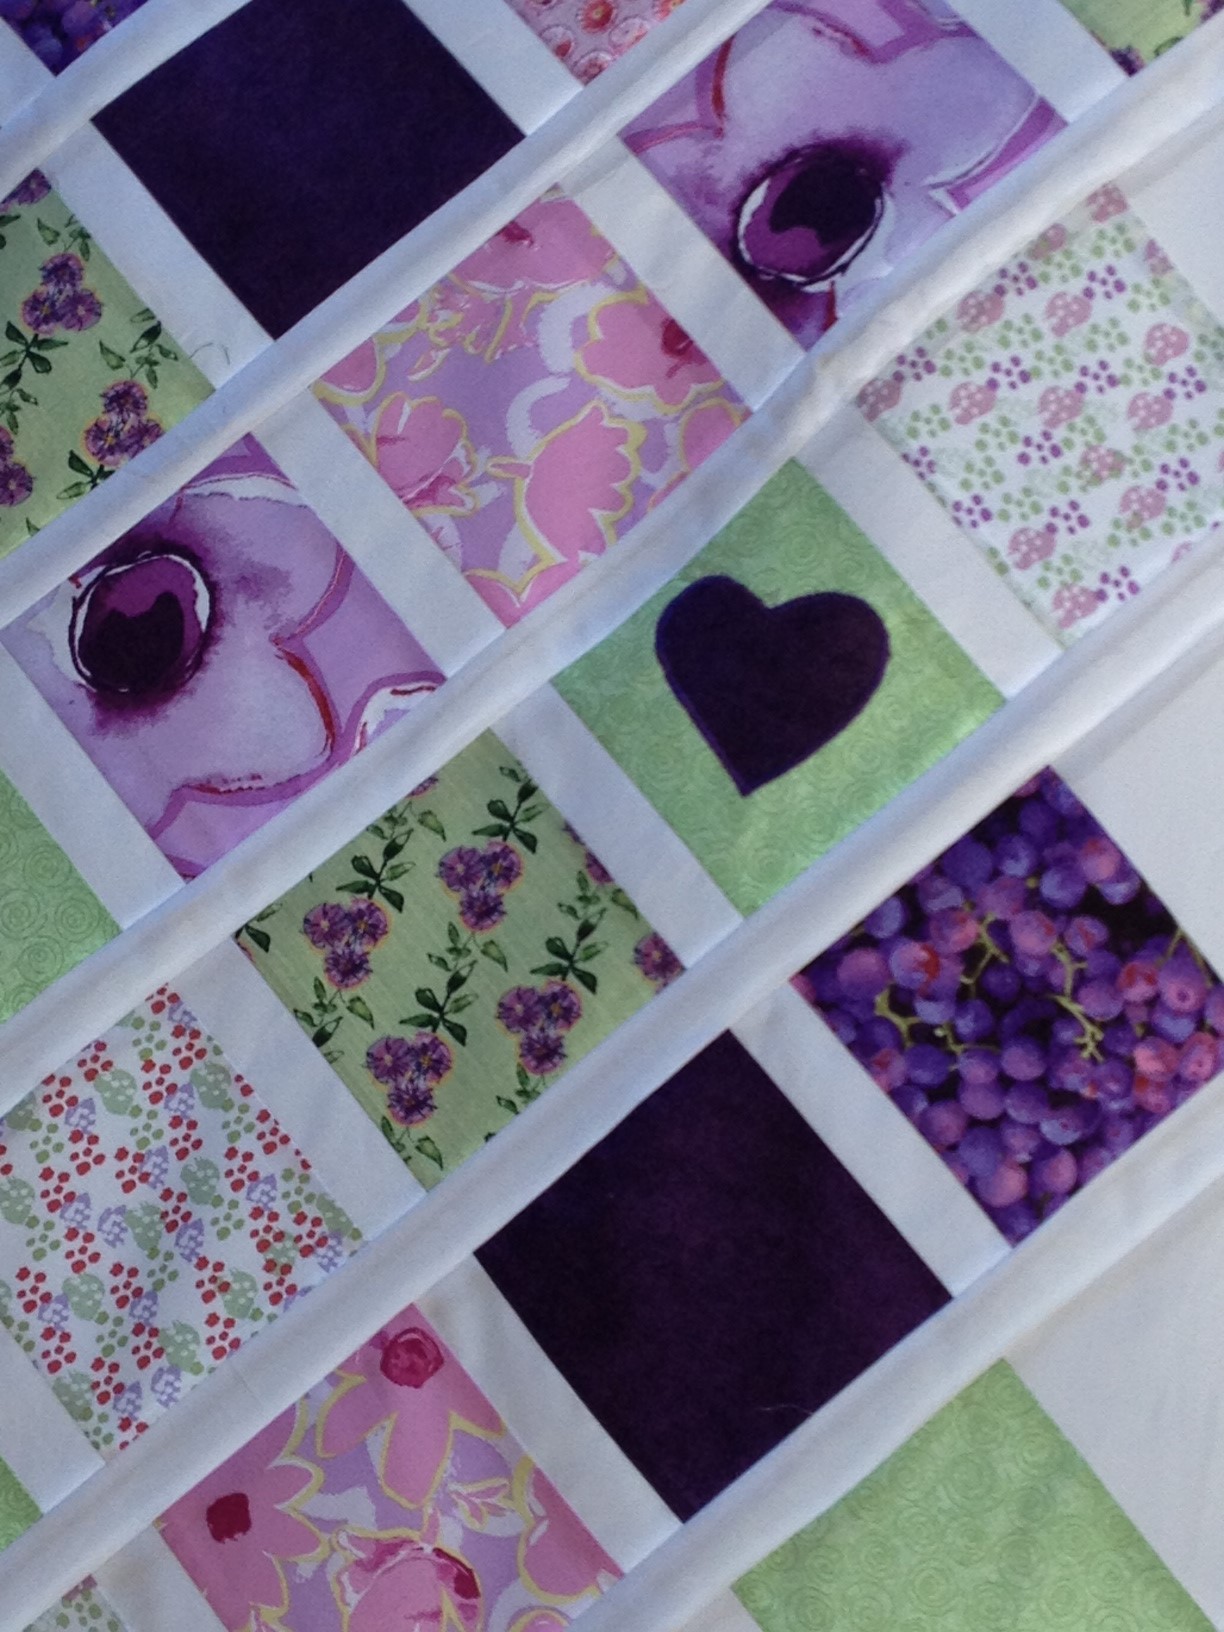
I have a huge collection of charm squares. Some I have purchased, some were cut from my scraps, and some have been won in giveaways. One collection that I have been holding on to is the Michael Miller Gem Tones pack. I received this one for free from Alyssa at Pile O’ Fabric. Last year, over Thanksgiving weekend, Alyssa had a huge Black Friday sale. I ordered a number of basics from her. Somehow her inventory was off and there were a number of items I ordered that she couldn’t ship to me. (She was also hugely pregnant at the time and having a tough pregnancy – just to further explain.) She kindly refunded my money on the items that were not available and then threw in this charm pack – which was above and beyond, right? I liked the colors in it, mostly deep jewel tones with the addition of some orange and brown. It was quite bold. But there were thirty charms total and I had only one pack.

Reading Amanda’s lesson, I decided to start pulling from my other charm squares and build out the collection.

img_7992
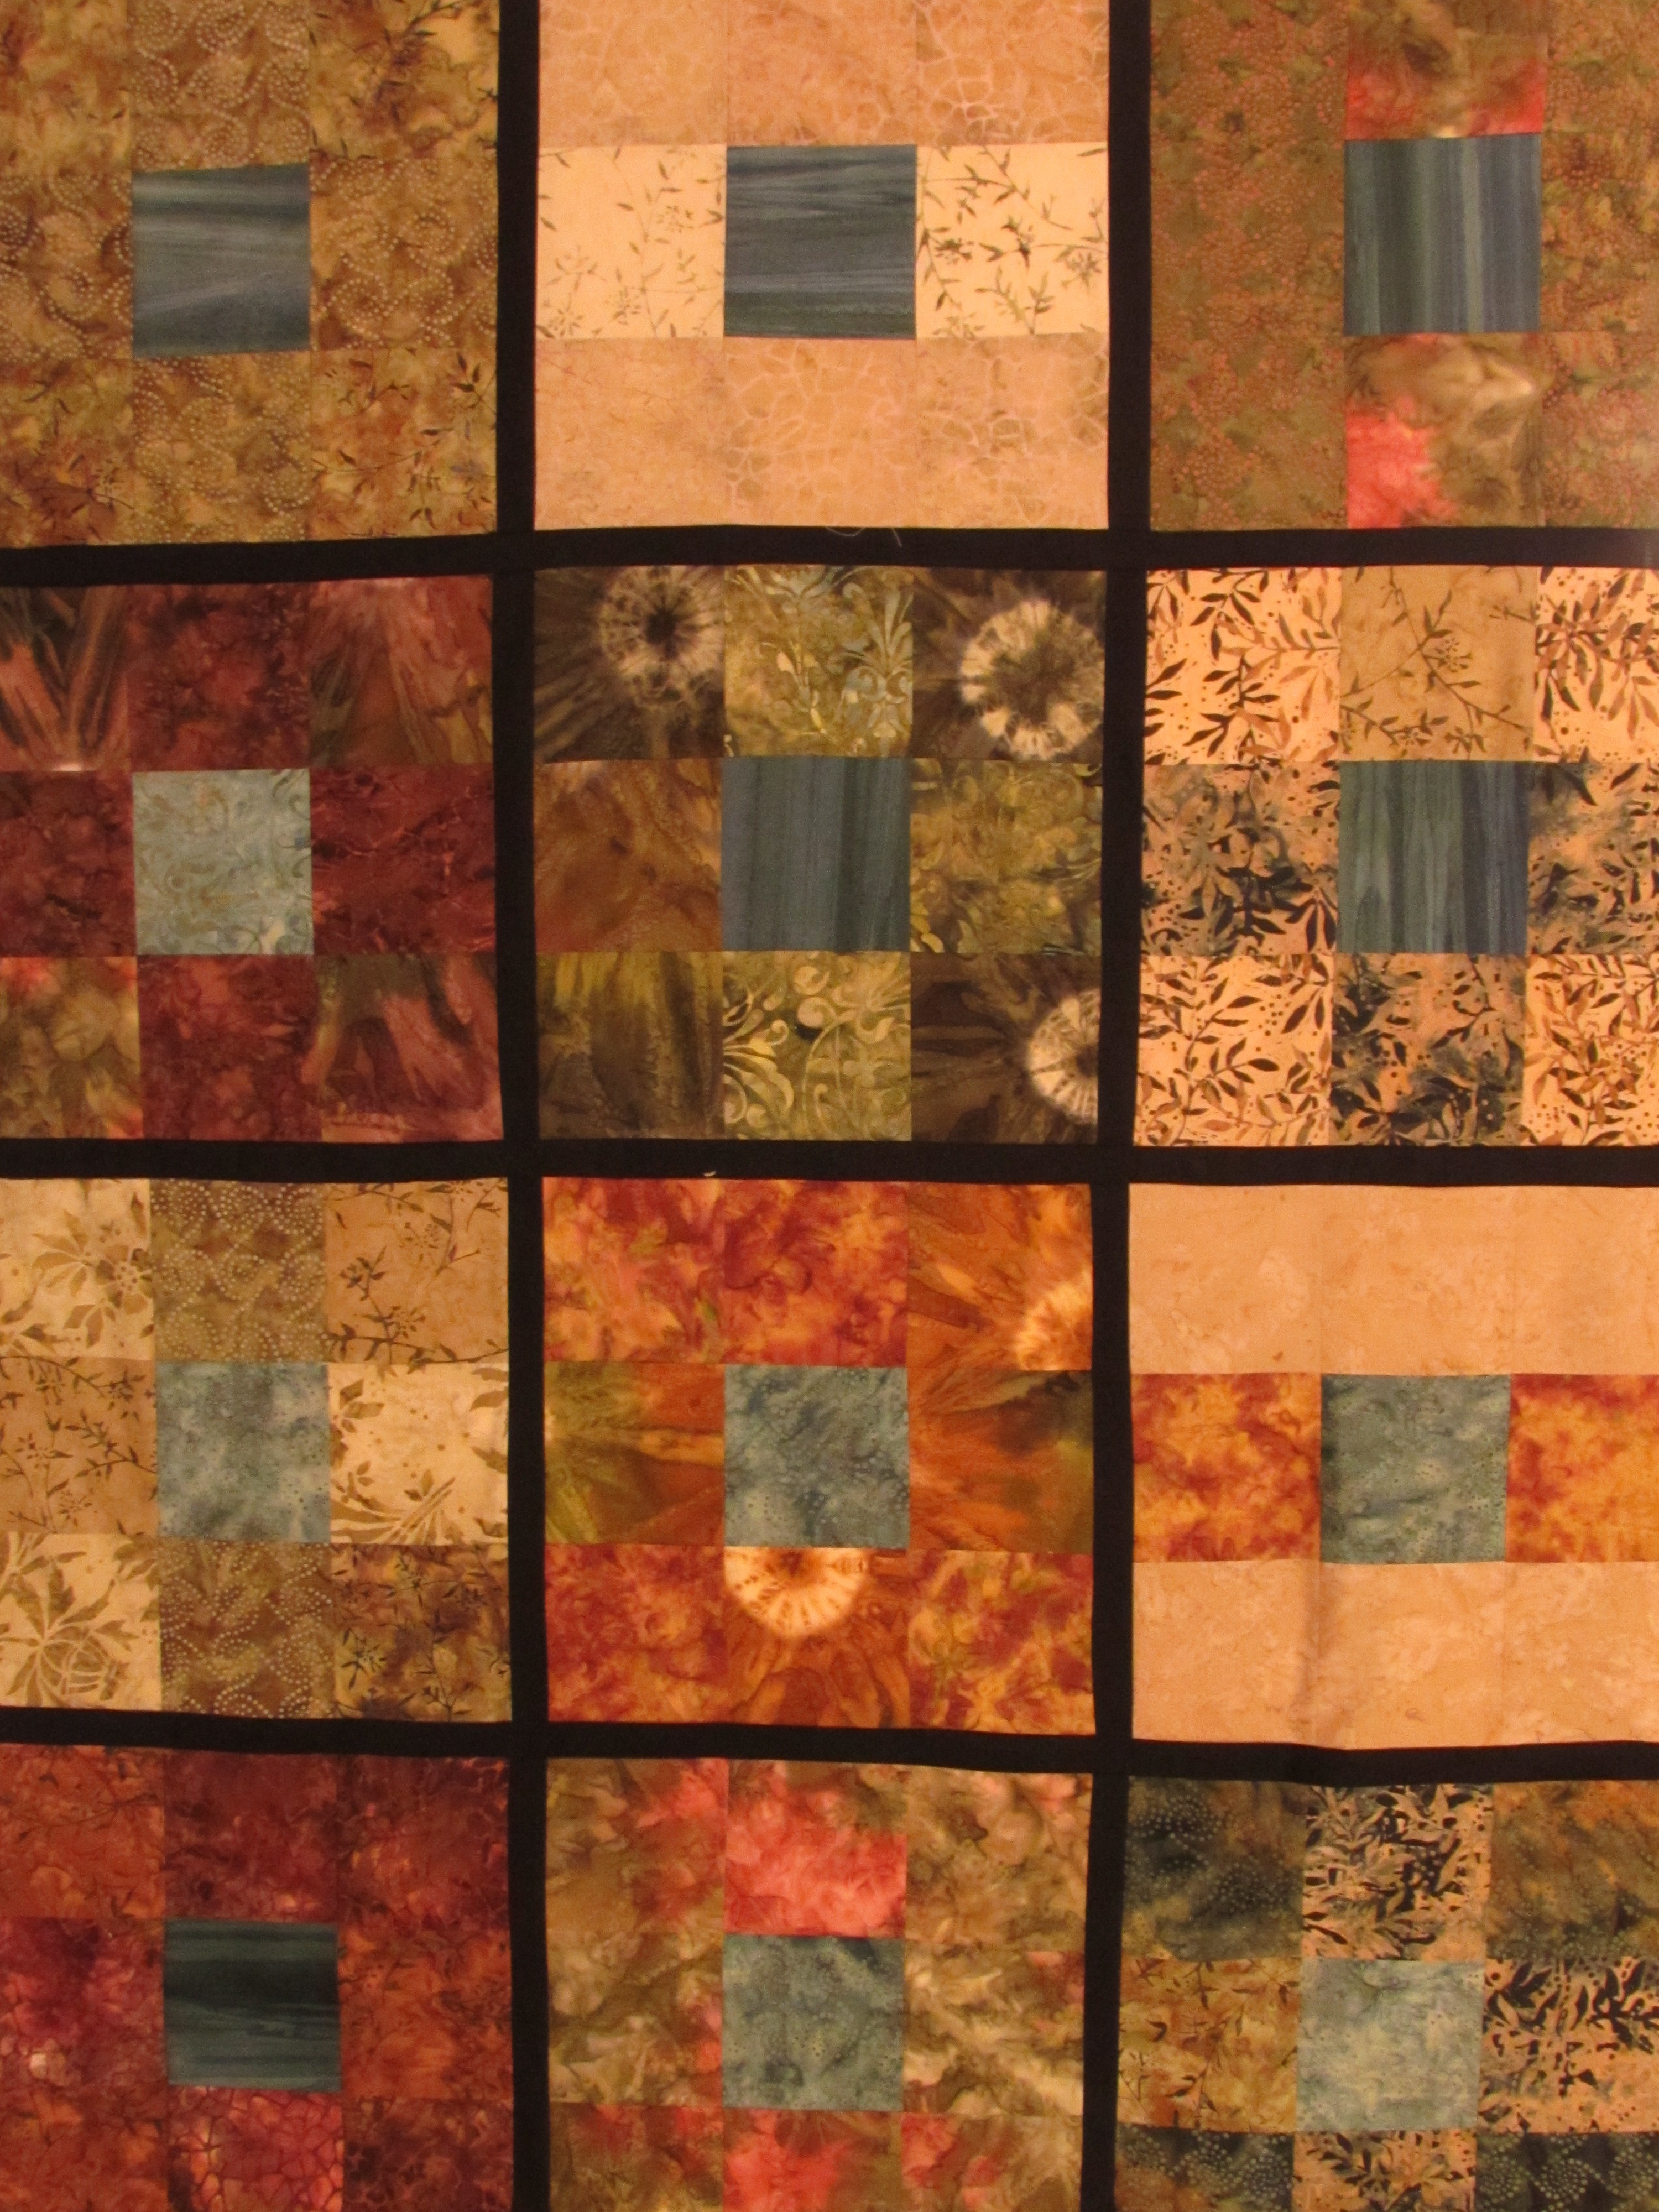
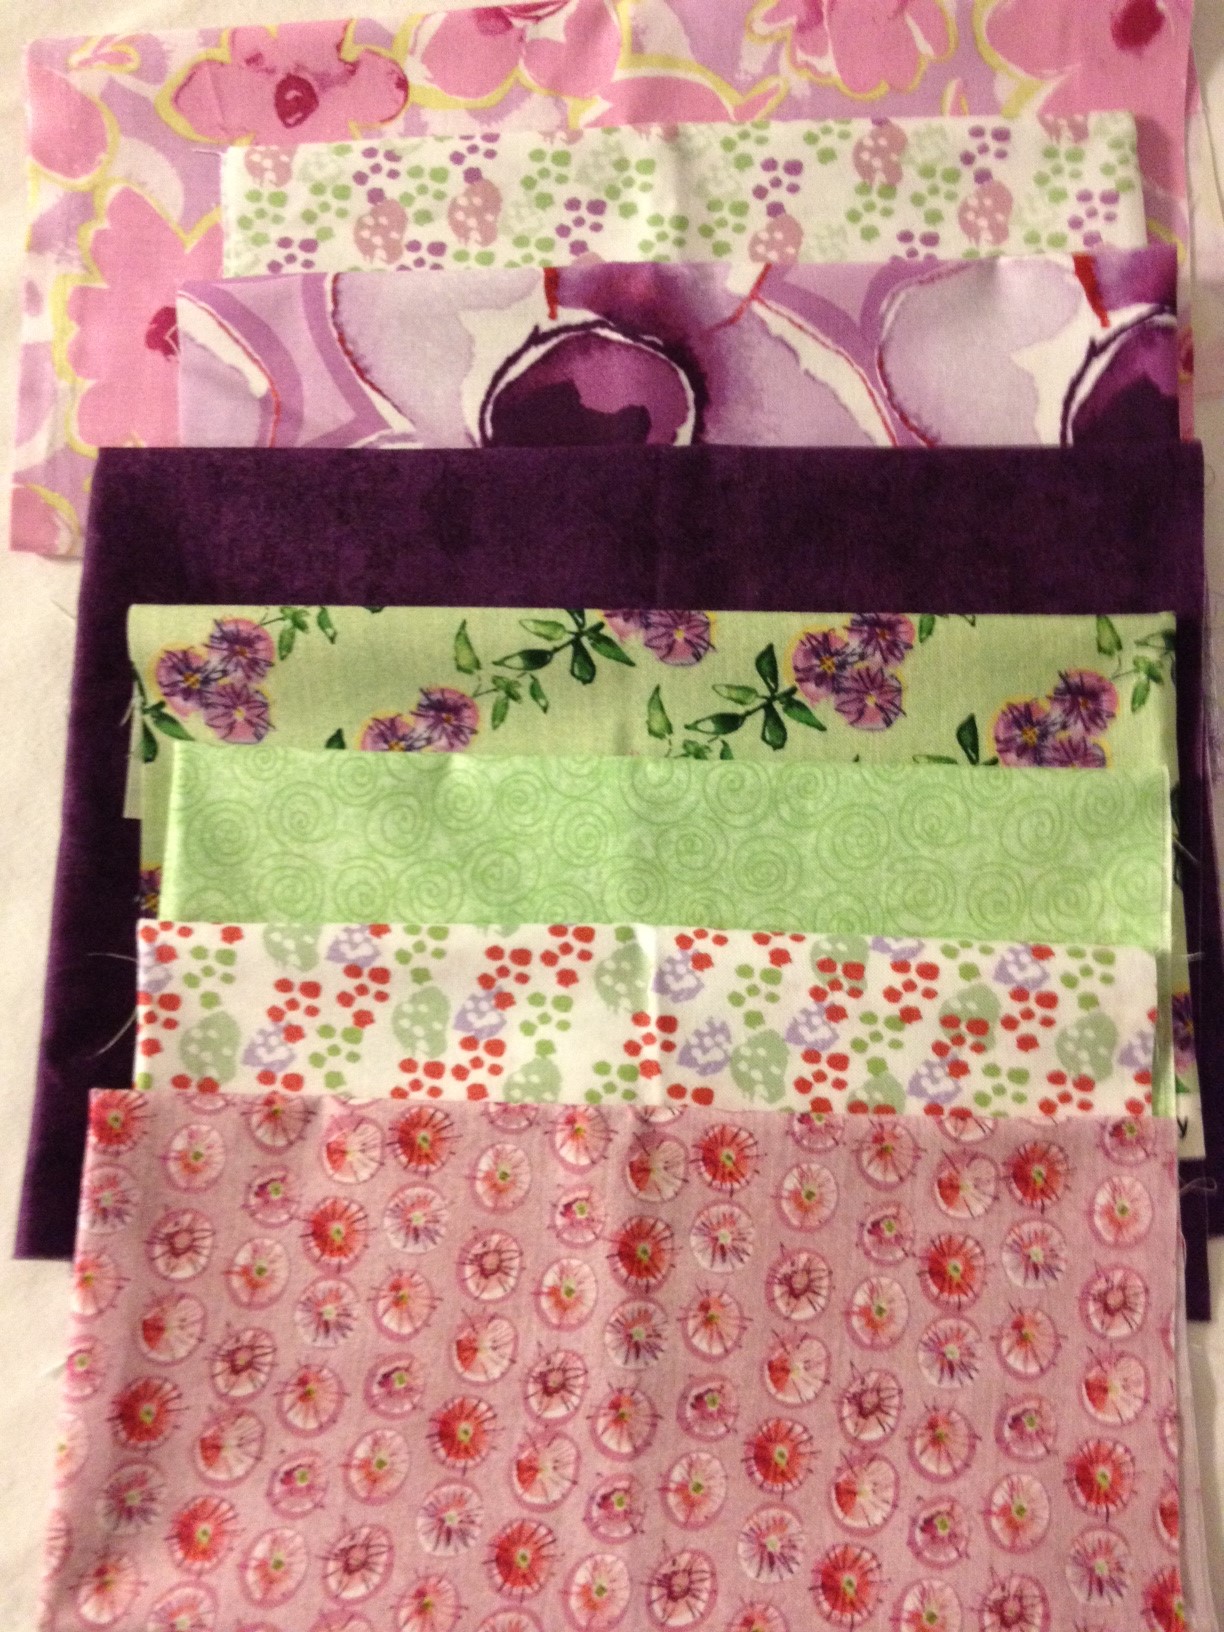
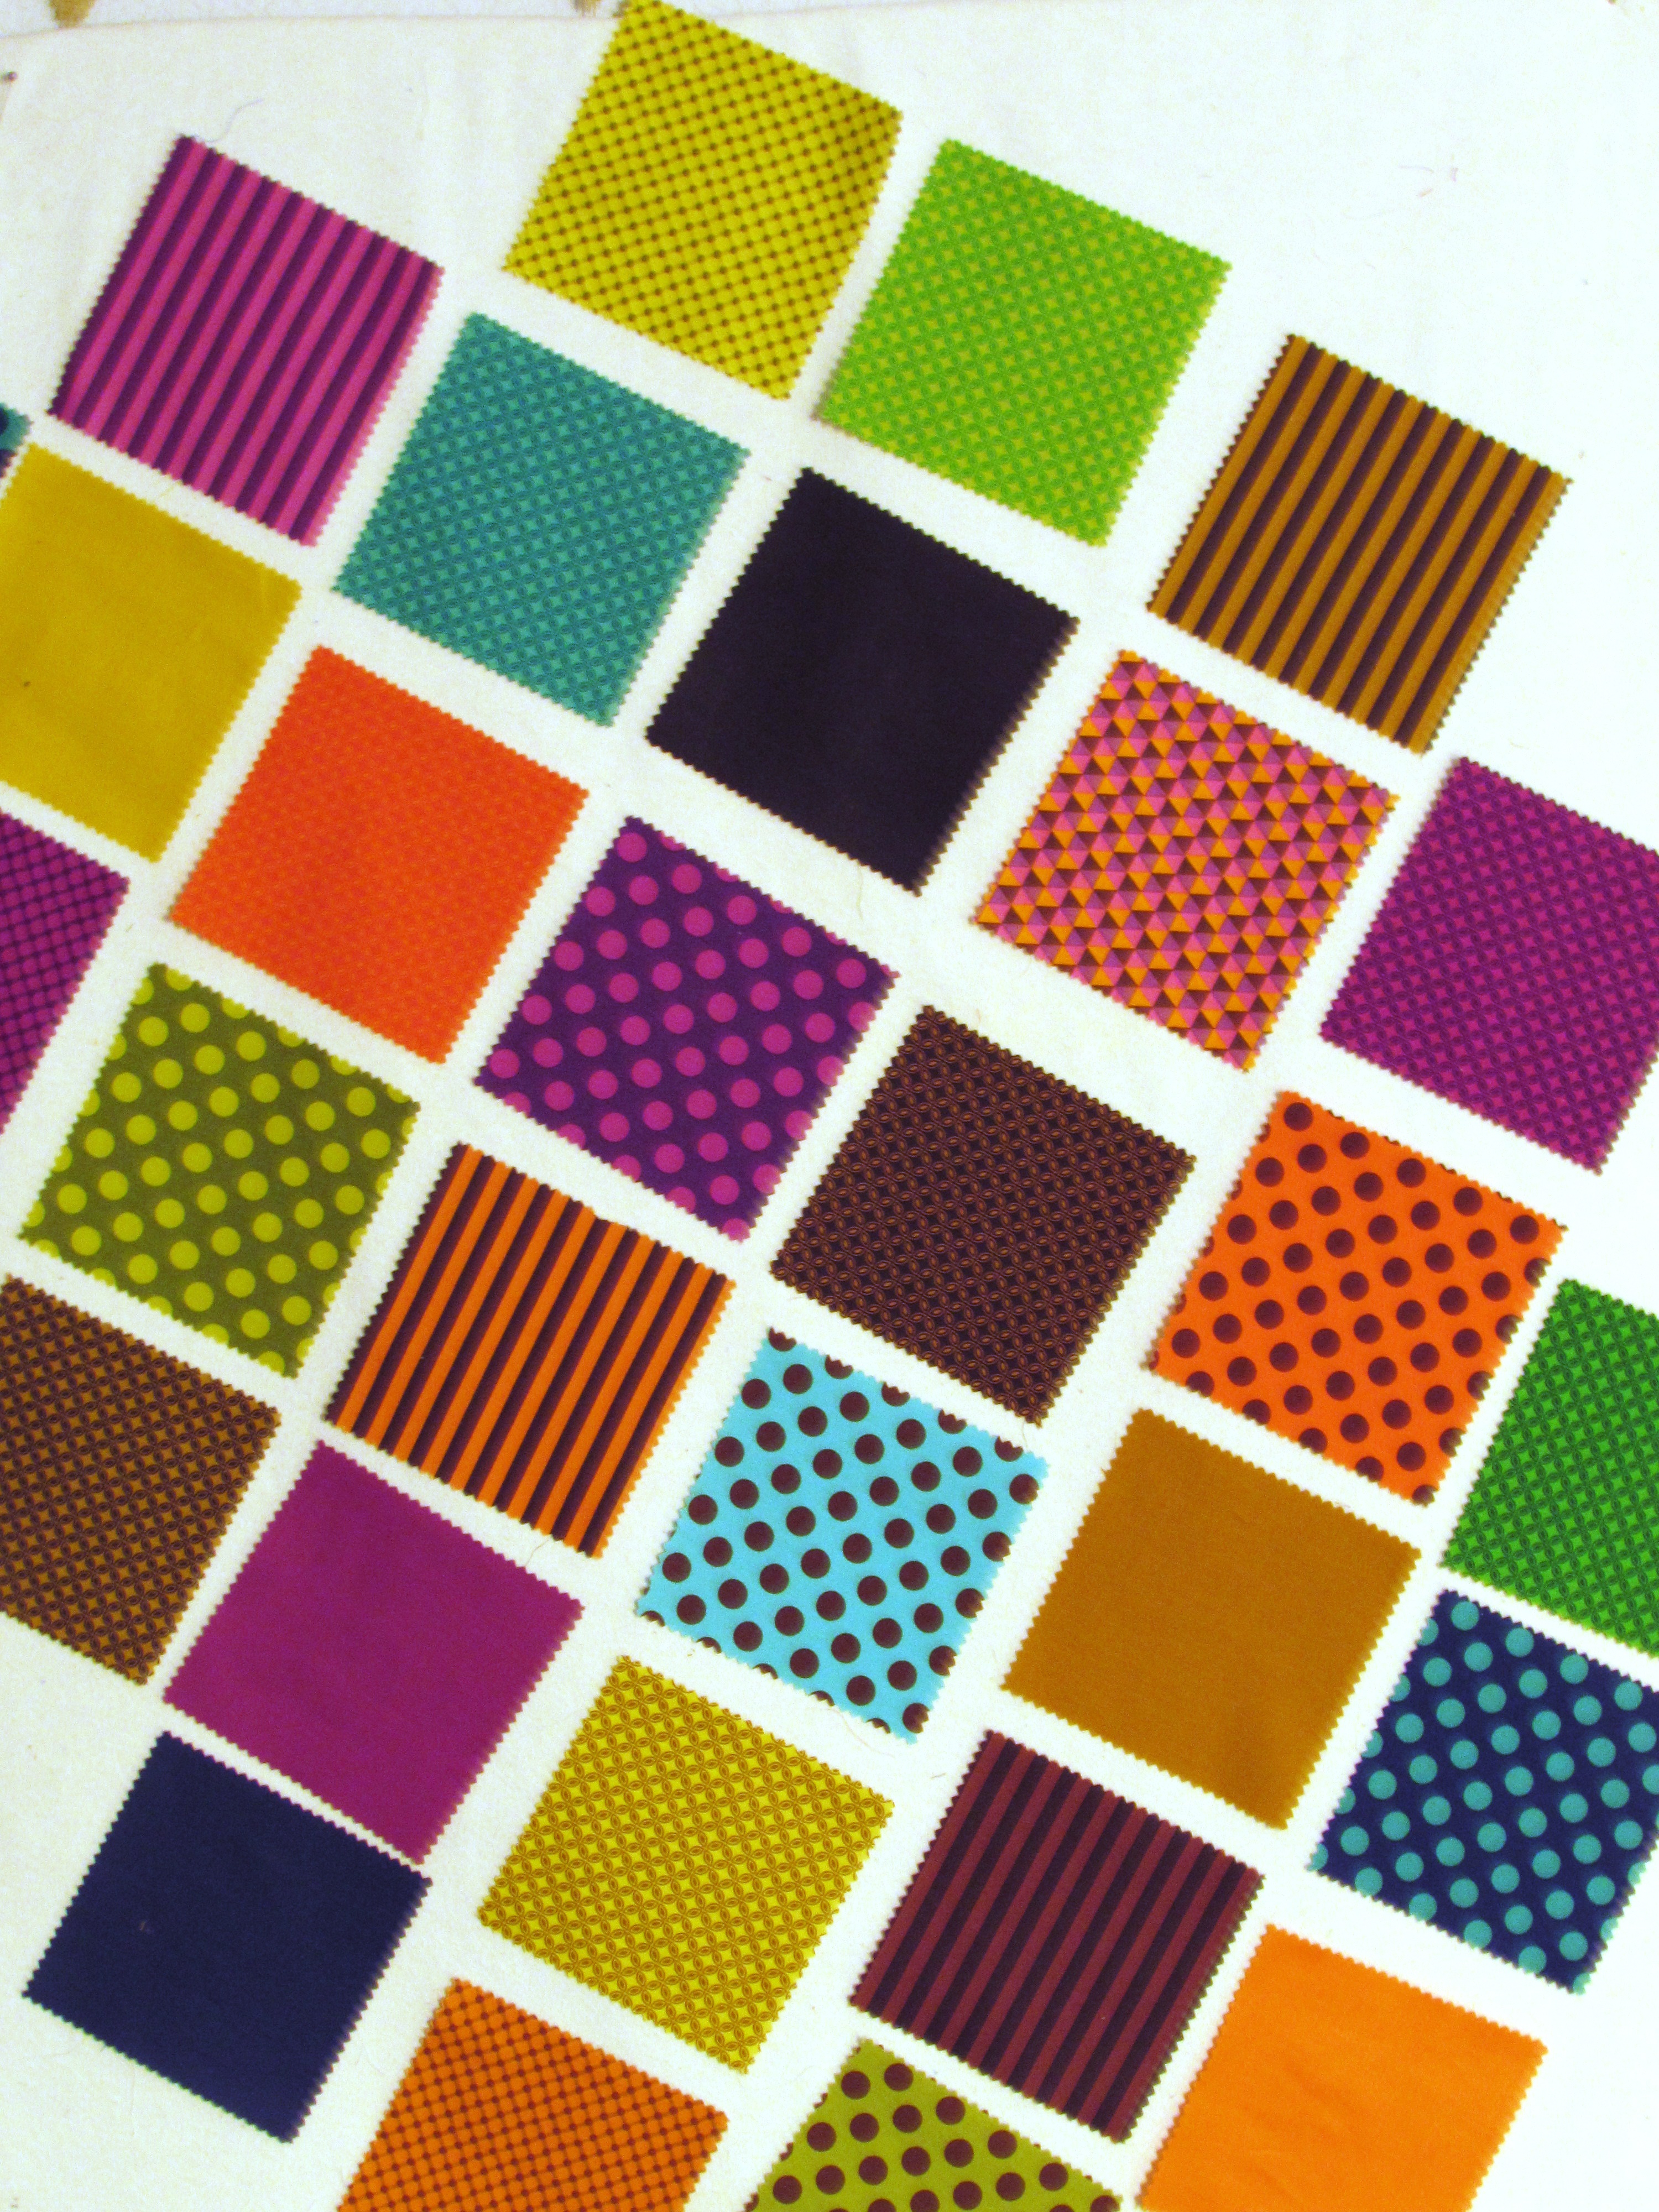
Above is the original set of charms. I apologize – this photo is blurred and I didn’t see that until it was too late. Whoops. It is a nice set – good colors, but all seem similar in value (light vs medium vs dark) I pulled all sorts of other charms to see what else I could add in.

img_7993

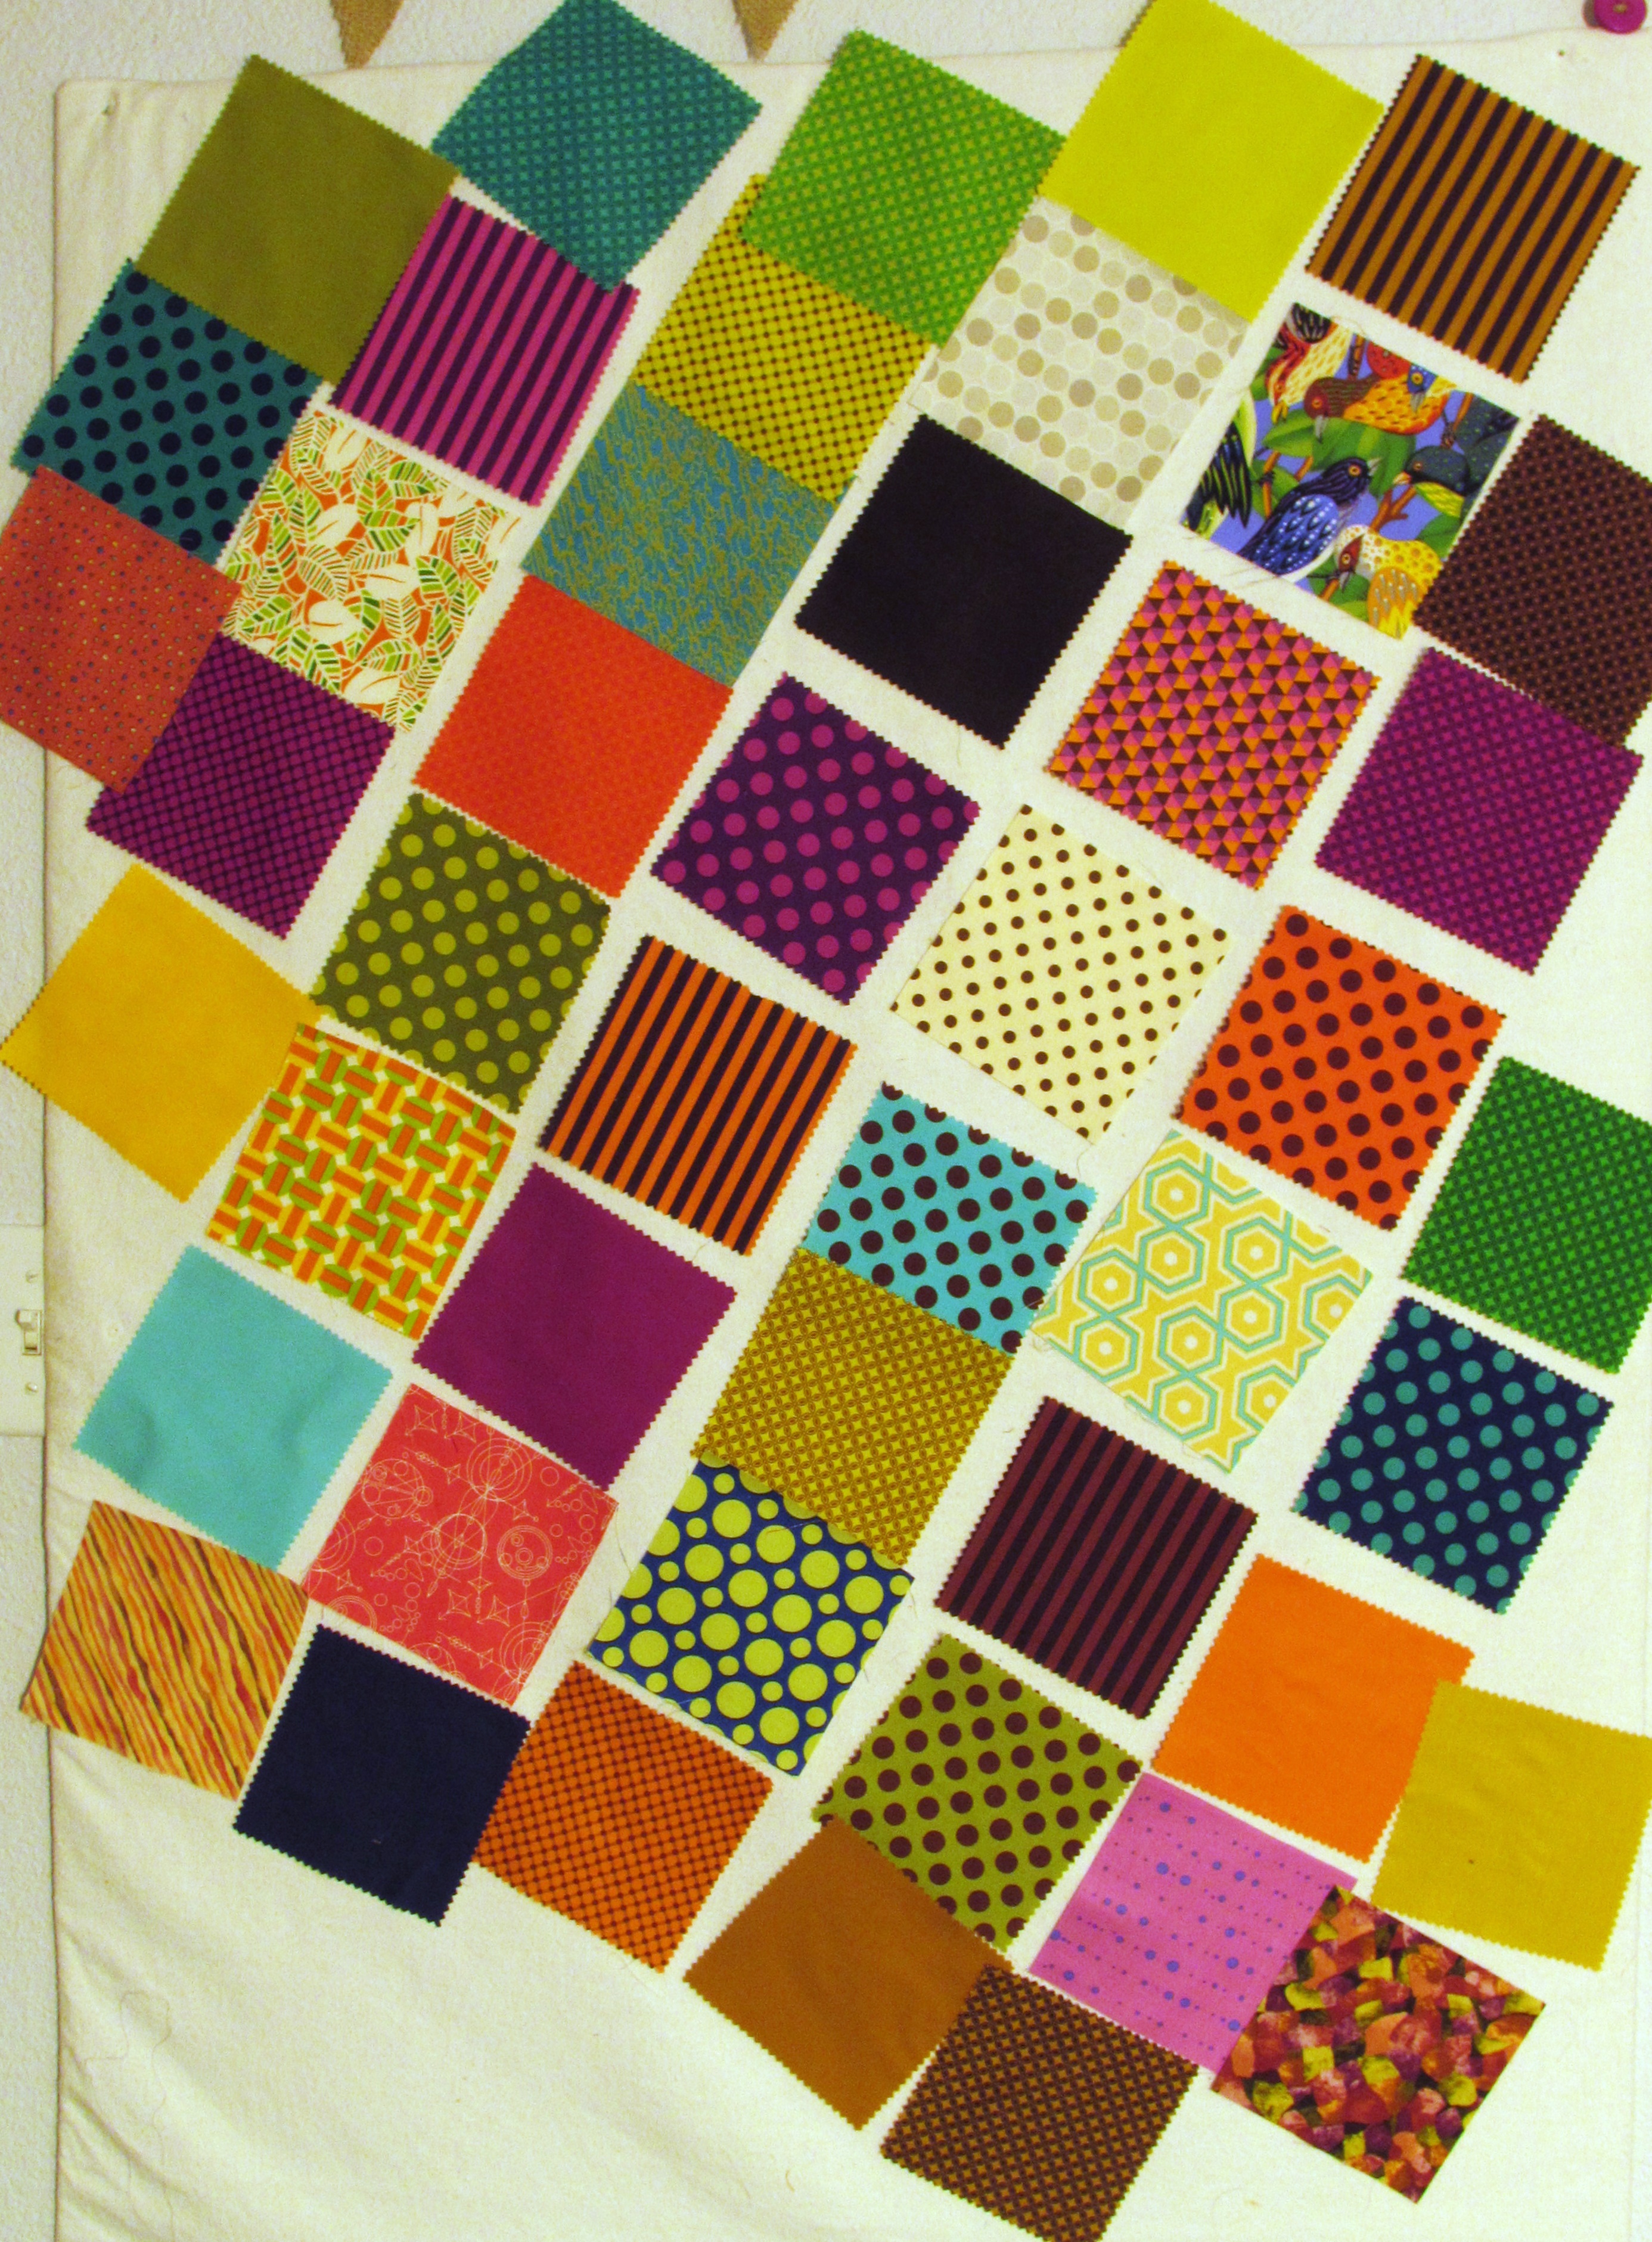
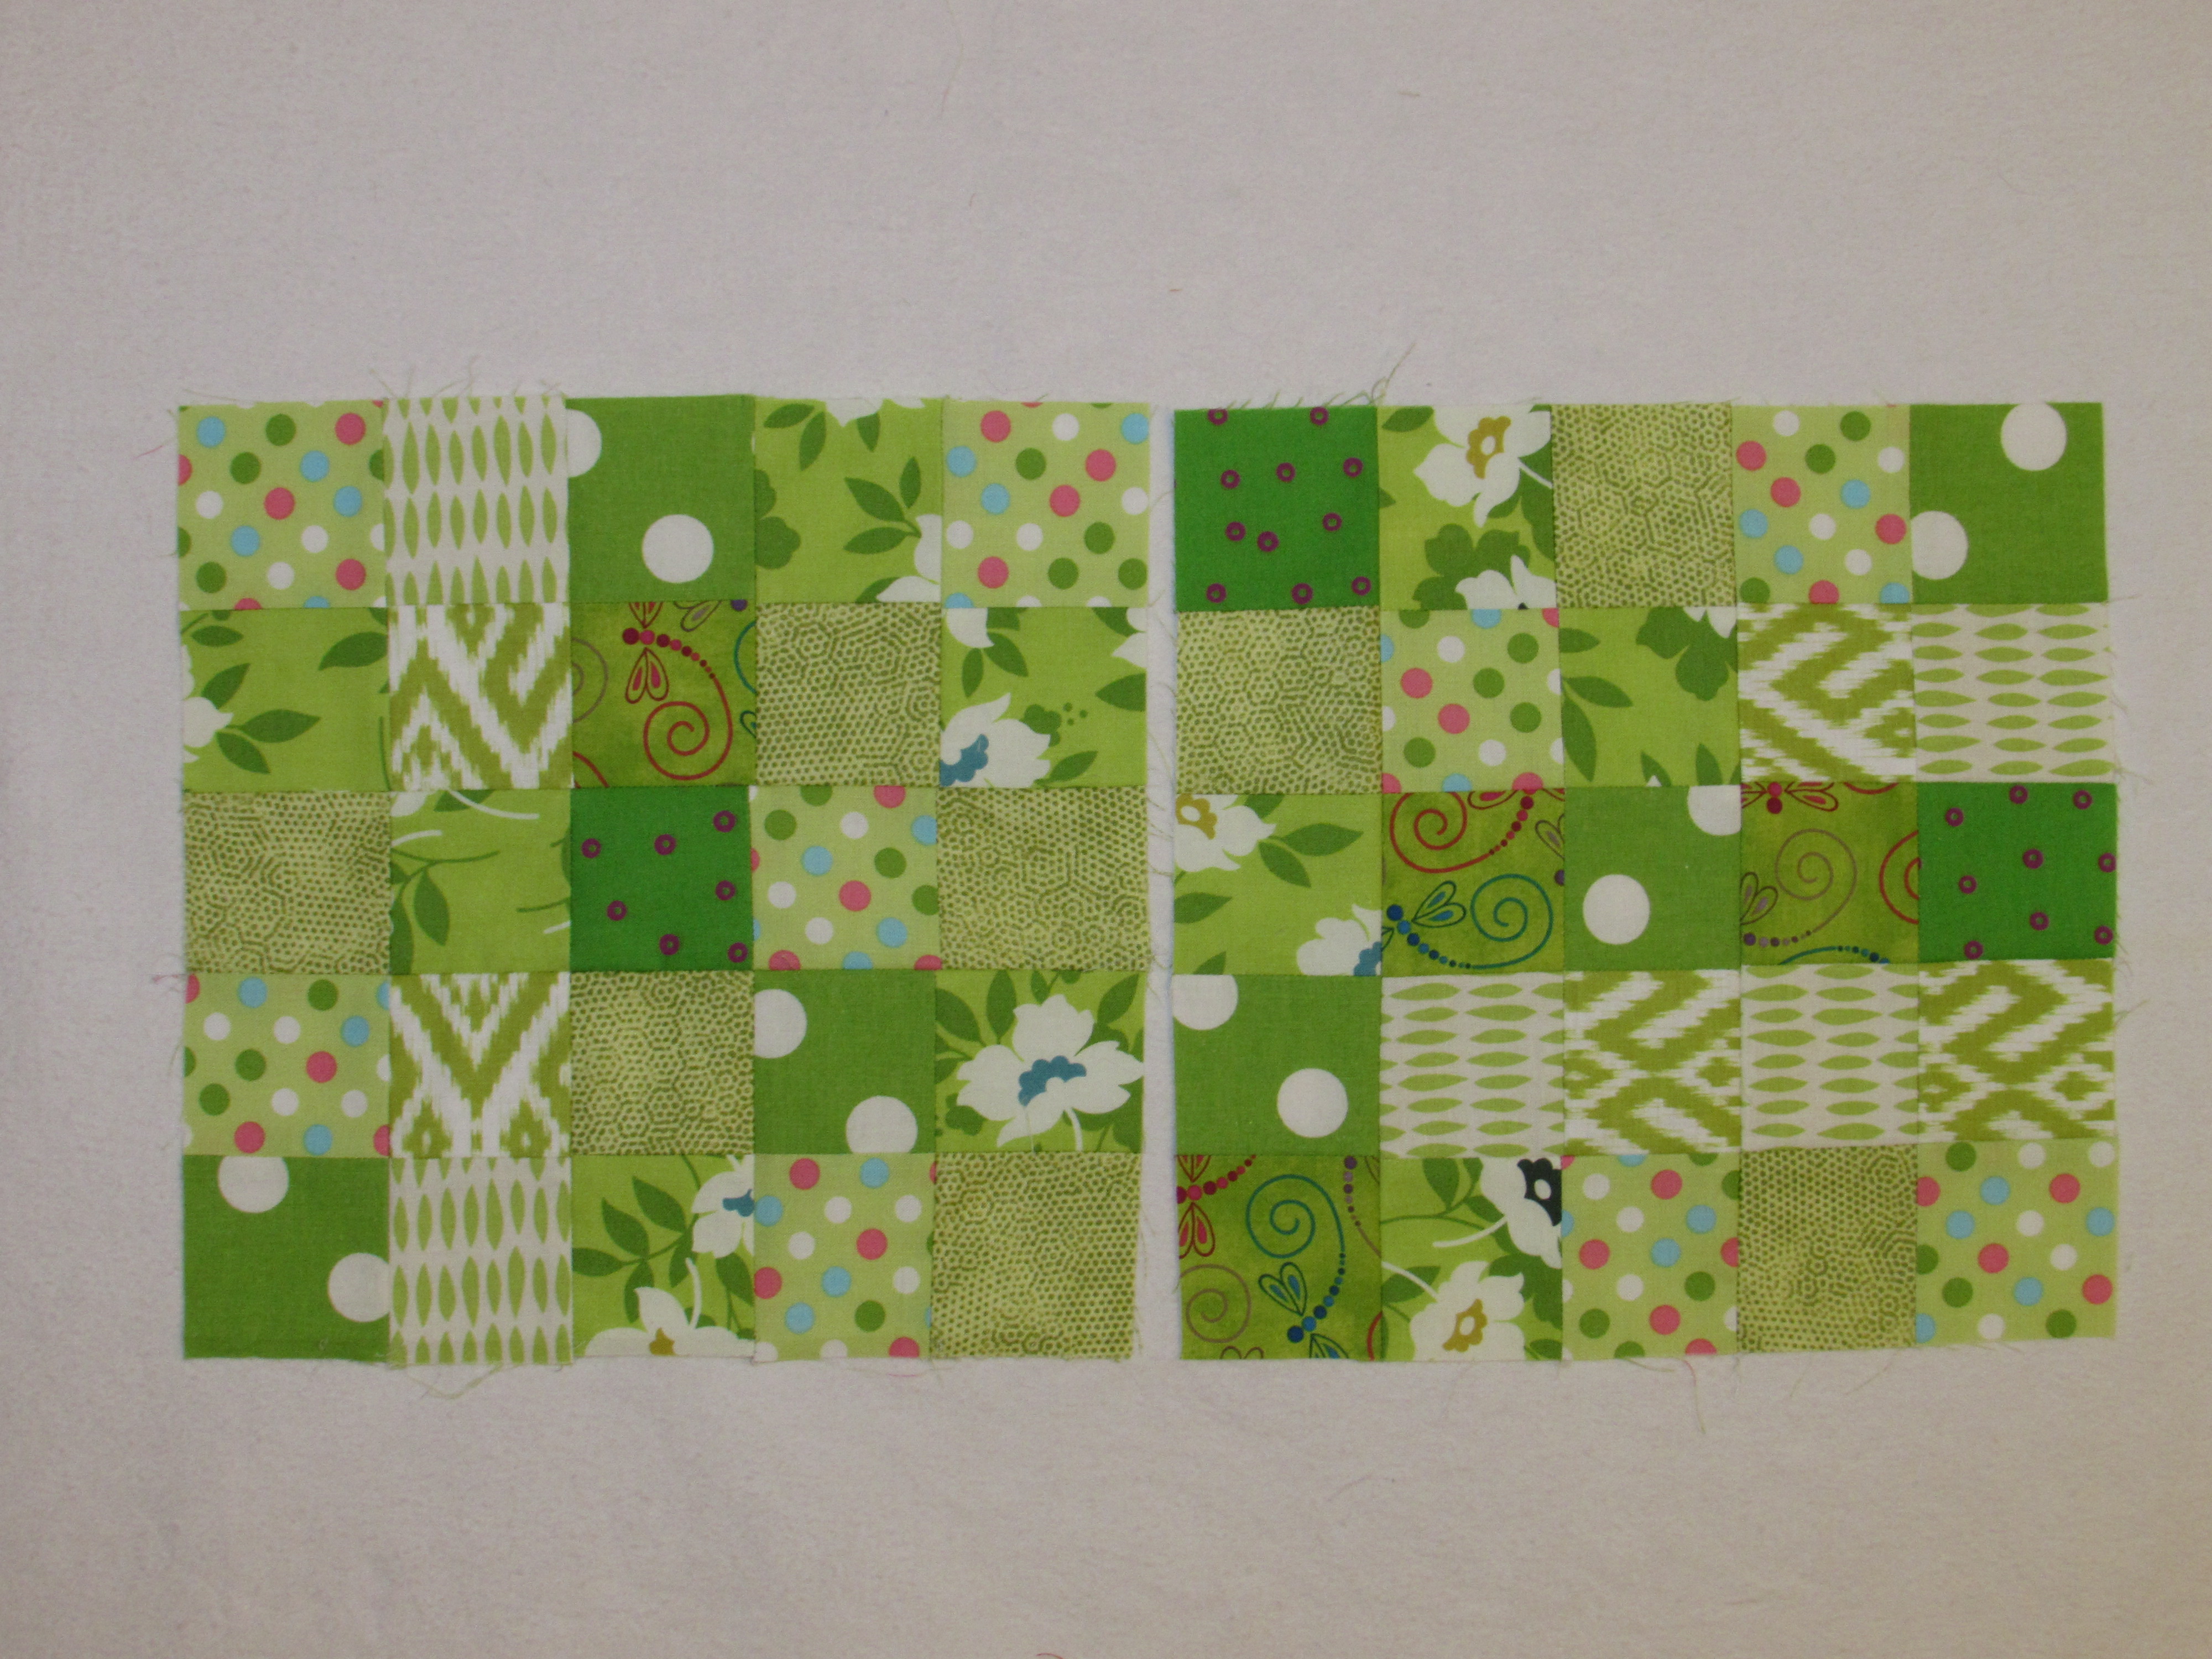
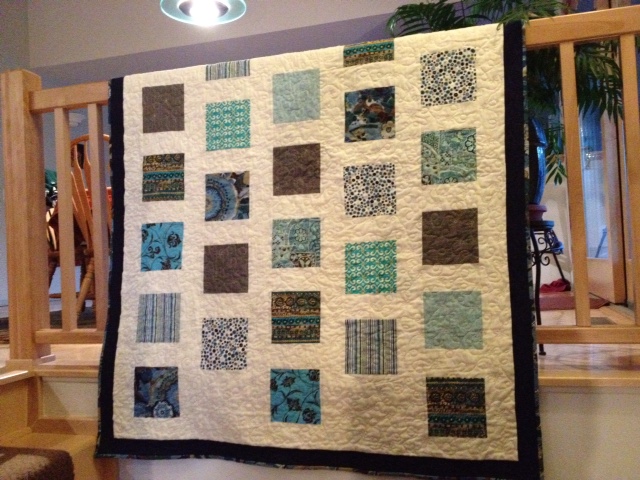
Some of these worked and some (most) did not. But when I added the two lighter dotted fabrics (center and upper right) I saw that it would help to add a lighter set of charms to brighten the darker Gem Tones kit. I took out most of the squares I had tried, leaving some of the solids and just a few prints. Then I cut a pile of charms from a Kona cream color that I had leftover from my Harmony quilt top.


img_8013

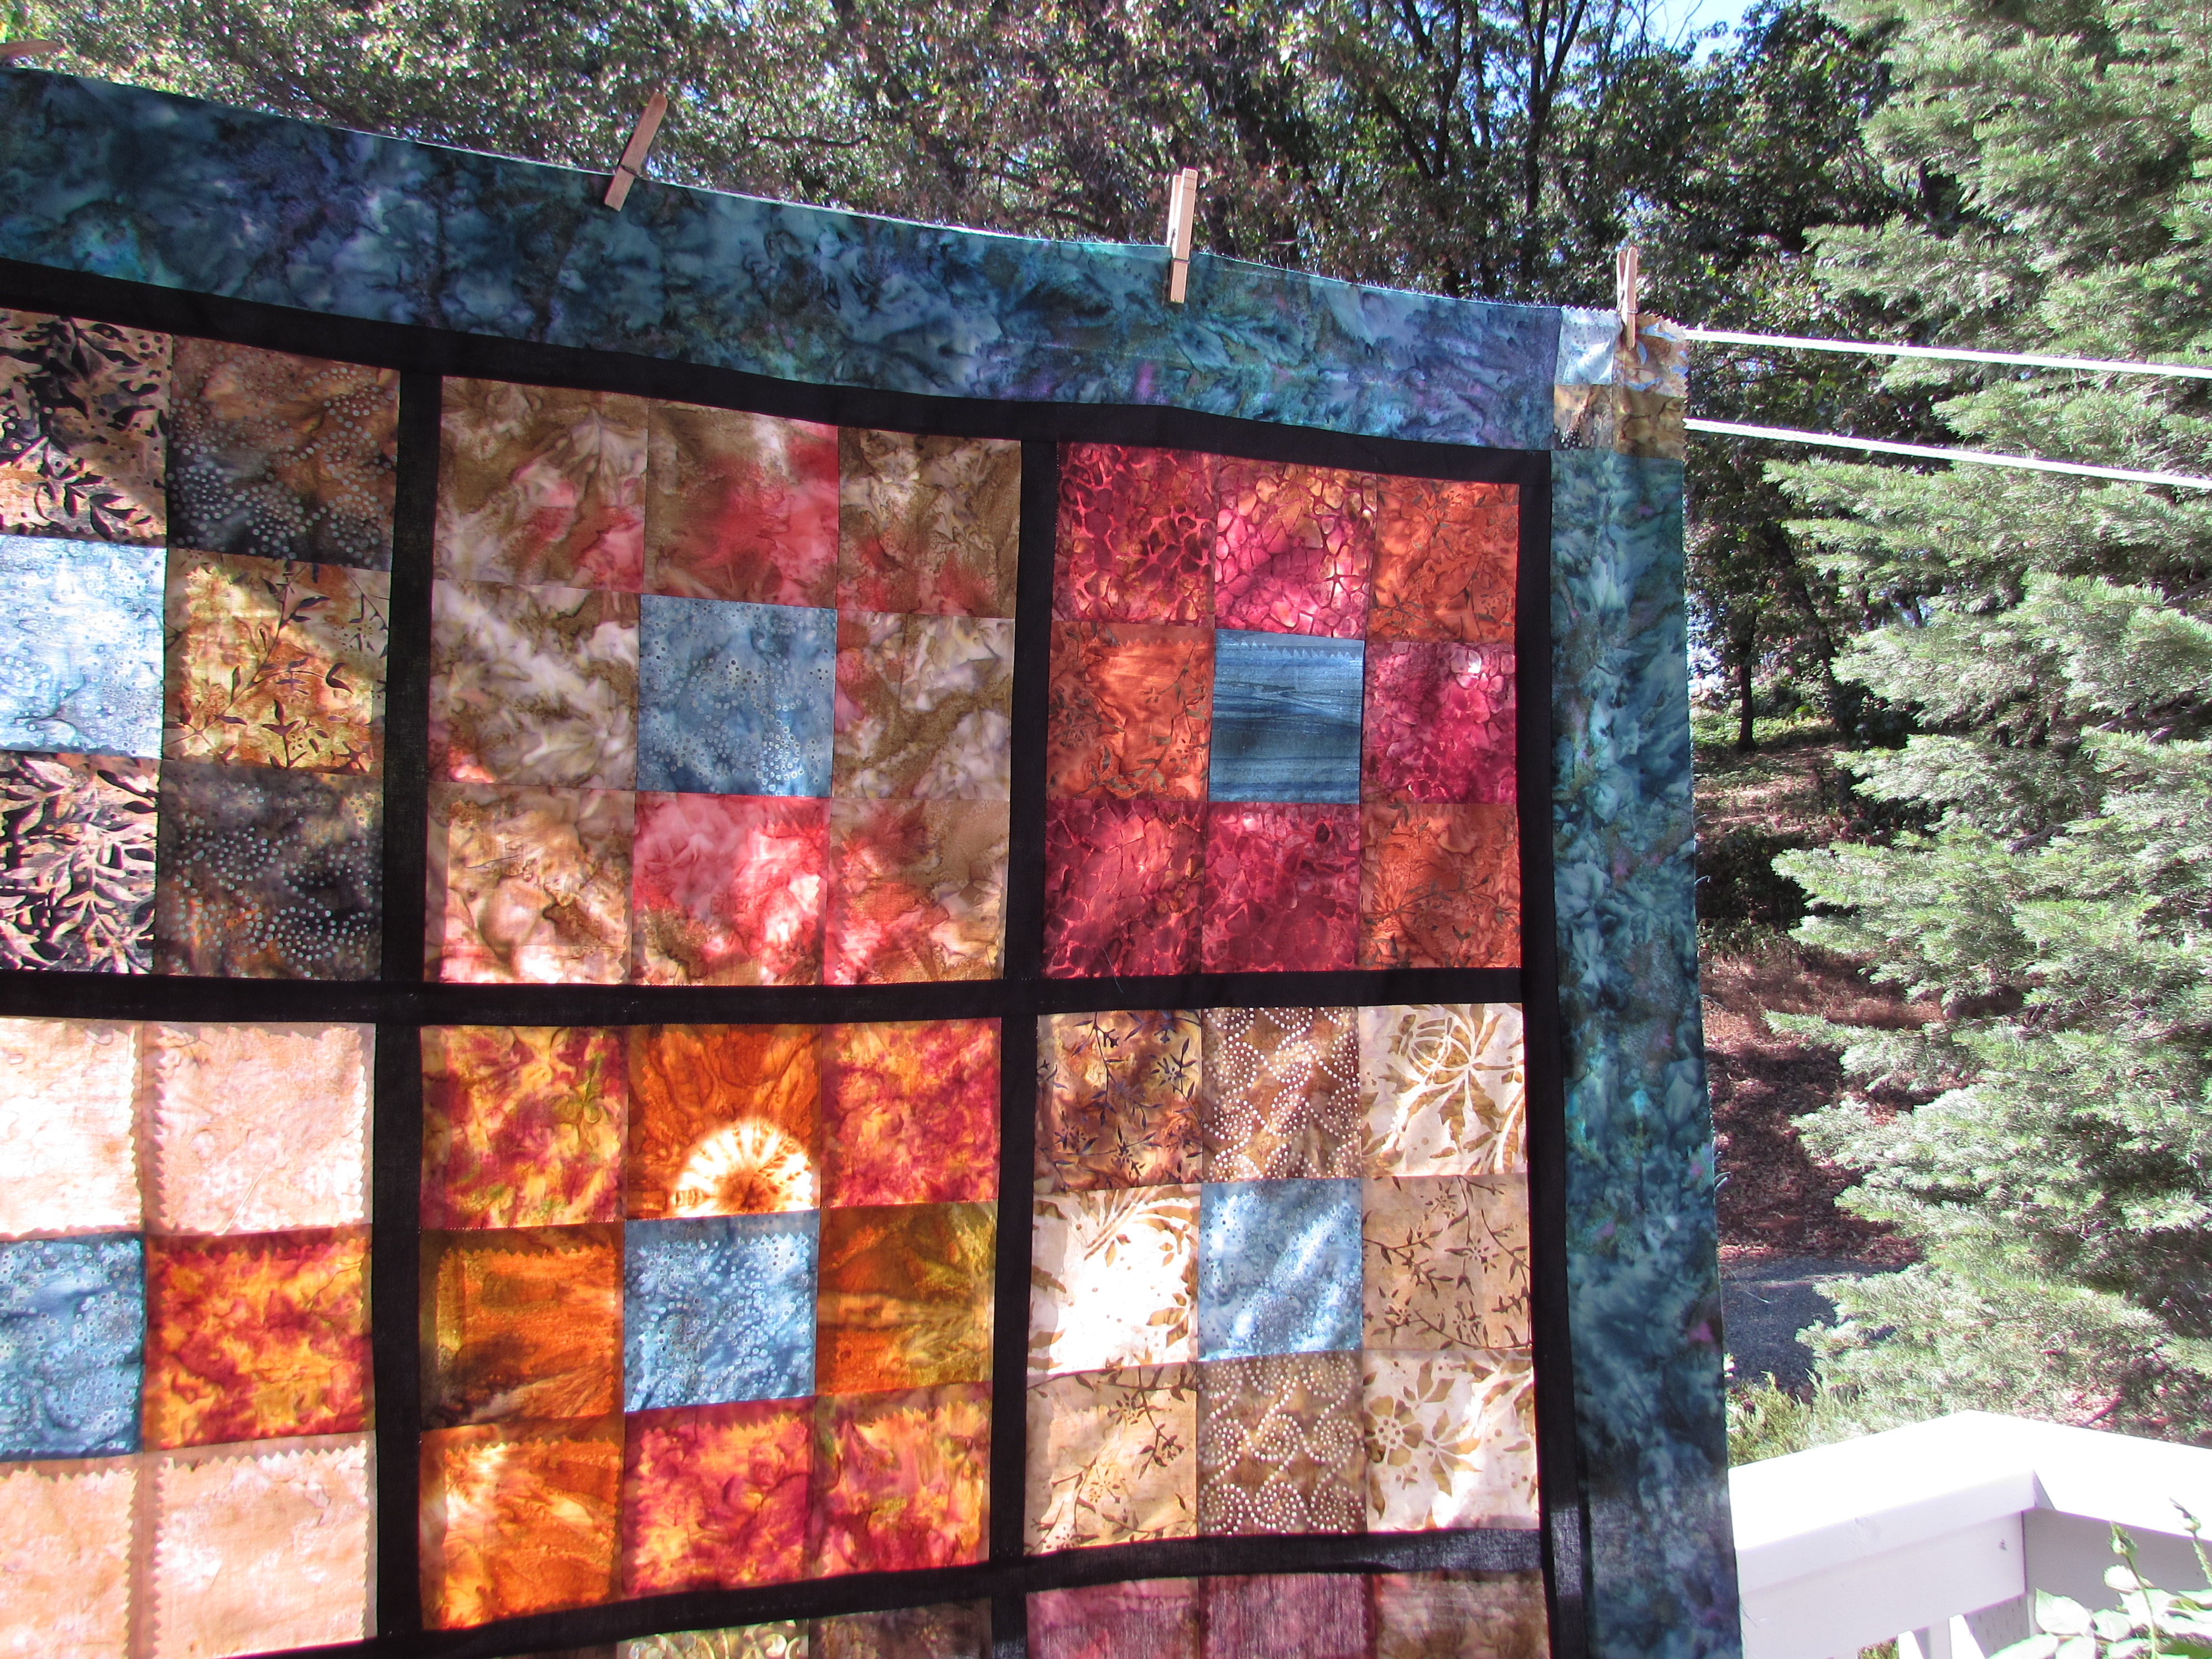
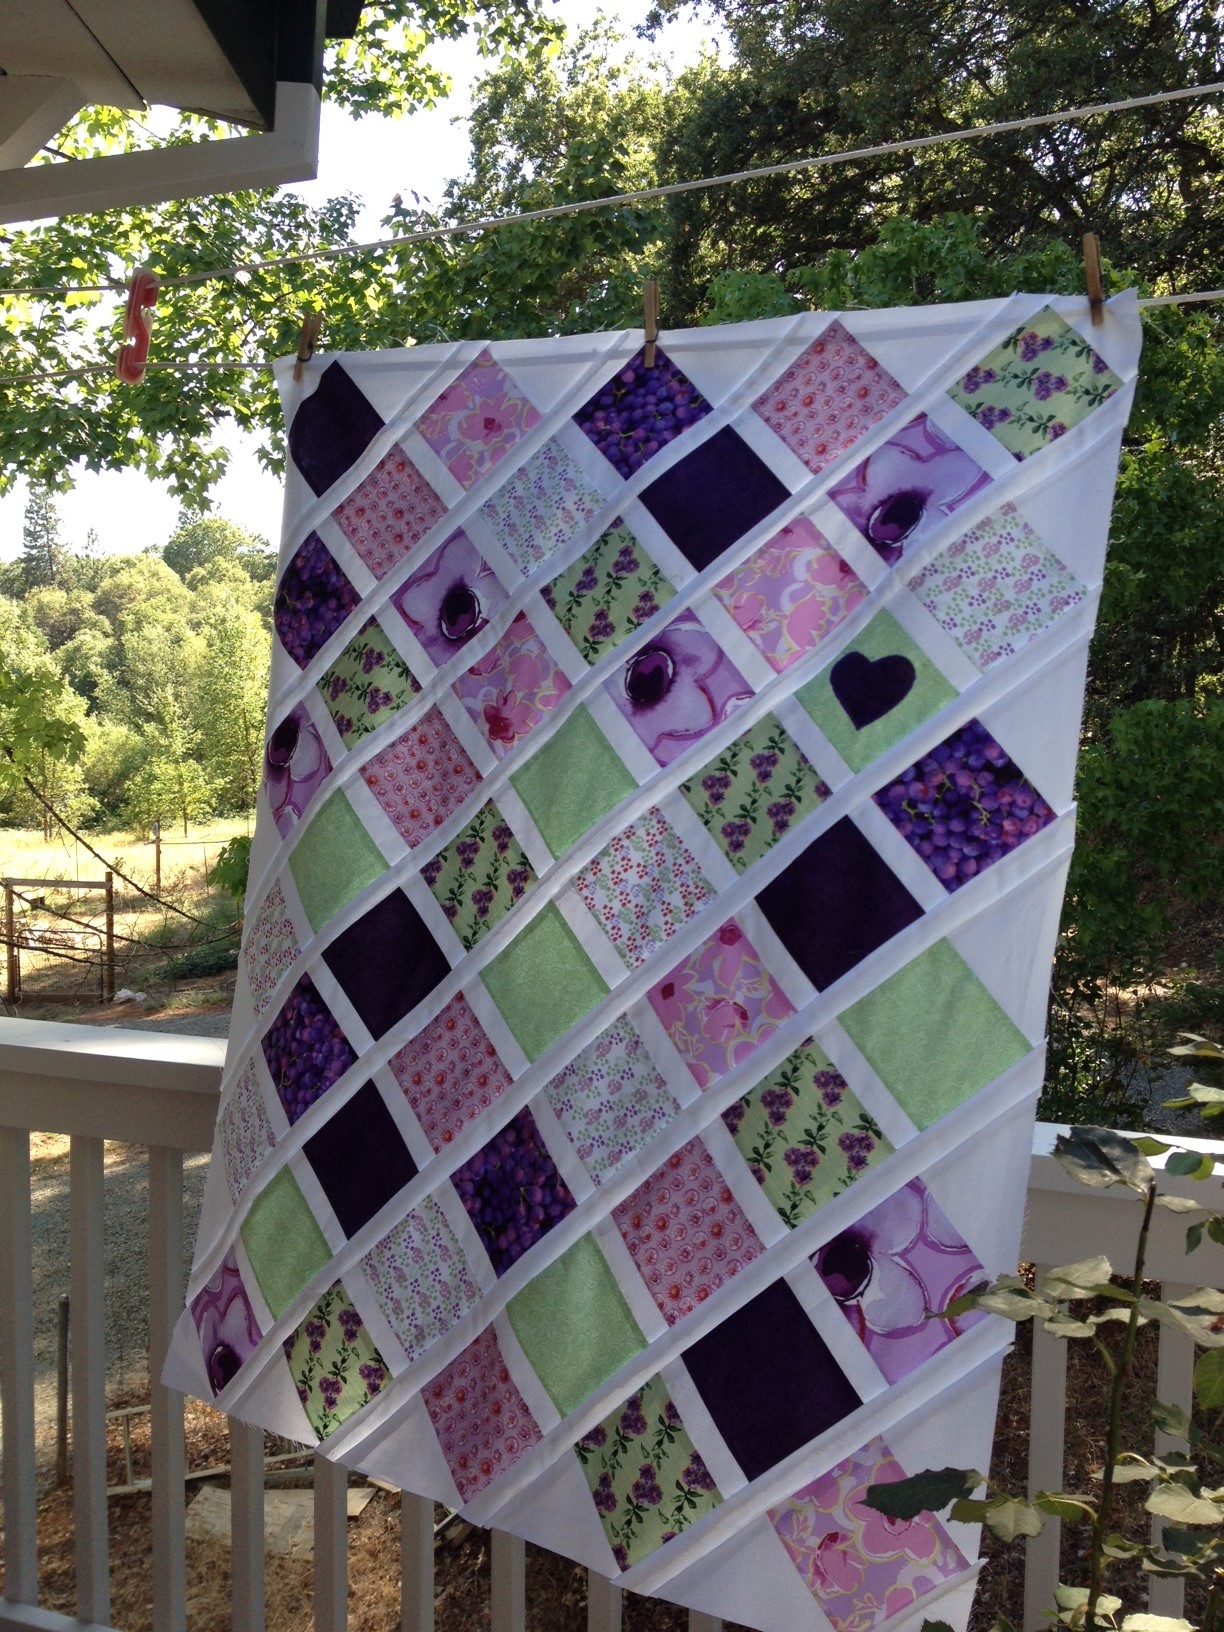
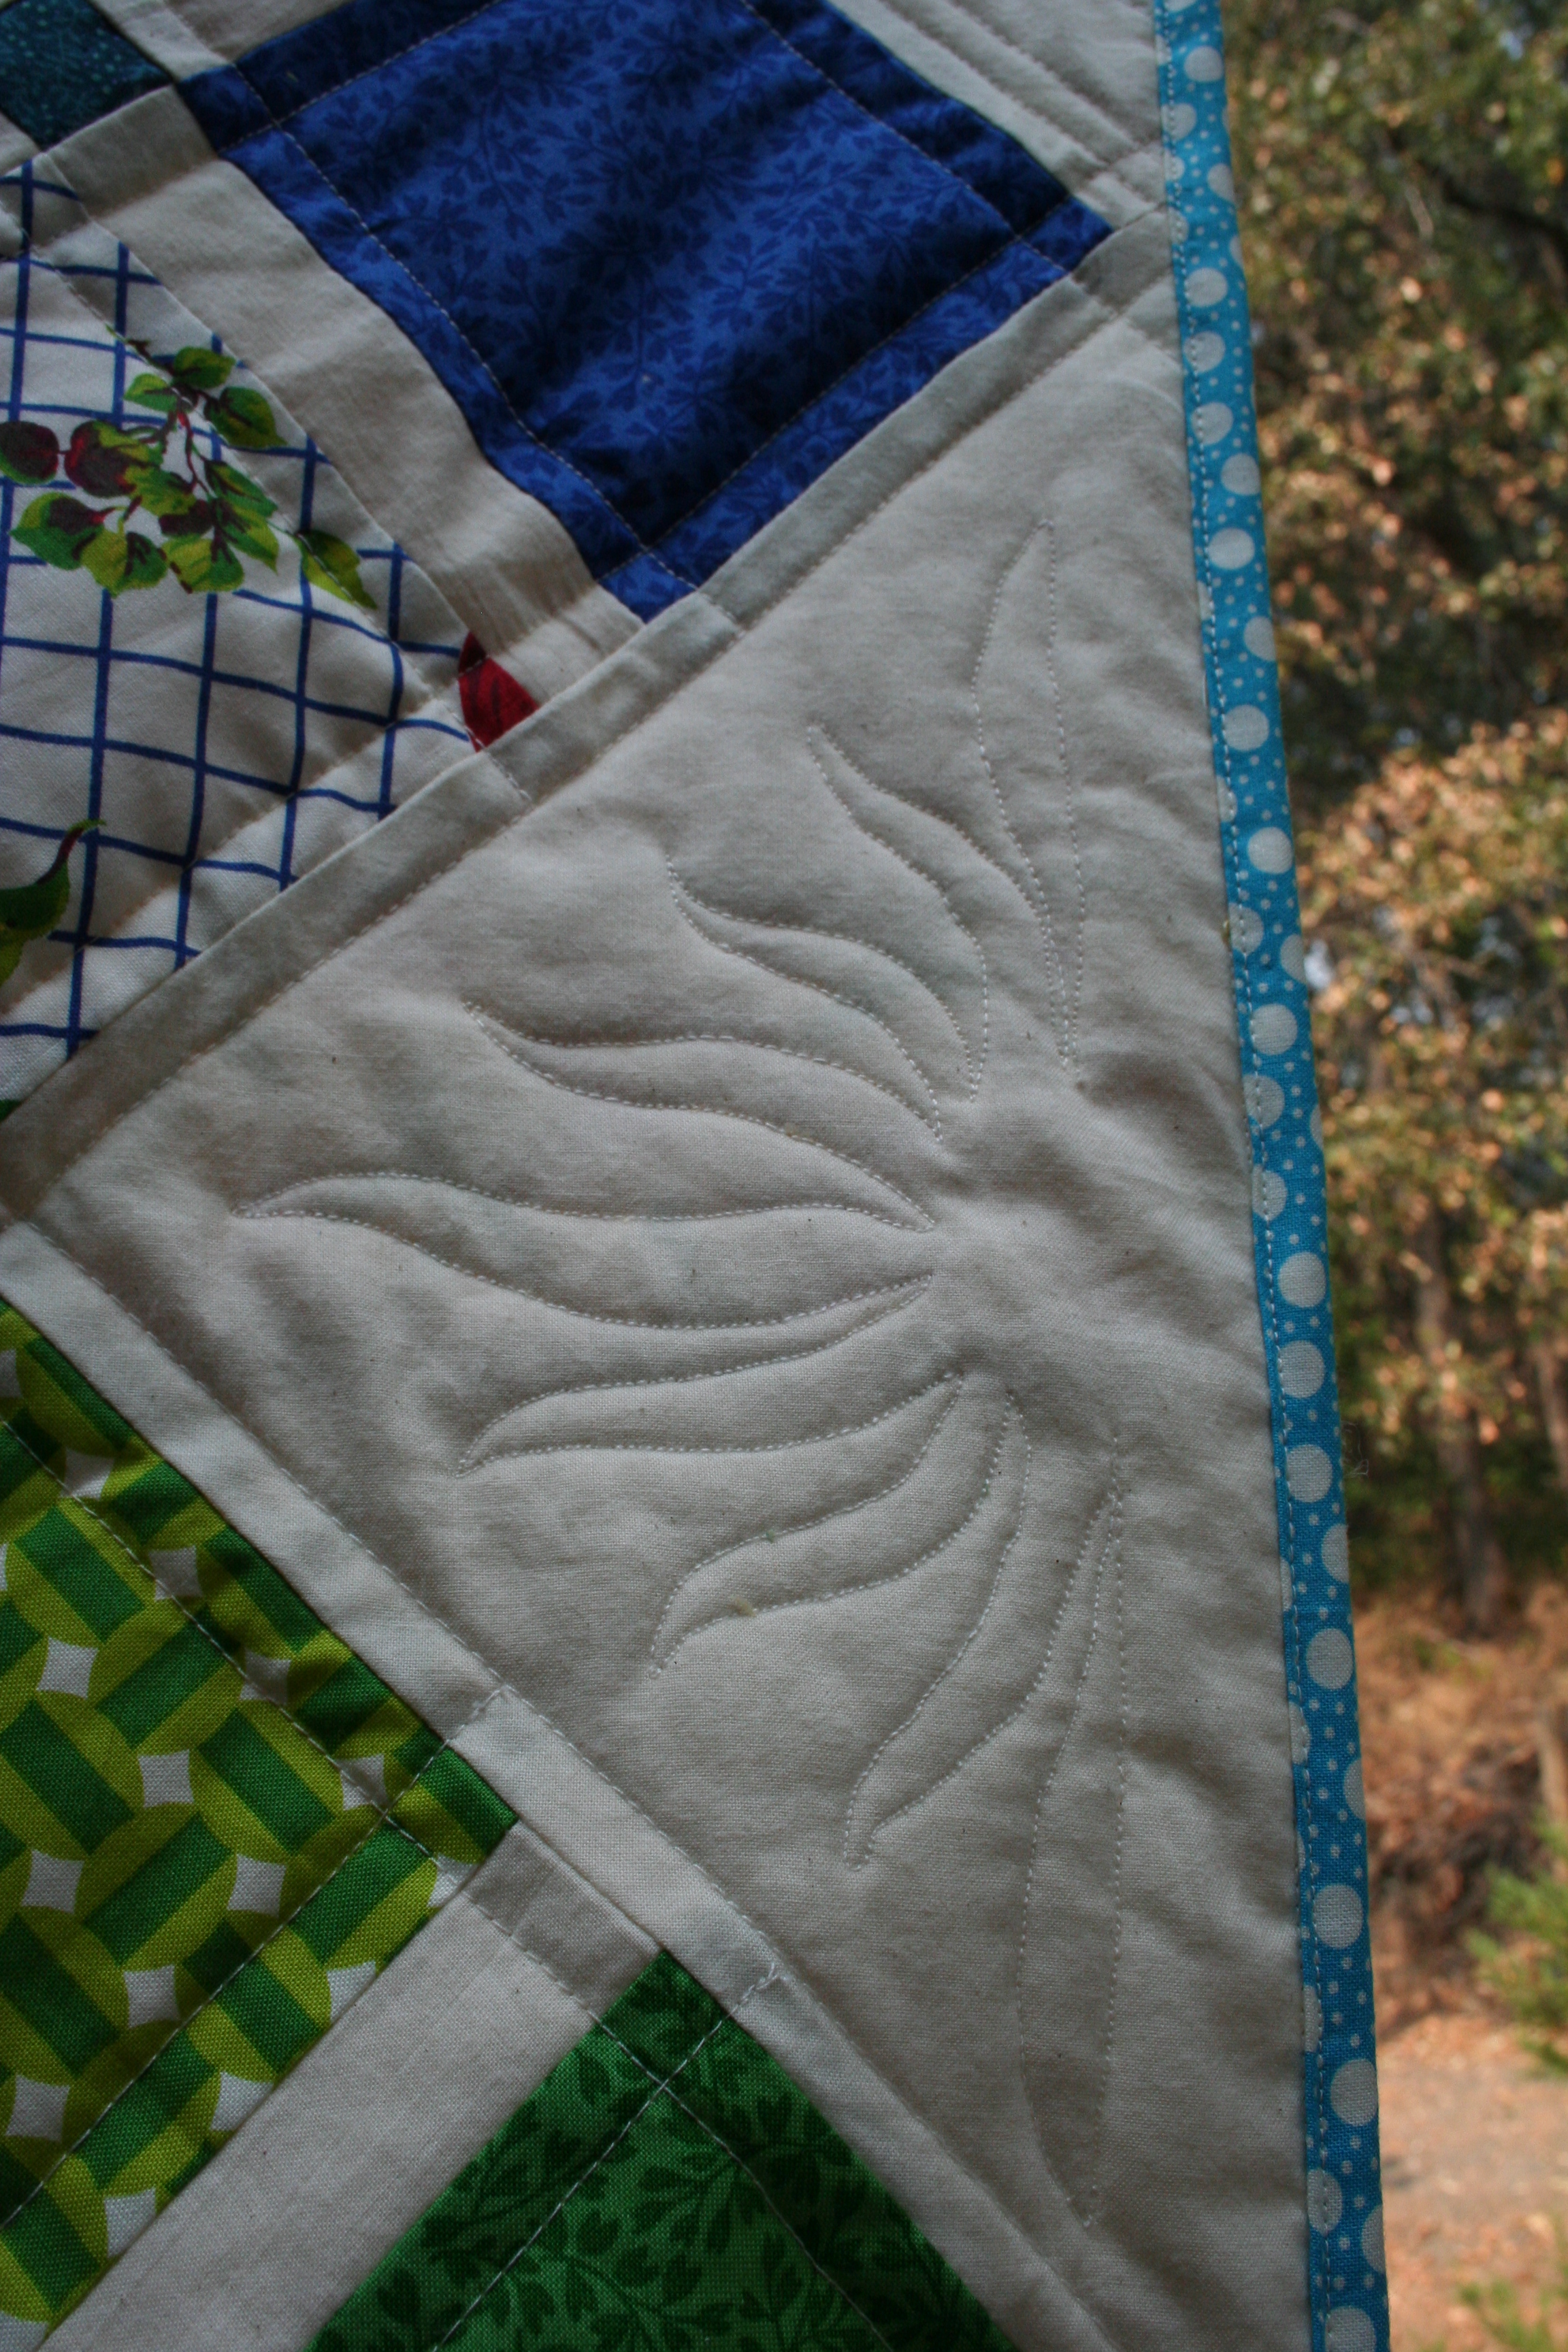
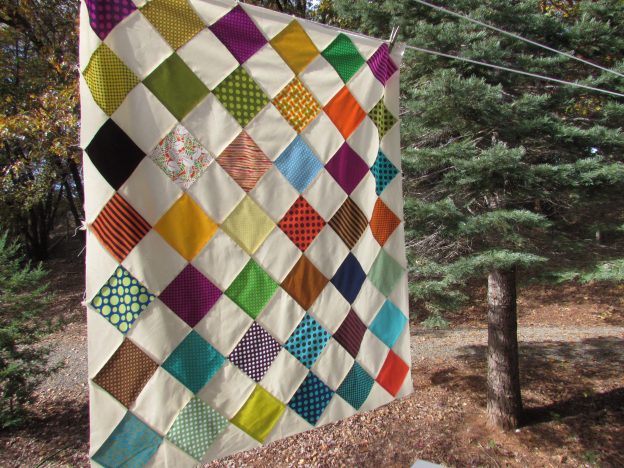
This worked well. It makes each of the charms stand on their own and the colors seem to become more vibrant when not adjacent to each other. I love the simplicity of patchwork but thought it made things a bit more interesting to put the blocks on point.

img_8014-1

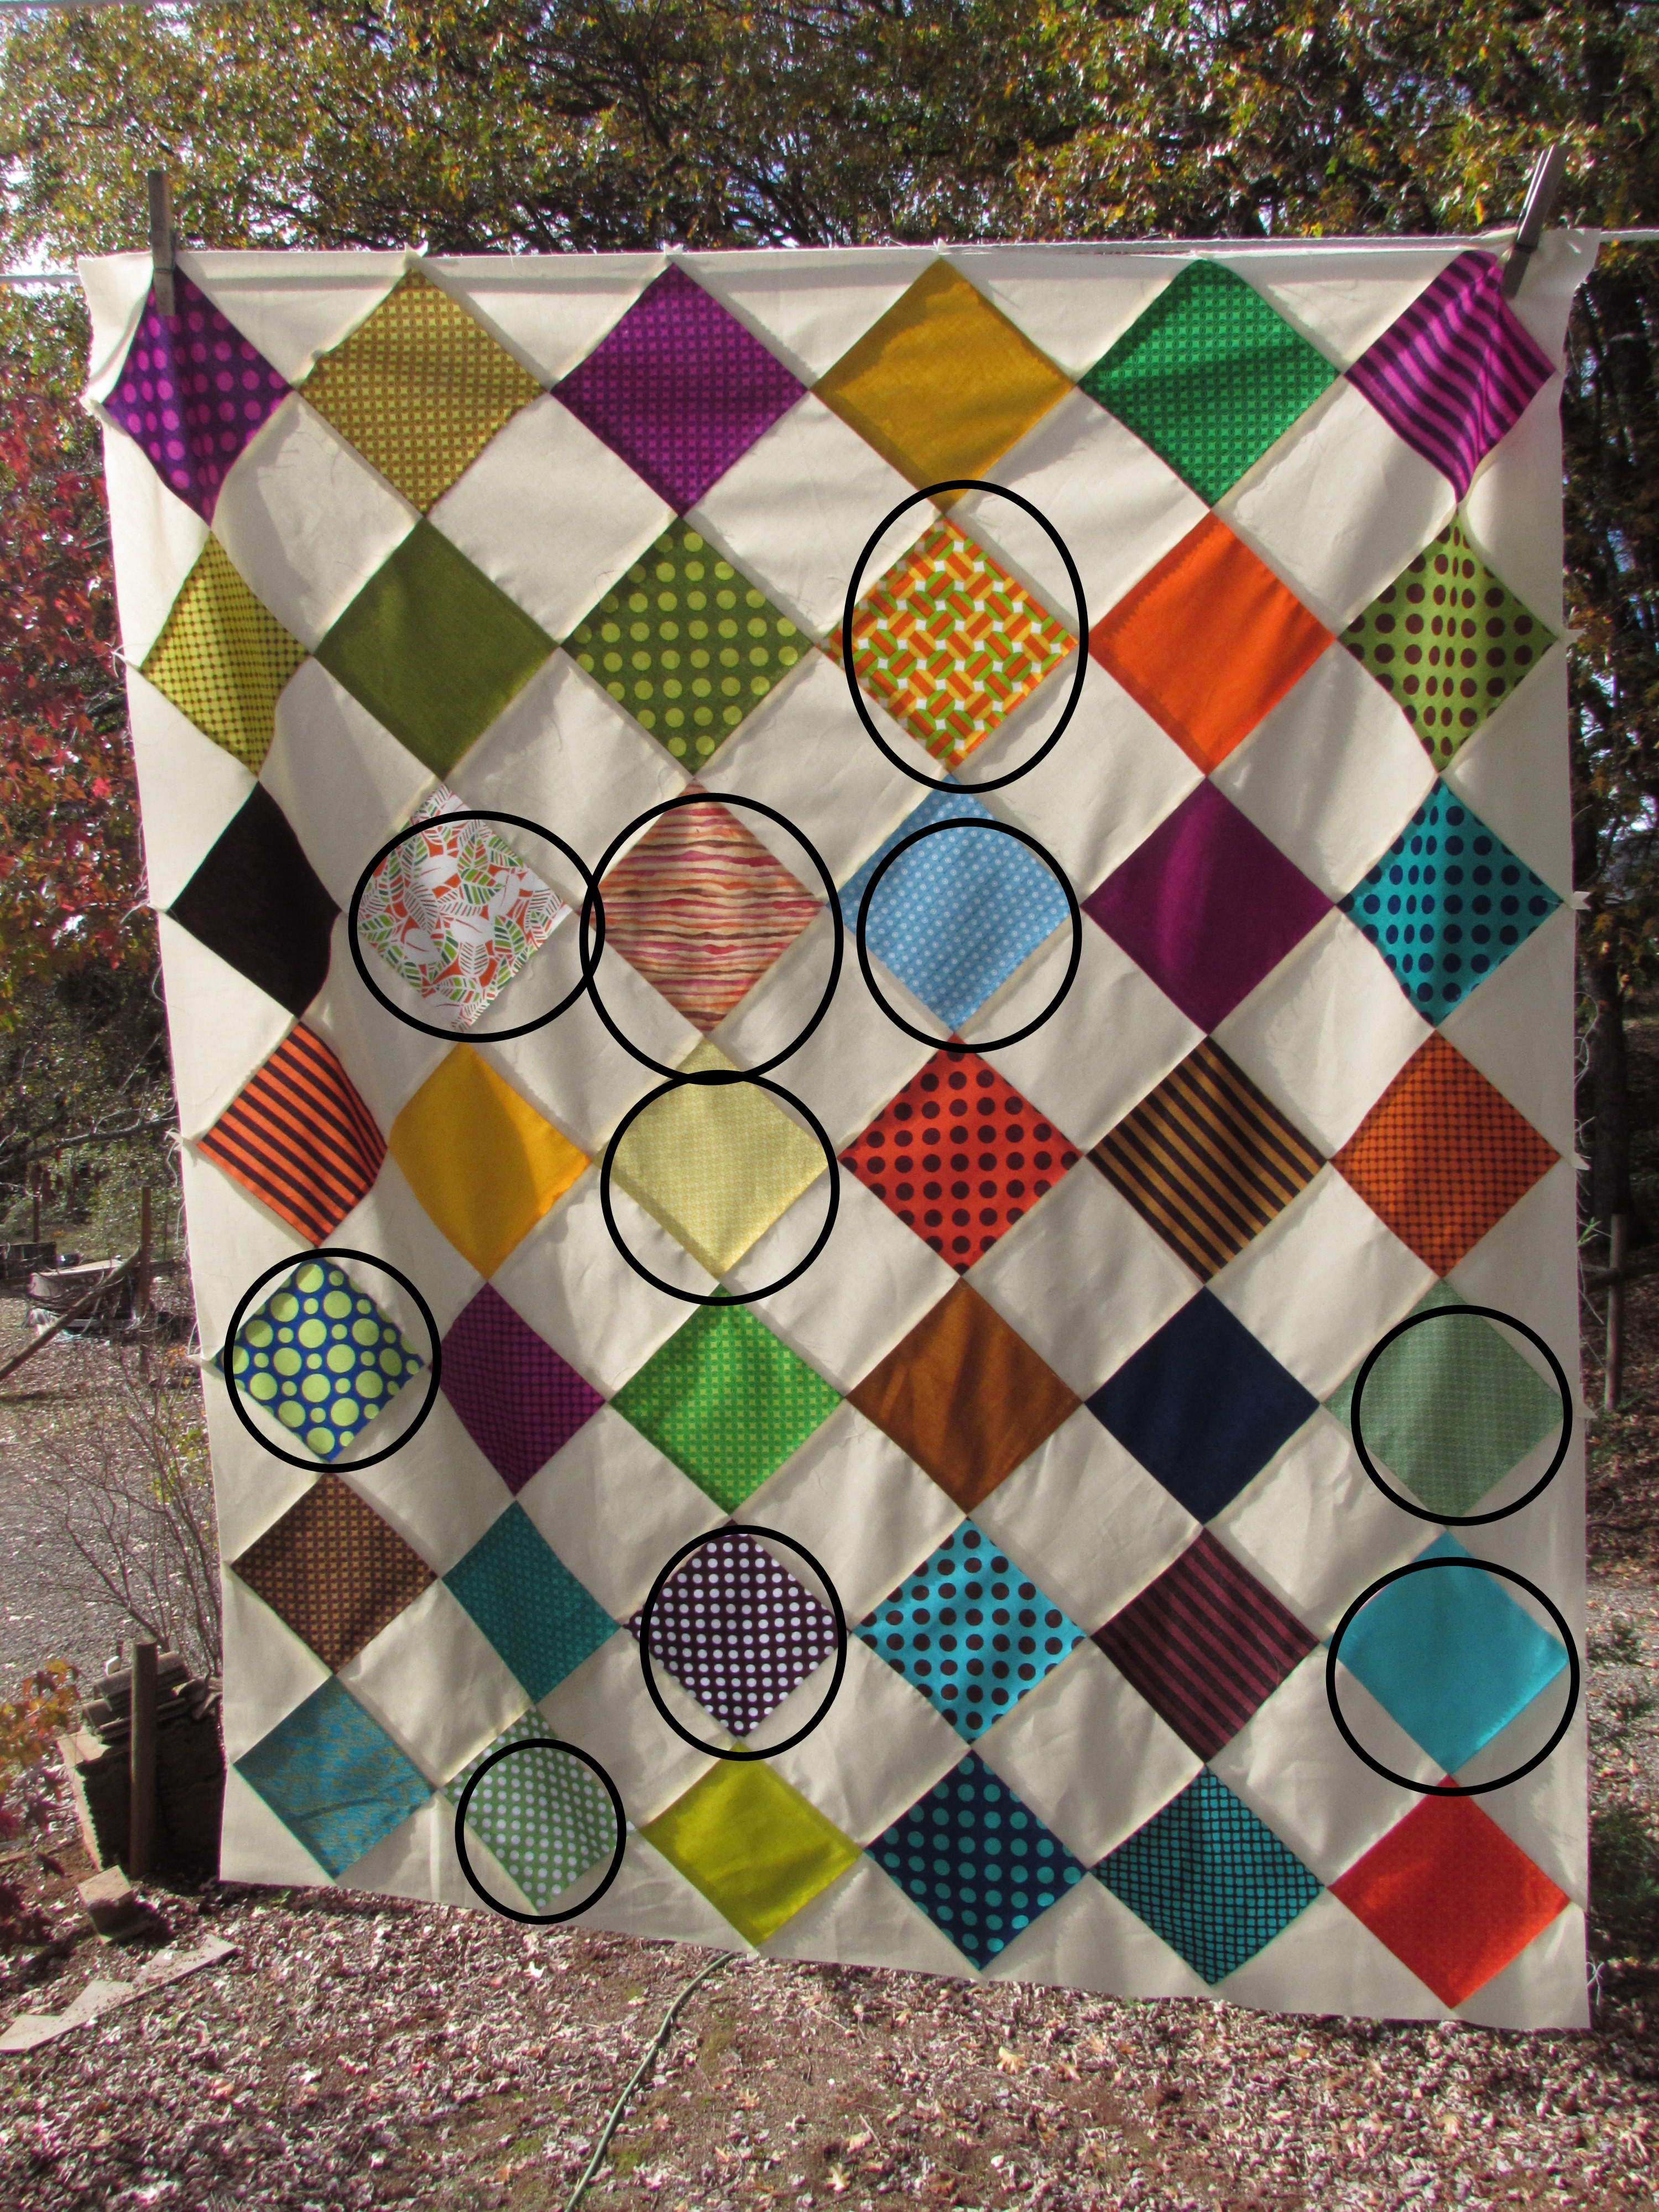
I circled some of the blocks that were added from my charms (that were not part of the original set. I think I succeeded in adding some lighter values and a few prints that changed the scale a bit. I love the look that resulted from playing with these charms. The quilt will be a gift for my niece who is expecting her third child in January. I want to get it finished up as I will see her over the Thanksgiving holiday.

This was a good exercise for me. Amanda’s lesson includes a few more ideas for curating fabric pulls. I would like to make some time to do those exercises (not necessarily even to create a quilt with – more for practice). It is a great way to learn and goodness knows, there is plenty of fabric in my sewing room to pull from. 🙂

To the same end, I have been reading this book that I picked up for a dollar at the thrift store a couple of weeks ago. It is really an interesting explanation of right and left brain processing and how to encourage your artistic abilities.img_8026

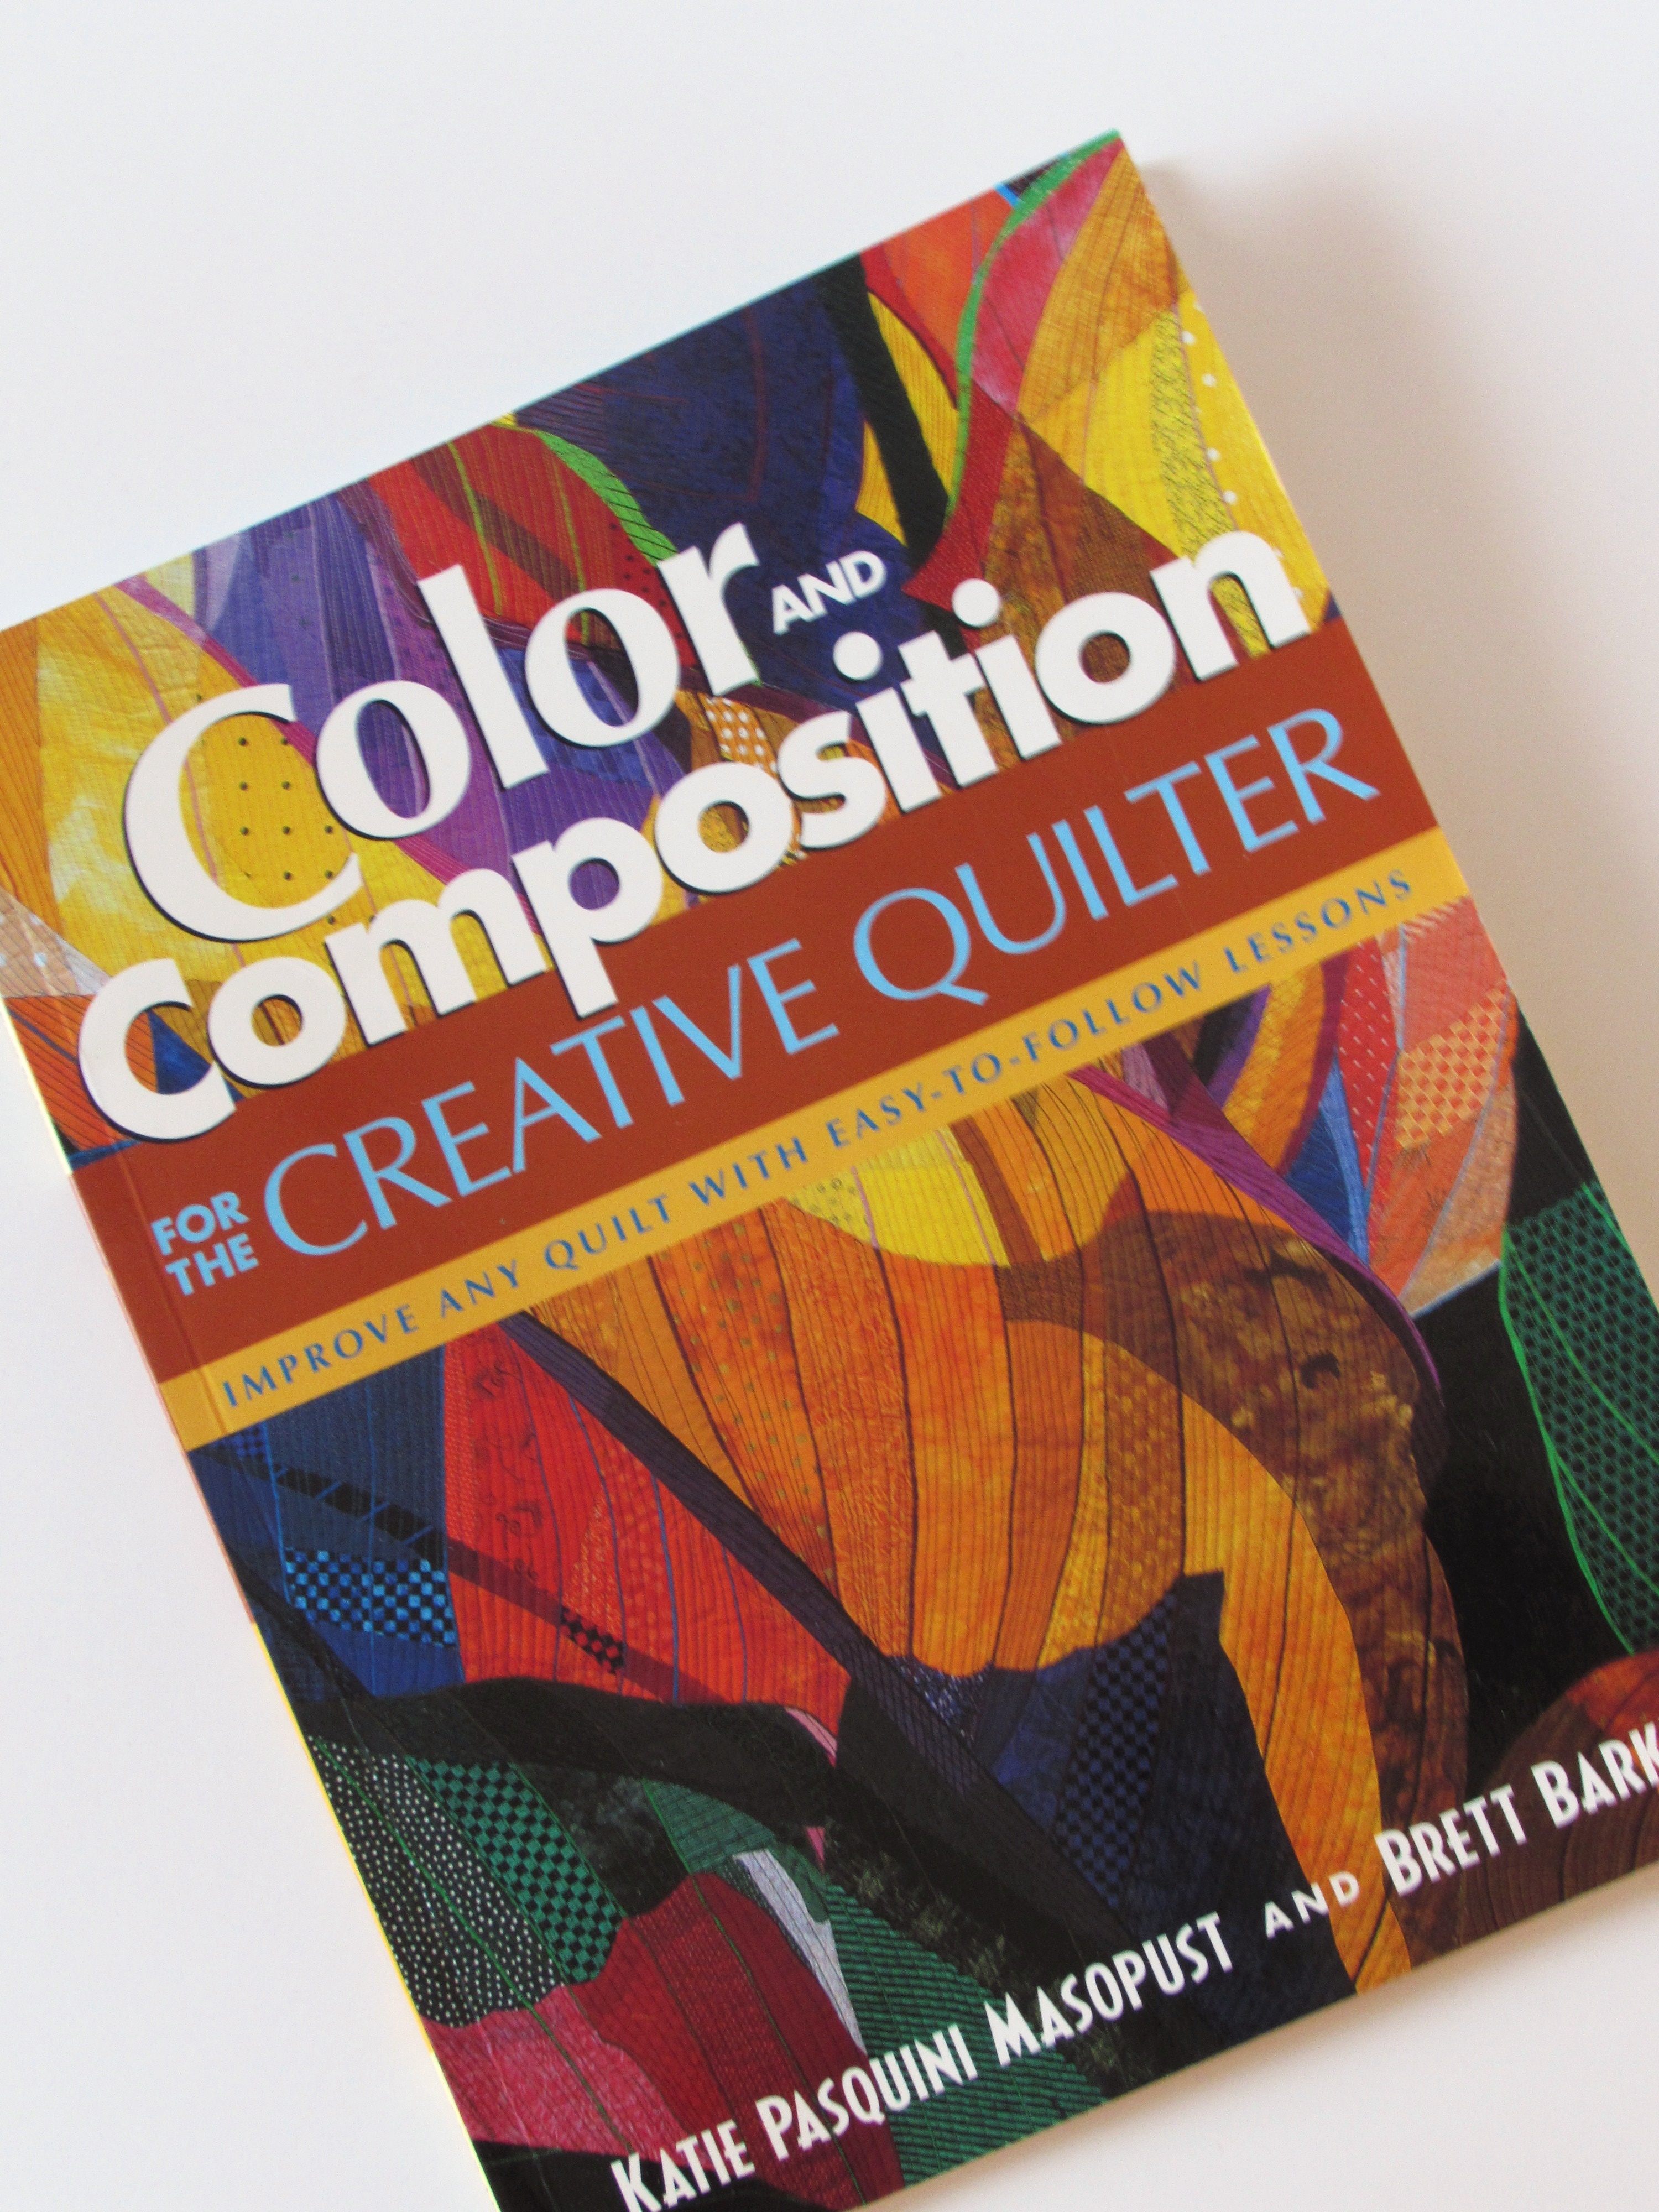
Written in 2005, by Katie Pasquini Masopust and Brett Barker, this book has a series of lessons to help the reader understand color, perspective and value. The language they use is relatable (which so often isn’t the case for me). I think the right/left brain information is so interesting. They talk about the left brain being so controlling and the difficulty in turning off the negative self-talk that we constantly play in our minds as we quickly dismiss our abilities.  This is something we should all work on, right?

Color– it’s all about color for now. There is so much to learn and, thankfully, so many fun ways to put the learning into practice.

I am sharing this post by linking up with lots of fun places. Find them at the top of the page, under Link Ups.

Stepping Stones Finish

It seems like I finished this quilt a while ago. You might remember that I made this as part of a quiltalong with Jennifer from Inquiring Quilter. Probably two weeks ago I finished up the quilting and got the binding stitched about 75% of the way. Then it sat there. I was distracted by purses and other fun projects. Yesterday afternoon I was able to stitch that last bit of binding down while Julia rested that poor pinkie toe of hers and it is now complete.

img_20160526_5255

The movement caused by the diagonal placement of the charms and those cute little HST’s make this quilt. The black, white and cobalt blue also worked very well together. (Though if I were to do this again, I think I would bind it in black. )

All of the quilting is curved (rather than angular) which complements the angular structure of the charm squares, borders, and HST’s. As far as my FMQ goes, this looks reasonable but is still not where I want to be. The only way to get there is to continue practicing, which is the plan! I look forward to washing this and letting it crinkle because that will hide some of the jitters in my stitching.

img_20160516_5157

Because I am lax in my use of quilt labels (meaning I label about 1 out of 12 projects) I stitched my initials on one of the HST’s.  At least that will give someone a hint as to who made this.

img_20160516_5160

I also put the month and year in. This was kind of funny though.  I was stitching the binding down and saw that I had left one bit of blue border empty so I took it over to the machine and quickly filled it in. I like it!

img_20160516_5159

For the backing I chose a print from the Good Neighbors line designed by Amanda Jean Nyberg of Crazy Mom Quilts. I am very happy with this fabric as it has a nice feel to it and the price is right (as it is with most of the fabric over at Connecting Threads.) It has a bright bit of color to it and the pattern hides some of the FMQ wiggles too.

img_20160516_5163

Finally, as with Amish tradition, there is one mistake. Look at these HST’s! The block was stitched incorrectly but I didn’t notice this until I was quilting up to these HST’s. Ah, well, this is testament to the imperfection of our craft!  Or, another way to look at it: ‘A diamond with a flaw is worth more than a pebble without imperfections.’ (Chinese Proverb)

img_20160526_5259

This was a fun experience, between the social aspects of the quiltalong, using these particular colors (which I have wanted to do for quite a while), and furthering my FMQ just a bit, it was very satisfying. Hopefully you are enjoying your projects too. If you are in the US, have a great Memorial weekend. We are supposed to have some hot weather over the next couple of days – here comes summer!


Linking to my usuals! Check them out at the top of the page, under Link Ups.

Honeymoon Quilt Finish

A couple of months ago my husband and I celebrated our 17th anniversary. This week I finished a quilt made with fabric purchased on our honeymoon on the island of St. John. It may have taken me 16 years to think of how I wanted to use the fabric but once I got going, it didn’t take too long to finish it up. I posted earlier about making the quilt top in August of last year. Because I wasn’t sure how I wanted to quilt it, I set it aside (for nearly a year!) Come January of 2015, I set a goal to finish this quilt up and I did it. This finish means that I do not have any unquilted tops lying around. Yahoo!

This project was fun to plan. I have been reading about whether to stitch in the ditch before starting to FMQ. Honestly, this sounded like a whole lot of extra work. I decided to compromise and I stitched the perimeter of each nine patch. I thought this would stabilize the quilt and hopefully, reduce and puckers on the backing. It is so irritating when you flip the quilt over to check on it and there is a fold. Between pin basting and ditch stitching I was hoping for a better back. Some quilters think it holds the quilt square and prevents distortion. Others say it makes the FMQ work look better. I do think it helped. My quilt stayed square and often, it doesn’t. I didn’t have a single pucker on the back. The only thing is that on the back of the quilt, the ditch stitching is very visible so one has to take that into account when planning the quilting. It doesn’t show much at all on the front. As for any benefit to the look of the quilting on each nine patch, I didn’t notice a huge difference. In fact, after I had quilted about 65% of the project, I noticed that I had skipped ditch stitching one block. That block really didn’t look noticeable different from the others. So, I think it is good forquilt stabilization and keeping square but doesn’t noticeably enhance the FMQ.

IMG_20150618_3476

I took a look at some quilting sites (mainly Lori Kennedy’s site, The Inbox Jaunt) to get inspiration. I knew that I would do an all over FMQ pattern but wanted just a bit more detail than that. Each of the nine patch blocks have a blue center. Starting with that, I quilted a large flower in the center of each blue square.

IMG_20150618_3479

I decided that leafy fines would complement the flowers. Using a variegated green YLI quilting thread, I FMQ’d leaves of various sizes on each block. I left the black sashing plain.  Because the backing is a light green batik, the FMQ stitching really shows up on the back. Not sure if this is good or bad!  For the most part, I am happy with the stitching. Why is it that my eye goes to the little tension blips and the occasional jittery stitching instead of the overall look? For those of you that quilt on your domestic machine, how to you handle the starts and stops? Look closely at the squares that I ditch stitched, see the dark spots at one corner where I stopped and started? I chose to reverse a few stitches rather than knot and bury tons of threads. Not sure I like how this looks. What is the consensus? Do you back tack stitches or knot and bury threads? I know which is cleaner but yikes, burying all of those threads is time-consuming.

IMG_20150619_3486

The binding is, as usual, one of my favorite parts. I used the honeymoon batik for the border and also for the binding. To add some depth, I attached a black flange to the perimeter of the quilt before binding the quilt. I love the ‘something extra’ that this flange adds to the quilt.

IMG_20150618_3478

To honor our honeymoon, I tried stitching St. John as well as April, 1998 on a corner of the quilt. Kind of difficult to see but it was a good addition.

IMG_20150618_3477

When I was binding it, I came upon my two ends that needed to be joined and sighed my heavy, here-we-go sigh. I hate attaching the tails of the binding. This time I looked to Rita over at Red Pepper Quilts. On the off chance that there is someone who hasn’t heard of Rita, she is an amazing quilter who has the most amazing sense of color. Her quilts are bright, happy and so vivid. Truly amazing. If you haven’t looked at her work, now is the time. She has numerous tutorials, several of which talk about binding. This is the one that I used. The result was good so I will refer back to her measurements next time.

I can check this goal off of my 2015 list and move on to another one! I think the next goal I need to work on is some quilt restoration. I have two quilts to restore and I want to get one of them going soon.

Finally, remember the Allison Glass mini swap that I participated in? I blogged about the mini that I made here. There were a few comments asking me to post the mini that I received. Wow, I can’t wait to share it. It is gorgeous. I am so grateful to my partner for putting so much effort into this project!

IMG_20150616_3470

My partner outdid herself with this. I love the text print that was used as the background on each 2″ square. She appliqued the orange peels with a blanket stitch which was brilliant.

IMG_20150616_3471

She also made this smaller mini. I think it is intended as a pot holder but I am hanging it on the wall. I don’t want it soaked with food splatter, which we all know would happen.

IMG_20150616_3469

I also received this sweet wallet. Hand-made and so well done, it is lovely.

IMG_20150616_3472

IMG_20150616_3473

The swap was fun and I am thankful that I gave it a try as it pushed me quite far out of my comfort zone. Also, I am truly grateful for the work my partner put into the items I received.  That being said, I am not sure I will do another one for a while. I could see participating in one each year. They are quite time-consuming and it set my nerves on edge trying to think of what my partner would want, based on the few hints we are given. The process is a good way to get to know other makers though. It is really a big deal on Instagram and there is a swap for just about anything crafty.

Hope you all have something fun planned for the upcoming weektend.

Linking to Freemotion Mavericks, Quilting Jetgirl’s Thankful Thursday, Let’s Bee Social and Finish It Up Friday. Also with Sew Bittersweet Designs for the June ALYOF Link up.


Honeymoon Quilt-16 years late!

I was fortunate enough to meet my husband back in 1997.  We were set up on a blind date by a good friend that we both worked with at the time. It was just a lunch and as blind dates go, it wasn’t bad! I was a single mom with three small children under the age of 11 years and it was a busy time.  My blind date called me a couple of times and I didn’t return the calls.  Mostly because dating as a single mom was just a pain. Somehow we did go out again about a month later.  And that was it.  We were engaged six weeks after that, married six months after becoming engaged. A whirlwind romance, to be sure.

I can’t say that I heartily recommend becoming engaged after six weeks of dating but it worked well for us.  Both of us joke about it often.  We have decided that the universe somehow knew that if we spent any length of time dating and/or deliberating marriage, we would both chicken out.  It was his first marriage and he hadn’t any children.  He was inheriting my three boys with no kid experience at all (he did however have a huge dog, which was a big score for my dog-less children.) It was my second marriage, after having been widowed four years earlier.  Things were still rough as the boys and I continued to grieve the loss of their dad. Step-parenting is an absolute challenge, as I am sure many of you know.  Both for the step-parent and for the natural parent overly-possessive-mama of the kids being step-parented. However, we worked through all of it and life is grand.

On to the quilty part of the story.  After the wedding we honeymooned on the island of St. John in the Virgin Islands.  It was blissful. Heavenly! One of the many things I learned about my new husband on that trip is that he takes millions of sunset pictures and they are really good.  This just looks heavenly, doesn’t it? (This was before digital was available so scanning this photo doesn’t really do it justice.)

EPSON MFP image

While we were on our trip I picked up a piece of batik fabric, maybe 1 and 1/2 yards.  It was so pretty.  It sat on the shelf with my other fabrics and waited patiently for me to figure out what to do with it.  Sat there for sixteen years! I looked at it now and then but didn’t want to cut into it.  I couldn’t figure out the best way to use it.

20140830_1646Last week I finally decided what to do with it! About a year ago I purchased three charm packs of Moda’s Dancing In the Rain batiks. I bought them for a great price from Judy Madsen’s on-line shop, Green Fairy Quilts.  Quick, unsponsored, plug here – This shop is awesome.  She has good prices and often has great sales.  There is no shop (that I have used) that ships as fast as Green Fairy Quilts.  I swear they must ship the order the day it is received.  She ships out of Utah and it hits my California address within a matter of a couple of days.  Wonderful!  Anyway, I purchased these charm packs and added them to the proverbial shelf.  When I was looking for a project last week, I pulled these out.  I chose to make a nine patch quilt.  Something simple, mainly for the satisfaction of sewing and finishing something without any fuss.  As I was laying out the charm squares and deciding how to use them, I remembered that batik from St. John.  Perfect for the border!! I was so excited. I knew it was the right place for that fabric.

I sashed the nine patch blocks with a bit of black to set off the colors.  I think it lends a look of stained glass to the quilt.

20140829_1640

I decided to use the blue batik charm squares as the center of each block.  It lends continuity to the colors. After I sashed the blocks, I made four cornerstone blocks.  I just diced four extra charm squares into four squares and made small patchwork blocks with them.  I cut my precious honeymoon fabric into strips for the border and added the cornerstone blocks.  Hurray, my quilt top is finished!!

20140901_1658The sun was shining hard through the quilt top which makes it even more reminiscent of stained glass.  Love the pink square at the upper right corner.

20140901_1660

I keep looking through my fabric trying to come up with something that works for the back.  Alas, I have not found anything I like which necessitates a trip to my LQS.  How unfortunate for me.  😉

I am so happy with this quilt top.  I love the batiks.  I haven’t ever made anything with batik before and it is really pretty.  I plan to add a black piping or flange to the top and then bind it with the honeymoon batik against that black flange.  I will post a picture of the finished quilt when it is actually that, finished!

Happy weekend all!

Linking to: Freemotion by the River, Sew Cute Tuesday, Let’s Bee Social, NeedleandThread Thursday, TGIFF, Finish It Up Friday.  All of these wonderful sites have a link listed in the Link-Up tab at the top of my page.


Summer is Winding Down

This summer flew by.  I knew it would because we had a lot of different things scheduled when it started.  That usually makes time go by (too) quickly. This week and last were filled with appointments for my 8th grader that are easier done during summer.  The dentist, the orthodontist and the optometrist.  When I took her for an eye exam (she usually only has the quickies that they do at school) and found out that she is near-sighted. She and I were both so surprised. He asked her if she has to squint a lot or if she had trouble reading the board at school.  She innocently says, “No squinting but I can’t read the exponents during math.” I looked at her and wondered why she didn’t ever mention this??  The doctor said that when this happens gradually the person just doesn’t really notice.  Now she is happily wearing glasses and keeps lowering them on her nose, looking ahead without them, then through the glasses.  Comparing the difference with awe.  So funny. 20140730_1481   In between all of that I got loads of time at the sewing machine.  Hurray!! Here are some of the things I worked on. First off was this little baby boy quilt.  Puppies and boys, perfect fit, right? I used a simple patchwork of charm squares for the center.  Borders of navy blue were added, as well as a stripped border made from the leftover charm squares. 20140805_1522This was inspired by a photo I saw on Pinterest. Very easy to do. I didn’t really do any math beforehand; rather I just built it as I went along. The fabric is called “Here Boy” by Abi Hall, designed for Moda. This line is adorable.  It features puppies, dog bones and bouncing balls.  The colors are bright and happy, blues, orange, reds, green and yellow. 20140805_1521 I backed it with a dark navy and white oversized polka dot.  For the first time, I didn’t use a pieced backing.  The dots are very sweet on their own. Finished it off with a crazy bright orange binding. I love the contrast. I bound it as I usually do by machine stitching to the front and hand stitching to the back.  I am wondering though, if I should machine stitch both sides.  Seems like a baby quilt is going to be laundered often.  Would it hold up better if I machine stitched the binding on both sides? Give me your thoughts on this please!

Also got some time to work on my RSC14 blocks.  I finished the red blocks that were scheduled for July. I love the cherry fabric scraps. They were from a bag of scraps that my neighbor gave to me. (What a fun bag to look through!)

20140805_1509 I also finished the bright greens that are the color for August. Looking through my strips, I didn’t have tons of bright green but was able to find enough to do these two blocks. 20140805_1508 So, I still have to catch up and finish March, April, May and June.  Here is what I’ve got so far. 20140805_1507  This weekend I am off with my sisters for our annual “sisters’ weekend”.  Cannot wait!! Hope you all are enjoying the tail end of summer.

Linking with Linky Tuesday @ Freemotion by the River, WIP Wednesday @ Freshly Pieced, Fabric Tuesday @ Quilt Story, and Let’s Bee Social @ Sew Fresh Quilts.  Also to Needle and Thread Thursday, Crazy Mom Quilts’ Finish It Up Friday, Can I Get a Whoop Whoop, and TGIFF which is at QuiltMatters today. Links to all of these are listed at the top of my page under the Link-Ups tab

Friday Finish!

The past week was a busy one and I didn’t spend lots of time at the sewing machine. I spent several days visiting with my son who lives in the Central Valley.  Soooo hot there. I lived there years ago and acclimated to the heat back then.  Now?  Not so much. While I was there I made a trip to the local quilt shop in Turlock, CA — called “Cloth and Quilts”.  It was really well stocked and the people were so friendly. (But then, isn’t that always the case?  They are quilters, after all.) I was fairly disciplined and only picked up two pieces of yardage and three fat quarters.  Not too bad at all.

Even with being gone for a few days, I did manage to finish a baby quilt that I have been working on.  I posted about it earlier here. I am so pleased with the final result! The colors are adorable and overall it is a sweet little quilt that will, hopefully, make some new mama out there very happy. I did five inch squares on point with white sashing.  I also appliqued a heart to one of the squares on the front and then did a pieced backing with three more appliqued hearts.  Love these accents!

20140730_1466

The print that I used for the backing was leftover from another project.  I can’t remember the name of it but I love the floral print.  They look like hydrangea blossoms to me but who knows??

20140730_1469

I quilted it on my machine with a large, loose stipple.  It was a breeze to quilt up. Then bound it with a dark purple piece.

20140730_1471

Just had some labels made and tucked one at the bottom edge.

20140730_1473


A finish for this Friday – Yay!  The quilt is listed in my shop on Etsy waiting for the right person to come along and snap it up.


Linking to Crazy Mom Quilts and TGIFF.

The Sisterhood

Eventually, after just few more words, this post becomes quilt related.  Honest.

I consider myself to be incredibly fortunate. Life is good and I have all that I need or want.  Not everyone can say this and I know I am so lucky. Part of my good fortune involves my five sisters. I am one of six girls and it is the best. My parents, like so many couples in the 1950’s, married really young (at the ripe old age of 20).  They produced their first daughter three days after their first wedding anniversary.  Within another nine years they created five more daughters!  So, we six girls were all within ten years of one another.

You can only imagine the craziness that it is to grow up with six girls in the house and no boys (other than Dad). It was a sort of love/hate relationship.  We fought incessantly – about who the sweater belonged to, whose night it was to do the dishes, who was supposed to vacuum this week, who left the dried up ice cream bowl out and should really be blamed for it – it went on and on.  However we were also each other’s best friend.  There was always someone to hang out with, lay in the sun with, our bottles of baby oil and tubs of cocoa butter at our side. (sunblock? I don’t think so….) My mom actually told us, on more than one occasion, that we should  make some friends (what? like with someone from another family? but why?)

Now that we are adults we are still so close, probably more so since we don’t have to share a room or fight over the dishes. There are daily text strings, sometimes numbering upward of 50 exchanges, between us.  These involve the really important (earth shattering actually) details of daily life.  How do you make cucumber/tomato salad?  How much should I be paying for apricots? Look at the latest picture of this grandbaby, or that one.

sisters

As I started this blog, they were my first supporters and definitely my first followers (since no one else knew I was out here writing away). And here comes the quilty part of the post….

Wednesday, during a morning text marathon, we were celebrating my very first sale on Etsy!! A momentous occasion.  See?

20140723_1452

One of my sisters asked what else I was going to put up on Etsy.  (They are like my advisory board.) We tossed some ideas around and a baby quilt was suggested.  I decided this would be a fun thing to do.  I hunted through my fabrics and found a great assortment to use for a baby quilt for a sweet little girl.

baby quilt fabric

Love having this all on hand and ready to go!  I wanted to make something sweet and simple.  I chose to do a quick lattice work pattern using five inch squares on point, sashed with white.  The tutorial is from none other than Amy Smart of Diary of a Quilter.  She posted it at the Moda Bakeshop  site a long  while back. Couldn’t get much easier than this.  Well, actually, it could.  If I would have had the right charm squares on hand it would have gone together much quicker.  As it was, I had to cut fifty (5) inch squares myself.  That took a bit of time but I need to be using the fabric I have, right?? The result is adorable.  Got the quilt top finished yesterday.  Yay!

baby quilt front

I added an appliqued heart to one of the squares for an extra touch.

baby quilt close up

My sisters were right.  (They always are.)  This was a really fun project.  I have the pieces for the back all cut and ready to assemble.  I haven’t found anything that I like in my stash to be used as binding.  (Oh well, a quick stop at my LQS will fix that–everything else was on hand, right??) Unfortunately I don’t have any batting just now.  Living 45 minutes from the nearest shop that carries batting for a decent price means I use Amazon a lot!  (Go Amazon Prime.) The batting will be here on Saturday and then I can get this finished up.

A quick question.  How should I quilt this.  Such a contrast between the white sashing and the dark purple squares.  I don’t know what color thread to use if I want to do a meandering, all over FMQ or a straight line pattern? Or, do I just quilt each square, avoiding the white sashing? I would love some input on this.

Great finish for Friday though.  A lovely quilt top in two quick afternoons!

Linking up with Crazy Mom Quilts, TGIFF, Link a Finish Friday, Confessions of a Fabric Addict, and finally, Fabric Frenzy Friday!!  Check out these links to see some really great work.

Have a great weekend everyone.

Donation Quilts

I have been a volunteer with our local food ministry (www.interfaithfoodministry.org) for a long while now. As with any non-profit, we are constantly fund raising to keep the ministry going.  We have had several fund raising dinners at local restaurants and along with the dinner we usually hold a raffle or silent auction.  I have donated three quilts over the past 18 months for these events.  It has been great practice for me and the quilts are popular items that have raised money for a cause that is near and dear to my heart.

The first quilt I made was a simple one that was based on a tutorial at Crazy Mom Quilts called “Fair and Square”. The pattern was very easy to use, which was a good thing since this was one of my first quilts! It was made using scraps I had on-hand with the exception of the sashing and the backing. This was the first quilt that I free motion quilted and I did it with random loops.  It turned out decent, considering it was the first one!

The front:

ifm donor quilt frontI pieced the back with fabric I had left over.


ifm quilt back

Quilt number two was one of my favorites.  I love both the pattern and fabric. The pattern is called Doubly Charming and was provided by Teresa at Sewn Up By Teresa Down Under. I love this pattern. It came together easily. It uses three charm packs. I chose “Eat Your Fruits and Veggies” by Pat Sloan for Moda. The colors were so bright and cheerful. I quilted it with straight diagonal lines which basically outlined the squares.  I also tried tracing a sunrise and quilting that design on the setting triangles. That worked really well. I machine quilted the binding.


Oh So Charming Donation Quilt September, 2013

Sept 2013 002

Here is the back:

ifm quilt 2 back


FInally, the third quilt.  For this one I used a tutorial at Crazy Mom Quilts (she has the best tutorials!!) called Zig Zag Quilt. I love this pattern for it’s chevron look but no piecing of triangles needed! So simple.  The fabric line was called Beyond the Gate by Jill Finley for Henry Glass & Co. This was such a fun project. I love the look of this quilt – it’s very soothing. I quilted the colored rows with gray thread and used white on the white rows. The gray looked fine with the green and blue rows but stood out a bit too much against the yellow rows.

20140422_0637


20140429_0655


and now the back side……….

20140422_0638

Love putting this quilty hobby of mine to good use for a good cause!! Anyone else making donation quilts? Comment with some links so I can see them!

Linking up to Anything Goes Monday at Stitch by Stitch, Linky Tuesday at Freemotion by the River, Show and Tell Tuesday at Fresh Squeezed Fabrics, and Sew Cute Tuesday at Blossom Heart Quilts.