Tag Archives: baby quilt

Fleet & Flourish- A finish

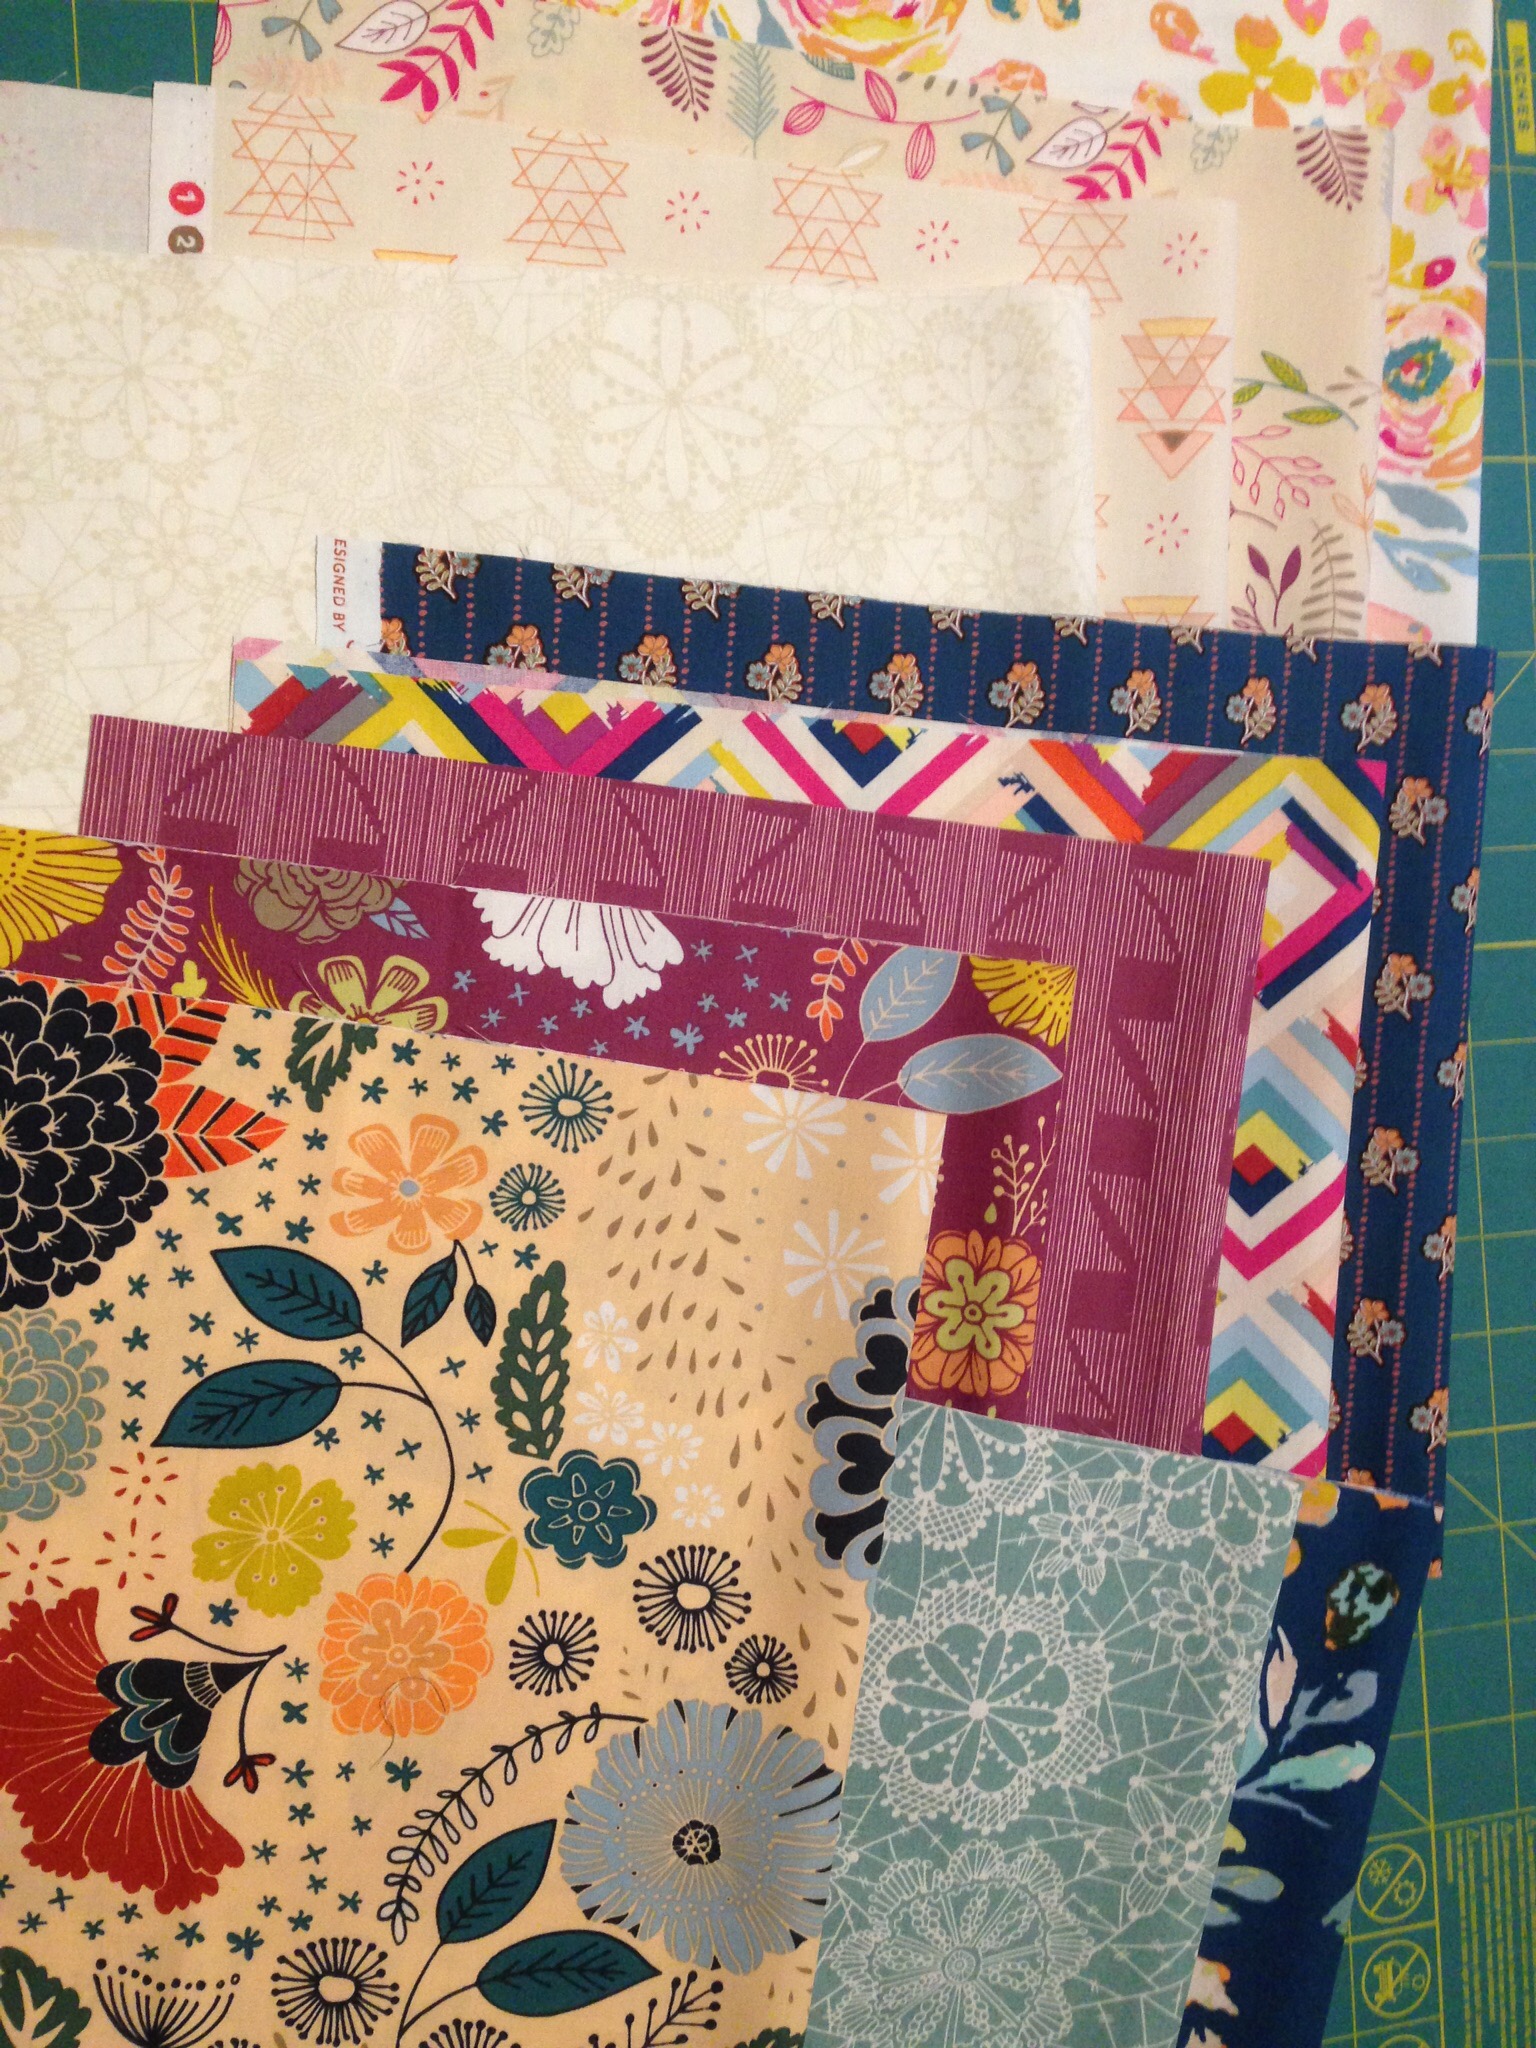
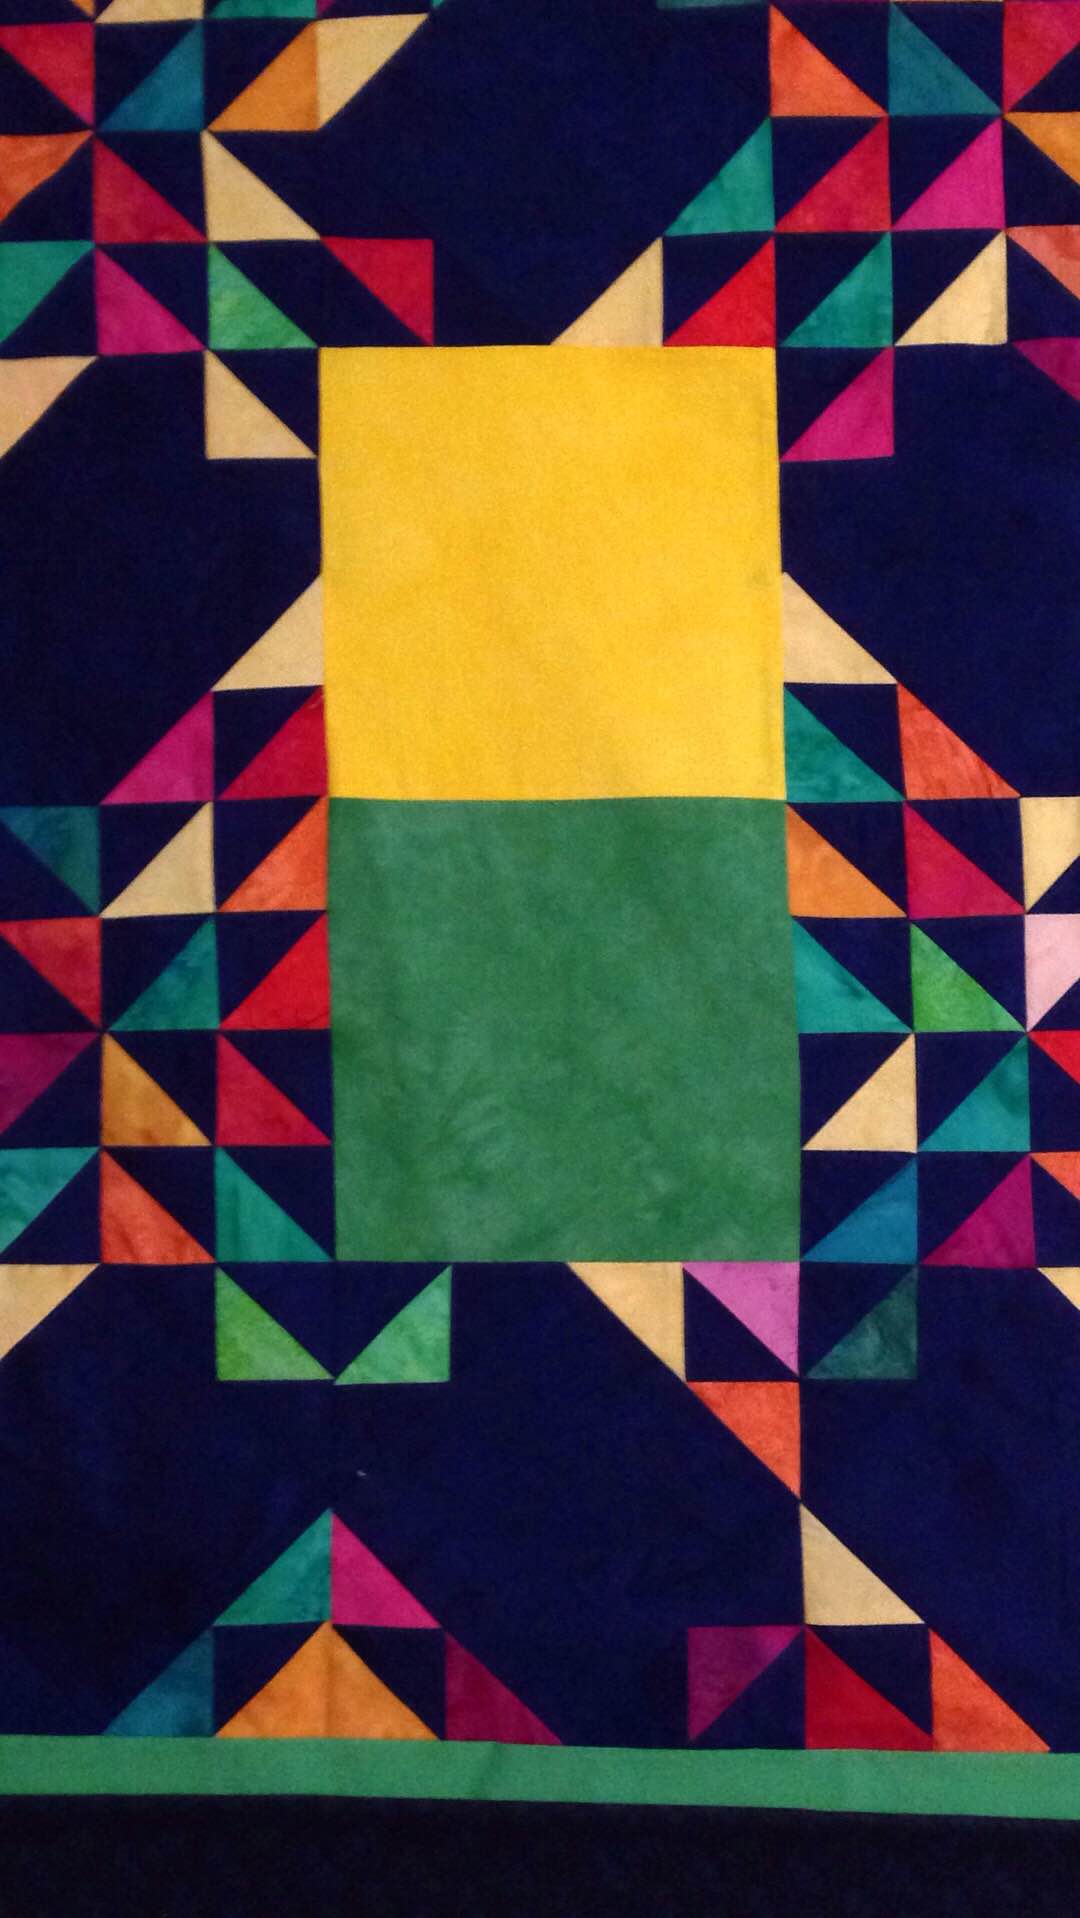
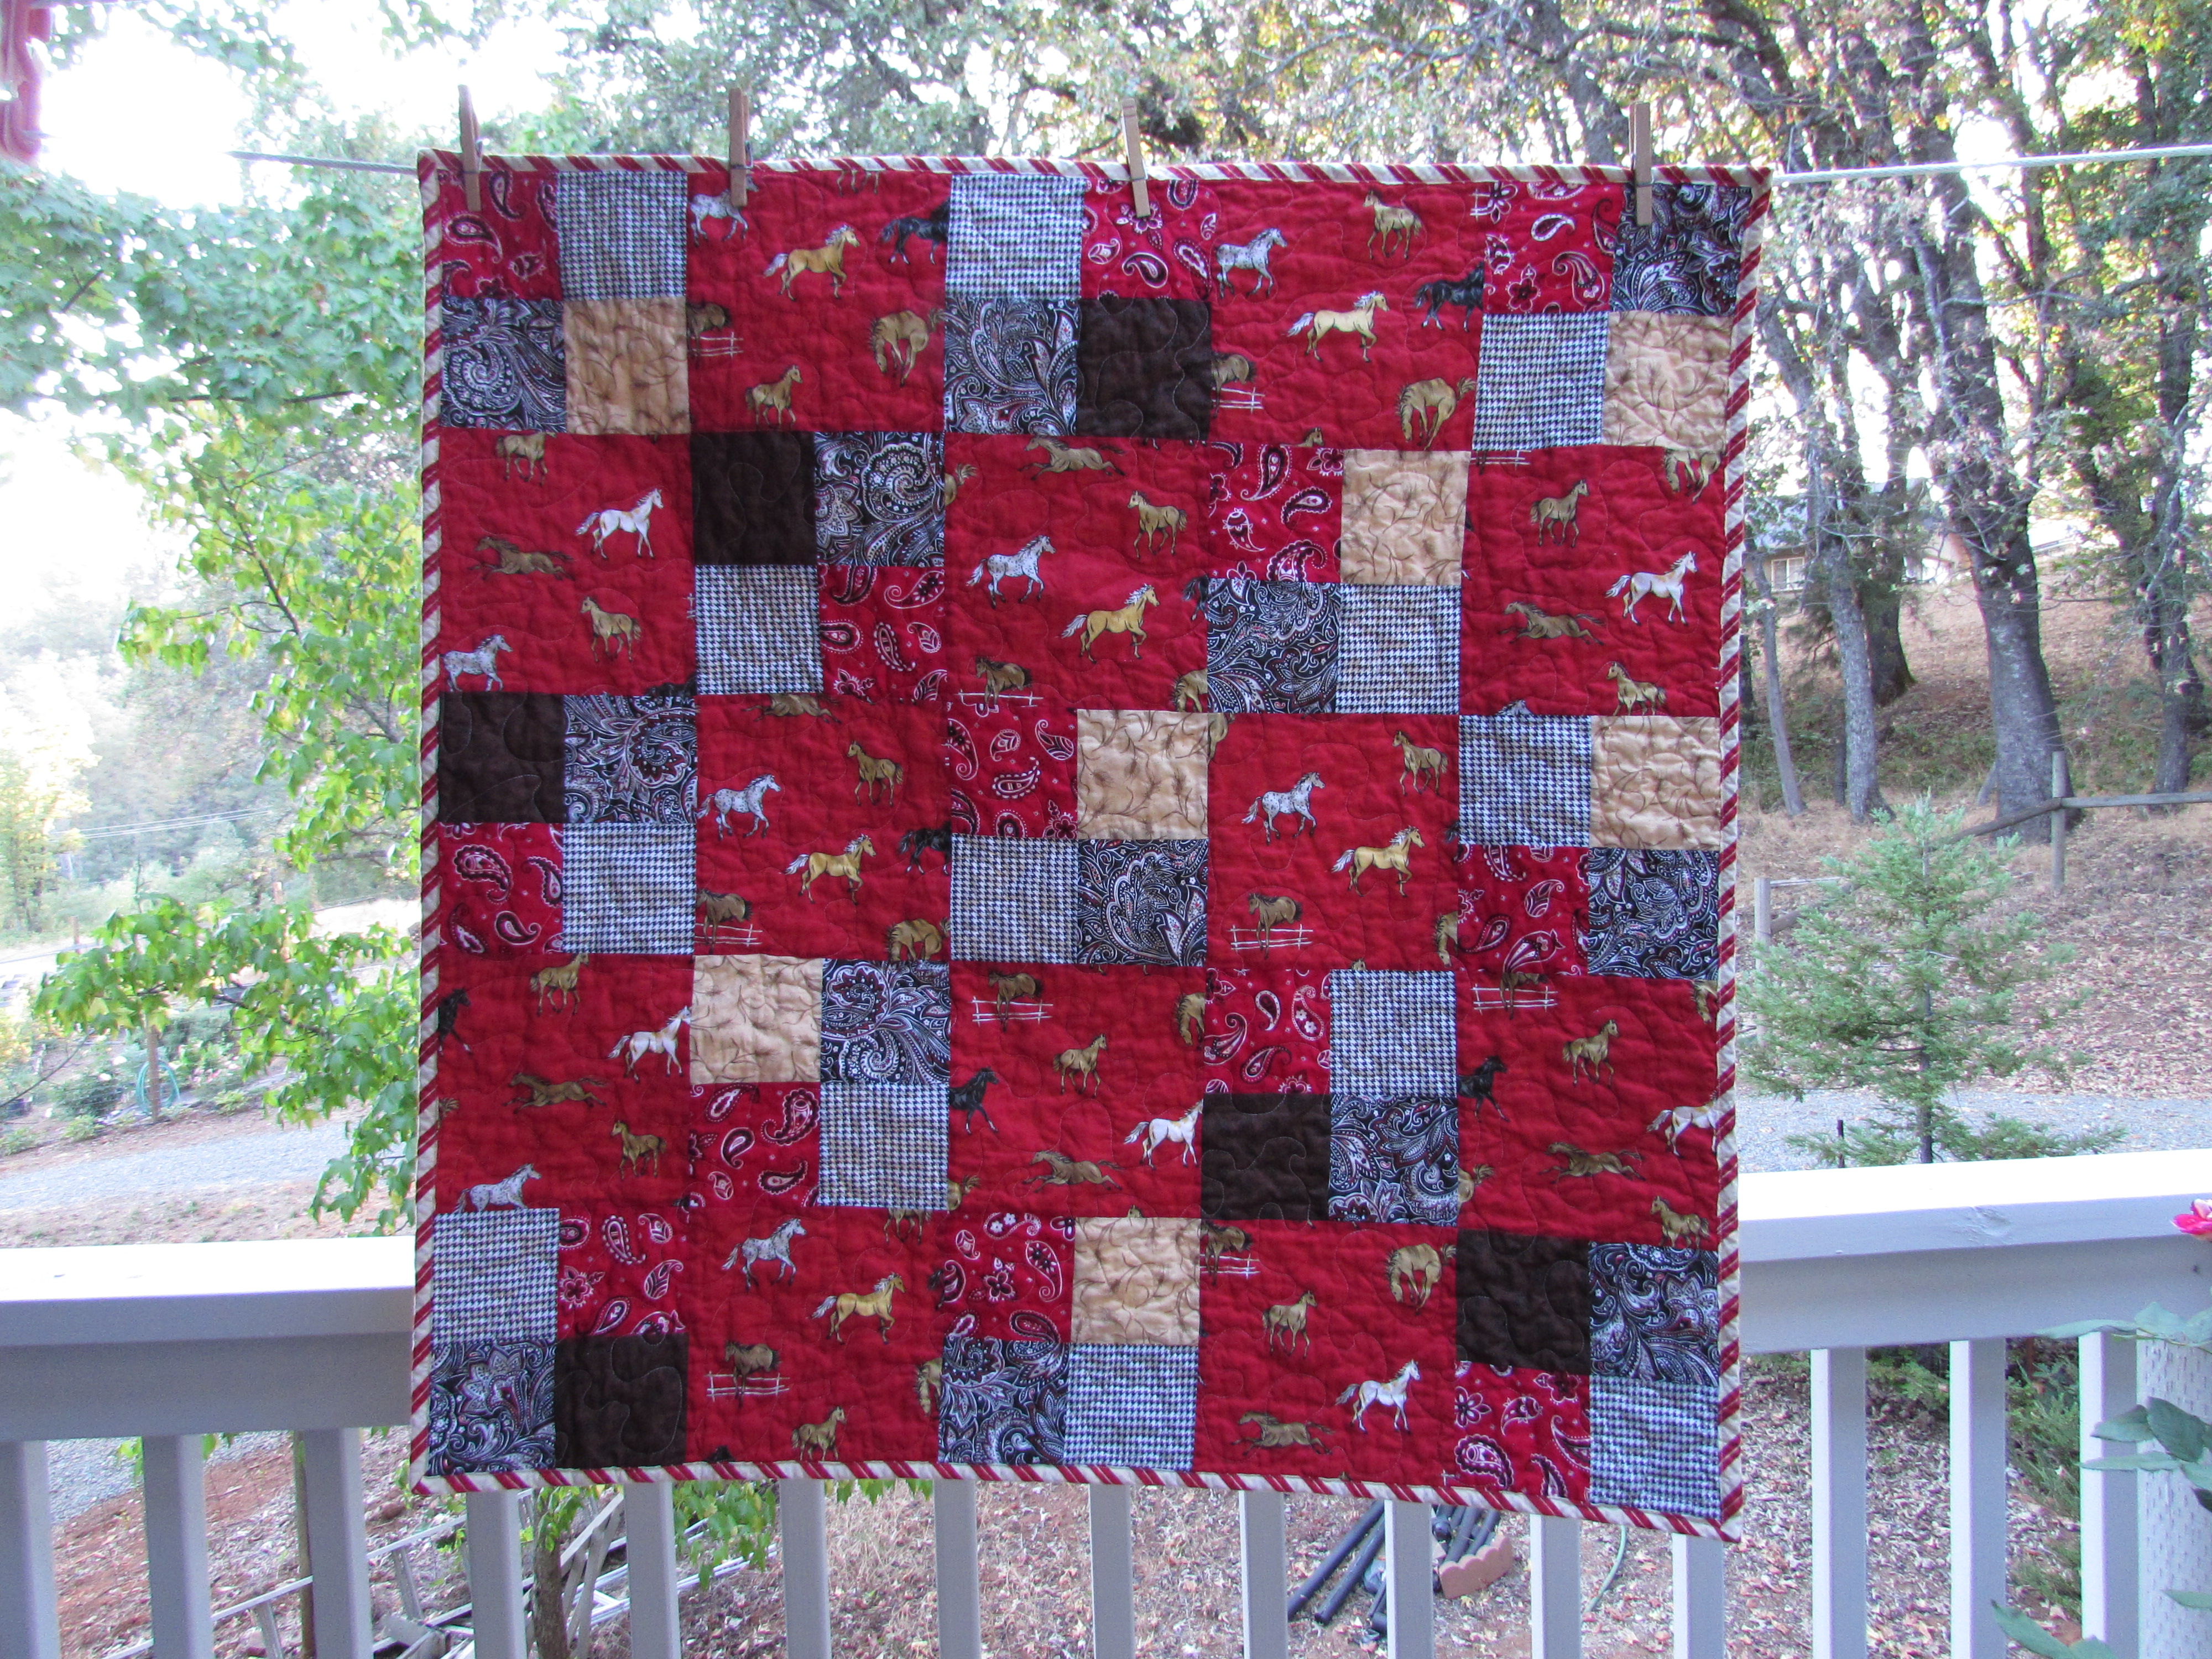
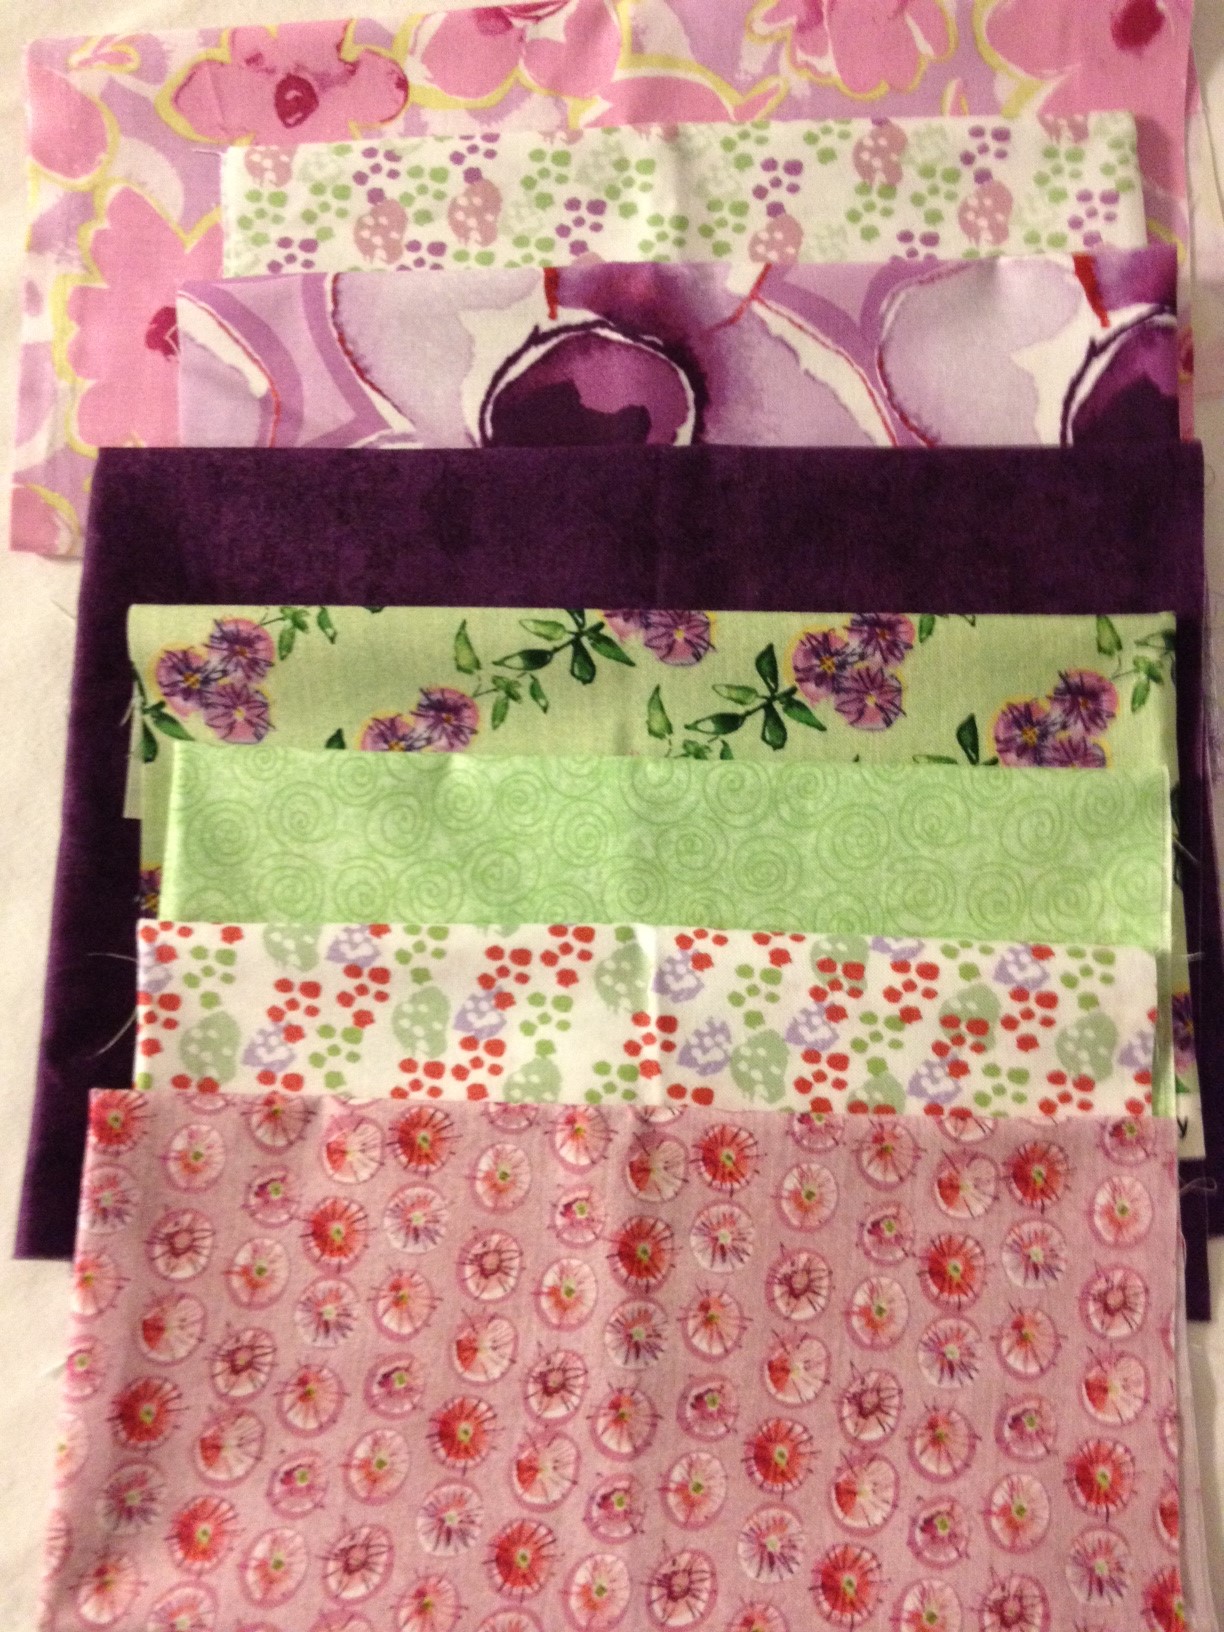
Fleet and Flourish is a gorgeous line of Art Gallery Fabrics designed by Maureen Cracknell. I was lucky enough to receive a set of fat eighths of this line from my kids for my 2015 birthday. It was one of the monthly shipments of the fat eighth club at Pink Castle Fabrics. (Pink Castle never disappoints!!) I love this set and really had a tough time cutting into it. But that is so silly. What good does gorgeous fabric do for me if it is sitting up on a shelf in the closet?

img_1549

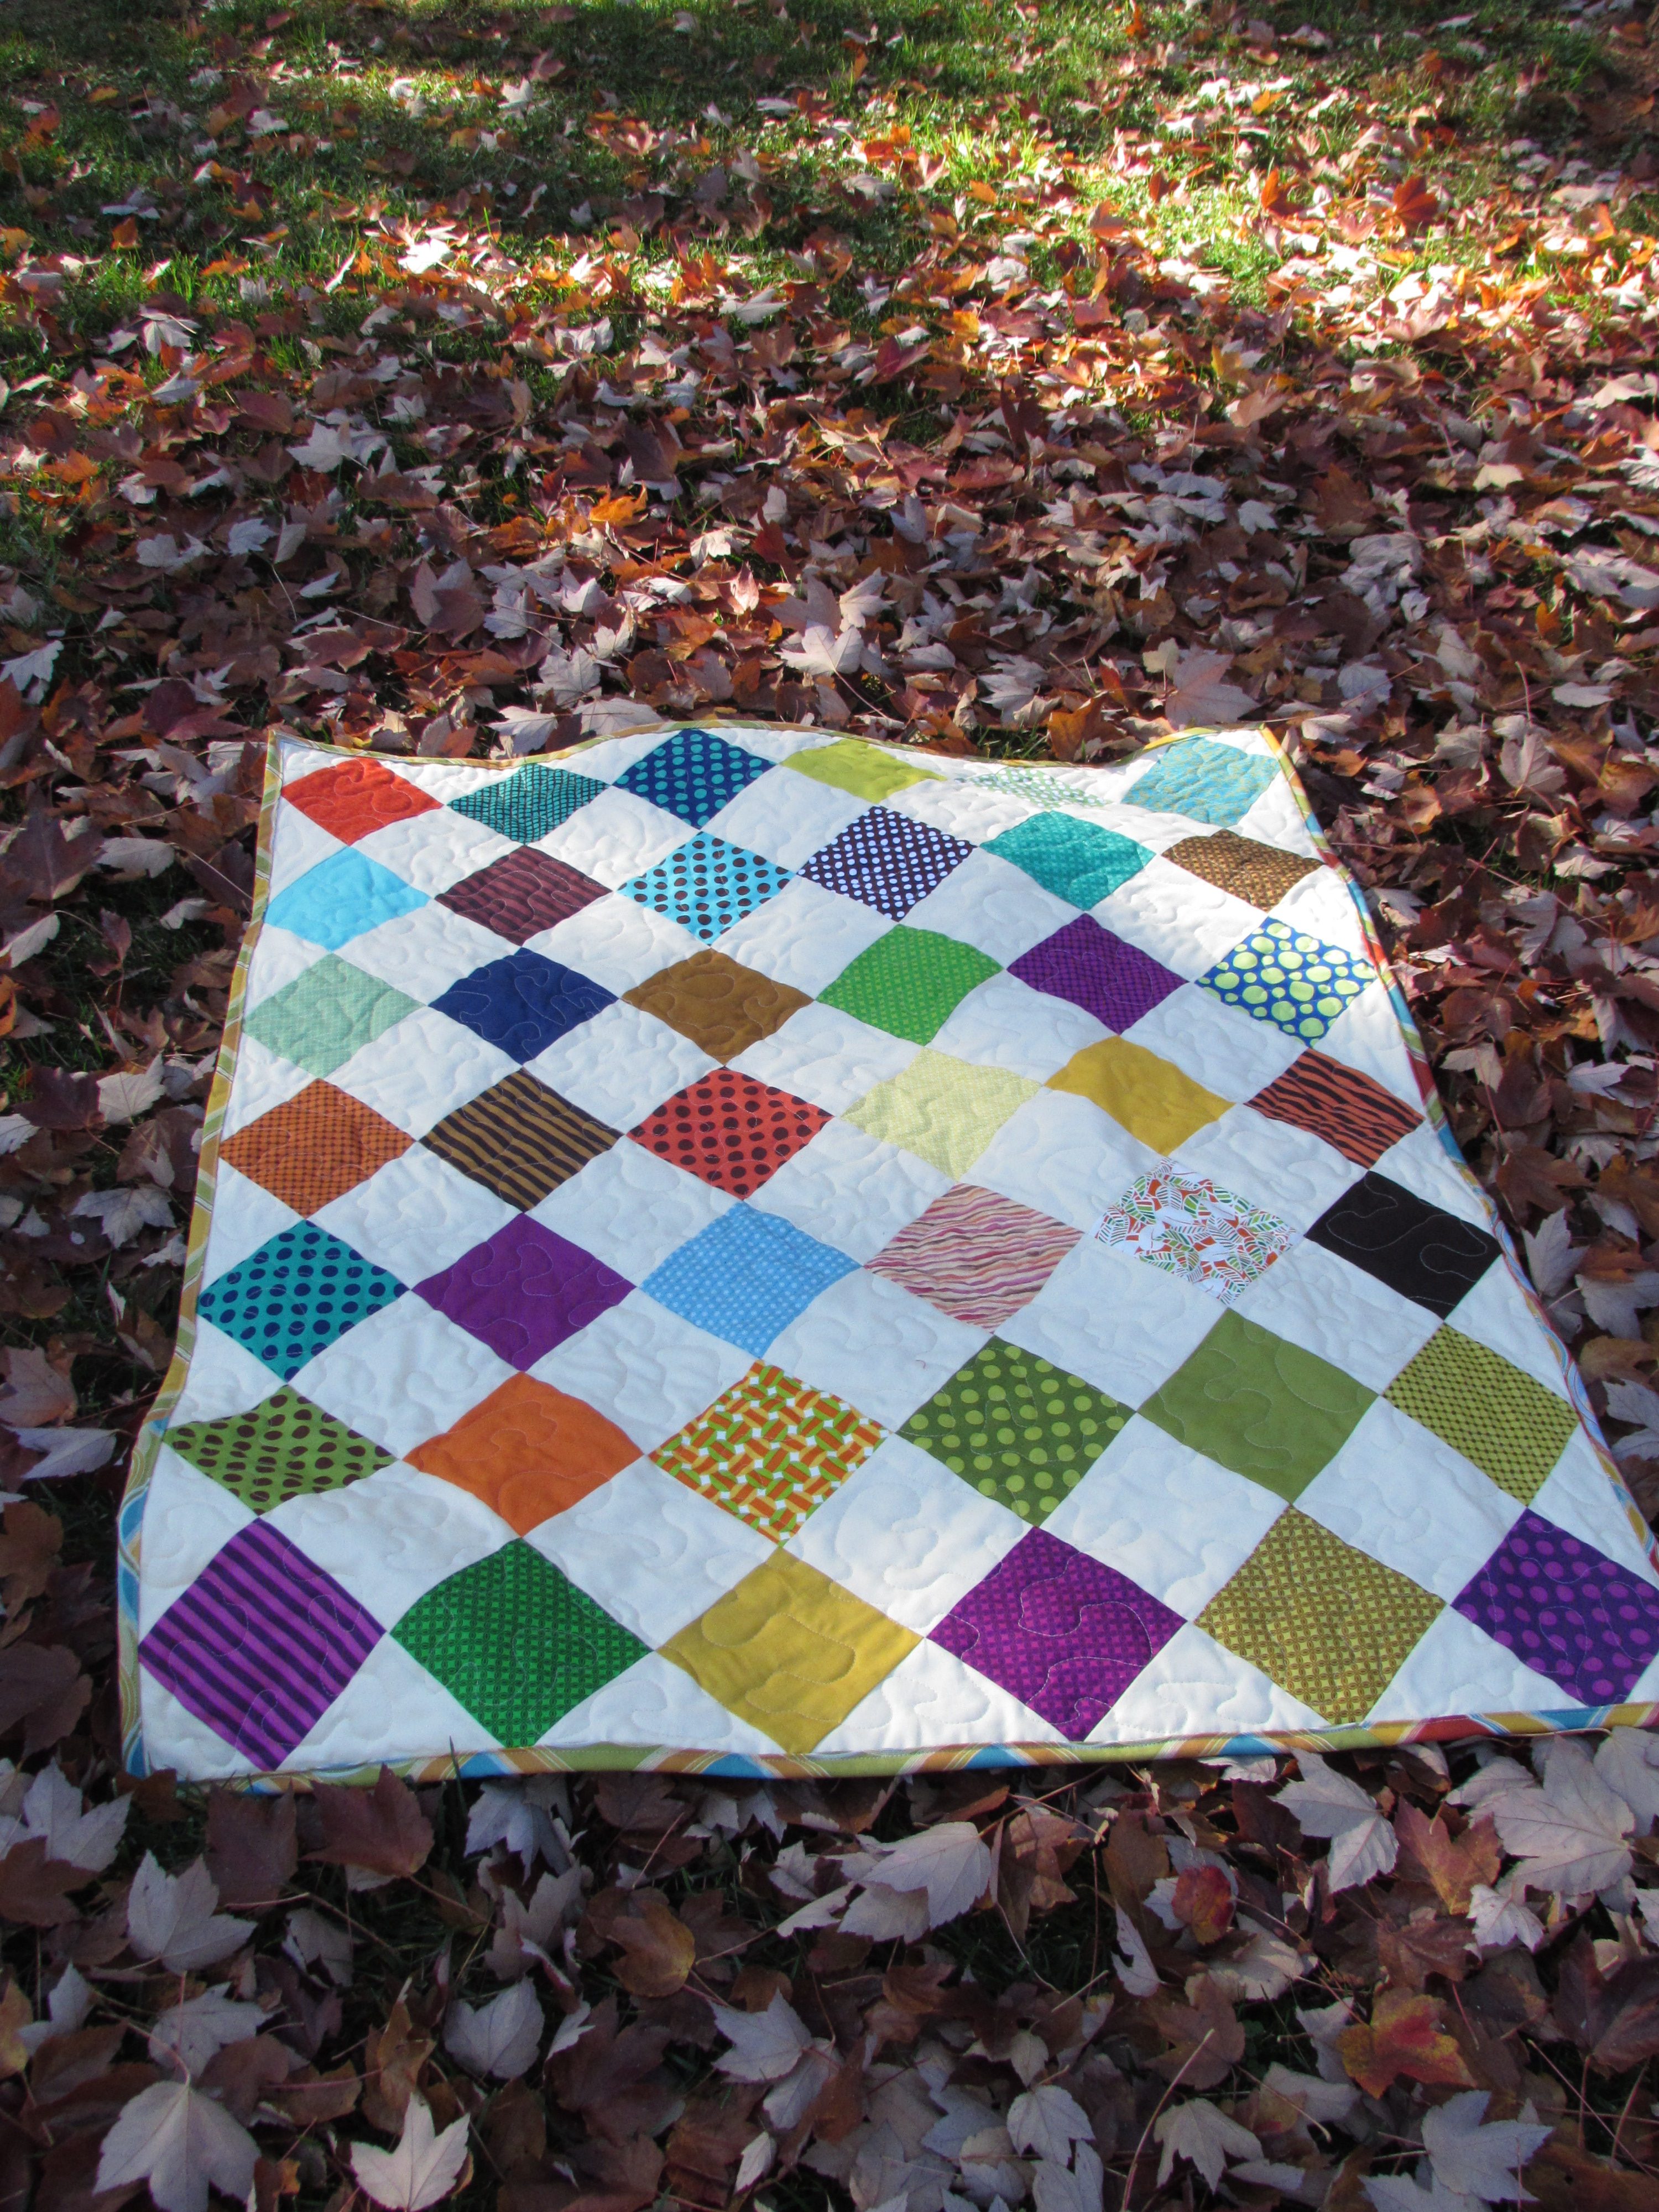
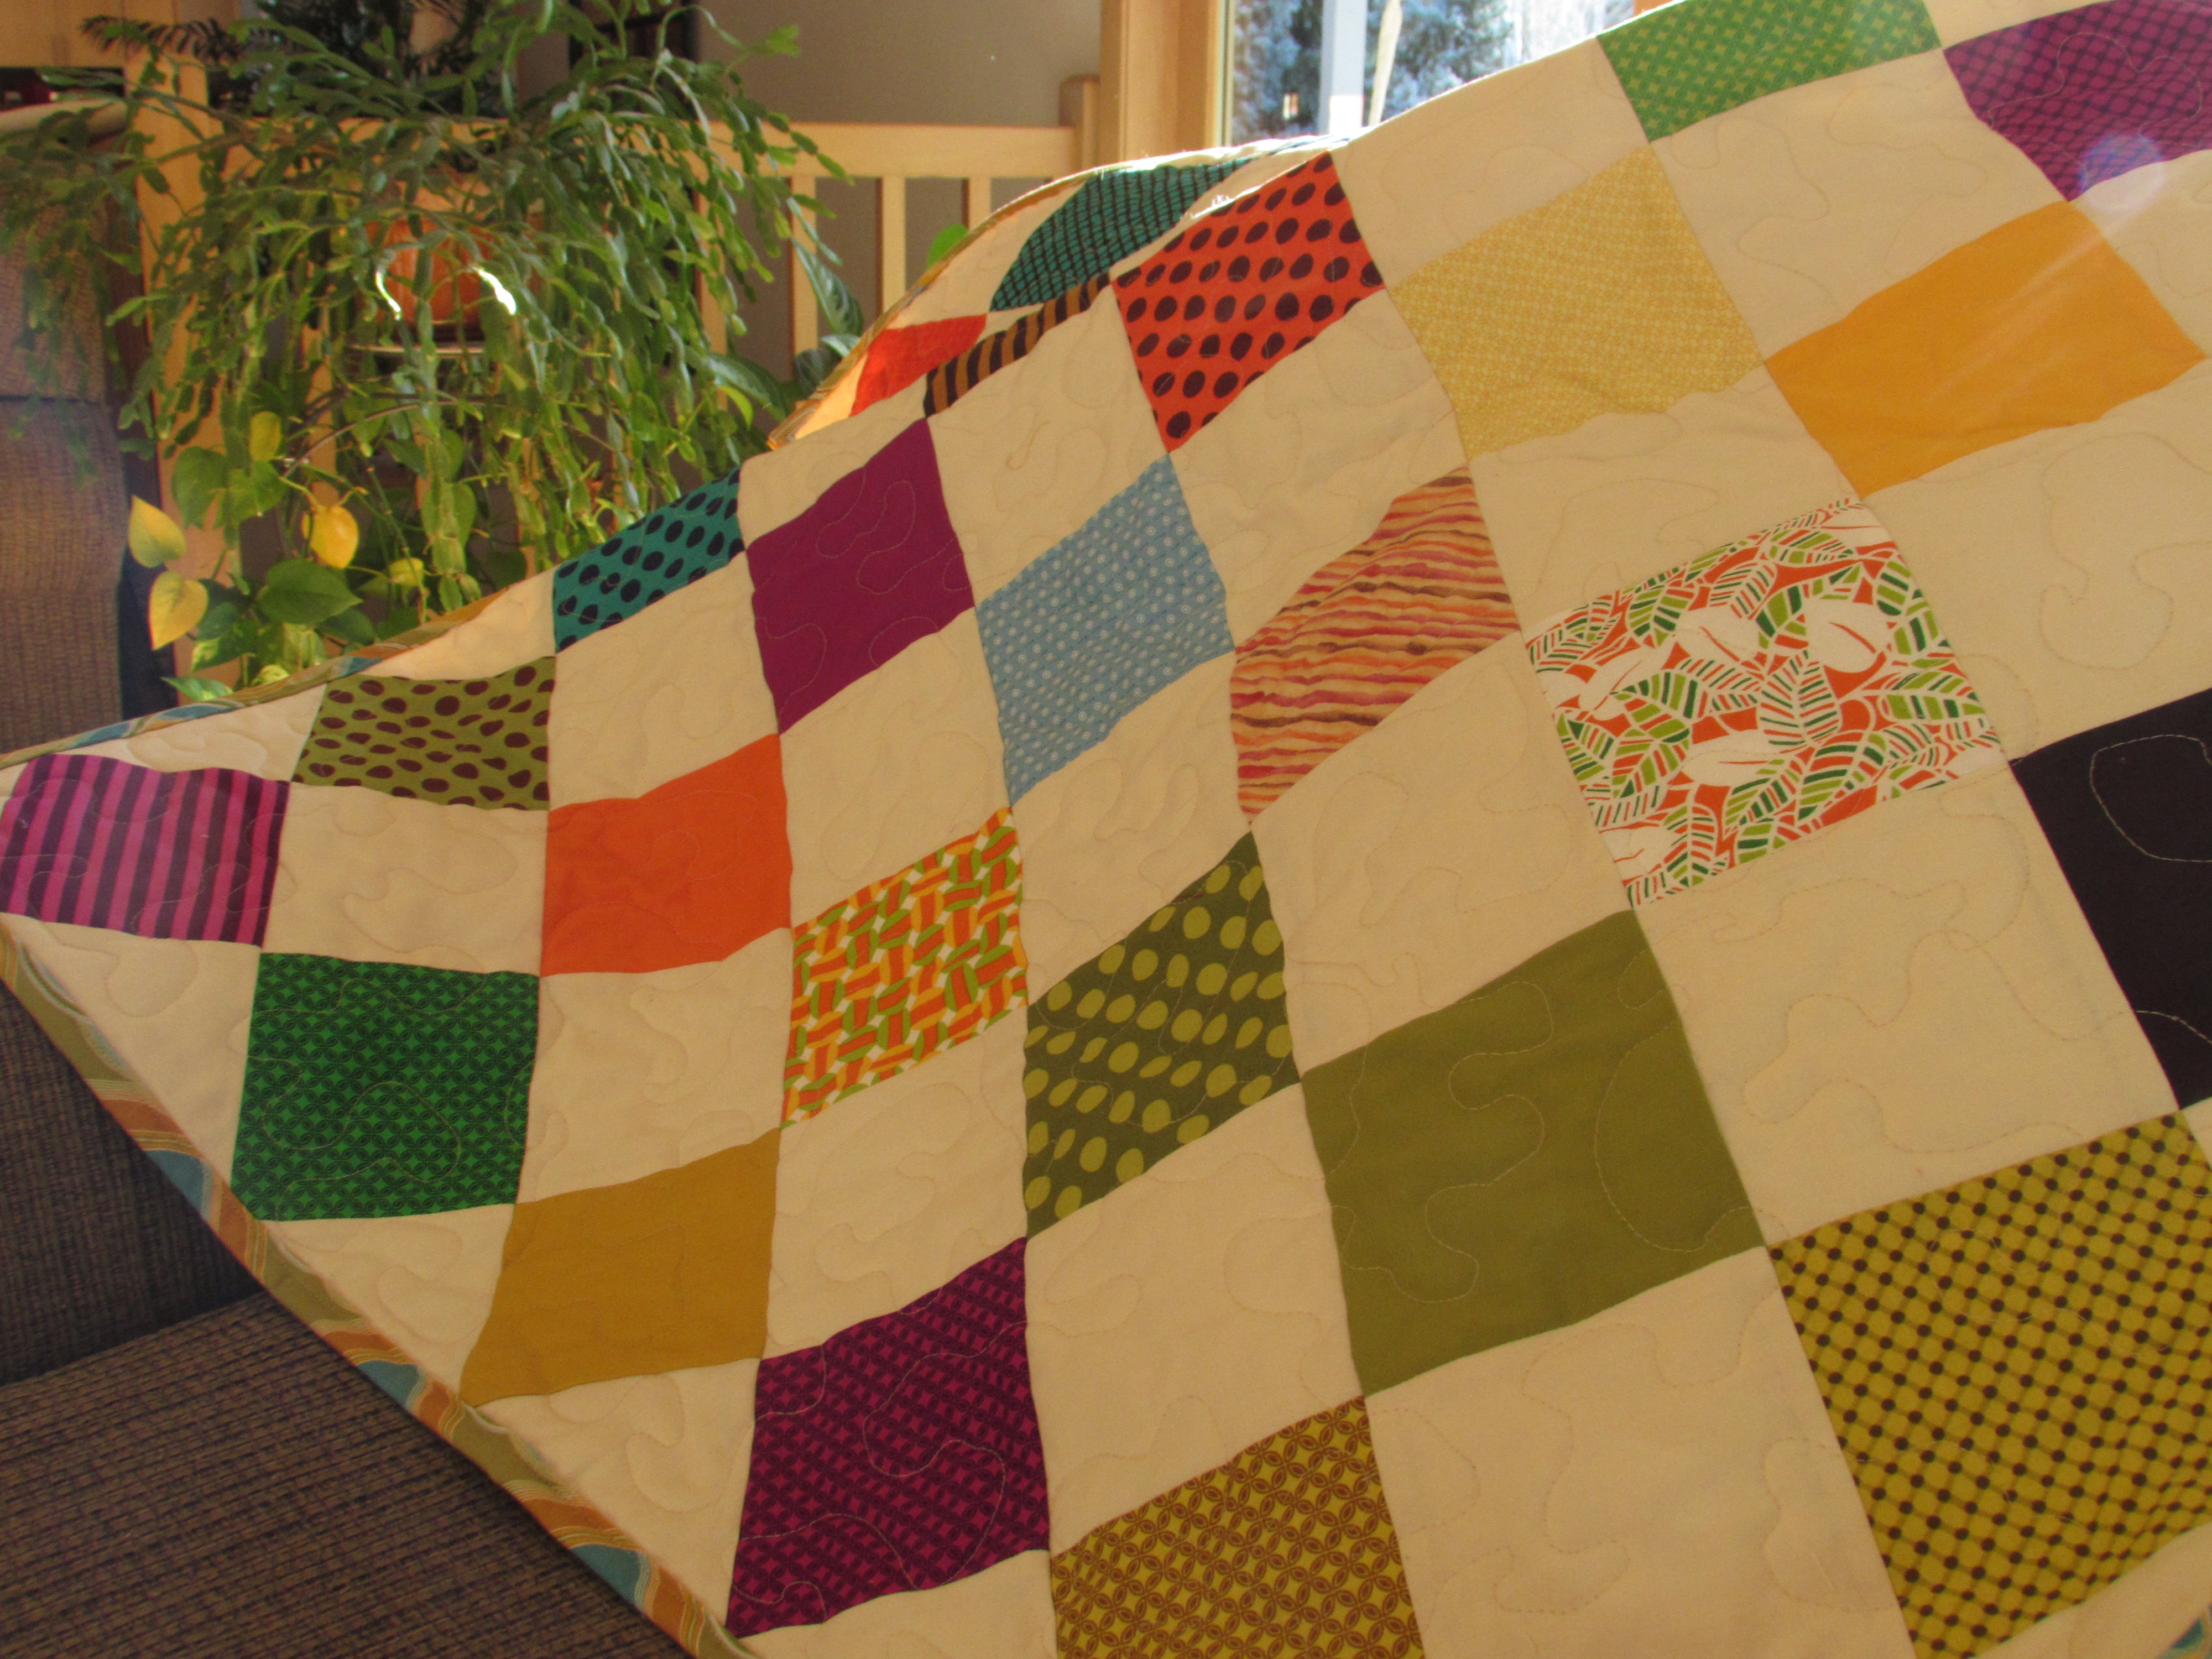
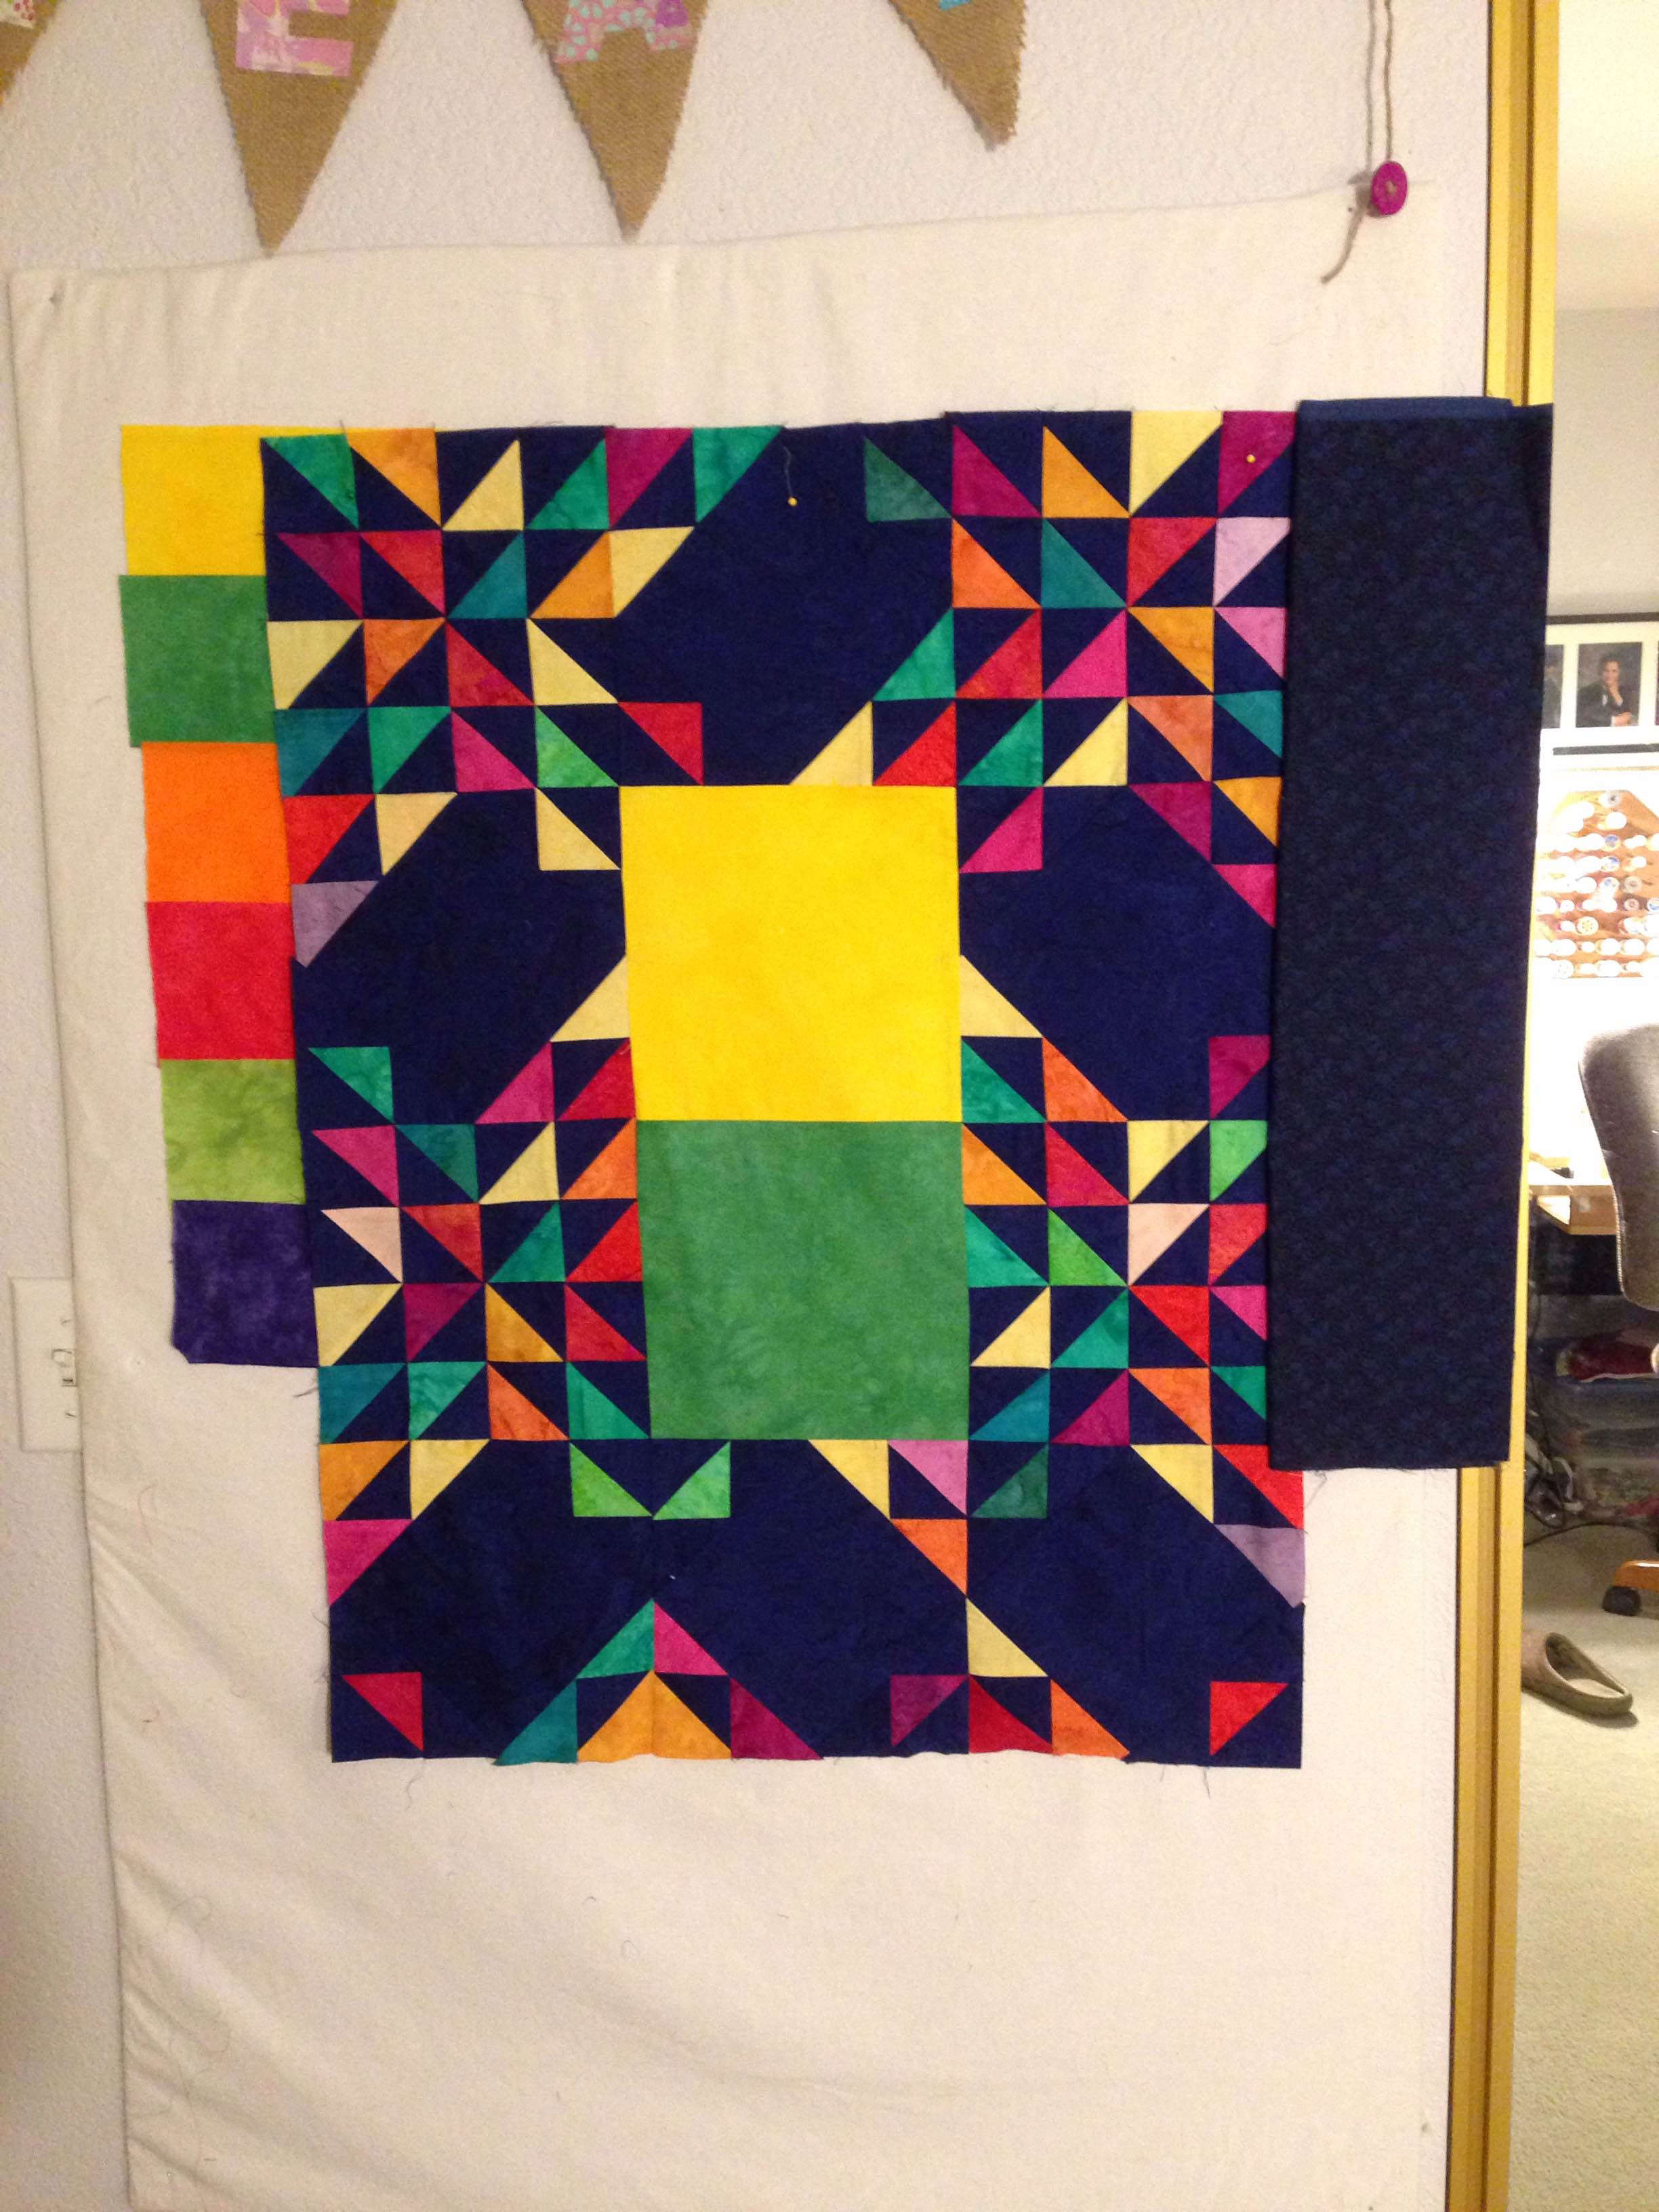
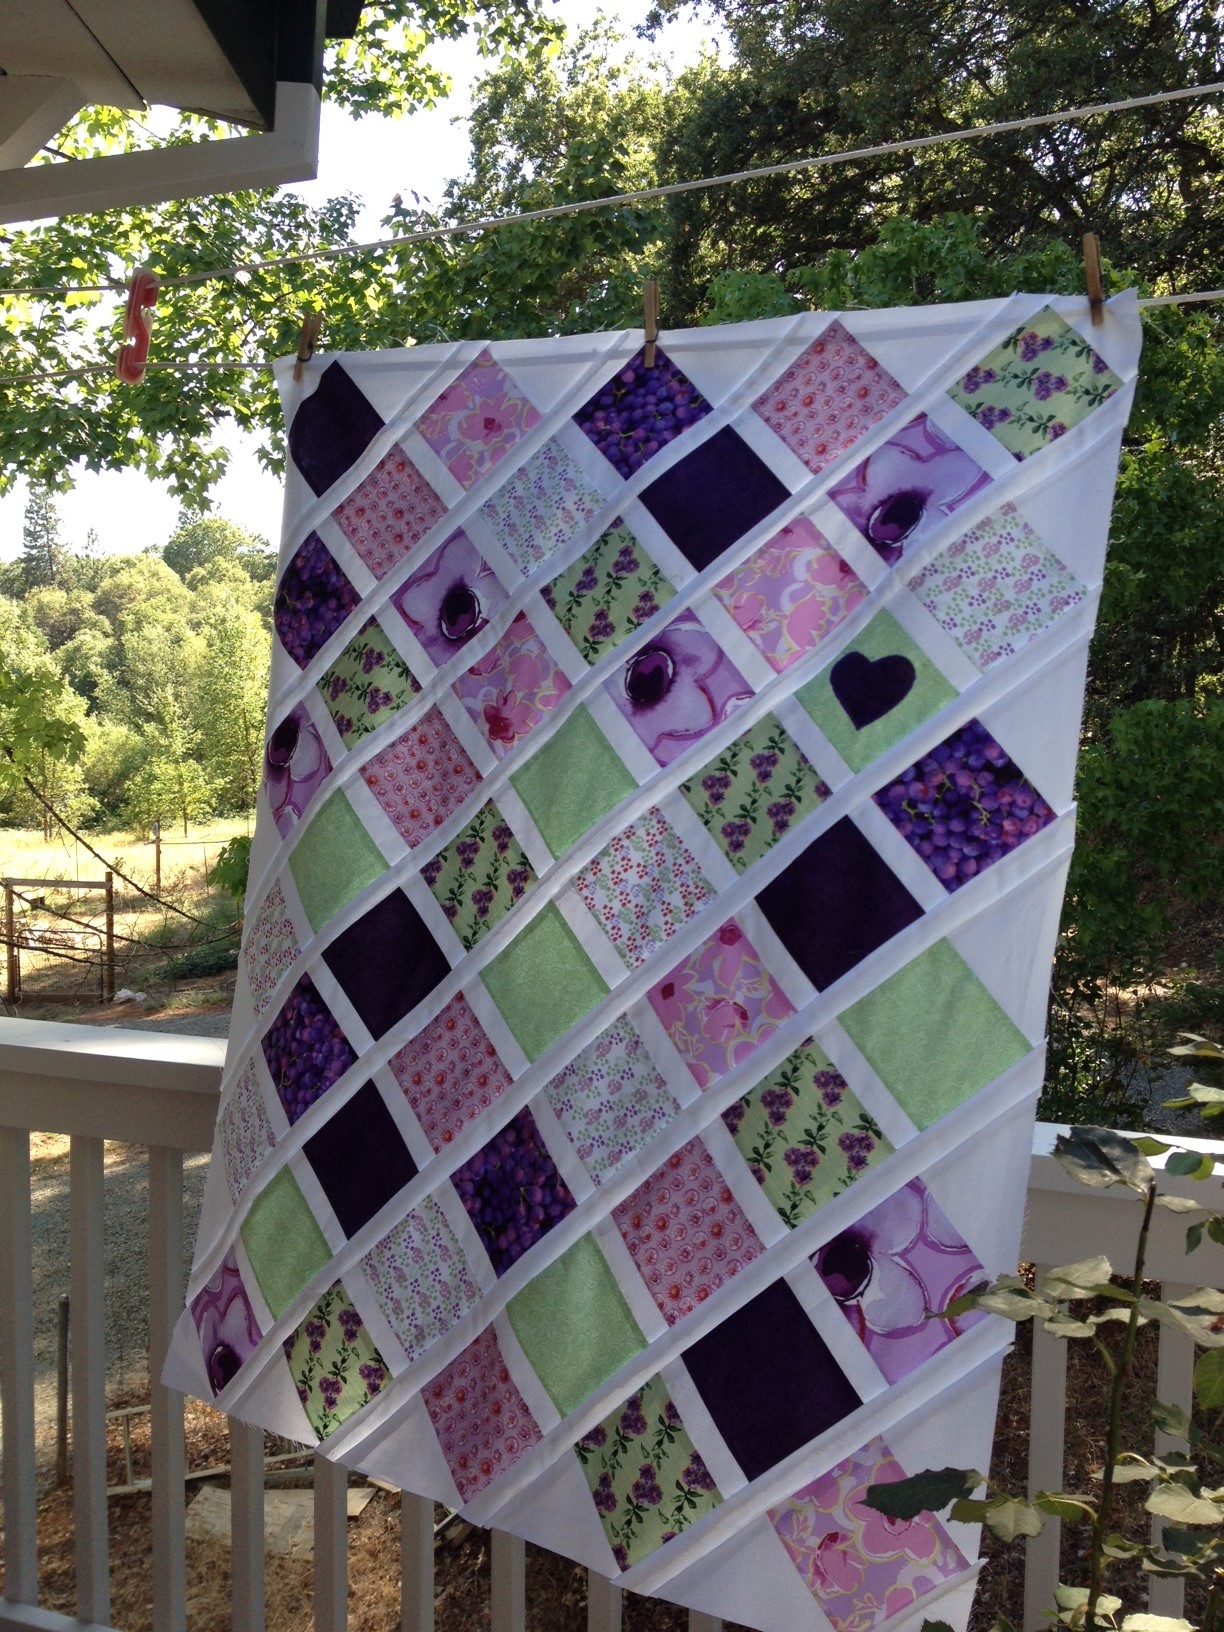
I decided to use it to create a mid-size quilt; either to be used as a baby quilt or a wall quilt. It has been a long while that I have looked at the large star quilts that float around Pinterest. I have several pinned and decided to pick one and make it. (If ever you are in need of ideas, you are welcome to check out the bazillion pins I have collected over time.) This was not the first star quilt I have made. Back in the early 1980’s I made a large star quilt for a queen size bed for my parents. unfortunately, I don’t have pictures of it but I remember it was navy, maroon, and cream colors. (It also faded terribly because of the large windows they had in their bedroom at the time.) I decided it was time for another one – though on the smaller side.

img_1550

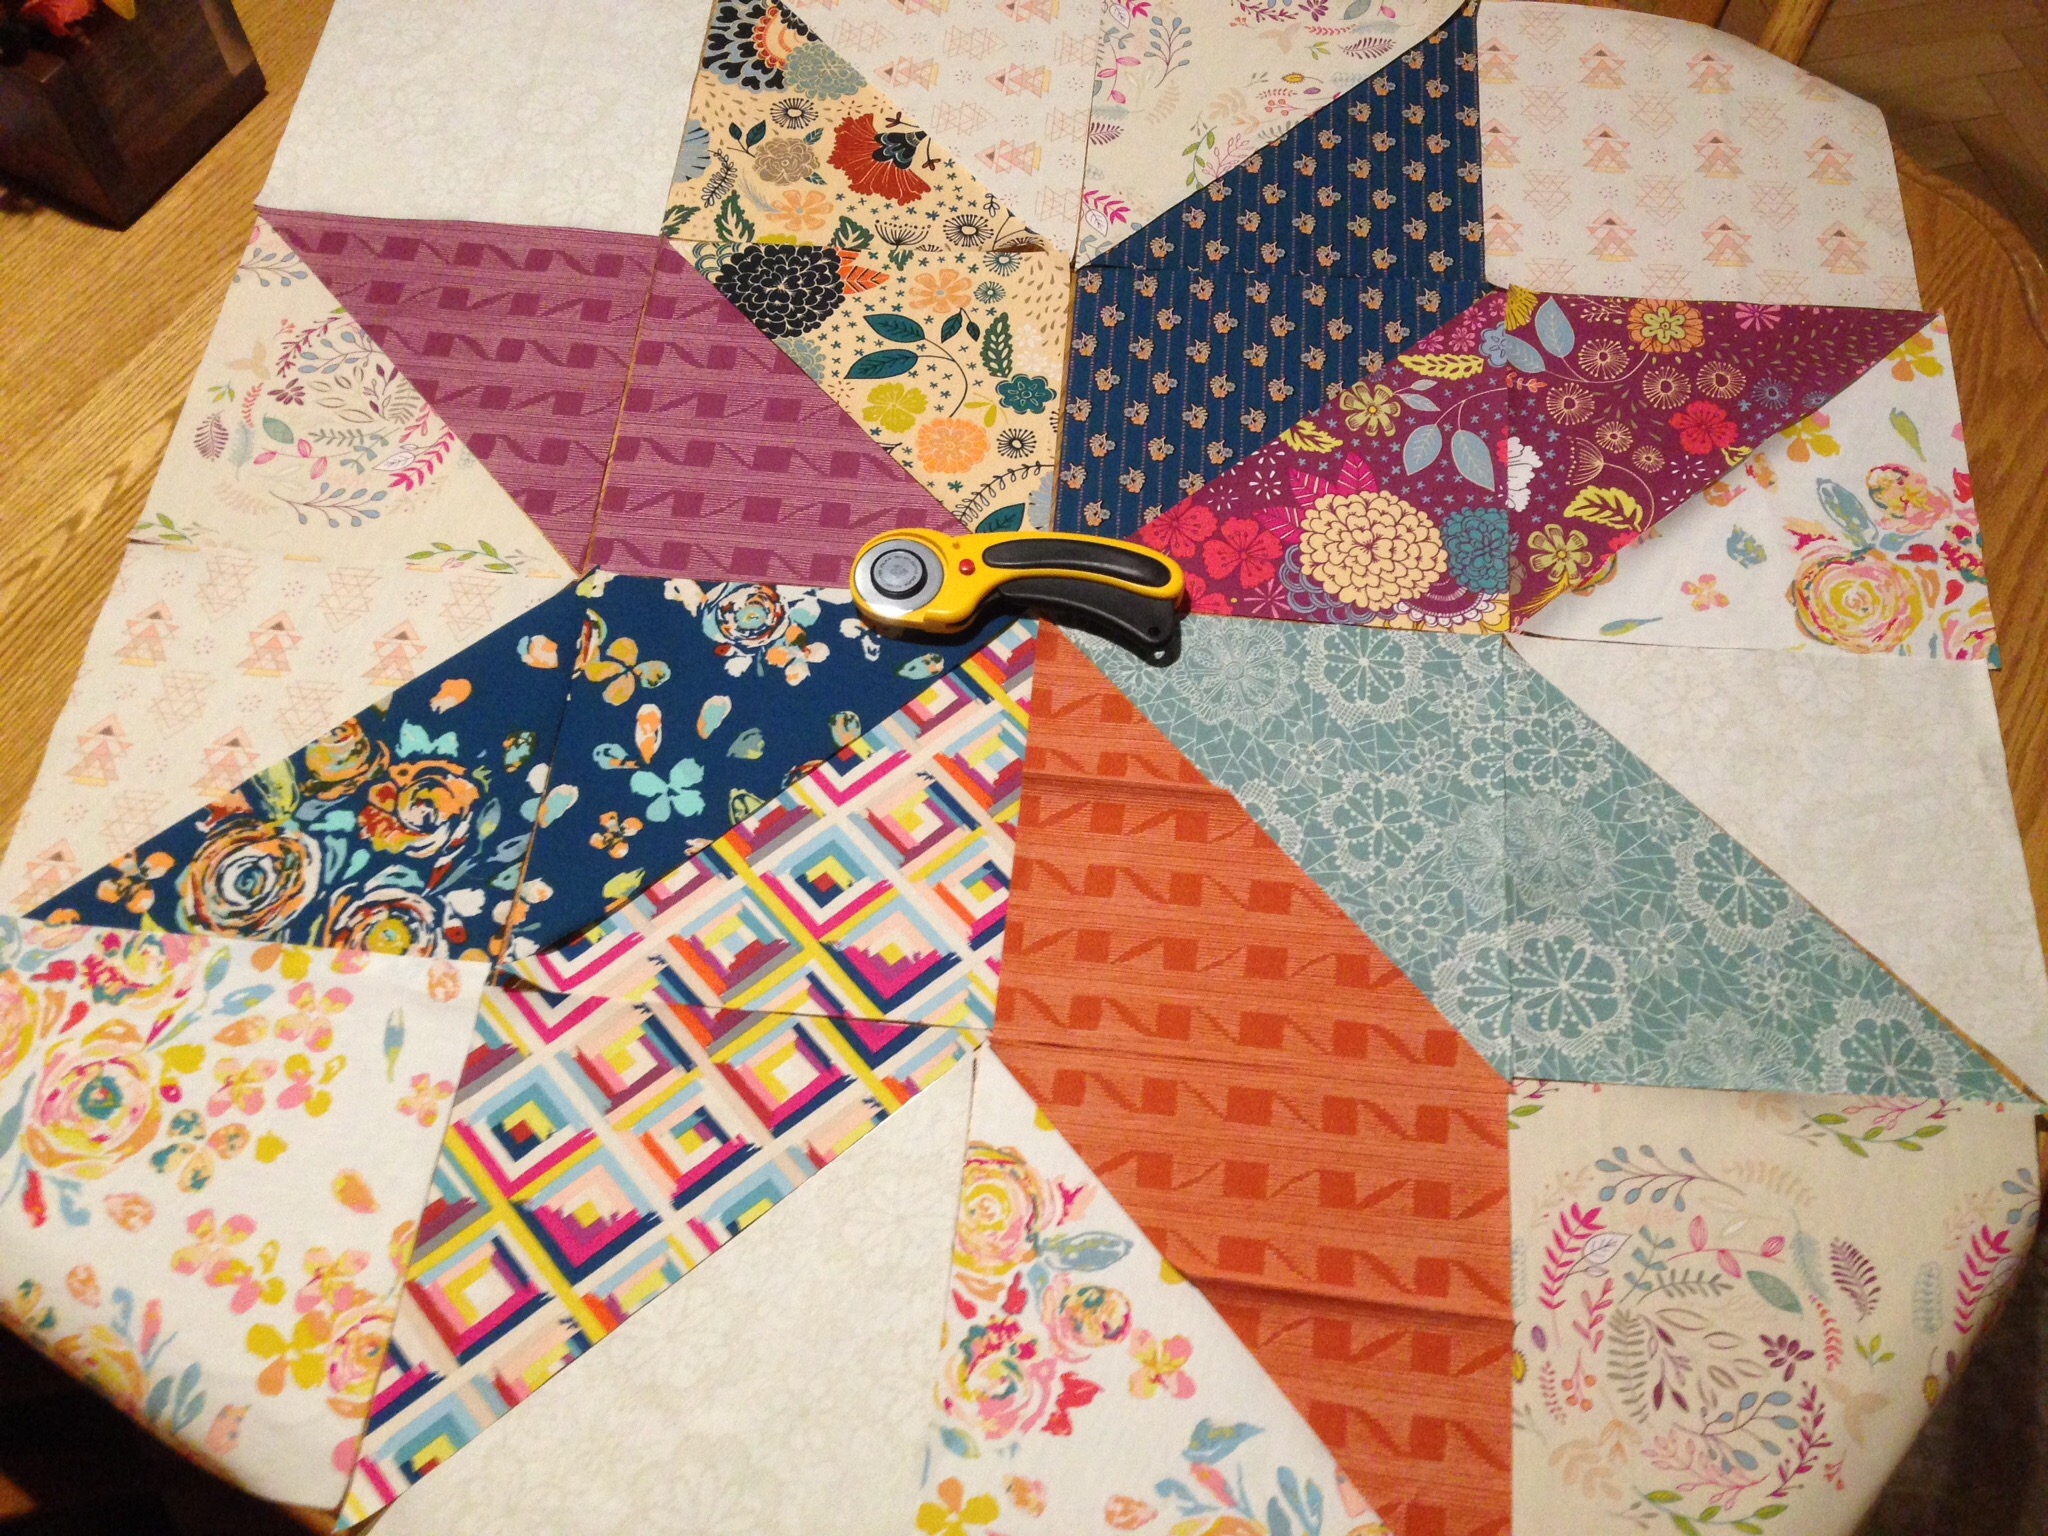
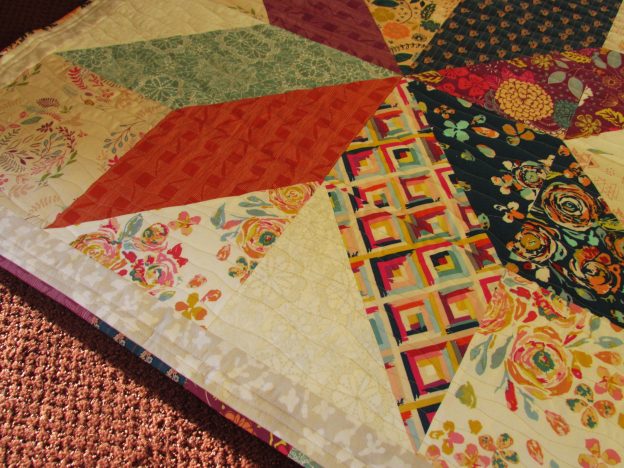
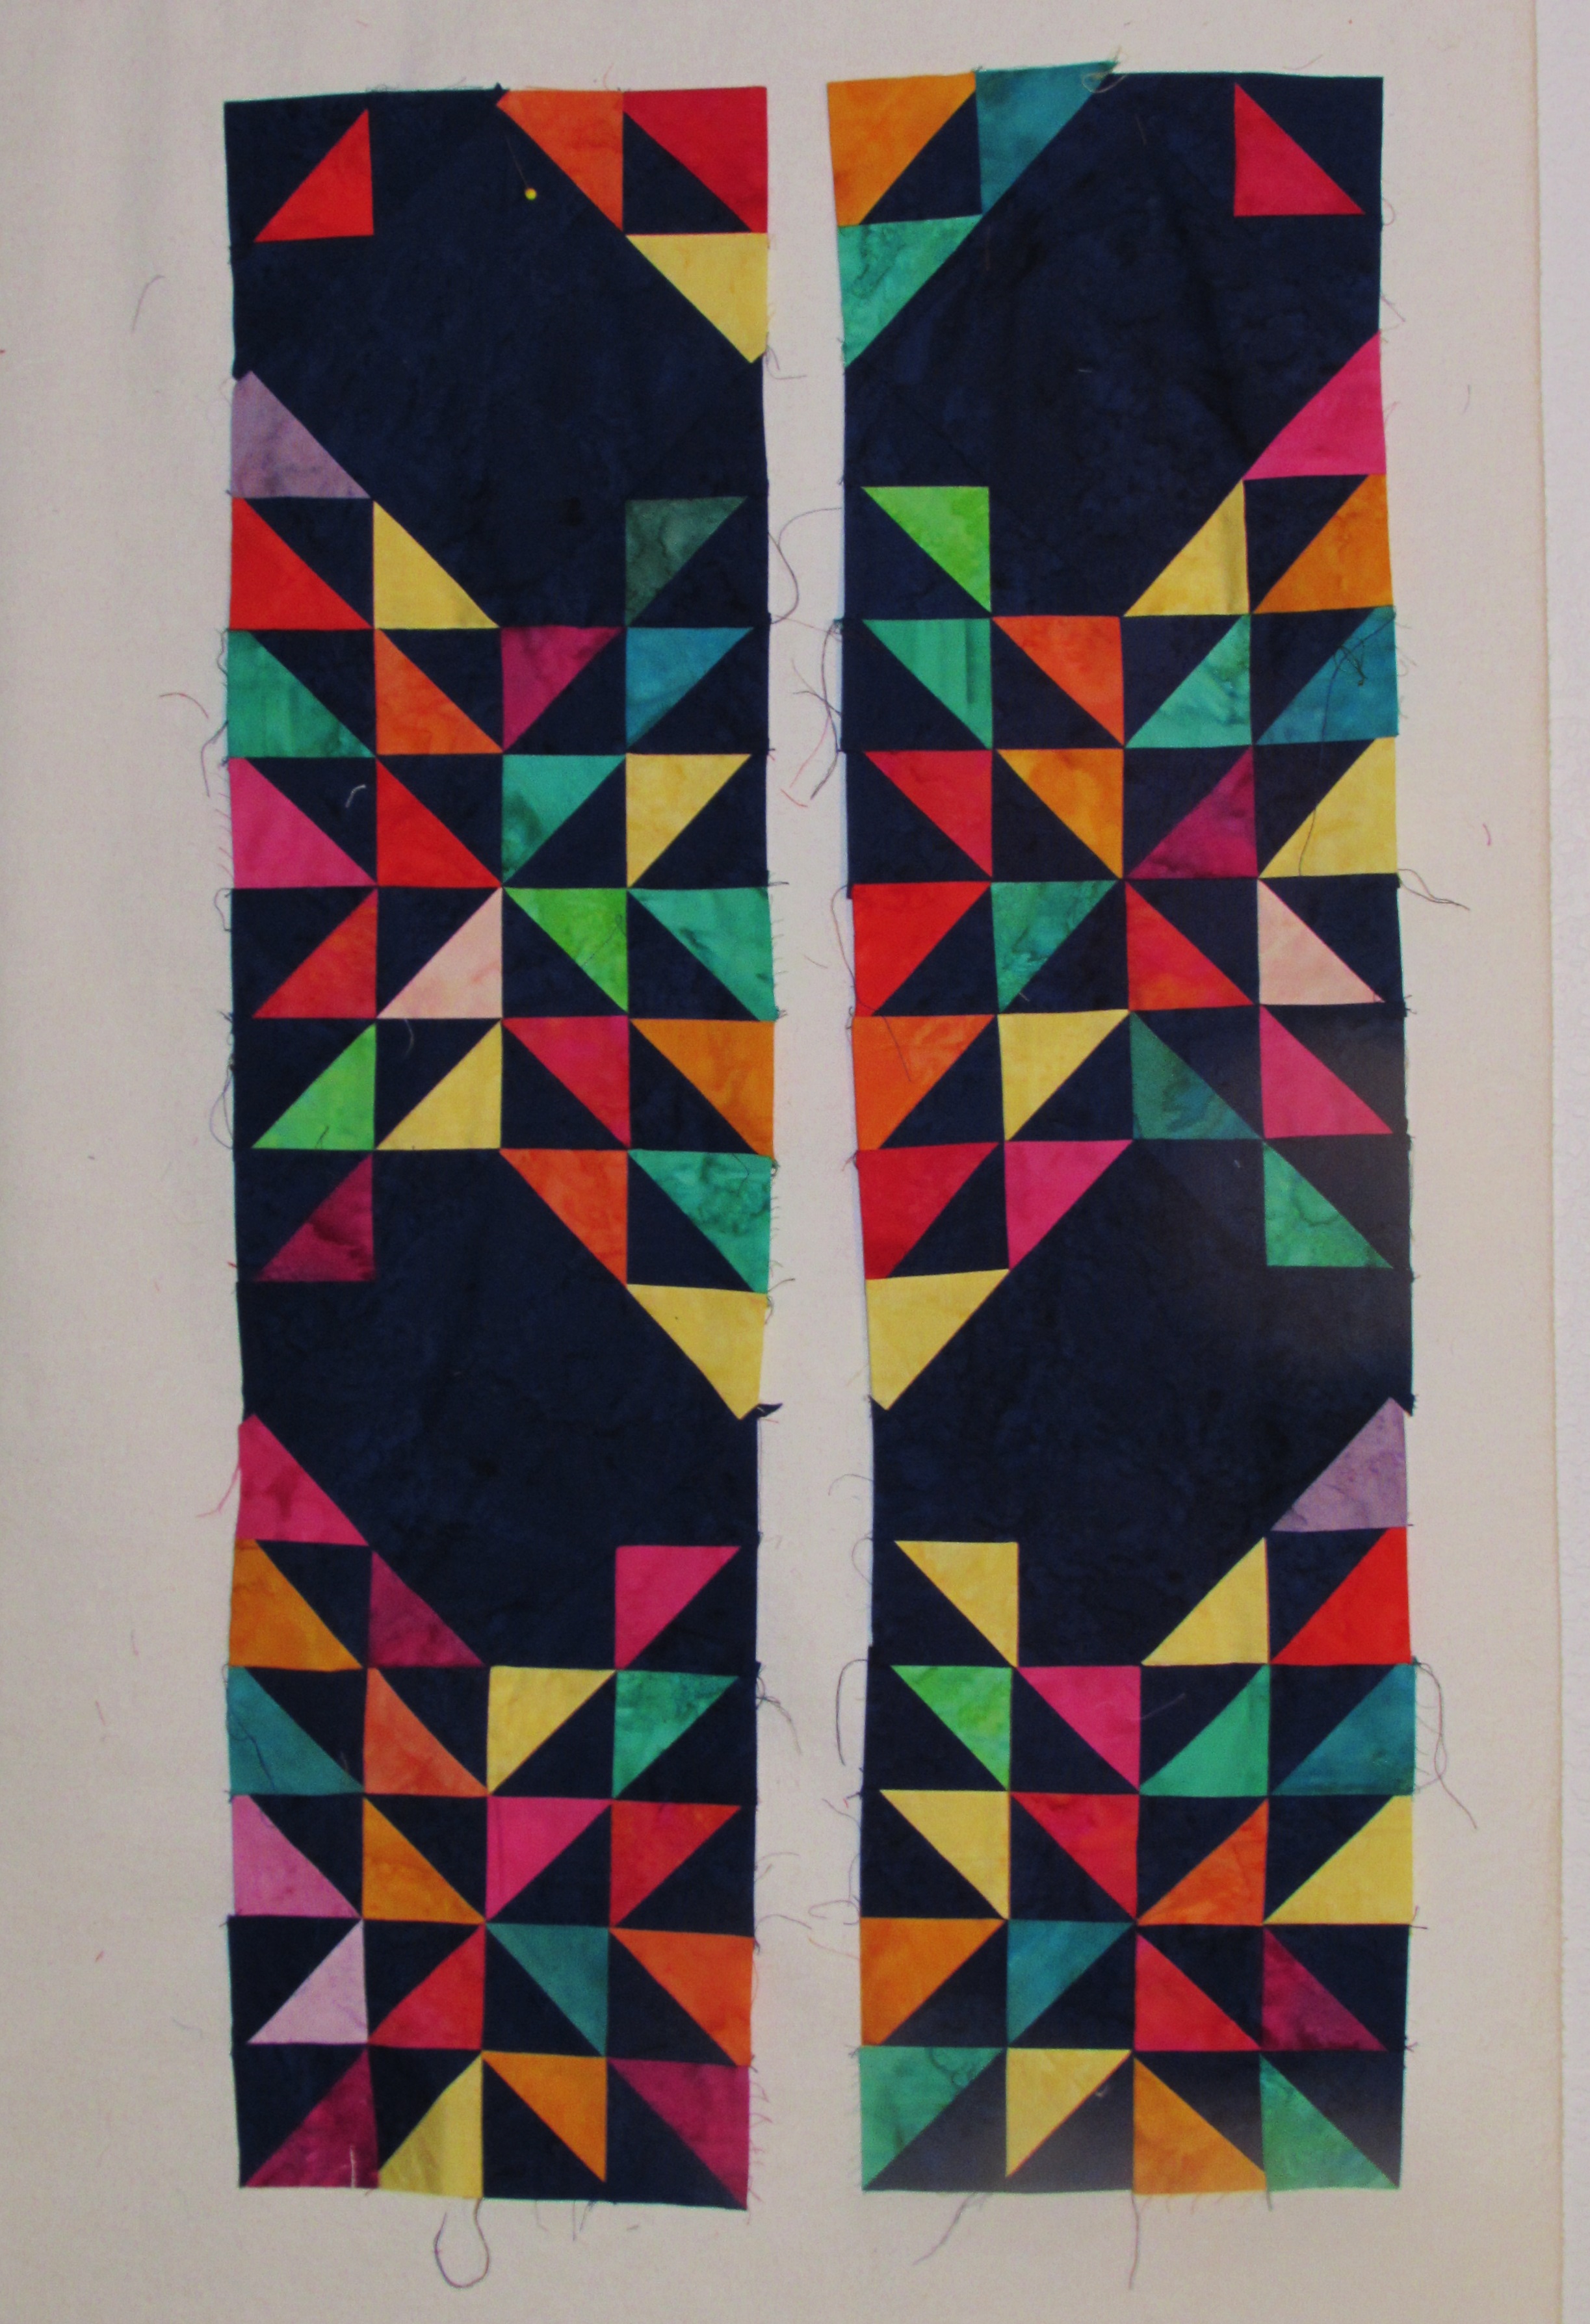
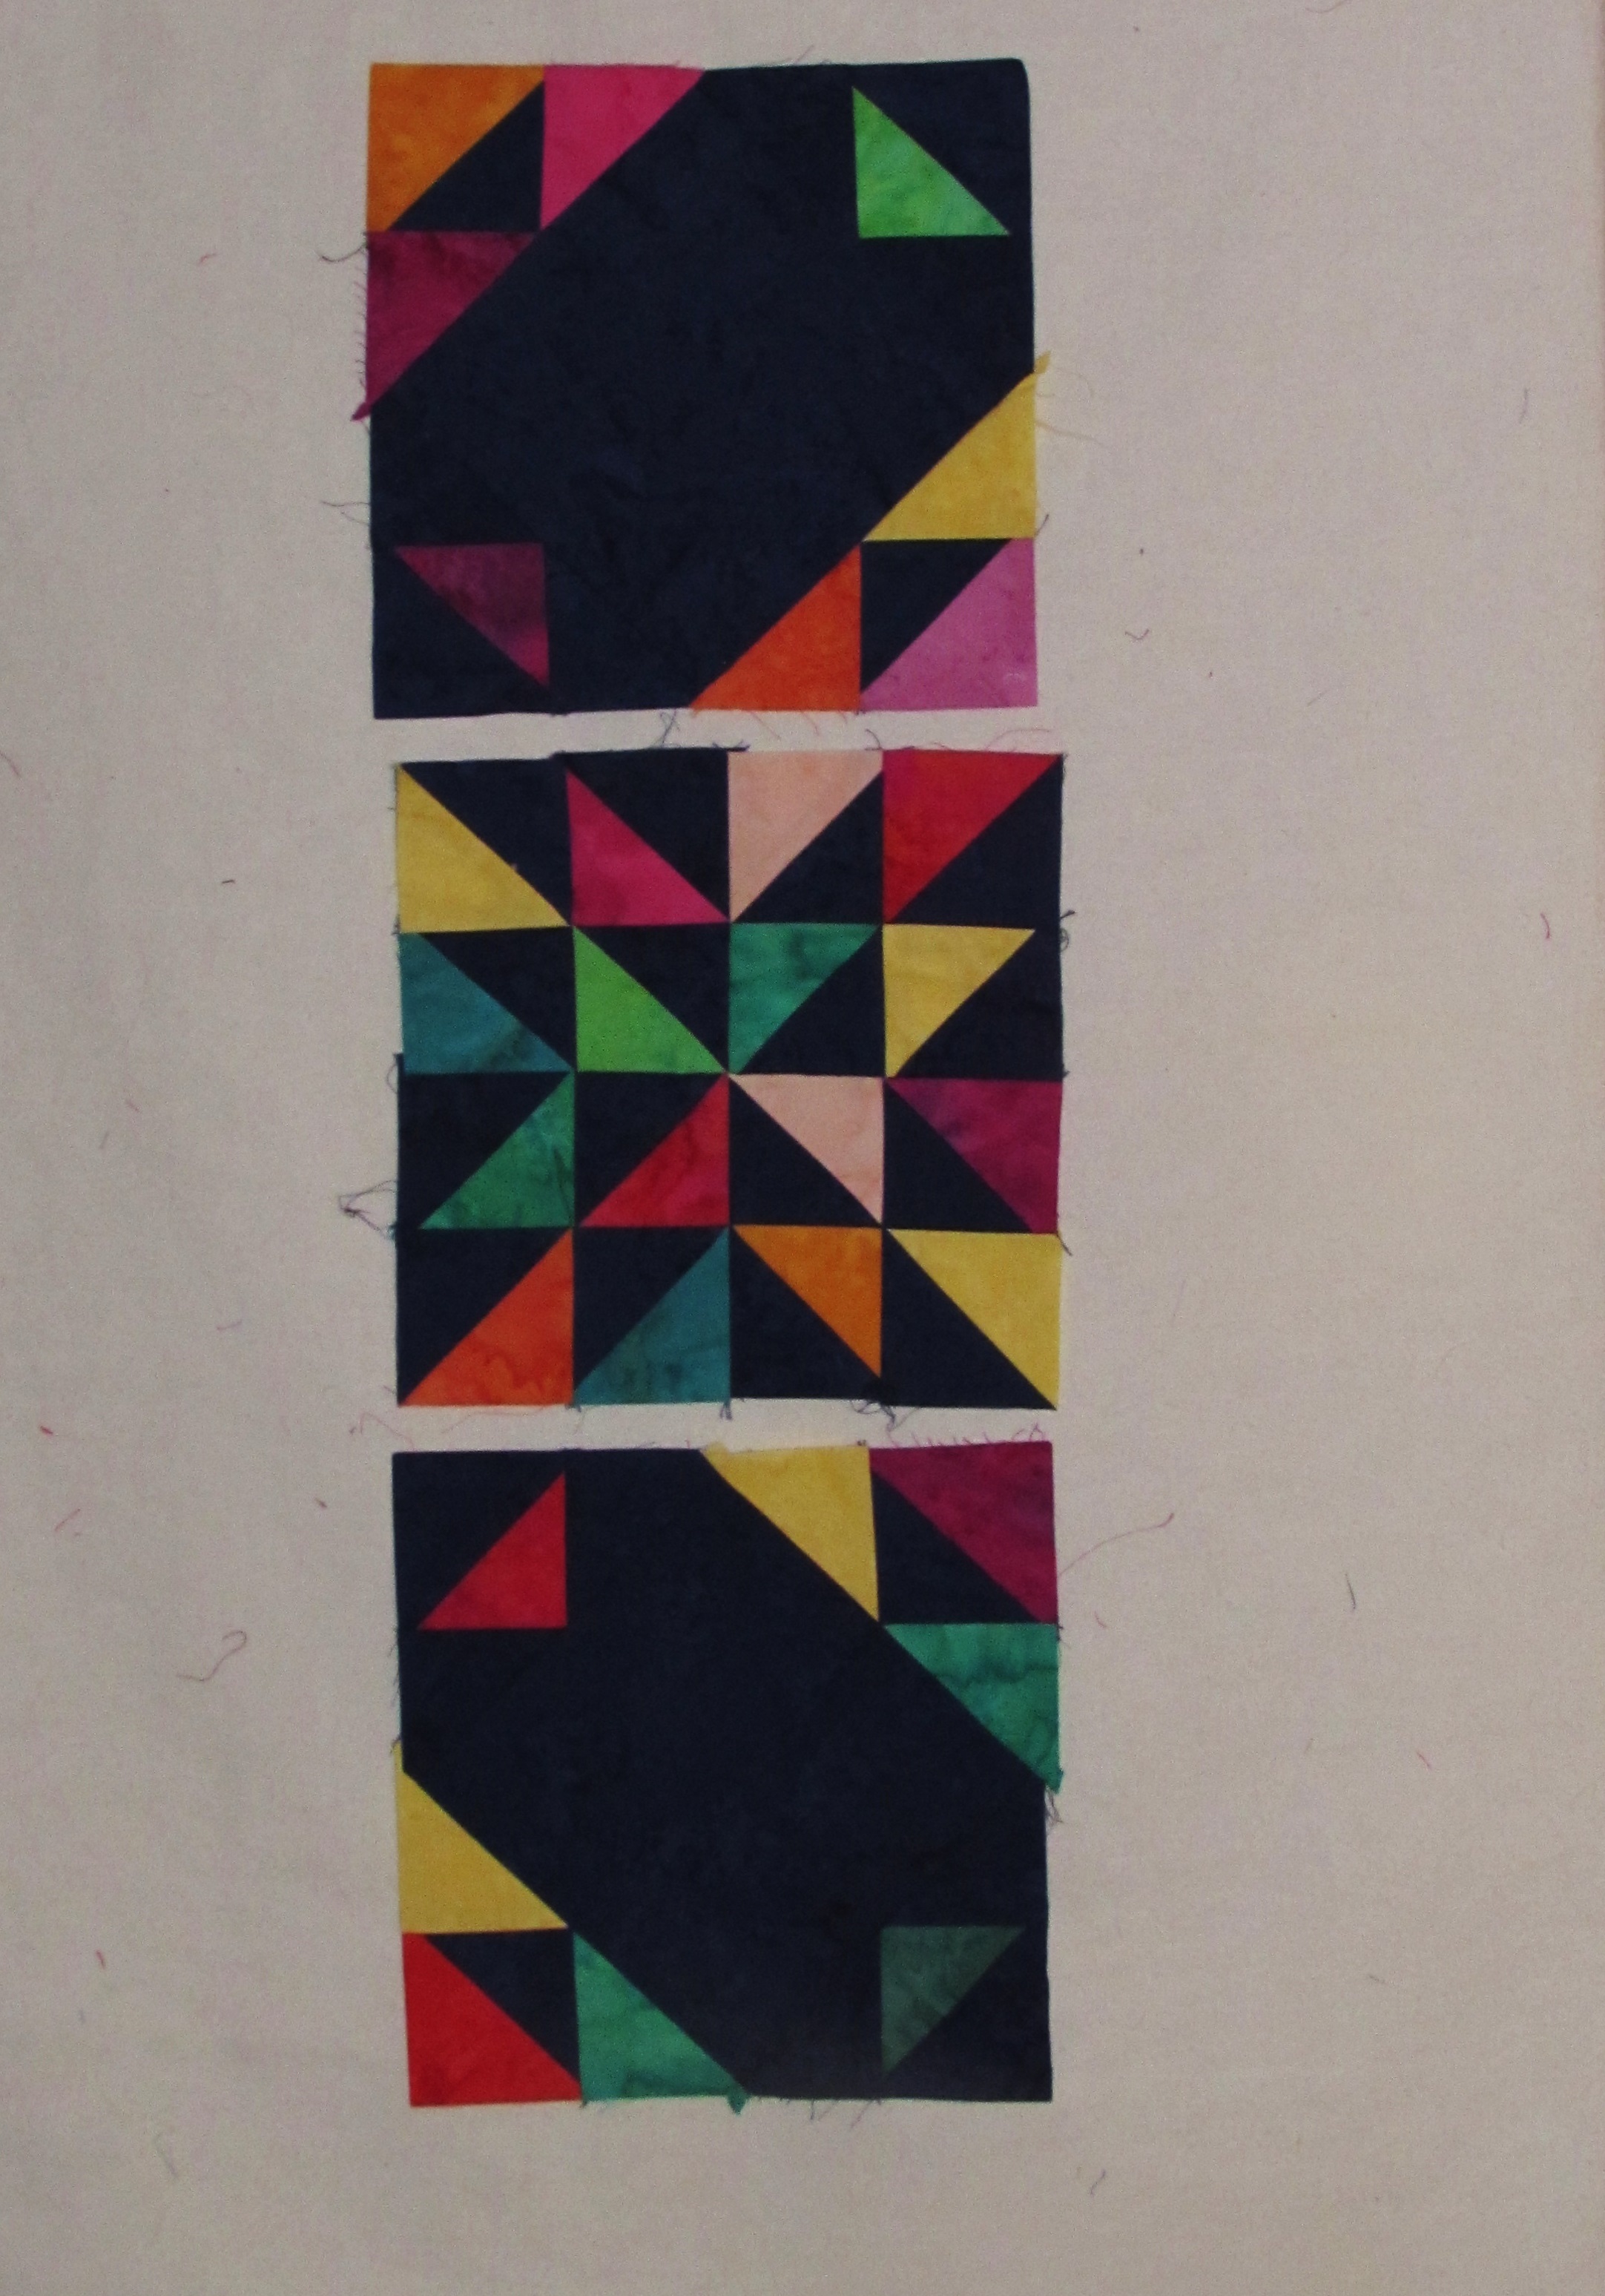
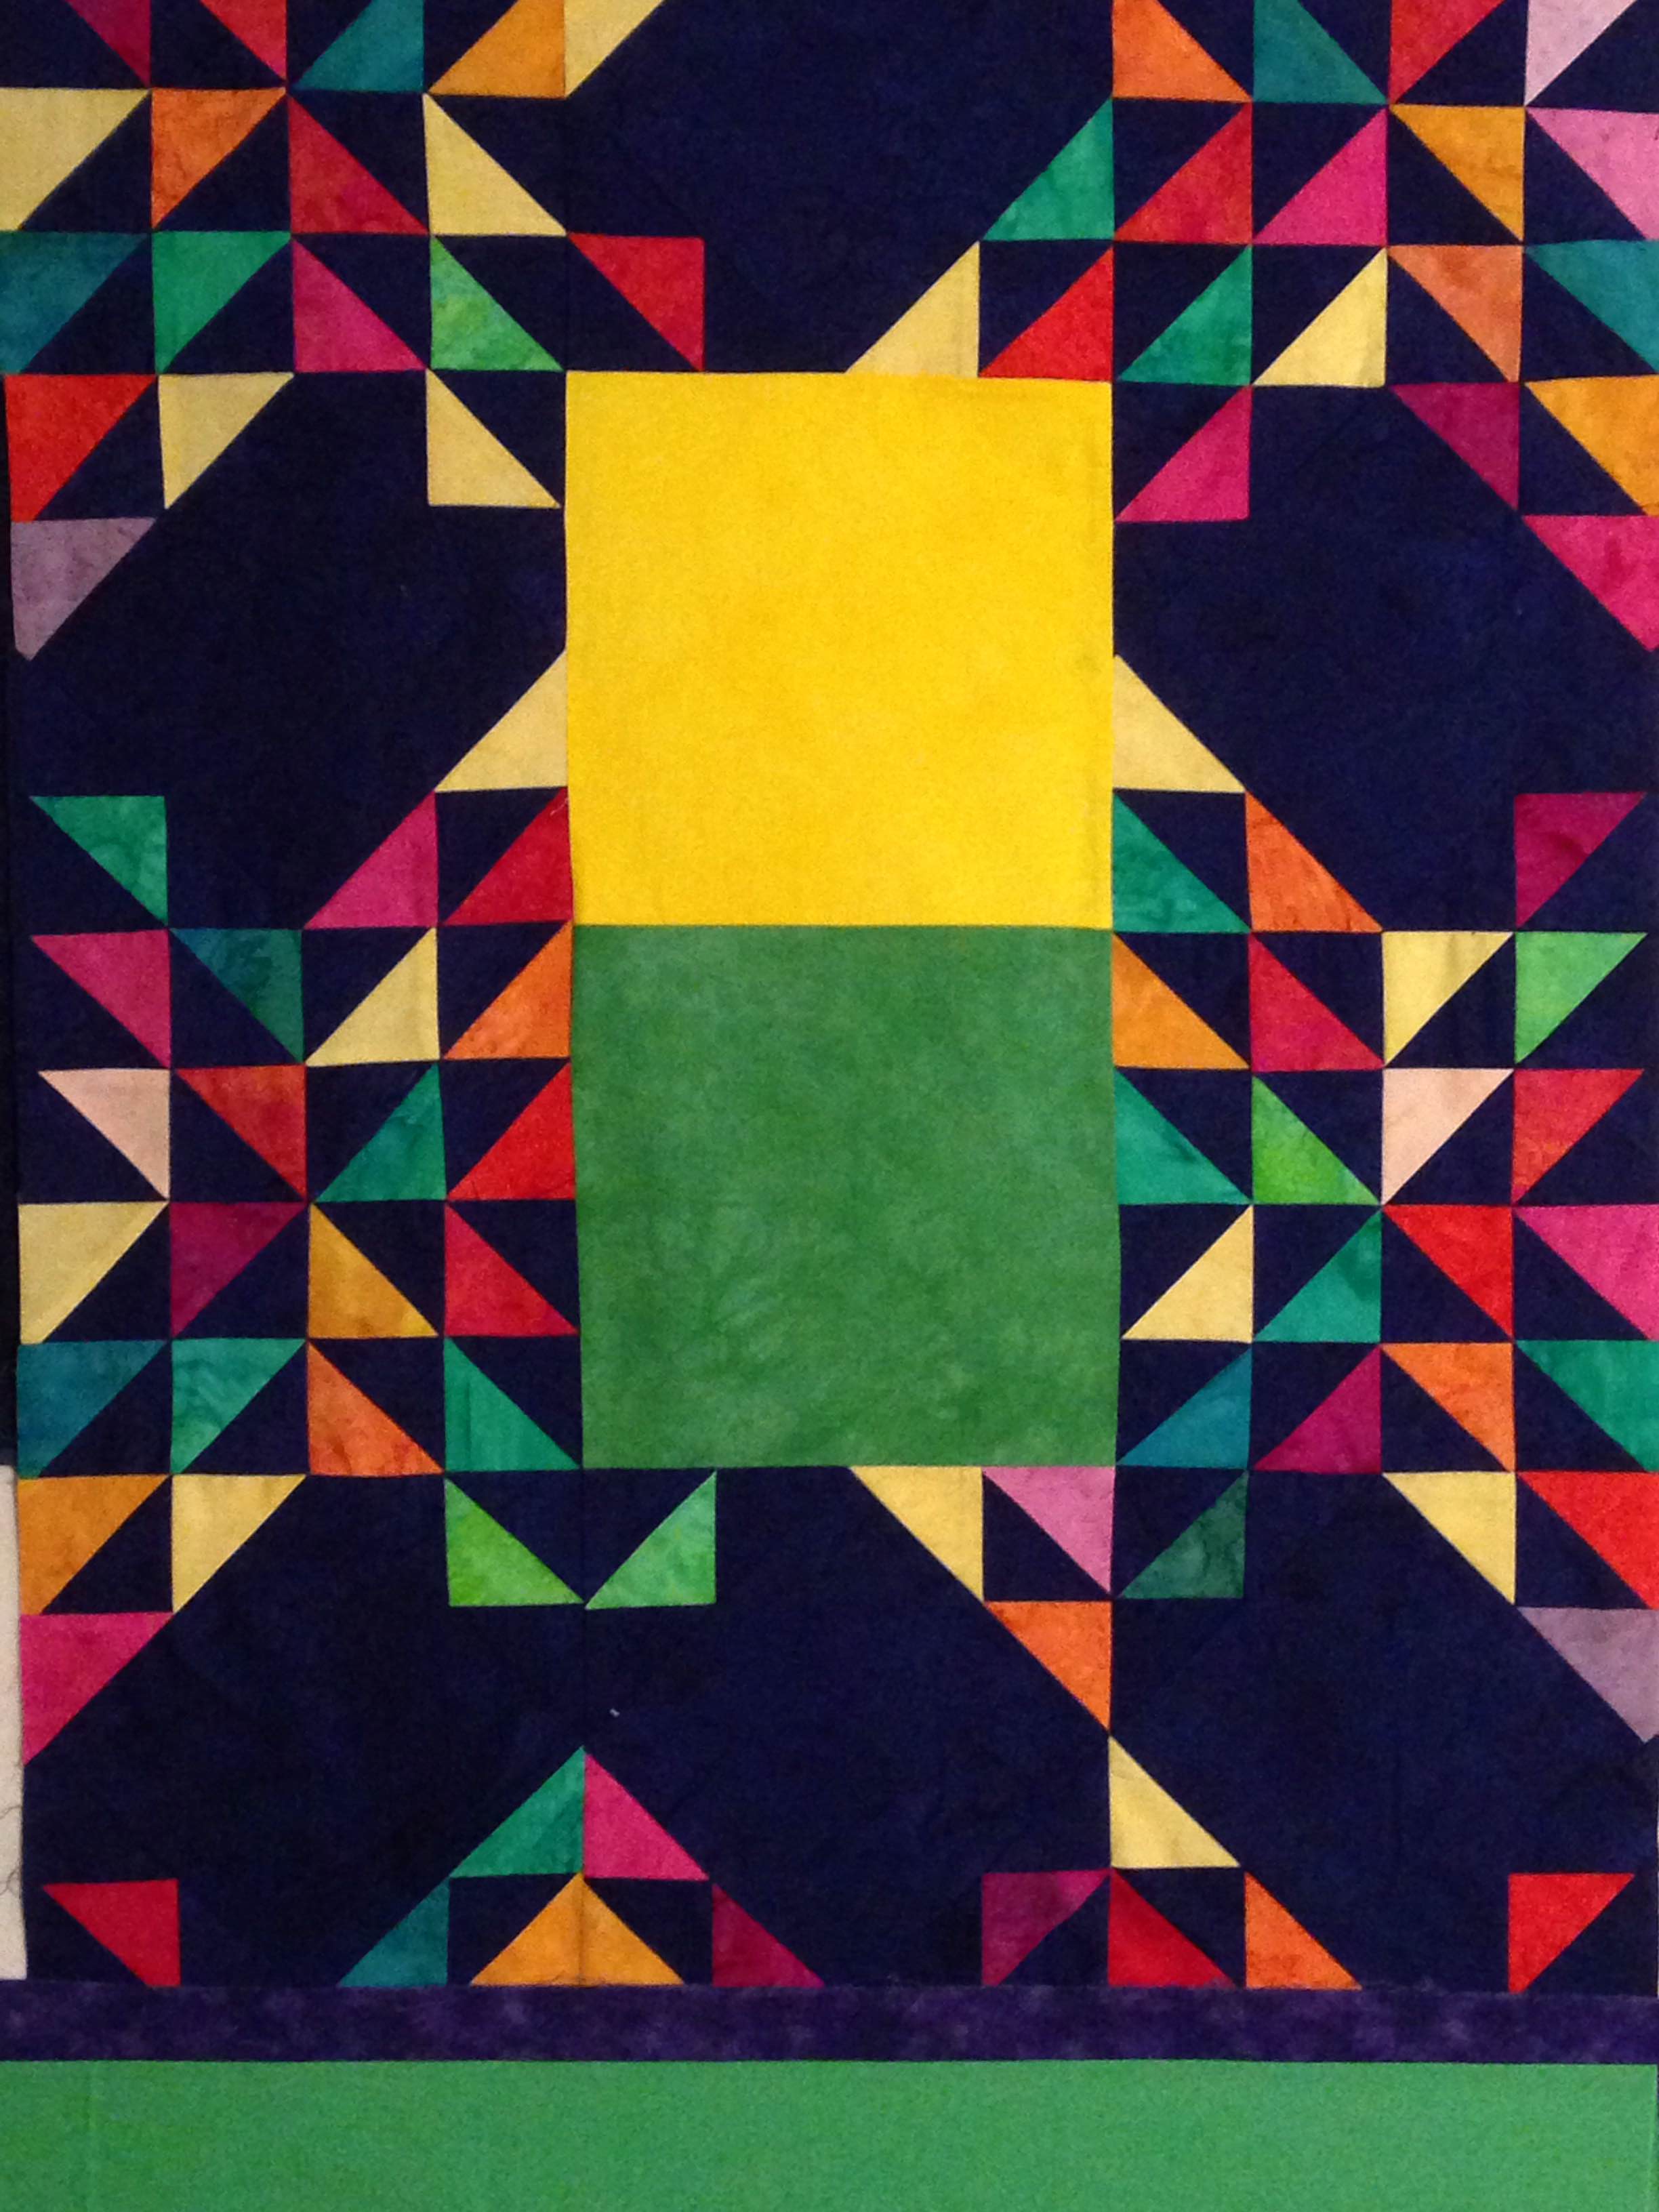
I used the tutorial at Diary of a Quilter to look at dimensions. Her blocks were a bit bigger than mine. Having the bundle of fat eighths (which measure 9″x18″ each) set a limit to what size I could use. I cut 9 inch blocks and then sub-cut them into triangles. The four corner blocks were made with 8 1/2″ squares. After playing with the colors, I stitched the triangles together and squared them into 8 1/2″ squares.

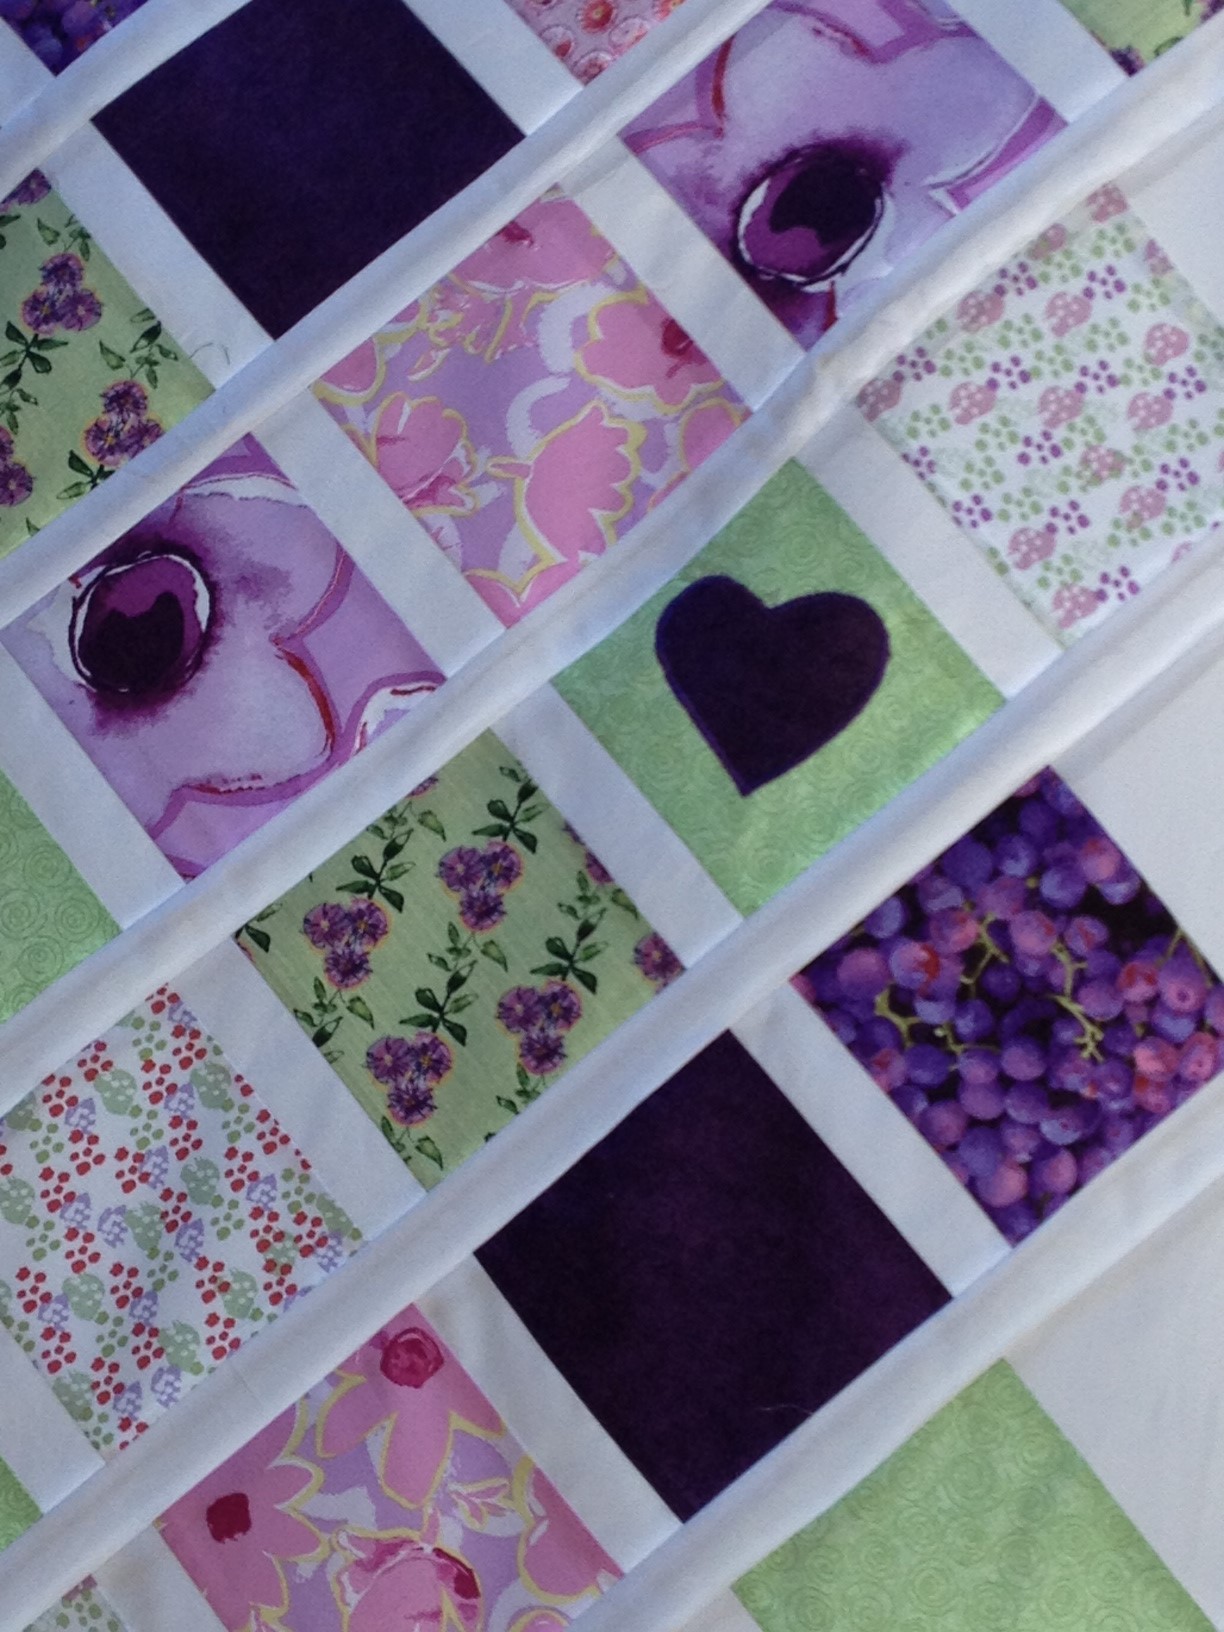
This very simple project is a perfect use of this fabric as many of the prints have a bold scale such that leaving the pieces rather large shows it off well. Aren’t the colors just gorgeous? I am a huge fan of Maureen Cracknell and there isn’t a line of hers that I don’t love! As an added bonus, I still have a number of pieces left from the bundle. More Fleet and Flourish to play with!

img_8232

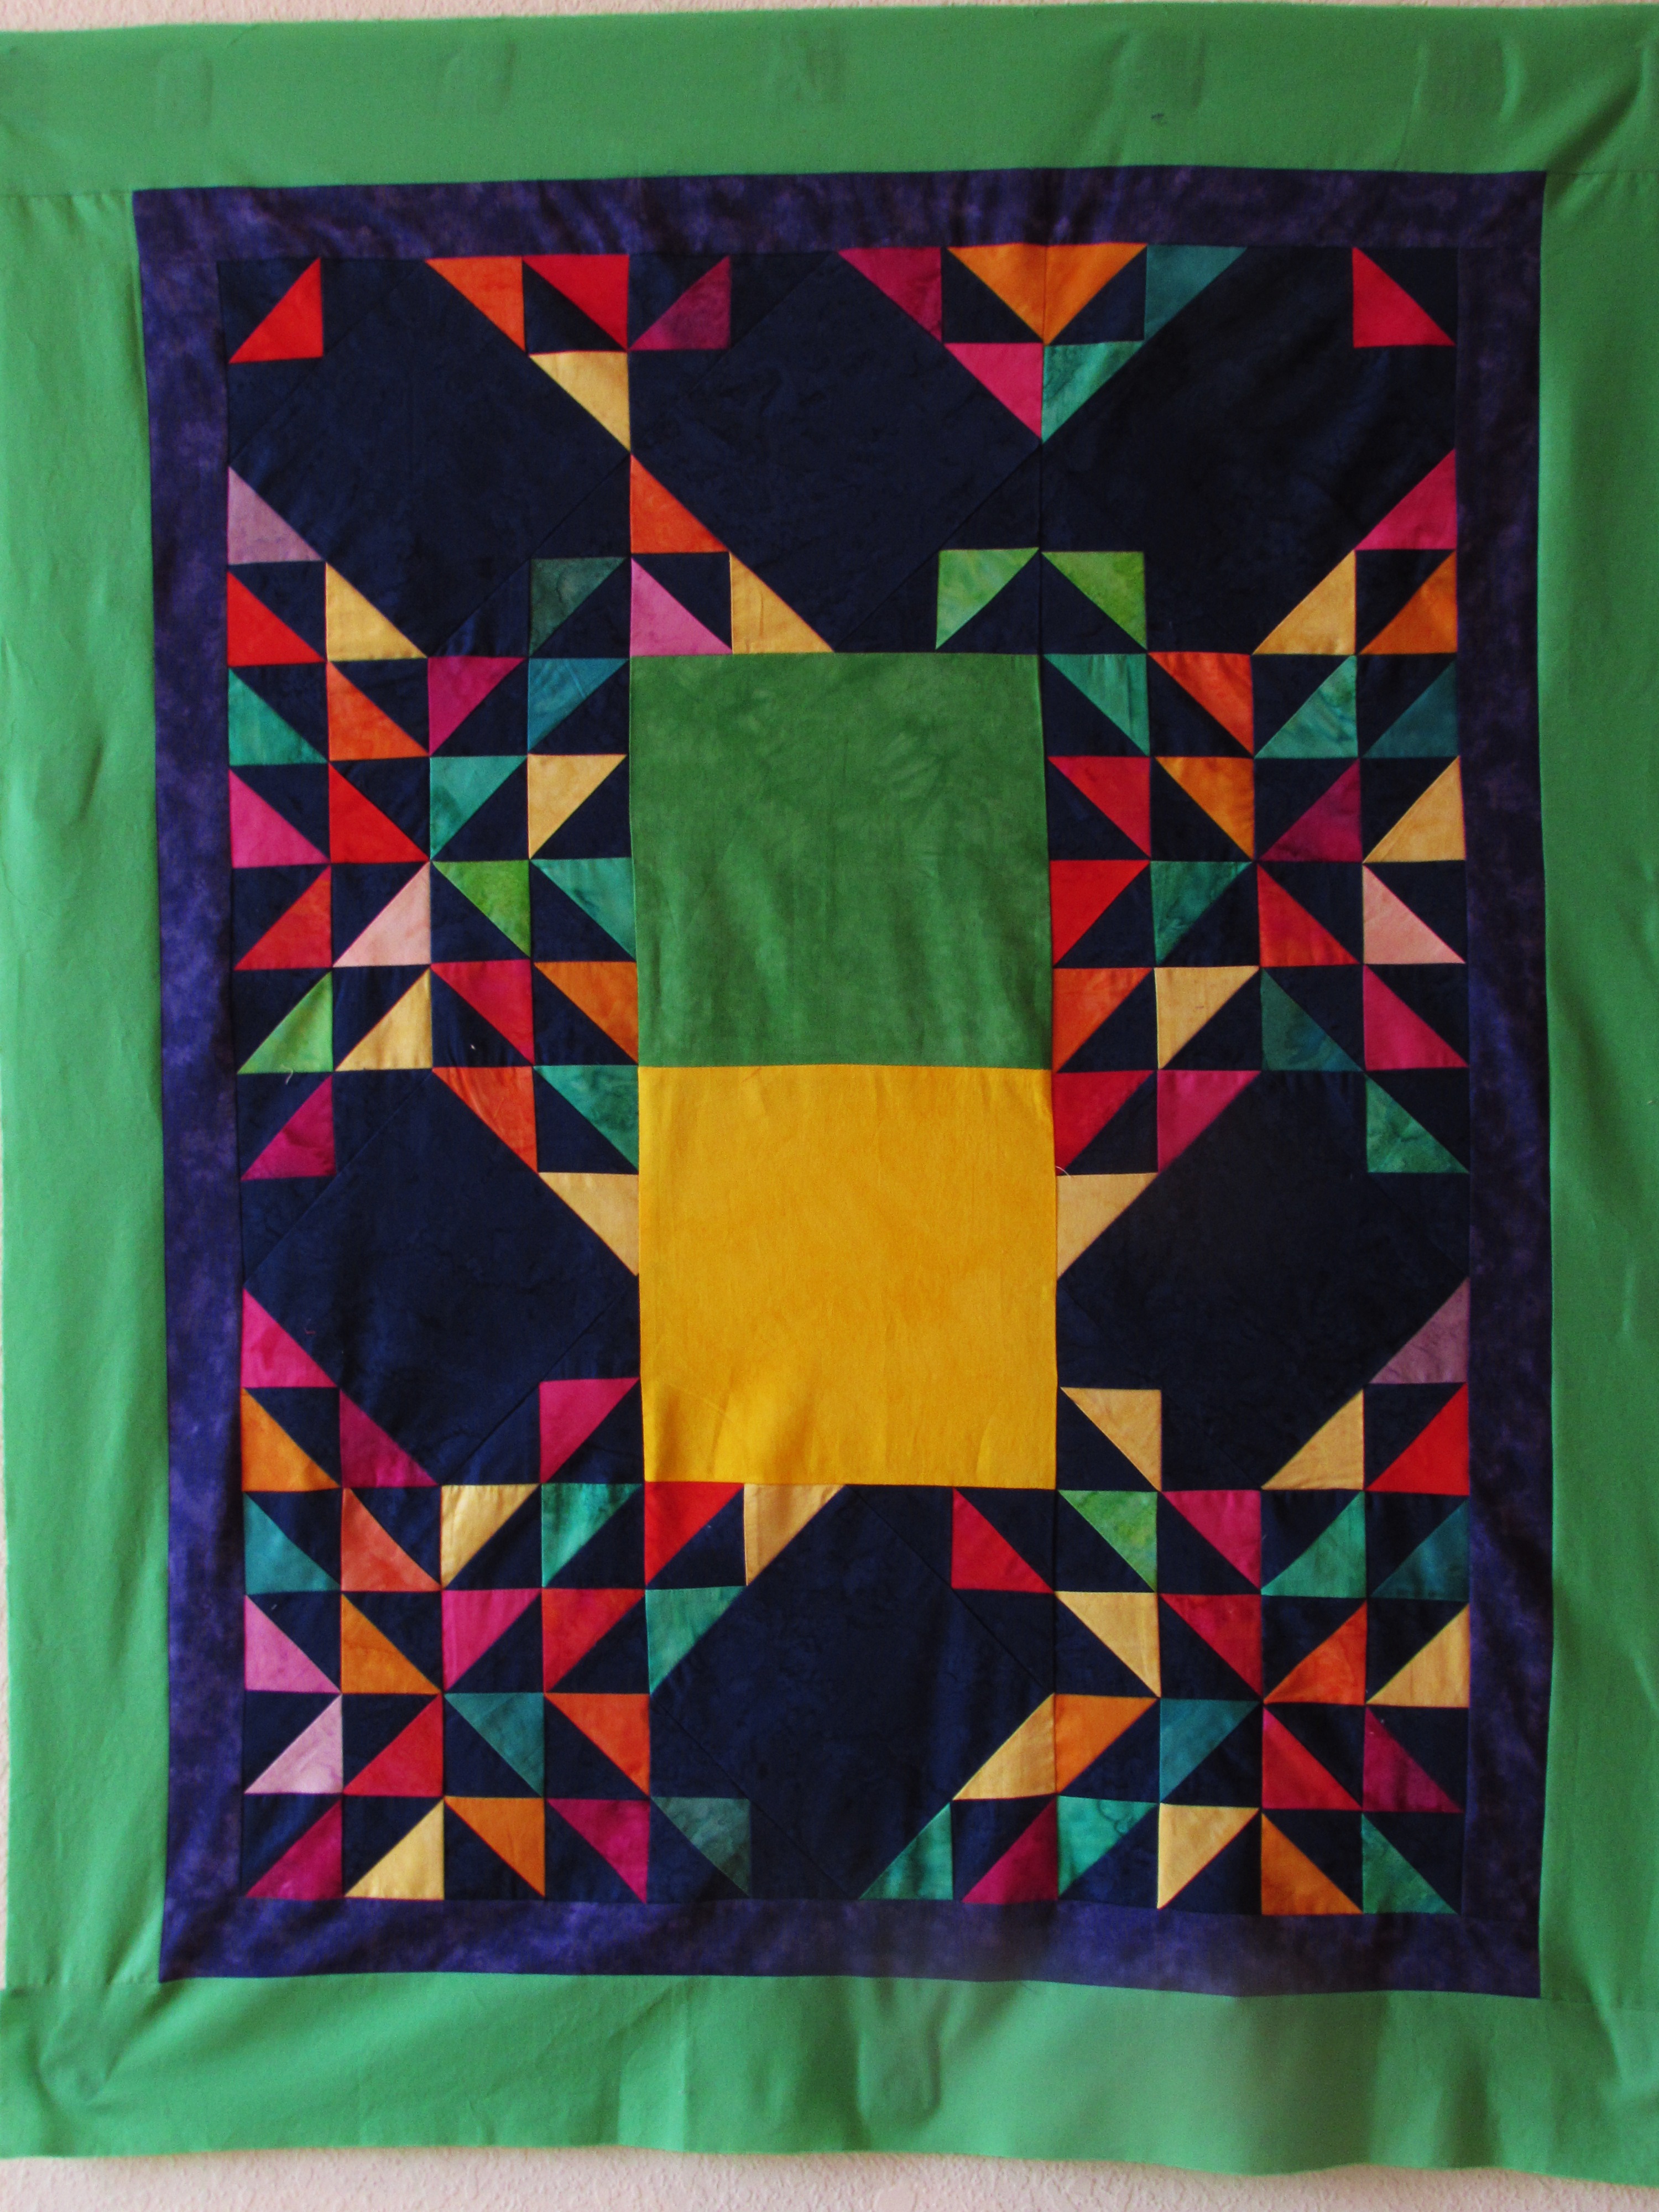
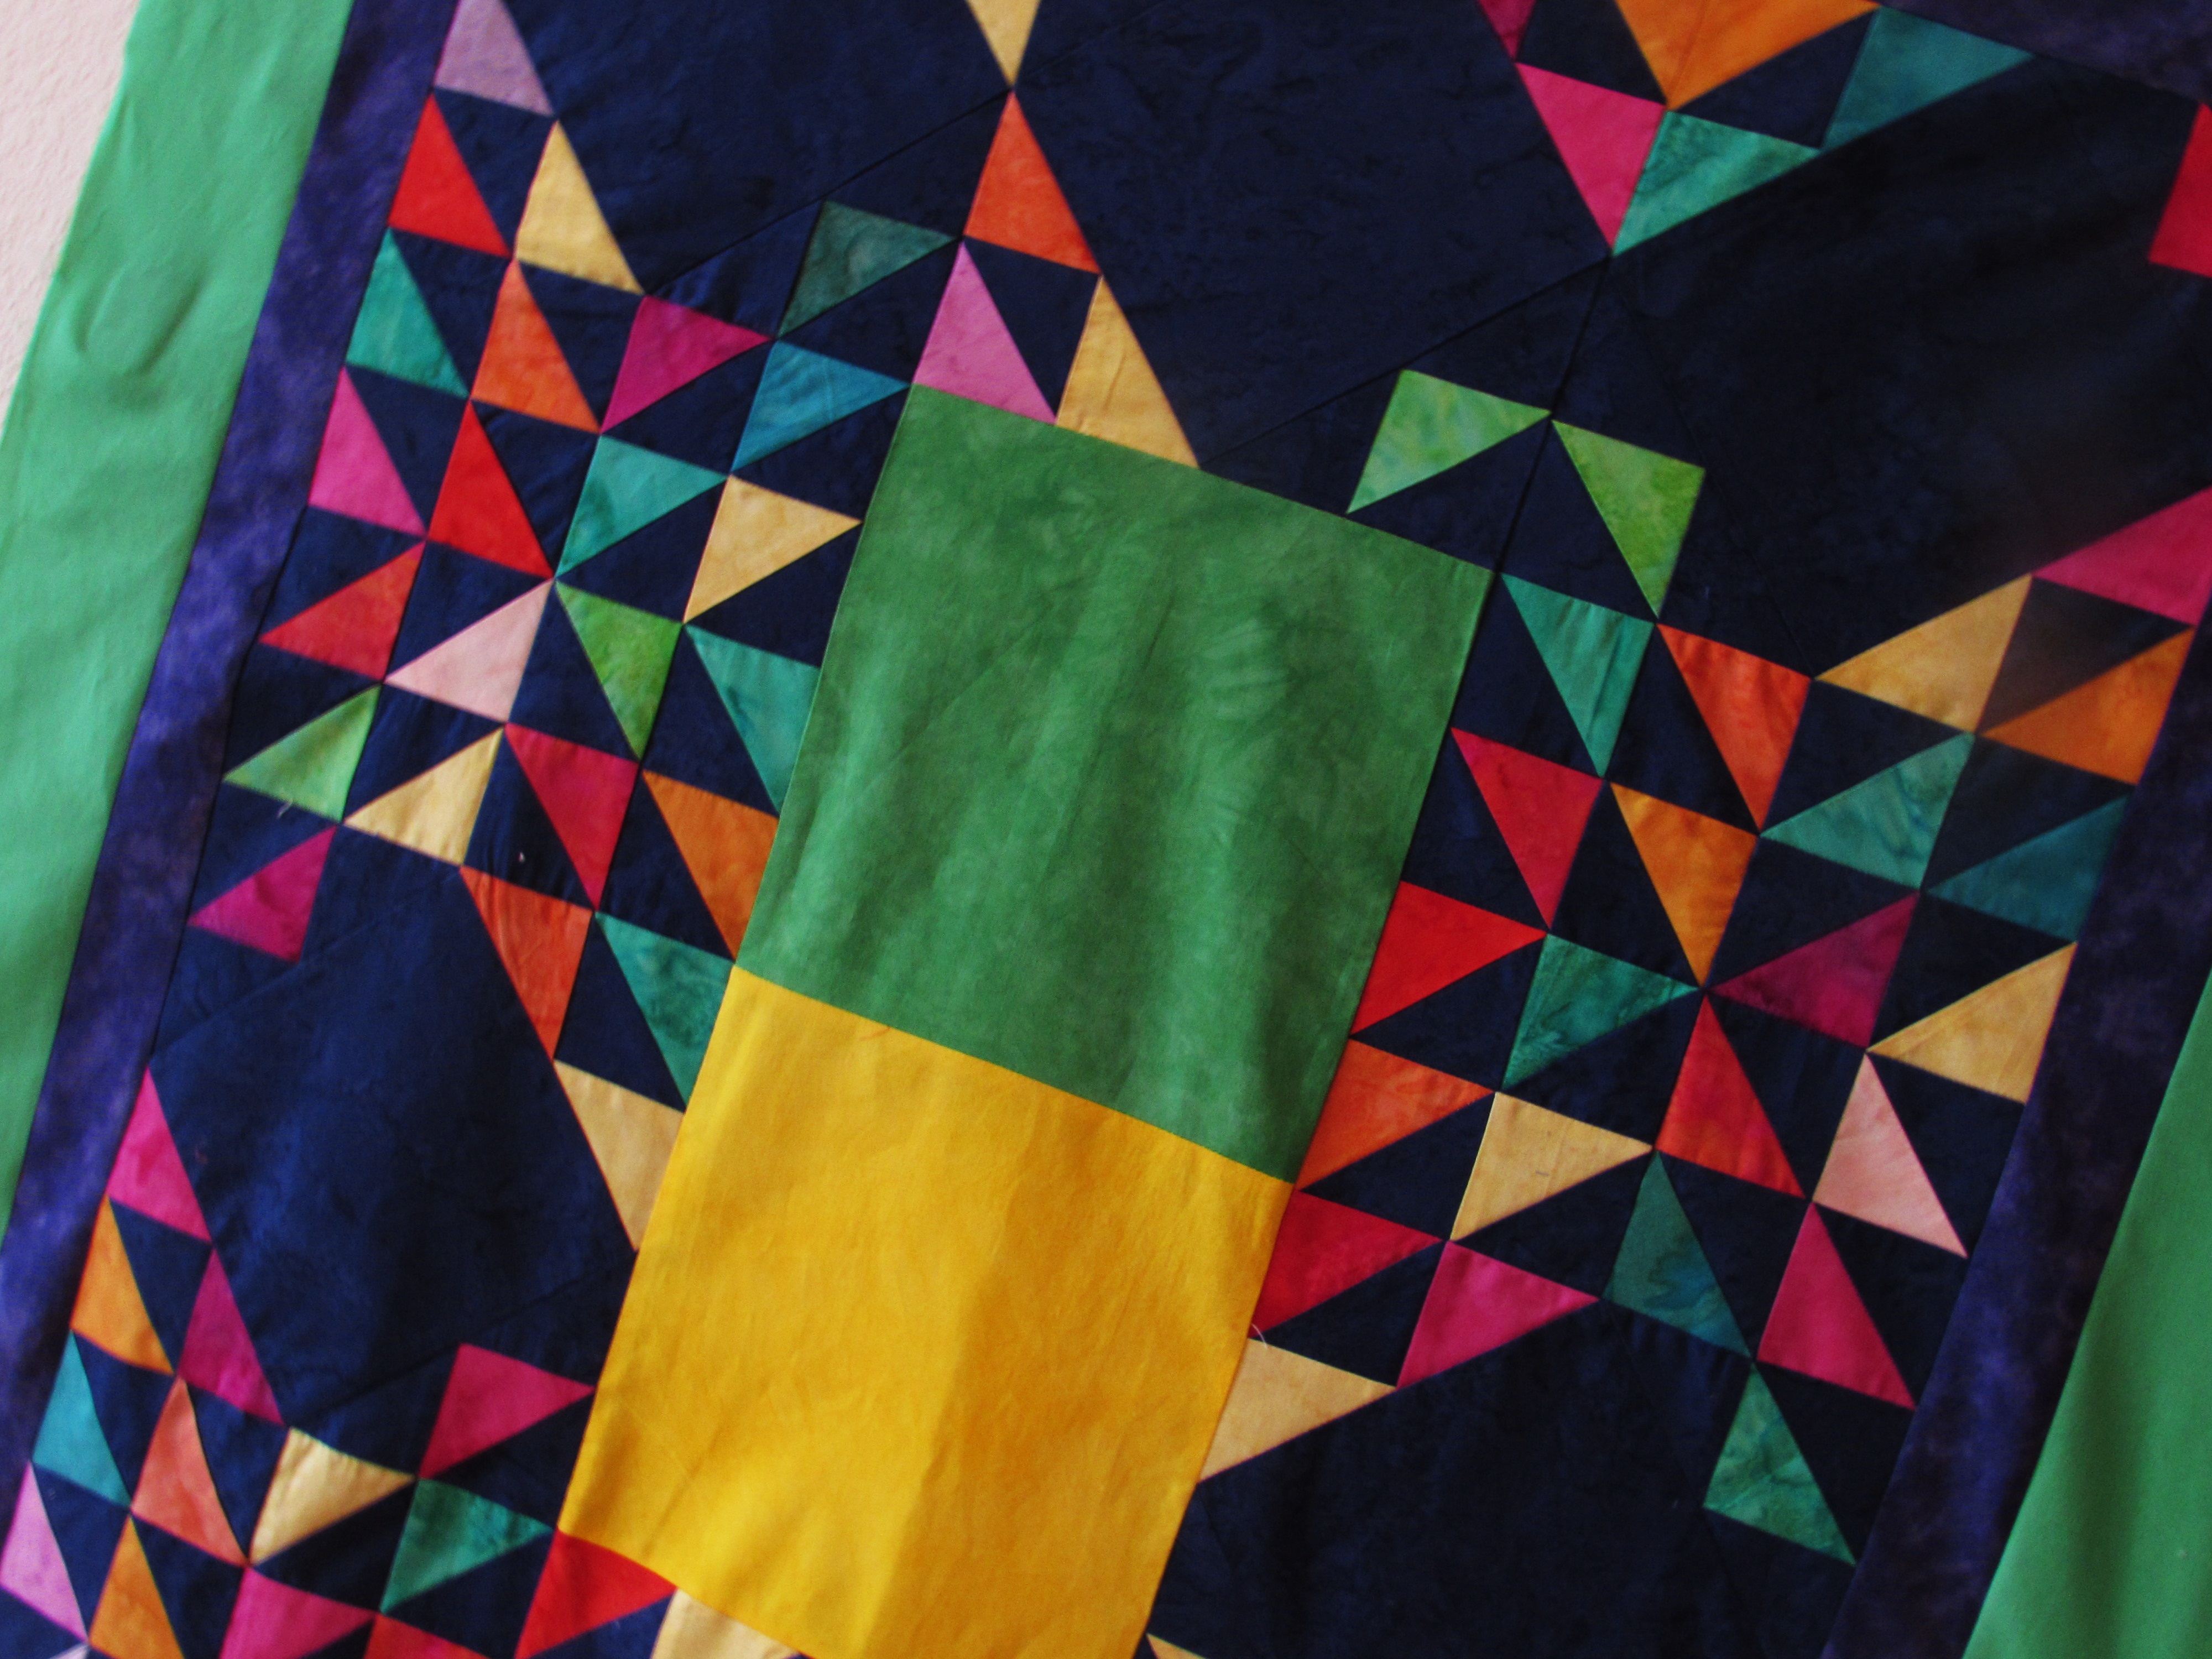
Once the star was built, I put a simple 2 1/2 inch border around it to make it just a bit bigger. I used my walking foot to quilt the star with soft, wavy lines. Then I stitched a couple of straight lines through the border. I think I may add one more line on the inside of the border.

img_8233

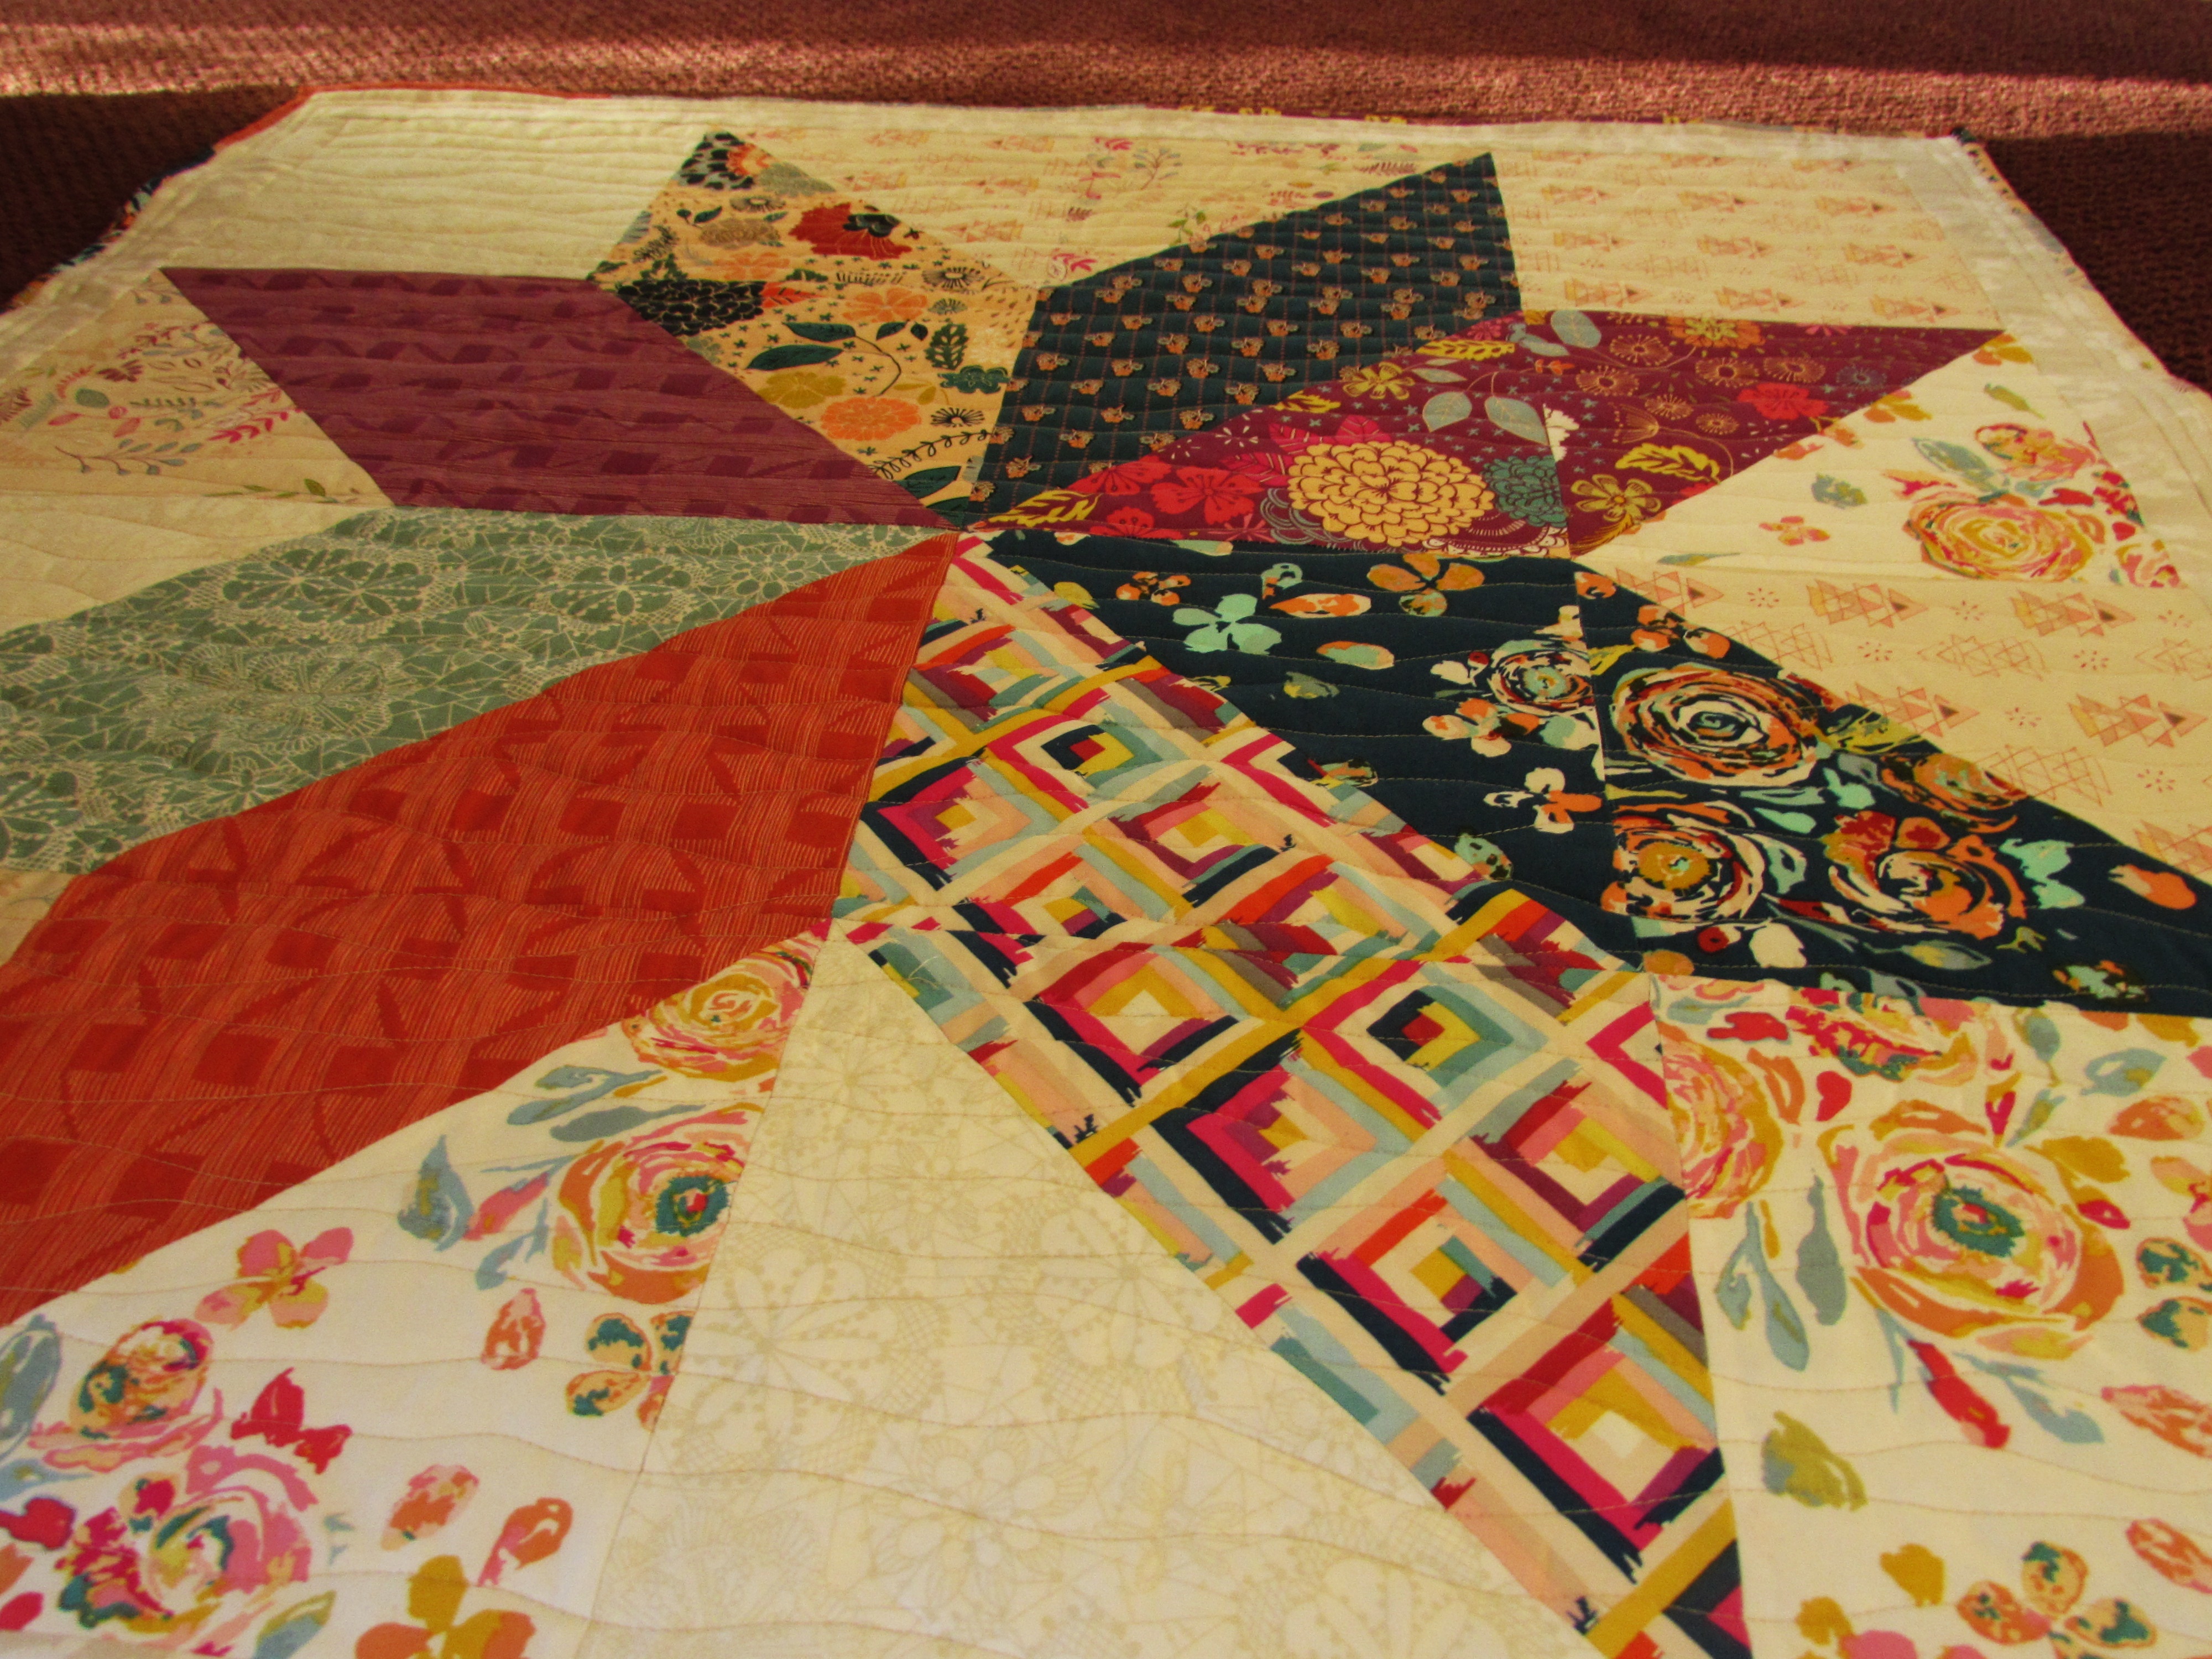
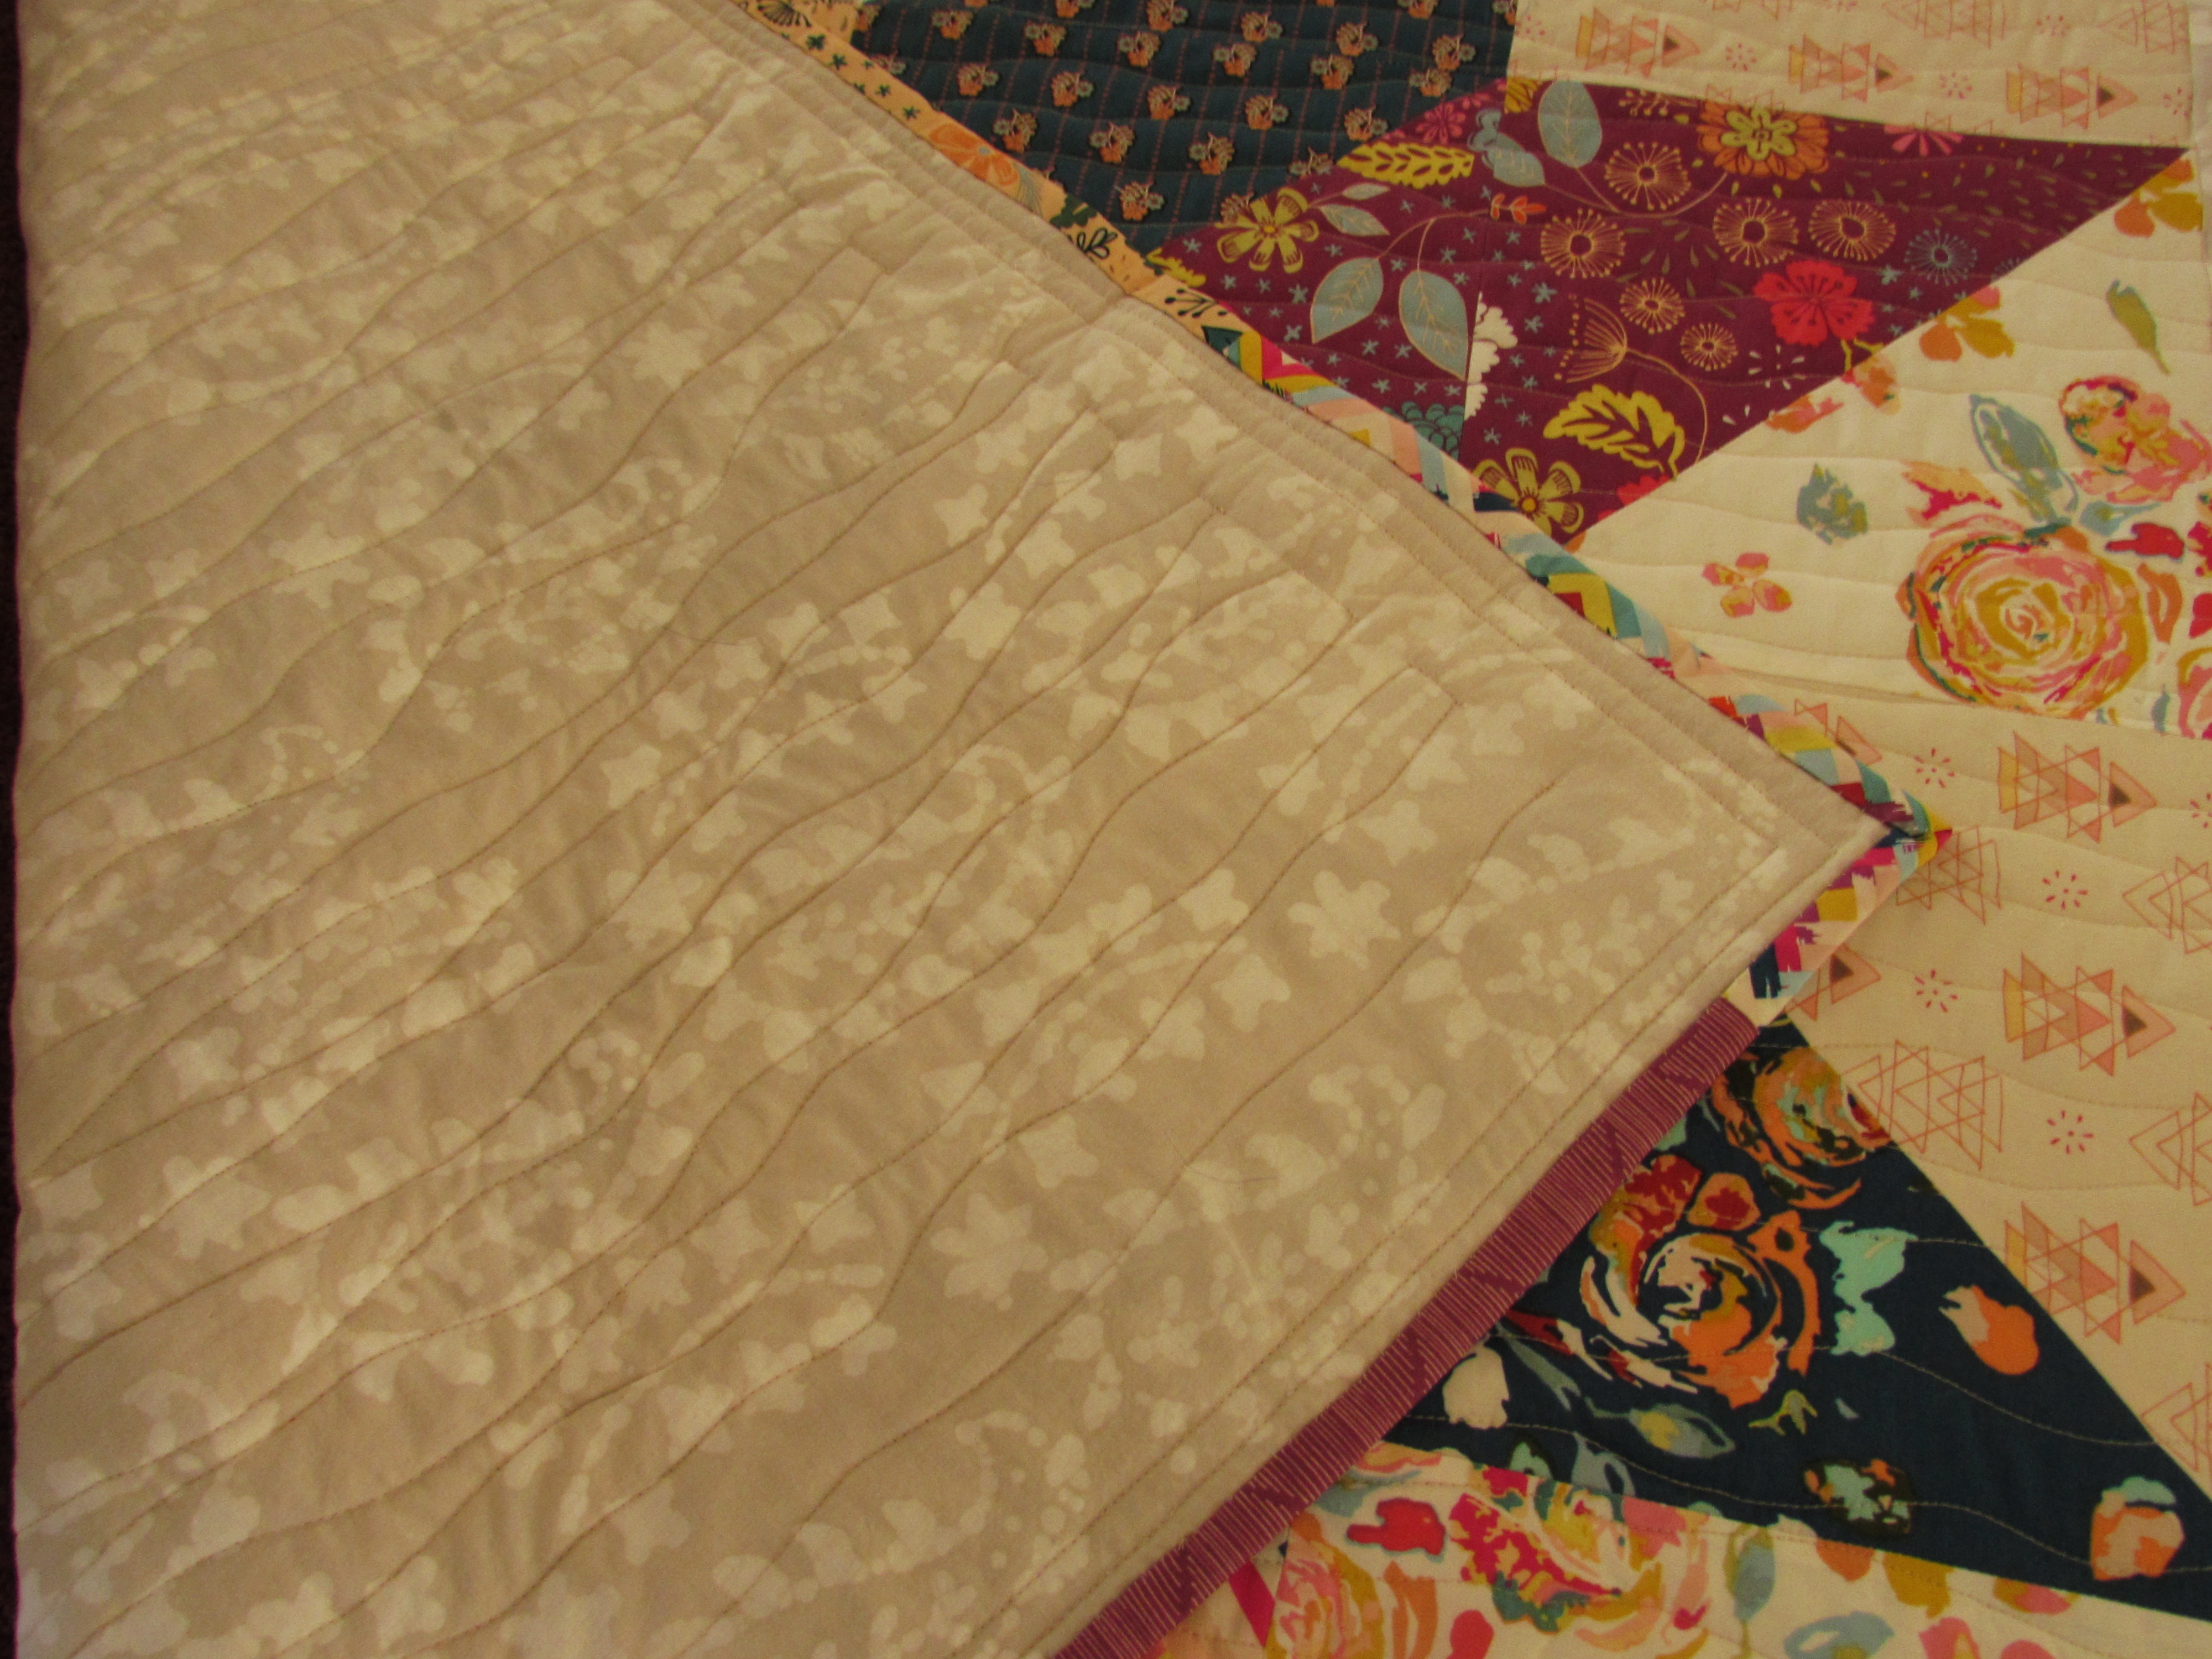
The border worked to enclose the star and to show off this scrappy binding.

img_8239

Doesn’t the binding just tie everything together?  For the backing, I used the same neutral fabric as the border. It is actually a batik fabric but doesn’t really look like one to me.

img_8236

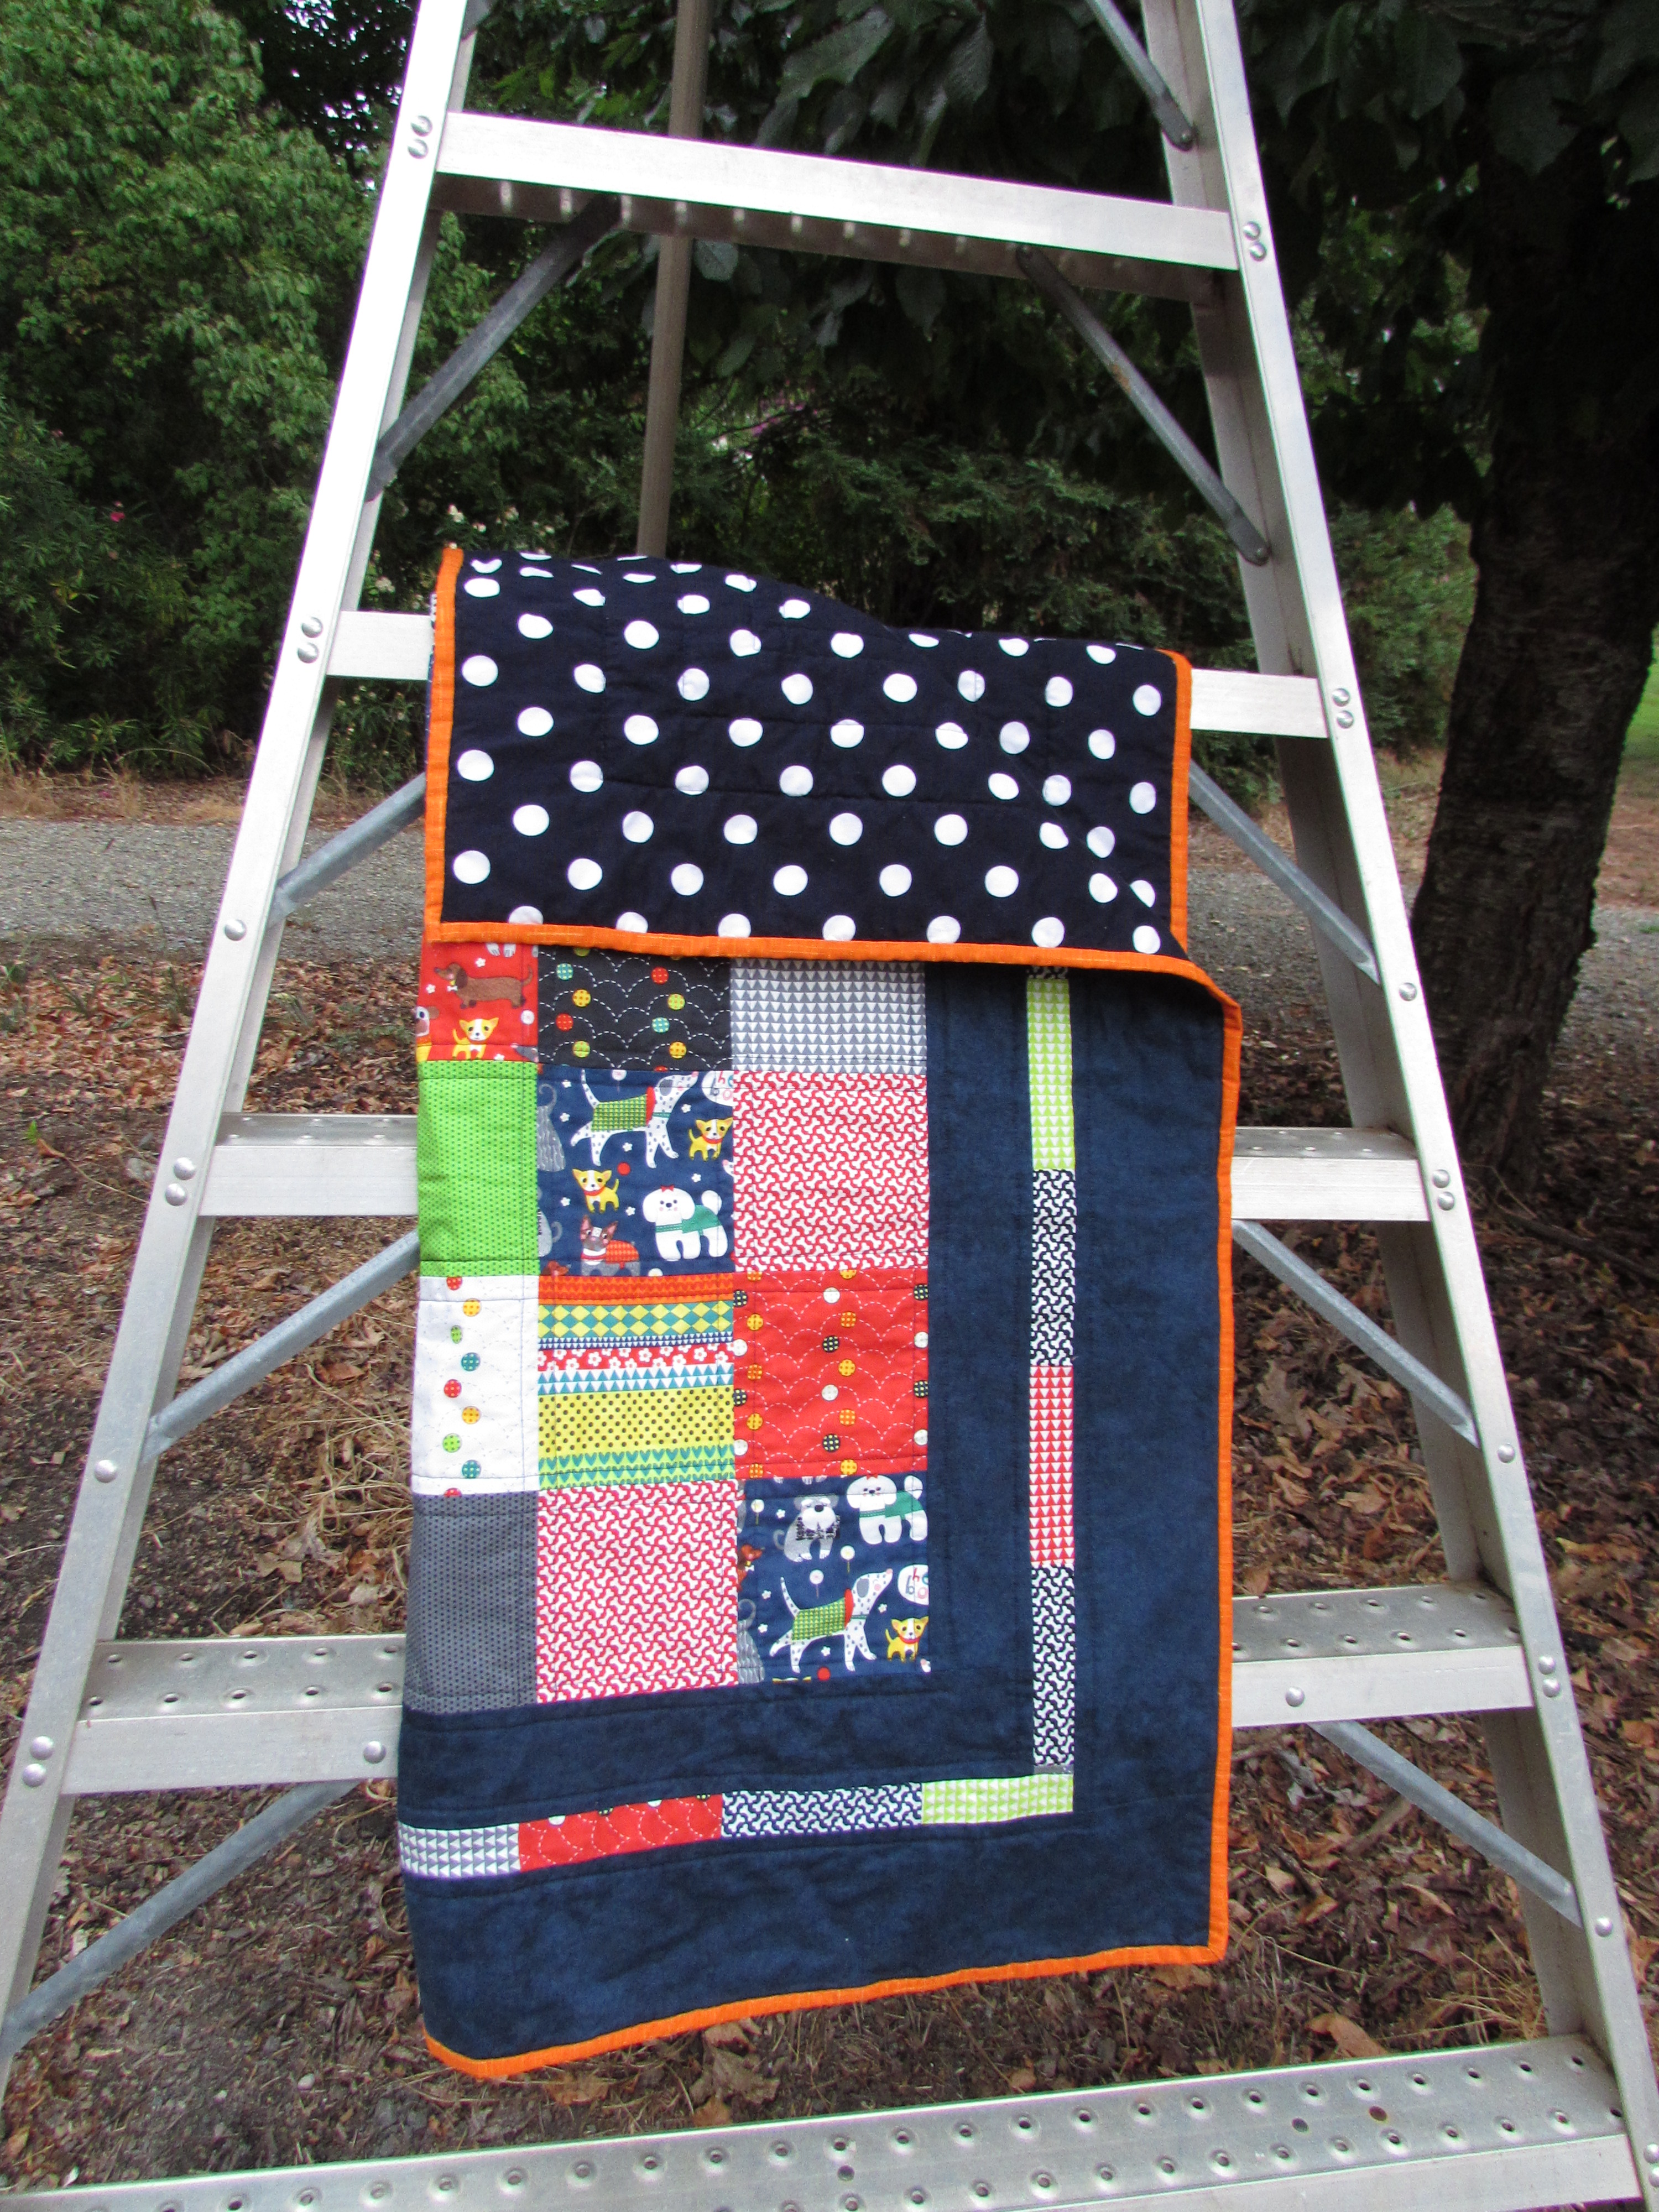
At 36″ x 36″, this is a lovely baby quilt or would be pretty hanging on a wall. I have listed it in my Etsy shop and hope someone will snap it up soon.


Linking to my favorite places, all of which are listed at the top of the page, under Link Ups.


Sweet Baby Quilt Finish

I love this quilt. It is simply sweet and joyful.  It came together quick as anything and that is satisfying too. My niece is expecting her third child in January. She is such a wonderful mom to her two daughters. She has a huge balancing act to juggle these days with a busy career as an attorney in the Bay Area, mom to two girls ages 3 and 5 and a baby due in a few months. As with their first two babies, they have chosen not to find out the gender of this baby so I kept this project unisex as far as color schemes go. I am excited to meet this baby and especially to hear the name that she/he will be given. My niece’s husband is from Ireland and their girls have beautiful Irish names (Ciara and Roisin). I expect this baby will have an equally special name.

img_8030

For the first time, I used Hobb’s Heirloom batting, an 80/20 cotton and polyester batting. It has a different feel;  lighter in weight and a bit puffier. I stippled it with a wide, open pattern to keep that lofty feel.

img_8022

Another satisfying bit about this project is that it required not one trip to the store. I had every bit of this in my stash. From charm squares to background fabric and from backing to batting and binding – it was all from my stash. That is fantastic.  All too often I end up buying fabric for this or that and to just pick from what I have and get a sweet quilt as a result; that is what it is all about. (Lately, I have really been thinking about the amount of fabric I have accumulated over the past three years. It is time to use it. There are so many pretty projects waiting for me in that closet!)

img_8024

The backing is a cute text print that has been languishing on the shelf for a good two years. It is from a line called 8 Days a Week and was put out by Windham fabric. I only had one yard of it so I added a top and bottom border in this pretty cheddar yellow solid that I thrifted a while back. I think it is adorable and this baby will be one step ahead learning to read cursive at such an early age. 😉

img_8023

The binding is a Riley Blake print that I purchased a while ago on a whim. Fortunately, the colors worked perfectly with this quilt. More of that cheddar yellow, some blue and green tones that are just right.

img_8025-1

The icing on the cake is that I actually labeled the quilt. (I never think to do this!!)  I framed the label with the binding fabric. (I blurred out their last name for privacy.)

img_8034

And now comes the part where I tell the maddening part of this whole project – it is that darn quilty math. When I cut the triangles for the side setting and corner setting triangles, I cut them too small. I didn’t see this until after I quilted the whole thing. So every. single. point is cut off with from the binding. Go ahead, take a look – it’s quite apparent. I feel terrible because while this child will be able to read cursive and recite the months of the year, he/she won’t know that a square has four points….  Ok. That is enough negativity. It is a sweet quilt and I know my niece will love it.  That is all that matters.


Linking to my favorites – find them at the top of the page, under Link Ups.

Thrifting SCORE

I went to a few of my favorite thrift stores last weekend. While I was out I also shopped at Humble Fabrics, it’s not really a thrift store, because she sells both new and “pre-owned” fabrics. It is, however, one of my favorite places to hunt for unusual fabrics. Last weekend I found an abundance of both new and pre-owned fabrics.

My favorite score has to be this set of quilt blocks! Two rows of four were stitched together.

IMG_20151210_4241

There were also these three additional blocks.

IMG_20151210_4243

I was thrilled to find them in a tub of scraps! The tub mainly holds small pieces that are not big enough to fold and put on the shelves. I don’t usually rummage through this but one of the quilt blocks caught my eye.  I dug through it and was able to find two pieced strips containing four blocks each.  The piecing is lovely – great points and tight stitching. Before I took these pictures (which I apologize for because they were taken at night, indoors. Forgive me. 😉 ) the blocks were labeled – A-1, A-2 etc. So I could sort of tell where the quilter was headed. However I wasn’t able to place the blocks as they were intended. Having only a few of them, I just did what I could. It looks good though!

When I got home, I pressed them and played around a bit. Finally I decided to piece them for a baby quilt to be donated. I love the bright colors. In the center I used two blocks from a set of hand dyed fabric that I won last year in a giveaway for RSC14 over at So Scrappy. They were made by Vicki Welsh. Her work is fantastic.

The squares finish out at 8″ which means that the body of the quilt comes to 24 x 36″. I felt that was too small even for a baby quilt so I played around with various ideas for borders.

IMG_2836

The left side with the square patched border looked way too busy.  On the right was a piece of blue and black print.  I rejected that one because it was too dark and I wanted to stick with solids and batiks (like the body of the quilt.)

IMG_2839

After trying a number of borders, I decided on this combination of purple (Moda Marbles line) and solid green. Softer than the others I tried and remains neutral (so fine for either a boy or girl).


Here is the end result, made with thrifted blocks and fabric from my stash. It finishes at approximately 33 x 42″.

IMG_20151211_4248

We are having a rainy day (Yahoo!) so I had to tape this to the wall for photos. Not the best but good enough to give you the idea.

IMG_20151211_4247

IMG_2837

While I am very excited to finish this up, I have to set it aside and finish up some Christmas secret sewing. I have the backing and binding all ready to go, so after the holidays I will finish it up and donate.  I know about Project Linus but are there other nice organizations to donate baby quilts to?  If you know of one, leave it in a comment for me.  Thanks so much and have a wonderful weekend!

If you haven’t already, be sure to check out the giveaways on Sew Mama Sew.  You can enter my giveaway until Sunday night. Take a peek!

Linking to Confessions of a Fabric Addict and Crazy Mom Quilts – links for both are at the top of the page, under Link Ups

Love and Good Luck Rolled Up in a Quilt

This is the greatest story and it led to the sweetest quilt I have made yet. Get your tissues ready!

My daughter-in-law, Naomi, has a wonderful family. (Side note, isn’t it cool that when my son married, I gained not just my DIL but also some really nice friends from her family??)  Included in her family are her mom, two brothers and her sister-in-law. Just today I finished an adorable quilt for her sister-in-law, brother and the baby they are expecting in September. The story of this baby is pretty darned amazing.

Margot and TJ (these are their real names – Margot blogs at Find Your Spark and uses their names publically so I have done the same) have been trying to have a baby for years. This has been a really rough time for them. Margot has been pregnant numerous times and has miscarried at various stages of pregnancy. (This post tells part of her story.) It has been really painful for both of them. I can relate somewhat to this sort of pain. I miscarried a child a long while back. It was my third child and I lost the baby at 14 weeks. It was a painful experience that took some time to grieve. But this happened to me only once. And it was after having two healthy babies and before having two more healthy babies. Margot has gone through this repeatedly and has not (yet) had the joy of holding her baby or bringing the baby home. That sort of pain and frustration is truly torturous.

After years of this, they decided last December to take an alternative route to their goal of having a family. Margot and TJ are working with a surrogate. You can read all about their decision and experience on her blog – the story of the surrogacy begins with this post.  The surrogacy agency they are using is located in Mumbai, India. To say that 2015 has been an exciting year for them is a huge understatement. They went to India at Christmas last year and were able to achieve a successful surrogate pregnancy. They have been in constant communication with the agency and the surrogate mother and everything is going along perfectly. Their sweet baby is due to arrive in September. Margot and TJ will be going back to India in several weeks to wait for the birth of their baby. I am so dang happy for them.

When a quilter knows a new baby is coming there is only one way to respond, right? Today I mailed off this quilt to New York and I am hoping that it brings great joy to Margot and TJ.

IMG_20150722_3575

I know that they are incorporating elephants into the baby’s nursery. Elephants are a symbol of good fortune in India and I am pretty sure that Margot and TJ will be forever grateful for this woman who has given of herself to birth their child for them. Good fortune? Oh yeah. In India, elephants  represent Ganesha, one of the most important gods in Hinduism. Ganesha is the god of success and the destroyer of evil and obstacles – perfect! For more details on this, here is a site to read. With elephants being symbolic for their family, I used that as the theme for the quilt.

The pattern is a simple stripe with the two focus fabrics cut in widths ranging from two to six inches. Just like the green and white quilt that I made a few weeks ago, I have the stripes arranged from narrow to wide widths, in alternating order. The pattern is Firefly, by Canoe Ridge Creations. I went with a color scheme of gray and yellow. They don’t know the sex of the baby so these colors are gender-neutral.  Finding this elephant print, “Oh Boy” by Riley Blake was a perfect choice for the backing and binding.

IMG_20150722_3578 Those tiny elephants are sweet in every way. The yellow dot on the front is from the “Mixology” line by Studio for Moda. I can’t honestly remember which gray I used. My favorite part of the quilt is the elephant that I thread sketched at the bottom, on the widest gray stripe.

IMG_20150722_3577To create this little guy I took the backing fabric and made of copy of it on my printer/copier. I kept enlarging it until the size felt right. Then I cut him out and traced a rough shape right on to the quilt. (Actually I made several of them on practice fabric first.) It is hard to tell from the picture but I used three different shades of gray thread so that the elephant would have some definition. I love him. (Why do I keep calling the elephant ‘him’? Is that an omen for Baby Guy? We will know in just two short months!)

IMG_20150722_3578

To quilt this piece, I used organic wavy lines that were sewn with my walking foot. I didn’t space them too close as I wanted it to be really soft when washed. The binding is double fold as usual, and I machine stitched it to the front and back. Going for baby-proof durability here. After I washed it, the quilt measured 36″ x 36″. Hopefully this quilt will be used and washed and then used some more. It will hold up well for outings to the park, rolling around on the floor, tummy time, and then eventually fort making, pretend play, and so many naps.

IMG_20150722_3581

A quilt filled with good fortune and love all rolled up in one for a very special baby.

Linking to Lorna at Let’s Bee Social and Amanda Jean at Crazy Mom Quilts.

Mint Green

This has been a nice week. Hope the same goes for you. I joined the 2015 New Quilt Bloggers group that is being hosted by Quilting Jetgirl, Childlike Fascination, Late Night Quilter, and Meadow Mist Designs. So far, we are all getting to know each other. There are about 70 bloggers in the group which is a load of blogs to familiarize myself with. I really like the writing style of many of these bloggers and can tell already that this is going to be a fun project. The goal is to work together to improve our blogs. There is always something to be learned from a group such as this. I so appreciate the work of the four bloggers that put this together.

Even with the huge amount of time I spent reading these new blogs, I have a minty green finish this week. I came across a pattern on Pinterest from Canoeridge Creations. I love Megan’s patterns. This is the second one I have used. Her “Fireworks” mini quilt pattern was used for my Allison Glass mini swap. This free pdf pattern is called “Firefly” and it is a fun, quick project. It took no time at all to cut the fabric and piece the top (maybe a little over an hour?)

image

I had some solid minty green fabric and a large piece of white Kona that looked great together. The pattern is basically a series of stripes. Each color has a set of stripes that decrease one-half inch with each strip. They begin at 5.5 inches and decrease to 2.5 inches. The size of the stripes alternate such that one color begins with the widest and the other color begins with the most narrow. I like the effect.

image

I felt this quilt did not warrant an all over FMQ pattern. Initially I quilted straight lines on the white stripes. I wanted to keep it soft, thus didn’t want to densely quilt it. Without measuring or marking, I used the walking foot and/or the edges of the strips as my guide. My pin basting wasn’t tight enough and I ended up with huge fold in the backing fabric. Ugh. Ripping out that part of the quilting was really the longest part of making the quilt.

My thought was to quilt the white and leave the green blank. Feeling unsure about that decision, I put it out there to my Facebook quilting community and asked what to do with the green. I really didn’t want the quilt to be dense, I wanted a puffy soft feel to it.  Someone suggested doing a very wide, edge to edge zig zag on the green. That was genious. Perfect.

image

I tried to FMQ the first stripe. I marked it and used the free motion foot. Yuk. I hate quilting straight lines without the (stabilizing) help of the feed dogs. For the rest of the rows I marked them with a Frixion pen and a 90 degree trianglular template that I already had. Using the walking foot, I quickly quilted the zig zags.

The back is a very simple Timeless Treasures print that has the perfect shade of green in it.  I bound the quilt with the solid green to retain the simplicity of the quilt top. I listed this quilt in my Etsy shop.

image

In keeping with my goals for June, I did get the batik quilt (my ALYOF goal) pin basted and plan to  start quilting it this weekend. I am using an all-over pattern of a leafy vine from Christina Cameli’s book. Crossing fingers for this one!

Hope everyone has a wonderful weekend!

Linking to Amanda Jean over at Crazy Mom Quilts as well as Sarah at Confessions of a Fabric Addict.

Cowboy Small

Big news! I sold my first baby quilt on Etsy! I was so excited to see that order come across. My  quilt, Snips and Snails, featuring the ‘Here Boy’ fabric ,was purchased. I wrote a post about it earlier. After recovering from the excitement of selling a quilt, I decided I needed to make another baby boy quilt to list in my Etsy shop.

So… What to make??  I love reading and/or hearing about the process that an individual quilter uses to develop the design, choose the right fabrics, auditioning different prints and then coming up with the quilt they want to create. It is interesting to hear about those that choose and buy fabric first and then go forward from there  vs those that develop the design and then purchase fabric. I fall into the camp of buying the fabric first.  I love to pick up pieces that strike me for whatever reason.  Once I have a few that go together or even one that will be a good focus fabric, I start to think about what I want to make with it.

This week I made a darling baby quilt for a boy.  I developed the project around a piece of fabric with a vintage design featuring horses. About two weeks ago I found a great deal on some fabric at a garage sale.  I don’t tend to pay much attention to garage sales but my husband happened to notice an ad for a garage sale that listed fabric for sale. My interest was piqued and I went to it.  I scored an assortment of awesome fabric!

Back to the retro fabric that I found.  It is adorable.  I became sort of nostalgic as it reminded me of a book I read to my boys when they were little. This book, Cowboy Small, was written in 1949 by Lois Lenski. We read this book constantly and it was especially favored by my eIdest, Andrew (now 29 years). At some point in the story the cowboys are shown sitting around their campfire (eating beans out of a can) singing “Home on the Range.” At this point, Andrew would belt out his rendition of Home, Home on the Range. Look at the picture below from the book.

cowboy quilt 2

On the fabric there is a bucking horse that is so similar to this. Look to the left side.

horse quilt

Such a good memory for me. Needless to say, I was pretty excited to use the horse print for a baby quilt for a little guy. I selected a simple pattern alternating whole 8″ blocks with 8″ four-patch blocks.  The pattern was inspired by a quilt made by Amy Smart on Diary of a Quilter. Making the quilt five blocks wide and five blocks tall would give me a baby quilt that measured 40″ x 40″.   Ok, focal fabric selected and pattern decided upon, I just needed the scrappy fabrics for the four patch blocks. I pulled a stack of fat quarters and played around with those. Fortunately my sister was visiting for the weekend so I had her take a look.  As only a sister is allowed, she looked at a number of them and scratched them from the list right away.  She vetoed them saying they were too modern, wrong color, or too contemporary. Looking through my shelves, she pulled a black and white houndstooth pattern and the black, white and red paisley. Perfect additions! She has such good taste. Cutting and piecing such a simple design took no time at all.

Cowboy Small Baby Quilt; September 2014

20140911_1672

I backed it with this sweet Moda fabric called Honky Tonk. This was the perfect piece to use as backing.  It features cactus, guitars and musical notes – just like Cowboy Small!

20140911_1667

I quilted it with a large meandering pattern.  I really enjoyed quilting this project.  The stippling is a little herky-jerky in spots but overall it looks good (especially after washing and drying the quilt.) The binding is a bias stripe of light tan and red. Adorable! I machine stitched the binding on both the front and back of the quilt. (If you need a good tutorial on quilt binding, check out this one at Crazy Mom Quilts.)

Overall, this project was a blast.  It was a trip down memory lane which is always a fun thing! I will list this quilt in my Etsy shop for some lucky little cowboy.

Linking to: Freemotion by the River, Needle and Thread Thursday, Finish it Up Friday, and TGIFF. Links to each of these sites are available at the top of my page under Link Ups. There are some great projects featured at these linky sites. Take a minute and check them out!

Summer is Winding Down

This summer flew by.  I knew it would because we had a lot of different things scheduled when it started.  That usually makes time go by (too) quickly. This week and last were filled with appointments for my 8th grader that are easier done during summer.  The dentist, the orthodontist and the optometrist.  When I took her for an eye exam (she usually only has the quickies that they do at school) and found out that she is near-sighted. She and I were both so surprised. He asked her if she has to squint a lot or if she had trouble reading the board at school.  She innocently says, “No squinting but I can’t read the exponents during math.” I looked at her and wondered why she didn’t ever mention this??  The doctor said that when this happens gradually the person just doesn’t really notice.  Now she is happily wearing glasses and keeps lowering them on her nose, looking ahead without them, then through the glasses.  Comparing the difference with awe.  So funny. 20140730_1481   In between all of that I got loads of time at the sewing machine.  Hurray!! Here are some of the things I worked on. First off was this little baby boy quilt.  Puppies and boys, perfect fit, right? I used a simple patchwork of charm squares for the center.  Borders of navy blue were added, as well as a stripped border made from the leftover charm squares. 20140805_1522This was inspired by a photo I saw on Pinterest. Very easy to do. I didn’t really do any math beforehand; rather I just built it as I went along. The fabric is called “Here Boy” by Abi Hall, designed for Moda. This line is adorable.  It features puppies, dog bones and bouncing balls.  The colors are bright and happy, blues, orange, reds, green and yellow. 20140805_1521 I backed it with a dark navy and white oversized polka dot.  For the first time, I didn’t use a pieced backing.  The dots are very sweet on their own. Finished it off with a crazy bright orange binding. I love the contrast. I bound it as I usually do by machine stitching to the front and hand stitching to the back.  I am wondering though, if I should machine stitch both sides.  Seems like a baby quilt is going to be laundered often.  Would it hold up better if I machine stitched the binding on both sides? Give me your thoughts on this please!

Also got some time to work on my RSC14 blocks.  I finished the red blocks that were scheduled for July. I love the cherry fabric scraps. They were from a bag of scraps that my neighbor gave to me. (What a fun bag to look through!)

20140805_1509 I also finished the bright greens that are the color for August. Looking through my strips, I didn’t have tons of bright green but was able to find enough to do these two blocks. 20140805_1508 So, I still have to catch up and finish March, April, May and June.  Here is what I’ve got so far. 20140805_1507  This weekend I am off with my sisters for our annual “sisters’ weekend”.  Cannot wait!! Hope you all are enjoying the tail end of summer.

Linking with Linky Tuesday @ Freemotion by the River, WIP Wednesday @ Freshly Pieced, Fabric Tuesday @ Quilt Story, and Let’s Bee Social @ Sew Fresh Quilts.  Also to Needle and Thread Thursday, Crazy Mom Quilts’ Finish It Up Friday, Can I Get a Whoop Whoop, and TGIFF which is at QuiltMatters today. Links to all of these are listed at the top of my page under the Link-Ups tab

The Sisterhood

Eventually, after just few more words, this post becomes quilt related.  Honest.

I consider myself to be incredibly fortunate. Life is good and I have all that I need or want.  Not everyone can say this and I know I am so lucky. Part of my good fortune involves my five sisters. I am one of six girls and it is the best. My parents, like so many couples in the 1950’s, married really young (at the ripe old age of 20).  They produced their first daughter three days after their first wedding anniversary.  Within another nine years they created five more daughters!  So, we six girls were all within ten years of one another.

You can only imagine the craziness that it is to grow up with six girls in the house and no boys (other than Dad). It was a sort of love/hate relationship.  We fought incessantly – about who the sweater belonged to, whose night it was to do the dishes, who was supposed to vacuum this week, who left the dried up ice cream bowl out and should really be blamed for it – it went on and on.  However we were also each other’s best friend.  There was always someone to hang out with, lay in the sun with, our bottles of baby oil and tubs of cocoa butter at our side. (sunblock? I don’t think so….) My mom actually told us, on more than one occasion, that we should  make some friends (what? like with someone from another family? but why?)

Now that we are adults we are still so close, probably more so since we don’t have to share a room or fight over the dishes. There are daily text strings, sometimes numbering upward of 50 exchanges, between us.  These involve the really important (earth shattering actually) details of daily life.  How do you make cucumber/tomato salad?  How much should I be paying for apricots? Look at the latest picture of this grandbaby, or that one.

sisters

As I started this blog, they were my first supporters and definitely my first followers (since no one else knew I was out here writing away). And here comes the quilty part of the post….

Wednesday, during a morning text marathon, we were celebrating my very first sale on Etsy!! A momentous occasion.  See?

20140723_1452

One of my sisters asked what else I was going to put up on Etsy.  (They are like my advisory board.) We tossed some ideas around and a baby quilt was suggested.  I decided this would be a fun thing to do.  I hunted through my fabrics and found a great assortment to use for a baby quilt for a sweet little girl.

baby quilt fabric

Love having this all on hand and ready to go!  I wanted to make something sweet and simple.  I chose to do a quick lattice work pattern using five inch squares on point, sashed with white.  The tutorial is from none other than Amy Smart of Diary of a Quilter.  She posted it at the Moda Bakeshop  site a long  while back. Couldn’t get much easier than this.  Well, actually, it could.  If I would have had the right charm squares on hand it would have gone together much quicker.  As it was, I had to cut fifty (5) inch squares myself.  That took a bit of time but I need to be using the fabric I have, right?? The result is adorable.  Got the quilt top finished yesterday.  Yay!

baby quilt front

I added an appliqued heart to one of the squares for an extra touch.

baby quilt close up

My sisters were right.  (They always are.)  This was a really fun project.  I have the pieces for the back all cut and ready to assemble.  I haven’t found anything that I like in my stash to be used as binding.  (Oh well, a quick stop at my LQS will fix that–everything else was on hand, right??) Unfortunately I don’t have any batting just now.  Living 45 minutes from the nearest shop that carries batting for a decent price means I use Amazon a lot!  (Go Amazon Prime.) The batting will be here on Saturday and then I can get this finished up.

A quick question.  How should I quilt this.  Such a contrast between the white sashing and the dark purple squares.  I don’t know what color thread to use if I want to do a meandering, all over FMQ or a straight line pattern? Or, do I just quilt each square, avoiding the white sashing? I would love some input on this.

Great finish for Friday though.  A lovely quilt top in two quick afternoons!

Linking up with Crazy Mom Quilts, TGIFF, Link a Finish Friday, Confessions of a Fabric Addict, and finally, Fabric Frenzy Friday!!  Check out these links to see some really great work.

Have a great weekend everyone.

My First Quilt

The first quilt I ever made was back in high school, meaning it was a very, very long time ago…. It was my senior year and I was taking a sewing class.  I don’t really remember how I got the idea to make the quilt but somehow I figured it out and decided to make it with log cabin blocks.  I knew next to nothing about quilting and didn’t really ask anyone how to do it.  I was just winging it.  Looking at the quilt now, this is painfully apparent!

I chose to use blues and browns for the color schemes.  I didn’t know that it would be best to use fabrics that were all one weight.  Instead, I chose cottons of all sorts, mainly based on whether I liked the colors and patterns.  Unfortunately, I used some very thin, lightweight cottons.  Over the years, these wore out quickly.  To make each block I used a sort of quilt-as-you-go method that I made up. (Not like I invented it but I had no instruction so I had to figure this out on my own.) I cut a block of muslin as a backing and centered a small square on it.  Then I created each block by sewing strips around and around that center block. This was a huge project at the time. I decided to make the quilt for a queen sized bed. If I was going to make it, I wanted to be able to use it for a long time. After weeks and weeks, I finished all of the squares. I sewed them together and, not surprisingly, my corners didn’t match.  At the time, I wasn’t really aware that they should.  Blissful ignorance!

This was back in 1978 and the batting that I was familiar with was mainly fluffy polyester. My Grandma Josie was looking at my quilt top and told me I should fill it with a blanket so it would be warmer. Once again, I didn’t know any better!  She gave me a huge and extremely heavy wool blanket. Ever obedient, I used this as the filling of my quilt.  I used a (very) thin muslin as the backing. All together this quilt weighed about twenty pounds.  Definitely warm and with the wool blanket in the middle, not easily washable! I had no idea about machine quilting, the only thing I had heard of was tying it.  So I tied it with yarn at each corner of the squares, nothing in the centers. It was so heavy and the muslin so thin that the yarn ties broke free from the muslin.  Really the backing floated freely and the quilt top was tied to that oh-so-heavy woolen blanket!

I loved this quilt and used it for years.  I even took it to college with me.  A queen sized, woolen filled, heavy-as-lead quilt to college on the central coast of California.  The weather is usually in the 70’s there so you can bet I was nice and warm at night.  Plus, I had to fold the quilt to fit it on my single size bed in the dorms.  Doubly warm! After college it was our quilt in my first home when I got married.  Here is my first baby snuggled into the quilt when he was just a few weeks old.  So, circa 1985.  Clearly this was taken before moms were taught to put their babies to sleep on their backs.  This poor little guy is face down, on a quilt, and….. on a waterbed. Yikes!! But just look at him….. so sweet.

quilt with andrew-3

The next baby came along in 1987 and yep, still face down but on a regular mattress by now. This quilt was so loved.

Over the years, the quilt has completely worn out.  I am now taking it apart so I can try to restore it.  I removed the ties and that weighty woolen blanket and I can now work on the top.  I think I will be able to replace some of the frayed strips. I will find some neutral fabrics that looks relatively similar. I am going to have to fuse the strips in place and applique the edges. Then I plan to create a new backing and use cotton batting in between.  I will machine quilt the top pretty tightly so that the worn strips will be held in place.  Can’t wait to give it a makeover!

With the scraps from the log cabin quilt I also made a tiny log cabin quilt for my babies to use.  I loved that it matched our quilt.  When each of my boys were newborns they used the quilt while they were still cozied up in the cradle that my father made. This quilt was filled with a puffy, poly batting and then stitched in the ditch for quilting.  No binding – I didn’t know about these details.  I just made it “envelope” style, sewing it right sides together and then flipping it right sides out.

BABY QUILT 1


After the first quilt, I made two more simple patchwork quilts in the late 1970’s.  These were filled with a poly batting and hand tied with yarn.  Both have worn out completely.  I wish I had pictures of them.  Fast forward 35 years and I am, once again, happily immersed in this quilting hobby of mine.


Linking up with Richard and Tanya’s LAFF, CrazyMomQuilts, and Link a Finish Friday.