Yearly Archives: 2014

Four Weddings and Four Dresses

As I have mentioned in previous posts, I am so lucky to have grown up with five sisters.  Our house was fueled by huge amounts of estrogen and my dad was surrounded by females.  We argued incessantly and stole each other’s clothing which created more arguing. For the most part though it was the best and I wouldn’t have it any other way.

With six girls, my parents knew that they would be shelling out for a lot of weddings. Having the six of us within ten years meant that college for some and weddings for others would all hit at once. What they didn’t know was that the three oldest girls would all be married within ten months of each other.  It seemed that once one got engaged, the other two followed suit immediately.  So in the year 1978 we had three weddings; one in February, the next in August and the last in December.  It was a wild year, to be sure.  I am pretty sure my parents are still exhausted from it.

Growing up we all learned to sew. We tackled shirts, pj’s, shorts, dresses and even the occasional bathing suit (you can only imagine how lovely those were).  One of my sisters even made a three piece suit for my uncle. (She is still an excellent seamstress.) It was only natural that each of these three sisters would make their wedding gowns. I thought it would be fun to share them with you.  When I was searching for pictures I found that my copies had yellowed.  It is hard to preserve pictures from that era.  They have really deteriorated. When I scanned these in, I used a black and white filter. It looks much better then the jaundiced look my sisters had with the yellowed pictures.

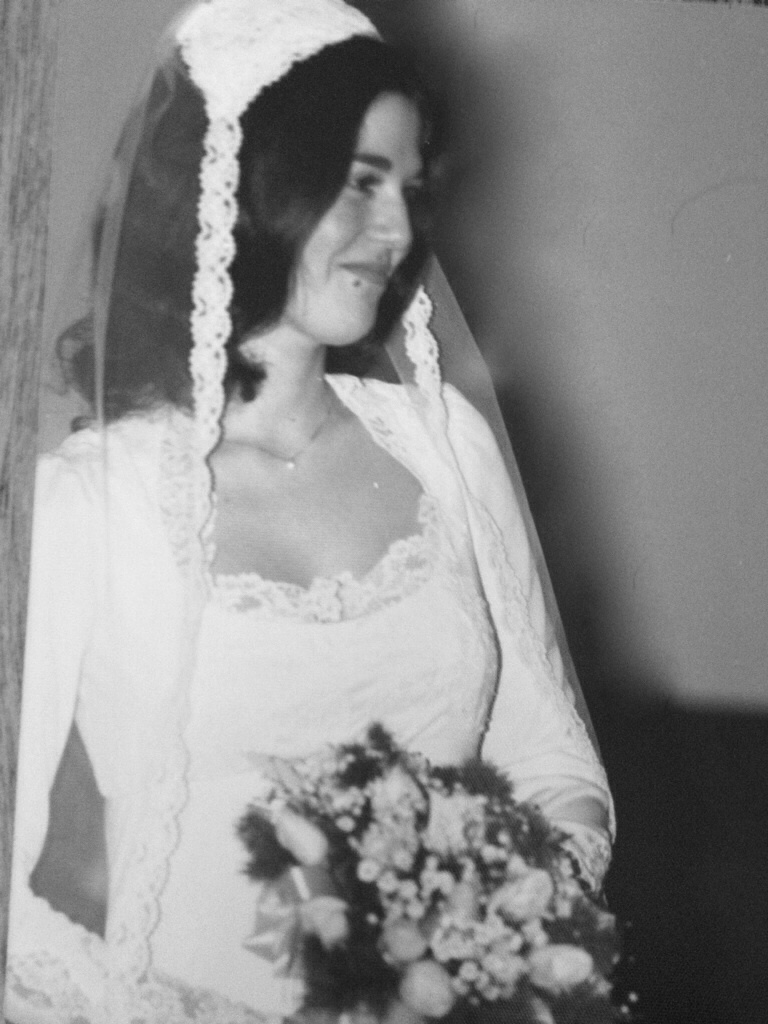
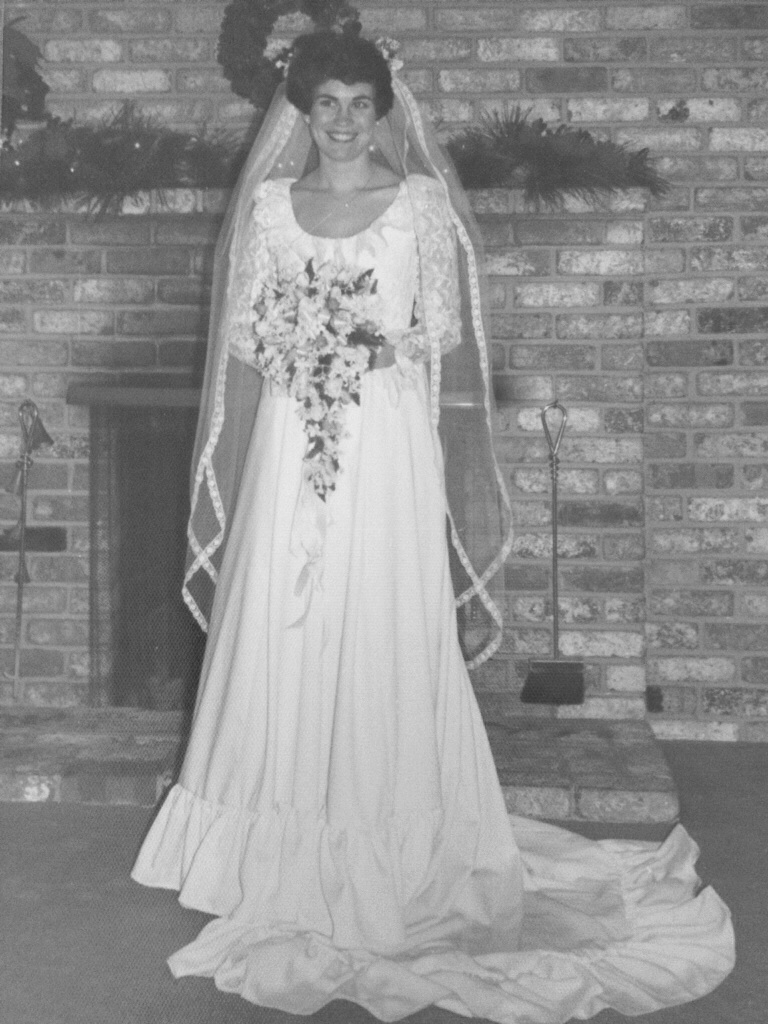
Ok.  Here is wedding number one which happened in February of 1978.  Tina made this dress out of Qiana.  Do you remember Qiana?  If you are my age, you’ll probably remember that it was very popular in the 1970’s. It was developed by DuPont in the early 1960’s and was a polyester knit but was so silky.  My sisters and I loved it.  We used it for dresses for high school dances. Lovely.  😉

image

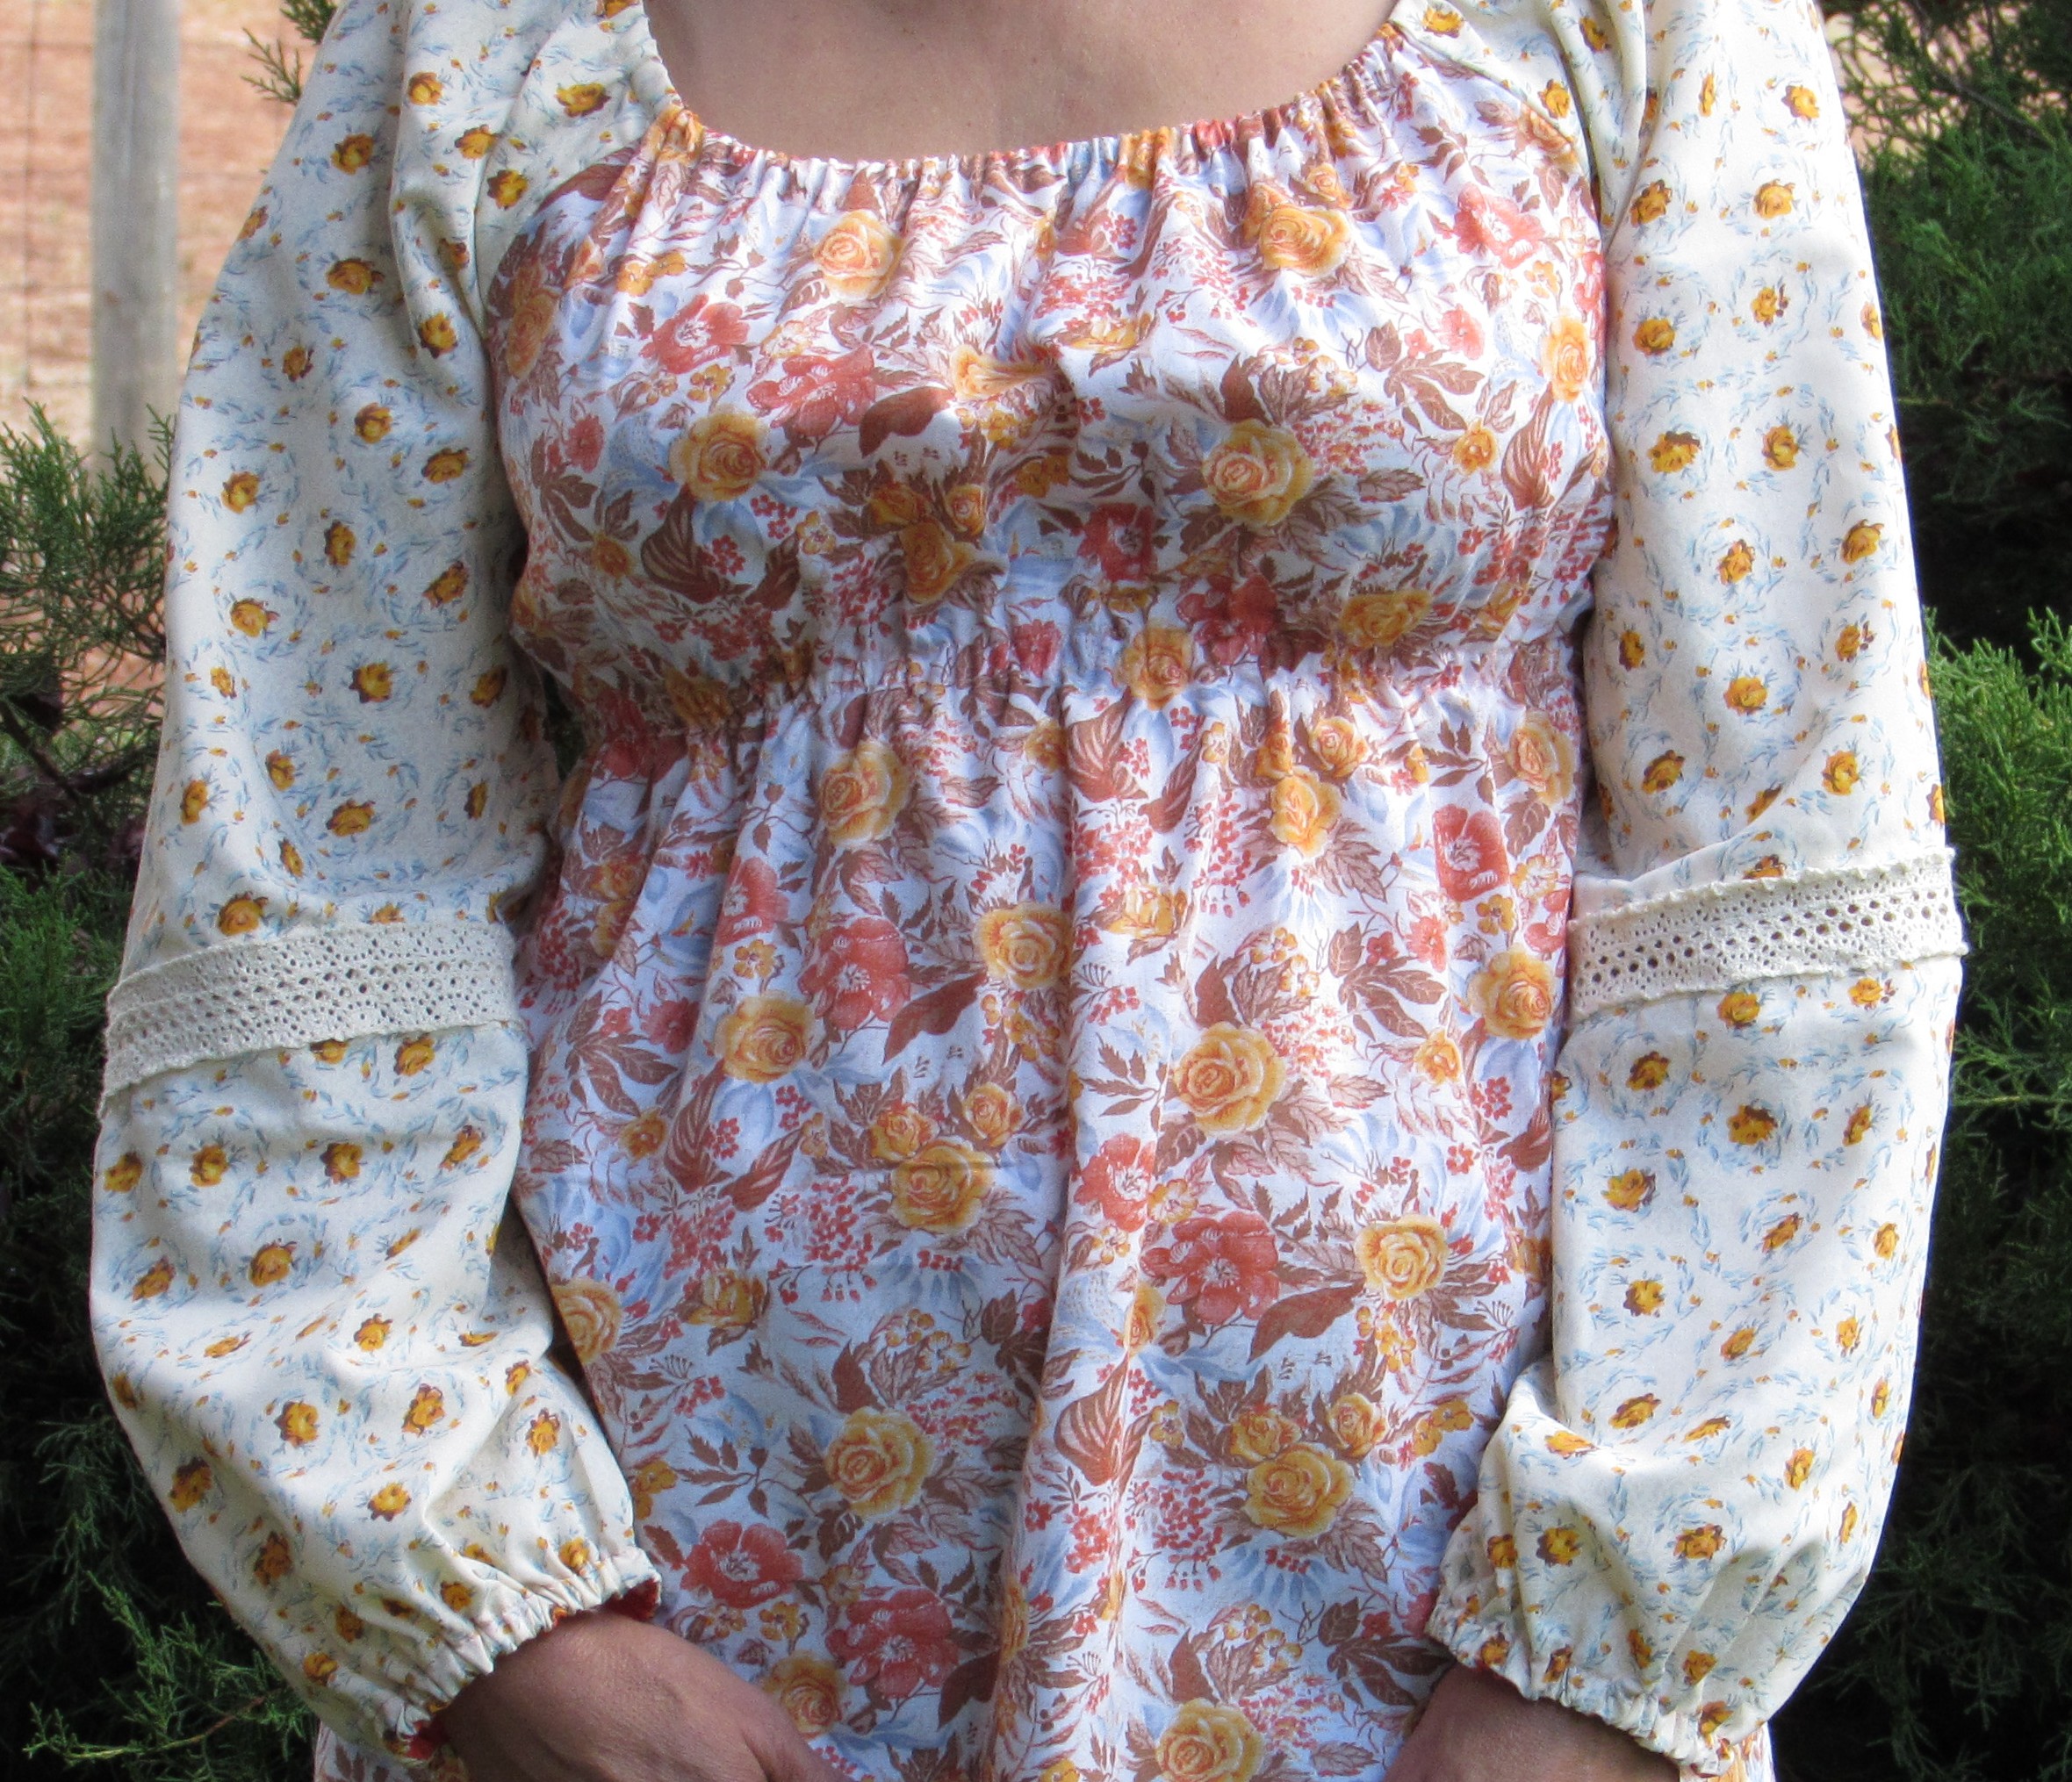
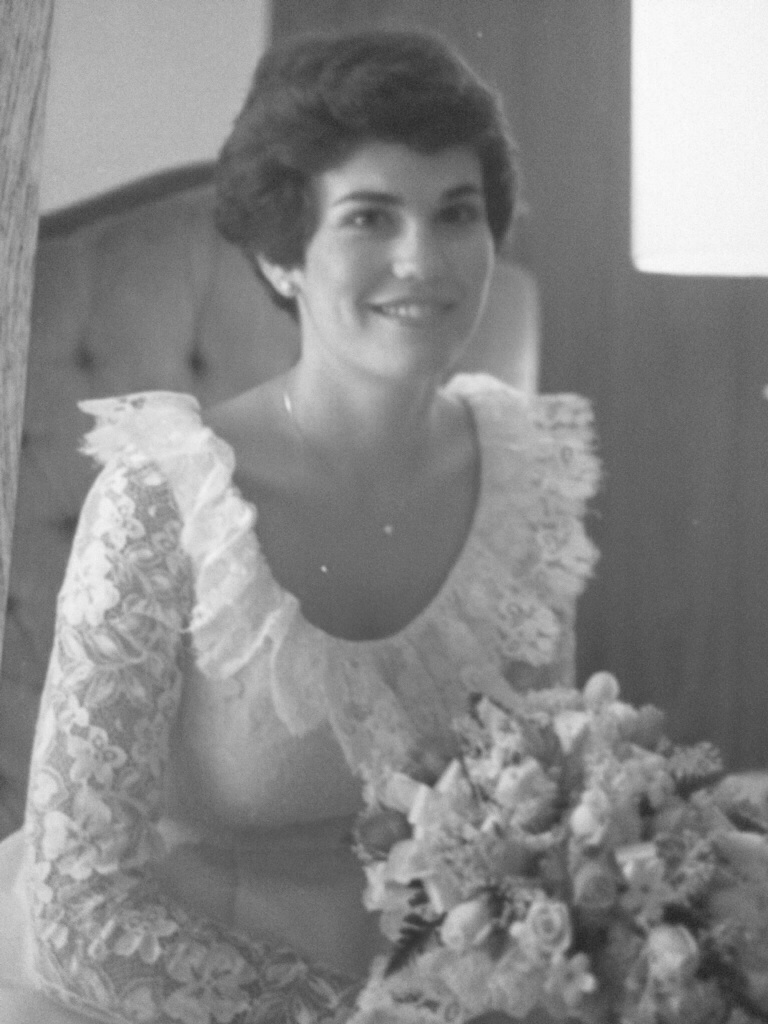
Kind of hard to see the detail but it was a clingy, silky, thin knit that draped perfectly on her. I am fairly certain she made her veil as well.  Here is the detail for the neckline. (She was such a pretty bride.)

image

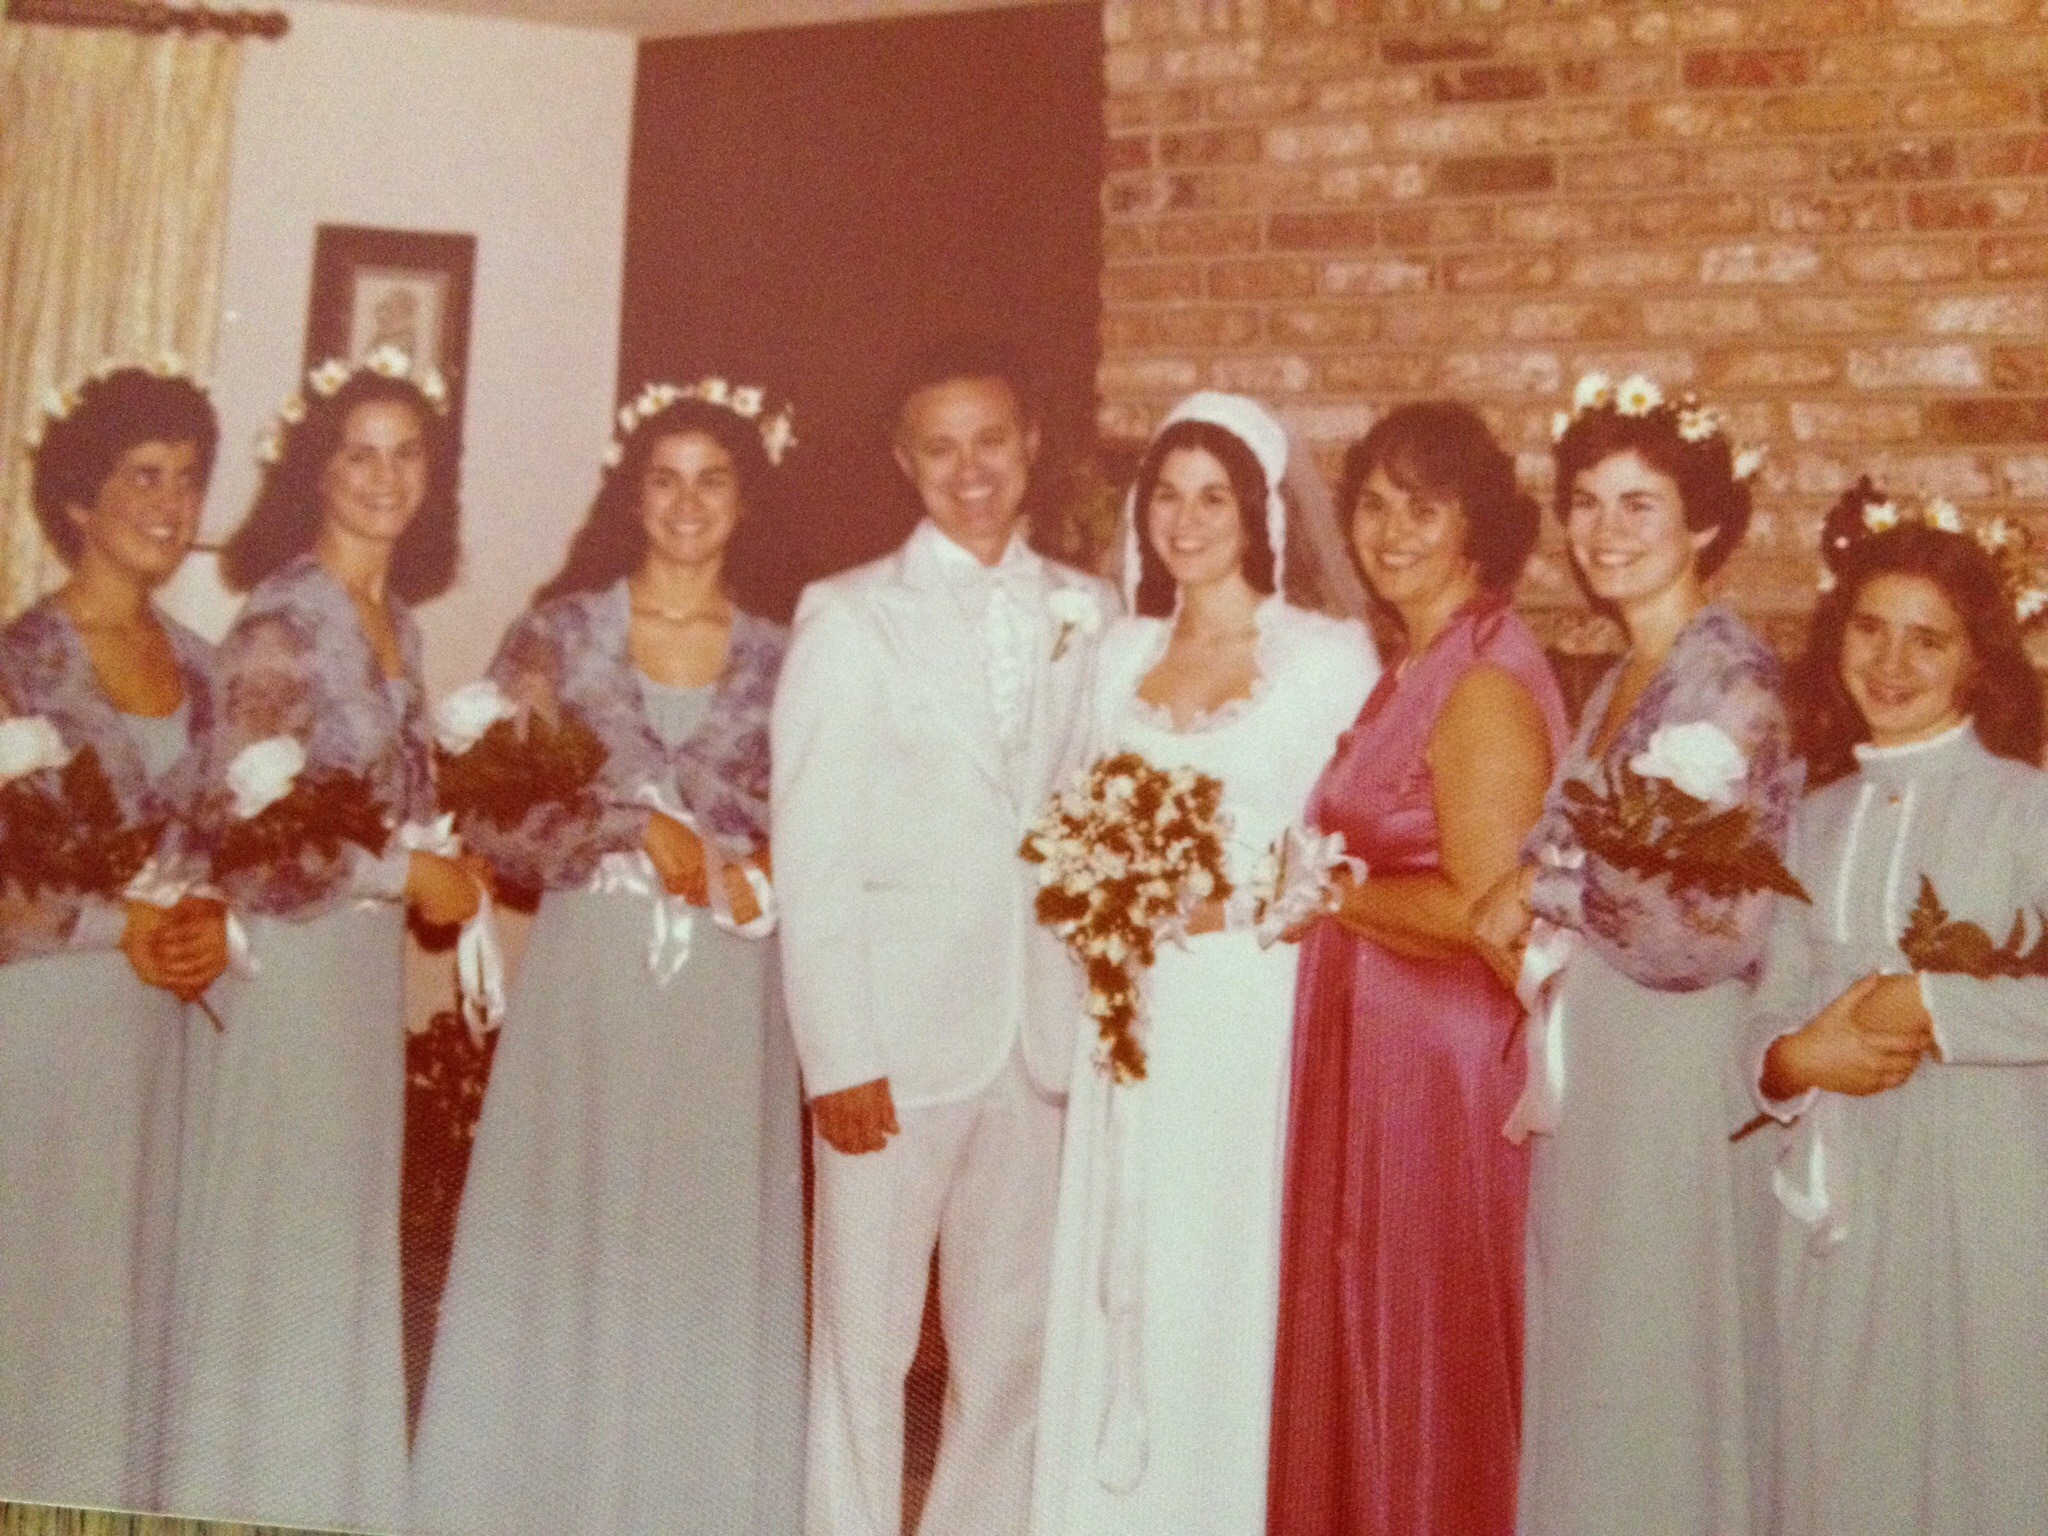
Tina had each of the five sisters as attendants.  We, of course, made the dresses.  I left this picture in color so you could appreciate the awesomeness of these bridesmaid dresses made of a light blue crepe.  The piece de resistance has to be the “Mother Earth” daisy crowns we so happily wore. I remember loving the chiffon flowery jackets too.

imageWedding number two was scheduled for August.  So, just after hosting this wedding, my parents were off and working on the next one.  The reception was to be in our backyard so there was plenty to do.

Patti made her dress over the summer.  It was sweet and feminine, made of a satin crepe. The sleeves were an opaque chiffon knit. I have this memory of her running out to buy shoes to wear with her dress – on the morning of the wedding! That’s my sister.

image

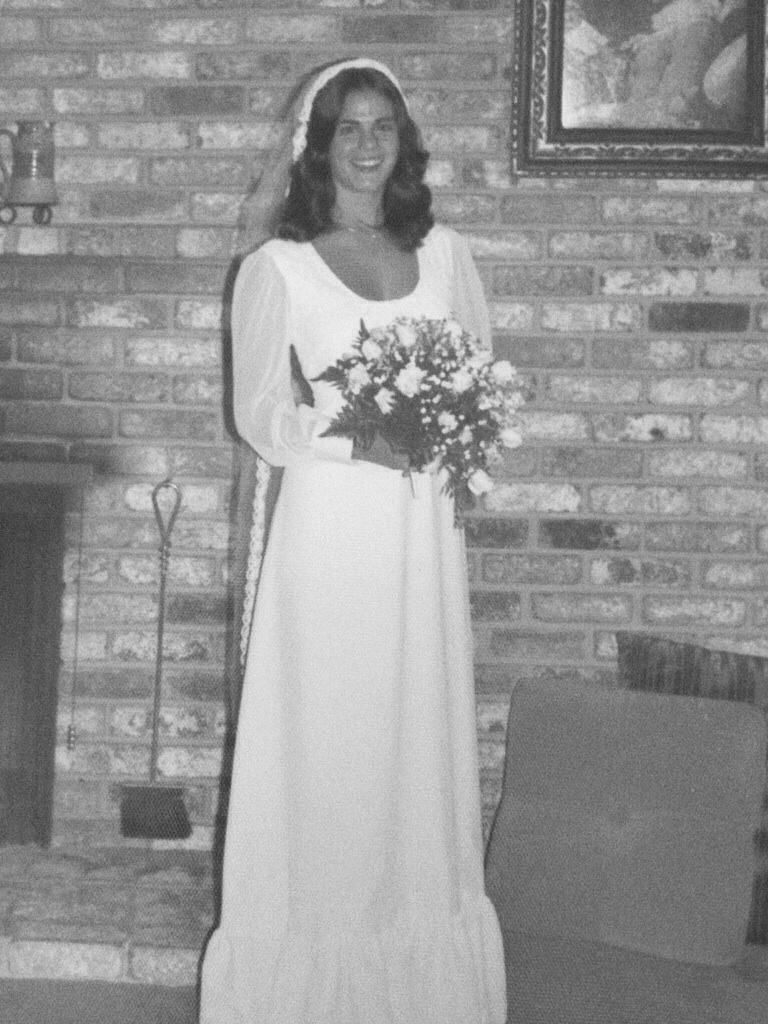
Here is another view. It looks like she used Tina’s veil. This girl was all of 19 years old when she got married. (Most of us got married really young.) She looked adorable.

image
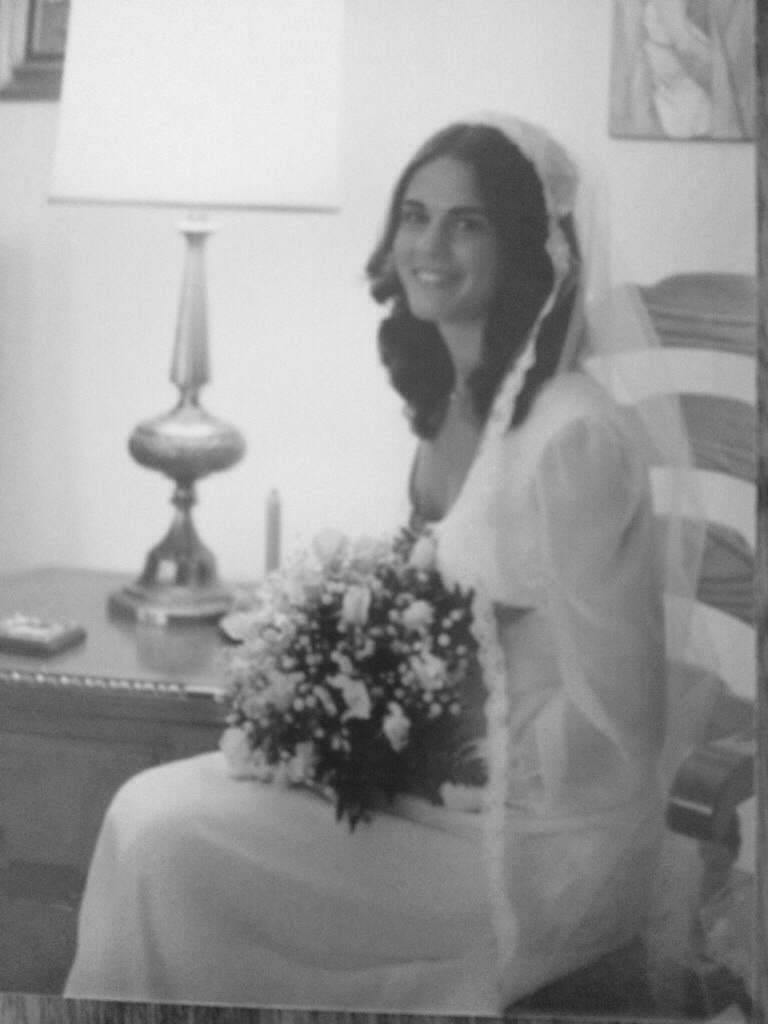
Summer ended with this wedding and fall was spent planning the next one.  Cathy’s wedding was in December. The reception was also at our home. (My poor parents.) Following suit, she made her dress as well. If I remember right, it was made of a satin type of taffeta. It had a low sheen to it. She went all out and made a new veil which was decorated with a half crown of fresh flowers.

image

Like the others, she was young – she’d just turned 21. Here is a closer picture of Cathy’s dress (aren’t the sleeves pretty?).

imageWell my parents survived the three weddings.  My strongest memory was that the house became so quiet and I was so lonely for all of my older sisters. Even though there were still three of us at home, it was just way too quiet.

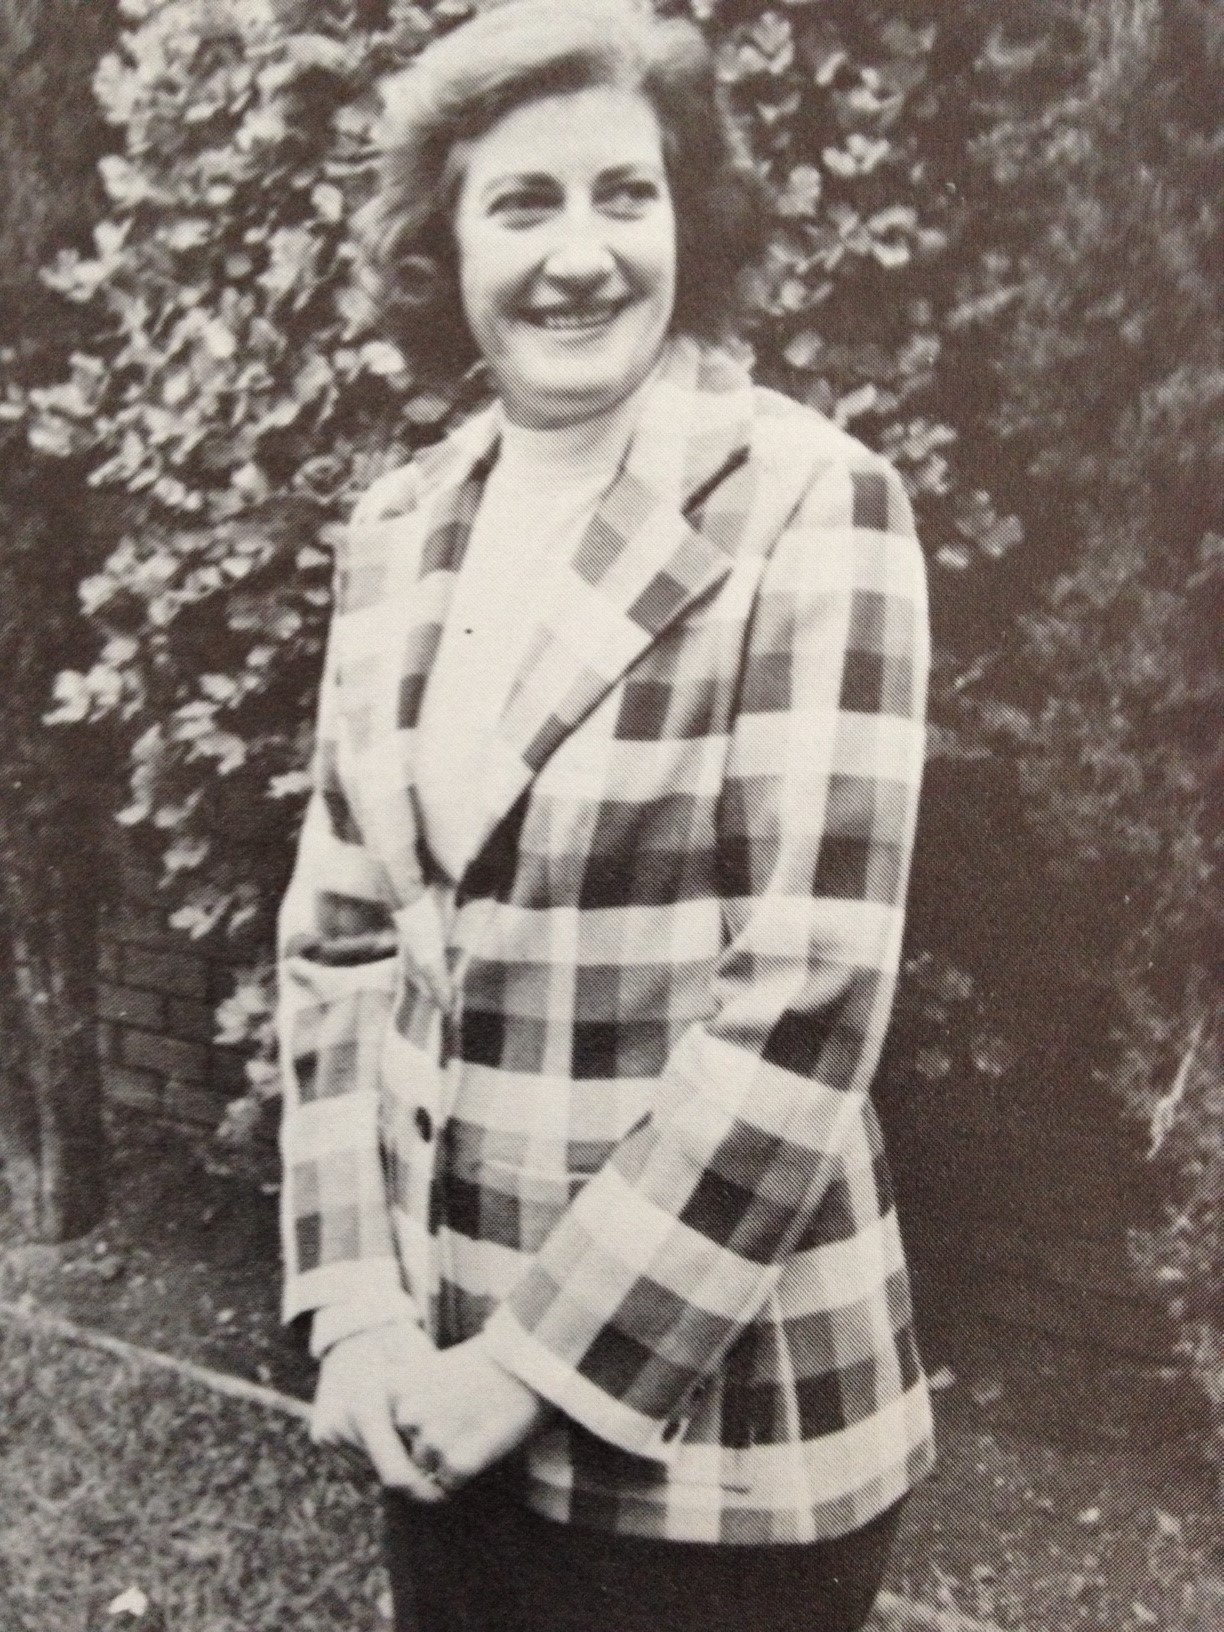
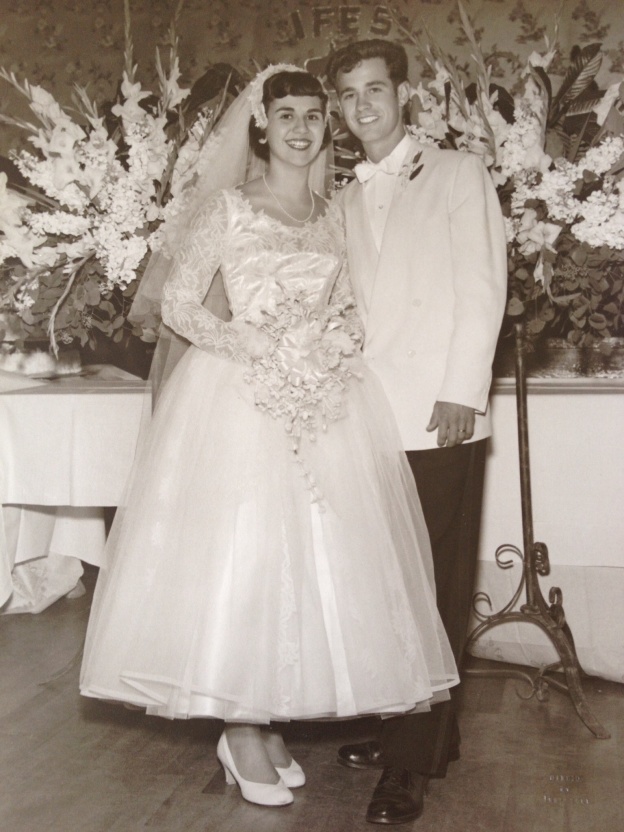
Just three years later I was engaged.  I married the summer after my junior year of college in August of 1981, at the ripe old age of 20. I suppose this may have been the beginning of my love of retro and vintage styles because I asked my mom if I could use her dress for my wedding gown.  (I also used my grandmother’s wedding band as my own.) You can see the original dress at the top of this post. My parents are so cute.  Like their daughters after them, they also married young.  It was spring of 1955 so my mom was 19 and my father was 20.

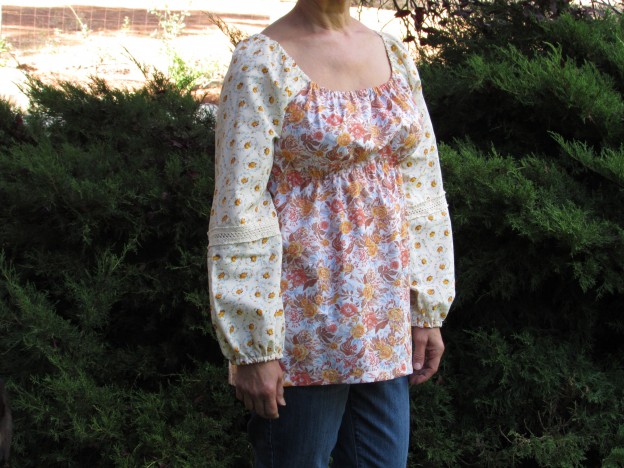
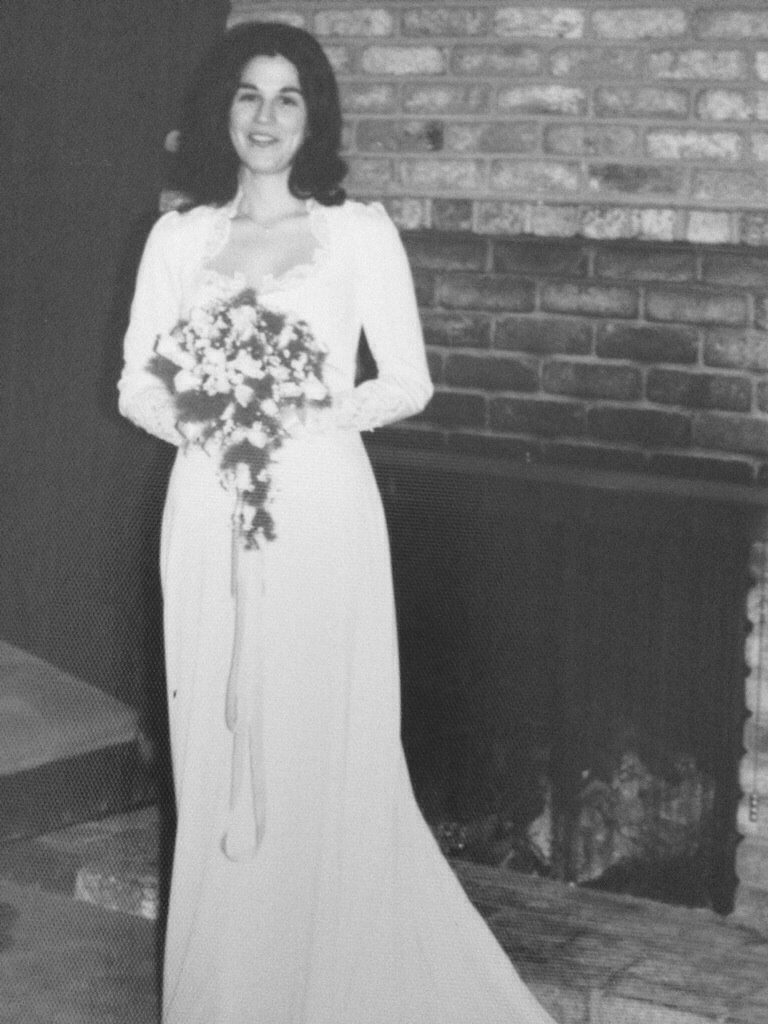
I decided I wanted a full length skirt with a train for my dress.  I took the bodice off of the skirt.  With (lots of) Cathy’s help, I made a new skirt to attach the bodice too.  Cathy and I shopped for satin and about 500 yards of tule. (I don’t know why we bought so much – This was back in 1981 and I still have leftover tule in my sewing room.  Comes in handy for crafts and costumes now and then.) We painstakingly cut the lace out from the skirt of the original dress. Because it was shorter than the new version, we had to piece the lace so that it could extend down the length of the skirt. I pulled out the dress today to look at how we actually made it which was so fun. It had covered buttons in the back which we extended down the back of the skirt. We pleated the front of the skirt and cut a long curved train for the back. I was talking to Cathy the other night and neither of us has much memory of making this. I do know for sure she helped because I wouldn’t have had the skill to do this without her.  I know we didn’t use a pattern of any sort.  I also remember that I used Cathy’s veil.

image

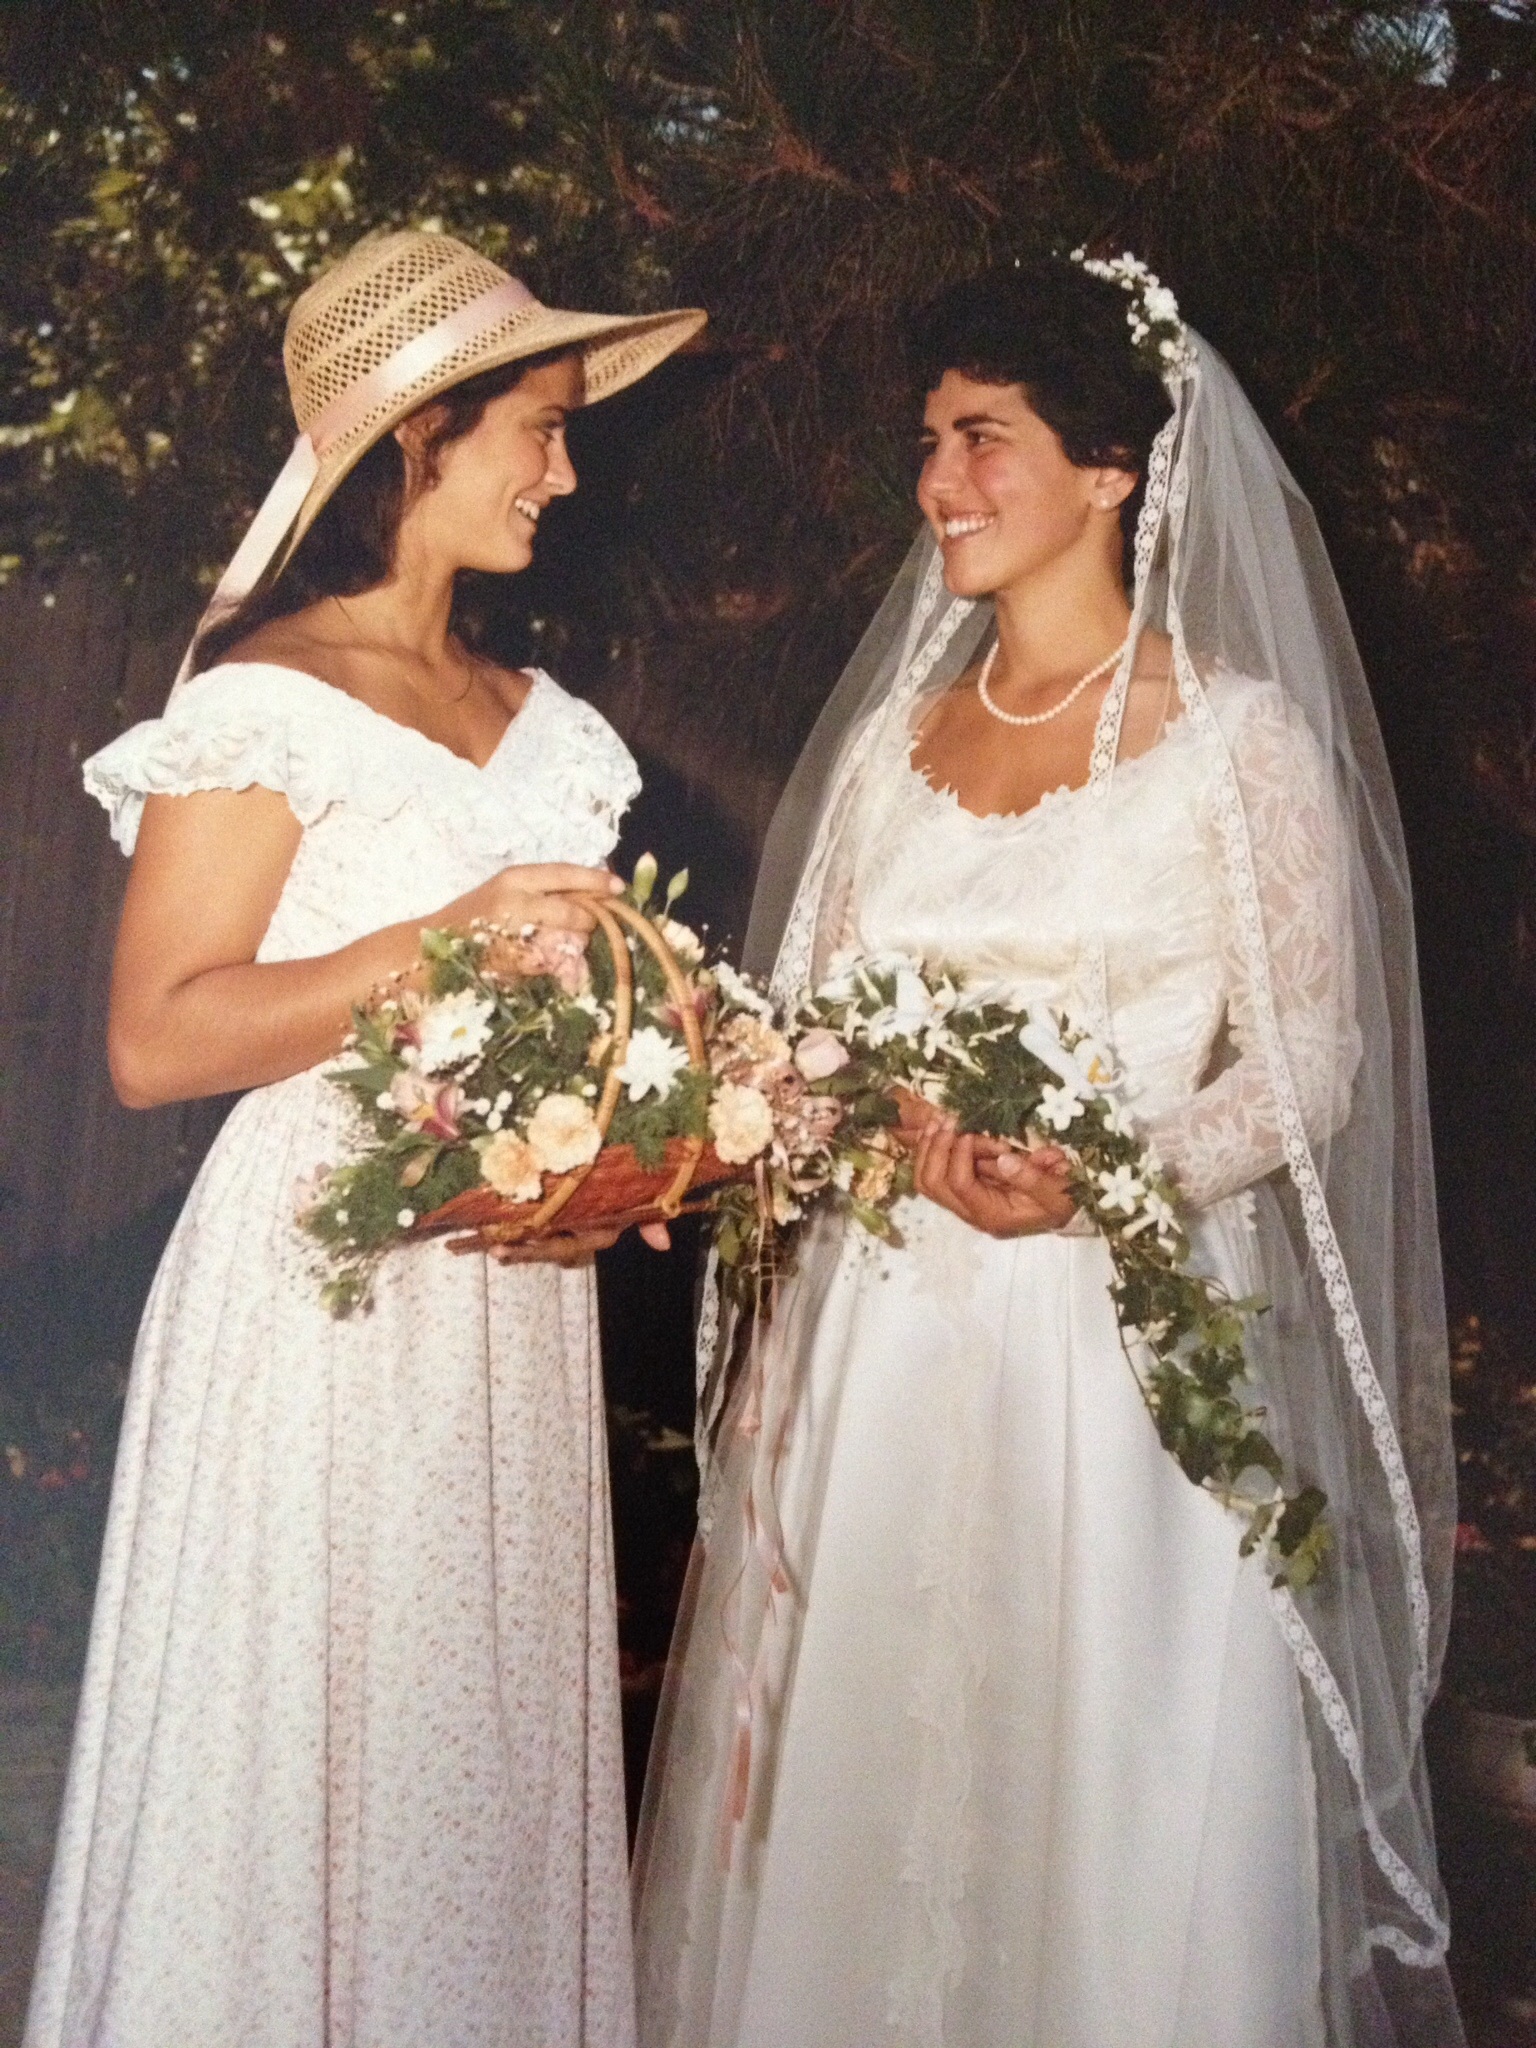
This shot is me with my sister, Juanita. She was my maid of honor. You can see the lace that we hand stitched to the tule on the dress.  I love the dress – it was so sweet to use Mom’s dress and make it my own.

So…. four weddings and four dresses in three year’s time. (The youngest two gave my parents a break and married six and nine years later. Neither of them are into sewing so they went the traditional route and bought their dresses.) Great memories for sure!

Linking to Anything Goes Monday and Let’s Bee Social.  Links to both of these are at the top of the page under Link Ups.

Happy Birthday to Me

Warning, this post contains some parental bragging.  If this is going to annoy you, I will understand if you decide to skip over this post.  However, my kids are pretty awesome and that is what I plan to brag about.  The decision is yours.  🙂

Saturday was my birthday.  I am even older now than I was last week. I find this mildly irritating but what am I going to do about it?  My youngest son came over Sunday for the night.  He brought me a gift that was from him and his two brothers.  It was so cool. The way I hear it, they were emailing back and forth trying to decide what to get me for my oh-so-special day.  They wanted it to be a quilty gift.  That right there is amazing.  Three guys, ages 24, 27 and 29 and they are thinking along the quilty gift lines.  I raised them right. They finally decided they would just pick out fabric for me.  Again, amazing – three guys fabric shopping for their mama.  Not even on-line shopping.  Real life quilt shops with all the rows and rows of bolts of fabric – that kind of shopping.

This was quite the task because the three of them live in different parts of the country.  One in Chicago, one in Delaware and the youngest is in Central California.  They decided that each of the boys would select six 1/2 yard pieces of yardage thus giving me a custom assortment of their choosing.

My Chicago guy actually found his way to a quilt shop in Chicago – not a quick trip since he lives in Hyde Park which is home to no fabric stores. He traveled to Lincoln Park to a shop called The Needle Shop and picked out a lovely assortment of fabrics. According to Kyle, the lady there was really helpful and he highly recommends this shop. If they can so impress and help a 27 year old guy, they are doing something right. Look at his choices:

20141026_2001This assortment totally looks like Kyle.  Check out the Wee Wander piece on the front, on the far right. I love that piece.  The little girl is only on the print two times on the 1/2 yard so I will choose carefully how I use the piece. Love the little super hero print too.  Love them all actually. He swiftly mailed off his assortment to the youngest brother since he was going to bring the gift to me.

Andrew, the Delaware guy, worked with his youngest brother to pick out his assortment. Youngest brother, Ian, was shopping at Cloth and Quilts in Turlock. The process was described as such.  Andrew told Ian that I needed to add some excitement to my stash.  He wanted to go bold.  And he did.  He would describe something to Ian who would then take pictures of what he thought worked and text them to Andrew.  This went on and on while Andrew deliberated and told Ian what to purchase.  Here is the set Andrew came up with:

20141026_2003Looking at these pieces, it is obvious that they are completely versatile. I will be able to use them in pretty much any design (hee hee hee). Check out the super hero piece. Amazing.  Also love the robots which are from the line “Where the Toys Are” by RJR Fabrics.  That is a really cute line.  The llamas are hard to explain but represent a private joke we have going on about my (and everyone else in the world’s) ridiculous obssession with Pinterest.  I can’t quite picture what I will use that baby in, but you can bet Andrew will be the recipient of it in some fashion or other. He tossed in the tan piece because he felt like he needed to ‘calm his assortment down’. 🙂

Ian had the advantage of knowing what the other two assortments contained.  He made a brilliant move and gave me this rich assortment of the colors of the rainbow.  Here they are, in ROYGBIV order!

20141026_2002These are gorgeous.  The colors are crisp and pure and I love them all. Have to say that even though I am not usually a huge fan of orange, it and the red piece are probably my favorites of this set. He made absolutely the right move.  When you look at all three of the collections together, it is easy to see that these brights will work with many of the pieces his brother chose (well ….. maybe with the exception of those little llamas.) Ian was telling me that the gals working at Cloth and Quilts were politely trying to steer him in the direction of buying some pre-cuts. He said they suggested trying a jelly roll or maybe a ‘nice set of fat quarters’.  I appreciate what she was doing.  It must have looked like complete madness – this young guy pulling bolts down right and left, texting pictures of them.  But really, she didn’t know who she was dealing with.  I am so happy to have my three custom collections rather than some matchy-matchy sets  of fat quarters!

20141026_2004

My stash grew significantly this weekend.  Total of NINE yards of new fabric.  Cannot wait to decide what to create first with ths gorgeous assortment of yardage.  The gift is definitely one of the best I have received.  The thought  and planning that went into it touches my heart.  Love my boys!

Linking to Stitch by Stitch, Freemotion by the River, Sew Cute Tuesday and Let’s Bee Social. As f before, all of these lovely blogs have links listed at the top of the page, under Link Ups.


Christmas Finishes

Loved waking up to rain this morning.  It is still going and that is making for a great start to the day. Today is my birthday…..  my husband asked what I wanted to do today.  Did he really need to ask? I haven’t had much sewing time this week so today I am going to spend the afternoon in the sewing room.  My daughter is down with a bug so it is a good day for just hanging out. Before I get to the machine tho, there is a sale at Roxann’s Humble Fabrics in town. I love her shop.  She has a great selection of new and “pre-owned” fabrics with a lot of cool vintage pieces if you look hard enough.  I figure a fabric sale on my actual birthday is a must.

I have several holiday items that I have been working on. Three of which are finished or, almost finished. I posted about this disappearing nine patch that I pieced a few weeks ago.  It is done.  The binding needs to be hand sewn on the back side but that will wait until tonight.  It is a good “tv watching” task.

20141025_1971

It finished out as a 38″ square.  My mother-in-law called dibs on this one and wants to hang it on the wall.  I will put a sleeve on the back after I sew the binding. To quilt it I outlined the Santas and then used a large circular pattern all over the rest of it. Kind of reminds me of Christmas ornaments. For some reason the thread shredded constantly and this drove me batty. I don’t know what the issue was. I cleaned the machine and re-threaded everything but it kept happening.  For the first time I was using Superior’s Bottom Line thread in the bobbin which felt soooo thin. I don’t know if this had anything to do with it. Though it was my top thread that was shredding? I switched to Aurifil in the bobbin and that actually seemed to help. Maybe it was just coincidence.  I am not sure.

20141025_1973I like the dark green polka dots that I used for the binding.  All in all, it turned out pretty cute.

I also finished up a few table runners over the past week or two.  These are both destined for my Etsy Shop. Here is the first one.

20141008_1788Very pleased with the look of the fabric and the green and gold striped binding.

20141008_1786And another runner:

20140925_1733A different look altogether.  The tan and red borders are so pretty. Kind of a linen look to these fabrics.

20140925_1735Not so sure if I like the idea of putting labels on items that are in the shop. It means that the runner isn’t really reversible.  I may not put them on in the future.

Hope you are all enjoying some lovely fall weather. My maple trees are turning and I am loving the colors!!

Linking to Confessions of a Fabric Addict and Crazy Mom Quilts.  As always, the links are available up at the top of the page, under Link Ups.


Mini Design Board

I currently have a very fancy, high tech design wall consisting of a large piece of thick cardboard covered in white flannel.  I then used high tech push pins to hang it on the wall.  It works great but is across the room from the sewing machine. There are times when I am playing with piecing a block and want to then carry the block to the sewing machine and piece it in the order. it is laid out. I haven’t always been very successful in stacking the pieces and then sewing them together. Better for me to have it laid out in front of me. So I made this little guy.

20141022_1970

To illustrate the ease of this little project, I assembled this while talkiing to one of my kids this morning. I love talking to my boys on the phone (none of them live at home or we would talk in person.)  🙂   Today my youngest called me to talk about his rotten day at work. He is working his first job out of college and quickly learning the joys of managing a large team.  During the 26 minute conversation I made this little design board.  I had to put him on speaker so I had my hands free. The pictures aren’t great but just in case they are of any help to you. This is how I did it.

First took some scraps of foam core board (remember I recycle everything and have a bag of scraps from my daughter’s school projects) and taped them together.  It was roughly square which is good enough for non-perfectionist me.

20141022_1965

I found a piece of batting that was just a bit larger than the square. Using hot glue, I pulled the edges tightly to the back and glued them down. I did trim the bulk off of the corners to minimize the fabric in the corner fold.

20141022_1966Like I said, I am not a perfectionist so I didn’t trim the batting to be straight.  It doesn’t matter. Once all four edges are glued down you are done. Hmmm, if I get fancy, I might hot glue a square piece of fabric over the back, covering the raw edges and the taped board. Just thought of that!

20141022_1968Flip it over and you’re good to go.

20141022_1969The board measures 14 x 14″. I can prop it up right by the machine to piece a block. Here is another orange block for the Rainbow Scrap Challenge I have been working on. Look closely.  See the error in this layout? You would think with my handy new board this wouldn’t have happened! Didn’t catch it till after I sewed it together.  Dang it.  I hate ripping a seam out.   😉

Linking to Lets Bee Social and Needle and Thread Thursday. Links to these sites are up at the top of the page under Link Ups.

Home Sweet Home

We are home. Fall break is over and my daughter went back to school today. We got back from our vacation on Saturday. The trip was fun but not exactly what we expected.  All three of us; me, my daughter and husband got sick over the trip. Yuk. Nothing worse than traveling across the country only to come down with a nasty virus. We felt awful bringing our California germs to our Delaware kids. (So far they haven’t come down with it. Maybe they will get lucky!)  We also felt bad about the fact that we probably infected all sorts of people on the plane. If you were on our flight from Delaware to Dallas to CA on Saturday, my apologies. I hope you are well soon!

We had intended to take Julia to Washington DC to see all of the monuments and do some touring of Smithsonian.  Well, that didn’t happen.  We did go to Philadelphia one day, between illnesses, when we were feeling good.  That was a great day. We also toured the Amish country in Lancaster County, PA (more about that in this post.) We spent an afternoon having lunch at a little town on the Chesapeake Bay, the name of which completely escapes me at the moment.  Best of all was spending time with my son and daughter-in-law in their cute home. They were so gracious as we dropped like flies, polluting their home with germs.

a and n

It isn’t hard to guess what I did as soon as we got home.  Ditched the laundry and unpacking and headed for the sewing room. I felt lousy yesterday so I didn’t trust my brain functionality enough to work on anything very challenging.  Instead, I pulled out the RSC14 blocks that I have been working on. I was still catching up on my blocks since I didn’t begin this challenge until June.  I made one each of the yellow, brown and dark green blocks. So far I have 16 blocks made, each measuring 10 inches. I clearly need more of the brighter colors.

20141020_1963

Laying them out on this lovely old white sheet, I think the colors are leaning heavily toward the blues and purples. I am not positive how I feel about the brown block. That was the October color. Should the brown block stay or should I take it out??  I think I will make one more of each of the orange and yellow blocks.  Not sure yet what the November color will be, but I know I want one more row of four blocks. If I do an orange, a yellow plus the November color I will be close.  Then I can do the last block in whatever colorway is most needed.  Definitely going to sash it with white and put some bright cornerstone blocks with the sashing.  Should be pretty.

In closing for today, I will just shout with joy – IT’S RAINING! So thrilled to have some rain this afternoon. Hope it sticks around for a bit.

Linking to Anything Goes Monday, Freemotion by the River, Sew Cute Tuesday, Let’s Bee Social and finally, WIP Wednesday.  All of these lovely sites are listed at the top of the page under Link Ups.

Experiencing Obie’s

We are in the middle of a vacation, visiting my son and daughter-in-law. They live in Delaware and we live in California so we don’t see each other too often. We are having a blast.  So far, we have checked out Chesapeake Bay, the Longwood Gardens (the DuPont family), Philadelphia, and – best of all – Lancaster County for my own personal quilt shop hop!

Before our Lancaster day I posted a query on Facebook. I belong to a group called the Nighttime Quilters which has the nicest people in it. I asked which quilt shops I should check out and was given several suggestions. I also checked out some forums on line which gave additional suggestions. Armed with a list of places we headed out.  My son was the chauffeur and my daughter came along for the trip. (My husband conveniently caught a horrible cold the night before. Coincidence? I think not! He stayed behind for the day.) It was a gorgeous drive. I lived in Pennsylvania for a couple of years in the early 1990’s and had forgotten how pretty the rolling hills of PA are. With the colors turning it was just spectacular.

image

First place on my list was Obies’s  Country Store in Goodville, PA.  I had read a few sites that claimed it was ‘jammed with fabric’. When we pulled up to it I couldn’t believe what I saw. After checking out the front of the shop we decided to go to the next place on the list. It didn’t look particularly inviting.  See?

image

After seeing the front we moved on to the Goodville Fabric Outlet which was just around the corner from Obie’s. This store was quite large and had all sorts of fabrics, not just quilting fabric. However much of it was not first run fabric. It was interesting to see the variety though.

image

I dug around a bit and did find a few choice pieces though.  I collected several neutrals for a quilt that will be shades of cream, tan and brown.  This photo shows the pure joy of purchasing fabric for $4.99/yard which is petty much unheard of in Northern CA. (Photo credit to my daughter, Julia.)

image

When I was paying for these little treasures, I asked the clerk about Obie’s. She smiled and said that ‘while it wasn’t necessarily safe, it was a sight to see.’ That intrigued me. We went back around the corner to Obie’s. Oh my gosh!! It was incredible. Fabric was stacked along the walls from floor to ceiling in this tiny shop. You can see by the floor tiles that the aisles were maybe two feet wide and it made it hard for two people to pass each other.  The fabric was somewhat organized by color and theme (for the novelty fabrics at least.)image

We went upstairs which was crazy. There were quilts everywhere. They were definitely hand quilted but I think some were machine pieced.  The quantity of quilts was overwhelming. They were hanging over the stair railing and folded up and stacked on the shelves along the wall. Digging through the flat folds proved to be fruitful. I found two prints that I loved and both were a mere $3.99/yard! Loved the bargains!

image

After this experience there was still one place left on the list.  I wanted to go to Weavers Dry Goods in Lilitz, PA. This shop was amazing! The selection and the prices were over the top.  It was really well organized and she carried all the best brands (Moda, Michael Miller, Benartex, Henry Glass, Alexander Henry and Hoffman to name just a few).

image

She had a large room full of novelty fabrics and they were beautifully sorted and labeled by theme. Lots of really cute lines.

image

I found a lot of fabric here – A pile of fat eighths and three different pieces of yardage. Again, the prices were great. California pricing is just ridiculous. I was happy to discover that Weaver’s has an on-line shop as well. I will definitely use them in the future. This was a top notch quilt shop.

Three quilt shops, three totally different experiences. It was a great day. Have you been to any of these quilt shops?

Linking to Freemotion by the River, Let’s Bee Social, Needle and Thread Thursday. All of these wonderful sites have links listed up at the top of the page under Link Ups.


A Very Quick Friday Finish

This afternoon I was checking out some of the blogs I follow.  One of which is Kati’s blog, www.fromthebluechair.com. Her latest post talks about making some autumn decorations for her house.  I liked the idea of the little Halloween bunting she made up.  It was so cute and clearly a quick project to whip up. I bought some Halloween fat quarters for 50% off last year after the holiday was over. (I will almost always grab some novelty fat quarters after each holiday. They are always a bargain at that point. That way I have some if I need – read want – them.) Already having a bunting template from the holiday banners I made, it was a breeze to cut these little flags out.

20141009_1801

I stitched the flags wrong sides together and then just encased them with a piece of double fold black seam binding that I had in the sewing junk drawer – where you will find a plethora of old ribbon, hem tape, seam binding and elastic.  Never know when it will come in handy, like today. (The door with the ‘DANGER’ sign and the ‘Sorry we’re CLOSED sign’ is my 13 year old daughter’s.  Need I say more?)

20141009_1802The points curled after I sewed the two sides together. I starched the heck out of them which helps a bit.

I am not big fan of orange but it’s October.  October is all about orange.  Last year I made this little flag.  I love it.  I intended to give credit to the website that I copied it from but I can’t remember where I found it. I know it was through Pinterest but somehow it is not on any of my boards any longer. So, whomever had this posted, you get the credit. I certainly didn’t make this one up. I like it though – even if the rick rack isn’t as straight as it could be between the two “o’s”. I had made this days before Halloween last year so it was only hung for a couple of days. Halloween decorations are usually taken down by about November 2nd.  They aren’t my favorites.  😉

20141009_1800

Except for the pumpkins.  I do love the pumpkins.  We grew these out in the garden this year.

photo (12)

Linking to:  Needle and Thread Thursday, TGIFF, Finish It Up Friday at Crazy Mom Quilts, Confessions of a Fabric Addict – all of these wonderful sites have links posted at the top of this page, under Link Ups.

Quilt Retreat in the Wild West

Great title for a post, right??

This weekend my friend Sophia and I went to a quilt retreat that was hosted by a quilt guild in the neighboring community of Downieville. Downieville is a gold rush town that is about 50 miles from my home. Unfortunately, 30 of those miles are cutting through the Sierras on a really, really winding road. (Yuk.)  It is worth the nasty drive though. Downieville is a gorgeous, tiny town of about 500 people. It sits on the north fork of the Yuba River which flows through Downieville and winds its way through the Sierras to my hometown of Grass Valley. It is a popular place for fishing, mountain bike riding, and hiking. The main block of “town” consists of three restaurants, two shops, a tiny theatre, the community center, and a hardware store. Check out the North Yuba River. I love the one bright red tree that had already turned to its fall color.
photo (10)

Downieville has a colorful history as a gold rush town. While we were there Sophia and I noticed that several buildings bore the name “Juanita”. This made me curious because my younger sister’s name is Juanita.

One of the “Juanita” sightings was a sign on the door between Sophia’s motel room and mine.  Sophia was in room 5 and I was in room 7.  On the door of room 6 was the name “Juanita”. We thought this odd since the other rooms didn’t have any names on the doors. We didn’t have any decent cell reception being in such a remote town so I figured I would google this when I got home.  Clearly Juanita had some history in Downieville.

photo (11)After doing the research, I am somewhat glad I didn’t check into this until I got home!  Apparently, there was a Mexican woman living with her lover (Jose?) in Downieville in the early 1850’s, which was during the height of the Gold Rush in California. This woman, Josefa Segovia, was the only woman to be lynched in the history of California. Yikes! This story is a horrid tale of the treatment of the Mexican population living in the old gold rush towns during that time period.  Apparently, a gang of drunk miners, led by a guy by the name of Frederick Cannon showed up at the home of Josefa and her lover during the night. They were angry with Josepha and Jose because of an incident at a saloon earlier in the evening. Some say they attempted to gang rape Josepha. Somehow she was able to get her hands on a large knife and stabbed and killed Frederick. This was impressive since history says that Josefa was a tiny woman in her early 20’s. She was declared guilty without any trial and lynched the following day, July 5, 1851. The historical records don’t often use this woman’s true name. They call her Juanita which began as a show of disrespect, using a more familiar name rather than her true name.

When I was doing this bit of research, I found out that the Inn  I stayed at (with the name Juanita on the door) is listed as “certified to be haunted”. Of course, it is easy to guess who haunts the place…. Juanita. Supposedly there have been proven ghost experiences in rooms 1 and 3 (kind of glad we were in rooms 5 and 7!) For the most part, I do not believe in ghosts or supernatural activity. But it might have been uncomfortable to hear all of this and then to stay in this place for the night. The motel, one of two in town, was a bit on the sketchy side.

Here is Juanita’s home.

photo (9)

This whole story was such a wild bit of history to discover. It made my quilt retreat weekend that much more memorable.

The weekend itself was great, even without all of the tales of ghosts and lynchings. Sophia and I were able to indulge ourselves with two long days of sewing, some good food and a nice hike.  Wonderful! I completed about 85% of two different quilt tops.  One of them was a strip quilt, or a 1600 quilt.  If you haven’t made a 1600 quilt, it is incredibly simple.  It requires a jelly roll or a set of 45-50 2 and 1/2″ strips. I used the line called “Merriment” by Moda. I also added in some strips to be able make a larger quilt.

wip fabric 2

These are sewn end to end until you have a length of fabric that runs about 1600 inches.  Mine was closer to 2000 inches as I added the extra strips.  Here is the first pile of strips when sewn end to end. I also cut some of my red strips into 2 and 1/2″ blocks and used them intermittently when sewing the very long strip together at the beginning. I was hoping that these little blocks would be more noticeable than they actually were. The effect would have been nicer had I used a different color, maybe a gold or a color with some shimmer to it.

photo 1 (4)Once the strips are sewn into one length, they are folded in half and sewn together (lengthwise) so that you now have a long strip that is two rows deep. This is done again and again to create the quilt. I trimmed off five strips that were 2 and 1/2″ wide to use as an outer border.  I added a 1 inch wide dark green border to the main quilt and then attached the striped border.  The overall effect is lovely.
20141006_1776Thank you to my husband for assisting with the phot shoot, those are his toes peeking out at the bottom!
The other quilt that I worked on used “Ten Minute Blocks”.  They were really fun to make – a lttle confusing for the first one and then they came together so fast.  Being the sort to compete with myself constantly, I started timing myself after the first couple – to confirm whether these were indeed “10 Minute” blocks! (I know, I know….)  Well, they are.  I got them down to about 9 minutes to assemble each block.
20141006_1774
I made all 13 blocks.  I  have some topstitching to do on the center accent blocks. You can see that I have turned the edges in and pinned them. I will stitch those before I put the blocks together.  They are all in various shades of black, cream and gray with jewel toned centers. I will set the blocks on point with black sashing and setting triangles. I love the whole effect. These blocks are 12 inch blocks. Next time around I will make smaller blocks as I think the effect will be better on a smaller scale.
The retreat was great fun.  The Mountain Star Quilt Guild hosts this weekend event on alternate years.  I definitely plan to return.  The town is fun with such gorgeous scenery. Hiking along the river is wonderful (though there were numerous spots where we saw bear scat – I was not at all unhappy that the two of us didn’t actually cross paths with a bear! Yes, I will go to the next retreat.  I may stay in a different inn though!
Linking to:
Anything Goes Monday, Freemotion by the River, Sew Cute Tuesday, WIP Wednesday, and Lorna at Let’s Bee Social. Take a minute to check out some of these sites. I have links to all of them at the top of my page under Link Ups.


Low and Slow

This week has been moving along slowly for me. I have hypoglycemia and every once in a while my blood sugar tanks.  When it does I am wiped out for a few days. For the most part if I do eat the right foods and don’t eat the wrong foods and my levels stay copacetic (a word my father loves to use!) Ok, last weekend I was not so careful. A couple of m&m’s, a 1/2 of a cookie here or there. white rice instead of brown and I am paying the price for these transgressions!  The problem is that 3 out of 4 times, such a small stray from my “healthy” diet doesn’t cause any problems, which makes temptation hard to resist. Every once in a while it throws everything out of balance.  Anyway, this makes for a ‘low and slow’ week, as my husband and I have come to call it. No energy to do much of anything. No ability to focus or concentrate.

Just to illustrate my point, here is a picture of the tub of butter that I personally selected at the grocery store this afternoon.  Please note that there is butter smeared on the outside, the little plastic seal is loose and protruding from the lid.  This is exactly how my husband found it in the fridge tonight.  He asked me if I had used this yet, or was it new? “New”, I replied.  “Just bought it earlier this afternoon”.  He just smiled.  No need to comment further.  He knows me too well. This is how the tub was when I bought it and how it was when I put it away.  Never did I even notice this mess.  Yep, low and slow.

photo (7)

Of course, it doesn’t take much energy to sit at a sewing machine between naps and reading my book on the couch. Surprisingly I got a number of things accomplished. Not with any great efficiency and certainly not without error.  I made great use of my seam ripper over the past few days.  Remember, low blood sugar = low brain function (at least for me anyways!!)  I was working on the sashing, corner and setting triangles for the Christmas Lattice Quilt that I blogged about here.  I just could not believe how many times I sewed the triangles in upside down.  Really? Upside down? Then I would have to look at it for a minute or two to determine exactly what I had done wrong. Jeez! The fabric I am using for the sashing is a white on white holiday print.  Again, upside down, or wrong side facing out. I was covered in tiny threads, picking out one seam after another. Finally I set that aside. It was making me more than a little crazy.

I needed a new project to work on (well, ‘needed’ might be a bit strong.) Never having made a disappearing nine patch, I decided to give that a try.   If you are unfamiliar with this block, there are a million tutorials out there for it. Basically you just create a nine patch block (3 rows of 3 squares each.) Then I cut the block down the center and across the center, creating four equal pieces. These smaller blocks are rearranged in whatever layout is pleasing to the eye and sewn back together. I was shopping a week or so ago and came across some cute retro looking holiday fabric in Jo-Ann’s. Without any plan in mind, I cut my squares, fussy cutting the Santa fabric and the candy cane fabric as much as possible so I could use those as a focal point.  I used a deeper red fabric for each of the center squares as I wanted to have smaller squares with a darker value than the rest of the squares. Here is the resulting 36 x 36″ quilt top.

disappearing 9 patch 2

Now that this little guy is sewn together, I have absolutely no plan as to what I will do with it! It is too large for a table topper and too small for a quilt. I didn’t really take into account what I wanted to do with this project when I was cutting up the squares.  (Remember, I was operating with significantly lower than normal brain function!) The size of Santa determined the size of that block and the rest of it just sort of happened. Any ideas??  I am thinking of adding a fairly large red border (maybe five inches wide all the way around?) and then just backing it with the same red. Then sewing the back to the front, envelope style – no binding needed. I could use it as a small table cloth if I don’t use any batting in the center.  Maybe that would be fun?

Another project that I worked on was a small art quilt. My inspiration for this project came from a piece that I saw on Pinterest (of course, where else?) I followed the link back to the original site, www.onthetrailcreations.com. The artist at this site designs and sells patterns and kits for quilted cards that are really pretty. I wanted to make a small (7 x 9 inch) art quilt. It was really the first time that I sketched something out and just cut little pieces to applique. I was pleasantly surprised at how easy it was. I did an autumn theme with a bird that is reminiscent of the nuthatches that frequent my feeders in the winter months.

Red-breasted-Nuthatch-3c

Here is my version:

20141001_1768

For the most part I used raw edge applique. For the gold strip running through the center I used a decorative, blanket stitch.  The branch that the little guy is sitting on was sketched with thread. (I have been practicing a bit of thread sketching lately and really enjoy it.) The leaves were cut from a scrap of fabric I found with leaves printed on it. I bound the quilt with the same fabric. You will notice the lower right corner of the binding looks all saggy and weird.  What can I say? Not my best work right there. 😉

20141001_1769I am really happy with the bird and the branch he is resting on though. Such a cute little guy. I used a french knot for his eye. I applied fusible stabilizer on the back of the base fabric before doing any of the stitching or fusing the applique pieces on. The stabilizer makes a world of difference.  Without it the fabric will often pull and bunch when densely stitching something (like the branch).

All in all, a fun week in the sewing room. My friend and I are going to a quilting retreat sponsored by a neighboring quilt guild in the town of Downieville this weekend. I have been stacking up everything I need to bring.  I have fabric ready for two different projects and most of the supplies gathered. Hoping for better energy and a higher level of functioning by then!!

Linking to my usual sites:  Freemotion by the River, WIP Wednesday, Lorna at Let’s Bee Social, Needle and Thread Thursday, TGIFF, and of course, Amanda Jean at Crazy Mom Quilts!! Take a minute to check out some of these sites. I have links to all of them at the top of my page under Link Ups.


Paying Homage to High School Home Ec

Growing up, I used to sew a lot of my clothes.  Even as an adult I made clothes for myself as well as my kids.  Since I have been spending so much time quilting over the past several years, I haven’t done any garment sewing for a long while.

I mentioned in an earlier post that I started sewing when I was in 7th grade. My mom taught me to use the sewing machine and cut a pattern out. Because I went to a small parochial school through 8th grade I didn’t have any home economics classes during junior high school.  Once I got to high school we had all sorts of Home Ec options. I took them all. Let’s face it.  Home Ec was an easy elective. I loved to sew and this class beat Spanish, History, Math and English any day. My sewing teacher was fussy, really fussy (or at least she seemed like it to 15 year old me). She was forever making me rip seams out and fix my errors. The nerve!  I suppose she had to be tough on me. I was a lazy seamstress. I can remember, on multiple occasions, sewing the sleeves in the armholes backward.  The pattern companies try very, very hard to help the seamstress avoid doing this by clearly marking the sleeves with those small and large arrows.  Match the arrows and you are golden.  Sloppy cutting leads to a vague arrow and, hmmmm, which one matches to which?  More than once (probably more than five times!) I got it wrong,  resulting in my shirts having the cuffs on upside down so that the buttons were on top of my wrist.  This didn’t honestly bother me.  My go-to solution was to wear the shirt with the cuffs rolled up. I was going for kind of a casual, sporty look. My teacher, Mrs. H, was not ok with my sporty fashion.  It is really a pain to take the sleeves out.  Not a lot of fun. The lazy 15 year old that I was could usually circumvent this task by finishing the project without letting her see it in progress.  My grade was lowered but at least I didn’t have to rip the sleeves out. We usually had to turn in our projects along the way and it was so irritating to get something back with a veritable list of errors that needed to be fixed. Looking back, I will admit if it wasn’t for Mrs. H and her pickiness, I wouldn’t have learned to sew; or at the very least I would have been wearing lots of shirts with the sleeves rolled up. I found her picture in my yearbook from my sophmore year of high school.

mrs HI haven’t looked at a high school yearbook in many years – at least 20. I remembered Mrs. H as being old. When I was in high school I am sure I thought of her as old. Now that I look at her  picture, she doesn’t look all that old. She was probably in her 40’s? My perspective has changed some 38 years later. I bet anything she made her plaid blazer!

OK – moving on. I had a hankering to make something that was not-a-quilt.  Anything really.  I poked around the fabric in my sewing room and decided to use these two vintage pieces that I bought a while back. I played around with them and decided to make a blouse – my vision was something kind of bohemian or like a peasant blouse. The vintage prints made me think of peasant blouses, the 1970’s, high school and Mrs. H.  One thing led to another and the whole time I sewed this blouse I kept thinking of what Mrs. H would have changed, commented on or corrected.  Lots of nostalgia going on in my sewing room over the past couple of days! First, let’s  take a look at the blouse. It turned out pretty but definitely would not have earned me an “A”.

Here are a couple of things that would have brought the grade down.  First of all, the sleeves. I did a french seam on the first sleeve but then got distracted and did a regular seam on the other sleeve.  The 15 year old me decided this was just fine.  At least one sleeve has a nicely finished seam. Two french seams? Overkill.

20140925_1752Another definite mark-down is the hem.  I didn’t use any sort of hem tape or blind stitch for a nicely finished hem. I am so sorry Mrs. H but I just didn’t feel like it.  I did a quick roll of the fabric and machine stitched the hem.  I know, I know, it should have been hand sewn and she would have knocked my grade for that but I am ok with a machine stitched hem.  Honest, it is fine with me.

20140925_1759Then there is the sleeve length.  I had this idea to cut the sleeves and put a cotton lace trim on them. That worked out nicely except that I didn’t measure the sleeve length correctly and they ended up almost-too-short.  The 15 year old me was not at all concerned about this.  She found some bright orange, single fold bias tape (that was probably purchased back in the 1970’s) and made a casing for the elastic so as not o lose any length on the sleeves by making a casing for the elastic.  If you look closely you can see the orange peeking out of the bottom of the sleeves. I feel this was probably a wash – Mrs. H would have been impressed with the inset cotton lace and irritated with the bright orange bias tape.

This was a really fun, sweetly nostalgic project.  Just for kicks, here is 15 year old me.  I cannot explain the hair except to say that my hair was never my best feature!  Also cannot explain the halter top on picture day. Remember, this was 1975. We got to wear halter tops to school. Times have changed!

hs pic

Linking to TGIFF, Finish It Up Friday, Link a Finish Friday and Confessions of a Fabric Addict. All of these wonderful sites are listed at the top of my page, under Link Ups.  Take a minute and check out these blogs. I love them all!  Have a good weekend everyone!