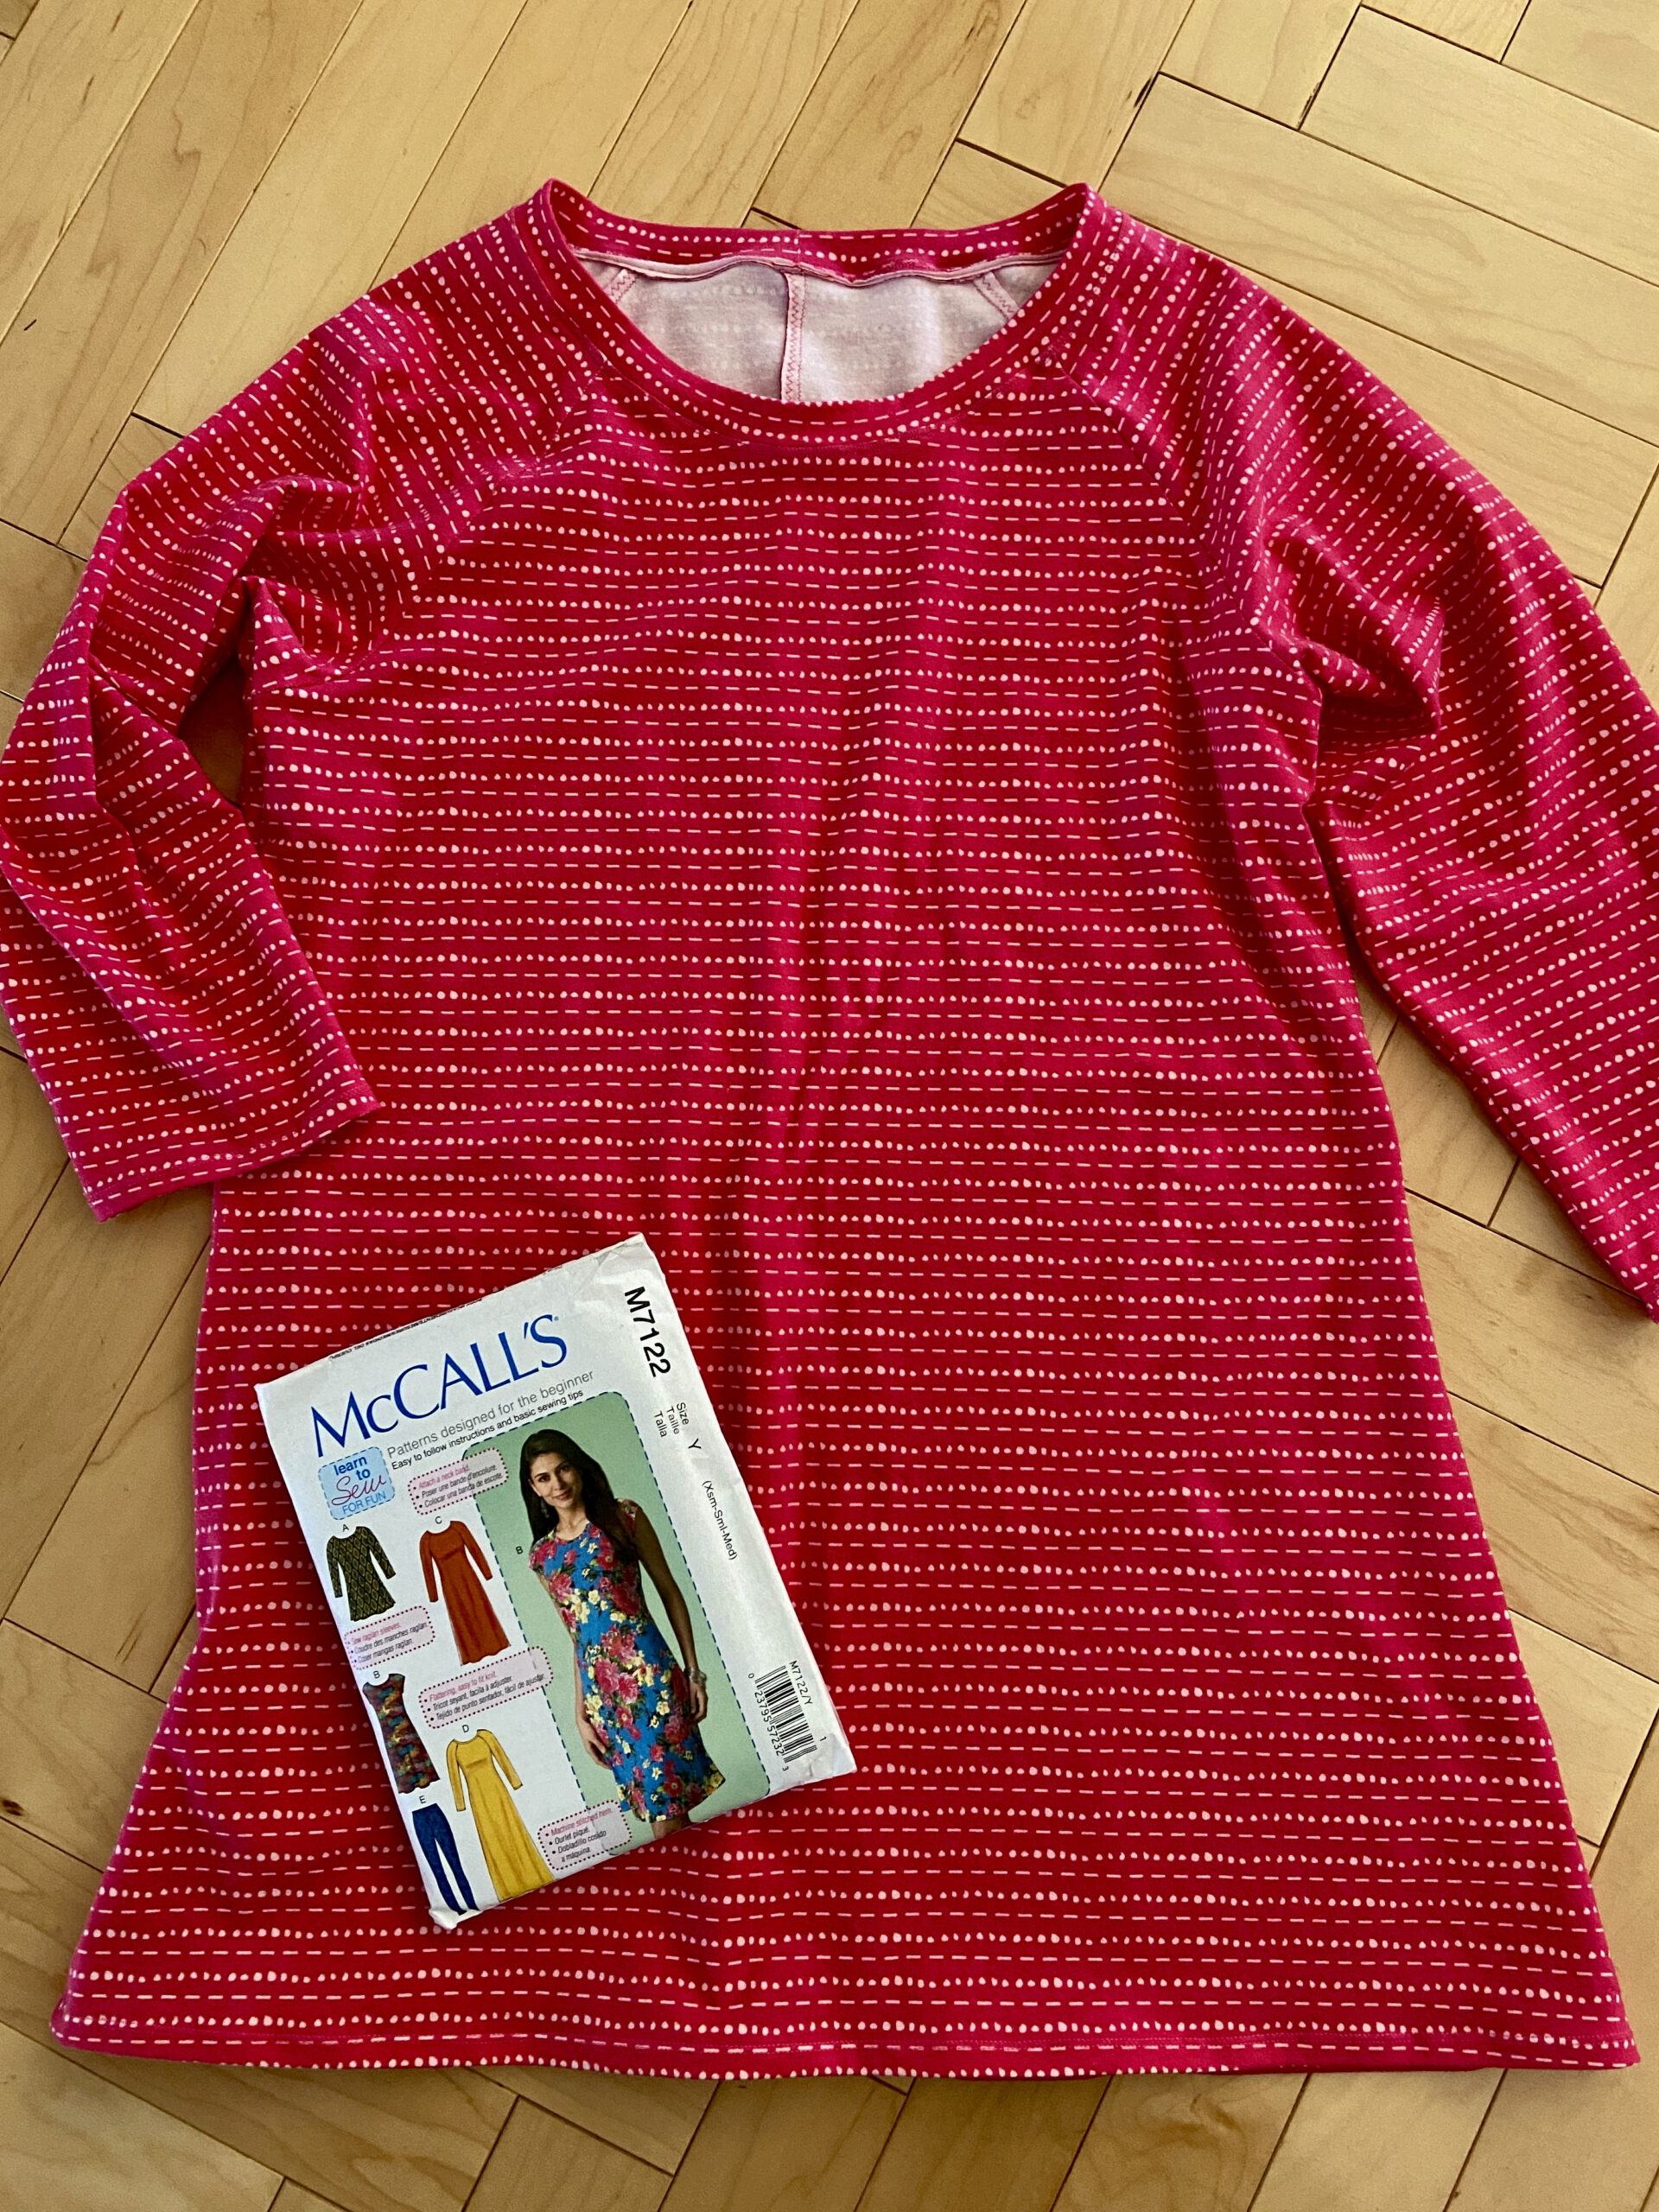
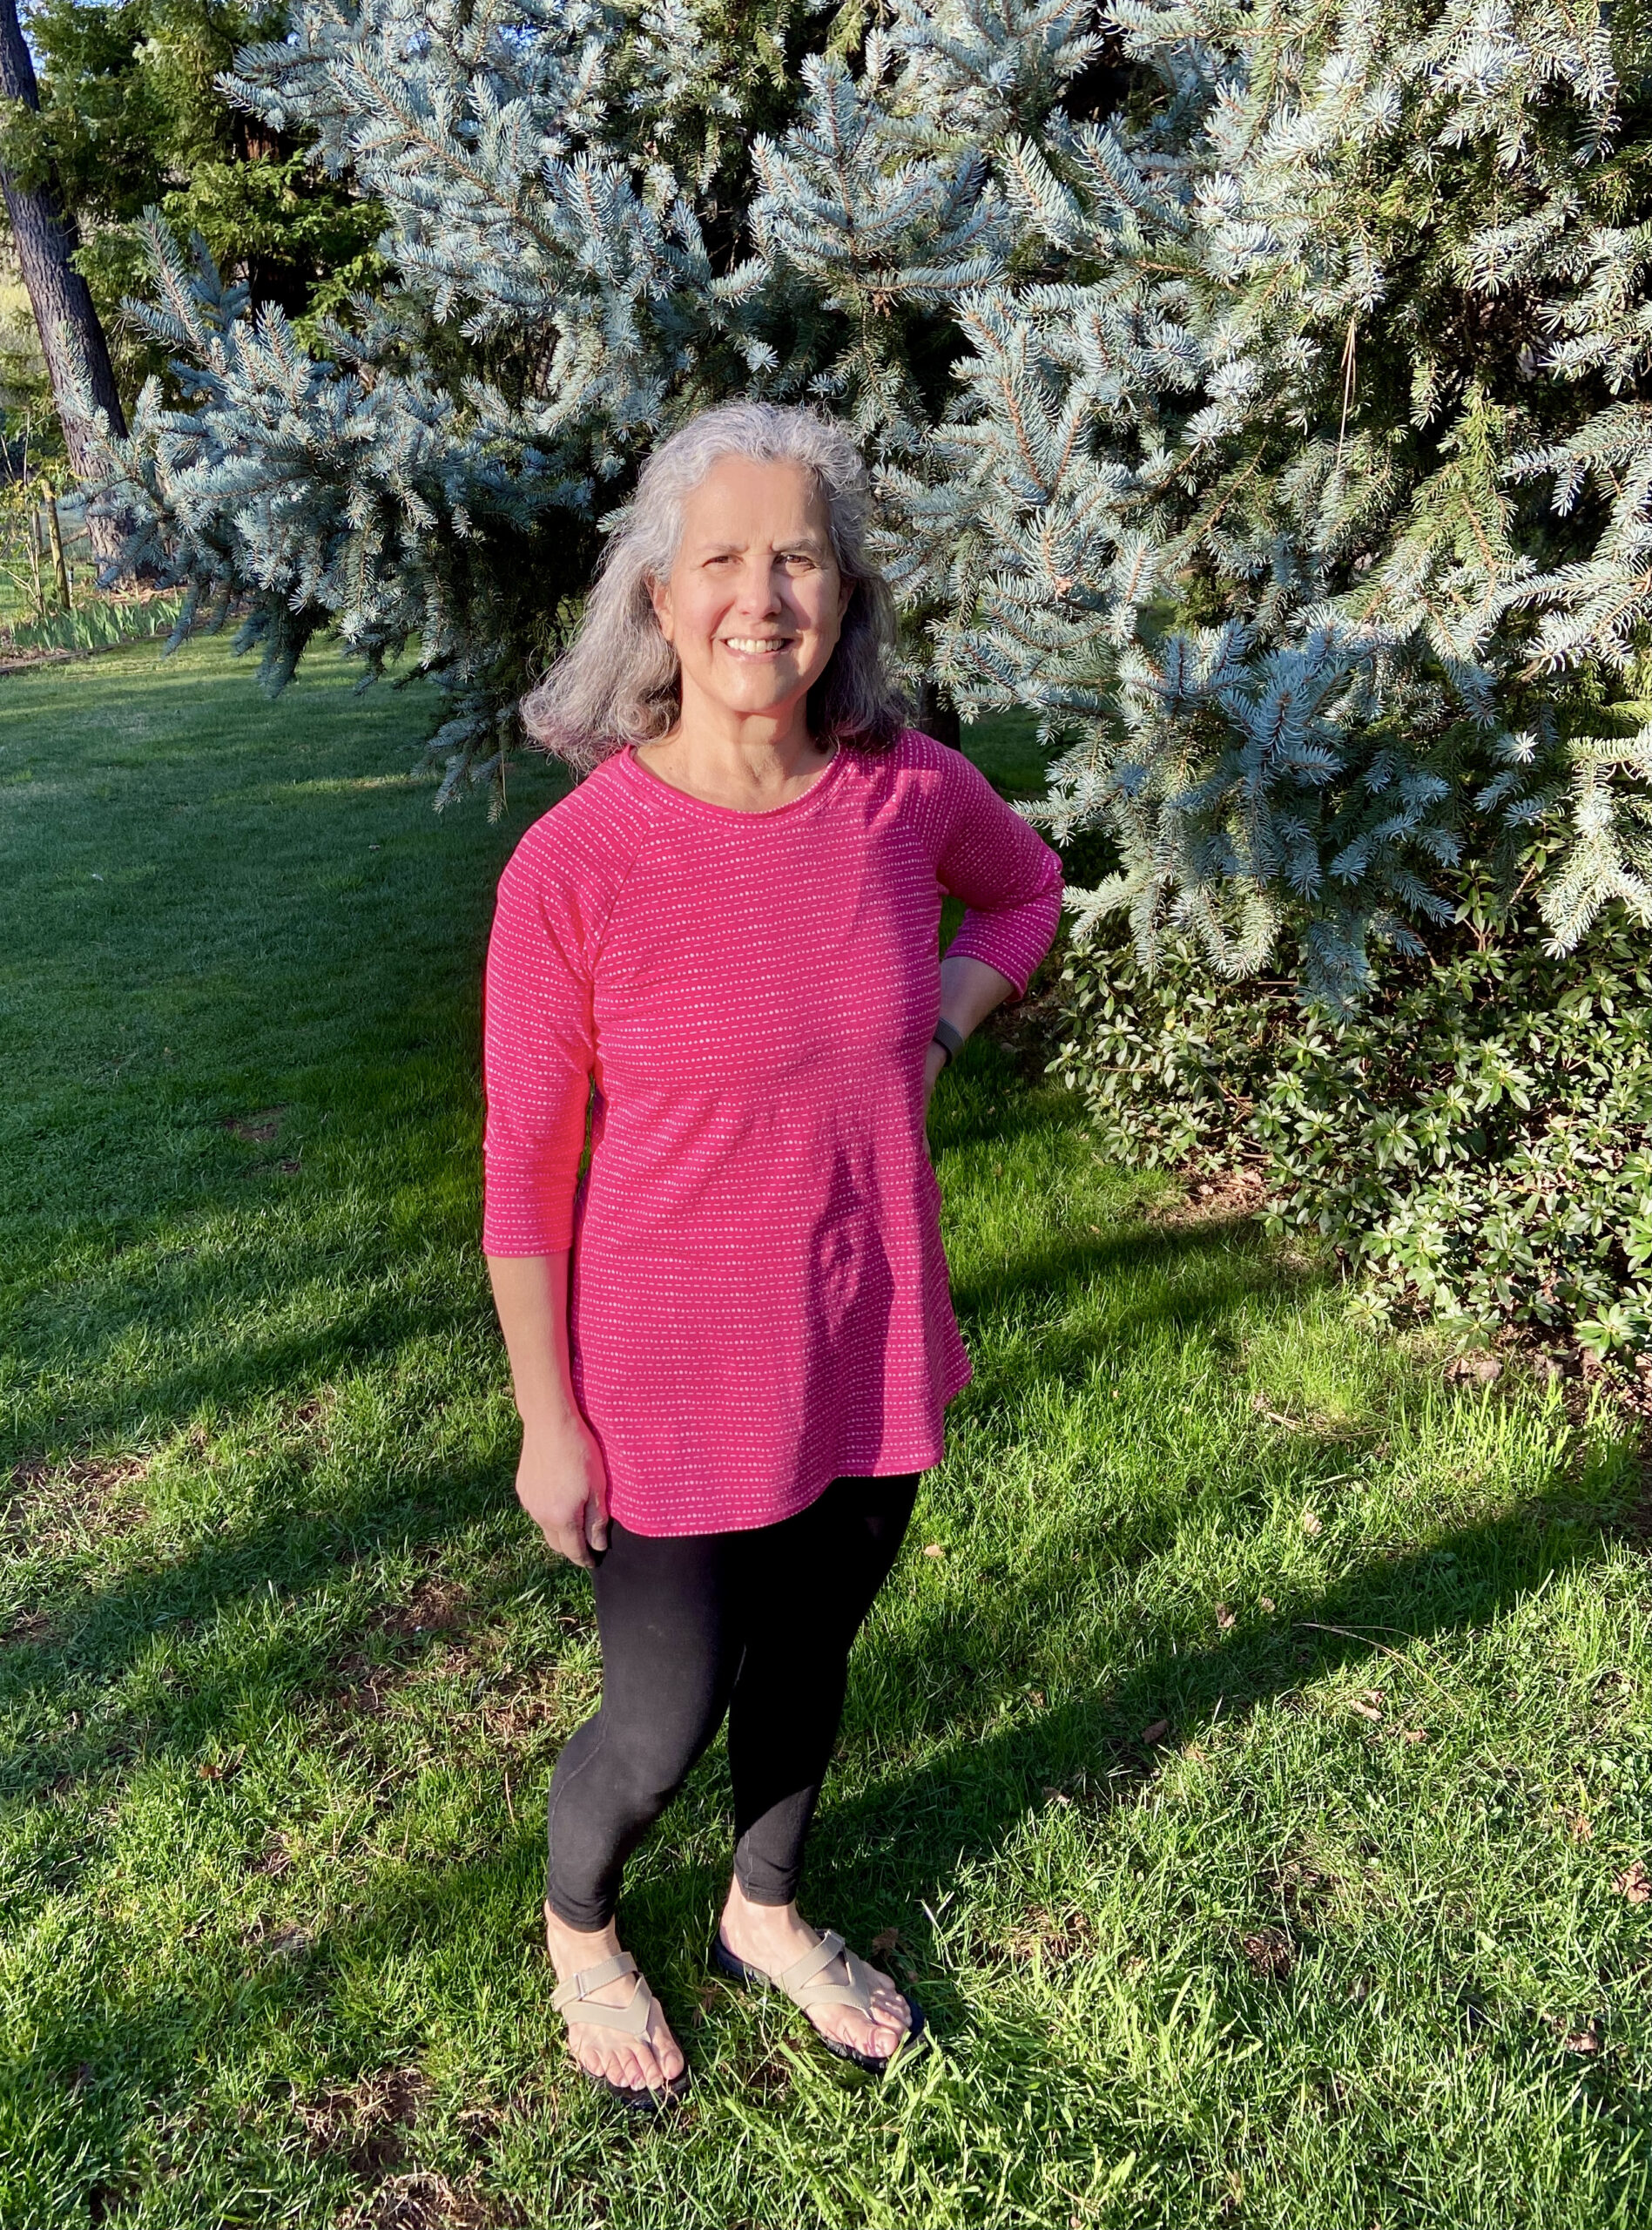
When I got home from Washington I picked up a project that I started about a month ago. I had it 80% complete and for whatever reason, it was set aside. It was fun to pick it up and finish it. Even more fun that I really like the fit, which as you can imagine, is not always the case!
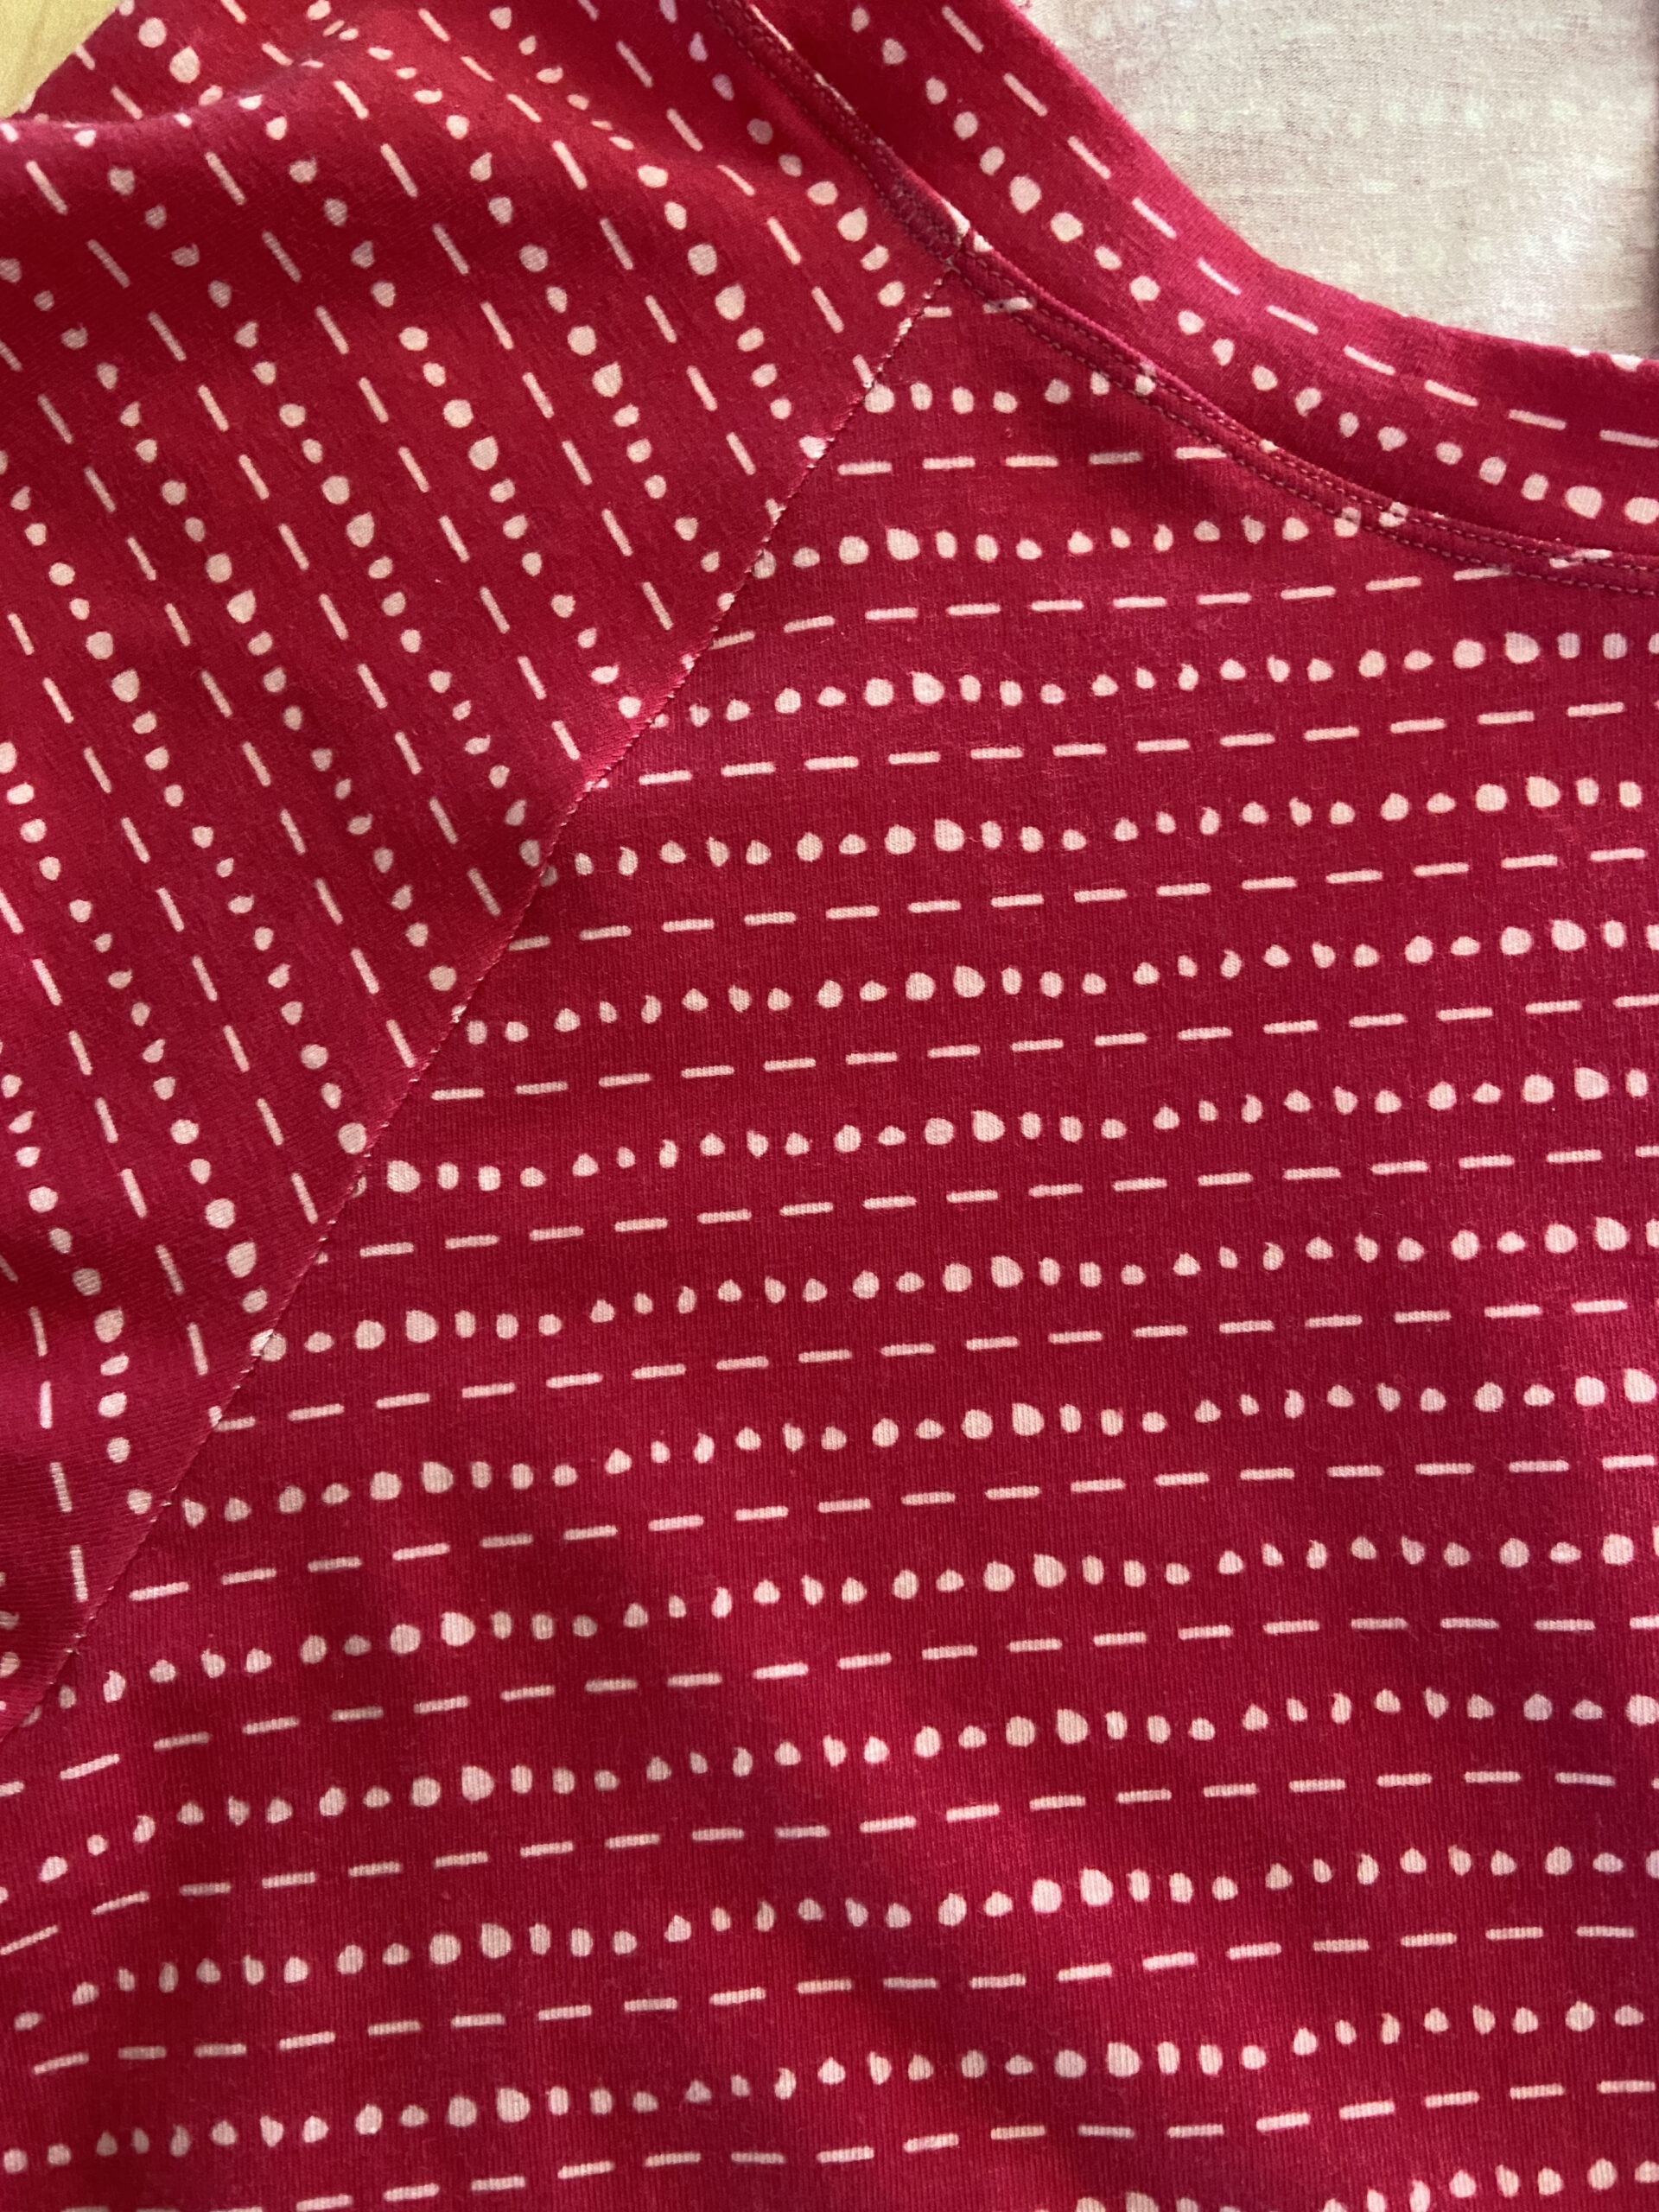
Using McCall’s Pattern M7122, and a jersey knit by Art Gallery Fabric, I made a fun t-shirt. It has dolman sleeves that are 3/4 length. Being a vertically challenged person, I did cut the sleeves and overall length shorter. I made sure to prewash the fabric and dried it in a warm drier to make sure I wouldn’t have a shrinkage problem.
The only area where I did have to pay a bit of extra attention was making sure the striped pattern matched up when cutting the pieces. For the most part, I was successful here. It isn’t perfect but from a distance it looks nice.
The morning sun was making my eyes squint a bit but I am pleased with the fit (more so than the photo!!)
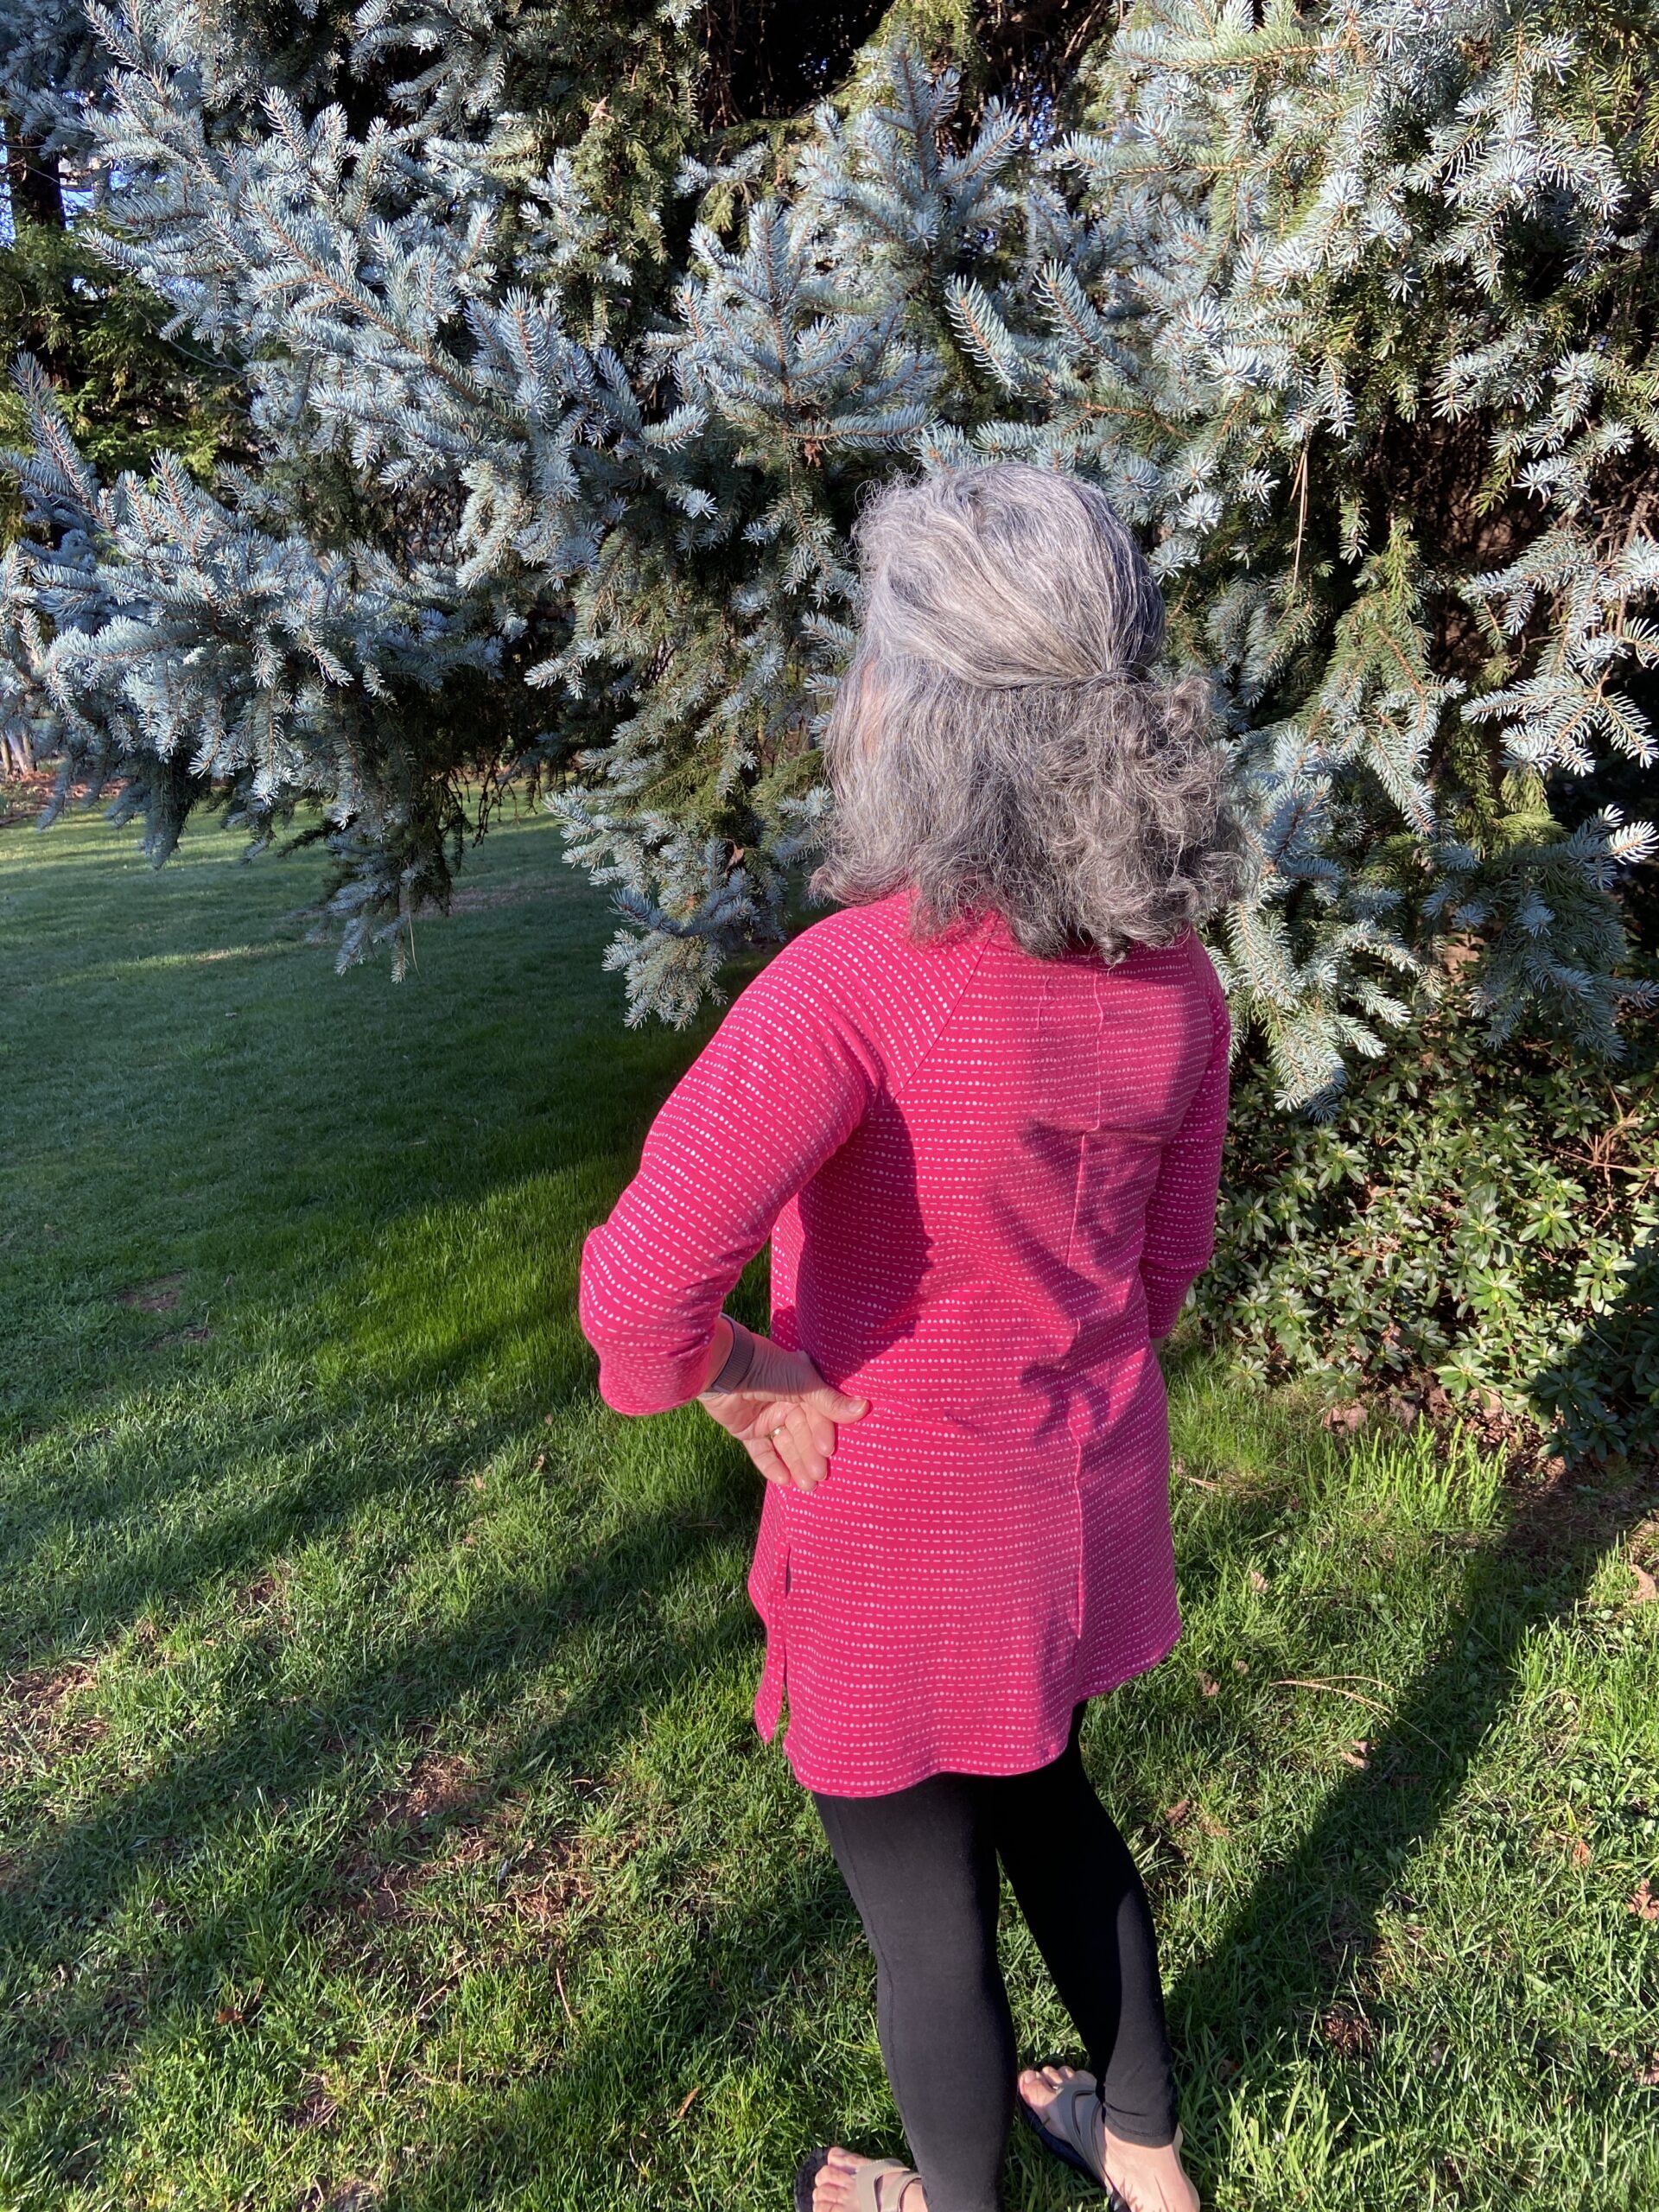
I like the little slits at each side. The t-shirt is really comfy and perfect to wear with leggings.
POST UPDATE: I should have included more details about how I made the shirt – there was a good question in the comments. Here are some tips.
I use my normal Janome 6500P sewing machine. All of the seams are stitched with a very, very narrow zig zag. On my machine it is 1 for width and 1 for length. This allows for some stretch so the seams don’t pop. Once I try it on and the fit is good, I do another, slightly wider zig zag to the right of the stitching line and then I trim the seam close to that. I use a ball point needle for the entire project. This is critical when sewing with knits. Also, I use a double point needle for any top stitching such as the hemlines and around the neckline. Hope this is helpful information. If you have questions, let me know.
Now I just have to be sure and wear it a few times before it gets too hot. I can tell summer will be here far too early. It has been in the mid-70’s this week. By end of May it will probably be hot. Ugh! We didn’t get nearly enough rain and I am definitely not ready for the heat of summer. (It is my least favorite season.)
In other news, my husband and I got our first vaccine injection yesterday! We both felt a little bit off last night but hopefully that will be it. Feels so good to have that done. I hope you are all making progress with the vaccines as well. We will soon be safely visiting friends and family in person!! Have a lovely weekend everyone.
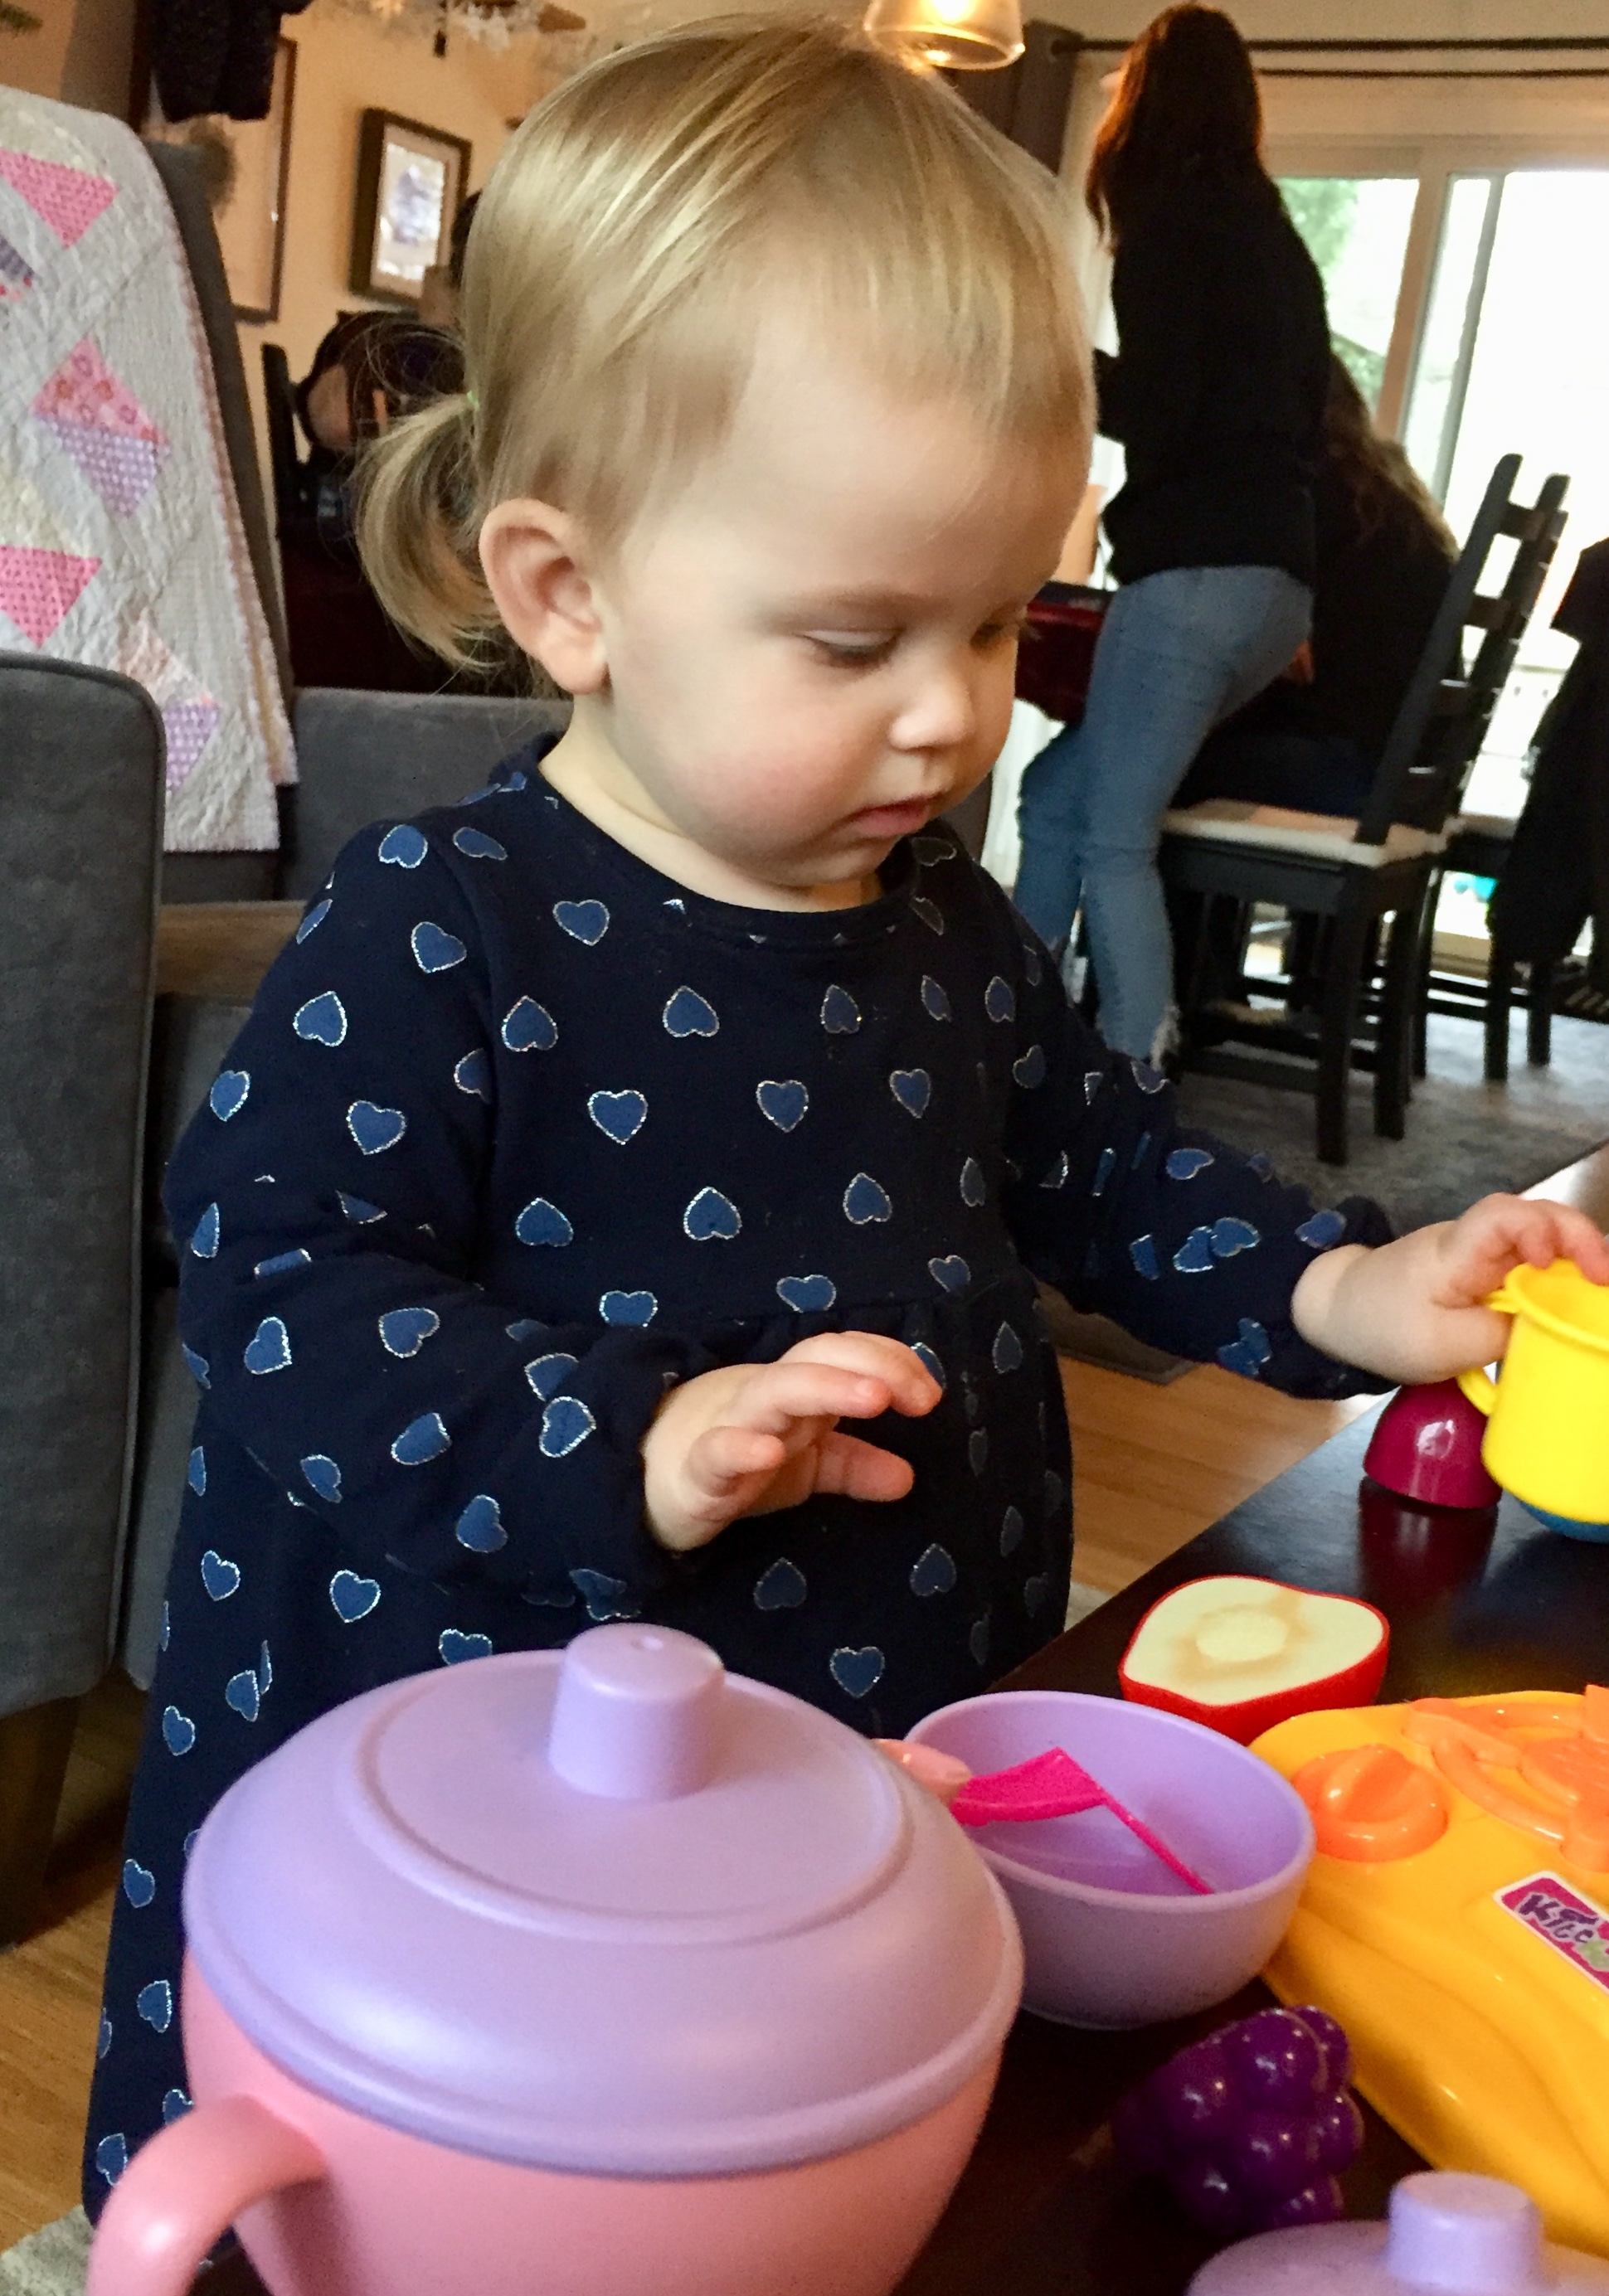
Hello all and Happy New Year to you. I hope the holidays were pleasant for all of you. While this year was definitely not how we normally celebrate, we did enjoy them. We scheduled a Zoom call with our three boys who live away from home and that was great. Also, my son set up a Zoom so we could just quietly watch the girls’ Christmas morning excitement. That was especially great – seeing them so excited, opening their gifts. Sometimes I wish I could just have a webcam to the girls’ play room and watch them all the time. However, that would also mean I would get absolutely nothing done. They are so entertaining.
This year our tradition of making some holiday gifts continued. I wanted to show you some of them.
Bookmarks!
Have you made these bookmarks before? There are loads of tutorials for them on the internet and they are super fun. It is made to slip over the corner of the page to keep your place. I used a stack of miscellaneous charm squares I had for these. I tucked them into cards for my sisters and included them in gifts to (most of?) the family. Coincidentally, I also received one in the mail from a quilting friend which was a fun surprise!
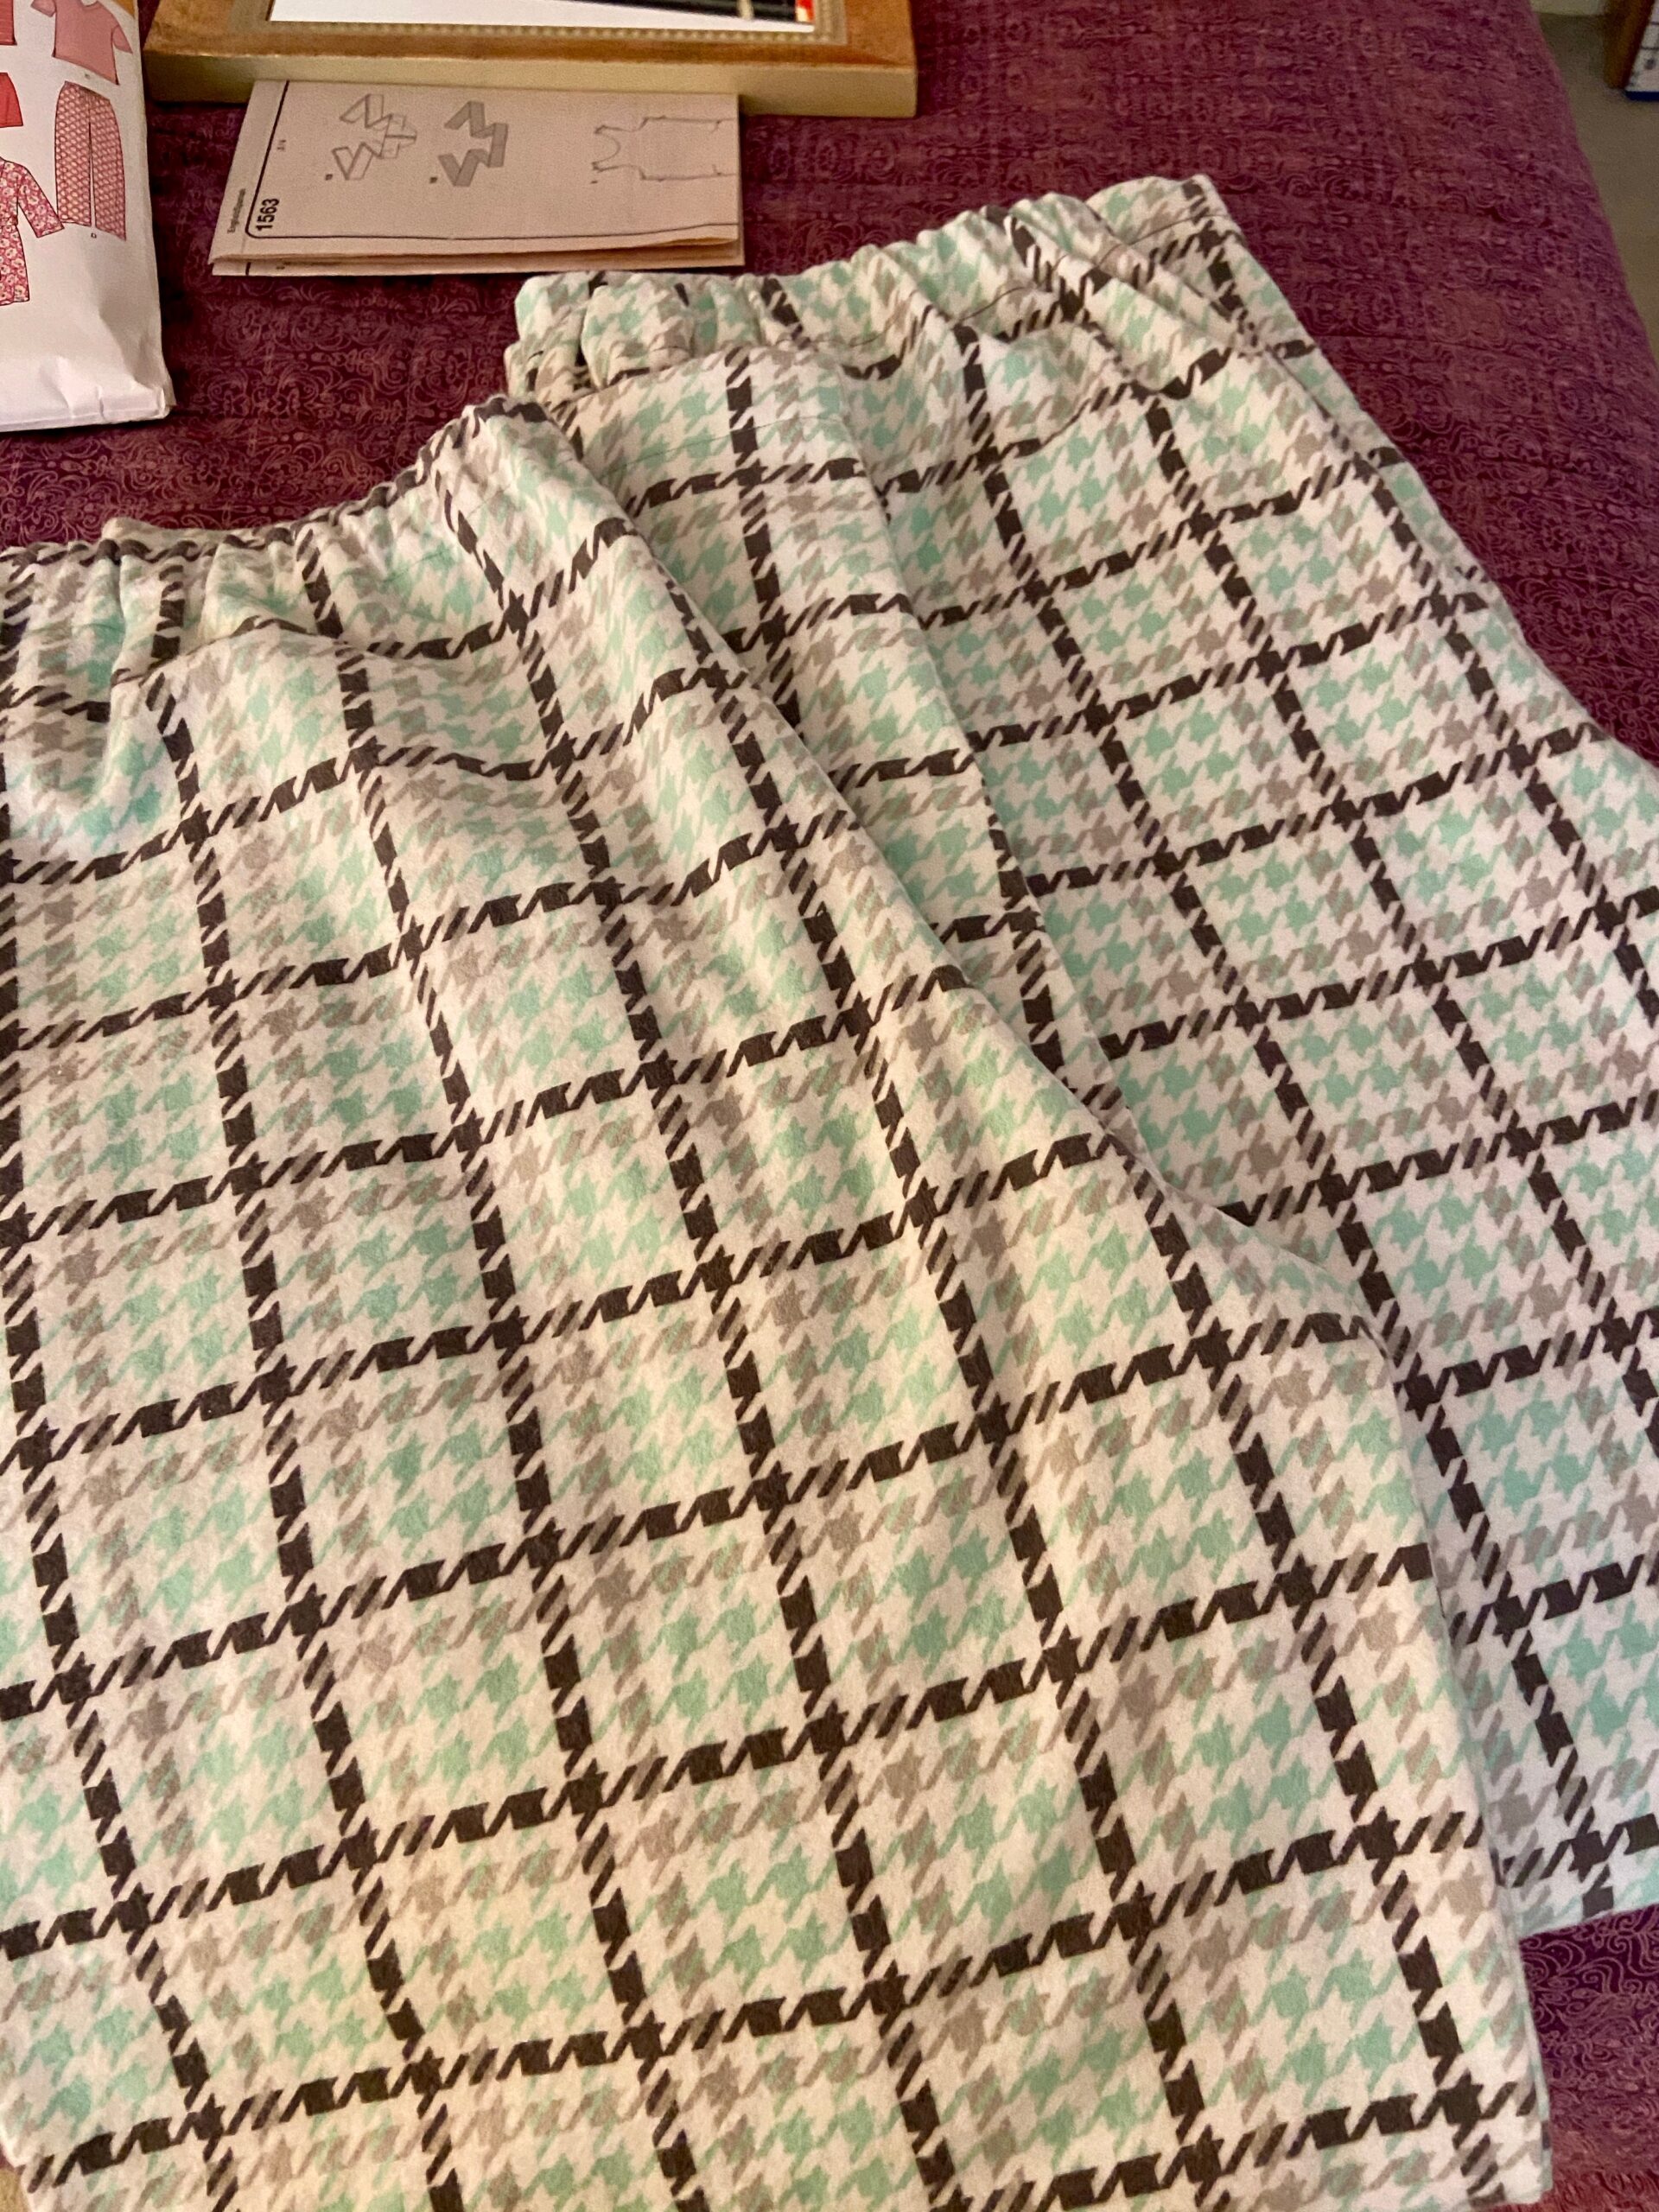
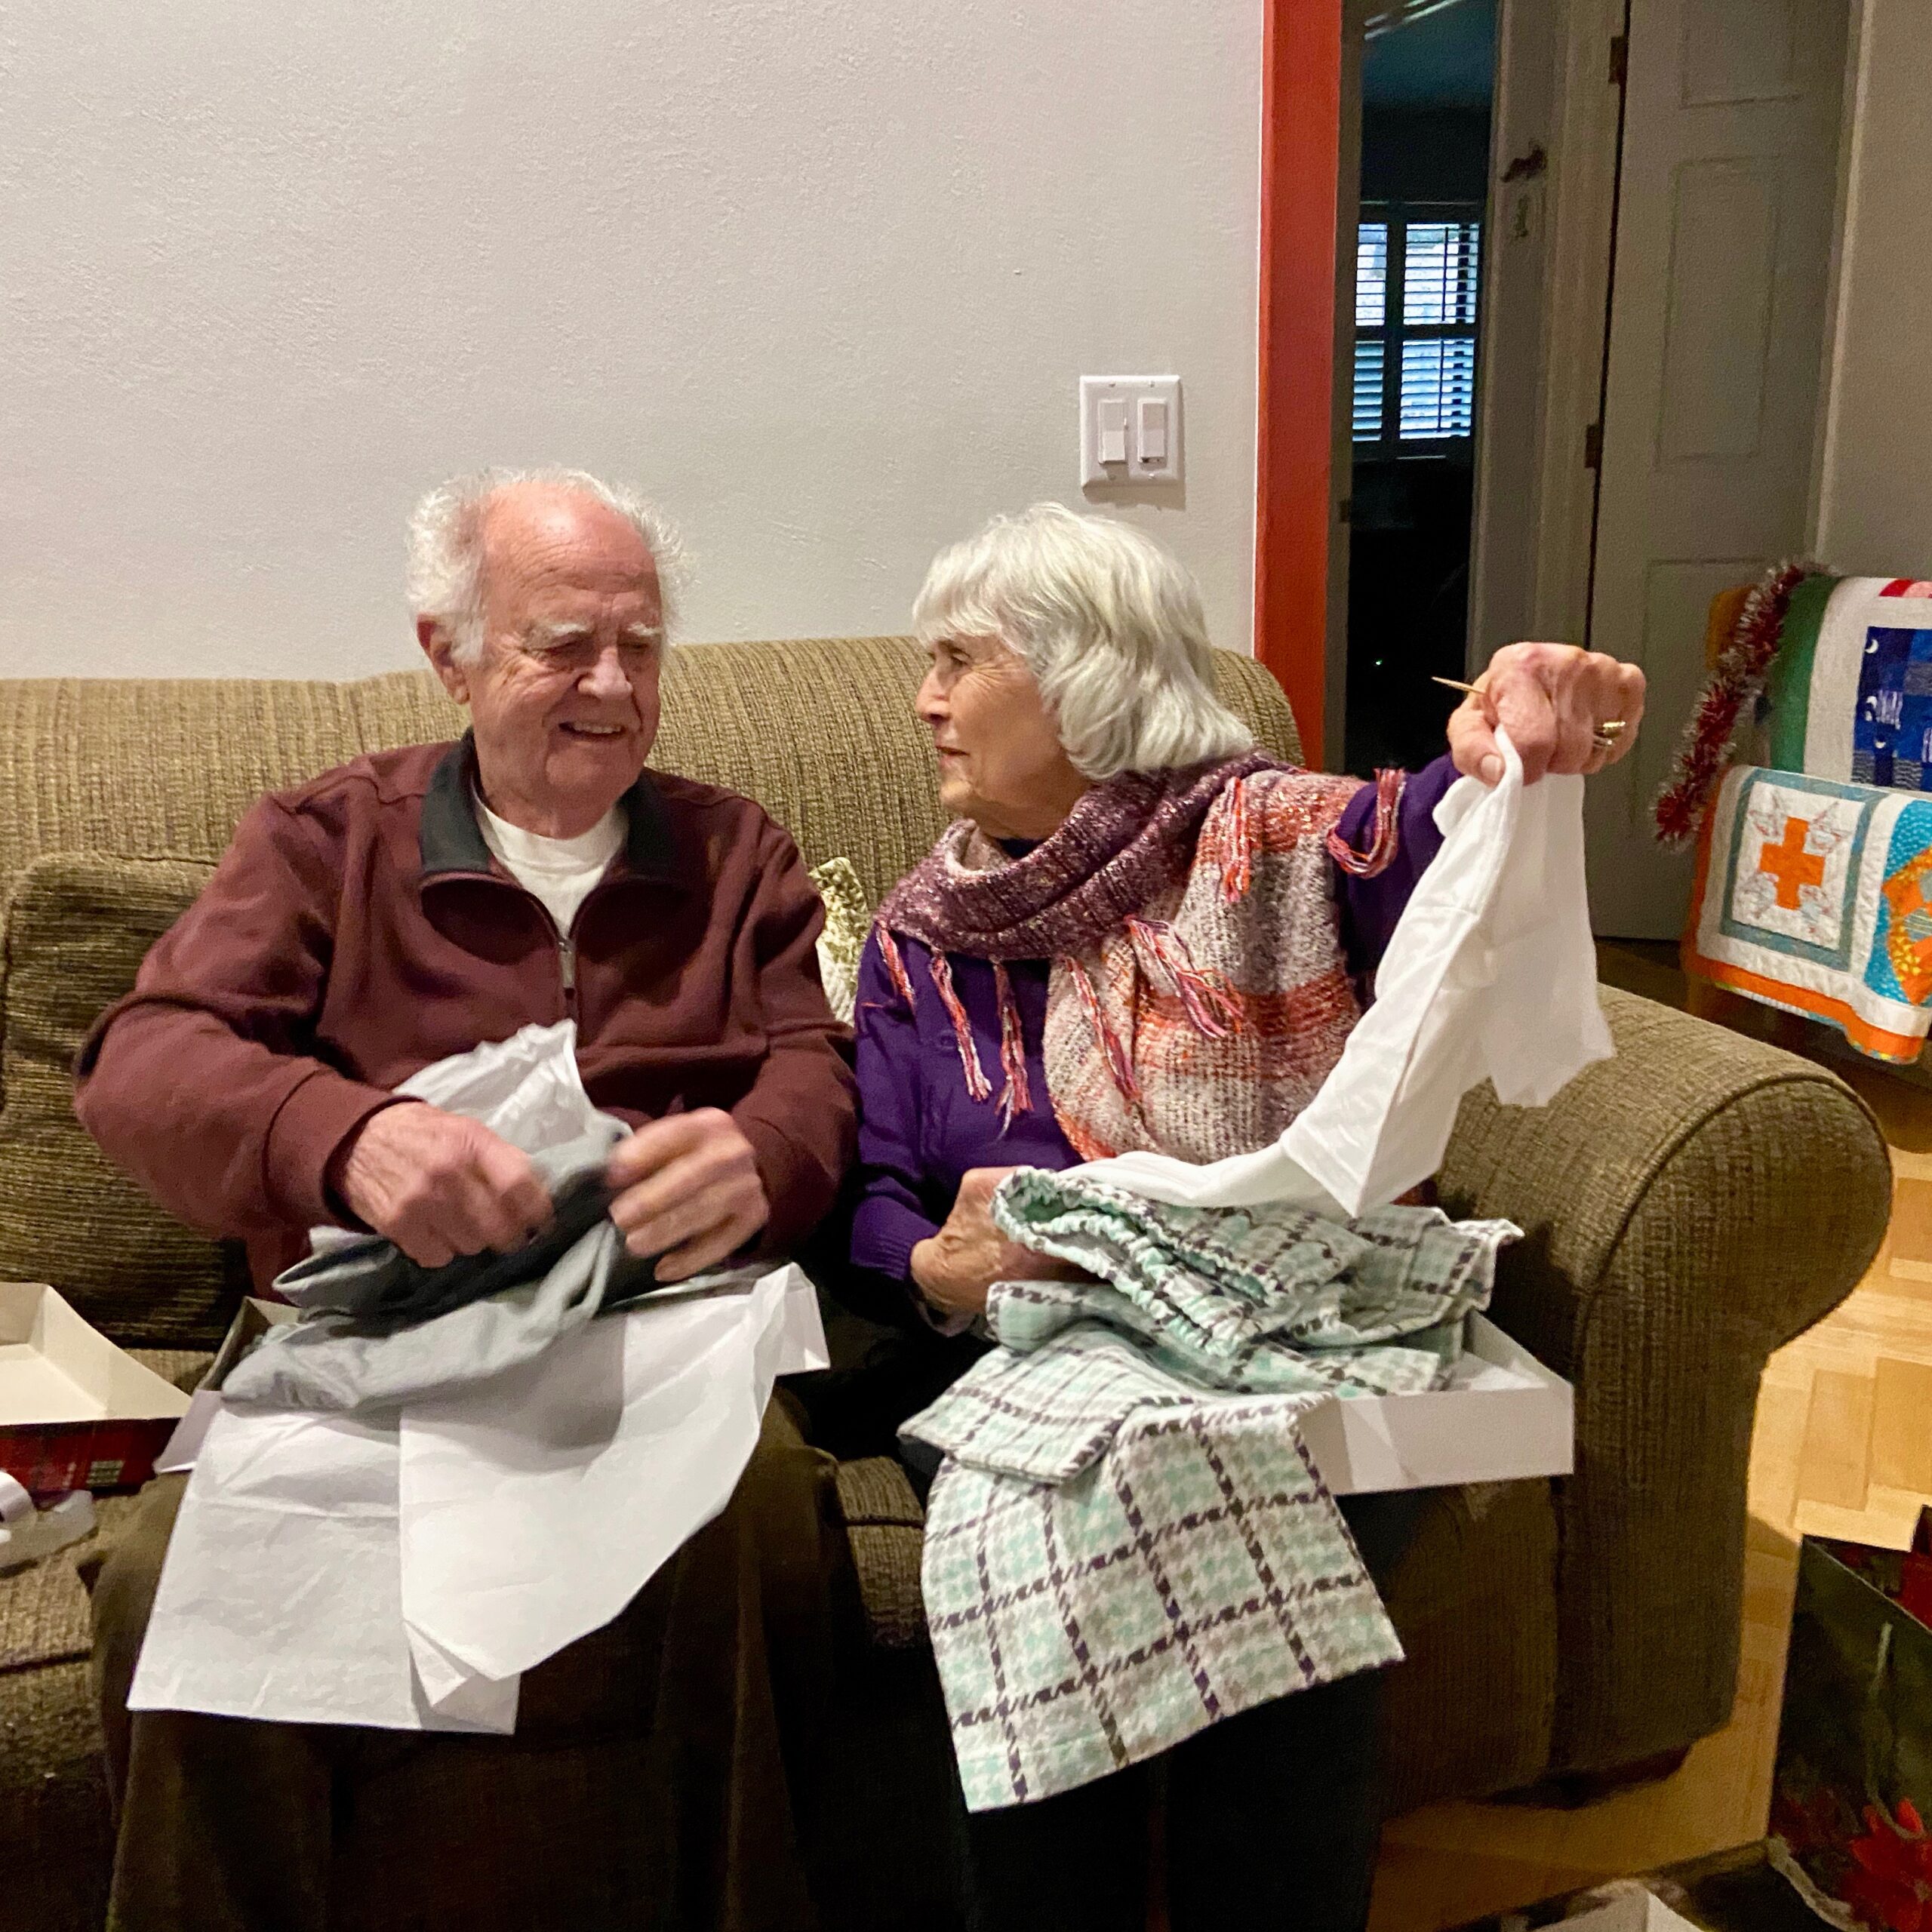
Pajama Pants
I made three pair of pajama pants. The two above were made for my parents. I believe this is their first pair of matching pj’s and I am hoping they will take a picture of both of them when they wear them.
Opening gifts.
They seemed quite happy with the idea of matching jammies though I did get them different color t-shirts to go with them.
Julia and Townes
This is the only picture I could find of Julia in her new pj pants. Cute polar bear flannel, right? You will also see Townes in this photo. Julia is fostering him for the shelter. This is the third dog she has fostered and he is such a sweet animal.
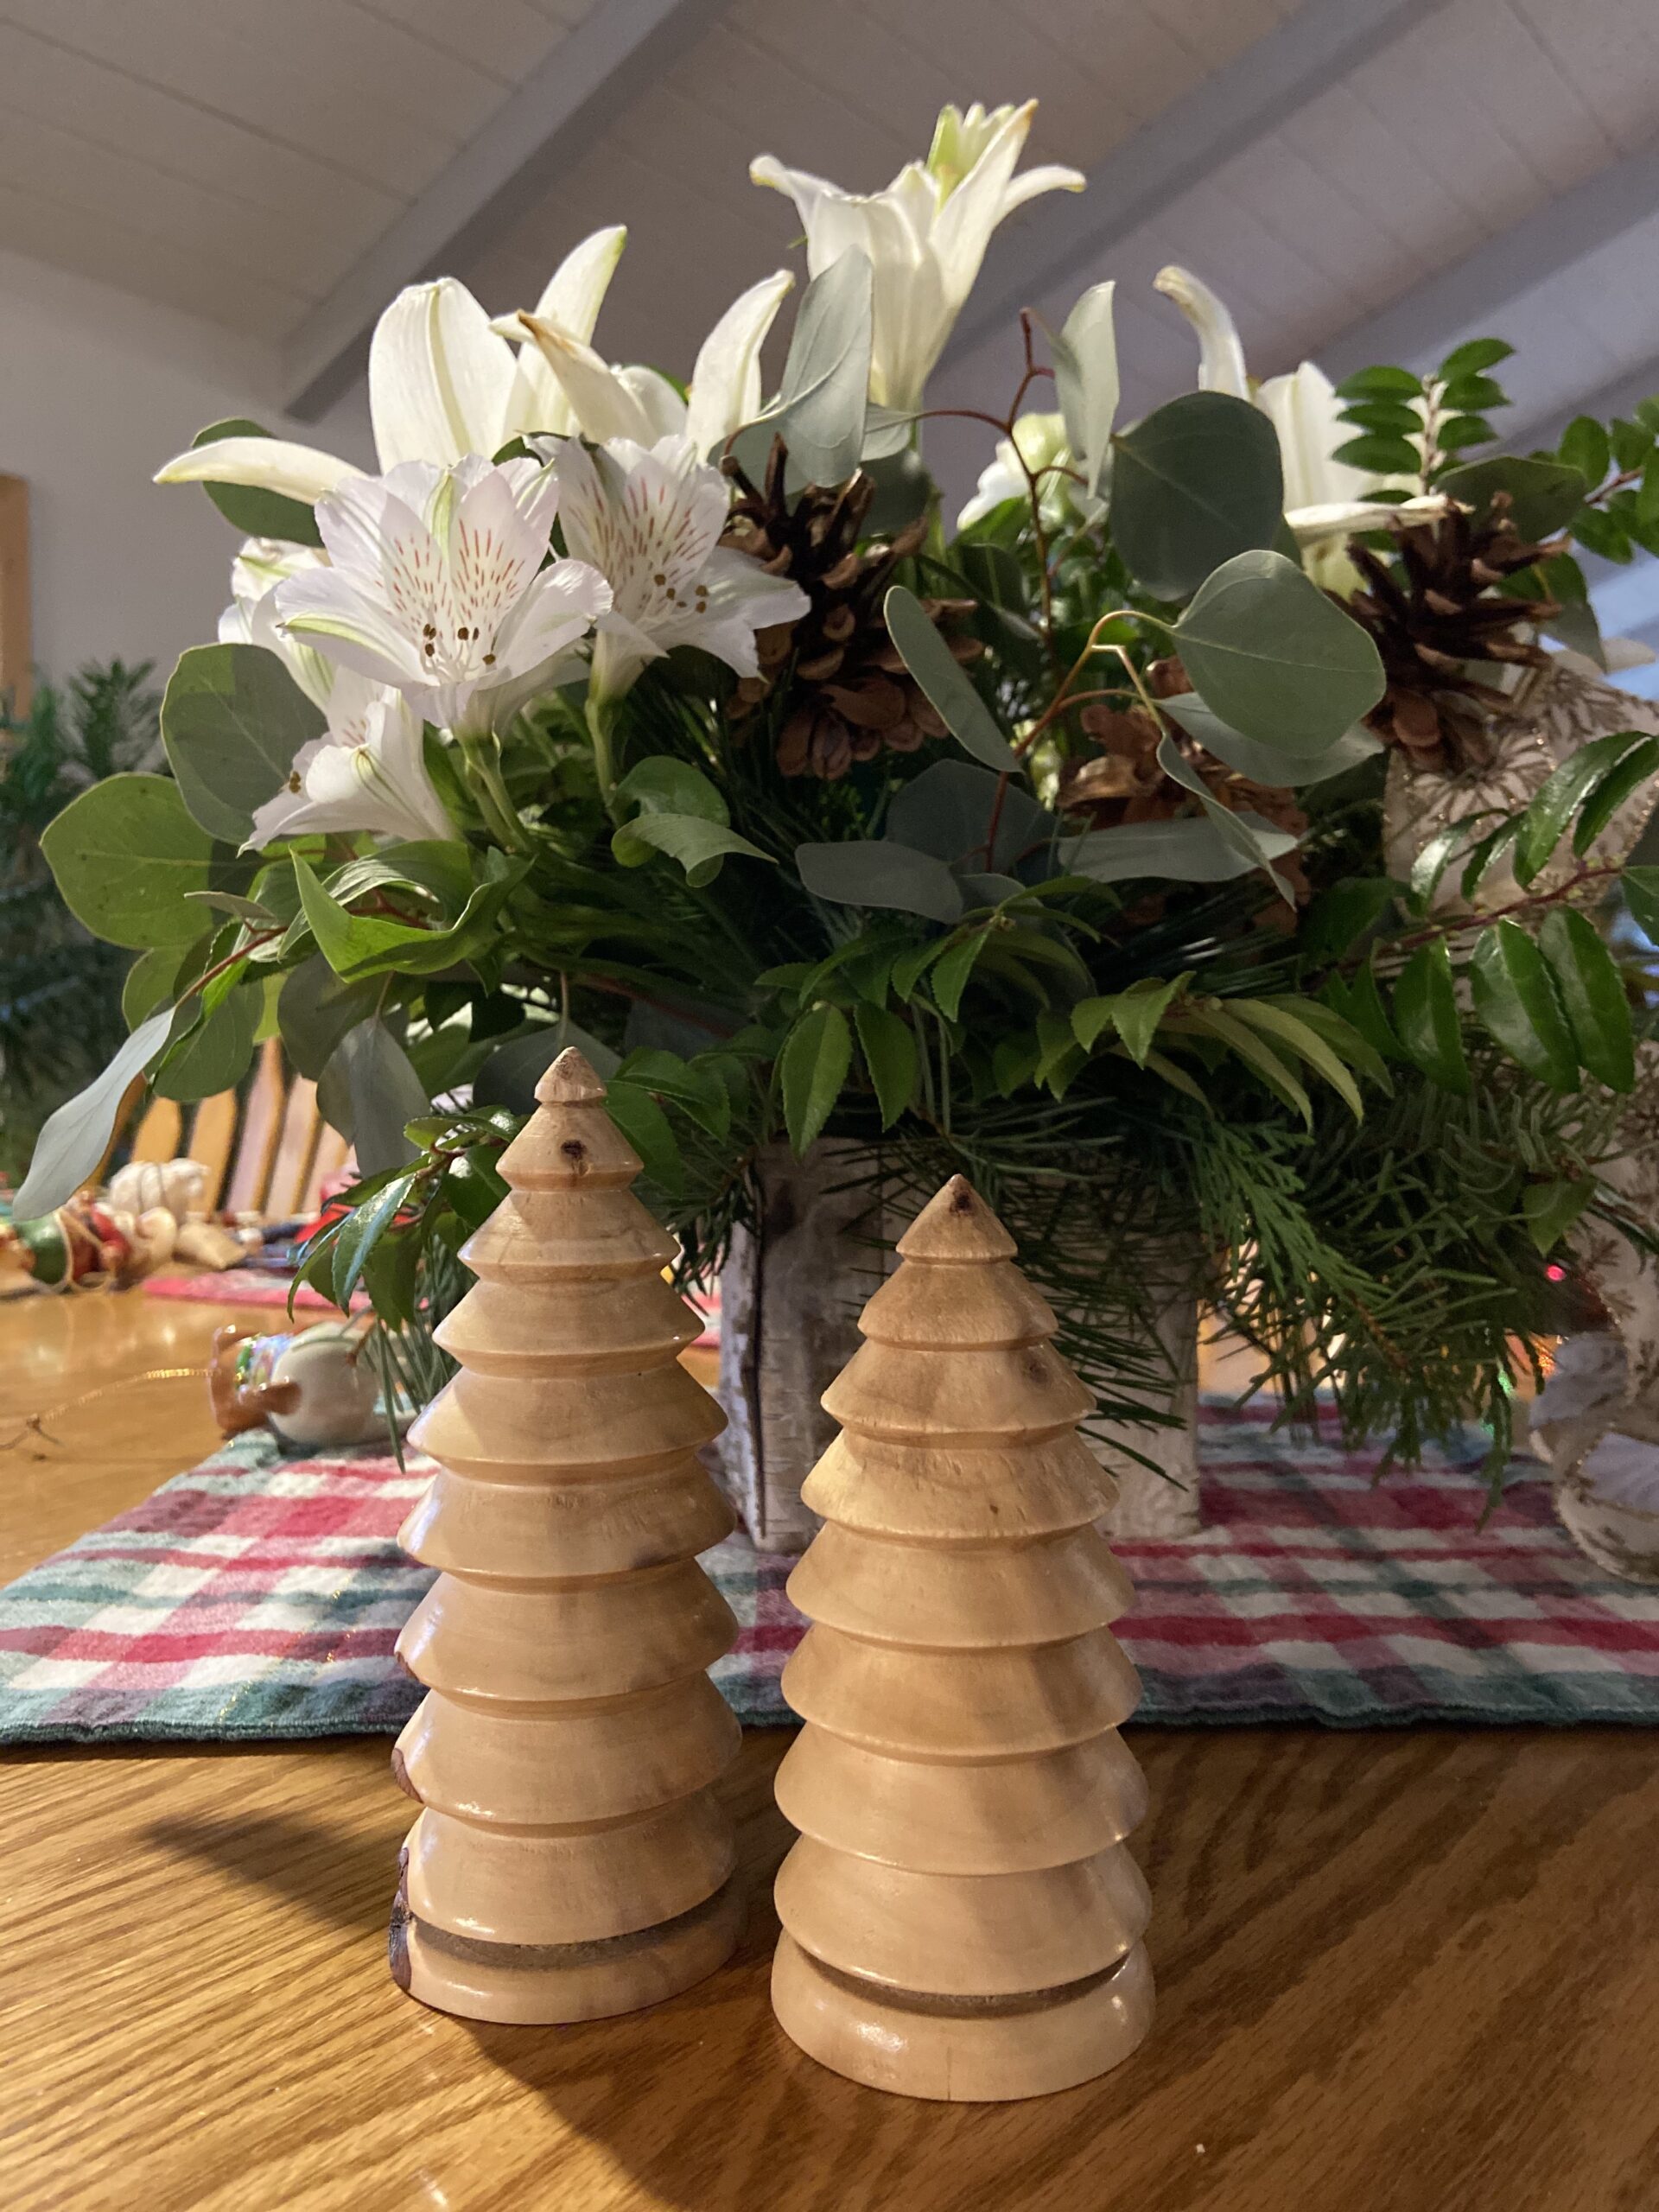
Wooden Christmas Trees
My husband made a set of these sweet Christmas trees, enough for one for each of our children plus our parents. I love these and they are definitely one of my favorite of all the things he has made. So simple and really pretty.
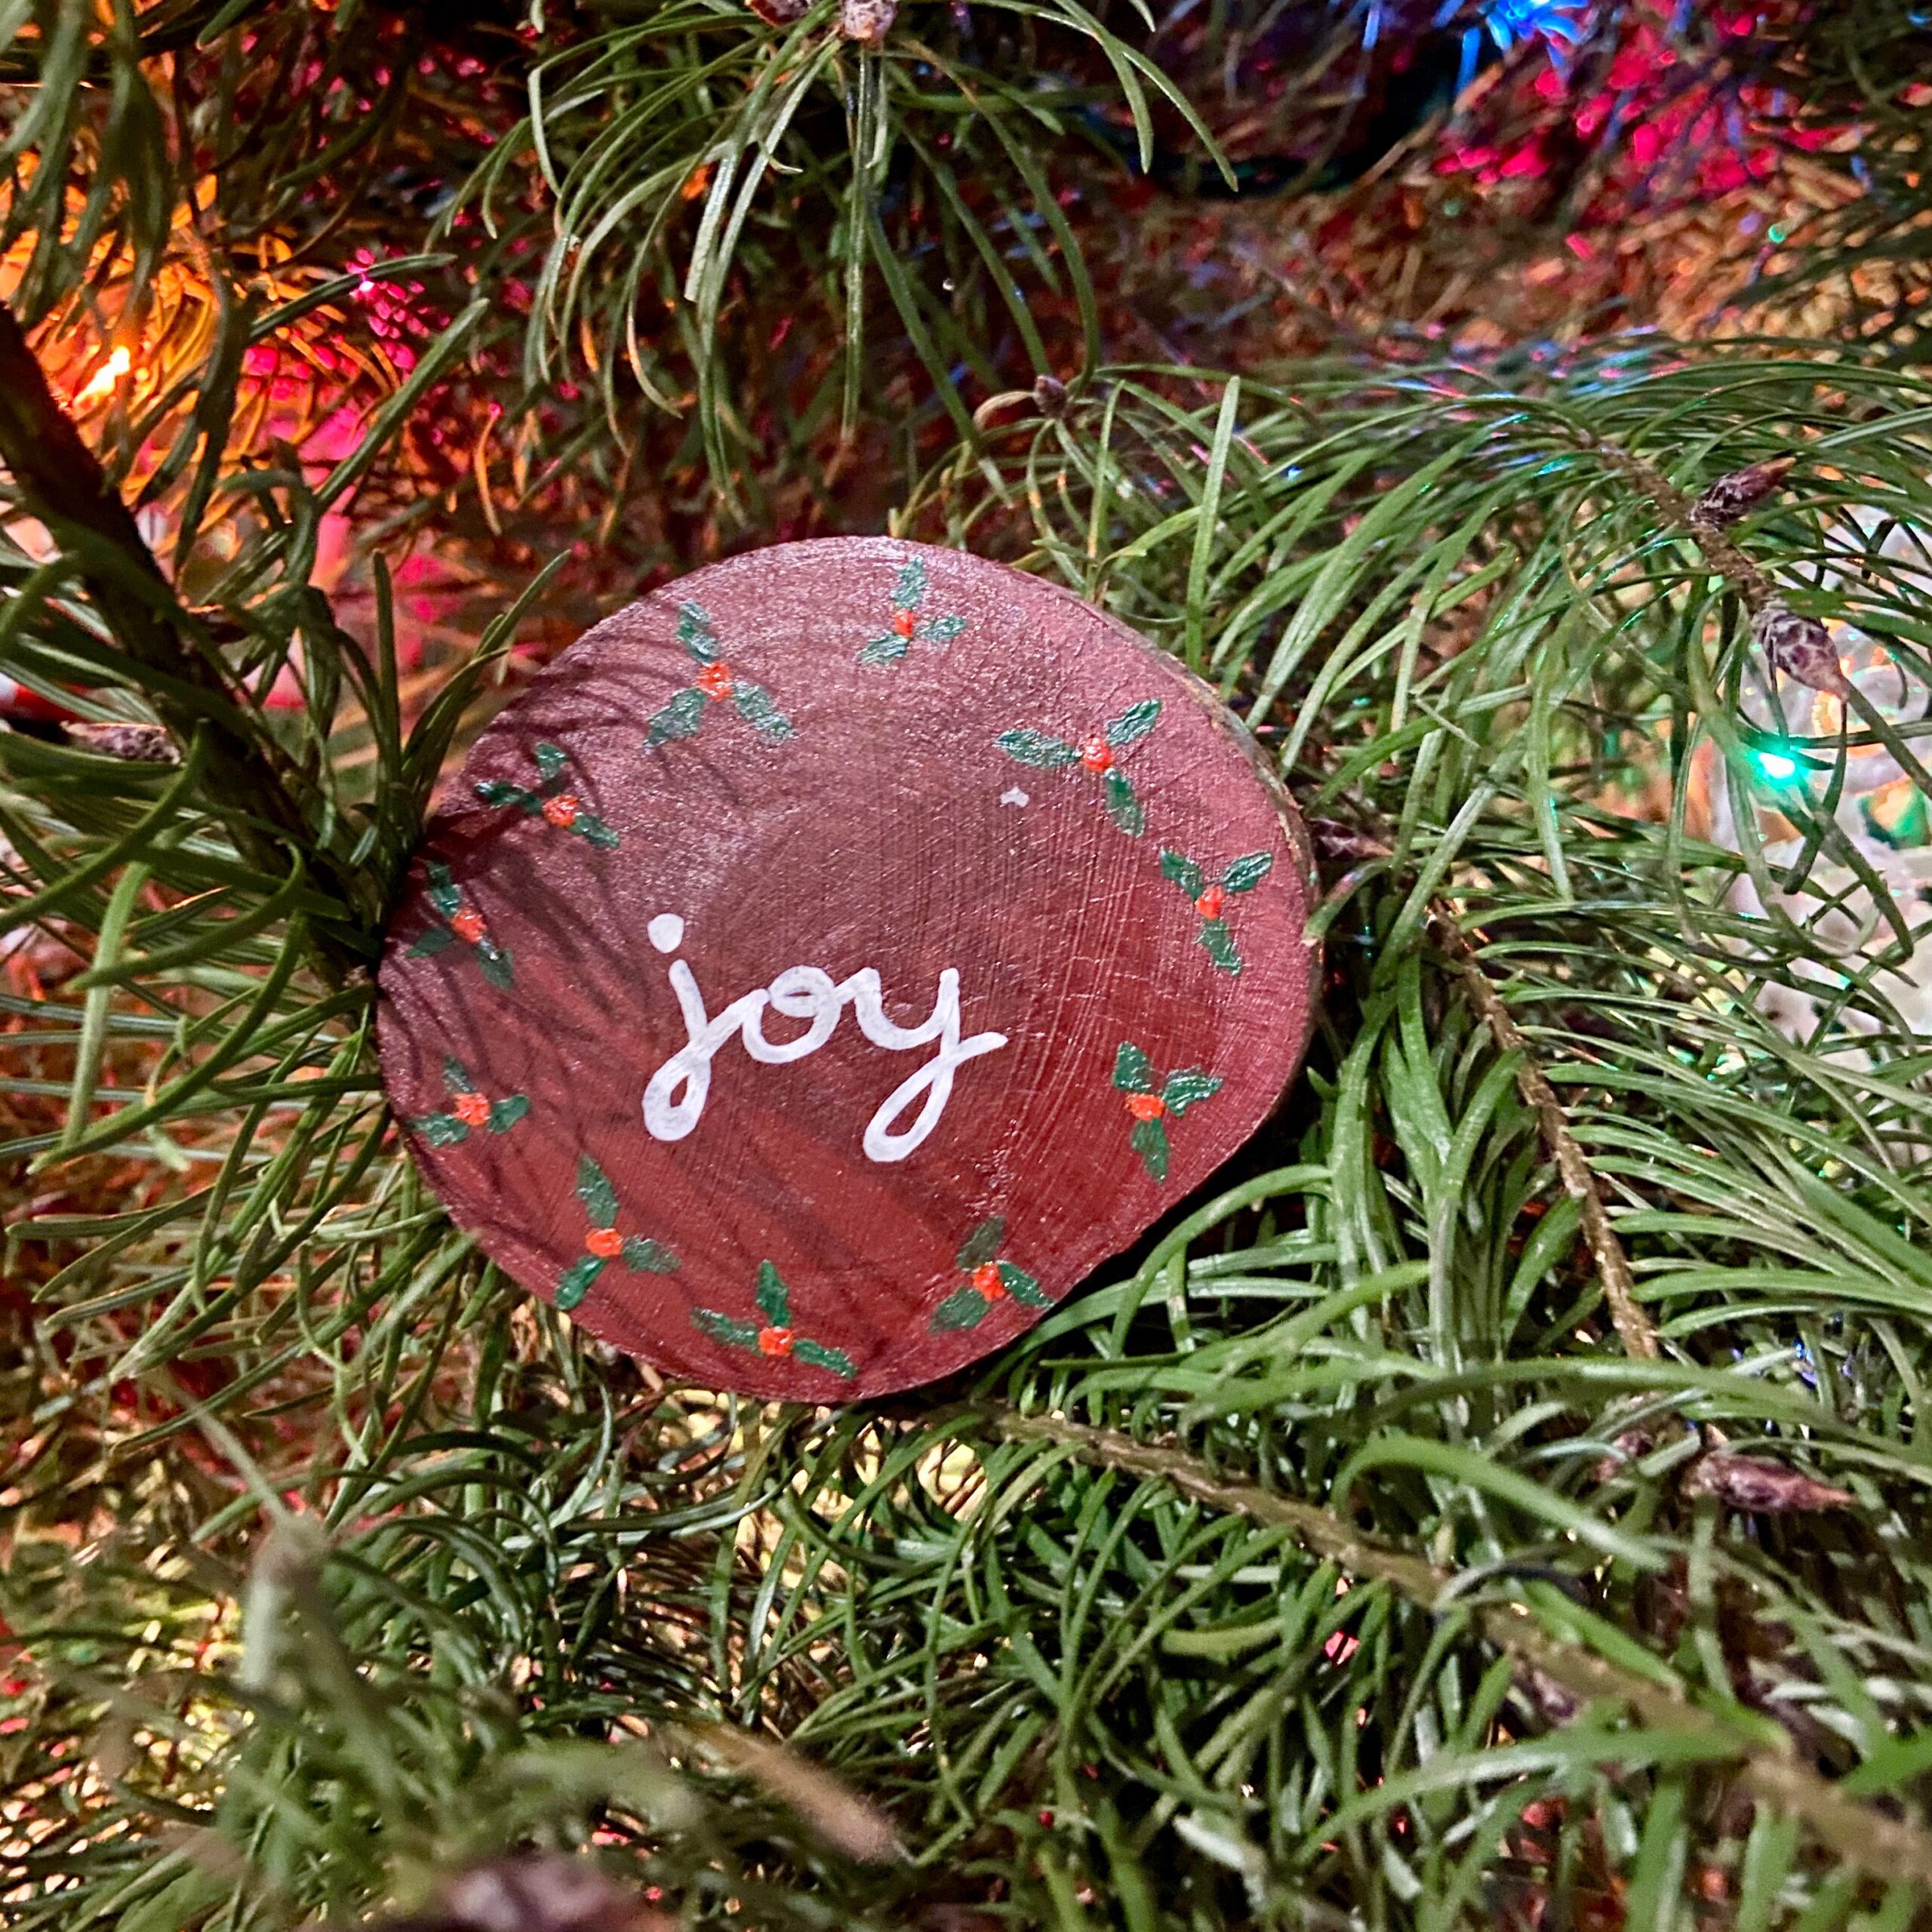
Julia painted this wooden ornament for me. A while back, Ray sliced a branch into small rounds and gave them to her to craft with. She has made several ornaments so far. Mine is so sweet. She made one for Ray as well but he keeps it in our room and I failed to grab a picture of it for this post. It is a cute camping scene of a lone tent in the mountains. Perfect for him!
I also made two aprons, one for Julia and one for my daughter-in-law, Shar. I don’t (yet?) have any good photos of those gifts though.
I do love making gifts for people. I am happy to see Julia also making some gifts. It makes gift giving even more special. Today is going to be the take-down-the-holiday-decorations-day. How about you? As much as I love Christmas, I am ready to get the house back to normal. Enjoy the weekend everyone!
June is winding down. Not sure how that is possible but really, it is best not to question things these days. Time passes, some days fly by and others feel so incredibly repetitive. Such is life during a pandemic.
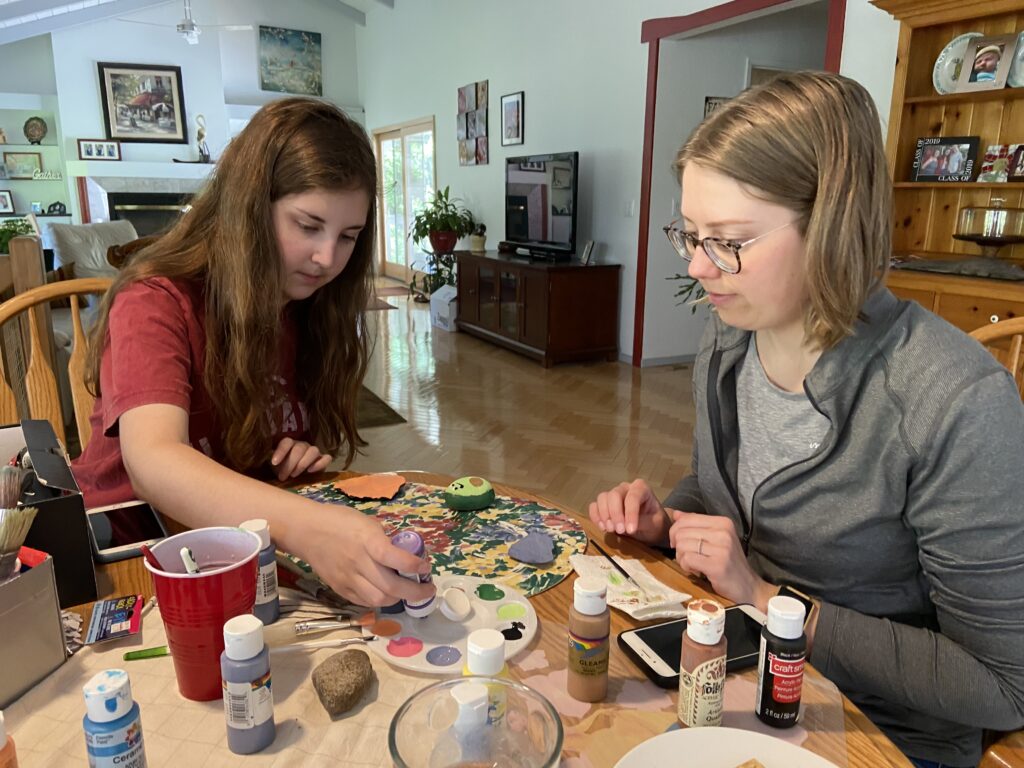
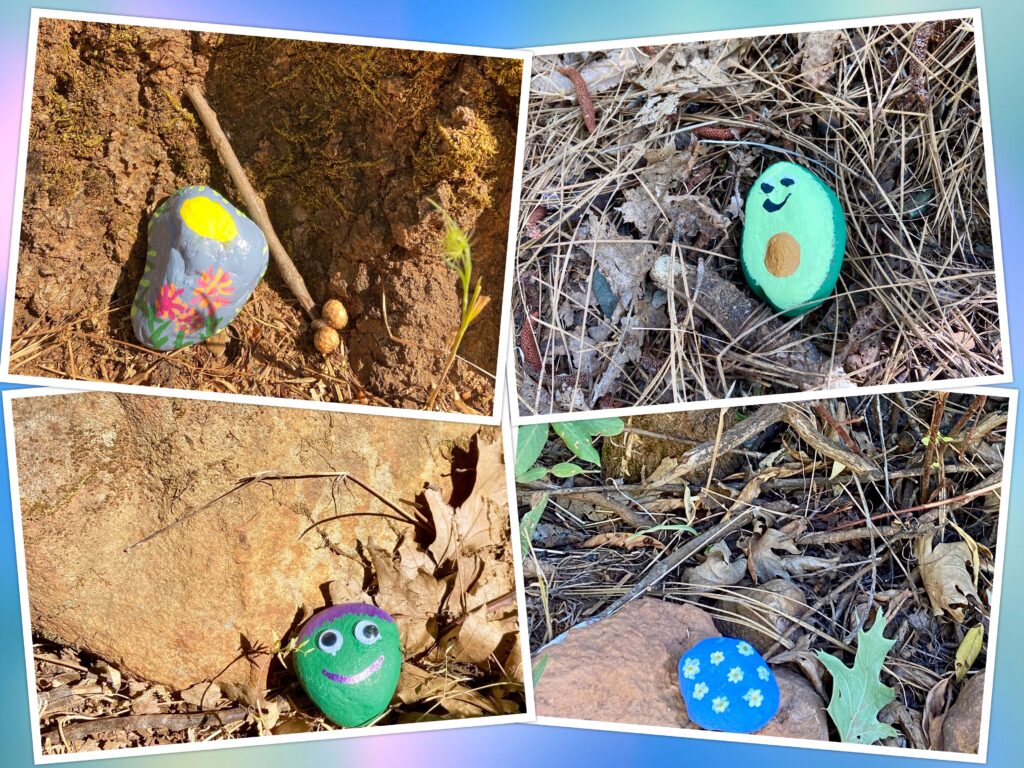
I haven’t shared much lately so I need to get caught up! First off – a little crafting. Julia and I have been trying to spend some time together making projects. A few weeks ago, my son and his wife were here for a weekend (the first time we had seen them since Christmas!!). We spent some time painting small rocks Julia had collected outside. The goal was to place them here and there along a local trail so others could spot them as they walked. We pulled out some (really old) acrylic paints and started painting. It was a fun way to spend an afternoon and we made quite an assortment.
Flowers, an avocado, a monster and some sweet daisies
A few days ago we lucked into a nice cool morning so Julia and I walked the local trail and tucked the rocks here and there as we went. Love the monster with the googly eyes and the avocado (my DIL painted). Pretty creative!
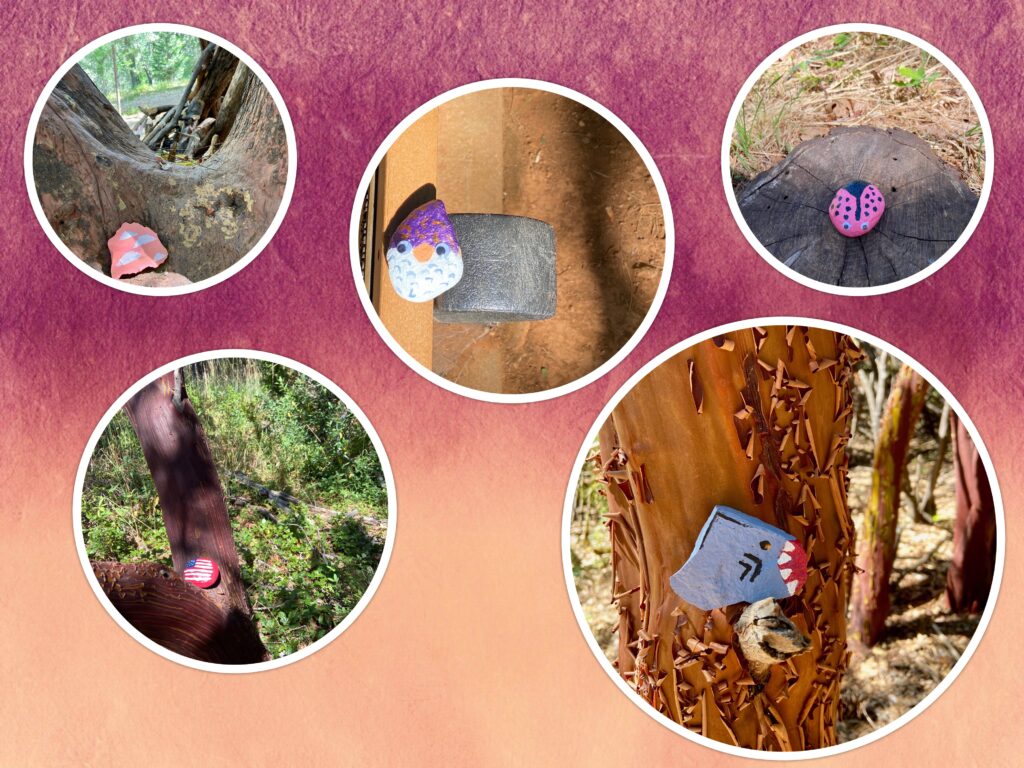
Clouds, Gnome, Ladybug, Flag and the scariest Shark EVER!
More fun! They look really cute out there. The shark is probably my favorite of this bunch. Plus he is sitting on the branch of a Manzanita tree and that curly bark is always fun to see. Julia and I will head back to the trail later this week. We want to see whether people leave the rocks there for others to see or if they pick them up.
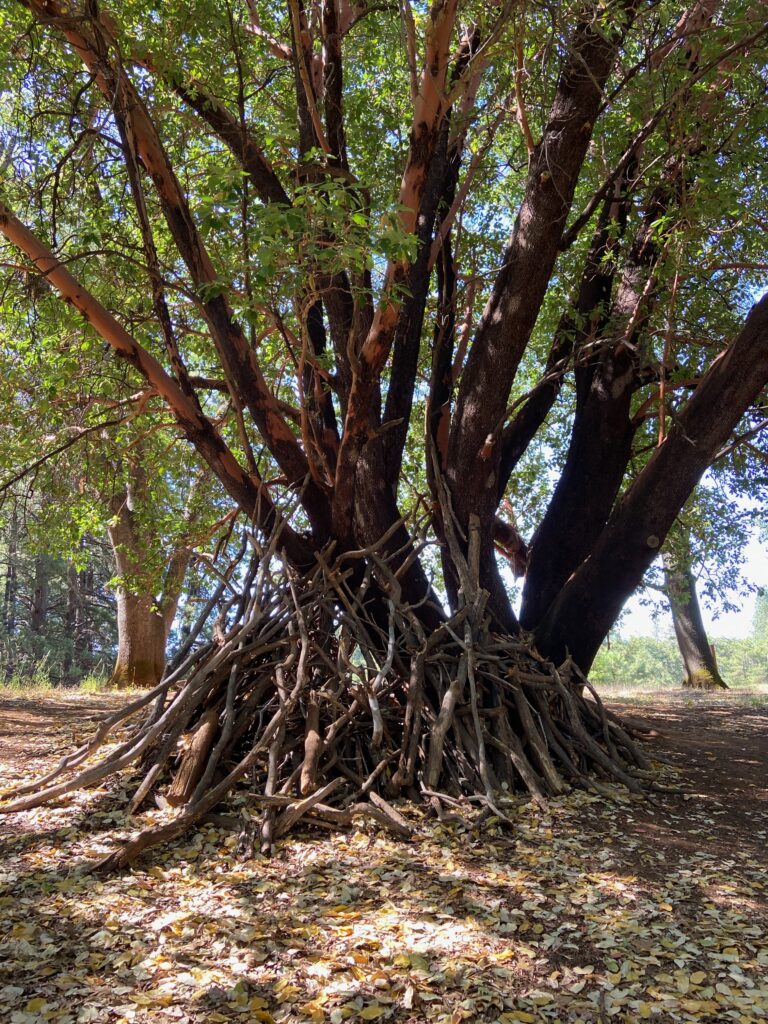
A play fort
About half way through the loop, there is this huge old oak tree. I have pictures of Julia sitting in it from years back. This time, there was this play fort built around the base of the tree. So many branches were collected and assembled teepee-style around the base. We went and peeked in. So cute!! There were a few bits and pieces of construction paper with flowers drawn on them hanging on the inside with string. At the opening to the fort there was a bit of red glitter sprinkled on the ground. I just love thinking of the kids who made this. I hope it stays in place as it must have taken quite a while to gather the branches and assemble this. There is nothing like pretending in a fort like this. I know my kids would have loved this when they were young.
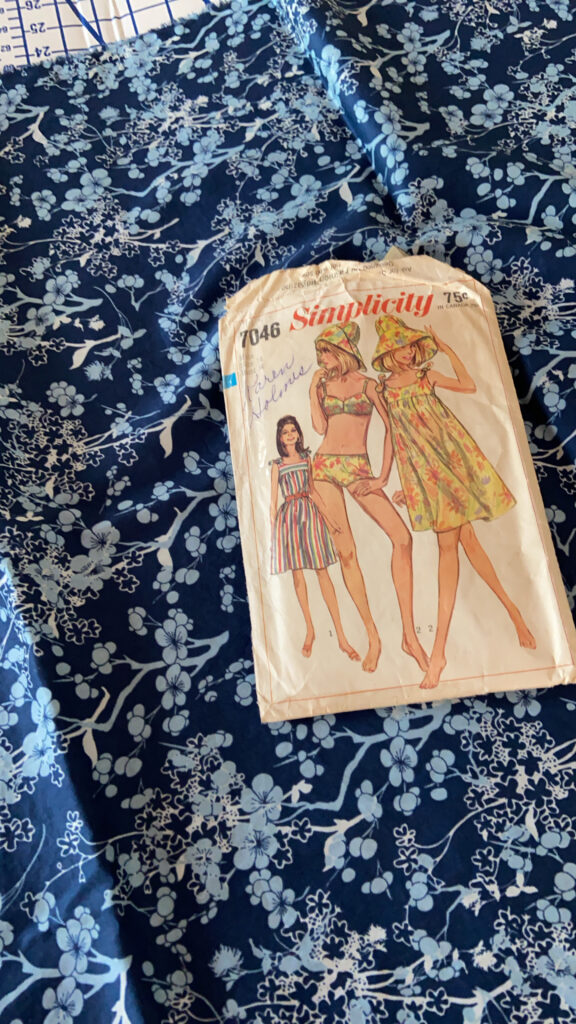
Vintage Simplicity Pattern
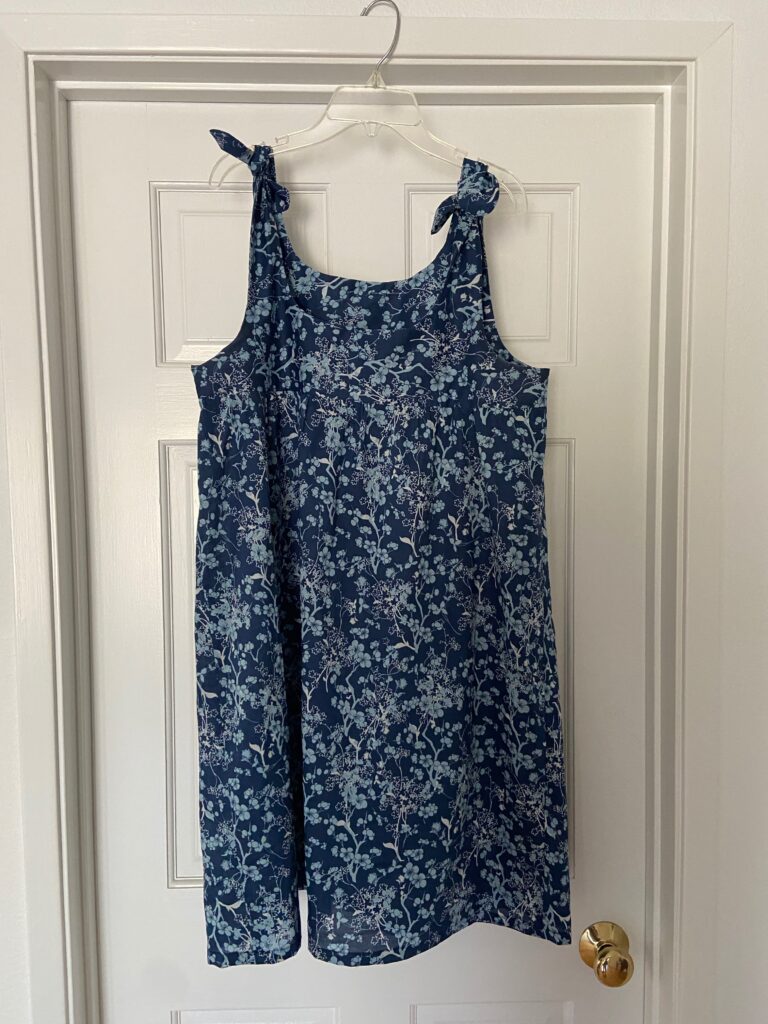
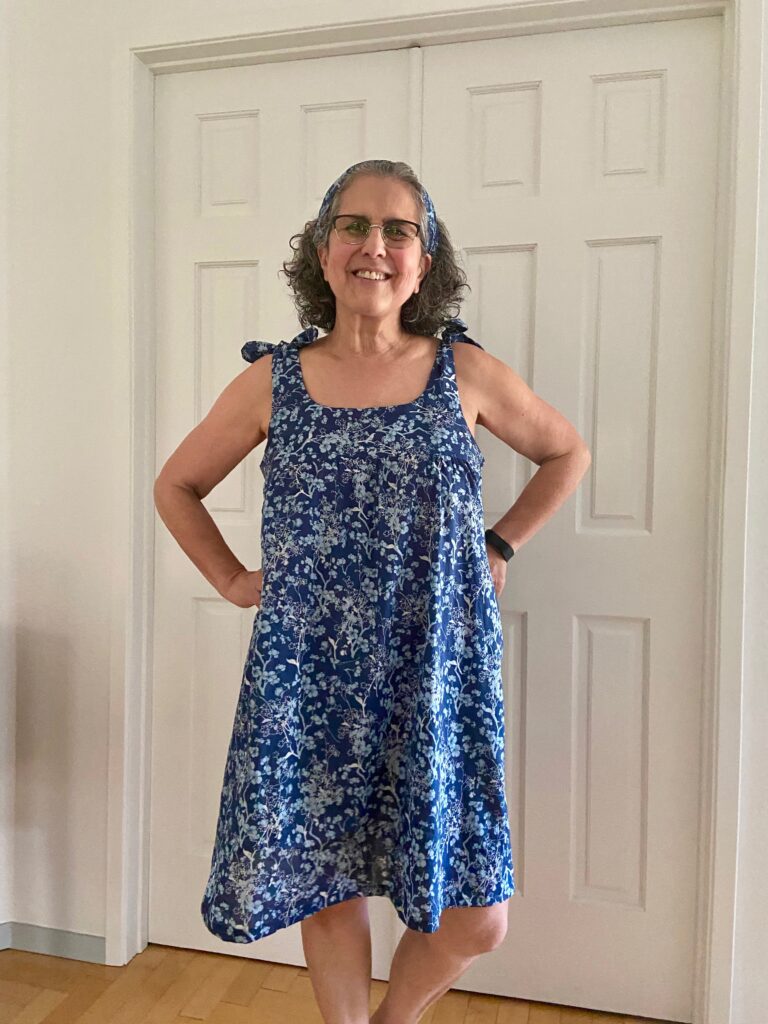
About a week or so back, I posted this picture on Instagram and Facebook. I decided to make a summer dress. I have had this vintage Simplicity pattern for a long time now. It was printed in 1966. I thought this would be perfect for lounging around. The fabric is a voile by Art Gallery Fabric. I love their voiles because they hang nicely and don’t wrinkle after washing. Super soft and comfortable too. The voiles have been quite popular in the shop lately so I am running low. I just placed an order for more and cannot wait until they arrive (maybe another ten days or so?)
The dress took no time to put together. Four pieces to cut out and since it ties at the shoulder, no zipper to fuss with.
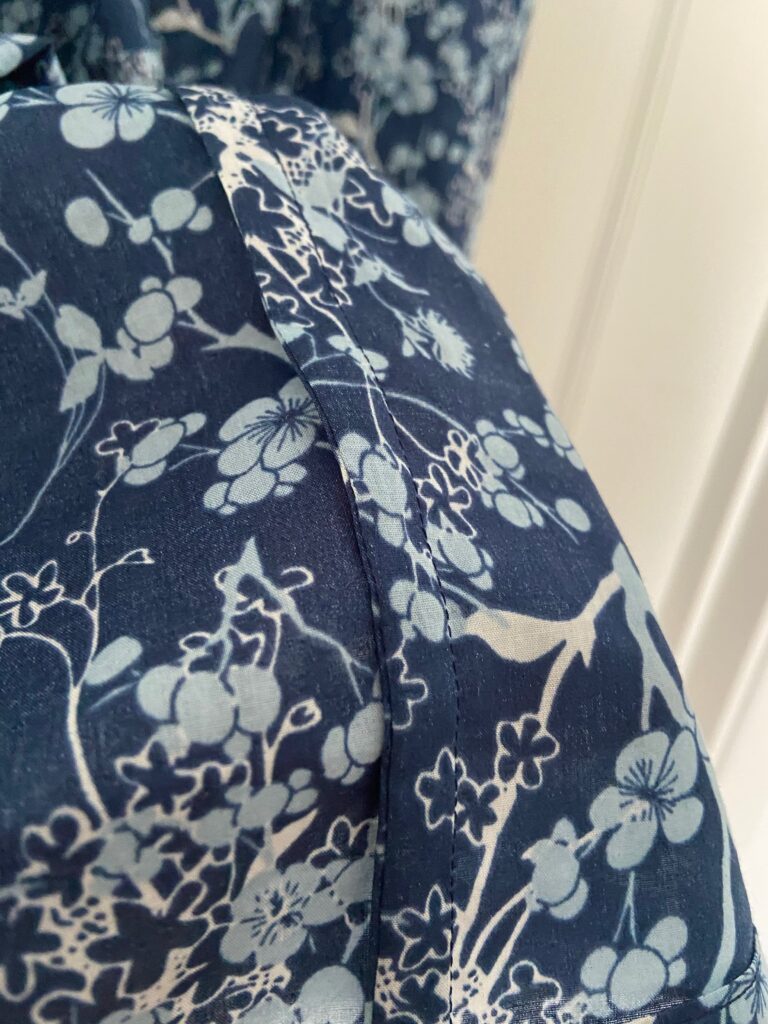
French seams to prevent fraying
I used French seams on the two side seams to prevent any fraying. These are super simple when dealing with simple, straight seams.
While it is certainly nothing fancy, it is just what I wanted. Cool and loose and comfy which is just my style. Whether it be 1966 or 2020, the pattern works just fine. Be warned though – sewing with vintage patterns is a little bit tricky. The sizing is very different. Don’t assume you are the same size with older patterns as with current. Rely on the measurements listed on the pattern – that will tell you what size you need to use. It was a fun dress to make.
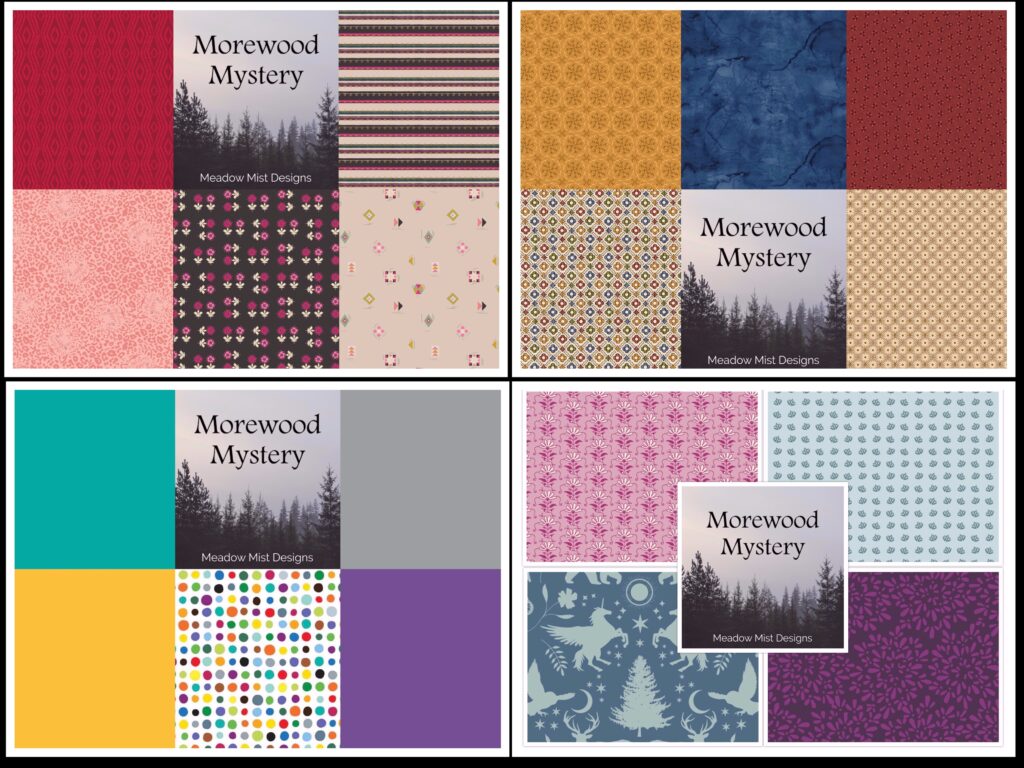
The kick off for this year’s Mystery Quilt Along happens this week! I am really excited. Probably due to the lack of local quilt guild activity and community quilting (with everyone staying home during the pandemic), the sign ups for this years QAL increased greatly. If you have not participated before, I encourage you to give it a try. I love working with Cheryl of Meadow Mist Designs, the host of this event and her patterns are always a hit. Without divulging anything I will tell you Cheryl described this year’s pattern as beginner friendly and it does not require any paper piecing or difficult techniques (eg the dreaded Y seams or curved blocks.)
Here are a few of the kits available. Pop over if you want to see the rest of them!
There are kits available in the shop if you prefer working from a kit rather than picking fabric yourself. Take a peek. They are selling like crazy and I have been cutting yard after yard of fabric this week!
Covid numbers continue to climb. Life is filled with this strange feeling of uncertainty even as we live in quarantine, doing the same things over and over with one day melting into the next. Hang in there, support each other and above all, sew something!
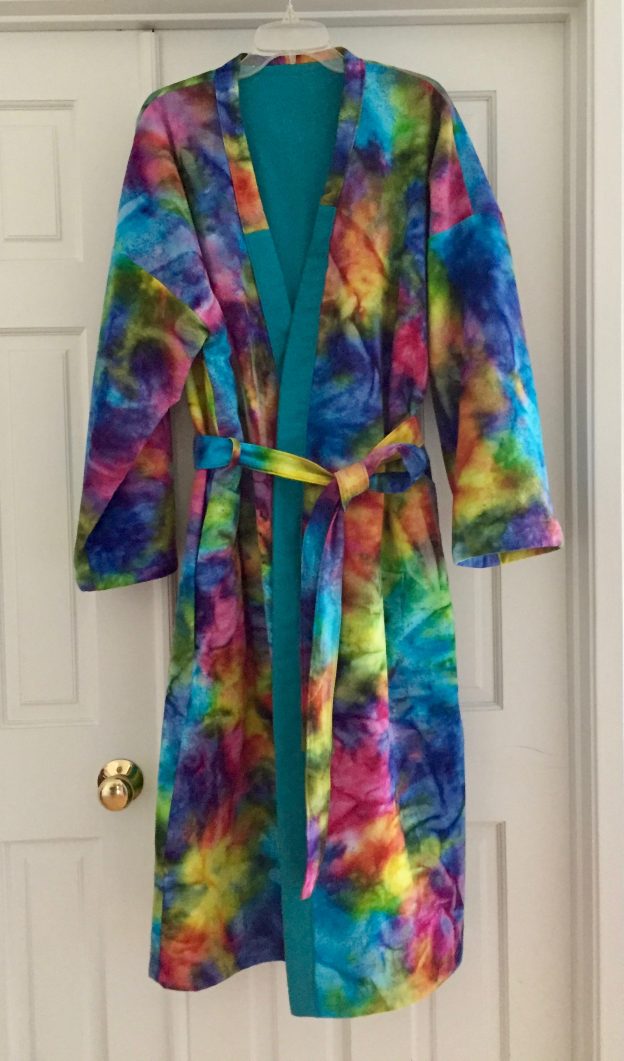
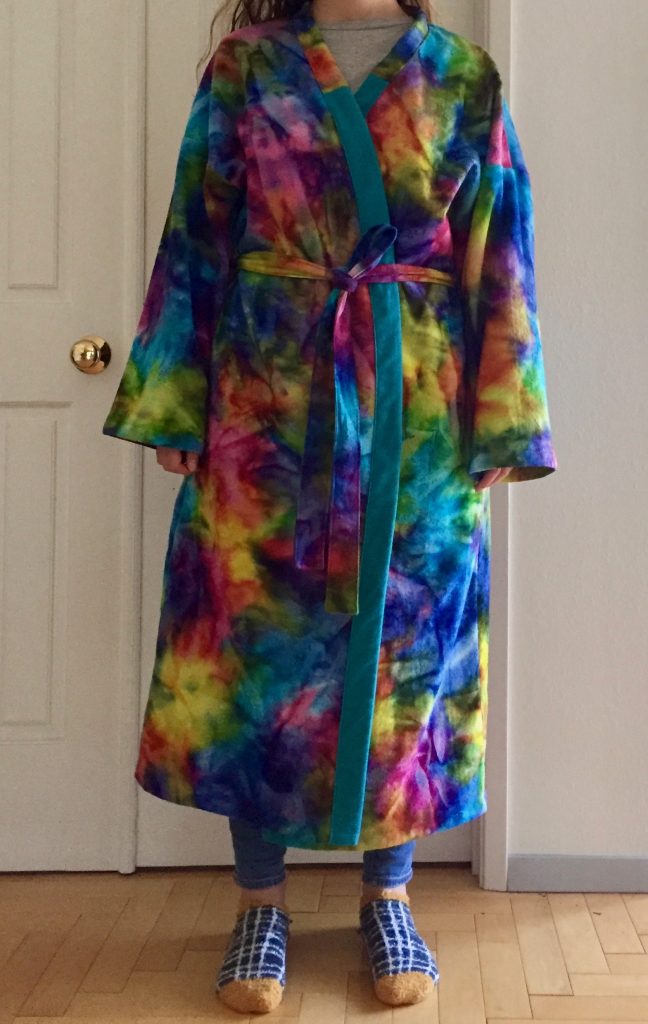
Back in October my daughter told me her friend was wanting a new bathrobe. To which I replied (as you would I am sure) “Oh, well why don’t I make one for him?” Any excuse to sew something, am I right? Anyway, Balam (her friend) was excited and even told me no one had ever made any clothing for him. I certainly didn’t need to hear anymore than that.
A few weeks later, Balam and I met at Ben Franklin to choose a fabric. I had hoped for a thick terrycloth or a nice fleece. No luck finding either one. I steered Balam over to the flannels. You need to know Balam has some wild taste in clothing. He is often wearing really bright Hawaiian shirts. He and Julia like combing thrift stores for fun clothes and both of them usually have on some pretty crazy socks. When Balam spotted a section of tie-dyed flannels his eyes lit up. I tried to steer him over to the blue and green tie-dyed flannel but clearly it was far too subdued for him.
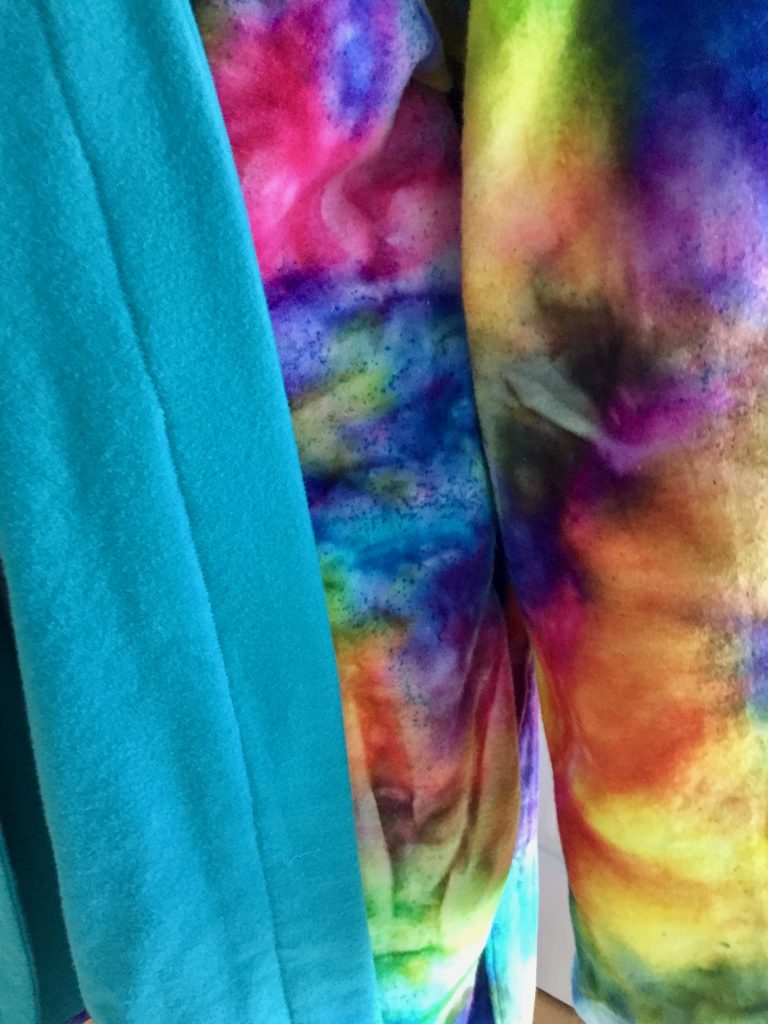
I have been calling this project the Coat of Many Colors or the Robe of Many Colors since I started working on it. I got home with the fabric and washed it with several color catchers and then dried it in a hot dryer. After cutting out the pieces, Julia and I were looking at it. It felt too thin for a bathrobe. With the one layer of flannel, it just didn’t have a cozy feel to it. This was over Thanksgiving weekend. We hopped on-line to see what was on sale at Jo-Ann’s. There was a teal blue flannel for $2.99 per yard and it was a great match. Score!
The lining made the robe so much cozier and it matched really well.
When the solid flannel arrived a few days later, I cut out the same set of pieces (front, back and sleeves). I had already constructed the outer portion with the tie-dyed fabric and now I put the blue lining together. It went together very quickly as this was a super easy pattern. Inserting the lining, wrong sides together with the outer fabric was simple. Then I carefully pinned the edges together along the neckline and all the way down the front opening. I top-stitched the outer robe and lining together at the shoulder seams to anchor everything. Then I ran a basting stitch around the entire open edges, up each side of the front and around the back of the neck.
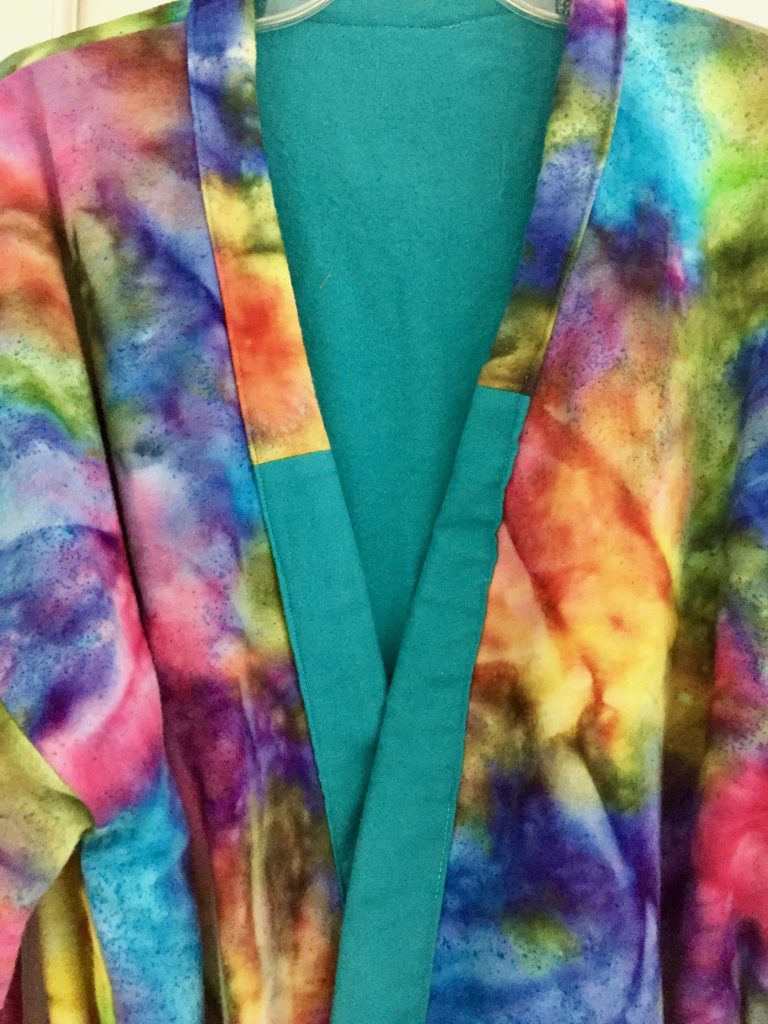
I was ready to finish the open edges in front when I realized I didn’t have quite enough of either the teal fabric or the brightly colored fabric. So I used both. I put the bright portion around the back of the neck and slightly extending into the front. The rest was finished in teal.
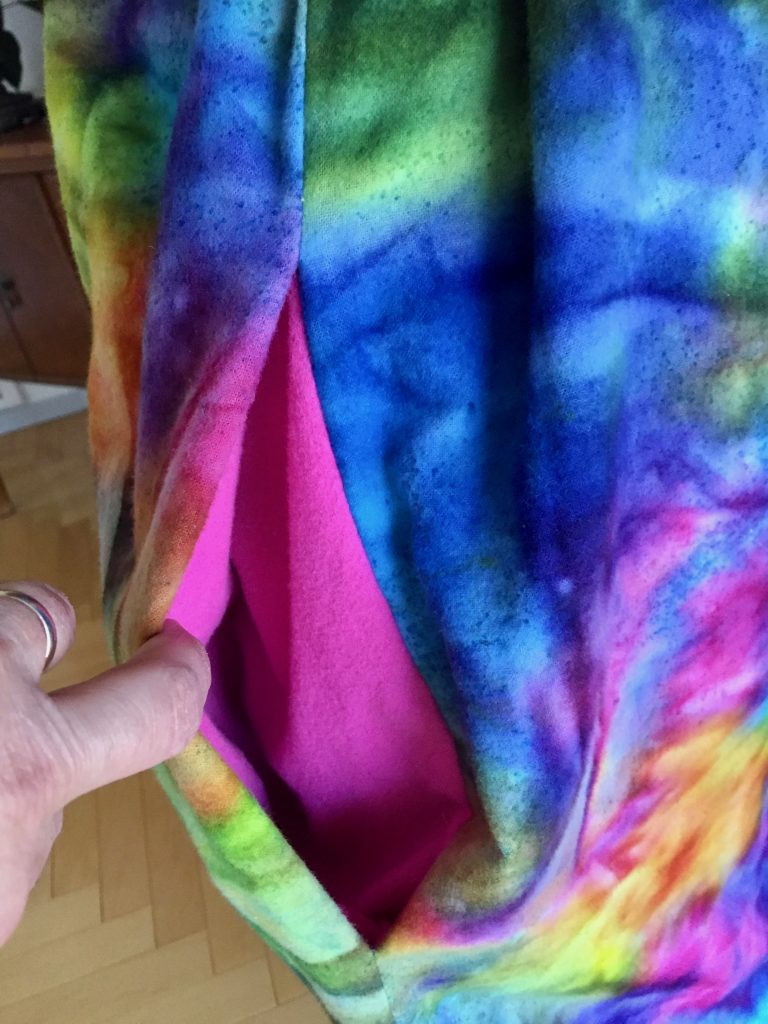
A pop of hot pink in the pockets.
For fun, I used a hot pink flannel for the inner pockets, which Balam really liked. He was so appreciative when he received the robe yesterday. All smiles and he wore it over his jeans all the way through dinner. Isn’t that the best?
Julia modeled for me even though this is a bit too big for her.
This was a super fun and very easy make. Balam is really happy with it which makes me so satisfied. Most likely this will be my last finish for 2019.
November’s blocks.December’s Flying Geese blocks.
Today I worked to get caught up on my piecing for the Mosaic Mystery QAL. I have to say, I am tickled to have these finished up. For one reason or another, it seems like I rarely keep up with these quilt alongs. Because I was sick a lot in late November and early December, I fell way behind. But with a few nice, long sewing sessions, I am all caught up! Now I can begin piecing this quilt when the next set of instructions are released. WooHoo!!! Since I am on top of this QAL, I think I will go ahead and start the Push-Pull QAL with Quilting Jetgirl in January. I keep looking at fabrics for that one and haven’t quite made up my mind yet. Decisions, decisions…
Here we are at the end of 2019! I would love to reduce the inventory in the shop for end of year and tax purposes! How about a huge sale? Just in case you are inclined to help me out with this??? For today and tomorrow only, 20% off all yardage! Even better, 50% off Clearance, Remnants, Bargains, Winter and Autumn fabric, and End of Bolt pieces. This is a sale not to be missed!
Happy New Year everyone! I am looking forward to all sorts of fun, creativity and quilting in 2020. How about you?
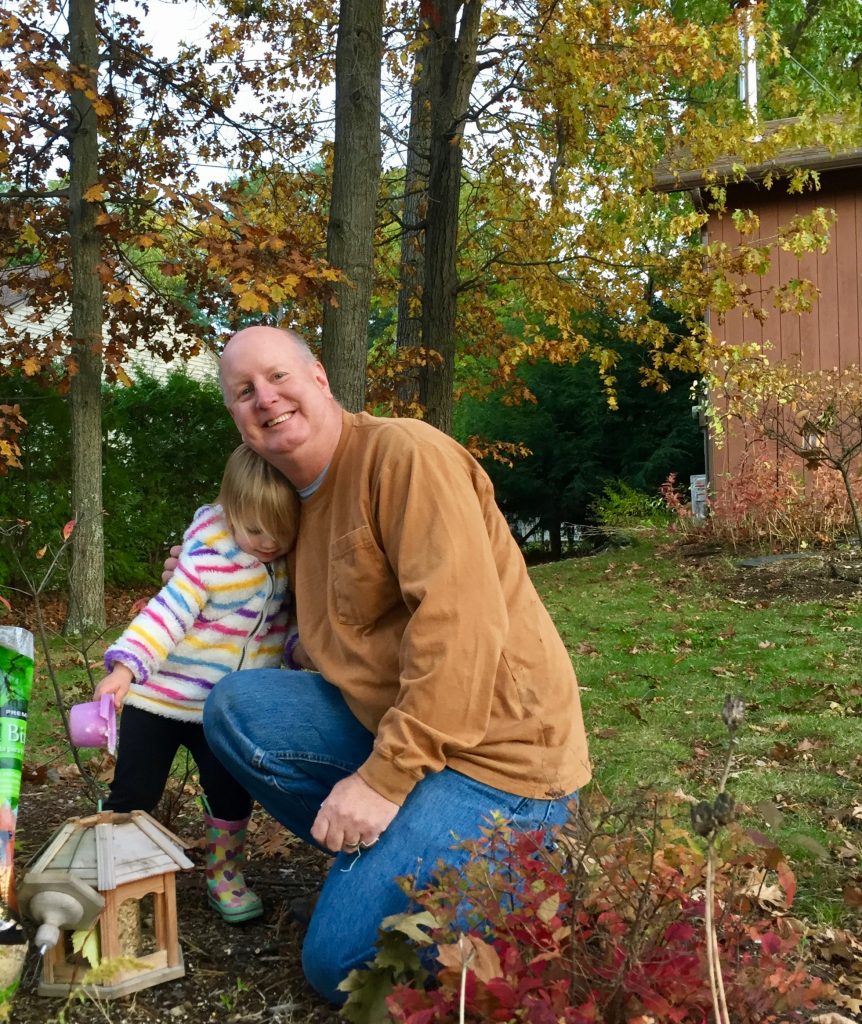
Happy Halloween!! Your recent two weeks of family time in Vermont were wonderful. The goal was to hang out with our son and his wife and spend as much time as possible with our grand daughter.
Grandpa was her favorite during our visit!
While there my grand daughter came down with a miserable virus and had terrible croup. Poor little girl was sick for a long stretch and toward the end of it, my husband came down with it. Not a fun bug at all! The two days before we left, my son and his wife were starting to come down with it but it didn’t look like they were going to be quite as sick.
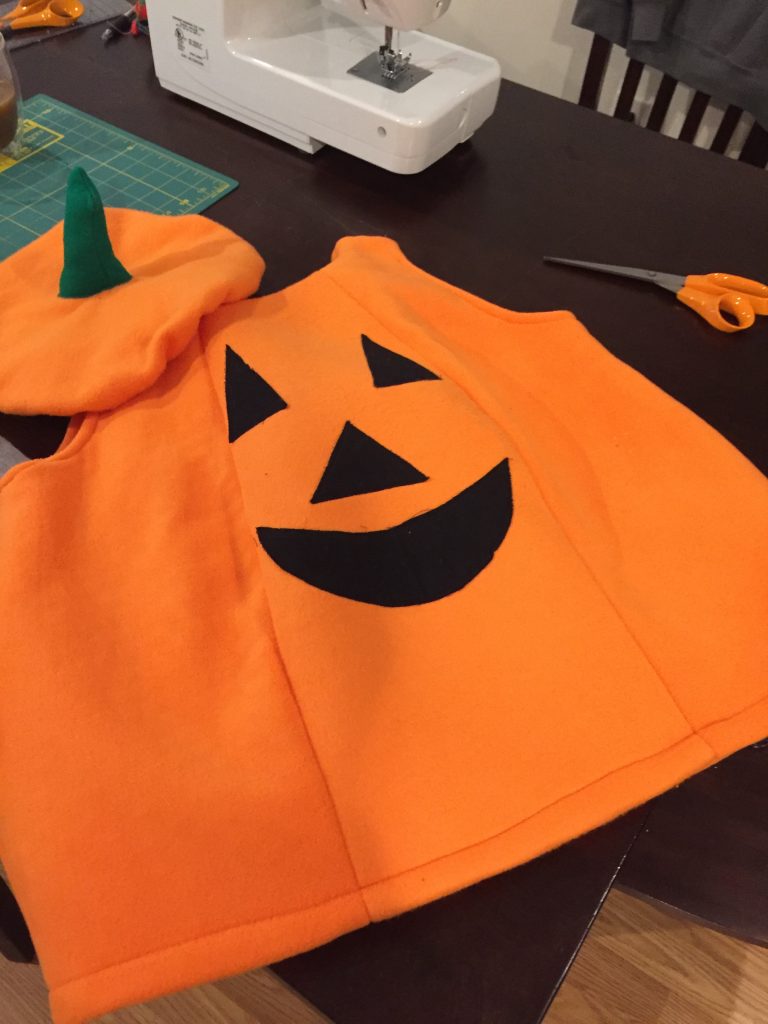
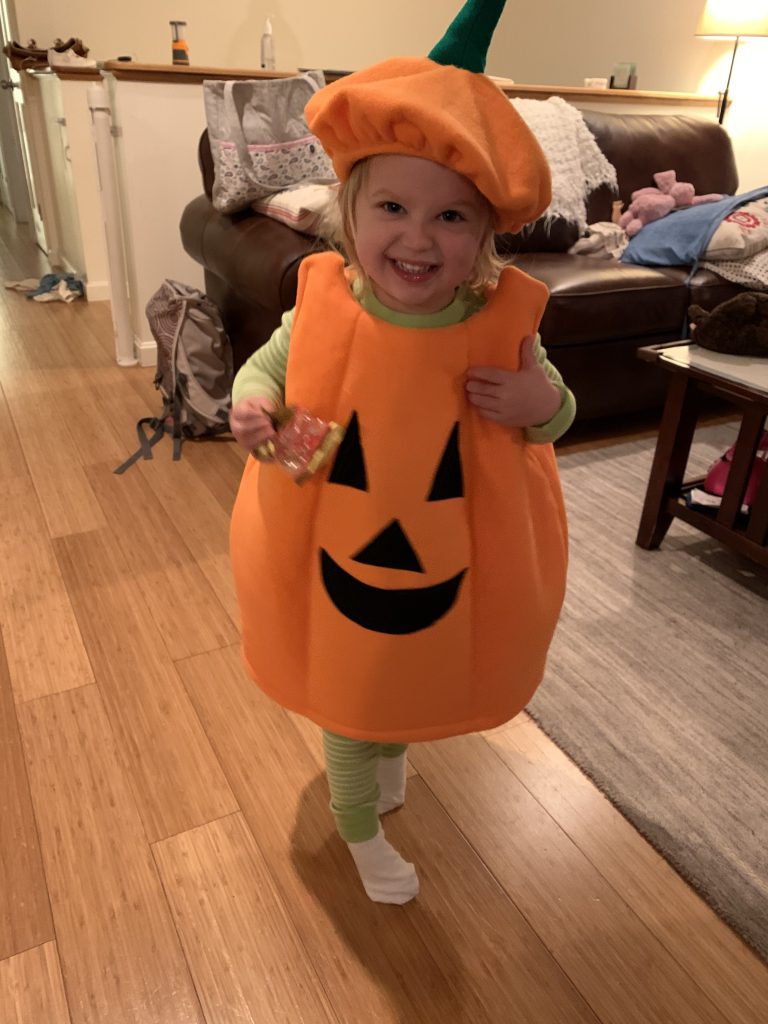
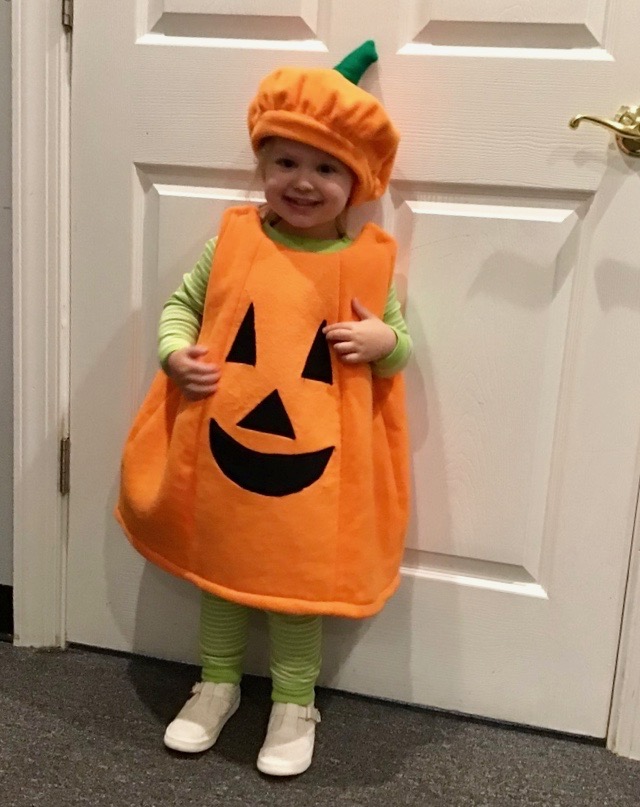
Since we were having some quiet time at home and H was taking long naps due to being sick, i did have time to do some sewing. I pulled out my DIL’s sewing machine to make a Halloween costume for H. She and her mom found a cute picture of a little girl dressed up as a pumpkin with green leggings and t-shirt on underneath.
I used a Simplicity pattern for the costume. There is a Jo-Ann’s in the next town over so off I went in search of orange fabric. At first I planned to use a wool felt but it was so stiff. I knew H wouldn’t have fun running around in that at her Halloween party (at her daycare). I was with my son Kyle (he and his wife drove over from New York for a weekend) and he spotted a bolt of orange fleece way up on a top shelf, not yet unwrapped. Lucky for me he is 6’ 2” and was happy to hop up and down to grab it. This was perfect.
The pumpkin is lined with fleece and filled with batting. Even trick or treating in Vermont, this girl is going to be quite warm. Her outfit is so heavy!! There was a stencil for the face but i felt like it was too big so I ended up cutting the pieces out free hand. Using a few bits of ‘Wonder-Under’, I fused the face to the front and appliquéd them with a simple zig zag stitch. The pattern called for a casing to be made at the hemline with elastic inserted to make it puffy. However with the fleece, there was already a nice shape to the pumpkin. Instead, I trimmed the fleece lining to be about two inches shorter than the outer layer. Turning one inch of the outer layer to the inside, I machine stitched the hemline.
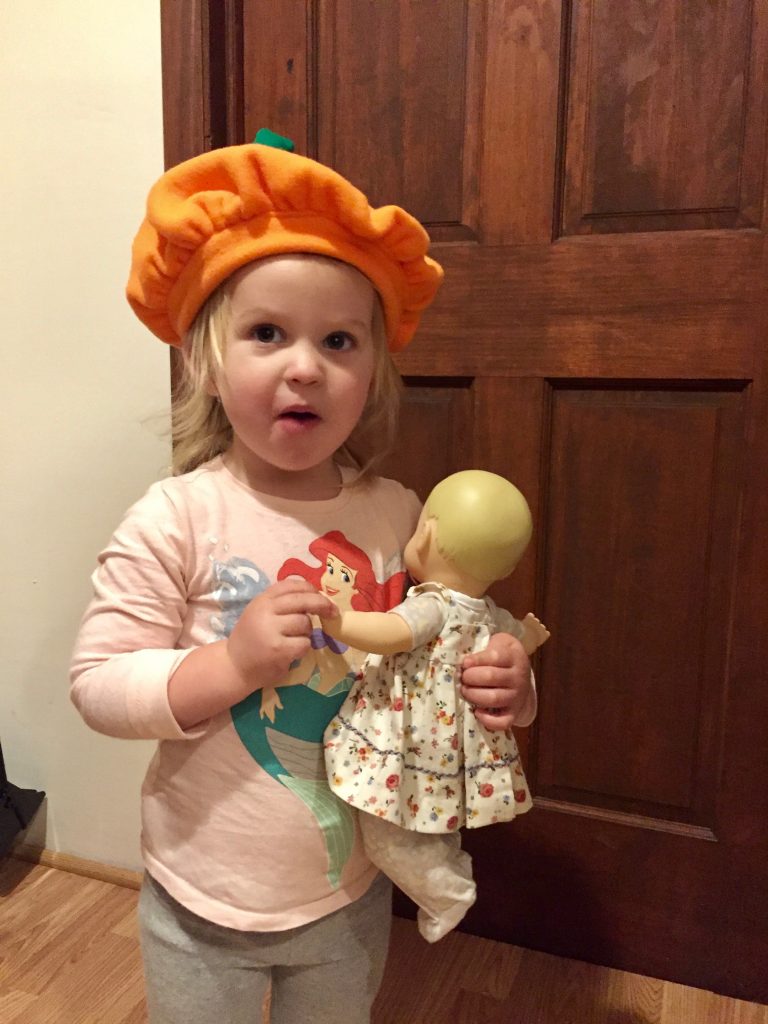
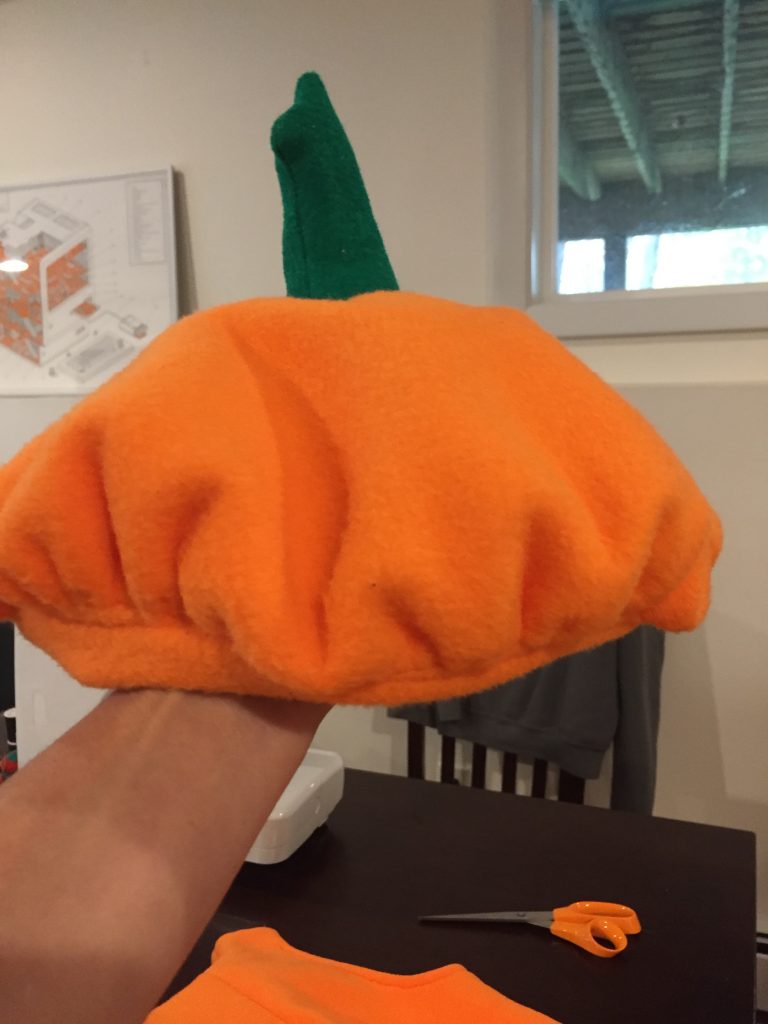
She was trying on the hat when I first finished it. But it was a bit too big.
Ok- my favorite part of the whole costume is definitely the hat. When I made it, H was quite happy to wear it about the house for an afternoon so I really hope she wears it on Halloween. It looks so darn cute on her. I made it during a nap time, guessing at the sizes and it was too big for her. There wasn’t a clean way to fix this without doing a lot of seam ripping. I had to rip one seam on the pumpkin and it was difficult to manage with that puffy fleece fabric. So I cheated and took a little tuck and just stitched it up. The hat is still a bit large but better than before.
So darn cute!
When I left I had not had time to run out and buy some velcro which was needed for the shoulder straps. So I left it unfinished and my daughter-in-law took care of it. I received some really cute pictures of H having fun with her costume today.
Getting ready for daycare earlier this morning. So much excitement!
I am glad they had a little party at her daycare. I hear they are supposed to have a lot of rain tonight so that may put the kibosh on any trick or treating.
I love the green and white striped leggings and t-shirt under her pumpkin costume.
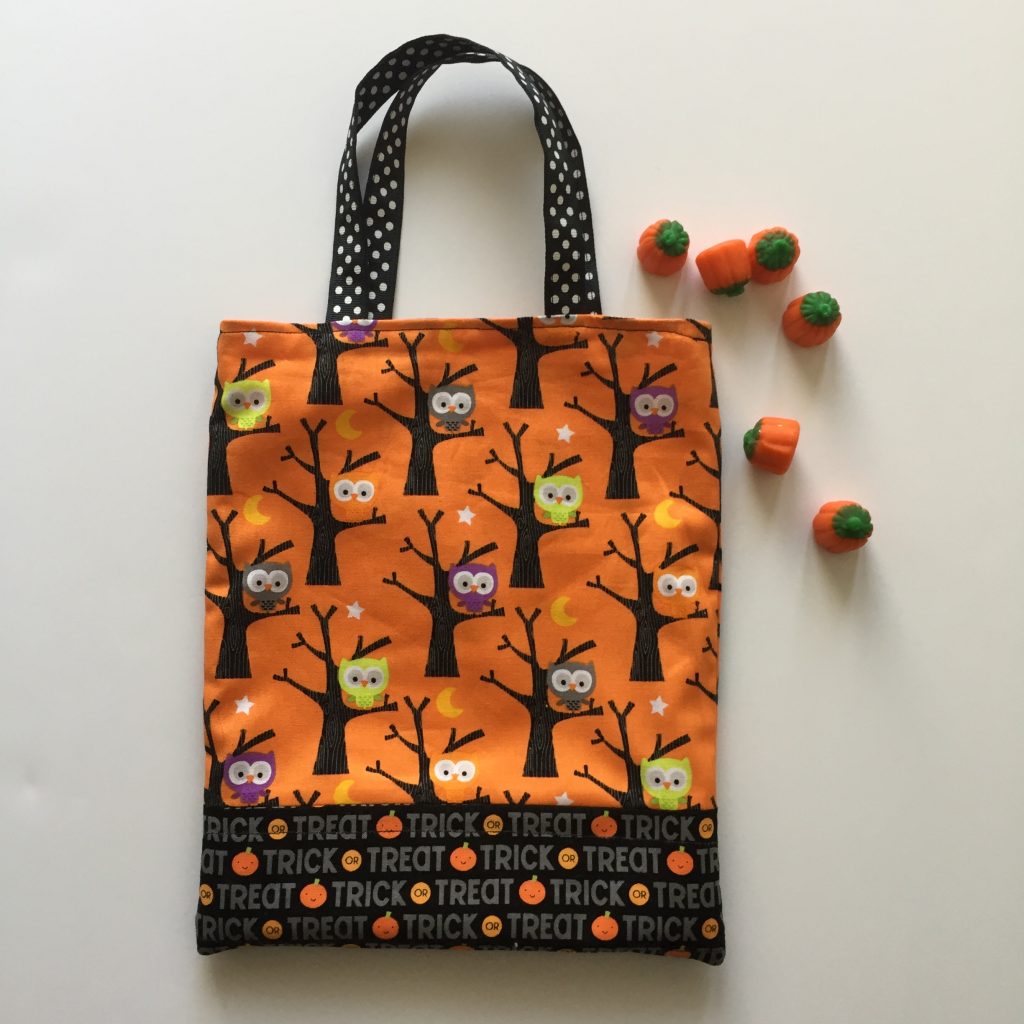
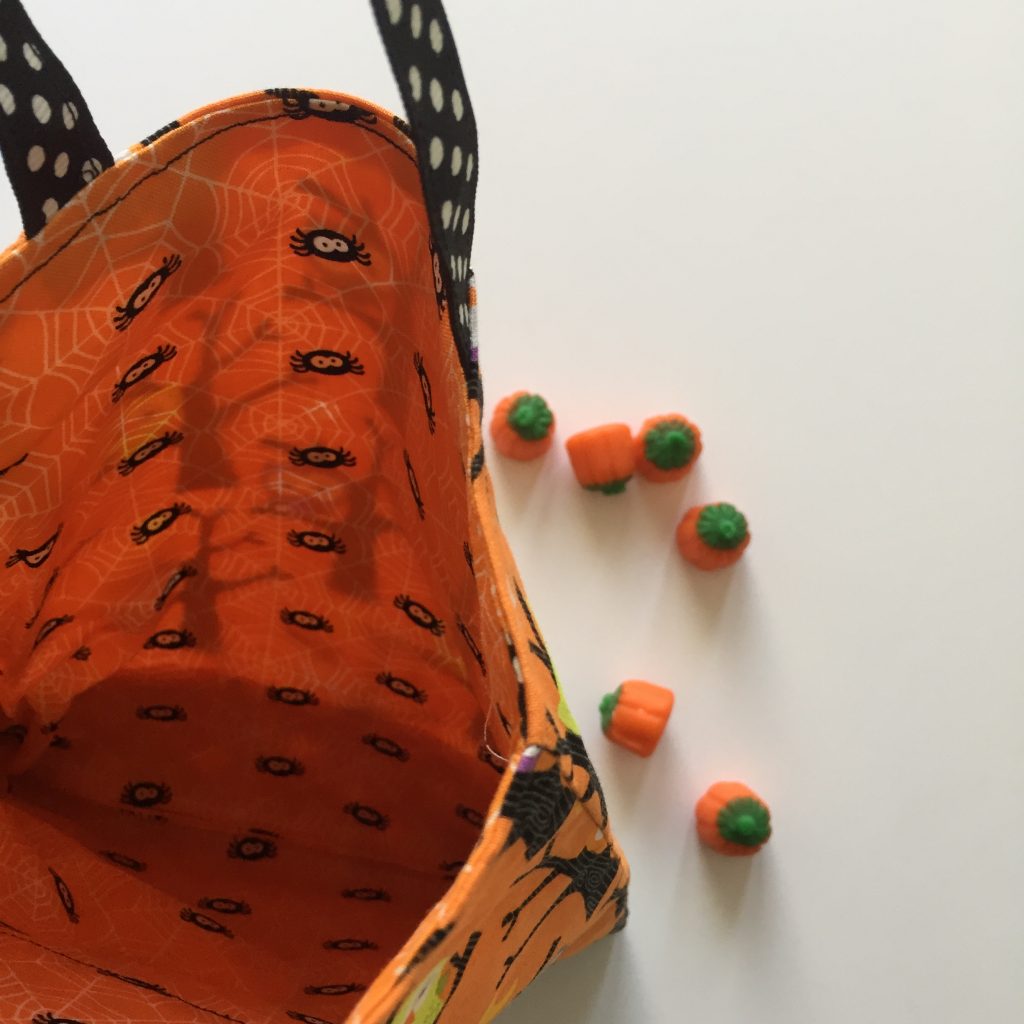
Just in case there was a chance for trick or treating, I also made her a tiny treat bag to carry.
This was designed off the cuff and I didn’t write down any measurements. If I had to guess, I would say it finished at about 8″ x 11″ or so. Maybe even a bit smaller. I had that polka dot ribbon on hand (actually had all of the supplies on hand) and I took two pieces and sewed them together (wrong sides together) just to make it a bit heftier.
The bag is lined, which makes it a bit stronger. Since she does not yet know what trick or treating really is, she won’t be disappointed this year if they skip it due to weather. She can play with this bag or use it next year.
While I was there H and I made a festive bandana for their dog Wusha. I think Wusha looks a bit embarrassed to wear it but this dog will do anything my grand daughter asks of her. I had the triangular pieces cut and pinned and then had H sit on my lap and help me feed the fabric through the machine. I tried to take a selfie because it was so sweet but I am really, really not good at those and didn’t get much of a picture! But we had fun and she was thrilled to help Gram-gram sew for a few minutes.
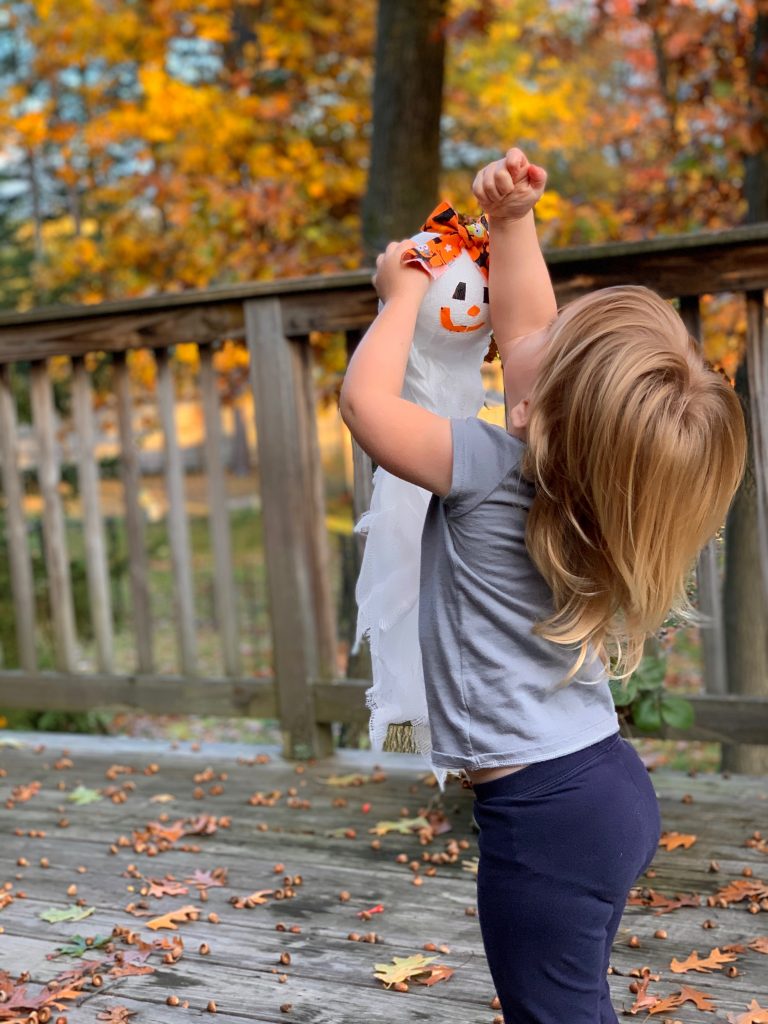
Introducing Georgie Ghost
One last project while we were there was to make a little ghost to hang in the dining room. We had been taking walks around the neighborhood and she really liked looking at the neighbors decorations. She loved the ghosts and a few little scarecrows we saw. I asked her if she would like to make a ghost and she was so excited.
This was super easy. One styrofoam ball from Wal-Mart and a packet of cheesecloth from the grocery store. I cut the cheesecloth in two strips and with the help of one happy two year old, layered the ball with the cheesecloth. Then we worked together to cut the eyes, nose and mouth. I had gotten her a glue stick that starts out purple and dries clear. This way she could see where she was putting the glue to put the pieces on. The addition of the bow on her head turned this little ghost into a girl. H and I had so much fun with this project and it was the perfect amount of work for a two year old.
Checking to see if Georgie Ghost can fly.
My son took the photos of H and her ghost – they are so sweet! We really enjoyed our time with the kids and can’t wait for our next visit. Grand parenting is the best and it would be even better if we all lived on the same side of the country!! Someday…
Linking up with a few fun places, including the monthly Favorite Finish party at Meadow Mist Designs. Be sure to check the top of the page under Link Ups!
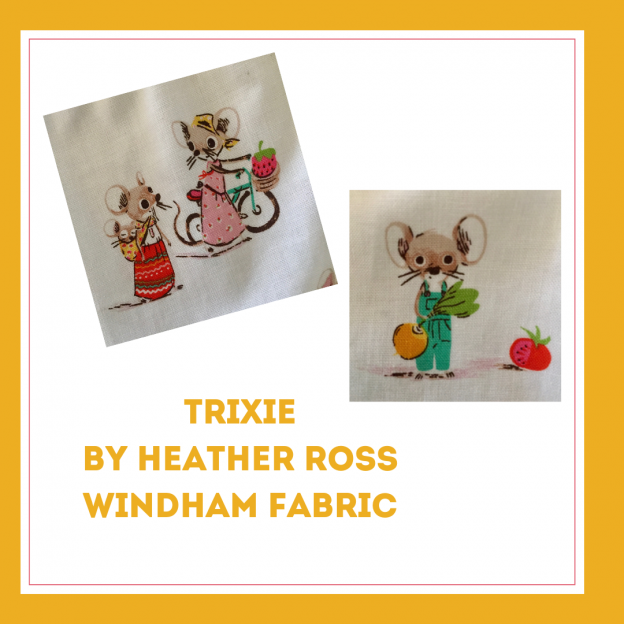
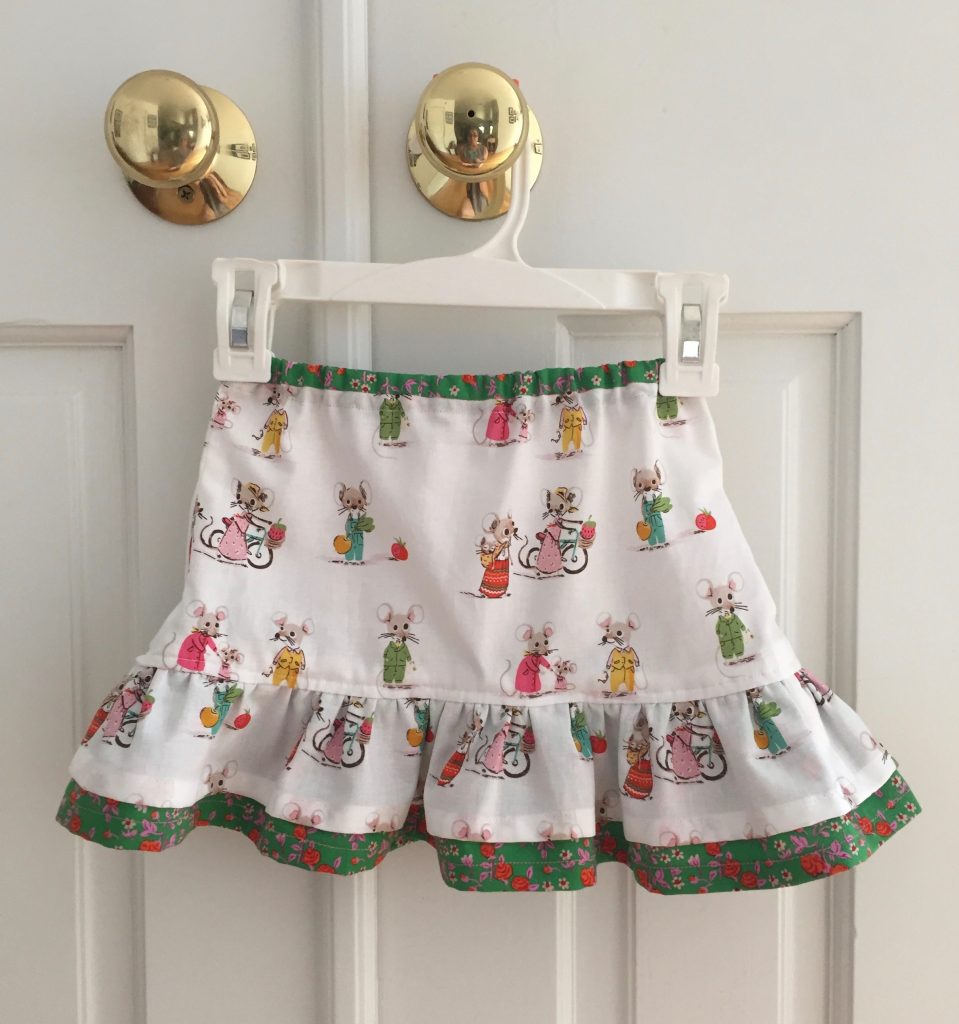
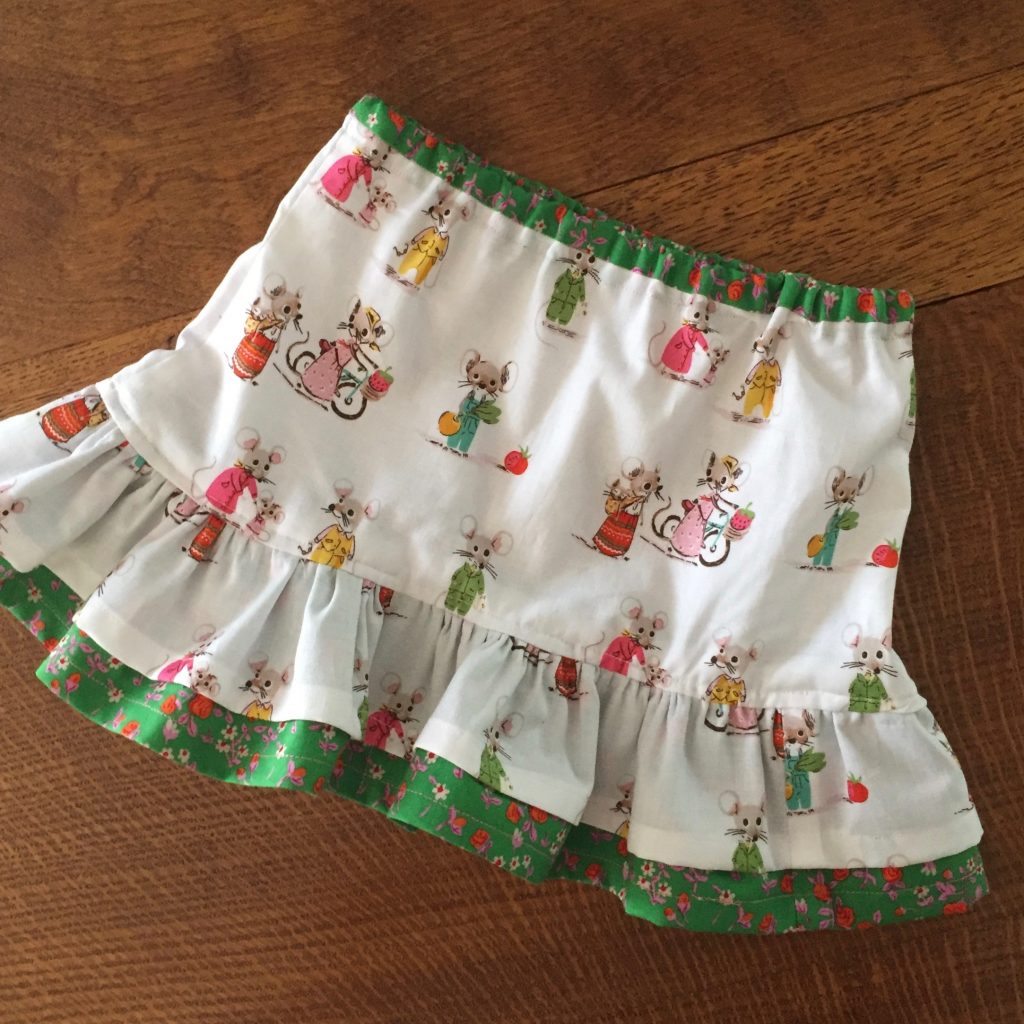
Another distraction popped up the other day. I have been wanting to make something for my grand daughter with the new Trixie fabric. This piece was designed by Heather Ross and it features two little mice, Trixie and her friend Thomas. I really love it! By the time I ordered it, a few key pieces were already sold out. However, I do have these two sweet bolts in the store.
I am fully aware the fabric in the shop is supposed to be sold. That is the goal. However, it is really difficult not to cut into certain bolts and this is one of those. These little mice are too cute. In real life, I have a huge issue with rodents, mice, etc. Ugh! But these, I can handle these little critters!
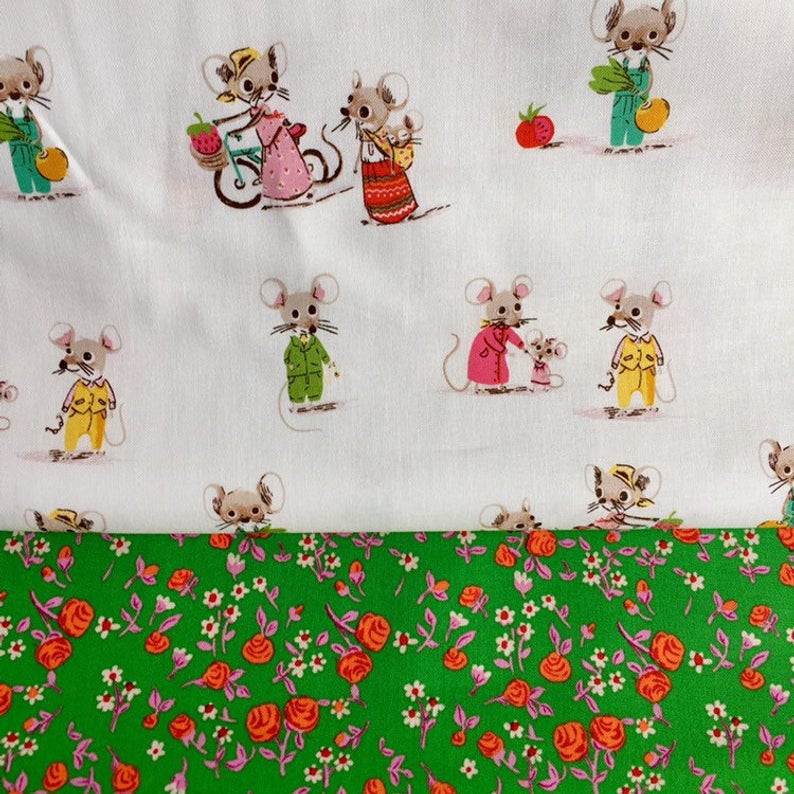
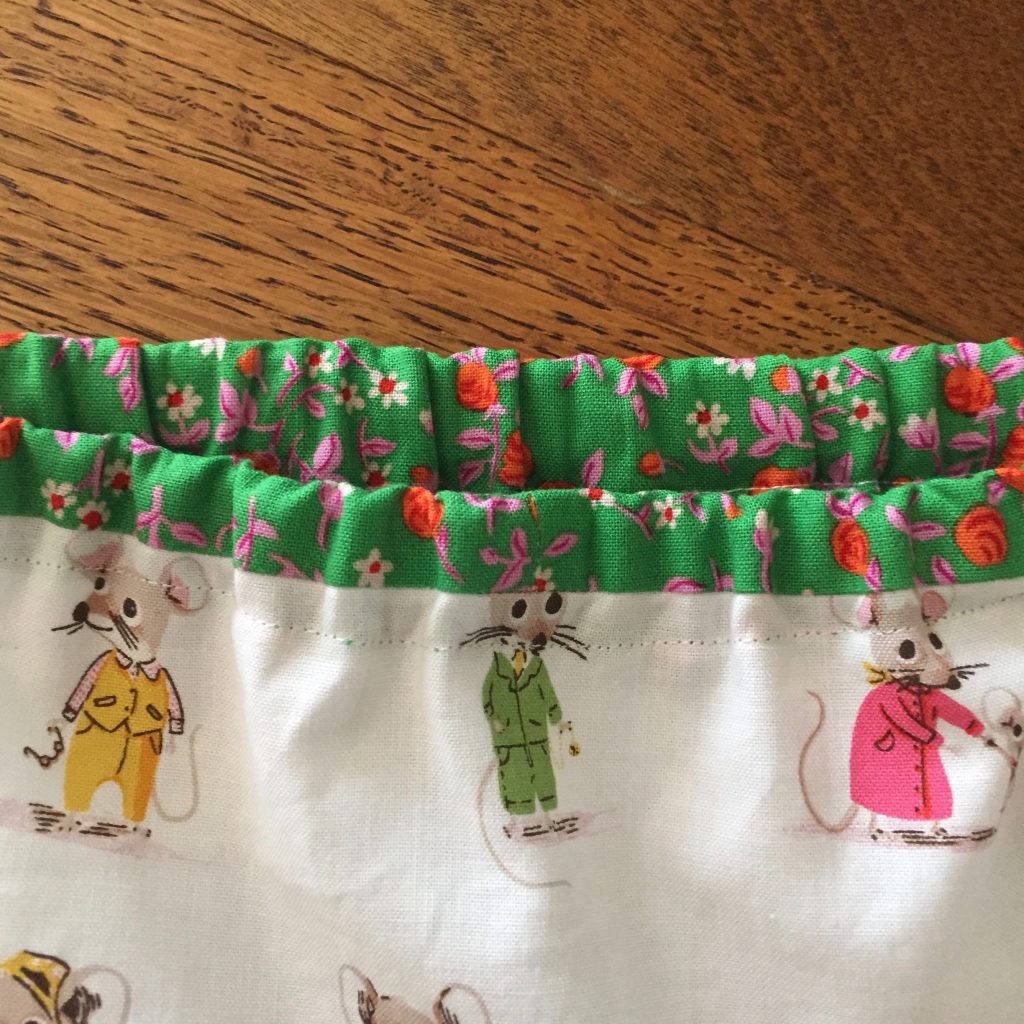
The pattern was a freebie from SewCanShe.com. This little skirt is so simple to make. The length of the skirt seemed quite short so I added a bit more length by adding on the second ruffle with the green floral.
I was also able to add some length by stitching a band of the floral around the top of the skirt. I used that to create the casing for the elastic. This added about one inch to the overall length. I love the way that pop of green looks at the top too!
I packaged up the skirt this morning and will mail it off to Vermont tomorrow morning. The elastic is not yet stitched together. I really wasn’t sure if I was making the waist the correct size so I am hoping my daughter in law can check the fit and then stitch it together. I know H will love these little mice with the bicycles.
Heather Ross creates such whimsical designs. Trixie is no exception. For those of you who are really into fussy cutting, the design lends itself perfectly! Hopefully it will fit H and I can share a picture of her wearing it soon.
Sewing with knit fabrics, making t-shirts and tank tops is not terribly difficult. I have made a number of them. However I am usually less than satisfied with the finished look, especially the hem and the neckline. The other day I was reading a post by Leanne at Devoted Quilter and she shared a pretty blue t-shirt she made. By using a double needle (or twin needle) she was able to achieve a nice finish at the hem and neckline.
These are available everywhere – Jo-Anns, Amazon, etc.
Some time back, I purchased a double needle, fully intending to try this. But for whatever reason, the needle landed in the drawer with lots of other needles and was forgotten. Leanne’s success gave me just the push I needed to give it a try. I looked on-line to see if there was anything special about threading my machine (Janome 6500) for this needle. My machine has two posts for thread which is mandatory. But threading it was nearly the same as using only one spool of thread. I didn’t want to buy two spools of the same color thread since this isn’t a color I will use often. Instead, I wound an extra bobbin and used it on the second post. This worked just fine.
Two very neat rows of topstitching forming the hem of the sleeve.
Sewing with a twin needle is interesting in that you must stitch from the right (or the top) side of the garment. The twin stitching shows on top and the bottom stitching has an interesting zig zag pattern achieved from the use on two needles on top and only one bobbin on the bottom.
This is how the back side looks.
This is the part I think is so magical. When I first tried using the needle and a a few scraps, I wasn’t at all sure what the bottom would look like as I didn’t really understand how one bobbin would deal with two threads.
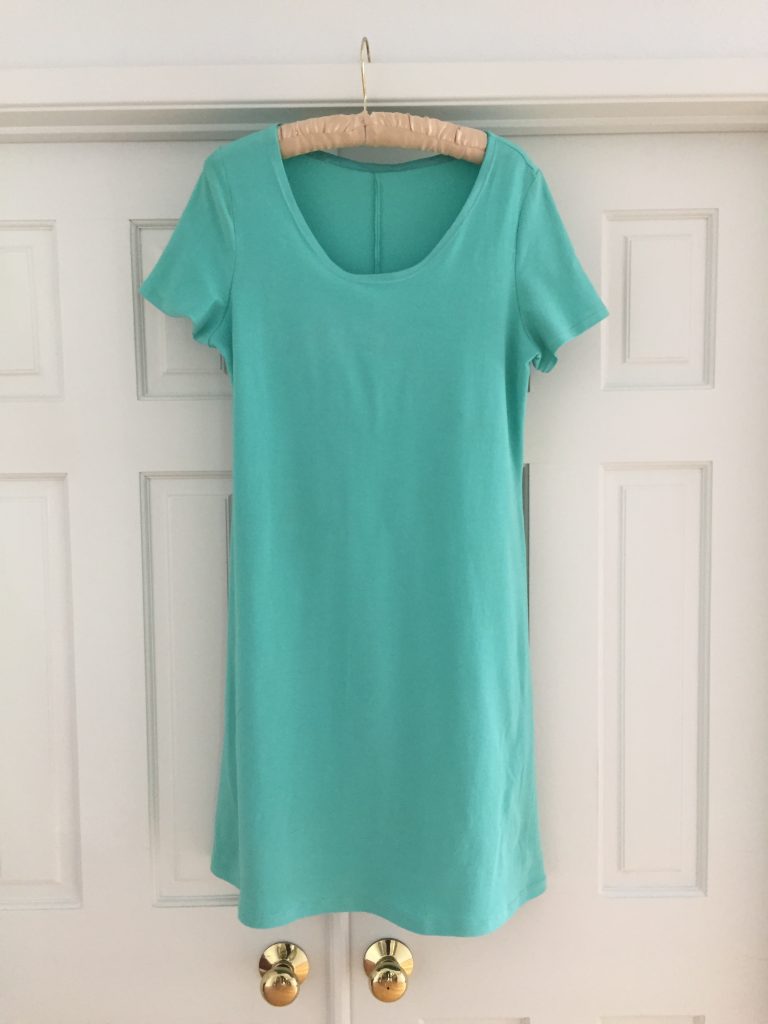
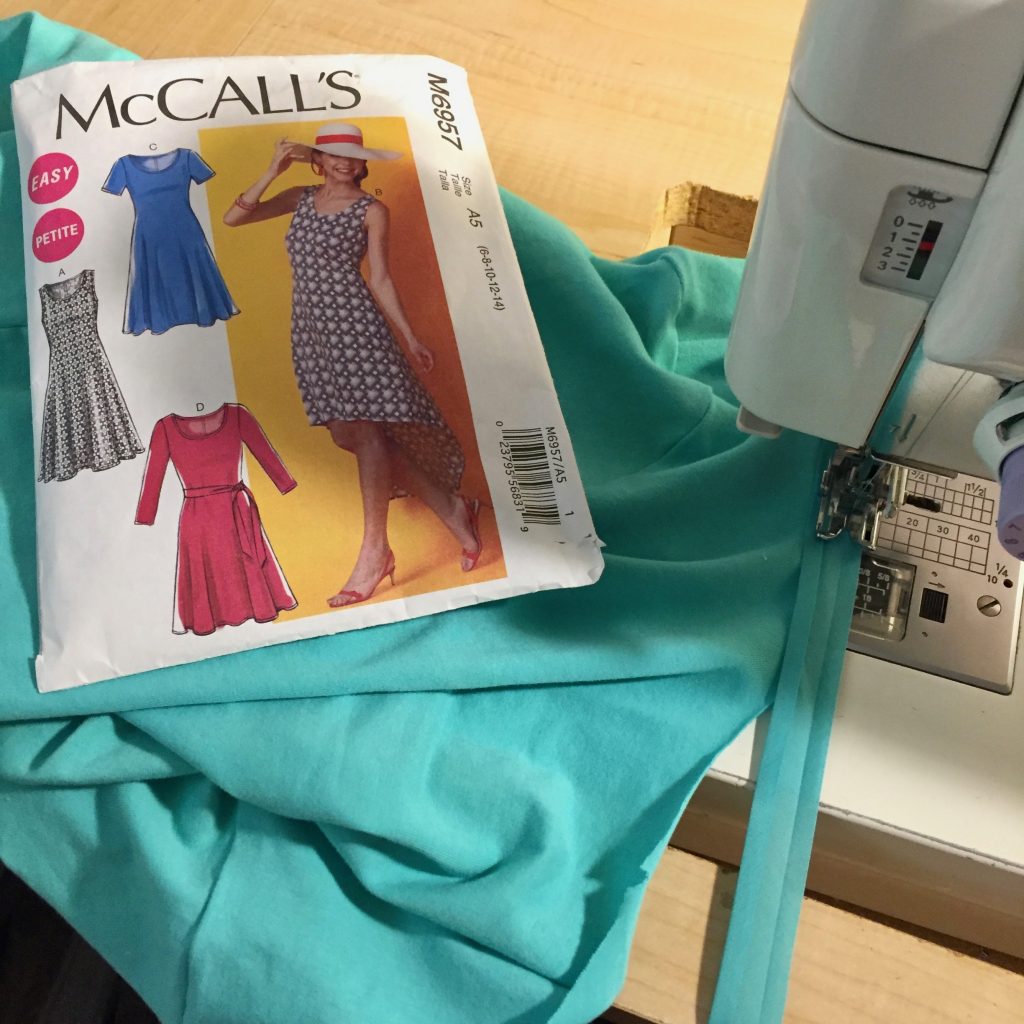
Ok, here are a few details about this project. Using McCall’s M6957 and my thrifted stretch knit fabric, I made a very simple t-shirt dress. I cut the top at a size 12 and graded the waist and hip area to a 14 so it wouldn’t hug at the belly (because that isn’t a look I need to share with the world). The cut of this simple dress is really comfortable and the fact there are only three pieces to the pattern makes it a very easy project to put together.
I have had this green knit fabric in the drawer for about a year now. I picked it up at a garage sale from someone who was clearing out a lot of fabric. (That was a great sale and I was fortunate to purchase a large stack of knit fabric in good condition). I thought I would use this piece of fabric because if the fit wasn’t good there wasn’t a big loss since there was only a few dollars investment.
I got lucky though and the fit is great. I don’t have a picture of it on me because as I write this, I don’t have anyone to take a photo. Selfies are not my forte so I am not going to bother. Maybe I will post one later on. For now, you get the boring picture of it hanging from the door.
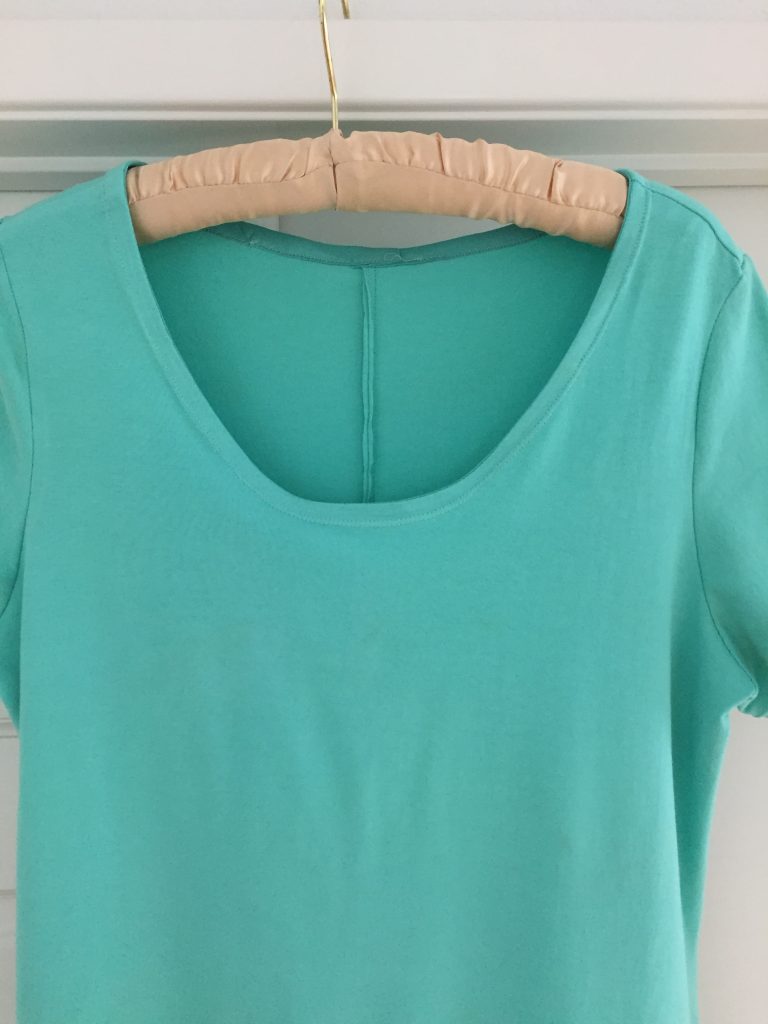
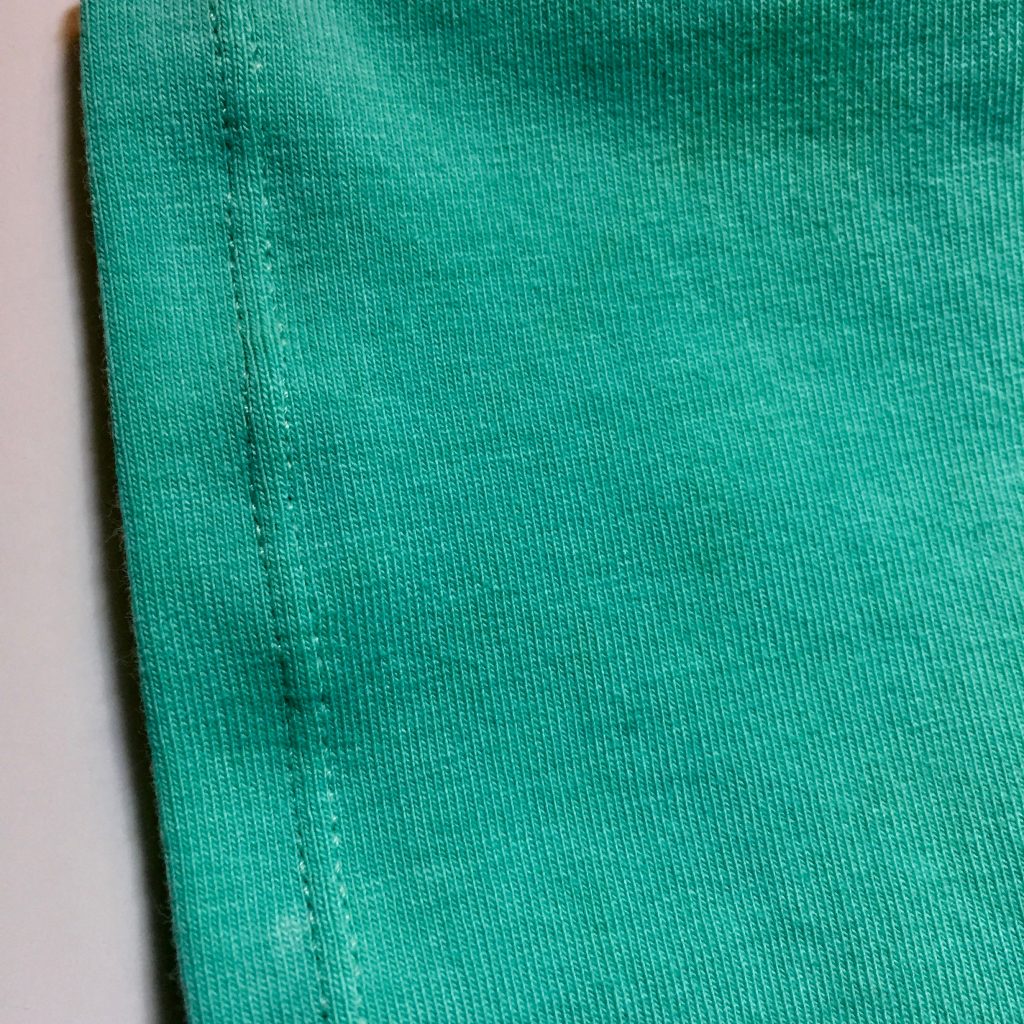
In my opinion the double needle makes all the difference. The hemline, hem of the sleeves and the topstitching of the neckline look so clean. It really elevates the finish of this dress. One thing to note, the pattern instructions told me to just fold the neckline in toward the wrong side and topstitch. I don’t like that method as it usually makes a wavy neckline and it allows too much stretch.
Instead, I attached single fold bias tape and then folded that to the inside and topstitched it. This way, I have a cotton strip creating shape to the neckline. It lays flat and looks really nice. I also reinforced the shoulder seams with bias tape so they wouldn’t stretch. After sewing the shoulder seams and checking the fit, I took a small piece of bias tape, laid it over the seam line and stitched it down. A very easy task and it will prevent the seams from stretching.
Now that I feel confident about the fit and look of this pattern, I want to make another one. I have lots of nice knits and look forward to using them. I think I will make a sleeveless version since we have such warm summers.
Hoping all of you enjoy the weekend. We will likely have a fairly quiet weekend. Julia is studying for finals. My husband wrenched his back and is limping around trying to let it heal. No big plans for the Kringel’s this weekend!
Linking to my usuals – check them out at the top of the page under Link Ups.
I saw a funny graphic on Facebook the other day. It isn’t something I made up and I don’t know to whom I would credit this but it resonated with me.
Of course, it is even worse now. It isn’t a couple of years out. Next year is 2020 so, 30 years ago will be 1990. How can that be? Thirty years ago seems such a long while back. However 1990 doesn’t seem that long ago. Ah, I am such the philosopher. These are the deep thoughts I have been having as we move into 2019 –
I have had the pleasure of spending the New Year’s holiday with my oldest son and DIL in Vermont. It has been a wonderful week of family time – my middle son and his wife drove here from Toronto for the holiday. My grand daughter has been charming – I gave her a little plastic tea set for Christmas and we have had a number of tea parties with her stuffed animals.. I am surprised to see how quickly she fell into this pretend routine of pouring tea (she calls it ‘pepper tea’ as she can’t quite say peppermint tea). She adds a spoonful of sugar, stirs the tea and then blows on it to cool it off for her hedge hog and her Elmo doll. I love it!
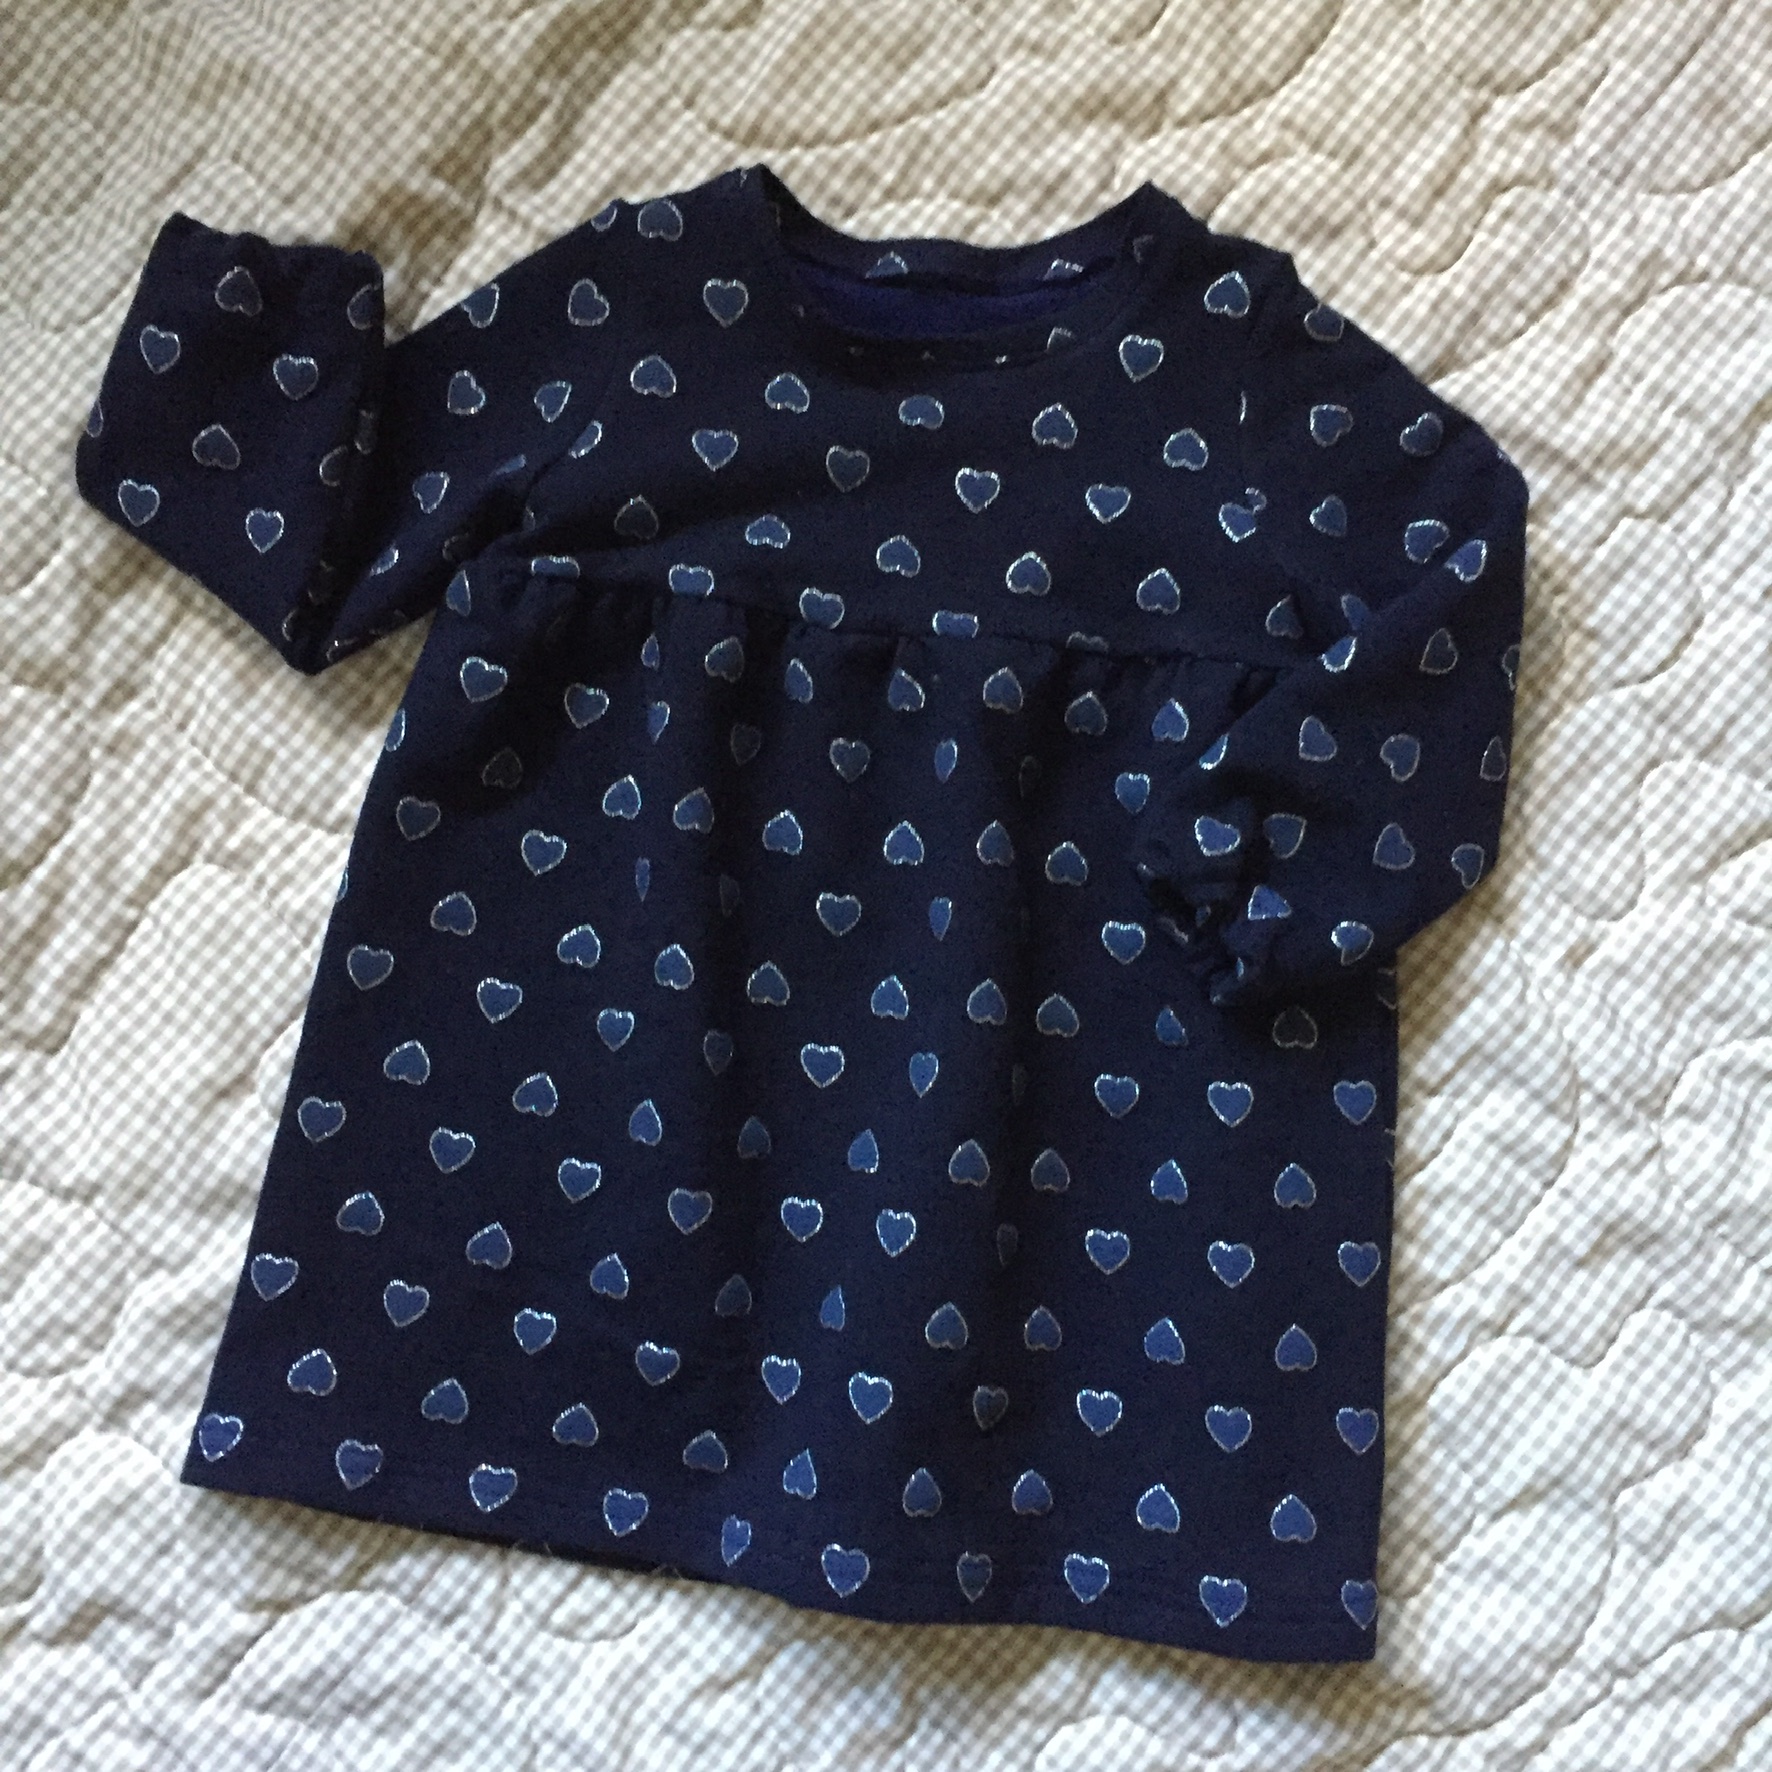
I also brought her a little dress that I made a couple of days before flying out. This is the first time I have sewn anything with a Burda pattern. The directions were clearly explained though so I didn’t have any issues. When I was making this, my DIL’s mother was visiting in Vermont so I was able to ask her to take a few measurements for me. I made a size 2 and, for the most part, it fits nicely
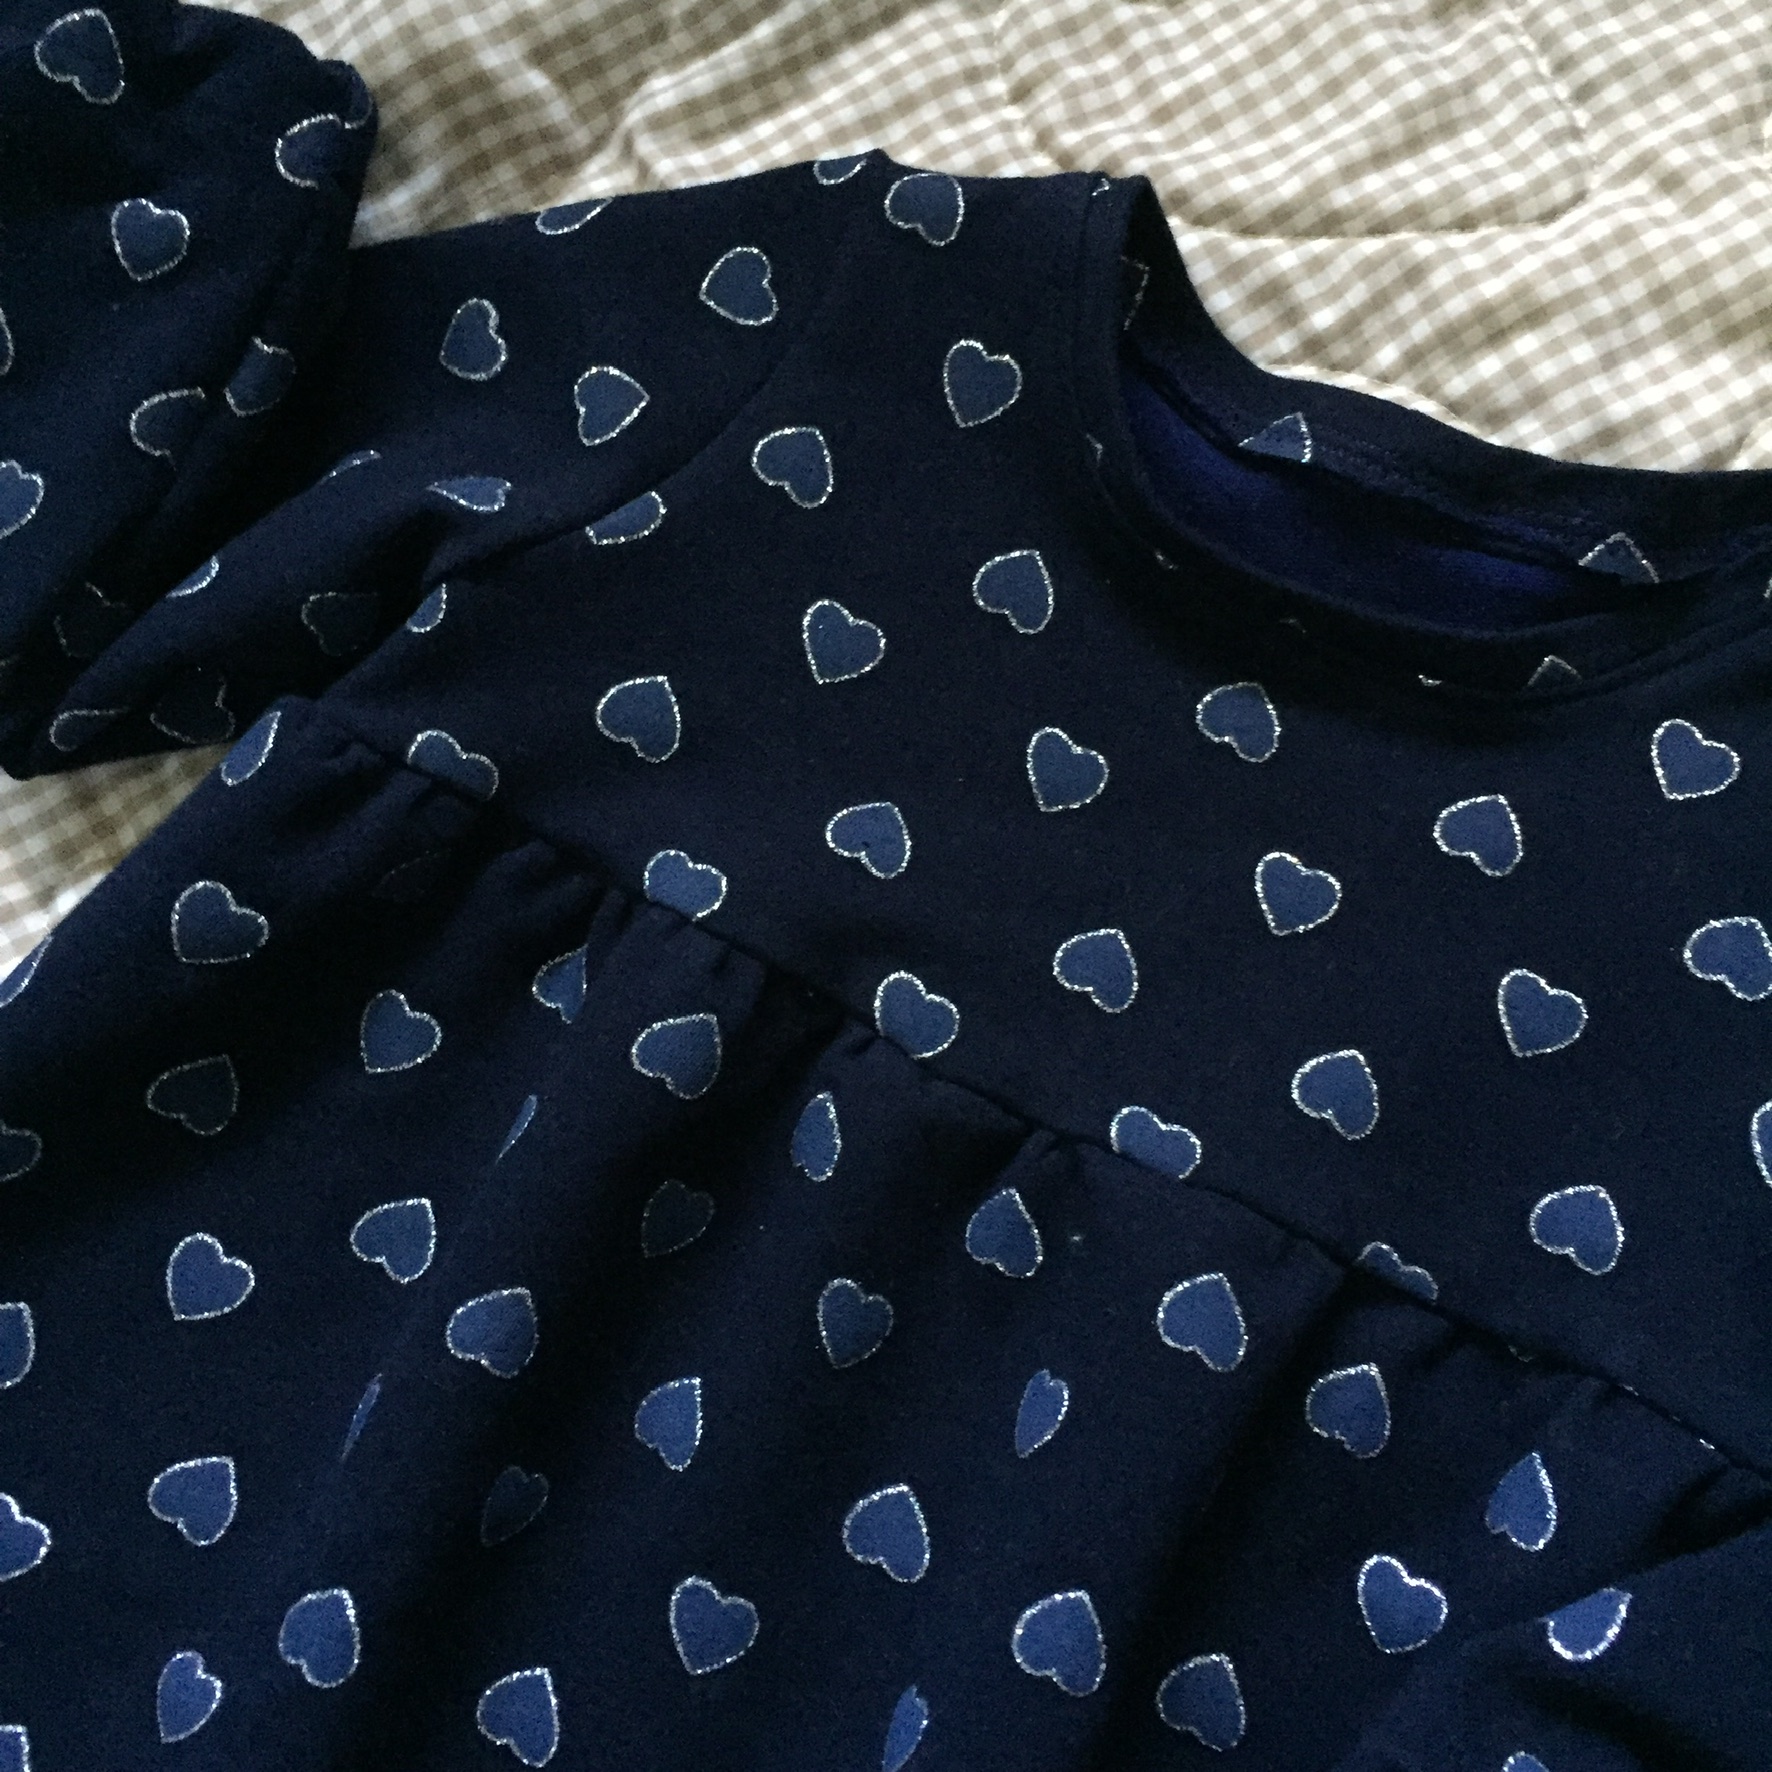
The fabric is a soft and cozy fleece from Jo-Ann Fabrics. It is a deep navy with little hearts outlined in silver. H called them stars, maybe because they are sort of sparkly?
The neckline is finished with a strip of the same fabric. I am STILL having issues with my serger so I finished the seams with a small zig zag stitch and then trimmed the seams. It worked just fine.
Here is a cute picture of H wearing her new dress. Is she not absolutley adorable??
Earlier that same day, she asked Grammy to put ‘pretty-pretties’ in her hair which means a pony tail. She has so little hair, but I did the best I could! She makes me smile.
This morning we woke to a little bit of snow. Perfect timing – we get to have just a bit of wintry weather before heading back to California tomorrow to the real world. School starts next week for Julia and I have orders to ship. We had such a great visit though – Vermont life is pretty wonderful!
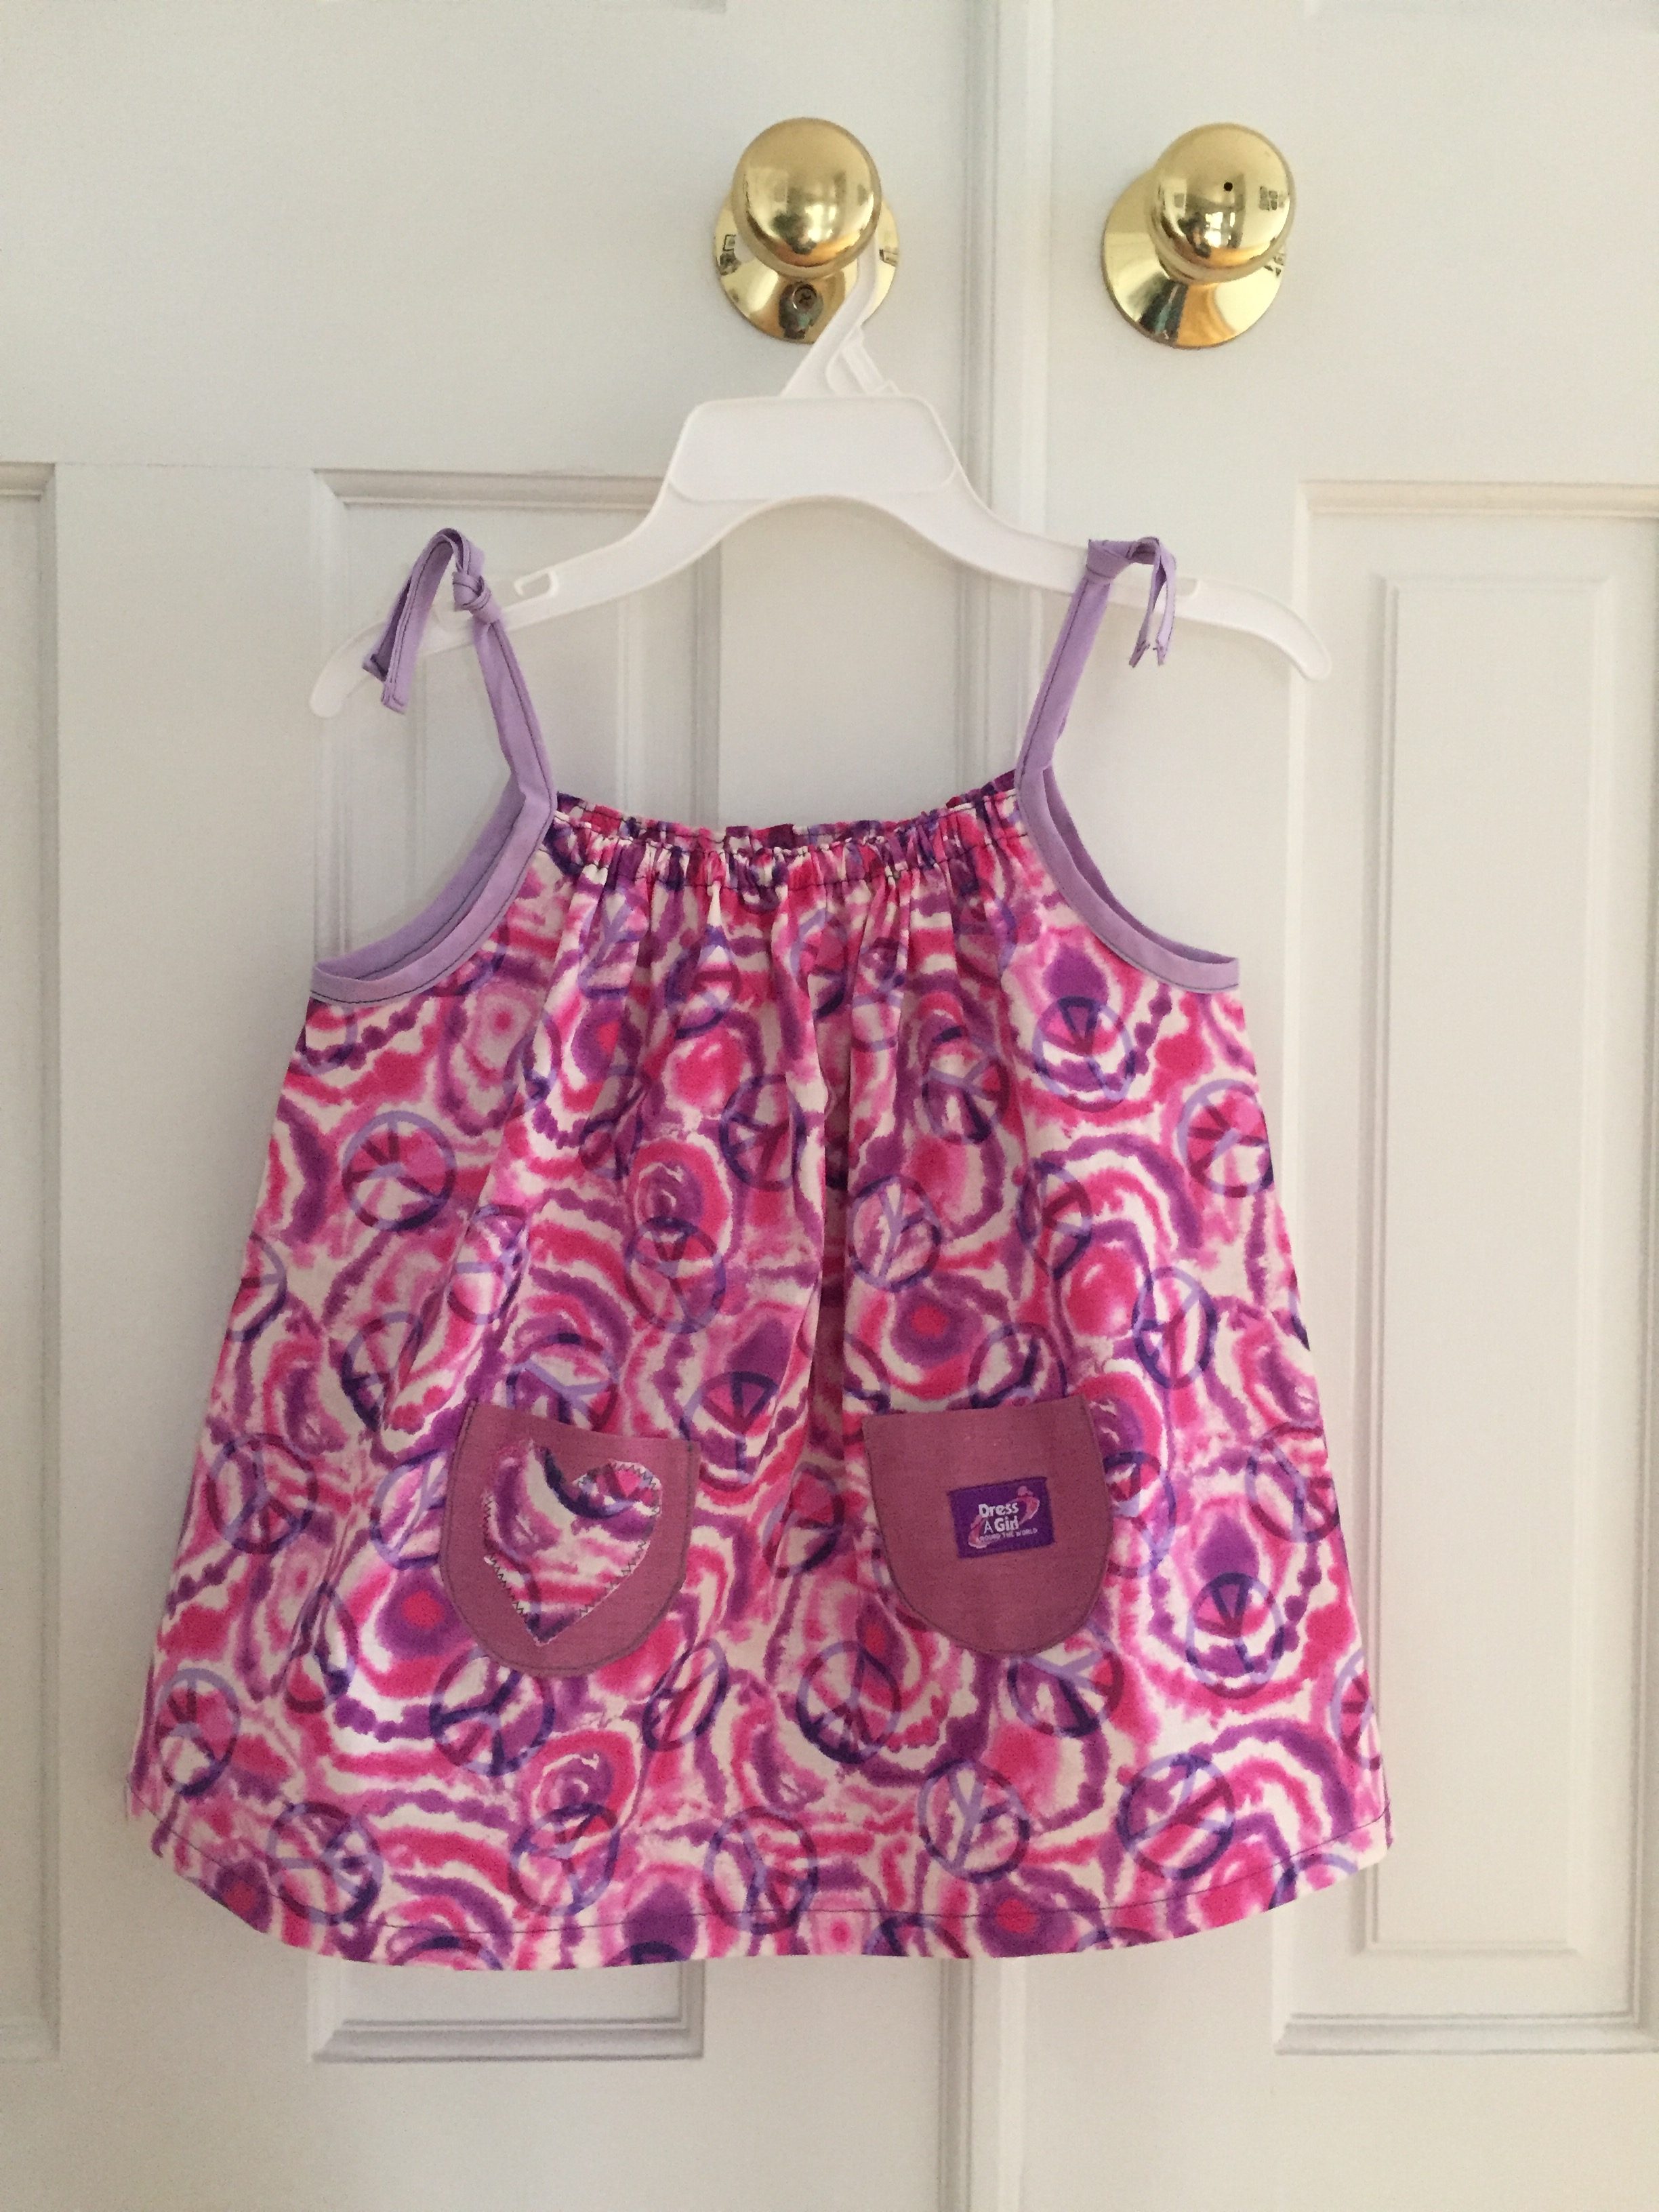
I have a quick, cute, feel-good finish to share today. I know I am a bit late to the party but I (finally) made a little dress to donate to the Dress a Girl Around the World program. I have read lots of posts over the years about others making these sweet dresses. I am happy to finally have joined in and made one too!
Dress a Girl Around the World is a campaign under the non-profit called Hope 4 Women International. They hope to bring dignity to girls and women throughout the world. It is such a simple thing – wanting a girl to have a dress to wear. They are sent to many different third world countries. While this organization has many goals they are trying to fulfill with the program, it is their basic mission to make girls and women of all ages feel worthy that moves me the most. In so many of these countries, females are undervalued or even not valued at all. While one dress isn’t going to correct the problem, it will bring a smile to the sweet face of a girl who has never had her own dress. Also, many of the people working in these countries and delivering the dresses have said that dressing a girl in a clean dress with the Dress a Girl label attached on the outside, shows this child is being cared for. Sometimes this is enough to ward of predators (criminals involved in human trafficking.) If these little dresses can have this sort of impact even a couple of times over, that is enough reason for me to make one.
Finished seams are a requirement for making these dresses.
There are lots of guidelines for making these dresses. While they originally began by making the dressed with pillow cases, this is no longer the method. Quality cotton fabric is longer lasting and this is what they ask be used in the dresses. If you are interested, you can read about this requirement and others here. The biggest thing is coordinating with an ambassador in your area. There are many available and their contact info can be found here.
This label is sewn to the outside of each dress.
As for me, our local Soroptomist club held a drive to have dresses made by locals who enjoy sewing. I was referred to them and happily made a dress. It was a very simple project and took maybe a couple of hours at most. The little dress looks to be about a size three so for a little one. I hope she loves the fun pink and purple colors and the little heart on the pocket. As you likely already know, I love these sorts of projects – they just have satisfaction and purpose written all over them.
Linking up for the last time with Finish it Up Friday at Crazy Mom Quilts. Sniff, sniff. I will surely miss reading Amanda Jean’s blog posts and wish her well in her next adventure. Other links ups are found at the top of the page under Link Ups.
Did you happen to read about the series of Quilting Cozy mystery novels in yesterday’s post? If not, go and take a peek. You can enter to win the books in a giveaway too!
Newsletter!
Have you signed up for my newsletter? It is published every month or so and contains information about my shop, new arrivals, sales, and events. Click here to sign up!
When the family was all here for the wedding last month, I asked my daughter in law if I could make a Halloween costume for H. I know she won’t really ‘trick or treat’ since she isn’t even 2 years old yet. But the kids at daycare will likely celebrate Halloween. Also, she is starting to enjoy pretend play and dressing up with silly hats, wearing her mama’s ‘pretties’ (bracelets), etc. I think even if she doesn’t trick or treat, she will enjoy having the costume to play with.
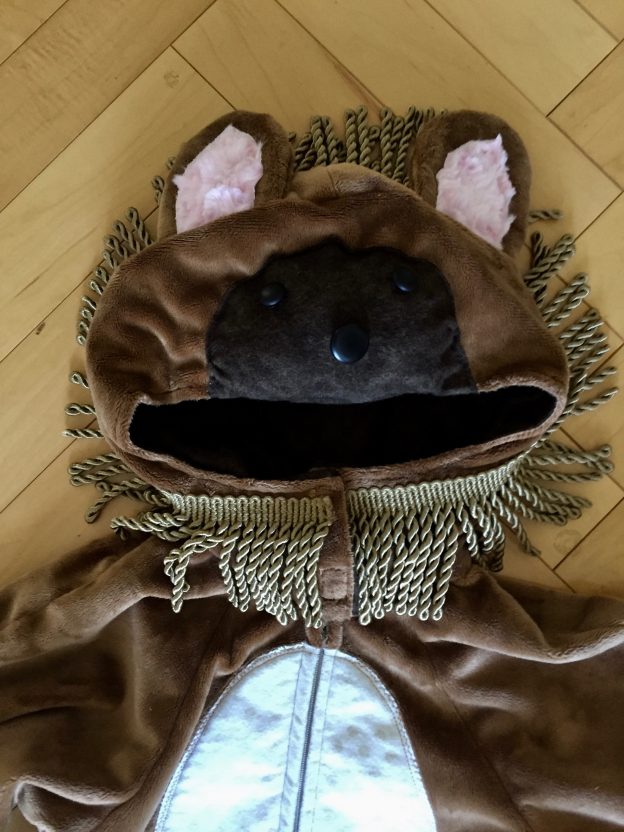
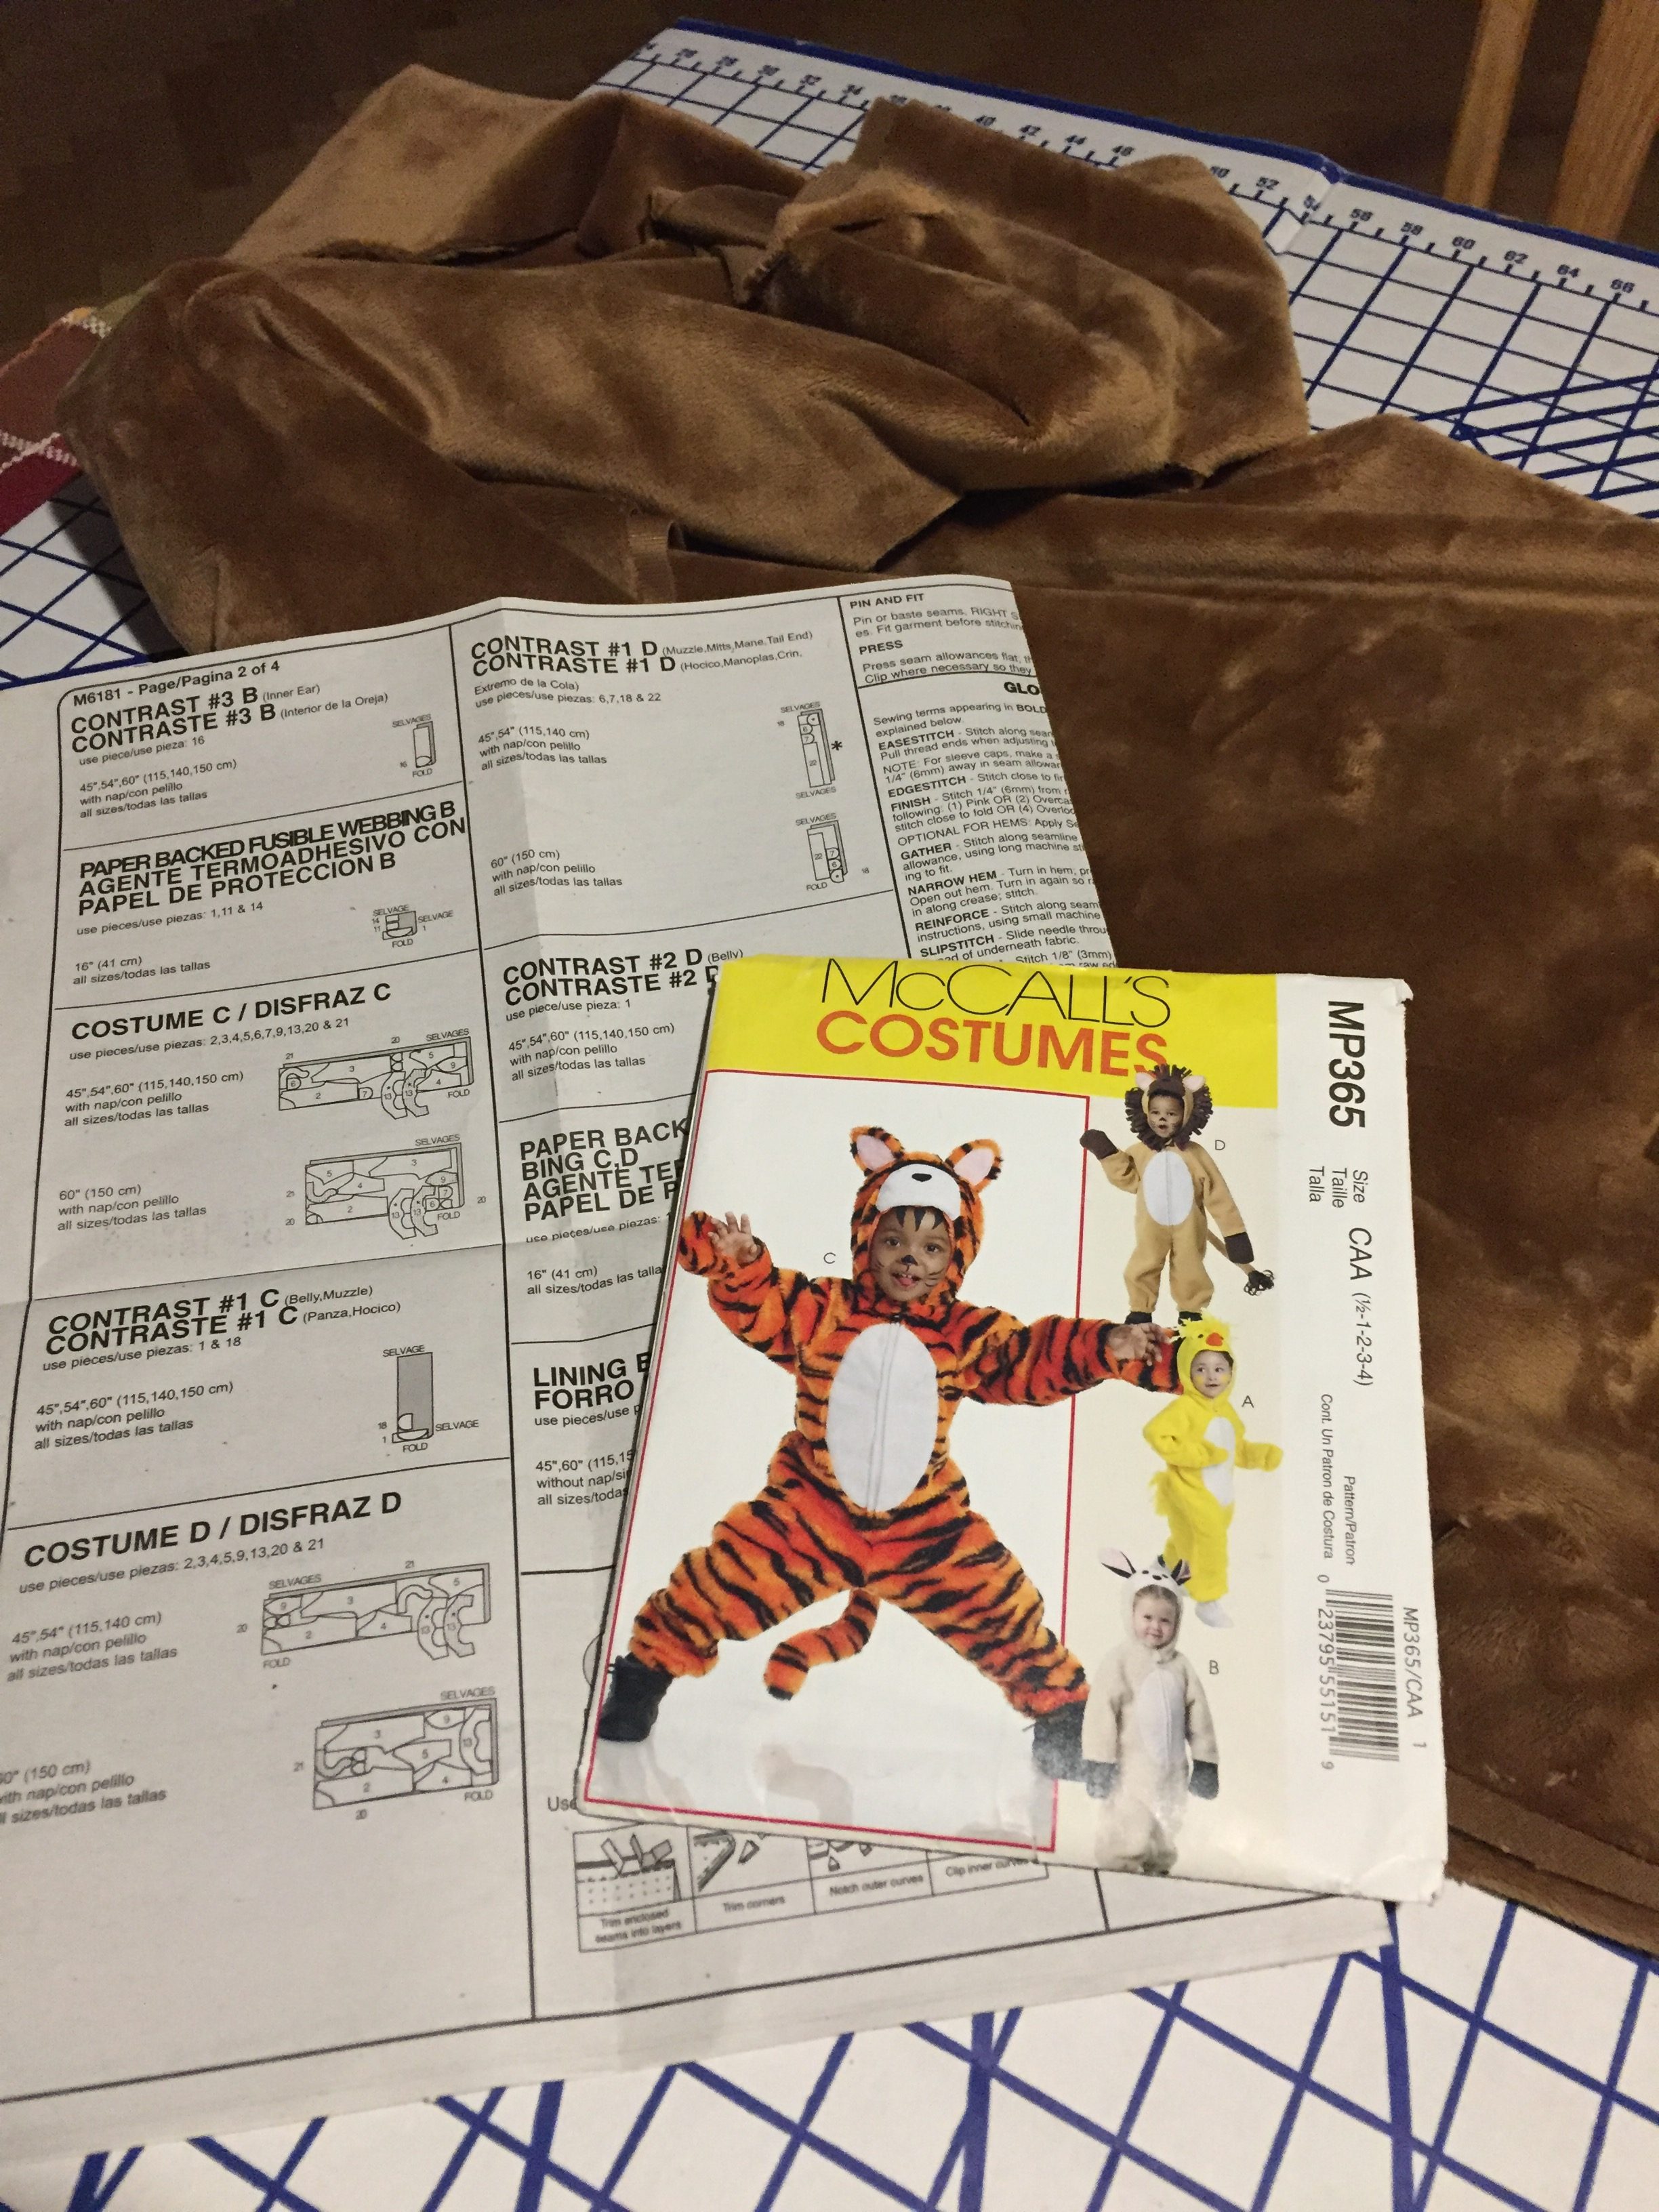
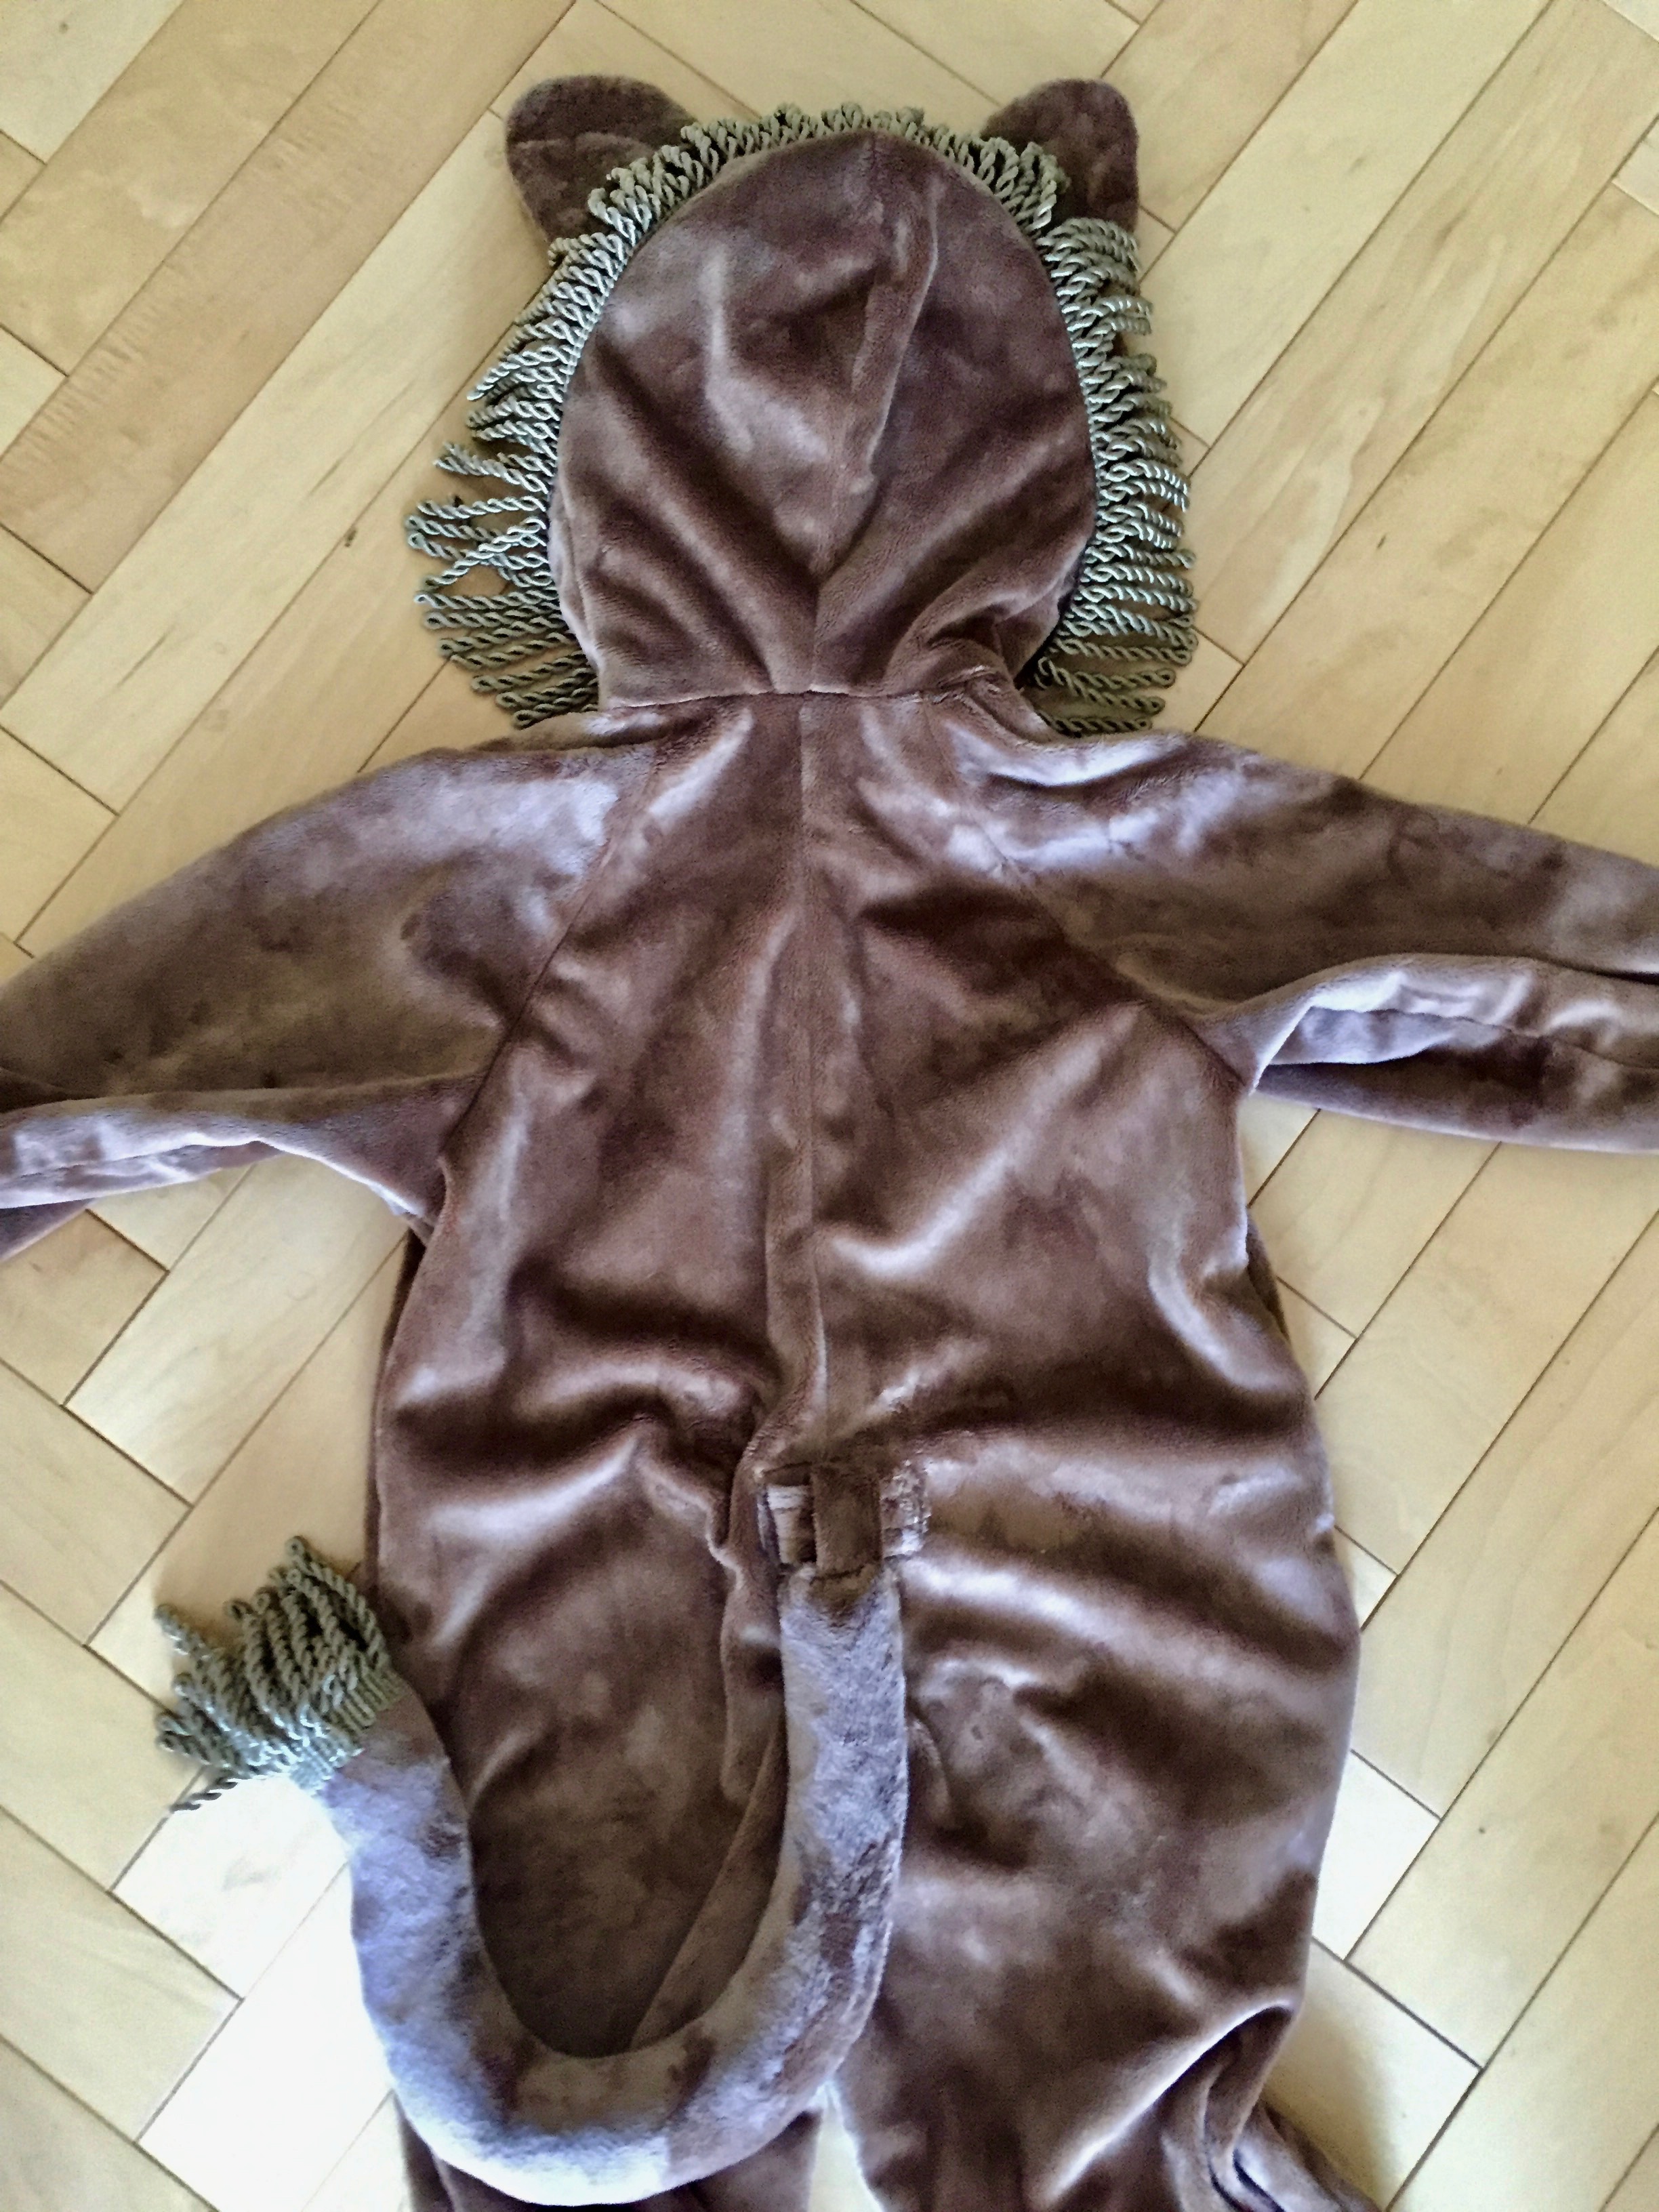
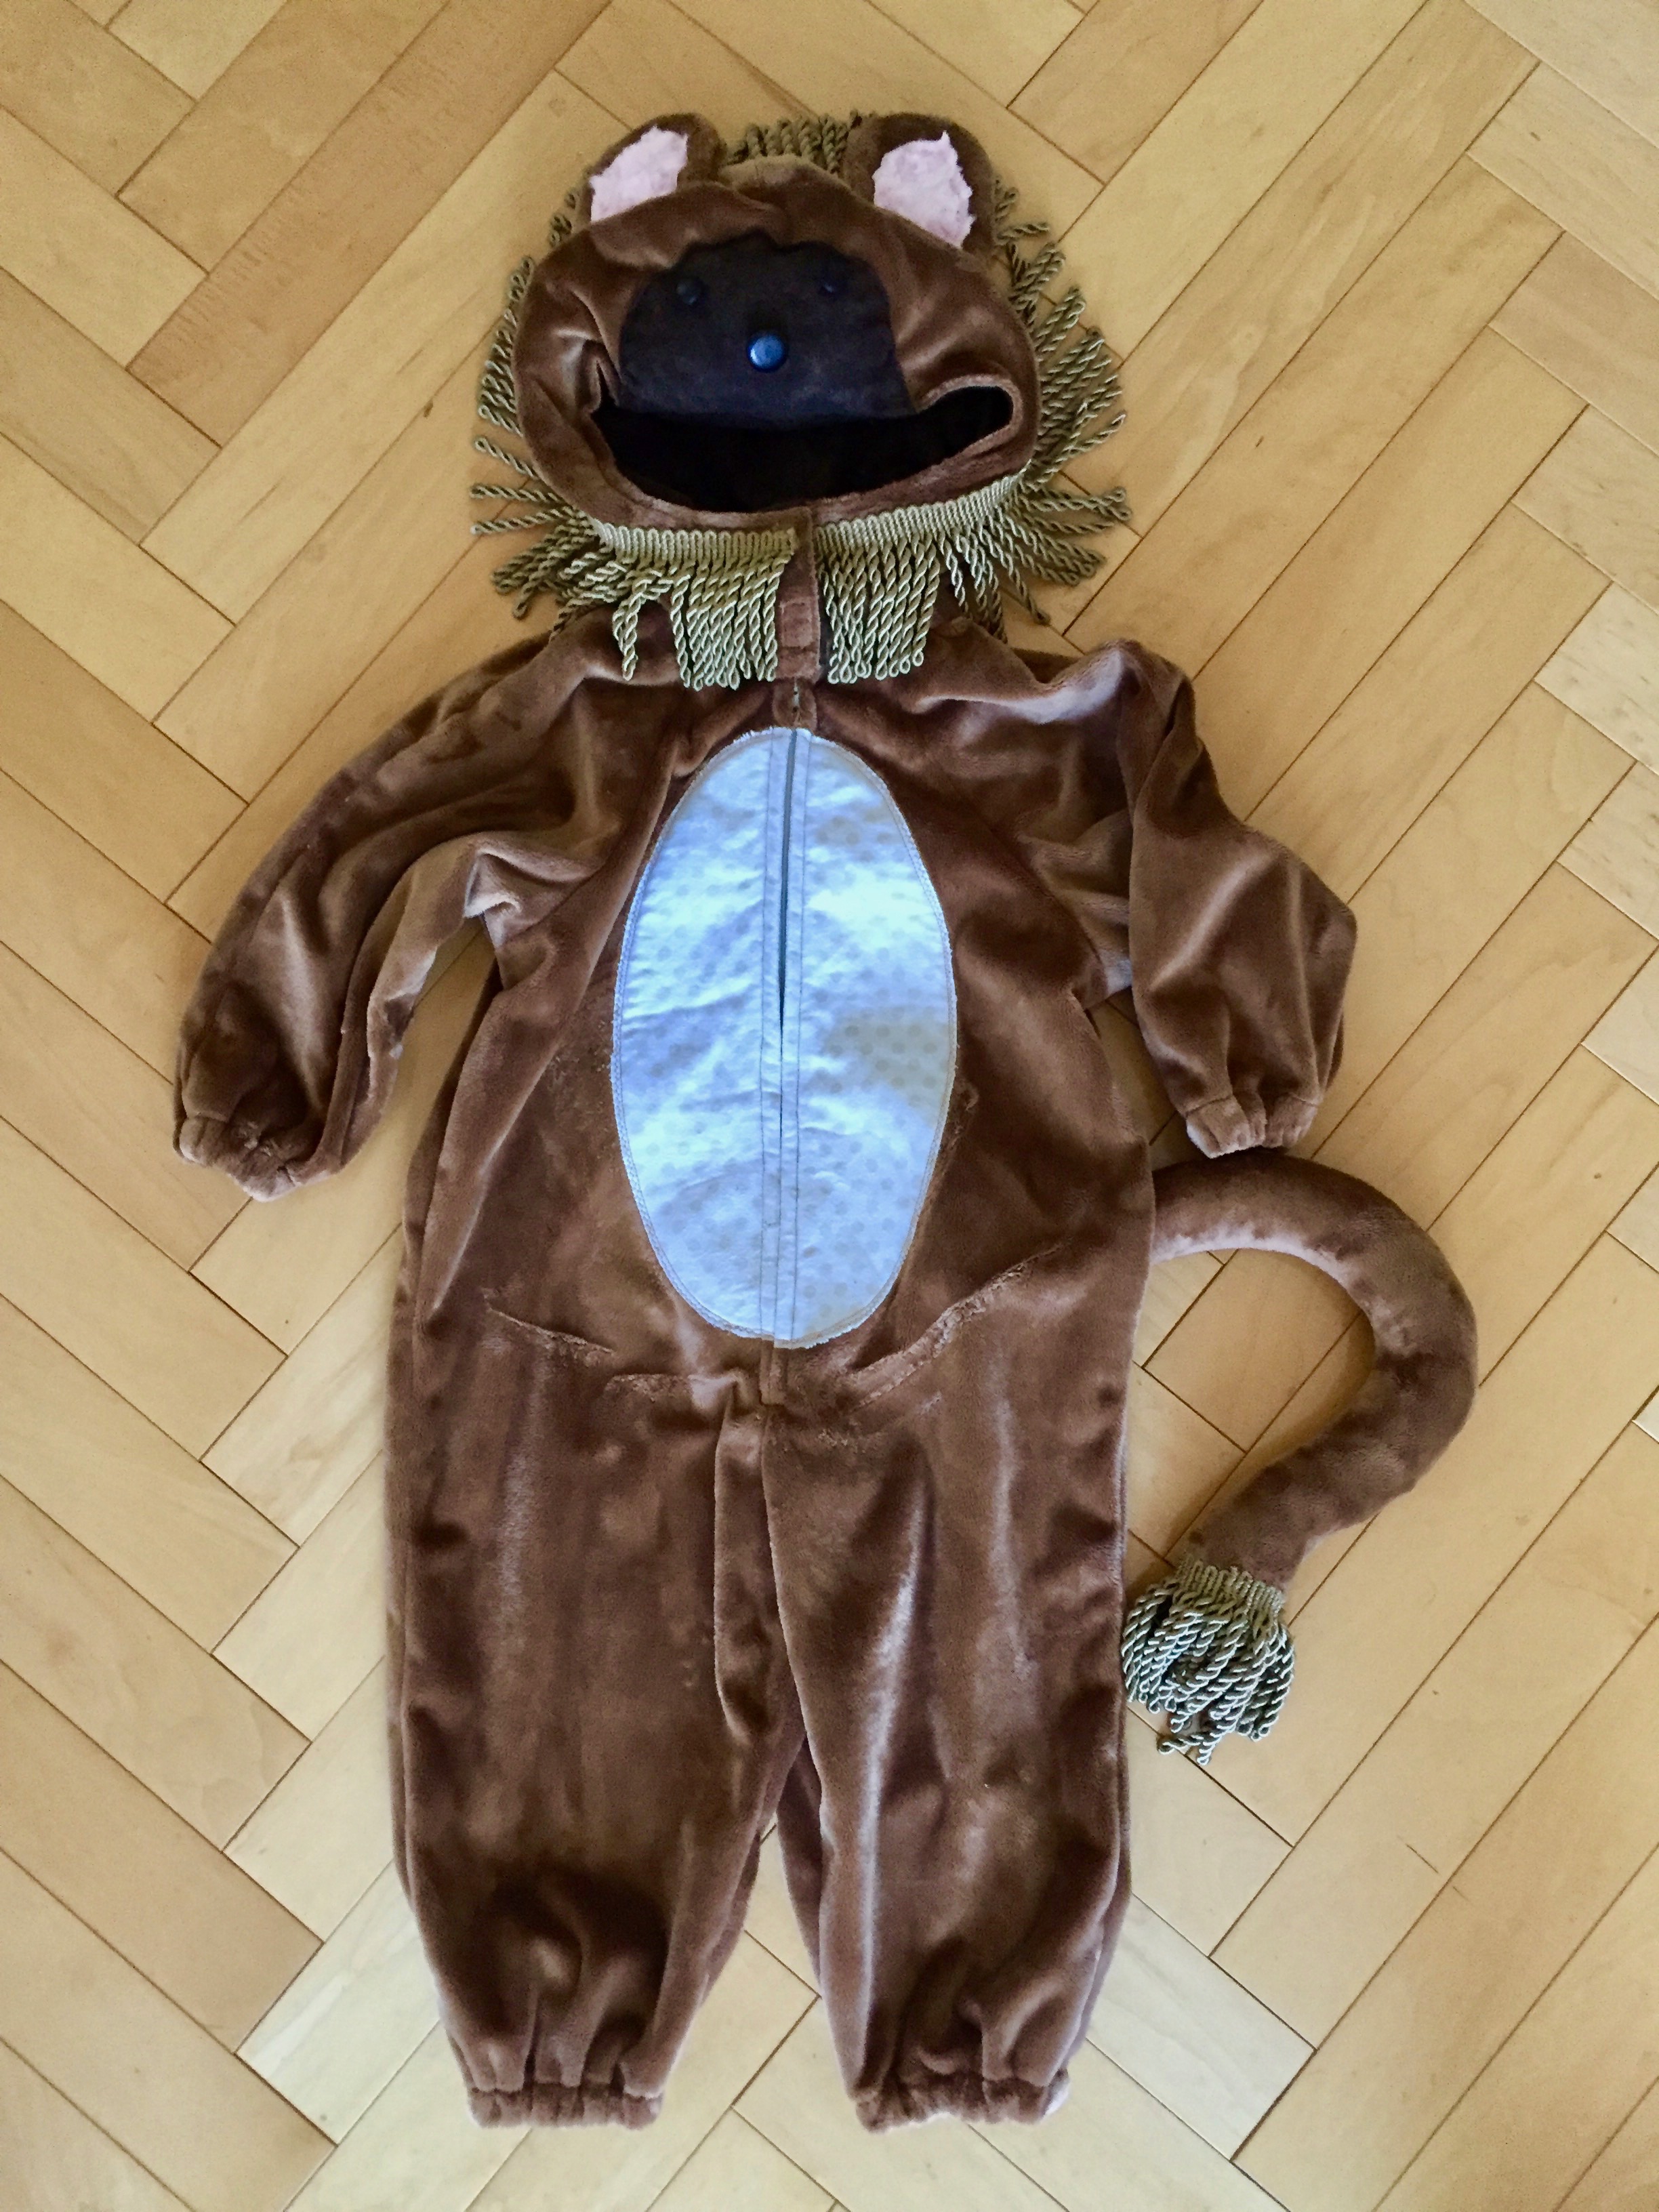
After chatting, we decided on a lion costume. It will be fun for her to play with and she does enjoy roaring like a lion (which just cracks me up). I ordered a pattern, which was silly because I have so many costume patterns in my pattern shop but I had sold the lion pattern already. Anyway, I selected McCall’s MP365 as it looked like it would be pretty simple to make. I decided to leave the hand mitts off and make the tail detachable in case it was annoying when H was pretending to be a ferocious lion.
I chose a soft minky fabric for the body of the costume. So cuddly….and so evil! Honestly, cutting the minky was incredibly frustrating. It slips and slides all over the place. I would begin pinning the pattern piece from the center and work outward. By the time I was to one end, the other would be off. It was crazy! So after putting nine billion pins in it, I finally started cutting. It made me nervous that sewing it would be a miserable experience but it wasn’t at all. I had talked to my minky-expert-friend, Sophia, and she told me to use lots of pins and my walking foot. The walking foot made all the difference.
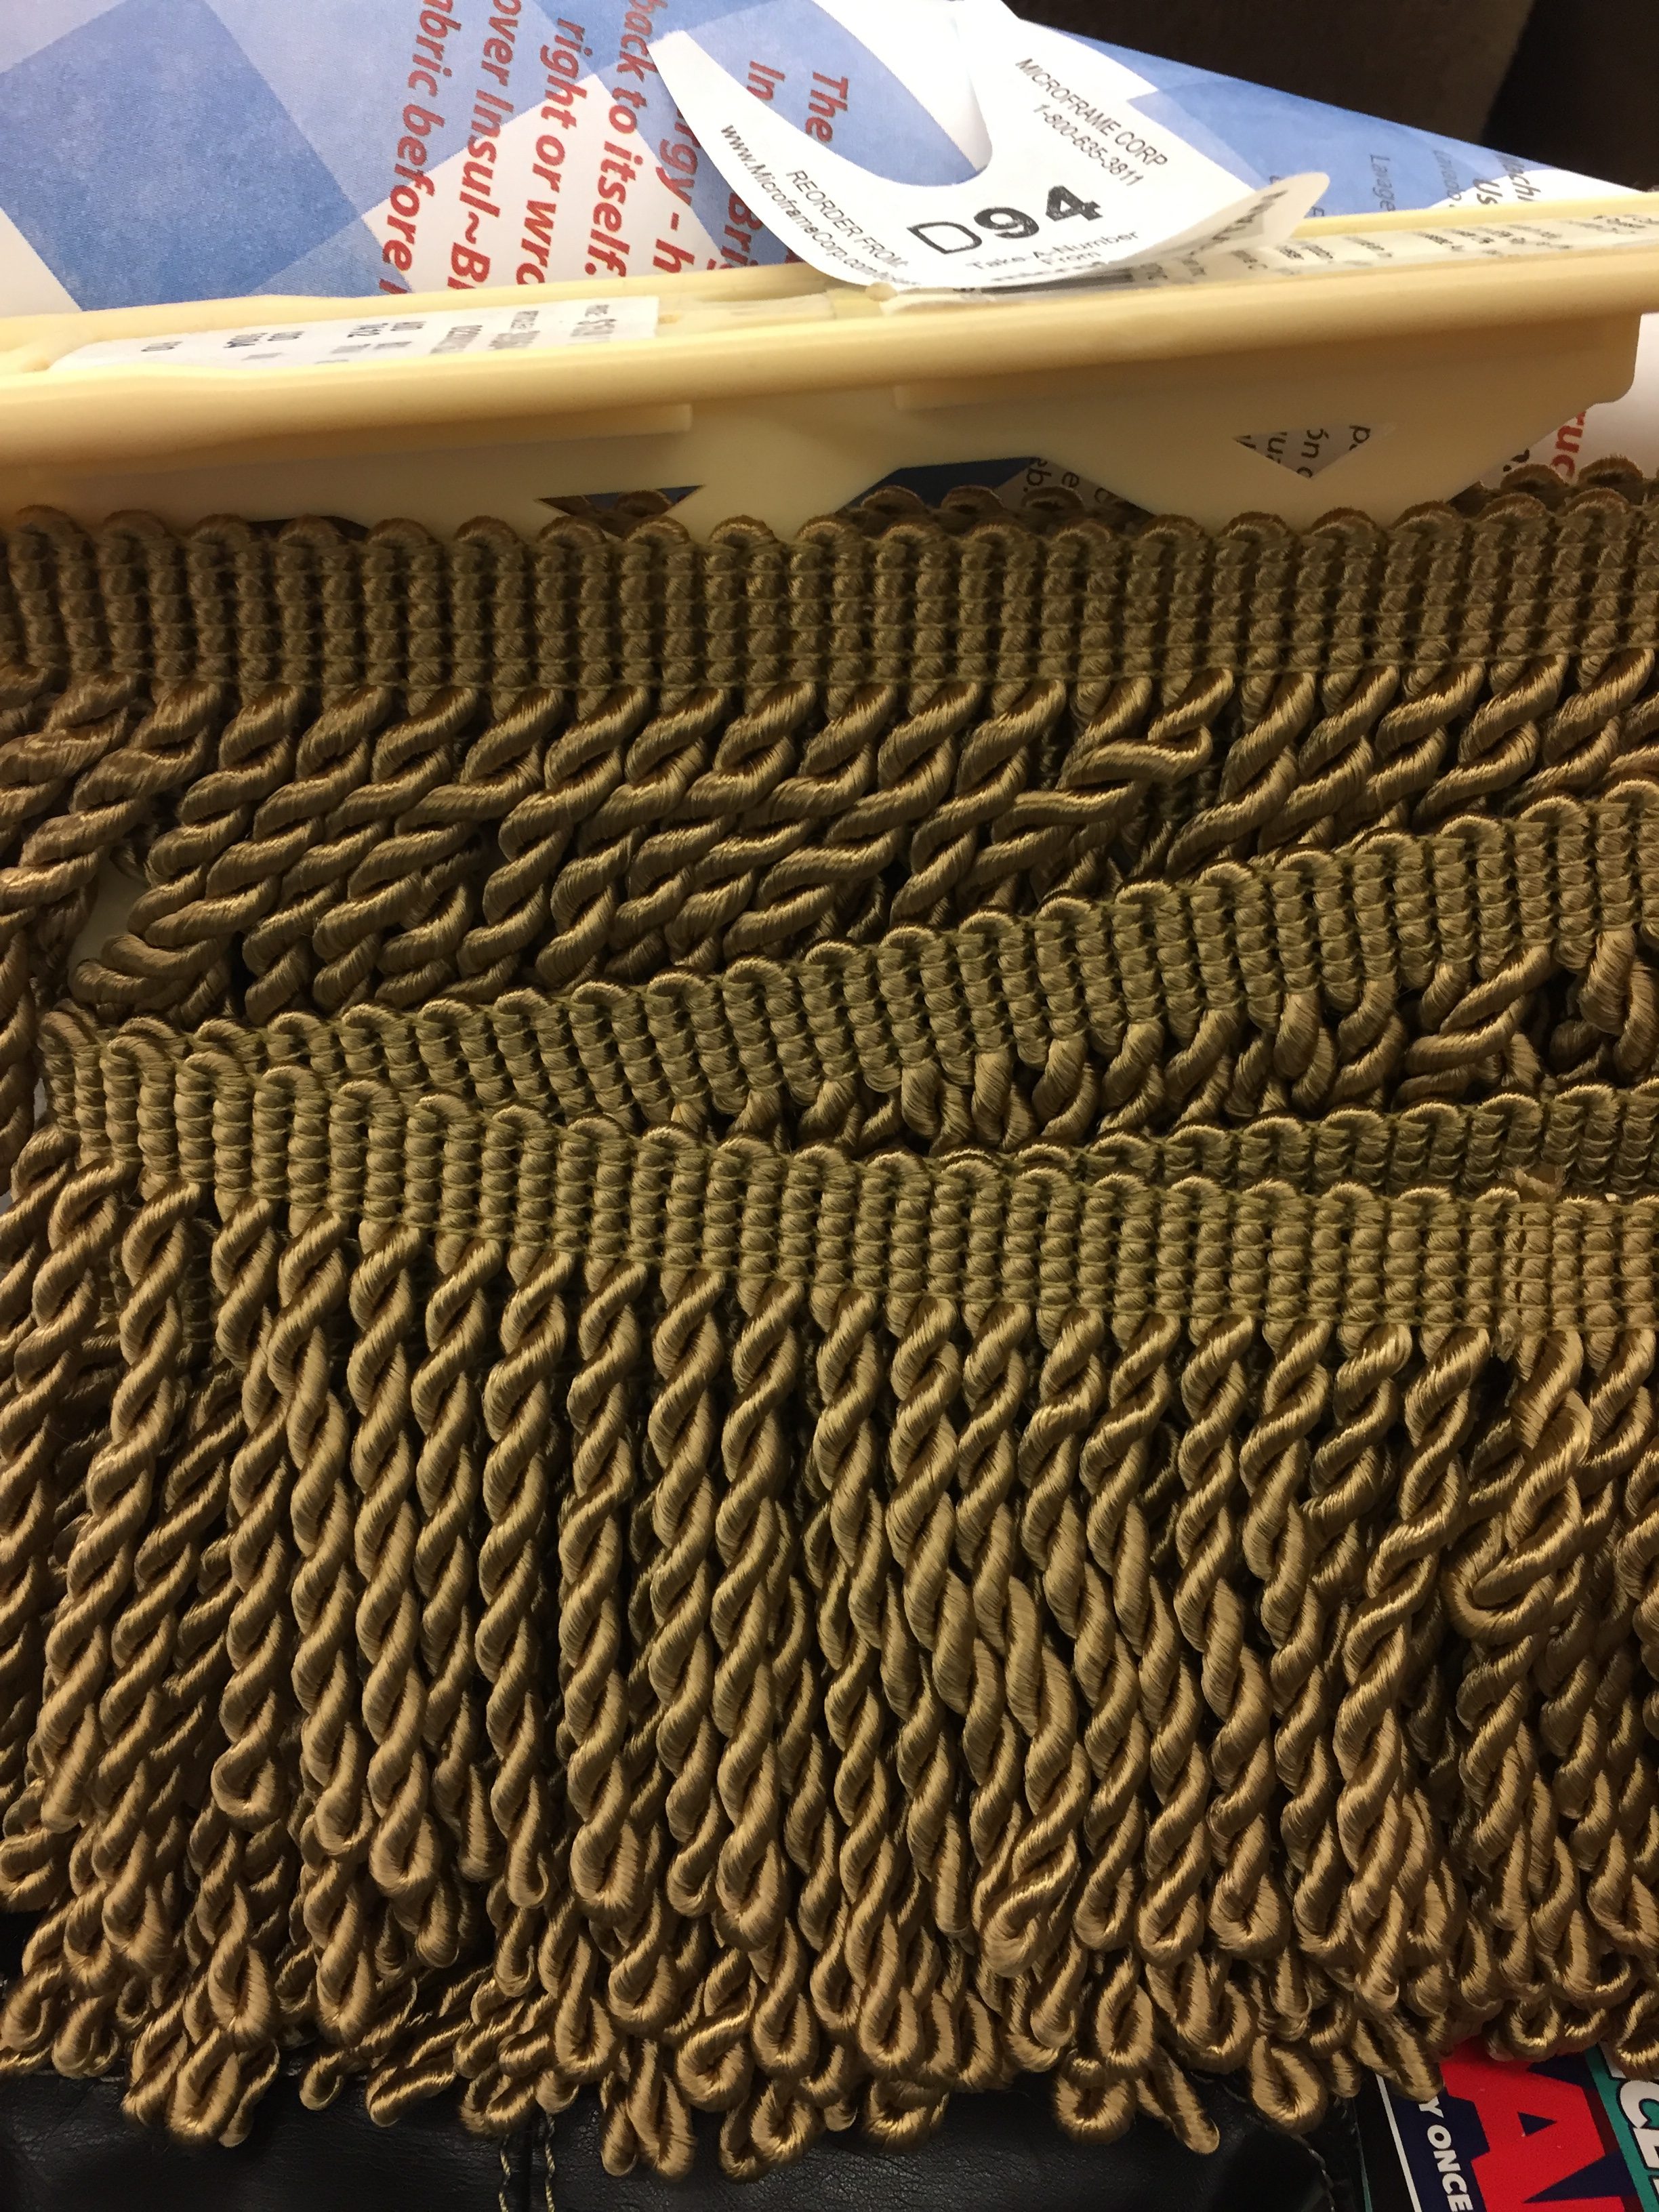
One of my favorite parts of the costume is the lion’s mane. I had bought brown fabric and was supposed to cut fringe to create the mane. But if H uses this very much, it will be washed a lot and I wasn’t about to finish each edge of the fringed mane. I could have used minky because I wouldn’t need to finish the edges. Then one day I was at Jo-Ann’s and I took a look at prepared trims. I found this fringe and it was perfect!! It makes the lion sort of sweet. My DIL says it reminds her of the Cowardly Lion from the Wizard of Oz. It was so easy to attach and saved me a lot of time. I also hand stitched a bit of it to the end of the tail.
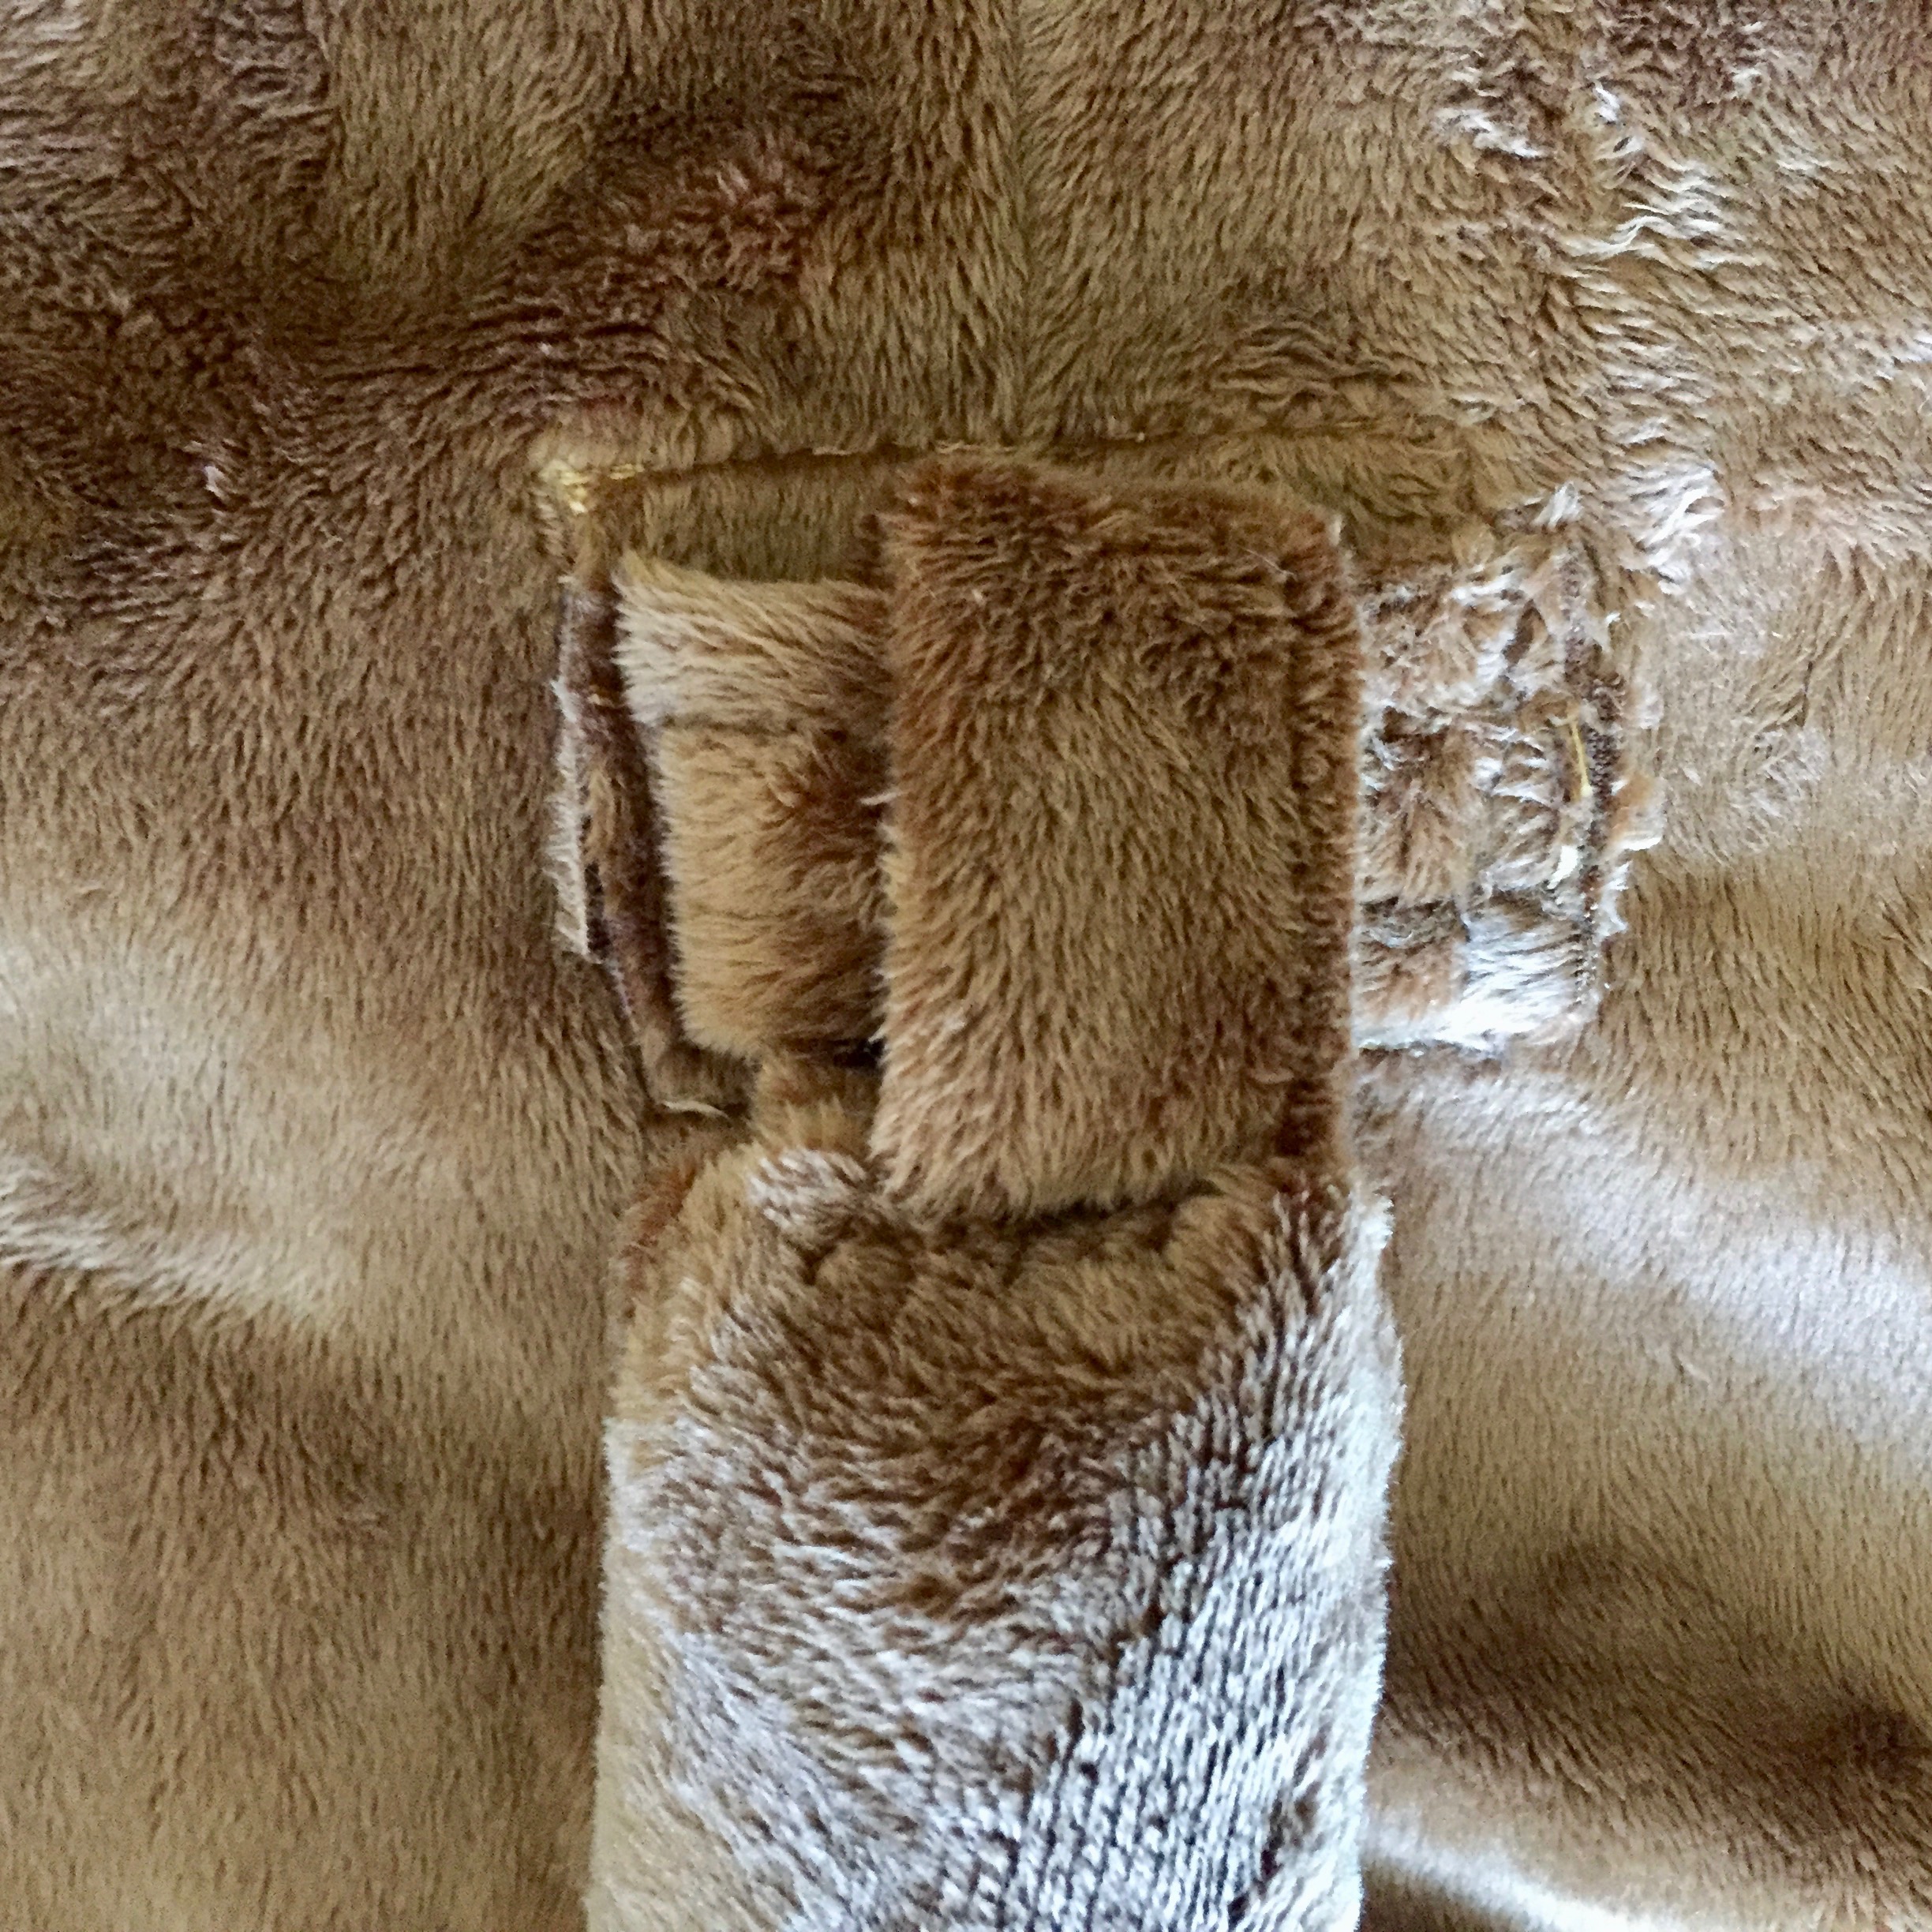
This loop on the back side of my little lion holds the tail.
Making the tail detachable was not a huge deal. I took a strip of minky and folded it wrong sides together and top stitched around all sides. Then I used “steam a seam” and fused a square of fabric to the inside of the costume just behind where the tail would hang. I wanted to reinforce that spot so the tail didn’t stretch out the fabric when my little lion was roaring over the grasslands. Once the back side fabric was reinforced, I used the strip of fabric to make a belt loop of sorts. Then I made a second strip of fabric in the same was as the first. After putting velcro on each end of the strip, I hand stitched it to the end of the tail. This strip passes through the loop and Velcro’s to itself.
All in all, it turned out really cute. I just hope it fits! I had measurements to work with but I won’t know until they try it on her.
The cutest, cuddliest lion costume!
I can’t wait to see this on H. I am putting it in the mail this morning. When I have pictures of it on her, I will share one. Of course, one never knows how a toddler will react and she may decide she hates lion costumes. In which case, I am sure the next child will enjoy it. I can remember my kids wanting to be something for Halloween and I would not want to start that costume until just before Halloween because surely they would change their mind at least a couple of times.
A few new items for the shop.
Other than the costume, I have been focused on adding new versions of Chemex Cozies and French Press Cozies to my shop. This is the season where people begin shopping for the holidays and these two items sell quite well as gifts. That will likely be what I concentrate on for the next couple of weeks. When I select another fabric to offer, I make one as a sample and then my customers order them according to the size they need. I make them to order which keeps me busy but it also means I am not sewing and sewing unless the item is sold. Otherwise, I am guessing at which size and version to make.
Are you doing any Halloween sewing this year? Maybe fall decorations? Tell me what you are working on!
Linking up with lots of fun places. Check them out at the top of this page, under Link Ups.
Newsletter!
Have you signed up for my newsletter? It is published every month or so and is full of information about my shop, new arrivals, sales, and events. Click here to sign up!


 The cut of this simple dress is really comfortable and the fact there are only three pieces to the pattern makes it a very easy project to put together.