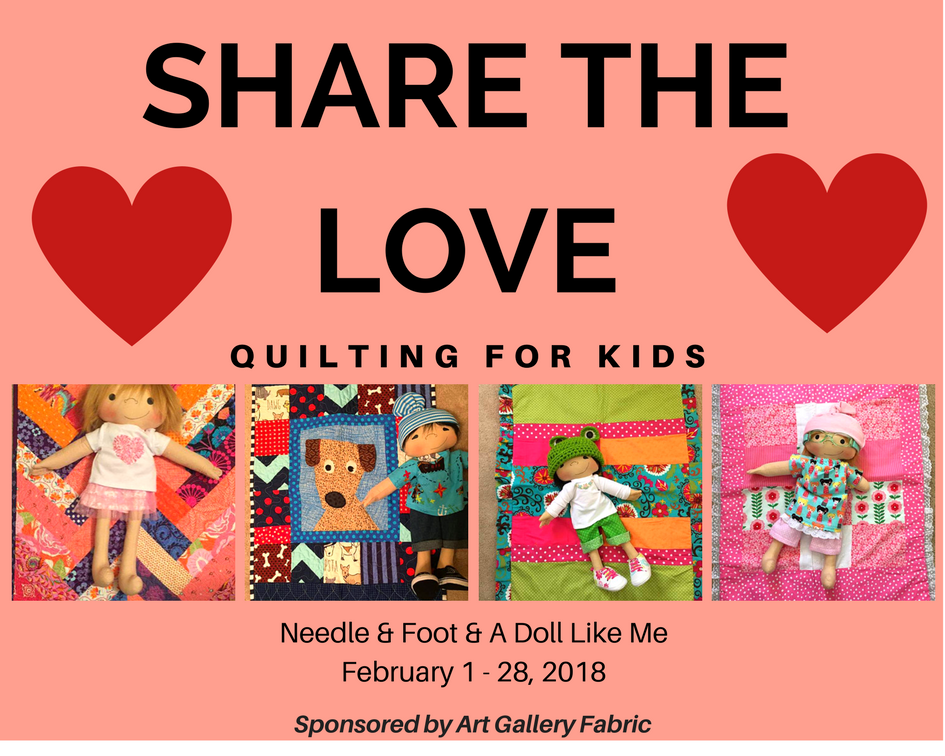
I don’t think I can really articulate all that this Spread the Love, Quilting for Kids event has meant to me, but I am going to try. This is likely to be a long post…. Bear with me.
When I first read about Amy and her shop, A Doll Like Me, I knew she was special. I knew the work she does is really important and so valuable. But I didn’t know what all would happen when I put out the call to the quilting community to make doll quilts for A Doll Like Me. I didn’t realize how much I would come to enjoy working with Amy. I didn’t know I was going to have the opportunity to become friends with her and get to know about her family and what is important to her about this work she does. Also, I had no idea I would make so many new friends within the quilting community. I hadn’t a clue how much support my family would pour into this project. My sisters that sew, made blankets, quilts and gowns, my family donated financial support to the Go Fund Me campaign for A Doll Like Me. My nephew works for Go Fund Me and he took Amy’s campaign to his management team – they loved it and donated $1,000 to it.
Kindness begets kindness. It has this incredibly powerful, trickle down effect. Let’s take a look at the flow of kindness within this event. I think it is so important.
Amy made a doll for a friend’s child. Kind act #1
Her friend showed it to another friend. Kind act #2
That friend asked for a special doll with a limb difference for her child and Amy made it for her. Hugely Kind Act #3
The friend shared the doll and Amy’s world changed. A Doll Like Me began. Hugely Kind Act #4
Sometime later, Elana of That Fabric Feeling somehow connected with Amy and offered to make doll quilts for her. Amazingly Kind Act #5
Elana posted about the doll quilts on her blog, thereby sharing the need with the online quilting community. Kind Act #6
I randomly stumbled on to the posts about Elana’s doll quilts. Random and happy occurence!
I decide this needs to be shared as a community event so more people can participate, thus creating Spread the Love, Quilting for Kids. Kind Act #7
Art Gallery Fabric offers me an amazingly generous number of prizes to offer and hopefully encourage participation so Amy would have a large stash of quilts to use in her work. Kind and Generous Act #8
My family reads about my work (they are such faithful blog readers!) and decide to contribute financially via the Go Fund Me campaign for A Doll Like Me. Kind Act #9
My nephew finds out about these donations from his mom (my sister) and takes it to the management at Go Fund Me. They donate $1,000 to the campaign. Hugely generous and Surprising Kind Act #10
Quilters take this event and announce it at their guilds, their sewing groups, their on-line community and I start receiving emails, lots of emails, asking if they can continue to contribute after the February event concludes. I can’t remember how many groups contacted me but it was at least ten. Kind Acts #11 through 20 or so?
My sister, who lives in the UK, offers to be a collection point so that quilters in the UK can participate without having to mail their quilts to the states. They are mailing their donation to Juanita and she will collect them, package them up and send them to Amy. Kind Act #21
A quilter in Canada offers to do the same thing so the participants in Canada won’t be paying such high postage expenses. Debbie is collecting the Canadian doll quilts and will package them up and send them to Amy. Kind Act #22
Doll quilts start arriving – I have received pictures of well over 200 doll quilts so far. Promises of more are in the works. I have heard tales of how meaningful this has been to so many quilters, how much they have enjoyed taking part in this and thinking of these kids who will have their Doll Like Me and also a quilt to wrap up their baby. So, let’s try to quantify this and say these are Kind Acts #23 – 228. I know there are more quilts in process but this gets the idea across, right?
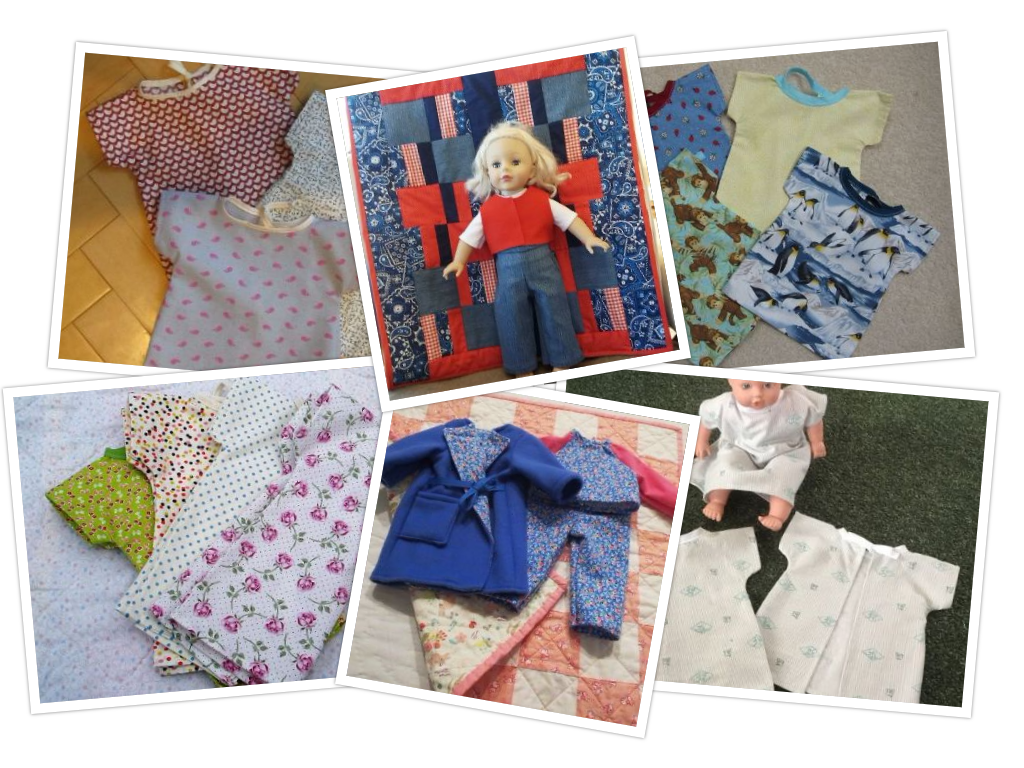
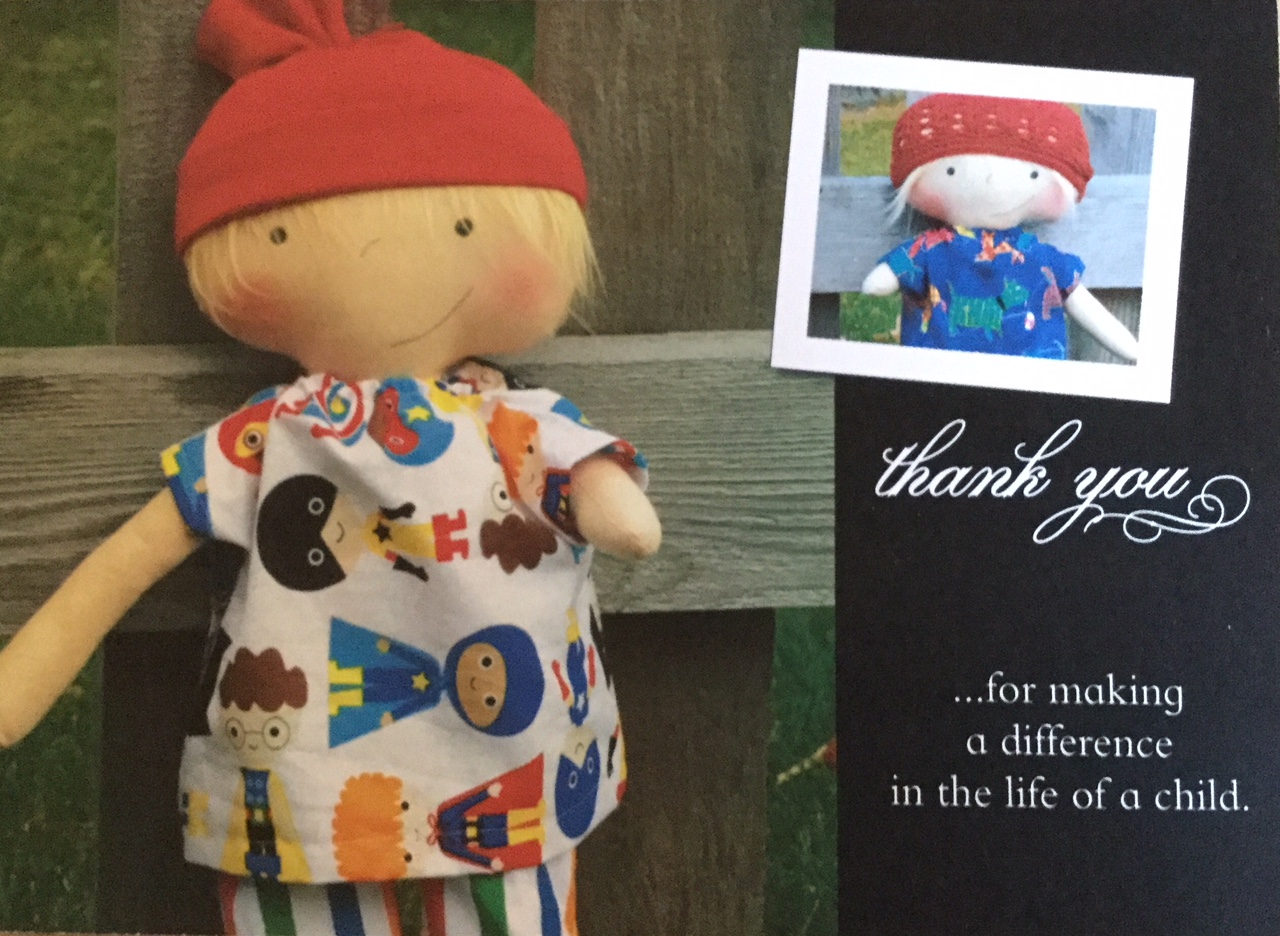
Quilters ask what else they can do. Amy says ‘well, I would like to have some doll size hospital gowns for kids facing a hospital stay.’ So far I know of fifteen hospital gowns that are finished and sent. Also two more doll outfits. More are in the works, but for now this will be Kind Acts #229 – 246.
See how this works? Kindness begets kindness. Small acts grow, more people get involved, more compassion is extended, and people feel intrinsically rewarded; it feels good to be kind. That warm feeling of satisfaction causes kind acts to happen more and more. One mom is using this project as a teaching tool. She has five children and has committed to making five quilts, one with each child helping her. Those kids will likely benefit and become more compassionate for others, more sympathetic to the needs of others. How will they use that lesson in compassion as they grow? Who knows, but you know it will affect them in a positive manner.
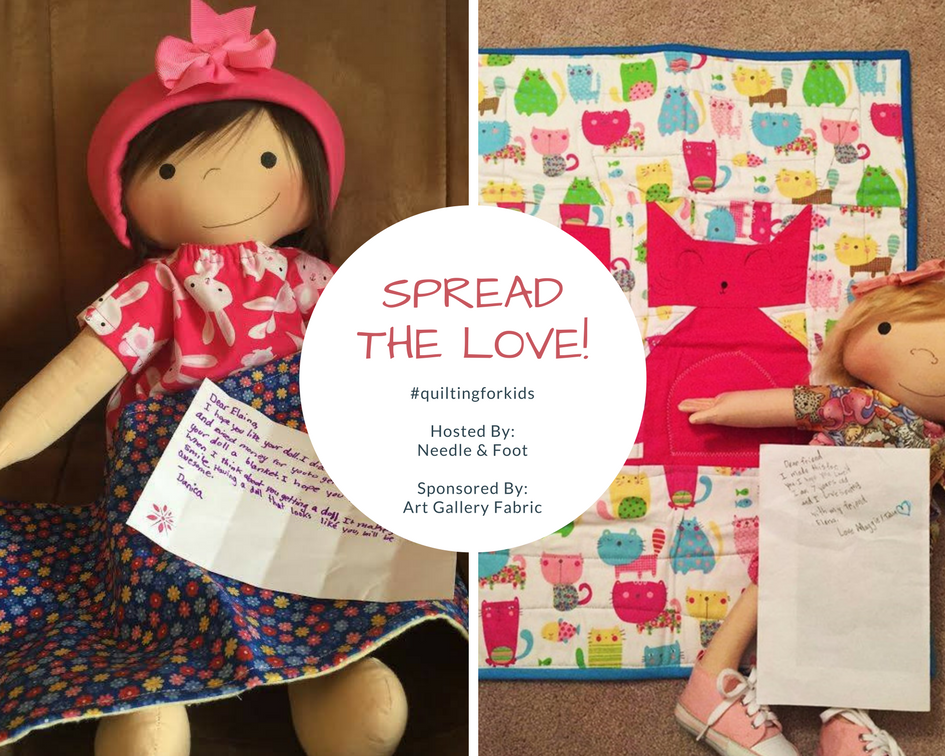
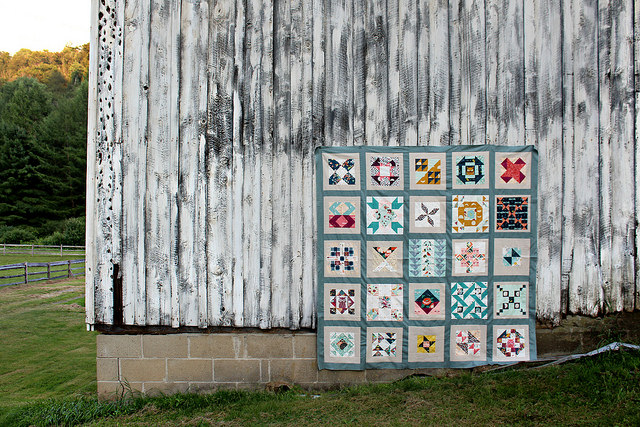
I cannot thank everyone enough. You are all so amazing. Want to see some of the quilts that were made?
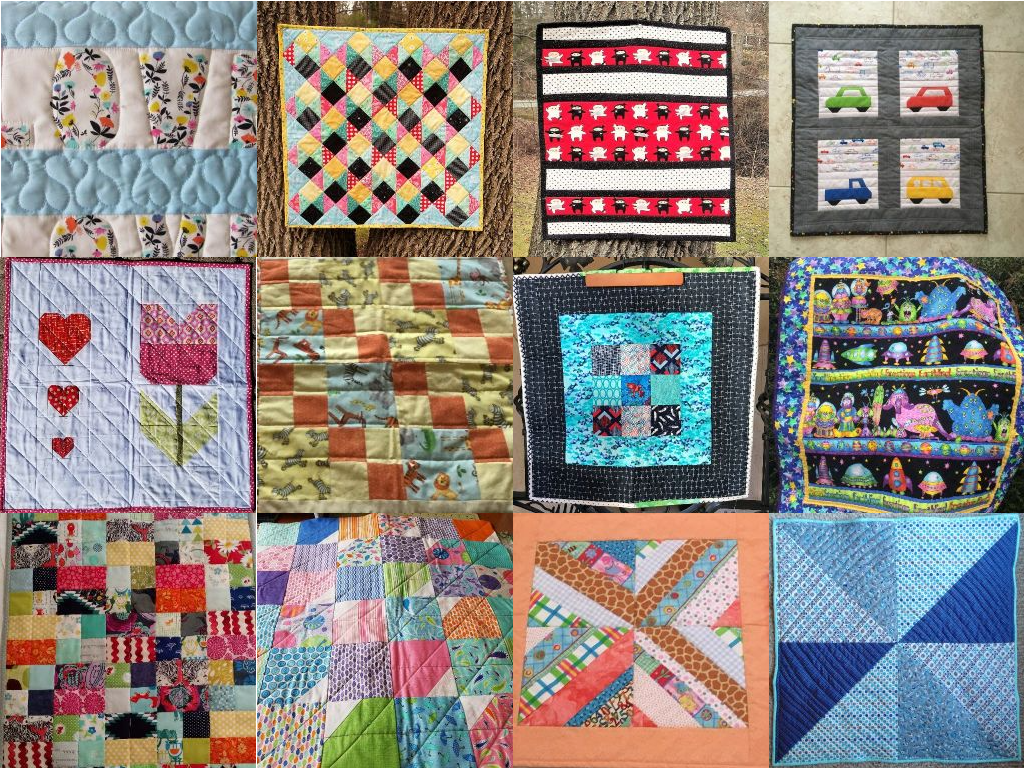
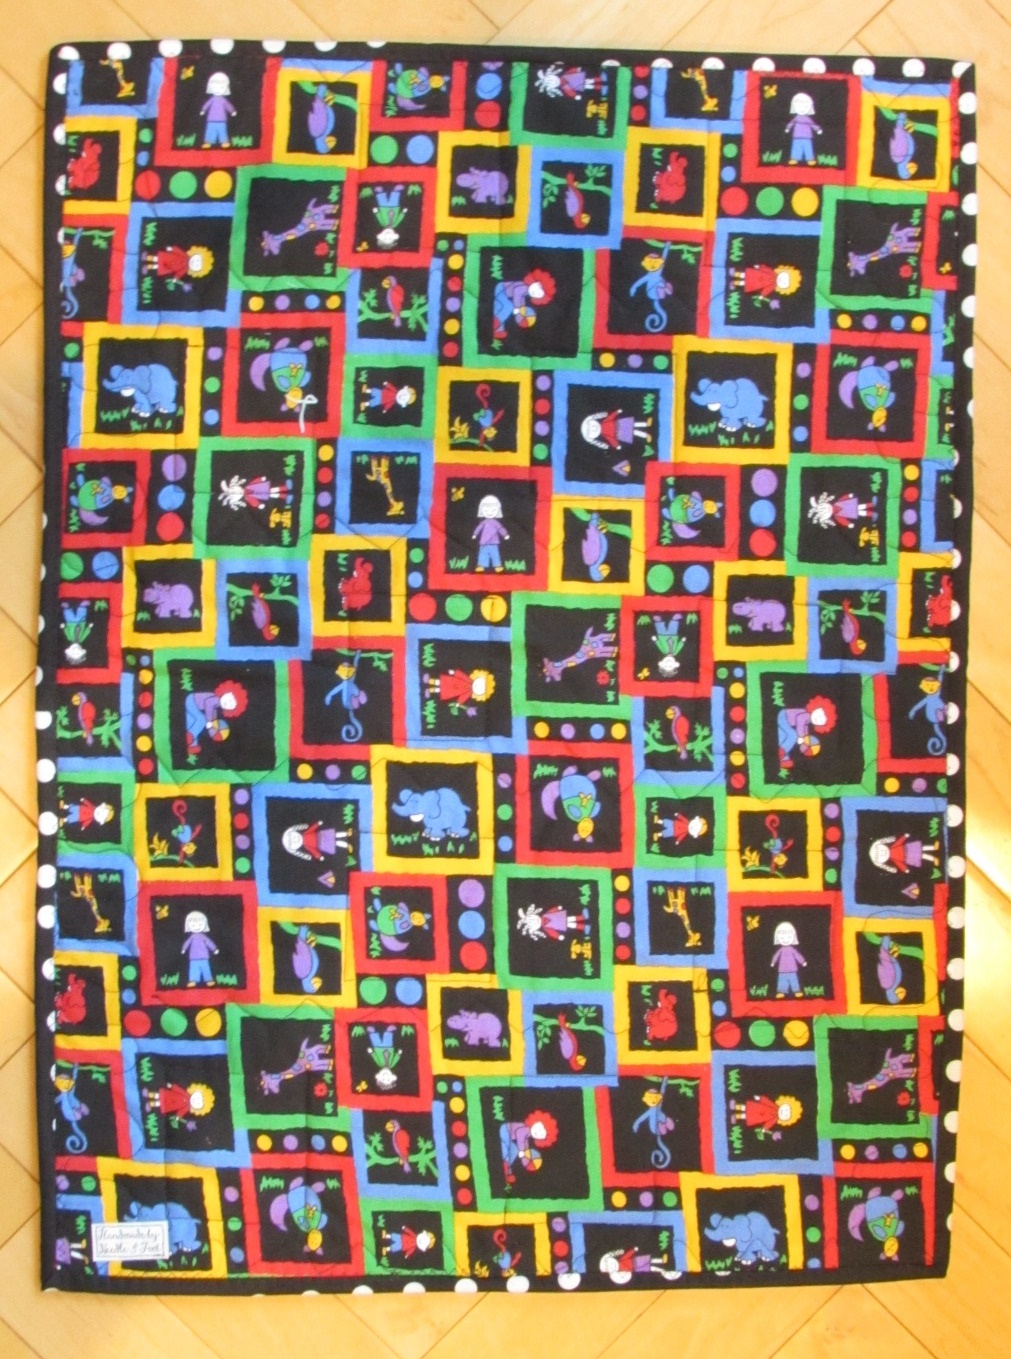
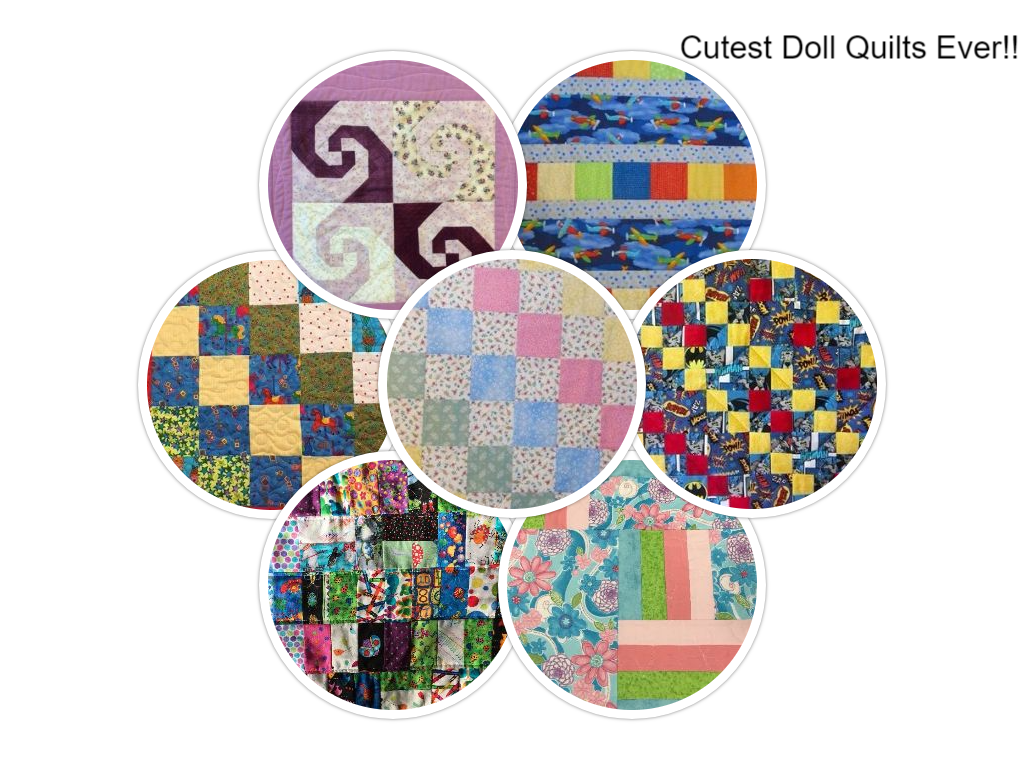
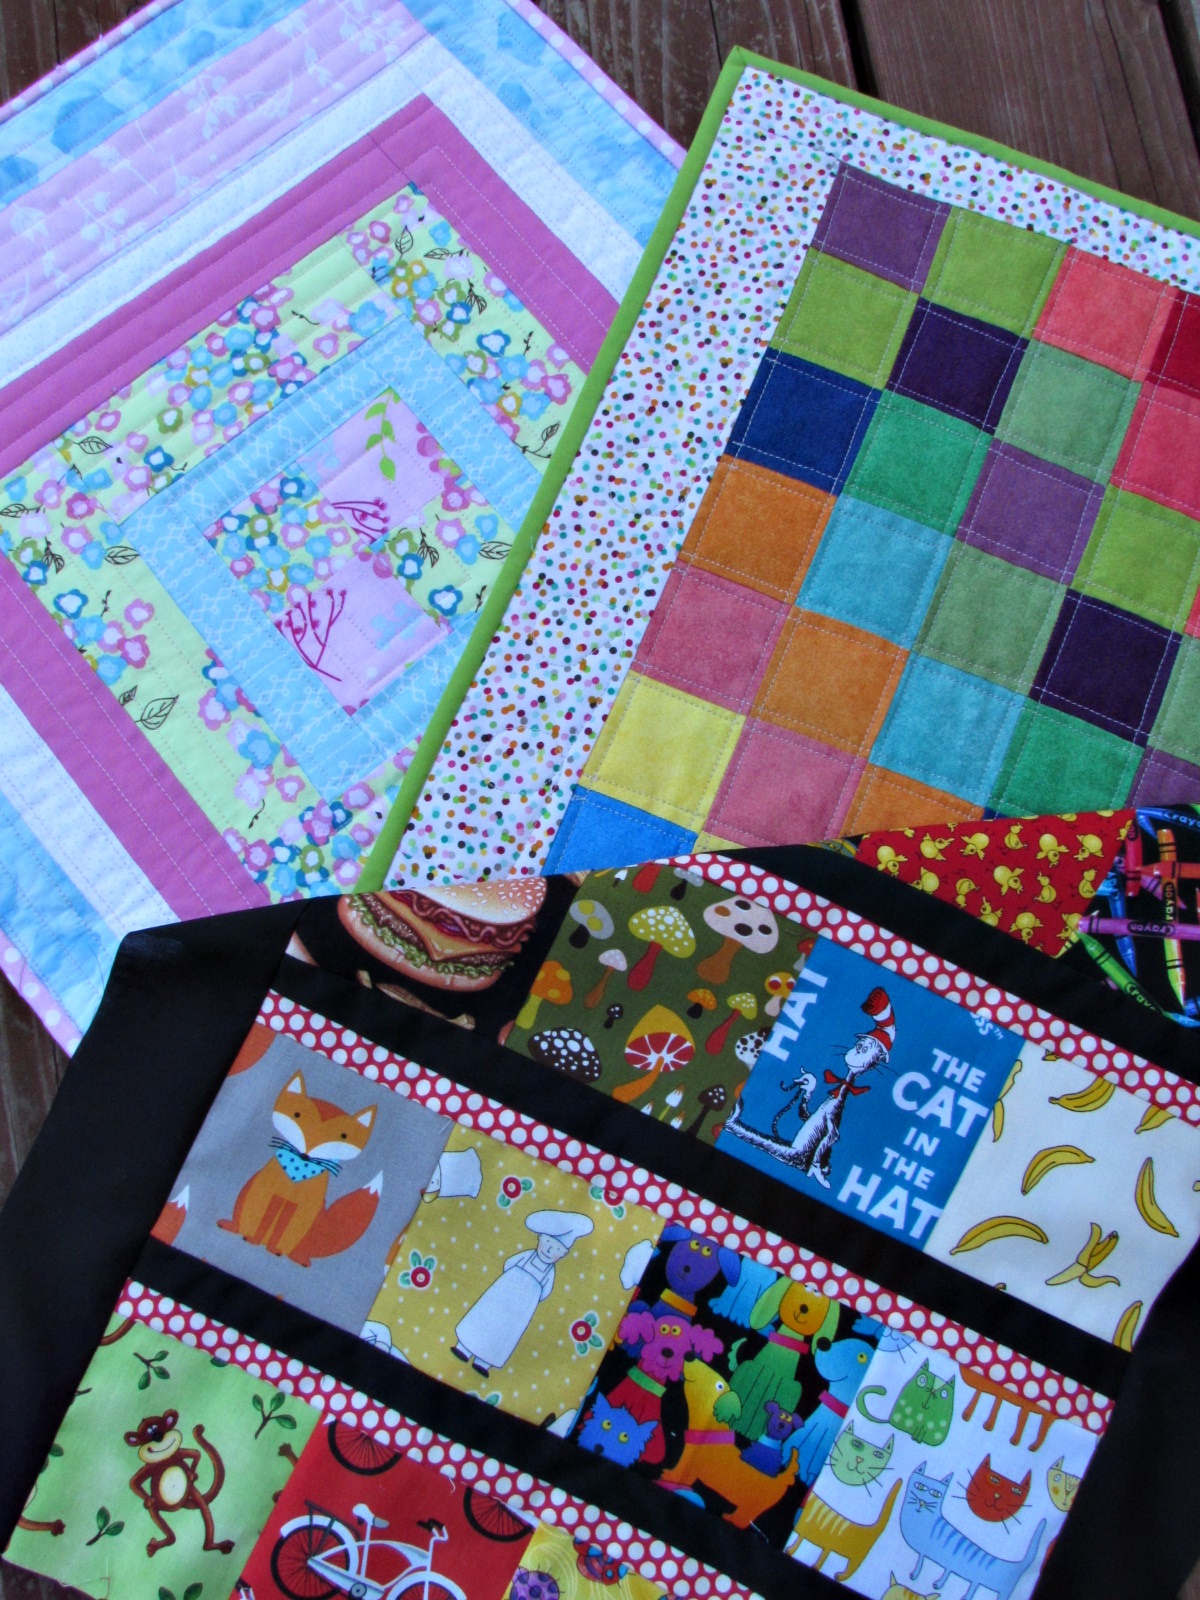
I didn’t think it was feasible to upload over 200 pictures so I just made a few collages. So many fun quilts though. I am sorry I couldn’t share every single quilt. They are all outstanding. Included in these special quilts are applique, strip quilts, animals, patchwork, Dr. Suess, Sesame Street, Raggedy Ann, flowers, tractors, and even race cars. Whether modern or traditional, each one is unique and so special.
This community grabbed on to the idea of helping children. It spoke to so many of us. It felt good to do something positive. To have something meaningful to work on as we deal with one senseless tragedy after another in this world we live in.
So many amazing, adorable, hand made quilts in all shapes, colors and styles. These tiny quilts aren’t going to change the world but we are giving something special to a child who needs our love, maybe just a bit more than the other kids.
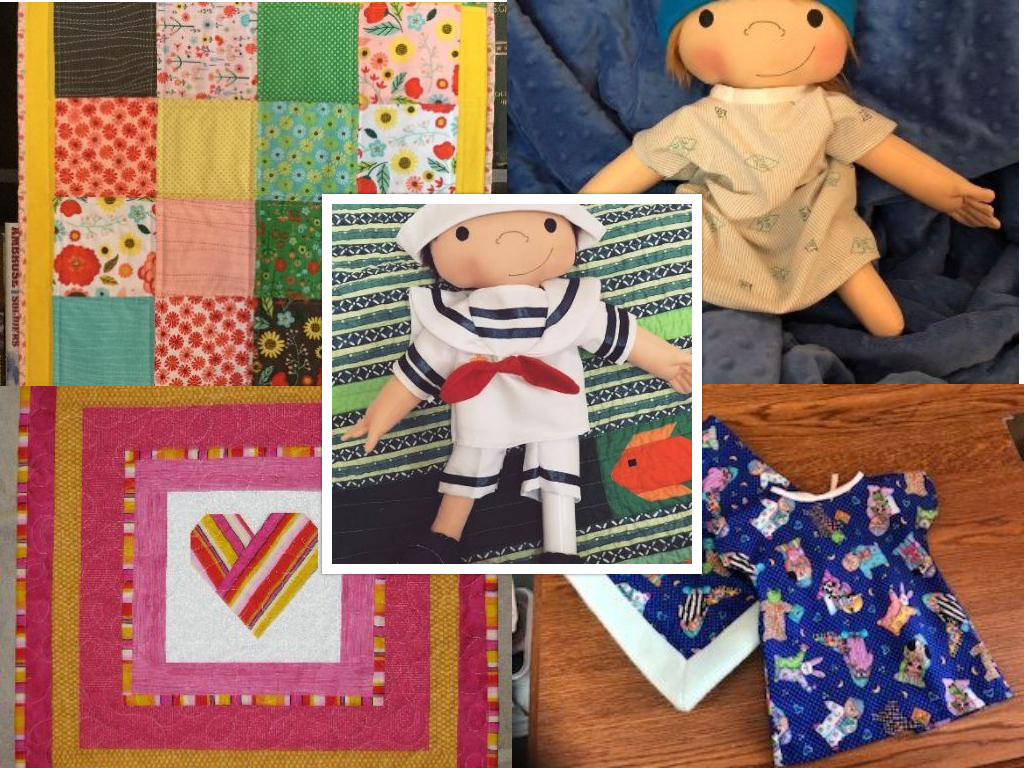
Look at these sweet hospital gowns, pajamas and clothes that have been made so far.
When I was talking to my friend Mari about this doll quilt event I was dreaming up, I asked what she thought – she said there would be an overwhelming response. She nailed it, didn’t she? Do you know what? One quilter made seventeen doll quilts! She was on a tear (no pun intended!), making one after another; an example of the kindness spreading throughout the community.
Let’s talk about those gorgeous fat quarter bundles offered up by Art Gallery Fabrics! Each person who emailed me pictures of their quilts has been entered once for each quilt they shared with me. Also an extra entry was made if the person made hospital gowns or outfits. You may continue to email me pictures of completed items through February 28th.
Quilt bloggers who have gotten involved can share their posts by linking up below. The link up will remain open through February 28th. When I read through the link ups, I will enter the blogger once for each quilt shared on the post. I hope you will take a few minutes and check out the other posts. I am sure you will come away inspired and gratified.
On March 1st I will have the fun task of picking ten winners via Random Number Generator. I will email the winners and ask for their mailing information. If you are a winner, please email me your information within two days. Otherwise, I will pick another winner. Does this all make sense? If you have questions, leave them in the comments and I will get back to you.
I am so energized by the response from all of you. You are amazing, generous people and there are no words to accurately describe how gratifying this has been. Thank you for all of the time and effort you have poured into these sweet quilts over the last several weeks. Thanks in advance for the quilts promised to A Doll Like Me in the future. I know Amy is overwhelmed by the response and also very grateful.
Hi everyone! I have a few more finishes to share with you for the Spread the Love event. Remember this doll quilt drive is in support of A Doll Like Me, and will run through the end of the month. I have a box filled with donations for Amy and plan to send it off tomorrow.
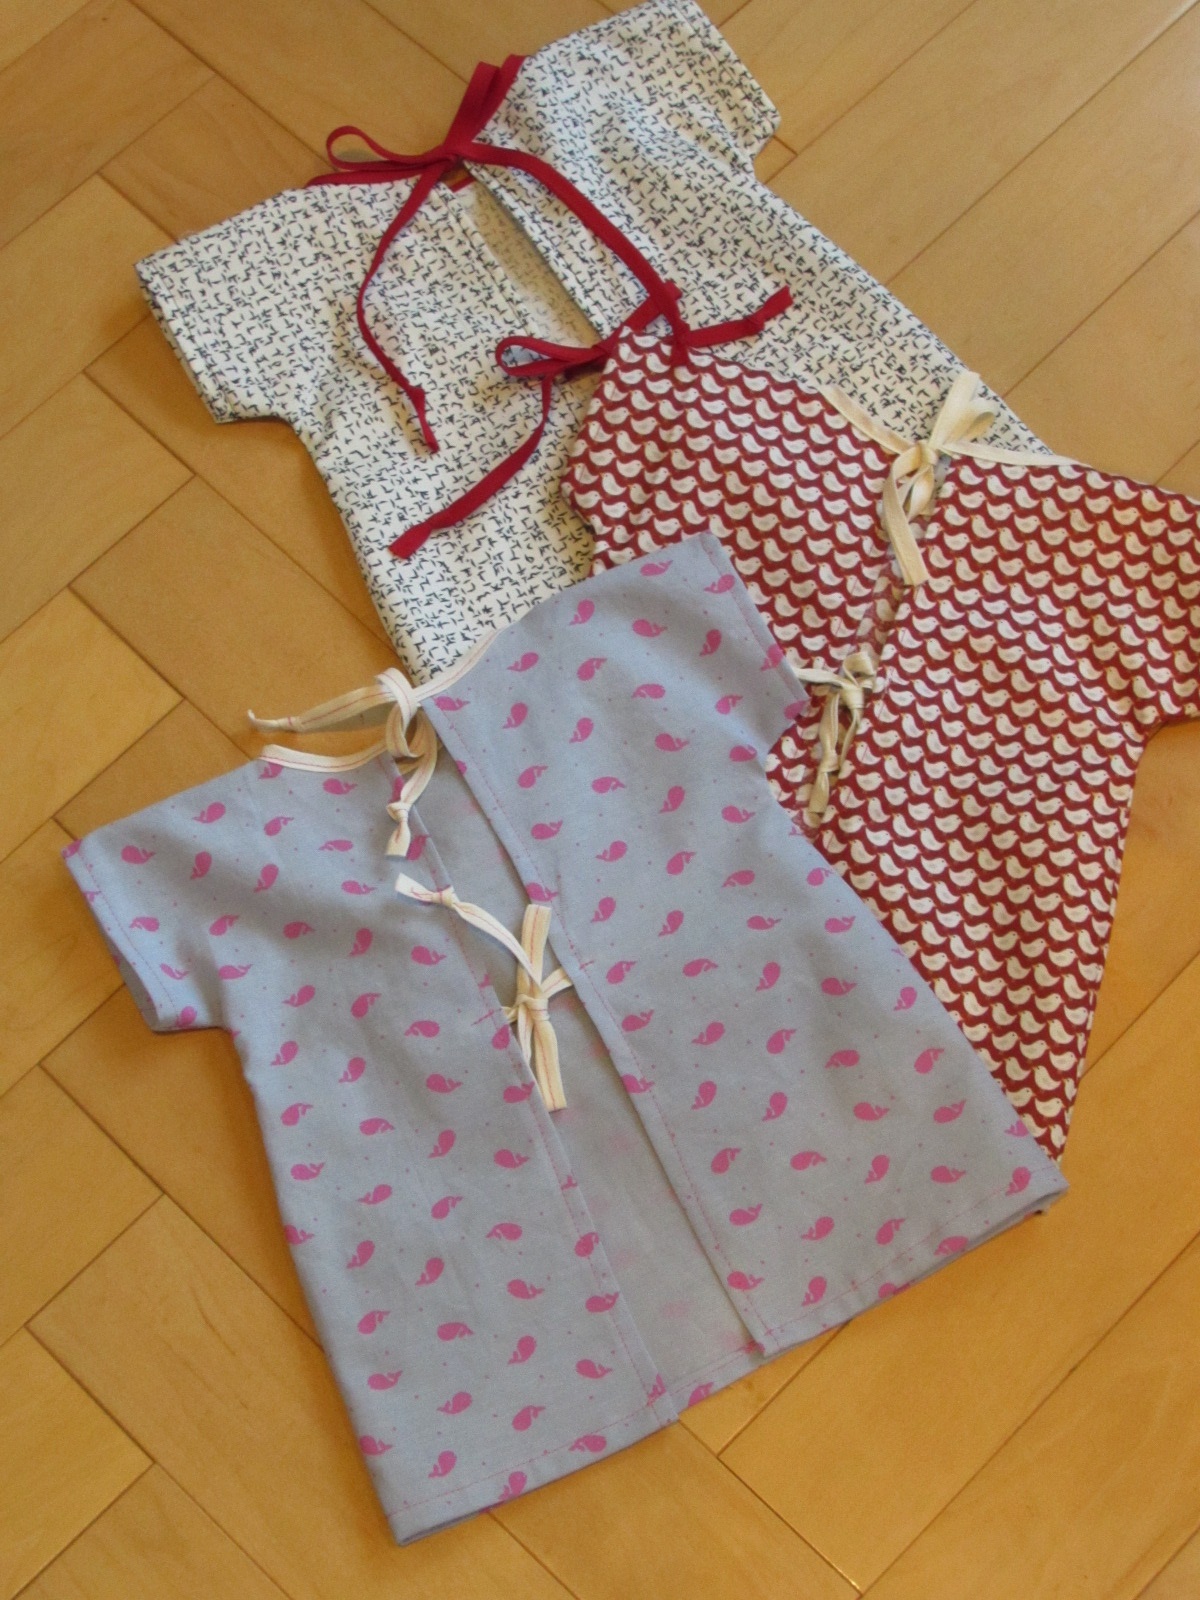
In the box are a number of doll quilts (made by me as well as a couple of local guild members) and three hospital gowns. Amy has asked for the gowns because she wants to include one with the doll when she knows the child has a hospital stay in their near future. What a cute idea and how therapeutic it is for the child to dress his or her doll in a gown when she will also be wearing one. You can see the gowns up above from the front. I used this free pattern to cut the gowns out and used a simple narrow, double fold bias tape for the neck and ties in the back. They can be made out of a fat quarter or similarly sized scrap and take no time at all.
Doll size hospital gown, back side
Next on the list of projects to mail is this I Spy Quilt. I mentioned it a couple of weeks ago and finally got it quilted and bound. I used a black and whit polka dot fabric for the binding but it is pretty wonky. I do love the variety of fun fabrics used and think it will be a cute on for a child to play with.
The backing is a piece of fabric I have had in my stash for years. It has lots of animals scattered about and will be another fun one for a game of I Spy.
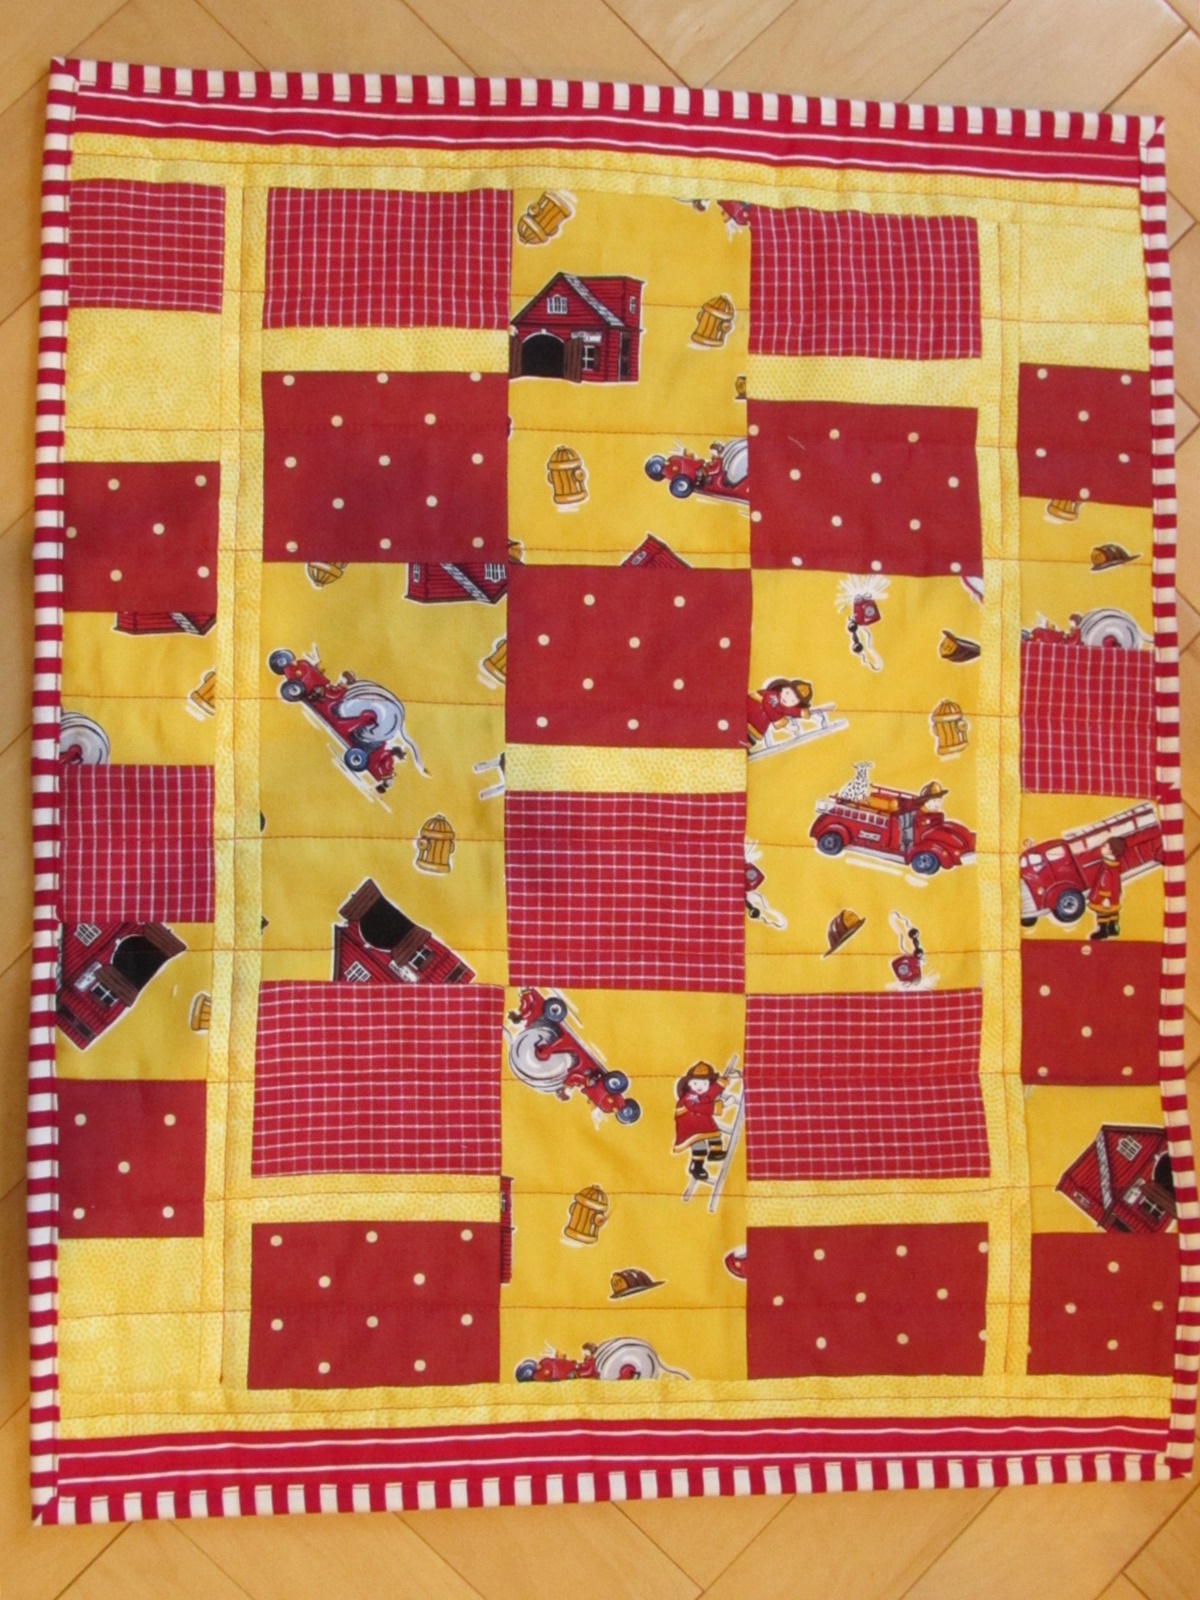
This Fire Truck Quilt is one of my favorites – you know I am a sucker for anything with a vintage look to it! The red and yellow combination is so sweet.
Determined to use only fabrics from my stash, I used red and yellow scraps for the quilt, sashing, backing and binding. It came together nicely and will surely be loved by its new owner when Amy decides to send it off to a child.
Just an update on the progress of this doll quilt drive. I have recorded more than 135 quilts finished and shipping at this point. Promises of many more are made. How amazing is that???
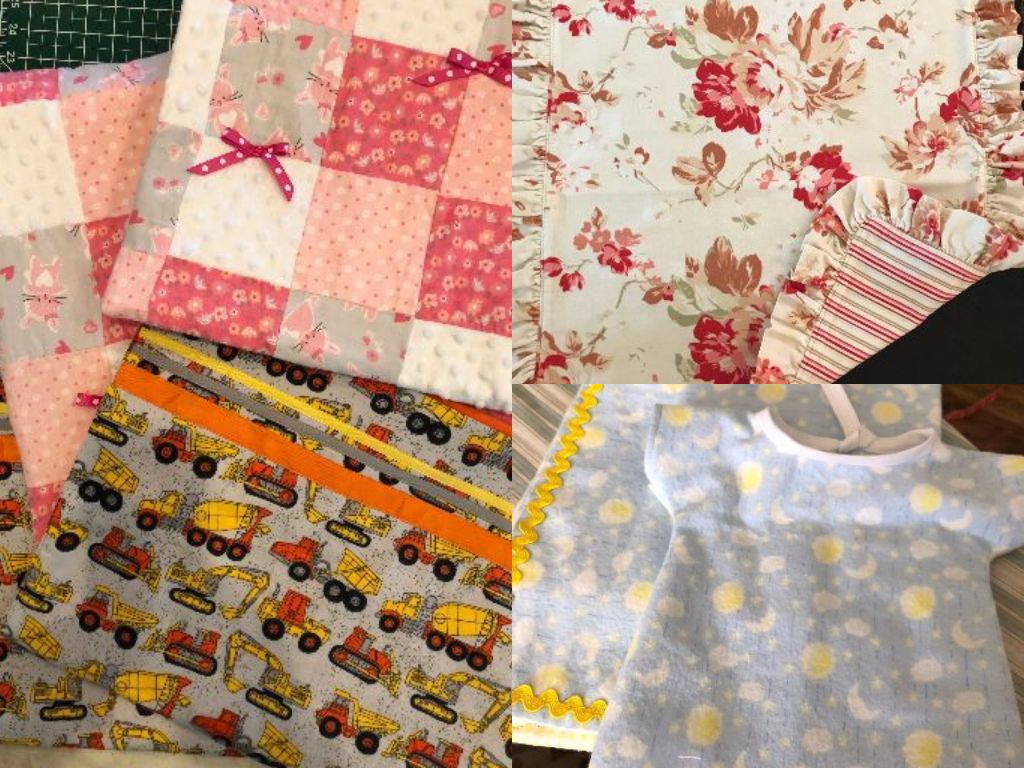
Here is a photo of some projects made by my sisters. Flannel blankets, a hospital gown, ruffles and flowers, trucks and cement mixers — perfect for A Doll Like Me!! I am so happy they wanted to make and contribute these.
Finally, I have had a few readers ask if there is a way to contribute to A Doll Like Me financially. Because of the costs of shipping, the fabric and accessories to make the doll, stuffing for the dolls, and most especially the need to fund dolls for families who cannot afford one, there is a Go Fund Me account. If you feel you would like to contribute, that is wonderful. Donations can be in any amount, don’t feel it has to be a large amount of money; five or ten dollar donations add up and are very helpful. The quilting community has given so much to Amy’s cause so please don’t feel pressured to make a monetary gift.
Remember if you are making quilts, you can email me for the shipping information. Any questions? Leave a comment and I will get right back to you. Thanks everyone!
Come back on Wednesday the 21st because I will be sharing the blogger bundle for February. Curated by Kitty Wilkin of Night Quilter, it does not disappoint!!
Linking to many fun places – check them out at the top of the page under Link Ups.
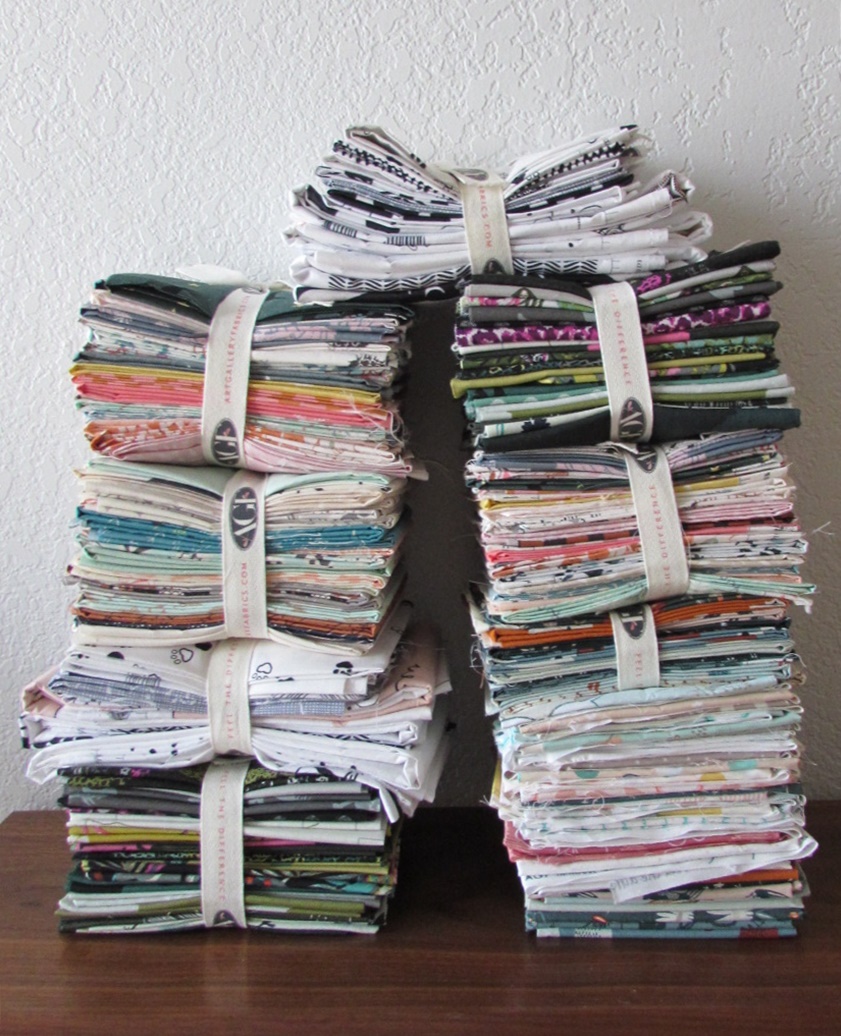
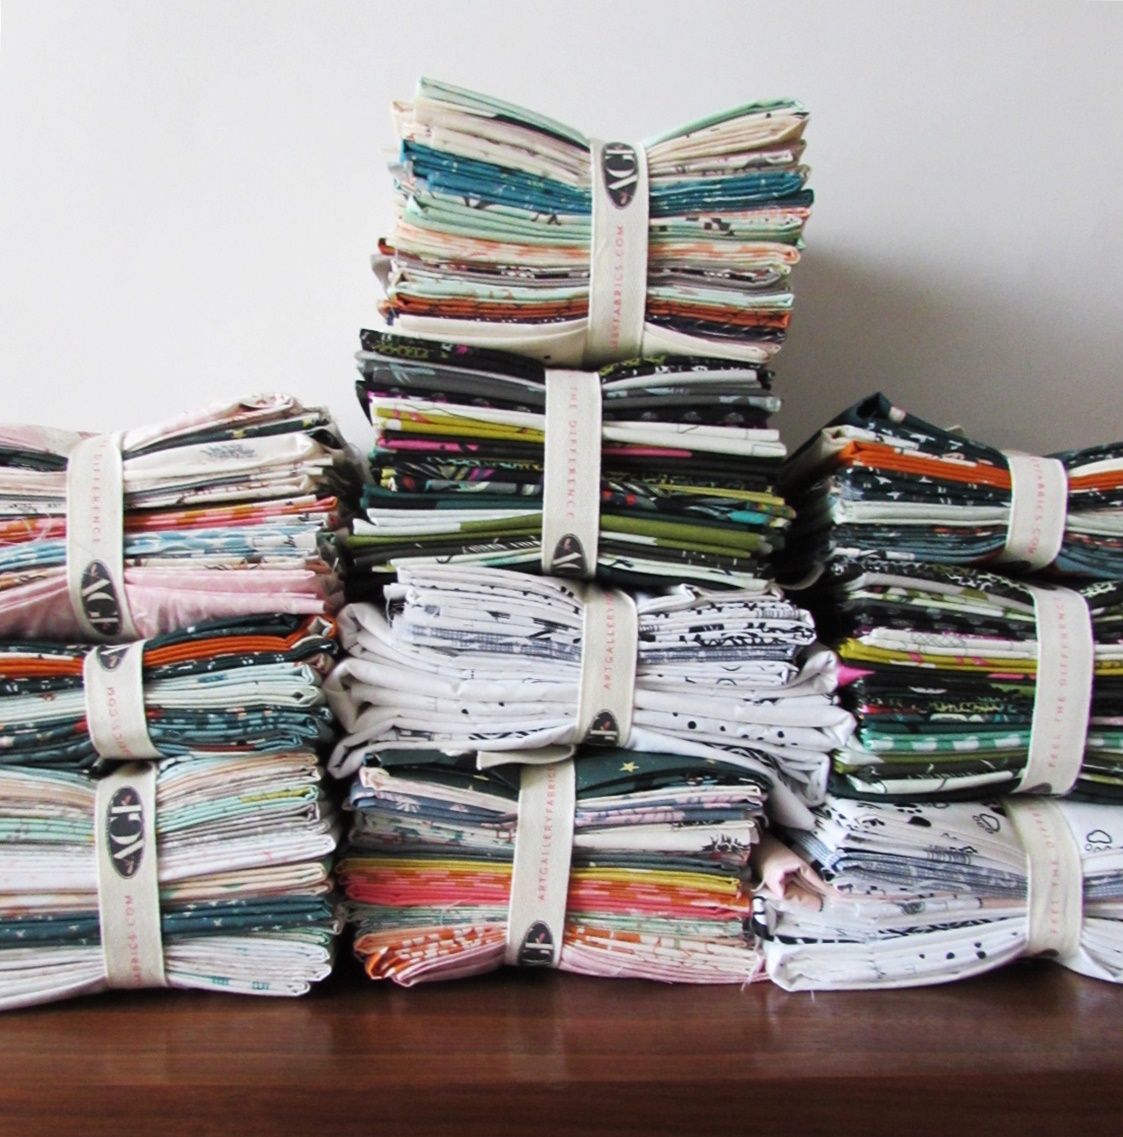
Today I want to share the incredible fabric donated by the ever generous Art Gallery Fabric to be used as prizes for the Spread the Love, Quilting for Kids campaign ongoing during the month of February. To read more about the actual event, click here, here and here. You won’t be sorry – this has been a very special project and so many quilters are involved!
In late January, just before I was planning to announce the event on my blog, I sent an email to Walter Bravo, owner of Art Gallery Fabric. I explained the project and sent a few links to some of the work done by Amy Jandrisevits, owner of A Doll Like Me. Hoping to have a bundle of Art Gallery goodness to offer as a prize, I politely asked for a bundle of fabric, hopefully one with a theme appropriate for children. I kid you not when I say Mr. Bravo replied in under ten minutes. (This is on par with Art Gallery Fabrics; as a customer I receive a response incredibly fast each time I have a question about fabric or what I am ordering for my shop. )
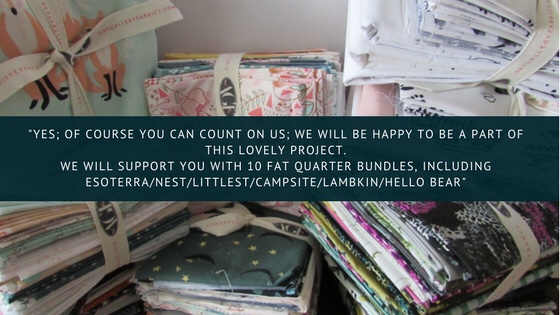
His reply was this:
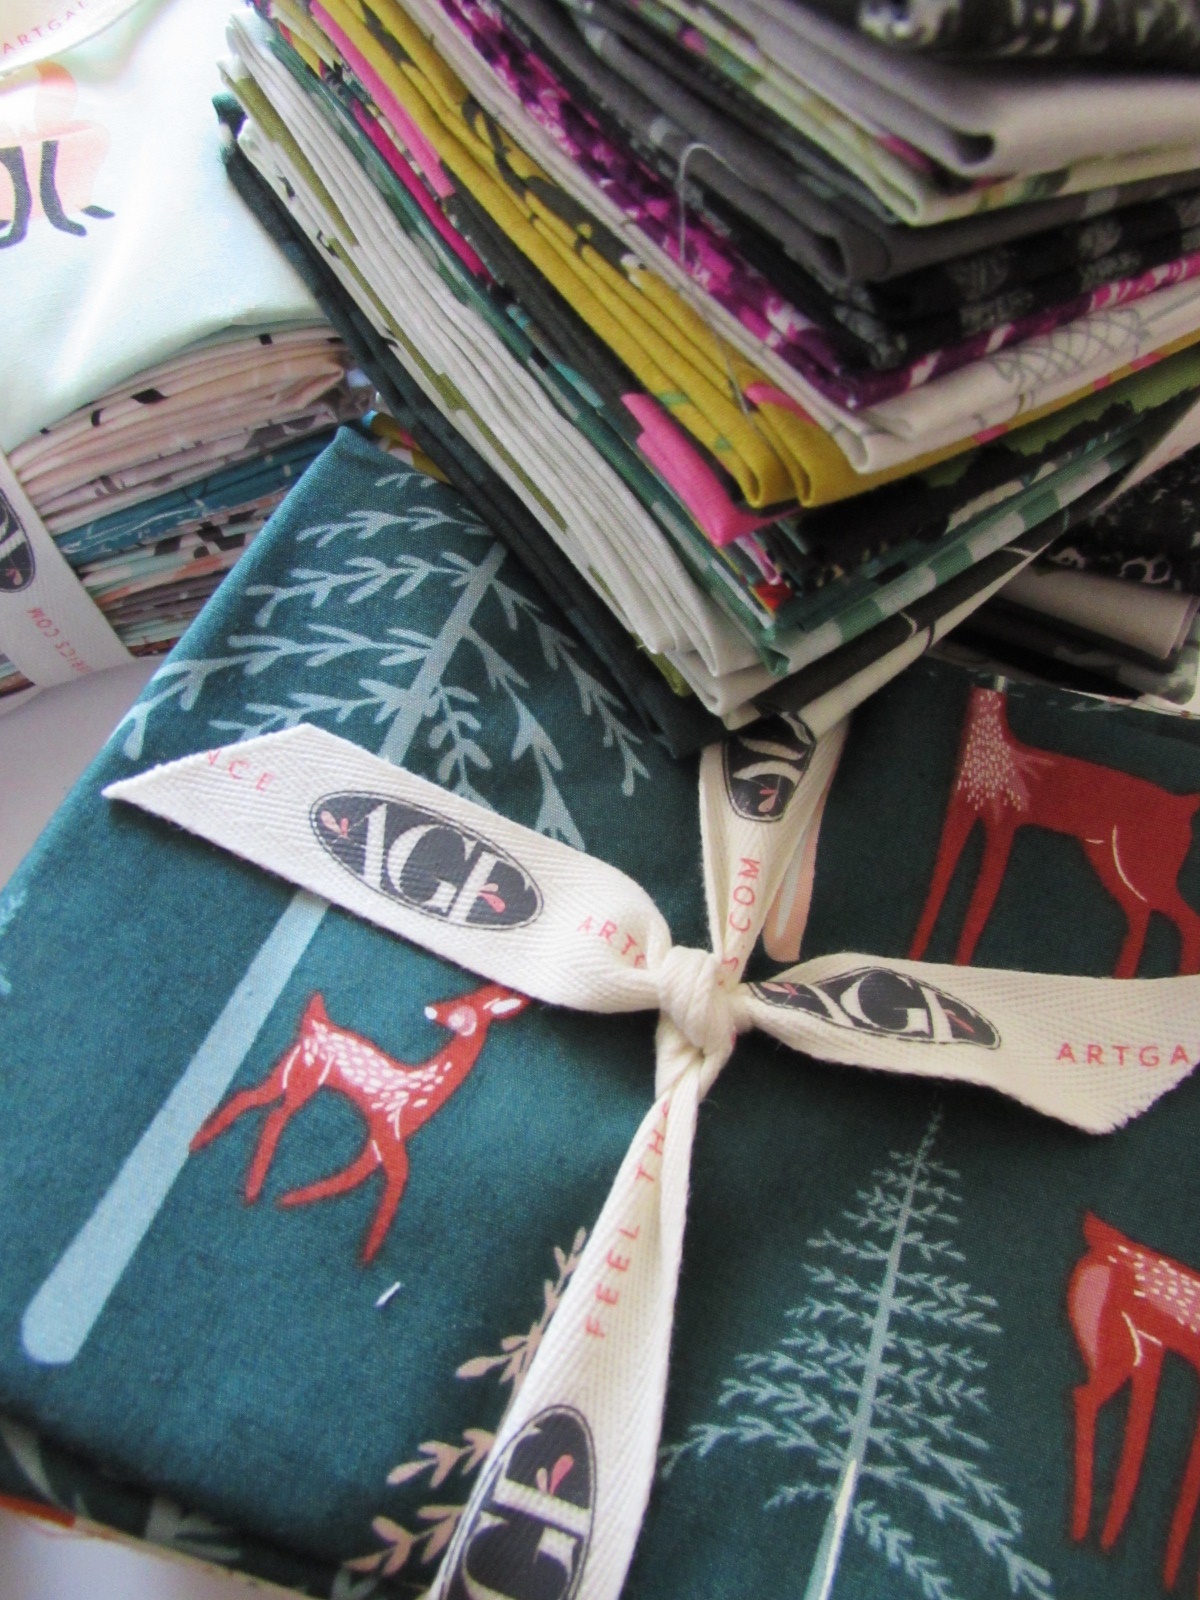
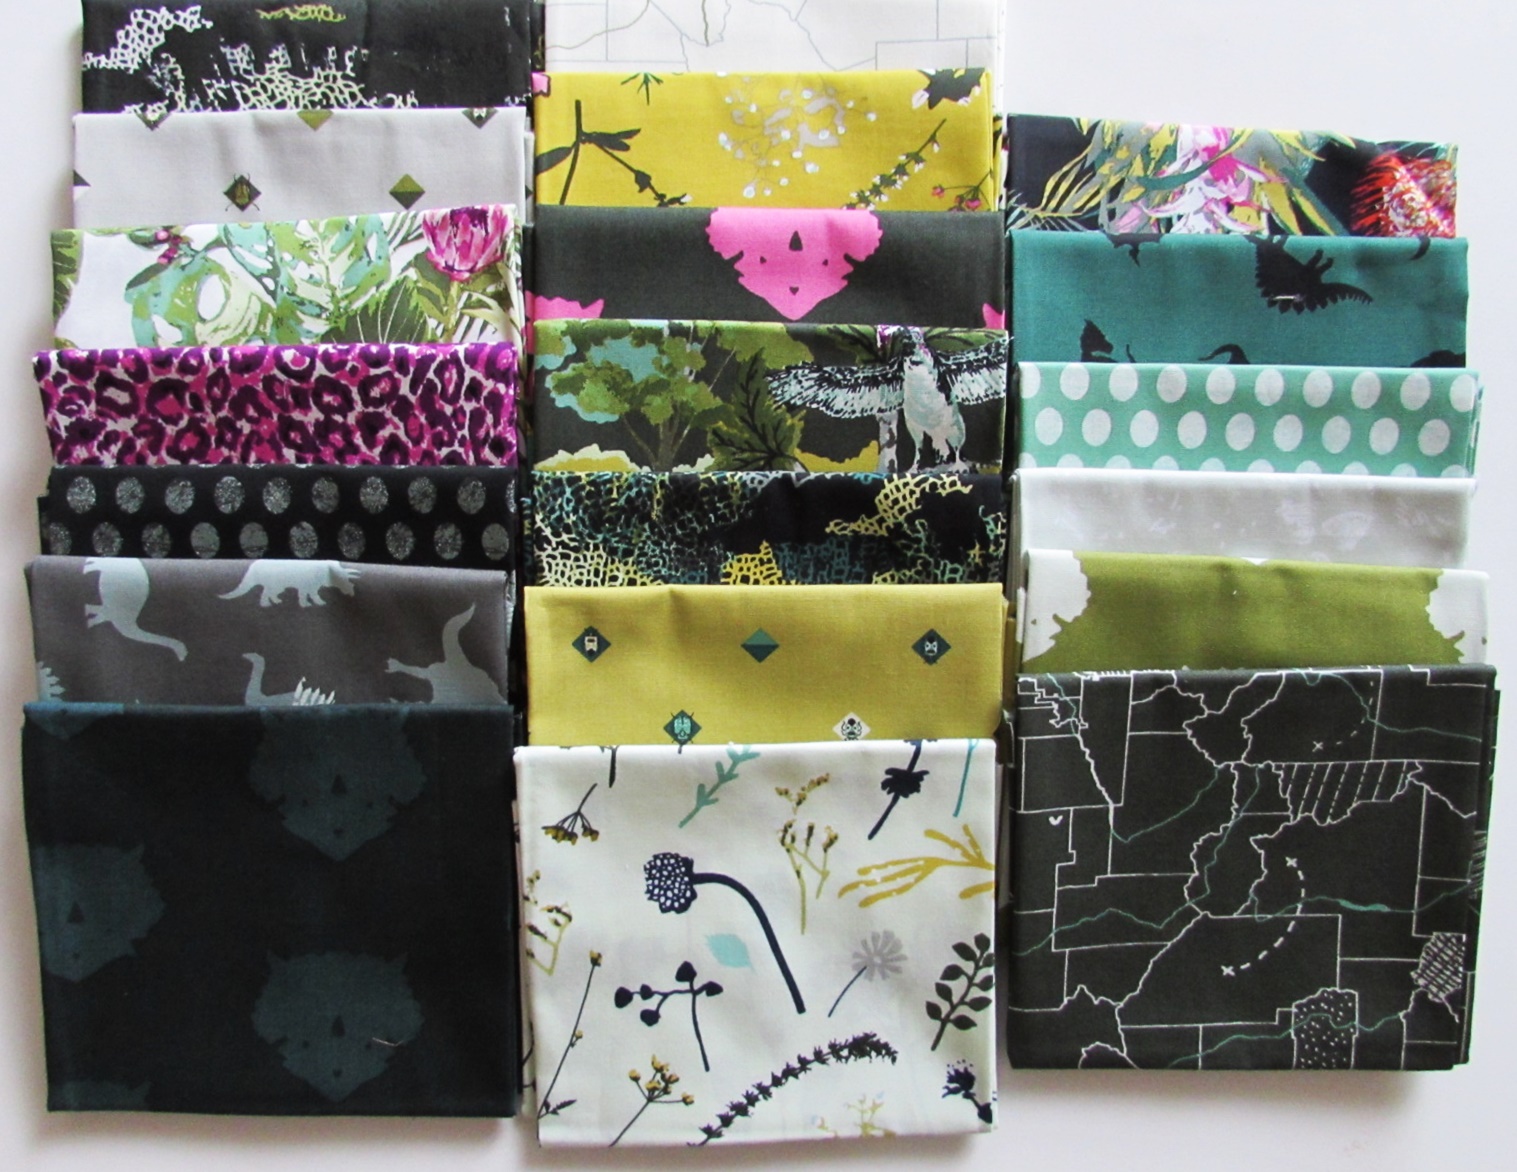
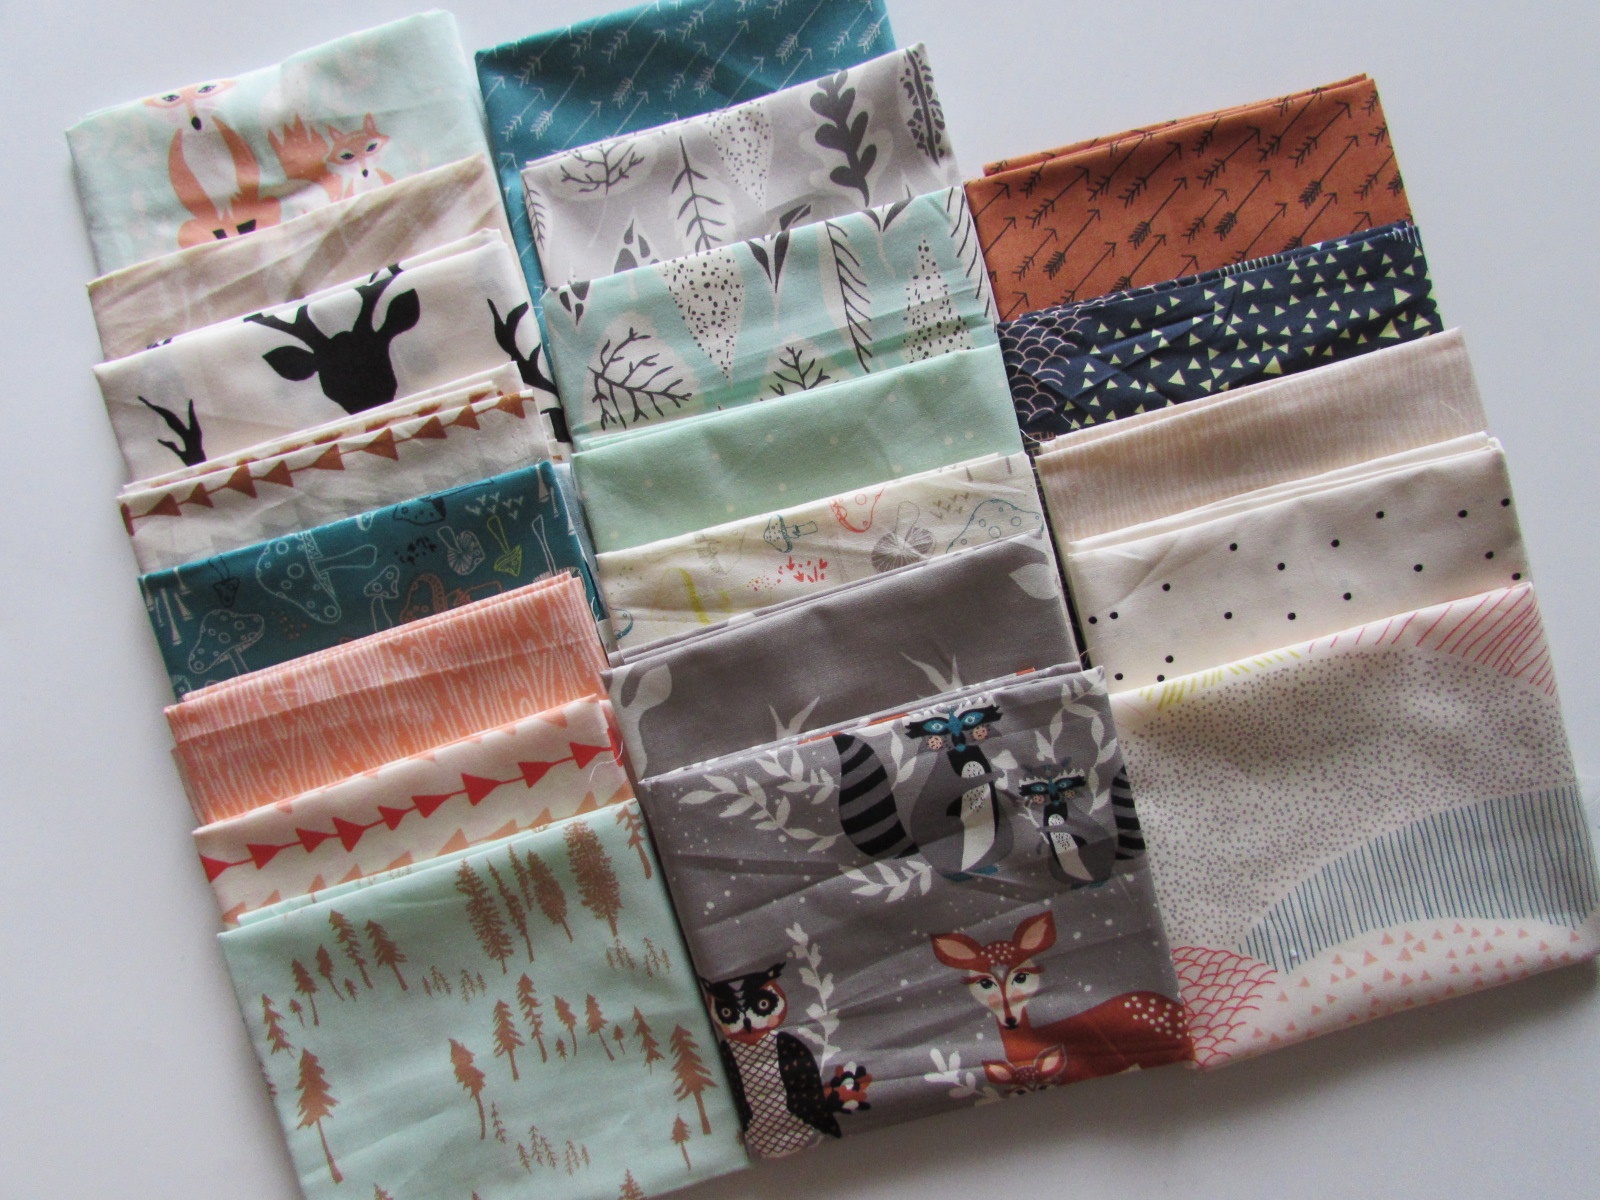
I was so excited to hear of this gift! I suspect almost all of the doll quilts that have been made and/or promised, would have been made without the offer of prizes at the end of the event. Quilters love to help and are willing to jump right in. But really, does the idea of a possible prize hurt? Not one bit! Last week I received the box of bundles and quickly opened it to see the variety of colors and patterns. This is a whole lot of gorgeous fabric!! Let’s take a look. (By the way, there was no request by Art Gallery to feature their fabrics in a post, I decided to highlight their generosity myself.)
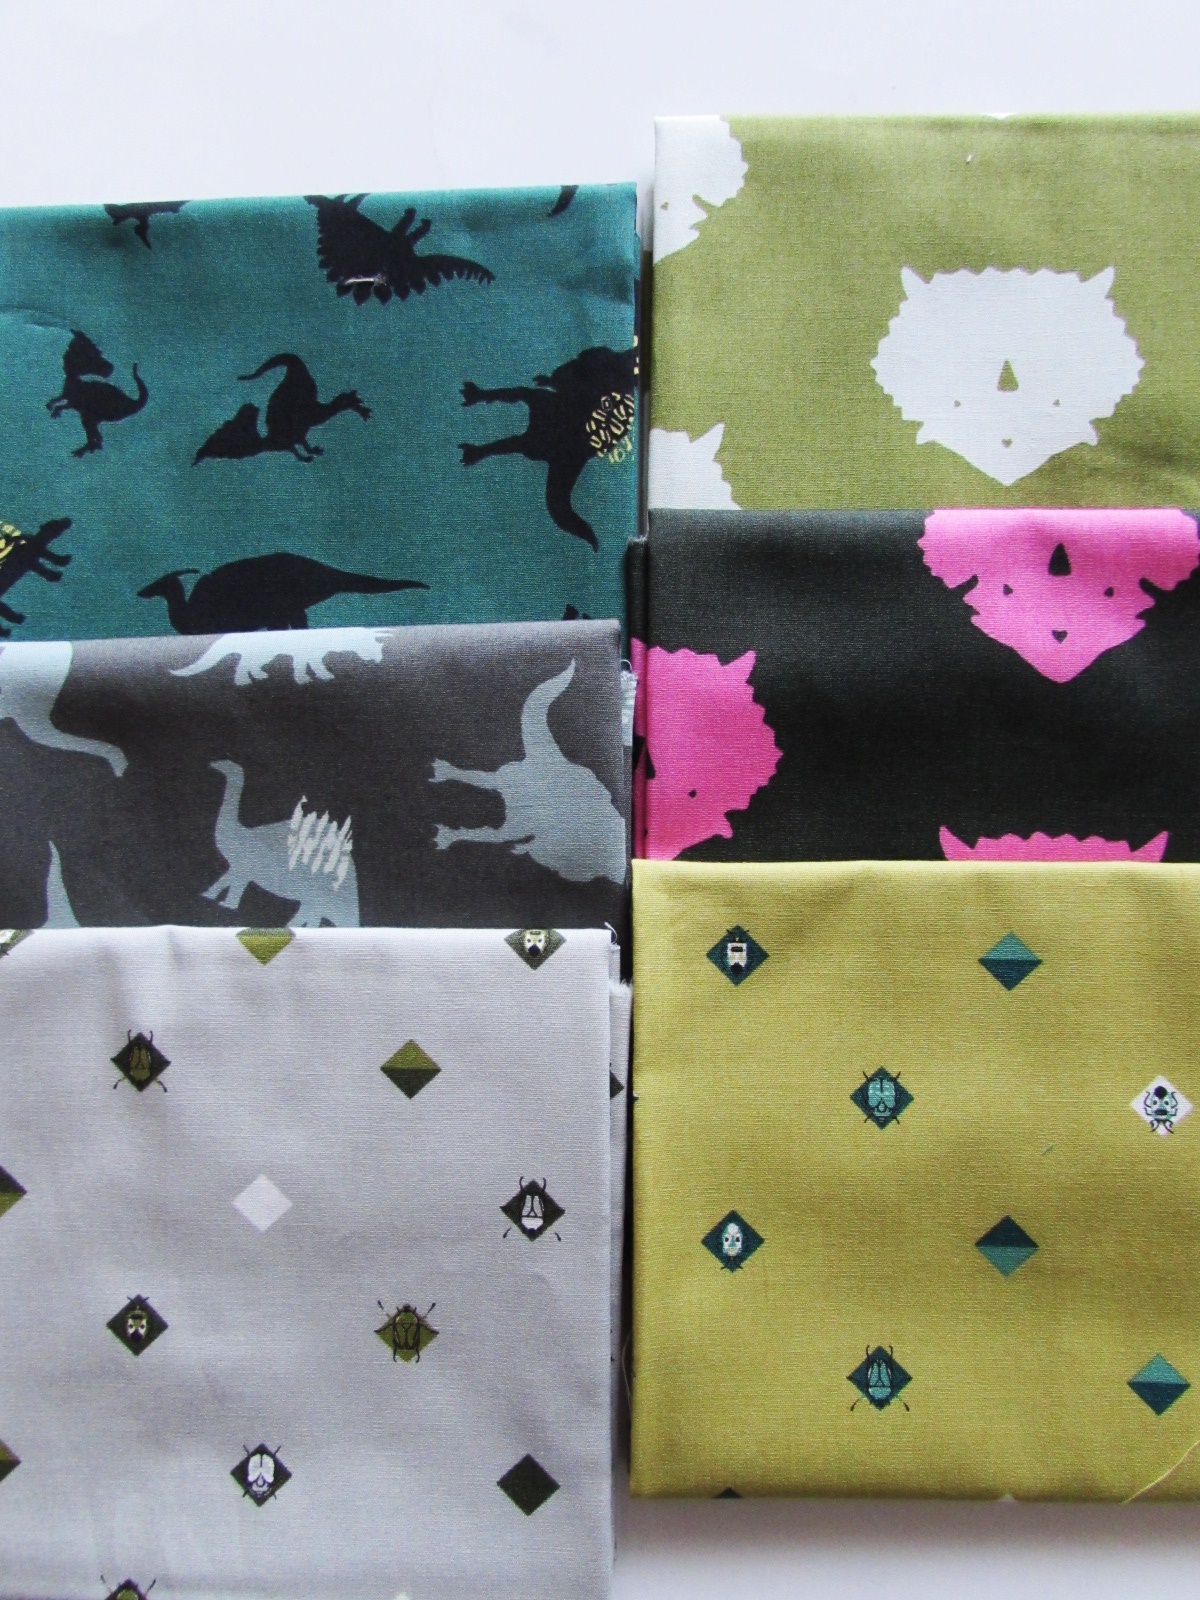
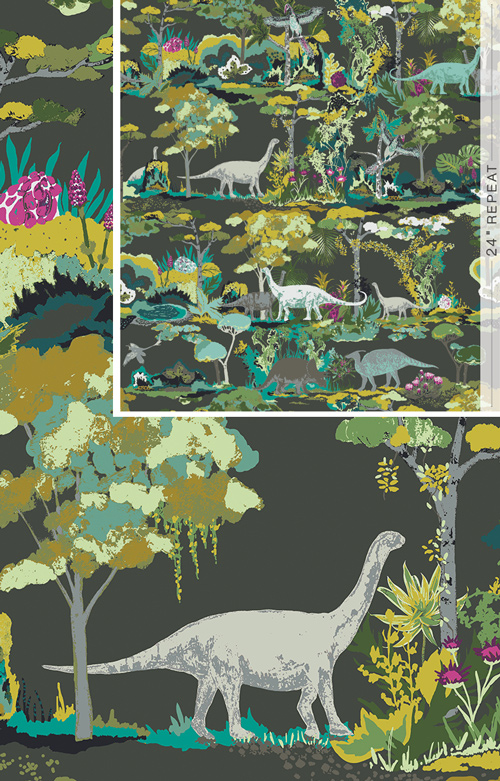
First we will look at Esoterra, a dinosaur themed line designed by Katarina Roccella. This line contains a dramatic look at prehistoric creatures that once roamed the earth. The palette features deep green, dark teals, grays and hints of fuchsia.
The pieces that are focused on the dinosaurs include those shown above.
I love the piece shown above – it is really dramatic and would be great as a whole cloth quilt for the dinosaur loving child!
Next up is Hello Bear, designed by Bonnie Christine. This line was inspired by her son, Bear. (By the way, I am sorry about the wrinkles. Might have been better to press some of the fabrics before taking pictures.)
Bonnie Christine used woodsy tones like pastel moss, conifer and bark for this bundle of fabric. It is soothing and has a very modern look to it. Woodland creatures never disappoint.
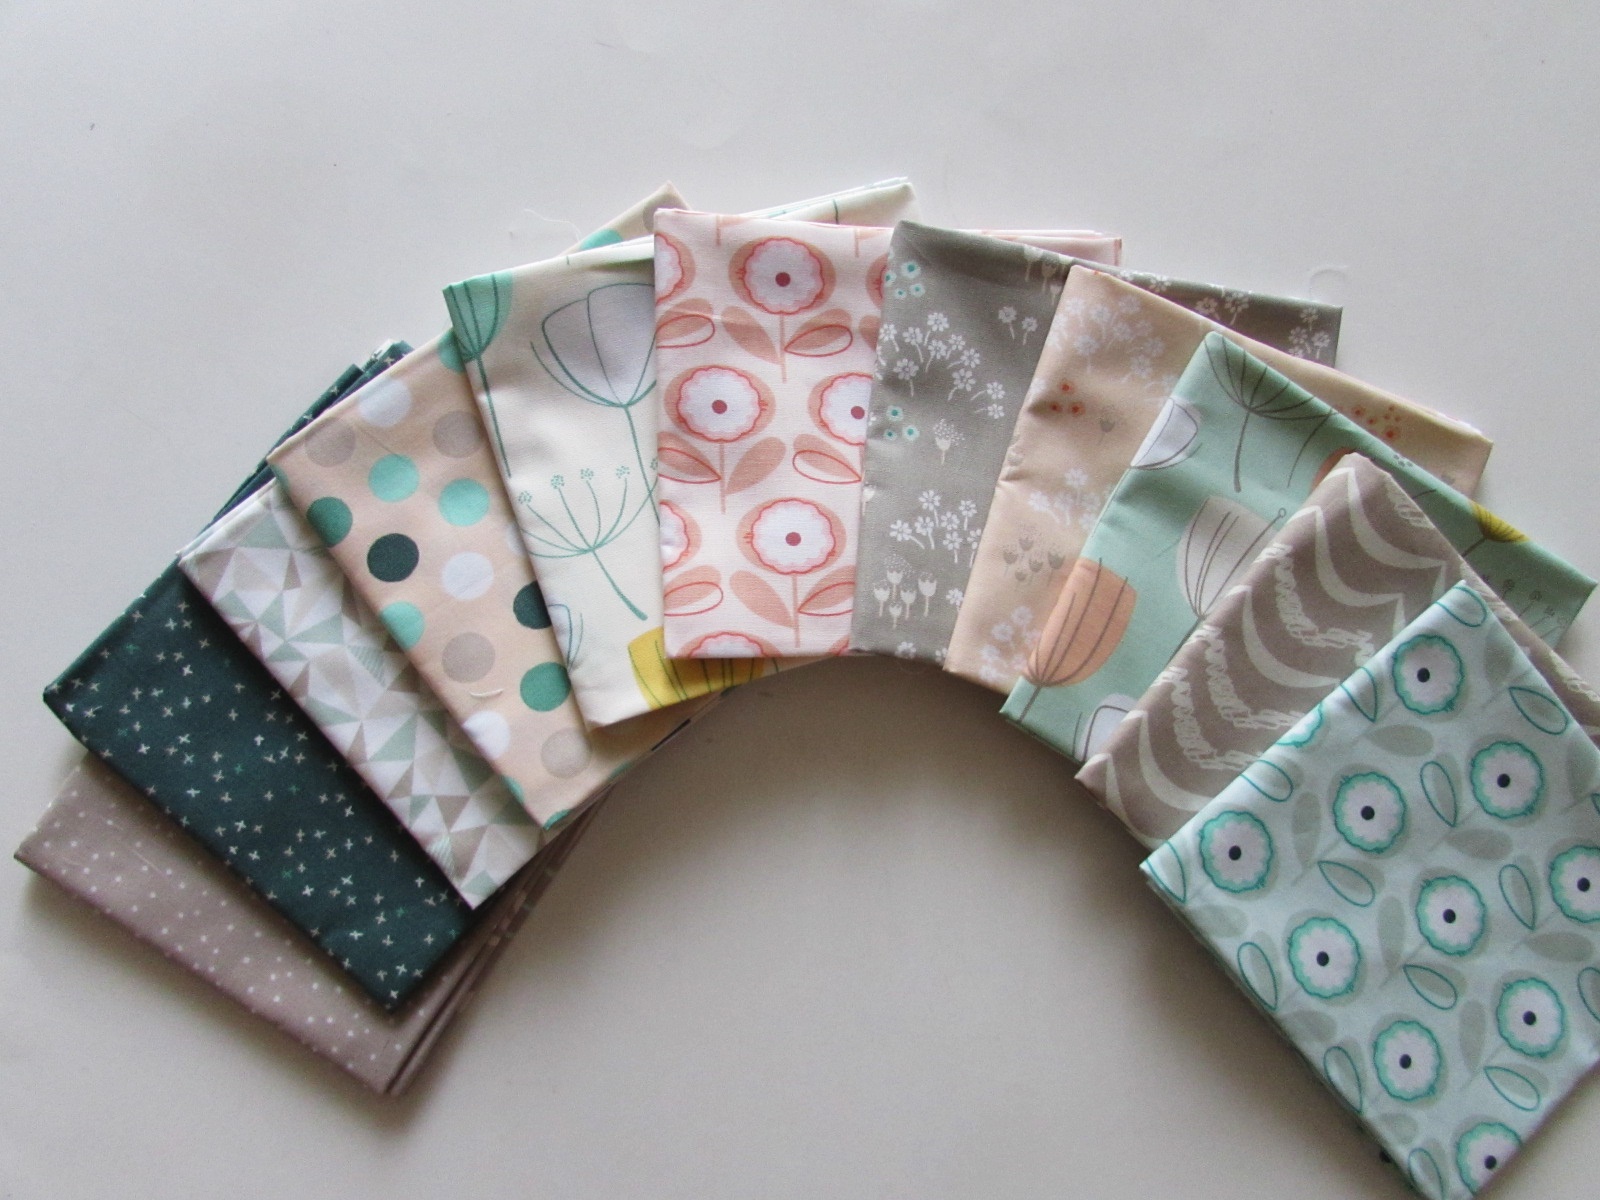
The picture above shows the Lambkin line, also designed by Bonnie Christine. Here she used sophisticated colors of mint, slate and blush this collection shows the vision of a peaceful farmstead.
Moving along, we will take a look at Littlest, designed in house by the folks at Art Gallery Fabric. Using tones of mint, taupe, grey & peach, this line has soft bunnies and sweet musings (I love a text print!!)
If those sweet little fabrics are removed from the bundle, one is left with a pretty bundle of muted florals, dots, and stars. I think the dusty tones of taupe, pink, green and blue are really attractive. This bundle could be used in so many projects and provides a totally different look.
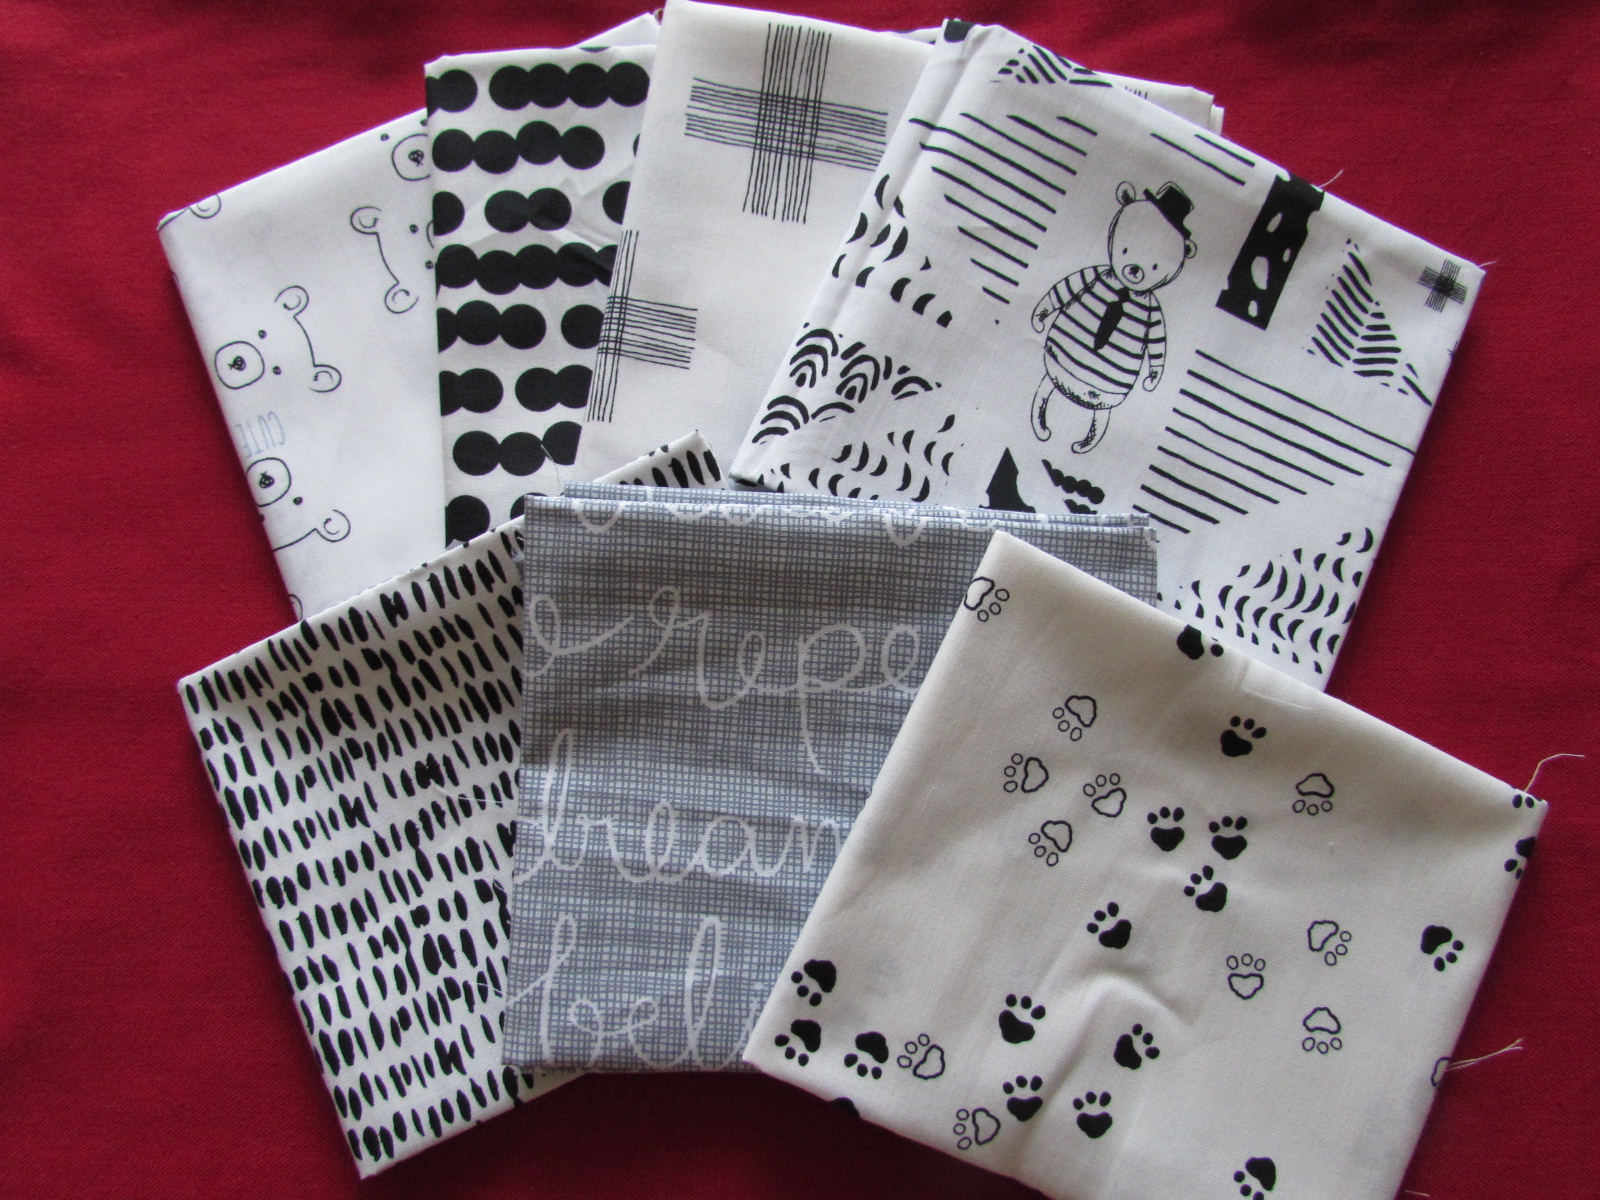
There has been a lot of talk about Nest, one of the newest lines by Art Gallery. This was also designed in house. I am showing it against a red background to provide a good look at this gender neutral collection. What a sweet bundle of fabric – it showcases cute paws, little bears, and adorable lambs against a contrasting black and white palette.
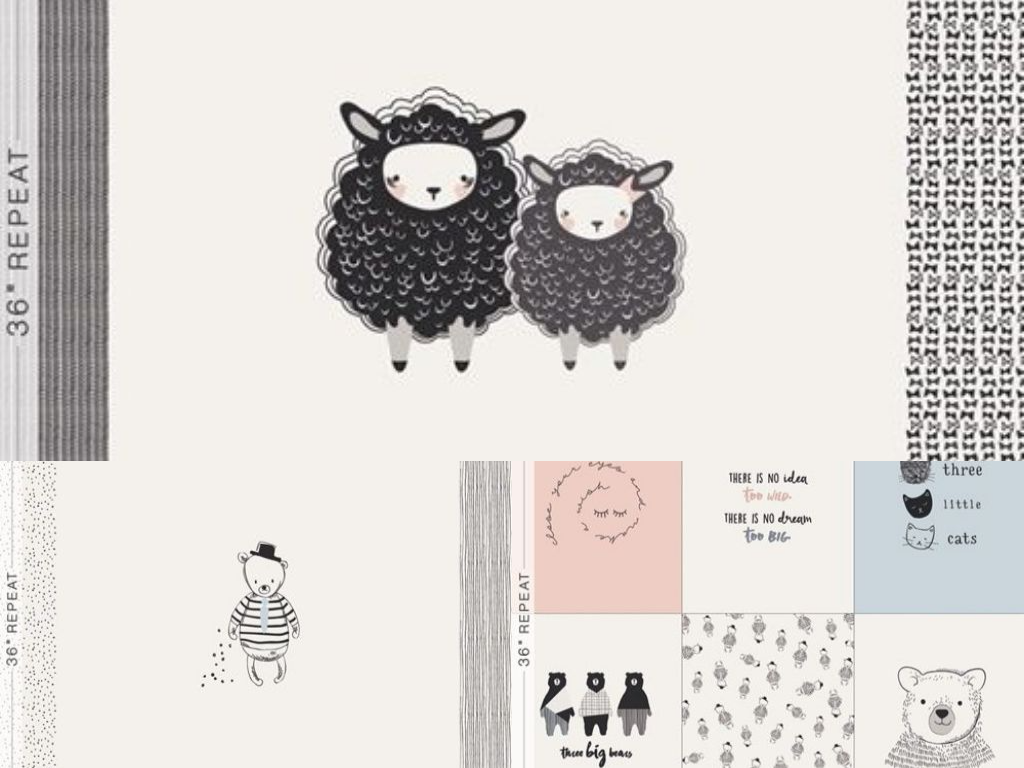
The fabric line comes with three panels, each measuring 36″ x 42″. Above is a collage of all three panels. They are just the sweetest. Two lucky winners will receive the fat quarters of the coordinates plus one of each of the panels!!
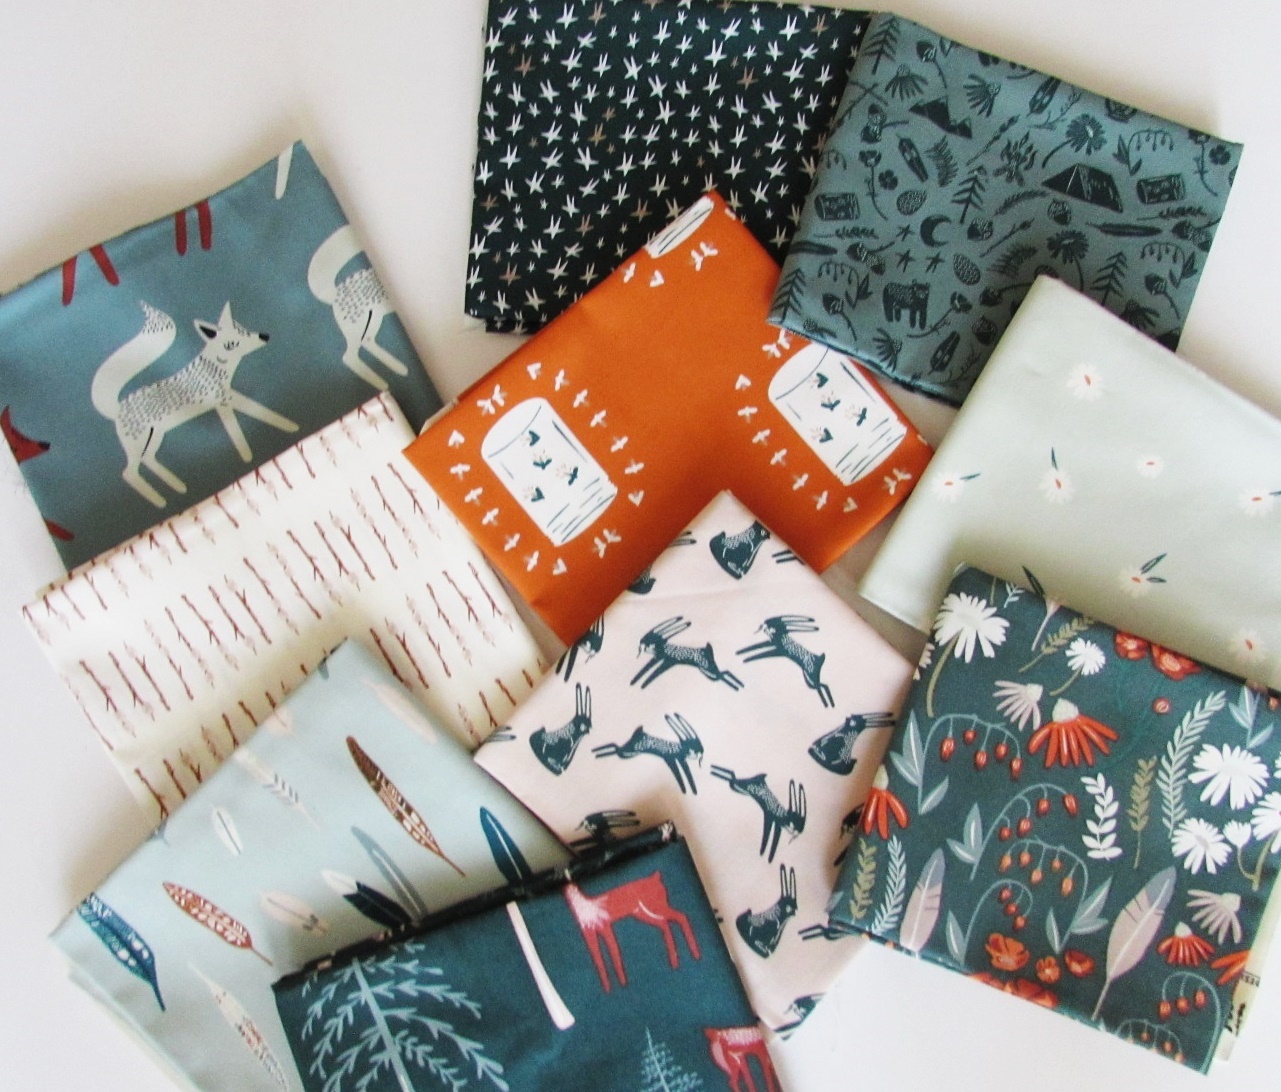
Finally, let’s take a look at Campsite, also designed in house at Art Gallery Fabric. I actually just purchased several bolts of this and listed them in my shop last week. But the entire collection is shown above. I am in love with this bundle. I grew up camping and really our family camped until the last couple of years. (My bones are not happy sleeping on the ground these days!) But the fabric sure makes me nostalgic – especially the print on the left showing the sticks loaded with marshmallows, ready for roasting. Who wants a s’more? The jars of fireflies are really cute too.
As I looked through all of the bundles sent to me, I felt overwhelmed with gratitude for Mr. Bravo’s generosity. He really went above and beyond, didn’t he? Looking at both Nest and Lambkin, I realized I need to add some of these to my shop. I will be placing an order later today and will let you know when they are listed.
Remember, each quilt made and donated to A Doll Like Me is one entry in the prize drawing. There are two ways I am keeping track. One is with email; just email me a picture of the quilts you send off to Amy and I will enter you. Send your email to me at [email protected] . The other way is with a link up on the blog. The link up will be open from 2/25 – 2/28/18. Bloggers, link up your posts featuring the doll quilts you made. From there, I will enter you in the drawing.
Thanks to everyone who is sewing for A Doll Like Me. Amy and I both are so grateful for your participation! I will close with this collage of some of the quilts that have been made thus far.
Linking up to some fun sites – take a look at the list of linky parties at the top of the page, under Link Ups.
The incredible response to the Spread the Love, Quilting for Kids event has been overwhelming and has definitely reaffirmed my feeling that quilters are an amazingly compassionate, generous and kind group of people. Truly!! When I thought about hosting this event I had this idea in the back of my mind where we would provide Amy, owner and creator of A Doll Like Me, with a stack of 25 quilts or so. Well, I can tell you with absolute certainty, we are far beyond that already. I would estimate at least 46 quilts have been shipped. Judging by the daily emails I am receiving, many more are in progress. I am starting to log the entries in the giveaway that will happen on March 1st. (Remember to be eligible for prizes, you must either link up with the linky party I will open from February 25 – 28. Or, you may email me a picture showing each quilt you finish and ship to Amy by February 28th. Each quilt counts as one entry.)
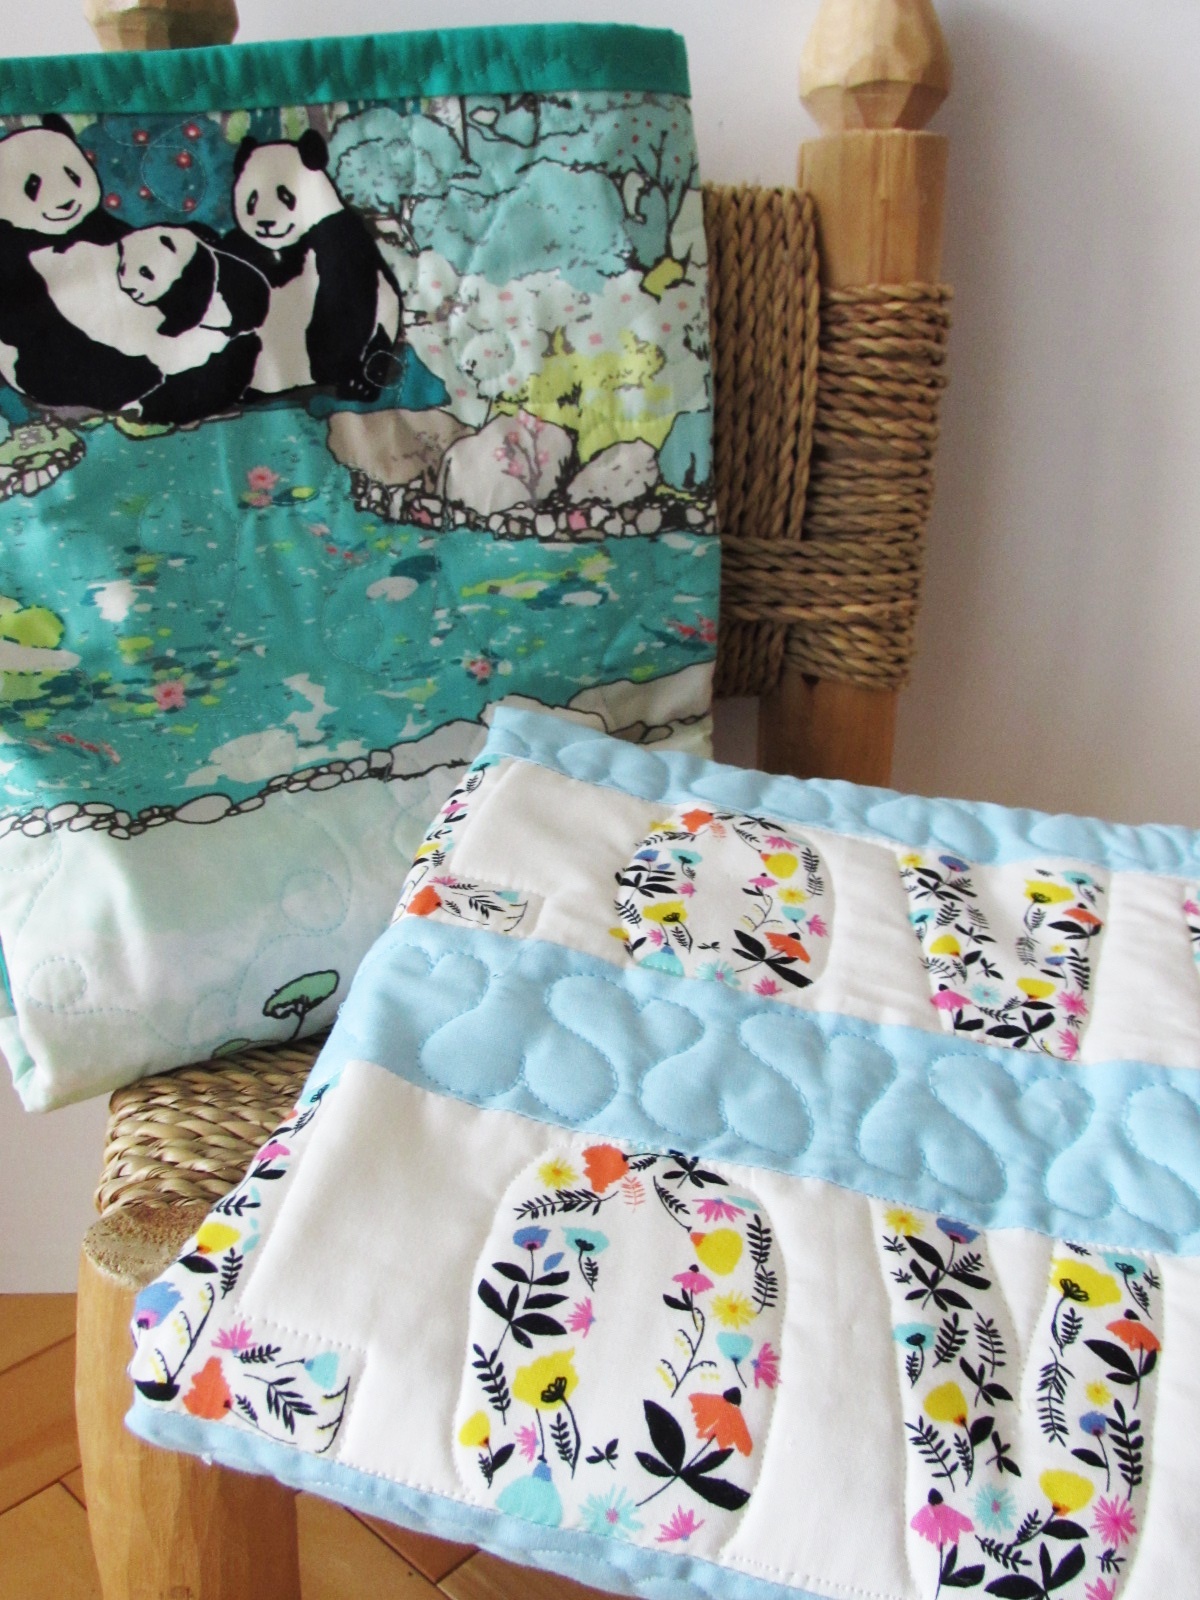
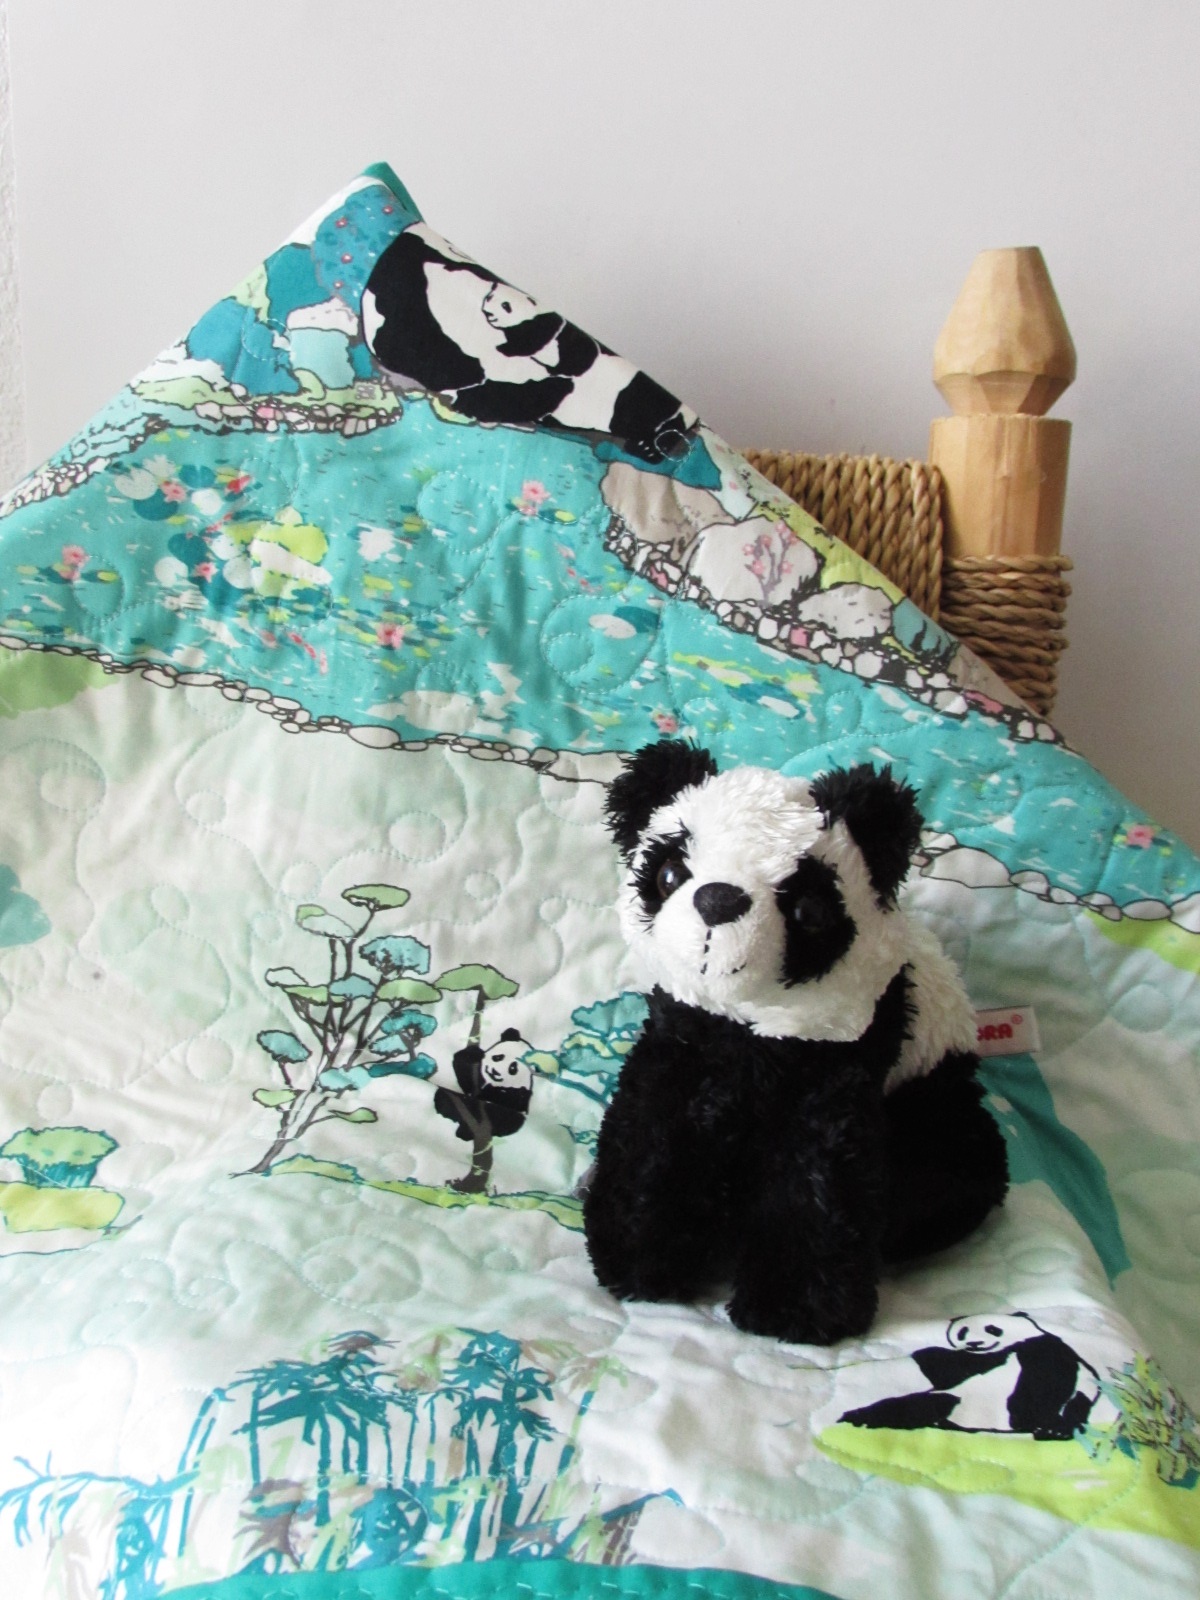
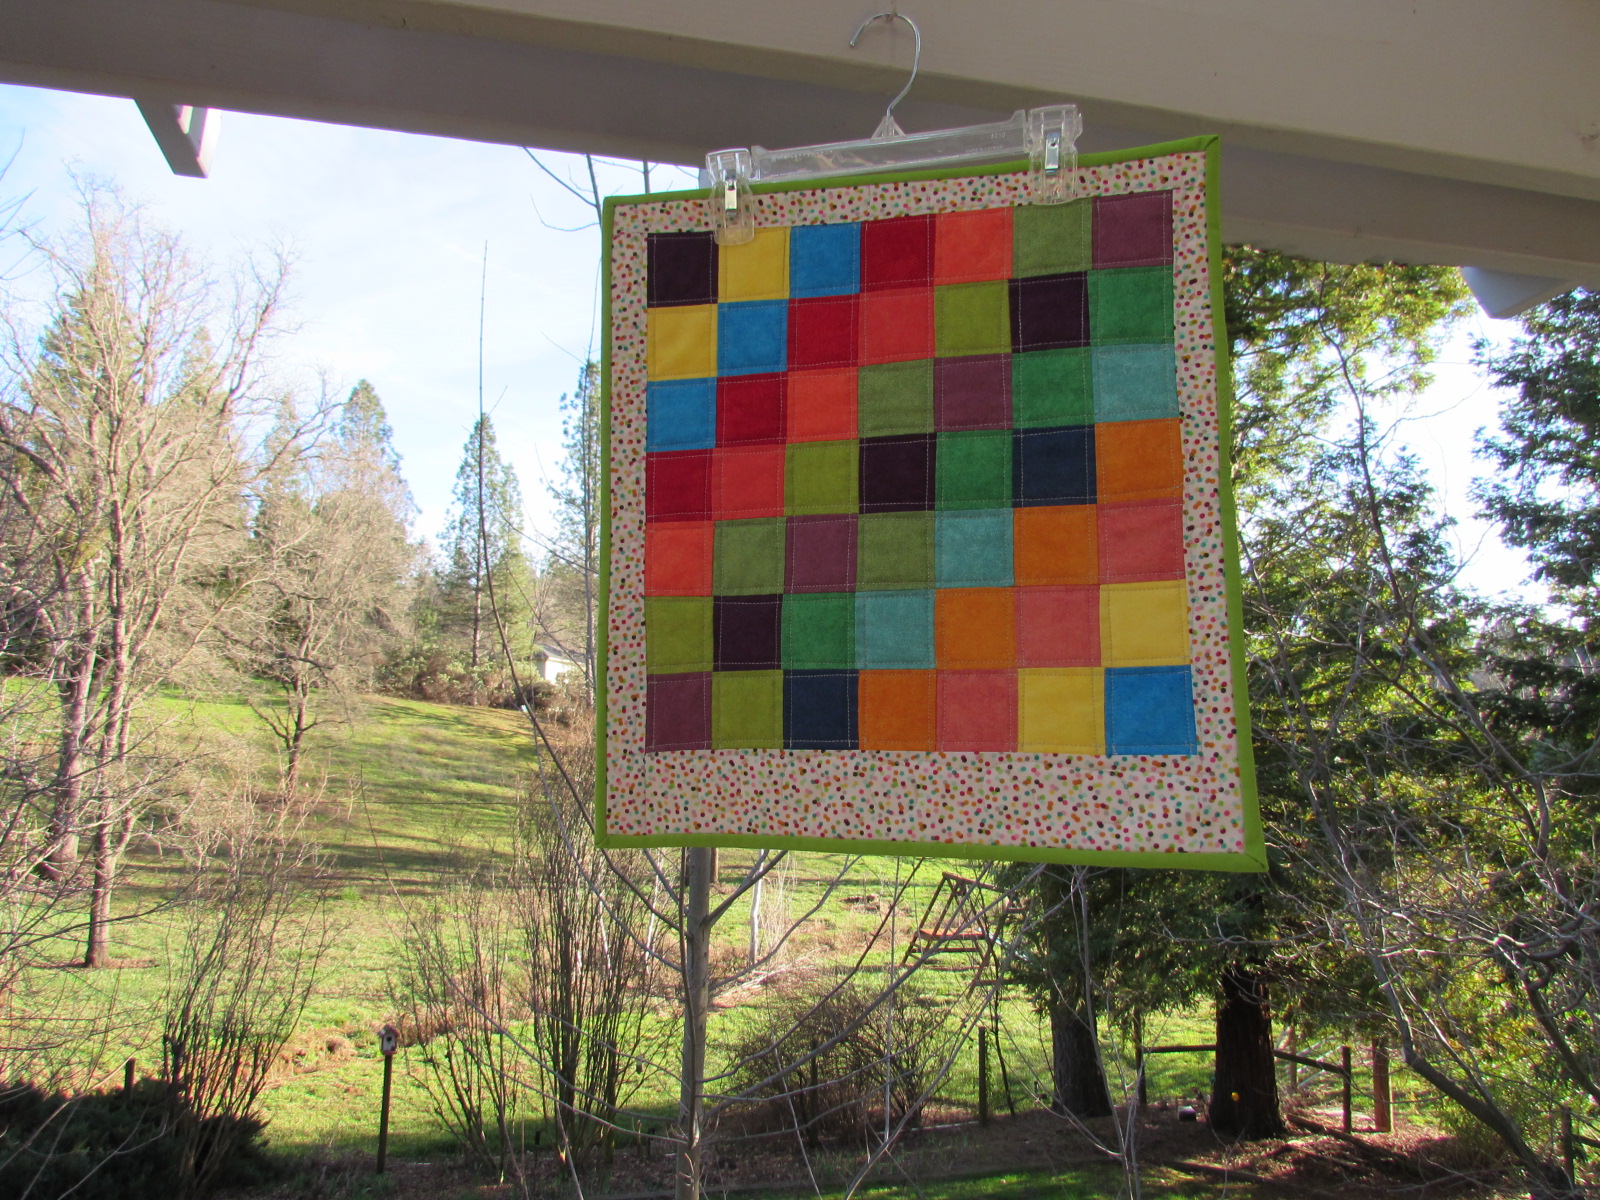
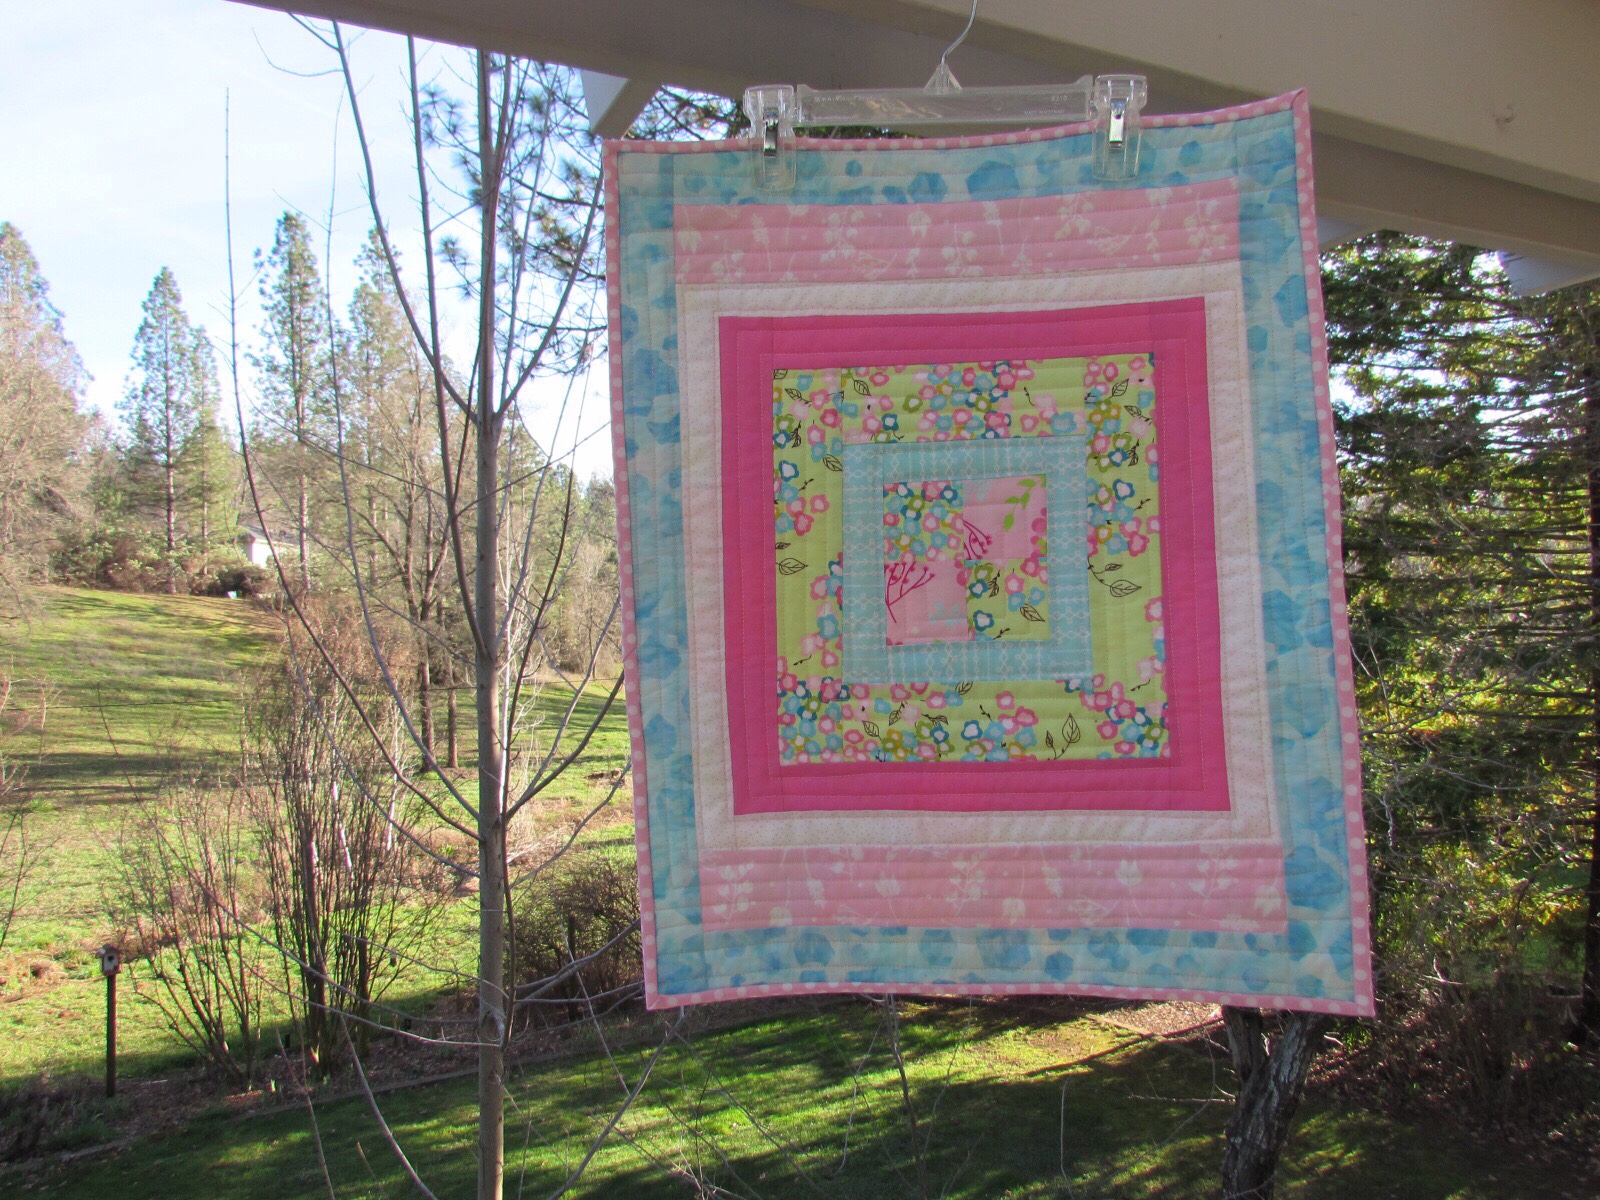
Busy as this event has made me, I am so happy to host it. Sewing for a such a great cause is completely satisfying. This week I made several quilts. I want to share two of them with you today. They are both just adorable and were so simple to construct. For the first one, I used Pandagarden Recess. You might remember I made a whole cloth quilt with this sweet panda bear fabric designed by Katarina Roccella last November. Originally I made a larger crib quilt and used it as a sample to show during quilt shows I was working. Well, this cute line is selling quickly and I don’t have very much left. (But if you are interested, there is still some in the shop!!) I decided to repurpose the quilt and create several doll size quilts. Manufactured by Art Gallery Fabric, this line is so whimsical. I love the palette used by Katarina – black, white, shades of green and the occasional pop of pink.
I was able to cut it into three pieces and retain much of the pandas playing on each quilt. If you remember, it is backed with the fabric called Hidden Panda. So much fun and I am so happy to be able to take that whole cloth quilt and share it with more children.
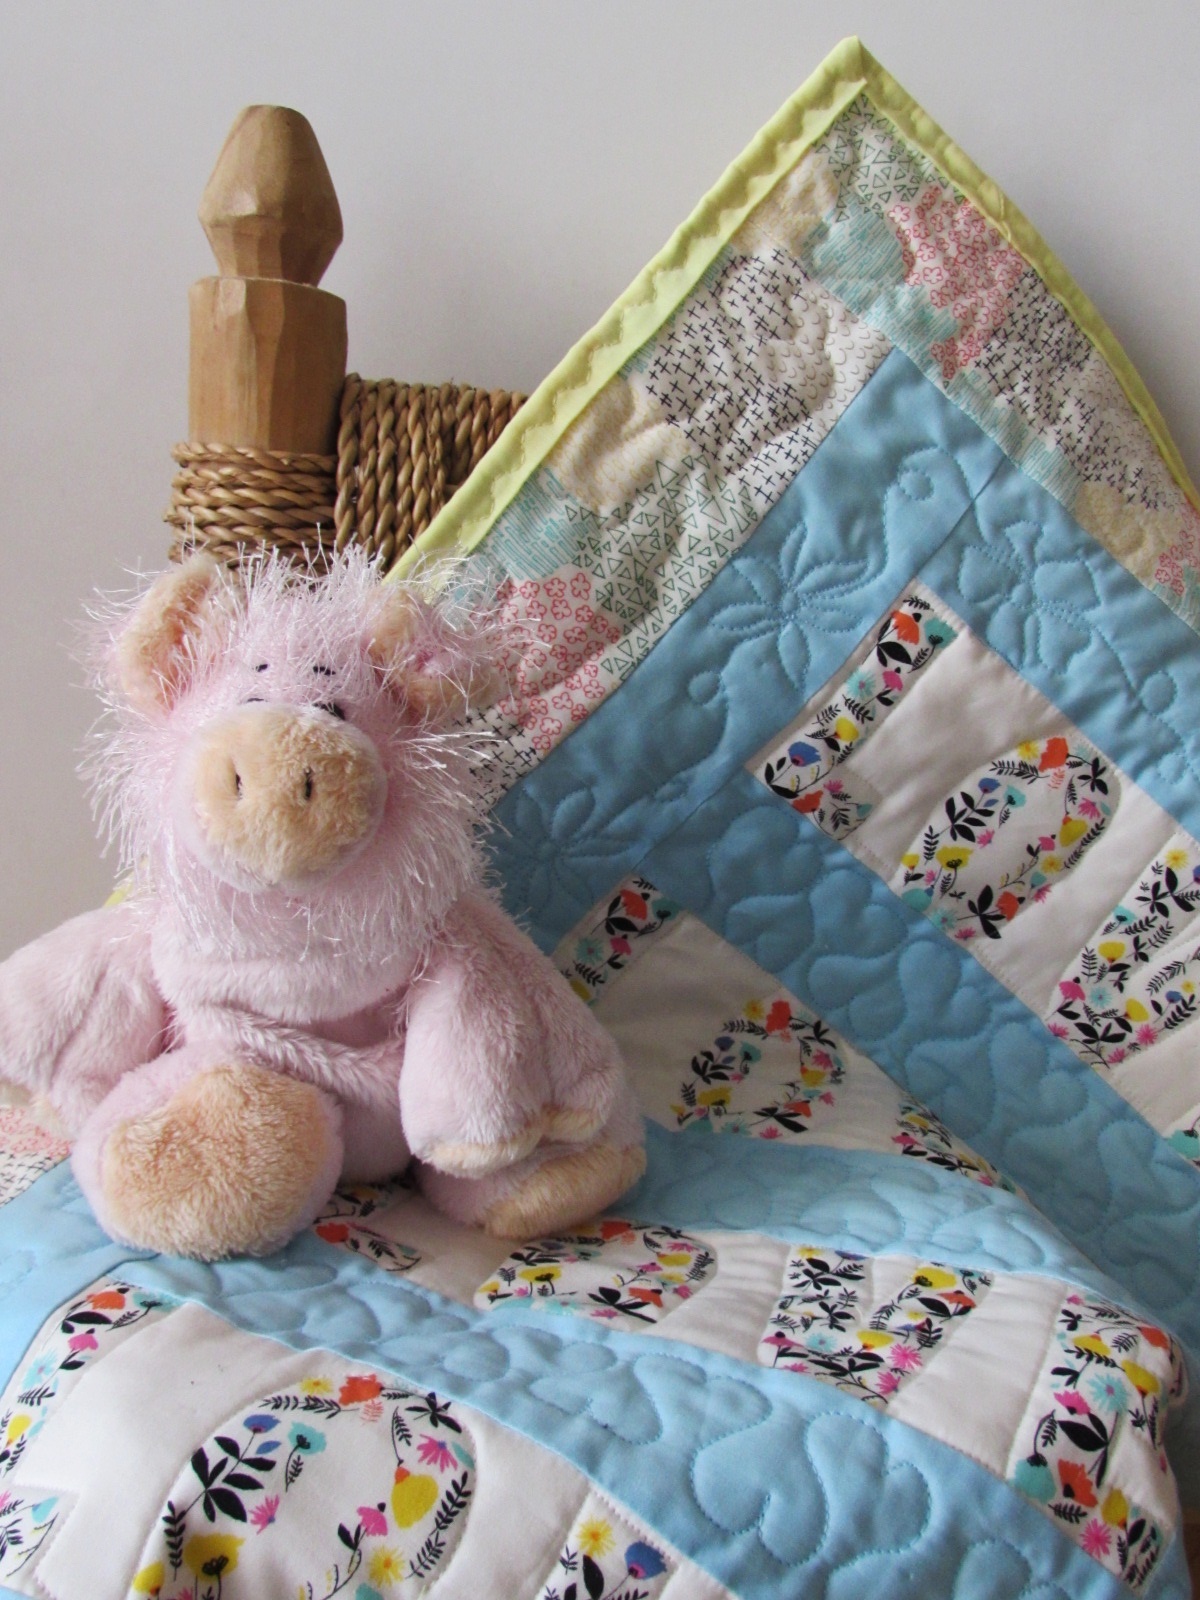
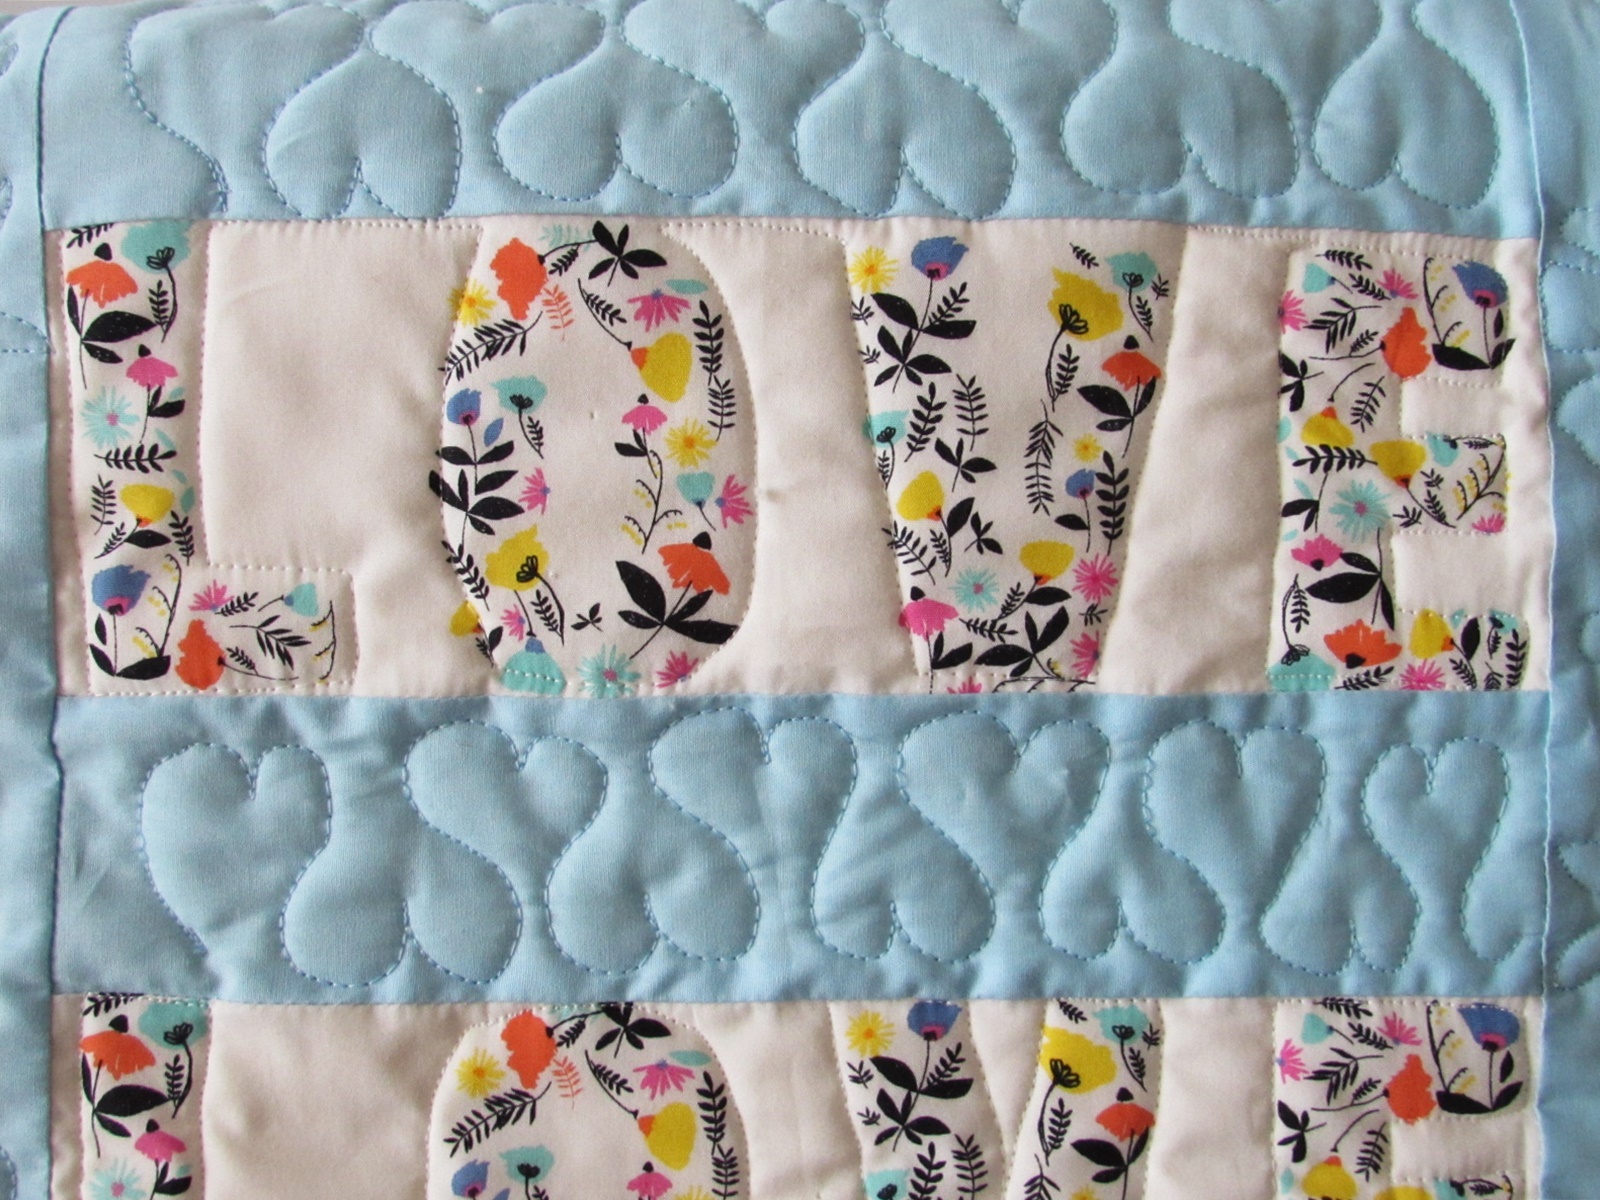
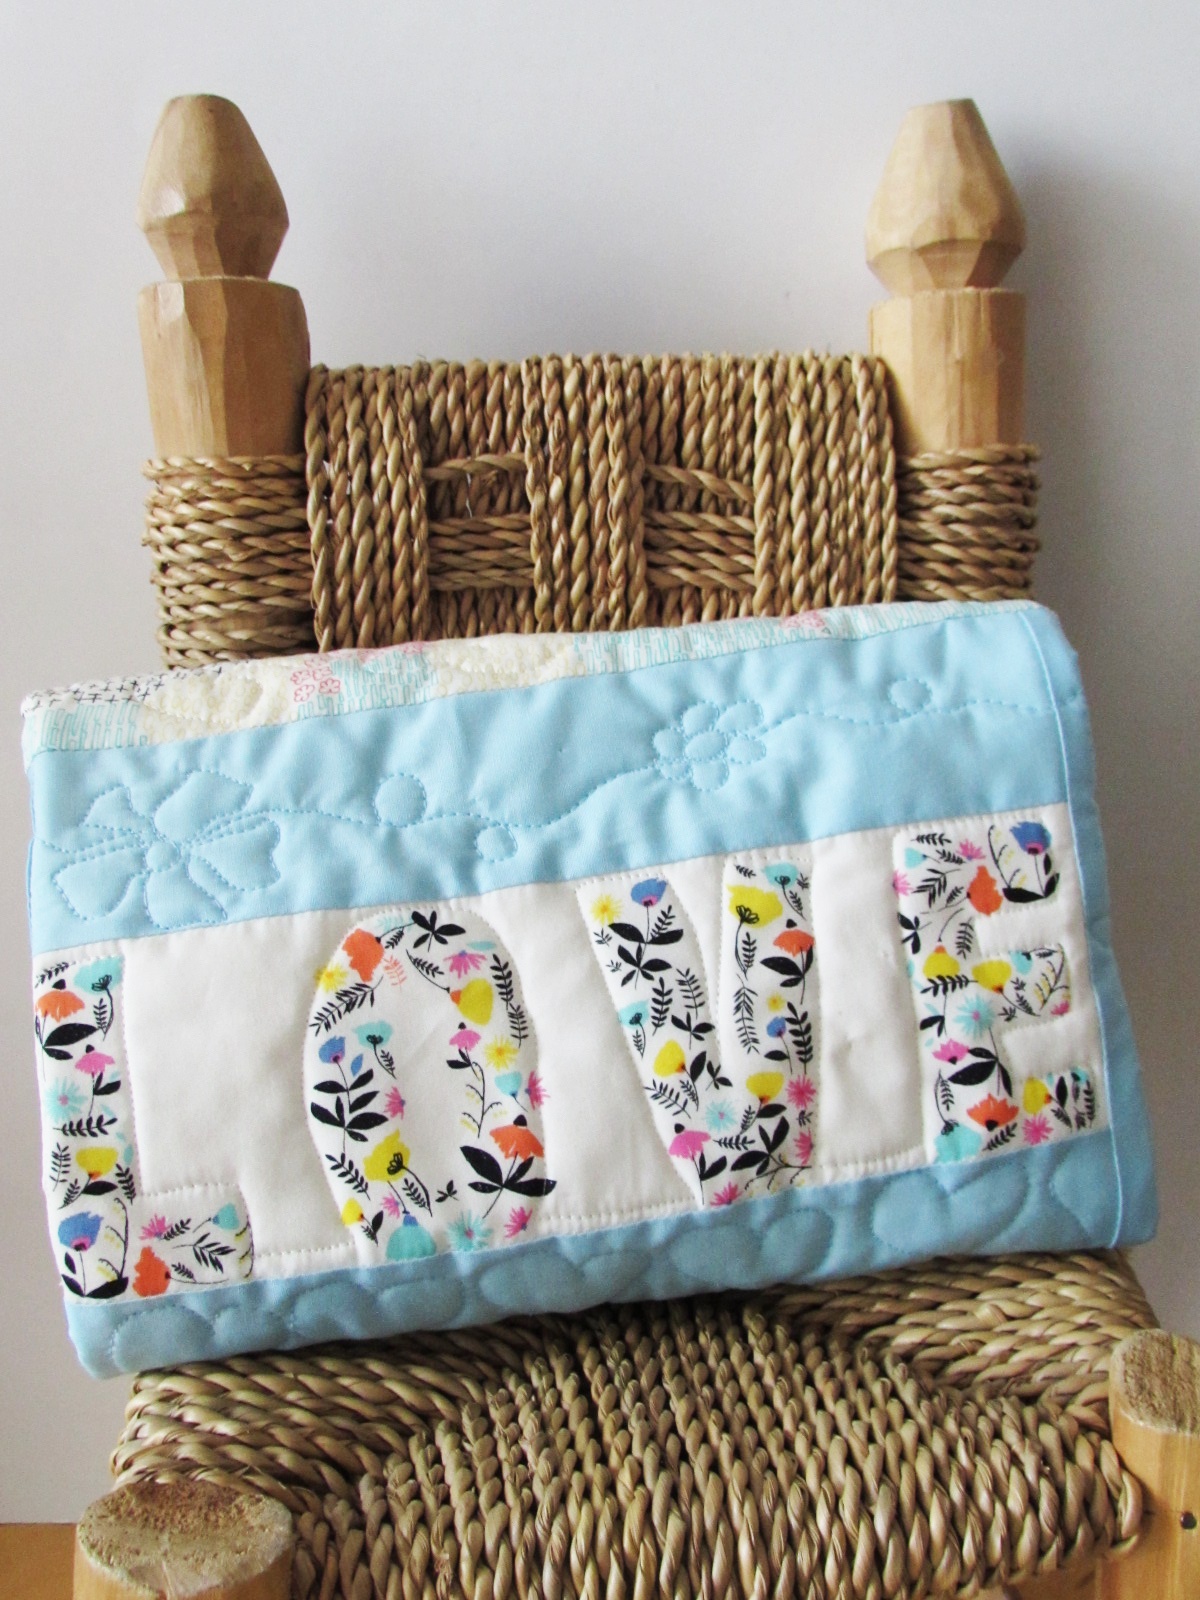
Next I used the LOVE Blooms fabric, from the Capsules line produced by Art Gallery Fabric. To begin, I fussy cut four rectangles that contained the word LOVE. I knew that was the word I wanted to build off of. I took a light blue Pure Element solid called Tranquil Waters (also by Art Gallery) and sashed the four rectangles. Once the center was sashed and assembled, I added a border using Window View in Spring. This piece is from the Happy Home line designed by Caroline Hulse , for Art Gallery. The abstract floral is so sweet and adds lovely color to this tiny quilt.
I took advantage of the size of this quilt and practiced my free motion quilting – I love having these smaller projects to practice on. I suspect the recipient of this little quilt will not be looking at my stitches with a critical eye! First I did a quick outline of the blocky letters spelling LOVE. Then I did a stipple over the outermost border. Because of the pattern on that fabric, the quilting doesn’t show up well. I decided to just do a basic stipple since it won’t be readily visible. For the solid blue sashing I had thought of quilting words over it to express love for this little child. When I told Julia, she thought it might not be effective because the child might not be able to read. Instead, I hopped over the my all-time favorite quilting site, The Inbox Jaunt, and searched for heart motifs. When I found this one, I doodled it on paper for a while. It was a breeze to quilt and looks so sweet on the rows of light blue between the LOVE rectangles. On the outer blue borders, I quilted loops and flowers.
For both quilts, I machine stitched the binding to the back side, folded it to the front and used a zig-zag stitch to attach it to the front. The stitch is decorative and I am hoping these quilts are played with and used constantly. This will require lots of laundering and the machine stitched binding might be a bit sturdier than a hand stitched.
Both of these quilts will be sitting on the sewing table for a couple of days while I finish up a couple of others that are nearly done. Then they will travel to Wisconsin to live at Amy’s until she sends them off to a child who needs them.
Before I close, I want to show you a picture or two to pique your interest in the prizes I will be giving at the end of February. I still cannot get over the generous support provided by Art Gallery Fabric. When this box arrived yesterday I just squealed. There is a whole lot of gorgeous fabric there. For now though, this is all I am showing you!! Come back Monday and I will give you a closer look. I am truly honored to have the support of this amazing company.
Linking to my favorite parties – click on the Link Up tab at the top of the page for more info.
This morning I want to share my progress on the doll quilts I am making for the February Spread the Love event. If you haven’t yet read about this creative and inspiring event, please hop over here and read this post. Then come back for more!
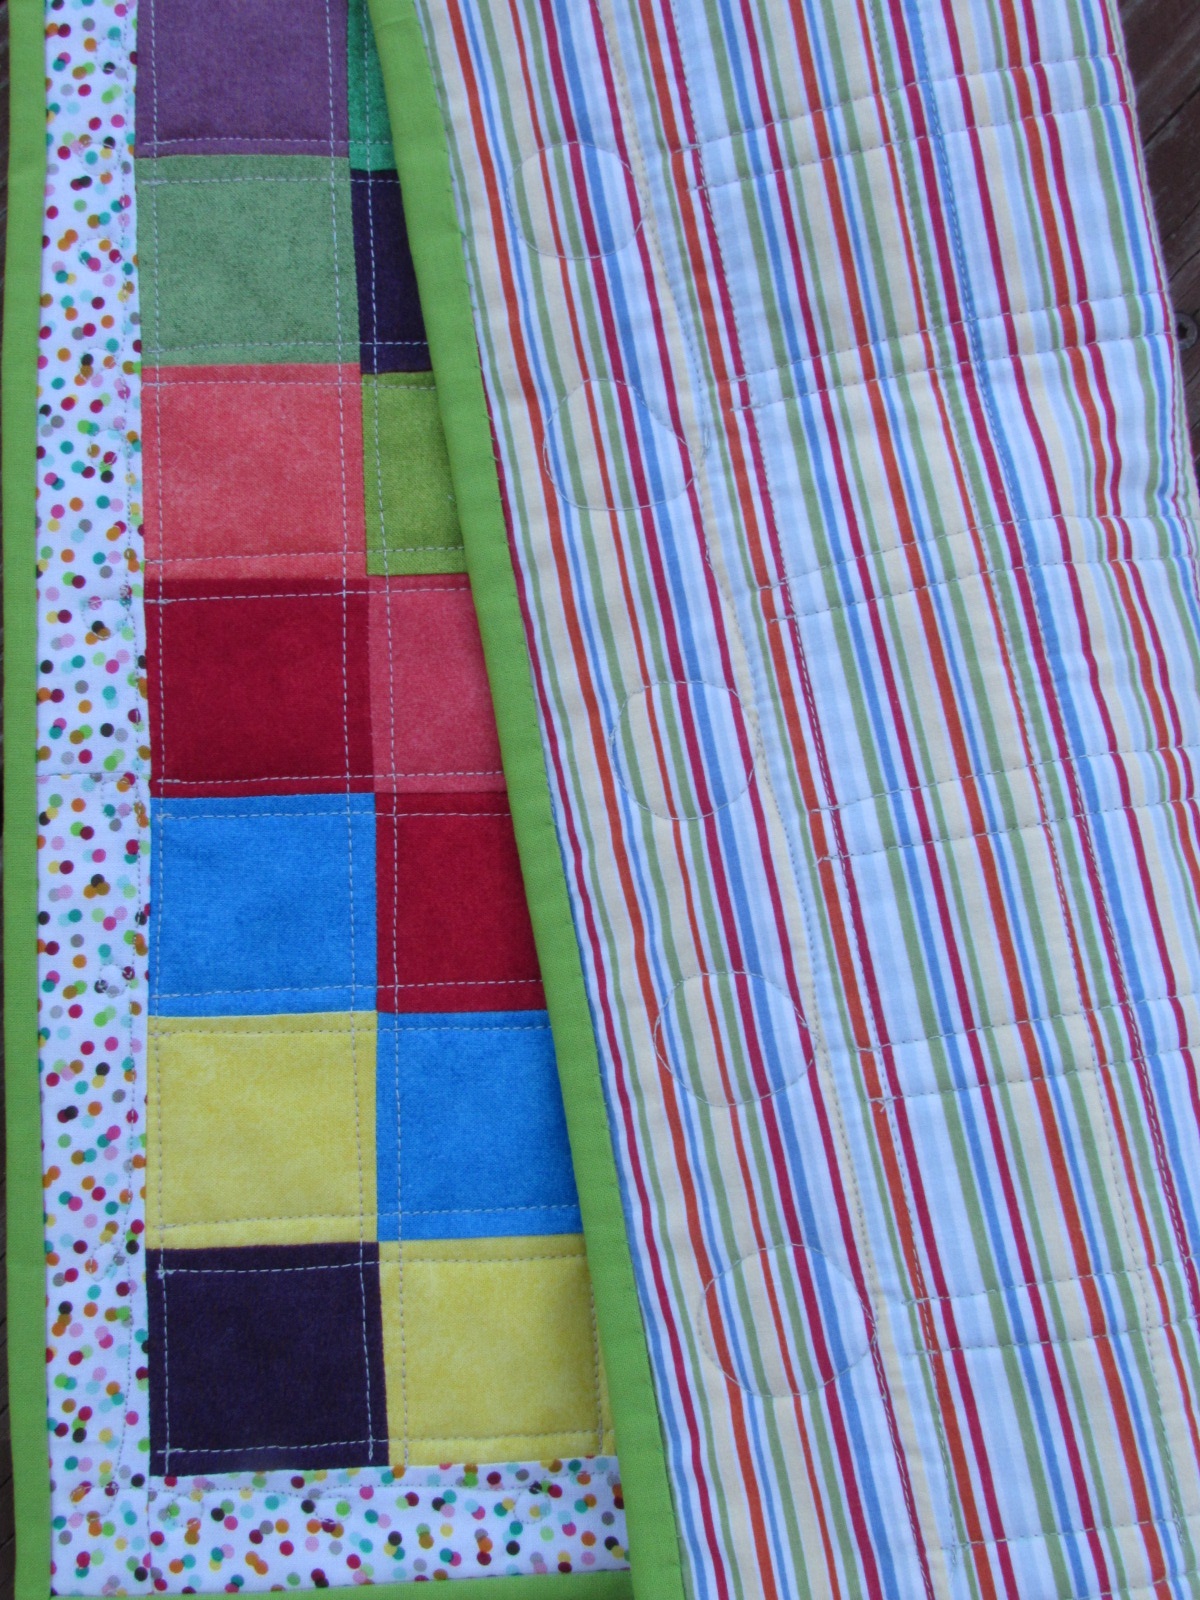
So far I have two quilts finished, one ready to quilt, and another still in pieces on the design wall. The first one I made was a simple patchwork. I had a charm pack of solid colors from Connecting Threads. I cut the charms into four pieces and arranged them on the diagonal. I had some cute polka dot scraps that are from the Henry Glass line, Modern Tykes which made a cute border. Quilting was simple lines following the seams and a few loops in the border.
I had a cute striped sheet and used a piece of it as the backing. My only regret with this quilt is the size. At 16″ x 18″, it is a bit on the small size.
For this quilt I had some Joel Dewberry fabric that has been sitting on the shelf. A long while back, I started making City Sampler blocks from the Tula Pink book. But I don’t like the blocks. I have learned so much about color since starting that project and I know I will never finish these as a quilt. So I picked one, placed it in the center and built around it. It looks so cute that I will likely make more with these leftover blocks.
The backing is an older Moda print from my stash. This quilt is a bit bigger, 17 x 21 inches, but I still think it is a bit small. I quilted a rectangular spiral with my walking foot. I think these doll quilts are the perfect projects to practice my quilting. Whether it be free motion or walking foot, the small size is just right.
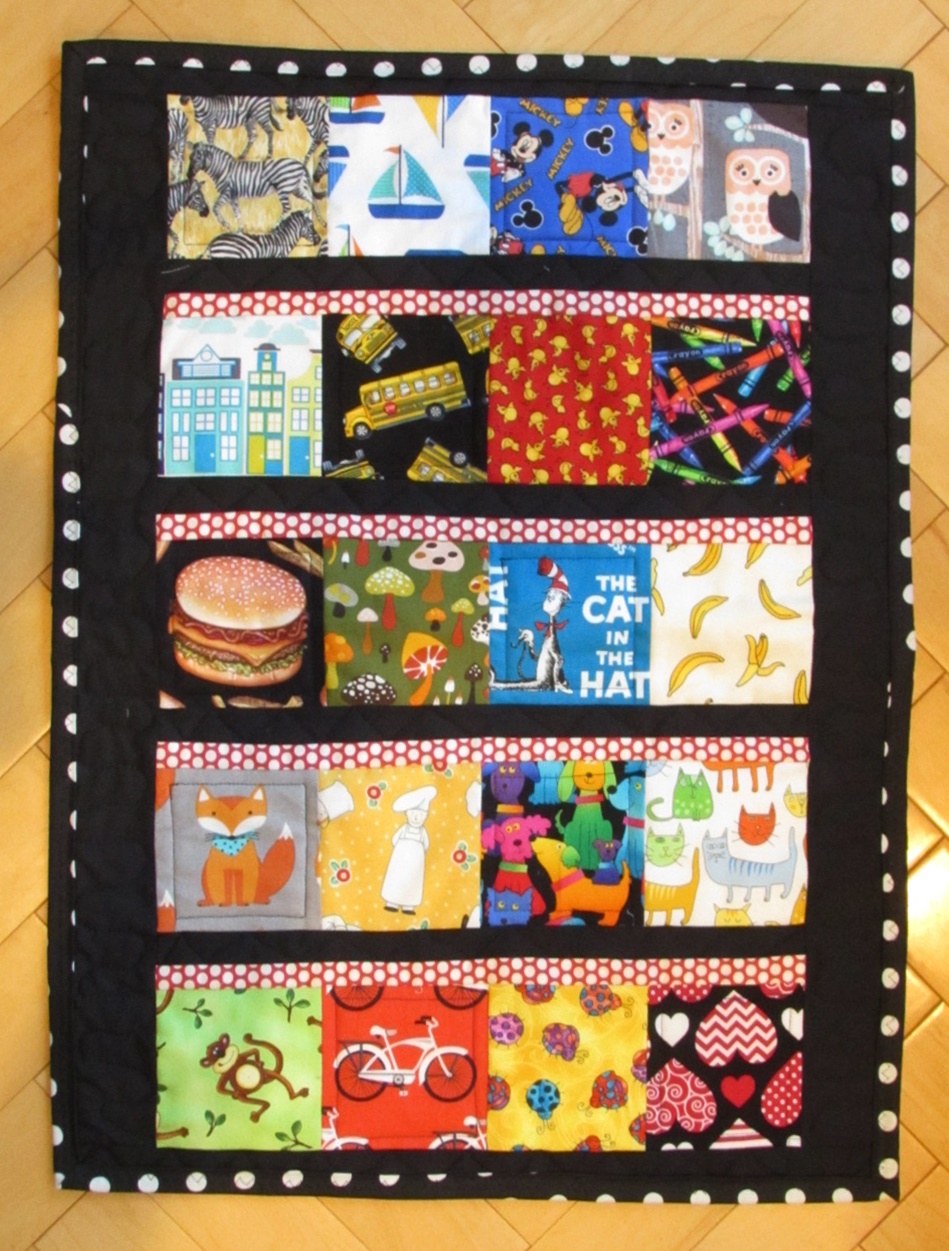
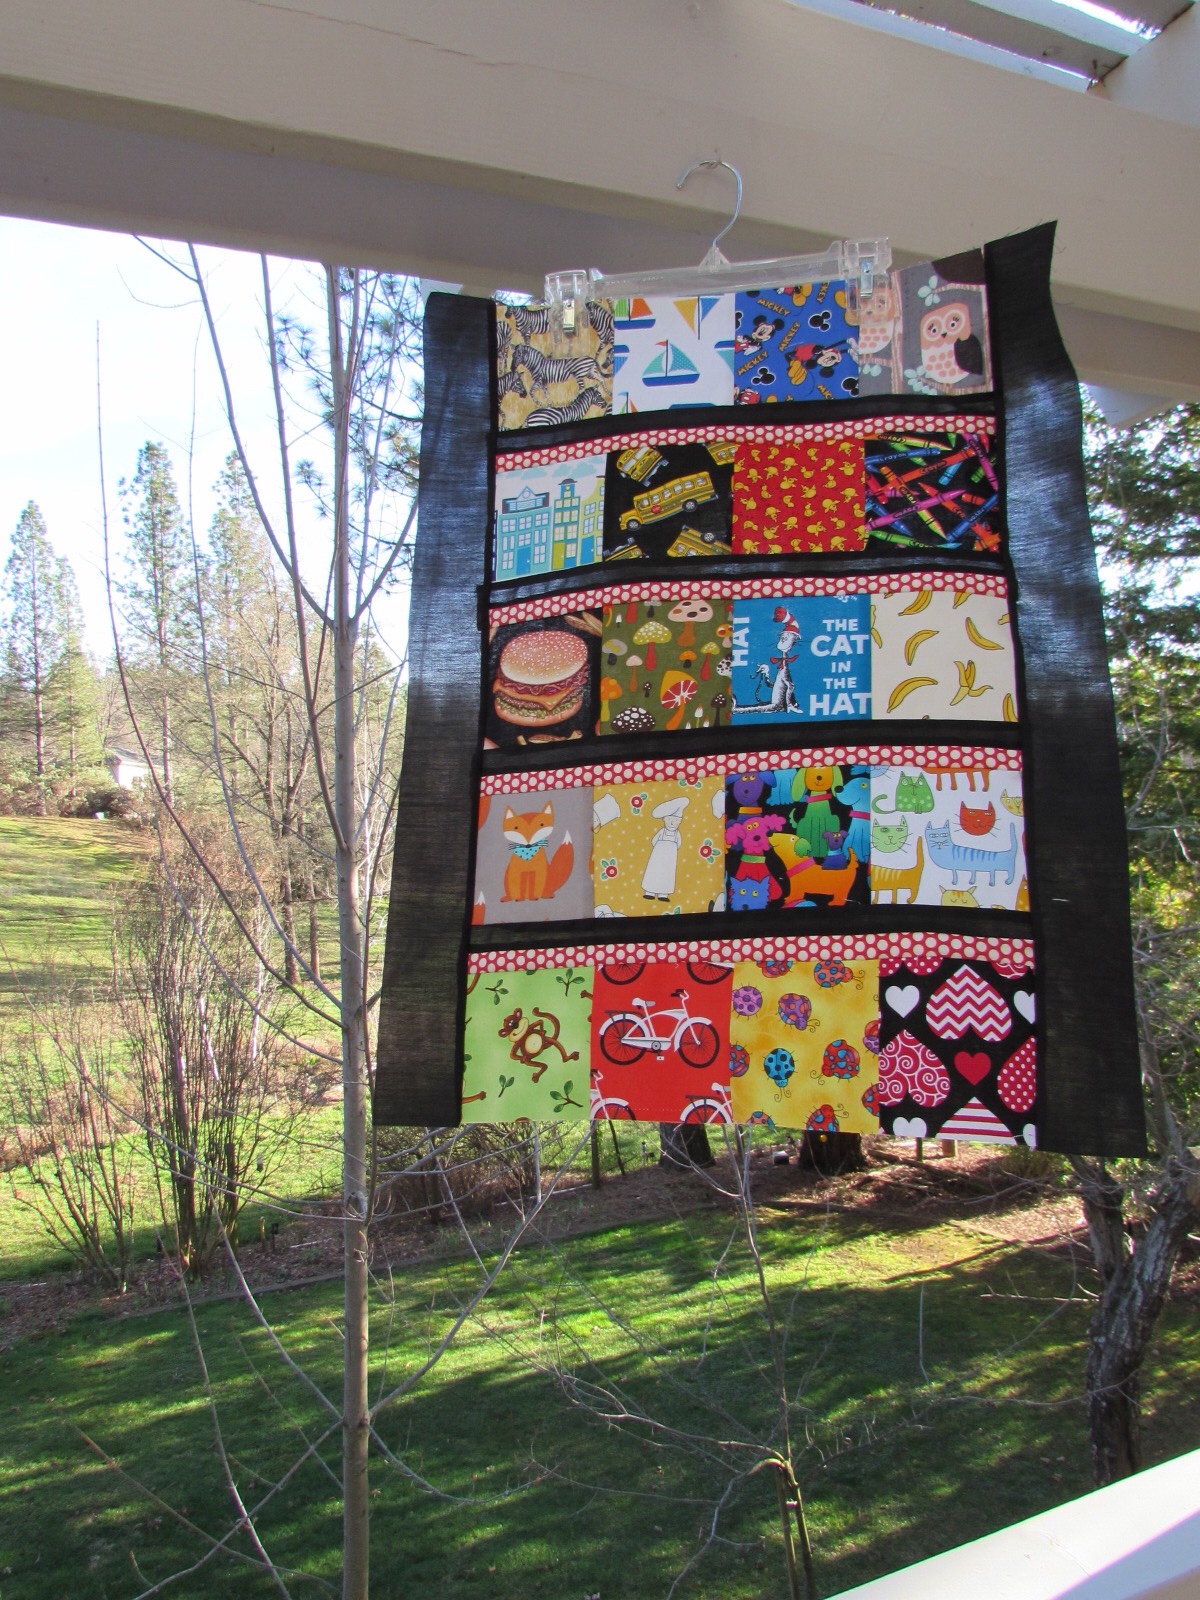
I decided to make this I-Spy quilt next. Last year I won a a set of I-Spy charms from a giveaway over at Val’s Quilting Studio. It was fun to pick through and use some for this little quilt. I arranged several rows of blocks and added a narrow rows of black and red polka dot fabrics. Hopefully the child receiving this will enjoy playing I-Spy and looking for the fun objects contained in the quilt! It needed width so I put a larger border of black on the sides. It still needs a narrow black border at the top and bottom to finish it off. It should finish at 21 x 24 inches and for whatever reason, this seems like a nice, generous size.
I want to thank everyone for your excitement about this project. The gift of your time and creativity will be much appreciated by the families that receive your quilt with their doll. A couple of readers showed interest in also making some doll clothes for Amy. I checked with her and she would happily welcome doll clothes made to fit an 18″ doll. I have seen patterns available both at Jo-Ann’s and occasionally at thrift stores. One thing Amy mentioned is she would especially like pajamas and hospital gowns for the dolls. Remember, she is providing ‘a doll like me’ and some of these children have more than their fair share of hospital stays and periods of recuperation. Having their doll wear a hospital gown would be another way the doll is like the child.
Also, I have set up a process for quilters in the UK. My sister lives outside of London and she is happy to be a central point for any quilts. So, this means if you are a quilter in the UK and want to participate, you would mail your quilt to my sister. She will gather them and then send them to Amy in Wisconsin. I am very happy about this because otherwise, the shipping expense might prevent a quilter from being able to participate. If you know of quilters in the UK who might want to participate, please share this event with them! If you are in the UK and want more info, email me or leave a comment.
Keep the questions coming, either by commenting on this post or emailing me at needleandfoot at gmail dot com. Thanks so much for participating! I can’t wait to see some doll quilts. Have a great weekend!
Linking up with all sorts of blogs. Check the Link Ups tab at the top of the page for more info.
Today I am incredibly excited to share an event with you. I have been getting to know Amy Jandrisevits, owner and creator of A Doll Like Me. To begin though, I need to tell you, this is a long post. I have so much to share! Go grab a cup of coffee and settle in. 🙂
Several weeks ago, I was browsing quilt blogs (a favorite past time for all of us, right?) I began reading and skipping around Elana Goldberg’s blog, That Fabric Feeling. I landed on a post from early last year titled Doll Quilts. I read about quilts she was making to be given with dolls made for children with special needs. I was immediately intrigued by this and started following links. The links led me straight to a Facebook page for A Doll Like Me. I read and read and read. Honestly, I was so touched by this and I couldn’t get enough. My first thought was, oh, I should make a quilt and send it to this organization. But the more I thought about it, the more I wanted to help in a bigger way. I kept thinking what if I could gather some quilters together and we could make a bundle of quilts for these dolls. Ok, I am getting ahead of myself here….
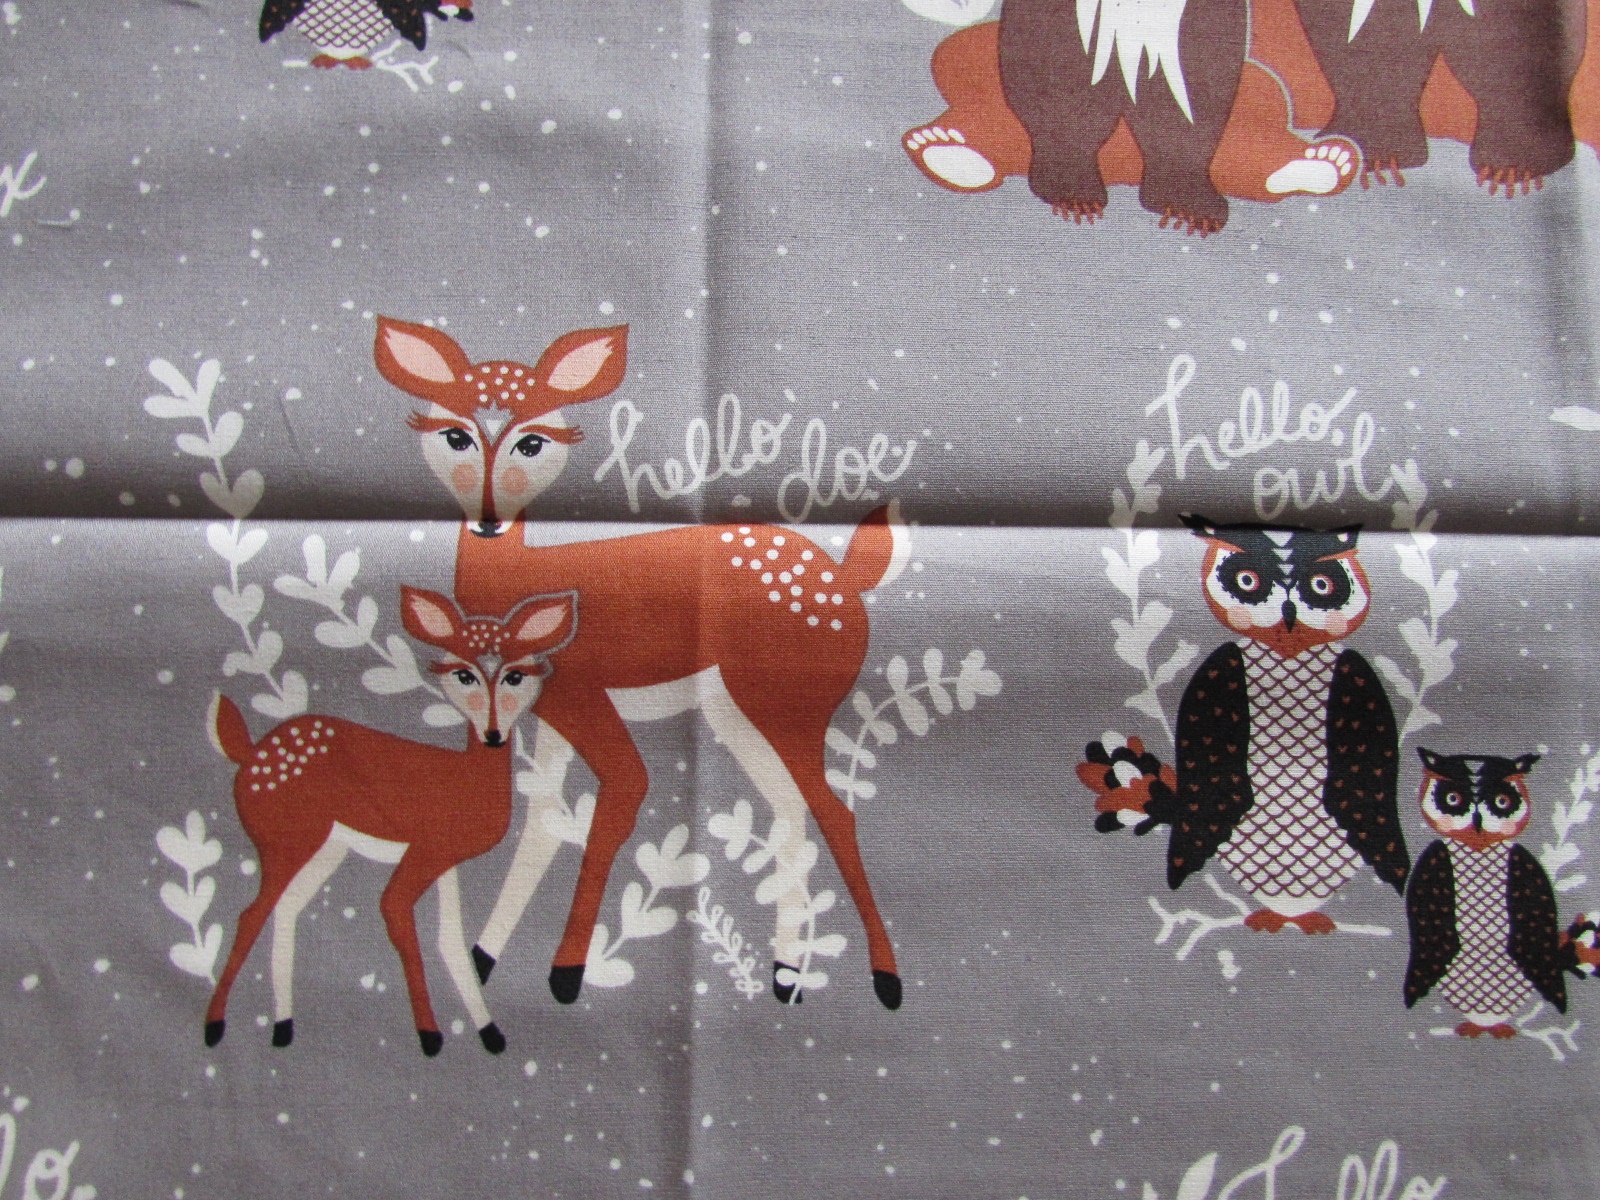
First let’s really get to know Amy Jandrisevits, the woman behind this incredible shop. Writing prior posts about people I interviewed, I would rework the conversation and put it into my words, often because I needed to shorten the post. Today, I don’t think I will do that. I want you to know Amy through her own words. When she wrote me, her words had a huge impact on me and I don’t want to lose any of that. So, meet Amy – mom to three children and currently a stay at home mom. Prior to staying home with her kids, she worked as a social worker in pediatric oncology. Her husband is a child psychologist at the Children’s Hospital in Wisconsin. Now she makes very special dolls that look like the child who receives them. Amy makes many dolls with limb differences (missing a hand, or arm, or leg). She makes dolls with a birthmark matching the child who own’s it. Maybe the doll wears a cannula (the little tube bringing oxygen to the child’s nose). The doll might have glasses, a hearing aid, or possibly albino skin or hair. Anything that the child has, Amy will make the doll have it – so the child can see his or her self in that doll, and have “A Doll Like Me”.
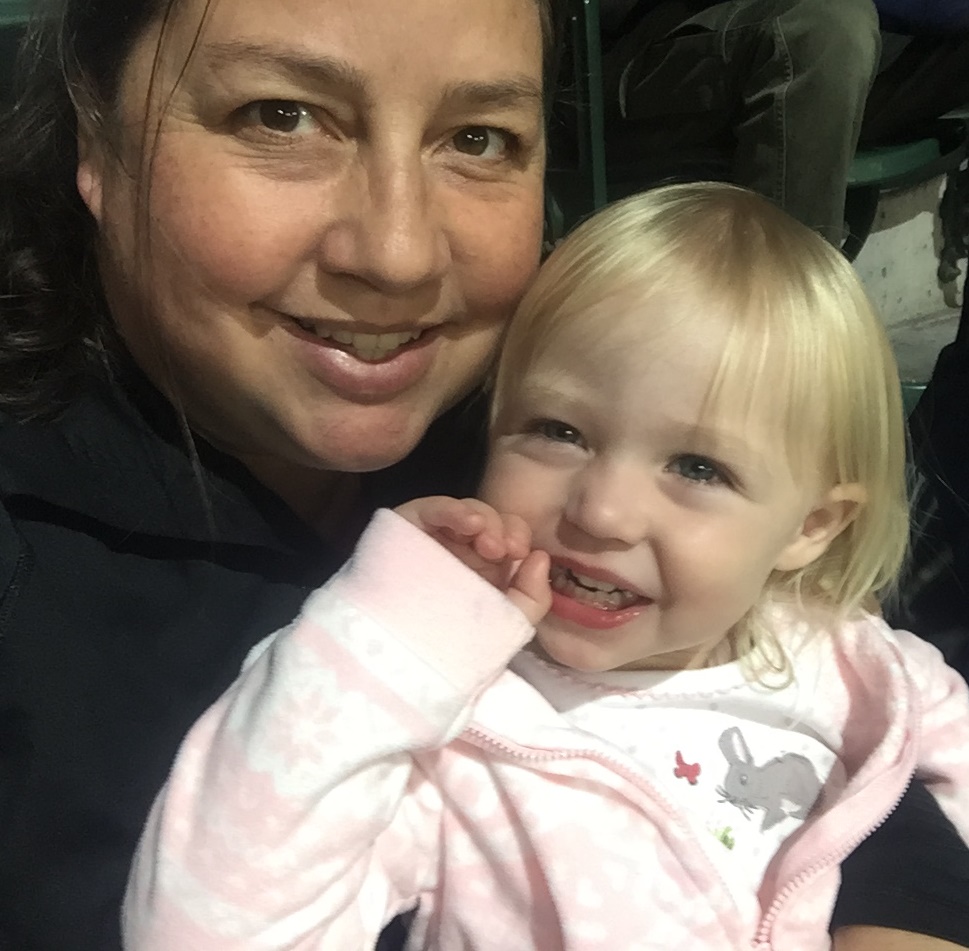
Amy with her youngest child.
My first point of contact with Amy was via Facebook Messenger.
Me: I am a quilter/blogger at Needleandfoot.com. I would like to host an event in February asking my followers to make a quilt to “spread the love”. It will be tied into Valentine’s Day and community service. Would you like to receive some doll quilts for your dolls? I love the idea of what you do. It is heartwarming and incredibly important. Is this something that would be helpful for you? I would love to hear back from you. If you like the idea, please provide an email address so I can correspond with you outside of Facebook Messenger. Thanks so much and either way this goes, keep up the good work!! Best regards,B.
Amy: Good afternoon!
YES, yes, yes!!! I love this idea.
I am going to attempt to give you a short answer I never anticipated that I’d be making these dolls…but one of the best parts is how people have volunteered to participate. I’ve had a Girl Scout do a bake-sale; I’ve had friends pool their money; I’ve had Bible Studies collect money; I’ve had a few people crochet hats…and then the quilts. My mom is an avid quilter (she just got back from a show in Ontario, California!) and quilts are so important. I think it’s a very tangible way to cover someone with love. For many of these parents, they are familiar with isolation and judgment. I think quilts show them (and ultimately their children) that someone cares….that someone also sees their child as something other than a medical specimen. They, when the day is done, are just little people who have parents or grandparents that want everyone to see the same beautiful person that they do.
I think that there is no time like now to show people that loving folks DO exist!!!
I could go on and on…but I am honored to participate. Tell me what you want to do and I’ll make it happen. The way the quilts have worked in the past is that I typically send them with dolls who have extra special circumstances. I don’t have enough quilts to give to every single person…in fact, at the moment I don’t have any! So I usually do kids who are about to be hospitalized or are currently hospitalized. I try to do kids with tough circumstances…foster care and adoption…and kids who are ashamed about how they look because people can be so cruel. I would LOVE to have quilts on reserve.
Maybe you know Elana Goldberg…she has been amazing. And a couple times I’ve been able to message her with something that I know is coming. Her quilts are works of art and families are SO grateful. My son’s best friend asked for a sewing machine for Christmas and he’s going to make a quilt for me to give!
It’s very exciting and very humbling.
Amy
Cutest Smiles EVER!!
Later the same day, after reading, and re-reading, Amy’s response, I sent her a list of questions. She took some time and sent me such thoughtful responses. I want to just share them directly with you.
1. How many dolls are given out – either monthly or annually?
The number of dolls given out is probably…75 this last year? Tough because Kalea is two and that makes working a bit tough right now. I am technically a stay home mom so I sew in between keeping up with her and my two boys (13, 8)
I do have a long wait list. But I always prioritize requests that seem more urgent (all of them really are…) So, ones that come directly from doctors and nurses and hospital staff, teachers, kids in the hospital or about to be in the hospital, kids that have been identified as having issues with their appearance. And granted, it’s not a precise determination. Sometimes I just go on my gut. I never wanted to run this like a business…but I am a business (I know that because I lose 30% of each doll to taxes!!!) One of the things that happens when I’m getting to know the people who want dolls is that I get to hear their stories. It’s such a privilege and it’s something I don’t take lightly. For many of these families, it’s the first time someone sees their kid through THEIR eyes. Someone else who will see the charming things that they do and recreate them in the form of a doll.
So let me back up…every child deserves to see his or her face in the sweet face of a doll. We do a horrible job as a society in how we represent (or don’t) differences. We want to tell kids that they’re beautiful but for SO many kids, it’s often followed by – but you’ll never see a human representation of yourself – and this covers ethnicity, limb differences, skin markings, and disabilities. I’ve been asked to do a few talks about my dolls and I always tell this story. One of my first dolls was a doll for a teenage boy who mused that the only representation of himself that he’d see was in a “Teenage Mutant Ninja Turtle.” His mom bought him a doll because she didn’t want him to be left with that sentiment. I always tell people that the doll can spend its entire life on a shelf or under the bed…but it has to be a part of the journey (and not just my dolls…so long as it looks like the person who will love it!) I sent you a video of Hope. It was the first time she’d seen any human representation of herself and….well, you see what happens.The majority of my dolls have some type of limb difference…however, shortly after I started, a mom asked for a doll for her daughter from China born with albinism! She said, “You’re the closest I’ve come to finding a doll like her.” So I’ve done dolls with albinism and birth marks…medical equipment…burns and scars.
Before staying home, I was a pediatric oncology social worker and I always felt wrong giving a kid undergoing chemo a doll with long hair! Representation (especially in our current climate) is SO important. Dolls are integral to play therapy – not just any animal – but dolls specifically. You’d be amazed at how many kids name their dolls either their own name or some variation. Why? Because they really look into that face and see their own. There’s a little guy on my page right now…rough circumstances and he’s got one more shot at a medical miracle… His sister got a doll last year (and actually Little Things and USA Today picked up the story!) and he was so interested – and he’d never attached to anything like a doll before. I found someone to donate a doll to him and “Stuart” has become so important in Ping’s care. He talks through the doll…does medical procedures on the doll…and journals from the doll’s perspective. It’s classic play therapy!
What was the original question?!?! LOL I could go on and on about the therapeutic nature of dolls – and I don’t say that with any arrogance. I don’t mean only mine. Mine just happen to hit a niche of kids who haven’t seen themselves before.
2. Do people buy the dolls? If so, how much do you charge? If not, how are you funded?
My dolls are between $65-75. Once you subtract taxes and supplies…and my time, it’s a bargain. I NEVER turn anyone away due to cost. It’s why I try to keep the cost reasonable. Early on in this process, a guy asked if he could donate a doll – actually he donated three. He’d seen the video of Hope and wanted other kids to feel like that. I’d never considered it but what a WONDERFUL component to this. I’ve had people donate a few different ways. Church groups (and then they can pray for the recipient); a Girl Scout; doctors; a few friends. Whoever I can get. I think it’s so important for the families who receive a donated doll. There’s a story on my page…right before Christmas. Ping’s family donated a doll and unbeknownst to me, the little girl that received the doll just lost her dad. Read the story. It’s incredible.
So I’d like to have more sponsors – and in my ideal world, no one will pay for their doll. I’ve talked about being a nonprofit, but that’ll have to wait a couple years. At least until my youngest is in school. Who knows? I have a friend who works for the IRS and she says it’s pretty simple. At this point I’m lucky if I can brush my hair and teeth AND sew!
3. How big are the dolls (so we can make appropriately sized quilts)?
The dolls are about 18″….American Girl sized. This is important. It means that the dolls can share clothes with American Girl dolls and essentially look like everyone else! There are so many cute clothes and now my dolls look like the cool ones 😉
4. How did you get started? When did this all begin?
This started when someone saw a doll that I’d made for a friend of a friend! It wasn’t even a limb difference doll but her daughter had just had a leg amputated. Macey was 8 at the time. Her mom asked if I’d consider making a doll without her leg. It was a no brainer…of course! Two limb different organizations shot the interest through the roof. I quickly bought the email and web domains and then secured a trademark. All of it pretty reactive. My middle son had just started Kindergarten and I was barely pregnant with my younges. I had NO IDEA that I’d be making dolls with limb differences.
5. What is your background (e.g.jobs, school, how did you learn to sew, what other things do you enjoy making?)
My name is Amy and I hoard craft supplies. There. I said it. My mom taught me to sew (she’s a quilter and now helps me with clothes and bodies)…but she’s on the other side of the country! I used to design scrapbook pages, so I own a million stickers and sheets of paper. I did clay, rubber stamping, wood crafts. When we moved from California to Wisconsin, my husband said ‘when people say they have a ton of craft supplies, you really do. This all weighs a ton!’ LOL
I have a master’s degree in social work and worked in a hospital before staying home with my two boys and baby girl. My husband is a child psychologist at the Children’s Hospital of Wisconsin, so he helps me get some of the unusual medical equipment. CHW has also requested several dolls for some of their patients.
6. Any special requirements for us as quilters? For example, I would assume no embellishments such as decorative buttons or beads because they would be choking hazards.
I have absolutely no requirements. I have SO many orders that I can always find someone for each quilt. It’ a non-issue. I think that quilting is an art and I’d never ask someone to alter their canvas. Elana makes intricate quilts, but simple 5″ blocks are fine, too! In fact, there’s an older woman who sews front to back panels. The gesture is so kind that people feel so touched. The kindness of strangers is such a special thing. I think it’s wonderfully therapeutic for families to receive something so special – from someone they don’t know. You have to know that many of the people who FINALLY find someone to make a doll like their child have been through so much. People judge them and gasp at their kids; medical professionals photograph the limb/burn/cleft lip because it’s a teaching tool. It’s so…dehumanizing. That being said, I love this personal touch.
7. Number of boy quilts vs girl quilts? Since girls tend to play with dolls more, do you need more girl quilts?
Interestingly enough, I do a boy doll about every third one! Isn’t that amazing? There’s a couple little guys whose dolls go everywhere with them. Boys need the same things that the dolls offer!
8. Do you work with children only in the US or do you have international customers?
I mail at least two dolls a month out of the country. Canada, Australia, and England are the most common. But I’ve mailed to Denmark, Scotland, Chile, and even Egypt! The limb organizations that I work have a huge amount of followers…and for some of the adoption groups, the circles run small. Shipping out of the country is ridiculously expensive, though…nearly $30 sometimes.
Note: Amy and I are working on some ideas for international quilters who would like to participate. I will let you know details in a separate post.
9. How do you find out about a child who needs a doll?
I own the webpage www.adolllikeme.com but it loops you to Facebook. I don’t have time to maintain a web page right now and I probably can’t handle the additional traffic. But someone told me to buy it so that companies wouldn’t try to sell it to me at a premium I couldn’t afford…ugh. My orders ONLY come through Facebook and then direct referrals (from hospitals). I’ve not had to do advertising yet (fortunately) and now I think my page pops up when people do a “limb different doll” search. A few bloggers (especially special needs moms) have referenced the dolls, so I get orders that way also. But truly it’s through my Facebook page. I’m on Instagram…but honestly it’s because my tech savvy brother in law said I needed to be!
10. Where would we be mailing the quilts to?
You would mail the quilts directly to me. That way I can match outfits and send them with the dolls. Keep in mind, it won’t be to everyone – I simply don’t have enough quilts to do that. There was actually a little one last week who is about to be born with a limb difference and I would have LOVED to include a quilt. She’s nowhere near the top of my wait list but the family is having a rough time adjusting to the news. See? Every doll has a story. And one is as amazing as the next.
When people send quilts, I always take a picture of the doll with the quilt…and usually families will send a picture of the child with both! It’s so fun to see your work in the arms of the intended recipient.
11. What is the average age of the child receiving the doll?
The average age? I’d say probably early elementary school. The ages of recipients totally varies (I’m doing one for a mom right now! She wants her kids to see HER in a doll!!!)….newborn to adulthood. Someone actually ordered one for my grandma when she turned 100! (I didn’t even know she wanted one!!!) I think the most pressing ones, though, are about 5-10. Pretty young.
Here is my plan! I hope to gather a large number of quilts for Amy’s children. I love the idea of our giving community working to provide special little quilts for these amazing children and their awesome dolls. Giving comfort and showing kindness to the parents of these little ones fills my heart. I love the idea of providing comfort to a child going through a scary time in life. I love the idea that some of these children will form a special attachment to a quilt we provide, maybe the quilt will be their ‘lovey’. Might it provide an avenue for some of these cute kiddos to explore their feelings with their doll? Just look at the picture at the top of the page with the little guy sitting on the bed in the hospital with his doll, wrapped up in a quilt. It fills me with joy to see his sweet smile.
This is such an easy way to help others! We all have a tremendous assortment of scraps (and if you don’t happen to, let me know. I will happily share with you). The quilts can be simple or as complex as you feel like making. Use an orphan block as the beginning and build on. Take a cute juvenile fabric and make a whole cloth quilt and bind it up! Doll quilts are super fun to make and not too time-consuming or expensive because they are not very big. As for the size of these quilts, they should be made to wrap around or cover an 18″ doll. I would suggest 22″ x 24″ or so? A little smaller or larger is fine too.
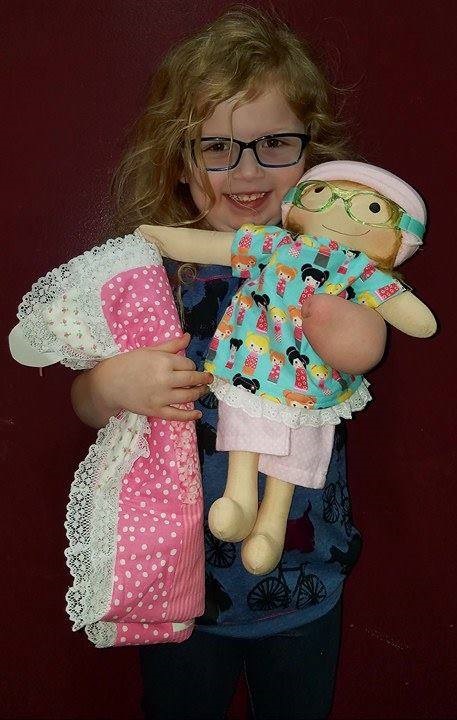
Such a sweet girl with a baby just like her.
This is my call for quilters to Spread the Love and quilt for kids. It is a new month and February is all about love and kindness. Please take an afternoon and make something special for this very special project. I promise you the following; an incredibly satisfying, warm, fuzzy feeling inside that is both heartwarming and fulfilling. For the month of February I will host Spread the Love. Quilters who participate will make one, or five, or twenty (?!?) quilts and will send them directly to Amy. The number of quilts you decide to make is totally up to you, I am only teasing. But the goal is for our giving community to supply Amy with a reserve of doll quilts to be given as she sees fit.
Note: I did not put Amy’s mailing info here for obvious reasons. When you are ready to mail a finished quilt, please email me at needleandfoot at gmail dot com. I will privately send you the info you need.
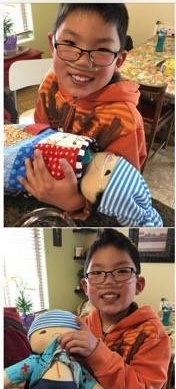
A cute little guy with his doll, which is Just Like Him
What do you think? Is this something you want to participate in? Leave comments and let me know if you have questions. As I said above, Amy and I are tossing around some ideas for international participants. Please do make quilts and we will let you know as soon as we come up with a plan to help with the shipping expense to get your gorgeous quilts back to Wisconsin and in a child’s arms. I hope you will take a minute (or an hour!) to scroll through Amy’s Facebook page. The pictures and stories about the dolls and their owners are amazing. You will be in awe of all that Amy has done for these children by creating the dolls for them.
Finally, prizes! Yep, I have prizes. Art Gallery Fabrics has generously donated ten bundles of fat quarters for me to give out. You are all familiar with the amazing quality of Art Gallery Fabrics. They make quilting cottons of the highest quality. Walter Bravo, owner of AGF, is happy to sponsor this project as he sees a need and knows our community will step up and fill it. Pictures of the bundles will be posted soon. I am excited to share them with you. I plan to host a link up during the last part of February. You will enter a picture of your finished quilt at that time. If you make more than one, enter a picture (separately) of each one. Each quilt made is one entry to win a beautiful bundle of AGF! If you have trouble with the link up, or you don’t blog, etc, you may email me a picture of your quilt (s) and I will enter you in the drawing. I will provide more info on this as the month progresses.
Tomorrow I will put up a post sharing a few doll quilts I have been working on. Maybe these quilts will inspire you! For today though, I encourage you to take a look at your scrap bins, your juvenile prints, those novelty fabrics you weren’t quite sure what to do with, the orphan blocks that have been languishing in a bin somewhere — those are the perfect pieces to use! Use your own unique aesthetic, be it modern, traditional or somewhere in between and Spread the Love.
Finally – this is a call to share the event. If you have a blog, please take a quick minute and share ithe post. Use the HTML code below to put the graphic on your side bar. Post it on Instagram with the hashtag #quiltingforkids. Help me spread this far and wide! I will be linking up to many of the linky parties listed at the top of the page under Link Ups. Thanks everyone. I am looking forward to hearing your thoughts on this and sharing all sorts of cute quilts this month!
Yikes, I checked my blog after many days away and realized I haven’t posted since the first of December. So, this is just a quick one to check in and say hi. It has been a rough start to the month for me. I have mentioned before I deal with chronic migraine and it has been a constant battle these past couple of weeks.
I thought this humorous picture by Natalya Lobanova described what I deal with quite well. Sometimes it feels like I am constantly explaining or apologizing for being unable to keep a commitment or come to a scheduled appointment. Just today I cancelled a dental appointment (which I hate to do on such short notice as it causes gaps in their schedule) as well as a coffee date I was looking forward to with a friend (Sorry Kristi!) I have another coffee date tomorrow morning and am crossing my fingers I will feel well enough to keep that one.
Chronic illnesses are very often invisible to others. Because of this, we never truly know what the person next to us in line at the store, walking down the street, or maybe driving in the lane up ahead of us, is really experiencing and it is important to remember that and treat each other with compassion and patience. Additionally, people living with chronic illness need to extend that same compassion to oneself. It takes an incredible amount of patience to live with something like this. I am so fortunate to have a great support system made up of family and friends.
Anyway, this is just my way of letting you know I am down for the count but once this cycle breaks, should be back on track. Hopefully sooner rather than later. I have done very little sewing except for some custom orders for my Etsy customers. Also I am in the midst of making a cute tree skirt for our Christmas tree and should be sharing that soon.
Now to put a positive spin on this post, I will share the Santa figure made by my husband when he was about 8 years old or so. My mother-in-law brought it to me several months ago and I LOVE it. Made of toilet paper rolls and red tissue paper, this guy makes me smile each time I walk by. I am so glad my MIL saved it and passed the treasure on to me. 🙂
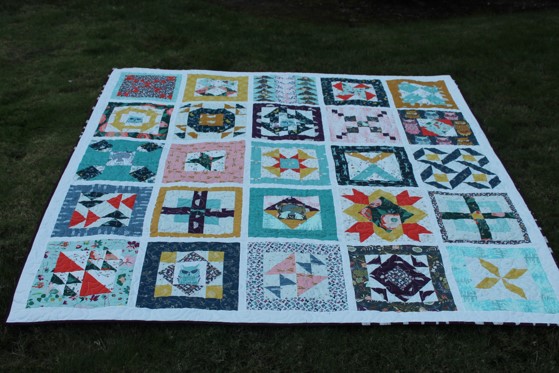
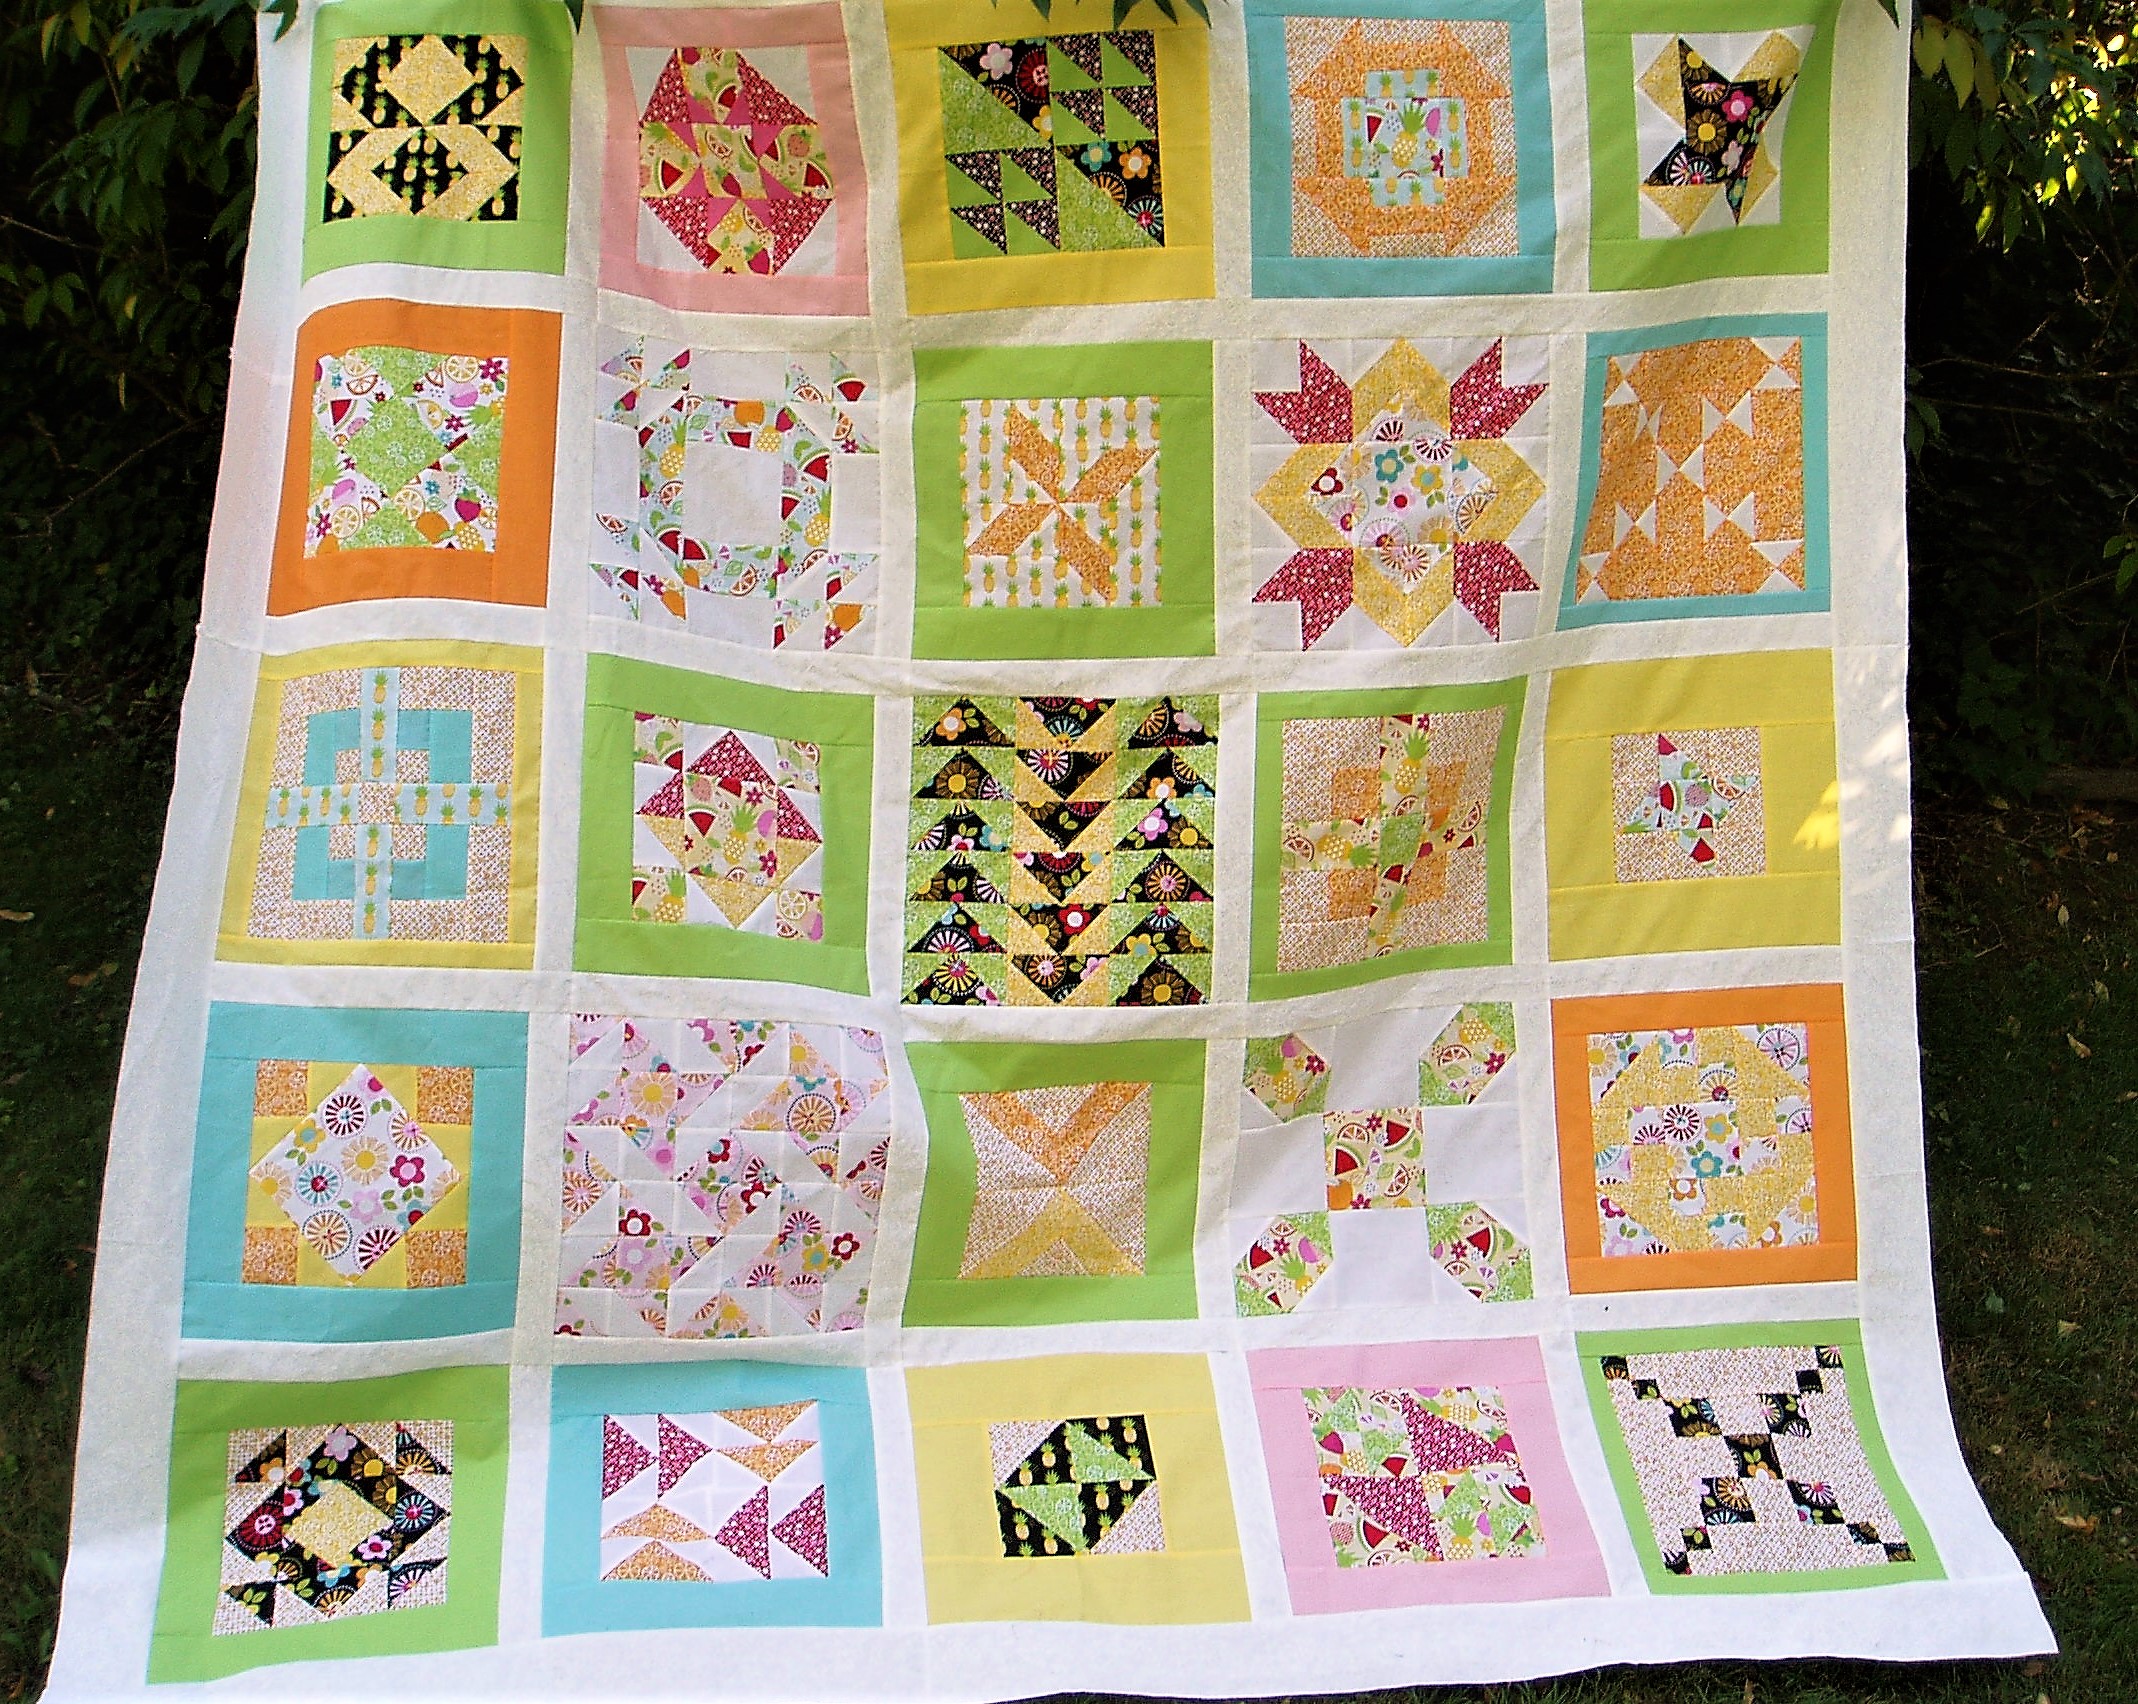
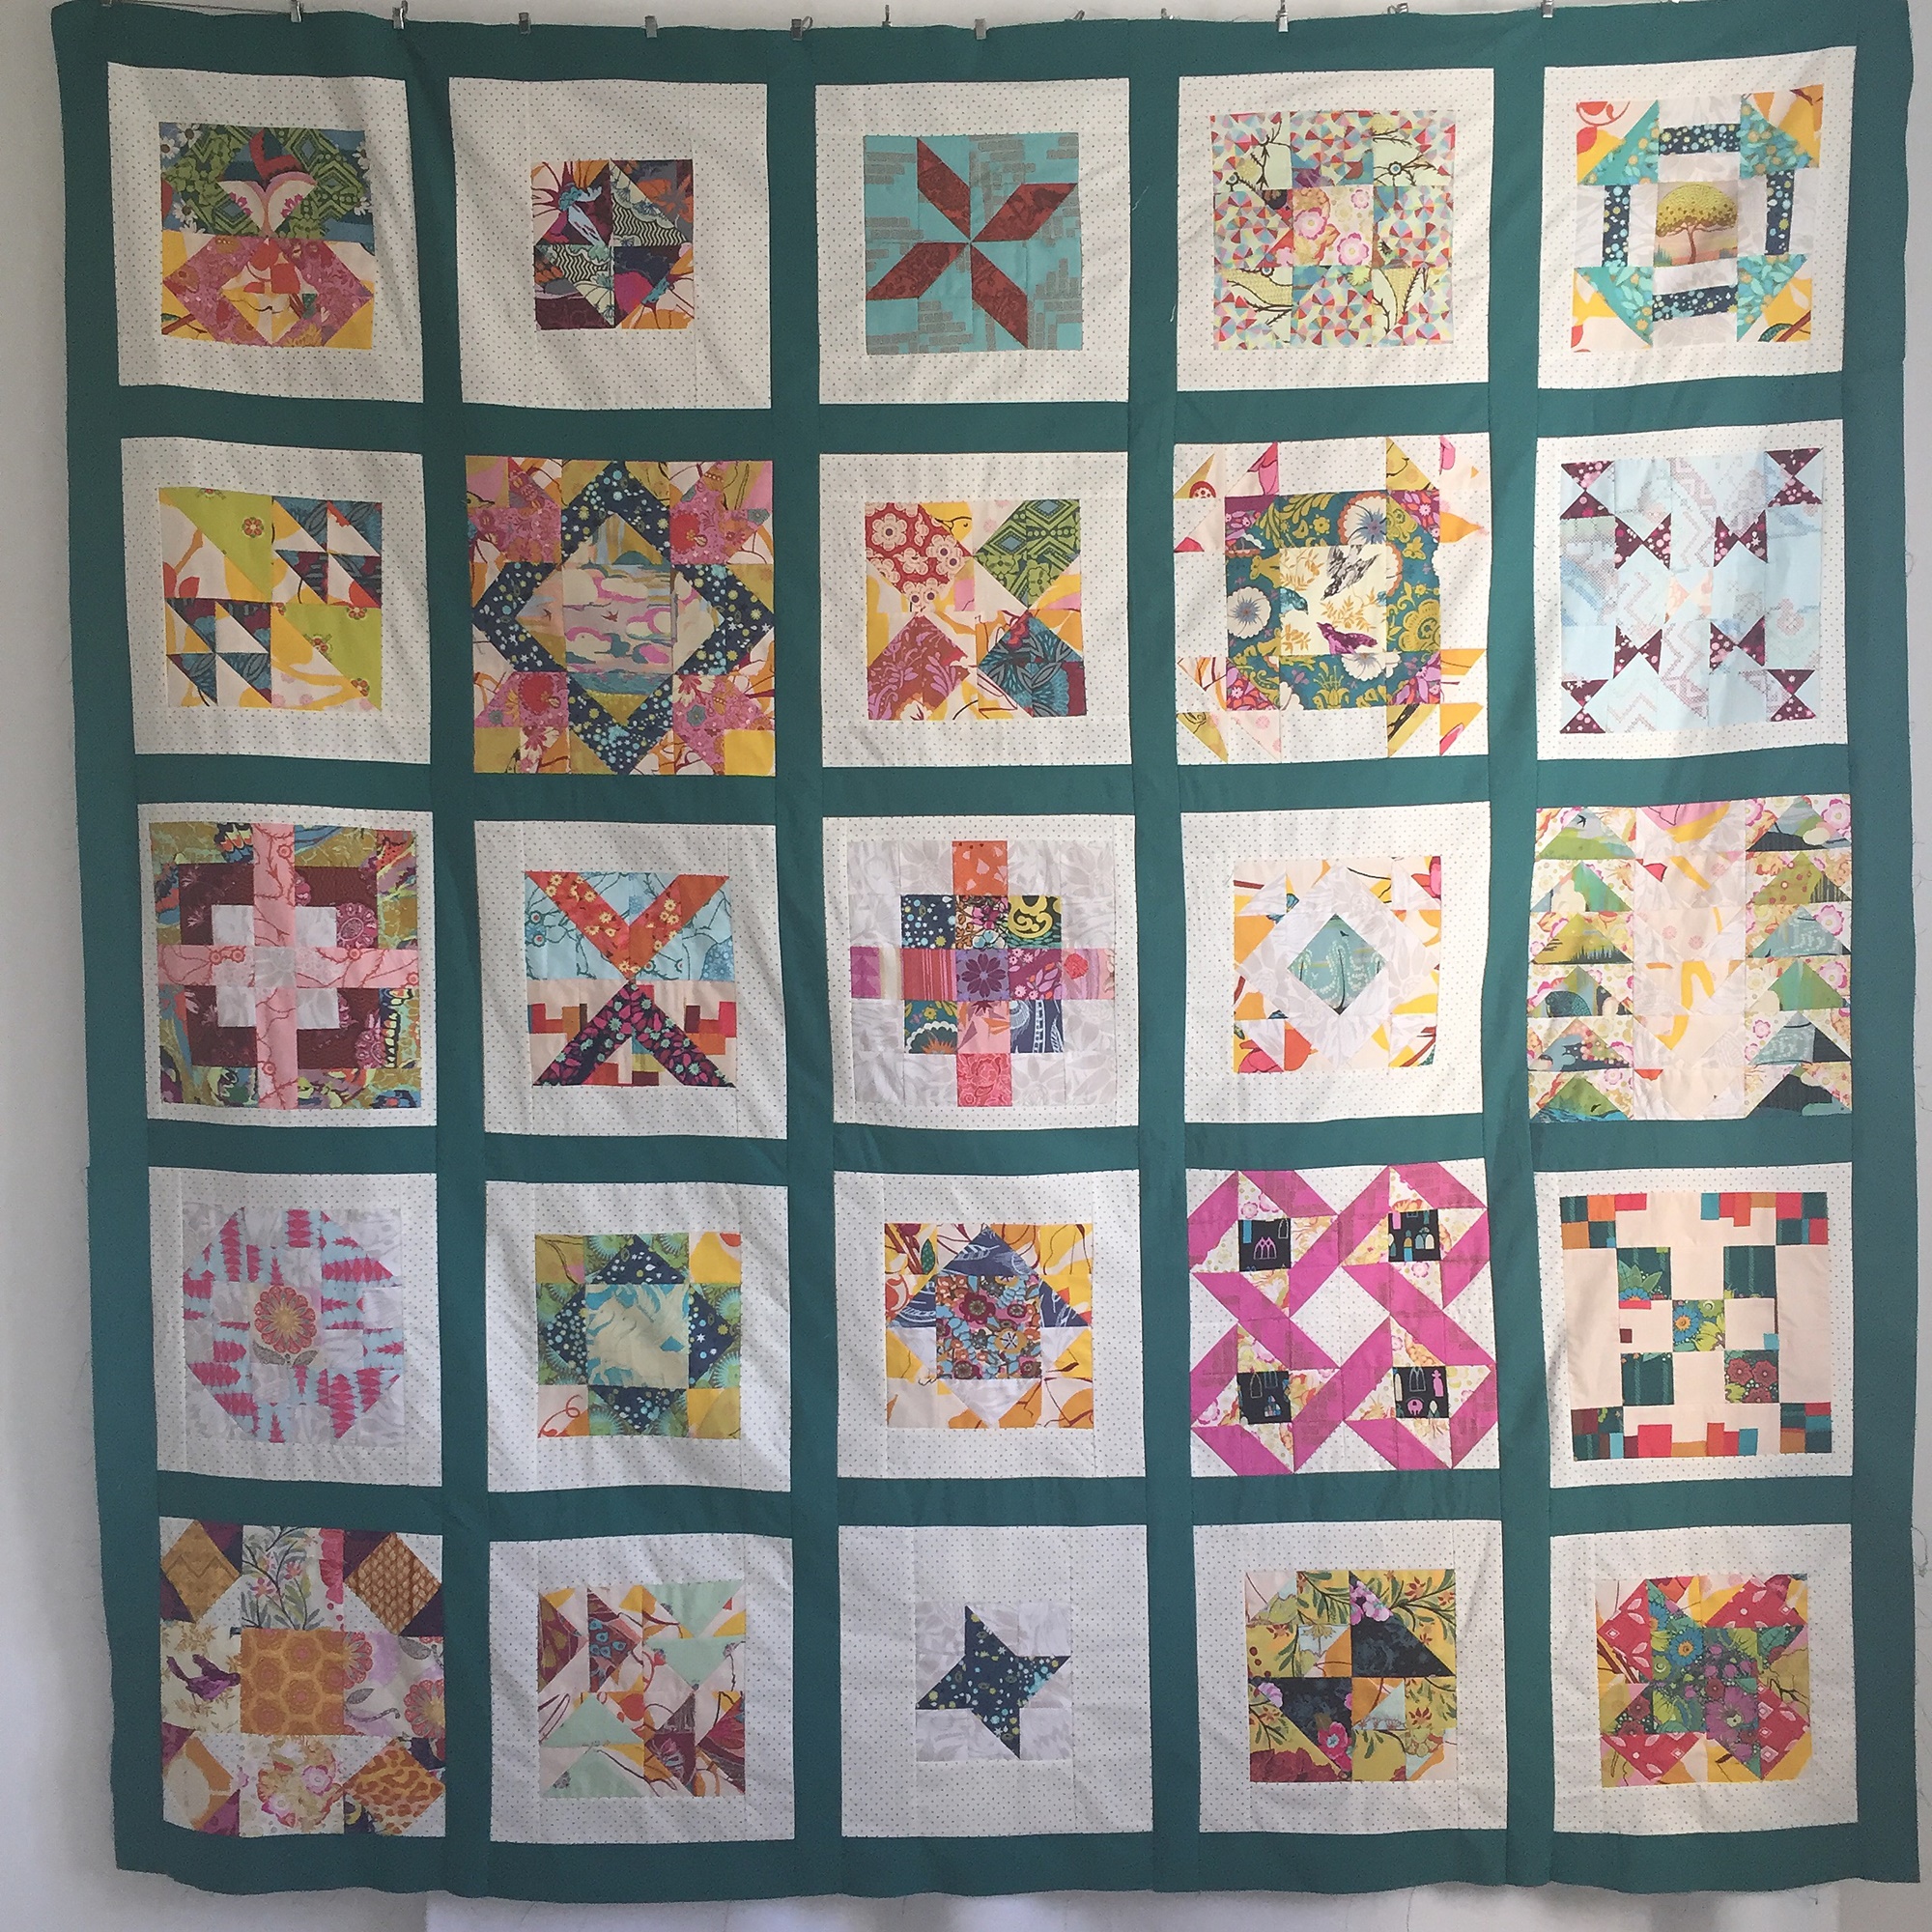
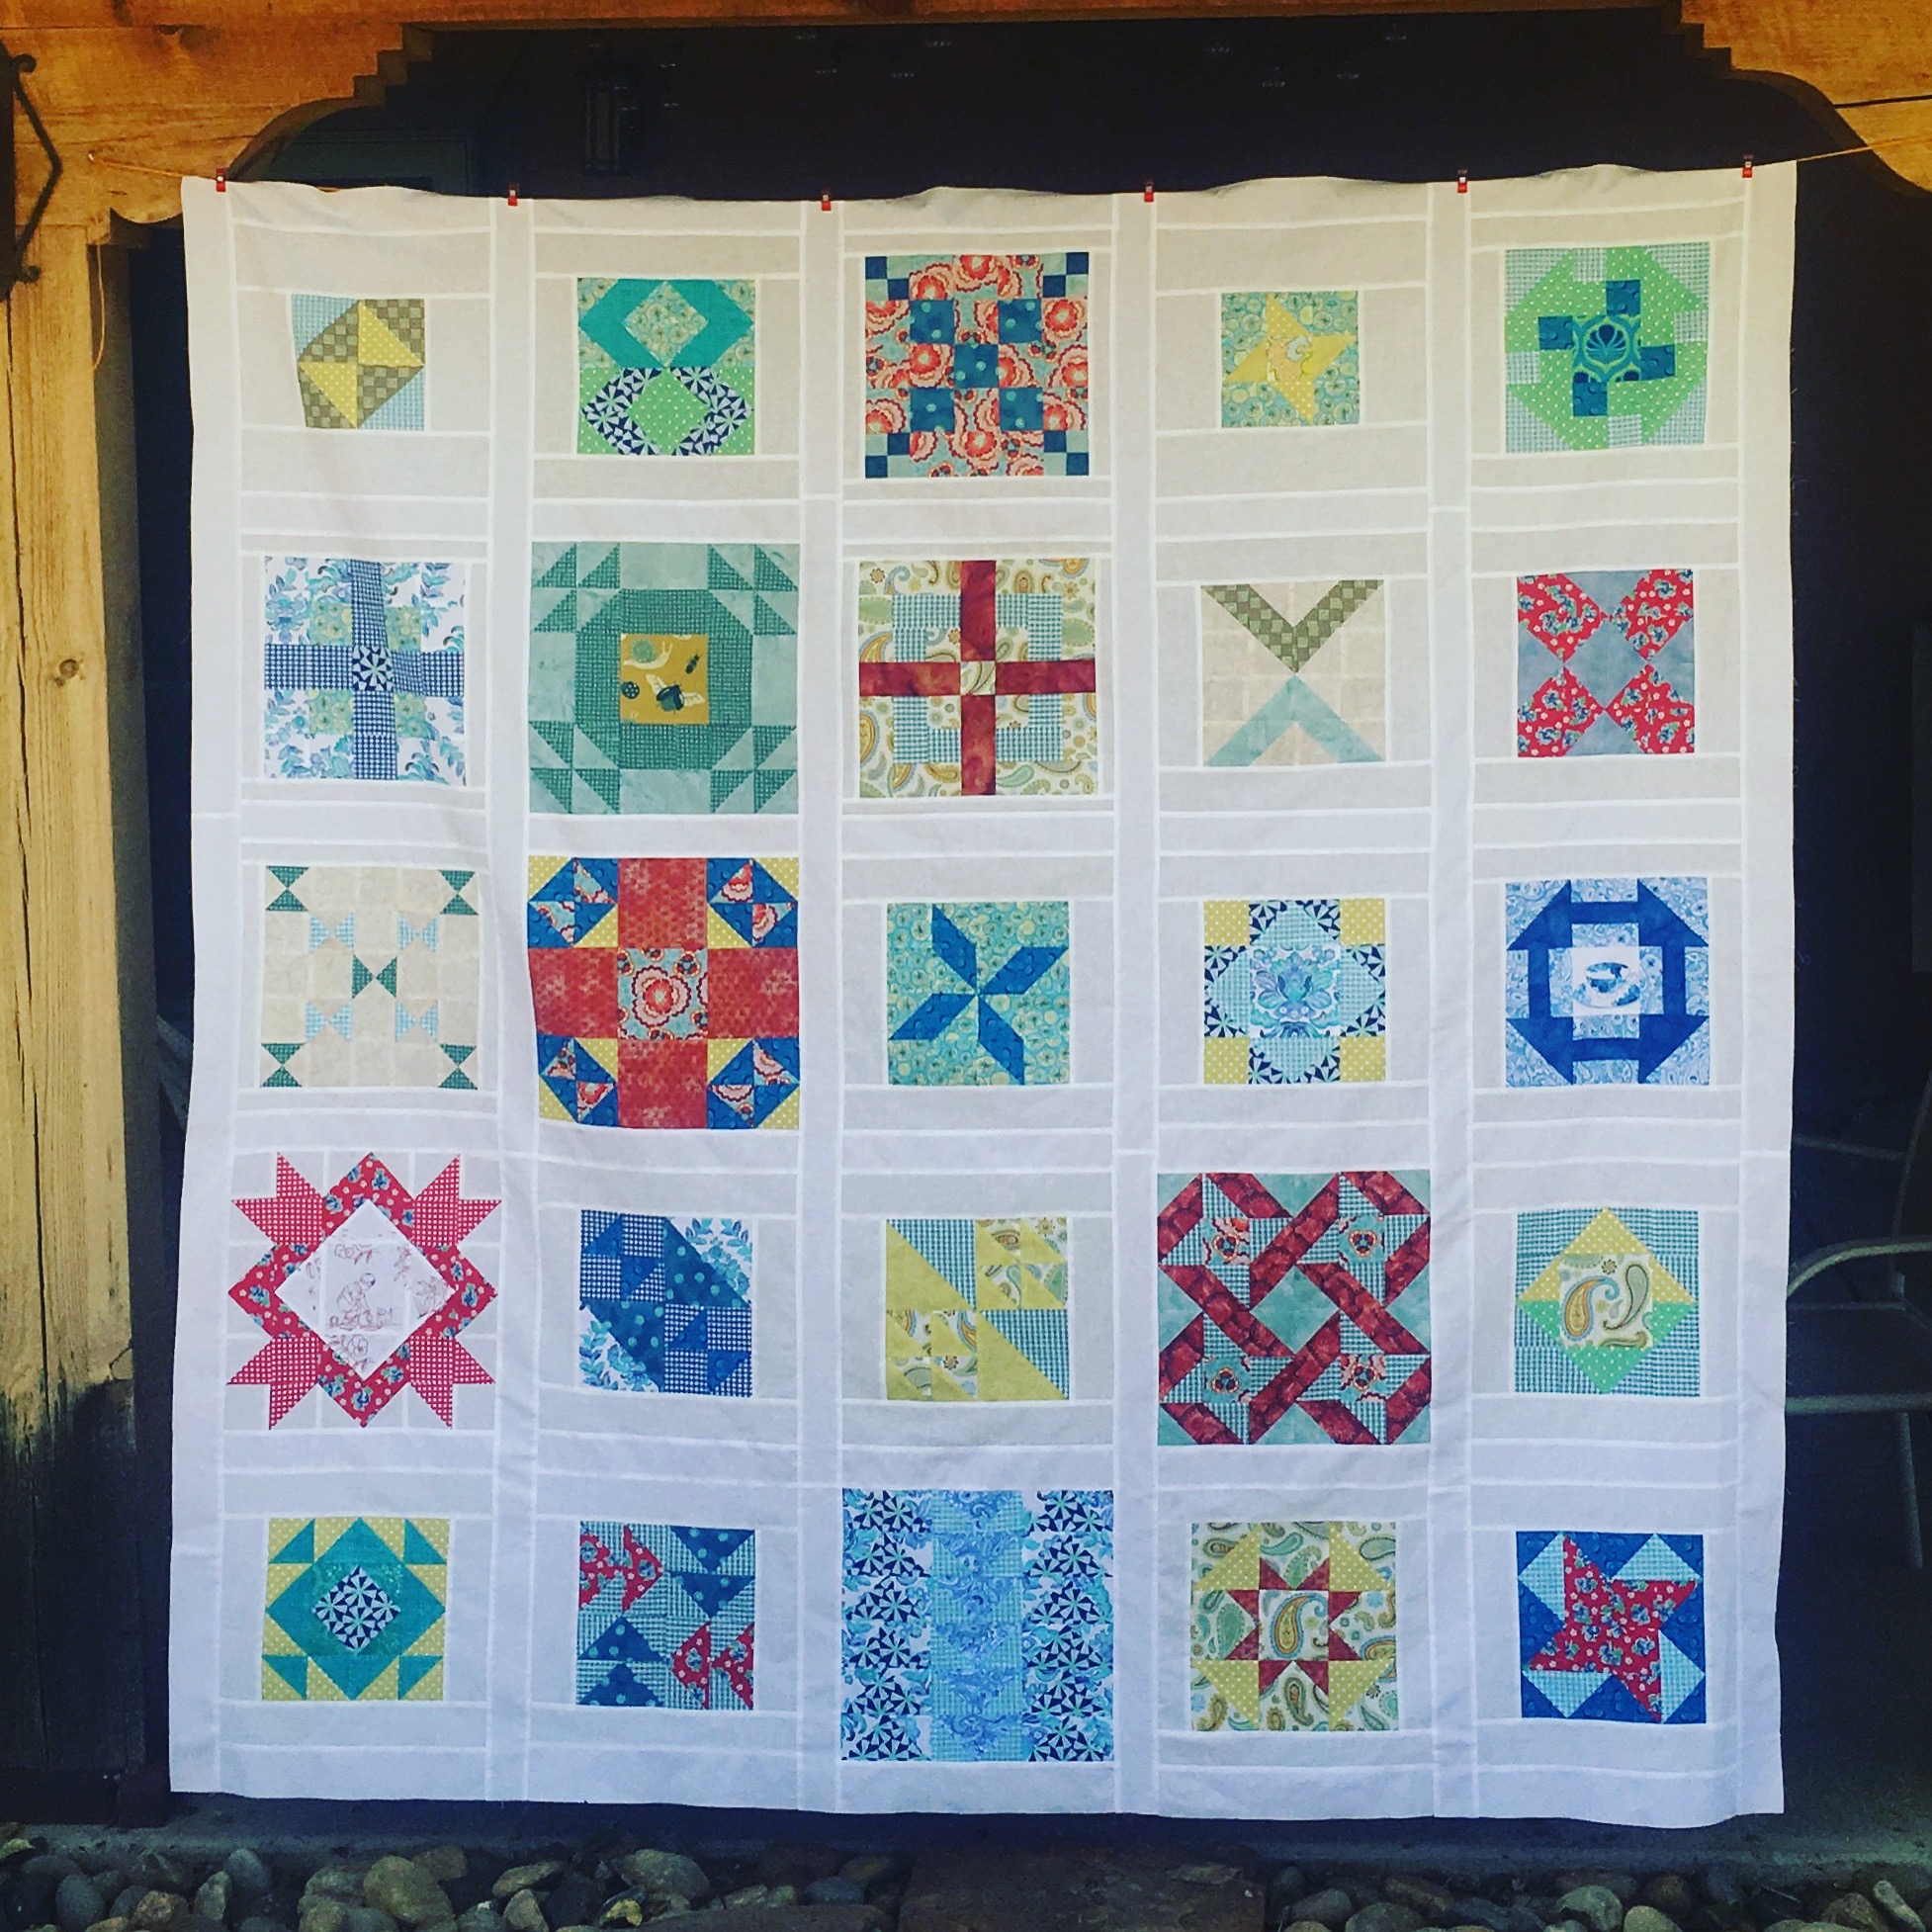
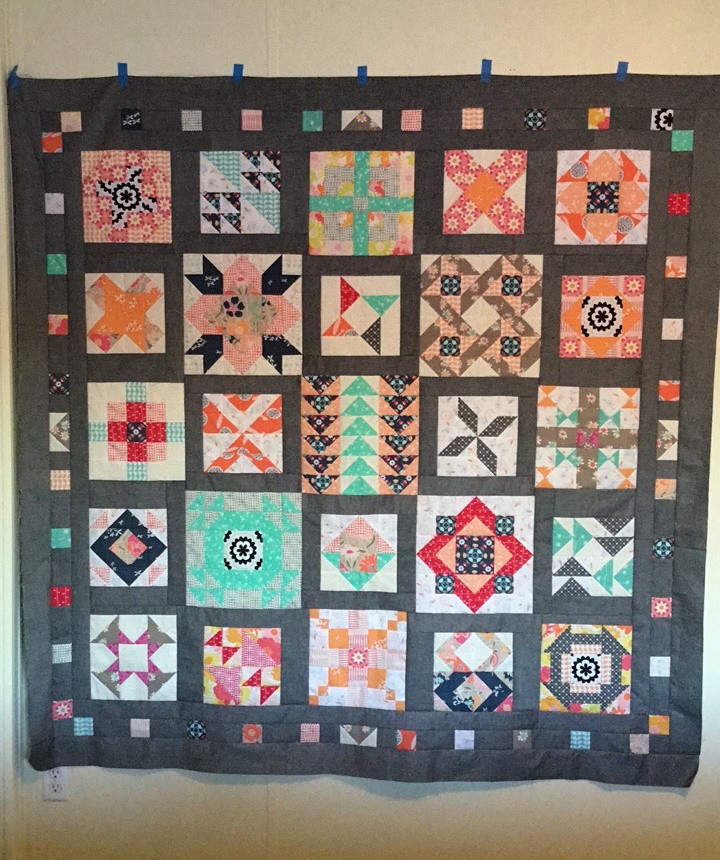
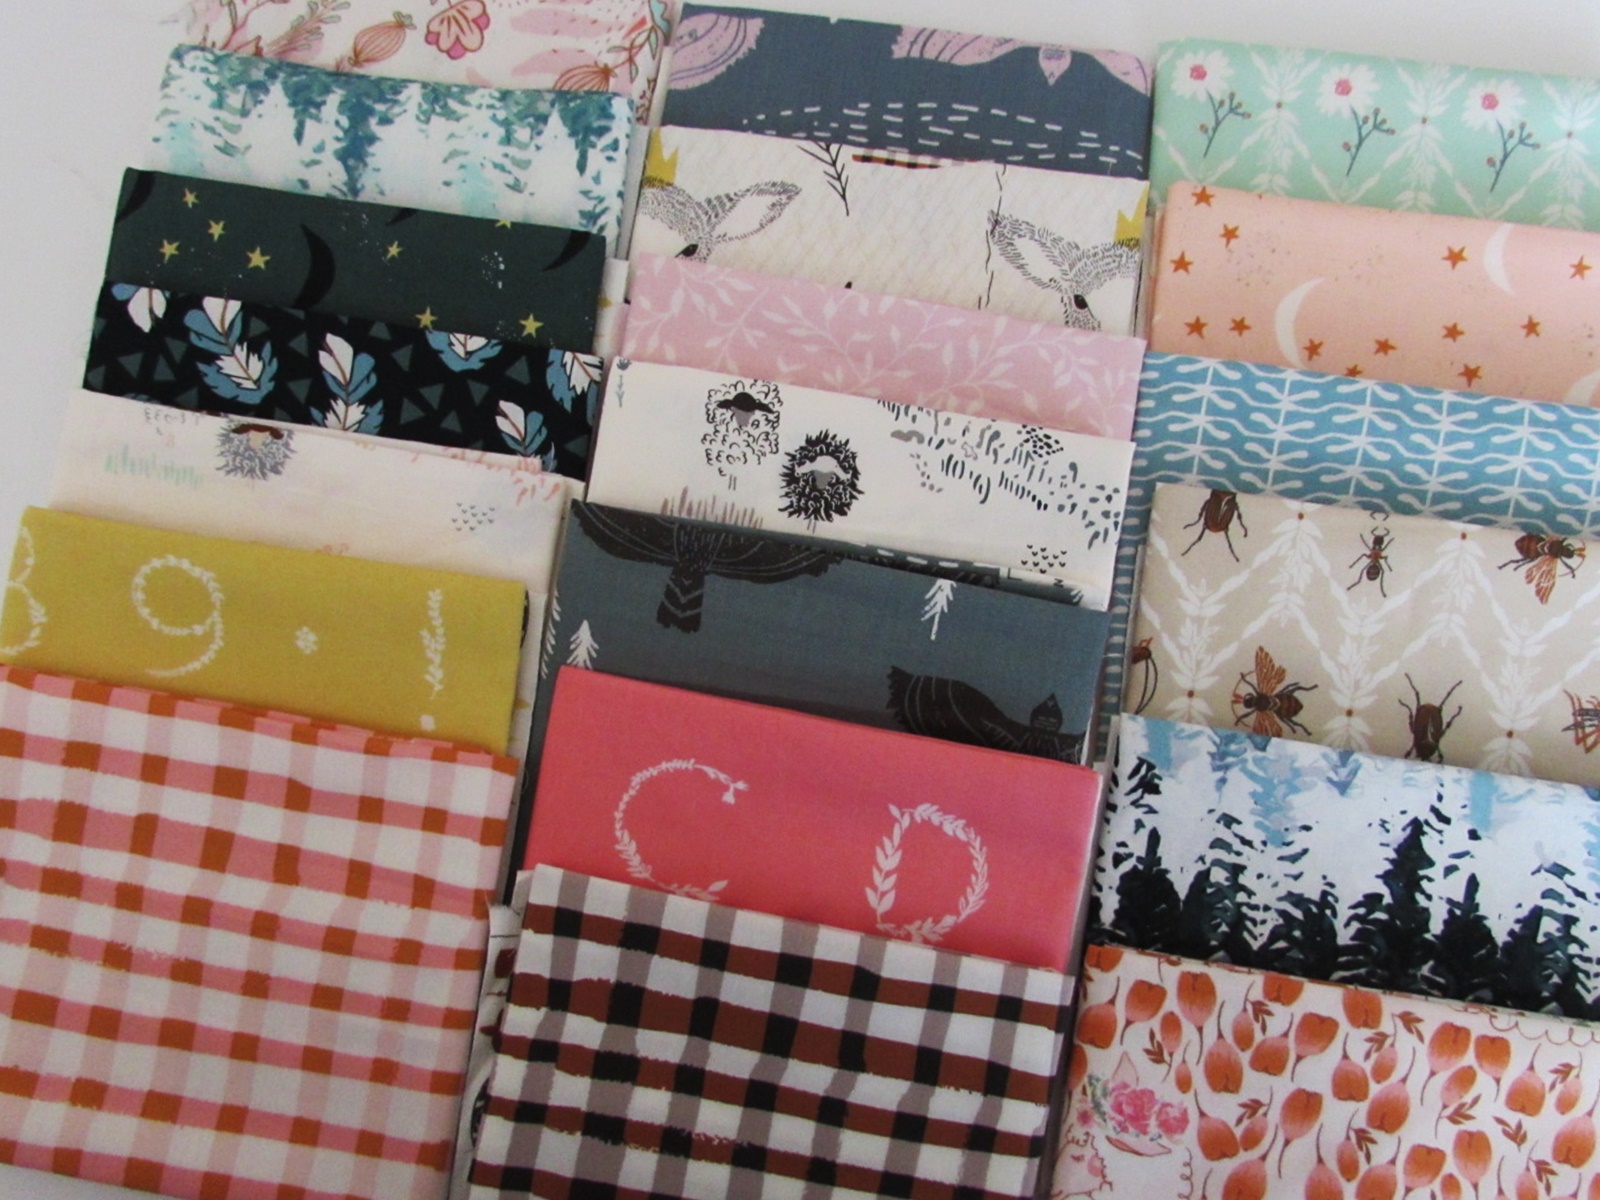
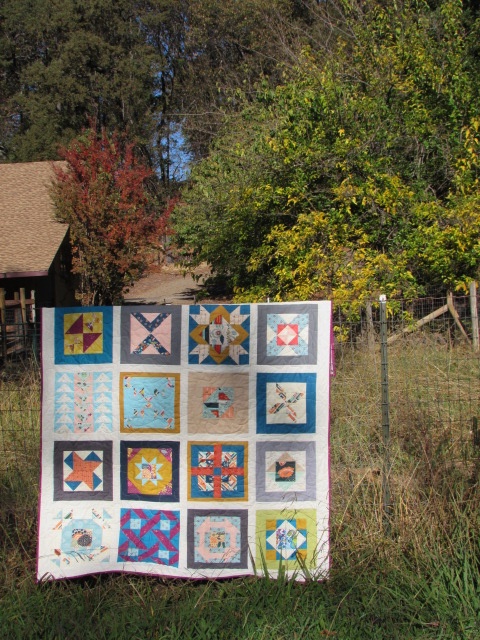
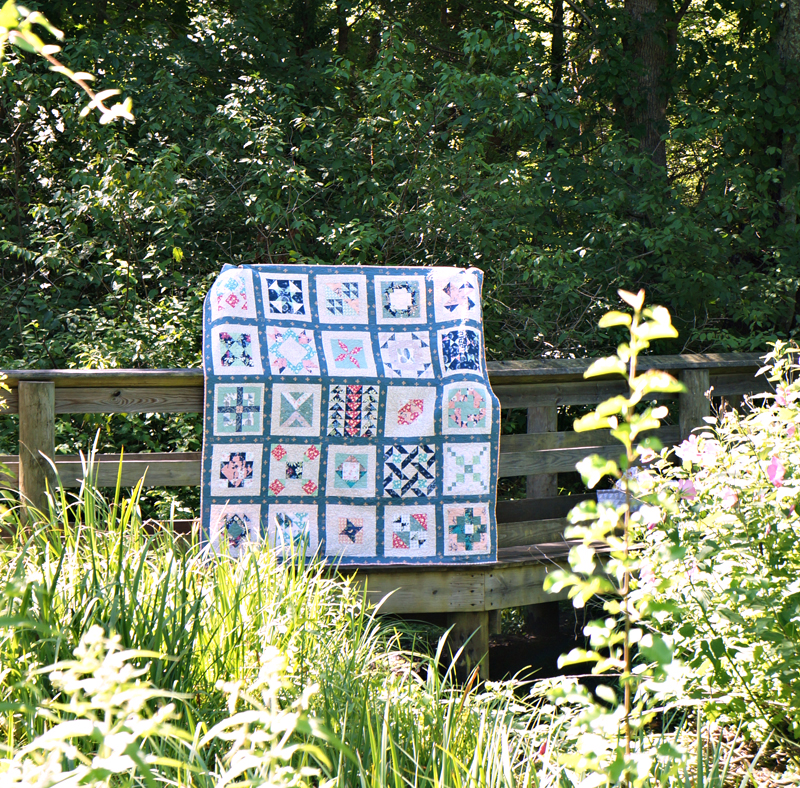
One of my favorite projects from this year has to be the quilt I made with the Sewcial Bee Sampler Quilt Along. Remember this? Hosted by Sharon Holland and Maureen Cracknell, there was one block released each Wednesday for twenty five weeks. There were several reasons for this being my favorite. One was the block design. The blocks were based on common piecing methods but Sharon and Maureen gave them a really modern look, probably because they included solids in their fabric selections. It gave the blocks such a fresh look. Also, the blocks were doable. I have been quilting for a while but I am definitely still in the advanced beginner stage and fussy, intricate blocks tend to frustrate me. Finally, the community developed by Sharon and Maureen. This was actually the main draw for me. So many quilters joined in – I would have to say there are hundreds of SBS quilts either finished or in progress.
The use of social media greatly enhanced the development of a friendly group participating in this QAL. Also, Sharon and Maureen were really dedicated to staying involved in the conversations on Instagram and put out a strong, positive vibe by giving great feedback and praise as we all shared the blocks we were working on. While this is not my first QAL, it is the first time I really paid attention to the quilts others were making as I made mine. With previous projects, I wasn’t as involved with the other quilters so I didn’t see as many projects made from the same quilt pattern.
The Sewcial Bee Sampler quilts that were made are gorgeous. I have had such a fun time perusing the #sewcialbeesampler hashtag and looking at the color schemes, fabric choices, and the ways quilters chose to set or arrange their blocks. I thought it might be fun to share some with you today. When you look at the quilts one after the other, it is so cool to see the varied interpretations of the patterns Sharon and Maureen developed.
Let’s start with the queens of the quilt along, Sharon and Maureen! Believe it or not, Sharon made two quilts (I had enough trouble keeping up with just one!) The quilt above was made with the same fabric for the block borders and sashing which gives a cohesive look to the quilt. It makes the blocks float on the surface.
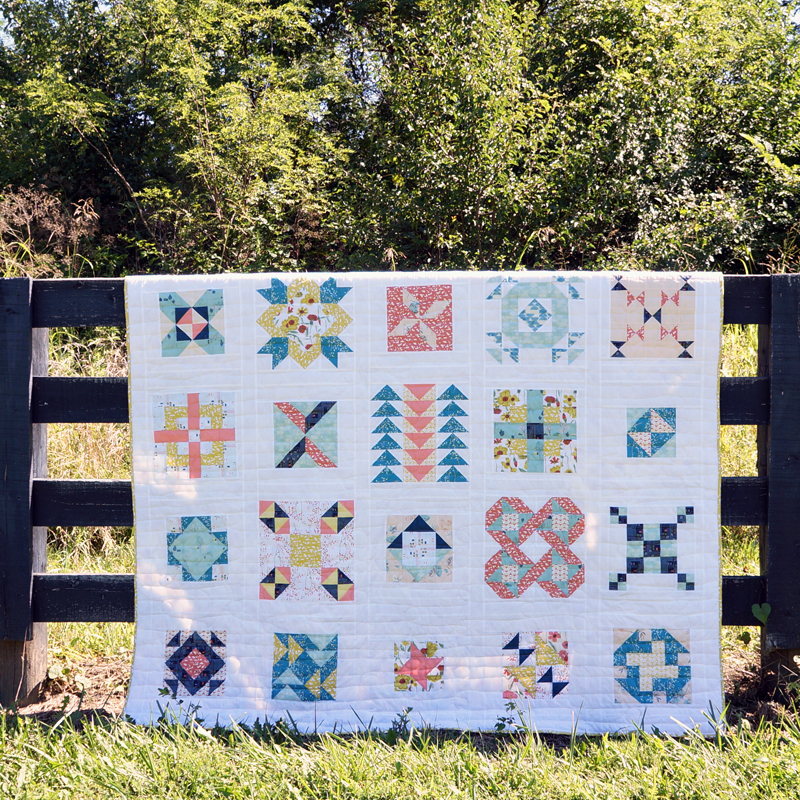
In the second version of the SBS quilt, Sharon used uniform frames for the blocks and chose to set them with a blue sashing. Notice how distinctly the blocks stand out when sashed like this. She used a palette focusing on blues, pinks and white which is really sharp.
This quilt is Maureen’s project. It looks like she sashed hers with a denim color chambray fabric. I like that she has some really vivid pops of color – the three bursts of yellow that stand out to me.
Also, because Maureen often designs fabrics with a large focal point, she was able to use those and do some great fussy cutting for block centers. Look at the shot above and you’ll see an owl, dragonfly and her gorgeous orange peony.
Cynthia of Quilting is More Fun than Housework, also used Maureen’s Garden Dreamer fabric for her quilt. You will find the owl and the peony in her quilt as well. Same fabrics building many of the blocks, yet it looks different. Maybe partially due to the white sashing and varied fabrics used to frame the blocks?
OLYMPUS DIGITAL CAMERA
My friend Mari of Academic Quilter also made a quilt. She chose bright, colorful fabrics which gave her quilt a definite summery vibe. It makes a person happy just to look at it and I think it is the colorful palette she used. She also framed her blocks in a variety of colors.
Let’s take a look at an international version of the SBS. I watched this quilt grow on Instagram. Mariana (@cosertejercrear on Instagram) is a quilter who lives in a town just north of Valencia, in Spain. She began quilting six years ago. Because there are no quilt shops or guilds in her part of the world, Mariana has made friends with lots of quilters over the internet. She orders her fabric on-line and says most of her quilty friends are American. Participating in a QAL that has such a strong presence on-line makes the world feel much smaller as we are always communicating with quilters from every corner of the world. Looking at Mariana’s quilt, she used really bright colors and lots of prints. This could be overwhelming but it isn’t — she used white frames on the blocks and a calm, blue sashing to set the blocks. It ties everything together neatly.
This one will surprise you. Lisa made the SBS quilt as her first quilt project ever. I know…. that is crazy, right?? When I saw her posts on Instagram (@knitluxe) and realized she was a newbie quilter, I wanted to know more. She has been a crafter for a long while who has done a lot of knitting and has made clothing but this quilt is her first attempt at quilting. She lives in New Mexico and clearly has a talent for sewing! Like Sharon, Lisa framed her blocks in white and also sashed them with white. Again, the blocks are floating. The crisp blue tones look great with the white setting. Kudos to Lisa for taking on something like this as her first project!
Last but not least is my friend Sarah’s quilt. Sarah of Cedar Fork Stitches lives in cold, cold Montana in a really rural area. I think she told me she is 40 minutes from town. Kind of remote, I’d say! She and I have been friends on Instagram for a while now. (She is @cedarforksarah) I love Sarah’s quilt for the personal twist she put on it. She chose to skip the frames on the blocks, added a few of her own blocks and put a great border on the quilt. The chambray she used for the sashing and borders is really rich and sets her blocks off well.
Clearly this post could go on and on because there are hundreds more quilts to see. If you want to take a look, hop over to Instagram and search on #sewcialbeesampler. As I write this, there are 7,280 photos in the hashtag. Really amazing and far more than I think Maureen or Sharon anticipated!!
I am looking around at the quilt alongs and block of the month events that are starting to line up for 2018. I’ll be back with a round up of some fun events in a few weeks. If you know of a good one, leave it in the comments and I will check it out. I am definitely going to do at least one. Just need to decide which one!
Ok – this post has nothing to do with quilting or sewing and everything to do with service to one’s community, helping those who need it, and bragging about one of my kids. Sorry, I can’t help it – but I am so dang proud of her so I decided to write about this. Plus, it may inspire another family to do a similar project once they see how easy this came together.
Our family has always felt the importance of volunteer work. My parents instilled it in me and my sisters from a long ways back. I have tried to instill it into my children as they grew up. Because of this, Julia is already an active volunteer in our community. She has been helping at the local food ministry since she was about five years old. For the past four years she has volunteered at the thrift store benefiting the animal shelter off and on as her school schedule allows.
Julia and I were recently talking about other ways she could actively volunteer in the community. She wanted a project that was ‘all hers’. She wanted to think of it, organize it and carry it out on her own. After some discussion, she decided to hold a Toiletries Drive for the shelter. To do this she first got permission from her principal to hold the event at school. Then she approached the shelter and asked for a ‘wish list’ of what they needed in this regard. They were thrilled to give her a list of items such as toothpaste, tooth brushes, hand sanitizer, antibiotic creams, antacids, deodorant, lip balm, band aids, and many other items along these lines.
Julia’s next step was to create a little brochure which she posted at school and gave to the principal and school secretary. They both posted it on various avenues of communication with the students and parents. I posted her project on my personal Facebook account so my local friends and neighbors would know what she was trying to do. Oh. My. Gosh. The response to Julia’s project was just awesome.
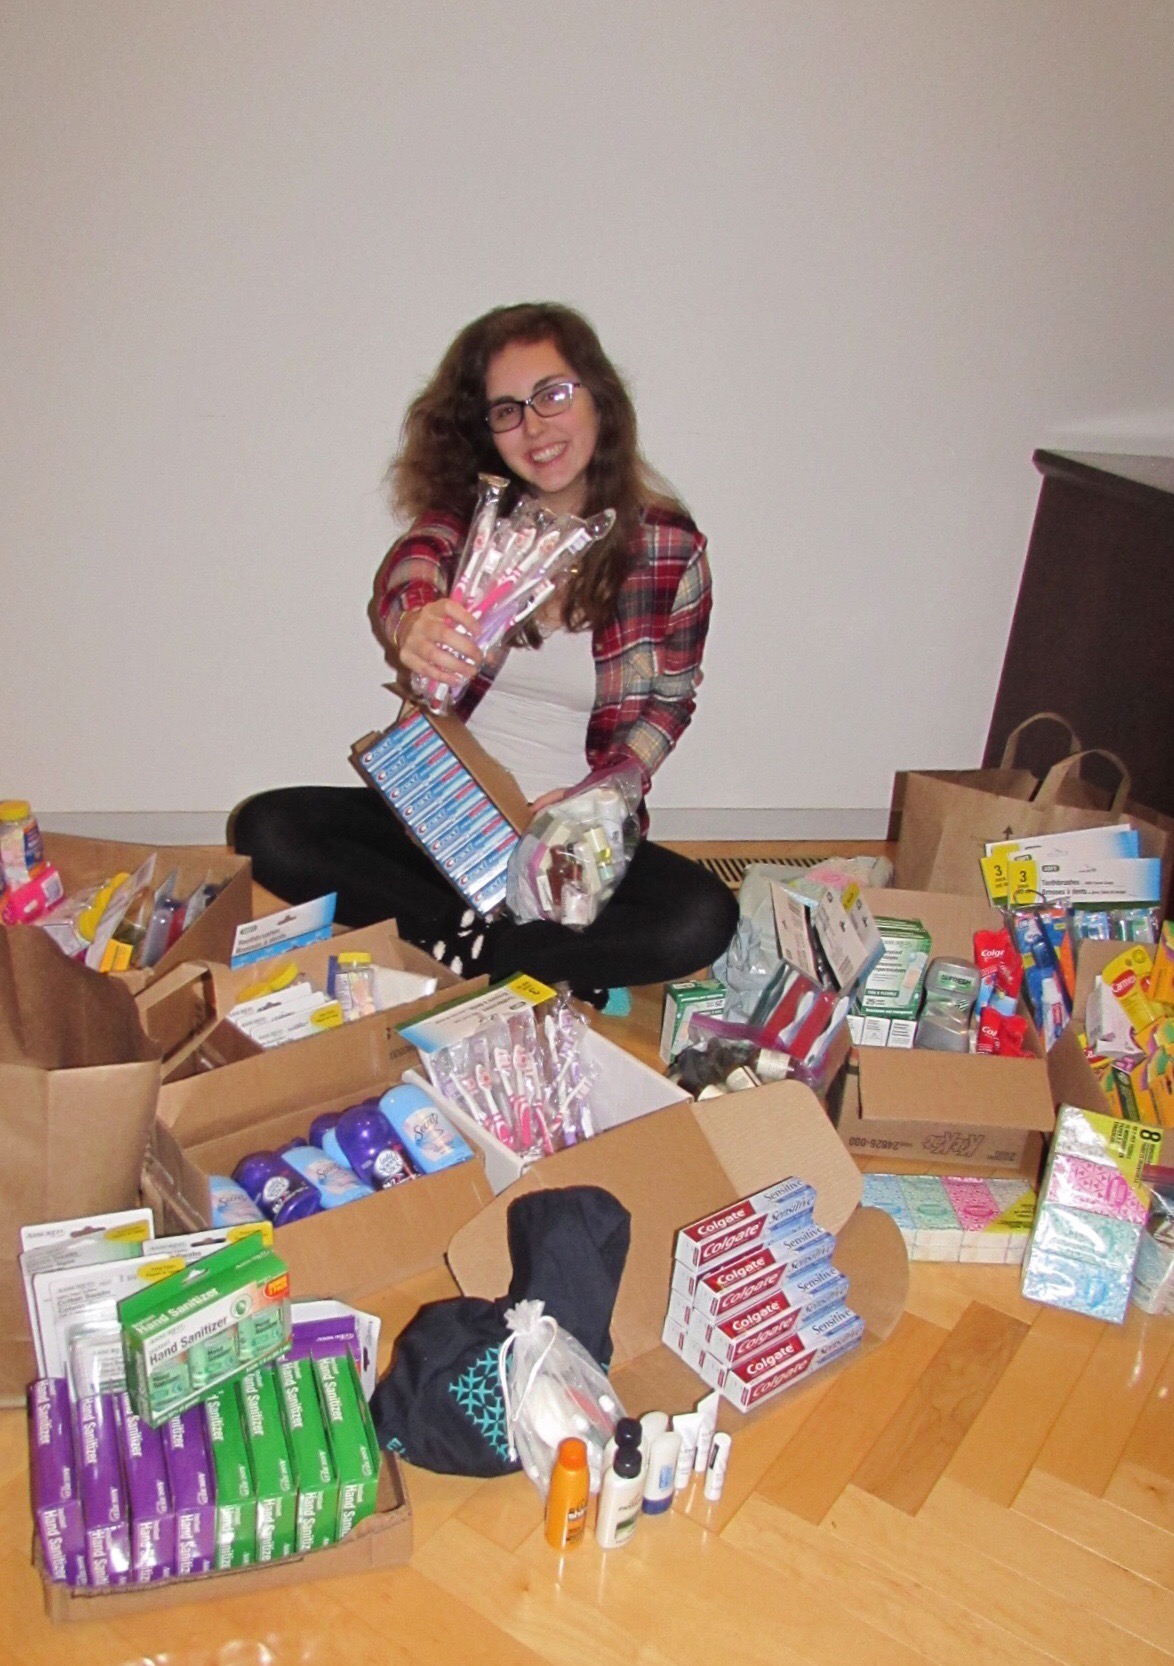
She specifically suggested people donate all of those free little shampoos and lotions that one collects from hotel visits which often seem to linger on in the bathroom cabinet. She also proposed cash donations and promised to use them wisely to purchase what was needed. People from everywhere donated. Kids, moms and teachers at her school brought items in. Neighbors, friends and family members donated money. She ended up with bags and bags of items plus $245 in cash donations.
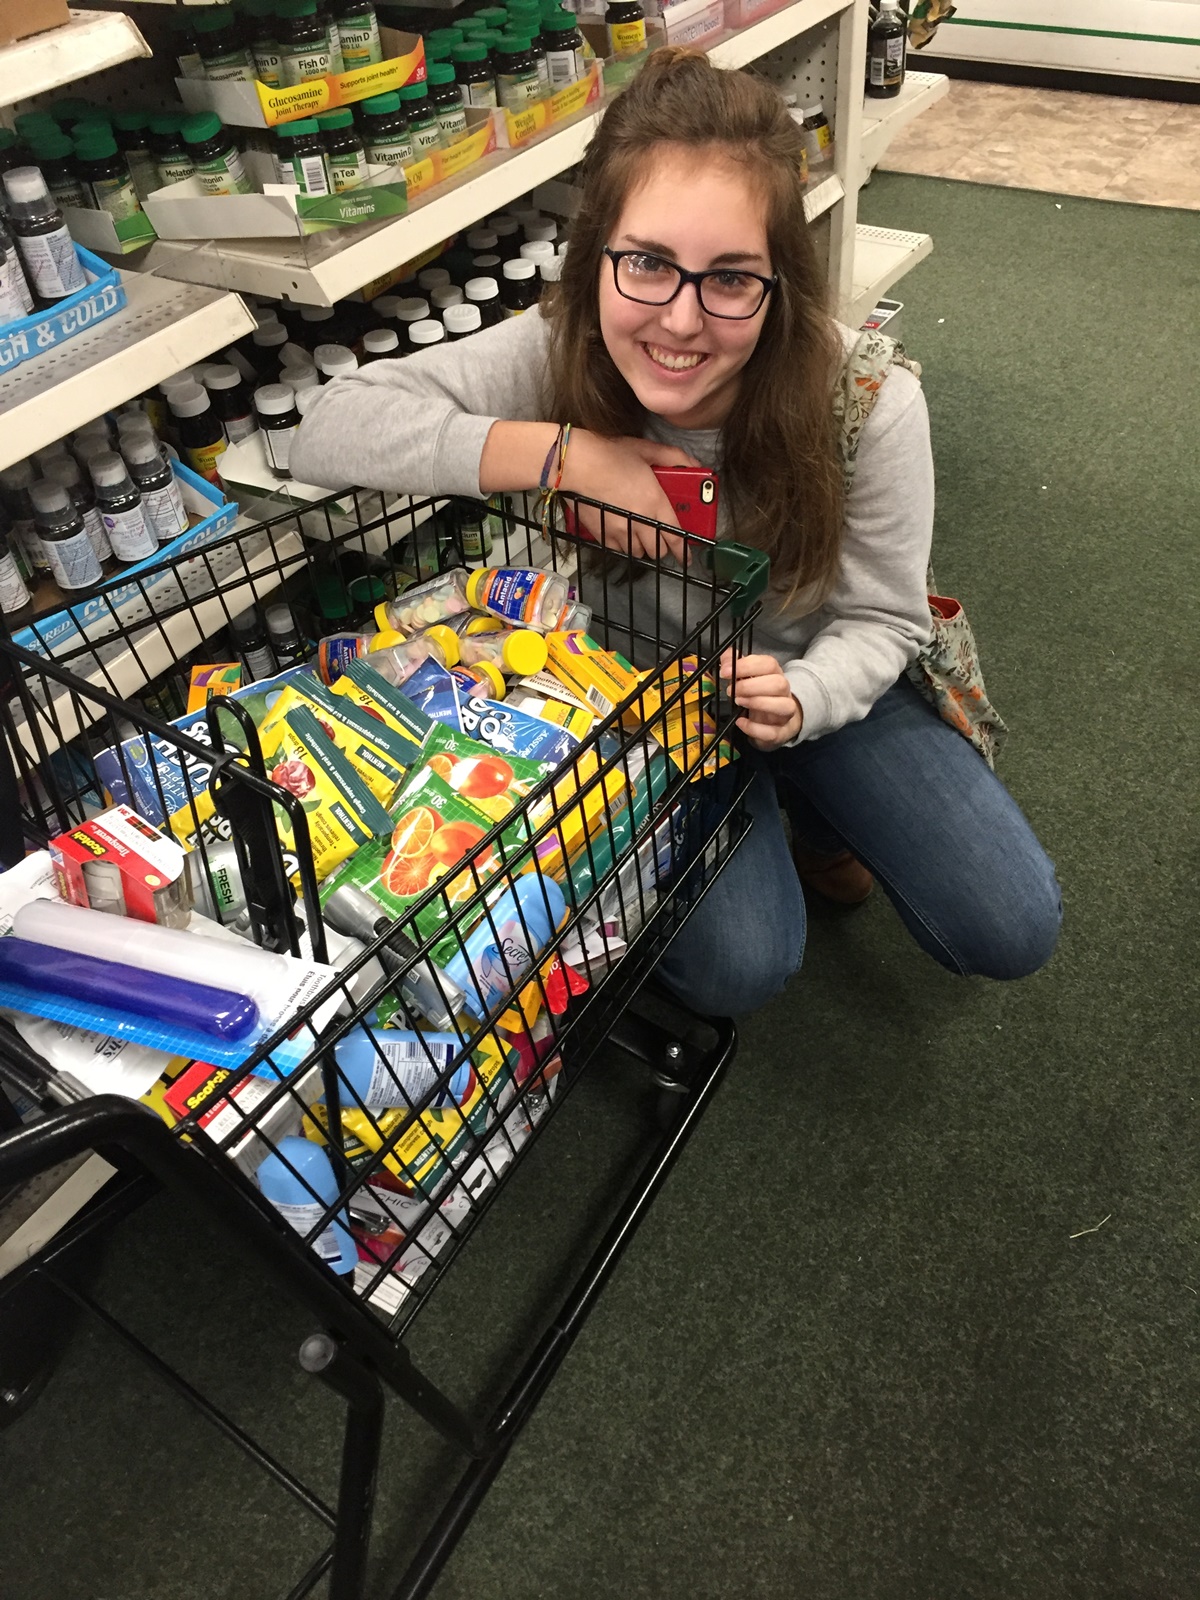
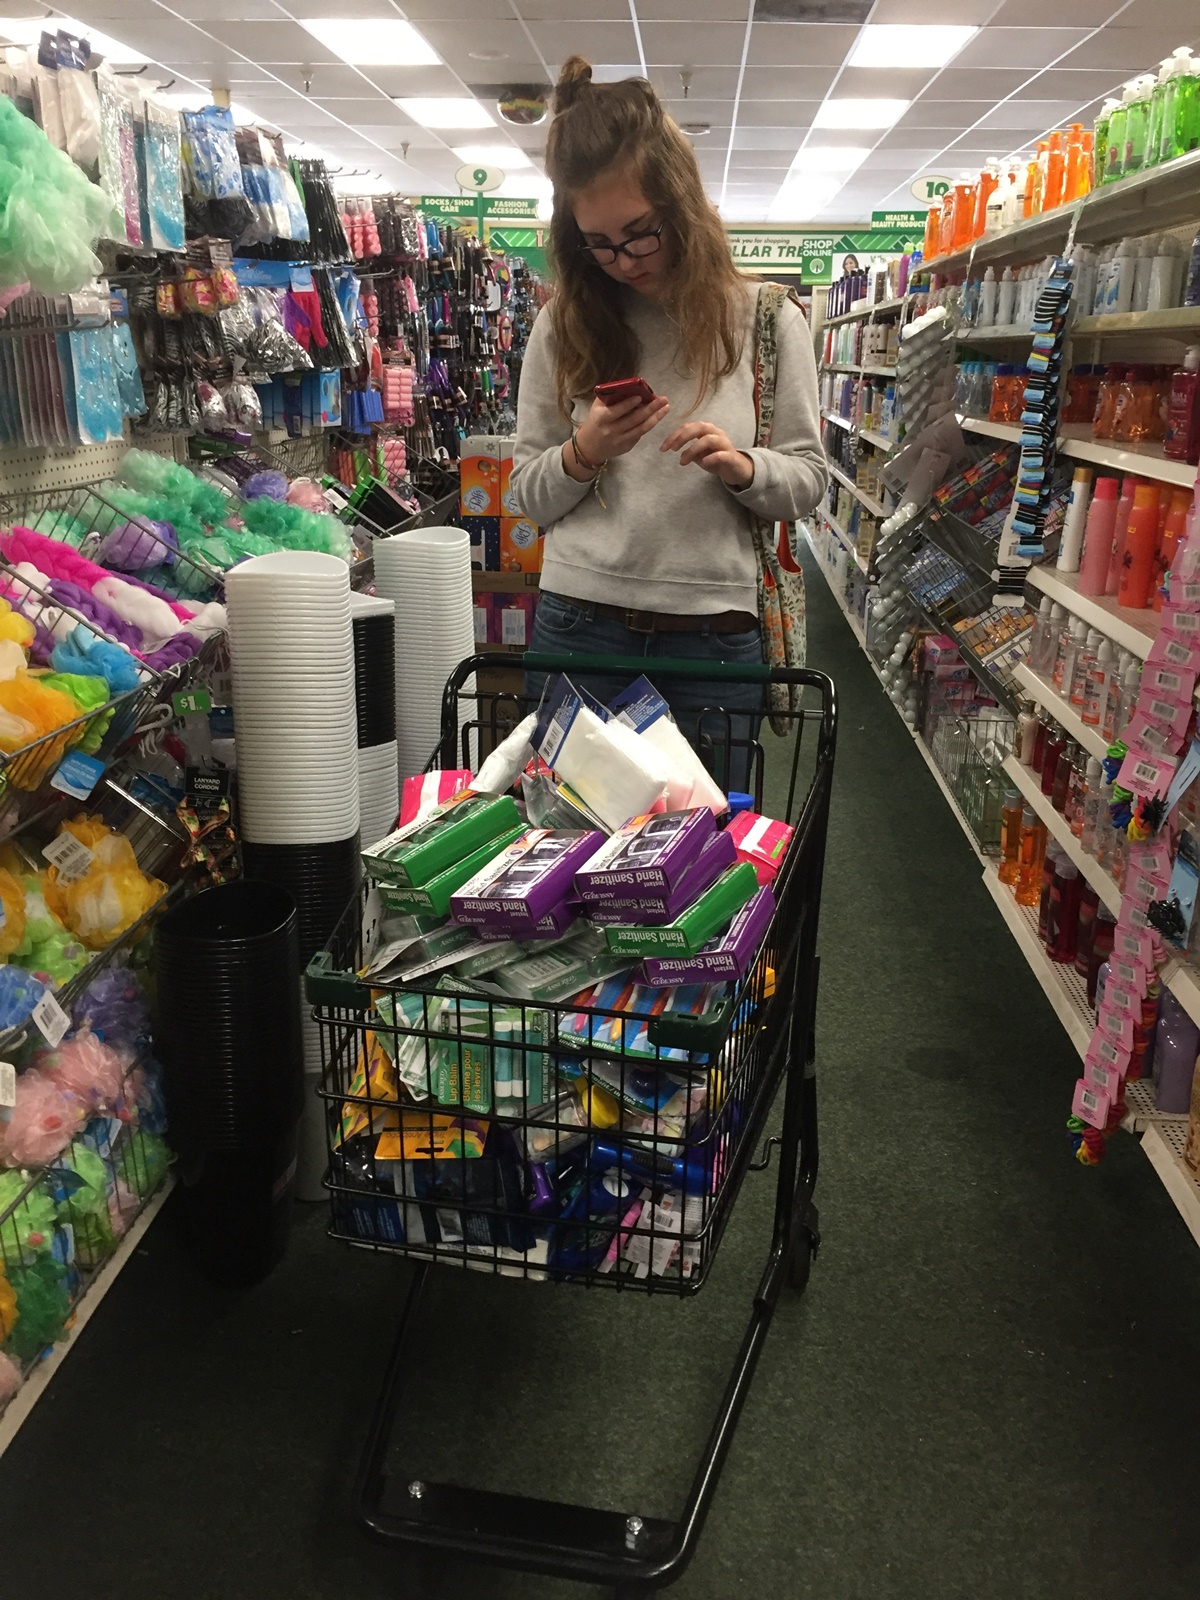
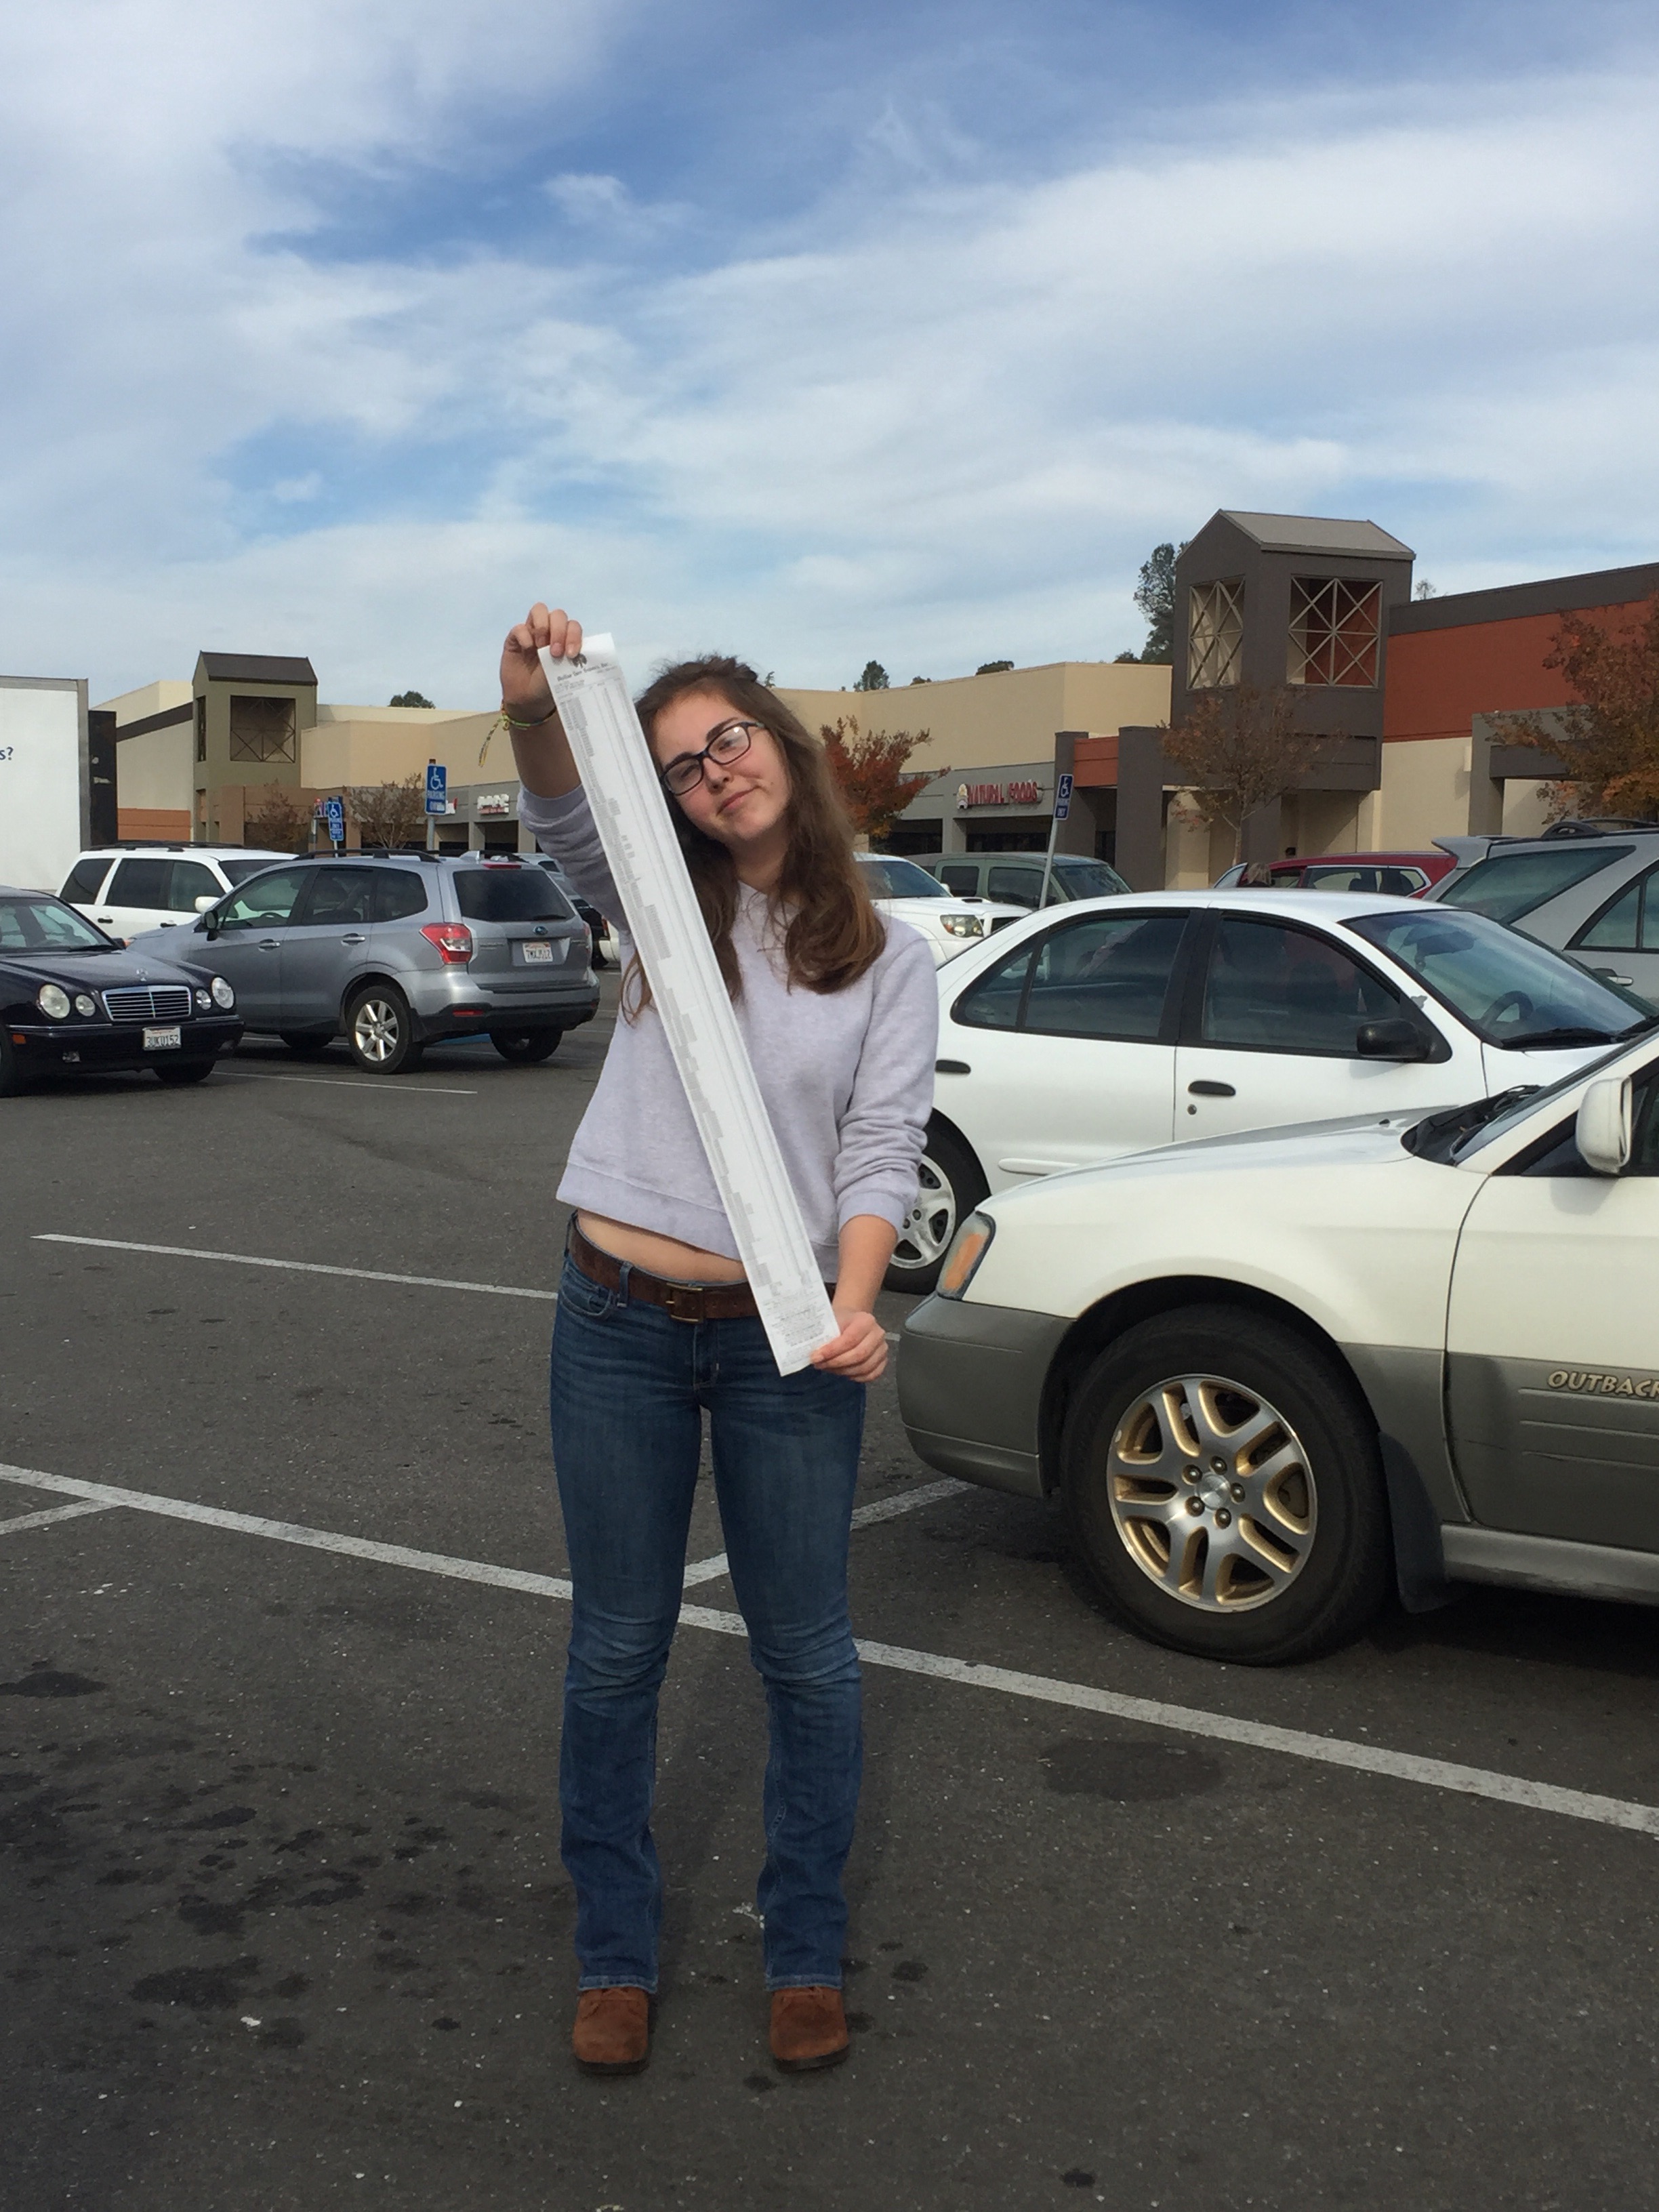
Yesterday she and I went to the local dollar store. She carefully counted and selected items from the list. It took quite a while to fill the cart but she heaped it with all sorts of supplies.
Calculating what she had spent, keeping notes on how many of each item she had selected, and figuring out what the tax would be was quite the process. She wanted to spend all of the money but not exceed the $245.00. She did great and has about $10 left over which we will take to the dollar store once more to buy a few more things. We didn’t dare go get more items on that trip. It took the cashier forever to ring up more than 200 items as I boxed them up and Julia tracked the costs. The other customers in line were so patient and kind. They could see she was doing a project and if they asked, she would explain it. One older gentleman chuckled and said ‘oh phew, I thought that was all for you.’ It was so nice to see everyone being supportive and sort of cheering her on rather than grumbling about having to wait behind her for a bit.
This picture makes me smile – she has a receipt that is about three feet long!
In addition to collecting from friends and kids at school, Julia also asked two of our family dentists for donations. One dentist donated a carton of toothpaste tubes and the other dentist gave her a box of toothbrushes. This is one generous community we live in!
There is so much value in a project like this! For one, she learned to define the steps needed to get this going. She approached adults – at school, at the homeless shelter and the local dentists – on her own – to ask for permission and support of her project. She lugged supplies home, posted signs at school, promoted the project on her social media account and will finish up by bringing the donations to the shelter next week. She also plans to write thank you notes for many of the donations. If I think about how projects are done in the professional realm, many of these steps are the same. I feel like this was a hugely valuable experience for Julia.
This is such a cute shot so I am including it, even though it is a bit blurry.
Honestly, it wasn’t all that difficult. I would strongly recommend something like this if your family is looking for a way to give back to the community. If your kiddos are younger, you might want to be more hands-on and supportive. As a teenager, Julia required only a little coaching here and there but truly she did 90% of the work herself.
I am really proud of this girl and she is (rightfully) proud of herself. She likes the fact that she started this, kept to a timeline that she developed, and was very successful. If you have any questions about implementing a project like this, feel free to ask. These are the times when parenting is so gratifying; when we see one of our kids giving time and energy in a selfless manner.
And now just a quick Thanksgiving recap: We had a great holiday! Very quiet with only three of us celebrating together but so much fun. I also held my first big sale in the shop. Orders kept me busy and I truly appreciate each of the orders I received, some from blog friends and others from new customers – thank you so much for supporting my business!
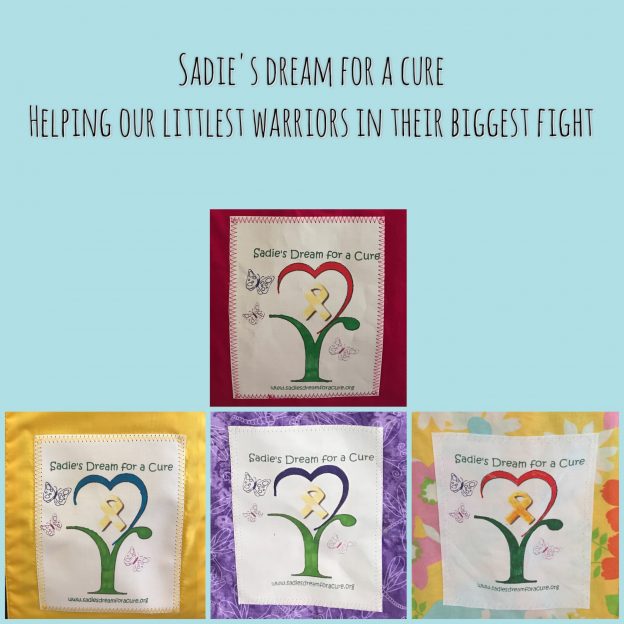
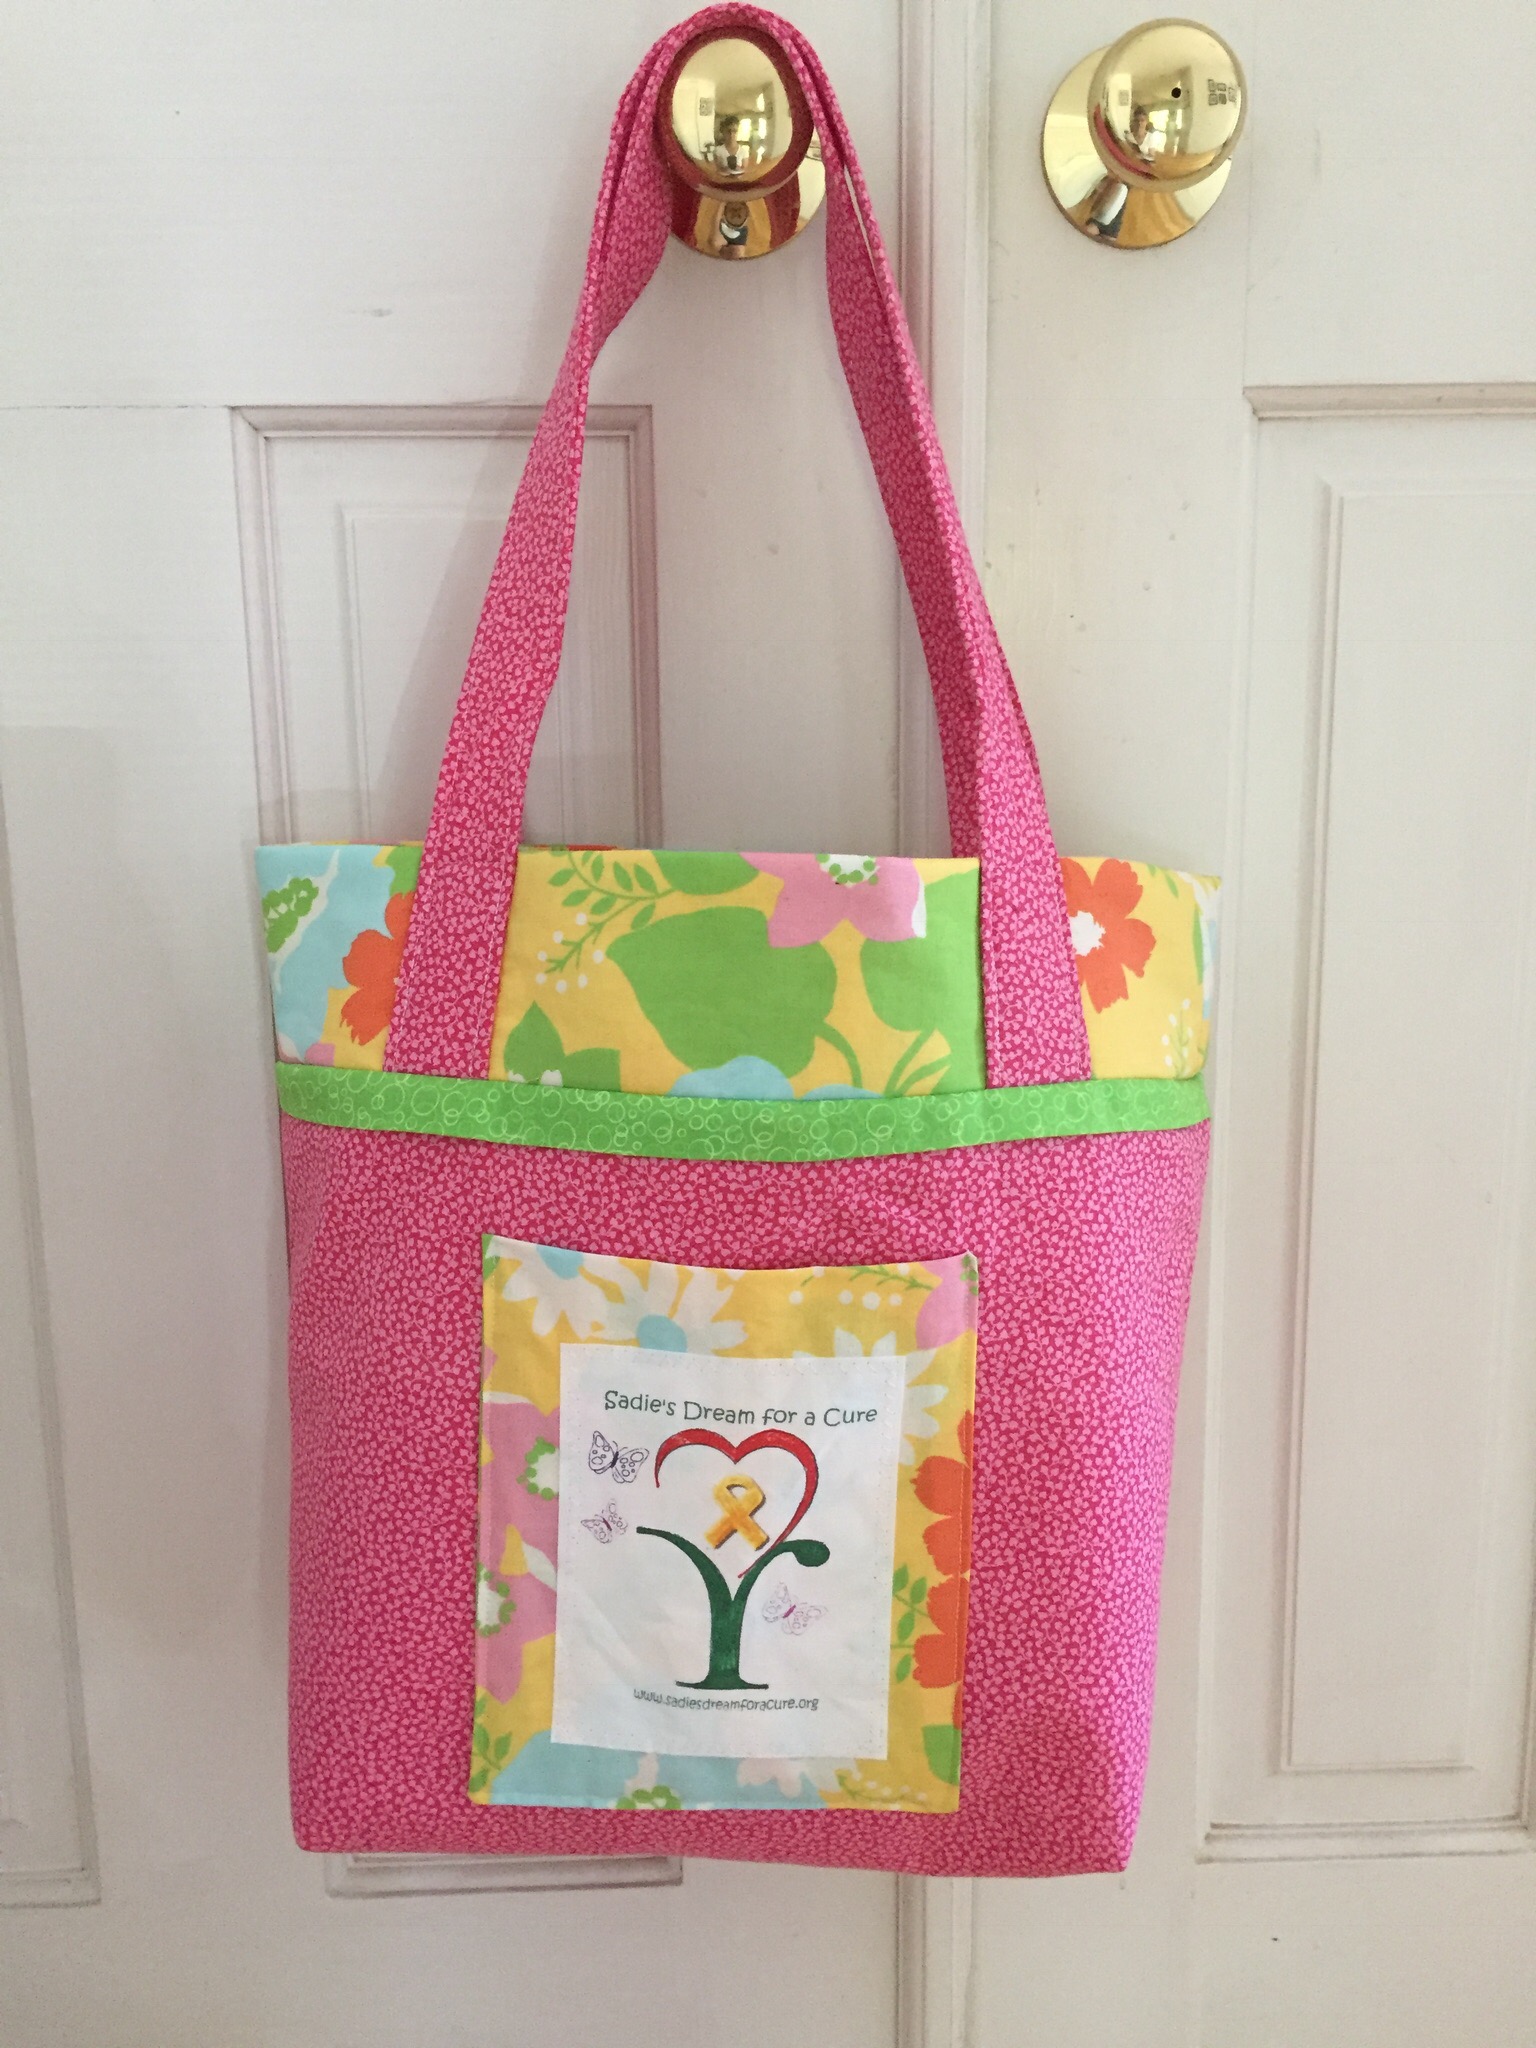
I know I am not alone when I say I love to sew for a cause. There are so many people less fortunate than us, people who are dealing with all sorts of hardship. Quilting and sewing cannot fix these things, but it can show others how much we care. One such cause is Sadie’s Dream for a Cure. Founded in 2012, this organization provides tote bags filled with toys, crayons, games and stuffed animals to children who are battling cancer. Sometimes the child regularly endures long IV infusions or hospital stays in an isolation room while their immune system is severely compromised from their treatments. These bags bring a little happiness to a scary time for a child.
This organization has several options for how we can help. They will provide an entire kit to a person wanting to sew a bag. These kits contain the fabric, fusible batting and the label for the front. Alternatively, they will send you just the label, if you would like to rather use your own fabric. I thought it would be a good use of some stash so I requested just the label. Finally, if you don’t have time to sew just now, they keep a wish list on their website of items they need for filling the bags. Here is a link to check it out.
Bags are donated to hospitals all over the country. Some of the bags are filled with adult items for parents who find themselves suddenly experiencing an extended stay at a pediatric hospital. The adult bags are stocked with toiletries and snacks.
Before I go any further, I need to make a clarification. I didn’t make all four bags shown at the top of the page. I first heard of this project on Instagram when The Quilter’s Planner announced a sew along to make these bags as a group. They did a few posts explaining the steps along the way. I didn’t join in with the sew along due to some timing issues. However, I did pass the idea along to my sister. She also loves to sew and I was fairly sure she would want to make a bag or two. Turns out she made three! Hurray for the kindness of others.
It has been fun to receive pictures of the bags my sister made over the last week or so. She did this cute one with bugs — perfect for the budding entomologist.
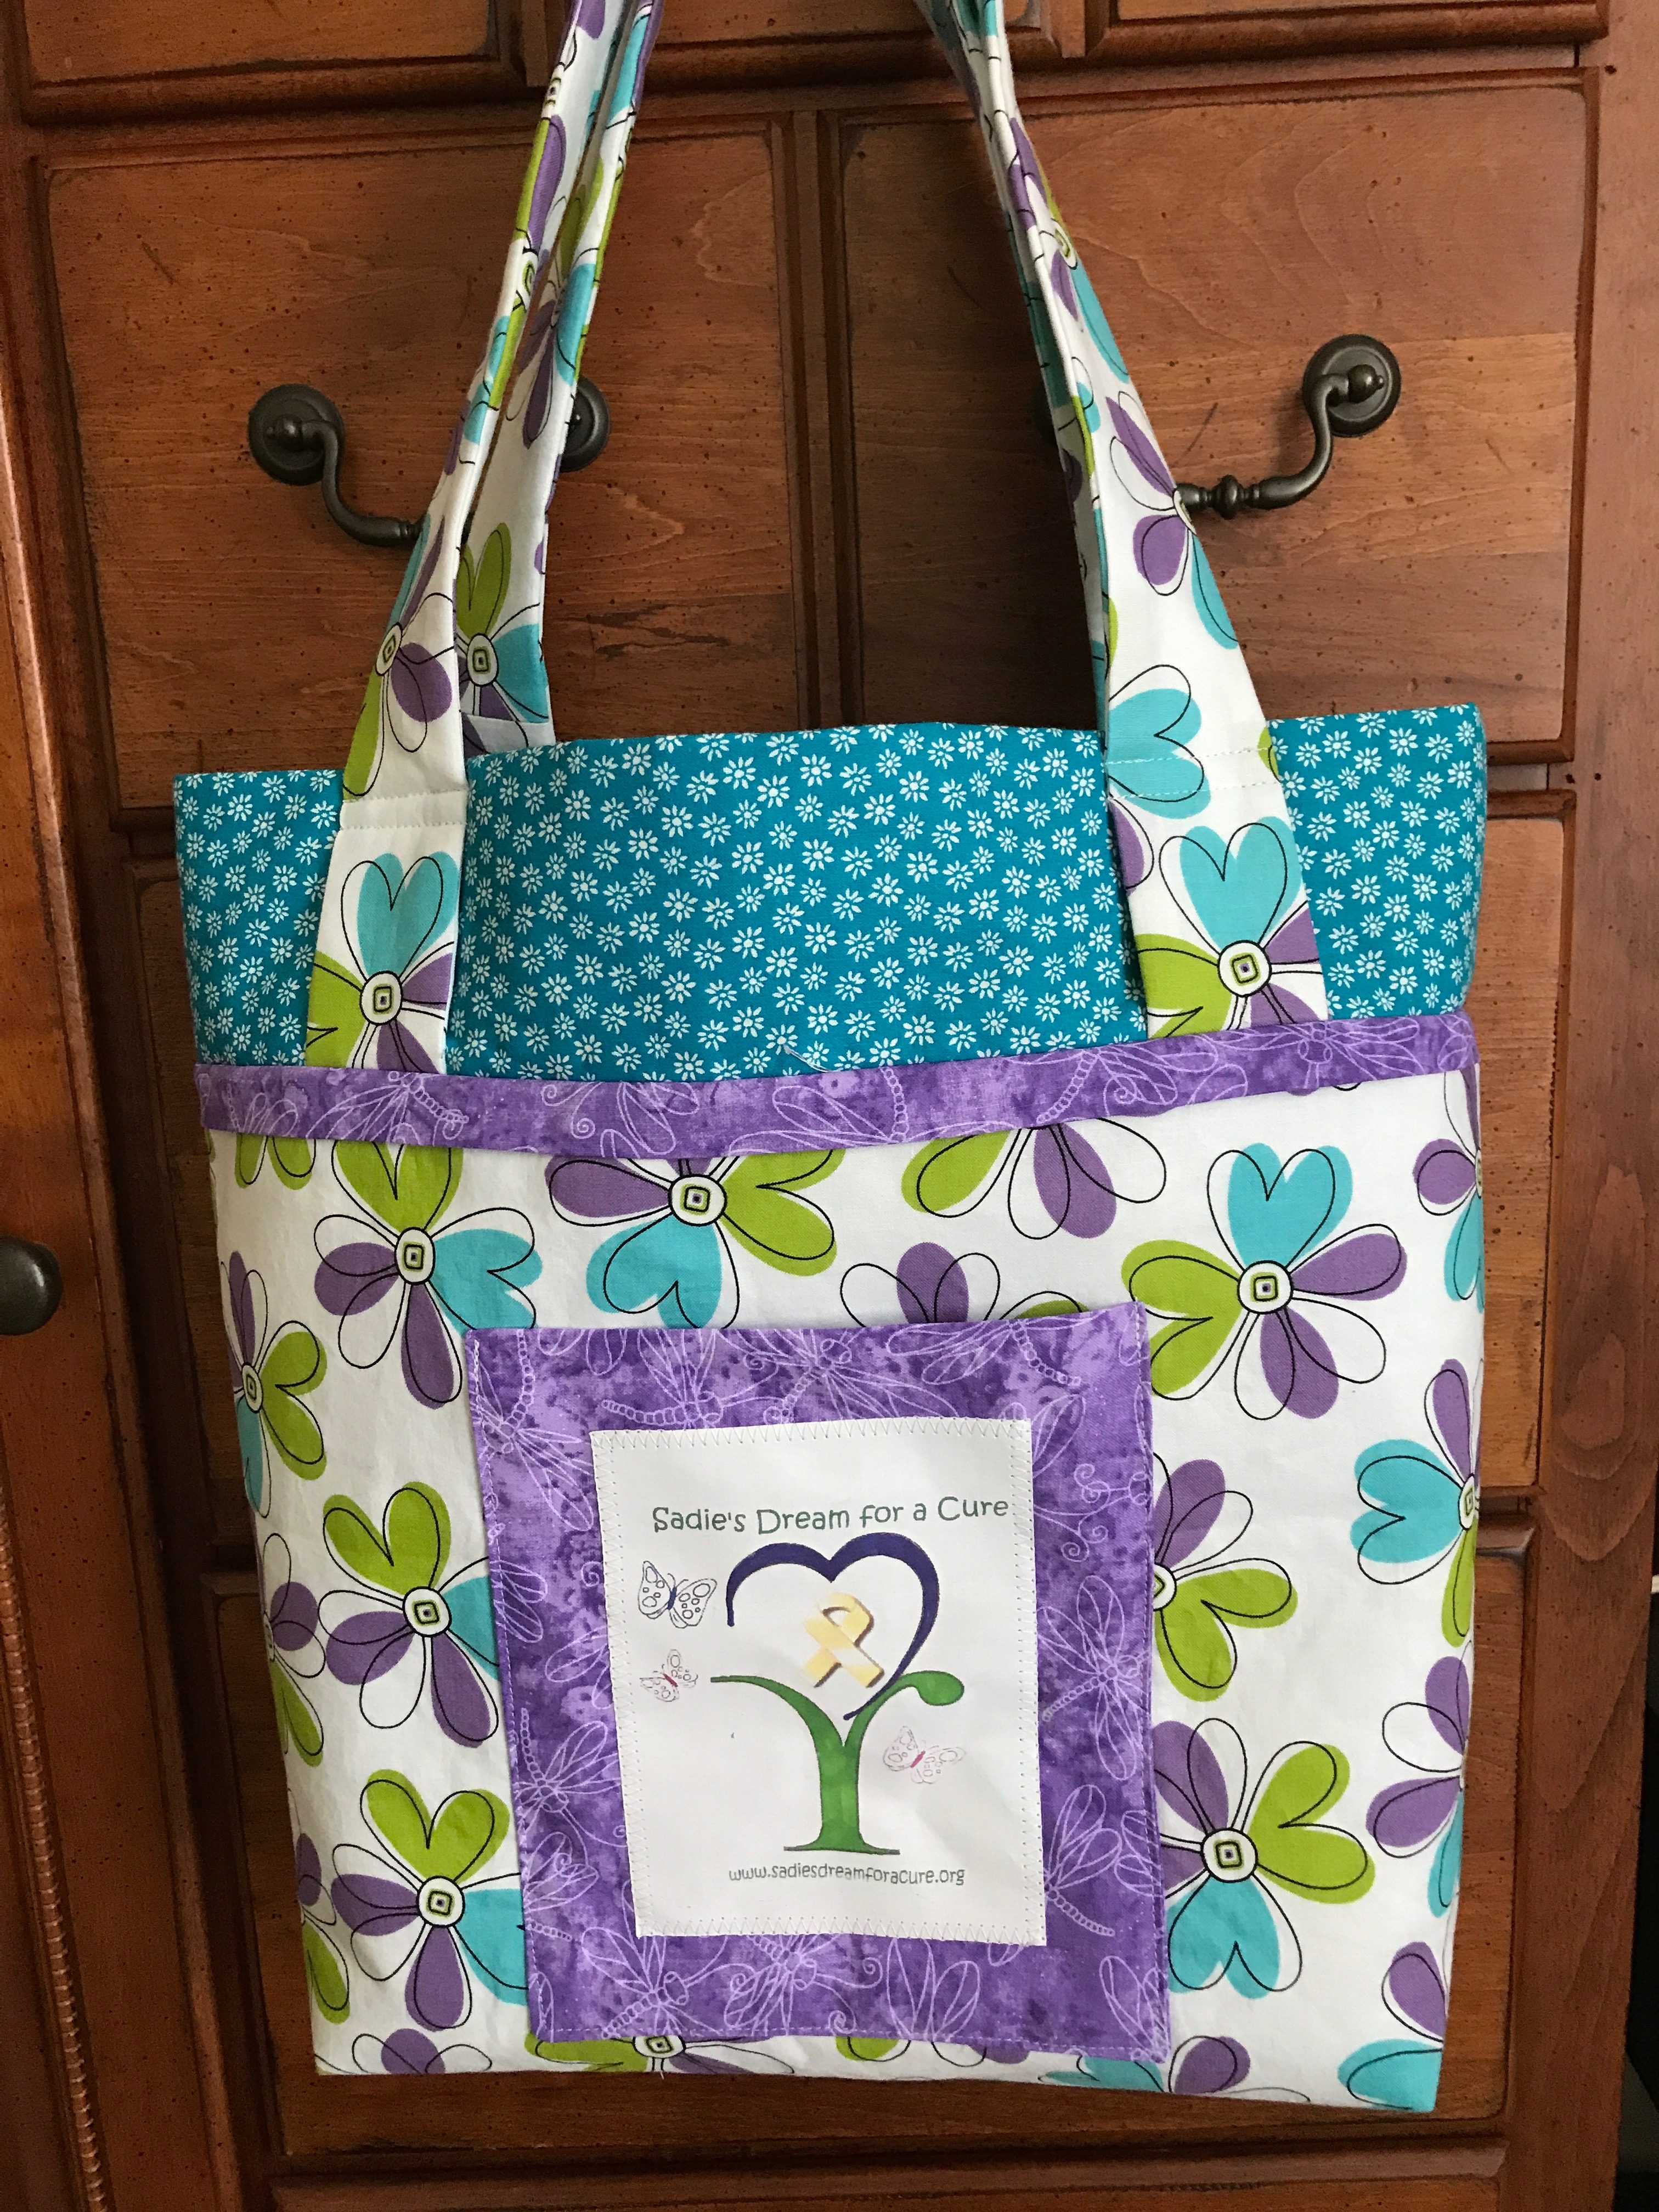
Who wouldn’t love the colors in this purple and blue bag? The fabric choices are perfect. It would work for a child or an adult.
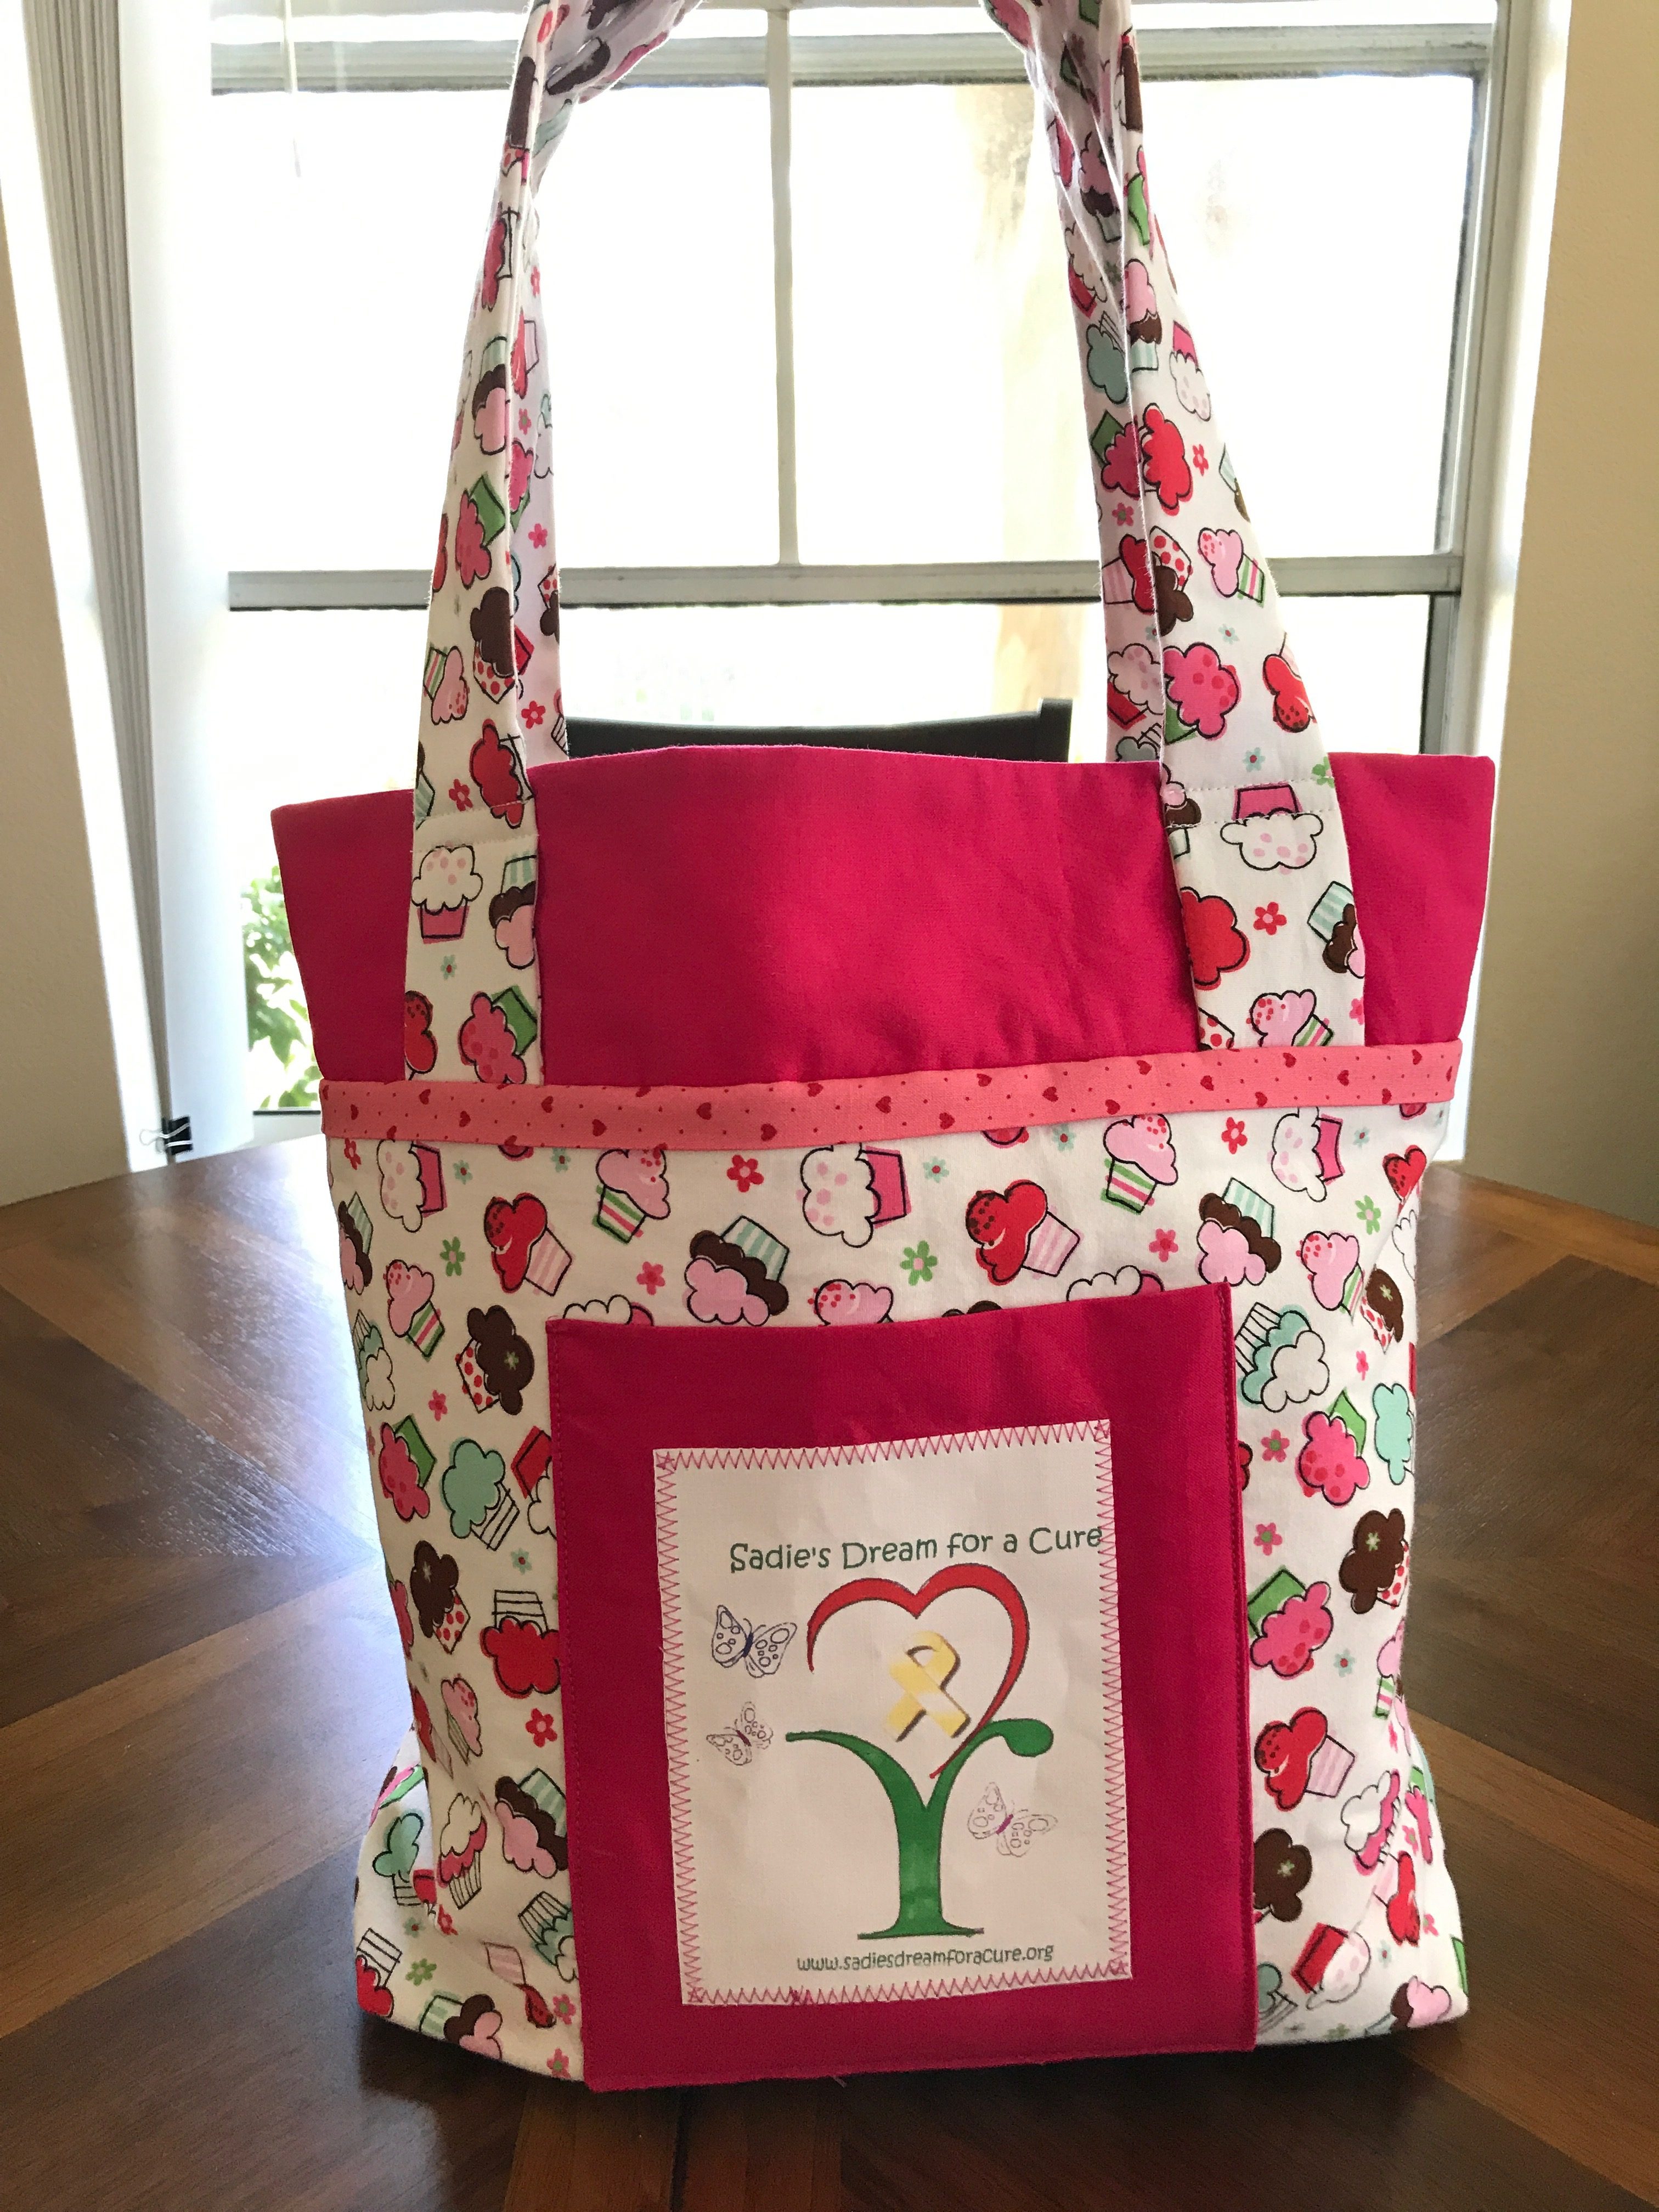
For the third bag she used this sweet multicolored fabric with little cupcakes.
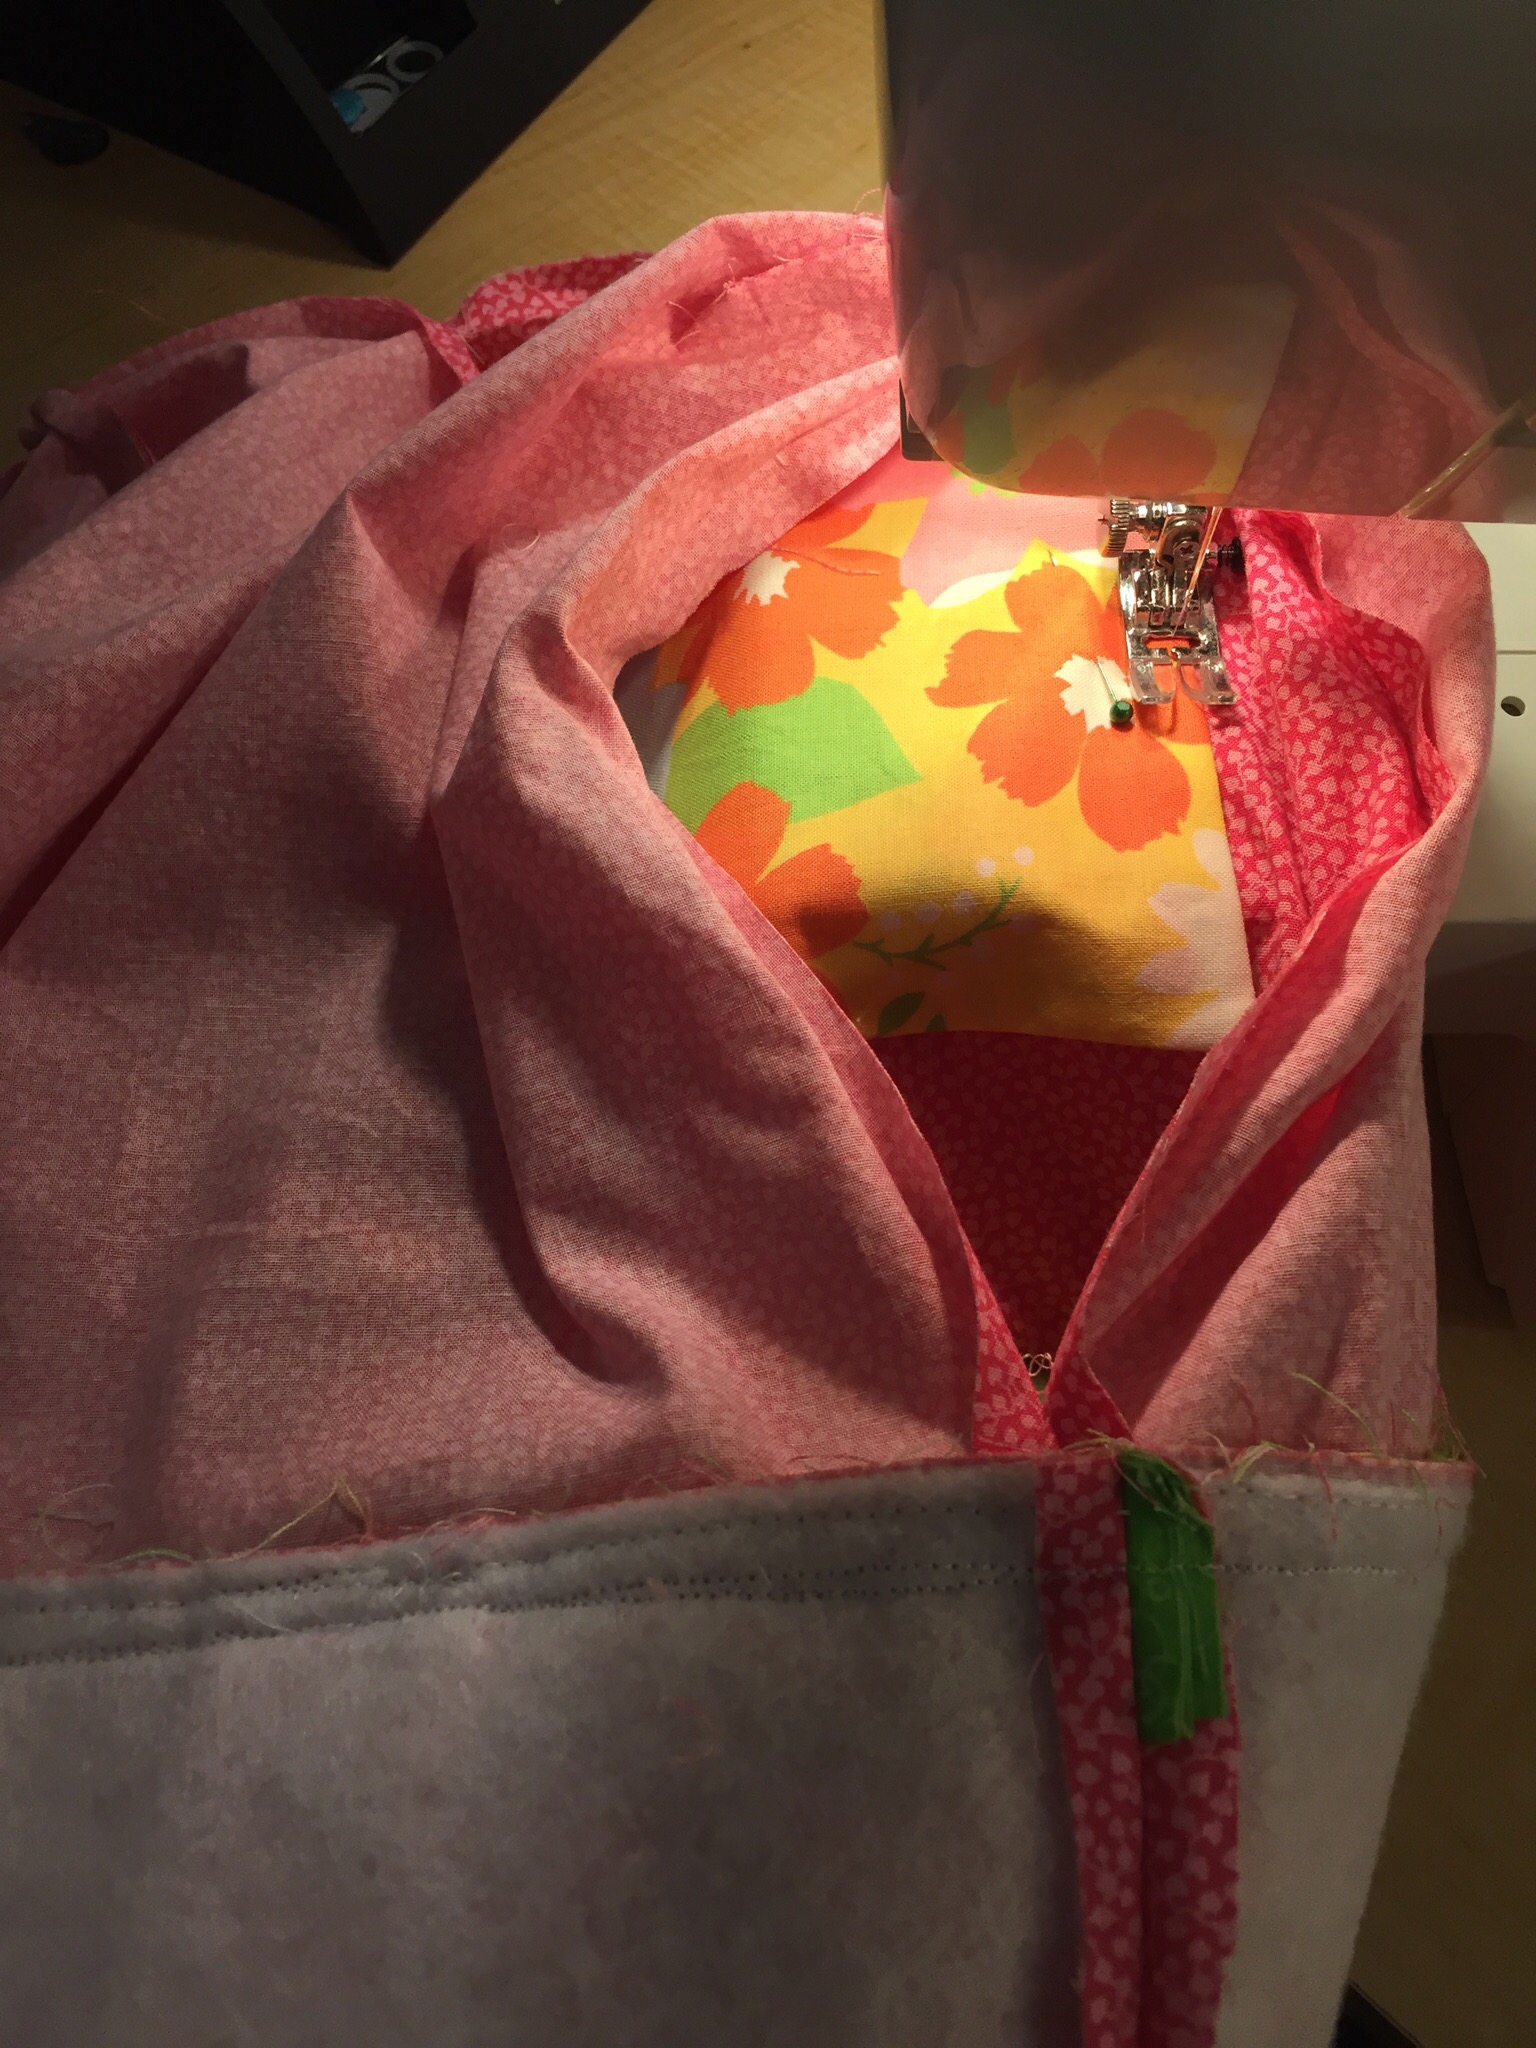
My bag is pink with a floral print used for the pockets and the trim around the top. I added a pop of green for the accent strip. When I was making it there was one hiccup. After I attached the lining to the outer bag, I noticed I had forgotten to put the pocket on the lining (for the inside of the bag). Dang it. I decided to unpick the stitches on the side seam and carefully insert the pocket and try to stitch it down. It was kind of silly but it worked.
I am pretty happy with the final results! Fun, bright colors make for a cute bag.
These bags are fun to make and a simple way to help out a family going through a rough time. I enjoy bag making anyway so this was a pleasant way to spend an afternoon.
Just a quick note – I want to let you know I have begun a newsletter to keep readers posted about my fabric shop. I will be sending it out about every eight weeks or so and it will contain information on new arrivals and fun promotions for my newsletter subscribers. If you are interested, there is a sign up form on the right side of the page.
Linking up to Crazy Mom Quilts and TGIFF. Hope all of you have a fantastic long weekend for the Memorial Day holiday.

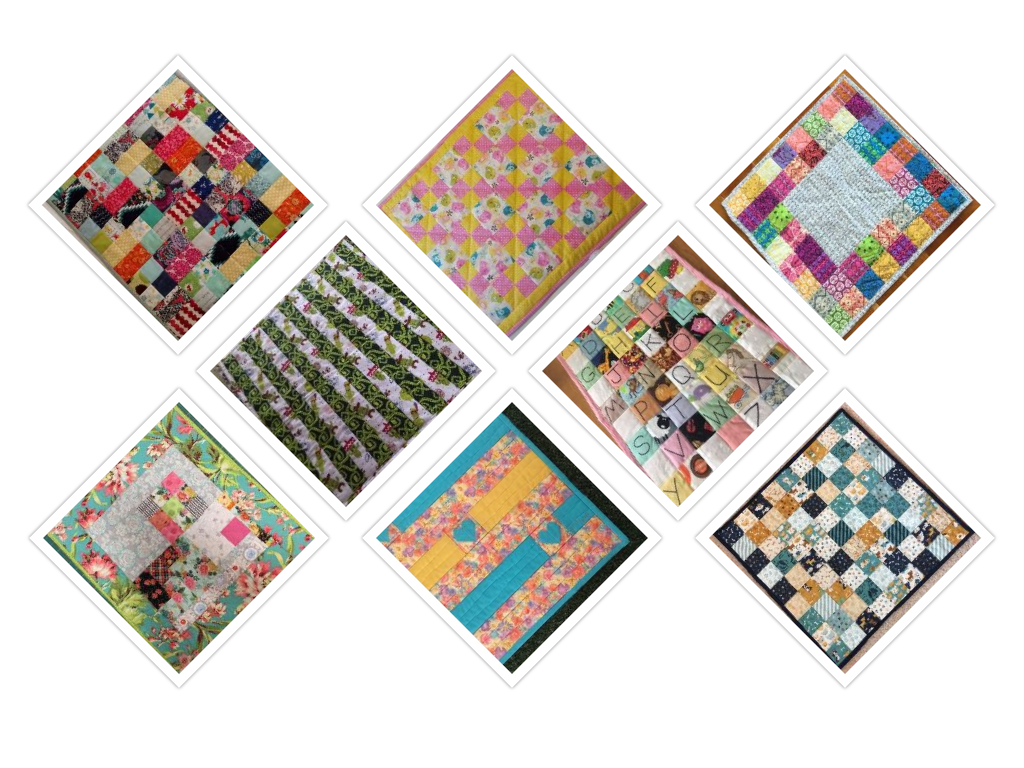 I didn’t think it was feasible to upload over 200 pictures so I just made a few collages. So many fun quilts though. I am sorry I couldn’t share every single quilt. They are all outstanding. Included in these special quilts are applique, strip quilts, animals, patchwork, Dr. Suess, Sesame Street, Raggedy Ann, flowers, tractors, and even race cars. Whether modern or traditional, each one is unique and so special.
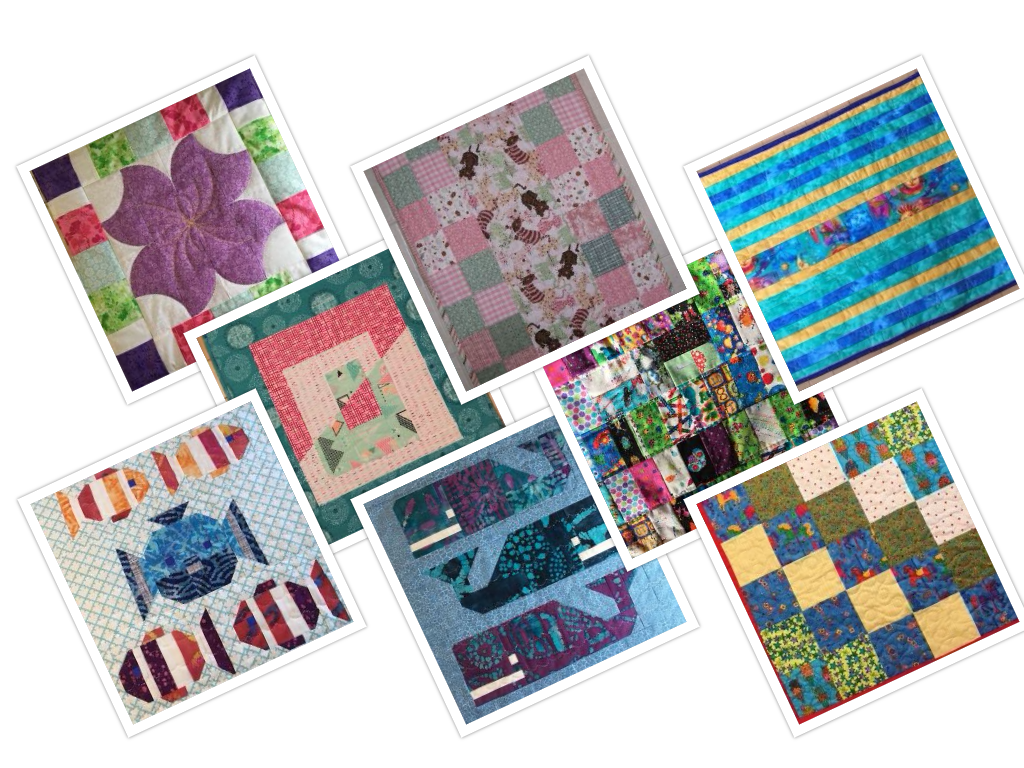
 Loading InLinkz ...
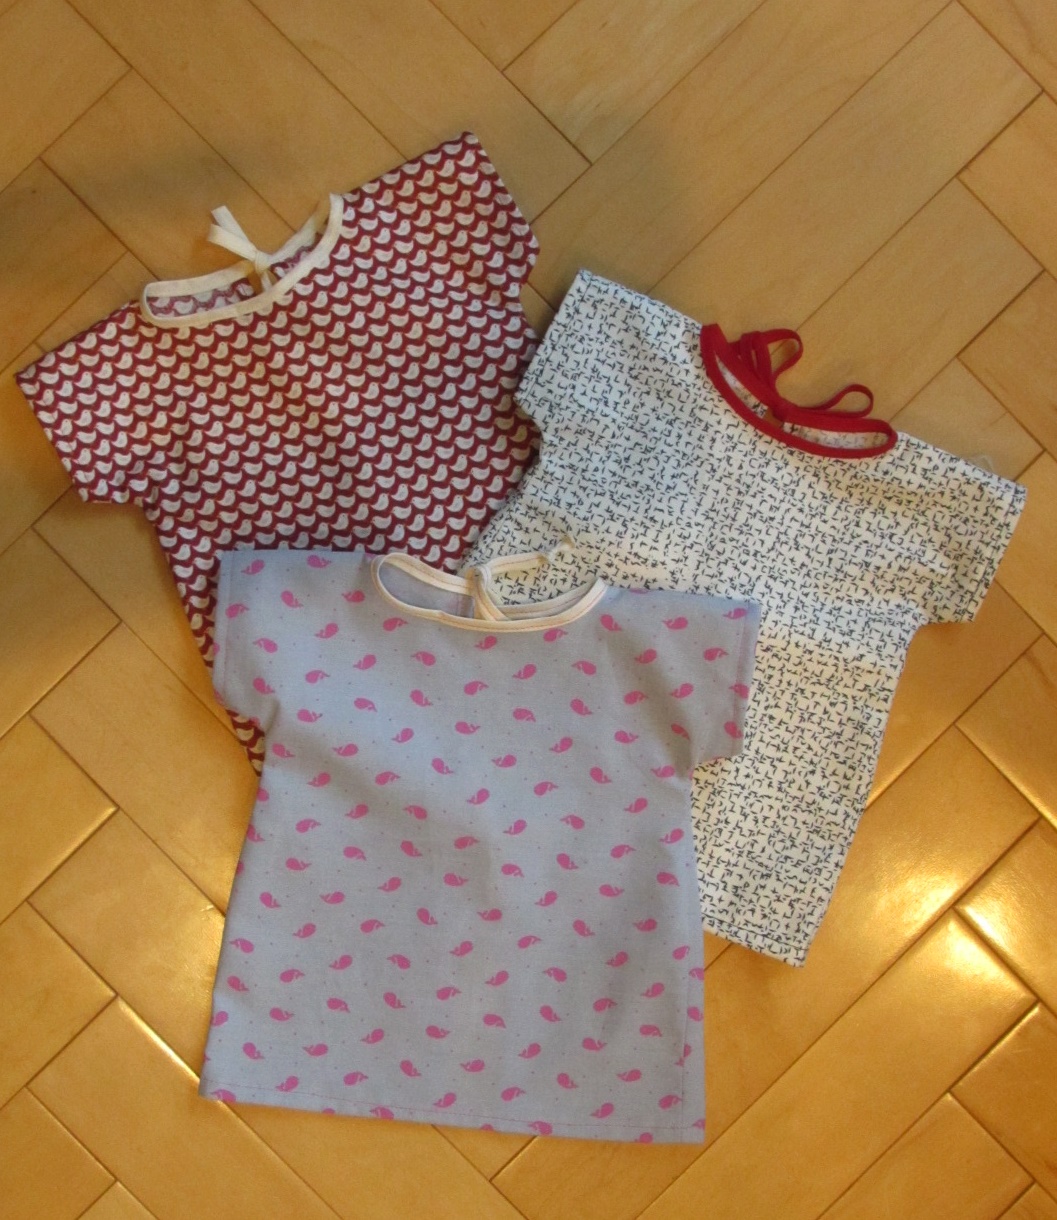


 I never anticipated that I’d be making these dolls…but one of the best parts is how people have volunteered to participate. I’ve had a Girl Scout do a bake-sale; I’ve had friends pool their money; I’ve had Bible Studies collect money; I’ve had a few people crochet hats…and then the quilts. My mom is an avid quilter (she just got back from a show in Ontario, California!) and quilts are so important. I think it’s a very tangible way to cover someone with love. For many of these parents, they are familiar with isolation and judgment. I think quilts show them (and ultimately their children) that someone cares….that someone also sees their child as something other than a medical specimen. They, when the day is done, are just little people who have parents or grandparents that want everyone to see the same beautiful person that they do.
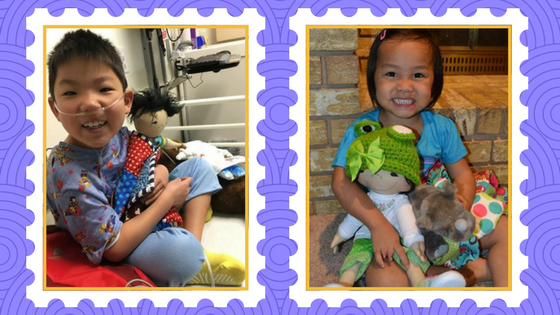
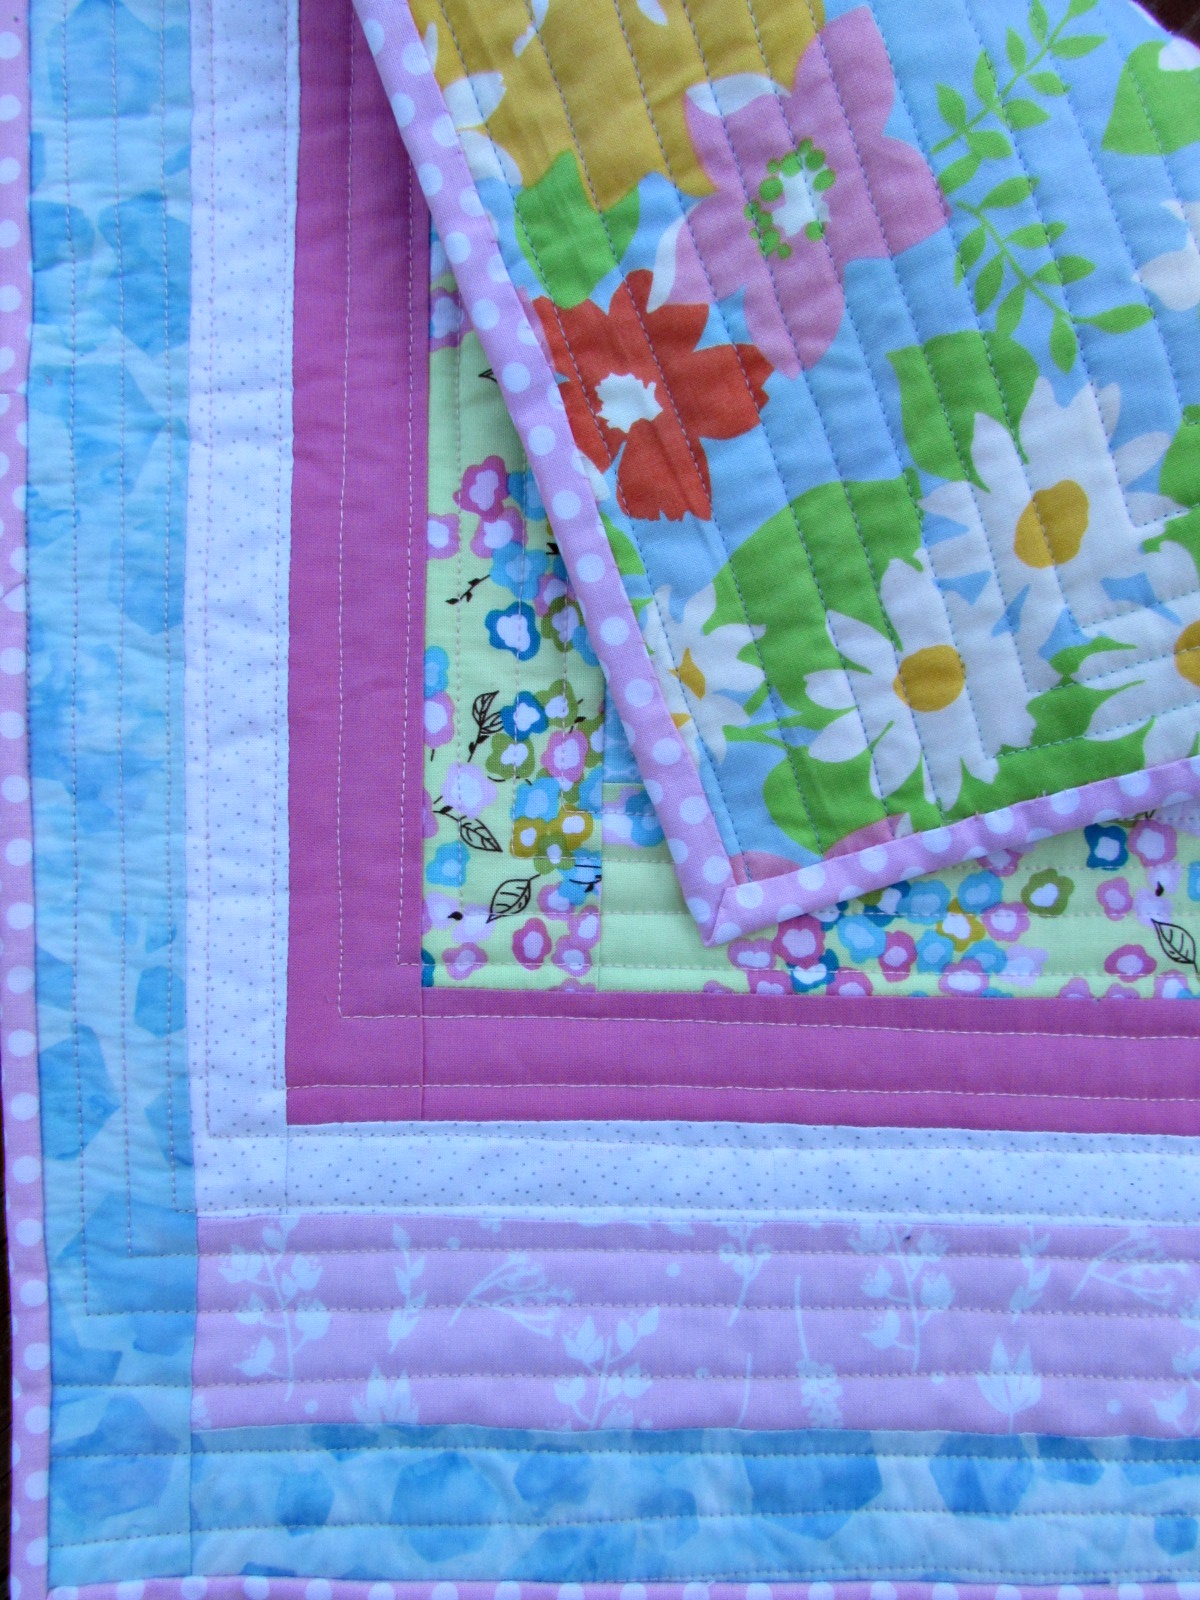
 This quilt is