First project to share for this year! Continuing on with my supposed clean-up in the sewing room, I found my bag of linen scraps. These are scraps left over from making French Press cozies which I sell in my shop. I cannot bear to throw these scraps away so I have been stashing them in a zip lok bag and stuffing them under the sewing table.
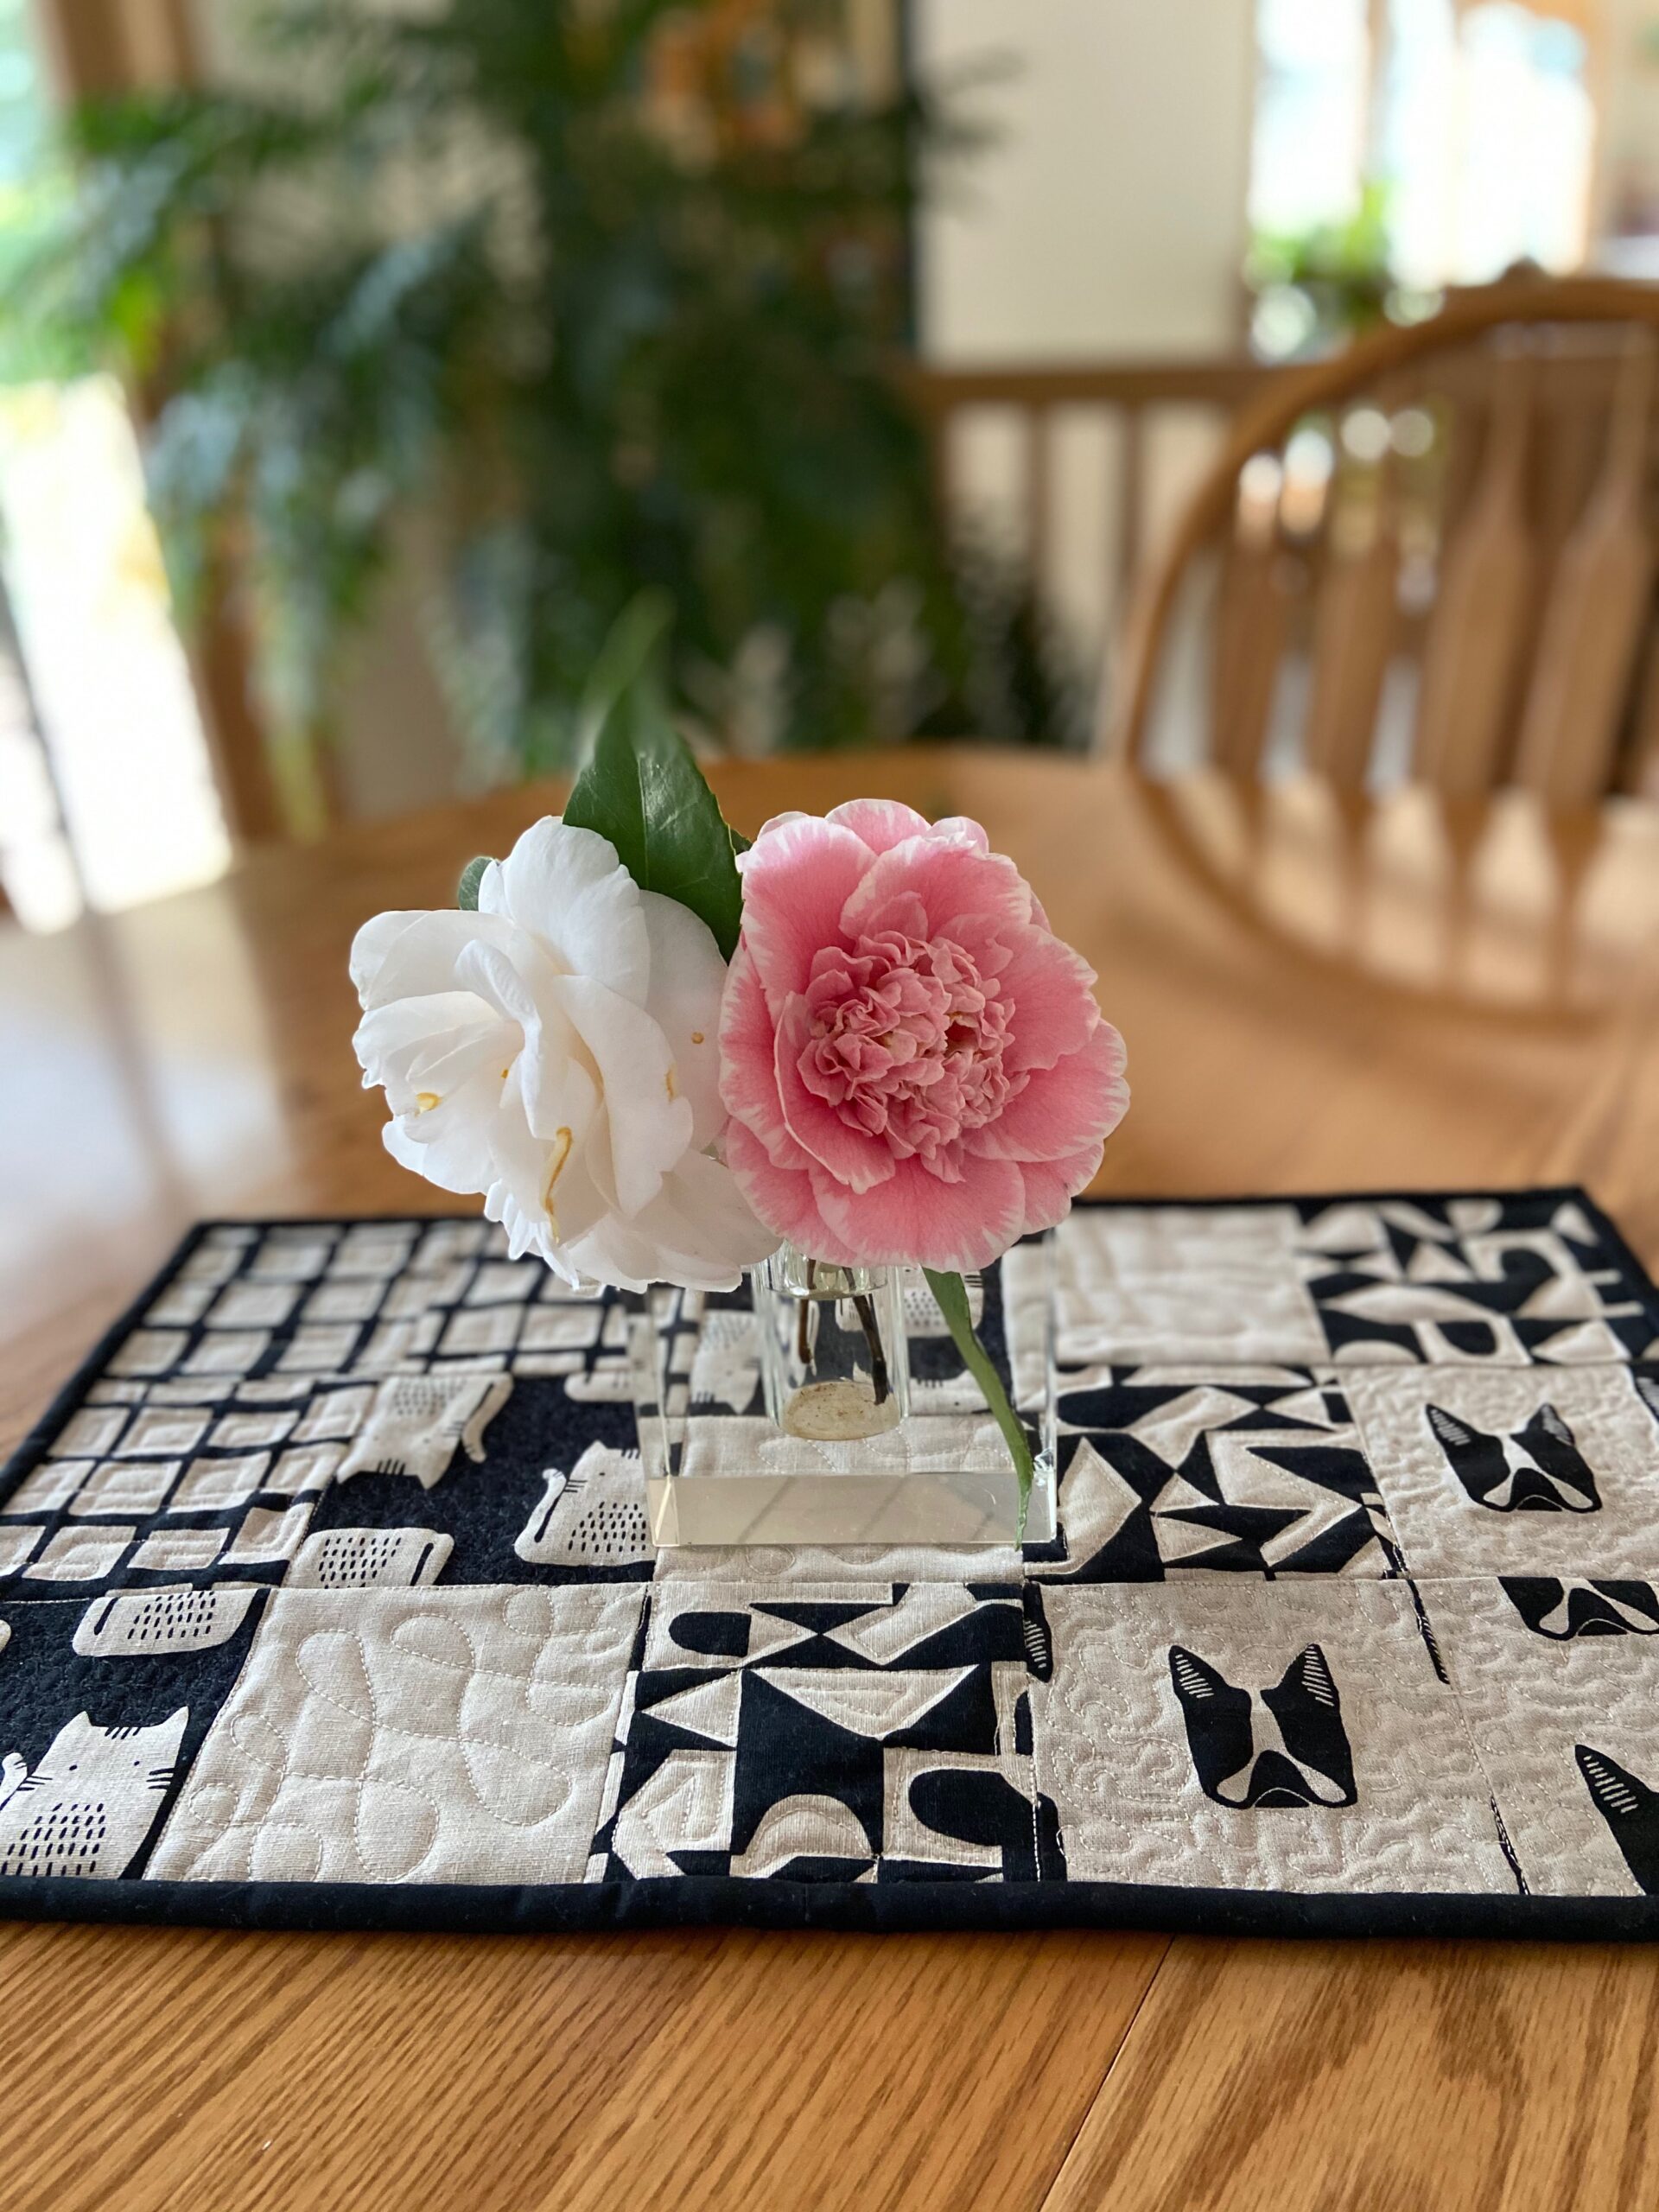
The first mat
Last February, I made one place mat – fully intending to make several more for the table. That didn’t happen because – you know…. I got distracted. But I have used it here and there in the house and love it.
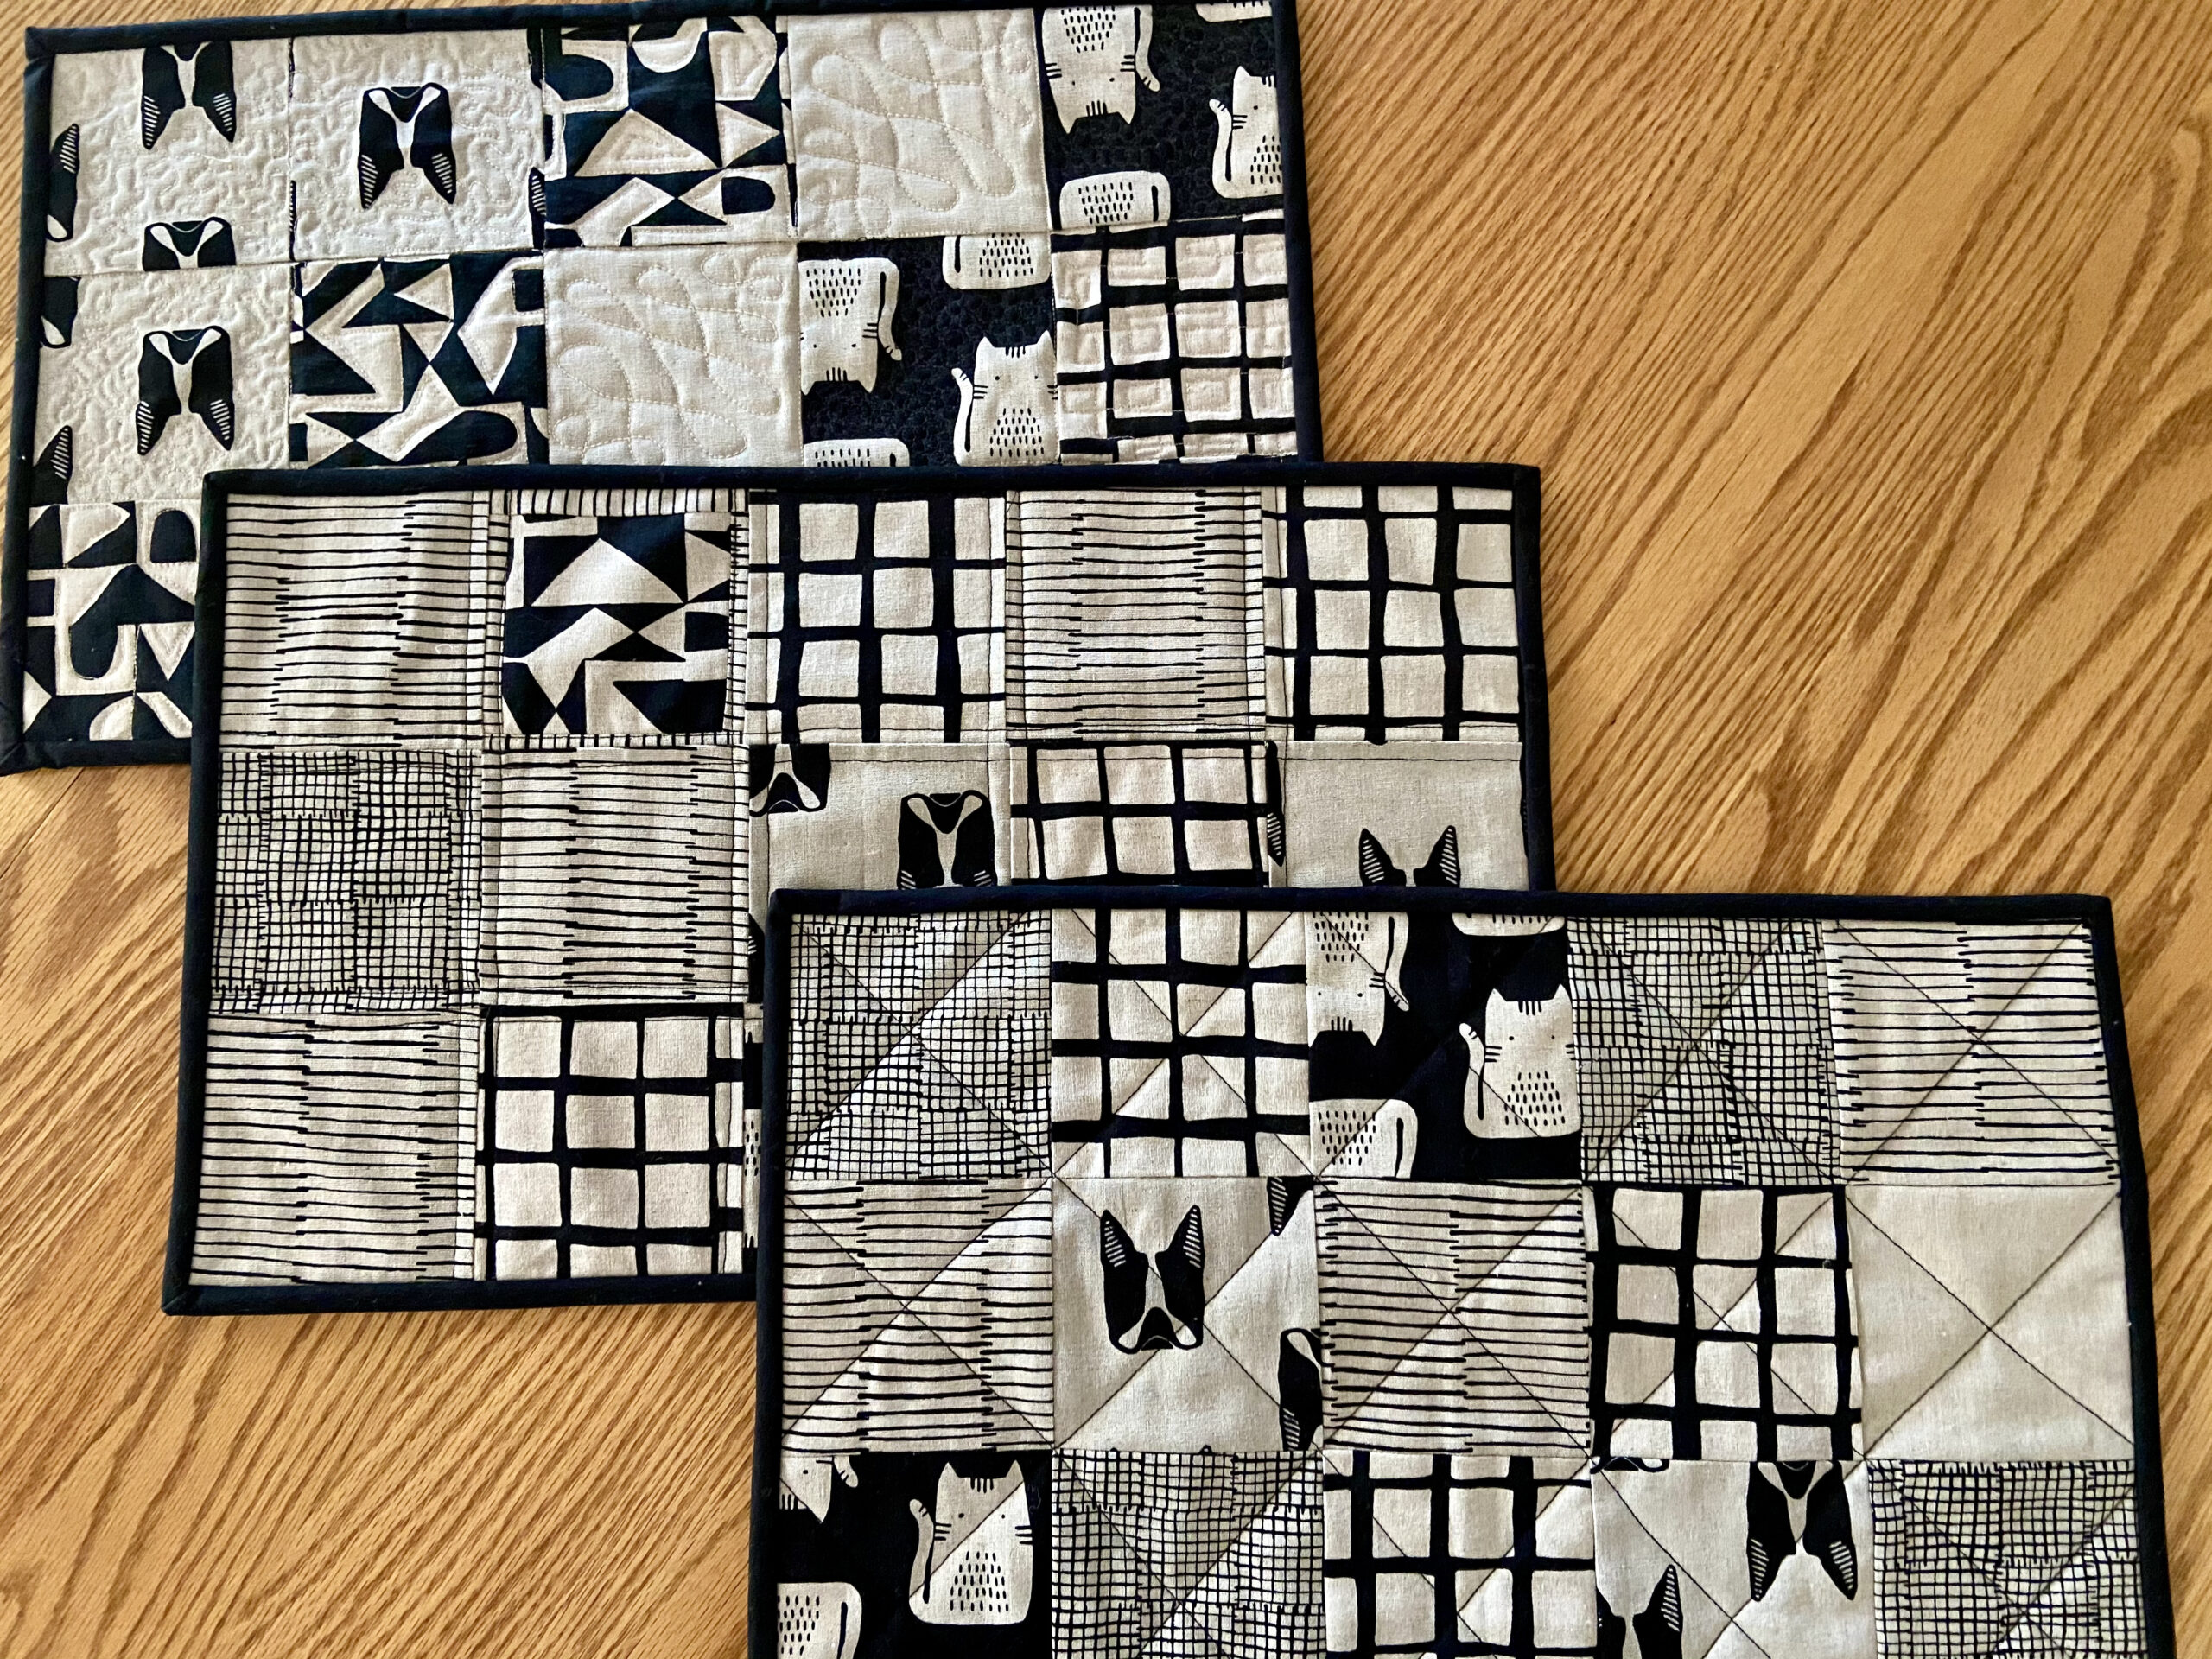
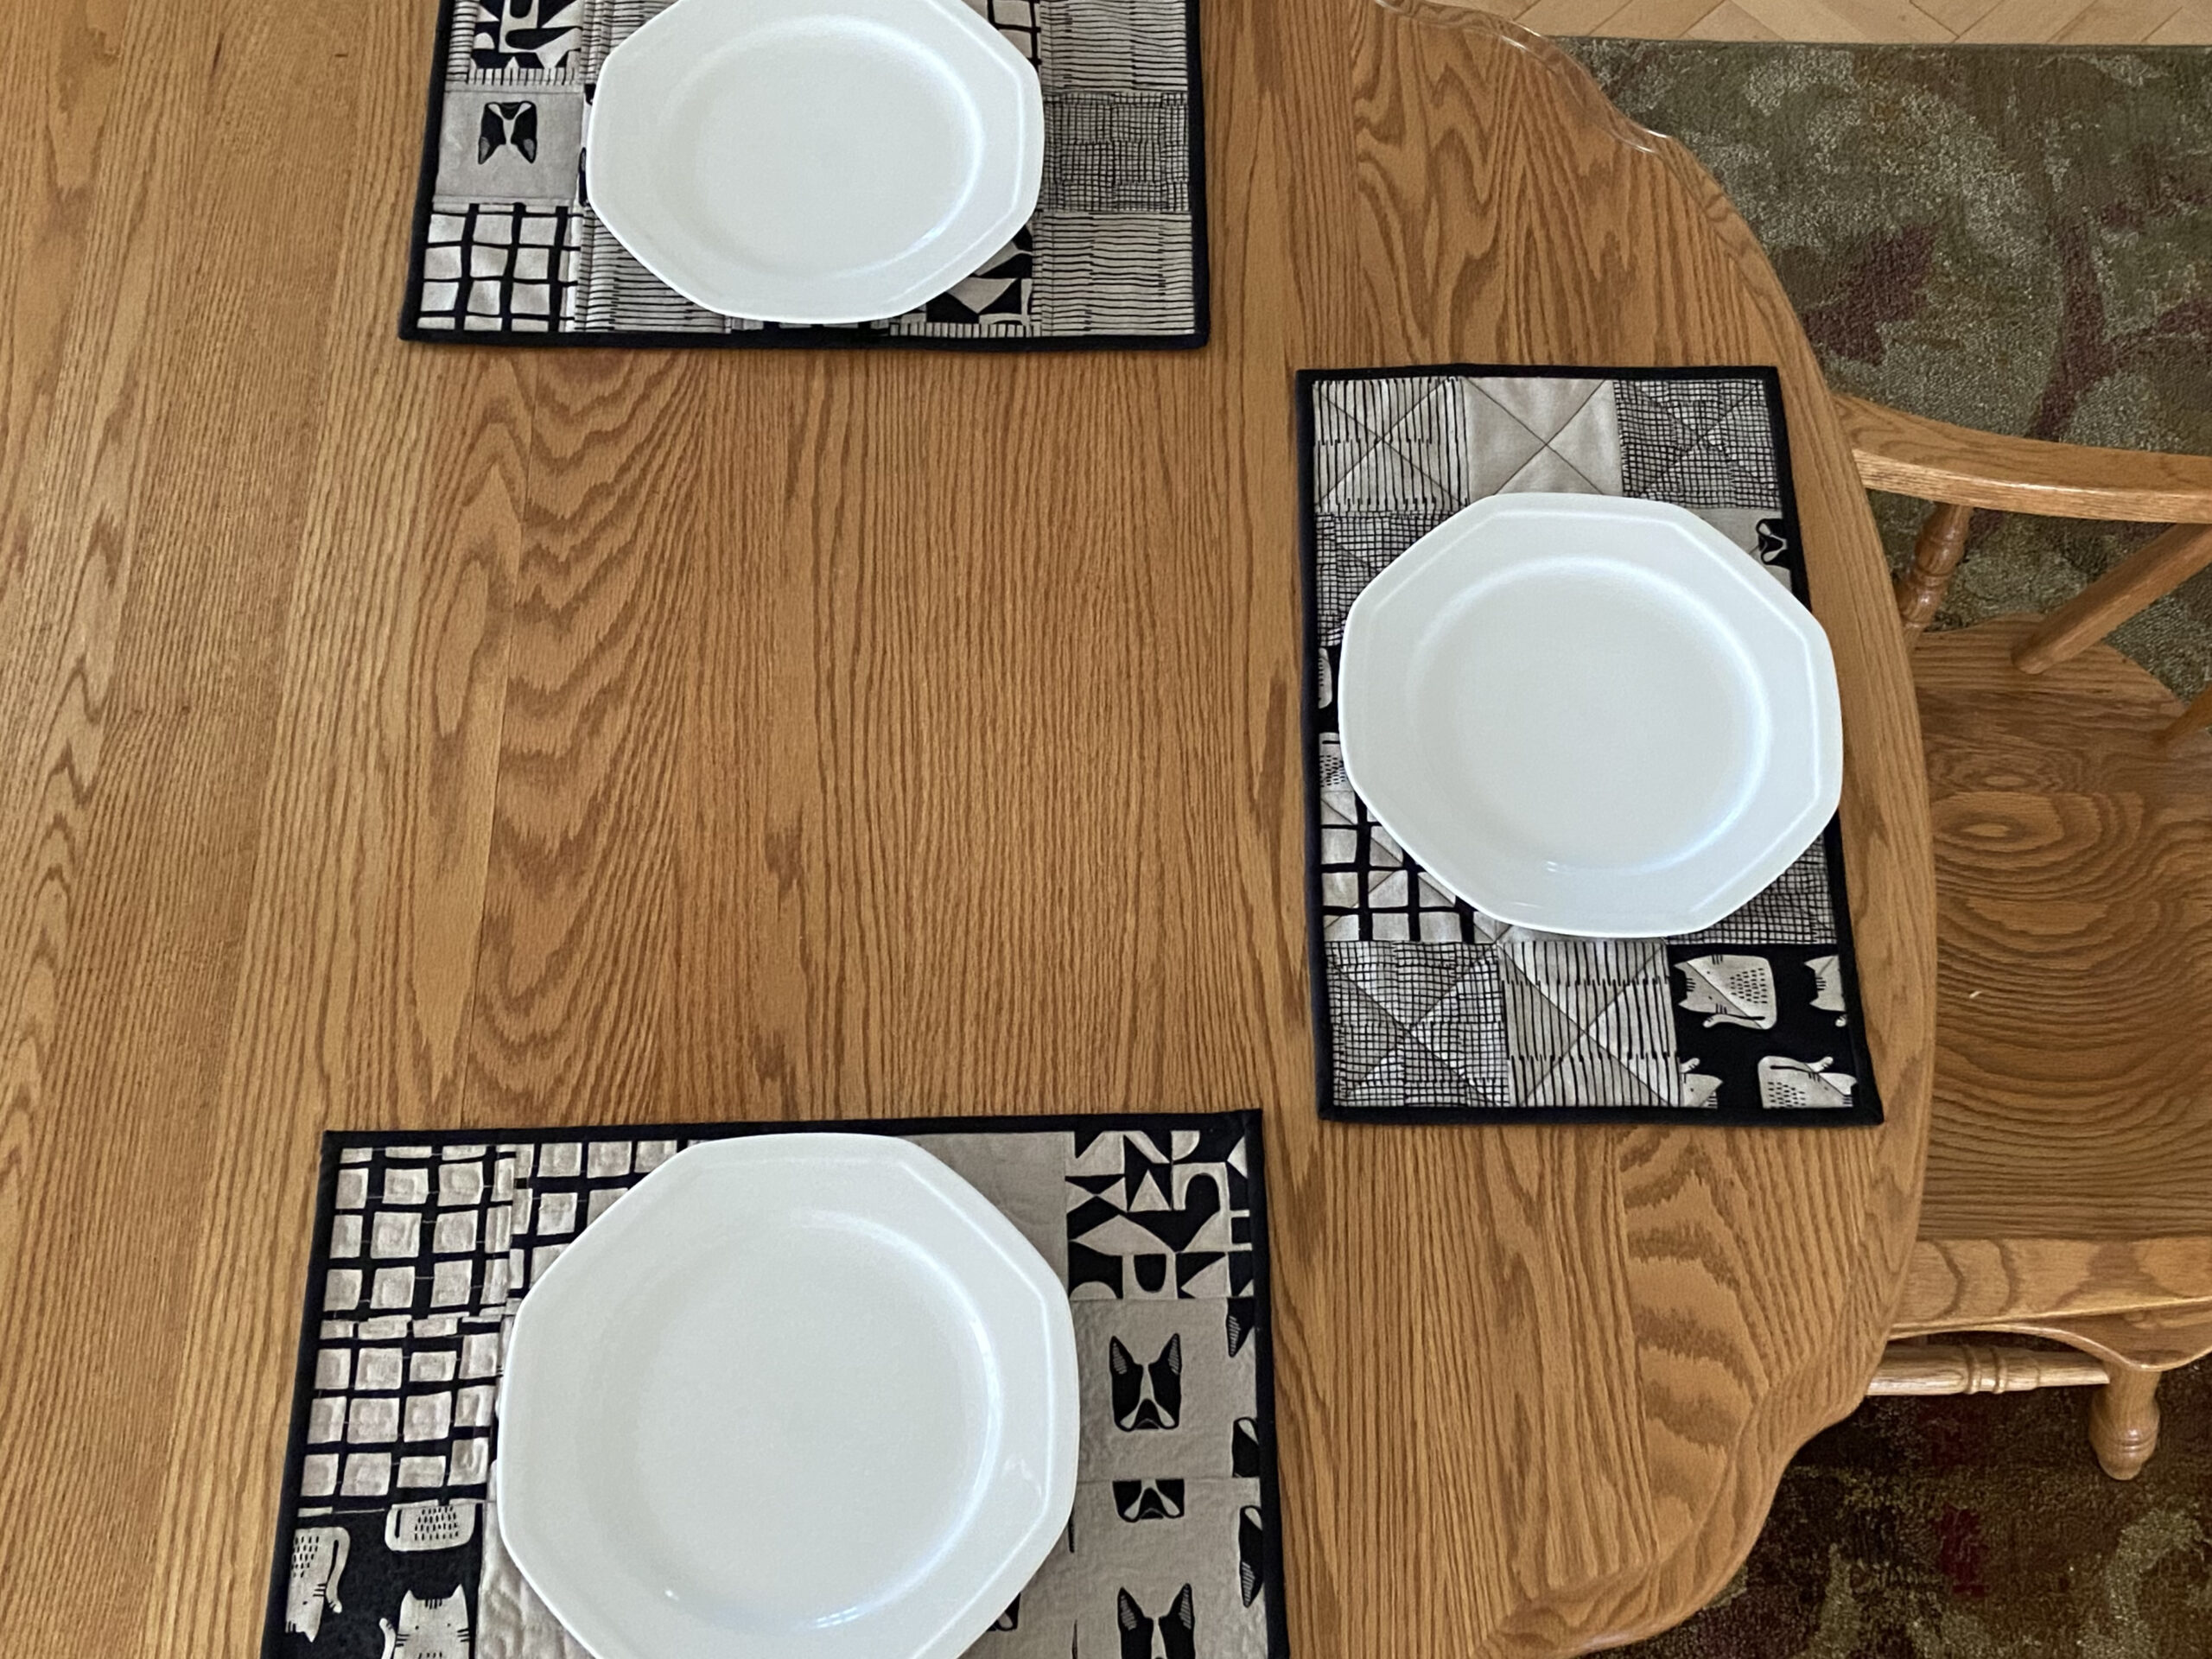
And now there are three.
I made two more placemats but this time, I didn’t quilt them as much. I decided to go with a minimalist approach which I think looks a lot better. The fabrics are so pretty and have a lot of texture – they just don’t warrant heavy quilting.
What do you think? They really need coordinating cloth napkins. I have some off-white cloth napkins but they are getting really grungy. It is definitely time to replace them. I still have more of these linen scraps so hopefully I will get a few more coordinating placemats made. For now though, at least I have three, enough for Ray, Julia and me!
In my last post I mentioned I was going to tackle taking down the Christmas decorations. Well Julia and I did a lot of it and then got bored of doing housework. So we only got about 1/2 way there. Maybe today I will get around to the rest of it. I am also working on a cute baby quilt for my niece who is due to have her first baby in a couple of weeks. Hopefully I will have that finish to share with you soon! Finally, last night I attended a Zoom meeting of our local quilt guild. These have been happening for a while now and this is the first time I joined in. While it wasn’t the same as the in person meetings (obviously), it was really nice to see so many of the people I haven’t seen in such a long while. The coordinators of the meeting really try to keep it warm and interactive. The ‘show and tell’ portion of the meeting was actually kind of a bonus since we could see the detail in the guild member’s work up close (on our screen) rather than from the front of a large room. So that was great. If you haven’t tried joining in on something like this, give it a go. We are all home so much of the time and this provides a much needed bit of community. Take care all of you!
Linking to Stitch, Sew & Show over at Life in the Scrapatch (this is a new link up that just started this week. Go take a look.) Also at Finished or Not Friday and a few other link parties – they are listed at the top of the page, under Link Ups.
Hi Everyone – I am back from our back-to-back vacations! Both trips were awesome but as always, home sweet home! After a relaxing time away, I am ready to jump back into my blogging/sewing/shop routine. Today I have a really special post to share with you. I would like to introduce you to Heidi Emmett. Heidi is a really talented pattern designer and I am proud to carry a number of her patterns in my pattern shop. To do justice to this introduction, I need to tell you a bit more! Heidi lives in Grass Valley and we are both in the same quilt guild. Heidi makes both quilts and garments, designs clothing patterns, teaches sewing classes at an annual retreat up at Lake Tahoe and is generally a creative maker at heart. She also owned a brick and mortar fabric shop in Grass Valley for quite a few years. She is a person with what seems like unlimited energy and is constantly making or designing something. About a month ago, she and I chatted at a guild meeting and we were brainstorming ways we could work together since we both have so many common interests. As a result, I have begun to carry her patterns in my pattern shop. She had purchased some of the Sarah Golden linen blends from me at the quilt show last May with the intent to make one of her Terrific Tabard vests. Today she will share the vest she made and explain the process she used to make it. I hope you enjoy the post. If you have any questions for Heidi, be sure to leave them in the comments and she will post a reply to you there. I hope you all will enjoy getting to know Heidi as she is a creative force to be reckoned with!
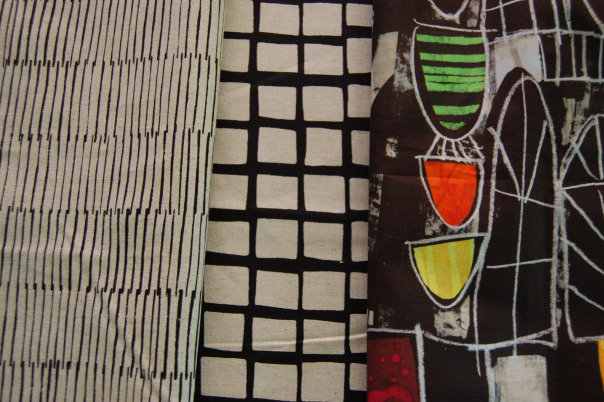
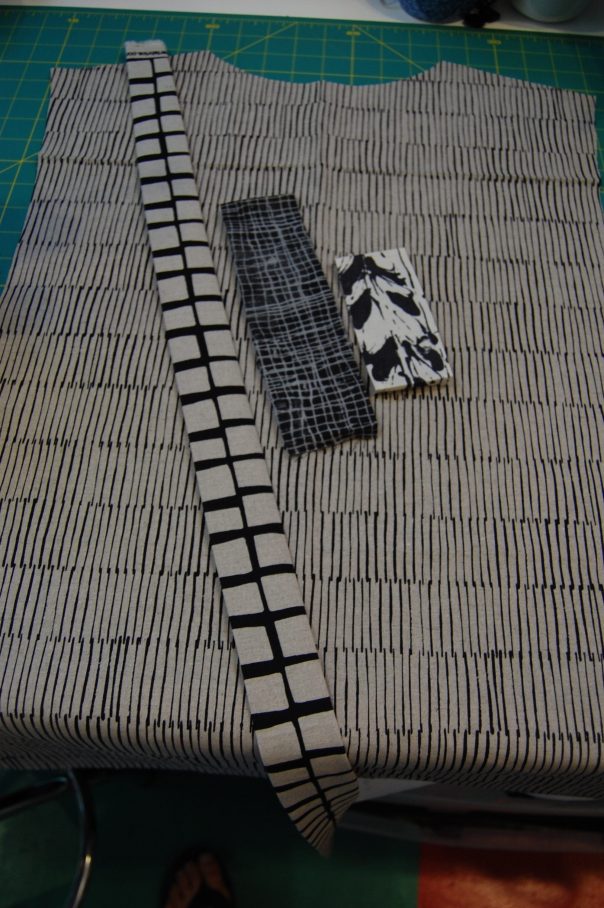
I’m going for a whole new look (than the cover shot above) with the linen blends I got from Bernie’s Etsy shop. Let me show you what I did to create a sophisticated and smooth Terrific Tabard. I started with two linen blends from Bernie. I absolutely LOVE linen! And these two linens by Andover Fabric are neutrals that will work with ANY other palette of colors. The piece with the columns of lines is called Lines (appropriate enough!) and the piece with the checked pattern is called Squares on Tailored Cloth. Both were designed by Sarah Golden and are available in Bernie’s shop.
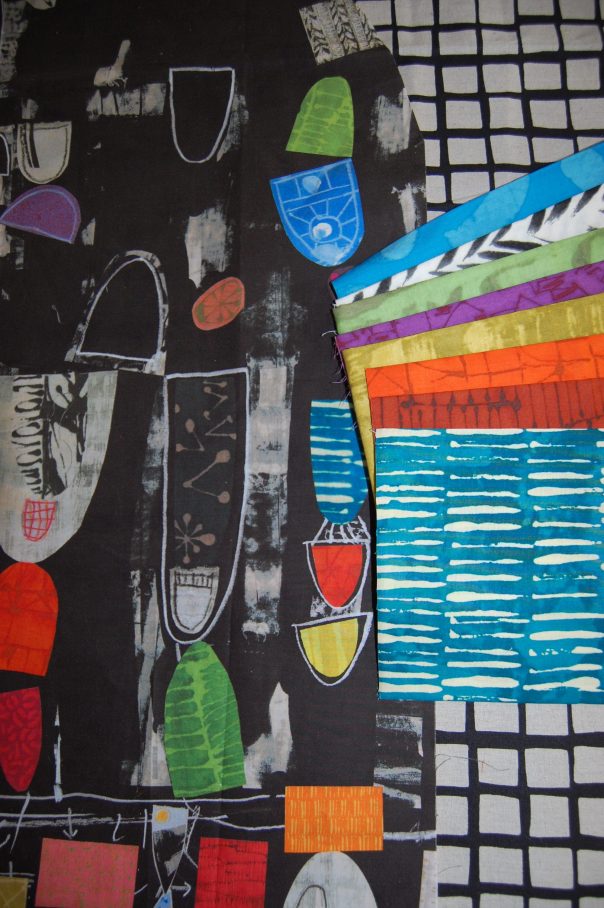
I went to Quilt Market in Portland, OR this past May and was able to buy a modern black and brightly colored panel by Marcia Derse. This panel won’t be available in stores until October. I immediately thought to use it as a part of my Tabard vest!
Fortunately, I also snagged some very small pieces from Marcia’s newest collection, again available in October. The linen fabric is just perfect with these prints.
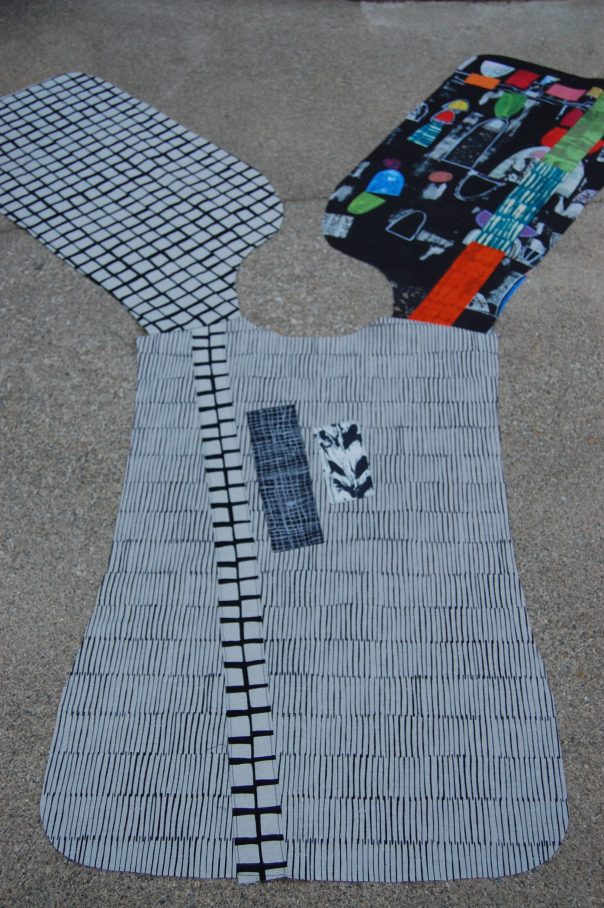
Most of my patterns have tissue pattern pieces included (I always include a range of sizes in one pattern). Notice I have taken a lengthwise fold in some of the tissue (closest to the side, not the center). I did this because I want to insert some improv strips to add color and visual interest to the vest.
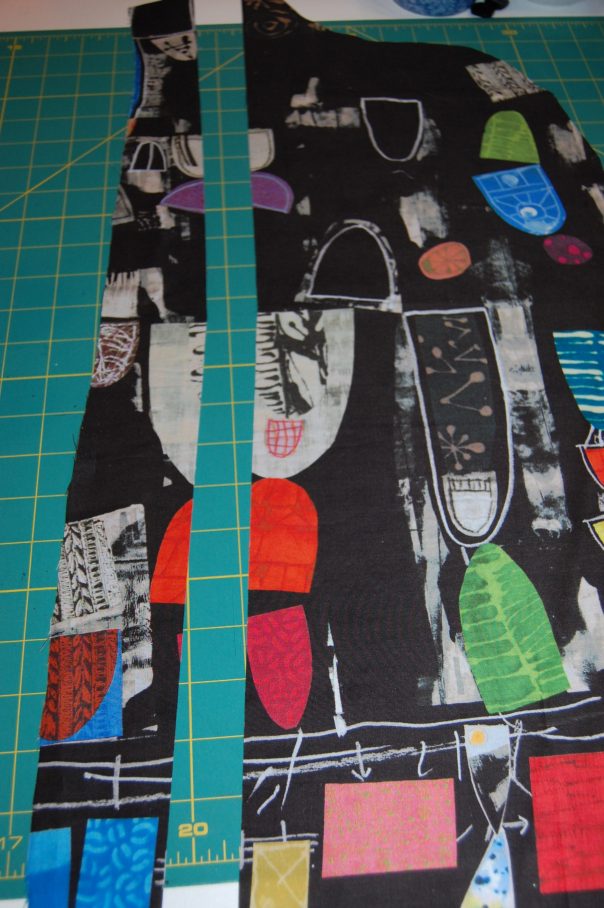
I love lots of bold color and plan to use bits of the smaller Marcia Derse pieces to create a long strip of fabric. Remember when I cut out this piece I pinched out some, so now I have to fill it back in with something.
I first cut the panel apart near the pinched out area all the way up through the shoulder area. Tip: Always cut wherever you pinch it out, then you can replace that space with your accent fabric and bring it back to size again. It is a fun and creative trick.
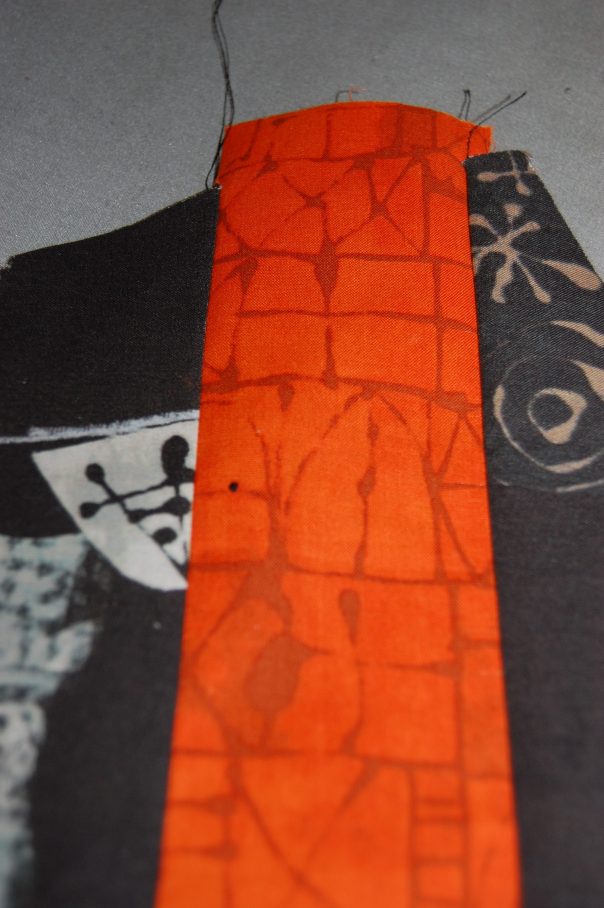
I cut up a few of those colorful pieces and sewed them together and then stitched them to either side of what I cut apart.
Always line up other seams and plan to have extra on either end to trim off. I do not like to run short. I will just snip, snip, the orange fabric in line with the shoulder seam.
While I let the fashion layer dictate what each section will look like, I always, ALWAYS, strive for a long and lean look. I want your eyes to see the whole design in an up and down fashion as this tends to be much more flattering than looking side to side.
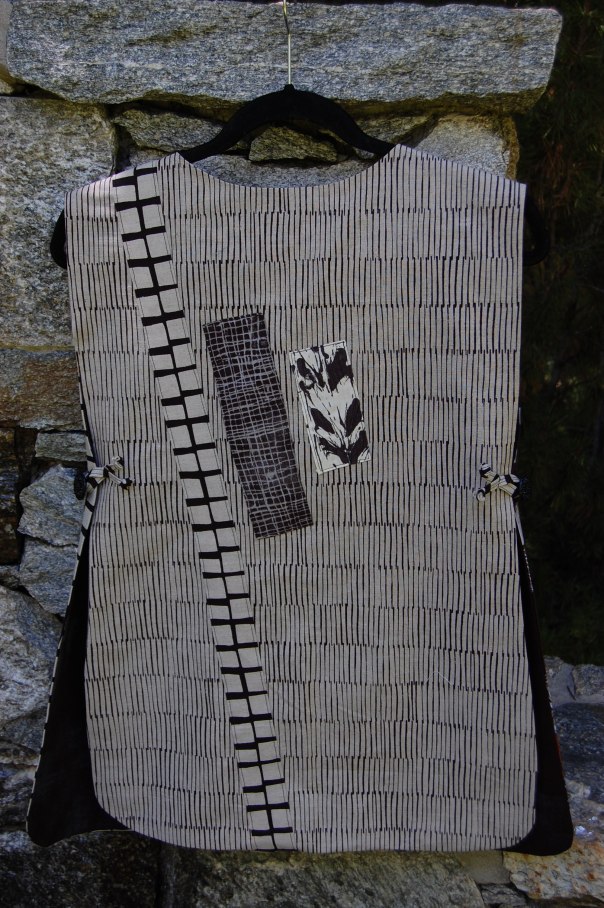
Preparing the embellishments for the back of the vest
When I created the back piece, I wanted to add some embellishment to it as well. For this, I used an applique process rather than slicing and inserting a strip. I cut the pieces I wanted and folded the raw edges under and pressed them. Next I pinned them in place and top-stitched around the edges to attach them to the back as well as finish those raw edges. I didn’t fuse them first though you certainly could if you preferred that method.
After stitching the front pieces to the back, in most other “quilted” version of Terrific Tabard, I would be layering the vest with batting right now (sometimes even before the shoulder seams are stitched together) and quilting all three pieces. Then the vest would be finished off with quilt style binding (albeit much narrower than a quilt binding). These instructions are included in the pattern. But THIS vest will have no batting. I chose to line it traditionally which means no binding necessary! This version really goes together quickly.
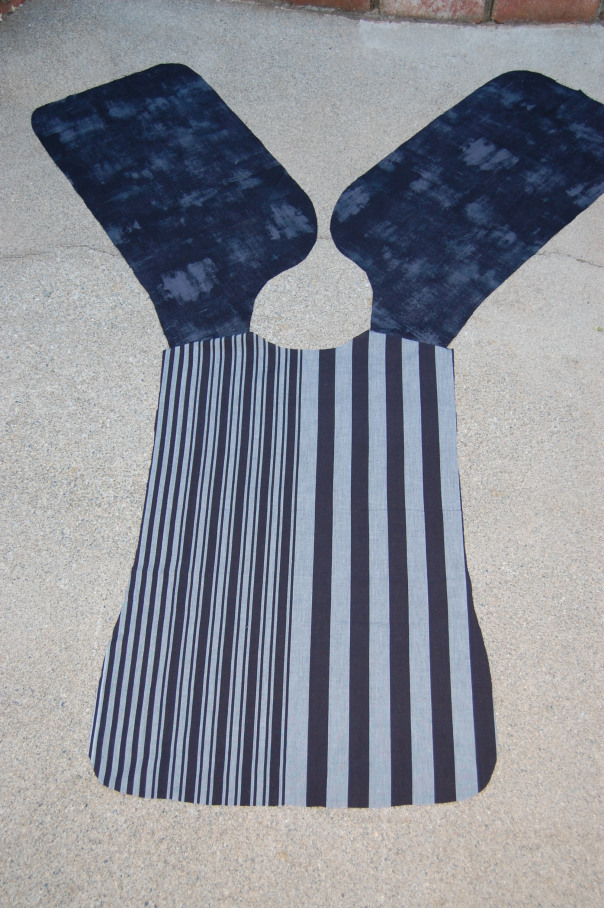
Front and back lining pieces stitched at the shoulders
The two front lining pieces are “Grunge” in black. The back piece lining is a very old (no longer being made) Kaffe Fassett stripe. To line this I pinned it, right sides together, and stitched all the way around using a 1/4″ seam allowance. I made sure to leave about a 6-8″ opening on one side so I could turn it right side out.
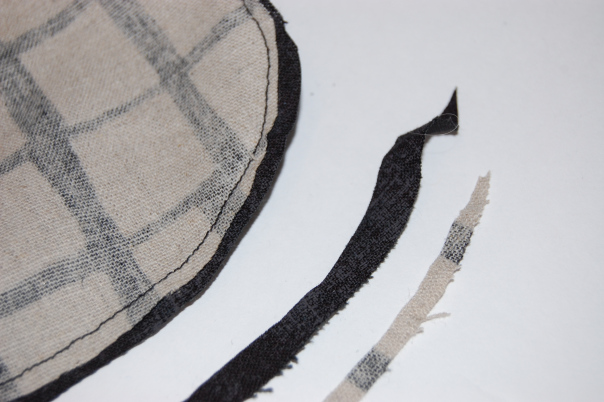
Grading a curved seam.
Very carefully grade the seams on the curved portions. Grading just means trimming one piece smaller than the other. When you turn the whole piece inside out and begin to press, press, press (that’s the secret to a beautifully lined piece), all the rounded edges will fall into place as you press. Tip: On dark fabrics use a press cloth (a piece of muslin works) on top of the fabric before you press. Sometimes you get a shine, even on linen.
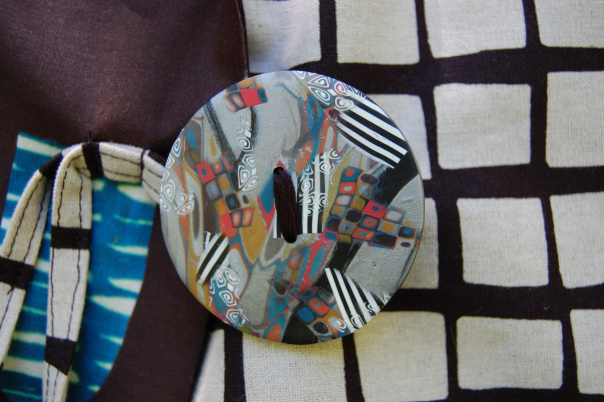
Handmade buttons by Sandra Bruce
I have a rather large collection of buttons. Here is a group of handmade polymer buttons by the talented Sandra Bruce. I love to buy the buttons I like, knowing that someday, I’ll have the perfect button for a project. Forget buttonholes. I use strips of fabric that have been folded and pressed and stitched into place.
The polymer button I chose for the front is very intricate and it’s really BIG, but I think it blends in nicely.
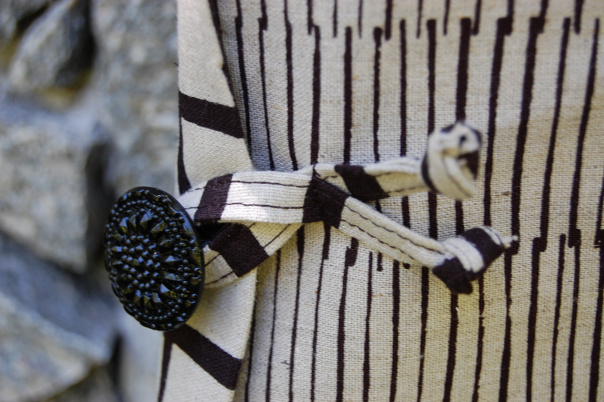
The two side buttons are from my glass button stash. I know, I know, it’s a sickness, but one I don’t want to get over. Ha, ha.
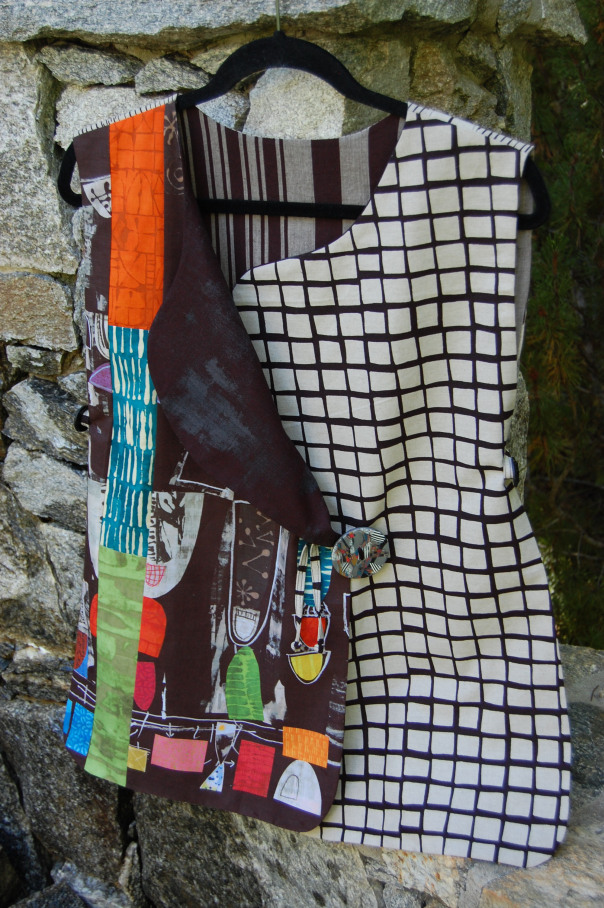
It’s finished!!
I love my new vest. I can’t wait to wear it (not sure when since it is still summer!), but I’ll be ready when cooler weather comes.
Here is the finished back side of the vest. I love the look of the larger scale linen print slicing through the narrower lines.
Worn with just one lapel folded out.
One last way to style this Terrific Tabard, fold back the lapel on just one side.
If you like what you have seen, please join me at Designs by Heidi for more fun and creative happenings. I love sewing “Art to Wear.” You can also follow me on Instagram to see the latest patterns and classes I offer. Thank you again Bernie for letting me join in with you all at Needle & Foot.
Good morning! It has been a crazy week which hasn’t allowed me much time in the sewing room. Plus the two projects I worked on most are not able to be shared just yet. But I do have something cute to show you. When I make Chemex cozies for my customers, I end up with scraps. Of course I do, right? There are usually several larger scraps that result from cutting the curved shape of the cozy. I have been saving them (because my fabric obsession says I have to). They are starting to really pile up.
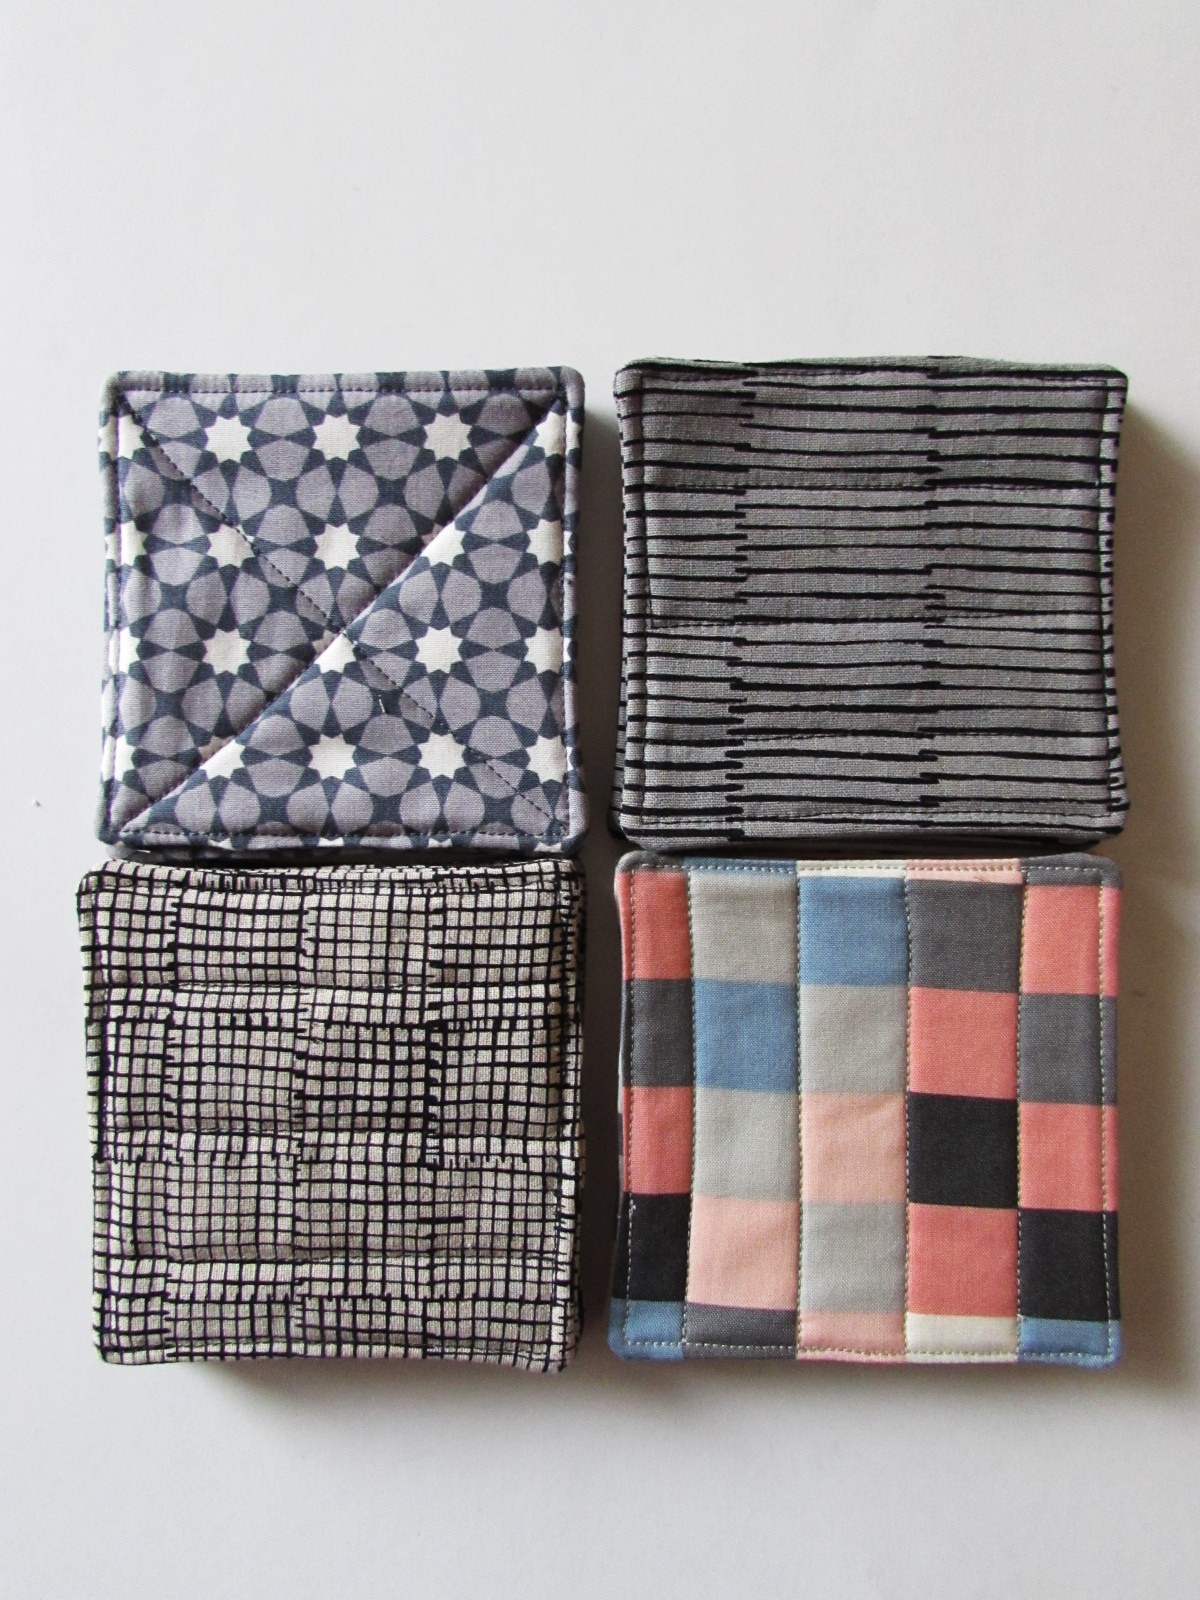
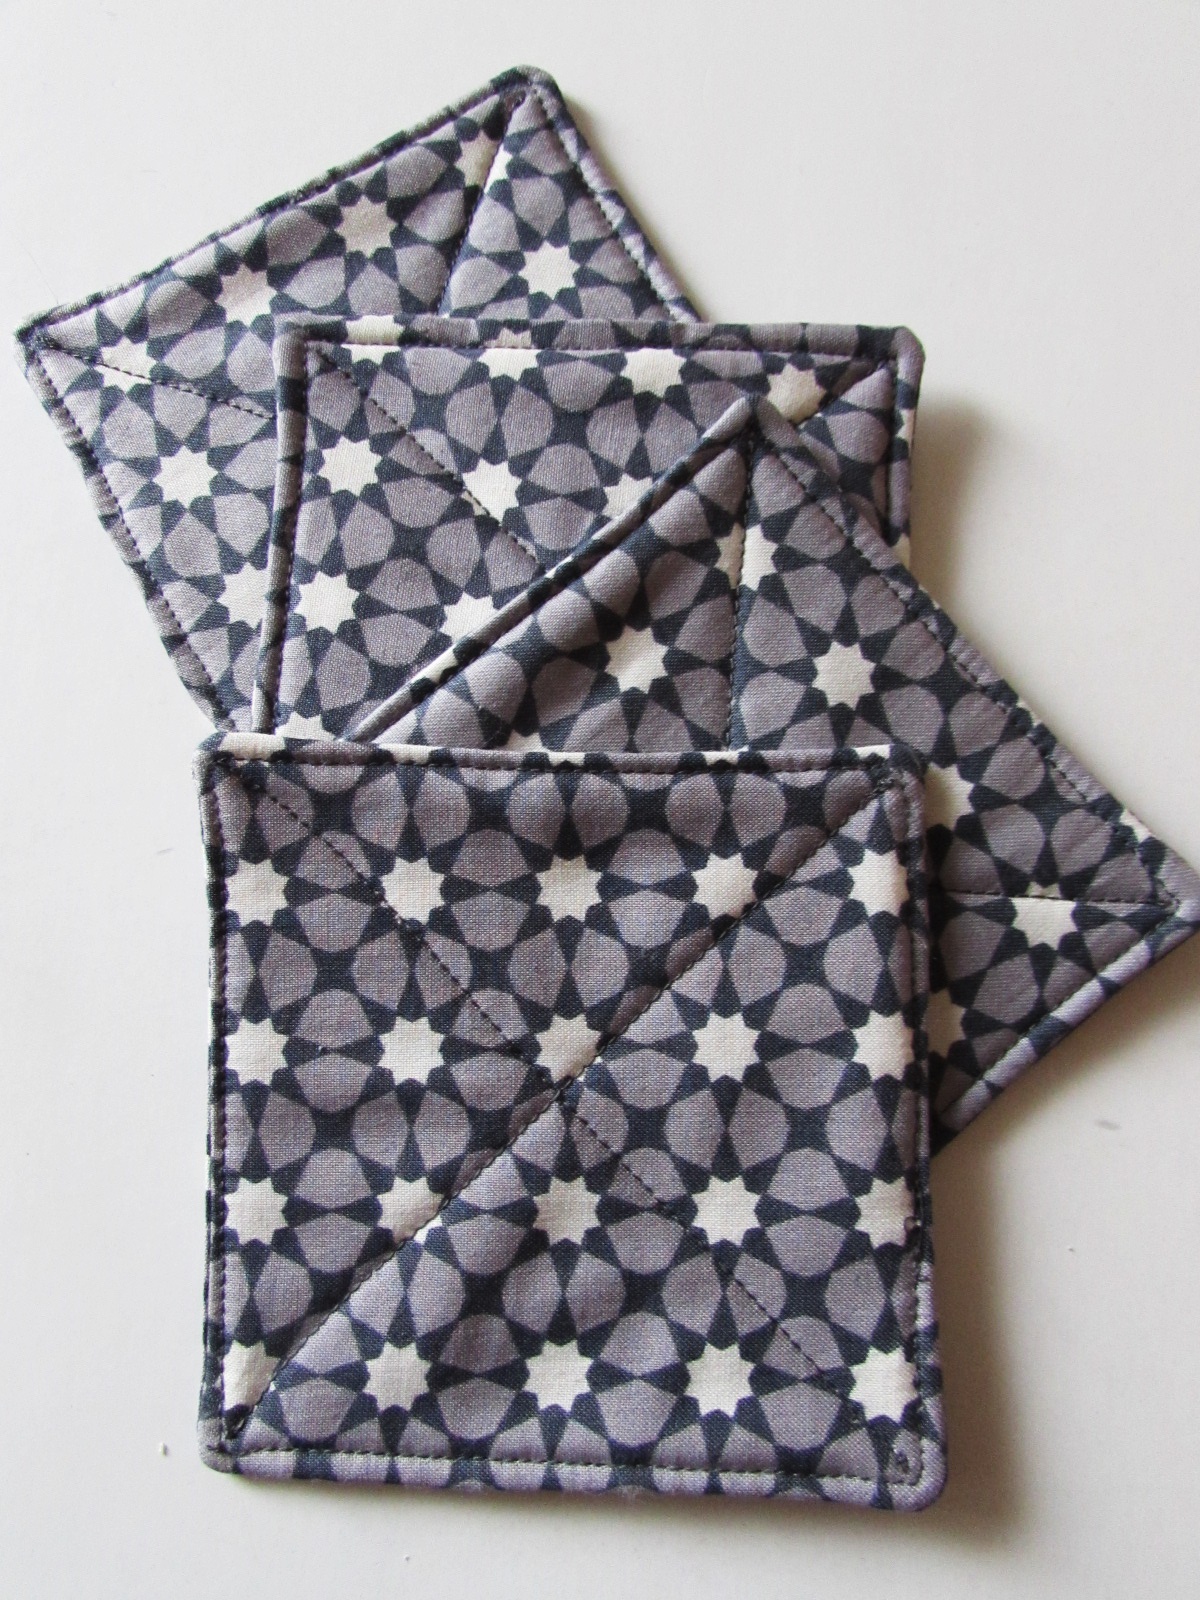
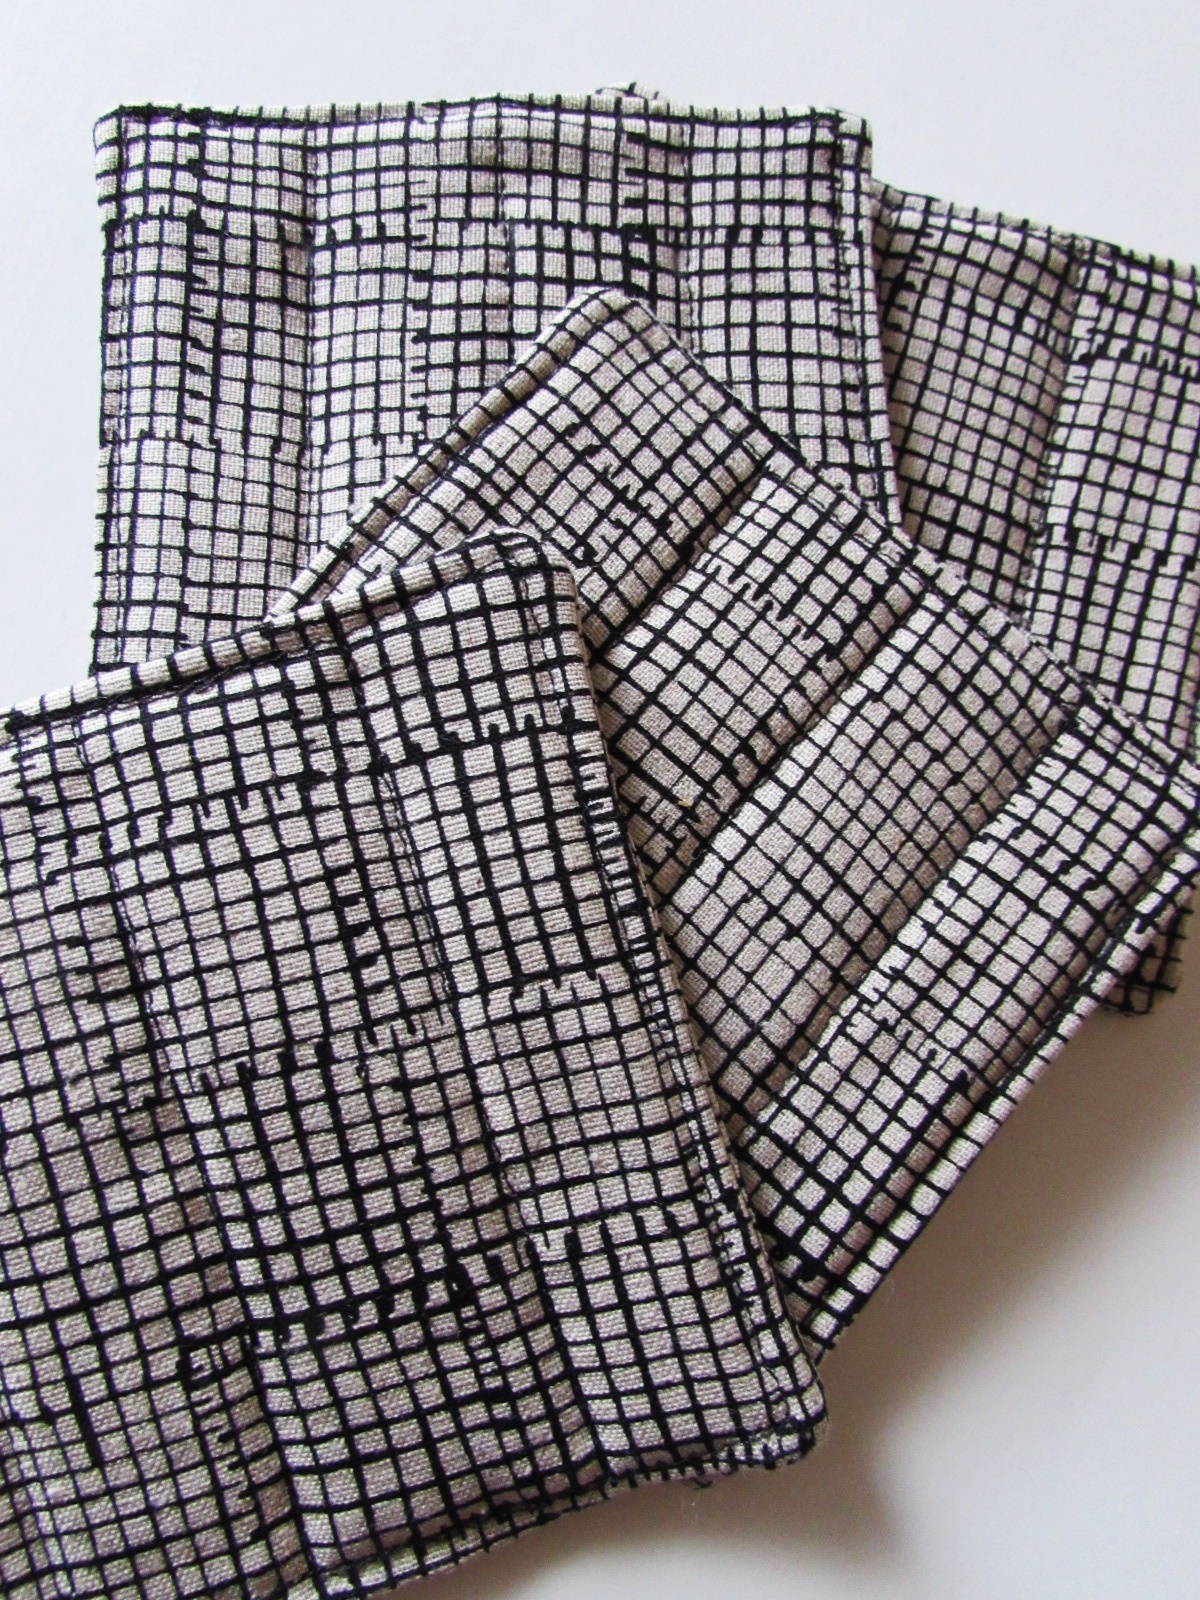
I cut a stack of 5″ squares and thought I would eventually quilt them together. But realistically, when is that going to happen? Instead, I started making fabric coasters. I love them and it is such meditative sewing. Just listen to music and stitch away! They are so pretty.
Alison Glass Fabric Coasters
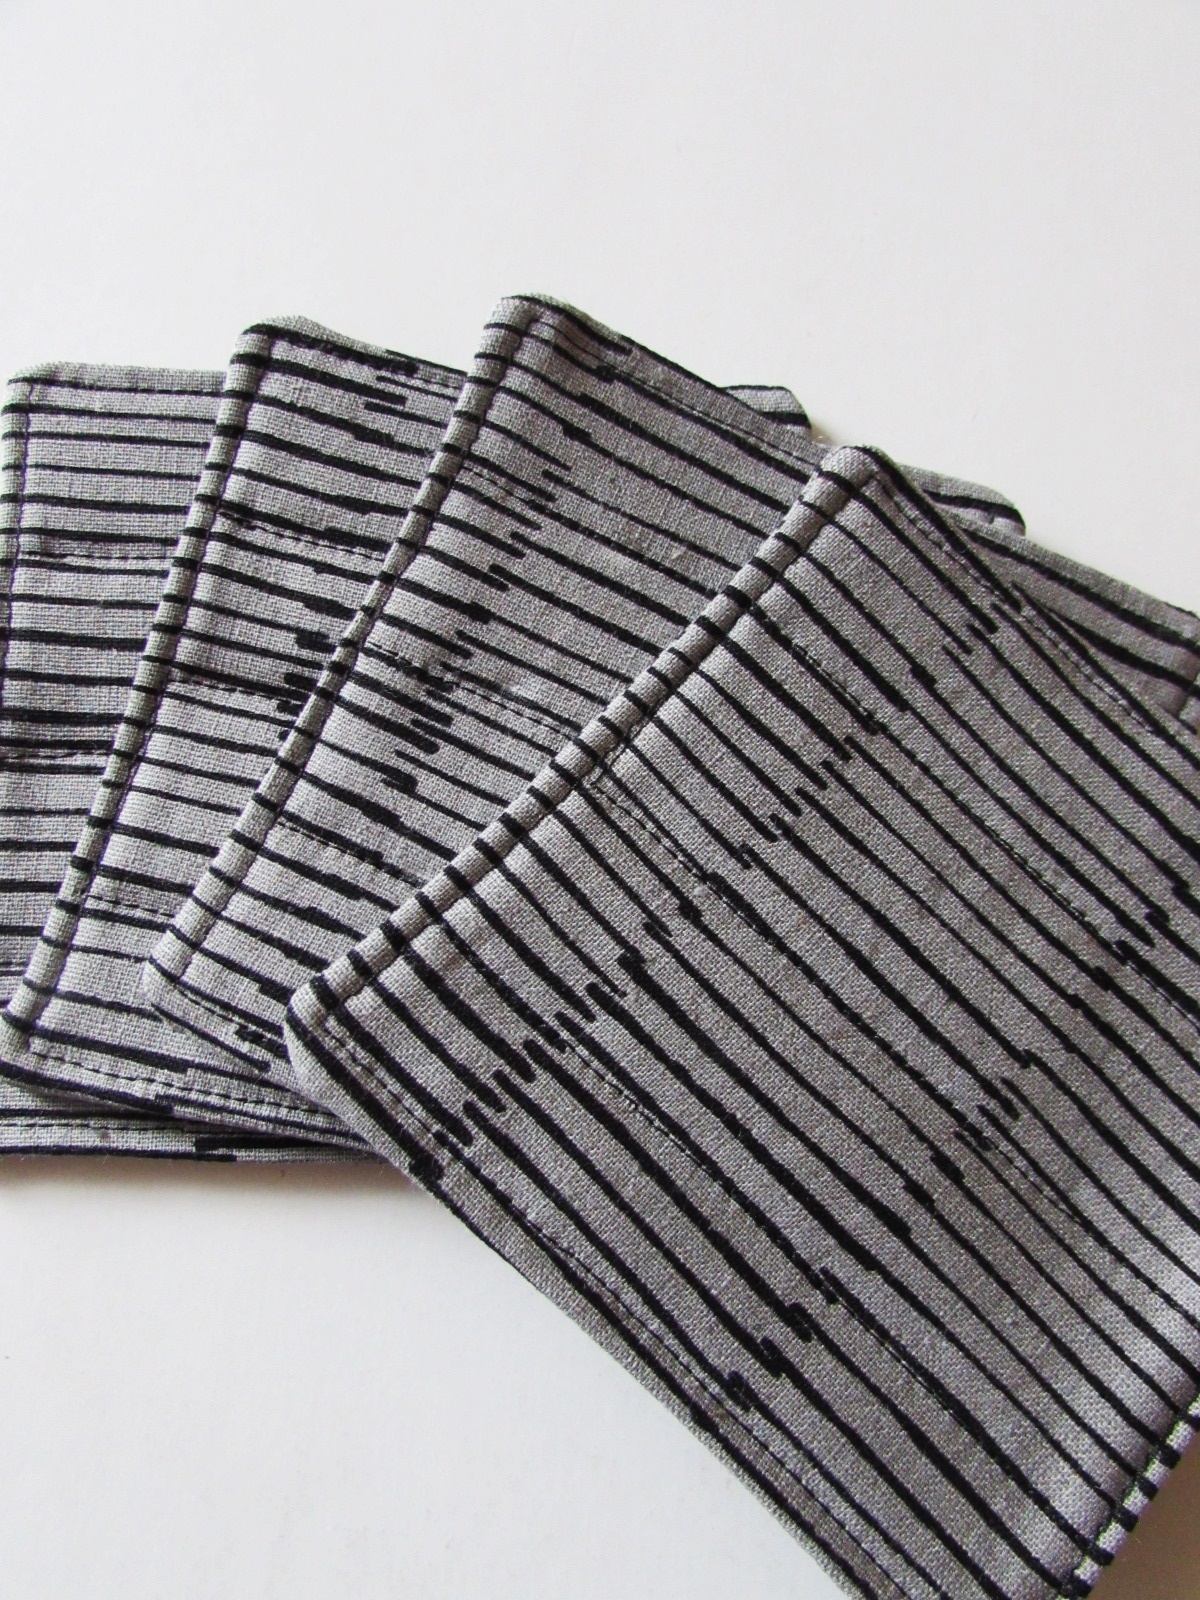
This print has been really popular for the cozies so I have a ton of scraps from it.
Maker Maker Grid Fabric Coasters
This is the linen and cotton blend called Maker Maker. Also a popular one for the cozies and it has wonderful texture for the coasters.
Maker Maker Cotton and Linen Fabric Coasters
Here is another fabric from Maker Maker. I actually used about half a bolt of this for cozies. I think I made around 15 sets of Chemex cozies and hot pads, maybe more?
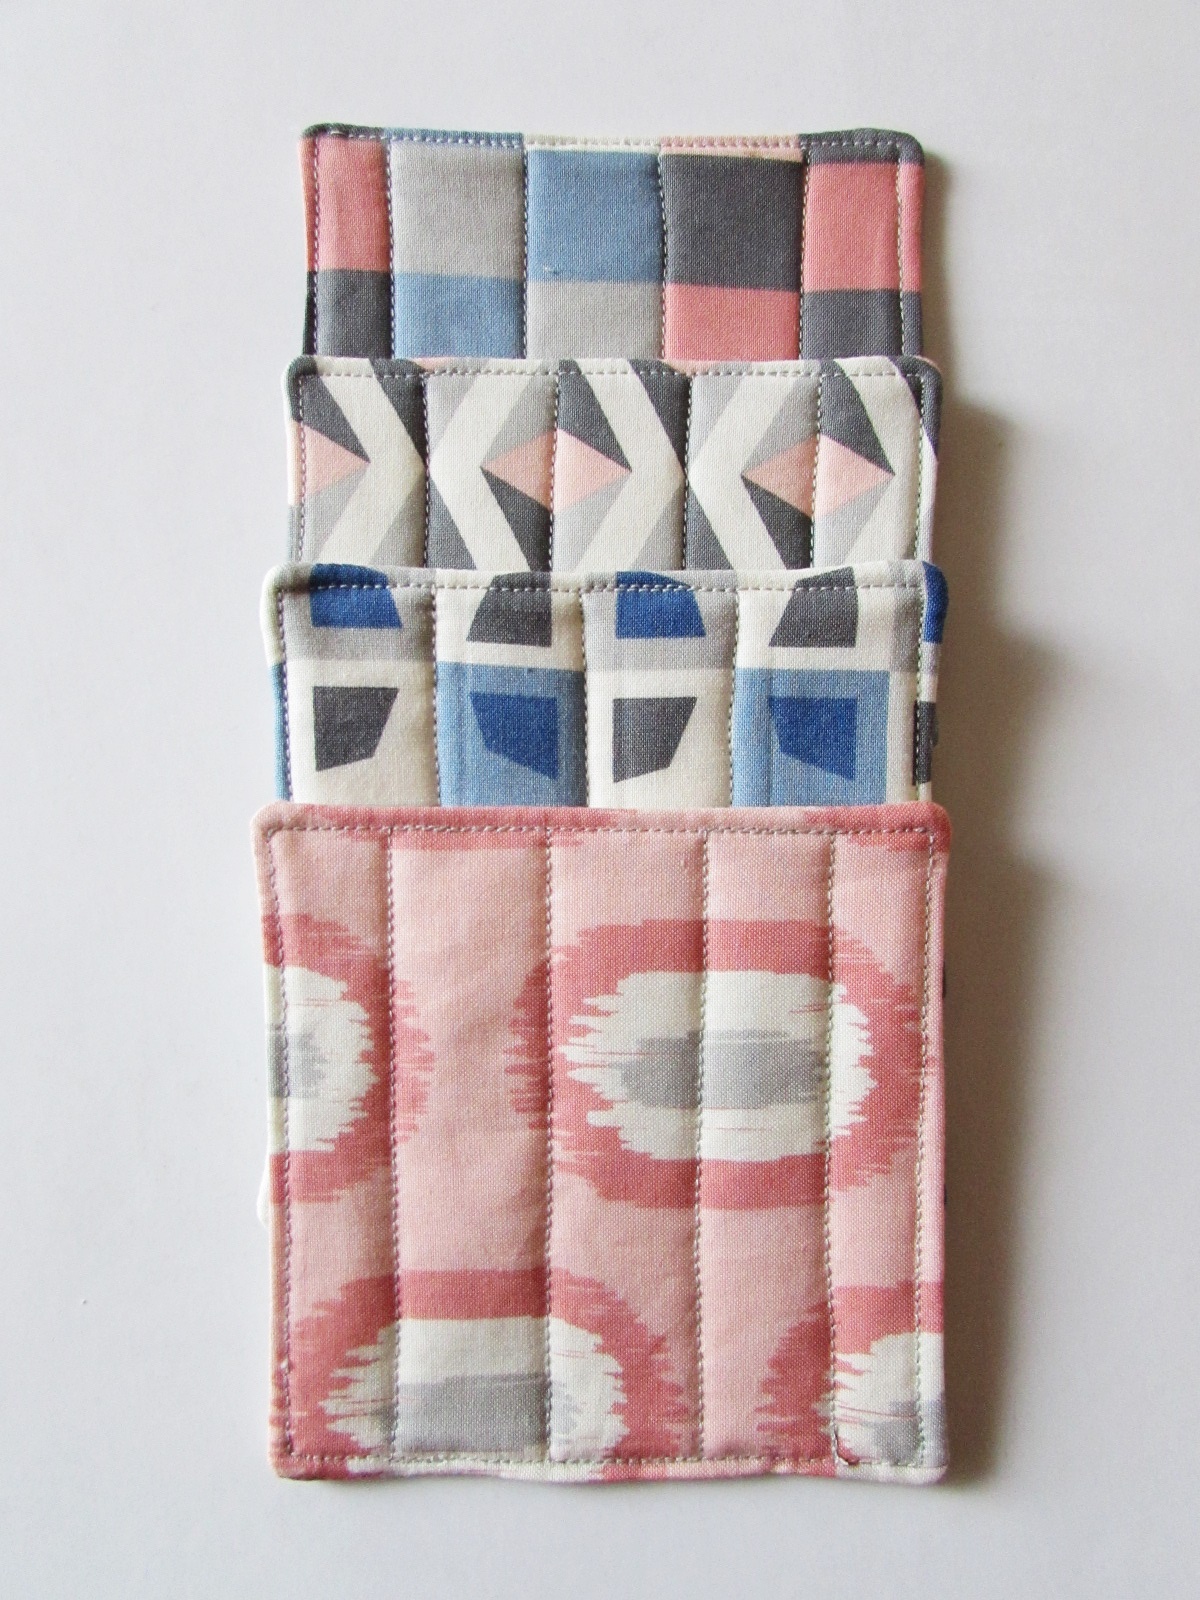
Lovely bits of pink, blue and gray!These are made from a charm pack I have – It is a Moda line called Serenity, designed by Amy Ellis. I love it and plan to use the whole pack for coasters.
I am not sure what to do with all of these. I could try listing them in the shop and see if there is any interest. Alternatively, they are cute gifts to have on hand. Either way, super fun way to use up scraps. Especially batting scraps. All of those long strips one cuts after quilting a project – I have really worked that pile down! For now, it just feels good to use up the fabric.
Finally, just want to throw a teaser out there. I have an amazing event coming up. I promise you are going to smile and feel so good inside when you read about it. Come back to learn more on February 1st! See you then.
Linking to the usuals. Find them at the top of the page, under Link Ups!! Have a great weekend all.
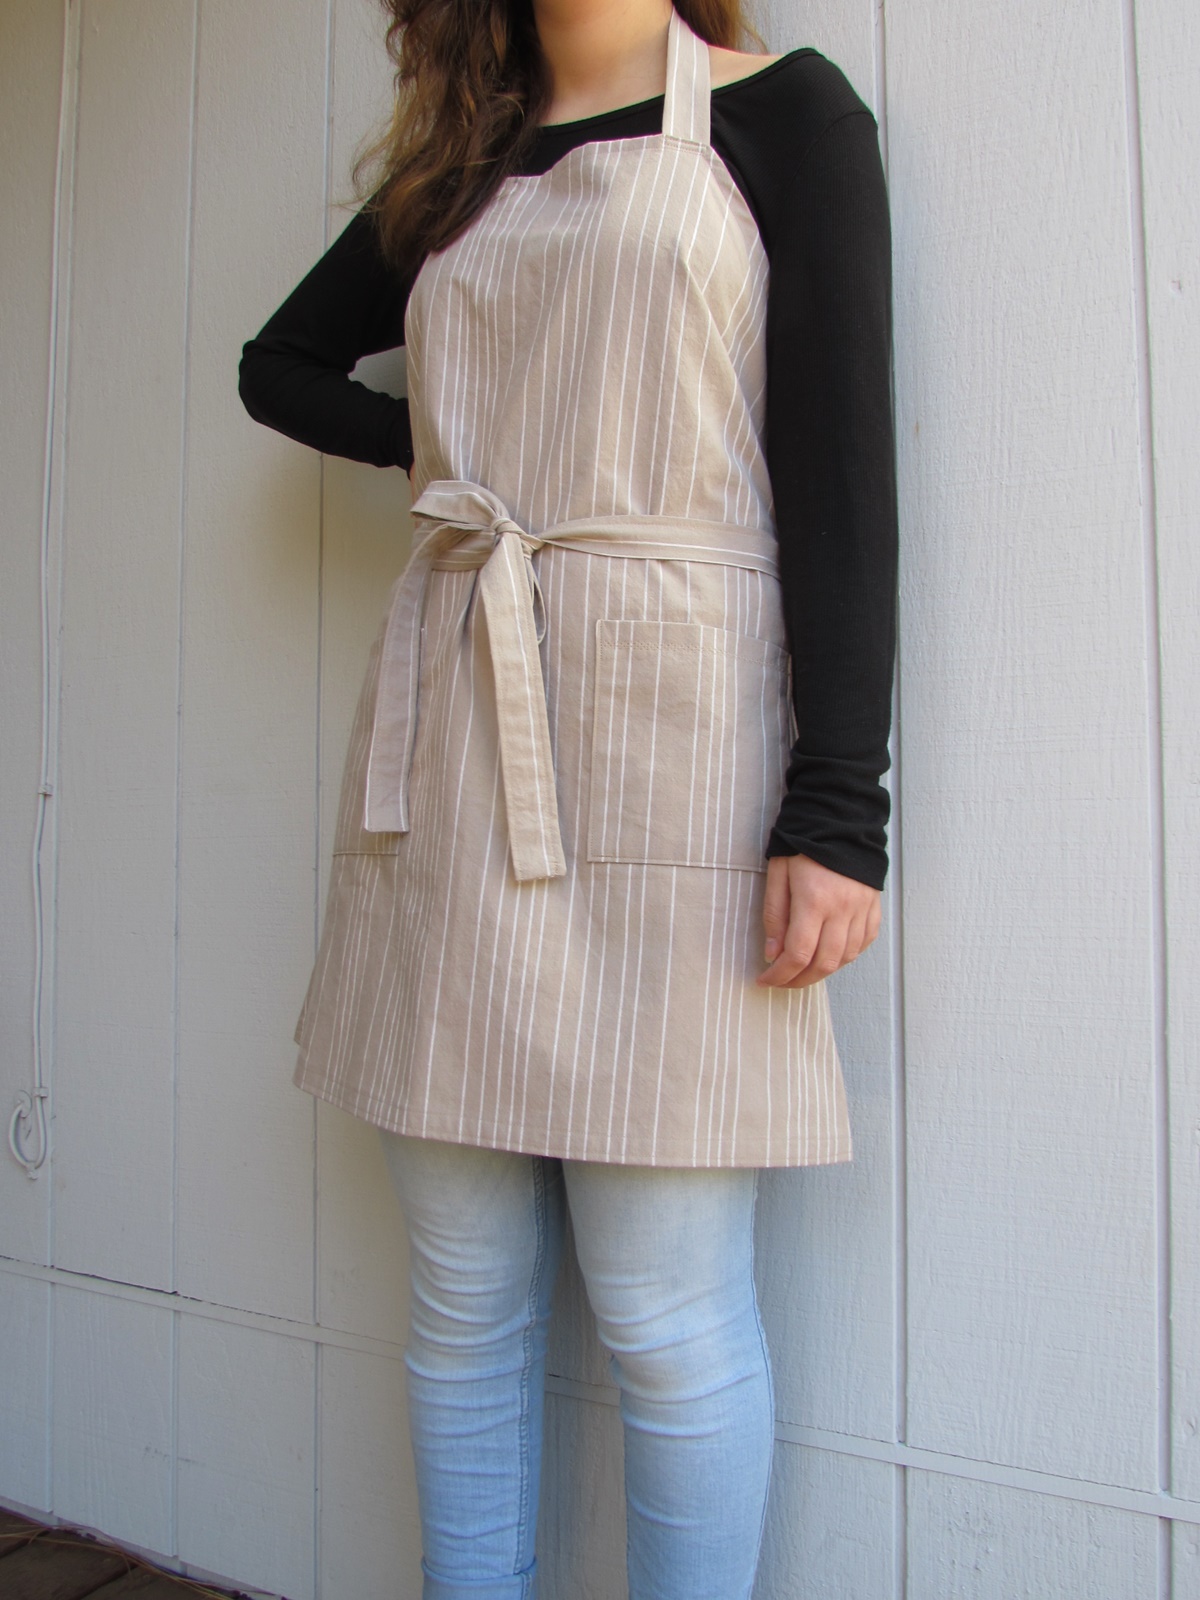
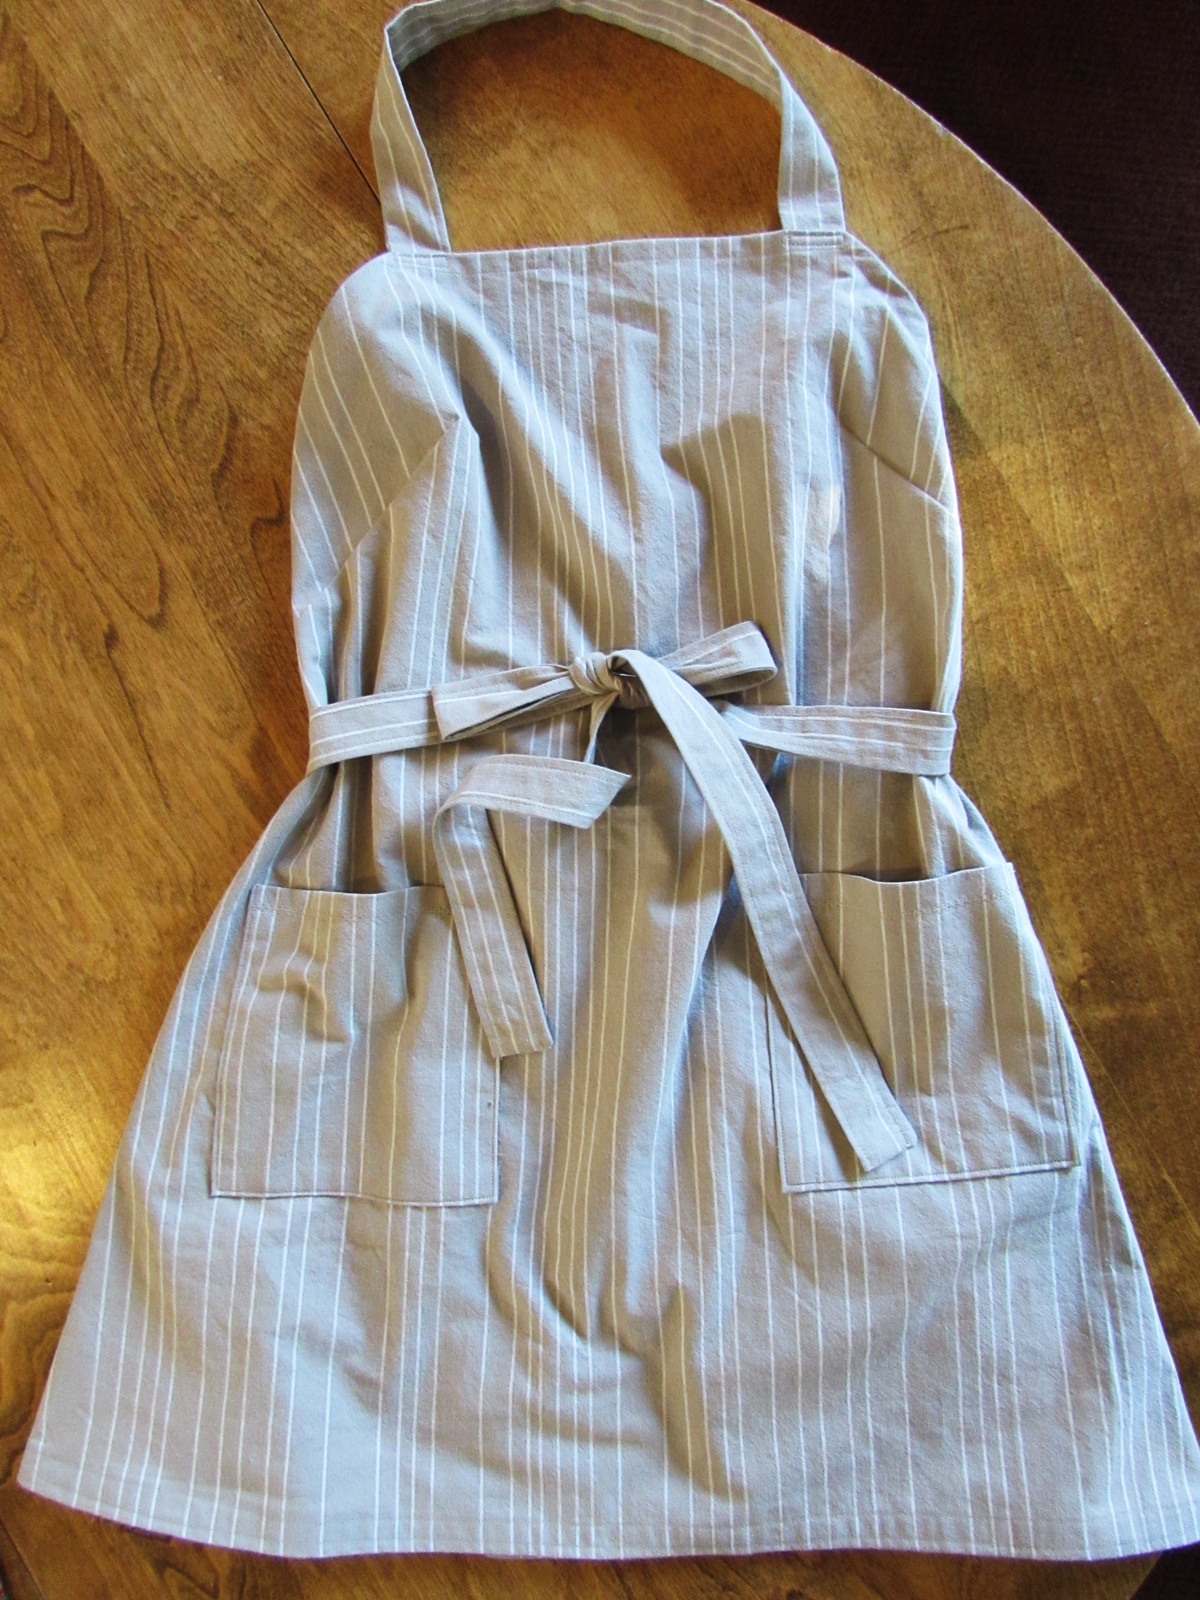
Now that Christmas is done and gifts have been given and received, I thought I would share what I made with you. Usually I try to find a fun project to make and give during the Christmas season. In recent years I have made purses, zip pouches, table runners and hot pads. This year I decided to make an apron for my Vermont daughter-in-law. Also, I made hot pads for my California son and his girlfriend as well as my Toronto son and his wife. These projects were quick and satisfying.
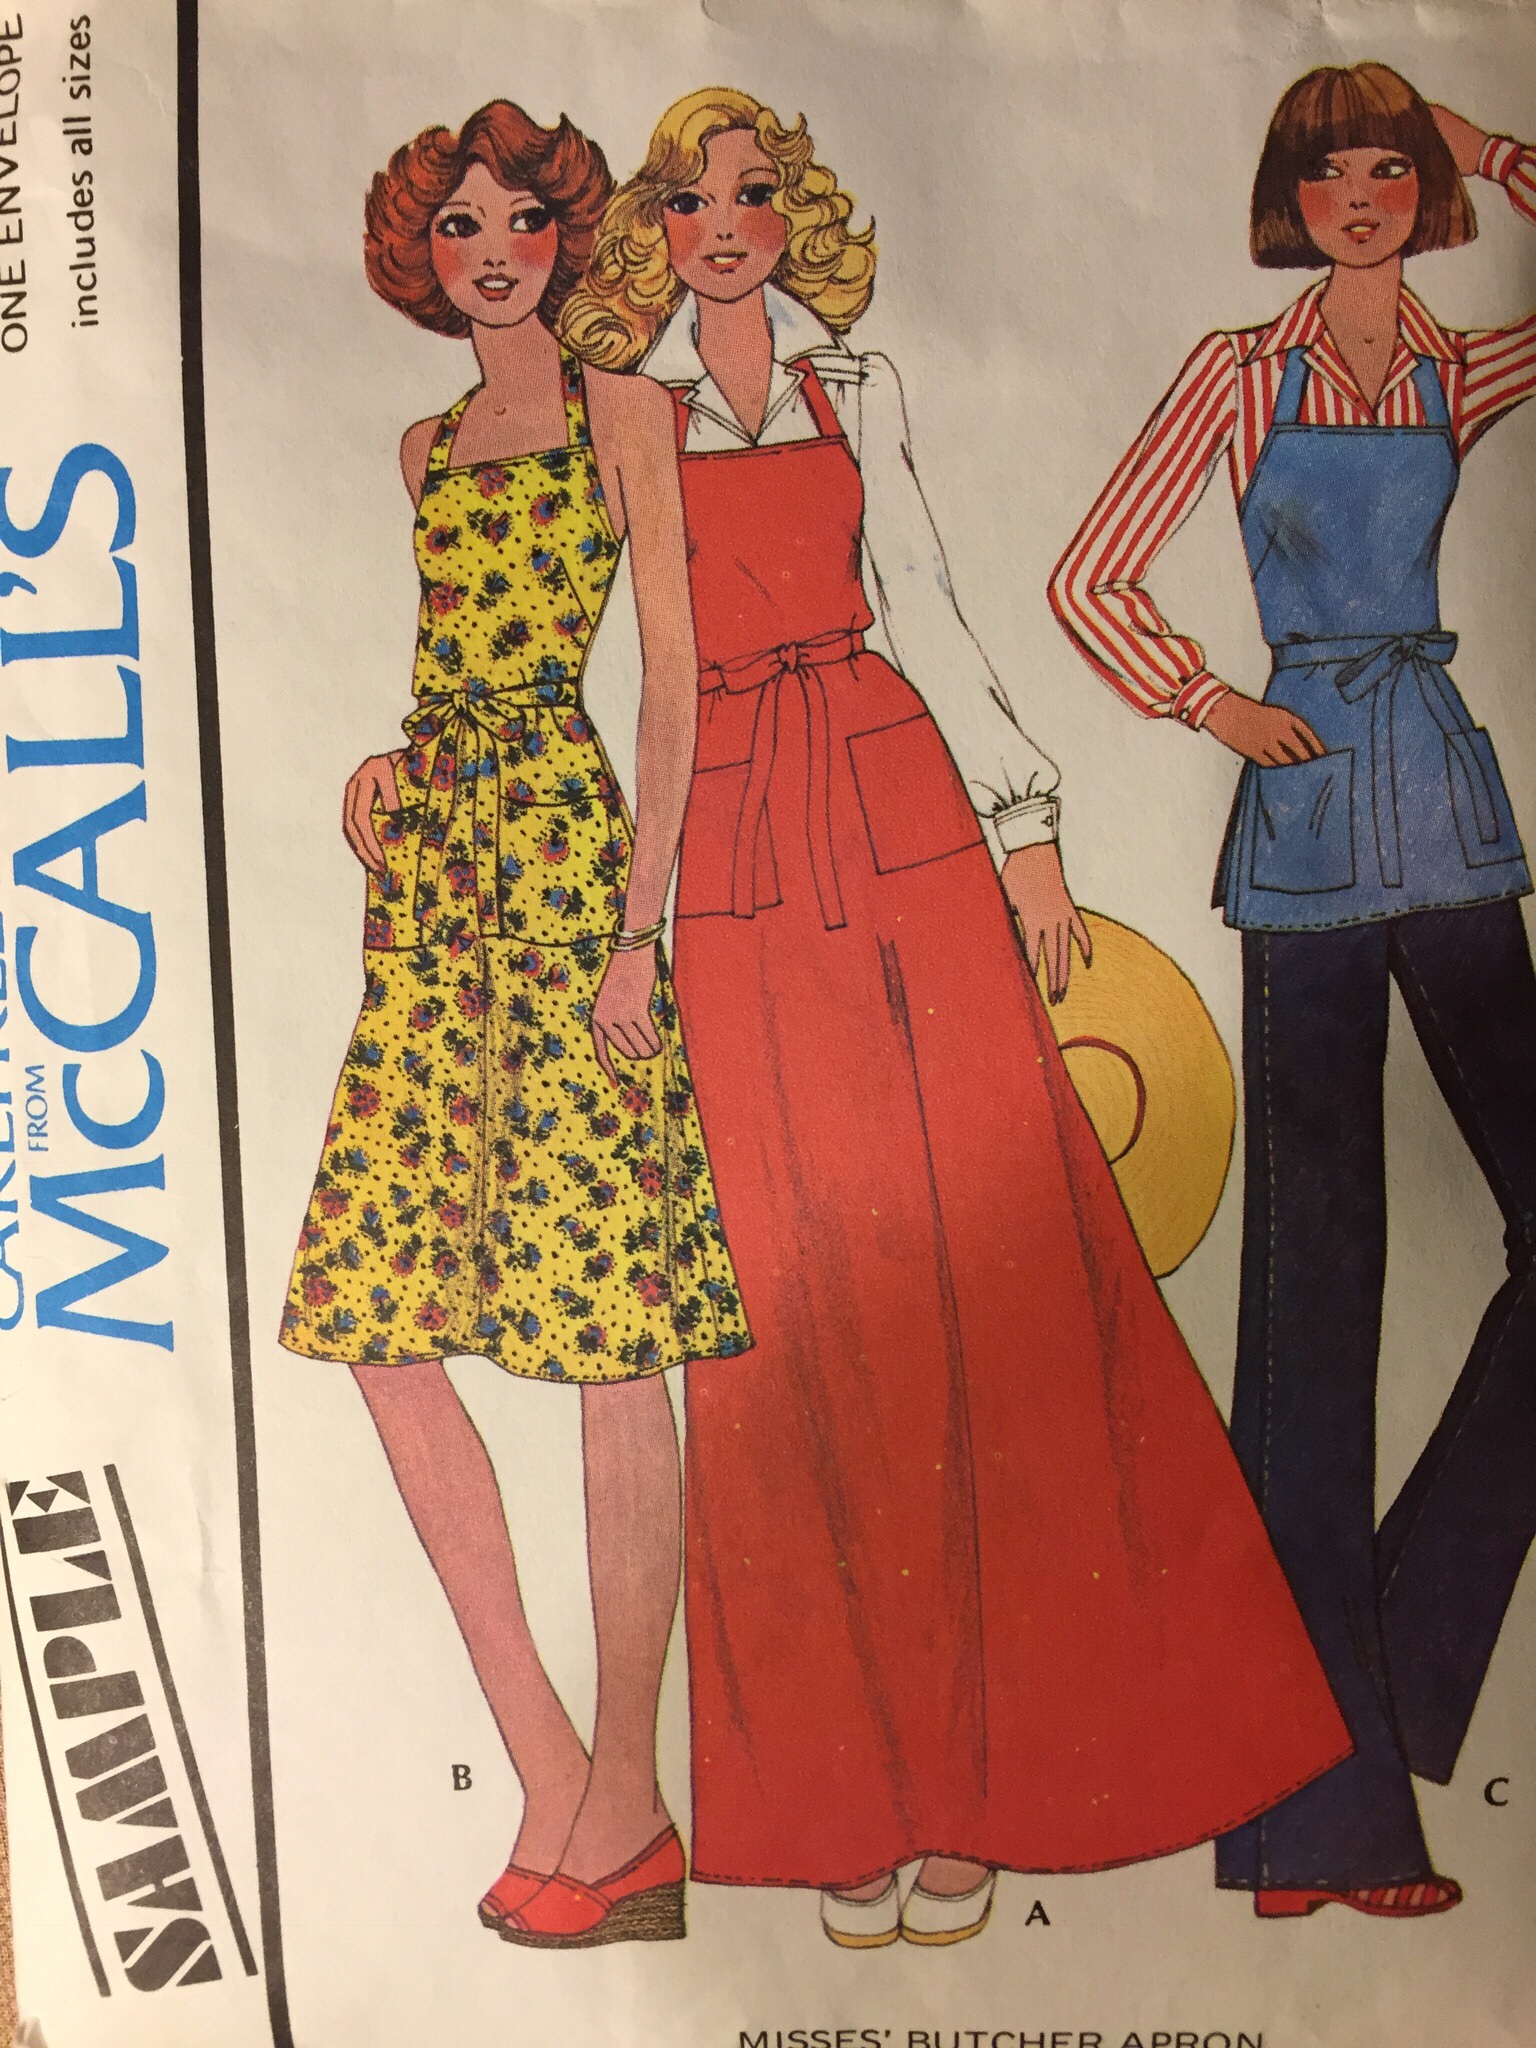
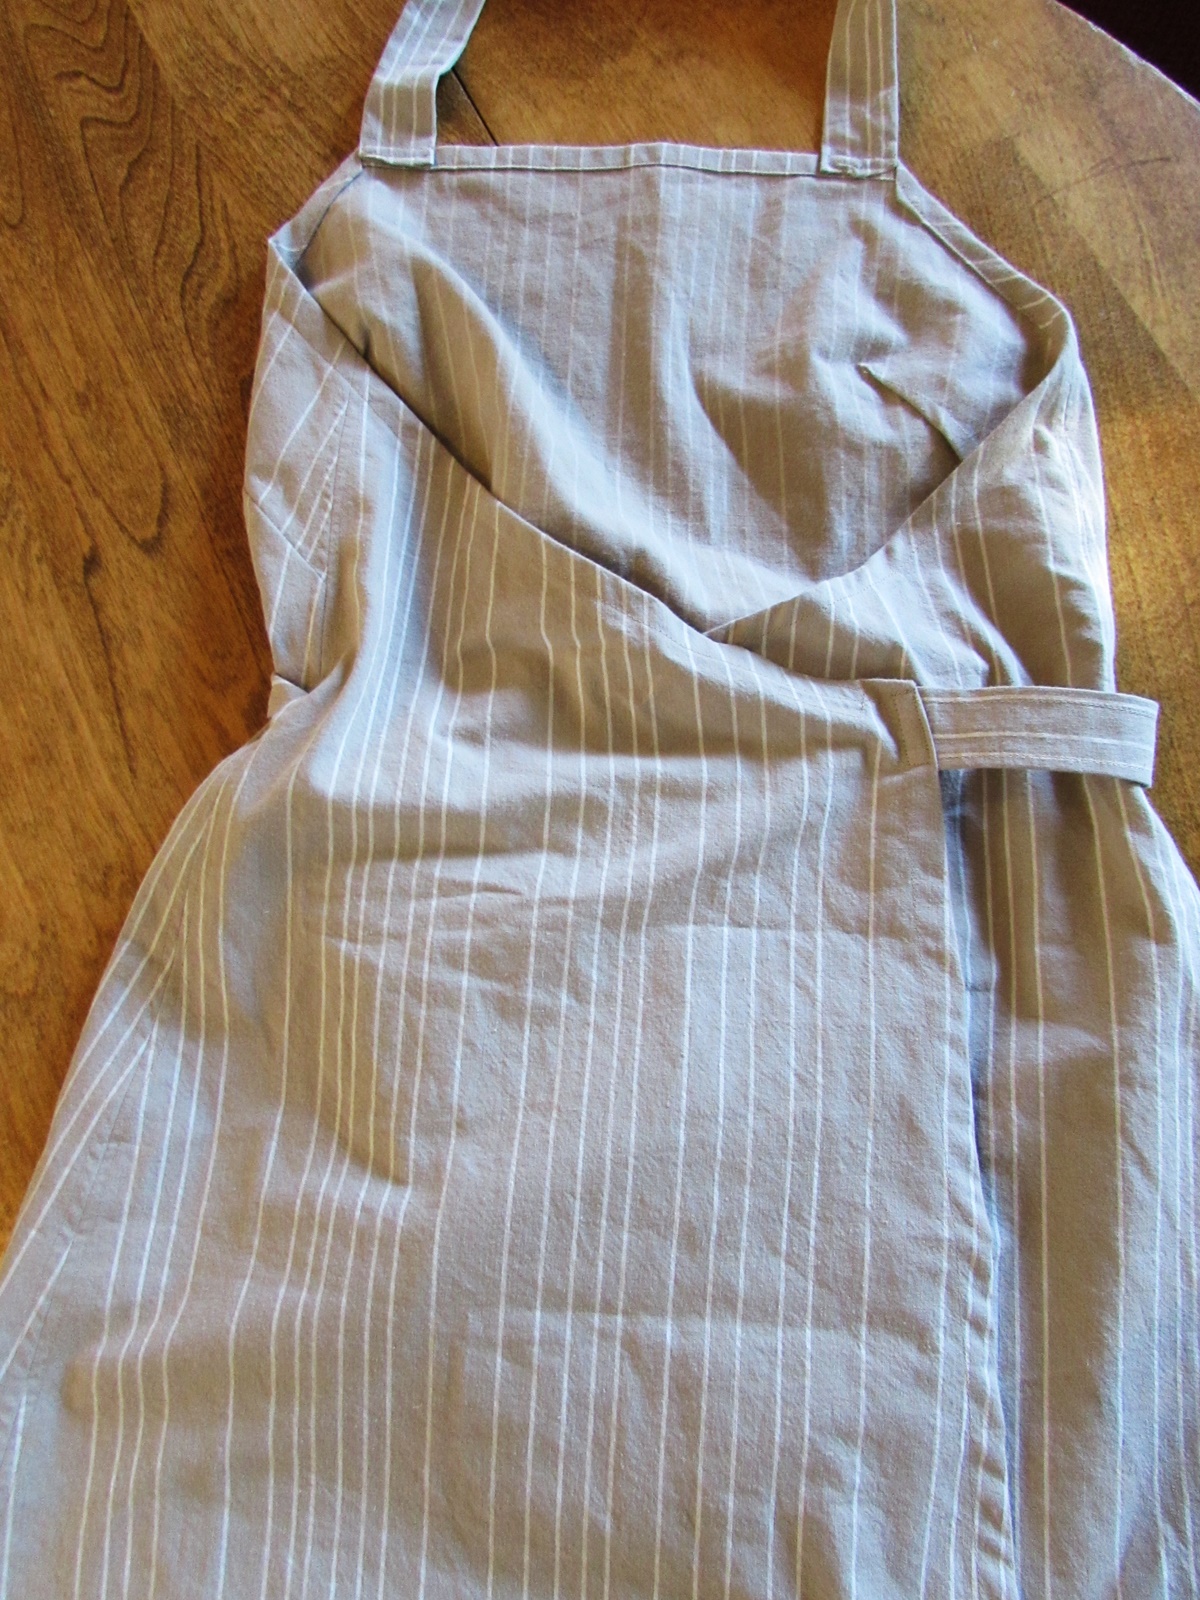
For the apron, I upcycled a duvet cover that I had bought a while back. I was thrilled to find this cover in a tan and cream stripe. The neutral colors and the feel of the fabric assured me I would easily find many uses for the fabric. I had a vintage pattern from 1975 that I have been holding on to, thinking it would make a really cute apron.
Originally the pattern was designed for a wrap around dress and let me just say, I would have totally loved wearing this dress at age 15 (not that I was necessarily 15 in 1975… oh wait, I was.) Anyway, I had a really similar dress that I made out of a green striped seersucker fabric. I was so cool.
Ok, back to the apron. I had seen these Japanese work aprons and really liked them – this pattern is a bit of a compromise between a standard apron and the Japanese wrap style. This one is more fitted with darts in the bodice.
It wraps around the back with the tie coming through an opening left in the side seam.
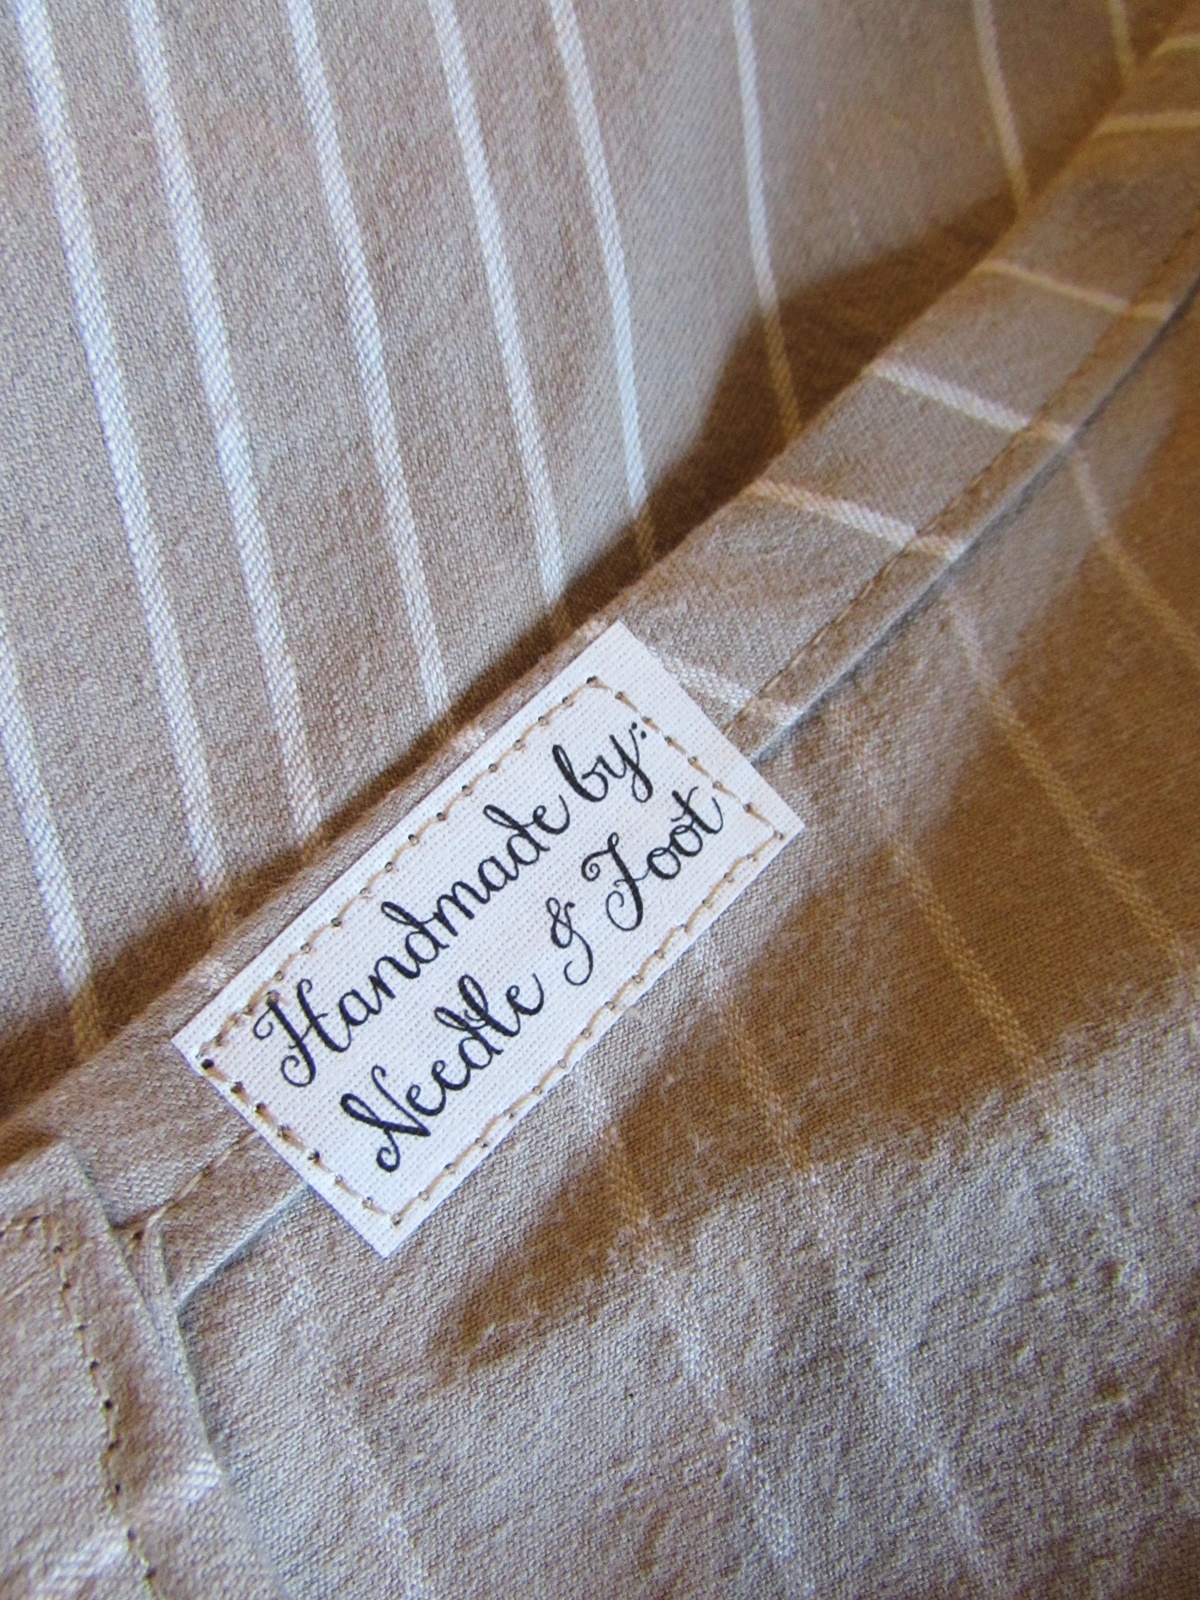
I finished the interior seams by folding the raw edges in and top stitching them for a clean look. This fabric would likely fray in the wash so this will prevent any issues.
I even remembered to put a little label on the inside.
Overall, this was a fun project and hopefully my daughter-in-law will get lots of use out of it. She is a great cook so I suspect she will use it.
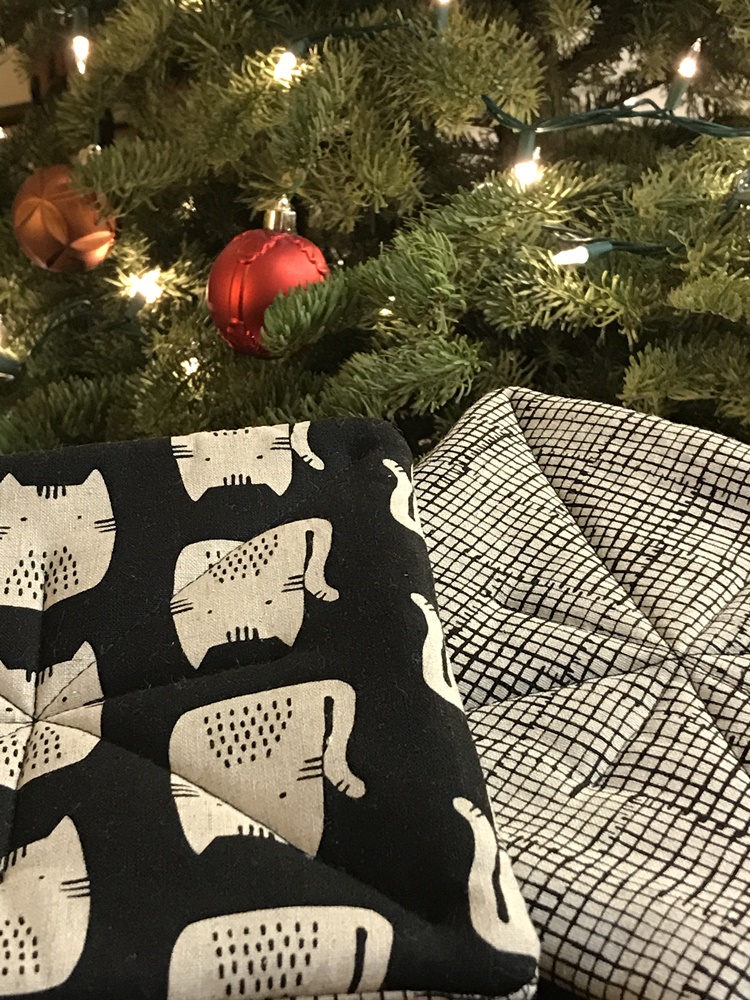
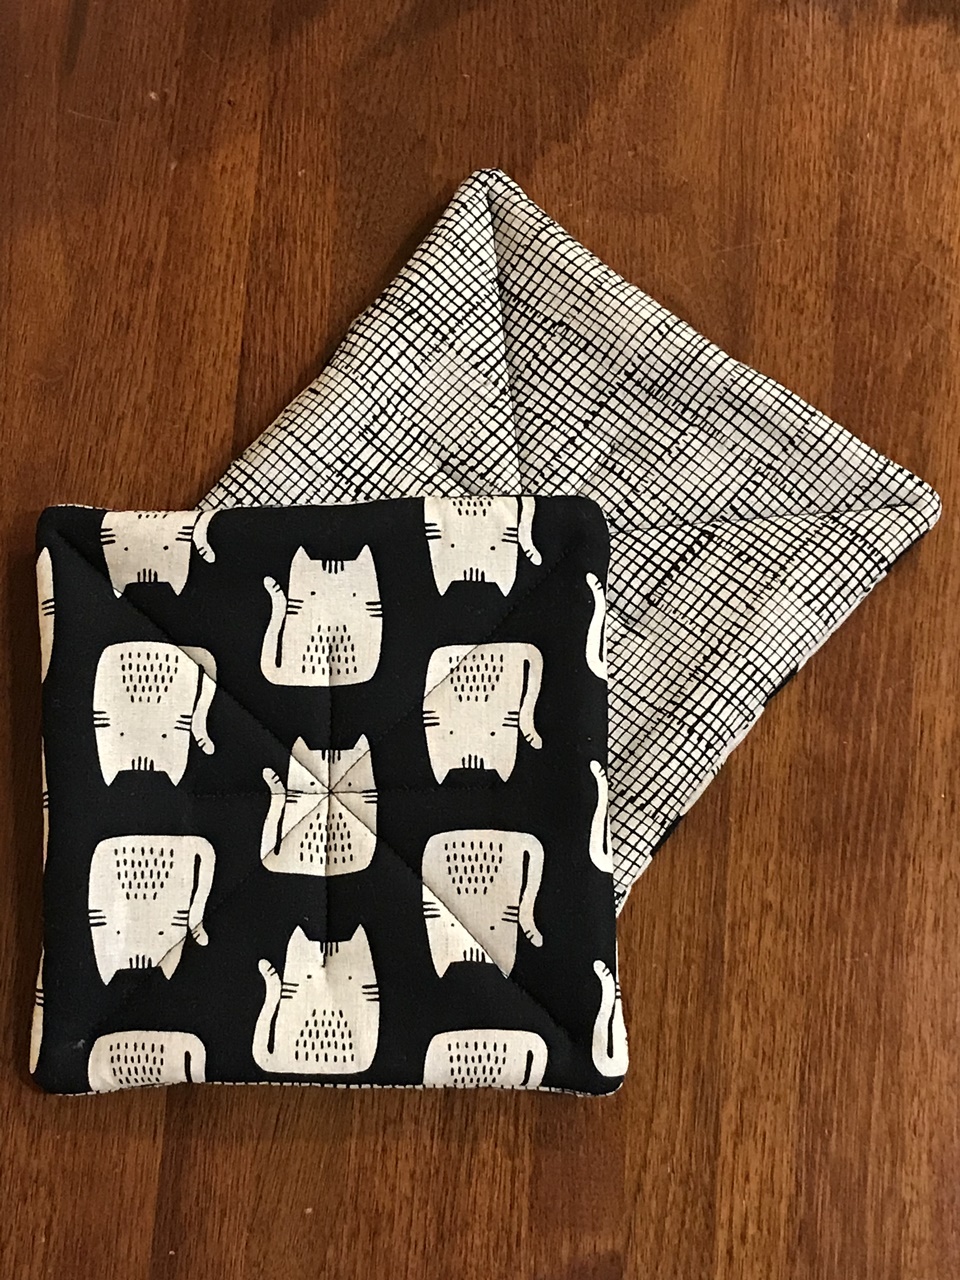
On to the hot pads! I wanted to make something with the Maker Maker fabric I have in the shop. I cannot even express how much I love this fabric!! I made Chemex Cozies out of the Grid fabric and the gray and black Lines fabric. They were far and above, my top sellers for the Christmas shopping season.Anyway, I thought I would make some hot pads using the Grid fabric and the cats. The linen has such a nice texture and weight, making it perfect for kitchen accessories. These finished at at eight inches square and are filled with two layers of Insul Bright, making them nice and thick.
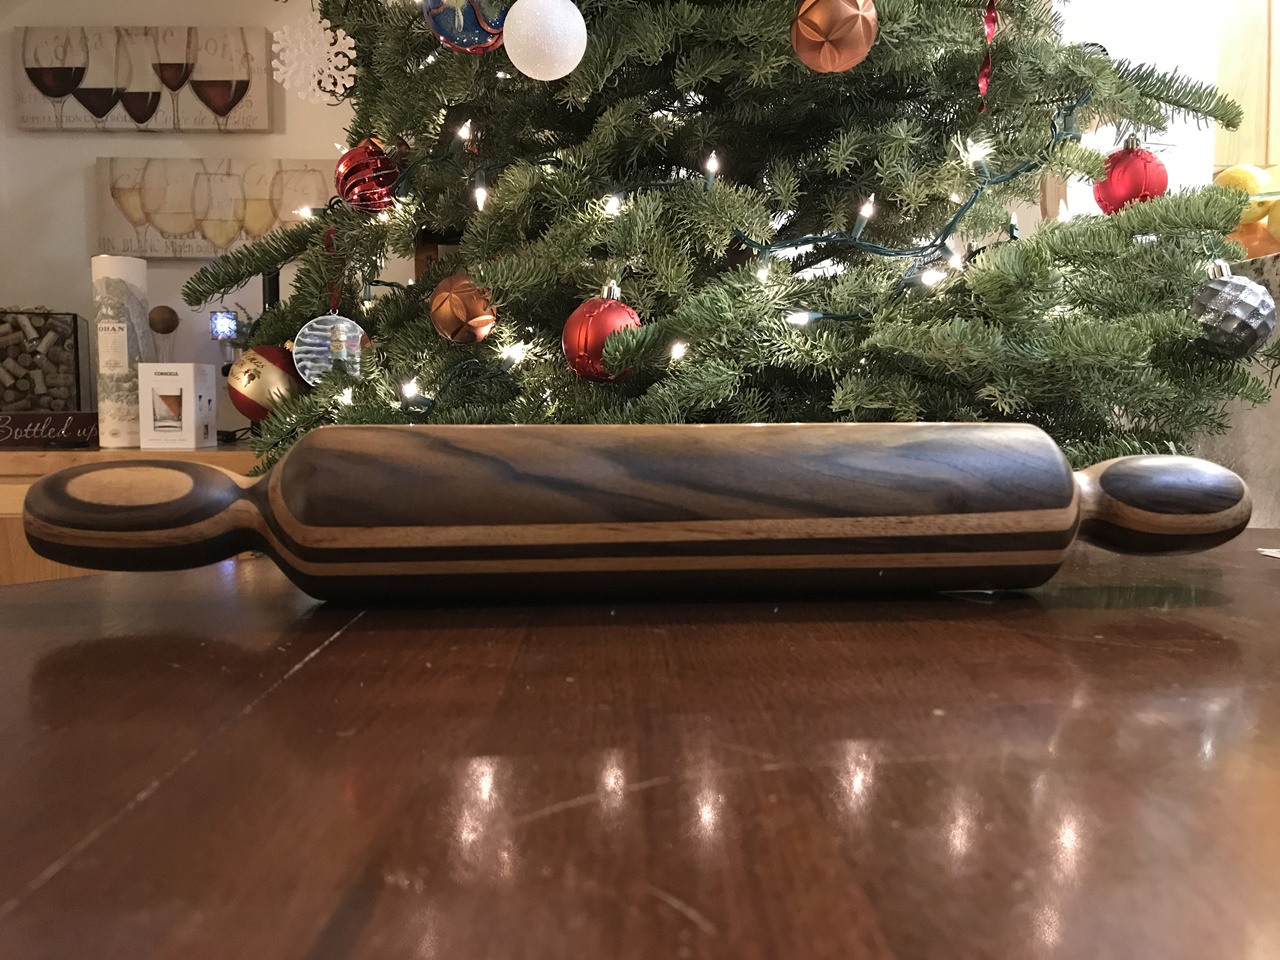
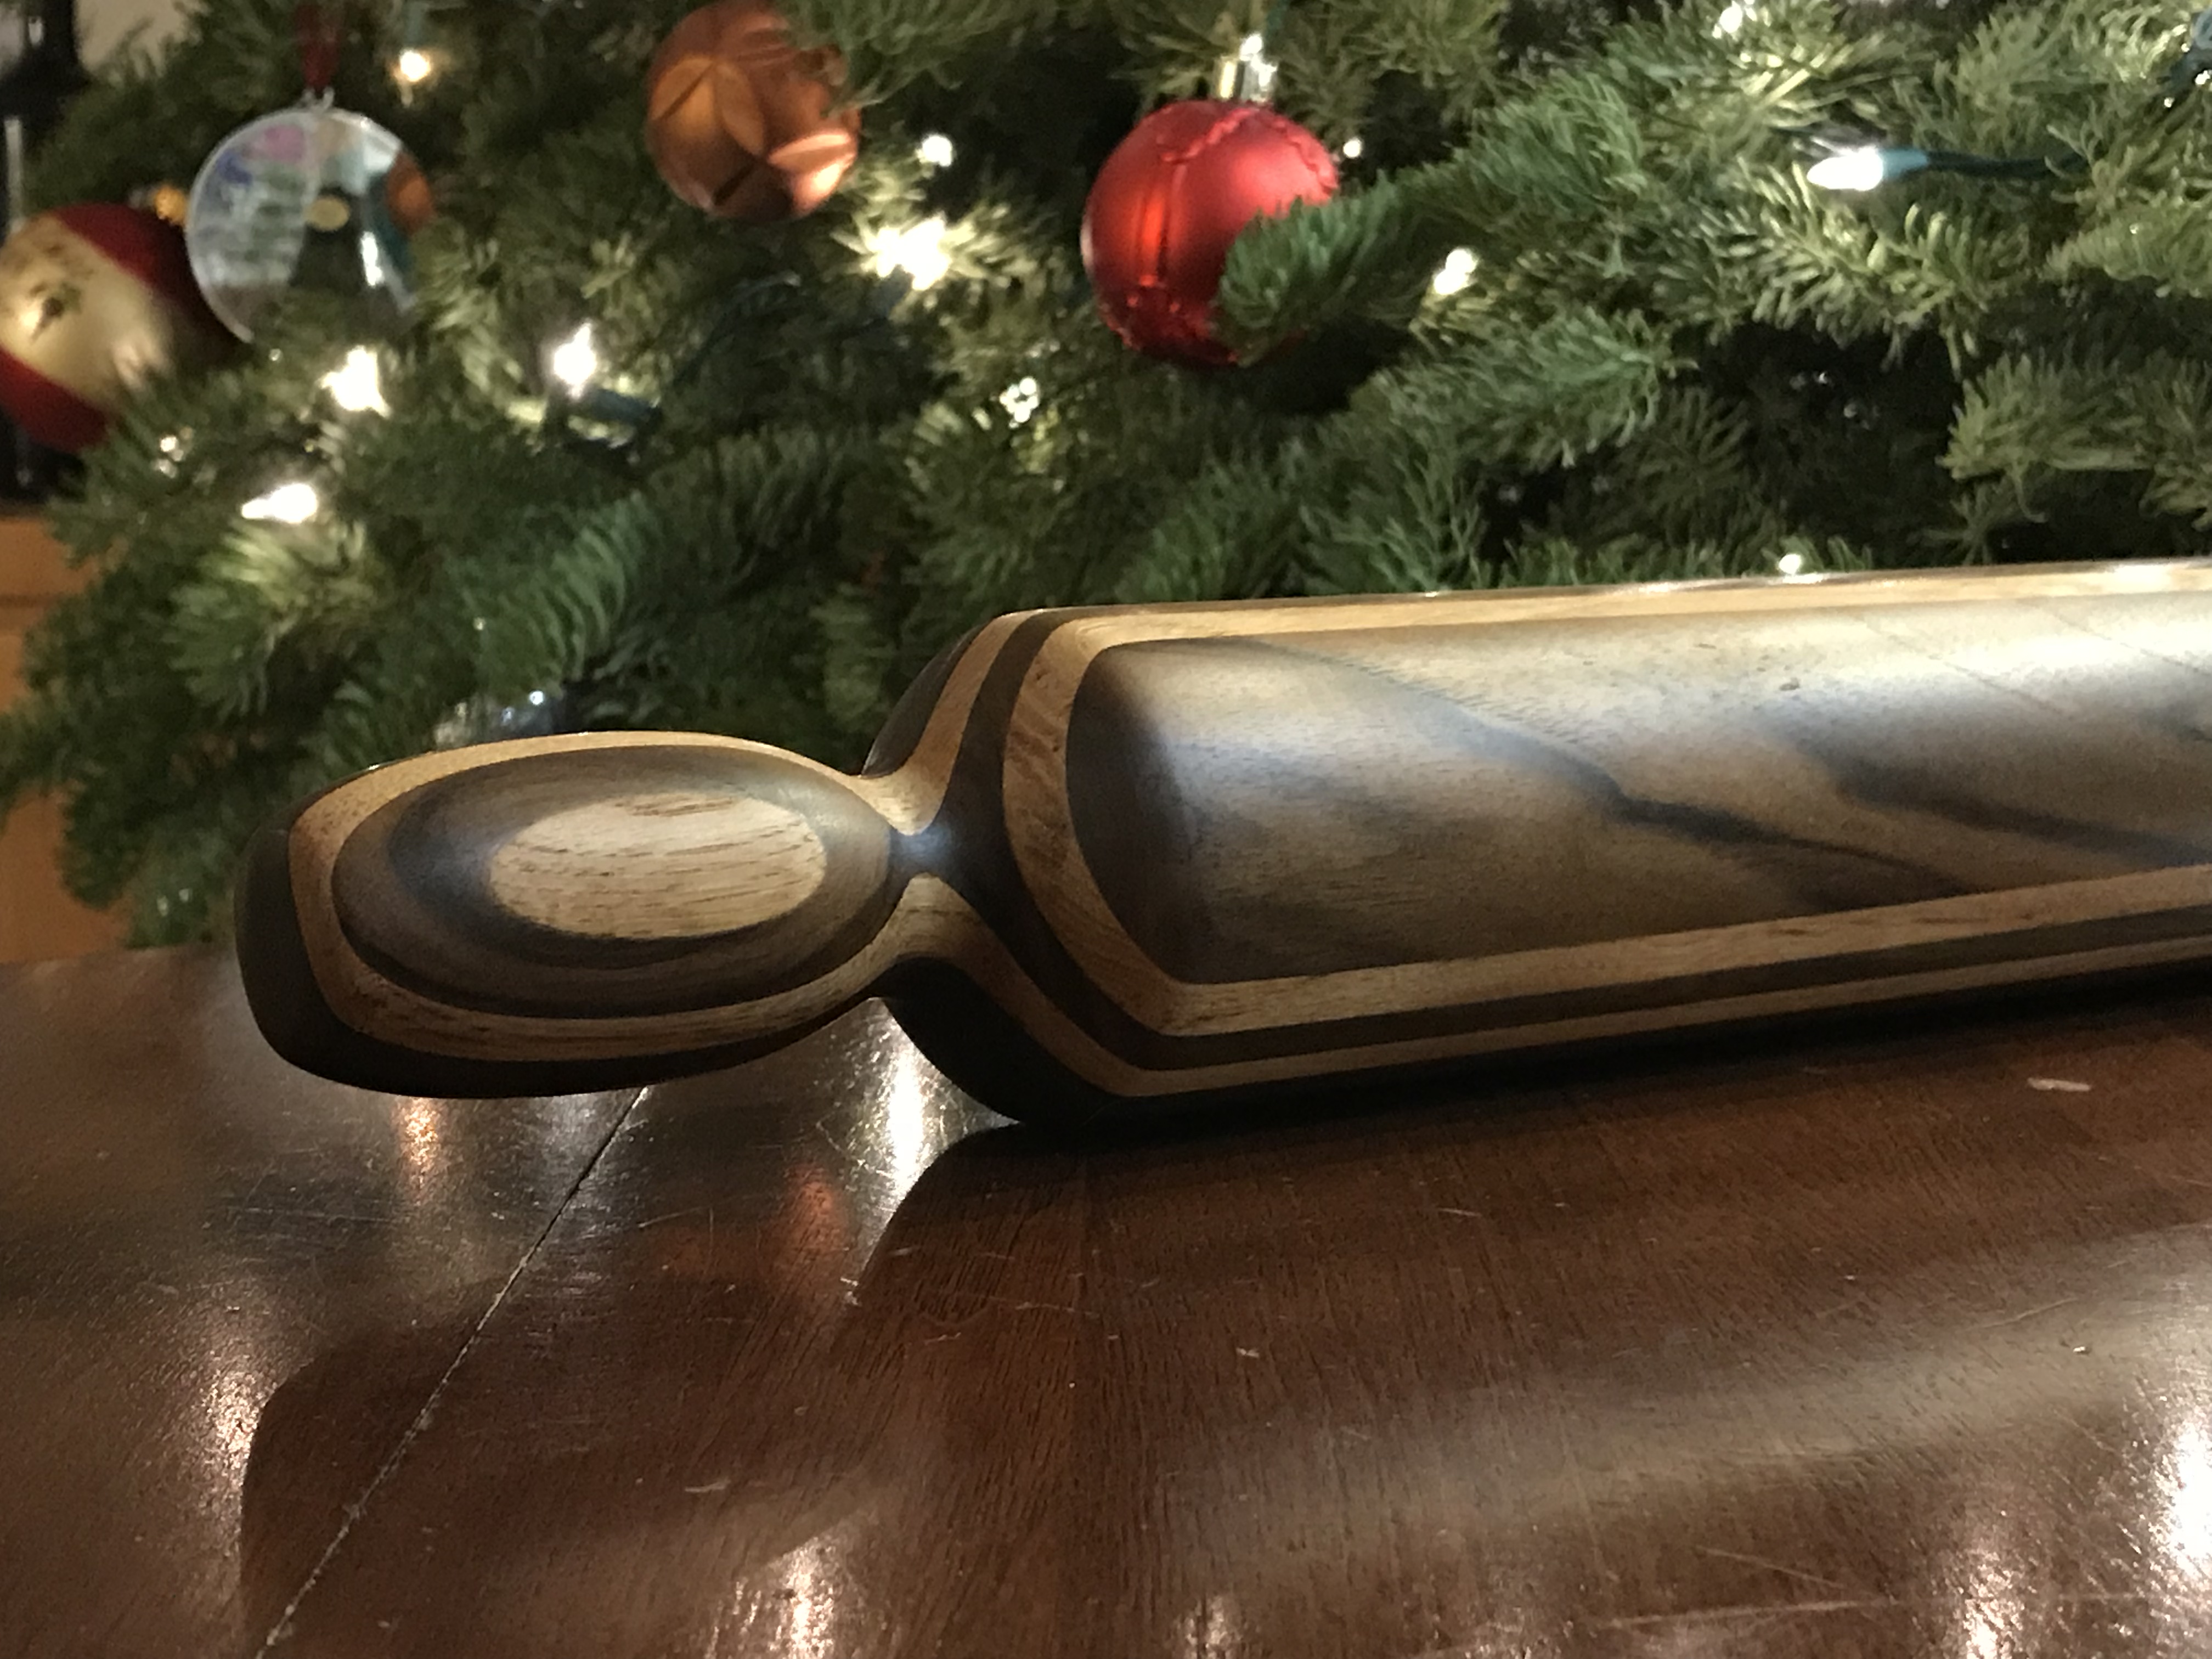
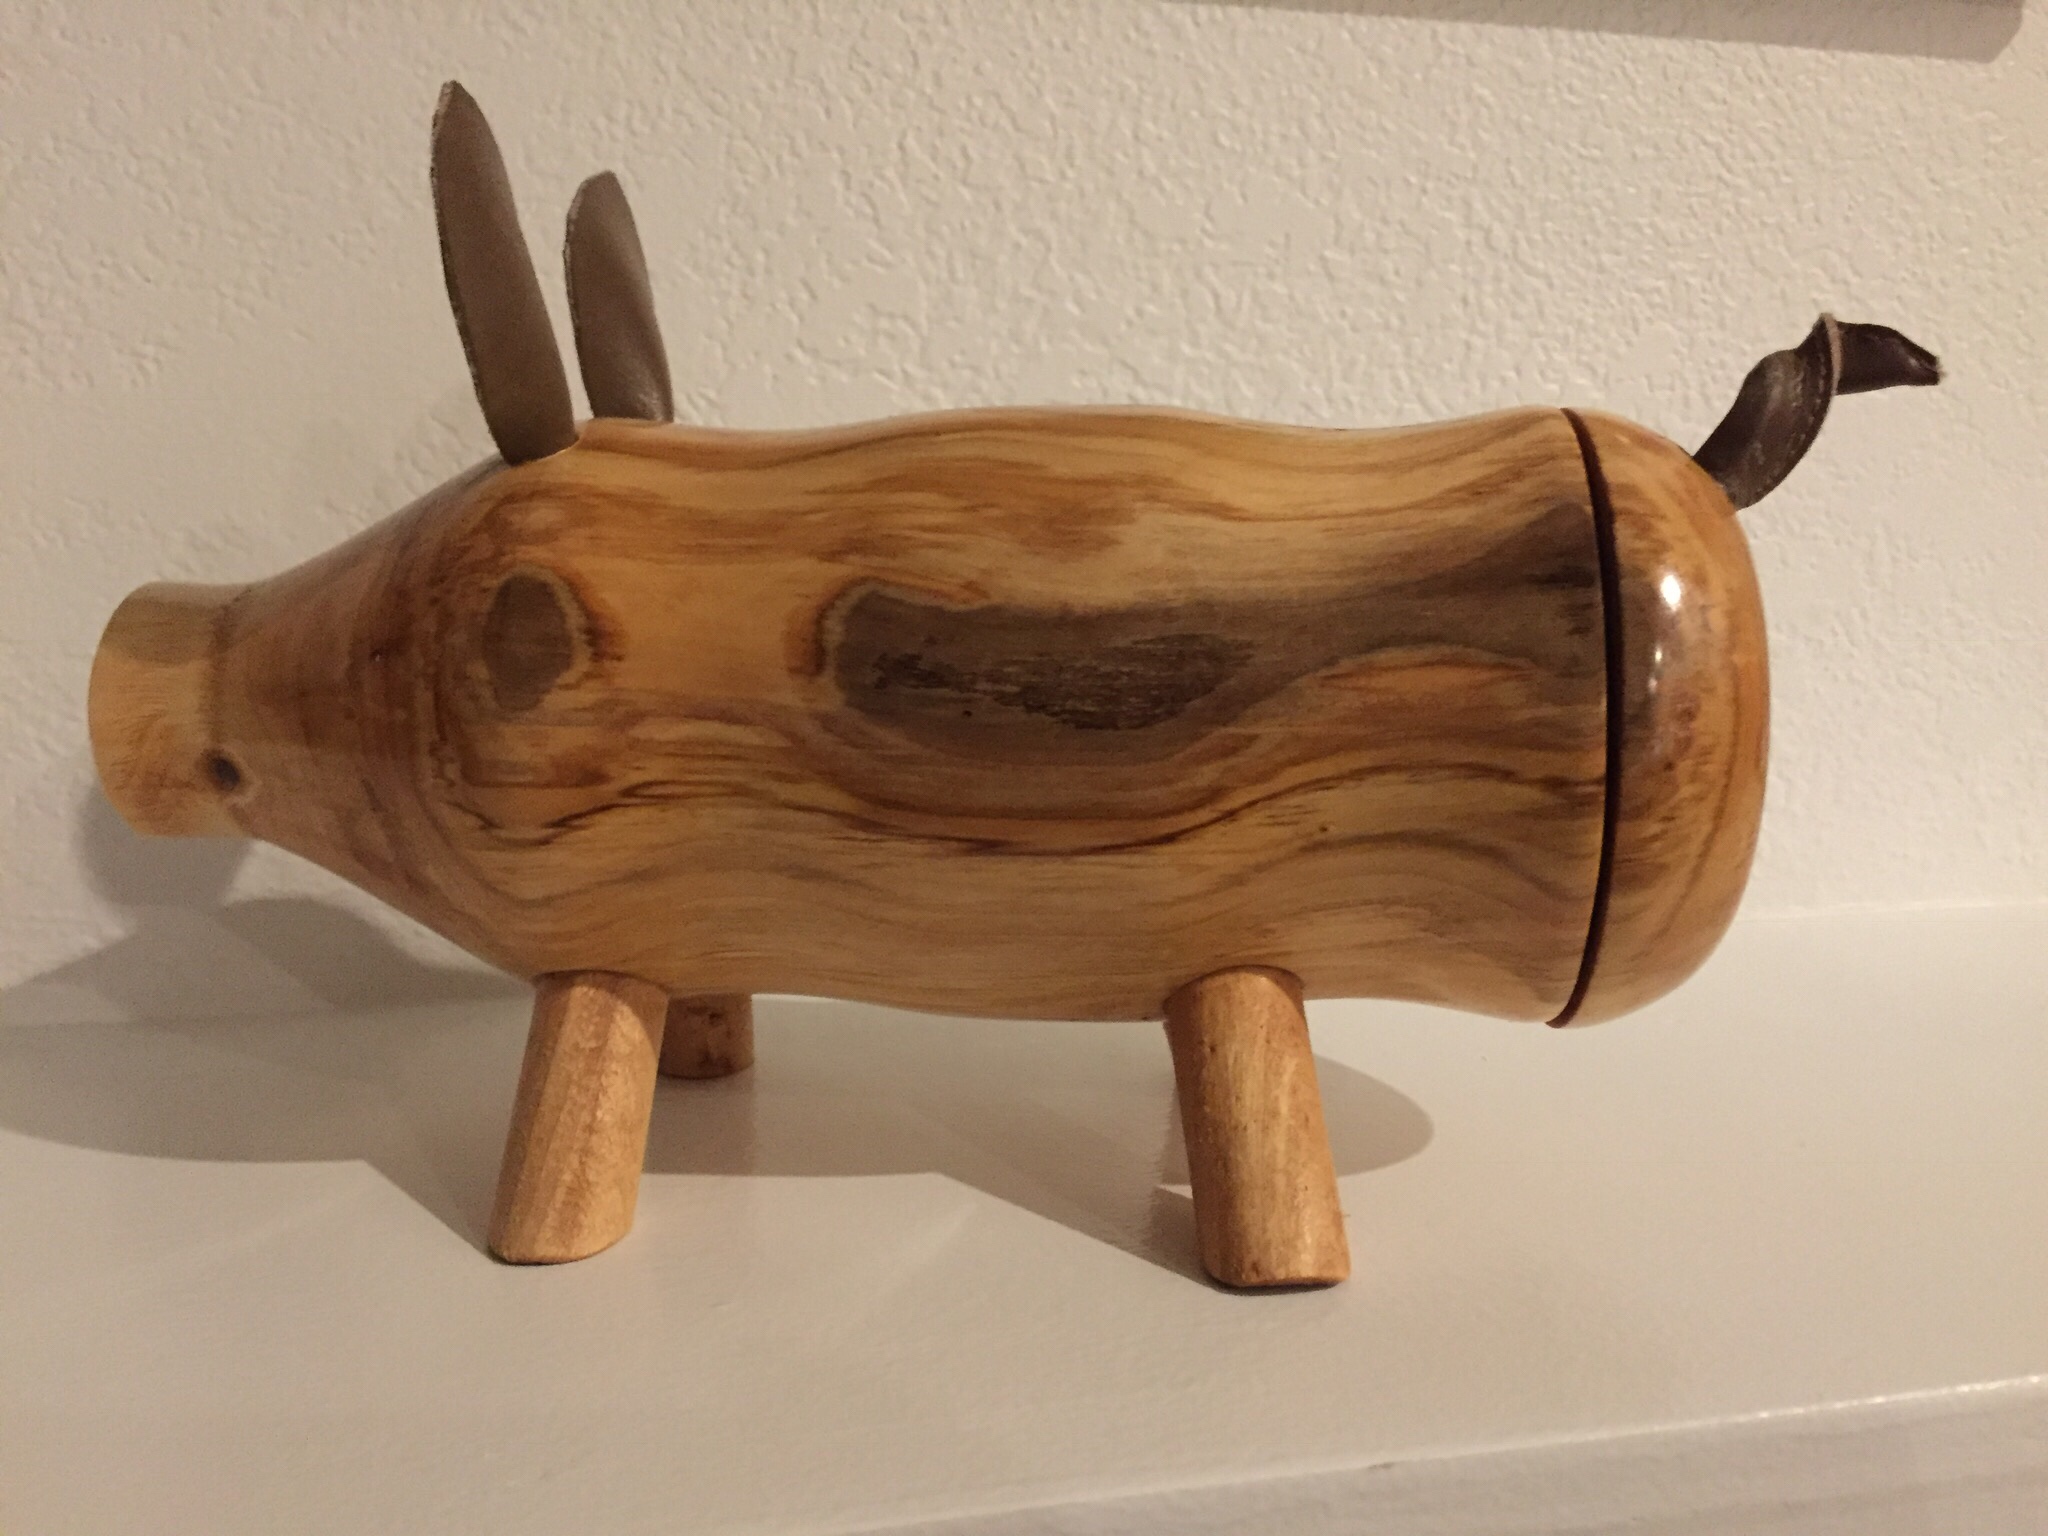
The next gift I want to share was not made in the sewing room! My husband decided he wanted to make a gift for each of the kids. The boys and their spouses received gorgeous rolling pins made with pieces of walnut and oak that he laminated together. He turned them on his lathe to make a one piece rolling pin. I just love them! The kids were taken with the wonderful finish and really appreciated the work that went into these.
Each piece is different from the next with the stripes and color variations making them unique.
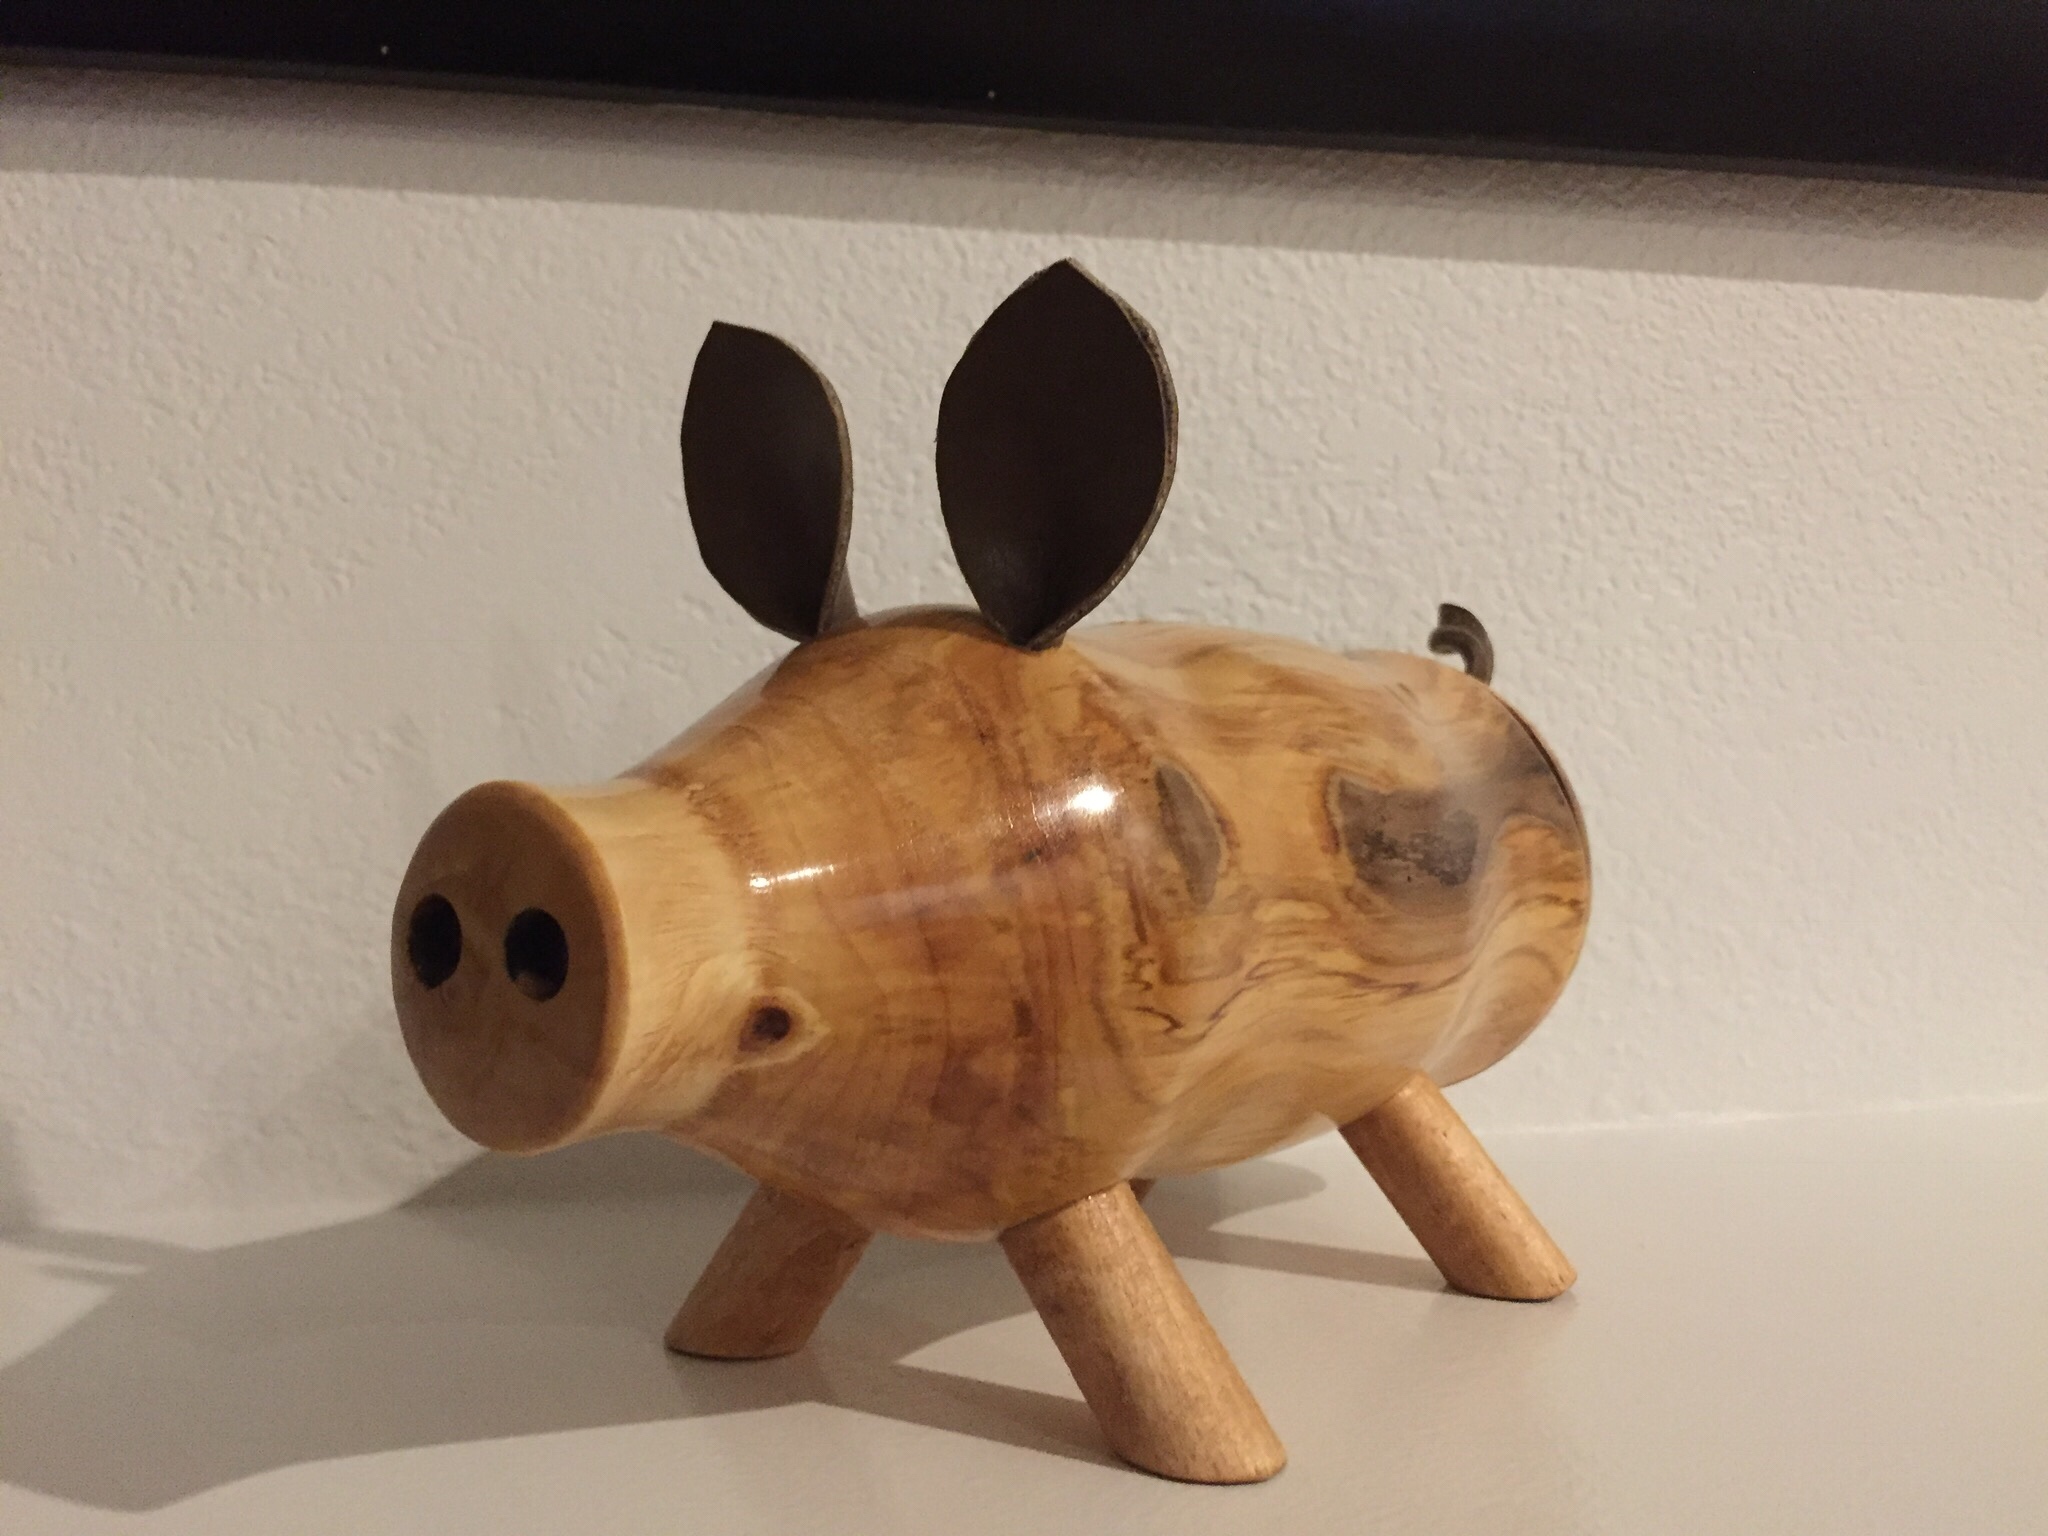
Since Julia isn’t really in need of a rolling pin just yet, he made her a piggy bank. She had such a great time with Daisy and Ella last year, he thought this would be a fun way to remember that summer.
This was a challenging project but it turned out so cute!I love the shape of this little pig’s body and her curly tail. It was so much fun to watch Ray making these projects during the months before the holidays. I love having a few handmade gifts under the tree. I also made some placemats for my parents but didn’t think to take pictures. I will take some the next time I am up at their house so I can share them. Were you able to make any of your holiday gifts this year? If so, share in the comments. I would love to hear about them!
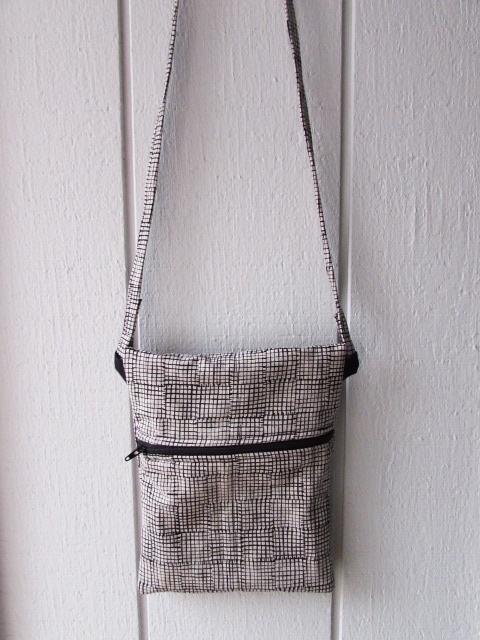
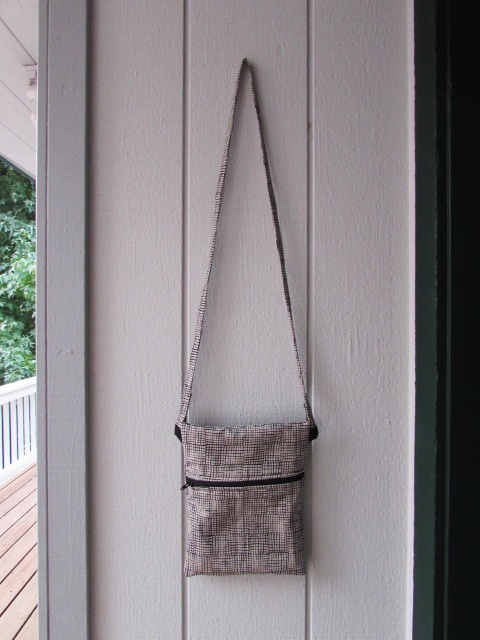
Most of the time, I use a big purse. I carry all sorts of stuff, probably more than I really need to. But that doesn’t work as well when I am traveling. If I bring a tote bag or backpack on a plane (for a book, iPad, food etc) it becomes cumbersome to also have a purse.
I decided to make a slim, simple cross body bag for these, not-very-frequent, travel days. This way I will have a purse with my wallet and phone in it while I am traveling and it won’t take up tons of room in the carry-on bag. Brilliant, you say? Aw, shucks…
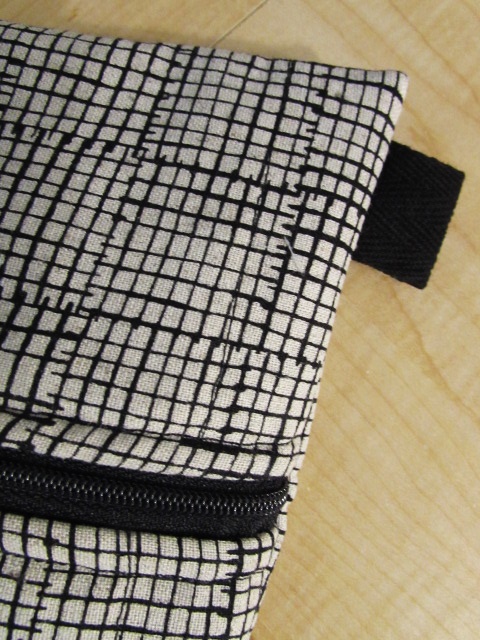
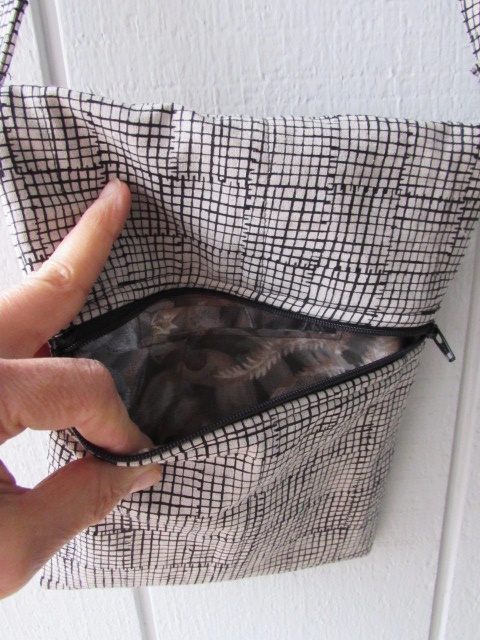
I chose the Grid fabric from Sarah Golden’s Maker Maker fabric. It is a wonderful cotton and linen blend with great texture. Andover makes it and I have a selection in my shop. I washed the fabric before I started so it would soften up a bit.
When I was thinking about this project, I decided to model it after the 30 Minute Pouch on KelbySews.com. I have made tons of these as gifts. One Christmas I gave them to a number of my friends, my sisters, my mom and mother-in-law. You can check those out here. Anyway, I thought if I just made it substantially larger, added an interior pocket, and loops for a strap, it would be a cute bag. Guess what? I was right! It turned out great. Here are some photos of my process.
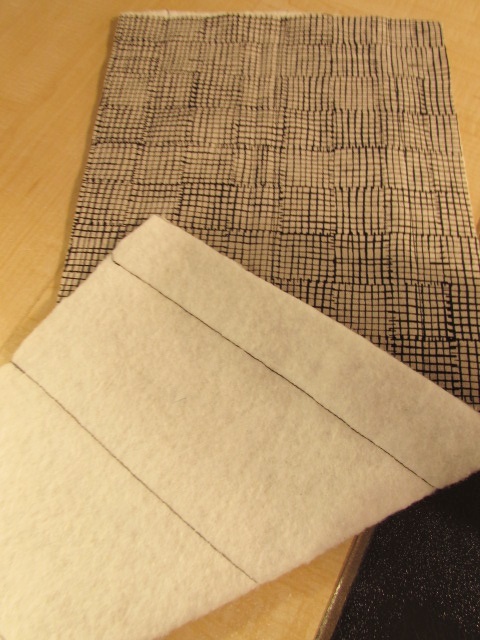
I cut the exterior piece, the batting and the lining all the same size, 9″ x 20″. Then I quilted the batting to the exterior piece with three seams. The quilting doesn’t show at all, black thread on a black print, but it held the batting in place while making the bag.
The interior pocket came next. It is a bit of a trick to explain but I took a 5″ square and placed it on top of the lining piece, right sides together. I drew a rectangle toward the top, on the back side of the square and stitched around that rectangle. Next I clipped out the interior of the rectangle so I could turn the fabric to the other side of the lining.
Finally, I took a second 5″ square and sewed it to the flap of fabric that was now on the wrong side of the lining. (I know this is hard to follow and if anyone wants further info, I can write a tutorial. It is a nice way to add a pocket to any bag you are working on. Let me know if you would be interested.)
Interior pocket sewed to lining fabric.
Once the pocket was in place, I set the zipper – I won’t go into detail here because I used the exact process described in the KelbySews tutorial. It is very simple.
Before sewing the side seams, I placed two loops of twill tape, one on each side, to be stitched into the side seam. Then I sewed the side seams.
This bag has exposed seams (the lining doesn’t hide them) so I did run a tight zig zag stitch along each side to finish the fabric.
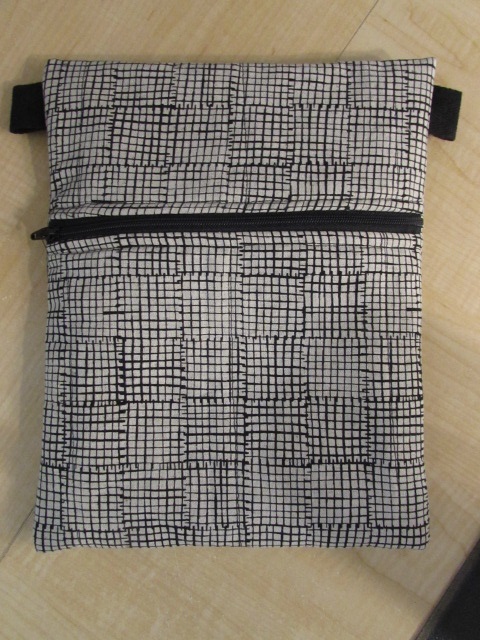
Once the bag was flipped right side out, it looked like this.
The final piece was to make a long strap. I pieced together two lengths of fabric that were two inches wide. By pressing the raw edges to the center first, then pressing the whole strip in half, and finally stitching the strap all the way down the length of it, I quickly had a shoulder strap. I looped one end through each of the twill tape loops and stitched them together. This means it isn’t adjustable. If you wanted something more flexible, you could buy the hardware to make a little looped finish on the end of one strap.
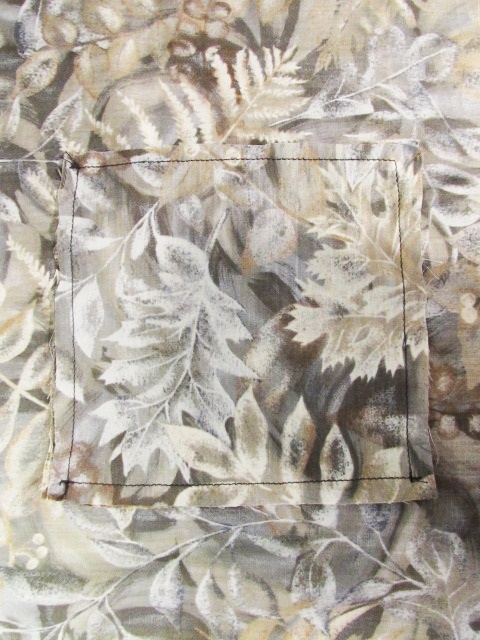
Peeking at the interior of the bag.
The lining was a scrap from a thrift store but I love it with the Grid fabric.
For measurements, in case you are curious, the bag finishes at 8″ wide, 10″ tall, with a strap that is 50″ long. I think the size is just what I wanted. The only change I would make is to move the zipper up about two inches so I would have a bit more usable space inside the bag. The most functional space is below the zipper and it would be better to have less space above the zipper.