Category Archives: Quilting Skills

Long Arm Quilting Class

Earlier this week I mentioned I was taking a class on long arm quilting. Wow, it was so much fun. Not so much that I plan to shell out the kind of money required to buy a long arm machine but enough that I would definitely go and rent time on the machine. Probably on a regular basis.

I have wanted to take a class on long arm quilting for quite a while. The stars finally aligned and it happened this week! The shop that rents time on these amazing Innova machines is about an hours drive from my house. This is a good thing – if it was more convenient I would be in there all the time! This way, it takes a bit of thought and planning to get there, which might help me to control the spontaneous urge to go quilt something. The rate is $20 per hour which is high except when one considers how fast a project can be quilted on a long arm vs my domestic machine. Taking this class also enables me to quilt larger projects. As I mentioned before, I have only made two large quilts and this is because it is tough quilting them. I don’t really want to pay someone to quilt my projects because I like to do it from start to finish. Anyway, now I will be able to make larger quilts!

Here are some thoughts on my experience. First of all, as I expected, loading the machine is challenging. It does make the basting process less of a physical challenge in that I am not crawling all over the floor but it is quite a process to load the backing and then the batting and quilt top, making sure all is square and straight. Naturally, this process will be quicker after I do it a few times.  There is much to learn about stitch length and tension but for my first time, I thought it was relatively easy. There were three of us in the class and each of us had our own machine to load. We brought two pieces of fabric that were each about 1.5 yards and this is what we practiced with.

What wasn’t so easy was quiltiing a smooth circle. For whatever reason, when I tried to move in a circular pattern it was difficult and my curves had a distinctly rectangular look to them. It was surprisingly easy to get a nice straight line though. Looking at the bit of stitching at the top of the picture, the horizontal lines were stitched with channel  locks on and this made those lines very straight because the machine could only stitch in that one direction (no free motion, just straight).  But the vertical up and down lines that I did were done with everything open (no channel locks) and it was easy to create a nice, straight line. When I FMQ at home, I find straight lines to be very challenging if I FMQ so I normally use a walking foot and have to move the fabric with each line.

IMG_7323

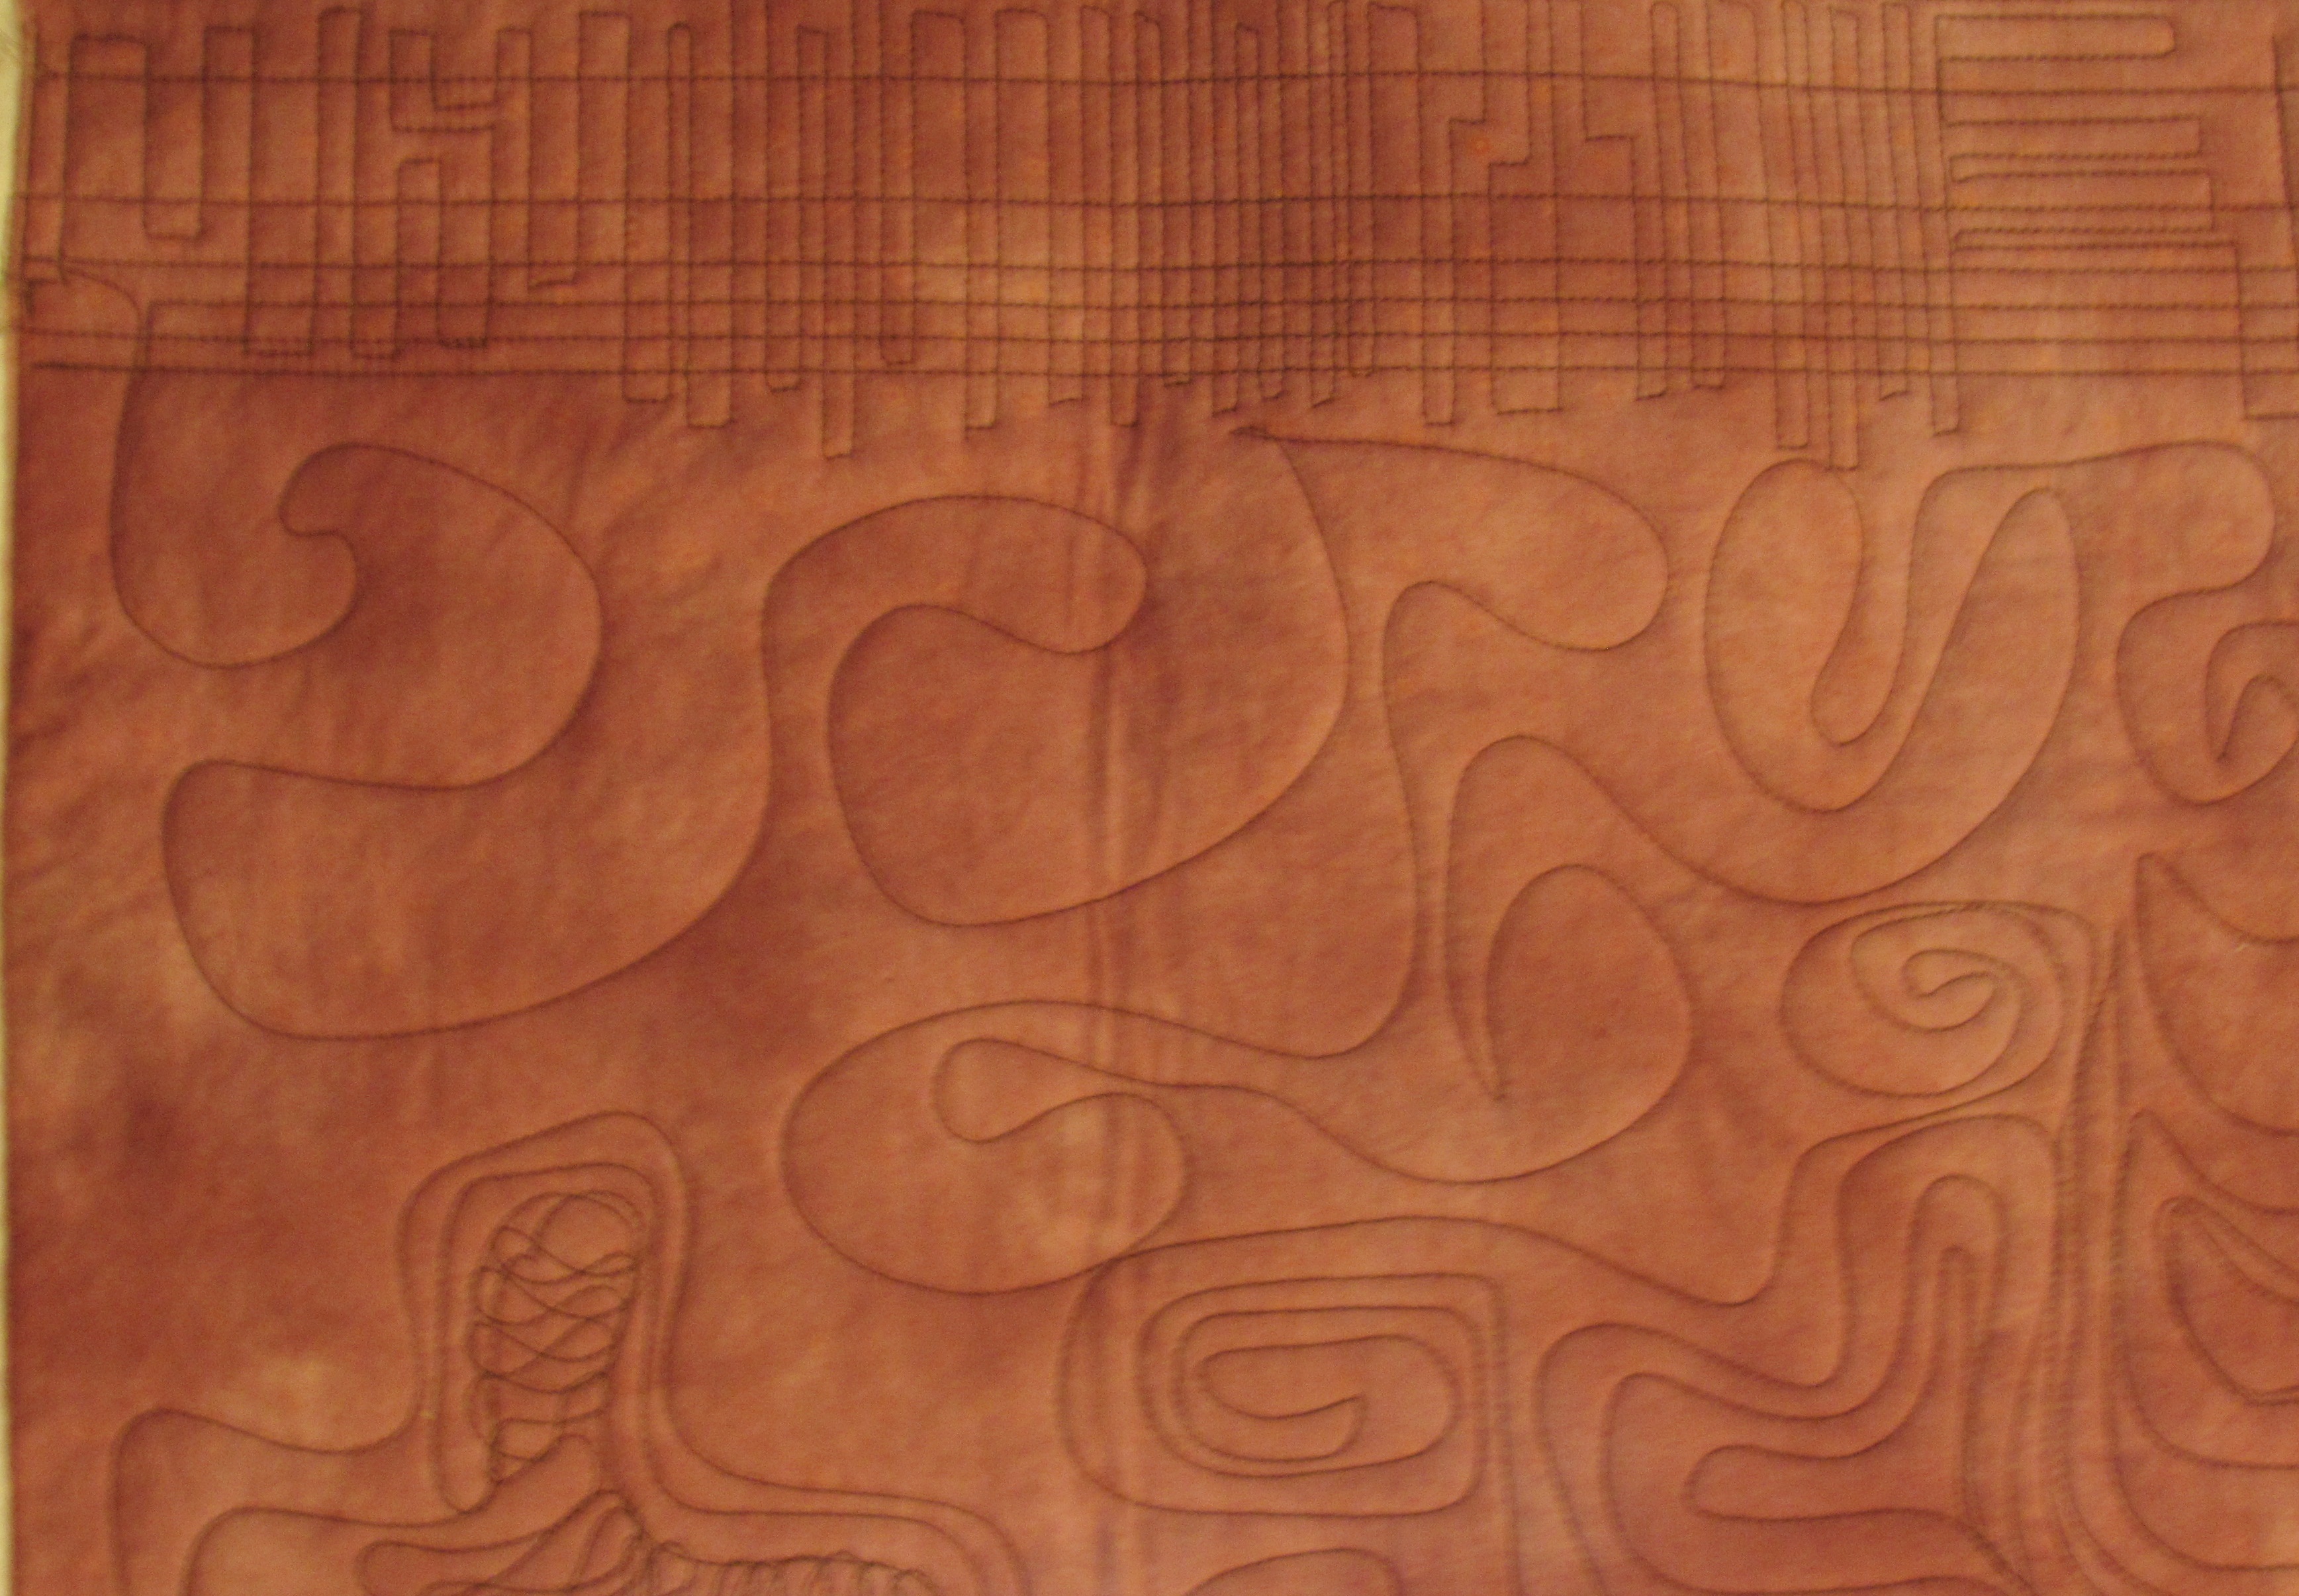
As would happen, the more I stitched, the softer the circular motion became. I tried to do a bit of pebbling and that was difficult.

IMG_7324

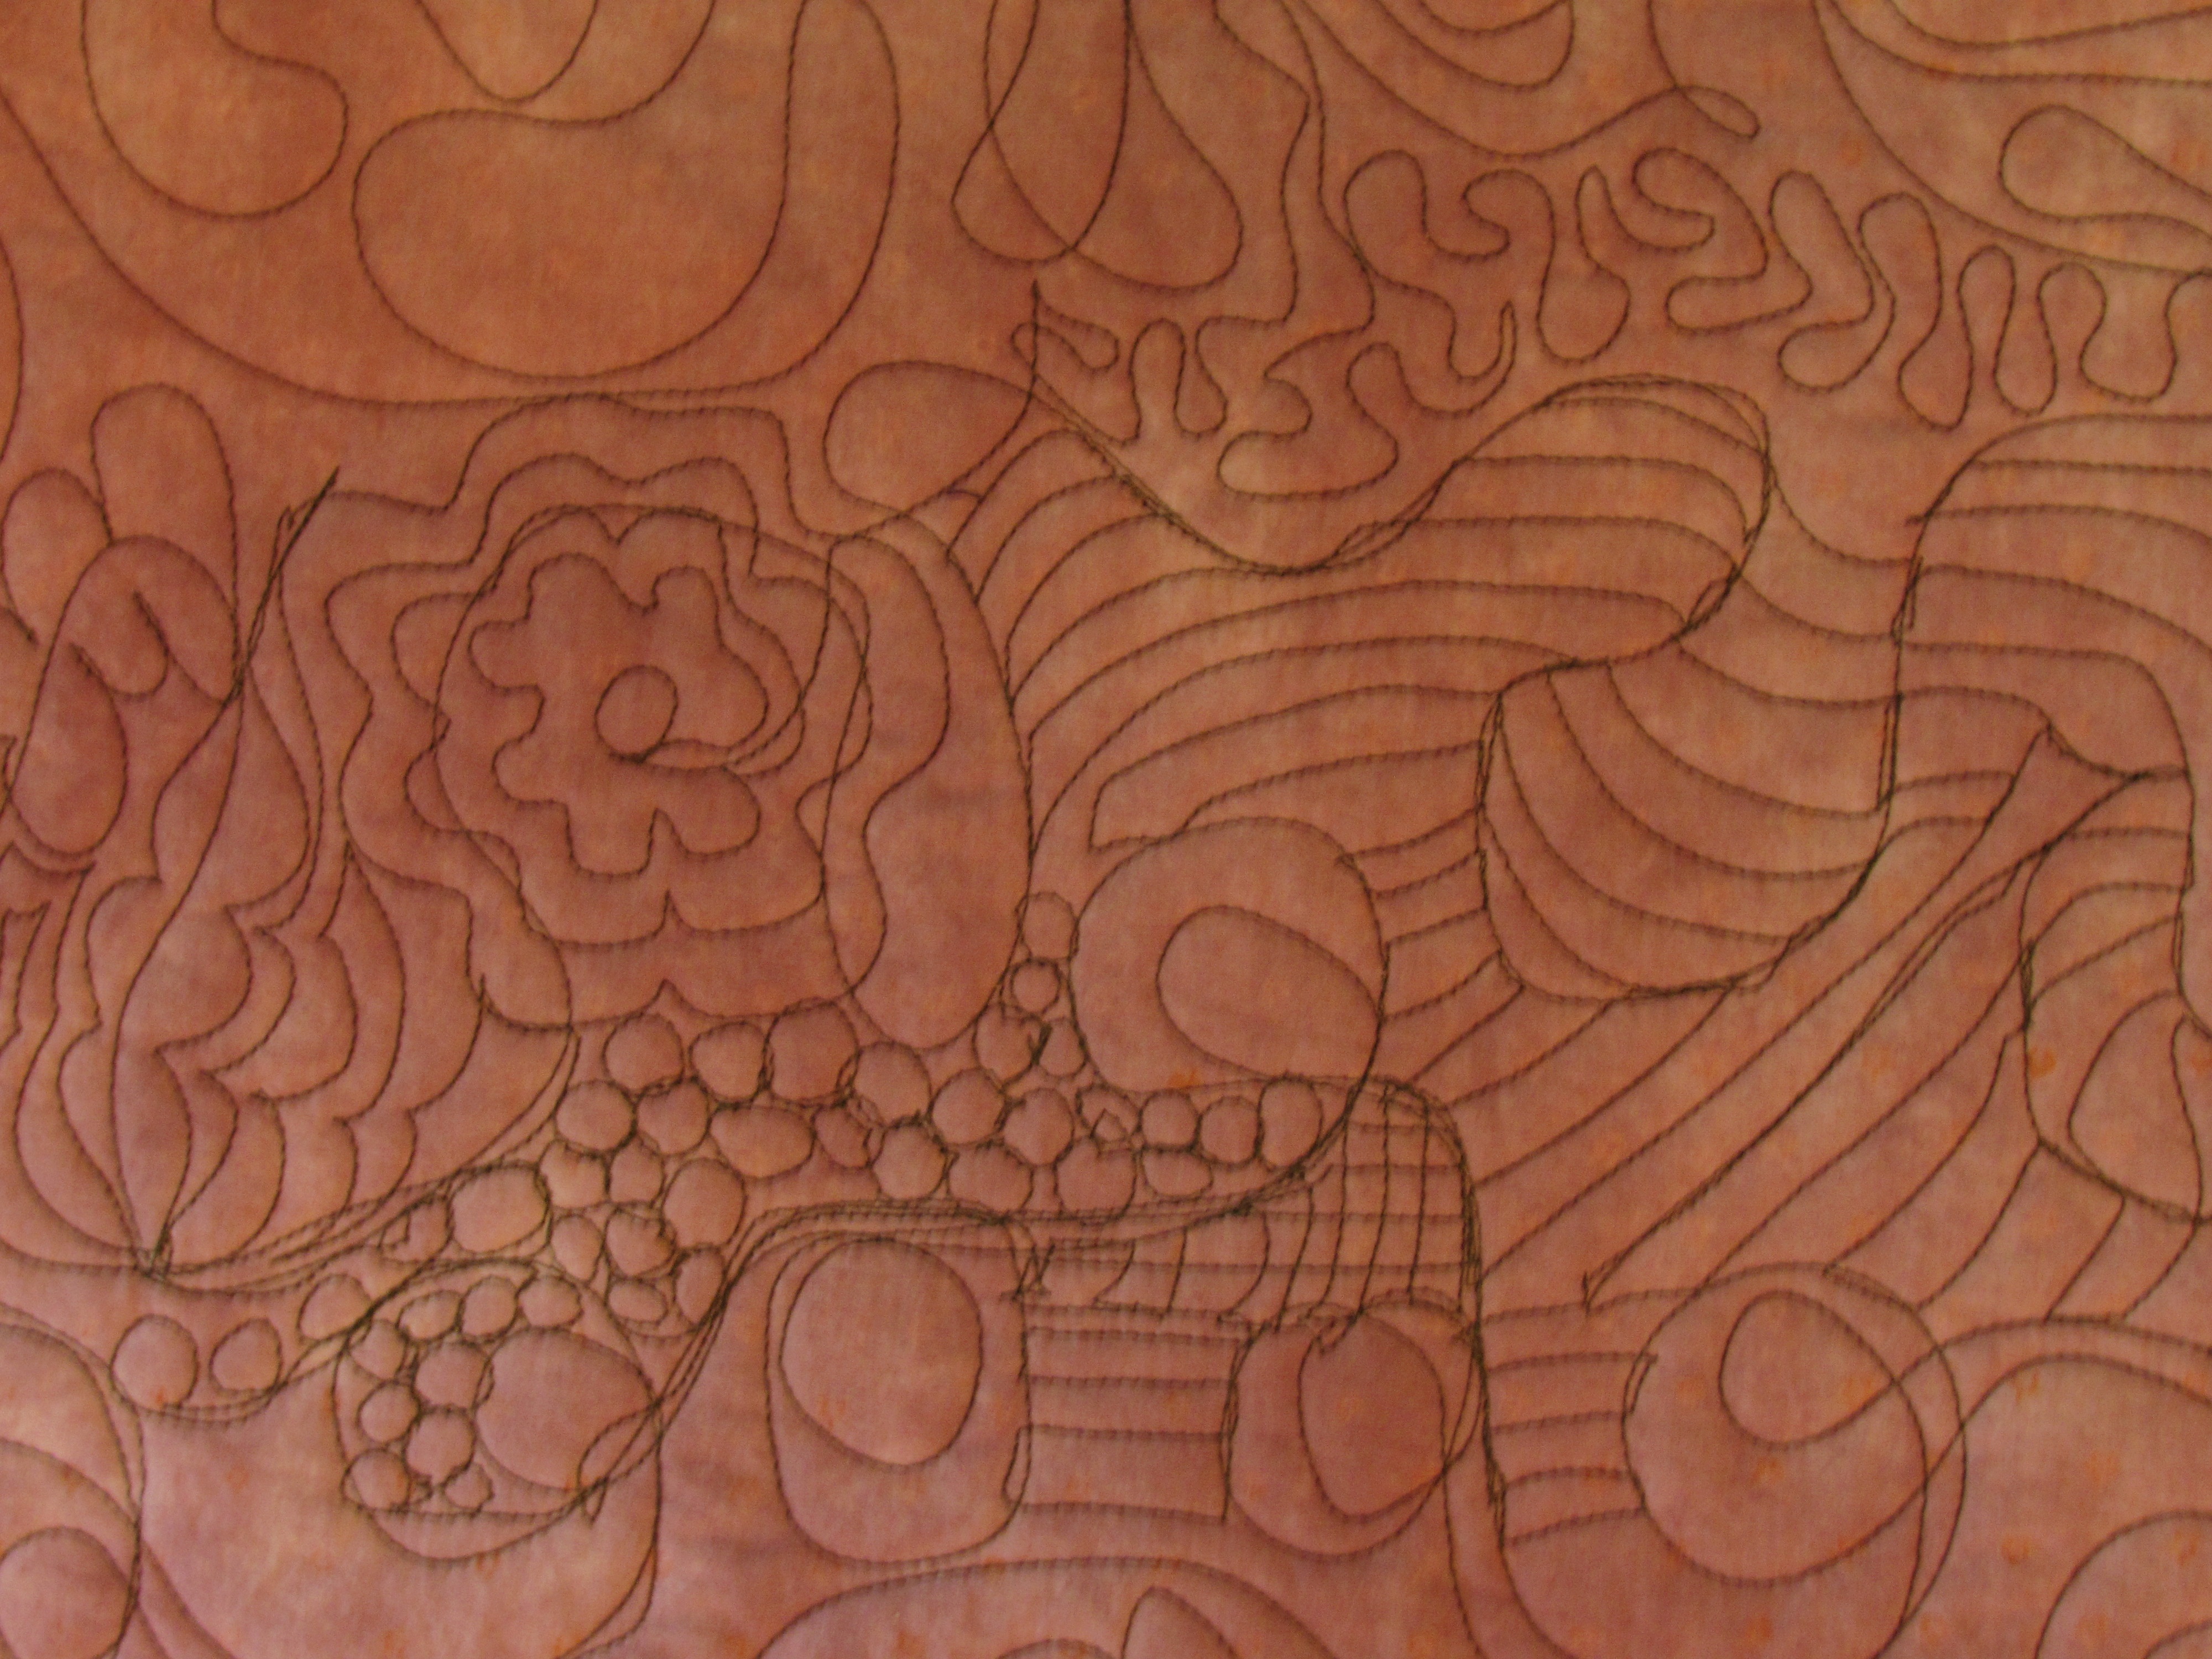
But the circles got rounder as I went. To explain the mess you see above you, I first did a very large stipple or meandering stitch and I used up my practice piece of fabric too quickly. So I went back and started filling in the shapes. Messy yes, but so much fun to play with. Sort of like some very rough graffiti quilting.

IMG_7325

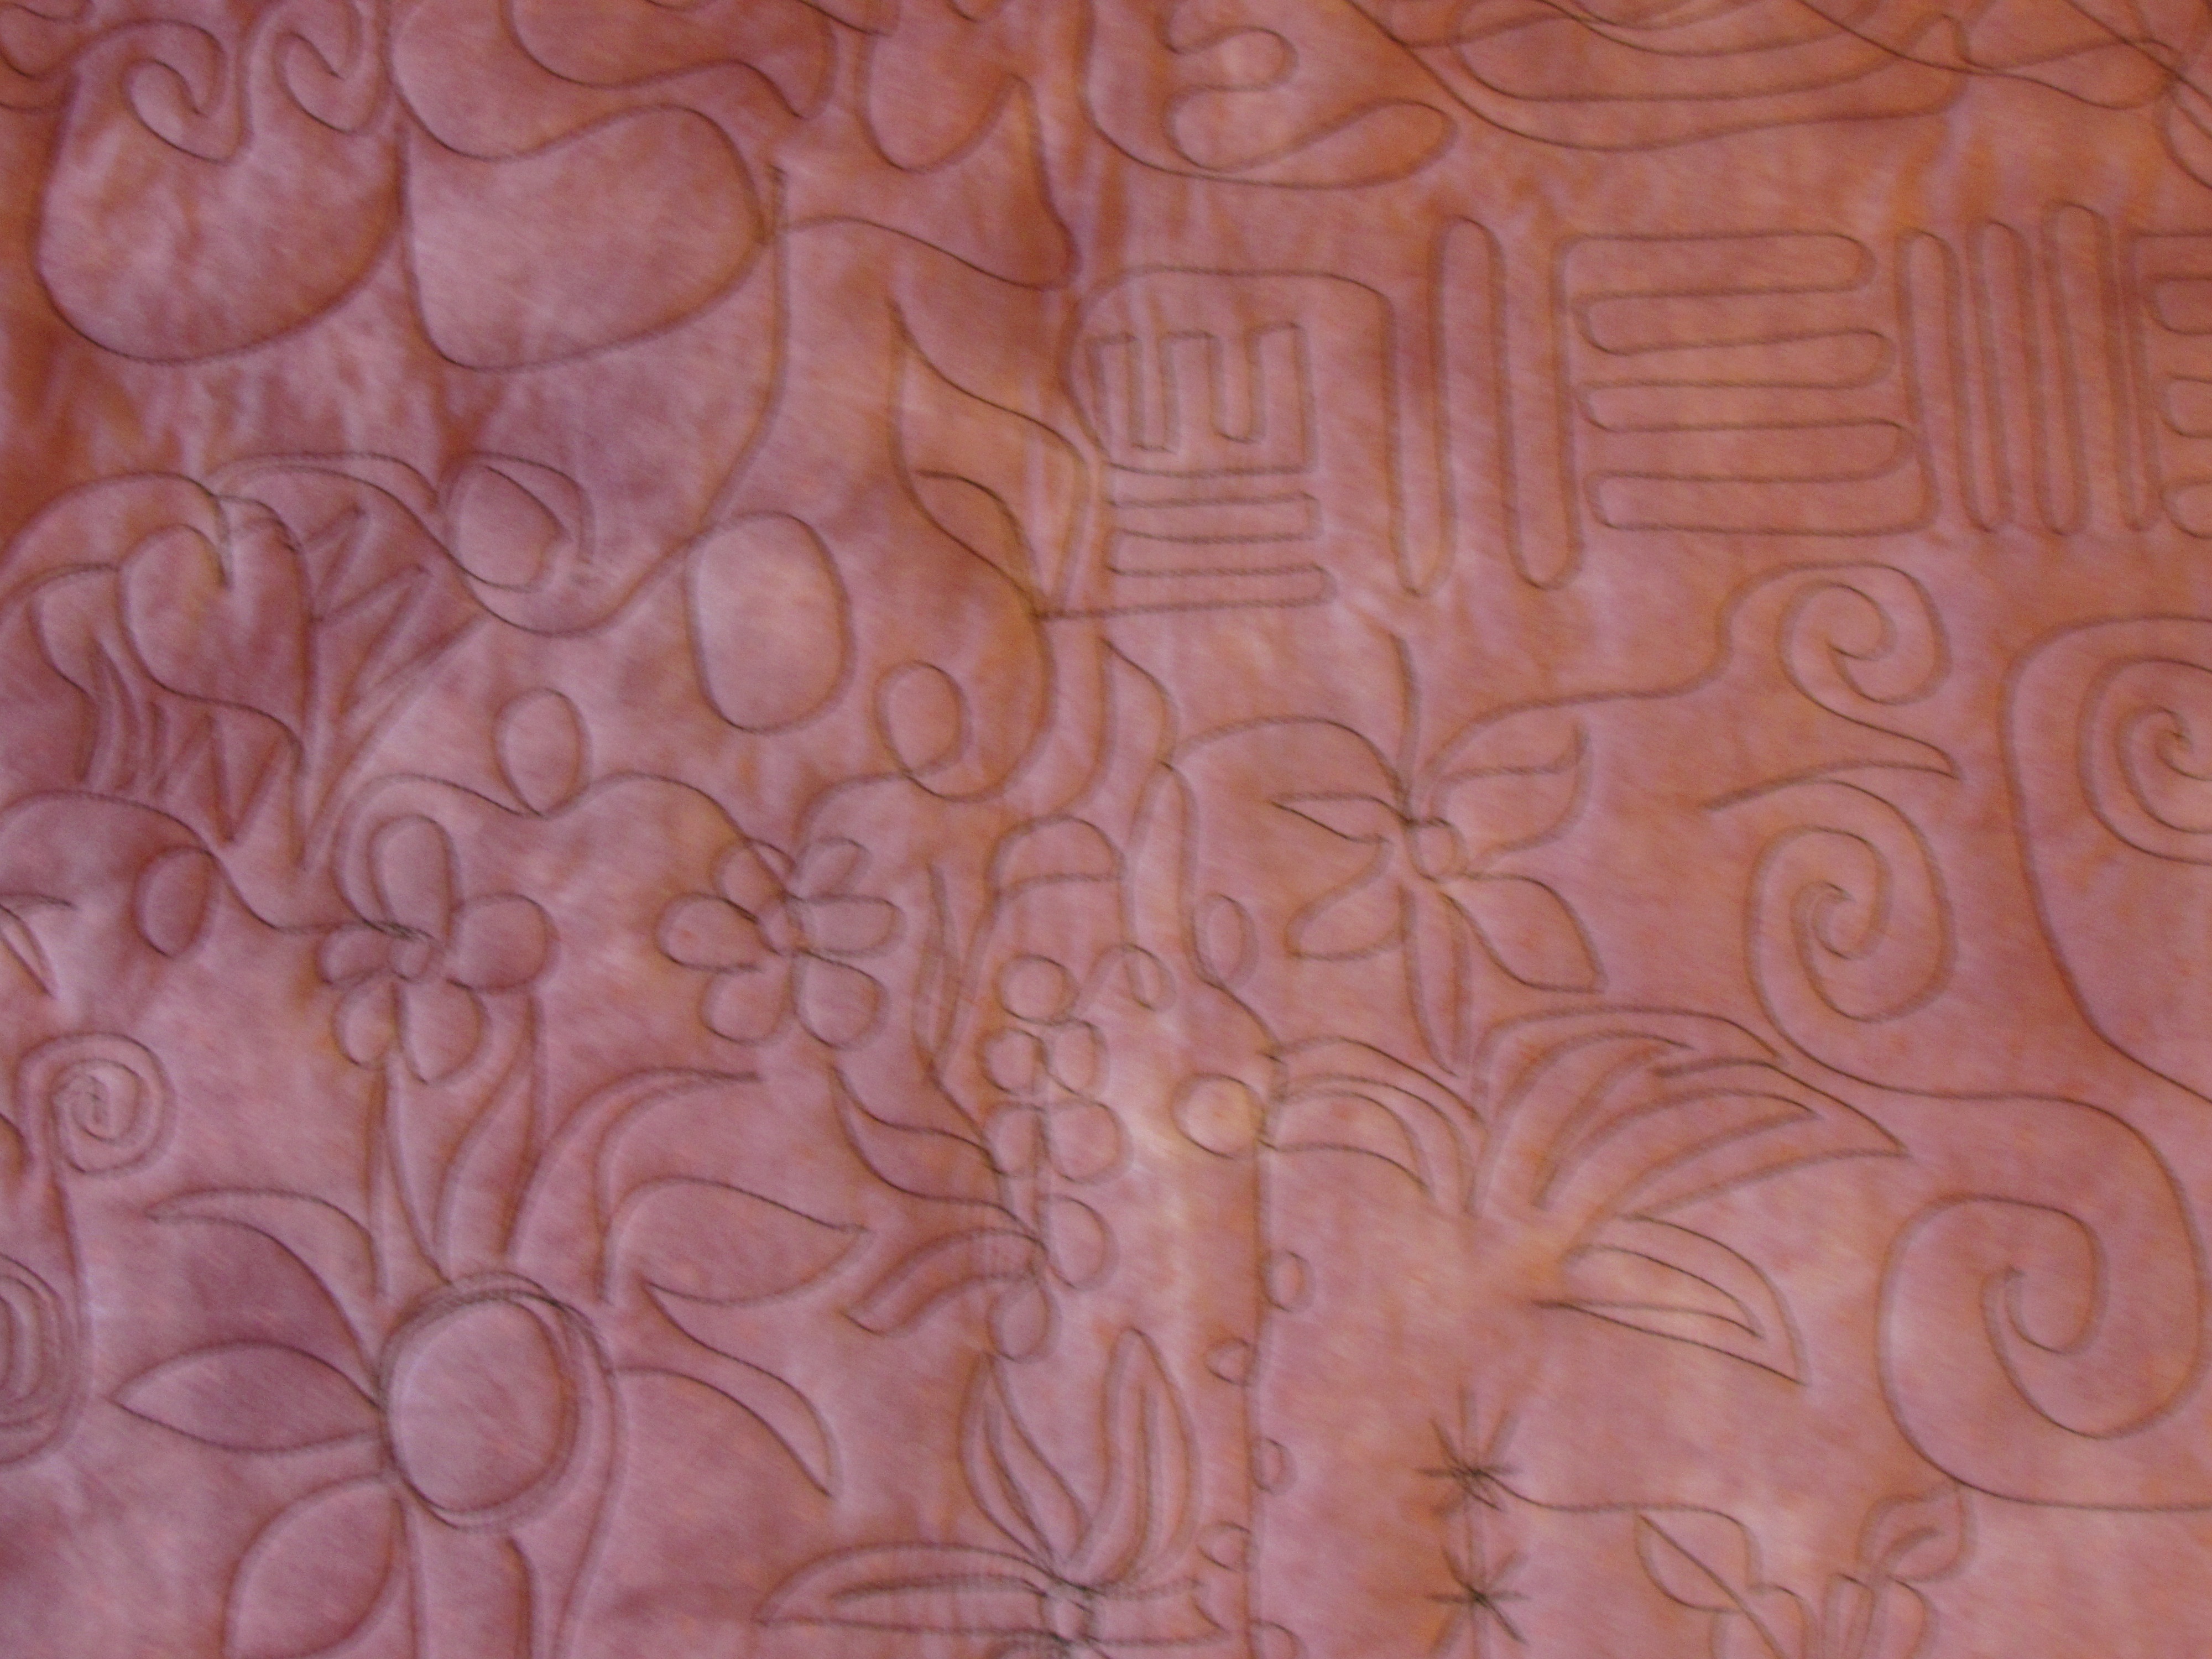
This photo shows stitching done toward the end of the afternoon. The shapes are looking better and the circles were easier. It doesn’t have the harsh flow of the quilting done earlier.

We also had a bit of time to practice using pantographs. This was far more difficult than I anticipated. Just in case you don’t know how they work, pantographs are designs that one can purchase. They are a length of design printed on a long strip of paper.  Once the quilt is loaded, the long strip of paper with the design is placed on a table which is between you and the quilt. Then the design is basically traced, or followed, with a tiny laser beam that emits from the machine. As you trace the design, the machine is stitching the lines that you trace. It was very hard for me to relax and the stitching reflects that,. Also, because I was staring at the design and not looking at the quilt top, I didn’t get to plan where the design would hit the print of the fabric or shape of the block. I didn’t like this. With FMQ one looks at the quilt as it is stitched and there is the ability to plan where to go next. These all over designs done with a pantograph don’t really allow for this. I am sure I would get used to it but it wasn’t as easy as it looks!

IMG_3795

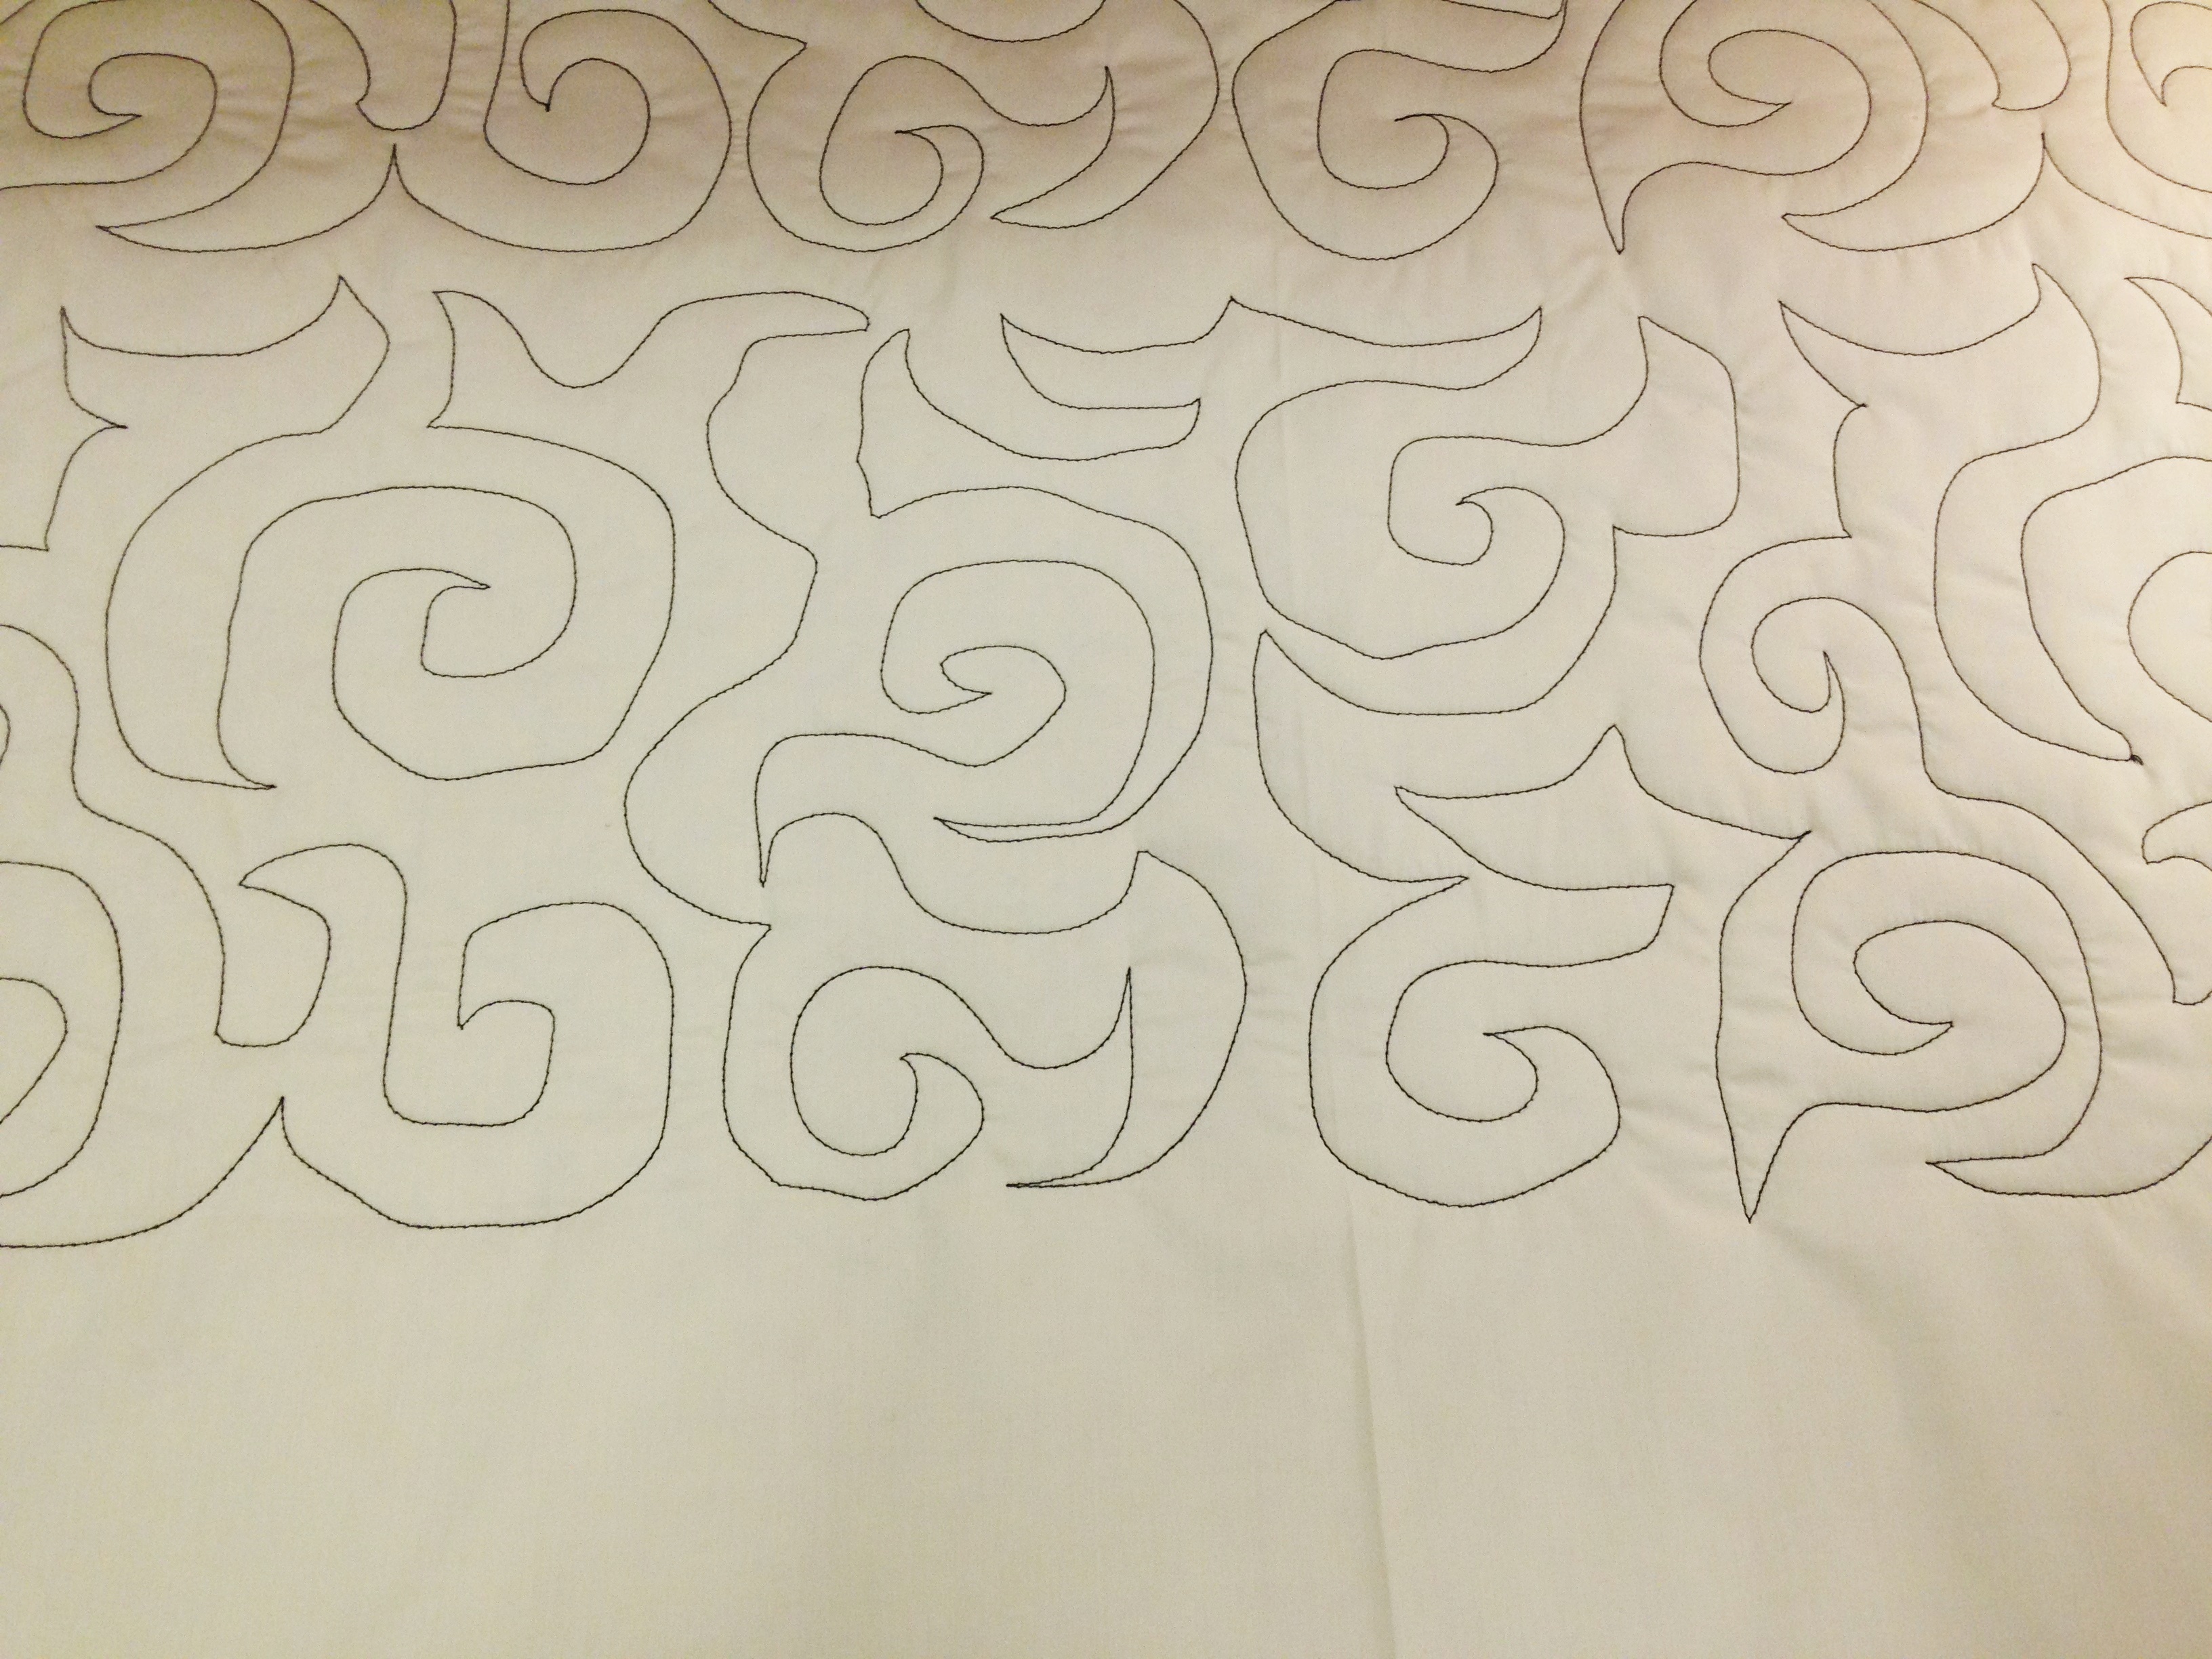
You can see that the stitching is very awkward here. We did trace the panto without stitching a few times and that helped to get my brain to remember the flow of the movement. Practicing will certainly make this flow more easily. At this point though I think I prefer quilting without a panto so that I can look at the quilt and plan the stitching according to fabric and blocks. With simple quilt designs, a panto would certainly be fast and very attractive. Maybe the first time I actually use one, I will pick something with softer shapes?  Or maybe a broader design? Mostly, it is going to require practicing which means I’ll need to make more quilt tops so I have something to practice on. A girl’s gotta do what a girl’s gotta do.  😉

I am excited to go back and practice on something real. I have two quilt tops in the WIP pile and I plan to do both of them as practice on the long arm. Overall, the biggest benefit is this type of quilting didn’t strain my neck. Using my machine to quilt anything larger than a wall quilt creates a strain on my (often cranky) neck so I have to take lots of breaks, stopping every 15 minutes or so. I quilted for a couple of hours straight while practicing and my neck didn’t fatigue. Hurray!!! It was a blast to learn something new and to see what it felt to use a machine like this. I can’t wait to go back and try again.

Linking to several sites – take a look at the list at the top of the page, under Link Ups.

Relief Quilting – Learning Something New

I have been remiss in posting lately. It has been really hectic and I haven’t had time to sit with my laptop. What little free time there was, I spent in front of the sewing machine. A girl’s got her priorities, right? As summer came to a close, Julia had the typical teenager desire to pack as much as she could into those last few days. That is fine – she will soon be a slave to homework and won’t have a lot of free time. There were movies to see, shopping to do, and friends to hang out with. School started Wednesday and so another year begins.

When it is busy I like to have a simple project to work on during those 15 minutes of sewing time that present themselves now and then. I have been wanting to try relief quilting for quite a while now. Over a year ago, I read a cute post over at Night Quilter where Kitty explained her process of relief quilting a name on a baby quilt. I love the look and have been planning to give it a try. I pulled out some graph paper and fabric scraps and got started.

image

After creating this incredibly inspiring sketch of the project that was floating in my head, I brought out some alphabet stencils that I have. I don’t have the whole alphabet but it was enough to get going. I used the E in place of the F. For some reason, the R was a bit bigger than the rest. I think there are multiple sets in the zip-lok bag and these letters weren’t really from the same set.

image

Next I found a rectangular scrap of some Kona cotton and traced the letters, centering them as best I could. I didn’t measure this at all. I used a Frixion pen to trace them. I am not a huge fan of Frixion pens for marking but I figured this was just a practice piece so I wasn’t too worried about the final result. Isn’t there something totally freeing about working on a practice piece? Knowing it isn’t going to be your best work and it doesn’t have to be spot on allows one to sit down and have fun. No pressure.

I placed the fabric on top of the batting (which was a large piece that I had created with batting scrap). Using a walking foot, I started to fill in the areas around the letters I had traced. I used tight, straight-line quilting. Without a real plan, I was sort of all over the place – just filling in areas.

image

In retrospect, I see that I didn’t need to stitch as wide a swath above and below the letters. With my next attempt, I will plan a bit further and decide how far I really need to stitch. I wasted quite a bit of thread with the extra quilting. I used a variegated YLI thread which provided a nice bold look. The more I use YLI thread, the more I love it. The texture is provides is just wonderful.

When the quilting was done I was just thrilled with the look, even with the slightly oversized R!  😉

IMG_7166

When I first sketched the project out, I planned to use a stack of 2 1/2″ squares that I have collected to make a border for this. Once I got to this point though, I changed my mind. This guy was calling out for a scrappy, improv border. With my bin of bright, multicolored scraps, I began piecing bits together with only a rough idea of what I wanted the result to be. For the borders I created two large improv pieces that were both more than five inches wide. Then I sliced each in half lengthwise, creating 4 strips measuring 2 1/2″ wide.

IMG_7155

I laid them, right sides together, on both sides and stitched the border on. It was a bit of a Quilt as You Go project, since I was just sewing right on top of the base fabric and the batting. The bottom borders were stitched a few inches below and above the lettering. (This is where it became very clear that I didn’t need to quilt as high and low as I had done.)

Borders on and pressed, all that was left was to make baste the top to a backing and quilt it. I thought it would be cute to FMQ a spool of thread in one corner and then have the “thread” spooling off of it, looping along the borders.

IMG_7167

After creating that little spool, I wished I had used a solid fabric on each corner so I could place spools on all four of them. I did put one on another corner but it doesn’t show up very well with the print fabric. The overall look is cute though, isn’t it?

IMG_7169I love all the bits of different fabric that surround this piece. They bring back a little memory of whatever project they were originally used in. A piece of green dotted fabric was used for the backing (I think I got it out of the remnant bin at Jo-Ann’s) and I bound it with the same Kona that is in the center.

IMG_7165

As always, I would do a few things differently the next time I made this sort of project.  If I were doing this sort of thing as a part of a larger quilt, I would fuse stabilizer behind the solid fabric and do the relief quilting over just the fabric (sans batting). Then I would incorporate the block into the larger project. Once I was quilting the larger project, I would use a walking foot to outline the letters (to quilt the block down).

I need to make a sleeve for it and then I will hang it above my sewing machine. This was great fun and I am really pleased with the result. I encourage you to give it a try. Let me know if you have any questions or check out Kitty’s tutorial.

Linking up all over the place – for details, look at the top of the page, under Link Ups.

Copy of 1200x627_handmade-holiday_sew

Weekends are the time to shop Craftsy. This weekend they are having a Black Friday “When You Need It” sale on kits and supplies. If you are hoping to make handmade gifts in time for the holidays, it is a good time to make a plan and stock up. I love the kits at Craftsy – the fabric is often a huge bargain and no one will know if you use that fabric for a different purpose. I am loving this Benartex quilt kit – 100 charms and 3 yards of fabric?  Another one is the Eclipse kit,  which uses the Allison Glass Sunprints line. There are almost 18 yards of fabric included and the pattern is gorgeous.

blowout sale

If fabric isn’t your thing this weekend, there is also a great sale on books over at C&T. They are having a $5.00 Blowout Sale and many great quilting titles are on sale. I love C&T – they are the publishers of so many of our favorite quilty books. Check it out! Sale runs through the end of day on Sunday, August 21st.

(This post contains affiliate links.)

Quiltography App Review

I spent $14.99 the other day and it is turning out to be a great investment. I finally quit being stingy and purchased the Quiltography app. Quiltography is an app used for designing quilt blocks and quilts. I have mentioned in many posts that I cannot easily conceptualize design in my head. For example, the lovely secondary patterns that are created by combining blocks or even when the same block is set side by side?  Those are a trick for me. If I look at a block I often cannot see the patterns that will be created in this manner. This makes it difficult to plan a quilt.

Like many quilters, I do love graph paper. I scribble on it all the time, take notes and measurements, count blocks and figure out how many of each piece I will need. But My planning is not always correct. In fact, it is oftentimes incorrect. Plus it takes such a long time to do this. Sometimes I start one sketch and halfway through it I can finally see what the resulting quilt would look like, only to see it isn’t the effect I wanted in the first place. Argh! To illustrate my severely lacking sketchbook skills, here is a sip of truth tea.

image1 (1)

Using Quiltography, I can place blocks side by side, can design my own blocks if I don’t want to use one of the many blocks they in the library and all of this takes just minutes. (By the way, this is not an affiliate post.) Additionally, when the user is planning a project, she can upload pictures of the fabrics that are to be incorporated. At first I thought this would be cheesy but it isn’t. I took a few pieces of fabric and took a quick photo, just using the iPad camera. That way they were already in my camera roll file and very accessible. Having the real fabrics is going to be very helpful. Just in case you are wondering, while I am fairly comfortable on a computer,  I do not think this is a difficult tool to learn to use.

Once the fabrics are loaded, it is quite simple. Choose the block(s) you intend to use and load them with your fabric choices.

quiltography 5

In the block above, I have loaded the first two fabrics (the green and the pink). The next step would be to choose a fabric for the lower right triangle. Then I would save the block and it would be available to use in a quilt design. On the right side of the screen, you can see the wheel that shows available fabrics that might be selected to populate the block.

When arranging the layout for a quilt, the user can add sashing, borders, or cornerstones to their heart’s content. You can easily set the number of rows and columns as well as the block size. The blocks can be flipped horizontally or vertically, rotated or, set on point.

Once the design is as you want it, the app determines the yardage needed of each fabric. It does not break down the block and give you cutting instructions. The quilter has to break it all down. (This is not EQ7 – it is a $14.99 app, after all.)  However, it absolutely does the part I need. It creates a visual for me. That is huge.  Here are examples of the first few quilts I sketched out, mostly in order to learn how to use the app. Most of the fabrics I used were loaded on the app, only a couple of them were loaded with my photos.

quiltography 1

Off to the right, the wheel that displays any blocks you have made. (That same wheel displays fabric choices when designing a block.)

quiltography 3

The picture above shows a combo of quarter square triangles and friendship stars. When the blocks first populated the design, the quarter square triangles were all oriented in one direction. By rotating them on every other line, a good secondary pattern developed.


Finally, this design was made while playing with HST’S and Flying Geese blocks. I like the angular, southwestern look of it.

I am quite certain I will get my money’s worth on this purchase. There are some things that would be nice to have, but like I said, for $14.99, it is full of functionality. I love it so far and hoped to share it with you in case it would be helpful for some of you. If you have any questions about it, feel free to leave them in the comments and I will get back to you.