
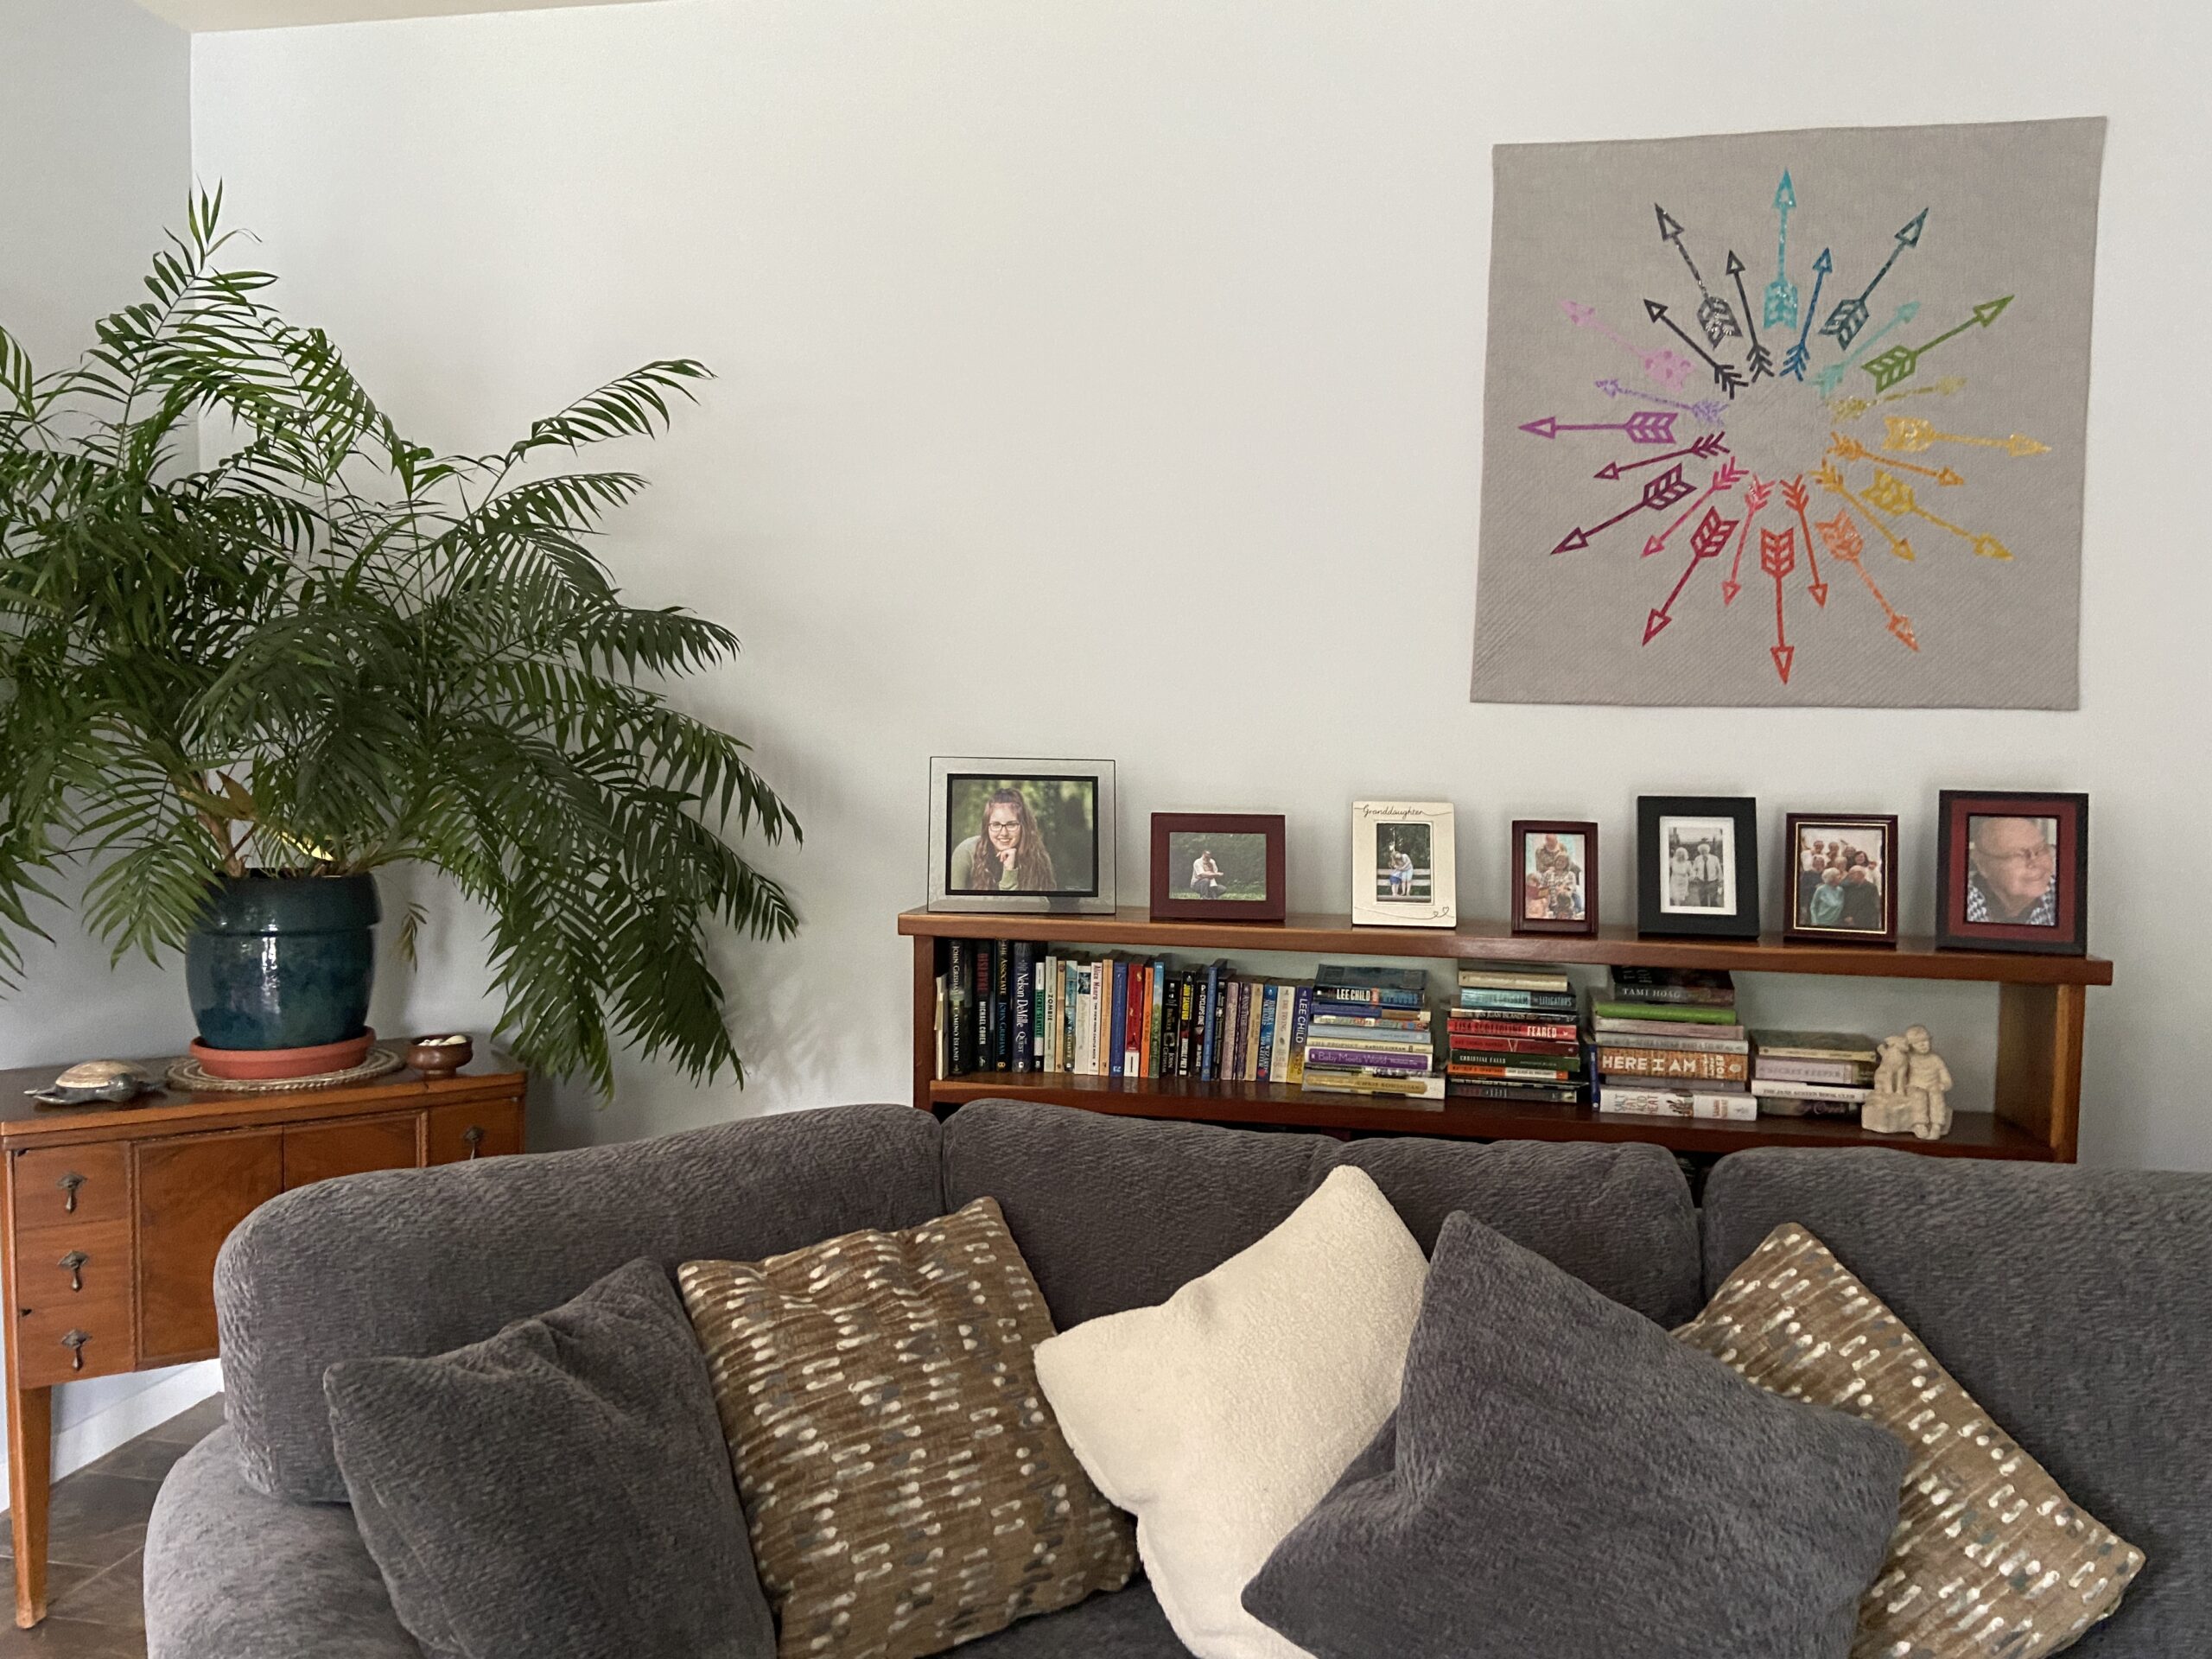
The quilt I am sharing today exemplifies our many choices and the potential with each one. All arrows point outward to a possible path taken. Many colors to choose from allows a person to pick what is right for them. This project is really different from anything I have made previously and thus presented a few hiccups along the way. But the result is great and I am happy to see it hanging in our family room.
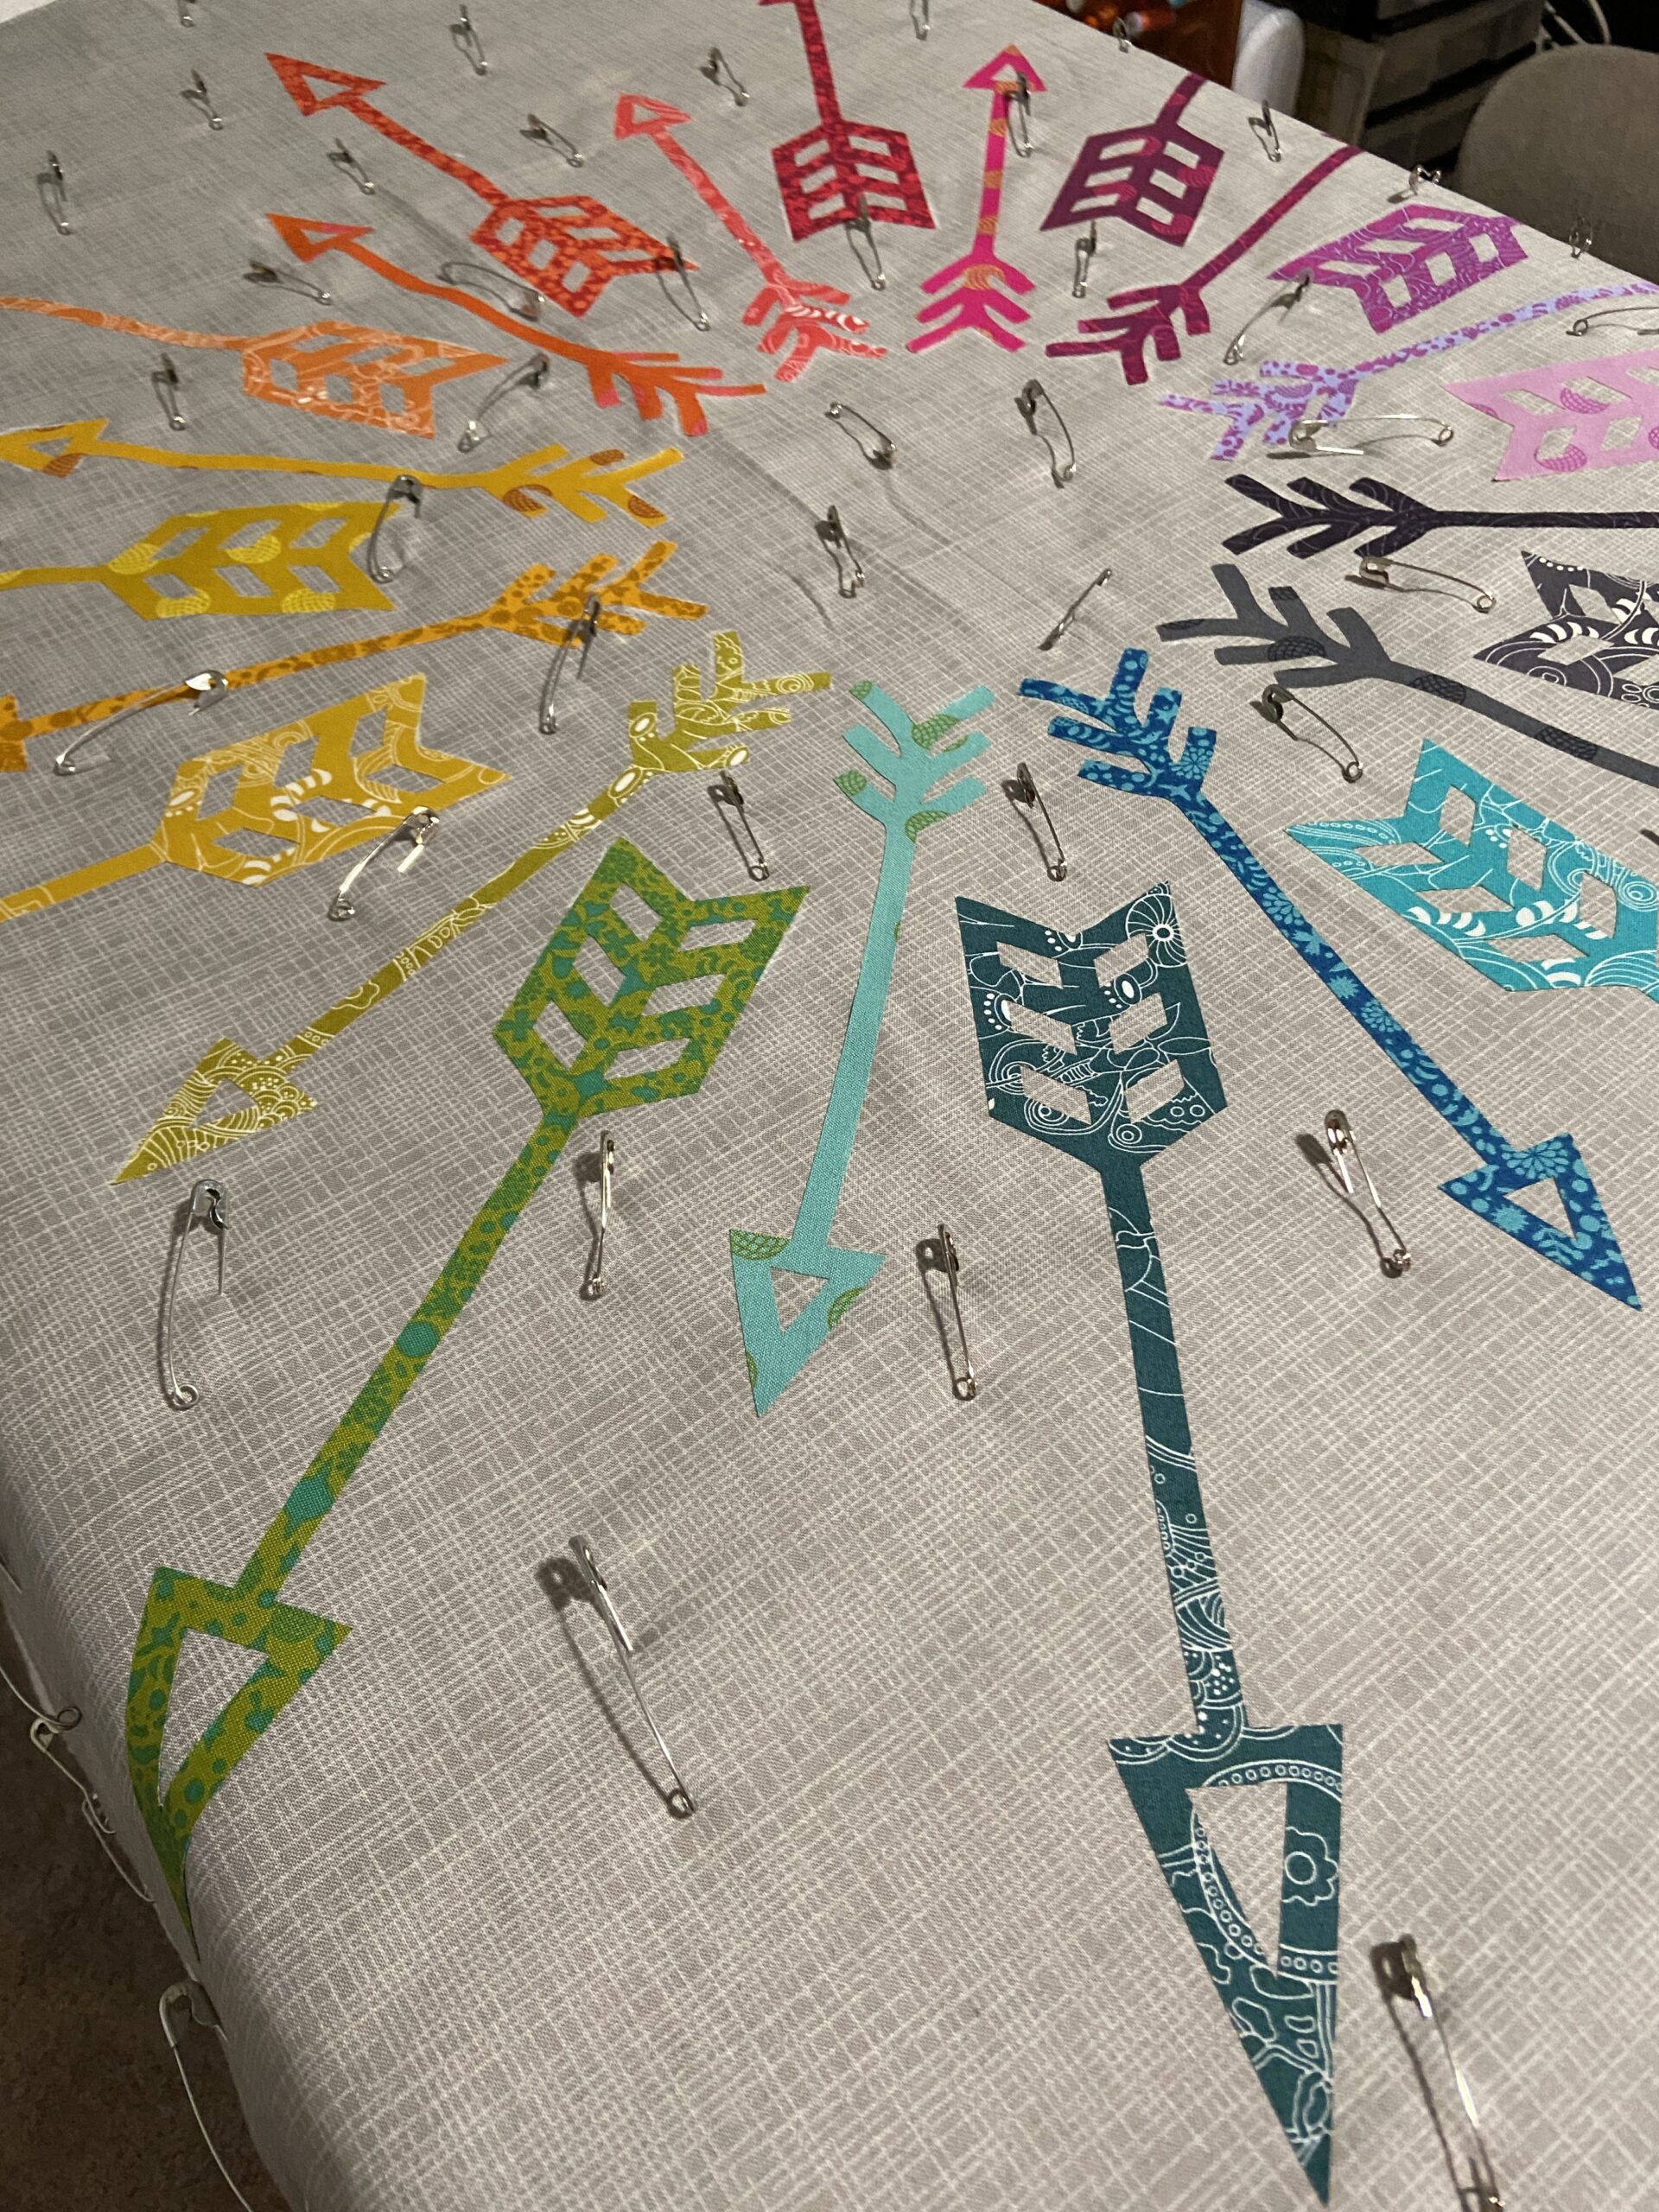
I bought this as a kit at a quilt show last summer. The arrows are laser cut from Alison Glass 2016 Sunprint line. They had the fusible backing already applied to them. All of this is great because the arrows are very thin and delicate. It would have been a tedious process were I to have to apply the fusible myself. Anyway, I think I actually fused the arrows to the backing in November. With the holidays and myriad illnesses all winter long, I didn’t get it basted until some time in February.
To really be sure the arrows stayed glued to the backing, I decided to use matchstick quilting. I started with wide-ish lines. Maybe spaced an inch apart? Then I filled it in, stitching between the lines. This is when I had the problems!

As I got to the corners the fabric just ruffled – it was a mess and I was really concerned. I posted on Instagram and Facebook asking for advice. Yvonne, Quilting Jetgirl, sent me a link to a tutorial she has for blocking a quilt. I decided to block it before I finished quilting it. I was somewhat skeptical because I had tried to block a quilt some years ago and wasn’t successful (and now I know I didn’t do it correctly)! But with her tutorial, I got to work on this piece.
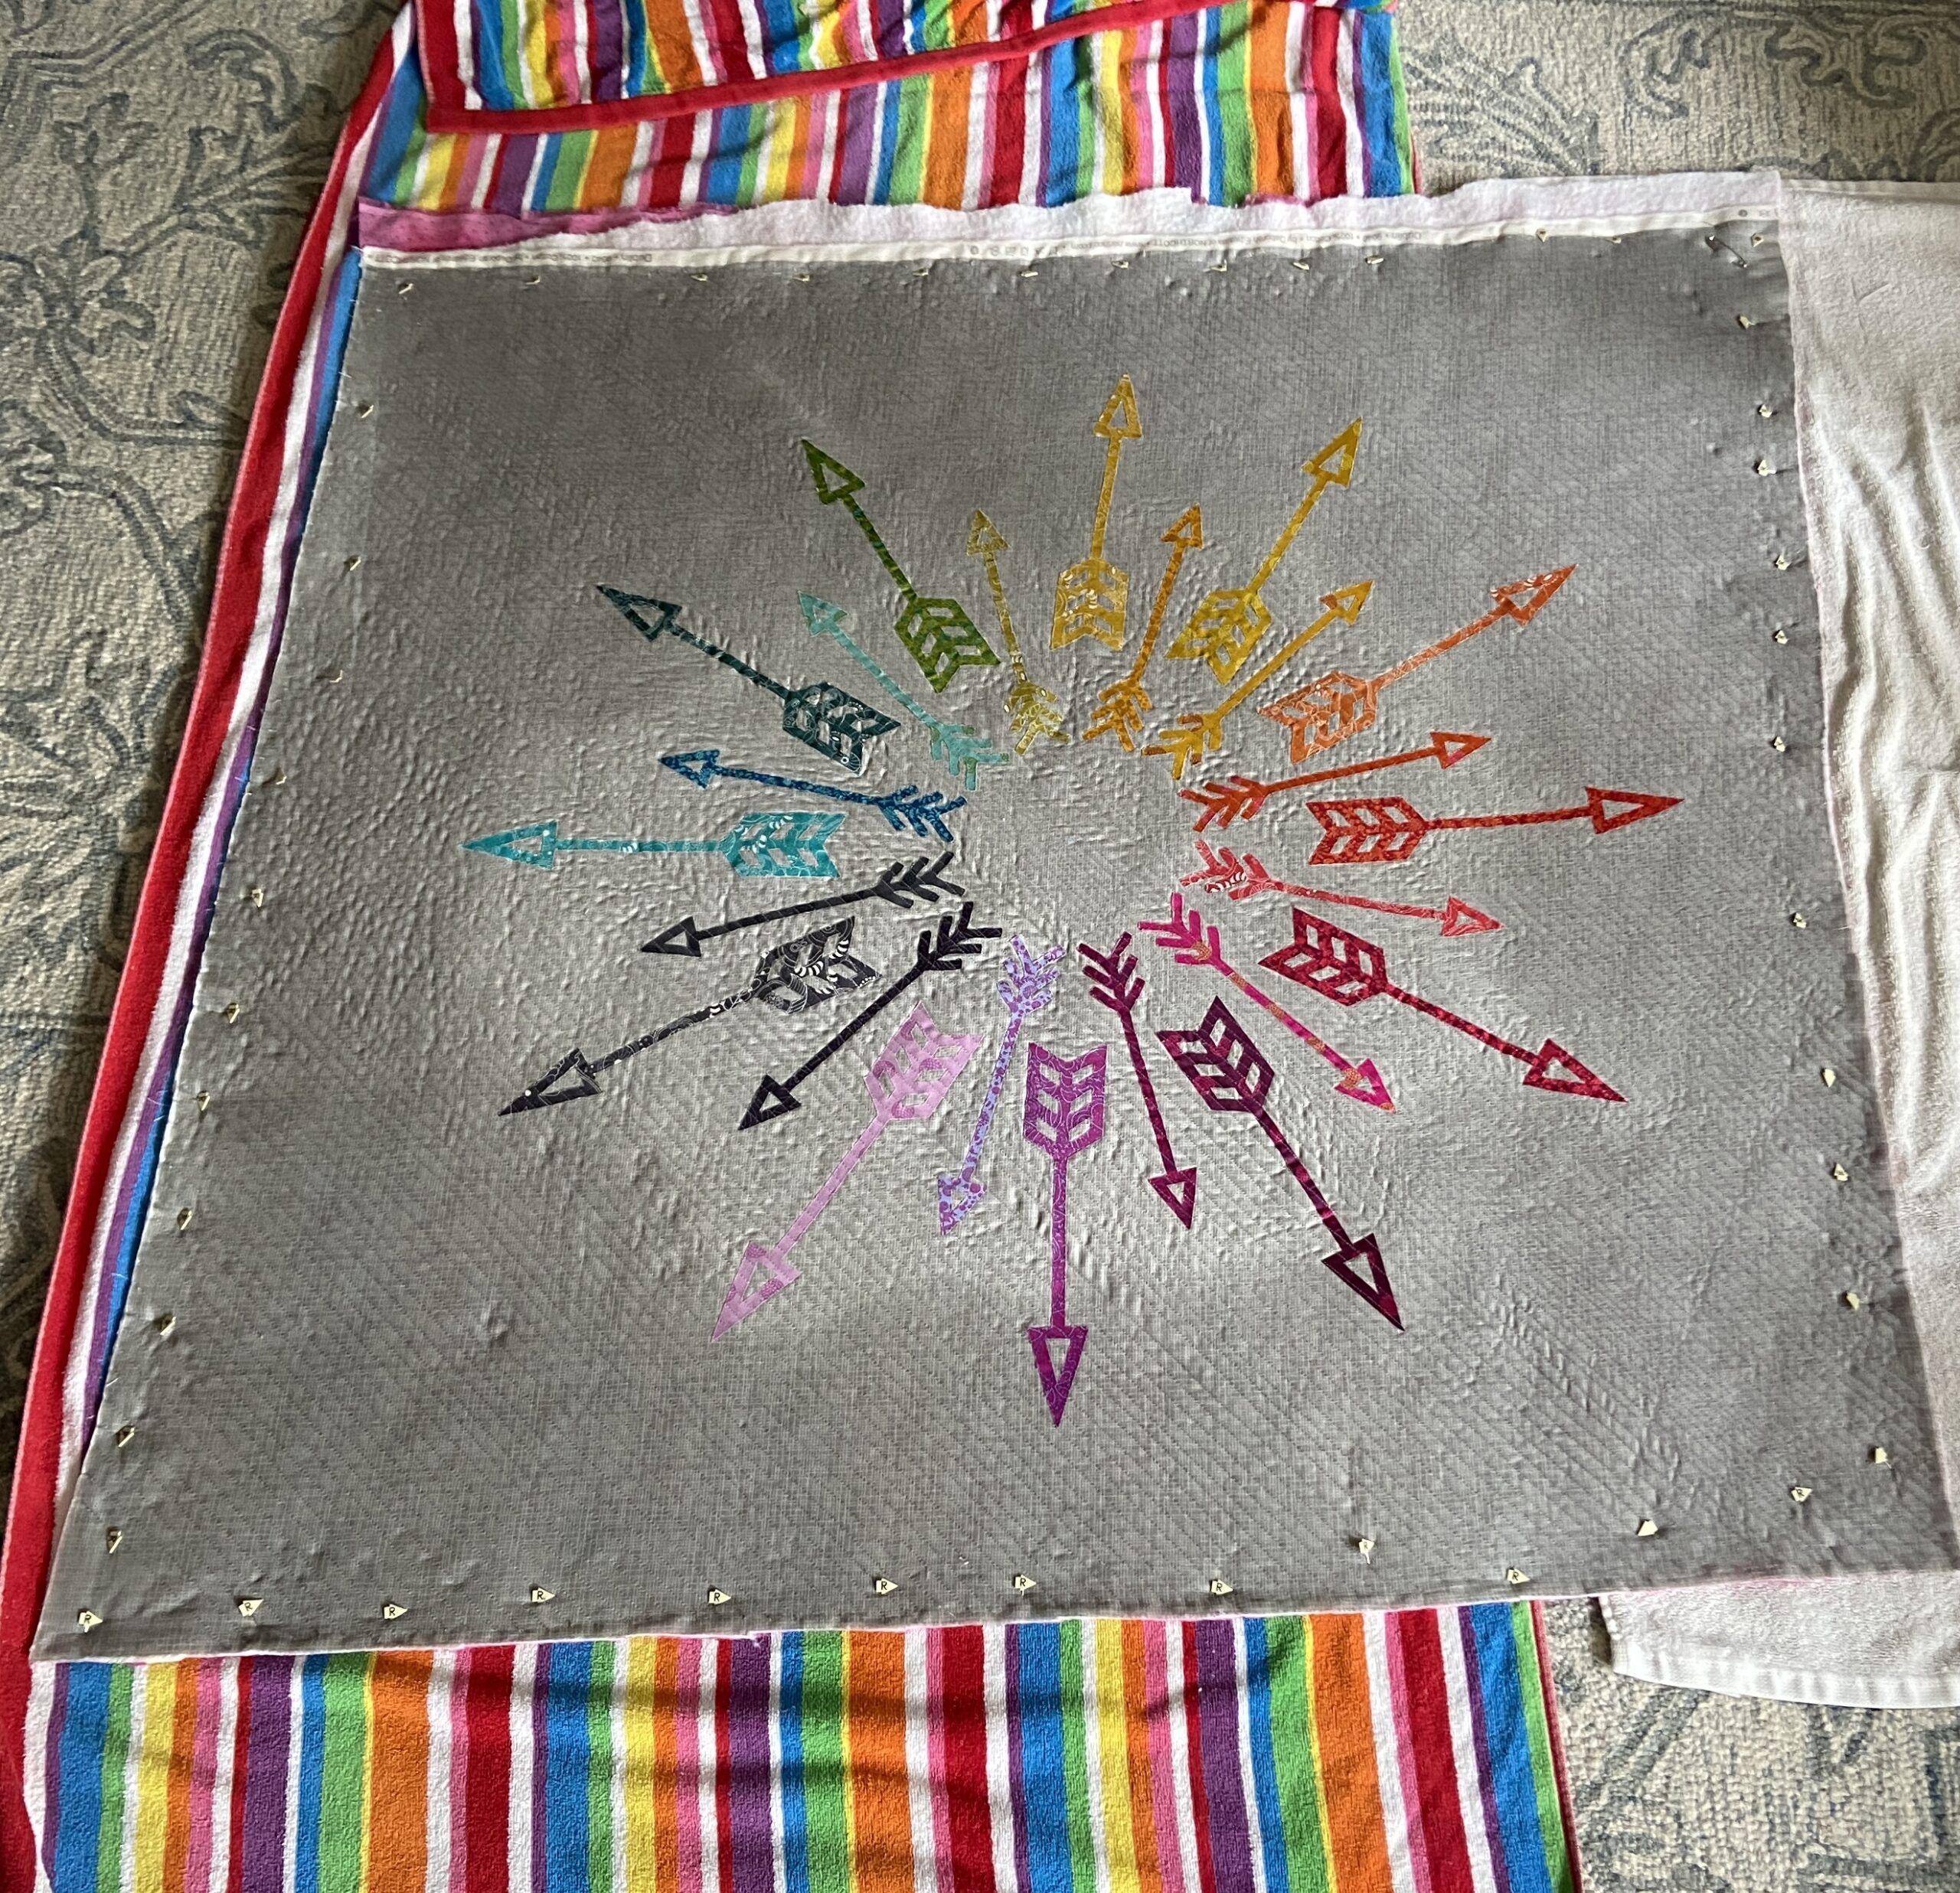
With beach towels under the quilt to protect the carpet, I sprayed water all around the permitter of the quilt. I didn’t want to soak the arrows if possible because I think it would have diluted the fusing. But I really wet the outer portion. Then I took long pins and pinned all the way around. As I was pinning, I was either stretching or patting inward to get the fabric back into shape. I left it pinned to the towels & carpet for several days to be sure it was truly dry. This worked beautifully.
After the quilt was flat and shaped nicely, I finished the quilting. With Yvonne’s advice playing in my head, I stitched very slowly and tried to be sure not to pull on the piece at all.
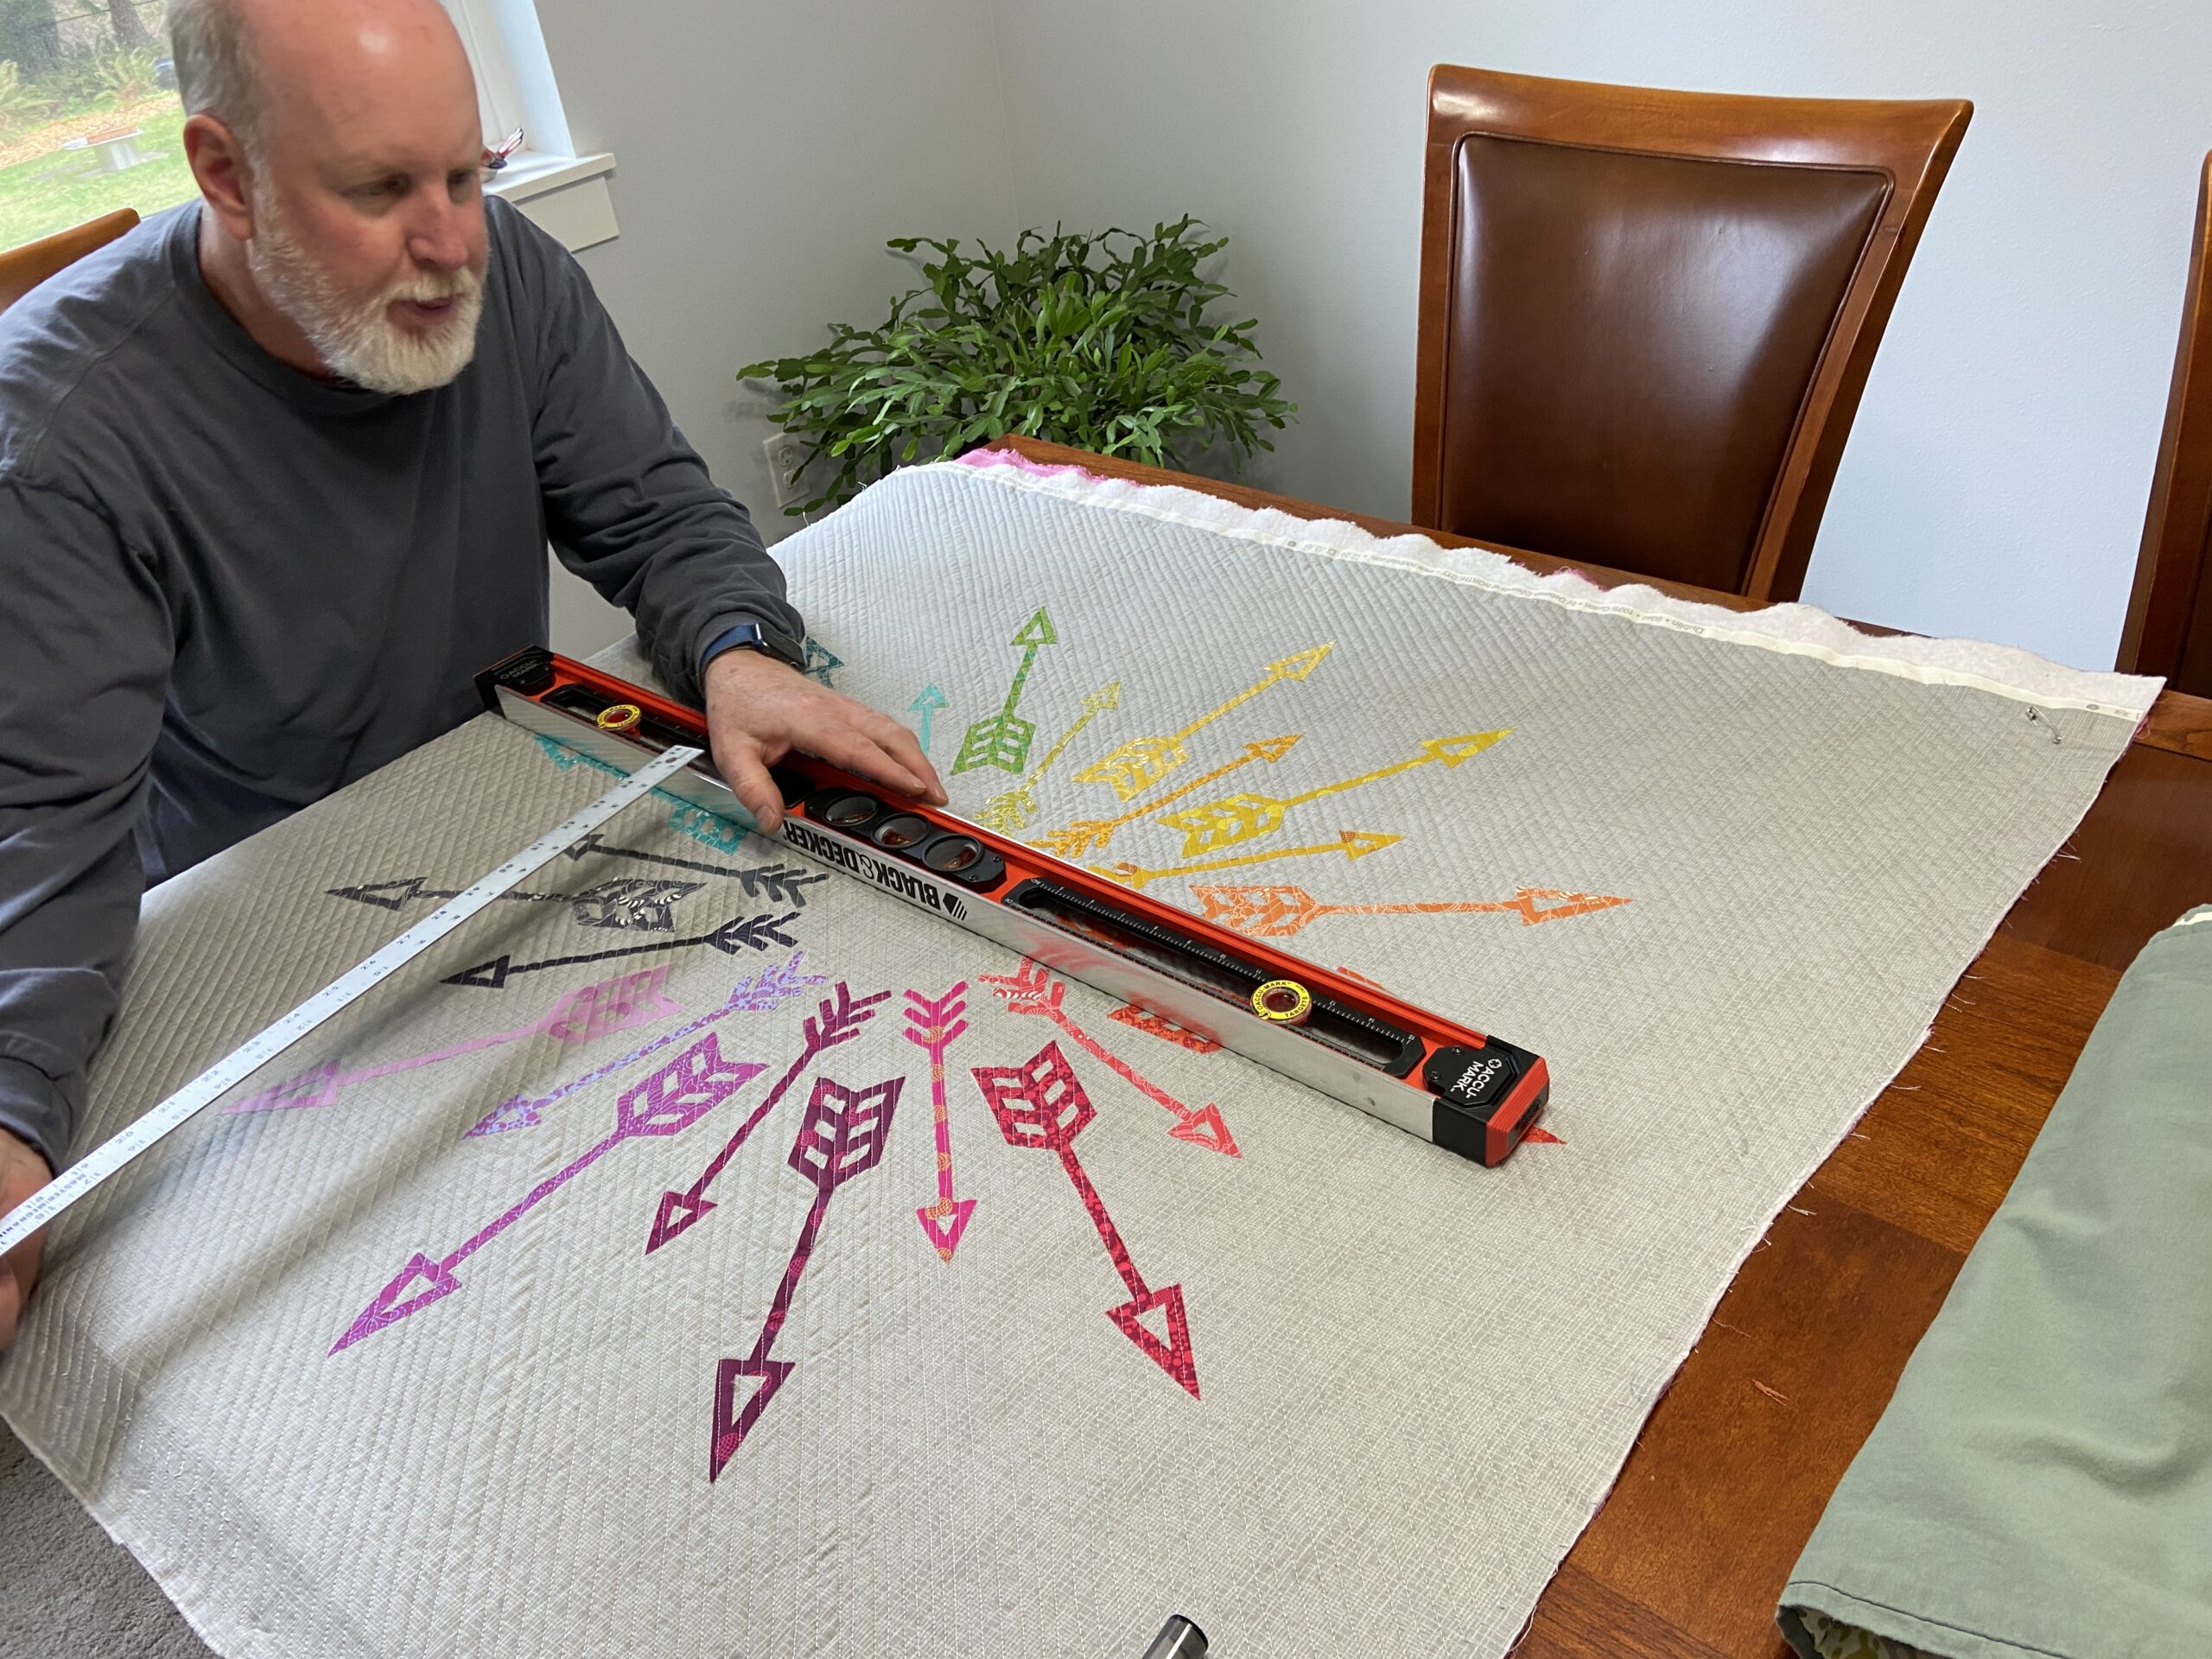
The next task was to square it up. Truth be told, I did a poor job of placing the arrows on the background. Because of this, I was having a heck of a time figuring out how to square this and have the arrows centered properly. Ray to the rescue. This is right up his alley and he got a border drawn for me to cut. After squaring the quilt, I did a facing instead of a binding. I wanted a clean edge for this piece.
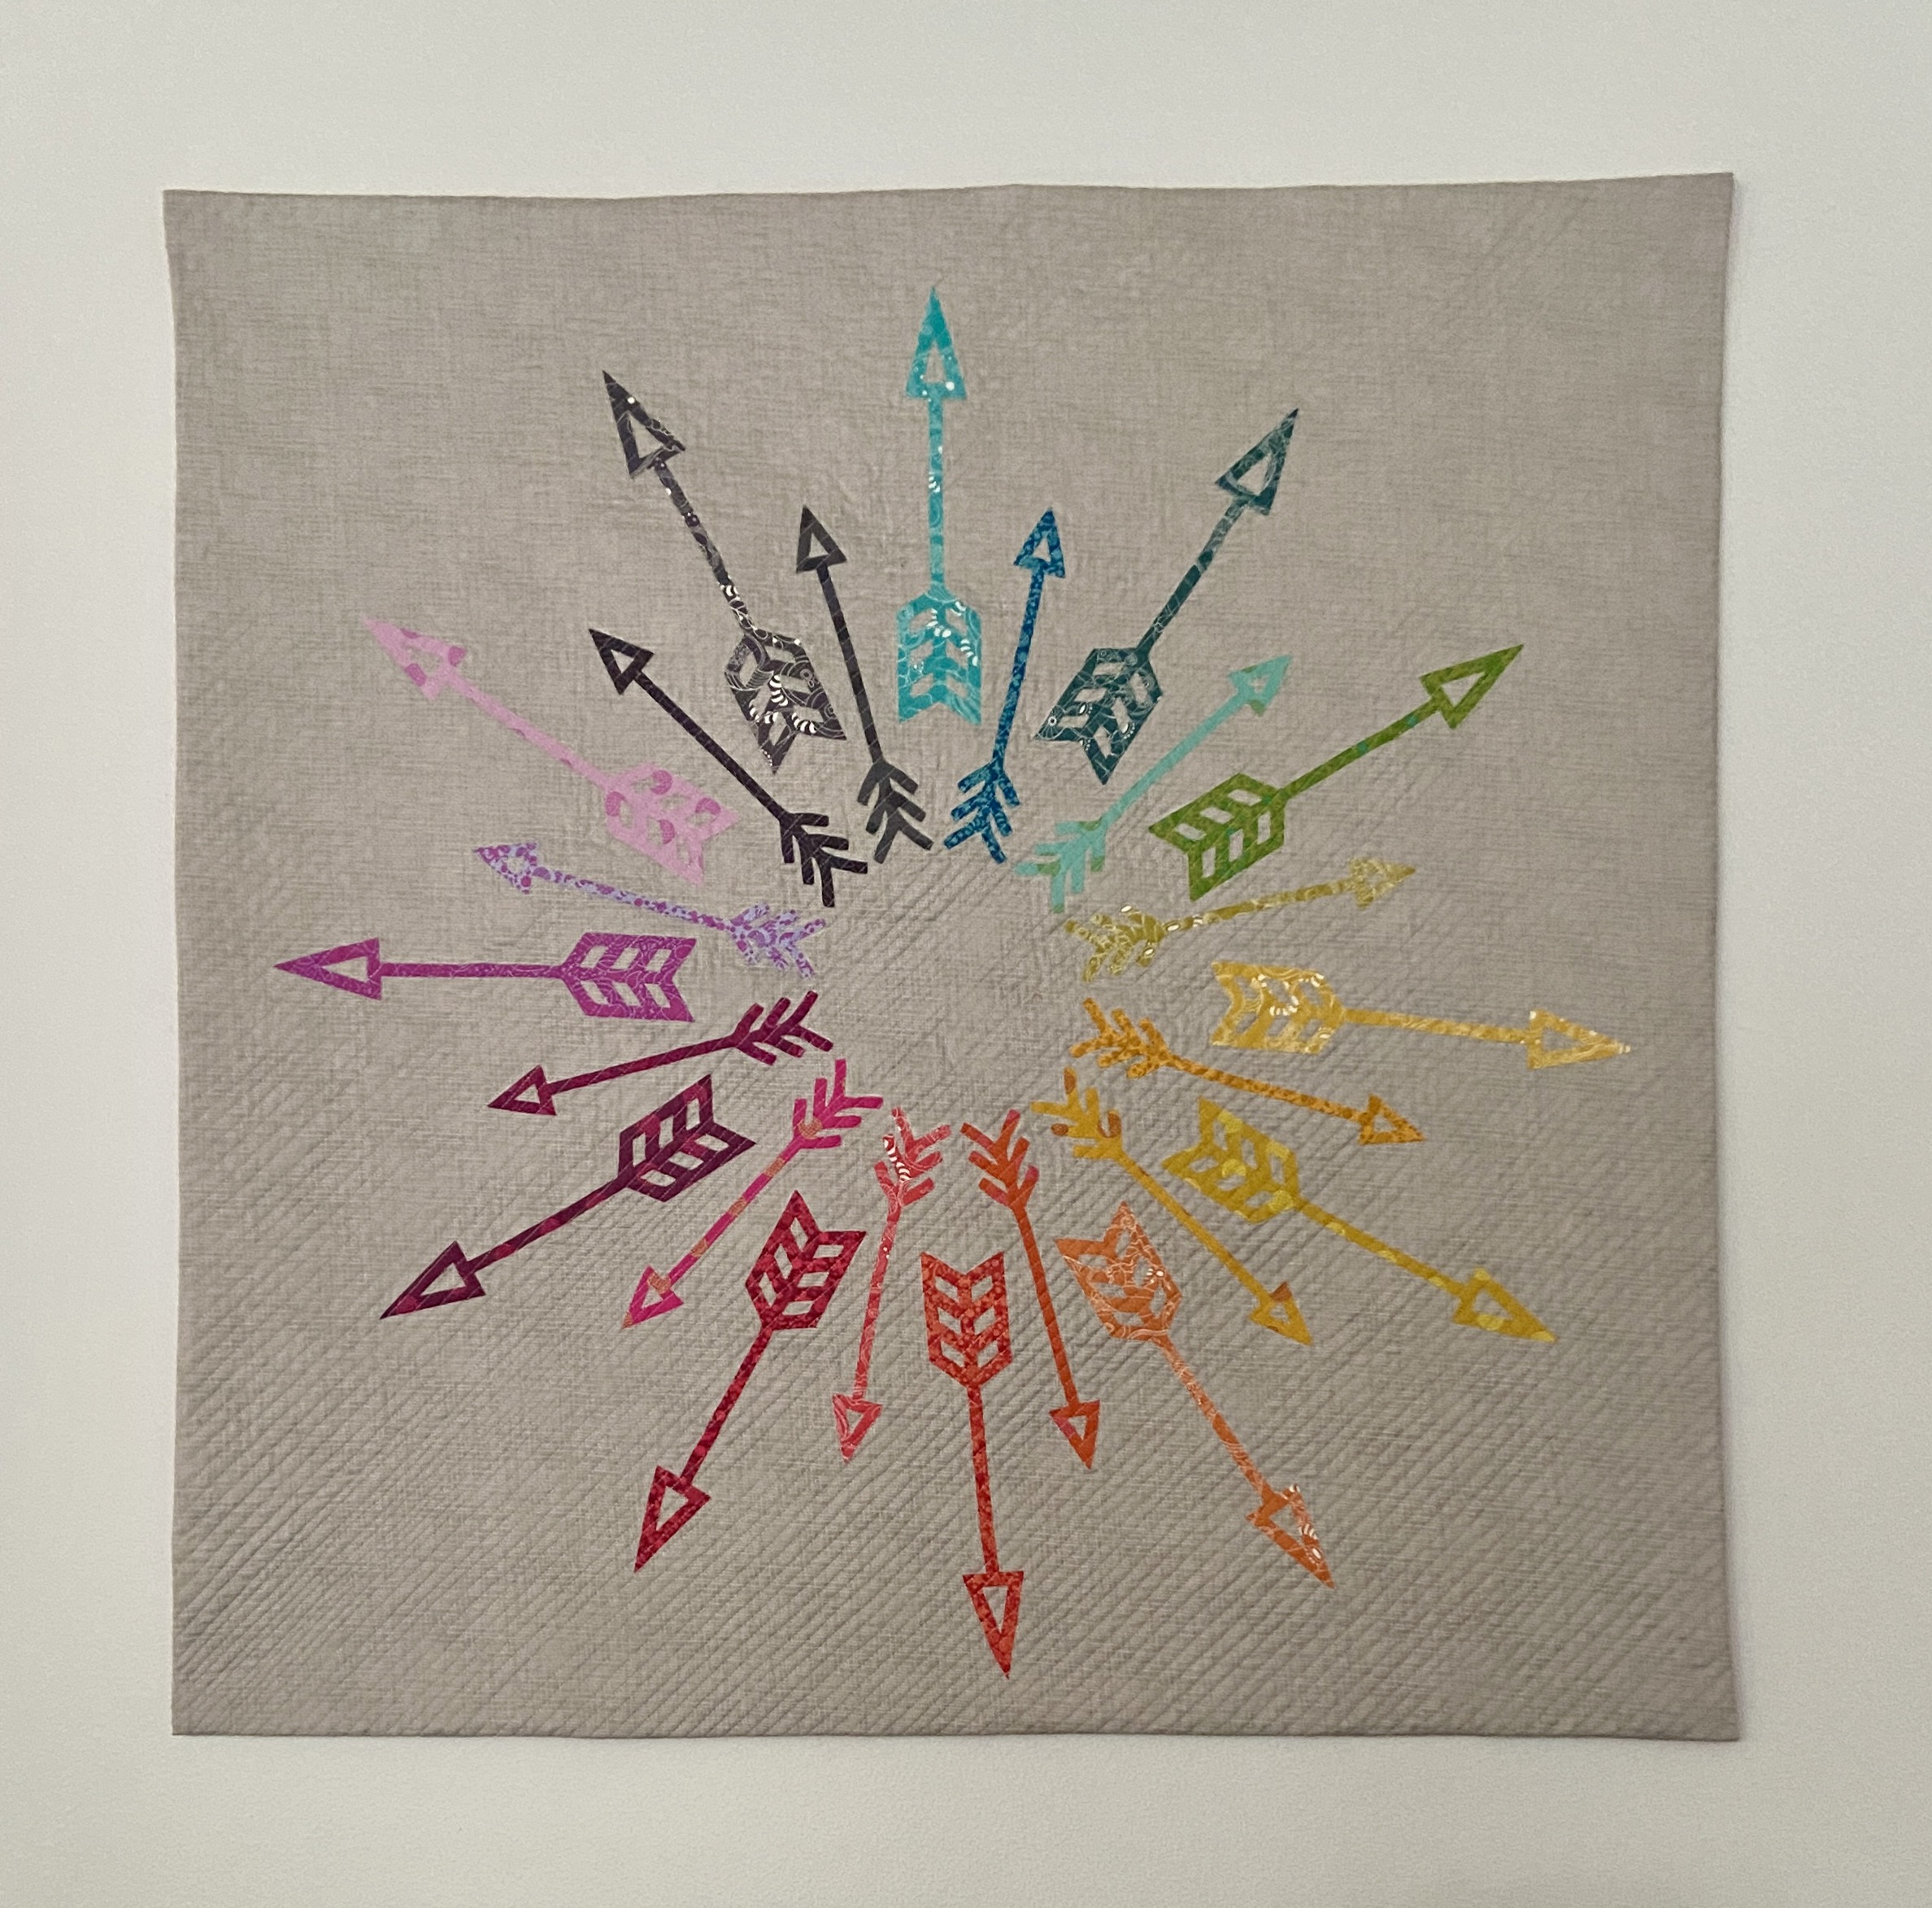
It is hanging above the couch and I love it. This project included quite a series of lessons for me! But this is a good thing – there is always more to learn.
Happy to call this finished and to check off one more unfinished project from my list.
I have moved on to the next UFO. I am quilting the chambray patchwork this week. Hope to share it with you soon!
WOW! What a great wall quilt! Thank you for sharing your problems with it and how you solved each one. That’s one of the best things in quilting, I think — the creative process often leads us to places we ‘haven’t been before’ and figuring out alternative ways to do things or to solve problems is what really makes it a bit more fun to me (although not at the moment when working on it!). I love the colors and how you quilted it, and what a blessing your husband was in solving one of the issues — a collaborative effort! Beautiful!
Deb, Thank so much. This quilt was frustrating at times. It was so nice of Yvonne to help me with parts of it. She is a wealth of information! It surprised me how well the blocking worked. I actually have a wall quilt that annoys me because it has some flair to the edges. I might try to block that one and see if I can make it hang flatter. Hope life is treating you well!
Good for you for persisting and learning along the way. Your quilt looks great on the wall!
Thank you Laura. I am pleased with it overall. I admit, I do look at the arrows and wish I had positioned them slightly ‘straighter’ if that makes sense. But I keep telling myself to let it go. We are always our own worst critics. Sigh. It is satisfying to learn a little something with each project though. Take care and hope all is well.
That is a fantastic wall quilt, Bernie! I am so glad you shared how you solved the problem and got it to work out like you wanted. Have a great day!
It looks great on your wall, and I’m glad you have it up where you can see it and feel good about the work you put into it. I love the quilting community, too, for help when we need a word of encouragement, or solution, etc. Yay for Ray, too, helping out!
Thank you Wendy. So glad Ray is willing and able to do the spatial stuff for me. My eyes just don’t work that way (or my brain, I guess). He has a more organized brain than I do. If that makes any sense….
Wow, the quilt turned out beautifully and looks great in your living room. Some quilts really do test our patience and skills, don’t they? I’m glad I was able to help a bit, but you did all the hard work to make it work. The facing was a perfect choice to finish this one off.
Thank you!! Your help was greatly appreciated Yvonne. I was so frustrated with the way the fabric was rippling. I honestly thought about just tossing it. Very happy I didn’t!! Thanks for sharing your knowledge with me –
You did fabulously on this quilt. I love the matchstick quilting and that you were able to block it so well. I have never tried it, but I am not surprised her instructions worked. It is gorgeous!
Your quilt looks great hanging where can see and appreciate all the hard work you put into it. They say we learn something new every day. Well done Bernie!
I agree Cindy – we do learn something new every day (or most days). This 39″ square piece offered many lessons – on matchstick quilting, proper placement so it could be squared nicely, how to block a quilt, and how to handle a quilt so it doesn’t become so wonky in the first place. That’s a whole lot of learning from one project!!
Yay for you and Yvonne and Ray for getting this project to the finish line together! And yay for continuing education and always learning about new directions to take. It looks great in your family room. I like the idea of pre-fused pieces.
This was definitely a collaborative project. So nice to have the help of others.
Thank you Janine!
My other half had also been put to work helping as he can “see” things. So do we share one more thing – is Ray an engineer?
Love the meaning of the wall hanging, and that matchstick quilting looks great with it. Well done for being tenacious! Bernie
Hi Bernie! This post needs a multitude of Like buttons because one is just not enough. And, I would prefer it if it said Love instead. What a cool project. This represents my life’s motto perfectly. We all have different paths to choose from . . . we don’t know if we’ve made the correct choice but there we go. And the rainbow colors just scream inclusivity to me. It’s very modern and lovely and so many good things. I also learned some lessons along with you. I have had a quilt with ripply edges and didn’t know why. I have blocked a quilt in the past and somehow managed to do it correctly. And, I can easily see how it would be difficult to place those arrows. What a nice job you did!! All around, I call it a masterpiece. {{Hugs}} a bunch! ~smile~ Roseanne
Thank you Roseanne. Your comments are always so uplifting! I appreciate you.
B.
Hi Bernie,
What a great quilt! You did a wonderful job all the way around. LOL!
You can’t tell you had issues with it, because it looks perfect!
Thank you for sharing.
Gloria Herrera
“All the way around”. Hahaha, That is pretty cute. Thanks so much Gloria. Very nice to hear from you. Sure do hope all is well with you.
This is so good Bernie – I’m so glad you persevered and that Yvonne was able to throw in her 10 cents’ worth too (she’s so clever). It really looks wonderful and looking at the final piece you’d never imagine you had any trouble with it. So straight and true (like the best arrows, eh?)
Thanks Kirsty. Perseverance paid off this time around! Hope your back is healing so you can get back to normal. Take care.