
I have thought about hosting an event like this for a long while now. Occasional frustration while scrolling my various social media feeds got me thinking. While I do love the inspiration found on Instagram and Facebook, sometimes it makes me wish I were more skilled or more artistic or more prolific a quilter or more, just more. Know what I mean? It seems to me we should share both – the mistakes and the achievements, the blunders and the best of our work. This would present a balanced picture, it would show quilting – in real life!
In an effort to do this, I invite anyone who wants to share to leave a story in the comments. Explain what your mistake was, how you did or didn’t fix it, and what you learned from it (if anything!). Bloggers – if you write a post describing the same, please put the URL in a comment so we can all click through and read about your silly mistake or misunderstanding.
I have so many I could tell you about but I have chosen one big one that I chuckle about almost every time I bind a quilt. I would define this as a complete misunderstanding. I don’t have any wonderful pictures to illustrate this so I will just have to tell the story.
When I started quilting, I basically taught myself. This was back in the late 1970’s. At that time, I made three quilts – each one queen size. I had no clue about actually quilting a quilt so they were hand tied. Also, I didn’t know about binding a quilt so they were sort of made ‘envelope’ style. I layered the front and back, right sides together. Then I stitched around the perimeter, leaving an opening large enough to turn it right sides out. Then, get this, I took a layer of polyester batting and inserted it into the quilt and basically crawled in with it as far as I could to smooth it out. So the batting wasn’t really stitched in to anything and you can bet it was lumpy but I was 17 or 18 and I thought this was fine. This is sort of the back story – it isn’t the misunderstanding. We haven’t gotten there yet! I just wanted to tell you where I was coming from as far as quilting knowledge goes! It helps to know that though I began sewing when I was 11 years old, I made clothes – not quilts. I took home ec classes in high school and learned a lot about sewing then. You can read a post here that talks more about those classes if you like. The rules for making clothes are quite different than those for making quilts. This is what caused my major misunderstanding!!
Fast forward from 1978 to 2010 and I began quilting again. This time I had the benefit of all the tutorials on the internet. I read many and they were (and still are) very helpful. Some of the first projects I made were minis and table runners. Then I moved on to trying to make some lap size quilts. Binding quilts was quite tricky for me. I would look at the pictures of other quilts and the crisp bindings with beautifully mitered corners and wonder why the heck mine looked so weird.
Want to know why? Let me tell you. For the most part, I understood the process of making the double fold binding, stitching to 1/4″ before the corner and then off the corner, then I mitered the corner as I turned. All of that worked well. Once I got the binding entirely stitched on, I made my mistake.
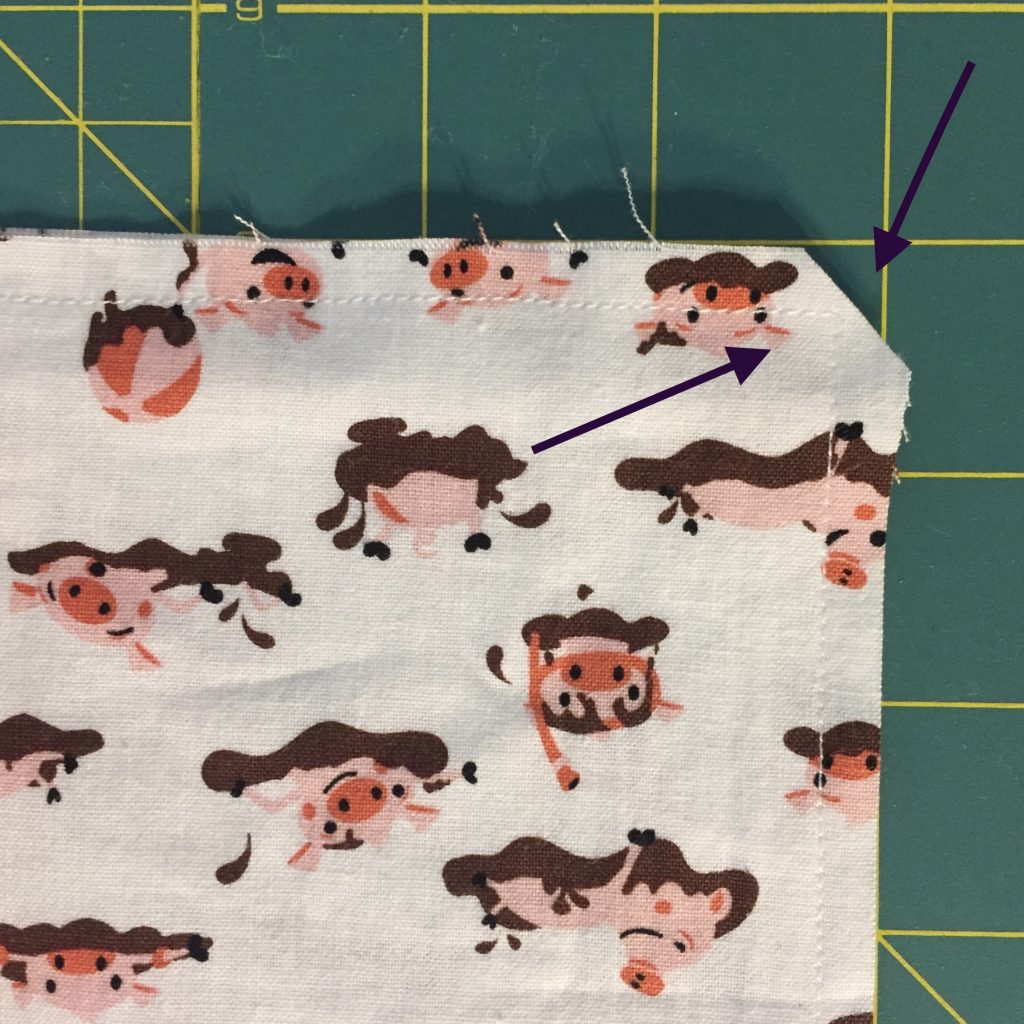
I assumed that the 90 degree corner needed to be clipped! After all that work, I went to each of the corners and snipped them off!!! No kidding. I didn’t do this only once either. I did it to a couple of quilts before I figured it out. When sewing clothes, pillow cases or anything with a 90 degree angle, the corner is clipped off so when you turn it right side out, there is a nice crisp corner without excess fabric bunching it up. Well, as we know, bindings are folded over the corners and the corners need to be intact so they fill the binding. My habit to clip those corners was so strong I just did it automatically. Let’s just say the bindings on the first couple of quilts were very weird indeed. I don’t have any pictures of this. But I assure you, I did it repeatedly.
There were actually several habits that were hard to change when I started quilting. Using a 1/4″ seam felt so wrong to me. It didn’t seem like such a small seam could actually hold the pieces together. When sewing clothes, it is standard to use a 5/8″ seam. Also, I am used to back tacking each time I start and stop a seam. Most of the time, I still do this. Old habits die hard. But when I am piecing small blocks, it is problematic if I tack at the beginning and end of the seams – it can make my seams too fat, make the blocks too small, and sometimes causes those bitty pieces to get sucked into the machine at the feed dogs (which makes me crazy!)
We are all constantly learning. Many of my readers are amazing quilters, some are quite new to it and others are like me – gaining confidence with much still to learn. But – we are all right where we should be. Our projects should not be compared. They are as unique as each of us which is what makes life interesting.
I am looking forward to reading tales from others about your blunders, mishaps and misunderstandings! I had planned to have a link up ready for those with blog posts. Well, the weekend got away from me and it didn’t happen. Instead, bloggers, please leave the URL link to your blog post in a comment. Readers, please scroll the comments and click through to read the mistakes others have made. I can almost guarantee I will both learn something by reading these and will also have a laugh or two. For readers who are not bloggers, will you tell your story of a mistake or goof you made? Explain it, tell us how you did or didn’t fix it – share with us! Your story in a comment enters you in the drawing for the prizes! Readers, if you want to comment on others stories, please feel free. I think this will be a lot of fun.
At the end of the week, I will close the comments. Then I am going to draw names from all who entered their story and prizes will be given! Remember from the prior post? We have a gorgeous fat quarter bundle from Art Gallery Fabric, a $30 gift certificate to my shop, three pdf patterns from Bonjour Quilts, one pdf pattern from Devoted Quilter, two mini charm packs from My Sewcalled Quilts. Also, one more prize has been thrown into the mix – one book from C&T Publisher will also be awarded. Lots of fun things to give away!! (Note, when you leave your comment, please let me know if you live outside the US. I have to limit the fat quarter bundle to US residents only – darn those shipping costs!)
Thanks to everyone for participating! We need to encourage each other – one way to do this is to show both sides; our successes and our blunders!
Oh Bernie, I get it! I clipped the corners when I first started too! Here’s my blog post, joining in with you. http://www.piecefulthoughts.com/imperfections-ive-had-a-few/
There are so many times I make a mistake, and have to fix it before moving on. Putting blocks together wrong seems to be the one that I make most frequently. Once I did this and didn’t see it until the quilt was finished! So, I had to fix it – see that story here – https://frommycarolinahome.com/2015/09/12/fixing-a-mistake-in-a-finished-quilt/ . Then, another time I quilted a quilt really badly, it was awful, and a couple of years later decided to fix it. I had to ‘skin’ the quilt to get the layers apart, then requilt and rebind. See that story here – https://frommycarolinahome.com/2015/12/30/reworking-the-cottage-garden-quilt/ . I usually confess to my blunders as I go too, so you’ll see lots of real sewing when I post. I cannot tell you how often I have had to rip out a row of longarm quilting because the bobbin jumped out of the tension, or the top tension wasn’t right.
Hi! I found out about you from my friend Roseanne over at Home Sewn by Us, and decided to share my blunder. This post was actually my contribution to the Quilt Qwazy Queens Blog Hop in March. Not that I don’t make MORE mistakes than this, it’s just that I’ve been on vacation and this one is already written! LOL Please note that the contest mentioned has already ended – sorry! My post was about my mistake in quilting math and how I corrected it. You can read about it here: https://songbirddesigns.biz/quilt-qwazy-queens-blog-hop/. Thanks for visiting!
My first “big” mistake was when I used to sew my own clothes, way back when, I cut out two right sides of a blouse front. Of course the fabric was not cheap and there was no more to be found, pre Google days, that ended up in the trash! My first quilt was a log cabin and I knew nothing about the quality of fabric vs price and I had never heard of a local quilt shop. Needless to say I shopped my local large fabric store for the best deals. It only took about 3 years and a few washings for me to see what happens with those looser woven fabrics. Many attempted repairs over a couple of years it was finally “retired” no longer the heirloom I had expected it to be! Latest “big” mistake is quilting an entire section on my long arm machine with the presser foot up, of course I didn’t check tension on those first few stitches I was just excited to get quilting. It was my first quilt on the long arm and I had been told all I needed to know LOL. Funny thing was it took me about 30 minutes to figure out what the problem was, I was sure my machine needed repairs! Anyway mistakes happen and we all learn from them, these are just three of the many I have made in many years if sewing/quilting but I still love it!
Quite a coincidence that I had made a log cabin as my first quilt too. Like you, I used loosely woven cottons and they wore out completely – I have hopes of someday repairing it because there is so much sentimental value in that quilt. But it will take time and so far, I haven’t fit it in. If you want to read about that one here is a link:
https://needleandfoot.com/2014/06/26/my-first-quilt/. Thanks for sharing your stories.
Hi Bernie! It was so EASY to come up with a post for today, as blunders are a mainstay for me. Sometimes easy fixes correct the mistake while other times there is no fix and it remains a ‘creative decision.’ I also came from garment background so I still have an issue with 1/4″ seam allowance. And I can easily see why it made sense to clip those corners! I’m looking forward to reading all the comments and posts about this fun topic! Here’s my link: http://homesewnbyus.com/april-fools-perfection-blunder-quilting/ . Thanks for hosting this event! ~smile~ Roseanne
I knew exactly what I wanted to link up as soon as you announced the April Fool Bloopers idea. I was making a baby quilt for my cousin — who is a PROFESSOR — and so much care and concern went into making everything so special and perfect. I embroidered the parents’ favorite Dr. Seuss quote in the border, and then instead of sewing a label to the back of this minky-backed quilt, I embroidered the “stitched with love by Rebecca Deming Rumpf, Charlotte, N.C., 2015” in the opposite border. Except that, in my haste to get the quilt done, I had a TYPO when I digitized the machine embroidery on my computer and I didn’t realize it until after stitching it out on the actual quilt top. I misspelled the name of MY OWN CITY on a quilt that I was giving to a professor… LOL! http://cheekycognoscenti.blogspot.com/2015/02/dilemma-du-jour-in-which-rebecca-gives.html
I sewed a wedding quilt for my niece and her new husband, but I spelled the groom’s name wrong. Turns out his name is spelled RICKIE, not RICKY. By the time I realized this, the quilt was machine embroidered, pieced and quilted, so they have a lovely keepsake with the name wrong. By the way, what happens to wedding quilts if the couple divorces…
Oh no!! Well, in your defense, that is an unusual spelling for the name. No real way to fix that one!! Thank you for sharing it.
The DOG gets the quilt if they split….. heck, the dog may get the quilt in this case any way. Or the next dog will be named Ricky and gifted said quilt…..
This was such a great idea for a blog post and go back to read thru the comments to see what others wrote too, so I will be coming back to read the others. I too began sewing with garments and struggled with back stitching and 1/4” seams when I began in the mid 70’s learning the art of quilting. My blunder was sewing a 12” leaf wall hanging with a sawtooth border and once I proudly put it completed in its stand on my mantle, realized when I stood back I sewed one of the squares wrong! Each fall I look at it again and say to myself I am not perfect nor never will be. It’s the journey of creating more than perfection.
Hi! Bernie, My series of mistakes happened as I set about putting together 36 blocks to make a quilt top. I arranged them on my design wall but didn’t number them all…Funny how that short distance from the design wall to the sewing machine is just far enough for errors in piecing to happen… You can read about my self-imposed troubles here: https://patchwork-quilting.co.uk/saturday-quilting-bring-and-share-49/ and in the follow-up blog post. This time-consuming error made my cheeks turn red as the quilt top is the demonstration I was using to teach a Beginners Class! definitely a case of ‘do as I say, not as I do!’
Yes, yes, yes on the old sewing habits! 5/8″ seams, snipping the corners, envelope-style sewing – all very familiar. So I thought when I first started quilting that I would have very little to learn – hah!
I’ve really been looking forward to this, and my mistake mode kicked into high gear, providing me with some stellar mistakes to blog about here: https://mysewcalledquilts.blogspot.com/2019/04/today-bernie-of-needle-and-foot-is.html
I’m looking forward to reading all the comments.
It is funny how the two sewing camps are really very different. I think it just depends on which you learn first. I find piecing quilts to be difficult and others say that sewing “3-D” items like t-shirts, etc is harder. Ah well, glad to hear you understand where I am coming from. Heading over to read your post now!
This happens to be one of those situations where I think “which mishap/mistake should I share”…. This one will always remain with me. I do longarm quilting for myself and several quilt group friends. Several years back one friend brought me a very special Christmas quilt to quilt for her. The quilt had some holly fabric in it and I ordered a specific pantogram to use on her quilt. The quilt was a queen size. I loaded the quilt, checked tensions , lined up the panto and off I went. No problems at all and the quilt turned out great, or so I thought. Well, at our next quilt group meeting we were fixing our snack plates and my sweet friend said I think I need to mention to you that the quilting design you did on my Christmas quilt was upside down. My heart dropped. Oh no! I was at a loss for words, which is unusual. Granted my intake sheet says if your quilt has a top and bottom make sure you mark the top with a safety pin and tell me. She forgot and I did not check. Never the less it was my fault. Hopefully, so far, lesson learned, I always check to see if there is fussy cutting or directional prints and yes this is a quilters worse nightmare. I offered to remove the quilting and redo it but she would not let me. We laugh about it now but I still have a knot in my stomach when I think about this. Happy quilting and heres to learning from mistakes which we ALL make.
Oh my goodness. That must have just felt awful. Even if it was a joint error, I can only imagine that sinking feeling in your stomach. But mistakes are made and it isn’t the end of the world. I am glad your friend was ok with it. Thank you for sharing this!!
I went looking for photos to share in a blog post here: https://katiemaytoo.blogspot.com/2019/04/the-oops-post.html and boy did I find some doozies! And now I need to go read about the mistakes of others to have a good laugh. Thanks for the prompt to share. It’s good to know we’re not all perfect!
We all have them, right!?! Looking forward to hopping over and reading your post!
I have a couple short blunders. I was working on a mini quilt, being very careful because lots of small pieces needed to be oriented correctly and of course I sewed one piece in the wrong direction, right smack in the middle of the mini. I was going to leave it but a friend detailed exactly how I could extract that piece and turn it around, so I did it! The other one happened when working with a fusible. I needed a press cloth because the fusible needed a damp cloth to make it adhere. Hubby gave me one of his hankies. I wet it, wrung it out, and proceeded to fuse the fusible directly to the hankie instead of the fabric! Had to ask hubby for another hankie . . .
kakingsbury at verizon dot net
Haha! Love the story of fusing to your hubby’s hankie!! That’s so cute. I have fused to an ironing board cover before. Such a mess. Sounds like a good friend – telling you how to fix that one piece in your mini!! Thanks for sharing!
I came from a clothing background and when I first began quilting 12 years ago, I had the hardest time adjusting to a 1/4″ seam. I joined the local quilt shop’s Block of the Month program with a friend who had experience quilting. She would observe me piecing and then I would realize that I had sewn the pieces together wrong. She told me to sew one seam and then place that sewn piece back on the table in it’s correct position. It was slow going, but it progress was much faster than all the un-sewing I had been doing. My January block is a full 2″ smaller in size than my December block as I grew to understand that 1/4″ is really a scant 1/4″. I’ve yet to put the blocks together, but when I do, I’ll have to adjust the sashings to get the blocks to all come out in the end. You’ve got to start somewhere! You learn along the way.
Oh my gosh yes! I have had blocks that I just couldn’t get to size correctly. Thankfully, adjusting a sashing is a great way to compensate for this and I have done it many times! Love your attitude tho – “You’ve got to start somewhere! You learn along the way.” Thank you for your story!
Thanks so much Bernie for this great event. I still struggle with accurate 1/4 inch seams. I come from a sewing background and taught myself to quilt in 1994 or so when I figured that I would not be getting anymore quilts from my DMIL as my FIL had developed Alzheimer’s. I have taken classes, and I ended up teaching at a quilt shop that used to be nearby. I wrote a blog post today about some of my oops moments.
As a teacher I am sure you see lots of mistakes and misunderstandings. It is validating to hear you say you still struggle with accurate seams. Me too!! And this is probably the most important aspect of piecing a quilt. It is such a challenge. Looking forward to hopping over and reading your post. Thank you for sharing!
What an excellent blog post you have here! I also came from a sewing background and struggled initially with some of the basics of quilting. I think my biggest oops came when my Supreme Slider came undone and became a part of my quilt. I noticed that something suddenly felt different as I was FMQ but I was in my mojo (or so I thought!). I think the thread breaking forced me to stop. What a mess! Now when I make goofs I ask myself, “can I live with it?” Sometimes yes and sometimes no. Of course, I couldn’t live with a Supreme Slider attached to the back of my quilt!
Oh no!! That would be quite a heavy quilt with the slider on the back. Haha, I have heard of others saying the slider was hard to control at times. I haven’t ever used one. Do you still like using it (after this happened?). Thanks for sharing Deb!
Yes, I do like using it! FMQ is much easier with it. The second time around I purchased a larger Slider and it doesn’t move at all.
What a great way to do a Linky party, confess and then link to the blog, short and sweet, I love the concept. Good for you for not getting your act together because this is just plain wonderful. I really can’t participate, though, in this Linky party, because I never made a Quilting Mistake–ha, ha, April Fools, sometimes the middle M in my initials RMM could stand for Mistake. My whoops have to be about being angled-challenged and my lack of math knowledge so I’m linking to my post about die-cutting triangles that aren’t HSTs: https://somethingrosemade14.blogspot.com/2017/12/the-last-quilt-of-2017-splash-of-color.html This and my Gypsy Wife quilt still make my eyes crossed thinking about them.
Hahaha – you had me for a second. I thought you were going to say you were too busy to participate or something?? But hmmm… never made a mistake. Yeah Rose?? You made me smile. I will pop over and look at this post now!
I love to have a hand sewn project to work on in the evenings. I looked at the paper piecing projects found on pinterest mainly and thought that looked like something I would be interested in. So I made potholders and small candle mats. This one time I was finishing up the binding on the potholder and thought why is this so crunchy feeling. Well I forgot to remove the paper. I had a good laugh at myself and now it sits above my cutting table as a reminder.
Hahaha! That is a cute story! What a silly oops! Thanks a bunch for sharing it. Glad to hear it wasn’t a huge deal. Now you can just crinkle it and remember.
I seem to be averse to calculating exactly how many blocks I need to make a quilt. I just cannot design on paper, or in any formal way. So, my efforts usually result in so many excess blocks that two quilts get made. So much wasted effort. Yet next time….same thing again.
Hmmm… I suppose it is better to have too many than not enough? But it probably means you are buying more fabric than you need, huh? I am not great with design either. I like following someone else’s patterns. The math just never works out for me! Thanks for sharing Tarnia.
http://www.southernprairiegirl.com/happy-sailing/
If you look at this quilt I made you will find many mistakes. I get in a hurry, I get tired of cutting, and I fail to fix some things like points matching up. But the best blunder of all time is that the panel of this quilt is actually crooked or something. I read and re-read the pattern, apparently the pattern was off (which I hear happens often) so the top row of pinwheeels and the single banner fabric are all a little askew. And the binding overlaps into the layout due to this defect. Now I guess I could have bought more material and cut this section again, but recall how I said I get fired lol? Nope, so I finished it and sent it on it’s merry way. It was a gift so thankfully they hadn’t noticed the errors, at least not that I know of.
Hurrying almost always leads to an error for me as well. I get that one for sure. I am going to hop over and read the post now – I want to see the quilt! Thanks for sharing Melissa!
One of my bloopers occurred when I was FMQ’ing a quilt. I was totally focused on creating a meander all over design. When I finished I was admiring my quilt and noticed something odd hanging on the back. Without realizing it I had sewn a scrap piece of fabric onto the backing. The scrap had been on a table next to my sewing machine and automatically got swooped up in the process. I had no choice but to unpick and resew the area. I learned to keep the area neat and free of any loose fabric pieces or they could be part of an art deco quilt or a time consuming picking out process.
Yikes! I did that once as well but I caught it quite early so I didn’t have too much unpicking to do. But it was no fun! Have you ever folded the corner of the backing into the quilting? I did that once as well! Thanks for sharing Rosalind!
This has happened to me too! Here’s a fix that sometimes eliminates the need to pick out the quilting. I carefully trim the scrap of fabric very close to the quilting. Then I gently scratch the remaining bit of fabric with my fingernail until it frays. I am then able to pull the threads out from under the quilting stitches. On something that’s not densely quilted I find this to be a quick solution.
This is a great idea. Thanks Lisa.
I have gotten the back of the quilt in the stitching before. It’s no fun.
Thanks for the fun idea, Bernie! Here’s my April Fools joke on me: https://needleandfoot.com/2019/04/01/quilting-in-real-life/
I have made so many stupid mistakes I cannot even recall the worst or dumbest. But the one that came to mind was when I was having my young daughter help me snip threads (to give her something to do!) and she snipped a hole in the quilt….of course. It was a great opportunity to extend grace and not totally freak out. It was an Amish pattern. I didn’t have enough of the fabric to replace that block so I made do, in the spirit of the Amish philosophy, purposely making one block different to represent that no one but GOD is perfect. Love the sentiment and since, have always embraced my quilting mistakes with that attitude.
Oh that must have been frustrating – How old was your daughter at the time? I bet it was hard not to be mad at her after all the work you had done. I like the attitude you have about it though. We all make mistakes!! I have a quilt made my a Mennonite quilter – all hand stitched and quilted. It is a bear paw pattern and one claw is pointing the wrong direction – I love that!!
Thanks, Bernie.
I think my daughter was about 8 so I felt safe having her help me but it all worked out just fine. I love what one person commented earlier in the day, it’s about creating, not perfection.
Oh, dear…let me try that again: http://www.ricefordstreams.com/2019/04/01/quilting-real-life-mistakes/
That’s what I have always heard. Once is a mistake but multiples are a plan change.
Oddly enough, when I posted the completed quilt I did not yet see my mistake(s). The top was sewn some years ago during my learning phase into quilting. It was quilted a few years later by a pro long arm quilter. The errors are all mine, not his. The quilt is log cabin blocks. Looking carefully at the 2nd row, the far right block, and the lowest row the 2nd and far right corner blocks, ‘see what is wrong? The outer logs in all three of those blocks should have been other fabrics than the green fabric that is the sashings! Oops. https://homespunhannahblog.blogspot.com/2018/12/log-cabin-hidden-stars-finished.html
I meant the top row, not the 2nd row. My mistake.
Oops!! Isn’t it crazy how many times we can look at a quilt, as we make it, once the top is together, even after quilting it and not see something?? Our eyes just look at the whole thing I suppose – How did you finally see those green strips being out of place? Did someone else see it or did it just finally register with you?
The quilt is beautiful either way. I love log cabin quilts. Thanks for sharing Danice!
Thank you Bernie. Actually, I noticed it as soon as I completed the top. Being a novice, thinking it would be difficult to change them, I just left them. Now I realize that it would have been kinda easy to change them.
Here’s the link to my entry: https://www.kathleenmcmusing.com/2019/04/clanger-confession-quilting-blunders.html. No stellar pictures but a little of fun on April 1!
Thanks Kathleen – off to read your post!
Hi Bernie. What a great topic! I’m going to spend some time reading everyone’s blog posts. I just finished writing my blog post to join in on the fun, https://quiltingisinmyblood.com/2019/04/01/quilting-blunders-ive-made-my-fair-share-of-them/. Thanks for generating such great discussion and sharing! Take care, Mary.
i thought this was an interesting topic request. And I just happen to have a big quilting boo-boo to share. I have been sewing for a long time, starting with 4-H and then high school where i learned the basics. My grandmother made a lot of my clothes and she worked with me growing up. I also had a few other mentors along the way including my mother. I didn’t really start quilting until i retired although i did a t-shirt quilt for my daughter at her request. And i started a quilt for a different daughter which still remains incomplete. My sister became interested in quilting and tried and tried to get me started. I did not see the point of cutting up beautiful fabrics and then sewing them back together. It didn’t make sense. I did at some point start to dabble a little, making some smaller things like placemats, table runners and etc. Not sure when i realized that I was actually making quilts. My mother in law, Rubye turned 100 last year and i started thinking about a year prior, that maybe i could make her a quilt. Something bright and cheerful. I came across a fabric line called Little Ruby and I knew I was on my way. I decided on a simple pattern…..I had seen Jenny at MSQC do it in a tutorial. Seemed simple enough so I ordered the packs of charm squares needed and started making the blocks. When I had completed probably 30 blocks I decided to lay them out on the bed in our guest room next to my sewing room. I almost choked! It was the ugliest thing i had ever seen. It looked like an epic explosion of too many colors! I put all of the blocks and the remaining charm squares in a box and shoved it under my sewing table. Every time I saw that box under there it made me sick! I decided to sew some of the blocks together as the pattern stated and see if that improved things anything. Nope! I considered sewing four of the blocks together and then sew lattice strips around that 4-patch. Still didn’t improve it too much but it did help. I took several of the 4-patch blocks to my monthly quilting group. They thought it was beautiful, so bright and cheerful. Just perfect for someone turning 100 years old. Would really brighten up her room. I agreed. I would certainly fill her room with a lot of color. They encouraged me to put the white lattice strips around it. I finally managed to get the top completely pieced and did some simple stitching in the ditch quilting and it was completed. The day before her birthday party i was squaring up the quilt to attach the binding and as my rotary blade went zipping up the quilt I cut straight through the power cord to my Brother Dream Machine! I heard a FZZZZZZIP and then it was almost dark in the room. I sat down trying to figure out what had happened. I looked down at the quilt and it had a nice black streak about 15” down the white lattice edge where I had been cutting and at the end of the black streak was a nice blackened hole burned into the lattice. On the back-side of the quilt the “fire” had followed the quilting stitches for about 8” from the edge toward the center of quilt. On further inspection I discovered the spark had burned a hole in the blade of my rotary cutter as well! Long story short…..I was able to get most of the black scorch marks out using Grandma’s Secret Spot Remover. Only a faint black line remained on the back of the quilt along the quilting stitches. All of the blackened mess came out on the front and the hole made by the spark was completely covered by the binding. WHEW! I took the quilt to the party the next day and gave it to her! I have not changed the blade in that rotary cutter. I leave it out on the table to remind me how easy it is to have an accident. I am fortunate my machine was not damaged and I did not start a fire in my sewing room. So thankful for the breaker that shut off the power. So thankful for Grandma’s Secret Spot Remover. Saved me for sure!
Wow! What a wild series of events. I think this is the craziest story I have heard! How lucky that you were able to save the quilt and that you were not hurt! It is quite the reminder that rotary cutters can be dangerous. Thanks for sharing!
I have made so many goof ups that I lost count long ago. I’ve been sewing since I was a kid so I figured quilting wouldn’t be much different. My first blunder was missing the importance of the word scant. After all one quarter inch is one quarter inch, right? I know it had to have been a few months of sewing blocks and continually being perplexed as to why my blocks weren’t matching up right. Then one day I happened upon an article that caught my attention which explained the importance of the word scant in the quilting world.
Ah Sharon, this one just drives me mad. Scant is such a subjective word!! 1/4″ seam should just be that, but you are right. A true 1/4″ seam is often too big. Makes me crazy! Thank you for sharing.
I think of it as 1/4 inch from the front side. If you’re using thinker fabric that’s going to be a smaller seam allowance. If you have thin fabrics, it’s going to be a relatively wider seam allowance. Same thing for thicker and thinner threads. But in all cases you want two 5 inch squares to sew together and end up 5×9.5″ — losing a 1/4 inch from each piece, on the front side so to speak after the pieces are pressed and the seam allowance is open or to one side. It helps me not go crazy to realize that you always have to be adjusting and testing your seam allowance. There’s no one perfect setting (unless you always work with the same fabric and thread). Long comment but I think remembering this will help reduce frustration!
Here’s my post about some recent mistakes! Thanks for hosting this, if nothing else it is always good to have a laugh at ourselves!
https://patchesofdestruxion.blogspot.com/2019/04/making-mistakes.html?m=1
One of my bigger blunders (there have been plenty of others too!) was when I was making a baby quilt for a gift. The blocks were assembled in 3 sections – a top, middle, and bottom section. When the sections were joined, the overall pattern appeared. Some of the blocks formed an S curve that went from the top section, through the middle, and finished in the bottom section. The piecing was simple and went together in a hurry. I got it pieced, quilted, and bound. Then I took a photo of the finished quilt, as I always do. When I looked at the photo I saw my mistake. I had sewn the bottom section on upside down! So much for that lovely S curve! Once I saw it, I couldn’t leave it that way. So I got out the seam ripper. I undid the binding on the lower half of the quilt. Picked out the quilting on that half too. Undid the seam joining the middle and bottom sections. Then I sewed the bottom section on correctly, and re-did the quilting and binding that I had picked out. It’s debatable whether I could have just made a new quilt from scratch in less time! The lesson I learned from this is that photos are really helpful. Sometimes when you are up close looking at the details, you miss the overall picture. It’s worth taking a photo and checking things BEFORE quilting, when they are easier to fix.
Oh my gosh, this would have made me cry. I can hardly believe you went to all the effort of unpicking quilting and taking off the binding. I don’t think I would have had the patience. Good for you! I completely agree that we can miss the most obvious of errors because we are looking at it for so long – which seems odd, right? Thank you for sharing!
Making something with directional fabric almost always goes awry. I am the kind of person to straighten pictures in offices so you can imagine my consternation with stitch and flip corners with directional fabric AND it was being made for a mini quilt swap. I had it figured out….and was wrong many times. I even cut sample squares of my loved Tula Pink fabric to test before sewing. I persevered and did it. Next time….no directional fabrics, lol. Here’s my Instagram photo. https://www.instagram.com/p/BvwNZoHnOe1/
What a great idea Bernie! Having read some of these comments I could hold my hand up to many of them and indeed I was quite selective about which to flag up in my post as I have so many. Most involve my brain temporarily switching off and using/doing something that I shouldn’t have done. But we are a resourceful bunch and can usually get round a problem or just accept we are human and smile at the things we have done. Anyway here’s my post http://thelilaccat.com/2019/04/02/mistakes-blunders-and-downright-ugliness
PS Don’t worry about putting me in for prizes I’m in the UK and postage is exorbitant. Its just fun taking part
Thanks for joining in Jenny. Off to read your post now!
I started quilting in 2017 even though I’ve done clothing sewing for many years. My biggest blunder is fear of trying a new technique or trying something new. I fear I will mess up the lovely fabric! I’m not sure how I might deal with a mess or if I should run short of fabric I might not be able to purchase again. Silly?
No, not silly at all. I get it. When sewing clothing, I believe the mistakes are more easily remedied, the pieces are larger, it just seems more manageable. (well, fixing the poor fit can be really challenging though..). Anyway, quilting means such little pieces and once those pieces are cut that is what you are going to be working with. So I do have some uneasiness when cutting fabric – especially directional prints! I try to stay away from those when I can.
Fun event Bernie. I think every quilter has stories about their blunders. Here is mine.
https://quiltingismorefunthanhousework.blogspot.com/2019/04/for-love-of-color.html
That’s for sure! Thanks a bunch for sharing yours Cynthia.
I too learned to sew my own clothes when I was 13 and had a hard time adjusting to 1/4 inch seams and will still do a backstitch at the beginning and end of a seam sometimes. I now have fabric squares ready to sew together as leaders and enders, this helps with the seams without backstitching. A recent project that started out to be a bit of a mess was when I quilted my grandsons baby quilt. It is a simple quilt with a row of ducks on it. I started by quilting a wavy line fairly close together. I kept working away and realized that my spacing of the lines kept getting farther and farther apart. I realized this after many rows. I was a bit frustrated but then decided that I would say that the lower wavy lines meant that the water was calmer below the ducks and that I planned it that way. Now that I convinced myself that it was planned I kind of like it.
I haven’t gotten into the habit of leaders/enders but many quilters use them. I should give it a try.
Nice to see your wavy quilting as a design element! Well done.
Here’s my post on mistakes and blunders, linked back to you.
https://thriftshopcommando.blogspot.com/2019/04/quilting-irl.html
tvonzalez@gmail.com
Yes, yes, yes – color value is a challenge especially when first starting out (it was for me anyway). The wicked 1/4″ seam has been mentioned in many, if not most, of the comments. It is a struggle to get that one right! Thanks for sharing!
I found this blog post by following a link from another. What a great idea! My first quilt was started in the mid 80s. I had purchased a packet of precut squares in reds and whites from a Laura Ashley shop in Seattle. (This was long before “precuts” were a thing!) I started sewing a simple patchwork baby quilt. But had NO idea what I was doing! Laura Ashley reds were a sort of brick color… hard to find a backing for!! The whites were hard too… sort of creamy but not cream. I finally found a small red and white check for the backing. I didn’t know about how to bind… so I did the envelope turn thing and added lace to the edge! Ugg! Then I proceeded to hand quilt hearts in the red squares but had no idea what to quilt in the white squares. With each of my 3 babies, I’d dig out the baby quilt and try to work on it. At some point, I lost the heart template… and the unfinished quilt became a family joke especially from my firstborn! “I’ll do thus n so for you when you finish my baby quilt!!” Well I finally figured out I could make a new heart template. I decided to quilt simple X’s in the white squares. I finished the baby quilt and gave it to her when she was around 24!! I asked if she wanted me to remove the lace and put a “real” binding on it. She said no… she loved the lace! Go figure! The quilt is now packed away, at her house… waiting for when she has a baby of her own. In the meantime… I am sewing the binding on a baby quilt today… that I will put away for her first baby… just so I’ll have one ready to give on time!!
This is such a sweet story. I am so glad your daughter likes her baby quilt 24 years later! And now you have another one to present when you get the opportunity. So cute!
Hi Bernie! I just wrote a post on Monday about my first experience with quilting a whole cloth quilt. It includes many mistakes & what I learned from the process. This particular quilt had a solid fabric on the front with no print & it really was so much different from any other quilt I’ve made. I think it’s so important to show others that no one is perfect in their making, so thank you for this!
https://www.teadoddles.com/thread-sketching-on-a-whole-cloth-quilt/
You’re welcome Kristie. It has been really fun to read all of these stories. I will be over in a bit to read about your whole cloth quilt!
Hands down, the mistake I make the most often (as often as last night!) is cutting / piecing quilt backs that are too small! Although I pride myself on my quilt math, it continually lets me down when putting together a quilt back. Honestly contributing to this is my general nature of being frugal and as a result I try to go with the smallest possible back so as not to ‘waste’ fabric.
My way to avoid this issue is to go with wide backs – no math, no seams!
Great solution. Wide backs are so easy and I love having a chunk leftover to use in other projects.Thanks for sharing Patty!
On my very first quilt, I made the mistake of cutting the basted quilt sandwich BEFORE quilting. I cut all four sides so they were perfectly square and all three layers were even – the top, batting and backing. If course, all three layers did not stay even after machine quilting! I had to re-cut to even it off again, making it a little smaller than intended. I’ve never done that again.
Hi Bernie! I have had many quilts that had “design changes”. Here is the post to the latest (just a couple of weeks ago). https://shesstitchinagain.blogspot.com/2019/04/im-reposting-this-picture-because.html
I can’t wait to look at all of the others. Thanks for the idea.
Bernie, this is such fun reading people’s comments and blog posts about mistakes they’ve made – we are really all in the same boat, aren’t we?! This reminded me of a quilt I finished in 2015 that was a big Oops, but turned into a beautiful quilt. Here’s the Oops post – https://littlepenguinquilts.blogspot.com/2015/01/oops.html
And here’s the finished quilt top – https://littlepenguinquilts.blogspot.com/2015/02/progress.html
I’ll just call it a Design Decision rather than a mistake!
Hi Diann, So glad you are enjoying this event. I am as well. Heading over to read about your Design Decision!
Great post Diann – both of them! Did you ever figure out what happened that made the order of the strips change? Doesn’t really matter because it ended up looking great. That looks like something I would do for sure! (and, like you, I would have let it be!)
Hi, it was so fun to read the other posts. I did the same thing with the Supreme Slider, sewing it to the back of the quilt. I also sew a long way with an empty bobbin. I was working on a small project late one night and was going slow and trying to guide the pieces under the presser foot, when I got my finger too close. The needle went thru my finger and I pulled back and ended up with half of the needle in my finger. I started yelling for my hubby to come help me. He got a pliers and pulled the needle the rest of the way thru my finger. Another time I was putting in a new needle and it slipped and went down into the machine. I didn’t have any idea of what to do and didn’t want to sew if the needle was lodged somewhere and could cause damage. I called the lady that services my machine and she calmly said just lay it on its side and unscrew the bottom of the machine. Well it worked. The needle was laying there out of the way of any moving parts.
What a great idea, Bernie. I think this is worth doing a few times a year (at least)! I shared about one of my favorite quilts that didn’t really start out that way. I had a very short deadline to make the quilt because I needed to ship to France and I stepped in at the last minute to fill a slot… so I didn’t have time to reorder fabric when my initial selections were a bit less than ideal: https://quiltingjetgirl.com/2019/04/02/quilting-blunders/
You have no idea what you have started, Bernie. I will be returning to this post again and again for reassurance, laughter and just some tips and techniques on what not to do. Of course, I have made a few mistakes and I am haunted by them. But I do believe that I am a better quilter because of those mistakes. I hope that sharing my mistakes will make other newbies more relaxed and fearless about creating in general and quilting in particular. Here is my blogpost –
https://sewpreetiquilts.blogspot.com/2019/04/perfection-ha.html
Oh my gosh Preeti! Your post is just excellent. I hope tons of people will click through and read it because it is just that good. Love the demonstration of the effects of using strong contrast is really helpful – your dancing ladies are so sweet! Great post.
I found a blog post about a total rookie mistake…cutting a block to the finished size (no seam allowance). It was for a raffle quilt and I had to use the given fabrics and had no more! Ack! As I reread the post before linking here, I saw that it describes two other mistakes I made on the same block. (I’ve been quilting for years…you’re never really safe!)
Link: https://christinacreating.blogspot.com/2018/07/rookie-mistake.html
PS I blog about my mistakes as I make them…No perfect social media here! I just Instagrammed about misreading a knitting pattern and having to rip out 18 rows (“only” 150 sts each–double ack!)
I popped over from Cynthia at Quilting is more fun than housework. I don’t have a blog so no post to share. I bought a travel machine a few years ago and took it to FL to work on some projects. I was using one of those Cake Mix paper piecing patterns and needed to wind a new bobbin. I then proceeded to sew 15 ten inch blocks only to discover that the bobbin had seated incorrectly and the backs of all those blocks were loopy. Had to unstitch them all so now I mostly remember to check the bobbin tension after putting a new bobbin in.
Then there’s the time I sliced the edge of my finger with the rotary cutter. Grabbed some paper towels, wrapped it up and finished cutting the strips I was working on. Then called a nurse friend who came and bandaged me up. Fortunately didn’t need stitches
And finally a hint for those who have trouble with scant 1/4″ seams. Make sure you are cutting your pieces correctly. The line on the ruler should be on top of the left edge of your fabric not just to the left of the edge. Learned this from Bonnie Hunter and it has made a big difference.
This was a fun blog event. Thanks for thinking of it.
Thank you for the tips on the 1/4″ seam. Also, that bobbin thing? Happens to me all the time! I need to slow down and make sure the bobbin is seated properly. I hate when that happens because the top stitching looks fine and then the mess on the back side!! At least it is very loose and easily unpicked.
My first big mistake was when I first started quilting. This was back around 1990. I bought fabrics at a Hancocks store in Jacksonville Florida. I did not pre wash them. I had a dark green, a dark blue and a burgundy, along with unbleached muslin. I thought “real” quilts all had muslin in them. I used Georgia Bonesteel’s lapquilting method where you make the blocks and quilt them, before you join them together. I wanted a queen size quilt. I did not butt the batting correctly when joining the blocks, so I had a very noticeable lumpy ridge in between each block, and of course, when I did wash it, the colors bled on the muslin. I had that quilt on my bed for a lot of years, but I never went back to that method of making quilts. I use color catchers now and pre wash any fabric that might bleed. My quilts are much better now.
I also was a garment sewer first and had the same issues with the transition to quilting as you did Bernie. I too still regress.
Oh no!! I bet that was so irritating. Were you able to get some of the color out of the muslin?
You know, I have not yet made a quilt in that way even tho I am so tempted because I fear a lumpy join. Many quilters seem to have success with it. It would certainly make it more fun to quilt if I could work on it in sections though.
What a great idea to have us share our blunders! This will keep me humble…
I had made a number of quilts for sale and for family and friends and decided I wanted a vintage looking log cabin for my queen size bed. This was before I had even heard of long-arm quilting, I was using my domestic machine. I knew that quilting that large of a quilt would be challenging so I decided to do my own version of QAG. I made my blocks and sewed them into rows, then sandwiched the batting backing and top as rows. Then I joined them (the layers on one side of each row was secured), I joined all the rows together and bound the edge. I thought I’d go back and finish the quilting “later”. I wanted to see it on the bed and it did look nice. Well Later didn’t come for many years, maybe 14 or 15. The batting shifted in each row to where it was secured, so there were puffy rows accompanied by areas with no batting. It got shoved into a bag an languished until about a year ago when I joined a finish along and it’s number turned up one month. So I removed the binding, unstitched the rows and put it back together with an appropriate amount of quilting to hold it together. Now I finally have my log cabin quilt and it is just perfect for spring or summer nights.
How great you were able to salvage the quilt. I bet it was time consuming to fix it. Now you can enjoy your quilt!!
Here’s the story of my latest quilt, which I named “Snafu.” Mistakes were made, for sure!
https://myquiltodyssey.blogspot.com/2019/04/its-finish-snafu.html
Hahaha! Your post is so funny. What a great story – Thank you for sharing it.
Oh dear, I had to share another wake up moment….I started a small block using someone’s free pattern. I thought I was doing it correctly but one of her instructions didn’t work. Being a smartie pants, I made it work for me…..and even thought about emailing her about her mistake. Thank goodness I didn’t! Today, when I went to put it together nothing matched up. Now I understand….her way was correct. I just can’t follow directions! I am now taking to my bed with a book and a needed nap! Here’s my instgram post. https://www.instagram.com/p/BvzRk7en5nA/
I still cannot make decent mitred corners. Every new project, I make a small “square of shame” to try to teach myself to make show-worthy corners. And each new project ends up with square corners because I cannot mitre nicely.
I made my first quilt in 1976 when quilting had a revival due to the Bicentennial. I went to Joann’s and bought an assortment of fabrics, mostly polyester blends and none of them when together but at the time I thought they did! I cut out 4 inch squares with my scissors and sewed using 1/8 inch seam allowance, not knowing any better. I hand tied it using navy blue yarn and used it on my bed for a few years until the seams started popping. I didn’t go back to quilting until 1991. My quilts are so much better today!
Hmm… we started quilting at about the same time! 1/8″ seams – that is soooo tiny. I bet the fact that it was polyester actually helped because it may have frayed less. I am sure your quilts are gorgeous now. Thanks for joining in!!
My first two quilt tops had 5/8ths seams! This was long before the internet. Those first quilt tops were a monkey wrench pattern. This was about the time the olfa rotary cutter came out. I was so inspired by Nancy Zeiman I just had to piece. It was never explained you needed a self healing mat. I used an old trapper keeper from high school for my cutting surface. By the time I got done, the trapper keeper was no more. And I did not know the next step in quilting. There were no hobby stores back then around me. I hung onto those chopped off point quilt tops for years and ended up selling them on a yard sale for $15.00 each. That was the cost of fabric I had in them. I broke even…er…down one trapper keeper!
Haha, that is funny to hear you talk about a Trapper Keeper. I remember those. Self healing mats are an amazing thing, right?? Thanks for joining in Dee.
I started quilting in the late 70’s with scissors and a school ruler. My first quilt was a bear paw for my second daughter. It has held up well. I quilted it on my sewing machine by stitching close to the ditch, never mind the wrinkles I created on the back! My second quilt was embroidered sunbonnet sue squares with pieced squares around the squares. I had a book that said 1/4” seams which looked so small. However, I tied that quilt and my girls used it up! All that’s left are a few squares because I used fabrics from the local department store. These seem mild compared to the day I sewed my right index finger into my machine Quilting or sewed the bottom three rows of my quilt upside down to the top two rows. I’ve learned to look and decide whether I can live with the error or not!
Isn’t it amazing how much better the fabrics are today? The weave is much tighter and the colors don’t bleed like they used to. Hope you haven’t sewed your finger since then. Ouch! Thanks for joining in Jean.
Funny thing, Bernie, I actually clip all of my binding corners exactly like you showed and I find it gives me a nicer corner. Go figure! My quilting blunder is also a binding one, and one I’m very glad to have only done once, lol https://www.devotedquilter.com/2019/04/my-quilting-blunder.html
Really!?! That is crazy. It sure didn’t work for me. How funny Leanne. Thanks for linking up. I will click through and read your post now.
LOL, do you know (quilty confession here) I still will clip a teeny bit off the corner if the mitre isn’t lying quite as evenly as the border on either side of it? shhh! I wrote a post about my big blunder: https://www.mmmquilts.com/2019/04/tbt-16-farm-quilt.html
Ha!! Now I read Leanne’s comment above me and I’m not so quilty-guilty about doing that from time to time too!
Directional fabric. I started sewing clothing and then moved on to quilting but directional fabric is usually what causes me the most headaches! My husband got sleep pants with one side upside done and usually with Quilts the directional fabric plays havoc with me.
I love reading everyone’s comments. Nice to know I’m in good company in my errors.
I made my first t-shirt quilt quilt when my daughter was going to college in the fall of 2000. I was a self taught sewist, and had sewn mostly garments. I had used “interfacing” on my clothes, and had never even heard of stabilizer. I fought those stretchy shirts, of varying weights, but finished the quilt in time for her to leave. She loved the quilt. As we’re packing her up I folded her new quilt, and noticed it was not square. And I mean it was off by about 12”! Somewhere in the middle one of those T-shirts had stretched horribly. She, of course, didn’t mind a bit, and I wasn’t changing it,
She has used that wonky little quilt for all these years, and I sleep under it when I visit her. Gifts made with love don’t have to be perfect!
As I was readying the comments I thought, oh yes, I’ve done that (quilted in an extra piece of fabric). I’ve done that (not noticing the bobbin tension was bad until I finished quilting a wall hanging). I’ve done that (not realizing an area of a quilt was not quilted until I took the quilt off the longarm). But the one I really really remember was the points on a large star that were turned the wrong way. I didn’t realize it until I had quilted most of the lap size quilt. I decided I would “fix” it by doing lots of line based quilting on that point so no one would notice. Well I still notice, so I fold the quilt so that corner doesn’t show and hang it over the back of a rocking chair.
I have added my Quilts to Use for Real Life to my blog here: https://nettiesews.blogspot.com/2019/04/quilts-to-use-for-real-life.html I am enjoying reading everyone’s blogs with all of the quilting mishaps. Thank you for hosting this.
I can’t believe I did it again….Yes I can. But not this soon!
https://shesstitchinagain.blogspot.com/2019/04/again.html
Ah Rose… Your churn dash block looks like something I would have done!! At least that one didn’t take too much ripping out to fix. Hope you get lots of sewing time this weekend!!
I remember only to well the first time I heard someone say “What do you mean,we don’t trim off the corners?” and it was my voice saying it. If I only had a quarter for every time I’ve heard it since……….
 Carol
Carol
I wrote up a post to participate in the “tell all” event:
https://thejoyfulquilter.blogspot.com/2019/04/throwback-thursday-quilting-in-real-life.html
Thanks, Bernie, for helping us take a lighter look at our quilting mishaps!
My latest sewing snafu involved Alison Glass fabric, a pesky pillow form, and a lot of quilting …
https://frombolttobeauty.blogspot.com/2019/04/lets-be-honest-beauties-pageant-27.html
This was a great post Michelle. I have had troubles with pillow coverings fitting the inserts at times too. Your end result is pretty though – it looks cozy and soft. Thanks for sharing!!
Oh, I feel like I’ve made most of these mistakes! I make mistakes every single time I sew. It’s just a continuing lesson in humility. Today I’ve got a post about a really big one that I finally fixed, with a nudge from this linkup. http://academicquilter.blogspot.com/2019/04/ripped-and-restitched.html Thanks Bernie!
Love, love, love your post. You really did a wonderful job fixing your error. Beautiful!!
This is one of my favorite reads yet! I definitely think we could learn more from each other’s mistakes and loved learning about your clipped corners. My story is about my first pieced quilt. I followed a pattern, thought it was going great, then went to assemble the blocks and nothing lined up. The intersections were terrible and some were almost a full 3/4 inch apart. I cried and struggled to understand how I spent so much time thinking I was following instructions to the letter, only to have it impossible to use. I put it in a drawer and never finished the top. On my next project, for whatever reason, I decided to use a walking foot. When I changed out the foot it hit me that I’d ASSUMED the edge of my foot was 1/4″ but it was JUST a bit larger (closer to 3/8ths). Since one of the quilt blocks had more seams than the connecting one, every seam took just a bit more fabric and eventually ruined the math of the whole quilt! I learned to measure my quilting feet and not take measurements for granted!
Even though I sew a lot of garments for my kids, I once managed to sew both armholes while stitching the shoulder and side seams of a top. I had to reopen them to attach the sleeves and my family found it funny. But my most recent mistake came from having too many WIP.
A few months ago, I planned a doll quilt for my son entirely based on the backing fabric (multicolor houses). I measured and cut the back and put it away with my others WIP, then slowly English-paper-pieced 50 mini houses on the rare evenings I watch DVDs. When the top was completed, I looked everywhere for the backing and couldn’t find it… But I was so attached to this initial choice I didn’t want another fabric. In the end, I used a smallish scrap of the little houses fabric I had kept and pieced a backing from fabrics used in the top, and added a scrap with a firetruck. My son immediately understood the doll quilt had been planned especially for him (he is fond of firefighters) and was very happy. So after cursing myself for having too much stash, too many UFO, not being organized etc. I realized that I was unkind to myself and that my sewing chaos brings unpredictability and fun ! Of course I found the initial backing 3 days later in a completely logical place: yet another box of WIP. But I laughed instead of blaming myself.Thanks for your blog and for this great idea, Sophie (France).
I’ve made my own mistakes, but one hubby made when learning how to piece quilts comes to mind. When doing a half square triangle he forgot to separate the two triangle pieces he had cut, so when he sewed the seam one side had one piece of fabric, as it should, but the other half of the block had two… Older hands have difficulty separating the fabrics. Another quilt, one that we both worked on, was a Double Irish Chain, with a white on white fabric, that he could not see the difference, so there are some upside down white fabrics in the quilt for his baby sis. I left them in.
This was a great idea. I didn’t get a chance to do my blog post. But I will do it this week.
Pingback: I’m a Winner! - Southern Prairie Girl
With its ability to cut, craft, emboss, deboss, score, and engrave on various materials, the Cricut machine has become a must-have tool for crafters. Along with the machine, the graphic tool named ‘Design Space’ allows beginners to create their designs from scratch or use ready-made templates available in the app’s library.